vcenter hyperic administration guide 5.8
TRANSCRIPT
vCenter Hyperic Administration GuidevCenter Hyperic 5.8
This document supports the version of each product listed andsupports all subsequent versions until the document isreplaced by a new edition. To check for more recent editionsof this document, see http://www.vmware.com/support/pubs.
EN-000958-02
vCenter Hyperic Administration Guide
2 VMware, Inc.
You can find the most up-to-date technical documentation on the VMware Web site at:
http://www.vmware.com/support/
The VMware Web site also provides the latest product updates.
If you have comments about this documentation, submit your feedback to:
Copyright © 2013 VMware, Inc. All rights reserved. Copyright and trademark information.
VMware, Inc.3401 Hillview Ave.Palo Alto, CA 94304www.vmware.com
Contents
About vCenter Hyperic Administration Guide 7
1 Discover and Import Resources to Inventory 9
Import or Skip Resources in Auto-Discovery Portlet 9Using the Auto-Discovery Results Page 10Import or Skip Resources in Auto-Discovery Results Page 11
2 Options for Running and Controlling Resource Discovery 13
Configure the Frequency of the Default Scan 13Configure the Frequency of the Runtime Scan 13Scan a Platform On-Demand 14Solving Auto-Discovery Problems 14
3 Setting Up Alert Notifications and Escalations 15
Tailoring Alert Notification Templates 15Configuring Roles for Role-Based Alert Notifications 15Enabling SNMP Trap Notifications 15Enable Syslog Notifications 18Configuring and Managing Escalations 19Setting Up Alert Action Scripts 23Configuring a Custom Control Action 23Environment Variables for Fired Alert Data 25
4 Configure Monitoring and Alerting for a Resource 27
Configure Metric Baselines 27Setting Up Log Tracking for a Resource 29Setting Up Configuration Tracking for a Resource 32
5 Configuring Monitoring and Alerting for a Resource Type 35
Tailoring Metric Collection for a Resource Type 35Define a Resource Type Alert 37Define a Recovery Alert for a Resource Type Alert 41
6 Using Dynamic Groups and Policies 43
Working with Dynamic Groups 43Working with Policies 45
7 Global Monitoring and Alerting Settings 49
Configuring Global Alert Properties 49Configure Alert Notification Throttling 50Configuring Alert Notification Email Properties 50
VMware, Inc. 3
Configure Hyperic Version and Security Announcements 50
8 Managing Alert and Notification Volume 53
Preventing Multiple Alerts for the Same Problem 53Disable all Alert Notifications 54Configure Network Host Dependencies for Hierarchical Alerting 54Setting a Notification Throttle 54
9 Manage Alert Definitions 55
Viewing and Editing Alert Definitions 55Enabling or Disabling Alert Definitions 56Enable Alert Definition Change Logging 58
10 Creating and Managing Resource Groups and Applications 61
Configuring and Managing Resource Groups 61Defining Alerts for a Resource Group 63Schedule Downtime for a Resource Group 64Creating and Managing Applications 65
11 Map vCenter Virtual Machine IDs to vCenter Hyperic Platforms 67
12 Configuring Hyperic as an SNMP Trap Receiver 69
Step 1 - Select and Enable an Agent to Receive Traps 69Step 2 - Configure Trap Generator 70Step 3 - Create a Proxy Platform for Trap Data 70Resolving Configuration Issues 71
13 Managing Hyperic Users and Roles 73
Creating and Manage User Accounts 73Creating and Managing Roles in vCenter Hyperic 76Understanding Role-based Dashboards 81
14 View and Manage Resource Data 83
Navigate to the Inventory Page for a Platform 84Viewing Inventory Properties for a Platform 84Navigate to the Inventory Page for a Server 87Viewing Inventory Properties for a Server 87Navigate to the Inventory Page for a Service 89Viewing Inventory Properties for a Service 89Navigate to the Inventory Page for a Group 90Viewing Inventory Properties for a Group 90Navigate to the Inventory Page for an Application 92Viewing Inventory Properties for an Application 92Creating Nework Entities Manually 93Remove a Resource from the Inventory 101
vCenter Hyperic Administration Guide
4 VMware, Inc.

15 Deploying and Managing Plug-ins 103Plugin Administration Tasks 103Resource Plugin Deployment Directories 104Working with Plugin Manager 104About Custom Plugin Deployment with Plugin Manager 104Removing a Plugin with Plugin Manager 105Synchronizing Plugins at Startup 105Disable Server-Agent Plugin Synchronization 106
Index 107
Contents
VMware, Inc. 5

vCenter Hyperic Administration Guide
6 VMware, Inc.
About vCenter Hyperic Administration Guide
The vCenter Hyperic Administration Guide provides information about adding resources to VMware®
vCenter™ Hyperic®, and how configure monitoring and alerts, and to manage users and roles.
Intended AudienceThis information is intended for anyone who wants to install, upgrade, or use ESX. The information iswritten for experienced Windows or Linux system administrators who are familiar with virtual machinetechnology and datacenter operations.
VMware, Inc. 7

vCenter Hyperic Administration Guide
8 VMware, Inc.
Discover and Import Resources toInventory 1
There are various ways to discover and import resources to the vCenter Hyperic inventory.
n Import or Skip Resources in Auto-Discovery Portlet on page 9This topic describes how to process the contents of the Auto-Discovery Portlet.
n Using the Auto-Discovery Results Page on page 10This topic desribes the Auto-Disovery Results page and its components.
n Import or Skip Resources in Auto-Discovery Results Page on page 11This topic describes how to process the contents of the Auto-Discovery Results page.
Import or Skip Resources in Auto-Discovery PortletThis topic describes how to process the contents of the Auto-Discovery Portlet.
You can process the contents of the Auto-Discovery Portlet in these ways:
Prerequisites
If the vCenter Hyperic agent discovered all of the resource properties required to monitor a resource, itstarts monitoring that resource as soon as you add it to inventory. This is the case for most resource types.Note however, that some level of configuration is required to start managing some resources types - see theConfiguration Properties section on a resource's Inventory tab for configuration requirements.
Procedure
1Option Description
To import all resources leave all resources selected, and click Add to Inventory.
To skip all resources leave all resources selected, and click Skip Checked Resources.
2 To import selected resources
n De-select the resources you do not want to add to inventory, and click Add to Inventory,
Or
n De-select the resources you do want to add to inventory and click Skip Checked Resources.
If you do not import a resource displayed in the Auto-Discovery portlet, note:
n n If you skip a new platform, you skip its servers as well.
n During the next platform scan, skipped resources will reappear in the portlet after the next scanthat detects them.
VMware, Inc. 9
Using the Auto-Discovery Results PageThis topic desribes the Auto-Disovery Results page and its components.
The Auto-Discovery Results page appears when you click a platform name in the Dashboard's Auto-Discovery portlet. The page shows the results of the most recent platform scan - the new or changedresource information that was discovered, as well as information for unchanged resources. You can filter thepage for new, modified, or unchanged resources. You can selectively import new and changed data toinventory.
The Auto-Discovery Results page has three sections:
n Platform Type — This section contains the following data and controls
Platform Type The resource type of the platform.
Fully Qualified DomainName
The platform's FQDN
Import Values/Do NotImport
In this version of Hyperic, this control has no effect. Changing the valuehas no impact on what values are imported.
n Network Properties — This section contains the following data and controls:
n All States/New/Modified/Unchanged selector — This pulldown allows you to filter the IPaddresses that appear in the list by change state.
n The following data is shown for each IP address matching the currently selected filter value:
n IP Address
n Netmask
n MAC Address
n Properties State - Value indicates if the connection properties are "New", "Unchanged", or"Changed".
n Servers — This section contains the following data and controls:
n Server Types selector ---This pulldown allows you restrict the list to servers of a particular type.
n All States/New/Modified/Unchanged filter ---This pulldown allows you to filter the servers thatappear in the list by change state.
n The following data is shown for each for each server in the list:
n Server---The name of the resource.
n Server type---The resource type of the server.
n Install Path---Where the server is installed.
n Server Status---Value indicates whether the server is "New", "Unchanged", or "Modified.
n Import Values/Do Not Import (callout #5 in screenshot)---The value of this pull-down controlswhether the server data will be imported when the OK button is clicked.
vCenter Hyperic Administration Guide
10 VMware, Inc.
Import or Skip Resources in Auto-Discovery Results PageThis topic describes how to process the contents of the Auto-Discovery Results page.
If the vCenter Hyperic agent discovers all of the resource properties required to monitor a resource, it startsmonitoring that resource as soon as you add it to inventory. This is the case for most resource types.However, some level of configuration is required to start managing some resources types. For moreinformation, see the Configuration Properties section on a resource's Inventory tab for configurationrequirements.
To process the contents of the Auto-Discovery Results page:
Procedure
1 View the new and changed properties in the Network Properties section of the page.
2 If you do not want to import the new or changed network properties to the Hyperic inventory, selectDo Not Import from the pulldown in the Platform Type section of the page
3 View the new and changed servers listed in the Servers section of the page.
4 If you do not want to import a new or changed server to Hyperic inventory, select Do Not Import fromthe pulldown in the Action column.
5 Click OK to import the resource data which you have approved for import.
Chapter 1 Discover and Import Resources to Inventory
VMware, Inc. 11

vCenter Hyperic Administration Guide
12 VMware, Inc.
Options for Running and ControllingResource Discovery 2
This section describes options for initiating and preventing vCenter Hyperic resource discovery processes.
n Configure the Frequency of the Default Scan on page 13This section describes how to configure the frequency of the default scan.
n Configure the Frequency of the Runtime Scan on page 13This section describes how to configure the frequency of the runtime scan.
n Scan a Platform On-Demand on page 14This section describes how to initiate a platform scan.
n Solving Auto-Discovery Problems on page 14
Configure the Frequency of the Default ScanThis section describes how to configure the frequency of the default scan.
The default scan detects servers and platform services, typically using the process table or the Windowsregistry. Default scans are less resource-intensive than runtime scans. By default, an agent runs a defaultscan upon startup and every 15 minutes thereafter. To change the frequency:
Procedure
u Uncomment the autoinventory.defaultScan.interval.millis line in the agent.properties file, and setthe desired value in milliseconds.
Example: Disable Default ScanTo prevent the agent from running default scans on the platform, uncomment theautoinventory.defaultScan.interval.millis parameter in the agent.properties file , and set it to -1, asfollows:
autoinventory.defaultScan.interval.millis=-1
Configure the Frequency of the Runtime ScanThis section describes how to configure the frequency of the runtime scan.
By default, an HQ Agent runs a runtime scan once a day. A runtime scan may use more resource-intensivemethods to detect services than a default scan. For instance, a runtime scan may involve issuing an SQLquery or looking up an MBean. To change the frequency of the runtime scan:
Prerequisites
VMware, Inc. 13
Procedure
u Edit the autoinventory.runtime.Scan.interval.millis line in the agent.properties file , and set thedesired value in milliseconds.
Scan a Platform On-DemandThis section describes how to initiate a platform scan.
To initiate a platform scan:
Prerequisites
You can only initiate an auto-discovery scan for a platform that runs an Hyperic Agent. Platforms that areremotely monitored, such as Cisco and other network device platforms that do not run an agent, cannot bescanned.
Procedure
1 Navigate to the platform you want to scan.
2 Select Tools > New Auto-Discovery.
3 You can run default scan only, or run a file scan in addition to the default scan.
Option Description
Default Scan Click OK at the top of the page.
File Scan Follow the procedure below a Check the server types that vCenter Hyperic should look for on the platform.
b In ScanDirs, specify the directories that vCenter Hyperic should scan.
c In ExcludeDirs, specify the directories that vCenter Hyperic should not scan.
d In fsTypes, select the type of file system to scan: local disks, network-mounted disks, or both (all).
e In depth, specify the depth in the directory structure to which vCenter Hyperic should scan.
f To have vCenter Hyperic follow symlinks when scanning, select Should symlinks be followed.
g Click OK.
Solving Auto-Discovery Problems
vCenter Hyperic Administration Guide
14 VMware, Inc.
Setting Up Alert Notifications andEscalations 3
n Tailoring Alert Notification Templates on page 15
n Configuring Roles for Role-Based Alert Notifications on page 15
n Enabling SNMP Trap Notifications on page 15This section has information about enabling vFabric Hyperic to send SNMP traps to an SNMPmanagement system.
n Enable Syslog Notifications on page 18This section describes how to enable the syslog notifications.
n Configuring and Managing Escalations on page 19This section provides information about conifguring and managing escalations.
n Setting Up Alert Action Scripts on page 23This topic describes action scripts and how they can be used.
n Configuring a Custom Control Action on page 23This section has instructions about how to configure vCenter Hyperic to run a script or executable thatimplements a resource control action.
n Environment Variables for Fired Alert Data on page 25This topic lists the environment variables for fired alert data and their descriptions.
Tailoring Alert Notification Templates
Configuring Roles for Role-Based Alert NotificationsAn authorized user can access the New Role command in the Administration tab of the HQ user interface.You can also create HQ roles using the HQApi role command.
Enabling SNMP Trap NotificationsThis section has information about enabling vFabric Hyperic to send SNMP traps to an SNMP managementsystem.
This section has information about enabling vFabric Hyperic to send SNMP traps to an SNMP managementsystem. For information about enabling Hyperic to receive traps, see
VMware, Inc. 15
Configure vCenter Hyperic Server to Send SNMP TrapsThis section has information about enabling vCenter Hyperic to send SNMP traps to an SNMP managementsystem.
Procedure
1 Click HQ Server Settings on the Administration page.
2 At the bottom of the page, in the SNMP Server Configuration Properties section, define the propertiesfor your version of SNMP. For more information, refer to the SNMP tables respective to your version.
After the configuration above is complete, the SNMP Trap notification tab is available when you defineor edit an alert definition.
vCenter Hyperic Server SNMP v1 ParametersThis section lists the parameters for SNMP v1, and their descriptions.
SNMP v1 Properties
Table 3‑1. SNMP v1 Properties
Configuration Option Description Allowable Values
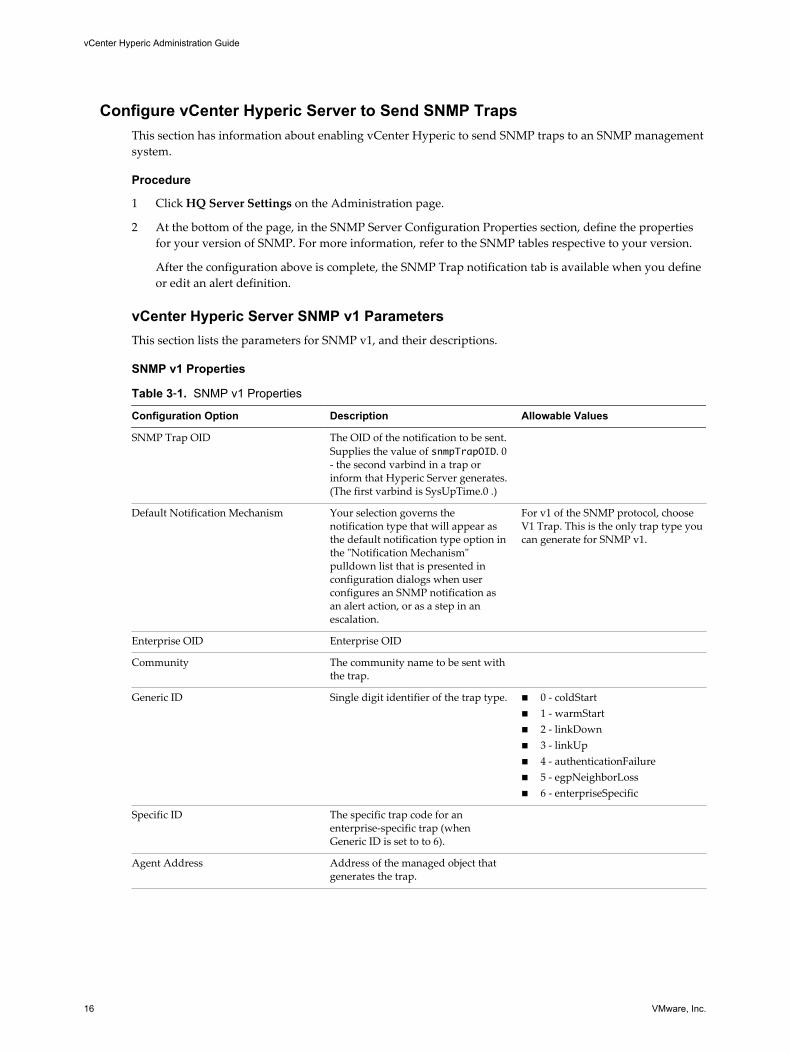
SNMP Trap OID The OID of the notification to be sent.Supplies the value of snmpTrapOID. 0- the second varbind in a trap orinform that Hyperic Server generates.(The first varbind is SysUpTime.0 .)
Default Notification Mechanism Your selection governs thenotification type that will appear asthe default notification type option inthe "Notification Mechanism"pulldown list that is presented inconfiguration dialogs when userconfigures an SNMP notification asan alert action, or as a step in anescalation.
For v1 of the SNMP protocol, chooseV1 Trap. This is the only trap type youcan generate for SNMP v1.
Enterprise OID Enterprise OID
Community The community name to be sent withthe trap.
Generic ID Single digit identifier of the trap type. n 0 - coldStartn 1 - warmStartn 2 - linkDownn 3 - linkUpn 4 - authenticationFailuren 5 - egpNeighborLossn 6 - enterpriseSpecific
Specific ID The specific trap code for anenterprise-specific trap (whenGeneric ID is set to to 6).
Agent Address Address of the managed object thatgenerates the trap.
vCenter Hyperic Administration Guide
16 VMware, Inc.
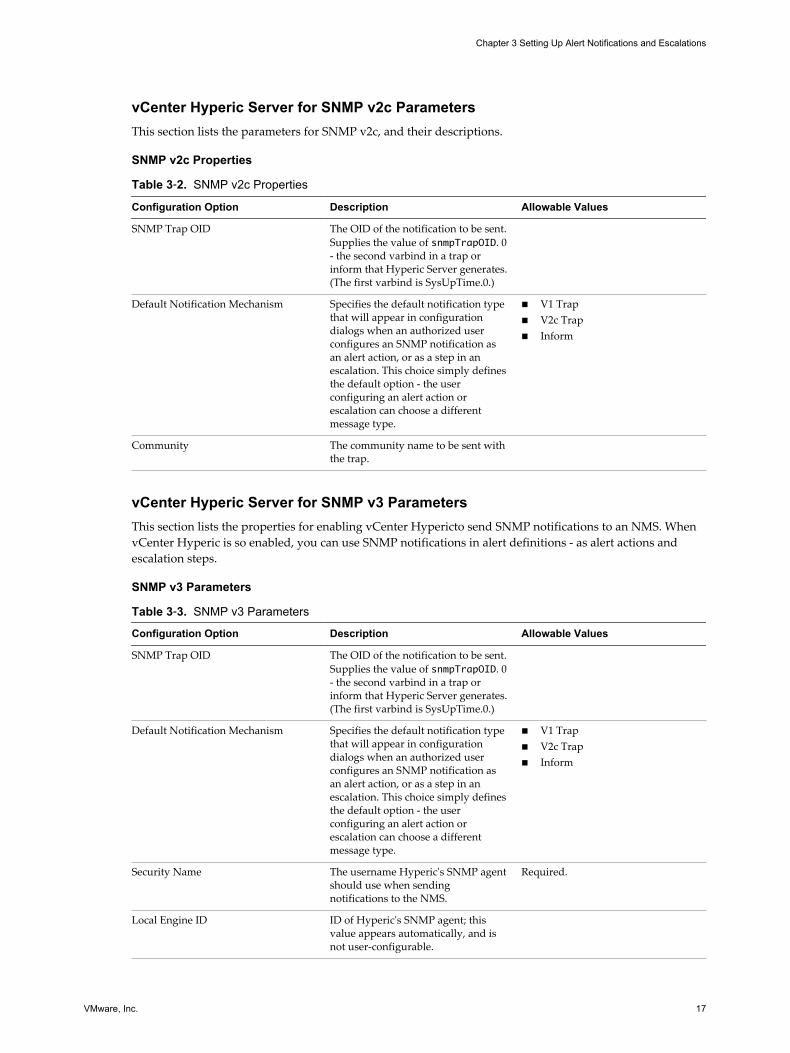
vCenter Hyperic Server for SNMP v2c ParametersThis section lists the parameters for SNMP v2c, and their descriptions.
SNMP v2c Properties
Table 3‑2. SNMP v2c Properties
Configuration Option Description Allowable Values
SNMP Trap OID The OID of the notification to be sent.Supplies the value of snmpTrapOID. 0- the second varbind in a trap orinform that Hyperic Server generates.(The first varbind is SysUpTime.0.)
Default Notification Mechanism Specifies the default notification typethat will appear in configurationdialogs when an authorized userconfigures an SNMP notification asan alert action, or as a step in anescalation. This choice simply definesthe default option - the userconfiguring an alert action orescalation can choose a differentmessage type.
n V1 Trapn V2c Trapn Inform
Community The community name to be sent withthe trap.
vCenter Hyperic Server for SNMP v3 ParametersThis section lists the properties for enabling vCenter Hypericto send SNMP notifications to an NMS. WhenvCenter Hyperic is so enabled, you can use SNMP notifications in alert definitions - as alert actions andescalation steps.
SNMP v3 Parameters
Table 3‑3. SNMP v3 Parameters
Configuration Option Description Allowable Values
SNMP Trap OID The OID of the notification to be sent.Supplies the value of snmpTrapOID. 0- the second varbind in a trap orinform that Hyperic Server generates.(The first varbind is SysUpTime.0.)
Default Notification Mechanism Specifies the default notification typethat will appear in configurationdialogs when an authorized userconfigures an SNMP notification asan alert action, or as a step in anescalation. This choice simply definesthe default option - the userconfiguring an alert action orescalation can choose a differentmessage type.
n V1 Trapn V2c Trapn Inform
Security Name The username Hyperic's SNMP agentshould use when sendingnotifications to the NMS.
Required.
Local Engine ID ID of Hyperic's SNMP agent; thisvalue appears automatically, and isnot user-configurable.
Chapter 3 Setting Up Alert Notifications and Escalations
VMware, Inc. 17
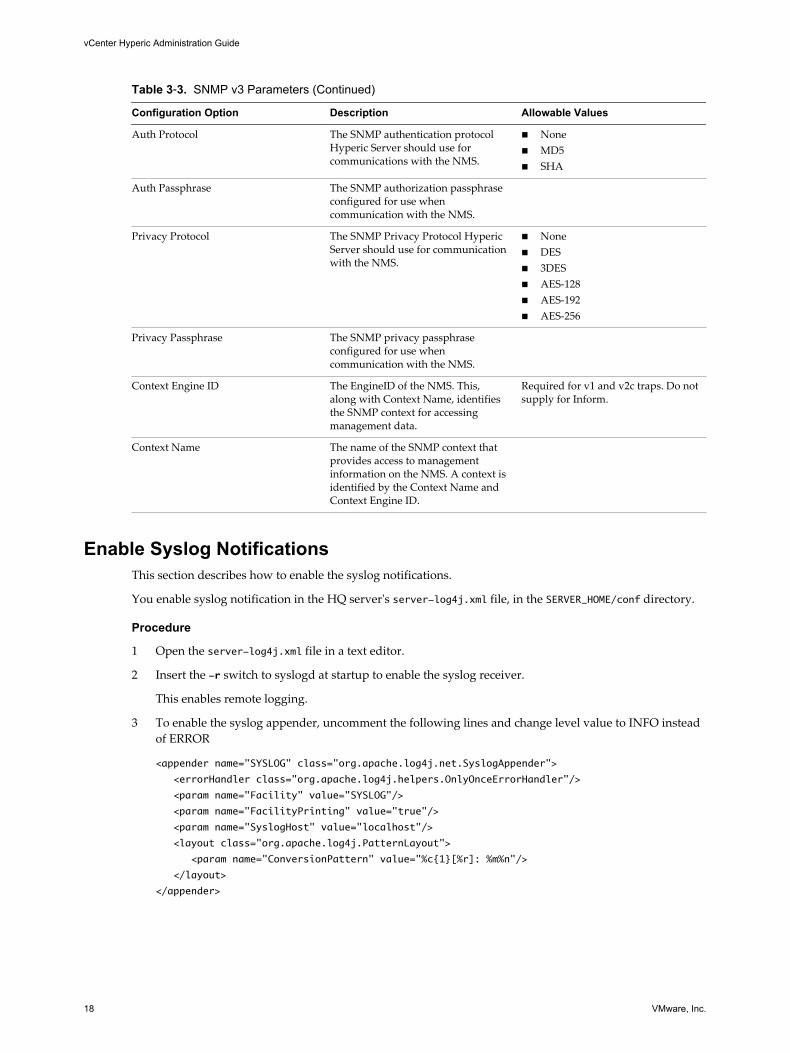
Table 3‑3. SNMP v3 Parameters (Continued)
Configuration Option Description Allowable Values
Auth Protocol The SNMP authentication protocolHyperic Server should use forcommunications with the NMS.
n Nonen MD5n SHA
Auth Passphrase The SNMP authorization passphraseconfigured for use whencommunication with the NMS.
Privacy Protocol The SNMP Privacy Protocol HypericServer should use for communicationwith the NMS.
n Nonen DESn 3DESn AES-128n AES-192n AES-256
Privacy Passphrase The SNMP privacy passphraseconfigured for use whencommunication with the NMS.
Context Engine ID The EngineID of the NMS. This,along with Context Name, identifiesthe SNMP context for accessingmanagement data.
Required for v1 and v2c traps. Do notsupply for Inform.
Context Name The name of the SNMP context thatprovides access to managementinformation on the NMS. A context isidentified by the Context Name andContext Engine ID.
Enable Syslog NotificationsThis section describes how to enable the syslog notifications.
You enable syslog notification in the HQ server's server-log4j.xml file, in the SERVER_HOME/conf directory.
Procedure
1 Open the server-log4j.xml file in a text editor.
2 Insert the -r switch to syslogd at startup to enable the syslog receiver.
This enables remote logging.
3 To enable the syslog appender, uncomment the following lines and change level value to INFO insteadof ERROR
<appender name="SYSLOG" class="org.apache.log4j.net.SyslogAppender">
<errorHandler class="org.apache.log4j.helpers.OnlyOnceErrorHandler"/>
<param name="Facility" value="SYSLOG"/>
<param name="FacilityPrinting" value="true"/>
<param name="SyslogHost" value="localhost"/>
<layout class="org.apache.log4j.PatternLayout">
<param name="ConversionPattern" value="%c{1}[%r]: %m%n"/>
</layout>
</appender>
vCenter Hyperic Administration Guide
18 VMware, Inc.
<logger name="org.hyperic.hq.bizapp.server.action.log.SyslogAction">
<level value="INFO" />
<appender-ref ref="SYSLOG" />
</logger>
If you want to configure a different facility for the appender, note that it must be syslog-configured. Ifserver-log4j.xml does not contain the lines shown above, add them in the appenders section. Allappenders in the file must be grouped together.
What to do next
To present the syslog notification as an option when you set up an escalation, restart the vCenter Hypericserver.
Configuring and Managing EscalationsThis section provides information about conifguring and managing escalations.
Create an EscalationThis section desribes the steps necessary to create an escalation.
Procedure
1 Create an Escalation Scheme on page 19This section describes how to create an escalation scheme.
2 Create Escalation Actions on page 20This section describes how to create an escalation action for the escalation scheme.
Procedure
1 Create an escalation scheme.
2 Create escalation actions.
Create an Escalation SchemeThis section describes how to create an escalation scheme.
Procedure
1 In the masthead, click Administration.
2 Click Escalation Schemes Configuration.
3 Enter values in the Name and, optionally, Description fields.
4 Configure acknowledgment options in the If the alert is acknowledged section:
n Allow user to pause escalation for - Click to enable a user to pause the escalation whenacknowledging the alert. Select Until Fixed or a duration from the pulldown list. (Options rangefrom 5 minutes to 72 hours.) A user acknowledging an alert with this escalation will have theoption of pause the escalation process for the period you specify.
n Continue escalation without pausing - With this default value, a user acknowledging an alert withthis escalation will not be offered the option to pause the escalation.
Chapter 3 Setting Up Alert Notifications and Escalations
VMware, Inc. 19
5 Configure state change notification options in the If the alert state has changed section:
n Notify previously notified users of the change - With this default setting, when the state of the alertchanges, state change notifications will be sent only to recipients who have already received anotification in previous escalation steps.
n Notify entire escalation of the change - Click if you want alert state change notifications to be sentto every notification recipient in the escalation - whether or not they have received a previousnotification.
6 Configure escalation repeat behavior in the "If alert is fixed" section:
n Stop escalation execution - With this default setting, the escalation will not be repeated for an alertthat is unfixed at the end of the escalation.
n Repeat escalation actions - Click to repeat the escalation process if the alert has not been fixed bythe end of the escalation.
7 Click Next Step.
What to do next
“Create Escalation Actions,” on page 20
Create Escalation ActionsThis section describes how to create an escalation action for the escalation scheme.
Prerequisites
Verify that you have completed the instructions in “Create an Escalation Scheme,” on page 19.
Procedure
1 On the Escalation Configuration page, click Create Action.
2 In the Create Escalation Scheme Actions section, select an action type and proceed to the directions forthat type.
n Email. For more information, see “Create an Email Action,” on page 20
n SMS. For more information, see “Create an SMS Action,” on page 21
n Sys Log. For more information, see “Create a Sys Log Action,” on page 21
n SNMP Trap. For more information, see “Create an SNMP Notification Action,” on page 21
n Suppress Alert. For more information, see “Create a Suppress Alerts Action,” on page 22
Create an Email Action
This section provides instructions for creating an email action.
Procedure
1 From the Choose Who to Notify menu, select a notification target type:
n Notify Roles - You are prompted to select one or more roles. The users with those role assignmentswill be notified.
n Notify HQ Users - You are prompted to select one or more Hyperic users to be notified.
n Notify Other Recipients - You are prompted to enter a comma-separated email list for theindividuals you want to notify.
vCenter Hyperic Administration Guide
20 VMware, Inc.
2 Select Continue if you want the next step in the escalation to occur immediately after the current one.To specify a delay before the next step is performed, select an interval from the pulldown. The intervalsrange from 5 minutes to 24 hours.
3 Click Save.
4 Repeat this procedure to add another step to the escalation.
Create an SMS Action
After creating an action type, you must specify the action type.
Procedure
1 From the Choose Who to Notify menu, select a notification target type:
n Notify Roles - You are prompted to select one or more roles. The users with those role assignmentswill be notified.
n Notify HQ Users - You are prompted to select one or more Hyperic users to be notified.
n Notify Other Recipients - You are prompted to enter a comma-separated email list for theindividuals you want to notify.
2 Select Continue if you want the next step in the escalation to occur immediately after the current one.To specify a delay before the next step is performed, select an interval from the pulldown. The intervalsrange from 5 minutes to 24 hours.
3 Click Save.
4 Repeat this procedure to add another step to the escalation.
Create a Sys Log Action
After enabling notifications for escalations, you can create a sys log action.
Prerequisites
To enable this option, verify that you have completed the steps in “Enable Syslog Notifications,” on page 18.
Procedure
1 Supply the value for these segments of the syslog message:
n meta
n product
n version
2 Select Then continue selected if you want the next step in the escalation to occur immediately after thecurrent one. To specify a delay before the next step is performed, select an interval from the pulldown.The intervals range from 5 minutes to 24 hours.
3 Click Save.
4 Repeat this process to add another step to the escalation.
Create an SNMP Notification Action
This section describes how to create an SNMP notification action.
You can define an SNMP notification to be performed as a step in an escalation if the vCenter Hypericserver is configured for your NMS.
The trap or inform sent when the escalation step is performed contains three variable bindings:
n sysUptimeOID.0 - No configuration is required for this binding.
Chapter 3 Setting Up Alert Notifications and Escalations
VMware, Inc. 21

n snmpTrapOID.0 - This binding is configured on the HQ Server settings page. You can customize thisvariable for a specific action.
n A variable binding for the alert data specified in snmp_trap.gsp, a Groovy Server Page template thatreturns the alert definition name and the "short reason" for firing. This template can be customized, asdesired. “Tailoring Alert Notification Templates,” on page 15.
n any additional variable bindings you define.
To configure an SNMP notification as an escalation step:
Procedure
1 After selecting the "SNMP Notification" action type, enter the following details:
a In the IP Address field, enter the address and port of the target SNMP server.
b In the Use Default SNMP Trap OID field,
n Select the checkbox to use the default.
n Clear the checkbox to specify a different SNMP Trap OID.
c In the Notification Mechanism field, select a notification type to send.
d In the OID field, enter the OID of the notification that will contain the alert details specified in thein snmp_trap.gsp, template.
2 To add additional variable bindings, click Add Another Variable Binding and enter
n OID - Enter an additional OID to include in the notification.
n Value - Enter a value for the OID. You can enter plain text, or an alert variable.
3 Select Then continue if you want the next step in the escalation to occur immediately after the currentone. To specify a delay before the next step is performed, select an interval from the pulldown. Theintervals range from 5 minutes to 24 hours.
4 Click Save.
5 Repeat this procedure to add another step to the escalation.
Create a Suppress Alerts Action
This section describes how to create a suppress alerts action.
This action stops the alert from repeated firing - it is useful if the alert definition for the fired alert is not isnot configured to "fire once until fixed", and but you want to stop repetitive firing at a specific point in theescalation process. After this step in the escalation process is performed, the alert will not fire again untilfixed.
After selecting the "SNMP Notification" action type:
Procedure
1 Select Then continue if you want the next step in the escalation to occur immediately after the currentone. To specify a delay before the next step is performed, select an interval from the pulldown. Theintervals range from 5 minutes to 24 hours.
2 Select Then continue if you want the next step in the escalation to occur immediately after the currentone. To specify a delay before the next step is performed, select an interval from the pulldown. Theintervals range from 5 minutes to 24 hours.
3 Repeat this procedure to add another step to the escalation.
vCenter Hyperic Administration Guide
22 VMware, Inc.
Setting Up Alert Action ScriptsThis topic describes action scripts and how they can be used.
A script action allows you to access and use vCenter Hyperic environment variables that containinformation about a fired alert. Script actions execute one at a time. Until a script action completes,additional alerts will not fire on the resource. You can use the data in any fashion you wish, for instance in aweb service call to external management system.
To use the script action feature, write a script that implements the action or logic you wish to perform withthe alert-related environment variables. When you configure the alert, specify the script to be executedwhen the alert fires. The script is server-side only, meaning it must be accessible and executable by the sameuser running the HQ Server process. For information about agent-side scripts,
Script actions can be defined for resource alerts and resource type alerts. In this version of Hyperic,escalation schemes do not support script actions.
Script actions are forked by the the vCenter Hyperic Server's Java process. Most operating systems duplicatethe Java process's memory before executing the new process; exact behavior varies by operating system. Ifthe operating system does not provide for over-committing memory, script execution requires an amount offree memory equal to the amount of memory that the Hyperic Server's Java process consumes - otherwise,the script action will not run.
Configuring a Custom Control ActionThis section has instructions about how to configure vCenter Hyperic to run a script or executable thatimplements a resource control action.
Configuring a Custom Control ActionThis section has instructions about how to configure vCenter Hyperic to run a script or executable thatimplements a resource control action.
1 Install the Control Action Executable on page 23This topic provides instructions for installing the control action executable.
2 Configure Control Action as a Platform Service on page 24You must configure the means by which an authorized user can invoke the custom control action.
Install the Control Action ExecutableThis topic provides instructions for installing the control action executable.
Install the executable that implements the control action on each managed platform where it will be used.
Prerequisites
The account under which the vCenter Hyperic agent runs must have:
n Adequate permissions to run the file.
n Adequate permissions to perform the tasks defined in the executable.
You can control the permissions required to run the file with chmod or an equivalent utility in yourenvironment. If the tasks defined in the executable require permissions not granted to the account theHyperic Agent runs under, one option is to add specific "NOPASSWD" entries in the sudoers file on theplatform.
Chapter 3 Setting Up Alert Notifications and Escalations
VMware, Inc. 23
Procedure
u Create a "control_scripts" (or similar) directory in /opt/hyperic, or a directory high enough in the agentinstallation that it will not be overwritten during an agent upgrade.
Configure Control Action as a Platform ServiceYou must configure the means by which an authorized user can invoke the custom control action.
To do so, you configure it as a platform service of FileServer File Service type on each platform where theaction will be used.
Procedure
1 Browse to the platform in the Resource Hub.
2 Select Tools > New Platform Service.
3 Name the service.
Including the platform name in the name for the new service will help you distinguish it from otherservices of the same type.
4 (Optional) In the Description field, describe the functionality of the control action.
5 Select FileServer File from the Service Type pulldown.
6 Click OK.
The Inventory page for the new platform service appears.
7 Click Edit in the Configuration Properties section of the Inventory page.
The Configuration Properties page for the new platform service appears.
8 On the Configuration Properties page, provide the following information:
Table 3‑4. Configuration Properties
Parameter Description
path Enter the path to the executable in the path field in theShared section, including the name of the file itself. Thiscan be a relative path if the executable is in thevCenter Hyperic agent directory structure. A betterpractice is to store the script external to the agentdirectory structure, and specify the full path to theexecutable, forexample, /opt/hyperic/control_scripts/test.sh.
timeout Check the value in the timeout field in the Controlsection. This is the time in seconds HQ will wait for aresponse from the control before declaring it as a failedaction. The default is 30 seconds, and under mostcircumstances should be adequate.
9 If the executable requires higher privileges than those available to the account running the HypericAgent, you can use the "prefix" field in the "Control" section to specify the sudo command. In this case,the local sudoers file has an entry for the user to run the script with a NOPASSWD directive.
10 Click Ok.
vCenter Hyperic Administration Guide
24 VMware, Inc.
Environment Variables for Fired Alert DataThis topic lists the environment variables for fired alert data and their descriptions.
Environment Variables for Fired Alert DataThe environment variables for fired alert data are prefixed with the string "HYPERIC_". The table belowdescribes the variables.
Table 3‑5. Environment Variables for Fired Alert Data
Variable Description Example Output
HYPERIC_ALERT_ALERT_ TIME The time at which the alert fired, inmilliseconds from epoch.
1219167000000
HYPERIC_ALERT_CONDI TION The condition that caused the alert tofire.NOTE This environment variable issupported only on Unix-basedplatforms. The value contains theJava \n character, which causeserrors under Windows. In Windowsenvironments, use theHYPERIC_ALERT_SUMMARYvariable, which provides the sameinformation without the \n character.
If Load Average 5 Minutes > 1.0 (actualvalue = 1.4)
HYPERIC_ALERT_DESCRIP TION The description of the alert that fired. This alert will fire when the load rises
HYPERIC_ALERT_ID The internal Hyperic ID for the alertthat fired.NOTE The HYPERIC_ALERT_ID foran alert is not committed to theHyperic database until all alertactions are complete. Therefore, analert action script (whether it usesSQL or HQApi) cannot query orupdate the Hyperic database usingthe alert's HYPERIC_ALERT_ID,because that value will not yet existin the Hyperic database.
HYPERIC_ALERT_NAME The name of the alert that fired. High Load
HYPERIC_ALERT_PRIORITY The priority of the alert that fired, 1for High, 2 for Medium, 3 for Low.
2
HYPERIC_ALERT_SUMMARY A condensed data string that containsthe relevant alert and resource namesand values which triggered the alert.
Mac OS X DOWN The-Idea-MenAvailability (0.0%)
HYPERIC_FIXED_ALERT_ID Valid for recovery alerts only.Supplies the internal Hyperic ID forthe primary alert to which therecovery alert is assigned.
HYPERIC_FIXED_ALERT_ NAME Valid for recovery alerts only.Supplies the name of the primaryalert to which the recovery alert isassigned.
High Load
HYPERIC_PLATFORM_NAME The platform on which this alertfired.
localhost.hyperic.com
HYPERIC_RECOVERY_ALERT A boolean that indicates if the alert isa recovery alert.
False
Chapter 3 Setting Up Alert Notifications and Escalations
VMware, Inc. 25
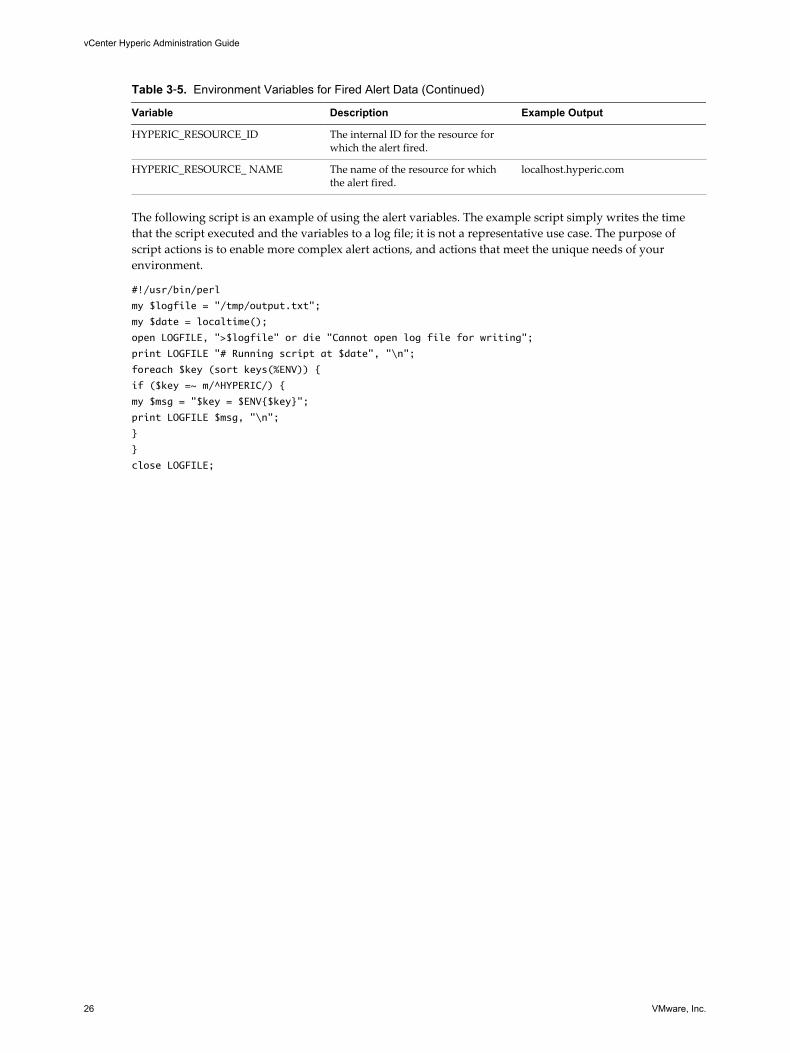
Table 3‑5. Environment Variables for Fired Alert Data (Continued)
Variable Description Example Output
HYPERIC_RESOURCE_ID The internal ID for the resource forwhich the alert fired.
HYPERIC_RESOURCE_ NAME The name of the resource for whichthe alert fired.
localhost.hyperic.com
The following script is an example of using the alert variables. The example script simply writes the timethat the script executed and the variables to a log file; it is not a representative use case. The purpose ofscript actions is to enable more complex alert actions, and actions that meet the unique needs of yourenvironment.
#!/usr/bin/perl
my $logfile = "/tmp/output.txt";
my $date = localtime();
open LOGFILE, ">$logfile" or die "Cannot open log file for writing";
print LOGFILE "# Running script at $date", "\n";
foreach $key (sort keys(%ENV)) {
if ($key =~ m/^HYPERIC/) {
my $msg = "$key = $ENV{$key}";
print LOGFILE $msg, "\n";
}
}
close LOGFILE;
vCenter Hyperic Administration Guide
26 VMware, Inc.
Configure Monitoring and Alerting fora Resource 4
There are several aspects to configuring monitoring and alerting for a resource.
n Configure Metric Baselines on page 27This topic describes how to configure metric baselines.
n Setting Up Log Tracking for a Resource on page 29IT problems can often be detected or diagnosed from messages generated by operating systems,application servers, network services, or middleware throughout the environment.
n Setting Up Configuration Tracking for a Resource on page 32This section provides information about seeting up configuration tracking for a resource.
Configure Metric BaselinesThis topic describes how to configure metric baselines.
You configure the properties that control baseline calculations on the Server Settings page, available on theAdministration tab.
Procedure
u In vCenter Hyperic, configure the following properties to control the baselining process. Changing thedata set used to calculate baselines can affect baseline accuracy.
Table 4‑1. Global Baselining Properties
Server Setting Description Default
Baseline Frequency The frequency with whichvCenter Hyperic calculates abaseline for each metric.
3 Days
Baseline Dataset The time range of metric data usedin calculating the baseline.
7 days
Baseline Minimum Data Points The minimum number of datapoints used in calculating abaseline.
40
Track Out-of-Bounds Metrics Controls whether or not Hyperictracks out-of-bounds metrics -measurements that are greater thanexpected high range for a metric, orless than the expected low range fora metric.
off
VMware, Inc. 27
Recalculate Baselines for a ResourceThis topic describes how to recalculate baselines for a resource.
The baseline and expected high and low range values for every metric are calculated periodically — bydefault, every three days.
For an individual resource, you can recalculate baseline and high/low range values on-demand; when youdo, the calculation will be based on the currently selected metric display range. The next timevCenter Hypericdoes its periodic baseline calculations, baselines will again be based on the configured"Baseline Dataset" property.
To recalculate the metric baseline and expected range values for one or more metrics for a resource.
Procedure
1 Navigate to the Metric Data tab on the resource's Monitor page.
2 Set the metric display range upon which you wish to calculate baselines.
3 Select each metric whose baseline values you want to set.
4 Click Set Baselines.
The Low Range, Baseline, and High Range values for the selected metrics will be set to the low, average, andpeak values for the current display range.
You can also initiate re-calculation of the baseline values for a single resource metric when you chart themetric.
Reset Baselines for a Charted MetricThis topic provides instructions about how to recalculate baselines for an individual metric from a metricchart.
Procedure
1 Chart the metric whose baseline you want to recalculate — click the chart icon next to it on the MetricData minitab.
2 Click Edit Range, select the desired period of history upon which to base the baseline, and redraw thechart.
3 In the Metric Baseline & Expected Range section, click Change Value next to the Baseline field.
A new baseline value is displayed. For example:
New value calculated from current Display Range: 26.5 MB
4 Click Save Value to save the calculated value as the baseline value for the metric.
New values for High Range and Low Range appear.
5 To modify the values for High Range and Low Range:
a Click Change Value next to the High Range and Low Range field.
b Enter a value.
c Click Save Value.
vCenter Hyperic Administration Guide
28 VMware, Inc.
Setting Up Log Tracking for a ResourceIT problems can often be detected or diagnosed from messages generated by operating systems, applicationservers, network services, or middleware throughout the environment.
vCenter Hyperic can monitor messages in log files and in memory, and record events in thevCenter Hyperic database based on criteria you specify.
n Configuring Log Tracking on page 29This topic provides information about the supported resource tpyes and message types, as well asconfiguration options.
n View Log Events on page 32Log events for a particular resource are indicated in the timeline at the bottom of the resource'sIndicators page.
n Log Tracking Support Classes on page 32This topic provides information about the different support classes.
Configuring Log TrackingThis topic provides information about the supported resource tpyes and message types, as well asconfiguration options.
Hyperic Resource Types that Support Log TrackingHyperic supports log tracking for operating system platforms, network services, and most server types. If aresource supports log tracking, its Configuration Properties page contains log tracking configurationoptions.
Supported Log Message TypesHyperic can monitor and record events for:
n Log file messages that specify log levels using log4j log levels.
n Events written to Windows Event Logs.
n Network request results for a variety of network services.
Log Tracking Configuration OptionsYou enable and configure log tracking for a resource on its Configuration Properties page. Navigate to theresource's Inventory page, and click Edit in the Configuration Properties section to display theConfiguration Properties page.
NOTE Log and configuration tracking must be enabled for a resource if you wish to log events for logmessages or configuration changes. Event logging is automatic for alerts and control actions. Log trackingconfiguration options vary somewhat by resource type.
Log Tracking for Resources with Log4j LogsThis section describes the log tracking configuration options for resources that whose log files use logj4levels.
An authorized user can set the values of these configuration options:
n Enable/disable log tracking.
Chapter 4 Configure Monitoring and Alerting for a Resource
VMware, Inc. 29
n Specify one or more files to track, as a comma-separated list. The Hyperic Agent must be able to readthese files, so make sure permissions are set appropriately.
n Specify the highest log level to track:
n Error - Messages with log level FATAL or ERROR
n Warn
n Info
n Debug
n Specify substrings or expressions to use as include/exclude filter criteria. Enter a substring or a regularexpression that a log message must contain or match in Log Pattern Match.
Log Tracking for Network ServicesThis section describes the log tracking configuration options for network services.
An authorized user can set the values of these configuration options:
n Enable/disable log tracking.
n Specify the highest log level to track:
n Error
n Warn
n Info
n Debug
n Specify substrings or expressions to use as include/exclude filter criteria. Enter a substring or a regularexpression that a log message must contain or match in Log Pattern Match.
Log Tracking for Windows PlatformsThis section describes the log tracking configuration options for platforms of type "win32".
An authorized user can set the values of these configuration options:
n Enable/disable log tracking.
n Specify one or more Event Log to track:
n System - contains events logged by Windows system components. For example, if a driver fails toload during startup, an event is recorded in the system log. Windows predetermines the eventsthat are logged by system components.
n Application - contains events logged by programs. For example, a database program may record afile error in the application log. Events that are written to the application log are determined by thedevelopers of the software program.
n Security - contains events such as valid and invalid logon attempts, as well as events related toresource use, such as the creating, opening, or deleting of files. For example, when logon auditingis enabled, an event is recorded in the security log each time a user attempts to log on to thecomputer. A Windows administrator or member of the Windows Administrators group specifywhich events are recorded in the security log.
n * - causes all event logs to be tracked.
n Specify the highest log level to track:
n Error
n Warn
vCenter Hyperic Administration Guide
30 VMware, Inc.
n Info
n Debug
Content of Logged Windows EventsWhen Windows log tracking is enabled, an entry of this form is logged for events that match the criteria youspecified on the resource's Configuration Properties page:
[Timestamp] Log Message (EventLogName):
EventLogName:EventAttributes
where:
n Timestamp - is when the event occurred
n Log Message - is an text string
n EventLogName - is the Windows event log type, "System", "Security", or "Application".
n EventAttributes - a colon delimited string made of the Windows event Source and Message attributes.
For example, this log entry:
04/19/2010 06:06 AM Log Message (SYSTEM): SYSTEM: Print:
Printer HP LaserJet 6P was paused
is for an Windows event written to the Windows System event log at 6:06 AM on 04/19/2010. The Windowsevent Source and Message attributes, are "Print" and "Printer HP LaserJet 6P was paused.", respectively.
Tailoring the Content and Format of Logged Windows EventsYou can configure the last portion of the log data that the agent writes for a Windows event - referred toabove as EventAttributes. You can include additional event attributes, for example User and Computer. Todo so, you add the platform.log_track.eventfmt property to the agent.properties file for thevCenter Hyperic agent monitoring the Windows platform.
platform.log_track.eventfmt PropertyThis property specifies the content and format of the Windows event attributes that a vCenter Hyperic agentincludes when logging a Windows event as an event in vCenter Hyperic.
agent.properties does not contain the platform.log_track.eventfmt property, you must explicitly add itif you want to tailor the data logged for Windows events.
When Windows log tracking is enabled, an entry of this form is logged for events that match the criteria youspecified on the resource's Configuration Properties page.
You can use the parameters below to configure the Windows event attributes that the agent writes for aWindows event. Each parameter maps to Windows event attribute of the same name.
n %user% - The name of the user on whose behalf the event occurred.
n %computer% - The name of the computer on which the event occurred.
n %source% - The software that logged the Windows event.
n %event% - A number identifying the particular event type.
n %message% - The event message.
n %category% - An application-specific value used for grouping events.
Chapter 4 Configure Monitoring and Alerting for a Resource
VMware, Inc. 31
View Log EventsLog events for a particular resource are indicated in the timeline at the bottom of the resource's Indicatorspage.
A circular indicator over the timeline indicates a timeslice in which one or more events of any type - logevents, configuration change events, or alerts - were logged.
Procedure
u Click the event indicator to view the data collected at that time.
You can use the Event Center to view events over time for all, or selected groups of resources, and filterby log event severity.
Log Tracking Support ClassesThis topic provides information about the different support classes.
For information about the vCenter Hyperic support class for log events for log file messages that specify alog4j level, see the section about the Log4JLogTrackPlugin.
For information about the vCenter Hyperic support class for tracking Windows Event logs, seeWin32EventTrackPlugin.
Plugin classes monitor network services log events using the plugin.getManager().reportEvent method.
Setting Up Configuration Tracking for a ResourceThis section provides information about seeting up configuration tracking for a resource.
n Understanding vCenter Hyperic Configuration Tracking Functionality on page 32For supported resource types, you can configure vCenter Hyperic to track changes made toconfiguration files (or other local files of interest) and log events for the associated resource.Configuration tracking is supported for most platform and server types; typically not for services.
n Set Up Event-Based Configuration Tracking for a Server on page 33The instructions in the section apply to server types whose plugin uses event-based configurationtracking, listed below.
n Set Up Polling-Based Configuration Tracking on page 34For platforms and services that support configuration tracking, and server types that have the agentuses a cryptographic hash function to continuously compare a original version of the file with thecurrent version to see if it has changed.
Understanding vCenter Hyperic Configuration Tracking FunctionalityFor supported resource types, you can configure vCenter Hyperic to track changes made to configurationfiles (or other local files of interest) and log events for the associated resource. Configuration tracking issupported for most platform and server types; typically not for services.
Configuration tracking functionality for server types varies by resource type, plugins that have beenupdated to use the event-based tracking added in vCenter Hyperic 4.6.5 track more information about filechanges than those that still use the still-supported polling-based tracking.
The plugins that are updated to use event-based tracking are listed in “Set Up Event-Based ConfigurationTracking for a Server,” on page 33. Follow the instructions in that section for those server types. For otherserver types, and for platform and service types that support configuration tracking see “Set Up Polling-Based Configuration Tracking,” on page 34.
vCenter Hyperic Administration Guide
32 VMware, Inc.
Set Up Event-Based Configuration Tracking for a ServerThe instructions in the section apply to server types whose plugin uses event-based configuration tracking,listed below.
To enable and configure configuration tracking for a resource of one of the following server types:
n Tomcat
n Apache
n WebSphere
n WebLogic Server
n JBoss
n PostgreSQL
n mySQL
n Oracle
Procedure
1 Navigate to the server instance.
2 Select Configure Server from the Tools menu.
3 In the Monitoring section of the page:
a Verify that the Enable Config Tracking checkbox, which enables and disables configurationtracking for the server, is checked.
b In the Configuration Files field, specify the files you wish to monitor, as follows:path;recurse;regex1|regex2,path2;recurse;regex1|regex2|...|regexN
c Click OK.
Example: Configuration Files SettingFor MySQL, the default value of the Configuration Files field, which specifies which files to track is:
/etc;false;my\.cnf;,/etc/mysql;false;my\.cnf;,;false;my\.cnf;
,~/;false;\.my\.cnf;,/usr/local/mysql/data;false;my\.cnf;
,/usr/local/var;false;my\.cnf;,%WINDIR%;false;my\.ini|my\.cnf;
,c:;false;my\.ini|my\.cnf;,;false;my\.ini|my\.cnf;
When configuration tracking is enabled, this filter causes vCenter Hyperic to track my.cnf in the followingdirectories:
n MySqlHome/etc
n MySqlHome/etc/mysql
n MySqlHome
n the home directory of the user under which MySQL runs
n /usr/local/mysql/data
n /usr/local/var
n the Windows directory
Chapter 4 Configure Monitoring and Alerting for a Resource
VMware, Inc. 33

n c:/
and track my.ini in the following directories:
n the Windows directory
n c:/
n MySqlHome
Set Up Polling-Based Configuration TrackingFor platforms and services that support configuration tracking, and server types that have the agent uses acryptographic hash function to continuously compare a original version of the file with the current versionto see if it has changed.
To enable and configure configuration tracking for a platform or service:
Procedure
1 Navigate to the resource instance.
2 Select Configure ... from the Tools menu.
3 On the Edit Configuration Properties page:
a Select the Enable Config Tracking checkbox to toggle configuration tracking on and off for theresource.
b Enter the path, relative to the resource's installation directory, to each file you wish to track.Separate files with a comma.
c Click OK.
vCenter Hyperic Administration Guide
34 VMware, Inc.
Configuring Monitoring and Alertingfor a Resource Type 5
This section provides information about configuring monitoring and alerting for a resource type.
n Tailoring Metric Collection for a Resource Type on page 35Metric collection settings for a resource type are configured on the Monitoring Defaults page for theresource type.
n Define a Resource Type Alert on page 37This topic explains how to define an resource type alert.
n Define a Recovery Alert for a Resource Type Alert on page 41A recovery alert is special type of alert definition that you pair with a properly configured primaryalert definition to streamline alert management.
Tailoring Metric Collection for a Resource TypeMetric collection settings for a resource type are configured on the Monitoring Defaults page for theresource type.
An authorized user can tailor metric collection settings on a per resource basis (on the resource's Metric Dataminitab in the Resource Hub.) When you save changes to the metric collection settings for a resource typeon the Monitoring Defaults page, the settings you configure will apply to all resources of that type ininventory. So, any custom metric collection configuration for resources of that type will be overwritten.
However, if a user has chosen a different set of indicator metrics for a resource instance (on the resource'sIndicators minitab in the Resource Hub) changing the indicator metrics for a resource type on theMonitoring Defaults page will not override the user's selections.
n Navigate to the Monitoring Defaults Page for a Resource Type on page 36This topic provides instructions for accessing the Monitoring Defaults page for a resource type.
n Manage Metric Collection on page 36This topic provides instructions for enabling and disabling metric collection, as well as changing thecollection interval.
n Set Indicator Metrics on page 36This topic provides instructions for setting indicators for metrics.
n APIs for Metric Collection Settings on page 36This topic provides information about using APIs for metric collection.
VMware, Inc. 35
Navigate to the Monitoring Defaults Page for a Resource TypeThis topic provides instructions for accessing the Monitoring Defaults page for a resource type.
Procedure
1 Click the Administration tab.
2 Click Monitoring Defaults in the Server Settings section of the Administration tab.
3 Scroll to the desired resource type on the Monitoring Defaults page, and click Edit Metric Template inthat row.
Manage Metric CollectionThis topic provides instructions for enabling and disabling metric collection, as well as changing thecollection interval.
Procedure
1 Collection of the metric is now enabled by default with the specified collection interval on everyresource of this type. To disable the collection of a metric, select the checkbox next to the metric name atthe left and click Disable Collection at the bottom of the page.
2 To change a metric collection interval:
a Select the checkbox to left of the metric name.
b In Collection Interval for Selected at the bottom of the page, enter a time value and select a unit oftime measure for the collection interval.
c Click the Collection Interval for Selected control at the bottom of the Monitoring Defaults page.
Set Indicator MetricsThis topic provides instructions for setting indicators for metrics.
To select the indicator metrics for a resource type (indicator metrics are the metrics that are charted on aresource's Indicators minitab in the Resource Hub):
Procedure
u Select the checkbox to the left of each metric name you wish to be an indicator, and click Set SelectedMetrics as Indicators at the bottom of the Monitoring Defaults page.
The metrics you configure will be the default indicators for the resource type.
Changes to indicator metrics apply to existing resources but only for users that have not explicitlychanged the default indicator page on the resources (of the specified type). If a user has changed thedefault indicator page for a resource, that will not be overwritten with changes made here.
APIs for Metric Collection SettingsThis topic provides information about using APIs for metric collection.
As an alternative to the updating updating metric collection settings from the user interface, you can usevCenter Hyperic APIs to perform updates from the command line or from scripts to perform bulk updates:
n HQApi metric command - for listing and updating metric collection settings for an individual resource.
n Api metricTemplate command - for listing and updating metric collection settings for an all instances ofa resource type.
vCenter Hyperic Administration Guide
36 VMware, Inc.
Define a Resource Type AlertThis topic explains how to define an resource type alert.
A resource type alert is applied to all resources of the specific type that currently exist and new resources ofthe type that get created in the future. Only administrators can create resource type alerts.
n Understanding Alert Condition Sets on page 37This topic provides information about the structure of a condition set.
n Understanding Alert Actions on page 40This topic provides information about the different aspects of an alert action.
Procedure
1 Select the target resource type.
a Click Administration in the masthead.
b Click Monitoring Defaults in Server Settings section of the page.
c On the Monitoring Defaults Configuration page, click Edit Alerts for the resource type for whichyou want to define an alert.
The Monitoring Defaults page will display any alert definitions already assigned to the alert.
d Click New.
2 Define the alert properties.
n Name — Name assigned by the user creating an alert definition. A fired alert is identified, in theuser interface and alert notifications, by the alert definition name and a timestamp. An alertdefinition name should clearly communicate the nature of the problem. For example, Down for analert on availability, or Low Memory for an alert on free memory.
n Description — Description entered by the user creating the alert definition.
n Priority — The severity of the problem, as defined by the person creating the alert definition: Low,Medium, or High. A consistent policy for defining an alert definition priority makes it easier totriage problems appropriately. An alert's priority is shown in vCenter Hyperic pages that presentalert status and in alert notifications. You can sort alerts by priority in vCenter Hyperic's AlertCenter or Operations Center.
n Active — The current enabled/disabled status of the alert definition. Alerts only fire for enabledalert definitions. When an alert definition is disabled, Hyperic does not evaluate its condition orfire alerts for it.
3 Define the Alert Condition set and click OK.
For more information, refer to “Understanding Alert Condition Sets,” on page 37.
4 Define alert actions. For more information, refer to “Understanding Alert Actions,” on page 40.
Understanding Alert Condition SetsThis topic provides information about the structure of a condition set.
Condition SetAn alert condition specifies a resource metric value or event that will initiate the alert firing process.
Chapter 5 Configuring Monitoring and Alerting for a Resource Type
VMware, Inc. 37
The condition types you can choose when you define a alert vary by resource type and Hyperic version. If acondition type is not supported by your version of Hyperic or is not valid for the target resource, it will notappear as an option.
To define a condition, choose one of the following condition types, and supply required parameter values.
n Metric condition - To base the alert on the value of a metric that vCenter Hyperic collects for theresource:
n Metric - Select a metric from the selector list. Only currently enabled metrics are listed.
n Define the rule for evaluating the metric value. You can:
n Compare metric value to an absolute value. Select an operator: >(greater than), <(less than),=(equal to), or != (not equal to), and enter a metric value. If the metric value is a percentage,specify it as a float value. For example, enter .99 for 99%, 1.0 for 100%. Use a period (.) as adecimal separator, rather than a comma (,).
n Compare metric value to its minimum, baseline, or maximum value, in vCenter Hyperic only.Select an operator: >(greater than), <(less than), =(equal to), or != (not equal to), and choose MinValue, Baseline Value or Max Value. Baselining must be enabled.
n Fire upon change in metric value. Click value changes.
n Inventory Property Condition - To define a condition that is triggered when the value of an inventoryproperty for resource changes, select an inventory property. The pulldown contains only thoseinventory properties that are valid for the type of the resource to which the alert applies.
n Control Action Condition - When you define an alert for a resource that supports control actions, youcan define a condition that is triggered when a particular control action is performed. If desired, youcan base the condition on a control action with a particular result status: in progress, completed, orfailed. Pulldowns allow you to select a control action that the resource supports, and a result status ifdesired.
n Events/Log Level Condition - To define a condition that is triggered by a log event, select a messageseverity level (error, warn, info, debug, all) and optionally a match string. The condition is satisfiedeach time a message of the selected severity that contains the match string (if one was specified) iswritten to a log file that vCenter Hyperic is tracking. Log tracking must be enabled for the resource. Todetermine the log files that vCenter Hyperic monitors for the resource, see the Configuration Propertiessection of the resource's Inventory tab. The log files that vCenter Hyperic monitors for a resource aredefined using the server.log_track.files property.
n Config Changed... Condition - This type of condition is triggered by a change to a configuration file thatvCenter Hyperic is configured to monitor for the resource. To limit the condition to a single file, enterits filename in the match filename field. If you don't specify a filename, a change to any file monitoredwill trigger the alert. To determine the log files that vCenter Hyperic monitors for the resource, see theConfiguration Properties section of the resource's Inventory tab. The files that vCenter Hypericmonitors for a resource are defined using the server.config_track.files property. The maximumlength for filename entered is 25 characters.
Define Additional ConditionsIn vCenter Hyperic, you can define up to three conditions for an alert. To add another condition, click AddAnother Condition and specify whether both the new condition and the preceding one must be satisfied forthe alert to be triggered ("AND") or only one must be satisfied ("OR").
Define Recovery Alert BehaviorTo designate the alert you're defining as a recovery alert, select the primary alert definition from thepulldown.
vCenter Hyperic Administration Guide
38 VMware, Inc.
A recovery alert condition should detect when the condition that fired the primary alert is no longer true.When a recovery alert fires, it marks the primary alert Fixed, and the primary alert definition is re-enabled.The primary alert definition should be configured to generate one alert and then disable alert definitionuntil fixed, as described below.
Enable ActionsYou can make the condition absolute, or fire after the condition occurs repeatedly. Choose one of thefollowing options:
n Each time conditions are met.
The alert fires upon a single occurrence of the condition.
n Once every _ times conditions are met within a time period of _ minutes.
This option configures an alert to fire when the condition(s) occur multiple times over a period of time.Enter the number of occurrences and period of time.
This condition depends on the time interval that you choose when setting the metric conditions.
The number of recurrences, multiplied by the time interval, must be equal or less that the "time periodof minutes" that you specify. For example, if the available metric interval equals two minutes, and thecondition is 3 recurrences in 6 minutes (2 x 3 is less than or equal to 6), the condition is valid.If the available metric interval equals two minutes, and the condition is 3 recurrences in 5 minutes,the condition is invalid and is not applied.
Enable Action FiltersAn action filter can be used to control alert firing and alert actions.
Disable an Alert Definition Upon FiringClick Generate one alert and then disable alert definition until fixed to disable the alert definition afterfiring and reenable it when the alert that triggered it is marked Fixed.
This option eliminates redundant firing for the same problem. If you do not choose this option, the alert willfire repeatedly as long as the triggering condition is still true.
This configuration option, used in conjunction with recovery alerts, automates the process of disabling andre-enabling an alert definition. The outcomes are that there are no redundant alerts for the same problem,and you do not have manually "fix" an alert triggered by a transient problem.
Disregard Control Actions for Related AlertsThe Disregard control actions that are defined for related alerts option appears on New Alert Definitionpages for resources that support control actions. This option only applies when:
n The current alert definition will include an alert action.
n The resource associated with the alert is a member of an application.
n There are other members of the same application with alerts that fire control actions (ideally the samecontrol action)
Under these circumstances, this configuration option ensures that if multiple alerts are fired within a shortperiod for resources that are members of the same application, only one control action will be executed. Forexample, this would prevent a server from being restarted several times in a short period of time for thesame alert conditions. For instance, you might have an alert with an action to restart a Tomcat server if theJVM Free Memory got too low and another alert with an action to restart the same server if the JVM ActiveThread count got too high. If both alerts fired at the same time and they were filtering control actions, only 1restart control action would be executed and not two.
Chapter 5 Configuring Monitoring and Alerting for a Resource Type
VMware, Inc. 39
Understanding Alert ActionsThis topic provides information about the different aspects of an alert action.
You assign actions to an alert definition on the Alert Definition page, which appears when you save a newalert definition or edit an existing alert definition.
The Alert Definition page is similar to the New Alert page, with the addition of Edit controls in the AlertProperties and Condition Set sections, and tabs at the bottom of the page for defining alert actions.
You can specify multiple actions to be performed automatically when an alert fires. The types of actionsavailable in the Alert Definition page vary based on: (1) the type of resource the alert applies to, (2) yourversion of vCenter Hyperic, and (3) whether you've configured vCenter Hyperic for the types of actions thatmust be enabled before you can use them, such as escalations, OpenNMS trap actions, and invCenter Hyperic, SNMP notifications.
To define an alert action, select one of the tabs and supply the required information.
EscalationSelect an escalation from the Escalation Scheme pulldown; the tab refreshes and shows the escalation steps.You must define an escalation before you can assign it to an alert definition. Using an escalation that isconfigured to repeat until the alert is fixed is a good way to prevent redundant alerts firing for the sameproblem. To create an escalation, click Escalation Schemes Configuration on the Administration tab.
Control ActionIn vCenter Hyperic, you can define a resource control action to perform when the alert fires. The controlaction can target the current resource (the one to which the alert definition is assigned) or a differentresource on the same platform, as long as the resource type has supported control actions.
To configure a control action for the alert:
1 Select the Control Action tab and click Edit.
You can only assign a single control action to an alert definition.
You cannot assign a control action to a resource type alert.
Notify RolesIn vCenter Hyperic you can specify one or more roles as notification recipients. vCenter Hyperic users witha role you specify will be notified when an alert is fired.
1 Click Add to List on the Notify Roles tab.
2 On the roles selection page, choose the role(s) to be notified when the alert fires.
Notify other RecipientsClick Add to List on this tab to specify non-vCenter Hyperic user email recipients for alert notifications.
ScriptIn vCenter Hyperic, to assign a script action to the alert definition, click the Script tab, enter the full path tothe script, and click Set. vCenter Hyperic will run the script when the alert fires. Scripts can reference alert-related vCenter Hyperic environment variables to perform custom notification logic.
vCenter Hyperic Administration Guide
40 VMware, Inc.
OpenNMSIf vCenter Hyperic server is configured for OpenNMS integration, you can use this tab to configurevCenter Hyperic to send an SNMP trap to OpenNMS when the alert fires. The notification will be generatedby opennms_notify.gsp alert notification template.
To configure an OpenNMS trap action, enter:
n Server - Listen address for the OpenNMS server.
n Port for the OpenNMS server.
SNMP NotificationIf the vCenter Hyperic server is configured to send SNMP notifications to your NMS, you can use this tab toconfigure a trap notification action.
The notification sent when the alert fires will contain three variable bindings:
n sysUptimeOID.0 - No configuration is required for this binding.
n snmpTrapOID.0 - This binding is configured on the HQ Server settings page.
n A variable binding for the alert data specified in the snmp_trap.gsp alert notification template - the alertdefinition name and the short reason for firing.
To configure an SNMP notification action enter:
n IP Address - the address and port of the target NMS.
n OID -
The OID of the notification to send, which will contain the alert details specified in thesnmp_trap.gsp, template.
n Notification Mechanism
n v1 Trap
n v2C Trap
n Inform
Define a Recovery Alert for a Resource Type AlertA recovery alert is special type of alert definition that you pair with a properly configured primary alertdefinition to streamline alert management.
The purpose of a recovery alert is to fire when the condition that fired another alert - the primary alert - is nolonger true, and then mark the primary alert fixed and re-enable the primary alert definition. This strategyprevents redundant alerts and automates the task of marking an alert fixed.
You can define a recovery alert for a resource alert, and in vCenter Hyperic, a resource type alert. Youcannot and don't need to define a recovery alert for a resource group alert in vCenter Hyperic - recoveryalert behavior is automatic for resource group alerts.
To effectively leverage the benefits of recovery alert functionality you need to:
n Configure the primary alert definition to fire once when triggered and then disable itself until that firedalert is fixed. This prevents multiple alerts for a single incident.
Chapter 5 Configuring Monitoring and Alerting for a Resource Type
VMware, Inc. 41

n Configure a recovery alert definition and assign it to the primary alert definition. Make the recoveryalert condition the opposite of the primary alert condition. The recovery alert fires when the primaryalert condition is no longer true. Upon firing, the recovery alert marks the alert fired by the primaryalert "fixed", and re-enables the primarily alert definition, so that if the problem occurs again, theprimary alert is again triggered.
Properly configured primary and recovery alert definitions keep users notified of problems withoutdeluging them with alert notifications.
n Define Primary Alert Definition to Disable Itself on page 42You can only define a recovery alert for a primary alert definition that already exists.
n Create a Recovery Alert Definition for a Resource Type Alert on page 42This topic provides instructions for creating a recovery alert definition for a resource type alert.
Define Primary Alert Definition to Disable ItselfYou can only define a recovery alert for a primary alert definition that already exists.
Procedure
u Create the primary alert definition, and choose the Disable alert until re-enabled manually or byrecovery alert option.
Create a Recovery Alert Definition for a Resource Type AlertThis topic provides instructions for creating a recovery alert definition for a resource type alert.
Procedure
1 Click Administration in the masthead.
2 Click Monitoring Defaults in Server Settings section of the page.
3 On the Monitoring Defaults Configuration page, click Edit Alerts for the resource type for which youwant to define an alert.
4 Click New.
Follow the directions in “Define a Resource Type Alert,” on page 37, setting the Condition Set asfollows:
n Specify the condition that is the opposite of the primary alert definition's condition. For example ifthe primary alert condition is "1 Minute Load Avg > 2.0.", define the recovery alert condition as "1Minute Load Avg < 2.0.
n Use the Recovery Alert pulldown to select the primary alert.
vCenter Hyperic Administration Guide
42 VMware, Inc.
Using Dynamic Groups and Policies 6You use dynamic groups and policies to manage resource monitoring in large scale environments.
n Working with Dynamic Groups on page 43A dynamic group is a logical collection of resources that are organized by a specific criterion, such asname or type. After you have defined a dynamic group, you can assign one or more policies tomanage large environments effectively.
n Working with Policies on page 45A monitoring policy contains the settings and rules for monitoring resources of a specific type. Youcan assign a policy to one or more dynamic groups and you can edit a policy that has been assigned,or clone a policy as the basis of a new policy.
Working with Dynamic GroupsA dynamic group is a logical collection of resources that are organized by a specific criterion, such as nameor type. After you have defined a dynamic group, you can assign one or more policies to manage largeenvironments effectively.
After dynamic groups have been created, and monitoring policies defined and assigned, all the resourcesthat match the group criteria become a member of that group and subject to the monitoring policies that areassigned to the group members. When vCenter Hyperic discovers a new resource, it is dynamically addedto the group.
NOTE When you assign a policy to a dynamic group whose members are already configured, whethermanually or by vCenter Hyperic auto-discovery, the policy becomes effective on the group members,meaning that configuration and monitoring parameters are overwritten with the policy configurations.
Using resource groups with assigned policies enables you to:
n Configure monitoring parameters, such as collected metrics and collection interval, for all groupmembers.
n Manage access to group members according to user roles .
n Configure the resources that are members of the dynamic group.
Example: Adding a New Exchange Server to a Data CenterThis scenario demonstrates how using dynamic groups works when a new Exchange server is added to adata center.
vCenter Hyperic discovers the Exchange server, after which you add it to the data center's inventory.vCenter Hyperic adds the server to the Exchange-type dynamic groups, and the server inherits theconfigurations and metrics that are specified in the Exchange monitoring policies.
VMware, Inc. 43
Membership of Groups and PermissionsA resource is determined to be a member of a dynamic group when the following conditions exist:
n The resource matches the group selection criteria. For example, the resource name matches a regularexpression.
n The resource is accessible in terms of permissions. One or more of the following must apply:
n The resource is accessible by the owner of the dynamic group.
n The resource is accessible by a user with a role that has been associated with the dynamic group.The role must have at least Write permissions for the groups.
Create a Dynamic GroupYou can create groups and specify the criteria that defines when a resource is dynamically added to a group.You also assign the policies that determine the configuration and metrics for resource types, and roles thatdetermine the access privileges for those resources.
You can create a dynamic group and choose to assign policies to it at a later time.
Prerequisites
n You must have sufficient privileges to create dynamic groups.
n If you are assigning roles, you must have sufficient privileges for this function.
Procedure
1 On the Management > Dynamic Groups tab, click the add icon.
2 Enter the necessary information in the Create Dynamic Group wizard.
Text boxes with red borders are mandatory. The Next button is not enabled until all mandatoryinformation is provided.
3 On the Ready to Complete page of the wizard, review the criteria that you have defined.
This page is read only. If you must make changes, click Back to return to the relevant page.
The Members area shows the anticipated number of members in the group, based on the currentinventory.
4 Click Finish.
On the Resources tab, the new dynamic group resource is added to the table. When you click the groupname, a list of all the members of the group appears.
The effective policy that is applied to the resource appears on the Inventory tab of a resource that is amember of the group.
If you change the resource's configuration or the monitoring parameters after applying an policy, the policyis no longer applied on that resource. If the resource does not match the group criteria, it is excluded fromthe group and the policy is no longer effective. However, policy configurations continue to be applied on theresource, unless the resource configuration is modified.
Edit a Dynamic GroupYou can edit definitions, for example the criteria or the policies that are assigned to a dynamic group.
When a group is updated, the policy is reapplied to all resources that are members of the updated group.
vCenter Hyperic Administration Guide
44 VMware, Inc.
Prerequisites
n You must have sufficient privileges to edit dynamic groups.
n If you are assigning roles, you must have sufficient privileges for this function.
Procedure
1 On the Management > Dynamic Groups tab, select the group to change and click the edit icon.
2 In the Edit Dynamic Group wizard, use the Next button to navigate to the information that you arechanging.
3 On the Ready to Complete page of the wizard, review the criteria summary.
This page is read only. If you must make additional changes, click Back to return to the relevant page.
4 Click Finish.
Delete a Dynamic GroupYou can delete dynamic groups that are no longer required.
Prerequisites
You must have sufficient privileges to delete dynamic groups.
Procedure
1 On the Management > Dynamic Groups tab, select the group to remove and click the delete icon.
2 At the confirmation prompt, click Yes.
vCenter Hyperic removes the dynamic group. Resources that were members of the deleted group no longerhave an effective policy. They retain their current configuration and do not receive any subsequent policyupdates.
Working with PoliciesA monitoring policy contains the settings and rules for monitoring resources of a specific type. You canassign a policy to one or more dynamic groups and you can edit a policy that has been assigned, or clone apolicy as the basis of a new policy.
When you assign a policy to a dynamic group whose members are already configured, whether manually orby vCenter Hyperic auto-discovery, the policy becomes effective on the group members. An effective policyis a policy whose configuration and monitoring parameters were applied to the resource.
Configuration and MetricsSettings can include configuration parameters and metric collection definitions.
ConfigurationProperties
Configuration parameters that are available for a resource type are inheritedfrom the plug-in to which the resource is related. You can overwrite thedefault values when you create or edit a policy.
Some values are optional and others are mandatory.
Metric Collection You can specify which of the available metrics of a resource type are to becollected, and the collection interval.
Default metrics are retrieved from Administration > Monitoring Defaults.
Chapter 6 Using Dynamic Groups and Policies
VMware, Inc. 45

Effect of Changing Resource Configuration or Monitoring ParametersIf you manually change a resource's configuration or the monitoring parameters after applying a policy, thepolicy is no longer effective on that resource. However, if the policy or the dynamic group is updated later,the policy becomes effective on the resources again.
If a resource does not match the group criteria, it is excluded from the group and the policy is no longereffective. The configurations do not change unless the resource configuration is modified.
Policy ConflictsIn the event that there is a conflict between policies, for example when two dynamic groups containingdifferent policies are relevant for the resource, the policy that is most recently updated, or the policy thatwas most recently assigned to a group, is the policy that applies. This process is followed even when aresource is manually changed.
Create a PolicyA policy is a configuration that can be assigned to a dynamic group.
Prerequisites
n You must have a role that grants full privileges to create policies.
n Roles that you are adding to a policy must have already been defined. See Create a Role in thevCenter Hyperic Administration Guide.
Procedure
1 On the Management > Policies tab, click the add icon.
2 Enter the necessary information in the Create Policy wizard.
Text boxes with red borders are mandatory. The Next button is not enabled until all mandatoryinformation is provided.
3 On the Ready to Complete page of the wizard, review the values that you have defined.
This page is read only. If you must make changes, click Back to return to the relevant page.
4 Click Finish.
Edit a PolicyYou can edit the settings and definitions of a policy.
When you edit a policy that has already been assigned to a group, the updated policy is reapplied tomatching resources in that group.
Prerequisites
n You must have sufficient privileges to create policies.
n If you are assigning roles, you must have sufficient privileges for this function.
Procedure
1 On the Management > Policies tab, click the edit icon.
2 In the Edit Policy wizard, use the Next button to navigate to the information that you are changing.
3 On the Ready to Complete page of the wizard, review the criteria that you have defined.
This page is read only. If you must make changes, click Back to return to the relevant page.
vCenter Hyperic Administration Guide
46 VMware, Inc.
4 Click Finish.
Clone a PolicyCloning a policy allows you to use an existing policy as a template, and adjust the definition as required.
All parameters, other than resource type can be changed when you clone a policy.
Prerequisites
n You must have sufficient privileges to create policies.
n If you are assigning roles, you must have sufficient privileges for this function.
Procedure
1 On the Management > Policies tab, click the clone icon.
2 In the Create Policy wizard, use the Next button to navigate to the information that you are changing.
3 On the Ready to Complete page of the wizard, review the criteria that you have defined.
This page is read only. If you must make changes, click Back to return to the relevant page.
4 Click Finish.
Delete a PolicyYou can delete policies that are no longer required.
Prerequisites
You must have sufficient privileges to delete policies.
Procedure
1 On the Management > Policies tab, click the delete icon.
2 At the confirmation prompt, click Yes.
vCenter Hyperic removes the effective policy from the resources and from the policy list.
Chapter 6 Using Dynamic Groups and Policies
VMware, Inc. 47

vCenter Hyperic Administration Guide
48 VMware, Inc.
Global Monitoring and AlertingSettings 7
These sections describe options and settings that are defined globally for a vCenter Hyperic deployment.
n Configuring Global Alert Properties on page 49This topic provides information about configuring global alert properties.
n Configure Alert Notification Throttling on page 50You can use notification throttling to limit the number of alert email actions (notifications sent byemail for a fired alert) that are issued in a 15 second interval.
n Configuring Alert Notification Email Properties on page 50The settings in the Email Configuration Properties section of the Server Settings page are used to formnotifications that vCenter Hyperic sends for a fired alert.
n Configure Hyperic Version and Security Announcements on page 50vCenter Hyperic sends email announcements to vCenter Hyperic administrators when a key release isupcoming, or to distribute important product information.
Configuring Global Alert PropertiesThis topic provides information about configuring global alert properties.
The settings in the Global Alert Properties section of the Administration > Server Settingspage enableimmediate and global control of alert processing.n Alerts - Disable or enable all alert definitions for all resources immediately. Disabling stops any alerts
from firing; notifications defined in escalations that are currently in progress will be completed.
n Alert Notifications - Disable or enable alert notifications for all resources immediately. Disabling stopsall notifications, include those for alerts with escalations currently in progress.
n Hierarchical Alerting - This setting controls whether alerts are evaluated using the hierarchical alertingmethod. When hierarchical alerting is enabled, before firing an alert for a resource, HQ considers theavailability and alert status of the resource's parent. The purpose of hierarchical alerting is to avoidfiring alerts for every resource affected by a single root cause.
NOTE You can extend the effect of hierarchical alerting by configuring the relationship between a networkdevice or virtual host and the platforms that depend on it using the Network and Host DependencyManager available in the Plugins section of the Administration tab.
VMware, Inc. 49

Configure Alert Notification ThrottlingYou can use notification throttling to limit the number of alert email actions (notifications sent by email for afired alert) that are issued in a 15 second interval.
When the threshold you specify is reached, vCenter Hypericstops sending email alert notifications andinstead sends a summary of alert activity every ten minutes to the recipients you specify.
After starting to throttle, vCenter Hyperic re-evaluates notification volume for fired alerts every 10 minutes;when it determines that the per interval volume of individual notifications that fired alerts would generateis less than the configured threshold, vCenter Hyperic resumes sending individual notifications.
In the Notification Throttling Configuration Properties section of the Server Settings page:
Procedure
1 Click the Notification Throttling ON control.
2 In the Threshold field, enter the maximum number of notifications you want sent in a 15 secondinterval.
3 Enter one or more email addresses in the Notification Email(s) field.
Configuring Alert Notification Email PropertiesThe settings in the Email Configuration Properties section of the Server Settings page are used to formnotifications that vCenter Hyperic sends for a fired alert.
Table 7‑1. Alert Notification Email Properties
Property Description
Base URL The address:port where the vCenter Hyperic server listensfor web application requests.The initial value of Base URL is the web application listenport configured when the vCenter Hyperic server wasinstalled, for example:http://Ms-MacBook-Pro-15.local:7080Base URL forms the prefix of the URL to which Hypericappends the remainder of the URL, which points to theAlert Detail page for the fired alert. For example:http://Ms-MacBook-Pro-15.local:7080/alerts/Alerts.do?mode=viewAlert&eid=5:10611&a=16431
From Email Address The email address listed as the sender of the alert emails.For example:
Configure Hyperic Version and Security AnnouncementsvCenter Hyperic sends email announcements to vCenter Hyperic administrators when a key release isupcoming, or to distribute important product information.
You can configure the level of messages you wish to receive or disable receipt of notifications with theVersion and Security Announcements property.
vCenter Hyperic Administration Guide
50 VMware, Inc.

Procedure
u In the Announcement Properties section of the Server Settings page, choose:
n All
n Major - Default value
n None
Chapter 7 Global Monitoring and Alerting Settings
VMware, Inc. 51

vCenter Hyperic Administration Guide
52 VMware, Inc.
Managing Alert and NotificationVolume 8
The purpose of alerting is to speed the process of detecting and resolving problems. Rapid detection andresponse can be compromised when multiple alerts fire as a result of the same problem, or if responders areinundated by repetitive alert notifications.
Excessive alert and notification are less likely when:
n A given problem or root cause results in one, rather than many, alerts.
n An alert status of "unfixed" indicates a problem that still exists and needs attention, rather than atransient issue that occurred, and then went away.
n A single problem doesn't result in a firestorm of redundant notifications.
n Preventing Multiple Alerts for the Same Problem on page 53When the volume of fired alerts is high, prioritizing and resolving problems is harder.
n Disable all Alert Notifications on page 54If the volume of notifications exceeds manageable levels you can disable alert notifications globally.
n Configure Network Host Dependencies for Hierarchical Alerting on page 54You can extend the reach of hierarchical alerting beyond the basic platform-server-service hierarchy totop level platforms - network devices or virtual hosts upon which operating system platforms depend.
n Setting a Notification Throttle on page 54You can configure the vCenter Hyperic server to throttle back alert notifications in the event of an alertstorm.
Preventing Multiple Alerts for the Same ProblemWhen the volume of fired alerts is high, prioritizing and resolving problems is harder.
You can reduce the overall volume of fired alerts without sacrificing visibility if you limit the number oftimes a given alert definition fires an alert for the same incident.
n Use repeating escalations - Assign an escalation that repeats until the alert is fixed. An alert is inescalation cannot re-fire. The use of repeating escalations for all alerts is highly recommended and thebest way to control alert volume in vCenter Hyperic.
n Fire one alert then disable the definition - You can configure a alert definition to fire once and disableitself until that alert is marked fixed. When the alert is marked "fixed" the alert definition is re-enabled.If you have vCenter Hyperic, you can can define an associated recovery alert to automatically fix thealert when the triggering condition is no longer true.
VMware, Inc. 53
Disable all Alert NotificationsIf the volume of notifications exceeds manageable levels you can disable alert notifications globally.
This option stops all alert notifications immediately including those resulting from escalations in process.
Procedure
1 Click the Administration tab.
2 Click Server Settings.
3 In the Global Alert Properties section, click the Alert Notifications OFF or ON control.
The change takes effect immediately. No alert notifications will be issued when OFF is selected. Escalationscurrently in progress will be terminated.
Configure Network Host Dependencies for Hierarchical AlertingYou can extend the reach of hierarchical alerting beyond the basic platform-server-service hierarchy to toplevel platforms - network devices or virtual hosts upon which operating system platforms depend.
To enable vCenter Hyperic to consider a top-level platform's availability and alert status before firing analert for a dependent resources, you must define the relationship between a top-level platform and theoperating system platforms that depend on it.
Procedure
u Use the Network Host Dependency Manager, available in the Plugins section on the Administrationtab of the user interface.
Setting a Notification ThrottleYou can configure the vCenter Hyperic server to throttle back alert notifications in the event of an alertstorm.
You configure the maximum number of notifications that Hyperic will issue within a fifteen second interval.When the threshold is reached, vCenter Hyperic stops sending individual alert notifications, and instead,sends a summary of alert activity to designated recipients every ten minutes. When the volume ofnotifications falls below the specified threshold, vCenter Hyperic resumes sending individual notifications.
Notification throttling is disabled by default. You configure it on the Server Settings page, available from theAdministration tab.
vCenter Hyperic Administration Guide
54 VMware, Inc.
Manage Alert Definitions 9This section provides information about accessing alert definitions, as well as enabling and disabling alertdefinitions.
n Viewing and Editing Alert Definitions on page 55There are a variety of ways to navigate to pages that list and provide detailed information about alertdefinitions.
n Enabling or Disabling Alert Definitions on page 56This section provides information about enabling or disabling alert definitions.
n Enable Alert Definition Change Logging on page 58The vCenter Hyperic audit subsystem logs changes made to alert definitions. When an alert definitionis enabled, disabled, or deleted, the event is written to the database. The information includes theusername of the person who made the change.
Viewing and Editing Alert DefinitionsThere are a variety of ways to navigate to pages that list and provide detailed information about alertdefinitions.
n List Alert Definitions for a Resource on page 55This topic provides instructions for listing alert definitions for a resource.
n List Alert Definitions for a Resource Type on page 56This topic provides instructions for listing alert definitions for a resource type.
n List Alert Definitions for a Resource Group on page 56This topic provides instructions for listing alert definitions for a resource group.
n View All Alert Definitions for all Resources on page 56This topic provides instructions for viewing all alert definitions for all resources.
n View and Edit an Alert Definition on page 56This topic provides instructions for viewing and editing an alert definition.
List Alert Definitions for a ResourceThis topic provides instructions for listing alert definitions for a resource.
Procedure
1 Browse to the resource.
VMware, Inc. 55
2 Click the Alert tab.
3 Click the Configure tab to see a list of alert definitions for the resource.
List Alert Definitions for a Resource TypeThis topic provides instructions for listing alert definitions for a resource type.
Procedure
1 Click Administration in the masthead.
2 Click Monitoring Defaults in Server Settings section.
3 On the Monitoring Defaults Configuration page, click Edit Alerts for the resource type.
List Alert Definitions for a Resource GroupThis topic provides instructions for listing alert definitions for a resource group.
Procedure
1 Browse to the resource group.
2 Click the Alert tab.
3 Click the Configure tab to see a list of alert definitions for the resource.
View All Alert Definitions for all ResourcesThis topic provides instructions for viewing all alert definitions for all resources.
Procedure
1 Click the Analyze tab in the Masthead.
2 Click Alert Center.
3 Click Definitions.
View and Edit an Alert DefinitionThis topic provides instructions for viewing and editing an alert definition.
Procedure
u Click the alert definition name in an alert definition list for the resource it is assigned to, or, click thealert definition name in the Definitions tab in the Alert Center.
Enabling or Disabling Alert DefinitionsThis section provides information about enabling or disabling alert definitions.
n Enable or Disable a Resource Alert Definition on page 57There are multiple ways you can enable or disable a resource alert definition in the user interface.
n Enable or Disable a Resource Type Alert Definition on page 57When you enable or disable a resource type alert, the change applies to all resources of that type.
n Enable or Disable a Group Alert Definition on page 57This topic provides instructions for enabling or disabling group alert definitions.
vCenter Hyperic Administration Guide
56 VMware, Inc.

n Enable or Disable all Alert Definitions for Multiple Resources on page 58You can disable or enable all of the alert definitions for selected resources on the Browse Resourcepage.
n Enable or Disable all Alert Definitions on page 58You can disable or enable alert definitions globally, if you want to turn alerting on or off for allresources in inventory.
Enable or Disable a Resource Alert DefinitionThere are multiple ways you can enable or disable a resource alert definition in the user interface.
Procedure
1 On the Alerts tab for a resource, browse the the resource to which the alert definition is assigned.
2 Click the Alerts tab.
3 Click Configure to display a list of alert definitions for the resource.
The page will include any alert definitions that the resource inherits from a resource type alertdefinition, marked with an asterisk. if you enable or disable the alert definition at this level, the changewill be overridden by subsequent updates to the alert definition at the resource type level.
4 Select the checkbox for the alert definition you wish to enable or disable and toggle the Set Activecontrol.
5 On the Alert Definition page:
a Navigate to the Alert Definition page by clicking the alert definition name on the Alert Centerpage.
b Click Edit in the Alert Properties section of the Alert Definition page.
c Toggle the Set Active button.
Enable or Disable a Resource Type Alert DefinitionWhen you enable or disable a resource type alert, the change applies to all resources of that type.
Procedure
1 Click Administration in the masthead.
2 Click Monitoring Defaults in Server Settings section.
3 On the Monitoring Defaults Configuration page, click Edit Alerts for the resource type.
4 Click one or more alert definitions, and toggle the Set Active button.
Enable or Disable a Group Alert DefinitionThis topic provides instructions for enabling or disabling group alert definitions.
Procedure
1 Browse the the group to which the alert definition is assigned.
2 Click the Alert tab.
3 Click Configure to display a list of alert definitions for the group.
4 Select the checkbox for the alert definition you wish to enable or disable and toggle the Set Activecontrol.
Chapter 9 Manage Alert Definitions
VMware, Inc. 57
Enable or Disable all Alert Definitions for Multiple ResourcesYou can disable or enable all of the alert definitions for selected resources on the Browse Resource page.
Procedure
1 Click the Resources tab.
2 Use the filter options at the top of the page to list the resources of interest.
3 Select the checkbox for one or more resources.
4 Click Enable all Alerts or Disable all Alerts.
Enable or Disable all Alert DefinitionsYou can disable or enable alert definitions globally, if you want to turn alerting on or off for all resources ininventory.
Procedure
1 Click the Administration tab.
2 Click Server Settings.
3 In the Global Alert Properties section, click the Alerts ON or OFF control.
Enable Alert Definition Change LoggingThe vCenter Hyperic audit subsystem logs changes made to alert definitions. When an alert definition isenabled, disabled, or deleted, the event is written to the database. The information includes the username ofthe person who made the change.
You can configure vCenter Hyperic server to also write the audit events to the server.log file in the server'slogs directory.
Procedure
u Add the following section to ServerHome/conf/server-log4j.xml
<!-- Use this category to log every instance of a group alert firing.
Comment out if the log messages become unwieldy. -->
<category name="org.hyperic.hq.galerts.processor.MemGalertDef.Fired">
<priority value="DEBUG" />
</category>
<category
name="org.hyperic.hq.common.server.session.AuditManagerEJBImpl"> <!--SEE
HERE -->
<priority value="DEBUG"/>
</category>
This section should be added before the root stanza.
The entries are written to logs/server.log, similar to the following:
2009-03-18 15:56:20,088 INFO
[main][org.hyperic.hq.common.server.session.AuditManagerEJBImpl@259]
Audit Manager starting up2009-03-18 15:58:28,223 DEBUG
[main][org.hyperic.hq.common.server.session.AuditManagerEJBImpl@87]
Audit:Audit[user=admin,purpose=12288,time=1237409692209,resource=,
msg=HQ Started]2009-03-18 16:01:12,114 DEBUG
vCenter Hyperic Administration Guide
58 VMware, Inc.

[UserLoginListener1][org.hyperic.hq.common.server.session.
AuditManagerEJBImpl@87]Audit:Audit[user=hqadmin,
purpose=16384,time=1237410072113,
resource=,msg=HQ Administrator logged in]
2009-03-18 16:05:18,485 DEBUG [http-0.0.0.0-7080-4]
[org.hyperic.hq.common.server.session.AuditManagerEJBImpl@87]
Audit:Audit[user=hqadmin,purpose=20482,time=1237410318484,
resource=Linux,msg=Alert definition deleted (High Load)]
Chapter 9 Manage Alert Definitions
VMware, Inc. 59

vCenter Hyperic Administration Guide
60 VMware, Inc.
Creating and Managing ResourceGroups and Applications 10
This section provides information about creating and managing resource groups and applications.
n Configuring and Managing Resource Groups on page 61This section has instructions for creating and managing groups.
n Defining Alerts for a Resource Group on page 63This section provides information about defining an alert for a compatible group - a group whosemembers are all of the same resource type.
n Schedule Downtime for a Resource Group on page 64The Schedule Downtime page, available from the Tools menu when a resource, or a resource group isselected, allows you to schedule a downtime period, during which alerts for the resource(s).
n Creating and Managing Applications on page 65This section provides information about configuring an application in vCenter Hyperic
Configuring and Managing Resource GroupsThis section has instructions for creating and managing groups.
n Create a Group on page 61This topic provides instructions for creating a group.
n Add Resources to a Group on page 62This topic provides instructions for adding resources to a group.
n Assign Roles to a Group on page 62This topic provides instructions for assigning roles to a group.
n Remove Resources from a Group on page 63This topic provides instructions for removing a resource from a group.
n Remove Roles from a Group on page 63This topic provides instructions for removing roles from a group.
Create a GroupThis topic provides instructions for creating a group.
Procedure
1 From Browse > Resource page, click New Group on the Tools menu.
VMware, Inc. 61
2 On the New Group page, enter the following:
n Name
n Description
n Location
n Make group private - select this checkbox to make the group private. A private group is invisible toother users, including admin users. You can share a private group with other users by associating itwith a role. Note that the name you assign to a private group is automatically prefixed with thestring private to username, where username is the creator's vCenter Hyperic username.
n Contains Resources - Select the type of group:
n Compatible/cluster - the group will contain resources of a single type. For example, Linux orJBoss 4.2.
n Mixed - the group will contain multiple resource types. Mixed groups are useful for role-basedresource access control.
n The Select Resource Type pulldown appears to the right of the Contains Resources — theoptions vary depending upon whether you are created a compatible or mixed group.
n For a compatible group, the Select Resource Type pulldown contains a list of all resourcetypes in inventory.
For a mixed group, the Select Resource Type pulldown contains these choices:
n Groups
n Platforms, Servers, & Services
n Applications
3 Click OK.
What to do next
Add resources to the new group. For more information, refer to “Add Resources to a Group,” on page 62.
Add Resources to a GroupThis topic provides instructions for adding resources to a group.
Procedure
1 Navigate to the group's Inventory page, if it is not currently selected.
2 Click Add To List in the Resources section of the page.
3 On the Add to Group page, filter the resource list as desired by entering all or a part of the resourcename in the Filter By Name field.
4 Select the checkbox for the desired resources and click the blue arrow to move them from the Resourcescolumn to the Add Resources column. (The arrow is enabled when you select a resource.)
5 Click OK.
Assign Roles to a GroupThis topic provides instructions for assigning roles to a group.
Procedure
1 Navigate to the group's Inventory page, if it is not currently selected.
vCenter Hyperic Administration Guide
62 VMware, Inc.
2 Click Add To List in the Roles section of the page.
3 On the Add to Roles to Group page, select the checkbox for the desired roles and click the blue arrow tomove them from the Roles column to the Add to Roles column.
4 Click OK.
Remove Resources from a GroupThis topic provides instructions for removing a resource from a group.
Procedure
1 Navigate to the group's Inventory page, if it is not currently selected.
2 In the Resources section, select the checkboxes for the resources you want to remove.
3 Click Remove From List.
Remove Roles from a GroupThis topic provides instructions for removing roles from a group.
Procedure
1 Navigate to the group's Inventory page, if it is not currently selected.
2 In the Roles section, select the checkboxes for the roles you want to remove.
3 Click Remove From List.
Defining Alerts for a Resource GroupThis section provides information about defining an alert for a compatible group - a group whose membersare all of the same resource type.
n Understanding Resource Group Alerts on page 63A resource group alert is an alert assigned to a compatible group - a group or resources you havedefined that contains selected resources, all of which have the same resource type.
n Define a Resource Group Alert on page 64This topic provides instructions for defining a resource group alert.
Understanding Resource Group AlertsA resource group alert is an alert assigned to a compatible group - a group or resources you have definedthat contains selected resources, all of which have the same resource type.
Resource group alerts are different than resource alerts in the following ways:
n A resource group alert definition has a single condition - A resource group alert definition is based on asingle condition.
n A resource group alert condition is based on the behavior of multiple resources - Resource group alertsare evaluated differently than other alert types. A resource alert or resource type alert is fired for aspecific resource based on monitoring results for that resource only. A resource group alert fires when ametric condition is true for a specified number or percentage of the resources in the group.
n The only action a resource group alert can trigger is an escalation - The only action you can assign to agroup alert definition is an escalation.
Chapter 10 Creating and Managing Resource Groups and Applications
VMware, Inc. 63
n A resource group alert fixes itself - Although you can mark a group alert fixed - from the group's Alertstab or other alert views - you don't need to. HQ automatically marks a group alert "fixed" when thecondition that caused it to fire is no longer true. This shows up in the UI as "The problem fixed itself." inthe "Alert Detail" screen.
Define a Resource Group AlertThis topic provides instructions for defining a resource group alert.
Procedure
1 Select a target compatible group.
a Browse to the compatible group to which the new alert definition will apply.
b Under the Alert tab, click Configure.
c Click New to display the New Alert page.
2 Define the alert properties.
n Name — Name assigned by the user creating an alert definition. A fired alert is identified, in theuser interface and alert notifications, by the alert definition name and a timestamp. An alertdefinition name should clearly communicate the nature of the problem. For example, Down for analert on availability, or Low Memory for an alert on free memory.
n Description — Description entered by the user creating the alert definition.
n Priority — The severity of the problem, as defined by the person creating the alert definition: Low,Medium, or High. A consistent policy for defining an alert definition priority makes it easier totriage problems appropriately. An alert's priority is shown in vCenter Hypericpages that presentalert status and in alert notifications. You can sort alerts by priority in vCenter Hyperic's AlertCenter or Operations Center.
n Active — The current enabled/disabled status of the alert definition. Alerts only fire for enabledalert definitions. When an alert definition is disabled, Hyperic does not evaluate its condition orfire alerts for it.
3 Define the alert conditions that will cause the alert to fire.
a Select how many (an absolute number or percentage) of the resources in the group (the number ofmembers is shown) that must satisfy the condition.
b Select the metric and the comparison value that those resources must satisfy.
c Click OK.
4 Assign the escalation for the alert.
a Click Escalation Schemes Configuration on the Administration tab to define an escalation.
The series of notifications defined in the escalation will be performed when an alert is fired. You mustdefine an escalation before you can assign it to an alert definition.
Schedule Downtime for a Resource GroupThe Schedule Downtime page, available from the Tools menu when a resource, or a resource group isselected, allows you to schedule a downtime period, during which alerts for the resource(s).
You define a period of time - a start and end date and time. At the start of the downtime period, currentlyactive alert definitions for resources in the group are disabled. At the end of the period, those alertdefinitions are re-enabled.
vCenter Hyperic Administration Guide
64 VMware, Inc.
Only a user with the Super User role may schedule downtime.
To schedule or reschedule maintenance:
Procedure
1 Navigate to the individual resource (a platform, server, or service) or the resource group for which youwish to schedule downtime.
2 Select Schedule Downtime from the Tools menu.
3 On the Schedule Downtime page, enter the start and end dates and times for the downtime and clickSchedule.
Creating and Managing ApplicationsThis section provides information about configuring an application in vCenter Hyperic
n Understanding Instrument Java Components (Optional) on page 65You can gain deeper visibility into the health of Java applications by instrumenting applicationservices.
n Create an Application on page 65This topic provides instructions for creating an application.
n Add Services to an Application on page 66This topic provides instructions for adding services to an application.
n Add Application to a Group on page 66This topic provides instructions for adding an application to a group.
n Monitoring an Application with Indicator Charts on page 66After you have created an application and added services to it, you can start monitoring all theapplication's components as a whole using indicator charts.
Understanding Instrument Java Components (Optional)You can gain deeper visibility into the health of Java applications by instrumenting application services.
The vCenter Hyperic agent can auto-discover and manage Java application services via Model MBeans thatadhere to a specified ObjectName naming convention and expose a specified set of service data. Thisenables deeper visibility into application health: you can monitor application services along with the hostingapplication server and its internal services.
NOTE Although instrumentation provides deeper visibility into Java application health, it is not requiredfor application monitoring.
Create an ApplicationThis topic provides instructions for creating an application.
Procedure
1 Click Browse on the Resources tab.
2 Click New Application in the Tools menu.
Chapter 10 Creating and Managing Resource Groups and Applications
VMware, Inc. 65
3 In the General Properties section of the New Application page, enter:
n Name
n Description
n Location
4 In the Application Properties section of the New Application page, provide desired contact information:
n Engineering Contact
n Business Owner
n IT Contact
5 Click OK.
Add Services to an ApplicationThis topic provides instructions for adding services to an application.
Procedure
1 In the Services section of the Inventory page for the application, click Add to List.
The Edit Application page appears.
2 Select the checkbox for the desired services and click the blue arrow to move them from the Servicescolumn to the Add Services column. (The arrow is enabled when you select a resource.)
3 Click OK.
Add Application to a GroupThis topic provides instructions for adding an application to a group.
Procedure
1 In the Groups section of the Inventory page for the application, click Add to List.
The Edit Application page lists existing mixed groups of applications.
2 Select the checkbox for the desired services and click the blue arrow to move them from the Servicescolumn to the Add Services column. (The arrow is enabled when you select a resource.)
Monitoring an Application with Indicator ChartsAfter you have created an application and added services to it, you can start monitoring all the application'scomponents as a whole using indicator charts.
Initially, the Monitor tab displays only the availability metric indicator for the new application. The servicesyou added are listed, along with Host Servers (the servers that host the listed services), on the Resourcesminitab tab, and through those you can add more metrics to the display.
vCenter Hyperic Administration Guide
66 VMware, Inc.
Map vCenter Virtual Machine IDs tovCenter Hyperic Platforms 11
In order for vCenter Operations Manager to synchronize information from a vCenter server withvCenter Hyperic, the vCenter Hyperic platforms must have a unique identifier assigned that can be mappedto the corresponding vCenter virtual machine.
To configure unique IDs for vCenter Hyperic platforms:
Procedure
1 On the masthead, click the Administration tab.
2 Select the HQ Server Settings link.
3 In the vCenter Server Settings section, enter the appropriate values:
a Enter the URL of the vCenter SDK in the vCenter URL text box.
The URL is generally https://<IP address of vCenter Server>/sdk
b Enter the username of a user with vCenter administrator privileges in the vCenter User text box.
c Enter the password for the specified user in the vCenter Password text box.
4 Click OK.
5 (Optional) Verify that the properties have been correctly applied.
a On the Resources tab, click a platform link.
b Verify that vCenter UUID and MOID values appear in the summary information at the top of thepage.
VMware, Inc. 67

vCenter Hyperic Administration Guide
68 VMware, Inc.
Configuring Hyperic as an SNMPTrap Receiver 12
You can set up vCenter Hyperic to receive and log SNMP messages from a remote network managementsystem or other SNMP-capable system or device.
You can set alerts based on the received SNMP data to trigger notifications or other responses.
The process involves configuring the agent and the network system or device to communicate with eachother, and creating a platform of type Network Device to represent the remote system or device.
n Step 1 - Select and Enable an Agent to Receive Traps on page 69When you configure a platform of type Network Device, you must specify connection information fora vCenter Hyperic agent running on an operating system in your environment - that agent will receivethe SNMP data. The agent you designate must be able to receive traps.
n Step 2 - Configure Trap Generator on page 70This topic provides instructions for configuring the trap generator.
n Step 3 - Create a Proxy Platform for Trap Data on page 70In vCenter Hyperic, remotely monitored resources are represented as a platform.
n Resolving Configuration Issues on page 71This topic provides information about dealing with configuration issues.
Step 1 - Select and Enable an Agent to Receive TrapsWhen you configure a platform of type Network Device, you must specify connection information for avCenter Hyperic agent running on an operating system in your environment - that agent will receive theSNMP data. The agent you designate must be able to receive traps.
The agent's default UDP port for receiving traps is 162, in the privileged range, which the agent cannotaccess unless it runs as as root (or as an Administrative user on Windows).
To configure a non-privileged port to receive SNMP traps:
Procedure
1 Open the agent.properties file in a text editor.
2 Add the following line to the file:
snmpTrapReceiver.listenAddress=udp:0.0.0.0/1620
3 Restart the agent.
This setting enables the agent to receive traps through any interface on the platform at UDP port 1620.If desired, you can specify an specific interface's IP address, or different port in the unprivileged range(1024 or above).
VMware, Inc. 69
If you try to check that the SNMP port is open at this point, netstat will not show it open. Once youcomplete all steps in this procedure netstat output will produce expected results.
Step 2 - Configure Trap GeneratorThis topic provides instructions for configuring the trap generator.
Procedure
1 Set up the agent as a trap destination on the SNMP-enabled system or application.
2 Supply the agent's SNMP listen address and port - either the default connection settings, or ifapplicable, those configured in the previous step.
Step 3 - Create a Proxy Platform for Trap DataIn vCenter Hyperic, remotely monitored resources are represented as a platform.
To create a platform for the remote device or host:
Procedure
1 Select New Platform from the Tools menu.
2 Enter a name for the platform.
3 Select Network Device from the Platform Type pulldown.
4 Enter the FQDN of the network device or host.
5 Select the agent connection from the pulldown list - it must have connectivity to the SNMP port on thedevice or host.
6 Enter the IP address of the network device or host.
Do not use 127.0.0.1, even if the application is local to the agent being used for the SNMP connection.
7 The netmask or MAC address of the device or server may be required depending on the configurationof the device.
8 Click OK.
The Inventory tab for the new platform is displayed.
9 Click Edit in the Configuration Properties section.
10 Select the interface.index the device uses to uniquely identify interface services. Most devices work withthe default (ifDescr).
11 Supply or validate the snmpIp, snmpPort and SNMP community string.
12 Select the value for the snmpVersion that corresponds to the device.
13 If you use SNMP v3, it is likely that authentication is configured, in which case enter username,password and auth type.
14 Select the Enable Log Tracking checkbox.
15 Click OK.
vCenter Hyperic Administration Guide
70 VMware, Inc.

Resolving Configuration IssuesThis topic provides information about dealing with configuration issues.
Problem
SNMP configuration is not accepted
Solution
1 Verify the IP address, SNMP port, SNMP version, and authentication settings, are properly conifgured.
2 Verify that the agent you selected for the proxy platform has network connectivity and can reach theSNMP port of the network device (check firewalls).
3 Make sure that the community string configured for the proxy platform is the same as the communitystring the trap generator uses to send traps. If the strings do not match, traps cannot be sent to theproxy platform - instead, traps will be routed to the default platform, if that platform has log trackingenabled.
Check the vCenter Hyperic agent log file to make sure that the agent has opened the proper UDP port. Ifproperly configured, you should see messages similar to:
2008-06-05 16:45:05,447 DEBUG [SNMPTrapReceiver] snmpTrapReceiver.listenAddress=udp:0.0.0.0/1620
2008-06-05 16:45:05,572 DEBUG [SNMPTrapReceiver] Add 1:10003 for 10.2.0.2-switch
Chapter 12 Configuring Hyperic as an SNMP Trap Receiver
VMware, Inc. 71

vCenter Hyperic Administration Guide
72 VMware, Inc.
Managing Hyperic Users and Roles 13This section provides information about managing users and roles.
n Creating and Manage User Accounts on page 73This topic provides information about managing users and accounts.
n Creating and Managing Roles in vCenter Hyperic on page 76This section provides information about creating and managing roles.
n Understanding Role-based Dashboards on page 81A role-based dashboard is a version of the vCenter Hyperic dashboard available to users assigned tothe role.
Creating and Manage User AccountsThis topic provides information about managing users and accounts.
If vCenter Hyperic is configured to use your enterprise directory for user authentication, you do not have tomanually create user accounts. vCenter Hyperic will automatically create an account for users that areexternally authenticated by your LDAP, Active Directory, or Kerberos system.
Create a User AccountThis topic provides instructions for creating a user, and assigning roles to the user.
Procedure
1 Click New User on the Administration page.
2 Enter values for the following fields:
n Name
n Username
n Phone
n Department
n Password - Passwords must contain at least 6 case-sensitive characters and numbers, and no spacesor quotation marks.
n Email
n Format - can be either HTML or plain text.
n SMS Address — An email-to-SMS gateway email address for the user's SMS device.
VMware, Inc. 73
For a cellular phone on the Cingular network, this might look [email protected]. Check with the service provider for details about an email-to-SMS configuration. Basic alert notification sent to this user's SSS address will be in long format,which can result in up to five separate messages on the SMS device each time notification is sent byvCenter Hyperic. vCenter Hyperic recommends that SMS alerting be used in conjuction withescalations, not basic alert notification, but short format is used there.
n Enable Login - Toggle the radio button to disable or enable the account. The user cannot log inwhen the login is disabled
3 Click OK and Assign to Roles.
Assign Roles to a New User AccountThis topic provides instructions for assigning roles to a new user account.
In vCenter Hyperic, the roles to which a user is assigned govern which resources the user may access, andthe operations the user can perform on those resources. Each role invCenter Hyperic defines a permissionmatrix; users with a role may exercise the permissions it grants, on the resources in groups assigned to therole.
Procedure
1 In the Roles panel on the left side of the page, select the checkbox for each role to which you want toassign the user.
2 Click the blue arrow to move the roles to the Add to Roles panel.
3 Click OK.
View User AccountsThis topic provides instructions for listing user accounts.
Procedure
1 Click List Users on the Administration page.
The List Users page lists the following information for each user account.
n First Name
n Last Name
n Username
n Email
n Department
2 Click the Username of the users whose details you want to view.
The following information is displayed:
n Name
n Username
n Phone
n Department
n Password - The user's password is not displayed. If you have the permission to modify thepassword, a Change link is presented.
n Email
vCenter Hyperic Administration Guide
74 VMware, Inc.
n Format - Format for email notifications sent to the user - HTML or plain text.
n SMS - An email-to-SMS gateway email address for the user's SMS device.
n Enable Login — Indicates whether or not the account is enabled. The user cannot log in when thelogin is disabled.
n Roles assigned to - this section contains a list of roles to which the user is assigned.1 To assign additional roles, click Add to List.
Change a User PasswordIn vCenter Hyperic, only a user with a role that grants Full or Read/Write permissions to user accounts maychange another user's password.
You must enter your current password to change an account password, whether the account is yours, oranother user's.
Procedure
1 Click the Administration tab in the user interface.
2 Navigate to the user account for the user whose password you want to change. For more information,see “View User Accounts,” on page 74.
3 In the General Properties section of the page that appears, click the Change... link in the Password field.
The Change Password page appears.
4 Enter your password in the Enter Your Current Password field.
The password entered must be the password of the user making the change, not the password of theuser whose password is being changed.
5 Enter the new password for the selected account in the New Password field.
6 Re-enter the password in the Confirm New Password field.
7 Click OK.
Edit Account SettingsThis topic provides information about editing account settings.
Procedure
1 Click Edit in the General Properties section of the UserName page.
2 Edit the respective fields.
3 Click OK.
Update Roles Assigned to a UserThis topic provides instructions for updating roles assigned to a user.
Procedure
1 Click Add to List in the Roles Assigned To section of the UserName page. The Edit UserName pageappears.
2 In the Roles panel on the left side of the page, select the checkbox for each role to which you want toassign the user.
Click the blue arrow to move the roles to the Add to Roles panel.
Chapter 13 Managing Hyperic Users and Roles
VMware, Inc. 75
3 Click OK.
Creating and Managing Roles in vCenter HypericThis section provides information about creating and managing roles.
If you use LDAP or Active Directory for user authorization, vCenter Hypericcan automatically assign usersto vCenter Hyperic roles whose name matches a group to which the user is assigned - if the role names andLDAP group names adhere to a required naming convention. To take advantage of this functionality:
n a role name in vCenter Hyperic must match a group name in your authorization directory. In additionto being identical, both role name and group name must be prefixed by org\, for example org\Admin.
n vCenter Hyperic server must be configured to use your LDAP system.
Create a RoleThis topic provides instructions for creating a new role.
Procedure
1 Click New Role on the Administration page.
2 In the Properties section of the New Role page, enter the name and description for the role.
3 In the Permissions section, select a permission level:
n Full
n Read-Write
n Read-Only
n None
For each type:
n Users
n Grant Full to enable role users to create and delete user accounts.
n Grant Read-Write to enable role users to edit users accounts.
n Roles
If you select Full, which enables role users to create roles, vCenter Hypericwill ensure that therole's permission level to Users and Groups is at least Read-Only, because to create a role, youneed to view users and groups.
n Groups
n Grant Full to enable role users to delete groups created by other users.
n Grant Read-Write to enable role users to modify groups created by others.
Regardless of the permission level you select, any user can create groups, and as the owner of suchgroups, delete them.
n Platforms
n If you select Full, which enables role users to delete platforms and their child resources,vCenter Hyperic will require that the role's permission level to Servers and Services is alsoFull.
n If you select Full or Read-Write, vCenter Hyperic will automatically select the checkbox forthe Can Fix/Ack Alerts? and Can Control? capabilities.
vCenter Hyperic Administration Guide
76 VMware, Inc.
n If you select Read-Only, you have the option to grant alert management or resource controlcapabilities by clicking Can Fix/Ack Alerts? or Can Control? respectively.
n If you select None, you cannot grant alert management or resource control permissions.
n Servers
n If you select Full, which enables role users to delete servers and child services,vCenter Hyperic will require that the role's permission level to Platforms is at least Read-Write, and its permission level to Services is Full.
n If you select Full or Read-Write, vCenter Hyperic will automatically checkmark the CanFix/Ack Alerts? and Can Control? capabilities.
n If you select Read-Only, you have the option to grant alert management or resource controlcapabilities by clicking Can Fix/Ack Alerts? or Can Control? respectively.
n If you select None, you cannot grant alert management or resource control permissions.
n Services
n If you select Full, vCenter Hyperic will require that the role's permission level to Servers is atleast Read-Write.
n Grant at least Read-Only if you are going to grant the role Full permission to Applications.
n If you select Full or Read-Write, vCenter Hyperic will automatically select the checkboxes forthe Can Fix/Ack Alerts? and Can Control? capabilities.
n If you select Read-Only, you have the option to grant alert management or resource controlcapabilities by clicking Can Fix/Ack Alerts? or Can Control? respectively.
n If you select None, you cannot grant alert management or resource control permissions.
n Applications
n Grant Full if you want role users to be able to create and delete applications.
n Grant Read-Write if you want role users to be able to modify change applications created byothers.
n Escalations
n Grant Full if you want role users to be able to create and delete escalations groups.
n Grant Read-Write if you want role users to be able to modify escalations.
n Policies
n Grant Full if you want role users to be able to create and delete policies.
n Grant Read-Write if you want role users to be able to modify policies created by others.
n Grant Read-Only if you want role users to be able to view policies created by others.
n If you select None, you cannot grant policies permission.
The role is saved, and the refreshed role page will have three new sections: Assigned Users, AssignedGroups, and Alert Calendar.
What to do next
Once you have saved the role in the system, proceed to “Assign Users to a Role,” on page 78.
Chapter 13 Managing Hyperic Users and Roles
VMware, Inc. 77
Assign Users to a RoleIn vCenter Hyperic, each user you assign to a role can exercise the permissions defined for the role, onresources in the groups assigned to the role.
Procedure
1 If you are not currently viewing the role to which you wish to assign users, navigate to the role.
2 Click Add to List in the Assigned Users section of the page.
The Assign Users to Role page appears.
3 On the Users panel on the left side page, select the checkbox for each user you wish to add to the role,and click the blue arrow to move the users to the Assign To Role panel.
4 Click OK.
What to do next
If you are creating a role purely for the purpose of role-based alert notification, skip to “Define AlertCalendar for Follow-the-Sun Role-Based Notifications,” on page 78. Otherwise, proceed to “AssignGroups to a Role,” on page 78.
Assign Groups to a RoleIn vCenter Hyperic, the groups of resources you assign to a role constitute the population of resources towhich users with that role may exercise the permissions associated with the role.
For example, if the role's permission level to Platforms is None, role users will not have access to platformsin groups assigned to the role.
Assigning a group of groups or a group of applications to a role does not grant permissions to individualresources in nested groups or applications. Groups you assign to a role for the purpose of grantingpermissions must contain individual resources, as opposed to other groups or applications.
Procedure
1 If you are not currently viewing the role to which you wish to assign groups, navigate to the role.
2 Click Add to List in the Assigned Groups section.
The Assign Groups to Role page appears.
3 On the Groups panel on the left side of the page, select the checkbox for each resource group you wishto add to the role, and click the blue arrow to move the groups to the Assign To Role panel.
4 Click OK.
Define Alert Calendar for Follow-the-Sun Role-Based NotificationsAn alert calendar defines the availability calendar during which role users are available for alertnotfications.
You should define an alert calendar if:
n You are creating a role that will be a recipient of alert notifications, and
n The users assigned to the role users are available only during specific intervals only.
By default, a role's alert calendar settings specify that role users are available for notifications 24 hours aday, 7 days a week, with no exceptions. To define a narrower availability calendar:
vCenter Hyperic Administration Guide
78 VMware, Inc.
Procedure
1 For each day in the week,
n Use the first set of From and To pull-downs to specify a start time and an end time that role usersare availability for notifications.
n If there is a period of time within the availability period specified in the previous step, duringwhich role users should not receive notifications, click Except, and use the From and To pull-downs on the right to specify that period of time.
2 Click Save.
You must define additional role or roles with complementary alert calendars to ensure that there is a rolewhose users are available during periods of time that the current role's alert calendar does not include.
Customize Role-Specific DashboardWhen you create a role, vCenter Hypericcreates a Dashboard with the same name as the role.
Procedure
u Select the customized dashboard from the Select a Dashboard pull-down in the upper left corner of thevCenter Hyperic dashboard.
Use Roles for Follow the Sun AlertingvCenter Hyperic allows you to notify users of incidents based on support schedules, greatly simplifying themanagement of 24x7 or rotating support teams.
This is accomplished through the use of role-based alert calendars. The alert calendar can be most usefullyapplied in an , wherein multiple sets of people can be selected for notification, but only the one whose alertcalendar is currently open will be notified.
Procedure
1 Create multiple roles.
2 For each role, assign complementary alert calendars (that is, alert calendars that span different periodsof time, but all together cover the calendar). On the Edit Role screen, follow the instructions for creatinga calendar for a role.
3 Define an escalation scheme with at least one SMS or email escalation action.
In the escalation action, instruct vCenter Hyperic to notify All users assigned to a specific role and thenselect all of the just-defined roles.
4 Create an alert and assign that escalation scheme to it.
When the alert is fired, vCenter Hyperic will start performing the escalation actions but will only notify theroles whose alert calendars are currently open.
Role DefinitionsThis topic provides information about the data available when viewing a role.
PropertiesThe Properties section contains this information:
n Name
n Owner
Chapter 13 Managing Hyperic Users and Roles
VMware, Inc. 79

n Description
n Administer Server Configuration
n Dashboard Name
PermissionsThe Permissions section displays the permission matrix for the role.
n • None - No access at all to instances of the type.
n • Read-Only - Allows role users to view instances of the type, but not create, edit, or delete them.
For Platforms, Servers, Services, Groups, also enables:
n Read-Only access to alert definitions for the inventory type.
A role with Read-Only permission level does not have permissions to enable/disable/fix/ack alertsor control resources - these capabilities must be explicitly granted.
n Read-Write - Allows role users to view and edit instances of the type, but not create or delete them.For Platforms, Servers, Services, Groups, also gives:
n Full access to alert definitions for the inventory type
n Permission to manage alerts (enable/disable, fix, acknowledge) for the inventory type.
n Permission to perform supported control operations on resources of the inventory type.
n • Full - Allows role users to create, edit, delete, and view instance of the type.
For Platforms, Servers, Services, Groups, also gives:
n Full access to alert definitions for the inventory type.
n Permission to manage alerts (enable/disable, fix, acknowledge) for the inventory type.
n Permission to perform supported control operations on resources of the inventory type.
Assigned UsersThe Assigned User section lists the following information for each user assigned to the role:
n First Name
n Last Name
n Username - you can clilck the username to view the user.
Assigned GroupsThe Assigned Groups section lists the group name and description of the group for each group assigned tothe role.
Alert CalendarThe Alert Calendar section defines the availability calendar during which role users are available for alertnotifications.
Custom alerts calendars enable follow-the-sun alert notifications. To implement a follow the sun notificationstrategy, you create multiple roles with complementary alert calendars. You assign a user to the role whosealert calendar matches the user's availability.
By default, a role's alert calendar settings specify that role users are available for notifications 24 hours aday, 7 days a week, with no exceptions.
vCenter Hyperic Administration Guide
80 VMware, Inc.
To define an availability calendar for a role:
1 For each day in the week,
a Use the first set of From and To pull-downs to specify a start time and an end time that role usersare availability for notifications.
b If there is a period of time within the availability period specified in the previous step, duringwhich role users should not receive notifications, click Except, and use the From and To pull-downs on the right to specify that period of time.
2 Click Save.
You must define additional role or roles with complementary alert calendars to ensure that there is a rolewhose users are available during periods of time that the current role's alert calendar does not include.
Understanding Role-based DashboardsA role-based dashboard is a version of the vCenter Hyperic dashboard available to users assigned to therole.
A role-based dashboard can be customized to match the needs and interests of users with that role. You canconfigure the contents of a role-based dashboard to meet the needs of users with that role.
A role-based dashboard is available in addition to a user's personal dashboard. Every vCenter Hyperic userhas a personal dashboard, and a role-based dashboard for each role to which he is assigned.
Any modification to a role-based dashboard affects all users with the role; unlike a personal dashboard, arole-based dashboard cannot be customized on a per user basis.
Role-Based Dashboards are Automatically AvailableUpon creation of a new role, a copy of the standard vCenter Hyperic dashboard is saved and available tomembers of the role. Any user with this role can navigate to it using the Select a Dashboard pull-down, anddesignate it as his default dashboard.
The default dashboard for a new user is his personal dashboard. To set a role-based dashboard to be thedefault, a user must select select it and click Make Default.
Permissions for Modifying Role-Based DashboardsA role-based dashboard can be modified by:
n an administrator with the Super User role.
n a user assigned to the role, if the role grants the Modify permission.
Tailor a Role-Based DashboardThis topic provides information about customizing a role-based dashboard.
To tailor the layout and content of a role-based dashboard:
Procedure
1 Select the role-based dashboard from the Select a Dashboard pull-down on the currently displayeddashboard.
2 Add, configure, remove, and rearrange the portlets in the dashboard, as desired.
Modifications to a role-based dashboard are immediate, and will appear any time a user with that roleaccesses it.
Chapter 13 Managing Hyperic Users and Roles
VMware, Inc. 81

vCenter Hyperic Administration Guide
82 VMware, Inc.
View and Manage Resource Data 14In the vCenter Hyperic user interface, a resource's Inventory Page presents a variety of resource propertiesand key information about the resource's closest relatives in the resource hierarchy.
The information on the Inventory page varies by both inventory type and resource type, and includes auto-discovered and user-configured resource properties. For a fundamental inventory type — a platform,servee, or service — the Inventory Page contains a Configuration Properties section, where you can viewand update the properties that enable or tailor monitoring behaviors for the resource.
n Navigate to the Inventory Page for a Platform on page 84This topic provides instructions for accessing the Inventory page for a platform.
n Viewing Inventory Properties for a Platform on page 84This topic describes the data and controls that appear at the top of the Inventory page for a platform.
n Navigate to the Inventory Page for a Server on page 87This topic provides instructions for accessing the Inventory page for a server
n Viewing Inventory Properties for a Server on page 87This section describes the contents of the Inventory page for a server.
n Navigate to the Inventory Page for a Service on page 89This topic provides instructions for accessing the Inventory page for a service
n Viewing Inventory Properties for a Service on page 89This topic describes the data and controls that appear at the top of the Inventory page for a service.
n Navigate to the Inventory Page for a Group on page 90This topic provides instructions for accessing the Inventory page for a group.
n Viewing Inventory Properties for a Group on page 90This topic describes the data and controls that appear at the top of the Inventory page for a group.
n Navigate to the Inventory Page for an Application on page 92In vCenter Hyperic, an application is an inventory type, configured by an authorized user. Anapplication is a set of selected services, usually running in different servers on multiple platforms, thattogether fulfill a single business purpose.
n Viewing Inventory Properties for an Application on page 92This topic describes the data and controls that appear at the top of the Inventory page for anapplication.
VMware, Inc. 83
n Creating Nework Entities Manually on page 93Most resource types are automatically discovered, and auto-discovery is the only way an operatingsystem platform can be added to inventory. Conversely, auto-discovery of network or virtual platformtypes is not possible — you must add such platforms to inventory manually.
n Remove a Resource from the Inventory on page 101This topic provides instructions for removing a resource from the vCenter Hyperic inventory.
Navigate to the Inventory Page for a PlatformThis topic provides instructions for accessing the Inventory page for a platform.
Procedure
1 Click Resources > Browse > Platformsto navigate to the platform.
2 Click the Inventory tab.
Viewing Inventory Properties for a PlatformThis topic describes the data and controls that appear at the top of the Inventory page for a platform.
Resource PropertiesThe properties at the top of the Inventory page for a platform provide identifying information about themanaged product. The inventory properties displayed for a platform vary slightly by platform type, buttypically will include most of these properties.
The properties displayed are:
n Description
n Owner - By default, the vCenter Hypericuser under whose account the resource was added toinventory. Click Change... to assign a different resource owner.
n Secondary DNS
n Default Gateway
n Vendor
n Vendor Version
n IP address
n Primary DNS
n CPU Speed
n OS Version
n RAM
n Architecture
The plugin developer controls which resource properties are displayed at the top of a resource's Inventorypage: any properties enclosed in a <properties> element for a resource type appear in the page header whenyou browse to an instance of that type.
vCenter Hyperic Administration Guide
84 VMware, Inc.
Map Control for a PlatformClick the Map control in the page header for a graphical view of the servers on the platform. The platform isdisplayed at the bottom of the map; servers are displayed above the platform. Resource names are in boldand the resource type is displayed just below in smaller type. Click a resource name to navigate to thatserver.
Tools Menu for a PlatformWhen a platform is selected, the Tools menu has the following commands:
n Configure Platform — Opens the Configuration Properties page for the platform, where you can editthe resource's configuration properties.
n • Clone Platform — Creates a new platform with the same configuration as an existing platform. Formore information, refer to “Clone a Platform,” on page 95.
n Delete Platform — Delete the platform, its platform services, servers, and the services in the serversfrom inventory.
If you delete all of the platforms that a vCenter Hyperic agent manages, the vCenter Hyperic server alsoremoves the saved authentication token for that agent from the vCenter Hyperic database. Therefore, ifyou delete a platform that is managed by an agent that does not manage any other platforms (as in thecase of an agent that manages only the platform it runs on), the agent will no longer be able to connectto the server. If you want the agent to rediscover the platform where the agent runs, you must repeatthe agent setup process. Otherwise (if you do not want the agent to re-discover the platform it runs on)shut down the agent, and uninstall the agent from that platform.
n New Server — Displays the New Server page, where you can manually add a new server to theplatform. (For instance, a server that was not auto-discovered.) For more information, refer to “Create aServer,” on page 99.
n New Platform Service — Displays the New Service page, where you can manually add a new service,for instance a remotely monitored network service, to the platform. For more information, refer to “Create a Platform,” on page 94.
n New Auto-Discovery
n Enable All Alerts on this Agent
n Dsiable All Alerts on this Agent
n Add to Dashboard Favorites — Adds the platform to the Favorite Resources portlet on the currentuser's dashboard.
n Add to Group — Opens the Group Manager page, which lists the groups to which the platform may beadded. You can add a platform to a group if:
n You have permission to access the group, and:
n The group is a mixed group that contains platforms, servers, and services.
n The group is a compatible group of the selected platform's platform type.
General Properties for a PlatformThe General Properties section of the Inventory page for a platform lists the following information:
n Description
n Date Created
n Location
Chapter 14 View and Manage Resource Data
VMware, Inc. 85
n Date Modified
n Resource Type
Type and Network Properties for a PlatformThe Type and Network Properties section of the Inventory page for a platform lists the followinginformation:
n Platform Type
n Agent Connection — The IP address:port pair that the vCenter Hyperic server will use to connect to theagent on the platform device.
In the case of a platform type that is monitored by an agent on a different platform, such as a networkor virtual host, this property identifies the agent that manages the platform.
n Fully Qualified Domain Name — The platform's FQDN.
n IP Address, MAC Address, Netmask — One or more sets of these identifiers for the platform. There isat a minimum one set for the loopback (local) IP address — 127.0.0.1 — and then additional sets foreach network interface on the device.
Servers on a PlatformThe Servers section lists the following information for each server on the platform:
n Server
n Server Type
n Install Path
n Description
n Availability
There are two controls available:
n New — Click to add a server to the platform.
n Delete — Click to delete a server from the platform. Services in the server will also be deleted.
Services on a PlatformThis section lists the following information for each platform service on the platform:
n Service - The resource name, presented as a hyperlink you can click to navigate to the service.
n Description
n Availability
There are three controls available:
n View — This pull-down allows you to filter the list to display only platform services of a selected type.
n New — Click to add a platform service to the platform.
n Delete — Click to delete a platform service from the platform.
Groups Containing a PlatformThis section lists the following information for each the group of which the platform is a member:
n Group — The resource name, presented as a hyperlink you can click to navigate to the group.
vCenter Hyperic Administration Guide
86 VMware, Inc.
n Description
There are two controls available:
n Add to List — Click to add the platform to a group.
n Remove From List — If you have checkmarked one or more groups in the list, this control allows you toremove the resource from the selected groups.
Configuration Properties for a PlatformThis section displays the configuration properties for the platform:
n Shared — These properties are typically only present for platform types that vCenter Hyperic does notauto-discover, and vary by platform type.
n Monitoring — These properties control log and configuration tracking for the platform.
Navigate to the Inventory Page for a ServerThis topic provides instructions for accessing the Inventory page for a server
Procedure
1 Click Resources > Browse > Serversto navigate to the platform.
2 Click the Inventory tab.
Viewing Inventory Properties for a ServerThis section describes the contents of the Inventory page for a server.
Resource PropertiesThe properties at the top of the Inventory page for a server provide identifying information about themanaged product. The inventory properties displayed for a server vary by server type, but typically willinclude vendor name and software version.
The properties displayed in the screenshot below (for a JBoss server) are:
n Java Vendor
n Owner - By default, the vCenter Hyperic user under whose account the resource was added toinventory. Click Change... to assign a different resource owner.
n Build Date
n JBoss Version
n Version Name
The plugin developer controls which resource properties are displayed at the top of a resource's Inventorypage: any properties enclosed in a <properties> element for a resource type appear in the page header whenyou browse to an instance of that type.
Map Control for a ServerClick the Map control in the page header to view the server's child services(s) and its parent platform.
You can click the name of a child or parent resource to view its Monitor page.
Chapter 14 View and Manage Resource Data
VMware, Inc. 87
Tools Menu for a ServerWhen a server is selected, the Tools menu has the following commands:
n Configure Server — Opens the Configuration Properties page for the server, where you can edit theresource's configuration properties.
n Delete Server — Delete the server and all its child services from inventory.
n New Service — Displays the New Service page, where you can manually add a new child service to theserver. (For instance, a service that was not auto-discovered.)
n Add to Dashboard Favorites — Adds the server to the Favorite Resources portlet on the the currentuser's dashboard.
n Add to Group — Opens the Group Manager page, which lists any compatible groups of the same typeas the server.
General Properties for a PlatformThe General Properties section of the Inventory page for a platform lists the following information:
n Description
n Date Created
n Date Modified
n Resource Type
Type and Host PropertiesThe Type and Host Properties section of the Inventory page for a server lists the following informationabout the server:
n Install Path
n Host Platform
Services on a ServerThe Services section of the Inventory page for a server contains:
n The total number of child services on the server, and the number of services of each service typediscovered on the server.
n The following columns for each service:
n Service
n Service Type
n Description
n Availability
Groups Containing a ServerThe Groups Containing This Resource section of the Inventory page for a server lists the groups of whichthis server is a member. To view the Inventory page for a group, click its name.
vCenter Hyperic Administration Guide
88 VMware, Inc.
Configuration Properties for a ServerThe Configuration Properties section of the Inventory page for a resource contains the configuration optionsand currently selected values for the resource. Configuration properties for the resource are presented inthree sections:
n Shared — The properties in this section relate to more than one management function, for instance bothmonitoring and control actions.
n Monitoring — These properties set options related to log tracking, configuration tracking, and, forservers, here is where you can disable auto-discovery of child services.
n • Control — If vCenter Hyperic supports control actions for the currently selected resource type, thissection includes any configuration properties required to enable resource control, for example, the pathof the start script to use to start a server.
Navigate to the Inventory Page for a ServiceThis topic provides instructions for accessing the Inventory page for a service
Procedure
1 Click Resources > Browse > Servicesto navigate to the platform.
2 Click the Inventory tab.
Viewing Inventory Properties for a ServiceThis topic describes the data and controls that appear at the top of the Inventory page for a service.
Resource PropertiesThe properties at the top of the Inventory page for a service provide identifying information including:
n Description
n Owner - By default, the vCenter Hyperic user under whose account the resource was added toinventory. Click Change... to assign a different resource owner.
The plugin developer controls which resource properties are displayed at the top of a resource's Inventorypage: any properties enclosed in a <properties> element for a resource type appear in the page header whenyou browse to an instance of that type.
Map Controls for a ServiceThe Map control presents graphical view of the service and the resources that are related to it. The mapillustrates hierarchical inventory relationships, and a resource's membership in groups or applications.
Tools Menu for a ServiceWhen a service is selected, the Tools menu has the following commands:
n Configure Service — Opens the Configuration Properties page for the service, where you can edit theresource's configuration properties.
n Delete Service
n Add to Dashboard Favorites — Adds the service to the Favorite Resources portlet on the currentHyperic user's Dashboard.
Chapter 14 View and Manage Resource Data
VMware, Inc. 89
n Add to Group — Opens the Group Manager page, which lists the groups to which the platform may beadded. You can add a platform to a group if:
n You have permission to access the group, and:
n The group is a mixed group that contains platforms, servers, and services.
n The group is a compatible group of the selected platform's platform type.
General Properties for a ServiceThe General Properties section of the Inventory page for a service lists the following information:
n Description
n Date Created
n Location
n Date Modified
n Resource Type
Groups Containing a ServiceThe Groups Containing this Resource section lists the following information for each the group of which theservice is a member:
n Group
n Description
There are two controls available:
n Add to List
n Remove from List
Configuration Properties for a ServiceThis section displays the configuration properties for the service:
n Shared - These properties vary by service type.
n Monitoring - These properties control log and configuration tracking for the service.
Navigate to the Inventory Page for a GroupThis topic provides instructions for accessing the Inventory page for a group.
Procedure
1 Click Resources > Browse > Compatible Groups/Clustersto navigate to the group.
2 Click the Inventory tab.
Viewing Inventory Properties for a GroupThis topic describes the data and controls that appear at the top of the Inventory page for a group.
Resource Properties for a GroupThe properties at the top of the Inventory page for either a compatible or mixed group are:
n Description
vCenter Hyperic Administration Guide
90 VMware, Inc.
n Owner - By default, the vCenter Hyperic user under whose account the resource was added toinventory. Click Change to assign a different resource owner.
Map Control for a Compatible GroupThe Map control is present on the Inventory tab for a compatible group, not for a mixed group. The map fora compatible group shows the members of the group.
Tools Menu for a GroupThe Tools menu for a compatible or a mixed group has the following commands:
n New Group
n Delete Group
n Add to Dashboard Favorites — Adds the group to the Favorite Resources portlet on the currentHyperic user's Dashboard.
n Add to Group — Opens the Group Manager page, which lists the groups to which the platform may beadded. You can add a platform to a group if:
n You have permission to access the group, and:
n The target group is a mixed group that contains groups.
n Schedule Downtime — This option opens the Schedule Downtime popup, where you can schedule aperiod of time during which alerts for members of the group will not fire.
General Properties for a PlatformThe General Properties section of the Inventory page for a platform lists the following information:
n Description
n Date Created
n Location
n Date Modified
n Resource Type
ResourcesThis section lists the following information for each the group of which the service is a member:
n Group
n Description
There are two controls available:
n Add to List
n Remove from List
Roles a Group is Assigned ToThe Roles Assigned To section lists the roles to which the group is assigned, which, along with thepermission matrix for the role, governs the access that users with the role have to resources in the group.
Chapter 14 View and Manage Resource Data
VMware, Inc. 91
Navigate to the Inventory Page for an ApplicationIn vCenter Hyperic, an application is an inventory type, configured by an authorized user. An application isa set of selected services, usually running in different servers on multiple platforms, that together fulfill asingle business purpose.
Configuring applications enables you to manage your infrastructure from an application - as opposed to ahardware - perspective.
Procedure
1 Click Resources > Browse > Applicationsto navigate to the application.
2 Click the Inventory tab.
This is the tab you use to add services to an application.
The Service Counts section shows the total number of services in the application, and the number ofeach type.
The Services section lists key information for each service in the application.
Viewing Inventory Properties for an ApplicationThis topic describes the data and controls that appear at the top of the Inventory page for an application.
Resource PropertiesThe properties at the top of the Inventory page for an applications are:
n Owner - By default, the vCenter Hyperic user under whose account the resource was added toinventory. Click Change to assign a different resource owner.
Tools Menu for an ApplicationWhen an application is selected, the Tools menu has the following commands:
n Delete Application — remove the application from inventory.
n Add to Dashboard Favorites — Adds the application to the Favorite Resources portlet on the thecurrent user's Dashboard.
n Add to Group — Opens the Group Manager page.
General Properties for an ApplicationThe General Properties section of the Inventory page for an application lists the following information:
n Description
n Date Created
n Location
n Date Modified
Application PropertiesThe General Application section of the Inventory page for an application lists the following informationabout the application:
n Application Type - This property, supported in previous versions of Hyperic, is no longer used.
vCenter Hyperic Administration Guide
92 VMware, Inc.
n Engineering Contact - An optional property.
n Business Owner - The date the application was created.
n IT Operations Contact - The date the application was last modified and the user who modified it.
Service Counts for an ApplicationThe Service Counts section of the Inventory page for an application lists the total number of services in theapplication and the number of services of each service type.
Services in an ApplicationThe Services section of the Inventory page for an application lists the following information for each of theservices in the application:n Name
n Entry Point - Whether the service is the entry point for the application.
n Service Type
n Res Type
n Host Server - Name of the server where the service runs.
n Availability
You can update the application in one of the following ways:n To add services to the application, click Add to List---the Edit ApplicationName appears.
n To remove one or more services from the application, click the box to the left of each service you wishto delete, and click Delete.
Groups Containing an ApplicationThe Groups Containing This Resource section of the Inventory page for an application lists the groups towhich it belongs:n To view the inventory page for a group to which the application belongs, click the group's name.
n Click Add To List to select the groups to which you wish to add the application.
n To remove the application from a group, checkmark the group, and click Remove From List.
Group ManagerThe Group Manager, which appears when you click Add to List on the Groups Containing This Resourcesection of a resource's Inventory page, lists the groups to which you can add the application. Only groupsthat contain applications appear on the list, and only those that do not already contain the currentapplication.
Creating Nework Entities ManuallyMost resource types are automatically discovered, and auto-discovery is the only way an operating systemplatform can be added to inventory. Conversely, auto-discovery of network or virtual platform types is notpossible — you must add such platforms to inventory manually.
Most server types are auto-discovered. You create a server manually only if the managing plugin does notsupport server discovery, or if the plugin fails to discover a server, for instance, because it has an other-than-expected name in the process list or Windows registry.
Network services that are monitored remotely cannot be auto-discovered---you must manually create aplatform service to represent a network service.
Chapter 14 View and Manage Resource Data
VMware, Inc. 93
n Create a Platform on page 94This topic provides instructions for creating a platform in vCenter Hyperic.
n Clone a Platform on page 95vCenter Hyperic's Clone Platform feature allows you to copy configuration properties for servers andmanually created platform services from one platform to one or more other platforms.
n Create a Platform Service on page 96This topic provides instructions for creating a platform service.
n Configuration Instructions for Platform Services on page 97This topic lists all supported platform service types in vCenter Hyperic.
n Create a Server on page 99This topic provides instructions for creating a server.
n Create a Service on page 100This topic provides instructions for creating a service.
Create a PlatformThis topic provides instructions for creating a platform in vCenter Hyperic.
Operating system platform types are auto-discovered and cannot be manually added to inventory. The onlyplatform types you can manually add to inventory are:
n Cisco IOS
n Cisco PIXOS
n GemFire Distributed System
n NetApp Filer
n Network Device
n VMWare VI3 Host
n Network Host
n VMWare vSphere Host
n VMWare vSphere VM
n Xen Host
To add a platform to the inventory using the user interface:
Procedure
1 Click New Platform on the Tools menu under Browse > Resource.
2 On the New Platform page, enter the following:
n Name
n Description
n Location
n Platform Type - Select the platform type from the list. Once you create the platform, you cannotchange its type.
n Full Qualified Domain Name
vCenter Hyperic Administration Guide
94 VMware, Inc.
n Agent Connection - The IP address:port pair of the agent the proxied connection to this platformshould go through. When a platform is created manually (on this screen), the platform cannot ordoes not run an agent itself, and therefore the agent must connect to the platform via proxy. Thelist contains the IP address:port pairs from all the currently deployed Agents.
n IP Address
n MAC Address
n Netmask
3 Click OK.
What to do next
Configure Platform for Monitoring - After creating the new platform, you may need supply values for oneor more configuration properties. See the resource's Inventory page for configuration options andrequirements.
Clone a PlatformvCenter Hyperic's Clone Platform feature allows you to copy configuration properties for servers andmanually created platform services from one platform to one or more other platforms.
Manually created platform services are the types of platform services that cannot be auto-discovered -typically the types you configure to proxy metrics for network services and devices, such as HTTP, POP3, orDNS services.
Platform cloning is supported between platforms of the same type (for example, Linux) that run the sameversion of the agent.
The cloning process can create new resources on the target platform or update an existing resource'sconfiguration properties. The cloning process:
n Copies the configuration properties for each server on the source platform to corresponding servers ofthe same type on the target platforms. If there is not a corresponding server of the same type on a targetplatform, it is created, with the same configuration properties as the source server.
n Copies the configuration properties for each manually created platform service on the source platformto the target platforms - adding a new platform service to the target platform's inventory, or updatingconfiguration properties of corresponding instances in the target platform inventory.
n Cloning occurs asynchronously, so you can perform other functions in the Hyperic user interface afterinitiating the process. The Event Center indicates the start and stop of the cloning process for the sourceplatform.
The cloning process does not
n update auto-discovered properties.
n create or update auto-discovered platform services, such as CPUs or File Server Mounts.
n create or update services that comprise the cloned servers; the child services will be added to inventoryon the target platform via auto-discovery.
The Clone Platform page is available on the Tools menu when a platform is selected.
To clone a platform:
Procedure
1 Navigate to the platform whose inventory resources you wish to clone.
2 Choose Clone Platform from the Tools menu.
Chapter 14 View and Manage Resource Data
VMware, Inc. 95
3 On the Clone Platform page, the Available clone targets list shows platforms of the same type as thesource platform. Narrow the list by entering a string in the Search resources box.
4 Move desired target platforms from the Available clone targets list to the Selected clone targets list.
5 Click Queue for Cloning.
Cloning occurs asynchronously. You can perform other functions in the user interface without waitingfor the cloning process to complete.
Example: Why to ClonePlatform cloning makes it easy to replicate configuration properties for resources of the same type. Forinstance,
n You have a dozen Linux platforms, each running Tomcat 6.0, JBoss 4.2, and MySQL 5.0. ThevCenter Hyperic agent is installed on each platform, and has auto-discovered the Tomcat, JBoss, andMySQL instances on each platform. You want to implement an identical log tracking configuration forservers of the same type on each of platforms. You edit the Configuration Properties on the Inventorypage for the Tomcat, JBoss, and MySQL instances on one of the platforms. You can use Clone Platformto copy the configuration settings to the Tomcat, JBoss, and MySQL instances on the other 11 platforms.
n You are setting up multiple platforms to monitor network services or devices. To enable networkmonitoring, on each platform you need a properly configured platform service to serve as a proxy foreach remote service or device. You can configure the platform services on one platform, and use ClonePlatform to create platform services with the same configuration properties on each of the otherplatforms.
What to do next
Create a Platform ServiceThis topic provides instructions for creating a platform service.
There are two types of platfrom services in vCenter Hyperic:
n System services local to an operating system platform, such as CPUs, network interfaces, filesystems,and so on. Most local service are auto-discovered by the system plugin.
n Remote services that the vCenter Hyperic agent monitors over the network, such as HTTP, FTP, DNS,and other services using a supported protocol. Because such services are monitored by a remote agent,they cannot be auto-discovered. For network services, you manually configure platform service on theplatform running the agent that will monitor the service.
To create a platform service:
Procedure
1 Select Browse > Resources > Platforms to navigate to the platform to which you wish to add a service.
2 Select New Platform Service from the Tools menu.
3 On the New Platform Service page enter:
n Name
n Description
n Service Type
vCenter Hyperic Administration Guide
96 VMware, Inc.
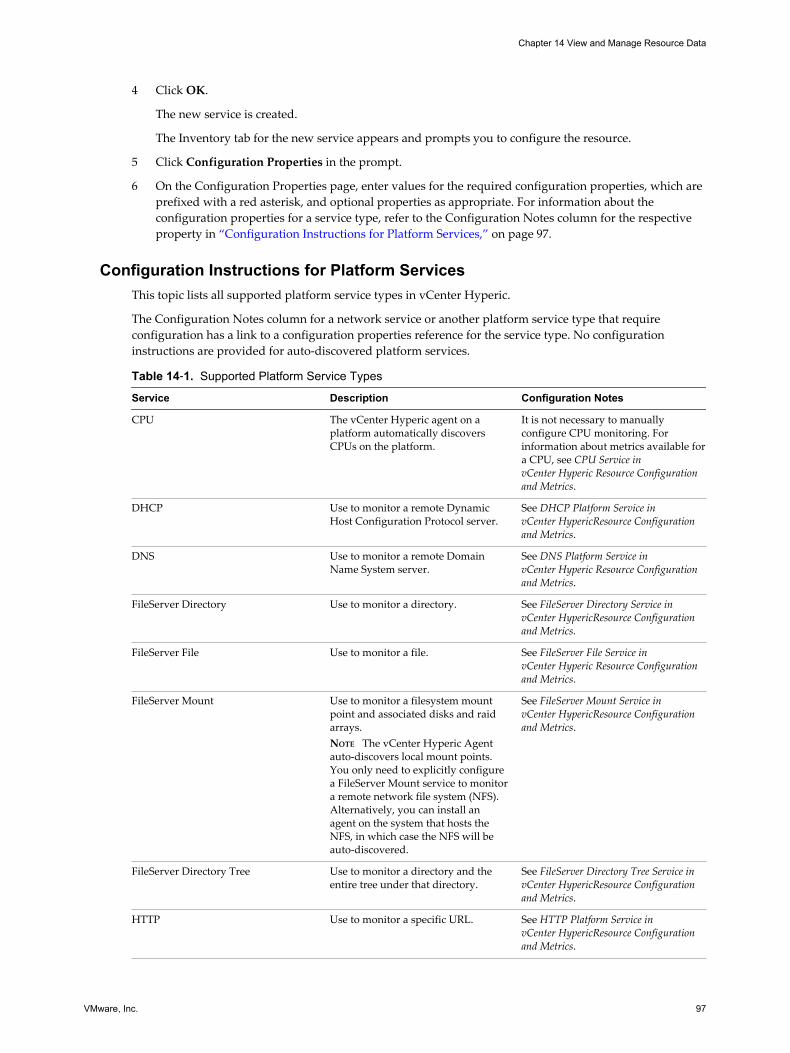
4 Click OK.
The new service is created.
The Inventory tab for the new service appears and prompts you to configure the resource.
5 Click Configuration Properties in the prompt.
6 On the Configuration Properties page, enter values for the required configuration properties, which areprefixed with a red asterisk, and optional properties as appropriate. For information about theconfiguration properties for a service type, refer to the Configuration Notes column for the respectiveproperty in “Configuration Instructions for Platform Services,” on page 97.
Configuration Instructions for Platform ServicesThis topic lists all supported platform service types in vCenter Hyperic.
The Configuration Notes column for a network service or another platform service type that requireconfiguration has a link to a configuration properties reference for the service type. No configurationinstructions are provided for auto-discovered platform services.
Table 14‑1. Supported Platform Service Types
Service Description Configuration Notes
CPU The vCenter Hyperic agent on aplatform automatically discoversCPUs on the platform.
It is not necessary to manuallyconfigure CPU monitoring. Forinformation about metrics available fora CPU, see CPU Service invCenter Hyperic Resource Configurationand Metrics.
DHCP Use to monitor a remote DynamicHost Configuration Protocol server.
See DHCP Platform Service invCenter HypericResource Configurationand Metrics.
DNS Use to monitor a remote DomainName System server.
See DNS Platform Service invCenter Hyperic Resource Configurationand Metrics.
FileServer Directory Use to monitor a directory. See FileServer Directory Service invCenter HypericResource Configurationand Metrics.
FileServer File Use to monitor a file. See FileServer File Service invCenter Hyperic Resource Configurationand Metrics.
FileServer Mount Use to monitor a filesystem mountpoint and associated disks and raidarrays.NOTE The vCenter Hyperic Agentauto-discovers local mount points.You only need to explicitly configurea FileServer Mount service to monitora remote network file system (NFS).Alternatively, you can install anagent on the system that hosts theNFS, in which case the NFS will beauto-discovered.
See FileServer Mount Service invCenter HypericResource Configurationand Metrics.
FileServer Directory Tree Use to monitor a directory and theentire tree under that directory.
See FileServer Directory Tree Service invCenter HypericResource Configurationand Metrics.
HTTP Use to monitor a specific URL. See HTTP Platform Service invCenter HypericResource Configurationand Metrics.
Chapter 14 View and Manage Resource Data
VMware, Inc. 97
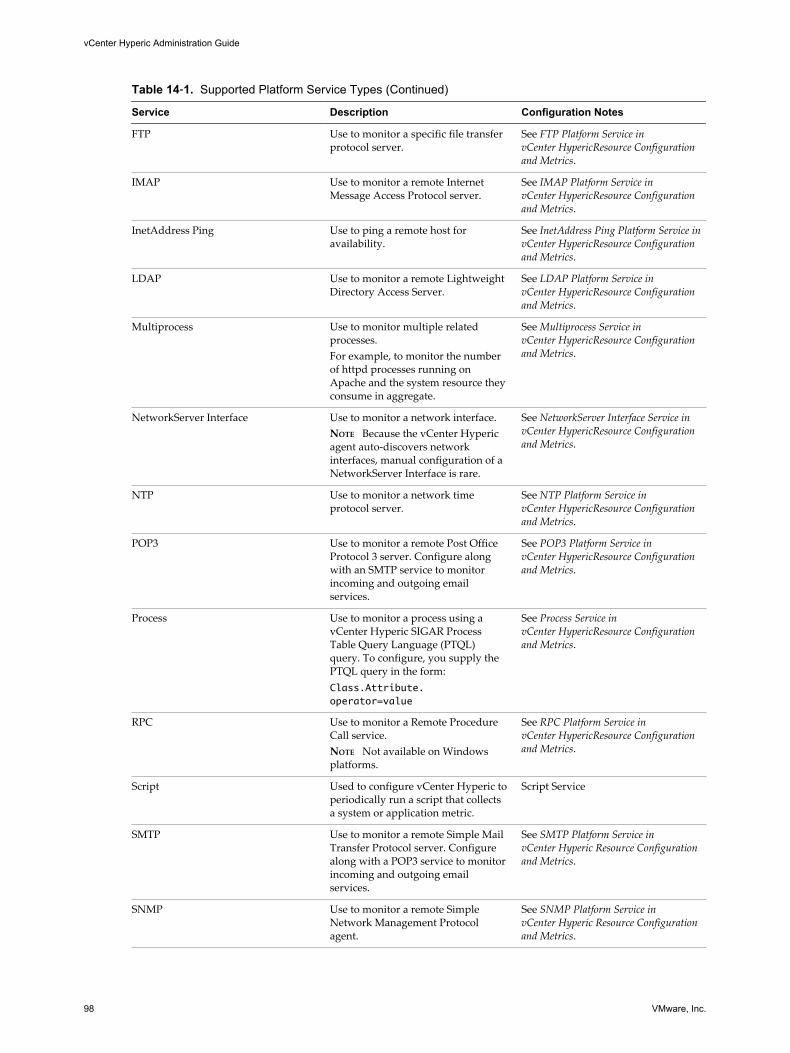
Table 14‑1. Supported Platform Service Types (Continued)
Service Description Configuration Notes
FTP Use to monitor a specific file transferprotocol server.
See FTP Platform Service invCenter HypericResource Configurationand Metrics.
IMAP Use to monitor a remote InternetMessage Access Protocol server.
See IMAP Platform Service invCenter HypericResource Configurationand Metrics.
InetAddress Ping Use to ping a remote host foravailability.
See InetAddress Ping Platform Service invCenter HypericResource Configurationand Metrics.
LDAP Use to monitor a remote LightweightDirectory Access Server.
See LDAP Platform Service invCenter HypericResource Configurationand Metrics.
Multiprocess Use to monitor multiple relatedprocesses.For example, to monitor the numberof httpd processes running onApache and the system resource theyconsume in aggregate.
See Multiprocess Service invCenter HypericResource Configurationand Metrics.
NetworkServer Interface Use to monitor a network interface.NOTE Because the vCenter Hypericagent auto-discovers networkinterfaces, manual configuration of aNetworkServer Interface is rare.
See NetworkServer Interface Service invCenter HypericResource Configurationand Metrics.
NTP Use to monitor a network timeprotocol server.
See NTP Platform Service invCenter HypericResource Configurationand Metrics.
POP3 Use to monitor a remote Post OfficeProtocol 3 server. Configure alongwith an SMTP service to monitorincoming and outgoing emailservices.
See POP3 Platform Service invCenter HypericResource Configurationand Metrics.
Process Use to monitor a process using avCenter Hyperic SIGAR ProcessTable Query Language (PTQL)query. To configure, you supply thePTQL query in the form:Class.Attribute.operator=value
See Process Service invCenter HypericResource Configurationand Metrics.
RPC Use to monitor a Remote ProcedureCall service.NOTE Not available on Windowsplatforms.
See RPC Platform Service invCenter HypericResource Configurationand Metrics.
Script Used to configure vCenter Hyperic toperiodically run a script that collectsa system or application metric.
Script Service
SMTP Use to monitor a remote Simple MailTransfer Protocol server. Configurealong with a POP3 service to monitorincoming and outgoing emailservices.
See SMTP Platform Service invCenter Hyperic Resource Configurationand Metrics.
SNMP Use to monitor a remote SimpleNetwork Management Protocolagent.
See SNMP Platform Service invCenter Hyperic Resource Configurationand Metrics.
vCenter Hyperic Administration Guide
98 VMware, Inc.
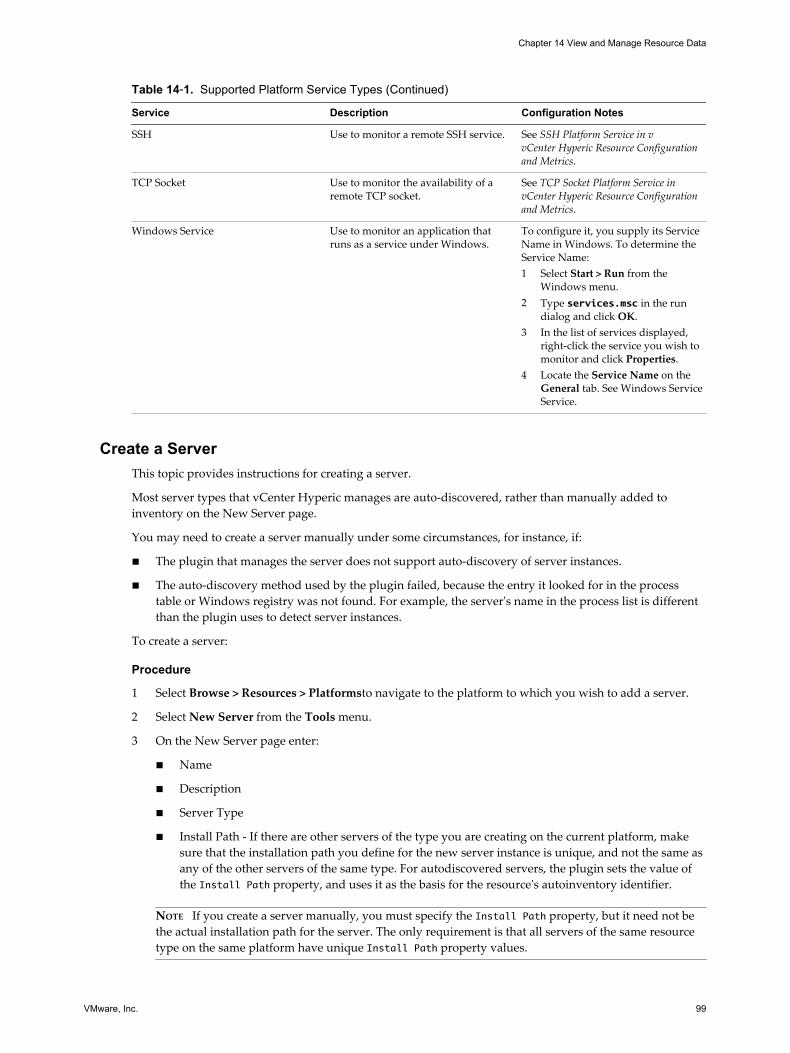
Table 14‑1. Supported Platform Service Types (Continued)
Service Description Configuration Notes
SSH Use to monitor a remote SSH service. See SSH Platform Service in vvCenter Hyperic Resource Configurationand Metrics.
TCP Socket Use to monitor the availability of aremote TCP socket.
See TCP Socket Platform Service invCenter Hyperic Resource Configurationand Metrics.
Windows Service Use to monitor an application thatruns as a service under Windows.
To configure it, you supply its ServiceName in Windows. To determine theService Name:1 Select Start > Run from the
Windows menu.2 Type services.msc in the run
dialog and click OK.3 In the list of services displayed,
right-click the service you wish tomonitor and click Properties.
4 Locate the Service Name on theGeneral tab. See Windows ServiceService.
Create a ServerThis topic provides instructions for creating a server.
Most server types that vCenter Hyperic manages are auto-discovered, rather than manually added toinventory on the New Server page.
You may need to create a server manually under some circumstances, for instance, if:
n The plugin that manages the server does not support auto-discovery of server instances.
n The auto-discovery method used by the plugin failed, because the entry it looked for in the processtable or Windows registry was not found. For example, the server's name in the process list is differentthan the plugin uses to detect server instances.
To create a server:
Procedure
1 Select Browse > Resources > Platformsto navigate to the platform to which you wish to add a server.
2 Select New Server from the Tools menu.
3 On the New Server page enter:
n Name
n Description
n Server Type
n Install Path - If there are other servers of the type you are creating on the current platform, makesure that the installation path you define for the new server instance is unique, and not the same asany of the other servers of the same type. For autodiscovered servers, the plugin sets the value ofthe Install Path property, and uses it as the basis for the resource's autoinventory identifier.
NOTE If you create a server manually, you must specify the Install Path property, but it need not bethe actual installation path for the server. The only requirement is that all servers of the same resourcetype on the same platform have unique Install Path property values.
Chapter 14 View and Manage Resource Data
VMware, Inc. 99
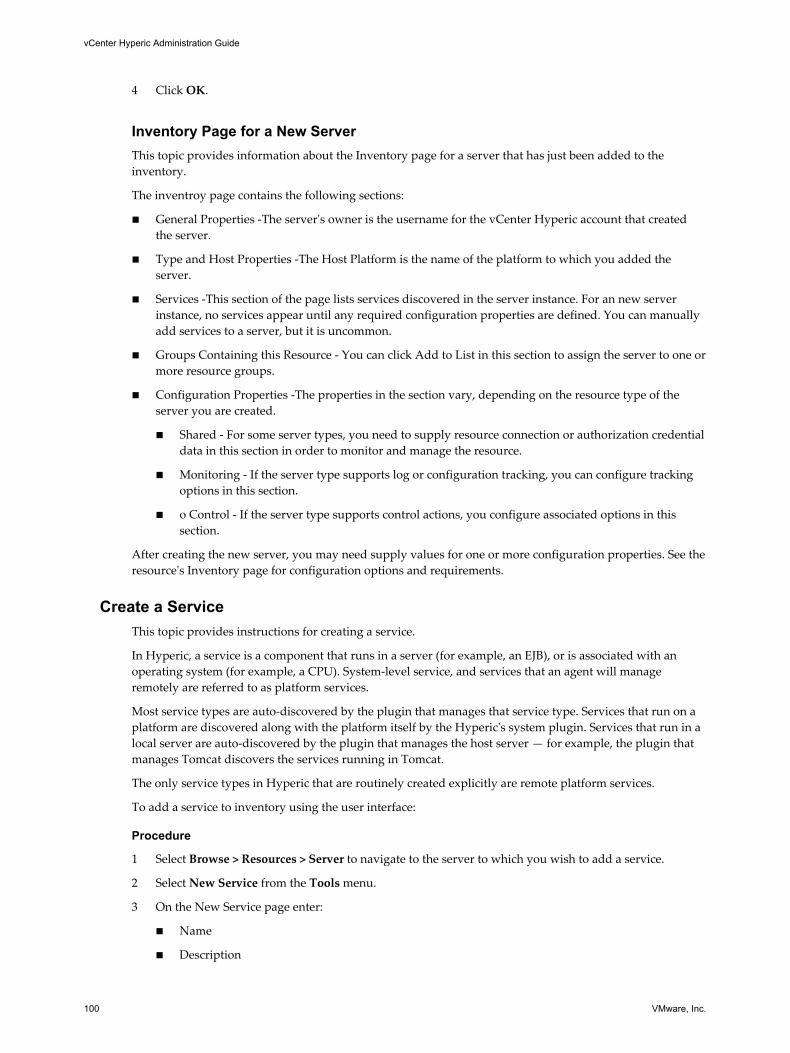
4 Click OK.
Inventory Page for a New ServerThis topic provides information about the Inventory page for a server that has just been added to theinventory.
The inventroy page contains the following sections:
n General Properties -The server's owner is the username for the vCenter Hyperic account that createdthe server.
n Type and Host Properties -The Host Platform is the name of the platform to which you added theserver.
n Services -This section of the page lists services discovered in the server instance. For an new serverinstance, no services appear until any required configuration properties are defined. You can manuallyadd services to a server, but it is uncommon.
n Groups Containing this Resource - You can click Add to List in this section to assign the server to one ormore resource groups.
n Configuration Properties -The properties in the section vary, depending on the resource type of theserver you are created.
n Shared - For some server types, you need to supply resource connection or authorization credentialdata in this section in order to monitor and manage the resource.
n Monitoring - If the server type supports log or configuration tracking, you can configure trackingoptions in this section.
n o Control - If the server type supports control actions, you configure associated options in thissection.
After creating the new server, you may need supply values for one or more configuration properties. See theresource's Inventory page for configuration options and requirements.
Create a ServiceThis topic provides instructions for creating a service.
In Hyperic, a service is a component that runs in a server (for example, an EJB), or is associated with anoperating system (for example, a CPU). System-level service, and services that an agent will manageremotely are referred to as platform services.
Most service types are auto-discovered by the plugin that manages that service type. Services that run on aplatform are discovered along with the platform itself by the Hyperic's system plugin. Services that run in alocal server are auto-discovered by the plugin that manages the host server — for example, the plugin thatmanages Tomcat discovers the services running in Tomcat.
The only service types in Hyperic that are routinely created explicitly are remote platform services.
To add a service to inventory using the user interface:
Procedure
1 Select Browse > Resources > Server to navigate to the server to which you wish to add a service.
2 Select New Service from the Tools menu.
3 On the New Service page enter:
n Name
n Description
vCenter Hyperic Administration Guide
100 VMware, Inc.
n Service Type
n Host Server
4 Click OK.
Remove a Resource from the InventoryThis topic provides instructions for removing a resource from the vCenter Hyperic inventory.
To remove a resource:
Procedure
1 Select Browse > Resourcesto navigate to the resource you wish to delete.
2 Select the Delete ResourceType option from the Tools menu.
Monitoring ceases and the resource is removed from inventory. If the resource has child resources, thosechildren (and their children, as applicable) will be removed as well.
Resources you delete will disappear from the resource list immediately. Removal of the resources from thedatabase occurs asynchronously; there may be a slight delay before resources are removed from thedatabase. If you restart the agent prior to the resource being removed from the database, errors might occurif you re-add the resource to memory after the agent rediscovers it.
Do not try to re-import a platform immediately after deleting it — this may fail. Also, until the deleteprocess running in background completes, a deleted platform will still appear in the vCenter HypericHealth's agent tab. Similarly, the vCenter Hyperic license count displayed in the web user interface will notbe decremented until the delete process is completed.
Chapter 14 View and Manage Resource Data
VMware, Inc. 101

vCenter Hyperic Administration Guide
102 VMware, Inc.
Deploying and Managing Plug-ins 15vCenter Hyperic product plugin management and deployment features ensure that all agents reporting tothe server run exactly the same product plugins as those deployed to the server.
The key features are:
n Plugin management interface - Plugin Manager is a user interface for deployment-wide management ofproduct plugins. You use the Plugin Manager to deploy and manage plugins on the server and agentsthat report to the server.
n Server-Agent Plugin Synchronization (SAPS) - An agent, and the server to which it reports, cooperate toensure that the agent is running exactly the same set of plugins as the server.
Version Requirements for Plugin SynchronizationThe SAPS process will not synchronize plugins on agents of an earlier version than the server. The servercan only synchronize plugins on agents running the same or later version. The Plugin Manager userinterface indicates how many of the agents reporting to the server are in sync. If there are agents that areout-of-date, you can see which agents need upgrading.
This chapter includes the following topics:
n “Plugin Administration Tasks,” on page 103
n “Resource Plugin Deployment Directories,” on page 104
n “Working with Plugin Manager,” on page 104
n “About Custom Plugin Deployment with Plugin Manager,” on page 104
n “Removing a Plugin with Plugin Manager,” on page 105
n “Synchronizing Plugins at Startup,” on page 105
n “Disable Server-Agent Plugin Synchronization,” on page 106
Plugin Administration TasksIf you run vCenter Hyperic with SAPS enabled, you can use Plugin Manager to administer plugins on up-to-date agents throughout your deployment.
The primary tasks you perform are:
n Deploy and update custom plugins — If you develop your own plugin, or customize a built-in plugin,use Plugin Manager to upload and deploy the new or modified plugin to the server and to all up-to-date agents in your deployment. Plugins you deploy with Plugin Manager are deployed to a directoryexternal to the server's installation directory, so that they are not overwritten by a server upgrade.
VMware, Inc. 103
n Remove plugins — For optimal vCenter Hyperic scalability, it is good practice to reduce the agentfootprint by running only the plugins you use, and to remove a plugin if you have no resources of thetypes the plugin manages. You can remove one or more plugins from all up-to-date agents in yourdeployment with a single Plugin Manager command.
Since version 4.6, vCenter Hyperic you cannot manually deploy your plugins.
Resource Plugin Deployment DirectoriesThis topic provides information about the resource plugin deployment directories.
There are two product plugin deployment directories on the vCenter Hyperic server:
n Standard plugins - the ServerHome/hq-engine/hq-server/webapps/ROOT/WEB_INF/hq-plugins/ directoryis used for standard plugins packaged with vCenter Hyperic server.
n Custom plugins - the user.dir/hq-plugins directory is used for custom plugins or a customized versionof a built-in plugin. Plugin Manager deploys the plugin to the hq-plugins subdirectory of the currentworking directory of the server process. Custom plugins are deployed to a separate plugin directory,external to the server installation, so that they will not be overwritten when you upgrade thevCenter Hyperic server.
You can configure the server to store custom plugins in a different directory with theserver.plugin.custom.dir property.
On the Hyperic Agent all product plugins reside in the AgentHome/bundles/agent-x.y.z/pdk/plugins/directory.
Working with Plugin ManagerPlugin Manager, available on the Server Settings section of the Administration tab, is a user interface fordeployment-wide management of product plugins.
You can use the Plugin Manager to administer plugins on the vCenter Hyperic server and on all up-to-dateagents that report to the server.
Plugin Manager displays all plugins deployed to the server, and the status of each plugin on agentsreporting to the server.
You can use Plugin Manager to upload new plugins, update existing plugins, and remove plugins. Thechanges you make are replicated on all up-to-date agents that report to the server. Note that plugins youupload must comply with plugin naming conventions, and may not be larger than 5 MB.
When you remove one or more plugins using Plugin Manager, all resources in inventory of types managedby the plugin are removed from inventory.
About Custom Plugin Deployment with Plugin ManagerThis topic provides information about what happens when you upload a plugin with Plugin Manager.
When you upload a new or updated plugin with the Plugin Manager:
n The plugin is copied to the vCenter Hyperic server's user.dir/hq-plugins directory.
n If a product plugin of the same name exists in the server's hq-plugins directory (likely to be the case ifyou are deploying a customized version of a built-in plugin), the version in user.dir/hq-pluginshenceforth is loaded, rather than the version in the server's hq-plugins directory (ServerHome/hq-engine/hq-server/webapps/ROOT/WEB_INF/hq-plugins/).
vCenter Hyperic Administration Guide
104 VMware, Inc.
n The vCenter Hyperic server updates and restarts each up-to-date agent. Note that agent update andagent restart are asynchronous - the server processes two queues: one of agents that still need theupdate pushed, and one of those that have the update and need to be restarted.
n The server pushes the new or changed plugins to all up-to-date agents, up to four at a time. Abuilt-in throttle mechanism limits the number of agent update threads.
n The server issues a restart command to each updated agent, up to 20 in parallel. A built-in throttlemechanism limits the number of agent restart threads.
Removing a Plugin with Plugin ManagerYou can use the Plugin Manager to remove one or more plugins from the vCenter Hyperic server and allup-to-date agents that report to the server.
When you remove a plugin:
n The plugin is removed from its deployment directory on the vCenter Hyperic server.
n The plugin is removed from its deployment directory on each up-to-date vCenter Hyperic agentreporting to the server, and each agent is restarted.
n All resources in inventory managed by the removed plugin are removed from vCenter Hyperic'sresource inventory.
Synchronizing Plugins at StartupServer-side and agent-side plugins can become out-of-sync if you manually add or remove plugins and donot apply updates consistently to the server and to every agent.
To detect plugin mismatches caused by inconsistent manual deployment, the vCenter Hyperic server checksfor out-of-sync plugins every time it starts up, and every time an agent connects to it upon agent start orrestart. (The server does the post-startup checks five minutes after startup, so that any agents that wererestarted while the server was down to sync their plugin inventory.) In the case of a mismatch betweenserver-side and agent-side plugins, the server updates the agent.
Synchronizing Plugins at Agent StartupWhen an up-to-date agent starts up and loads the plugins in its plugin directory, it sends a plugin statusreport to the server, including the MD5 checksum of each plugin it loaded.
On receipt of a plugin status report from an up-to-date agent, the vCenter Hyperic server compares theMD5 checksum of each plugin that the agent loaded with the the MD5 checksum of the correspondingplugin (a plugin with the same name) currently deployed on the server.
For a mismatch:
n If the agent loaded a plugin with the same name but different MD5 checksum than one that is currentlydeployed to the server, the server pushes its version to the agent.
n If the agent did not load a plugin that is currently deployed to the server (the agent did not load aplugin with the same name as one that the server loaded), the server pushes the plugin to the agent.
n If the agent loaded a plugin that is not deployed to the vCenter Hyperic server (there is no plugin withthe same name on the server), the server removes the plugin from the agent.
After adding or removing agent plugins as necessary, the server restarts the agent.
Synchronizing Plugins at Server StartupWhen the vCenter Hyperic server starts up and loads the plugins in its deployment directories, it comparesthe MD5 checksum of the plugins it loaded with the MD5 checksums in the plugin status report lastreceived from each agent.
Chapter 15 Deploying and Managing Plug-ins
VMware, Inc. 105
For a mismatch:
n If an agent's last plugin status report included a plugin with the same name but different MD5checksum than one that is currently deployed to the vCenter Hyperic server, the server pushes itsversion to the agent.
n If an agent's last plugin status report does not include a plugin that is currently deployed to the server(the agent did not load a plugin with the same name as one that the server loaded), the server pushesthe plugin to the agent.
n If an agent's last plugin status report included a plugin that is not deployed to the server (there is noplugin with the same name on the server), the server removes the plugin from the agent.
After updating the agent plugins appropriately, the server restarts the agent.
Disable Server-Agent Plugin SynchronizationThis topic provides instructions for disabling server-agent plugin synchronization.
SAPS is enabled by default. To disable SAPS:
Procedure
u Add the following line to the ServerHome/conf/hq-server.conf file.
server.pluginsync.enabled=false
vCenter Hyperic Administration Guide
106 VMware, Inc.
Index
Aaction, create SNMP notification 21
Bbaselining, global properties 27
Ccreate action, syslog 21
Ddefault scan 13dynamic groups
about 43create 44delete 45edit 44
Eemail, create action 20escalation, create 19escalation, new scheme 20
Ggroups
assigning roles 62dynamic 43
Ppolicies
about 45clone 47conflicts 45create 46delete 47edit 46settings and rules 45
Rroles
assigning to groups 62create 76
Ssms, create action 21SNMP traps 16SNMP v1, parameters 16
SNMP v2c, parameters 17SNMP v3, paramters 17suppress alerts, create action 22synchronization 103sys log, create action 21
VMware, Inc. 107

vCenter Hyperic Administration Guide
108 VMware, Inc.