vdl readme 6 - leroncarlton.net · if you are a vdl2 user, ... vdl 2.5.1 updater can be downloaded...
TRANSCRIPT
Sibelius
VDL Template 6.0

2
Sibelius VDL Template 6.0 by Hugh Smith ©2009 Tapspace Publications LLC, Portland, OR. All rights reserved. By purchasing this product, you are hereby agreeing to adhere to its licensing terms. Anyone using any components of this product without having purchased it is doing so without a valid license and is subject to prosecution. This product is offered as a SINGLE-USER license and is only permitted to be used by the individual who purchased it. Unauthorized use of any of the files included in this product by anyone other than the purchased licensee in any format is strictly prohibited. This includes, but is not limited to, sharing, selling, transmitting, uploading, emailing, photocopying, plagiarizing, etc. any of the information received as a part of this product. These terms pertain to the template score itself (.sib file), the sound set (.xml file), and all included documentation. You, the licensed user, are permitted to use this template file and its accompanying support files on all projects in which you intend to utilize Tapspace Virtual Drumline in combination with the Sibelius/VDL Template found in this package. In other words, you aren't required to purchase a new template for every project you work on. We simply request that the Template only be used by the individual who purchased it. Your adherence to these guidelines will help us continue to develop effective tools that will benefit your experience with Virtual Drumline.
3
................................................................................................................................................................... 4
...................................................................................................................................................... 5............................................................................................................................................. 7
...................................................................................................... 9...................................................................................................................... 10
....................................................................................................................... 11.................................................................................................................................................................... 13
..................................................................................................................................................................... 15................................................................................................................................................... 15
.............................................................................................................................................. 18
................................................................................................................................................... 21................................................................................................................................................................ 22
................................................................................................................................................................... 24......................................................................................................... 25
......................................................................................................................................................... 30.................................................................................................................................................... 45
.............................................................................................................................................................................. 52................................................................................................................................................................................... 55................................................................................................................................................................................... 57
........................................................................................................................................................ 60..................................................................................................................................................................... 65
........................................................................................................................................................ 71................................................................................................................................................................................... 75
.................................................................................................................................................. 79............................................................................................................................................................................................ 82
............................................................................................................. 83........................................................................................................................................................ 85
Contents Important Information Getting Started All the Right Pieces
Playback Configuration Opening the Template for the First Time Adding Instruments to the Score Changing Instruments Mid Staff
House Styles How to Read the Mapping Diagrams SoundWorld Pitched Instruments Controller Changes
Sounds Above the Range Unpitched Instruments Articulations Tremolos Glissandi Markings Controller Changes Keyswitches Naming Convention
Inputting notes With a keyboard Without a keyboard Entering Modwheel Changes & Keyswitches Input Variables Playback Dictionary Complete List of Template Definitions Mapping Diagrams DrumLine Battery Pitched Percussion Cymbals
Gongs Drums
World Percussion Accessories Combos & Vocals Effects Customizing Instruments
For Advanced Users In Closing Appendix A: Identifying Template Versions Appendix B: TriggerTest
4
Important Information: This version of the Readme is to be used with VDL_Template_6.0.sib You are strongly encouraged to read this entire Readme before you begin working with VDL Template 6.0. You need to learn how to drive the race car before you just hop right on in and stomp on the gas. After you have finished reading this document, we highly recommend you view video tutorials posted on the Tapspace website. Go to the following URL for more information:
http://www.tapspace.com/support If you are a VDL2 user, you should upgrade to VDL 2.5 at tapspace.com. VDL 2.5 uses KontaktPlayer2, which is fully integrated into Sibelius 6, and will be required to make use of the various foundations within VDL Template 6.0. * When the term “VDL” is used by itself, it will be referring to Virtual Drumline 2.5.1. (* Make sure you are using the 2.5.1 update.) When the term “Sibelius” is used by itself, it will be referring to Sibelius 6.x, unless otherwise noted. When the term “Template” is used by itself, it will be referring to VDL Template 6.0. Any references to earlier versions of VDL Templates will be noted. When the term “KP2” is used, it will be referring to KontaktPlayer2. As we move along in this document, be aware that not all of the features of Sibelius 6.0 will be discussed in detail. You may be directed to read specific sections in your Sibelius Reference if we feel that more information may be required. If we do not include a page reference to something you want more information on, use the Index toward the end of your Sibelius Reference to quickly find what you are looking for. The primary reason for this Readme is to guide you in using the Template. Once you get the hang of it, you won't have much need for this document except for possibly referring to the mapping diagrams and playback dictionary functions. This Template is for new projects going forward. If you have scores created in Sibelius 5 or earlier, please see Appendix A.
PLEASE NOTE: Several instruments use mappings with optimized noteheads in this Template. What this means is that many of the notehead assignments have been changed (from earlier template versions) to make better use of the entire list of available noteheads and to improve overall functionality of the Template. As a result, this Template is intended for new projects going forward. If you have scores created with a VDL Template for Sibelius 5.2.5 or earlier, please see Appendix A. See the Input Variables section for more information.
You will need to use Adobe Reader 5 or later to view the interactive elements in the VDL_Keymaps_6.0 PDF file. Get the latest free version here: http://get.adobe.com/reader/ The opinions that may be expressed in this document are not necessarily those of Tapspace Publications or Sibelius Software, they are the sole responsibility of the author. There are many internal links in this document, use them with much enthusiastic productivity.
5
Getting Started Welcome! Before we start pointing and clicking on everything, we want to congratulate you on finding quite possibly the most user friendly way to write percussion music, or any music for that matter. OK, here we go.
All the Right Pieces There are a few items that you will need to have before you can start using this Template:
1. Sibelius 6.0 2. VDL SoundSet 6.0 3. VDL 2.5.1 update
Install Sibelius 6.0 Whether you are upgrading or buying new, you can find the Sibelius 6.0 main web page by following this link:
http://www.sibelius.com/products/sibelius/6/index.html Install VDL SoundSet 6.0 Find the file labeled VDL_SoundSet_6.0.xml and copy it into one of the following folders (this is one of the files included within the VDL Template zip file you downloaded): Windows XP: C:\Documents and Settings\your username\Application Data\Sibelius Software\Sibelius 6\Sounds
or C:\Program Files\Sibelius Software\Sibelius 6\Sounds Windows Vista: C:\Users\your username\AppData\Roaming\Sibelius Software\Sibelius 6\Sounds Mac OS X: /Users/your username/Library/Application Support/Sibelius Software/Sibelius 6/Sounds (You may have to create the Sibelius 6 and Sounds folders yourself.)
6
Why do I need this particular sound set?
A sound set is an XML file that has all of the relevant information allowing Sibelius to communicate with whatever device the sound set is written for. In this case, the VDL SoundSet 6.0 sound set will allow Sibelius to correctly sort out all the instruments, techniques, articulations, controllers, and keyswitches for every instrument in the Template.
Make sure that you install and use the sound set that you downloaded with the Template so all the instruments will function properly. Update VDL to version 2.5.1 Most likely, when you installed VDL from the DVD, it installed version 2.5. Since that version, maintenance updates have become available. The 2.5.1 update is highly recommended for Sibelius users since it makes instruments play back with more consistent volume levels, plus it updates the KontaktPlayer2 to a more current version, and several other improvements. The VDL 2.5.1 updater can be downloaded using the Native Instruments Service Center program which you used to activate VDL on your computer. For more information on updating to VDL 2.5.1, here is the direct link on the updates page:
http://www.tapspace.com/Downloads-Updates-p-2.html#VDL25Updates Now that you have installed Sibelius 6, the VDL update and the included sound set, let's set up your Playback Configuration.
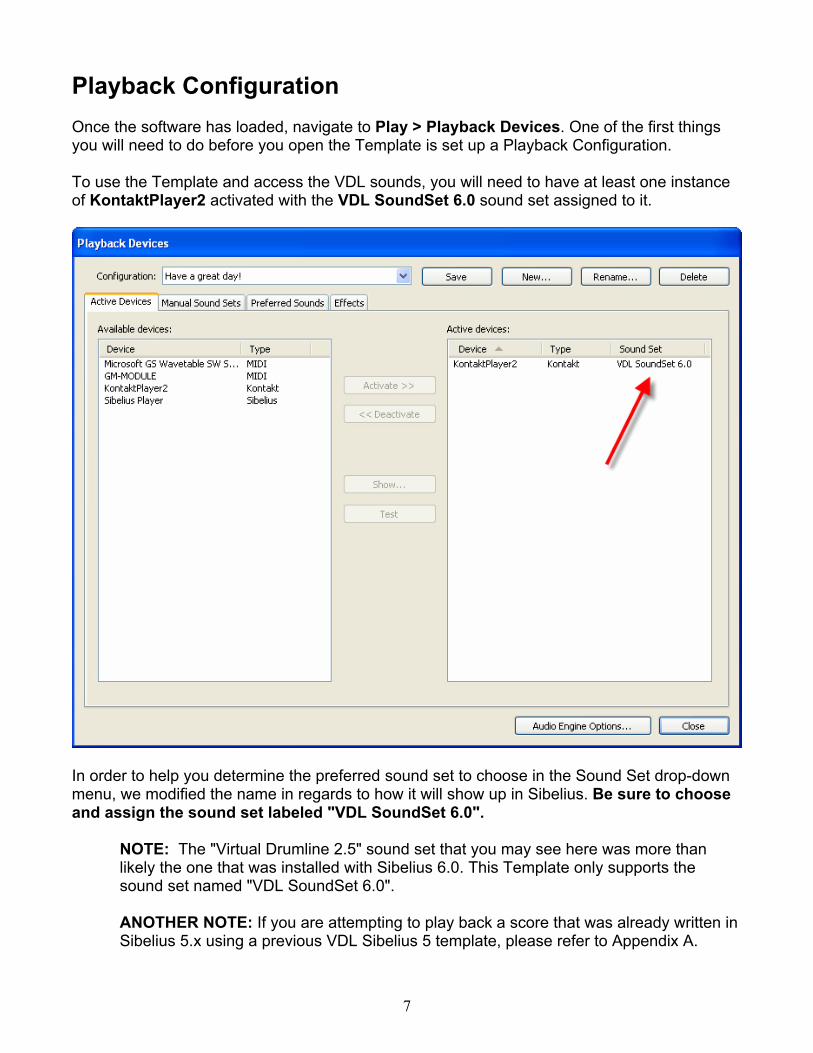
Playback Configuration Once the software has loaded, navigate to Play > Playback Devices. One of the first things you will need to do before you open the Template is set up a Playback Configuration. To use the Template and access the VDL sounds, you will need to have at least one instance of KontaktPlayer2 activated with the VDL SoundSet 6.0 sound set assigned to it.
In order to help you determine the preferred sound set to choose in the Sound Set drop-down menu, we modified the name in regards to how it will show up in Sibelius. Be sure to choose and assign the sound set labeled "VDL SoundSet 6.0".
NOTE: The "Virtual Drumline 2.5" sound set that you may see here was more than likely the one that was installed with Sibelius 6.0. This Template only supports the sound set named "VDL SoundSet 6.0". ANOTHER NOTE: If you are attempting to play back a score that was already written in Sibelius 5.x using a previous VDL Sibelius 5 template, please refer to Appendix A.
7
8
If you want to use a score that utilizes woodwinds, brass, or other instruments not in Virtual Drumline, you will need to have a separate device activated for them to play back through with an appropriate sound set assigned. This could be any number of things depending on your system, but for the sake of simplicity, we recommend you activate your instance of Sibelius Player, and assign the "Essentials" sound set to play back your other non-VDL instruments. Sibelius Player can hold up to 128 instruments; if you have 2 GB of RAM, its default is set to 64. Please see your Sibelius Reference for more on Sibelius Player. When hosting KontaktPlayer2 like this, each instance of the KP2 plug-in can accommodate up to 16 instruments. If your score will need more VDL instruments than 16, simply activate another instance of KP2 and be sure to assign it to the "VDL SoundSet 6.0" sound set. By doing this, you've just bought 16 more slots for Sibelius to load VDL instruments into. Here's an example. Let's say you're writing a full band score. In this score, you'll have 14 brass/woodwind instruments and about 35 various percussion instruments between the battery and pit. In this scenario you would need three instances of KontaktPlayer2 activated and the one instance of Sibelius Player activated here in the Playback Devices window. The three KP2 instances would have the VDL 6.0 sound set assigned and the Sibelius Player instance would have "Essentials" assigned (to accommodate the brass/woodwind instruments). Don't worry about which instruments go into which instance. Sibelius will figure that out for you. RECAP:
1) You've installed Sibelius 6.0
2) You've installed the latest VDL sound set for Sibelius ("VDL SoundSet 6.0")
3) You’ve updated your VDL library to 2.5.1
4) You've created a playback configuration that will use this new sound set. With the above steps completed, it's time to open up the Template and get working! BONUS: If you would like to test your configuration to make sure you've set it up correctly, we've provided TriggerTest files for doing just that. See Appendix B for instructions on performing a TriggerTest.
9
Opening the Template for the First Time Many of the topics that will be discussed from here on out will give you a glimpse of how the Template will function within Sibelius. You will not experientially know until you dig in and begin to use it - but either way, we think you will like your workflow.
NOTE: It is recommended that you make copies of the original Template file for use with your individual music projects. (Also see the section on House Styles.)
When you open the Template for the first time you are not going to see very much. In fact, you may be asking yourself, “Where is everything?” The one instrument you do see is there because Sibelius requires that you have at least one in the score. This should make more sense as you gain experience with the program. Now that you have the score open, you have several choices as how to proceed.
1) You can insert the instruments you want into the score and start writing music. 2) You can make a copy of the file and rename it as this may be your first project with this
software. 3) You can finish reading this document so you don’t crash the race car. 4) You can shut your computer off, call it a night and go to bed.
Odds are you are going to choose number 1 - right after number 3.

Adding Instruments to the Score Navigate to Create > Instruments; the dialog box that appears will look similar to this:
The Family field has all of the VDL instruments grouped into types, and are otherwise arranged to maximize the use of field sizes for better viewing. Find the instrument(s) you would like to add to the score, then do so. After you have filled up the Staves in score field, you can order them however you wish by using the Up/Down buttons. Click OK when you are done playing around in this dialog.
10
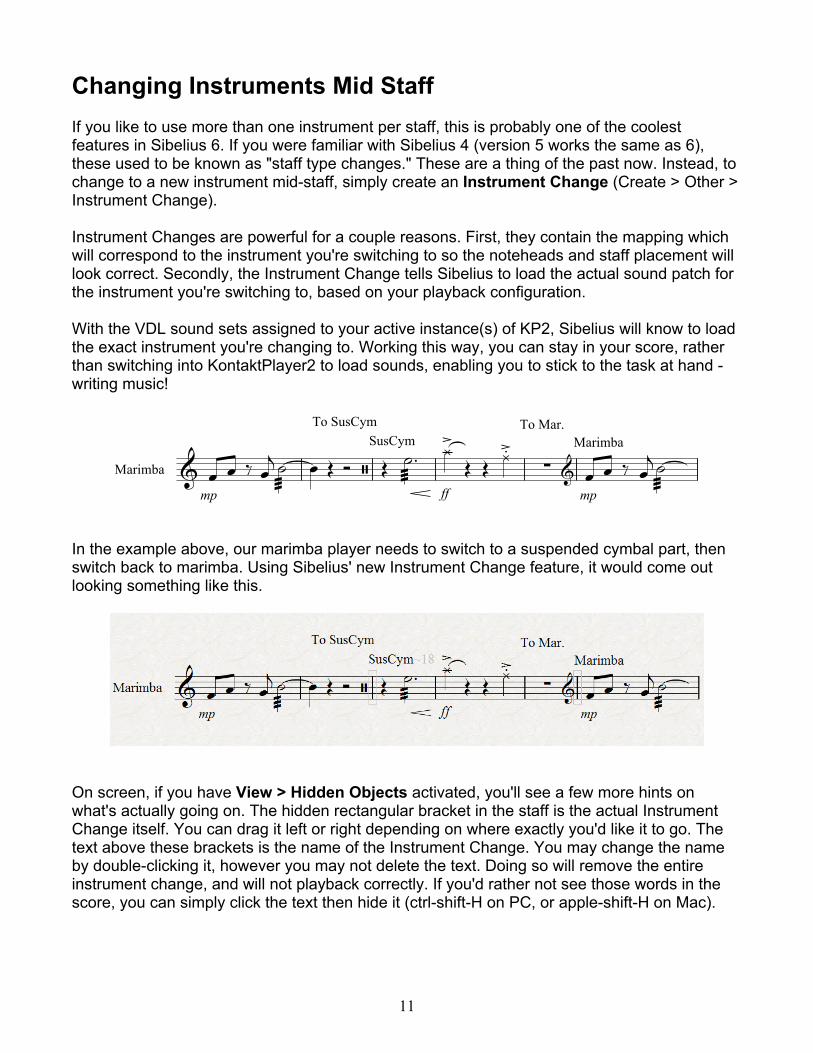
Changing Instruments Mid Staff If you like to use more than one instrument per staff, this is probably one of the coolest features in Sibelius 6. If you were familiar with Sibelius 4 (version 5 works the same as 6), these used to be known as "staff type changes." These are a thing of the past now. Instead, to change to a new instrument mid-staff, simply create an Instrument Change (Create > Other > Instrument Change). Instrument Changes are powerful for a couple reasons. First, they contain the mapping which will correspond to the instrument you're switching to so the noteheads and staff placement will look correct. Secondly, the Instrument Change tells Sibelius to load the actual sound patch for the instrument you're switching to, based on your playback configuration.
Marimba mp
To SusCym
SusCym
ff
To Mar.
Marimba
mp
With the VDL sound sets assigned to your active instance(s) of KP2, Sibelius will know to load the exact instrument you're changing to. Working this way, you can stay in your score, rather than switching into KontaktPlayer2 to load sounds, enabling you to stick to the task at hand - writing music!
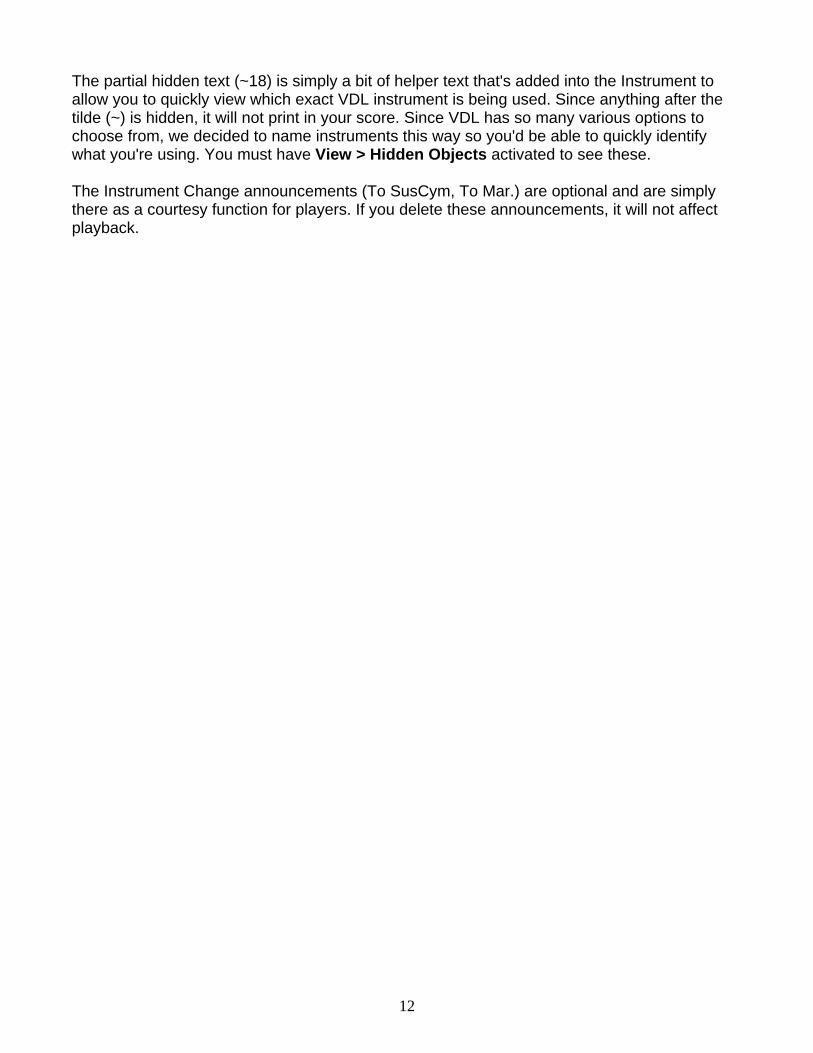
In the example above, our marimba player needs to switch to a suspended cymbal part, then switch back to marimba. Using Sibelius' new Instrument Change feature, it would come out looking something like this.
On screen, if you have View > Hidden Objects activated, you'll see a few more hints on what's actually going on. The hidden rectangular bracket in the staff is the actual Instrument Change itself. You can drag it left or right depending on where exactly you'd like it to go. The text above these brackets is the name of the Instrument Change. You may change the name by double-clicking it, however you may not delete the text. Doing so will remove the entire instrument change, and will not playback correctly. If you'd rather not see those words in the score, you can simply click the text then hide it (ctrl-shift-H on PC, or apple-shift-H on Mac).
11
12
The partial hidden text (~18) is simply a bit of helper text that's added into the Instrument to allow you to quickly view which exact VDL instrument is being used. Since anything after the tilde (~) is hidden, it will not print in your score. Since VDL has so many various options to choose from, we decided to name instruments this way so you'd be able to quickly identify what you're using. You must have View > Hidden Objects activated to see these. The Instrument Change announcements (To SusCym, To Mar.) are optional and are simply there as a courtesy function for players. If you delete these announcements, it will not affect playback.
13
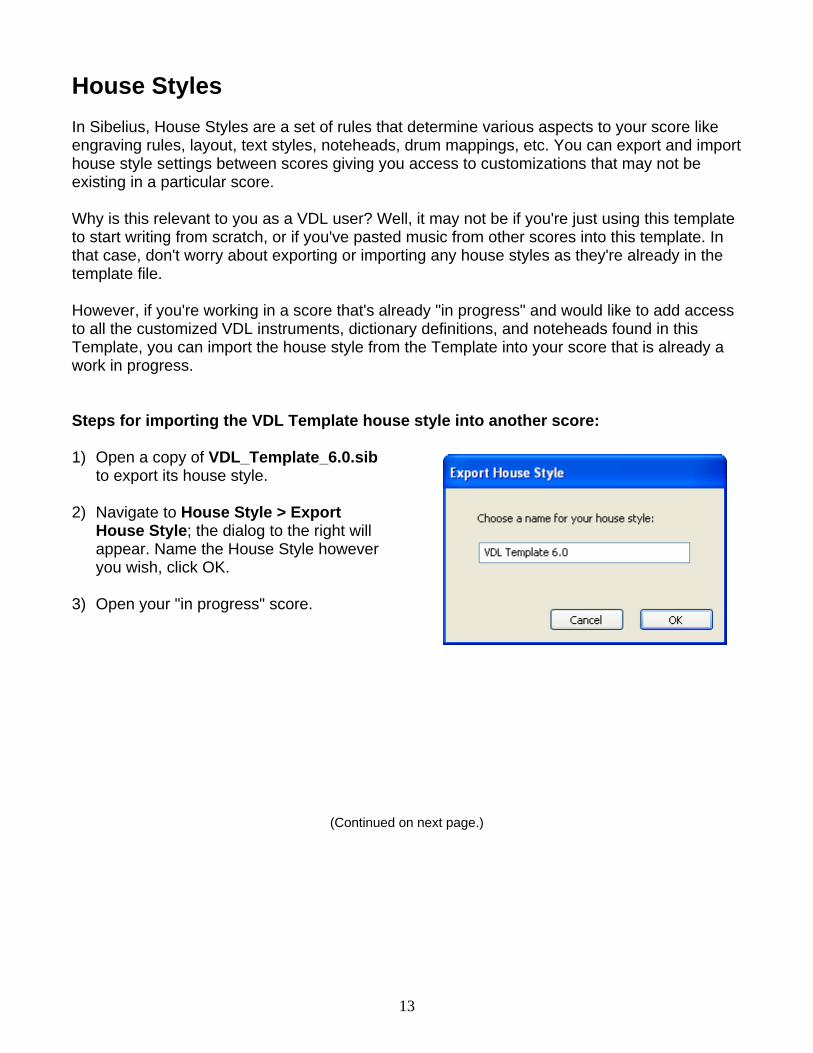
House Styles In Sibelius, House Styles are a set of rules that determine various aspects to your score like engraving rules, layout, text styles, noteheads, drum mappings, etc. You can export and import house style settings between scores giving you access to customizations that may not be existing in a particular score. Why is this relevant to you as a VDL user? Well, it may not be if you're just using this template to start writing from scratch, or if you've pasted music from other scores into this template. In that case, don't worry about exporting or importing any house styles as they're already in the template file. However, if you're working in a score that's already "in progress" and would like to add access to all the customized VDL instruments, dictionary definitions, and noteheads found in this Template, you can import the house style from the Template into your score that is already a work in progress. Steps for importing the VDL Template house style into another score: 1) Open a copy of VDL_Template_6.0.sib
to export its house style. 2) Navigate to House Style > Export
House Style; the dialog to the right will appear. Name the House Style however you wish, click OK.
3) Open your "in progress" score.
(Continued on next page.)
14
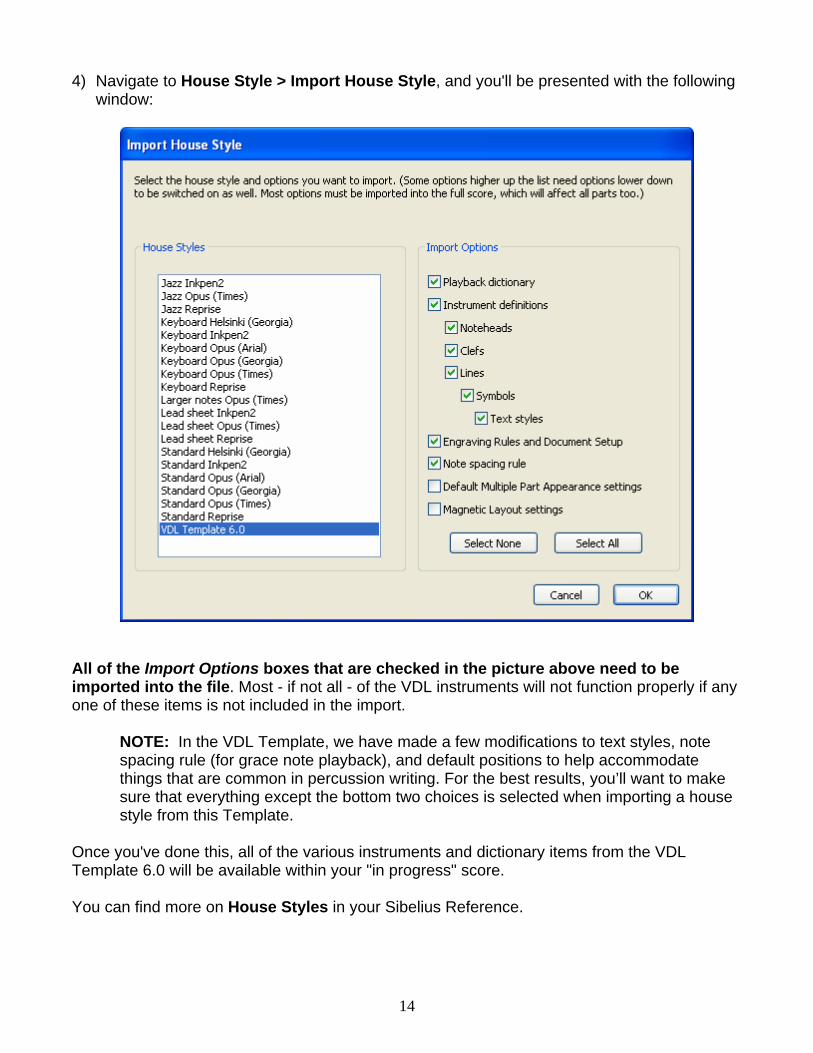
4) Navigate to House Style > Import House Style, and you'll be presented with the following window:
All of the Import Options boxes that are checked in the picture above need to be imported into the file. Most - if not all - of the VDL instruments will not function properly if any one of these items is not included in the import.
NOTE: In the VDL Template, we have made a few modifications to text styles, note spacing rule (for grace note playback), and default positions to help accommodate things that are common in percussion writing. For the best results, you’ll want to make sure that everything except the bottom two choices is selected when importing a house style from this Template.
Once you've done this, all of the various instruments and dictionary items from the VDL Template 6.0 will be available within your "in progress" score. You can find more on House Styles in your Sibelius Reference.
15
How to Read the Mapping Diagrams
SoundWorld™ As of Sibelius 5, “SoundWorld is a new standard developed by Sibelius Software for naming and classifying sound timbres.” Those of you who may have found some confusion in this new setup, bear with it. SoundWorld wasn't designed to work the way Sibelius' old MIDI system worked. So if you're one of the many who were used to the old way of setting up your playback environment, this new method will require some mental reprogramming. The good news is that once you understand the basic workings of this system, we think you'll find that it will save a lot of time - and technical housekeeping with ins, outs, and various devices, that you may have become accustomed to, will go away. You'll no longer have to worry about routing various channels, banks or patches as Sibelius will handle all of this for you automatically based on a few simple instructions you give it. The end result of all this is that you will have much more time to actually write music. And that is what we all want to do anyway, right? If you still want to learn the details of this new system, SoundWorld can be found in your Sibelius Reference.
Pitched Instruments Pitched instruments will be a little more straightforward than the unpitched instruments and not require as much explanation as to what we had to do to set them up in the Template. To help make the distinction between pitched and unpitched instruments in the Diagrams section, the pitched instruments will display all of the noteheads as normal half notes. The clef that is present may also be a giveaway.
NOTE: A few of the pitched instrument diagrams contain both clefs on the same staff, this was done to help display the available range of that particular instrument - or set of instruments - without the diagram getting visually messy. (The only instrument that uses both clefs and therefore two staves is the Piano (PED); this is more commonly referred to as a grand staff.)
Each diagram will have the written Range on it. If you enter a note - or drag it - above or below these ranges, the notehead will turn red, as this is letting you know that it is out of the available range of the corresponding VDL KP2 patch. Somewhere close to the range diagram you will see a small chart that has a listing of the available sounds as well as the corresponding Staff Text which you must enter to get those sounds. * The items that are asterisked are the default sounds.
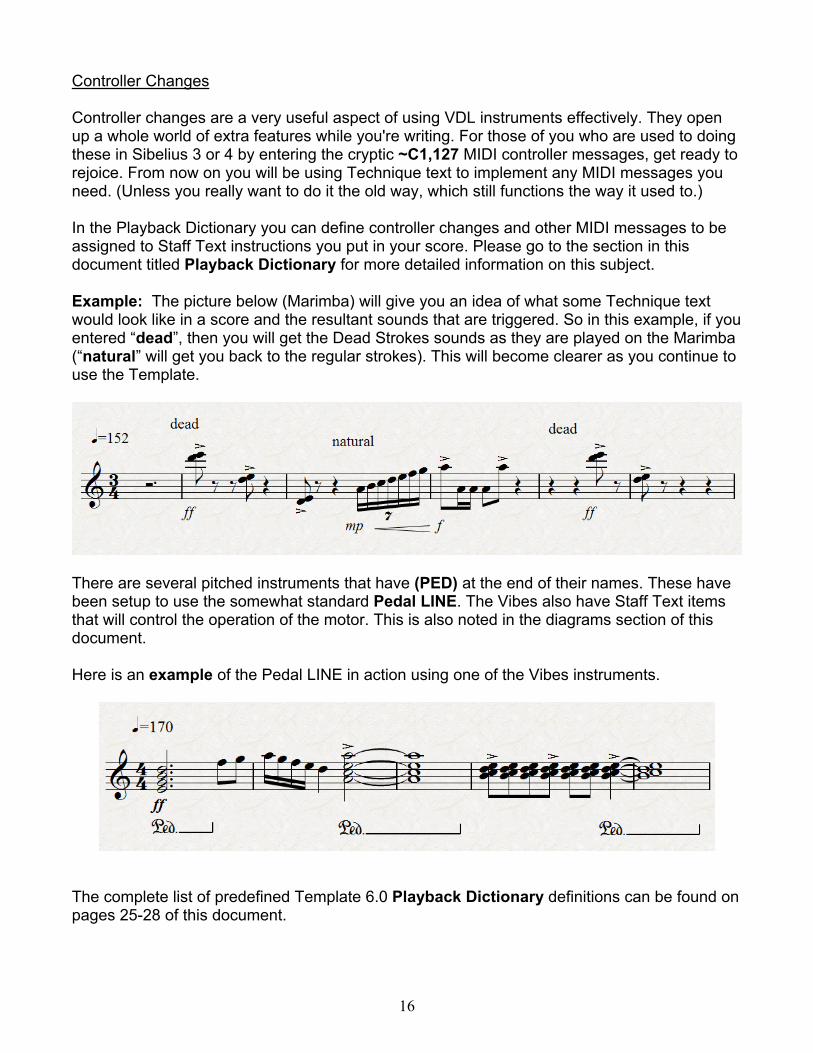
Controller Changes Controller changes are a very useful aspect of using VDL instruments effectively. They open up a whole world of extra features while you're writing. For those of you who are used to doing these in Sibelius 3 or 4 by entering the cryptic ~C1,127 MIDI controller messages, get ready to rejoice. From now on you will be using Technique text to implement any MIDI messages you need. (Unless you really want to do it the old way, which still functions the way it used to.) In the Playback Dictionary you can define controller changes and other MIDI messages to be assigned to Staff Text instructions you put in your score. Please go to the section in this document titled Playback Dictionary for more detailed information on this subject. Example: The picture below (Marimba) will give you an idea of what some Technique text would look like in a score and the resultant sounds that are triggered. So in this example, if you entered “dead”, then you will get the Dead Strokes sounds as they are played on the Marimba (“natural” will get you back to the regular strokes). This will become clearer as you continue to use the Template.
There are several pitched instruments that have (PED) at the end of their names. These have been setup to use the somewhat standard Pedal LINE. The Vibes also have Staff Text items that will control the operation of the motor. This is also noted in the diagrams section of this document. Here is an example of the Pedal LINE in action using one of the Vibes instruments.
The complete list of predefined Template 6.0 Playback Dictionary definitions can be found on pages 25-28 of this document.
16
17
Sounds Above the Range For those of you who have been using VDL2 or VDL 2.5 for any period of time know that there are suspended cymbal sounds mapped above the ranges in most of the Marimba and Vibe KontaktPlayer2 patches. Until now they have been quite handy. The problem we had in incorporating these sounds into the Template is that Sibelius requires you to choose between either Pitched or Unpitched Percussion when creating an instrument. An instrument must be either pitched or unpitched; it can not be both. We could have made two separate instruments for each patch to accommodate this, but then the memory usage would have been ridiculous if you did not load the correct matching instruments. Anyway, to make a long story short, here is what we did as it pertains to you now. You will not be using those sounds anymore. Instead, use one of the SusCym instruments located in the Cymbals Family of the Create > Instruments dialog. Here’s why:
1. You would have to make an instrument change on that staff anyway. 2. You'd waste valuable RAM, as previously stated. 3. You won't be limited to just the few sounds in the keyboard’s cymbal patches; the
SusCym instruments have more than three times as many sound choices available. 4. Why be limited to just the SusCyms? You can use any of the cymbal instruments that
are in the Cymbals Family. (Such as chinas, splash cymbals, hihats, ride, etc) This is one of the things that will need to be part of your mental reprogramming, but in the long run will make your workflow very efficient. Chime Rakes: In addition to the suspended cymbal sounds from the vibraphone and marimba instruments, the Chimes contain some "Rake" sounds which also must be treated as unpitched. As such, these rake sounds may now be accessed by using the Chime Rakes instrument. The same goes for the three glissando sounds from each of the Glockenspiel patches. To access those sounds in Sibelius, load any one of the three Glock Glissandi instruments.
18
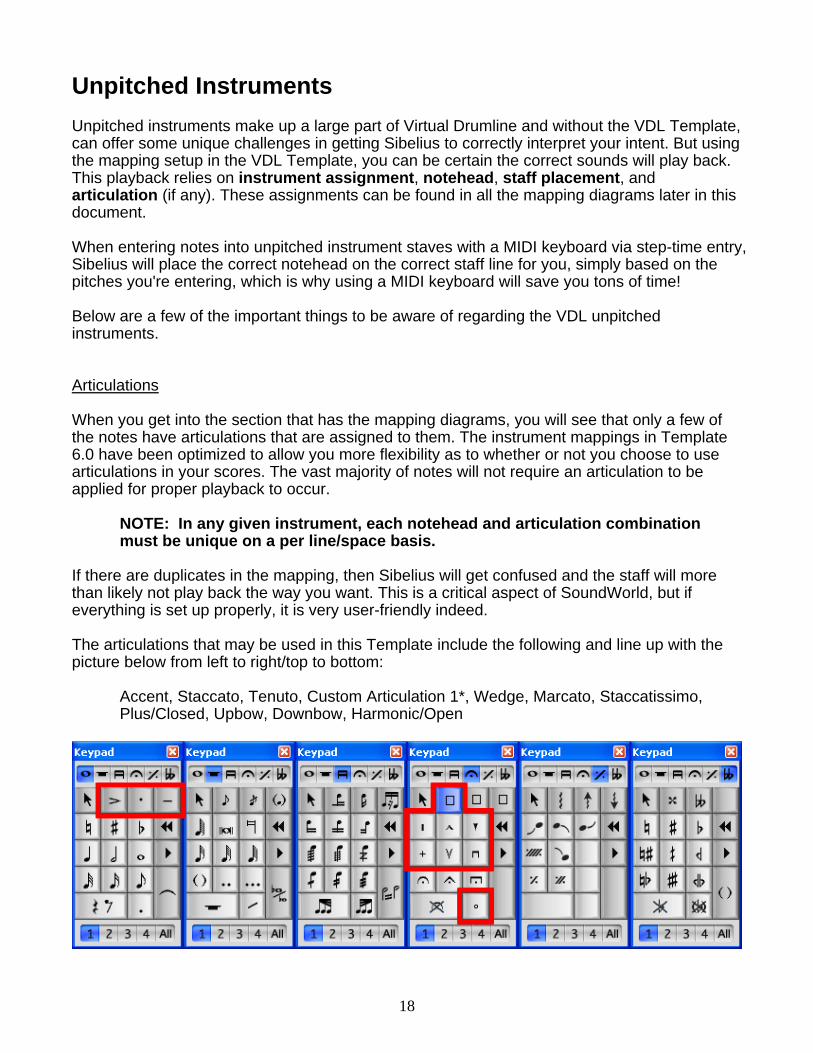
Unpitched Instruments Unpitched instruments make up a large part of Virtual Drumline and without the VDL Template, can offer some unique challenges in getting Sibelius to correctly interpret your intent. But using the mapping setup in the VDL Template, you can be certain the correct sounds will play back. This playback relies on instrument assignment, notehead, staff placement, and articulation (if any). These assignments can be found in all the mapping diagrams later in this document. When entering notes into unpitched instrument staves with a MIDI keyboard via step-time entry, Sibelius will place the correct notehead on the correct staff line for you, simply based on the pitches you're entering, which is why using a MIDI keyboard will save you tons of time! Below are a few of the important things to be aware of regarding the VDL unpitched instruments. Articulations When you get into the section that has the mapping diagrams, you will see that only a few of the notes have articulations that are assigned to them. The instrument mappings in Template 6.0 have been optimized to allow you more flexibility as to whether or not you choose to use articulations in your scores. The vast majority of notes will not require an articulation to be applied for proper playback to occur.
NOTE: In any given instrument, each notehead and articulation combination must be unique on a per line/space basis.
If there are duplicates in the mapping, then Sibelius will get confused and the staff will more than likely not play back the way you want. This is a critical aspect of SoundWorld, but if everything is set up properly, it is very user-friendly indeed. The articulations that may be used in this Template include the following and line up with the picture below from left to right/top to bottom:
Accent, Staccato, Tenuto, Custom Articulation 1*, Wedge, Marcato, Staccatissimo, Plus/Closed, Upbow, Downbow, Harmonic/Open
19
* The Inverted Mordent symbol is assigned to the first position available of the Custom Articulation spaces (4th keypad, in blue, above the Marcato).
NOTE: If you want to change an articulation in a percussion mapping to suit your personal preference, make sure that you experiment in a file that you use just for that. Then, if everything goes as planned, you can do it for real in the file you intend to use the change in.
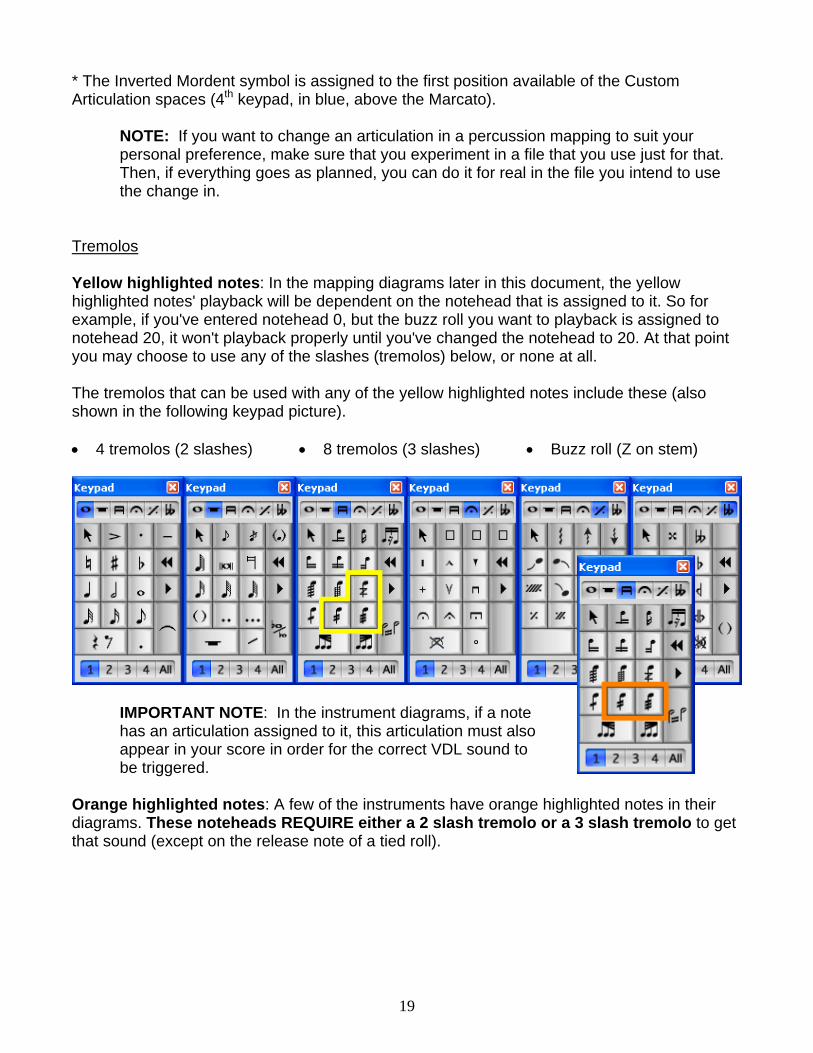
Tremolos Yellow highlighted notes: In the mapping diagrams later in this document, the yellow highlighted notes' playback will be dependent on the notehead that is assigned to it. So for example, if you've entered notehead 0, but the buzz roll you want to playback is assigned to notehead 20, it won't playback properly until you've changed the notehead to 20. At that point you may choose to use any of the slashes (tremolos) below, or none at all. The tremolos that can be used with any of the yellow highlighted notes include these (also shown in the following keypad picture). 4 tremolos (2 slashes)
8 tremolos (3 slashes) Buzz roll (Z on stem)
IMPORTANT NOTE: In the instrument diagrams, if a note has an articulation assigned to it, this articulation must also appear in your score in order for the correct VDL sound to be triggered.
Orange highlighted notes: A few of the instruments have orange highlighted notes in their diagrams. These noteheads REQUIRE either a 2 slash tremolo or a 3 slash tremolo to get that sound (except on the release note of a tied roll).
20
22
Ascen
d
22
Desce
nd 22
Slow D
esce
nt
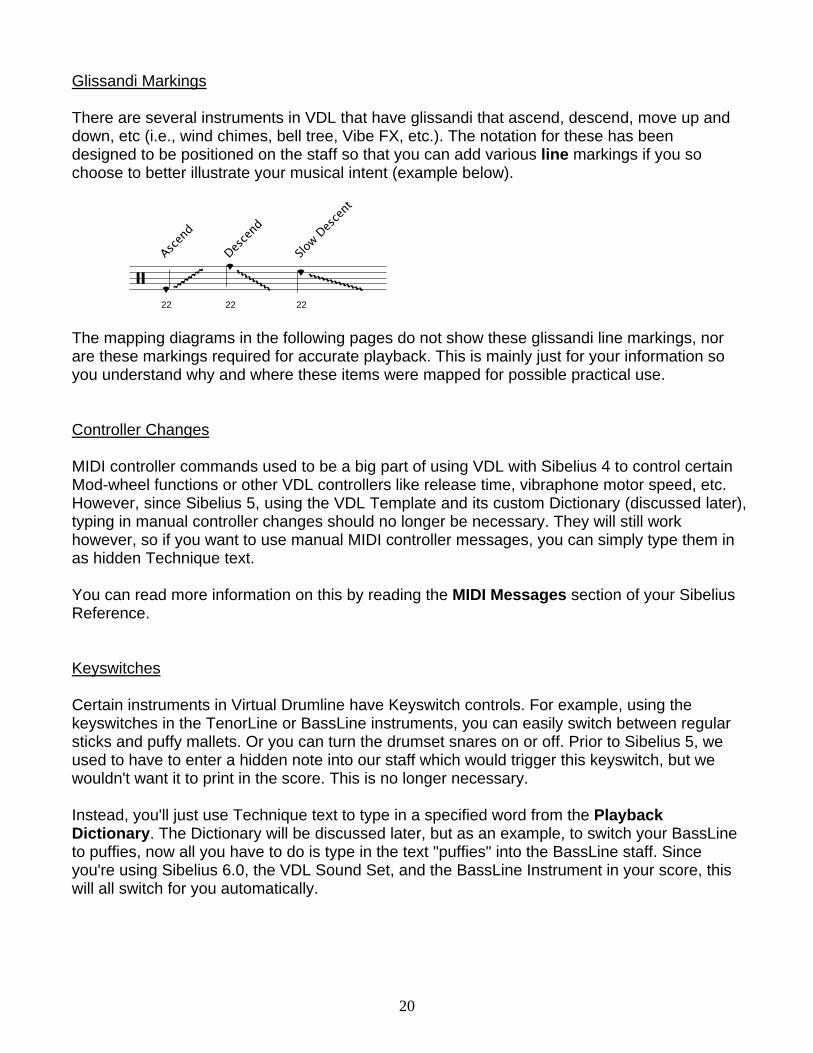
Glissandi Markings There are several instruments in VDL that have glissandi that ascend, descend, move up and down, etc (i.e., wind chimes, bell tree, Vibe FX, etc.). The notation for these has been designed to be positioned on the staff so that you can add various line markings if you so choose to better illustrate your musical intent (example below). The mapping diagrams in the following pages do not show these glissandi line markings, nor are these markings required for accurate playback. This is mainly just for your information so you understand why and where these items were mapped for possible practical use. Controller Changes MIDI controller commands used to be a big part of using VDL with Sibelius 4 to control certain Mod-wheel functions or other VDL controllers like release time, vibraphone motor speed, etc. However, since Sibelius 5, using the VDL Template and its custom Dictionary (discussed later), typing in manual controller changes should no longer be necessary. They will still work however, so if you want to use manual MIDI controller messages, you can simply type them in as hidden Technique text. You can read more information on this by reading the MIDI Messages section of your Sibelius Reference. Keyswitches Certain instruments in Virtual Drumline have Keyswitch controls. For example, using the keyswitches in the TenorLine or BassLine instruments, you can easily switch between regular sticks and puffy mallets. Or you can turn the drumset snares on or off. Prior to Sibelius 5, we used to have to enter a hidden note into our staff which would trigger this keyswitch, but we wouldn't want it to print in the score. This is no longer necessary. Instead, you'll just use Technique text to type in a specified word from the Playback Dictionary. The Dictionary will be discussed later, but as an example, to switch your BassLine to puffies, now all you have to do is type in the text "puffies" into the BassLine staff. Since you're using Sibelius 6.0, the VDL Sound Set, and the BassLine Instrument in your score, this will all switch for you automatically.
21
Naming Convention Every instrument (KP2 patch) in the Virtual Drumline 2.5 library has a corresponding instrument defined within the VDL Template. If you open the Instruments window (shortcut: I), you'll see that there is an ensemble called VDL Template 6.0. Within that ensemble are various "Families" containing different categories of VDL instruments. This should all be pretty self-explanatory. Once you've assigned instruments to your score, or if you do instrument changes mid-staff, you can view exactly which instrument is loaded if you have View > Hidden Objects activated. Oftentimes, it is beneficial to use a variety of VDL Marimba patches in a score (for example) to give a more varied and lifelike sound. By viewing hidden objects, you'll see that the instruments (or instrument changes) in your score will display the exact patch you are using. The grayed out (hidden) text will not appear in the printed score. However, you may wish to deactivate View > Hidden Objects prior to printing, or put a line break into your staff names so the hidden portion of the instrument name doesn't affect the spacing between the staff name and the left bar line. For more information, look up Instrument names in your Sibelius Reference.
22
Inputting Notes With a keyboard The easiest way to input notes into your score will be to use a MIDI keyboard that is attached to your computer. When you type in a pitch on your MIDI keyboard, Sibelius will correctly and automatically input the notehead which corresponds to that sound and it will be placed in the correct location on the staff.
REMINDER: Proper playback is reliant on three main things: Notehead number, staff position, and articulation assignment (if applicable).
Once you have entered notes that have articulations assigned to them, you will then have to add the corresponding articulations so the program knows which sounds to trigger in KontaktPlayer2. This is one of the things that may take a little bit to get used to, but once you do, you will be golden.
NEW FEATURE: A set of keymaps specifically designed to be used with this Template is included – the file name is VDL_Keymaps_6.0.pdf. These keymaps not only show you where the sounds are in relation to a MIDI keyboard, but they also contain the Template Staff Text items, notehead variations, and articulations (if necessary) that you will need to know when using a MIDI keyboard for note input. Read the instructions in that file for more information. You will need to use Adobe Reader 5 or later to view the interactive elements in the VDL_Keymaps_6.0 PDF file. Get the latest free version here:
http://get.adobe.com/reader/
Without a keyboard If you choose to not use a keyboard, you can still enter notes into your score. The only extra thing you must do is manually change the noteheads and staff placements so they reflect the assignments defined in the mapping diagrams.
NOTE: The noteheads that have been used in the mappings have been provided in the diagrams in case you use this method.
Entering Modwheel Changes & Keyswitches As mentioned earlier, you shouldn't have to manually enter controller changes or keyswitches. The articulations, noteheads, staff placement, and text (from the Playback Dictionary) should handle all these switches for you.
23
1
Crash
40 1
Crash C
hoke
0
RH Hit
33 0
Mute w
/LH
20 0
Susta
ined B
uzz R
oll
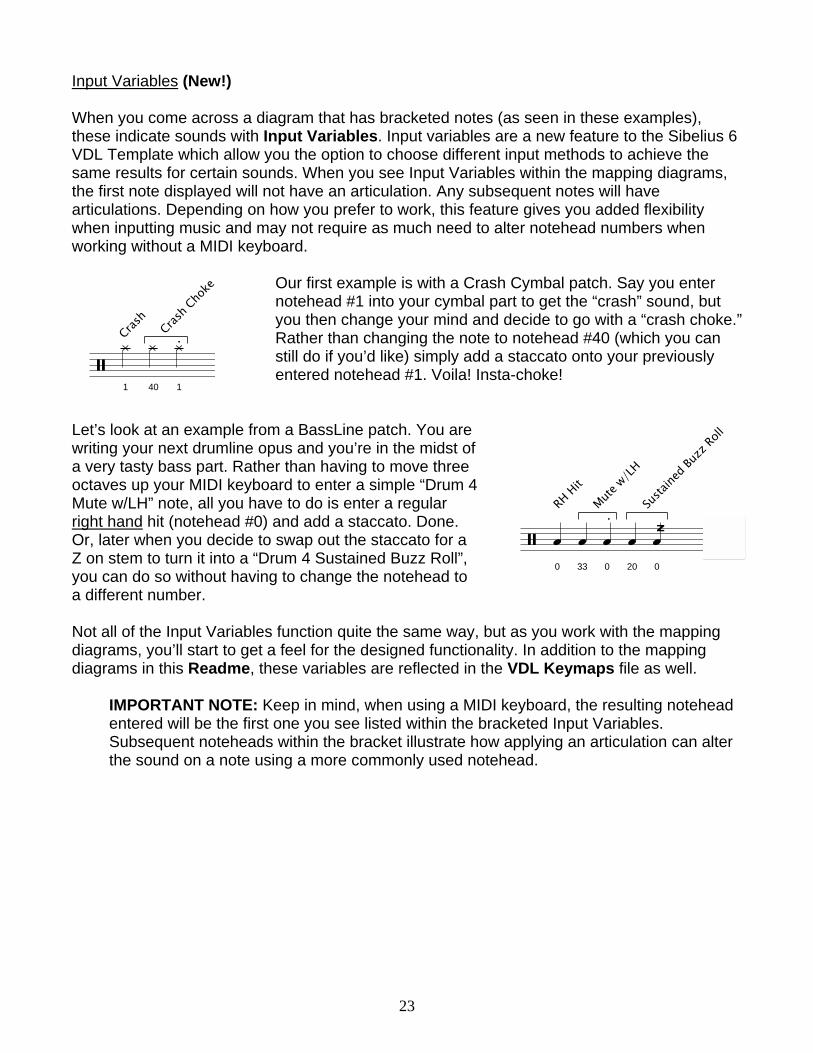
Input Variables (New!) When you come across a diagram that has bracketed notes (as seen in these examples), these indicate sounds with Input Variables. Input variables are a new feature to the Sibelius 6 VDL Template which allow you the option to choose different input methods to achieve the same results for certain sounds. When you see Input Variables within the mapping diagrams, the first note displayed will not have an articulation. Any subsequent notes will have articulations. Depending on how you prefer to work, this feature gives you added flexibility when inputting music and may not require as much need to alter notehead numbers when working without a MIDI keyboard.
Our first example is with a Crash Cymbal patch. Say you enter notehead #1 into your cymbal part to get the “crash” sound, but you then change your mind and decide to go with a “crash choke.” Rather than changing the note to notehead #40 (which you can still do if you’d like) simply add a staccato onto your previously entered notehead #1. Voila! Insta-choke!
Let’s look at an example from a BassLine patch. You are writing your next drumline opus and you’re in the midst of a very tasty bass part. Rather than having to move three octaves up your MIDI keyboard to enter a simple “Drum 4 Mute w/LH” note, all you have to do is enter a regular right hand hit (notehead #0) and add a staccato. Done. Or, later when you decide to swap out the staccato for a Z on stem to turn it into a “Drum 4 Sustained Buzz Roll”, you can do so without having to change the notehead to a different number. Not all of the Input Variables function quite the same way, but as you work with the mapping diagrams, you’ll start to get a feel for the designed functionality. In addition to the mapping diagrams in this Readme, these variables are reflected in the VDL Keymaps file as well.
IMPORTANT NOTE: Keep in mind, when using a MIDI keyboard, the resulting notehead entered will be the first one you see listed within the bracketed Input Variables. Subsequent noteheads within the bracket illustrate how applying an articulation can alter the sound on a note using a more commonly used notehead.
24
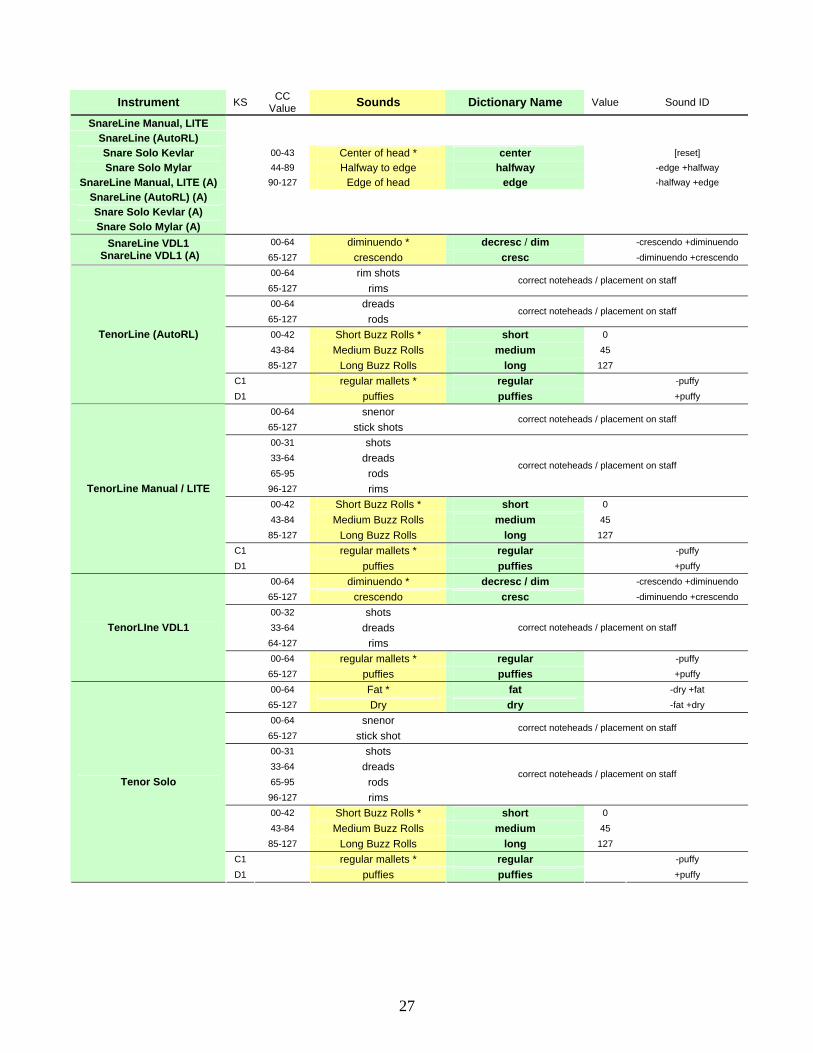
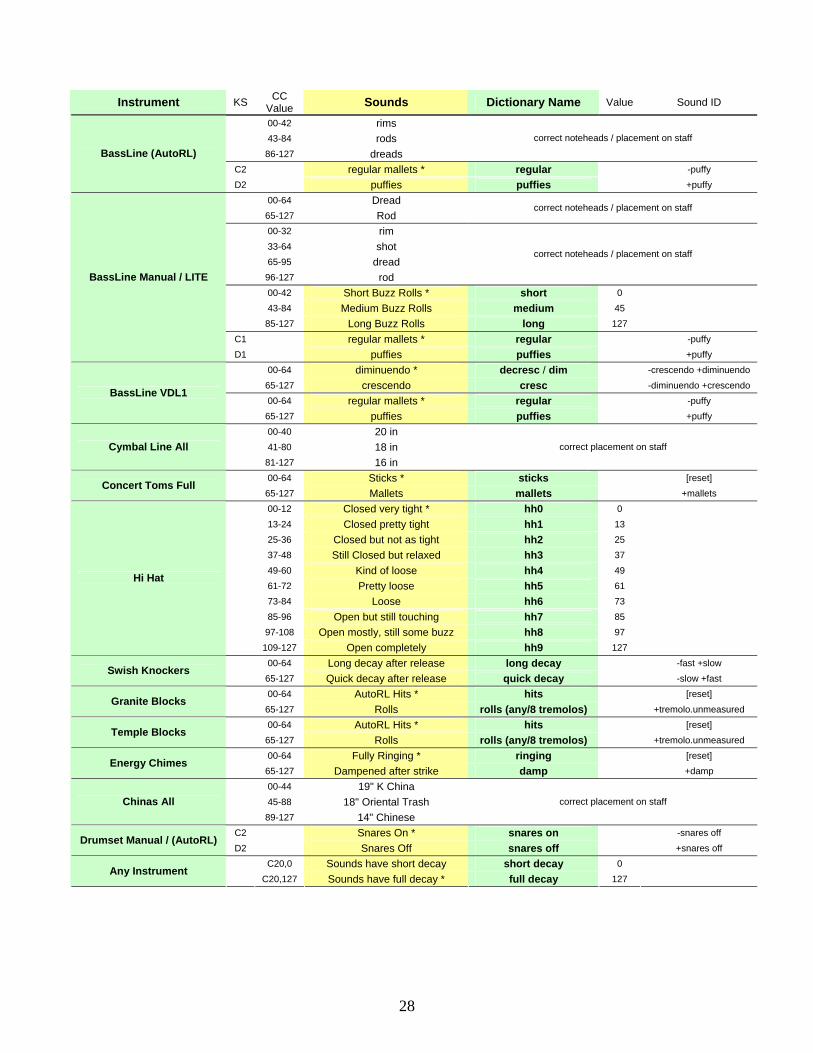
Playback Dictionary For a long time now, Sibelius has used a powerful feature called Dictionary to control certain things playback-wise. We can now do a lot with it to control certain aspects of the Template without needing to resort to cryptic MIDI messages. You can always view what's available in the Playback Dictionary by going to Play > Dictionary. We've already setup the playback functions for VDL in the Template, so as long as you're using the dictionary terms outlined here, everything should work as expected. Here's an example of how the Playback Dictionary works. Let's say you're writing a SnareLine part. At a certain point in the music you want your SnareLine to play at the edge of the drum. To do this, simply type the Technique text "edge" into your snare staff. Sibelius and the VDL SoundSet will know that in the SnareLine instrument, this means to move the mod-wheel up, and it does it for you behind the scenes. When you're ready to have the SnareLine return to the center of the drum, simply type in "center" and again, Sibelius does the rest for you. Another valuable feature of the Sibelius dictionary is that it can perform certain tasks based on the articulations used in your parts. For example, you may write a part for Timpani that is supposed to roll (tremolo). So you put three slashes on the note so your timpanist knows it's a rolled part. Since VDL contains actual sampled rolls by moving the mod-wheel up, Sibelius will see these slashes, reference the dictionary and the sound set, and realize this means to move the mod-wheel up to perform VDL's sampled rolls. It will also ensure that it doesn't try to "fake" the roll by performing a series of MIDI attacks since the sound set has told Sibelius that this is an actual roll sample. This is a hugely time-saving feature of Sibelius’ playback system. This sort of feature works for any VDL patch that plays rolls. Under the hood, what most of these definitions in the dictionary are doing is performing "sound ID changes" to create a new outcome. So for example, when your TenorLine staff encounters the word "puffies" essentially Sibelius interprets that as +puffy, which will alter the sound of that instrument. Sound ID's can get pretty complex and there can be many variables at play, but the way the sound set has been designed, you shouldn't have to deal with them directly too often. If you study these charts for the playback dictionary, you'll see that [reset] is a sound ID change used frequently. This resets any of the instrument's altered mod-wheel/keyswitch settings back to its default state, with no extra sound IDs affecting it. In any instrument, you can always return to its default state by typing nat. into your score. Nat. will activate the [reset] sound ID message, and in many cases will look at home in your score. You can also use any of the dictionary terms assigned to [reset] in the following charts to reset your instruments (i.e., typing "hits" for marimba). You may find certain dictionary terms to be items you don't necessarily want to print in your score. For example, the cresc/dim buzz rolls in VDL's TenorLine and BassLine instruments now use text to control their length (short/medium/long). This is a handy way to easily try different roll lengths without resorting to MIDI commands, however you may not necessarily want the word "medium" to appear in your score. Simply hide the text by selecting it then going to View > Hide or Show > Hide (shortcut: ctrl-shift-H on PC, or apple-shift-H on Mac). Alternately, you could simply enter this text as ~medium and Sibelius will (as always) hide anything after the tilde (~).
25
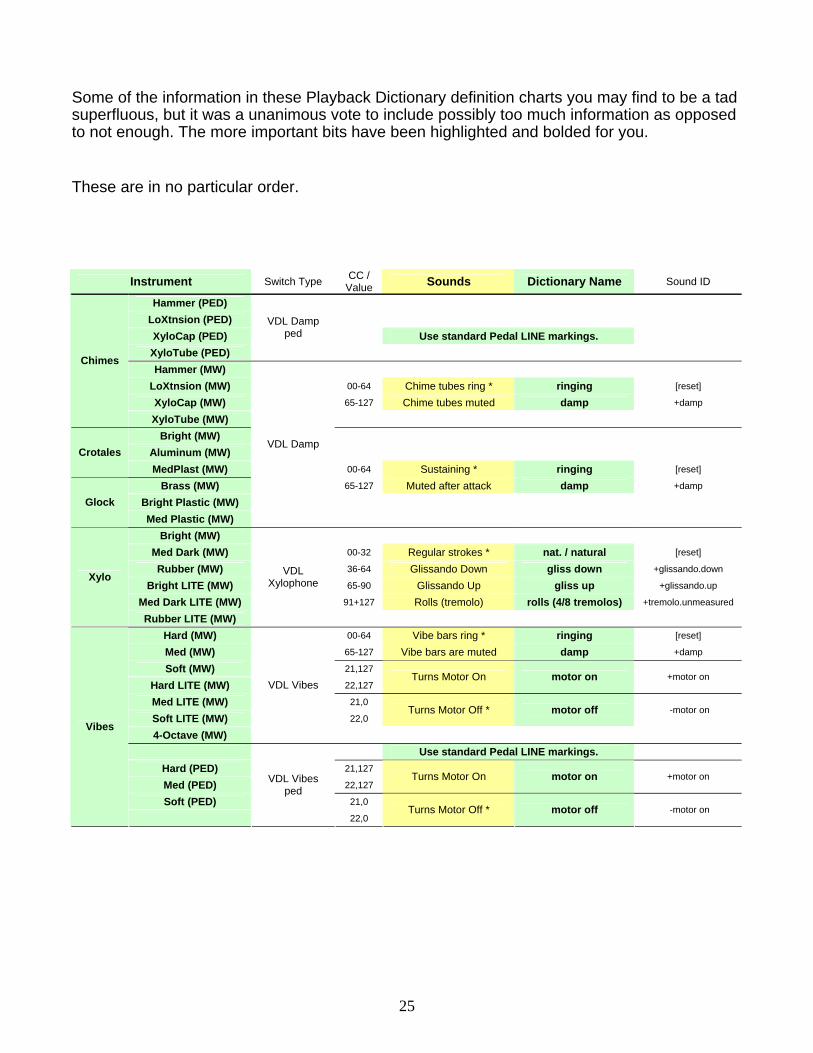
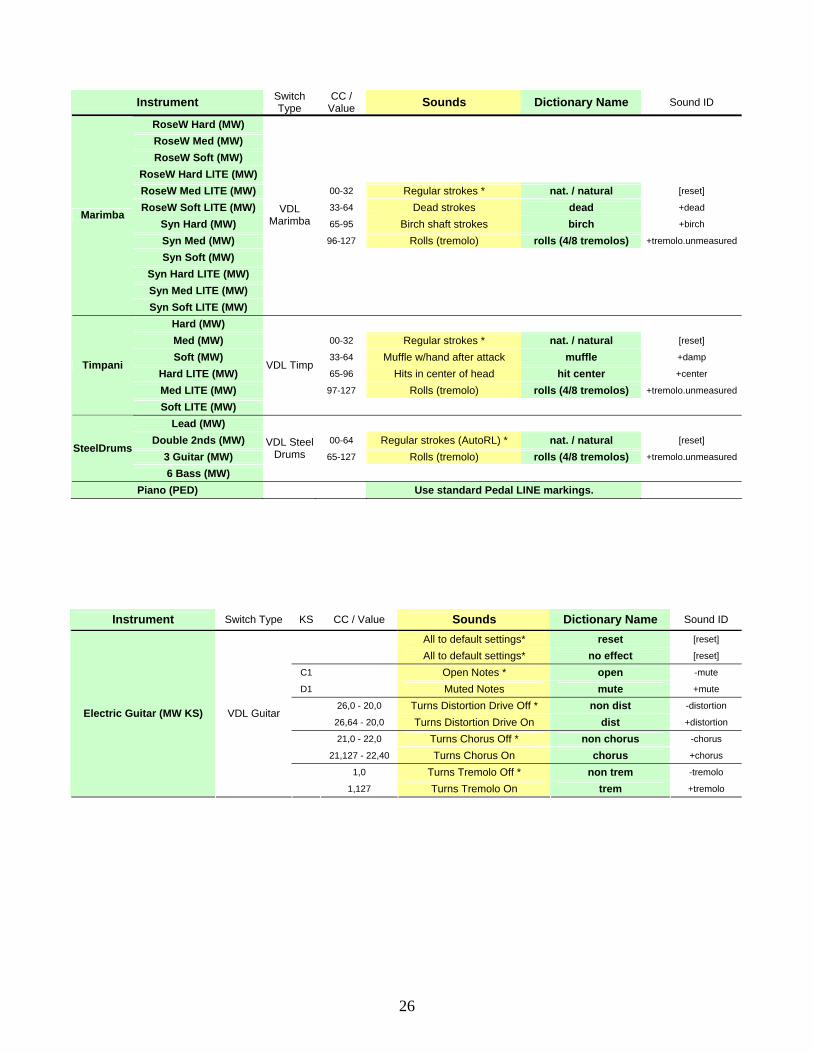
Some of the information in these Playback Dictionary definition charts you may find to be a tad superfluous, but it was a unanimous vote to include possibly too much information as opposed to not enough. The more important bits have been highlighted and bolded for you. These are in no particular order.
Instrument Switch Type CC /
Value Sounds Dictionary Name Sound ID
Hammer (PED)
LoXtnsion (PED)
XyloCap (PED) Use standard Pedal LINE markings.
XyloTube (PED)
VDL Damp ped
Hammer (MW)
LoXtnsion (MW) 00-64 Chime tubes ring * ringing [reset]
XyloCap (MW) 65-127 Chime tubes muted damp +damp
Chimes
XyloTube (MW)
Bright (MW)
Aluminum (MW) Crotales
MedPlast (MW) 00-64 Sustaining * ringing [reset]
Brass (MW) 65-127 Muted after attack damp +damp
Bright Plastic (MW) Glock
Med Plastic (MW)
VDL Damp
Bright (MW)
Med Dark (MW) 00-32 Regular strokes * nat. / natural [reset]
Rubber (MW) 36-64 Glissando Down gliss down +glissando.down
Bright LITE (MW) 65-90 Glissando Up gliss up +glissando.up
Med Dark LITE (MW) 91+127 Rolls (tremolo) rolls (4/8 tremolos) +tremolo.unmeasured
Xylo
Rubber LITE (MW)
VDL Xylophone
Hard (MW) 00-64 Vibe bars ring * ringing [reset]
Med (MW) 65-127 Vibe bars are muted damp +damp
Soft (MW) 21,127
Hard LITE (MW) 22,127 Turns Motor On motor on +motor on
Med LITE (MW) 21,0
Soft LITE (MW) 22,0 Turns Motor Off * motor off -motor on
4-Octave (MW)
VDL Vibes
Use standard Pedal LINE markings.
Hard (PED) 21,127
Med (PED) 22,127 Turns Motor On motor on +motor on
Soft (PED) 21,0
Vibes
VDL Vibes ped
22,0 Turns Motor Off * motor off -motor on
26
Instrument Switch
Type CC /
Value Sounds Dictionary Name Sound ID
RoseW Hard (MW)
RoseW Med (MW)
RoseW Soft (MW)
RoseW Hard LITE (MW)
RoseW Med LITE (MW) 00-32 Regular strokes * nat. / natural [reset]
RoseW Soft LITE (MW) 33-64 Dead strokes dead +dead
Syn Hard (MW) 65-95 Birch shaft strokes birch +birch
Syn Med (MW) 96-127 Rolls (tremolo) rolls (4/8 tremolos) +tremolo.unmeasured
Syn Soft (MW)
Syn Hard LITE (MW)
Syn Med LITE (MW)
Marimba
Syn Soft LITE (MW)
VDL Marimba
Hard (MW)
Med (MW) 00-32 Regular strokes * nat. / natural [reset]
Soft (MW) 33-64 Muffle w/hand after attack muffle +damp
Hard LITE (MW) 65-96 Hits in center of head hit center +center
Med LITE (MW) 97-127 Rolls (tremolo) rolls (4/8 tremolos) +tremolo.unmeasured
Timpani
Soft LITE (MW)
VDL Timp
Lead (MW)
Double 2nds (MW) 00-64 Regular strokes (AutoRL) * nat. / natural [reset]
3 Guitar (MW) 65-127 Rolls (tremolo) rolls (4/8 tremolos) +tremolo.unmeasuredSteelDrums
6 Bass (MW)
VDL Steel Drums
Piano (PED) Use standard Pedal LINE markings.
Instrument Switch Type KS CC / Value Sounds Dictionary Name Sound ID
All to default settings* reset [reset]
All to default settings* no effect [reset]
C1 Open Notes * open -mute
D1 Muted Notes mute +mute
26,0 - 20,0 Turns Distortion Drive Off * non dist -distortion
26,64 - 20,0 Turns Distortion Drive On dist +distortion
21,0 - 22,0 Turns Chorus Off * non chorus -chorus
21,127 - 22,40 Turns Chorus On chorus +chorus
1,0 Turns Tremolo Off * non trem -tremolo
Electric Guitar (MW KS) VDL Guitar
1,127 Turns Tremolo On trem +tremolo
27
Instrument KS
CC Value Sounds Dictionary Name Value Sound ID
SnareLine Manual, LITE
SnareLine (AutoRL)
Snare Solo Kevlar 00-43 Center of head * center [reset]
Snare Solo Mylar 44-89 Halfway to edge halfway -edge +halfway
SnareLine Manual, LITE (A) 90-127 Edge of head edge -halfway +edge
SnareLine (AutoRL) (A)
Snare Solo Kevlar (A)
Snare Solo Mylar (A)
00-64 diminuendo * decresc / dim -crescendo +diminuendo SnareLine VDL1 SnareLine VDL1 (A) 65-127 crescendo cresc -diminuendo +crescendo
00-64 rim shots
65-127 rims correct noteheads / placement on staff
00-64 dreads
65-127 rods correct noteheads / placement on staff
00-42 Short Buzz Rolls * short 0
43-84 Medium Buzz Rolls medium 45
85-127 Long Buzz Rolls long 127
C1 regular mallets * regular -puffy
TenorLine (AutoRL)
D1 puffies puffies +puffy
00-64 snenor
65-127 stick shots correct noteheads / placement on staff
00-31 shots
33-64 dreads
65-95 rods
96-127 rims
correct noteheads / placement on staff
00-42 Short Buzz Rolls * short 0
43-84 Medium Buzz Rolls medium 45
85-127 Long Buzz Rolls long 127
C1 regular mallets * regular -puffy
TenorLine Manual / LITE
D1 puffies puffies +puffy
00-64 diminuendo * decresc / dim -crescendo +diminuendo
65-127 crescendo cresc -diminuendo +crescendo
00-32 shots
33-64 dreads
64-127 rims
correct noteheads / placement on staff
00-64 regular mallets * regular -puffy
TenorLIne VDL1
65-127 puffies puffies +puffy
00-64 Fat * fat -dry +fat
65-127 Dry dry -fat +dry
00-64 snenor
65-127 stick shot correct noteheads / placement on staff
00-31 shots
33-64 dreads
65-95 rods
96-127 rims
correct noteheads / placement on staff
00-42 Short Buzz Rolls * short 0
43-84 Medium Buzz Rolls medium 45
85-127 Long Buzz Rolls long 127
C1 regular mallets * regular -puffy
Tenor Solo
D1 puffies puffies +puffy
28
Instrument KS
CC Value Sounds Dictionary Name Value Sound ID
00-42 rims
43-84 rods
86-127 dreads
correct noteheads / placement on staff
C2 regular mallets * regular -puffy
BassLine (AutoRL)
D2 puffies puffies +puffy
00-64 Dread
65-127 Rod correct noteheads / placement on staff
00-32 rim
33-64 shot
65-95 dread
96-127 rod
correct noteheads / placement on staff
00-42 Short Buzz Rolls * short 0
43-84 Medium Buzz Rolls medium 45
85-127 Long Buzz Rolls long 127
C1 regular mallets * regular -puffy
BassLine Manual / LITE
D1 puffies puffies +puffy
00-64 diminuendo * decresc / dim -crescendo +diminuendo
65-127 crescendo cresc -diminuendo +crescendo
00-64 regular mallets * regular -puffy BassLine VDL1
65-127 puffies puffies +puffy
00-40 20 in
41-80 18 in Cymbal Line All
81-127 16 in
correct placement on staff
00-64 Sticks * sticks [reset] Concert Toms Full
65-127 Mallets mallets +mallets
00-12 Closed very tight * hh0 0
13-24 Closed pretty tight hh1 13
25-36 Closed but not as tight hh2 25
37-48 Still Closed but relaxed hh3 37
49-60 Kind of loose hh4 49
61-72 Pretty loose hh5 61
73-84 Loose hh6 73
85-96 Open but still touching hh7 85
97-108 Open mostly, still some buzz hh8 97
Hi Hat
109-127 Open completely hh9 127
00-64 Long decay after release long decay -fast +slow Swish Knockers
65-127 Quick decay after release quick decay -slow +fast
00-64 AutoRL Hits * hits [reset] Granite Blocks
65-127 Rolls rolls (any/8 tremolos) +tremolo.unmeasured
00-64 AutoRL Hits * hits [reset] Temple Blocks
65-127 Rolls rolls (any/8 tremolos) +tremolo.unmeasured
00-64 Fully Ringing * ringing [reset] Energy Chimes
65-127 Dampened after strike damp +damp
00-44 19" K China
45-88 18" Oriental Trash Chinas All
89-127 14" Chinese
correct placement on staff
C2 Snares On * snares on -snares off Drumset Manual / (AutoRL)
D2 Snares Off snares off +snares off
C20,0 Sounds have short decay short decay 0 Any Instrument
C20,127 Sounds have full decay * full decay 127
29
Mapping Diagrams
30
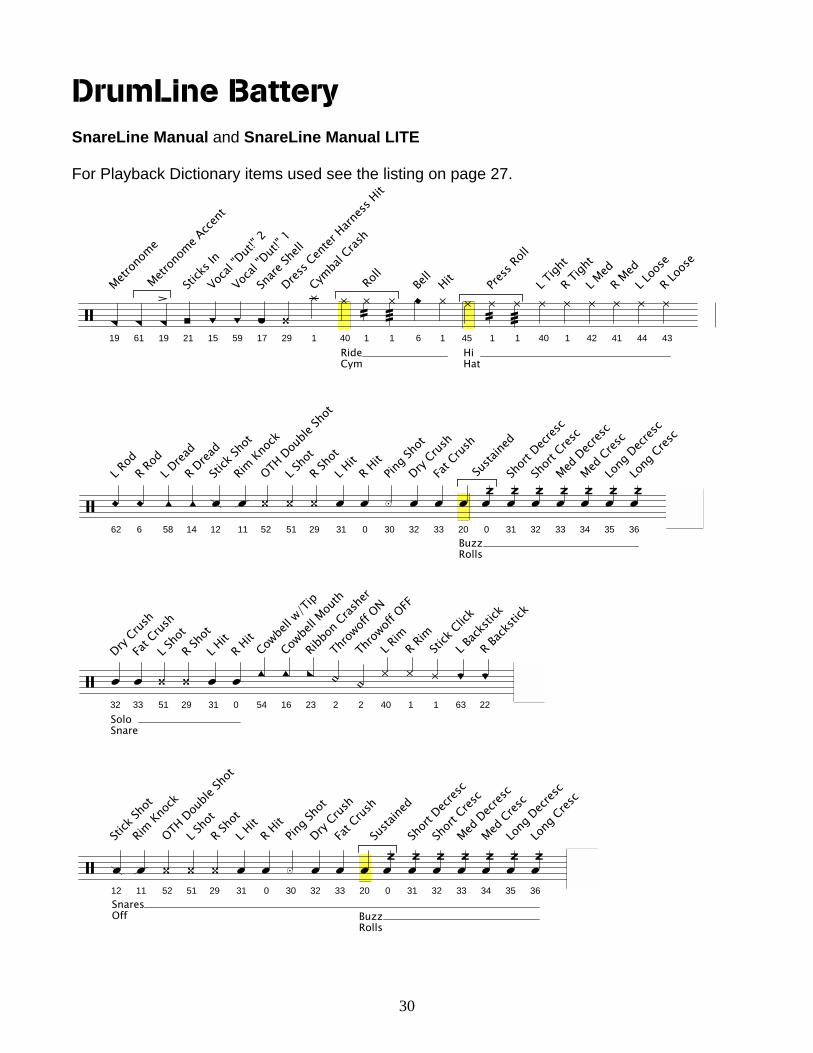
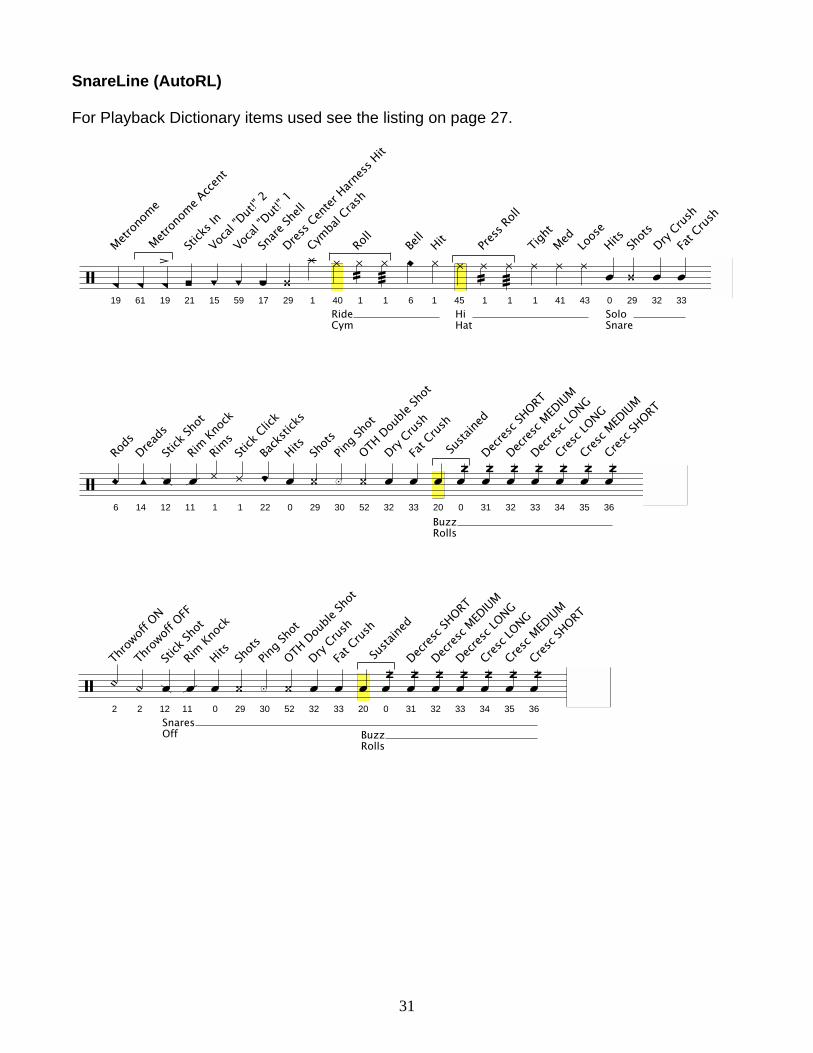
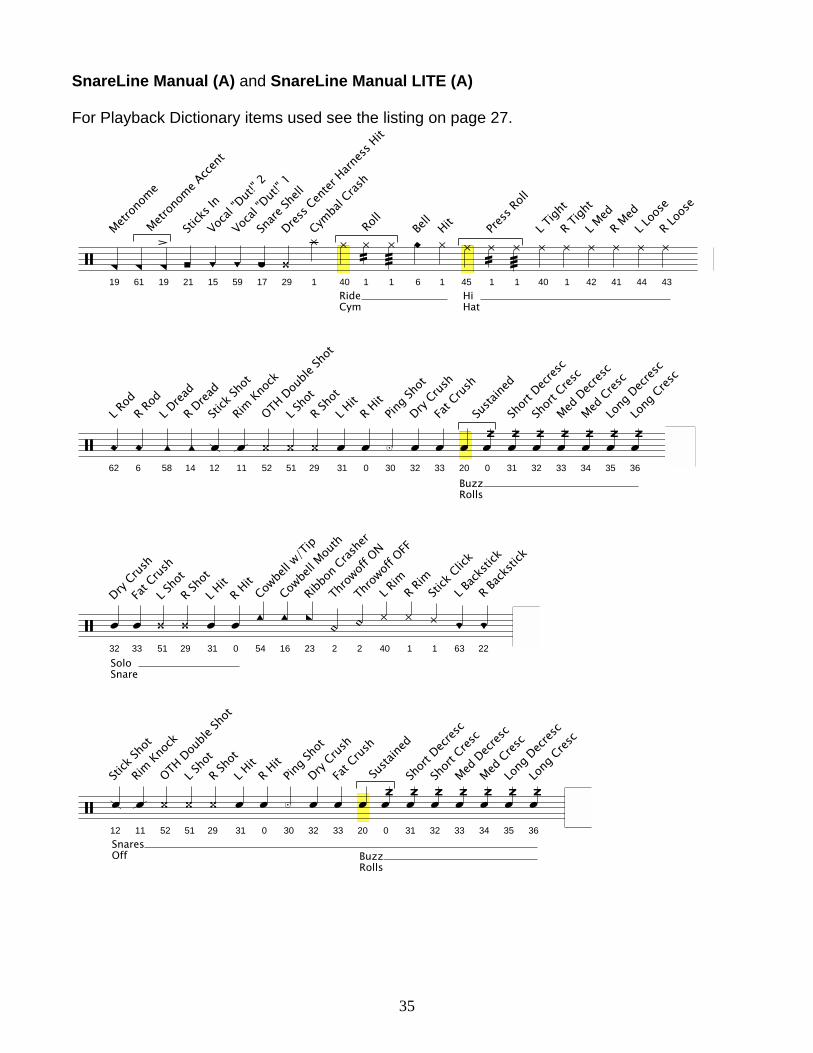
DrumLine Battery SnareLine Manual and SnareLine Manual LITE For Playback Dictionary items used see the listing on page 27.
19
Metron
ome
61 19
Metron
ome A
ccent
21
Stick
s In
15
Vocal
"Dut!
" 2
59
Vocal
"Dut!
" 1
17
Snare
Shell
29
Dress C
enter
Harness
Hit
1
Cymba
l Cras
h
RideCym
40 1
Roll
1 6
Bell
1
Hit
45
HiHat
1
Press
Roll
1 40
L Tigh
t
1
R Tigh
t
42
L Med
41
R Med
44
L Loo
se
43
R Loo
se
62
L Rod
6
R Rod
58
L Drea
d
14
R Drea
d
12
Stick
Shot
11
Rim Kn
ock
52
OTH Dou
ble Sh
ot
51
L Sho
t
29
R Sho
t
31
L Hit
0
R Hit
30
Ping S
hot
32
Dry Crus
h
33
Fat C
rush
BuzzRolls
20 0
Susta
ined
31
Short
Decresc
32
Short
Cresc
33
Med Decr
esc
34
Med Cres
c
35
Long
Decresc
36
Long
Cresc
SoloSnare
32
Dry Crus
h
33
Fat C
rush
51
L Sho
t
29
R Sho
t
31
L Hit
0
R Hit
54
Cowbe
ll w/T
ip
16
Cowbe
ll Mou
th
23
Ribbo
n Cras
her
2
Throw
off O
N
2
Throw
off O
FF
40
L Rim
1
R Rim
1
Stick
Click
63
L Back
stick
22
R Back
stick
SnaresOff
12
Stick
Shot
11
Rim Kn
ock
52
OTH Dou
ble Sh
ot
51
L Sho
t
29
R Sho
t
31
L Hit
0
R Hit
30
Ping S
hot
32
Dry Crus
h
33
Fat C
rush
BuzzRolls
20 0
Susta
ined
31
Short
Decresc
32
Short
Cresc
33
Med Decr
esc
34
Med Cres
c
35
Long
Decresc
36
Long
Cresc
31
SnareLine (AutoRL) For Playback Dictionary items used see the listing on page 27.
19
Metron
ome
61 19
Metron
ome A
ccent
21
Stick
s In
15
Vocal
"Dut!
" 2
59
Vocal
"Dut!
" 1
17
Snare
Shell
29
Dress C
enter
Harness
Hit
1
Cymba
l Cras
h
RideCym
40 1
Roll
1 6
Bell
1
Hit
HiHat
45 1
Press
Roll
1 1
Tight
41
Med
43
Loos
e
0
SoloSnare
Hits
29
Shots
32
Dry Crus
h
33
Fat C
rush
6
Rods
14
Dreads
12
Stick
Shot
11
Rim Kn
ock
1
Rims
1
Stick
Click
22
Back
stick
s
0
Hits
29
Shots
30
Ping S
hot
52
OTH Dou
ble Sh
ot
32
Dry Crus
h
33
Fat C
rush
BuzzRolls
20 0
Susta
ined
31
Decresc
SHORT
32
Decresc
MED
IUM
33
Decresc
LONG
34
Cresc L
ONG
35
Cresc M
EDIUM
36
Cresc S
HORT
2
Throw
off O
N
2
Throw
off O
FF
12
SnaresOff
Stick
Shot
11
Rim Kn
ock
0
Hits
29
Shots
30
Ping S
hot
52
OTH Dou
ble Sh
ot
32
Dry Crus
h
33
Fat C
rush
20
BuzzRolls
0
Susta
ined
31
Decresc
SHORT
32
Decresc
MED
IUM
33
Decresc
LONG
34
Cresc L
ONG
35
Cresc M
EDIUM
36
Cresc S
HORT
32
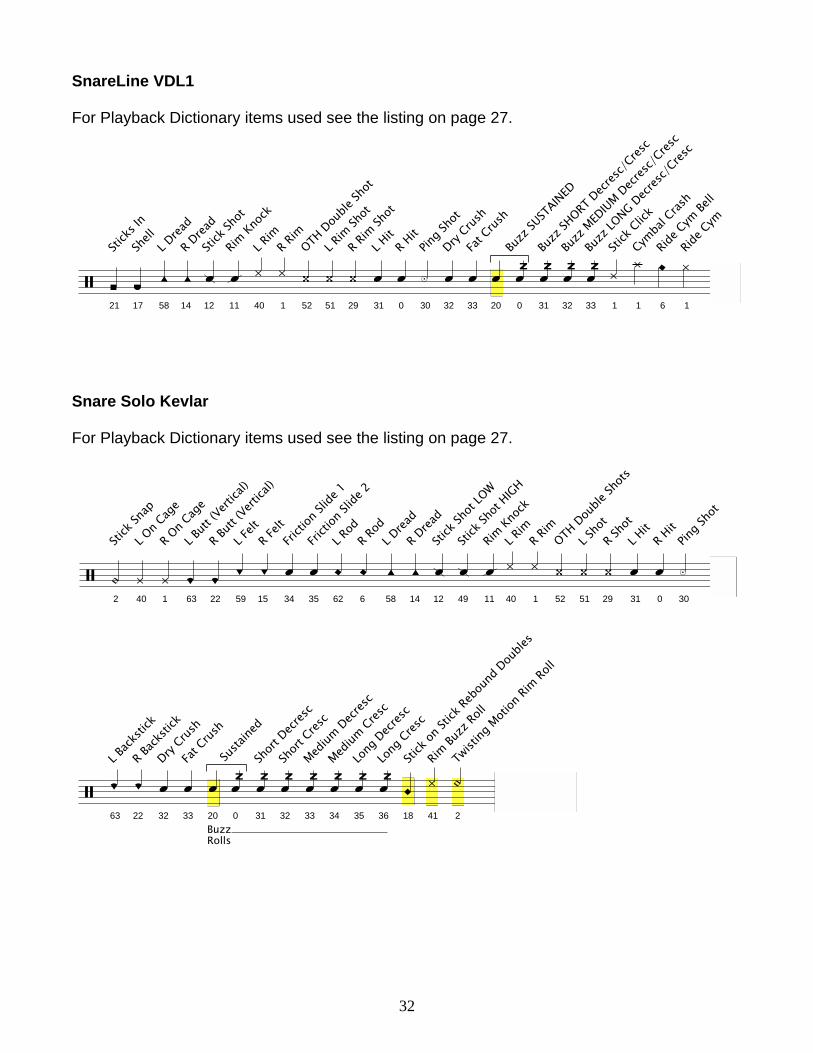
SnareLine VDL1 For Playback Dictionary items used see the listing on page 27.
21
Stick
s In
17
Shell
58
L Drea
d
14
R Drea
d
12
Stick
Shot
11
Rim Kn
ock
40
L Rim
1
R Rim
52
OTH Dou
ble Sh
ot
51
L Rim
Shot
29
R Rim
Shot
31
L Hit
0
R Hit
30
Ping S
hot
32
Dry Crus
h
33
Fat C
rush
20 0
Buzz
SUST
AINED
31
Buzz
SHORT
Decresc
/Cres
c
32
Buzz
MED
IUM Decresc
/Cres
c
33
Buzz
LONG Decr
esc/C
resc
1
Stick
Click
1
Cymba
l Cras
h
6
Ride C
ym Be
ll
1
Ride C
ym
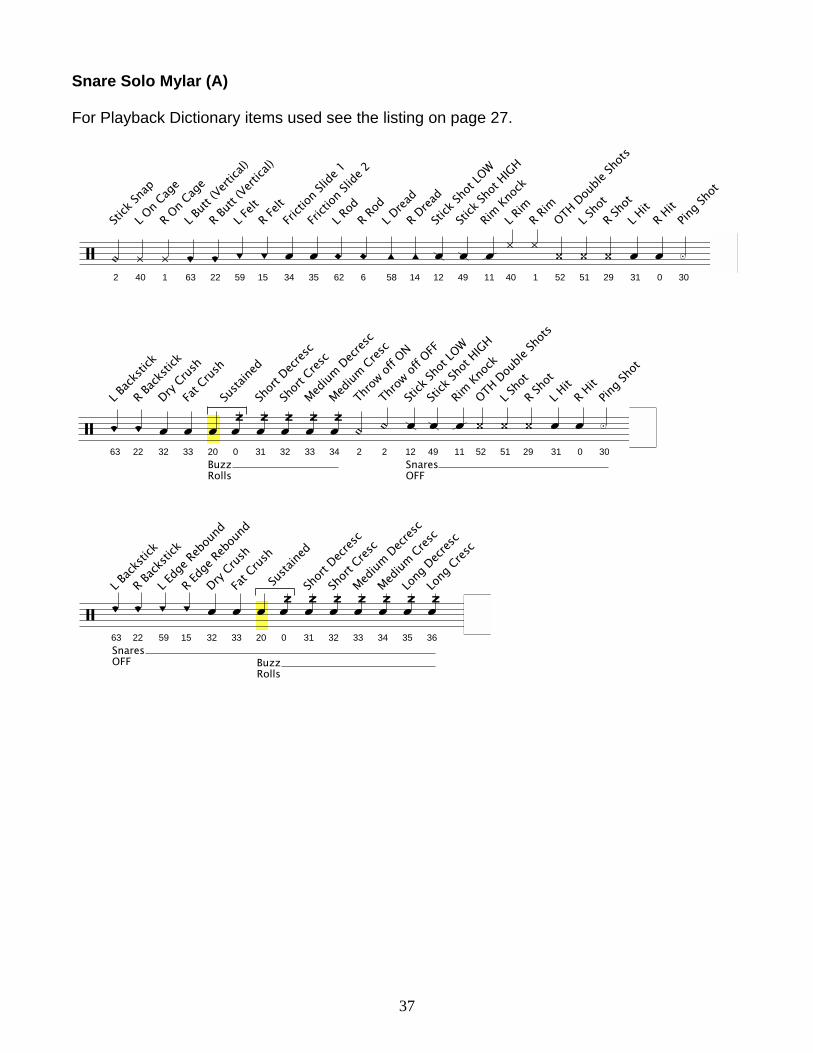
Snare Solo Kevlar For Playback Dictionary items used see the listing on page 27.
2
Stick
Snap
40
L On C
age
1
R On C
age
63
L Butt
(Vert
ical)
22
R Butt
(Vert
ical)
59
L Felt
15
R Felt
34
Fricti
on Sl
ide 1
35
Fricti
on Sl
ide 2
62
L Rod
6
R Rod
58
L Drea
d
14
R Drea
d
12
Stick
Shot
LOW
49
Stick
Shot
HIGH
11
Rim Kn
ock
40
L Rim
1
R Rim
52
OTH Dou
ble Sh
ots
51
L Sho
t
29
R Sho
t
31
L Hit
0
R Hit
30
Ping S
hot
63
L Back
stick
22
R Back
stick
32
Dry Crus
h
33
Fat C
rush
BuzzRolls
20 0
Susta
ined
31
Short
Decresc
32
Short
Cresc
33
Medium
Decresc
34
Medium
Cresc
35
Long
Decresc
36
Long
Cresc
18
Stick
on St
ick Re
boun
d Dou
bles
41
Rim Bu
zz Ro
ll
2
Twist
ing M
otion
Rim Ro
ll
33
Left38 38 38
Right37
Crosso
vers
37 37
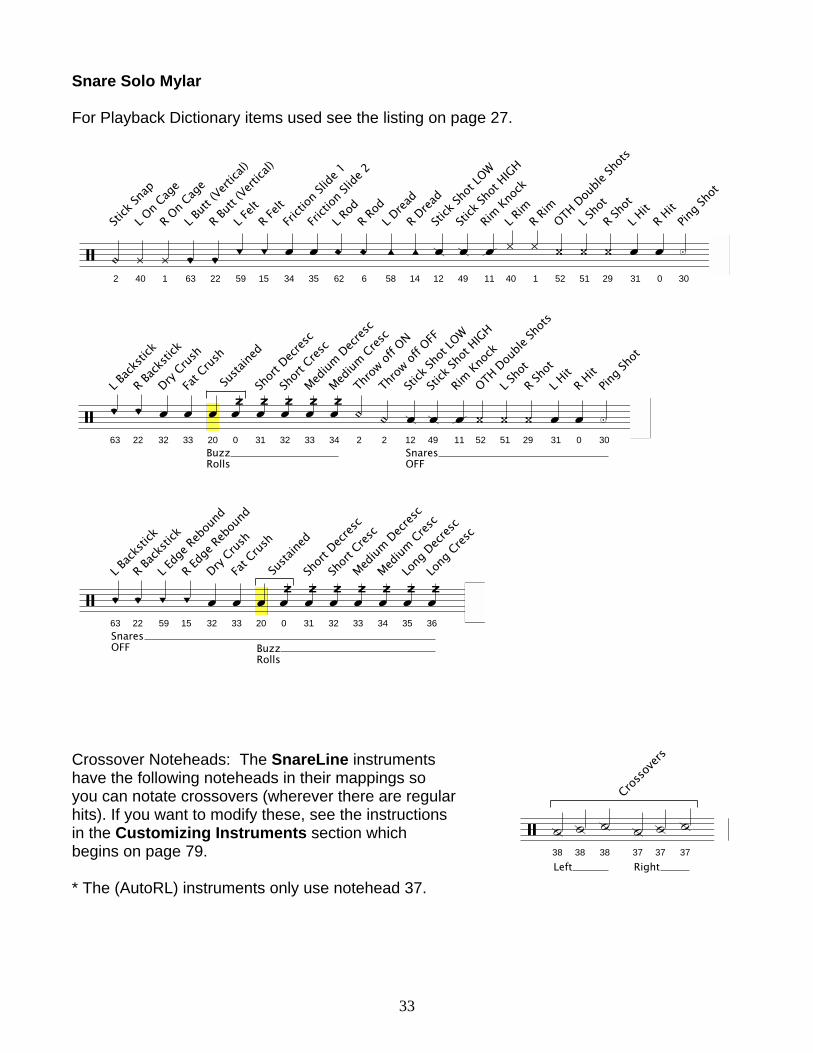
Snare Solo Mylar For Playback Dictionary items used see the listing on page 27.
2
Stick
Snap
40
L On C
age
1
R On C
age
63
L Butt
(Vert
ical)
22
R Butt
(Vert
ical)
59
L Felt
15
R Felt
34
Fricti
on Sl
ide 1
35
Fricti
on Sl
ide 2
62
L Rod
6
R Rod
58
L Drea
d
14
R Drea
d
12
Stick
Shot
LOW
49
Stick
Shot
HIGH
11
Rim Kn
ock
40
L Rim
1
R Rim
52
OTH Dou
ble Sh
ots
51
L Sho
t
29
R Sho
t
31
L Hit
0
R Hit
30
Ping S
hot
63
L Back
stick
22
R Back
stick
32
Dry Crus
h
33
Fat C
rush
BuzzRolls
20 0
Susta
ined
31
Short
Decresc
32
Short
Cresc
33
Medium
Decresc
34
Medium
Cresc
2
Throw
off O
N
2
Throw
off O
FF
SnaresOFF
12
Stick
Shot
LOW
49
Stick
Shot
HIGH
11
Rim Kn
ock
52
OTH Dou
ble Sh
ots
51
L Sho
t
29
R Sho
t
31
L Hit
0
R Hit
30
Ping S
hot
SnaresOFF
63
L Back
stick
22
R Back
stick
59
L Edg
e Reb
ound
15
R Edg
e Reb
ound
32
Dry Crus
h
33
Fat C
rush
BuzzRolls
20 0
Susta
ined
31
Short
Decresc
32
Short
Cresc
33
Medium
Decresc
34
Medium
Cresc
35
Long
Decresc
36
Long
Cresc
Crossover Noteheads: The SnareLine instruments have the following noteheads in their mappings so you can notate crossovers (wherever there are regular hits). If you want to modify these, see the instructions in the Customizing Instruments section which begins on page 79. * The (AutoRL) instruments only use notehead 37.
34
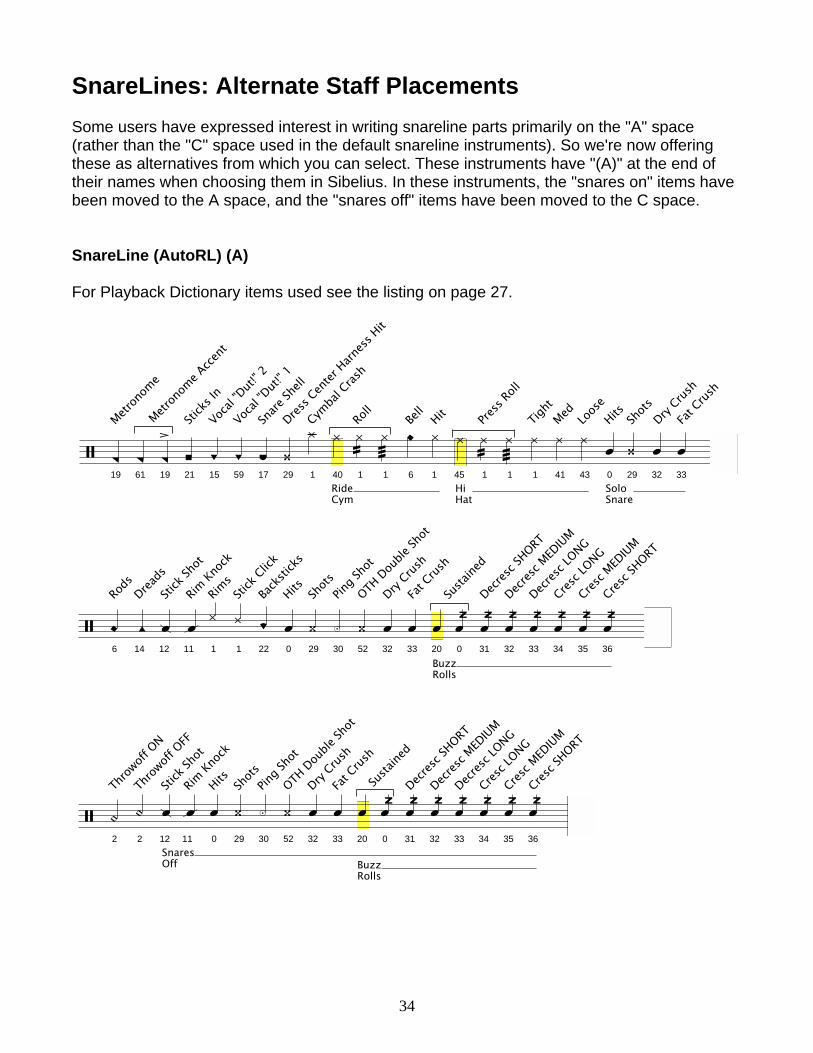
SnareLines: Alternate Staff Placements Some users have expressed interest in writing snareline parts primarily on the "A" space (rather than the "C" space used in the default snareline instruments). So we're now offering these as alternatives from which you can select. These instruments have "(A)" at the end of their names when choosing them in Sibelius. In these instruments, the "snares on" items have been moved to the A space, and the "snares off" items have been moved to the C space. SnareLine (AutoRL) (A) For Playback Dictionary items used see the listing on page 27.
19
Metron
ome
61 19
Metron
ome A
ccent
21
Stick
s In
15
Vocal
"Dut!
" 2
59
Vocal
"Dut!
" 1
17
Snare
Shell
29
Dress C
enter
Harness
Hit
1
Cymba
l Cras
h
RideCym
40 1
Roll
1 6
Bell
1
Hit
HiHat
45 1
Press
Roll
1 1
Tight
41
Med
43
Loos
e
0
SoloSnare
Hits
29
Shots
32
Dry Crus
h
33
Fat C
rush
6
Rods
14
Dreads
12
Stick
Shot
11
Rim Kn
ock
1
Rims
1
Stick
Click
22
Back
stick
s
0
Hits
29
Shots
30
Ping S
hot
52
OTH Dou
ble Sh
ot
32
Dry Crus
h
33
Fat C
rush
BuzzRolls
20 0
Susta
ined
31
Decresc
SHORT
32
Decresc
MED
IUM
33
Decresc
LONG
34
Cresc L
ONG
35
Cresc M
EDIUM
36
Cresc S
HORT
2
Throw
off O
N
2
Throw
off O
FF
12
SnaresOff
Stick
Shot
11
Rim Kn
ock
0
Hits
29
Shots
30
Ping S
hot
52
OTH Dou
ble Sh
ot
32
Dry Crus
h
33
Fat C
rush
BuzzRolls
20 0
Susta
ined
31
Decresc
SHORT
32
Decresc
MED
IUM
33
Decresc
LONG
34
Cresc L
ONG
35
Cresc M
EDIUM
36
Cresc S
HORT
35
SnareLine Manual (A) and SnareLine Manual LITE (A) For Playback Dictionary items used see the listing on page 27.
19
Metron
ome
61 19
Metron
ome A
ccent
21
Stick
s In
15
Vocal
"Dut!
" 2
59
Vocal
"Dut!
" 1
17
Snare
Shell
29
Dress C
enter
Harness
Hit
1
Cymba
l Cras
h
RideCym
40 1
Roll
1 6
Bell
1
Hit
45
HiHat
1
Press
Roll
1 40
L Tigh
t
1
R Tigh
t
42
L Med
41
R Med
44
L Loo
se
43
R Loo
se
62
L Rod
6
R Rod
58
L Drea
d
14
R Drea
d
12
Stick
Shot
11
Rim Kn
ock
52
OTH Dou
ble Sh
ot
51
L Sho
t
29
R Sho
t
31
L Hit
0
R Hit
30
Ping S
hot
32
Dry Crus
h
33
Fat C
rush
BuzzRolls
20 0
Susta
ined
31
Short
Decresc
32
Short
Cresc
33
Med Decr
esc
34
Med Cres
c
35
Long
Decresc
36
Long
Cresc
32
SoloSnare
Dry Crus
h
33
Fat C
rush
51
L Sho
t
29
R Sho
t
31
L Hit
0
R Hit
54
Cowbe
ll w/T
ip
16
Cowbe
ll Mou
th
23
Ribbo
n Cras
her
2
Throw
off O
N
2
Throw
off O
FF
40
L Rim
1
R Rim
1
Stick
Click
63
L Back
stick
22
R Back
stick
12
SnaresOff
Stick
Shot
11
Rim Kn
ock
52
OTH Dou
ble Sh
ot
51
L Sho
t
29
R Sho
t
31
L Hit
0
R Hit
30
Ping S
hot
32
Dry Crus
h
33
Fat C
rush
20
BuzzRolls
0
Susta
ined
31
Short
Decresc
32
Short
Cresc
33
Med Decr
esc
34
Med Cres
c
35
Long
Decresc
36
Long
Cresc

36
SnareLine VDL1 (A) For Playback Dictionary items used see the listing on page 27.
21
Stick
s In
17
Shell
58
L Drea
d
14
R Drea
d
12
Stick
Shot
11
Rim Kn
ock
40
L Rim
1
R Rim
52
OTH Dou
ble Sh
ot
51
L Rim
Shot
29
R Rim
Shot
31
L Hit
0
R Hit
30
Ping S
hot
32
Dry Crus
h
33
Fat C
rush
20 0
Buzz
SUST
AINED
31
Buzz
SHORT
Decresc
/Cres
c
32
Buzz
MED
IUM Decresc
/Cres
c
33
Buzz
LONG Decr
esc/C
resc
1
Stick
Click
1
Cymba
l Cras
h
6
Ride C
ym Be
ll
1
Ride C
ym
Snare Solo Kevlar (A) For Playback Dictionary items used see the listing on page 27.
2
Stick
Snap
40
L On C
age
1
R On C
age
63
L Butt
(Vert
ical)
22
R Butt
(Vert
ical)
59
L Felt
15
R Felt
34
Fricti
on Sl
ide 1
35
Fricti
on Sl
ide 2
62
L Rod
6
R Rod
58
L Drea
d
14
R Drea
d
12
Stick
Shot
LOW
49
Stick
Shot
HIGH
11
Rim Kn
ock
40
L Rim
1
R Rim
52
OTH Dou
ble Sh
ots
51
L Sho
t
29
R Sho
t
31
L Hit
0
R Hit
30
Ping S
hot
63
L Back
stick
22
R Back
stick
32
Dry Crus
h
33
Fat C
rush
BuzzRolls
20 0
Susta
ined
31
Short
Decresc
32
Short
Cresc
33
Medium
Decresc
34
Medium
Cresc
35
Long
Decresc
36
Long
Cresc
18
Stick
on St
ick Re
boun
d Dou
bles
41
Rim Bu
zz Ro
ll
2
Twist
ing M
otion
Rim Ro
ll
37
Snare Solo Mylar (A) For Playback Dictionary items used see the listing on page 27.
2
Stick
Snap
40
L On C
age
1
R On C
age
63
L Butt
(Vert
ical)
22
R Butt
(Vert
ical)
59
L Felt
15
R Felt
34
Fricti
on Sl
ide 1
35
Fricti
on Sl
ide 2
62
L Rod
6
R Rod
58
L Drea
d
14
R Drea
d
12
Stick
Shot
LOW
49
Stick
Shot
HIGH
11
Rim Kn
ock
40
L Rim
1
R Rim
52
OTH Dou
ble Sh
ots
51
L Sho
t
29
R Sho
t
31
L Hit
0
R Hit
30
Ping S
hot
63
L Back
stick
22
R Back
stick
32
Dry Crus
h
33
Fat C
rush
BuzzRolls
20 0
Susta
ined
31
Short
Decresc
32
Short
Cresc
33
Medium
Decresc
34
Medium
Cresc
2
Throw
off O
N
2
Throw
off O
FF
SnaresOFF
12
Stick
Shot
LOW
49
Stick
Shot
HIGH
11
Rim Kn
ock
52
OTH Dou
ble Sh
ots
51
L Sho
t
29
R Sho
t
31
L Hit
0
R Hit
30
Ping S
hot
SnaresOFF
63
L Back
stick
22
R Back
stick
59
L Edg
e Reb
ound
15
R Edg
e Reb
ound
32
Dry Crus
h
33
Fat C
rush
BuzzRolls
20 0
Susta
ined
31
Short
Decresc
32
Short
Cresc
33
Medium
Decresc
34
Medium
Cresc
35
Long
Decresc
36
Long
Cresc
38
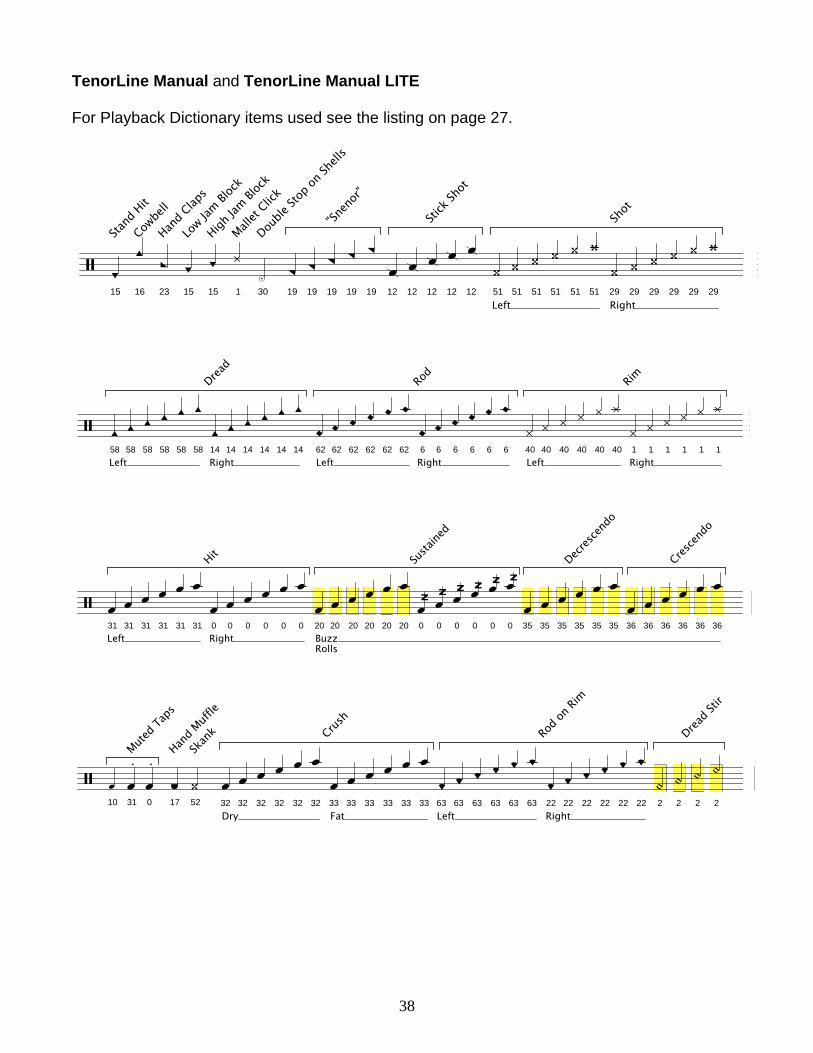
TenorLine Manual and TenorLine Manual LITE For Playback Dictionary items used see the listing on page 27.
15
Stand
Hit
16
Cowbe
ll
23
Hand C
laps
15
Low Ja
m Bloc
k
15
High Ja
m Bloc
k
1
Mallet
Click
30
Double
Stop
on Sh
ells
19 19 19
"Snen
or"
19 19 12 12 12
Stick
Shot
12 12
Left51 51 51 51 51 51
Right29
Shot
29 29 29 29 29
Left58 58 58 58 58 58
Right14
Dread
14 14 14 14 14
Left62 62 62 62 62 62
Right6
Rod
6 6 6 6 6
Left40 40 40 40 40 40
Right1
Rim
1 1 1 1 1
Left31 31 31 31 31 31
Right0
Hit
0 0 0 0 0
BuzzRolls
20 20 20 20 20 20 0
Susta
ined
0 0 0 0 0 35 35 35 35
Decresc
endo
35 35 36 36 36 36
Crescen
do
36 36
10 31
Muted T
aps
0 17
Hand M
uffle
52
Skan
k
32
Dry32 32 32 32 32 33
Fat
Crush
33 33 33 33 33
Left63 63 63 63 63 63
Right22
Rod o
n Rim
22 22 22 22 22 2 2 2
Dread S
tir
2
39
Left38 38 38 38 38 38
Right37
Cross
over
s
37 37 37 37 37
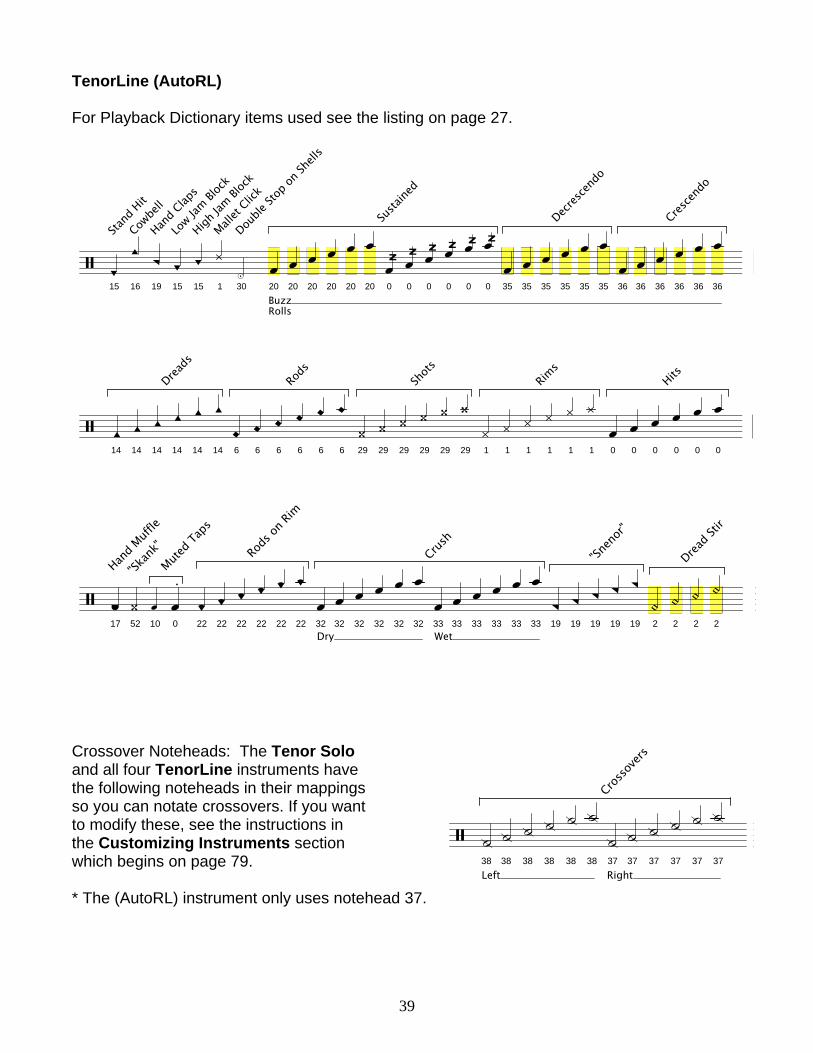
TenorLine (AutoRL) For Playback Dictionary items used see the listing on page 27.
15
Stand
Hit
16
Cowbe
ll
19
Hand C
laps
15
Low Ja
m Bloc
k
15
High Ja
m Bloc
k
1
Mallet
Click
30
Double
Stop
on Sh
ells
BuzzRolls
20 20 20 20 20 20 0
Susta
ined
0 0 0 0 0 35 35 35 35
Decresc
endo
35 35 36 36 36 36
Crescen
do
36 36
14 14 14 14
Dreads
14 14 6 6 6 6
Rods
6 6 29 29 29 29
Shots
29 29 1 1 1 1
Rims
1 1 0 0 0 0
Hits
0 0
17
Hand M
uffle
52
"Skan
k"
10 0
Muted T
aps
22 22 22 22
Rods
on Ri
m
22 22 32
Dry32 32 32 32 32 33
Wet
Crush
33 33 33 33 33 19 19 19
"Snen
or"
19 19 2 2 2
Dread S
tir
2
Crossover Noteheads: The Tenor Solo and all four TenorLine instruments have the following noteheads in their mappings so you can notate crossovers. If you want to modify these, see the instructions in the Customizing Instruments section which begins on page 79. * The (AutoRL) instrument only uses notehead 37.
40
31
L Hit
0
R Hit
40
L Rim
1
R Rim
32
Hits
AutoRL41
Rims
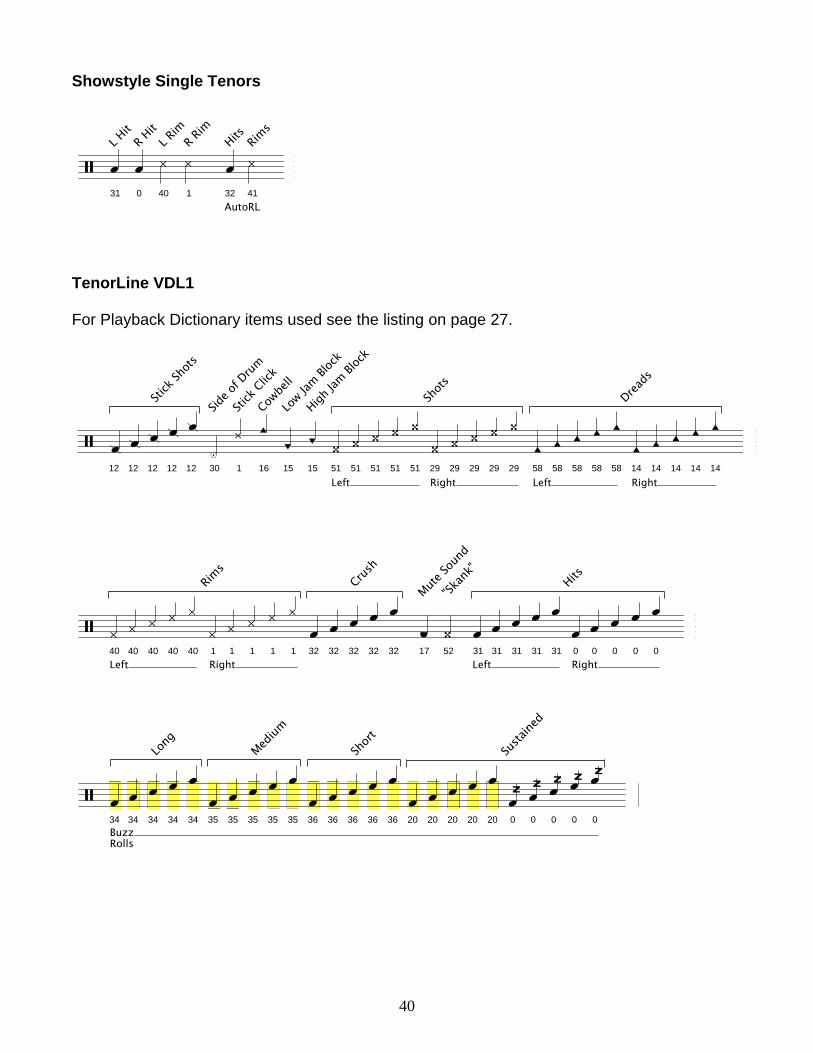
Showstyle Single Tenors TenorLine VDL1 For Playback Dictionary items used see the listing on page 27.
12 12 12
Stick
Shots
12 12 30
Side o
f Drum
1
Stick
Click
16
Cowbe
ll
15
Low Ja
m Bloc
k
15
High Ja
m Bloc
k
Left51 51 51 51 51
Right29
Shots
29 29 29 29
Left58 58 58 58 58
Right14
Dreads
14 14 14 14
Left40 40 40 40 40
Right1
Rims
1 1 1 1 32 32 32
Crush
32 32 17
Mute So
und
52
"Skan
k"
Left31 31 31 31 31
Right0
Hits
0 0 0 0
BuzzRolls
34 34 34
Long
34 34 35 35 35
Medium
35 35 36 36 36
Short
36 36 20 20 20 20 20 0
Susta
ined
0 0 0 0
41
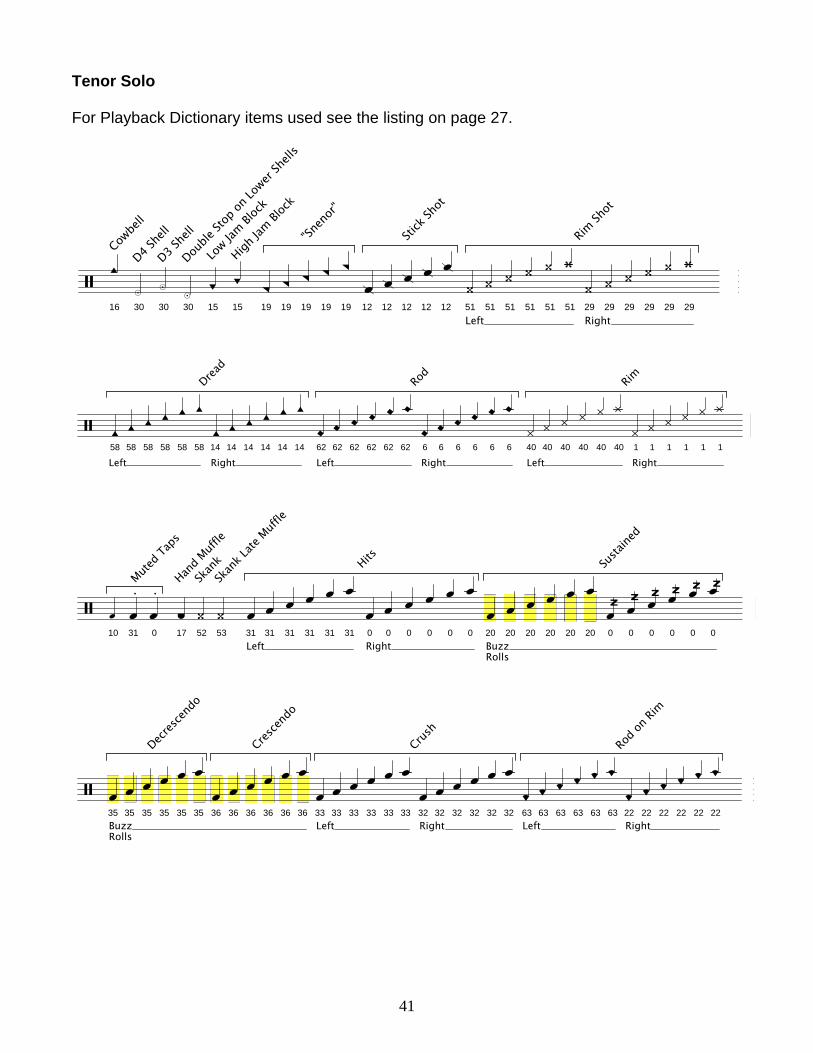
Tenor Solo For Playback Dictionary items used see the listing on page 27.
16
Cowbe
ll
30
D4 She
ll
30
D3 She
ll
30
Double
Stop
on Lo
wer Sh
ells
15
Low Ja
m Bloc
k
15
High Ja
m Bloc
k
19 19 19
"Snen
or"
19 19 12 12 12
Stick
Shot
12 12
Left51 51 51 51 51 51
Right29
Rim Sh
ot
29 29 29 29 29
Left58 58 58 58 58 58
Right14
Dread
14 14 14 14 14
Left62 62 62 62 62 62
Right6
Rod
6 6 6 6 6
Left40 40 40 40 40 40
Right1
Rim
1 1 1 1 1
10 31
Muted T
aps
0 17
Hand M
uffle
52
Skan
k
53
Skan
k Late
Muff
le
Left31 31 31 31 31 31
Right0
Hits
0 0 0 0 0
BuzzRolls
20 20 20 20 20 20 0
Susta
ined
0 0 0 0 0
BuzzRolls
35 35 35 35
Decresc
endo
35 35 36 36 36
Crescen
do
36 36 36
Left33 33 33 33 33 33
Right32
Crush
32 32 32 32 32
Left63 63 63 63 63 63
Right22
Rod o
n Rim
22 22 22 22 22
42
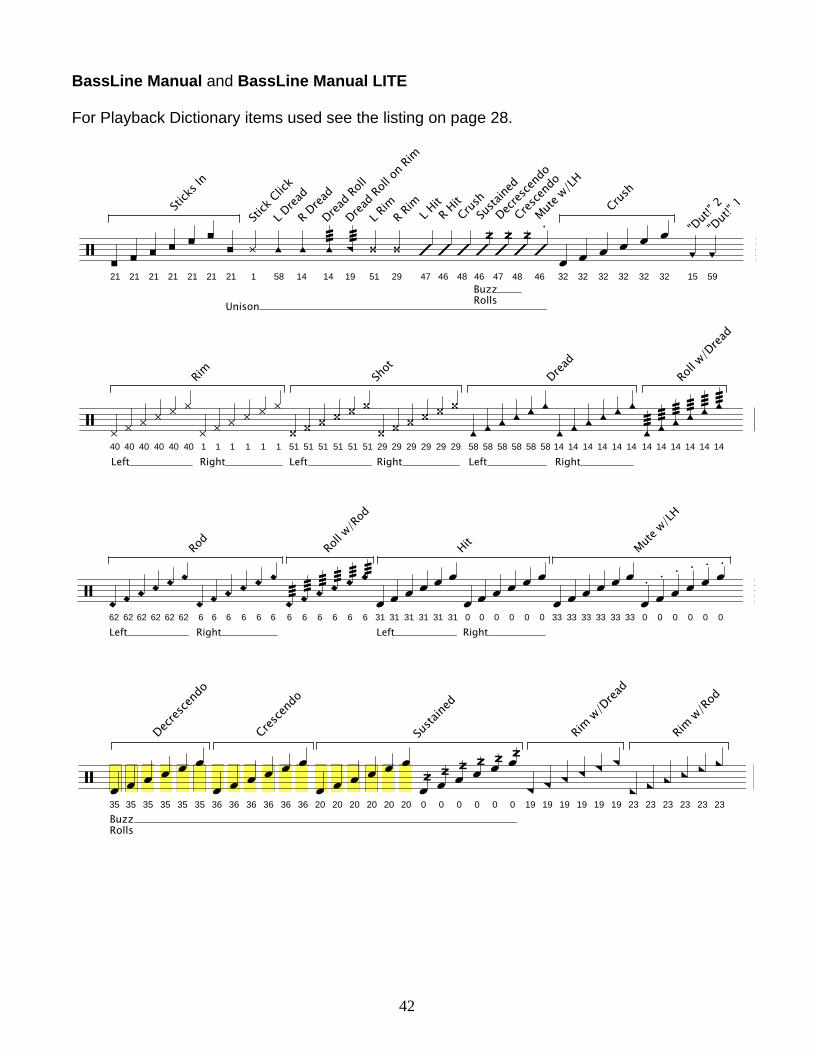
BassLine Manual and BassLine Manual LITE For Playback Dictionary items used see the listing on page 28.
21 21 21 21
Stick
s In
21 21
Unison
21 1
Stick
Click
58
L Drea
d
14
R Drea
d
14
Dread R
oll
19
Dread R
oll on
Rim
51
L Rim
29
R Rim
47
L Hit
46
R Hit
48
Crush
BuzzRolls
46
Susta
ined
47
Decresc
endo
48
Crescen
do
46
Mute w
/LH
32 32 32 32
Crush
32 32 15
"Dut!
" 2
59
"Dut!
" 1
Left40 40 40 40 40 40
Right1
Rim
1 1 1 1 1
Left51 51 51 51 51 51
Right29
Shot
29 29 29 29 29
Left58 58 58 58 58 58 14
Right
Dread
14 14 14 14 14 14 14 14 14
Roll w
/Drea
d
14 14
Left62 62 62 62 62 62
Right6
Rod
6 6 6 6 6 6 6 6 6
Roll w
/Rod
6 6
Left31 31 31 31 31 31
Right0
Hit
0 0 0 0 0 33 33 33 33 33 33 0
Mute w
/LH
0 0 0 0 0
BuzzRolls
35 35 35 35
Decresc
endo
35 35 36 36 36 36
Crescen
do
36 36 20 20 20 20 20 20 0
Susta
ined
0 0 0 0 0 19 19 19 19
Rim w
/Drea
d
19 19 23 23 23 23
Rim w
/Rod
23 23
43
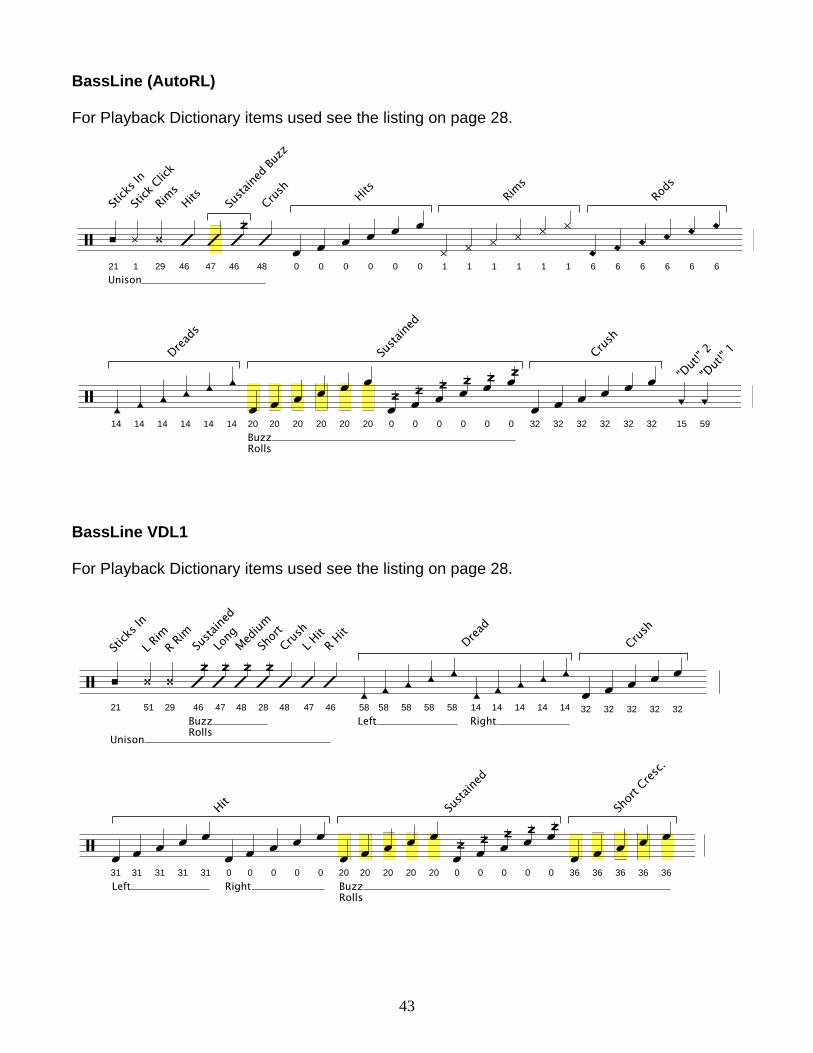
BassLine (AutoRL) For Playback Dictionary items used see the listing on page 28.
Unison21
Stick
s In
1
Stick
Click
29
Rims
46
Hits
47 46
Susta
ined B
uzz
48
Crush
0 0 0 0
Hits
0 0 1 1 1 1
Rims
1 1 6 6 6 6
Rods
6 6
14 14 14 14
Dreads
14 14
BuzzRolls
20 20 20 20 20 20 0
Susta
ined
0 0 0 0 0 32 32 32 32
Crush
32 32 15
"Dut!
" 2
59
"Dut!
" 1
BassLine VDL1 For Playback Dictionary items used see the listing on page 28.
Unison
21
Stick
s In
51
L Rim
29
R Rim
BuzzRolls
46
Susta
ined
47
Long
48
Medium
28
Short
48
Crush
47
L Hit
46
R Hit
Left58 58 58 58 58
Right14
Dread
14 14 14 14 32 32 32
Crush
32 32
Left31 31 31 31 31
Right0
Hit
0 0 0 0
BuzzRolls
20 20 20 20 20 0
Susta
ined
0 0 0 0 36 36 36
Short
Cresc.
36 36
44
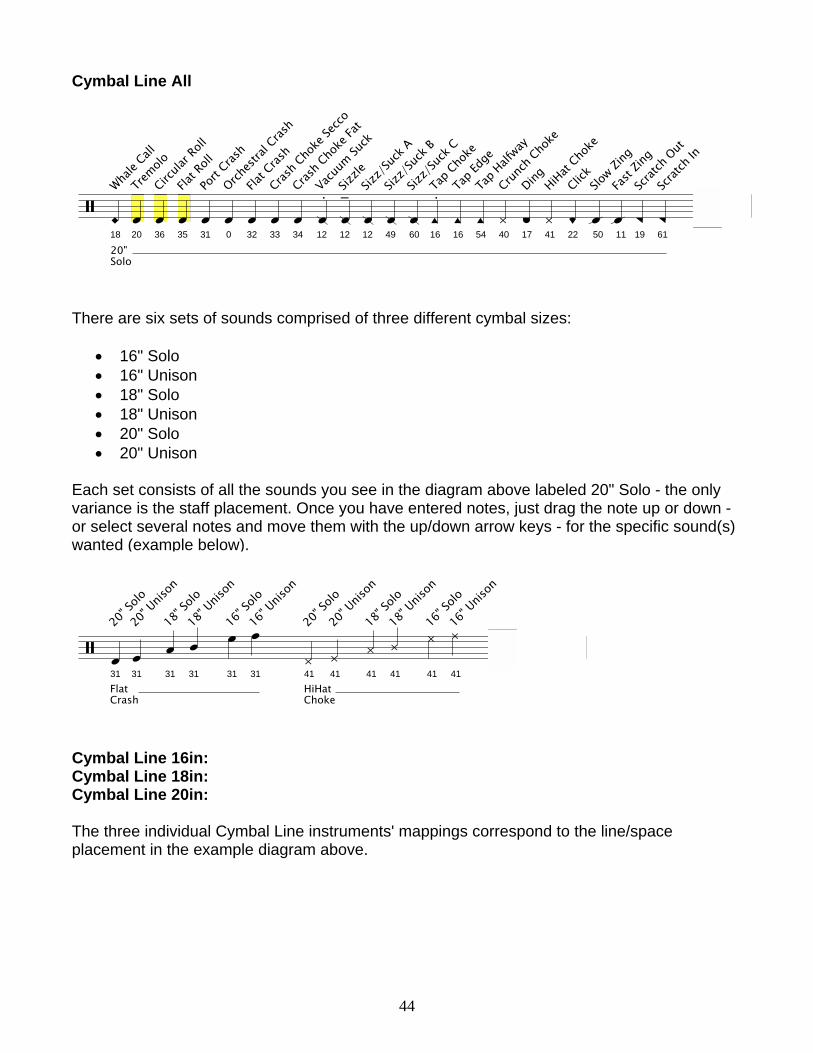
Cymbal Line All
18
Whale
Call
20"Solo
20
Tremolo
36
Circula
r Roll
35
Flat R
oll
31
Port
Crash
0
Orchest
ral Cras
h
32
Flat C
rash
33
Crash C
hoke
Secco
34
Crash C
hoke
Fat
12
Vacu
um Su
ck
12
Sizzle
12
Sizz/
Suck
A
49
Sizz/
Suck
B
60
Sizz/
Suck
C
16
Tap C
hoke
16
Tap E
dge
54
Tap H
alfway
40
Crunch
Choke
17
Ding
41
HiHat Cho
ke
22
Click
50
Slow Zi
ng
11
Fast
Zing
19
Scratc
h Out
61
Scratc
h In
There are six sets of sounds comprised of three different cymbal sizes:
16" Solo 16" Unison 18" Solo 18" Unison 20" Solo 20" Unison
Each set consists of all the sounds you see in the diagram above labeled 20" Solo - the only variance is the staff placement. Once you have entered notes, just drag the note up or down - or select several notes and move them with the up/down arrow keys - for the specific sound(s) wanted (example below).
FlatCrash
31
20" S
olo
31
20" U
nison
31
18" S
olo
31
18" U
nison
31
16" S
olo
31
16" U
nison
HiHatChoke
41
20" S
olo
41
20" U
nison
41
18" S
olo
41
18" U
nison
41
16" S
olo
41
16" U
nison
Cymbal Line 16in: Cymbal Line 18in: Cymbal Line 20in: The three individual Cymbal Line instruments' mappings correspond to the line/space placement in the example diagram above.
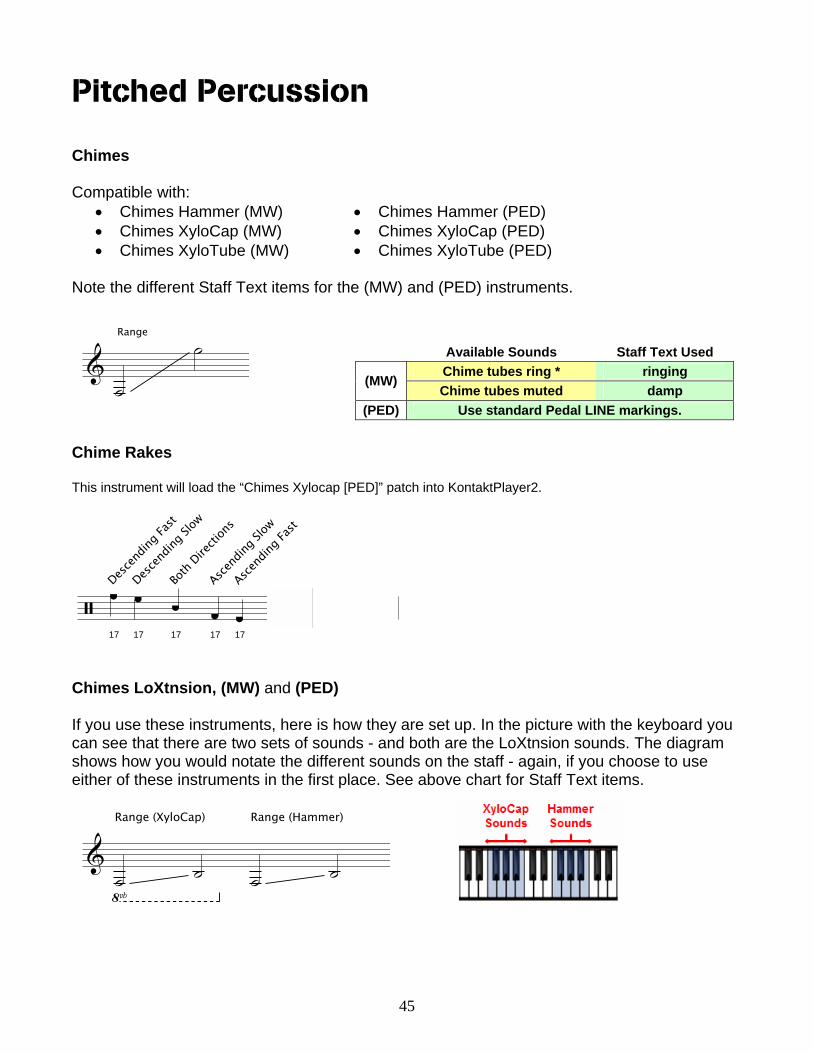
45
Range
Range (XyloCap)
Range (Hammer)
17
Descen
ding F
ast
17
Descen
ding S
low
17
Both
Directi
ons
17
Ascend
ing Sl
ow
17
Ascend
ing Fa
st
Pitched Percussion Chimes Compatible with:
Chimes Hammer (MW) Chimes XyloCap (MW) Chimes XyloTube (MW)
Chimes Hammer (PED) Chimes XyloCap (PED) Chimes XyloTube (PED)
Note the different Staff Text items for the (MW) and (PED) instruments. Chime Rakes This instrument will load the “Chimes Xylocap [PED]” patch into KontaktPlayer2. Chimes LoXtnsion, (MW) and (PED) If you use these instruments, here is how they are set up. In the picture with the keyboard you can see that there are two sets of sounds - and both are the LoXtnsion sounds. The diagram shows how you would notate the different sounds on the staff - again, if you choose to use either of these instruments in the first place. See above chart for Staff Text items.
Available Sounds Staff Text Used
Chime tubes ring * ringing (MW)
Chime tubes muted damp
(PED) Use standard Pedal LINE markings.
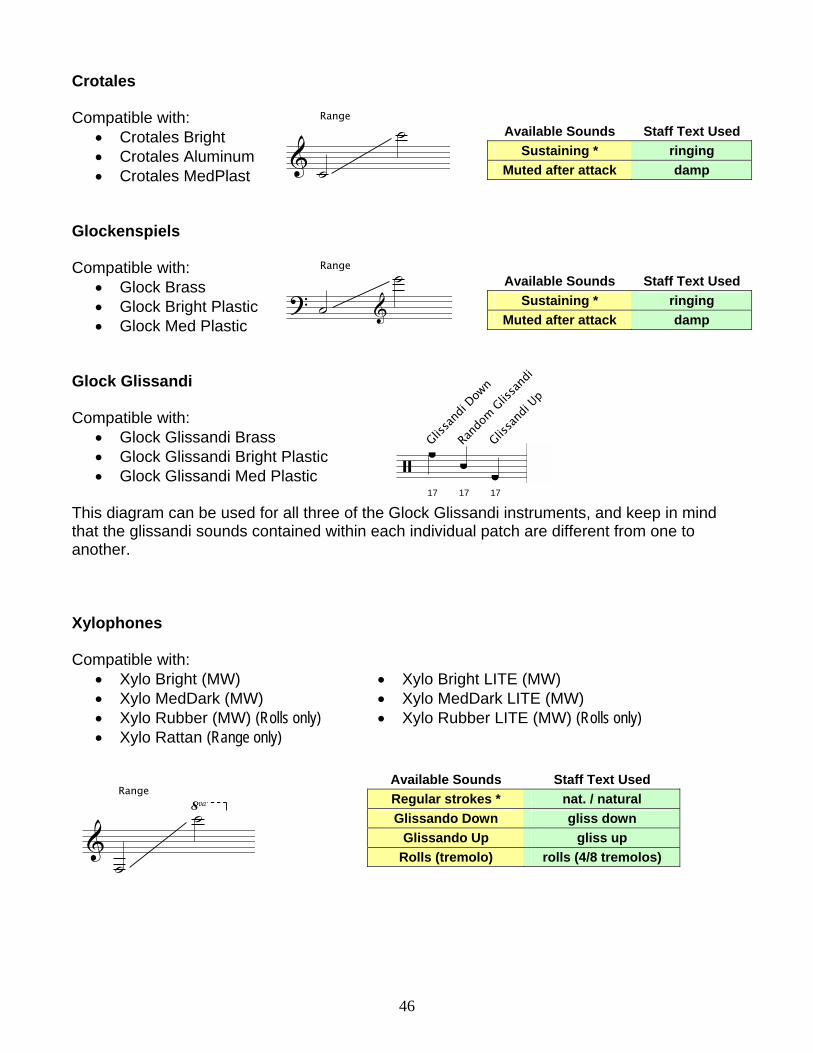
46
Range
Range
17
Glissa
ndi D
own
17
Rand
om G
lissa
ndi
17
Glissa
ndi U
p
Range
Crotales Compatible with:
Crotales Bright Crotales Aluminum Crotales MedPlast
Glockenspiels Compatible with:
Glock Brass Glock Bright Plastic Glock Med Plastic
Glock Glissandi Compatible with:
Glock Glissandi Brass Glock Glissandi Bright Plastic Glock Glissandi Med Plastic
This diagram can be used for all three of the Glock Glissandi instruments, and keep in mind that the glissandi sounds contained within each individual patch are different from one to another. Xylophones Compatible with:
Xylo Bright (MW) Xylo MedDark (MW) Xylo Rubber (MW) (Rolls only) Xylo Rattan (Range only)
Xylo Bright LITE (MW) Xylo MedDark LITE (MW) Xylo Rubber LITE (MW) (Rolls only)
Available Sounds Staff Text Used
Regular strokes * nat. / natural
Glissando Down gliss down
Glissando Up gliss up
Rolls (tremolo) rolls (4/8 tremolos)
Available Sounds Staff Text Used
Sustaining * ringing
Muted after attack damp
Available Sounds Staff Text Used
Sustaining * ringing
Muted after attack damp
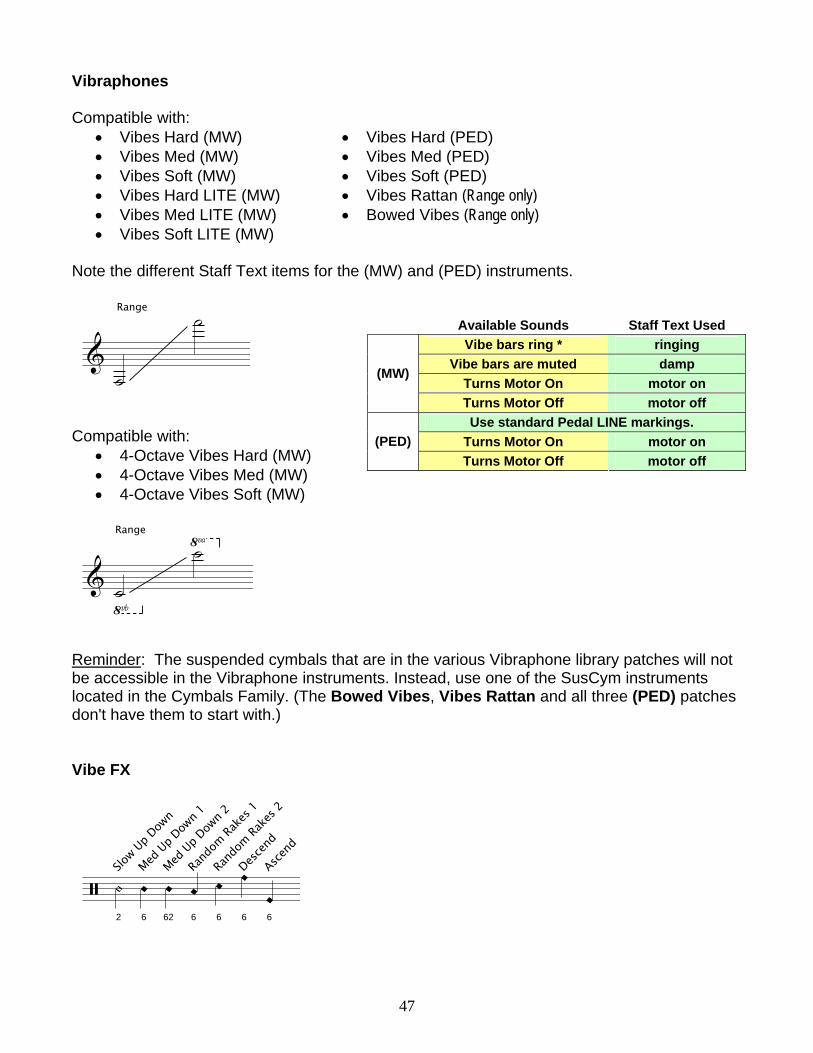
47
Range
Range
2
Slow U
p Dow
n
6
Med
Up
Down
1
62
Med
Up
Down
2
6
Rand
om R
akes
1
6
Rand
om R
akes
2
6
Desce
nd
6
Ascen
d
Vibraphones Compatible with:
Vibes Hard (MW) Vibes Med (MW) Vibes Soft (MW) Vibes Hard LITE (MW) Vibes Med LITE (MW) Vibes Soft LITE (MW)
Vibes Hard (PED) Vibes Med (PED) Vibes Soft (PED) Vibes Rattan (Range only) Bowed Vibes (Range only)
Note the different Staff Text items for the (MW) and (PED) instruments. Compatible with:
4-Octave Vibes Hard (MW) 4-Octave Vibes Med (MW) 4-Octave Vibes Soft (MW)
Reminder: The suspended cymbals that are in the various Vibraphone library patches will not be accessible in the Vibraphone instruments. Instead, use one of the SusCym instruments located in the Cymbals Family. (The Bowed Vibes, Vibes Rattan and all three (PED) patches don't have them to start with.) Vibe FX
Available Sounds Staff Text Used
Vibe bars ring * ringing
Vibe bars are muted damp
Turns Motor On motor on (MW)
Turns Motor Off motor off
Use standard Pedal LINE markings.
Turns Motor On motor on (PED)
Turns Motor Off motor off
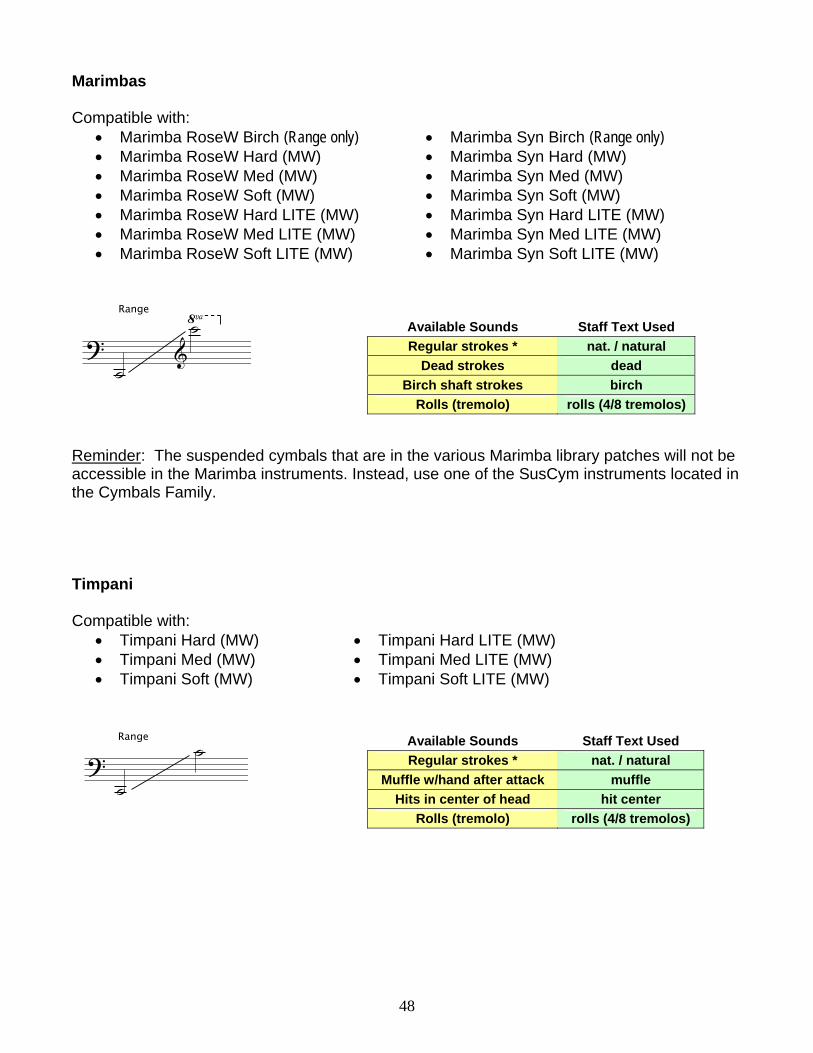
48
Range
Range
Marimbas Compatible with:
Marimba RoseW Birch (Range only) Marimba RoseW Hard (MW) Marimba RoseW Med (MW) Marimba RoseW Soft (MW) Marimba RoseW Hard LITE (MW) Marimba RoseW Med LITE (MW) Marimba RoseW Soft LITE (MW)
Marimba Syn Birch (Range only) Marimba Syn Hard (MW) Marimba Syn Med (MW) Marimba Syn Soft (MW) Marimba Syn Hard LITE (MW) Marimba Syn Med LITE (MW) Marimba Syn Soft LITE (MW)
Reminder: The suspended cymbals that are in the various Marimba library patches will not be accessible in the Marimba instruments. Instead, use one of the SusCym instruments located in the Cymbals Family. Timpani Compatible with:
Timpani Hard (MW) Timpani Med (MW) Timpani Soft (MW)
Timpani Hard LITE (MW) Timpani Med LITE (MW) Timpani Soft LITE (MW)
Available Sounds Staff Text Used
Regular strokes * nat. / natural
Dead strokes dead
Birch shaft strokes birch
Rolls (tremolo) rolls (4/8 tremolos)
Available Sounds Staff Text Used
Regular strokes * nat. / natural
Muffle w/hand after attack muffle
Hits in center of head hit center
Rolls (tremolo) rolls (4/8 tremolos)
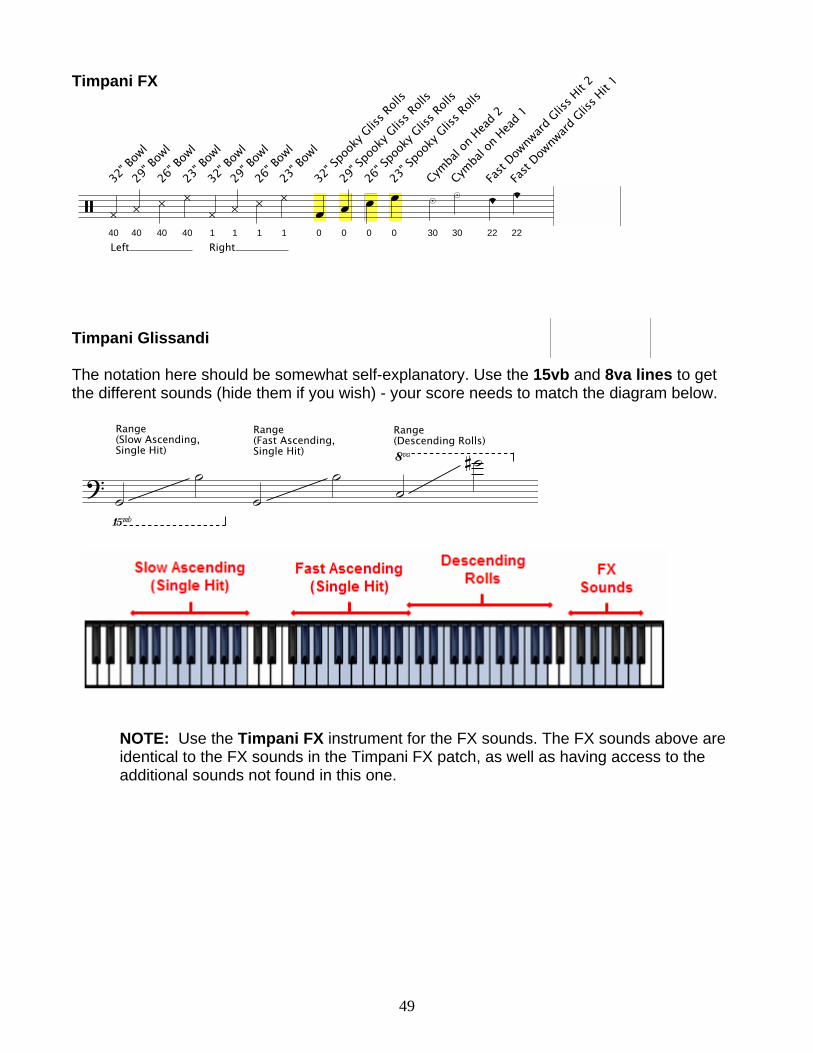
49
Range(Slow Ascending,Single Hit)
Range(Fast Ascending,Single Hit)
Range(Descending Rolls)
Timpani FX Timpani Glissandi The notation here should be somewhat self-explanatory. Use the 15vb and 8va lines to get the different sounds (hide them if you wish) - your score needs to match the diagram below.
NOTE: Use the Timpani FX instrument for the FX sounds. The FX sounds above are identical to the FX sounds in the Timpani FX patch, as well as having access to the additional sounds not found in this one.
40
Left
32" B
owl
40
29" B
owl
40
26" B
owl
40
23" B
owl
1
Right
32" B
owl
1
29" B
owl
1
26" B
owl
1
23" B
owl
0
32" S
pook
y Glis
s Roll
s
0
29" S
pook
y Glis
s Roll
s
0
26" S
pook
y Glis
s Roll
s
0
23" S
pook
y Glis
s Roll
s
30
Cymba
l on H
ead 2
30
Cymba
l on H
ead 1
22
Fast
Downw
ard Glis
s Hit 2
22
Fast
Downw
ard Glis
s Hit 1
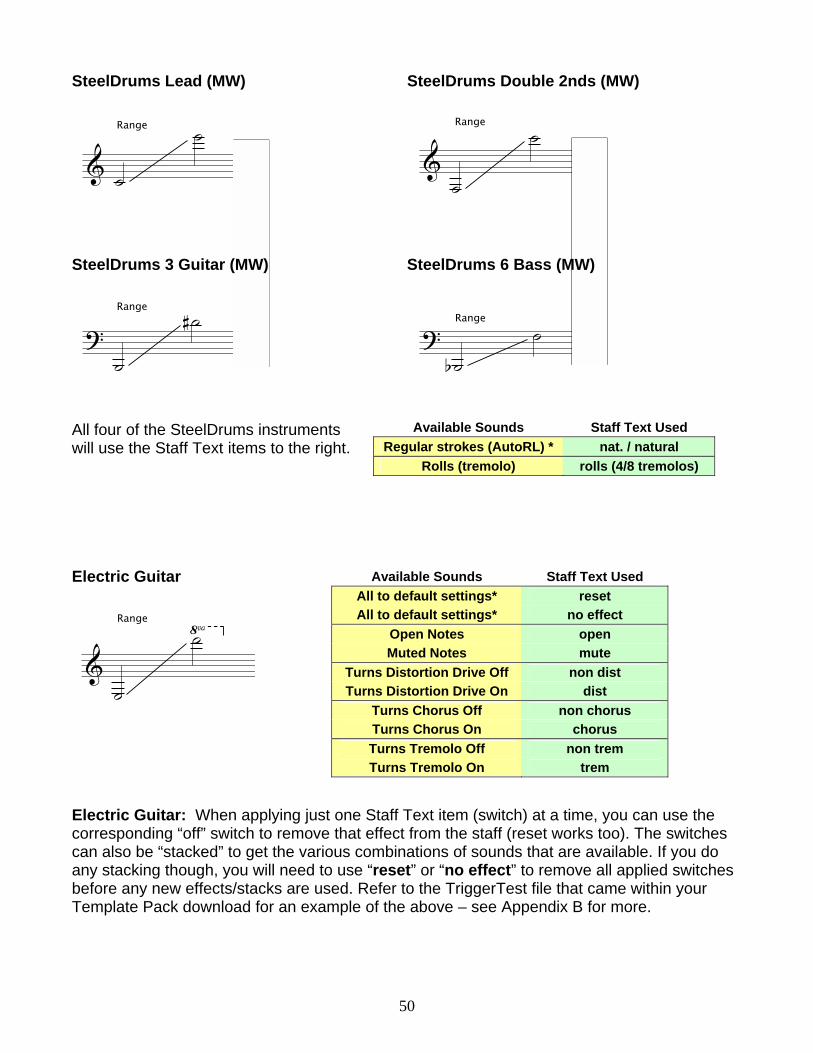
50
Range
Range
Range
Range
Range
SteelDrums Lead (MW) SteelDrums Double 2nds (MW) SteelDrums 3 Guitar (MW) SteelDrums 6 Bass (MW) All four of the SteelDrums instruments will use the Staff Text items to the right. Electric Guitar Electric Guitar: When applying just one Staff Text item (switch) at a time, you can use the corresponding “off” switch to remove that effect from the staff (reset works too). The switches can also be “stacked” to get the various combinations of sounds that are available. If you do any stacking though, you will need to use “reset” or “no effect” to remove all applied switches before any new effects/stacks are used. Refer to the TriggerTest file that came within your Template Pack download for an example of the above – see Appendix B for more.
Available Sounds Staff Text Used
Regular strokes (AutoRL) * nat. / natural
Rolls (tremolo) rolls (4/8 tremolos)
Available Sounds Staff Text Used
All to default settings* reset
All to default settings* no effect
Open Notes open
Muted Notes mute
Turns Distortion Drive Off non dist
Turns Distortion Drive On dist
Turns Chorus Off non chorus
Turns Chorus On chorus
Turns Tremolo Off non trem
Turns Tremolo On trem
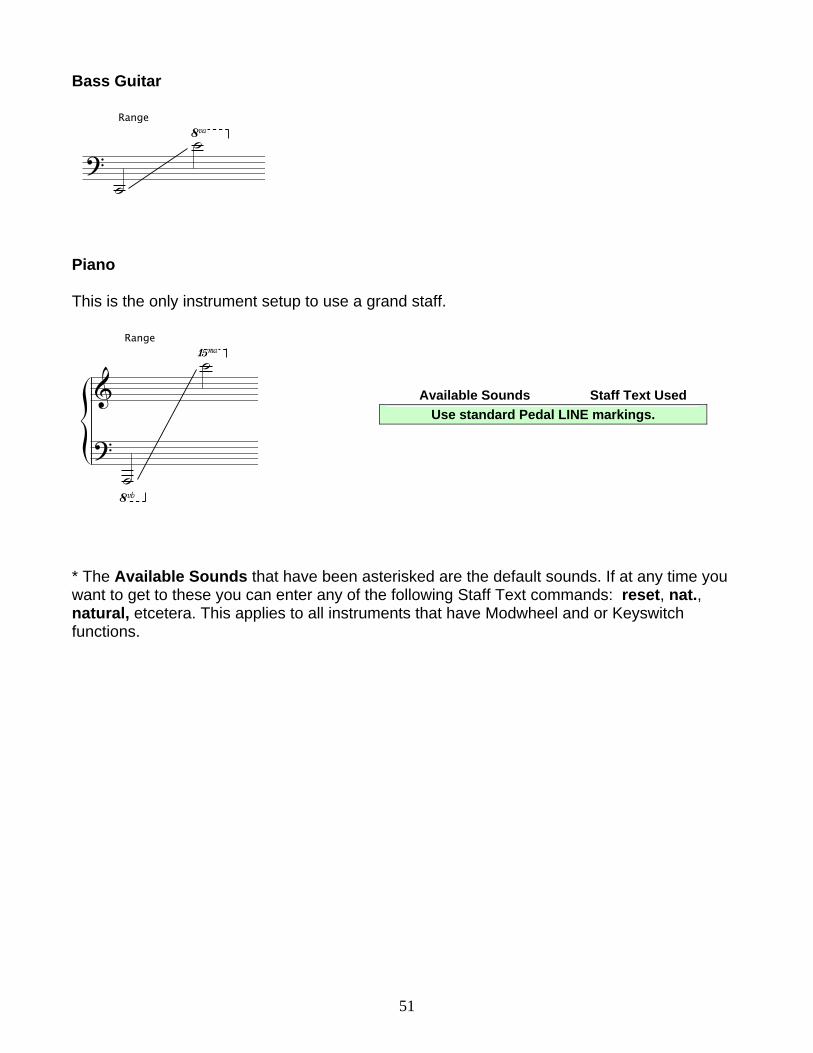
51
Range
Range
Bass Guitar Piano This is the only instrument setup to use a grand staff. * The Available Sounds that have been asterisked are the default sounds. If at any time you want to get to these you can enter any of the following Staff Text commands: reset, nat., natural, etcetera. This applies to all instruments that have Modwheel and or Keyswitch functions.
Available Sounds Staff Text Used
Use standard Pedal LINE markings.
52
1
Crash
40 1
Crash C
hoke
41
Sizzle
Crash
11
Zing (
Scrap
e)
29
Crash w
/Mall
et
18"Oriental"Trash"
51 29
Choke
w/M
allet
1
Crash w
/Stick
40 1
Choke
w/St
ick
0
CrescRolls
Short
31
Medium
32
Long
33
Short
Mute
d
34
Medium
Mute
d
29
Crash w
/Mall
et
14"Chinese
51 29
Choke
w/M
allet
1
Crash w
/Stick
40 1
Choke
w/St
ick
0
CrescRolls
Short
31
Medium
32
Long
33
Short
Mute
d
34
Medium
Mute
d
29
Crash w
/Mall
et
19"KChina
51 29
Choke
w/M
allet
1
Crash w
/Stick
40 1
Choke
w/St
ick
0
CrescRolls
Short
31
Medium
32
Long
33
Short
Mute
d
34
Medium
Mute
d
1
w/Tipof
Stick
Near E
dge
1
Furth
er In
6
Shoulder
On Be
ll
10
Softl
y w/F
inge
r
29
Softl
y w/M
allet
51
Loud
er w
/Mallet
0
SustainedRoll
w/Mallet 1
31
w/Mallet 2
Cymbals Chinas All Once you have entered notes, just drag the note up or down - or select several notes and move them with the up/down arrow keys - for the specific sound wanted. Each individual China instrument is mapped identically to what you see here. Crash Cymbals Compatible with:
CrCym 16 Symph CrCym 18 Constantinople CrCym 18 Viennese CrCym 20 Germanic
Ride Cymbal Sizzle Cymbal
53
Left40
Closed
42 44 40 42 40 42 40 42
Open
TIP of Stick
44 1
RightClosed
41 43 1 41 1 41 1 41
Open
43
Left40
Closed
42 40 42 44 40
SHOULDER of Stick
Open
42 1
RightClosed
41 1 41 43 1
Open
41 1
HiHatw/Foot
Closed
1
40
Closed
2
41
Closed
3
1
Splas
h 1
40
Splas
h 2
62
L on C
losed
Bell
6
R on C
losed
Bell
58
L on S
tand
14
R on S
tand
Hi Hat Manual Hi Hat (MW) For Playback Dictionary items used see the listing on page 28.
1
Foot
Splas
h
1
Closed
w/Fo
ot
40
L w/Sh
oulde
r of S
tick *
1
R w/Sh
oulde
r of S
tick *
40
L w/T
ip of
Stick
*
1
R w/T
ip of
Stick
*
62
L on C
losed
Bell
6
R on C
losed
Bell
58
L on S
tand
14
R on S
tand
* All four of these noteheads can accommodate any of the following articulation choices:
Plus/Closed - “+” Harmonic/Open - “o” Neither
54
1
Low
1
High
12"K
29
Strike
w/M
allet
1
Strike
w/St
ick
40 1
Choke
w/St
ick
10"K
29
Strike
w/M
allet
1
Strike
w/St
ick
40 1
Choke
w/St
ick
10"A
29
Strike
w/M
allet
1
Strike
w/St
ick
40 1
Choke
w/St
ick
8"A
29
Strike
w/M
allet
1
Strike
w/St
ick
40
Choke
w/St
ick
1
Large40
L Hit
1
R Hit
41 1
Choke
After H
it
42
Muffled
Hit
0
Roll w
/Quic
k Rele
ase
31
Roll,
Let R
ing
Small40
L Hit
1
R Hit
41 1
Choke
After H
it
42
Muffled
Hit
0
Roll w
/Quic
k Rele
ase
31
Roll,
Let R
ing
SoftCresc
0
Short
20
Medium
31
Long
MUTECresc
32
Short
33
Medium
34
Long
LoudCresc
35
Short
36
Medium
39
Long
w/Mallet29
Soft H
it
51
Loud
Hit
52
Fat C
hoke
53 29
Short
Choke
51 0
SustainedRoll
Natural
Relea
se
31
Mute Re
lease
w/Stick40
L w/T
ip
1
R w/T
ip
6
Shou
lder o
n Bell
41
Strike
43
Fat C
hoke
42 1
Short
Choke
41 11
CoinScrape
Short
50
Long
Splash Cymbals Suspended Cymbals Compatible with:
SusCym 15 K Zildjian SusCym 18 Constantinople SusCym 20 Constantinople
Swish Knockers (MW) Zil-Bells Hi Lo See Playback Dictionary for Swish Knockers (MW) items, page 28.
55
1
Soft
40
Loud
er 1
41
Loud
er 2
42
Loud
est *
1
Soun
d 1
40
Soun
d 2
41
Soun
d 3
42
Soun
d 4
43
Soun
d 5
1
Hit
40
Hit Lou
dest
41
Half M
ute
42
Bend
Mute
1
43
Bend
Mute
2
44
No-Be
nd M
ute 1
45
No-Be
nd M
ute 2
Gongs
Bowed Gong Chinese Gongs Compatible with:
Chinese Gong Circus Gong Fuyin Gong Jing Gong Pasi Gong
* Fuyin Gong 15in does not contain “Loudest” sound. Opera Gong
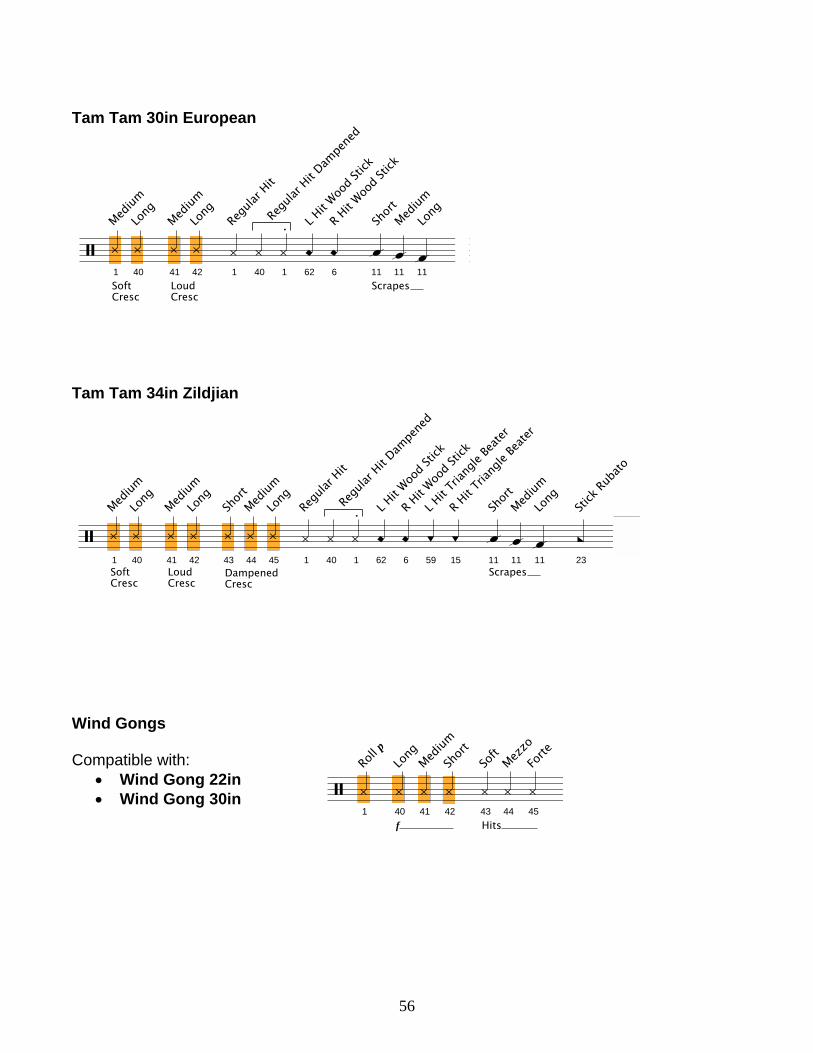
56
1
Roll
p
40
f
Long
41
Med
ium
42
Shor
t
43
Hits
Soft
44
Mez
zo
45
Forte
1SoftCresc
Medium
40
Long
41LoudCresc
Medium
42
Long
43
DampenedCresc
Short
44
Medium
45
Long
1
Regu
lar Hit
40 1
Regu
lar Hit D
ampe
ned
62
L Hit W
ood S
tick
6
R Hit W
ood S
tick
59
L Hit T
riang
le Be
ater
15
R Hit T
riang
le Be
ater
Scrapes11
Short
11
Medium
11
Long
23
Stick
Ruba
to
1
SoftCresc
Medium
40
Long
41
LoudCresc
Medium
42
Long
1
Regu
lar Hit
40 1
Regu
lar Hit D
ampe
ned
62
L Hit W
ood S
tick
6
R Hit W
ood S
tick
Scrapes11
Short
11
Medium
11
Long
Tam Tam 30in European Tam Tam 34in Zildjian Wind Gongs Compatible with:
Wind Gong 22in Wind Gong 30in
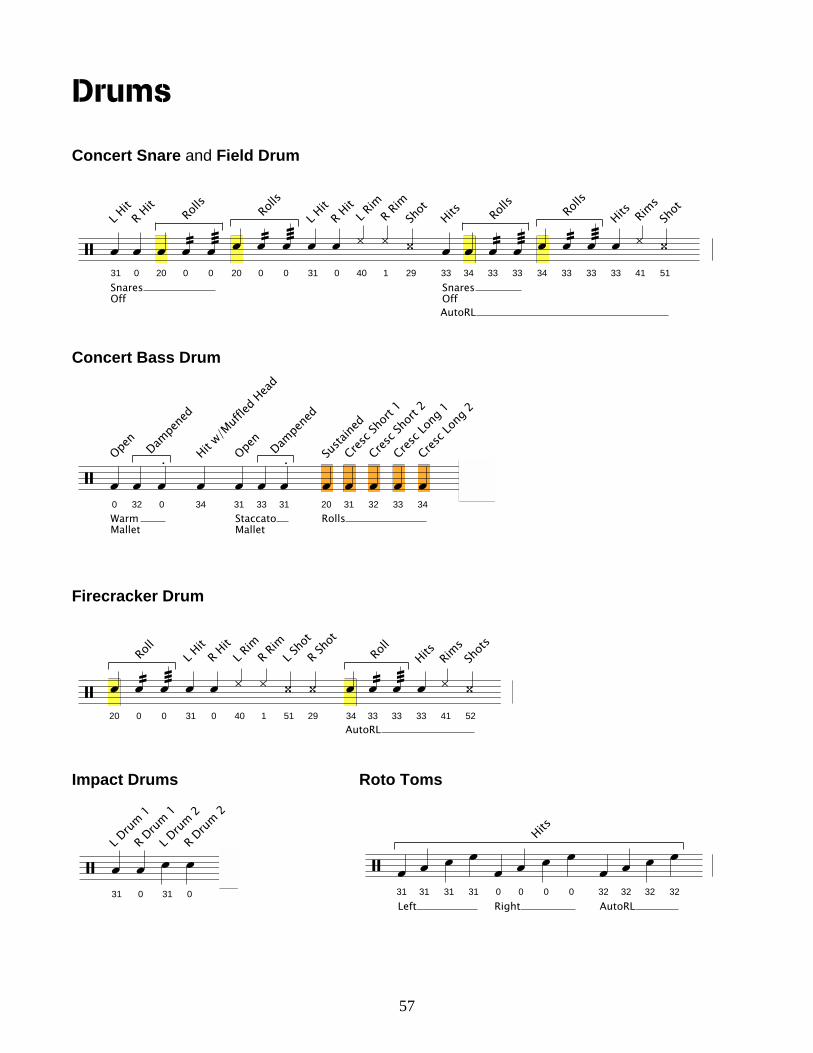
57
31
L Drum
1
0
R Drum
1
31
L Drum
2
0
R Drum
2
0
WarmMallet
Open
32 0
Dampe
ned
34
Hit w/M
uffled
Head
31
StaccatoMallet
Open
33 31
Dampe
ned
Rolls20
Susta
ined
31
Cresc S
hort
1
32
Cresc S
hort
2
33
Cresc L
ong 1
34
Cresc L
ong 2
Left31 31 31 31
Right0 0 0
Hits
0 32
AutoRL32 32 32
SnaresOff
31
L Hit
0
R Hit
20 0
Rolls
0 20 0
Rolls
0 31
L Hit
0
R Hit
40
L Rim
1
R Rim
29
Shot
AutoRL
33
SnaresOff
Hits
34 33
Rolls
33 34 33
Rolls
33 33
Hits
41
Rims
51
Shot
20 0
Roll
0 31
L Hit
0
R Hit
40
L Rim
1
R Rim
51
L Sho
t
29
R Sho
t
AutoRL34 33
Roll
33 33
Hits
41
Rims
52
Shots
Drums Concert Snare and Field Drum Concert Bass Drum Firecracker Drum Impact Drums Roto Toms
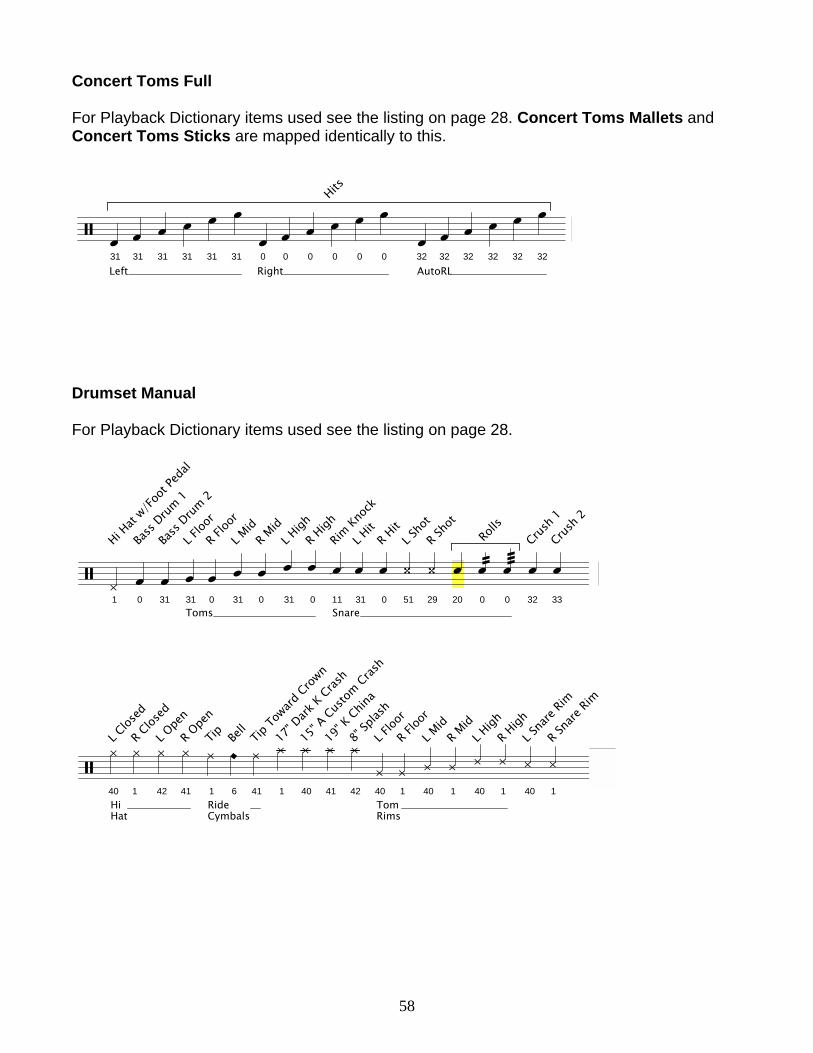
58
Left31 31 31 31 31 31
Right0 0 0 0
Hits
0 0
AutoRL32 32 32 32 32 32
Concert Toms Full For Playback Dictionary items used see the listing on page 28. Concert Toms Mallets and Concert Toms Sticks are mapped identically to this. Drumset Manual For Playback Dictionary items used see the listing on page 28.
1
Hi Hat
w/Foot
Peda
l
0
Bass
Drum 1
31
Bass
Drum 2
Toms31
L Floo
r
0
R Floo
r
31
L Mid
0
R Mid
31
L High
0
R High
Snare11
Rim Kn
ock
31
L Hit
0
R Hit
51
L Sho
t
29
R Sho
t
20 0
Rolls
0 32
Crush 1
33
Crush 2
40
HiHat
L Clos
ed
1
R Clos
ed
42
L Ope
n
41
R Ope
n
1
RideCymbals
Tip
6
Bell
41
Tip To
ward Crow
n
1
17" D
ark K
Crash
40
15" A
Custom
Crash
41
19" K
China
42
8" Sp
lash
40
TomRims
L Floo
r
1
R Floo
r
40
L Mid
1
R Mid
40
L High
1
R High
40
L Sna
re Rim
1
R Sna
re Rim
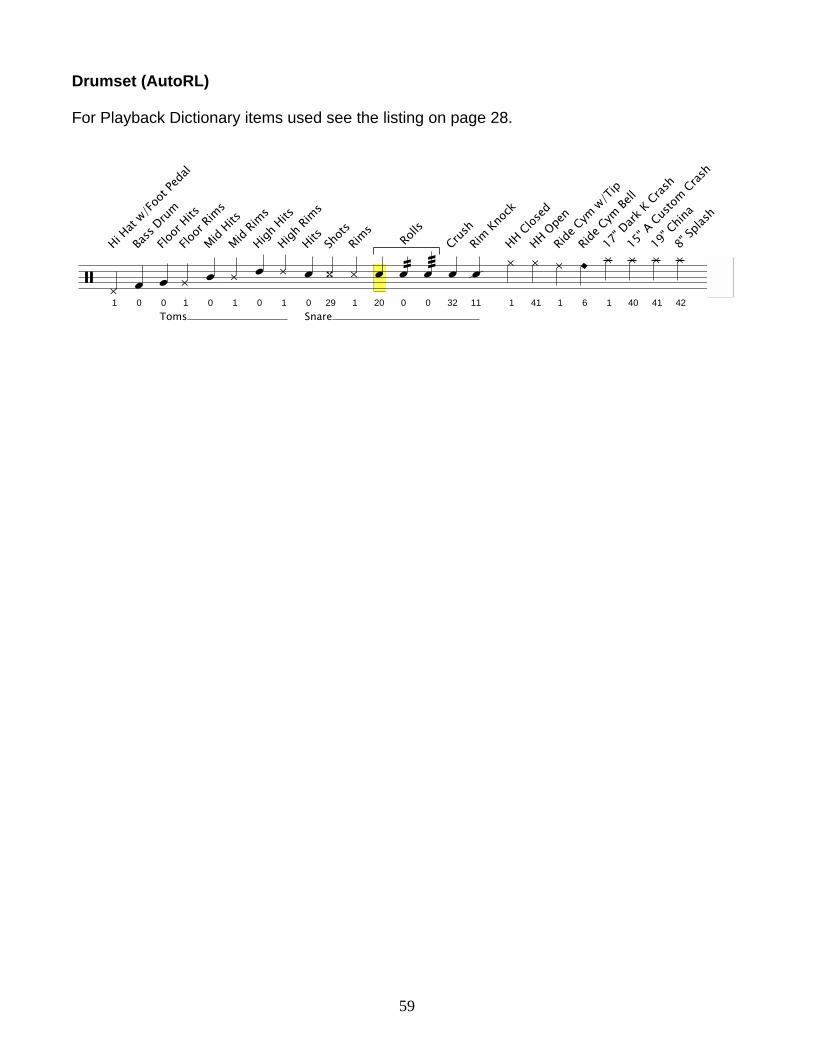
59
Drumset (AutoRL) For Playback Dictionary items used see the listing on page 28.
1
Hi Hat
w/Foot
Peda
l
0
Bass
Drum
0
Toms
Floor
Hits
1
Floor
Rims
0
Mid Hits
1
Mid Rim
s
0
High Hits
1
High Ri
ms
0
Snare
Hits
29
Shots
1
Rims
20 0
Rolls
0 32
Crush
11
Rim Kn
ock
1
HH Closed
41
HH Ope
n
1
Ride C
ym w
/Tip
6
Ride C
ym Be
ll
1
17" D
ark K
Crash
40
15" A
Custom
Crash
41
19" C
hina
42
8" Sp
lash
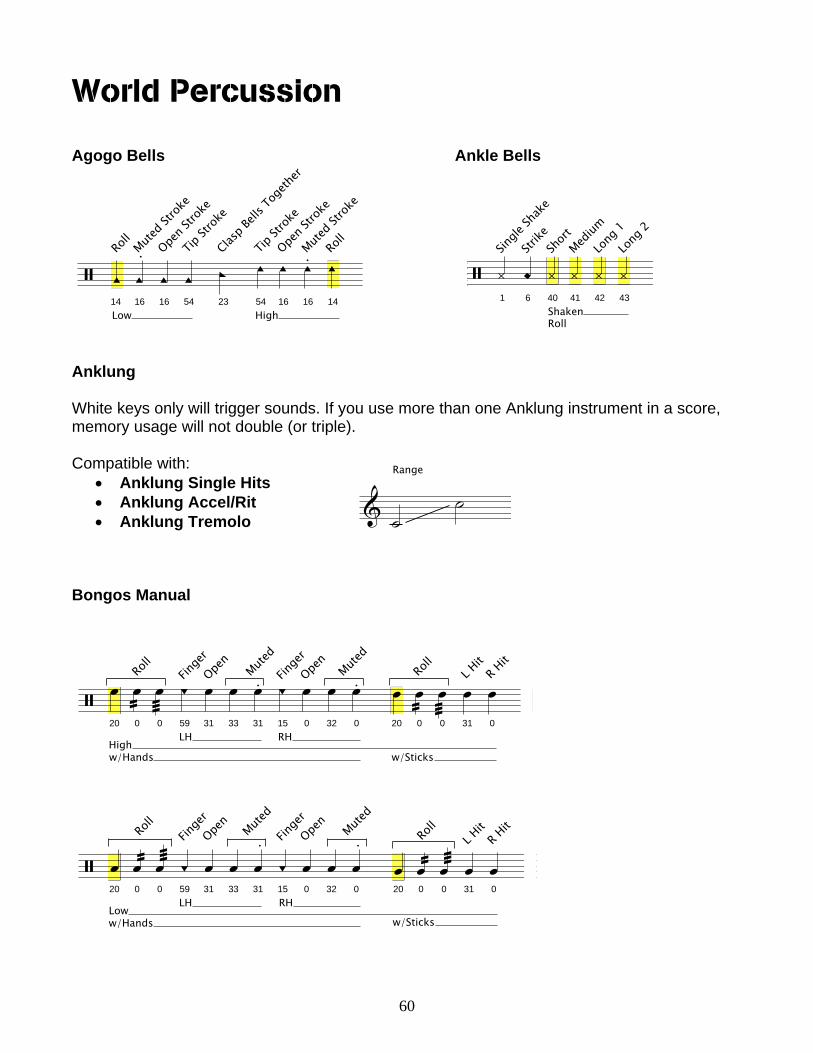
60
1
Singl
e Sh
ake
6
Strik
e
ShakenRoll
40
Shor
t
41
Med
ium
42
Long
1
43
Long
2
Range
World Percussion Agogo Bells Ankle Bells
14
Low
Roll
16
Muted S
troke
16
Open S
troke
54
Tip St
roke
23
Clasp B
ells T
ogeth
er
High54
Tip St
roke
16
Open S
troke
16
Muted S
troke
14
Roll
Anklung White keys only will trigger sounds. If you use more than one Anklung instrument in a score, memory usage will not double (or triple). Compatible with:
Anklung Single Hits Anklung Accel/Rit Anklung Tremolo
Bongos Manual
Highw/Hands
20 0
Roll
0
LH59
Finge
r
31
Open
33
Muted
31
RH15
Finge
r
0
Open
32 0
Muted
w/Sticks
20 0
Roll
0 31
L Hit
0
R Hit
Loww/Hands
20 0
Roll
0
LH59
Finge
r
31
Open
33 31
Muted
15
RH
Finge
r
0
Open
32 0
Muted
w/Sticks
20 0
Roll
0 31
L Hit
0
R Hit
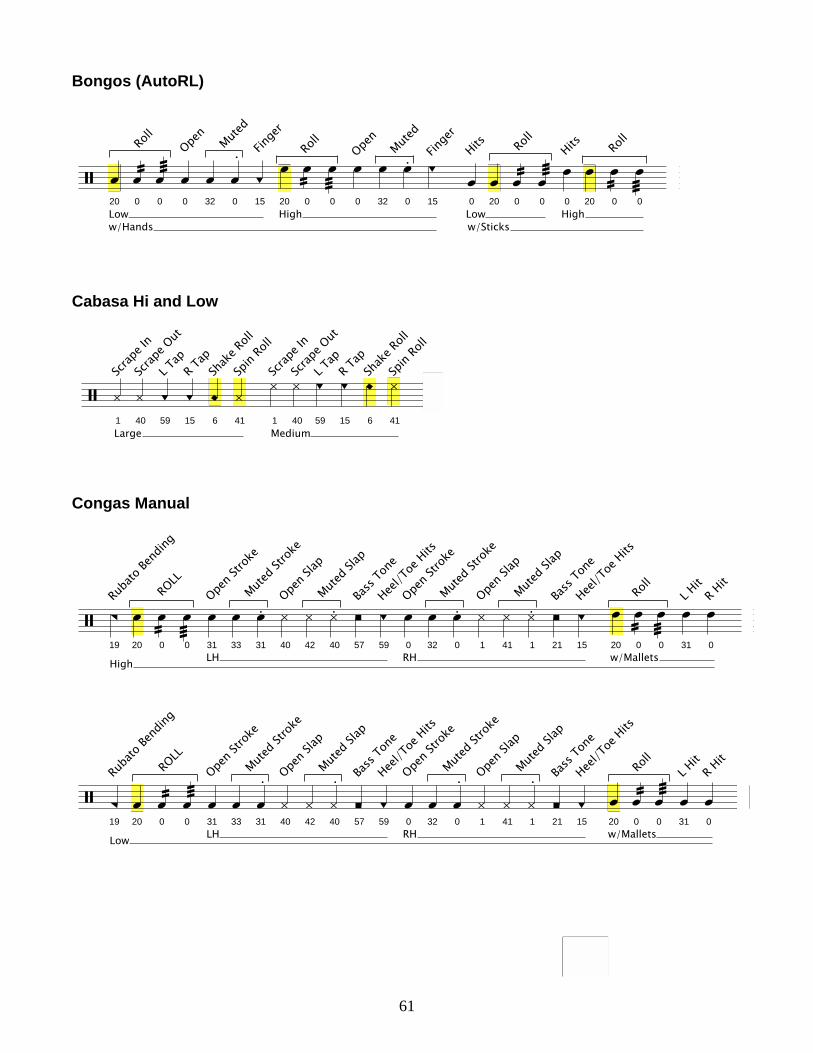
61
1
Large
Scra
pe In
40
Scra
pe O
ut
59
L Ta
p
15
R Ta
p
6
Shak
e Ro
ll
41
Spin
Rol
l
1
Medium
Scra
pe In
40
Scra
pe O
ut
59
L Ta
p15
R Ta
p6
Shak
e Ro
ll
41
Spin
Rol
l
Loww/Hands
20 0
Roll
0 0
Open
32 0
Muted
15
Finge
r
High20 0
Roll
0 0
Open
32 0
Muted
15
Finge
r
Low0
w/Sticks
Hits
20 0
Roll
0
High0
Hits
20 0
Roll
0
Bongos (AutoRL) Cabasa Hi and Low Congas Manual
High19
Ruba
to Be
nding
20 0
ROLL
0
LH31
Open S
troke
33 31
Muted S
troke
40
Open S
lap
42 40
Muted S
lap
57
Bass
Tone
59
Heel/T
oe Hits
RH0
Open S
troke
32 0
Muted S
troke
1
Open S
lap
41 1
Muted S
lap
21
Bass
Tone
15
Heel/T
oe Hits
w/Mallets20 0
Roll
0 31
L Hit
0
R Hit
Low19
Ruba
to Be
nding
20 0
ROLL
0
LH31
Open S
troke
33 31
Muted S
troke
40
Open S
lap
42 40
Muted S
lap
57
Bass
Tone
59
Heel/T
oe Hits
RH0
Open S
troke
32 0
Muted S
troke
1
Open S
lap
41 1
Muted S
lap
21
Bass
Tone
15
Heel/T
oe Hits
w/Mallets20 0
Roll
0 31
L Hit
0
R Hit
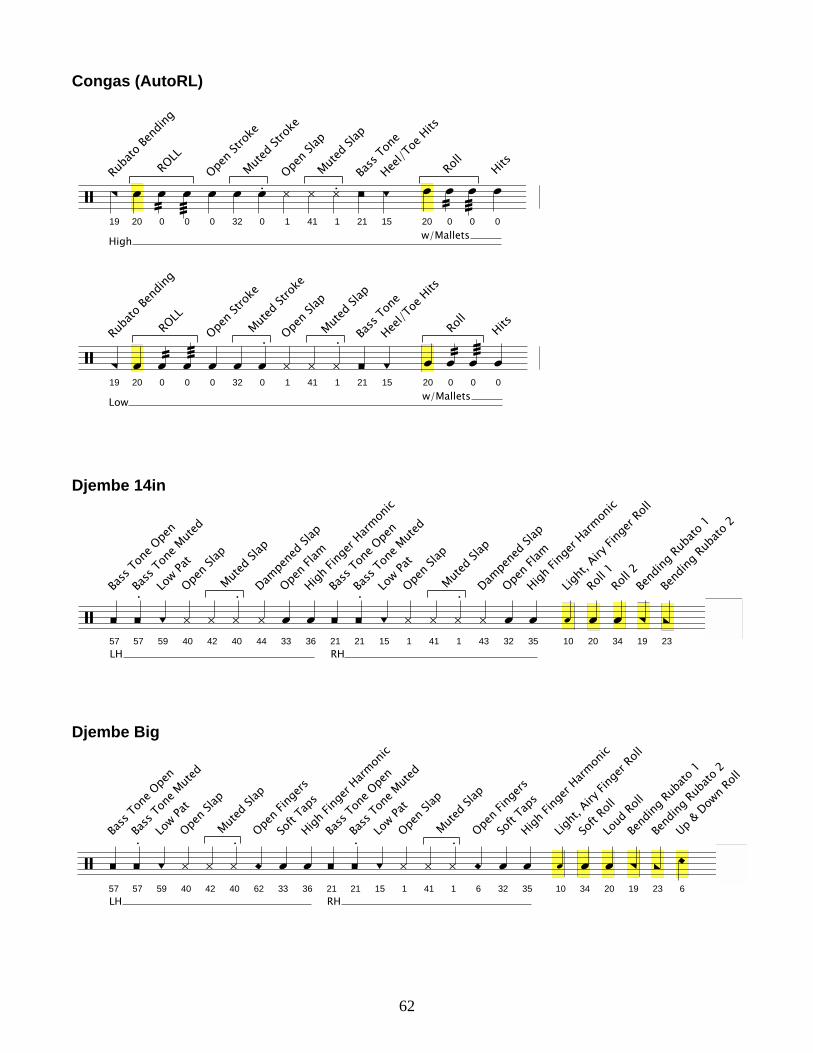
62
Congas (AutoRL)
High
19
Ruba
to Be
nding
20 0
ROLL
0 0
Open S
troke
32 0
Muted S
troke
1
Open S
lap
41 1
Muted S
lap
21
Bass
Tone
15
Heel/T
oe Hits
w/Mallets20 0
Roll
0 0
Hits
Low
19
Ruba
to Be
nding
20 0
ROLL
0 0
Open S
troke
32 0
Muted S
troke
1
Open S
lap
41 1
Muted S
lap
21
Bass
Tone
15
Heel/T
oe Hits
w/Mallets20 0
Roll
0 0
Hits
Djembe 14in
LH57
Bass
Tone
Ope
n
57
Bass
Tone
Mute
d
59
Low Pa
t
40
Open S
lap
42 40
Muted S
lap
44
Dampe
ned S
lap
33
Open F
lam
36
High Fi
nger
Harmon
ic
RH21
Bass
Tone
Ope
n
21
Bass
Tone
Mute
d
15
Low Pa
t
1
Open S
lap
41 1
Muted S
lap
43
Dampe
ned S
lap
32
Open F
lam
35
High Fi
nger
Harmon
ic
10
Light,
Airy Fi
nger
Roll
20
Roll 1
34
Roll 2
19
Bend
ing Ru
bato
1
23
Bend
ing Ru
bato
2
Djembe Big
LH57
Bass
Tone
Ope
n
57
Bass
Tone
Mute
d
59
Low Pa
t
40
Open S
lap
42 40
Muted S
lap
62
Open F
ingers
33
Soft T
aps
36
High Fi
nger
Harmon
ic
RH21
Bass
Tone
Ope
n
21
Bass
Tone
Mute
d
15
Low Pa
t
1
Open S
lap
41 1
Muted S
lap
6
Open F
ingers
32
Soft T
aps
35
High Fi
nger
Harmon
ic
10
Light,
Airy Fi
nger
Roll
34
Soft R
oll
20
Loud
Roll
19
Bend
ing Ru
bato
1
23
Bend
ing Ru
bato
2
6
Up & Dow
n Roll
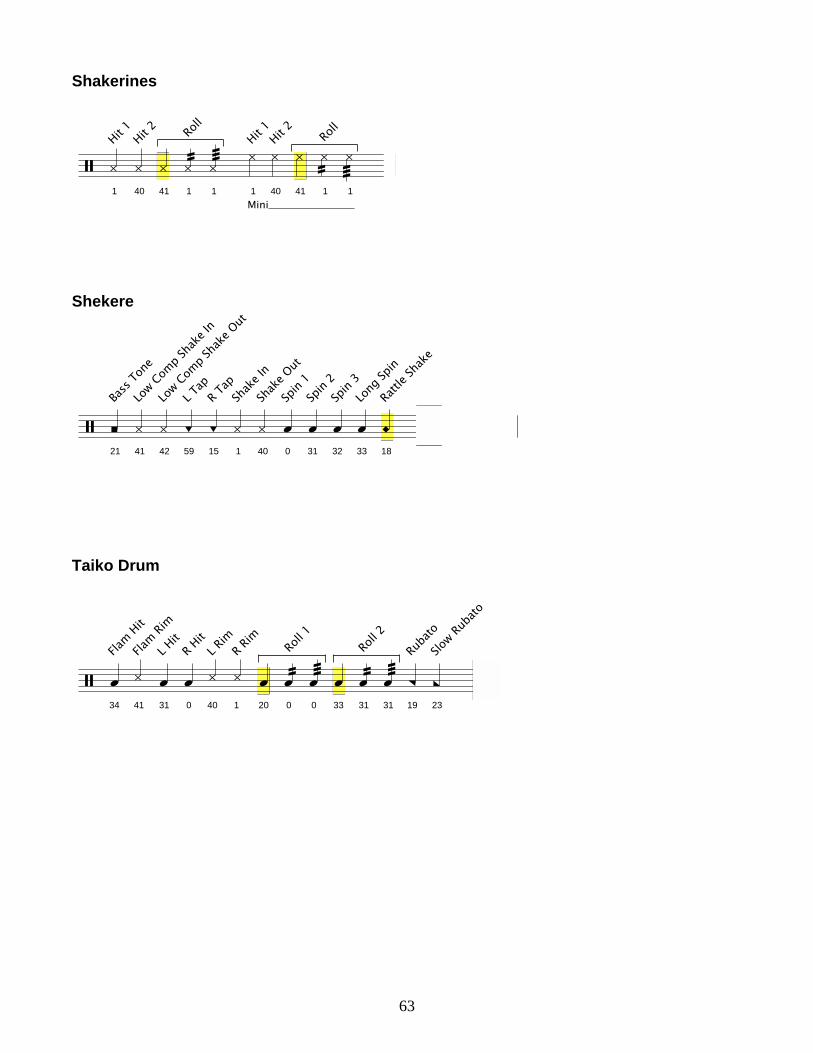
63
1
Hit 1
40
Hit 2
41 1
Roll
1
Mini1
Hit 1
40
Hit 2
41 1
Roll
1
Shakerines Shekere
21
Bass
Tone
41
Low Com
p Sha
ke In
42
Low Com
p Sha
ke O
ut
59
L Tap
15
R Tap
1
Shak
e In
40
Shak
e Out
0
Spin
1
31
Spin
2
32
Spin
3
33
Long
Spin
18
Rattle
Shak
e
Taiko Drum
34
Flam Hit
41
Flam Ri
m
31
L Hit
0
R Hit
40
L Rim
1
R Rim
20 0
Roll 1
0 33 31
Roll 2
31 19
Ruba
to
23
Slow Ru
bato
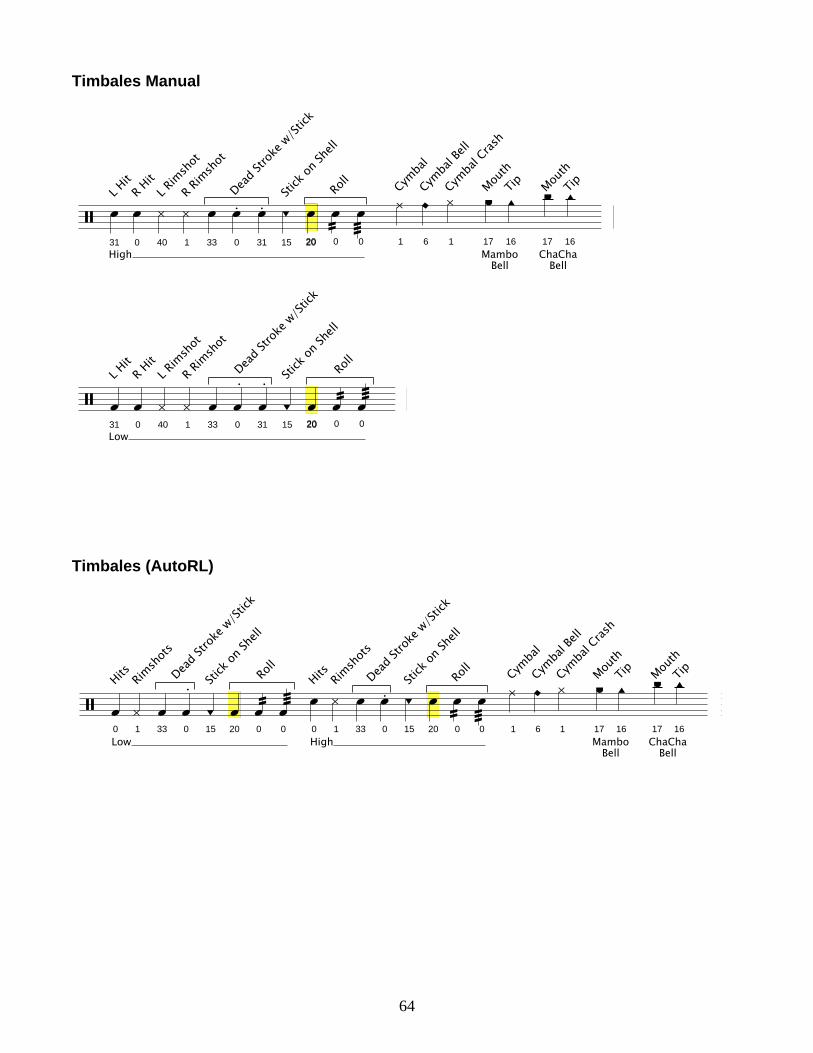
64
Timbales Manual
High31
L Hit
0
R Hit
40
L Rim
shot
1
R Rim
shot
33 0
Dead S
troke
w/St
ick
31 15
Stick
on Sh
ell
2020 0
Roll
0 1
Cymba
l
6
Cymba
l Bell
1
Cymba
l Cras
h
17
MamboBell
Mouth
16
Tip
17
ChaChaBell
Mouth
16
Tip
Low31
L Hit
0
R Hit
40
L Rim
shot
1
R Rim
shot
33 0
Dead S
troke
w/St
ick
31 15
Stick
on Sh
ell
2020 0
Roll
0
Timbales (AutoRL)
0
Low
Hits
1
Rimsh
ots
33 0
Dead S
troke
w/St
ick
15
Stick
on Sh
ell
20 0
Roll
0 0
High
Hits
1
Rimsh
ots
33 0
Dead S
troke
w/St
ick
15
Stick
on Sh
ell
20 0
Roll
0 1
Cymba
l
6
Cymba
l Bell
1
Cymba
l Cras
h
17
MamboBell
Mouth
16
Tip
17
ChaChaBell
Mouth
16
Tip
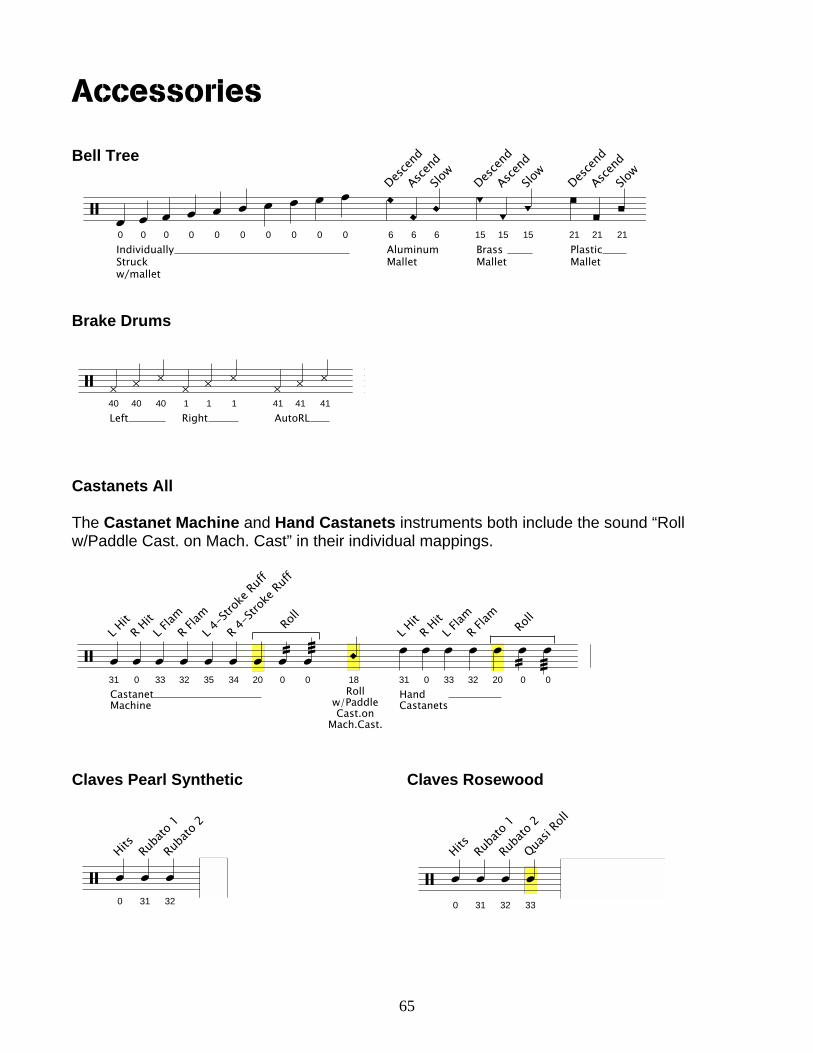
65
0
Hits
31
Ruba
to 1
32
Ruba
to 2
33
Quasi
Roll
0
IndividuallyStruckw/mallet
0
0
0
0
0
0
0
0
0
6
AluminumMallet
Desce
nd
6
Ascen
d
6
Slow
15
BrassMallet
Desce
nd
15
Ascen
d
15
Slow
21
PlasticMallet
Desce
nd
21
Ascen
d
21
Slow
0
Hits
31
Ruba
to 1
32
Ruba
to 2
Left40 40 40
Right1 1 1 41
AutoRL41 41
31
CastanetMachine
L Hit
0
R Hit
33
L Flam
32
R Flam
35
L 4-S
troke
Ruff
34
R 4-S
troke
Ruff
20 0
Roll
0 18Roll
w/PaddleCast.on
Mach.Cast.
HandCastanets
31
L Hit
0
R Hit
33
L Flam
32
R Flam
20 0
Roll
0
Accessories Bell Tree Brake Drums Castanets All The Castanet Machine and Hand Castanets instruments both include the sound “Roll w/Paddle Cast. on Mach. Cast” in their individual mappings. Claves Pearl Synthetic Claves Rosewood
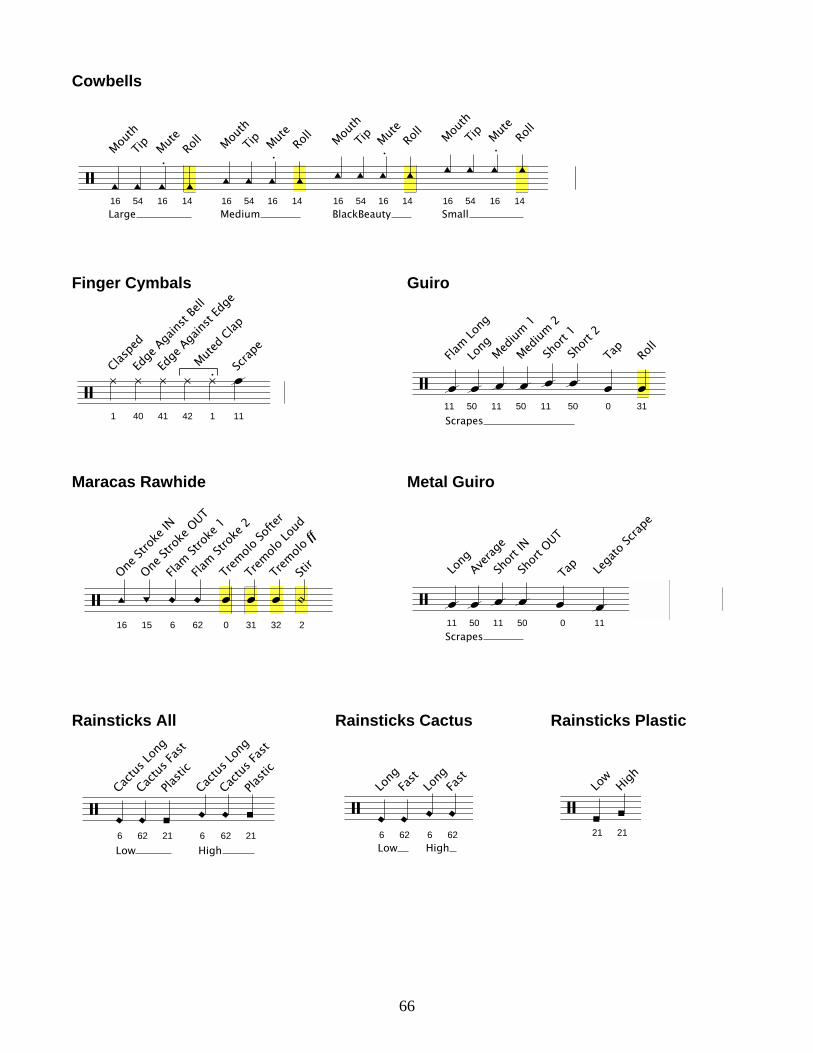
66
16
One Stro
ke IN
15
One Stro
ke O
UT
6
Flam
Stro
ke 1
62
Flam
Stro
ke 2
0
Trem
olo
Softe
r
31
Trem
olo
Loud
32
Trem
olo
ff
2
Stir
21
Low
21
High
6
Low
Long
62
Fast
6
High
Long
62
Fast
6
Low
Cactu
s Lon
g
62
Cactu
s Fas
t
21
Plas
tic
6
High
Cactu
s Lon
g
62
Cactu
s Fas
t
21
Plas
tic
Scrapes11
Flam Lo
ng
50
Long
11
Medium
1
50
Medium
2
11
Short
1
50
Short
2
0
Tap
31
Roll
Scrapes11
Long
50
Averag
e
11
Short
IN
50
Short
OUT
0
Tap
11
Lega
to Scr
ape
Large16
Mouth
54
Tip
16
Mute
14
Roll
Medium16
Mouth
54
Tip
16
Mute
14
Roll
BlackBeauty16
Mouth
54
Tip
16
Mute
14
Roll
Small16
Mouth
54
Tip
16
Mute
14
Roll
Cowbells Finger Cymbals Guiro
1
Claspe
d
40
Edge
Agains
t Bell
41
Edge
Agains
t Edg
e
42 1
Muted C
lap
11
Scrap
e
Maracas Rawhide Metal Guiro Rainsticks All Rainsticks Cactus Rainsticks Plastic
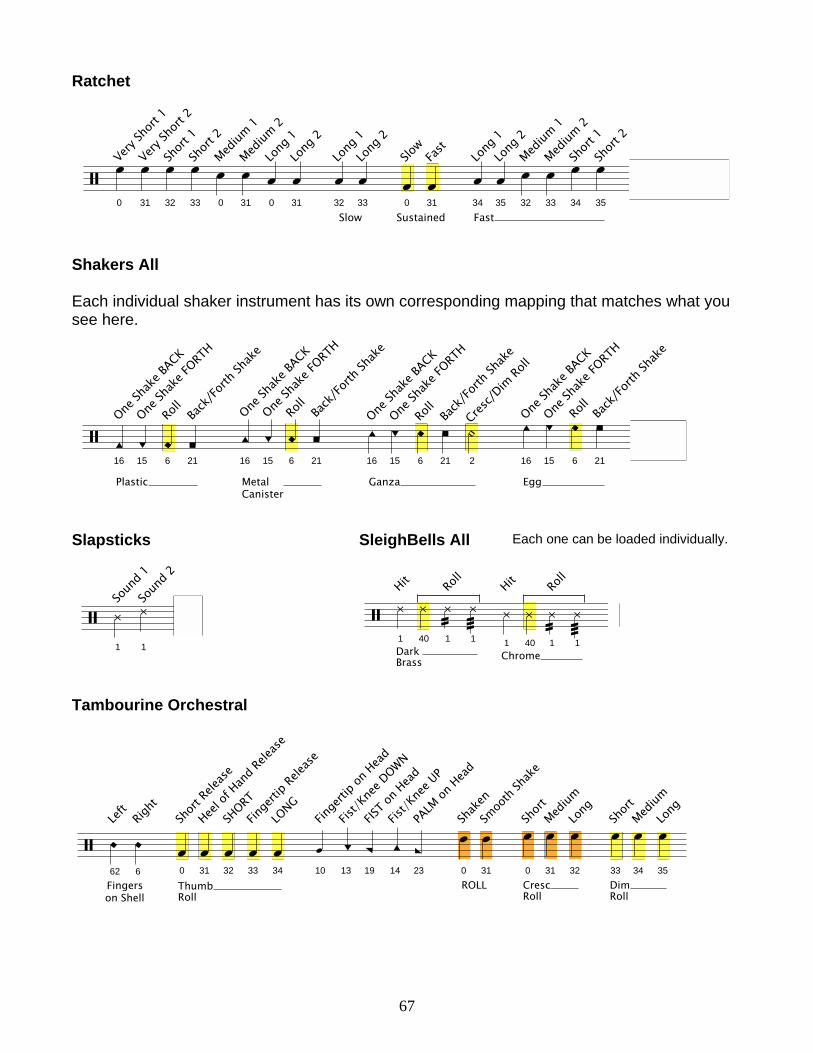
67
0
Very
Sho
rt 1
31
Very
Sho
rt 2
32
Shor
t 1
33
Shor
t 2
0
Med
ium
1
31
Med
ium
2
0
Long
1
31
Long
2
32
Slow
Long
1
33
Long
2
Sustained
0
Slow
31
Fast
34
Fast
Long
1
35
Long
2
32
Med
ium
1
33
Med
ium
2
34
Shor
t 1
35
Shor
t 2
16
Plastic
One Sha
ke BACK
15
One Sha
ke FORT
H
6
Roll
21
Back
/For
th Sha
ke
16
MetalCanister
One Sha
ke BACK
15
One Sha
ke FORT
H
6
Roll
21
Back
/For
th Sha
ke
16
Ganza
One Sha
ke BACK
15
One Sha
ke FORT
H
6
Roll
21
Back
/For
th Sha
ke
2
Cresc
/Dim
Rol
l
16
Egg
One Sha
ke BACK
15
One Sha
ke FORT
H
6
Roll
21
Back
/For
th Sha
ke
1
Soun
d 1
1
Soun
d 2
62
on ShellFingers
Left
6
Right
0
ThumbRoll
Short
Relea
se
31
Heel o
f Han
d Rele
ase
32
SHORT
33
Finge
rtip Re
lease
34
LONG
10
Finge
rtip on
Head
13
Fist/K
nee D
OWN
19
FIST o
n Hea
d
14
Fist/K
nee U
P
23
PALM
on Hea
d
0
ROLL
Shak
en
31
Smoo
th Sh
ake
CrescRoll
0
Short
31
Medium
32
Long
DimRoll
33
Short
34
Medium
35
Long
DarkBrass
1
Hit
40 1
Roll
1
Chrome1
Hit
40 1
Roll
1
Ratchet Shakers All Each individual shaker instrument has its own corresponding mapping that matches what you see here. Slapsticks SleighBells All Tambourine Orchestral
Each one can be loaded individually.
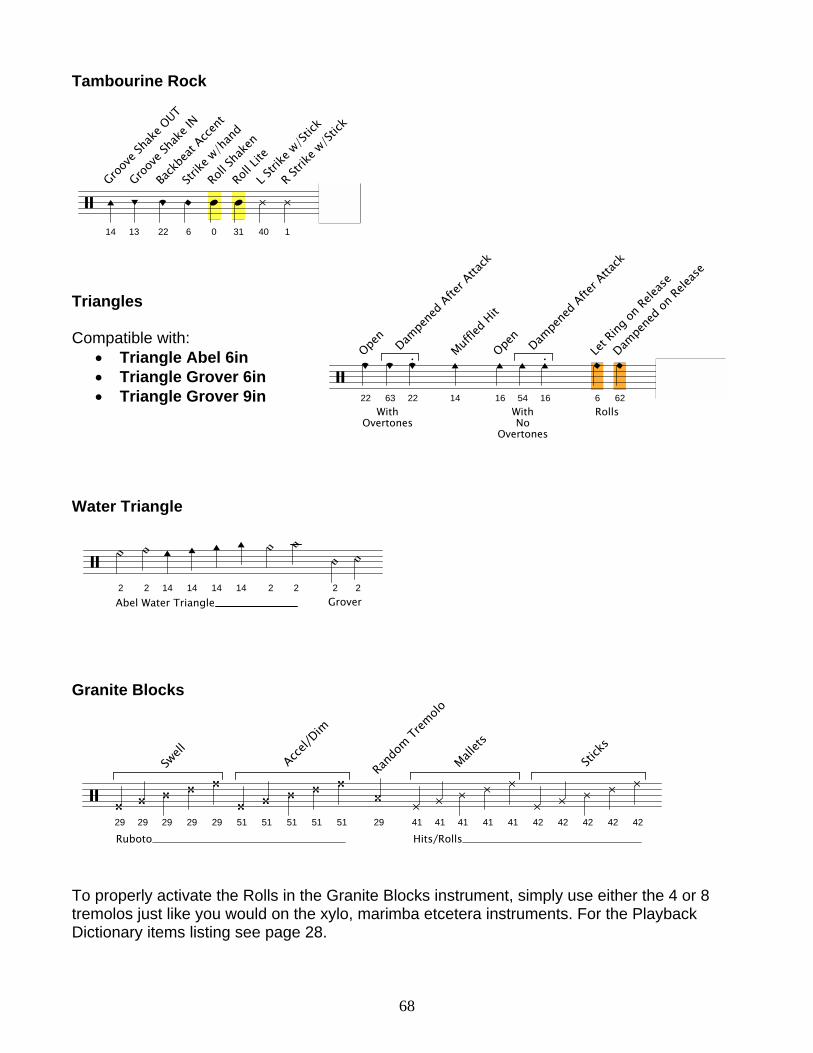
68
14
Groove
Shak
e OUT
13
Groove
Shak
e IN
22
Back
beat
Accent
6
Strike
w/h
and
0
Roll S
hake
n
31
Roll L
ite
40
L Strik
e w/St
ick
1
R Strik
e w/St
ick
22
Open
WithOvertones
63 22
Dampe
ned A
fter A
ttack
14
Muffled
Hit
16
Open
54
WithNo
Overtones
16
Dampe
ned A
fter A
ttack
6
Rolls
Let R
ing on
Relea
se
62
Dampe
ned o
n Rele
ase
2
Abel Water Triangle
2
14
14
14
14
2
2
2
Grover
2
Tambourine Rock Triangles Compatible with:
Triangle Abel 6in Triangle Grover 6in Triangle Grover 9in
Water Triangle Granite Blocks
29
Ruboto
29
29
Swell
29
29
51
51
51
Accel/D
im
51
51
29
Rand
om T
rem
olo
41
Hits/Rolls
41
41
Mallets
41
41
42
42
42
Stick
s
42
42
To properly activate the Rolls in the Granite Blocks instrument, simply use either the 4 or 8 tremolos just like you would on the xylo, marimba etcetera instruments. For the Playback Dictionary items listing see page 28.
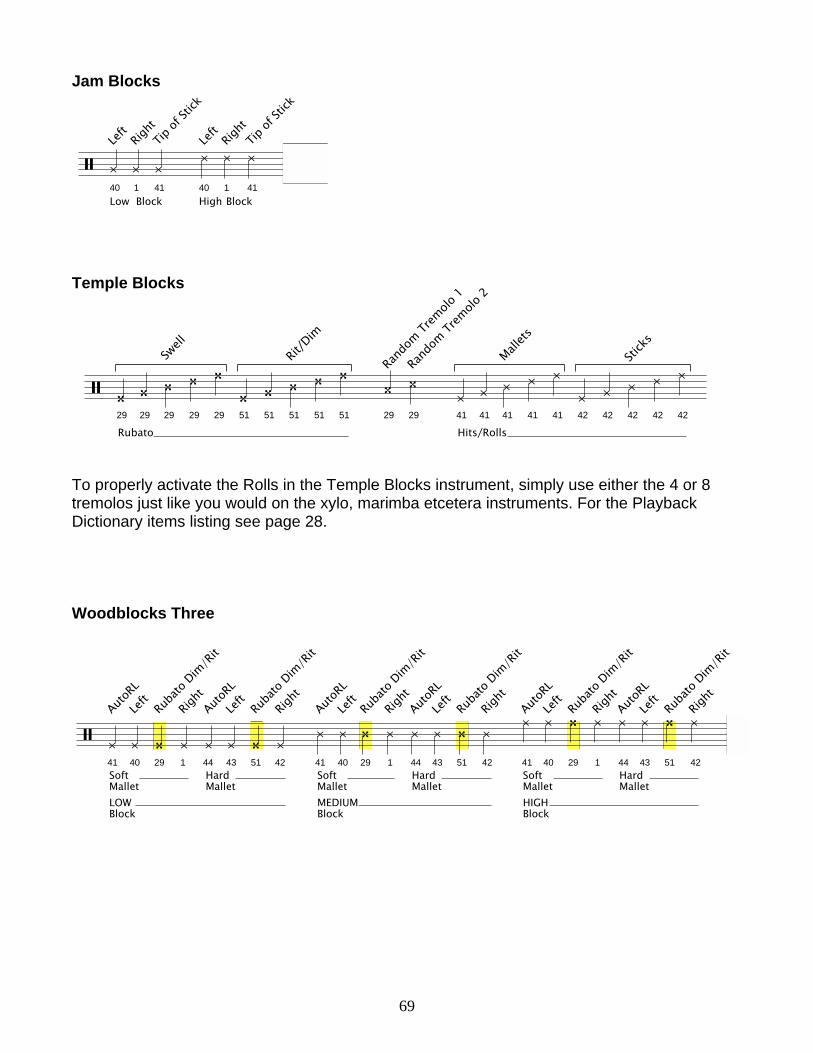
69
29
Rubato
29
29
Swell
29
29
51
51
51
Rit/Dim
51
51
29
Rand
om T
rem
olo
1
29
Rand
om T
rem
olo
2
41
Hits/Rolls
41
41
Mallets
41
41
42
42
42
Stick
s
42
42
40
Low
Left
1
Right
Block41
Tip of
Stick
40
High
Left
1
Block
Right
41
Tip of
Stick
Jam Blocks Temple Blocks To properly activate the Rolls in the Temple Blocks instrument, simply use either the 4 or 8 tremolos just like you would on the xylo, marimba etcetera instruments. For the Playback Dictionary items listing see page 28. Woodblocks Three
41
SoftMalletLOWBlock
AutoRL
40
Left
29
Ruba
to Dim
/Rit
1
Right
44
HardMallet
AutoRL
43
Left
51
Ruba
to Dim
/Rit
42
Right
41
SoftMalletMEDIUMBlock
AutoRL
40
Left
29
Ruba
to Dim
/Rit
1
Right
HardMallet
44
AutoRL
43
Left
51
Ruba
to Dim
/Rit
42
Right
SoftMalletHIGHBlock
41
AutoRL
40
Left
29
Ruba
to Dim
/Rit
1
Right
HardMallet
44
AutoRL
43
Left
51
Ruba
to Dim
/Rit
42
Right
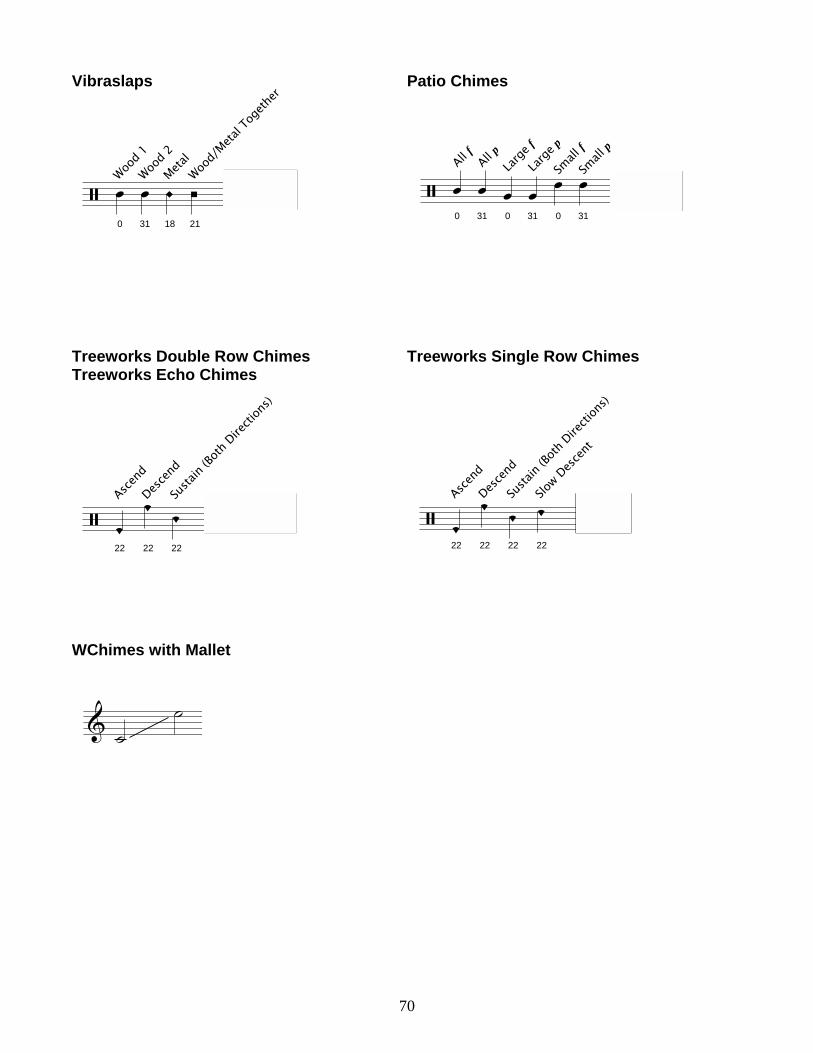
70
0
Woo
d 1
31
Woo
d 2
18
Met
al21
Woo
d/Met
al T
oget
her
0
All f
31
All p
0
Larg
e f
31
Larg
e p
0
Small f
31
Small p
22
Ascen
d
22
Desce
nd22
Sustain
(Bot
h Dire
ctio
ns)
22
Ascen
d
22
Desce
nd22
Sustain
(Bot
h Dire
ctio
ns)
22
Slow D
esce
nt
Vibraslaps Patio Chimes Treeworks Double Row Chimes Treeworks Single Row Chimes Treeworks Echo Chimes WChimes with Mallet

71
Combos, Vocals BD and Tam Tam
BD20
Susta
ined R
oll
0
Stacca
to Mall
et Fu
ll
33 0
Stacca
to Mall
et Dam
pene
d
34
w/Tow
el Dam
pene
d
31
Regu
lar M
allet
Full
35 31
Regu
lar M
allet
Dampe
ned
TamTam
43
Hit
1
Cresc F
orte M
edium
40
Cresc F
orte L
ong
41
Cresc M
ezzo
Med
ium
42
Cresc M
ezzo
Long
General MIDI Set
0
Bass
Drum 1
31
Bass
Drum 2
SnareDrum
11
Cross S
tick
0
Hits
29
Rimsh
ot
0
Toms
Low Fl
oor
0
High Fl
oor
0
Low
0
Low M
id
0
High M
id
0
High
40
HiHat
Closed
1
Peda
l
41
Open
1
Cymbals
Crash 1
40
Crash 2
1
Ride T
ip 1
40
Ride T
ip 2
6
Ride B
ell
1
Chinese
1
Splas
h
19
Hand C
lap
14
Tambo
urine
16
Cowbe
ll
18
Vibras
lap
31
Bongo
High
31
Low
32
Conga31
High M
ute
31
High O
pen
0
Low
31
High
Timbale32
Low
14
Agogo
High
14
Low
1
Cabasa
18
Maracas
31
Whistle
Short
32
Long
11
Short
Scrap
e
Guiro50
Long
Scrap
e
22
Claves
16
High
Woodblock16
Low
Triangle54
Muted
16 16
Open
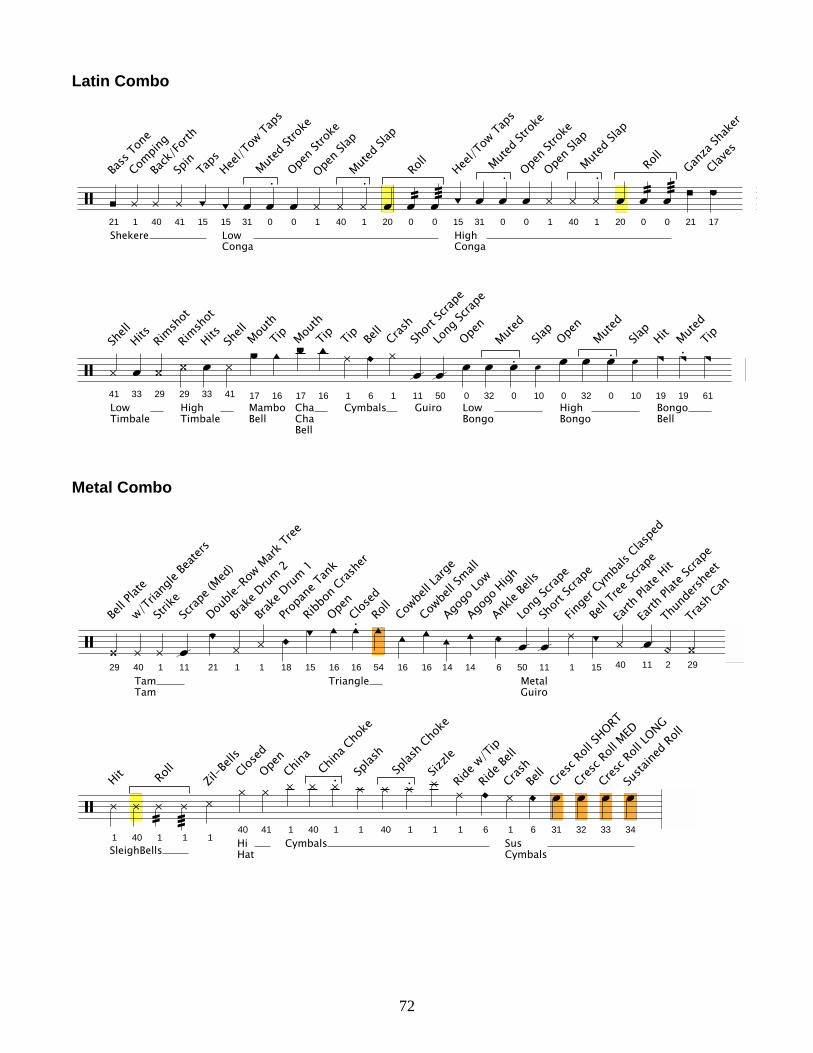
72
Latin Combo
21
Shekere
Bass
Tone
1
Compin
g
40
Back
/Forth
41
Spin
15
Taps
15
LowConga
Heel/T
ow Ta
ps
31 0
Muted S
troke
0
Open S
troke
1
Open S
lap
40 1
Muted S
lap
20 0
Roll
0 15
HighConga
Heel/T
ow Ta
ps
31 0
Muted S
troke
0
Open S
troke
1
Open S
lap
40 1
Muted S
lap
20 0
Roll
0 21
Ganza
Shak
er
17
Claves
41
LowTimbale
Shell
33
Hits
29
Rimsh
ot
29
HighTimbale
Rimsh
ot
33
Hits
41
Shell
MamboBell
17
Mouth
16
Tip
ChaChaBell
17
Mouth
16
Tip
1Cymbals
Tip
6
Bell
1
Crash
11Guiro
Short
Scrap
e
50
Long
Scrap
e
0LowBongo
Open
32 0
Muted
10
Slap
0HighBongo
Open
32 0
Muted
10
Slap
19BongoBell
Hit
19
Muted
61
Tip
Metal Combo
29
Bell P
late
40
TamTam
w/Tria
ngle
Beate
rs
1
Strike
11
Scrap
e (Med
)
21
Double
-Row
Mark
Tree
1
Brake
Drum 2
1
Brake
Drum 1
18
Propa
ne Ta
nk
15
Ribbo
n Cras
her
Triangle16
Open
16
Closed
54
Roll
16
Cowbe
ll Larg
e
16
Cowbe
ll Small
14
Agogo
Low
14
Agogo
High
6
Ankle
Bells
50
Long
Scrap
e
MetalGuiro
11
Short
Scrap
e
1
Finge
r Cym
bals
Claspe
d
15
Bell T
ree Sc
rape
40
Earth
Plate
Hit
11
Earth
Plate
Scrap
e
2
Thun
dersh
eet
29
Trash
Can
SleighBells1
Hit
40 1
Roll
1 1
Zil-B
ells
HiHat
40
Closed
41
Open
Cymbals1
China
40 1
China C
hoke
1
Splas
h
40 1
Splas
h Cho
ke
1
Sizzle
1
Ride w
/Tip
6
Ride B
ell
SusCymbals
1
Crash
6
Bell
31
Cresc R
oll SH
ORT
32
Cresc R
oll M
ED
33
Cresc R
oll LO
NG
34
Susta
ined R
oll
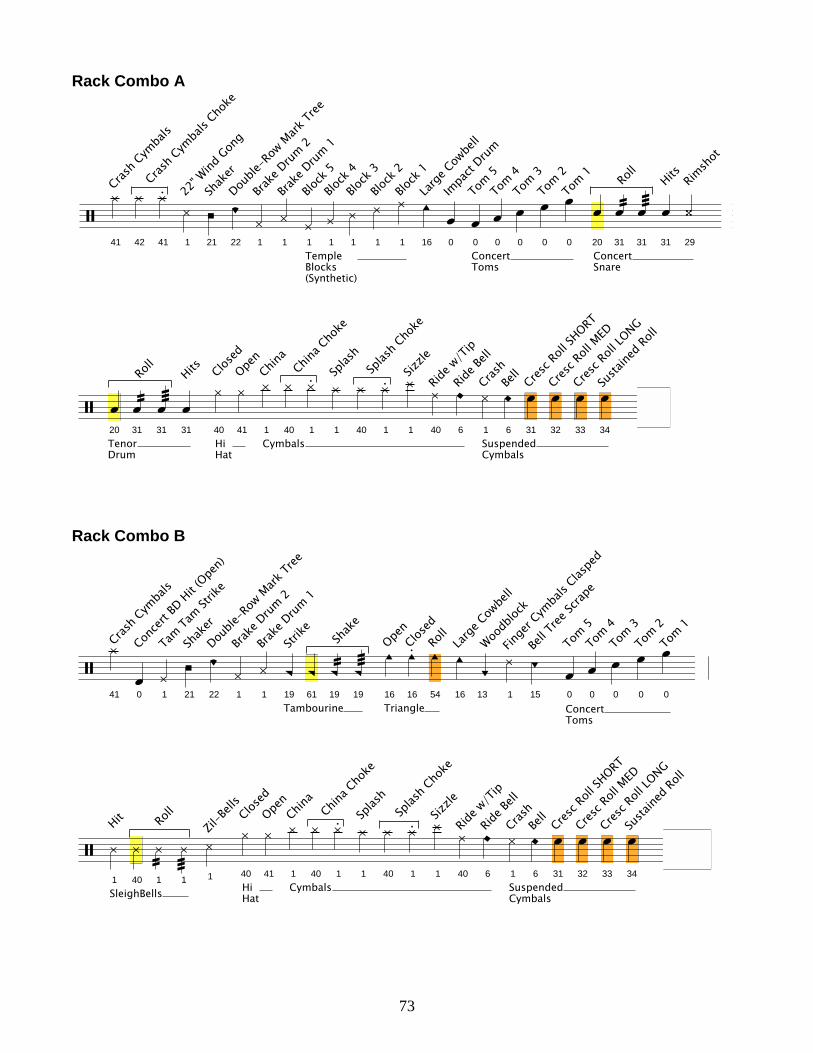
73
Rack Combo A
41
Crash C
ymba
ls
42 41
Crash C
ymba
ls Cho
ke
1
22" W
ind Gon
g
21
Shak
er
22
Double
-Row
Mark
Tree
1
Brake
Drum 2
1
Brake
Drum 1
1
TempleBlocks(Synthetic)
Block
5
1
Block
4
1
Block
3
1
Block
2
1
Block
1
16
Large
Cowbe
ll
0
Impa
ct Drum
0
ConcertToms
Tom 5
0
Tom 4
0
Tom 3
0
Tom 2
0
Tom 1
20
ConcertSnare
31
Roll
31 31
Hits
29
Rimsh
ot
TenorDrum
20 31
Roll
31 31
Hits
40
HiHat
Closed
41
Open
1
Cymbals
China
40 1
China C
hoke
1
Splas
h
40 1
Splas
h Cho
ke
1
Sizzle
40
Ride w
/Tip
6
Ride B
ell
1
SuspendedCymbals
Crash
6
Bell
31
Cresc R
oll SH
ORT
32
Cresc R
oll M
ED
33
Cresc R
oll LO
NG
34
Susta
ined R
oll
Rack Combo B
41
Crash C
ymba
ls
0
Concer
t BD Hit (
Open)
1
Tam Ta
m Strik
e
21
Shak
er
22
Double
-Row
Mark
Tree
1
Brake
Drum 2
1
Brake
Drum 1
Tambourine19
Strike
61 19
Shak
e
19
Triangle16
Open
16
Closed
54
Roll
16
Large
Cowbe
ll
13
Woodb
lock
1
Finge
r Cym
bals
Claspe
d
15
Bell T
ree Sc
rape
0
ConcertToms
Tom 5
0
Tom 4
0
Tom 3
0
Tom 2
0
Tom 1
SleighBells1
Hit
40 1
Roll
1 1
Zil-B
ells
40
HiHat
Closed
41
Open
1
Cymbals
China
40 1
China C
hoke
1
Splas
h
40 1
Splas
h Cho
ke
1
Sizzle
40
Ride w
/Tip
6
Ride B
ell
1
SuspendedCymbals
Crash
6
Bell
31
Cresc R
oll SH
ORT
32
Cresc R
oll M
ED
33
Cresc R
oll LO
NG
34
Susta
ined R
oll
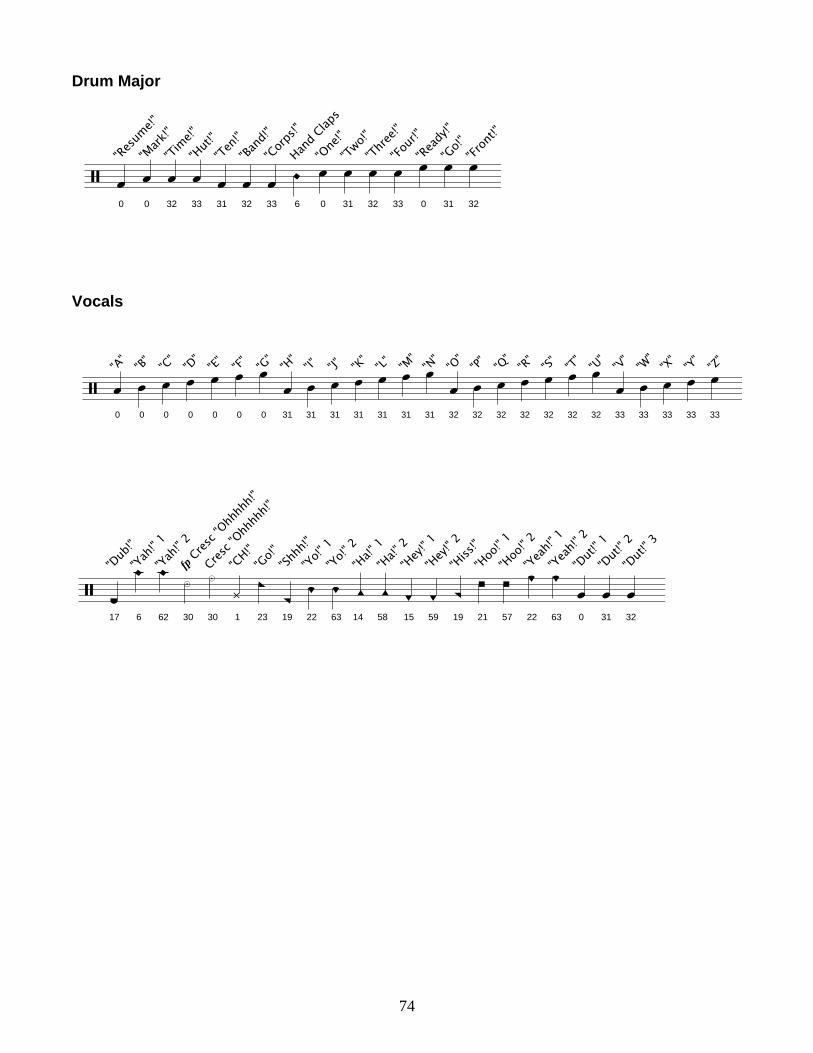
74
0
"A"
0
"B"
0
"C"
0
"D"
0
"E"
0
"F"
0
"G"
31
"H"
31
"I"31
"J"31
"K"
31
"L"
31
"M"
31
"N"
32
"O"
32
"P"
32
"Q"
32
"R"
32
"S"
32
"T"
32
"U"
33
"V"
33
"W"
33
"X"
33
"Y"
33
"Z"
0
"Res
ume!"
0
"Mar
k!"
32
"Tim
e!"
33
"Hut
!"
31
"Ten
!"
32
"Ban
d!"
33
"Cor
ps!"
6
Hand
Claps
0
"One
!"
31
"Two!
"
32
"Thr
ee!"
33
"Fou
r!"
0
"Rea
dy!"
31
"Go!
"
32
"Fro
nt!"
17
"Dub
!"
6
"Yah!"
1
62
"Yah!"
2
30
fp Cres
c "Ohh
hhh!"
30
Cresc "
Ohhhh
h!"
1
"CH!"
23
"Go!"
19
"Shhh
!"
22
"Yo!" 1
63
"Yo!" 2
14
"Ha!"
1
58
"Ha!"
2
15
"Hey!
" 1
59
"Hey!
" 2
19
"Hiss
!"
21
"Hoo
!" 1
57
"Hoo
!" 2
22
"Yeah
!" 1
63
"Yeah
!" 2
0
"Dut!
" 1
31
"Dut!
" 2
32
"Dut!
" 3
Drum Major Vocals
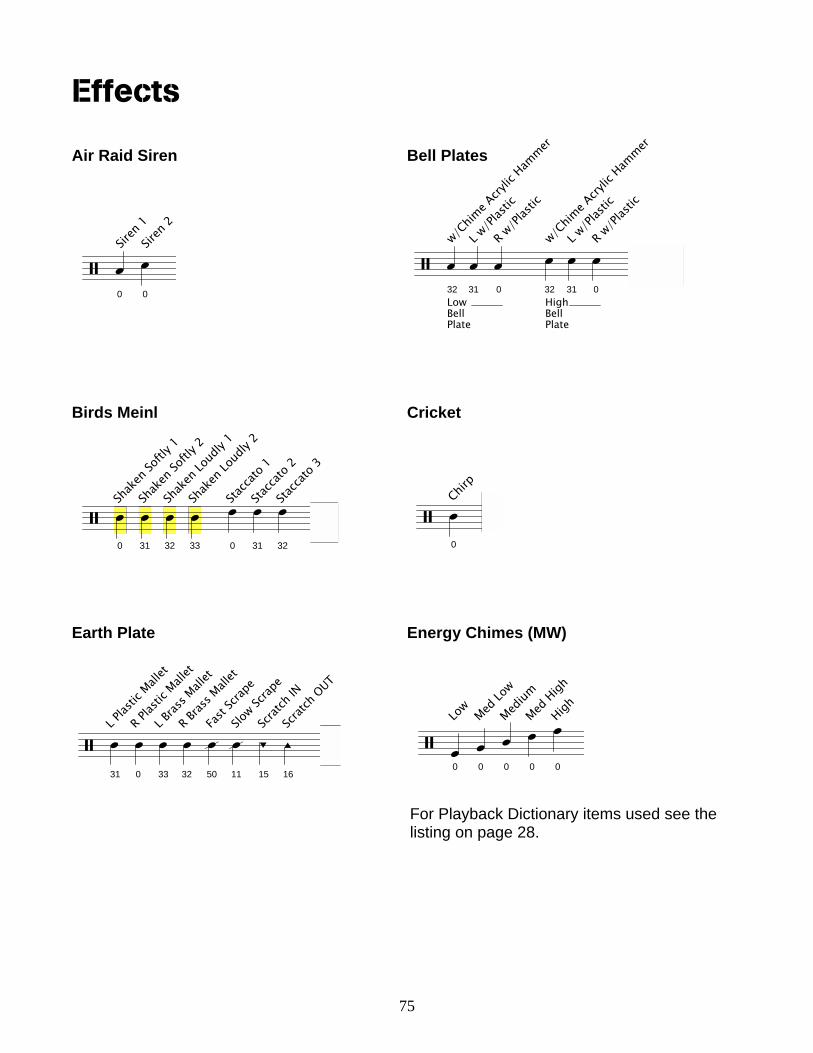
75
31
L Plas
tic M
allet
0
R Plas
tic M
allet
33
L Bras
s Mall
et
32
R Bras
s Mall
et
50
Fast
Scrap
e
11
Slow Sc
rape
15
Scratc
h IN
16
Scratc
h OUT
0
Shak
en Sof
tly 1
31
Shak
en Sof
tly 2
32
Shak
en Lou
dly 1
33
Shak
en Lou
dly 2
0
Stac
cato
1
31
Stac
cato
2
32
Stac
cato
3
0
Siren
1
0
Siren
2
LowBellPlate
32
w/Chim
e Acry
lic Ham
mer
31
L w/Pl
astic
0
R w/Pl
astic
HighBellPlate
32
w/Chim
e Acry
lic Ham
mer
31
L w/Pl
astic
0
R w/Pl
astic
0
Chirp
0
Low
0
Med
Low
0
Med
ium
0
Med
Hig
h
0
High
Effects Air Raid Siren Bell Plates Birds Meinl Cricket Earth Plate Energy Chimes (MW)
For Playback Dictionary items used see the listing on page 28.
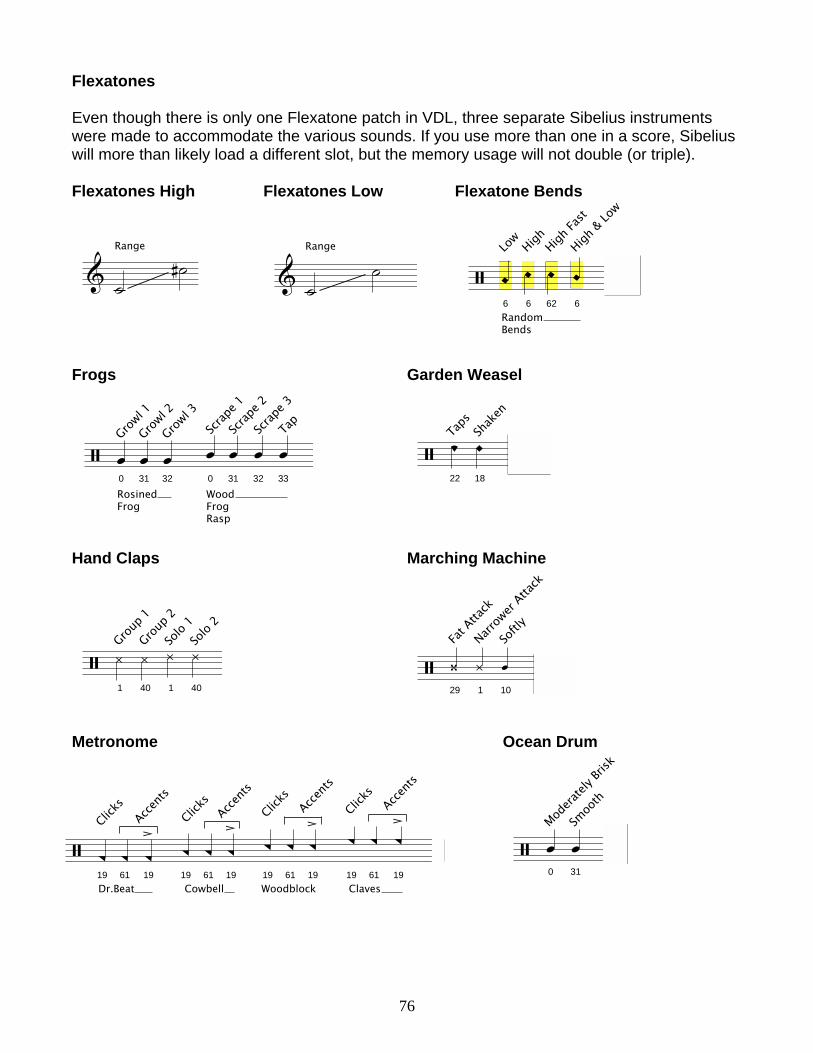
76
0
RosinedFrog
Growl 1
31
Growl 2
32
Growl 3
0
WoodFrogRasp
Scra
pe 1
31
Scra
pe 2
32
Scra
pe 3
33
Tap
6
RandomBends
Low
6
High
62
High
Fast
6
High
& Low
22
Taps
18
Shak
en
29
Fat A
ttack
1
Narro
wer A
ttack
10
Softl
y
0
Mod
erat
ely B
risk
31
Smoo
th
1
Group
1
40
Group
2
1
Solo
1
40
Solo
2
Range
Range
19
Dr.Beat
Clicks
61 19
Accents
19
Cowbell
Clicks
61 19
Accents
Woodblock19
Clicks
61 19
Accents
19
Claves
Clicks
61 19
Accents
Flexatones Even though there is only one Flexatone patch in VDL, three separate Sibelius instruments were made to accommodate the various sounds. If you use more than one in a score, Sibelius will more than likely load a different slot, but the memory usage will not double (or triple). Flexatones High Flexatones Low Flexatone Bends Frogs Garden Weasel Hand Claps Marching Machine Metronome Ocean Drum
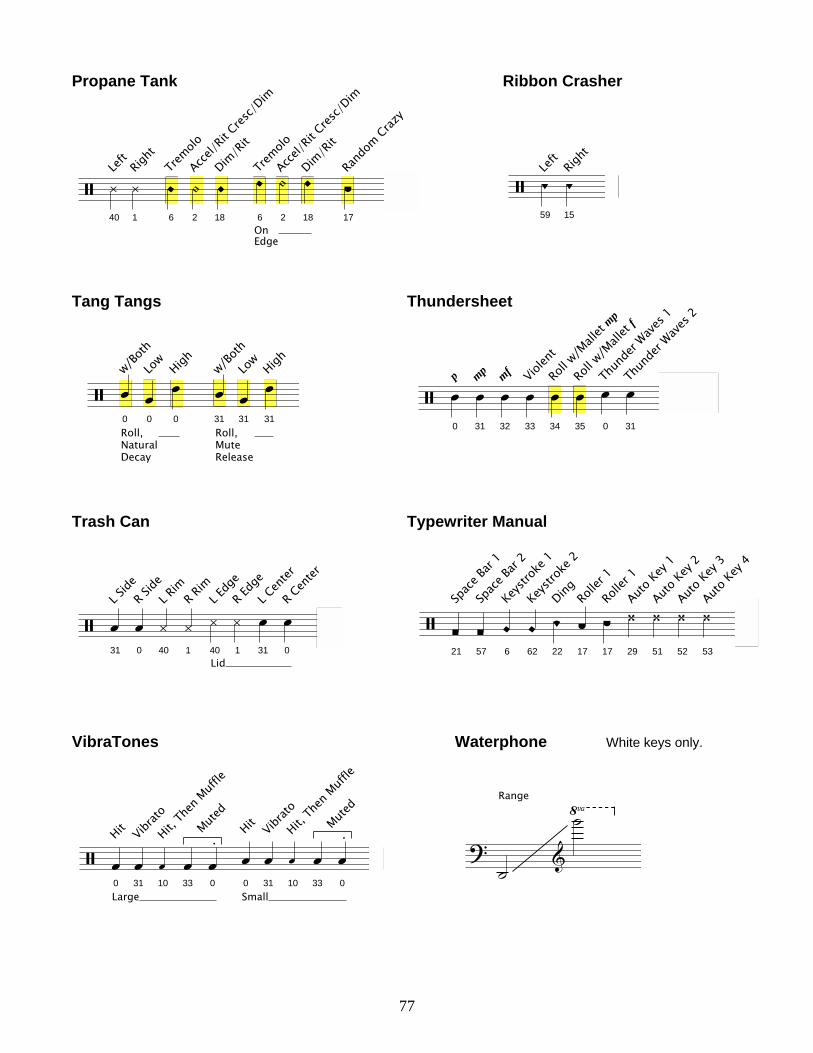
77
40
Left
1
Right
6
Tremolo
2
Accel/R
it Cres
c/Dim
18
Dim/R
it
OnEdge
6
Tremolo
2
Accel/R
it Cres
c/Dim
18
Dim/R
it
17
Rand
om Craz
y
31
L Side
0
R Side
40
L Rim
1
R Rim
Lid40
L Edg
e
1
R Edg
e
31
L Cen
ter
0
R Cen
ter
0
Roll,NaturalDecay
w/Bot
h
0
Low
0
High
31
Roll,MuteRelease
w/Bot
h
31
Low
31
High
0
p31
mp32
mf33
Viol
ent
34
Roll
w/Mallet m
p
35
Roll
w/Mallet f
0
Thun
der W
aves
1
31
Thun
der W
aves
2
21
Spac
e Ba
r 1
57
Spac
e Ba
r 2
6
Keys
troke
1
62
Keys
troke
2
22
Ding
17
Rolle
r 1
17
Rolle
r 1
29
Auto
Key 1
51
Auto
Key 2
52
Auto
Key 3
53
Auto
Key 4
Range
59
Left
15
Right
0
Large
Hit
31
Vibrat
o
10
Hit, Th
en M
uffle
33 0
Muted
0
Small
Hit
31
Vibrat
o
10
Hit, Th
en M
uffle
33 0
Muted
Propane Tank Ribbon Crasher Tang Tangs Thundersheet Trash Can Typewriter Manual VibraTones Waterphone
White keys only.
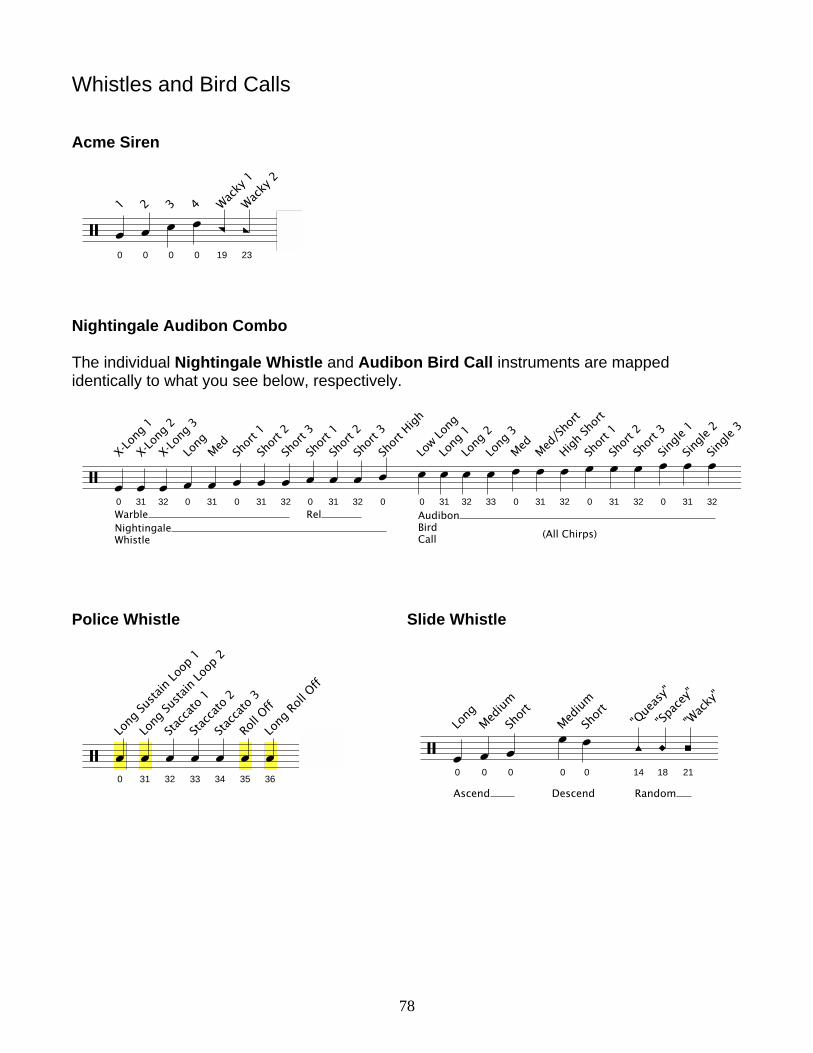
78
0
Long
Sus
tain
Loo
p 1
31
Long
Sus
tain
Loo
p 2
32
Stac
cato
1
33
Stac
cato
2
34
Stac
cato
3
35
Roll Off
36
Long
Rol
l Off
0
Ascend
Long
0
Med
ium
0
Shor
t
0
Descend
Med
ium
0
Shor
t
14
Random
"Que
asy"
18
"Spa
cey"
21
"Wac
ky"
0
1
0
2
0
30
419
Wac
ky 1
23
Wac
ky 2
0
WarbleNightingaleWhistle
X-Lo
ng 1
31
X-Lo
ng 2
32
X-Lo
ng 3
0
Long
31
Med
0
Shor
t 1
31
Shor
t 2
32
Shor
t 3
0
Rel
Shor
t 1
31
Shor
t 2
32
Shor
t 3
0
Shor
t Hig
h
0
AudibonBirdCall
Low L
ong
31
Long
1
32
Long
2
33
Long
3
0
Med
31
Med
/Sho
rt
(All Chirps)
32
High
Shor
t
0
Shor
t 1
31
Shor
t 2
32
Shor
t 3
0
Singl
e 1
31
Singl
e 2
32
Singl
e 3
Whistles and Bird Calls Acme Siren Nightingale Audibon Combo The individual Nightingale Whistle and Audibon Bird Call instruments are mapped identically to what you see below, respectively. Police Whistle Slide Whistle
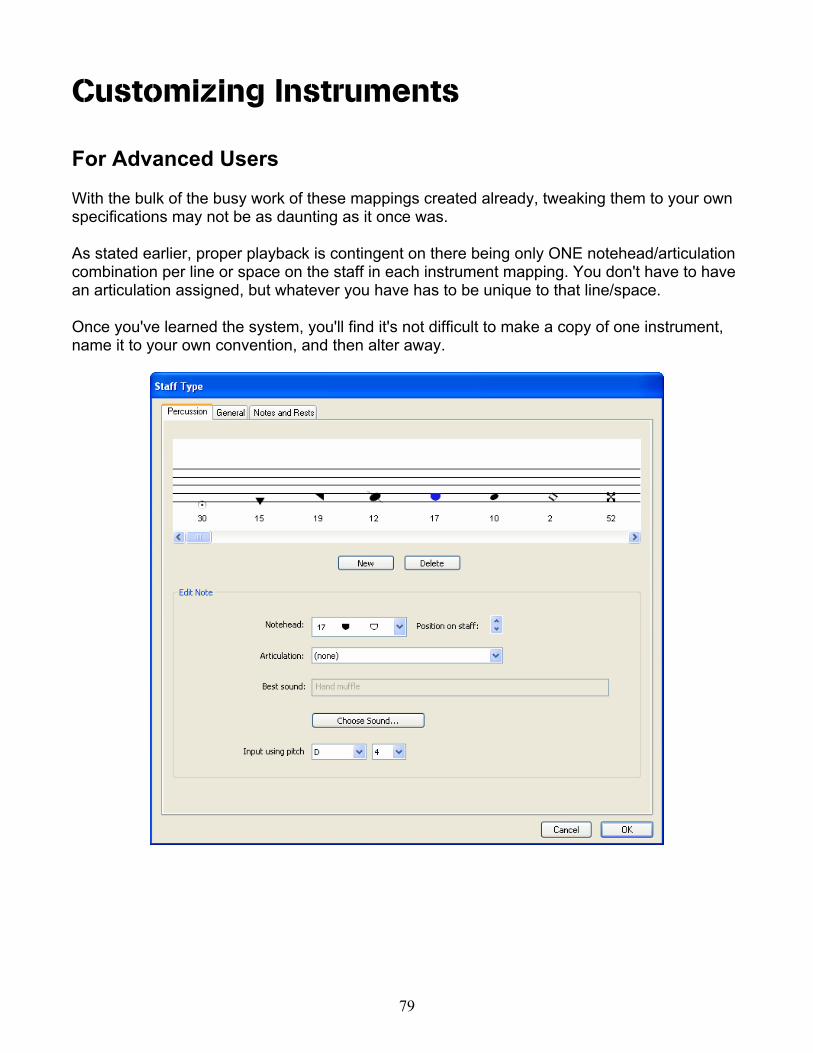
Customizing Instruments
For Advanced Users With the bulk of the busy work of these mappings created already, tweaking them to your own specifications may not be as daunting as it once was. As stated earlier, proper playback is contingent on there being only ONE notehead/articulation combination per line or space on the staff in each instrument mapping. You don't have to have an articulation assigned, but whatever you have has to be unique to that line/space. Once you've learned the system, you'll find it's not difficult to make a copy of one instrument, name it to your own convention, and then alter away.
79
80
Moving Notes Up / Down on the Staff The main area to pay attention to is the Input Using Pitch field which will change if you move notes up or down on the staff in the Percussion tab of the Staff Type designer. Keep a mental note of what the pitch is before you move it so you can change it back to what it should be after you have moved the note up or down on the staff.
NOTE: As stated earlier, it might be a good idea to make whatever modifications you want in a “test” file first. Then, when the results you want are achieved, make those exact same changes in the file you will be using them in.
Noteheads List If you were to create a new file using Sibelius 6.0, you would see that there are only 31 noteheads available to you (numbers 0 thru 30). These are the default/stock noteheads that Sibelius provided its users “out of the box”. In this Template, the original 31 noteheads have not been modified in any way. However, in order to be able to map the larger VDL instruments, we had to make several “twin” noteheads to be used along with the originals. Most of these are to accommodate the RH and LH sounds; others are to stay within the notehead/articulation combination guidelines. You may have already noticed in the diagrams that certain noteheads were used over and over again - and usually for similar kinds of sounds. This was not done just for the persons who may be using this Template in their music writing, but also for the musician and or student who will be reading and playing the music that is written. And yet, we know there will still be users who will want to change things to suit their personal preferences. With this Template - and more so the features in Sibelius 6 - it will be much easier to do so compared to templates of old. To get more detailed instructions on how to Edit Instruments you will need to consult your Sibelius Reference.
Originals Matching Twins 0 31-36,39 1 40-45 6 62
11 50 12 49, 60 14 58 15 59 16 54 17 55 18 56 19 61 21 57 22 63 28 46-48 29 51-53 - 37,38
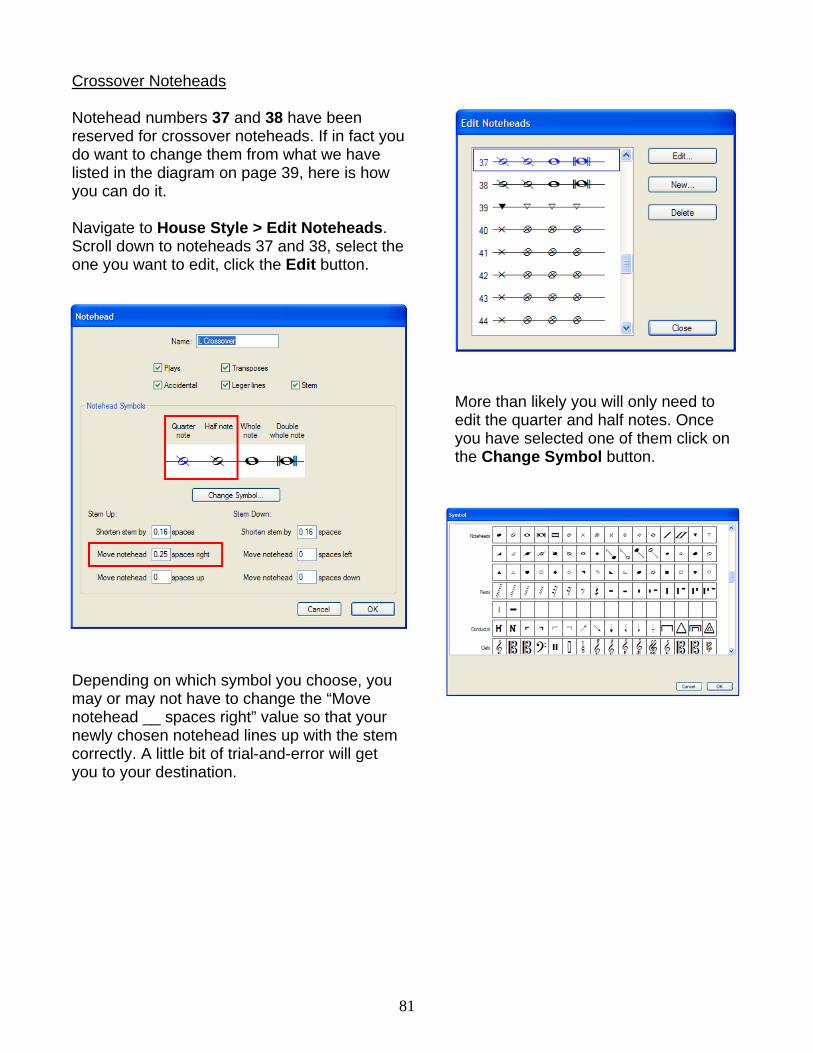
81
Crossover Noteheads Notehead numbers 37 and 38 have been reserved for crossover noteheads. If in fact you do want to change them from what we have listed in the diagram on page 39, here is how you can do it. Navigate to House Style > Edit Noteheads. Scroll down to noteheads 37 and 38, select the one you want to edit, click the Edit button.
More than likely you will only need to edit the quarter and half notes. Once you have selected one of them click on the Change Symbol button.
Depending on which symbol you choose, you may or may not have to change the “Move notehead __ spaces right” value so that your newly chosen notehead lines up with the stem correctly. A little bit of trial-and-error will get you to your destination.
82
In Closing Congratulations! You are now at the end of this Readme and as such you are on your way to becoming a true Sibelius/VDL guru! As you can probably tell, this has been a very large and detail-driven process. If you happen upon anything that doesn't work the way we've described here, please be sure to let us know on the Tapspace Forum, which is where all things VDL related can be discussed with a growing community of VDL users. The Tapspace Forum can be visited at: www.tapspace.com/forums At this point you should have a pretty good handle on what you can and can't do with your brand new or updated race car. So now that you know how to drive it, you just need to go ahead and get in and get some experience with it. If you do manage to come out of turn 8 too hard and smack into the wall, we will do our best to help you put the car back together so you can get to racing again.
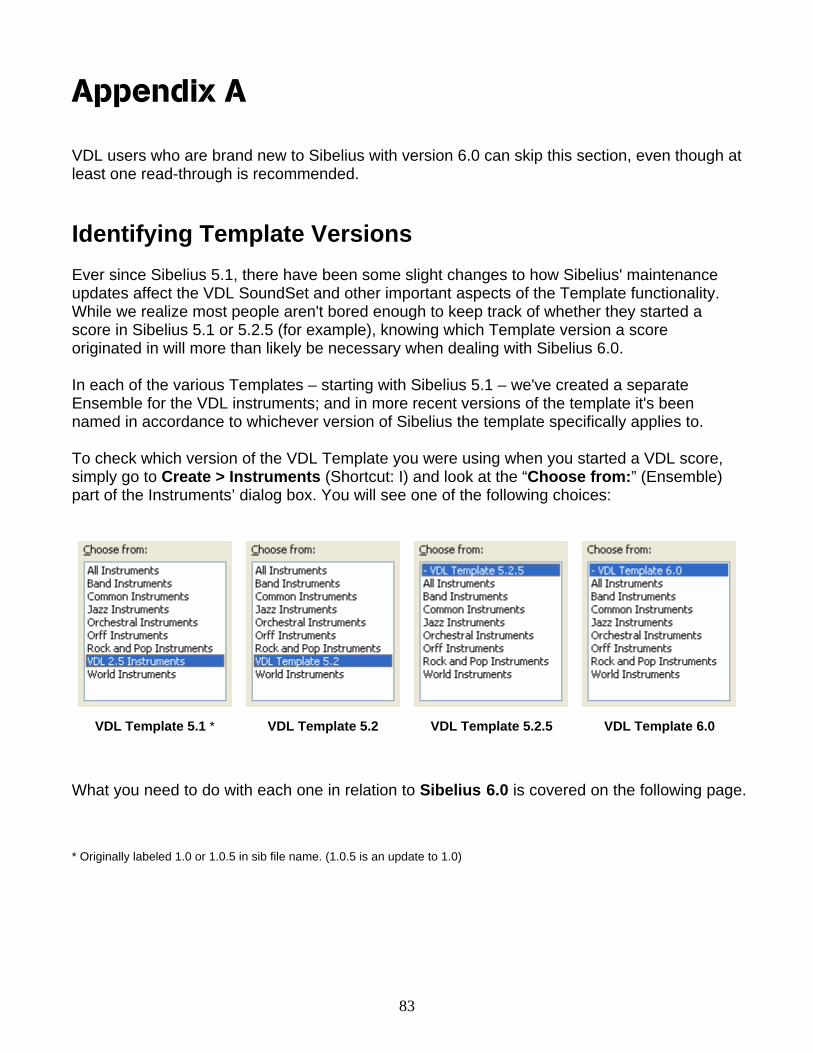
83
VDL Template 5.1 * VDL Template 5.2 VDL Template 5.2.5 VDL Template 6.0
Appendix A VDL users who are brand new to Sibelius with version 6.0 can skip this section, even though at least one read-through is recommended.
Identifying Template Versions Ever since Sibelius 5.1, there have been some slight changes to how Sibelius' maintenance updates affect the VDL SoundSet and other important aspects of the Template functionality. While we realize most people aren't bored enough to keep track of whether they started a score in Sibelius 5.1 or 5.2.5 (for example), knowing which Template version a score originated in will more than likely be necessary when dealing with Sibelius 6.0. In each of the various Templates – starting with Sibelius 5.1 – we've created a separate Ensemble for the VDL instruments; and in more recent versions of the template it's been named in accordance to whichever version of Sibelius the template specifically applies to. To check which version of the VDL Template you were using when you started a VDL score, simply go to Create > Instruments (Shortcut: I) and look at the “Choose from:” (Ensemble) part of the Instruments’ dialog box. You will see one of the following choices:
What you need to do with each one in relation to Sibelius 6.0 is covered on the following page. * Originally labeled 1.0 or 1.0.5 in sib file name. (1.0.5 is an update to 1.0)
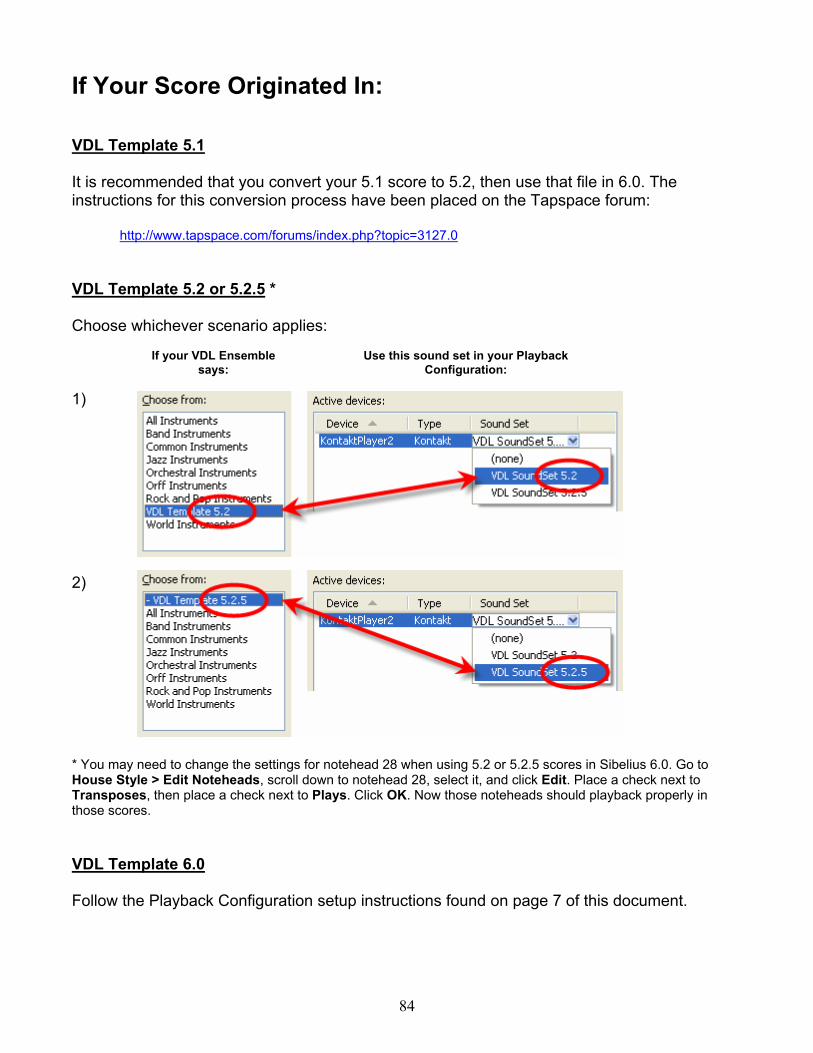
If Your Score Originated In: VDL Template 5.1 It is recommended that you convert your 5.1 score to 5.2, then use that file in 6.0. The instructions for this conversion process have been placed on the Tapspace forum:
http://www.tapspace.com/forums/index.php?topic=3127.0 VDL Template 5.2 or 5.2.5 * Choose whichever scenario applies:
If your VDL Ensemble Use this sound set in your Playback Configuration: says:
1) 2) * You may need to change the settings for notehead 28 when using 5.2 or 5.2.5 scores in Sibelius 6.0. Go to House Style > Edit Noteheads, scroll down to notehead 28, select it, and click Edit. Place a check next to Transposes, then place a check next to Plays. Click OK. Now those noteheads should playback properly in those scores. VDL Template 6.0 Follow the Playback Configuration setup instructions found on page 7 of this document.
84
85
Appendix B
TriggerTest Do you have your Sibelius/VDL work environment setup properly? There is a folder in the Template package you downloaded labeled “TriggerTest”. Contained within this folder is a set of sib files that has every instrument and all the sounds (with switch variations) on the staves which you can use to perform what we call a TriggerTest. The idea is to play each staff individually and watch the KontaktPlayer2 keyboard to make sure each and every sound “triggers” the way it should. As each staff is played, the corresponding patch in KP2 will start triggering on the left side of the keyboard (keys highlighted in blue) and progress to the right, sequentially (for the most part), until it reaches the other end of the blue keys.
EXTRA: Another way to use the TriggerTest files is to just play them back and listen so as to get an overview of ALL of the sounds that are available in the Virtual Drumline sample library. There may very well be several sounds contained in the VDL library that you previously didn’t know about.
Input Variables Instruments that have Input Variables in their mappings have these included in their TriggerTests as well. You will see them in their own section after the main triggers. PLEASE BE ADVISED: These TriggerTest files were created during the Template development process and may not be complete. Use of these files for your writing projects is NOT recommended.
(Continued on next page.)
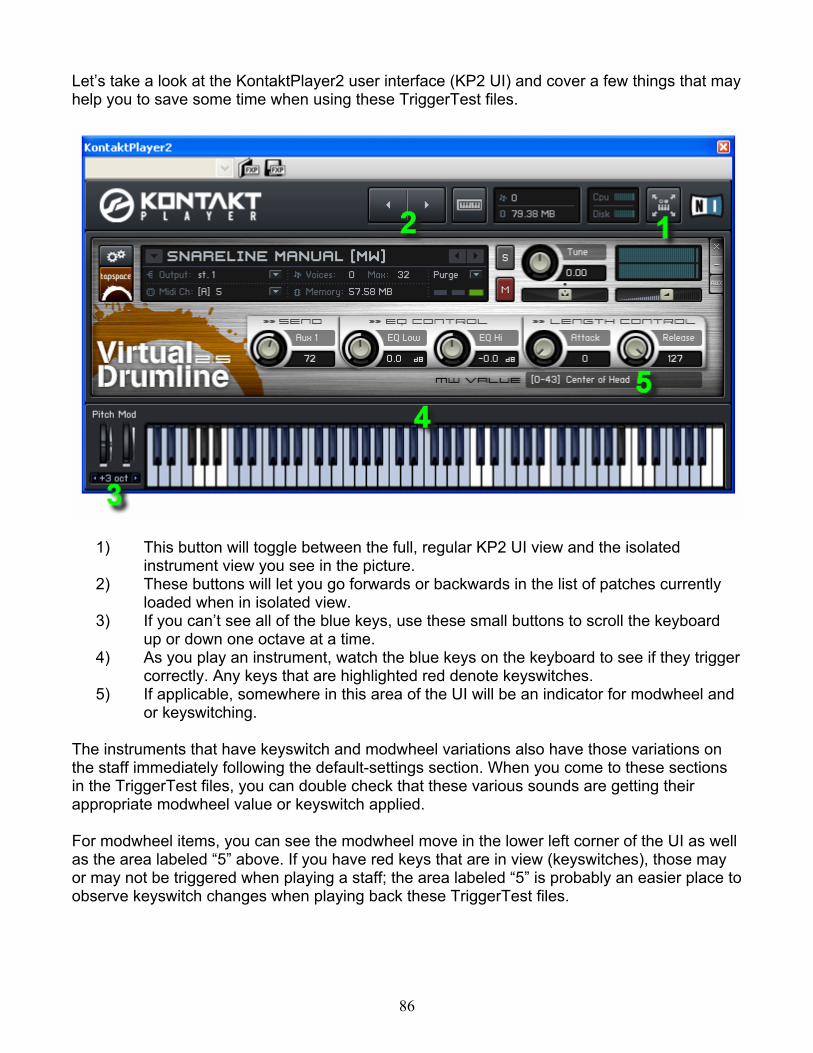
86
Let’s take a look at the KontaktPlayer2 user interface (KP2 UI) and cover a few things that may help you to save some time when using these TriggerTest files.
1) This button will toggle between the full, regular KP2 UI view and the isolated instrument view you see in the picture.
2) These buttons will let you go forwards or backwards in the list of patches currently loaded when in isolated view.
3) If you can’t see all of the blue keys, use these small buttons to scroll the keyboard up or down one octave at a time.
4) As you play an instrument, watch the blue keys on the keyboard to see if they trigger correctly. Any keys that are highlighted red denote keyswitches.
5) If applicable, somewhere in this area of the UI will be an indicator for modwheel and or keyswitching.
The instruments that have keyswitch and modwheel variations also have those variations on the staff immediately following the default-settings section. When you come to these sections in the TriggerTest files, you can double check that these various sounds are getting their appropriate modwheel value or keyswitch applied. For modwheel items, you can see the modwheel move in the lower left corner of the UI as well as the area labeled “5” above. If you have red keys that are in view (keyswitches), those may or may not be triggered when playing a staff; the area labeled “5” is probably an easier place to observe keyswitch changes when playing back these TriggerTest files.