veeam cloud connect: manual configuration guide for ... · pdf fileveeam cloud connect: manual...
TRANSCRIPT

Veeam Cloud Connect: Manual configuration guide for Microsoft AzureMike ResselerVeeam Product Strategy Specialist, MVP, Microsoft Certified IT Professional, MCSA, MCTS, MCP

Veeam Cloud Connect: Manual configuration guide for Microsoft Azure
2© 2015 Veeam Software
ContentsIntroduction . . . . . . . . . . . . . . . . . . . . . . . . . . . . . . . . . . . . . . . . . . . . . . . . . . . . . . . . . . . . . . . . . . . . . . . . . . . 4
Architecture and scenario . . . . . . . . . . . . . . . . . . . . . . . . . . . . . . . . . . . . . . . . . . . . . . . . . . . . . . . . . . . . . . 5
Scenario . . . . . . . . . . . . . . . . . . . . . . . . . . . . . . . . . . . . . . . . . . . . . . . . . . . . . . . . . . . . . . . . . . . . . . . . . . . . . . . . . . . . . . . . .5
Prerequisites . . . . . . . . . . . . . . . . . . . . . . . . . . . . . . . . . . . . . . . . . . . . . . . . . . . . . . . . . . . . . . . . . . . . . . . . . . . . . . . . . . . . .5
Single VM Veeam Cloud Connect architecture . . . . . . . . . . . . . . . . . . . . . . . . . . . . . . . . . . . . . . . . . . . . . . . . . . . .6
Roles and concepts . . . . . . . . . . . . . . . . . . . . . . . . . . . . . . . . . . . . . . . . . . . . . . . . . . . . . . . . . . . . . . . . . . . . . . . . . . . . . .6
Distributed Veeam Cloud Connect infrastructure . . . . . . . . . . . . . . . . . . . . . . . . . . . . . . . . . . . . . . . . . . . . . . . . .9
Azure preparations . . . . . . . . . . . . . . . . . . . . . . . . . . . . . . . . . . . . . . . . . . . . . . . . . . . . . . . . . . . . . . . . . . . 10
Sign up for an Azure subscription . . . . . . . . . . . . . . . . . . . . . . . . . . . . . . . . . . . . . . . . . . . . . . . . . . . . . . . . . . . . . . 10
Billing . . . . . . . . . . . . . . . . . . . . . . . . . . . . . . . . . . . . . . . . . . . . . . . . . . . . . . . . . . . . . . . . . . . . . . . . . . . . . . . . . . . . 11
Log in to the Management Portal . . . . . . . . . . . . . . . . . . . . . . . . . . . . . . . . . . . . . . . . . . . . . . . . . . . . . . . . . 12
Create a virtual machine . . . . . . . . . . . . . . . . . . . . . . . . . . . . . . . . . . . . . . . . . . . . . . . . . . . . . . . . . . . . . . . . . . . . . . . 13
Configure endpoints . . . . . . . . . . . . . . . . . . . . . . . . . . . . . . . . . . . . . . . . . . . . . . . . . . . . . . . . . . . . . . . . . . . . . . . . . . . 15
Create and assign a repository disk . . . . . . . . . . . . . . . . . . . . . . . . . . . . . . . . . . . . . . . . . . . . . . . . . . . . . . . . . . . . . 17
Install and configure Veeam Backup & Replication . . . . . . . . . . . . . . . . . . . . . . . . . . . . . . . . . . . . . . 19
Install Veeam Backup & Replication server . . . . . . . . . . . . . . . . . . . . . . . . . . . . . . . . . . . . . . . . . . . . . . . . . . . . . . 19
Initial configuration . . . . . . . . . . . . . . . . . . . . . . . . . . . . . . . . . . . . . . . . . . . . . . . . . . . . . . . . . . . . . . . . . . . . . . . . . . . 21
Configure Veeam Backup & Replication repository . . . . . . . . . . . . . . . . . . . . . . . . . . . . . . . . . . . . . . . . . . . . . . 21
Configure Veeam Cloud Connect . . . . . . . . . . . . . . . . . . . . . . . . . . . . . . . . . . . . . . . . . . . . . . . . . . . . . . . . . . . . . . 25
Manage a certificate . . . . . . . . . . . . . . . . . . . . . . . . . . . . . . . . . . . . . . . . . . . . . . . . . . . . . . . . . . . . . . . . . . . . . . 25
Create Cloud Gateway . . . . . . . . . . . . . . . . . . . . . . . . . . . . . . . . . . . . . . . . . . . . . . . . . . . . . . . . . . . . . . . . . . . . 27
Create tenant . . . . . . . . . . . . . . . . . . . . . . . . . . . . . . . . . . . . . . . . . . . . . . . . . . . . . . . . . . . . . . . . . . . . . . . . . . . . . 29
The end-user side! . . . . . . . . . . . . . . . . . . . . . . . . . . . . . . . . . . . . . . . . . . . . . . . . . . . . . . . . . . . . . . . . . . . . 31
Connect to a service provider . . . . . . . . . . . . . . . . . . . . . . . . . . . . . . . . . . . . . . . . . . . . . . . . . . . . . . . . . . . . . . . . . . 32
Create a Backup Copy job . . . . . . . . . . . . . . . . . . . . . . . . . . . . . . . . . . . . . . . . . . . . . . . . . . . . . . . . . . . . . . . . . . . . . . 34

Veeam Cloud Connect: Manual configuration guide for Microsoft Azure
3© 2015 Veeam Software
Restore . . . . . . . . . . . . . . . . . . . . . . . . . . . . . . . . . . . . . . . . . . . . . . . . . . . . . . . . . . . . . . . . . . . . . . . . . . . . . . . 39
Test 1: Recovering an Active Directory item . . . . . . . . . . . . . . . . . . . . . . . . . . . . . . . . . . . . . . . . . . . . . . . . . . . . . 39
Test 2: Recovering a file . . . . . . . . . . . . . . . . . . . . . . . . . . . . . . . . . . . . . . . . . . . . . . . . . . . . . . . . . . . . . . . . . . . . . . . . 42
Test 3: Recovering a virtual disk . . . . . . . . . . . . . . . . . . . . . . . . . . . . . . . . . . . . . . . . . . . . . . . . . . . . . . . . . . . . . . . . . 45
Test 4: Recovering the complete virtual machine . . . . . . . . . . . . . . . . . . . . . . . . . . . . . . . . . . . . . . . . . . . . . . . 49
Conclusion . . . . . . . . . . . . . . . . . . . . . . . . . . . . . . . . . . . . . . . . . . . . . . . . . . . . . . . . . . . . . . . . . . . . . . . . . . . 54
Appendix A: Extending your data volumes . . . . . . . . . . . . . . . . . . . . . . . . . . . . . . . . . . . . . . . . . . . . . 55
Appendix B: Using WAN acceleration . . . . . . . . . . . . . . . . . . . . . . . . . . . . . . . . . . . . . . . . . . . . . . . . . . . 57
About the Author . . . . . . . . . . . . . . . . . . . . . . . . . . . . . . . . . . . . . . . . . . . . . . . . . . . . . . . . . . . . . . . . . . . . . 59
About Veeam Software . . . . . . . . . . . . . . . . . . . . . . . . . . . . . . . . . . . . . . . . . . . . . . . . . . . . . . . . . . . . . . . 59

Veeam Cloud Connect: Manual configuration guide for Microsoft Azure
4© 2015 Veeam Software
IntroductionThis white paper explains how IT service providers can use Veeam Availability Suite™ v8 Veeam Cloud Connect
with Microsoft Azure to build their business and offer their customers new cloud-based services .
With Veeam Cloud Connect for Service Providers, you can configure multi-tenant backup stores in
Microsoft Azure in just 10 minutes . Veeam Cloud Connect provides all the capabilities you need to
manage cloud backup repositories, including setting up tenants, assigning quotas and tracking usage .
Cloud backup repositories for tenants are completely isolated from one another and customers can
encrypt their backups . Just as important, Veeam customers can connect to their cloud repositories
directly from the Veeam backup console—seamlessly, securely and with a standard Internet
connection . No VPN is required .
Veeam Cloud Connect even makes it easy for you to find new customers . The integrated service
provider lookup helps customers find service providers and cloud repositories when and where they
need them, right from within the Veeam backup console . Your approved service provider listing in the
lookup is free!
Your customers get Veeam Cloud Connect at no additional charge with Veeam Availability Suite v8,
Veeam Backup & Replication v8 and Veeam Backup Essentials™ v8 . They will need a subscription with
a Veeam Cloud Provider (VCP) to host their backup repository—and this is where you come in! As a VCP,
you can provide your Veeam Backup & Replication™ customers, version v8 and higher, backup repositories in
Azure . To provide Veeam Cloud Connect services, service providers must purchase a license key from Veeam
aggregators . Licensing is priced per virtual machine (VM) backed up through Veeam Cloud Connect to Azure,
per month . If you are not a Veeam Cloud Provider, learn more today—there’s no fee to apply .

Veeam Cloud Connect: Manual configuration guide for Microsoft Azure
5© 2015 Veeam Software
Architecture and scenarioAs you start, it is important to understand various parts of the Veeam Cloud Connect solution in Azure,
its key components and use scenarios .
ScenarioThis white paper will walk you through a basic, first-time setup and deployment of Veeam Cloud
Connect using Microsoft Azure resources, simulate the onboarding of a customer (or tenant), and
demonstrate how to test your service .
By the end of this white paper, the tenant will have on-premises, local backups as well as backups on
the Azure cloud infrastructure that you, as a service provider, offer . The tenant will also have performed
four types of restores to ensure success and correct functionality .
PrerequisitesThe scenario covered in this white paper is built on the following prerequisites:
1 . 1) You should have a basic understanding of Veeam Cloud Connect, its capabilities and features .
Before you proceed, please familiarize yourself with the information and resources available on
http://www.veeam.com/cloud-connect.html .
2 . The tenant meets the following prerequisites:
• The Veeam Backup & Replication server is deployed and functioning in their on-premises
infrastructure .
• The infrastructure is running on Microsoft Hyper-V 2012 R2, but the same concepts and
processes apply to VMware scenarios as well .
• Backups of one or more VMs are taken on a daily or more frequently . In this scenario, the tenant
protects one VM, which is its domain controller identified as DC01 .
• The Veeam Backup & Replication server has Internet access .
3 . The service provider meets the following prerequisites::
• Has a current Microsoft Azure subscription . NOTE: If you don’t have a subscription, please see
Sign-up for an Azure Subscription in this white paper .
• Is a Veeam Cloud Provider and has a signed rental agreement .

Veeam Cloud Connect: Manual configuration guide for Microsoft Azure
6© 2015 Veeam Software
Single VM Veeam Cloud Connect architectureFor this scenario, the Veeam Cloud Connect VM will be a standard VM deployed from Microsoft Azure, and all
of the different roles will be configured on a single machine . While this is not an ideal setup for a production
environment, for the purposes of this white paper, we will keep the configuration simple . Plus, when you start
with a single VM, you can easily scale-out to multiple VMs later by simply spinning up new VMs in Microsoft
Azure and distributing roles to those servers .
Roles and conceptsSP (service provider)
Data communication in Azure is between two parties, the service provider (SP) on one side and
tenants on the other .
• The SP is an organization that provides the cloud repository service to tenants .
• The tenant is an SP customer who sends VM data off site and stores backups in the cloud repository
on the SP side .
In Azure, the SP performs the following tasks:
• Configures the Veeam Cloud Connect infrastructure, which is environment needed to provide BaaS
to tenants . As part of this process, the SP takes the following steps:
• Decides what backup repositories must be used as cloud repositories
• Sets up SSL certificates to enable secure communication in the Veeam Cloud Connect infrastructure
• Creates Cloud Gateways
• Creates tenant user accounts
• Manages tenants’ accounts and data for proper functionality of the Veeam Cloud Connect infrastructure .

Veeam Cloud Connect: Manual configuration guide for Microsoft Azure
7© 2015 Veeam Software
Tenant
Tenants, on the other hand, perform the following tasks:
• Connect to the Veeam Cloud Connect infrastructure in order to use cloud repositories .
• Configure and run jobs, and perform restore tasks targeted at Veeam Cloud Connect repositories
Cloud Connect infrastructure
To expose cloud repository resources to tenants, the SP must configure the Veeam Cloud Connect
infrastructure . The Veeam Cloud Connect infrastructure is comprised of the following components:
• Components on the SP side:
• SP Veeam backup server
• SSL certificate
• Cloud repository
• Cloud Gateway
• Target WAN accelerator [optional]
• Components on tenant’s side:
• Tenant’s Veeam backup server
• Source WAN accelerator [optional]
SP Veeam backup server
The Veeam Cloud Connect infrastructure runs on the Veeam backup server within Azure . It is the
configuration and control center .
On this server, the Veeam Backup Cloud Service runs a Microsoft Windows service that is responsible for:
• Validating tenants’ credentials and access rights to assigned resources
• Providing access to the cloud repository for tenants
• Controlling transport services that work with the cloud repository
• Communicating with the Veeam Backup & Replication database
SSL certificate
SSL certificates are not being used for encrypting data stored on the cloud repository. If the tenant wants to
encrypt data, he or she needs to enable encryption in Veeam Backup & Replication.

Veeam Cloud Connect: Manual configuration guide for Microsoft Azure
8© 2015 Veeam Software
Cloud repository
The cloud repository is a storage location in the cloud where tenants can keep their VM data . Tenants
can use the cloud repository as a target for Veeam backup and Veeam Backup Copy jobs and is the
source from which they can restore their data .
The cloud repository is a multi-tenant repository configured in the SP backup infrastructure . It is built on top
of a standard Veeam repository . Being a multi-tenant storage resource, the cloud repository still appears as a
logically separate backup repository to every tenant . Data in the underlying repository, the cloud repositories,
are segregated and isolated giving every tenant its own folder on the underlying repository where the tenant’s
data is stored . A service provider’s tenants do not have access, or visibility, to other tenants’ data within the
cloud Azure repository, and they have no access to data belonging to other tenants .
Cloud Gateway
The Veeam Cloud Connect infrastructure configured on the SP side is hidden from tenants . Tenants
know only about cloud repositories and can use them as they use local backup repositories . Veeam
backup servers on the tenant side do not communicate with the cloud repository directly . Data
communication and transfer in the cloud is carried out via one or more Cloud Gateway .
The Cloud Gateway is a network service that resides on the SP side and acts as a communication point
in the cloud . It routes commands and traffic between the SP, tenants and the cloud repository .
The Cloud Gateway is a Microsoft Windows server running the Cloud Gateway Service—a Microsoft
Windows service responsible for establishing a connection between the SP Veeam backup server,
tenants’ Veeam backup servers and the cloud repository .
WAN accelerator [Optional]
WAN accelerators are optional components in the Veeam Cloud Connect infrastructure . Tenants may
use WAN accelerators for Backup Copy jobs targeted at the cloud repository .
WAN accelerators deployed in the cloud run the same services and perform the same role as WAN
accelerators in an on-premises backup infrastructure . When configuring Backup Copy jobs, tenants can
choose to exchange data over a direct channel or communicate with the cloud repository via a pair
of WAN accelerators . To pass VM data via WAN accelerators, the SP and tenants must configure WAN
accelerators in the following way:
• The source WAN accelerator is configured on tenant side .
• The target WAN accelerator is configured on the SP side .
Veeam Cloud Connect: Manual configuration guide for Microsoft Azure
9© 2015 Veeam Software
Tenant Veeam backup server
To connect to the cloud and use the cloud repository service provided by the SP, tenants utilize Veeam
backup servers deployed on their side .
Veeam backup servers on the tenants’ side represent client machines . Tenants can store their data in
the cloud to connect to the SP via their Veeam backup servers . Once connected, tenants configure
necessary jobs and perform data protection and disaster recovery tasks targeted at the cloud
repository . All tasks are performed by the tenants themselves . The SP only sets up the Veeam Cloud
Connect infrastructure and exposes storage resources to tenants with the use of the cloud repository .
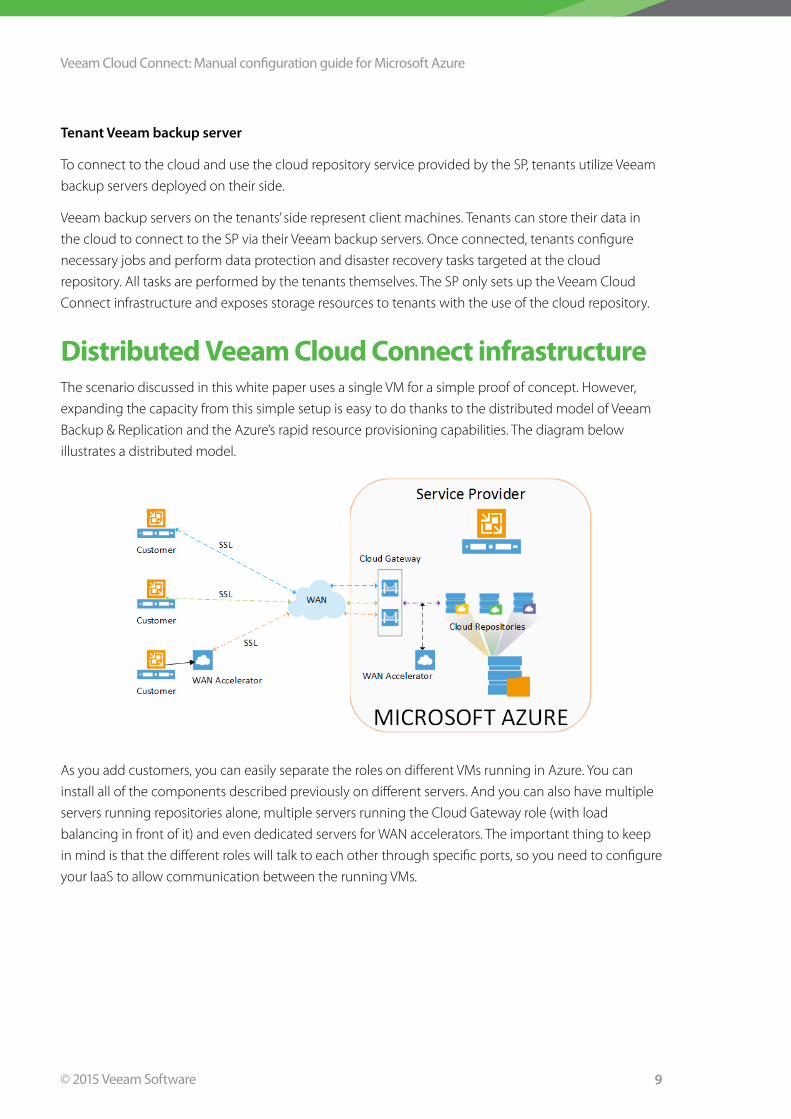
Distributed Veeam Cloud Connect infrastructureThe scenario discussed in this white paper uses a single VM for a simple proof of concept . However,
expanding the capacity from this simple setup is easy to do thanks to the distributed model of Veeam
Backup & Replication and the Azure’s rapid resource provisioning capabilities . The diagram below
illustrates a distributed model .
As you add customers, you can easily separate the roles on different VMs running in Azure . You can
install all of the components described previously on different servers . And you can also have multiple
servers running repositories alone, multiple servers running the Cloud Gateway role (with load
balancing in front of it) and even dedicated servers for WAN accelerators . The important thing to keep
in mind is that the different roles will talk to each other through specific ports, so you need to configure
your IaaS to allow communication between the running VMs .

Veeam Cloud Connect: Manual configuration guide for Microsoft Azure
10© 2015 Veeam Software
Azure preparationsBefore going into details about deploying the Veeam solution from Microsoft Azure, there are a few
things you need to know about the scope of this white paper .
This white paper won’t go too deep into the configuration of Microsoft Azure . We will deploy a
single VM with Windows Server 2012 R2 on it, attach a repository disk for Veeam and open the port
connections to it . The Veeam Backup & Replication server running in Microsoft Azure won’t be joined to
any domain and will be a single, multi-purpose server .
To begin:
• Sign up for an Azure subscription
• Create a VM
• Configure the endpoints
• Create and assign a data disk to the VM
Sign up for an Azure subscriptionBefore you can start, you need a Microsoft Azure subscription . In case you don’t already have one, you
can simply request a 30-day trial through http://azure.microsoft.com/en-us/ .
The sign-up process requires a mobile phone number (to receive a verification code through SMS), a
credit card (you won’t get billed during the trial, but it is required for proof of identity) and a Microsoft
Account username (formerly Windows Live ID) . Once you’ve signed up, you can start your deployment .
Please note that at the time of publication of this white paper, trial subscriptions were given a $200
credit in Azure, but that may not be the case going forward . If you hit that spending limit or pass the
30-day trial period, your account will be suspended; however, you have the option to upgrade the trial
to a Pay-As-You-Go Azure subscription .

Veeam Cloud Connect: Manual configuration guide for Microsoft Azure
11© 2015 Veeam Software
Billing
One of the items you should keep an eye on is your usage . You can easily see what you are using by looking at
the billing page of your subscription . Simply go to http://azure.microsoft.com/en-us/account/ .
Figure 1: Manage your Azure account webpage
From this page, you can go to the Management Portal (we will do that later) and to the Usage and billing portal . Select Usage and billing to see your usage and billing history .
After signing in with your Microsoft Account you will be able to see your subscription (or
subscriptions) and look at the usage .
Figure 2: Usage history
Veeam Cloud Connect: Manual configuration guide for Microsoft Azure
12© 2015 Veeam Software
The Usage and billing page shows a lot of data in addition to your current usage . You can view your historical
billing and even download a CSV with lots of valuable data to view what you are exactly consuming .
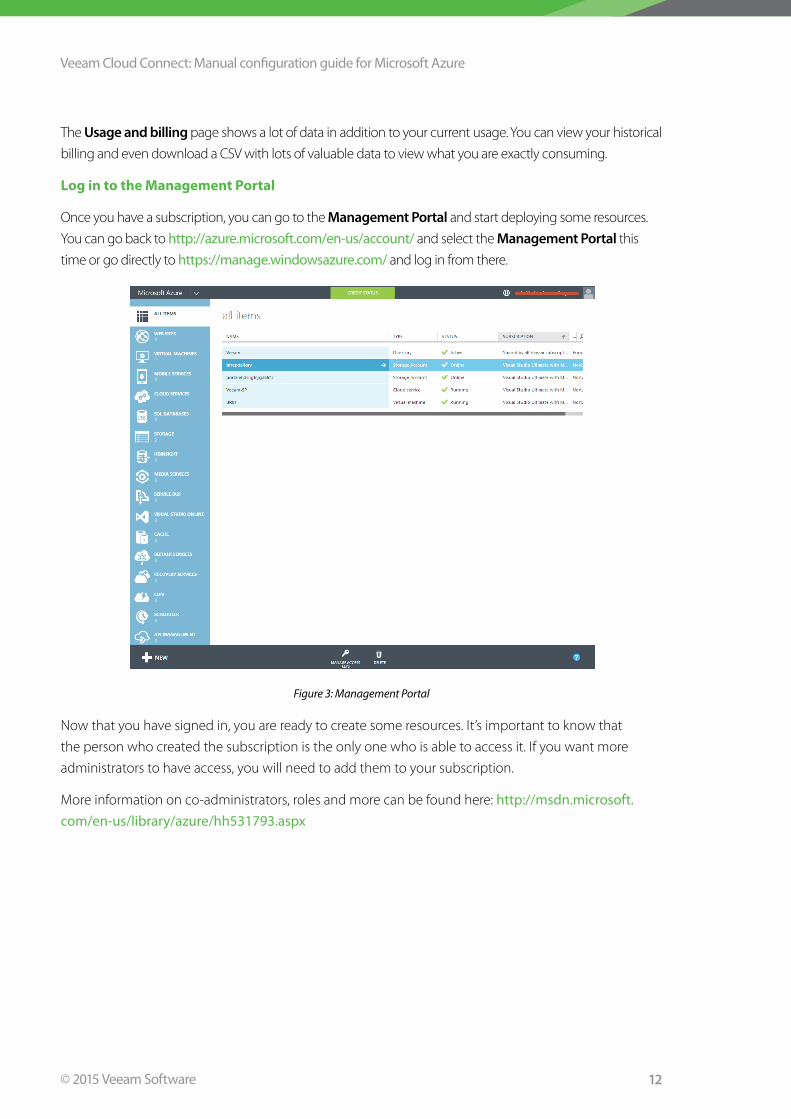
Log in to the Management Portal
Once you have a subscription, you can go to the Management Portal and start deploying some resources .
You can go back to http://azure.microsoft.com/en-us/account/ and select the Management Portal this
time or go directly to https://manage.windowsazure.com/ and log in from there .
Figure 3: Management Portal
Now that you have signed in, you are ready to create some resources . It’s important to know that
the person who created the subscription is the only one who is able to access it . If you want more
administrators to have access, you will need to add them to your subscription .
More information on co-administrators, roles and more can be found here: http://msdn.microsoft.com/en-us/library/azure/hh531793.aspx

Veeam Cloud Connect: Manual configuration guide for Microsoft Azure
13
Create a virtual machineNext you will create the Veeam Backup & Replication server . To create a VM, go to New and choose
Compute – Virtual Machine – From Gallery1
Figure 4: Create a new VM
Now you will see a wizard that allows you to choose different items . For the purposes of this white
paper, these are the settings that I chose:
Parameter Value
Image Windows Server 2012 R2 datacenter
Version Release Date (Latest)
Virtual Machine Name BR01
Tier Standard
Size A1 (1 core, 1 .75 GB Memory)
New User Name Username
New Password Password
Cloud Service2 Veeam-SP
Region North-Europe (choose your best suited region)
Storage Account Use an automatically generated storage account
Availability set None
Endpoints Leave as is, see later for changes
Install the VM agent Checked
There are a few notes of importance here . When you want to deploy multiple machines; for example,
when you want to scale-out the Veeam Backup & Replication Cloud Connect service, you will need
to make sure that they are connected through a Cloud Service . You also have the option to create an
Availability Setting for high availability . These settings are out of the scope of this project, but if you are
planning to scale-out after this trial, you should start planning immediately by selecting the correct
setting from the outset, even if you start with only one VM .
1. Note: You can also use the Quick Create option, which is great when you only want to deploy a standalone VM. As soon as you need networking between the different VMs in Azure, it is preferable to work with the From Gallery option.
2. Cloud Service: A Cloud Service is a container for one or more VMs you create. You can create a Cloud Service for a single VM, or you can load balance multiple VMs by placing them in the same Cloud Service. For more information: http://azure.microsoft.com/en-us/documentation/articles/cloud-services-what-is/

Veeam Cloud Connect: Manual configuration guide for Microsoft Azure
14© 2015 Veeam Software
For the purposes of this white paper we use the default IP address setting, which is a dynamic external
and private IP address that works well for a proof of concept . However, the problem with dynamic IP
addresses is that they can change over time; for example, when you stop the VMs in your service or
de-allocate them . To solve this issue, you can work with a reserved IP address that won’t change over
time unless you decide to disassociate it . It’s important to know that the reserved IP address needs to
be reserved FIRST, before you deploy the solution .
When you are finished, Microsoft Azure will create and deploy the VM, and after a few minutes, the job
will be finished and your VM will be ready to use .
Figure 5: VM Ready to use – CreateVM03.png
Veeam Cloud Connect: Manual configuration guide for Microsoft Azure
15
Please note some important items shown in Figure 5:
1 . DNS name: This is the Cloud Service that you chose . In this case, we are using a DNS name under
the cloudapp .net domain (the default MSFT domain), but you can use your own domain, which we
recommend when you want to get this setup into production for customers . For more information:
http://azure.microsoft.com/en-us/documentation/articles/cloud-services-custom-domain-name/
2 . Public virtual IP (VIP) address: This is your public IP address to which your customers (and you
with RDP, PowerShell remoting) will connect . You receive this public IP whenever you deploy your
first VM in your cloud service, and that will be your public IP for all the VMs in that service .
3 . Internal IP address: This is your private IP address . In this setup, it is possible to lose the IP address
whenever you fully shut down the VM . This can cause issues when you configure Veeam Backup &
Replication Cloud Connect with different servers . In a production environment, it is better to have a
static IP, which is now possible on Microsoft Azure .
4 . Connect: This button allows you to RDP into your VM . It will let you download an RDP
connection that already has the correct settings . The only thing left to do is add your
username and password to connect to the server .
Configure endpointsNow that your VM is running, you need to open certain ports to allow communication . By default, any
VM you deploy will have some ports opened to allow Remote PowerShell and RDP to your VM or VMs .
This is done through the VIP as explained earlier . The VM that will hold the Cloud Gateway role needs to
have a specific port opened; by default, we use port 6180 for this . Note that you can change this port
during setup, but if you do, then you will need to use the correct port when you create the endpoint .
Of course, you can do this after you have installed Veeam Backup & Replication .
Creating endpoints is very easy . On the Management Portal, select your VM and then go to endpoints . You will
see the ports that are opened to your VM . Then press the Add button to create a new endpoint . You can select
a standalone endpoint or add an endpoint to an existing load-balanced set 3
In this white paper, the example is of a single VM for all roles, so we can choose the stand-alone endpoint .
3. For more information on load-balancing: http://azure.microsoft.com/en-us/documentation/articles/load-balance-virtual-machines/

Veeam Cloud Connect: Manual configuration guide for Microsoft Azure
16© 2015 Veeam Software
Figure 6: Create an endpoint
On this page you can give your endpoint a name, choose the protocol and choose the public and
private port .
Figure 7: Overview of your current endpoint configuration

Veeam Cloud Connect: Manual configuration guide for Microsoft Azure
17© 2015 Veeam Software
Create and assign a repository diskAs explained in the Architecture and scenario section, you also need a repository to store your customer
backups . Since you don’t want to store them on the C:\ drive, you will attach a new disk to your VM . This disk
will hold your backup files . There are a few options to create and attach an empty disk .
There are two methods to do this:
• Attach an existing disk
• Attach an empty disk
More information can be found here: http://azure.microsoft.com/en-us/documentation/articles/storage-windows-attach-disk/
In this case, we will attach an empty disk to the VM .
Figure 8: Attach an empty disk

Veeam Cloud Connect: Manual configuration guide for Microsoft Azure
18© 2015 Veeam Software
Please note that I have chosen None as the host caching preference .
Finally, after the disk is attached to the VM, you will need to connect though RDP and initialize the disk
in your operating system (see Figure 9) .
Figure 9: Configure the disk in your VM
Figure 10: IP Address configuration

Veeam Cloud Connect: Manual configuration guide for Microsoft Azure
19© 2015 Veeam Software
Install and configure Veeam Backup & ReplicationThe first part is ready . You have an Azure subscription, there is one VM running in Azure, you’ve
configured endpoints and data disks . Now you can install Veeam Backup & Replication .
The next steps are the service provider side:
• Install Veeam Backup & Replication server
• Initial configuration
• Repository configuration
• WAN acceleration configuration (optional): see Appendix B: Using WAN Acceleration
• Veeam Cloud Connect configuration
Install Veeam Backup & Replication serverThis section will not include the entire installation process, but highlights a few steps in the
installation process .
• The license
You need a special license to use Veeam Cloud Connect as a service provider .
Figure 11: Provide License dialog

Veeam Cloud Connect: Manual configuration guide for Microsoft Azure
20© 2015 Veeam Software
• Veeam Backup & Replication PowerShell SDK
Although optional, we recommend installing the Veeam Backup & Replication PowerShell SDK, which
allows you to use automation .
Figure 12: Enable the PowerShell SDK
• Port configuration
You will be asked to specify ports for various parts of the solution . If you change these ports, note of
them for later reference .
Figure 13: Ports used

Veeam Cloud Connect: Manual configuration guide for Microsoft Azure
21© 2015 Veeam Software
It’s easy to install Veeam Backup & Replication . After this step, you will have a running Veeam Backup &
Replication server with the Veeam Cloud Connect infrastructure enabled .
Initial configuration Before telling your end users what they need to do, you need to do some small configuration steps .
First you need to register your own server within the Veeam Backup & Replication UI . Although this
step isn’t always necessary, it can make your life easier when you are working with multiple servers for
multiple roles, and it’s a very quick job .
Go to Backup Infrastructure > Managed Servers and press the button Add Server in the ribbon .
Using a wizard, you can add the server into the UI . You only need the IP or DNS name and the
credentials to connect to the server .
Figure 14: B&R – Initial configuration
Configure Veeam Backup & Replication repositoryBefore you configure the Cloud Gateway, SSL certificate, tenants and cloud repositories, you need a
regular repository .
Go to Backup Infrastructure > Backup Repositories and click the Add Repository button in the ribbon .
Figure 15: Add Repository button

Veeam Cloud Connect: Manual configuration guide for Microsoft Azure
22© 2015 Veeam Software
In the New Backup Repository wizard, type in the name and description for the repository . Note that
this name won’t be shown to the tenant . You will give each tenant a specific name that the tenant will
see in its infrastructure . Press Next .
Figure 16: Name your repository
On the Type page, select Microsoft Windows server and press Next .
Figure 17: Choose Windows Server
On the Server page, choose the server that holds the storage (note, avoid the use of This Server) and
select the path to the data disk .

Veeam Cloud Connect: Manual configuration guide for Microsoft Azure
23© 2015 Veeam Software
Figure 18: Choose the destination drive
On the Repository page, create or type in the path to the specific folder . A Windows Server volume
can hold multiple different repositories, so it is always good to agree on a folder structure upfront .
Figure 19: Create the volume
Veeam Cloud Connect: Manual configuration guide for Microsoft Azure
24© 2015 Veeam Software
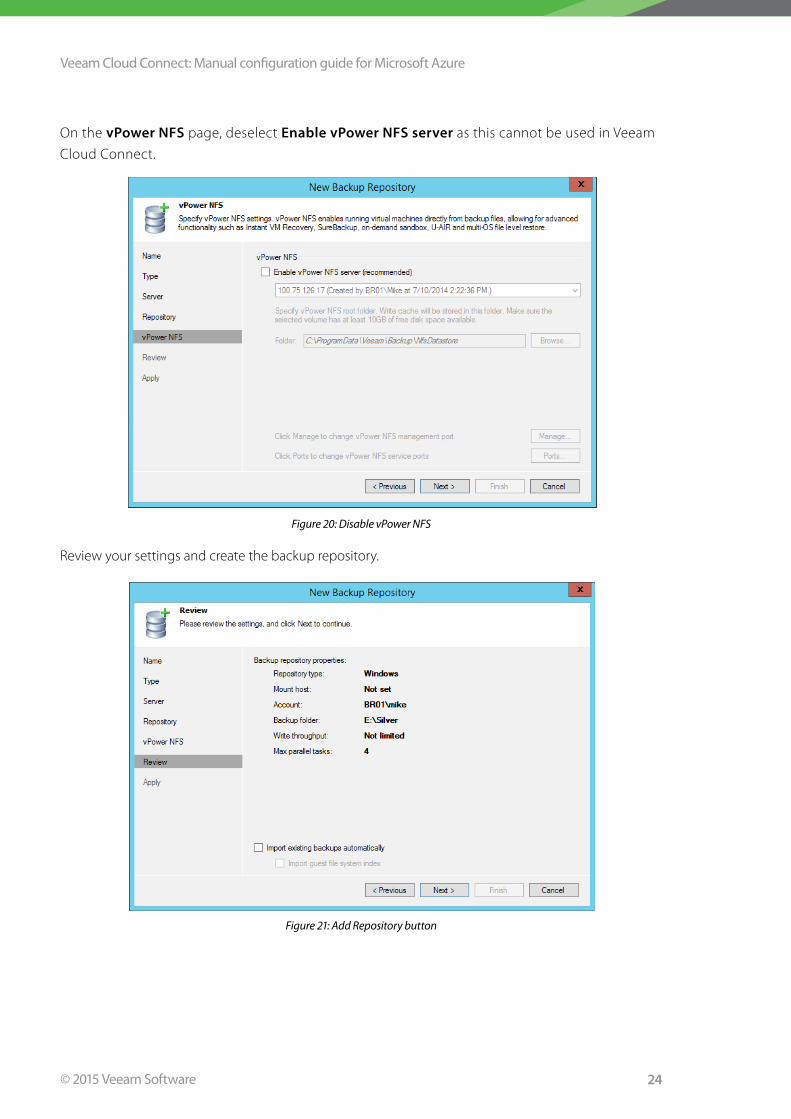
On the vPower NFS page, deselect Enable vPower NFS server as this cannot be used in Veeam
Cloud Connect .
Figure 20: Disable vPower NFS
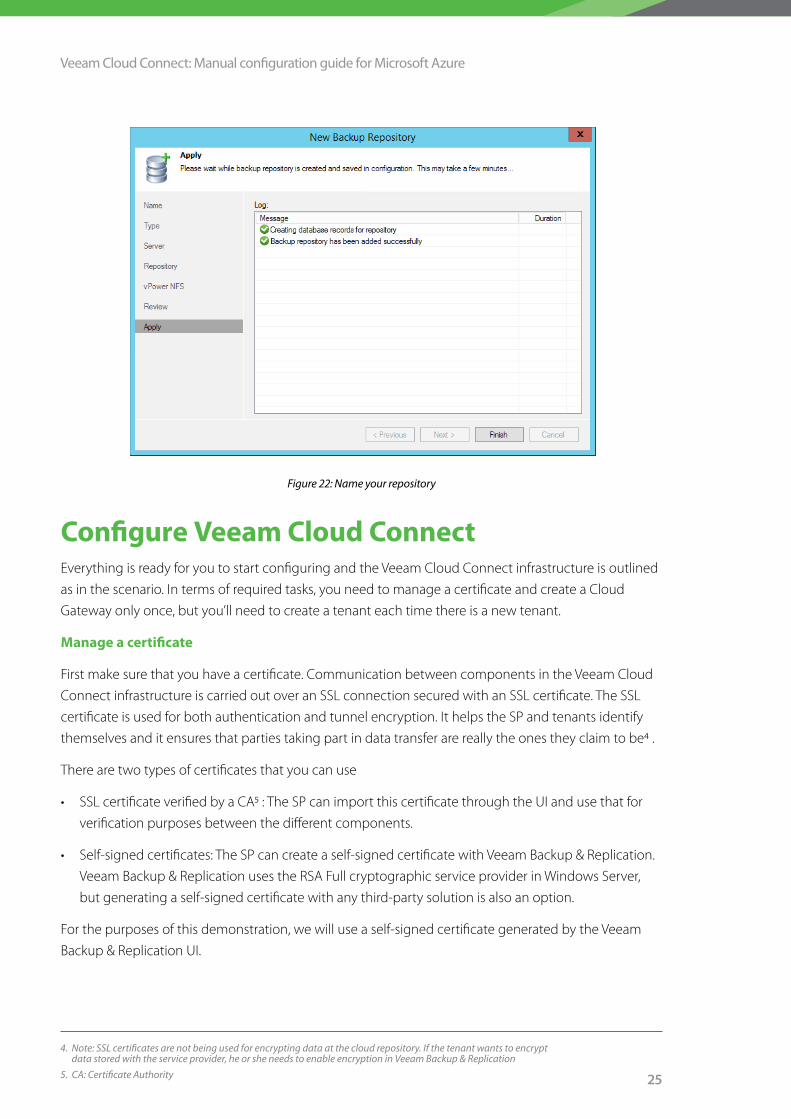
Review your settings and create the backup repository .
Figure 21: Add Repository button
Veeam Cloud Connect: Manual configuration guide for Microsoft Azure
25
Figure 22: Name your repository
Configure Veeam Cloud ConnectEverything is ready for you to start configuring and the Veeam Cloud Connect infrastructure is outlined
as in the scenario . In terms of required tasks, you need to manage a certificate and create a Cloud
Gateway only once, but you’ll need to create a tenant each time there is a new tenant .
Manage a certificate
First make sure that you have a certificate . Communication between components in the Veeam Cloud
Connect infrastructure is carried out over an SSL connection secured with an SSL certificate . The SSL
certificate is used for both authentication and tunnel encryption . It helps the SP and tenants identify
themselves and it ensures that parties taking part in data transfer are really the ones they claim to be4 .
There are two types of certificates that you can use
• SSL certificate verified by a CA5 : The SP can import this certificate through the UI and use that for
verification purposes between the different components .
• Self-signed certificates: The SP can create a self-signed certificate with Veeam Backup & Replication .
Veeam Backup & Replication uses the RSA Full cryptographic service provider in Windows Server,
but generating a self-signed certificate with any third-party solution is also an option .
For the purposes of this demonstration, we will use a self-signed certificate generated by the Veeam
Backup & Replication UI .
4. Note: SSL certificates are not being used for encrypting data at the cloud repository. If the tenant wants to encrypt data stored with the service provider, he or she needs to enable encryption in Veeam Backup & Replication
5. CA: Certificate Authority

Veeam Cloud Connect: Manual configuration guide for Microsoft Azure
26© 2015 Veeam Software
Steps:
Open Veeam Backup & Replication . Go to Cloud Connect Infrastructure and press the Manage Certificates button in the ribbon .
In the wizard, select Generate new certificate and press Next .
Figure 23: Generate a new certificate
On the Server page, choose the server that holds the storage and select the path to the data disk .
Figure 24: Give the certificate a friendly name

Veeam Cloud Connect: Manual configuration guide for Microsoft Azure
27© 2015 Veeam Software
On the Review page, review the summary, copy the data to the clipboard and store it away safely . Then
press Finish .
Figure 25: Copy the certificate to the clipboard
Create Cloud Gateway
As we discussed before, the Cloud Gateway is a network service that resides on the SP side and is
the communication endpoint for tenants . It routes traffic and commands between the SP, tenants
and the cloud repository .
Building a Cloud Gateway is very easy .
Go to Cloud Connect Infrastructure and press the Add Cloud Gateway button in the ribbon .
Choose the server on which you want to install the gateway (remember to choose it by IP or DNS
name and not this server), type in a description and change the gateway port if necessary . Note:
This port must match the port you selected as an endpoint in the Azure section .

Veeam Cloud Connect: Manual configuration guide for Microsoft Azure
28© 2014 Veeam Software
Figure 26: New Cloud Gateway wizard
Choose This server is located behind NAT and type in the external IP address that you noted down
when you created the VM in Microsoft Azure . Leave the internal port the same as the external port .
Figure 27: Networking settings

Veeam Cloud Connect: Manual configuration guide for Microsoft Azure
29
Review your settings and apply . That’s it; you’ve configured the Cloud Gateway .
Figure 28: Your Cloud Gateway is ready
Create tenant
At this point, everything is ready for you to start serving your first customer or tenant . The last step is
to create your first tenant . Before you start, you should know the quota6 in GB or TB that the tenant is
allowed and if the tenant has a lease7 . If you have configured the WAN acceleration, you need to know
which WAN accelerator the tenant is allowed to use .
Go to Cloud Connect Infrastructure and press the Add User button in the ribbon .
Type in the username for that tenant and create a password (or use the Generate Password button) for
the tenant . Select a date for the lease expiration (if any) .
6. Quota: The amount of space assigned to one tenant on one cloud repository. It is a chunk of storage resources that the tenant can use for storing backups on the cloud repository. The SP can assign quotas on different cloud repositories to one tenant.
7. Lease: This is a period of time for which the tenant has access to tenant’s quotas on the cloud repository. The lease settings help the SP restrict for how long the tenant should be able to use cloud repository resources.

Veeam Cloud Connect: Manual configuration guide for Microsoft Azure
30
Figure 29: Create a new tenant
The next page shows the Resources page . This is where you will add the allowed quota and
repository (or multiple) . Press the Add button .
Figure 30: Add resources for the tenant
© 2014 Veeam Software

Veeam Cloud Connect: Manual configuration guide for Microsoft Azure
31
Type in the name for the cloud repository . This name will be seen by the tenant . Then select the
effective backup repository you previously created and fill in the user quota . Optionally, select the WAN
accelerator that the tenant is allowed to use .
As you can see, the tenant now has a resource available in your environment; and in case you have
multiple resources for the tenant, you can add those as well .
Review your summary, and you are ready .
Figure 31 Tenant is ready for use
The end-user side!You have successfully configured your service provider infrastructure . Now it is time to connect your
first customer . In the scenario for this white paper, the tenant has signed a contract with you to store
some backups off site . The tenant is already protecting his VMs (or in this scenario, one specific VM) .
The tenant needs to take the next steps . But first you need to provide the tenant with some information:
• Cloud Gateway: DNS name or IP address . While it is preferred to have a DNS name, we will be using
the IP address here for the purposes of testing
• Username: The username of the tenant
• Password: The password of the tenant
• Port of the Cloud Gateway (example, 6180)
• In case of a self-signed certificate8, provide the fingerprint of the certificate; e .g .,
32E709CD6F0FF598A1A46FBF5A3BB940E0931EF3
8. In case you are using a self-signed certificate, consider using the “Copy to clipboard” button on the last page of the certificate wizard. This will allow you to copy and send the information related to the certificate to the tenant.

Veeam Cloud Connect: Manual configuration guide for Microsoft Azure
32© 2014 Veeam Software
The tenant will take the following steps:
• Connect to a service provider
• Create a Backup Copy job
Connect to a service providerIn Veeam Backup & Replication, there is a new item in the Backup Infrastructure UI called “service
providers .” From there, the tenant can choose Add Service Provider from the ribbon .
Figure 32: Service provider section
Type in the DNS name or IP address of the Cloud Gateway and see if the port matches the port that is
configured for the Cloud Gateway .
Figure 33: Add a service provider

Veeam Cloud Connect: Manual configuration guide for Microsoft Azure
33
The wizard will connect to the Cloud Gateway and request the certificate . The tenant can paste the
fingerprint information into the verification box and verify the certificate . The tenant will also add the
username and password to connect to your cloud infrastructure here .
Figure 34. Verification of the certificate and username / password
On the resources page, the tenant will be able to see the available cloud repositories and capacity and
whether or not the WAN acceleration is enabled .
Figure 35: Review the resources
© 2014 Veeam Software

Veeam Cloud Connect: Manual configuration guide for Microsoft Azure
34© 2015 Veeam Software
Figure 36: The service provider is added
The tenant is now ready to use the cloud repository and can see it in the tenant infrastructure .
Figure 37: Cloud repository seen in the infrastructure
Create a Backup Copy jobThe tenant can now configure a Backup Copy job to the service provider to store its data off site . Please note
that a Backup Copy job isn’t the only option . The tenant can use Backup, Backup Copy and File Copy .
In this scenario, the tenant is regularly protecting its Domain Controller called DC01 and the tenant wants to
store it in your cloud infrastructure .
On the Tenant side, go to Backup & Replication and choose the Backup Copy button from the ribbon .
Type in a name for the job, a description and how frequently you want to run the Backup Copy job .

Veeam Cloud Connect: Manual configuration guide for Microsoft Azure
35© 2015 Veeam Software
Figure 38: New Backup Copy job
On the Virtual Machines page, add the VM from the Backup and select the required VM .
Figure 39: Add VM(s) to the job
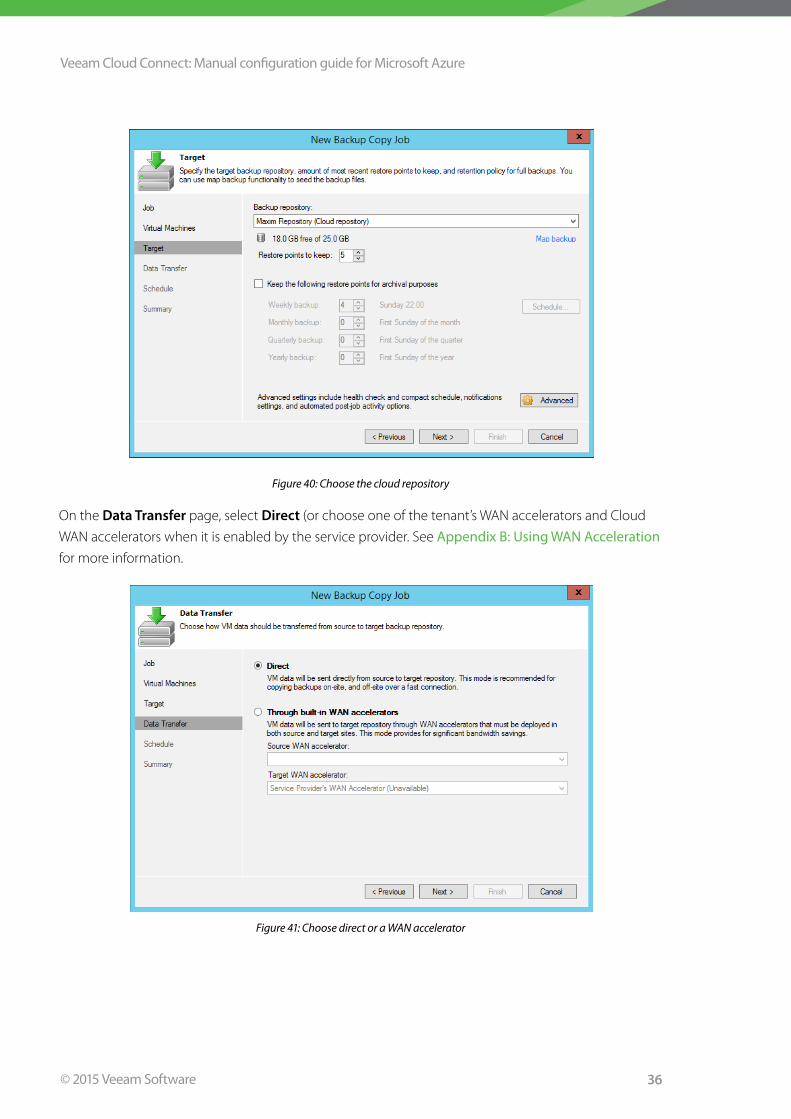
On the Target page, select the cloud repository and the number of restore points to keep . Alternatively,
you can create an archive schedule . If necessary, configure advanced settings such as encryption,
notifications and deduplication .
Veeam Cloud Connect: Manual configuration guide for Microsoft Azure
36© 2015 Veeam Software
Figure 40: Choose the cloud repository
On the Data Transfer page, select Direct (or choose one of the tenant’s WAN accelerators and Cloud
WAN accelerators when it is enabled by the service provider . See Appendix B: Using WAN Acceleration
for more information .
Figure 41: Choose direct or a WAN accelerator

Veeam Cloud Connect: Manual configuration guide for Microsoft Azure
37© 2015 Veeam Software
On the Schedule page, select Any time or choose specific time periods to upload data .
Figure 42: Time to allow upload of data
Review the summary and press Finish .
Figure 43: Review the job settings and apply

Veeam Cloud Connect: Manual configuration guide for Microsoft Azure
38© 2015 Veeam Software
At the scheduled time, the Backup Copy job will connect to your cloud infrastructure and start the job .
Figure 44: Finished job
When the job has finished, the service provider can see the used space in its infrastructure .
Figure 45: View of used space on the cloud repository

Veeam Cloud Connect: Manual configuration guide for Microsoft Azure
39© 2015 Veeam Software
RestoreBacking up to a service provider is one thing; restoring the data is another thing (and it’s the most
important) . To fully test the capabilities, the tenant, in this example, will do a few restore tests .
The tenant will perform four different tests:
• Recover an Active Directory item (since it is a Domain Controller)
• Recover a file out of the VM
• Restore the VHDX file
• Restore an entire VM
When you perform file recovery or application-item recovery, you don’t need to download the entire
VM first . You only need to download the requested file or application item .
Test 1: Recovering an Active Directory itemThe first test in this scenario is to recover an Active Directory item . In the scenario, I have accidentally
deleted the administrator and want to recover that as soon as possible .
Go to Backup & Replication > Backups > Cloud . Select the created Backup Copy job and the VM in
that job and press Application Items > Microsoft Active Directory from the ribbon .
Choose the restore point . In this example, I only have one restore point .
Figure 46: Choose your restore point

Veeam Cloud Connect: Manual configuration guide for Microsoft Azure
40© 2015 Veeam Software
Give a reason for restoring .
Figure 47: Add the restore reason
Press Finish on the Completing the Restore Wizard page .
Figure 48: Finish

Veeam Cloud Connect: Manual configuration guide for Microsoft Azure
41© 2015 Veeam Software
The system will now connect to the backup on the service provider side and open Veeam Explorer™
for Microsoft Active Directory . It will take some time to enumerate the information and load the Active
Directory tree in Explorer . The time required depends on the line speed
When the tree is loaded, you can browse through it and select the object you want to restore .
Figure 49: Search or select your object
Right-click on the object and choose your preference for restoring . In this scenario, I decided to export
the object to my desktop . It will become an LDF file that can be imported later .
Figure 50: Export options
Figure 51: Finished exporting object(s)

Veeam Cloud Connect: Manual configuration guide for Microsoft Azure
42© 2015 Veeam Software
And this is the actual LDF file you can import .
Figure 52: LDF file as a result of the export
Test 2: Recovering a fileThe second test is similar to the first, but now you will restore a file out of the VM . And instead of saving
it somewhere else, you will recover it directly to the running VM .
Go to Backup & Replication > Backups > Cloud . Select the created Backup Copy job and the VM in
that job and press Guest Files > Microsoft Windows from the ribbon .
Choose the restore point . In this example, I only have one restore point .
Figure 53: Choose your restore point

Veeam Cloud Connect: Manual configuration guide for Microsoft Azure
43© 2015 Veeam Software
Give a reason for restoring .
Figure 54: Give a reason for restoring
Press Finish to start the Backup Browser .
Figure 55: Finish
Next, the system launches a browser that shows the entire file system tree . You can browse in that tree
and select the file(s) necessary to restore . As with Veeam Explorer for Active Directory, this will take a
few minutes . After selecting a file or files, press the restore button .

Veeam Cloud Connect: Manual configuration guide for Microsoft Azure
44© 2015 Veeam Software
Figure 56 Browse through the file system and select your file
The system will request credentials to connect to the running VM to do the restore .
Figure 57: Select credentials to connect to the running server
The system will now restore the file .
Figure 58: Restore successful

Veeam Cloud Connect: Manual configuration guide for Microsoft Azure
45© 2015 Veeam Software
Test 3: Recovering a virtual diskThe third test is a bit different . In this example, I want to restore the entire VHDX and import it in a
different environment .
Go to Backup & Replication > Backups > Cloud . Select the created Backup Copy job and the VM in
that job and press VM Files > VM Files from the ribbon .
Choose the restore point . In this case, I only have one restore point .
Figure 59: Choose your restore point
Now you can select the VM files that you want to restore . In this case, I’m only interested in the VHDX, so
I chose that specific file . Also select the server location and file path to where you want to restore .

Veeam Cloud Connect: Manual configuration guide for Microsoft Azure
46© 2015 Veeam Software
Figure 60: Select the file(s)
Give a restore reason .
Figure 61: Type in a restore reason

Veeam Cloud Connect: Manual configuration guide for Microsoft Azure
47© 2015 Veeam Software
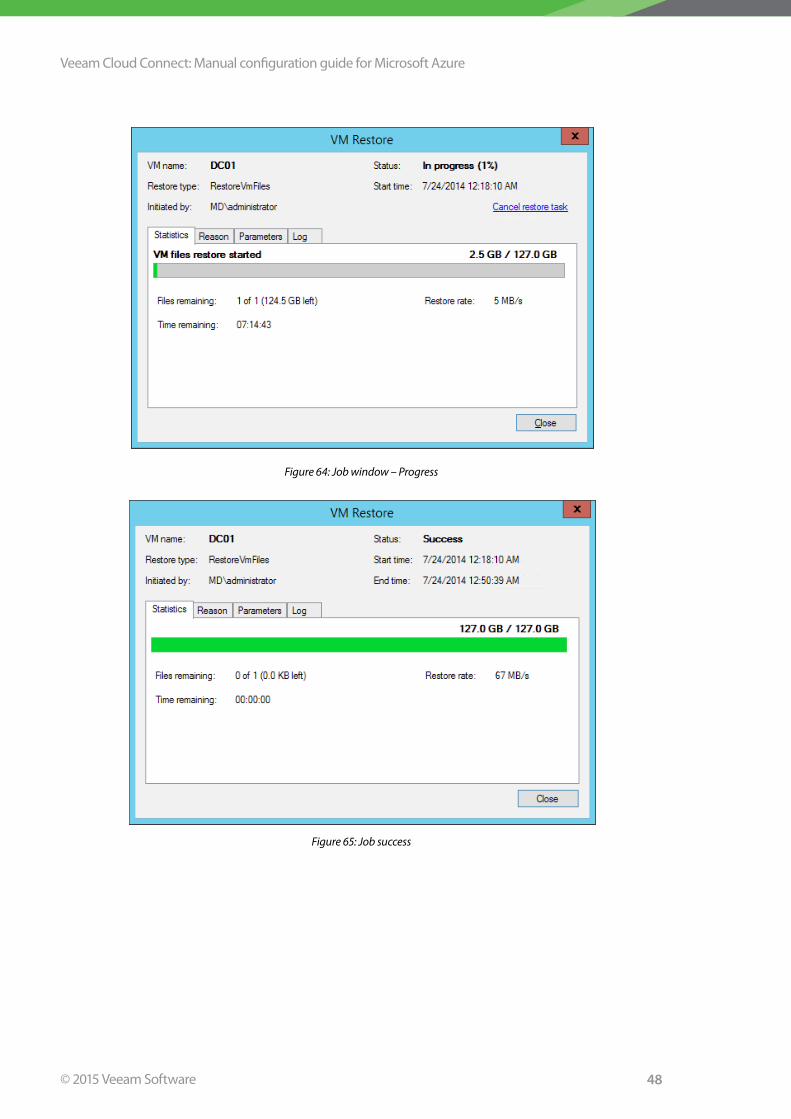
Review the summary and press Finish .
Figure 62: Finish and let the job run
The system is now restoring the VHDX file to the server and location of your choice .
Figure 63: Job window – Log
Veeam Cloud Connect: Manual configuration guide for Microsoft Azure
48© 2015 Veeam Software
Figure 64: Job window – Progress
Figure 65: Job success

Veeam Cloud Connect: Manual configuration guide for Microsoft Azure
49© 2015 Veeam Software
Test 4: Recovering the complete virtual machineThe fourth and last test is to recover the entire VM . In this scenario, we don’t want to recover the VM
to the original host . Assume that we lost that host and we want to restore it to a different host with
settings that differ from the original host .
Go to Backup & Replication > Backups > Cloud . Select the created Backup Copy job and the VM in
that job and press Entire VM from the ribbon .
Select the VM and the restore point (if you have multiple) and press Next .
Figure 66: Choose your restore point
Select Restore to a new location, or with different settings .
Figure 67: Choose to restore to new location, or with different settings
Veeam Cloud Connect: Manual configuration guide for Microsoft Azure
50© 2015 Veeam Software
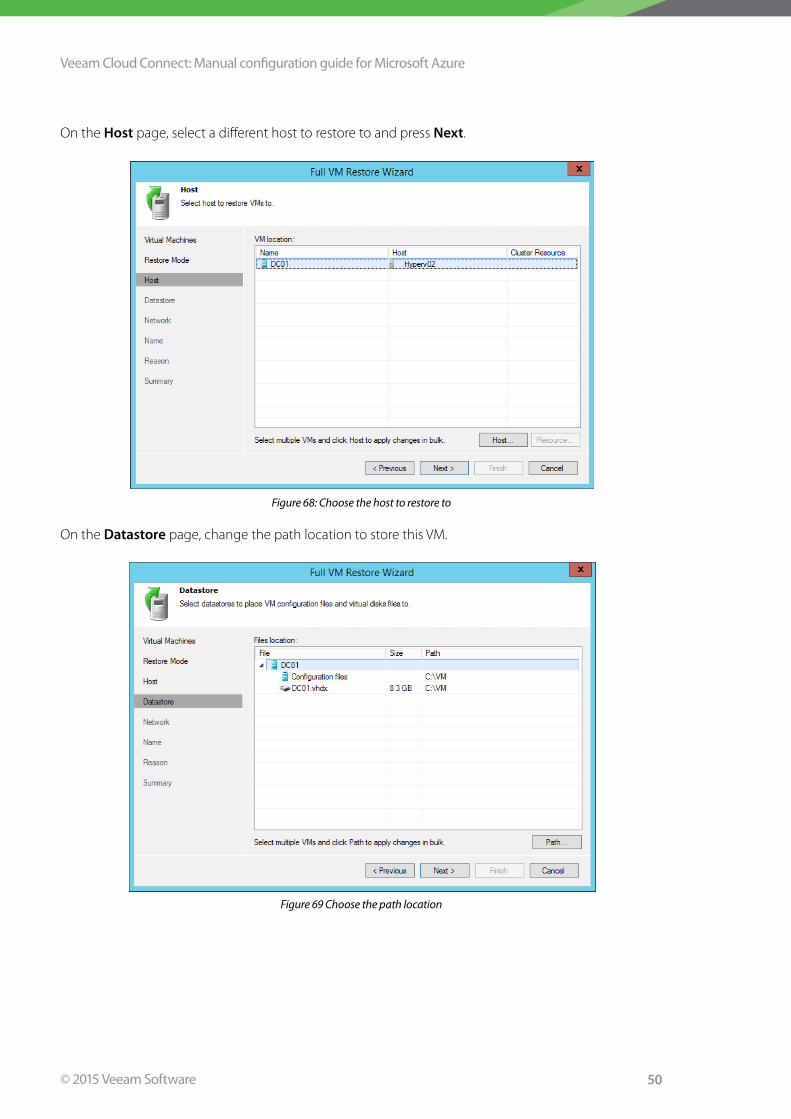
On the Host page, select a different host to restore to and press Next .
Figure 68: Choose the host to restore to
On the Datastore page, change the path location to store this VM .
Figure 69 Choose the path location

Veeam Cloud Connect: Manual configuration guide for Microsoft Azure
51© 2015 Veeam Software
On the Network page, select the network from that host where you want to connect your VM .
Figure 70: Choose the virtual network to connect to
Finally, choose a new name if necessary and decide whether you want to preserve the VM UUID or not .
Figure 71: Change the VM name and UUID if necessary

Veeam Cloud Connect: Manual configuration guide for Microsoft Azure
52© 2015 Veeam Software
Give a reason for the restore .
Figure 72: Type in the restore reason
Review your settings and decide if you want to automatically start the VM after the restore or not .
Figure 73: Review and start the restore job

Veeam Cloud Connect: Manual configuration guide for Microsoft Azure
53© 2015 Veeam Software
Figure 74: Job log window
Figure 75: Finished and successful restore
Veeam Cloud Connect: Manual configuration guide for Microsoft Azure
54© 2015 Veeam Software
ConclusionBecoming a service provider with minimum effort and almost no CAPEX is easy with Veeam Backup &
Replication Cloud Connect and Microsoft Azure . You can set up your cloud infrastructure quickly and easily in
Microsoft Azure’s IaaS offering . You can complete the entire setup and configuration in a few hours .
There is not much effort required on the tenant side to connect to your cloud infrastructure . And handling
backups, Backup Copy jobs, file copy and restores works with the same easy-to-use interface as the tenant
already knows from Veeam Backup & Replication .
By following this guide, you can quickly set up a test or POC environment and try it out for yourself . Becoming
a service provider with Veeam Backup & Replication and Microsoft Azure only takes 10 steps:
1 . Sign up for an Azure subscription
2 . Create a VM
3 . Configure the endpoints
4 . Create and assign a data disk to the VM
5 . Install Veeam Backup & Replication server
6 . Complete the initial configuration
7 . Complete the repository configuration and optional WAN acceleration configuration
8 . Configure Veeam Cloud Connect
9 . Connect to a service provider as a tenant
10 . Create a Backup Copy job as a tenant

Veeam Cloud Connect: Manual configuration guide for Microsoft Azure
55© 2015 Veeam Software
Appendix A: Extending your data volumesAttaching a disk in a VM on Azure has limitations . Depending on the size, you can add more or fewer
virtual hard disks to the VM . For example, the A1 size used in this white paper can attach a maximum of
two virtual hard disks (in addition to the OS disk) . An A4 with eight CPU cores can attach 16 disks (with
500 IOPS per disk) . More information about the maximum number of disks you can attach per plan can
be found here: http://msdn.microsoft.com/en-us/library/azure/dn197896.aspx
Each disk can also be a maximum of 1 TB . That means that in the heaviest configuration, you can
have 16 disks of 1 TB .
Instead of creating 16 different volumes, you can use a dynamic volume so that your data volume
(which holds the repository) is 16 TB .
By following the procedure described in Create and Assign a Repository Disk, you can add
additional disks to your running VM .
When connecting to your VM and opening Disk Manager in the OS, you can expand your volume . Note that
this can be done live, and even if the used disk already has data on it, you won’t lose it or have downtime .
Figure 76: Disk Management

Veeam Cloud Connect: Manual configuration guide for Microsoft Azure
56© 2015 Veeam Software
Right-click on the existing disk and choose Extend Volume .
Figure 77: Choose Extend Volume
Now you will be able to choose the newly unallocated disk that you just created .
Figure 78: Choose the disk to be used for extending the volume
Even if you start with a minimum amount of storage (such as a 1 TB disk attached to it), you can rapidly
create more storage available for your repositories . Another method is to create a new VM(s) that
can be used as a repository server . The beauty of Veeam Cloud Connect is that it scales so easily . In
combination with Microsoft Azure, you can quickly provision additional resources when necessary .
Veeam Cloud Connect: Manual configuration guide for Microsoft Azure
57© 2015 Veeam Software
Appendix B: Using WAN accelerationIf you want to allow your tenants to use WAN acceleration as part of their agreement, you need to
deploy one or more WAN accelerators in your Veeam Cloud Connect infrastructure . After you have
done that, you can assign a WAN accelerator to the tenant’s cloud repository (see Create tennt) .
To create a WAN accelerator:
Go to Backup Infrastructure > WAN Accelerators and press the Add WAN Accelerator button
in the ribbon .
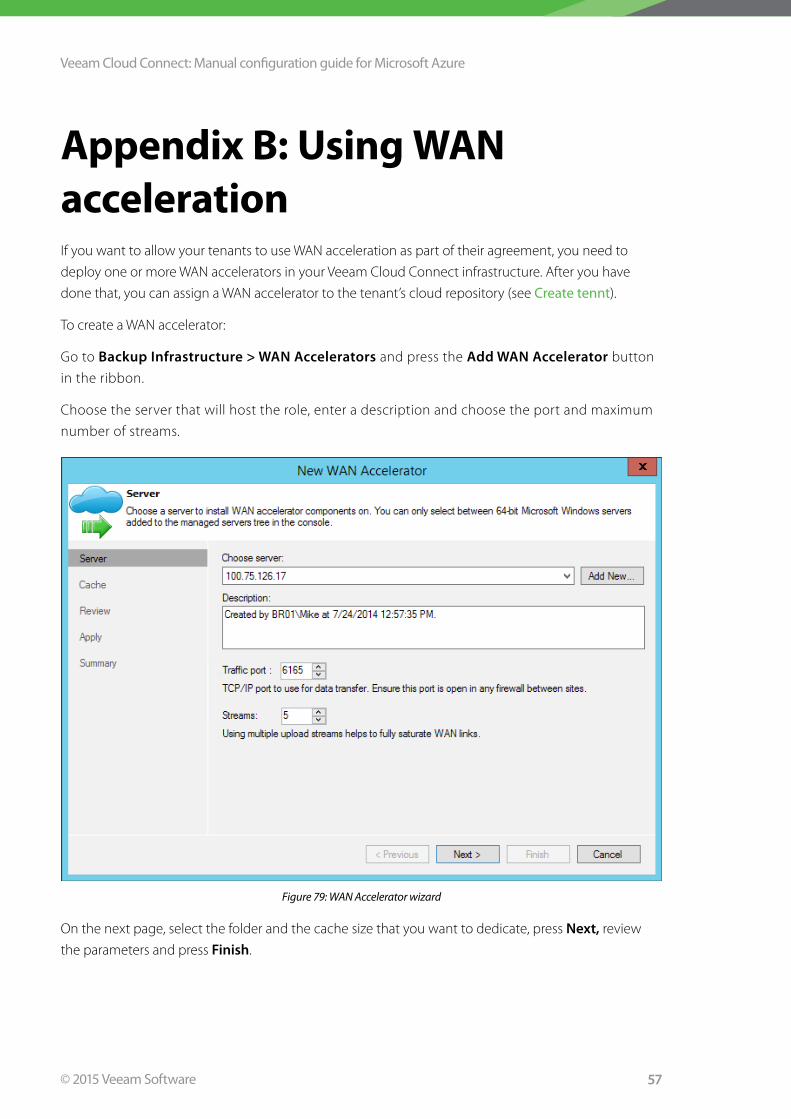
Choose the server that will host the role, enter a description and choose the port and maximum
number of streams .
Figure 79: WAN Accelerator wizard
On the next page, select the folder and the cache size that you want to dedicate, press Next, review
the parameters and press Finish .

Veeam Cloud Connect: Manual configuration guide for Microsoft Azure
58© 2015 Veeam Software
Figure 80: Cache size and location
Note that in order for this to work, both the tenant and the SP need to have a WAN accelerator configured .
You don’t need to open additional ports as the traffic will be tunneled through the Cloud Gateway .

Veeam Cloud Connect: Manual configuration guide for Microsoft Azure
59© 2015 Veeam Software
Mike Resseler is a Product Strategy Specialist for Veeam . Mike is focused on
technologies around Hyper-V and System Center . With years of experience in
the field, he presents on many occasions at large events such as MMS, TechEd
and TechDays . Mike has been awarded the MVP for System Center Cloud
and Datacenter Management since 2010 . His major hobby is discussing and
developing solid disaster recovery scenarios . Additionally, he has enterprise-
class experience in private cloud architecture and deployment, with marked
focus on protection from the bottom to the top . He holds certifications in many
Microsoft Technologies such as MCITP .
Follow Mike on @MikeResseler or @Veeam and on Google+ .
About Veeam Software Veeam® enables the Always-On Business™ by providing solutions that deliver Availability for the
Modern Data Center™, which provides recovery time and point objectives (RTPO™) of less than 15
minutes for all applications and data . Veeam recognizes the challenges in keeping a business up
and running at all times and addresses them with solutions that provide high-speed recovery,
data loss avoidance, verified protection, leveraged data and complete visibility . Veeam Backup & Replication™ leverages technologies that enable the modern data center, including VMware
vSphere, Microsoft Hyper-V, NetApp storage, and HP 3PAR StoreServ and StoreVirtual Storage,
to help organizations meet RTPO, save time, mitigate risks, and dramatically reduce capital and
operational costs . Veeam Availability Suite™ provides all of the benefits and features of Veeam
Backup & Replication along with advanced monitoring, reporting and capacity planning for the
backup infrastructure . Veeam Management Pack™ for System Center is the most comprehensive,
intuitive and intelligent extension for app-to-metal management of Hyper-V and vSphere
infrastructures, and includes monitoring and reporting for Veeam Backup & Replication . The
Veeam Cloud Provider Program (VCP) program offers flexible monthly and perpetual licensing
to meet the needs of hosting, managed service and cloud service providers . The VCP program
currently includes more than 6,000 service provider partners worldwide .
Founded in 2006, Veeam currently has 27,000 ProPartners and more than 121,500 customers
worldwide . Veeam’s global headquarters are located in Baar, Switzerland, and the company has offices
throughout the world . To learn more, visit http://www.veeam.com .
About the Author

Veeam Cloud Connect: Manual configuration guide for Microsoft Azure
60© 2015 Veeam Software