vehicle manual - cloudinaryres.cloudinary.com/thl/image/upload/v1528841567/... · check engine...
TRANSCRIPT

Vehicle Manual
Operation & Troubleshooting PLEASE LEAVE THIS MANUAL IN THE MOTOR HOME
www.roadbearrv.com / www.britz-usa.com

SUBJECT INDEX
Page 2
Accident 5 & 13
Air Conditioner 42
Awning 47
Battery Disconnect Switch 34
Breakdown 5 & 14
Cab-over Bed 28
Campground – Set up & break down 49
Carbon Monoxide Alarm 11
Check Engine light 16
Circuit Breakers 36
Cook Top 25
Cruise Control 18
Damages 14
Dinette Bed 29
Driving Safety 6
Electrical System – 120 volts 36
Electrical System – 12 volts 34
Emergency Assistance 5
Fire Extinguisher 12
Flat Tire 14
Following Distance 6
Fresh Water System 30
Fuel requirement 16
Furnace (Heater) 43
Fuses & Relays (Automotive) 19 - 23
Fuses (Living Quarters) 35
Gas Cap light 16
Generator 38
Ground Fault Interrupter 37
Help-Desk 4
Ignition Lock 17
Introduction 3
Keys & Doors 24
Lights 17
Maintenance 14
Measurement Conversions 50
Monitor Panel 25
Motor Oil 16
Mountain Driving 6 & 18
Oven (Propane) 26
Overloading Circuit 37
Parking Brake 17
Propane Alarm 11
Radio – Car 27
Refrigerator 40
Refueling 6
Rental Locations 54
Repairs 15
Returning Motor Home 52
Shower 31
Seat Belts 7
Shuttle Service 53
Side winds 6
Slide room 46
Smoke Detector 12
Toilet 33
Traffic Collision 5 & 13
Traffic Rules 9
Transmission 18
TV & DVD Player 44
Vehicle Specifications 51
Ventilation 29
Waste Water System 33
Water Heater 31
Water System – Fresh 30
Water System – Waste 30
Windows 29
Winterization 31
Wrench Light 16

Page 3
INTRODUCTION
Thank you for choosing ROAD BEAR RV / BRITZ USA for your motor home vacation. We provide this manual as a guide and it describes the operation of the motor home equipment in general. Due to differences between similar equipment and motor home models as well as changes from year to year, we cannot precisely describe every motor home individually, but the systems and operation are very similar if not the same. Please read the following information thoroughly.
Your personal walk-through may have been overwhelming or just too much information in a short time. Please take a few minutes and read this manual carefully. Familiarize yourself with the vehicle. This will ensure that you get the best use of the motor home.
We at ROAD BEAR RV / BRITZ USA are committed to make your vacation as fun and trouble-free as possible. In the event of unanswered questions or a malfunction please call our Help Desk* during business hours (California / Pacific Time).
This document is the property of ROAD BEAR RV and is for informational purposes only ROAD BEAR RV reserves the right to change the documentation at any time without prior notice. ROAD BEAR RV does not assume any liability for the accuracy of any instructions or specifications contained herein. The document is not intended to describe the specific function of any appliance or item within a particular motor home. Please assure yourself of the contents and the operation of each item in your motor home before you leave our rental location. Our employees are able to give you specific instructions. Please ask if you have any questions. This document is not to be duplicated in any way without written consent by ROAD BEAR RV. Cover picture: - Agoura Hills, CA / Februar 2018
* Road Bear RV / Britz USA are not liable for any air time, data, roaming or other charges related to phone calls or electronic messages to/from our Help Desk

Page 4
HELP DESK
In case of an operational or technical problem and after consulting this manual, you can contact our Help Desk for assistance during business hours
Mon. – Fri. 8:00 – 5:00, Sat. 8:00 – 1:00, Pacific Time Keep in mind that most repair centers have business hours and are closed on weekends and Holidays
The phone numbers are located on the key tag or the rental contract
You can also contact us by e-mail for operational questions or to report damages and accidents.
Please include your Vehicle Number (as listed on your Rental Contract & Key Tag) in the subject line.
To assist you we may have to ask questions or give you multi-step instructions, for which e-mail is not practical and will delay effective help. Please understand that we are not always able to return phone calls.
Mountain Time (+1 hr)
Central Time (+2 hr)
Eastern Time (+3 hr)
Pacific Time Zone
* Road Bear RV / Britz USA are not liable for any air time, data, roaming or other charges related to phone calls or electronic messages to/from our Help Desk
Page 5
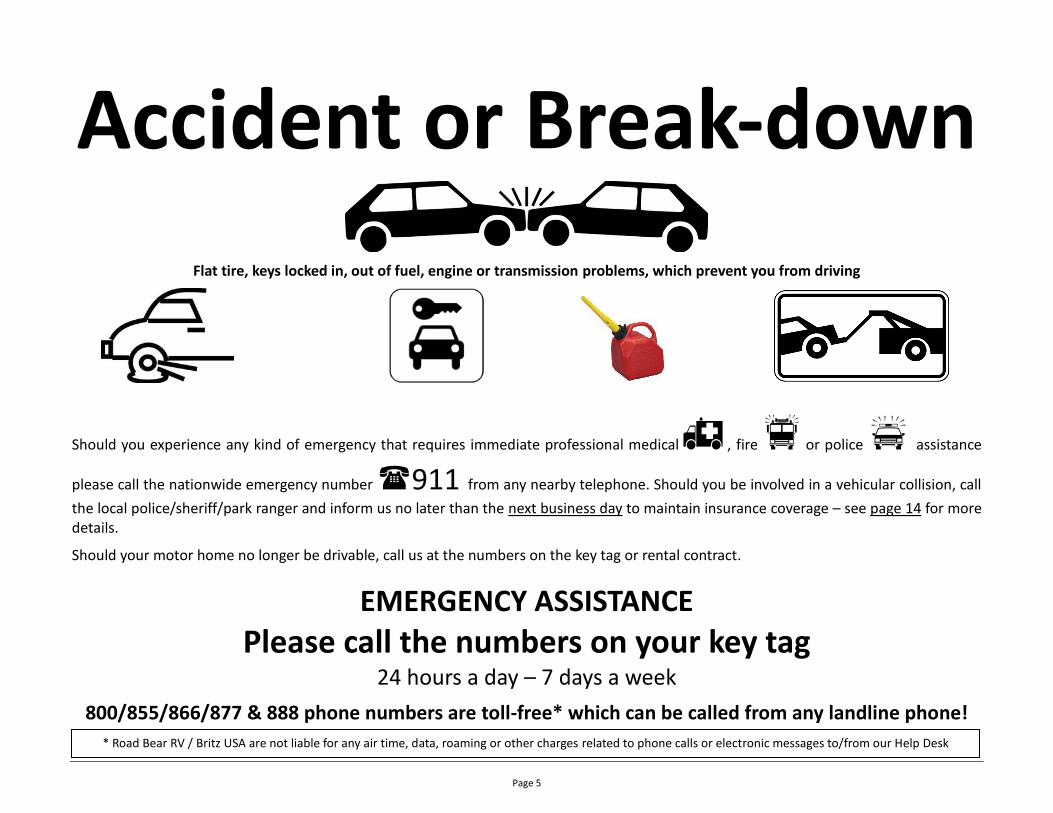
Accident or Break-down
Flat tire, keys locked in, out of fuel, engine or transmission problems, which prevent you from driving
Should you experience any kind of emergency that requires immediate professional medical, fireor police assistance
please call the nationwide emergency number 911 from any nearby telephone. Should you be involved in a vehicular collision, call
the local police/sheriff/park ranger and inform us no later than the next business day to maintain insurance coverage – see page 14 for more details.
Should your motor home no longer be drivable, call us at the numbers on the key tag or rental contract.
EMERGENCY ASSISTANCE
Please call the numbers on your key tag 24 hours a day – 7 days a week
800/855/866/877 & 888 phone numbers are toll-free* which can be called from any landline phone!
* Road Bear RV / Britz USA are not liable for any air time, data, roaming or other charges related to phone calls or electronic messages to/from our Help Desk

Page 6
DRIVING SAFETY Be aware that you are driving a much larger and heavier vehicle than a car. This will cause the vehicle to react differently from what you may be used to. Failure to follow this safety information may result in an accident, injury or death. Obey all local, state and federal traffic laws. Plan your route in advance and know the vehicles dimensions and limitations!
Refueling (Gasoline and Propane)
Refueling of gasoline and propane releases highly flammable fumes. It is therefore mandatory to TURN OFF any spark emitting appliances (engine, refrigerator, water heater, furnace, etc.) before fueling. - Turn off the engine and the battery disconnect switch by the entry door. - Do not forget to turn the switch back on after fueling.
Side winds
SLOW DOWN! Use caution or stop if necessary when traveling in high wind conditions. Do not ignore wind warnings on the radio or by traffic officers. When trucks park along the road – stop as well.
Following distance
Distance in seconds:
5 4 3 2 1 --------------------------------------------------------------------------------------------------------------------------------------------------------------- The braking distance is much greater than for a car. Keep a greater distance to the vehicle in front of you! If you follow a truck, keep extra distance to reduce risk of damage to the windshield by stones thrown up.
Mountain driving When driving in the mountains engage the transmissions tow/ haul mode (separate button). This setting will provide improved pulling power for uphill and engine braking with transmission downshifts for downhill driving. To prevent brake overheating engage the tow/haul mode any time extra braking is required. Higher engine speed and noise are normal in tow/haul mode. Adjust your speed according to current road and traffic conditions!

Page 7
Driving at night
If you are driving at night, be aware that in many rural areas (especially in the wide open areas of the western states) wildlife and in some areas livestock can be encountered on the roads. Adjust your speed accordingly.
Seat belts All passengers in the motor home need to be buckled up. Children - typically up to age 6 or 60 pounds – need to be in a child or booster seat. Consult state regulations – see our website for further details.
DO NOT get up, cook, shower, use bathroom, walk around or lie on any bed in the motor home while the vehicle is in motion!
The safety of yourself and your loved ones is very important.
GPS – Navigation System NEVER operate the GPS device while driving – it is unsafe and dangerous! Do NOT handle the GPS while the vehicle transmission is in gear – stop and park before operating the GPS. Install and use the GPS device in such a manner that does not cause accidents, personal injury or property damage.
Overhead obstacles Watch for low overpasses, low-hanging trees, roof edges and road signs. If needed, have a passenger step outside and guide you past the obstacle. Required vertical clearance for Class C is 12 feet (3.65m) and for Class A is 13 feet (3.95m). Entering parking structures is PROHIBITED!
Driveway entrances and rough road surface Enter and exit driveways SLOW and at an angle – the rear of the motor home could hit the ground. Drive slowly over ramps, humps, bumps, rough ground and other obstacles of any kind. CAUTION - Cabinets could open and objects fall out!

Page 8
Maneuvering & parking The rear of the motor home swings out wide and clips corners when you make turns. Allow for extra room when making turns and parking. Park in an area with a lot of free space and use more than one parking spot if possible to ensure other cars do not park too close. You are responsible to pay for all parking spaces used! Parking structures are PROHIBITED! When maneuvering on a campground, parking lot and especially while backing up, ALWAYS get help from a passenger → do not rely on mirrors or backup cameras only! Have someone outside of the motor home checking for overhead- & side-clearance and obstacles. Even if the motor home is equipped with a rearview camera - there remain blind spots! Damages caused by backing up are negligent and NOT covered by the insurance!
Tunnels and narrow roads Drive slowly in tunnels and on narrow mountain roads. Many roads in National and State Parks have been built long before motor homes were common vehicles. If you slow down when roads narrow, you are more likely able to avoid a mirror-to-mirror or other collisions.
Mobile phone use while driving It is not just unsafe to use a cell phone while behind the wheel, but in most states it is illegal! If you have to make a call – pull over or have a passenger make the call.
Loose items Secure any loose items or equipment before you drive off. In case of an accident or emergency stop, such a loose item could cause severe injury.

Page 9
Break-in and theft Motor homes can be a target of thieves. Keep all doors locked while the vehicle is in motion. Do not leave valuables like cameras, computers, etc. laying out where they can be seen. To prevent somebody from hiding in the vehicle, lock all windows and doors; open all curtains and remove the privacy curtain when leaving the motor home. This helps the police/security personnel to spot suspicious activities. Should you have fallen victim to a theft or break-in, call the police and get a police report for your insurance.
Emergency exits Emergency exits are clearly marked. Special window exits are not to be opened - except in emergencies.
Hot surfaces Exhaust ports of furnace, water heater and generator are extremely hot when in use. Do not touch!
Slippery when wet Entry steps and floors can be slippery when wet. Watch your step! Showers are very slippery when wet and not for use while vehicle is in motion.
Risk of falling - The cab-over bunk bed is above the cockpit and one could fall out of bed. ALWAYS
use the safety net when small children sleep in the cab-over bunk - Watch your step when exiting the vehicle. If the motor home is equipped with an
entry step and it is retracted you could fall and get hurt. Electric step: wait until the step is fully extended before you step outside
- For safety reasons, renters is not allowed access the roof area!
Traffic Rules There are some unique traffic rules in North America, not commonly encountered elsewhere. Road signs are often spelled out.
Emergency vehicles If an emergency vehicle on duty is approaching from either direction with its siren and warning lights on, you are required to pull over to the right side of the road and stop until the emergency vehicle has passed.

Page 10
Traffic stop If a police car is following you with its flashing lights on, you have to pull over in a safe place as soon as possible and stop. Do NOT exit the vehicle and keep your hands visible for the officer. Follow the officer’s instructions and answer all questions. If you are issued a traffic ticket, call ROAD BEAR RV for further instructions.
School bus If you encounter a stopped school bus with its red lights blinking you are required to stop fully until the lights are turned off. You have to stop from either direction if there is no raised center divider between the traffic lanes.
Traffic lanes Passing: Only on a broken line on your side of the road. Only pass if there is no oncoming traffic. The motor home is heavier, longer and slower than a
car and needs more room and time to pass another vehicle.
Turning: If there is a center lane, you may use it to make a left hand turn. You may also use the center lane when entering traffic.
Hand signals Should the turn or brake lights fail, you are required to signal your intentions by hand.
These traffic rules are by no means complete and all traffic laws are applicable.

Page 11
MOTOR HOME SAFETY EQUIPMENT
PROPANE & CARBON MONOXIDE DETECTOR Carbon Monoxide is an odorless gas often caused by burning. Propane is very flammable, heavier than air and smells like rotten eggs. It is used for heating, cooking and refrigeration. For your safety, a propane & carbon monoxide detector is installed in each motor home often near the kitchen - just above the floor. Green (blinking) light = Normal. Blinking red or red/green light = Error – have it checked before you stop for the night! Red (blinking) light and fast loud high pitch chirping = Danger - high propane or carbon monoxide levels. Proceed immediately with the following steps:
1. Turn off all open flames – do NOT touch electrical switches (potential sparks!) 2. Exit the vehicle immediately and close the main valve on the propane tank 3. Turn off the battery disconnect switch at the entry door 4. Wait several minutes before re-entering the vehicle 5. Open windows and the entry door - allow the propane/carbon monoxide to fully dissipate 6. Ensure the stove and oven burner valves are closed; turn off the water heater, the furnace, refrigerator
and generator 7. Reset the alarm by pushing the test/mute button 8. Turn the main valve on the propane tank back on – if you smell propane again – turn it back off and call
our Help Desk 9. If you do not smell propane and the alarm does not go off anymore, the source of the leak may have been
a temporarily open valve at the cook top.
Certain cleaning solvents, dust and camp fire fumes can also trigger the alarm. Blowing into the sensor can help to clear it out.
TROUBLESHOOTER
CO detector alarm going off CO in coach Open all windows - turn off engine and/or generator
CO detector “chirping”/60 sec. Low coach battery voltage Recharge coach battery by starting engine
Propane detector alarm going off Possible propane leak in system See steps above
Cleaners or fumes activating alarm Press mute/test button, blow into the alarm and air out motor home thoroughly
Propane detector “chirping”/60-90 sec.
Low coach battery voltage Recharge coach battery by starting engine
Foul egg smell in and/or around motor home
Possible propane leak - See above steps - Have the gas system checked and leak corrected before using again - Call Help Desk
After recent refilling of propane tank: Vapor valve not fully closed
Close Vapor valve completely

Page 12
SMOKE DETECTOR & FIRE EXTINGUISHER Every motor home is equipped with a fire extinguisher near the entry door. The smoke alarm is mounted to the ceiling, usually near the kitchen. The alarm sounds off a very shrill beep if it detects smoke – indicating a potential fire. Sometimes, cooking will also make the alarm to sound – please make sure you only cook with an open window and the range hood or roof vent fan running.
If the alarm sounds, proceed with the following steps immediately:
1. Turn off any propane appliance – cook top, furnace, etc. 2. Extinguish any visible flames, using the fire extinguisher 3. If the fire cannot be extinguished, exit the vehicle immediately. Turn off the battery disconnect switch and close the main
valve on the propane tank 4. Get help – call 9-1-1! 5. Once everybody is safe and the fire has been extinguished, call our Help Desk for further assistance
If there was no fire, open a few windows and get fresh air thru the motor home. To reset the alarm push the test button until it beeps.
A regular low pitch beep about every 60 – 90 seconds indicates low battery voltage.
TROUBLESHOOTING
Smoke alarm going off
Smoke & fumes while cooking
Turn on range hood/roof vent fan and open some windows. Push mute/test button on alarm
Fire in motor home Close main propane valve. Call 911 and use fire extinguisher
Smoke detector “chirping”; 60-90 sec. Battery voltage low Replace battery

Page 13
VEHICULAR COLLISION – ACCIDENT An accident is a vehicular collision in traffic and/or with property resulting in injury and/or damage to others and/or their property. Collisions without harm and/or damage to others and /or their property are designated as damage (see next section).
1. Get to safety if situation is dangerous
2. Make sure everybody is okay – administer first aid
3. Call the local police and have an officer take a report. In case of injuries dial 911 (ambulance – police – fire department). Request the officer’s name, ID-, case number, phone number and how to get a copy of his report. If the police refuses to come or take a report; get the name, ID number and local phone number of the officer answering your call
For minor accidents or on private property, the police usually does not take a report. Proceed with step 4 below
4. Take pictures of the accident scene and the involved vehicles – if possible before moving the vehicles. If the vehicles were moved take pictures of the accident area as well
5. Exchange all information with the other party and fill in the Road Bear RV accident report form. It is necessary to provide the information from the other party – name, address, phone number, insurance information – if the other person refuses, call the police. Only a police report alone is not enough! The accident report form, registration and insurance information are located in the pouch in the glove box on the passenger side
6. Road Bear RV must be contacted no later than the next business day at our Help Desk; phone number on the key tag or at [email protected]
7. E-mail the accident report (high resolution pictures) or fax it from the next campground to 1-818-827-1304
The insurance company has the right to decline coverage if accidents are not reported on time or if no accident report can be provided.
Please arrive before 09:30 a.m. on your return day to process the formalities

Page 14
DAMAGES In case the motor home got damaged without harm to people and/or damage to property of others, please report the damage to the Help Desk (key tag) or [email protected] and to get assistance in having the vehicle repaired - if needed.
Please arrive before 09:30 a.m. on your return day
FLAT TIRE Do NOT drive with a flat tire! Even if there is a second tire on the same side, driving with a flat tire will overload the other tire and is dangerous. In case you have a flat tire please call our Help Desk for assistance. Please have the following information available: a) miles, b) which tire and c) the exact street address. We will arrange for professional help to install the spare tire. Repair or replacement cost of the flat tire is your responsibility within the insurance deductible. For safety, insurance & liability reasons there are no tools in the vehicle.
BREAKDOWN Should the vehicle break down – not drivable anymore – call our Help Desk. Please have the following information available: a) miles, b) problem description, c) number of passengers and d) the exact street address. Unauthorized towing will not be reimbursed.
MAINTENANCE You as renter are responsible for the maintenance of the rental vehicle during the rental period. Check the engine oil and coolant levels every other time you refuel. A motor oil change is required every 5,000 miles you drive. Maintenance expenses in excess of $50.00 will be reimbursed only with prior approval by Road Bear RV and with receipt only. Oil changes can be done at any nationwide lube center such as Jiffy Lube/Quick Lube/EZ-Lube or similar. You are not required to have the oil changed by a Ford or motor home dealership.
Motor oil is best checked with a cold engine on level ground. The oil level has to be between the MIN and MAX mark. NEVER fill more than ½ quart/liter at one time! Always wait 2 minutes after adding oil and before filling more.

Page 15
Inspect the oil level in the generator every 8 hours of usage. Damages due to lack of maintenance are the customers responsibility. Use regular motor oil if needed.
The engine coolant has to be inspected regularly and if needed, add drinking water only. Check the coolant level when the engine is cold.
Have the tire pressure checked weekly. Pressure information is found on the manufacturer label near the driver seat – usually on the door frame.
REPAIRS If there is a defect and you are close to a Road Bear RV facility, please call ahead for an appointment. Addresses and phone numbers can be found on page 53. Our staff is best qualified and equipped to get the problem resolved quickly.
We do NOT offer repairs off-site (on campgrounds, etc.).
Any on-the-road repairs that are more than US$ 50.00 require prior authorization by Road Bear RV. For authorization call our Help Desk. Non-authorized repairs will NOT be reimbursed.
Mobile repair service is generally not authorized.
If you need a repair, have the repair shop a) diagnose the problem and prepare a repair estimate, b) have the repair shop contact our Help Desk for repair authorization & payment, c) record the stock#, VIN, current mileage & appliance serial# (if applicable).
Please show the back side of your document folder to the repair shop with these instructions.
Repairs will be paid directly by Road Bear RV to the repair facility – you are required to return any defective parts. To get reimbursed for repairs, receipts and defective parts need to be returned to Road Bear RV. Non-authorized repairs and repairs without a receipt will NOT be reimbursed.
Most repair shops have regular business hours and are usually closed on weekends and holidays. Some are closed during the winter season.
Generator oil level
Oil grade
Coolant level

Page 16
AUTOMOTIVE EQUIPMENT (FORD) FUEL REQUIREMENT
The motor home requires 89 octane grade unleaded gasoline. If 89 octane fuel is not available use the next higher grade.
MOTOR OIL The motor oil grade is indicated on the filler cap in the engine compartment. Vehicles oil level needs to be inspected every 500 driven miles and the generator oil level every 8 hours of generator operation. NEVER fill more than ½ quart/liter at one time! Always wait 2 minutes after adding oil and before filling more.
GAS CAP LIGHT If the gas cap light turns on; open and close the gas cap and you can drive on. The computer will need a few days (variations of driving cycles) before turning the light off.
CHECK ENGINE LIGHT If the check engine light turns on and there are no changes in engine performance (such as lack of power, extra engine noise or vibrations) you can drive on. The computer will need a few days (driving cycles) before turning the light off. If you notice any change in performance, noise, vibrations or otherwise – call the Help Desk. If the light is flashing (blinking) stop as soon as possible in a safe place to prevent engine damage and call the Help Desk.
WRENCH LIGHT If the wrench light turns on and there are no changes in vehicle operation (such as loss of power, extra noise or vibrations) you can drive on. If you notice any change in performance, noise, vibrations or otherwise – call the Help Desk. If the light is flashing (blinking) stop as soon as possible in a safe place to prevent damage and call the Help Desk.

Page 17
PARKING BRAKE Stop vehicle fully and apply the parking brake (1) before shifting the transmission into ‘Park’. To release the parking brake, pull the marked handle (2).
Some vehicle models have a hand operated parking brake
LIGHTS Headlight & parking light control switch is located to the left of the steering wheel Instrument panel (dashboard) illumination – turn wheel up or down or push appropriate buttons to adjust
For high beam push the turn signal lever forward
IGNITION LOCK Turn the key clockwise to start the engine
1/B – Radio/Accessory position 2/A – Remove key position 3/A – OFF position 4/C – Ignition ON position 5/D – START position
TROUBLESHOOTING
Cannot remove ignition key Gear not in Park position Put gear in Park position
Key not in correct position Turn key to the remove position
Some reading lamps: ON → rotate wheel all the way up or push on lamp; OFF → rotate wheel down or push on lamp Some vehicle models have a switch on the lamp itself or next to it
Ford Transit
Ford E-Series & Class A
Page 18
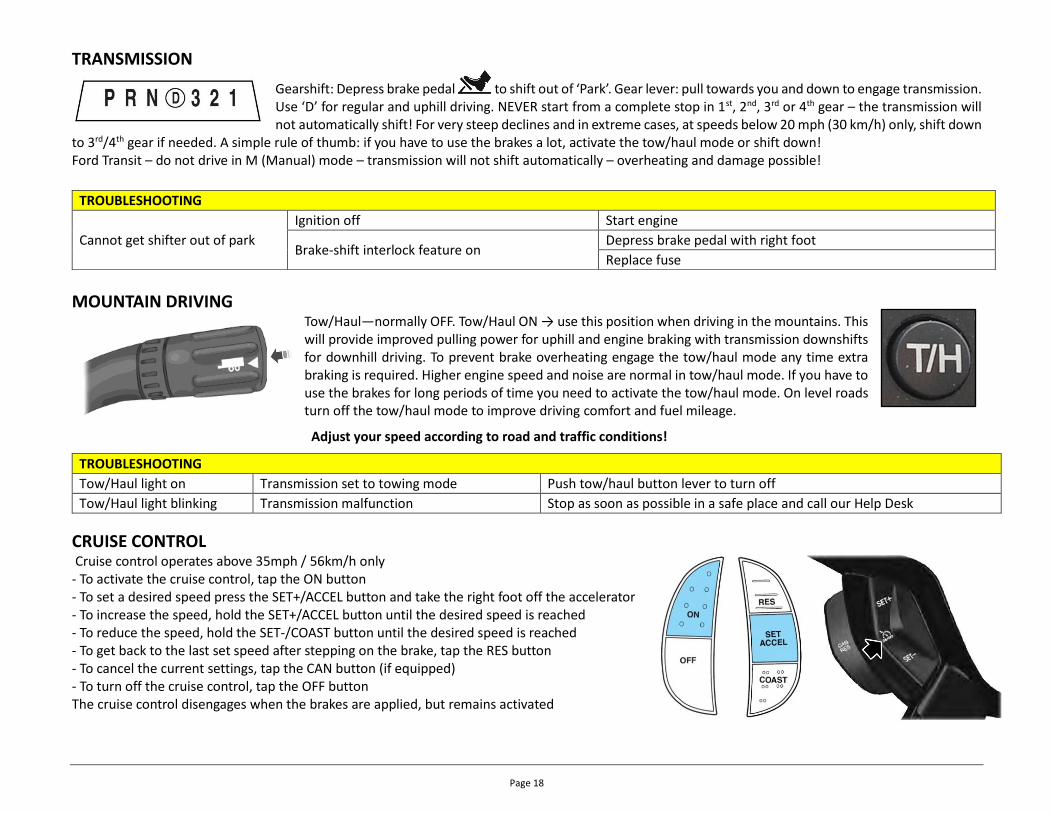
TRANSMISSION
Gearshift: Depress brake pedal to shift out of ‘Park’. Gear lever: pull towards you and down to engage transmission. Use ‘D’ for regular and uphill driving. NEVER start from a complete stop in 1st, 2nd, 3rd or 4th gear – the transmission will not automatically shift! For very steep declines and in extreme cases, at speeds below 20 mph (30 km/h) only, shift down
to 3rd/4th gear if needed. A simple rule of thumb: if you have to use the brakes a lot, activate the tow/haul mode or shift down! Ford Transit – do not drive in M (Manual) mode – transmission will not shift automatically – overheating and damage possible!
MOUNTAIN DRIVING Tow/Haul—normally OFF. Tow/Haul ON → use this position when driving in the mountains. This will provide improved pulling power for uphill and engine braking with transmission downshifts for downhill driving. To prevent brake overheating engage the tow/haul mode any time extra braking is required. Higher engine speed and noise are normal in tow/haul mode. If you have to use the brakes for long periods of time you need to activate the tow/haul mode. On level roads turn off the tow/haul mode to improve driving comfort and fuel mileage.
Adjust your speed according to road and traffic conditions!
TROUBLESHOOTING
Tow/Haul light on Transmission set to towing mode Push tow/haul button lever to turn off
Tow/Haul light blinking Transmission malfunction Stop as soon as possible in a safe place and call our Help Desk
CRUISE CONTROL Cruise control operates above 35mph / 56km/h only - To activate the cruise control, tap the ON button - To set a desired speed press the SET+/ACCEL button and take the right foot off the accelerator - To increase the speed, hold the SET+/ACCEL button until the desired speed is reached - To reduce the speed, hold the SET-/COAST button until the desired speed is reached - To get back to the last set speed after stepping on the brake, tap the RES button - To cancel the current settings, tap the CAN button (if equipped) - To turn off the cruise control, tap the OFF button The cruise control disengages when the brakes are applied, but remains activated
TROUBLESHOOTING
Cannot get shifter out of park
Ignition off Start engine
Brake-shift interlock feature on Depress brake pedal with right foot
Replace fuse

Page 19
FUSES AND RELAYS Each vehicle has fuses and relays related to the operation of the vehicle – unrelated to the systems in the living (house) area.
FORD – E-Series (E350/E450) model: 1. Underneath the dash board (near parking brake):
2. Engine compartment (driver side):
1. – 4. Spares 26. Instrument cluster 5. Brake interlock 27. Ignition switch feed 6. Turn & stop lights 28. Audio mute 7. Low beam – left 29. Instrument cluster 8. Low beam – right 30. – 31. Not used 9. Dome lights 32. Restraint system 10. Switch illumination 33. – 34. Spare 11. – 12. Not used 35. Run/start 13. Mirrors 36. Anti-theft system 14. – 16. Spares 37. Air conditioner 17. Door locks 38. Not used 18. – 19. Spares 39. Radio 20. Diagnostics connector 40. Not used 21. Spare 41. Radio, switch illumination 22. Parking lights 42. – 44. Spare 23. High beam 45. Windshield washer 24. Horn 46. – 47. Spares 25. Demand lighting 48. Relay
1. – 10. Relays 37. – 40. Relays 65. Power point #2 (glove box) 11. Empty/Spare 41. – 42. Spares 66. Power point #3 12. Run/Start 43. Fuel pump 67. Power point #1 (dash board) 13. Starter 44. – 45. Spare 68. Spare 14. Run/Start 46. PCM 69. Not used 15. Chassis battery 47. ABS coil 70. Spare 16. – 22. Spare 48. Trailer turn/stop lights 71. Not used 23. – 25. Relays 49. Wiper motor 72. Cigarette lighter/power point 26. – 27. Empty 50. – 51. Spare 73. Not used 28. Back up lights 52. Run/start coil 74. Power seats 29. Compressor clutch 53. ABS 75. – 77. PCM 30. Brake light switch 54. Fuel pump 78. Ignition coil 31. Spare 55. – 56. Not used 79. Transmission 32. Blower 57. – 58. Trailer lights 80. Spare 33. ABS pump 59. – 61. Not used 81. – 82. Not used 34. Spare 62. Trailer battery 83. Fuel pump diode 35. PCM 63. Spare 84. Not used 36. Ignition lock 64. Not used 85. Relay
Page 20
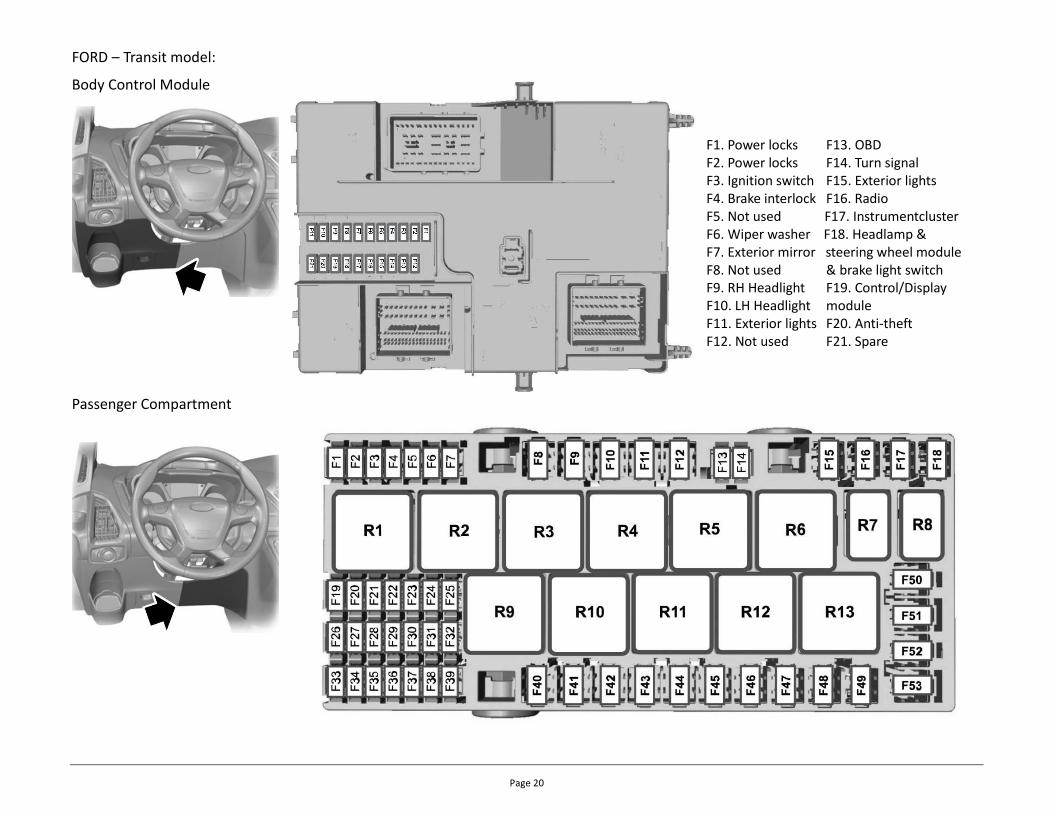
FORD – Transit model:
Body Control Module
Passenger Compartment
F1. Power locks F13. OBD F2. Power locks F14. Turn signal F3. Ignition switch F15. Exterior lights F4. Brake interlock F16. Radio F5. Not used F17. Instrumentcluster F6. Wiper washer F18. Headlamp & F7. Exterior mirror steering wheel module F8. Not used & brake light switch F9. RH Headlight F19. Control/Display F10. LH Headlight module F11. Exterior lights F20. Anti-theft F12. Not used F21. Spare
Page 21
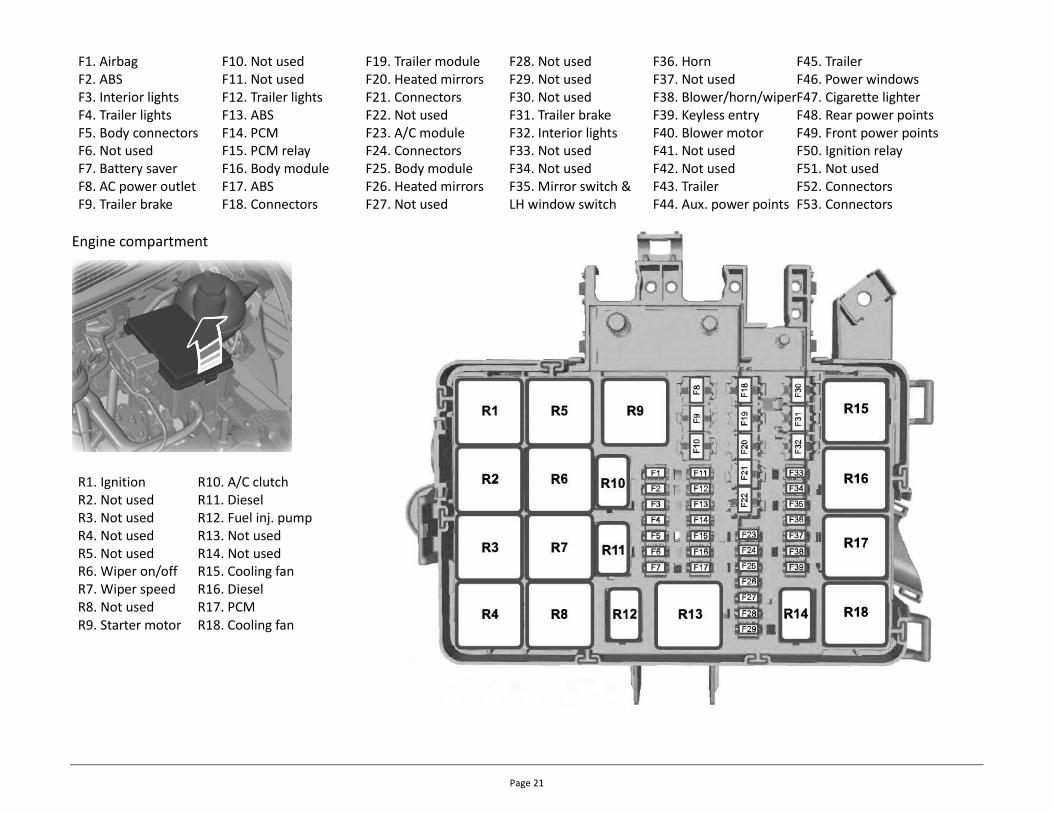
Engine compartment
F1. Airbag F10. Not used F19. Trailer module F28. Not used F36. Horn F45. Trailer F2. ABS F11. Not used F20. Heated mirrors F29. Not used F37. Not used F46. Power windows F3. Interior lights F12. Trailer lights F21. Connectors F30. Not used F38. Blower/horn/wiperF47. Cigarette lighter F4. Trailer lights F13. ABS F22. Not used F31. Trailer brake F39. Keyless entry F48. Rear power points F5. Body connectors F14. PCM F23. A/C module F32. Interior lights F40. Blower motor F49. Front power points F6. Not used F15. PCM relay F24. Connectors F33. Not used F41. Not used F50. Ignition relay F7. Battery saver F16. Body module F25. Body module F34. Not used F42. Not used F51. Not used F8. AC power outlet F17. ABS F26. Heated mirrors F35. Mirror switch & F43. Trailer F52. Connectors F9. Trailer brake F18. Connectors F27. Not used LH window switch F44. Aux. power points F53. Connectors
R1. Ignition R10. A/C clutch R2. Not used R11. Diesel R3. Not used R12. Fuel inj. pump R4. Not used R13. Not used R5. Not used R14. Not used R6. Wiper on/off R15. Cooling fan R7. Wiper speed R16. Diesel R8. Not used R17. PCM R9. Starter motor R18. Cooling fan

Page 22
FORD – Bus style model:
A. Under dash board (near parking brake):
F1-F5 – Diesel F12 – Diesel F18 – Fuel pump F28 – Crank case F35 – PCM F6 - Not used F13 – Not used F19 – Starter F29 – PCV F36 – Diesel F7 – Transmission F14 – Diesel F20 – Diesel F30 – Cooling fan 1 F37 – Fuel system F8-F9 – Not used F15 – Not used F21 – Ignition F31 – Not used F38 – A/C clutch F10 – Spare F16 – Fuel pump F22 – Diesel F32 – Wiper motor F39 – Emission systems F11 – A/C clutch F17 – Transmission F23-F27 – Spares F33 – F34 – Not used
1. Turn & stop lights 19. Daytime running lights 2. – 3. Empty 20. Empty 4. Dash board 21. Right turn signal 5. Accessory feed 22. Trailer turn signals 6. Empty 23. Dash board 7. Blower relay 24. Empty 8. Brake lights 25. Headlight, right 9. Turn & stop lights 26. Brake interlock 10. Dash board 27. – 30. Empty 11. Wiper/washer 31. Headlight, left 12. Empty 32. Empty 13. ABS System 33. Back up lights 14. Dash board 34. Empty 15. Left turn signal 35. High beam 16. Battery feed 36. – 40. Empty 17. Radio 41. Dash board illumination 18. Empty 42. – 44. Empty

Page 23
B. Under dash board (near parking brake):
Engine compartment (center):
1. Power brake assist 16. ABS system 2. A/C clutch 17. Horn 3. Oxygen sensor 18. A/C clutch 4. PCM relay 19. Brake switch 5. PCM 20. PCM relay 6. Parking lights 21. Fuel pump 7. Ignition 22. Cigarette lighter 8. ABS 23. Blower 9. PCM 24. Instrument panel 10. Daytime running lights 25. Ignition switch 11. Fuel pump 26. Ignition switch 12. Instrument lights 27. Head lamps 13. Trailer brake 28. Starter 14. Lights 29. Power brake assist 15. Trailer lights
A
B

Page 24
MOTOR HOME EQUIPMENT KEYS AND DOORS There is only one set of keys for the motor home. Splitting up keys may prevent you from locking yourself out of the vehicle – one person keeps the entry door keys and the driver keeps all others. There are multiple keys for different locks: - Entry door handle (round plastic head - Trimark) - Entry door dead bolt (rectangular head - Trimark) - Exterior compartment doors (round or square head; silver – CH751 or G391) - Some vehicles have a key for the exterior shower (CH751 or unmarked round head or small
rectangular plastic head) - The bus style vehicles have a key for the engine compartment (large rectangular metal head –
E3-5-15) - The bus style vehicles have a key for the cab-over drop down bed (round head; silver – 0C01)
From the inside – move the handles to the lock ( ) or unlock ( ) positions. Please push on the doors while unlocking or unlatching.
To avoid injury or damage during high winds, make sure the entry door is always hooked-in (if equipped) or closed at all times.
Page 25
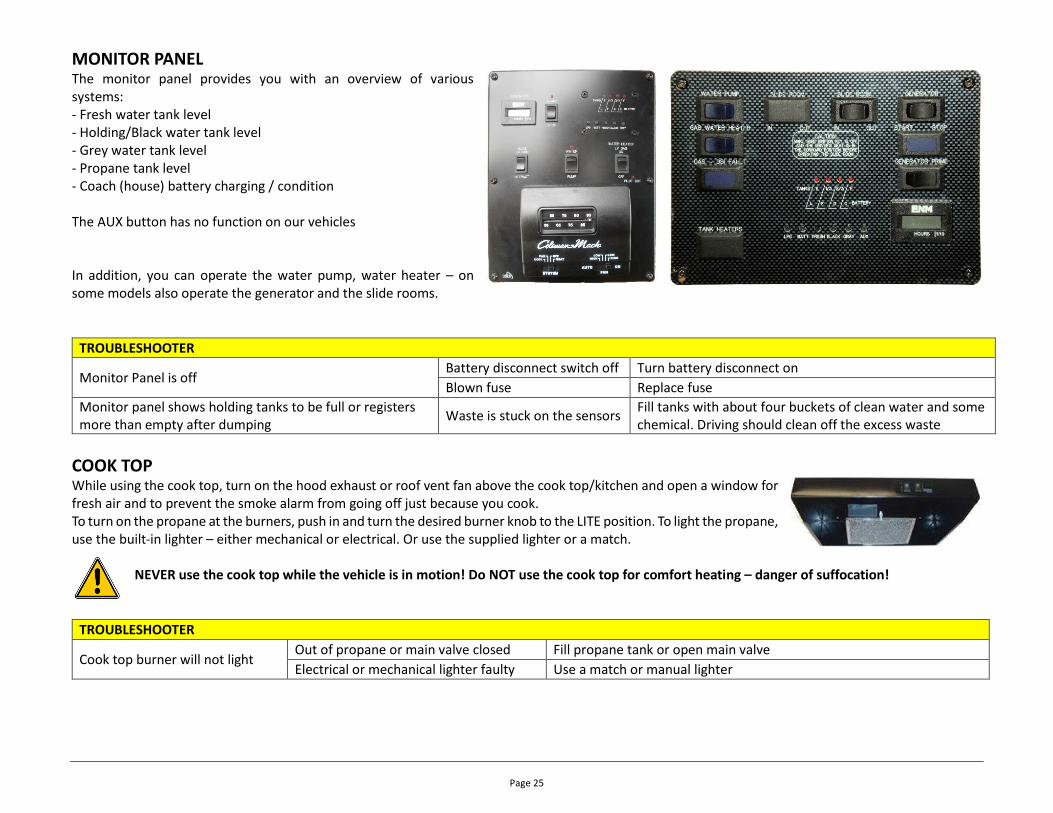
MONITOR PANEL The monitor panel provides you with an overview of various systems: - Fresh water tank level - Holding/Black water tank level - Grey water tank level - Propane tank level - Coach (house) battery charging / condition The AUX button has no function on our vehicles In addition, you can operate the water pump, water heater – on some models also operate the generator and the slide rooms.
TROUBLESHOOTER
Monitor Panel is off Battery disconnect switch off Turn battery disconnect on
Blown fuse Replace fuse
Monitor panel shows holding tanks to be full or registers more than empty after dumping
Waste is stuck on the sensors Fill tanks with about four buckets of clean water and some chemical. Driving should clean off the excess waste
COOK TOP While using the cook top, turn on the hood exhaust or roof vent fan above the cook top/kitchen and open a window for fresh air and to prevent the smoke alarm from going off just because you cook. To turn on the propane at the burners, push in and turn the desired burner knob to the LITE position. To light the propane, use the built-in lighter – either mechanical or electrical. Or use the supplied lighter or a match.
NEVER use the cook top while the vehicle is in motion! Do NOT use the cook top for comfort heating – danger of suffocation!
TROUBLESHOOTER
Cook top burner will not light Out of propane or main valve closed Fill propane tank or open main valve
Electrical or mechanical lighter faulty Use a match or manual lighter

Page 26
OVEN (PROPANE) While using the stove top and/or oven, turn on the hood exhaust fan above the stove and open a window for fresh air and to prevent the smoke alarm from going off just because you cook. Push in, turn the oven knob to PILOT and HOLD it in for 30 – 60 seconds. While holding the knob in, use the open flame of a lighter or a match to light the pilot flame. Hold the lighter or match to the pilot (located next to the burner under the bottom rack of the oven) until the pilot flame lights up. Hold the knob for another 30 seconds – then adjust the oven control knob to the desired temperature. Note: Be patient when lighting the pilot flame as it may take some time.
NEVER use the oven while the vehicle is in motion! Do NOT use the oven for comfort heating – danger of suffocation!
TROUBLESHOOTER
Turned knob but oven won’t light Pilot light must be lit manually Turn oven knob to “Pilot” and keep pushed in, then use match or lighter to light pilot light
KITCHEN COUNTER & DINING TABLE Do NOT place hot pots and pans directly on the kitchen counters or dining tables. These surfaces are mostly plastic or covered by a plastic film and will melt/burn!
ALWAYS use a cutting board when working with a knife

Page 27
CAR RADIO COACHMEN motor homes car radios can only be played with the ignition key in the accessory or run (ignition ON) position. THOR motor homes car radios runs off the coach battery. Due to the variety of car radios only a minimal description can be made. On some models, iPhones & iPods cannot be played thru the USB connection. If the Bluetooth mode is asking for a code, try the generic codes 0000 or 1234. Exterior speakers on THOR motor homes only play with the bedroom radio.
JENSEN VX4020: Power: 1 Mode: 2 Time: Setting – Time; touch Save to store new time
AXXERA AV6337MB: Power: 1 Mode: 1 - Select from touch screen Time: Settings – touch Time on screen Use < or > to adjust
SONY WXGT90BT: Power: 4 Mode: 4 – to shut off completely hold button for 3 seconds Time: Tap menu knob (3) & turn to GENERAL & tap it Turn to CLOCK ADJ & tap it Turn knob to adjust hours & minutes Press menu knob to save new time
1

Page 28
CAB-OVER BED Above the driver cabin there are different kinds of beds. In the Class C motor home it is a permanent structure with a removable section for easier access to the driver area. Just lift the removable section out of the way during the day.
In Class A motor homes the bed is raised out of the way to allow driving of the vehicle. The bed is operated electrically.
1. Pull the front curtains closed 2. Remove the ignition key 3. Lower the bed electrically When raising the bed, make sure nothing is left on the mattress.
ALWAYS use the safety net if small children are sleeping in the cab-over!
DUAL DC525Bi: Power: 4 Mode: 7 Time: 14 – Hold DISP until clock flashes Tap Tune down (5) to adjust hours Tap Tune up (6) to adjust minutes Tap DISP (14) to save new time
Page 29
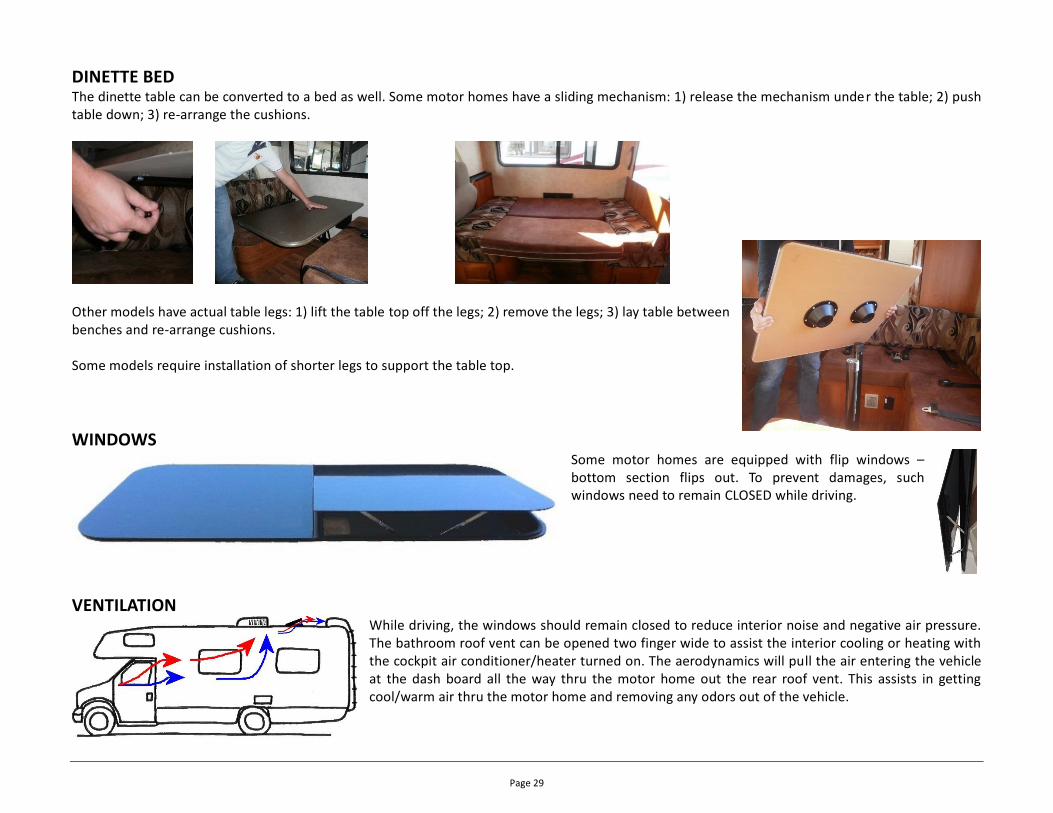
DINETTE BED The dinette table can be converted to a bed as well. Some motor homes have a sliding mechanism: 1) release the mechanism under the table; 2) push table down; 3) re-arrange the cushions.
Other models have actual table legs: 1) lift the table top off the legs; 2) remove the legs; 3) lay table between benches and re-arrange cushions. Some models require installation of shorter legs to support the table top.
WINDOWS Some motor homes are equipped with flip windows – bottom section flips out. To prevent damages, such windows need to remain CLOSED while driving.
VENTILATION While driving, the windows should remain closed to reduce interior noise and negative air pressure. The bathroom roof vent can be opened two finger wide to assist the interior cooling or heating with the cockpit air conditioner/heater turned on. The aerodynamics will pull the air entering the vehicle at the dash board all the way thru the motor home out the rear roof vent. This assists in getting cool/warm air thru the motor home and removing any odors out of the vehicle.
Page 30
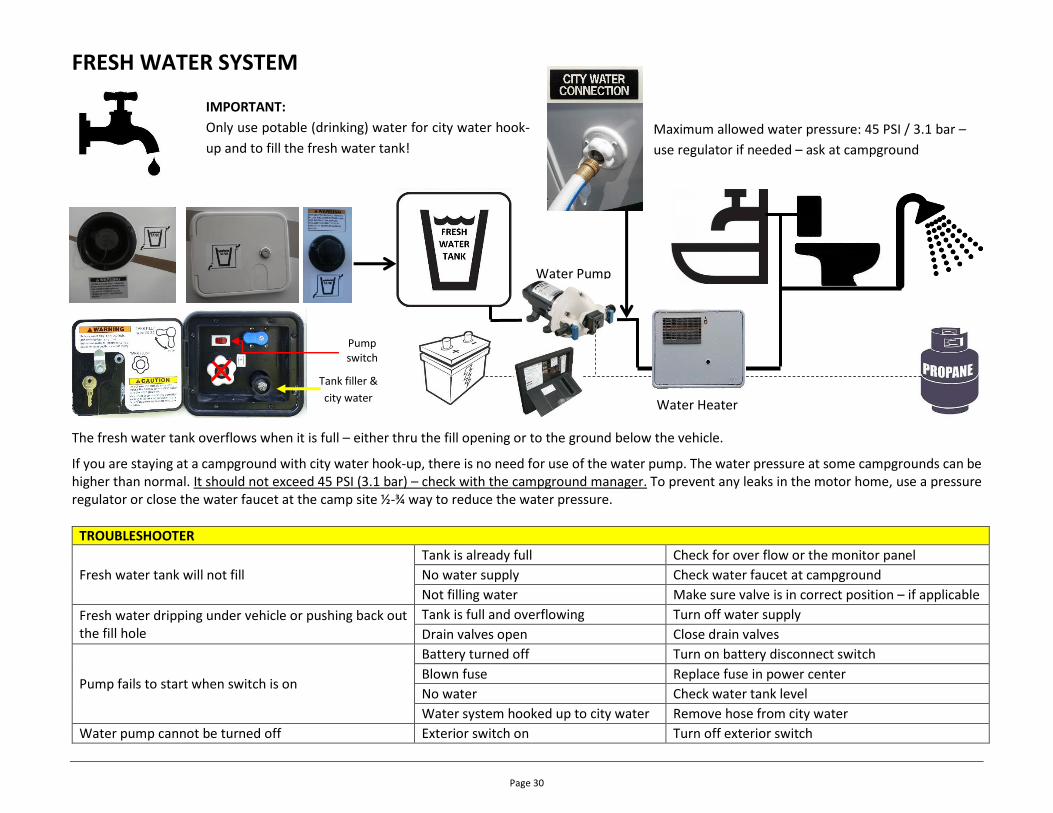
FRESH WATER SYSTEM
The fresh water tank overflows when it is full – either thru the fill opening or to the ground below the vehicle.
If you are staying at a campground with city water hook-up, there is no need for use of the water pump. The water pressure at some campgrounds can be higher than normal. It should not exceed 45 PSI (3.1 bar) – check with the campground manager. To prevent any leaks in the motor home, use a pressure regulator or close the water faucet at the camp site ½-¾ way to reduce the water pressure.
TROUBLESHOOTER
Fresh water tank will not fill
Tank is already full Check for over flow or the monitor panel
No water supply Check water faucet at campground
Not filling water Make sure valve is in correct position – if applicable
Fresh water dripping under vehicle or pushing back out the fill hole
Tank is full and overflowing Turn off water supply
Drain valves open Close drain valves
Pump fails to start when switch is on
Battery turned off Turn on battery disconnect switch
Blown fuse Replace fuse in power center
No water Check water tank level
Water system hooked up to city water Remove hose from city water
Water pump cannot be turned off Exterior switch on Turn off exterior switch
Water Pump
IMPORTANT:
Only use potable (drinking) water for city water hook-
up and to fill the fresh water tank!
Maximum allowed water pressure: 45 PSI / 3.1 bar –
use regulator if needed – ask at campground
Water Heater
Tank filler &
city water
Pump switch

Page 31
WINTERIZATION OVERNIGHT – If the outside temperature falls below freezing (32°F/0°C), empty the holding tanks. The water heater needs to be ON and
the furnace (heater) needs to be turned ON and set to at least 55°F/12°C over night – even if you are not in the vehicle!
ALL DAY – If temperatures remain below freezing during the day, the water system has to be professionally winterized at an RV service
center to prevent any damages to the plumbing system. The water system will not be usable once it has been winterized.
Please call our Help Desk for more information and assistance. Depending on season and pick up location, the motor home may already be winterized.
WATER HEATER The water heater operates on propane and battery power. It takes 20-30 minutes to heat the 6 gallons/22 liters of water.
The Pilot or DSI light will turn on briefly but turns off while the water is getting hot.
TROUBLESHOOTER
Water heater not working or illuminated switch not lit
No 12V power Turn battery disconnect on
Replace fuse
Water is already hot Check for hot water at faucet
DSI/Pilot light turning on Temporary ignition failure Turn off and wait 30 seconds before turning back on
No propane or main valve closed Fill propane tank or open main valve
SHOWER Dry camping: make sure you have plenty of fresh water and the grey water tank is empty. Full hook-up: make sure the city water at
the campsite is on and the drain valve of the grey water tank is open.
The shower head has a water saving feature with an on/off valve built into the shower head to reduce the water consumption.
TROUBLESHOOTER
No water at shower head Valve at shower head is turned off Open valve at shower head
Lack of water Turn on pump, check tank level or city water hookup
Water backs up into shower Grey water tank is full Empty the grey water holding tank
It is your responsibility to have the plumbing system winterized when temperatures fall below freezing! See Winterization form
For safety reasons turn the water heater off while driving.

Page 32
Waste Water System
The waste water system
operates without any
pump and empties thru
a hose
Some vehicle
may have an
extra valve on
the passenger
side
To drain the tanks: 1. Remove end cap 2. Attach sewer hose 3. Stick hose in ground 4. Drain BLACK water (large valve) 5. Close black water valve 6. Drain GREY water 7. Close grey water valve 8. Remove sewer hose 9. Install end cap 10. Rinse hose
Grey Water
Black Water – Drain only when at least 2/3 full!
Black Water
Open Close
1st
2nd
End Cap – Needs to be secured while traveling

Page 33
TROUBLESHOOTER
Waste tank will not drain
Valve(s) closed Ensure all valves are open – see opposite side of vehicle
Waste tank empty Check for water in tank thru toilet (on some models)
Drain pipe plugged Insert a wire to unclog from the outside – CAUTION: sudden discharge
Contents in tank are frozen Dump in warmer climate
Waste water valve is broken Visit a repair facility – see page 16
Grey water is backing up into shower Full waste tank Empty the grey water holding tank
Monitor panel shows full or registers more than empty after dumping
Waste is stuck on the sensors Fill tanks with about four buckets of clean water and some chemical. Driving should clean off the excess waste
TOILET All motor homes are equipped with a flush toilet. Flushing the toilet requires water pressure from the water pump or city water connection. Before using
the toilet ensure you have water pressure!
Flushing the toilet is done with a foot pedal. Flush for at least 10 seconds.
To prevent odors and to dissolve human waste add RV holding tank chemicals after every first time use on an empty tank. Do NOT use regular household
toilet cleaner!
Do NOT drop anything in the
toilet that does not belong!

Page 34
ELECTRICAL SYSTEM
12 VOLTS – BATTERY POWER The coach (house) battery operates many electrical appliances. Make sure the battery disconnect is always turned ON (USE).
The coach battery is getting charged while driving and when connected to the campground or when the generator is running. Its condition can be seen on
the monitor panel with the BATT button.
If you are dry (freedom) camping (without electricity from the campground) for a few days and do not drive much, you have to run the
engine at least two hours per day to maintain enough battery power. If the outside temperature is low and you use the furnace (heater) at
night, you have to run the engine at least four hours per day to maintain enough battery power. A fully discharged battery requires driving
(or running of engine) for at least eight hours. Battery life varies widely depending on multiple factors.
BATTERY DISCONNECT SWITCH All motor homes have a coach battery disconnect switch which is located by the entry door. Leave the
switch ON (USE) to assure overall function of the appliances. If the switch is OFF (STORE) – nothing in the
motor home will work and the coach battery will not get charged when connected to campground
electricity or running generator.
The only time it has to be turned OFF is when re-filling fuel or propane
refueling.
Battery Disconnect Switches
Campground power Vehicle engine
Water pump
Generator
Charges battery

Page 35
FUSES Each motor home has a fuse box which is located in the bedroom or living area. It contains
a series of fuses (standard 12 volt automotive fuses). If any electrical appliance stops to
operate, check the fuses first. A defective fuse has the thin wire inside broken.
TROUBLESHOOTER
No power at all Battery disconnect switch off Turn battery disconnect switch back on
Battery level low on the monitor panel
Battery voltage is low Recharge the battery by starting engine or hooking up at campground
Battery not charging while driving
Blown fuse Call our Help Desk for assistance
Battery not charging with campground electricity
Tripped circuit breaker Reset all circuit breakers in the power center
Technical problem Call our Help Desk for assistance
Lights don’t turn on Switch at wall or on lamp off Turn both switches on
Battery disconnect switch off Turn battery disconnect switch on
Lights dim or half bright Battery voltage is low Recharge the battery by starting engine or connecting to campground
Good Bad

Page 36
120 VOLTS – HOUSEHOLD POWER
CIRCUIT BREAKERS Each motor home has a fuse box which is located in the bedroom or living area. It contains a series of 120 volt circuit breakers. If any electrical appliance
stops to operate, check first the circuit breakers.
A circuit breaker ON
B circuit breaker TRIPPED (activated)
C circuit breaker OFF
Charges battery
Generator power
see picture on next page on how to reset a breaker
Switch main power on when arriving at campsite
GFI
Campground power
Some vehicles have a power outlet for the cable and it always needs to be connected to have generator power
Vehicles with a detachable power cable or no power outlet automatically select between generator and campground power
Page 37
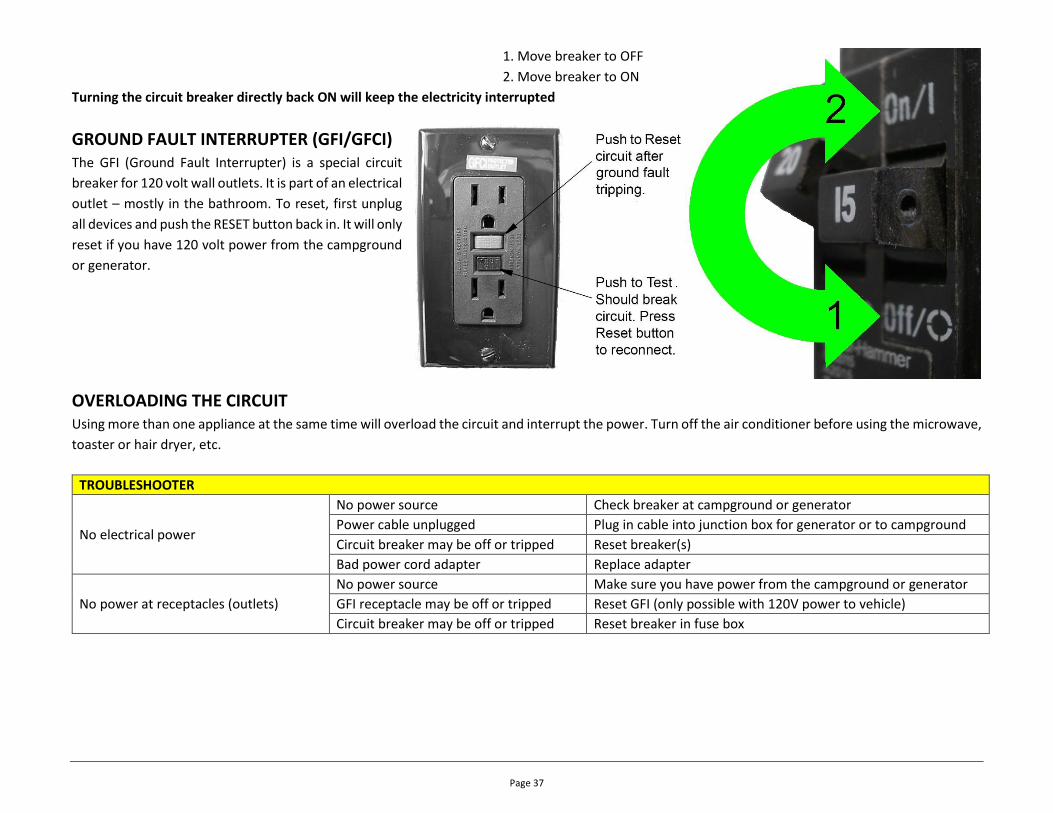
1. Move breaker to OFF
2. Move breaker to ON
Turning the circuit breaker directly back ON will keep the electricity interrupted
GROUND FAULT INTERRUPTER (GFI/GFCI) The GFI (Ground Fault Interrupter) is a special circuit
breaker for 120 volt wall outlets. It is part of an electrical
outlet – mostly in the bathroom. To reset, first unplug
all devices and push the RESET button back in. It will only
reset if you have 120 volt power from the campground
or generator.
OVERLOADING THE CIRCUIT Using more than one appliance at the same time will overload the circuit and interrupt the power. Turn off the air conditioner before using the microwave,
toaster or hair dryer, etc.
TROUBLESHOOTER
No electrical power
No power source Check breaker at campground or generator
Power cable unplugged Plug in cable into junction box for generator or to campground
Circuit breaker may be off or tripped Reset breaker(s)
Bad power cord adapter Replace adapter
No power at receptacles (outlets)
No power source Make sure you have power from the campground or generator
GFI receptacle may be off or tripped Reset GFI (only possible with 120V power to vehicle)
Circuit breaker may be off or tripped Reset breaker in fuse box

Page 38
GENERATOR
The generator uses gasoline from the vehicle fuel tank. A minimum of ¼ fuel tank is needed in order to operate. Fuel use up to 0.7 gallon / 2.7 liter per hour. Using two appliances at the same time can overload the generator itself and shut it down. Turn off every appliance before re-starting the generator. NEVER run the generator for more than a minute with the green service door removed! Overheating and serious mechanical damage could occur!
Circuit Breaker on Generator Power Cord connected* Fuse box with Circuit Breakers
The generator motor oil level
needs to be inspected and adjust-
ted every eight (8) hours of use.
GFI
*Vehicles with a detachable power cable or no outlet to connect the cable automatically select between generator and campground power

Page 39
Higher temperatures & altitudes will reduce power output and can cause the generator to stop running. Temperatures above 100°F/38°C can cause vapor-lock and stop the generator from running (3.5% decrease for every 1000ft/300m in elevation and 1% decrease for every 10°F/5.5°C over 77°F/25°C The generator produces 3600 watts (4000 peak) 120 volts @ 30 amperes - Typical power usages: Air Conditioner 1200-2400 watts 10-20 amperes (30+ peak) Microwave 900 watts 7.5 amperes Coffee maker 900 watts 7.5 amperes Toaster 900 watts 7.5 amperes Laptop charger 300 watts 3 amperes Battery charger 720 – 3360 watts 6-28 amperes
TROUBLESHOOTER
Generator cranks but will not start Generator may be out of fuel
Press ‘Prime’ or ‘Stop’ button for 15 seconds and try again
Check the fuel level - At least ¼ of fuel in tank required
Vapor-lock It is too hot – wait for cooler temperatures
Generator runs but no power Circuit breakers may be off or tripped Reset breaker at generator / in fuse box
Power cable unplugged Plug power cable into receptacle – if equipped
Circuit breaker trips Overloaded circuit Turn off all the electrical load and reset the circuit breaker
Stops when driving around corners Low on fuel Refill fuel tank – more than ½ full is recommended

Page 40
REFRIGERATOR
For proper operation, the vehicle needs to be on level ground. Use levelers as needed.
For the most efficient operation pre-cool all food at home; do not place any hot or warm food in the refrigerator and do not overfill
it, blocking air circulation. If possible, keep the refrigerator side of the motor home in the shade.
The refrigerator is using propane or household (120 volt) power to cool but needs battery power (12 volt) to operate. For an extended stay it is recommended to have electricity from the campground. The motor home refrigerator is technical different from a household refrigerator and therefore less efficient by design.
The DOMETIC model has an adjustable temperature
sensor. Make sure the sensor cable is not hanging loose.
You can download a leveling app to your phone or a drinking glass filled with water can also be used.
Refrigerators work best with outside temperatures between 32 -75°F (0-25°C) and below 5000 feet (1500 meter) elevation

Page 41
Operation
TROUBLESHOOTER
CHECK light on / GAS light blinking
Temporary malfunction Turn off and wait about 45 seconds before turning it back on
Main valve closed or out of propane Open main valve or fill propane tank
Ignitor problem Elevation – Air/gas mixture unable to ignite – travel to lower altitude
Visit a repair facility – see page 15
Refrigerator is off
Turned off Turn it on
No or low 12V power Turn battery disconnect on/recharge battery
Fuse blown Check and replace fuse
Thermal fuse tripped Reset thermal fuse on back of refrigerator (outside)
Reduced cooling
Outside extremely hot Move out of sunshine
Temperature sensor not properly adjusted or hanging loose
Adjust temperature sensor (Dometic only)
Motor home not level Level out motor home
Refrigerator not cooling
Any of the above All of the above
Motor home not level Level out motor home and turn off refrigerator. Requires complete shut down for 12 hours. Vibrations while driving may restore system but problem may persist and will require a larger repair.
DOMETIC
Push button 1 to turn ON the refrigerator
Set button 2 to Auto mode (pushed in)
A indicates AUTO mode
B indicates propane ignition problem
NORCOLD
Move switch (1) to AUTO mode Press button (1) to turn on – green LED (2) on
Select temperature (2) Select AUTO mode (3) – (4) lights up
(3) = power on Select temperature (5, 6)
(4) = propane operation (7) = electrical operation
(4) Flashing = Blinking = Ignition Error (8) = propane operation
A red light (2) indicates a problem
Refrigerators work best with outside temperatures between 32 -75°F (0-25°C) and below 5000 feet (1500 meter) elevation
1 2 3
8
7 5 6
4

Page 42
AIR CONDITIONER
To avoid electrical overload (tripping circuit breaker or stalling generator) wait 3 minutes between turning the A/C on again.
NOTE - The air conditioner can only cool about 20˚F/11˚C temperature difference. With outside temperatures of 100˚F/38˚C it can take hours to cool to a comfortable temperature. Opening windows and doors will prolong the cooling time.
TROUBLESHOOTER
A/C does not run No power source Make sure you have power from the campground or generator
Circuit breakers may be off or tripped Reset circuit breakers at campground, fuse box and/or generator
A/C not or weak cooling Evaporator coils are iced up Turn A/C off and run fan only for about 1 hour
Blower runs but no cooling Blower on but not the A/C Set fan to AUTO and switch to COOL
1. Press (MODE) once 2. Fan – Select Au (auto)* (press & to change
selection) 3. Press MODE again 4. Select temperature To turn OFF - press MODE again 2x To change between Fahrenheit & Celsius press the & buttons at the same time *In Hi or Lo the fan will work without cooling
1. System – Select COOL 2. Fan – Select Auto Low 3. Select temperature To turn OFF – Select System OFF
The roof air conditioner requires power
from the campground or the generator to
operate but also battery power for the
controls. See pages 34 – 38
Ceiling mounted model: 1. Cooling – Turn system knob 2. Select temperature Note: There is NO heat from the air conditioner
Page 43
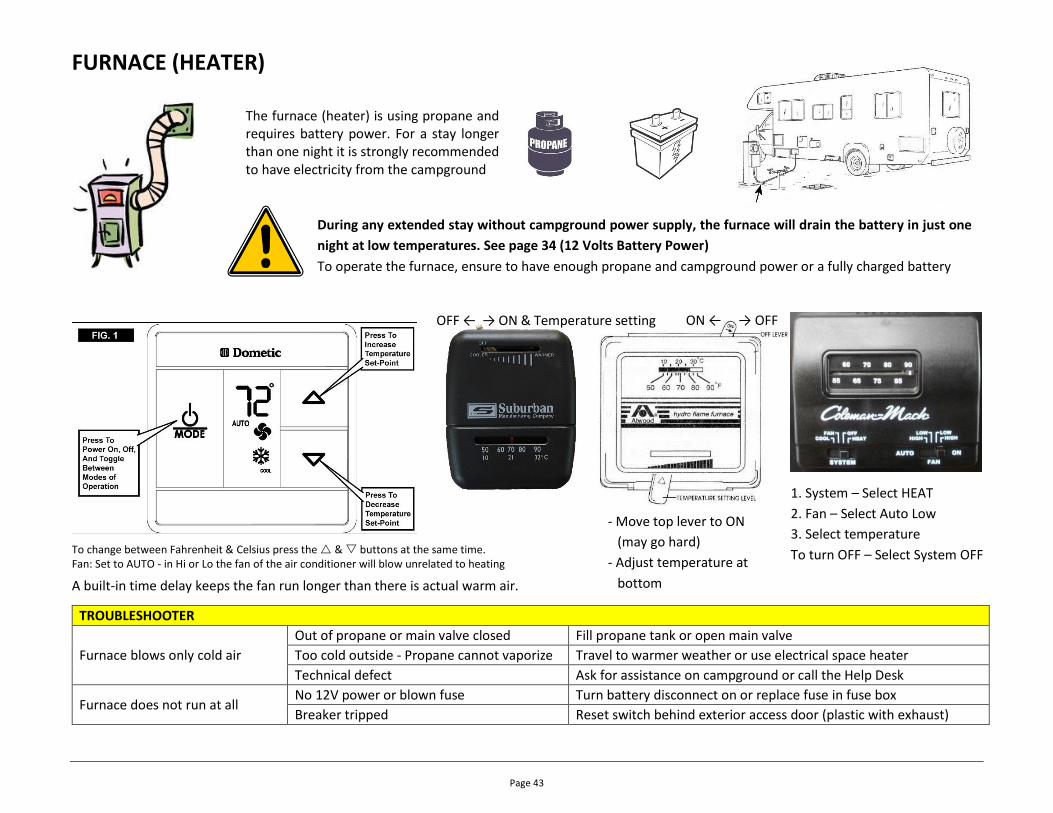
FURNACE (HEATER)
A built-in time delay keeps the fan run longer than there is actual warm air.
TROUBLESHOOTER
Furnace blows only cold air
Out of propane or main valve closed Fill propane tank or open main valve
Too cold outside - Propane cannot vaporize Travel to warmer weather or use electrical space heater
Technical defect Ask for assistance on campground or call the Help Desk
Furnace does not run at all No 12V power or blown fuse Turn battery disconnect on or replace fuse in fuse box
Breaker tripped Reset switch behind exterior access door (plastic with exhaust)
The furnace (heater) is using propane and requires battery power. For a stay longer than one night it is strongly recommended to have electricity from the campground
During any extended stay without campground power supply, the furnace will drain the battery in just one
night at low temperatures. See page 34 (12 Volts Battery Power)
To operate the furnace, ensure to have enough propane and campground power or a fully charged battery
1. System – Select HEAT
2. Fan – Select Auto Low
3. Select temperature
To turn OFF – Select System OFF
- Move top lever to ON
(may go hard)
- Adjust temperature at
bottom
ON ← → OFF
To change between Fahrenheit & Celsius press the & buttons at the same time. Fan: Set to AUTO - in Hi or Lo the fan of the air conditioner will blow unrelated to heating
OFF ← → ON & Temperature setting
Page 44
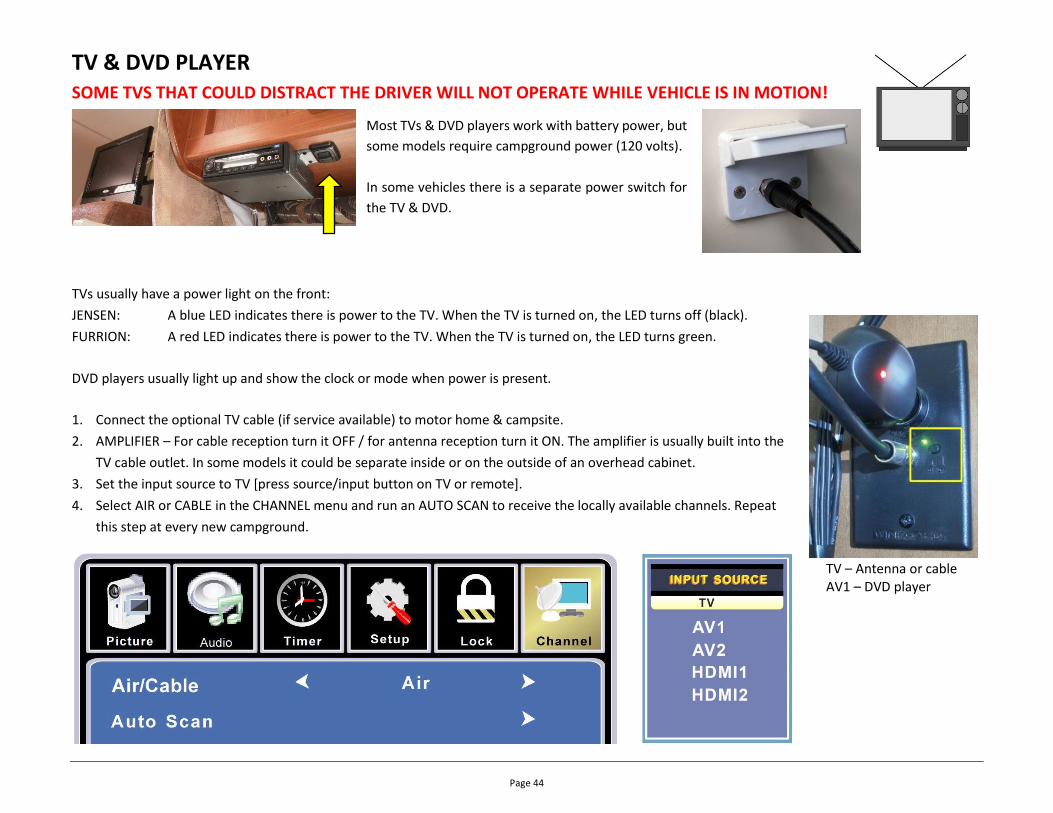
TV & DVD PLAYER SOME TVS THAT COULD DISTRACT THE DRIVER WILL NOT OPERATE WHILE VEHICLE IS IN MOTION!
TVs usually have a power light on the front:
JENSEN: A blue LED indicates there is power to the TV. When the TV is turned on, the LED turns off (black).
FURRION: A red LED indicates there is power to the TV. When the TV is turned on, the LED turns green.
DVD players usually light up and show the clock or mode when power is present.
1. Connect the optional TV cable (if service available) to motor home & campsite.
2. AMPLIFIER – For cable reception turn it OFF / for antenna reception turn it ON. The amplifier is usually built into the
TV cable outlet. In some models it could be separate inside or on the outside of an overhead cabinet.
3. Set the input source to TV [press source/input button on TV or remote].
4. Select AIR or CABLE in the CHANNEL menu and run an AUTO SCAN to receive the locally available channels. Repeat
this step at every new campground.
Most TVs & DVD players work with battery power, but
some models require campground power (120 volts).
In some vehicles there is a separate power switch for
the TV & DVD.
TV – Antenna or cable AV1 – DVD player
Page 45
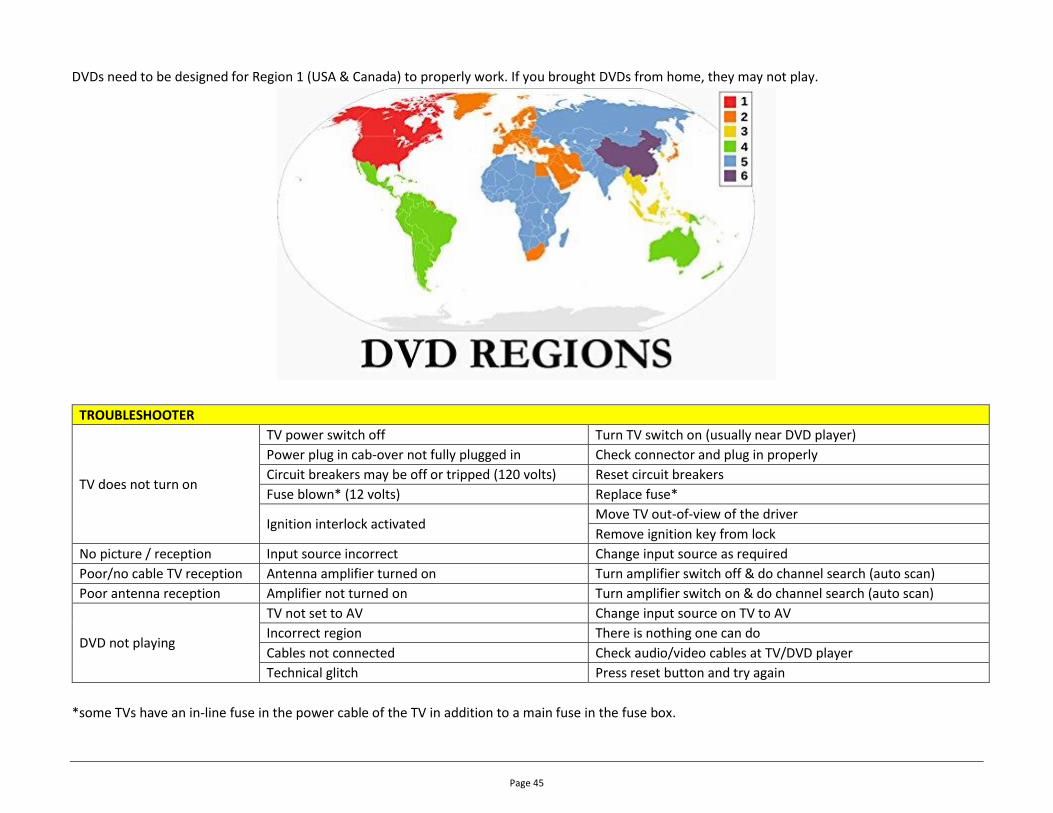
DVDs need to be designed for Region 1 (USA & Canada) to properly work. If you brought DVDs from home, they may not play.
TROUBLESHOOTER
TV does not turn on
TV power switch off Turn TV switch on (usually near DVD player)
Power plug in cab-over not fully plugged in Check connector and plug in properly
Circuit breakers may be off or tripped (120 volts) Reset circuit breakers
Fuse blown* (12 volts) Replace fuse*
Ignition interlock activated Move TV out-of-view of the driver
Remove ignition key from lock
No picture / reception Input source incorrect Change input source as required
Poor/no cable TV reception Antenna amplifier turned on Turn amplifier switch off & do channel search (auto scan)
Poor antenna reception Amplifier not turned on Turn amplifier switch on & do channel search (auto scan)
DVD not playing
TV not set to AV Change input source on TV to AV
Incorrect region There is nothing one can do
Cables not connected Check audio/video cables at TV/DVD player
Technical glitch Press reset button and try again
*some TVs have an in-line fuse in the power cable of the TV in addition to a main fuse in the fuse box.

Page 46
SLIDE ROOM (SLIDE-OUT) The slide room (if equipped) is a great feature that allows you to greatly expand your living space while parked.
Please follow these instructions before operating the slide room to assure proper function:
1. Make sure the motor home is level
2. The parking brake has to be engaged
3. Make sure the transmission is in the ‘P’ (park) position
4. Turn the engine off and remove the ignition key or the slide room will not operate
5. Make sure the driver seat backrest is moved forward so that it does not interfere with the motion of the slide room trim. Damages to the driver seat and slide room trim are the responsibility of the renter
6. Verify clearance to objects on the outside before operating the slide room to its full extension (min. 3.3 ft. / 100 cm outside clearance)
7. Make certain that no objects get jammed between the slide room frame and the sidewall while extending the slide room. NEVER store anything on top or next of the slide room
8. Do not allow anyone to sit on the slide room sofa, bed and/or dinette while operating the slide room
9. Push the button to extend the slide room until the slide room stops completely and the motors turn off automatically – hold button for 3 more seconds
To retract the slide room, repeat steps 5 – 9. Make sure the path is clear of objects and watch your feet while retracting
TROUBLESHOOTER
Slide room does not move
Safety inter-lock engaged Remove key from ignition and apply parking brake
No power supply Turn on battery disconnect
Weak battery Run engine for 15 min. – start generator – turn off engine
Connect to campground electricity
Fuse blown Replace fuse
Slide room only moves on one side Possible mechanical/electrical defect Retract as much as possible to be able to drive – call Help Desk
NEVER drive the motor home while a slide room is extended

Page 47
AWNING
Before rolling out the awning, ensure there is enough space to fully extend it and that it does not interfere with tree branches, etc.
NEVER leave the awning unattended (absence or overnight)! To enjoy the shade an awning can provide, follow these steps:
1. Release the travel locks and loosen the tightening wheels on both arms
2. Flip the release lever at the roller tube to the ‘roll down’ position, using the pull rod 3. Pull the pull strap using the pull rod. Do not release the awning pull strap.
4. Once the awning is rolled out all the way, move the rafter arms all the way out to the roller tube, stretch the fabric and secure the tightening wheels.
NEVER roll out the awning in windy conditions or rainy weather!

Page 48
5. To raise the awning up, fold out the handle on the awning arm and pull up to the desired height. Ensure the latching mechanism is properly engaged before letting go
To keep the awning pull strap from getting dirty or lost, wrap it loosely around the awning arm closest to the release lever To roll up the awning into the travel position have a 2nd person to assist. Center the strap and pull. Hold on tight! The 2nd person flips the release lever. Slowly let the awning roll up – using the pull rod. Ensure the travel locks are engaged and the tightening wheels are tight
Ensure the release lever at the roller tube is in the ‘ROLL UP’ position - use the pull rod to adjust if needed
NEVER release the awning arms from the wall brackets at any time!
CAUTION: When it is windy or rainy, retract and roll-up the awning!
Remember – Weather conditions can change rapidly.
Especially in the desert and mountains!
Before driving off – ensure the awning is properly secured

Page 49
SETTING UP AND BREAKING DOWN CAMP
When you arrive at the camp site 1. Have a passenger guide you into the camp site to prevent hitting an obstacle
and damage the vehicle 2. Park the motor home on a level surface. Otherwise use the levelers to level the
vehicle from front to back and side to side (see page 39 – Refrigerator) 3. Apply the parking brake before shifting into park 4. Before extending the slide rooms make sure there is enough clearance 5. If equipped – extend the entry step (turn off the electrical step, so it remains
extended) 6. Hook up the power cord, fresh water and sewer hose 7. Turn on air conditioner or heater – as needed 8. Turn on water heater
Power
Water
Sewage
Before leaving the camp site 1. Roll up and secure the awning 2. Retract the slide room(s) 3. Close all roof vents and windows 4. Turn off the air conditioner/heater 5. Turn off the water heater and water pump 6. Unplug and store the power cord and TV cable 7. Disconnect and store the fresh water hose 8. Close dumping valves, disconnect and rinse the sewer
hose and store it. Put the sewer cap on 9. Release the parking brake and drive motor home off
levelers 10. Put levelers in storage 11. Close and lock all compartment doors 12. If equipped – retract the entry step (turn on electrical
step, so it retracts when closing the door) 13. Lock the entry door 14. Secure any loose items in the motor home 15. Close all drawers and cabinets inside the motor home 16. Ensure everybody is buckled in 17. Drive carefully on the campground and roads – request
help from a passenger in narrow spots
For safety reasons Road Bear RV / Britz USA does not recommend ‘street-side’ camping, which is illegal in some states
Water
Sewage
Power

Page 50
MEASUREMENT CONVERSIONS
Length
1 Kilometer (km) 0.621 miles
1 Meter (m) 3.28 feet
1 mile (mi) / 5730 feet 1.609 kilometers
1 foot (ft.) 30.48 centimeters
1 inch (in) 2.54 centimeter
Liquids
1 gallon (gal) 3.78 liters
1 quart (qt.) 0.94 liters
1 ounce (fl. oz.) 0.03 liter
1 liter (lt.) 0.264 gallons
Weight
1 kilogram (kg) 2.205 pounds
1 ounce (oz.) 28.35 grams
1 pound (lb.) 453 grams
1 ton (t) / 2000 lbs. 906 kilograms
Speed
35 miles per hour (mph) 56 kilometers per hour
45 miles per hour (mph) 72 kilometers per hour
55 miles per hour (mph) 88 kilometers per hour
65 miles per hour (mph) 105 kilometers per hour
75 miles per hour (mph) 120 kilometers per hour
Page 51
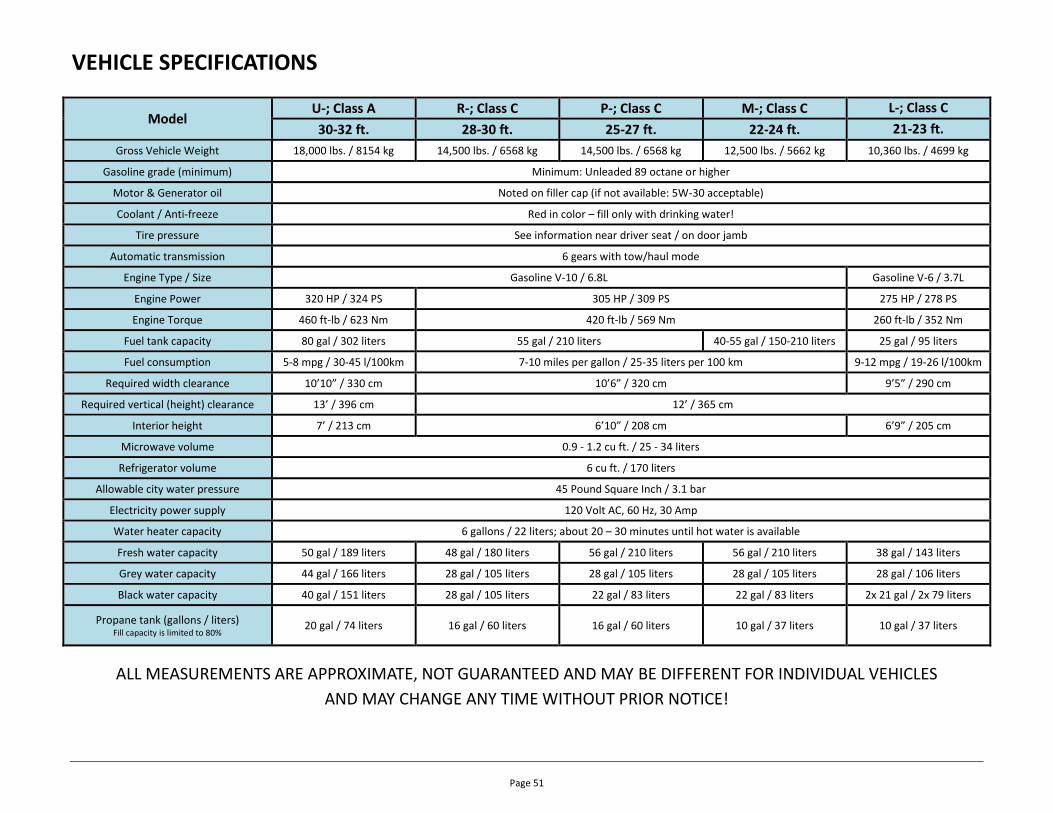
VEHICLE SPECIFICATIONS
Model U-; Class A R-; Class C P-; Class C M-; Class C L-; Class C
30-32 ft. 28-30 ft. 25-27 ft. 22-24 ft. 21-23 ft.
Gross Vehicle Weight 18,000 lbs. / 8154 kg 14,500 lbs. / 6568 kg 14,500 lbs. / 6568 kg 12,500 lbs. / 5662 kg 10,360 lbs. / 4699 kg
Gasoline grade (minimum) Minimum: Unleaded 89 octane or higher
Motor & Generator oil Noted on filler cap (if not available: 5W-30 acceptable)
Coolant / Anti-freeze Red in color – fill only with drinking water!
Tire pressure See information near driver seat / on door jamb
Automatic transmission 6 gears with tow/haul mode
Engine Type / Size Gasoline V-10 / 6.8L Gasoline V-6 / 3.7L
Engine Power 320 HP / 324 PS 305 HP / 309 PS 275 HP / 278 PS
Engine Torque 460 ft-lb / 623 Nm 420 ft-lb / 569 Nm 260 ft-lb / 352 Nm
Fuel tank capacity 80 gal / 302 liters 55 gal / 210 liters 40-55 gal / 150-210 liters 25 gal / 95 liters
Fuel consumption 5-8 mpg / 30-45 l/100km 7-10 miles per gallon / 25-35 liters per 100 km 9-12 mpg / 19-26 l/100km
Required width clearance 10’10” / 330 cm 10’6” / 320 cm 9’5” / 290 cm
Required vertical (height) clearance 13’ / 396 cm 12’ / 365 cm
Interior height 7’ / 213 cm 6’10” / 208 cm 6’9” / 205 cm
Microwave volume 0.9 - 1.2 cu ft. / 25 - 34 liters
Refrigerator volume 6 cu ft. / 170 liters
Allowable city water pressure 45 Pound Square Inch / 3.1 bar
Electricity power supply 120 Volt AC, 60 Hz, 30 Amp
Water heater capacity 6 gallons / 22 liters; about 20 – 30 minutes until hot water is available
Fresh water capacity 50 gal / 189 liters 48 gal / 180 liters 56 gal / 210 liters 56 gal / 210 liters 38 gal / 143 liters
Grey water capacity 44 gal / 166 liters 28 gal / 105 liters 28 gal / 105 liters 28 gal / 105 liters 28 gal / 106 liters
Black water capacity 40 gal / 151 liters 28 gal / 105 liters 22 gal / 83 liters 22 gal / 83 liters 2x 21 gal / 2x 79 liters
Propane tank (gallons / liters) Fill capacity is limited to 80%
20 gal / 74 liters 16 gal / 60 liters 16 gal / 60 liters 10 gal / 37 liters 10 gal / 37 liters
ALL MEASUREMENTS ARE APPROXIMATE, NOT GUARANTEED AND MAY BE DIFFERENT FOR INDIVIDUAL VEHICLES
AND MAY CHANGE ANY TIME WITHOUT PRIOR NOTICE!

Page 52
RETURNING THE MOTOR HOME AT THE END OF YOUR TRIP
1. RETURN the motor home between 8:00 and 10:30 a.m. If you do not require the transfer to the airport or airport hotels, return no later than 11:00 a.m. If the motor home has any damage, please return before 09:30 a.m.
2. BEFORE returning to ROAD BEAR RV; at the last campground or overnight stop: a. Dispose of any left-over food and trash b. Pack your personal belongings and luggage
c. Clean the inside (wipe clean the shower, toilet, sinks, refrigerator, stove, oven, microwave; wash the dishes, pots, pans, and coffeemaker) and sweep out the motor home
d. Drain the waste water tanks. Tanks must be empty!
3. Fuel and propane tanks need to be FULL (verify the tank indicators!)

Page 53
4. At ROAD BEAR RV: a. Please unload all linens and camping chairs and put them in their designated return areas
b. Please unlock all exterior compartment doors
c. Check all storage areas and cabinets, remove all personal items. Items left behind will be discarded after 14 days
d. Let our office staff know that you are ready for the check-in
COMPLEMENTARY SHUTTLE SERVICE
The vehicle return has to be concluded by 10.30 am for the transfer. The shuttle transfer to the airport or airport hotels departs ROAD BEAR RV at 11:00 a.m.! If you require a taxi to an alternate location or for an early flight, please contact the return location in advance
MINIMUM CHARGES - Late charges: US$ US$300.00 plus direct customer daily rate - Gasoline: As calculated upon return plus a handling fee - Propane: As calculated upon return plus a handling fee - Dumping: up to US$ 75.00 - Cleaning Fee: US$ 50.00 minimum; US$ 250.00 minimum for smoking & pets
There is no shuttle service for late returns!

Page 54
RENTAL LOCATION ADDRESS LISTINGS Business Hours: Monday – Friday 8:00 AM – 5:00 PM Saturday 8:00 AM – 1:00 PM (by appointment) Sundays & Holidays closed
Denver (DEN) 7685 Dahlia Street Commerce City, CO 80022 Tel: 1-720-570-1100 Toll free: 1-866-457-1100 www.roadbearrv.com/den 22 miles / 35 km from DEN airport – No public transport access
Las Vegas (LAS) 4730 Boulder Highway Las Vegas, NV 89121 Tel: 1-702-453-1109 Toll free: 1-866-303-1057 www.roadbearrv.com/las 8 miles / 13 km from LAS airport – Impractical public transport access
Los Angeles (LAX) 28404 Roadside Drive Agoura Hills, CA 91301 Tel: 1-818-991-2794 Toll free: 1-866-527-6876 www.roadbearrv.com/lax 36 miles / 58 km from LAX airport – Impractical public transport access
New York (NYC) 42 State Route 36 East North Middletown, NJ 07748 Tel: 1-732-495-0959 Toll free: 1-866-787-3682 www.roadbearrv.com/nyc 33 miles / 53 km from EWR airport - NJ TRANSIT train between Middletown and EWR & Manhattan / Ferry between
Belford/Harbor Way and Manhattan – Free transfer to & from train station/ferry terminal offered with prior appointment
only
Orlando (MCO) 3800 W Colonial Drive Orlando, FL 32808 Tel: 1-407-384-9241 Toll free: 1-855-926-8727 www.roadbearrv.com/mco 17 miles / 27 km from MCO airport – Impractical public transport access
San Francisco (SFO) 420 San Leandro Blvd San Leandro, CA 94577 Tel: 1-510-564-4444 Toll free: 1-866-249-1119 www.roadbearrv.com/sfo 30 miles / 48 km from SFO airport – BART (train) to/from downtown & airport
Seattle (SEA) 1541 South 96th Street Seattle, WA 98108 Tel: 1-206-334-7303 Toll free: 1-855-732-1541 www.roadbearrv.com/sea 7 miles / 11 km from SEA-TAC airport – Bus 132 stop Des Moines Memorial Drive S at S 96th St
For maps visit the Road Bear RV website1 or Google Maps2
1 http://www.roadbearrv.com/rv-rental-locations 2 https://maps.google.com
(New Year’s Day, Presidents Day; Memorial Day; 4th of July; Labor Day; Thanksgiving Day, Christmas Day)