vending machine operation and maintenancecoffeemach.ru/instrukcii/saeco_ambra_eng.pdfenglish 3 1...
TRANSCRIPT

Vending Machine
model
AMBRAType SUP 015VR
OPERATION AND MAINTENANCE
WARNING: This instruction manual is intended exclusively for specialized personnel.

English
2
TABLE OF CONTENTS
MAIN PARTS ................................................ 3
1 - INTRODUCTION TO THE MANUAL ............ 41.1 Foreword ................................................... 41.2 Symbols used ............................................. 4
2 - GENERAL INFORMATION......................... 42.1 Foreword ................................................... 42.2 Intended use of the machine ........................ 42.3 Residual risks ............................................. 42.4 Machine identification ................................. 52.5 Technical specifications ............................... 5
3 - HANDLING AND STORAGE ...................... 6Handling .................................................... 6Storage ...................................................... 6
4 -SAFETY .................................................... 64.1 General safety norms .................................. 64.2 Operators requirements ............................... 7Maintenance technician ............................... 7Supply operator ......................................... 7User .......................................................... 74.3 Safety devices ............................................. 74.4 Safety microswitch efficiency test .................. 7
5 - CONTROLS DESCRIPTION ........................ 85.1 Main controls ............................................. 8Main switch (Fig. 5) .................................... 8Control panel (Fig. 6) ................................. 8Dispensing mode ........................................ 8Setting mode .............................................. 8
6 - INSTALLATION........................................ 96.1 List of supplied accessories .......................... 96.2 Positioning ................................................. 96.3 Electric connection ...................................... 9
7 - SETTINGS.............................................. 10Structure of programming functions ...........10Menu selection .........................................10Changing numeric values ..........................10
8 - USE OF THE VENDING MACHINE ............ 238.1 Machine status ......................................... 23Off and electrically insulated .....................23On ..........................................................23Energy saving ..........................................238.2 Recommendations ..................................... 23Prolonged inactivity ...................................23Temperature control ..................................23Bean hopper empty ...................................23Water tank empty .....................................23Dump box full ..........................................238.3 First Switching on ..................................... 24Filling the bean hopper ..............................24Fixing the cover lock plate .........................24Filling the water tank .................................24Water circuit filling ...................................25Grinding adjustment ..................................25Coffee blends ...........................................268.4 Beverage dispensing .................................. 26Adjusting the coffee dispenser ....................26Adjusting the cup filling level .....................27Coffee dispensing .....................................27Preheating ...............................................27Hot water dispensing .................................278.5 Messages and special warnings ................. 28Bean hopper electronic control ...................28Coffee beans protection against impurities ..28Water level electronic control .....................28
9 - MAINTENANCE .................................... 289.1 Foreword ................................................. 289.2 Cleaning and maintenance ........................ 29Brew group ..............................................30Coffee grinder ..........................................31
10- INACTIVITY .......................................... 32
11- INSTRUCTIONS FOR END-OF-LIFEDISPOSAL TREATMENT .......................... 32
12- TROUBLESHOOTING ............................. 32
13- ACCESSORIES ...................................... 32
14- GENERAL MAINTENANCE ...................... 3314.1 Troubleshooting ........................................ 33

English
3
1 Dump box2 Drip Tray3 Grill drip tray4 Main switch(rear side of the machine)
5 Power cord6 Coffee dispenser7 Hot water spout8 Control panel9 Water tank
10 Water level gauge(inside water tank)
11 Coffee bean hopper12 Coffee bean hopper cover(under the cover with lock)
13 Grind adjustment knob14 Coffee doser screw15 Service door with lock16 Coffee load hopper17 Brew group lock lever
18 Brew group19 Dregs drawer20 Safety microswitch21 Cover with lock22 Cover lock plate23 Locking keys (2x)24 Brew group key25 Cover lock fastening screw
MAIN PARTS
Fig. 1
2
7
6
5
3
8
9
21
11
12
15
13
16
1719
1814
20
1
10
4
24
22
23
25

English
4
1 - INTRODUCTION TO THE
MANUAL
1.1 Foreword
Important
This manual is an integral part of the machine and must beread carefully. It contains all the information about installa-tion, maintenance and correct use of the AMBRA machine.
Always refer to this manual before performing any opera-tion.
Manufacturer: Saeco International Group S.p.A.Via Panigali, 39 - 40041 GAGGIO MONTANO (Bo) Italy
This manual must be preserved with care and must accom-pany the machine throughout its operational life includingchanges of ownership.
If this manual is lost or damaged, request a copy from anApproved Assistance Centre.
The manufacturer reserves all copyrights on this manual.
Important
The keys to open the water and bean hoppers, the side doorand the optional coiner door are available only to the supplyoperator and maintenance technician.
1.2 Symbols used
A number of symbols are used in this manual to indicatedanger or situations that require various degrees of exper-tise.Each symbol is explained by a message.Where no symbol is used, the information is intended for allusers of the machine. The symbols used are the following:
Supply operator
Those in charge of supplying and cleaning the machine.Maintenance operations that require a specialized techni-cian are not to be performed by supply operators.
Maintenance technician
The symbol indicates operations to be performed only byspecialized maintenance technicians and servicemen.
Warning
The symbol indicates danger for operators and the machineitself.
Important
The symbol indicates operations that contribute to keep themachine in good working conditions.
2 - GENERAL INFORMATION
2.1 Foreword
This machine is an automatic coffee and hot water dispenserwith programmable dosing of all beverages.If necessary, contact the nearest Distributor or NationalImporter or the Manufacturer when no importers are avail-able.
APPROVED ASSISTANCE CENTERS are available for infor-mation and explanations about the machine, and to providetechnical assistance and spare parts supplies.
The Manufacturer reserves the right to modify the machinewithout any obligation to provide advance notice.
2.2 Intended use of the machine
The AMBRA machine automatically dispenses:- freshly brewed coffee and espresso coffee;- hot water for beverage preparation.
Important
Improper use of the machine determines the immediatewarranty expiration and the Manufacturer declines responsi-bility for damages and personal injuries.
Improper use includes:- using the machine for purposes other than that intendedand/or following procedures not described in thismanual;- interventions on the machine that are against instruc-tions included in this manual;- using the machine after component parts have beentampered with and/or safety devices have been altered;- installing the machine outdoors
2.3 Residual risks
The dispensing outlet has no protections against accidentalhand exposure to coffee and hot water.

English
5
2.4 Machine identification
Fig. 2
The machine is identified by the model and serial numbersoutlined on the specific plate (Fig. 2).The plate also contains the following specifications:
- name of Manufacturer- CE marking- machine model- serial number- manufacturing year- technical specifications- Power supply voltage (V)- Power supply frequency (Hz)- Power consumption (W)
Important
When contacting APPROVED ASSISTANCE CENTERS alwaysrefer to the plate and the specific data it contains.
2.5 Technical specifications
Power supply ...................................................................................................................... see data platePower rating ....................................................................................................................... see data plateDimensions (l x w x h) ....................................................................................... ca. 380 x 460 x 440 mmMachine case ................................................................ galvanized steel and thermoplastic material (ABS)Weight ................................................................................................................................. ca. 17.5 kgCable length ............................................................................................................................ ca. 1.2 mOperating system ............................................................................................. 1000W immersion boiler.............................................................................................................. Electromagnetic vibration pumpTemperature control .................................................................................................................. electronicCoffeegrinder adjusting device ............................................................................................. fine-grindingCoffee grounds ejection ........................................................................................................... automaticCoffee powder dosing ................................................................................................... adjustment screwQuantity setting ................................................................................................................ ca. 0 - 250 mlWater tank ........................................................................................................... removable, transparentCapacity -Water tank ........................................................................................ ca. 6.5 l
-Coffee bean hopper ...................................................................... ca. 720 gr.-Drip tray ................................................................ ................................. ca. 1 l
Heating time ...................................................................................................................... ca. 3 minutesPreparation time -espresso ......................................................................ca. 20 seconds per cup
-coffee .........................................................................ca. 35 seconds per cup-hot water .................................................................... ca. 60 seconds per cup
Thermal cut-out ........................................................................................................................... built-inInsulation ...................................................................................................................... class protection IApproval ............................................................................................................................ see data plateConformity with existing product class regulations ........... (see Declaration of Conformity in the packaging)

English
6
3 - HANDLING AND
STORAGE
Handling
During handling and transport, the machine must be kept inthe upright position according to the instructions on thepackaging.Lift and position with care.Do not shake the machine.
Storage
The machine must be stored according to the followingtemperatures:-- minimum temperature: 4°C.- maximum temperature: 40°C- maximum humidity: 95%
The machine packaging consists of cardboard and expandedpolystyrene.
Warning
Given the overall packaging weight, do not pile up morethan three machines.
The machine must be stored in its original packaging awayfrom humidity and dust.
4 - SAFETY
In compliance with the Low Tension Directive 2006/95/EC(which replaces the directive 73/23/EEC and followingamendments) and CE Marking Directive 93/68/EEC,SAECO Vending has drawn up a technical file of theAMBRA vending machine held at its plants. The followingregulations were taken into account during the design phase:
- EN 55014 - EN 6100-3-2- EN 61000-3-3 - EN 61000-4-2- EN 61000-4-3 - EN 61000-4-4- EN 61000-4-5 - EN 61000-4-11- EN 60335-2-75 - EN 60335-1
4.1 General safety norms
Danger
It is extremely dangerous to put electrical parts in contactwith water! Do not direct the hot water jet toward bodyparts; handle the hot water pipe with care: danger of burns!
Use the machine for its intended use only.Do not apply technical modifications to the machine: it canbe extremely dangerous!
WarningThe machine must be used only by adults and by those familiarwith it.Do not allow children to play with the machine. Childrenare not aware of the danger of electrical devices.
Power supplyDo not touch electrical parts to avoid serious injuries. Plugthe machine in the correct socket. Voltage must correspondto that indicated on the plate inside the machine (Fig. 2).
Power cordIf damaged, the power cord must be replaced by an Ap-proved Assistance Centre. Do not connect the cord nearcorners and sharp or very hot objects. Avoid contact withoil. Do not stretch the cord when moving the machine. Donot unplug the machine by pulling the cord or touch it withwet hands. The cord must not hang from tables and shelves.
LocationPlace the machine on a stable surface that cannot be knockeddown. Water could pour out: danger of burns! Do not usethe appliance outdoors or in low temperature environments.Do not place the machine on a very hot surface or nearopen flames to avoid damage to the machine casing.
Danger of burnsKeep hands away from the hot water and coffee jet.
PositioningFor the correct functioning of the machine follow the indica-tions below:- select an even surface- select a location that is sufficiently well-lit, clean andnear an easily reachable power source.- the minimum distance between the wall and the machinemust be in line with the indications outlined in figure 3.
Fig. 3
100 mm.

English
7
CleaningBefore cleaning the machine, turn the main switch off anddisconnect the power supply. Wait until the machine is cold.Do not soak the machine in water! Do not disassemble themachine or perform any operation on the internal compo-nents of the machine.
Repairing and maintenanceIn case of failure or faults possibly after a fall, immediatelyunplug the machine. Do not turn the faulty machine on. Themachine can be repaired only by Approved AssistanceCentres. The Manufacturer declines responsibility for damageand injuries caused by incorrect repairing of the machine.In case of failure and/or malfunctioning contact exclusivelyqualified ASSISTANCE SERVICE repairmen.
In case of fire use Carbon Dioxide extinguishers (CO2). Donot use water or dry-powder extinguishers.
4.2 Operators requirements
To guarantee the safety and good functioning of the ma-chine two operators with different skills are required:
Maintenance technician
A specialized technician in charge of machine instal-lation, set-up, maintenance and technical assistance.
Supply operator
An operator in charge of turning the machine on/off, supplying products, removing coins and of the internaland external cleaning of the machine.If the machine is malfunctioning, the supply operator mustrequest the intervention of the maintenance technician.
User
The person who uses the machine. Users must NOT performany of the tasks of the supply operator or the maintenancetechnician.If the machine is malfunctioning, users should request theintervention of the supply operator or the maintenance tech-nician.
4.3 Safety devices
All the components that can be potentially dangerous arelocated inside the machine.Two microswitches (ref. 1 – Fig. 4) placed side by side,automatically cut the power supply if the side door is opened.
4.4 Safety microswitch efficiencytest
When the machine is on, open the side door and check thatthe display (ref. 8 - Fig. 1) and LEDs on the control panelkeypad (rif.8 - Fig. 1) turn off.
When they turn off, it indicates that the vending machine isnot in operation and that the microswitches are working.
Fig. 4
1

English
8
Fig. 5
Fig. 6
SELECT PRODUCTREADY FOR USE
5 - CONTROLS DESCRIPTION
Important
The dispensing keys of the machine are programmed withpre-set values.
5.1 Main controls
Main switch (Fig. 5)
Located in the rear side of the machine, centre-left.When in the ”I” position, the machine is on (electricalfunctions on).When in the ”O” position, the machine is off (electricalfunctions off).
Control panel (Fig. 6)
It consists of 4 keys with different functions according to themachine mode (standard running or setting mode).
Dispensing mode
In this normal running mode, the following operations canbe performed by pressing the keys as indicated in figure 6:
Keys , ,
Dispensing programmed beverages
= espresso coffe
= light coffee
= hot water
Setting mode
In this service mode, the following operations can be per-formed by pressing the keys as indicated in figure 6:
E ENT key - “Espresso coffee”Confirm modified parameters.Allows you to go to the lower programming level
C ESC keyReturn to higher settings level without saving new pa-rameters.
UP key - “Coffee”Scroll Menu and increase the displayed value for reset-ting.
DOWN key - “Hot water”Scroll Menu and decrease the displayed value for reset-ting.
Dispensing LEDsDispensing LEDs are green LEDs located inside the threeselection keys. During beverage dispensing, only the LEDcorresponding to the selected beverage remains on. Afterbeverage dispensing, all three LEDs turn back on.
DisplayIt consists of 2 15-character lines and it displays mes-sages about operations under way or programmed andabout the machine status.

English
9
6 - INSTALLATION
Warning
The presence of nearby magnetic fields or electric devicesgenerating interference may cause malfunctioning in theelectronic control of the machine.
Important
Do not install the machine outdoors and in environments wherewater or steam jets are used.
Important
When the temperature is approaching 0°C internal compo-nents containing water are subject to freezing.
Do not use the machine in such conditions.
To guarantee the correct functioning and durability of theappliance, follow the indications below:- room temperature: 10°C ÷ 40°C- maximum humidity : 90%.- make sure that the machine has not been tampered withduring transport by verifying the package sealing;- verify the machine conditions and model inside thepackaging;- verify the content of the accessories envelope enclosedto the machine (see “6.1 List of supplied accessories”);- remove the machine from the original packaging thatshould be preserved for future use (e.g. change of lo-cation);- remove all the remaining packaging.
Important
Disposal of packaging should be carried out according toexisting laws and regulations and in line with environmentalconsiderations.
6.1 List of supplied accessories
• N. 1 brew group key (ref. 24 - Fig. 1).• N. 1 Instruction and Maintenance Manual
6.2 Positioning
For correct functioning of the appliance follow the indica-tions below:- select an even surface- select a location that is sufficiently well-lit, clean andnear an easily reachable power source;- the distance from the walls must be as shown in Fig.3;
- the maximum angle of inclination of the supportingsurface must not exceed 2°
6.3 Electric connection
Warning
This operation must be performed by the maintenance techni-cian.
The machine requires single-phase voltage according to thevalue contained in the identification plate (2.4 Machine
identification).
Warning
The socket should be easily accessible to the supply opera-tor, so that the machine can be easily unplugged whennecessary.
Before connecting the machine check the following points:- the line voltage of the socket must correspond to thatindicated on the machine plate;- the electrical system must be in line with existing lawsand regulations and must have the load capacity indi-cated on the plate.When in doubt, request professional assistance to de-termine the characteristics of the electrical system.
Warning
The use of extensions and adapters is forbidden.

English
10
7 - SETTINGS
This chapter illustrates how to set up or modify the machineprogrammable parameters.The chapter should therefore be read carefully, to fully un-derstand the correct sequence of operations to be performed.To access the programming menu, turn off the machine,hold down the (Hot Water) and C (Esc) keys, pressingthe main power switch to turn the machine back on.
The main settings options are the following:
• CREDIT MANAGEMENT
• AUDIT SINCE RESET
• AUDIT SINCE INIT
• SETTINGS
• CODE
• TIMER
• PAYMENT SYSTEM
Structure of programming functions
CODE ? ......
CREDIT MANAGEMENT ->
To exit the settings menu press C (Esc). The machine is instandard running mode.
Menu selection
Select menus using the various keys and select optionsby pressing the E key. The parameters of each menu can bemodified by pressing keys. To save the desired settingpress the E key (e.g., “YES” for “SET DOSE”).
If a value has wrongly been modified, the menu can beexited by pressing the C (Esc) key without saving thenew value.
Changing numeric values
When you wish to modify a value, press the “E” key. Modifythe 1st number with the keys and save by pressing the“E” key again. The cursor will move to the next number.Use this method for all the numbers present, in the end thewhole value will be saved and you will exit from themodification.
When entering the programming menu, the set code will berequested. This will allow you to continue with theprogramming. To set it, see “CODE” in the Vending menu.Note the code when it is changed.
Warning
After 5 attempts to enter an incorrect code, the vendingmachine requires the PUC (Personal User Code) to accessthe programming menu.
To receive the PUC code, contact the CUSTOMER SERVICECENTRE.If the PUC is correctly entered, you will be requested to set anew code.The keys have the following values while setting the codeand the PUC:
Key 1 E (Ent) Espresso Coffee ............................... 1Key 2 Coffee ............................................ 2Key 3 Hot Water ....................................... 3Key 4 C (Esc) ...................................................... 4
For example, if the code 312241 must be set, the sequencefor entering it is as follows:1: Key 3 Hot Water 32: Key 1 E (Ent) Espresso Coffee 13: Key 2 Coffee 24: Key 2 Coffee 2

English
11
5: Key 4 C (Esc) 46: Key 1 E (Ent) Espresso Coffee 1
Warning
Note the new password because, if it is lost, it will not bepossible to access the programming menu.
Vending FunctionsFunzioni per il Vending
Ambra is equipped with a menu for managing coffeebrewing.This function allows you to lock coffee brewing but not hotwater dispensing after a determined number of cycles andcan be used, for example, to program the machine’smaintenance operations.
Menu for displaying the beverages that may still be dispensedbefore the lock (max.65535).
Menu for adding credits: allowed values (0÷9999) up to atotal of 65535.
Menu that enables/disables the dispensing control throughcredit management.
Menu that sets the current credits to zero. It is used if anerror is committed in introducing the credits.
Menu that enables/disables displaying the “Credit Warning”and “No Credits” alarms.The alarm is displayed when the number of coffees that canstill be brewed is reached (entered value).If the 0 value is entered, the function is deactivated.
Values: default = 20; range 0÷99.
When the credits are finished, the brewing of coffee stopsand the following message appears on the display: “NOCREDITS”.
PAYMENT SYSTEM
AUDIT SINCE RESET ->
ADD CREDITS0000
CREDITS00000
CREDIT CONTROLNO
CREDIT CONTROLNO
CREDIT CONTROLYES
CLEAR CREDITSNO
CLEAR CREDITS
CLEAR CREDITSYES
ALARM LEVEL00
CREDIT MANAGEMENT->

English
12
AUDIT RESET Functions
Ambra is equipped with a system that records sales andcollections from the last reset that has been performed bythe manager.
General menu for the total display of:Number of coins inserted: Value of coins inserted:
Partial menu relating to coin type 1 to display:Number of coins inserted: Value of coins inserted:
Partial menu relating to coin type 2 to display:Number of coins inserted: Value of coins inserted:
Partial menu relating to coin type 3 to display:Number of coins inserted: Value of coins inserted:
Partial menu relating to coin type 4 to display:Number of coins inserted: Value of coins inserted:
Partial menu relating to coin type 5 to display:Number of coins inserted: Value of coins inserted:
Partial menu relating to coin type 6 to display:Number of coins inserted: Value of coins inserted:
General menu to display the beverages that have beendispensed using the key:Number of beverages dispensed: Value of beveragesdispensed:
General menu to display the recharges that have been madeusing the key:Number of recharges made: Value of recharges made:
General menu to display the sales made (beveragedispensing):Number of sales made: Value of sales made:
General menu to display the sales made (beverage dispensing)using the key:Number of sales made: Value of sales made:
General menu to display the brewing of espresso coffee usingthe key:Number of sales made: Value of sales made:
CREDIT MANAGEMENT ->
AUDITSINCEINIT
COIN 10: 0.00
TOTAL COINS ->0: 0.00
ENCASHMENT CARD0: 0.00
SALES BY CARD ->0: 0.00
TOTAL RECHARGE0: 0.00
S. COFFEE [CARD]0: 0.00
SALES ->0: 0.00
COIN 20: 0.00
COIN 30: 0.00
COIN 40: 0.00
COIN 50: 0.00
COIN 60: 0.00
AUDIT SINCE RESET->
TOTALOVERPAY
SALESBY COINS
COFFEE[CARD]

English
13
CREDITMANAGEMENT ->
COFFEE [CARD]0: 0.00
SALES SALES BYCARD
S. COFFEE[CARD]
WATER [CARD]0: 0.00
SALES BY COINS->0: 0.00
S. COFFEE [COINS]0: 0.00
COFFEE [COINS]0: 0.00
WATER [COINS]0: 0.00
SALES BY F_PRICE->0: 0.00
S. COFFEE [F_PRICE]0: 0.00
COFFEE [F_PRICE]0: 0.00
WATER [F_PRICE]0: 0.00
SALES BY F_CARD->0: 0.00
S. COFFEE [F_CARD]0: 0.00
COFFEE [F_CARD]0: 0.00
WATER [F_CARD]0: 0.00
AUDITSINCE INIT
TOTALOVERPAY
General menu to display the brewing of coffee using thekey:Number of sales made: Value of sales made:
General menu to display the dispensing of hot water usingthe key:Number of sales made: Value of sales made:
General menu to display the sales made (beverage dispensing)using coins through the coiner:Number of sales made: Value of sales made:
Menu to display the brewing of espresso coffee using coins:Number of sales made: Value of sales made:
General menu to display the brewing of coffee using coins:Number of sales made: Value of sales made:
General menu to display the dispensing of hot water usingcoins:Number of sales made: Value of sales made:
General menu to display the sales made (beverage dispensing)free of charge:Number of sales made: Value of sales made:
Menu to display the brewing of espresso coffee free ofcharge:Number of sales made: Value of sales made:
Menu to display the brewing of coffee free of charge:Number of sales made: Value of sales made:
Menu to display the dispensing of hot water free of charge:Number of sales made: Value of sales made:
General menu to display the sales made (beverage dispensing)using FREE VEND cards:Number of sales made: Value of sales made:
General menu to display the brewing of espresso coffee usingFREE VEND cards:Number of sales made: Value of sales made:
General menu to display the brewing of coffee using FREEVEND cards:Number of sales made: Value of sales made:
General menu to display the dispensing of hot water usingFREE VEND cards:Number of sales made: Value of sales made:
English
14
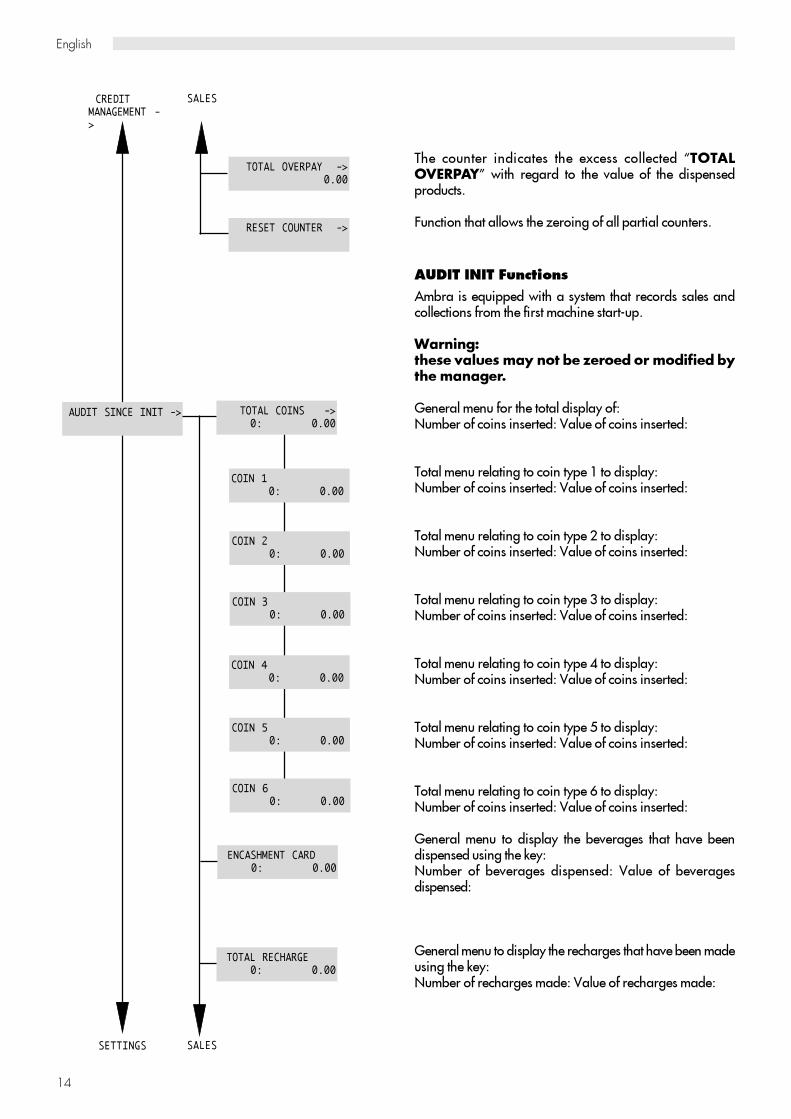
The counter indicates the excess collected “TOTALOVERPAY” with regard to the value of the dispensedproducts.
Function that allows the zeroing of all partial counters.
AUDIT INIT Functions
Ambra is equipped with a system that records sales andcollections from the first machine start-up.
Warning:these values may not be zeroed or modified bythe manager.
General menu for the total display of:Number of coins inserted: Value of coins inserted:
Total menu relating to coin type 1 to display:Number of coins inserted: Value of coins inserted:
Total menu relating to coin type 2 to display:Number of coins inserted: Value of coins inserted:
Total menu relating to coin type 3 to display:Number of coins inserted: Value of coins inserted:
Total menu relating to coin type 4 to display:Number of coins inserted: Value of coins inserted:
Total menu relating to coin type 5 to display:Number of coins inserted: Value of coins inserted:
Total menu relating to coin type 6 to display:Number of coins inserted: Value of coins inserted:
General menu to display the beverages that have beendispensed using the key:Number of beverages dispensed: Value of beveragesdispensed:
General menu to display the recharges that have been madeusing the key:Number of recharges made: Value of recharges made:
TOTAL OVERPAY ->0.00
COIN 10: 0.00
COIN 20: 0.00
COIN 30: 0.00
SETTINGS SALES
RESET COUNTER ->
AUDIT SINCE INIT -> TOTAL COINS ->0: 0.00
COIN 40: 0.00
COIN 50: 0.00
COIN 60: 0.00
ENCASHMENT CARD0: 0.00
TOTAL RECHARGE0: 0.00
CREDITMANAGEMENT ->
SALES

English
15
General menu to display the sales made (beveragedispensing):Number of sales made: Value of sales made:
General menu to display the sales made (beverage dispensing)using the key:Number of sales made: Value of sales made:
General menu to display the brewing of espresso coffee usingthe key:Number of sales made: Value of sales made:
General menu to display the brewing of coffee using thekey:Number of sales made: Value of sales made:
General menu to display the dispensing of hot water usingthe key:Number of sales made: Value of sales made:
General menu to display the sales made (beverage dispensing)using coins through the coiner:Number of sales made: Value of sales made:
Menu to display the brewing of espresso coffee using coins:Number of sales made: Value of sales made:
General menu to display the brewing of coffee using coins:Number of sales made: Value of sales made:
General menu to display the dispensing of hot water usingcoins:Number of sales made: Value of sales made:
General menu to display the sales made (beverage dispensing)free of charge:Number of sales made: Value of sales made:
Menu to display the brewing of espresso coffee free ofcharge:Number of sales made: Value of sales made:
Menu to display the brewing of coffee free of charge:Number of sales made: Value of sales made:
Menu to display the dispensing of hot water free of charge:Number of sales made: Value of sales made:
AUDITSINCE RESET
TOTALRECHARGE
SALES BY CARD->0: 0.00
S. COFFEE [CARD]0: 0.00
COFFEE [CARD]0: 0.00
WATER [CARD]0: 0.00
SETTINGS TOTALOVERPAY
SALES ->0: 0.00
S. COFFEE [COINS]0: 0.00
COFFEE [COINS]0: 0.00
WATER [COINS]0: 0.00
SALES BY F_PRICE ->0: 0.00
S. COFFEE [F_PRICE]0: 0.00
COFFEE [F_PRICE]0: 0.00
WATER [F_PRICE]0: 0.00
SALES BY COINS->0: 0.00
SALESBY F_CARD

English
16
General menu to display the sales made (beverage dispensing)using FREE VEND cards:Number of sales made: Value of sales made:
General menu to display the brewing of espresso coffee usingFREE VEND cards:Number of sales made: Value of sales made:
General menu to display the brewing of coffee using FREEVEND cards:Number of sales made: Value of sales made:
General menu to display the dispensing of hot water usingFREE VEND cards:Number of sales made: Value of sales made:
The counter indicates the excess collected “VALUE” ofthe dispensed products.
Settings
This menu enables setting the machine according to therequirements requested.
Language Selection
With this function the display language may be changed.You can choose from Italian, German, Portuguese, Spanish,English, French and Dutch.
AUDITSINCE RESET
SALES SALESBY F_PRICE
SALES BY F_CARD ->0: 0.00
S. COFFEE [F_CARD]0: 0.00
COFFEE [F_CARD]0: 0.00
WATER [F_CARD]0: 0.00
CODE TEMP.S. COFFEE
TOTAL OVERPAY ->0.00
SETTINGS ->
LANGUAGEENGLISH
LANGUAGEENGLISH
LINGUAITALIANO
LANGUEFRANCAIS
SpracheDeutsch
TAALNEDERLANDS
LINGUAPORTUGES
IDIOMAESPAGNOL
English
17
AUDITSINCE INIT
LANGUAGE
TEMP. COFFEEMAXIMUM
CODE SHOWCOUNTERS
TEMP. COFFEEMEDIUM
TEMP. COFFEEHIGH
TEMP. COFFEEMEDIUM
TEMP. COFFEELOW
TEMP. COFFEEMINIMUM
PROGR. QUANTITYNO
PROGR. QUANTITYYES
PROGR. QUANTITYNO
PREGRINDINGYES
PREGRINDINGNO
PREGRINDINGYES
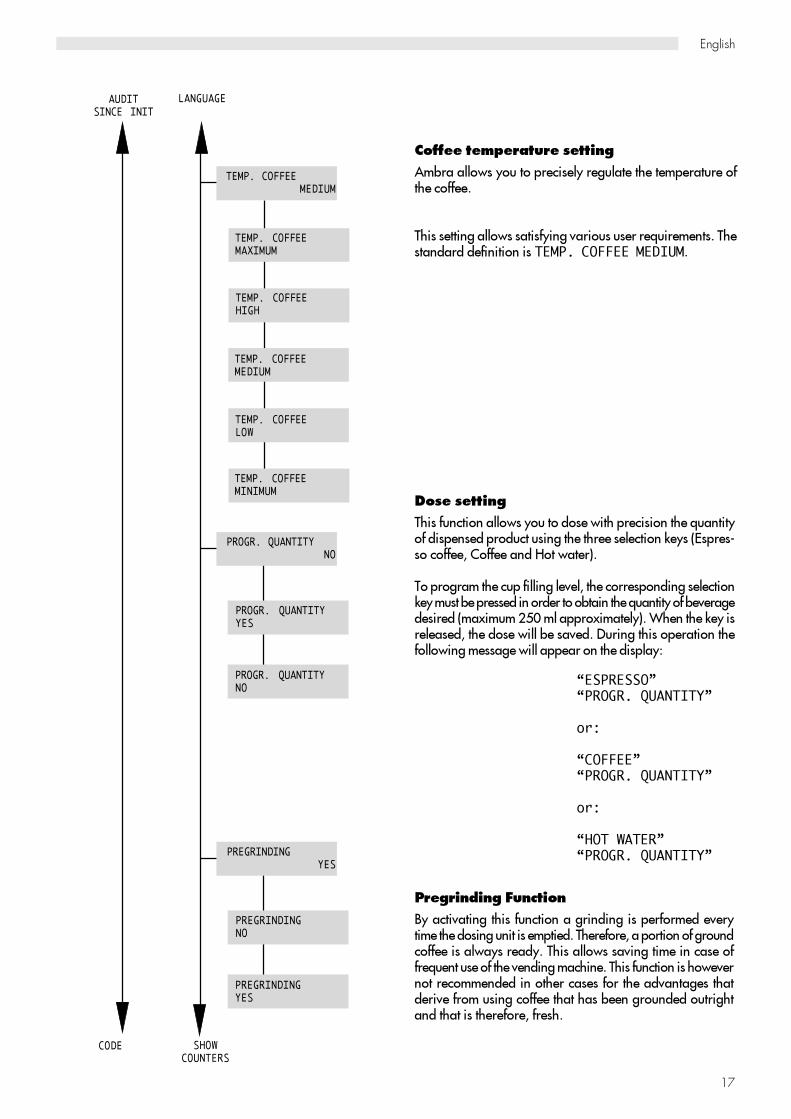
Coffee temperature setting
Ambra allows you to precisely regulate the temperature ofthe coffee.
This setting allows satisfying various user requirements. Thestandard definition is TEMP. COFFEE MEDIUM.
“ESPRESSO”“PROGR. QUANTITY”
or:
“COFFEE”“PROGR. QUANTITY”
or:
“HOT WATER”“PROGR. QUANTITY”
Dose setting
This function allows you to dose with precision the quantityof dispensed product using the three selection keys (Espres-so coffee, Coffee and Hot water).
To program the cup filling level, the corresponding selectionkey must be pressed in order to obtain the quantity of beveragedesired (maximum 250 ml approximately). When the key isreleased, the dose will be saved. During this operation thefollowing message will appear on the display:
Pregrinding Function
By activating this function a grinding is performed everytime the dosing unit is emptied. Therefore, a portion of groundcoffee is always ready. This allows saving time in case offrequent use of the vending machine. This function is howevernot recommended in other cases for the advantages thatderive from using coffee that has been grounded outrightand that is therefore, fresh.

English
18
AUDITSINCE INIT
PREGRINDING
SHOW COUNTERSYES
PAYMENTSYSTEM
SHOW COUNTERSNO
SHOW COUNTERSNO
Counter display function
This functions allows you to enable/disable the display ofthe total counter by pressing the C key (Esc) on the controlpanel.
This function allows you to display the total dispensing withouthaving to enter into the programming menu.
Change Access Code
Allows the setting of a code (“111111” by default) to avoidthat unauthorized people access programming menu. Byconfirming it, the menu item is accessed:
The code will be requested every time the programming menuis accessed.
CODE111111
CHANGE CODE
NEW CODE ? ......
NEW CODE 111111SAVE NO
TIMER
STANDBYAFTER 3:00
Timer
This function, which is preset by the constructor, automaticallyputs the vending machine in “Standby” mode after 3 hoursfrom the last dispensing.The switch-off time may be regulated at intervals of 15minutes, up to a minimum of 0 minutes.When the value is set to 0:00 the function isdeactivated.
Using the keys , move the asterisk to the TIMER menuitem.To activate the item use the E (Ent) key.The display shows:
“STANDBY ”“AFTER 3:00 ”
The desired times can be set using the keys .Use the E (Ent) key to save.If the time set is already run out, the following message willappear on the display:
“STANDBY ”
and the vending machine will turn off. If necessary, thevending machine can be turned on again using the C (Esc)key.

English
19
TIMER
CREDITMANAGEMENT
PAYMENT SYSTEM ->
COIN VALIDATOR ->
ACTIVENO
ACTIVEYES
ACTIVENO
Payment Systems
The machine has software that manages the payment systemscommonly available on the market. This software is activeonly if the Coiner Box is correctly installed.
This menu enables or disables the coin acceptance system.
If it is deactivated, it remains permanently locked and willnot accept the inserted coins.
COIN VALUE ->
COIN 1000.00
COIN 2000.00
COIN 3000.00
COIN 4000.00
COIN 5000.00
COIN 6000.00
MAXIMUM CREDIT000.00
Menu for setting the values of the coins that may be used.
This menu sets the coin value of channel 1.
This menu sets the coin value of channel 2.
This menu sets the coin value of channel 3.
This menu sets the coin value of channel 4.
This menu sets the coin value of channel 5.
This menu sets the coin value of channel 6.
This menu sets the maximum allowed amount using the coinerbox.
MDBREADER

English
20
TIMER
CREDITMANAGEMENT
MDB READER ->
ACTIVENO
ACTIVEYES
ACTIVENO
MAXIMUM CREDIT000.00
PRICES
This menu sets all the operation parameters of the MDBreader.
This menu enables or disables the card acceptance system.If it is deactivated, it remains permanently locked and willnot accept product payments by card.
COIN VALIDATOR
This menu sets the maximum credit allowed by the card. If acard that contains a greater amount is used, it will not beaccepted and the following message appears on the display:
“MDB READER ”“CARD ERROR ”
Then “Maximum Credit” = “Maximum Recharge”.If at the time of setting, the chosen “Maximum Credit” valueis less than the “Maximum Recharge” value, the “MaximumRecharge” will be equal to the “Maximum Credit”.
This menu activates or deactivates any recharge operation.
If the function is deactivated, the card may not be recharged.
This menu sets the maximum rechargeable value of the card.If the credit of the card is less than the “Maximum Recharge”,the card may be recharged. Otherwise, recharging will bedisabled.
E.g.: Card Credit = 40 EURMaximum Recharge = 50 EURCredit inserted in the coiner = 20 EURAmount reported on the card = 10 EUR
The remaining 10 EUR shall remain in the machine as creditin the coiner and at the end of the overpay time it will be lost.
If at the time of setting, the chosen “Maximum Recharge”value is greater than the “Maximum Credit” value, the settingwill not be accepted.
The card reader has a recharge limit as well. If this limit isless than the one defined for “Maximum Recharge”, the lattershall be equal to the one defined in the card reader.
RECHARGEYES
RECHARGENO
RECHARGENO
MAXIMUM RECHARGE000.00
FREEVEND
English
21
TIMER
CREDITMANAGEMENT
FREE VENDNO
FREE VENDYES
FREEVENDNO
OVERPAYTIME
MDB READER
MULTIVENDNO
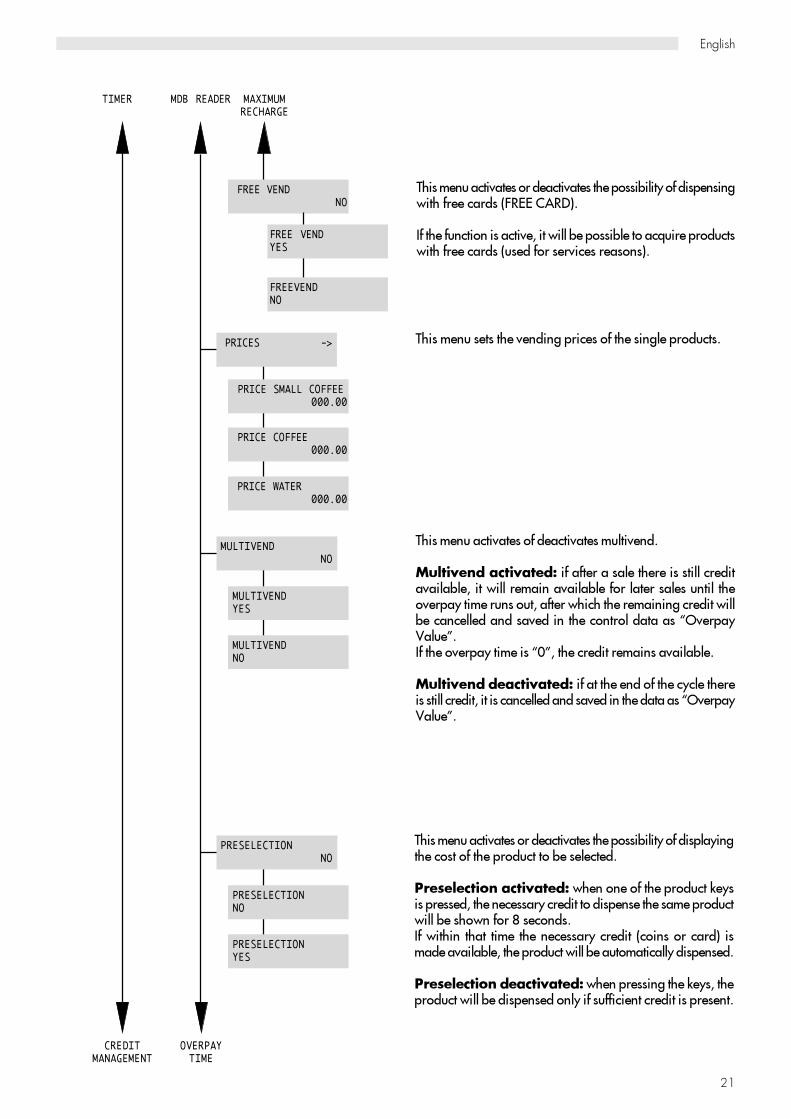
This menu activates or deactivates the possibility of dispensingwith free cards (FREE CARD).
If the function is active, it will be possible to acquire productswith free cards (used for services reasons).
MAXIMUMRECHARGE
PRICES ->
PRICE SMALL COFFEE000.00
PRICE COFFEE000.00
PRICE WATER000.00
MULTIVENDYES
MULTIVENDNO
This menu sets the vending prices of the single products.
This menu activates of deactivates multivend.
Multivend activated: if after a sale there is still creditavailable, it will remain available for later sales until theoverpay time runs out, after which the remaining credit willbe cancelled and saved in the control data as “OverpayValue”.If the overpay time is “0”, the credit remains available.
Multivend deactivated: if at the end of the cycle thereis still credit, it is cancelled and saved in the data as “OverpayValue”.
This menu activates or deactivates the possibility of displayingthe cost of the product to be selected.
Preselection activated: when one of the product keysis pressed, the necessary credit to dispense the same productwill be shown for 8 seconds.If within that time the necessary credit (coins or card) ismade available, the product will be automatically dispensed.
Preselection deactivated: when pressing the keys, theproduct will be dispensed only if sufficient credit is present.
PRESELECTIONNO
PRESELECTIONNO
PRESELECTIONYES

English
22
TIMER
CREDITMANAGEMENT
PRESELECTION
SCALING FACTOR0
OVERPAY TIME000
DECIMAL POINT000.00
This menu sets the overpay time: time limit beyond which theamount present in the machine is cancelled and saved in thecontrol data as “Overpay Value”.
Value Range: 0 - 255 seconds (0 = Deactivated)
It may be used only when the credit is inserted by means ofthe coiner and behaves in the following way:
Multivend deactivated: the credit inserted and not usedwithin the time limit is cancelled and is saved in the controldata as “Overpay Value”.
Multivend activated: the remaining credit is availablefor later sales until the overpay time runs out, after whichthe remaining credit will be cancelled and saved in the controldata as “Overpay Value”.
Every time that a coin is inserted in the coiner or a product isdispensed, the overpay time restarts the count.
This menu sets the minimum unit that the machine managesnotwithstanding the decimals (range: 1, 10, 100, standard1). E.g.: In Euro use the scale factor 1.
This menu sets the position of the decimal point: if the settingis different from the decimal point setting of the card reader,the coffee machine locks and the following error messageappears on the display:
“MDB READER ”“DECIMAL ERROR”

English
23
8 - USE OF THE VENDING
MACHINE
Important
Read this manual in full before using the machine so as tobecome sufficiently familiar with its functioning.
Before using the machine after a period of inactivity it isadvisable to read again paragraph 8.3 “First switching on”.
8.1 Machine status
Depending on the power supply, the status of the machinecan be as follows:
Off and electrically insulated
• Main switch (Fig. 5) in “0“ position.• Only the settings memory is on.
On
• Main switch in “I“ position.• All functions are on and the display (ref. 8 - Fig. 1) islit.
Energy saving
It indicates the energy saving of the machine when theTIMER function is on (see SETTINGS) and automaticallyturns the machine on and off.
• Main switch in “I“position;• The display shows the message: “ENERGY SAVING”.• Settings memory is on.• The machine is not dispensing beverages.
8.2 Recommendations
Prolonged inactivity
Following a long period of inactivity, the circuit should befully cleaned for hygienic reasons.Place a cup under the hot water spout (ref. 7 - Fig. 1) andfill it with water by pressing the hot water key.
Temperature control
Every time the machine is started, the display reads:
“WARMING UP......“
When the necessary temperature has been reached, thedisplay reads:
“SELECT PRODUCT “
“READY FOR USE “
Bean hopper empty
When the bean hopper is empty, the coffee grinder stopsand the display reads:
“COF. BEANS EMPTY “
“READY FOR USE “
The dispensing LED inside the coffee selection key turns off.The message “READY” refers only to the availability of hotwater.Fill the coffee bean hopper and eliminate the NO COFFEEmessage by holding the Espresso key down for 5 seconds.
Water tank empty
When the water tank is empty, the program stops automati-cally and the display reads:
“FILL WATERTANK “
Fill the tank and restart the cycle.
Dump box full
When the Dump box contains 30 used coffee grounds, thedisplay reads:
“DREGDRAWER FULL “
“READY FOR USE “
The machine can dispense water only; remove and emptythe drawer.The message “READY” refers to hot water dispensing only.
English
24
Fig. 7
Fig. 8
Fig. 9
Fig. 10
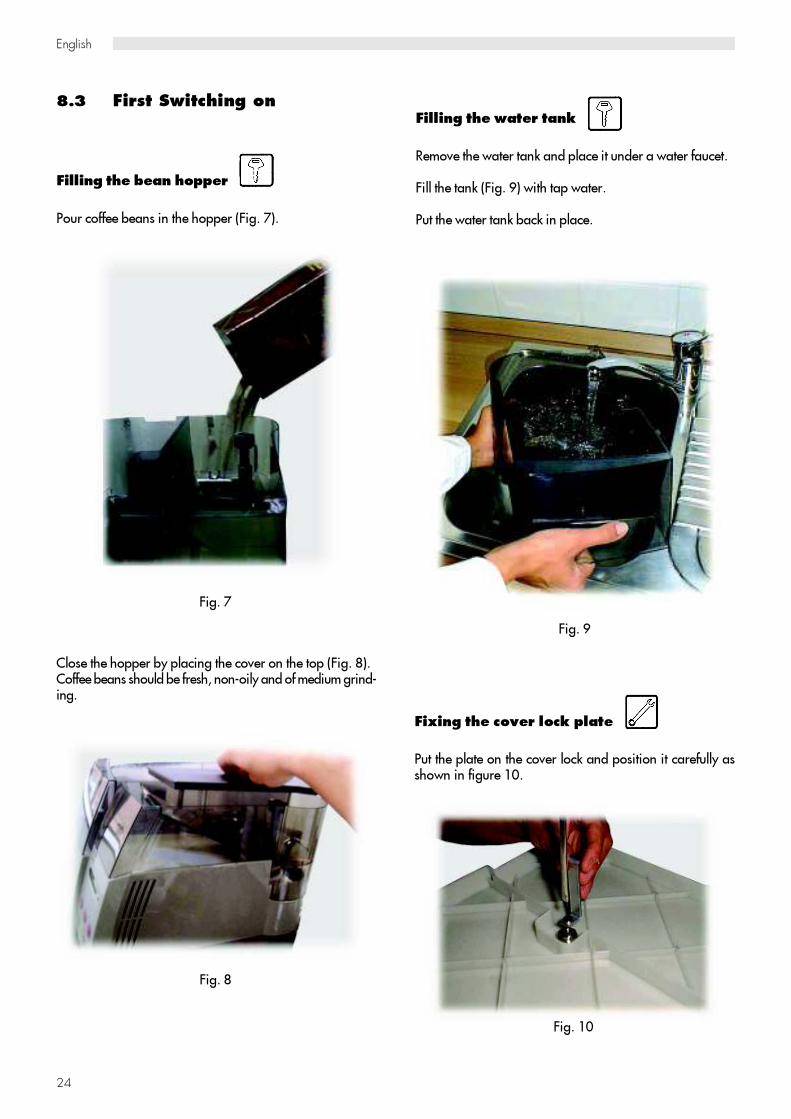
8.3 First Switching on
Filling the bean hopper
Pour coffee beans in the hopper (Fig. 7).
Close the hopper by placing the cover on the top (Fig. 8).Coffee beans should be fresh, non-oily and of medium grind-ing.
Filling the water tank
Remove the water tank and place it under a water faucet.
Fill the tank (Fig. 9) with tap water.
Put the water tank back in place.
Fixing the cover lock plate
Put the plate on the cover lock and position it carefully asshown in figure 10.

English
25
Fig. 11
Fig. 12
After fixing the plate the cover must be placed on the waterand bean hoppers before using the machine (Fig. 11).
Secure the cover by turning the key in the lock (Fig. 12).
Water circuit filling
When the vending machine is turned on for the first time, theboiler is automatically filled.This message will appear on the display:
“SELF-DIAGNOSIS”
“BOILER FILLING”
Place a cup or a suitable container under the hot water spout.Turn on the vending machine and wait for the procedure toend.
Important
Prime the circuit before starting the machine for the first time,following a long period of inactivity, if the water tank hasbeen fully emptied or if the pump has malfunctioned.
Grinding adjustment
If the coffee is brewed too fast, as in the case of a too coarsegrinding, or if it drips out, in the case of a too fine grinding,the grinding of the coffee grinder must be adjusted. Itsrecommended initial position is point 5 on the ring nut.
If grinding is too coarse and the coffee is dispensed toorapidly, adjust the grinder to a finer setting (e.g., from 5 to3). If the coffee drops out, select a coarser setting (e.g.,from 5 to 7) (Fig. 13) (Fig. 14).
Fig. 13

English
26
Warning
Grinding adjustments must be performed only when the grinderis on. Avoid extreme adjustments in the position below 1:this may cause damage to grinders. Use instead a differentcoffee blend, since not all blends produce the same results.
To adjust grinding, follow the procedure outlined below:- press the coffee key and verify the coffee outflow fromthe dispenser;- Open the machine housing’s main door, lift the lid ofthe coffee bean hopper and consequently adjust the grind(see fig. 13).
Warning
The new grinding selection can be appreciated only after the thirdcoffee grinding.
Coffee blends
Coffee must be fresh and an espresso coffee blend must beused.To obtain a strong and tasty espresso, use a specific es-presso machine blend. Keep the coffee in a fresh place in aairtight sealed container.
8.4 Beverage dispensing
Adjusting the coffee dispenser
The coffee dispenser is adjustable according to the cup size.For short cups, position the dispenser as shown in figure 15.
Fig. 15
For tall cups, position the dispenser as shown in figure 16.
Fig. 14
Fig. 16

English
27
Adjusting the cup filling level
With this machine the quantity of coffee dispensed can beadjusted according to the cup used.
Select the desired quantity by pressing the two selection keys.The display will show the corresponding messages.
To set the cup filling level press the corresponding selectionkey until the desired quantity has been reached (max. ca.250 ml).
When performing this operation, the display reads:
"1 SMALL COFFEE "
"PROGR. QUANTITY "
"1 COFFEE "
"PROGR. QUANTITY "
Important
This operation can be interrupted only after the minimumquantity has been dispensed.
Coffee dispensing
Place the cup on the Grill drip tray (ref. 3 - Fig. 1) under thedispenser (ref. 6 - Fig. 1).
Press the corresponding selection key and the machineautomatically dispenses the selected coffee.
Warning
Coffee can be programmed only if the corresponding settingis on (see page 17).
Preheating
When brewing the first cup of coffee, the preheating functionis activated. The following message will appear on the dis-play:
“PREHEATING”
Preheating consists of a cycle of water flowing through thebrew group. It is automatically activated when the machineis turned on and if more than 300 seconds have passedbetween a coffee brewing cycle and the next one.
Hot water dispensing
Hot water is dispensed thanks to a circuit that guaranteesthat the water is tastefree and at the right temperature toprepare tea and soups.
Press the HOT WATER key (Fig. 17), the display reads:
“HOT WATER “
If the hot water key is pressed (Fig. 17) after brewing coffee,the circuit rinsing cycle is activated, which consists inrepeatedly opening the solenoid valve with the followingmessage appearing on the display:
“RINSE ”
At the end of the rinsing cycle, the hot water dispensing willautomatically start and the following message will appear:
“HOT WATER “
Fig. 17
HOT WATER
If the corresponding setting is on, only the set quantity ofhot water is dispensed. Otherwise, it is necessary to stopwater dispensing by pressing the key again when reachingthe desired level of hot water.
To set the quantity of hot water, press the hot water selectionkey until the desired quantity has been reached.
Warning
The quantity of hot water dispensed can be programmedonly if the corresponding setting is on (see page 17).
English
28
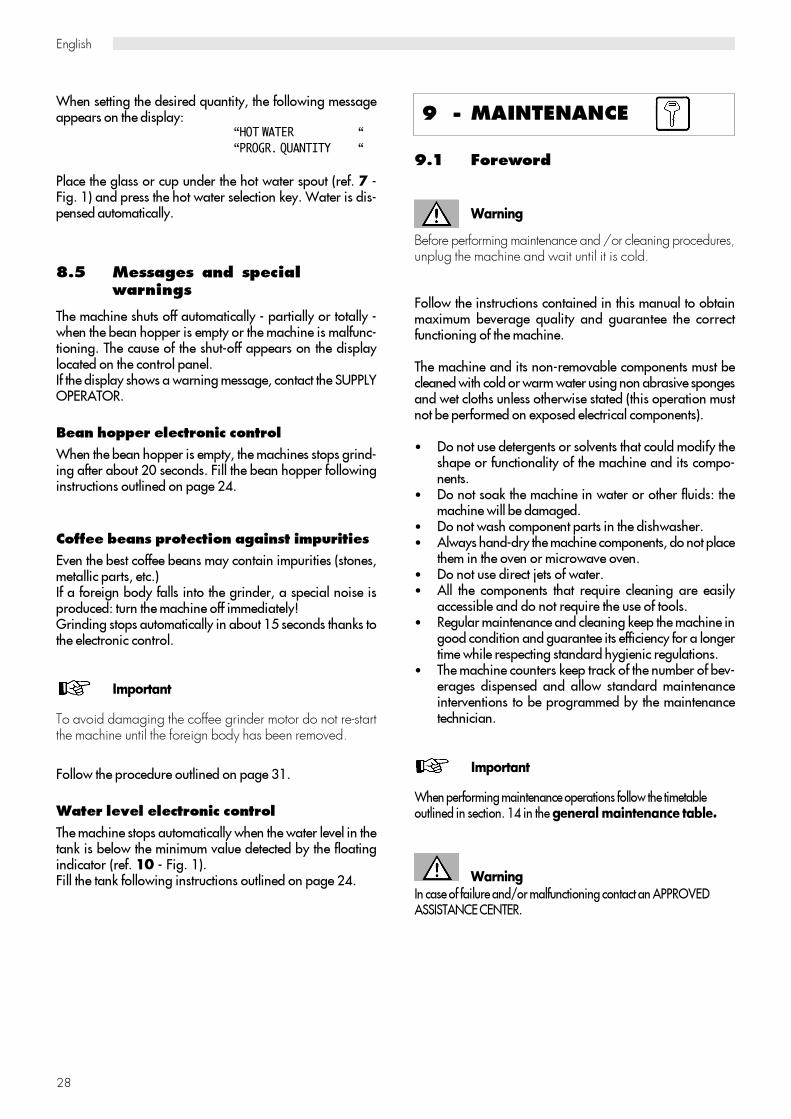
When setting the desired quantity, the following messageappears on the display:
“HOT WATER “
“PROGR. QUANTITY “
Place the glass or cup under the hot water spout (ref. 7 -Fig. 1) and press the hot water selection key. Water is dis-pensed automatically.
8.5 Messages and specialwarnings
The machine shuts off automatically - partially or totally -when the bean hopper is empty or the machine is malfunc-tioning. The cause of the shut-off appears on the displaylocated on the control panel.If the display shows a warning message, contact the SUPPLYOPERATOR.
Bean hopper electronic control
When the bean hopper is empty, the machines stops grind-ing after about 20 seconds. Fill the bean hopper followinginstructions outlined on page 24.
Coffee beans protection against impurities
Even the best coffee beans may contain impurities (stones,metallic parts, etc.)If a foreign body falls into the grinder, a special noise isproduced: turn the machine off immediately!Grinding stops automatically in about 15 seconds thanks tothe electronic control.
Important
To avoid damaging the coffee grinder motor do not re-startthe machine until the foreign body has been removed.
Follow the procedure outlined on page 31.
Water level electronic control
The machine stops automatically when the water level in thetank is below the minimum value detected by the floatingindicator (ref. 10 - Fig. 1).Fill the tank following instructions outlined on page 24.
9 - MAINTENANCE
9.1 Foreword
Warning
Before performing maintenance and /or cleaning procedures,unplug the machine and wait until it is cold.
Follow the instructions contained in this manual to obtainmaximum beverage quality and guarantee the correctfunctioning of the machine.
The machine and its non-removable components must becleaned with cold or warm water using non abrasive spongesand wet cloths unless otherwise stated (this operation mustnot be performed on exposed electrical components).
• Do not use detergents or solvents that could modify theshape or functionality of the machine and its compo-nents.• Do not soak the machine in water or other fluids: themachine will be damaged.• Do not wash component parts in the dishwasher.• Always hand-dry the machine components, do not placethem in the oven or microwave oven.• Do not use direct jets of water.• All the components that require cleaning are easilyaccessible and do not require the use of tools.• Regular maintenance and cleaning keep the machine ingood condition and guarantee its efficiency for a longertime while respecting standard hygienic regulations.• The machine counters keep track of the number of bev-erages dispensed and allow standard maintenanceinterventions to be programmed by the maintenancetechnician.
Important
When performing maintenance operations follow the timetableoutlined in section. 14 in the general maintenance table.
WarningIn case of failure and/or malfunctioning contact an APPROVEDASSISTANCE CENTER.

English
29
The water tank (ref. 9 - Fig. 1), the dregs drawer and therelevant conveyor (if necessary, remove the conveyor as inFig. 19), drip tray (Fig. 20) and Grill drip tray (Fig. 20)should be washed regularly using non abrasive detergentsand dried with care.
9.2 Cleaning and maintenance
Maintenance operations must be performed at least once ayear and include testing the condition of the machine andthe conformity of the electric system.
Water tank/ Drip tray/ Dump box/ Brewgroup / Machine
To keep the dispensing outlet and brew group (ref. 18 - Fig.1) clean, the Dump box should be emptied daily, accordingto needs (Fig. 18).
The coffee dispenser (ref. 6 - Fig. 1) can be removed forcleaning.Remove the protection cover (Fig. 21).
Fig. 18
fig. 19
Fig. 21
Fig. 22
fig. 20
Unfasten the knurled screw under the dispenser (Fig. 22).
Remove the dispenser by lifting it out (Fig. 23).
English
30
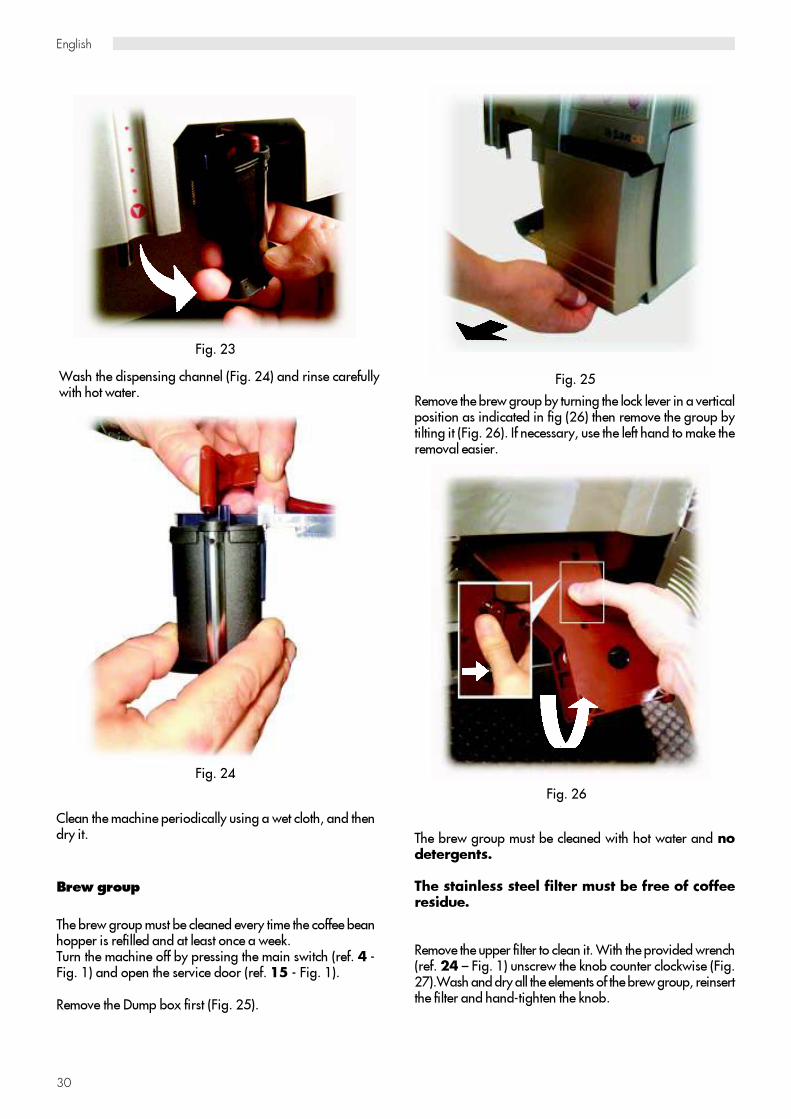
Wash the dispensing channel (Fig. 24) and rinse carefullywith hot water.
Remove the brew group by turning the lock lever in a verticalposition as indicated in fig (26) then remove the group bytilting it (Fig. 26). If necessary, use the left hand to make theremoval easier.
The brew group must be cleaned with hot water and nodetergents.
The stainless steel filter must be free of coffeeresidue.
Remove the upper filter to clean it. With the provided wrench(ref. 24 – Fig. 1) unscrew the knob counter clockwise (Fig.27).Wash and dry all the elements of the brew group, reinsertthe filter and hand-tighten the knob.
Clean the machine periodically using a wet cloth, and thendry it.
Brew group
The brew group must be cleaned every time the coffee beanhopper is refilled and at least once a week.Turn the machine off by pressing the main switch (ref. 4 -Fig. 1) and open the service door (ref. 15 - Fig. 1).
Remove the Dump box first (Fig. 25).
Fig. 24
Fig. 25
Fig. 26
Fig. 23

English
31
Remove the dregs drawer for cleaning (Fig. 28).Important
If the brew group is not inserted correctly, the display reads:
“INSERT GROUP “
Coffee cannot be brewed. The machine is not working.
Place the Dump box back in (ref. 1 - Fig. 1).
Coffee grinder
Warning
Never put water inside the grinder, to avoid irreparabledamage to the machine!
Clean the coffee bean hopper regularly. This operation mustbe performed only by a specialized technician only.
Unplug the machine from the socket (ref. 5 - Fig. 1).
Remove the cover with the lock (ref. 21 - Fig. 1) and thebean hopper cover (ref. 12 - Fig. 1).
Empty the bean hopper and unfasten the two fixing screws(fig. 31).
Fig. 28
Fig. 27
Fig. 29
Use non-abrasive detergents only.Carefully clean the dispensing outlet and reinsert the dregsdrawer.Reintroduce the brew group by turning down the appropriatelever. Tilt the group to insert it, then position it inside theguides of the dregs drawer (Fig. 29).Once inserted, the releaselever must automatically return to its initial position and thereference pin must coincide with the arrow point (Fig. 30).Closethe service door (ref. 15 – Fig. 1).
Fig. 30
Fig. 31

English
32
10 - INACTIVITY
When the machine is not used, it must be turned off andunplugged from the socket.
Keep the machine in a dry place away from children.
If the machine is not used for a long period of time, it mustbe protected from dust and dirt.
11- INSTRUCTIONS FOR END-
OF-LIFE DISPOSAL
TREATMENT
This product complies with EU Directive 2002/96/EC.
The symbol on the product or on its packagingindicates that this product may not be treated as householdwaste. Instead it shall be handed over to the applicablecollection point for the recycling of electrical and electronicequipment.By ensuring this product is disposed of correctly,you willhelp prevent potential negative consequences for theenvironment and human health, which could otherwise becaused by inappropriate waste handling of this product. Formore detailed information about recycling of this product,please contact your local city office, your household wastedisposal service or the shop where you purchased the product.
Warning
The diposal of the vending machine or of a part of it must becarried out with full respect of the environment and accordingto local laws in force.
12 - TROUBLESHOOTING
In case of faults or damage possibly after a fall, immediatelyunplug the machine.
If the problem cannot be solved by following the instructionspresented in the table below, contact the nearest ASSIST-ANCE CENTER.
Important
Problems may arise when using the machine that can causemalfunctioning.
The possible causes are listed in par.14.1 of this manual inthe Troubleshooting table below along with the correspond-ing solutions.
If the problem cannot be solved, the machine must not beused until the nearest ASSISTANCE CENTER has been con-tacted.
13 - ACCESSORIES
The Ambra machine can be equipped with the followingoptional components:
- Coiner boxArrangement for housing a coiner or key system.
- CabinetTo support the machine and to store cups, stirrers, sugarand stocks.
For further information see the corresponding manuals.
Fig. 32
The container can then be cleaned (Fig. 32).
English
33
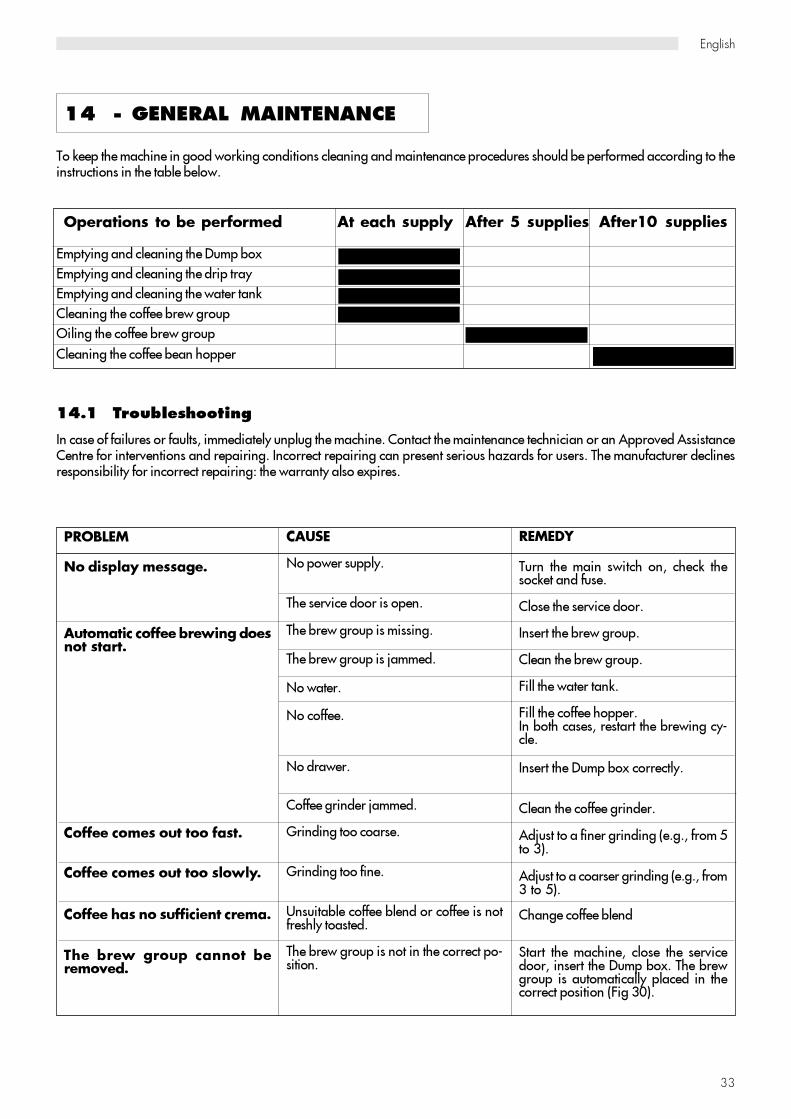
To keep the machine in good working conditions cleaning and maintenance procedures should be performed according to theinstructions in the table below.
Operations to be performed At each supply After 5 supplies After10 supplies
Emptying and cleaning the Dump box
Emptying and cleaning the drip tray
Emptying and cleaning the water tank
Cleaning the coffee brew group
Oiling the coffee brew group
Cleaning the coffee bean hopper
14.1 Troubleshooting
In case of failures or faults, immediately unplug the machine. Contact the maintenance technician or an Approved AssistanceCentre for interventions and repairing. Incorrect repairing can present serious hazards for users. The manufacturer declinesresponsibility for incorrect repairing: the warranty also expires.
14 - GENERAL MAINTENANCE
PROBLEM
No display message.
Automatic coffee brewing doesnot start.
Coffee comes out too fast.
Coffee comes out too slowly.
Coffee has no sufficient crema.
The brew group cannot beremoved.
CAUSE
No power supply.
The service door is open.
The brew group is missing.
The brew group is jammed.
No water.
No coffee.
No drawer.
Coffee grinder jammed.
Grinding too coarse.
Grinding too fine.
Unsuitable coffee blend or coffee is notfreshly toasted.
The brew group is not in the correct po-sition.
REMEDY
Turn the main switch on, check thesocket and fuse.
Close the service door.
Insert the brew group.
Clean the brew group.
Fill the water tank.
Fill the coffee hopper.In both cases, restart the brewing cy-cle.
Insert the Dump box correctly.
Clean the coffee grinder.
Adjust to a finer grinding (e.g., from 5to 3).
Adjust to a coarser grinding (e.g., from3 to 5).
Change coffee blend
Start the machine, close the servicedoor, insert the Dump box. The brewgroup is automatically placed in thecorrect position (Fig 30).

English
34
NOTE

English
35
NOTE

Cod. 15000695 - Ed. 0
4 10/07