vendor management system uploading compliance … management system – uploading compliance...
TRANSCRIPT

The information contained in document is for the exclusive use of the person or entity to which it is addressed and may contain confidential information. If you are not the intended recipient of this document, you are prohibited from reading, printing, duplicating, disseminating or otherwise using this information. If you have received this information in error, please notify the sender at VRM immediately, delete this information from your computer, and destroy all copies of the information.
© Vendor Resource Management, Inc. 2015. Confidential and Privileged Information. 1
Vendor Management System – Uploading Compliance Documents Guide
Vendors must upload ALL required documentation (if applicable) in PDF format:
W-9
General Liability Insurance Policy
Errors & Omissions Insurance Policy
Executed Contract Agreement
Valid Business/Real Estate Licenses
Required Training
Required Certifications
Log in to your Vendor Management System (VMS) account occasionally to ensure ALL information and Due
Diligence documents stay current and updated before existing documents are set to expire. Please respond to
all requests in a timely manner.
***NOTE: The W-9, Insurance, and Contracts can only be uploaded by the Owner. Contacts can only upload
their Real Estate License and Training documents to their individual contact profile. ***

The information contained in document is for the exclusive use of the person or entity to which it is addressed and may contain confidential information. If you are not the intended recipient of this document, you are prohibited from reading, printing, duplicating, disseminating or otherwise using this information. If you have received this information in error, please notify the sender at VRM immediately, delete this information from your computer, and destroy all copies of the information.
© Vendor Resource Management, Inc. 2015. Confidential and Privileged Information. 2
Table of Contents
How to Access the Vendor Resource Management System (VRMS) ....................................... Error! Bookmark not defined.
UPLOADING W-9 FORM .......................................................................................................................................................... 5
UPLOADING INSURANCE DOCUMENTS .................................................................................................................................. 7
UPLOADING DIVERITY ............................................................................................................................................................. 8
UPLOADING REAL ESTATE LICENSE ....................................................................................................................................... 10
UPLOADING TRANING AND CERTIFICATIONS ....................................................................................................................... 12
UPLOADING BUSINESS LICENSE ............................................................................................................................................ 14
Uploading Background Certification ..................................................................................................................................... 16
UPLOADING CONTRACTS ...................................................................................................................................................... 17

The information contained in document is for the exclusive use of the person or entity to which it is addressed and may contain confidential information. If you are not the intended recipient of this document, you are prohibited from reading, printing, duplicating, disseminating or otherwise using this information. If you have received this information in error, please notify the sender at VRM immediately, delete this information from your computer, and destroy all copies of the information.
© Vendor Resource Management, Inc. 2015. Confidential and Privileged Information. 3
How to Access the Vendor Resource Management System (VRMS)
Step 1: Log in to the Vendor Resource Management System at (http://vrms.vrmco.com) with the assigned Username and Password. If lost/forgotten Username and Password send email directly to [email protected]

The information contained in document is for the exclusive use of the person or entity to which it is addressed and may contain confidential information. If you are not the intended recipient of this document, you are prohibited from reading, printing, duplicating, disseminating or otherwise using this information. If you have received this information in error, please notify the sender at VRM immediately, delete this information from your computer, and destroy all copies of the information.
© Vendor Resource Management, Inc. 2015. Confidential and Privileged Information. 4
Step 2: Select “Vendor Management System” listed under TOOLS.
The information contained in document is for the exclusive use of the person or entity to which it is addressed and may contain confidential information. If you are not the intended recipient of this document, you are prohibited from reading, printing, duplicating, disseminating or otherwise using this information. If you have received this information in error, please notify the sender at VRM immediately, delete this information from your computer, and destroy all copies of the information.
© Vendor Resource Management, Inc. 2015. Confidential and Privileged Information. 5
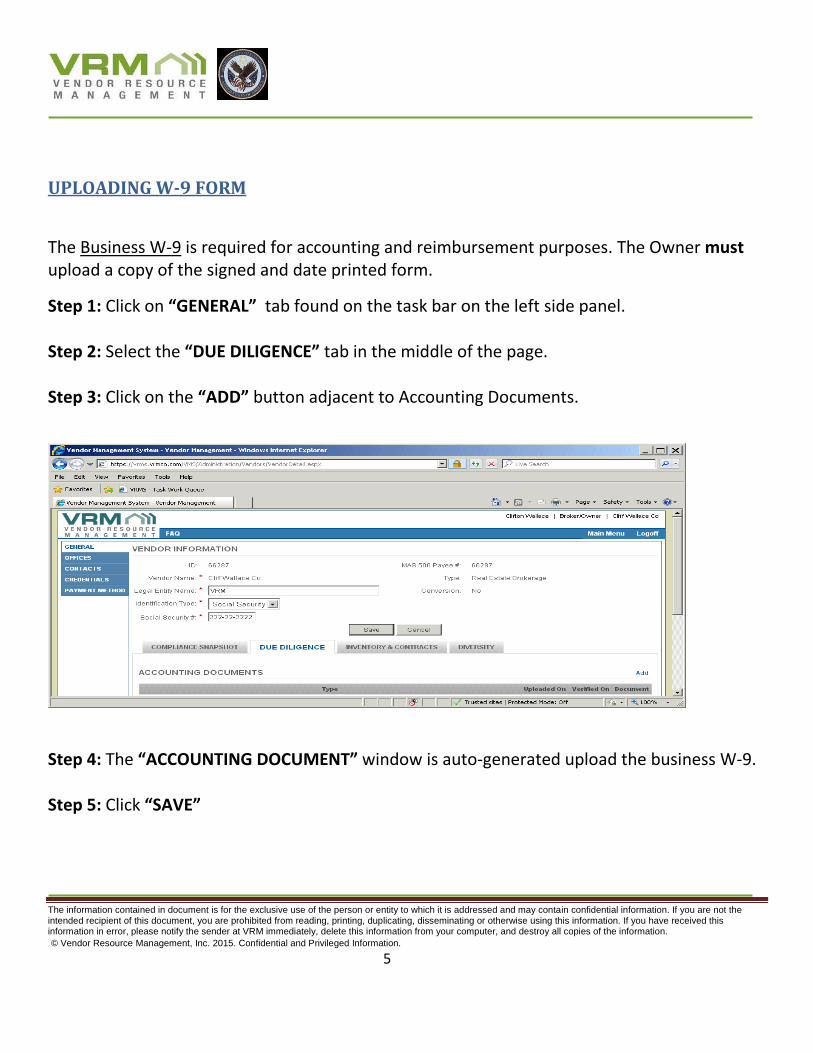
UPLOADING W-9 FORM
The Business W-9 is required for accounting and reimbursement purposes. The Owner must upload a copy of the signed and date printed form.
Step 1: Click on “GENERAL” tab found on the task bar on the left side panel. Step 2: Select the “DUE DILIGENCE” tab in the middle of the page. Step 3: Click on the “ADD” button adjacent to Accounting Documents.
Step 4: The “ACCOUNTING DOCUMENT” window is auto-generated upload the business W-9. Step 5: Click “SAVE”

The information contained in document is for the exclusive use of the person or entity to which it is addressed and may contain confidential information. If you are not the intended recipient of this document, you are prohibited from reading, printing, duplicating, disseminating or otherwise using this information. If you have received this information in error, please notify the sender at VRM immediately, delete this information from your computer, and destroy all copies of the information.
© Vendor Resource Management, Inc. 2015. Confidential and Privileged Information. 6
Step 6: Verify the W-9 information entered is accurate and upload to the document in the “ACCOUNTING DOCUMENTS” section.

The information contained in document is for the exclusive use of the person or entity to which it is addressed and may contain confidential information. If you are not the intended recipient of this document, you are prohibited from reading, printing, duplicating, disseminating or otherwise using this information. If you have received this information in error, please notify the sender at VRM immediately, delete this information from your computer, and destroy all copies of the information.
© Vendor Resource Management, Inc. 2015. Confidential and Privileged Information. 7
UPLOADING INSURANCE DOCUMENTS
Step 1: Click on “GENERAL” tab found on the task bar on the left side panel. Step 2: Select the “DUE DILIGENCE” tab in the middle of the page. Step 3: Click on the “ADD” button adjacent to the Insurances header.

The information contained in document is for the exclusive use of the person or entity to which it is addressed and may contain confidential information. If you are not the intended recipient of this document, you are prohibited from reading, printing, duplicating, disseminating or otherwise using this information. If you have received this information in error, please notify the sender at VRM immediately, delete this information from your computer, and destroy all copies of the information.
© Vendor Resource Management, Inc. 2015. Confidential and Privileged Information. 8
Step 4: The “ADD INSURANCE” window is auto-generated, then select the appropriate Coverage Type and upload the individual insurance coverages separately to the profile.
Step 5: Click “SAVE”
UPLOADING DIVERITY
Step 1: Click on “GENERAL” tab of the task bar on the left side panel. Step 2: Select the “DIVERSITY” tab far left of the page. Step 3: Click on the “ADD” button adjacent to the DIVERSITY CERTIFICATIONS header.

The information contained in document is for the exclusive use of the person or entity to which it is addressed and may contain confidential information. If you are not the intended recipient of this document, you are prohibited from reading, printing, duplicating, disseminating or otherwise using this information. If you have received this information in error, please notify the sender at VRM immediately, delete this information from your computer, and destroy all copies of the information.
© Vendor Resource Management, Inc. 2015. Confidential and Privileged Information. 9
Step 4: The “ADD DIVERSITY CERTIFICATION” window is auto-generated Select the appropriate “Certification Type”
Enter in the “Certification Number”
Enter document “Effective Date”
Click on “Browse” to upload the Certificate

The information contained in document is for the exclusive use of the person or entity to which it is addressed and may contain confidential information. If you are not the intended recipient of this document, you are prohibited from reading, printing, duplicating, disseminating or otherwise using this information. If you have received this information in error, please notify the sender at VRM immediately, delete this information from your computer, and destroy all copies of the information.
© Vendor Resource Management, Inc. 2015. Confidential and Privileged Information. 10
Step 6: If you quality for multiple certification types for example, but not limited to:
SDVOSB and Veteran Owned Business
Women Owned Small Business and Small Business ** Upload the documentation for each certification category.**
Step 5: Click “SAVE”
UPLOADING REAL ESTATE LICENSE
Each contact, excluding Office Managers, is required to update the contact profile with the appropriate real estate license and training.
Step 1: Click on the “CONTACTS” tab of the task bar on the left side panel.
Step 2: Select the appropriate Contact Name.

The information contained in document is for the exclusive use of the person or entity to which it is addressed and may contain confidential information. If you are not the intended recipient of this document, you are prohibited from reading, printing, duplicating, disseminating or otherwise using this information. If you have received this information in error, please notify the sender at VRM immediately, delete this information from your computer, and destroy all copies of the information.
© Vendor Resource Management, Inc. 2015. Confidential and Privileged Information. 11
Step 3: Click on the “LICENSES” tab in the middle of the page.
Step 4: The “ADD LICENSE” window is auto-generated Select the appropriate “License Type”
Select license “State”
Enter in the valid “License Number”
Enter in the license valid “Expiration Date” Click on “Browse” to upload License

The information contained in document is for the exclusive use of the person or entity to which it is addressed and may contain confidential information. If you are not the intended recipient of this document, you are prohibited from reading, printing, duplicating, disseminating or otherwise using this information. If you have received this information in error, please notify the sender at VRM immediately, delete this information from your computer, and destroy all copies of the information.
© Vendor Resource Management, Inc. 2015. Confidential and Privileged Information. 12
Step 5: Click “SAVE”
Step 6: Repeat steps 1-5 to upload your renewal license by clicking on the “RENEW” tab.
UPLOADING TRANING AND CERTIFICATIONS
Each contact is responsible for uploading your real estate licenses and training documents to your personal profile.
Step 1: Click on the “CONTACTS” tab of the task bar on the left side panel. Step 2: Select the appropriate Contact Name. Step 3: Click on the “CREDENTIALS” tab in the middle of the page.

The information contained in document is for the exclusive use of the person or entity to which it is addressed and may contain confidential information. If you are not the intended recipient of this document, you are prohibited from reading, printing, duplicating, disseminating or otherwise using this information. If you have received this information in error, please notify the sender at VRM immediately, delete this information from your computer, and destroy all copies of the information.
© Vendor Resource Management, Inc. 2015. Confidential and Privileged Information. 13
Step 4: Select “ADD” adjacent to Certifications.
Step 5: The “ADD CERTIFICATION” window is auto-generated for the contact to add required client training.
Step 6: Click “SAVE”
When you upload the HUD Lead Based Paint training Certificate, enter the certificate number as 00000. The effective date will be the date the certificate is uploaded. All other training documents have certificate numbers printed on the certificate.

The information contained in document is for the exclusive use of the person or entity to which it is addressed and may contain confidential information. If you are not the intended recipient of this document, you are prohibited from reading, printing, duplicating, disseminating or otherwise using this information. If you have received this information in error, please notify the sender at VRM immediately, delete this information from your computer, and destroy all copies of the information.
© Vendor Resource Management, Inc. 2015. Confidential and Privileged Information. 14
Step 6: Click “SAVE”
Repeat steps 1 thru 5 to upload each training certificate (if applicable).
UPLOADING BUSINESS LICENSE
Step 1: Click on “GENERAL” tab of the task bar on the left side panel Step 2: Select the “DUE DILIGENCE” tab in the middle of the page. Step 3: Click on the “ADD” button adjacent to licenses.

The information contained in document is for the exclusive use of the person or entity to which it is addressed and may contain confidential information. If you are not the intended recipient of this document, you are prohibited from reading, printing, duplicating, disseminating or otherwise using this information. If you have received this information in error, please notify the sender at VRM immediately, delete this information from your computer, and destroy all copies of the information.
© Vendor Resource Management, Inc. 2015. Confidential and Privileged Information. 15
Step 4: Click “SAVE”
The information contained in document is for the exclusive use of the person or entity to which it is addressed and may contain confidential information. If you are not the intended recipient of this document, you are prohibited from reading, printing, duplicating, disseminating or otherwise using this information. If you have received this information in error, please notify the sender at VRM immediately, delete this information from your computer, and destroy all copies of the information.
© Vendor Resource Management, Inc. 2015. Confidential and Privileged Information. 16
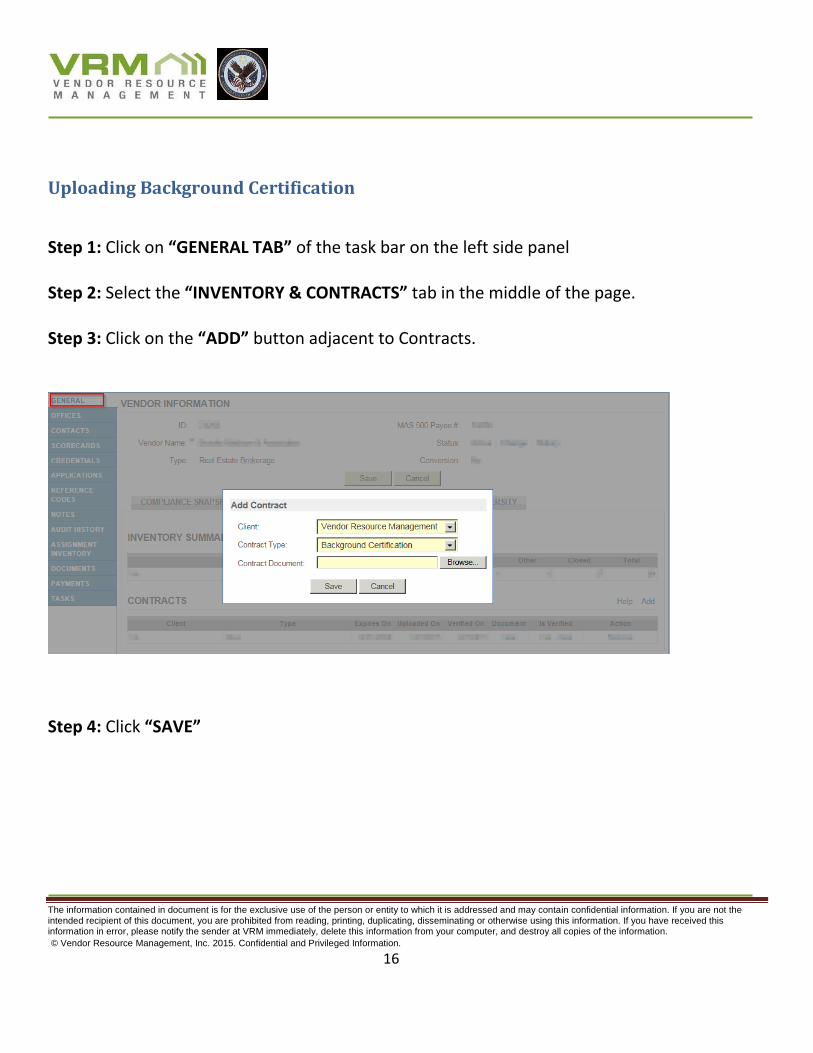
Uploading Background Certification
Step 1: Click on “GENERAL TAB” of the task bar on the left side panel Step 2: Select the “INVENTORY & CONTRACTS” tab in the middle of the page. Step 3: Click on the “ADD” button adjacent to Contracts.
Step 4: Click “SAVE”

The information contained in document is for the exclusive use of the person or entity to which it is addressed and may contain confidential information. If you are not the intended recipient of this document, you are prohibited from reading, printing, duplicating, disseminating or otherwise using this information. If you have received this information in error, please notify the sender at VRM immediately, delete this information from your computer, and destroy all copies of the information.
© Vendor Resource Management, Inc. 2015. Confidential and Privileged Information. 17
UPLOADING CONTRACTS Step 1: Click on “GENERAL TAB” of the task bar on the left side panel Step 2: Select the “INVENTORY & CONTRACTS” tab in the middle of the page. Step 3: Click on the “ADD” button adjacent to Contracts.
Step 4: The “ADD CONTRACT” window is auto-generated
Select Client Name
Select Contract Type
Enter the document Expiration Date
Upload executed Contract

The information contained in document is for the exclusive use of the person or entity to which it is addressed and may contain confidential information. If you are not the intended recipient of this document, you are prohibited from reading, printing, duplicating, disseminating or otherwise using this information. If you have received this information in error, please notify the sender at VRM immediately, delete this information from your computer, and destroy all copies of the information.
© Vendor Resource Management, Inc. 2015. Confidential and Privileged Information. 18
Step 5: Click “SAVE”
If there are additional questions or concerns, please email [email protected]