vengeance producer suite avenger avenger manual... · vengeance producer suite – avenger 8 an o...
TRANSCRIPT

Vengeance Producer Suite
Avenger
Version: 1.1
Date: December 2016

Vengeance Producer Suite – Avenger
2
Contents
Introduction............................................................................................6
Installation..............................................................................................7
Windows..................................................................................................... 7
Mac............................................................................................................. 7
An overview of the features in Avenger ..................................................8
Quick guide................................................................................................. 8
Generators........................................................................................................................... 9
Transformers ....................................................................................................................... 9
Effects................................................................................................................................ 10
Modulation sources............................................................................................................ 11
Selection............................................................................................................................ 13
Avenger’s features in detail ..................................................................14
The preset browser................................................................................... 14
Searching for preset names....................................................................... 16
The file browser / importing drums .......................................................... 18
Importing multisamples............................................................................ 19
Importing / creating OSC shapes............................................................... 21
The oscillator area.................................................................................22
Overview .................................................................................................. 22
The functions in detail .............................................................................. 23
Further parameters for the oscillator in the waveform display ................. 27
Multisamples ............................................................................................ 29
Sample Stacker ......................................................................................... 31
Wavetables / Resamples........................................................................... 33
V-Saw ....................................................................................................... 34

Vengeance Producer Suite – Avenger
3
Voicing...................................................................................................... 35
Chorder.............................................................................................................................. 35
Sub osc .............................................................................................................................. 35
General.............................................................................................................................. 35
Routing ..................................................................................................... 37
Drums....................................................................................................... 38
Drums main page ............................................................................................................... 38
Drum sample editor ........................................................................................................... 39
Drums routing.................................................................................................................... 40
Drums routing (multi-selection) .......................................................................................... 40
Drum kit / sequences browser ............................................................................................ 41
The amp section....................................................................................42
Overview .................................................................................................. 42
The filter section ...................................................................................45
Overview .................................................................................................. 45
The shaper section ................................................................................47
Overview .................................................................................................. 47
The mod matrix.....................................................................................48
Overview .................................................................................................. 48
Mod matrix routing via drag & drop.......................................................... 50
The LFO section.....................................................................................51
Overview .................................................................................................. 51
Macro area............................................................................................54
Overview .................................................................................................. 54
Lock buttons .........................................................................................55
Overview .................................................................................................. 55
The readout display ..............................................................................56
The MIDI controller bar.........................................................................57
Vengeance Producer Suite – Avenger
4
MIDI controllers to mod wheel .............................................................59
The FX section .......................................................................................60
The central display ................................................................................62
Editor with normal waveforms (FFT) ......................................................... 62
Controls in the FFT editor ................................................................................................... 64
Editor with free waveforms (freeform) ..................................................... 65
Controls in the freeform editor ........................................................................................... 65
Resampler / Wavetable editor .................................................................. 66
The Arpeggiator ........................................................................................ 71
The drum sequencer ................................................................................. 73
The step sequencer................................................................................... 75
The pitch module ...................................................................................... 77
The modulation envelopes........................................................................ 79
The mixer area.......................................................................................... 81
Key and velocity zones.............................................................................. 82
System page ............................................................................................. 83
MIDI learn .............................................................................................85
Connecting external MIDI controllers........................................................ 85
Deleting and managing existing MIDI connections .................................... 86
Extras ....................................................................................................87
Tips on working ........................................................................................ 87
Right-clicks and menus ....................................................................................................... 87
The middle mouse button / double-click ............................................................................. 87
Turning the dials (fine) ....................................................................................................... 87
Effects as send effects ........................................................................................................ 87
Master filter....................................................................................................................... 87
Arrow keys / preset choice ................................................................................................. 88
MIDI controller (pedals)...................................................................................................... 88

Vengeance Producer Suite – Avenger
5
New features via update .......................................................................89
Release notes........................................................................................89
Support & contact .................................................................................89
Glossary ................................................................................................90
List of category prefixes ............................................................................ 90
Vengeance Producer Suite – Avenger
6
Introduction
Dear customer,
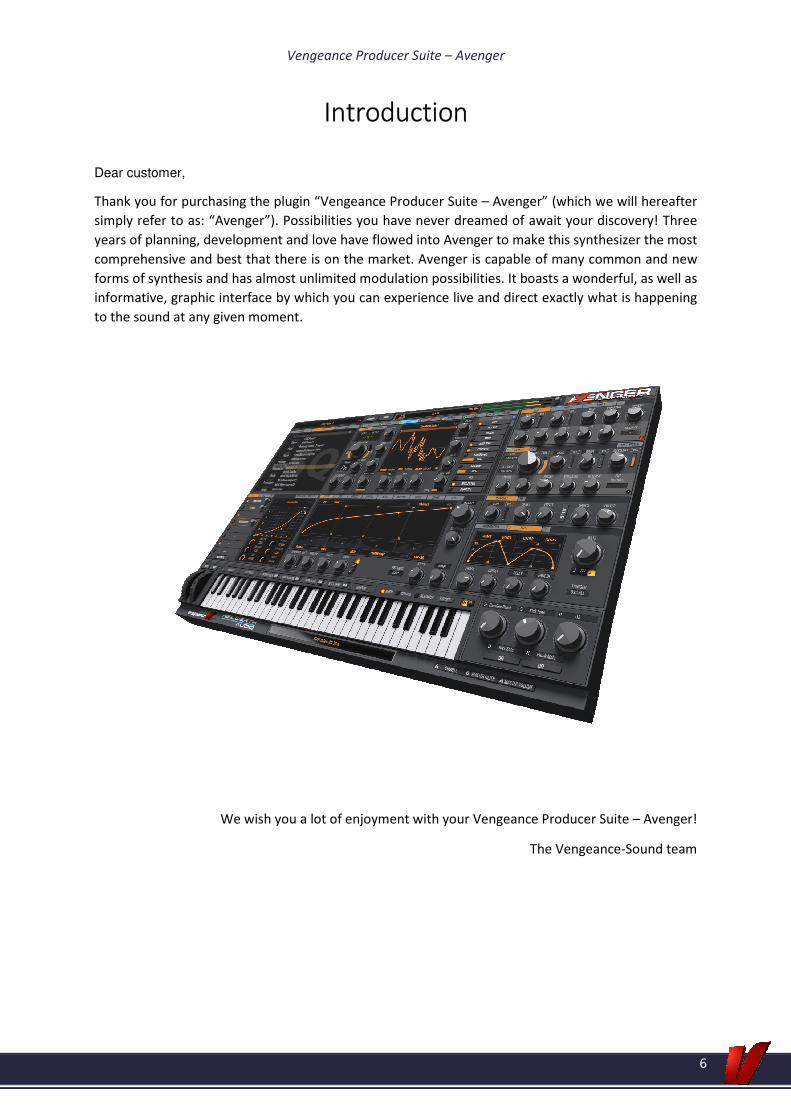
Thank you for purchasing the plugin “Vengeance Producer Suite – Avenger” (which we will hereafter
simply refer to as: “Avenger”). Possibilities you have never dreamed of await your discovery! Three
years of planning, development and love have flowed into Avenger to make this synthesizer the most
comprehensive and best that there is on the market. Avenger is capable of many common and new
forms of synthesis and has almost unlimited modulation possibilities. It boasts a wonderful, as well as
informative, graphic interface by which you can experience live and direct exactly what is happening
to the sound at any given moment.
We wish you a lot of enjoyment with your Vengeance Producer Suite – Avenger!
The Vengeance-Sound team

Vengeance Producer Suite – Avenger
7
Installation
Windows
Start the “win_vpsAvenger_1.0.0.exe” and follow the instructions on the screen to install the plugin
to your sequencer’s “VST plugins” folder.
The plugin should now be available the next time you start your sequencer.
Mac
Unzip the file “vps Avenger installer.zip” and start “vpsAvenger.pkg”. Follow the on-screen
instructions to proceed with the installation.
Listed below are the standard installation paths for the various plugin formats:
Format Path
VST /library/audio/plug-ins/vst
VST3 /library/audio/plug-ins/vst3
AU /library/audio/plug-ins/components
AAX /library/application support/avid/plug-ins
After installation, please check that the files for Avenger can be found in these locations.
The plugin should now be available the next time you start your sequencer.
Vengeance Producer Suite – Avenger
8
An overview of the features in Avenger
Quick guide
Avenger is an incredibly powerful synthesizer and the latest development from Vengeance-Sound
and Keilwerth Audio. There is almost nothing that Avenger cannot do. A preset in Avenger begins
simply and grows to accommodate the complexity of your ideas. Individual components can be
added or removed at will via the tabs (such as oscillators, LFOs, filters, effects) and linked in many
creative ways to sculpt your sound. Every waveform can be manipulated through the interface in real
time or by use of modulation sources for example to bend and shape its frequency content (FFT) – all
of that with a very low CPU usage and an amazing alias-free sound quality.
Avenger features a multitude of synthesis forms for sound generation such as complex wavetables.
In this form of synthesis, the relationship between the harmonic and disharmonic overtones can be
regulated by FFT. The results can be seen in the central display that shows the state of the waveform
at any given time. Avenger comes with a very clean and CPU friendly “supersaw” mode named V-
Saw, a chorder to stack notes, a multisample stacker for layering samples and separate drum kits
complete with a drum sequencer. Thus, very complex arpeggios and sequences can be created.
The flexible FX routing system is also one of the highlights. There are insert, send and master effect
racks. The oscillators (oscs) and busses are freely routable (for example: rack 1 -> rack 2). There is the
shaper with many different distortion types, which can be placed before or after the filter. Naturally,
there are many filter types. We invested a great deal of time into achieving the perfect balance
between quality sound filters and high performance.
Modulations have never been so complex yet so easy to configure. Almost anything can be combined
with anything else. You can do this in the mod matrix or simply be dragging and dropping between
source and destination. There are arpeggiators, step sequencers, a drum sequencer, pitch and mod
envelopes, special wavetable envelopes with patterns for wobble sequences, keyzones, velocity
zones, macro controls, MIDI controller/pedal support and much more.
On top of that, there is an interactive library with a tag/cloud keyword filter. The library will let you
search for presets quickly and to find files from your hard drive. This lets the user import their own
samples, waveforms, wavetables and drums, expanding the possibilities even further.
Before continuing with the overview, you may be interested to learn that Vengeance-Sound has
produced many product videos explaining the synthesizer’s features. You can find these by visiting
the Vengeance-Sound YouTube channel.
Vengeance Producer Suite – Avenger
9
Generators
• Classic VA synthesis
This is where you will find the classic waveforms, sine, saw, pulse, triangle etc.
• Oscillator shapes
All single cycle waveform samples can be converted and used as oscillator shapes to be
manipulated and bent in any direction – 100% clean and free of any aliasing.
• Wavetables
These are “oscillator shapes” in series (up to 256), which you can smoothly transition
through. Avenger comes complete with a huge collection of wavetables; you can however
also create your own.
• Resampler
Similar to the wavetable mode but differs by letting you load longer wave files. You can then
transition through microscopically small grains to use as your sound source.
• Multisamples
An oscillator can also play multisamples. With our “sample stacker”, you can layer up to 4
samples of your choice per osc from the many wave files that are included. Special samples
such as “attack clicks” and “organic noises” can also be found here.
• Drum kits
These are not your ordinary multisamples but rather “real” drum kits with many editing
options and their own specially optimized drum sequencer.
Transformers
• FM/AM
Frequency and amplitude modulation can be used on each of the above-mentioned synthesis
forms (apart from the drum kits).
• X-bend / formant shift / bitcrush
The generated waveforms from each of the synthesis types (apart from multisamples and
drum kits) can be bent, squashed, stretched or crushed. All of this controlled and modulated
in real time or by envelopes/LFOs.
• Osc sync
Each form of synthesis (apart from the drum kits) can be “synced”. An integrated “sync
envelope” can be used as modulation source.

Vengeance Producer Suite – Avenger
10
• FFT filter (free / harmonic / bin)
Apart from multisamples and drum kits, the synthesis types can be cut up using an FFT filter.
Root tones, individual harmonics, fifths or disharmonic frequency content can be individually
boosted, reduced or completely rejected.
• V-Saw
The V-Saw is our equivalent to the well-known “supersaw” (unison) sound and functions with
all the synthesis forms (apart from the drum kits). The V-Saw can generate up to seven softly
detuned voices and allows them to be spread across either the panoramic field or by octave.
Adding to this, there is a vibrato LFO that can be applied to all of the voices uniformly or even
to oscillate each voice independently. All the while, the CPU usage is kept happily to a
minimum.
• Noise
The noise generator can be mixed with all the synthesis forms. The sample rate and color of
the noise can also be set.
• Chorder
A comfortable “note stacker”. With the chorder you can quickly generate a further 4 voices,
for instance a +12 voice on top or a -12 bass voice, a fifth or any other interval/chord. All
voices can be panned, volume levels can be adjusted and the detune amount set.
• Sub-bass module
Avenger includes a dedicated sub oscillator, which can be mixed in with all the synthesis
forms (apart from the drum kits). The 4 oscillator shapes that can be chosen from are sine,
triangle, square and sawtooth.
Effects
• Insert FX rack
Avenger offers you up to 4 insert FX racks with up to 8 individual effects per rack. The output
of one insert FX rack can be routed to another (to serialize them), alternatively to the master
FX rack or directly to the output. Avenger includes a plethora of high-quality effects such as a
sidechain, reverbs, a delay, distortion and lo-fi effects, dynamic and chorus effects as well as
special effects like tape stop. Seven premium ArtsAcoustic effects are also included.
• Send FX rack
There is a separate FX rack solely for send effects (up to 8 in parallel). Therefore, multiple
oscillators can make use of the same effect without duplicating the cost on the CPU.

Vengeance Producer Suite – Avenger
11
• Master FX rack
At the end of the effects chain is the master FX rack. This includes a further 8 effects slots.
The master FX rack is ideally suited for EQs, compressors and limiters. Individual FX busses or
oscillators can be routed to bypass the master effects. So for example, you can route a bass
drum to bypass the master limiter, whilst heavily compressing the rest of the drums.
• Shaper
The shaper is a distortion module on an oscillator level with two integrated special EQs. It
includes numerous distortion models and can be routed flexibly, for instance before or after
a filter.
• Filter / master filter
We paid a lot of attention to the development of the filter. You have the possibility to choose
between many filter types such as special filters for vocal/robot sounds, a TB-303 filter,
comb, FM and lo-fi filters. Many of these filter types can be overdriven (drive).
• Mixer
To improve the simplicity of each preset, Avenger offers a mixer page on which you can
clearly see all your drums, oscs and amp groups, as well as the master fader, allowing you to
mix them together with ease.
Modulation sources
• Mod matrix
The heart of all your modulations: we have given the traditional mod matrix a completely
new look in Avenger! It is now child’s play to organize whole modulation groups and to edit
them with just one click. All the sources listed below, including external MIDI or
mathematically produced sources, can be combined with any imaginable destination – for
instance visible dials and almost any possible setting.
• LFOs
You can have up to 4 LFOs. LFOs function as modulation sources and can also receive
modulation, for instance to reduce their own oscillation speed. You can choose between
many included LFO forms or easily draw up to three of your own.
• Modulation envelopes
Other sources of modulation are the modulation envelopes – in short “mod envs”. These are
freely editable envelope curves, which means that you can add as many points as you
require simply by double-clicking. Mod envs can also be looped and synced to the song's
tempo.

Vengeance Producer Suite – Avenger
12
• Pitch envelopes
The pitch envelopes, with their bi-directionality and relevant controls, are perfectly suited to
modulate the pitch of oscillators. However, pitch envelopes are not limited this and can be
routed, just like mod envs, to any destination. Settings such as poly/legato mode and the
range for the pitch bend wheel are found here.
• Step sequencer
Formerly known as the “Trancegate” effect from VPS Phalanx, this step sequencer can now
however do much more than simply influence volume. As with the rest of Avenger’s mod
sources, it can be routed to virtually any parameter or setting. The step sequencer offers
amazing possibilities with regard to exact timing and synchronized modulation.
• Arpeggiator
Avenger’s arpeggiator was also born out of its predecessors: an “arp” can consist of up to 4
patterns (A, B, C and D) which can be played back in series or individually. The arpeggiator is
also a powerful and accurate source of modulation: the pitch of a note could for instance
control the filter cutoff amount at the same time as controlling velocity and reverb mix.
• Drum sequencer
The drum sequencer is a totally new development specifically designed for working with the
drum kits. A major difference to the arp is that you can play more than one note at the same
time (kick + clap). Apart from that, it offers numerous special functions such as various
copy/paste modes, a drum roll mode notes in quick succession, group selections and velocity
flags.
• Key/velocity zones
Zones are used to define the playability of any preset. You can freely set different velocity
zones, which for instance could mix in more oscillators the harder a key is pressed. You may
also use keyzones to split the keyboard into different voice areas. Everything is clearly and
graphically editable. Seamless blends between the areas are naturally also possible.
• Wavetable envelope / envelope patterns
This is an envelope that traverses the wavetable index, which obviously can also be routed to
anything else. This envelope offers many features that are especially suited for use with
wavetables, for instance the pattern editor to generate “wobble” sequences in various
successive speeds.
• Macro controls
Avenger offers you 3 macro controls and 2 macro switches as modulation sources. These
macros typically control modulation groups and thus totally change the sound. All the macro
controls and switches can be named and naturally, they are saved within the preset. All the
factory presets have had their macros preassigned, allowing you to instantly influence each
sound.

Vengeance Producer Suite – Avenger
13
• External MIDI pedals
As most of the presets have also been assigned suitable modulation to the mod wheel, with a
single click you can route an external controller to it to take advantage of its modulation
destinations. The MIDI pedal for instance would then behave identically to the mod wheel
that it is now routed to.
• Quick modulation assign
A comprehensive modulation matrix is great but there are times when things need to be
quick and easy. You can therefore assign almost any visible source with almost any visible
destination, simply via dragging and dropping from one to the other and then directly setting
the modulation depth from the GUI. It could not be easier. As each dial has a surrounding
LED ring, you can always see when a dial is being modulated and all in real time.
Selection
• Preset library
The new preset library in Avenger allows you to organize all your installed sound banks. The
library is not simply text-based; it uses graphics and icons for things like banks and
expansions to improve usability.
• Tag / search
Avenger comes with a huge number of presets. To give clarity and find the sound you want,
Avenger uses a tag cloud. With this, you can select sounds by genres (house, EDM, dub etc)
or by sound characteristics (aggressive, warm, bass etc). Your chosen tags will then limit the
search results.
• Import / organize
You can also import your own (multi)samples, wavetables, drums etc from your hard drive.
On top of that, you can create your own custom expansions with all presets and used
samples contained in one file. You can also specify your own icon for the expansion.
• Preset browser everywhere
Within every subsystem in Avenger you have the possibility to save presets. There are very
many presets for each effect type, such as arp sequences for the arpeggiator, step sequencer
sequences, FFT filter settings, wavetable envelope shapes, chorder presets, drum sequence
presets etc.
• Undo
Avenger’s amazing undo function should also be mentioned! Whatever you have done –
loaded another preset by mistake, changed the filter or deleted an arp note – anything can
be undone with a single click. A real life safer in many situations.
Vengeance Producer Suite – Avenger
14
Avenger’s features in detail
The preset browser
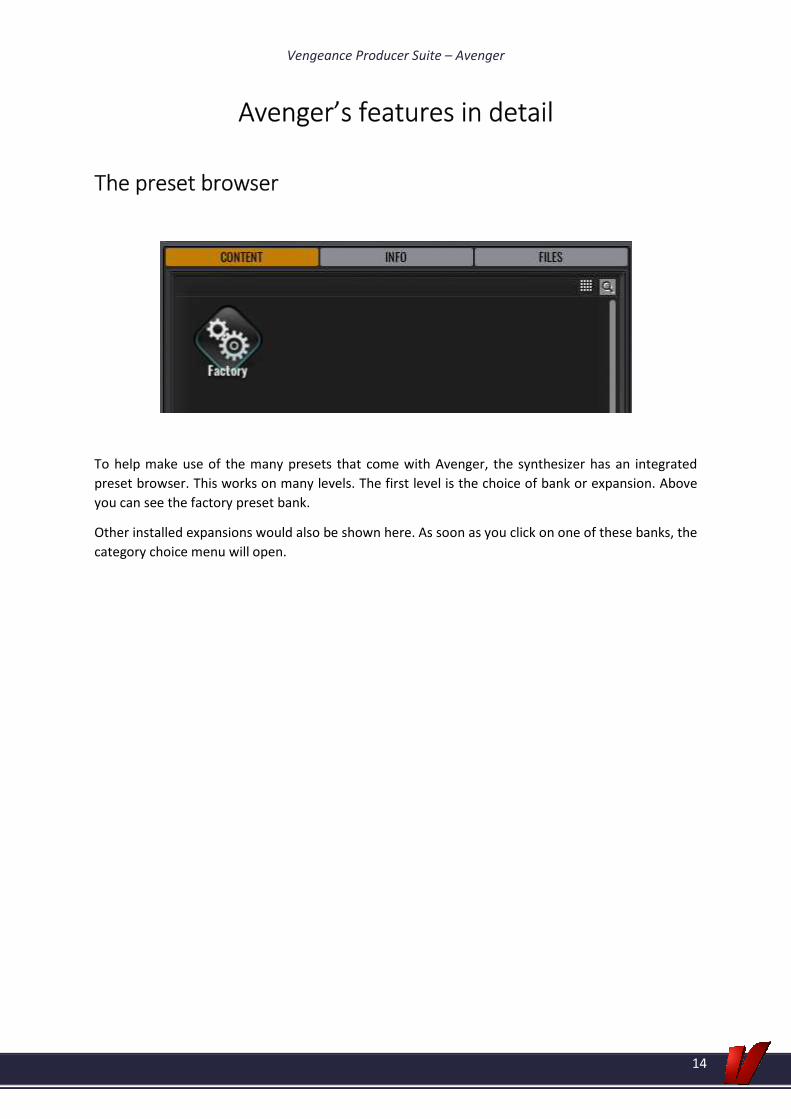
To help make use of the many presets that come with Avenger, the synthesizer has an integrated
preset browser. This works on many levels. The first level is the choice of bank or expansion. Above
you can see the factory preset bank.
Other installed expansions would also be shown here. As soon as you click on one of these banks, the
category choice menu will open.

Vengeance Producer Suite – Avenger
15
You are now in this chosen bank, the second level, ready to explore its contents. The categories in
this bank can be seen on the left. In the case of the factory bank that would be arpeggios, leads, bass,
effects or sequences. By clicking on a category, you select it and the third menu level opens to the
right where you can now browse the presets individually. To load a preset, double-click on its name
or use the arrow key (see: “Extras” > “Tips on working”). Don't forget that you can use your
mousewheel to scroll through these menus as well as by using the scroll bars.
You can go back to the previous level at any time by simply clicking on the arrow at the top left.
A right-click allows you to do numerous things such as deleting or renaming presets. The presets can
also be organized directly from hard drive. You’ll find these in your Avenger folder under “presets”.
Vengeance Producer Suite – Avenger
16
Searching for preset names

Vengeance Producer Suite – Avenger
17
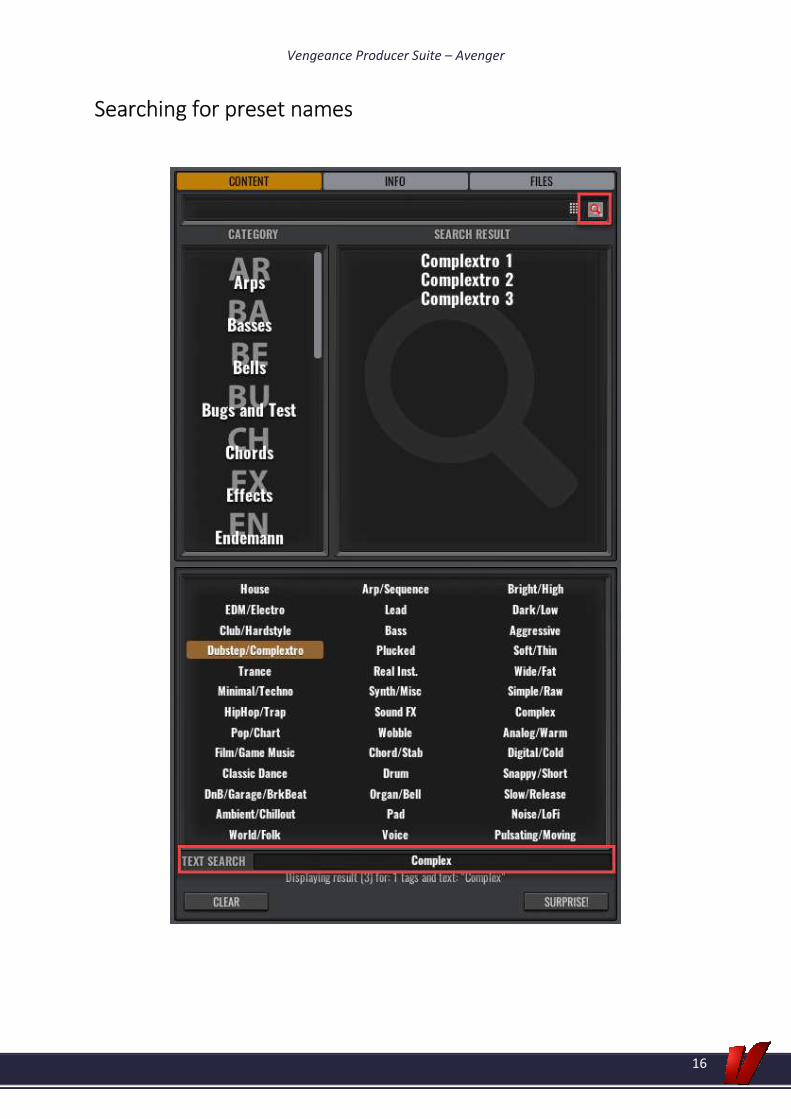
This is Avenger’s search window. Here you have three different ways to search for presets:
• Category search: at the top left you can find the well-known categories such as AR
(arpeggios), BA (basses) etc. By selecting one or more of these, your results will be shown on
the right. These results will only include the categories that you have chosen.
• Text search: at the bottom, you can find a text field. You can enter anything here that you
would like to search for. The results are then shown above. For instance, you can type
“piano” and you will be shown presets that only contain that word.
• The tag cloud (keyword search):
You can also search for various genres, sound types and characteristics to quickly find the sound you
are looking for. Our preset designers have tagged each preset with descriptive keywords and you are
encouraged to do the same for the presets that you save. A sound may therefore be tagged with
“Trance”, “Bass” and “Aggressive”. These characteristics are saved within each preset and can be
used by you in your search to easily find your sounds later. Choose “Trance”, “Bass” and “Aggressive”
and Avenger will show you all the sounds in your collection that have these keywords associated with
them. You can further narrow your search by activating “Snappy/Short”. Now your results will only
include snappy and short aggressive trance basses. You can also search for a specific author/artist.
• Search for authors: This is a new feature, which came with release of VPS Avenger. You can
select an author as search term and all presets designed by this sound designer will be
displayed as a result.

Vengeance Producer Suite – Avenger
18
The file browser / importing drums
The third tab in this section takes you to the file browser. Here you can browse through all your
drives and import your own content (wave files). This functions simply with drag and drop. Change to
the “drums” page and drag your chosen drum samples to the appropriate slots. Multisamples or “osc
shapes” can also be converted here.

Vengeance Producer Suite – Avenger
19
Importing multisamples
Please choose the folder which contains the multisample. The files must be in wav format and
named in accordance with the following scheme:
1_c0.wav 2_e0.wav 3_f#0.wav 4_c1.wav 5_e1.wav etc…
This is an example of 4th
intervals. You may choose any interval that you wish. Another example
would be the following octave interval:
1_c0.wav 2_c1.wav 3_c2.wav 4_c3.wav 5_c4.wav 6_c5.wav
Every other interval is also possible. Instead of using numbers at the beginning, you can also use any
text that you wish. The only important thing is that the note name at the end (before the “.wav”) is
included. We recommend however that you do use numbers as this helps keep the files displayed in
order. You can only use sharp notes (#) in note names; no flat (b) half notes.
Vengeance Producer Suite – Avenger
20
By right-clicking the folder that contains the wav files, you can choose the destination for the
multisample to be created inside Avenger. Having done so, your wav files have been converted into a
multisample and from then on is available within Avenger's library. The multisample gets the name
of the folder which contains the wav files. For this reason, please name the folder in the way that you
wish the multisample to be named within the library.
Vengeance Producer Suite – Avenger
21
Importing / creating OSC shapes
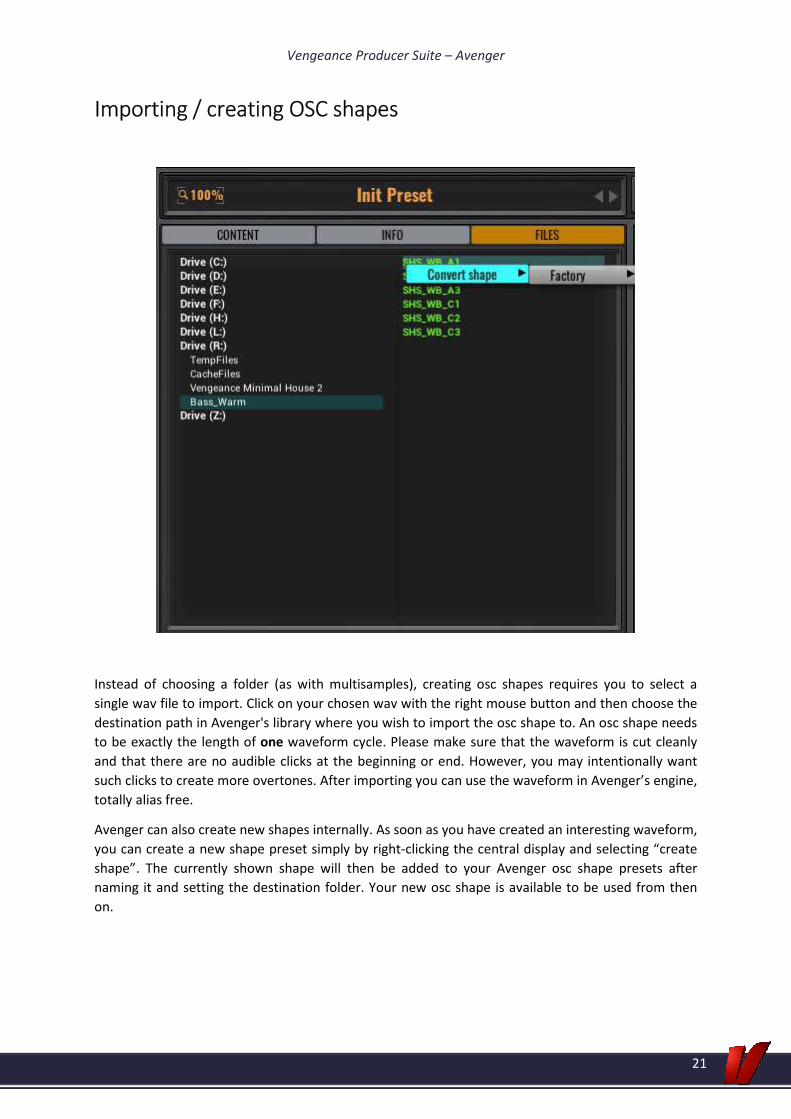
Instead of choosing a folder (as with multisamples), creating osc shapes requires you to select a
single wav file to import. Click on your chosen wav with the right mouse button and then choose the
destination path in Avenger's library where you wish to import the osc shape to. An osc shape needs
to be exactly the length of one waveform cycle. Please make sure that the waveform is cut cleanly
and that there are no audible clicks at the beginning or end. However, you may intentionally want
such clicks to create more overtones. After importing you can use the waveform in Avenger’s engine,
totally alias free.
Avenger can also create new shapes internally. As soon as you have created an interesting waveform,
you can create a new shape preset simply by right-clicking the central display and selecting “create
shape”. The currently shown shape will then be added to your Avenger osc shape presets after
naming it and setting the destination folder. Your new osc shape is available to be used from then
on.
Vengeance Producer Suite – Avenger
22
The oscillator area
Overview
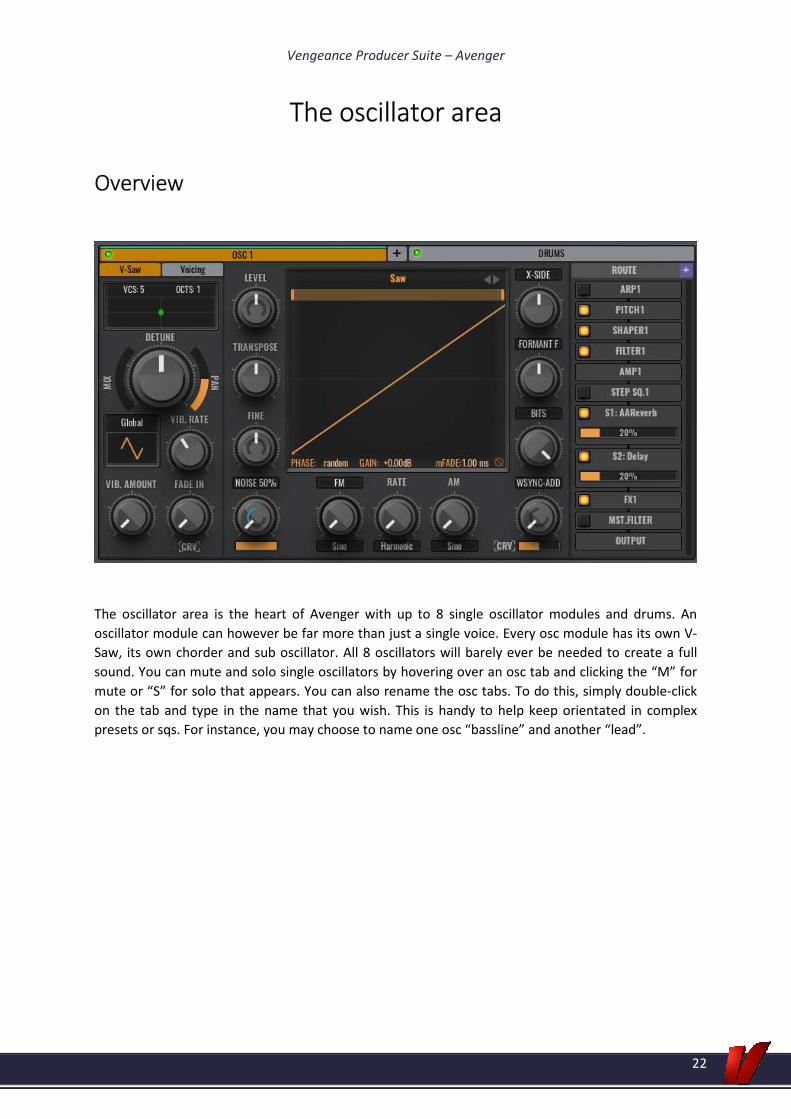
The oscillator area is the heart of Avenger with up to 8 single oscillator modules and drums. An
oscillator module can however be far more than just a single voice. Every osc module has its own V-
Saw, its own chorder and sub oscillator. All 8 oscillators will barely ever be needed to create a full
sound. You can mute and solo single oscillators by hovering over an osc tab and clicking the “M” for
mute or “S” for solo that appears. You can also rename the osc tabs. To do this, simply double-click
on the tab and type in the name that you wish. This is handy to help keep orientated in complex
presets or sqs. For instance, you may choose to name one osc “bassline” and another “lead”.
Vengeance Producer Suite – Avenger
23
The functions in detail
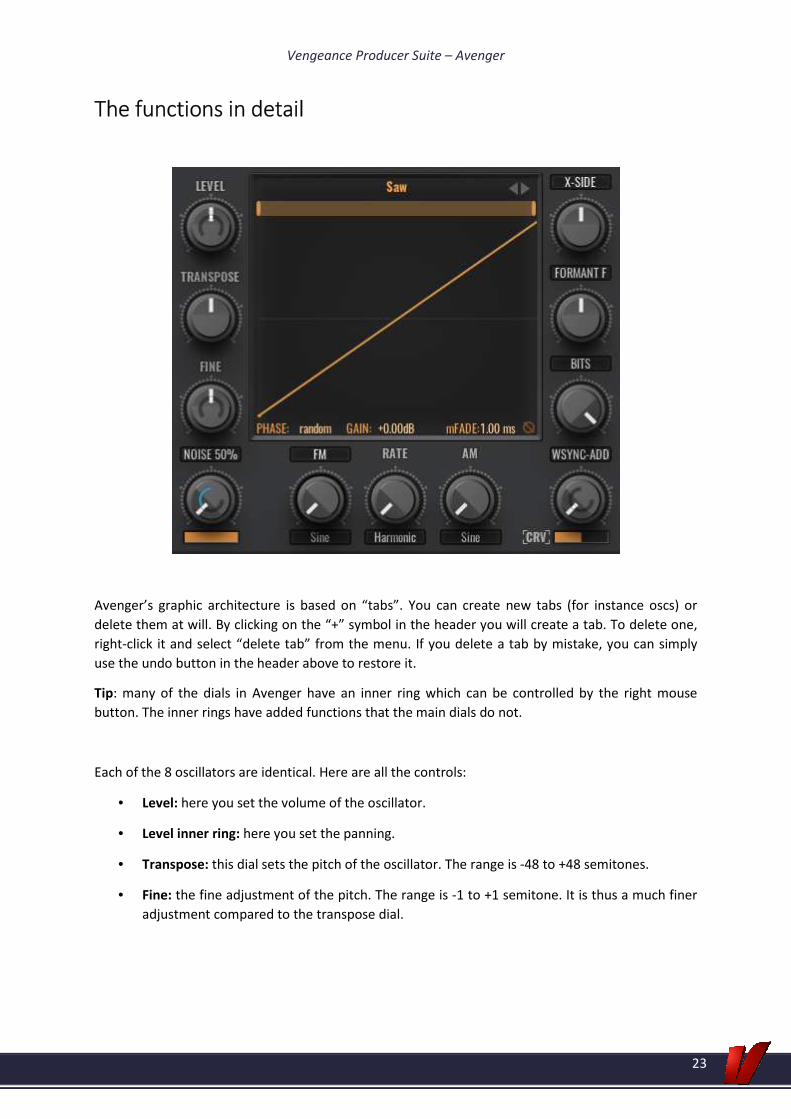
Avenger’s graphic architecture is based on “tabs”. You can create new tabs (for instance oscs) or
delete them at will. By clicking on the “+” symbol in the header you will create a tab. To delete one,
right-click it and select “delete tab” from the menu. If you delete a tab by mistake, you can simply
use the undo button in the header above to restore it.
Tip: many of the dials in Avenger have an inner ring which can be controlled by the right mouse
button. The inner rings have added functions that the main dials do not.
Each of the 8 oscillators are identical. Here are all the controls:
• Level: here you set the volume of the oscillator.
• Level inner ring: here you set the panning.
• Transpose: this dial sets the pitch of the oscillator. The range is -48 to +48 semitones.
• Fine: the fine adjustment of the pitch. The range is -1 to +1 semitone. It is thus a much finer
adjustment compared to the transpose dial.
Vengeance Producer Suite – Avenger
24
• Fine inner ring: the inner dial's function depends on the direction it is being turned. Turn the
inner ring from the middle position (0) to the left and every note played will have a random
fine value. The more that you turn the inner ring the more intense the randomness. Turn the
inner ring from the 0 position (middle) to the right and the pitch will no longer be
randomized but rather alternate between two fixed minimum and maximum values. The
difference between these values will be greater the more you increase the inner dial.
• Noise: every oscillator can include noise. The label of the noise dial is clickable and opens a
popup menu, which gives you the choice between 3 stereo width settings. Noise 100% is full
stereo width; the left and right channel are totally different. Noise 50% has only half the
width and noise mono, as the name suggests, has no stereo width at all.
• Noise inner ring: with this, you can control the color of the noise. You can mix smoothly
between white, pink and brown noise.
• Noise horizontal control: a third setting here is the horizontal slider under the noise dial.
This is a rate reducer just for the noise. Perfect for lo-fi sounds or percussion.
• X-side/mid: these dials on the right-hand side directly shape the waveform. Beginning with
the x-side control, this allows you to squash the left or right side of the waveform, depending
on which direction you turn the dial from its central position (neutral). The dial’s label above
is clickable and opens up a menu in which you can choose an alternate mode, the x-mid
mode. Unlike x-side mode, x-mid does not squash the sides of the waveform but rather
zooms the middle of it in or out, depending on the direction in which you turn the dial from
its central position.
• Formant cut/fade: the formant dial controls the pulse width of the waveform. Turn it left
from its neutral position and the waveform is squashed towards the left-hand side. Turn it to
the right and the waveform increases in size, expanding beyond the right-hand side. The part
of the waveform that is now beyond the display, will either be simply cut off (audible clicks)
or gently faded out depending on the mode that you are in. The formant dial’s label is
clickable and allows you to choose between formant-cut and formant-fade.
• Rate / bit reducer: this dial sets the sampling frequency, bit depth or both. This effect is on
the oscillator level and acts differently than most normal audio effects that you may know. It
actually draws numerous steps and inaccuracies into the waveform. A click on the name of
the dial lets you choose between “rate” (sampling frequency reduction), “bit” (bit depth
reduction) and “both” (a combination of both).
• Sync add/pure: you can sync the waveform to another oscillator (sine generator). The pitch
of this 2nd oscillator and thus the sound of the sync effect is controlled by this dial. You can
choose between 4 modes: add (windowed), pure (windowed), add (non-windowed) and pure
(non-windowed). The difference between add and pure is that add mixes the 2nd oscillator
with this one and pure lets you hear only the 2nd (synced) oscillator. The difference between
windowed and non-windowed is that with windowed the second synced oscillator is faded in
and out so that clicks are avoided when a pitch that would be outside the original waveform
occurs. This can be easily heard in the non-windowed mode.
Vengeance Producer Suite – Avenger
25
• Sync inner dial: the sync dial has its own small modulation envelope which can be bent up or
down. This is set by the inner dial. The envelope is bent upwards by turning the dial past its
central position. Turning the dial left of its central position and you will bend the envelope
downwards.
• Sync horizontal control: the horizontal control under the sync dial sets the amount of
modulation to be sent to the internal sync modulation envelope. This control has a neutral
position (0, no modulation). Move it to the right and the sync dial will be positively
modulated. Move it to the left and negative modulation occurs.
• FM: frequency modulation (FM) means that the pitch (frequency) of an oscillator (also
known as a carrier) is modulated rapidly by a second oscillator (also known as a modulator).
The depth of the modulation can be set here. You can also choose the modulator’s osc shape
from numerous waveforms by clicking on the name under the FM dial to reveal a popup
menu. Doing so on the name above the FM dial presents 3 choices:
o FM (normal): this mode continuously generates FM signals. It is thus completely
smooth. Because of this, aliasing can occur in the highs (which could be wanted in
some cases).
o FM (table mode): this FM mode generates an FM signal in blocks, similar to a
wavetable. Intermediate steps, which do not fit in the table, sound different from
the FM normal mode. We suggest “harmonic” or “octave” mode for the FM rate. In
these rate modes, all the waveforms fit perfectly within a table. Table mode is crystal
clear in the highs and has no aliasing artifacts.
o FM (table mode windowed): equivalent to the normal “table mode” with the
difference that a fade in and fade out takes place at the beginning and end of the
table respectively. This makes sure that clicks are dampened when a wave doesn’t fit
properly within a table.
• AM: the opposite of FM is amplitude modulation (AM). This dial acts exactly like the FM dial
but with one difference: instead of the modulating the frequency (pitch) of a carrier osc, this
modulates the amplitude (volume).
• Rate: FM and AM share the same rate dial which sets the high speed of the modulator osc.
Because even intervals (octaves) or fifths sound more harmonious than odd intervals, you
can set various rate modes underneath the dial which constrain the rate to various intervals:
o Free: the grid is off. The pitch of the modulating oscillator can be freely set.
o Harmonic: only octaves (+12), fourths (+5) and fifths (+7) allowed.
o Semitone: the rate dial is fixed to semitone steps.
o Octave: only octaves allowed.
o Chord octave min/maj: only octaves and minor/major thirds (+3/+4) allowed.
o Chord octave 5th
/7th
: only octaves and fourths/fifths (+5/+7) allowed.

Vengeance Producer Suite – Avenger
26
o Phase lock on/off: this sets the start phase of the modulator oscillator for FM/AM.
If phase lock is set to on, the phase is the same as the main voice. If phase lock is set
to off, the modulation phase is random. You can see the result better if you set a
start offset for the main carrier oscillator.
Vengeance Producer Suite – Avenger
27
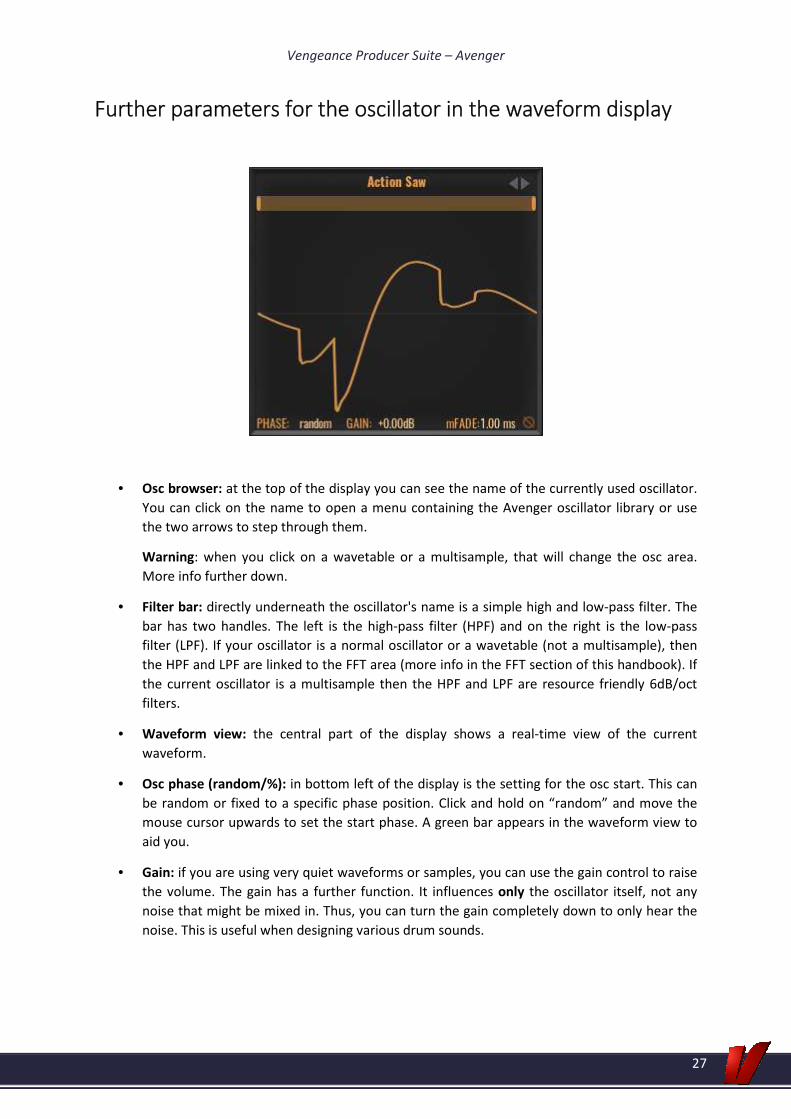
Further parameters for the oscillator in the waveform display
• Osc browser: at the top of the display you can see the name of the currently used oscillator.
You can click on the name to open a menu containing the Avenger oscillator library or use
the two arrows to step through them.
Warning: when you click on a wavetable or a multisample, that will change the osc area.
More info further down.
• Filter bar: directly underneath the oscillator's name is a simple high and low-pass filter. The
bar has two handles. The left is the high-pass filter (HPF) and on the right is the low-pass
filter (LPF). If your oscillator is a normal oscillator or a wavetable (not a multisample), then
the HPF and LPF are linked to the FFT area (more info in the FFT section of this handbook). If
the current oscillator is a multisample then the HPF and LPF are resource friendly 6dB/oct
filters.
• Waveform view: the central part of the display shows a real-time view of the current
waveform.
• Osc phase (random/%): in bottom left of the display is the setting for the osc start. This can
be random or fixed to a specific phase position. Click and hold on “random” and move the
mouse cursor upwards to set the start phase. A green bar appears in the waveform view to
aid you.
• Gain: if you are using very quiet waveforms or samples, you can use the gain control to raise
the volume. The gain has a further function. It influences only the oscillator itself, not any
noise that might be mixed in. Thus, you can turn the gain completely down to only hear the
noise. This is useful when designing various drum sounds.
Vengeance Producer Suite – Avenger
28
• Micro fade-in: in certain start phase positions the oscillator may cause audible clicks. This
may be desired for bass drum sounds for instance, generally however, clicks are not wanted.
For this reason, you can use a tiny micro fade (up to 5ms) to fade in the waveform so that
such clicks are eliminated.
• Phase invert: the small icon in the bottom right flips the phase 180°. This is useful to create
very specific cancelations between two oscillators.

Vengeance Producer Suite – Avenger
29
Multisamples
Choose a multisample and the waveform display changes to that of the sample. The left-hand side
with level, transpose, fine tune, noise and FM/AM remains the same. The right-hand side changes to:
• Sample start: here you can set an offset to the sample start. A green line appears in the
waveform display. The sample now plays back from the green line when a key is pressed,
skipping over anything that lies before it. With this, you can for instance miss out the attack
phase of a piano and so creating a pad sound.
• Random start: turn this dial and a gray area appears over the waveform. Inside this area, a
random sample start position will be chosen each time you press a key. This is very useful
when using the V-Saw so that all seven voices have a different phase length. With arpeggios,
you can use the same function to avoid any “machine gun effect”.
• Delay: here you can set a delay for the samples. After pressing a key, the sample will play
after the delay time has passed. This is useful for instance with a group of bells that you
would like to play with slightly different start times.
• Rate/bit reducer: this effect is similar to the rate/bit reducer in the normal oscillator. Its
sound however is more akin to that of an external rate reducer/bitcrusher effect.

Vengeance Producer Suite – Avenger
30
There are more multisample options. These are to be found in the central display editor below the
oscillator module and will be explained further on in this handbook.
Vengeance Producer Suite – Avenger
31
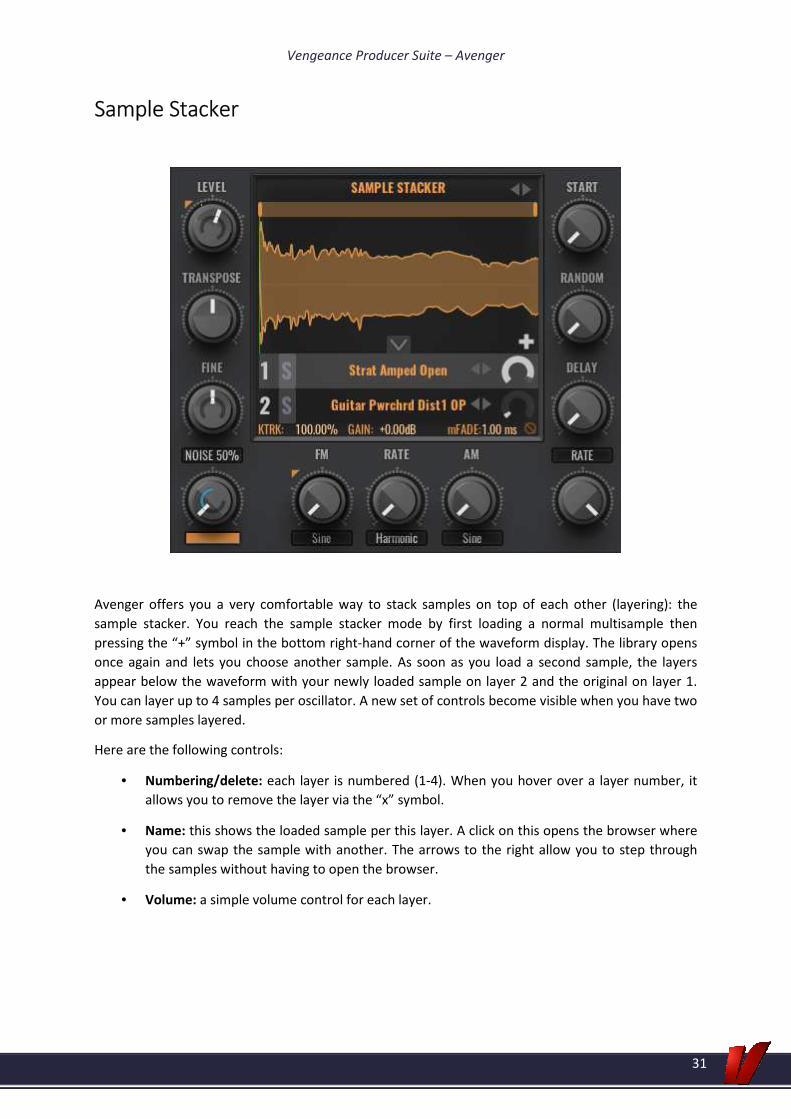
Sample Stacker
Avenger offers you a very comfortable way to stack samples on top of each other (layering): the
sample stacker. You reach the sample stacker mode by first loading a normal multisample then
pressing the “+” symbol in the bottom right-hand corner of the waveform display. The library opens
once again and lets you choose another sample. As soon as you load a second sample, the layers
appear below the waveform with your newly loaded sample on layer 2 and the original on layer 1.
You can layer up to 4 samples per oscillator. A new set of controls become visible when you have two
or more samples layered.
Here are the following controls:
• Numbering/delete: each layer is numbered (1-4). When you hover over a layer number, it
allows you to remove the layer via the “x” symbol.
• Name: this shows the loaded sample per this layer. A click on this opens the browser where
you can swap the sample with another. The arrows to the right allow you to step through
the samples without having to open the browser.
• Volume: a simple volume control for each layer.

Vengeance Producer Suite – Avenger
32
Remember, a sample stacker needs much less CPU than if you were to load every sample on its own
oscillator module. For this reason, always use the sample stacker if you can. To take the sample
stacker apart again you simply need to delete all but one of the layers or choose another
multisample or osc shape from the main browser.
There are more controls for the sample stacker. These are however in the central display editor and
are explained further on in this handbook.
Vengeance Producer Suite – Avenger
33
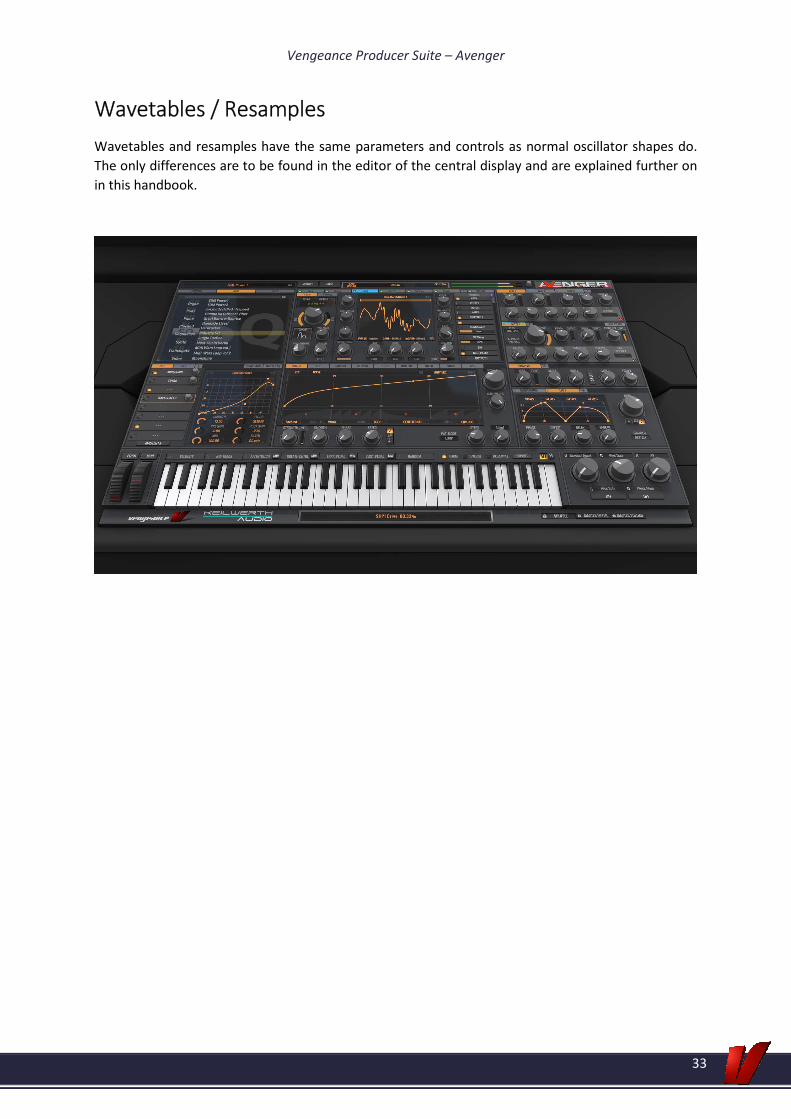
Wavetables / Resamples
Wavetables and resamples have the same parameters and controls as normal oscillator shapes do.
The only differences are to be found in the editor of the central display and are explained further on
in this handbook.

Vengeance Producer Suite – Avenger
34
V-Saw
Avenger’s V-Saw is a classic “supersaw” unison module with its own
special features. With this, you can quickly and efficiently create really
fat and detuned sounds, which are essential in modern club music.
• Voices (“vcs”): Avenger’s V-Saw can generate up to 6 additional
voices based upon the oscillator’s voice. Here you can define
how many voices are played in total per note (2-7).
• Octaves (“octs”): using this control, the 6 voices can be spread
over up to 4 octaves.
• Voices display: a small display shows the number of generated
voices (the yellow dots), their octave spread, detune amount
and panning. The green dot is the original oscillator voice.
• Mix: with this slider you can set the mix level of the V-Saw. At 0
(slider completely down) the V-Saw is not active and thus uses
no CPU. If the mix slider is set to fully wet (dragged to the top)
it means the generated voices will be as loud as the original.
• Detune: the largest and most important control in the V-Saw is
the detune dial. This sets how much the generated voices are
detuned apart from each other.
• Pan: here you can set how much the voices are spread out across the stereo field.
• Vibrato LFO waveform: the V-Saw includes its own special vibrato LFO. This modulates the
pitch of the V-Saw. You can choose between two modes:
o Global: the vibrato LFO modulates the pitch of all the voices as a whole.
o Independent: the vibrato LFO modulates the pitch of each voice individually. This
gives you new possibilities and allows you to create even wider sounds.
Under the global/independent selector, you can choose the waveform of the vibrato LFO.
Click on the waveform graphic to take your pick.
• Vibrato LFO rate: this sets the speed of the LFO.
• Vibrato LFO amount: this sets the amount of pitch modulation (depth of the vibrato).
• Vibrato LFO fade in: the pitch modulation depth can be faded in to smoothly reach the set
amount. This dial sets the length of time required to reach from no depth to the set
modulation depth. You can set the shape of the transient response with the “curve” control
located under the fade in dial.
Vengeance Producer Suite – Avenger
35
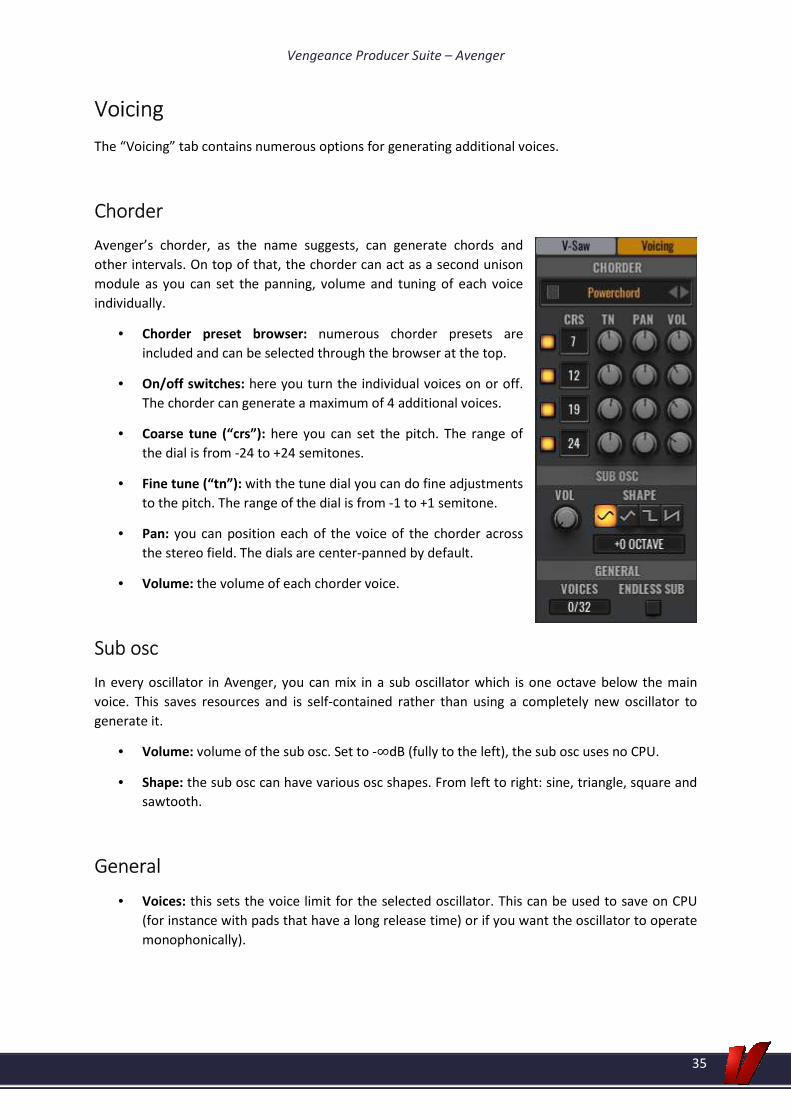
Voicing
The “Voicing” tab contains numerous options for generating additional voices.
Chorder
Avenger’s chorder, as the name suggests, can generate chords and
other intervals. On top of that, the chorder can act as a second unison
module as you can set the panning, volume and tuning of each voice
individually.
• Chorder preset browser: numerous chorder presets are
included and can be selected through the browser at the top.
• On/off switches: here you turn the individual voices on or off.
The chorder can generate a maximum of 4 additional voices.
• Coarse tune (“crs”): here you can set the pitch. The range of
the dial is from -24 to +24 semitones.
• Fine tune (“tn”): with the tune dial you can do fine adjustments
to the pitch. The range of the dial is from -1 to +1 semitone.
• Pan: you can position each of the voice of the chorder across
the stereo field. The dials are center-panned by default.
• Volume: the volume of each chorder voice.
Sub osc
In every oscillator in Avenger, you can mix in a sub oscillator which is one octave below the main
voice. This saves resources and is self-contained rather than using a completely new oscillator to
generate it.
• Volume: volume of the sub osc. Set to -∞dB (fully to the left), the sub osc uses no CPU.
• Shape: the sub osc can have various osc shapes. From left to right: sine, triangle, square and
sawtooth.
General
• Voices: this sets the voice limit for the selected oscillator. This can be used to save on CPU
(for instance with pads that have a long release time) or if you want the oscillator to operate
monophonically).

Vengeance Producer Suite – Avenger
36
• Endless sub mode: this is a special mode designed for bass sounds used in sequencers (sqs).
If the endless sub mode is active, there are only 2 octaves of bass that continuously blend
with each other. This means that even if you play far left on the keyboard the bass stays
clearly audible and powerful. This is important with sequencer and arpeggio runs.

Vengeance Producer Suite – Avenger
37
Routing
The entire right side of the oscillator mode consists of the routing
section. In principle, this allows you to see the path the selected
oscillator takes in the chain, to influence it and to add effects etc. You
can add new modules (for instance a further shaper or filter) at any
time by clicking on the “+” button in the top right corner.
Some modules such as the arp or amp are fixed and cannot be
rearranged within oscillator chains. Other modules can be moved. It
makes a huge difference whether or not a shaper module is before or
after a filter for instance. You can move a module by clicking with the
left mouse button and dragging the module to where you would like it
to be. If a module is moveable, you will immediately see where you can
move it to. Experiment with the routing to get an idea of which
modules can be moved where. With a simple left-click of your mouse
you can open a menu where additional functions such as “remove” are
found.
You can also add send effects by using the “+” button. The send effect
obviously has to be added first to the send rack before it can be seen
listed here. Send effects are a resource friendly way to use effects such
as reverb or delay. The effect is only loaded once and can have differing
send mix settings per oscillator.
At the end of the chain, you can route the oscillator to one or more of the 4 insert FX channels or
directly to the master FX. The master filter can also be turned on and off from here.
Warning: insert effects and other shaper modules must actually exist first before they appear here in
the list. Use the “+” button next to a module’s tab to create a new one.
Should you ever lose your bearings you can use the “go to” function. To do this, click on the left of a
module (or use a simple right-click and choose “go to”). Avenger will bring your attention to where
the module can be located on the GUI by drawing a red target around it.

Vengeance Producer Suite – Avenger
38
Drums
You can also find the tab for the drums / drum kits amongst the osc tabs. This osc module differs
quite largely from the normal oscs. The V-Saw and voicing sections are not present and these make
way for an octave of vertical keyboard keys. The keys of this keyboard can be assigned drum
samples. All together, this makes for a complete drum kit which you can use over and over again.
Following is a short overview of all the elements:
Drums main page
• Vertical keyboard/sample fields: every key has a sample loaded on it. For better orientation,
the names are set (C = Bass drum, D# = Clap). This aligns with the general MIDI standard.
Naturally, you load different samples or even your own.
• Waveform view: a miniature waveform view shows the form of the sample. A running line
show you the current position during playback. Hover over one of these waveforms with
your mouse and the text “edit” appears, which you can then left-click on to enter the sample
editor below.
• Mute/solo (“M”/”S”): using these buttons you can mute or solo the individual drum parts.
• Volume (“vol”): this sets the volume of the specific drum slot. Another way of raising or
lowering the volume is by using the “gain” dial. This is in the sample editor and will be
explained further on in this handbook.
• Pan: this positions the sample within the stereo field.

Vengeance Producer Suite – Avenger
39
• Pitch: this sets the pitch of the specific sample. This dial is set to step in semitones, however
a pitch control that can be set freely can be found in the sample editor.
• Save drum kit: a right-click on the drums main page opens you the menu. Here you can save
the current drum kit or initialize it the default state.
Drum sample editor
By clicking on “edit” in the miniature waveform view of a specific sample, you reach the drum sample
editor. Here you can do various things that only affect that sample.
Following are the controls in detail:
• Sample start and end flags: these two flags are to be found in the large waveform and
represent the start and end points of the sample.
• Monophonic/polyphonic mode: if very fast successive overlapping notes are used (for
instance for snare drum roll), then this control sets whether the notes can overlap
(polyphonic) or are cut off (monophonic).
• Gain: if the normal volume dial is not enough you can use the gain dial to further adjust the
volume. This is helpful if you are using very loud or very quiet samples.
• Envelope: overlaid with the waveform graphic is the envelope. It is possible to add new
points to the curve by double-clicking and to delete points by right-clicking on them. The
menu that appears when you right-click on the envelope contains many other functions such
as mirroring or rotating of the curve.
• Volume: this dial is the same as the volume dial that you already know from the drums main
page.

Vengeance Producer Suite – Avenger
40
• Pitch: this dial is the same as the pitch dial on the drums main page with the difference that
it isn’t fixed to turn in semitone steps. It has a finer resolution.
• Pan: another duplicate control; the same as the pan dial found on the drums main page.
• Spike: this gives the sample an additional accent on the attack (for the first few milliseconds
of the sample).
• Delay: this control has two function both for sliding the sample off the grid. You can use it to
delay the sample's playback (right of center) or to trigger the sample earlier in the drum
sequencer (left of center). If you delay the sample, it will be played back later in time and the
waveform moves to the right. Trigger the sample earlier in time and a green bar appears to
reflect that. This bar represents the anchor point of the sample in the drum sequencer (the
gridline that it sits upon). This makes it possible to precisely position handclaps, snares or
short FX swooshes for example.
• LP/HP: a simple 6dB/oct filter. Well suited to thin out hi-hats or dampen kicks.
Drums routing
In principle functionally the same as the normal oscillators (see: “The
oscillator area” > “Routing”). The drum routing is however not quite so
involved. You do have the possibility to add send effects, FX busses or
shaper modules. The routing is per drum sample, thus it only affects the
sample that is currently selected on the left. The first entry however is
an exception; “Drum sq” is global and turns the internal drum
sequencer on and off for the entire drums section.
Drums routing (multi-selection)
You can multi-select the drums by pressing
and holding the [Shift] key as you do. Every
change that you do to the routing will then
affect all the selected drums. With the [Ctrl]
key pressed and held you can also add or
subtract drums from the current selection. This
way you can select everything in one go, then
deselect the bass drum for instance to easily
add a reverb insert effect to everything else.

Vengeance Producer Suite – Avenger
41
Drum kit / sequences browser
Under the routing area, you can find the browser for drum kits and
drum sequences (the tabs “Drums” and “Seq.”). You can load drum kits
(whether they be from the factory bank, expansions or your own) from
the “Drums” tab. Similarly, the “Seq.” tab allows you to load drum
sequences. Between both these tabs resides a green lock symbol. If this
is activated (solid green), then whenever you load a drum kit the
related drum sequence is also loaded (and vice versa).
Tip: if you wish to link your own drum kit and sequence so that they
can be loaded together, then they must both share the same filename
and be placed respectively into the drum kits and sequences folders
that exist within your Avenger folder.
Vengeance Producer Suite – Avenger
42
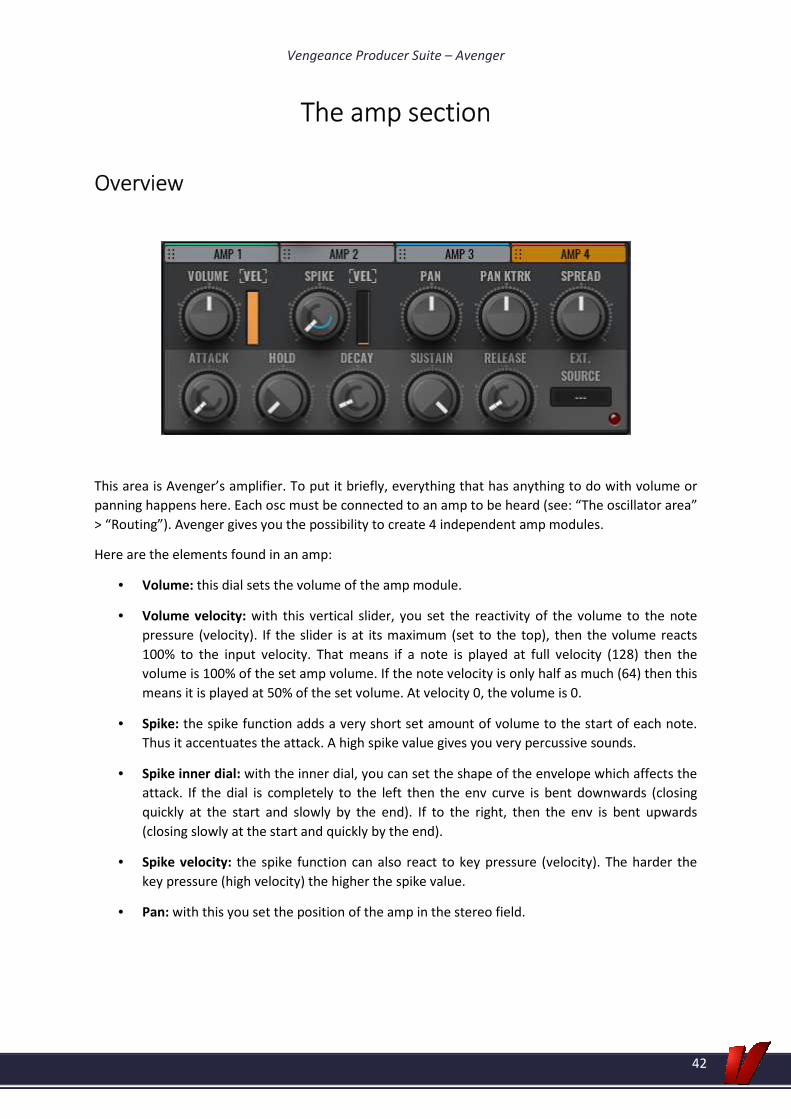
The amp section
Overview
This area is Avenger’s amplifier. To put it briefly, everything that has anything to do with volume or
panning happens here. Each osc must be connected to an amp to be heard (see: “The oscillator area”
> “Routing”). Avenger gives you the possibility to create 4 independent amp modules.
Here are the elements found in an amp:
• Volume: this dial sets the volume of the amp module.
• Volume velocity: with this vertical slider, you set the reactivity of the volume to the note
pressure (velocity). If the slider is at its maximum (set to the top), then the volume reacts
100% to the input velocity. That means if a note is played at full velocity (128) then the
volume is 100% of the set amp volume. If the note velocity is only half as much (64) then this
means it is played at 50% of the set volume. At velocity 0, the volume is 0.
• Spike: the spike function adds a very short set amount of volume to the start of each note.
Thus it accentuates the attack. A high spike value gives you very percussive sounds.
• Spike inner dial: with the inner dial, you can set the shape of the envelope which affects the
attack. If the dial is completely to the left then the env curve is bent downwards (closing
quickly at the start and slowly by the end). If to the right, then the env is bent upwards
(closing slowly at the start and quickly by the end).
• Spike velocity: the spike function can also react to key pressure (velocity). The harder the
key pressure (high velocity) the higher the spike value.
• Pan: with this you set the position of the amp in the stereo field.

Vengeance Producer Suite – Avenger
43
• Pan keytrack: the pan can also be linked to the keyboard. This way you can have the deeper
notes panned slightly to the left and the higher one somewhat to the right. This is in fact how
a real piano sounds when played; setting the dial a bit to the right will emulate this. Turned
to the left, the effect is mirrored. The central setting of this dial is the neutral position.
• Spread: the spread dial allows you to set whether you want individual notes to alternate or
randomly move within the panoramic field. The central position is neutral and spread is not
in effect. Turning the dial to the left will set the amount of random panning to occur. Turning
the dial to the right will set the amount of an alternating panoramic spread (alternating
between the left and right channels).
The amp section runs subsequently through an envelope. This has various phases: attack, hold,
decay, sustain and release (also known as AHDSR). Here are the phases described in detail:
• Attack: the first phase of the envelope is the attack. This sets how quickly a note reaches
its maximum value after it’s played.
• Attack inner dial: the inner dial lets you set the form of the attack phase allowing it to be
bend in both directions. The neutral position, in the center, is a linear form. Turning the
dial to the right bends the linear form upwards into a curve and the opposite is true
when turning the dial left.
• Hold: the second phase of the envelope is the hold phase. After the attack has reached
its maximum level, the length of time that this level should be kept before moving onto
the next phase is set by the hold parameter.
• Decay: the third phase is the decay. Here you can set how quickly it decays into the
fourth phase.
• Decay inner dial: the decay dial also has an inner dial with which you can set the form.
The central position is neutral (linear).
• Sustain: the fourth phase is the sustain. This phase is a special one. It doesn’t have a
fixed time but rather affects the level of the held volume. The sustain phase is active for
as long as a note is being played.
• Release: the fifth and final phase is the release phase. This phase starts as soon as a note
or key is released. At this point, the phase moves on from sustain to release and the
sounds fade out. Release always ends at zero.
• Release inner dial: this lets you set the form of the release phase. A negative
(downward) bend sounds more natural to the ear as it mimics how we perceive sounds
fading in nature.
Tip: You should keep an eye on the number of voices / CPU shown in the readout display
(at the very top of the synth), because notes that can barely be heard with a long release
still use CPU.
• External source: with this drop-down menu you can bypass the amp’s own internal
envelope and instead use a mod envelope or the envelope from another amp module for
instance. As soon as you have chosen another source, the internal amp envelope is no
longer active.

Vengeance Producer Suite – Avenger
44
• Status LED: this light gives you visual feedback for your envelope. The greater the level
and/or value in the envelope the brighter the light.

Vengeance Producer Suite – Avenger
45
The filter section
Overview
Filters are inherent in modern music production. It's the filter that gives a sound its form and
character. Avenger gives you the possibility to create and use 4 independent filter modules. You can
also route the filters to be in serial (one after another) via the routing section found within each
oscillator. There are many different filter types you can chose from.
Described below in detail are the elements found within a filter module:
• Keytrack: the keytrack sets if and by how much the filter reacts to the pitch of an incoming
note. If the keytrack is set to 0% then the filter doesn’t react to the pitch at all and sounds
the same no matter which key is pressed. Set it to 100% and the cutoff of the filter will open
more and more as the pitch of the notes being played increases. At 100%, the keytracking
relates 1:1 to the note pitches, that means you can create a tonally playable “whistling” tone
by now setting the filter’s resonance very high.
• Type: this is the filter’s type and it defines the main characteristic of the filter itself.
• Cutoff: the cutoff dial is the most important dial in the filter section and sets how open or
closed the filter is.
• Cutoff velocity: the value of the cutoff dial can also obviously be controlled by velocity. Set
the velocity slider high and the cutoff value will be low when a key is played softly. Play with
more velocity and the cutoff value will be higher.
• Resonance / Q-factor: the resonance dial sets the level of amplification on the cutoff edge
frequency. High resonance values sound very shrilling, like the whistling sound mentioned
above. The resonance moves whenever the cutoff value changes.
Vengeance Producer Suite – Avenger
46
• Resonance velocity: the level of the resonance can also be influenced by note velocity. This
can be set with this slider.
• Drive / band / comb: this dial has numerous functions depending on the filter’s type:
o Drive: this is the distortion resulting directly from the filter being overdriven.
o Band: on most of the bandpass or notch filter types you can use this to set the
distance between the high and low bands – very important for creating vocal-like
filter sounds.
o Comb: a comb filter can be added to many of the filter types and creates many
interesting phase cancelations. If “comb” is selected, then the filter envelope also
reacts to the strength of the comb effect.
• Envelope amount: the intensity with which the filter envelope acts upon the cutoff is set
here. The central setting is neutral (no effect). Negative values are also possible.
• Envelope amount velocity: the intensity of the cutoff for the filter envelope can react to
note velocity by this slider.
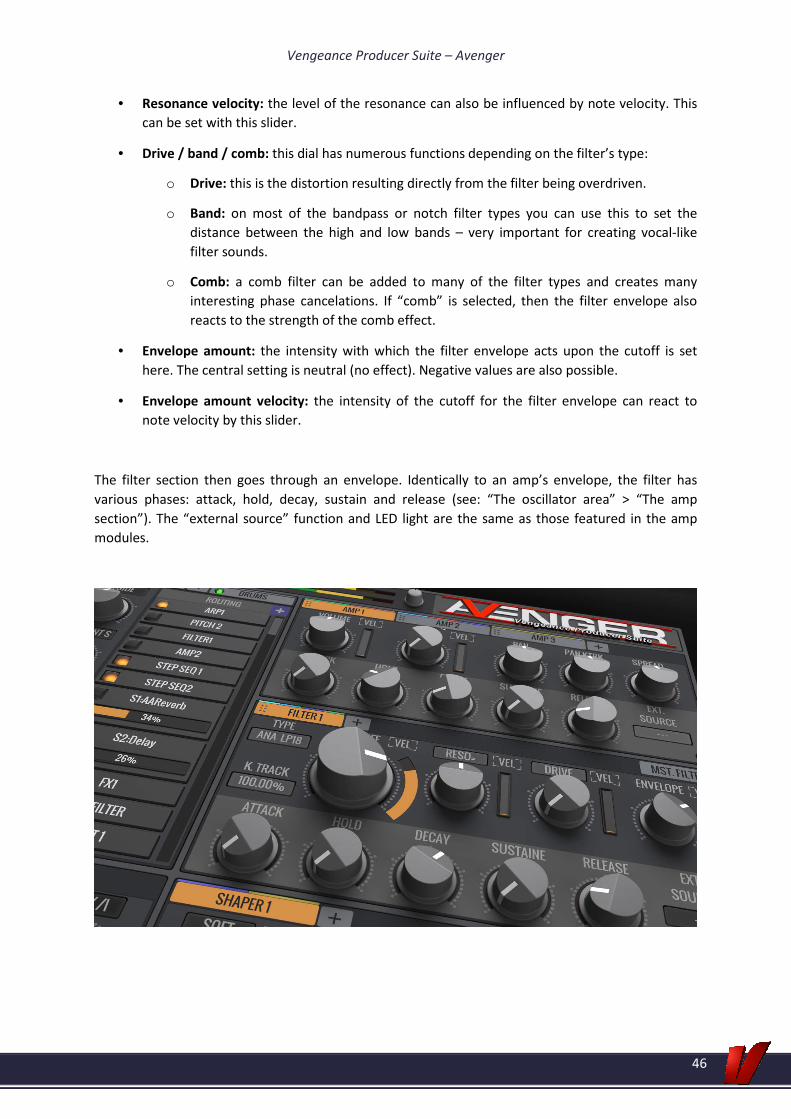
The filter section then goes through an envelope. Identically to an amp’s envelope, the filter has
various phases: attack, hold, decay, sustain and release (see: “The oscillator area” > “The amp
section”). The “external source” function and LED light are the same as those featured in the amp
modules.
Vengeance Producer Suite – Avenger
47
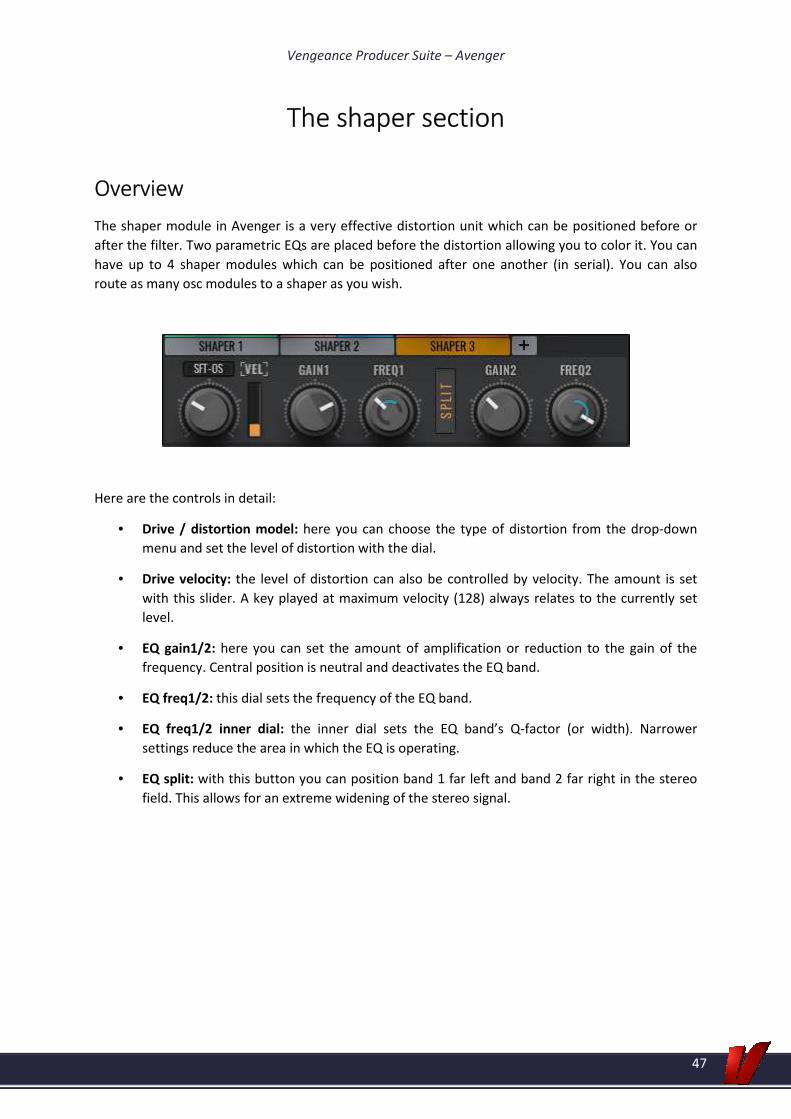
The shaper section
Overview
The shaper module in Avenger is a very effective distortion unit which can be positioned before or
after the filter. Two parametric EQs are placed before the distortion allowing you to color it. You can
have up to 4 shaper modules which can be positioned after one another (in serial). You can also
route as many osc modules to a shaper as you wish.
Here are the controls in detail:
• Drive / distortion model: here you can choose the type of distortion from the drop-down
menu and set the level of distortion with the dial.
• Drive velocity: the level of distortion can also be controlled by velocity. The amount is set
with this slider. A key played at maximum velocity (128) always relates to the currently set
level.
• EQ gain1/2: here you can set the amount of amplification or reduction to the gain of the
frequency. Central position is neutral and deactivates the EQ band.
• EQ freq1/2: this dial sets the frequency of the EQ band.
• EQ freq1/2 inner dial: the inner dial sets the EQ band’s Q-factor (or width). Narrower
settings reduce the area in which the EQ is operating.
• EQ split: with this button you can position band 1 far left and band 2 far right in the stereo
field. This allows for an extreme widening of the stereo signal.

Vengeance Producer Suite – Avenger
48
The mod matrix
Overview
Avenger has a very powerful mod matrix. A mod matrix can seem complex at first but it's worth the
effort to understand it. When creating our mod matrix, we tried (and succeeded) in making it less
complicated than most others – for instance, same sources are displayed in groups. In principle, a
mod matrix area consists of three elements:
Modulation source � destination � with value X%
Value X is displayed in percent and can either be negative (-100%) or positive (+100%). No
modulation occurs in the central (0%) position. Avenger always displays the modulation sources as
group headers (the gray bars with white centered font). The destination (yellow font) is then shown
directly below the modulation source. A source can be sent to multiple destinations at once.
Here are the individual elements described in detail:
• On/off button: the first of the buttons on the left-hand side (top left) lets you turn the entire
mod matrix on or off. Turned off, no modulations will occur at all.
• “+” button: directly below the on/off button you can find the “+” button. Using this you can
add a new modulation source. Press the button and a menu appears containing every
possible source available in Avenger. Choose a source and it then appears added as a new
group on the right, now needing a destination.
• Init button: this button (below the previous one) sets the mod matrix back to its initial state.

Vengeance Producer Suite – Avenger
49
• Collapse in/out: this final button allows you to collapse or expand all the source groups. This
is handy in complex mod matrices to help keep an overall view of the sources.
• Group on/off button: each modulation group can be turned on or off by the button located
on the left of each group's header.
• Readout (“#1” etc.): this readout helps with clarity and shows how many modulation
destinations are currently within a group. If for instance “#7” is shown here, this means that
this source is being sent to seven destinations.
• Group collapse: to the right of the readout you can find an arrow to collapse/expand this
group.
• Source (name display): in the middle of the header, you can see the chosen source for this
group (the white text). You can change the source at any time by clicking on the name.
• +add button: this button allows you to add additional modulation destinations to the group.
A selection of all possible destinations appears and the selected destination will be added to
the group.
• Destination on/off button: individual modulation destinations can also be turned on or off.
• Destination (name): all modulation destinations are displayed in yellow text. You can swap
one destination for another at any time simply by clicking on its name and selecting a new
choice. If you wish to delete a destination, simply choose the selection “-----” instead. The
destination is then removed from the group.
• “+/%" switch: the modulation can affect the destination additively (a fixed value positively or
negatively) or percentually (the value depends on the remaining travel). An example: the
source is an LFO and the destination is the FM amount dial. The FM dial is set to its middle
position (it has 50% of its maximum value and 50% dial travel available in both directions left
and right). Set the strength of the modulation to +100% and the “+/%” switch to “+”
(additive). Only half of the modulation strength can be used up before the FM dial reaches its
maximum value – the dial cannot go further. Now toggle the “+/%” switch to “%”
(percentual) and the FM dial is modulated precisely from its middle position to its max, using
up all 100% of the modulation strength. In percentual mode, the dial will always reach the
end of its travel even if you set the FM dial to just 20%. Experiment with the mod matrix to
gain a better understanding for how it behaves.
• Modulation strength: here you set the strength of the modulation. It goes from -100% to
+100%. In the central position, the modulation source has no effect on the destination.
• Modulation lag: the small yellow control to the right of the modulation strength sets
whether or not the modulation is instantaneous or gradually introduced. Left-click and hold
on this element then move the mouse cursor up or down to set it. If the graphic is angular,
then the modulation begins immediately. If the graphic is rounded, then there is a smooth
transition from no modulation to the set modulation over a period of time.
Vengeance Producer Suite – Avenger
50
Mod matrix routing via drag & drop
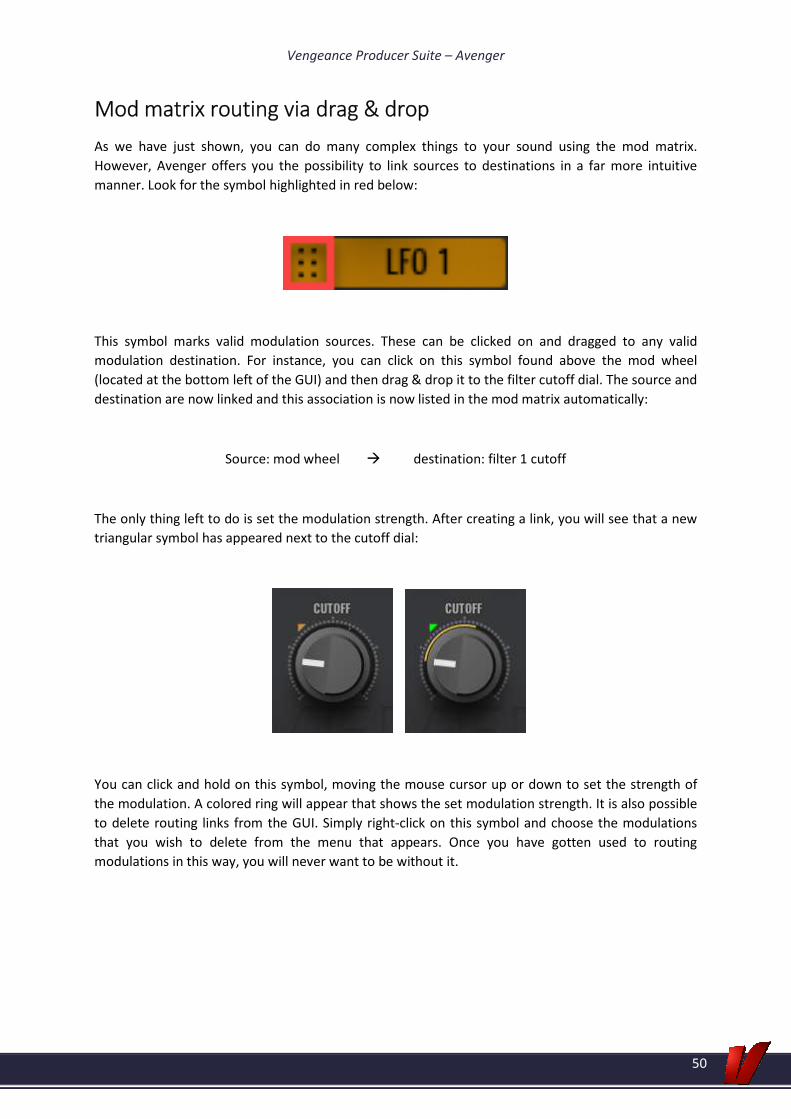
As we have just shown, you can do many complex things to your sound using the mod matrix.
However, Avenger offers you the possibility to link sources to destinations in a far more intuitive
manner. Look for the symbol highlighted in red below:
This symbol marks valid modulation sources. These can be clicked on and dragged to any valid
modulation destination. For instance, you can click on this symbol found above the mod wheel
(located at the bottom left of the GUI) and then drag & drop it to the filter cutoff dial. The source and
destination are now linked and this association is now listed in the mod matrix automatically:
Source: mod wheel � destination: filter 1 cutoff
The only thing left to do is set the modulation strength. After creating a link, you will see that a new
triangular symbol has appeared next to the cutoff dial:
You can click and hold on this symbol, moving the mouse cursor up or down to set the strength of
the modulation. A colored ring will appear that shows the set modulation strength. It is also possible
to delete routing links from the GUI. Simply right-click on this symbol and choose the modulations
that you wish to delete from the menu that appears. Once you have gotten used to routing
modulations in this way, you will never want to be without it.

Vengeance Producer Suite – Avenger
51
The LFO section
Overview
Avenger offers up to 4 independent LFOs as modulation sources. An LFO is a periodically oscillating
waveform, which can be used to modulate any number of parameters.
Here the individual elements in an LFO module:
• Waveform display: here you can see the current waveform. By clicking on the display, you
may choose from a selection of other waveforms. The last three waveforms are user-editable
shapes.
• C-LFO1-3: these are custom LFO waveforms, editable by you. By clicking on any one of the
three C-LFO tabs, you will be given the opportunity to draw your own custom shape. Every
Avenger preset can have up to 3 custom shapes. Once drawn, they can be chosen directly
from the waveform choice menu. These C-LFO shapes can also be used as modulation for the
FM mode as well as the vibrato LFO of the V-Saw.
• One-shot mode: to the left of the waveform you can find the “one-shot” button. Normally a
waveform will be continuously looped. This behavior can be turned off using this button. If
one-shot mode has been activated, then the waveform will only cycle once. This is useful for
percussive sounds or other single events.
• Phase: turning this dial changes the starting phase position of the waveform.
• Offset: using this dial, you can change the offset of the waveform relative to the central null
line. The dial’s central position is neutral which means the waveform oscillates above
(positive values) and below (negative values) the null line. You can however offset the
waveform so that it is entirely above the null line and thus only emits positive values.

Vengeance Producer Suite – Avenger
52
• Delay: here you can set to delay the LFO. Once the delay is over, the LFO will start.
• Fade-in: with this dial you can cause the LFO to fade in. The strength of the LFO will
therefore start from zero and smoothly increase until the fade-in duration is over.
• Rate: the rate sets the frequency (speed) of the LFO waveform.
• Sync: the sync function affects the rate dial above and determines whether it is synced to a
fixed note value and thus to a BPM or not. You have a choice between 4 different modes:
o No button activated: the rate is in “free” mode and isn’t synchronized to the song’s
tempo or note values.
o Notes button activated: this is the normal sync mode with “even” note values (1/4,
1/8 etc).
o Triplet button activated: this is the sync mode for triplet notes (1/4t, 1/8t etc).
o Dotted button activated: this is the sync mode for dotted notes (1/4d, 1/8d etc).
• Trigger: the LFO can have various trigger modes:
o Global free: in this mode the LFO is monophonic. This means that there is only one
LFO that permanently runs in the background, even when notes aren’t being played.
Thus the LFO does not retrigger.
o First MIDI note: only the first note triggers the LFO. All further notes (whilst the first
note remains held) are simply effected by the LFO at its current position. This mode
is monophonic (global) because only one LFO is active at any time.
o Last MIDI note: every new note retriggers the LFO. For example: pressing a key starts
the LFO. Whilst this note is held, pressing additional keys will keep retriggering the
LFO each time. This mode is monophonic (global) because only one LFO is playing
and is only being retriggered by newly incoming notes.
o Arpeggiators: played or sent MIDI notes play no part in this mode. Only new notes
from Avenger’s internal arpeggiator trigger the LFO. This mode is also monophonic
as only one LFO is playing at any one time. It is simply being retriggered.
o Drum sq: this mode is identical to the “arpeggiators” mode with one difference;
Avenger’s internal drum sequencer triggers the LFO.
o Osc: this submenu contains 2 osc trigger modes:
• All oscs: this is the default mode. In this mode, the LFO is polyphonic (one
copy per voice). This means that every note played has its own copy of the
LFO which runs fully independently of the others. An example: an LFO
modulates the pitch of a sawtooth osc. Each note played will have its pitch
modulated by a new (and out of phase) copy of the LFO.
• Osc 1-8: a single oscillator can also retrigger the LFO. This mode is however
monophonic (global). Example: osc 1 is being modulated by LFO 1. Whenever
osc 2 plays a voice however, the LFO retriggers, therefore affecting osc 1.
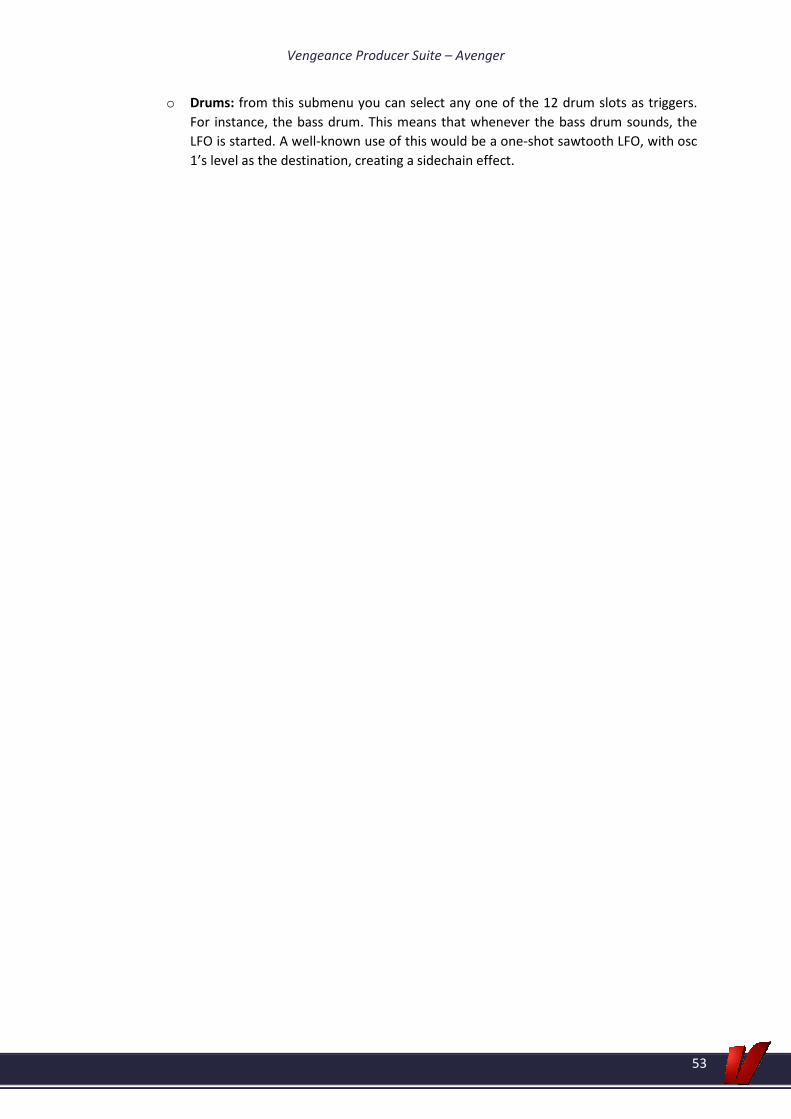
Vengeance Producer Suite – Avenger
53
o Drums: from this submenu you can select any one of the 12 drum slots as triggers.
For instance, the bass drum. This means that whenever the bass drum sounds, the
LFO is started. A well-known use of this would be a one-shot sawtooth LFO, with osc
1’s level as the destination, creating a sidechain effect.

Vengeance Producer Suite – Avenger
54
Macro area
Overview
Avenger offers 3 macro controls as well
as 2 macro buttons, almost all of which
have been assigned useful modulation
routings for each of the factory library
presets. Thus, you can use these to
quickly and easily manipulate and
modulate your sound. You can also
patch these controls to your external
hardware MIDI controllers for live use
without a mouse.
• Macro controls: these are normal dials which do not have any functionality until they have
been given a modulation destination. The easiest way to do this is via drag & drop (see: “The
mod matrix” > “Mod matrix routing via drag & drop”). Each macro control can be freely
named. To do this, simply double-click on the readout above and name the control. For
instance “Filter Sweep” for a filter cutoff movement or “Vibrato” for a pitch modulation.
• Macro buttons: in principle these are the same as the macro controls apart from the fact
that they have only two states: off and on (0% or 100% of the set modulation). These are
great for example to switch arp patterns or to turn something on and off.
• Macro button special mode: hidden in a menu (accessed by a right-click on a macro button)
you will see that these buttons have a special function. If the special mode is enabled, then
both buttons can never be active at the same time. One will always switch the other off
when activated. It is sometimes necessary (with advanced modulations) to make sure that
both button 1 and 2, never add to each other or get in each other’s way.

Vengeance Producer Suite – Avenger
55
Lock buttons
Overview
Problem: you have found the perfect shuffle factor, reverb amount or global volume for your song
and you do not wish to lose these when loading new presets. These three lock buttons will allow you
to “freeze” these settings so that they will not be lost upon changing preset.
The buttons in detail:
• Lock shuffle: here you can freeze the shuffle factor. This will stay unchanged even when you
load new drum kit patterns, arp presets etc.
• Lock master filter: the master filter module stays unchanged when loading new presets.
• Lock master volume: Avenger’s global master volume stays as you have set it even when you
load new presets.

Vengeance Producer Suite – Avenger
56
The readout display
This large display area, which you can find centered at the bottom edge of the GUI) should always be
kept an eye on. Hovering over any control will reveal its complete name and exact value. Controls
being moved also display their exact values.
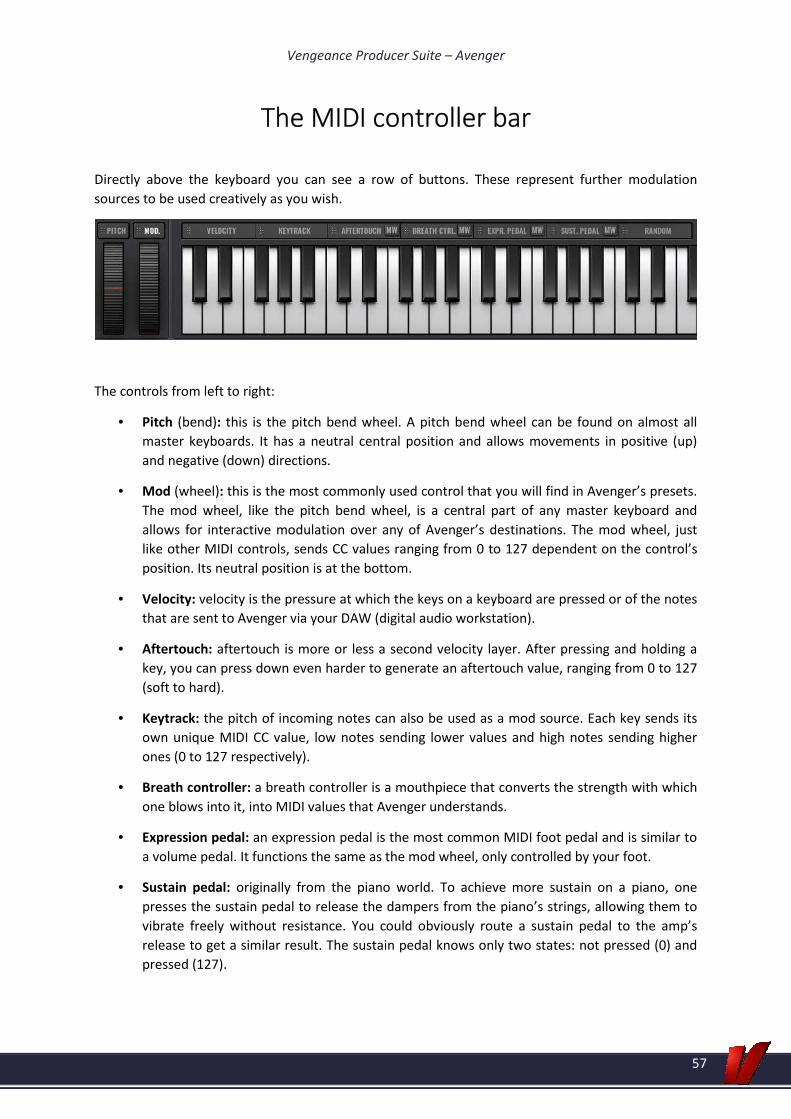
Vengeance Producer Suite – Avenger
57
The MIDI controller bar
Directly above the keyboard you can see a row of buttons. These represent further modulation
sources to be used creatively as you wish.
The controls from left to right:
• Pitch (bend): this is the pitch bend wheel. A pitch bend wheel can be found on almost all
master keyboards. It has a neutral central position and allows movements in positive (up)
and negative (down) directions.
• Mod (wheel): this is the most commonly used control that you will find in Avenger’s presets.
The mod wheel, like the pitch bend wheel, is a central part of any master keyboard and
allows for interactive modulation over any of Avenger’s destinations. The mod wheel, just
like other MIDI controls, sends CC values ranging from 0 to 127 dependent on the control’s
position. Its neutral position is at the bottom.
• Velocity: velocity is the pressure at which the keys on a keyboard are pressed or of the notes
that are sent to Avenger via your DAW (digital audio workstation).
• Aftertouch: aftertouch is more or less a second velocity layer. After pressing and holding a
key, you can press down even harder to generate an aftertouch value, ranging from 0 to 127
(soft to hard).
• Keytrack: the pitch of incoming notes can also be used as a mod source. Each key sends its
own unique MIDI CC value, low notes sending lower values and high notes sending higher
ones (0 to 127 respectively).
• Breath controller: a breath controller is a mouthpiece that converts the strength with which
one blows into it, into MIDI values that Avenger understands.
• Expression pedal: an expression pedal is the most common MIDI foot pedal and is similar to
a volume pedal. It functions the same as the mod wheel, only controlled by your foot.
• Sustain pedal: originally from the piano world. To achieve more sustain on a piano, one
presses the sustain pedal to release the dampers from the piano’s strings, allowing them to
vibrate freely without resistance. You could obviously route a sustain pedal to the amp’s
release to get a similar result. The sustain pedal knows only two states: not pressed (0) and
pressed (127).
Vengeance Producer Suite – Avenger
58
• Random: this is a special function that when used as a modulation source, generates random
values between 0 and 127.

Vengeance Producer Suite – Avenger
59
MIDI controllers to mod wheel
Almost all of Avenger’s factory presets use the mod wheel to control modulation within the sound,
so by using the special “MW” buttons you can easily re-route any of these controllers to the mod
wheel.
An example: you load a preset which has a mod matrix routing where the mod wheel controls the
filter cutoff. Now, by clicking on the expression pedal’s “MW” button, you can re-route your pedal to
the mod wheel. Thus, your expression pedal immediately controls the mod wheel and therefore the
cutoff. As expected, it is possible to route more than one source to the mod wheel in this way.

Vengeance Producer Suite – Avenger
60
The FX section
Avenger includes a substantial effects section. Effects are important and often give a sound their
necessary depth and complexity. You can create up to 4 independent FX modules (busses). Each of
these modules can be the home of to up to 8 effects which work in series. There is also a send
module that supports up to 8 send effects which run in parallel, with each being able to be mixed
with more than one oscillator. There is also a master FX module which sits at the end of the chain
and consists of up to a further 8 effects working in series. Altogether, this means you can have 48
effects running at once. This is huge amount and you will almost never use up all of the FX slots. You
can also set where the output of each of the 4 FX modules should be routed to.
Here are the controls in detail:
• FX slot: as already mentioned, each FX module has 8 such slots into which you can load
effects. A click on a slot opens a menu containing all the available effects. You can also
change the position of an effect within the list. Click on an effect and drag it to its new
position.
• FX slot on/off: on the left of every FX slot, you will find an on/off button.
• FX slot gain: on the right of every FX slot, you will find a dial with which you can set the
intensity of the effect.
• FX editor area: the parameter settings of each loaded effect are displayed to the right of the
FX slots. This area also has its own browser to change presets.
Vengeance Producer Suite – Avenger
61
• Output routing: at the bottom of FX slots, you can find a button with which you can set
where the output of this effects chain should be sent. This could be another FX bus (should
they exist), the master FX bus (default setting) or even to completely bypass everything and
go directly to the output. For instance, you could send a bass drum past the mastering
effects (master FX bus) so that it doesn’t get compressed by the limiter.
The effects in the FX modules 1-4 have a mix dial. With this, the relationship between wet (effected
signal) and dry (non-effected signal) can be balanced. Please notice that this dial is missing from the
send effects. The wet/dry relationship of send effects is set from the oscillators themselves, directly
mixed from the routing area.
Tip: a detailed description of every effect type would be too much for this handbook. You can
however find this information contained within both of our handbooks “Vengeance Producer Suite –
Essential FX Bundle” 1 & 2. These can be downloaded from our site:
Vengeance Producer Suite - Essential FX Bundle
Vengeance Producer Suite - Essential FX Bundle 2
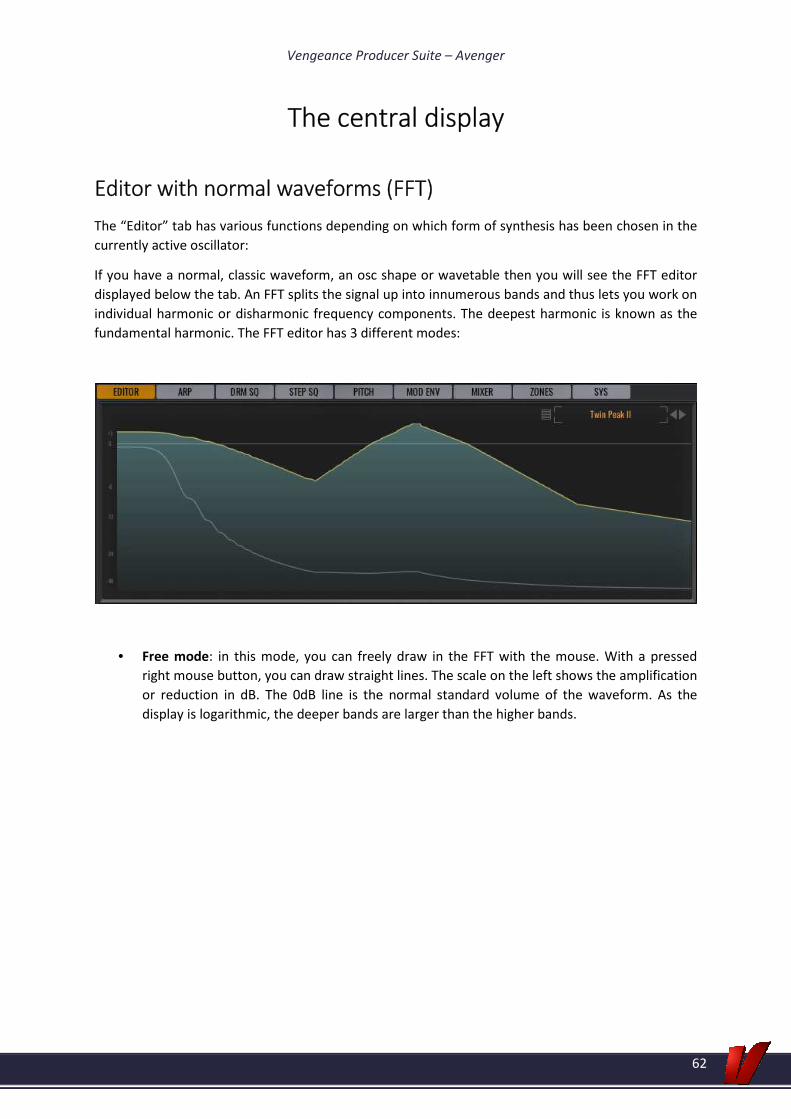
Vengeance Producer Suite – Avenger
62
The central display
Editor with normal waveforms (FFT)
The “Editor” tab has various functions depending on which form of synthesis has been chosen in the
currently active oscillator:
If you have a normal, classic waveform, an osc shape or wavetable then you will see the FFT editor
displayed below the tab. An FFT splits the signal up into innumerous bands and thus lets you work on
individual harmonic or disharmonic frequency components. The deepest harmonic is known as the
fundamental harmonic. The FFT editor has 3 different modes:
• Free mode: in this mode, you can freely draw in the FFT with the mouse. With a pressed
right mouse button, you can draw straight lines. The scale on the left shows the amplification
or reduction in dB. The 0dB line is the normal standard volume of the waveform. As the
display is logarithmic, the deeper bands are larger than the higher bands.

Vengeance Producer Suite – Avenger
63
• Harmonic mode: the harmonic mode groups individual harmonic and disharmonic bands
together. You can see which band is which by looking at labels written along the bottom of
the scale and also by the color of each band. “O0” is the fundamental harmonic and “O1” is
an octave above (both in light gray). Next, there is the “7th” interval which sits a fifth above
“O1” (these are the medium gray bands). Following this is “O2” (the next octave) and after
that you can see a nameless band (dark gray in color). These dark bands contain all
disharmonic content that exists between the octaves and 7ths grouped up together.
• Bin mode: in this mode, all 256 bands of the FFT are shown at the same size, this time
linearly as opposed to logarithmically. Because of the width of this window you can zoom in
and out using your mousewheel. Straight harmonic octaves have been marked with lines to
help with orientation.

Vengeance Producer Suite – Avenger
64
Controls in the FFT editor
• Sweep: the sweep dial moves your drawn changes upwards or downwards. Thus, very nice
phasing and morph effects are possible with complex mountain/valley waveforms. The
default setting for this dial is the middle position. The dial also has two sub modes which can
be accessed through a popup box that appears when you click on the name. The sweep can
sit either before or after the LP/HP dial. This means that a set LP value can act as a limit for
the sweep or move along with the sweep.
• Flip: as the name suggests, the flip control flips all the drawn settings in the FFT editor
vertically. A valley shape would then become a mountain.
• LP / HP: an FFT-based low-pass and high-pass filter.
Tip: naturally, you can automate this dial with an envelope. Thus, he LP and HP dials give you
an FFT-based alternative to a normal filter. The special thing about an FFT-based filter is the
steepness of its flanks and the resonance which can be freely drawn by you. The steepness
can be up to 90°!
• Slope: if you don’t want to draw the steepness of the LP/HP yourself, you can use the slope
dial to increase or decrease it.
• Random: a press of the “random” button gives all of the 256 FFT bands a random value.
• Reset: this resets the FFT back to its original state.
• Vspeed / vstrength: this is a special mode in the FFT. You can oscillate all the bands with
control over the speed (vspeed dial) and the intensity (vstrength dial). A really nice effect for
continuous frequency morphings, for instance for organic sounds.
• Preset browser: here you can choose between numerous FFT curves and patterns. Also, your
own FFT presets can be saved by clicking on the button to the left of the browser and
choosing “Save as”.
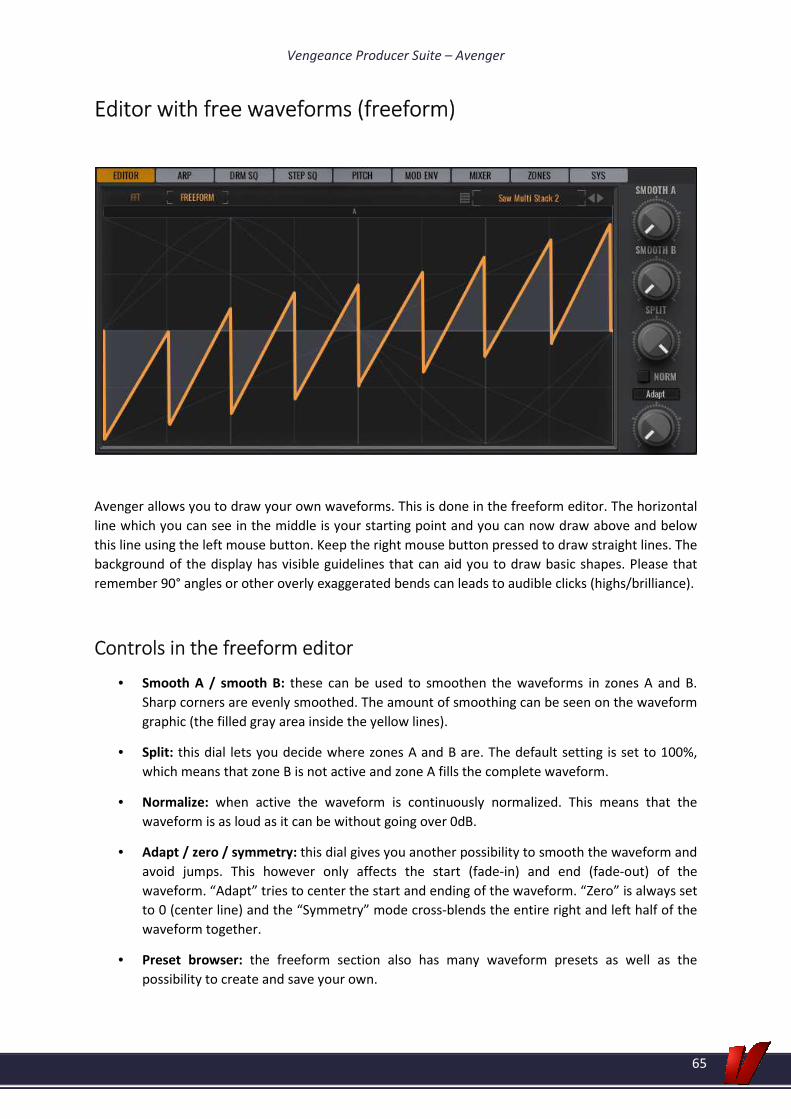
Vengeance Producer Suite – Avenger
65
Editor with free waveforms (freeform)
Avenger allows you to draw your own waveforms. This is done in the freeform editor. The horizontal
line which you can see in the middle is your starting point and you can now draw above and below
this line using the left mouse button. Keep the right mouse button pressed to draw straight lines. The
background of the display has visible guidelines that can aid you to draw basic shapes. Please that
remember 90° angles or other overly exaggerated bends can leads to audible clicks (highs/brilliance).
Controls in the freeform editor
• Smooth A / smooth B: these can be used to smoothen the waveforms in zones A and B.
Sharp corners are evenly smoothed. The amount of smoothing can be seen on the waveform
graphic (the filled gray area inside the yellow lines).
• Split: this dial lets you decide where zones A and B are. The default setting is set to 100%,
which means that zone B is not active and zone A fills the complete waveform.
• Normalize: when active the waveform is continuously normalized. This means that the
waveform is as loud as it can be without going over 0dB.
• Adapt / zero / symmetry: this dial gives you another possibility to smooth the waveform and
avoid jumps. This however only affects the start (fade-in) and end (fade-out) of the
waveform. “Adapt” tries to center the start and ending of the waveform. “Zero” is always set
to 0 (center line) and the “Symmetry” mode cross-blends the entire right and left half of the
waveform together.
• Preset browser: the freeform section also has many waveform presets as well as the
possibility to create and save your own.

Vengeance Producer Suite – Avenger
66
Resampler / Wavetable editor
Choose “Resample” in the oscillator section or load a wavetable and quite a lot changes in the editor
and keyboard area. In principle, a wavetable is a string of 256 different waveforms which can be
traveled between each other in real time. Avenger’s resampler lets you load normal wav files from
which you can generate wavetables. Both modes, from a parameter point of view, are almost
identical which is why they are explained here as one. The FFT mode is also available in the
resampler/wavetable mode.

Vengeance Producer Suite – Avenger
67
Let’s take look at the various dials and the waveform area:
• Preset browser: here you can find many preset patterns for the wavetable envelope section.
You can also save your own settings.
• Index: if a wavetable is loaded then all its tables are displayed one after another here and
can be scrolled through with the index dial. The index dial has two sub modes, which can be
reached by clicking on the index dial’s name. “Index smooth” allows smooth movement
between tables. In “Steppy mode”, the movement between two wavetables is hard (without
smoothing).
• Num waves: this dial allows you to increase (resampler) or decrease the number of tables.
• Increment (resampler): this mode exists only in the resampler and allows you to set a
distance between individual tables. If this is set to “off” then a table will directly follow the
previous one. An increment of “2” for instance puts an empty table between 2 tables or skips
over a table. There is also a special “Sub. divide” mode, which allows tables to overlap.
• Root (resampler): this mode also exists only in the resampler. The size of the tables can be
set with this (globally), note values can also be used. If it’s known that the wav file you have
loaded is in the key of C for instance, then you should write “C” here. This is so that the
wavelength fits a C note perfectly. Manual size inputs are also possible, for instance “2048”
samples.
• Adapt / zero / symmetry: as already explained in the freeform area, this smooths the start
and end of the waveform to avoid clicks.
• Strength: this dial is to be found at the bottom left of the wavetable envelope display and is
very important. Using this you can set the amount of modulation that the wavetable
envelope affects the index position.
• Strength velocity: with this slider you can set how much the strength dial reacts to velocity.
A click on the “Vel” lets you bend the velocity curve in a positive or negative direction.

Vengeance Producer Suite – Avenger
68
• Smooth: this sets how much the wavetable envelope should be smoothed.
• Phase: here you can set the start phase of the wavetable envelope. This has a huge effect on
the rhythm when the pattern editor is being used.
• Speed: the speed dial sets the speed at which the wavetable is traversed through. Next to
the speed dial, you can set whether or not this is synchronized to the song’s BPM or not. This
is set to quarter notes by default. This means that the envelope pulses in a 1/4th
note grid.
Triplets (t) and dotted (d) are also possible.
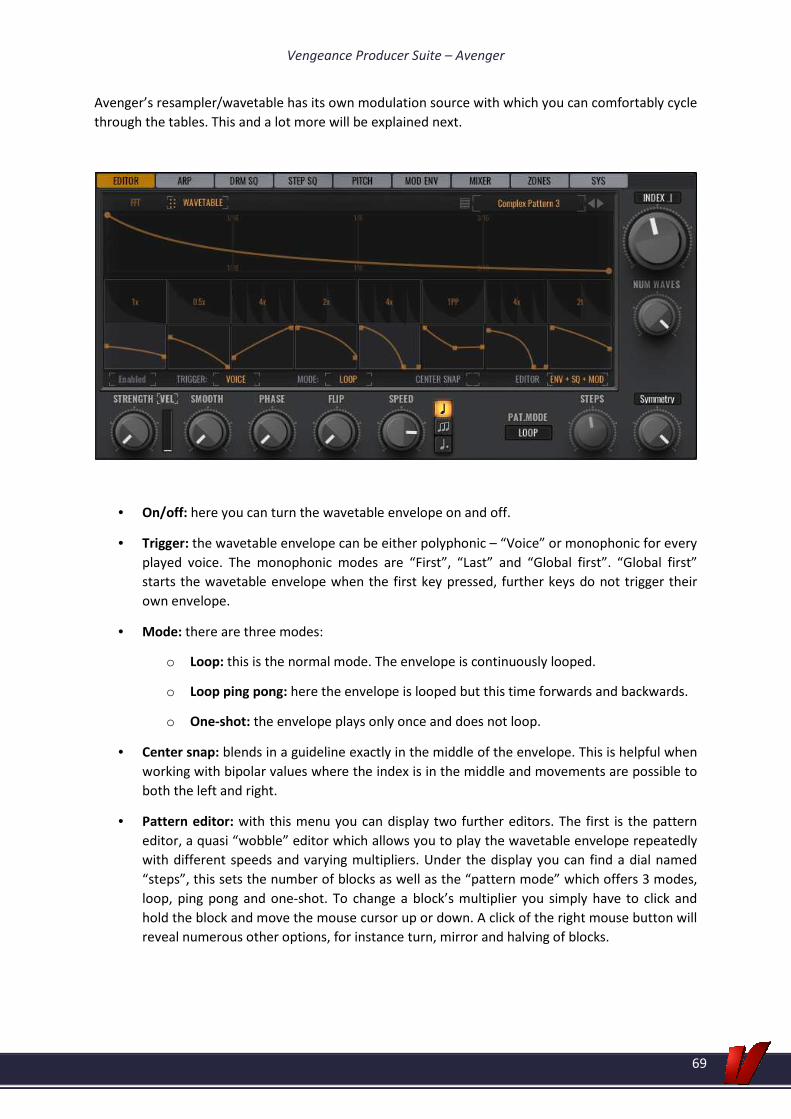
Vengeance Producer Suite – Avenger
69
Avenger’s resampler/wavetable has its own modulation source with which you can comfortably cycle
through the tables. This and a lot more will be explained next.
• On/off: here you can turn the wavetable envelope on and off.
• Trigger: the wavetable envelope can be either polyphonic – “Voice” or monophonic for every
played voice. The monophonic modes are “First”, “Last” and “Global first”. “Global first”
starts the wavetable envelope when the first key pressed, further keys do not trigger their
own envelope.
• Mode: there are three modes:
o Loop: this is the normal mode. The envelope is continuously looped.
o Loop ping pong: here the envelope is looped but this time forwards and backwards.
o One-shot: the envelope plays only once and does not loop.
• Center snap: blends in a guideline exactly in the middle of the envelope. This is helpful when
working with bipolar values where the index is in the middle and movements are possible to
both the left and right.
• Pattern editor: with this menu you can display two further editors. The first is the pattern
editor, a quasi “wobble” editor which allows you to play the wavetable envelope repeatedly
with different speeds and varying multipliers. Under the display you can find a dial named
“steps”, this sets the number of blocks as well as the “pattern mode” which offers 3 modes,
loop, ping pong and one-shot. To change a block’s multiplier you simply have to click and
hold the block and move the mouse cursor up or down. A click of the right mouse button will
reveal numerous other options, for instance turn, mirror and halving of blocks.
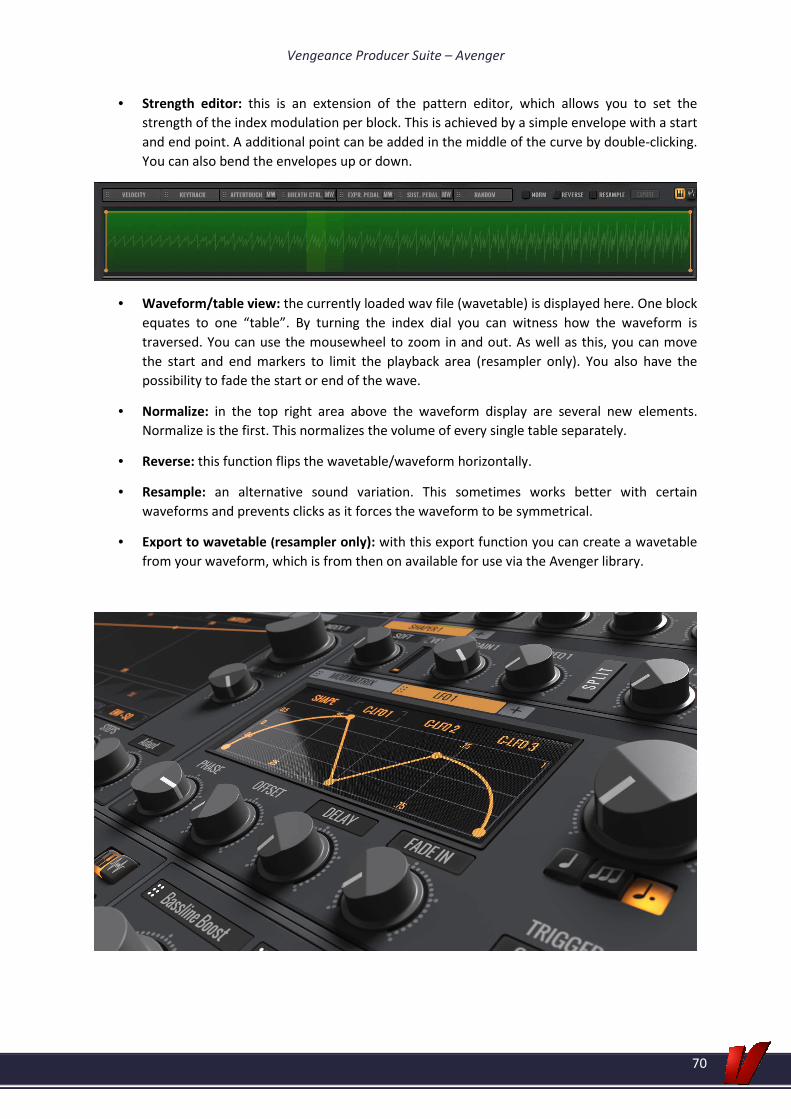
Vengeance Producer Suite – Avenger
70
• Strength editor: this is an extension of the pattern editor, which allows you to set the
strength of the index modulation per block. This is achieved by a simple envelope with a start
and end point. A additional point can be added in the middle of the curve by double-clicking.
You can also bend the envelopes up or down.
• Waveform/table view: the currently loaded wav file (wavetable) is displayed here. One block
equates to one “table”. By turning the index dial you can witness how the waveform is
traversed. You can use the mousewheel to zoom in and out. As well as this, you can move
the start and end markers to limit the playback area (resampler only). You also have the
possibility to fade the start or end of the wave.
• Normalize: in the top right area above the waveform display are several new elements.
Normalize is the first. This normalizes the volume of every single table separately.
• Reverse: this function flips the wavetable/waveform horizontally.
• Resample: an alternative sound variation. This sometimes works better with certain
waveforms and prevents clicks as it forces the waveform to be symmetrical.
• Export to wavetable (resampler only): with this export function you can create a wavetable
from your waveform, which is from then on available for use via the Avenger library.
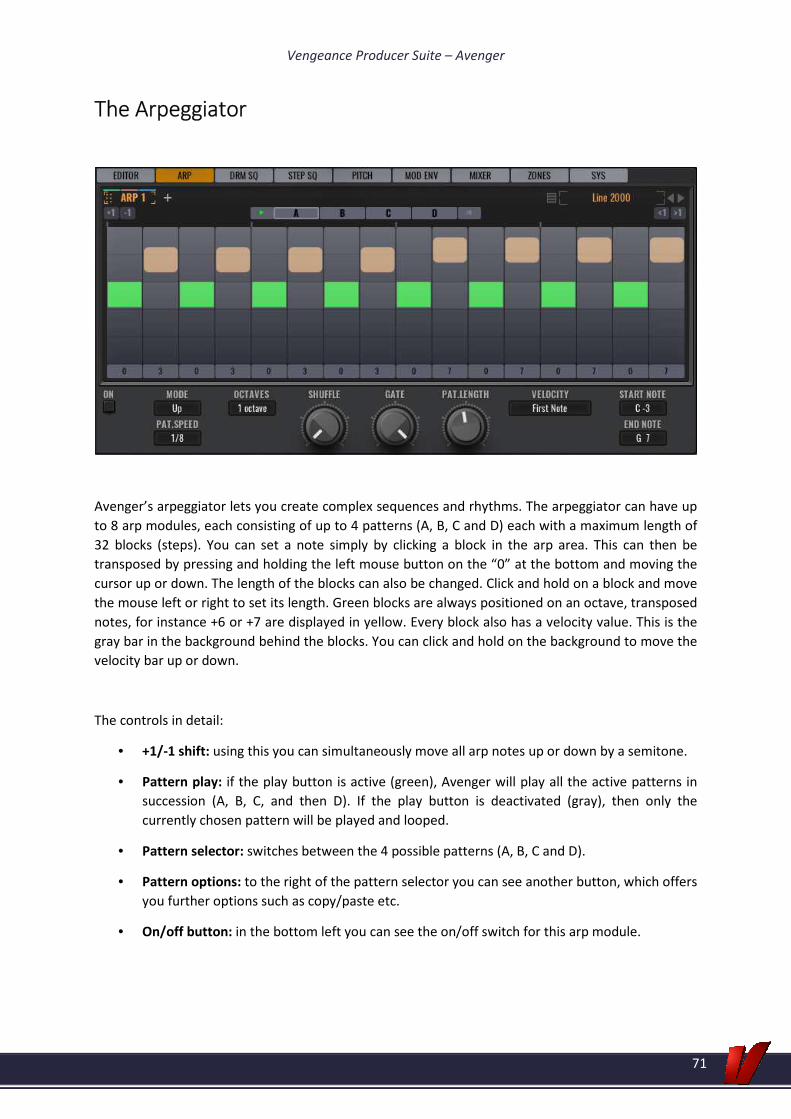
Vengeance Producer Suite – Avenger
71
The Arpeggiator
Avenger’s arpeggiator lets you create complex sequences and rhythms. The arpeggiator can have up
to 8 arp modules, each consisting of up to 4 patterns (A, B, C and D) each with a maximum length of
32 blocks (steps). You can set a note simply by clicking a block in the arp area. This can then be
transposed by pressing and holding the left mouse button on the “0” at the bottom and moving the
cursor up or down. The length of the blocks can also be changed. Click and hold on a block and move
the mouse left or right to set its length. Green blocks are always positioned on an octave, transposed
notes, for instance +6 or +7 are displayed in yellow. Every block also has a velocity value. This is the
gray bar in the background behind the blocks. You can click and hold on the background to move the
velocity bar up or down.
The controls in detail:
• +1/-1 shift: using this you can simultaneously move all arp notes up or down by a semitone.
• Pattern play: if the play button is active (green), Avenger will play all the active patterns in
succession (A, B, C, and then D). If the play button is deactivated (gray), then only the
currently chosen pattern will be played and looped.
• Pattern selector: switches between the 4 possible patterns (A, B, C and D).
• Pattern options: to the right of the pattern selector you can see another button, which offers
you further options such as copy/paste etc.
• On/off button: in the bottom left you can see the on/off switch for this arp module.

Vengeance Producer Suite – Avenger
72
• Mode: every arp module can also have a special mode which defines how incoming
polyphonic notes are separated in the arp. For instance with the “up” mode, the notes are
separated from top to bottom. The “poly” mode does not separate the notes at all but rather
sends them in their original polyphonic state. This allows for arpeggiated chords.
• Pattern speed: here you can set the length of an arp block. This also sets the speed for this
arp module.
• Octaves: this defines how many octaves the arp notes are spread across.
• Shuffle: this is the global shuffle in Avenger. Shuffle gives the melody “groove” or “swing”.
This control is global which means other shuffles, for instance in the drum and step
sequencer, are linked to this.
• Gate: the gate dial lets you shorten the arp blocks. This affects all the arp blocks in the arp
module.
Tip: if portamento/legato is set, then only the notes which are touching in the arp will
“slide”. This means the gate dial should be set to maximum, otherwise this will never occur.
• Pattern length: here you can set how many blocks an arp module has. Put differently, the
length of the arpeggio. The range is from 2 to 32 blocks.
• Velocity: here you set how the arp module deals with incoming velocity values.
o First note: the first pressed note sets the velocity. The velocity remains the same no
matter which velocity any following notes may have.
o Last note: every newly pressed note sets a new velocity. All the previously played
notes then inherit this new velocity value.
o Each note: every note played has its own velocity value which it then keeps no
matter the velocity of other notes.
o Lowest note: the lowest note currently active sets the velocity value.
� Start note / end note: here you can set the range/zone in which the arp is active. This is
especially important with complex sequence presets, when you for instance only want a
bassline arp to be playable on the left-hand side of the keyboard. The most commonly used
split in Avenger’s sequence presets is at the “B1” note. This note separates the bottom half
of the keyboard from the top.
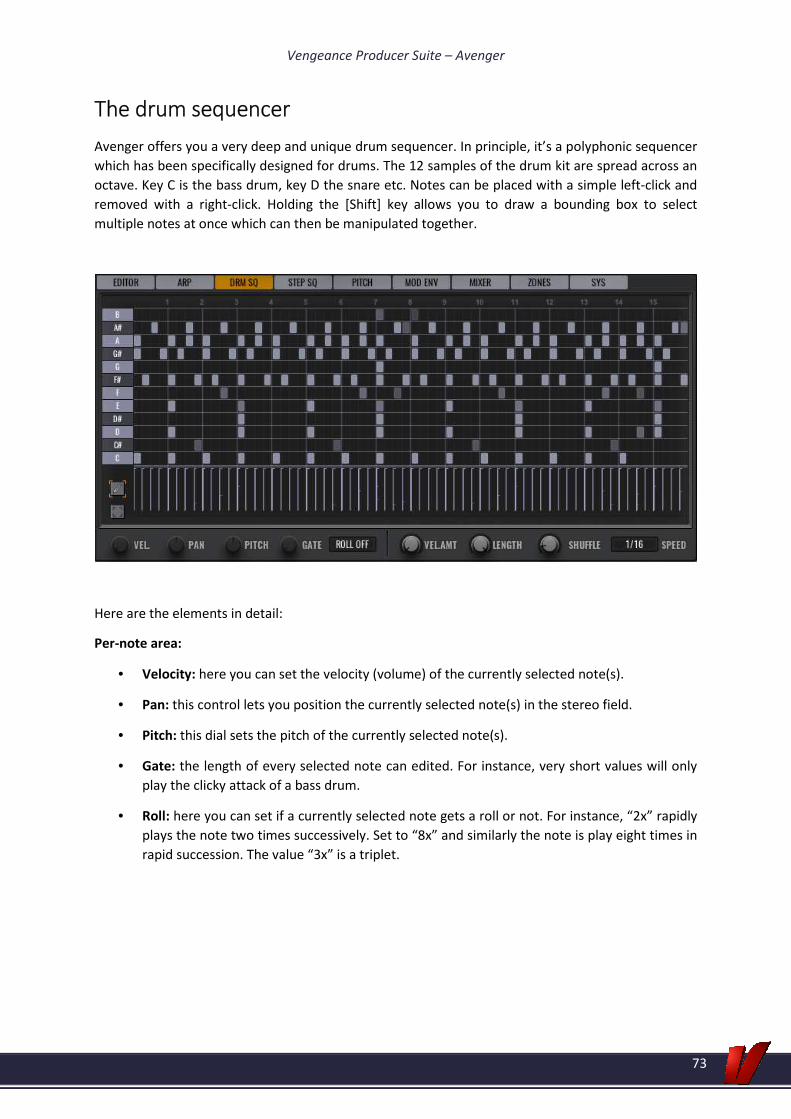
Vengeance Producer Suite – Avenger
73
The drum sequencer
Avenger offers you a very deep and unique drum sequencer. In principle, it’s a polyphonic sequencer
which has been specifically designed for drums. The 12 samples of the drum kit are spread across an
octave. Key C is the bass drum, key D the snare etc. Notes can be placed with a simple left-click and
removed with a right-click. Holding the [Shift] key allows you to draw a bounding box to select
multiple notes at once which can then be manipulated together.
Here are the elements in detail:
Per-note area:
• Velocity: here you can set the velocity (volume) of the currently selected note(s).
• Pan: this control lets you position the currently selected note(s) in the stereo field.
• Pitch: this dial sets the pitch of the currently selected note(s).
• Gate: the length of every selected note can edited. For instance, very short values will only
play the clicky attack of a bass drum.
• Roll: here you can set if a currently selected note gets a roll or not. For instance, “2x” rapidly
plays the note two times successively. Set to “8x” and similarly the note is play eight times in
rapid succession. The value “3x” is a triplet.

Vengeance Producer Suite – Avenger
74
Global area:
• Velocity amount: here you set whether or not the entire drum sequence reacts to velocity.
Velocity values set in the drum sequencer remain untouched, this only affects played velocity
on a keyboard. Set the velocity to “0” for instance and the incoming velocity will be totally
ignored.
• Length: this sets the length of the drum sequencer. This is in beats. Maximum length is 16.
• Shuffle: this dial is exactly the same as in the arp section (global).
• Speed: this sets the speed at which the drum sequencer is played. Triplets are also possible.
A beat is then automatically spilt up and no longer consists of 4 parts but rather 3.
• Pen / frame selector: you can choose between two different control modes. If “pen” mode is
active then you can the draw and erase notes. If “frame” mode is active then you can do
multi-selections.
Tip: if you are in frame mode, you can open a special menu with a right-click, which reveals
numerous functions such as mirror, invert, copy or repeat a selection. Another feature in this
mode is the capability to move a multi-selection using the arrow keys on your keyboard. You
can also hold [Shift] + [Up]/[Down] to change the velocity of all selected notes.
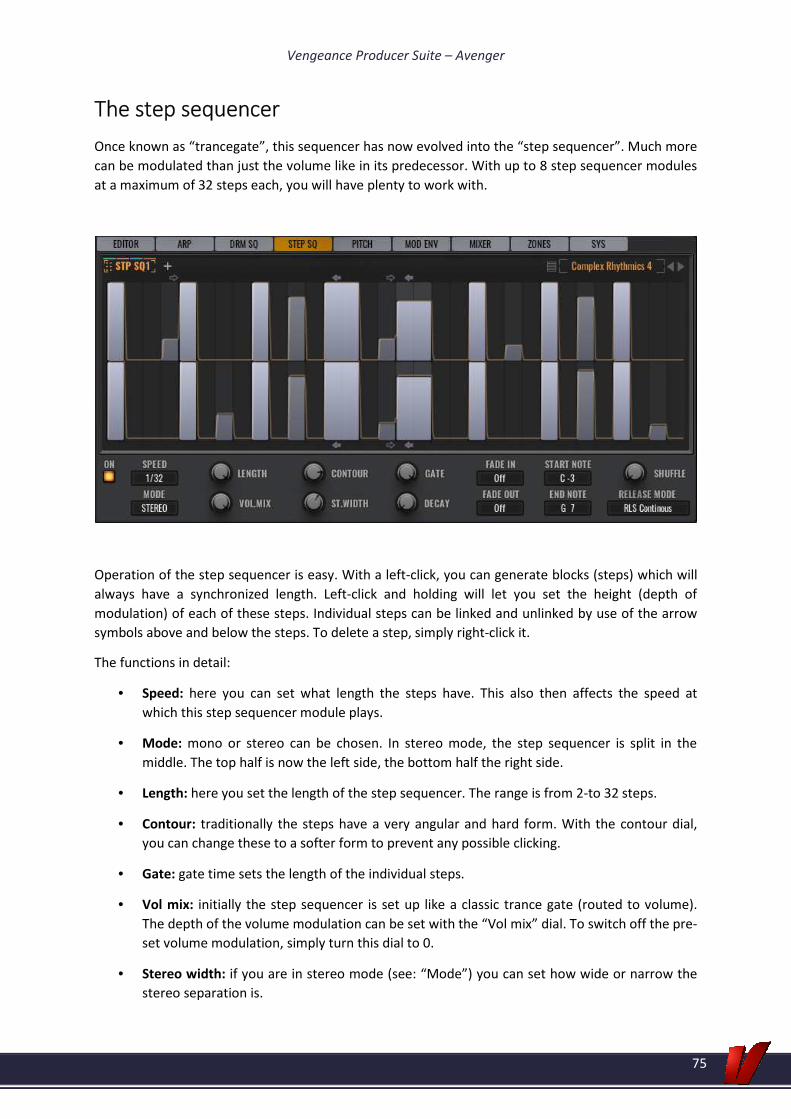
Vengeance Producer Suite – Avenger
75
The step sequencer
Once known as “trancegate”, this sequencer has now evolved into the “step sequencer”. Much more
can be modulated than just the volume like in its predecessor. With up to 8 step sequencer modules
at a maximum of 32 steps each, you will have plenty to work with.
Operation of the step sequencer is easy. With a left-click, you can generate blocks (steps) which will
always have a synchronized length. Left-click and holding will let you set the height (depth of
modulation) of each of these steps. Individual steps can be linked and unlinked by use of the arrow
symbols above and below the steps. To delete a step, simply right-click it.
The functions in detail:
• Speed: here you can set what length the steps have. This also then affects the speed at
which this step sequencer module plays.
• Mode: mono or stereo can be chosen. In stereo mode, the step sequencer is split in the
middle. The top half is now the left side, the bottom half the right side.
• Length: here you set the length of the step sequencer. The range is from 2-to 32 steps.
• Contour: traditionally the steps have a very angular and hard form. With the contour dial,
you can change these to a softer form to prevent any possible clicking.
• Gate: gate time sets the length of the individual steps.
• Vol mix: initially the step sequencer is set up like a classic trance gate (routed to volume).
The depth of the volume modulation can be set with the “Vol mix” dial. To switch off the pre-
set volume modulation, simply turn this dial to 0.
• Stereo width: if you are in stereo mode (see: “Mode”) you can set how wide or narrow the
stereo separation is.
Vengeance Producer Suite – Avenger
76
• Decay: in addition to the gate time, the steps can also have a decay time.
• Fade-in: this sets how long the modulation in the step sequencer takes to fades in.
• Delay: sets how much times passes before the step sequencer starts.
• Start / end note: this is the same as found in the arpeggiator module. You can set a keyzone
in which the step sequencer is active.
• Shuffle: this dial’s value is shared with the one found in both the arpeggiator and drum
sequencer (global).

Vengeance Producer Suite – Avenger
77
The pitch module
A pitch module is the perfect tool to affect the pitch of an oscillator. You can have up to 8 of these
modules. The majority of a pitch module is taken up by the bipolar pitch envelope. The horizontal
line in the middle is neutral and positive and negative values are above and below this respectively.
Thus it is well-suited for use as a source of pitch modulation. The envelope is what is known as a
“multi-point envelope” on which you can add as many points as you’d like via a double-click.
Conversely, a right-click allows you to delete a point. Clicking on the line between two points will let
you set the curve. Right-clicking on a blank area opens a menu which offers further options such as
to flip the envelope, rotate or reset it.
The controls in detail:
• Enabled (on/off): Switch the pitch envelope to “Disabled” to turn it off.
• Mode: There are 4 different modes on offer:
o One-shot: one-shot is the default mode. In this mode, the pitch envelope triggers
only once per note played, from beginning to the end. It is not looped.
o Sustain: in this mode, an envelope is started for each and every note. It however
keeps the position of the release flag when a key is pressed and stays there until the
key is released. The envelope then runs through to the end.
o Loop: in this mode, two moveable flags appear. The envelope then loops
continuously between these two markers.
o Loop + release: this mode is the same as the normal mode apart from one thing:
after releasing a key, the position jumps to the release flag and then runs to the end
of the envelope.

Vengeance Producer Suite – Avenger
78
o Loop ping pong: this mode is the same as the normal mode except for the play
direction; the play direction goes backwards and forwards between start and end.
o Loop ping pong + release: this mode is the same as the normal loop ping pong mode
apart from one difference: after releasing a key the position jumps to the release flag
then runs through to the end.
• Speed: this sets the play speed of the pitch envelope (min = 10x slower, max = 10x quicker).
• Range: here you can set the pitch range of the envelope. A maximum range of 48 semitones
(24 both up and down).
• Steps: normally the envelope works very smoothly. You can however use this control to
introduce stepping to create arcade game sounds or FX for example.
• Flip: flips the envelope on upside down.
Tip: this dial is obviously modulatable from other sources.
• Keytrack: this dial has nothing to do directly with the envelope but rather defines an area
which can actually be pitched. A setting of 0 means that an oscillator that is routed to this
pitch module can no longer be pitched. A negative -100 would mean that everything is
turned on its head – higher notes would be ever lower. The default setting is +100.
• Pitch bend up/down: here you can set the range of the pitch bend control. A range of +/-2
semitones is the default. You can however set it to an octave (+/-12).
• Pitch bend lag: here you can give the pitch bend a certain amount of lag. This can smooth
90° host automation or pitch bend automation that isn’t as smooth as it could be.
• Portamento mode: this sets whether or not an oscillator routed to this pitch module uses
portamento / glide. If this is not wanted, you should switch this to “off”.
o Legato: this makes the sound monophonic. When notes overlap (old and new notes),
the sound will glide smoothly to the new note (at the speed set by “Time”).
o Poly: this time the sound will glide polyphonically. This has the disadvantage that
every note glides (apart from doubly played notes), for instance in a chord.
o Poly legato: this is a mixture of both modes. A simultaneously pressed chord will not
glide, however every additional note played after will be.
o Split zone: some modes (poly and poly legato) have the possibility to define a note
from which the portamento is active. All other notes below this will not be glided
and have no effect on the higher notes in the portamento zone. This allows you for
instance to play bass notes in the left hand and a lead voice in the right, with only
the lead voice gliding.
• Time: this sets the length of the portamento / glide.
• Curve: this control allows you to make the glide function (which by default is linear), become
logarithmically bent upwards. This sounds slightly different, similar to a siren.
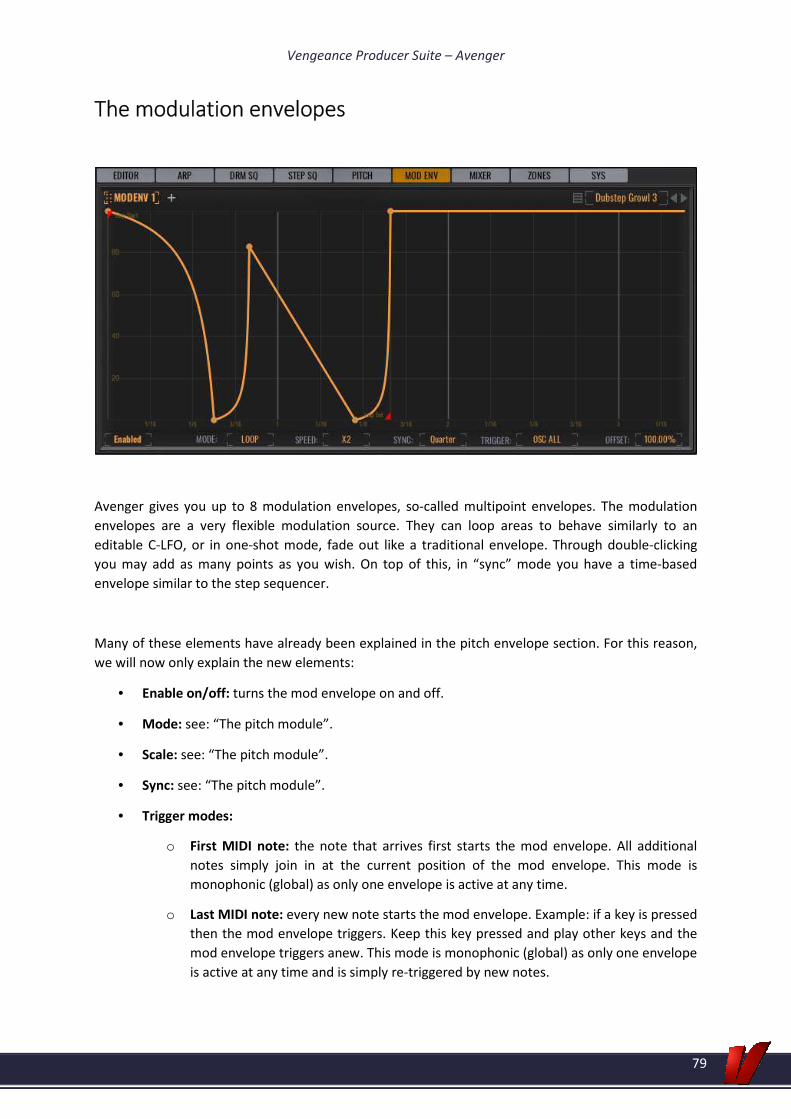
Vengeance Producer Suite – Avenger
79
The modulation envelopes
Avenger gives you up to 8 modulation envelopes, so-called multipoint envelopes. The modulation
envelopes are a very flexible modulation source. They can loop areas to behave similarly to an
editable C-LFO, or in one-shot mode, fade out like a traditional envelope. Through double-clicking
you may add as many points as you wish. On top of this, in “sync” mode you have a time-based
envelope similar to the step sequencer.
Many of these elements have already been explained in the pitch envelope section. For this reason,
we will now only explain the new elements:
• Enable on/off: turns the mod envelope on and off.
• Mode: see: “The pitch module”.
• Scale: see: “The pitch module”.
• Sync: see: “The pitch module”.
• Trigger modes:
o First MIDI note: the note that arrives first starts the mod envelope. All additional
notes simply join in at the current position of the mod envelope. This mode is
monophonic (global) as only one envelope is active at any time.
o Last MIDI note: every new note starts the mod envelope. Example: if a key is pressed
then the mod envelope triggers. Keep this key pressed and play other keys and the
mod envelope triggers anew. This mode is monophonic (global) as only one envelope
is active at any time and is simply re-triggered by new notes.
Vengeance Producer Suite – Avenger
80
o Arpeggiators: played or sent MIDI notes play no part in this mode. Only internally
played notes (the arpeggiator) trigger the envelope. This mode is also monophonic
(global) as only one envelope is active at any one time and is simply re-triggered by
new notes.
o Drum sq: this mode acts similarly to the “Arpeggiators” mode, with the difference
being that it is Avenger’s internal drum sequencer triggering the mod envelope.
o Osc: this submenu contains 2 osc trigger modes (see: “The LFO section”):
� All oscs: An example: the mod envelope controls pitch changes in an
oscillator. Every key pressed goes though the same pitch changes. Even
notes played shortly after one another do not affect each other. The note
that was played first does not get its mod env retriggered, but rather
continues to run independently from any subsequently played notes.
� Osc 1-8: An example: whenever osc 2 generates a voice, the mod envelope is
triggered which, per the mod matrix, could be routed to modulate osc 1.
o Drums: from this submenu you can select one of the 12 drum slots as the trigger.
See: “The LFO section”).
• Offset: the mod envelope is not bipolar by default. However, by using the offset you can
insert a 0 central line. This way the envelope is now bipolar and it works in both directions
just like the pitch envelope.
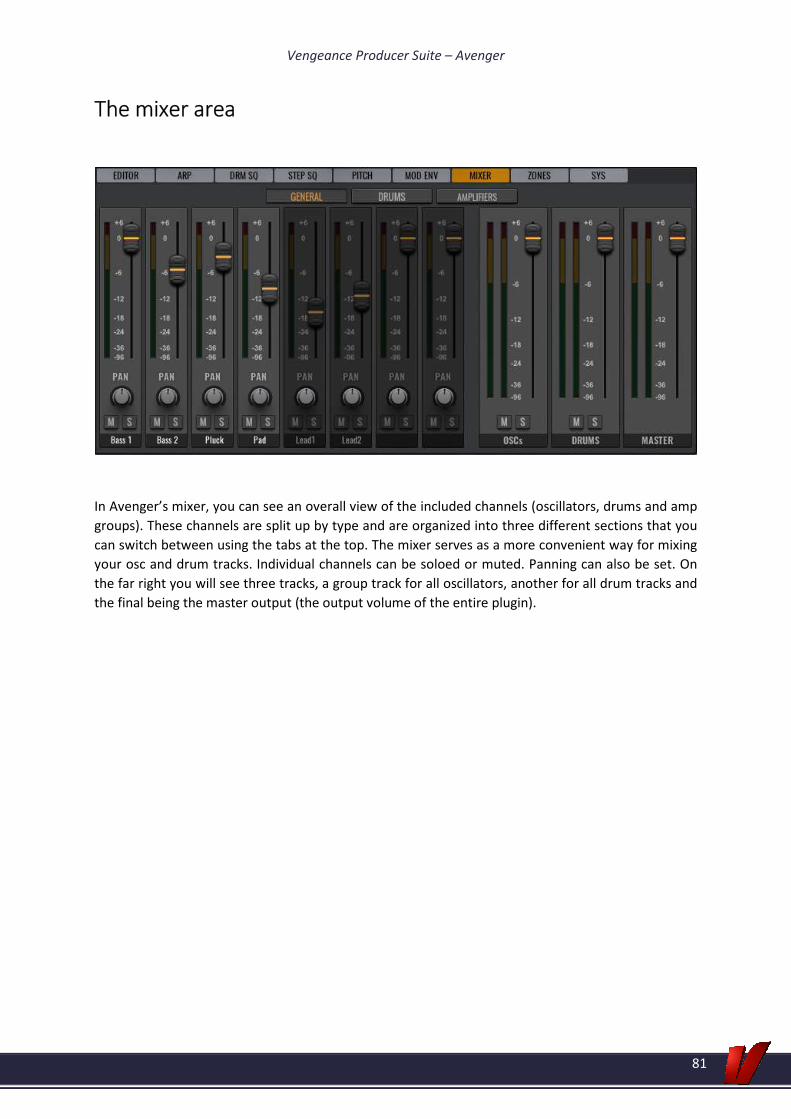
Vengeance Producer Suite – Avenger
81
The mixer area
In Avenger’s mixer, you can see an overall view of the included channels (oscillators, drums and amp
groups). These channels are split up by type and are organized into three different sections that you
can switch between using the tabs at the top. The mixer serves as a more convenient way for mixing
your osc and drum tracks. Individual channels can be soloed or muted. Panning can also be set. On
the far right you will see three tracks, a group track for all oscillators, another for all drum tracks and
the final being the master output (the output volume of the entire plugin).
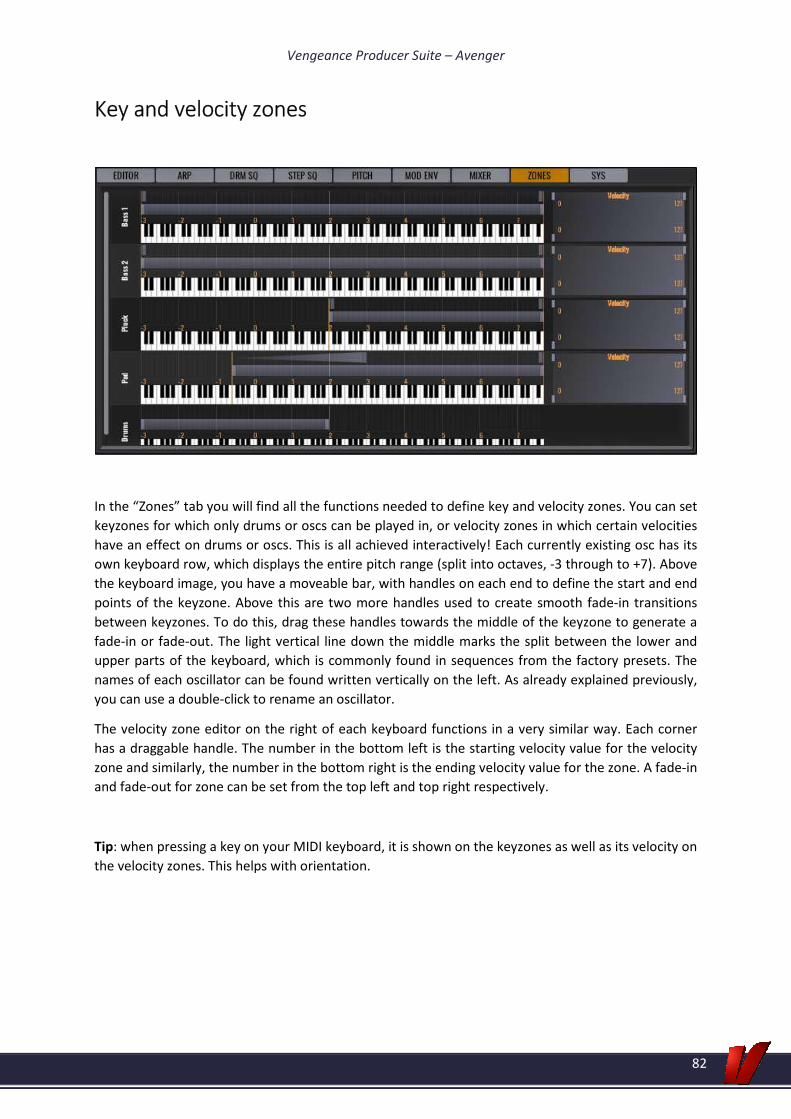
Vengeance Producer Suite – Avenger
82
Key and velocity zones
In the “Zones” tab you will find all the functions needed to define key and velocity zones. You can set
keyzones for which only drums or oscs can be played in, or velocity zones in which certain velocities
have an effect on drums or oscs. This is all achieved interactively! Each currently existing osc has its
own keyboard row, which displays the entire pitch range (split into octaves, -3 through to +7). Above
the keyboard image, you have a moveable bar, with handles on each end to define the start and end
points of the keyzone. Above this are two more handles used to create smooth fade-in transitions
between keyzones. To do this, drag these handles towards the middle of the keyzone to generate a
fade-in or fade-out. The light vertical line down the middle marks the split between the lower and
upper parts of the keyboard, which is commonly found in sequences from the factory presets. The
names of each oscillator can be found written vertically on the left. As already explained previously,
you can use a double-click to rename an oscillator.
The velocity zone editor on the right of each keyboard functions in a very similar way. Each corner
has a draggable handle. The number in the bottom left is the starting velocity value for the velocity
zone and similarly, the number in the bottom right is the ending velocity value for the zone. A fade-in
and fade-out for zone can be set from the top left and top right respectively.
Tip: when pressing a key on your MIDI keyboard, it is shown on the keyzones as well as its velocity on
the velocity zones. This helps with orientation.

Vengeance Producer Suite – Avenger
83
System page
On the “Sys” tab you will find all the general system settings for Avenger. The path to the factory
library can be seen here changed to point to another location if desired.
• Global Tune: Avenger is set to concert pitch (A440Hz). This however can be changed. You can
see this as a fine-tuning for the entire plugin.
• Global Transpose: here you can set the octave position for Avenger. -12, 0 (default) or +12
are possible.
• Master Gain: this setting influences the volume level at which Avenger enters your DAW.
The default setting is -3dB. If you want it to be louder or more quiet, you can do that here. Be
careful not to go too loud to avoid clipping in your DAW.
• Preview Drum Sample in Sequencer: here you can set if the drum sound plays when you
place a drum note. This is set to “Yes” by default.
• Preview Drum Sample in Drum Kit: here you can set whether or not the drum sample is
played when you click a drum slot on the drums page. This is set to “Yes” by default.
• Show Tooltip: here you can turn the tooltips on or off (these are the help popups that
appear when you hover over an element). This is set to “Yes” by default. Advanced users
may wish to turn this off.
• Ask before deleting a send FX: if this is enabled, Avenger asks you to confirm if you really
want to delete a send FX. Deleting a send FX has an effect on all the oscillators that are using
it. Even if you accidentally delete something, you can always use Avenger’s undo function to
correct your mistake.
Vengeance Producer Suite – Avenger
84
• Enable Sequencer on Seq. Load: this turns the drum sequencer on when you load a drum
sequence through a preset, so that you can immediately hear the loaded sequence.
• MIDI note-off stops sample: this option sets whether or not a sample is played to the end or
stops as soon as you release the key. This is set to “Yes” by default.
• All Arp Sync Trigger: this is a very interesting function and affects the live playing with
sequences and arp presets.
o First note: if the first note is played then this silently starts all the arps and
sequencers in Avenger, even if they are in other keyzones and not audible. This has
the advantage that a note played slightly afterwards in another keyzone is always in
sync with the note that was played first. Example: a sequencer preset with
bassline/drums on the left of the keyboard and a lead arp on the right. When you
want to play both at the same time, it could be that for instance the bass note for
the bassline/drum is played somewhat late. Normally this would indicate that their
arps are starting slightly later and so are out of sync with the lead arps being played
by the right hand. This can be avoided by using the “First note” setting as all arps
start (silently) when the first note is pressed.
o Independent: arps in the various keyzones start independently from one another
when a key in their keyzone is pressed.
• Init Preset: here you can set the path to your init preset (the preset that is loaded when you
first start Avenger). You can design a preset for this purpose and use it as your staring point.
• Factory Library location: this sets the path to Avenger’s factory content.

Vengeance Producer Suite – Avenger
85
MIDI learn
Connecting external MIDI controllers
In the lower right-hand corner you can see the MIDI control that you have last manipulated. As you
can see, there is a 6-pin handle to drag & drop this external control to any Avenger control (as you
can do with the mod matrix drag & drop feature). Once you have linked the two, for example a knob
on your controller to Avenger’s cutoff dial, you can now control Avenger’s dial externally from it.

Vengeance Producer Suite – Avenger
86
Deleting and managing existing MIDI connections
On the system tab, you can reach the MIDI connections overview. Here you can delete any existing
MIDI connections. You can also import/export your settings, or set them as default so that they will
be remembered even if you close/re-open Avenger. You reach these functions by using a right-click
or by the icons above.
Vengeance Producer Suite – Avenger
87
Extras
Tips on working
Right-clicks and menus
Whenever possible try to see if a right-click opens a menu. In various areas of the plugin, a right-click
will reveal additional settings.
The middle mouse button / double-click
Almost every element in Avenger, be it a dial, envelope, fader or number field can be set to its
default value by clicking on the control with the middle mouse button. If you don’t have a middle
mouse button, then a double-click for normal dials and a double right-click for inner dials does the
same.
Turning the dials (fine)
Turning a dial with the right mouse button instead of the left allows you to adjust the dial in a far
finer, more accurate way. This is ideal for finely setting certain values. For inner dials (which normally
require the right mouse button), you have to use [Shift] + right-click to achieve this.
Effects as send effects
Effects such as reverb, delay and chorus are perfect to be used as send effects. This way you have an
effect, for instance a reverb, only loaded once and you can send every track in your project through
this one reverb. This saves on CPU enormously and helps to keep things simpler. How to create send
effects can be found in this handbook (see: “The FX section”).
Master filter
The simplest way to send the entire output of Avenger through a filter (for instance for a high or low-
pass sweep) is to use the master filter. This has to first be turned on. It acts like all other filters and
offers the expected filter types.
Vengeance Producer Suite – Avenger
88
Arrow keys / preset choice
The easiest way to browse through the presets is to use the arrow keys. [Up]/[Down] navigates the
presets in the current folder, [Right] arrow loads the preset and [Left] arrow sends you back a folder.
Warning: certain DAWs block such use of the arrow keys and we could not find a way to bypass this.
In these hosts, the arrow keys will unfortunately not work.
MIDI controller (pedals)
As we only have two hands, it can be at times difficult to adjust the mod wheel whilst playing. Our
hands are in use; we do however have two feet. For this, there are MIDI pedals. With a bit of practice
you can use a pedal as you play and soon enough you’ll never want to be without one.
Warning: expression pedals have a range of 0-127, which are perfect for controlling the mod wheel.
There are also sustain pedals, which are simple on/off switches that only send the values 0 and 127.
These are perfect, for instance, to completely open the release of a note or change patterns. If both
feet are now using pedals, all you have left is your mouth. For this, there is the breath controller –
but at that point, the coordination becomes somewhat difficult…

Vengeance Producer Suite – Avenger
89
New features via update
We always try to expand “Vengeance Producer Suite – Avenger” with new updates and functions. As
soon as updates and new features are available, we will inform you here.
Release notes
V1.00 (Dec 2016): Official release
Updates, if available, can be found here: www.vengeance-sound.com
Support & contact
Technical support: www.vengeance-forum.com
Contact: [email protected]
Billing support: [email protected]
Manual: Manuel Schleis & R. ‘Lopez’ Biermann
Manual V1.1 edited by Mikael C. H. Tate
Copyright © 2016 Vengeance-Sound / Keilwerth Audio
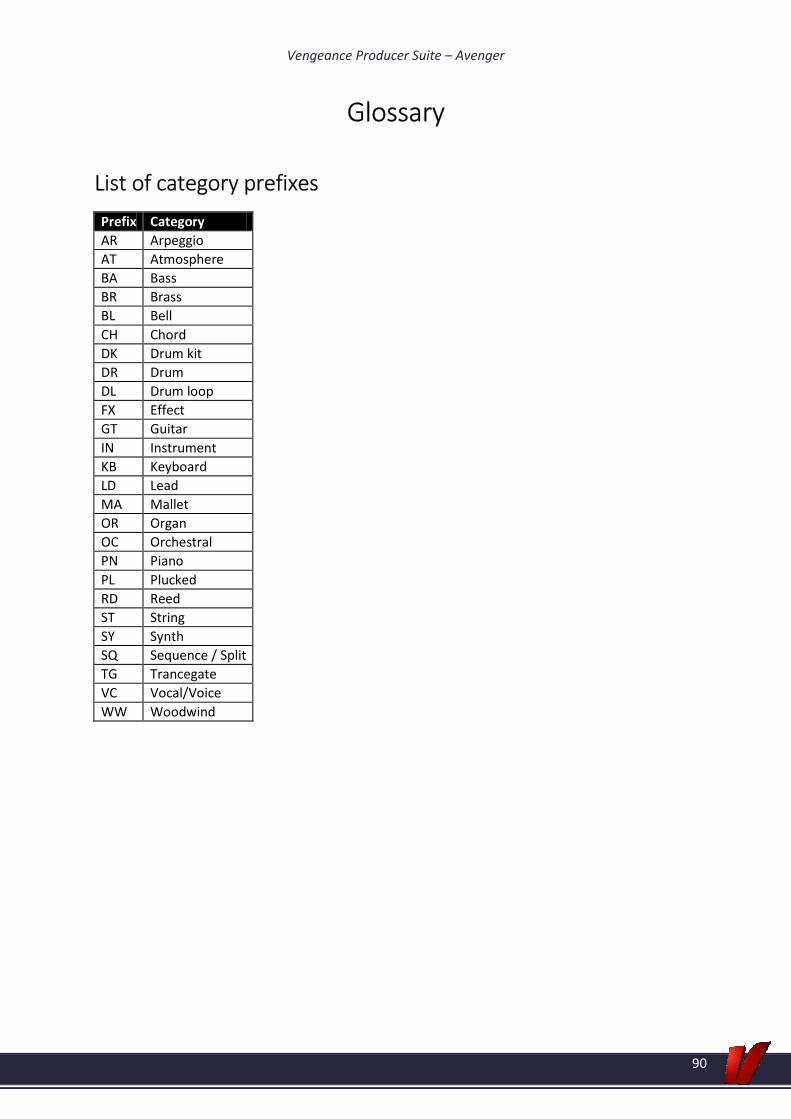
Vengeance Producer Suite – Avenger
90
Glossary
List of category prefixes
Prefix Category
AR Arpeggio
AT Atmosphere
BA Bass
BR Brass
BL Bell
CH Chord
DK Drum kit
DR Drum
DL Drum loop
FX Effect
GT Guitar
IN Instrument
KB Keyboard
LD Lead
MA Mallet
OR Organ
OC Orchestral
PN Piano
PL Plucked
RD Reed
ST String
SY Synth
SQ Sequence / Split
TG Trancegate
VC Vocal/Voice
WW Woodwind