verde 4.5 admin guide
DESCRIPTION
Verde administration guideTRANSCRIPT

Copyright © 2009-2010 Virtual Bridges, Inc.
All Rights Reserved.
V4.4.11.11.10
VERDE™ 4.5 Administrator Guide

VERDE™ 4.5 Administrator Guide
Copyright © 2009-2010 Virtual Bridges, Inc. All Rights Reserved. 2
Table of Contents
Administrator Guide Release Notes .............................................................................................................. 7
Introduction ................................................................................................................................................... 8
Scope ......................................................................................................................................................... 8
Assumptions .............................................................................................................................................. 8
Document Conventions ............................................................................................................................. 8
Terms and Definitions ............................................................................................................................... 8
VERDE Architecture ............................................................................................................................... 10
High-Level Task Overview ......................................................................................................................... 12
Planning the Installation ............................................................................................................................. 14
Server Capacity Planning ........................................................................................................................ 14
Guest Image RAM and Disk Space Planning ......................................................................................... 17
Installing the Operating System .................................................................................................................. 19
Installing Java Runtime Environment (JRE) ........................................................................................... 19
Likewise Open......................................................................................................................................... 20
Red Hat and CentOS (5.4 and 5.5) Server Installation Notes ................................................................. 20
SuSE Linux Enterprise Server 11 – SP1 ................................................................................................. 20
Suse Linux Enterprise Server 11 SP1...................................................................................................... 20
Ubuntu 8.04 LTS Server ......................................................................................................................... 21
Ubuntu Server ......................................................................................................................................... 21
Ubuntu 10.04 LTS ................................................................................................................................... 21
Installing VERDE on the Server ................................................................................................................. 22
Prerequisites ............................................................................................................................................ 22
Supported Host Platforms ....................................................................................................................... 22
Supported Guest Virtual Desktop Platforms ........................................................................................... 22
Additional System Requirements ............................................................................................................ 23
Getting a VERDE License ...................................................................................................................... 23
Getting the VERDE Software ................................................................................................................. 23
Installing the VERDE Software Package ................................................................................................ 24
Verifying the Installation ........................................................................................................................ 24
Licensing the VERDE Software Package ............................................................................................... 25
VERDE™ 4.5 Administrator Guide
Copyright © 2009-2010 Virtual Bridges, Inc. All Rights Reserved. 3
Base License Installation ......................................................................................................................... 25
Creating User Accounts .......................................................................................................................... 26
Upgrading VERDE Server Software .......................................................................................................... 28
Operating System Post-Installation Instructions ......................................................................................... 29
Applying VERDE KVM Drivers (Ubuntu 8.04 LTS Server) ................................................................. 29
Applying VERDE KVM Drivers to SuSE Enterprise Server ................................................................. 29
Suse Linux Enterprise Server (SLES) 11 ................................................................................................ 30
VERDE Post-Installation Configuration ..................................................................................................... 31
VERDE Management Console ................................................................................................................... 34
Starting the VERDE Console .................................................................................................................. 34
Managing Gold Images ........................................................................................................................... 35
Managing Desktop Policies ..................................................................................................................... 41
Managing Session Settings ...................................................................................................................... 46
Managing VERDE Console Administrators ........................................................................................... 50
Monitoring the VERDE environment ..................................................................................................... 51
Installing a Gold Image Desktop Virtual Machine ..................................................................................... 54
Desktop Virtual Machine Prerequisites ................................................................................................... 54
Gold Images Considerations – VERDE 4.3 and Higher ......................................................................... 54
Installing Gold Images with the VERDE Management Console ............................................................ 56
Installing Gold Images with the Command Line Interface ..................................................................... 61
Command Line Installation of a Windows Virtual Machine Image ....................................................... 62
Installing a Linux Desktop Virtual Machine Image ................................................................................ 75
VERDE Installation Script – VERDE Tools ........................................................................................... 84
Upgrading Old Gold Images to VERDE 4.3 Gold Image Architecture .................................................. 84
Starting the Virtual Desktop ....................................................................................................................... 86
Initially Configuring the Virtual Desktop ............................................................................................... 86
Windows XP Tasks ................................................................................................................................. 86
Windows 7 Tasks .................................................................................................................................... 87
Windows XP/Windows 7 Best Practices ................................................................................................. 89
Linux Task............................................................................................................................................... 90
Provisioning a Gold Image Virtual Machine .............................................................................................. 91
Deploying a Gold Image VM with the VERDE Console........................................................................ 91
Publishing a Gold Image VM with the Command Line Interface ........................................................... 93

VERDE™ 4.5 Administrator Guide
Copyright © 2009-2010 Virtual Bridges, Inc. All Rights Reserved. 4
Deploying and Undeploying a Gold Image Virtual Desktop .................................................................. 94
Automating Deployment with Rules-Based Provisioning ...................................................................... 96
Installing or Provisioning a Static Virtual Desktop ................................................................................. 98
USB Redirection Configuration .................................................................................................................. 99
Overview ................................................................................................................................................. 99
Installing the USB Redirect Feature ........................................................................................................ 99
Administering Your Virtual Desktops ...................................................................................................... 102
Adjusting Virtual Machine Settings ...................................................................................................... 102
Updating and Adding Applications to the Virtual Desktop .................................................................. 112
Customizing the Gold Image Update Pop-up Message and Frequency ................................................ 112
Backing Up the Virtual Desktop and Data ............................................................................................ 113
Virtual Desktop Networking ..................................................................................................................... 114
Basic Networking .................................................................................................................................. 114
NAT Networking ................................................................................................................................... 116
Bridged Networking .............................................................................................................................. 116
Firewall Considerations ......................................................................................................................... 118
VERDE Dynamic Network Configuration ............................................................................................... 119
Architecture ........................................................................................................................................... 119
Connecting Remote Users to VERDE ...................................................................................................... 125
Configuring a Firewall for Use with the VERDE Clients ..................................................................... 125
Installing and Configuring the VERDE Client Software ...................................................................... 125
Using the VERDE Client ...................................................................................................................... 127
Installing and Configuring VERDE User Console ................................................................................ 129
RDP and NX Connection Scripts .......................................................................................................... 133
Installing and Configuring iVERDE client for iPad and iPhone ........................................................... 133
Remote Display Security and Encryption ............................................................................................. 134
Printing .................................................................................................................................................. 135
Accessing Client Files and Storage ....................................................................................................... 136
Troubleshooting .................................................................................................................................... 137
Enabling RDP and NX in Gold Images .................................................................................................... 139
Single Server Session Management .......................................................................................................... 146
Real-Time Monitoring with verdetop .................................................................................................... 146
Listing Running Sessions with win4-sessions ....................................................................................... 146

VERDE™ 4.5 Administrator Guide
Copyright © 2009-2010 Virtual Bridges, Inc. All Rights Reserved. 5
Shutting Down Sessions with win4-shutdown ...................................................................................... 147
Login Scripting and Automation............................................................................................................... 149
Login ―Hooks‖ ...................................................................................................................................... 149
Dumping Virtual Bridges Client Parameters ......................................................................................... 151
Active Directory and Dynamic Desktops ................................................................................................. 154
Considerations for Server-Level Active Directory Authentication and Authorization ......................... 155
Joining the VERDE Server to an Active Directory Domain ................................................................. 156
Joining a Gold Image Windows Virtual Desktop to an Active Directory Domain ............................... 157
Joining a Windows XP Gold Image to an Active Directory Domain ................................................... 158
Joining a Windows 7 Gold Image to an Active Directory Domain ...................................................... 161
Joining a Gold Image Virtual Linux Desktop to an Active Directory Domain ..................................... 164
Two Factor Authentication ....................................................................................................................... 165
Configuring PAM to work with RADIUS on the VERDE Server ........................................................ 165
Configuring the RADIUS Server .......................................................................................................... 166
Clustering .................................................................................................................................................. 167
VERDE Clustering Overview ............................................................................................................... 167
VERDE Clustering Terminology .......................................................................................................... 168
Clustering System Requirements .......................................................................................................... 169
Installation Considerations .................................................................................................................... 170
Configuring Clustering Software .......................................................................................................... 170
Virtual Desktop Provisioning and Management ................................................................................... 172
Cluster and Session Management ............................................................................................................. 173
Managing the Cluster Interactively Using a Shell ................................................................................. 173
Managing the Cluster Interactively Using A Web-Based Application ................................................. 174
Managing the Cluster Using a Socket Session ...................................................................................... 177
DNS Load Balancing to Avoid Single Points of Failure ....................................................................... 178
Cluster Master Fail-Over Procedures ........................................................................................................ 180
Initial Configuration .............................................................................................................................. 180
Active Cluster Master Configuration .................................................................................................... 180
Fail-over Cluster Master Configuration ................................................................................................ 180
Adding a Fail-over Cluster Master Nodes to an Active Cluster ............................................................ 181
Executing a Fail-over upon Primary Cluster Master Failure ................................................................. 181
Configuring the Satellite Servers to Connect to New Primary Cluster Master ..................................... 182

VERDE™ 4.5 Administrator Guide
Copyright © 2009-2010 Virtual Bridges, Inc. All Rights Reserved. 6
Disconnected Use and Local Processing .................................................................................................. 183
Overview of Disconnected Use ............................................................................................................. 183
Solution and Assurance from IBM ........................................................................................................ 183
System Requirements for Disconnected Use ........................................................................................ 183
Server Deployment Options .................................................................................................................. 184
Configuring a Firewall for the SMART Client ..................................................................................... 186
Configuring the SMART Client ............................................................................................................ 186
Starting the SMART-Managed Virtual Desktop on the Client ............................................................. 188
LEAF Installation .................................................................................................................................. 190
VERDE Cloud Branch .............................................................................................................................. 195
What is VERDE Cloud Branch? ........................................................................................................... 195
Cloud Branch General Architecture ...................................................................................................... 195
Cloud Branch Deployment Workflow .................................................................................................. 196
Reference ............................................................................................................................................... 199
Troubleshooting ........................................................................................................................................ 201
Useful Log files ..................................................................................................................................... 201
Enabling Logging .................................................................................................................................. 201
LDAP Authentication Issues ................................................................................................................. 202
Legal ......................................................................................................................................................... 203

VERDE™ 4.5 Administrator Guide
Copyright © 2009-2010 Virtual Bridges, Inc. All Rights Reserved. 7
Administrator Guide Release Notes
Due to the nature of the constantly evolving VERDE product, which delivers new features on a regular
basis, and based on the feedback received from business partners and customers, this Administrator Guide
may encounter updates. This section lists the major changes. The document release number is available in
the green box at the bottom of the cover page.
V4.4.11.11.10
- USB Redirection
- Changes to the Gold Image Update section
- Added information about configuring printing
V4.4.10.08.10
- Added time factor to the ―LEAF Update Process‖ section.
V4.4.10.08.10
- Changed the order of some Linux commands in ―Dynamic Network Configuration‖ chapter.
V4.4.10.07.10
- Updated section on Bridged Networking in the ―Virtual Desktop Networking‖ chapter.
V4.4.09.30.10
- Updated the Dynamic Network Configuration chapter.
- Updated the Connecting Remote Users to VERDE chapter.
V4.4.09.29.10:
- Updated LEAF Client Installation chapter with the new LEAF architecture.
- Updated Clustering chapter.
- Removed references to Windows 2000.

VERDE™ 4.5 Administrator Guide
Copyright © 2009-2010 Virtual Bridges, Inc. All Rights Reserved. 8
Introduction
Scope
This guide discusses how to administer the Virtual Bridges VERDE product, including basic server
deployment and management, clustering, and disconnected use/local processing.
Assumptions
To complete the tasks discussed in this guide, you must be an experienced Linux administrator. The
VERDE software must be installed on a Linux host for a server or servers in a cluster.
You must be able to access the server’s console using protocols such as telnet or ssh. If a task
requires the use of an X11 server on the display terminal, it is the responsibility of the Linux
administrator to set up and configure X11 access using the console, ssh, telnet, or another method. This
includes setting the DISPLAY environment variable appropriately.
Unless otherwise noted, commands in this manual assume a Bourne or POSIX shell (for example, sh or
bash).
Many tasks discussed in this guide require the use of the root privileges on the server, either as the root
user or using sudo. Note that in this guide the phrase ―root access‖ means sudo, su, or login as root.
Document Conventions
The following table lists the typographical and syntax conventions used in this manual.
Convention Description
Italics Emphasizes important words and denotes terms that are being defined.
Bold Commands, text, and buttons that you select or click on a user interface
(UI).
Monospaced Literal text or commands.
{ } Enclose required command-line parameters.
[ ] Enclose optional command-line parameters.
| Separates required or optional command-line parameters.
Terms and Definitions
Key elements of the VERDE environment are defined in the following.

VERDE™ 4.5 Administrator Guide
Copyright © 2009-2010 Virtual Bridges, Inc. All Rights Reserved. 9
Client
Remote access point that connects to a guest on the host; typically this is either an ordinary desktop
PC/laptop, or a thin client device running Virtual Bridges access software to display and access a server-
hosted virtual desktop.
Cluster
A group of servers acting as a single group that serves large numbers of virtual desktop environments to
remote users.
Gold Image
A master or ―template‖ virtual machine installation that can then be deployed to multiple users for
dynamic instantiation. A Gold Image combines a guest operating system, applications, system-wide
desktop configuration, and policies—to later be layered with individual user data when deployed.
Dynamic virtual desktop
One instance of a Gold Image virtual machine when started by a user. The guest operating system,
application, system-wide desktop configuration, and policies may not be changed by the dynamic user.
However, the dynamic user may apply personal settings and documents to the virtual desktop instance to
form a full-featured, personalized session.
Guest
The virtual desktop itself (as a guest of the host). One host may serve many guest virtual desktops.
Host
The server hardware and operating system which provide an environment to consolidate virtual desktops.
KVM
Kernel Virtual Machine—the Linux 2.6 kernel’s standard virtualization/hypervisor technology, which
VERDE uses to create and run virtual machine containers. KVM is part of the Linux kernel as of 2.6.20
and is open source software. It is used as a series of dynamically loadable kernel module device drivers,
installed either by Linux distribution vendors, or as part of the Virtual Bridges VERDE package.
KSM
KSM (Kernel SamePage Merging) is a Linux kernel feature which combines identical memory pages
from multiple processes into one copy. KVM guest virtual machines run as processes under Linux. This
feature provides the memory ―over-commit‖ feature to KVM and provides more efficient use of memory,
thus improving scalability.
Management Console
Graphical interface used to create and manage Gold Images.

VERDE™ 4.5 Administrator Guide
Copyright © 2009-2010 Virtual Bridges, Inc. All Rights Reserved. 10
Server
The computer hosting virtual desktop sessions to remote users, or the computer used to administer virtual
desktops in a single-node environment.
VDI
Virtual Desktop Infrastructure—the mechanism of serving desktop sessions to remote users from servers
as discrete environments.
VERDE
Virtual Enterprise Remote Desktop Environment—the suite of virtual desktop/management software from
Virtual Bridges, Inc.
Virtual Machine
The ―container‖ technology that runs desktop environments for remote users. A VERDE server will host
many virtual machines, each containing a user desktop session and providing a common set of emulated
―hardware‖ to the operating system and applications running inside. This is regardless of the underlying
server architecture.
VERDE Architecture
VERDE is an all-in-one VDI solution that includes hypervisor, virtual desktop manager, and connection
broker. The components are tightly integrated and are designed for virtual desktop use. Each VERDE
server runs its own connection broker, which authenticates users and then uses the virtual desktop
manager to either instantiate new virtual machines or to connect users to existing virtual machines.
In the VERDE model, virtual machines are stateless; in other words, they do not need to be powered on or
off, or created ahead of time. They are created on demand based on a particular provisioned Gold Image.
Each user in the system is assigned one or more dynamic desktops based on a Gold Image, and users can
also optionally host their own self-managed virtual desktop if needed.
Authentication for Gold Image virtual machines is provided by the VERDE server. VERDE uses the
Linux-standard Pluggable Authentication Module (PAM) subsystem to authenticate users, so your
corporate authentication repository can be used as long as the Linux server hosting VERDE is configured
to communicate with that service using PAM.
Make note of the following:
Every user must have a Linux user ID and a home directory.
The home directories must reside on the same file system.
Virtual Windows desktops usually run as the local administrator, which prevents issues related to
applications running as an account with non-administrator privileges.
Virtual desktops themselves usually run in an ―auto login‖ configuration to avoid redundant logins
and to preserve single sign-on capabilities. Because the virtual desktops are authenticated and

VERDE™ 4.5 Administrator Guide
Copyright © 2009-2010 Virtual Bridges, Inc. All Rights Reserved. 11
authorized at the server level, traditional standalone desktop security policies inside the virtual
machines are not usually relevant.
Virtual Bridges highly recommends creating a user account with a common user ID from the
GNOME/KDE Desktop Manager. Even though all users provisioned from a Gold Image seemingly
log in as the same ID to their virtual machines, they are still running discretely and are authorized
with the host system's security. Their files are kept in their underlying host home directories with
appropriate permissions.
A typical VERDE server configuration has the following qualities:
One or more ―template‖ or Gold Image virtual desktop installations are stored under Linux user
account(s).
One or more dynamic desktops are provisioned from that ―template‖ or Gold Image to Linux user
account(s).
User documents and personal settings for provisioned dynamic desktop instances are stored under the
respective Linux user's home directory.
Each virtual desktop user has a unique Linux user ID with which to log in to the VERDE server.
VERDE desktop virtual machines run as Linux processes, authorized as the user who logged into the
connection broker. To the host system, they appear as ordinary applications, and obey all process
limits and restrictions set by the system administrator. This includes ulimit, nice, and quota
settings.

VERDE™ 4.5 Administrator Guide
Copyright © 2009-2010 Virtual Bridges, Inc. All Rights Reserved. 12
High-Level Task Overview
The tasks of creating a virtual computer, publishing it, deploying it, and maintaining it are contained in
the following high-level steps. Use the information provided in the following table to plan your time and
resources accordingly.
Step Task Description
1 Plan the installation Make sure the VERDE server has sufficient disk
space and RAM for the number of virtual desktops
and users you anticipate. For more information, see
Planning the Installation.
2 Install and license the VERDE software
on the server
The VERDE software enables you to create, deploy,
and publish virtual desktops. For more information,
see Installing the Operating System.
3 Create a virtual desktop Gold Image The Gold Image is the reference copy of the virtual
desktops. Users access a read-only copy of the Gold
Image. Create one Gold Image per unique
environment (for example, one Gold Image for a
Windows 7 desktop with 32GB of RAM). For more
information, see Installing a Gold Image Desktop
Virtual Machine.
4 Start the virtual desktop Start the virtual desktop and minimally configure it
using provided post-installation scripts. For more
information, see VERDE Installation Script –
VERDE Tools.
5 Provision virtual desktops To provision a virtual desktop, you first publish it
and then deploy it to users or groups so they can
start dynamic instances of it. These dynamic
instances present a transient ―copy-on-write‖ system
image with persistent user settings and documents.
For more information, see Provisioning a Gold
Image Virtual Machine.
6 Set up networking Depending on your needs, you can choose from
Basic, Bridged, and Network Address Translation
(NAT) networking protocols. For more information,
see VERDE Dynamic Network Configuration.
7 Prepare for users to connect to dynamic
instances
Understand options related to file sharing, printing,
and security. For more information, see Connecting
Remote Users to VERDE.

VERDE™ 4.5 Administrator Guide
Copyright © 2009-2010 Virtual Bridges, Inc. All Rights Reserved. 13
Step Task Description
8 Set up a VERDE cluster A VERDE cluster enables you to load-balance
processing and storage requirements and is ideally
suited for a large-scale enterprise deployment. For
more information, see Clustering.
9 Set up a disconnected deployment As an alternative to clustering, users can connect to
their virtual machines and use local processing to
run their dynamic instances. For more information,
see Disconnected Use and Local Processing.
10 Customize your deployment VERDE offers a wide variety of customization
options for virtual desktops. For more information,
see Administering Your Virtual Desktops.
11 Set up a VERDE cloud branch Ideal for Managed Service Providers (MSPs), a
cloud branch enables you to separate central office
activity from branch office activity. Servers in
remote branches synchronize Gold Images from
data center servers, and in turn, provision these Gold
Images as dynamic instances to local users.
For more information, see VERDE Cloud Branch.

VERDE™ 4.5 Administrator Guide
Copyright © 2009-2010 Virtual Bridges, Inc. All Rights Reserved. 14
Planning the Installation
This section discusses the following topics:
Server Capacity Planning
Guest Image RAM and Disk Space Planning
Guest application profile
Server Capacity Planning
You must plan VERDE server capacity for peak concurrent virtual desktop usage (which is not
necessarily the same as peak connected usage). Any virtual desktop environment running on the server—
whether a user is connected to it or not—counts toward concurrent usage. This is due to the fact that even
if users are not connected to the server, they might still have a virtual desktop environment consuming
resources.
It is important that the server have enough resources to accommodate peak concurrent virtual desktop
usage; otherwise, performance and virtual desktop usability deteriorate. It is especially important to never
over-commit RAM—in other words, the total assigned virtual machine RAM, plus overhead, can never
exceed the amount of physical RAM in the server. Doing so will result in extreme performance
degradation.
For more information, see the following topics:
Background Information
Calculating VERDE Server Virtual Desktop Density
Network Bandwidth for Connected Users
Storage Planning
Background Information for VERDE Server Capacity Planning
Make sure you understand the following information before attempting to calculate VERDE server
capacity:
Guest application profile
The actual applications (and use case for them) running in guest virtual machines play a major factor
in determining the virtual desktop density of a given VERDE server. For example, office/business
applications scale much better than high-resolution multimedia programs.
Virtual Machine RAM assignment
Virtual machine RAM assignment must be calculated strictly for capacity, not performance. This is
because, unlike with a physical computer, assigning more RAM to a virtual machine does not
improve performance. In fact, assigning too much RAM to a virtual machine might adversely
degrade performance of the overall system, because this reduces the amount of system-wide caching
that the host can perform.

VERDE™ 4.5 Administrator Guide
Copyright © 2009-2010 Virtual Bridges, Inc. All Rights Reserved. 15
The allocation of RAM must be based on the minimum RAM required for the applications you intend
to run. Most desktop application vendors provide a ―minimum‖ and a ―recommended‖ RAM
requirement. When planning virtual machine RAM assignment, always use the ―minimum‖ figure,
and, if need be, consider assigning less than the minimum to increase server density in certain
situations.
Calculating VERDE Server Virtual Desktop Density
When determining the virtual desktop density possible on particular hardware for a VERDE server, the
following information is needed:
Number of CPU sockets (C)
Number of CPU cores per socket (c)
Total system RAM (M)
Guest virtual machine RAM assignment (m)
The memory density coefficient (a)
The number of concurrent sessions that fit in memory on a particular VERDE server (T1)—that is,
sessions that are either connected or disconnected—can be calculated as follows:
T1 = M(a) / m
KSM (Kernel Samepage Merging) allows for better memory density, thus depending on your
implementation requirements the memory density coefficient can vary from 0.75 (conservative) to 1.25
(aggressive).
The table below shows an example of a system with 16GB of physical RAM, where each guest session
would require a 512MB RAM assignment, the number of concurrent sessions that can fit in memory
without degrading server performance is:
T1 = 16384(a) / 512
Conservative Average Aggressive
a 0.75 1 1.25
T1 24 Sessions 32 Sessions 40 Sessions
Additionally, a common guideline metric for calculating the number of concurrent sessions that can be
executed on a given CPU core is 10. Note that depending on application profile, this number might be as
high as 15 (or more). For the purpose of planning for typical application load (for example,
office/productivity applications), it is safe to use 10 concurrent sessions per core metric.
To calculate the maximum number of concurrent sessions that can be executed on a given VERDE Server
without degrading session performance (T2):
T2 = 10(C(c))

VERDE™ 4.5 Administrator Guide
Copyright © 2009-2010 Virtual Bridges, Inc. All Rights Reserved. 16
For example, on a system with 2 sockets and 4 cores per socket:
T2 = 10(2(4))
(T2 = 80)
The actual maximum number of concurrent sessions that will both fit in memory and execute with
expected performance on a given VERDE server (T) is the lesser of the values T1 and T2. In the examples
above, this number would be T = 40. In order to support the T = 80 concurrent users that the CPU cores
are capable of, the server would need at least M = 48GB of RAM (the formula yields 41GB but this is not
practical).
The following table illustrates example server CPU/RAM capacity for 30, 60, and 100 concurrent user
sessions. The example desktop virtual machine profile is for typical consumption (office/productivity),
and has 512MB of RAM assigned per session. The table shows both a ―high performance‖ and ―high
density‖ configuration. Host RAM is designated in gigabytes, while host CPU capacity is designated in
total number of processing cores1:
Concurrent user sessions
High performance configuration
High density configuration
30 4 CPU cores, 16GB RAM 2 CPU cores, 16GB RAM
60 6 CPU cores, 32GB RAM 4 CPU cores, 32GB RAM
100 12 CPU cores, 48GB RAM 8 CPU cores, 48GB RAM
1—Total number of CPU cores rounded to account for dual, quad, and six core processors; actual
configuration might vary by server chassis and motherboard combination
In the preceding example, the ―high performance‖ configuration requires more CPU resources but
provides more computational power to each virtual machine. The ―high density‖ configuration requires
fewer CPU resources, but might increase time slicing and reduce per-user virtual machine responsiveness.
You should determine what is appropriate for your deployment based on the actual applications, the
subjective user expectations, and the general organization requirements for response time. Note that
server RAM requirements do not change because virtual machine RAM assignment is not associated with
per-session performance as discussed earlier in this section.
Network Bandwidth for Connected Users
VERDE sessions require a minimum of 256Kbps bandwidth per session to produce an acceptable desktop
user experience.
The per-session remote display and device performance depend heavily on the amount of total network
bandwidth available. Generally speaking, the higher the switched bandwidth, the faster and more
responsive the end-user sessions will be. In cases where not all users will be connected at the same time,
the actual total network bandwidth might be lower without sacrificing session responsiveness because
only a portion of users will be transmitting at any given time.
From the per-user perspective, the following table illustrates the minimum and recommended bandwidth
(shown in KB/sec) and latency (shown in milliseconds) figures for various usage profiles:

VERDE™ 4.5 Administrator Guide
Copyright © 2009-2010 Virtual Bridges, Inc. All Rights Reserved. 17
Virtual desktop usage Minimum Bandwidth/Latency Recommended Bandwidth/Latency
Casual/Line work 256kbps/180ms 512kbps/100ms
Office/Productivity 384kbps/100ms 768kbps/75ms
Multimedia Playback 512kbps/75ms 1024kbps/50ms
Note that these are suggested figures only. Actual bandwidth requirements will vary by exact usage
profile, subjective user expectation, and effective network topology. In all cases, the higher the available
bandwidth per user, the better the user experience will be.
Storage Planning
Dynamic desktop VERDE sessions use a copy-on-write mechanism to minimize the actual per-user
persistent storage of a given Gold Image configuration. For example, if a Gold Image guest installation
consumes 32GB of storage, each deployed user running a dynamic instance of it might need less than
1GB of persistent storage space.
The copy-on-write information itself requires transient storage. Transient storage requirements vary
greatly depending on applications, use, and even runtime length of sessions. However, a conservative
estimate is to use 20% of the Gold Image size for each deployed instance.
For example, if a template guest installation consumes 32GB of storage, the transient storage size for each
server should be 6.4GB per user. For 50 concurrent users, assuming the preceding example, it would be
320GB.
Guest Image RAM and Disk Space Planning
When you create a guest image, you have the following options:
Setting the amount of virtual RAM used by the guest image.
Setting the number of GB used by the operating system virtual disk image (in Windows, the C:
volume; in Linux, /).
Setting the number of MB for the user files virtual disk image (in Windows, the D: volume; in Linux,
the /home directory).
While the guest virtual machine RAM assignment can be changed after installation, the virtual disk image
size cannot be changed after installation. The following table shows how virtual disk assignments are
made and VERDE defaults for each:
Operating system C: volume,
VERDE default
D: volume,
VERDE default
/, VERDE default /home, VERDE
default
Windows XP Operating system,
8GB
User’s Documents
and Settings,
2GB
n/a n/a

VERDE™ 4.5 Administrator Guide
Copyright © 2009-2010 Virtual Bridges, Inc. All Rights Reserved. 18
Operating system C: volume,
VERDE default
D: volume,
VERDE default
/, VERDE default /home, VERDE
default
Windows 7 Operating system,
16GB
User’s Documents
and Settings,
2GB
n/a n/a
Linux n/a n/a System files,
12GB
User home
director,
2GB
Notes:
The virtual disk image size is the maximum amount of disk space, in MB, to which the image is
allowed to grow. The disk space is not allocated in advance of the guest system requesting it.
Windows: The user’s Documents and Settings are stored on volume D: and users can also store
documents (by default) on their underlying Linux home directory.
Windows: A typical Windows installation, initially without applications installed, consumes about
1.5GB of disk space, but can quickly grow larger after you install applications and Windows Update
patches. Also note that disk space saved by deleting files is not reclaimed on the host file system. It
will be used automatically the next time space is required, and before allocating more space for the
guest disk image.

VERDE™ 4.5 Administrator Guide
Copyright © 2009-2010 Virtual Bridges, Inc. All Rights Reserved. 19
Installing the Operating System
This section describes some distribution specific installation instructions, as well as the Java Runtime
Environment installation.
Note: We recommend that as soon as the Operating System installation is completed, you install the
available updates prior to completing the steps below. Installing the latest updates will ensure that you are
accessing the latest repository information. See the following sections for installation details:
JRE installation
RedHat EL/ CentOS (5.4, 5.5)
SuSE Linux Enterprise Server 11
Ubuntu 8.04 LTS Server
Ubuntu Server 9.04
Installing Java Runtime Environment (JRE)
The VERDE Management Console requires Java to run. If you are planning to use the console, you will
first need a working JRE on your system. VERDE requires Java 1.6, which does not typically ship by
default on distributions.
JRE installation on Ubuntu 8.04, 9.04 and 10.04 LTS:
sudo apt-get install openjdk-6-jre
CentOS 5.4 / RedHat EL 5.4:
su-
yum install –y java
Suse Linux Enterprise Server 11:
Sun JRE on SLES 11 is a 32-bit on 64-bit installation; you can run java –version to verify which
version of Java is installed.
Download the 64-bit Sun JRE 1.6 (http://java.com) for the applicable architecture (i586 or x86_64)
Extract it to a /usr/lib64/jvm (64-bit example)
Use update-alternatives to set the default JRE on the server (64-bit example); the command below
makes the JRE known to update-alternatives:
update-alternatives --install "/usr/bin/java" "java"
"/usr/lib64/jvm/jre1.6.0_20/bin/java" 1
The command below updates the system to use the newly installed JRE:
update-alternatives --set java /usr/lib64/jvm/jre1.6.0_20/bin/java

VERDE™ 4.5 Administrator Guide
Copyright © 2009-2010 Virtual Bridges, Inc. All Rights Reserved. 20
Run java –version and verify you have properly set the 64 bit JRE as the default for the OS.
Likewise Open
If you plan to authenticate users against an existing Active Directory domain (please refer to the Active
Directory and Dynamic Desktops section for more information), this can be done by either configuring
Pluggable Authentication Modules (PAM) manually, or by using a third-party integration package such as
Likewise-Open from Likewise Software.
If you choose the Likewise-Open solution, we recommend that you install this third party product prior to
installing VERDE.
You can install Likewise-Open at no cost. Please see Likewise Open for download and detailed
installation instructions.
Note: We recommend getting Likewise-Open from the Likewise website, instead of using the package
available on the Linux distribution repository.
Please refer to the Joining the VERDE Server to an Active Directory Domain section for instructions on
how to join an Active Directory domain.
Red Hat and CentOS (5.4 and 5.5) Server Installation Notes
Make sure that VT is enabled in the BIOS.
When installing CentOS do not check the Virtualization box. We recommend that you only check the
server box and Gnome or KDE for installation options.
If there is a previous version of the VERDE product, please remove it by running the command:
rpm –e VERDE
Install the ―kmod-kvm‖ package:
yum install kmod-kvm
SuSE Linux Enterprise Server 11 – SP1
Make sure that VT is enabled in the BIOS.
Install SuSE Enterprise Server without any virtualization support.
Upgrade to SuSE Enterprise Server 11 kernel 2.6.27.45-0.1-default
YaST -i kernel-source gcc
Suse Linux Enterprise Server 11 SP1
Make sure that VT is enabled in the BIOS.
Install SuSE Enterprise Server without any virtualization support

VERDE™ 4.5 Administrator Guide
Copyright © 2009-2010 Virtual Bridges, Inc. All Rights Reserved. 21
Ubuntu 8.04 LTS Server
If you are deploying VERDE on Ubuntu 8.04 LTS Server, you must apply the VERDE-supplied KVM
drivers because the drivers shipped with the Ubuntu kernel do not provide adequate virtual machine
performance.
To do this, first install the kernel build tool chain with the following command:
Run: uname -r
sudo apt-get –y install linux-headers- <value_returned_by_uname-r> gcc
Ubuntu Server
Ubuntu server only: If you are installing on Ubuntu Server, you must run the following command to
install all necessary packages for hosting VERDE:
sudo apt-get install libglade2-0 libesd0 libasound2 xfonts-base
Follow the prompts on your screen to complete the installation.
Ubuntu 10.04 LTS
If the ―Chkconfig‖ package has been installed, it needs to be removed before installing VERDE server.
Run the following command to remove it:
sudo apt-get remove chkconfig

VERDE™ 4.5 Administrator Guide
Copyright © 2009-2010 Virtual Bridges, Inc. All Rights Reserved. 22
Installing VERDE on the Server
To install VERDE on the server, you must complete the following tasks:
Prepare for installation.
Install and license the VERDE software package.
Install a Gold Image desktop virtual machine.
Provision the Gold Image as dynamic instances for user(s) or group(s).
Prerequisites
Before you continue, review the following information:
Terms and Definitions
VERDE Architecture
Server Capacity Planning
Guest Image RAM and Disk Space Planning
Installing the Operating System Notes
Supported Host Platforms
32-bit or 64-bit x86 Intel or AMD processor with Intel VT or AMD V capabilities
Canonical Ubuntu 8.04 LTS Server, or 9.04 Server (9.10 is not supported), 10.04 LTS Server
Red Hat Enterprise Linux 5.4 and 5.5
CentOS 5.4 and 5.5
Novell SUSE Linux Enterprise 11
VERDE installs and runs on most other Linux Standard Based (LSB) 3.1-compliant distributions with
2.6.20 or newer kernels, but only the Linux platforms in the preceding list are supported at this time. For
the most up-to-date information, refer to the Release Notes.
Supported Guest Virtual Desktop Platforms
32-bit and 64-bit Windows XP1 Professional, any service pack
32-bit and 64-bit Microsoft Windows 7 Professional, Enterprise, and Ultimate Editions
32-bit (i386) Ubuntu 8.04 LTS ―Hardy‖ Desktop Linux
1—Windows XP Home Edition might install and run but is not explicitly supported for server
configurations.
32-bit (i386) Ubuntu 9.04 ―Jaunty‖ Desktop Linux
32-bit (i386) Ubuntu 10.04 ―Lucid‖ Desktop Linux

VERDE™ 4.5 Administrator Guide
Copyright © 2009-2010 Virtual Bridges, Inc. All Rights Reserved. 23
32-bit and 64-bit Novell SUSE Linux Enterprise Desktop 11, any service pack
32-bit (i386) or 64-bit (x86_64) Red Hat Enterprise Linux 5.4 and 5.5 Workstation, any updates
32-bit (i386) or 64-bit (x86_64) CentOS 5.4 and 5.5, any updates
For the most up-to-date list of supported guest virtual desktop platforms, refer to the Release Notes.
Additional System Requirements
Requirements for processing power, networking, storage, and memory vary by size of installation. For a
detailed explanation on how to determine these parameters, see Server Capacity Planning.
Check if Intel VT/AMD V is enabled on the Server
Make sure that virtualization has been enabled in the BIOS.
If you cannot access the BIOS and want to verify that the CPU is VT capable, follow the steps below,
note that the installation process checks that virtualization is enabled.
First and easiest test:
Intel processors: egrep '^flags.*(vmx)' /proc/cpuinfo
AMD processors: egrep '^flags.*(svm)' /proc/cpuinfo
If neither of those commands outputs anything, then the CPU is not VT or AMD-V capable; you cannot
run VERDE on this server.
Note: Even if the chip is capable of running virtualization, that doesn't mean that functionality has been
enabled in the BIOS. In order to do this you need to actually load the appropriate KVM module and, if it
fails, check the dmesg output. The easiest thing to do is just install VERDE, run dmesg, and check for
"kvm: disabled in bios" or something to that effect, as one of the last messages in the log. If that
happens, reboot the system, enter the BIOS setup, and enable virtualization support.
Getting a VERDE License
VERDE is licensed per host or server, and each license sets a limit on the number of concurrent virtual
desktop sessions allowed on the host or server. A standalone VERDE server (or satellite server in a
cluster) typically has a multiuser license with at least 10 or 25 concurrent session entitlements.
A VERDE license consists of a base license code, and optionally one or more ―bump‖ license codes.
To obtain or purchase a VERDE server or workstation license, or to extend the evaluation period on a
license, please contact the Virtual Bridges sales team at [email protected], or your authorized VERDE
reseller.
Getting the VERDE Software
Before installing VERDE on your system you must find your computer’s kernel architecture, which in
turn determines which VERDE package you need to get.

VERDE™ 4.5 Administrator Guide
Copyright © 2009-2010 Virtual Bridges, Inc. All Rights Reserved. 24
Use the following command:
uname -m
If the command returns i386, i486, i586, i686, or athlon, you should get the i386 VERDE package.
If the command returns x86_64 or amd64, you should get the x86_64 or amd64 VERDE package.
Note: amd64 is compatible with both AMD and Intel 64-bit x86 processors.
To get the VERDE software, go to the Virtual Bridges download page. Save the package in any available
directory.
Installing the VERDE Software Package
Use your host operating system's default package manager to install the VERDE software. Examples
follow; use the documentation provided with your operating system for alternative package installation
methods.
Examples:
For RPM-based distributions, such as Novell SUSE and Red Hat, run the rpm command as root:
rpm -ivh /download-dir/package-name.rpm
For example, to install the package named VERDE-4.0-r400.3850.i386.rpm from /tmp, use the
following command:
rpm -ivh /tmp/VERDE-4.0-r400.3850.i386.rpm
For Debian-based distributions, such as Ubuntu, run the dpkg command as root (for Ubuntu: sudo dpkg -–install /download-dir/package-name.deb)
dpkg -–install /download-dir/package-name.deb
For example, to install the package named verde_4.0-r400.3850_amd64.deb from /tmp, use the
following command:
dpkg –-install /tmp/verde_4.0-r400.3850_amd64.deb
Verifying the Installation
A successful installation is confirmed by messages similar to the following:
VERDE 4.0 (rev 4.0-r400.3850)
Copyright 1984-2010 Virtual Bridges, Inc. All Rights Reserved.
- Configuring VERDE services
- Configuring VERDE tools
- Configuring VERDE objects
Starting VERDE ...done.

VERDE™ 4.5 Administrator Guide
Copyright © 2009-2010 Virtual Bridges, Inc. All Rights Reserved. 25
Licensing the VERDE Software Package
This section discusses the following topics:
Base License Installation
―Bump‖ License Installation
Base License Installation
To license the VERDE software, a license file that is owned by root must be created. This step is now
optional since the file is created by the VERDE post-installation script; see Running the VERDE Post-
Installation Script.
If you want to install manually, follow these instructions. This file must be named
/var/lib/verde/license.lic and it has the following contents:
LICENSE_CODE=XXXXX
CUSTOMER_NAME=”CCCCCC”
Where XXXXXX is the license code you received at the time of purchase or as part of an evaluation package
from Virtual Bridges, Inc. Be sure to enter it (or copy and paste it) exactly as it appears in the official
correspondence. Replace CCCCCC with your name, or your organization's name. This text will appear on
the splash screen of the virtual machine loader and will be visible to all users. Note that you should
enclose this name in quotes, especially if there are blank spaces in it. You can verify that the license is
applied correctly by running the win4-licinfo command:
/usr/lib/verde/bin/win4-licinfo
The command should report the license status as ―Product is licensed‖ if you created the license file
correctly. It is also recommended that you give permissions of 0600 to this file.
“Bump” License Installation
This section discusses how to install a bump license, which increases the number of concurrent user
counts from the default base concurrent license count of either 10 or 25.
After you have obtained a bump license, you must complete the following tasks in the order in which they
are presented:
1 Log in as the root user, or use sudo to gain root privileges.
2 Create a backup copy of the file /var/lib/verde/license.lic as follows:
cp /var/lib/verde/license.lic /var/lib/verde/license.lic.saved
3 Open the file /var/lib/verde/license.lic in a text editor.

VERDE™ 4.5 Administrator Guide
Copyright © 2009-2010 Virtual Bridges, Inc. All Rights Reserved. 26
4 At the end of the file, add a line similar to the following:
BUMPS_n=bump_license_code
—where:
n is the bump license sequence number, starting at 1. If you have more than one bump license
code to add, or the license file already has BUMPS_n lines in it, then the sequence number should
be the last sequence number plus 1.
bump license code is the bump license code you obtained, exactly as you received it.
The following license file example shows a five-concurrent-user base license with two separate
bumps. Please note that the license codes in the example are not valid and are for illustration only,
and the total number of users after the bumps are added is unspecified in the example:
LICENSE_CODE=1s1pXXXX-XXXXXXXX
CUSTOMER_NAME="VERDE User"
BUMPS_1=XXX-XXXXXXXX
BUMPS_2=YYY-YYYYYYYY
5 Save the file and exit the text editor.
6 Verify that the bump license(s) applied correctly by running the following command:
/usr/lib/verde/bin/win4-licinfo
Sample output follows:
$ /usr/lib/verde/bin/win4-licinfo
license status: Product is licensed
licensed product type: VERDE VDI
licensed to: ”Example Corp"
expiration date: never expires
maximum sessions: 25
current sessions: 0
If the maximum sessions value does not accurately reflect your base license count plus the bump
licenses, repeat the tasks discussed in this section to verify that you entered the information
exactly as you received it. If the license information displays an error, you can easily restore your
backup copy of the license file using the following command:
cp /var/lib/verde/license.lic.saved /var/lib/verde/license.lic
Creating User Accounts
To create virtual machines for users, you must create user accounts on the VERDE server. Each user
account corresponds to one virtual machine so if you expect to have 50 virtual machines, you must create
50 user accounts. Many users can share the same virtual machine so if you expect to have 50 unique

VERDE™ 4.5 Administrator Guide
Copyright © 2009-2010 Virtual Bridges, Inc. All Rights Reserved. 27
combinations of operating systems and environments (including RAM, user space disk space sizes, and so
on), you must create 50 user accounts.
The following must be true of each user account:
The user can be unprivileged. However, to initially install the Gold Image, the user account must have
access to the CD or DVD drive containing the operating system installation image.
The user who does the Gold Image installation must have read access to the CDROM device (for
example /dev/cdrom or /dev/scd0 on most distributions).
The user must have a unique home directory.
The home directories must reside on the same file system.
User naming convention recommendations:
Virtual Bridges recommends you do not use the same user names as users in your network. In
other words, instead of using user names like john.smith, use simpler names like verde-user1,
verde-user2, and so on.
This is due to the fact that users do not authenticate with the virtual machine. Users authenticate
with the VERDE server and the server delivers the virtual desktop to the user without further
authentication or authorization.
Use a naming convention that is different from the Gold Image configuration name. For example,
you might choose to name a user verde-user1 but choose a Gold Image configuration name of
ubuntu1004. Making these names the same prevents you from deploying the Gold Image later.
More information about setting up Gold Images can be found in Installing Gold Image Desktop
Virtual Machines.
IMPORTANT: Never install or start a virtual desktop as the root user on your system. Virtual
desktops can be installed for and used by non-root users only!

VERDE™ 4.5 Administrator Guide
Copyright © 2009-2010 Virtual Bridges, Inc. All Rights Reserved. 28
Upgrading VERDE Server Software
To upgrade VERDE server software, use the same procedure to download and install the package as that
discussed in Installing the VERDE Software Package.
Debian-based Distributions (Ubuntu)
Debian based packages do not require uninstalling VERDE manually prior to installing the upgrade.
dpkg -–install /download-dir/package-name.deb
Ubuntu: sudo dpkg -–install…
Red Hat/CentOS
Red Hat or CentOS requires uninstallation of a previously installed version of VERDE:
rpm –e VERDE
rpm -ivh /tmp/ VERDE-4.0-r400.xxx.rpm

VERDE™ 4.5 Administrator Guide
Copyright © 2009-2010 Virtual Bridges, Inc. All Rights Reserved. 29
Operating System Post-Installation Instructions
The following sections describe post-installation instructions for these distributions.
Applying VERDE KVM Drivers (Ubuntu 8.04 LTS Server)
SUSE Linux Enterprise Server (SLES) 11
Applying VERDE KVM Drivers (Ubuntu 8.04 LTS Server)
If you are deploying VERDE on Ubuntu 8.04 LTS Server, you must apply the VERDE-supplied KVM
drivers because the drivers shipped with the Ubuntu kernel do not provide adequate virtual machine
performance.
Run the following command to build the VERDE-supplied driver and instruct VERDE to maintain this
driver permanently on this server:
sudo /usr/lib/verde/bin/build_kvm_kmod.sh
If the command completes successfully, you should see a message indicating Driver installation
complete at the end of the script output. In case of failure, check /tmp/build_kvm_kmod.log for details.
The most common cause of failure is improper installation of the kernel build tool chain, as described
above, which will result in compilation errors and/or mismatched module symbols.
After successful completion of the build_kvm_kmod.sh command, either reboot the computer or use the
following command to restart VERDE services:
/etc/init.d/VERDE restart
After you perform this function, VERDE-supplied KVM drivers will always be built and used on your
server. They will replace the Ubuntu 8.04 LTS-supplied drivers. The VERDE startup scripts will ensure
that the drivers are maintained for best compatibility with VERDE-based virtual machines. Should
building the drivers fail at any point in the future after completing this process, the VERDE services will
fail to start, alerting the system administrator to verify that the kernel build tool chain is the correct
version.
For the most up-to-date information and status on KVM driver support, issues, and recommendations for
VERDE, see the Release Notes.
Applying VERDE KVM Drivers to SuSE Enterprise Server
Note: This is not required for SLES 11 SP1
Run the following command to build the VERDE-supplied driver and instruct VERDE to maintain this
driver permanently on this server:
/usr/lib/verde/bin/build_kvm_kmod.sh
After successful completion of the build_kvm_kmod.sh command, either reboot the computer or use the
following command to restart the VERDE services:

VERDE™ 4.5 Administrator Guide
Copyright © 2009-2010 Virtual Bridges, Inc. All Rights Reserved. 30
/etc/init.d/VERDE restart
Suse Linux Enterprise Server (SLES) 11
This is required if you plan to use NX protocol to connect to Linux guest sessions.
SLES 11 uses blowfish encryption in /etc/shadow which prevents Single Sign On (SSO) to work with
NX protocol. The encryption protocol needs to be replaced by MD5:
In /etc/default/passwd, change CRYPT_FILES=md5
Then update passwords to MD5 encryption on existing users by running (as root):
passwd <USER>

VERDE™ 4.5 Administrator Guide
Copyright © 2009-2010 Virtual Bridges, Inc. All Rights Reserved. 31
VERDE Post-Installation Configuration
VERDE 4 includes the VERDE Console, a graphical management console which is a major new feature
in the VERDE product. The management console and the new VERDE infrastructure require the creation
of two new users in the Linux system.
One is a VERDE system user (default name of this user is ―vb-verde‖).
The second user is the master administrator for the VERDE Console. The default name for this user is
―mcadmin1‖. The console uses this as the bootstrap administrator of the system.
Please create these users on your Linux system, and ensure that both users have a home directory. You
will not be able to use ―www-data‖ for example, because this user does not have a home directory.
Notes:
The adduser command, or the graphical interface, creates the home directory automatically. useradd
does not, run ―useradd -m‖ to create the home directory.
IMPORTANT:
WIN4_MC_USER and WIN4_MASTER_ADMIN must use different user names.
The passwords of these users must never expire.
Clustering environment:
Both users will need their home directory to reside in a shared storage space.
Their UID/GID will need to be identical across all servers; in such context, it is recommended to use a
central directory system like Active Directory.
The installation requires the following to be set in /var/lib/verde/settings.global
Setting permissions for /etc/shadow:
The file /etc/shadow must be given permissions 0444
chmod 0444 /etc/shadow
Ubuntu: sudo chmod 0444 /etc/shadow
Running the VERDE Post-Installation Script
VERDE provides a post-installation interview script to facilitate the configuration of the VERDE server;
it will:
Create the license information.
Set the public address of the server.

VERDE™ 4.5 Administrator Guide
Copyright © 2009-2010 Virtual Bridges, Inc. All Rights Reserved. 32
Update the /var/lib/verde/settings.global file–required by the VERDE Management Console.
Set the port used by the VERDE Console.
Run the script with root access. The post-installation script will prompt you with configuration questions,
then will restart the VERDE server.
/usr/lib/verde/bin/verde-config
Ubuntu: sudo /usr/lib/verde/bin/verde-config
Note:
Press Ctrl-C to exit the script without saving.
Some configuration questions present previous/default value between brackets []. Press Enter to accept
the value. If no value is present, pressing Enter will leave the value empty.
The VERDE server will restart automatically.
Script questions:
Question Description
What is the public IP or FQDN of this
server [Servername]?
Enter you public IP or the Fully Qualified Domain Name of
this server. This name or address needs to be resolvable
from any computer on the network; this is especially
important in a cluster environment.
What is the role of this server? Choose
from the following options
1) Cluster Master (not licensed, does not do VDI, runs MC)
2) Cluster Master + VDI (single server deployment)
3) VDI only (cluster node)
4) Gateway only
What is the public IP address of VDI
server []?
Who is the management user [vb-
verde]?
The system user who runs the application server.
Note: This user must be different from the MC
administrator.
Who is the master MC administrator
[mcadmin1]?
master administrator of the VERDE Management Console,
default mcadmin1
Note: This user must be different from the management
user.
What is the address of the Cluster
Master [127.0.0.1]?

VERDE™ 4.5 Administrator Guide
Copyright © 2009-2010 Virtual Bridges, Inc. All Rights Reserved. 33
Question Description
Enter the VDI license code [1s5f062x-
xxx-xxx-xxx]:
Enter your license code.
What is the path to local scratch []? This sets the SNAP_DIR variable in the settings.global file.
This is the directory where temporary changes to the system
volume (ex: C:) will be stored. Make sure there is enough
space. Those changes will be lost at the next session
initialization. Default is user’s home directory. You can use /tmp
On which port should we run tomcat
[8443]?
Enter the port used by the application server Tomcat (the
default https port is 8443)
Enabling KSM
KSM (Kernel Same Page Merging) is a Linux kernel feature which combines identical memory pages
from multiple processes into one copy and is therefore very useful to improve scalability.
KSM is not activated by default and should be turned on if you want to benefit from this feature:
Ubuntu 10.04:
sudo -s
echo "1" >/sys/kernel/mm/ksm/run
RedHat EL 5:
modprobe ksm
VERDE™ 4.5 Administrator Guide
Copyright © 2009-2010 Virtual Bridges, Inc. All Rights Reserved. 34
VERDE Management Console
This section gives an overview of the VERDE Management Console, a key feature of VERDE V4. The
management console is a graphical interface which replaces the command line interface for the
management of the VERDE environment.
Note: The command line interface is still available but it is not possible to switch back and forth between
the two features. Gold Images created with the command line interface will not be visible from the
VERDE Management Console and vice versa. Images can be imported in the console, but once imported,
they will no longer be manageable from the command line interface.
The section reviews:
Starting the VERDE Management Console
Managing Gold Images
Managing Desktop Policies/User Deployment
Managing VERDE Console Administrators
Monitoring the VERDE environment
Starting the VERDE Console
Launch the VERDE Management Console at:
https://<server-name-or-IP>:8443/mc or http://<server-name-or-IP>:8080/mc
Note: Make sure to replace ―8443‖ (default port) by the port you setup during the VERDE Post
Installation phase and open this port in the server firewall configuration.

VERDE™ 4.5 Administrator Guide
Copyright © 2009-2010 Virtual Bridges, Inc. All Rights Reserved. 35
Login using your console administrator ID; the management console interface will open on the ―GOLD
IMAGES‖ page of the Configuration tab.
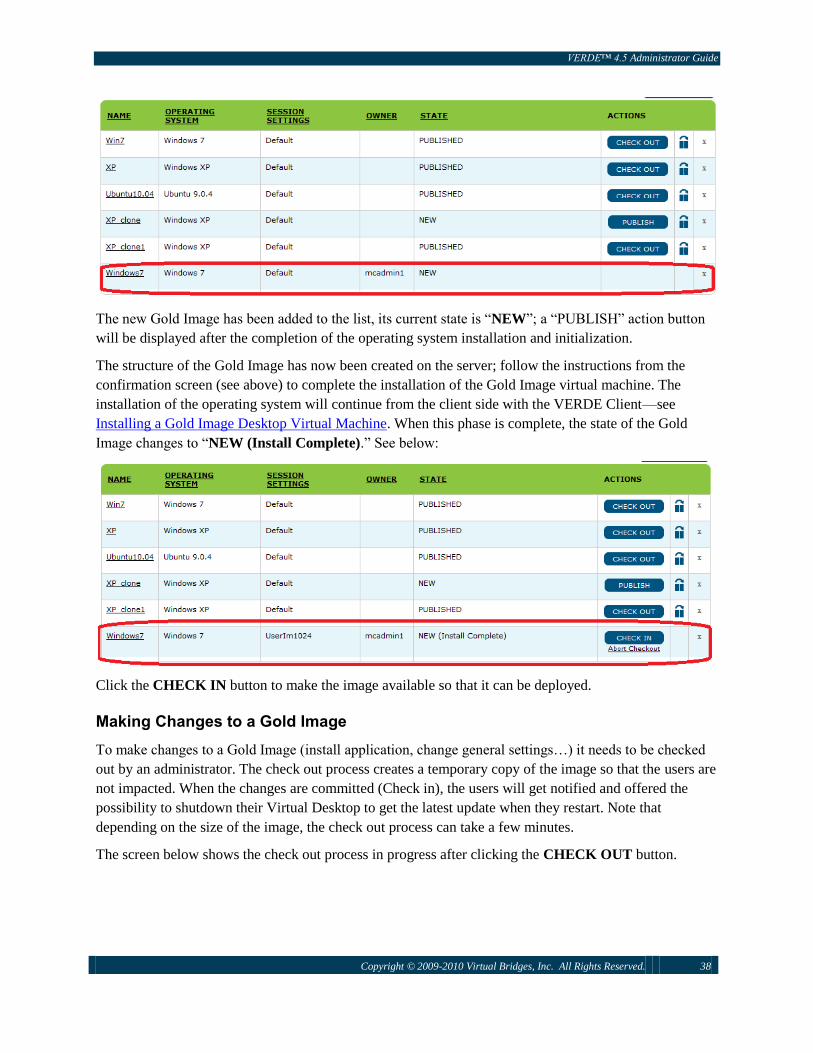
Managing Gold Images
Use this table to manage the life cycle of Gold Images. Only the administrator who checked out
an image can check it back in. Any master administrator may abort a check out, canceling any
changes made since check out.
The table displays the list of existing Gold Images—for each its name, operating system, virtual
session settings, status (New, Install Complete, Published…) and actions that can be performed
are displayed:
Create New Images, check-in, check-out, delete, clone existing images.
Creating a New Gold Image
Updating an existing Gold Image – Check out/Check in process
Cloning a Gold Image
Importing Gold Images
Deleting a Gold Image

VERDE™ 4.5 Administrator Guide
Copyright © 2009-2010 Virtual Bridges, Inc. All Rights Reserved. 36
Creating a New Gold Image
This screen capture shows several existing Gold Images (Win7, XP, Ubuntu …) Three of them have been
published (―PUBLISHED‖ in the State column) and Win7 has been checked out for update (note the
―CHECKIN‖ button available in the ―Actions‖ column). The XP clone is new and still has to be
published (―PUBLISH‖ button in the Actions column).
To create a new Gold Image, click the ―CREATE NEW‖ button.
1 Enter the Gold Image Name (No space).
2 Enter Gold Image Title and Description (optional).

VERDE™ 4.5 Administrator Guide
Copyright © 2009-2010 Virtual Bridges, Inc. All Rights Reserved. 37
3 Choose the Operating System from the drop-down list.
4 Click Next.
Next:
1 Select the installation media (the location where the operating system installation code resides).
The installation can be done from the local CD/DVD drive or another location which contains the
image (―iso‖ files) of the operating system.
Note: To get a Linux guest installation to ―PXE boot‖ for the install, you have to specify
/usr/lib/verde/etc/PXE.BOOT in the ―Image File (ISO)‖ field and select Session Settings
which have ―Bridge Networking‖ enabled.
2 Select the System Image Max Size from the drop-down list. This is the maximum size allowed for
guest virtual C: (system) volume size in GB (default: 8 for Windows XP, 16 for Windows 7)
3 Select the Session Settings for this image; see Manage Sessions Settings for details on how to
define these settings.
4 Click CREATE NEW IMAGE, and then CLOSE
VERDE™ 4.5 Administrator Guide
Copyright © 2009-2010 Virtual Bridges, Inc. All Rights Reserved. 38
The new Gold Image has been added to the list, its current state is ―NEW‖; a ―PUBLISH‖ action button
will be displayed after the completion of the operating system installation and initialization.
The structure of the Gold Image has now been created on the server; follow the instructions from the
confirmation screen (see above) to complete the installation of the Gold Image virtual machine. The
installation of the operating system will continue from the client side with the VERDE Client—see
Installing a Gold Image Desktop Virtual Machine. When this phase is complete, the state of the Gold
Image changes to ―NEW (Install Complete).‖ See below:
Click the CHECK IN button to make the image available so that it can be deployed.
Making Changes to a Gold Image
To make changes to a Gold Image (install application, change general settings…) it needs to be checked
out by an administrator. The check out process creates a temporary copy of the image so that the users are
not impacted. When the changes are committed (Check in), the users will get notified and offered the
possibility to shutdown their Virtual Desktop to get the latest update when they restart. Note that
depending on the size of the image, the check out process can take a few minutes.
The screen below shows the check out process in progress after clicking the CHECK OUT button.

VERDE™ 4.5 Administrator Guide
Copyright © 2009-2010 Virtual Bridges, Inc. All Rights Reserved. 39
After the check out completes, the Gold Image is available for update. The state remains ―PUBLISHED‖
and there is an ―Abort Checkout‖ link below the CHECK IN button. Use this link if you decide to
cancel the changes made to the Gold Image.
Launch the VERDE Client and login with the image owner’s ID (VERDE Console administrator).
When the update is completed, click the CHECK IN button to deploy the changes.
Note: The users running an active VDI session with the dynamic instance of this Gold Image will
be notified of the update and will be prompted to shutdown and restart their session. See
Customizing the Gold Image Update Pop-up Message and Frequency to customize the
notification message and frequency
Cloning a Gold Image
A clone of a Gold Image is a copy of an existing image. It is very useful if you want to keep an image as a
reference and start from there to test and/or install new applications. It is an easy way to start from an
existing environment without having to create a new image and go through the operating system and
applications installation and configuration.
To create a clone of a Gold Image, click the icon on the image you want to clone.
Fill in the fields in the Clone window.

VERDE™ 4.5 Administrator Guide
Copyright © 2009-2010 Virtual Bridges, Inc. All Rights Reserved. 40
Note: The Title is optional but if left blank the clone will be listed with the same title as the original Gold
Image in the guest list when launching the client.
Click CREATE CLONE.
The cloned image will be listed with the other Gold Images.
Importing Gold Images
With the VERDE Management Console, it is possible to import Gold Images from a previous installation.
If the console detects existing images, the IMPORT button will be activated. Simply click the button and
the images will be imported and manageable from the console.
Note: To be seen by the management console as ―importable,‖ the Gold Images must reside in the
console administrator’s home directory (/home/mcadmin in our example). The structure of a Gold Image
is a directory whose name is the name of the Gold Image itself (ex: Windows7). The directory contains
the image files and some configuration files. The Gold Images can be copied to the appropriate location;
just be careful to copy the entire content of that directory (not only the GUEST.IMG and USER.IMG files,
but also the ―.xxx‖ files).
After copying the folder, change the ownership of the folder so that the owner of the copied folder and
files is the VERDE Management Console administrator who is importing the image (mcadmin).
See below the Gold Image page with the IMPORT button activated.
Click the IMPORT button.

VERDE™ 4.5 Administrator Guide
Copyright © 2009-2010 Virtual Bridges, Inc. All Rights Reserved. 41
The operation takes a few seconds and the imported image will appear as ―NEW (Install Complete)‖ in
the list of Gold Images. In the example below, we have imported Windows 7 and Windows XP Gold
Images (―Win7‖ and ―XP‖). They are now ready to be checked in and then deployed to users. Note that
the IMPORT button is now grayed.
Deleting a Gold Image
To delete a Gold Image, click the ―x‖ on the far right column of the table, click OK on the confirmation
screen.
Managing Desktop Policies
Use this table to determine which Gold Images will be accessible by which users. You may enter
multiple values in the User/Group column, separated by spaces (e.g. "tom.smith Marketing
Sales").
Deploying a Gold Image to a User/Group:

VERDE™ 4.5 Administrator Guide
Copyright © 2009-2010 Virtual Bridges, Inc. All Rights Reserved. 42
Click the ―EDIT‖ button to assign or remove images, and then choose ―SESSION SETTINGS.‖
Click ADD RULE.
1 In the ―Add Rule‖ Window, enter the user or group to whom you want to deploy the image. Note
that the user must exist on the Linux server as explained in the Creating User Account section.
Note: To specify a group, enter ―%‖ before be name (ex: %verdegroup)
2 Select the Gold Image from the drop-down list
3 Save the new rule
In this example we deployed a Windows 7 image (Win7) to the user verde4 and we applied the session
setting rule RDP 768 (RAM 768MB, 1GB user data space, NAT) defined in the Manage Session Settings
section.

VERDE™ 4.5 Administrator Guide
Copyright © 2009-2010 Virtual Bridges, Inc. All Rights Reserved. 43
Close the confirmation window.
User verde4 can now start a Windows 7 desktop session that will use the ―Win7‖ Gold Image.
You can deploy more than one Gold Image per user/group. To do so, Click on the ―Add Image‖ link for
that User/Group.
In the ―Add Image‖ window:
1 Select the Gold Image to deploy from the drop-down list.
2 Make a selection from the Settings drop-down list.
3 Save your selection.
4 Click the UPDATE button to save the changes in the Desktop Policy page and exit the edit mode.

VERDE™ 4.5 Administrator Guide
Copyright © 2009-2010 Virtual Bridges, Inc. All Rights Reserved. 44
In this example we have deployed a Windows XP image with the default session settings to the user
verde4. In the Desktop Policy page, the user now been assigned two Gold Images.
Updating a Desktop Policy Rule
The rules assigned to users and groups can be updated by editing the Desktop Policy page.
1 Click the EDIT button.
2 Locate the rule that requires updating; make the necessary changes—Gold Image available,
session settings…
3 Click the UPDATE button.
Note: It is not possible to change the user data space (D: drive) by changing session settings in this
window. Even if a setting rule with a larger space is assigned, it will have no effect. This setting will be
taken into account when the session is launched for the first time.
If ―APPLY CUSTOM SETTINGS‖ is set to ―No,‖ the session will inherit the session settings of the Gold
Image, as defined in the ―GOLD IMAGES‖ page. See Managing Session Settings for more details on
changing session settings.
Undeploying a Gold Image
To undeploy a Gold Image to a user/group:
1 Open the Desktop Policy page.
2 Click EDIT.
3 Click the ―Remove‖ link for the corresponding image.

VERDE™ 4.5 Administrator Guide
Copyright © 2009-2010 Virtual Bridges, Inc. All Rights Reserved. 45
In this example below, the XP Gold Image will be removed (undeployed), and the verde1 user will be
left with Win7 image only.
Removing a Rule
To remove a rule for a user/group:
1 Open the Desktop Policy page.
2 Click EDIT.
3 Click the X icon (right) on the corresponding rule.
This will remove the desktop policy for the user verde4.
Changing the order of the rules in the Desktop Policy list
To change the order in which the rules are listed:
1 Click the EDIT button.
2 Edit the number in the ―Rule Number‖ column.
3 Click UPDATE.

VERDE™ 4.5 Administrator Guide
Copyright © 2009-2010 Virtual Bridges, Inc. All Rights Reserved. 46
Rule 1 for user verde1 is now in row 1 and verde4 in row 3, see below.
Managing Session Settings
Use this page to create and manage the environment for your virtual sessions in terms of system
resources, networking, and access to peripherals. The settings you create can be assigned to a
Gold Image as the default environment for that image, or can be used to customize the
environment for a specific rule in the ―Desktop Policies‖ page.
Note: The RAM and Max Size User Image must be the same in the session settings used to create
the Gold Image and in the session settings applied to deploy the Gold Image to a user or group
(Desktop Policy page). Creating a Gold Image with a User Image size and deploying with a larger
one can be problematic. Windows ―thinks‖ that hardware has been added and the user can be put
in a ―reboot loop‖. Linux guests do not seem to have this problem, but we recommend staying
consistent with these settings.
The table below lists the parameters available:
Option Description

VERDE™ 4.5 Administrator Guide
Copyright © 2009-2010 Virtual Bridges, Inc. All Rights Reserved. 47
Option Description
RAM Amount of RAM, in MB allocated to the guest session – 4MB
increment. guest (default: 128MB for Windows XP, 512MB for
Windows 7)
Max Size for user image
(MB)
Maximum guest virtual D: (user data) volume size, in MB; valid
values: 512, 1024, 2048, 4096, 8192, 18384, 32768 (default: 2048)
Store user document files
outside the user image
By default the user document files are stored outside of the user image
(USER.IMG).
Keyboard input language Choose your keyboard language from the list.
Virtual CPU Number of virtual CPU available for the guest operating system. Vaild
values: 1, 2, 4, 8.
Note: This parameter has no effect for Windows XP guests.
Network Type Type of networking to present to virtual machine environment: Basic,
NAT, or Bridged. More information in Virtual Desktop Networking.
Note: If NAT networking in deployed instances, the Gold Image also
needs to use session settings with NAT networking. The Gold Image
has to be started one time at least with NAT networking configured.
That way all the drivers and configuration necessary is done just once,
automatically, by Windows, and then inherited by the user desktops.
Bridge Interface Host network device to bridge virtual machine to (for example, eth0);
you must specify this value if using bridged networking, and the host
networking adapter must also be configured to allow bridging.
Printing Enable printing to a default host or client printer from virtual machine.
For more information about printing, see Printing in the ―Connecting
Remote Users to VERDE‖ chapter.
File Sharing The following parameters refer to shared folders on the host only. VDI
clients can always access local folders if those folders are shared on the
client and the option is selected in the Virtual Bridges Client connection
dialog box.
Clipboard Allow cut/copy and paste between guest and host applications, or
between guest and client applications
From the Session Settings page:

VERDE™ 4.5 Administrator Guide
Copyright © 2009-2010 Virtual Bridges, Inc. All Rights Reserved. 48
Click the ―Create New‖ button to create a new session setting rule. The OVERRIDE SYSTEM
box needs to be checked for a corresponding parameter so that the change can take effect.
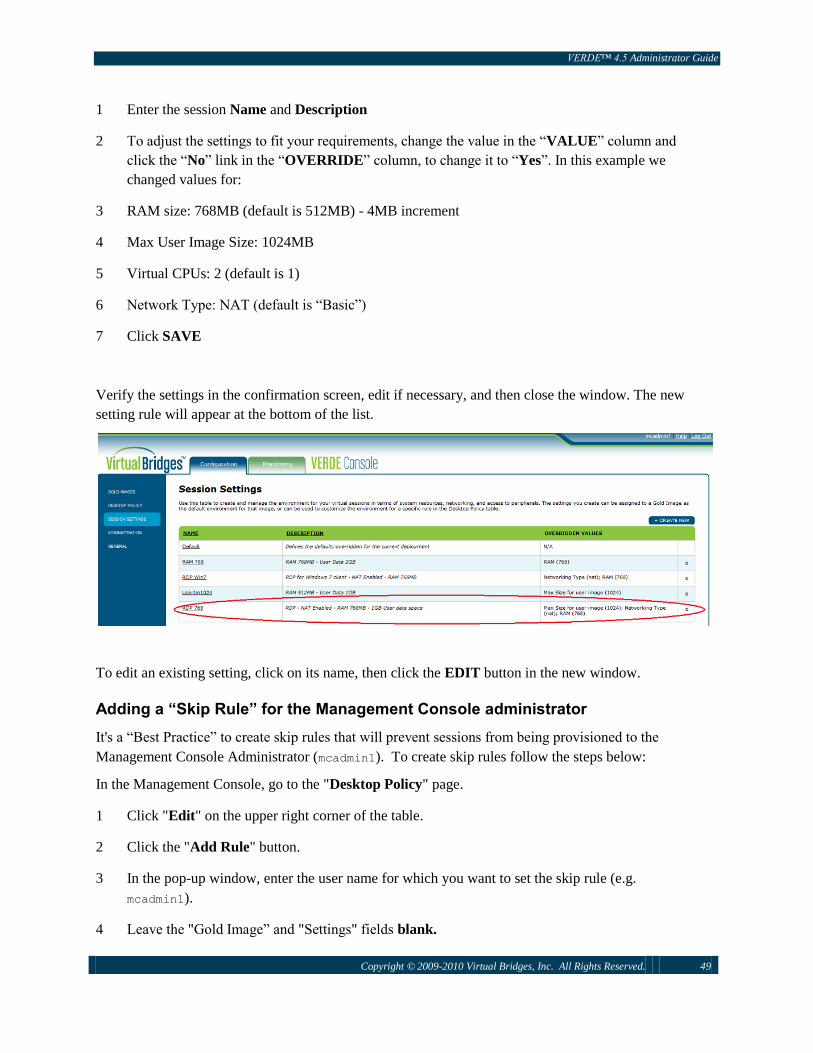
VERDE™ 4.5 Administrator Guide
Copyright © 2009-2010 Virtual Bridges, Inc. All Rights Reserved. 49
1 Enter the session Name and Description
2 To adjust the settings to fit your requirements, change the value in the ―VALUE‖ column and
click the ―No‖ link in the ―OVERRIDE‖ column, to change it to ―Yes‖. In this example we
changed values for:
3 RAM size: 768MB (default is 512MB) - 4MB increment
4 Max User Image Size: 1024MB
5 Virtual CPUs: 2 (default is 1)
6 Network Type: NAT (default is ―Basic‖)
7 Click SAVE
Verify the settings in the confirmation screen, edit if necessary, and then close the window. The new
setting rule will appear at the bottom of the list.
To edit an existing setting, click on its name, then click the EDIT button in the new window.
Adding a “Skip Rule” for the Management Console administrator
It's a ―Best Practice‖ to create skip rules that will prevent sessions from being provisioned to the
Management Console Administrator (mcadmin1). To create skip rules follow the steps below:
In the Management Console, go to the "Desktop Policy" page.
1 Click "Edit" on the upper right corner of the table.
2 Click the "Add Rule" button.
3 In the pop-up window, enter the user name for which you want to set the skip rule (e.g.
mcadmin1).
4 Leave the "Gold Image‖ and "Settings" fields blank.

VERDE™ 4.5 Administrator Guide
Copyright © 2009-2010 Virtual Bridges, Inc. All Rights Reserved. 50
5 Click Save.
6 Change the Rule Number for the ―Stop Matching‖ rule to ―1‖. The skip rules must be at the top of
the list.
7 Click ―Update‖ on the upper left corner.
The new rule will display "Stop matching" in the Gold Image column; see below:
Managing VERDE Console Administrators
Use this table to create and manage administrators of VERDE Console. A master administrator
has the privileges to create other administrators, and to abort a check out of a Gold Image.
Adding a New Administrator
To add a new administrator or to manage existing administrators, go to the ―ADMINISTRATION‖
page.
Click ―CREATE NEW‖ to add a new administrator

VERDE™ 4.5 Administrator Guide
Copyright © 2009-2010 Virtual Bridges, Inc. All Rights Reserved. 51
1 Check the Master box if this new administrator is a master administrator. A master administrator
has the privileges to create other administrators, and to abort a check out of a Gold Image. He/she
cannot checkout images created by other administrators.
2 Click SAVE.
Admin1 has been created; this new administrator is not a Master Administrator.
Removing an Administrator
To remove an administrator, click the ―X‖ icon. See below:
Monitoring the VERDE environment
The Monitoring page displays the active user sessions (User page) and the server usage (Server page).
Users Monitoring
The figure below displays three user sessions, with some information about each session.
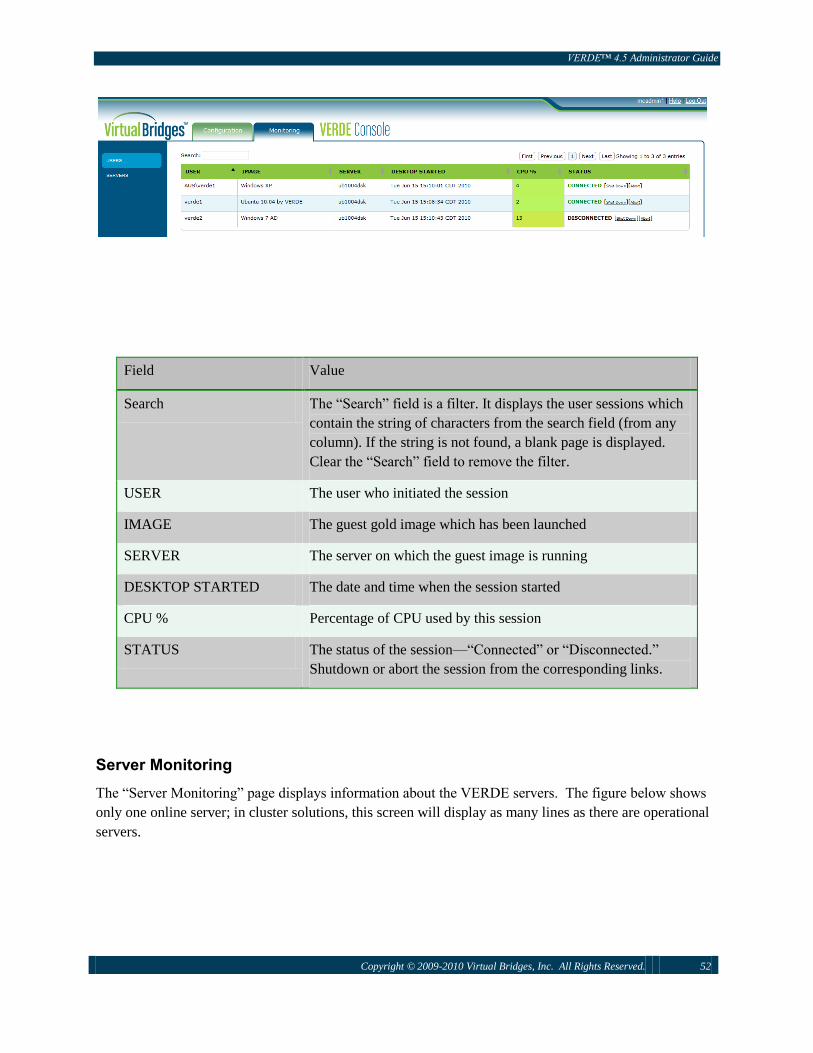
VERDE™ 4.5 Administrator Guide
Copyright © 2009-2010 Virtual Bridges, Inc. All Rights Reserved. 52
Field Value
Search The ―Search‖ field is a filter. It displays the user sessions which
contain the string of characters from the search field (from any
column). If the string is not found, a blank page is displayed.
Clear the ―Search‖ field to remove the filter.
USER The user who initiated the session
IMAGE The guest gold image which has been launched
SERVER The server on which the guest image is running
DESKTOP STARTED The date and time when the session started
CPU % Percentage of CPU used by this session
STATUS The status of the session—―Connected‖ or ―Disconnected.‖
Shutdown or abort the session from the corresponding links.
Server Monitoring
The ―Server Monitoring‖ page displays information about the VERDE servers. The figure below shows
only one online server; in cluster solutions, this screen will display as many lines as there are operational
servers.
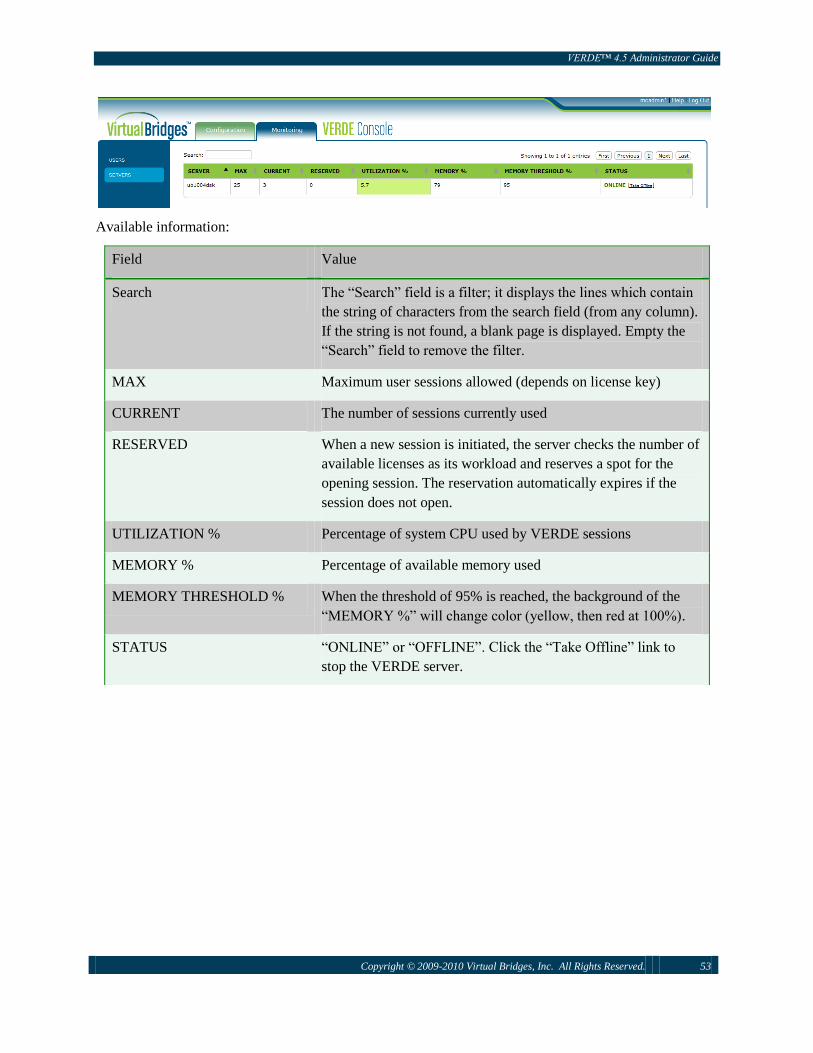
VERDE™ 4.5 Administrator Guide
Copyright © 2009-2010 Virtual Bridges, Inc. All Rights Reserved. 53
Available information:
Field Value
Search The ―Search‖ field is a filter; it displays the lines which contain
the string of characters from the search field (from any column).
If the string is not found, a blank page is displayed. Empty the
―Search‖ field to remove the filter.
MAX Maximum user sessions allowed (depends on license key)
CURRENT The number of sessions currently used
RESERVED When a new session is initiated, the server checks the number of
available licenses as its workload and reserves a spot for the
opening session. The reservation automatically expires if the
session does not open.
UTILIZATION % Percentage of system CPU used by VERDE sessions
MEMORY % Percentage of available memory used
MEMORY THRESHOLD % When the threshold of 95% is reached, the background of the
―MEMORY %‖ will change color (yellow, then red at 100%).
STATUS ―ONLINE‖ or ―OFFLINE‖. Click the ―Take Offline‖ link to
stop the VERDE server.

VERDE™ 4.5 Administrator Guide
Copyright © 2009-2010 Virtual Bridges, Inc. All Rights Reserved. 54
Installing a Gold Image Desktop Virtual Machine
This section describes how to create a Gold Image virtual machine. This process will take you through the
installation steps of the operating system of your choice. It starts on the server side (via command lines)
or with the VERDE Management Console, which provides a graphical interface to manage the images.
This is a two phase process:
Phase 1 prepares the structure to receive the Gold Image on the VERDE server.
Phase 2 consists of the installation of the operating system itself. This can be done either locally
on the server or from a remote workstation with the VERDE Client software; in most cases the
server will not be physically accessible.
Desktop Virtual Machine Prerequisites
Before you continue, verify all of the following:
Created User Accounts, see Creating User Accounts if you have not done it (home directories must
reside on the same file system).
You have a bootable CD, DVD, or an .iso image on a CD or DVD accessible to the VERDE server.
The CD or DVD must contain a bootable operating system installation disc or an .iso image.
You have licensed your guest operating system. You are responsible for obtaining licensing, if
required, for your guest operating system. Virtual Bridges, Inc. does not license guest operating
systems.
IMPORTANT: You now have to choose between two options to manage your Gold Images:
Installing Gold Images with the VERDE Management Console
Installing Gold Images with the Command Line Interface
Note: It is not possible to switch back and forth between the two methods; Gold Images created with the
command line interface will not be visible from the VERDE Management Console unless they are
imported in the console. Once imported, they will not be manageable anymore from the command line
interface.
Never install or start a virtual desktop as the root user on your system. Virtual desktops can be installed
for and used by non-root users only! If you use the VERDE Console, the installation will be conducted
with a console administrator user.
Gold Images Considerations – VERDE 4.3 and Higher
VERDE 4.3 introduced major changes in the structure of the Gold Images. Starting with this version,
Windows XP and Windows 7 Gold Images will have these new characteristics. Gold Images created
prior to version 4.3 still work but will not benefit from these changes.

VERDE™ 4.5 Administrator Guide
Copyright © 2009-2010 Virtual Bridges, Inc. All Rights Reserved. 55
1 Virtual floppy drives are no longer used (except during Windows installation), and will be visible
in the Windows file manager after the installation is complete.
2 While drive D: is still the default user disk, it is now also mounted into C:\VERDEUsers. Drive D:
can be safely unmounted (and not used). Use the Windows disk manager in Computer Management
in a Gold Image after installation, or change the drive letter if desired.
Note: Do not touch C:\VERDEUsers; it MUST be left alone.
3 Windows XP now uses the same user state separation as Windows 7, which means users must log
out of their session (not just close the client) in order for their session changes to be continued. By
default, user documents are written synchronously.
4 The setting to store documents inside the VM (Store User document files outside user
image = yes/No) is now honored, but this must be set before a user starts a desktop session for the
first time. By default, once the first desktop session is started from a given image, the Document
folders are configured automatically to be stored outside the VM in the user’s Documents’ folder
($HOME/Documents).
5 Users must never make changes to the network settings for the first ―Local Area Network
Connection;‖ it is configured during the Gold Image creation and should be left alone.
6 The program ―vbverdeuser_bootstrap.exe‖ in the users StartUp folder must NOT be deleted. It
is present in the ―All Users Startup folder.‖ This program starts the user portion of the guest agent.
7 In the VERDE Client, printing is no longer configured by default. In order to configure printing in
Windows Gold Image, the administrator has to add a network printer: \\HOST\client-printer
manually (using a generic PostScript driver as described in the Administrator Guide). See Printing.
8 RDP is enabled by default in Windows 7 guests. In Windows XP guests, the Windows firewall
must be disabled in the Gold Image manually (or the Remote Desktop service must be allowed as
an exception).
9 Shell Folders for My Pictures, My Videos, and My Music are now subdirectories of My
Documents (if storing documents outside the VM, they will be in \\HOST\Documents\*) To access
old pictures, videos, and music created with older VM's, simply browse to My Documents.
10 Windows 2000 Gold Image installations are no longer supported.
Existing Windows 2000 images will continue to run, but you cannot install new ones starting with
VERDE 4.3.
11 We have introduced VERDE Tools. They will be used to complete the Gold Image post-installation
if this step has been missed during the standard Gold Image installation process. See VERDE
Installation Script – VERDE Tools.

VERDE™ 4.5 Administrator Guide
Copyright © 2009-2010 Virtual Bridges, Inc. All Rights Reserved. 56
Installing Gold Images with the VERDE Management Console
Please refer to the VERDE Management Console section for more information on how to use the
management console.
This section will take you through the creation of a Gold Image with the VERDE Management Console.
Launch the management console and login as a console administrator user (mcadmin):
http://<server-name-or-IP>:8080/mc or https://<server-name-or-IP>:8443/mc
From the Gold Images page, click the ―CREATE NEW" button (upper right)

VERDE™ 4.5 Administrator Guide
Copyright © 2009-2010 Virtual Bridges, Inc. All Rights Reserved. 57
The above example shows the creation of a new Windows 7 Gold Image, named Windows7. To create
Windows XP, or Linux Gold Images, select the system of your choice from the Operating System drop-
down list.
1 Enter the Gold Image Name (No space).
2 Enter Gold Image Title and Description (optional).
3 Choose the Operating System from the drop-down list.
4 Click NEXT.
1 Select the installation media (the location where the operating system installation code reside).
The installation can be done from the local CD/DVD drive or another location which contains the
images (―iso‖ files) of the operating system.

VERDE™ 4.5 Administrator Guide
Copyright © 2009-2010 Virtual Bridges, Inc. All Rights Reserved. 58
Note: To get a Linux guest installation to ―PXE boot‖ for the install, you have to specify
/usr/lib/verde/etc/PXE.BOOT in the ―Image File (ISO)‖ field and select Session Settings
which have ―Bridge Networking‖ enabled.
2 Select the System Image Max Size from the drop-down list. This is the maximum size allowed
for the guest virtual C: (system) volume size in GB (default: 8 for Windows XP, 16 for Windows
7)
3 Select the Session Settings for this image, see the Manage Sessions Settings section for details on
how to define these settings.
4 Click CREATE NEW IMAGE.
The structure of the Gold Image has now been created on the server; follow the instructions from the
confirmation screen above to complete the installation.
The installation will now continue from the client side.
Launch the VERDE Client–See Connecting Remote Users to VERDE for more information on how
install the VERDE Client.

VERDE™ 4.5 Administrator Guide
Copyright © 2009-2010 Virtual Bridges, Inc. All Rights Reserved. 59
1 Enter the VERDE Server address
2 User Name and Password: User name of the administrator who created the Gold Image
(mcadmin1)
3 Click Connect
The operating system installation will now start in the virtual desktop session.
Please refer to the corresponding section and follow the installation steps for the operating system of your
choice:
Installing A Windows XP Virtual Machine Image
Installing a Windows 7 Virtual Machine Image: Skip the steps involving command lines and go
directly to Step 5 through Step 12 of the installation, the beginning of the graphical part of the
operating system installation.
Installing a Linux Desktop Virtual Machine Image: Skip the steps involving command lines and go
directly to Step 6 of the installation, the beginning of the graphical part of the operating system
installation.
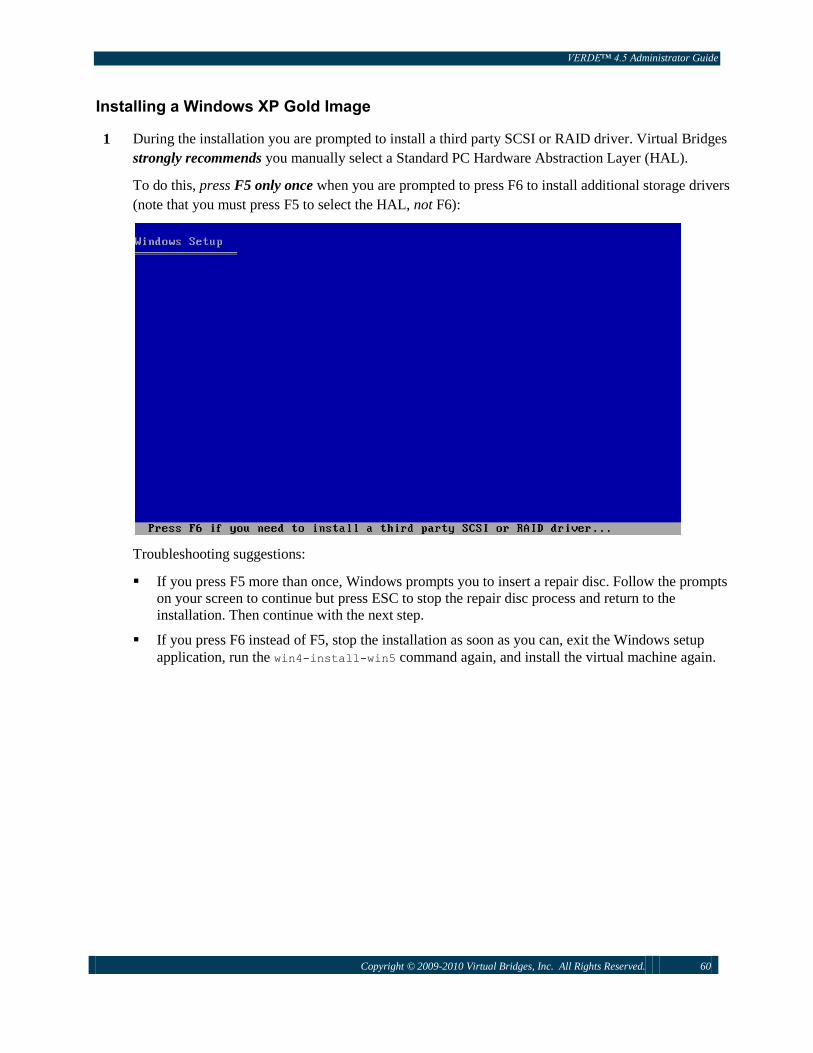
VERDE™ 4.5 Administrator Guide
Copyright © 2009-2010 Virtual Bridges, Inc. All Rights Reserved. 60
Installing a Windows XP Gold Image
1 During the installation you are prompted to install a third party SCSI or RAID driver. Virtual Bridges
strongly recommends you manually select a Standard PC Hardware Abstraction Layer (HAL).
To do this, press F5 only once when you are prompted to press F6 to install additional storage drivers
(note that you must press F5 to select the HAL, not F6):
Troubleshooting suggestions:
If you press F5 more than once, Windows prompts you to insert a repair disc. Follow the prompts
on your screen to continue but press ESC to stop the repair disc process and return to the
installation. Then continue with the next step.
If you press F6 instead of F5, stop the installation as soon as you can, exit the Windows setup
application, run the win4-install-win5 command again, and install the virtual machine again.

VERDE™ 4.5 Administrator Guide
Copyright © 2009-2010 Virtual Bridges, Inc. All Rights Reserved. 61
2 Then select either the Standard PC or Standard PC with C-Step i486 option as follows.
3 Follow the prompts on your screen to complete the Windows XP installation.
If prompted, enter your Windows product key.
The virtual machine session ends automatically when the Windows installer finishes.
4 Launch the VERDE Client and login as the Gold Image administrator. This will start a new
virtual session and launch the operating system that has just been installed, so that you can run
some initial configuration steps.
5 Continue with Initially Configuring the Virtual Desktop.
6 After completing the initial Virtual Desktop configuration, please go to Provisioning a Gold
Image Virtual Machine.
Installing Gold Images with the Command Line Interface
After you select the user account that will host the Gold Image desktop virtual machine as discussed in
Creating User Accounts, log in as that user. Next, use the win4-install-win5, win4-install-win7, or the
win4-install-linux command to install a Windows XP, Windows 7, or Linux virtual machine, respectively,
as discussed in this section.
See the following sections for more information:
Desktop Virtual Machine Prerequisites
Command Line Installation of a Windows Virtual Machine Image
VERDE™ 4.5 Administrator Guide
Copyright © 2009-2010 Virtual Bridges, Inc. All Rights Reserved. 62
For information about Windows 7 installation, see Windows 7 Command-Line Examples and
Installation
Installing a Linux Desktop Virtual Machine Image
Command Line Installation of a Windows Virtual Machine
Image
Usage:
Windows XP: win4-install-win5 [options] [config-name]
Windows 7: win4-install-win7 [options] [config-name]
Option Description
-h Display help usage
-X Start a deferred installation. A deferred installation is useful if you do not have the
ability to run X11 remotely from the VERDE server. A deferred installation has two
parts: creating an installation image using the win4-install-{win | win7}
command, and logging in to the VERDE server with the VERDE Client to complete
the Windows installation.
-K Use safer (that is, slower) VM settings
-r Overwrite an existing installation
-y Do not prompt to overwrite or install
-i Install a desktop icon when the installation completes1
-m
size
Amount of RAM, in MB, for the guest (default: 128 for Windows XP, 512 for
Windows 7)
-d
size
Maximum guest virtual C: (system) volume size, in GB (default: 8 for Windows XP,
16 for Windows 7)
-D
size Maximum guest virtual D: (user) volume size, in MB; valid values: 512, 1024, 2048,
4096, 8192, 18384, 32768 only!
(default: 2048)
-c
path
Name of CD/DVD device or .iso image file (default: CD device guessed)
-k key Windows Product Key to pass to Windows Installer (default: prompt)
-t
―title‖
Virtual Machine Window title (default: config-name)1
1—The –i and –t options are generally not needed when deploying in a VDI model because users will
never log in to their underlying host Linux desktops.
config-name:

VERDE™ 4.5 Administrator Guide
Copyright © 2009-2010 Virtual Bridges, Inc. All Rights Reserved. 63
The configuration name to install (default if not specified: win4). A subfolder of the user’s home
directory will be created with this name and the virtual machine configuration files and disk images will
be stored there. (With our previous example the installation directory which contains the Gold Image will
be created in /home/verde-admin/win4). To backup a Gold Image you can make a copy of the
installation directory, see also Backing up the Virtual Desktop and Data.
Windows XP Command-Line Examples and Installation
This section discusses some command-line examples and a sample installation for Windows XP. It is very
important that you install a Windows XP virtual machine properly so Virtual Bridges strongly
recommends you review this section carefully. Improper installation can render your virtual machine
unusable.
Command line examples for Windows XP:
Examples of installation from a CD/DVD device, or an image file (.iso).
Example 1: install a Windows XP virtual desktop, with the bootable Windows CD in the default
CD/DVD device on the system, under the default configuration name win5:
win4-install-win5
Example 2: install a Windows XP virtual desktop, from an ISO 9660 image (winxpro.iso) of a bootable
Windows CDROM in your home directory, under the default configuration name win4:
win4-install-win5 -c $HOME/winxppro.iso
Example 3: install a Windows XP virtual desktop, from an ISO 9660 image of a bootable Windows
CDROM in your home directory, with 16GB virtual C: disk size, under the configuration name winxp:
win4-install-win5 -c $HOME/winxppro.iso -d 16 winxp
Sample Windows XP Installation
1 Insert the Windows XP installation CD-ROM in the computer’s CD-ROM drive or put an .iso
image in a location accessible to the installation.
Have your Windows XP product key ready.
2 Log in to the VERDE server remotely using an SSH application or use an X-terminal application
either remotely or locally. Log in to the VERDE server as the non-root user you created for the
installation (in this example, the user name is verde-admin).

VERDE™ 4.5 Administrator Guide
Copyright © 2009-2010 Virtual Bridges, Inc. All Rights Reserved. 64
3 Enter a command similar to the following as the non-root (ex: verde-admin)user:
win4-install-win5 -X -m 256 -t "Windows XP by VERDE" winxp
The following message displays:
Installation setup complete. You may run this installation as follows:
/usr/lib/verde/bin/win4 winxp
The preceding command starts a Windows XP installation using the default CD-ROM drive. The
virtual machine has 256MB of RAM and the default user disk space size of 2GB. The virtual
machine has a title Windows XP by VERDE and a configuration name of winxp.
The installation is deferred, meaning it can be started remotely using an SSH application. The
installation must be completed on the VERDE server, as discussed in the next step.
4 Because a deferred installation is used in this example, you must log in to the VERDE server and
enter the following command as the non-root user or complete the installation from a remote
workstation using the VERDE Client:
/usr/lib/verde/bin/win4 winxp
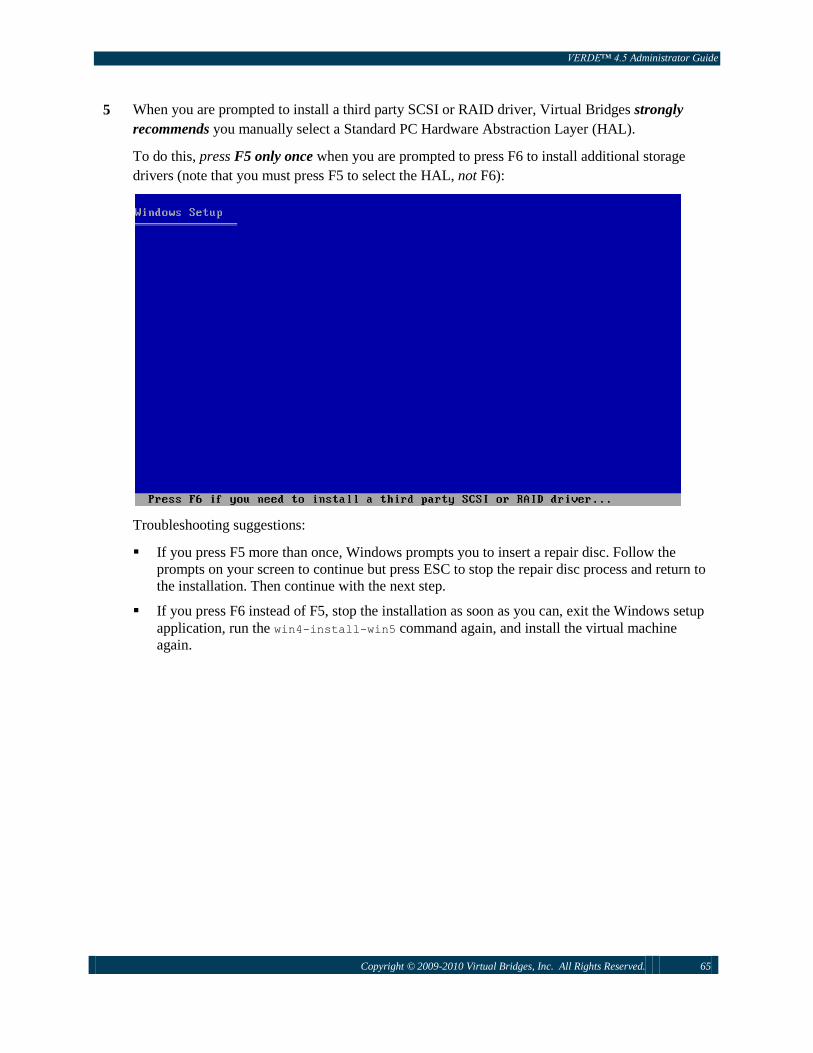
VERDE™ 4.5 Administrator Guide
Copyright © 2009-2010 Virtual Bridges, Inc. All Rights Reserved. 65
5 When you are prompted to install a third party SCSI or RAID driver, Virtual Bridges strongly
recommends you manually select a Standard PC Hardware Abstraction Layer (HAL).
To do this, press F5 only once when you are prompted to press F6 to install additional storage
drivers (note that you must press F5 to select the HAL, not F6):
Troubleshooting suggestions:
If you press F5 more than once, Windows prompts you to insert a repair disc. Follow the
prompts on your screen to continue but press ESC to stop the repair disc process and return to
the installation. Then continue with the next step.
If you press F6 instead of F5, stop the installation as soon as you can, exit the Windows setup
application, run the win4-install-win5 command again, and install the virtual machine
again.

VERDE™ 4.5 Administrator Guide
Copyright © 2009-2010 Virtual Bridges, Inc. All Rights Reserved. 66
6 Then select either the Standard PC or Standard PC with C-Step i486 option as follows.
7 Follow the prompts on your screen to complete the Windows XP installation.
If prompted, enter your Windows product key.
The virtual machine session ends automatically when the Windows installer finishes.
8 Log in to the computer as the non-root user.
9 Enter the following command or launch the VERDE Client as the non-root user
win4 winxp (where winxp is the configuration name you chose earlier).
This starts the Windows virtual desktop.
10 Continue with Starting the Virtual Desktop.
Windows 7 Command-Line Examples and Installation
This section discusses some command-line examples and a sample installation for Windows 7. It is very
important that you install a Windows 7 virtual machine properly so Virtual Bridges strongly recommends
you review this section carefully. Improper installation can render your virtual machine unusable.
Command line examples to install Windows 7:
VERDE™ 4.5 Administrator Guide
Copyright © 2009-2010 Virtual Bridges, Inc. All Rights Reserved. 67
Example 1: Install a Windows 7 virtual desktop, with the bootable Windows DVD in the default DVD
device on the system, under the default configuration name win4:
win4-install-win7
Example 2: Install a Windows 7 virtual desktop, from an ISO 9660 image of a bootable Windows 7 DVD
in your home directory, under the default configuration name win4:
win4-install-win7 -c $HOME/win7.iso
Example 3: Install a Windows 7 virtual desktop, from an ISO 9660 image of a bootable Windows DVD in
your home directory, with 20GB virtual C: disk size, under the configuration name win7:
win4-install-win7 -c $HOME/winxppro.iso -d 20 win7
Windows 7 Sample Installation
In this example we are going to use the deferred installation option (-X) to install Windows 7. The first
installation step creates the environment to receive the Gold Image on the server. It can be done locally or
remotely using an SSH or X-terminal application. The second step will be done remotely. Use the
VERDE Client on the remote workstation to log in to the VERDE server to complete Windows
installation and create the Gold Image.
1 Insert the Windows 7 installation DVD-ROM in the computer’s DVD-ROM drive or put
an .iso image in a location accessible to the installation.
Have your Windows 7 product key ready.
2 Log in to the VERDE server remotely using an SSH application or use an X-terminal
application either remotely or locally. Log in to the VERDE server as the non-root user you
created for the installation (in this example, the user name is verde-admin).
3 Enter a command similar to the following as the non-root user (ex: verde-admin):
win4-install-win7 -X win7pro
The following message displays:
Installation setup complete. You may run this installation as follows:
/usr/lib/verde/bin/win4 win7pro
The preceding command starts a Windows 7 installation using the default DVD-ROM drive.
The virtual machine has the default 512MB of RAM and the default user disk space size of
16GB. The virtual machine has a configuration name of win7pro.
The installation is deferred, meaning it can be started remotely using an SSH application. The
installation must be completed on the VERDE server, as discussed in the next step.

VERDE™ 4.5 Administrator Guide
Copyright © 2009-2010 Virtual Bridges, Inc. All Rights Reserved. 68
4 Because a deferred installation is used in this example, you must log in to the VERDE server
and enter the following command as the non-root user:
/usr/lib/verde/bin/win4 win7pro
Note: If the installer stops with an out-of-memory error, you likely used the win4-install-
win5 command instead of the win4-install-win7 command to create the Gold Image. Enter
the win4-install-win7 command again as discussed in Command Line Installation of a
Windows Virtual Machine Image and start the process over.
5 When prompted for installation type, click Custom (advanced); do not click Upgrade.

VERDE™ 4.5 Administrator Guide
Copyright © 2009-2010 Virtual Bridges, Inc. All Rights Reserved. 69
6 At the following prompt, always click Disk 0 Unallocated Space; never click Disk 1.

VERDE™ 4.5 Administrator Guide
Copyright © 2009-2010 Virtual Bridges, Inc. All Rights Reserved. 70
7 When prompted to enter a user name, Virtual Bridges recommends you choose a generic user
name such as verde-xxx. Make sure to choose a computer name that is unique in your network
if you plan on joining the guest to Active Directory or otherwise configuring it for Bridged
networking.
If you are using Active Directory, you must specify the computer name\user name explicitly
when you log in to the Gold Image; therefore, Virtual Bridges recommends you avoid spaces in
the user name and do not choose something complicated.
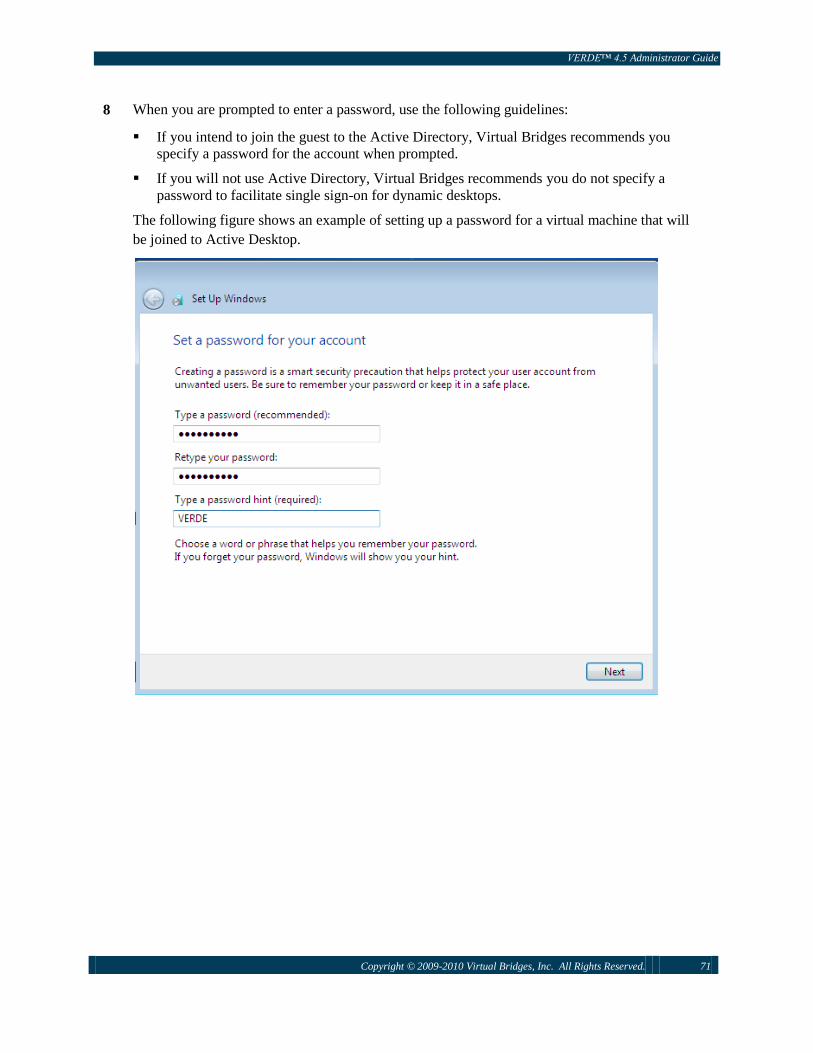
VERDE™ 4.5 Administrator Guide
Copyright © 2009-2010 Virtual Bridges, Inc. All Rights Reserved. 71
8 When you are prompted to enter a password, use the following guidelines:
If you intend to join the guest to the Active Directory, Virtual Bridges recommends you
specify a password for the account when prompted.
If you will not use Active Directory, Virtual Bridges recommends you do not specify a
password to facilitate single sign-on for dynamic desktops.
The following figure shows an example of setting up a password for a virtual machine that will
be joined to Active Desktop.

VERDE™ 4.5 Administrator Guide
Copyright © 2009-2010 Virtual Bridges, Inc. All Rights Reserved. 72
9 If you are prompted to enter a product key, Virtual Bridges recommends you clear the
Automatically active Windows when I’m online check box. Instead, you should activate
Windows manually. This avoids excessive activations if you decide to reinstall the session
before the activation period expires.

VERDE™ 4.5 Administrator Guide
Copyright © 2009-2010 Virtual Bridges, Inc. All Rights Reserved. 73
10 When you are prompted to select protection settings, click Use recommended settings.

VERDE™ 4.5 Administrator Guide
Copyright © 2009-2010 Virtual Bridges, Inc. All Rights Reserved. 74
11 When prompted for the computer’s location, click Work network.
12 Allow Windows to download updates. Some Windows components might not work unless they
have been updated (for example, audio and video drivers).
13 After the Windows installation completes, click Start > Computer.

VERDE™ 4.5 Administrator Guide
Copyright © 2009-2010 Virtual Bridges, Inc. All Rights Reserved. 75
14 In the right pane, double-click the VERDE CD (CD Drive with the VERDE icon).
Note: It is very important that you run this post-installation script; otherwise the Gold Image
will miss VERDE components and will not be fully operational.
15 Then double-click FinishWin7Install.
16 At the User Account Control dialog box, click Yes.
17 The process runs in a command box and shuts down the session when done. Continue with
Starting the Virtual Desktop, Windows 7 Tasks.
18 After completing the initialization of the Virtual Desktop, proceed to Provisioning a Gold
Image Virtual Machine.
Installing a Linux Desktop Virtual Machine Image
This section discusses how to install a Linux desktop virtual machine. For a list of supported guest
operating systems, see Supported Guest Virtual Desktop Platforms.
Note for Red Hat and CentOS Gold Images installation: Once you log in to the VERDE Client as the
VERDE Management Console administrator (mcadmin1) and begin to build the image, you are presented

VERDE™ 4.5 Administrator Guide
Copyright © 2009-2010 Virtual Bridges, Inc. All Rights Reserved. 76
with the option of using partitions ―hda‖ and ―hdb‖. You must specify IGNORE for ―hdb‖. The
installation will use ―hda‖.
See one of the following topics:
Linux Installation Syntax
Linux Command-Line Examples and Installation
Linux Installation Syntax
Usage: win4-install-linux [options] [config-name]
Option Description
-h Displays help usage
-X Start a deferred installation. A deferred installation is useful if you
do not have the ability to run X11 remotely from the VERDE
server. A deferred installation has two parts: creating an
installation image using the win4-install-linux command, and
logging in to the VERDE server to complete the Linux installation.
-K Use safer (that is, slower) virtual machine settings
-S num Enable SMP in guest (experimental) … num is the number of
virtual CPUs to make available to guest, 2-81
-64 Use 64-bit guest CPU (experimental)2
-l Use legacy graphics mode (required for older Linux, such as SLED
10)
-a Use alternate mouse mode (required for some Linux, such as
SLED 11)
-r Overwrite an existing installation if present
-y Do not prompt to overwrite or install
-i Install a desktop icon when the installation completes3
-m size Amount of RAM for the guest, in megabytes (default: 256)
-d size Maximum guest virtual / (system) partition size, in GB (default:
12)
-H size Maximum guest virtual /home partition size, in MB; valid values:
1024, 2048, 4096, 8192, 16384 only! (default: 2048)

VERDE™ 4.5 Administrator Guide
Copyright © 2009-2010 Virtual Bridges, Inc. All Rights Reserved. 77
Option Description
-c path Name of CD/DVD device or .iso image file (default: CD device
guessed)
Note: To get a Linux guest installation to ―PXE boot‖ for the
install, you have to specify /usr/lib/verde/etc/PXE.BOOT in the
―Image File (ISO)‖ field and select Session Settings which have
―Bridge Networking‖ enabled. So you have to manually export
WIN4_NIC2_TYPE="bridged" and WIN4_NIC2_BRIDGE
variables in the environment
-t ―title‖ Virtual Machine Window title (default: config-name) 3
1— Enabling SMP in guest might require specifying an –m value of at least 512
2—64-bit guest support is limited to only certain Linux distributions. See Supported Host Platforms for
information on which 64-bit distributions are supported.
3—The –i and –t options are generally not needed when deploying in a VDI model, because users will
never log in to their underlying host Linux desktops.
config-name:
The configuration name to install (default if not specified: win4). A subfolder of the user's home directory
will be created with this name, and the virtual machine configuration files and disk images will be stored
there. Virtual Bridges suggests you use a name that describes the guest image, such as ubuntu8.0432.
Notes:
Do not use an unattended installation if your Linux distribution supports it. Doing so might prevent
your Gold Image from installing properly. For example, Ubuntu 8.04 has a 30-second timer on the
first installation page. Allowing 30 seconds to elapse without inputting any data enables Ubuntu to
install without additional user input. However, the resulting Gold Image is not usable.
Linux guest installations are not completely automatic and require you to interact with the installer of
the particular distribution of your choice. Following are some guidelines for installing Linux in the
guest virtual machine:
The virtual machine has 2 virtual disks—either /dev/hda and /dev/hdb, or /deb/sda and /deb/sdb,
depending on your Linux distribution. Do not install anything on nor initialize /dev/hdb or
/dev/sdb. If you are prompted to format it or initialize its partition table, always decline to do this.
The only disk you should write on is /dev/hda or /dev/sda.
Note: Initializing or writing to /dev/hdb or /dev/sdb with the Linux installer causes the virtual
machine installation to fail.
The –i and –t options are generally not needed when deploying in a VDI model because users will
never actually log in to their underlying host Linux desktops.
VERDE™ 4.5 Administrator Guide
Copyright © 2009-2010 Virtual Bridges, Inc. All Rights Reserved. 78
Linux Command-Line Examples and Installation
This section discusses some command-line examples and a sample installation for Linux. It is very
important that you install a Linux virtual machine properly so Virtual Bridges strongly recommends you
review this section carefully.
Linux Examples
Example 1: Start a deferred installation of an Ubuntu 8.0.4, 32-bit virtual desktop, with the bootable
Linux CDROM/DVD in the default CD/DVD device on the system using the configuration name
ubuntu80432:
win4-install-linux –X ubuntu80432
Example 2: Start a deferred installation of a Novell SUSE Enterprise Desktop 10 virtual desktop, from an
ISO 9660 image of a bootable Linux CDROM/DVD in your home directory, using the configuration
name SUSEDesktop10:
win4-install-linux -c $HOME/linux.iso –X SUSEDesktop10
Example 3: Install a Red Hat Enterprise 5, 64-bit virtual desktop, from an ISO 9660 image of a bootable
Linux CDROM/DVD in your home directory, with 16GB virtual system disk size, under the
configuration name RedHat564:
win4-install-linux -c $HOME/linux.iso -d 16 RedHat564
Linux Sample Installation
The following shows an example of Ubuntu 10.04 LTS 32-bit deferred installation, but the installation
steps will be very close for another Linux distribution.
1 Log in to the VERDE server as the non-root user you created for the installation (in this
example, the user name is verde-user-ubuntu8).
2 Insert the operating system CD-ROM in the VERDE server’s CD-ROM drive. In this example,
insert a CD-ROM containing the ISO image for Ubuntu 10.0.4, 32-bit, in the CD-ROM drive.
3 Start the deferred installation by entering the following command:
win4-install-linux -X ubuntu100432
The following message displays:
Installation setup complete. You may run this installation as follows:
/usr/lib/verde/bin/win4 ubuntu100432
4 Log in to the VERDE server as verde-user-ubuntu8.
5 Enter the following command:
win4 config-name
For example,
win4 ubuntu100432

VERDE™ 4.5 Administrator Guide
Copyright © 2009-2010 Virtual Bridges, Inc. All Rights Reserved. 79
6 The following window displays when the installation starts.
Notes:
If the VERDE Client dialog box displays, click Cancel, log in to the VERDE server remotely
using an SSH application, and run the win4-linux command again as shown in step 3.
Do not use an unattended installation if supported by your Linux distribution. Doing so might
disable your Gold Image. For example, Ubuntu 8.04 has a 30-second timer on the first
installation page. Allowing 30 seconds to elapse without inputting any data enables Ubuntu to
install without additional user input. However, the resulting Gold Image is not usable.
7 Select your language and click Install Ubuntu 10.04

VERDE™ 4.5 Administrator Guide
Copyright © 2009-2010 Virtual Bridges, Inc. All Rights Reserved. 80
8 At the Prepare disk space page, click the option to use the entire disk and click Forward.

VERDE™ 4.5 Administrator Guide
Copyright © 2009-2010 Virtual Bridges, Inc. All Rights Reserved. 81
9 At the Who are you? Page, enter the same login name and password as the non-root user you used
to create the Gold Image.
10 At the end of the installation, click Restart Now when prompted to do so.
Important: On Ubuntu, leave the CD-ROM in the CD drive until Ubuntu prompts you to remove
it; otherwise, the operating system might not restart.
Note: Other Linux distributions (such as Red Hat) prompt you to log in to the virtual desktop.

VERDE™ 4.5 Administrator Guide
Copyright © 2009-2010 Virtual Bridges, Inc. All Rights Reserved. 82
11 When the virtual computer restarts, log in as the non-root user.
Note: For other Linux distributions (such as Red Hat), you must log in as root.
Ubuntu 10.04 LTS will display the following screen.
12 Double-click the VERDE 4.0 CD-ROM on the desktop.
This enables you to run post-installation scripts that complete the desktop installation.
Note: It is very important that you run this post-installation script; otherwise the Gold Image will
miss VERDE components and will not be fully operational.

VERDE™ 4.5 Administrator Guide
Copyright © 2009-2010 Virtual Bridges, Inc. All Rights Reserved. 83
13
In the root folder of the VERDE 4.0 CD-ROM, double-click the post-installation script for your
Linux distribution.
For Ubuntu 10.04, double-click Finish Ubuntu Lucid Install as shown in the following example.
15 Click ―Run in Terminal‖ and enter the user’s password.
When the post-installation script completes, the virtual desktop shuts down.
16 Continue with the next section, Linux Task

VERDE™ 4.5 Administrator Guide
Copyright © 2009-2010 Virtual Bridges, Inc. All Rights Reserved. 84
17 After completing the initialization of the Virtual Desktop, proceed to Provisioning a Gold Image
Virtual Machine.
VERDE Installation Script – VERDE Tools
The VERDE Tools can be used by administrators who use automated installation tools like Sysprep to
prepare their operating system and application packages. The VERDE Tools, now available as an ―msi‖
package, can be used as part of this process to install the VERDE guest services and create a Gold Image.
The VERDE Tools can also be used if for some reasons, during the manual installation of a Gold Image,
the VERDE installation script has not been launched at the end of the Gold Image creation.
To proceed, install the guest services from the MSI package available in: /usr/lib/verde/etc/VERDETOOLS.IMG
The package can be mounted inside the VM using the Shift+F12 menu in the VERDE Client (not RDP):
1 Select CD-ROM…
2 Browse the filesystem to open /usr/lib/verde/etc/VERDETOOLS.IMG
3 Double click on the VERDETools.msi file and follow the installation prompts
4 Run the profset.bat program manually from C:\Program Files\Virtual Bridges\Install ,
or C:\Program Files (x86)\Virtual Bridges\Install (on 64-bit Windows 7)
Note: In Windows 7, you must right click on it and select "Run as Administrator... ―
5 Shut down the Gold Image in order to apply the settings.
Upgrading Old Gold Images to VERDE 4.3 Gold Image
Architecture
The Gold Images created with a VERDE version prior to 4.3 will work with 4.3 but to benefit from the
latest architecture updates introduced with version 4.3, Gold Images need to either be reinstalled or
upgraded. The VERDE Tools must be used when upgrading Gold Images.
Note: Choosing a drive letter other than ―D‖ for the user data drive is only available with Gold Images
created with VERDE 4.3 or later.
To upgrade an ―old‖ Gold Image, please follow the instructions below:
VERDE™ 4.5 Administrator Guide
Copyright © 2009-2010 Virtual Bridges, Inc. All Rights Reserved. 85
The server must be running the build version 5442 or later.
1 Back up the Gold Image folder (located under the administrative user, for example: /home/vb-
verde/<GoldImage>). You can also clone the image, and use the clone as the backup; you will
need to upgrade the original Gold Image to keep the user data.
2 Check out the Gold Image, and run it with VERDE Client
3 Once inside the Gold Image, press Shift+F12, and then click CDROM…
4 Navigate to /usr/lib/verde/etc/ , and double click on VERDETOOLS.IMG
5 When Windows detects the disk, browse the files on it (if the disk is not detected, open the
Computer/My Computer link in the Start Menu, and browse to the virtual CDROM, usually E:)
6 Double click on VERDETools.msi (the .msi extension will probably be hidden)
Accept all defaults
7 After the package installs, restart the Gold Image
8 Check in the Gold Image in the VERDE Management Console
The Gold Image has now been be upgraded.

VERDE™ 4.5 Administrator Guide
Copyright © 2009-2010 Virtual Bridges, Inc. All Rights Reserved. 86
Starting the Virtual Desktop
To start the virtual machine you just installed, first make sure the user account has the ability to run X11
applications. If not, you can start the virtual machine by starting the VERDE Client or by logging in
locally on the VERDE server.
Log in to the VERDE server as the user you created earlier (ex: verde-admin) and run the following
command:
win4 [config-name]
config-name is required only if your configuration name is different from the default (win4).
The win4 command starts a desktop window displaying the virtual desktop console and enables you to
interact with the virtual desktop using your keyboard and mouse.
Initially Configuring the Virtual Desktop
The first time you start the virtual desktop, Virtual Bridges recommends you configure it as follows:
Activate the installation if required (Windows XP/Windows 7)
Disable System Restore and Automatic Updates (Windows XP/Windows 7)
System restore is never used because the virtual desktop is a read-only copy of the Gold Image and
restore points will not be used. To back up a Gold Image, you can copy the corresponding folder
created in /home/<MC Admin> (ex: /home/vb-verde/Windows7).
Similarly, because the virtual desktop can be refreshed at any time from the Gold Image, Windows
updates will either not be used or will be discarded the next time a Gold Image is deployed.
Windows 7 create a local policy to delete copies of the computer’s roaming profile.
VERDE creates a roaming profile for the virtual desktop, so any roaming profile on the virtual
desktop will be replaced.
Linux configures the Gnome Display Manager (GDM) to automatically log in the non-root user you
created during installation.
See one of the following sections for more information:
Windows XP Tasks
Windows 7 Tasks
Windows XP/Windows 7 Best Practices
Linux Task
Windows XP Tasks
This section discusses how to perform the following tasks for Windows XP:

VERDE™ 4.5 Administrator Guide
Copyright © 2009-2010 Virtual Bridges, Inc. All Rights Reserved. 87
Activate Windows if required
Disable system restore and automatic updates
To activate Windows XP:
1 Click Start > [All] Programs > Accessories > System Tools > Activate Windows.
2 Follow the prompts on your screen to complete the activation.
To disable automatic updates:
1 Click Start > Control Panel.
2 Double-click Security Center.
3 Under Automatic Updates, follow the prompts on your screen to disable automatic updates.
To disable System Restore:
1 Click Start > [All] Programs > Accessories > System Tools > System Restore.
2 In the left pane, click System Restore Settings.
3 In the System Properties dialog box, select the Turn off System Restore on all drives check
box.
4 Click OK.
5 Shut down the virtual desktop.
Windows 7 Tasks
To activate Windows 7:
1 Click Start > Computer
2 Right click on Properties
3 Click the message Click here to activate at the bottom of the window
4 Follow the prompts on your screen to complete the activation.
To disable System Restore:
1 Click Start > Control Panel > System and Security.

VERDE™ 4.5 Administrator Guide
Copyright © 2009-2010 Virtual Bridges, Inc. All Rights Reserved. 88
2 Click System.
3 In the left pane, click System protection.
4 If prompted, enter an administrator password to continue.
5 To turn off System Protection for a hard disk, click the name of the hard disk and click
Configure.
6 In the System Protection for Local Disk dialog box, click Turn off system protection.
7 Click OK.
8 Repeat these tasks for other hard drives if necessary.
To disable automatic updates:
1 Click Start > Control Panel > System and Security.
2 Click Action Center.
3 In the left pane, click Windows Update.
4 Select Change Settings in the left pane.
5 If prompted, in the Action Center dialog box, click Let me choose.
6 Under Important Updates, click Never Check for Updates.
To set local policy on Windows 7 Professional, Enterprise, and Ultimate Editions:
1 Click Start.
2 Enter gpedit.msc in the provided field.
3 Under Programs, click gpedit.
4 Expand Local Computer Policy > Computer Configuration > Administrative Templates >
System > User Profiles.
5 Enable the policy Delete cached copies of roaming profiles.
6 Shut down the virtual desktop.
Disable ―Set Network Location for Network 2.‖
Prompt when starting a new session.

VERDE™ 4.5 Administrator Guide
Copyright © 2009-2010 Virtual Bridges, Inc. All Rights Reserved. 89
The latest releases of VERDE prevent this from happening but if you still encounter this issue in some
situations, creating a dummy registry key will remove this prompt. Follow the instructions below to add
the required registry key:
1 Check out the Gold Image.
2 Start the VERDE Client and login to the Gold Image with the administrator account (mcadmin1).
3 Launch "regedit" to create a new Registry key (without any value).
4 Right click on HKEY_LOCAL_MACHINE\SYSTEM\CurrentControlSet\Control\Network, and
select the New > Key option... then name the key NewNetworkWindowOff
5 Shutdown the session
6 Check-in the Gold Image
Windows XP/Windows 7 Best Practices
The configuration steps below are optional but they are worth considering:
These settings can be enabled/disabled from the Windows group policies (gpedit.msc); see previous
section.
Navigate to User Configuration > Administrative Templates > Start Menu and Taskbar.
1 Remove My Pictures icon from Start Menu.
2 Remove My Music icon from Start Menu.
3 Remove Logoff on the Start Menu (Workgroup workstations only).
4 Remove user name from Start Menu (Workgroup workstations only).
Navigate to Computer Configuration > Administrative Templates > Network > Offline Files
Disable Offline Folders – Allow or Disallow use of the Offline Files feature.
Computer Configuration > Administrative Templates >Windows Components > Internet Explorer
Prevent Performance of First Run Customize Settings (Go to home page).
User Configuration > Administrative Templates >Windows Components > Windows Explorer
Hide these specified drives in My Computer (floppy disks a: and b:)
Delete cached copies of roaming profiles.
1 Expand Local Computer Policy > Computer Configuration > Administrative Templates > System
> User Profiles

VERDE™ 4.5 Administrator Guide
Copyright © 2009-2010 Virtual Bridges, Inc. All Rights Reserved. 90
2 Enable the policy ―Delete cached copies of roaming profiles‖
Known Limitations for Windows 7 Guests
Windows 7 desktop gadgets are not persistent across sessions; if gadgets are configured, they will be lost
the next time the user logs out and logs back in.
Linux Task
Logging in Automatically
Virtual Bridges recommend you set the VERDE server to automatically log in as the non-root user you
created, as discussed in Creating User Accounts.
First, make sure the virtual desktop is running by entering the following command as the non-root user:
win4 config-name
Then, in Ubuntu, either click System > Administration > Login Screen or run the following command
with root privileges in a Terminal command prompt:
/usr/bin/gdmsetup
After you have finished, shut down the virtual desktop.
Disable Automatic Updates
Disable automatic updates in the Gold Image so that users are not prompted
Ubuntu:
System > Administration > Update Manager
Click the Settings… Button
Uncheck the box ―Check for updates‖

VERDE™ 4.5 Administrator Guide
Copyright © 2009-2010 Virtual Bridges, Inc. All Rights Reserved. 91
Provisioning a Gold Image Virtual Machine
This section discusses how to publish and deploy dynamic or static instances of the Virtual Machine to
one or more users or groups.
While it is not recommended, you might sometimes encounter users who require a ―static‖ virtual
desktop; in other words, an unmanaged, standalone virtual machine on which the user is free to modify
and store persistent system data. See Installing or Provisioning a Static Virtual Desktop.
You publish a virtual desktop Gold Image, and then you deploy it to the users or groups who are going to
use it so they can start dynamic instances of it. These dynamic instances present a transient ―copy-on-
write‖ system image (C: drive for Windows guests, or / partition for Linux guests), but with persistent
user settings and documents.
Any changes made in the published Gold Image automatically propagate to dynamic instances the next
time those users start their virtual desktops. Therefore, after a Gold Image is published, there is no need to
publish it again if you make changes to it in the future (for example, install software or make system
settings adjustments). The mechanism is completely automatic and transparent to users.
Even though the root user cannot host virtual desktops, you must have root privileges to publish and
deploy virtual desktops.
IMPORTANT: Before continuing, make sure the virtual desktop is shut down.
Note: Both the VERDE Management Console and the command line can be used to deploy Gold Images,
but if you started the installation with the Management Console, please continue with it; otherwise the
changes will not be reflected in the VERDE Management Console. See the following:
Deploying a Gold Image VM with the VERDE Console
Publishing a Gold Image VM with the Command Line Interface
Deploying a Gold Image VM with the VERDE Console
In the VERDE Management Console, the Gold Image is automatically published when the installation of
the guest operation system is completed. Its status becomes NEW (Install Complete) and the Gold
Image is ready to be checked in and become available for deployment. Please refer to the VERDE
Management Console section for general information on how to use the console.
IMPORTANT: Gold Images should not be deployed to the VERDE Management Console
administrator(s) to avoid potential conflicts during the check out/check in process. To prevent that, we
recommend that you implement a ―Skip rule‖ for each administrator (mcadmin1 for example). Please refer
to Adding a ―Skip Rule‖ for the Management Console administrator for instructions on how to set a skip
rule.

VERDE™ 4.5 Administrator Guide
Copyright © 2009-2010 Virtual Bridges, Inc. All Rights Reserved. 92
1 Click the CHECK IN button in the Actions column.
2 Go to the Desktop Policy page, click EDIT.
3 Click the ADD RULE button to add a new deployment rule for a user or a group.
1 Enter an existing User/Group name
Notes:
This procedure does not create the user.
To enter a group name, insert % before the name.
For AD user and groups: Enter the domain name before the user name or group name, example:
NET\username or %NET\groupname
2 Select the Gold Image to be deployed.
3 Select the Settings (specific settings for the session like NAT or bridge networking can be defined
in the Session Settings page).
4 Click SAVE
5 Close the confirmation window

VERDE™ 4.5 Administrator Guide
Copyright © 2009-2010 Virtual Bridges, Inc. All Rights Reserved. 93
The new deployment rule is now listed in the table; in the example below, the Windows 7 image; ―Win7‖
will be available for the verde4 user.
Click the UPDATE button.
Gold Images can also be deployed/added in an existing rule; to do so:
Click the EDIT button on the Desktop Policy page.
Click the Add Image link on the rule to which you want to add a Gold Image for an existing user or
group.
Note that the User/Group field is already filed; make the Gold Image and Settings selection
Click SAVE
The Gold Image has been deployed and is now accessible by the users.
Publishing a Gold Image VM with the Command Line
Interface
Usage: win4-publish-session [-U] {username | uid} [config]

VERDE™ 4.5 Administrator Guide
Copyright © 2009-2010 Virtual Bridges, Inc. All Rights Reserved. 94
Parameter Description
-U Indicates that the virtual desktop is being unpublished; this reverses the effect
of publishing a Gold Image and disables the ability to deploy it to other users
as dynamic instances.
username | uid Linux user name or numeric user ID of the user for whom you installed the
Gold Image virtual machine.
config Optional configuration name to publish or unpublish. The default with no
parameter specified is win4.
Example 1: Publish the winXPPro Gold Image virtual desktop, where user verde-admin is the user who
created the Gold Image :
win4-publish-session verde-admin winXPPro
Example 2: Unpublish the Gold Image virtual desktop named ubuntu80432 created by user verde-
admin :
win4-publish-session –U verde-admin ubuntu80432
Deploying and Undeploying a Gold Image Virtual Desktop
The deployment process will assign Gold Images to users or groups. To deploy or undeploy a published
Gold Image virtual desktop to one or more users or groups of users, use the win4-deploy-published
command as follows:
Deploy:
win4-deploy-published {{published-user} [config-name1] {-u users | -U user} | -g groups}}
[config-name2]
Undeploy:
win4-deploy-published -x user [config-name]
Parameter Description
published-user Linux user name or numeric user ID of the user hosting the
published virtual desktop (that is, Gold Image).

VERDE™ 4.5 Administrator Guide
Copyright © 2009-2010 Virtual Bridges, Inc. All Rights Reserved. 95
Parameter Description
-u users Use one win4-deploy-published command to publish multiple
Gold Images. Users are specified by a space-delimited list of Linux
user names or numeric user IDs. If the home directory of a user
specified by the list already exists, a new directory is created with
an integer appended to the directory name.
For example, if you run win4-deploy-published verde-admin
RedHatLinux5 –u verde-user RedHatLinux twice, the following
home directories will be created and verde-user will have two
dynamic instances of each Gold Image available:
/home/verde-user/RedHatLinux5
/home/ubuntu80432/RedHatLinux5-1
/home/verde-user/RedHatLinux
/home/verde-user/RedHatLinux-1
-U user Run win4-deploy-published for one Linux user name or numeric
user ID, this option allows for the specification of a policy file in
addition to the config name:
win4-deploy-published <published-user> [<config>] -U
<user> [<config> [<policy file>]]
If the home directory of a user specified by the list already exists, a
new directory is created with an integer appended to the directory
name.
For example, if you run win4-deploy-published –u ubuntu80432
twice, the following home directories will be created:
/home/ubuntu80432
/home/ubuntu80432 -1
-g groups Use one win4-deploy-published command to publish multiple
Gold Images. Users are specified by a space-delimited list of Linux
group names or numeric group IDs.
Each user in each group (except the user for whom the published
virtual desktop is installed, if that user is in one of the groups)
receives the dynamic instance of the published virtual desktop.
If the home directory of a user specified by the list already exists, a
new directory is created with an integer appended to the directory
name.

VERDE™ 4.5 Administrator Guide
Copyright © 2009-2010 Virtual Bridges, Inc. All Rights Reserved. 96
Parameter Description
config-name1 The optional configuration name to deploy from. The default (with
no parameter specified) is win4. Note that if you choose to use
configuration names, the names cannot be identical. For example, if
you created a Gold Image named ubuntu80432, you cannot deploy
it to a configuration named ubuntu80432.
config-name2 The optional configuration name to deploy to.
-x user [config] Undeploys the virtual desktop for the user specified by a Linux user
name or numeric user ID.
config is the optional configuration name. The default (with no
parameter specified) is win4.
Example 1: Deploy the published virtual desktop ubuntu80432 from user verde-adm as a dynamic
desktop for user ubuntu1:
win4-deploy-published verde-admin ubuntu80432 -U verde-user ubuntu1
Example 2: Deploy published virtual desktop RedHat5 from user verde-user as a dynamic desktop for
users verde-user2 and verde-user3:
win4-deploy-published verde-user RedHat5 -u verde-user2 verde-user3 RedHat5-1
Example 3: Deploy a published virtual desktop NovellSUSE from user verde-user as a dynamic desktop
for all users in the groups users and testers:
win4-deploy-published verde-user NovellSUSE -g users testers NovellSUSE-1
Example 4: Remove a deployed virtual desktop image NovellSUSE from the user verde-user:
win4-deploy-published -x verde-user NovellSUSE-1
Automating Deployment with Rules-Based Provisioning
VERDE supports an automation mechanism for virtual desktop deployment, referred to as rules-based
provisioning. Rules-based provisioning deploys virtual desktops at user login time, without requiring
system administrators to explicitly issue the win4-deploy-published command. This is especially useful
when authenticating against an external authentication repository, because users might not exist in the
repository at the time the Gold Image is published.
A well designed set of provisioning rules can lead to all virtual desktop deployments being driven from an
organization’s authentication system rather than from VERDE itself. For example, in an Active Directory
deployment, you can deploy virtual desktops using the Active Directory Users and Groups Control Panel
on the domain controller by adding users to groups.

VERDE™ 4.5 Administrator Guide
Copyright © 2009-2010 Virtual Bridges, Inc. All Rights Reserved. 97
The VERDE server in turn would match users logging in to provisioning rules—such as group
membership—and deploy instances of the appropriate Gold Images at the time users log in (unless the
Gold Images had already been deployed).
The VERDE rules-based provisioning engine operates with a set of rules stored locally (for single server
deployments) or on shared storage (for clustered deployments). The exact location and name of the rules
file is configurable, but defaults to /home/<mc_user>/.verde/provtab (ex: /home/vb-
verde/.verde/provtab); if this file does not exist, rules-based provisioning is not used (in other words,
you must explicitly deploy Gold Images using the win4-deploy-published command).
provtab is a text file with one rule per line, each rule consisting of 4 columns. You must use the tab
character, rather than spaces, to delimit the columns. The following text defines an example provtab file:
# dynamic user/group gold user gold config dynamic config
# ======================= ================= ============ ===============
#
# - all lines beginning with # are ignored as comments
# - blank lines are also ignored
# sample provisioning follows (explanation follows provisioning rules)
gold - - -
jsmith gold win7 win7
%users gold ubuntu ubuntu
" gold winxp winxp
# above rules mean (in the order they are entered):
#
# 1. skip any provisioning for the user "gold"; since in the example this
# user hosts Gold Images, we don't want to do any provisionig for him at all,
# even if he matches a group rule below
#
# 2. for the user "jsmith", provision the configuration "win7" hosted by the
# user "gold" as the dynamic configuration "win7" for "jsmith"; stop
# matching any rules after this, even if "jsmith" would otherwise match
# a future group rule
# 3. the group "users" (notice the % in front to designate that the name
# is a group, not a user), provision the configuration "ubuntu" hosted by
# the user "gold" as the dynamic configuration "ubuntu" for any user with
# group membership in "users"
#
# 4. (ditto, designated with " character); for users matching the above
# membership to the "users" group, provision the configuration "winxp"
# hosted by the user "gold" as the dynamic configuration "winxp" for any
# user with group membership in "users"; this is how we deploy multiple
# desktops to a particular user, since the matching continues due to the "
#
The preceding example assumes the system has a Linux user named gold, which has various Gold Images
installed (in the directories win7, ubuntu, and winxp), and that a Linux group named users exists. The
user jsmith need not always exist, but if it does, and this user attempts to log in, VERDE matches the
respective rule for it.
Rules are tested and matched in the order they are presented. For example, in the preceding example, the
user jsmith may or may not belong to the users group. But if the user does belong to a group, only the

VERDE™ 4.5 Administrator Guide
Copyright © 2009-2010 Virtual Bridges, Inc. All Rights Reserved. 98
explicit rule for jsmith will be matched when the user logs in. This means this user will receive only the
win7 Gold Image, even if the user has membership in the users group.
To match multiple rules for a specific user, you must specify them sequentially with a single quotation
mark (") following the initial rule. In the example above the users in the group users will match two
rules, and therefore receive instances of both ubuntu and winxp Gold Images from the user gold. There
is no limit to the number of rules, with single or multiple matching, which can be specified.
An important rule type is referred to as a ―skip rule,‖ which is designated with the user or group to match
followed by 3 – (hyphen) characters in the last 3 columns. This tells VERDE that if a user matches such a
rule, no provisioning of any sort should be performed. Instead VERDE should proceed to start any
existing deployment for that user, or prompt for which desktop to start if there is more than one. This rule
type is useful for Gold Image users who may otherwise match subsequent rules.
Rules can match either a user name or group membership. To match on group membership, the %
(percent) character must precede the group name, indicating to VERDE that it is a group rather than a
user name.
If provisioning fails, users will not be able to log in and will receive an error message instead. In order to
ensure the syntax of the rules file is correct, you can test it with the VERDE-provision command. For
usage information, run it without arguments, as follows:
/usr/lib/verde/bin/verde-provision
To change the location of the rules file, use the variable VERDE_PROVTAB_FILE in
/var/lib/verde/settings.global. For example, to use a provtab file named /mnt/shared/provtab,
add the following line to the end of the /var/lib/verde/settings.global file (creating the file if it
does not exist):
VERDE_PROVTAB_FILE=”/mnt/shared/provtab”
Installing or Provisioning a Static Virtual Desktop
While it is not recommended, you might sometimes encounter users who require a ―static‖ virtual
desktop; in other words, an unmanaged, standalone virtual machine on which the user is free to modify
and store persistent system data. You can of course deploy whatever management tools are necessary
within the virtual machine, but VERDE itself does not manage these after they are deployed.
In practical terms, a static virtual desktop is the same as a Gold Image, but it is not deployed to other
users as dynamic instances. In fact, to install such a virtual desktop, follow the same process discussed in
Installing a Gold Image Desktop Virtual Machine.
VERDE™ 4.5 Administrator Guide
Copyright © 2009-2010 Virtual Bridges, Inc. All Rights Reserved. 99
USB Redirection Configuration
Overview
USB redirection means that the USB ports available on the client computer that runs the VDI session will
be reachable from inside the virtual machine. The support of USB ports redirection has been introduced
with VERDE 4.4.
It is currently supported in Windows XP and Windows 7 VDI sessions running on Windows XP and
Windows 7 clients.
Note: The USB ports cannot be shared between the VDI session and the client; in other terms when the
USB Redirect service is started on the Windows client and a VDI session is launched, the USB
peripherals will only be available to the VDI session.
Installing the USB Redirect Feature
In order for the VDI session to recognize the peripheral connected to the USB ports of the client computer,
the USB redirect feature requires:
1 On the client: The installation of an application, which runs as a Windows service, to assist the
VERDE User Console in accessing the USB peripherals
2 In the Gold Image: The installation of the ―USB Redirect Server‖ code
Installing the Software on the Client:
Download the ―vb-redirect-rdp.msi‖ package from the Virtual Bridges website and install it on the
client. The installation package will be installed in ―C:\Program Files\virtual bridges\vb-
redirect-rdp‖.
Installing the Server Software in the Gold Image:
1 Download the server package from Virtual Bridges website
2 Check out the Gold Image
3 Run the server installation package (usbrdp_ts_install.exe). There is no configuration required
4 Check in the Gold Image
A default policy filter file (vb-redirect-filter.txt) is installed in the same location as the application
(C:\Program Files\Virtual Bridges.txt).
This file can be edited to prevent control of specific devices from being passed to the guest (Operating
system running in the VDI session).

VERDE™ 4.5 Administrator Guide
Copyright © 2009-2010 Virtual Bridges, Inc. All Rights Reserved. 100
Default filter file (vb-redirect-filter.txt) structure:
0 0 8 6 1
0x1871 0x0d01 0 0 1
0x1385 0x5f01 0 0 0
# This is a sample USB peripheral filter file
# each rule (above this comment) consists of the following numeric fields:
vendor-id product-id class subclass sharing
A USB peripheral will match a rule if both vendor id and product id match, or if class and subclass
match.
Zero values in the rule are ignored during matching.
Rule matching terminates on the first match. If the sharing field is 1 the device will be shared with
VERDE guests.
If it is 0 the device will not be shared.
In the default file, the first line: 0 0 8 6 1
Both the ―vendor id‖ and ―product id‖ are set to ―0‖ but the ―class‖ and ―subclass‖ are set to ―8‖ and ―6‖
respectively and the ―sharing‖ bit is set to ―1‖. This means that storage devices plugged to the USB ports
on the client will be shared with the guest VDI.
Finding the vendor-id, product-id, class, subclass of a USB device
When a new USB device is plugged to the client computer, its vendor-id, product-id, class, and subclass
information will be logged in the file ―usb-server-rdp.txt‖ located in the client’s %TEMP% folder.
Use the data from this file to assist you when editing the filter file (vb-redirect-filter.txt) to share or
not the attached USB devices.
Launching the VDI Session with USB Redirection support
Once the client application has been installed and the Gold Image updated, to activate the USB
redirection in the RDP VDI session:
1 Launch the VERDE User Console
2 Click ―Show Advanced Options‖
3 Select ―USB Support‖ (see below)

VERDE™ 4.5 Administrator Guide
Copyright © 2009-2010 Virtual Bridges, Inc. All Rights Reserved. 101
The redirected USB devices will be accessible in the VDI session.

VERDE™ 4.5 Administrator Guide
Copyright © 2009-2010 Virtual Bridges, Inc. All Rights Reserved. 102
Administering Your Virtual Desktops
Virtual Desktop administration is a two-part process:
Adjusting virtual machine parameters, such as RAM and shared folder assignments.
Installing, updating, and configuring software inside the virtual desktop environment itself.
Administering virtual desktops is limited only to static and Gold Image virtual machines because dynamic
desktops (deployed from Gold Images) automatically inherit both virtual machine settings and virtual
desktop system/application updates from their respective Gold Image.
Adjusting Virtual Machine Settings
This section discusses the following methods of adjusting virtual machine settings:
Modifying the settings.local File Directly
Modifying the settings.local File Directly
If you prefer to set parameters directly in the configuration file, simply edit the settings.local file in
the virtual machine’s configuration folder (ex: /home/vb-verde/Windows7/settings.local). The
following tables discuss all relevant parameters in the settings.local file, organized by respective
functional areas.
Important: Modify only the parameters listed in the following tables. Any values in settings.local
that are not discussed in the following tables are reserved for VERDE Support only. Attempting to
manipulate these parameters can result in an unstable and unsupported configuration.
All parameters and values shown in the tables that follow are case-sensitive.
General Parameters
Parameter Allowed values Default Description
WIN4_TITLE n/a config-name Virtual machine’s window title
WIN4_RAM_SIZE 64-4096 128 The amount of RAM, in MB, to
assign to the virtual machine
WIN4_KBD_LANG ISO 639 codes Automatically
assigned
The ISO 639 code of the keyboard
locale to set for the virtual
machine. This parameter is
required if you are in a non-U.S.
locale and provide remote access
to the virtual desktop.
Valid ISO 639 codes are listed in the following table.

VERDE™ 4.5 Administrator Guide
Copyright © 2009-2010 Virtual Bridges, Inc. All Rights Reserved. 103
Value Description
Ar Arabic
cs Czech
da Danish
de German
de-ch German(Switzerland)
en-dv American Dvorak
en-gb English (Great Britain)
en-us English (United States)
es Spanish
et Estonian
fi Finnish
fo Faroese
fr French
fr-be French (Belgium)
fr-ca French (Canada)
fr-ch French (Switzerland
he Hebrew
hr Croatian
hu Hungarian
is Icelandic
it Italian
ja Japanese
ko Korean
lt Lithuanian
lv Latvian;Lettish
mk Macedonian
nl Dutch
nl-be Dutch (Belgium)
no Norwegian
pl Polish
pt Portuguese
pt-br Portuguese (Brazil)

VERDE™ 4.5 Administrator Guide
Copyright © 2009-2010 Virtual Bridges, Inc. All Rights Reserved. 104
Value Description
ru Russian
sl Slovenian
sv Swedish
th Thai
tr Turkish
Display Parameters
In general, the following parameters apply only when running virtual machines on host X11 desktops.
Parameter Allowed values Default Description
WIN4_FULL_SCREEN yes | no no Start virtual
machine in full-
screen mode by
default; ignored for
remote VDI clients
WIN4_START_MAXIMIZED yes | no no Start virtual
machine
maximized on
desktop; ignored
for remote VDI
clients
WIN4_FAST_MOUSE on | off on Accelerate mouse
cursor tracking at
the expense of
cursor shape
accuracy; do not
disable for VDI
clients!
WIN4_FAST_MOUSE_MSEC 100-1000 1000 Milliseconds of no
mouse motion to
wait before
updating cursor
shape in VDI
clients (use higher
numbers if users
will connect on low
bandwidth lines)
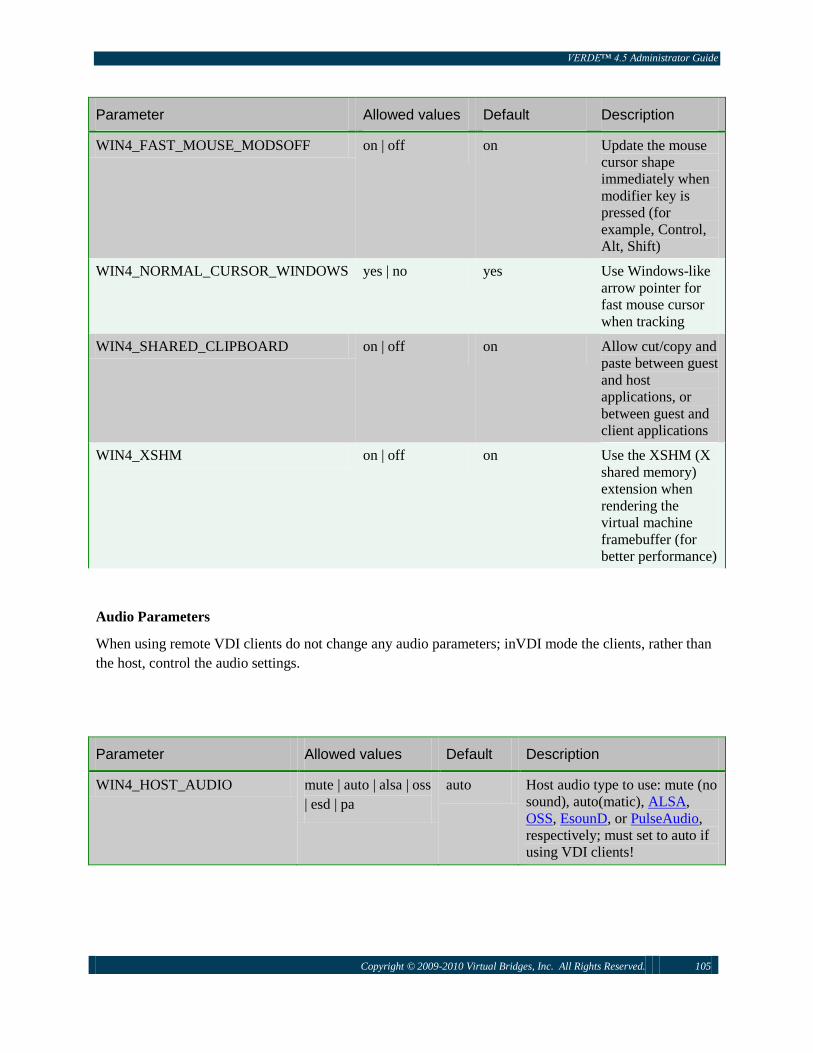
VERDE™ 4.5 Administrator Guide
Copyright © 2009-2010 Virtual Bridges, Inc. All Rights Reserved. 105
Parameter Allowed values Default Description
WIN4_FAST_MOUSE_MODSOFF on | off on Update the mouse
cursor shape
immediately when
modifier key is
pressed (for
example, Control,
Alt, Shift)
WIN4_NORMAL_CURSOR_WINDOWS yes | no yes Use Windows-like
arrow pointer for
fast mouse cursor
when tracking
WIN4_SHARED_CLIPBOARD on | off on Allow cut/copy and
paste between guest
and host
applications, or
between guest and
client applications
WIN4_XSHM on | off on Use the XSHM (X
shared memory)
extension when
rendering the
virtual machine
framebuffer (for
better performance)
Audio Parameters
When using remote VDI clients do not change any audio parameters; inVDI mode the clients, rather than
the host, control the audio settings.
Parameter Allowed values Default Description
WIN4_HOST_AUDIO mute | auto | alsa | oss
| esd | pa
auto Host audio type to use: mute (no
sound), auto(matic), ALSA,
OSS, EsounD, or PulseAudio,
respectively; must set to auto if
using VDI clients!

VERDE™ 4.5 Administrator Guide
Copyright © 2009-2010 Virtual Bridges, Inc. All Rights Reserved. 106
Parameter Allowed values Default Description
WIN4_AUDIO_QUALITY low | normal | high |
highest
normal Audio quality if host audio
subsystem supports it (for
example, EsounD). Generally,
lower quality means less
bandwidth utilization when
using network audio. However,
this value is ignored by VDI
clients, which control their own
audio quality.
WIN4_ALSA_PLAY_DEV n/a auto ALSA host audio only. ALSA
device to play to, when using
ALSA audio
WIN4_ALSA_PLAY_FREQ 8000-96000 48000 ALSA host audio only. ALSA
playback frequency, in Hz
WIN4_ALSA_PLAY_BUFSIZE 64-131072 4096 ALSA host audio only. ALSA
playback buffer size, in KB
WIN4_ALSA_REC_DEV n/a auto ALSA host audio only. ALSA
device to record from
WIN4_ALSA_REC_FREQ 8000-96000 48000 ALSA host audio only. ALSA
recording frequency, in Hz
WIN4_ALSA_REC_BUFSIZE 64-131072 4096 ALSA host audio only. ALSA
recording buffer size, in KB
Networking Parameters
For more information, see Virtual Desktop Networking for additional details.
Parameter Allowed values Default Description
WIN4_NIC2_TYPE basic | nat | bridged basic Type of networking to present
to virtual machine
environment: Basic, NAT, or
Bridged, respectively
WIN4_NIC2_BRIDGE n/a n/a Host network device to bridge
virtual machine to (for
example, eth0); you must
specify this value if using
bridged networking, and the
host networking adapter must
also be configured to allow
bridging
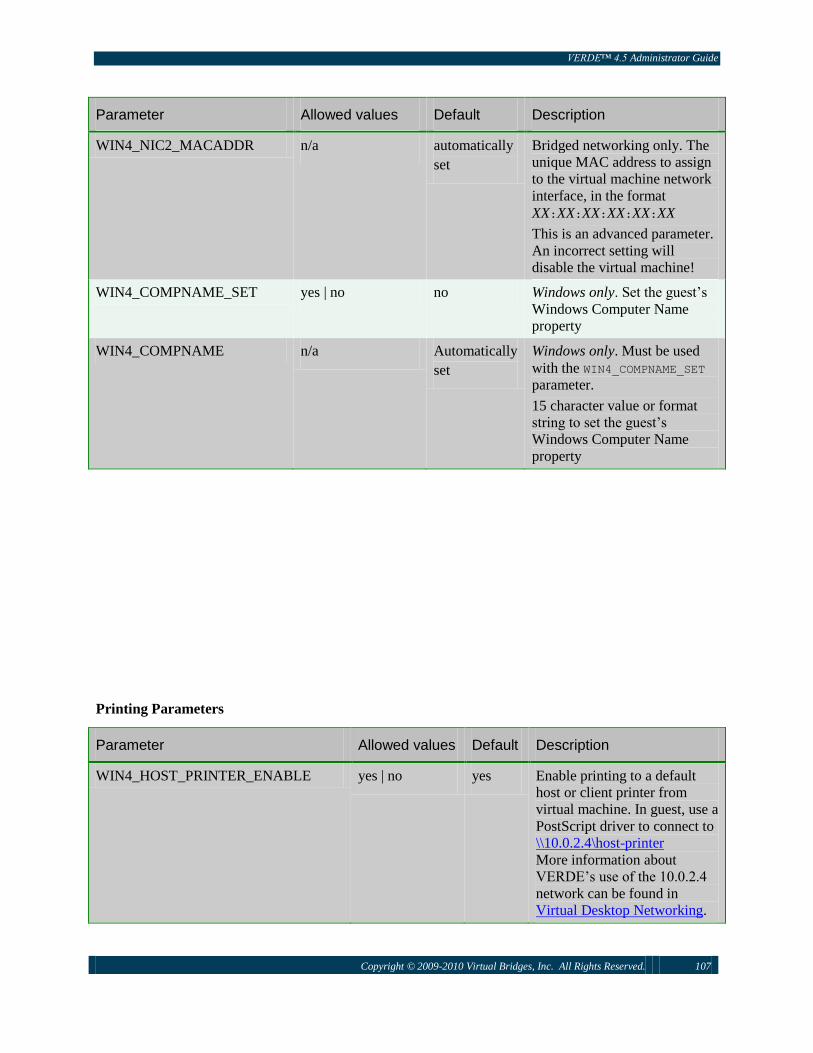
VERDE™ 4.5 Administrator Guide
Copyright © 2009-2010 Virtual Bridges, Inc. All Rights Reserved. 107
Parameter Allowed values Default Description
WIN4_NIC2_MACADDR n/a automatically
set
Bridged networking only. The
unique MAC address to assign
to the virtual machine network
interface, in the format
XX:XX:XX:XX:XX:XX
This is an advanced parameter.
An incorrect setting will
disable the virtual machine!
WIN4_COMPNAME_SET yes | no no Windows only. Set the guest’s
Windows Computer Name
property
WIN4_COMPNAME n/a Automatically
set
Windows only. Must be used
with the WIN4_COMPNAME_SET
parameter.
15 character value or format
string to set the guest’s
Windows Computer Name
property
Printing Parameters
Parameter Allowed values Default Description
WIN4_HOST_PRINTER_ENABLE yes | no yes Enable printing to a default
host or client printer from
virtual machine. In guest, use a
PostScript driver to connect to
\\10.0.2.4\host-printer
More information about
VERDE’s use of the 10.0.2.4
network can be found in
Virtual Desktop Networking.

VERDE™ 4.5 Administrator Guide
Copyright © 2009-2010 Virtual Bridges, Inc. All Rights Reserved. 108
Parameter Allowed values Default Description
WIN4_GUEST_PRINTER_ENABLE yes | no yes Enable printing to a default
host or client printer from the
virtual machine, allowing the
virtual machine to drive the
printer directly. In the guest,
use the appropriate printer
driver to connect to
\\10.0.2.4\guest-printer. More
information about VERDE’s
use of the 10.0.2.4 network
can be found in Virtual
Desktop Networking.
WIN4_HOST_PDF_ENABLE yes | no yes Allow a guest to print to a
PDF generator that can save
files on the underlying host
home directory. In guest, use a
PostScript driver to connect to
\\10.0.2.4\host-pdf. More
information about VERDE’s
use of the 10.0.2.4 network
can be found in Virtual
Desktop Networking.
WIN4_CUSTOM_PRINTCAP_ENABLE yes | no no Enable the use of a custom
printcap file for guest
WIN4_CUSTOM_PRINTCAP n/a n/a Path to the custom printcap
file to use
Host Device Parameters
The following parameters only apply to host devices, not client devices.
Parameter Allowed values
Default Description
WIN4_DEV_CDROM_ENABLE yes | no yes Enable virtual CD/DVD access in
guest
WIN4_DEV_CDROM_AUTO yes | no yes Automatically detect host CD/DVD
device

VERDE™ 4.5 Administrator Guide
Copyright © 2009-2010 Virtual Bridges, Inc. All Rights Reserved. 109
Parameter Allowed values
Default Description
WIN4_DEV_CDROM n/a n/a Path to host CD/DVD device, or ISO
9660/UDF image file (for example,
/dev/scd0, /dev/cdrom, or
cdrom.img)
WIN4_DEV_FDA_ENABLE yes | no yes Enable virtual floppy drive 0 access
WIN4_DEV_FDA n/a n/a Path to host floppy device, or floppy
image file (for example, /dev/fd0,
/dev/floppy, or floppy.img)
WIN4_DEV_SERIAL_ENABLE yes | no No Enable virtual serial port access
WIN4_DEV_SERIAL n/a n/a Path to host serial device (for
example, /dev/ttyS0)
Protection
The following parameter should be set only for standalone/static virtual machines, never for Gold Image
virtual machines.
Parameter Allowed values
Default Description
WIN4_SNAPSHOT_MODE On | off off Run guest session in copy-on-write‖
―snapshot‖ mode, where all changes
to the guest system disk image are
transient rather than persistent
Shared Folders
The following parameters refer to shared folders on the host only. VDI clients can always access local
folders if those folders are shared on the client and the option is selected in the Virtual Bridges Client
connection dialog box.
Parameter Allowed values
Default Description
WIN4_SHARED_HOME on | off off Allow access to underlying host
user’s home directory from guest via
\\10.0.2.4\HOME in guest
WIN4_SHARED_HOME_RO yes | no no Make access to underlying host home
directory read-only from the guest
WIN4_SHARED_DOCS on | off on Allow access to underlying host
user’s documents folder from guest
via \\10.0.2.4\Documents

VERDE™ 4.5 Administrator Guide
Copyright © 2009-2010 Virtual Bridges, Inc. All Rights Reserved. 110
Parameter Allowed values
Default Description
WIN4_SHARED_DOCS_RO yes | no no Make access to underlying host
user’s documents folder read-only
from guest
WIN4_SHARED_DOCS_DIR_SET yes | no no Explicitly set a host user’s documents
folder path rather than auto-detect
WIN4_SHARED_DOCS_DIR n/a n/a Host path to documents folder to
present to guest using
\\10.0.2.4\Documents
WIN4_SHARED_DEVS on | off off Allow access to additional host block
devices (for example, removable
media) from guest using
\\10.0.2.4\mnt and \\10.0.2.4\media
WIN4_SHARED_DEVS_RO yes | no no Make access to additional host block
devices read-only from guest
Time and Date Parameters
These parameters apply to Windows guests only; Linux guests should use NTP clients to maintain
accurate time.
Parameter Allowed values
Default Description
WIN4_SYNC_TIME yes | no yes Maintain guest real-time clock
synchronized with host
WIN4_SYNC_TZ yes | no no Synchronize guest time zone with
host – sets guest time zone as an
offset of GMT, which may differ
slightly in terminology from what the
―real‖ time zone is; however, the time
itself will be accurate
RDP Parameters
These parameters control direct RDP access into Windows XP Professional virtual machines, and should
never be modified if you are serving to VDI clients. Please note that modifying these parameters might
disable VDI functionality because RDP is not used for VERDE VDI.
Parameter Allowed values
Default Description

VERDE™ 4.5 Administrator Guide
Copyright © 2009-2010 Virtual Bridges, Inc. All Rights Reserved. 111
Parameter Allowed values
Default Description
WIN4_SESSION_RDP on | off off Enable direct RDP access to the guest
session (requires Windows XP
Professional or later)
WIN4_SESSION_RDP_PUBLIC yes | no no Expose virtual machine RDP access
to entire local network
WIN4_SESSION_RDP_PORT 1024-
65535
n/a If you use the RDP connector, you
must connect to the host on that port
rather than to the virtual machine on
that port. The RDP connector cannot
be used on a server.
Advanced
The following parameters provide access to advanced audio and video settings. This information is
provided only for the benefit of administrators with a high degree of understanding of video and audio
concepts. Use this information at your own risk. Improper settings can disable the virtual machine.
Parameter Allowed
values
Default Description
WIN4_DEV_VGA vbe |
cirrus
cirrus Virtual video device type to present
to guest. Modify only if you are using
a Windows 2000 guest and plan on
installing a 3rd-party VESA Bios
Extensions (VBE) driver
WIN4_VIRTUAL_AUDIO sb16 |
es1370
es1370 Virtual audio device type to present
to guest (do not modify unless you
are using a Windows guest and have
an explicit application-related need to
use the legacy driver)
WIN4_DISABLE_POSIX_LOCKS yes | no no Disable the use of POSIX locks for
this session. Modify this parameter
only if you underlying host file
system is incompatible with POSIX
locking. Note that if you disable
POSIX locking on a cluster
configuration, this might lead to
virtual machine disk image
corruption!

VERDE™ 4.5 Administrator Guide
Copyright © 2009-2010 Virtual Bridges, Inc. All Rights Reserved. 112
Updating and Adding Applications to the Virtual Desktop
This section discusses how to perform updates and applications to the Gold Image and how to push those
changes to users’ dynamic instances. Updates and applications are installed by starting the Gold Image
with the user who owns the image (mcadmin for example), and then running the update or application
installation process. A pop-up message will let the users know that changes are available and will be
available after they restart their virtual machine. This message and the frequency of the pop-up can be
customized to your needs if the user decides to postpone the update. See Customizing the Gold Image
Update Pop-up Message and Frequency for more details.
Recommended method for updating the Gold Images:
1 Check out the Gold Image in the VERDE Management Console.
2 Launch the VERDE Client, login with the Gold Image owner, and start the Gold Image.
3 Update the operating system and/or install applications on the Gold Image.
4 Shut down the Gold Image.
5 Check in the Gold Image in the VERDE Management Console.
Updates are automatically and instantaneously available to users’ dynamic instances.
On running dynamic instances, a pop-up displays informing users to restart their machines to get
the updates. The pop-up displays periodically (every five minutes by default) until the session is
restarted.
Customizing the Gold Image Update Pop-up Message and
Frequency
To change the content of the message follow these steps:
1 Create a file called update-notification.txt in the $WIN4_SETTINGS_ROOT directory.
WIN4_SETTINGS_ROOT is defined in /var/lib/verde/settings.global (exple: /home/vb-verde/.verde)
Note: DO NOT modify WIN4_SETTINGS_ROOT.
2 The file must be readable by everyone.
3 The content of the file will be displayed in the guest session when the Gold Image is checked in.
To change the frequency of the message:
1 Edit the settings.local file in the Gold Image folder (exple: /home/vb-verde/<Gold
Image>/settings.local)

VERDE™ 4.5 Administrator Guide
Copyright © 2009-2010 Virtual Bridges, Inc. All Rights Reserved. 113
2 Add the a line with WIN4_MIN_UR_INT="x" where x is the number of minutes the system will wait
before displaying the shutdown message again if the VDI user clicked "Cancel" on the previous
message.
Note: The parameter could also be added to the file instead, and would then apply to all Gold Images.
However, the parameter will be overwritten if the VERDE Post Installation script is run.
Backing Up the Virtual Desktop and Data
The following table discusses ways to back up virtual desktops:
Backup method Description
Archive or copy the contents of the Gold Image
virtual machine folder in the Gold Image owner’s
home directory (for example, /home/vb-
verde/windows7) to a different location.
This backs up the Gold Image and its data.
Back up the contents of a dynamic user’s personal
setting and document.
Make sure there are no running sessions. In other
words, before you can back up a virtual desktop, it
must be shut down. Alternatively, schedule your
backups at night or at some other off-peak usage
period.
Copy the contents of that user’s dynamic virtual
machine folder in his or her underlying home
directory (for example, $HOME/windows7) to a
different location.
You must also copy any additional user documents
stored outside their virtual machine folder (for
example, in their home directory).

VERDE™ 4.5 Administrator Guide
Copyright © 2009-2010 Virtual Bridges, Inc. All Rights Reserved. 114
Virtual Desktop Networking
VERDE supports three types of networking options for virtual machines: basic, Network Address
Translation (NAT), and bridged. By default, virtual machines use basic networking.
Additionally, VERDE uses an internal 10.0.2.x subnet (with a subnet mask of 255.255.255.0), which
does not map to any physical network. This network is used to provide various guest-to-host and host-to-
guest integration services. If your organization has a physical 10.0.2.x network, VERDE virtual
machines cannot access it.
See the following sections for more information:
Basic Networking
NAT Networking
Bridged Networking
Firewall Considerations
Basic Networking
This type of networking enables virtual machines to seamlessly access IP networks connected to the
underlying host using TCP, UDP, or NetBIOS-over-IP protocols. Other protocols, such as ICMP (for
example, \ping), are not supported by basic networking.
This section discusses the following topics:
Basic Networking Strengths
How Basic Networking Works
Accessing External Servers Using Basic Networking
Basic Networking Strengths
Basic networking is sufficient for most organizations and can be used to provide users access to e-mail,
Web browsing, and certain shared network resources. Its main advantage is the ease of deployment,
because it requires no configuration whatsoever, and very good scalability, because there is no
requirement for an IP address per virtual machine. In fact, to the underlying host operating system,
VERDE virtual machines configured with basic networking appear as regular network-enabled Linux
applications such as Web browsers and e-mail clients.
How Basic Networking Works
Basic networking works by routing the private, virtual 10.0.2.x subnet through an internal gateway that
provides access to networks outside the virtual machine. It also provides DNS services to the virtual
machine automatically, using the host’s default DNS provider (as described in the host file
/etc/resolv.conf).

VERDE™ 4.5 Administrator Guide
Copyright © 2009-2010 Virtual Bridges, Inc. All Rights Reserved. 115
The only other requirement is that the computer you are accessing the shares on is capable of serving
NetBIOS-over-IP over TCP port 139 or 445.
IMPORTANT: Do not modify any networking parameters in the virtual machine. Doing so can disable
network access and guest-to-host or host-to-guest integration services.
Accessing External Servers Using Basic Networking
From a user’s perspective, almost all network operations work as expected with the exception of the ping
command and My Network Places (also referred to as Network on Windows 7), which fails.
You can access Windows server resources and shares by using the Universal Naming Convention (UNC)
path and substituting the server name for its network-accessible IP address. For example, to access the
share \\ACCTSERVER\QBFILES from a VERDE virtual machine using Basic networking, replace the host
name (ACCTSERVER) with its IP address. Assuming the IP address is 192.168.10.50, the UNC share that
is accessible using basic networking follows:
\\192.168.10.50\QBFILES
While it is not possible to browse the network for the shares, this makes it possible to access them (or
map drive letters or printers to them) from guest virtual machines.

VERDE™ 4.5 Administrator Guide
Copyright © 2009-2010 Virtual Bridges, Inc. All Rights Reserved. 116
NAT Networking
Network Address Translation (NAT) networking enables you to provide certain types of access, such as
PORT mode FTP, or binding to Active Directory/Windows Server domains from a virtual machine.
NAT networking provides a good platform to deliver services securely, without exposing the virtual
machine to the network at large or requiring a unique IP address across the subnet. In this mode, the
virtual machine does receive an IP address, but that address is visible only to the host server and it is
managed automatically by VERDE. Also, as with basic networking, virtual machines do not receive
inbound network connections when using NAT networking.
Other than the additional access to advanced network resources, the main difference when compared to
basic networking is that the virtual machine has a secondary virtual network interface. The primary
interface will still be used for guest-to-host and host-to-guest services, and will still be configured on the
private 10.0.2.x as discussed in How Basic Networking Works.
The secondary network interface is used to route to the external networks connected to the host, assigned
by default a virtual subnet of 192.168.84.x (netmask 255.255.255.0). If this subnet is not acceptable
on your host (for example, because it interferes with a real subnet), you can change this parameter
manually by editing the file /var/lib/verde/settings.global as root, and set a value for
WIN4_NAT_SUBNET.
For example, to set the NAT IPv4 subnet to 192.168.99.x, add or edit the following in
/var/lib/verde/settings.global:
WIN4_NAT_SUBNET=”192.168.99”
If not specified, the default is 192.168.84.
To disable NAT networking system-wide, set WIN4_NAT_SUBNET=””.
Please note that after changing this value, you must restart VERDE services, using the following
command with root privileges:
/etc/init.d/VERDE restart
IMPORTANT: Do not modify any networking parameters in the virtual machine. Doing so can disable
network access and guest-to-host or host-to-guest integration services.
Bridged Networking
This section discusses the following topics:
About Bridged Networking
Setting up Bridged Networking
Additional Information about Bridged Networking

VERDE™ 4.5 Administrator Guide
Copyright © 2009-2010 Virtual Bridges, Inc. All Rights Reserved. 117
About Bridged Networking
Bridged networking enables full access to a physical network from a VERDE virtual machine. In
practical terms, it is the same as deploying physical PCs on a network. In most cases, it is not necessary
to use this functionality for virtual machines because of issues discussed in the following paragraphs.
However, bridged networking can be advantageous when compared to basic or NAT in some situations. It
has the following unique capabilities:
Virtual machines have full access at the Ethernet level to a specific host-attached network, allowing
advanced functions such as network share browsing, and so on.
Virtual machines can export shares or allow inbound connections from other computers or virtual
machines.
In some cases, bridged networking provides better performance than NAT networking for large file
transfers between virtual machines.
Considerations and concerns of using bridged networking versus basic or NAT networking:
Virtual machines must receive a unique IP address from a DHCP server, or configure one statically,
and this IP address must be unique among the entire subnet.
Large deployments can experience congestion or overloading of routers, which can easily be avoided
by using basic or NAT networking. In typical terms, bridged networking does not scale as well as
basic or NAT networking when applied to large deployments.
Virtual machines are exposed to the subnet to which they are bound, leading to increased security
risks and the potential need to administer firewalls inside virtual desktops themselves, depending on
your organizational policies.
Bridged networking is not compatible with wireless interfaces. This should not be a consideration for
server-hosted VDI virtual machines but it can pose a problem for managed workstation/disconnected
use/local processing deployments.
As with NAT networking, bridged networking provides a secondary virtual network interface to the
virtual machine. Unlike with NAT networking, this secondary guest virtual network interface binds to a
physical Ethernet interface on the host and maintains real network parameters (IP address, netmask, and
so on). The primary virtual network interface is still used for guest-to-host and host-to-guest services, and
will still be configured on the private 10.0.2.x subnet.
Setting up Bridged Networking
To set up bridged networking, first ensure that basic networking is currently working correctly – check
that it is able to access the outside world.
Next, configure bridged networking using the ―General‖ tab in the VERDE Management Console. Then
reboot the server/host. This completes the setup of bridged networking.
NOTE: Do not change the file /var/lib/verde/settings.global.

VERDE™ 4.5 Administrator Guide
Copyright © 2009-2010 Virtual Bridges, Inc. All Rights Reserved. 118
Additional Information about Bridged Networking
For more complex configurations, or to set up multiple interfaces for bridging, you can also use the Linux
bridge-utils package manually. Any bridge device you establish with these tools will be compatible
with VERDE virtual machines for bridging.
Note that bridge-utils combines user space tools with Linux kernel drivers and is neither developed
nor supported by Virtual Bridges, Inc. Bridged networking in VERDE generally requires use of this
Linux kernel functionality, and any restrictions associated with it apply to VERDE virtual machines. For
more information on such restrictions or considerations, consult the documentation provided by your
Linux distribution vendor.
IMPORTANT NOTE: Do not modify any networking parameters in the virtual machine. Doing so can
disable network access and guest-to-host or host-to-guest integration services. Although you can
explicitly set parameters for the secondary interface, Virtual Bridges strongly recommends you configure
it with DHCP (the default), especially if the virtual machine is a Gold Image.
Firewall Considerations
If you are using NAT or Bridged networking, you might need to disable firewall software in use on your
Linux server. It is recommended that after disabling this firewall, you restart the server. This task is
generally not required for bridged networking.
Make sure you contact your Linux administrator before you change firewall rules.
If the firewall uses iptables, you can also disable it manually as follows (as root):
1 Enter the following command to stop VERDE services:
/etc/init.d/VERDE stop
2 Enter the following command to remove all iptables rules:
/sbin/iptables –F
3 Enter the following command to VERDE services again:
/etc/init.d/VERDE start

VERDE™ 4.5 Administrator Guide
Copyright © 2009-2010 Virtual Bridges, Inc. All Rights Reserved. 119
VERDE Dynamic Network Configuration
VERDE Dynamic Network Configuration is a mechanism to assign static network parameters to dynamic
virtual desktop environments. Unlike DHCP, it does not require specific MAC address assignment,
supports additional network configuration capabilities such as joining domains, and works with NAT
networking as well as Bridged networking. Common uses of this technology include setting static IP
addresses for specific dynamic desktops that used Bridged networking, assigning static Windows
Computer Names, and automatically joining Active Directory domains and taking advantage of machine
policies. VERDE Dynamic Network Configuration is currently limited to Windows XP and Windows 7
virtual desktop environments.
Common Use Cases:
Support application access restricted by IP address: assign static IP addresses to dynamic virtual desktops
using Bridged networking, without requiring a DHCP server or static MAC address assignment.
Support Windows workgroup functions requiring static Computer Names (i.e. network scanners, etc.):
assign static Windows Computer Names to dynamic virtual desktops using Bridged networking.
Automatically join Active Directory as specific Computer Names, allowing for the use of AD policies
operating on computer objects: assign static Windows Computer Names, domain names, and domain
credentials to dynamic virtual desktops using NAT or Bridged networking.
Note: VERDE Dynamic Network Configuration supports any combination of the above – for example, it
is possible to assign a static IP address and join an Active Directory domain automatically for a given
virtual desktop.
Architecture
Database
VERDE Dynamic Network Configuration utilizes a database to correlate dynamic virtual desktops to
specific network configurations, and in-VM agents to perform the configuration itself for given virtual
desktops.
Currently, the database is stored as a plain-text CSV file, which can be managed with a text editor or
spreadsheet program of choice. The file should contain one row per virtual desktop to be assigned. The
location of the file is in $WIN4_SETTINGS_ROOT, and should be named netcfg.csv. It must be readable
by root, and must have a mode of ―0400‖ minimum. The value of WIN4_SETTINGS_ROOT is set in
/var/lib/verde/settings.global on any server in the cluster. (Do not change this value.)
The netcfg.csv file will be located in:
/home/<WIN4_MC_USER>/.verde/netcfg.csv (ex: /home/vb-verde/.verde/netcfg.csv)

VERDE™ 4.5 Administrator Guide
Copyright © 2009-2010 Virtual Bridges, Inc. All Rights Reserved. 120
The netcfg.csv file does not have to be created on the server, this can be done on your favorite client and
text editor, and then imported on the server from the VERDE Management Console.
To import the netcfg.csv file:
1 Login to the VERDE Management Console.
2 Go to the ―General‖ Tab.
3 Browse to locate your ―netcfg.csv‖ file.
4 Click Import.
See below:
From the VERDE Management Console, the netcfg.csv file can be exported by clicking the Export
button.
Note: The file should not use a ―text delimiter,‖ only a ―field delimiter‖. The ―field delimiter‖ should be
the comma character. If your spreadsheet program writes ―text delimiters‖ between fields, such as double
quote marks, the mechanism will fail. Please ensure that you are not using additional delimiters other
than commas.
The format of each row of the ―netcfg.csv‖ file is:
<user>,<image>,<ip-address>,<netmask>,<gateway>,<ComputerName>,<domain>,<domain-
admin>,<domain-password>
Where:
Field Description
<user> The user name or Linux user ID of the user receiving the virtual desktop
<image> The image name of the virtual desktop, as assigned by the Management
Console in the Desktop Policy screen
<ip-address> The IPv4 address to set for the session if using Bridged networking
Note: When the session is using NAT networking, this is ignored

VERDE™ 4.5 Administrator Guide
Copyright © 2009-2010 Virtual Bridges, Inc. All Rights Reserved. 121
Field Description
<netmask> The IPv4 network mask to set for the session if using Bridged
networking
Note: When the session is using NAT networking, this is ignored
<gateway> The IPv4 default gateway to set for the session if using Bridged
networking
Note: When the session is using NAT networking, this is ignored
<Computername> The Windows Computer Name to set for the session, up to 15 characters
in length (names longer than 15 characters are automatically truncated)
<domain> The Active Directory domain to join, generally specified in FQDN
format (ex: domain.company.com)
<domain-admin> The Active Directory user name of a domain administrator who can join
computers to the domain
<domain-password> The Active Directory domain administrator's password, specified in
plain text format
For example, to assign the image winxp for the user xpuser to IPv4 parameters:
IP Address: 192.168.10.5
Network Mask: 255.255.255.0
Default Gateway: 192.168.10.1
Windows Computer Name: xpuser-winxp
Active Directory domain: ad.corp.com
Domain administrator: admin
Domain administrator: password
The row in netcfg.csv file would be (one line):
xpuser,winxp,192.168.10.5,255.255.255.0,192.168.10.1,xpuser-
winxp,ad.corp.com,admin,password
To perform the same assignment but without IPv4 parameters (defaults to DHCP):
xpuser,winxp,,,,xpuser-winxp,ad.corp.com,admin,password
VERDE™ 4.5 Administrator Guide
Copyright © 2009-2010 Virtual Bridges, Inc. All Rights Reserved. 122
To perform the same assignment but without joining the Active Directory domain:
xpuser,winxp,192.168.10.5,255.255.255.0,192.168.10.1,xpuser-winxp,,,
Note: Blank fields must still be delimited by commas. Improperly formatted rows which may be missing
delimiters are ignored.
Rules:
1 Linux VERDE server must have as the IP address of the Windows Domain Controller first
nameserver entry in its /etc/resolv.conf file; for example:
# ***** resolv.conf *****
search ad.corp.com
nameserver 192.168.1.111 IP address of Windows Active Directory server
nameserver 24.93.41.115
nameserver 24.93.41.116
2 The $WIN4_SETTINGS_ROOT/netcfg.csv file should have permissions 0400 and be owned
by root in order to preserve security, as this file contains plain-text passwords to the domain
controller.
3 IPv4 parameters are only honored if using Bridged networking – if using NAT networking,
they are ignored. We recommend using NAT or bridge networking.
4 In order to join Active Directory, you must specify all four relevant parameters (Windows
Computer Name, FQDN, domain administrator user name, and domain administrator
password) – Failure to specify one or more of these values correctly will result in the virtual
machine not joining the Active Directory.
5 The first 2 fields, Linux user name and image name, are case sensitive. The Windows
fields are generally not case sensitive unless the domain controller requires it.
6 There is no limit to the number of rows in the CSV file, as long as each assignment is on its
own row and the fields are delimited correctly.
Agent
VERDE runs an agent inside Windows virtual machines that automatically performs dynamic network
configuration. First, if specified, it assigns any IPv4 parameters for the session as well as Windows
Computer Name. Next, if specified the virtual desktop joins the Active Directory domain. If the desktop
is already joined to a domain, it does not join again. After the virtual desktop joins the domain, it
automatically reboots itself twice. (When connecting through RDP, it will just mean a longer connection
cycle, but with VERDE client the user will see two restarts.) The virtual desktop maintains a small
VERDE™ 4.5 Administrator Guide
Copyright © 2009-2010 Virtual Bridges, Inc. All Rights Reserved. 123
persistent delta file with the domain membership information so that future reboots do not require
rejoining.
When its respective Gold Image is updated (a new version is checked in), the next time the dynamic
desktop starts it will perform the domain join operation again since its small persistent delta file will no
longer be valid. All this happens automatically without requiring user intervention. If the user connects
to the virtual machine via RDP, the initial boot of the VM (or after its Gold Image is checked in and it is
restarted) will require additional time for the automatic domain join and reboot. During this time the user
will not need to reconnect manually – the entire process is automatic.
If the user connects using a framebuffer protocol such as VERDE Protocol, he or she will actually witness
the automatic reboot after the domain join when necessary.
IMPORTANT:
In order for this mechanism to work, it is very important that the Gold Image itself NOT be joined to the
Active Directory.
If the domain name or credentials are not specified correctly, the dynamic virtual machine may enter a
―reboot loop‖ where the user will never be able to use the desktop. It is very important that the
credentials and domain name be specified correctly in order to avoid this situation.
Single Sign-on Capabilities
If joining a virtual desktop to the Active Directory, it is possible to utilize single sign-on so that users can
use the same credentials to log into both the VERDE User Console and the virtual machine itself. In
order to do this, the host environment must be joined to the Active Directory using Likewise Open. If this
is the case, these credentials are passed to the virtual machine automatically when using the VERDE User
Console.
Note: The RDP client may still require the users to type their password again before completing the login
into Windows.
Best Practices
1 For a better user experience, the Windows Gold Image should have ―Offline Folders‖
disabled in Windows Explorer to prevent unnecessary synchronization activities when
dynamic instances of it log off.
2 To prevent users from accidentally logging on with local image credentials, you should set
the Gold Image to have an Administrator password and not automatically log in when it
starts.
3 Windows 7 profile persistence:
To avoid losing the user profiles after a Windows 7 Gold Image update:
Launch gpedit.msc
In Computer Configuration > Administrative Templates > System > User Profiles, enable

VERDE™ 4.5 Administrator Guide
Copyright © 2009-2010 Virtual Bridges, Inc. All Rights Reserved. 124
―Set roaming profile path for all users logging onto this computer‖ and enter:
C:\VERDEUsers\Users\%USERNAME% in the Options field
Click OK.

VERDE™ 4.5 Administrator Guide
Copyright © 2009-2010 Virtual Bridges, Inc. All Rights Reserved. 125
Connecting Remote Users to VERDE
Remote users can connect to VERDE servers or clusters with either the Virtual Bridges Client application,
VERDE Client available on the Virtual Bridges download page, or from the VERDE User Console
accessible from a browser. The VERDE Client program is available for various client platforms, such as
32- and 64-bit Linux, Microsoft Windows, iPhone, iPad clients, and is compatible with thin client
platforms based on Linux and Windows XP ―embedded.‖ On the download page, you will also find the
VERDE client source code.
The Virtual Bridges Client protocol supports remote display over LAN, WAN, and Internet; as well as
seamless printing to local client printers from remote server-hosted desktops; file sharing; and multimedia
playback.
The Virtual Bridges Client software is released under various Open Source licenses.
This section discusses the following topics:
Configuring a Firewall for Use with the VERDE Client
Installing and Configuring the VERDE Client Software
Using the VERDE Client
Installing and Configuring the User Console
Remote Display Security and Encryption
Printing
Accessing Client Files and Storage
Troubleshooting
Configuring a Firewall for Use with the VERDE Clients
Virtual Bridges Client connections use outbound ports only, meaning that the client computers
themselves can be behind a standard firewall or NAT device. If the VERDE server(s) are also behind a
firewall, you must verify that the following ports are open and that they route to the appropriate VERDE
server(s):
48602/tcp
48603/tcp
48604/tcp
48607/tcp
48622/tcp (Use Console – RDP and NX connections)
Installing and Configuring the VERDE Client Software
To install the VERDE Client software on your computer, use the following steps:

VERDE™ 4.5 Administrator Guide
Copyright © 2009-2010 Virtual Bridges, Inc. All Rights Reserved. 126
1 Get the software from the Virtual Bridges download page.
2 Start the client. For example, on Windows, double-click VERDE-Client.exe.
The Virtual Bridges VERDE Client dialog box displays.

VERDE™ 4.5 Administrator Guide
Copyright © 2009-2010 Virtual Bridges, Inc. All Rights Reserved. 127
3 Enter or edit the following information:
Server: Enter the VERDE server’s fully qualified host name or IP address.
User name: Enter the user name of a non-root user. To make modifications to the Gold
Image, enter the name of its owner (ex: verde-admin) who created the virtual desktop.
Password: Enter the user’s password.
Desktop size: Click one of the following:
Small (800x600): Open the VM window at a size of 800 pixels by 600 pixels.
Medium (+33%): Open the VM window at a size 33% larger than the Small setting.
Large (maximized): Open the VM window maximized. You can minimize, restore, or
close the window using controls on its upper right hand corner.
Full screen: Open the VM window to use the full screen length and width. To exit from
full screen mode, press Control+Shift+Alt+F. To issue commands to the VM window,
press Shift+F12.
Connection Speed: Slide the bar to the position that indicates the type of connection (for
example, if you are accessing the VM from the Internet, slide the bar to Broadband).
Modem: low display quality, muted audio
DSL/WAN: medium display quality, low audio quality
Broadband: high display quality, normal audio quality
LAN: very high display quality, CD audio quality
Use color compression instead of JPEG compression: Because color compression is lossier
than JPEG compression, choose this option only on severely bandwidth-constrained
connections.
Always print to default printer without prompting: Always prints to the default printer,
regardless of your choice in the Print dialog box. For more information about printing, see
Printing.
Allow remote session to access shares on this computer: For more information about shares,
see Accessing Client Files and Storage.
Use 128-bit data encryption to secure this connection: Select to encrypt data using 128-bit
key encryption, utilizing Diffie-Hellman key agreement. For more information, see Remote
Display Security and Encryption.
Using the VERDE Client
After you click the Connect button in the VERDE Client window, the operating system starts. Login and
use the Virtual Desktop as you would with a local environment. Note that some combination of keyboard
keys (Control + Alt + Delete, Alt + F4 for example) cannot be performed from the keyboard on the virtual
desktop; to run such key combinations, press ―Shift + F12‖:

VERDE™ 4.5 Administrator Guide
Copyright © 2009-2010 Virtual Bridges, Inc. All Rights Reserved. 128
The menu lists some available key combinations; as well as some predefined setup for the mouse. There
are four predefined behaviors that can be adjusted to fit your environment and user requirements.
Client Mouse Tracking: No motion events are sent to the virtual desktop unless the user presses a button
or a control key - this is great for low bandwidth/high latency connections, but has the drawback that tool-
tips, etc. do not work – The user has to click an object to select it, hovering over it is not sufficient.
Fast Mouse (legacy) Tracking: This was the mouse operating mode in VERDE 3.0. It is a less intelligent
form of the current fast mouse, but some customers may prefer this mode.
Fast Mouse Tracking: Default: Tuned to give a decent experience and compromise between precision and
speed, sending some motion events depending on movement threshold, etc.

VERDE™ 4.5 Administrator Guide
Copyright © 2009-2010 Virtual Bridges, Inc. All Rights Reserved. 129
Precise Mouse Tracking: All motion events are sent to the VM - Not recommended on low
bandwidth/high latency connections because the mouse lag may make it unusable. This is the most
precise form, but is also the slowest.
Single sign on
If using local authentication, single sign-on will work for dynamic instances automatically - The
credentials used to log into the VM (via the protocol) are the same as those used to log into the
infrastructure. If using Active Directory, Likewise Open will be required for integration with AD, the
guest itself must also be bound to AD (by installing Likewise Open in it and using domainjoin-cli
command to join the Active Directory domain) in order for single sign-on to work.
Set up the user on the guest operating system.
User needs to have the same credentials on the guest as the VERDE infrastructure.
Installing and Configuring VERDE User Console
The browser based User Console became available with VERDE 4; it currently supports access to virtual
desktops using RDP or NX protocols.
To access your desktop using the VERDE protocol, please use the VERDE client. Virtual Bridges
recommends that VERDE system administrators select the protocol for their end-users based on the type
of guest operating system, usage patterns, network bandwidth, etc. Mixing the use of VERDE with NX or
RDP protocols for the same desktop is not currently supported; the virtual session must be shutdown to be
able to switch between protocols.
The VERDE User Console requires a browser that has a Java plug-in and Java enabled, as well as a RDP
and/or NX client. The following browsers are supported:
Internet Explorer 7 or 8 (Windows)
Firefox (Windows or Linux)
Note: The Java Runtime Environment may need to be installed if it has not been installed as part of the
operating system installation.
IMPORTANT:
1 RDP support needs to be enabled in the Windows Gold Images to be able to launch a RDP
session from the User Console; see Enabling RDP and NX in Gold Images
2 Advanced RDP features like multimedia redirection and support of multiple monitors are only
available with Windows 7 Enterprise or Ultimate Editions. In other words, even if Windows 7
Professional supports RDP 7 the multimedia experience will not be optimal (for example,
slow video playback).
3 NX support needs to be enabled in the Linux Gold Images to be able to launch an NX session
from the User Console, see Configuring Gold Images for NX access

VERDE™ 4.5 Administrator Guide
Copyright © 2009-2010 Virtual Bridges, Inc. All Rights Reserved. 130
RDP Client
The RDP client is used by the User Console to access Windows Gold Images.
Windows RDP Client
The RDP client is available by default on Windows XP and Windows 7. The User Console uses this
feature automatically to start RDP sessions.
Linux RDP Client
To use the RDP protocol to access a Windows Gold Image from a Linux client, the User Console requires
RDesktop, a Linux RDP client.
RDesktop is not available by default and needs to be explicitly installed on Linux clients:
yum install rdesktop (or) sudo apt-get install rdesktop
After installing the RDP client, launch the User Console from your browser. See Starting the User
Console below -- the console will automatically launch the RDesktop client.
NX Client
To access a Linux image from either a Windows or a Linux client, the User Console will require an NX
Client. The client is not part of the operating system and needs to be installed on both Windows and
Linux systems.
The NX client is available for free at: http://www.nomachine.com.
Please download the package for your system and install it with the default settings. The User Console
will automatically use the installed NX client to access the virtual desktop.
Starting the User Console
Once VERDE V4 is installed successfully, the VERDE User Console will be available at:
http://<server-name-or-IP>:8080 or https://<server-name-or-IP>:8443
(8443 is the default, replace with your own port value)

VERDE™ 4.5 Administrator Guide
Copyright © 2009-2010 Virtual Bridges, Inc. All Rights Reserved. 131
Click the ―Show Advanced Options‖ link to change your connection speed. Slide the cursor to the
connection type that best fits your needs.

VERDE™ 4.5 Administrator Guide
Copyright © 2009-2010 Virtual Bridges, Inc. All Rights Reserved. 132
Check the ―Run session in full screen mode‖ if you want to run the session in full screen. Additional
display options are available with the next option.
Checking the box ―Show additional options…‖ will let you specify options offered by the RDP client
(display configuration, colors…)
Note: Be patient, the session takes several seconds (40+) to initialize; unlike the VERDE Client, you will
not see Windows starting.
Note: The ―USB Support‖ option is for future use and is not currently supported. Checking the box will
have no effect in the current release.
User Console Login
If you use the Active Directory, then you simply log in with your AD credentials
In you are not using Active Directory, the username and password that you should use in the Virtual
Desktop is the actual Windows username for the image. For example, if you created the Gold Image with
"administrator", then you should have a user ―administrator‖ defined on your VERDE server and use
those credentials to log in with the User Console. Any additional users will have to be defined in the Gold
Image.
The default on XP is "administrator" and blank password

VERDE™ 4.5 Administrator Guide
Copyright © 2009-2010 Virtual Bridges, Inc. All Rights Reserved. 133
On Windows 7, it is whatever username and password that you created during the Gold Image
provisioning.
RDP and NX Connection Scripts
The section describes the RDP and NX connection scripts which have been introduced with VERDE
version 4.3. The administrator can edit these shell scripts to customize the connection settings
permanently (display size, user experience…) so that the user does not have to access the advanced
options in the VERDE User Console (―Show Advanced Options‖) to set connection options. They can
also be used to set parameters that can only be enabled or disabled with a script (compression for
example).
The default scripts for RDP and NX connections are present in the /usr/lib/verde/etc/apache-
tomcat/webapps/VIA/verde-scripts folder.
rdp-connection-settings:
This script is used by the VERDE User Console to get the connection file content for the RDP session.
rdesktop-connection-settings
This script is used by the VERDE User Console to get the connection file content for the rDesktop
session.
nx-connection-settings:
This script is used by the VERDE User Console to get the connection file content for NX sessions.
You can either make your own script or use the default scripts from the folder
/usr/lib/verde/etc/apache-tomcat/webapps/VIA/verde-scripts as a basis; and make a copy in the
/home/vb-verde/verde-scripts (create verde-script folder if not present). The files have to be
named:
rdp-connection-settings, rdesktop-connection-settings,
or nx-connection-settings according to the type of connection you are customizing.
To be active, the customized script must be present in the: /home/vb-verde/verde-scripts folder. If
the script is not present in this folder when the user launches the session from the VERDE User Console,
the console will start the RDP or NX session with the defaults.
Note: The parameters contained in each script are RDP or NX specific and are not described here. Some
of them are straightforward; while others may require more research. Make sure that you test them
thoroughly before implementation.
Installing and Configuring iVERDE client for iPad and iPhone
Virtual Bridges has released a VERDE client application for iPhone/iTouch as well as for iPad. You can
download the application at no cost from the Apple App Store. The installation and configuration is easy
and will allow you to lauch a VDI session from your favorite mobile device.

VERDE™ 4.5 Administrator Guide
Copyright © 2009-2010 Virtual Bridges, Inc. All Rights Reserved. 134
Note: The current version of the client does not allow selection of the image to load from a list. Just
deploy one Gold Image to the users or group who will use the VDI from the Apple device; else the first
image from the list of deployed images will be used.
1 From your iPhone/iTouch or iPad, access the App Store, the select FREE.
2 Search for iVERDE.
3 Download iVERDE and press the Install button.
4 Launch the iVERDE applet.
5 To configure the server connection, on the Server page, fill in the fields:
Title: The name you want to give to this connection
Hostname: The FQDN or IP address of your VERDE server
User Name: The name of the user to whom the image has been provisioned
Password: The password of this user
Domain: (optional)
6 Press Save
Your Server is now listed by the Title name on the Server page. Press the blue arrow > button to log in.
To delete a server, press the Manage button on the Server page. Press the red dash button of the Server
to be deleted.
Remote Display Security and Encryption
For the best combination of connection performance and security, VERDE provides 128-bit key
encryption, utilizing Diffie-Hellman key agreement. This level of encryption provides adequate
protection against eavesdropping attacks. The VERDE Client also allows users to optionally disable this
feature, which might be useful to improve performance on private networks that are either closed or are
already encrypted.
Users or organizations looking for stronger encryption should consider purchasing or downloading a
third-party software and/or hardware Virtual Private Network (VPN) solution. The VERDE Client
operates transparently on such a system. Check with your network administrator to see if VPN is already
set up.
In cases where you will use only the built-in VERDE encryption, you can restrict your firewall port
forwarding configuration to the following ports if desired:
48602/tcp
48607/tcp

VERDE™ 4.5 Administrator Guide
Copyright © 2009-2010 Virtual Bridges, Inc. All Rights Reserved. 135
Note however that if only these ports are open, clients connect without selecting the encryption option.
Printing
Printing from virtual desktop sessions to local client printers is transparent and seamless for most users.
Virtual Desktop sessions are automatically configured to print by default, so there is no need to adjust
print settings in virtual machines. Printing to clients works without installing or maintaining specific
printer drivers. Generally, as long as the client computer can print from native applications to its local
default printer, it can print from remote virtual desktop sessions using the VERDE Client.
To enable printing, the virtual desktop has a generic PostScript driver. Do not change the print driver if
you expect printing to work transparently.
The following sections discuss details of Windows and Linux printers.
Note: Before you attempt to print from a virtual desktop, make sure the client has a working default
printer configured.
Printing on Windows Clients
You must install the Adobe Acrobat Reader before you can print from remote VERDE sessions. This
program may be downloaded free of charge from www.adobe.com.
Creating a Network Printer on Windows Clients
This section applies to RDP VDI sessions launched from the VERDE User Console.
You can create a network printer inside a Windows Gold Image that will allow any virtual desktop
launched from the Gold Image to print to its client’s default printer.
Important: A default printer must be defined to the user’s client/workstation.
Log in to the VERDE Management Console as an administrator and check out the Gold Image you want
to modify for network printing. Start the Gold Image with the VERDE Client.
In Windows XP:
1 In Windows XP, click on Start -> Settings -> Printers and Faxes.
2 Click on Add a printer and click ―Next.‖
3 Choose a network printer and click ―Next.‖
4 Select the second option, ―Connect to this printer.‖
5 Type \\HOST\client-printer in the text box and click ―Next.‖
6 Search for the Apple LaserWriter 660 PS and install the printer driver.
7 Click ―Finish.‖
8 In the VERDE Management Console, check in the Gold Image that you have modified. Any

VERDE™ 4.5 Administrator Guide
Copyright © 2009-2010 Virtual Bridges, Inc. All Rights Reserved. 136
virtual desktop session using that Gold Image will now be able to print to its client’s default
printer.
In Windows 7:
1 Click on Start -> Devices and Printers.
2 Click on ―Add a printer‖.
3 Click on ―Add a network printer …‖
4 Click on ―The printer I want isn’t listed.‖
5 Choose the second option, ―Select a shared printer by name‖
6 Type \\HOST\client-printer in the text box and click ―Next.‖
7 Search for the HP Color LaserJet 2800 PS and install the printer driver.
8 Click ―Finish.‖
9 In the VERDE Management Console, check in the Gold Image that you have modified. Any
virtual desktop session using that Gold Image will now be able to print to its client’s default
printer.
Printing on Linux Clients
On Linux virtual desktops, a standard default PostScript printer is configured in CUPS.
You must have the BSD-style lpr program available. On platforms using the CUPS engine, typically
this is available in the cups-bsd package. You must be able to print to the default printer from a shell
using the lpr command if you expect it to work with the Virtual Bridges Client.
For situations where you must drive the printer directly from the virtual desktop environment, you can
configure the guest-printer queue.
Accessing Client Files and Storage
VERDE provides a convenient facility to access local client-side files and storage devices from remote
desktop sessions. It configures the virtual IPv4 address 10.0.2.5 in the virtual machine to map to the
client directly to access shared folders. This allows the remote session to connect to any shares published
on a Windows client, or using Samba-based folder sharing in Linux clients.
This method is also firewall-friendly, so you do not need to compromise client-side network security to
enable shared folder capabilities. Note that access control from the remote virtual desktop depends on the
permissions and security policies you set on the shares in the client. For example, if you set the client
share for guest access, the remote may open the folder without prompting the user for user name and
password.

VERDE™ 4.5 Administrator Guide
Copyright © 2009-2010 Virtual Bridges, Inc. All Rights Reserved. 137
After you log in to the virtual machine using the VERDE Client, you can browse shares on your client
using the \\10.0.2.5 path or using a UNC path. For example, if you set up a share named
SharedDocuments on the client, you can access it from the remote virtual desktop session with the UNC
path \\10.0.2.5\SharedDocuments.
Note that the 10.0.2.5 IP address is virtual and is the same regardless of the client’s assigned IP
address.
For more information on sharing folders from your client computer, consult the documentation provided
with your client operating system. Note that accessing shares on Vista clients might be problematic and
require additional permission settings on each file to be shared. Various Internet resources exist for
understanding file sharing on Vista, including the Microsoft Knowledgebase at
http://support.microsoft.com, and other information you can find with your favorite search engine.
Troubleshooting
Problem Solution
Client cannot connect Make sure the firewall is configured to allow the
TCP discussed in Firewall Considerations to the
VERDE server.
Client cannot print
If you are using a Windows client, make sure
Adobe Acrobat Reader is installed on the client
platform. If you are using a Linux client, make sure
a default printer is specified on the client, and make
sure you can print to it on the client platform using
the lpr or lp commands.
Mouse is not tracking smoothly Press ―Shift + F12‖ to access the special key
combination and mouse tracking options menu.
Select the mouse behavior that best fits your
environment and requirements. These settings are
persistent. See Using the VERDE Client for more
details.
Remote virtual desktop cannot access shared
folders on client
Make sure the option Allow remote session to
access shares on this computer is checked on the
client when connecting. Make sure the folder is
shared with appropriate permissions on the client.
Try using the full share name in the guest virtual
desktop when connecting (for example,
\\10.0.2.5\SharedFolder) rather than browsing
\\10.0.2.5 only.

VERDE™ 4.5 Administrator Guide
Copyright © 2009-2010 Virtual Bridges, Inc. All Rights Reserved. 138
Problem Solution
Remote virtual Linux desktop does not resize
properly (for example, the menu bar or taskbar is
off the client screen)
It is possible the user manually set the screen
resolution within the guest. Perform each of the
following tasks in the order shown until the issue is
resolved:
Close the client session, reconnect,
reauthenticate, and launch the guest session
again.
In the guest session, remove the directory
$HOME/.gconf/desktop/gnome/screen, or the
file $HOME/.config/monitors.xml, and restart
the guest session.
Be sure to instruct users never to manually set
the screen resolution in the guest.
Virtual machine does not shutdown This could be caused by your antivirus. If you have
an antivirus like Symantec Corporate Edition, you
will have to kill the process to be able to shutdown.
To prevent it from happening, remove scanning of
floppy drives in the Gold Image.

VERDE™ 4.5 Administrator Guide
Copyright © 2009-2010 Virtual Bridges, Inc. All Rights Reserved. 139
Enabling RDP and NX in Gold Images
Configuring RDP In the Windows XP Gold Image
This section describes the necessary steps to configure Windows XP Gold Images for use with RDP.
Windows 7 configuration is very similar; see Configuring RDP in the Windows 7 Gold Image.
Adjusting the Windows Firewall
1 If the Gold Image has been created with the VERDE Management Console, check out the Gold
Image.
2 Launch the VERDE Client and log into the guest session as the local machine Administrator
account (mcadmin1).
3 From the Start menu, select Run…, type firewall.cpl, and press <Enter>.
4 In the General tab, make sure the On radio button is selected.
5 Click the Advanced tab.
6 In the Network Connection Settings area, select the first connection (typically called ―Local Area
Connection‖), and click the Settings… button.
7 Check the box next to Remote Desktop, and click the OK button.
8 Click OK to close the dialog box.
Joining the Active Directory Domain
1 If for some reason the VDI session has been closed after setting up the firewall, launch the
VERDE Client and log into the guest session as the local machine Administrator account
(mcadmin1).
2 From the Start menu or on the Desktop right click on My Computer > Properties, then click the
Computer Name tab.
3 Click the Change button.
4 In the ―Member if‖ section, select ―Domain‖ and enter your domain name (ex: network.cy.com),
then click OK.
5 When prompted to log on, enter a user name and password of an administrator of the Active
Directory domain controller. If successful, you will get a confirmation window welcoming you to
the domain. Click the OK button.
6 Click OK in the window asking you to reboot the computer.
VERDE™ 4.5 Administrator Guide
Copyright © 2009-2010 Virtual Bridges, Inc. All Rights Reserved. 140
Allowing Users to Access the Session via RDP
1 Launch the VERDE Client and log in with the Gold Image Administrator account.
If you have just joined the Active Directory domain, the Gold Image has restarted (you should not
have to restart the VERDE Client).
Login with the local Windows XP administrator.
2 From the Start menu or on the Desktop right click on My Computer > Properties.
3 Click the Remote tab.
4 In the Remote Desktop section, check the box ―Allow users to connect remotely to this
computer,‖ then click the Select Remote Users… button.
5 If you are not using Active Directory, you should see the comment ―Administrator already has
access‖, in this case click OK to close the dialog box then OK again to close the ―System
Properties‖ and skip the following steps.
6 If you are using Active Directory, Click the Add… button, in the Select Users dialog box, click
the Locations… button.
7 If/when prompted to log on to the domain controller, enter a user name of an administrator who has
the rights to search the Active Directory on the domain controller. In the Locations dialog box,
click Entire Directory, and click the OK button.
8 Click the Object Types… button, and check the box next to Groups, then click the OK button.
9 Type the full or partial group name in edit field, and click OK; click the Add button in the Remote
Desktop Users dialog box and use this edit box to continue finding group or user names if you want
to add more than one, or make a mistake.
10 Click the OK button in the Remote Desktop Users dialog box to finish.
11 Go to Setting up the Session Settings to support RDP
Configuring RDP in the Windows 7 Gold Image
Configuring the Firewall
1 If the Gold Image has been created with the VERDE Management Console, check out the Gold
Image.
2 Launch the VERDE Client and log in with the Gold Image Administrator account.
3 Log into the guest session as the local machine Administrator account.
4 Open the Windows Firewall configuration panel, from the Start menu, select Run…, type
firewall.cpl, and press <Enter> (or System > Security > Windows Firewall).

VERDE™ 4.5 Administrator Guide
Copyright © 2009-2010 Virtual Bridges, Inc. All Rights Reserved. 141
5 In the General tab, make sure the On radio button is selected.
6 Select Advanced Settings in the left pane.
7 Select Inbound Rules in the left pane.
8 Enable Remote Desktop (TCP-In) on both Domain and Public.
9 Exit the Firewall configuration panel.
Joining the Active Directory Domain
1 From the Start menu or on the Desktop right click on Computer > Properties.
2 Click Change Settings in the ―Computer name, domain, and workgroup settings‖ section.
3 In the ―System Properties‖ window, click the ―Change…‖ button.
4 In the ―Member of‖ section, select ―Domain‖ and enter your domain name (ex: network.cy.com).
5 When prompted to log on, enter a user name and password of an administrator of the Active
Directory domain controller. If successful, you will get a confirmation window welcoming you to
the domain. Click the OK button.
6 Click OK in the window asking you to reboot the computer.
Allowing Users to Access the Session via RDP
1 Launch the VERDE Client and log in with the Gold Image Administrator account.
If you have just joined the Active Directory domain, the Gold Image has restarted (you should not
have to restart the VERDE Client).
Login with the local Windows 7 administrator.
2 From the Start menu or on the Desktop right click on Computer > Properties > Remote Settings
(Left pane).
3 In the Remote Desktop section, select ―Allow connection from computers running any version of
Remote Desktop.‖
4 Click the Select Users… button.
5 If you are not using Active Directory, you should see the comment ―Administrator already has
access‖ above the Add - Remove buttons. In this case click OK to close the dialog box then OK
again to close the ―System Properties‖ and skip the following steps
6 If you are using Active Directory, Click the Add… button. In the Select Users dialog box, click
the Locations… button.

VERDE™ 4.5 Administrator Guide
Copyright © 2009-2010 Virtual Bridges, Inc. All Rights Reserved. 142
7 If/When prompted to log on to the domain controller, enter a user name and password that has
access to search the Active Directory on the domain controller. In the Locations dialog box, click
Entire Directory, and click the OK button.
8 Click the Object Types… button, and check the box next to Groups, then click the OK button.
9 Type the full or partial group name in edit field, and click OK. Click the Add button in the Remote
Desktop Users dialog box and use this edit box to continue finding group or user names in order to
add more than one, or if you make a mistake.
10 Click the OK button in the Remote Desktop Users dialog box to finish.
11 Go to Setting up the Session Settings to support RDP.
Setting up the Session Settings to support RDP
At this point configuration is complete. Shutdown the Gold Image virtual machine. Return to the
management console as the image owner and ―Check in‖ the image. This publishes the modified image to
the users specified via the Desktop Policy page.
Modifying the Session Settings
In certain situations desktops using RDP may need to use NAT network option. If you need to do so, this
is done in the session settings management area in the VERDE Management Console. See Manage
Sessions Settings in the VERDE Management Console section for more details .
1 Login to the VERDE Console.
2 Go to the ―Session Settings‖ page.
3 Click ―CREATE NEW‖ on the upper right corner above the table.

VERDE™ 4.5 Administrator Guide
Copyright © 2009-2010 Virtual Bridges, Inc. All Rights Reserved. 143
Enter a Name and Description to the new session settings rule and specify ―NAT‖ as the network option,
then save the new setting rule.
Go to the Desktop Policy page to assign the RDP session setting to the user(s) who require RDP protocol.

VERDE™ 4.5 Administrator Guide
Copyright © 2009-2010 Virtual Bridges, Inc. All Rights Reserved. 144
Click the UPDATE button to save the changes and exit the edit mode.
Start the User Console (see the beginning of this chapter) to launch the RDP connection
Configuring Gold Images for NX access
With VERDE4, the NX protocol can be used by Linux or Windows clients to access their Linux virtual
sessions. The following steps should be followed to enable Linux Gold Images for use with the NX
protocol.
1 Check out the Gold image as the image owner/administrator (ex: mcadmin1).
2 Install the NX packages:
Nxclient
Nxnode
Nxserver
The ―free edition‖ .rpm and .deb packages are available at:
http://www.nomachine.com/select-package.php?os=linux&id=1
(If this link does not work, please select the ―Download‖ tab on the main page, and then select NX Free
Edition for Linux.)
1 Select the package according to your Linux distribution.
2 In the new window, select:
Download client.
Download node.
Download server.
Additional notes specific to some Linux distributions:
Ubuntu
SSH must be installed in the Gold Image:

VERDE™ 4.5 Administrator Guide
Copyright © 2009-2010 Virtual Bridges, Inc. All Rights Reserved. 145
sudo apt-get install ssh
Ubuntu 9.04 and 10.04
There is a known audio compatibility issue between Nomachine NX and Ubuntu 9.04 and 10.04. Audio
cannot currently be played on the VDI session.
RedHat/CentOS/Novell/SUSE/SLED
You must disable the in-guest firewall, (use YaST on SUSE for example), or at least open port 22 in the
guest firewall.
SUSE Linux Enterprise Desktop 11 (SLED 11) – 64 bit
Gnome desktop does not show the menu bars when accessed via NX client.
Please view the Novel website for more details.
The current workaround is to downgrade to gnome-panel-2.24.1-12.19:
rpm -Uvh --oldpackage gnome-panel-2.24.1-12.19

VERDE™ 4.5 Administrator Guide
Copyright © 2009-2010 Virtual Bridges, Inc. All Rights Reserved. 146
Single Server Session Management
VERDE servers provide tools for listing, shutting down, and aborting user sessions. Because each
session runs as a Linux process group, it has a unique PID number.
IMPORTANT NOTE: This section addresses single server session management only. If you are using a
cluster of servers, skip this section and see Clustering instead.
This section discusses the following topics:
Real-Time Monitoring with verdetop
Listing Running Sessions with win4-sessions
Shutting Down Sessions with win4-shutdown
Real-Time Monitoring with verdetop
VERDE provides a real-time server monitoring utility called verdetop, which functions much like
top(1) on Linux. Unlike top(1), however, verdetop monitors only VERDE virtual desktop sessions,
and reports system utilization and load according to VERDE characteristics. verdetop also enables you
to abort and shut down sessions without having to exit the utility and run the win4-shutdown command
manually.
You can run verdetop in one of two ways: single-pass, and interactive. Use the following syntax:
verdetop [number-of-seconds]
where the optional number-of-seconds parameter specifies the frequency, in seconds, to refresh the
information. Omitting number-of-seconds runs verdetop in single-pass mode.
Notes:
To abort and shut down sessions belonging to other users, you must run verdetop with root
privileges.
The interactive form of verdetop displays only as many sessions as will fit in the terminal window
you are running it in. To increase the number of sessions reported, increase the size of the terminal
window.
Listing Running Sessions with win4-sessions
Another more script-friendly method to list running sessions on the server is with the win4-sessions
command:
win4-sessions [-n]
The optional -n parameter lists the user for each session as a numeric UID rather than a name. This might
be desirable if you are wrapping this command in a custom script.
Example: list the running sessions on the server:

VERDE™ 4.5 Administrator Guide
Copyright © 2009-2010 Virtual Bridges, Inc. All Rights Reserved. 147
win4-sessions
Note that there is no need to run this command as root because it only lists information.
Each session manages a group of processes. The PID you see in the list is the ―runtime‖ process ID,
which is the parent of all related processes for that virtual machine. The core virtual machine process
running in that process group is called kvm.
Never attempt to use kill -9 until you have attempted kill -15 and waited a few seconds with no
result. Using kill -9 on any process in this process group might leave system resources such as shared
memory and semaphores in an unknown state, and should be used only as a last resort.
Shutting Down Sessions with win4-shutdown
Usage: win4-shutdown [-a] [-s] [-t timeout] [pid]
Parameter Description
pid Process ID of session as reported by win4-sessions command
-a Abort the session immediately. This option should be used only if the
session is unresponsive, and in some cases might lead to minor data loss or
corruption.
This is the virtual machine equivalent of pressing the power button on a
computer without first shutting down the operating system.
-s Attempt a graceful shutdown
This is the equivalent of using the shutdown option in the guest operating
system.
-t timeout If combined with –s parameter, specifies a timeout, in seconds, to wait for
the session to shut down gracefully before aborting it. The default is to
wait forever.
Guest operating system shutdowns usually take less than 60-120 seconds if
functioning correctly.
Note that the user you run win4-shutdown as must have permissions to operate on whichever session(s)
you want to abort or shut down. To shut down or abort other users’ sessions, you must run win4-
shutdown with root privileges.
Example 1: Immediately abort the session with PID of 12543:
win4-shutdown –a 12543
Example 2: Shut down session with PID of 12543 gracefully, with no timeout:
win4-shutdown –s 12543
Example 3: Shut down session with PID of 12543 gracefully, waiting up to 60 seconds for it to shut
down cleanly before aborting the session:
win4-shutdown –s –t 60 12543

VERDE™ 4.5 Administrator Guide
Copyright © 2009-2010 Virtual Bridges, Inc. All Rights Reserved. 148
Example 4: Bourne shell script to shut down all running sessions on this server gracefully, allowing them
120 seconds to complete their shut down before resorting to the abort function:
#!/bin/sh
# walk through list of all sessions, skipping the header, getting just
# the PID
for i in `win4-sessions |grep -v ^PID |cut -d ' ' -f 1`; do
win4-shutdown -s –t 120 $i
done
exit 0

VERDE™ 4.5 Administrator Guide
Copyright © 2009-2010 Virtual Bridges, Inc. All Rights Reserved. 149
Login Scripting and Automation
VERDE enables system administrators to write a variety of scripts—including automation scripts—to
allow you to easily integrate VERDE virtual desktops with your existing infrastructure. In addition to the
scripting capabilities focused on virtual desktop provisioning and session management, login automation
is a powerful feature set that can be used to integrate complex functions quickly using simple procedures,
Linux scripting, and even custom or third-party applications.
This section discusses the following topics:
Login ―Hooks‖
Dumping Virtual Bridges Client Parameters
Login “Hooks”
The VERDE connection broker, which presents users with a server login screen and instantiates or
resumes virtual machines based on authentication and authorization, provides several integration ―hooks‖
where system administrators can add custom commands and/or scripts. These hooks include:
Pre-show login window (run as root, as soon as user connects but before being challenged for
authentication)
Post-show login window (run as root, immediately after user login dialog box is presented)
Post-login success (run as root, immediately after user is successfully authenticated)
Post-login failure (run as root, immediately after user authentication fails)
Pre-session launch (as authorized non-root user, can be used to perform user-level tasks after
privileges are dropped but before user virtual machine starts)
User session launch command (as authorized non-root user, can be used to wrap virtual machine
startup/resume using the win4 command)
User desktop launch command (as authorized non-root user, can be used to start a non-virtual
machine application or desktop environment if the user has no provisioned virtual desktop)
This section discusses the following topics:
Example Uses of Login Hooks
General Hook Rules
Login Hook Assignment
Login Hook Environment Variables
Example Uses of Login Hooks
All hooks except for the user session launch command and user desktop launch command are unassigned
by default, meaning that they are not executed. You can assign a script, executable program, or shell
command line to any or all hooks. Examples of why hooks can be used include, but are not limited to:
VERDE™ 4.5 Administrator Guide
Copyright © 2009-2010 Virtual Bridges, Inc. All Rights Reserved. 150
To present users with important, organizational-specific information or set a custom login screen
background upon connection to the server.
To create home directories for users who may not have home directories yet (for example, users
created on a directory/authentication server but who have never logged in to the VERDE server).
To collect, analyze, and/or save client-specific parameters from client connections.
To enable a completely transient user experience by deleting remnants of persistent user data before
starting virtual desktops.
General Hook Rules
The following rules apply to hook commands, scripts, and executable programs:
Each hook command must be a properly formatted Linux executable, with read/execute permissions,
and proper script header (if it is a script).
Each hook command must return a 0 value, or the user will be presented with an error message
indicating that the hook command failed (this might be desirable in situations where failures should
be reported).
Hook commands should execute as quickly as possible to avoid ―hanging‖ the user for prolonged
periods of time—because hook commands execute serially.
Login Hook Assignment
Edit the /var/lib/verde/settings.global file with root privileges. The following settings
correspond to each login hook command:
Parameter Description
WIN4_HOOKCMD_PRESHOW Pre-show login window (as root)
WIN4_HOOKCMD_POSTSHOW Post-show login window (as root)
WIN4_HOOKCMD_LOGINOK Post-login success (as root)
WIN4_HOOKCMD_LOGINFAIL Post-login failure (as root)
WIN4_HOOKCMD_SESSEXEC User session launch command (as authorized non-root user)
WIN4_HOOKCMD_DESKTOPEXEC User desktop launch command (as authorized non-root user)
WIN4_HOOKCMD_PRELAUNCH User desktop pre-launch command (as authorized non-root
user)
You should enclose the values of these settings in quotes if they contain spaces in them. Some example
values follow:
WIN4_HOOKCMD_PRESHOW=”/usr/local/bin/myscript”
WIN4_HOOKCMD_LOGINOK=”/usr/lib/verde/bin/win4-cda-paramset >p.log”
WIN4_HOOKCMD_SESSEXEC=”/usr/local/bin/win4-wrapper.sh”

VERDE™ 4.5 Administrator Guide
Copyright © 2009-2010 Virtual Bridges, Inc. All Rights Reserved. 151
Note that the above examples are for illustration purposes only and are not intended to necessarily
resemble any real-world use of the hook assignments. For best security and reliability practice, use
absolute paths for the hook commands themselves, especially if they run as the root user.
Login Hook Environment Variables
Login hook commands, scripts, and programs can rely on certain environment variables set by the login
process in order to help facilitate identification and functions:
Environment variable Set for hook
PATH All hooks; set to “/sbin:/usr/sbin:/bin:/usr/bin” for hooks that run
as root, and “/usr/bin:/bin:/usr/bin/X11” for hooks that run as non-root
DISPLAY All hooks
HOME All hooks that run as authorized user
PWD All hooks; set to / for hooks that run as root, and the respective home
directory for hooks that run as non-root
WIN4_USERNAME For all hooks except pre-show and post-show, indicates the user name
specified or authenticated
WIN4_CONFIGNAME Pre-launch and User session launch command—indicates the virtual
machine configuration to start (default is win4)
Dumping Virtual Bridges Client Parameters
VERDE provides a convenient mechanism for retrieving one or more parameters from clients themselves.
These parameters can be used by scripts within login hooks to affect the login process, or placed in files
to present into the virtual desktops themselves via host shared folders. To dump these parameters to the
standard output of a script or to a file, use the /usr/lib/verde/bin/win4-cda-paramset program as
follows:
Usage: /usr/lib/verde/bin/win4-cda-paramset [-h] [-g] [-q] [-m] [param]
Parameter Description
-h Show help usage
-g Show graphical progress bar while fetching parameters
-q Exit quietly if client does not provide parameters
-m Use Microsoft-format (CRLF) for dump

VERDE™ 4.5 Administrator Guide
Copyright © 2009-2010 Virtual Bridges, Inc. All Rights Reserved. 152
Parameter Description
param Parameter number (0-255), or all to dump all parameters, one per line
To make parameter values available to guest virtual machines, redirect the output to a file in a well-
known location (for example, the user’s home directory), and use the host shared folder feature to access
the file from the virtual desktop.
For example, to dump all client parameters to a text file in the user’s home directory, for later access from
the virtual desktop:
/usr/lib/verde/bin/win4-cda-paramset –gqm all >.client_paramset
From the virtual desktop session, access this file as \\10.0.2.4\HOME\.client_paramset. You should
assign this command to the session pre-launch hook (WIN4_HOOKCMD_PRELAUNCH) so that parameters are
dumped after the user is authenticated and authorized, but before their virtual desktop session starts.
The command outputs parameter value(s) one per line, in the following format:
parameter-number parameter-value
For example:
140 Linux
Client parameters numbers include:
Parameter # Description
128 User name specified in VERDE Client application
129 Local (client) user domain (Windows)
131 Local (client) authenticated user ID that is running the VERDE Client
application
140 Client operating system type (for example, Windows, Linux, etc.)
141 Client operating system version
150 Client operating system’s root path/drive letter
151 Client operating system’s ―system‖ path/drive letter
152 Client operating system’s user home directory/drive letter
153 Client operating system’s temporary file directory/drive letter
154 Client operating system’s user desktop directory/drive letter
155 Client operating system’s user document directory/drive letter
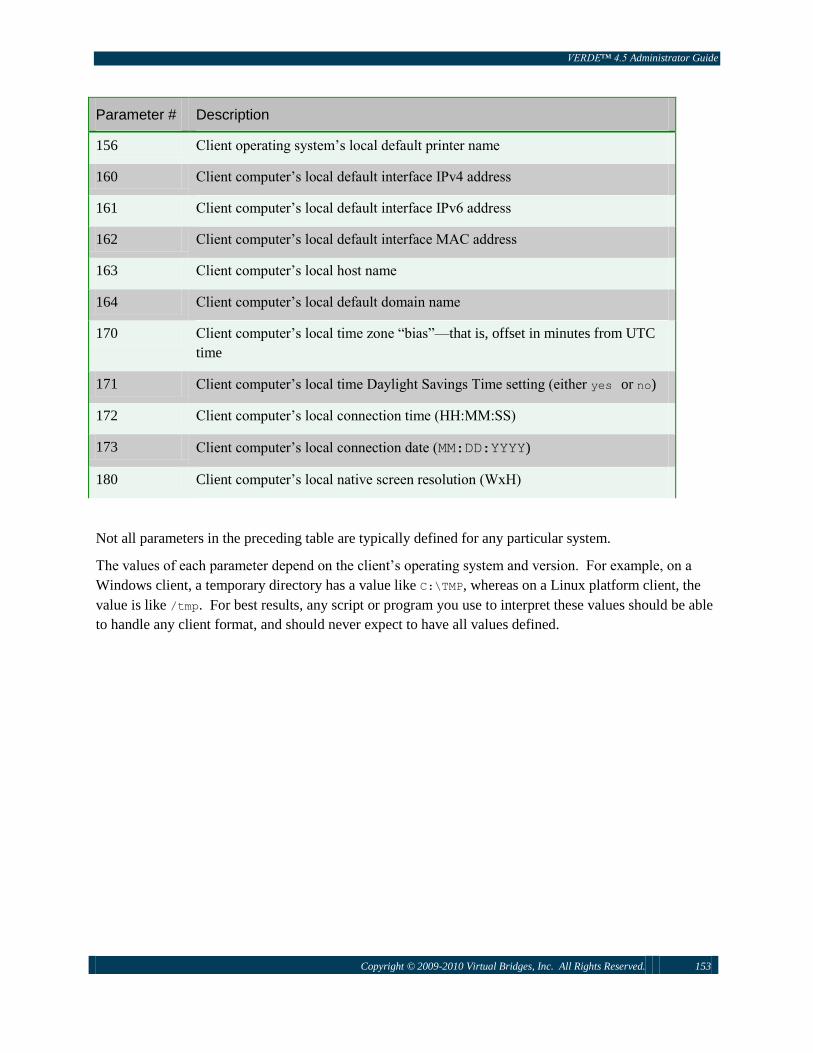
VERDE™ 4.5 Administrator Guide
Copyright © 2009-2010 Virtual Bridges, Inc. All Rights Reserved. 153
Parameter # Description
156 Client operating system’s local default printer name
160 Client computer’s local default interface IPv4 address
161 Client computer’s local default interface IPv6 address
162 Client computer’s local default interface MAC address
163 Client computer’s local host name
164 Client computer’s local default domain name
170 Client computer’s local time zone ―bias‖—that is, offset in minutes from UTC
time
171 Client computer’s local time Daylight Savings Time setting (either yes or no)
172 Client computer’s local connection time (HH:MM:SS)
173 Client computer’s local connection date (MM:DD:YYYY)
180 Client computer’s local native screen resolution (WxH)
Not all parameters in the preceding table are typically defined for any particular system.
The values of each parameter depend on the client’s operating system and version. For example, on a
Windows client, a temporary directory has a value like C:\TMP, whereas on a Linux platform client, the
value is like /tmp. For best results, any script or program you use to interpret these values should be able
to handle any client format, and should never expect to have all values defined.

VERDE™ 4.5 Administrator Guide
Copyright © 2009-2010 Virtual Bridges, Inc. All Rights Reserved. 154
Active Directory and Dynamic Desktops
There are two ways to leverage Microsoft Active Directory with dynamic virtual desktops with VERDE:
Configure the underlying Linux server to authenticate users against an existing Active Directory
domain. This can be done either by configuring Pluggable Authentication Modules (PAM) manually,
or using a third-party integration package such as Likewise Open.
Some Linux server vendors, such as Novell, also provide very sophisticated Active Directory
integration without any additional configuration, simply by choosing an installation-time option.
Using Active Directory in this way enables users to log in to the VERDE server or cluster using their
domain credentials, but then run as a common user ID in their respective virtual desktop.
Users maintain their own unique documents and desktop settings, but authentication and authorization
are never performed in the virtual desktop environment. By the time the user reaches their own
virtual desktop, they have already authenticated at the server level using a user name and password
for the particular Active Directory domain.
This method is very simple to set up and is compatible with both Windows and Linux virtual
desktops with no special configuration other than linking the server or cluster to Active Directory.
Authenticate the virtual machine environment itself to Active Directory. This method is also
compatible with Windows and Linux virtual desktops, but is more logical if using Windows virtual
desktops.
Note that this does not preclude the user from logging in to the server with appropriate credentials,
but it does allow administrators to use Active Directory to drive Windows environment configuration
itself, such as logon scripts and shared resources.
To do this with Linux virtual desktops would require configuring the virtual desktop itself to join an
Active Directory domain, because you configure the underlying server or cluster of servers. Note that
this method does not provide single sign-on, because users must authenticate to VERDE and then
authenticate to their respective virtual desktops once VERDE authorizes them. However, the dual
sign-on generally happens very infrequently, because users can simply disconnect from the VERDE
server and then connect again, at which point VERDE authenticates them and they resume their
existing authorized desktop sessions.
In general, authenticating the virtual desktop itself against Active Directory is not recommended
because it is largely redundant. However, in cases where infrastructure exists to configure desktops
using Active Directory—and some of this configuration makes sense for dynamic desktops as well—
this method is reasonable.
Examples of Active Directory-driven solutions that apply to dynamic desktops are logon scripts and
shared resources.
Examples of Active Directory-driven solutions that do not make sense for dynamic desktops are stateful
application configuration or patch management, because the dynamic virtual desktops do not maintain
persistent changes to applications or operating system components.
Finally, note that these two methods are not directly related. It generally makes sense to connect the
VERDE server or cluster to Active Directory if you are connecting the virtual desktops to prevent users
from having to log in twice. However, it is possible to use a different server-level authentication

VERDE™ 4.5 Administrator Guide
Copyright © 2009-2010 Virtual Bridges, Inc. All Rights Reserved. 155
mechanism, such as LDAP, NIS, or even local authentication (for standalone servers), and then allow the
virtual desktops themselves to communicate with Active Directory if desired.
From VERDE’s perspective, it does not matter how users authenticate at either the server or virtual
machine level, as long as each user has a Linux user ID (whether derived from Active Directory or not)
under which to run authorized virtual machines.
For more information on virtual desktop configuration, including recommendations for single-sign-on if
not connecting to Active Directory in the virtual machine itself, see Installing a Gold Image Desktop
Virtual Machine.
IMPORTANT: The remainder of this section assumes you are using build 660.2606 or later of the
VERDE 2.0 package, because previous versions did not correctly support some of the functionality
required for Active Directory use with dynamic virtual desktop sessions.
This section discusses the following topics:
Considerations for Server-Level Active Directory Authentication and Authorization
Joining the VERDE Server the an Active Directory Domain
Joining a Gold Image Windows Virtual Desktop to an Active Directory Domain
Joining a Windows XP Gold Image to an Active Directory Domain
Joining a Windows 7 Gold Image to an Active Directory Domain
Joining a Gold Image Virtual Linux Desktop to an Active Directory Domain
Considerations for Server-Level Active Directory
Authentication and Authorization
The main requirement for authenticating users at the VERDE server or cluster level against Active
Directory is to have unique and consistent Linux user IDs for each respective user. You can do this in
any of the following ways:
Host unique, consistent Linux UIDs for each domain user in the Active Directory database itself,
using technology such as Microsoft’s Identity Management for UNIX. Note that such technology
might require schema changes to your organization’s existing database, and might not be an ideal
solution in all cases.
Use a third-party service running on the Windows server or domain controller, which extends UNIX
identities to existing Active Directory users without modifying the underlying schema. While Virtual
Bridges does not recommend nor support any specific solution, various vendors are known to provide
products to address this problem.
Use a third-party Linux-based package to derive UNIX identities (such as unique and consistent UIDs)
from the existing Active Directory. Virtual Bridges recommends the product Likewise Open from
Likewise Software to deliver this functionality. You can install it at no cost, please see the Likewise
website for download and installation instructions. For large Active Directory configurations (more than
524,287 relative identifiers (RIDs), Likewise Enterprise version or their UID-GID management tool may
be required. See the Likewise Open Guide for more information.

VERDE™ 4.5 Administrator Guide
Copyright © 2009-2010 Virtual Bridges, Inc. All Rights Reserved. 156
Note that some Linux vendors, such as Novell, also offer excellent Active Directory integration as a
simple install-time option for the server package. Make sure such a solution delivers unique and
consistent Linux UIDs for Active Directory users. Consult the documentation of your Linux server
package for more information on its capabilities in this area.
Joining the VERDE Server to an Active Directory Domain
This section describes how to join an Active Directory domain with Likewise Open. As mentioned in the
Likewise Open section of the Installing the Operating System chapter, we recommend that you install this
third party product prior to installing VERDE.
You can install Likewise-Open at no cost, please see the Likewise website for download and detailed
installation instructions.
Note: We recommend getting Likewise-Open from their website instead of using the package available
on the Linux distribution repository.
Server Configuration:
Add or change the DNS name definition on the VERDE server to the IP address of your Active Directory
Domain controller. In the /etc/resolv.conf file, the AD server needs to be the first ―nameserver‖ listed;
for example:
# Generated by NetworkManager
search <network>.<company>.com
nameserver 192.168.1.225
Note for Ubuntu: The Ubuntu Nework manager (GUI) resets network settings on a regular basis. So the
manually edited resolv.conf can be overwritten. Either remove the Network Manager or modify the
configuration from the Network Manager only.
Joining the Active Directory Domain:
The command below is for Likewise-Open 5.3. Other versions may do it differently. Please refer to the
Likewise documentation for more details:
1 After installing Likewise Open, run the command below on the VERDE server to join the domain:
/opt/likewise/bin/domainjoin-cli join <network>.<company>.com <AD administrator>
2 Enter the AD administrator’s password when prompted.
3 Your server has now joined the <network>.<company>.com Active Directory domain.
4 You can verify that domain user authentication is resolved with ―su‖, for example:
su - <network>\\joe
5 Likewise recommends that you reboot the server.
VERDE™ 4.5 Administrator Guide
Copyright © 2009-2010 Virtual Bridges, Inc. All Rights Reserved. 157
Joining a Gold Image Windows Virtual Desktop to an Active
Directory Domain
To deliver Active Directory credentials to dynamic Windows virtual desktops inside the virtual machines
themselves it is necessary to join the Gold Image virtual desktop to the domain. Please review the
following notes before attempting this:
Dynamic virtual desktops provisioned from Gold Images do not have unique computer SIDs. This is
not an issue in a domain-based environment because ―domain accounts have SIDs based on the
domain SID‖. After testing and validation of VERDE in Active Directory environments, Virtual
Bridges does not believe this issue is cause for any technical concern.
Virtual Bridges does not recommend or require using the NewSID application in VERDE
environments.
Dynamic virtual desktops joining Active Directory must be configured to use NAT or bridged
networking rather than the default basic networking. In almost all cases NAT is preferred to bridged
networking because it does not require a dedicated IP address on the network at-large.
However, consider your requirements carefully before choosing one method or the other. Generally,
it is easy to switch between the two methods just by configuring the Gold Image, but network
topology and configuration might have other requirements. VERDE automatically assigns to each
session a unique Windows Computer Name when exposing it to the network, even if these sessions
are from the same Gold Image.
For more information about NAT and bridged networking options, see Virtual Desktop Networking.
Windows XP:
Logging into Windows XP when using Active Directory under VERDE takes considerably longer
than using local Windows authentication. In some cases these logins may take more than a
minute to complete. However, users do not need to log off their respective Windows sessions
before disconnecting from the VERDE server, because the server will authenticate them again
when they reconnect. Therefore logins generally occur fairly infrequently.
VERDE automatically populates the Windows login page with the Gold Image’s Active
Directory domain so dynamic desktop users do not need to select it manually each time they log
in. However, this means the Gold Image administrator will likely need to select the local
computer manually before logging in with the Administrator account to perform maintenance
duties on the virtual desktop.
For security purposes, VERDE does not allow Windows to pre-populate the last user name who
logged in to the Gold Image in the login page because this would likely result in Administrator
being pre-populated on all dynamic desktop login screens.
VERDE supports Active Directory users with or without roaming profiles. It is not necessary to use
roaming profiles for VERDE users logging to an Active Directory domain.
VERDE does not support the feature that requires users to press Control+Alt+Delete to reach the
Windows login prompt, and disables this automatically. There is no security risk of disabling this
because users are already authenticated at the server level before entering the virtual desktop.
Windows 7:

VERDE™ 4.5 Administrator Guide
Copyright © 2009-2010 Virtual Bridges, Inc. All Rights Reserved. 158
VERDE does not automatically populate the domain name or user name in the Windows login
page. For details, see Joining a Windows 7 Gold Image to an Active Directory Domain.
Windows 7 logins are typically faster than Windows XP Active Directory logins.
VERDE does not support the use of the Windows Network Identification Wizard to join the Gold
Image virtual desktop to the Active Directory domain. Instead, you should use the Change button in
the Computer Name tab page of the System Properties Control Panel to join the Active Directory
domain in the Gold Image virtual desktop.
Virtual Bridges documents Windows procedures based on Windows XP and Windows 7 only.
Continue with one of the following sections:
Joining a Windows XP Gold Image to an Active Directory Domain
Joining a Windows 7 Gold Image to an Active Directory Domain
Joining a Windows XP Gold Image to an Active Directory
Domain
This section discusses the following topics:
Preparing the Gold Image Virtual Windows XP Desktop
Joining the Gold Image Virtual Windows XP Desktop to the Active Directory Domain
Windows XP: What to Do After the Computer Joins the Domain
Preparing the Gold Image Virtual Windows XP Desktop
Before joining the Gold Image virtual desktop to an Active Directory domain, you must prepare the
virtual machine as discussed in this section. Before continuing, make sure you configured the Gold Image
for NAT or bridged networking as discussed in Virtual Desktop Networking.
First, you must disable offline folders because host file system integration triggers unnecessary (and
wasteful, in terms of disk space) synchronization when users log out.
Windows XP:
1 Log in as Administrator to the Windows virtual desktop session.
2 Click Start > [All] Programs > Accessories > Windows Explorer.
3 Click Tools > Folder Options.
4 Click the Offline Files tab.
5 Clear the Enable Offline Files check box and click OK.
6 If prompted, restart the computer
Change only the following TCP/IP settings in the configuration for Local Area Connection (not Local
Area Connection 2).

VERDE™ 4.5 Administrator Guide
Copyright © 2009-2010 Virtual Bridges, Inc. All Rights Reserved. 159
1 If you have not already done so, start the Windows Control Panel.
2 In category view, click Network and Internet Connections. In classic view, double-click
Network Connections.
3 In category view, click Network Connections, then double-click Local Area Connection. In
category view, double-click Local Area Connection. (Do not click a link named Local Area
Connection 2 if it exists.)
4 In the Local Area Connection Status dialog box, click Properties.
5 In the Local Area Connection Properties dialog box, double-click Internet Protocol (TCP/IP).
6 In the bottom section of the dialog box, click Use the following DNS server addresses.
7 In the Preferred DNS Server field, enter the IP address of the Active Directory domain
controller.
8 Click Advanced.
9 In the Advanced TCP/IP Settings dialog box, click the DNS tab.
10 Select the check box Register this connection’s address in DNS.
11 Click Append these suffixes (in DNS order).
12 Click Add.
13 In the TCP/IP Domain suffix dialog box, in the Domain suffix field, enter the fully qualified
domain name (for example,domain.example.com) and not the short name (for example, domain).
14 In the TCP/IP Domain suffix dialog box, click Add.
15 In the Advanced TCP/IP Settings dialog box, click the WINS tab.
16 On the WINS tab page, click Add.
17 In the TCP/IP WINS Server dialog box, in the WINS server field, enter the Active Domain
controller’s IP address and click Add.
18 In the Advanced TCP/IP Settings dialog box, click Enable NetBIOS over TCP/IP.
19 In the Advanced TCP/IP Settings dialog box, click OK.
20 In the Internet Protocol Properties dialog box, click OK.
Your Windows XP virtual desktop is now ready to join the domain. It is not necessary to restart the
session before continuing with the next section.

VERDE™ 4.5 Administrator Guide
Copyright © 2009-2010 Virtual Bridges, Inc. All Rights Reserved. 160
Joining the Gold Image Virtual Windows XP Desktop to the Active Directory
Domain
To actually join the domain in the Gold Image virtual Windows XP desktop:
1 Click Start.
2 Right-click My Computer.
3 From the pop-up menu, click Properties.
4 In the System Properties dialog box, click the Computer Name tab.
5 On the Computer Name tab page, click Change.
6 In the Computer Name Changes dialog box, in the Computer name field, enter a unique name to
identify this computer on the network.
Consult your Active Directory administrator if you are not sure what name to choose. This task is
optional if only one Gold Image will join the Active Directory domain.
7 In the Member of section, click Domain.
8 Enter the fully qualified domain name (for example, domain.example.com) and not the short
name (for example, domain).
9 In the Computer Name Changes dialog box, click OK.
10 When prompted enter the userid and password of an Active Directory administrator with
authority to join the domain.
Windows XP: What to Do After the Computer Joins the Domain
Windows pauses for a few seconds and then welcomes you to the domain. In the event of errors or
problems, double-check the DNS settings discussed in Preparing the Gold Image Virtual Windows XP
Desktop. If problems persist, make sure you followed all procedures exactly as discussed previously and
contact your Active Directory administrator for additional assistance.
After the virtual desktop joins the domain, you must restart it to apply the changes. After it restarts, log in
as Administrator for the local virtual desktop computer, and then restart it again.
After the login window appears, notice that it has the user name and password fields empty, and the
domain name field is pre-populated with the name of the Active Directory domain you joined. This is
what your virtual desktop users experience when they log in.
If Windows displays a Please Wait While Domain List is Created when you try to toggle between
the Active Directory domain and the local computer in the login screen—especially if the message
persists for a long time—you can interrupt it by pressing Shift+F12 and selecting the option to Send
Control+Alt+Delete to the virtual desktop.

VERDE™ 4.5 Administrator Guide
Copyright © 2009-2010 Virtual Bridges, Inc. All Rights Reserved. 161
This message typically indicates a problem in the DNS or WINS properties, but it should display only
when you change the name of the domain in the Login dialog box. In particular, this issue should not
affect dynamic desktop users who log in with their regular Active Directory credentials.
It is generally not recommended that you log into the Active Directory with the Gold Image virtual
desktop session because this will cache credentials in the Windows registry that will propagate to
dynamic sessions and can pose a security risk. You should instead restrict logins in the Gold Image to the
local virtual desktop’s Administrator account.
Joining a Windows 7 Gold Image to an Active Directory
Domain
This section discusses the following topics:
Preparing the Gold Image Virtual Windows 7 Desktop
Joining the Gold Image Virtual Windows 7 Desktop to the Active Directory Domain
Preparing the Gold Image Virtual Windows 7 Desktop
Before joining a Windows 7 virtual desktop to an Active Directory domain, verify all of the following:
The underlying Linux server is configured to use the Active Directory domain controller for DNS
lookups. To do this, make sure that the domain controller’s IP address is specified in the nameserver
directive of the /etc/resolv.conf file on the server.
Configure the virtual desktop for NAT or bridged networking as discussed in Virtual Desktop
Networking.
If prompted to configure a secondary virtual LAN connection, choose Work network.
Joining the Gold Image Virtual Windows 7 Desktop to the Active Directory
Domain
To join the domain in the Gold Image virtual Windows 7 desktop:
1 Click Start.
2 Right-click Computer.
3 From the pop-up menu, click Properties.

VERDE™ 4.5 Administrator Guide
Copyright © 2009-2010 Virtual Bridges, Inc. All Rights Reserved. 162
4 In the lower right corner of the window, click Change Settings.
5 In the System Properties dialog box, click the Computer Name tab.
6 Click Change.
7 In the Computer Name/Domain Name Change dialog box, in the Computer name field, enter a
unique name to identify this computer on the network.
Consult your Active Directory administrator if you are not sure what name to choose. This task is
optional if only one Gold Image will join the Active Directory domain.
9 In the Member of section, click Domain.
9 Enter the fully qualified domain name (for example, domain.example.com) and not the short
name (for example, domain).
10 In the Computer Name/ Domain Name Changes dialog box, click OK
11 When prompted, enter the user ID and password of the Active Directory administrator with
permission to join the domain, click OK
12 Windows welcomes you to the domain. If you encounter an error, please read the details
carefully and contact your Active Directory administrator for additional assistance
13 After welcoming you to the domain, Windows requires you to restart the session to apply the
changes. To restart the session, click OK to continue, then Close, then Restart Now

VERDE™ 4.5 Administrator Guide
Copyright © 2009-2010 Virtual Bridges, Inc. All Rights Reserved. 163
Windows 7: What to Do After the Computer Joins the Domain
After the session restarts, Windows prompts you for a user name and password. By default it will choose
the local computer and the administrator user. Note this user name because you must enter it after you
finish configuring the Gold Image for Active Directory use by its dynamic instances.
Finally, you must configure Group Policy so dynamic instance users log in by default to the domain that
you joined. Follow the steps below:
1 Click Start.
2 In the Search field at the bottom of the Start menu, enter gpedit.msc.
3 At the top of the pop-up menu, under Programs, click gpedit.msc.
The Local Group Policy Editor window displays.
4 In the left pane, expand Computer Configuration > Windows Settings > Security Settings > Local
Policy
5 In the left pane, click Security Options
6 In the right pane, double-click the policy Interactive logon: do not display last user name.
7 In the policy’s Properties dialog box, click Enabled.
9 Click OK.
10 Restart the virtual desktop session.
11 When the session starts, Windows 7 prompts you for a user name and password. This time, the
default domain will be the Active Directory domain that you joined, rather than the local
computer.
IMPORTANT NOTE: Do not log into a Gold Image as a domain user, domain users should log in only
from dynamic instances of the Gold Image. However, if the Gold Image is a static session, you can log in
as a domain user into that session.
After initial configuration as discussed in this section, to log into the Gold Image and administer it, you
must specify the computer name and administrator user name. For example, if the computer name is
WIN7GOLD and the administrator user name is VERDE, you must enter WIN7GOLD\VERDE as the user name
when you log in.

VERDE™ 4.5 Administrator Guide
Copyright © 2009-2010 Virtual Bridges, Inc. All Rights Reserved. 164
Joining a Gold Image Virtual Linux Desktop to an Active
Directory Domain
VERDE automatically passes user credentials in to Linux virtual desktops, which usually eliminates the
need to join the Gold Image virtual Linux desktop to the Active Directory domain. If you use Likewise
Open on the server, see About Likewise Open and the VERDE Server.
You must verify that the underlying Linux server is configured to use the Active Directory domain
controller for DNS lookups. To do this, make sure the domain controller’s IP address is specified in the
nameserver directive of the /etc/resolv.conf file on the server. The Gold Image virtual machine’s
DNS configuration should not be changed because VERDE automatically configures it.
About Likewise Open and the VERDE Server
If you use Likewise Open on the server, or if user names contain the backslash ( \ ) character, you must
also join the Linux virtual desktop Gold Image to the Active Directory domain the same way you joined
the server itself.
For example, if you are using Likewise Open on Ubuntu Linux servers with Ubuntu Linux virtual
desktops, this is as simple as installing the likewise-open package on both the server(s) and the Gold
Image virtual desktop, and using the domainjoin-cli(8) or domainjoin-gui(8) to join the domain.

VERDE™ 4.5 Administrator Guide
Copyright © 2009-2010 Virtual Bridges, Inc. All Rights Reserved. 165
Two Factor Authentication
Two-factor authentication means that instead of using only one type of authentication (something the user
knows) such as login IDs, passwords… A second ―factor‖ (something the user has), a hardware token for
example, must be supplied in order to authenticate. Two-factor authentication is the combination of
"something the user has" + "something the user knows" to provide a stronger authentication process.
Two-factor authentication mechanisms also generate a ―new token‖ for each login preventing security
issues with keystroke loggers etc – which is a risk area when users access virtual desktops from untrusted
devices or locations.
This section describes the implementation of ―Two-Factor Authentication‖ in the VERDE environment.
In this scenario, VERDE uses a WIKID client to authenticate with a RADIUS server. The information
below will serve you as guidelines, if you need more in depth information please refer to the individual
product documentations.
If you have specific two-factor authentication requirements, please contact us so we can evaluate the
integration process with your specific authentication system and architecture, note that this may require
custom services work from Virtual Bridges.
Notes:
User accounts must be visible to the operating system. It is not enough to have the users defined on the
RADIUS server
The RADIUS server will rely on an external LDAP/AD repository for group management, groups are
managed on the external repository
Users who log into VERDE Management Console, the VERDE User Console or the SMART server must
have home directories that are accessible by the VERDE server
Single Sign On is currently not supported because of the difficulty to integrate ―One Time Password‖
(OTP) with the guest operating system
When working offline, the OTP cannot be verified
Configuring PAM to work with RADIUS on the VERDE Server
The RADIUS integration is achieved through JPAM, below are guidelines on how to configure PAM on
Ubuntu. This may vary with other distributions.
1 Install the RADIUS PAM plugin: sudo apt-get install libpam-radius-auth
2 Configure /etc/pam_radius_auth.conf
Under the 127.0.0.1 line add:

VERDE™ 4.5 Administrator Guide
Copyright © 2009-2010 Virtual Bridges, Inc. All Rights Reserved. 166
“<your.radius.server.ip> <shared-secret> <timeout>”
3 Edit the JPAM configuration file (/etc/pam.d/net-sf-jpam) and add the line below after the
pam_securetty.so line:
"auth sufficient /lib/security/pam_radius_auth.so"
Note: If you are having issues, add the word "debug" at the end of the line you added to net-sf-jpam.
Then look at /var/log/auth.log for hints.
Configuring the RADIUS Server
Make sure that your RADIUS client (the VERDE server) is allowed to contact the RADIUS server
Configure the same shared-secret as you have in the previous section

VERDE™ 4.5 Administrator Guide
Copyright © 2009-2010 Virtual Bridges, Inc. All Rights Reserved. 167
Clustering
This section discusses the following topics:
VERDE Clustering Overview
VERDE Clustering Terminology
Clustering System Requirements
Configuring Clustering Software
Virtual Desktop Provisioning and Management
VERDE Clustering Overview
VERDE offers a highly scalable clustering mechanism to help serve hundreds, thousands, or even
hundreds of thousands of virtual desktops from large arrays of servers. A VERDE cluster can scale from
two to 10,000 servers, and can host up to one million concurrent virtual desktop sessions, given enough
storage and network capacity.
Before continuing, read the following carefully:
http://www.vbridges.com/docs/VERDEClusterOverview.pdf
The following figure shows a sample cluster.
In the figure, one VERDE cluster master manages three ―satellite servers‖—each server hosting one or
more Gold Images. External systems serve to manage authentication (for example, Active Director or
NIS) and as mass storage in the form of a Storage Area Network (SAN) or Network-Attached Storage
(NAS).

VERDE™ 4.5 Administrator Guide
Copyright © 2009-2010 Virtual Bridges, Inc. All Rights Reserved. 168
VERDE Clustering Terminology
This section discusses the terms satellite server and cluster manager and how they relate to administering
a VERDE cluster.
Satellite server
The VERDE satellite server is one of many nodes in the cluster that serve virtual desktops to users. After
first connecting to the cluster manager, the satellite server ―pushes‖ state updates to the cluster manager
when needed.
Given the VERDE connection-oriented model, cluster master failures are detected instantly as broken
connections. In the event of a cluster master failure, each satellite server continues to attempt
reconnection until it is accepted. In the meantime, virtual desktop sessions, whether connected or not,
continue operating without interruption. However, satellite servers do not allow logins while the cluster
master is off-line.
Users connect to the cluster using an entry point and a session point. The entry point is any satellite server
in the cluster. Administrators can configure user clients to connect to the same IP address each time, or
use a ―round robin‖ DNS approach. When a new connection comes in, the satellite server automatically
checks the cluster master for either a matching persistent session (if one exists), or a recommended
satellite server to host the new session. The satellite server communicates this information back to the
client as a referral.
The session point is the referral’s IP address. Clients disconnect from the entry point and connect to this
session point using a transparent, instantaneous mechanism. Because connections are stateless, the cluster
master would have made a ―reservation‖ for the session point on the particular server that receives it.
Users then authenticate against the configured repository and are either connected to an existing persistent
session or given a new session.
Cluster Master
The cluster master provides a real-time session directory to the entire cluster. At any given moment, it
maintains a list of all satellite servers in the cluster, as well as a list of all logged-in users. Each user is
tracked so that sessions persist across logins in the event of disconnections—either intentional
disconnections or unintentional disconnections where the user does not log out first. After logging in to
the cluster, a user's session resumes regardless of what satellite server it is running.
While the cluster master observes the entire cluster, it is not the connection point for inbound sessions.
Instead, it communicates with satellite servers at the system level. Users connect directly to any satellite
server in the cluster, and are referred from there.
This eliminates ―gateway‖ bottlenecks and improves general scalability, performance, and reliability
because many computers manage a few connections each, instead of having one computer managing all
connections.
If the cluster master fails, existing user sessions continue operating without interruption because the
sessions are connected to their respective satellite servers directly. However, during this period of failure,
new user logins are not permitted. As soon as the cluster master comes back online—or is replaced by
VERDE™ 4.5 Administrator Guide
Copyright © 2009-2010 Virtual Bridges, Inc. All Rights Reserved. 169
another system to perform its duties—all satellite servers automatically connect and report state to this
new system, re-creating the real-time session directory automatically upon recovery.
The cluster master does not search for satellite servers; instead, it listens for connections from these
servers. Because the cluster manager is not responsible for entirely controlling the cluster, the cluster
manager is not a single point of failure. The cluster manager is merely a directory used to log in users and
match them with persistent sessions on satellite servers if needed.
Clustering System Requirements
This section discusses system requirements for the VERDE clustering components.
VERDE Cluster Master System Requirements
32 or 64-bit x86 Intel or AMD processor, 1.5GHz or faster
512MB RAM minimum
Ethernet networking (gigabit capacity recommended)
10GB free local storage minimum
Linux 2.6 (for example, RedHat, Novell SuSE, Ubuntu, and so on)
VERDE Satellite Server System Requirements
32 or 64-bit x86 Intel or AMD processor(s), 1.5GHz or faster (recommended: 2GHz or faster,
VT/AMD-V capable, multiple sockets, multiple cores per socket)
2GB RAM minimum (4GB or more recommended)
Ethernet networking (multiple adapters with gigabit or faster capacity recommended)
20GB free local storage minimum. Apply the ―20%‖ rule to estimate the satellite storage space (20%
of gold image size * number of concurrent sessions).
Linux 2.6 (for example, RedHat, Novell/SuSE, Ubuntu, etc., KVM-capable Linux 2.6.24 or newer
kernel recommended)
PAM configured to authenticate users against authentication server’s protocols
SAN/NAS Requirements
100GB minimum free space
Any network file-system supporting file locking and POSIX permissions (for example, NFS, CIFS)
Gigabit or faster networking capacity
Authentication Server Requirements
Any platform providing Microsoft Active Directory, NIS, LDAP, and so on
Gigabit, or faster, networking capacity

VERDE™ 4.5 Administrator Guide
Copyright © 2009-2010 Virtual Bridges, Inc. All Rights Reserved. 170
Client Requirements
Please refer to Supported Guest Virtual Desktop Platforms.
Installation Considerations
If using Active Directory, it is better to install Likewise Open before installing VERDE. (Likewise Open
creates additional PAM rules.) Refer to Likewise Open installation for more details.
When creating users on both the Cluster Master and the Satellite servers, the user ID (uid) and group ID
(gid) need to be identical on every node.
Also, make sure that the DNS entries for hostnames exist in your DNS.
Setting up Shared Storage
The home directories need to reside on the same file system. The example below shows you how to
modify your fstab file to achieve this result.
On the shared device’s <IP address> (for example, 192.168.1.111) create a directory named shared,
for example.
On the Cluster Master (for example, clustersrv1) modify the /etc/fstab to share the home directory at
boot time. For example, add:
192.168.1.111:/vo10/data/shared /home nfs auto 0 0
This syntax is for NetApp storage devices. Other devices may use another syntax.
The home directory will be available as an NFS mounted drive.
Note: We recommend using NFS 4 for performance reasons.
Repeat this procedure on every node.
Configuring Clustering Software
This section discusses the following topics:
Installing the VERDE Cluster Master
Creating User Accounts
Installing the VERDE Satellite Server
Installing the Cluster Master is the same as installing the VERDE server. Follow the steps outlined in
Installing VERDE on the Server to install the Cluster Master.
When this is completed add the VERDE post-installation script, as described in Running the VERDE
Post-Installation Script.
During the post-installation script procedure, you are presented with the question “What is the role of
this Server?” Select option 3, VDI only (cluster node).

VERDE™ 4.5 Administrator Guide
Copyright © 2009-2010 Virtual Bridges, Inc. All Rights Reserved. 171
Installing the VERDE Cluster Master
The VERDE Cluster Master can be installed either on one of the satellite servers, or on its own dedicated
server. It ships with the normal VERDE binary .deb or .rpm package. Installing the Cluster Master is
the same as installing the VERDE server. Follow the steps outlined in Installing VERDE on the Server to
install the Cluster Master.
When the installation has completed run the VERDE post-installation script, as described in Running the
VERDE Post-Installation Script.
During the post-installation script procedure, you are presented with the question “What is the role of
this Server?” You can either select:
option 1, Cluster Master (not licensed, does not do VDI, runs MC), if the cluster is not a VDI
server, or
option 2, Cluster Master + VDI (single server deployment).
Creating User Accounts
User IDs and group IDs need to be identical on each node. You can create user accounts on the Cluster
Master using the Linux command line. For example:
groupadd –gid 5000 vb-verde
useradd –uid 5000 –gid 5000 vb-verde
groupadd –gid 6000 mcadmin1
useradd –uid 6000 –gid 6000 mcadmin1
Next, set passwords:
passwd mcadmin1
Passwd vb-verde
Now, create user accounts on the Satellite Server. Note that the home directories have already been
created when the users are created on the first node, so it is not necessary to create them again. For
example:
groupadd –gid 5000 vb-verde
useradd –uid 5000 –gid 5000 –M vb-verde (-M does not create a home directory.)
groupadd –gid 6000 mcadmin1
useradd –uid 6000 –gid 6000 –M mcadmin1
Note: Repeat this procedure for any additional local users. UID and GID need to match on each node.
Installing the VERDE Satellite Server
Installing the Cluster Master is the same as installing the VERDE server. Follow the steps outlined in
Installing VERDE on the Server to install the Cluster Master.

VERDE™ 4.5 Administrator Guide
Copyright © 2009-2010 Virtual Bridges, Inc. All Rights Reserved. 172
When this is completed add the VERDE post-installation script, as described in Running the VERDE
Post-Installation Script.
During the post-installation script procedure, you are presented with the question “What is the role of
this Server?” Select option 3, VDI only (cluster node).
To deploy more satellite servers, simply repeat this process for each one. In large configurations, you
should consider scripting the deployment in order to automate the process.
Your server is now set up and you can proceed with the next step of installing Gold Images.
Virtual Desktop Provisioning and Management
You must use the management console to create Gold Images, publish them, and deploy them. For more
information about these tasks, see the following sections:
Installing a Gold Image Desktop Virtual Machine
Provisioning a Gold Image Virtual Machine

VERDE™ 4.5 Administrator Guide
Copyright © 2009-2010 Virtual Bridges, Inc. All Rights Reserved. 173
Cluster and Session Management
You must manage the cluster using the cluster manager computer. You can do either an interactive
session with verbose information using the shell or a Web browser, or you can write an application that
connects to the verdecmd management UNIX socket (/var/run/verde/verdecmd-socket). Such
applications can be written in any language that supports access to UNIX domain sockets, including C,
C++, PHP, Perl, and others, and can be deployed as an interactive Linux application or from a Web server
on the same computer.
See one of the following sections for more information:
Managing the Cluster Interactively Using a Shell
Managing the Cluster Interactively Using A Web-Based Application
Managing the Cluster Using a Socket Session
Managing the Cluster Interactively Using a Shell
To start an interactive session from the shell on the Cluster Master, log in as root on that system and run
the following command:
/usr/lib/verde/bin/verdecmon
Use the help command to list available commands, or enter help command to get usage information for
any specific command. The basic commands follow (commands are case-sensitive):
Command Description
help [command] Show list of available commands, or usage for a specific command (if the
optional command parameter is used)
hello Show the interactive greeting message, including overview information such
as number of servers and users
verbose Show verbose setting, or set it (default is on for interactive mode, off for
socket mode)
server List information about a specific satellite server, by Server ID
user userid List information about a specific user, by Linux user ID
servers List information about all known connected satellite servers
users userid List information about all known running user sessions on the cluster
sessions List running sessions for a given user ID
sessions serverid List all running sessions on a given server ID

VERDE™ 4.5 Administrator Guide
Copyright © 2009-2010 Virtual Bridges, Inc. All Rights Reserved. 174
Command Description
offlineserver Take a server offline, which prevents users from logging into it. Any running
sessions on the server continue to run without problem
onlineserver Take a server back online, allowing logins again
abortsession Shut down a user session immediately, without waiting for it to exit gracefully
shutdownsession Shut down a user session gracefully (using the guest operating system’s
shutdown mechanism)
logoffsession Attempt a graceful shutdown, but resort to abortuser if the shutdown exceeds
a certain length of time
Quit Exit this verdecmon session
The VERDE cluster master’s management interface can be provided to non-root users as well if desired,
although this is usually not recommended. Typically you will do this if you use a pseudo-administrator on
the cluster master server or if you run a Web server (for example, Apache) hosting an application that
connects to the management UNIX socket but runs as a non-root user in the Web server. To do this, use
the following settings in /var/lib/verde/settings.global:
Parameter Description
VERDECMD_CONN_UID Set to the user name or numeric Linux user ID who should own the socket
file
VERDECMD_CONN_GID Set to the group name or numeric Linux group ID who should own the
socket file
The default for both settings is 0, indicating the file is owned by root:root. Regardless of these settings,
the file /var/run/verde/verdecmd-socket will always have mode 01770, which indicates ―sticky‖
bit, and read/write permissions for both user and group.
Managing the Cluster Interactively Using A Web-Based
Application
VERDE ships with a web-based version of the interactive shell known as the VERDE cluster monitor
(verdecmon). It requires a Web server, such as Apache, and the ability for the session to run PHP version
5 code.

VERDE™ 4.5 Administrator Guide
Copyright © 2009-2010 Virtual Bridges, Inc. All Rights Reserved. 175
It is easy to develop your own custom PHP-based presentation layer to the verdecmon application. The
file /usr/lib/verde/etc/verdecmon/sock.inc provides a self-documented PHP class to create objects
that connect to and retrieve information from the cluster master server component.
This section discusses the following topics:
Web-Based Application Security Considerations
Configuring a Web Server and PHP
Connecting from a Web Browser
Using and Configuring the Web Interface
Web-Based Application Security Considerations
The default configuration for verdecmon supplied with VERDE uses basic HTTP authentication (that is,
user name and password authentication). This mechanism is generally safe on internal networks but must
be encrypted on public networks to prevent eavesdroppers from learning the administrative user name and
password by intercepting messages between the Web browser and Web server.
Virtual Bridges recommends you configure a certificate for the Web server and use the HTTPS protocol
to access the verdecmon application if you will be using it over a public network. Note that verdecmon
enables a user to shut down and abort virtual desktop sessions, and to take servers out of the cluster. It is
important to protect these functions from unauthorized access.
Creating and applying a certificate varies by Linux server version and Web server. Refer to the
documentation provided with Linux and your Web server for details about configuring them for HTTPS.
Configuring a Web Server and PHP
Refer to the documentation provided with your Linux server distribution for information on how to install
a Web server and PHP version 5 on the cluster master server computer. For example, use the following
commands to install these components on a cluster master server running Ubuntu Linux:
sudo apt-get -y install apache2 php5
Next, you must link the Web server configuration with the verdecmon application.
Apache 2: If you are using Apache version 2, VERDE provides a configuration file that you can
install into Apache’s conf.d directory. For example, to link this configuration file on an Ubuntu
Linux installation, run the following shell commands:
sudo ln -s /usr/lib/verde/etc/verdecmon-apache2.conf
/etc/apache2/conf.d
sudo /etc/init.d/apache2 restart
If you are using Apache version 2 and the supplied VERDE configuration file, you must create an
HTTP password file because verdecmon defaults to using Basic HTTP authentication. The supplied
verdecmon application expects the file to be named /var/lib/verde/verdecmon-passwd. For
example, to do this on Ubuntu Linux and create a user named admin, run the following shell
command:
sudo htpasswd -c /var/lib/verde/verdecmon-passwd admin

VERDE™ 4.5 Administrator Guide
Copyright © 2009-2010 Virtual Bridges, Inc. All Rights Reserved. 176
Note that you should omit the -c flag to htpasswd when using it to create additional users because
this parameter is used to create the file initially.
Another Web server: If you prefer not to use the VERDE-supplied configuration file, or if you are not
using Apache version 2, you must manually configure the Web server to link the /verdecmon/ URL
to the directory /usr/lib/verde/etc/verdecmon/.
Regardless of which Web server you use and how you link the verdecmon application to it, you must
configure VERDE to give the Web server permissions to the control socket.
First, you must determine the authenticated user ID as whom the web server process runs using the id
command. Refer to the documentation of your Linux server operating system for this information.
For example, on Ubuntu Linux, the web server runs as the authenticated user www-data and group www-
data. You will need to resolve these names to actual user and group ID numbers. On Ubuntu Linux, this
is typically 33 for user ID and 33 for group ID.
After determining the Web server’s numerical user and group IDs, you must configure VERDE to grant
permission on the cluster master control socket to this user and group. For example, if the user and group
number are both 33, add the following lines to the end of the file /var/lib/verde/settings.global, or
change the settings below if they are already configured:
VERDECMD_CONN_UID=33
VERDECMD_CONN_GID=33
After doing this, you must restart the VERDE services on the cluster master for the changes to take effect.
To do this, run the following command with root privileges:
/etc/init.d/VERDE restart
Connecting from a Web Browser
To access verdecmon, use the following URL format from a web browser:
http://cluster-master-server-hostname-or-ip-address/verdecmon/
For example, if the cluster master server’s IP address is 192.168.0.100, use the following URL:
http://192.168.0.100/verdecmon/
The trailing / (forward slash) character is mandatory if you are using the VERDE-supplied configuration.
You must authenticate with the user credentials that you created as discussed in Configuring a Web
Server and PHP if you used the VERDE-supplied configuration file.
Using and Configuring the Web Interface
The verdecmon application presents the administrative functions in a tabbed format, enabling you to
monitor and control the Cluster, Servers, Users, and Sessions. All tables are sortable by clicking the table
headings, and clicking on most items will cause the application to filter on that information. The
verdecmon application is otherwise self-explanatory.
You can also configure the verdecmon web application by editing the variables in the file
/var/lib/verde/verdecmon-settings.inc. This file is fully commented and is self-explanatory to set

VERDE™ 4.5 Administrator Guide
Copyright © 2009-2010 Virtual Bridges, Inc. All Rights Reserved. 177
up. To revert to an original version, copy it from the package location in
/usr/lib/verde/etc/verdecmon-settings.inc.
Managing the Cluster Using a Socket Session
The machine-readable socket interface to the cluster master daemon (verdecmd) is available by
connecting to the UNIX socket file /var/run/verde/verdecmd-socket. With this interface it is easy to
create custom user interfaces or Web consoles to control the cluster master using any programming
language that supports basic Linux system calls.
Connections to the cluster master socket are non-verbose by default, meaning all information is returned
in single lines or tables, with columns delimited by the vertical bar (|) character. Commands should be
issued by name as discussed in Managing the Cluster Interactively Using a Shell, followed by a newline
character (ASCII character 10). For example, when issuing the servers command on the socket,
verdecmd returns a table similar to the following:
0|192.168.0.1|50|1|1|0.40|1
1|192.168.0.2|50|4|2|0.30|1
The fields are in the same order as in verbose mode, which in this case indicate server ID number,
server’s public IP address, maximum number of concurrent sessions licensed, current number of sessions
running, current number of sessions reserved, Linux load average for the machine, and Boolean
online/offline status (1 or 0, respectively).
If you access the socket from a program running as a non-root user, you must set the
VERDECMD_CONN_UID and VERDECMD_CONN_GID variables in /var/lib/verde/settings.global
appropriately. Note that you must restart VERDE services on the cluster master computer after changing
these variables. To do this, run the following command with root privileges on the cluster manager:
/etc/init.d/VERDE restart
IMPORTANT: verdecmd sends the ETX (end of text) character, ASCII code 3, after each complete
response to indicate there is no more output for that command. This is especially useful for multi-line
responses, such as those to the servers and users commands.
Example
The following example block of Linux C source code reads (from the UNIX socket file descriptor sfd)
and outputs (to stdout) a response from the socket, stopping on the ETX character:
struct pollfd fdset;
char buffer[4096];
ssize_t len;
int got_etx = 0;
fdset.fd = fd;
fdset.events = POLLIN;
while ((!got_etx) && (poll(&fdset, 1, -1) == 1)) {
errno = 0;
if ((len = read(sfd, buffer, sizeof(buffer))) < 1) {
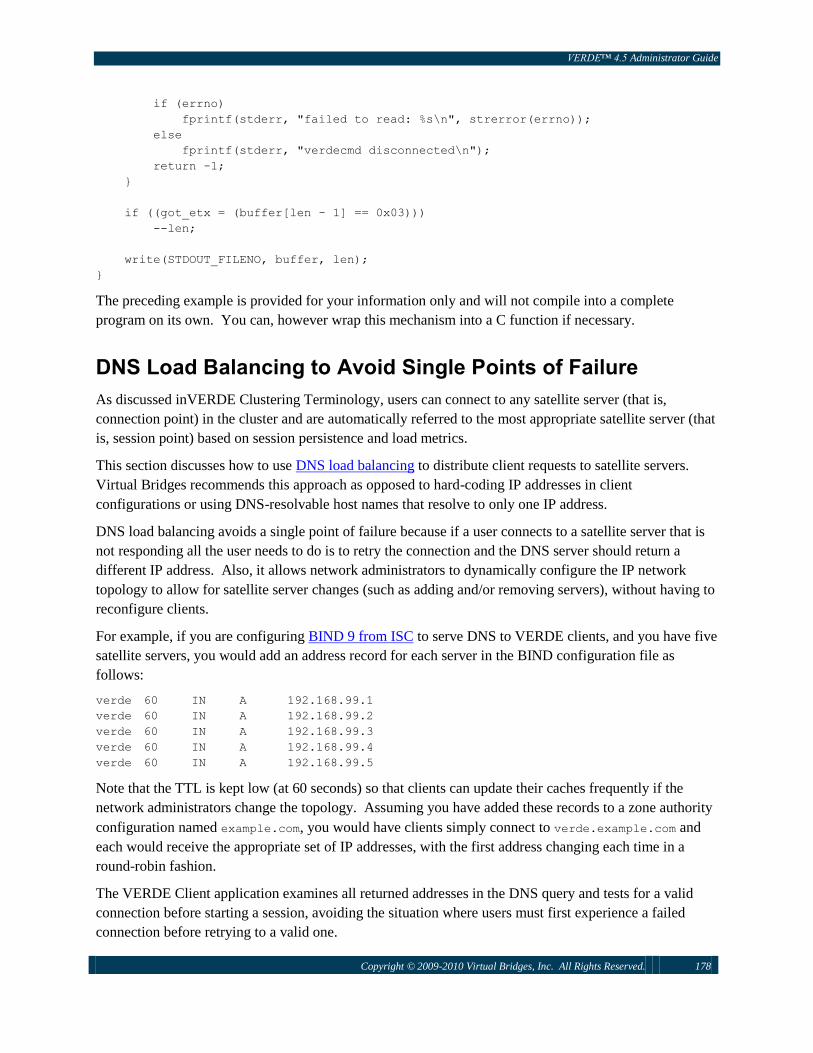
VERDE™ 4.5 Administrator Guide
Copyright © 2009-2010 Virtual Bridges, Inc. All Rights Reserved. 178
if (errno)
fprintf(stderr, "failed to read: %s\n", strerror(errno));
else
fprintf(stderr, "verdecmd disconnected\n");
return -1;
}
if ((got_etx = (buffer[len - 1] == 0x03)))
--len;
write(STDOUT_FILENO, buffer, len);
}
The preceding example is provided for your information only and will not compile into a complete
program on its own. You can, however wrap this mechanism into a C function if necessary.
DNS Load Balancing to Avoid Single Points of Failure
As discussed inVERDE Clustering Terminology, users can connect to any satellite server (that is,
connection point) in the cluster and are automatically referred to the most appropriate satellite server (that
is, session point) based on session persistence and load metrics.
This section discusses how to use DNS load balancing to distribute client requests to satellite servers.
Virtual Bridges recommends this approach as opposed to hard-coding IP addresses in client
configurations or using DNS-resolvable host names that resolve to only one IP address.
DNS load balancing avoids a single point of failure because if a user connects to a satellite server that is
not responding all the user needs to do is to retry the connection and the DNS server should return a
different IP address. Also, it allows network administrators to dynamically configure the IP network
topology to allow for satellite server changes (such as adding and/or removing servers), without having to
reconfigure clients.
For example, if you are configuring BIND 9 from ISC to serve DNS to VERDE clients, and you have five
satellite servers, you would add an address record for each server in the BIND configuration file as
follows:
verde 60 IN A 192.168.99.1
verde 60 IN A 192.168.99.2
verde 60 IN A 192.168.99.3
verde 60 IN A 192.168.99.4
verde 60 IN A 192.168.99.5
Note that the TTL is kept low (at 60 seconds) so that clients can update their caches frequently if the
network administrators change the topology. Assuming you have added these records to a zone authority
configuration named example.com, you would have clients simply connect to verde.example.com and
each would receive the appropriate set of IP addresses, with the first address changing each time in a
round-robin fashion.
The VERDE Client application examines all returned addresses in the DNS query and tests for a valid
connection before starting a session, avoiding the situation where users must first experience a failed
connection before retrying to a valid one.

VERDE™ 4.5 Administrator Guide
Copyright © 2009-2010 Virtual Bridges, Inc. All Rights Reserved. 179
Another approach is to use DNS round-robin style load balancing with multiple A records. For example,
Microsoft’s DNS performs this automatically when you create multiple A records with the same host
name in the Forward Lookup Zone for your domain. In this scenario, you should not create matching
Reverse Lookup Zone records because most likely such records already exist for the IP addresses that
refer to the individual real host names.
For more information on configuring round-robin A records, consult the documentation provided with
your particular DNS, or contact your network administrator.

VERDE™ 4.5 Administrator Guide
Copyright © 2009-2010 Virtual Bridges, Inc. All Rights Reserved. 180
Cluster Master Fail-Over Procedures
This chapter provides information on how to set up one or more VERDE Cluster Master ―fail-over‖
servers, and the mechanics required to actually execute a fail-over
The VERDE Cluster Master (CM) can only be active on one server at a time in a given cluster. In order
to eliminate this as a single point of failure, it is necessary to configure one or more additional servers to
act as fail-over targets in the event the primary fails.
IMPORTANT: The VERDE architecture does not permit more than one active Cluster Master in a given
cluster.
Assumption
In this document, it is assumed that each Cluster Master node (primary and fail-over alike) is a dedicated
Cluster Master and NOT a VDI server.
Initial Configuration
When initially deploying a system, it is important that the fail-over Cluster Master targets/backups be
installed first and respectively demoted. Once all fail-over targets are deployed, then it is safe to deploy
the primary Cluster Master. It is also important that you install and demote each fail-over target before
moving on to the next. ―Demote‖ refers to stopping the VERDE service and configuring the service not
to start automatically on a particular node, see Fail-over Cluster Master Configuration for more details.
Active Cluster Master Configuration
Configuring an active Cluster Master is as simple as installing VERDE on a given server.
1 Install VERDE
2 Run the VERDE post-installation script /usr/lib/verde/bin/verde-config
3 Select the option 1 – Cluster master (not licensed, does not do VDI, runs MC) role for
the server
Note: It is important that the active Cluster Master be the last CM started (see Fail-over CM
Configuration below).
Fail-over Cluster Master Configuration
The simplest way to configure a fail-over Cluster Master is to install VERDE on a given server, run the
VERDE post-installation script, and select the CM role as described in Active Cluster Master
Configuration.

VERDE™ 4.5 Administrator Guide
Copyright © 2009-2010 Virtual Bridges, Inc. All Rights Reserved. 181
When done, you should stop VERDE services, and use the system's chkconfig command to prevent the
VERDE service from starting automatically when the system reboots.
IMPORTANT: It is imperative that once the cluster is deployed, only one Cluster Master is active at any
given time.
For example, to convert an active Cluster Master to a fail-over target, the following commands would be
used on a Red Hat server system, as root:
1 service VERDE stop
2 chkconfig VERDE off
Adding a Fail-over Cluster Master Nodes to an Active Cluster
IMPORTANT: In order to prevent corruption of the configuration database, it is important that the
VERDE services on the active Cluster Master be shut down before adding additional fail-over CM nodes.
This is because fail-over nodes will temporarily become active when first installed, until VERDE services
are shut down on those nodes.
The sequence of commands below would achieve adding a fail-over Cluster Master node to an active
cluster without corrupting the environment.
1 service VERDE stop Stop VERDE on the active Cluster master
2 rpm -ivh VERDE-xxx… Install VERDE on the new ―fail-over‖ node
3 /usr/lib/verde/bin/verde-config Run the VERDE post-installation script on the new
fail-over node
4 service VERDE stop Stop VERDE on the new fail-over node
5 chkconfig VERDE off Prevent VERDE from starting when the fail-over node
boots
6 service VERDE start Start VERDE on previously active Cluster Master
Executing a Fail-over upon Primary Cluster Master Failure
Failing over the CM node
If the current primary CM node is still active, it is very important that it be demoted before promoting a
fail-over node to primary status. One reason to fail-over an active Cluster Master node may be to test a
3rd party clustering or High Availability (HA) solution, or to perform maintenance on the primary CM.
To demote the primary Cluster Master, execute the following commands, as root, on that system:

VERDE™ 4.5 Administrator Guide
Copyright © 2009-2010 Virtual Bridges, Inc. All Rights Reserved. 182
1 service VERDE stop
2 chkconfig VERDE off
Note: If the Cluster Master is not reachable due to a genuine hardware or operating system failure on its
computer, then there is no need to demote it because it has already failed.
Promoting the Fail-over Server
Now that the Cluster Master is down, you must promote the fail-over server, by executing the following
commands, as root, on that system:
1 chkconfig VERDE on
2 service VERDE start
Configuring the Satellite Servers to Connect to New Primary
Cluster Master
Option 1: Gratuitous ARP from CM Node
This mechanism is commonly used by 3rd-party clustering/High Availability solutions after failing over
to a new node, and configuring the IP address on that node to match the address held by the node that
previously failed. Consult the documentation to your HA solution for how to implement this. For
example, the Linux-HA project is an open source solution that can fail-over one server to another and use
the same IP address, by utilizing gratuitous ARP using the send_arp command:
http://linux-ha.org/wiki/Main_Page
VERDE Satellite Servers will attempt to reconnect to the Cluster Master every 3 seconds after a Cluster
Master failure, so once the new CM advertises the new ARP information to the local Ethernet
network/switch, Satellite Servers will immediately broadcast all their states to this new primary CM.
Option 2: DNS
If your solution does not support gratuitous ARP for fail-over, you can achieve a similar result with DNS.
This assumes that you have configured each Satellite Server's Cluster Master address to be the Fully
Qualified Domain Name (FQDN) of the primary Cluster Master, rather than its IP address. In this case,
all you must do is execute the fail-over procedure, then modify the DNS record for the FQDN of the
Cluster Master to point to the IP address of the newly promoted active Cluster Master.
VERDE Satellite Servers perform DNS lookups every time they attempt to connect to a Cluster Master.
They do not cache the address returned by the previous DNS lookup, which makes this mechanism
possible.

VERDE™ 4.5 Administrator Guide
Copyright © 2009-2010 Virtual Bridges, Inc. All Rights Reserved. 183
Disconnected Use and Local Processing
Overview of Disconnected Use
VERDE offers an option to run client-side hypervisors so that virtual desktops can extend to both
disconnected/mobile clients, as well as to high-performance local-processing workstations. The
technology behind this feature is the Self-Managing, Auto-Replicating Technology protocol (SMART),
which replicates virtual desktop images to local devices using differential updates.
Before continuing, review the following carefully:
http://www.vbridges.com/docs/VERDE2BeyondVDI.pdf
This section discusses the following topics:
Solution and Assurance from IBM
System Requirements for Disconnected Use
Server Deployment Options
Configuring a Firewall for the SMART Client
Configuring the SMART Client
Starting the SMART-Managed Virtual Desktop on the Client
Running the VERDE SMART Client
LEAF Client Installation Notes
Solution and Assurance from IBM
On IBM System p and z, the VERDE server components received the IBM mark ―Ready for IBM Systems
with Linux‖, and accompanying Assurance Statement, in June of 2009. VERDE 2.0 is available in the
IBM Global Solutions Directory as follows:
Company Name: Virtual Bridges, Inc.
Solution ID #: 39465
Solution Name: VERDE 2.0
System Requirements for Disconnected Use
This section discusses the following topics:
VERDE Server System Requirements (Standalone, SMART Client)
VERDE Workstation (SMART Client)
Non-x86 Server Support

VERDE™ 4.5 Administrator Guide
Copyright © 2009-2010 Virtual Bridges, Inc. All Rights Reserved. 184
VERDE Server System Requirements (Standalone, SMART Client)
Virtually any Linux/UNIX-based server platform10
Immediate availability of x86-base Linux platform support; other platforms available on request.
Microsoft Windows Server 2003 or 2008
512MB of RAM minimum
Access to any centralized storage—SAN, NAS, or replicated, as provided by the server operating
system
Integration with enterprise authentication/directory services, such as Active Directory, LDAP, or NIS.
Note that VERDE SMART servers can also coexist on the same computers as regular VERDE VDI
servers if so desired. For details, see Clustering System Requirements.
VERDE Workstation (SMART Client) System Requirements
Intel or AMD-based x86 processor with virtualization extensions (Intel VT or AMD-V)
1GB of RAM minimum
20GB hard disk or solid state disk space minimum
Video display with minimum of 1024x600 resolution
Ethernet or wireless network device
Non-x86 Server Support
In addition to the normally supported architecture, you can deploy the subset of VERDE that serves
SMART clients on certain non-x86 hardware platforms:
s390x: IBM System z, 64-bit partition
ppc64: IBM System p or i, 64-bit host or partition
On the preceding platforms, you can host VERDE on the following Linux server operating systems:
Red Hat Enterprise Linux 5
Novell SUSE Linux Enterprise Server 10
Novell SUSE Linux Enterprise Server 11
These platforms are not suitable for hosting virtual desktops in a traditional VDI model, but they can be
used to serve and manage x86-based SMART clients taking advantage of disconnected use and local
processing.
Server Deployment Options
This section discusses how to deploy VERDE server software either standalone or in a cluster.
Fundamentally, you must perform any function involving installing or running virtual machine sessions
on the management workstation, while all other functions can be performed on the server.

VERDE™ 4.5 Administrator Guide
Copyright © 2009-2010 Virtual Bridges, Inc. All Rights Reserved. 185
Although Virtual Bridges strongly recommends the server and management workstation share an
authentication repository, you can also deploy local authentication on the management workstation as
long as the user and group IDs match for the Gold Image virtual machine users, so that permissions on the
mounted storage for these users will work as expected.
The server handles inbound connections from SMART clients, taking care of updates for them. The
management workstation provides the platform for administering the virtual desktop Gold Images. You
can provision the Gold Images, using tools such as win4-publish-session and win4-deploy-
published, on either the server or the management workstation.
For more information on installing and provisioning virtual desktop sessions, see Installing a Gold Image
Desktop Virtual Machine and Provisioning a Gold Image Virtual Machine. For more information on
administering and updating virtual desktop sessions, see Administering Your Virtual Desktops.
See one of the following sections for more information:
Deploying on an Existing VERDE Server or Cluster
Deploying on a Standalone x86, s390x, or ppc64 Server
Deploying on an Existing VERDE Server or Cluster
No additional configuration is needed to serve SMART clients from an existing VERDE server or cluster.
The SMART protocol services load automatically with the VERDE stack on these servers. If you are
using a VERDE cluster, users can connect to any satellite server (using either the satellite server’s IP
address or DNS name as discussed in DNS Load Balancing to Avoid Single Points of Failure) to
download updates for their client-side hypervisor and replicated virtual desktop cache.
Deploying on a Standalone x86, s390x, or ppc64 Server
Deploying the SMART server component of VERDE in a standalone stack requires the following
components:
x86 (32-bit or 64-bit), s390x, or ppc64 host running one of the following supported Linux servers:
Red Hat Enterprise Linux 5
Novell SUSE Linux Enterprise Server 10
Novell SUSE Linux Enterprise Server 11
Product packages for x86, s390x, and ppc64 platforms are available on the VERDE download page.
NFS-exported /home partition to the management workstation
Recommended: serves authentication repository (for example, NIS or LDAP)
32 or 64-bit x86-based management workstation connected to the server, meeting the minimum
system requirements discussed in Supported Host Platforms.
NFS-Mounted /home partition from the VERDE server, with read/write access
PAM configured to authenticate to services provided by server (recommended), or local
authentication (/etc/passwd) populated with matching user and group IDs for Gold Image virtual
machine users

VERDE™ 4.5 Administrator Guide
Copyright © 2009-2010 Virtual Bridges, Inc. All Rights Reserved. 186
Standalone VERDE SMART configurations do not require a license code on the server side, only on the
management workstation and clients themselves.
Configuring a Firewall for the SMART Client
Regardless of server type, you must open inbound TCP port 48632 to serve SMART clients and you must
make sure this port is forwarded to the appropriate computer if required.
On the client, outbound access to TCP port 48632 is required. The client has no inbound port
requirements.
Configuring the SMART Client
This section discusses the following topics:
SMART Client System Requirements
Calculating RAM and Disk Space Requirements for the SMART Client
Calculating RAM and Disk Space Requirements for the SMART Client
Installing and Licensing the SMART Client
SMART Client System Requirements
The VERDE SMART client has the same hardware and software requirements as the VERDE server and
management workstation (see Supported Host Platforms).
Calculating RAM and Disk Space Requirements for the SMART Client
The client should have sufficient RAM not only to run the deployed virtual desktop but also for overhead
such as underlying caching and kernel mechanisms. Virtual Bridges recommends that the client computer
have 1.5 times the amount of physical RAM installed as the virtual desktop requires. For example, if the
virtual desktop requires 512MB of RAM, the client computer should have at least 768MB of physical
RAM installed.
Free disk space requirement depends on the size of the ―system‖ and ―user‖ disk images assigned to the
virtual desktop (seeInstalling a Gold Image Desktop Virtual Machine). Additionally, Virtual Bridges
recommends you reserve 20% overhead for transient storage. A simple formula to determine the free disk
space required on the client in order to run a particular virtual desktop follows:
F = S(1.20) + U
Where S is the ―system‖ disk image size assigned, U is the ―user‖ disk image size assigned, and F is the
total free space required on the client. Note this is a conservative method for sizing and is recommended
for most scenarios, but your actual use might vary. Using the preceding formula—assuming the virtual
desktop’s ―system‖ disk image size is 16GB, and its ―user‖ disk image size is 2GB—the total free space
required on the client in order to deploy the virtual desktop is 21.2GB:
F = 16GB(1.20) + 2GB
(F = 21.2GB)

VERDE™ 4.5 Administrator Guide
Copyright © 2009-2010 Virtual Bridges, Inc. All Rights Reserved. 187
Note that this free space requirement decreases after the client-side image is deployed for the first time
because the initial images will already exist. The exact amount of free space required for updates varies.
Installing and Licensing the SMART Client
The package installation step is the same as for the VERDE server which is discussed in Installing the
VERDE Software Package.
You must license the VERDE SMART client with a single user workstation license, as you would a
management workstation. If you do not license the VERDE software on the client, the user will be
prompted when they attempt to start a virtual desktop for the first time. For more information, see Getting
a VERDE License.
Running the VERDE SMART Client on Windows
VERDE SMART Client requires a Linux system to run, then to run the VERDE SMART Client on a
workstation which initially runs Windows, you must first install a Linux partition. The simplest way to do
that is to use the free Wubi installer, which enables you to install a Linux desktop directly on an existing
Windows installation without repartitioning or first removing Windows. After you install Wubi, a boot
manager prompts you whether or not to boot to Windows or Linux.
Install Wubi as follows:
1 Calculate the amount of disk space to allocate to Ubuntu using the following formula:
F = S(1.20) + U
Where S is the ―system‖ disk image size assigned, U is the ―user‖ disk image size assigned, and F
is the total free space required on the client. Note this is a conservative method for sizing and is
recommended for most scenarios, but your actual use might vary.
2 To the total from step 1, add 8MB.
Plan the installation as follows:
After downloading and launching the Wubi executable from the Windows PC, you should assign it
enough disk space using the formula described above, plus an additional 8 gigabytes for the Linux system
files and swap space itself. For example, if the formula produces F = 24, you should actually reserve 32
gigabytes in the Wubi installer.
Once Wubi is installed, users can reboot their PCs and select the Ubuntu option from the boot menu in
order to start the Linux desktop rather than the existing Windows desktop. Please note that Wubi does
not alter their existing Windows desktop and this is easily reachable from the boot menu presented to
them when they power on their PCs.
After installing and booting the Wubi platform, VERDE SMART Client installation is exactly the same
as for regular Linux desktops, as described above.
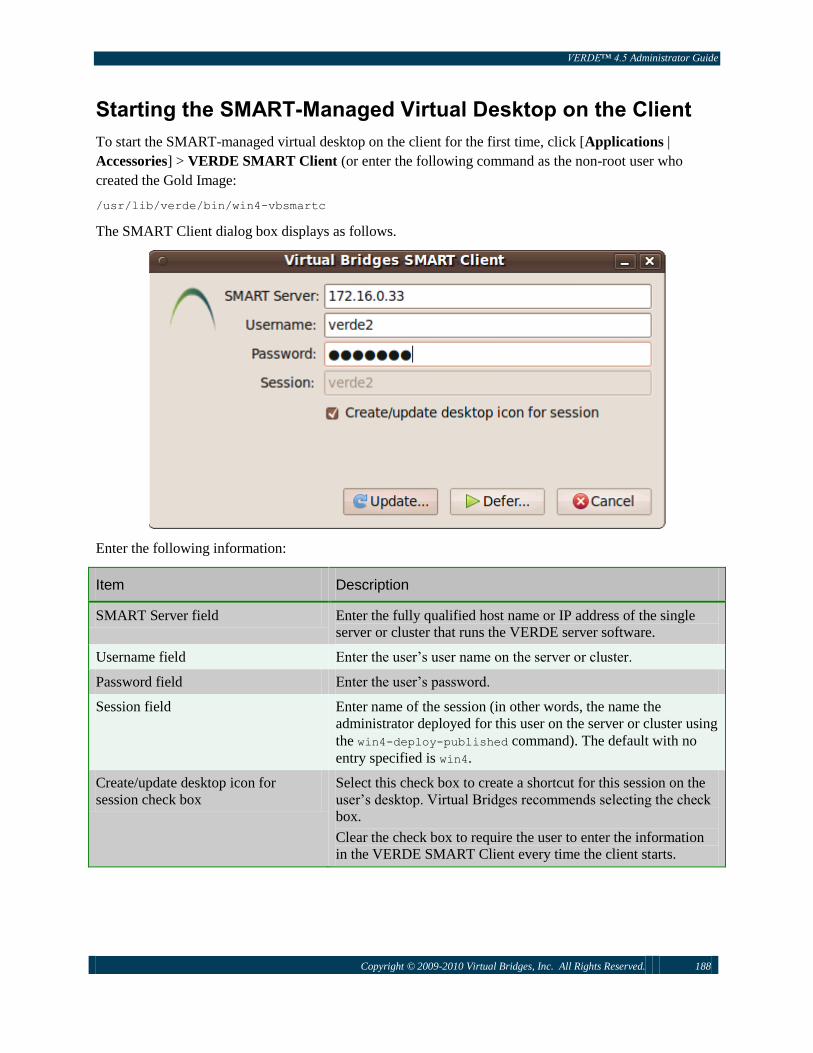
VERDE™ 4.5 Administrator Guide
Copyright © 2009-2010 Virtual Bridges, Inc. All Rights Reserved. 188
Starting the SMART-Managed Virtual Desktop on the Client
To start the SMART-managed virtual desktop on the client for the first time, click [Applications |
Accessories] > VERDE SMART Client (or enter the following command as the non-root user who
created the Gold Image:
/usr/lib/verde/bin/win4-vbsmartc
The SMART Client dialog box displays as follows.
Enter the following information:
Item Description
SMART Server field Enter the fully qualified host name or IP address of the single
server or cluster that runs the VERDE server software.
Username field Enter the user’s user name on the server or cluster.
Password field Enter the user’s password.
Session field Enter name of the session (in other words, the name the
administrator deployed for this user on the server or cluster using
the win4-deploy-published command). The default with no
entry specified is win4.
Create/update desktop icon for
session check box
Select this check box to create a shortcut for this session on the
user’s desktop. Virtual Bridges recommends selecting the check
box.
Clear the check box to require the user to enter the information
in the VERDE SMART Client every time the client starts.

VERDE™ 4.5 Administrator Guide
Copyright © 2009-2010 Virtual Bridges, Inc. All Rights Reserved. 189
Item Description
Update button Click to connect to the VERDE server or cluster and start the
session1.
On subsequent attempts (after the Gold Image has been
downloaded) this button enables the user to get any updates to
the virtual desktop.
Defer button Click to resume a desktop session that was interrupted before the
initial Gold Image copy completed2.
On subsequent attempts (after the Gold Image has been
downloaded) this button starts the virtual desktop without first
checking for updates.
Cancel button Click to quit without connecting or saving any changes.
1—The first time a session is started on a particular computer, a copy of the entire Gold Image is
downloaded to the user’s computer. The Gold Image might be several gigabytes in size and might take a
long time to download, depending on the speed of the user’s connection.
For best results, Virtual Bridges recommends that this task be performed on a LAN rather than on a WAN
or Internet. There is no specific bandwidth requirement because the faster the user’s connection, the
faster the image will be received. Likewise, if many clients are downloading simultaneously and the
server’s network bandwidth is exceeded, each client will be throttled to ―fit‖ within the total bandwidth
available. VERDE’s SMART protocol works with any transparent Ethernet or IP traffic shaping
technology in use.
2—IMPORTANT: A Gold Image copy must complete before the user can start the virtual desktop again.
If the process is interrupted for any reason, the user must run the SMART VERDE Client again to
complete the Gold Image copy from where it last left off. When the user restarts the SMART VERDE
Client, the user must click Defer instead of Update.
More Information about Starting the VERDE SMART Client
After the image is downloaded, the virtual desktop starts in a dynamic mode—meaning users can store
persistent documents and settings, but cannot make changes to the virtual desktop’s system image (for
example, guest operating system, applications, and system-wide configuration parameters).
After a user has completed the initial imaging, they can start the virtual desktop by double-clicking the
desktop shortcut. The user must enter their credentials and click one of the following buttons:
Update: To download any updates to the virtual desktop.
Defer: To start the Gold Image without checking for updates.
For more information about updates to the virtual desktop, see Updating and Adding Applications to
the Virtual Desktop.
VERDE™ 4.5 Administrator Guide
Copyright © 2009-2010 Virtual Bridges, Inc. All Rights Reserved. 190
Using the SMART Client – User Data Synchronization
A useful feature provided by the SMART client is the possibility to synchronize user data. Data stored in
the Windows folder My Documents will be synchronized with the server when the SMART Client is
started.
If the connection with the server is lost during a synchronization session, the subsequent synchronization
will attempt to resume synchronization from where it left off, the files that were successfully
synchronized before the abrupt termination will not be resent (unless they were modified by the user
between the two synchronization sessions).
Conflicts Handling:
If a conflict occurs during the synchronization, the user will be presented with a list of files and will
decide what he/she wants to do:
Local copy overrides remote copy
Remote copy overrides local copy
Do not synchronize the files
LEAF Installation
LEAF is a VERDE pre-packaged and self contained solution that can be installed on a USB stick, a
portable drive or locally on the hard drive of the computer. This allows the user to start a full VERDE
environment in disconnected mode.
When installed on a portable drive, the operating system of the host computer will stay untouched. LEAF
simply starts from the external drive computer. Either VDI or SMART sessions can be used from the
LEAF environment.
Note: When LEAF is installed on the local hard drive of a computer, the drive will be reformatted and all
the data on that drive will be lost. LEAF will use 1GB of space as its system drive. The rest of the drive
will be used to store Gold Images and user data.
This section covers:
The installation of the LEAF client
The configuration of the VERDE Server to Support Package Updates
Installation Overview
A major change to the LEAF infrastructure and installation/upgrade procedures was introduced with
VERDE 4.4.
The LEAF image now comes in a bootable ―.iso‖ format, and it is now possible to install future upgrades
to the LEAF environment without reinstalling the entire image. After setting up the upgrade environment
on the VERDE server, upgrades will be automatically downloaded from the server to the LEAF clients.
The installation process consists of:
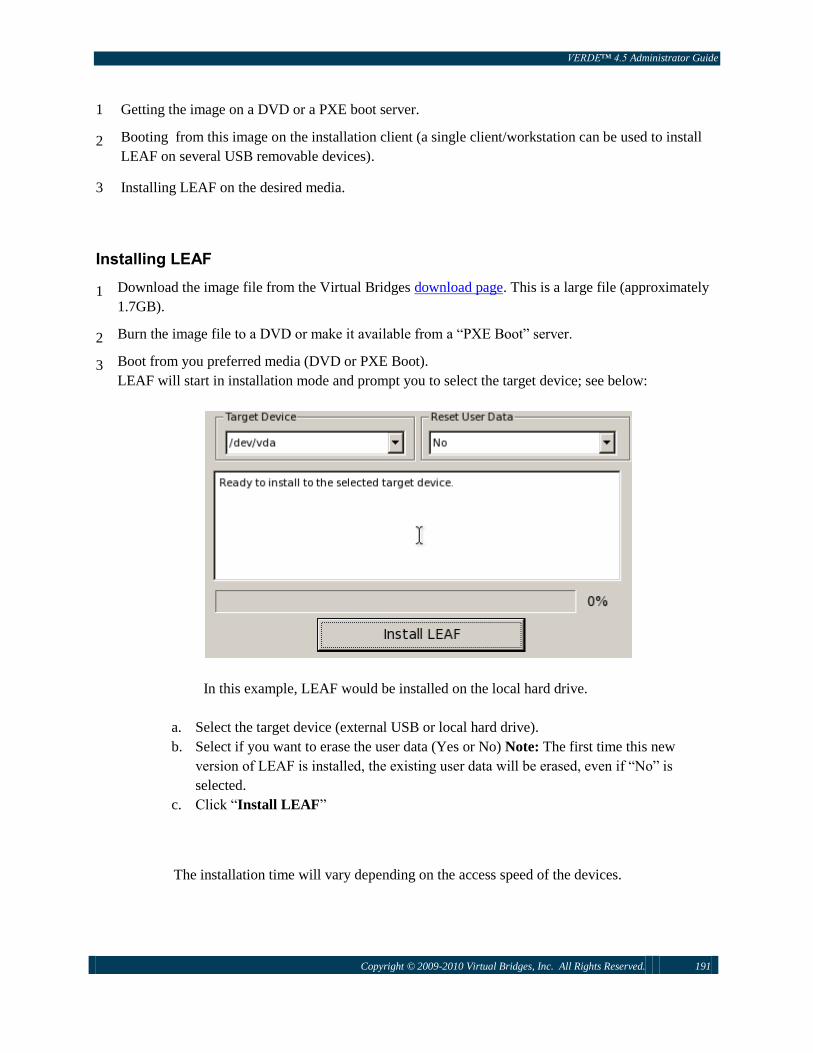
VERDE™ 4.5 Administrator Guide
Copyright © 2009-2010 Virtual Bridges, Inc. All Rights Reserved. 191
1 Getting the image on a DVD or a PXE boot server.
2 Booting from this image on the installation client (a single client/workstation can be used to install
LEAF on several USB removable devices).
3 Installing LEAF on the desired media.
Installing LEAF
1 Download the image file from the Virtual Bridges download page. This is a large file (approximately
1.7GB).
2 Burn the image file to a DVD or make it available from a ―PXE Boot‖ server.
3 Boot from you preferred media (DVD or PXE Boot).
LEAF will start in installation mode and prompt you to select the target device; see below:
In this example, LEAF would be installed on the local hard drive.
a. Select the target device (external USB or local hard drive).
b. Select if you want to erase the user data (Yes or No) Note: The first time this new
version of LEAF is installed, the existing user data will be erased, even if ―No‖ is
selected.
c. Click ―Install LEAF‖
The installation time will vary depending on the access speed of the devices.

VERDE™ 4.5 Administrator Guide
Copyright © 2009-2010 Virtual Bridges, Inc. All Rights Reserved. 192
When the installation is completed, either:
Install LEAF on another USB device (Remove the completed one and replace it with the new
one), or
Click the ―Shutdown‖ button on the upper left corner (the DVD will eject).
The portable drive (or local hard drive) is now ready. Just plug it in a computer which supports
virtualization and boot.
You can access your Gold Images with a VDI session or with the SMART client; see the previous section
about Configuring the SMART Client for more details.
Configuring the VERDE Server to Support Package Updates
As mentioned earlier in this chapter, LEAF now supports package updates driven from the VERDE server
infrastructure.
Any VERDE server in a cluster can provide LEAF updates, so the URL can actually be an FQDN that is
set up in a "round robin DNS", or behind a 3rd-party load balancer. Updates are served via HTTP or
HTTPS, and can even be hosted on separate dedicated web servers if the organization already has such an
infrastructure set up.
The default location for storing LEAF update packages is in a folder called .LEAF in the home directory
of the WIN4_MC_USER (/home/vb-verde/.LEAF by default). When Virtual Bridges produces update
packages they will need to be unzipped in that directory. The actual subdirectory hierarchy needed to
provide all the versioning and binary bits will be created automatically relative to
~$WIN4_MC_USER/.LEAF/ when unzipped.
To enable these, first, the management console must be configured to indicate the public URL where
clients will query for updates. This base URL must route to any (or all) servers in the VERDE cluster,
either via direct IP address, FQDN resolving to a single IP address, or FQDN resolving to a list of IP
addresses (e.g. utilizing round robin DNS). Note that if you want LEAF computers to download updates

VERDE™ 4.5 Administrator Guide
Copyright © 2009-2010 Virtual Bridges, Inc. All Rights Reserved. 193
from outside the organization's network, this URL must refer to something that will route into the
VERDE cluster.
In this example, verde.company.com is an FQDN that maps to a list of IP addresses representing
computers in a VERDE cluster. The example assumes that LEAF users will only download updates from
the company LAN (or VPN connection), and not from the public Internet, so the company's own DNS
server is resolving verde.company.com.
To configure the management console to instruct LEAF clients to download updates, log in as an
administrator (mcadmin1), click General, and then click the Edit button to edit the settings. In the box for
―Base URL for LEAF updates‖, enter:
http://verde.company.com:8080
Note: LEAF clients will not download updates via HTTPS if the certificate is invalid. Port 8080 is the
HTTP (unencrypted) port that VERDE delivers web services on. LEAF updates are not sensitive in any
way and do not require delivery over HTTPS, so it's okay to use HTTP (on port 8080 for example), to
ensure the client never has any certificate issues. However, if you are concerned about impersonations or
unauthorized packages being installed in LEAF, you should either:
restrict updates to within the company network/VPN, or
supply a valid, signed certificate to VERDE and use HTTPS on port 8443 (or whatever port you
configured and/or route into the servers with).
Alternatively, you can set up a separate web server or use an existing web infrastructure, and configure
the base URL for that. The base URL must begin with http:// or https://, must include an IP address or
FQDN, and if using port numbers other than 80 (for HTTP) or 443 (for HTTPS), must be followed
by :<port>. No further information should be present in the URL.
The LEAF Update Process
VERDE LEAF clients periodically check for updates from this URL when connected to the network (and
after at least one successful SMART Client authentication). LEAF clients download any updates
automatically. Updates are not installed until the LEAF user reboots LEAF or powers it on after they are
downloaded. Updates are applied at boot-up time, and if necessary, LEAF may reboot itself again after
applying them.
NOTE: The update may take about 20 minutes to download to the client.

VERDE™ 4.5 Administrator Guide
Copyright © 2009-2010 Virtual Bridges, Inc. All Rights Reserved. 194
To verify that the update has been installed, press ―Shift + F12‖ in the virtual machine session and then
click ―About‖ – here you can verify the installed version.
If you have deployed a Virtual Bridges LEAF update pack, we recommend you notify all LEAF users to
connect to a network that can access the infrastructure, leave the system on for some time (depending on
network bandwidth, this can be a few minutes or a few hours), and then power off the LEAF system.
Virtual Bridges will make LEAF update packs available to customers periodically, to distribute security
patches and/or hypervisor fixes.

VERDE™ 4.5 Administrator Guide
Copyright © 2009-2010 Virtual Bridges, Inc. All Rights Reserved. 195
VERDE Cloud Branch
What is VERDE Cloud Branch?
VERDE Cloud Branch provides central management to remote facilities (branches, regional data centers,
and so on) and to large enterprises with multiple locations, as well as to Managed Service Providers
(MSPs) looking to provide managed desktop services to customers in their own facilities.
Cloud Branch Attributes
One or more Gold Image virtual desktops deployed from central data center and updated periodically
using VERDE technology
―VDI on premises‖ means the branch does not need constant connectivity to central location to
function because processing and user data is served locally
Users authenticate locally, or use a replica of a central directory service (such as Active Directory,
LDAP, NIS, and so on)
User desktops are provisioned locally
Cloud Branch Benefits and Use Cases
Enterprise:
Serve remote locations without concern for VDI WAN scaling, because desktops are served
locally.
Maintain central administrative control of application configuration (using Gold Images) for all
users across many locations.
Fault tolerance to enable branches to continue to operate even if data center infrastructure fails.
Managed Service Providers:
Reduce desktop management costs and overhead while preserving data-on-premise model
customers often prefer.
Manage standardized desktops for many tenants from one location.
Enterprise and MSP: small branch deployments have no need for complicated shared storage because
if clustering is not needed at the branch level, local storage can be used to reduce costs
Cloud Branch General Architecture
The VERDE cloud branch uses the same Gold Image/dynamic instance theme that connects all VERDE
administration concepts. Servers in remote branches synchronize Gold Images from data center servers,
and in turn, provision these Gold Images as dynamic instances to local users.
The VERDE cloud branch uses the disconnected use/local processing technology and the SMART
protocol to achieve this, effectively turning branch servers into SMART clients themselves. The
difference is that these clients in turn serve their own set of users.

VERDE™ 4.5 Administrator Guide
Copyright © 2009-2010 Virtual Bridges, Inc. All Rights Reserved. 196
In the datacenter, the Gold Image is provisioned to a user (ex: branch-admin) that will be used for
synchronization purpose only; this user is also defined in the cloud branch. The Gold Image is
downloaded to the cloud branch using the VERDE Synchronization tools and is deployed to the cloud
branch users (ex: branch-user1, branch-user2…)
Note: Do NOT provision the Gold Image to this user in the branch.
The updates of the image are done on the datacenter Gold Image, and then synchronized with the copy of
the Gold Image in the branch. The synchronization process is done by scheduling a periodic task on the
cloud server, using ―cron‖ for example (cron is a Linux system process that will execute a program at a
preset time), see the example below for implementation steps). The frequency of the synchronization will
be defined in that ―cron‖ task.
For more information about disconnected use, see Disconnected Use and Local Processing.
There is technically no limit to the levels of hierarchy in this model, but in practical terms, two levels
often provide the most optimized deployment. These two levels are:
Data center/headquarters: A VERDE server, cluster, or mainframe running VERDE software with
access to Gold Image storage and provisioned users.
Branch/local data center: A VERDE server or cluster synchronizing its Gold Images from
respective deployed dynamic desktops in the data center/headquarters, and in turn serving dynamic
instances of this cached Gold Image to its own set of users.
Cloud Branch Deployment Workflow
IMPORTANT: Do not use the VERDE Management Console on the cloud branch server. Doing so
would corrupt the configuration. On the cloud branch server, the deployment and control of the Gold
Images has to be done from the command line interface.
Following are the tasks you must perform for cloud branch deployment:
1 Install the VERDE infrastructure in the central data center/headquarters. See Server Capacity
Planning and subsequent chapters.
2 Install the VERDE server or cluster in the remote branch. See Server Capacity Planning and
subsequent chapters.
For a standalone server installation, select the option #2 for the role of the cloud branch server
when running the ―verde-config‖ script: ―Cluster Master + VDI‖
3
4
Install a Gold Image virtual machine in the central data center/headquarters. See Installing a Gold
Image Desktop Virtual Machine.
In the branch, create a user (ex: branch-admin), with a home directory, that will be used to
synchronize the Gold Image with the data center. See Creating User Accounts if needed.
5 In the central data center/headquarters, create the same user (ex: branch-admin) and provision the

VERDE™ 4.5 Administrator Guide
Copyright © 2009-2010 Virtual Bridges, Inc. All Rights Reserved. 197
Gold Image to this user. See Provisioning a Gold Image Virtual Machine.
Note: In the datacenter, the provisioning can be done from the VERDE Management Console
(from the ―Desktop Policy‖ page)
6 Download the Gold Image to the branch server or storage using VERDE synchronization tools.
See the example below, for the appropriate command.
7 Publish the Gold Image in the branch. See the example below and for more details.
Note: You MUST use the command line interface to manage the Gold Image on the cloud branch
server.
8 Deploy the Gold Image in the branch to multiple VDI or disconnected users, (ex: branch-user1,
branch-user2…).
See Deploying and Undeploying a Gold Image Virtual Desktop.
9 Schedule a periodic task (for example, using cron(8) ) in the branch server or cluster to check for
and download updates to its copy of the Gold Image from the central data center/headquarters.
Example
The following example demonstrates provisioning a Gold Image in the central data center to a branch,
and configuring the branch to automatically pull updates to this Gold Image on a periodic basis. The
branch server uses the /usr/lib/verde/bin/vbsmartc command to synchronize the Gold Image, and
uses ordinary VERDE provisioning tools to deploy it to its own set of dynamic users.
In the following example, the name of the Gold Image is ―XP-44‖, the user that will be used on the
datacenter server for the synchronization process is ―branch-admin” and the users to whom the Gold
Image will be deployed in the branch are branch-user1, branch-user2…
1 In the datacenter/headquarters server, provision a Gold Image to a non-root user that will be created
on the branch server using the VERDE Management Console:
Or the following command:
sudo win4-deploy-published mcadmin1 XP-44 –U branch-admin XP-44

VERDE™ 4.5 Administrator Guide
Copyright © 2009-2010 Virtual Bridges, Inc. All Rights Reserved. 198
Where:
“mcadmin1” is the VERDE Management Console administrator (can be different in your
installation).
“branch-admin” is the user the Gold Image is deployed to for synchronization purpose.
2 On the branch server, as root create a credentials file (branch-admin.cred in this example) for
accessing the central data center cluster and fetch updates to this Gold Image:
cat <<EOF >/etc/branch-admin.cred
SERVER=verde1.example.com
USERNAME= branch-admin
PASSWORD=password
EOF
chmod 0600 /etc/branch-admin.cred
Notice that the file is given mode 0600 so that only the root user can read it - this is important
because there is a plain text password in it.
3 On the branch server, as root download the initial Gold Image copy from the central data center
(user branch-admin, Gold image XP-44) using the /usr/lib/verde/bin/vbsmartc utilitiy:
/usr/lib/verde/bin/vbsmartc –u branch-admin /etc/branch-admin.cred XP-44
Depending on the bandwidth between branch and the central data center, this process can take
anywhere from a few minutes to a few hours. Future updates download only differential data, but
the initial imaging must download the complete set, which typically means several GB for a Gold
Image virtual machine’s system disk image.
Note: The copy of the Gold Image will be created in the home directory of the branch-admin user.
4 After the Gold Image is copied, the Gold Image on the branch server must be published and
deployed to dynamic users on the branch server:
win4-publish-session branch-admin XP-44
win4-deploy-published branch-admin XP-44 –u branch-user1 branch-user2 branch-user3
At this point branch-user1, branch-user2, and branch-user3 in the branch have dynamic
desktops deployed from the locally cached Gold Image ―XP-44‖, which in turn will be synchronized
from the data center.
Note: This Gold Image cannot be started directly on the branch—only dynamic instances of it can be
started. All Gold Image management (updates) must occur at the central data center.
5 The branch’s copy of the Gold Image should be configured for automatic updates from the data
center. Add the following line to the branch server’s /etc/crontab file to check for and download
updates to the Gold Image daily if available from the central data center:
0 0 * * * root /usr/lib/verde/bin/vbsmartc –q -u branch-admin /etc/branch-admin.cred XP-44
The preceding command causes cron(8) to run the update daily at 0:00 (midnight local time), as the
root user, and tells vbsmartc to exit quietly if the image is already being updated on another

VERDE™ 4.5 Administrator Guide
Copyright © 2009-2010 Virtual Bridges, Inc. All Rights Reserved. 199
machine in the cluster (if clustering is enabled). Adjust the ―cron‖ task according to your
synchronization requirements.
The –q flag must be used to avoid race conditions in clustered environments at the branch level.
The vbsmartc utility automatically creates a replica before downloading updates from the server, so
that live dynamic users do not need to log off before updates can be performed. As with regular VDI
Gold Image updates, dynamic users are automatically notified that updates are available and they
are encouraged to restart their active sessions if vbsmartc download updates from the central data
center.
Considerations
If a cluster is deployed at the branch level, Virtual Bridges recommends that all machines in the
cluster use a cron-driven vbsmartc rule for redundancy purpose, only one cron task will be able to
complete, but with this process the synchronization will take place even in the event one or more
servers in the cluster fail.
This is particularly important because even though Gold Images are managed centrally, branch-level
servers and clusters by default are managed as separate entities.
For remote administration, the branch server(s) should be accessible from the central data center
using ssh. This is especially important in the case where IT administrators are not available on site at
remote locations, such as small branches.
It is common for branch-level users to not have corresponding user IDs and home directories at the
central data center, because these logins typically exist at the branch level only. Therefore it also
makes sense to perform authentication locally at the branch level, either using a local /etc/passwd,
or a local directory.
User data at the branch level must be backed up or archived at the branch level, including dynamic
desktop virtual machine data. For more information, see Backing Up the Virtual Desktop and Data.
Reference
Usage: /usr/lib/verde/bin/vbsmartc {credentials-file} [options] [config]
Where options:
Option Description
-h Display help usage
-q Exit quietly if not able to lock session (avoids race conditions on
clusters)
-u user Run as username or user ID user. This parameter is mandatory if
running as root

VERDE™ 4.5 Administrator Guide
Copyright © 2009-2010 Virtual Bridges, Inc. All Rights Reserved. 200
-s server Fully qualified host name or IP address of the SMART server,
overriding the setting in credentials-file
credentials-file is required and refers to a text file with the following contents:
SERVER=server-name-or-IP-address
USERNAME=remote-username
PASSWORD=remote-password
config is optional and refers to the configuration name of the Gold Image to synchronize. The default is
win4. The local copy of the Gold Image has the same configuration name as the central data center
dynamic desktop it is synchronized from.
Notes
For best security practice, Virtual Bridges recommends that the credentials file be owned by root,
with mode 0600, and in turn /usr/lib/verde/bin/vbsmartc run as root with the –u flag to
explicitly set the user name to which to synchronize.
SERVER is not required in the credentials file, but is recommended. If not set in the credentials file,
use the –s flag with the /usr/lib/verde/bin/vbsmartc command.
Virtual Bridges recommends you always use the –q flag, whether the branch has a cluster or not, so
that very lengthy updates can span multiple update periods without failing. For example, if you have
a daily update rule set in /etc/crontab, and an update takes longer than 1 day to download (because
of a very large change set, Internet traffic congestion, and so on), using –q causes the next nightly
update to fail quietly if the first update is still in progress.
VERDE™ 4.5 Administrator Guide
Copyright © 2009-2010 Virtual Bridges, Inc. All Rights Reserved. 201
Troubleshooting
This section lists log files that you may be asked to reference by the Virtual Bridges support during
troubleshooting operations.
Useful Log files
File Name and Location Description
/home/<mc_user>/logs/<Server IP>-mc.log Records the tasks completed in the VERDE
Management Console log file
/home/<user>/<GoldImage>/win4.log
If using Active Directory and Likewise Open, the
file will be located in:
/home/likewise-
open/<domain>/<user>/<GoldImage>/win4.log
This file contains the information logged during the
session with the Gold Image
Windows 7:
C:\Users\<local user>\verde.log
Windows XP:
C:\Documents and Settings\<local user>\
Linux:
/home/local user
User Console log file.
Note : This file is located on the client (the
computer where the User Console runs), not on the
guest.
Enabling Logging
This section describes how to enable logging in VERDE for debugging purposes. Logging can be enabled
for the user sessions only or for the user sessions and the server services. Enabling logging of the server
services requires restarting VERDE in logging mode.
Enabling Logging of the User Sessions
Edit in /var/lib/verde/settings.global and add:
WIN4_DBG_MOD_ALL="xxx"
Value of <xxx> Description

VERDE™ 4.5 Administrator Guide
Copyright © 2009-2010 Virtual Bridges, Inc. All Rights Reserved. 202
note
Intended to trace the main events in the execution of the
system. The ―note‖ logging level is a good debugging
starting point
info
Includes the ―note‖ logging level plus some moderate
levels of debugging information
Shutdown and restart the VDI session
Note: Restarting the VERDE server is not required to activate the logging of the user sessions
The information is logged in the user log file, located in:
/home/<username>/<Gold Image Name>/win4.log
Enabling Logging on the Server:
1 Repeat the step from ―Enabling Logging for User Sessions‖
2 Restart VERDE with the command below:
WIN4_DBG_MOD_ALL="xxx" /etc/init.d/VERDE restart
For example:
WIN4_DBG_MOD_ALL="note" /etc/init.d/VERDE restart
The log files are located in: /var/log/verde/1
When the system restarts, the existing set of log is moved to /var/log/verde/2 (after moving the
previous backup to /var/log/verde/3). This is done to preserve some history but the only relevant log
file is located in /var/log/verde/1
LDAP Authentication Issues
If you encounter problems while authenticating with LDAP or other directory system check the policies
in the files below and make sure they are compatible with your PAM (Pluggable Authentication Modules)
system:
/etc/pam.d/net-sf-jpam
/etc/pam.d/win4-gauth

VERDE™ 4.5 Administrator Guide
Copyright © 2009-2010 Virtual Bridges, Inc. All Rights Reserved. 203
Legal
VERDE, Virtual Bridges, and the Virtual Bridges logo are trademarks of Virtual Bridges, Inc. Other
company, product, or service names may be trademarks or service marks of others.
The Ready for IBM Systems with Linux mark on the title page of this document is used with explicit
permission from IBM.
Copyright © 2009—2010 Virtual Bridges, Inc. All Rights Reserved.