veritas replication exec, version 3
TRANSCRIPT

VRE3-1_UserGuide.book Page i Tuesday, November 9, 2004 11:25 AM
December 2004
N163518
VERITAS Replication Exec™ version 3.1 for Windows
Administrator’s Guide

VRE3-1_UserGuide.book Page ii Tuesday, November 9, 2004 11:25 AM
Disclaimer
The information contained in this publication is subject to change without notice. VERITAS Software Corporation makes no warranty of any kind with regard to this manual, including, but not limited to, the implied warranties of merchantability and fitness for a particular purpose. VERITAS Software Corporation shall not be liable for errors contained herein or for incidental or consequential damages in connection with the furnishing, performance, or use of this manual.
Copyright
Copyright © 2004 VERITAS Software Corporation. All rights reserved. VERITAS is a registeredtrademark of VERITAS Software Corporation in the US and other countries. The VERITAS logo and VERITAS Storage Replicator are trademarks of VERITAS Software Corporation. All other trademarks or registered trademarks are the property of their respective owners.
VERITAS Software Corporation1600 Plymouth St.Mountain View, CA 94043 Phone 650–335–8000 Fax 650–335–8050www.veritas.com
ii VRE 3.1 Administrator’s Guide

VRE3-1_UserGuide.book Page iii Tuesday, November 9, 2004 25 AM11:
Preface
This VRE 3.1 Administrator’s Guide describes how to install, configure and manage the VERITAS Replication ExecTM software. Use of this software assumes that the user is an experienced network administrator and is familiar with the Windows server platforms.
Document Release Notes This version of the VRE 3.1 Administrator’s Guide addresses minimal changes to this product since the release of VERITAS Storage Replicator (VSR 3.0). These changes are as follows.
◆ The product has changed names. VERITAS Storage Replicator (VSR) is now VERITAS Replication Exec (VRE).
Additional features have been added to VERITAS Replication Exec (VRE 3.1) as follows.
◆ Backup Exec SmartLink is a command line utility that adds replication job monitoring and alerting capability to VERITAS Backup Exec version 10.0. This feature is documented in the VERITAS Replication Exec version 3.1, Backup Exec SmartLink Reference Guide.
◆ VERITAS Replication Exec version 3.1 now supports clustering of the Job Agent and Replication Management Server (RMS) using VERITAS Cluster Server and Microsoft Cluster Server. These features are described in the VERITAS Replication Exec version 3.1, Clustering Reference Guide.
◆ Refer also to the VERITAS Replication Exec version 3.1, Readme file for additional changes to Replication Exec.
iii

VRE3-1_UserGuide.book Page iv Tuesday, November 9, 2004 11:25 AM
What You’ll Find in this Guide . . .
What You’ll Find in this Guide . . .
Chapter 1. “Introducing VERITAS Replication Exec” on page 1
This provides an overview of storage replication and VERITAS Replication Exec version VRE 3.1. Topics include a general presentation of data replication using Replication Exec, as well as the features, benefits and changes with Replication Exec.
Chapter 2. “Planning for a Replication Exec System” on page 11
This provides basic guidelines (questions) for planning storage replication, describes replication performance and network resources, and lists minimum hardware and software requirements for Replication Exec.
Chapter 3. “Installing Replication Exec” on page 21
This provides pre-installation considerations, procedures for installing the software from CD-ROM or remotely, and uninstalling the software.
Chapter 4. “How Replication Exec Works” on page 49
This provides a description of the storage replication processes, including synchronization, replication types, modes, rules, scheduling, security and typical uses of replication.
Chapter 5. “Using the Administration Console” on page 69
This provides a description of the functionality of the Administrative Console, which is the primary user interface to Replication Exec. Each Console View is introduced as well as its use.
Chapter 6. “Creating and Managing Replication Jobs” on page 119
This provides detailed procedures for creating a new replication Job and modifying existing replication Jobs.
Chapter 7. “Troubleshooting the VRE 3.1 System” on page 161
This provides general and specific symptoms and solutions for troubleshooting Replication Exec operations.
iv VRE 3.1 Administrator’s Guide

VRE3-1_UserGuide.book Page v Tuesday, November 9, 2004 11:25 AM
What You’ll Find in this Guide . . .
Appendix A. “Replication Exec Utilities and Tools” on page 179
This provides a description of the functionality of Replication Exec diagnostic tools and utilities, including srTool, VRE Ping, and Database Backup and Restore.
Appendix B. “Clustering the RMS with MSCS” on page 195
This describes how the cluster server software supports failover of the RMS operations with Replication Exec.
Appendix C. “Accessibility and Replication Exec” on page 205
This describes VERITAS’ commitment to meet federal accessibility requirements for software as defined in Section 508 of the Rehabilitation Act, and keyboard shortcuts for this product.
Appendix D. “Glossary” on page 211
This provides descriptions and definitions of terms related to storage replication and Replication Exec.
Preface v

VRE3-1_UserGuide.book Page vi Tuesday, November 9, 2004 11:25 AM
How to Use This Manual
How to Use This Manual Use this manual to accomplish the following:
◆ understand the features and benefits of VRE 3.1
◆ understand how VRE 3.1 works
◆ assess existing network resources and plan for a VRE 3.1 system
◆ install and configure the VRE 3.1 software components
◆ understand the VRE 3.1 Administrative Console
◆ create and manage VRE 3.1 replication jobs
◆ configure VRE 3.1 servers within the replication neighborhood
◆ monitor the VRE 3.1 replication processes
◆ troubleshoot a VRE 3.1 replication problem
◆ locate and use VRE 3.1 diagnostic tools and utilities
◆ use VRE 3.1 database backup and restore capabilities
◆ cluster the RMS for failover in the event of system failure
Getting Help VERITAS offers a variety of support options.
Accessing the VERITAS Support Web Site
The VERITAS Support Web site allows you to:
◆ contact the VERITAS Support staff and post questions to them
◆ get the latest patches, upgrades, and utilities
◆ view the Replication Exec Frequently Asked Questions (FAQ) page
◆ search the knowledge base for answers to technical support questions
◆ receive automatic notice of product updates
◆ find out about Replication Exec training
◆ read current white papers related to Replication Exec
The address for the VERITAS Support Web site is:
http://support.veritas.com
vi VRE 3.1 Administrator’s Guide

VRE3-1_UserGuide.book Page vii Tuesday, November 9, 2004 25 AM11:
Replication Exec Documentation Set
Replication Exec Documentation Set The following manuals and help files comprise the VRE 3.1 documentation set:
Document Title Description
VRE 3.1 Administrator’s Guide The VRE 3.1 Administrator’s Guide in Adobe Acrobat format. (admin_en.pdf)
VRE 3.1 Help files Accessible as a standard Windows help file from the VRE 3.1 (admin_en.chm) software.
srTool Reference Guide The srTool Reference Guide in Adobe Acrobat format. (srtool_en.pdf)
srTool Help files Accessible as a standard Windows help file from the VRE 3.1 (srtool_en.chm) or srTool software.
Conventions
Typographical The following conventions apply throughout this manual.
Convention Description
GUI Font Used to depict graphical user interface (GUI) objects, such as fields, listboxes, menu commands, and so on. For example: Enter the password in the Password field.
Italics Used for placeholder text, book titles, new terms, or emphasis. Replace placeholder text with the specific text. For example: Replace filename with the name of your file. Do not use file names that contain spaces.
Code Used to show what commands you need to type, to identify pathnames where files are located, and to distinguish system or application text that is displayed to you or that is part of a code example.
Path Name Used to show the path for files, directories and volumes. For example, move to the directory containing the console file:
C:\Program Files\VERITAS\Replication Exec\
Preface vii

VRE3-1_UserGuide.book Page viii Tuesday, November 9, 2004 11:25 AM
Conventions
Convention Description
User Input Used to show the information to be input by the user. For example, from the command line, enter regedit32.
Tips, Notes and Cautions You should use the appropriate conventions for your platform. For example, when specifying a path, use backslashes on Microsoft Windows and slashes on UNIX. Significant differences between the platforms are noted in the text.
Tips, notes, and cautions are used to emphasize information. The following samples describe when each is used.
Tip Used for nice-to-know information, like a shortcut.
Note Used for important information that you should know, but that should not cause any damage to your data or your system if you choose to ignore it.
Caution Used for information that will prevent a problem. Ignore a caution at your own risk.
viii VRE 3.1 Administrator’s Guide

VRE3-1_UserGuide.book Page ix Tuesday, November 9, 2004 11:25 AM
Contents
Preface . . . . . . . . . . . . . . . . . . . . . . . . . . . . . . . . . . . . . . . . . . . . . . . . . . . . . . . . . . . . . . iii
Document Release Notes . . . . . . . . . . . . . . . . . . . . . . . . . . . . . . . . . . . . . . . . . . . . . . . . . . . iii
What You’ll Find in this Guide . . . . . . . . . . . . . . . . . . . . . . . . . . . . . . . . . . . . . . . . . . . . . . iv
How to Use This Manual . . . . . . . . . . . . . . . . . . . . . . . . . . . . . . . . . . . . . . . . . . . . . . . . . . . vi
Getting Help . . . . . . . . . . . . . . . . . . . . . . . . . . . . . . . . . . . . . . . . . . . . . . . . . . . . . . . . . . . . . . vi
Replication Exec Documentation Set . . . . . . . . . . . . . . . . . . . . . . . . . . . . . . . . . . . . . . . . .vii
Conventions . . . . . . . . . . . . . . . . . . . . . . . . . . . . . . . . . . . . . . . . . . . . . . . . . . . . . . . . . . . . . .vii
Typographical . . . . . . . . . . . . . . . . . . . . . . . . . . . . . . . . . . . . . . . . . . . . . . . . . . . . . . . . . .vii
Tips, Notes and Cautions . . . . . . . . . . . . . . . . . . . . . . . . . . . . . . . . . . . . . . . . . . . . . . . viii
Chapter 1. Introducing VERITAS Replication Exec . . . . . . . . . . . . . . . . . . . . . . . . . . .1
Features and Benefits . . . . . . . . . . . . . . . . . . . . . . . . . . . . . . . . . . . . . . . . . . . . . . . . . . . . . 1
What’s New in Replication Exec . . . . . . . . . . . . . . . . . . . . . . . . . . . . . . . . . . . . . . . . . . . 3
Replication Exec Overview . . . . . . . . . . . . . . . . . . . . . . . . . . . . . . . . . . . . . . . . . . . . . . . . . . . 4
Replication Neighborhoods . . . . . . . . . . . . . . . . . . . . . . . . . . . . . . . . . . . . . . . . . . . . . . . 4
Replication Management Server . . . . . . . . . . . . . . . . . . . . . . . . . . . . . . . . . . . . . . . . . . . 5
RMS Configurations . . . . . . . . . . . . . . . . . . . . . . . . . . . . . . . . . . . . . . . . . . . . . . . . . . . 6
Replication Service Agent (RSA) . . . . . . . . . . . . . . . . . . . . . . . . . . . . . . . . . . . . . . . . . . . 6
Administration Console . . . . . . . . . . . . . . . . . . . . . . . . . . . . . . . . . . . . . . . . . . . . . . . . . . 7
Replication Jobs . . . . . . . . . . . . . . . . . . . . . . . . . . . . . . . . . . . . . . . . . . . . . . . . . . . . . . . . . 7
Job Types . . . . . . . . . . . . . . . . . . . . . . . . . . . . . . . . . . . . . . . . . . . . . . . . . . . . . . . . . . . . 8
Command Line Interface (srTool) . . . . . . . . . . . . . . . . . . . . . . . . . . . . . . . . . . . . . . . . . . 8
Replication Exec Key Components . . . . . . . . . . . . . . . . . . . . . . . . . . . . . . . . . . . . . . . . . . . . 8
ix

VRE3-1_UserGuide.book Page x Tuesday, November 9, 2004 11:25 AM
Chapter 2. Planning for a Replication Exec System . . . . . . . . . . . . . . . . . . . . . . . . . 11
Planning Considerations . . . . . . . . . . . . . . . . . . . . . . . . . . . . . . . . . . . . . . . . . . . . . . . . . . . 11
Data-Protection Questions . . . . . . . . . . . . . . . . . . . . . . . . . . . . . . . . . . . . . . . . . . . . . . . 12
Network System Questions . . . . . . . . . . . . . . . . . . . . . . . . . . . . . . . . . . . . . . . . . . . . . . 12
Replication Job Questions . . . . . . . . . . . . . . . . . . . . . . . . . . . . . . . . . . . . . . . . . . . . . . . 13
Performance and Network Resources . . . . . . . . . . . . . . . . . . . . . . . . . . . . . . . . . . . . . . . . 14
Improving Performance . . . . . . . . . . . . . . . . . . . . . . . . . . . . . . . . . . . . . . . . . . . . . . . . . . . . 16
Windows Operating System TCP/IP Configuration . . . . . . . . . . . . . . . . . . . . . . . . . 16
Replication Exec Bandwidth Usage Limit . . . . . . . . . . . . . . . . . . . . . . . . . . . . . . . . . . 17
Supported Windows Operating Systems . . . . . . . . . . . . . . . . . . . . . . . . . . . . . . . . . . . . . 17
Minimum Hardware and Software Requirements . . . . . . . . . . . . . . . . . . . . . . . . . . . . . 18
Replication Management Server (RMS) . . . . . . . . . . . . . . . . . . . . . . . . . . . . . . . . . . . . 18
Administration Console . . . . . . . . . . . . . . . . . . . . . . . . . . . . . . . . . . . . . . . . . . . . . . . . . 18
Replication Service Agent (RSA) Server (each) . . . . . . . . . . . . . . . . . . . . . . . . . . . . . . 19
Compatibility with Other Applications . . . . . . . . . . . . . . . . . . . . . . . . . . . . . . . . . . . . . . . 19
Chapter 3. Installing Replication Exec . . . . . . . . . . . . . . . . . . . . . . . . . . . . . . . . . . . . 21
Pre-Installation Considerations . . . . . . . . . . . . . . . . . . . . . . . . . . . . . . . . . . . . . . . . . . . . . . 21
Installation Permissions and Rights . . . . . . . . . . . . . . . . . . . . . . . . . . . . . . . . . . . . . . . 22
Firewall Support and Port-Mapping Characteristics . . . . . . . . . . . . . . . . . . . . . . . . . 22
Replication Exec Clustering Capabilities . . . . . . . . . . . . . . . . . . . . . . . . . . . . . . . . . . . 23
Upgrading from Earlier Versions . . . . . . . . . . . . . . . . . . . . . . . . . . . . . . . . . . . . . . . . . . . . 24
Installing VRE 3.1 Software from CD . . . . . . . . . . . . . . . . . . . . . . . . . . . . . . . . . . . . . . . . . 26
Installing the RSA Software Remotely . . . . . . . . . . . . . . . . . . . . . . . . . . . . . . . . . . . . . . . . 36
Rolling Upgrade of Replication Neighborhoods . . . . . . . . . . . . . . . . . . . . . . . . . . . . . . . 42
Introduction . . . . . . . . . . . . . . . . . . . . . . . . . . . . . . . . . . . . . . . . . . . . . . . . . . . . . . . . . . . 42
Requirements . . . . . . . . . . . . . . . . . . . . . . . . . . . . . . . . . . . . . . . . . . . . . . . . . . . . . . . . . . 42
Procedure . . . . . . . . . . . . . . . . . . . . . . . . . . . . . . . . . . . . . . . . . . . . . . . . . . . . . . . . . . . . . 42
Removing the Replication Exec Software . . . . . . . . . . . . . . . . . . . . . . . . . . . . . . . . . . . . . 45
Uninstalling the Console . . . . . . . . . . . . . . . . . . . . . . . . . . . . . . . . . . . . . . . . . . . . . . . . 46
x VRE 3.1 Administrator’s Guide

VRE3-1_UserGuide.book Page xi Tuesday, November 9, 2004 11:25 AM
Uninstalling an RSA . . . . . . . . . . . . . . . . . . . . . . . . . . . . . . . . . . . . . . . . . . . . . . . . . . . . . 46
Uninstalling the RMS . . . . . . . . . . . . . . . . . . . . . . . . . . . . . . . . . . . . . . . . . . . . . . . . . . . . 46
Install and Uninstall Problems . . . . . . . . . . . . . . . . . . . . . . . . . . . . . . . . . . . . . . . . . . . . . . . 47
Chapter 4. How Replication Exec Works . . . . . . . . . . . . . . . . . . . . . . . . . . . . . . . . . . .49
Synchronizing Servers . . . . . . . . . . . . . . . . . . . . . . . . . . . . . . . . . . . . . . . . . . . . . . . . . . . . . . 49
Dynamic Replication . . . . . . . . . . . . . . . . . . . . . . . . . . . . . . . . . . . . . . . . . . . . . . . . . . . . 50
Non-Replicated Files . . . . . . . . . . . . . . . . . . . . . . . . . . . . . . . . . . . . . . . . . . . . . . . . . 50
Journaling . . . . . . . . . . . . . . . . . . . . . . . . . . . . . . . . . . . . . . . . . . . . . . . . . . . . . . . . . . . . . 50
Replication Efficiency . . . . . . . . . . . . . . . . . . . . . . . . . . . . . . . . . . . . . . . . . . . . . . . . . . . 51
Replication Types . . . . . . . . . . . . . . . . . . . . . . . . . . . . . . . . . . . . . . . . . . . . . . . . . . . . . . . . . . 52
Standard Replication (One-to-One) . . . . . . . . . . . . . . . . . . . . . . . . . . . . . . . . . . . . . . . . 52
Centralization (Many-to-One) . . . . . . . . . . . . . . . . . . . . . . . . . . . . . . . . . . . . . . . . . . . . 52
Publication (One-to-Many) . . . . . . . . . . . . . . . . . . . . . . . . . . . . . . . . . . . . . . . . . . . . . . . 53
Replication Modes . . . . . . . . . . . . . . . . . . . . . . . . . . . . . . . . . . . . . . . . . . . . . . . . . . . . . . . . . 54
Exact Replica Characteristics . . . . . . . . . . . . . . . . . . . . . . . . . . . . . . . . . . . . . . . . . . . . . 54
Merged Replica Characteristics . . . . . . . . . . . . . . . . . . . . . . . . . . . . . . . . . . . . . . . . . . . 56
Replication Rules . . . . . . . . . . . . . . . . . . . . . . . . . . . . . . . . . . . . . . . . . . . . . . . . . . . . . . . . . . 58
Rules for Selecting Data . . . . . . . . . . . . . . . . . . . . . . . . . . . . . . . . . . . . . . . . . . . . . . . . . . 58
Rules for Placing Data on the Target . . . . . . . . . . . . . . . . . . . . . . . . . . . . . . . . . . . . . . . 59
Default Destination Rule Generation . . . . . . . . . . . . . . . . . . . . . . . . . . . . . . . . . . . . . . 61
Invalid Mapping Path . . . . . . . . . . . . . . . . . . . . . . . . . . . . . . . . . . . . . . . . . . . . . . . . 62
Recovering Data from the Target Server . . . . . . . . . . . . . . . . . . . . . . . . . . . . . . . . . . . 62
Replication Scheduling . . . . . . . . . . . . . . . . . . . . . . . . . . . . . . . . . . . . . . . . . . . . . . . . . . . . . 63
Replication Security . . . . . . . . . . . . . . . . . . . . . . . . . . . . . . . . . . . . . . . . . . . . . . . . . . . . . . . . 63
Typical Uses for Replication Exec . . . . . . . . . . . . . . . . . . . . . . . . . . . . . . . . . . . . . . . . . . . . 64
Data Protection Between Two Machines (Standard Replication orOne–to–One) . . . . . . . . . . . . . . . . . . . . . . . . . . . . . . . . . . . . . . . . . . . . . . . . . . . . . . . . 64
Distributing Web Content (Publication or One–to–Many) . . . . . . . . . . . . . . . . . 65
Harvesting Sales Data (Centralization or Many–to–One) . . . . . . . . . . . . . . . . . . 66
Contents xi

VRE3-1_UserGuide.book Page xii Tuesday, November 9, 2004 25 AM11:
Backing Up Many Machines at a Central Location (Centralization orMany–to–One) . . . . . . . . . . . . . . . . . . . . . . . . . . . . . . . . . . . . . . . . . . . . . . . . . . . . . . 67
Cannot Replicate the Windows Operating System . . . . . . . . . . . . . . . . . . . . . . . . . . . . . 68
Chapter 5. Using the Administration Console . . . . . . . . . . . . . . . . . . . . . . . . . . . . . . 69
Console Security and Credentials . . . . . . . . . . . . . . . . . . . . . . . . . . . . . . . . . . . . . . . . . . . . 70
Accessing the Console . . . . . . . . . . . . . . . . . . . . . . . . . . . . . . . . . . . . . . . . . . . . . . . . . . . . . 71
Console: User Interface Map . . . . . . . . . . . . . . . . . . . . . . . . . . . . . . . . . . . . . . . . . . . . . . . . 72
Common Console Features . . . . . . . . . . . . . . . . . . . . . . . . . . . . . . . . . . . . . . . . . . . . . . . . . 73
Console Features Description . . . . . . . . . . . . . . . . . . . . . . . . . . . . . . . . . . . . . . . . . . . . 73
Main Menu Bar . . . . . . . . . . . . . . . . . . . . . . . . . . . . . . . . . . . . . . . . . . . . . . . . . . . . . 73
Toolbar . . . . . . . . . . . . . . . . . . . . . . . . . . . . . . . . . . . . . . . . . . . . . . . . . . . . . . . . . . . . 76
Navigation Bar . . . . . . . . . . . . . . . . . . . . . . . . . . . . . . . . . . . . . . . . . . . . . . . . . . . . . . 76
Task Pane . . . . . . . . . . . . . . . . . . . . . . . . . . . . . . . . . . . . . . . . . . . . . . . . . . . . . . . . . . 77
Selection Pane . . . . . . . . . . . . . . . . . . . . . . . . . . . . . . . . . . . . . . . . . . . . . . . . . . . . . . . 78
Discovering the Console Information Desk . . . . . . . . . . . . . . . . . . . . . . . . . . . . . . . . . . . 79
Overview View Options . . . . . . . . . . . . . . . . . . . . . . . . . . . . . . . . . . . . . . . . . . . . . . . . . 79
Main Menu Bar . . . . . . . . . . . . . . . . . . . . . . . . . . . . . . . . . . . . . . . . . . . . . . . . . . . . . 79
Navigation Bar . . . . . . . . . . . . . . . . . . . . . . . . . . . . . . . . . . . . . . . . . . . . . . . . . . . . . . 80
Task Pane . . . . . . . . . . . . . . . . . . . . . . . . . . . . . . . . . . . . . . . . . . . . . . . . . . . . . . . . . . 80
Selection Pane . . . . . . . . . . . . . . . . . . . . . . . . . . . . . . . . . . . . . . . . . . . . . . . . . . . . . . . 80
Locating the Information Desk Files . . . . . . . . . . . . . . . . . . . . . . . . . . . . . . . . . . . . . . . 82
Discovering the Console Jobs View . . . . . . . . . . . . . . . . . . . . . . . . . . . . . . . . . . . . . . . . . . 83
Jobs View Options . . . . . . . . . . . . . . . . . . . . . . . . . . . . . . . . . . . . . . . . . . . . . . . . . . . . . . 83
Main Menu Bar . . . . . . . . . . . . . . . . . . . . . . . . . . . . . . . . . . . . . . . . . . . . . . . . . . . . . 84
Navigation Bar . . . . . . . . . . . . . . . . . . . . . . . . . . . . . . . . . . . . . . . . . . . . . . . . . . . . . . 84
Task Pane . . . . . . . . . . . . . . . . . . . . . . . . . . . . . . . . . . . . . . . . . . . . . . . . . . . . . . . . . . 85
Selection Pane . . . . . . . . . . . . . . . . . . . . . . . . . . . . . . . . . . . . . . . . . . . . . . . . . . . . . . . 86
Job Status States . . . . . . . . . . . . . . . . . . . . . . . . . . . . . . . . . . . . . . . . . . . . . . . . . . . . . 87
Working with Job Functions . . . . . . . . . . . . . . . . . . . . . . . . . . . . . . . . . . . . . . . . . . . . . . . . 88
Monitoring Jobs . . . . . . . . . . . . . . . . . . . . . . . . . . . . . . . . . . . . . . . . . . . . . . . . . . . . . . . . 88
xii VRE 3.1 Administrator’s Guide

VRE3-1_UserGuide.book Page xiii Tuesday, November 9, 2004 11:25 AM
Discovering the Console Servers View . . . . . . . . . . . . . . . . . . . . . . . . . . . . . . . . . . . . . . . . 90
Servers View Options . . . . . . . . . . . . . . . . . . . . . . . . . . . . . . . . . . . . . . . . . . . . . . . . . . . 90
Main Menu Bar . . . . . . . . . . . . . . . . . . . . . . . . . . . . . . . . . . . . . . . . . . . . . . . . . . . . . . 90
Navigation Bar . . . . . . . . . . . . . . . . . . . . . . . . . . . . . . . . . . . . . . . . . . . . . . . . . . . . . . 91
Task Pane . . . . . . . . . . . . . . . . . . . . . . . . . . . . . . . . . . . . . . . . . . . . . . . . . . . . . . . . . . . 91
Selection Pane . . . . . . . . . . . . . . . . . . . . . . . . . . . . . . . . . . . . . . . . . . . . . . . . . . . . . . . 92
Working with Server Functions . . . . . . . . . . . . . . . . . . . . . . . . . . . . . . . . . . . . . . . . . . . . . . 93
Viewing Server Properties . . . . . . . . . . . . . . . . . . . . . . . . . . . . . . . . . . . . . . . . . . . . . . . 93
Server Properties Screen . . . . . . . . . . . . . . . . . . . . . . . . . . . . . . . . . . . . . . . . . . . . . . . . . 93
Server Properties - General Tab . . . . . . . . . . . . . . . . . . . . . . . . . . . . . . . . . . . . . . . . 94
Server Properties - Volumes Tab . . . . . . . . . . . . . . . . . . . . . . . . . . . . . . . . . . . . . . . 95
Server Properties - Folders Tab . . . . . . . . . . . . . . . . . . . . . . . . . . . . . . . . . . . . . . . . 96
Server Properties - Log Tab . . . . . . . . . . . . . . . . . . . . . . . . . . . . . . . . . . . . . . . . . . . . 97
Server Properties - Serial Number Tab . . . . . . . . . . . . . . . . . . . . . . . . . . . . . . . . . . 98
Changing the Status of a Server . . . . . . . . . . . . . . . . . . . . . . . . . . . . . . . . . . . . . . . . . . . 99
Discovering the Console Alerts View . . . . . . . . . . . . . . . . . . . . . . . . . . . . . . . . . . . . . . . . 100
Alerts View Options . . . . . . . . . . . . . . . . . . . . . . . . . . . . . . . . . . . . . . . . . . . . . . . . . . . 100
Main Menu Bar . . . . . . . . . . . . . . . . . . . . . . . . . . . . . . . . . . . . . . . . . . . . . . . . . . . . . 101
Navigation Bar . . . . . . . . . . . . . . . . . . . . . . . . . . . . . . . . . . . . . . . . . . . . . . . . . . . . . 101
Task Pane . . . . . . . . . . . . . . . . . . . . . . . . . . . . . . . . . . . . . . . . . . . . . . . . . . . . . . . . . . 101
Filtering Drop-Down Lists . . . . . . . . . . . . . . . . . . . . . . . . . . . . . . . . . . . . . . . . . . . 102
Alert Selection Pane Properties . . . . . . . . . . . . . . . . . . . . . . . . . . . . . . . . . . . . . . . 103
Working with Alert Functions . . . . . . . . . . . . . . . . . . . . . . . . . . . . . . . . . . . . . . . . . . . . . . 104
Sorting Alerts . . . . . . . . . . . . . . . . . . . . . . . . . . . . . . . . . . . . . . . . . . . . . . . . . . . . . . . . . 104
Grooming Alerts . . . . . . . . . . . . . . . . . . . . . . . . . . . . . . . . . . . . . . . . . . . . . . . . . . . . . . . 104
Alert Properties Screen . . . . . . . . . . . . . . . . . . . . . . . . . . . . . . . . . . . . . . . . . . . . . . . . . 106
Alert Properties - Details . . . . . . . . . . . . . . . . . . . . . . . . . . . . . . . . . . . . . . . . . . . . . 107
SNMP Traps . . . . . . . . . . . . . . . . . . . . . . . . . . . . . . . . . . . . . . . . . . . . . . . . . . . . . . . . . . 108
Logs . . . . . . . . . . . . . . . . . . . . . . . . . . . . . . . . . . . . . . . . . . . . . . . . . . . . . . . . . . . . . . . . . 109
Server Logs . . . . . . . . . . . . . . . . . . . . . . . . . . . . . . . . . . . . . . . . . . . . . . . . . . . . . . . . 110
Contents xiii

VRE3-1_UserGuide.book Page xiv Tuesday, November 9, 2004 11:25 AM
Job Logs . . . . . . . . . . . . . . . . . . . . . . . . . . . . . . . . . . . . . . . . . . . . . . . . . . . . . . . . . . . 110
Pair Logs . . . . . . . . . . . . . . . . . . . . . . . . . . . . . . . . . . . . . . . . . . . . . . . . . . . . . . . . . . 111
Discovering the Console Monitor View . . . . . . . . . . . . . . . . . . . . . . . . . . . . . . . . . . . . . . 115
Monitor View Options . . . . . . . . . . . . . . . . . . . . . . . . . . . . . . . . . . . . . . . . . . . . . . . . . 115
Main Menu Bar . . . . . . . . . . . . . . . . . . . . . . . . . . . . . . . . . . . . . . . . . . . . . . . . . . . . 115
Navigation Bar . . . . . . . . . . . . . . . . . . . . . . . . . . . . . . . . . . . . . . . . . . . . . . . . . . . . . 115
Task Pane . . . . . . . . . . . . . . . . . . . . . . . . . . . . . . . . . . . . . . . . . . . . . . . . . . . . . . . . . 116
Selection Pane . . . . . . . . . . . . . . . . . . . . . . . . . . . . . . . . . . . . . . . . . . . . . . . . . . . . . . 116
Chapter 6. Creating and Managing Replication Jobs . . . . . . . . . . . . . . . . . . . . . . . 119
Replication Jobs Overview . . . . . . . . . . . . . . . . . . . . . . . . . . . . . . . . . . . . . . . . . . . . . . . . . 119
Jobs: User Interface Map . . . . . . . . . . . . . . . . . . . . . . . . . . . . . . . . . . . . . . . . . . . . . . . . 120
Job Creation or Modification Permissions . . . . . . . . . . . . . . . . . . . . . . . . . . . . . . . . . 121
Job Size Limits . . . . . . . . . . . . . . . . . . . . . . . . . . . . . . . . . . . . . . . . . . . . . . . . . . . . . . . . 121
VRE 3.1 Inherent Limitations . . . . . . . . . . . . . . . . . . . . . . . . . . . . . . . . . . . . . . . . . 121
Windows Server versus Non-Server (Workstation) Limitations . . . . . . . . . . . 121
Creating a New Replication Job . . . . . . . . . . . . . . . . . . . . . . . . . . . . . . . . . . . . . . . . . . . . 122
Accessing the New Job Wizard . . . . . . . . . . . . . . . . . . . . . . . . . . . . . . . . . . . . . . . . . . 122
Entering the Job Name and Description . . . . . . . . . . . . . . . . . . . . . . . . . . . . . . . . . . 124
Selecting Replication Options . . . . . . . . . . . . . . . . . . . . . . . . . . . . . . . . . . . . . . . . . . . 125
Defining the Job Replication Pairs . . . . . . . . . . . . . . . . . . . . . . . . . . . . . . . . . . . . . . . 127
Adding Pairs to a Job . . . . . . . . . . . . . . . . . . . . . . . . . . . . . . . . . . . . . . . . . . . . . . . 128
Defining Replication Pair Properties . . . . . . . . . . . . . . . . . . . . . . . . . . . . . . . . . . . . . 130
Setting Bandwidth Usage . . . . . . . . . . . . . . . . . . . . . . . . . . . . . . . . . . . . . . . . . . . . 130
Defining Job Scripts . . . . . . . . . . . . . . . . . . . . . . . . . . . . . . . . . . . . . . . . . . . . . . . . . . . . 131
Setting Script Time-outs . . . . . . . . . . . . . . . . . . . . . . . . . . . . . . . . . . . . . . . . . . . . . 134
Defining Job Scripts . . . . . . . . . . . . . . . . . . . . . . . . . . . . . . . . . . . . . . . . . . . . . . . . . 134
Entering Replication Rules . . . . . . . . . . . . . . . . . . . . . . . . . . . . . . . . . . . . . . . . . . . . . . 135
Rule Types . . . . . . . . . . . . . . . . . . . . . . . . . . . . . . . . . . . . . . . . . . . . . . . . . . . . . . . . 135
Scheduling Replication Jobs . . . . . . . . . . . . . . . . . . . . . . . . . . . . . . . . . . . . . . . . . . . . . 141
xiv VRE 3.1 Administrator’s Guide

VRE3-1_UserGuide.book Page xv Tuesday, November 9, 2004 11:25 AM
Scheduling and Display Options . . . . . . . . . . . . . . . . . . . . . . . . . . . . . . . . . . . . . . 142
Backing Up Replication Job Databases . . . . . . . . . . . . . . . . . . . . . . . . . . . . . . . . . . . . . . . 143
Modifying Replication Jobs . . . . . . . . . . . . . . . . . . . . . . . . . . . . . . . . . . . . . . . . . . . . . . . . 144
Accessing the Jobs View Window . . . . . . . . . . . . . . . . . . . . . . . . . . . . . . . . . . . . . . . . 144
Using the Jobs View Specific Menu . . . . . . . . . . . . . . . . . . . . . . . . . . . . . . . . . . . . . . . 146
Accessing the Job Properties Windows . . . . . . . . . . . . . . . . . . . . . . . . . . . . . . . . . . . 147
Modifying Job Name, Job Description and Replication Options . . . . . . . . . . . . . . 147
Modifying the Replication Pairs . . . . . . . . . . . . . . . . . . . . . . . . . . . . . . . . . . . . . . . . . 148
Adding Pairs (Servers) to a Job . . . . . . . . . . . . . . . . . . . . . . . . . . . . . . . . . . . . . . . 149
Deleting Pairs (Servers) from a Job . . . . . . . . . . . . . . . . . . . . . . . . . . . . . . . . . . . . 149
Changing Bandwidth Usage . . . . . . . . . . . . . . . . . . . . . . . . . . . . . . . . . . . . . . . . . . 150
Revising Job Scripts . . . . . . . . . . . . . . . . . . . . . . . . . . . . . . . . . . . . . . . . . . . . . . . . . 151
Modifying Replication Rules . . . . . . . . . . . . . . . . . . . . . . . . . . . . . . . . . . . . . . . . . . . . 152
Rule Types . . . . . . . . . . . . . . . . . . . . . . . . . . . . . . . . . . . . . . . . . . . . . . . . . . . . . . . . . 152
Modifying or Adding Rules . . . . . . . . . . . . . . . . . . . . . . . . . . . . . . . . . . . . . . . . . . 153
Using the Rules Dialog . . . . . . . . . . . . . . . . . . . . . . . . . . . . . . . . . . . . . . . . . . . . . . 154
Viewing Inclusions and Exclusions . . . . . . . . . . . . . . . . . . . . . . . . . . . . . . . . . . . . 155
Changing the Target Path . . . . . . . . . . . . . . . . . . . . . . . . . . . . . . . . . . . . . . . . . . . . 156
Editing an Existing Rule . . . . . . . . . . . . . . . . . . . . . . . . . . . . . . . . . . . . . . . . . . . . . 157
Changing a Job Schedule . . . . . . . . . . . . . . . . . . . . . . . . . . . . . . . . . . . . . . . . . . . . . . . . 157
Scheduling and Display Options . . . . . . . . . . . . . . . . . . . . . . . . . . . . . . . . . . . . . . 159
Scheduling Examples . . . . . . . . . . . . . . . . . . . . . . . . . . . . . . . . . . . . . . . . . . . . . . . . 159
Deleting a Job . . . . . . . . . . . . . . . . . . . . . . . . . . . . . . . . . . . . . . . . . . . . . . . . . . . . . . . . . . . . 160
Backing Up Replication Job Databases . . . . . . . . . . . . . . . . . . . . . . . . . . . . . . . . . . . . . . . 160
Chapter 7. Troubleshooting the VRE 3.1 System . . . . . . . . . . . . . . . . . . . . . . . . . . .161
General Troubleshooting Issues . . . . . . . . . . . . . . . . . . . . . . . . . . . . . . . . . . . . . . . . . . . . 162
Administration Console Issues . . . . . . . . . . . . . . . . . . . . . . . . . . . . . . . . . . . . . . . . . . 162
Data Replication Issues . . . . . . . . . . . . . . . . . . . . . . . . . . . . . . . . . . . . . . . . . . . . . . . . . 163
Hardware and Software Issues . . . . . . . . . . . . . . . . . . . . . . . . . . . . . . . . . . . . . . . . . . 163
Contents xv

VRE3-1_UserGuide.book Page xvi Tuesday, November 9, 2004 11:25 AM
Journals and Database Issues . . . . . . . . . . . . . . . . . . . . . . . . . . . . . . . . . . . . . . . . . . . 164
Neighborhood Issues . . . . . . . . . . . . . . . . . . . . . . . . . . . . . . . . . . . . . . . . . . . . . . . . . . 164
Network System Issues . . . . . . . . . . . . . . . . . . . . . . . . . . . . . . . . . . . . . . . . . . . . . . . . . 165
Replication Alerts, Logs and Monitoring Issues . . . . . . . . . . . . . . . . . . . . . . . . . . . . 165
Replication Jobs Issues . . . . . . . . . . . . . . . . . . . . . . . . . . . . . . . . . . . . . . . . . . . . . . . . . 166
Replication Management Server (RMS) Issues . . . . . . . . . . . . . . . . . . . . . . . . . . . . . 167
Replication Rules Issues . . . . . . . . . . . . . . . . . . . . . . . . . . . . . . . . . . . . . . . . . . . . . . . . 168
Replication Server Issues . . . . . . . . . . . . . . . . . . . . . . . . . . . . . . . . . . . . . . . . . . . . . . . 169
Replication Service Agent (RSA) Issues . . . . . . . . . . . . . . . . . . . . . . . . . . . . . . . . . . . 169
User Security Issues . . . . . . . . . . . . . . . . . . . . . . . . . . . . . . . . . . . . . . . . . . . . . . . . . . . 170
Specific Troubleshooting Symptoms . . . . . . . . . . . . . . . . . . . . . . . . . . . . . . . . . . . . . . . . 171
The Windows Event Log indicates that the Replication DBMS failed toinitialize and the RMS or RSA failed to start . . . . . . . . . . . . . . . . . . . . . . . . . . . . . . . 171
The RSA is not attached to the correct replication neighborhood . . . . . . . . . . . . . 172
Problems are encountered when connecting to an RMS with multiple IP addresses . . . . . . . . . . . . . . . . . . . . . . . . . . . . . . . . . . . . . . . . . . . . . . . . . . . . . . . . . . 174
Under heavy I/O loads, the Journal directory conflicts with the Sourcedirectories . . . . . . . . . . . . . . . . . . . . . . . . . . . . . . . . . . . . . . . . . . . . . . . . . . . . . . . . . . . . 176
A Replication Service Agent (RSA) Server is unable to connect to the Replication Management Server (RMS) . . . . . . . . . . . . . . . . . . . . . . . . . . . . . . . . . . . 177
Appendix A. Replication Exec Utilities and Tools . . . . . . . . . . . . . . . . . . . . . . . . . 179
VRE 3.1 srTool . . . . . . . . . . . . . . . . . . . . . . . . . . . . . . . . . . . . . . . . . . . . . . . . . . . . . . . . . . . 179
VRE 3.1 Database Backup and Restore . . . . . . . . . . . . . . . . . . . . . . . . . . . . . . . . . . . . . . 180
Introduction . . . . . . . . . . . . . . . . . . . . . . . . . . . . . . . . . . . . . . . . . . . . . . . . . . . . . . . . . . 180
Why backup? . . . . . . . . . . . . . . . . . . . . . . . . . . . . . . . . . . . . . . . . . . . . . . . . . . . . . . 180
Transaction Log Files . . . . . . . . . . . . . . . . . . . . . . . . . . . . . . . . . . . . . . . . . . . . . . . 180
Requirements of Database Backups . . . . . . . . . . . . . . . . . . . . . . . . . . . . . . . . . . . 181
Database Backup and Restore Command Line Window . . . . . . . . . . . . . . . . . . 181
Backup Process . . . . . . . . . . . . . . . . . . . . . . . . . . . . . . . . . . . . . . . . . . . . . . . . . . . . . . . 181
Making a Backup . . . . . . . . . . . . . . . . . . . . . . . . . . . . . . . . . . . . . . . . . . . . . . . . . . . 181
Working with Backup Errors . . . . . . . . . . . . . . . . . . . . . . . . . . . . . . . . . . . . . . . . . . . . 182
xvi VRE 3.1 Administrator’s Guide

VRE3-1_UserGuide.book Page xvii Tuesday, November 9, 2004 11:25 AM
Restoring the Database . . . . . . . . . . . . . . . . . . . . . . . . . . . . . . . . . . . . . . . . . . . . . . . . . 183
Reconfiguring VRE 3.1 for Discontinued Backups . . . . . . . . . . . . . . . . . . . . . . . . . . 184
Replication DBMS Backup Utility (rxDBBackup) Reference . . . . . . . . . . . . . . . . . . 184
VRE 3.1 Database Validation and Repair . . . . . . . . . . . . . . . . . . . . . . . . . . . . . . . . . . . . . 187
Replication DBMS Validation Utility (rxDBValidate) Reference . . . . . . . . . . . . . . 188
Replication Exec Ping (rxPing) . . . . . . . . . . . . . . . . . . . . . . . . . . . . . . . . . . . . . . . . . . . . . . 191
Usage . . . . . . . . . . . . . . . . . . . . . . . . . . . . . . . . . . . . . . . . . . . . . . . . . . . . . . . . . . . . . 191
Options . . . . . . . . . . . . . . . . . . . . . . . . . . . . . . . . . . . . . . . . . . . . . . . . . . . . . . . . . . . . 191
Examples . . . . . . . . . . . . . . . . . . . . . . . . . . . . . . . . . . . . . . . . . . . . . . . . . . . . . . . . . . 192
Typical Output . . . . . . . . . . . . . . . . . . . . . . . . . . . . . . . . . . . . . . . . . . . . . . . . . . . . . 192
Appendix B. Clustering the RMS with MSCS . . . . . . . . . . . . . . . . . . . . . . . . . . . . . .195
Prerequisites . . . . . . . . . . . . . . . . . . . . . . . . . . . . . . . . . . . . . . . . . . . . . . . . . . . . . . . . . . 195
Installation . . . . . . . . . . . . . . . . . . . . . . . . . . . . . . . . . . . . . . . . . . . . . . . . . . . . . . . . . . . . . . . 195
Creating an RMS Resource . . . . . . . . . . . . . . . . . . . . . . . . . . . . . . . . . . . . . . . . . . . . . . . . . 196
Configuring VRE 3.1 for Your Network . . . . . . . . . . . . . . . . . . . . . . . . . . . . . . . . . . . . . . 199
Removing the Agent . . . . . . . . . . . . . . . . . . . . . . . . . . . . . . . . . . . . . . . . . . . . . . . . . . . . . . 201
Moving a Clustered RMS to a Standalone Server . . . . . . . . . . . . . . . . . . . . . . . . . . . 201
Remove the RMS Agent Software . . . . . . . . . . . . . . . . . . . . . . . . . . . . . . . . . . . . . . . . 202
Understanding Error Messages . . . . . . . . . . . . . . . . . . . . . . . . . . . . . . . . . . . . . . . . . . . . . 203
Appendix C. Accessibility and Replication Exec . . . . . . . . . . . . . . . . . . . . . . . . . . .205
Keyboard Navigation and Shortcuts in VRE 3.1 . . . . . . . . . . . . . . . . . . . . . . . . . . . . . . . 206
General Keyboard Navigation Within the GUI . . . . . . . . . . . . . . . . . . . . . . . . . . . . . 206
Keyboard Navigation Within Dialog Boxes . . . . . . . . . . . . . . . . . . . . . . . . . . . . . . . . 207
Tabbed Dialog Boxes . . . . . . . . . . . . . . . . . . . . . . . . . . . . . . . . . . . . . . . . . . . . . . . . 208
Keyboard Shortcuts . . . . . . . . . . . . . . . . . . . . . . . . . . . . . . . . . . . . . . . . . . . . . . . . . . . . 208
Support for Accessibility Settings . . . . . . . . . . . . . . . . . . . . . . . . . . . . . . . . . . . . . . . . . . . 209
Glossary . . . . . . . . . . . . . . . . . . . . . . . . . . . . . . . . . . . . . . . . . . . . . . . . . . . . . . . . . . . .211
Contents xvii

VRE3-1_UserGuide.book Page xviii Tuesday, November 9, 2004 11:25 AM
Index . . . . . . . . . . . . . . . . . . . . . . . . . . . . . . . . . . . . . . . . . . . . . . . . . . . . . . . . . . . . . . 215
xviii VRE 3.1 Administrator’s Guide

VRE3-1_UserGuide.book Page 1 Tuesday, November 9, 2004 11:25 AM
Introducing VERITAS Replication Exec
1 VERITAS Replication Exec™ (VRE 3.1) for Windows provides organizations with the ability to protect their remote office data by replicating the data to a secondary server, such as at a centralized location. Data replication provides near real-time backup and data redundancy.When the data arrives at the Target location, administrators can perform normal backups on the stored data. The data can be restored quickly without having to rely on remote personnel to manage and restore the data from tape. Replication Exec enables administrators to centralize backup or provide data redundancy without disrupting normal server operations.
Features and Benefits Replication Exec allows data to be replicated with up-to-the-second accuracy for any specified files, volumes, or directories. Identical copies — stored locally, remotely or in several places — allow immediate recovery from server or hardware failures. VRE 3.1 automatically duplicates files or file systems at any number of locations for complete data protection and/or information redistribution.
VRE 3.1’s features and benefits are described in the following table.
Feature Benefit
Easy to use VRE 3.1’s easy to use technology allows system administrators to integrate replication into their network environment.
Scalability VRE 3.1 supports 500 nodes per neighborhood, and 250 replication pairs per Job.
1

VRE3-1_UserGuide.book Page 2 Tuesday, November 9, 2004 11:25 AM
Feature Benefit
Powerful Administration Console
The Administration Console allows users to access system documentation, and control the Servers, Jobs, Status, and Alerts from anywhere on the network.
Sophisticated replication modes Replication jobs support a variety of distribution configurations as well as bandwidth control and flexible scheduling.
Ability to define the data that will be replicated
Users save on bandwidth and storage by replicating only the data that needs to be replicated to a secondary location.
Flexible scheduling Replication can be scheduled to initiate at any time of the day or night.
Replicates only the data that changes
After synchronization of the servers, VRE 3.1 then only replicates the changed portions of the data sets.
Data mounted as read-only at target
Optionally, data replicated to a Target cannot be modified but can be viewed, while replication is active, thus protecting the integrity of the data.
Replication journaling VRE 3.1 maintains full data integrity and consistency within and among file systems for any file types including open files and databases.
Clustering capabilities Cluster server software assures that replication management information is highly available. RMS agent provides failover data protection for the RMS.
Cross-platform and network VRE 3.1 works across Windows domains and subnets.
Easily managed data copies The copied data can be placed in any location on the Target to facilitate backups, data mining, or other uses.
2 VRE 3.1 Administrator’s Guide

VRE3-1_UserGuide.book Page 3 Tuesday, November 9, 2004 11:25 AM
What’s New in Replication Exec The primary improvements in VRE 3.1 are as follows.
◆ Scalability to much larger environments
◆ Improved ability to start many jobs concurrently
◆ Job-pair limits extended to 250
◆� Better tolerance of network outages (dynamic replication now resumes after the network is interrupted); particularly beneficial to WAN environments
◆ Fully documented command line tool for use in scriptable environments
◆ New efficient graphical user interface (GUI)
◆ More robust and flexible database (non-proprietary, ODBC)
◆� 64 replication Jobs—versus prior 64 replication Pairs—running concurrently on a Source
◆ Target protection is now unlimited
◆ Ability to trigger an event (Script) when consistency of Target is achieved.
◆ VRE 3.1 no longer uses Noblenet portmapper, but now uses Microsoft’s RPC.
◆� Improved clustering of the Replication Management Server (RMS) using Microsoft Cluster Server.
◆ Rolling upgrade and migration of Replication neighborhoods
◆ Replication data backup and restore capabilities have been extended.
◆ The location of the VRE 3.1 services has changed to the following root directory:
<drive>:\Program Files\VERITAS\Replication Exec
◆ The following Windows services’ names have changed:
Old Name New Name
ENL Enterprise Network Layer
Storage Replicator RMS Replication Management Server
Storage Replicator RSA Replication Service Agent
NobleNet Portmapper for TCP Replaced with Microsoft Remote Procedure Call (RPC)
(none) Replication DBMS
◆ The proprietary database has been replaced with a commercial ODBC SQL database.
Chapter 1, Introducing VERITAS Replication Exec 3

VRE3-1_UserGuide.book Page 4 Tuesday, November 9, 2004 11:25 AM
Replication Exec Overview
Replication Exec Overview Replication is the process of continually copying data from one or more Source servers onto one or more Target servers. VRE 3.1 provides real-time data protection for Windows servers by moving critical files to one or more local or remote servers. Replicated files on the Target server are constantly updated with any changes made to the original files on the Source server. Thus, an exact copy of each file is always available. Following is a discussion of the key concepts of storage replication.
Replication Neighborhoods Replication neighborhoods consist of all servers that will need to share (replicate) data with one another. The replication neighborhood is defined by the user during the installation of the VRE 3.1 software. At that time, all available servers within the network are identified and the user can select which servers to include in the neighborhood. Thus, preplanning should include an assessment of current and predicted replication requirements with respect to the available servers.
The neighborhood can be expanded through standard installation of servers. Perhaps more efficiently, servers can be moved between neighborhoods by editing the Registry.
For example, a replication neighborhood is defined by servers in Seattle, Dallas, Atlanta, and New York. (Refer to the following figure.) The financial data in Seattle and Atlanta need to be replicated to the server in New York. The payroll data in Seattle, New York and Atlanta need to be replicated to the server in Dallas. And, the sales data in New York is to
4 VRE 3.1 Administrator’s Guide

VRE3-1_UserGuide.book Page 5 Tuesday, November 9, 2004 11:25 AM
Replication Exec Overview
be replicated to the server in Atlanta. Combined, these servers constitute a single replication neighborhood. Each server in the neighborhood must contain the Replication Exec application which allows them to serve either as a Source and/or Target server.
VRE 3.1 also allows replication across subnets and Windows domains within the replication neighborhood.
Replication Management Server The Replication Management Server (RMS) provides primary control of the replication process. The RMS functions include:
◆ retaining configuration data for the replication system,
◆ driving the replication process according to the configuration settings sent from the Administration Console and command line tool, and
◆ providing a repository for Job logs, alerts, and histories.
While the RMS maintains a database with all the command and control information for the replication process, these important records do not require significant disk space or CPU processing capacity. However, depending on the network topology, the server that hosts the RMS might have an impact on the network. The rate of data changes being replicated does not affect the RMS, since data is only sent to Target servers. However, Job controls, monitoring, and alerts all communicate with the RMS.
Chapter 1, Introducing VERITAS Replication Exec 5

VRE3-1_UserGuide.book Page 6 Tuesday, November 9, 2004 11:25 AM
Replication Exec Overview
RMS Configurations
Note Due to the importance of the RMS in the replication system, users should carefully consider the following items when setting up the RMS. See also “Planning for a Replication Exec System” on page 11.
◆ The replication system integrity is only as good as the network and network connections.
◆ Only one RMS may be installed in each Replication Neighborhood.
◆ The RMS is the managing element to the replication system and should be installed prior to the other VRE 3.1 software. An RMS cannot be created on an RSA without first uninstalling the RSA.
◆ Each Source/Target server in the Replication Neighborhood requires access to the RMS. The RMS server maintains current command and control data for the entire Replication Neighborhood, so it must be continually available to the other replicating servers. A server will continue to function without access to the RMS, however other operations cannot be performed until access to the RMS is reestablished.
◆ VRE 3.1 optionally also supports failover of a primary RMS node to a secondary node via clustering.
◆ The RMS should be installed on a server appropriate for its use. The RMS should be installed on a dedicated server, especially if the anticipated load is expected to be high.
◆ The RMS should be installed on a subnet that has easy and efficient access to all servers.
◆ The RMS must have a fixed IP address.
Caution Do not change the IP address of the RMS during replication. If the IP address for the RMS is changed during replication, problems may be encountered that may require all services to be restarted.
Replication Service Agent (RSA) The Replication Service Agent (RSA) is the active agent that drives the replication process. The RSA maintains control over those Jobs that involve a particular server. The RSA also stores replication logs and hosts the filter drivers that monitor the file systems to track changes.
6 VRE 3.1 Administrator’s Guide

VRE3-1_UserGuide.book Page 7 Tuesday, November 9, 2004 11:25 AM
Replication Exec Overview
The RSA software must be installed on each server within the replication Neighborhood. That server can then be designated a Source server, a Target server, or both. The RSA software can be installed either manually at the server itself, or by remote installation of the software across the network from the Administration Console.
The RSA software must be installed on any server, including the RMS, if it is to be used as a Source, Target, or both.
Administration Console The Administration Console is the user interface for all replication processes, and is responsible for the following:
◆ configuring, monitoring, and interactively commanding and controlling the replication jobs,
◆ allowing the administrator to deploy and enable the servers, set rules (filters) for including or excluding the data, and control replication scheduling,
◆ monitoring the replication Jobs,
◆ viewing the Alert notices from the system during the replication processes.
Multiple Consoles can operate simultaneously in the same neighborhood.
The RMS responds to commands sent from any Console, whether or not the Console is installed on the same machine as the RMS or an RSA.
Replication Jobs Replication of data between servers is accomplished by creating and running “Jobs” from the Administration Console. A replication Job defines the Source and Target servers, the specific data to be replicated, where on the Target the data should be placed, the interval or scheduled duration of the replication Job, and the settings used.
When a replication Job is begun, the Source server is not considered protected until all specified files have been replicated onto the Target server. The first step of a replication Job is therefore to synchronize the Source and Target servers. The synchronization phase replicates files from the Source server to create an identical set of files on the Target server. Once this first phase is complete, then only changes or updates to the files are replicated. This preserves data in the order in which it is changed; that is, in “write-order fidelity“.
Chapter 1, Introducing VERITAS Replication Exec 7

VRE3-1_UserGuide.book Page 8 Tuesday, November 9, 2004 11:25 AM
Replication Exec Key Components
Job Types
Each Job must be defined within a specific Job type. The Job types available for VRE 3.1 are described in the following table.
Job Types Description
Standard (One-to-one)
Data is to be replicated from a single Source server to a single Target server. Source servers control standard Jobs.
Centralization (Many-to-one)
Data is to be replicated (“centralized”) from multiple Source servers to a single Target server. Target servers control centralization Jobs.
Publication (One-to-many)
Data is to be replicated (“published”) from a single Source server to multiple Target servers. Source servers control publication Jobs.
The Job types, pairings of Source and Target servers, attributes, data to be replicated and schedule are all defined for each Job at the Administrative Console.
Command Line Interface (srTool) Replication Exec includes srToolTM, a command line interface tool. srTool is a “shell” program that allows the administrator to create, configure, and control replication Jobs without using the Console. srTool incorporates a powerful command language that enables administrators to easily automate many complex administrative tasks.
srTool is introduced in Appendix A of this guide, and presented thoroughly in the srTool Reference Guide, packaged with this documentation set.
Replication Exec Key Components VRE 3.1 consists of the following key components.
◆ Replication Management Server (RMS)
◆ Replication Service Agent (RSA)
◆ Administration Console
◆ srTool — command line interface. See “Replication Exec Utilities and Tools” on page 179, the srTool online Help, or the VERITAS Replication Exec, srTool Reference Guide.
◆ Replication Exec Tools and Utilities, including VRE rxPing and Replication Database Backup and Restore are discussed in “Replication Exec Utilities and Tools” on page 179.
8 VRE 3.1 Administrator’s Guide

VRE3-1_UserGuide.book Page 9 Tuesday, November 9, 2004 11:25 AM
Replication Exec Key Components
◆ Clustering of the RMS Agent for Microsoft Cluster Server is discussed in “Clustering the RMS with MSCS” on page 195.
Chapter 1, Introducing VERITAS Replication Exec 9

VRE3-1_UserGuide.book Page 10 esday, November 9, 2004 11:25 AMTu
Replication Exec Key Components
10 VRE 3.1 Administrator’s Guide

VRE3-1_UserGuide.book Page 11 esday, November 9, 2004 11:25 AMTu
Planning for a Replication Exec System
2 Before installing VRE 3.1, there are several systemadministration issues that should be considered so asto optimize the replication process. These planningconsiderations should include defining your dataprotection requirements, assessing the capabilities ofyour network system, and understanding your specific replication project(s).This is also a good time to consider which data shouldbe protected through replication, how often the datashould be replicated, where the replicated data should be stored, and who has access to thereplication processes.
Adequate front-end planning also allows VRE 3.1 users the ability to optimize replication performance by coordinating the scope of theirreplication projects with the available network resources. Additionally, there are varioususer-controlled configurations to improve the replication performance.
Note While there are many flexible and reversible options available to the user during the replication process, there are several administrative options that must be defined at the time of installation. Further, an assessment of the network over which VRE 3.1 will be installed will aid greatly in reducing future problems.
Please review these considerations carefully prior to installing the software.
Planning Considerations In planning an optimal VRE 3.1 replication system, the user should have a clear understanding of the replication needs and condition of the existing network system. The user should also have a sense of what additional influence the replication requirements are going to be on the existing servers and network. Consider the following questions in planning the replication system.
11

VRE3-1_UserGuide.book Page 12 esday, November 9, 2004 11:25 AMTu
Planning Considerations
Data-Protection Questions ◆ Which data needs to be protected through replication to a separate server?
◆ How often should the data be replicated? Critical data might be replicated continuously for optimal protection, and less-sensitive data might be scheduled for periodic replication.
◆ Where should the Target servers be located? Critical data might be replicated to secure servers located in separate buildings or cities.
◆ Will the data be exposed to a wider audience once it is replicated? In other words, will sensitive data be replicated that should have a normally controlled access on the Target?
◆ Once replicated, will the Target data then need to be quickly redistributed (“published”) to other users or servers?
◆ Once replicated, will the Target data then need to be backed up by secondary protective measures, such as tape drives?
◆ Once replicated, will the data be used or edited on the Target?
◆ Who will administer the replication of data? What security credentials should the replication administrator possess?
◆ What procedures will be required to quickly restore the replicated data such as in the case of failure of the Source servers or network?
◆ Will replication be scheduled so as to use the available network resources only during off-hours?
Network System Questions ◆ What impact will replication have on your network? A Source server with many,
frequent data changes will have a high network bandwidth impact due to all changes also being transmitted to the Target server. See also “Performance and Network Resources” on page 14.
◆ How much disk space will be needed on the Target servers for the replicated data? Generally, the available disk space on the Target server should be ten percent greater than the current data size on the Source server.
◆ How quickly is the data size growing? Is there a foreseeable time when the replicated data will exceed the capacity of the Target servers?
◆ Are there periods of peak (or quiescent) activity during which replication might be best scheduled?
12 VRE 3.1 Administrator’s Guide

VRE3-1_UserGuide.book Page 13 esday, November 9, 2004 11:25 AMTu
Planning Considerations
◆ Which server is best suited to host the RMS? The RMS server maintains current command and control data for the entire Replication Neighborhood, so it must be continually available to the other replicating servers. An RSA will continue to function—start and stop Jobs with potentially old configuration data—if the RMS is not available.
◆ Which servers will be in the Replication Neighborhood and thus available for replication?
◆ Do all servers within the Neighborhood maintain good connectivity, and particularly with the RMS server?
◆ Will clustering server software be required to compliment VRE 3.1?
◆ Will data be replicated across a firewall?
Replication Job Questions ◆ How many jobs will be standard (one-to-one), centralization (many-to-one), and
publication (one-to-many)? A centralization Job can be initially established with only a single Source server. Additional servers can be added and existing servers removed at any time. A publication Job can be established with a single target server, then additional target servers can be added (or removed) at a later time.
◆ How many nodes (multiple Source or Target servers) are required for each Job?
◆ What specific data should be included or excluded for each Job?
◆ Which data-set replications warrant ongoing monitoring?
◆ Is there more than one logical set of data on a Source server that could be best managed by more than one Job? For example, some data might best be periodically replicated and other data continually replicated?
◆ Will some Jobs require pre-seeding the Target for synchronization? For example, if the overall size of the data set is large and the network is relatively slow (WAN), synchronization may take a very long time and consume the entire link. If the slow WAN is fast enough to handle the dynamic change rate, the Job will succeed if it synchronizes. If it is not fast enough to handle the change rate, then pre-seeding the Target with a backup on tape/CD or drives can overcome the initial synchronization problem.
Chapter 2, Planning for a Replication Exec System 13

VRE3-1_UserGuide.book Page 14 esday, November 9, 2004 11:25 AMTu
Performance and Network Resources
Performance and Network Resources An understanding of replication performance and network resources is essential in developing and managing an effective replication program. Compare the following two replication network scenarios.
Example 1. Simple Standard Replication Scenario
In a relatively simple Standard (one-to-one) replication Job, most replication variables can be predicted with a sense of likely performance. Consider a moderate sized data set to be replicated continuously from the Source server to the Target server, over an efficient local area network (LAN). It is estimated that the original data set will be modified occasionally requiring periodic update at the Target. Based on this scenario, the network resources are expected to be more than adequate and the replication performance to be non-intrusive and very efficient.
Example 2. Complex Centralization Replication Scenario
In a complex Centralization replication (say, 250-to-one), it is nearly impossible to completely estimate all of the variables that will affect the performance of the replication. Consider vast amounts of data from each node (Source) undergoing continual changes, and being communicated to the Target via a variety of networks and subnets. If the overall network is already nearing capacity—even at only occasional peak periods—very poor performance would be expected in the replication. It might even be accurately predicted that some network outages, prolonged hang times, countless replication restarts, and large Journal growth will result.
Note Replication typically fails when large amounts of data (or data changes) are not being transmitted to the Target due to insufficient network bandwidth which results in the Journal files filling the available disk space on the Source.
As seen by a comparison of these two examples, performance is a function of the following.
◆ the size of the data sets to be replicated (data quantity)
◆ the frequency of the data replication and rate of protected data change on the Source server (data rewrite quantity)
◆ the quality of the system networks (available bandwidth) and latency
◆ the size of the Target servers (memory quantity and speed of I/O subsystem)
If none of these variables is excessive and network resources are adequate for their routine functions and replication, replication should be quite efficient. On the other hand, if the data sets are unduly large and changing rapidly over an already taxed network system, replication may be sluggish and prone to failure.
14 VRE 3.1 Administrator’s Guide

VRE3-1_UserGuide.book Page 15 esday, November 9, 2004 11:25 AMTu
Performance and Network Resources
The following chart shows the relationship between the amount of data (or rate of change of data being replicated) versus the available network bandwidth for replication.
Note These relationships are only qualitative. There is no way to accurately predict all variables influencing replication performance in a given network system. However, large amounts of data piped over a weak system will probably produce marginal results at best.
One technique to determine the input/output activity on a given volume is to use Windows Performance Monitor (Perfmon). The results of Perfmon should be compared against the available network resources to ensure that the I/O writes are less than the network bandwidth. Refer to the Windows documentation for a description of Perfmon and its functionality.
Users should also monitor the size of the outbound Journal directory for excessive growth and/or sluggish performance. See “Journaling” on page 50.
Chapter 2, Planning for a Replication Exec System 15

VRE3-1_UserGuide.book Page 16 esday, November 9, 2004 11:25 AMTu
Improving Performance
Improving Performance This section discusses system configurations that may improve replication performance.
Windows Operating System TCP/IP Configuration By default, the Windows operating systems make certain assumptions about the network environment they are operating in. These include the assumptions that a reasonable amount of network bandwidth is available, and that overall network latency (as measured by round-trip packet time) is modest.
However, when replicating in environments that are severely bandwidth-constrained or in extremely high-latency networks, or both, it may be necessary to make an adjustment to the communications configuration of VRE 3.1 to use the network more efficiently.
When VRE 3.1 is replicating in low-bandwidth/high-latency environments, it may be necessary to change the amount of time that VRE 3.1 will go without receiving network traffic from a node before declaring the node down.
If replicating in low-bandwidth/high-latency environments, the following registry change is recommended.
▼ To change the registry folder
Caution Using Registry Editor incorrectly can cause serious problems that may require you to reinstall your operating system. VERITAS cannot guarantee that problems resulting from the incorrect use of Registry Editor can be solved. Use Registry Editor at your own risk.
1. Select Start, then Run, and type in regedt32.
2. Creat the following registry key if it does not exist:
HKLM\software\veritas\Storage Replicator\Parameters\Communications\ KeepAliveTime
3. Specify the amount of time that VRE 3.1 will wait for network traffic before declaring a network connection down. The value is specified in milliseconds. The default timeout is 120000 (two minutes).
4. Restart the RxRSA service.
16 VRE 3.1 Administrator’s Guide

VRE3-1_UserGuide.book Page 17 esday, November 9, 2004 11:25 AMTu
Supported Windows Operating Systems
Replication Exec Bandwidth Usage Limit To balance replication activity and network resource usage, VRE 3.1 allows the user to specify the maximum percentage of network bandwidth to be used when replicating data between a Target Server and a Source Server.
Note Bandwidth usage selection applies during synchronization and dynamic replication.
VRE 3.1 throttles the bandwidth usage by limiting the amount of data it places on the network per unit of time. It calculates its bandwidth usage limit based on the maximum percentage of bandwidth specified and the type of network specified. For example, if replication is specified to use up to 50% of a 10 megabit Ethernet, VRE 3.1 throttles its usage to stay at or below 5 megabits per second.
For procedures to throttle the network bandwidth, see “Setting Bandwidth Usage” on page 130.
Supported Windows Operating Systems VRE 3.1 features (RMS, RSA, and Console) are supported only by the following Windows operating systems.
◆ Windows 2000 Professional with Service Pack 2
◆ Windows 2000 Server with Service Pack 2
◆ Windows 2000 Advanced Server with Service Pack 2
◆ Windows XP Professional
◆ Windows 2003 Server versions
VRE 3.1 is not supported by the following Windows operating systems.
◆ Windows 9x
◆ Windows Millennium Edition (ME)
◆ Windows NT 4.0
◆ Windows XP Home
Chapter 2, Planning for a Replication Exec System 17

VRE3-1_UserGuide.book Page 18 esday, November 9, 2004 11:25 AMTu
Minimum Hardware and Software Requirements
Minimum Hardware and Software Requirements The minimum hardware and software requirements recommended for the VRE 3.1 components are as follows.
Note Actual production requirements may require greater resources than the noted minimum requirements.
Replication Management Server (RMS)
Feature Description
Operating System See “Supported Windows Operating Systems” on page 17
Utilities Microsoft Data Access Components (MDAC) 2.5 or greater
RAM 128 MB min. (512 MB or more recommended)
Disk space: (VRE 3.1 software) 25 MB
Disk Space: (Logs and Alerts) 100 MB
Optional RAID and UPS
Administration Console
Feature Description
Operating System See “Supported Windows Operating Systems” on page 17
Utilities Microsoft Data Access Components (MDAC) 2.5 or greater
RAM 128 MB min. (512 MB or more recommended)
Disk space 25 MB
18 VRE 3.1 Administrator’s Guide

VRE3-1_UserGuide.book Page 19 esday, November 9, 2004 11:25 AMTu
Compatibility with Other Applications
Replication Service Agent (RSA) Server (each)
Feature Description
Operating System See “Supported Windows Operating Systems” on page 17
Utilities Microsoft Data Access Components (MDAC) 2.5 or greater
RAM 128 Mb min. (512 MB or more recommended)
Disk space: (Journals) 100 MB (10 GB or more recommended)
Disk space: (Target replica data) as required
Compatibility with Other Applications Replication Exec Setup installs a file system filter driver on the system. VRE 3.1 may encounter incompatibility with any applications also utilizing filter drivers. These include anti-virus software, disk defragmenter utilities, open file managers, or quota managers.
Note This section applies only to servers being utilized as RSA (Source and/or Target) servers. Neither the RMS or Console servers utilize filter drivers and are not affected by these compatibility issues.
If an incompatible product is installed on the system that is to run VRE 3.1, it will be necessary to either disable or remove the incompatible product before installing VRE 3.1.
If VRE 3.1 is already installed on the system, the ioncompatible product should not be enabled or run while VRE 3.1 is installed and running.
VRE 3.1 has known incompatibilities with the following applications:
◆ Computer Associates InoculateITTM virus protection software. Replication Exec will not replicate files in continuous mode if the InoculateIT software's "Enable real-time file monitor" option is turned on. This option should be disabled in InoculateIT if a job is continuously replicating data from this server.
◆ Network Associates ViruScanTM for Windows versions that use a file system filter driver (version 7.0). VRE 3.1 is compatible with versions 4.5 and 7.1.
◆ ArcServeTM for Windows 2000 (OpenFile option only).
◆ VERITAS Storage MigratorTM.
Chapter 2, Planning for a Replication Exec System 19

VRE3-1_UserGuide.book Page 20 esday, November 9, 2004 11:25 AMTu
Compatibility with Other Applications
Note Consult the README file on the VRE 3.1 CD or contact Technical Support for the most current list of incompatible applications.
If an incompatible product is found to be installed on a Replication Exec server:
◆ Starting both VRE 3.1 and the incompatible product may cause the system to become unstable or crash.
◆ Enabling both products at system boot will prevent the system from booting.
20 VRE 3.1 Administrator’s Guide

VRE3-1_UserGuide.book Page 21 esday, November 9, 2004 11:25 AMTu
Installing Replication Exec
3 This chapter describes the software installation processes. It includes procedures to install the RMS software on the Replication Management Server, and the Console software on the machines that will manage the replication process. From the Console, the RSA software can be installed remotely over the network to the Source and Target servers.Pre-Installation Considerations The following should be considered before installing VRE 3.1.
Pre-Installation Topics See...
The anticipated replication requirements and existing network resources may have a significant impact on the performance of VRE 3.1.
“Planning Considerations” on page 11
The minimum and recommended hardware and software requirements to support VRE 3.1
“Minimum Hardware and Software Requirements” on page 18
The installer of the VRE 3.1 software must have adequate permissions and rights.
“Installation Permissions and Rights” on page 22
VRE 3.1 is not compatible with earlier VRE versions.
“Upgrading from Earlier Versions” on page 24
21

VRE3-1_UserGuide.book Page 22 esday, November 9, 2004 11:25 AMTu
Pre-Installation Considerations
Pre-Installation Topics See...
Only one RMS may be installed in each replication neighborhood
“RMS Configurations” on page 6
The RMS should be installed prior to the other VRE 3.1 software
“RMS Configurations” on page 6
An RMS cannot be created on an RSA without first uninstalling the RSA
“RMS Configurations” on page 6
The RMS should be installed on a non-critical or dedicated server
“RMS Configurations” on page 6
The RMS should be installed on a subnet that has easy and efficient access to all servers.
“RMS Configurations” on page 6
The RMS must have a fixed IP address. “Problems are encountered when connecting to an RMS with multiple IP addresses” on page 174.
VRE 3.1 supports failover of a primary RMS node to a secondary node via clustering.
“Replication Exec Clustering Capabilities” on page 23
VRE 3.1 has firewall support and port mapping capabilities.
“Firewall Support and Port-Mapping Characteristics” on page 22
VRE 3.1 supports SNMP trap generation. “SNMP Traps” on page 108
Installation Permissions and Rights The person installing VRE 3.1 must have Administrator rights on the local machine being installed. If VRE 3.1 is being installed from a network share, the user needs Read permission to that share as well.
Firewall Support and Port-Mapping Characteristics A firewall is a hardware or software device that prevents inbound TCP and UDP connections to specific ports. Firewalls protect computers from unauthorized network manipulation by preventing access to network services that may be running on a computer.
VRE 3.1’s firewall support and portmapping capabilities support Windows XP Service Pack 2.
22 VRE 3.1 Administrator’s Guide

VRE3-1_UserGuide.book Page 23 esday, November 9, 2004 11:25 AMTu
Pre-Installation Considerations
The portmapper must be configured to allow the following ports through to support replication. Create or modify the following registry entries, as appropriate.
Service Name Default Port Number
Port Type
Editable Registry Key
ENL 1804 UDP Not applicable
RxService 20481 TCP Hklm\software\veritas\Storage Replicator\parameters\ communications\FFXPort
RxService RPC (only) 20483 TCP Hklm\software\veritas\Storage Replicator\parameters\Rpc Interface\ RxRsaStaticPort
RMSService RPC (RMS machine only)
20485 TCP Hklm\software\veritas\Storage Replicator\parameters\Rpc Interface\ RxRmsStaticPort
Replication Exec Clustering Capabilities Cluster support of the RMS is provided using Microsoft Cluster ServerTM (MSCS), and is installed at the same time as the VRE 3.1 software. The cluster server software supports failover of the RMS operations from one node to another.
The RMS manages many replication operations in the replication Neighborhood. To provide for the continued operation of the RMS service in the event of a system failure, the RMS can be made highly available using MSCS. In the event of an RMS server failure, the replication management functions move to another node in that cluster, and the cluster server software restarts the RMS on the new node.
VRE 3.1’s clustering capabilities and installation procedures are in “Clustering the RMS with MSCS” on page 195.
Note If the RMS is installed before establishing an RMS cluster, extra steps are required.
Chapter 3, Installing Replication Exec 23

VRE3-1_UserGuide.book Page 24 esday, November 9, 2004 11:25 AMTu
Upgrading from Earlier Versions
Upgrading from Earlier Versions VRE 3.1 is not compatible with VERITAS Storage Replicator (VSR) version 2.1 software. Thus, the RMS, RSA and Console applications must be updated to VRE 3.1.
It is not necessary to uninstall VSR 2.1J (or greater) as the VRE 3.1 installer will upgrade VSR 2.1J, migrating existing job configuration information automatically.
Note All earlier versions of VSR must be manually uninstalled before installing VRE 3.1.
Note All prior alerts and log information are not migrated by the installer.
▼ To upgrade from VSR 2.1 to VRE 3.1
1. Before upgrading the VSR software, close all other programs that may be running.
2. Insert the VRE 3.1 CD into the CD-ROM drive. If AutoPlay is not enabled, navigate the installation CD and double-click on setup.exe. This will open the welcome screen of the VERITAS Replication Exec installation wizard.
Note If VSR versions earlier than VSR 2.1J are detected, a prompt will appear noting that the earlier versions must be manually uninstalled before VRE 3.1 can be installed.
3. Click Update to continue.
24 VRE 3.1 Administrator’s Guide

VRE3-1_UserGuide.book Page 25 esday, November 9, 2004 11:25 AMTu
Upgrading from Earlier Versions
4. If upgrading an RSA, when prompted, enter the Serial Number for the VRE 3.1 product.
Click Next to continue.The installation wizard will detect which Replication Exec components are already installed on that server, and update them to VRE 3.1.
As soon as VRE 3.1 is installed on one server, the Console running on that server can be used to install or update RSA’s (and Consoles) to other remote servers.
Note When upgrading a VSR 2.1J database, all Job schedules are disabled to allow RSAs to be upgraded before the RMS attempts to start the scheduled Jobs. As soon as the RSAs are upgraded, the Job schedules must be re-enabled from the Console.
Chapter 3, Installing Replication Exec 25

VRE3-1_UserGuide.book Page 26 esday, November 9, 2004 11:25 AMTu
Installing VRE 3.1 Software from CD
Installing VRE 3.1 Software from CD
▼ To install the VRE 3.1 software
1. Before installing the VRE 3.1 software, close all other programs that may be running.
2. Insert the VRE 3.1 CD into the CD-ROM drive. If AutoPlay is not enabled, navigate the installation CD and double-click on setup.exe. This will open the welcome screen of the VERITAS Replication Exec installation wizard.
Click Next to continue.
26 VRE 3.1 Administrator’s Guide

VRE3-1_UserGuide.book Page 27 esday, November 9, 2004 11:25 AMTu
Installing VRE 3.1 Software from CD
3. Read the Software License Agreement, and note acceptance to the Agreement by clicking the appropriate radio button.
Click Next to continue.
4. Select Setup Type. That is whether the installation will be Complete, Replication Service Agent (RSA) only, or Custom. A complete installation installs all software (RMS, RSA and Console) on the designated server. A custom installation allows the user to select which software should be installed on the server.
It is anticipated that an initial “Complete” installation will be performed from the VRE 3.1 CD, where all three features are desired. It is also anticipated that subsequent RSA installations will be performed remotely.
Chapter 3, Installing Replication Exec 27

VRE3-1_UserGuide.book Page 28 esday, November 9, 2004 11:25 AMTu
Installing VRE 3.1 Software from CD
Note Although a replication neighborhood can have any number of RSAs or Consoles installed, only one RMS may be installed. If the VRE 3.1 CD is used for subsequent installations where an RMS has already been installed, select Replication Service Agent or use the Custom setup and deselect VERITAS Replication Management Server.
Click Next to continue.
28 VRE 3.1 Administrator’s Guide

VRE3-1_UserGuide.book Page 29 esday, November 9, 2004 11:25 AMTu
Installing VRE 3.1 Software from CD
5. For a Custom Setup, the user has the option of installing one or more of the three VRE 3.1 features: RMS, RSA or Console. For a Complete installation, all three features will be installed at once, if this server will be the RMS and also used as a Console and as a Source or a Target.
Select the desired VRE 3.1 features, and click Next to continue.
Chapter 3, Installing Replication Exec 29

VRE3-1_UserGuide.book Page 30 esday, November 9, 2004 11:25 AMTu
Installing VRE 3.1 Software from CD
6. Enter the Replication Neighborhood name for this VRE 3.1 server. The Replication Neighborhood is a group of replication servers managed by a single RMS server. If the RMS is located in another subnet, enter the RMS server name in the lower entry field. If the RMS is clustered and in another subnet, enter the virtual server IP address in the lower entry field.
Click Next to continue.
The software will check for the existing Replication Neighborhood, with the following results.
◆� If an RMS has been selected for installation and the software finds an existing neighborhood, it will not allow the installation to continue.
◆� If an RSA has been selected for installation, but not an RMS, and a Replication Neighborhood is not discovered, a prompt will appear.
30 VRE 3.1 Administrator’s Guide

VRE3-1_UserGuide.book Page 31 esday, November 9, 2004 11:25 AMTu
Installing VRE 3.1 Software from CD
Additionally, a Skip Check button is added to the Replication Neighborhood screen that allows the user to bypass checking for an existing Neighborhood at this time.
Click Next to continue.
7. When prompted, enter the Serial Number for the VRE 3.1 product.
Click Next to continue.
Chapter 3, Installing Replication Exec 31

VRE3-1_UserGuide.book Page 32 esday, November 9, 2004 11:25 AMTu
Installing VRE 3.1 Software from CD
8. Select the default location for the Replica Directory or click Browse to select the location or to enter the location manually. The replica directory can be easily changed when creating a Job.
Click Next to continue.
32 VRE 3.1 Administrator’s Guide
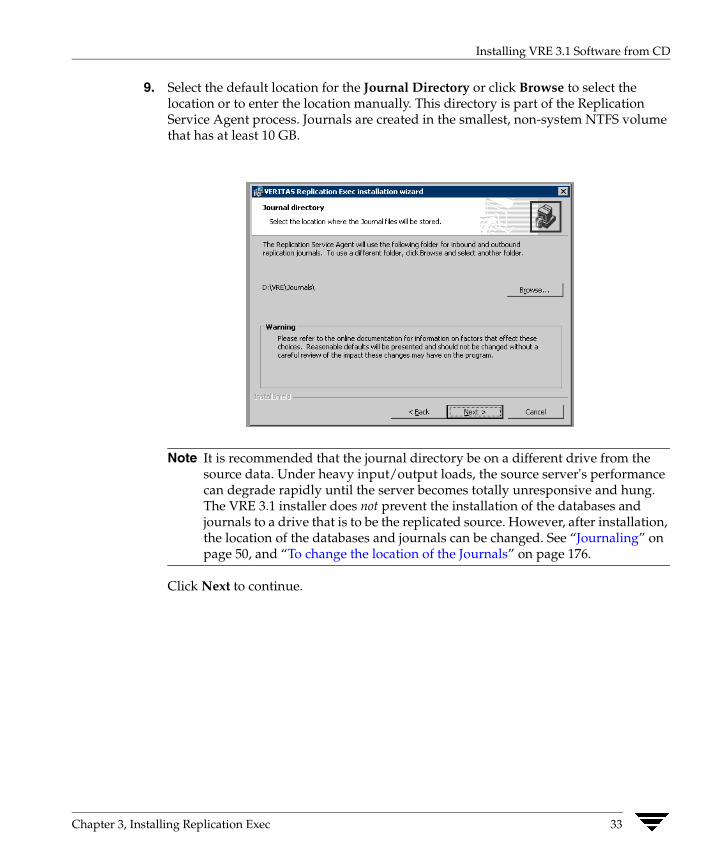
VRE3-1_UserGuide.book Page 33 esday, November 9, 2004 11:25 AMTu
Installing VRE 3.1 Software from CD
9. Select the default location for the Journal Directory or click Browse to select the location or to enter the location manually. This directory is part of the Replication Service Agent process. Journals are created in the smallest, non-system NTFS volume that has at least 10 GB.
Note It is recommended that the journal directory be on a different drive from the source data. Under heavy input/output loads, the source server's performance can degrade rapidly until the server becomes totally unresponsive and hung. The VRE 3.1 installer does not prevent the installation of the databases and journals to a drive that is to be the replicated source. However, after installation, the location of the databases and journals can be changed. See “Journaling” on page 50, and “To change the location of the Journals” on page 176.
Click Next to continue.
Chapter 3, Installing Replication Exec 33

VRE3-1_UserGuide.book Page 34 esday, November 9, 2004 11:25 AMTu
Installing VRE 3.1 Software from CD
10. This displays the Ready to Install screen.
Click Install to begin the installation.
11. The installation progress will be displayed in the next screen.
34 VRE 3.1 Administrator’s Guide
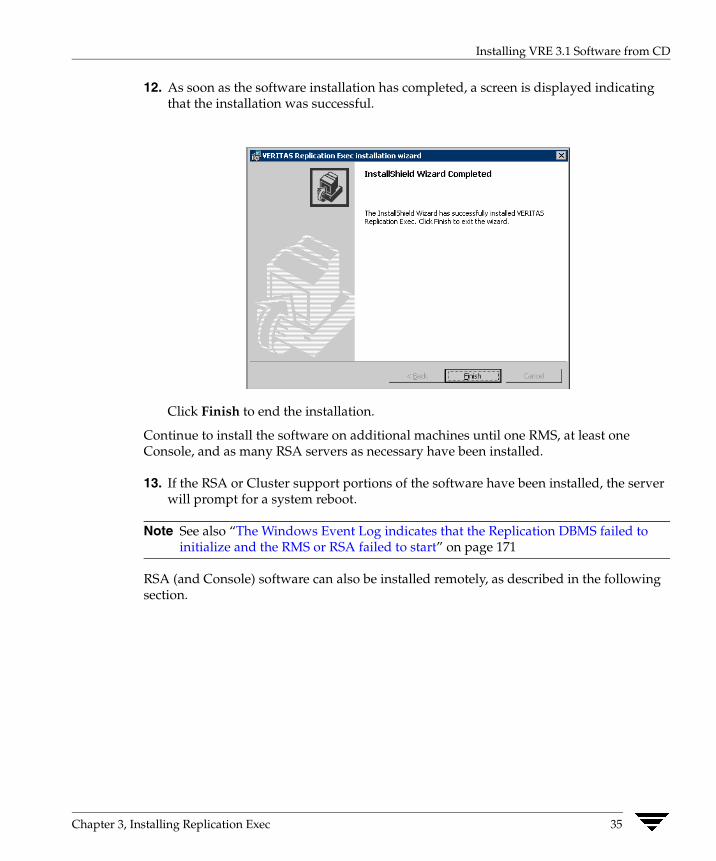
VRE3-1_UserGuide.book Page 35 esday, November 9, 2004 11:25 AMTu
Installing VRE 3.1 Software from CD
12. As soon as the software installation has completed, a screen is displayed indicating that the installation was successful.
Click Finish to end the installation.
Continue to install the software on additional machines until one RMS, at least one Console, and as many RSA servers as necessary have been installed.
13. If the RSA or Cluster support portions of the software have been installed, the server will prompt for a system reboot.
Note See also “The Windows Event Log indicates that the Replication DBMS failed to initialize and the RMS or RSA failed to start” on page 171
RSA (and Console) software can also be installed remotely, as described in the following section.
Chapter 3, Installing Replication Exec 35

VRE3-1_UserGuide.book Page 36 esday, November 9, 2004 11:25 AMTu
Installing the RSA Software Remotely
Installing the RSA Software Remotely Installing the Replication Service Agent (RSA) software can be done at a future time using the installation CD-ROM and the procedure above. Alternatively, the RSA software can be installed remotely using the New Server wizard.
Note If SNMP support is installed and enabled when the VRE 3.1 software is installed, then VRE 3.1’s trap generation support will be enabled. See also “SNMP Traps” on page 108.
Note The Console and srTool software are automatically also installed whenever the RSA software is remotely installed.
▼ To install the RSA software remotely
1. From the Console’s navigation menu, select Servers.
2. From the Servers drop-down menu, select Deploy New Server.
3. On the New Server Wizard Introduction screen, click Next.
36 VRE 3.1 Administrator’s Guide

VRE3-1_UserGuide.book Page 37 esday, November 9, 2004 11:25 AMTu
Installing the RSA Software Remotely
4. The Select the Destination Computer window allows a machine from a list of all computers in a domain to be selected, or other domains may be browsed. The machines that already have the VRE 3.1 RSA software installed are shown in bold text. All machine icons are shown in white, until one is selected.
Note The user must have administrator rights to the machine where the RSA software is being installed. When a destination server is selected for which the user does not have access rights, a security dialog appears prompting for valid credentials. See also “Installation Permissions and Rights” on page 22.
Chapter 3, Installing Replication Exec 37

VRE3-1_UserGuide.book Page 38 esday, November 9, 2004 11:25 AMTu
Installing the RSA Software Remotely
5. If a machine is selected for which the user does have administrator rights or the user has entered the proper credentials, that machine icon changes to green and the installation can proceed. VRE 3.1 will only be deployed to the currently selected server.
Note If upgrading from Storage Replicator 2.1, note that all servers with VSR 2.1 appear in the servers list in bold text, with an asterisk by the server name. To see only those servers with VSR 2.1 installed, click the Show upgrade candidates only box above the server list.
Note To upgrade a server from VSR 2.1 software to VRE 3.1, first stop all Jobs, then take the 2.1 server offline. This is accomplished by right clicking on the Server in the Server View, and setting it to Offline. This prevents replication errors while upgrading. Continue with the installation procedure as described here.
Click Next to continue.
6. Select the Destination Path where the RSA software will be installed. Installation must occur on one of the drives shown in the list, although the rest of the path may be modified.
Note When specifying a destination path, be sure to select a volume that has sufficient space for the replicated data (if this is to be a Target machine), and the journals of changes.
Click Next to continue.
38 VRE 3.1 Administrator’s Guide

VRE3-1_UserGuide.book Page 39 esday, November 9, 2004 11:25 AMTu
Installing the RSA Software Remotely
7. Enter the VRE 3.1 Serial Number provided for this server.
Click Next to continue.
8. The destination machine must be rebooted for the installation to be completed. Select Reboot for this to occur automatically at the end of the installation. If not, the system must be manually rebooted at another time before this server can be part of the replication process.
Click Next to continue.
Chapter 3, Installing Replication Exec 39

VRE3-1_UserGuide.book Page 40 esday, November 9, 2004 11:25 AMTu
Installing the RSA Software Remotely
9. The Summary of Server creation settings screen allows verification of the information selected for domain, machine name, software installation path, and reboot preferences. If the settings are satisfactory, click Finish to begin the software installation.
10. A prompt will appear to verify the creation of the Server.
Click OK to continue.
40 VRE 3.1 Administrator’s Guide

VRE3-1_UserGuide.book Page 41 esday, November 9, 2004 11:25 AMTu
Installing the RSA Software Remotely
11. A screen will appear showing the installation progress.
Chapter 3, Installing Replication Exec 41

VRE3-1_UserGuide.book Page 42 esday, November 9, 2004 11:25 AMTu
Rolling Upgrade of Replication Neighborhoods
Rolling Upgrade of Replication Neighborhoods This section describes how to upgrade the replication neighborhoods from VSR 2.1J to VRE 3.1.
Note Due to ongoing improvements of the Rolling Upgrade feature, be sure to see the Readme file for any changes that may supercede the information in this section.
Introduction You may want to upgrade from VSR 2.1J (or greater) to VRE 3.1 in a step-wise fashion, migrating one Job and its associated servers at a time. This allows you to validate relatively small changes to the new configuration, and make it easier to address any problems that may occur. This section describes a relatively safe and easy method to perform a rolling upgrade.
Requirements A rolling upgrade requires setting up a temporary second RMS. This new server will run as an exact clone of the existing VSR 2.1 RMS server for the duration of the upgrade. Once the upgrade is complete, the VSR software on this machine may be uninstalled and the machine turned to other tasks.
Note The existing VSR 2.1 installation and the new VRE 3.1 installation will both run using the same replication neighborhood name. This is possible because each will run in different namespaces. The VSR 2.1 software will run in the 2.1 namespace, and the VRE 3.1 software will run in the 3.0 namespace. Thus, the RMS’s will not interfere with one another.
Procedure Follow this procedure to perform a rolling upgrade of a single VSR 2.1 replication neighborhood. Repeat this process for each VSR 2.1 replication neighborhood until each has been upgraded to VRE 3.1.
Note Descriptions are included on how to reverse a change should problems occur. These descriptions are prefixed with the phrase “Should a problem occur, …” Please note that there is no automatic rollback mechanism.
42 VRE 3.1 Administrator’s Guide

VRE3-1_UserGuide.book Page 43 esday, November 9, 2004 11:25 AMTu
Rolling Upgrade of Replication Neighborhoods
▼ To perform a rolling upgrade of the replication neighborhood
Clone the Current VSR 2.1 RMS�
These steps create a clone of the current VSR 2.1 RMS that is capable of running all the original file replication Jobs, and thus, must have the same or equivalent hardware and system software as the original. Cloning the current VSR 2.1 RMS can be done manually by performing the following:
1. Stop the VSR services on the original VSR 2.1 RMS. That is, stop the ENL service and verify that the RMS service has stopped. This is necessary to allow the creation of the clone RMS in step 3.
2. Manually make a copy of the VSR 2.1 RMS database files rxdb and rxdb.index. This provides both a backup of the current RMS configuration and the ability to clone the configuration in step 4. In VSR 2.1, the location of the database files can be identified in the following Registry entry:
HKLM\Software\VERITAS\Storage Replicator\2.x\ProtectedDataSetDirectory
3. Create a new VSR 2.1 RMS. Install VSR 2.1 (and all appropriate patches) on the clone using the same replication neighborhood name as the old.
4. Install the copied RMS database. Stop the RMS service on the clone and replace its database files with copies obtained in step 2.
Note A backup copy of the original RMS database files should be maintained during the duration of the rolling upgrade.
5. Copy the machine ID from the original VSR 2.1 RMS to the clone. Duplicate the following Registry key and its value to the clone:
HKLM\Software\VERITAS\MachineId
6. Verify the VSR 2.1 RMS clone. Restart the VSR services on the clone and verify that all of the Jobs that could previously run can still do so before continuing.
Should a problem occur, the clone can be shutdown and the original restarted to resume normal operation.
Chapter 3, Installing Replication Exec 43
VRE3-1_UserGuide.book Page 44 esday, November 9, 2004 11:25 AMTu
Rolling Upgrade of Replication Neighborhoods
Upgrade the Original VSR 2.1 RMS�
The following steps upgrade the RMS on the original VSR 2.1 RMS machine and migrates the Job configuration to VRE 3.1 format. This upgrade will result in a VRE 3.1 RMS running with the same replication neighborhood name and Job configuration as the original VSR 2.1 RMS, except that all of the Jobs will be disabled. Again, the VRE 3.1 software will not interfere with the VSR 2.1 software.
The Jobs are disabled because none of the RSA’s, other than the RSA on the RMS machine, will have been upgraded, and are therefore unavailable to the VRE 3.1 RMS. If the Jobs were not disabled, they would attempt to run and fail.
7. Run the VRE 3.1 installer on the original VSR 2.1 RMS server. The installer will upgrade the Job configurations in the database.
8. Verify the upgrade by verifying that the upgraded RMS is running and that the new console displays the unavailable RSA’s, other than the RSA on the just upgraded server. All of the Jobs should be disabled.
Migrate File Replication Jobs to the VSR 3.1 RMS�
The following steps allow the Job by Job migration from the VSR 2.1 RMS to the VRE 3.1 RMS, allowing each Job to be independently validated. Each Job will be disabled until it has been completely migrated.
9. Select a Job on the VRE 3.1 RMS to migrate. This can be any Job, but it is suggested that simpler Jobs be migrated first to ease the learning curve; for example, Standard (one-to-one) Jobs before Centralization and Publication Jobs.
10. Find the RSA’s associated with this Job. Run the following two VRE 3.1 srTool commands:
get name of every sourceServer of job 'x', and get name of every targetServer of job 'x'
Where 'x' is the name of the job you selected in step 9.
11. Disable the Job with the VSR 2.1 console and push-install VRE 3.1 to the servers identified in step 10 with the VRE 3.1 console.
Should a problem occur, this step may be reversed by uninstalling the VRE 3.1 software from the RSA’s, and push-installing from a VSR 2.1 console.
12. Validate the upgraded VRE 3.1 RSA’s by making sure that each server identified in step 10 becomes available and online in the VRE 3.1 console.
44 VRE 3.1 Administrator’s Guide
VRE3-1_UserGuide.book Page 45 esday, November 9, 2004 11:25 AMTu
Removing the Replication Exec Software
13. Enable the Job with the VRE 3.1 console. The migrated Job should now run according to its schedule. If there are any problems with the Job correct them now.
Note When upgrading a VSR 2.1J database, all Job schedules are disabled to allow RSAs to be upgraded before the RMS attempts to start the scheduled Jobs. As soon as the RSAs are upgraded, the Job schedules must be re-enabled from the Console.
Should a problem occur, this Job may be downgraded at this point only by disabling the Job with the VSR 3.1 console, reinstalling the VSR 2.1 software (step 11), , and finally by enabling the Job by way of the VSR 2.1 console.
14. If the migrated Job runs correctly, repeat steps 8–12 until no more enabled Jobs remain on the VSR 2.1 RMS.
Uninstall VSR 2.1 from the Temporary RMS Machine�
At this point the VSR 2.1 RMS should contain no enabled Jobs and no available RSA’s associated with those Jobs. Likewise, the VRE 3.1 RMS should contain only enabled and run-able Jobs, and available and online RSA’s associated with those Jobs.
15. The VSR 2.1 software on the RMS clone may now be uninstalled and the machine turned to other duties such as a rolling upgrade of a different replication neighborhood.
Removing the Replication Exec Software Uninstalling the VRE 3.1 software removes all components, including the Console, RSA, and RMS that are installed on that server.
Note The RSA must be uninstalled locally. It cannot be uninstalled remotely from the VRE 3.1 software.
▼ To remove the Replication Exec software
1. From the Windows Start menu, select Settings, then Control Panel.
2. On the Control Panel, select Add/Remove Programs.
3. In the Install/Uninstall list, select VERITAS Replication Exec.
4. Click the Remove button.
Chapter 3, Installing Replication Exec 45

VRE3-1_UserGuide.book Page 46 esday, November 9, 2004 11:25 AMTu
Removing the Replication Exec Software
5. Confirm file deletion.
6. Reboot the server to complete the uninstall.
Uninstalling the Console Removing the software where only the Console was installed does not affect the replication process. The RMS continues to replicate according to previous configurations.
Uninstalling an RSA If the VRE 3.1 software is removed from a server where only the RSA was installed, that server shows as Unavailable on the Server List. If it was part of a running Job, the state of the Job changes to Rallying while the Job attempts to restart the server. The Job state then changes either to Invalid for a standard Job or Running Partially for a Centralization or Publication Job that still has replication pairs continuing to replicate. If the RSA software is installed on that server, the Job resynchronizes and continues according to the schedule of the Job.
▼ To remove an RSA server
1. Go the Server View.
2. Select the unavailable former RSA server in the Server List
3. Select Delete Unavailable Server from the Server menu, or right-click on that server and select Delete Unavailable Server from the context menu. Although the RSA server has been deleted, it will continue to appear on the Servers List, but as unavailable.
To remove the server from the replication process, edit any Jobs that include that server. See “Modifying the Replication Pairs” on page 148.
Uninstalling the RMS If the VRE 3.1 software is removed from the server acting as the RMS, replication stops in that Replication Neighborhood. All configurations are lost. The replicated data on the Target servers is unaffected.
Note Any Jobs currently running when the RMS is uninstalled will continue to run until stopped or completed. However, Jobs cannot be run after the RMS has been uninstalled.
46 VRE 3.1 Administrator’s Guide

VRE3-1_UserGuide.book Page 47 esday, November 9, 2004 11:25 AMTu
Install and Uninstall Problems
During the uninstall process, a prompt will appear asking whether to retain or delete the database.
Install and Uninstall Problems If problems are encountered during installation or uninstall, refer to “General Troubleshooting Issues” on page 162 and “Specific Troubleshooting Symptoms” on page 171.
Chapter 3, Installing Replication Exec 47

VRE3-1_UserGuide.book Page 48 esday, November 9, 2004 11:25 AMTu
Install and Uninstall Problems
48 VRE 3.1 Administrator’s Guide

VRE3-1_UserGuide.book Page 49 esday, November 9, 2004 11:25 AMTu
How Replication Exec Works
4 Replication is the process of accurately copying specific data from one server to another. VRE 3.1 creates and maintains an exact replica of the data selected from the Source server to the Target server. How this occurs varies by the replication mode selected and by the data selection rules defined by the user.This section describes how VRE 3.1 performs storage replication.
Synchronizing ServersThe replication process begins by comparing the data on the Source with the data on the Target. If replication is being performed for the first time, synchronization begins the process of copying data to the Target. Starting a replication Job activates both the synchronization phase and the dynamic phase. During synchronization, the dynamic phase simply tracks all changes to the Source while VRE 3.1 is synchronizing. The last step of synchronization is to copy the dynamically captured changes to the Target. When synchronization is finished, the data is identical on both the Source and Target servers.
All files are analyzed for differences between the Source and Target. Files that have changed (date/time/size) and are smaller than 1 MB are copied without further comparison. Files larger than 1 MB and within 25 percent change in size are reviewed in 64Kb blocks. Only those blocks with differences are copied to the Target. Files that change in size by more than 25 percent are sent in their entirety. Data transmittal during synchronization is performed via efficient fast-object transfer (FOT).
Note Encrypted files and files with reparse points are not replicated and are simply passed over. See “Non-Replicated Files” on page 50.
49

VRE3-1_UserGuide.book Page 50 esday, November 9, 2004 11:25 AMTu
Synchronizing Servers
Dynamic ReplicationThe dynamic phase of replication begins at the same time as the synchronization phase. Dynamic replication saves any changes made to the Source during the synchronization phase, and sends those to the Target as the last step of synchronization. All data is transmitted in the order that it changed on the server so that write-order fidelity is achieved at the end of synchronization and maintained during dynamic replication.
Once synchronization is complete, if the replication Job is set for continuous replication, VRE 3.1 continues to send changes on the Source server to the Target server. This happens asynchronously, so that delays are not apparent to the user when the original data is saved on the Source server. And, often the data changes are transmitted to the Target and written to disk very soon afterward. However, the delay interval is dependant upon the network speed, availability, utilization, rate of data changes, and the CPU speed and I/O subsystem speed of the Target system. See “Performance and Network Resources” on page 14.
The VRE 3.1 file system filter driver detects all changes to qualifying files on the Source and records them in journals. Optionally, the drivers also prevent anyone from changing the Target data during replication. Data is protected while a Job is running if Target protection—"No changes on Target"—is enabled at the Console.
If a Job is stopped for any reason, then the next time the Job is scheduled, it will re-synchronize and update the Target so that the data sets are again identical.
Non-Replicated Files
If a file on the Source machine is given a reparse point (by another application, such as SIS or HSM), VRE 3.1 detects that action and immediately removes the replica file from the Target machine. Conversely, if a reparse point is removed from a file on a Source machine during dynamic replication, VRE 3.1 immediately restores the file by copying it to the Target machine.
Encrypted files are treated in the same way as reparse points. When a Source file or directory is encrypted, that file is removed from the Target. If the file or directory is later un-encrypted, VRE 3.1 immediately replicates it to the Target.
Note Encrypted files on the destination path cannot be overwritten. Ensure that the target volume or directory is not encrypted.
JournalingVRE 3.1 uses asynchronous replication. In asynchronous replication, when a change is made to the Source data, that change is written immediately to the Source. A copy of that change is placed in a journal file, then transmitted over the network and written to a
50 VRE 3.1 Administrator’s Guide

VRE3-1_UserGuide.book Page 51 esday, November 9, 2004 11:25 AMTu
Synchronizing Servers
journal on the Target. Because the network may cause transmittal delays, outbound journals are kept on each Source server. The Targets use inbound journals as buffering for efficiency, and to separate data between synchronization and dynamic replication. All synchronization data is written first on the Target, and then dynamic data is written. The journal files are written to the Target as quickly as the network allows, which may approach real time.
Journal files are transitory and self-managing. They require no user interaction. Journal files do require adequate space on the server. During periods with high rates of change, many journals are created and can be 10% or more larger than the data changes on the Source. Each journal typically holds 4 MB of changed data per Job. Journals are created as needed, and transmitted or written in the order they were created. When all entries in a journal are marked as read, then VRE 3.1 deletes that journal.
If the network is operating efficiently, the journals can be deleted so quickly that they are not visible. However, if there are any delays, journals can take up considerable disk space. Processing delays and journal buildup are usually caused by network delays, insufficient bandwidth, and rapid changes to large data files.
The journal directory contains both inbound and outbound subdirectories. Any server with an RSA installed can be a Source using the outbound journal, or a Target using the inbound journal. Deleting either an inbound or outbound journal directory will cause the RSA software to fail.
Caution It is recommended that the databases and journal files be located on a drive that will never be used as a replicated Source drive. See “To change the location of the Journals” on page 176.
Replication EfficiencyReplication is only as efficient as the network allows. If there are excessive processing delays, it is advisable to upgrade the network bandwidth, or decrease the number of servers using that network. See “Performance and Network Resources” on page 14, and “Improving Performance” on page 16.
During periods with high rates of data change, replication will be more efficient if the network bandwidth utilization is set at 100%. Jobs can protect data better with higher bandwidth.
Chapter 4, How Replication Exec Works 51

VRE3-1_UserGuide.book Page 52 esday, November 9, 2004 11:25 AMTu
Replication Types
Replication TypesVRE 3.1 supports the following replication types.
Standard Replication (One-to-One)VRE 3.1 provides full control over the replication process by using management units called Jobs. When files, directories, and volumes are replicated from a single Source server — where data resides that needs to be protected — to a single Target server where the replicated data can be accessed by others, it is termed “Standard Replication.”
For example, a server with mission critical data needs tobe replicated to an off-site location to ensure that the data is secure. Part of the requirements for protectingthe data includes insuring that nothing is altered on the Target server. By creating a standard replication Job, theSource server can be replicated across a WAN to a distant location and the Job can be set to allow No Changes on Target. Thus, the Source server will be protected and its information available at an alternate location.
Complete control of the replication process is providedthrough the Job properties functions. This type of replication Job is intended to keep themanagement between two servers simple and manageable.
Centralization (Many-to-One)VRE 3.1 provides the ability to centralize replicateddata using management units called centralization Jobs. When files, directories, and volumes need to be replicated from several Source servers, to a single Targetserver, it is termed “Centralized Replication.”
For example, the IT department is required to backup all corporate internal servers each night. This can take aconsiderable effort to configure. All of the servers’ data must be archived to tape each night to ensure that a particular version of a file can be restored if required.Archiving all server data to tape is difficult when the data is constantly changing on the Source servers. The window of opportunity to archive the data often changes and adjustments are required regularly in order to keep the system operating
52 VRE 3.1 Administrator’s Guide

VRE3-1_UserGuide.book Page 53 esday, November 9, 2004 11:25 AMTu
Replication Types
without losing some data due to the time constraints. VRE 3.1 is able to ensure that all servers are archived and that the changes to the files are archived despite ongoing changes. This method involves the configuration of a centralization Job.
All Source servers will be replicated to a single Target server. Once all the Source servers are synchronized with the Target server, the Target server can be archived to off-host media. This process eliminates the costly need to manage backups remotely. With VRE 3.1, just a single Target server’s data is processed to off-host media. This allows for greater efficiency and the steady stream of data being processed does not adversely impact the network. The time when the Target server is archived can be during normal working hours, non-business hours (nights), or whenever desired. Because VRE 3.1 only replicates the portion of a file that has changed, the changed data that is replicated from many Source servers can be processed in real-time during normal business hours.
Complete control over the replication process is provided through the Job properties functions. This type of replication Job is intended to keep the management of the centralization requirements simple by allowing many Source servers to be added with few changes in the Job configuration.
Publication (One-to-Many)VRE 3.1 provides the ability publish replicated data using management units called publication Jobs. “Publication Replication” is the process of replicating files, directories, and volumes from a single Source server to many Target servers. The data from the Source is then available to many others.
For example, a server with common sets of applicationsneeds to be replicated to many locations where otherusers of the data reside. The application server may beaccessible from all of the sites, but problems often occur when the network is down or busy. The application server can become overloaded by excessive networktraffic, and employees’ time can be wasted waiting for the needed applications. To solve this problem, a publication Job is created to ensure thatthe server’s data and applications are replicated to each remote site in the company. The Source server can be replicated across a LAN or WAN to as many distant locations as are required. The Target servers are updated when the Source server makes more applicationsavailable. This can be done periodically or in real-time.
Complete control over the replication process is provided through the Job propertiesfunctions. This type of replication Job is intended to keep the management of the publication requirements simple by allowing additional Target servers to be added withfew changes in the Job configuration.
Chapter 4, How Replication Exec Works 53

VRE3-1_UserGuide.book Page 54 esday, November 9, 2004 11:25 AMTu
Replication Modes
Replication ModesThe two modes of replication available in VRE 3.1 are exact and merged. Both modes move data from the Source, but the replicated data on the Target differs by the mode. In either mode, when synchronization is finished, the Source data that qualified for replication by the specified selection rules will be on the Target server.
Exact Replication Mode
An Exact replica of data means that all data selected from the Source server is replicated to the Target server and all data excluded or not present on the Source server is deleted from the Target server. In other words, all qualifying files on the Source are replicated to the Target, and all other files and subdirectories in the mapped directories on the Target are deleted. Thus, only the replicated Source files will exist on the Target.
However, if the replication rules do not include the subdirectory bit set, the subdirectories will not be removed.
Caution An Exact replica will erase files on the Target that are not on the Source. For example, if the destination path is set to D:\ then VRE 3.1 will erase everything on the D: drive except the data that it places there.
See “Exact Replica Characteristics,” below, for examples of this mode.
Merged Replication Mode
A Merged replica means that Source data can be added to a Target without removing files already existing in that Target directory. Any existing files on the Target with the same name as a replicated file will be overwritten, and other files residing there remain unaffected. In Merged replication mode, VRE 3.1 cannot replicate continuously. Merged replication can be scheduled frequently so that the files are synchronized often, but it will not replicate dynamically. See “Dynamic Replication” on page 50.
See “Merged Replica Characteristics” on page 56, for examples of this mode.
Exact Replica CharacteristicsAfter synchronization, the Target will have an exact replica of the data from the Source. The Target data will have the following characteristics:
◆ VRE 3.1 creates an exact replica. The Source data copied to the Target is exactly the same. For example, read-only Source files will be read-only on the Target.
◆ If a file is deleted from the Source, replication also removes it from the Target.
54 VRE 3.1 Administrator’s Guide

VRE3-1_UserGuide.book Page 55 esday, November 9, 2004 11:25 AMTu
Replication Modes
◆ Within the replica, the Target will have subdirectories that match the Source. Empty directories will not be replicated if include/exclude filters are set.
◆ If a file or subdirectory does not exist on the Source during synchronization, it will be deleted on the Target.
Example of Exact Replication with a Full Wildcard Rule
Configuration Values
Source path: d:\mySource\protect
Rule for selection: *.*
Target path: e:\replica
Option setting: include subdirectories
This example results in the following:
◆ Every file in the qualification path on the Source (d:\mySource\protect) will be replicated to the Target (e:\replica).
◆ Empty directories on the Source (in d:\mySource\protect) will be replicated to the Target (in e:\replica).
◆ Every file on the Target (in e:\replica) that doesn't correspond to a file on the Source will be deleted.
◆ Every directory on the Target that doesn't correspond to a directory on the Source will be deleted, recursively.
Example of Exact Replication with a Partial Wildcard Rule
Configuration Values
Source path: d:\mySource\protect
Rule for selection: *.doc
Target path: e:\replica
Option setting: include subdirectories
This example results in the following:
◆ Every *.doc file in the qualification path on the Source (d:\mySource\protect) will be replicated to the Target (e:\replica).
Chapter 4, How Replication Exec Works 55

VRE3-1_UserGuide.book Page 56 esday, November 9, 2004 11:25 AMTu
Replication Modes
◆ Directories on the Source (in d:\mySource\protect) that do not contain a *.doc file will not be replicated to the Target.
◆ Every *.doc file on the Target (in e:\replica) that does not correspond to a same-named file on the Source will be deleted.
◆ Every other file (not named *.doc) on the Target (in e:\replica) will be deleted.
◆ Every directory on the Target in e:\replica that does not correspond to a directory on the Source will be deleted recursively.
Merged Replica CharacteristicsOnce synchronized, the Target will have a replica of the data identified to be replicated from the Source, as well as any files that were on the Target before replication. The Target data will have these characteristics:
◆ VRE 3.1 merges the Source data with any Target data. Replication overwrites any files named the same.
◆ Replicated data is exactly the same on the Source and the Target. For example, read-only Source files will be read-only on the Target.
◆ No files are deleted from the Target, except those overwritten because of name collisions.
◆ Within the replica, the Target will have subdirectories that match the Source. VRE 3.1 does not collapse subdirectories.
Example of Merge Replication with a Full Wildcard Rule
Configuration Values
Source path: d:\mySource\protect
Rule for selection: *.*
Target path: e:\replica
Option setting: include subdirectories
This example results in the following:
◆ Every file in the qualification path on the Source (d:\mySource\protect) will be replicated to the Target (e:\replica).
◆ Empty directories on the Source (in d:\mySource\protect) will be replicated to the Target (in e:\replica).
56 VRE 3.1 Administrator’s Guide

VRE3-1_UserGuide.book Page 57 esday, November 9, 2004 11:25 AMTu
Replication Modes
◆ Every file on the Target (in e:\replica) that does not correspond to a file on the Source will be retained.
◆ Every directory on the Target that does not correspond to a directory on the Source will be retained.
Example of Merge Replication with a Partial Wildcard Rule
Configuration Values
Source path: d:\mySource\protect
Rule for selection: *.doc
Target path: e:\replica
Option setting: include subdirectories
This example results in the following:
◆ Every *.doc file in the qualification path on the Source (d:\mySource\protect) will be replicated to the Target (e:\replica).
◆ Directories on the Source (in d:\mySource\protect) that don't contain a *.doc file will not be replicated to the Target.
◆ Every *.doc file on the Target (in e:\replica) that doesn't correspond to a same-named file on the Source will be retained.
◆ Every other file (not named *.doc) on the Target (in e:\replica) will be retained.
◆ Every directory on the Target that doesn't correspond to a directory on the Source will be retained.
The above examples are relatively simple illustrations of replication policy; that is, Jobs with only one “include” rule. In fact, a replication Job can have many rules both inclusive and exclusive. Further, each “include” rule can map specific files to unique locations on a given Target server.
Chapter 4, How Replication Exec Works 57

VRE3-1_UserGuide.book Page 58 esday, November 9, 2004 11:25 AMTu
Replication Rules
Replication RulesRules determine which data is replicated and where it is placed on the Target. There is a default destination path for the data, but there is no default rule for selecting data for replication. When a Job is created, at least one data selection rule must be provided. Each dataset identified for replication by a rule can have a different destination path to the Target, so each Job can have many rules.
Note There are several functions of Windows 2000/2003/XP that offer challenges within replication. VRE 3.1 does not replicate reparse points or encrypted files. Likewise, VRE 3.1 does not allow replication of NTFS (NT File System) to FAT/FAT32 (File Allocation Table), or NTFS 5.0 to NTFS 4.0 due to file attribute conflicts. Likewise, encrypted files on the destination path cannot be overwritten. Ensure that the target volume or directory is not encrypted. See “Non-Replicated Files” on page 50.
Rules for Selecting DataRules select the data to be replicated. Rules can also exclude data. Both inclusion and exclusion rules can be set for files, file types, folders, or volumes. There are no default rules for including data. However, at least one selection rule must be specified when creating a Job.
When a rule is created, either within the New Job Wizard or in the Job properties, selections are made from a tree of directories on the Source server. The selected directory or volume becomes the source path for data to be replicated.
The next step in rule creation is to specify exclusion rules, such as "*.tmp" and inclusion rules, such as "*.*". These rules apply to all data in the selected directory or volume that is now the source path. If the option, Apply to Subdirectories, is selected, all data in directories below the selected directory or volume is also evaluated by the inclusion and exclusion rules, and replicated if the data meets those qualifications.
Note Inclusion and exclusion rules for specific files (or file types) with the option Apply to Subdirectories, will include all subdirectories, even though a subdirectory might not match the specified rule. VRE 3.1 matches patterns to files and not to the directories.
When the Apply to Subdirectories option is activated, it is possible to also apply another rule to a directory further down the tree. Potential conflicts are resolved by evaluating the data from the bottom up. Thus, VRE 3.1 looks at rules applying to the longest path names first.
58 VRE 3.1 Administrator’s Guide

VRE3-1_UserGuide.book Page 59 esday, November 9, 2004 11:25 AMTu
Replication Rules
Within each rule, the order of stating selection and exclusion rules is important. Always list the most restrictive rule last and least restrictive first, as the data is evaluated in that order. For example, if the last rule listed is an inclusion ("*.*"), then each piece of data in the source path is evaluated by that rule and included. VRE 3.1 does not look further up the list of selection rules. Rules may be promoted and demoted so they operate logically.
Rules for Placing Data on the TargetWhen the RSA software is installed, by default, VRE 3.1 selects the following volumes for the data and Journals.
◆ Data files are created in the largest NTFS, non-system, non-cluster volumes.
◆ Journals are created in the smallest, non-system, non-cluster NTFS volume that has at least 10 Gb free space.
Note The user should be sure that the Source files and Journals are on different volumes. These defaults can be changed in the Server properties.
VRE 3.1 allows user-specified path mapping of data onto the Target machine. Files on a given Source server can be mapped for replication to virtually anywhere on a Target server. Paths are always volume-rooted, meaning they are not relative to one default path or a redistribution rule higher up the directory tree.
Note The system page file (pagefile.sys) cannot reside on the root of a volume when the root of a volume is selected as a Target.
Directories containing files specified for inclusion are not replicated, just the files within them (see the example below). If the Apply to Subdirectories option is activated, then all subdirectories are copied in the replica, as well as the data within the directories.
Example of Replication of all files matching the rule c:\projects\antigravity\*.doc
Configuration Values
Source path: c:\projects\antigravity
Inclusion rule: *.doc
Options: apply to subdirectories
Destination path: e:\yoyodyne\distrib
Source file qualified by inclusion rule:
c:\projects\antigravity\tutorial.doc
Chapter 4, How Replication Exec Works 59

VRE3-1_UserGuide.book Page 60 esday, November 9, 2004 11:25 AMTu
Replication Rules
Configuration Values
Target: e:\yoyodyne\distrib\tutorial.doc
Source file qualified by inclusion rule:
c:\projects\antigravity\g-meter\parts_list.doc
Target: e:\yoyodyne\distrib\g-meter\parts_list.doc
Source file qualified by inclusion rule:
c:\projects\antigravity\prototype\field_manual\contents.do c
Target: e:\yoyodyne\distrib\prototype\field_manual\contents.doc
In this example, the Source directories "projects" and "antigravity" are not replicated to the Target. Permissions are replicated to the Target even if inherited from a higher directory.
Example of Replication of all files matching the pattern c:\*.doc
Configuration Values
Source path: c:\
Inclusion rule: *.doc
Options: Apply to subdirectories
Destination path: e:\yoyodyne\distrib
Source file qualified by inclusion rule:
c:\projects\antigravity\tutorial.doc
Target: e:\yoyodyne\distrib\projects\antigravity\tutorial.doc
Source file qualified by inclusion rule:
c:\projects\antigravity\g-meter\parts_list.doc
Target: e:\yoyodyne\distrib\projects\antigravity\g-meter\parts_lis t.doc
In this example, the Source directories "projects" and "antigravity" are replicated to the Target.
60 VRE 3.1 Administrator’s Guide

VRE3-1_UserGuide.book Page 61 esday, November 9, 2004 11:25 AMTu
Replication Rules
Example of Replication of all files matching the rule on a Source machine to a unique location on a Target server.
This server is also the Target for many other replication policies at that site.
Configuration Values
Source path: c:\projects\antigravity
Inclusion rule: *.doc
Options: apply to subdirectories
Source file qualified by inclusion rule:
c:\projects\antigravity\tutorial.doc
Target: e:\replica\Yoda\cVol\projects\antigravity\tutorial.doc
Source file qualified by inclusion rule:
c:\projects\antigravity\g-meter\parts_list.doc
Target: e:\replica\Yoda\cVol\projects\antigravity\g-meter\parts_li st.doc
Source file qualified by inclusion rule:
c:\projects\antigravity\prototype\ref_manual\contents.doc
Target: e:\replica\Yoda\cVol\projects\antigravity\prototype\ref_ma nual\contents.doc
In this example, the Source directories "projects" and "antigravity" are replicated to Target because the directory names were typed into the Target mapping rule. See “To add a new rule” on page 155.
Default Destination Rule GenerationThe ultimate default destination rule is a function of the following.
1. The default Target mapping path specified during installation of the Target RSA (see step 8 on page 32).
2. The Job Type specified during Job creation (see “Entering Replication Rules” on page 135).
3. The rules specified for placing the data on the Target (see “Rules for Placing Data on the Target” on page 59).
Chapter 4, How Replication Exec Works 61

VRE3-1_UserGuide.book Page 62 esday, November 9, 2004 11:25 AMTu
Replication Rules
For example, we wish to replicate C:\Mydocs\Special\*.* from the Source server "ss", which is the rule specified for this Job. During installation, the default Target mapping path was specified as F:\VSR\Replica.
◆ In a Standard Job Type, VRE 3.1 adds the volume-rooted path to the destination rule. That is, the default destination path becomes F:\VSR\Replica\Mydocs\Special\*.*, and all files in C:\Mydocs\Special are placed here.
◆ In a Centralization Job Type, VRE 3.1 adds the server-rooted source to the destination rule. That is, the default destination path becomes F:\VSR\Replica\ss\C\Mydocs\Special\*.*, and all files in C:\Mydocs\Special are placed here.
◆ In a Publication Job Type, VRE 3.1 adds the parent-rooted source to the destination rule. That is, the default destination path becomes F:\VSR\Replica\Special\*.*, and all files in C:\Mydocs\Special are placed here.
Sometimes a default destination rule cannot be generated by VRE 3.1 and must be specified by the user. This occurs, for example, when two different rules generate the same destination path. In this case one rule will conflict with the other, resulting in an Invalid Mapping Path message. The user will be required to generate a custom destination path for at least one of the rules that does not conflict with the other. See “Invalid Mapping Path” on page 62.
Invalid Mapping Path
VRE 3.1 prevents data from more than one running Job to be mapped to the same destination on a Target server. A valid mapping path does not conflict with any other mapping path for a specific Target within a Job. Mapping paths can refer to the same Target path in two separate Jobs as long as those Jobs never run at the same time. Each Job will overwrite the data on the Target when it runs depending on the replication mode selected (Exact or Merged). See “Replication Modes” on page 54.
Recovering Data from the Target ServerTo recover data back from the Target server to the Source server, the user can create a new Job to perform this function, or use Windows copying utilities, such as XCopy, to move the data back. Although VRE 3.1 is able to view the data on the Target, it cannot recall that data directly. Create a new Job or use Windows Explorer or XCopy to restore the data.
Note A reverse replication job cannot be performed while the forward Job is running.
62 VRE 3.1 Administrator’s Guide

VRE3-1_UserGuide.book Page 63 esday, November 9, 2004 11:25 AMTu
Replication Scheduling
Replication SchedulingIn the Job Properties user interface is a grid for scheduling Jobs. The schedule specifies when replication will occur. The schedule component allows for specified periods for replication to run, or to run continuously in real-time.
If a replication Job is scheduled to replicate and stop, the schedule limits the starting time of the Job. If network traffic or an unavailable server prevents a VRE 3.1 Job from starting, the Job continues to attempt to start until the end of the scheduled period. Once the Job begins the synchronization phase, it continues until finished, even if it extends beyond the scheduled finish time.
Caution Under some circumstances, it may be desired to terminate the Job at a specific time whether or not replication has finished. We do not recommend this option as there is no guarantee that the replica will be intact; that is, in write-order fidelity.
Although a delayed Job continually tries to start, when a Job is cancelled, the Job does not attempt to restart during that scheduled period. When the next scheduled period begins, a previously cancelled Job starts as usual. To prevent a Job from starting later, the Job should be disabled.
Because Replication Neighborhoods can span vast geographic areas, the VRE 3.1 schedule uses Universal Time (UT or GMT). This means that a server in the Pacific time zone responds to a Job schedule 8 hours earlier than GMT. This feature can be modified for viewing in local time. The local time used in the schedule is the time on the Administration Console machine, and not the Source or Target machines.
Replication SecuritySome replication operations require user authentication as a backup operator on a replication server (RSA). These operations include editing rules in a Job, adding or removing servers for a Job, and designating the status (online or offline) of a server. Editing server properties also requires user authentication. All security in Replication Exec is provided by Windows.
The current user's credentials — user name and password — will be used for the initial authentication for these operations. If the current user of the Console doesn't have backup rights on the server that is being utilized, the Console prompts for alternate credentials.
See also “Console Security and Credentials” on page 70, and “Job Creation or Modification Permissions” on page 121.
Chapter 4, How Replication Exec Works 63

VRE3-1_UserGuide.book Page 64 esday, November 9, 2004 11:25 AMTu
Typical Uses for Replication Exec
Typical Uses for Replication ExecFollowing are examples of typical uses and configurations for VRE 3.1.
Data Protection Between Two Machines (Standard Replication or One–to–One)
The Standard replication Job can be a cost-effective alternative to backups using tape drives, removable drives, and so on. The directories on the Source machine may be selected and directed to anywhere on the Target machine. Replication time intervals or continuous replication may be scheduled in the exact replication mode. Thus, there will always be another copy of the data available in the event of hardware or software failure on the Source server.
To replicate data between two servers, the administrator selects the directories on the Source that need to be replicated, and also the directory on the Target in which to store the data.
This can be accomplished with the following Job configurations.
Configuration Values
Type of Job Standard
Replication options:
Prescan ◆ Analyzes the data to be replicated so that status monitoring of synchronization is more accurate.
No changes on Target ◆ Data on the Target is protected while the Job is running.
Exact replica on Target ◆ This replication mode deletes items on the Target that were not replicated from the Source.
Continue Replicating After Synchronization
◆ The administrator turns this off for this Job, and only captures data once per day.
Replication Pairs Select one Source and one Target for a Standard Job.
Replication Rules Create rules that will include the desired files and exclude the unwanted files. This administrator chooses to replicate all files except temp files, so the rules are:
include *.* exclude *.tmp
To place the replicated data in a directory named to make its function clear, the administrator edits the destination path so that it points to D:\backup.
64 VRE 3.1 Administrator’s Guide

VRE3-1_UserGuide.book Page 65 esday, November 9, 2004 11:25 AMTu
Typical Uses for Replication Exec
Configuration Values
Schedule The administrator prefers to run backups after normal business hours. Since there are few changes to capture late at night, the administrator sets the scheduling grid for nightly replication beginning at 1 A.M., and then chooses Enable Scheduled Starts. A backup Job can be started when synchronization is completed with a VRE 3.1 script.
Distributing Web Content (Publication or One–to–Many)
Company X mirrors the data from their main Web server at their headquarters to Web servers all across the country. All of the data on the remote Web servers must be kept identical to the data on the main Web server. At the end of every business day, Company X distributes all changes to the remote machines. Using FTP and manually copying the files were time-consuming processes, so Company X streamlined this operation.
Using VRE 3.1, the data is now “published” from the single Source server to the many Target servers. The administrator sets the time at which the data should be replicated by using the scheduling grid. By publishing the data, the administrator ensures that all of his Web servers contain identical data for his customers to view.
This can be accomplished with the following Job settings.
Configuration Values
Type of Job Publication
Replication options:
Prescan ◆ Analyzes the data to be replicated so that status monitoring of synchronization is more accurate.
No changes on Target ◆ Data on the Target is protected while the Job is running.
Exact replica on Target ◆ This replication mode deletes items on the Target that were not replicated from the Source.
Continue Replicating After Synchronization
◆ With this option selected, the Job continues running after synchronization, and replicates in dynamic phase.
Replication Pairs The Web server at headquarters became the Source server and the mirror servers at the remote locations became the Targets.
Chapter 4, How Replication Exec Works 65

VRE3-1_UserGuide.book Page 66 esday, November 9, 2004 11:25 AMTu
Typical Uses for Replication Exec
Configuration Values
Replication Rules This administrator chooses to replicate all files in the Web server root directory using the following inclusion rule: D:\Inetpub\wwwroot For each Target server, the administrator pointed the data to: D:\mirror\Inetpub\www
Schedule To capture data changes as they occur, the administrator sets the replication options to Continue Replicating After Synchronization. On the schedule, the administrator selects all time periods on the scheduling grid and then chooses Enable Scheduled Starts.
Harvesting Sales Data (Centralization or Many–to–One)
Company Y, a broker with many world-wide locations, looked for a simple way to retrieve sales data in order to store and analyze it in one location. Their CFO believes that it would be more cost-effective and efficient to have one person at headquarters analyze all of the data from the Microsoft Excel spreadsheets of its branch offices.
Using a Centralization Job, the data can be collected from all of the remote sites, and each data set stored in a unique location on the Target server. The data can be collected on timed intervals or continuously as desired.
To centralize the data, the administrator selects the directories on each Source machine that need to be replicated. Then the administrator specifies the directory on the Target where the sales data will be stored. This can be accomplished with the following Job settings.
Configuration Values
Type of Job Centralization
Replication options:
Prescan ◆ Analyzes the data to be replicated so that status monitoring of synchronization is more accurate.
No changes on Target ◆ Data on the Target is protected while the Job is running.
Exact replica on Target ◆ Turned off, this changes the Replication mode to Merged. Note: To prevent overwriting the data from another server, the user applies a naming convention to produce unique file names for the different sites and data. For example, SFO7-31-00.xls and LAX 7-15-00.xls.
Continue Replicating After Synchronization
◆ This is not an option for the Merged replication mode.
66 VRE 3.1 Administrator’s Guide

VRE3-1_UserGuide.book Page 67 esday, November 9, 2004 11:25 AMTu
Typical Uses for Replication Exec
Configuration Values
Replication Pairs Select the remote computers that hold the sales data as the Source servers. The main server at headquarters is set as the Target server.
Replication Rules This administrator replicates all .xls files from the Sources using the following inclusion rule: D:\finance\*.xls
The administrator placed the collected data in the following Target path: E:\datacollection\finance
Schedule The administrator set the schedule to collect finance data from each site M–F at 6 P.M. local time, and then chooses Enable Scheduled Starts.
Backing Up Many Machines at a Central Location (Centralization orMany–to–One)
Company Y also wants to protect the data on each of the remote sales servers. In their current process, the central server must connect to each of the Source servers and obtain the data. Because there are many servers and a limited amount of time in which data can be streamed, the backups are sometimes incomplete and data is left unprotected.
By using VRE 3.1, the data can be synchronized between the many Sources and the single Target. Thereafter, only the changes made to the data on the Sources are replicated, thus making it possible to replicate data to the Target server continuously. Company Y is then able to make backups of the Target server during the day, vastly simplifying their backup processes.
This can be accomplished with the following Job configurations.
Configuration Values
Type of Job Centralization
Replication options:
Prescan ◆ Analyzes the data to be replicated so that status monitoring of synchronization is more accurate.
No changes on Target ◆ Data on the Target is protected while the Job is running.
Exact replica on Target ◆ This replication mode deletes items on the Target that were not replicated from the Source.
Continue Replicating After Synchronization
◆ With this option turned on, the Job continues running after synchronization, and replicates in dynamic phase.
Chapter 4, How Replication Exec Works 67
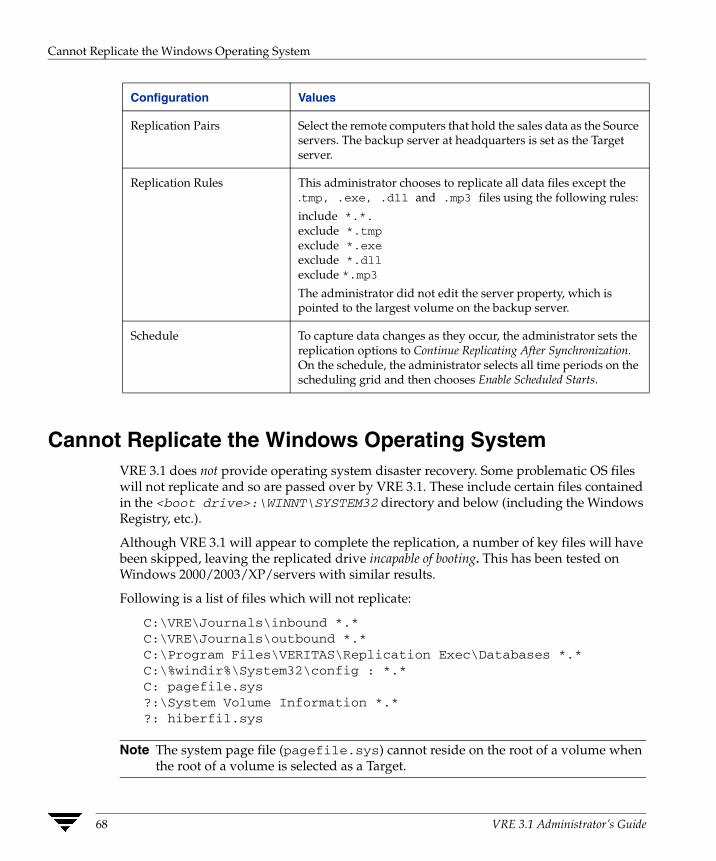
VRE3-1_UserGuide.book Page 68 esday, November 9, 2004 11:25 AMTu
Cannot Replicate the Windows Operating System
Configuration Values
Replication Pairs Select the remote computers that hold the sales data as the Source servers. The backup server at headquarters is set as the Target server.
Replication Rules This administrator chooses to replicate all data files except the .tmp, .exe, .dll and .mp3 files using the following rules:
include *.*. exclude *.tmp exclude *.exe exclude *.dll exclude *.mp3
The administrator did not edit the server property, which is pointed to the largest volume on the backup server.
Schedule To capture data changes as they occur, the administrator sets the replication options to Continue Replicating After Synchronization. On the schedule, the administrator selects all time periods on the scheduling grid and then chooses Enable Scheduled Starts.
Cannot Replicate the Windows Operating SystemVRE 3.1 does not provide operating system disaster recovery. Some problematic OS files will not replicate and so are passed over by VRE 3.1. These include certain files contained in the <boot drive>:\WINNT\SYSTEM32 directory and below (including the Windows Registry, etc.).
Although VRE 3.1 will appear to complete the replication, a number of key files will have been skipped, leaving the replicated drive incapable of booting. This has been tested on Windows 2000/2003/XP/servers with similar results.
Following is a list of files which will not replicate:
C:\VRE\Journals\inbound *.*C:\VRE\Journals\outbound *.*C:\Program Files\VERITAS\Replication Exec\Databases *.*C:\%windir%\System32\config : *.*C: pagefile.sys?:\System Volume Information *.*?: hiberfil.sys
Note The system page file (pagefile.sys) cannot reside on the root of a volume when the root of a volume is selected as a Target.
68 VRE 3.1 Administrator’s Guide

VRE3-1_UserGuide.book Page 69 esday, November 9, 2004 11:25 AMTu
Using the Administration Console
5 VRE 3.1’s Administration Console has been redesigned with this release to incorporate new features and make it easier to take advantage of Replication Exec’s expanded capabilities..All VRE 3.1 functions and configurations are managed through the Administration Console. VRE 3.1 documentation, online help, and links to VERITAS web sites are also available from the Console.
This chapter provides a detailed description of the Administration Console for VRE 3.1. Refer to the following contents and Console user interface map on page 72 when using the Console features.
Contents
Section Description Go to...
“Console Security and Credentials”
Describes the security and credentials required for Console users.
page 70
“Accessing the Console” Describes how to access the Administration Console.
page 71
“Console: User Interface Map”
Provides a reference map of the various user interfaces of the Console.
page 72
“Common Console Features”
Describes the common features of all Console views.
page 73
“Discovering the Console Information Desk”
The information desk provides immediate access to VRE 3.1 technical information. It includes links to system documentation, utilities and web sites.
page 79
69

VRE3-1_UserGuide.book Page 70 esday, November 9, 2004 11:25 AMTu
Console Security and Credentials
Section Description Go to...
“Discovering the Console Jobs View”
Describes the Jobs-specific features and options available from the Administration Console.
page 83
“Working with Job Functions”
Describes additional Job-configuration functions of the Console.
page 86
“Discovering the Console Servers View”
Describes the Servers-specific features and options available from the Administration Console.
page 90
“Working with Server Functions”
Describes additional server-configuration functions of the Console.
page 93
“Discovering the Console Alerts View”
Describes the Alerts-specific functions and options of the Administration Console.
page 100
“Working with Alert Functions”
Describes additional alerts-configuration functions of the Console.
page 104
“Discovering the Console Monitor View”
Describes the Monitoring-specific functions and options of the Administration Console.
page 115
Console Security and CredentialsThe user of the Console (or srTool) will need Backup or Administrator privileges on the RMS and Administrator rights on the local machine to start the Console (or srTool). The Console will prompt for credentials if the user does not have the correct rights on the RMS.
Likewise, some Replication Exec operations require the user to be a member of the Backup Operators group. These operations include editing rules in a Job, adding or removing servers for a Job, and designating the status (online or offline) of a server. Editing server properties also requires user authentication. All security in Replication Exec is provided by Windows.
The current user's credentials — user name and password — will be used for the initial authentication for these operations. If the current user of the Console does not have backup rights on the server that is being utilized, the Console prompts for alternate credentials.
When the security dialog comes up, the user can enter a user name, password and domain. The password and domain are optional but the user name is required. If the user does not enter a specific domain, then the name of the server that is being authenticated to is used.
70 VRE 3.1 Administrator’s Guide

VRE3-1_UserGuide.book Page 71 esday, November 9, 2004 11:25 AMTu
Accessing the Console
Pressing OK on the security dialog causes the Console to attempt to connect to the server in question with the credentials just entered. The operation continues if the login is successful. If it fails, then the security dialog redisplays and the user can reenter credentials. Pressing Cancel in the security dialog cancels the operation.
Additionally, when accessing an RSA server, there are two check boxes in the security dialog that give the user the option of having the Console remember the alternate credentials being entered. If the user selects Always use this user for this server, then the Console remembers these credentials and uses them whenever the currently logged in user's credentials fail when connecting to the server. If the user selects Always use this user for all servers then the credentials will be remembered and used for connecting to any server that the current user does not have access to.
If Always use this user for this server is not checked, the Console will use the given credentials until it is restarted.
Note The Console only applies remembered credentials on behalf of the user who entered them. If another user logs into the workstation, VRE 3.1 does not use the remembered credentials. This “remembered credentials” option is not available when accessing the RMS.
Accessing the ConsoleThe Console is installed optionally during the VRE 3.1 installation. See “Installing VRE 3.1 Software from CD” on page 26, or “Installing the RSA Software Remotely” on page 36.
Once the Console is installed, it may be accessed in one of the following ways.
▼ To access the Administration Console
1. Select VRE Console from the Startup menu.
2. Move to the directory containing the console file:
<drive>:\Program Files\VERITAS\Replication Exec\
3. Double-click on the file SRConsole.exe.
Chapter 5, Using the Administration Console 71

VRE3-1_UserGuide.book Page 72 esday, November 9, 2004 11:25 AMTu
Console: User Interface Map
Console: User Interface MapUse the following interface map to navigate the Console.
72 VRE 3.1 Administrator’s Guide

VRE3-1_UserGuide.book Page 73 esday, November 9, 2004 11:25 AMTu
Common Console Features
Common Console FeaturesThe general features of the Console are described in the following sections.
Main menu bar Toolbar Navigation bar
Drop-down menus
Task pane
Selection pane
Console Features DescriptionThe following Console feature descriptions are related to the main VSR screen.
Main Menu Bar
VRE 3.1’s main menu bar appears across the top of the screen. VRE 3.1 operations can be launched by selecting various options from the drop-down lists of the main menu. Some options may not be available until an item is selected from the Console screen.
To display the menu options, click the menu name on the main menu bar.
Chapter 5, Using the Administration Console 73

VRE3-1_UserGuide.book Page 74 esday, November 9, 2004 11:25 AMTu
Common Console Features
All Console views have File, Edit, View and Help menus. The Console Jobs view also has a Jobs menu (page 83), the Console Servers view has a Servers menu (page 90), and the Console Alerts view has an Alerts menu (page 100). The common Console menus are described in the following sections.
File Menu
The File menu provides the following options.
File Menu Options Description
New Currently, this feature is not functional.
Open Currently, this feature is not functional.
Print This option allows the selected information or screen to be printed.
Exit This option exits the Console application.
Edit Menu
The Edit menu provides the following options.
Edit Menu Options Description
Cut Currently, this feature is not functional.
Copy Currently, this feature is not functional.
Paste Currently, this feature is not functional.
Delete Currently, this feature is not functional.
74 VRE 3.1 Administrator’s Guide

VRE3-1_UserGuide.book Page 75 esday, November 9, 2004 11:25 AMTu
Common Console Features
View Menu
The View menu provides the following options.
View Menu Options Description
Overview Provides a link to the Console’s Overview view (Information Desk). For description, see “Navigation Bar” on page 76.
Jobs Provides a link to the Console’s Jobs view. For description, see “Navigation Bar” on page 76.
Servers Provides a link to the Console’s Servers view. For description, see “Navigation Bar” on page 76.
Alerts Provides a link to the Console’s Alerts view. For description, see “Navigation Bar” on page 76.
Monitor Provides a link to the Console’s Monitor view. For description, see “Navigation Bar” on page 76.
Refresh The Refresh option allows the data compiled within the Console to be updated when selected.
Next View If the Previous View option (below) has been used, the user can move forward again by selecting the Next View.
Previous View Previous view allows the user to move back to the last viewed screen.
Options... Allows the user to set the size and position of the Console when it starts, and what view to display: last-opened view or any specified view.
Show Allows the user to Show Toolbar and/or Show Status Bar.
Help Menu
The Help menu provides the following options.
Help Menu Options Description
Topics This option links to VRE 3.1’s online Help.
VERITAS on the Web Provides hyperlinks to the following information sites:
◆ VERITAS Replication Exec Support
◆ eLearning Web Site
◆ VERITAS Replication Exec Page
◆ VERITAS Home Page
Chapter 5, Using the Administration Console 75

VRE3-1_UserGuide.book Page 76 esday, November 9, 2004 11:25 AMTu
Common Console Features
Help Menu Options Description
View ReadMe File Provides a hyperlink to the ReadMe file for this release of VRE 3.1.
Adobe Acrobat Reader Web Site
Provides a hyperlink to the Adobe download web site for Acrobat.
View VERITAS Replication Exec Administrator’s Guide
Provides a hyperlink to the online version of this Administrator’s Guide in Acrobat (pdf) format.
About VERITAS Replication Exec for Windows
Provides information about the current version of the software.
Toolbar
The toolbar is located under the main menu bar and provides the following options.
Toolbar Options Description
(<-) left arrow Allows the user to move back to the prior screen; same as “Previous View” on View menu.
(->) right arrow If the left arrow (above) has been used to move to the prior screen, the right arrow allows the user to move back to the next screen; same as “Next View” on View menu.
Refresh The Refresh option allows the data compiled within the Console to be updated when selected.
Properties Depending on the Console view, this option allows the user to display a selected item’s properties. For example, see the Job Properties screen on page 83.
Print This option allows the user to print the selected information or screen.
Help This option links to VRE 3.1’s online Help.
Note: Context sensitive Help is available by pressing the [F1] key.
Navigation Bar
The navigation bar appears under the toolbar and allows users to quickly toggle between major replication tasks. In general, the principal tasks of replication are understanding the replication processes, creating and configuring Jobs, selecting and configuring Servers,
76 VRE 3.1 Administrator’s Guide

VRE3-1_UserGuide.book Page 77 esday, November 9, 2004 11:25 AMTu
Common Console Features
monitoring the replication, and assessing replication Alerts. These tasks are represented by the Console views, and accessed from the navigation bar. That is, operator tasks can be changed by clicking on the tabbed names.
The following options (Views) are available from the navigation bar.
Navigation Bar Options
Description
Overview view Use this view to access the Information Desk, which allows users to review the VRE 3.1 documentation, access VERITAS product support, understand VRE 3.1 high order functions, understand and access srTool, and navigate to product-specific VERITAS web sites.
For a description of the options available from the Overview view, see “Discovering the Console Information Desk” on page 79.
Jobs view Use the Jobs view to create, modify, monitor, stop and start replication Jobs.
For a detailed description of the Jobs view, see “Discovering the Console Jobs View” on page 83.
Servers view Use the Servers view to deploy, delete, modify and monitor replication Servers.
For a detailed description of the Servers view, see “Discovering the Console Servers View” on page 90.
Alerts view Use the Alerts view to monitor the various alerts for Jobs and Servers, and to assess their severity.
For a detailed description of the Alerts view, see “Discovering the Console Alerts View” on page 100.
Monitor view Use the Monitor view to assess the overall replication status, including idle and active Jobs, alert and server summaries, and general RMS information.
For a detailed description of the Monitor view, see “Discovering the Console Monitor View” on page 115.
Task Pane
The task pane displays on the left side of the Administration Console when in the Jobs, Servers, or Alerts views. The contents of the task pane change depending on the view selected from the navigation bar. General and administrative tasks can be initiated from the task pane. Some options may not be available until an item is selected from the selection pane or a prerequisite task is performed.
For information on the task pane options, see Jobs “Task Pane” on page 85, Servers “Task Pane” on page 91, or Alerts “Task Pane” on page 101.
Chapter 5, Using the Administration Console 77

VRE3-1_UserGuide.book Page 78 esday, November 9, 2004 11:25 AMTu
Common Console Features
Selection Pane
The selection pane displays information specific to the current Console view. The selection pane is used to select items to which certain functions can be applied. By selecting one of the items, for example, a specific Job, server or alert, in the selection pane, the corresponding available functions are displayed in the task pane. Refer to the appropriate section—Jobs View, Servers View, or Alerts View—for information on the specific selection pane contents.
78 VRE 3.1 Administrator’s Guide

VRE3-1_UserGuide.book Page 79 esday, November 9, 2004 11:25 AMTu
Discovering the Console Information Desk
Discovering the Console Information DeskThe Console Information Desk (Overview view) is accessed by selecting Overview from the navigation bar.
Overview View Options
Main Menu Bar
The main menu bar items for the Console Overview screen are unchanged from the general console features. See “Common Console Features” on page 73.
Chapter 5, Using the Administration Console 79

VRE3-1_UserGuide.book Page 80 esday, November 9, 2004 11:25 AMTu
Discovering the Console Information Desk
Navigation Bar
The navigation bar does not change between Console views. See “Common Console Features” on page 73, for a description of the navigation bar features.
Task Pane
There is no task pane in the Console Overview view.
Selection Pane
The available options from the Overview view (Information Desk) selection pane are as follows.
Information Desk Options Description
Getting Started
◆ What’s new in this release? This hyperlink provides access to the new features of VRE 3.1 section of this guide. See “What’s New in Replication Exec” on page 3.
◆ How to create a replication job This hyperlink directs the user to the replication job creation section of this guide. See “Creating a New Replication Job” on page 122.
◆ How to monitor active jobs This hyperlink directs the user to the replication job monitoring section of this guide. See “Discovering the Console Monitor View” on page 115.
◆ How to install additional servers This hyperlink directs the user to the replication server installation section of this guide. See “Working with Server Functions” on page 93.
Documentation
◆ View ReadMe file This hyperlink directs the user to the ReadMe file accompanying the software. The ReadMe file often contains the most current information about a specific software release.
◆ View VERITAS Storage Replicator Administrator’s Guide (PDF)
This hyperlink directs the user to the VRE 3.1 Administrator’s Guide in Adobe Acrobat (pdf) format.
80 VRE 3.1 Administrator’s Guide

VRE3-1_UserGuide.book Page 81 esday, November 9, 2004 11:25 AMTu
Discovering the Console Information Desk
Information Desk Options Description
◆ Adobe® Reader Web Site This hyperlink directs the user to the Adobe Acrobat Web Site where they may download Reader.
Technical Support
◆ VERITAS Replication Exec Support This hyperlink directs the user to the VERITAS Replication Exec Support web site.
Configuration
◆ Configuring replication jobs This hyperlink directs the user to the replication job configuration section of this guide.
◆ Configuring servers This hyperlink directs the user to the server configuration section of this guide.
◆ Installing new servers remotely This hyperlink directs the user to the remote server installation section of this guide.
◆ Security and Credentials This hyperlink directs the user to the replication job security and credentials section of this guide.
Command Line Interface
◆ What is srTool? This hyperlink directs the user to the srTool overview section of the srTool Reference Guide.
◆ Summary of changes for VRE 3.1 This hyperlink directs the user to the “Changes for VRE 3.1” section of the srTool Reference Guide.
◆ Getting Started Using srTool This hyperlink directs the user to the “Getting Started” section of the srTool Reference Guide.
◆ srTool Language Reference This hyperlink directs the user to the “Language Reference” section of the srTool Reference Guide.
◆ srTool Command Reference This hyperlink directs the user to the “Command Reference” section of the srTool Reference Guide.
◆ srTool Object Reference This hyperlink directs the user to the “Object Reference” section of the srTool Reference Guide.
◆ srTool Errors and Messages This hyperlink directs the user to the “Errors and Messages” section of the srTool Reference Guide.
Chapter 5, Using the Administration Console 81

VRE3-1_UserGuide.book Page 82 esday, November 9, 2004 11:25 AMTu
Discovering the Console Information Desk
Information Desk Options Description
◆ View the srTool Reference Guide (PDF)
This hyperlink directs the user to the srTool Reference Guide in Adobe Acrobat (pdf) format.
◆ Launch srTool This option launches the srTool command-line interface utility.
Web Sites
◆ eLearning Web Site This hyperlink directs the user to the VERITAS product knowledge web site.
◆ VERITAS Replication Exec Page This hyperlink directs the user to the VERITAS Replication Exec web site.
◆ VERITAS Home Page This hyperlink directs the user to the VERITAS home page.
Locating the Information Desk FilesThe information desk files accessed in the Console Overview view are installed in the following directories:
◆ VRE 3.1 Administrator’s Guide:
<Program Files>\VERITAS\Replication Exec\vreadmin_en.pdf
◆ VRE 3.1 ReadMe file:
<Program Files>\VERITAS\Replication Exec\ReadMe_en.txt
◆ VRE 3.1 srTool Reference Guide:
<Program Files>\VERITAS\Replication Exec\srtool_en.pdf
82 VRE 3.1 Administrator’s Guide

VRE3-1_UserGuide.book Page 83 esday, November 9, 2004 11:25 AMTu
Discovering the Console Jobs View
Discovering the Console Jobs ViewThe Console Jobs view is accessed by selecting Jobs from the navigation bar.
Jobs View OptionsThe following options are available from the Jobs view.
Chapter 5, Using the Administration Console 83

VRE3-1_UserGuide.book Page 84 esday, November 9, 2004 11:25 AMTu
Discovering the Console Jobs View
Main Menu Bar
The main menu bar items for the Console Jobs screen is the same as the general console features, with the following additional Jobs menu.
Jobs Menu Options Description
Create New Job This option allows the user to create a new Job, by directing the user to the New Job wizard. See “Creating a New Replication job” on page 58.
Delete Job When a specific job is selected in the selection pane, this option allows the user to delete the Job.
Properties... When a specific job is selected in the selection pane, this option directs the user to the Jobs Properties screen. See “Using the Jobs View Specific Menu” on page 81.
Monitor Job... When a specific job is selected in the selection pane, this option allows the user to monitor the Job.
Start Job When a specific job is selected in the selection pane, this option allows the user to start the Job.
Stop Job When a specific job is selected in the selection pane, this option allows the user to stop the Job.
Cancel Job When a specific job is selected in the selection pane, this option allows the user to cancel the Job.
View Job Log... When a specific job is selected in the selection pane, this option allows the user to view the Job log.
Enable Scheduled Starts When a specific job is selected in the selection pane, this option allows the user to run the Job at its scheduled time.
Disable Scheduled Starts When a specific job is selected in the selection pane, this option allows the user to not run the Job at its scheduled time.
Navigation Bar
The navigation bar does not change between views. See “Common Console Features” on page 73, for a description of the navigation bar features.
84 VRE 3.1 Administrator’s Guide

VRE3-1_UserGuide.book Page 85 esday, November 9, 2004 11:25 AMTu
Discovering the Console Jobs View
Task Pane
The task pane of the Console Jobs view has options to perform General and Administrative tasks as follows.
Jobs Task Pane Options Description
General Tasks:
◆ Create New Job This option allows the user to create a new Job, by directing the user to the New Job wizard. See “Creating a New Replication job” on page 58?.
◆ Delete Job When a specific Job is selected in the selection pane, this option allows the user to delete the Job.
◆ Properties When a specific Job is selected in the selection pane, this option directs the user to the Jobs Properties screen. See “Using the Jobs View Specific Menu” on page 81?.
◆ Monitor Job This option directs the user to the monitoring view for the active Job.
◆ Refresh (F5) The Refresh option allows the data compiled within the Console to be updated when selected.
Administrative Tasks:
◆ Start Job When a specific job is selected in the selection pane, this option allows the user to start the Job.
◆ Stop Job When a specific job is selected in the selection pane, this option allows the user to stop the Job.
◆ Cancel Job When a specific job is selected in the selection pane, this option allows the user to cancel the Job.
◆ View Job Log... When a specific job is selected in the selection pane, this option allows the user to view the Job log.
◆ Enable Scheduled Starts When a specific job is selected in the selection pane, this option allows the user to run the Job at its scheduled time.
◆ Disabled Scheduled Starts
When a specific job is selected in the selection pane, this option allows the user to not run the Job at its scheduled time.
Chapter 5, Using the Administration Console 85

VRE3-1_UserGuide.book Page 86 esday, November 9, 2004 11:25 AMTu
Discovering the Console Jobs View
Selection Pane
When in Console Jobs view, the selection pane displays all Jobs that have been created in the neighborhood. The Job properties are displayed in a columnar format.
Jobs Selection Pane Options
Column Descriptions
Name / Status (icon) Designates the name assigned to this Job.
The icon displays the status of the various Jobs, as follows:
◆ gray indicates the Job is inactive and disabled
◆ green indicates the Job is active and scheduled
◆ red indicates the Job is not completed due to errors
Status The status column is similar to the status icon, and indicates whether a Job is, for example, cancelled, Expired, etc. See “Job Status States”, below.
Scheduled Starts Indicates whether scheduled starts are enabled or disabled.
Type Designates the Job type:
◆ Standard (One-to-One)
◆ Centralization (Many-to-One)
◆ Publication (One-to-Many)
Description Designates the description provided for this Job if included.
Last Start Time Designates the last time the Job was started, or blank if Job has not run.
Number of Alerts Indicates the number of Alerts associated with this Job.
Current Operation Indicates the current operation of this Job, such as Starting. See “Job Status States”, below.
Next Pending Operation Indicates the next pending operation for this Job, such as cancelling. See “Job Status States”, below.
Last Requested Operation Indicates the last requested operation for this Job, such as Expiring. See “Job Status States”, below.
86 VRE 3.1 Administrator’s Guide

VRE3-1_UserGuide.book Page 87 esday, November 9, 2004 11:25 AMTu
Discovering the Console Jobs View
Job Status States
Jobs can be in one of the following operational states as reflected in the Status column of the Selection pane.
Jobs Operation State Descriptions
Cancelled Displays if the Job was stopped abruptly.
Cancelled with errors Displays if the Job was stopped abruptly and incurred errors.
Cancelling Displays if the Job is being stopped abruptly.
Completed Displays if the Job has completed.
Completed with errors Displays if the Job has completed, but incurred errors.
Completing Displays if the Job is being completed.
Expired Displays if the Job has expired from its scheduled start time or was cancelled gracefully.
Expired with errors Displays if the Job has expired from its scheduled start time or is being cancelled gracefully, and incurred errors.
Expiring Displays if the Job is expiring from its scheduled start time or is being cancelled gracefully.
Never run Displays if the Job has never run.
Rallying Displays if the Job has experienced a non-working replication pair and is attempting to reconnect them.
Running Displays if the Job is running.
Running partially Displays if the Job is only partially running; that is, with errors.
Starting Displays if the Job is starting.
Unknown Displays if the Job state is unknown.
Chapter 5, Using the Administration Console 87

VRE3-1_UserGuide.book Page 88 esday, November 9, 2004 11:25 AMTu
Working with Job Functions
Working with Job FunctionsIn addition to the functions inherent in the Console Jobs view menus, specific Job creation and configuration tasks are available to the user. For a detailed description of the replication Job actions, see “Modifying Replication Jobs” on page 144.
Monitoring JobsDouble-click on any Job Name to open the Job Details screen. The Replication Pairs tab lists the Source, Target and State for each replication pair. The Pair Log can also be viewed from this screen by selecting a replication pair, and clicking the View Pair Log... button.
The Stage Details section of the Replication Pairs tab provides additional information depending on the stage of the selected Job, and may include some or all of the following.
Stage Detail Object Description
Run Stage The stage in which the Job is currently running. The possible values are Not Running, PreScan, Synchronization, Dynamic, ReSynchronization, and Unknown.
Start time The time and date that the Job was started.
88 VRE 3.1 Administrator’s Guide

VRE3-1_UserGuide.book Page 89 esday, November 9, 2004 11:25 AMTu
Working with Job Functions
Stage Detail Object Description
Elapsed time The amount of time that the Job has been running.
Resync error count The umber of errors that occurred during resynchronization of the replica.
Current file or folder The current file or folder that is being replicated.
Bytes per second The rate at which the data is being replicated to the Target.
Total bytes sent The total amount of data that has been replicated thus far.
Percent complete The percentage of data that has been replicated thus far.
Estimated time remaining The estimated time remaining to complete the Job.
Selecting the Details tab on the Job Details dialog offers additional information about a specific Job. This window provides the Job Name, State, Number of alerts, Time the Job Started, Job Type, and Job Description.
Chapter 5, Using the Administration Console 89

VRE3-1_UserGuide.book Page 90 esday, November 9, 2004 11:25 AMTu
Discovering the Console Servers View
Discovering the Console Servers ViewThe Console Servers view is accessed by selecting Servers from the navigation bar.
Servers View OptionsThe following options are available from the Servers view.
Main Menu Bar
The main menu bar items for the Console Servers screen are the same as the general console features, with the following additional Servers menu.
Servers Menu Options Description
Deploy new server As soon as a new server has been configured, this option allows the user to deploy it to the neighborhood.
90 VRE 3.1 Administrator’s Guide

VRE3-1_UserGuide.book Page 91 esday, November 9, 2004 11:25 AMTu
Discovering the Console Servers View
Servers Menu Options Description
Delete unavailable server This option allows the user to delete an unavailable server from the server list.
Properties... When a specific server is selected in the selection pane, this option directs the user to the Server Properties screen. See “Viewing Server Properties” on page 93.
View Server Log... Use this option to view the server log for the selected server. See “Server Properties - Log Tab” on page 97, and “Server Logs” on page 110.
Set online Use this option to bring a selected server online. See “Changing the Status of a Server” on page 99.
Set offline Use this option to take a selected server offline. See “Changing the Status of a Server” on page 99.
Navigation Bar
The navigation bar does not change between views. See “Common Console Features” on page 73, for a description of the navigation bar features.
Task Pane
The task pane of the Console Servers view has options to perform General and Administrative tasks as follows.
Servers Task Pane Options Description
General Tasks:
◆ Deploy new server As soon as a new server has been configured, this option allows the user to deploy it to the neighborhood.
◆ Delete unavailable server
This option allows the user to delete a server from the server list (neighborhood) that is unavailable.
◆ Properties When a specific server is selected in the selection pane, this option directs the user to the Server Properties screen. See “Viewing Server Properties” on page 93.
◆ View server log Use this option to view the server log for the selected server. See “Server Properties - Log Tab” on page 97, and “Server Logs” on page 110.
Chapter 5, Using the Administration Console 91

VRE3-1_UserGuide.book Page 92 esday, November 9, 2004 11:25 AMTu
Discovering the Console Servers View
Servers Task Pane Options Description
◆ Refresh (F5) The Refresh option allows the data compiled within the Console to be updated when selected.
Administrative Tasks:
◆ Set online Use this option to bring a selected server online. See “Changing the Status of a Server” on page 99.
◆ Set offline Use this option to take a selected server offline. See “Changing the Status of a Server” on page 99.
Selection Pane
When in Console - Servers view, the selection pane displays all Servers that have been created in the neighborhood. The Job properties are displayed in a columnar format.
Jobs Selection Pane Options
Column Descriptions
Server (name) / Status (icon) Designates the name assigned to this Server.
The icon displays the status of the various Servers, as follows:
◆ green indicates the Server is online
◆ red indicates the Server is offline
◆ gray indicates the Server is unavailable
Status The status column is similar to the status icon, and indicates whether a Server is Online, Offline, or Unavailable.
IP Address Designates the IP Address assigned to the selected Server.
Domain Indicates the Windows domain of the selected Server.
Operating System Indicates the Windows version and service pack of the operating system for the selected machine.
Product Info Provides the name and build number of the VSR software on the selected machine.
92 VRE 3.1 Administrator’s Guide

VRE3-1_UserGuide.book Page 93 esday, November 9, 2004 11:25 AMTu
Working with Server Functions
Working with Server FunctionsFollowing are the functions available from the Servers view.
Viewing Server Properties
▼ To view detailed information about a single server
1. To bring up the Server Properties, do one of the following:
◆ Double-click on the server in the selection pane window.
◆ Right-click on the server name and select Properties from the context menu.
◆ Highlight the server in the selection pane and then select Properties from the Servers menu.
◆ Click on the Properties option in the task pane.
This displays the Server Properties window.
Server Properties Screen
Chapter 5, Using the Administration Console 93

VRE3-1_UserGuide.book Page 94 esday, November 9, 2004 11:25 AMTu
Working with Server Functions
The Server Properties window has five tabs across the top: General, Volumes, Folders, Log and Serial Number. These tabs and their corresponding options are discussed below.
Server Properties - General Tab
The General tab contains the following server information.
Server General Tab Fields
Description
Name The name of the selected machine.
Status The status of the selected machine: Online, Offline, or Unavailable.
IP Address The IP address of the selected machine.
Domain The domain where the selected machine is located.
OS Info The Windows version and service pack of the operating system for the selected machine.
Product Info The name and build number of the VSR software on the selected machine.
94 VRE 3.1 Administrator’s Guide

VRE3-1_UserGuide.book Page 95 esday, November 9, 2004 11:25 AMTu
Working with Server Functions
Server Properties - Volumes Tab
Selecting the Volumes tab displays the Server Properties - Volumes window.
The Volumes tab contains a list with the following information about the volume(s) on the selected server.
Server Volumes Tab Fields
Description
Name The drive letter, volume label and file system type (either NTFS or FAT32). Note: the Target must be NTFS for replication to occur.
File System The file system type, such as NTFS or FAT32.
Total Size The amount of total space on each volume.
Free Space The amount of free space on each volume.
Chapter 5, Using the Administration Console 95

VRE3-1_UserGuide.book Page 96 esday, November 9, 2004 11:25 AMTu
Working with Server Functions
Server Properties - Folders Tab
Selecting the Folders tab displays the Server Properties - Folders window.
The Folders tab displays the default path where the replicated data is stored on this server. The default path is created when installing the RSA software either by the Create Server option (remote deployment), or by installing directly on that server. The installation process selects the largest NTFS, non-system volume on the server for the default path.
Note Servers that are only used as a Source still display this path because the RSA software allows a server to be used as either a Source or a Target. Only in a Job that uses the server as a Target is this path used.
The displayed path is the default path to a folder receiving replicated data on that server. All replicated data on the Target server will be stored in the default folder, unless a custom path is set for a specific volume or folder in a Job.
Caution The source files and journal directory on the Source server should not be on the same volume. See “Replication Rules” on page 58.
Note Changing the default replica path will not affect any existing Jobs. They will continue to use the default path that was assigned when the Job was created. Any newly created Jobs, however, will default to the new default path. That is, the revised path will be the default path for any newly created Jobs.
96 VRE 3.1 Administrator’s Guide

VRE3-1_UserGuide.book Page 97 esday, November 9, 2004 11:25 AMTu
Working with Server Functions
▼ To change the Target destination path
1. The field displays the path to the data replica folder on a selected server.
2. Browse to the path by clicking on the Browse… button.
Server Properties - Log Tab
Selecting the Log tab displays the Server Properties - Log window.
A Server log is a text file with information about a particular server, including the current date and time when an event occurred relative to that server. Also shown are the server name, state, IP address, Windows domain, operating system version, and VSR version.
The Log tab offers easy Console access to the server logs, which are maintained on the individual servers. It also allows the user to either limit how long log records are preserved, or to protect the logs from deletion.
Note The information in the logs is recorded with the most recent information shown at the beginning of the log, and older information towards the end. That is, the events in the log are shown in reverse chronological order. See “Logs” on page 109.
Chapter 5, Using the Administration Console 97

VRE3-1_UserGuide.book Page 98 esday, November 9, 2004 11:25 AMTu
Working with Server Functions
▼ To access the server logs
1. Select the Log tab on the Server Properties page, or click the View server log button on the task pane.
2. The log opens in Windows Notepad.
Server Properties - Serial Number Tab
Selecting the Serial Number tab displays the Server Properties - Serial Number window.
98 VRE 3.1 Administrator’s Guide

VRE3-1_UserGuide.book Page 99 esday, November 9, 2004 11:25 AMTu
Working with Server Functions
The serial number tab allows the user to view or change the VRE 3.1 serial numbers, remove serial numbers, or add serial numbers. The server license key field also contains notes specific to the key, such as if a demonstration copy has expired.
▼ To change the evaluation software to a registered version
1. Open the Server Properties window by either right-clicking on the server in the server list, or by selecting a server and choosing Properties on the Servers task bar.
2. Select the Serial Number tab on the Properties page.
3. In the New serial number field, enter the correct serial number and click Add. Prior or expired keys can be deleted by selecting them and clicking Remove.
Changing the Status of a ServerA server can be in one of three states as described in the following table.
Status Description
Online The server is available for replication as scheduled
Offline The server has been disabled, and will not take part in any replication Jobs, either scheduled or started manually.
Unavailable The server cannot be seen in the Replication Neighborhood, perhaps because the server is down or because of a network failure.
If a server is powered down, when it is powered back up, VSR returns it automatically to its previous state, either Online or Offline.
▼ To take a server offline
1. Select the Server View from the Console if it is not already selected.
2. With the desired server selected, choose Set Offline. Alternatively, on the server name (or somewhere on that line) right-click to bring up the server context menu, and select Set Offline. The server must be Online in order to be set Offline.
Chapter 5, Using the Administration Console 99

VRE3-1_UserGuide.book Page 100 Tuesday, November 9, 2004 11:25 AM
Discovering the Console Alerts View
Discovering the Console Alerts ViewAn alert is generated when the replication system detects an event. Alerts can be as simple as a message informing the administrator that a Job has completed, to something critical that requires user intervention. Servers and Jobs can generate alerts. For example, a network hub that is unable to provide connectivity between servers generates an alert when the Job cannot replicate. The same situation might also generate another alert when the server is unable to communicate with the RMS.
The Console Alerts view is accessed by selecting Alerts from the navigation bar or View menu. Once the Alerts View has been selected, the alerts can be read and viewed.
Alerts View OptionsThe following options are available from the Alerts view.
100 VRE 3.1 Administrator’s Guide

VRE3-1_UserGuide.book Page 101 Tuesday, November 9, 2004 11:25 AM
Discovering the Console Alerts View
Main Menu Bar
The main menu bar items for the Console - Alerts screen are the same as the general console features, with the following additional Alerts menu.
Alerts Menu Options Description
Mark As Read After selecting and reviewing an alert, use this option to mark the alert as having been read. This option is only available if the Alert is unread.
Mark As Unread This option allows a specified alert to be unread after it has been read.
Properties When a specific alert is selected in the selection pane, this option directs the user to the Alerts Properties screen.
Delete Selected Alerts This option deletes the selected alert from the alert log.
Delete Selected and Older Alerts
This option deletes selected and older alerts from the alert log.
Delete Read Alerts This option deletes selected read alerts from the alert log.
Delete Filtered Alerts This option deletes all filter-defined alerts.
Delete All Alerts This option deletes all alerts from the alert log.
Groom Alerts... This option grooms selected alerts in the alert log. See “Grooming Alerts” on page 104.
Navigation Bar
The navigation bar does not change between views. See “Common Console Features” on page 73, for a description of the navigation bar features.
Task Pane
The task pane of the Console - Alerts view has options to perform General and Administrative tasks as follows.
Alerts Task Pane Options Description
General Tasks:
◆ Mark as Read After selecting and reviewing an alert, use this option to mark the alert as having been read.
Chapter 5, Using the Administration Console 101

VRE3-1_UserGuide.book Page 102 Tuesday, November 9, 2004 11:25 AM
Discovering the Console Alerts View
Alerts Task Pane Options Description
◆ Mark as Unread This option allows a specified alert to remain as unread.
◆ Properties When a specific alert is selected in the selection pane, this option directs the user to the Alerts Properties screen.
Administrative Tasks:
◆ Delete Selected Alerts This option deletes the selected alert from the alert log.
◆ Delete Selected and Older Alerts
This option deletes selected and older alerts from the alert log.
◆ Delete Read Alerts This option deletes selected read alerts from the alert log.
◆ Delete Filtered Alerts This option deletes the filter-defined alerts.
◆ Delete All Alerts This option deletes all alerts from the alert log.
◆ Groom Alerts This option grooms selected alerts in the alert log. See “Grooming Alerts” on page 104.
Filtering Drop-Down Lists
When in Console Alerts view, the selection pane displays all Alerts that have been created in the neighborhood. At the top of the selection pane are four filtering (drop-down) menus to select which alerts to display. These menus allow progressive filtering of the displayed alerts working from menu 1 to menu 4. The options available from the menus are as follows.
Alerts Lists Options Descriptions
Menu 1: Affected items Allows filtering by an affected item such as a Job or server. The affected item can be either the cause or the victim generating the alert.
◆ View alerts from jobs and servers ◆ Provides alerts generated from Jobs and Servers
◆ View alerts from jobs only ◆ Provides alerts generated from Jobs only
◆ View alerts from servers only ◆ Provides alerts generated from Servers only
Menu 2: Specific Jobs or Servers Allows sorting for a specific Job or server.
102 VRE 3.1 Administrator’s Guide

VRE3-1_UserGuide.book Page 103 Tuesday, November 9, 2004 11:25 AM
Discovering the Console Alerts View
Alerts Lists Options Descriptions
◆ View alerts for any job or server ◆ Provides alerts generated from Jobs or servers
Menu 3: View Alerts by Severity Allows filtering by alert type or severity.
◆ All Severities ◆ Provides alerts of any magnitude or importance
◆ Information ◆ Provides alerts of normal activities and of little consequence
◆ Warnings ◆ Alerts incidental to otherwise properly executing replication
◆ Errors ◆ Alerts that indicate specific problems
Menu 4: Reporting server Allows filtering by the reporting server that posted the alert message.
◆ All reporting servers ◆ Lists all RSA clients.
Alert Selection Pane Properties
Once the alert types are selected from the menus, the Alert properties are displayed in a columnar format in the selection pane.
Alert Selection Pane Options
Column Descriptions
Date / Time and Severity (icon)
Indicates the date and time that the specified alert was recorded.
The alert icon indicates the severity of the alert. See the Alert List Options, above.
Affected Item Indicates the item that caused the alert (server or Job).
Description Provides a description of the problem that caused the alert.
Severity Indicates the severity of the alert.
Reporting Server Indicates the server that reported the alert.
Chapter 5, Using the Administration Console 103

VRE3-1_UserGuide.book Page 104 Tuesday, November 9, 2004 11:25 AM
Working with Alert Functions
Working with Alert FunctionsThis section describes how to perform various alert functions.
Sorting AlertsThe Alerts displayed in the selection pane can be sorted in different ways by clicking on the column to be sorted. The icon in the left column shows the type of alert and indicates whether the alert has been read or not. In addition, any alert that has bold text indicates that the alert has not yet been read. Scroll bars are provided to view portions of the list that may not be visible.
Grooming AlertsBecause the replication process generates many alerts, VRE 3.1 provides the ability to groom alerts based on specific criteria. Grooming does not occur automatically. Alerts must be explicitly groomed in order to remove them from the system.
▼ To use alerts grooming
1. Select Alert Grooming from the Alerts menu at the top of the Console when the Alerts View is active, or right-click to get the context menu, and select Alert Grooming.
104 VRE 3.1 Administrator’s Guide

VRE3-1_UserGuide.book Page 105 Tuesday, November 9, 2004 11:25 AM
Working with Alert Functions
2. Groom the alerts by date, object and unread state as follows. Any combination of these options may be specified.
a. Groom by date
◆ Select Apply to alerts for all dates to specify all alerts without reference to date.
Select Apply to alerts older than to specify specific aged dates. When this option is selected the Groom alerts before screen appears, which allows the user to manually select a date for grooming and to enter a specific time for grooming.
b. Groom by object
◆ Select Apply to all alerts in the system to specify all alerts.
◆ Select Apply only to the alerts currently being shown in the list to specify only those alerts shown (filtered) in the list.
c. Groom by unread state
◆ Select Apply to read and unread alerts to specify all alerts without regard to whether they ave been read or not.
◆ Select Apply only to alerts that have been read to specify only those alerts that have been read.
3. Click Groom Now to activate the alert grooming.
Note Alert grooming is not an ongoing function when set. It only occurs on demand. That is, alerts are not groomed continuously, and alerts will continue to accumulate indefinitely until grooming is activated again. It is recommended the grooming be periodically performed to maintain adequate console perfomance.
Chapter 5, Using the Administration Console 105

VRE3-1_UserGuide.book Page 106 Tuesday, November 9, 2004 11:25 AM
Working with Alert Functions
Alert Properties ScreenThe Alert Properties screen displays information about the alert. The information depends entirely on the type and cause of the alert. In general, it specifies what occurred and the Job or Server from where the alert was generated.
▼ To access the Alert properties screen, do one of the following
◆ Double-click on a selected Alert.
◆ Right-click on an Alert and select Properties.
◆ Select Properties from the menu.
◆ Select from the Task Pane.
106 VRE 3.1 Administrator’s Guide

VRE3-1_UserGuide.book Page 107 Tuesday, November 9, 2004 11:25 AM
Working with Alert Functions
Alert Properties - Details
The Alert Properties Details screen displays the same information as the Alert list. Because the information cannot always be viewed in its entirety, the Details page of the Alert Properties was created to provide a better view of the information.
Alert Selection Pane Options
Column Descriptions
Affected Item Indicates the item that caused the alert.
Date / Time Indicates the date and time that the specified alert was recorded.
Reporting Server Indicates the server that reported the alert.
Severity Indicates the severity of the alert.
Description Provides a description of the problem that caused the alert.
Context The context field displays information about the alert. The information depends entirely on the type of alert and what caused the alert. In general, it specifies what occurred and the Job or Server from whence the alert was generated.
Chapter 5, Using the Administration Console 107

VRE3-1_UserGuide.book Page 108 Tuesday, November 9, 2004 11:25 AM
Working with Alert Functions
Previous and Next buttons are also supplied which allow the user to display details of previous or next alerts in the currently displayed list.
SNMP TrapsVRE 3.1 supports the generation of SNMP traps for significant events, such as server failure. If SNMP support is installed and enabled on the server when installing VRE 3.1, VRE 3.1’s SNMP trap generation support will automatically be enabled. To integrate the trap messages with a network management tool such as HP OpenView, load the ss_rx.mib file that was placed in the installation directory during the install process into the network management tool. Some network management tools refer to this process as compiling the MIB (Management Information Base).
If the Windows SNMP is enabled on the server when VRE 3.1 is installed, SNMP support will automatically be installed.
Caution Incorrect use of the Windows registry editor may prevent the operating system from functioning properly. Great care should be taken when making changes to a Windows registry. Registry modifications should only be performed by persons experienced in the use of the registry editor application. It is recommended that a complete backup of the registry and server be made prior to making any registry changes.
▼ To disable SNMP support
1. Open Registry editor.
2. Navigate to
HKEY_LOCAL_MACHINE\SYSTEM\CurrentControlSet\Services\SNMP\Parameters\ExtensionAgents
3. Delete the following registry value to disable VRE 3.1 SNMP support:
\Software\VERITAS\Replication Exec\3.1\SNMP
108 VRE 3.1 Administrator’s Guide

VRE3-1_UserGuide.book Page 109 Tuesday, November 9, 2004 11:25 AM
Working with Alert Functions
LogsLogs are a running history of events occurring in the replication process. Logs offer more information than alerts.
VSR maintains three kinds of log files.
◆ Servers (Source or Target)
◆ Jobs
◆ Replication Pairs
Because logs are continually being created, a limit must be placed on how long they are retained. Logs limits are measured in the number of days. The default limit is 30 days, which is set on the Server Properties Log Tab screen (see “Server Properties - Log Tab” on page 97.
The log retention limit applies to the Server, Job and Pair logs for that particular server, as follows.
Log Description and Location
Server Each server has its own log accessed from the Server Properties - Log Tab screen. The server log is located on the server.
Job (Source) In the case of a Standard (one-to-one) or Publication (one-to-many) Jobs, the Job log is located and limited on the Source server.
Job (Target) In the case of a Centalization (many-to-one) Job, the Job log is located and limited on the Target server.
Pair (Source) In the case of a Standard (one-to-one) or Publication (one-to-many) Jobs, the pair log is located and limited on the Source server.
Pair (Target) In the case of a Centalization (many-to-one) Job, the pair log is located and limited on the Target server.
Note The log limit defined on a particular server applies to all logs contained on that server.
Chapter 5, Using the Administration Console 109

VRE3-1_UserGuide.book Page 110 Tuesday, November 9, 2004 11:25 AM
Working with Alert Functions
Server Logs
A Server log is a text file that displays information about a particular server. The very first line of the log informs the user that this is indeed a Server log. Adjacent to this, the current date and time relative to the machine that the Console is running on are displayed. Also shown are the server name, state, IP Address, Windows domain, operating system version, and VSR version.
The rest of the log contains alert information for that particular server. An example log entry follows:
1:04 AM on 2/3/2003 Replication Exec for NT services has stopped asrequested.
Use the Server log to view all logged information for a particular Server.
Job Logs
A Job log is a text file that displays information about a particular Job. The very first line of the log informs the user that this is a Job log. It also displays the current date and time relative to the machine that the Console is running on. Also shown are the Job name, description (optional), type, state, start time, and number of alerts. The rest of the log contains alert information for that particular Job.
▼ To view a Job log
1. Start the Console.
2. Go to the Jobs view icon.
3. Right-click on any Job and from the context menu, select View Log.
110 VRE 3.1 Administrator’s Guide

VRE3-1_UserGuide.book Page 111 Tuesday, November 9, 2004 11:25 AM
Working with Alert Functions
4. The Job log will be opened in Windows Notepad.
Pair Logs
Pair logs contain information about the activity taking place between the Source and Target servers in a Job.
▼ To view a Pair log
1. Start the Console.
2. Go to the Jobs view icon.
3. Select Monitor Job.
Chapter 5, Using the Administration Console 111

VRE3-1_UserGuide.book Page 112 Tuesday, November 9, 2004 11:25 AM
Working with Alert Functions
4. Select a pair in the list.
5. Click View Pair Log.
112 VRE 3.1 Administrator’s Guide

VRE3-1_UserGuide.book Page 113 Tuesday, November 9, 2004 11:25 AM
Working with Alert Functions
6. The Pair Log (Job Details) screen has a Replication Pairs tab and Details tab.
Chapter 5, Using the Administration Console 113

VRE3-1_UserGuide.book Page 114 Tuesday, November 9, 2004 11:25 AM
Working with Alert Functions
7. The Pair Log will be opened in Windows Notepad.
114 VRE 3.1 Administrator’s Guide

VRE3-1_UserGuide.book Page 115 Tuesday, November 9, 2004 11:25 AM
Discovering the Console Monitor View
Discovering the Console Monitor View The Console Monitor view is accessed by selecting Monitor from the navigation bar.
Monitor View OptionsThe following options are available from the Monitor view.
Main Menu Bar
The main menu bar items for the Console Monitor screen are the same as the general console features (page 73).
Navigation Bar
The navigation bar does not change between views. See “Common Console Features” on page 73, for a description of the navigation bar features.
Chapter 5, Using the Administration Console 115

VRE3-1_UserGuide.book Page 116 Tuesday, November 9, 2004 11:25 AM
Discovering the Console Monitor View
Task Pane
There is no task pane associated with the Console Monitor view.
Selection Pane
When in Console Monitor view, the selection pane displays various information concerning all scheduled and active jobs, servers and alerts, as follows.
Monitor View Options Descriptions
Job Summary:
Idle Jobs
◆ Never run Displays the number of idle Jobs that have never been started.
◆ Cancelled Displays the number of Jobs that were cancelled and are now idle.
◆ Cancelled with errors Displays the number of Jobs that were cancelled with errors and are now idle.
◆ Expired Displays the number of Jobs that did not finish during the scheduled period.
◆ Expired with errors Displays the number of Jobs that expired with errors.
◆ Completed Displays the number of Jobs that were completed without errors (non-scheduled jobs).
◆ Completed with errors Displays the number of Jobs that were completed with errors.
Active Jobs
◆ Starting Displays the number of active Jobs that are in the process of starting.
◆ Running Displays the number of active Jobs that are running.
◆ Running partially Displays the number of active Jobs that are running with errors. One or more pairs may not be running.
116 VRE 3.1 Administrator’s Guide

VRE3-1_UserGuide.book Page 117 Tuesday, November 9, 2004 11:25 AM
Discovering the Console Monitor View
Monitor View Options Descriptions
◆ Rallying Displays the number of active Jobs that are rallying. Restarting failed pairs.
◆ Cancelling Displays the number of active Jobs that are in the process of cancelling.
◆ Expiring Displays the number of active Jobs that are in the process of expiring (scheduled).
◆ Completing Displays the number of active Jobs that are in the process of completing (non-scheduled jobs).
Alert Summary
◆ Alerts drop-down Allows the summary to be displayed for Unread, Read or All alerts.
◆ Errors Displays the number of error alerts for Jobs and Servers.
◆ Warnings Displays the number of warning alerts for Jobs and Servers.
◆ Informational Displays the number of informational alerts for Jobs and Servers.
◆ Total Displays the total number of alerts for Jobs and Servers.
Server Summary
◆ Online servers Displays the number of online servers.
◆ Offline servers Displays the number of offline servers.
◆ Unavailable servers Displays the number of unavailable servers.
RMS Summary
◆ Replication neighborhood (name) Displays the name assigned to the replication neighborhood.
◆ RMS server name Displays the name assigned to the RMS server.
◆ RMS server IP address Displays the IP address assigned to the RMS server.
Chapter 5, Using the Administration Console 117

VRE3-1_UserGuide.book Page 118 Tuesday, November 9, 2004 11:25 AM
Discovering the Console Monitor View
118 VRE 3.1 Administrator’s Guide

VRE3-1_UserGuide.book Page 119 Tuesday, November 9, 2004 11:25 AM
Creating and Managing Replication Jobs
6 Jobs define the replication of specific sets of data between specific groups of servers. The user-defined Job settings begin and manage the replication process. Replication occurs by creating and running a Job.A Job can establish replication between a single Source server and single Target server, which is a standard Job, or for multiple servers using a centralization (many-to-one) or publication (one-to-many) Job.
The New Job Wizard is used to create new Jobs. After Jobs have been created, they may be modified for changing replication requirements.
Replication Jobs Overview When a Job is created, it defines the Source and Target servers, replication mode and type, and whether the Job will run continuously or periodically. Rules (filters) are also defined that specify what data is included or excluded in the replication process, and the destination path to where the data will be stored on the Target server.
The Source server identifies which server will be replicated, and what data is to be replicated from that server. The Target server identifies which server will receive the data and a storage location for the data. Other options describe how a replication Job will deal with the data. The schedule specifies when the replication will occur.
The user’s work is minimized by predefining a set of rules, Source servers, Target servers, options and schedules to form a Job. These abstractions provide a simple way to perform complex replication processes quickly.
Replication Jobs are created by the New Job Wizard. As soon as a Job is created, it can be modified or reconfigured using the Job Properties View. This chapter describes how to create a new Job, and, once configured, how to modify Jobs through the Job Properties View. The figure below shows the general user interface map for the Jobs functions of VRE 3.1. These functions and interfaces are described in this section.
119

VRE3-1_UserGuide.book Page 120 Tuesday, November 9, 2004 11:25 AM
Replication Jobs Overview
Note Jobs can also be created and managed through Replication Exec’s command-line interface, srTool. See Appendix A, Replication Exec Utilities and Tools, and the VERITAS Replication Exec (VRE 3.1) srTool Reference Guide.
Jobs: User Interface Map
120 VRE 3.1 Administrator’s Guide
VRE3-1_UserGuide.book Page 121 Tuesday, November 9, 2004 11:25 AM
Replication Jobs Overview
Job Creation or Modification Permissions The logged-on user must have a minimum of Backup rights, local Administrator rights to the local server, or Domain Administrator rights for all Source and Target servers when traversing the network of the replication Job.
Problems will occur when user permissions are incorrect. For example, if the user has Backup rights on the Source and only User rights on the Target server, then that user will not be able to create a replication Job without authenticating to the Target server. The user will be able to select the Source server, but when selecting the Target server, the logged-on user will be asked to authenticate to the Target server with credentials that have the necessary rights to create the replication Job.
Job Size Limits
VRE 3.1 Inherent Limitations
◆ Any one replication service agent (RSA) can be the source for only 64 replication Jobs running at any one time.
◆ If an RSA is scheduled to run in more than 64 replication Jobs at any one time, then only the first 64 of those Jobs will start. The other Jobs will start as others stop, cancel, or expire.
Note VSR 2.1 was limited to 64 replication pairs versus VRE 3.1’s 64 replication Jobs.
◆ Target protection is no longer a limiting factor in terms of the number of Source servers that can replicate to one central Target server. There is no definite upper limit on the number of Source servers in a centralization Job.
◆ These limitations apply to Jobs that are all running at the same time. A single RSA can appear in thousands of replication Jobs as a Source so long as no more than 64 Jobs run at any one time.
Windows Server versus Non-Server (Workstation) Limitations
◆ The non-server versions of Windows are limited to 64 unique connections.
◆ The server versions of Windows are unlimited, although there may be practical limits imposed by insufficient system resources.
Chapter 6, Creating and Managing Replication Jobs 121

VRE3-1_UserGuide.book Page 122 Tuesday, November 9, 2004 11:25 AM
Creating a New Replication Job
Creating a New Replication Job Jobs manage the replication process. Replication happens only through a Job. Any number of Jobs may be created to successfully replicate the data. Data that should be maintained together, such as database logs and journals, should be in the same Job.
Note Before creating a replication Job, it is assumed that the user has reviewed the information provided in the preceding sections, particularly “Planning for a Replication Exec System” on page 11, and “How Replication Exec Works” on page 49.
Accessing the New Job Wizard
▼ To access the New Job Wizard
1. Do one of the following to access the New Job Wizard:
◆ Open the Jobs View window, and from the Jobs drop-down menu select New Job,
◆ Right-click anywhere in the Jobs list area and select New Job from the context menu,
◆ Click the New Job button in the navigation window,
◆ Select Create a New Job on the Task Pane (left side) of the Administrative Console.
122 VRE 3.1 Administrator’s Guide

VRE3-1_UserGuide.book Page 123 Tuesday, November 9, 2004 11:25 AM
Creating a New Replication Job
Any of these actions will display the New Job Wizard - Job Type window.
2. In the displayed window, select a Job Type. The Job Type may be Standard (one-to-one), Centralization (many-to-one), or Publication (one-to-many). See “Replication Types” on page 52.
Note The Job Type cannot be changed after it has been defined for a Job. A new Job must be created to perform a different Job Type. All other Job characteristics, such as name, schedule, and properties, can be altered after the Job is created.
3. Click Next to continue.
Chapter 6, Creating and Managing Replication Jobs 123

VRE3-1_UserGuide.book Page 124 Tuesday, November 9, 2004 11:25 AM
Creating a New Replication Job
Entering the Job Name and Description
▼ To enter a Job name and description
1. The New Job Wizard - Job Name window will appear. Enter a Job Name and, optionally, a Job Description.
The Job Name should be unique among the Job names on the network. The Job Name can be 255 characters long and spaces are allowed.
The optional Job Description field allows the user to enter information that may help other users understand the function and settings for that particular Job. Comments are limited to 511 characters.
2. Click Next to continue.
124 VRE 3.1 Administrator’s Guide

VRE3-1_UserGuide.book Page 125 Tuesday, November 9, 2004 11:25 AM
Creating a New Replication Job
Selecting Replication Options
▼ To select the replication options
1. The New Job Wizard - Replication Options window will be displayed.
The Job replication options are described in the following table.
Option Description
Prescan If selected, VRE 3.1 will first scan the Source server(s) to determine the quantity of data to be synchronized. The prescan allows the user to more accurately monitor the progress of the replication. However, the prescan process results in a slower synchronization due to the additional effort.
If this option is not selected, greater performance is achieved by not having to determine the amount of data prior to replicating the data. This may be desirable if the user is not interested in monitoring the replication process or if the file sets to be replicated are very large.
Chapter 6, Creating and Managing Replication Jobs 125
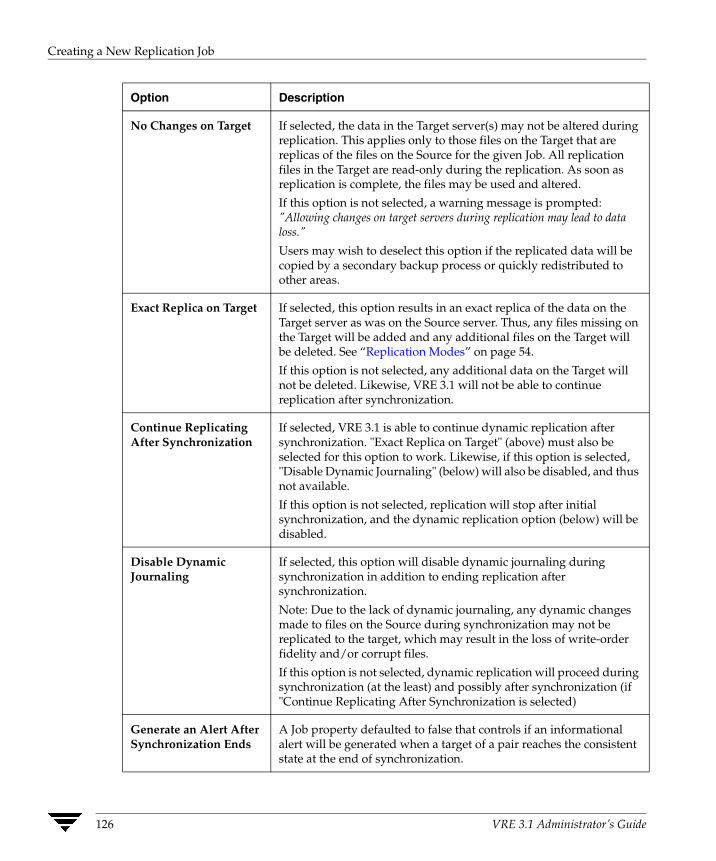
VRE3-1_UserGuide.book Page 126 Tuesday, November 9, 2004 11:25 AM
Creating a New Replication Job
Option Description
No Changes on Target If selected, the data in the Target server(s) may not be altered during replication. This applies only to those files on the Target that are replicas of the files on the Source for the given Job. All replication files in the Target are read-only during the replication. As soon as replication is complete, the files may be used and altered.
If this option is not selected, a warning message is prompted: "Allowing changes on target servers during replication may lead to data loss."
Users may wish to deselect this option if the replicated data will be copied by a secondary backup process or quickly redistributed to other areas.
Exact Replica on Target If selected, this option results in an exact replica of the data on the Target server as was on the Source server. Thus, any files missing on the Target will be added and any additional files on the Target will be deleted. See “Replication Modes” on page 54.
If this option is not selected, any additional data on the Target will not be deleted. Likewise, VRE 3.1 will not be able to continue replication after synchronization.
Continue Replicating After Synchronization
If selected, VRE 3.1 is able to continue dynamic replication after synchronization. "Exact Replica on Target" (above) must also be selected for this option to work. Likewise, if this option is selected, "Disable Dynamic Journaling" (below) will also be disabled, and thus not available.
If this option is not selected, replication will stop after initial synchronization, and the dynamic replication option (below) will be disabled.
Disable Dynamic Journaling
If selected, this option will disable dynamic journaling during synchronization in addition to ending replication after synchronization.
Note: Due to the lack of dynamic journaling, any dynamic changes made to files on the Source during synchronization may not be replicated to the target, which may result in the loss of write-order fidelity and/or corrupt files.
If this option is not selected, dynamic replication will proceed during synchronization (at the least) and possibly after synchronization (if "Continue Replicating After Synchronization is selected)
Generate an Alert After Synchronization Ends
A Job property defaulted to false that controls if an informational alert will be generated when a target of a pair reaches the consistent state at the end of synchronization.
126 VRE 3.1 Administrator’s Guide

VRE3-1_UserGuide.book Page 127 Tuesday, November 9, 2004 11:25 AM
Creating a New Replication Job
Option Description
Report Names of Files Synchronized by Pairs of this Job
A Job property defaulted to false that controls if the synchronization report of the respective pairs of a job will contain the names of synchronized files.
2. Select the desired Replication options, and click Next to continue.
Defining the Job Replication Pairs
▼ To define the Job replication pairs
1. The New Job Wizard - Replication Pairs window will be displayed. This window shows all of the Job pairs for the given Job.
As shown in the sample above, there are no items (Source-Target pairs) yet defined for this Job.
Chapter 6, Creating and Managing Replication Jobs 127

VRE3-1_UserGuide.book Page 128 Tuesday, November 9, 2004 11:25 AM
Creating a New Replication Job
1234567
At the most basic level, all replication is between a Source and a Target. This is called a Replication Pair. For example, in a publication Job (one-to-many), a single Source replicates to, say, seven Targets. The associated replication pairs are as follows.
Source #1 – Target # (i.e. 1:1) Source #1 – Target # (i.e. 1:2) Source #1 – Target # (i.e. 1:3) Source #1 – Target # (i.e. 1:4) Source #1 – Target # (i.e. 1:5) Source #1 – Target # (i.e. 1:6) Source #1 – Target # (i.e. 1:7)
All of these pairings constitute the Job itself. The Replication Pair Properties window allows the user to add, change or delete pairs for a Job.
Note Whenever possible, replication pairs should be combined into a single Job. In the above publication scenario of a single Source and seven Targets, when all replication pairs are combined into a single Job, only one outbound journal is created on the Source. In most applications, this is significantly more efficient than creating seven different one-to-one jobs, which results in seven different outbound journals, copies of data, and so on.
Note For very large Jobs with many Source and/or Target servers, users may prefer to use the command-line interface, srTool, to batch multiple Job functions. See Appendix A, Replication Exec Tools and Utilities, and the VERITAS Replication Exec (VRE 3.1) srTool Reference Guide.
Adding Pairs to a Job
▼ To add pairs to a Job
1. To add pairs, click the Add Pair button, which displays the Add a Replication Pair screen.
128 VRE 3.1 Administrator’s Guide

VRE3-1_UserGuide.book Page 129 Tuesday, November 9, 2004 11:25 AM
Creating a New Replication Job
2. Select a Source Server. Click the Select button to see a list of servers in this Neighborhood. In a Centralization (many-to-one) Job, select as many Source servers as needed. In a Publication (one-to-many) Job, select one Source. The selected server(s) appears as a Source in the Replication Pair list.
3. Click OK to continue.
4. Select a Target Server. Click the Select button to see a list of servers with the RSA software installed. Select the server to add to this Job. In a Publication (one-to-many) Job, select as many Target servers as needed. In a Centralization (many-to-one) Job, select one Target. The selected server appears as the Target in each Replication Pair.
Chapter 6, Creating and Managing Replication Jobs 129

VRE3-1_UserGuide.book Page 130 Tuesday, November 9, 2004 11:25 AM
Creating a New Replication Job
5. Click OK to continue.
The New Job Wizard - Replication Pairs window is displayed. This window shows the selected Source and Target server pairs.
Defining Replication Pair Properties
▼ To define replication pair properties
1. After selecting the replication Pair, click Properties to display the Replication Pair Properties window.
Setting Bandwidth Usage
This window allows the user to define the amount of system resources to be committed to the replication pair. See also “Performance and Network Resources” on page 14.
130 VRE 3.1 Administrator’s Guide

VRE3-1_UserGuide.book Page 131 Tuesday, November 9, 2004 11:25 AM
Creating a New Replication Job
Note Different bandwidth usage limits can be applied to different replication pairs within the same Job.
2. Set the desired bandwidth usage based on the available network resources, and the network connection type from the drop-down list.
Note VRE 3.1 does not automatically detect the type of connection of the system network. Thus, VRE 3.1 will throttle the bandwidth of the system specified by the user even if the connection type is incorrect.
Defining Job Scripts During a replication Job, it may be useful to run a command script before or after a significant event in the Job process. VRE 3.1 provides the capability of running scripts on the Source and/or Target machines when certain events happen during a replication Job.
Chapter 6, Creating and Managing Replication Jobs 131

VRE3-1_UserGuide.book Page 132 Tuesday, November 9, 2004 11:25 AM
Creating a New Replication Job
Scripts can be set to run before or after a Job. When a script is set to run before a Job, it is called a pre-script. When it runs after a Job, it is a post-script. For example, a pre-script might close a database before replicating it, and a post-script might commence a backup after the Job has run. Scripts can also be run on the Target where the Target data is found to be consistent or inconsistent
A VRE 3.1 script is simply a command that is executed by VRE 3.1 when a given event occurs.
The Script tells VRE 3.1 what to run when an event occurs. The first word of the script command must be the name of a program that can be executed. It can be the name of an .exe file, a .bat file, or a .cmd file, or a command built into the default Windows command processor, cmd.exe. Unless the program is in the System path, the entire path for the command must be included.
Note When the script file name contains some special characters such as “(“and“)”, you must surround the entire script file name with double-quote characters ( " ).
Following are some Script command examples.
◆ NET SEND myserver Job CopyAll Started
This command runs the NET.EXE program from the Windows System32 directory, which is in the System path. It posts a message on server "myserver"'s screen to tell an operator that the job named "CopyAll" started.
◆ D:\VRE\JobEnd.bat MyJob
This command runs a .bat file. Since the file is not in the standard System path, the full path name for this file must be used. The string "MyJob" is used as a parameter for this .bat file.
◆� "C:\Documents and Settings\MyName\DataConsistent.cmd" MyOtherJob
This command runs a .cmd file. Again, since the file is not in the standard System path, the full path name must be specified. And because there are spaces in the directory names, the name of the file must be surrounded with double-quote (") marks.
◆ dir D:\VRE\REPLICA\TARGET > C:\Status\dir.txt
This command runs the standard Windows command processor "dir" command to list the contents of a directory, and sends output to a file.
◆ C:\Windows\System32\cscript.exe D:\VRE\JobEnd.vbs MyLastJob
This command shows a method for running Visual Basic Scripting language (VBS) scripts. Notice that the first word of this command line is the name of the standard Windows VBS script processor, and the second word of the command line is the name of the actual .VBS script to run.
132 VRE 3.1 Administrator’s Guide

VRE3-1_UserGuide.book Page 133 Tuesday, November 9, 2004 11:25 AM
Creating a New Replication Job
Note Scripts will run under the security context of LOCAL_SYSTEM. Thus, scripts should be saved in a secure location with appropriate access rights.
A script has several properties as indicated in the following table.
Script Property Description
Script Command (The command to run)
See the description and examples in the preceding section.
Run Asynchronously Designates whether or not to wait for a script to finish. If selected, the script will run, but replication does not wait for it to finish before proceeding. If not selected, VRE 3.1 should wait for the script to finish before resuming replication for the pair of nodes which triggered the script to run.
Timeout Designates how long to wait for the script to finish before giving up waiting for it to occur. Timeout logically works only when "Run Asynchronously" is not selected.
Event Name: A symbolic name of the triggering event that causes the script to run.
Pre-Job Start ◆ Run the script just before the replication Job starts.
Post-Job End ◆ Run the script just after the replication Job ends.
Pair Data Consistent ◆ Run the script when the Target has a copy of the Source data that is consistent with some previous point in time. (This event happens after the job has finished synchronization, and finished "playing" all the dynamic journal data on the Target that accumulated during the synchronization phase of replication.)
Pair Data Inconsistent ◆ Run the script if the data on the Target becomes "inconsistent" with that on the Source due to a "rename into policy" event. Even after a Job has reached dynamic replication phase, with guarantees of "write-order fidelity" of source and Target data, there can be times when write-order fidelity cannot be preserved. If a file is renamed on the Source machine, and it suddenly matches the file name pattern for files to be replicated, VRE 3.1 must make a copy of the file on the target. While this copy is being made, there are no guarantees of write-order fidelity, and the Target data is deemed to be "inconsistent" with the Source.
Chapter 6, Creating and Managing Replication Jobs 133

VRE3-1_UserGuide.book Page 134 Tuesday, November 9, 2004 11:25 AM
Creating a New Replication Job
Setting Script Time-outs
As previously noted, any script has a timeout feature that allows a delay of up to 59 minutes to be specified before performing some function. In the case of Pre-scripts, the timeout specifies the delay before restarting the Job. A scheduled Job restarts as soon as a pre-script finishes. If the pre-script fails to run for any reason, the Job still commences after the timeout. If an indefinite timeout is desired, set the Timeout field to negative one (-1). For no timeout at all, set it to zero or check the “Run Asynchronously” box. If the script is required, then a (-1) is necessary; otherwise the Job will run without the script running.
Defining Job Scripts
▼ To define Job scripts
1. Select a Replication Pair in the Job Properties window.
2. Click the Properties button to display the Replication Pair Properties window.
3. Choose the appropriate Event Name for either the Source or Target, then click Edit to display the Script Properties screen. The Clear button removes a selected Script from a Source or Target.
4. Enter the proper Script syntax (path), or browse that server for the location of the script, and select the Script.
5. Click OK to return to the New Job Wizard - Replication Pairs window.
6. Click Next to continue.
134 VRE 3.1 Administrator’s Guide

VRE3-1_UserGuide.book Page 135 Tuesday, November 9, 2004 11:25 AM
Creating a New Replication Job
Entering Replication Rules
▼ To enter replication rules
1. The New Job Wizard - Replication Rules window will be displayed.
Rules specify what data is to be included and excluded from the replication Job. Rules also specify alternate destinations on the Target for the replicated data. See also “Replication Rules” on page 58.
Once rules are established, any volume or folder with a rule applied to it has a ruler icon on top of the file icon. Any folder or file that will be replicated by this rule is displayed with normal density, and any folder or file that is not to be replicated is greyed out.
Rule Types
Rule types include path mapping and data selection rules.
The Replication Rules screen shows the node icons (+) next to the Source server and drives have been expanded so that the volumes, directories, or files are displayed. In this example, we are replicating the data in the directory C:\Documents and Settings.
Chapter 6, Creating and Managing Replication Jobs 135

VRE3-1_UserGuide.book Page 136 Tuesday, November 9, 2004 11:25 AM
Creating a New Replication Job
Path Mapping Rules
Path Mapping Rule Description
Source Path The Source Path is determined by the location on the tree view where the rule is to be created. It is a volume-rooted (that is, fully qualified) path specification, and the rule dialog is completed with data selection rules. In other words, the rule designates a file specification and typically contains a wildcard pattern.
Target Path The Target Path is a specification to map selected files into the file system on the Target machine. This path specification is for a directory on the Target into which files in the qualification path will be replicated.
Caution VRE 3.1 allows different Jobs to be mapped into the same Target directory. The first Job to commence running prevents access to the Target by the second. The pair of the second Job will report a mapping path conflict in the Pairs Log and as an alert. When the first Job stops running, the second Job, if scheduled for that time, can begin replicating into that directory. Thus, same-named files will be overwritten by different Merged-mode Jobs, or all files from a previous Job will be erased by an Exact-mode Job. See “Replication Modes” on page 54.
Data Selection Rules
Data Selection Rule Description
Include Allows inclusion by file types that will be replicated.
Exclude Allows exclusion of certain file types that will not be replicated
Subdirectories Use the Apply to Subdirectories option to allow replication of the selected folder or volume on the Source and all folders (subdirectories) contained within it to corresponding subdirectories of the mapped path on the Target.
2. Select the desired folder and click the Add Rule button to access the Rules window, or right-click on data source to open the Rules menu and select Add Rule.
Note If an error occurs, it is probably due to the user not having sufficient permissions to write to the Target directory. See “Job Creation or Modification Permissions” on page 121.
136 VRE 3.1 Administrator’s Guide

VRE3-1_UserGuide.book Page 137 Tuesday, November 9, 2004 11:25 AM
Creating a New Replication Job
3. The Rule window is displayed, which allows both data selection rules and, if desired, path mapping rules to be modified. Only data included in a rule will be replicated.
4. To include and/or exclude data, click the Add button. This displays the Inclusion/Exclusion window.
A simple rule would be to include all Word document files (*.doc), and including all subdirectories.
5. Click OK to continue.
Chapter 6, Creating and Managing Replication Jobs 137

VRE3-1_UserGuide.book Page 138 Tuesday, November 9, 2004 11:25 AM
Creating a New Replication Job
6. Additionally, if we wish to exclude all text files (*.txt), we select the data in the Inclusions and Exclusions text box, and click Add. This time, in the Inclusion/Exclusion window, set the type as Exclusion, filter as *.txt, and select Apply to Subdirectories.
Note Inclusion and exclusion rules for specific files or file types with the option Apply to Subdirectories, will include all subdirectories, even though a particular subdirectory might not match the specified rule. VRE 3.1 matches patterns to files and not to the directories.
Note The order in which the rules are listed is very important. VRE 3.1 evaluates the inclusion and exclusion rules according to their Evaluation order. Thus, the most restrictive rule should have the greatest Evaluation Order number, while the least restrictive rule should have the lowest Evaluation Order number. The Evaluation order can be increased or decreased by selecting the rule and then pushing the up or down arrows. See “Rules for Selecting Data” on page 58.
138 VRE 3.1 Administrator’s Guide

VRE3-1_UserGuide.book Page 139 Tuesday, November 9, 2004 11:25 AM
Creating a New Replication Job
7. Click OK to continue.
The Rule window now shows the Source path, the data to be included and excluded, and the Target path.
This screen also has a check box that when selected validates that the Target paths do not violate the Target path rules.
8. The Target path is created by default, and can be redefined through the Servers Properties View (see “Server Properties - Volumes Tab” on page 95). If a different Target path is desired, select the indicated Target Path, and click the Edit button. This displays the Target Path window.
Chapter 6, Creating and Managing Replication Jobs 139

VRE3-1_UserGuide.book Page 140 Tuesday, November 9, 2004 11:25 AM
Creating a New Replication Job
9. To change the path for the Target server directory, select Custom Path, and type a new directory or browse to the Target path. This re-displays the New Job Wizard -Replication Rules window.
Alternatively, click on View As to get a list of all selection rules. This is helpful in locating the rules.
10. Click OK to continue.
Once rules are established, any volume or folder with a rule applied to it has a ruler icon on top of the file icon. Any folder or file that will be replicated by this rule is displayed with normal density, and any folder or file that is not to be replicated is grayed out.
ruler icon
Note Some Windows data types are not replicated, such as reparse points and encrypted files and directories. These directory types will appear in the rule tree without a plus (+) sign, similar to an empty directory, and you will not be able to open those icons. A rule cannot be added to reparse or encrypted directories. See “Non-Replicated Files” on page 50.
11. Click Next to continue.
140 VRE 3.1 Administrator’s Guide

VRE3-1_UserGuide.book Page 141 Tuesday, November 9, 2004 11:25 AM
Creating a New Replication Job
Scheduling Replication Jobs
1. The New Job Wizard - Replication Schedule window is displayed.
2. Create a replication schedule by clicking at least one interval marker ON (highlighted). For example, selecting the blocks in the columns beneath 2a, 8a and 2p results in replication being initiated on Monday through Saturday at 2:00 AM, 8:00 AM, and 2:00 PM (local time).
Note Although Jobs may be scheduled to run in one hour increments, they can only be scheduled to restart in two-hour increments. Likewise, Jobs can be scheduled to run in lesser schedule windows, but only using the srTool. See the srTool Reference Guide.
Chapter 6, Creating and Managing Replication Jobs 141

VRE3-1_UserGuide.book Page 142 Tuesday, November 9, 2004 11:25 AM
Creating a New Replication Job
Scheduling and Display Options
Additional options available on the Replication Schedule window are described in the following table.
Scheduling Options Description
Enable Scheduled Starts A new Job must be enabled before it begins replicating automatically, even if that Job is scheduled to run. Any Job can be run manually regardless of this setting. Select this option to enable the Job to begin immediately after the Job is created.
Likewise, a disabled Job does not run, even in scheduled periods, until it is enabled again. The Job can be manually started and stopped.
Allow Synchronization to continue after scheduled period expires.
If selected, replication is allowed to complete even if the schedule period is over. This option allows the replica to be consistent. This is equivalent to a Stop command.
If not selected, the replication is cancelled at the end of the schedule period, even though all of the data might not have been replicated. This is equivalent to a Cancel command and may result in the loss of some changes or an unusable replica.
Display Options Select whether the displayed time should be in Local Time or Greenwich Mean Time (GMT).
3. Select the desired scheduling options, and click Finish. The Job is now ready to begin replication.
142 VRE 3.1 Administrator’s Guide

VRE3-1_UserGuide.book Page 143 Tuesday, November 9, 2004 11:25 AM
Backing Up Replication Job Databases
Backing Up Replication Job Databases Users may want to back up a Job after the Job has been created and run. Jobs are backed up by backing up the VRE 3.1 database, which backs up all Jobs. To perform a Job backup or restore, see “VRE 3.1 Database Backup and Restore” on page 180.
Chapter 6, Creating and Managing Replication Jobs 143

VRE3-1_UserGuide.book Page 144 Tuesday, November 9, 2004 11:25 AM
Modifying Replication Jobs
Modifying Replication Jobs Jobs are only created using the New Jobs Wizard. Once a Job has been created, it can be modified or reconfigured using the Jobs View properties. In general, the screens and settings of the Jobs View are very similar to those of the New Jobs Wizard.
The purpose of the Jobs View Properties is to modify or reconfigure Jobs to better accomplish ongoing and changing replication needs.
Note In order to modify existing Jobs, the Jobs must be stopped prior to making the changes, and restarted for the changes to take effect.
Accessing the Jobs View Window The Jobs View window is displayed when Jobs View is selected from the Administration Console. This window provides a list of all existing Jobs and their status within the Replication Neighborhood.
144 VRE 3.1 Administrator’s Guide

VRE3-1_UserGuide.book Page 145 Tuesday, November 9, 2004 11:25 AM
Modifying Replication Jobs
Although only a few columns—Icon, Name, State and Scheduled Starts—are shown in the window, the Jobs View window actually contains 11 columns. The additional columns are displayed by pressing the left and right arrow keys at the bottom of the window. The Jobs View screen columns are described in the following table.
Jobs View Column Description
Name / Status Icon Displays the given name for each Job.
The Status icon graphically represents the state of the Job: running or not running.
Status Displays the current state of each Job.
Scheduled Starts Displays whether or not scheduled starts are enabled for each Job.
Type Displays the type of Job: Standard, Centralization or Publication.
Description Displays the description of the Job as entered by the user.
Last Start Time Displays the time, time zone, and date on which each Job last started.
Number of Alerts Displays the number of system Alerts associated with each Job.
Current Operationa Displays the currently executing operation for each Job.
Next Pending Operationa Displays the next pending operation for each Job.
Last Requested Operationa
Displays the most recently requested operation for each Job.
a. The available Job operations as defined in “Job Status States” on page 87.
Click on any column name, such as Name or Status, to sort the display by that item.
Chapter 6, Creating and Managing Replication Jobs 145

VRE3-1_UserGuide.book Page 146 Tuesday, November 9, 2004 11:25 AM
Modifying Replication Jobs
Using the Jobs View Specific Menu Selecting Jobs from the main menu bar or right-clicking anywhere on the Jobs View window displays the Jobs View specific menu. Many Job creation and monitoring functions can be performed from this menu.
Functions available from the Jobs View menu are described in the following table.
Jobs View Menu Function
Description
Create New Job Opens the New Job Wizard
Delete Job Deletes a Job from the list control
Properties... Opens the Job Properties property sheet
Monitor jobs... Opens the Job Details window to monitor replication Jobs
Start Job Starts the selected Job
Stop Job Gracefully stops the selected Job
Cancel Job Abruptly (ungracefully) cancels the selected Job
View Job Log... Displays a time/date log of replication activities.
Enable Scheduled Starts Enables scheduled starts for a Job
Disable Scheduled Starts
Disables scheduled starts for a Job
Refresh (F5) Refreshes the contents of the list control
146 VRE 3.1 Administrator’s Guide

VRE3-1_UserGuide.book Page 147 Tuesday, November 9, 2004 11:25 AM
Modifying Replication Jobs
Accessing the Job Properties Windows The Job Properties window is accessed by selecting Properties from the Jobs View menu or the Jobs drop-down menu from the main menu bar.
Four tabs located across the top of the Job Properties window allow the user to define and set properties for the Job (General tab), identify the replication pair properties (Replication Pairs tab), define Job rules (Rules tab), and schedule the Job activity (Schedule tab).
The functionality of each of these Job Properties (tabs) is provided in the following sections.
Modifying Job Name, Job Description and Replication Options Selecting the Job Properties - General window allows the user to modify the name and description for the Job. This window also allows the user to redefine the replication options for the Job. The Job replication options are described in “Selecting Replication Options” on page 125.
Chapter 6, Creating and Managing Replication Jobs 147

VRE3-1_UserGuide.book Page 148 Tuesday, November 9, 2004 11:25 AM
Modifying Replication Jobs
Modifying the Replication Pairs The Job Properties - Replication Pairs window is used to modify the pairs involved in a replication. It is accessed by pressing the Replication Pairs tab on the Job Properties window. This window shows all of the Job pairs identified for the given Job.
Note For very large Jobs with many Sources and/or Targets, users may prefer to use the command-line interface, srTool, to batch multiple Job functions. See Appendix A, Replication Exec Tools and Utilities, and the srTool Reference Guide.
148 VRE 3.1 Administrator’s Guide

VRE3-1_UserGuide.book Page 149 Tuesday, November 9, 2004 11:25 AM
Modifying Replication Jobs
Adding Pairs (Servers) to a Job
▼ To add pairs to a Job
1. Click the Add button to add a replication pair in a Centralization or Publication Job. In a Standard Job, there is only one pair and the only option is to delete that pair, and then add a new pair.
2. The Add Replication Pair window appears. In a Centralization Job, the Target is already selected. In a Publication Job, the Source is already selected. Click the Select button to specify a server to add to this Job. Select from the list of servers and click OK.
Deleting Pairs (Servers) from a Job
▼ To delete pairs from a Job
1. Select the pair to be deleted. Click the Delete button. Confirm deletion by clicking Yes.
Note Deleting replication pairs from a Job can result in old selection rules being left in the database. These rules have no effect on replication, but can appear in the Console.
Chapter 6, Creating and Managing Replication Jobs 149
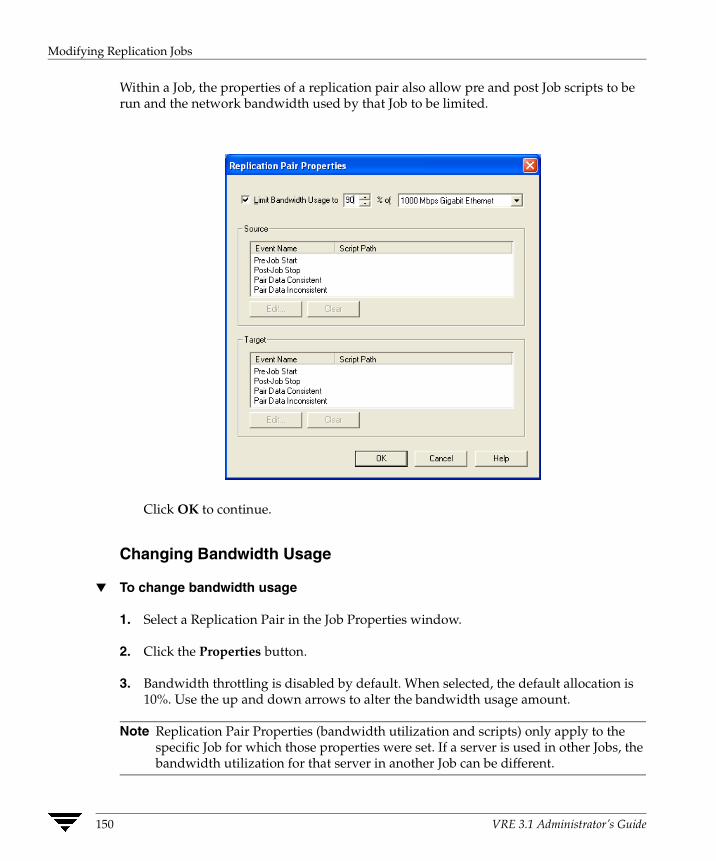
VRE3-1_UserGuide.book Page 150 Tuesday, November 9, 2004 11:25 AM
Modifying Replication Jobs
Within a Job, the properties of a replication pair also allow pre and post Job scripts to be run and the network bandwidth used by that Job to be limited.
Click OK to continue.
Changing Bandwidth Usage
▼ To change bandwidth usage
1. Select a Replication Pair in the Job Properties window.
2. Click the Properties button.
3. Bandwidth throttling is disabled by default. When selected, the default allocation is 10%. Use the up and down arrows to alter the bandwidth usage amount.
Note Replication Pair Properties (bandwidth utilization and scripts) only apply to the specific Job for which those properties were set. If a server is used in other Jobs, the bandwidth utilization for that server in another Job can be different.
150 VRE 3.1 Administrator’s Guide

VRE3-1_UserGuide.book Page 151 Tuesday, November 9, 2004 11:25 AM
Modifying Replication Jobs
Revising Job Scripts
Refer to “Defining Job Scripts” on page 131 for information about Job Scripts.
▼ To revise a Job script
1. Select a Replication Pair in the Job Properties window.
2. Click the Properties button.
3. Choose the desired Script for either the Source or Target, then click Edit to display the Script Properties screen. The Clear button removes a selected Script from a Source or Target.
4. Enter the Script path and parameters, or browse that server for the location of the script.
5. Select the desired script.
6. Click OK to complete the selection.
Chapter 6, Creating and Managing Replication Jobs 151

VRE3-1_UserGuide.book Page 152 Tuesday, November 9, 2004 11:25 AM
Modifying Replication Jobs
Modifying Replication Rules The Job Properties - Rules window allows users to modify the replication rules for a Job. It is accessed by pressing the Rules tab on the Job Properties window. The Rules Tab window allows the user to select the data to be replicated and the path directories for the data. The user has the option of viewing the data in Source Tree or Rule List views.
Rules permit the user to include or exclude files, file types, folders, or volumes from the replication process. Rules also map the destination path for the replicated data on the Target server.
Once rules are established, that volume or folder icon shows a bright dot in the center. Altered icons appear on any folder that has a rule applied, but not on folders that have no rules applied. See also “Replication Rules” on page 58.
Rule Types
See “Rule Types” on page 135 for additional information on Replication Rules.
152 VRE 3.1 Administrator’s Guide

VRE3-1_UserGuide.book Page 153 Tuesday, November 9, 2004 11:25 AM
Modifying Replication Jobs
Modifying or Adding Rules
▼ To modify or add Job rules
1. Select the Rules tab on the Job View window to access the Job Properties - Rules window.
2. Expand the tree, right-click on a volume or a folder, and select either Add Rule or Edit Rule to open the Rules dialog.
Note Apply rules to the highest logical level in the tree. Path-mapping rules then apply to all subdirectories below this level, unless another rule is set for a subdirectory.
Note Some Windows data types are not replicated, such as reparse points and encrypted files and directories. These directory types will appear in the rule tree without a plus (+) sign, similar to an empty directory, and those icons will not be openable. A rule cannot be added to reparse or encrypted directories. See “Dynamic Replication” on page 50.
Chapter 6, Creating and Managing Replication Jobs 153

VRE3-1_UserGuide.book Page 154 Tuesday, November 9, 2004 11:25 AM
Modifying Replication Jobs
Using the Rules Dialog
Open the Rules dialog by right-clicking on a volume or folder or selecting Add Rule or Edit Rule from the context menu.
Note Each volume or folder can have only one rule, but each rule may have as many inclusions or exclusions as desired. If desired, also create a custom Target path. The default mapping rule for each volume or folder is the default path to the Target.
The Source path appears at the top of the rule dialog. This displays the path to the folder or volume to which this rule will apply.
“Orphan” rules occur if the directory on the Source is deleted to which the rule applied. A deleted directory no longer appears in the Source Tree. To delete a rule for a directory that no longer exists on the Source, change the view to Rules List, using the drop down menu in the Rules tab of the Job Properties page.
154 VRE 3.1 Administrator’s Guide

VRE3-1_UserGuide.book Page 155 Tuesday, November 9, 2004 11:25 AM
Modifying Replication Jobs
Viewing Inclusions and Exclusions
Below the Source path is the Inclusions and Exclusions field. This contains a list with the following columns.
Columns Description
Action Inclusion or Exclusions
Filter The document extension or filename to Include or Exclude (ex: *.doc, *.*, or filename.htm)
Apply to Subdirectories
Yes or No
Note The order in which Inclusions and Exclusions are added determines the order in which they are applied. The first matching rule in the (correct) bottom-to-top ordering is the one that controls whether a file is replicated or not.
Be sure not to backtrack and re-include (or exclude) files to be excluded (or included). If a rule has been added in an incorrect order, use the up or down arrows to elevate or demote Inclusions or Exclusions so that they occur in logical order.
The Add button allows a new Inclusion or Exclusion to be added. The Edit button allows an existing Inclusion or Exclusion to be edited. The Delete button allows unwanted Inclusions or Exclusions to be deleted.
▼ To add a new rule
1. Click on the Add button in the Inclusions and Exclusions group.
2. Choose the type, either Inclusion or Exclusion. Inclusion specifies which files to include while replicating, whereas Exclusion specifies which files not to include.
3. Specify the file types to include or exclude. Wildcards are valid specifiers. The user may specify a filename, an extension, or any combination of these two with wildcards.
Chapter 6, Creating and Managing Replication Jobs 155

VRE3-1_UserGuide.book Page 156 Tuesday, November 9, 2004 11:25 AM
Modifying Replication Jobs
Note Remember that the order that the inclusions and exclusions are entered determines the order that they run. Use the up or down arrows to reorganize rules already entered, if necessary.
4. Leave the Apply to Subdirectories check box checked if the Inclusions or Exclusion should be applied to all related subdirectories, otherwise uncheck it. Click OK to finish and return to the Rules dialog.
Changing the Target Path
Target Path field appears below the Inclusion/Exclusion rules on the Rules window. Here the user can redirect the path for replicated files on the Target servers. A destination rule determines how replicated data is stored on a Target server in a server-independent way. There can only be one path for each rule.
User options are to accept the default path or to create a custom path.
▼ To create a custom Target path
1. Click on the Edit button in the Target Path area.
The Target Path dialog appears, displaying the default path. The Default button is selected.
2. In the Custom Path field, enter the custom path where this Target server stores replicated data for this Job. The browse button to the right of the custom path field opens a source tree window, and allows the user to select the path from the tree.
VRE 3.1 gives a mapping path conflict error if the custom path rule will cause replica data to be overwritten or violates the replica characteristics.
Note A mapping path conflict error only shows up in the Alerts after a Job is created and executed. The error does not prevent the Job from being created or executed.
156 VRE 3.1 Administrator’s Guide

VRE3-1_UserGuide.book Page 157 Tuesday, November 9, 2004 11:25 AM
Modifying Replication Jobs
For example, if rule 1 sends data from the Source:
\\Srvr1\Dir1\Foo1 to the \\Target Srvr2\D\VRE\Replica\Bat
and if rule 2 then attempts to send data from the Source:
\\Srvr1\Dir1\Foo1\Bar1 to the \\Target Srvr2\D\VRE\Replica\Bat
then VRE 3.1 does not allow rule 2 because the data would be overwritten.
If rule 2 attempts to send data from the Source:
\\Srvr1\Dir1\Foo1\Bar1 to the \\Target Srvr2\D\VRE\Replica\Bat\Foo
then VRE 3.1 does not allow rule 2 because the Target would not have the same characteristics as the Source.
3. Click OK to finish creating the custom Target path.
4. Click OK to complete the rule creation process.
Editing an Existing Rule
To edit an existing rule, click on the Edit button in the Rules dialog, and then follow the steps outlined above to change the settings of that rule.
Changing a Job Schedule The Job Properties - Schedule window is accessed by pressing the Schedule tab on the Job Properties window. The Schedule Tab window allows the user to define when and for how long a Job will be activated.
Chapter 6, Creating and Managing Replication Jobs 157

VRE3-1_UserGuide.book Page 158 Tuesday, November 9, 2004 11:25 AM
Modifying Replication Jobs
VRE 3.1 synchronizes the servers at a scheduled start time and then continues to replicate for the scheduled period of time. The schedule can also be set to replicate continuously for the exact replication mode.
For example, selecting the blocks in the columns beneath 2a, 8a and 2p results in replication being initiated at Monday through Saturday at 2:00 AM, 8:00 AM, and 2:00 PM (local time).
Note If a Job schedule expires, synchronization will continue until it is complete regardless of the schedule if both Selection Options are selected. It will also complete any object transfers in progress before stopping. This is equivalent to the Stop command on the menu. If both Selection Options are not selected, the software behaves as a Cancel, which abruptly terminates the Job without completing synchronization or any in-progress object transfers. This can result in an invalid replica.
158 VRE 3.1 Administrator’s Guide

VRE3-1_UserGuide.book Page 159 Tuesday, November 9, 2004 11:25 AM
Modifying Replication Jobs
Note Although Jobs may be scheduled to run in one-hour increments, they can only be scheduled to start in two-hour increments. Likewise, Jobs can be scheduled to run in lesser schedule windows, but only when using VRE 3.1’s command-line utility, srTool. See the srTool Reference Guide.
Scheduling and Display Options
Additional options available on the Replication Schedule window include Schedule options and Display options. See “Scheduling and Display Options” on page 142, for descriptions of these options.
Scheduling Examples
▼ To replicate 24 hours per day, 7 days per week
1. On the Job Properties Schedule window, click the Set All button to select the entire time period. If Set All is not selected, then at least one interval must be selected as the time for replication to begin.
If no intervals are selected on the schedule, then replication will never start.
2. On the Job Properties General window, select Continue Replicating After Synchronization. With the entire time period selected and enabled, this allows VRE 3.1 to replicate continuously.
With the entire time period selected, if something such as a power failure causes replication to stop, when power resumes VRE 3.1 automatically restarts the replication process by resynchronizing and resuming replication. If the entire time period is not selected, then VRE 3.1 waits until the next scheduled and enabled interval to resynchronize.
▼ To set a limited replication schedule
1. Choose a Job Properties General option: Continue Replicating After Synchronization means that VRE 3.1 will synchronize the data and then continue to keep the Source and Target data identical until the scheduled time ends. If that option is turned off, VRE 3.1 will synchronize the data and stop until the next interval begins.
2. On the time grid, click to select a scheduled time, which will show as highlighted on the screen. Clicking the row or column headers allows an entire day or a daily time period to be selected, respectively.
Chapter 6, Creating and Managing Replication Jobs 159

VRE3-1_UserGuide.book Page 160 Tuesday, November 9, 2004 11:25 AM
Deleting a Job
Clicking the Set All button creates one large interval. There is no new interval to cause VRE 3.1 to synchronize again if the option Continue Replicating After Synchronization is turned off.
Note If the Set All button is selected and the Job Properties General option Continue Replicating After Synchronization is not selected, VRE 3.1 will synchronize once and stop. Only changing the schedule or manually Starting or Stopping the Job will restart the replication process.
Deleting a Job If a Job will no longer be used, it can be deleted. Any data previously replicated to a Target remains untouched by this delete command.
▼ To delete a Job
1. Highlight the Job in the Replication Jobs List area.
2. Select Delete from the Jobs Menu, or right-click to access the context menu, and select Delete.
Backing Up Replication Job Databases Users may want to back up a Job after the Job has been created and run. To perform a Job backup or restore, see “VRE 3.1 Database Backup and Restore” on page 180.
160 VRE 3.1 Administrator’s Guide

VRE3-1_UserGuide.book Page 161 Tuesday, November 9, 2004 11:25 AM
Troubleshooting the VRE 3.1 System
7 This section includes references to areas of the VRE 3.1 Administrator’s Guide that may provide answers to general troubleshooting issues. The situations or problems are arranged by key topics. This section also includes specific troubleshooting symptoms and solutions that are not otherwise addressed in this manual.If problems are encountered when installing or configuring the Replication Exec software, or running replication Jobs, consider the following approach.
1. Utilize the VRE 3.1 online Help, accessible from the software or from the Information Desk of the Administration Console.
2. Review the subjects under the related topics in the “General Troubleshooting Issues” on page 162.
3. Review the unique problems listed in “Specific Troubleshooting Symptoms” on page 171.
4. Consult the Table of Contents and Index of this VRE 3.1 Administrator’s Guide for related subjects.
5. Consult the technical support web site (see “Getting Help” in the Preface to the VRE 3.1 Administrator’s Guide).
6. Contact Technical Support directly (see “Getting Help” in the Preface to the VRE 3.1 Administrator’s Guide).
161

VRE3-1_UserGuide.book Page 162 Tuesday, November 9, 2004 11:25 AM
General Troubleshooting Issues
General Troubleshooting Issues Refer to the following sections to determine if a topic has been addressed elsewhere in the VRE 3.1 Administrator’s Guide that might help to resolve a problem. The topics are presented by key features and functions of replication.
Administration Console Issues
Subjects Find solutions here...
Accessing the Administration Console “Accessing the Console” on page 71
Accessing the VRE 3.1 documentation and technical support
“Discovering the Console Information Desk” on page 79
Assessing the overall replication status, including idle and active Jobs, alert and server summaries, and general RMS information
“Discovering the Console Monitor View” on page 115
Changing the Server status “Changing the Status of a Server” on page 99
Creating, modifying, monitoring, stopping and starting replication Jobs
“Discovering the Console Jobs View” on page 83
Deploying, deleting, modifying and monitoring replication Servers
“Discovering the Console Servers View” on page 90
Determining if more than one Console can be installed on a network.
“Administration Console” on page 7
Determining the user security and credentials “Console Security and Credentials” on page 70
Displaying Server logs “Server Properties - Log Tab” on page 97
Filtering Alert menus “Filtering Drop-Down Lists” on page 102
Installing the Console remotely “Installing the RSA Software Remotely” on page 36
Monitoring the various alerts for Jobs and Servers, and determining their severity
“Discovering the Console Alerts View” on page 100
Understanding the Console’s Alert functions “Working with Alert Functions” on page 104
Understanding the Console’s common features “Common Console Features” on page 73
162 VRE 3.1 Administrator’s Guide

VRE3-1_UserGuide.book Page 163 Tuesday, November 9, 2004 11:25 AM
General Troubleshooting Issues
Subjects Find solutions here...
Understanding the Console’s Jobs functions “Selection Pane” on page 86
Understanding the Console’s Server functions “Working with Server Functions” on page 93
Uninstalling the Console software “Uninstalling the Console” on page 46
Verifying minimum hardware and software requirements
“Supported Windows Operating Systems” on page 17
Viewing information on a Server “Viewing Server Properties” on page 93
Data Replication Issues
Subjects Find solutions here...
Data at Target does not exactly match the data on the Source
“Replication Modes” on page 54
Different Jobs being mapped to the same Target directory
“Rule Types” on page 135 and “Invalid Mapping Path” on page 62
Pre-planning considerations for data protection.
“Data-Protection Questions” on page 12
VRE 3.1 compatibility with other programs “Compatibility with Other Applications” on page 19
Hardware and Software Issues
Subjects Find solutions here...
Removing the VRE 3.1 software “Removing the Replication Exec Software” on page 45
Servers for VRE 3.1 components meet minimum hardware and software requirements
“Supported Windows Operating Systems” on page 17
Upgrading to VRE 3.1 from earlier versions “Upgrading from Earlier Versions” on page 24
Chapter 7, Troubleshooting the VRE 3.1 System 163
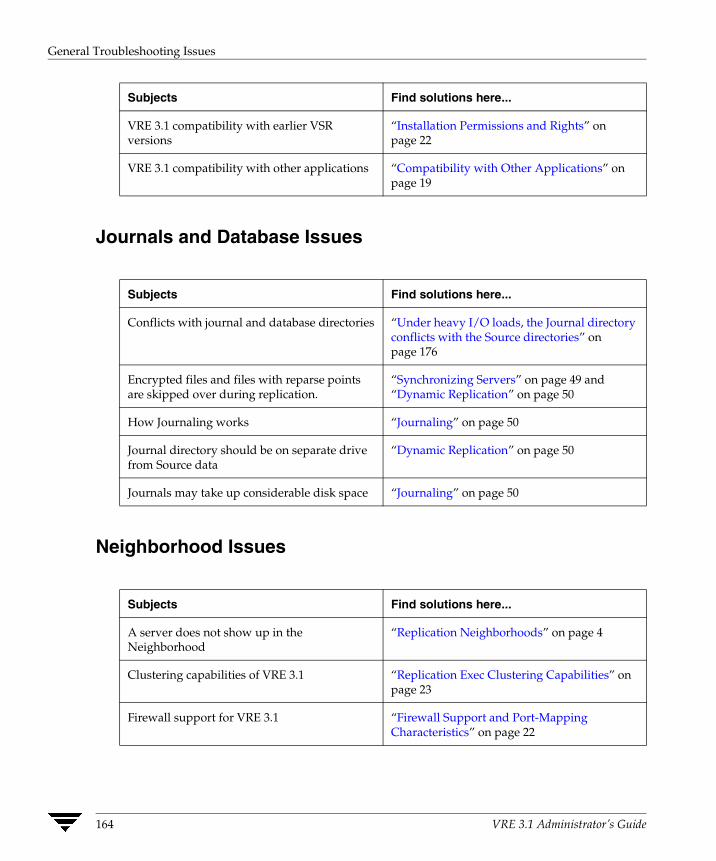
VRE3-1_UserGuide.book Page 164 Tuesday, November 9, 2004 11:25 AM
General Troubleshooting Issues
Subjects Find solutions here...
VRE 3.1 compatibility with earlier VSR versions
“Installation Permissions and Rights” on page 22
VRE 3.1 compatibility with other applications “Compatibility with Other Applications” on page 19
Journals and Database Issues
Subjects Find solutions here...
Conflicts with journal and database directories “Under heavy I/O loads, the Journal directory conflicts with the Source directories” on page 176
Encrypted files and files with reparse points are skipped over during replication.
“Synchronizing Servers” on page 49 and “Dynamic Replication” on page 50
How Journaling works “Journaling” on page 50
Journal directory should be on separate drive from Source data
“Dynamic Replication” on page 50
Journals may take up considerable disk space “Journaling” on page 50
Neighborhood Issues
Subjects Find solutions here...
A server does not show up in the Neighborhood
“Replication Neighborhoods” on page 4
Clustering capabilities of VRE 3.1 “Replication Exec Clustering Capabilities” on page 23
Firewall support for VRE 3.1 “Firewall Support and Port-Mapping Characteristics” on page 22
164 VRE 3.1 Administrator’s Guide

VRE3-1_UserGuide.book Page 165 Tuesday, November 9, 2004 11:25 AM
General Troubleshooting Issues
Network System Issues
Subjects Find solutions here...
Adjusting VRE 3.1 bandwidth usage limits to improve performance
“Replication Exec Bandwidth Usage Limit” on page 17 and “Setting Bandwidth Usage” on page 130
Adjusting Windows system memory allocation to improve performance
“Windows Operating System TCP/IP Configuration” on page 16
Assessing system resources “Replication Exec Bandwidth Usage Limit” on page 17
Enhancing network performance “Improving Performance” on page 16
Pre-planning considerations for network systems
“Network System Questions” on page 12
The existing network is insufficient for the intended replication program.
“Network System Questions” on page 12 and “Performance and Network Resources” on page 14
Understanding system resources and performance
“Performance and Network Resources” on page 14
Replication Alerts, Logs and Monitoring Issues
Subjects Find solutions here...
Filtering the Alert items displayed “Sorting Alerts” on page 104
Job log limits “Logs” on page 109
SNMP trap support “SNMP Traps” on page 108
Understanding the Console’s Monitor View “Discovering the Console Monitor View” on page 115
Viewing Alert details “Alert Properties - Details” on page 107
Viewing Job logs “Job Logs” on page 110
Viewing Pair logs “Pair Logs” on page 111
Chapter 7, Troubleshooting the VRE 3.1 System 165

VRE3-1_UserGuide.book Page 166 Tuesday, November 9, 2004 11:25 AM
General Troubleshooting Issues
Subjects Find solutions here...
Viewing replication activity “Discovering the Console Monitor View” on page 115
Viewing Server logs “Server Logs” on page 110
Replication Jobs Issues
Subjects Find solutions here...
A description of replication scheduling “Replication Scheduling” on page 63
A description of the modes of replication with examples
“Replication Modes” on page 54
A description of the types of replication “Replication Types” on page 52
Backing up replication Job databases “VRE 3.1 Database Backup and Restore” on page 180
Cannot replicate the Windows operating system
“Cannot Replicate the Windows Operating System” on page 68
Target data file types must be NTFS for replication to occur
“Server Properties - Volumes Tab” on page 95
Deleting a Job “Deleting a Job” on page 160
How dynamic replication works “Dynamic Replication” on page 50
How server sychronization works “Synchronizing Servers” on page 49
Job size limitations “Job Size Limits” on page 121
Job type cannot be changed after it has been created.
“Replication Types” on page 52
Modifying replication Jobs “Modifying Replication Jobs” on page 144
Pre-planning considerations for replication Jobs
“Replication Job Questions” on page 13
Scheduling replication “Scheduling Replication Jobs” on page 141 and “Changing a Job Schedule” on page 157
166 VRE 3.1 Administrator’s Guide

VRE3-1_UserGuide.book Page 167 Tuesday, November 9, 2004 11:25 AM
General Troubleshooting Issues
Subjects Find solutions here...
There are too many alerts being generated during replication
“SNMP Traps” on page 108
Types of files that are not replicated “Non-Replicated Files” on page 50
Typical uses of VRE 3.1 with examples “Typical Uses for Replication Exec” on page 64
Understanding and selecting the replication pairs
“Defining the Job Replication Pairs” on page 127 and “Modifying the Replication Pairs” on page 148
Understanding and using Job scripts “Defining Job Scripts” on page 131
Understanding Job scheduling options “Scheduling and Display Options” on page 142
Understanding the Job replication options “Selecting Replication Options” on page 125
Using the New Job Wizard “Creating a New Replication Job” on page 122
Replication Management Server (RMS) Issues
Subjects Find solutions here...
Each server in the Neighborhood requires access to the RMS
“Replication Management Server” on page 5
Installing the RMS software “Installing VRE 3.1 Software from CD” on page 26
Minimum hardware and software requirements
“Supported Windows Operating Systems” on page 17
Must have a single, static IP address for RMS “Problems are encountered when connecting to an RMS with multiple IP addresses” on page 174
Only one RMS can be installed on a Neighborhood
“Replication Management Server” on page 5
Pre-planning considerations for the RMS “Network System Questions” on page 12
Chapter 7, Troubleshooting the VRE 3.1 System 167

VRE3-1_UserGuide.book Page 168 Tuesday, November 9, 2004 11:25 AM
General Troubleshooting Issues
Subjects Find solutions here...
RMS installation with clustering. “Replication Exec Clustering Capabilities” on page 23
The RMS server should be protected by an uninteruptible power supply (UPS).
“Replication Management Server” on page 5
The RMS should be installed on a non-critical server and/or subnet with easy access to all servers.
“Replication Management Server” on page 5
The RMS should be installed prior to the other VRE 3.1 components
“Replication Management Server” on page 5
Uninstalling the RMS software “Uninstalling the RMS” on page 46
The service fails to start due to a corrupt database.
“VRE 3.1 Database Backup and Restore” on page 180
Replication Rules Issues
Subjects Find solutions here...
Changing the target path “Changing the Target Path” on page 156
Data selection rules “Rules for Selecting Data” on page 58
Description of replication rules “Replication Rules” on page 58 and “Rule Types” on page 152
Modifying replication rules “Modifying Replication Rules” on page 152
Order of rules selection must be correct “Entering Replication Rules” on page 135 and “Viewing Inclusions and Exclusions” on page 155
Rules for placing data on the target server with examples
“Rules for Placing Data on the Target” on page 59
168 VRE 3.1 Administrator’s Guide

VRE3-1_UserGuide.book Page 169 Tuesday, November 9, 2004 11:25 AM
General Troubleshooting Issues
Replication Server Issues
Subjects Find solutions here...
Accessing a Server’s logs “Server Properties - Log Tab” on page 97
Changing the status of a Server “Changing the Status of a Server” on page 99
Understand the Console’s Servers functions “Working with Server Functions” on page 93
Understanding the Console’s Servers View “Discovering the Console Servers View” on page 90
Viewing information on a Server “Viewing Server Properties” on page 93
Viewing information on a Server’s folders “Server Properties - Folders Tab” on page 96
Viewing information on a Server’s logs “Server Properties - Log Tab” on page 97
Viewing information on a Server’s serial number
“Server Properties - Serial Number Tab” on page 98
Viewing information on a Server’s volumes “Server Properties - Volumes Tab” on page 95
Replication Service Agent (RSA) Issues
Subjects Find solutions here...
After installation, RSA is not visible to RMS “A Replication Service Agent (RSA) Server is unable to connect to the Replication Management Server (RMS)” on page 177
Authentication is required during RSA installation
“Installation Permissions and Rights” on page 22
Encrypted files and files with reparse points are skipped over during replication.
“Synchronizing Servers” on page 49 and “Dynamic Replication” on page 50
Installing the RSA remotely “Installing the RSA Software Remotely” on page 36
Minimum hardware and software requirements for the RSA
“Supported Windows Operating Systems” on page 17
Chapter 7, Troubleshooting the VRE 3.1 System 169

VRE3-1_UserGuide.book Page 170 Tuesday, November 9, 2004 11:25 AM
General Troubleshooting Issues
Subjects Find solutions here...
Pre-planning considerations for the RSA “Network System Questions” on page 12
Replication server is offline or unavailable “Changing the Status of a Server” on page 99
The RSA software must be installed on each Source and Target server within the replication Neighborhood
“Replication Service Agent (RSA)” on page 6
Uninstalling the RSA software “Uninstalling an RSA” on page 46
Upon installation VRE 3.1 selects the largest directory on the server, which may be excessive to fulfill VRE 3.1’s jobs
“Rules for Placing Data on the Target” on page 59
The service fails to start due to a corrupt database.
“VRE 3.1 Database Validation and Repair” on page 187
User Security Issues
Subjects Find solutions here...
Authentication required to perform Job replication
“Replication Security” on page 63
Credentials required to install the software “Installation Permissions and Rights” on page 22
Security and credentials required to use the Console
“Console Security and Credentials” on page 70
170 VRE 3.1 Administrator’s Guide

VRE3-1_UserGuide.book Page 171 Tuesday, November 9, 2004 11:25 AM
Specific Troubleshooting Symptoms
Specific Troubleshooting Symptoms This section provides unique problem symptoms that are not specifically discussed elsewhere in the VRE 3.1 Administrator’s Guide.
◆ “The Windows Event Log indicates that the Replication DBMS failed to initialize and the RMS or RSA failed to start” on page 171
◆ “The RSA is not attached to the correct replication neighborhood” on page 172
◆ “Problems are encountered when connecting to an RMS with multiple IP addresses” on page 174
◆ “Under heavy I/O loads, the Journal directory conflicts with the Source directories” on page 176
◆ “A Replication Service Agent (RSA) Server is unable to connect to the Replication Management Server (RMS)” on page 177
The Windows Event Log indicates that the Replication DBMS failed to initialize and the RMS or RSA failed to start
The first thing is to verify that the Replication DBMS is installed and configured correctly using the ODBC Data Source Administrator (ODBCAD32.EXE).
▼ To verify that the Replication DBMS in installed correctly
1. Open ODBC by selecting Start, then Control Panel, then Administrative Tools, and double-clicking on Data Sources ODBC. This will open the ODBC Data Source Administrator screen.
2. Select the System DSN tab.
3. Double-click on RSA or RMS depending on the server in use. This will open the ODBC Configuration for... screen.
4. Click on Test Connection button.
5. Click No on the Adaptive Server Anywhere screen, if it appears.
6. If the Error screen returns a message, such as File Not Found, then the database files do not exist. The files may have been deleted or never existed.
To correct this problem, restore the latest backup or reinstall the VRE 3.1 software on that machine. See “VRE 3.1 Database Backup and Restore” on page 180. If the problem persists, contact Technical Support. See “Getting Help” on page vi.
Chapter 7, Troubleshooting the VRE 3.1 System 171

VRE3-1_UserGuide.book Page 172 Tuesday, November 9, 2004 11:25 AM
Specific Troubleshooting Symptoms
The RSA is not attached to the correct replication neighborhood
If an RSA is attached to the wrong replication neighborhood, it may be properly attached using the following procedure.
▼ To allow the RSA machine to see the RMS server
Caution Using Registry Editor incorrectly can cause serious problems that may require the operating system to be reinstalled. VERITAS cannot guarantee that problems resulting from the incorrect use of Registry Editor can be solved. Use Registry Editor at your own risk.
1. From the Windows Control Panel, select Services, select the ENL service, and then the Stop button. (This will give a warning that the Replication Exec agent service will also be stopped.)
2. Select OK to continue.
3. Select Start, then Run, and type in REGEDIT.
172 VRE 3.1 Administrator’s Guide

VRE3-1_UserGuide.book Page 173 Tuesday, November 9, 2004 11:25 AM
Specific Troubleshooting Symptoms
4. Move down to the registry key HKEY_LOCAL_MACHINE\SOFTWARE\VERITAS\ENL\System
5. Double-click the netgroup string value in the right-hand Data View window to open the Edit String window.
6. Change the name of the replication neighborhood (“netgroup”) to match the name of the RMS servers netgroup.
7. Re-start the ENL service first, and then start the Replication Exec RSA service.
The RMS server should now display the RSA machine in its Servers View screen.
Chapter 7, Troubleshooting the VRE 3.1 System 173

VRE3-1_UserGuide.book Page 174 Tuesday, November 9, 2004 11:25 AM
Specific Troubleshooting Symptoms
Problems are encountered when connecting to an RMS with multiple IP addresses
Specify a specific TCP/IP address to use for replication.
Note Do not follow this procedure unless the RMS has multiple IP addresses.
If a computer in the Replication Neighborhood has multiple network interfaces or multiple TCP/IP addresses assigned to it, the Replication Exec software should be reconfigured to use a specific TCP/IP address. By default, the Replication Exec software uses the first TCP/IP address that is given to it by Windows. If the address returned by the operating system does not have a route to the RMS, the Replication Exec software must be reconfigured to use a specific address. The TCP/IP address that Replication Exec uses must have the following properties.
◆� The address may not be shared with other computers or among the nodes of a cluster. The address must be unique to the node that it is being used on.
◆� The address must be a static address. If the address changes, the registry key will need to be changed again.
◆� The network address must be accessible from the computers that make up the Replication Exec Neighborhood.
▼ To specify the TCP/IP address to be used by VRE 3.1
Caution Using Registry Editor incorrectly can cause serious problems that may require the operating system to be reinstalled. VERITAS cannot guarantee that problems resulting from the incorrect use of Registry Editor can be solved. Use Registry Editor at your own risk.
1. From the Windows Control Panel, select Services, select the ENL service, and then the Stop button. (This will give a warning that the Replication Exec agent service will also be stopped.)
2. Select OK to continue.
3. Select Start, then Run, and type in REGEDIT.
4. Move down to the registry key
HKEY_LOCAL_MACHINE\SOFTWARE\VERITAS\ENL.
5. If the key Network.TCPIP key does not exist, create it.
174 VRE 3.1 Administrator’s Guide

VRE3-1_UserGuide.book Page 175 Tuesday, November 9, 2004 11:25 AM
Specific Troubleshooting Symptoms
6. Under the Network.TCPIP key, create a REG_SZ (String) value called PreferredAddress. Assign the IP address to be used for replication to this value. The address must be specified in standard dotted notation.
7. Re-start the ENL service first, and then start the Replication Management Service (RMS) and/or Replication Exec RSA service.
Chapter 7, Troubleshooting the VRE 3.1 System 175

VRE3-1_UserGuide.book Page 176 Tuesday, November 9, 2004 11:25 AM
Specific Troubleshooting Symptoms
Under heavy I/O loads, the Journal directory conflicts with the Source directories
It is recommended that the Journal directory be on a different drive from the Source data. Under a heavy I/O (input/output) load, the source server’s performance can possibly degrade rapidly until the server becomes totally unresponsive and hung.
The VRE 3.1 installer does not prevent the installation of the databases and journals to a drive that is to be the replicated source. However, after installation, the location of the databases and journals can be changed as follows.
▼ To change the location of the Journals
Caution Changing the location of the Journal directory requires making changes to the Windows Registry. Incorrect use of the Windows registry editor may prevent the operating system from functioning properly. Great care should be taken when making changes to a Windows registry. Registry modifications should only be carried-out by persons experienced in the use of the registry editor application. It is recommended that a complete backup of the registry and server be made prior to making any registry changes.
1. Stop the replication job.
2. Stop the Replication Exec RSA.
3. Edit the drive letter in the following registry key:
HKEY_LOCAL_MACHINE\SOFTWARE\VERITAS\Storage Replicator\3.1\JournalRoot
4. Restart the Replication Exec RSA.
5. Restart the replication job(s).
Notes:
◆� The storage location pointed to by the Journal root must always be available. For example, the journal files should not be stored on a shared cluster drive.
◆� The Journal root should not be placed on the same volume as the files being replicated.
176 VRE 3.1 Administrator’s Guide

VRE3-1_UserGuide.book Page 177 Tuesday, November 9, 2004 11:25 AM
Specific Troubleshooting Symptoms
A Replication Service Agent (RSA) Server is unable to connect to the Replication Management Server (RMS)
When the RMS is on a subnet separate from its RSA server, the RSA server cannot connect to the RMS. In order to correct this problem, a key needs to be added to the Registry on the RSA server.
Caution Using Registry Editor incorrectly can cause serious problems that may require reinstalling the operating system. VERITAS cannot guarantee that problems resulting from the incorrect use of Registry Editor can be solved. Use Registry Editor at your own risk.
▼ To add a key to the Registry
1. Enter the Registry editor (regedt32).
2. Select HKEY_LOCAL_MACHINE on the <RSA Server Name> window.
3. Select "SOFTWARE\VERITAS\ENL".
4. From the Edit menu, select Add Key...
5. Enter "Network.TCPIP" in the Key Name field. Do not enter a value in the Class field.
6. Highlight the Network.TCPIP key, and from the Edit menu, select Add Value...
7. Enter GATEWAY in the Value Name field.
8. From the list of Data Types, select REG_SZ, and press OK.
9. In the String Editor dialog box, enter the IP address of the RMS server.
Chapter 7, Troubleshooting the VRE 3.1 System 177

VRE3-1_UserGuide.book Page 178 Tuesday, November 9, 2004 11:25 AM
Specific Troubleshooting Symptoms
10. Press OK. The results will be similar to those displayed in the Figure below.
11. Close the Registry editor.
12. Stop the ENL service, which will stop the Replication Exec RSA service.
13. Restart the ENL service.
14. Restart the Replication Exec RSA service.
15. A system reboot may be necessary.
178 VRE 3.1 Administrator’s Guide

VRE3-1_UserGuide.book Page 179 Tuesday, November 9, 2004 11:25 AM
Replication Exec Utilities and Tools
A The VRE 3.1 software suite includes several powerful utilities and tools to aid replication management. These utilities include the following, and are discussed in the subsequent sections.◆ “VRE 3.1 srTool” on page 179
◆ “VRE 3.1 Database Backup and Restore” on page 180
◆ “VRE 3.1 Database Validation and Repair” on page 187
◆ “Replication Exec Ping (rxPing)” on page 191
VRE 3.1 srTool srTool is a powerful complement to VRE 3.1 that allows users to automate the control and configuration of a replication system. srTool is able to perform the following:
◆ provides a command line interface for detailed scripting of replication tasks
◆ extends beyond the limits of the graphical user interface
◆ allows batch-type processes of multiple objects
◆ vastly simplifies otherwise tedious object-by-object tasks
◆ extends diagnostic functionality through monitoring of replication activity
The functions and features of srTool are now covered in the VERITAS Replication Exec (VRE 3.1) srTool Reference Guide.
179

VRE3-1_UserGuide.book Page 180 Tuesday, November 9, 2004 11:25 AM
VRE 3.1 Database Backup and Restore
VRE 3.1 Database Backup and Restore This section describes how to:
◆ create RMS or RSA database backups,
◆ restore the backup, and
◆ reconfigure VRE 3.1 to discontinue backups.
Introduction
Why backup?
All replication Job configurations are stored in the RMS database. Any loss or corruption of this information without a backup would require the user to recreate every lost Job. Thus, it is highly recommended that the RMS database be periodically backed up for data protection and data redundancy.
Likewise, historical information is logged into a database at every RSA. While backing up these databases is not necessary, some users may wish to maintain RSA database backups to protect this information.
Caution Attempts to back up one of these databases on a running VRE 3.1 system by simply making a copy of the database files will not result in a valid backup.
Never attempt to restore a database from a “live file copy.”
Transaction Log Files
Each database consists of two physical files: the database file itself and a transaction log file. For example, rms.db is the RMS database file and rms.log is the associated transaction log file.
While the database file only grows to contain the configuration data added by the user, the transaction log file grows unbounded to contain information about every configuration and replication status change to the database. Each database contains an event handler that truncates the transaction log file when it grows too large. The event handler will interfere with attempts to backup the database and must be disabled when backups are to be performed.
180 VRE 3.1 Administrator’s Guide

VRE3-1_UserGuide.book Page 181 Tuesday, November 9, 2004 11:25 AM
VRE 3.1 Database Backup and Restore
Requirements of Database Backups
Once the user chooses to backup the RMS or an RSA database, the user is then responsible for assuring that the transaction log file does not grow too large by making periodic backups. Periodic backups truncate the transaction log file.
Note Weekly or daily backups should be more than sufficient. However, the user is advised to monitor the size of the transaction log file for the first few weeks after enabling backups to ensure that it does not grow excessively. The frequency of backups should be adjusted to control the size of the transaction log file.
The backup process overwrites any previous backups. Thus, any previous backup images should be saved by renaming the files, moving the files elsewhere, or archiving them to tape.
Database Backup and Restore Command Line Window
All backup and restore operations must be run out of the Database Backup and Restore Command Line Window. The command line window can be accessed from the Start menu, as follows.
Start\Programs\VERITAS Software\Replication Exec\Database Backup and Restore
Backup Process This section describes the backup process, including how to create backup images and how to optionally reconfigure the RMS or an RSA to discontinue backups. Database backup is performed using the rxDBBackup utility. For more detailed information, see “Replication DBMS Backup Utility (rxDBBackup) Reference” on page 184.
Backup images can be created at any time, even while the local VRE 3.1 software is running.
Note Running rxDBBackup stops the database from managing the size of its transaction log file. Performing periodic backups will truncate the transaction log. If it is desired to stop backing up the RMS or RSA databases, the rxDBBackup -d command must be run.
Making a Backup
All backup commands are run from the Database Backup and Restore command line window as previously discussed.
Appendix A, Replication Exec Utilities and Tools 181

VRE3-1_UserGuide.book Page 182 Tuesday, November 9, 2004 11:25 AM
VRE 3.1 Database Backup and Restore
Note A database backup can only be performed on the same machine on which the rxDBBackup command was run.
Run the following command to make a backup:
rxDBBackup [RSA] backup-location
where backup-location names a directory in which to create the new backup image.
For example,
rxDBBackup backup
will create a validated backup image of the RMS in the subdirectory named “backup” that will contain the two files, rms.db and rms.log.
Or,
rxDBBackup RSA c:\backups
will create a validated backup image of the local RSA in the directory named c:\backups consisting of the two files, rms.db and rms.log.
Working with Backup Errors If rxDBBackup encounters errors creating a validated backup image, it will print error messages and exit with a non-zero return code. This can be due to one of the following:
◆ either the backup-location is not being writable, for example, it is on a CD-ROM
◆� rxDBBackup was run outside of the Database Backup and Restore command-line Window, or
◆ the RMS or RSA database is corrupt.
If the latter is true the rxDBBackup can be rerun, but attempt to repair the database by specifying the –r option. For example,
rxDBBackup –r backup
will attempt to create a validated backup image of the RMS in the .\backup subdirectory. If that fails, rxDBBackup will attempt validate and repair the RMS database, and stop the local VRE 3.1 services to do so.
Or,
rxDBBackup –r RSA c:\backups
will attempt to create a validated backup image of the RSA in the c:\backups directory. If that fails, rxDBBackup will attempt validate and repair the RSA database, and stop the local VRE 3.1 services to do so.
182 VRE 3.1 Administrator’s Guide

VRE3-1_UserGuide.book Page 183 Tuesday, November 9, 2004 11:25 AM
VRE 3.1 Database Backup and Restore
Note rxDBBackup will only succeed in repairing databases with a corrupt index(es), but cannot repair data corruption. If the database cannot be repaired, the only options are to restore a recent backup of that database or to reinstall the database.
Caution A database repair is destructive. The corrupt database will be removed and replaced with an empty database as part of the process. If there is an error during this process, the VRE 3.1 software might not be able to run. Again, you will need to restore from a recent backup or reinstall the VRE 3.1 software.
Restoring the Database This section describes how to restore an RMS or RSA database backup.
Note All backup commands are run from the Database Backup and Restore command line window as previously discussed.
▼ To restore the RMS (or RSA) database
1. Obtain a copy of the backup images, both the database file and transaction log file.
2. Stop the Replication DBMS service on the machine that will be restored. This will automatically stop the local Replication Management Server (RMS) and/or the Replication Exec Agent (RSA) services. The backup cannot be restored unless these services have been stopped.
3. Save a copy of the database files to be replaced. By default, during installation, the database files are placed in the following directory:
C:\Program Files\VERITAS\Replication Exec\Database.
4. From the command line, run the database erase utility (dberase.exe), and erase the specific existing database:
dberase –y “C:\Program Files\VERITAS\Replication Exec\Database\rms.db (for the RMS) or
dberase –y “C:\Program Files\VERITAS\Replication Exec\Database\rsa.db (for the RSA)
5. Copy the backup images obtained in step 1 into the database location.
6. Apply the just restored transaction log to the database:
Appendix A, Replication Exec Utilities and Tools 183

VRE3-1_UserGuide.book Page 184 Tuesday, November 9, 2004 11:25 AM
VRE 3.1 Database Backup and Restore
dbeng8 “C:\Program Files\VERITAS\Replication Exec\Database\rms.db” -a “C:\Program Files\VERITAS\Replication Exec\Database\rms.log” (for the RMS) or
dbeng8 “C:\Program Files\VERITAS\Replication Exec\Database\rsa.db” -a“C:\Program Files\VERITAS\Replication Exec\Database\rsa.log” (for the RSA)
7. Restart the RMS (or RSA) services as appropriate.
Reconfiguring VRE 3.1 for Discontinued Backups If backups will are no longer to be performed, the VRE 3.1 software must be reconfigured by running rxDBBackup -d [RSA].
Note This procedure is not required after individual backup events, but only when database backups are no longer required.
Examples:
rxDBBackup -d to reconfigure the RMS, or
rxDBBackup -d RSA to reconfigure the RSA
Replication DBMS Backup Utility (rxDBBackup) Reference This utility creates validated backup images of an RMS or an RSA database and optionally validates and repairs the original database if the backup image is corrupt. By running this utility, the target RMS or RSA is automatically configured for backups, and the VRE 3.1 software will stop managing the size of the transaction log file. Optionally, the RMS or RSA can be configured for no backups by enabling the event handler.
A corrupt database is repaired by rebuilding it; unloading its schema and data, replacing the database with one of the "no schema" databases, and then reloading the schema and data. Rebuilds can only repair corrupt indexes. If a database has any data corruption, the rebuild will fail and the user's only resort is to restore a valid backup or reinstall.
Note A side effect of rebuilding a database is the creation of a temporary directory named reload in the current working directory. If the rebuild is successful, this directory and all of its contents will be deleted, including any user files.
184 VRE 3.1 Administrator’s Guide

VRE3-1_UserGuide.book Page 185 Tuesday, November 9, 2004 11:25 AM
VRE 3.1 Database Backup and Restore
By default rxDBValidate does not attempt to repair a corrupt database. Run with the –r (repair) option to do so. Repairing a database requires exclusive access so rxDBValidate stops the Replication DBMS, which in turn, stops RMS and RSA services. rxDBBackup attempts to rebuild the original database if this validation fails. If successful, rxDBBackup attempts to backup the database again and restart the VRE 3.1 services that where previously running.
Usage:
rxDBBackup -?rxDBBackup -d [RSA]rxDBBackup [options] [RSA] backup-location
The first form outputs help to the screen. The second form reconfigures the RMS or RSA for no backups. The third form creates a validated backup of the RMS or RSA to the backup location.
Options:
Option Description
-? Outputs help to the screen.
-d Disables backups so the target will manage its transaction log file size.
Note Do not use the -d option between backups. This option is only used when it is unlikely that a backup of the machine will be backed up again soon. This helps manage the growth of its transaction log.
-r Attempts to repair a corrupt database.
-v Runs in verbose mode. Normally rxDBBackup only writes error and warning messages on the standard error output stream.
Returns:
Value Description
0 Operation was completed successfully.
1 An illegal operation was requested, such as omitting the backup-location for a normal back up or specifying the backup-location with the -d option.
Appendix A, Replication Exec Utilities and Tools 185

VRE3-1_UserGuide.book Page 186 Tuesday, November 9, 2004 11:25 AM
VRE 3.1 Database Backup and Restore
Value Description
2 A bad command-line parameter was encountered, such as the backup location was not specified or a service was specified other than the RSA or RMS.
3 An assert failed or abort (3) was called.
4 The -? option was specified.
5 rxDBBackup ran out of memory.
6 An error occurred when trying to run one of the Sybase command line utilities.
7 The backup failed to copy or delete a file or directory.
8 Dbbackup failed to backup a database.
9 Dbvalid failed to validate a database.
10 Dberase failed to erase a database.
11 rxDBBackup failed to start a VRE 3.1 service.
12 rxDBBackup failed to stop a VRE 3.1 service.
13 Dbunload failed to unload a database.
14 An attempt to enable or disable the event-handler failed.
Examples:
rxDBBackup c:\backupsrxDBBackup -v RSA backuprxDBBackup -d RSA
The first command creates a backup image of RMS database in c:\backups. The second command runs in verbose mode and creates a backup image of the RSA in .\backup. The last command reconfigures an RSA for no backups.
186 VRE 3.1 Administrator’s Guide

VRE3-1_UserGuide.book Page 187 Tuesday, November 9, 2004 11:25 AM
VRE 3.1 Database Validation and Repair
VRE 3.1 Database Validation and Repair The Replication Management Server (RMS) and the Replication Service Agent (RSA) validate their databases at start up. If the RMS or an RSA database is found to be corrupt, the services fails to start and an alert is issued warning of a corrupt database. The database in question must be repaired or, failing that, replaced, preferably from a recent backup.
This section describes how to validate and optionally repair the RMS or an RSA database. Database validation and repair are performed using the rxDBValidate utility. For more detailed information, see “Replication DBMS Validation Utility (rxDBValidate) Reference” on page 188.
To validate the RMS or an RSA database, run the following command.
rxDBValidate [options] [RSA]
which validates the RMS, or optionally the RSA, both of which must be on the local machine. Normally this test is run on the online RMS or RSA, but validating a corrupt database may cause the online service to fail. rxDBValidate can be run with the –e (exclusive) option to stop the Replication DBMS, which in turn, stops the RMS and RSA services.
By default rxDBValidate does not attempt to repair a corrupt database. Run with the –r (repair) option to do so. Repairing a database requires exclusive access so rxDBValidate stops the Replication DBMS, which in turn, stops RMS and RSA services.
If successful rxDBValidate restarts all of the replication services that it stopped.
Caution A database is repaired by rebuilding it: unloading its schema and data, replacing the database files and reloading the schema and data. However, reloading a database can only repair a corrupt index. Corrupt data is fatal and any attempts to repair such a database will destroy the database.
▼ To test and repair a corrupt RMS or RSA database
1. Run rxDBValidate to validate the local RMS, or rxDBValidate RSA to validate the local RSA database. If that fails, go to the next step.
2. Repair the database. Run rxDBValidate –r to validate and repair the local RMS, or rxDBValidate –r RSA to validate and repair the local RSA database. If that fails, go to the next step, otherwise the database has been repaired.
3. Restore a recent backup of the database (see “VRE 3.1 Database Backup and Restore” on page 180). If that fails, perhaps by not having a recent backup, go to the next step.
4. Run a repair install to replace the database after making sure that the corrupt database has been deleted or renamed. All Jobs will need to be recreated.
Appendix A, Replication Exec Utilities and Tools 187

VRE3-1_UserGuide.book Page 188 Tuesday, November 9, 2004 11:25 AM
VRE 3.1 Database Validation and Repair
Replication DBMS Validation Utility (rxDBValidate) Reference This utility validates and optionally repairs the RMS or an RSA database if corrupt.
rxDBValidate relies on the Sybase dbvalid (Validate) command line utility. Repair relies on the Sybase dbunload (Unload), and dberase (Erase), as well as the presence of noschema.rms.db and noschema.rsa.db databases.
Repairs are not attempted by default; only if the -r option is specified. If so specified and if the validation attempt fails, rxDBValidate stops the Replication DBMS service, which stops the RMS and/or RSA as well, and then attempts to rebuild the database.
By default, rxDBValidate does not stop the Replication DBMS service before validating a database. This may cause problems if a corrupt database causes a DBMS assert while the RMS or an RSA are running. To run with exclusive access to the database, use the -e option which will cause rxDBValidate to stop the DBMS service if it is running, which stops the RMS and/or RSA as well.
If successful, rxDBValidate restarts the VRE 3.1 services that where previously running.
A corrupt database is repaired by rebuilding it. This is accomplished by unloading its schema and data, replacing the database with one of the "no schema" databases, and then reloading the schema and data. Rebuilds can only repair corrupt indexes as the unload operation is unordered and the indexes are rebuilt during reload. If a database has data corruption the rebuild will fail and the only resort is to restore a valid backup or reinstall.
Note A side effect of rebuilding a database is the creation of a temporary directory named reload in the current working directory. If the rebuild is successful, this directory and all of its contents will be deleted, including any user files.
Usage:
rxDBValidate -?
rxDBValidate [options] [RSA]
The first form outputs help to the screen. The second form validates the RMS or an RSA database.
Options:
Option Description
-? Outputs help to the screen.
-e Validate the database in exclusive access mode.
188 VRE 3.1 Administrator’s Guide

VRE3-1_UserGuide.book Page 189 Tuesday, November 9, 2004 11:25 AM
VRE 3.1 Database Validation and Repair
Option Description
-r Attempts to repair a corrupt database.
-v Runs in verbose mode. Normally rxDBValidate only writes error and warning messages on the standard error output stream.
Returns:
Value Description
0 Operation was completed successfully.
1 An illegal operation was requested.
2 A bad command-line parameter was encountered, such as a service was specified other than the RSA or RMS.
3 An assert failed or abort (3) was called.
4 The -? option was specified.
5 rxDBValidate ran out of memory.
6 An error occurred when trying to run one of the Sybase command line utilities.
7 The vaidate failed to copy or delete a file or directory.
8 Dbvalid failed to validate a database.
9 Dberase failed to erase a database.
10 rxDBValidate failed to start a VRE service.
11 rxDBValidate failed to stop a VRE service.
12 Dbunload failed to unload a database.
Examples:
rxDBValidaterxDBValidate -ev RSArxDBValidate -r
Appendix A, Replication Exec Utilities and Tools 189

VRE3-1_UserGuide.book Page 190 Tuesday, November 9, 2004 11:25 AM
VRE 3.1 Database Validation and Repair
The first command validates the RMS database. The second command runs in exclusive and verbose mode while validating an RSA. The last command validates and optionally repairs the RMS.
190 VRE 3.1 Administrator’s Guide

VRE3-1_UserGuide.book Page 191 Tuesday, November 9, 2004 11:25 AM
Replication Exec Ping (rxPing)
Replication Exec Ping (rxPing) This simple command line program can be used by technical support services to verify that the network interfaces to a given VRE 3.1 node are reachable. rxPing attempts an ICMP ping to the node followed by an ENL Ping to the node. Finally, an attempt is made to connect to the RSA services. If specified, an attempt is also made to connect to the RMS Server.
Usage
For example, the following command validates the user (Smith), in the domain (Central), with the password (abcd1234), on the server (servename), with IP address (101.24.36.164).
rxPing {-s servername | -ip 101.24.36.164} [-user Smith -domain Central -password abcd1234]
Options
Option Description
-s Use this option to specify the name of the server to ping.
-ip Use this option to specify the IP address of the server to ping. Note: -s and -ip cannot be specified at the same time.
-user Use this option to specify an alternative set of credentials to use when performing the check. If -user is specified, -domain and -password must also be specified. If -user is not specified, the currently logged in user's credentials are used.
-domain Use this option to specify the domain name in which the name specified by -user is valid. Must be used with -user and -password.
-password Use this option to specify the password for the account specified by the -user and -domain switch.
-rms Use this switch to test the RMS availability.
-enlretries This switch specifies the number of times that the ENL will attempt to ping the server. The default value is 5.
Appendix A, Replication Exec Utilities and Tools 191

VRE3-1_UserGuide.book Page 192 Tuesday, November 9, 2004 11:25 AM
Replication Exec Ping (rxPing)
Option Description
-enltimeout This switch specifies the amount of time, in seconds, that the ENL will wait for the ping response. The default value is 2 seconds.
-enlrequestsize This switch specifies the amount of data that will be included in the ENL ping request. The default value is 1024 bytes.
-ipretries This switch specifies the number of times that the ICMP ping operation will be attempted. The default value is 1.
-iptimeout This switch specifies the number of seconds that the utility will wait for the ping response. The default value is 120 seconds.
-iprequestsize This switch specifies the amount of data that will be included in the ICMP ping request. The default value is 32.
Examples
Attempt to ping the server with IP address 10.51.27.45.
rxPing -ip 10.51.27.45
Attempt to ping the server with name VREBLD
rxPing -s VREBLD
Attempt to ping the RMS node VRERMS while using credentials other than the logged in user.
rxPing -s VRERMS -user joeuser -domain RMSDOMAIN -password joespassword
Typical Output
C:\Program Files\Veritas\Replication Exec\rxping -s VREBLD
VRE Ping Utility
Copyright VERITAS Software Corp. 2004.
Testing ICMP Ping.
Testing ping on server VREBLD
Pinging 10.51.25.33
ICMP Ping Successful...
Testing ENL connectivity.
192 VRE 3.1 Administrator’s Guide
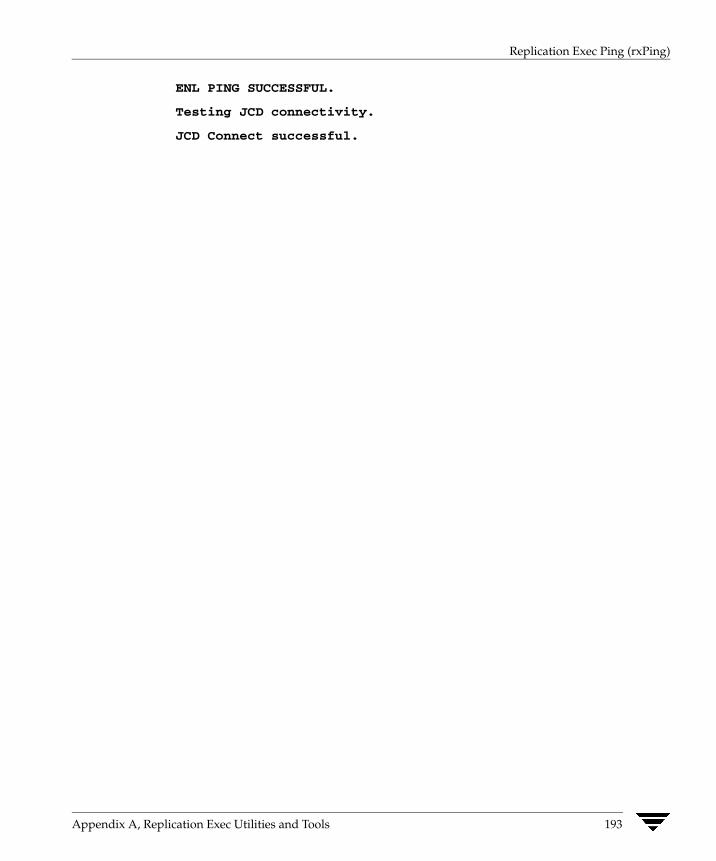
VRE3-1_UserGuide.book Page 193 Tuesday, November 9, 2004 11:25 AM
Replication Exec Ping (rxPing)
ENL PING SUCCESSFUL.
Testing JCD connectivity.
JCD Connect successful.
Appendix A, Replication Exec Utilities and Tools 193

VRE3-1_UserGuide.book Page 194 Tuesday, November 9, 2004 11:25 AM
Replication Exec Ping (rxPing)
194 VRE 3.1 Administrator’s Guide

VRE3-1_UserGuide.book Page 195 Tuesday, November 9, 2004 11:25 AM
Clustering the RMS with MSCS
B The RMS Agent for Microsoft Cluster ServerTM (MSCS) is an optional feature that can be installed after both the Cluster Server and VRE 3.1 software have been installed and configured. The cluster server software supports failover of the RMS operations from one node to another.The Replication Management Server (RMS) manages many replication operations in the replication Neighborhood. To provide for the continued operation of the RMS service in the event of a system failure, the RMS can be made highly available using MSCS. In the event that the RMS server is shut down, the replication management functions move to another node in that cluster, and the cluster server software restarts the RMS on the new node.
Prerequisites ◆ There can only be a single RMS resource per cluster.
◆ The RMS resource type requires a physical disk, managed by MSCS, that is used to store the RMS database files.
◆ The RMS resource type requires an IP address, managed by MSCS, that is used for RMS clients to connect. See “Configuring VRE 3.1 for Your Network” on page 199.
Installation
▼ To install the cluster services
1. If cluster services are detected during the installation of VRE 3.1, the RMS cluster agent software is also installed that allows the RMS to be clustered.
2. After VRE 3.1 is installed, the system rebooted, and an administrator logs back in, the RMS cluster agent registration utility is launched automatically and transparently to the user.
195

VRE3-1_UserGuide.book Page 196 Tuesday, November 9, 2004 11:25 AM
Creating an RMS Resource
3. The RMS cluster agent registration utility can be activated manually at any time by running it from the directory containing the VRE 3.1 services, such as: C:\Program Files\VERITAS\Replication Exec\Services\clusinst -install -resdll -adminextdll
Creating an RMS Resource Once the RMS Agent software is installed on each node, the RMS resource may be added using Microsoft Cluster Administrator.
Ensure that the following systems are available and operating correctly:
◆ MSCS Cluster Administrator
◆ A group with both of the following:
◆ A physical disk resource to store the RMS data files.
◆ An IP address managed by MSCS. See “Configuring VRE 3.1 for Your Network” on page 199.
196 VRE 3.1 Administrator’s Guide

VRE3-1_UserGuide.book Page 197 Tuesday, November 9, 2004 11:25 AM
Creating an RMS Resource
Note Only one RMS resource is allowed per cluster.
▼ To add the RMS resource to the Group
1. In the MSCS Cluster Administrator, select File menu, New, Resource to open the New Resource window. In the New Resource window, enter the following information:
a. Name — the resource might be named “RMS” to keep it simple and clear, although any name may be selected.
b. Description — optional.
c. Resource Type — from the drop-down menu, select VRE RMS. If this is not available, then install the RMS Agent for Microsoft Cluster Server software on this node. See “Creating an RMS Resource” on page 196.
d. Group — from the drop-down menu, select the group where this resource is to be created.
Click Next to continue.
Appendix B, Clustering the RMS with MSCS 197

VRE3-1_UserGuide.book Page 198 Tuesday, November 9, 2004 11:25 AM
Creating an RMS Resource
2. On the Possible Owners window, choose the nodes where the RMS resource can run. This allows some nodes in the cluster to be excluded, if desired.
a. Select the nodes to be included in the Nodes field.
b. Click the Add button to move the node to the Possible Owners field. The figure above shows this step correctly completed.
c. When all nodes that should be able to bring the RMS online are in the Possible Owners area, click Next to continue.
3. Create the Dependencies. Choose the resources to be brought online before the RMS resource. The RMS resource type requires a dependency on a physical disk resource and an IP address resource. The Resource Dependencies field on the right of the window lists the items available to the RMS resource.
a. Select the RMS resource in the Resource field.
b. Select the physical disk where the RMS should be placed and click that disk icon in the Resource Dependencies field.
c. Select an IP address for use by the RMS clients to locate the RMS. See “Configuring VRE 3.1 for Your Network” on page 199.
d. Click the Add button to move the RMS to the disk. The figure below shows this step correctly completed.
198 VRE 3.1 Administrator’s Guide

VRE3-1_UserGuide.book Page 199 Tuesday, November 9, 2004 11:25 AM
Configuring VRE 3.1 for Your Network
e. Click Next to complete that creating the dependency.
4. Enter the path to the RMS database directory on the shared drive.
5. Bring the group online to start the RMS service.
Configuring VRE 3.1 for Your Network In a clustered environment, the RMS Agent software uses two types of network addresses, one that is assigned to the cluster that is used by the Replication Exec clients to connect to the RMS, and network addresses that are not shared among the nodes of the cluster that are used for internal communications.
The Replication Exec RMS resource should depend on a Shared IP Address resource that the members of the Replication Neighborhood can use to contact the RMS. If the computers in the Replication Neighborhood are not in the same network or sub-network as the nodes of the cluster that will host the RMS Service, changes will have to be made to the registry to enter the shared IP address.
Caution Using Registry Editor incorrectly can cause serious problems that may require reinstalling the operating system. VERITAS cannot guarantee that problems resulting from the incorrect use of Registry Editor can be solved. Use Registry Editor at your own risk.
Appendix B, Clustering the RMS with MSCS 199

VRE3-1_UserGuide.book Page 200 Tuesday, November 9, 2004 11:25 AM
Configuring VRE 3.1 for Your Network
▼ To configure VRE 3.1 for your network
1. Make the following registry change on the computers that make up your Replication Neighborhood that are not in the same sub-net as the nodes that can host the RMS.
2. Using the Registry editor, locate the key under HKEY_LOCAL_MACHINE\SOFTWARE\VERITAS\ENL.
If the key Network.TCPIP does not exist under the ENL key, create it.
3. Under the Network.TCPIP key, create a REG_SZ value called Gateway.
4. Assign the local IP address to this value using standard dotted notation. Do not use a host name. You must enter the TCP/IP address.
The VRE 3.1 RMS software needs to know which TCP/IP address to use for internal communications. The address supplied must have the following properties.
◆ The address may not be shared with other computers or among the nodes of the cluster. The address must be unique to the node that is being used.
◆ The address must be a static address.
◆ The network address must be accessible from the computers that make up the replication Neighborhood. This usually means that the address must be on the public network. Do not choose a network address that is used exclusively for cluster communications.
Note The following two steps are performed on the RMS server and not the RSA server.
5. On each node of your cluster that can host the RMS, make the following change. Using the Registry editor, locate the key under HKEY_LOCAL_MACHINE\SOFTWARE\VERITAS\ENL.
If the key Network.TCPIP does not exist, create it.
6. Under the Network.TCPIP key, create a REG_SZ value called PreferredAddress. Assign the local IP address to this value using standard dotted notation. Do not use a host name. The TCP/IP address must be entered.
200 VRE 3.1 Administrator’s Guide

VRE3-1_UserGuide.book Page 201 Tuesday, November 9, 2004 11:25 AM
Removing the Agent
Removing the Agent Uninstalling the RMS Agent software leaves the VRE 3.1 Console and RSA intact.
Caution Uninstalling the RMS Agent for MSCS software removes the RMS software, including all Job configurations. Data on a Source or Target is unaffected. Move the RMS data to a standalone server to prevent loss of VRE 3.1 configuration.
Moving a Clustered RMS to a Standalone Server When removing the RMS from a cluster, the RMS data files need to be moved to a standalone server. The RMS journal files are specific to a computer and should not be moved.
Note Moving the RMS data will cause a brief interruption of the RMS service.
Caution If the standalone server that will become the RMS has any previous RMS data, that data will be overwritten when the clustered RMS files are moved to the standalone RMS.
▼ To move the clustered RMS data to a standalone server
1. Bring the RMS resource offline.
2. Copy the RMS database files (rms.db and rms.log) from the cluster database location to the standalone RMS server database location.
3. So that the RMS can now locate the database files, make the following Registry change on the standalone server.
[HKEY_LOCAL_MACHINE\SOFTWARE\ODBC\ODBC.INI\RMS] "DatabaseFile"= <RMS database location>\rms.db
4. Restart the Replication DBMS service.
Appendix B, Clustering the RMS with MSCS 201

VRE3-1_UserGuide.book Page 202 Tuesday, November 9, 2004 11:25 AM
Removing the Agent
Remove the RMS Agent Software
▼ To remove the RMS Agent software
1. Using MS Cluster Administrator, take the RMS resource offline and delete all resources of type VRE 3.1 RMS.
2. Run the uninstall utility from the directory containing the VRE 3.1 services, such as:
C:\Program Files\VERITAS\Replication Exec\Services\clusinst -uninstall -resdll -adminextdll
3. From the Start menu, select Settings, then Control Panel.
4. On the Control Panel, select Add/Remove Programs.
5. In the Install/Uninstall list, select VERITAS Replication Exec.
6. Click the Remove button to remove all VRE 3.1 components, or the Change button to remove only the Cluster support.
7. Confirm that the files were deleted, and reboot the server(s).
202 VRE 3.1 Administrator’s Guide

VRE3-1_UserGuide.book Page 203 Tuesday, November 9, 2004 11:25 AM
Understanding Error Messages
Understanding Error Messages This section contains the possible event logging messages that are displayed with normal logging turned on.
Message Description
OFFLINE -- Could not create the RMS Service object! windows-error-code
The RMS Agent software was not able to allocate memory.
OFFLINE -- Failed to delete the RMS database registry key. windows-error-code
The RMS Agent software was not able to update a critical registry entry.
OFFLINE -- Failed to stop the RMS service! Error = windows-error-code
The RMS Agent software was not able to stop the VRE 3.1 RMS service. Please verify that VRE 3.1 is installed. Rebooting the system may be required to recover from the problem.
ONLINE: Unable to fetch to the ENL Home Path. Error: windows-error-code
The RMS Agent software was not able to retrieve critical information from the registry.
ONLINE -- Unable to set the service start type for the RMS service.
windows-error-code
The RMS Agent software was not able to set the correct start type for the RMS service. Ensure that VRE 3.1 has been properly installed.
MONITOR -- Could not allocate a service object. Perhaps out of memory. windows-error-code
The RMS Agent software was not able to allocate memory.
The service arms does not exist. windows-error-code
The VRE 3.1 RMS service is not present on the cluster node. Ensure that VRE 3.1 is still installed.
The RMS database directory directory-name does not exist and could not be created. Error: windows-error-code
This message indicates that the Pathname resource attribute indicates a non-existent directory and that the RMS Agent software was not able to create the directory.
Unable to allocate the RMS Service object. Perhaps out of memory. windows-error-code
The RMS Agent software was not able to allocate memory.
Unable to bring the RMS online because the volume drive-letter does not exist.
This message indicates that the path name given for the location of the RMS datafiles does not exist. This could be because the cluster resource controlling the device is not online or that the RMS resource is not properly configured.
Unable to determine the run state for the RMS service. windows-error-code
The RMS Agent software was not able to determine if the VRE 3.1 RMS service was running.
Appendix B, Clustering the RMS with MSCS 203

VRE3-1_UserGuide.book Page 204 Tuesday, November 9, 2004 11:25 AM
Understanding Error Messages
Message Description
Unable to open the registry key registry-key. Error: windows-error-code
The RMS Agent software was not able to retrieve critical information from the registry.
Unable to open the registry key registry-key while trying to create the master key. Error: windows-error-code
The RMS Agent software was not able to update a critical registry entry.
Unable to open the RMS root key.registry-key windows-error-code
The RMS Agent software was not able to retrieve critical information from the registry.
Unable to set the ENL Alert path value. Error: windows-error-code
The RMS Agent software was not able to update a critical registry entry.
Unable to set the ENL Store path value. Error: windows-error-code
The RMS Agent software was not able to update a critical registry entry.
Unable to set the 'Master' registry value registry-key. WinError= windows-error-code
The RMS Agent software was not able to update a critical registry entry.
Unable to set the last database location in the registry. Error:windows-error-code
The RMS Agent software was not able to update a critical registry entry.
Unable to set the RMS value. Error: windows-error-code
The RMS Agent software was not able to update a critical registry entry.
Unable to start the RMS Service. Error: windows-error-code
The RMS Agent software was not able to start the VRE 3.1 RMS service. Ensure that the Storage Replicator software is properly installed. Rebooting this cluster node may be required to recover from this error.
Unable to stop the RMS while preparing for resource online. windows-error-code
The RMS Agent software was not able to stop the VRE 3.1 RMS service. Rebooting this node may be required to recover.
VRERMS Online This is a normal condition
204 VRE 3.1 Administrator’s Guide

VRE3-1_UserGuide.book Page 205 Tuesday, November 9, 2004 11:25 AM
Accessibility and Replication Exec
C VERITAS products meet federal accessibility requirements for software as defined in Section 508 of the Rehabilitation Act:◆ http://www.access-board.gov/508.htm
Keyboard shortcuts are available for all major graphical user interface (GUI) operations and menu items. VERITAS products are compatible with operating system accessibility settings as well as a variety of assistive technologies. All manuals also are provided as accessible PDF files, and the online help is provided as HTML displayed in a compliant viewer.
The following topics detail accessibility features and compliance in VRE 3.1:
◆ “Keyboard Navigation and Shortcuts in VRE 3.1” on page 206
◆ “General Keyboard Navigation Within the GUI” on page 206
◆ “Keyboard Navigation Within Dialog Boxes” on page 207
◆ “Keyboard Shortcuts” on page 208
◆ “Support for Accessibility Settings” on page 209
205

VRE3-1_UserGuide.book Page 206 Tuesday, November 9, 2004 11:25 AM
Keyboard Navigation and Shortcuts in VRE 3.1
Keyboard Navigation and Shortcuts in VRE 3.1 All program functions and menu items are accessible using the keyboard exclusively. VRE 3.1 uses standard operating system navigation keys and keyboard shortcuts. For its unique functions, VRE 3.1 uses its own navigation keys and keyboard shortcuts which are documented below.
To see a table of the standard Microsoft navigation keys and keyboard shortcuts, select your version of Microsoft Windows from the drop-down listbox at:
◆ http://www.microsoft.com/enable/products/keyboard/keyboardsearch.asp
Exceptions to the Windows conventions are documented in a table below.
General Keyboard Navigation Within the GUI You can navigate and use VRE 3.1 with only the keyboard. In the GUI, the current active tree or table has a dark blue highlight, and the current active tab, radio button, or checkbox is enclosed within a rectangle formed by dotted lines. These areas are said to have focus and will respond to commands.
The following table lists keyboard navigation rules and shortcuts unique to VRE 3.1:
VRE 3.1 Keyboard input
Result
[keystroke] [what happens when you do the keystroke]
All VERITAS GUIs use the following keyboard navigation standards:
VRE 3.1 Keyboard Standards
Result
Tab Tab moves the focus to the next active area, field, or control, following a preset sequence.
Shift+Tab Shift+Tab moves the focus in the reverse direction through the sequence.
Ctrl+Tab Ctrl+Tab moves user to the next page in the wizard.
Up and Down arrow keys
Up and Down arrow keys move focus up and down the items of a list.
Alt Alt in combination with the underlined mnemonic letter for a field or command button executes that command button.
206 VRE 3.1 Administrator’s Guide

VRE3-1_UserGuide.book Page 207 Tuesday, November 9, 2004 11:25 AM
Keyboard Navigation and Shortcuts in VRE 3.1
VRE 3.1 Keyboard Standards
Result
Enter or Spacebar Either Enter or the Spacebar activates your selection. For example, after pressing Tab to select Next in a wizard panel, press the Spacebar to display the next screen.
Keyboard Navigation Within Dialog Boxes Dialog boxes contain groups of controls necessary to set options or settings for programs. Here are some general rules about dialog box navigation:
◆ Tab moves focus between controls within the dialog box along a preset sequence.
◆ Controls displaying a mnemonic (an underlined letter) can be selected regardless of focus by typing Alt and the underlined letter.
◆ A dark border indicates the default command button. Press Enter at any time to choose the button with a dark border.
◆ Esc chooses the Cancel button if one exists.
◆ Spacebar chooses a control you select with Tab.
◆ Spacebar changes the state of a checkbox or radio button that has focus. Typing a mnemonic (if one is available) will move the focus to the checkbox or radio button and change its state.
◆ Arrow keys move focus within listboxes, sliders, groups of option controls, or groups of page tabs.
◆ Items that cannot be changed are not visited by the Tab key sequence. Options that are unavailable are grayed-out and can neither be selected nor given focus.
While the controls described here are typically found in dialog boxes, they also can occur in other contexts. The same navigation standards will apply.
Appendix C, Accessibility and Replication Exec 207

VRE3-1_UserGuide.book Page 208 Tuesday, November 9, 2004 11:25 AM
Keyboard Navigation and Shortcuts in VRE 3.1
Tabbed Dialog Boxes
Some dialog boxes use tabbed pages to subcategorize groups of many options. Each tabbed page contains different groups of controls. Use Tab to move the focus between tabs within a dialog box. Typing the mnemonic for a tab also moves the focus to the tab and displays its page of controls.
The following table lists keyboard navigation rules within tabbed dialog boxes:
Keyboard input Result
Ctrl+Page Down or Ctrl+Tab
Switches to the next tab and displays the page
Ctrl+Page Up Switches to the previous tab and displays the page
Right arrow or Left arrow
When the focus is on a tab selector, chooses the next or previous tab in the current row and displays the page
Down arrow or Up arrow
If there are two or more rows of tabs, chooses the tab in the next or previous row and displays the page
Keyboard Shortcuts All menu items can be selected by using accelerator or mnemonic keyboard shortcuts. An accelerator is a key combination that provides shortcut access to a GUI function. A mnemonic (sometimes referred to as a “hot key”) is a single-key equivalent (used in combination with the Alt key) for selecting GUI components such as menu items. The mnemonic “hot key” letter is underlined in the GUI.
Routine functions such as opening, saving, and printing files can be performed using the standard Microsoft keyboard shortcuts. Other menu items are unique to VRE 3.1. The following table lists the keyboard shortcuts unique to VRE 3.1:
VRE 3.1 Accelerator
VRE 3.1 Mnemonic
Result
Alt F The File menu expands. From the File menu, you can create new jobs, devices and media, print selected items, view properties, or exit VRE 3.1.
Alt E The Edit menu expands. From the Edit menu, you can cut, copy, paste and delete.
208 VRE 3.1 Administrator’s Guide

VRE3-1_UserGuide.book Page 209 Tuesday, November 9, 2004 11:25 AM
Support for Accessibility Settings
VRE 3.1 Accelerator
VRE 3.1 Mnemonic
Result
Alt V The View menu expands. From the View menu, you can change the information that displays on the screen. The options on the View menu change according to which item is selected on the navigation bar.
Alt J The Job menu expands. This menu is only active when the Jobs tab is selected. From the Jobs menu, you can select the same Job functions as on the Task pane.
Alt S The Server menu expands. This menu is only active when the Servers tab is selected. From the Servers menu, you can select the same Server functions as on the Task pane.
Alt A The Alerts menu expands. This menu is only active when the Alerts tab is selected. From the Alerts menu, you can select the same Alert functions as on the Task pane.
Alt H The Help menu expands. Use the Help menu to access VRE 3.1 documentation and various VERITAS web sites.
Select secondary menu items by opening the main menu and using the Up or Down arrow key until the desired item is highlighted. Press the Right arrow key to open a submenu, and Enter to select your choice.
Keyboard shortcuts are not case-sensitive. Mnemonic keystrokes may be pressed either sequentially or simultaneously. All menu items have mnemonics, but not all menu items have accelerators.
Support for Accessibility Settings VERITAS software responds to operating system accessibility settings.
VERITAS products are compatible with Microsoft's accessibility utilities. In Windows 2000, accessibility options involving keyboard responsiveness, display contrast, alert sounds, and mouse operation can be set through the Control Panel.
▼ To set accessibility options
1. On the Start menu, select Settings, and then select Control Panel.
2. Select Accessibility Options.
Appendix C, Accessibility and Replication Exec 209

VRE3-1_UserGuide.book Page 210 Tuesday, November 9, 2004 11:25 AM
Support for Accessibility Settings
Note You can also set accessibility options through the Accessibility Wizard. On the Start menu, select Programs, and then select Accessories. Select Accessibility, and then select Accessibility Wizard.
210 VRE 3.1 Administrator’s Guide

VRE3-1_UserGuide.book Page 211 Tuesday, November 9, 2004 11:25 AM
Glossary
D Administration ConsoleThe Console software allows the replication administrator to manage the replication process. Through the Console, the administrator can remotely install Replication Service Agent software to other machines, and then create Jobs to begin the replication process. The Console can monitor the replication process, as well as the Jobs and servers that make up that process. Each Replication Neighborhood can have many Consoles installed and operating, but each Console works within only one Replication Neighborhood. See “Using the Administration Console” on page 69.
Alerts
Alerts indicate that something has happened in the replication system, whether normal or abnormal. For example, a server may have simply started or there was an error. There are five levels of alerts: action (black), critical (red), error (orange), caution (yellow), and information (blue). See “Discovering the Console Alerts View” on page 100.
Centralization (Many-to-One)
A Job that replicates files from more than one Source servers onto a single Target server. See “Centralization (Many-to-One)” on page 52.
Command Line Interface
See “srTool” on page 214.
211

VRE3-1_UserGuide.book Page 212 Tuesday, November 9, 2004 11:25 AM
Dynamic Replication
When Continue replicating after synchronization is selected, all changes made to files on a Source server that meet the replication rule criteria are passed to the replicas on the Target server(s). These changes are duplicated asynchronously; that is, the replication software does not wait for a commit to disk on the Target server(s). This prevents noticeable delays when saving to the Source server. Each change is written to an outbound journal on the Source server, and then to an inbound journal on the Target server. Replication Exec preserves write order fidelity as it moves data onto the Target server. See “Dynamic Replication” on page 50.
File System Filter Drivers
A file filter driver runs in kernel space and interrogates every I/O request that Windows makes to the file system. When a file is manipulated (opened, renamed, written, deleted, closed) the file filter driver compares that to the rules of the replication Jobs that are running. The file filter driver determines whether that data change will be replicated. (The Job and its rules determine where the change is replicated.) If the machine the driver is running on is a Source server, the file filter driver stores all changes to be replicated in the Source server's outbound journal, and if it's acting as a Target machine, it applies all incoming changes from its inbound journal.
Job
A Job is the smallest logical grouping of the replication parameters and criteria in Replication Exec. Each Job has a user-created name, at least one Source server, at least one Target server and a schedule. The schedule can be set for time intervals, or set to synchronize and continue replicating. Rules must be added to replicate specific files or directories. See “Creating and Managing Replication Jobs” on page 119.
Job Control Delegate (JCD)
The Replication Service Agent (RSA) assigned to the Replication Management Server (RMS) to control a specific Job.
Many-to-One
See “Centralization (Many-to-One)” on page 211
One-to-Many
See “Publication (One-to-Many)” on page 212.
Publication (One-to-Many)
A replication Job that replicates the same material from the Source server and places it on one or more Target servers. See “Publication (One-to-Many)” on page 53.
212 VRE 3.1 Administrator’s Guide

VRE3-1_UserGuide.book Page 213 Tuesday, November 9, 2004 11:25 AM
Replica
A fully replicated copy of a file, directory, or volume.
Replication Management Server (RMS)
The Replication Management Server holds all the configuration information for a Replication Neighborhood. This includes all the alerts, and information about all defined Jobs. The RMS may have a Console running on it, but this is not a requirement. The Replication Management Server must be running for the Console or srTool to be able to create, edit or delete Jobs. See “Replication Management Server” on page 5.
Replication Neighborhood
A Replication Neighborhood is a group of replication servers. It contains one Replication Management Server, and as many Source servers, Target servers, and Consoles as necessary. See “Replication Neighborhoods” on page 4.
Replication Pairs
The relationship between any one Source and one Target. If a publication Job has one Source and 300 Targets, then that Job has 300 pairs. The network bandwidth usage can be altered for each individual pair, in the event that one of the servers in the Job has different network options and requirements. See “Modifying the Replication Pairs” on page 148.
Replication Service Agent (RSA)
The Replication Service Agent is the Replication Exec software that enables a server to work as a Source, a Target, or both. See “Replication Service Agent (RSA)” on page 6.
Rules
Rules are sets of inclusions and exclusions to manage the amount and kind of data to be replicated. A rule can be recursive, that is, it can apply to any current and newly created subdirectory. In addition, a rule can contain instructions about the destination path. See “Entering Replication Rules” on page 135.
Schedule
A Replication Exec schedule determines when a replication Job starts and stops. See “Changing a Job Schedule” on page 157.
Server
A Windows 2000, XP or 2003 Server or Workstation computer with the Replication Service Agent software installed. Any computer or server within the network may host the Console, and more than one Console may be defined in the network. Through Discovery, servers advertise their presence to all other servers and the Console.
213

VRE3-1_UserGuide.book Page 214 Tuesday, November 9, 2004 11:25 AM
Source
A server, with the Replication Service Agent software installed, that acts as a Source for data in one or more replication Jobs.
Source Journal
While replication is taking place, all changes to data on a Source server that meet the replication rules are written first to the Source outbound journal. A slow or interrupted network connection between the Source and Target(s) servers causes changes to accumulate in this journal.
srTool
srTool is a “shell” program that runs in a Command Prompt (cmd) window and allows the administrator to create, configure, and control replication Jobs without using the Console. srTool incorporates a powerful command language that enables administrators to easily automate many complex administrative tasks. See the VERITAS Replication Exec (VRE 3.1) srTool Reference Guide.
Standard Replication
A standard (one-to-one) Job can replicate any selected subset of a single Source server to a single Target server.
Synchronization
The first step in replication is to compare the Source and Target data and make them identical. Once synchronization is complete, then dynamic replication may commence, if it is configured to do so.
Target
A server, with the Replication Service Agent software installed, that acts as a repository for replicated data in one or more replication Jobs.
Target Journal
When data reaches the Target server, it is stored briefly in the Target server’s inbound journal.
Write Order Fidelity
Replication Exec maintains write order fidelity by writing changes to the Target in exactly the same order those changes were written on the Source. Write order fidelity is only achieved after a Job has synchronized and is running in dynamic mode.
214 VRE 3.1 Administrator’s Guide

VRE3-1_UserGuide.book Page 215 Tuesday, November 9, 2004 11:25 AM
Index A
accessibility assistive technology support 209 dialog boxes 207 keyboard navigation 206 keyboard shortcuts 208 overview 205
administration console see console
alerts console access 100 discovering 100 grooming 104 properties options 103 sorting 104 troubleshooting 165 working with 104
anti-virus software 19 assistive technology support 209 asynchronous replication 50 authentication
see credentials
B backup and restore
command line window 181 database 180
bandwidth usage limits 17, 130 versus data change 15
C centralization replication 52
examples 66, 67 clustering 23, 195
error messages 203 moving the RMS to standalone server 201 removing the agent 201 removing the RMS agent 202 RMS resource 196
command line interface see srTool
command line window, backup and restore 181
configurations replication management server 6 TCP/IP 16
console alerts view 73, 100 common features 73 credentials 70 description 7 edit menu 74 file menu 74 hardware requirements, minimum 18 help menu 75 information desk 79 jobs view
accessing 144 discovering 83 working with 88
logs 109 main menu 73 monitor view 115 navigation bar 76 overview view
see information desk security 70 selection pane 78 server properties 93 servers view
discovering 90 using 93
software requirements, minimum 18 task pane 77 toolbar 76 troubleshooting 162 uninstalling 46 user interface map 72 view menu 75
credentials 63, 121 console use 70 creating jobs 121 installation 22
Index 215

VRE3-1_UserGuide.book Page 216 Tuesday, November 9, 2004 11:25 AM
troubleshooting 170
D data backup, example 67 data files, sizes 59 data replication
troubleshooting 163 data selection rules 136 database
repairing 187 restoring 183 troubleshooting 164 validating 187
database backup process 181 requirements 181
default destination rule 61default path 96deleting jobs 160destination path
changing 97 default 61
disable dynamic journaling option 126 dynamic replication 50
disabling option 126
E edit menu, console 74encrypted files 50evaluation software 98exact replica on target option 126exact replication 54, 136
characteristics 54 examples
accessing alerts properties 106 accessing new job wizard 122 accessing the console 71 adding pairs to a job 128, 149 adding rules 153 centralization replication 66, 67 changing bandwidth usage limit 150 changing destination path 97 changing job schedules 159 changing server status 99 changing the target path 156 data protection 64 defining job scripts 134 deleting a job 160 deleting pairs from a job 149 disabling SNMP support 108
distributing web content 65editing existing rules 157entering replication rules 135evaluation software update 99exact replication mode 55harvesting sales data 66merged replication mode 56modifying rules 153placing data on target 59, 60publication replication 65replication neighborhoods 4replication pairs 128restoring the RMS or RSA database 183revising job scripts 151server logs, accessing 98standard replication 64taking a server offline 99using VRE Ping 192viewing job logs 110
exclusions 155
F failover protection 23 fast-object transfer 49 FAT/FAT32 files 58 file allocation table
see FAT files file menu, console 74 file sizes 49 file system, NT
see NTFS files file types
encrypted 50 non-replicated 50 reparse 140 reparse point 50, 140
filter drivers, compatibility with VRE 3.1 19 firewall support 22 folders, of servers 96
G grooming alerts 104
H hardware
requirements, minimum 18 troubleshooting 163
help menu, console 75 HP OpenView 108
216 VRE 3.1 Administrator’s Guide

VRE3-1_UserGuide.book Page 217 Tuesday, November 9, 2004 11:25 AM
I inbound journal 51 inclusions 155
see also source path viewing 155
information desk description 79 documentation 80 locating files 82 release notes 80 technical support 80 web sites 80
installation CD 26 credentials 22 destination server 37 earlier versions of VSR 38 license agreement 27 local 26 neighborhoods 30 pre-install considerations 21 problems 47 remote 36 rights 22 serial number 25, 31, 39 SNMP trap support 36 VRE 3.1 considerations 21
interface map console 72 jobs 120
invalid mapping path 62, 156 IP address 174
J jobs
backing up 143, 160 console features 83 console, using 83, 88 creating new 122 credentials 121 database backup 143, 160 deleting 160 description 7 description entry 124, 147 details screen 88 interface map 120 log 109 modifying 144 monitoring 88
name entry 124, 147operations descriptions 145overview 119pairs, adding 149permissions 121replication options 147scheduling 141scripts 131, 151size limits 121specific menu functions 146stage details 88status states 87terminating
cancel 63, 158 stop 63, 158
troubleshooting 166 types 8, 123 types cannot be changed 123 wizard 122
journal files directory 33 location of 33, 96 sizes 51, 59
journals 51 conflicts with database directory 176 inbound 51 outbound 51 troubleshooting 164
L license agreement 27 logs
description 109 jobs 110 pair 111 server 109 troubleshooting 165
M main menu, console 73 Management Information Base 108 many-to-one
see centralization replication menus, described 209 merged replication 54, 136
characteristics 56 examples 56
MIB 108 Microsoft Cluster Server 23 modifying jobs 121
Index 217

VRE3-1_UserGuide.book Page 218 Tuesday, November 9, 2004 11:25 AM
monitor view active jobs 116 console 115 job summary 116 RMS 116 servers 116
monitoring troubleshooting 165
monitoring jobs 88 multiple IP address 174
N navigation bar, console 76 neighborhoods
defined during installation 30 example 4 overview 4 troubleshooting 164
network neighborhoods see neighborhoods
network resources 14 see performance
networks troubleshooting 165
new job wizard 122 new server wizard 36 NICs, multiple 174 NTFS files 58
O one-to-many
see publication replication one-to-one
see standard replication open-file managers 19 operating systems, supported 17 outbound journal 51
P pagefile.sys 59, 68 pair logs 109, 111 pairs
adding to a job 128 bandwidth usage 130 defining 127 examples 128 modifying 148 properties 130
path mapping conflicts 156
default destination 61invalid 62rules 136
performance chart 15 examples 14 improvement 16 network resources 14 replication 14, 51
placing data on target rules 59 planning
considerations 11 data-protection questions 12 job questions 13 network questions 12 replication system 11
port mapping 22 preferred address 175 prescan option 125 publication replication 53
examples 65
Q quota managers 19
R readme file, VRE 3.1 82 regedit 16, 172, 174, 177 registry editor 16, 172, 174, 177, 199 registry folder changes 16, 108, 173, 174, 176,
177 release notes, VRE 3.1 82 remote installation 36 reparse point files 49, 50, 140, 153 reparse points 140, 153 replication
asynchronous 50backing up 143backup jobs 160bandwidth usage 17database backup 180database restore 180DBMS backup utility 184DBMS validation utility 188dynamic 50efficiency 51jobs
see jobs modes
exact 54
218 VRE 3.1 Administrator’s Guide

VRE3-1_UserGuide.book Page 219 Tuesday, November 9, 2004 11:25 AM
merged 54 neighborhoods 4 options, defined 4 overview 4 pairs
creating 4 description 127 modifying 148
rules see rules
scheduling 63, 141 security
see credentials system, planning 11 types 52 typical uses 64 Windows operating system 68
replication jobs see jobs
replication management server 5 configurations 6 description 5 hardware requirements, minimum 18 software requirements, minimum 18 troubleshooting 167 uninstalling 46
replication performance see performance
replication service agent 6 description 6 hardware requirements, minimum 19 installation 36 not visible to RMS 172 software requirements, minimum 19 troubleshooting 169 unable to connect to RMS 177 uninstalling 46
restore database 180, 183 RMS
see replication management server RMS resource
clustering 196 rolling upgrade of neighborhoods 42 RSA
see replication service agent rule trees 153 rules 58
adding 153, 155 data selection 136
description 58dialog 154entering 135exclusion 138inclusion 138mapping 154modifying 152, 153order of precedence 155placing data on target 59selecting data 58selection order 138source tree 154troubleshooting 168
S sales data harvesting 66scalability 1scheduling 63
changing 157display options 159examples 159job 157less than one-hour jobs 141local time 63new jobs 141options 142universal time 63
script properties command 133 description 133 examples 132 run asynchronously 133 security context 133 timeouts 133 triggering events 133
scripts defined 131 job 131 revising 151 using 131, 134
selecting data rules 58 selection pane, console 78 selection rules, order of 39 serial number 25, 31, 39, 98 server logs 109
accessing 98 server properties
folders tab 96 general tab 93
Index 219

VRE3-1_UserGuide.book Page 220 Tuesday, November 9, 2004 11:25 AM
log tab 97 serial number tab 98 volumes tab 95
Servers 109 servers 90
console features 90 console use 93 properties screen 93 status of 99 synchronization 49 troubleshooting 169 viewing information 93
size limits, jobs 121 skip check 31 SNMP traps 36, 108 software
evaluation 98 requirements, minimum 18 troubleshooting 163
software removal 45 sorting alerts 104 source path rules 136 source server
selecting for new job 129 source tree 154 srTool 8, 81, 120, 128, 141, 148, 159, 179 standard replication 52
examples 64 states, jobs 87 status, jobs 87 storage replication
see replication symptoms, troubleshooting 171 synchronization 49
continue replication after option 126
T target path 156
changing 156 target server
changing the destination path 97 no changes on 126 recovering data from 62 selecting for a new job 129
task pane, console 77 TCP/IP 16 TCP/IP configuration 16 The 3 tools bar, console 76
transaction log files 180 troubleshooting
approach 161 conflicts between journal and database directories 176 general issues 162
administration console 162alerts 165data replication 163database 164hardware and software 163jobs 166journals 164logs 165monitoring 165neighborhood 164networks 165replication service agent 169RMS 167rules 168servers 169user security 170
replication service agent not visible to RMS 172
RSA unable to connect to RMS 177 specific symptoms 171
U uninstalling 45
console 46 problems 47 replication management server 46 replication service agent 46
user rights see credentials
user security troubleshooting 170
V VBS scripts 132 view menu, console 75 volumes, of servers 95 VRE 3.1
accessibility 205administrator’s guide 82compatibilities, other applications 19components 8database backup 180database restore 180documentation 80
220 VRE 3.1 Administrator’s Guide

VRE3-1_UserGuide.book Page 221 Tuesday, November 9, 2004 11:25 AM
features and benefits 1filter driver compatibility 19firewall support 22installation, CD 26port mapping 22readme file 82release notes 82rolling upgrade 42scalability 1software removal 45technical support 80typical uses 64upgrading to 38web sites 80what’s new 3
VRE Ping description 191
examples 192 options 191 typical output 192
VSR 2.1 38, 42 VSR 2.1J 24 VSR 3.1
database backup 180
W Windows
cannot replicate 68 operating systems 17 size limits 121 TCP/IP configuration 16
write-order fidelity 50
X XCopy 62
Index 221