veritasstoragefoundation for oracle® rac installation and
TRANSCRIPT

Veritas Storage Foundation™for Oracle® RAC Installationand Configuration Guide
AIX
5.1 Service Pack 1 Platform Release 1

Veritas Storage Foundation™ for Oracle RAC Installationand Configuration Guide
The software described in this book is furnished under a license agreement and may be usedonly in accordance with the terms of the agreement.
Product version: 5.1 SP1 PR1
Document version: 5.1SP1PR1.3
Legal NoticeCopyright © 2010 Symantec Corporation. All rights reserved.
Symantec, the Symantec logo, Veritas, Veritas Storage Foundation, CommandCentral,NetBackup, Enterprise Vault, and LiveUpdate are trademarks or registered trademarks ofSymantec corporation or its affiliates in the U.S. and other countries. Other names may betrademarks of their respective owners.
The product described in this document is distributed under licenses restricting its use,copying, distribution, and decompilation/reverse engineering. No part of this documentmay be reproduced in any form by any means without prior written authorization ofSymantec Corporation and its licensors, if any.
THE DOCUMENTATION IS PROVIDED "AS IS" AND ALL EXPRESS OR IMPLIED CONDITIONS,REPRESENTATIONS AND WARRANTIES, INCLUDING ANY IMPLIED WARRANTY OFMERCHANTABILITY, FITNESS FOR A PARTICULAR PURPOSE OR NON-INFRINGEMENT,ARE DISCLAIMED, EXCEPT TO THE EXTENT THAT SUCH DISCLAIMERS ARE HELD TOBE LEGALLY INVALID. SYMANTEC CORPORATION SHALL NOT BE LIABLE FOR INCIDENTALOR CONSEQUENTIAL DAMAGES IN CONNECTION WITH THE FURNISHING,PERFORMANCE, OR USE OF THIS DOCUMENTATION. THE INFORMATION CONTAINEDIN THIS DOCUMENTATION IS SUBJECT TO CHANGE WITHOUT NOTICE.
The Licensed Software and Documentation are deemed to be commercial computer softwareas defined in FAR 12.212 and subject to restricted rights as defined in FAR Section 52.227-19"Commercial Computer Software - Restricted Rights" and DFARS 227.7202, "Rights inCommercial Computer Software or Commercial Computer Software Documentation", asapplicable, and any successor regulations. Any use, modification, reproduction release,performance, display or disclosure of the Licensed Software and Documentation by the U.S.Government shall be solely in accordance with the terms of this Agreement.

Symantec Corporation350 Ellis StreetMountain View, CA 94043
http://www.symantec.com
Technical SupportSymantec Technical Support maintains support centers globally. TechnicalSupport’s primary role is to respond to specific queries about product featuresand functionality. The Technical Support group also creates content for our onlineKnowledge Base. The Technical Support group works collaboratively with theother functional areas within Symantec to answer your questions in a timelyfashion. For example, the Technical Support group works with Product Engineeringand Symantec Security Response to provide alerting services and virus definitionupdates.
Symantec’s support offerings include the following:
■ A range of support options that give you the flexibility to select the rightamount of service for any size organization
■ Telephone and/or Web-based support that provides rapid response andup-to-the-minute information
■ Upgrade assurance that delivers software upgrades
■ Global support purchased on a regional business hours or 24 hours a day, 7days a week basis
■ Premium service offerings that include Account Management Services
For information about Symantec’s support offerings, you can visit our Web siteat the following URL:
www.symantec.com/business/support/index.jsp
All support services will be delivered in accordance with your support agreementand the then-current enterprise technical support policy.
Contacting Technical SupportCustomers with a current support agreement may access Technical Supportinformation at the following URL:
www.symantec.com/business/support/contact_techsupp_static.jsp
Before contacting Technical Support, make sure you have satisfied the systemrequirements that are listed in your product documentation. Also, you should beat the computer on which the problem occurred, in case it is necessary to replicatethe problem.
When you contact Technical Support, please have the following informationavailable:
■ Product release level

■ Hardware information
■ Available memory, disk space, and NIC information
■ Operating system
■ Version and patch level
■ Network topology
■ Router, gateway, and IP address information
■ Problem description:
■ Error messages and log files
■ Troubleshooting that was performed before contacting Symantec
■ Recent software configuration changes and network changes
Licensing and registrationIf your Symantec product requires registration or a license key, access our technicalsupport Web page at the following URL:
www.symantec.com/business/support/
Customer serviceCustomer service information is available at the following URL:
www.symantec.com/business/support/
Customer Service is available to assist with non-technical questions, such as thefollowing types of issues:
■ Questions regarding product licensing or serialization
■ Product registration updates, such as address or name changes
■ General product information (features, language availability, local dealers)
■ Latest information about product updates and upgrades
■ Information about upgrade assurance and support contracts
■ Information about the Symantec Buying Programs
■ Advice about Symantec's technical support options
■ Nontechnical presales questions
■ Issues that are related to CD-ROMs or manuals

Support agreement resourcesIf you want to contact Symantec regarding an existing support agreement, pleasecontact the support agreement administration team for your region as follows:
[email protected] and Japan
[email protected], Middle-East, and Africa
[email protected] America and Latin America
DocumentationProduct guides are available on the media in PDF format. Make sure that you areusing the current version of the documentation. The document version appearson page 2 of each guide. The latest product documentation is available on theSymantec Web site.
https://sort.symantec.com/documents
Your feedback on product documentation is important to us. Send suggestionsfor improvements and reports on errors or omissions. Include the title anddocument version (located on the second page), and chapter and section titles ofthe text on which you are reporting. Send feedback to:
About Symantec ConnectSymantec Connect is the peer-to-peer technical community site for Symantec’senterprise customers. Participants can connect and share information with otherproduct users, including creating forum posts, articles, videos, downloads, blogsand suggesting ideas, as well as interact with Symantec product teams andTechnical Support. Content is rated by the community, and members receivereward points for their contributions.
http://www.symantec.com/connect/storage-management
Technical Support . . . . . . . . . . . . . . . . . . . . . . . . . . . . . . . . . . . . . . . . . . . . . . . . . . . . . . . . . . . . . . . . . . . . . . . . . . . . . . . . . . . . . . . . . . . . . . . 4
Section 1 Installation overview and planning . . . . . . . . . . . . . . . . . . 25
Chapter 1 Introducing Veritas Storage Foundation for OracleRAC . . . . . . . . . . . . . . . . . . . . . . . . . . . . . . . . . . . . . . . . . . . . . . . . . . . . . . . . . . . . . . . . . . . . . . . . . . . . . . . . . . . 27
About Veritas Storage Foundation for Oracle RAC .... . . . . . . . . . . . . . . . . . . . . . . . . . . 27Benefits of SF Oracle RAC .... . . . . . . . . . . . . . . . . . . . . . . . . . . . . . . . . . . . . . . . . . . . . . . . . . . . . 27
About basic SF Oracle RAC components ... . . . . . . . . . . . . . . . . . . . . . . . . . . . . . . . . . . . . . . . . 29About SF Oracle RAC features ... . . . . . . . . . . . . . . . . . . . . . . . . . . . . . . . . . . . . . . . . . . . . . . . . . . . . . 30
About I/O fencing .... . . . . . . . . . . . . . . . . . . . . . . . . . . . . . . . . . . . . . . . . . . . . . . . . . . . . . . . . . . . . . . . 31Symantec Operations Readiness Tools ... . . . . . . . . . . . . . . . . . . . . . . . . . . . . . . . . . . . . 34About VCS notifications .... . . . . . . . . . . . . . . . . . . . . . . . . . . . . . . . . . . . . . . . . . . . . . . . . . . . . . . 35About campus clusters ... . . . . . . . . . . . . . . . . . . . . . . . . . . . . . . . . . . . . . . . . . . . . . . . . . . . . . . . . . 35About global clusters ... . . . . . . . . . . . . . . . . . . . . . . . . . . . . . . . . . . . . . . . . . . . . . . . . . . . . . . . . . . . 35About Veritas Volume Replicator ... . . . . . . . . . . . . . . . . . . . . . . . . . . . . . . . . . . . . . . . . . . . 35About database management using SF Oracle RAC .... . . . . . . . . . . . . . . . . . . . 35
About SF Oracle RAC optional components ... . . . . . . . . . . . . . . . . . . . . . . . . . . . . . . . . . . . 36About Symantec Product Authentication Service (AT) ... . . . . . . . . . . . . . . . . 36Veritas Operations Manager ... . . . . . . . . . . . . . . . . . . . . . . . . . . . . . . . . . . . . . . . . . . . . . . . . . . 36About Cluster Manager (Java Console) ... . . . . . . . . . . . . . . . . . . . . . . . . . . . . . . . . . . . . . 37
SF Oracle RAC cluster setup models ... . . . . . . . . . . . . . . . . . . . . . . . . . . . . . . . . . . . . . . . . . . . . . . 37Typical configuration of four-node SF Oracle RAC cluster ... . . . . . . . . . . . 38Typical configuration of SF Oracle RAC clusters in secure
mode .... . . . . . . . . . . . . . . . . . . . . . . . . . . . . . . . . . . . . . . . . . . . . . . . . . . . . . . . . . . . . . . . . . . . . . . . . . 39Typical configuration of VOM-managed SF Oracle RAC
clusters ... . . . . . . . . . . . . . . . . . . . . . . . . . . . . . . . . . . . . . . . . . . . . . . . . . . . . . . . . . . . . . . . . . . . . . . . 40Typical configuration of SF Oracle RAC campus clusters for
disaster recovery .... . . . . . . . . . . . . . . . . . . . . . . . . . . . . . . . . . . . . . . . . . . . . . . . . . . . . . . . . . 41Typical configuration of SF Oracle RAC global clusters for
disaster recovery .... . . . . . . . . . . . . . . . . . . . . . . . . . . . . . . . . . . . . . . . . . . . . . . . . . . . . . . . . . 43
Contents

Chapter 2 System requirements . . . . . . . . . . . . . . . . . . . . . . . . . . . . . . . . . . . . . . . . . . . . . . . . . . . . . . . . . 45
Important preinstallation information .... . . . . . . . . . . . . . . . . . . . . . . . . . . . . . . . . . . . . . . . . . 45Hardware requirements ... . . . . . . . . . . . . . . . . . . . . . . . . . . . . . . . . . . . . . . . . . . . . . . . . . . . . . . . . . . . . . 46I/O fencing requirements ... . . . . . . . . . . . . . . . . . . . . . . . . . . . . . . . . . . . . . . . . . . . . . . . . . . . . . . . . . . . 47
Coordinator disk requirements for I/O fencing .... . . . . . . . . . . . . . . . . . . . . . . . . 48CP server requirements ... . . . . . . . . . . . . . . . . . . . . . . . . . . . . . . . . . . . . . . . . . . . . . . . . . . . . . . . . 48
Supported AIX operating systems .... . . . . . . . . . . . . . . . . . . . . . . . . . . . . . . . . . . . . . . . . . . . . . . . 51Supported database software .... . . . . . . . . . . . . . . . . . . . . . . . . . . . . . . . . . . . . . . . . . . . . . . . . . . . . . 51Supported replication technologies for global clusters ... . . . . . . . . . . . . . . . . . . . . . 52
Chapter 3 Planning to install SF Oracle RAC . . . . . . . . . . . . . . . . . . . . . . . . . . . . . . . . . . . . 53
Planning your network configuration .... . . . . . . . . . . . . . . . . . . . . . . . . . . . . . . . . . . . . . . . . . . 53Planning the public network configuration for Oracle RAC .... . . . . . . . . 54Planning the private network configuration for Oracle RAC .... . . . . . . . 54
Planning the storage .... . . . . . . . . . . . . . . . . . . . . . . . . . . . . . . . . . . . . . . . . . . . . . . . . . . . . . . . . . . . . . . . . . 57Planning the storage for SF Oracle RAC .... . . . . . . . . . . . . . . . . . . . . . . . . . . . . . . . . . . 57Planning the storage for Oracle RAC .... . . . . . . . . . . . . . . . . . . . . . . . . . . . . . . . . . . . . . 57
Planning volume layout ... . . . . . . . . . . . . . . . . . . . . . . . . . . . . . . . . . . . . . . . . . . . . . . . . . . . . . . . . . . . . . . 62Planning file system design .... . . . . . . . . . . . . . . . . . . . . . . . . . . . . . . . . . . . . . . . . . . . . . . . . . . . . . . . . 62About planning to configure I/O fencing .... . . . . . . . . . . . . . . . . . . . . . . . . . . . . . . . . . . . . . . . 63
Typical SF Oracle RAC cluster configuration with disk-based I/Ofencing .... . . . . . . . . . . . . . . . . . . . . . . . . . . . . . . . . . . . . . . . . . . . . . . . . . . . . . . . . . . . . . . . . . . . . . . . 65
Typical SF Oracle RAC cluster configuration with server-basedI/O fencing .... . . . . . . . . . . . . . . . . . . . . . . . . . . . . . . . . . . . . . . . . . . . . . . . . . . . . . . . . . . . . . . . . . . 66
Recommended CP server configurations .... . . . . . . . . . . . . . . . . . . . . . . . . . . . . . . . . . 66Planning for cluster management ... . . . . . . . . . . . . . . . . . . . . . . . . . . . . . . . . . . . . . . . . . . . . . . . . 69Planning for disaster recovery .... . . . . . . . . . . . . . . . . . . . . . . . . . . . . . . . . . . . . . . . . . . . . . . . . . . . . 70
Planning a campus cluster setup .... . . . . . . . . . . . . . . . . . . . . . . . . . . . . . . . . . . . . . . . . . . . 70Planning a global cluster setup .... . . . . . . . . . . . . . . . . . . . . . . . . . . . . . . . . . . . . . . . . . . . . . 71Data replication considerations .... . . . . . . . . . . . . . . . . . . . . . . . . . . . . . . . . . . . . . . . . . . . . 71
Chapter 4 Licensing SF Oracle RAC . . . . . . . . . . . . . . . . . . . . . . . . . . . . . . . . . . . . . . . . . . . . . . . . . . . . 73
About Veritas product licensing .... . . . . . . . . . . . . . . . . . . . . . . . . . . . . . . . . . . . . . . . . . . . . . . . . . . 73About SF Oracle RAC licenses ... . . . . . . . . . . . . . . . . . . . . . . . . . . . . . . . . . . . . . . . . . . . . . . . . 74
Setting or changing the product level for keyless licensing .... . . . . . . . . . . . . . . 76Installing Veritas product license keys ... . . . . . . . . . . . . . . . . . . . . . . . . . . . . . . . . . . . . . . . . . . 77
Contents8

Section 2 Installation and configuration of SFOracle RAC . . . . . . . . . . . . . . . . . . . . . . . . . . . . . . . . . . . . . . . . . . . . . . . . . . . . . . . . . . . . . . . . . 79
Chapter 5 Preparing to install SF Oracle RAC . . . . . . . . . . . . . . . . . . . . . . . . . . . . . . . . . . 81
Setting the umask before installation .... . . . . . . . . . . . . . . . . . . . . . . . . . . . . . . . . . . . . . . . . . . . 81Synchronizing time settings on cluster nodes ... . . . . . . . . . . . . . . . . . . . . . . . . . . . . . . . . . 81Setting up shared storage .... . . . . . . . . . . . . . . . . . . . . . . . . . . . . . . . . . . . . . . . . . . . . . . . . . . . . . . . . . . 82Setting the environment variables ... . . . . . . . . . . . . . . . . . . . . . . . . . . . . . . . . . . . . . . . . . . . . . . . . 82Optimizing LLT media speed settings on private NICs .... . . . . . . . . . . . . . . . . . . . . . 83
Guidelines for setting the media speed of the LLTinterconnects ... . . . . . . . . . . . . . . . . . . . . . . . . . . . . . . . . . . . . . . . . . . . . . . . . . . . . . . . . . . . . . . . 83
Verifying the systems before installation .... . . . . . . . . . . . . . . . . . . . . . . . . . . . . . . . . . . . . . . 83
Chapter 6 Installing SF Oracle RAC . . . . . . . . . . . . . . . . . . . . . . . . . . . . . . . . . . . . . . . . . . . . . . . . . . . . 85
About installing SF Oracle RAC .... . . . . . . . . . . . . . . . . . . . . . . . . . . . . . . . . . . . . . . . . . . . . . . . . . . 85About installation and configuration methods .... . . . . . . . . . . . . . . . . . . . . . . . . . . . . . . . 86Installing SF Oracle RAC using the Veritas script-based installation
program .... . . . . . . . . . . . . . . . . . . . . . . . . . . . . . . . . . . . . . . . . . . . . . . . . . . . . . . . . . . . . . . . . . . . . . . . . . . . 87Installing SF Oracle RAC using the Veritas Web-based installation
program .... . . . . . . . . . . . . . . . . . . . . . . . . . . . . . . . . . . . . . . . . . . . . . . . . . . . . . . . . . . . . . . . . . . . . . . . . . . . 90Before using the Veritas Web-based installer ... . . . . . . . . . . . . . . . . . . . . . . . . . . . . 91Starting the Veritas Web-based installer ... . . . . . . . . . . . . . . . . . . . . . . . . . . . . . . . . . 91Installing products with the Veritas Web-based installer ... . . . . . . . . . . . . 92
Installing SF Oracle RAC using NIM and the installer ... . . . . . . . . . . . . . . . . . . . . . . . 93Preparing the bundle and script resources on NIM server ... . . . . . . . . . . . 94Installing SF Oracle RAC on the NIM client using SMIT .... . . . . . . . . . . . . . 95Installing SF Oracle RAC and the operating system on the NIM
client using SMIT .... . . . . . . . . . . . . . . . . . . . . . . . . . . . . . . . . . . . . . . . . . . . . . . . . . . . . . . . . . 96
Chapter 7 Preparing to configure SF Oracle RAC . . . . . . . . . . . . . . . . . . . . . . . . . . . . 97
Preparing to configure the clusters in secure mode .... . . . . . . . . . . . . . . . . . . . . . . . . 97Installing the root broker for the security infrastructure ... . . . . . . . . . . 101Creating authentication broker accounts on root broker
system .... . . . . . . . . . . . . . . . . . . . . . . . . . . . . . . . . . . . . . . . . . . . . . . . . . . . . . . . . . . . . . . . . . . . . . . 102Creating encrypted files for the security infrastructure ... . . . . . . . . . . . . 103Preparing the installation system for the security
infrastructure ... . . . . . . . . . . . . . . . . . . . . . . . . . . . . . . . . . . . . . . . . . . . . . . . . . . . . . . . . . . . . . 105Setting up the CP server ... . . . . . . . . . . . . . . . . . . . . . . . . . . . . . . . . . . . . . . . . . . . . . . . . . . . . . . . . . . . 106
Planning your CP server setup .... . . . . . . . . . . . . . . . . . . . . . . . . . . . . . . . . . . . . . . . . . . . . 107Installing the CP server using the installer ... . . . . . . . . . . . . . . . . . . . . . . . . . . . . . 108
9Contents

Configuring the CP server cluster in secure mode .... . . . . . . . . . . . . . . . . . . . 109Setting up shared storage for the CP server database ... . . . . . . . . . . . . . . . 110Configuring the CP server using the configuration utility ... . . . . . . . . . . 111Configuring the CP server manually ... . . . . . . . . . . . . . . . . . . . . . . . . . . . . . . . . . . . . . . 119Verifying the CP server configuration .... . . . . . . . . . . . . . . . . . . . . . . . . . . . . . . . . . . 121
Chapter 8 Configuring SF Oracle RAC . . . . . . . . . . . . . . . . . . . . . . . . . . . . . . . . . . . . . . . . . . . . . . 123
About configuring SF Oracle RAC .... . . . . . . . . . . . . . . . . . . . . . . . . . . . . . . . . . . . . . . . . . . . . . . 123Configuring the SF Oracle RAC components using the script-based
installer ... . . . . . . . . . . . . . . . . . . . . . . . . . . . . . . . . . . . . . . . . . . . . . . . . . . . . . . . . . . . . . . . . . . . . . . . . . . . 124Configuring the SF Oracle RAC cluster ... . . . . . . . . . . . . . . . . . . . . . . . . . . . . . . . . . . 126Creation of SF Oracle RAC configuration files ... . . . . . . . . . . . . . . . . . . . . . . . . . 139Stopping and starting SF Oracle RAC processes ... . . . . . . . . . . . . . . . . . . . . . . . 139
Configuring SF Oracle RAC using the Web-based installer ... . . . . . . . . . . . . . . . 140
Chapter 9 Configuring SF Oracle RAC clusters for dataintegrity . . . . . . . . . . . . . . . . . . . . . . . . . . . . . . . . . . . . . . . . . . . . . . . . . . . . . . . . . . . . . . . . . . . . . . . . . 147
Setting up disk-based I/O fencing using installsfrac program .... . . . . . . . . . 147Initializing disks as VxVM disks ... . . . . . . . . . . . . . . . . . . . . . . . . . . . . . . . . . . . . . . . . . . . 147Identifying disks to use as coordinator disks ... . . . . . . . . . . . . . . . . . . . . . . . . . . . 148Checking shared disks for I/O fencing .... . . . . . . . . . . . . . . . . . . . . . . . . . . . . . . . . . . 149Configuring disk-based I/O fencing using installsfrac
program .... . . . . . . . . . . . . . . . . . . . . . . . . . . . . . . . . . . . . . . . . . . . . . . . . . . . . . . . . . . . . . . . . . . . 153Setting up disk-based I/O fencing manually ... . . . . . . . . . . . . . . . . . . . . . . . . . . . . . . . . . . 156
Setting up coordinator disk groups .... . . . . . . . . . . . . . . . . . . . . . . . . . . . . . . . . . . . . . . 156Creating I/O fencing configuration files ... . . . . . . . . . . . . . . . . . . . . . . . . . . . . . . . . . 157Modifying VCS configuration to use I/O fencing .... . . . . . . . . . . . . . . . . . . . . . 158Starting SF Oracle RAC on all nodes ... . . . . . . . . . . . . . . . . . . . . . . . . . . . . . . . . . . . . . . 159Verifying I/O fencing configuration .... . . . . . . . . . . . . . . . . . . . . . . . . . . . . . . . . . . . . . 161
Setting up server-based I/O fencing using installsfrac program .... . . . . . . . 162Verifying the security configuration on the SF Oracle RAC cluster
to use CP server coordination point ... . . . . . . . . . . . . . . . . . . . . . . . . . . . . . . . . . 162Configuring server-based I/O fencing using the installsfrac
program .... . . . . . . . . . . . . . . . . . . . . . . . . . . . . . . . . . . . . . . . . . . . . . . . . . . . . . . . . . . . . . . . . . . . 164Setting up server-based I/O fencing manually ... . . . . . . . . . . . . . . . . . . . . . . . . . . . . . . . 173
Preparing the CP servers manually for use by the SF Oracle RACcluster ... . . . . . . . . . . . . . . . . . . . . . . . . . . . . . . . . . . . . . . . . . . . . . . . . . . . . . . . . . . . . . . . . . . . . . . . 173
Configuring server-based fencing on the SF Oracle RAC clustermanually ... . . . . . . . . . . . . . . . . . . . . . . . . . . . . . . . . . . . . . . . . . . . . . . . . . . . . . . . . . . . . . . . . . . . 177
Configuring Coordination Point agent to monitor coordinationpoints ... . . . . . . . . . . . . . . . . . . . . . . . . . . . . . . . . . . . . . . . . . . . . . . . . . . . . . . . . . . . . . . . . . . . . . . . . 181
Verifying server-based I/O fencing configuration .... . . . . . . . . . . . . . . . . . . . 183
Contents10

Chapter 10 Performing post-installation and configurationtasks . . . . . . . . . . . . . . . . . . . . . . . . . . . . . . . . . . . . . . . . . . . . . . . . . . . . . . . . . . . . . . . . . . . . . . . . . . . . . . . 185
About enabling LDAP authentication for clusters that run in securemode .... . . . . . . . . . . . . . . . . . . . . . . . . . . . . . . . . . . . . . . . . . . . . . . . . . . . . . . . . . . . . . . . . . . . . . . . . . . . . . . 185Enabling LDAP authentication for clusters that run in secure
mode .... . . . . . . . . . . . . . . . . . . . . . . . . . . . . . . . . . . . . . . . . . . . . . . . . . . . . . . . . . . . . . . . . . . . . . . . . 187Configuring Veritas Volume Replicator ... . . . . . . . . . . . . . . . . . . . . . . . . . . . . . . . . . . . . . . . 193Verifying SF Oracle RAC installation using VCS configuration
file ... . . . . . . . . . . . . . . . . . . . . . . . . . . . . . . . . . . . . . . . . . . . . . . . . . . . . . . . . . . . . . . . . . . . . . . . . . . . . . . . . . . 194Verifying LLT, GAB, and cluster operation .... . . . . . . . . . . . . . . . . . . . . . . . . . . . . . . . . . . 194
Verifying LLT .... . . . . . . . . . . . . . . . . . . . . . . . . . . . . . . . . . . . . . . . . . . . . . . . . . . . . . . . . . . . . . . . . . . 195Verifying GAB .... . . . . . . . . . . . . . . . . . . . . . . . . . . . . . . . . . . . . . . . . . . . . . . . . . . . . . . . . . . . . . . . . . . 197Verifying the cluster ... . . . . . . . . . . . . . . . . . . . . . . . . . . . . . . . . . . . . . . . . . . . . . . . . . . . . . . . . . . 198Verifying the cluster nodes ... . . . . . . . . . . . . . . . . . . . . . . . . . . . . . . . . . . . . . . . . . . . . . . . . . 199
Running VRTSexplorer to diagnose issues in the cluster ... . . . . . . . . . . . . . . . . . 202
Section 3 Upgrade of SF Oracle RAC . . . . . . . . . . . . . . . . . . . . . . . . . . . . . . . . . . . . 203
Chapter 11 Preparing to upgrade to SF Oracle RAC 5.1 SP1PR1 . . . . . . . . . . . . . . . . . . . . . . . . . . . . . . . . . . . . . . . . . . . . . . . . . . . . . . . . . . . . . . . . . . . . . . . . . . . . . . . . . 205
About upgrading SF Oracle RAC .... . . . . . . . . . . . . . . . . . . . . . . . . . . . . . . . . . . . . . . . . . . . . . . . . 205About types of upgrade .... . . . . . . . . . . . . . . . . . . . . . . . . . . . . . . . . . . . . . . . . . . . . . . . . . . . . . . . . . . . . 206Supported upgrade paths .... . . . . . . . . . . . . . . . . . . . . . . . . . . . . . . . . . . . . . . . . . . . . . . . . . . . . . . . . . 206Preparing to upgrade to SF Oracle RAC 5.1 SP1 PR1 .... . . . . . . . . . . . . . . . . . . . . . . 207Pre-upgrade tasks for migrating the SFDB repository database ... . . . . . . . . 209
Chapter 12 Performing a full upgrade to SF Oracle RAC 5.1 SP1PR1 . . . . . . . . . . . . . . . . . . . . . . . . . . . . . . . . . . . . . . . . . . . . . . . . . . . . . . . . . . . . . . . . . . . . . . . . . . . . . . . . . 211
About full upgrades ... . . . . . . . . . . . . . . . . . . . . . . . . . . . . . . . . . . . . . . . . . . . . . . . . . . . . . . . . . . . . . . . . . 211Upgrading to SF Oracle RAC 5.1 SP1 PR1 .... . . . . . . . . . . . . . . . . . . . . . . . . . . . . . . . . . . . . 212
Upgrading SF Oracle RAC using the Veritas script-basedinstallation program .... . . . . . . . . . . . . . . . . . . . . . . . . . . . . . . . . . . . . . . . . . . . . . . . . . . . 214
Upgrading SF Oracle RAC using a response file ... . . . . . . . . . . . . . . . . . . . . . . . 216
Chapter 13 Performing a phased upgrade to SF Oracle RAC 5.1SP1 PR1 . . . . . . . . . . . . . . . . . . . . . . . . . . . . . . . . . . . . . . . . . . . . . . . . . . . . . . . . . . . . . . . . . . . . . . . . . 221
About phased upgrade .... . . . . . . . . . . . . . . . . . . . . . . . . . . . . . . . . . . . . . . . . . . . . . . . . . . . . . . . . . . . . . 221Performing phased upgrade of SF Oracle RAC from version 5.0 ... . . . . . . . . 222
11Contents

Step 1: Performing pre-upgrade tasks on the first half of thecluster ... . . . . . . . . . . . . . . . . . . . . . . . . . . . . . . . . . . . . . . . . . . . . . . . . . . . . . . . . . . . . . . . . . . . . . . . 223
Step 2: Upgrading the first half of the cluster ... . . . . . . . . . . . . . . . . . . . . . . . . . 226Step 3: Performing pre-upgrade tasks on the second half of the
cluster ... . . . . . . . . . . . . . . . . . . . . . . . . . . . . . . . . . . . . . . . . . . . . . . . . . . . . . . . . . . . . . . . . . . . . . . . 227Step 4: Performing post-upgrade tasks on the first half of the
cluster ... . . . . . . . . . . . . . . . . . . . . . . . . . . . . . . . . . . . . . . . . . . . . . . . . . . . . . . . . . . . . . . . . . . . . . . . 229Step 5: Upgrading the second half of the cluster ... . . . . . . . . . . . . . . . . . . . . . . 231Step 6: Performing post-upgrade tasks on the second half of the
cluster ... . . . . . . . . . . . . . . . . . . . . . . . . . . . . . . . . . . . . . . . . . . . . . . . . . . . . . . . . . . . . . . . . . . . . . . . 231
Chapter 14 Performing a rolling upgrade to SF Oracle RAC 5.1SP1 PR1 . . . . . . . . . . . . . . . . . . . . . . . . . . . . . . . . . . . . . . . . . . . . . . . . . . . . . . . . . . . . . . . . . . . . . . . . . 233
About rolling upgrades ... . . . . . . . . . . . . . . . . . . . . . . . . . . . . . . . . . . . . . . . . . . . . . . . . . . . . . . . . . . . . . 233Prerequisites for a rolling upgrade .... . . . . . . . . . . . . . . . . . . . . . . . . . . . . . . . . . . . . . . . . . . . . . 233Performing a rolling upgrade using the installer ... . . . . . . . . . . . . . . . . . . . . . . . . . . . 234
Performing a rolling upgrade on kernel filesets: phase 1 .... . . . . . . . . . . 234Performing a rolling upgrade on non-kernel filesets: phase
2 .... . . . . . . . . . . . . . . . . . . . . . . . . . . . . . . . . . . . . . . . . . . . . . . . . . . . . . . . . . . . . . . . . . . . . . . . . . . . . . 237
Chapter 15 Upgrading from Storage Foundation products toSF Oracle RAC 5.1 SP1 PR1 . . . . . . . . . . . . . . . . . . . . . . . . . . . . . . . . . . . . . . . 239
About upgrading from Storage Foundation products to SF Oracle RAC5.1 SP1 PR1 .... . . . . . . . . . . . . . . . . . . . . . . . . . . . . . . . . . . . . . . . . . . . . . . . . . . . . . . . . . . . . . . . . . . . . 239
Upgrading from Storage Foundation products to SF Oracle RAC 5.1SP1 PR1 .... . . . . . . . . . . . . . . . . . . . . . . . . . . . . . . . . . . . . . . . . . . . . . . . . . . . . . . . . . . . . . . . . . . . . . . . . . . 240
Chapter 16 Migrating from single instance Storage Foundationfor Oracle HA to SF Oracle RAC . . . . . . . . . . . . . . . . . . . . . . . . . . . . . . . . 243
Migration overview .... . . . . . . . . . . . . . . . . . . . . . . . . . . . . . . . . . . . . . . . . . . . . . . . . . . . . . . . . . . . . . . . . . 243Sample configuration before and after migration .... . . . . . . . . . . . . . . . . . . . 244
Migration requirements ... . . . . . . . . . . . . . . . . . . . . . . . . . . . . . . . . . . . . . . . . . . . . . . . . . . . . . . . . . . . . 245Before you migrate ... . . . . . . . . . . . . . . . . . . . . . . . . . . . . . . . . . . . . . . . . . . . . . . . . . . . . . . . . . . . . . . . . . . 245Migrating to SF Oracle RAC 5.1 SP1 PR1 .... . . . . . . . . . . . . . . . . . . . . . . . . . . . . . . . . . . . . . 246
Migrating Storage Foundation for Oracle HA to SF OracleRAC .... . . . . . . . . . . . . . . . . . . . . . . . . . . . . . . . . . . . . . . . . . . . . . . . . . . . . . . . . . . . . . . . . . . . . . . . . . 246
Migrating a single instance Oracle database to Oracle RACdatabase .... . . . . . . . . . . . . . . . . . . . . . . . . . . . . . . . . . . . . . . . . . . . . . . . . . . . . . . . . . . . . . . . . . . . 247
Completing post-migration tasks ... . . . . . . . . . . . . . . . . . . . . . . . . . . . . . . . . . . . . . . . . . . 250Sample configuration files ... . . . . . . . . . . . . . . . . . . . . . . . . . . . . . . . . . . . . . . . . . . . . . . . . . . . . . . . . 253
Contents12

VCS configuration file for Storage Foundation for OracleHA .... . . . . . . . . . . . . . . . . . . . . . . . . . . . . . . . . . . . . . . . . . . . . . . . . . . . . . . . . . . . . . . . . . . . . . . . . . . . 253
Oracle initialization parameter file for Storage Foundation forOracle HA .... . . . . . . . . . . . . . . . . . . . . . . . . . . . . . . . . . . . . . . . . . . . . . . . . . . . . . . . . . . . . . . . . . 254
tnsnames.ora for Storage Foundation for Oracle HA .... . . . . . . . . . . . . . . . 255listener.ora for Storage Foundation for Oracle HA .... . . . . . . . . . . . . . . . . . . 255
Chapter 17 Performing post-upgrade tasks . . . . . . . . . . . . . . . . . . . . . . . . . . . . . . . . . . . . . . 257
Relinking Oracle RAC libraries with the SF Oracle RAC libraries ... . . . . . . . 257Setting or changing the product license level ... . . . . . . . . . . . . . . . . . . . . . . . . . . . . . . . . 259Changing permissions for Storage Foundation for Databases ... . . . . . . . . . . . 260Upgrading disk layout versions .... . . . . . . . . . . . . . . . . . . . . . . . . . . . . . . . . . . . . . . . . . . . . . . . . . 260Upgrading VxVM disk group version .... . . . . . . . . . . . . . . . . . . . . . . . . . . . . . . . . . . . . . . . . . . 260Post upgrade tasks for migrating the SFDB repository database ... . . . . . . . 261
Migrating from a 5.0 repository database to 5.1 Service Pack 1Platform Release 1 .... . . . . . . . . . . . . . . . . . . . . . . . . . . . . . . . . . . . . . . . . . . . . . . . . . . . . . . 261
Verifying the cluster ... . . . . . . . . . . . . . . . . . . . . . . . . . . . . . . . . . . . . . . . . . . . . . . . . . . . . . . . . . . . . . . . . 264
Section 4 Installation and upgrade of OracleRAC . . . . . . . . . . . . . . . . . . . . . . . . . . . . . . . . . . . . . . . . . . . . . . . . . . . . . . . . . . . . . . . . . . . . . . . . . . . . . . . 267
Chapter 18 Before installing Oracle RAC . . . . . . . . . . . . . . . . . . . . . . . . . . . . . . . . . . . . . . . . . . . 269
About preparing to install Oracle RAC .... . . . . . . . . . . . . . . . . . . . . . . . . . . . . . . . . . . . . . . . . 269Preparing to install Oracle RAC using the SF Oracle RAC installer or
manually ... . . . . . . . . . . . . . . . . . . . . . . . . . . . . . . . . . . . . . . . . . . . . . . . . . . . . . . . . . . . . . . . . . . . . . . . . . 270Identifying the public virtual IP addresses for use by Oracle ... . . . . . . 271Setting the kernel parameters ... . . . . . . . . . . . . . . . . . . . . . . . . . . . . . . . . . . . . . . . . . . . . . . 272Verifying the user "nobody" exists ... . . . . . . . . . . . . . . . . . . . . . . . . . . . . . . . . . . . . . . . . 272Launching the SF Oracle RAC installer ... . . . . . . . . . . . . . . . . . . . . . . . . . . . . . . . . . . 272Creating users and groups for Oracle RAC .... . . . . . . . . . . . . . . . . . . . . . . . . . . . . . 273Creating storage for OCR and voting disk .... . . . . . . . . . . . . . . . . . . . . . . . . . . . . . 276Configuring private IP addresses for Oracle RAC .... . . . . . . . . . . . . . . . . . . . . 288Creating Oracle Clusterware/Grid Infrastructure and Oracle
database home directories manually ... . . . . . . . . . . . . . . . . . . . . . . . . . . . . . . . 301Setting up user equivalence .... . . . . . . . . . . . . . . . . . . . . . . . . . . . . . . . . . . . . . . . . . . . . . . . . 317Verifying whether the Veritas Membership library is linked to
Oracle libraries ... . . . . . . . . . . . . . . . . . . . . . . . . . . . . . . . . . . . . . . . . . . . . . . . . . . . . . . . . . . . 317Verifying the systems for Oracle RAC installation .... . . . . . . . . . . . . . . . . . . 318
13Contents

Chapter 19 Installing Oracle RAC . . . . . . . . . . . . . . . . . . . . . . . . . . . . . . . . . . . . . . . . . . . . . . . . . . . . . . . . 323
About installing Oracle RAC .... . . . . . . . . . . . . . . . . . . . . . . . . . . . . . . . . . . . . . . . . . . . . . . . . . . . . . 323Installing the Oracle Clusterware/Grid Infrastructure software .... . . . . . . 324
Installing Oracle Clusterware/Grid Infrastructure using the SFOracle RAC installer ... . . . . . . . . . . . . . . . . . . . . . . . . . . . . . . . . . . . . . . . . . . . . . . . . . . . . . 325
Installing Oracle Clusterware/Grid Infrastructure using theOracle Universal Installer ... . . . . . . . . . . . . . . . . . . . . . . . . . . . . . . . . . . . . . . . . . . . . . 328
Configuring LLT links in the GPnP profile ... . . . . . . . . . . . . . . . . . . . . . . . . . . . . . . . . . . . . 330Installing the Oracle RAC database software .... . . . . . . . . . . . . . . . . . . . . . . . . . . . . . . . . 331
Installing the Oracle RAC database using the SF Oracle RACinstaller ... . . . . . . . . . . . . . . . . . . . . . . . . . . . . . . . . . . . . . . . . . . . . . . . . . . . . . . . . . . . . . . . . . . . . . 331
Installing the Oracle RAC database using the Oracle UniversalInstaller ... . . . . . . . . . . . . . . . . . . . . . . . . . . . . . . . . . . . . . . . . . . . . . . . . . . . . . . . . . . . . . . . . . . . . . 333
Verifying the Oracle Clusterware/Grid Infrastructure and databaseinstallation .... . . . . . . . . . . . . . . . . . . . . . . . . . . . . . . . . . . . . . . . . . . . . . . . . . . . . . . . . . . . . . . . . . . . . . 335Node numbering discrepancies in Oracle RAC 11g Release 2 .... . . . . . 336
Chapter 20 Performing Oracle RAC post-installation tasks . . . . . . . . . . . 339
Adding Oracle RAC patches or patchsets ... . . . . . . . . . . . . . . . . . . . . . . . . . . . . . . . . . . . . . . 339Configuring the CSSD resource ... . . . . . . . . . . . . . . . . . . . . . . . . . . . . . . . . . . . . . . . . . . . . . . . . . . 340
Configuring the CSSD resource using the SF Oracle RACinstaller ... . . . . . . . . . . . . . . . . . . . . . . . . . . . . . . . . . . . . . . . . . . . . . . . . . . . . . . . . . . . . . . . . . . . . . 340
Configuring the CSSD resource manually ... . . . . . . . . . . . . . . . . . . . . . . . . . . . . . . . 342Preventing automatic startup of Oracle Clusterware/Grid
Infrastructure ... . . . . . . . . . . . . . . . . . . . . . . . . . . . . . . . . . . . . . . . . . . . . . . . . . . . . . . . . . . . . . . . . . . . 344Relinking the SF Oracle RAC libraries with Oracle RAC .... . . . . . . . . . . . . . . . . . . 344
Relinking the SF Oracle RAC libraries with Oracle RAC using theSF Oracle RAC installer ... . . . . . . . . . . . . . . . . . . . . . . . . . . . . . . . . . . . . . . . . . . . . . . . . 345
Relinking SF Oracle RAC libraries with Oracle RACmanually ... . . . . . . . . . . . . . . . . . . . . . . . . . . . . . . . . . . . . . . . . . . . . . . . . . . . . . . . . . . . . . . . . . . . 346
Creating the Oracle RAC database .... . . . . . . . . . . . . . . . . . . . . . . . . . . . . . . . . . . . . . . . . . . . . . . 349Adding Oracle UDP IPC private IP addresses to the Oracle
initialization parameter file ... . . . . . . . . . . . . . . . . . . . . . . . . . . . . . . . . . . . . . . . . . . . . . . . . . 350Preventing automatic database startup .... . . . . . . . . . . . . . . . . . . . . . . . . . . . . . . . . . . . . . . 352Configuring VCS service groups for Oracle RAC .... . . . . . . . . . . . . . . . . . . . . . . . . . . . 352
Using the CLI to configure VCS service groups for OracleRAC .... . . . . . . . . . . . . . . . . . . . . . . . . . . . . . . . . . . . . . . . . . . . . . . . . . . . . . . . . . . . . . . . . . . . . . . . . . 356
Location of VCS log files ... . . . . . . . . . . . . . . . . . . . . . . . . . . . . . . . . . . . . . . . . . . . . . . . . . . . . . 358Removing permissions for communication .... . . . . . . . . . . . . . . . . . . . . . . . . . . . . . . . . . . 358Configuring the SFDB repository database after installation .... . . . . . . . . . . . 358
Contents14

Chapter 21 Upgrading Oracle RAC . . . . . . . . . . . . . . . . . . . . . . . . . . . . . . . . . . . . . . . . . . . . . . . . . . . . . . 359
Supported upgrade paths .... . . . . . . . . . . . . . . . . . . . . . . . . . . . . . . . . . . . . . . . . . . . . . . . . . . . . . . . . . 359Preparing to upgrade Oracle RAC .... . . . . . . . . . . . . . . . . . . . . . . . . . . . . . . . . . . . . . . . . . . . . . . 360
Preparing to upgrade from Oracle RAC 10g or Oracle RAC 11g.... . . . . . . . . . . . . . . . . . . . . . . . . . . . . . . . . . . . . . . . . . . . . . . . . . . . . . . . . . . . . . . . . . . . . . . . . . . . . . . . 360
Preparing to upgrade from Oracle RAC 9i ... . . . . . . . . . . . . . . . . . . . . . . . . . . . . . . . 361Upgrading Oracle RAC binaries ... . . . . . . . . . . . . . . . . . . . . . . . . . . . . . . . . . . . . . . . . . . . . . . . . . . 362Migrating the Oracle RAC database .... . . . . . . . . . . . . . . . . . . . . . . . . . . . . . . . . . . . . . . . . . . . . 363
Performing post-upgrade tasks ... . . . . . . . . . . . . . . . . . . . . . . . . . . . . . . . . . . . . . . . . . . . . 363
Section 5 Installation of SF Oracle RAC and OracleRAC using a response file . . . . . . . . . . . . . . . . . . . . . . . . . . . . . . . 365
Chapter 22 About response files . . . . . . . . . . . . . . . . . . . . . . . . . . . . . . . . . . . . . . . . . . . . . . . . . . . . . . . . . 367
About response files ... . . . . . . . . . . . . . . . . . . . . . . . . . . . . . . . . . . . . . . . . . . . . . . . . . . . . . . . . . . . . . . . . . 367Modular deployments using response files ... . . . . . . . . . . . . . . . . . . . . . . . . . . . . . 369About the installation simulator ... . . . . . . . . . . . . . . . . . . . . . . . . . . . . . . . . . . . . . . . . . . . 370
Response file syntax .... . . . . . . . . . . . . . . . . . . . . . . . . . . . . . . . . . . . . . . . . . . . . . . . . . . . . . . . . . . . . . . . 370Guidelines for creating the SF Oracle RAC response file ... . . . . . . . . . . . . . . . . . . 371Installation scenarios for response files ... . . . . . . . . . . . . . . . . . . . . . . . . . . . . . . . . . . . . . . . 376
Chapter 23 Installing and configuring SF Oracle RAC using aresponse file . . . . . . . . . . . . . . . . . . . . . . . . . . . . . . . . . . . . . . . . . . . . . . . . . . . . . . . . . . . . . . . . . 377
Installing and configuring SF Oracle RAC .... . . . . . . . . . . . . . . . . . . . . . . . . . . . . . . . . . . . 377Sample response file for installing and configuring SF Oracle
RAC .... . . . . . . . . . . . . . . . . . . . . . . . . . . . . . . . . . . . . . . . . . . . . . . . . . . . . . . . . . . . . . . . . . . . . . . . . . . . . . . . 379
Chapter 24 Configuring I/O fencing using a response file . . . . . . . . . . . . . 381
Configuring I/O fencing using response files ... . . . . . . . . . . . . . . . . . . . . . . . . . . . . . . . . 381Sample response file for configuring disk-based I/O fencing .... . . . . . . . . . . . 382Sample response file for configuring server-based I/O fencing .... . . . . . . . . 382
Chapter 25 Installing Oracle RAC using a response file . . . . . . . . . . . . . . . . . 385
About installing Oracle RAC using response files ... . . . . . . . . . . . . . . . . . . . . . . . . . . . 385Before you install .. . . . . . . . . . . . . . . . . . . . . . . . . . . . . . . . . . . . . . . . . . . . . . . . . . . . . . . . . . . . . . . . . . . . . . 385Installing Oracle RAC .... . . . . . . . . . . . . . . . . . . . . . . . . . . . . . . . . . . . . . . . . . . . . . . . . . . . . . . . . . . . . . . 387Sample response file for installing Oracle RAC .... . . . . . . . . . . . . . . . . . . . . . . . . . . . . . 388
15Contents

Chapter 26 Installing SF Oracle RAC and Oracle RAC using aresponse file . . . . . . . . . . . . . . . . . . . . . . . . . . . . . . . . . . . . . . . . . . . . . . . . . . . . . . . . . . . . . . . . . 391
About installing SF Oracle RAC and Oracle RAC using responsefiles ... . . . . . . . . . . . . . . . . . . . . . . . . . . . . . . . . . . . . . . . . . . . . . . . . . . . . . . . . . . . . . . . . . . . . . . . . . . . . . . . . 391Information required in the SF Oracle RAC response file ... . . . . . . . . . . 392
Before you install .. . . . . . . . . . . . . . . . . . . . . . . . . . . . . . . . . . . . . . . . . . . . . . . . . . . . . . . . . . . . . . . . . . . . . . 393Installing SF Oracle RAC and Oracle RAC .... . . . . . . . . . . . . . . . . . . . . . . . . . . . . . . . . . . . . 394Sample response file for installing SF Oracle RAC and Oracle
RAC .... . . . . . . . . . . . . . . . . . . . . . . . . . . . . . . . . . . . . . . . . . . . . . . . . . . . . . . . . . . . . . . . . . . . . . . . . . . . . . . . 396
Chapter 27 Response file variable definitions . . . . . . . . . . . . . . . . . . . . . . . . . . . . . . . . . . 399
Response file variables for installing SF Oracle RAC .... . . . . . . . . . . . . . . . . . . . . . . 399Response file variables to configure SF Oracle RAC .... . . . . . . . . . . . . . . . . . . . . . . . 402Response file variables to configure disk-based I/O fencing .... . . . . . . . . . . . . 411Response file variables to configure server-based I/O fencing .... . . . . . . . . . 413Response file variable definitions for Oracle RAC .... . . . . . . . . . . . . . . . . . . . . . . . . . 415
Section 6 Adding or removing nodes from an SFOracle RAC cluster . . . . . . . . . . . . . . . . . . . . . . . . . . . . . . . . . . . . . . . . . . . . . . 433
Chapter 28 Adding a node to SF Oracle RAC clusters . . . . . . . . . . . . . . . . . . . . . 435
About adding a node to a cluster ... . . . . . . . . . . . . . . . . . . . . . . . . . . . . . . . . . . . . . . . . . . . . . . . . . 435Before adding a node to a cluster ... . . . . . . . . . . . . . . . . . . . . . . . . . . . . . . . . . . . . . . . . . . . . . . . . 436
Meeting hardware and software requirements ... . . . . . . . . . . . . . . . . . . . . . . . . 436Setting up the hardware .... . . . . . . . . . . . . . . . . . . . . . . . . . . . . . . . . . . . . . . . . . . . . . . . . . . . . 436
Preparing to add a node to a cluster ... . . . . . . . . . . . . . . . . . . . . . . . . . . . . . . . . . . . . . . . . . . . . 438Adding a node to a cluster ... . . . . . . . . . . . . . . . . . . . . . . . . . . . . . . . . . . . . . . . . . . . . . . . . . . . . . . . . . 438
Adding a node to a cluster using the SF Oracle RACinstaller ... . . . . . . . . . . . . . . . . . . . . . . . . . . . . . . . . . . . . . . . . . . . . . . . . . . . . . . . . . . . . . . . . . . . . . 438
Adding the node to a cluster manually ... . . . . . . . . . . . . . . . . . . . . . . . . . . . . . . . . . . . 442Preparing the new node for installing Oracle RAC .... . . . . . . . . . . . . . . . . . . . . . . . . 454
Preparing the new nodes for installing Oracle RAC using the SFOracle RAC installer ... . . . . . . . . . . . . . . . . . . . . . . . . . . . . . . . . . . . . . . . . . . . . . . . . . . . . . 455
Preparing the new node manually for installing Oracle RAC .... . . . . . 462Adding the new node to Oracle RAC .... . . . . . . . . . . . . . . . . . . . . . . . . . . . . . . . . . . . . . . . . . . . 474Updating the Storage Foundation for Databases (SFDB) repository
after adding a node .... . . . . . . . . . . . . . . . . . . . . . . . . . . . . . . . . . . . . . . . . . . . . . . . . . . . . . . . . . . . 475Sample configuration file for adding a node to the cluster ... . . . . . . . . . . . . . . . 475
Contents16

Chapter 29 Removing a node from SF Oracle RAC clusters . . . . . . . . . . . 481
About removing a node from a cluster ... . . . . . . . . . . . . . . . . . . . . . . . . . . . . . . . . . . . . . . . . . 481Removing a node from a cluster ... . . . . . . . . . . . . . . . . . . . . . . . . . . . . . . . . . . . . . . . . . . . . . . . . . 482Modifying the VCS configuration files on existing nodes ... . . . . . . . . . . . . . . . . . 483
Editing the /etc/llthosts file ... . . . . . . . . . . . . . . . . . . . . . . . . . . . . . . . . . . . . . . . . . . . . . . . . . 483Editing the /etc/gabtab file ... . . . . . . . . . . . . . . . . . . . . . . . . . . . . . . . . . . . . . . . . . . . . . . . . . . 484Modifying the VCS configuration to remove the node .... . . . . . . . . . . . . . . 484
Removing the node configuration from the CP server ... . . . . . . . . . . . . . . . . . . . . . 485Removing security credentials from the leaving node .... . . . . . . . . . . . . . . . . . . . 486Updating the Storage Foundation for Databases (SFDB) repository
after removing a node .... . . . . . . . . . . . . . . . . . . . . . . . . . . . . . . . . . . . . . . . . . . . . . . . . . . . . . . . 487Sample configuration file for removing a node from the cluster ... . . . . . . . 487
Section 7 Configuration of disaster recoveryenvironments . . . . . . . . . . . . . . . . . . . . . . . . . . . . . . . . . . . . . . . . . . . . . . . . . . . . . . . . . 493
Chapter 30 Configuring a campus cluster setup for disasterrecovery . . . . . . . . . . . . . . . . . . . . . . . . . . . . . . . . . . . . . . . . . . . . . . . . . . . . . . . . . . . . . . . . . . . . . . . . . 495
Requirements for an SF Oracle RAC campus cluster ... . . . . . . . . . . . . . . . . . . . . . . . 495Setting up an SF Oracle RAC campus cluster for disaster
recovery .... . . . . . . . . . . . . . . . . . . . . . . . . . . . . . . . . . . . . . . . . . . . . . . . . . . . . . . . . . . . . . . . . . . . . . . . . . 496Preparing to set up a campus cluster ... . . . . . . . . . . . . . . . . . . . . . . . . . . . . . . . . . . . . . 497Configuring VxVM disk groups for Oracle RAC on a campus
cluster ... . . . . . . . . . . . . . . . . . . . . . . . . . . . . . . . . . . . . . . . . . . . . . . . . . . . . . . . . . . . . . . . . . . . . . . . 497Tuning guidelines for campus clusters ... . . . . . . . . . . . . . . . . . . . . . . . . . . . . . . . . . . . . . . . . 500Best practices for a campus cluster ... . . . . . . . . . . . . . . . . . . . . . . . . . . . . . . . . . . . . . . . . . . . . . 500
Chapter 31 Setting up a replicated global cluster . . . . . . . . . . . . . . . . . . . . . . . . . . . 503
Replication in the SF Oracle RAC environment .... . . . . . . . . . . . . . . . . . . . . . . . . . . . . . 503Requirements for SF Oracle RAC global clusters ... . . . . . . . . . . . . . . . . . . . . . . . . . . . . 504
Supported software and hardware for SF Oracle RAC .... . . . . . . . . . . . . . . 504Supported replication technologies for SF Oracle RAC .... . . . . . . . . . . . . . 504
About setting up a global cluster in an SF Oracle RACenvironment .... . . . . . . . . . . . . . . . . . . . . . . . . . . . . . . . . . . . . . . . . . . . . . . . . . . . . . . . . . . . . . . . . . . . 506
Configuring a cluster at the primary site ... . . . . . . . . . . . . . . . . . . . . . . . . . . . . . . . . . . . . . . 507Configuring a cluster at the secondary site ... . . . . . . . . . . . . . . . . . . . . . . . . . . . . . . . . . . . 509
Setting up the cluster on the secondary site ... . . . . . . . . . . . . . . . . . . . . . . . . . . . . 509Setting up the database for the secondary site ... . . . . . . . . . . . . . . . . . . . . . . . . 510
Configuring replication on clusters at both sites ... . . . . . . . . . . . . . . . . . . . . . . . . . . . . 512Modifying the ClusterService group for global clusters ... . . . . . . . . . . . . . . . . . . . 513
17Contents

Modifying the global clustering configuration using thewizard .... . . . . . . . . . . . . . . . . . . . . . . . . . . . . . . . . . . . . . . . . . . . . . . . . . . . . . . . . . . . . . . . . . . . . . . 513
Defining the remote cluster and heartbeat objects ... . . . . . . . . . . . . . . . . . . . . . . . . . 514Configuring the VCS service groups for global clusters ... . . . . . . . . . . . . . . . . . . . 518
Chapter 32 Configuring a global cluster using VVR . . . . . . . . . . . . . . . . . . . . . . . . 519
About configuring global clustering using VVR .... . . . . . . . . . . . . . . . . . . . . . . . . . . . . 519Setting up replication using VVR on the primary site ... . . . . . . . . . . . . . . . . . . . . . 520
Creating the SRL volume on the primary site ... . . . . . . . . . . . . . . . . . . . . . . . . . . 520Setting up the Replicated Volume Group (RVG) on the primary
site ... . . . . . . . . . . . . . . . . . . . . . . . . . . . . . . . . . . . . . . . . . . . . . . . . . . . . . . . . . . . . . . . . . . . . . . . . . . . 521Setting up replication using VVR on the secondary site ... . . . . . . . . . . . . . . . . . . 523
Creating the data and SRL volumes on the secondary site ... . . . . . . . . . 523Editing the /etc/vx/vras/.rdg files ... . . . . . . . . . . . . . . . . . . . . . . . . . . . . . . . . . . . . . . . . . 524Setting up IP addresses for RLINKs on each cluster ... . . . . . . . . . . . . . . . . . . 524Setting up the disk group on secondary site for replication .... . . . . . . . 525
Starting replication of Oracle RAC database volume .... . . . . . . . . . . . . . . . . . . . . . . 527Starting replication using automatic synchronization .... . . . . . . . . . . . . . 528Starting replication using full synchronization with
Checkpoint ... . . . . . . . . . . . . . . . . . . . . . . . . . . . . . . . . . . . . . . . . . . . . . . . . . . . . . . . . . . . . . . . . . 528Verifying replication status ... . . . . . . . . . . . . . . . . . . . . . . . . . . . . . . . . . . . . . . . . . . . . . . . . . 529
Configuring VCS to replicate the database volume using VVR .... . . . . . . . . . 529About modifying the VCS configuration for replication .... . . . . . . . . . . . 530Configuration examples before and after modification .... . . . . . . . . . . . . 531Modifying the VCS Configuration on the Primary Site ... . . . . . . . . . . . . . . 534Modifying the VCS Configuration on the Secondary Site ... . . . . . . . . . . . 537
Using VCS commands on SF Oracle RAC global clusters ... . . . . . . . . . . . . . . . . . . 542Using VVR commands on SF Oracle RAC global clusters ... . . . . . . . . . . . . . . . . . 543
About migration and takeover of the primary site role ... . . . . . . . . . . . . . . 543Migrating the role of primary site to the secondary site ... . . . . . . . . . . . . 543Migrating the role of new primary site back to the original
primary site ... . . . . . . . . . . . . . . . . . . . . . . . . . . . . . . . . . . . . . . . . . . . . . . . . . . . . . . . . . . . . . . . 544Taking over the primary role by the remote cluster ... . . . . . . . . . . . . . . . . . . 545VCS agents to manage wide-area failover ... . . . . . . . . . . . . . . . . . . . . . . . . . . . . . . . 549
Section 8 Uninstallation of SF Oracle RAC . . . . . . . . . . . . . . . . . . . . . . . 551
Chapter 33 Preparing to uninstall SF Oracle RAC from acluster . . . . . . . . . . . . . . . . . . . . . . . . . . . . . . . . . . . . . . . . . . . . . . . . . . . . . . . . . . . . . . . . . . . . . . . . . . . . 553
About uninstalling SF Oracle RAC from a cluster ... . . . . . . . . . . . . . . . . . . . . . . . . . . . 553Options for uninstalling SF Oracle RAC .... . . . . . . . . . . . . . . . . . . . . . . . . . . . . . . . . . . . . . . 554
Contents18
Preparing to uninstall SF Oracle RAC from a cluster ... . . . . . . . . . . . . . . . . . . . . . . 555Stopping Oracle instances ... . . . . . . . . . . . . . . . . . . . . . . . . . . . . . . . . . . . . . . . . . . . . . . . . . . . 556Backing up the Oracle database ... . . . . . . . . . . . . . . . . . . . . . . . . . . . . . . . . . . . . . . . . . . . . 556Unlinking the SF Oracle RAC libraries from Oracle RAC .... . . . . . . . . . . 557Uninstalling Oracle RAC (optional) .. . . . . . . . . . . . . . . . . . . . . . . . . . . . . . . . . . . . . . . . . 559Stopping the applications that use CVM or CFS (outside of VCS
control) .. . . . . . . . . . . . . . . . . . . . . . . . . . . . . . . . . . . . . . . . . . . . . . . . . . . . . . . . . . . . . . . . . . . . . . . 559Unmounting CFS file systems (outside of VCS control) .. . . . . . . . . . . . . . . 559Stopping VCS .... . . . . . . . . . . . . . . . . . . . . . . . . . . . . . . . . . . . . . . . . . . . . . . . . . . . . . . . . . . . . . . . . . . . 560Stopping the applications that use VxVM or VxFS (outside of
VCS control) .. . . . . . . . . . . . . . . . . . . . . . . . . . . . . . . . . . . . . . . . . . . . . . . . . . . . . . . . . . . . . . . . . 561Unmounting VxFS file systems (outside of VCS control) .. . . . . . . . . . . . . 561
Chapter 34 Uninstalling SF Oracle RAC from a cluster . . . . . . . . . . . . . . . . . . . 563
Uninstalling SF Oracle RAC from a cluster ... . . . . . . . . . . . . . . . . . . . . . . . . . . . . . . . . . . . 563Removing the CP server configuration using the removal
script ... . . . . . . . . . . . . . . . . . . . . . . . . . . . . . . . . . . . . . . . . . . . . . . . . . . . . . . . . . . . . . . . . . . . . . . . . 564Removing the SF Oracle RAC filesets ... . . . . . . . . . . . . . . . . . . . . . . . . . . . . . . . . . . . . . 568Removing other configuration files (optional) .. . . . . . . . . . . . . . . . . . . . . . . . . . . 569Removing the Storage Foundation for Databases (SFDB)
repository after removing the product ... . . . . . . . . . . . . . . . . . . . . . . . . . . . . . 570Uninstalling SF Oracle RAC with the Veritas Web-based
installer ... . . . . . . . . . . . . . . . . . . . . . . . . . . . . . . . . . . . . . . . . . . . . . . . . . . . . . . . . . . . . . . . . . . . . . . . . . . . 571Uninstalling SF Oracle RAC using a response file ... . . . . . . . . . . . . . . . . . . . . . . . . . . 573
Response file variables to uninstall SF Oracle RAC .... . . . . . . . . . . . . . . . . . . 573Sample response file for uninstalling SF Oracle RAC .... . . . . . . . . . . . . . . . 574
Section 9 Installation reference . . . . . . . . . . . . . . . . . . . . . . . . . . . . . . . . . . . . . . . . . . . . . . 577
Appendix A SF Oracle RAC installation filesets . . . . . . . . . . . . . . . . . . . . . . . . . . . . . . . . . 579
SF Oracle RAC installation filesets ... . . . . . . . . . . . . . . . . . . . . . . . . . . . . . . . . . . . . . . . . . . . . . . 579
Appendix B Installation scripts . . . . . . . . . . . . . . . . . . . . . . . . . . . . . . . . . . . . . . . . . . . . . . . . . . . . . . . . . . . . 583
About installation scripts ... . . . . . . . . . . . . . . . . . . . . . . . . . . . . . . . . . . . . . . . . . . . . . . . . . . . . . . . . . . 583Installation script options .... . . . . . . . . . . . . . . . . . . . . . . . . . . . . . . . . . . . . . . . . . . . . . . . . . . . . . . . . 584
Appendix C SF Oracle RAC installation and configurationsample values . . . . . . . . . . . . . . . . . . . . . . . . . . . . . . . . . . . . . . . . . . . . . . . . . . . . . . . . . . . . . . . 591
About the installation and configuration worksheets ... . . . . . . . . . . . . . . . . . . . . . 591SF Oracle RAC worksheet ... . . . . . . . . . . . . . . . . . . . . . . . . . . . . . . . . . . . . . . . . . . . . . . . . . . . . . . . . . . 592
19Contents

Veritas Cluster Server component information .... . . . . . . . . . . . . . . . . . . . . . . 595I/O fencing information .... . . . . . . . . . . . . . . . . . . . . . . . . . . . . . . . . . . . . . . . . . . . . . . . . . . . . . 596SF Oracle RAC secure mode cluster information .... . . . . . . . . . . . . . . . . . . . . . 597SF Oracle RAC add user information .... . . . . . . . . . . . . . . . . . . . . . . . . . . . . . . . . . . . . 597Global cluster information .... . . . . . . . . . . . . . . . . . . . . . . . . . . . . . . . . . . . . . . . . . . . . . . . . . 598
Oracle RAC worksheet ... . . . . . . . . . . . . . . . . . . . . . . . . . . . . . . . . . . . . . . . . . . . . . . . . . . . . . . . . . . . . . . 599Replicated cluster using VVR worksheet ... . . . . . . . . . . . . . . . . . . . . . . . . . . . . . . . . . . . . . . 604Replicated cluster using SRDF worksheet ... . . . . . . . . . . . . . . . . . . . . . . . . . . . . . . . . . . . . . 605Required installation information for Oracle Clusterware/Grid
Infrastructure ... . . . . . . . . . . . . . . . . . . . . . . . . . . . . . . . . . . . . . . . . . . . . . . . . . . . . . . . . . . . . . . . . . . . 606Required installation information for Oracle database ... . . . . . . . . . . . . . . . . . . . 610
Appendix D Sample configuration files . . . . . . . . . . . . . . . . . . . . . . . . . . . . . . . . . . . . . . . . . . . . . . . 613
About VCS configuration file ... . . . . . . . . . . . . . . . . . . . . . . . . . . . . . . . . . . . . . . . . . . . . . . . . . . . . 613About the LLT and GAB configuration files ... . . . . . . . . . . . . . . . . . . . . . . . . . . . . . . . . . . 614About I/O fencing configuration files ... . . . . . . . . . . . . . . . . . . . . . . . . . . . . . . . . . . . . . . . . . . 616Sample configuration files ... . . . . . . . . . . . . . . . . . . . . . . . . . . . . . . . . . . . . . . . . . . . . . . . . . . . . . . . . 618
sfrac01_main.cf file ... . . . . . . . . . . . . . . . . . . . . . . . . . . . . . . . . . . . . . . . . . . . . . . . . . . . . . . . . . . . 619sfrac02_main.cf file ... . . . . . . . . . . . . . . . . . . . . . . . . . . . . . . . . . . . . . . . . . . . . . . . . . . . . . . . . . . . 620sfrac03_main.cf file ... . . . . . . . . . . . . . . . . . . . . . . . . . . . . . . . . . . . . . . . . . . . . . . . . . . . . . . . . . . . 621sfrac04_main.cf file ... . . . . . . . . . . . . . . . . . . . . . . . . . . . . . . . . . . . . . . . . . . . . . . . . . . . . . . . . . . . 622sfrac05_main.cf file ... . . . . . . . . . . . . . . . . . . . . . . . . . . . . . . . . . . . . . . . . . . . . . . . . . . . . . . . . . . . 624sfrac06_main.cf file ... . . . . . . . . . . . . . . . . . . . . . . . . . . . . . . . . . . . . . . . . . . . . . . . . . . . . . . . . . . . 625sfrac07_main.cf and sample08_main.cf files ... . . . . . . . . . . . . . . . . . . . . . . . . . . . 626sfrac09_main.cf and sample10_main.cf files ... . . . . . . . . . . . . . . . . . . . . . . . . . . . 628sfrac11_main.cf file ... . . . . . . . . . . . . . . . . . . . . . . . . . . . . . . . . . . . . . . . . . . . . . . . . . . . . . . . . . . . 631sfrac12_main.cf and sample13_main.cf files ... . . . . . . . . . . . . . . . . . . . . . . . . . . . 632sfrac14_main.cf file ... . . . . . . . . . . . . . . . . . . . . . . . . . . . . . . . . . . . . . . . . . . . . . . . . . . . . . . . . . . . 635Sample configuration files for CP server ... . . . . . . . . . . . . . . . . . . . . . . . . . . . . . . . . 636
Appendix E Setting up inter-system communication . . . . . . . . . . . . . . . . . . . . . . 643
About configuring ssh or rsh using the Veritas installer ... . . . . . . . . . . . . . . . . . 643Setting up inter-system communication .... . . . . . . . . . . . . . . . . . . . . . . . . . . . . . . . . . . . . . 644
Setting up ssh on cluster systems .... . . . . . . . . . . . . . . . . . . . . . . . . . . . . . . . . . . . . . . . . 644
Appendix F Automatic Storage Management . . . . . . . . . . . . . . . . . . . . . . . . . . . . . . . . . . . 647
About ASM in SF Oracle RAC environments ... . . . . . . . . . . . . . . . . . . . . . . . . . . . . . . . . . 647ASM configuration with SF Oracle RAC .... . . . . . . . . . . . . . . . . . . . . . . . . . . . . . . . . . . . . . . 648Configuring ASM in SF Oracle RAC environments ... . . . . . . . . . . . . . . . . . . . . . . . . . 650
Setting up Automatic Storage Management ... . . . . . . . . . . . . . . . . . . . . . . . . . . . . 651Unlinking the SF Oracle RAC ODM library .... . . . . . . . . . . . . . . . . . . . . . . . . . . . . 653
Contents20

Creating database storage on ASM ..... . . . . . . . . . . . . . . . . . . . . . . . . . . . . . . . . . . . . . . 655Creating ASM disk groups and instances ... . . . . . . . . . . . . . . . . . . . . . . . . . . . . . . . . 655Verify the ASM setup .... . . . . . . . . . . . . . . . . . . . . . . . . . . . . . . . . . . . . . . . . . . . . . . . . . . . . . . . . 656Configuring VCS service groups for database instances on
ASM ..... . . . . . . . . . . . . . . . . . . . . . . . . . . . . . . . . . . . . . . . . . . . . . . . . . . . . . . . . . . . . . . . . . . . . . . . . 657Sample configuration file Veritas CVM and ASM main.cf file ... . . . . . . . . . . . 660
Appendix G Creating a test database . . . . . . . . . . . . . . . . . . . . . . . . . . . . . . . . . . . . . . . . . . . . . . . . . . 661
About creating a test database ... . . . . . . . . . . . . . . . . . . . . . . . . . . . . . . . . . . . . . . . . . . . . . . . . . . . 661Creating a database for Oracle ... . . . . . . . . . . . . . . . . . . . . . . . . . . . . . . . . . . . . . . . . . . . . . . . . . . . 661
Creating the database storage on raw volumes .... . . . . . . . . . . . . . . . . . . . . . . . 662Creating the database storage on CFS .... . . . . . . . . . . . . . . . . . . . . . . . . . . . . . . . . . . . 663
Appendix H High availability agent information . . . . . . . . . . . . . . . . . . . . . . . . . . . . . . . 665
About agents ... . . . . . . . . . . . . . . . . . . . . . . . . . . . . . . . . . . . . . . . . . . . . . . . . . . . . . . . . . . . . . . . . . . . . . . . . . . 665VCS agents included within SF Oracle RAC .... . . . . . . . . . . . . . . . . . . . . . . . . . . . . 666VCS agents for Oracle included within SF Oracle RAC .... . . . . . . . . . . . . . 666
CVMCluster agent ... . . . . . . . . . . . . . . . . . . . . . . . . . . . . . . . . . . . . . . . . . . . . . . . . . . . . . . . . . . . . . . . . . . . 667Entry points for CVMCluster agent ... . . . . . . . . . . . . . . . . . . . . . . . . . . . . . . . . . . . . . . . 667Attribute definition for CVMCluster agent ... . . . . . . . . . . . . . . . . . . . . . . . . . . . . . 668CVMCluster agent type definition .... . . . . . . . . . . . . . . . . . . . . . . . . . . . . . . . . . . . . . . . . 668CVMCluster agent sample configuration .... . . . . . . . . . . . . . . . . . . . . . . . . . . . . . . . 669
CVMVxconfigd agent ... . . . . . . . . . . . . . . . . . . . . . . . . . . . . . . . . . . . . . . . . . . . . . . . . . . . . . . . . . . . . . . . 669Entry points for CVMVxconfigd agent ... . . . . . . . . . . . . . . . . . . . . . . . . . . . . . . . . . . . 670Attribute definition for CVMVxconfigd agent ... . . . . . . . . . . . . . . . . . . . . . . . . . 670CVMVxconfigd agent type definition .... . . . . . . . . . . . . . . . . . . . . . . . . . . . . . . . . . . . . 674CVMVxconfigd agent sample configuration .... . . . . . . . . . . . . . . . . . . . . . . . . . . . 674
CVMVolDg agent ... . . . . . . . . . . . . . . . . . . . . . . . . . . . . . . . . . . . . . . . . . . . . . . . . . . . . . . . . . . . . . . . . . . . . . 674Entry points for CVMVolDg agent ... . . . . . . . . . . . . . . . . . . . . . . . . . . . . . . . . . . . . . . . . . 675Attribute definition for CVMVolDg agent ... . . . . . . . . . . . . . . . . . . . . . . . . . . . . . . . 676CVMVolDg agent type definition .... . . . . . . . . . . . . . . . . . . . . . . . . . . . . . . . . . . . . . . . . 678CVMVolDg agent sample configuration .... . . . . . . . . . . . . . . . . . . . . . . . . . . . . . . . . 678
CFSMount agent ... . . . . . . . . . . . . . . . . . . . . . . . . . . . . . . . . . . . . . . . . . . . . . . . . . . . . . . . . . . . . . . . . . . . . . . 678Entry points for CFSMount agent ... . . . . . . . . . . . . . . . . . . . . . . . . . . . . . . . . . . . . . . . . . 679Attribute definition for CFSMount agent ... . . . . . . . . . . . . . . . . . . . . . . . . . . . . . . . . 679CFSMount agent type definition .... . . . . . . . . . . . . . . . . . . . . . . . . . . . . . . . . . . . . . . . . . . 682CFSMount agent sample configuration .... . . . . . . . . . . . . . . . . . . . . . . . . . . . . . . . . . 683
CFSfsckd agent ... . . . . . . . . . . . . . . . . . . . . . . . . . . . . . . . . . . . . . . . . . . . . . . . . . . . . . . . . . . . . . . . . . . . . . . . 683Entry points for CFSfsckd agent ... . . . . . . . . . . . . . . . . . . . . . . . . . . . . . . . . . . . . . . . . . . . 684Attribute definition for CFSfsckd agent ... . . . . . . . . . . . . . . . . . . . . . . . . . . . . . . . . . 684CFSfsckd agent type definition .... . . . . . . . . . . . . . . . . . . . . . . . . . . . . . . . . . . . . . . . . . . . . 687CFSfsckd agent sample configuration .... . . . . . . . . . . . . . . . . . . . . . . . . . . . . . . . . . . . 687
21Contents

PrivNIC agent ... . . . . . . . . . . . . . . . . . . . . . . . . . . . . . . . . . . . . . . . . . . . . . . . . . . . . . . . . . . . . . . . . . . . . . . . . . 687Functions of the PrivNIC agent ... . . . . . . . . . . . . . . . . . . . . . . . . . . . . . . . . . . . . . . . . . . . . 688Attributes of the PrivNIC agent ... . . . . . . . . . . . . . . . . . . . . . . . . . . . . . . . . . . . . . . . . . . . . 688States of the PrivNIC agent ... . . . . . . . . . . . . . . . . . . . . . . . . . . . . . . . . . . . . . . . . . . . . . . . . . 690Sample service group configuration with the PrivNIC agent ... . . . . . . 691Type definition of the PrivNIC resource ... . . . . . . . . . . . . . . . . . . . . . . . . . . . . . . . . . 691Sample configuration of the PrivNIC resource ... . . . . . . . . . . . . . . . . . . . . . . . . 692
MultiPrivNIC agent ... . . . . . . . . . . . . . . . . . . . . . . . . . . . . . . . . . . . . . . . . . . . . . . . . . . . . . . . . . . . . . . . . . . 692Managing high availability of private interconnects ... . . . . . . . . . . . . . . . . . 693Functions of the MultiPrivNIC agent ... . . . . . . . . . . . . . . . . . . . . . . . . . . . . . . . . . . . . . 693Attributes of the MultiPrivNIC agent ... . . . . . . . . . . . . . . . . . . . . . . . . . . . . . . . . . . . . . 693States of the MultiPrivNIC agent ... . . . . . . . . . . . . . . . . . . . . . . . . . . . . . . . . . . . . . . . . . . 695Sample service group configuration with the MultiPrivNIC
agent ... . . . . . . . . . . . . . . . . . . . . . . . . . . . . . . . . . . . . . . . . . . . . . . . . . . . . . . . . . . . . . . . . . . . . . . . . . 695Type definition of the MultiPrivNIC resource ... . . . . . . . . . . . . . . . . . . . . . . . . . . 696Sample configuration of the MultiPrivNIC resource ... . . . . . . . . . . . . . . . . . 697
CSSD agent ... . . . . . . . . . . . . . . . . . . . . . . . . . . . . . . . . . . . . . . . . . . . . . . . . . . . . . . . . . . . . . . . . . . . . . . . . . . . . 697Functions of the CSSD agent ... . . . . . . . . . . . . . . . . . . . . . . . . . . . . . . . . . . . . . . . . . . . . . . . . 698Attributes of the CSSD agent ... . . . . . . . . . . . . . . . . . . . . . . . . . . . . . . . . . . . . . . . . . . . . . . . 698States of the CSSD agent ... . . . . . . . . . . . . . . . . . . . . . . . . . . . . . . . . . . . . . . . . . . . . . . . . . . . . . 699Sample service group configurations with the CSSD agent ... . . . . . . . . 699Type definition of the CSSD resource ... . . . . . . . . . . . . . . . . . . . . . . . . . . . . . . . . . . . . 700Sample configuration of the CSSD resource ... . . . . . . . . . . . . . . . . . . . . . . . . . . . . 700
VCS agents for Oracle ... . . . . . . . . . . . . . . . . . . . . . . . . . . . . . . . . . . . . . . . . . . . . . . . . . . . . . . . . . . . . . . . 700Oracle agent functions .... . . . . . . . . . . . . . . . . . . . . . . . . . . . . . . . . . . . . . . . . . . . . . . . . . . . . . . 701Resource type definition for the Oracle agent ... . . . . . . . . . . . . . . . . . . . . . . . . . 706Netlsnr agent functions .... . . . . . . . . . . . . . . . . . . . . . . . . . . . . . . . . . . . . . . . . . . . . . . . . . . . . . 712Resource type definition for the Netlsnr agent ... . . . . . . . . . . . . . . . . . . . . . . . . 714ASMDG agent functions .... . . . . . . . . . . . . . . . . . . . . . . . . . . . . . . . . . . . . . . . . . . . . . . . . . . . . 718Resource type definition for the ASMDG agent ... . . . . . . . . . . . . . . . . . . . . . . . 718
CRSResource agent ... . . . . . . . . . . . . . . . . . . . . . . . . . . . . . . . . . . . . . . . . . . . . . . . . . . . . . . . . . . . . . . . . . . 721Functions of the CRSResource agent ... . . . . . . . . . . . . . . . . . . . . . . . . . . . . . . . . . . . . . 721States of the CRSResource agent ... . . . . . . . . . . . . . . . . . . . . . . . . . . . . . . . . . . . . . . . . . . 721Attributes of the CRSResource agent ... . . . . . . . . . . . . . . . . . . . . . . . . . . . . . . . . . . . . . 722VCS service group dependencies with the CRSResource
agent ... . . . . . . . . . . . . . . . . . . . . . . . . . . . . . . . . . . . . . . . . . . . . . . . . . . . . . . . . . . . . . . . . . . . . . . . . . 723Resource type definition for the CRSResource agent ... . . . . . . . . . . . . . . . . 728Sample configuration for the CRSResource agent ... . . . . . . . . . . . . . . . . . . . . 728
Appendix I SF Oracle RAC deployment scenarios . . . . . . . . . . . . . . . . . . . . . . . . . . . 731
SF Oracle RAC cluster with VCS IPC and PrivNIC agent ... . . . . . . . . . . . . . . . . . . 731SF Oracle RAC cluster with UDP IPC and PrivNIC agent ... . . . . . . . . . . . . . . . . . . 734
Contents22

SF Oracle RAC cluster for multiple databases with UDP IPC andMultiPrivNIC agent ... . . . . . . . . . . . . . . . . . . . . . . . . . . . . . . . . . . . . . . . . . . . . . . . . . . . . . . . . . . . . 735
SF Oracle RAC cluster with isolated Oracle traffic and MultiPrivNICagent ... . . . . . . . . . . . . . . . . . . . . . . . . . . . . . . . . . . . . . . . . . . . . . . . . . . . . . . . . . . . . . . . . . . . . . . . . . . . . . . . 738
SF Oracle RAC cluster with NIC bonding, VCS IPC and PrivNICagent ... . . . . . . . . . . . . . . . . . . . . . . . . . . . . . . . . . . . . . . . . . . . . . . . . . . . . . . . . . . . . . . . . . . . . . . . . . . . . . . . 740
SF Oracle RAC cluster with NIC bonding, UDP IPC, and PrivNICagent ... . . . . . . . . . . . . . . . . . . . . . . . . . . . . . . . . . . . . . . . . . . . . . . . . . . . . . . . . . . . . . . . . . . . . . . . . . . . . . . . 742
Configuration diagrams for setting up server-based I/O fencing .... . . . . . . 744Two unique client clusters served by 3 CP servers ... . . . . . . . . . . . . . . . . . . . . 744Client cluster served by highly available CPS and 2 SCSI-3
disks ... . . . . . . . . . . . . . . . . . . . . . . . . . . . . . . . . . . . . . . . . . . . . . . . . . . . . . . . . . . . . . . . . . . . . . . . . . 745Two node campus cluster served by remote CP server and 2
SCSI-3 disks ... . . . . . . . . . . . . . . . . . . . . . . . . . . . . . . . . . . . . . . . . . . . . . . . . . . . . . . . . . . . . . . . 747Multiple client clusters served by highly available CP server and
2 SCSI-3 disks ... . . . . . . . . . . . . . . . . . . . . . . . . . . . . . . . . . . . . . . . . . . . . . . . . . . . . . . . . . . . . . 749Deploying Storage Foundation for Databases (SFDB) tools in a Storage
Foundation for Oracle RAC environment .... . . . . . . . . . . . . . . . . . . . . . . . . . . . . . . 751
Glossary . . . . . . . . . . . . . . . . . . . . . . . . . . . . . . . . . . . . . . . . . . . . . . . . . . . . . . . . . . . . . . . . . . . . . . . . . . . . . . . . . . . . . . . . . . . . . . . . . . . . . . . . . . . . . 753
Index . . . . . . . . . . . . . . . . . . . . . . . . . . . . . . . . . . . . . . . . . . . . . . . . . . . . . . . . . . . . . . . . . . . . . . . . . . . . . . . . . . . . . . . . . . . . . . . . . . . . . . . . . . . . . . . . . . . 757
23Contents

Contents24

Installation overview andplanning
■ Chapter 1. Introducing Veritas Storage Foundation for Oracle RAC
■ Chapter 2. System requirements
■ Chapter 3. Planning to install SF Oracle RAC
■ Chapter 4. Licensing SF Oracle RAC
1Section

26

Introducing Veritas StorageFoundation for Oracle RAC
This chapter includes the following topics:
■ About Veritas Storage Foundation for Oracle RAC
■ About basic SF Oracle RAC components
■ About SF Oracle RAC features
■ About SF Oracle RAC optional components
■ SF Oracle RAC cluster setup models
About Veritas Storage Foundation for Oracle RACVeritas Storage Foundation™ for Oracle® RAC (SF Oracle RAC) leveragesproprietary storage management and high availability technologies to enablerobust, manageable, and scalable deployment of Oracle RAC on UNIX platforms.The solution uses Veritas Cluster File System technology that provides the dualadvantage of easy file system management as well as the use of familiar operatingsystem tools and utilities in managing databases.
The solution stack comprises the Veritas Cluster Server (VCS), Veritas ClusterVolume Manager (CVM), Veritas Oracle Real Application Cluster Support(VRTSdbac), Veritas Oracle Disk Manager (VRTSodm), Veritas Cluster File System(CFS), and Veritas Storage Foundation, which includes the base Veritas VolumeManager (VxVM) and Veritas File System (VxFS).
Benefits of SF Oracle RACSF Oracle RAC provides the following benefits:
1Chapter

■ Support for file system-based management. SF Oracle RAC provides a genericclustered file system technology for storing and managing Oracle data filesas well as other application data.
■ Support for high-availability of cluster interconnects.For Oracle RAC 10g Release 2:The combination of LMX/LLT protocols and the PrivNIC/MultiPrivNIC agentsprovides maximum bandwidth as well as high availability of the clusterinterconnects, including switch redundancy.For Oracle RAC 11g Release 1/Oracle RAC 11g Release 2:The PrivNIC/MultiPrivNIC agents provide maximum bandwidth as well as highavailability of the cluster interconnects, including switch redundancy.
■ Use of clustered file system and volume management technologies forplacement of Oracle Cluster Registry (OCR) and voting disks. These technologiesprovide robust shared block and raw interfaces for placement of OCR andvoting disks. In the absence of SF Oracle RAC, separate LUNs need to beconfigured for OCR and voting disks.
■ Support for a standardized approach toward application and databasemanagement. A single-vendor solution for the complete SF Oracle RAC softwarestack lets you devise a standardized approach toward application and databasemanagement. Further, administrators can apply existing expertise of Veritastechnologies toward SF Oracle RAC.
■ Increased availability and performance using dynamic multi-pathing (DMP).DMP provides wide storage array support for protection from failures andperformance bottlenecks in the HBAs, SAN switches, and storage arrays.
■ Easy administration and monitoring of SF Oracle RAC clusters from a singleweb console.
■ Support for many types of applications and databases.
■ Improved file system access times using Oracle Disk Manager (ODM).
■ Ability to configure ASM disk groups over CVM volumes to take advantage ofdynamic multi-pathing (DMP).
■ Enhanced scalability and availability with access to multiple Oracle RACinstances per database in a cluster.
■ Support for backup and recovery solutions using volume-level and filesystem-level snapshot technologies. SF Oracle RAC enables full volume-levelsnapshots for off-host processing and file system-level snapshots for efficientbackup and rollback.
■ Ability to failover applications without downtime using clustered file systemtechnology.
Introducing Veritas Storage Foundation for Oracle RACAbout Veritas Storage Foundation for Oracle RAC
28

■ Prevention of data corruption in split-brain scenarios with robust SCSI-3Persistent Group Reservation (PGR) based I/O fencing or Coordination PointServer-based I/O fencing. The preferred fencing feature also enables you tospecify how the fencing driver determines the surviving subcluster.
■ Support for sharing all types of files, in addition to Oracle database files, acrossnodes.
■ Fast disaster recovery with minimal downtime and interruption to users. Userscan transition from a local high availability site to a wide-area disaster recoveryenvironment with primary and secondary sites. If a node fails, clients that areattached to the failed node can reconnect to a surviving node and resumeaccess to the shared database. Recovery after failure in the SF Oracle RACenvironment is far quicker than recovery for a failover database.
■ Verification of disaster recovery configuration using fire drill technologywithout affecting production systems.
■ Support for a wide range of hardware replication technologies as well asblock-level replication using VVR.
■ Support for campus clusters with the following capabilities:
■ Consistent reattach with Site Awareness
■ Site aware reads with VxVM mirroring
■ Monitoring of Oracle resources
■ Protection against split-brain scenarios
About basic SF Oracle RAC componentsThe basic components of SF Oracle RAC are as follows:
Veritas Cluster Server (VCS) manages Oracle RACdatabases and infrastructure components in a clusteredenvironment.
Veritas Cluster Server
Cluster Volume Manager (CVM) enables simultaneousaccess to the shared volumes that are based ontechnology from Veritas Volume Manager (VxVM).
Cluster Volume Manager
Cluster File System (CFS) enables simultaneous accessto the shared file systems that are based on technologyfrom Veritas File System (VxFS).
Cluster File System
29Introducing Veritas Storage Foundation for Oracle RACAbout basic SF Oracle RAC components
Oracle Disk Manager (ODM) is a disk and filemanagement interface that is provided by Oracle toimprove disk I/O performance. ODM enables Oracle toallocate and release disk space, manage tablespaces,and read/write disk blocks directly. SF Oracle RAC usesa custom driver that enables applications to use ODMfor enhanced file system performance and easy fileadministration.
Oracle Disk Manager
RAC Extensions manage the cluster membership andcommunications between cluster nodes.
RAC Extensions
For a detailed understanding of each component and the architectural overview,see the Veritas Storage Foundation for Oracle RAC Administrator's Guide.
About SF Oracle RAC featuresYou can configure the following features in an SF Oracle RAC cluster:
■ I/O fencingSee “About I/O fencing” on page 31.
■ Symantec Operations Readiness ToolsSee “Symantec Operations Readiness Tools” on page 34.
■ VCS notificationsSee “About VCS notifications” on page 35.
■ Campus clustersSee “About campus clusters” on page 35.
■ Global clustersSee “About global clusters” on page 35.
■ Storage Foundation Database Management toolsSee “About database management using SF Oracle RAC” on page 35.
■ Veritas Volume ReplicatorSee “About Veritas Volume Replicator” on page 35.
Note: I/O fencing is mandatory in SF Oracle RAC installations. All other featuresare optional and may be configured to suit your business needs.
Introducing Veritas Storage Foundation for Oracle RACAbout SF Oracle RAC features
30

About I/O fencingI/O fencing protects the data on shared disks when nodes in a cluster detect achange in the cluster membership that indicates a split-brain condition.
The fencing operation determines the following:
■ The nodes that must retain access to the shared storage
■ The nodes that must be ejected from the cluster
This decision prevents possible data corruption. The installer installs the I/Ofencing driver, VRTSvxfen, when you install SF Oracle RAC. To protect data onshared disks, you must configure I/O fencing after you install and configure SFOracle RAC.
I/O fencing technology uses coordination points for arbitration in the event of anetwork partition.
You can configure I/O fencing to use one or both of the following components ascoordination points:
I/O fencing that uses coordinator disks is referredto as disk-based I/O fencing.
Disk-based I/O fencing ensures data integrity ina single cluster.
Coordinator disk
I/O fencing that uses at least one CP server systemis referred to as server-based I/O fencing.
Server-based I/O fencing ensures data integrityin multiple clusters.
Coordination point server (CP server)
See the Veritas Storage Foundation for Oracle RAC Administrator's Guide.
About server-based I/O fencingIn a disk-based I/O fencing implementation, the vxfen driver handles variousSCSI-3 PR based arbitration operations completely within the driver. I/O fencingalso provides a framework referred to as customized fencing wherein arbitrationoperations are implemented in custom scripts. The vxfen driver invokes thecustom scripts.
The CP server-based coordination point uses a customized fencing framework.Note that SCSI-3 PR based fencing arbitration can also be enabled using customizedfencing framework. This allows the user to specify a combination of SCSI-3 LUNsand CP servers as coordination points using customized fencing. Customized
31Introducing Veritas Storage Foundation for Oracle RACAbout SF Oracle RAC features

fencing can be enabled by specifying vxfen_mode=customized andvxfen_mechanism=cps in the /etc/vxfenmode file.
Moreover, both /etc/vxfenmode and /etc/vxfentab files contain additionalparameter "security" which indicates if communication between CP server andSF Oracle RAC cluster nodes is secure.
Figure 1-1 displays a schematic of the customized fencing options.
Figure 1-1 Customized fencing
Clie
ntcl
uste
rno
deCP serverSCSI-3 LUN
CustomizedScripts
LLT
User space
Kernel space
cpsadmvxfenadm
vxfend
VXFEN
GAB
A user level daemon vxfend interacts with the vxfen driver, which in turn interactswith GAB to get the node membership update. Upon receiving membership updates,vxfend invokes various scripts to race for the coordination point and fence offdata disks. The vxfend daemon manages various fencing agents. The customizedfencing scripts are located in the /opt/VRTSvcs/vxfen/bin/customized/cps
directory.
Introducing Veritas Storage Foundation for Oracle RACAbout SF Oracle RAC features
32

The scripts that are involved include the following:
■ generate_snapshot.sh : Retrieves the SCSI ID’s of the coordinator disks and/orUUID ID's of the CP serversFor information about the UUID (Universally Unique Identifier), see theVeritasCluster Server Administrator's Guide.
■ join_local_node.sh: Registers the keys with the coordinator disks or CP servers
■ race_for_coordination_point.sh: Races to determine a winner after clusterreconfiguration
■ unjoin_local_node.sh: Removes the keys that are registered injoin_local_node.sh
■ fence_data_disks.sh: Fences the data disks from access by the losing nodes.
■ local_info.sh: Lists local node’s configuration parameters and coordinationpoints, which are used by the vxfen driver.
About the CP server database
CP server requires a database for storing the registration keys of the SF OracleRAC cluster nodes. CP server uses a SQLite database for its operations. By default,the database is located at /etc/VRTScps/db.
For a single node VCS cluster hosting a CP server, the database can be placed ona local file system. For an SFHA cluster hosting a CP server, the database must beplaced on a shared file system. The file system must be shared among all nodesthat are part of the SFHA cluster.
In an SFHA cluster hosting the CP server, the shared database is protected bysetting up SCSI-3 PR based I/O fencing. SCSI-3 PR based I/O fencing protectsagainst split-brain scenarios.
Warning: The CP server database must not be edited directly and should only beaccessed using cpsadm(1M). Manipulating the database manually may lead toundesirable results including system panics.
About the CP server user types and privileges
The CP server supports the following user types, each with a different access levelprivilege:
■ CP server administrator (admin)
■ CP server operator
33Introducing Veritas Storage Foundation for Oracle RACAbout SF Oracle RAC features

Different access level privileges permit the user to issue different commands. Ifa user is neither a CP server admin nor a CP server operator user, then the userhas guest status and can issue limited commands.
The user types and their access level privileges are assigned to individual usersduring SF Oracle RAC cluster configuration for fencing. During the installationprocess, you are prompted for a user name, password, and access level privilege(CP server admin or CP server operator).
To administer and operate a CP server, there must be at least one CP server admin.
A root user on a CP server is given all the administrator privileges, and theseadministrator privileges can be used to perform all the CP server specificoperations.
About preferred fencingThe I/O fencing driver uses coordination points to prevent split-brain in a VCScluster. By default, the fencing driver favors the subcluster with maximum numberof nodes during the race for coordination points. With the preferred fencingfeature, you can specify how the fencing driver must determine the survivingsubcluster.
You can configure the preferred fencing policy using the cluster-level attributePreferredFencingPolicy as follows:
■ Enable system-based preferred fencing policy to give preference to highcapacity systems.
■ Enable group-based preferred fencing policy to give preference to servicegroups for high priority applications.
■ Disable preferred fencing policy to use the default node count-based racepolicy.
See theVeritas StorageFoundation forOracleRACAdministrator'sGuide for moredetails.
Symantec Operations Readiness ToolsSymantec™ Operations Readiness Tools (SORT) is a set of Web-based tools thatsupports Symantec enterprise products. SORT increases operational efficiencyand helps improve application availability.
Among its broad set of features, SORT provides patches, patch notifications, anddocumentation for Symantec enterprise products.
To access SORT, go to:
http://sort.symantec.com
Introducing Veritas Storage Foundation for Oracle RACAbout SF Oracle RAC features
34

About VCS notificationsYou can configure both SNMP and SMTP notifications for VCS. Symantecrecommends you to configure at least one of these notifications. You have thefollowing options:
■ Configure SNMP trap notification of VCS events using the VCS Notifiercomponent
■ Configure SMTP email notification of VCS events using the VCS Notifiercomponent.
See the Veritas Cluster Server Administrator’s Guide.
About campus clustersA campus cluster has alternate nodes located in different data centers. Campusclusters are connected using a high speed cable that guarantees network accessbetween the nodes. The campus cluster configuration provides local highavailability and disaster recovery functionality in a single SF Oracle RAC cluster.This configuration uses data mirroring to duplicate data at different sites.
SF Oracle RAC supports campus clusters that employ shared disk groups mirroredwith Veritas Volume Manager (VxVM).
About global clustersGlobal clusters provide the ability to fail over applications between geographicallydistributed clusters when disaster occurs. This type of clustering involvesmigrating applications between clusters over a considerable distance. You canset up HA/DR using hardware-based or software-based replication technologies.
About Veritas Volume ReplicatorVeritas Volume Replicator (VVR) is a software-based replication technology usedin global cluster disaster recovery setups that replicates data to remote sites overany standard IP network. You can have up to 32 remote sites.
About database management using SF Oracle RACYou can leverage the database management capabilities of the Storage Foundationfor Databases (SFDB) tools to simplify storage management and improve databaseperformance.
For information on supported capabilities, see the Veritas Storage Foundation:Storage and Availability Management for Oracle Databases guide.
35Introducing Veritas Storage Foundation for Oracle RACAbout SF Oracle RAC features

About SF Oracle RAC optional componentsYou can add the following optional components to SF Oracle RAC:
See “About Symantec Product Authentication Service(AT)” on page 36.
Symantec ProductAuthentication Service
See “Veritas Operations Manager” on page 36.Veritas Operations Manager
See “About Cluster Manager (Java Console)” on page 37.Cluster Manager (Java console)
About Symantec Product Authentication Service (AT)SF Oracle RAC uses Symantec Product Authentication Service (AT) to providesecure communication between cluster nodes and clients. It uses digital certificatesfor authentication and SSL to encrypt communication over the public network tosecure communications.
AT uses the following brokers to establish trust relationship between the clustercomponents:
■ Root brokerA root broker serves as the main registration and certification authority; ithas a self-signed certificate and can authenticate other brokers. The rootbroker is only used during initial creation of an authentication broker.A root broker on a stable external system can serve multiple clusters. Symantecrecommends that you install a single root broker on a utility system. The utilitysystem, such as an email server or domain controller, can be highly available.You can also configure one of the nodes in the SF Oracle RAC cluster to serveas a root and an authentication broker.
■ Authentication brokersAuthentication brokers serve as intermediate registration and certificationauthorities. Authentication brokers have root-signed certificates. Each nodein VCS serves as an authentication broker.
See Symantec Product Authentication Service documentation for moreinformation.
See “Preparing to configure the clusters in secure mode” on page 97.
Veritas Operations ManagerSymantec recommends use of Veritas Operations Manager to manage StorageFoundation and Cluster Server environments.
Introducing Veritas Storage Foundation for Oracle RACAbout SF Oracle RAC optional components
36

The Veritas Enterprise Administrator (VEA) console is no longer packaged withStorage Foundation products. If you wish to continue using VEA, a version isavailable for download from http://go.symantec.com/vcsm_download. VeritasStorage Foundation Management Server is no longer supported.
If you wish to manage a single cluster using Cluster Manager (Java Console), aversion is available for download from http://go.symantec.com/vcsm_download.Veritas Cluster Server Management Console is no longer supported.
Veritas Operations Manager provides a centralized management console forVeritas Storage Foundation and High Availability products. You can use VeritasOperations Manager to monitor, visualize, and manage storage resources andgenerate reports. Veritas Operations Manager is not available on the StorageFoundation and High Availability Solutions release. You can download VeritasOperations Manager at no charge at http://go.symantec.com/vom.
Refer to the Veritas Operations Manager documentation for installation, upgrade,and configuration instructions.
About Cluster Manager (Java Console)Cluster Manager (Java Console) offers complete administration capabilities foryour cluster. Use the different views in the Java Console to monitor clusters andVCS objects, including service groups, systems, resources, and resource types.
See Veritas Cluster Server Administrator's Guide.
You can download the console from http://go.symantec.com/vcsm_download.
SF Oracle RAC cluster setup modelsSF Oracle RAC supports a variety of cluster configurations.
Depending on your business needs, you may choose from the following setupmodels:
■ Basic setupSee “Typical configuration of four-node SF Oracle RAC cluster” on page 38.
■ Secure setupSee “Typical configuration of SF Oracle RAC clusters in secure mode”on page 39.
■ Central management setupSee “Typical configuration of VOM-managed SF Oracle RAC clusters”on page 40.
■ Campus cluster setup
37Introducing Veritas Storage Foundation for Oracle RACSF Oracle RAC cluster setup models

See “Typical configuration of SF Oracle RAC campus clusters for disasterrecovery” on page 41.
■ Global cluster setupSee “Typical configuration of SF Oracle RAC global clusters for disasterrecovery” on page 43.
Typical configuration of four-node SF Oracle RAC clusterFigure 1-2 depicts a high-level view of a basic SF Oracle RAC configuration for afour-node cluster.
Figure 1-2 Sample four-node SF Oracle RAC cluster
Clients
Private networkIndependent hub/switch
per interconnect link
Switch
PublicNetworkLAN
SAN
Disk arrays
Legends
Public network links
Private network links
Shared storage links
Introducing Veritas Storage Foundation for Oracle RACSF Oracle RAC cluster setup models
38

A basic topology has the following layout and characteristics:
■ Multiple client applications that access nodes in the cluster over a publicnetwork.
■ Nodes that are connected by at least two private network links (also calledcluster interconnects) using 100BaseT or gigabit Ethernet controllers on eachsystem.If the private links are on a single switch, isolate them using VLAN.
■ Nodes that are connected to iSCSI or Fibre Channel shared storage devicesover SAN.All shared storage must support SCSI-3 PR.
■ Nodes that are connected with private network links using similar networkdevices and matching port numbers.For example, if you use en1 on one end of a link, it is recommended that theother end also use en1.
■ Every system must have a local disk.
■ The Oracle Cluster Registry and vote disks configured on the shared storagethat is available to each node.For Oracle RAC 10g Release 2/Oracle RAC 11g Release 1: The shared storagefor Oracle Cluster Registry and vote disks can be a cluster file system or rawVxVM volumes.For Oracle RAC 11g Release 2: The shared storage for Oracle Cluster Registryand vote disks can be a cluster file system or ASM disk groups created usingraw VxVM volumes.
■ Three or more odd number of disks or LUNs used as coordinator disks for I/Ofencing.
■ VCS manages the resources that are required by Oracle RAC. The resourcesmust run in parallel on each node.
Typical configuration of SF Oracle RAC clusters in secure modeSF Oracle RAC uses Symantec Product Authentication Service (AT) to providesecure communication between cluster nodes and clients.
See “About Symantec Product Authentication Service (AT)” on page 36.
Figure 1-3 illustrates typical configuration of VCS clusters in secure mode. Youcan use one of the cluster nodes as AT root broker or you can use a stable systemoutside the cluster as AT root broker.
39Introducing Veritas Storage Foundation for Oracle RACSF Oracle RAC cluster setup models

Figure 1-3 Typical configuration of VCS clusters in secure mode
Symantec ProductAuthentication Serviceroot broker
VCS cluster 1 VCS cluster 2
Root andauthentication broker
node1 node2 node3
Multiple VCS clusters witha single external root broker:
Single VCS cluster withone of the nodes as root broker:
Authentication brokers
Authentication brokers Authentication brokers
Typical configuration of VOM-managed SF Oracle RAC clustersVeritas Operations Manager (VOM) provides a centralized management consolefor Veritas Storage Foundation and High Availability products.
See “Veritas Operations Manager” on page 36.
Figure 1-4 illustrates a typical setup of SF Oracle RAC clusters that are centrallymanaged using Veritas Operations Manager. You can install Symantec ProductAuthentication Service root broker on the same system as that of VOM CentralServer or on a different system.
Introducing Veritas Storage Foundation for Oracle RACSF Oracle RAC cluster setup models
40

Figure 1-4 Typical configuration of VOM-managed clusters
Symantec ProductAuthenticationService rootbroker
Cluster 1 Cluster 2
VOMCentralServer
Cluster 1 Cluster 2
VOM Central Server and Symantec ProductAuthentication Service root broker
Typical configuration of SF Oracle RAC campus clusters for disasterrecovery
A campus cluster configuration provides local high availability and disasterrecovery capability in a single SF Oracle RAC cluster. This configuration uses datamirroring to duplicate data at different sites. No host or array replication isinvolved in the process. SF Oracle RAC supports campus clusters that employshared disk groups mirrored with Cluster Volume Manager (CVM).
The SF Oracle RAC campus cluster addresses the following basic challenges incampus cluster configurations:
An SF Oracle RAC campus cluster handles latencychallenges in keeping mirrors synchronized while ensuringthe efficient recovery in case of site failures for both dataand VxVM metadata.
Latency challenges
The read performance is enhanced as data is read fromlocal mirrors.
Read performance
SF Oracle RAC makes sure that all the mirrors on a site aredetached proactively even when a part of the site goes down.
Site awareness
Note: The DiskGroupSnap agent is not supported for SF Oracle RAC.
41Introducing Veritas Storage Foundation for Oracle RACSF Oracle RAC cluster setup models

Figure 1-5 illustrates a basic campus cluster setup.
Figure 1-5 Basic campus cluster setup
LAN
LAN
Dark Fibre
SITE 1 SITE 2
SITE 3
Physical view of 4-node SFRACCampus Cluster
NIC
1 NIC
2H
BA
2H
BA
1
Clusternode 1
NIC
1 NIC
2H
BA
2H
BA
1
Clusternode 2
NIC
1 NIC
2H
BA
2H
BA
1
Clusternode 3
NIC
1 NIC
2H
BA
2H
BA
1
Clusternode 4
ClientApplications
ClientApplications
Ethernet
Switch
Ethernet
Switch
Ethernet
Switch
Ethernet
Switch
Ethernet
Switch
Ethernet
Switch
FC SwitchFC Switch
FC Switch
FC Switch
CoordinatorLUN 1 Data
LUNsStorage Array
CoordinatorLUN 2 Data
LUNsStorage Array
CoordinatorLUN 3 Data
LUNsStorage Array
FC SwitchFC Switch
DWDM
Private Interconnects(GigE)
San 2 Connections
Legends
Dark FiberConnections
San 1 Connections
Public Links (GigE)
SANSAN
Introducing Veritas Storage Foundation for Oracle RACSF Oracle RAC cluster setup models
42

For more information, see the Veritas Storage Foundation for Oracle RACInstallation and Configuration Guide.
Typical configuration of SF Oracle RAC global clusters for disasterrecovery
SF Oracle RAC leverages the global clustering feature of VCS to enable highavailability and disaster recovery (HA/DR) for businesses that span widegeographical areas. Global clusters provide protection against outages caused bylarge-scale disasters such as major floods, hurricanes, and earthquakes. An entirecluster can be affected by such disasters. This type of clustering involves migratingapplications between clusters over a considerable distance.
You can set up HA/DR using hardware-based or software-based replicationtechnologies.
Figure 1-6 Global clusters
PublicNetwork
SeparateStorage
SeparateStorage
Client Client Client Client
ReplicatedData
ClientsRedirected
ApplicationFailover
OracleGroup
Cluster A Cluster B
OracleGroup
To understand how global clusters work, review the example of an Oracle RACdatabase configured using global clustering. Oracle RAC is installed and configuredin cluster A and cluster B. Oracle database is located on shared disks within eachcluster and is replicated across clusters to ensure data concurrency. The VCSservice groups for Oracle are online on a node in cluster A and are configured tofail over on cluster A and cluster B.
VCS continuously monitors and communicates events between clusters. If clusterA fails, the Oracle database is started on the remote cluster B.
43Introducing Veritas Storage Foundation for Oracle RACSF Oracle RAC cluster setup models

Note:You must have an SF Oracle RAC HA/DR license to configure global clusters.If you use VVR for replication, you must also have a VVR license. You mayconfigure a basic cluster initially and add the HA/DR and VVR licenses at a latertime or you may add the licenses during the SF Oracle RAC installation.
For information on supported replication technologies and more information, seethe Veritas Storage Foundation for Oracle RAC Installation and ConfigurationGuide.
Introducing Veritas Storage Foundation for Oracle RACSF Oracle RAC cluster setup models
44

System requirements
This chapter includes the following topics:
■ Important preinstallation information
■ Hardware requirements
■ I/O fencing requirements
■ Supported AIX operating systems
■ Supported database software
■ Supported replication technologies for global clusters
Important preinstallation informationBefore you install SF Oracle RAC, make sure you have reviewed the followinginformation:
■ Hardware compatibility list for information about supported hardware:http://entsupport.symantec.com/docs/330441
■ Disk storage array support information:http://entsupport.symantec.com/docs/283282
■ Latest information on support for Oracle database versions:http://www.symantec.com/docs/TECH44807
■ General information regarding the release, installation notes, known issues,and fixed issues:See Veritas Storage Foundation for Oracle RAC Release Notes.
■ Oracle documentation for additional requirements pertaining to your versionof Oracle.
2Chapter

Hardware requirementsDepending on the type of setup planned, make sure you meet the necessaryhardware requirements.
See Table 2-1 on page 46.For basic clusters
See Table 2-2 on page 47.For campus clusters
Table 2-1 Hardware requirements for basic clusters
DescriptionItem
Two to sixteen systems with two or more CPUs at 2GHz or higher.SF Oracle RACsystems
A DVD drive on one of the nodes in the cluster.DVD drive
SF Oracle RAC requires that all storage disks support SCSI-3 PersistentReservations (PR).
Note: The coordinator disk does not store data, so configure the diskas the smallest possible LUN on a disk array to avoid wasting space.
Disks
You can evaluate your systems for available disk space by runningthe product installation program. Navigate to the product directoryon the product disc and run the following command:
# ./installsfrac -precheck node_name
For details on the additional space that is required for Oracle, see theOracle documentation.
Disk space
Each SF Oracle RAC system requires at least 2 GB.
Symantec recommends additional amount of at least twice the OracleSGA size.
RAM
See the Oracle Metalink document: 169706.1Swap space
Two or more private links and one public link.
Links must be 100BaseT or gigabit Ethernet directly linking each nodeto the other node to form a private network that handles directinter-system communication. These links must be of the same type;you cannot mix 100BaseT and gigabit.
Symantec recommends gigabit Ethernet using enterprise-classswitches for the private links.
You can also configure aggregated interfaces.
Network links
System requirementsHardware requirements
46

Table 2-1 Hardware requirements for basic clusters (continued)
DescriptionItem
At least one additional SCSI or Fibre Channel Host Bus Adapter persystem for shared data disks.
Fiber Channel orSCSI host busadapters
Table 2-2 lists the hardware requirements for campus clusters in addition to thebasic cluster requirements.
Table 2-2 Hardware requirements for campus clusters
DescriptionItem
■ The storage switch (to which each host on a site connects) must haveaccess to storage arrays at all the sites.
■ Volumes must be mirrored with storage allocated from at least two sites.
■ DWDM links are recommended between sites for storage links.
DWDM works at the physical layer and requires multiplexer andde-multiplexer devices.
■ The storage and networks must have redundant-loop access betweeneach node and each storage array to prevent the links from becoming asingle point of failure.
Storage
■ Oracle requires that all nodes use the IP addresses from the same subnet.
■ Symantec recommends two Network Interface Cards (NIC) per host forLLT heartbeats. Oracle Clusterware requires one private and one virtualIP for each host.
■ Symantec recommends a common cross-site physical infrastructure forstorage and LLT private networks.
Network
I/O fencing requires placement of a third coordinator disk at a third site.The DWDM can be extended to the third site or the iSCSI LUN at the thirdsite can be used as the third coordination point. Alternatively CoordinationPoint Server can be deployed at the third remote site as an arbitration point.
I/O fencing
I/O fencing requirementsDepending on whether you plan to configure disk-based fencing or server-basedfencing, make sure that you meet the requirements for coordination points:
■ Coordinator disksSee “Coordinator disk requirements for I/O fencing” on page 48.
■ CP servers
47System requirementsI/O fencing requirements

See “CP server requirements” on page 48.
Coordinator disk requirements for I/O fencingMake sure that the I/O fencing coordinator disks meet the following requirements:
■ For disk-based I/O fencing, you must have three coordinator disks.
■ The coordinator disks can be raw devices, DMP devices, or iSCSI devices.
■ Each of the coordinator disks must use a physically separate disk or LUN.Symantec recommends using the smallest possible LUNs for coordinator disks.
■ Each of the coordinator disks should exist on a different disk array, if possible.
■ The coordinator disks must support SCSI-3 persistent reservations.
■ Symantec recommends using hardware-based mirroring for coordinator disks.
■ Coordinator disks must not be used to store data or must not be included indisk groups that store user data.
■ Coordinator disks cannot be the special devices that array vendors use. Forexample, you cannot use EMC gatekeeper devices as coordinator disks.
CP server requirementsSF Oracle RAC 5.1 SP1 PR1 clusters (application clusters) support CP serverswhich are hosted on the following VCS and SFHA versions:
■ VCS 5.1, 5.1 SP1, or 5.1 SP1 PR1 single-node clusterCP server requires LLT and GAB to be configured on the single-node VCScluster that hosts CP server. This requirement also applies to any single-nodeapplication cluster that uses server-based fencing.
■ SFHA 5.1, 5.1 SP1, or 5.1 SP1 PR1 cluster
Warning: Before you upgrade CP server nodes from 5.1 to use VCS or SFHA 5.1SP1 PR1, you must upgrade all the application clusters that use this CP server toversion 5.1 SP1 PR1. Application clusters at version 5.1 cannot communicate withCP server that runs VCS or SFHA 5.1 SP1 PR1.
Make sure that you meet the basic hardware requirements for the VCS/SFHAcluster to host the CP server.
See theVeritasCluster Server InstallationGuide or theVeritas StorageFoundationHigh Availability Installation Guide.
System requirementsI/O fencing requirements
48

Note:While Symantec recommends at least three coordination points for fencing,a single CP server as coordination point is a supported server-based fencingconfiguration. Such single CP server fencing configuration requires that thecoordination point be a highly available CP server that is hosted on an SFHAcluster.
Make sure you meet the following additional CP server requirements which arecovered in this section before you install and configure CP server:
■ Hardware requirements
■ Operating system requirements
■ Networking requirements (and recommendations)
■ Security requirements
Table 2-3 lists additional requirements for hosting the CP server.
Table 2-3 CP server hardware requirements
DescriptionHardware required
To host the CP server on a VCS cluster or SFHA cluster, eachhost requires the following file system space:
■ 550 MB in the /opt directory (additionally, the languagepack requires another 15 MB)
■ 300 MB in /usr
■ 20 MB in /var
Disk space
When CP server is hosted on an SFHA cluster, there mustbe shared storage between the CP servers.
Storage
Each CP server requires at least 512 MB.RAM
A secure TCP/IP connection is required to connect the CPservers to the SF Oracle RAC clusters (application clusters).
CP server to client nodephysical link
Table 2-4 displays the CP server supported operating systems and versions. Anapplication cluster can use a CP server that runs any of the following supportedoperating systems.
49System requirementsI/O fencing requirements

Table 2-4 CP server supported operating systems and versions
Operating system and versionCP server
CP server supports any of the following operating systems:
■ AIX 5.3, 6.1, and 7.1
■ HP-UX 11i v3
■ Linux:
■ RHEL 5
■ SLES 10
■ SLES 11
■ Solaris 9 and 10
Review other details such as supported operating systemlevels and architecture for the supported operating systems.
See the Veritas Cluster Server Installation Guide or theVeritas Storage Foundation High Availability InstallationGuide.
CP server hosted on a VCSsingle-node cluster or on anSFHA cluster
Following are the CP server networking requirements and recommendations:
■ Symantec recommends that network access from the application clusters tothe CP servers should be made highly-available and redundant. The networkconnections require either a secure LAN or VPN.
■ The CP server uses the TCP/IP protocol to connect to and communicate withthe application clusters by these network paths. The CP server listens formessages from the application clusters using TCP port 14250. This is thedefault port that can be changed during a CP server configuration.
■ The CP server supports either Internet Protocol version 4 or version 6 (IPv4or IPv6 addresses) when communicating with the application clusters. If theCP server is configured to use an IPv6 virtual IP address, then the applicationclusters should also be on the IPv6 network where the CP server is being hosted.
■ When placing the CP servers within a specific network configuration, you musttake into consideration the number of hops from the different applicationcluster nodes to the CP servers. As a best practice, Symantec recommends thatthe number of hops from the different application cluster nodes to the CPservers should be equal. This ensures that if an event occurs that results in anI/O fencing scenario, there is no bias in the race due to the number of hopsbetween the nodes.
For secure communications between the SF Oracle RAC cluster and CP server,consider the following requirements and suggestions:
System requirementsI/O fencing requirements
50

■ In a secure communication environment, all CP servers that are used by theapplication cluster must be configured with security enabled. A configurationwhere the application cluster uses some CP servers running with securityenabled and other CP servers running with security disabled is not supported.
■ The CP server and application clusters should also use the same root broker.If the same root broker is not being used, then trust can be established betweenthe cluster nodes and CP server for the secure communication. Trust can beestablished by the installer when configuring fencing.
■ For non-secure communication between CP server and application clusters,there is no need to configure Symantec Product Authentication Service. Innon-secure mode, authorization is still provided by CP server for the applicationcluster users. The authorization that is performed only ensures that authorizedusers can perform appropriate actions as per their user privileges on the CPserver.
For information about establishing secure communications between the applicationcluster and CP server, see the Veritas Storage Foundation for Oracle RACAdministrator's Guide.
Supported AIX operating systemsSF Oracle RAC will soon announce support for AIX 7.1.
Refer to the following TechNote for the latest information on supported operatingsystems and Oracle database versions:
http://www.symantec.com/docs/TECH44807
Supported database softwareFor the latest information on supported Oracle database versions, see the followingTechnical Support TechNote:
http://www.symantec.com/docs/TECH44807
Note: SF Oracle RAC supports only 64-bit Oracle.
The following database versions are supported:
■ Oracle RAC 10g Release 2
■ Oracle RAC 11g Release 1
■ Oracle RAC 11g Release 2
51System requirementsSupported AIX operating systems

Additionally, see the Oracle documentation for patches that may be required byOracle for each release.
Supported replication technologies for global clustersSF Oracle RAC supports the following hardware-based replication andsoftware-based replication technologies for global cluster configurations:
■ EMC SRDF
■ Hitachi TrueCopy
■ IBM Metro Mirror
■ IBM SAN Volume Controller (SVC)
■ EMC MirrorView
Hardware-based replication
■ Veritas Volume Replicator
■ Oracle Data Guard
Software-based replication
System requirementsSupported replication technologies for global clusters
52

Planning to install SFOracle RAC
This chapter includes the following topics:
■ Planning your network configuration
■ Planning the storage
■ Planning volume layout
■ Planning file system design
■ About planning to configure I/O fencing
■ Planning for cluster management
■ Planning for disaster recovery
Planning your network configurationThe following practices are recommended for a resilient network setup:
■ Configure the private cluster interconnect over multiple dedicated gigabitEthernet links. All single point of failures such as network interface cards(NIC), switches, and interconnects should be eliminated.
■ The NICs used for the private cluster interconnect should have the samecharacteristics regarding speed, MTU, and full duplex on all nodes. Do notallow the NICs and switch ports to auto-negotiate speed.
■ Configure non-routable IP addresses for private cluster interconnects.
■ The default value for LLT peer inactivity timeout is 16 seconds. The valueshould be set based on service availability requirements and the propagation
3Chapter

delay between the cluster nodes in case of campus cluster setup. The LLT peerinactivity timeout value indicates the interval after which SF Oracle RAC onone node declares the other node in the cluster dead, if there is no networkcommunication (heartbeat) from that node.The default value for the CSS miss-count in case of SF Oracle RAC is 600seconds. The value of this parameter is much higher than the LLT peerinactivity timeout so that the two clusterwares, VCS and Oracle Clusterware,do not interfere with each other’s decisions on which nodes should remain inthe cluster in the event of network split-brain. Veritas I/O fencing is allowedto decide on the surviving nodes first, followed by Oracle Clusterware. TheCSS miss-count value indicates the amount of time Oracle Clusterware waitsbefore evicting another node from the cluster, when it fails to respond acrossthe interconnect.For more information, see the Oracle Metalink document: 782148.1
Planning the public network configuration for Oracle RACIdentify separate public virtual IP addresses for each node in the cluster. Oraclerequires one public virtual IP address for the Oracle listener process on each node.Public virtual IP addresses are used by client applications to connect to the Oracledatabase and help mitigate TCP/IP timeout delays. Oracle Clusterware managesthe virtual IP addresses.
Planning the private network configuration for Oracle RACOracle RAC requires a minimum of one private IP address for Oracle Clusterwareheartbeat.
Depending on the version of Oracle RAC you want to install, use one of thefollowing options for setting up the private network configuration for Oracledatabase cache fusion:
Use either Oracle UDP IPC or VCSIPC/LMX/LLT for the database cachefusion traffic.
By default, the database cache fusion traffic is configured to useVCSIPC/LMX/LLT.
Oracle RAC 10g
You must use UDP IPC for the database cache fusion traffic.Oracle RAC 11g
The Oracle UDP IPC protocol requires an IP address. Symantec recommends thatan additional private IP address from a different subnet be used for load balancingthe Oracle cache fusion traffic.
Planning to install SF Oracle RACPlanning your network configuration
54

Note: Oracle UDP IPC is supported for both Oracle RAC 10g and Oracle RAC 11gwith SF Oracle RAC.
Note: The private IP addresses of all nodes that are on the same physical networkmust be in the same IP subnet.
The following practices provide a resilient private network setup:
■ Configure Oracle Clusterware interconnects over LLT links to prevent datacorruption.In an SF Oracle RAC cluster, the Oracle Clusterware heartbeat link MUST beconfigured as an LLT link. If Oracle Clusterware and LLT use different linksfor their communication, then the membership change between VCS and OracleClusterware is not coordinated correctly. For example, if only the OracleClusterware links are down, Oracle Clusterware kills one set of nodes after theexpiry of the css-misscount interval and initiates the Oracle Clusterware anddatabase recovery, even before CVM and CFS detect the node failures. Thisuncoordinated recovery may cause data corruption.
■ Oracle Clusterware interconnects need to be protected against NIC failuresand link failures. The PrivNIC or MultiPrivNIC agent can be used to protectagainst NIC failures and link failures, if multiple links are available. Even iflink aggregation solutions in the form of bonded NICs are implemented, thePrivNIC or MultiPrivNIC agent can be used to provide additional protectionagainst the failure of the aggregated link by failing over to available alternatelinks. These alternate links can be simple NIC interfaces or bonded NICs.An alternative option is to configure the Oracle Clusterware interconnectsover bonded NIC interfaces.See “High availability solutions for Oracle RAC private network” on page 56.
■ Configure Oracle Cache Fusion traffic to take place through the private network.Symantec also recommends that all UDP cache-fusion links be LLT links.The PrivNIC and MultiPrivNIC agents provide a reliable alternative whenoperating system limitations prevent you from using NIC bonding to providehigh availability and increased bandwidth using multiple network interfaces.In the event of a NIC failure or link failure, the agent fails over the private IPaddress from the failed link to the connected or available LLT link. To usemultiple links for database cache fusion for increased bandwidth, configurethecluster_interconnects initialization parameter with multiple IP addressesfor each database instance and configure these IP addresses under MultiPrivNICfor high availability.Oracle database clients use the public network for database services. Wheneverthere is a node failure or network failure, the client fails over the connection,
55Planning to install SF Oracle RACPlanning your network configuration

for both existing and new connections, to the surviving node in the clusterwith which it is able to connect. Client failover occurs as a result of Oracle FastApplication Notification, VIP failover and client connection TCP timeout. It isstrongly recommended not to send Oracle Cache Fusion traffic through thepublic network.
■ Use NIC bonding to provide redundancy for public networks so that Oraclecan fail over virtual IP addresses if there is a public link failure.
High availability solutions for Oracle RAC private networkTable 3-1 lists the high availability solutions that you may adopt for your privatenetwork.
Table 3-1 High availability solutions for Oracle RAC private network
DescriptionOptions
Use a native NIC bonding solution to provide redundancy, incase of NIC failures.
Make sure that a link configured under a aggregated link orNIC bond is not configured as a separate LLT link.
When LLT is configured over a bonded interface, do one ofthe following steps to prevent GAB from reporting jeopardymembership:
■ Configure an additional NIC under LLT in addition to thebonded NIC.
■ Add the following line in the /etc/llttab file:
set-dbg-minlinks 2
Using link aggregation/NIC bonding for OracleClusterware
Use the PrivNIC agent when operating system limitationsprevent you from using NIC bonding to provide highavailability using multiple network interfaces.
Use the MultiPrivNIC agent when operating system limitationsprevent you from using NIC bonding to provide highavailability and increased bandwidth using multiple networkinterfaces.
For more deployment scenarios that illustrate the use ofPrivNIC/MultiPrivNIC deployments, see the appendix "SFOracle RAC deployment scenarios" in this document.
UsingPrivNIC/MultiPrivNICagents
Planning to install SF Oracle RACPlanning your network configuration
56

Planning the storageSF Oracle RAC provides the following options for shared storage:
■ CVMCVM provides native naming as well as enclosure-based naming (EBN).Use enclosure-based naming for easy administration of storage.Enclosure-based naming guarantees that the same name is given to a sharedLUN on all the nodes, irrespective of the operating system name for the LUN.
■ CFS
■ Oracle ASM over CVM
The following recommendations ensure better performance and availability ofstorage.
■ Use multiple storage arrays, if possible, to ensure protection against arrayfailures. The minimum recommended configuration is to have two HBAs foreach host and two switches.
■ Design the storage layout keeping in mind performance and high availabilityrequirements. Use technologies such as striping and mirroring.
■ Use appropriate stripe width and depth to optimize I/O performance.
■ Use SCSI-3 persistent reservations (PR) compliant storage.
■ Provide multiple access paths to disks with HBA/switch combinations to allowDMP to provide high availability against storage link failures and to provideload balancing.
Planning the storage for SF Oracle RACTable 3-2 lists the type of storage required for SF Oracle RAC.
Table 3-2 Type of storage required for SF Oracle RAC
Type of storageSF Oracle RAC files
LocalSF Oracle RAC binaries
SharedSF Oracle RAC fencingcoordinator disks
Planning the storage for Oracle RACReview the storage options and guidelines for Oracle RAC:
■ Storage options for OCR and voting disk
57Planning to install SF Oracle RACPlanning the storage
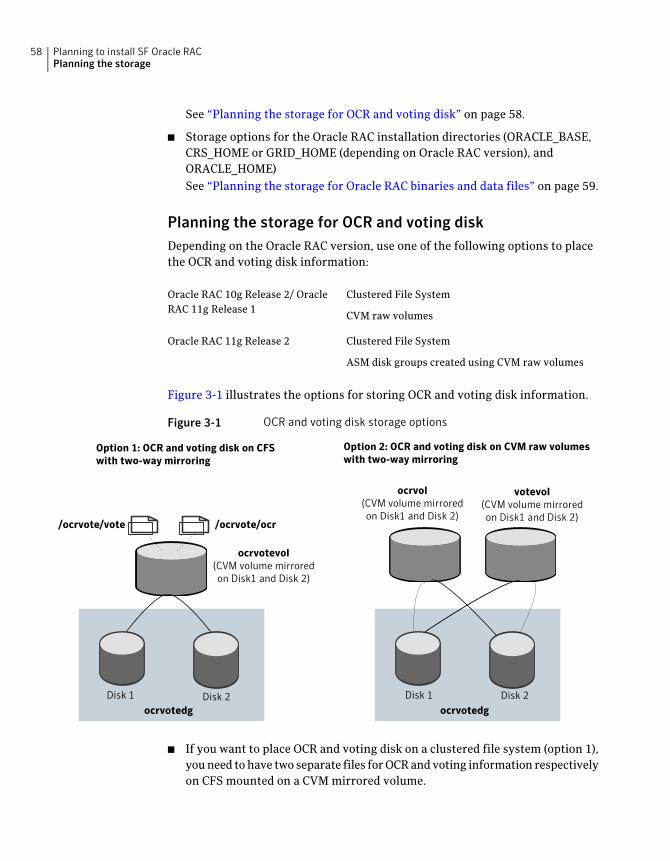
See “Planning the storage for OCR and voting disk” on page 58.
■ Storage options for the Oracle RAC installation directories (ORACLE_BASE,CRS_HOME or GRID_HOME (depending on Oracle RAC version), andORACLE_HOME)See “Planning the storage for Oracle RAC binaries and data files” on page 59.
Planning the storage for OCR and voting diskDepending on the Oracle RAC version, use one of the following options to placethe OCR and voting disk information:
Clustered File System
CVM raw volumes
Oracle RAC 10g Release 2/ OracleRAC 11g Release 1
Clustered File System
ASM disk groups created using CVM raw volumes
Oracle RAC 11g Release 2
Figure 3-1 illustrates the options for storing OCR and voting disk information.
Figure 3-1 OCR and voting disk storage options
Disk 1 Disk 2
ocrvotevol(CVM volume mirroredon Disk1 and Disk 2)
ocrvotedg
/ocrvote/ocr/ocrvote/vote
Disk 1 Disk 2ocrvotedg
ocrvol(CVM volume mirroredon Disk1 and Disk 2)
votevol(CVM volume mirroredon Disk1 and Disk 2)
Option 1: OCR and voting disk on CFSwith two-way mirroring
Option 2: OCR and voting disk on CVM raw volumeswith two-way mirroring
■ If you want to place OCR and voting disk on a clustered file system (option 1),you need to have two separate files for OCR and voting information respectivelyon CFS mounted on a CVM mirrored volume.
Planning to install SF Oracle RACPlanning the storage
58

■ If you want to place OCR and voting disk on CVM raw volumes or on ASM diskgroups that use CVM raw volumes (option 2), you need to use two CVM mirroredvolumes for configuring OCR and voting disk on these volumes.
For both option 1 and option 2:
■ The installer needs at least two LUNs of 640 MB each for creating the OCR andvoting disk storage.Additionally, refer to the Oracle documentation for Oracle's recommendationon the required disk space for OCR and voting disk.
■ The option External Redundancy must be selected at the time of installingOracle Clusterware.
Note: Update the default setting of the CVM disk group fail policy to leave forOCR and voting disk. Retain the default setting (global) for the disk detach policy.
You can use the installer to create the storage for OCR and voting disk. This stepis discussed later in the chapter "Installing Oracle RAC".
Note: For setting up replicated clusters, OCR and voting disk must be onnon-replicated shared storage.
Planning the storage for Oracle RAC binaries and data filesThe Oracle RAC binaries can be stored on local storage or on shared storage, basedon your high availability requirements.
Note: Symantec recommends that you install the Oracle Clusterware and Oracledatabase binaries local to each node in the cluster.
Consider the following points while planning the installation:
■ Local installations provide improved protection against a single point of failureand also allows for applying Oracle RAC patches in a rolling fashion.
■ CFS installations provide a single Oracle installation to manage, regardless ofthe number of nodes. This scenario offers a reduction in storage requirementsand easy addition of nodes.
Table 3-3 lists the type of storage for Oracle RAC binaries and data files.
59Planning to install SF Oracle RACPlanning the storage

Table 3-3 Type of storage for Oracle RAC binaries and data files
Type of storageOracle RAC files
Local
The ORACLE_BASE directory specified during the OracleClusterware/Grid Infrastructure installation is used to storethe Oracle Inventory files. Oracle requires that the Oracleinventory files be placed on the local file system.
Oracle base
Local or sharedOracle Clusterware
Local
Placing the Oracle Grid Infrastructure binaries on local disksenables rolling upgrade of the cluster.
Oracle Grid Infrastructurebinaries
Local or shared
Placing the Oracle database binaries on local disks enablesrolling upgrade of the cluster.
Oracle database binaries
Shared
Store the Oracle database files on CFS rather than on raw deviceor CVM raw device for easier management. Create separateclustered file systems for each Oracle database. Keeping theOracle database datafiles on separate mount points enablesyou to unmount the database for maintenance purposeswithout affecting other databases.
Note: Set the CVM disk group fail policy to leave for diskgroups containing the data files.
If you plan to store the Oracle database on ASM, configure theASM disk groups over CVM volumes to take advantage ofdynamic multi-pathing.
Database datafiles
SharedSF Oracle RAC databasestorage managementrepository
Shared
Place archived logs on CFS rather than on local file systems.
Database recovery data(archive, flash recovery)
Planning for Oracle ASM over CVMReview the following information on storage support provided by Oracle ASM:
Planning to install SF Oracle RACPlanning the storage
60

ASM provides storage for data files, controlfiles, online and archive log files, and backupfiles. Starting with Oracle RAC 11g Release2, ASM also supports storage for OCR andvoting disk.
Supported by ASM
Oracle RAC 11g Release 1 and earlierversions:
ASM does not support Oracle binaries, tracefiles, alert logs, export files, tar files, corefiles, Oracle Cluster Registry devices (OCR),and voting disk, and application binaries onASM.
Oracle RAC 11g Release 2:
ASM does not support Oracle binaries, tracefiles, alert logs, export files, tar files, corefiles, and application binaries on ASM.
Not supported by ASM
The following practices offer high availability and better performance:
■ Use CVM mirrored volumes with dynamic multi-pathing for creating ASMdisk groups. Select external redundancy while creating ASM disk groups.
■ The CVM raw volumes used for ASM must be used exclusively for ASM. Donot use these volumes for any other purpose, such as creation of file systems.Creating file systems on CVM raw volumes used with ASM may cause datacorruption.
■ Do not enable ODM when databases are created on ASM. ODM is a diskmanagement interface for data files that reside on the Veritas File System.
■ Use a minimum of two Oracle ASM disk groups. Store the data files, one setof redo logs, and one set of control files on one disk group. Store the FlashRecovery Area, archive logs, and a second set of redo logs and control files onthe second disk group.For more information, see Oracle's ASM best practices document.
■ Do not configure DMP meta nodes as ASM disks for creating ASM disk groups.Access to DMP meta nodes must be configured to take place through CVM.
■ Do not combine DMP with other multipathing software in the cluster.
■ Do not use coordinator disks, which are configured for I/O fencing, as ASMdisks.
■ Volumes presented to a particular ASM disk group should be of the samegeometry, speed, and type.
61Planning to install SF Oracle RACPlanning the storage
Planning volume layoutThe following recommendations ensure optimal layout of VxVM/CVM volumes:
■ Mirror the volumes across two or more storage arrays, if using VxVM mirrors.
■ Separate the Oracle recovery structures from the database files to ensure highavailability when you design placement policies.
■ Separate redo logs and place them on the fastest storage (for example, RAID1+ 0) for better performance.
■ Use "third-mirror break-off" snapshots for cloning the Oracle log volumes. Donot create Oracle log volumes on a Space-Optimized (SO) snapshot.
■ Create as many Cache Objects (CO) as possible when you use Space-Optimized(SO) snapshots for Oracle data volumes.
■ Distribute the I/O load uniformly on all Cache Objects when you create multipleCache Objects.
■ If using VxVM mirroring, keep the Fast Mirror Resync regionsize equal to thedatabase block size to reduce the copy-on-write (COW) overhead. Reducingthe regionsize increases the amount of Cache Object allocations leading toperformance overheads.
■ Implement zoning on SAN switch to control access to shared storage. Be awarethat physical disks may be shared by multiple servers or applications and musttherefore be protected from accidental access.
■ Choose DMP I/O policy based on the storage network topology and theapplication I/O pattern.
■ Exploit thin provisioning for better return on investment.
Planning file system designThe following recommendations ensure an optimal file system design fordatabases:
■ If using VxVM mirroring, use ODM with CFS for better performance. ODMwith SmartSync enables faster recovery of mirrored volumes using Oracleresilvering.
■ Create separate file systems for Oracle binaries, data, redo logs, and archivelogs. This ensures that recovery data is available if you encounter problemswith database data files storage.
■ Always place archived logs on CFS file systems rather then local file systems.
Planning to install SF Oracle RACPlanning volume layout
62

About planning to configure I/O fencingAfter you configure SF Oracle RAC with the installer, you must configure I/Ofencing in the cluster for data integrity.
You can configure either disk-based I/O fencing or server-based I/O fencing. Ifyour enterprise setup has multiple clusters that use VCS for clustering, Symantecrecommends you to configure server-based I/O fencing.
The coordination points in server-based fencing can include only CP servers or amix of CP servers and coordinator disks. Symantec also supports server-basedfencing with a a single coordination point which is a single highly available CPserver that is hosted on an SFHA cluster.
Warning: For server-based fencing configurations that use a single coordinationpoint (CP server), the coordination point becomes a single point of failure. In suchconfigurations, the arbitration facility is not available during a failover of the CPserver in the SFHA cluster. So, if a network partition occurs on any applicationcluster during the CP server failover, the application cluster is brought down.
Figure 3-2 illustrates a high-level flowchart to configure I/O fencing for the SFOracle RAC cluster.
63Planning to install SF Oracle RACAbout planning to configure I/O fencing

Figure 3-2 Workflow to configure I/O fencing
Initialize disks as VxVM disks
Check disks for I/O fencingcompliance
Manually configure disk-based I/Ofencing
Preparatory tasksvxdiskadm or vxdisksetup utilities
vxfenadm and vxfentsthdw utilities
Configuredisk-based fencing(scsi3 mode)
Configureserver-based fencing(customized mode)
Configuration tasksUse one of the following methods
Run installsfrac -fencing, chooseoption 2 and follow the prompts
Install and configure VCS or SFHA on CP serversystems
Manually configure server-based I/O fencing
Preparatory tasksIdentify an existing CP server
Configuration tasksUse one of the following methods
If the CP server is clustered, set up sharedstorage for the CP server
Run the configure_cps utility and follow theprompts (or) Manually configure CP server
Coordinationpoints for I/O
fencing?
Three disks At least one CP server
Initialize disks as VxVM disks andCheck disks for I/O fencing compliance
For the disks that will serve as coordination points
Install SF Oracle RAC andconfigure SF Oracle RAC components
Edit the response file you createdand use them with installsfrac -responsefile command
Establish TCP/IP connection between CP serverand SF Oracle RAC cluster
If SF Oracle RAC cluster is configured in securemode, configure CP server in secure mode
Run installsfrac -fencing, choose option 1, andfollow the prompts
Edit the values in the response file you createdand use them with installsfrac -responsefilecommand
(OR)Set up a CP server
Establish TCP/IP connection between the CPserver and SF Oracle RAC cluster
or
or
or
or
After you perform the preparatory tasks, you can use any of the following methodsto configure I/O fencing:
Planning to install SF Oracle RACAbout planning to configure I/O fencing
64

See “Setting up disk-based I/O fencing using installsfrac program”on page 147.
See “Setting up server-based I/O fencing using installsfracprogram” on page 162.
Using the installsfracprogram
See “Response file variables to configure disk-based I/O fencing”on page 411.
See “Response file variables to configure server-based I/Ofencing” on page 413.
See “Response file variables to configure server-based I/Ofencing” on page 413.
See “Configuring I/O fencing using response files” on page 381.
Using response files
See “Setting up disk-based I/O fencing manually” on page 156.
See “Setting up server-based I/O fencing manually” on page 173.
Manually editingconfiguration files
Typical SF Oracle RAC cluster configuration with disk-based I/O fencingFigure 3-3 displays a typical VCS configuration with two nodes and shared storage.The configuration uses three coordinator disks for I/O fencing.
Figure 3-3 Typical SF Oracle RAC cluster configuration with disk-based I/Ofencing
Public network
Private network
Shared storage
galaxy nebula
coordinatordisk1
data disksDisk array
coordinatordisk2
coordinatordisk3
VxVM-managed and SCSI3 PR-compliant
65Planning to install SF Oracle RACAbout planning to configure I/O fencing

Typical SF Oracle RAC cluster configuration with server-based I/Ofencing
Figure 3-4 displays a configuration using a SF Oracle RAC cluster (with two nodes),a single CP server, and two coordinator disks. The nodes within the SF Oracle RACcluster are connected to and communicate with each other using LLT links.
Figure 3-4 CP server, SF Oracle RAC cluster, and coordinator disks
Coordinator disk Coordinator disk
CP server
Client Cluster
Node 1 Node 2
Application Storage
LLT links
TCP/IP
Fiber channel
Recommended CP server configurationsFollowing are the recommended CP server configurations:
■ Multiple application clusters use three CP servers as their coordination points.See Figure 3-5 on page 67.
■ Multiple application clusters use a single CP server and multiple pairs ofcoordinator disks (two) as their coordination points.See Figure 3-6 on page 68.
■ Multiple application clusters use a single CP server as their coordination pointThis single coordination point fencing configuration must use a highly availableCP server that is configured on an SFHA cluster as its coordination point.See Figure 3-7 on page 68.
Planning to install SF Oracle RACAbout planning to configure I/O fencing
66

Warning: In a single CP server fencing configuration, arbitration facility is notavailable during a failover of the CP server in the SFHA cluster. So, if a networkpartition occurs on any application cluster during the CP server failover, theapplication cluster is brought down.
Although the recommended CP server configurations use three coordinationpoints, you can use more than three (must be an odd number) coordination pointsfor I/O fencing. In a configuration where multiple application clusters share acommon set of CP server coordination points, the application cluster as well asthe CP server use a Universally Unique Identifier (UUID) to uniquely identify anapplication cluster.
Figure 3-5 displays a configuration using three CP servers that are connected tomultiple application clusters.
Figure 3-5 Three CP servers connecting to multiple application clusters
Public networkTCP/IP
TCP/IP
CP servers hosted on a single-node VCS cluster(can also be hosted on an SFHA cluster)
application clusters
(clusters which run VCS, SFHA, SFCFS, SVS, or SF Oracle RACto provide high availability for applications)
Figure 3-6 displays a configuration using a single CP server that is connected tomultiple application clusters with each application cluster also using twocoordinator disks.
67Planning to install SF Oracle RACAbout planning to configure I/O fencing

Figure 3-6 Single CP server with two coordinator disks for each applicationcluster
CP server hosted on a single-node VCS cluster
Public network
TCP/IP
TCP/IP
Fibre channel
Public network
TCP/IP
application clusters(clusters which run VCS, SFHA, SFCFS, SVS, or SF Oracle RACto provide high availability for applications)
Fibre channel
coordinator diskscoordinator disks
(can also be hosted on an SFHA cluster)
Figure 3-7 displays a configuration using a single CP server that is connected tomultiple application clusters.
Figure 3-7 Single CP server connecting to multiple application clusters
Public networkTCP/IP
TCP/IP
CP server hosted on an SFHA cluster
application clusters(clusters which run VCS, SFHA, SFCFS, SVS, or SF Oracle RAC to provide high availability for applications)
See “Configuration diagrams for setting up server-based I/O fencing” on page 744.
Planning to install SF Oracle RACAbout planning to configure I/O fencing
68

Planning for cluster managementTable 3-4 lists the various agents supported in SF Oracle RAC installations foreffective cluster management.
Table 3-4 List of agents
DescriptionAgent
Oracle database management
The VCS Oracle agent is recommended for managing Oracledatabases. VCS controls the Oracle database in this configuration.The configuration without VCS Oracle agent may be used only ina single database setup.
VCS agent for Oracle
Volume management
An SF Oracle RAC installation automatically configures theCVMCluster resource and the CVMVxconfigd resource. You mustconfigure the CVMVolDg agent for each shared disk group.
VCS agent for CVM
File system management
If the database uses cluster file systems, configure the CFSMountagent for each volume in the disk group.
VCS agent for CFS
Oracle Clusterware management
The CSSD agent starts, stops, and monitors Oracle Clusterware.It ensures that the OCR, the voting disk and the private IP addressresources required by Oracle Clusterware are online before OracleClusterware starts.
Note: It is mandatory to use CSSD agent in SF Oracle RACinstallations to ensure adequate handling of inter-dependenciesand thereby prevent the premature startup of Oracle Clusterware.
CSSD agent
High availability for a private IP address
The PrivNIC agent provides a reliable alternative when operatingsystem limitations prevent you from using NIC bonding to providehigh availability using multiple network interfaces.
PrivNIC agent
High availability for multiple private IP addresses
The MultiPrivNIC agent provides a reliable alternative whenoperating system limitations prevent you from using NIC bondingto provide high availability and increased bandwidth usingmultiple network interfaces.
MultiPrivNIC agent
69Planning to install SF Oracle RACPlanning for cluster management

Table 3-4 List of agents (continued)
DescriptionAgent
Oracle database management
The CRSResource agent provides an alternative mechanism formonitoring the Oracle database in the absence of the VCS Oracleagent. It is useful in scenarios where the database is not managedby VCS and the applications need to be started using VCS afterOracle Clusterware starts the database.
CRSResource agent
Planning for disaster recoverySF Oracle RAC provides various disaster recovery configurations, such as campusclusters and global clusters, for multi-site clusters. In multi-site clusters, thenodes can be placed in different parts of a building, in separate buildings, or inseparate cities. The distance between the nodes depends on the type of disasterfrom which protection is needed and on the technology used to replicate data. SFOracle RAC supports various replication technologies for data replication.
To protect clusters against outages caused by disasters, the cluster componentsmust be geographically separated.
Planning a campus cluster setupA campus cluster is also known as a stretch cluster or remote mirror configuration.In a campus cluster, the hosts and storage of a cluster span multiple sites separatedby a few miles.
Bear in mind the following best practices mind when you configure a SF OracleRAC campus cluster:
■ Campus cluster sites are typically connected using a redundant high-capacitynetwork that provides access to storage and private network communicationbetween the cluster nodes. A single DWDM link can be used for both storageand private network communication.
■ Tag the disks or enclosures that belong to a site with the corresponding VxVMsite name. VxVM allocates storage from the correct site when creating orresizing a volume and when changing a volume’s layout if the disks in theVxVM disk group that contain the volume are tagged with the site name.
■ Tag each host with the corresponding VxVM site name. Make sure the readpolicy of the volumes is set to SITEREAD. This setting ensures that the readson the volumes are satisfied from the local site’s plex.
Planning to install SF Oracle RACPlanning for disaster recovery
70

■ Turn on the allsites attribute for all volumes that have data required by theapplication, to make sure they are evenly mirrored. Each site must have atleast one mirror of all volumes hosting application data, including theFlashSnap log volume.
■ In the case of a two-site campus cluster, place the third coordinator disk onthe third site. You may use iSCSI disk on the third site as an alternative to DarkFiber connected FC-SAN disk.Starting with version 5.1, you may use the software-based arbitration solution,Coordination Point Server (CPS), as a third coordination point.
■ Turn on the siteconsistent attribute for the disk groups and the volumes toenable site-aware plex detaches. Snapshot volumes need not be site-consistent.
■ Make sure that a DCO log version 20 or higher is attached to the volumes toenable Fast Resync operations.
■ Set the CVM disk detach policy as "global" and the disk group fail policy as"leave" for all disk groups containing data volumes as well as disk groupscontaining the OCR and VOTE volumes.
Planning a global cluster setupGlobal clusters provide the ability to fail over applications between geographicallydistributed clusters when a disaster occurs.
Global clustering involves two steps:
1. Replication of data between the sites
2. Migration of the application when disaster occurs
The following aspects need to be considered when you design a disaster recoverysolution:
■ The amount of data lost in the event of a disaster (Recovery Point Objective)
■ The acceptable recovery time after the disaster (Recovery Time Objective)
Data replication considerationsWhen you choose a replication solution, one of the important factors that youneed to consider is the required level of data throughput. Data throughput is therate at which the application is expected to write data. The impact of writeoperations on replication are of more significance than the read operations.
In addition to the business needs discussed earlier, the following factors need tobe considered while choosing the replication options:
71Planning to install SF Oracle RACPlanning for disaster recovery

■ Mode of replication
■ Network bandwidth
■ Network latency between the two sites
■ Ability of the remote site to keep up with the data changes at the first site
Planning to install SF Oracle RACPlanning for disaster recovery
72

Licensing SF Oracle RAC
This chapter includes the following topics:
■ About Veritas product licensing
■ Setting or changing the product level for keyless licensing
■ Installing Veritas product license keys
About Veritas product licensingYou have the option to install Veritas products without a license key. Installationwithout a license does not eliminate the need to obtain a license. A software licenseis a legal instrument governing the usage or redistribution of copyright protectedsoftware. The administrator and company representatives must ensure that aserver or cluster is entitled to the license level for the products installed. Symantecreserves the right to ensure entitlement and compliance through auditing.
If you encounter problems while licensing this product, visit the Symanteclicensing support website.
www.symantec.com/techsupp/
The Veritas product installer prompts you to select one of the following licensingmethods:
■ Install a license key for the product and features that you want to install.When you purchase a Symantec product, you receive a License Key certificate.The certificate specifies the product keys and the number of product licensespurchased.
■ Continue to install without a license key.The installer prompts for the product modes and options that you want toinstall, and then sets the required product level.
4Chapter

Within 60 days of choosing this option, you must install a valid license keycorresponding to the license level entitled or continue with keyless licensingby managing the server or cluster with a management server. If you do notcomply with the above terms, continuing to use the Veritas product is aviolation of your end user license agreement, and results in warning messages.For more information about keyless licensing, see the following URL:http://go.symantec.com/sfhakeyless
If you upgrade to this release from a prior release of the Veritas software, theproduct installer does not change the license keys that are already installed. Theexisting license keys may not activate new features in this release.
If you upgrade with the product installer, or if you install or upgrade with a methodother than the product installer, you must do one of the following to license theproducts:
■ Run the vxkeyless command to set the product level for the products youhave purchased. This option also requires that you manage the server or clusterwith a management server.See “Setting or changing the product level for keyless licensing” on page 76.See the vxkeyless(1m) manual page.
■ Use the vxlicinst command to install a valid product license key for theproducts you have purchased.See “Installing Veritas product license keys” on page 77.See the vxlicinst(1m) manual page.
You can also use the above options to change the product levels to another levelthat you are authorized to use. For example, you can add the replication optionto the installed product. You must ensure that you have the appropriate licensefor the product level and options in use.
Note: In order to change from one product group to another, you may need toperform additional steps.
About SF Oracle RAC licensesTable 4-1 lists the various SF Oracle RAC license levels in keyless licensing andthe corresponding features.
Licensing SF Oracle RACAbout Veritas product licensing
74

Table 4-1 SF Oracle RAC license levels (keyless licensing)
Features enabledDescriptionLicense
The license enables the following features:
■ Veritas Volume Manager
■ Veritas Storage and AvailabilityManagement Tools for Oracledatabases
■ Veritas Extension for ODM
■ Veritas File System
■ Veritas Cluster Server
■ Veritas Mapping Services
SF Oracle RACEnterprise Edition
SFRACENT
The license enables the following features:
■ Veritas Volume Manager
Veritas Volume Replicator is enabled.
■ Veritas Storage and AvailabilityManagement Tools for Oracledatabases
■ Veritas Extension for ODM
■ Veritas File System
■ Veritas Cluster Server
■ Veritas Mapping Services
SF Oracle RACEnterprise Editionwith VVR
SFRACENT_VVR
The license enables the following features:
■ Veritas Volume Manager
■ Veritas Storage and AvailabilityManagement Tools for Oracledatabases
■ Veritas Extension for ODM
■ Veritas File System
■ Veritas Cluster Server
Global Cluster Option is enabled.
■ Veritas Mapping Services
SF Oracle RACEnterprise Editionwith Global ClusterOption (GCO)
SFRACENT_GCO
75Licensing SF Oracle RACAbout Veritas product licensing

Table 4-1 SF Oracle RAC license levels (keyless licensing) (continued)
Features enabledDescriptionLicense
The license enables the following features:
■ Veritas Volume Manager
Veritas Volume Replicator is enabled.
■ Veritas Storage and AvailabilityManagement Tools for Oracledatabases
■ Veritas Extension for ODM
■ Veritas File System
■ Veritas Cluster Server
Global Cluster Option is enabled.
■ Veritas Mapping Services
SF Oracle RACEnterprise Editionwith VVR and GCO
SFRACENT_VVR_GCO
Setting or changing the product level for keylesslicensing
The keyless licensing method uses product levels to determine the Veritas productsand functionality that are licensed. In order to use keyless licensing, you must setup a Management Server to manage your systems.
For more information and to download the management server, see the followingURL:
http://go.symantec.com/vom
When you set the product license level for the first time, you enable keylesslicensing for that system. If you install with the product installer and select thekeyless option, you are prompted to select the product and feature level that youwant to license.
After you install, you can change product license levels at any time to reflect theproducts and functionality that you want to license. When you set a product level,you agree that you have the license for that functionality.
Licensing SF Oracle RACSetting or changing the product level for keyless licensing
76

To set or change the product level
1 View the current setting for the product level.
# vxkeyless -v display
2 View the possible settings for the product level.
# vxkeyless displayall
3 Set the desired product level.
# vxkeyless -q set prod_levels
where prod_levels is a comma-separated list of keywords, as shown in step 2
If you want to remove keyless licensing and enter a key, you must clear the keylesslicenses. Use the NONE keyword to clear all keys from the system.
Warning: Clearing the keys disables the Veritas products until you install a newkey or set a new product level.
To clear the product license level
1 View the current setting for the product license level.
# vxkeyless [-v] display
2 If there are keyless licenses installed, remove all keyless licenses:
# vxkeyless [-q] set NONE
For more details on using the vxkeyless utility, see the vxkeyless(1m) manualpage.
Installing Veritas product license keysThe VRTSvlic fileset enables product licensing. After the VRTSvlic is installed,the following commands and their manual pages are available on the system:
Installs a license key for a Symantec productvxlicinst
Displays currently installed licensesvxlicrep
Retrieves features and their descriptionsencoded in a license key
vxlictest
77Licensing SF Oracle RACInstalling Veritas product license keys

Even though other products are included on the enclosed software discs, you canonly use the Symantec software products for which you have purchased a license
To install a new license
◆ Run the following commands. In a cluster environment, run the commandson each node in the cluster:
# cd /opt/VRTS/bin
# ./vxlicinst -k xxxx-xxxx-xxxx-xxxx-xxxx-xxx
Licensing SF Oracle RACInstalling Veritas product license keys
78

Installation andconfiguration of SF OracleRAC
■ Chapter 5. Preparing to install SF Oracle RAC
■ Chapter 6. Installing SF Oracle RAC
■ Chapter 7. Preparing to configure SF Oracle RAC
■ Chapter 8. Configuring SF Oracle RAC
■ Chapter 9. Configuring SF Oracle RAC clusters for data integrity
■ Chapter 10. Performing post-installation and configuration tasks
2Section

80

Preparing to install SFOracle RAC
This chapter includes the following topics:
■ Setting the umask before installation
■ Synchronizing time settings on cluster nodes
■ Setting up shared storage
■ Setting the environment variables
■ Optimizing LLT media speed settings on private NICs
■ Verifying the systems before installation
Setting the umask before installationSet the umask to provide appropriate permissions for SF Oracle RAC binaries andfiles. This setting is valid only for the duration of the current session.
# umask 0022
Synchronizing time settings on cluster nodesMake sure that the time settings on all cluster nodes are synchronized.
Note: For Oracle RAC 11g Release 2, it is mandatory to configure NTP forsynchronizing time on all nodes in the cluster.
5Chapter

Setting up shared storageYou need to set up shared storage to meet the following requirements:
■ The LUNs from the shared storage must be visible to all the nodes in the clusteras seen by the following command:
# lsdev -Cc disk
■ The shared storage must support SCSI-3 persistent reservations (PR). Run thevxfentsthdw(1M) utility to ensure that the shared storage is SCSI-3 compliant.The vxfentsthdw utility is located in the directorycluster_server/tools/vxfentsthdw.
# ./vxfentsthdw
For more information on setting up shared storage, see theVeritas Cluster ServerInstallation Guide.
Setting the environment variablesSet the MANPATH variable in the .profile file (or other appropriate shell setupfile for your system) to enable viewing of manual pages.
Based on the shell you use, type one of the following:
# MANPATH=/usr/share/man:/opt/VRTS/man# export MANPATH
For sh, ksh, or bash
Set the PATH environment variable in the .profile file (or other appropriate shellsetup file for your system) on each system to include installation and othercommands.
Based on the shell you use, type one of the following:
# PATH=/usr/sbin:/sbin:/usr/bin:\/usr/lib/vxvm/bin:/opt/VRTSvcs/bin:\/opt/VRTS/bin:/opt/VRTSvcs/rac/bin:\$PATH; export PATH
For sh, ksh, or bash
Preparing to install SF Oracle RACSetting up shared storage
82

Optimizing LLTmedia speed settings on private NICsFor optimal LLT communication among the cluster nodes, the interface cards oneach node must use the same media speed settings. Also, the settings for theswitches or the hubs that are used for the LLT interconnections must match thatof the interface cards. Incorrect settings can cause poor network performance oreven network failure.
If you use different media speed for the private NICs, Symantec recommends thatyou configure the NICs with lesser speed as low-priority links to enhance LLTperformance.
Guidelines for setting the media speed of the LLT interconnectsReview the following guidelines for setting the media speed of the LLTinterconnects:
■ Symantec recommends that you manually set the same media speed settingon each Ethernet card on each node.If you use different media speed for the private NICs, Symantec recommendsthat you configure the NICs with lesser speed as low-priority links to enhanceLLT performance.
■ If you have hubs or switches for LLT interconnects, then set the hub or switchport to the same setting as used on the cards on each node.
■ If you use directly connected Ethernet links (using crossover cables), Symantecrecommends that you set the media speed to the highest value common toboth cards, typically 1000_Full_Duplex.
Details for setting the media speeds for specific devices are outside of the scopeof this manual. Consult the device’s documentation for more information.
Verifying the systems before installationUse any of the following options to verify your systems before installation:
■ Option 1: Run the Veritas Operations Services (VOS) utility.For information on downloading and running VOS:http://go.symantec.com/vos
■ Option 2: Run the installsfrac program with the "-precheck" option as follows:Navigate to the directory that contains the installsfrac program:
# cd /download_dir/sfrac
where download_dir is the directory where you downloaded the software.
83Preparing to install SF Oracle RACOptimizing LLT media speed settings on private NICs
Start the preinstallation check:
# ./installsfrac -precheck galaxy nebula
The program proceeds in a non-interactive mode, examining the systems forlicenses, filesets, disk space, and system-to-system communications. Theprogram displays the results of the check and saves them in a log file. Thelocation of the log file is displayed at the end of the precheck process.
■ Option 3: Run the Veritas Web-based installation program as follows:
■ Start the Web-based installer:
# ./webinstaller start
Paste the link in the address bar of the Web browser to access the installer.
■ On the Select a task and a product page, select Perform a Pre-installationcheck from the Task drop-down list.Select the product from the Product drop-down list, and click Next.The installer performs the precheck and displays the results.
Preparing to install SF Oracle RACVerifying the systems before installation
84

Installing SF Oracle RAC
This chapter includes the following topics:
■ About installing SF Oracle RAC
■ About installation and configuration methods
■ Installing SF Oracle RAC using the Veritas script-based installation program
■ Installing SF Oracle RAC using the Veritas Web-based installation program
■ Installing SF Oracle RAC using NIM and the installer
About installing SF Oracle RACYou can install SF Oracle RAC on clusters of up to 16 nodes.
The installation requires passwordless communication between systems forinstalling SF Oracle RAC. The installer prompts you to configure passwordlesscommunication at the time of installation, if it is not already set up.
The product installer has improved ability to recover from failed installations. Arecovery file is created if an installation fails due to a failed network connection.This file enables the install program to resume from the point where theinstallation failed.
By default, the installer generates a response file that you can reuse or customizefor silent installations on other systems. If you need to suspend the installation,make sure that you select the option Exit the installer to create the response filebefore exiting the installation.
Note: If you enter q to quit the installation, the installer does not create a responsefile.
6Chapter
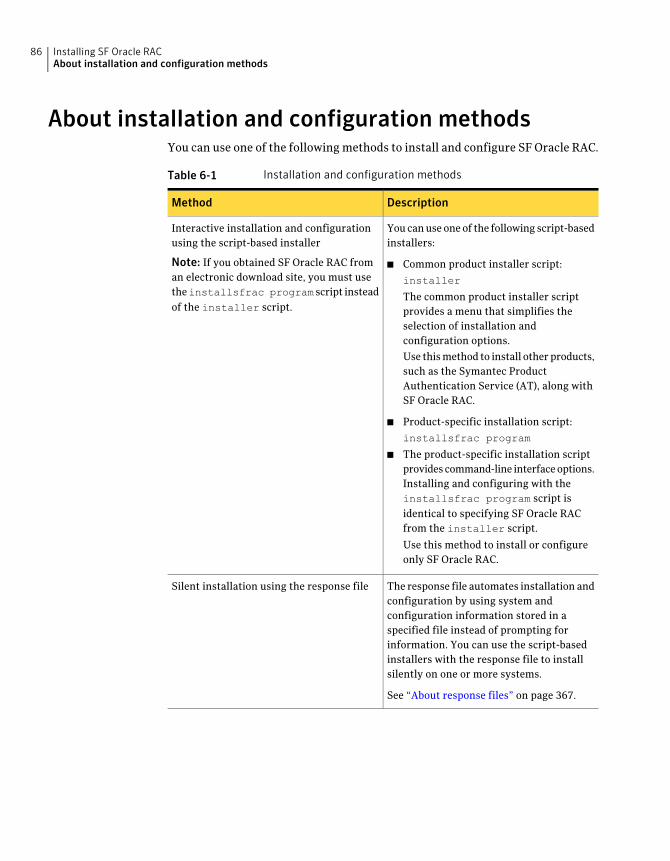
About installation and configuration methodsYou can use one of the following methods to install and configure SF Oracle RAC.
Table 6-1 Installation and configuration methods
DescriptionMethod
You can use one of the following script-basedinstallers:
■ Common product installer script:
installer
The common product installer scriptprovides a menu that simplifies theselection of installation andconfiguration options.
Use this method to install other products,such as the Symantec ProductAuthentication Service (AT), along withSF Oracle RAC.
■ Product-specific installation script:
installsfrac program
■ The product-specific installation scriptprovides command-line interface options.Installing and configuring with theinstallsfrac program script isidentical to specifying SF Oracle RACfrom the installer script.
Use this method to install or configureonly SF Oracle RAC.
Interactive installation and configurationusing the script-based installer
Note: If you obtained SF Oracle RAC froman electronic download site, you must usetheinstallsfrac program script insteadof the installer script.
The response file automates installation andconfiguration by using system andconfiguration information stored in aspecified file instead of prompting forinformation. You can use the script-basedinstallers with the response file to installsilently on one or more systems.
See “About response files” on page 367.
Silent installation using the response file
Installing SF Oracle RACAbout installation and configuration methods
86

Table 6-1 Installation and configuration methods (continued)
DescriptionMethod
The Web-based installer provides aninterface to manage the installation andconfiguration from a remote site using astandard Web browser.
./webinstaller
See “Installing SF Oracle RAC using theVeritas Web-based installation program”on page 90.
Web-based installer
You can perform many advanced NIMinstallation tasks using the NIM interfaceand the System Management Interface Tool(SMIT). Use the Veritas product installer orthe product-specific installation script togenerate a NIM configuration file. Use thegenerated script to install Veritas packagesfrom your NIM server.
Network Installation Manager (NIM)
Installing SF Oracle RAC using the Veritasscript-based installation program
Before you start the installation, make sure that you have the installation andconfiguration worksheet with the values on hand for the installation.
During the installation, the installer performs the following tasks:
■ Verifies system readiness for installation by checking system communication,network speed, installed packages, operating system patches, and availablevolume space.
Note: If the installer reports that any of the patches are not available, installthe patches on the system before proceeding with the SF Oracle RACinstallation.
■ Installs the SF Oracle RAC 5.1 SP1 PR1 filesets.
If you encounter issues during the installation, see theVeritas StorageFoundationforOracleRACAdministrator'sGuide, Chapter "Performance and troubleshooting"for information on resolving the issue.
87Installing SF Oracle RACInstalling SF Oracle RAC using the Veritas script-based installation program

The following sample procedure installs SF Oracle RAC on two systems—galaxyand nebula.
To install SF Oracle RAC
1 Log in as the superuser on one of the systems.
2 Start the installation program:
Navigate to the directory that contains the installation program:
# cd /download_dir/sfrac
where download_dir is the directory where you downloaded thesoftware.
Run the program:
# ./installsfrac galaxy nebula
SF OracleRAC installer
Navigate to the directory that contains the installation program:
# cd /download_dir
where download_dir is the directory where you downloaded thesoftware.
Run the program:
# ./installer galaxy nebula
From the opening Selection Menu, choose: "I" for "Install a Product."
From the displayed list of products to install, choose VeritasStorageFoundation for Oracle RAC.
Commonproductinstaller
The installer displays the copyright message and specifies the directory wherethe running logs are created.
3 Set up the systems so that commands between systems execute withoutprompting for passwords or confirmations.
4 If you had quit the installer in the process of an active installation, theinstaller discovers that installer process and provides the option of resumingthe installation or starting a new installation. Provide a suitable response.
The installer has discovered an existing installer process.
The process exited while performing configure of SF Oracle RAC
on galaxy.
Do you want to resume this process? [y,n,q,?] (y) n
Installing SF Oracle RACInstalling SF Oracle RAC using the Veritas script-based installation program
88

5 Enter y to agree to the End User License Agreement (EULA).
6 Select the type of installation—Minimal, Recommended, All. Symantecrecommends you to choose option 3 Install all Veritas Storage Foundationfor Oracle RAC filesets.
1) Install minimal required Veritas Storage Foundation for
Oracle RAC filesets
2) Install recommended Veritas Storage Foundation for
Oracle RAC filesets
3) Install all Veritas Storage Foundation for
Oracle RAC filesets
4) Display filesets to be installed for each option
Select the filesets to be installed on all systems? [1-4,q,?] (2) 3
The installer verifies the systems for compatibility and displays the list offilesets and patches that will be installed.
The installer installs the SF Oracle RAC filesets and patches.
7 Select the appropriate license option.
1) Enter a valid license key
2) Enable keyless licensing
How would you like to license the systems? [1-2,q]
■ Enter 1 if you have a valid license key. When prompted, enter the licensekey.
Enter a SF Oracle RAC license key:
XXXX-XXXX-XXXX-XXXX-XXXX-XXXX-XXXX-XXXX-X
If you plan to enable additional capabilities, enter the correspondinglicense keys when you are prompted for additional licenses.
Do you wish to enter additional licenses? [y,n,q,b] (n)
■ Enter 2 to enable keyless licensing.
Note: The keyless license option enables you to install SF Oracle RACwithout entering a key. However, you must still acquire a valid license toinstall and use SF Oracle RAC. Keyless licensing requires that you managethe systems with a Management Server.
Enter y if you want to configure Veritas Volume Replicator (VVR) andGlobal Cluster Option (GCO) during the installation. VVR is configured
89Installing SF Oracle RACInstalling SF Oracle RAC using the Veritas script-based installation program

with default values while GCO is configured with the settings you specify.You can reconfigure VVR and GCO manually at any time.
Would you like to enable the Veritas Volume Replicator? [y,n,q] y
Would you like to enable the Global Cluster Option? [y,n,q] y
The installer registers the license.
8 Verify that the installation process completed successfully. Review the outputat the end of the installation and note the location of the summary and logfiles for future reference.
9 Enter y to configure SF Oracle RAC:
Note: If you plan to configure clusters in secure mode or set up server-basedfencing, enter n at the prompt. You need to complete the preparatory tasksbefore starting the SF Oracle RAC configuration. For instructions, see thechapter "Preparing to configure SF Oracle RAC" in this document.
Would you like to configure SF Oracle RAC on galaxy nebula [y,n,q] (n) y
Proceed to configure the SF Oracle RAC components.
10 Enter y if you want to send the installation information to Symantec.
Would you like to send the information about this installation
to Symantec to help improve installation in the future? [y,n,q,?] (y) y
Installing SFOracle RACusing the VeritasWeb-basedinstallation program
Before you start the installation, make sure that you have the installation andconfiguration worksheet with the values on hand for the installation.
The installation of SF Oracle RAC using the Web-based installation programinvolves the following tasks:
■ Review the system configuration requirements for a Web-based installation.See “Before using the Veritas Web-based installer” on page 91.
■ Start the Veritas Web installer.See “Starting the Veritas Web-based installer” on page 91.
■ Install SF Oracle RAC.See “Installing products with the Veritas Web-based installer” on page 92.
Installing SF Oracle RACInstalling SF Oracle RAC using the Veritas Web-based installation program
90
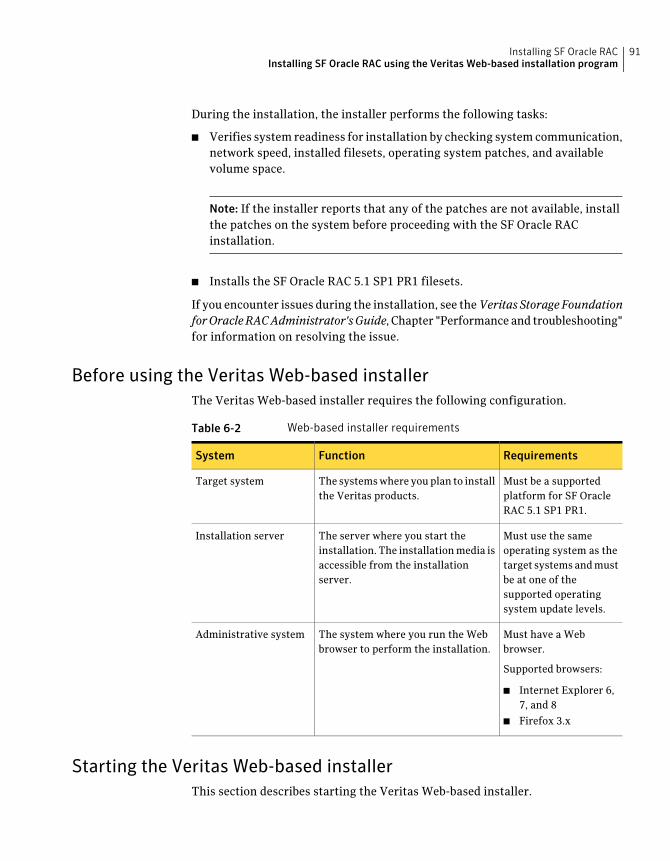
During the installation, the installer performs the following tasks:
■ Verifies system readiness for installation by checking system communication,network speed, installed filesets, operating system patches, and availablevolume space.
Note: If the installer reports that any of the patches are not available, installthe patches on the system before proceeding with the SF Oracle RACinstallation.
■ Installs the SF Oracle RAC 5.1 SP1 PR1 filesets.
If you encounter issues during the installation, see theVeritas StorageFoundationforOracleRACAdministrator'sGuide, Chapter "Performance and troubleshooting"for information on resolving the issue.
Before using the Veritas Web-based installerThe Veritas Web-based installer requires the following configuration.
Table 6-2 Web-based installer requirements
RequirementsFunctionSystem
Must be a supportedplatform for SF OracleRAC 5.1 SP1 PR1.
The systems where you plan to installthe Veritas products.
Target system
Must use the sameoperating system as thetarget systems and mustbe at one of thesupported operatingsystem update levels.
The server where you start theinstallation. The installation media isaccessible from the installationserver.
Installation server
Must have a Webbrowser.
Supported browsers:
■ Internet Explorer 6,7, and 8
■ Firefox 3.x
The system where you run the Webbrowser to perform the installation.
Administrative system
Starting the Veritas Web-based installerThis section describes starting the Veritas Web-based installer.
91Installing SF Oracle RACInstalling SF Oracle RAC using the Veritas Web-based installation program

To start the Web-based installer
1 Start the Veritas XPortal Server process xprtlwid, on the installation server:
# ./webinstaller start
The webinstaller script displays a URL. Note this URL.
Note: If you do not see the URL, run the command again.
2 On the administrative server, start the Web browser.
3 Navigate to the URL that the script displayed.
4 The browser may display the following message:
Secure Connection Failed
Obtain a security exception for your browser.
5 When prompted, enter root and root's password of the installation server.
Installing products with the Veritas Web-based installerThis section describes installing SF Oracle RAC with the Veritas Web-basedinstaller.
To install SF Oracle RAC
1 Perform preliminary steps.
2 Start the Web-based installer.
See “Starting the Veritas Web-based installer” on page 91.
3 Select Veritas Storage Foundation for Oracle RAC from the Productdrop-down list, and click Next.
4 On the License agreement page, select whether you accept the terms of theEnd User License Agreement (EULA). To continue, select Yes, I agree andclick Next.
5 Choose minimal, recommended, or all packages. Click Next.
6 Indicate the systems on which to install. Enter one or more system names,separated by spaces. Click Validate.
7 After the validation completes successfully, click Next to install SF OracleRAC on the selected system.
8 After the installation completes, you must choose your licensing method.
Installing SF Oracle RACInstalling SF Oracle RAC using the Veritas Web-based installation program
92

On the license page, select one of the following tabs:
■ Keyless licensing
Note: The keyless license option enables you to install without enteringa key. However, in order to ensure compliance you must manage thesystems with a management server.
For more information, go to the following website:
http://go.symantec.com/sfhakeyless
Complete the following information:Choose whether you want to enable Global Cluster option.Click Register.
■ Enter license keyIf you have a valid license key, select this tab. Enter the license key foreach system. Click Register.
9 The installer prompts you to configure the cluster. Select Yes to continuewith configuring the product.
If you select No, you can exit the installer. You must configure the productbefore you can use SF Oracle RAC.
After the installation completes, the installer displays the location of the logand summary files. If required, view the files to confirm the installation status.
10 Select the checkbox to specify whether you want to send your installationinformation to Symantec.
Would you like to send the information about this installation
to Symantec to help improve installation in the future?
Click Finish. The installer prompts you for another task.
Installing SF Oracle RAC using NIM and the installerYou can use the product installer in concert with NIM to install the Veritas product,or to install the operating system and the Veritas product.
The instructions in this section assume a working knowledge of the NetworkInstallation Management process. See the operating system documentation fordetailed information on Network Installation Management.
In the following samples, the LPP resource uses LPP-7100-up2date and its relevantSPOT resource is spot-7100-up2date.
93Installing SF Oracle RACInstalling SF Oracle RAC using NIM and the installer

Preparing the bundle and script resources on NIM serverYou need to prepare the bundle and script resources on the NIM server beforeusing NIM to install SF Oracle RAC filesets. The following actions are executedon the NIM server.
Note: Make sure that a NIM LPP_SOURCE is present on the NIM server.
To prepare the bundle and script resources
1 Insert and mount the installation media.
2 Choose an LPP source:
# lsnim |grep -i lpp_source
LPP-7100-up2date resources lpp_source
3 Navigate to the product directory and run the installsfrac command toprepare the bundle and script resources:
# ./installsfrac -nim LPP-7100-up2date
The installation program copies the necessary filesets and patches to the LPPresource directory.
4 Enter a name for the bundle, for example SFRAC51SP1PR1.
5 Enter y to generate the NIM script resource for copying the Veritas installerand libraries after the installation.
Do you want to generate the NIM script resource? [y,n,q] (n) y
NIM script resource copy_cpi for copying installer scripts
to disk created successfully
The script configure file is created at /opt/VRTS/nim/copy_cpi.
Installing SF Oracle RACInstalling SF Oracle RAC using NIM and the installer
94

6 Run the lsnim -l command to check that the install_bundle resource iscreated successfully.
# lsnim -l SFRAC51SP1_bundle
SFRAC51SP1_bundle:
class = resources
type = installp_bundle
Rstate = ready for use
prev_state = unavailable for use
location = /opt/VRTS/nim/SFRAC51SP1PR1.bnd
alloc_count = 0
server = master
7 Verify that the script resource is created successfully:
# lsnim -l copy_cpi
copy_cpi:
class = resources
type = script
Rstate = ready for use
prev_state = unavailable for use
location = /opt/VRTS/nim/copy_cpi
alloc_count = 0
server = master
Installing SF Oracle RAC on the NIM client using SMITYou can install SF Oracle RAC on the NIM client using the SMIT tool.
Perform these steps on each node to have SF Oracle RAC installed in a cluster.
To install SF Oracle RAC
1 On the NIM client, start smitty.
# smitty install
2 In the menu, select Network Installation Management.
3 In the menu, select Perform NIM Software Installation and MaintenanceTasks.
4 In the menu, select Install Software Bundle.
5 In the menu, select the LPP_SOURCE. In this example, specifyLPP-7100-up2date.
95Installing SF Oracle RACInstalling SF Oracle RAC using NIM and the installer

6 In the menu, select the bundle, for example, SFRAC51SP1PR1_bundle.
7 For the customization script that you want to run after installation, specifycopy_cpi.
8 For the installp flags, specify that the ACCEPT new license agreements flaghas a yes value.
9 Press the Enter key to start the installation. Note that it may take some timeto finish.
Installing SF Oracle RAC and the operating system on the NIM clientusing SMIT
You can install VCS and the operating system on the NIM client using the SMITtool.
Perform these steps on each node to have SF Oracle RAC and AIX installed in acluster.
To install SF Oracle RAC and the operating system
1 On the NIM server, start smitty for a NIM and operating system installation.
# smitty nim_bosinst
2 In the menu, select the stand-alone target.
3 In the menu, select spot - Install a copy of a SPOT resource.
4 In the menu, select the spot resource spot-7100-up2date.
5 In the menu, select the LPP_SOURCE. In this example, selectLPP-7100-up2date.
6 In the menu, select the following options:
■ For the Customization SCRIPT to run after installation option, specifycopy_cpi.
■ For the ACCEPT new license agreements option, specify yes.
■ For the Additional BUNDLES to install option, specifySFRAC51SP1PR1_bundle.
7 For the installp flags, specify that the ACCEPT new license agreements flaghas a yes value.
Installing SF Oracle RACInstalling SF Oracle RAC using NIM and the installer
96

Preparing to configure SFOracle RAC
This chapter includes the following topics:
■ Preparing to configure the clusters in secure mode
■ Setting up the CP server
Preparing to configure the clusters in secure modeYou can set up Symantec Product Authentication Service (AT) for the clusterduring or after the SF Oracle RAC configuration.
In a cluster that is online, if you want to enable or disable AT using theinstallsfrac -security command, see theVeritasClusterServerAdministrator'sGuide for instructions.
The prerequisites to configure a cluster in secure mode are as follows:
■ A system in your enterprise that serves as root broker (RB).
You can either use an external system as root broker, or use one of the clusternodes as root broker.
■ To use an external root broker, identify an existing root broker system inyour enterprise or install and configure root broker on a stable system.See “Installing the root broker for the security infrastructure” on page 101.
■ To use one of the cluster nodes as root broker, the installer does not requireyou to do any preparatory tasks.When you configure the cluster in secure mode using the script-basedinstaller, choose the automatic mode and choose one of the nodes for theinstaller to configure as root broker.
7Chapter

Symantec recommends that you configure a single root broker system for yourentire enterprise. If you use different root broker systems, then you mustestablish trust between the root brokers.For example, if the management server and the cluster use different rootbrokers, then you must establish trust.
■ For external root broker, an authentication broker (AB) account for each nodein the cluster is set up on the root broker system.See “Creating authentication broker accounts on root broker system”on page 102.
■ The system clocks of the external root broker and authentication brokers mustbe in sync.
The script-based installer provides the following configuration modes:
The external root broker system must allow rsh or ssh passwordlesslogin to use this mode.
Automatic mode
This mode requires encrypted files (BLOB files) from the ATadministrator to configure a cluster in secure mode.
The nodes in the cluster must allow rsh or ssh passwordless login.
See “Setting up inter-system communication” on page 644.
Semi-automaticmode
This mode requires root_hash file and the root broker informationfrom the AT administrator to configure a cluster in secure mode.
The nodes in the cluster must allow rsh or ssh passwordless login.
See “Setting up inter-system communication” on page 644.
Manual mode
Figure 7-1 depicts the flow of configuring SF Oracle RAC cluster in secure mode.
Preparing to configure SF Oracle RACPreparing to configure the clusters in secure mode
98

Figure 7-1 Workflow to configure SF Oracle RAC cluster in secure mode
Root brokersystem?
External system One of the cluster nodes
Follow the installer prompts to configure the cluster insecure mode
Installer option toconfigure the
cluster in securemode
Does the rootbroker allow youto login without
password
Automatic mode
On the root broker system,create encrypted file (BLOB) foreach node
Copy encrypted files to theinstallation system
Set up passwordlesscommunication between nodes
No action required
Copy root_hash file from theroot broker system to theinstallation system
Gather information to answerprompts
Set up passwordlesscommunication between nodes
Manual modeSemiautomatic mode
If VCS users belong to LDAP domain, enable LDAPauthentication plugin
No No
YesAutomatic mode
Identify a root broker system orinstall root broker on a system
Choose automatic mode at theinstaller prompt to configurethe cluster in secure mode
Choose the node that theinstaller must configure as rootbroker
On the root broker system,create authentication brokeridentities for each node
On the root broker system,create authentication brokeridentities for each node
Table 7-1 lists the preparatory tasks in the order which the AT and VCSadministrators must perform. These preparatory tasks apply only when you usean external root broker system for the cluster.
99Preparing to configure SF Oracle RACPreparing to configure the clusters in secure mode

Table 7-1 Preparatory tasks to configure a cluster in secure mode (with anexternal root broker)
Who performsthis task
Tasks
VCS administratorDecide one of the following configuration modes to set up a cluster insecure mode:
■ Automatic mode
■ Semi-automatic mode
■ Manual mode
AT administratorInstall the root broker on a stable system in the enterprise.
See “Installing the root broker for the security infrastructure”on page 101.
AT administratorTo use the semi-automatic mode or the manual mode, on the rootbroker system, create authentication broker accounts for each nodein the cluster.
See “Creating authentication broker accounts on root broker system”on page 102.
The AT administrator requires the following information from theVCS administrator:
■ Node names that are designated to serve as authentication brokers
■ Password for each authentication broker
AT administratorTo use the semi-automatic mode, create the encrypted files (BLOBfiles) for each node and provide the files to the VCS administrator.
See “Creating encrypted files for the security infrastructure”on page 103.
The AT administrator requires the following additional informationfrom the VCS administrator:
■ Administrator password for each authentication broker
Typically, the password is the same for all nodes.
AT administratorTo use the manual mode, provide the root_hash file(/opt/VRTSat/bin/root_hash) from the root broker system to the VCSadministrator.
Preparing to configure SF Oracle RACPreparing to configure the clusters in secure mode
100

Table 7-1 Preparatory tasks to configure a cluster in secure mode (with anexternal root broker) (continued)
Who performsthis task
Tasks
VCS administratorCopy the files that are required to configure a cluster in secure modeto the system from where you plan to install and configure SF OracleRAC.
See “Preparing the installation system for the security infrastructure”on page 105.
Installing the root broker for the security infrastructureInstall the root broker only if you plan to use AT to configure the cluster in securemode. You can use a system outside the cluster or one of the systems within thecluster as root broker. If you plan to use an external broker, the root brokeradministrator must install and configure the root broker before you configurethe Authentication Service for SF Oracle RAC. Symantec recommends that youinstall the root broker on a stable system that is outside the cluster.
You can also identify an existing root broker system in the data center to configurethe cluster in secure mode. The root broker system can run AIX, HP-UX, Linux,or Solaris operating system.
See Symantec Product Authentication Service documentation for moreinformation.
See “About Symantec Product Authentication Service (AT)” on page 36.
To install the root broker
1 Mount the product disc and start the installer.
# ./installer
2 From the Task Menu, choose I for "Install a Product."
3 From the displayed list of products to install, choose: Symantec ProductAuthentication Service (AT).
4 Enter y to agree to the End User License Agreement (EULA).
5 Enter 2 to install the recommended packages.
6 Enter the name of the system where you want to install the Root Broker.
Enter the operating_system system names separated by space [q,?]: venus
101Preparing to configure SF Oracle RACPreparing to configure the clusters in secure mode

7 Review the output as the installer does the following:
■ Checks to make sure that AT supports the operating system
■ Checks if the filesets are already on the system.
The installer lists the filesets that the program is about to install on thesystem. Press Enter to continue.
8 Review the output as the installer installs the root broker on the system.
9 After the installation, configure the root broker.
10 Select a mode to configure the root broker from the three choices that theinstaller presents:
1)Root+AB Mode
2)Root Mode
3)AB Mode
Enter the mode in which you would like AT to be configured? [1-3,q] 2
All AT processes that are currently running must be stopped
Do you want to stop AT processes now? [y,n,q,?] (y)
11 Press Enter to continue and review the output as the installer starts theAuthentication Service.
Creating authentication broker accounts on root broker systemOn the root broker system, the administrator must create an authentication broker(AB) account for each node in the cluster.
To create authentication broker accounts on root broker system
1 Determine the root broker domain name. Enter the following command onthe root broker system:
venus> # vssat showalltrustedcreds
For example, the domain name resembles "Domain Name:[email protected]" in the output.
2 For each node in the cluster, verify whether an account exists on the rootbroker system.
For example, to verify that an account exists for node galaxy:
Preparing to configure SF Oracle RACPreparing to configure the clusters in secure mode
102

venus> # vssat showprpl --pdrtype root \
--domain [email protected] --prplname galaxy
■ If the output displays the principal account on root broker for theauthentication broker on the node, then delete the existing principalaccounts. For example:
venus> # vssat deleteprpl --pdrtype root \
--domain [email protected] \
--prplname galaxy --silent
■ If the output displays the following error, then the account for the givenauthentication broker is not created on this root broker:
"Failed To Get Attributes For Principal"
Proceed to step 3.
3 Create a principal account for each authentication broker in the cluster. Forexample:
venus> # vssat addprpl --pdrtype root --domain \
[email protected] --prplname galaxy \
--password password --prpltype service
You must use this password that you create in the input file for the encryptedfile.
Creating encrypted files for the security infrastructureCreate encrypted files (BLOB files) only if you plan to choose the semiautomaticmode that uses an encrypted file to configure the Authentication Service. Theadministrator must create the encrypted files on the root broker node. Theadministrator must create encrypted files for each node that is going to be a partof the cluster before you configure the Authentication Service for SF Oracle RAC.
To create encrypted files
1 Make a note of the following root broker information. This information isrequired for the input file for the encrypted file:
The value of the root hash string, which consists of 40characters. Execute the following command to findthis value:
venus> # vssat showbrokerhash
hash
103Preparing to configure SF Oracle RACPreparing to configure the clusters in secure mode

The value for the domain name of the root brokersystem. Execute the following command to find thisvalue:
venus> # vssat showalltrustedcreds
root_domain
2 Make a note of the following authentication broker information for each node.This information is required for the input file for the encrypted file:
The value for the authentication broker identity, whichyou provided to create authentication broker principalon the root broker system.
This is the value for the --prplname option of theaddprpl command.
See “Creating authentication broker accounts on rootbroker system” on page 102.
identity
The value for the authentication broker password,which you provided to create authentication brokerprincipal on the root broker system.
This is the value for the --password option of theaddprpl command.
See “Creating authentication broker accounts on rootbroker system” on page 102.
password
3 For each node in the cluster, create the input file for the encrypted file.
The installer presents the format of the input file for the encrypted file whenyou proceed to configure the Authentication Service using encrypted file.For example, the input file for authentication broker on galaxy resembles:
[setuptrust]
broker=venus.symantecexample.com
hash=758a33dbd6fae751630058ace3dedb54e562fe98
securitylevel=high
[configab]
identity=galaxy
password=password
root_broker=venus.symantecexample.com:2821
Preparing to configure SF Oracle RACPreparing to configure the clusters in secure mode
104

start_broker=false
enable_pbx=false
4 Back up these input files that you created for the authentication broker oneach node in the cluster.
Note that for security purposes, the command to create the output file forthe encrypted file deletes the input file.
5 For each node in the cluster, create the output file for the encrypted file fromthe root broker system using the following command:
RootBroker> # vssat createpkg \
--in /path/to/blob/input/file.txt \
--out /path/to/encrypted/blob/file.txt \
--host_ctx AB-hostname
For example:
venus> # vssat createpkg --in /tmp/galaxy.blob.in \
--out /tmp/galaxy.blob.out --host_ctx galaxy
Note that this command creates an encrypted file even if you provide wrongpassword for "password=" entry. But such an encrypted file with wrongpassword fails to install on authentication broker node.
6 After you complete creating the output files for the encrypted file, you mustcopy these encrypted BLOB files for each node in the cluster.
Preparing the installation system for the security infrastructureThe VCS administrator must gather the required information and prepare theinstallation system to configure a cluster in secure mode.
To prepare the installation system for the security infrastructure
◆ Depending on the configuration mode you decided to use, do one of thefollowing:
Do the following:
■ Gather the root broker system name from the ATadministrator.
■ During SF Oracle RAC configuration, choose the configurationoption 1 when the installsfrac program prompts.
Automatic mode
105Preparing to configure SF Oracle RACPreparing to configure the clusters in secure mode

Do the following:
■ Copy the encrypted files (BLOB files) to the system from whereyou plan to install VCS.
Note the path of these files that you copied to the installationsystem.
■ During SF Oracle RAC configuration, choose the configurationoption 2 when the installsfrac program prompts.
Semi-automaticmode
Do the following:
■ Copy the root_hash file that you fetched to the system fromwhere you plan to install VCS.
Note the path of the root hash file that you copied to theinstallation system.
■ Gather the root broker information such as name, fullyqualified domain name, domain, and port from the ATadministrator.
■ Note the principal name and password information for eachauthentication broker that you provided to the ATadministrator to create the authentication broker accounts.
■ During SF Oracle RAC configuration, choose the configurationoption 3 when the installsfrac program prompts.
Manual mode
Setting up the CP serverTable 7-2 lists the tasks to set up the CP server for server-based I/O fencing.
Table 7-2 Tasks to set up CP server for server-based I/O fencing
ReferenceTask
See “Planning your CP server setup”on page 107.
Plan your CP server setup
See “Installing the CP server using theinstaller” on page 108.
Install the CP server
See “Configuring the CP server cluster insecure mode” on page 109.
Configure the CP server cluster in securemode
See “Setting up shared storage for the CPserver database” on page 110.
Set up shared storage for the CP serverdatabase
Preparing to configure SF Oracle RACSetting up the CP server
106

Table 7-2 Tasks to set up CP server for server-based I/O fencing (continued)
ReferenceTask
See “ Configuring the CP server using theconfiguration utility” on page 111.
See “Configuring the CP server manually”on page 119.
Configure the CP server
See “Verifying the CP server configuration”on page 121.
Verify the CP server configuration
Planning your CP server setupFollow the planning instructions to set up CP server for server-based I/O fencing.
To plan your CP server setup
1 Decide whether you want to host the CP server on a single-node VCS cluster,or on an SFHA cluster.
Symantec recommends hosting the CP server on an SFHA cluster.
2 If you host the CP server on an SFHA cluster, review the following information.Make sure you make the decisions and meet these prerequisites when youset up the CP server:
■ You must configure fencing in enabled mode during the SFHAconfiguration.
■ You must set up shared storage for the CP server database during yourCP server setup.
■ Decide whether you want to configure server-based fencing for the SFOracle RAC cluster (application cluster) with a single CP server ascoordination point or with at least three coordination points.Symantec recommends using at least three coordination points.
3 Decide whether you want to configure the CP server cluster in secure modeusing the Symantec Product Authentication Service (AT).
Symantec recommends configuring the CP server cluster in secure mode.Setting up AT secures the communication between the CP server and itsclients (SF Oracle RAC clusters). It also secures the HAD communication onthe CP server cluster, and makes the authentication broker highly available.
4 Set up the hardware and network for your CP server.
See “CP server requirements” on page 48.
107Preparing to configure SF Oracle RACSetting up the CP server

5 Have the following information handy for CP server configuration:
■ Name for the CP serverThe CP server name should not contain any special characters.
■ Port number for the CP serverAllocate a TCP/IP port for use by the CP server.Valid port range is between 49152 and 65535. The default port number is14250.
■ Virtual IP address, network interface, netmask, and networkhosts for theCP server
Note: If a CP server is configured to use an IPv6 network address for thevirtual IP, then the operating system of the cluster nodes where SF OracleRAC is hosted should also support the IPv6 network stack along with theIPv4 network stack. Note that even if SF Oracle RAC supports IPv6, itcannot be configured to use IPv6 network addresses for its agents, becauseOracle RAC does not support IPv6.
Installing the CP server using the installerPerform the following procedure to install and configure VCS or SFHA on CPserver systems.
To install and configure VCS or SFHA on the CP server systems
◆ Depending on whether your CP server uses a single system or multiplesystems, perform the following tasks:
Preparing to configure SF Oracle RACSetting up the CP server
108
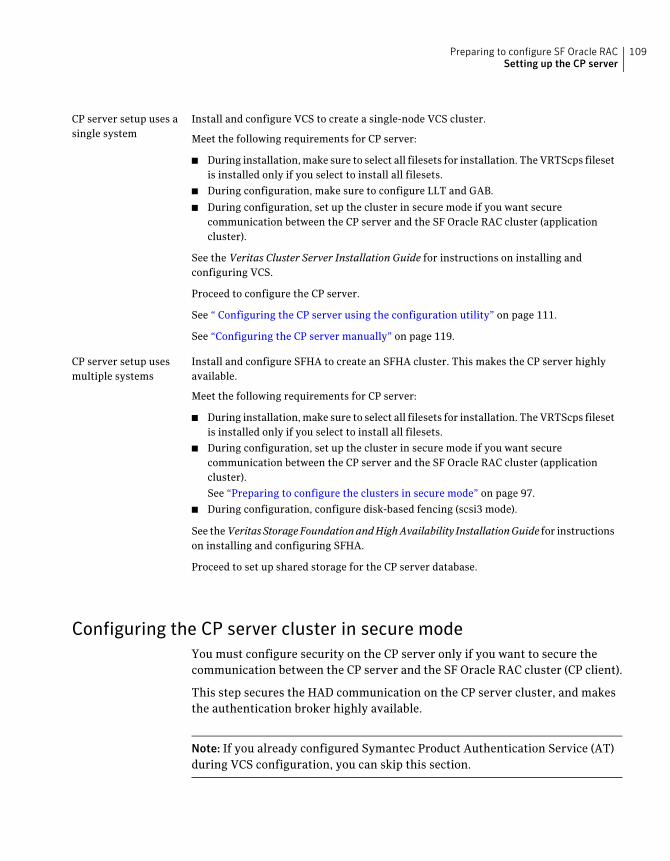
Install and configure VCS to create a single-node VCS cluster.
Meet the following requirements for CP server:
■ During installation, make sure to select all filesets for installation. The VRTScps filesetis installed only if you select to install all filesets.
■ During configuration, make sure to configure LLT and GAB.
■ During configuration, set up the cluster in secure mode if you want securecommunication between the CP server and the SF Oracle RAC cluster (applicationcluster).
See the Veritas Cluster Server Installation Guide for instructions on installing andconfiguring VCS.
Proceed to configure the CP server.
See “ Configuring the CP server using the configuration utility” on page 111.
See “Configuring the CP server manually” on page 119.
CP server setup uses asingle system
Install and configure SFHA to create an SFHA cluster. This makes the CP server highlyavailable.
Meet the following requirements for CP server:
■ During installation, make sure to select all filesets for installation. The VRTScps filesetis installed only if you select to install all filesets.
■ During configuration, set up the cluster in secure mode if you want securecommunication between the CP server and the SF Oracle RAC cluster (applicationcluster).
See “Preparing to configure the clusters in secure mode” on page 97.
■ During configuration, configure disk-based fencing (scsi3 mode).
See theVeritasStorageFoundationandHighAvailability InstallationGuide for instructionson installing and configuring SFHA.
Proceed to set up shared storage for the CP server database.
CP server setup usesmultiple systems
Configuring the CP server cluster in secure modeYou must configure security on the CP server only if you want to secure thecommunication between the CP server and the SF Oracle RAC cluster (CP client).
This step secures the HAD communication on the CP server cluster, and makesthe authentication broker highly available.
Note: If you already configured Symantec Product Authentication Service (AT)during VCS configuration, you can skip this section.
109Preparing to configure SF Oracle RACSetting up the CP server

To configure the CP server cluster in secure mode
◆ Run the installer as follows to configure the CP server cluster in secure mode:
# installsfrac -security
See “Preparing to configure the clusters in secure mode” on page 97.
Setting up shared storage for the CP server databaseSymantec recommends that you create a mirrored volume for the CP serverdatabase and that you use the vxfs file system type.
If you configured SFHA on the CP server cluster, perform the following procedureto set up shared storage for the CP server database.
To set up shared storage for the CP server database
1 Create a disk group containing the disks. You require two disks to create amirrored volume.
For example:
# vxdg init cps_dg disk1 disk2
2 Import the disk group if it's not already imported.
For example:
# vxdg import cps_dg
Preparing to configure SF Oracle RACSetting up the CP server
110
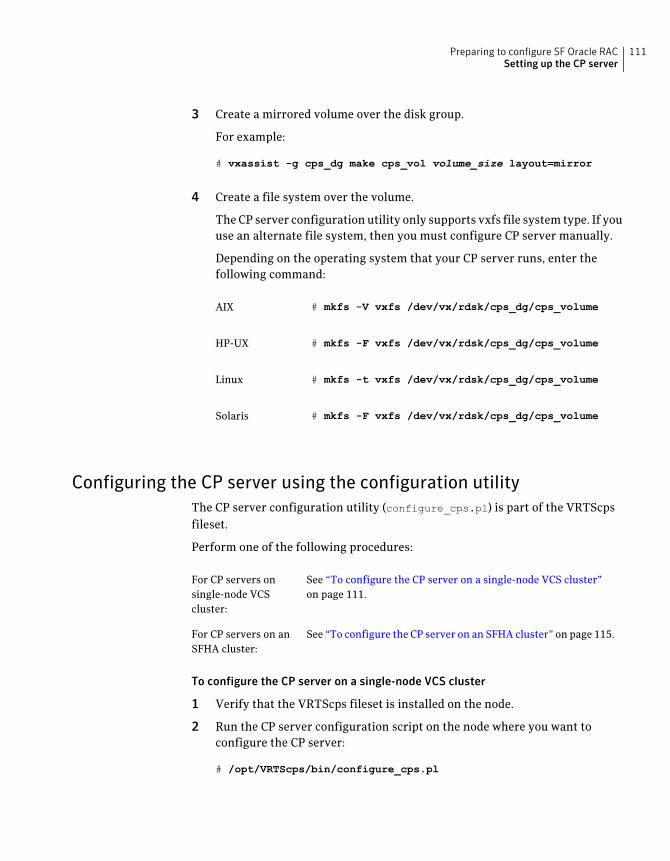
3 Create a mirrored volume over the disk group.
For example:
# vxassist -g cps_dg make cps_vol volume_size layout=mirror
4 Create a file system over the volume.
The CP server configuration utility only supports vxfs file system type. If youuse an alternate file system, then you must configure CP server manually.
Depending on the operating system that your CP server runs, enter thefollowing command:
# mkfs -V vxfs /dev/vx/rdsk/cps_dg/cps_volumeAIX
# mkfs -F vxfs /dev/vx/rdsk/cps_dg/cps_volumeHP-UX
# mkfs -t vxfs /dev/vx/rdsk/cps_dg/cps_volumeLinux
# mkfs -F vxfs /dev/vx/rdsk/cps_dg/cps_volumeSolaris
Configuring the CP server using the configuration utilityThe CP server configuration utility (configure_cps.pl) is part of the VRTScpsfileset.
Perform one of the following procedures:
See “To configure the CP server on a single-node VCS cluster”on page 111.
For CP servers onsingle-node VCScluster:
See “To configure the CP server on an SFHA cluster” on page 115.For CP servers on anSFHA cluster:
To configure the CP server on a single-node VCS cluster
1 Verify that the VRTScps fileset is installed on the node.
2 Run the CP server configuration script on the node where you want toconfigure the CP server:
# /opt/VRTScps/bin/configure_cps.pl
111Preparing to configure SF Oracle RACSetting up the CP server

3 Enter 1 at the prompt to configure CP server on a single-node VCS cluster.
The configuration utility then runs the following preconfiguration checks:
■ Checks to see if a single-node VCS cluster is running with the supportedplatform.The CP server requires VCS to be installed and configured before itsconfiguration.
■ Checks to see if the CP server is already configured on the system.If the CP server is already configured, then the configuration utilityinforms the user and requests that the user unconfigure the CP serverbefore trying to configure it.
4 Enter the name of the CP server.
Enter the name of the CP Server: mycps1.symantecexample.com
5 Enter a valid virtual IP address on which the CP server process should dependon.
Enter a valid Virtual IP address on which
the CP Server process should depend on:
10.209.83.85
6 Enter the CP server port number or press Enter to accept the default value(14250).
Enter a port number in range [49152, 65535], or
press <enter> for default port (14250):
Preparing to configure SF Oracle RACSetting up the CP server
112

7 Choose whether the communication between the CP server and the SF OracleRAC clusters has to be made secure.
If you have not configured the CP server cluster in secure mode, enter n atthe prompt.
Warning: If the CP server cluster is not configured in secure mode, and if youenter y, then the script immediately exits. You must configure the CP servercluster in secure mode and rerun the CP server configuration script.
Veritas recommends secure communication between the CP server and
application clusters. Enabling security requires Symantec Product
Authentication Service to be installed and configured on the cluster.
Do you want to enable Security for the communications? (y/n)
(Default:y) :
8 Enter the absolute path of the CP server database or press Enter to acceptthe default value (/etc/VRTScps/db).
CP Server uses an internal database to store the client information.
Note: As the CP Server is being configured on a single node VCS,
the database can reside on local file system.
Enter absolute path of the database (Default:/etc/VRTScps/db):
9 Verify and confirm the CP server configuration information.
Following is the CP Server configuration information:
-------------------------------------------------
(a)CP Server Name: mycps1.symantecexample.com
(b)CP Server Virtual IP: 10.209.83.85
(c)CP Server Port: 14250
(d)CP Server Security : 1
(e)CP Server Database Dir: /etc/VRTScps/db
-------------------------------------------------
Press b if you want to change the configuration, <enter> to continue :
113Preparing to configure SF Oracle RACSetting up the CP server

10 The configuration utility proceeds with the configuration process, and createsa vxcps.conf configuration file.
Successfully generated the /etc/vxcps.conf configuration file.
Successfully created directory /etc/VRTScps/db.
Configuring CP Server Service Group (CPSSG) for this cluster
----------------------------------------------
NOTE: Please ensure that the supplied network interface is a
public NIC
11 Enter a valid network interface for the virtual IP address for the CP serverprocess.
Enter a valid network interface for virtual IP 10.209.83.85
on mycps1.symantecexample.com: en0
12 Enter networkhosts information for the NIC resource.
Symantec recommends configuring NetworkHosts attribute to ensure
NIC resource to be online always.
Do you want to add NetworkHosts attribute for the NIC resource en0 on
system mycps1? [y/n] : y
Enter a valid IP address to configure NetworkHosts for NIC en0 on
system mycps1 : 10.209.83.86
Do you want to add another Network Host ?[y/n] : n
13 Enter the netmask for the virtual IP address. For example:
Enter the netmask for virtual IP 10.209.83.85 :
255.255.252.0
Preparing to configure SF Oracle RACSetting up the CP server
114

14 After the configuration process has completed, a success message appears.For example:
Successfully added the CPSSG service group to
VCS configuration. Bringing the CPSSG service
group online. Please wait...
The Veritas Coordination Point Server has been
configured on your system.
15 Run the hagrp -state command to ensure that the CPSSG service grouphas been added.
For example:
# hagrp -state CPSSG
#Group Attribute System Value
CPSSG State mycps1.symantecexample.com |ONLINE|
It also generates the configuration file for CP server (/etc/vxcps.conf).
The configuration utility adds the vxcpserv process and other resources tothe VCS configuration in the CP server service group (CPSSG).
For information about the CPSSG, refer to theVeritas Storage Foundation forOracle RAC Administrator's Guide.
In addition, the main.cf samples contain details about the vxcpserv resourceand its dependencies.
See “Sample configuration files for CP server” on page 636.
To configure the CP server on an SFHA cluster
1 Verify that the VRTScps fileset is installed on each node.
2 Make sure that you have configured passwordless ssh or rsh on the CP servercluster nodes.
3 Run the CP server configuration script on the node where you want toconfigure the CP server:
# /opt/VRTScps/bin/configure_cps.pl [-n]
The CP server configuration utility uses ssh by default to communicatebetween systems. Use the -n option for rsh communication.
4 Enter 2 at the prompt to configure CP server on an SFHA cluster.
The configuration utility then runs the following preconfiguration checks:
115Preparing to configure SF Oracle RACSetting up the CP server

■ Checks to see if an SFHA cluster is running with the supported platform.The CP server requires SFHA to be installed and configured before itsconfiguration.
■ Checks to see if the CP server is already configured on the system.If the CP server is already configured, then the configuration utilityinforms the user and requests that the user unconfigure the CP serverbefore trying to configure it.
5 Enter the name of the CP server.
Enter the name of the CP Server: mycps1.symantecexample.com
6 Enter a valid virtual IP address on which the CP server process should dependon.
Enter a valid Virtual IP address on which
the CP Server process should depend on:
10.209.83.85
7 Enter the CP server port number or press Enter to accept the default value(14250).
Enter a port number in range [49152, 65535], or
press <enter> for default port (14250):
8 Choose whether the communication between the CP server and the SF OracleRAC clusters has to be made secure.
If you have not configured the CP server cluster in secure mode, enter n atthe prompt.
Warning: If the CP server cluster is not configured in secure mode, and if youenter y, then the script immediately exits. You must configure the CP servercluster in secure mode and rerun the CP server configuration script.
Veritas recommends secure communication between the CP server and
application clusters. Enabling security requires Symantec Product
Authentication Service to be installed and configured on the cluster.
Do you want to enable Security for the communications? (y/n)
(Default:y) :
Preparing to configure SF Oracle RACSetting up the CP server
116
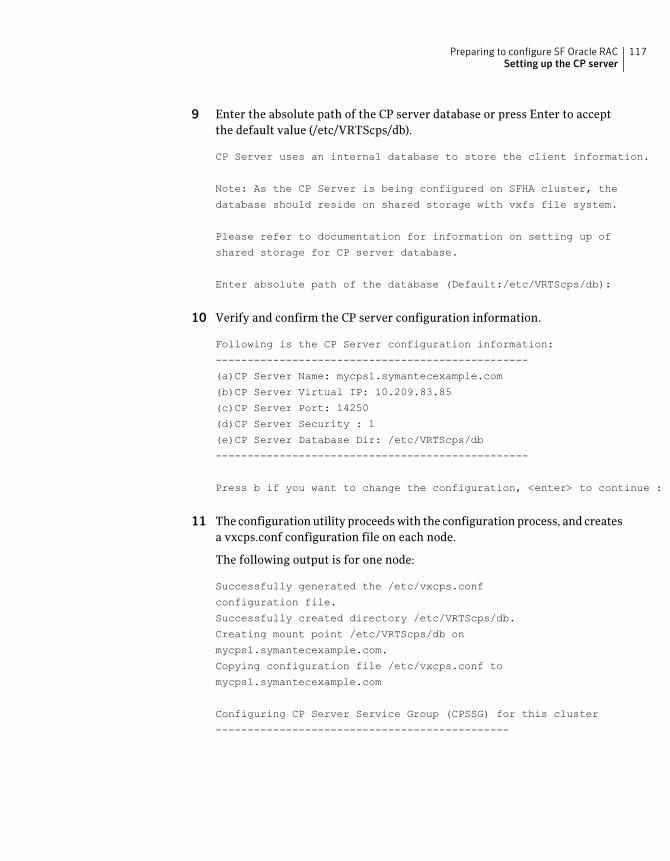
9 Enter the absolute path of the CP server database or press Enter to acceptthe default value (/etc/VRTScps/db).
CP Server uses an internal database to store the client information.
Note: As the CP Server is being configured on SFHA cluster, the
database should reside on shared storage with vxfs file system.
Please refer to documentation for information on setting up of
shared storage for CP server database.
Enter absolute path of the database (Default:/etc/VRTScps/db):
10 Verify and confirm the CP server configuration information.
Following is the CP Server configuration information:
-------------------------------------------------
(a)CP Server Name: mycps1.symantecexample.com
(b)CP Server Virtual IP: 10.209.83.85
(c)CP Server Port: 14250
(d)CP Server Security : 1
(e)CP Server Database Dir: /etc/VRTScps/db
-------------------------------------------------
Press b if you want to change the configuration, <enter> to continue :
11 The configuration utility proceeds with the configuration process, and createsa vxcps.conf configuration file on each node.
The following output is for one node:
Successfully generated the /etc/vxcps.conf
configuration file.
Successfully created directory /etc/VRTScps/db.
Creating mount point /etc/VRTScps/db on
mycps1.symantecexample.com.
Copying configuration file /etc/vxcps.conf to
mycps1.symantecexample.com
Configuring CP Server Service Group (CPSSG) for this cluster
----------------------------------------------
117Preparing to configure SF Oracle RACSetting up the CP server

12 Confirm whether you use the same NIC name for the virtual IP on all thesystems in the cluster.
Is the name of NIC for virtual IP 10.209.83.85 same on all the systems?
[y/n] : y
NOTE: Please ensure that the supplied network interface is a
public NIC
13 Enter a valid network interface for the virtual IP address for the CP serverprocess.
Enter a valid interface for virtual IP 10.209.83.85
on all the systems : en0
14 Enter networkhosts information for the NIC resource.
Symantec recommends configuring NetworkHosts attribute to ensure
NIC resource to be online always.
Do you want to add NetworkHosts attribute for the NIC resource en0 on
system mycps1? [y/n] : y
Enter a valid IP address to configure NetworkHosts for NIC en0 on
system mycps1 : 10.209.83.86
Do you want to add another Network Host ?[y/n] : n
15 Enter the netmask for the virtual IP address.
Enter the netmask for virtual IP 10.209.83.85 :
255.255.252.0
16 Enter the name of the disk group for the CP server database.
Enter the name of diskgroup for cps database :
cps_dg
17 Enter the name of the volume that is created on the above disk group.
Enter the name of volume created on diskgroup cps_dg :
cps_volume
Preparing to configure SF Oracle RACSetting up the CP server
118

18 After the configuration process has completed, a success message appears.For example:
Successfully added the CPSSG service group to
VCS configuration. Bringing the CPSSG service
group online. Please wait...
The Veritas Coordination Point Server has been
configured on your system.
19 Run the hagrp -state command to ensure that the CPSSG service grouphas been added.
For example:
# hagrp -state CPSSG
#Group Attribute System Value
CPSSG State mycps1.symantecexample.com |ONLINE|
CPSSG State mycps2.symantecexample.com |OFFLINE|
It also generates the configuration file for CP server (/etc/vxcps.conf).
The configuration utility adds the vxcpserv process and other resources tothe VCS configuration in the CP server service group (CPSSG).
For information about the CPSSG, refer to theVeritas Storage Foundation forOracle RAC Administrator's Guide.
In addition, the main.cf samples contain details about the vxcpserv resourceand its dependencies.
See “Sample configuration files for CP server” on page 636.
Configuring the CP server manuallyPerform the following steps to manually configure the CP server.
119Preparing to configure SF Oracle RACSetting up the CP server

To manually configure the CP server
1 Stop VCS on each node in the CP server cluster using the following command:
# hastop -local
2 Edit the main.cf file to add the CPSSG service group on any node. Use theCPSSG service group in the main.cf as an example:
See “Sample configuration files for CP server” on page 636.
Customize the resources under the CPSSG service group as per yourconfiguration.
3 Verify the main.cf file using the following command:
# hacf -verify /etc/VRTSvcs/conf/config
If successfully verified, copy this main.cf to all other cluster nodes.
4 Create the /etc/vxcps.conf file using the sample configuration file providedat /etc/vxcps/vxcps.conf.sample.
Based on whether you have configured the CP server cluster in secure modeor not, do the following:
■ For a CP server cluster which is configured in secure mode, edit the/etc/vxcps.conf file to set security=1.
■ For a CP server cluster which is not configured in secure mode, edit the/etc/vxcps.conf file to set security=0.
Symantec recommends enabling security for communication between CPserver and the application clusters.
5 Start VCS on all the cluster nodes.
# hastart
6 Verify that the CP server service group (CPSSG) is online.
# hagrp -state CPSSG
Output similar to the following appears:
# Group Attribute System Value
CPSSG State mycps1.symantecexample.com |ONLINE|
Preparing to configure SF Oracle RACSetting up the CP server
120

Verifying the CP server configurationPerform the following steps to verify the CP server configuration.
To verify the CP server configuration
1 Verify that the following configuration files are updated with the informationyou provided during the CP server configuration process:
■ /etc/vxcps.conf (CP server configuration file)
■ /etc/VRTSvcs/conf/config/main.cf (VCS configuration file)
■ /etc/VRTScps/db (default location for CP server database)
2 Run the cpsadm command to check if the vxcpserv process is listening on theconfigured Virtual IP.
# cpsadm -s cp_server -a ping_cps
where cp_server is the virtual IP address or the virtual hostname of the CPserver.
121Preparing to configure SF Oracle RACSetting up the CP server

Preparing to configure SF Oracle RACSetting up the CP server
122

Configuring SF Oracle RAC
This chapter includes the following topics:
■ About configuring SF Oracle RAC
■ Configuring the SF Oracle RAC components using the script-based installer
■ Configuring SF Oracle RAC using the Web-based installer
About configuring SF Oracle RACYou need to configure SF Oracle RAC when:
■ You have completed installation of SF Oracle RAC on your systems.
■ You want to reconfigure an existing SF Oracle RAC cluster.
Note: Before you reconfigure a cluster, make sure that you stop any runningapplications that use VxFS/CFS. Then, unmount the VxFS/CFS mounts.
SF Oracle RAC configuration involves the following high-level tasks:
■ Starting the product installer (if you quit the installer after installation orwant to reconfigure the cluster)
■ Configuring the SF Oracle RAC components—VCS, CVM, and CFS
■ Configuring the SF Oracle RAC clusters for data integrity
During the configuration process, the installer performs the following tasks:
■ Verifies the cluster information.
■ Stops SF Oracle RAC processes.
■ Starts SF Oracle RAC processes.
8Chapter

■ Creates a new directory with a log file that contains any system commandsexecuted, and their output, a response file that can be used with the-responsefile option of the installer, and a summary file that contains theoutput of the install scripts. The location of the files is indicated by the installer.
Configuring the SFOracle RAC components using thescript-based installer
Make sure that you have performed the necessary pre-configuration tasks if youwant to configure the cluster in secure mode.
Start the installsfrac or installer program if you quit the installer afterinstallation.
At the end of the configuration, the VCS, CVM, and CFS components are configuredto provide a cluster-aware environment.
Note: If you want to reconfigure SF Oracle RAC, before you start the installer youmust stop all the resources that are under VCS control using the hastop commandor the hagrp –offline command.
If you encounter issues during the configuration, see the Veritas StorageFoundation for Oracle RAC Administrator's Guide, Chapter "Performance andtroubleshooting" for information on resolving the issue.
Configuring SF Oracle RACConfiguring the SF Oracle RAC components using the script-based installer
124

To configure the SF Oracle RAC components
1 Log in as the superuser on any of the nodes in the cluster.
2 Start the configuration program.
Run the program:
# cd /opt/VRTS/install
# ./installsfrac -configure galaxy nebula
SF Oracle RAC installer
Run the program:
# ./installer -configure galaxy nebula
Choose Veritas Storage Foundation for Oracle RACto configure SF Oracle RAC.
Common product installer
The installer displays the copyright message and specifies the directory wherethe logs are created.
3 Enter 1 to select the option Configure SF Oracle RAC sub-components.
1) Configure SF Oracle RAC sub-components
2) SF Oracle RAC Installation and Configuration Checks
3) Prepare to Install Oracle
4) Install Oracle Clusterware/Grid Infrastructure and Database
5) Post Oracle Installation Tasks
6) Exit SF Oracle RAC Configuration
Choose option: [1-6,q] (1)
4 If you had quit the installer in the process of an active configuration, theinstaller discovers that installer process and provides the option of resumingthe configuration or starting a new configuration. Provide a suitable response.
The installer has discovered an existing installer process.
The process exited while performing configure of
SF Oracle RAC on galaxy.
Do you want to resume this process? [y,n,q,?] (y) n
5 Configure the Veritas Cluster Server component to set up the SF Oracle RACcluster.
See “Configuring the SF Oracle RAC cluster” on page 126.
125Configuring SF Oracle RACConfiguring the SF Oracle RAC components using the script-based installer

6 Add VCS users.
See “Adding VCS users” on page 134.
7 Configure SMTP email notification.
See “Configuring SMTP email notification” on page 134.
8 Configure SNMP trap notification.
See “Configuring SNMP trap notification” on page 136.
9 Configure global clusters, if you chose to enable GCO during the installation.
See “Configuring global clusters” on page 138.
10 Stop the SF Oracle RAC resources.
See “Stopping and starting SF Oracle RAC processes” on page 139.
Configuring the SF Oracle RAC clusterYou must configure the Veritas Cluster Server component to set up the SF OracleRAC cluster. You can configure a basic cluster with only the required components,or an advanced cluster with any or all the optional features that meet yourconfiguration requirements.
Refer to the Veritas Cluster Server Installation Guide for more information.
Configuring the cluster name and IDEnter the cluster information when the installer prompts you.
To configure the cluster
1 Review the configuration instructions that the installer presents.
2 Enter the unique cluster name and cluster ID.
Enter the unique cluster name: [q,?] rac_cluster101
Enter a unique Cluster ID number between 0-65535: [b,q,?] 7
Configuring private heartbeat linksYou now configure the private heartbeats that LLT uses. VCS provides the optionto use LLT over Ethernet or over UDP (User Datagram Protocol). Symantecrecommends that you configure heartbeat links that use LLT over Ethernet, unlesshardware requirements force you to use LLT over UDP. If you want to configureLLT over UDP, make sure you meet the prerequisites.
The following procedure helps you configure LLT over Ethernet.
Configuring SF Oracle RACConfiguring the SF Oracle RAC components using the script-based installer
126

To configure private heartbeat links
1 Choose one of the following options at the installer prompt based on whetheryou want to configure LLT over Ethernet or UDP.
■ Option 1: LLT over Ethernet (answer installer questions)Enter the heartbeat link details at the installer prompt to configure LLTover Ethernet.Skip to step 2.
■ Option 2: LLT over UDP (answer installer questions)Make sure that each NIC you want to use as heartbeat link has an IPaddress configured. Enter the heartbeat link details at the installer promptto configure LLT over UDP. If you had not already configured IP addressesto the NICs, the installer provides you an option to detect the IP addressfor a given NIC.Skip to step 3.
■ Option 3: LLT over Ethernet (allow installer to detect)Allow the installer to automatically detect the heartbeat link details toconfigure LLT over Ethernet. The installer tries to detect all connectedlinks between all systems.Skip to step 5.
2 If you chose option 1, enter the network interface card details for the privateheartbeat links.
The installer discovers and lists the network interface cards. You can useeither the standard interfaces or the aggregated interfaces (bonded NICs).
You must not enter the network interface card that is used for the publicnetwork (typically en0.)
Enter the NIC for the first private heartbeat NIC on galaxy:
[b,q,?] en1
Would you like to configure a second private heartbeat link?
[y,n,q,b,?] (y)
Enter the NIC for the second private heartbeat NIC on galaxy:
[b,q,?] en2
Would you like to configure a third private heartbeat link?
[y,n,q,b,?](n)
Do you want to configure an additional low priority heartbeat
link? [y,n,q,b,?] (n)
127Configuring SF Oracle RACConfiguring the SF Oracle RAC components using the script-based installer

3 If you chose option 2, enter the NIC details for the private heartbeat links.This step uses examples such as private_NIC1 or private_NIC2 to refer to theavailable names of the NICs.
Enter the NIC for the first private heartbeat
NIC on galaxy: [b,q,?] private_NIC1
Do you want to use address 192.168.0.1 for the
first private heartbeat link on galaxy: [y,n,q,b,?] (y)
Enter the UDP port for the first private heartbeat
link on galaxy: [b,q,?] (50000) ?
Would you like to configure a second private
heartbeat link? [y,n,q,b,?] (y)
Enter the NIC for the second private heartbeat
NIC on galaxy: [b,q,?] private_NIC2
Do you want to use address 192.168.1.1 for the
second private heartbeat link on galaxy: [y,n,q,b,?] (y)
Enter the UDP port for the second private heartbeat
link on galaxy: [b,q,?] (50001) ?
Do you want to configure an additional low priority
heartbeat link? [y,n,q,b,?] (n) y
Enter the NIC for the low priority heartbeat
link on galaxy: [b,q,?] (private_NIC0)
Do you want to use address 192.168.3.1 for
the low priority heartbeat link on galaxy: [y,n,q,b,?] (y)
Enter the UDP port for the low priority heartbeat
link on galaxy: [b,q,?] (50004)
4 Choose whether to use the same NIC details to configure private heartbeatlinks on other systems.
Are you using the same NICs for private heartbeat links on all
systems? [y,n,q,b,?] (y)
If you want to use the NIC details that you entered for galaxy, make sure thesame NICs are available on each system. Then, enter y at the prompt.
For LLT over UDP, if you want to use the same NICs on other systems, youstill must enter unique IP addresses on each NIC for other systems.
If the NIC device names are different on some of the systems, enter n. Providethe NIC details for each system as the program prompts.
Configuring SF Oracle RACConfiguring the SF Oracle RAC components using the script-based installer
128

5 If you chose option 3, the installer detects NICs on each system and networklinks, and sets link priority.
If the installer fails to detect heartbeat links or fails to find any high-prioritylinks, then choose option 1 or option 2 to manually configure the heartbeatlinks.
See step 2 for option 1, or step 3 for option 2.
6 Verify and confirm the information that the installer summarizes.
Configuring the virtual IP of the clusterYou can configure the virtual IP of the cluster to use to connect to the ClusterManager (Java Console) or to specify in the RemoteGroup resource.
See theVeritasClusterServerAdministrator'sGuide for information on the ClusterManager.
See the Veritas Cluster Server Bundled Agents Reference Guide for informationon the RemoteGroup agent.
To configure the virtual IP of the cluster
1 Review the required information to configure the virtual IP of the cluster.
2 To configure virtual IP, enter y at the prompt.
3 Confirm whether you want to use the discovered public NIC on the firstsystem.
Do one of the following:
■ If the discovered NIC is the one to use, press Enter.
■ If you want to use a different NIC, type the name of a NIC to use and pressEnter.
Active NIC devices discovered on galaxy: en0
Enter the NIC for Virtual IP of the Cluster to use on galaxy:
[b,q,?](en0)
4 Confirm whether you want to use the same public NIC on all nodes.
Do one of the following:
■ If all nodes use the same public NIC, enter y.
■ If unique NICs are used, enter n and enter a NIC for each node.
Is en0 to be the public NIC used by all systems
[y,n,q,b,?] (y)
129Configuring SF Oracle RACConfiguring the SF Oracle RAC components using the script-based installer

5 Enter the virtual IP address for the cluster.
Enter the Virtual IP address for the Cluster:
[b,q,?] 192.168.1.16
6 Confirm the default netmask or enter another one:
Enter the netmask for IP 192.168.1.16: [b,q,?] (255.255.240.0)
7 Enter the NetworkHosts IP addresses that are separated with spaces forchecking the connections.
Enter the NetworkHosts IP addresses, separated by
spaces: [b,q,?] 192.168.1.17
8 Verify and confirm the Cluster Virtual IP information.
Cluster Virtual IP verification:
NIC: en0
IP: 192.168.1.16
Netmask: 255.255.240.0
NetworkHosts: 192.168.1.17
Is this information correct? [y,n,q] (y)
Configuring the cluster in secure modeIf you want to configure the cluster in secure mode, make sure that you meet theprerequisites for secure cluster configuration.
The installer provides different configuration modes to configure a secure cluster.Make sure that you completed the pre-configuration tasks for the configurationmode that you want to choose.
See “Preparing to configure the clusters in secure mode” on page 97.
To configure the cluster in secure mode
1 Choose whether to configure SF Oracle RAC to use Symantec ProductAuthentication Service.
Would you like to configure VCS to use Symantec Security
Services? [y,n,q] (n) y
Configuring SF Oracle RACConfiguring the SF Oracle RAC components using the script-based installer
130

■ If you want to configure the cluster in secure mode, make sure you meetthe prerequisites and enter y.
■ If you do not want to configure the cluster in secure mode, enter n.
You must add VCS users when the configuration program prompts.See “Adding VCS users” on page 134.
2 Select one of the options to enable security.
Before you choose any of the options, make sure that all the nodes in thecluster can successfully ping the root broker system.
Select the Security option you would like to perform [1-3,b,q,?] (1)
Security Menu
1) Configure security completely automatically
2) Provide AB credentials using BLOBs
3) Provide AB credentials without using BLOBs
b) Back to previous menu
Review the following configuration modes. Based on the configuration thatyou want to use, enter one of the following values:
131Configuring SF Oracle RACConfiguring the SF Oracle RAC components using the script-based installer

Based on the root broker you want to use, do one of the following:
■ To use an external root broker:
Enter the name of the root broker system when prompted.
Requires remote access to the root broker. Make sure that allthe nodes in the cluster can successfully ping the root brokersystem.
Review the output as the installer verifies communicationwith the root broker system, checks vxatd process and version,and checks security domain.
■ To configure one of the nodes as root broker:
■ Press Enter at the following installer prompt:
If you already have an externalRB(Root Broker) installed and configured, enterthe RB name, or press Enter to skip: [b]
■ Choose the node that the installer must configure as rootand authentication broker. The installer configures theother nodes as authentication brokers.
At the installer prompt, you can choose the first node inthe cluster to configure as RAB, or you can enter n toconfigure another node as RAB. For example:
Do you want to configure <galaxy> as RAB,and other nodes as AB? [y,n,q,b] (y) nEnter the node name which you want toconfigure as RAB: nebula
Option 1.Automaticconfiguration
Enter the path of the encrypted file (BLOB file) for each nodewhen prompted.
Option 2 .Semiautomaticconfiguration
Configuring SF Oracle RACConfiguring the SF Oracle RAC components using the script-based installer
132

Enter the following Root Broker information as the installerprompts you:
Enter root broker name: [b]east.symantecexample.comEnter root broker FQDN: [b](symantecexample.com)symantecexample.comEnter the root broker domain name for theAuthentication Broker's identity: [b][email protected] root broker port: [b] 2821Enter path to the locally accessible root hash [b](/var/tmp/installvcs-200910221810ROA/root_hash)/var/tmp/installvcs-200910221810ROA/root_hash
Enter the following Authentication Broker information as theinstaller prompts you for each node:
Enter Authentication broker's identity ongalaxy [b](galaxy.symantecexample.com)galaxy.symantecexample.comEnter the password for the Authentication broker'sidentity on galaxy:Enter Authentication broker's identity onnebula [b](nebula.symantecexample.com)nebula.symantecexample.comEnter the password for the Authentication broker'sidentity on nebula:
Option 3.Manualconfiguration
3 After you provide the required information to configure the cluster in securemode, the program prompts you to configure SMTP email notification.
Note that the installer does not prompt you to add VCS users if you configuredthe cluster in secure mode. However, you must add VCS users later.
See the Veritas Cluster Server Administrator's Guide for more information.
133Configuring SF Oracle RACConfiguring the SF Oracle RAC components using the script-based installer

Adding VCS usersIf you have enabled Symantec Product Authentication Service, you do not needto add VCS users now. Otherwise, on systems operating under an English locale,you can add VCS users at this time.
To add VCS users
1 Review the required information to add VCS users.
2 Reset the password for the Admin user, if necessary.
Do you want to set the username and/or password for the Admin user
(default username = 'admin', password='password')? [y,n,q] (n) y
Enter the user name: [b,q,?] (admin)
Enter the password:
Enter again:
3 To add a user, enter y at the prompt.
Do you want to add another user to the cluster? [y,n,q] (y)
4 Enter the user’s name, password, and level of privileges.
Enter the user name: [b,q,?] smith
Enter New Password:*******
Enter Again:*******
Enter the privilege for user smith (A=Administrator, O=Operator,
G=Guest): [b,q,?] a
5 Enter n at the prompt if you have finished adding users.
Would you like to add another user? [y,n,q] (n)
6 Review the summary of the newly added users and confirm the information.
Configuring SMTP email notificationYou can choose to configure VCS to send event notifications to SMTP emailservices. You need to provide the SMTP server name and email addresses of peopleto be notified. Note that you can also configure the notification after installation.
Refer to the Veritas Cluster Server Administrator’s Guide for more information.
Configuring SF Oracle RACConfiguring the SF Oracle RAC components using the script-based installer
134

To configure SMTP email notification
1 Review the required information to configure the SMTP email notification.
2 Specify whether you want to configure the SMTP notification.
Do you want to configure SMTP notification? [y,n,q,?] (n) y
If you do not want to configure the SMTP notification, you can skip to thenext configuration option.
See “Configuring SNMP trap notification” on page 136.
3 Provide information to configure SMTP notification.
Provide the following information:
■ Enter the NIC information.
Active NIC devices discovered on galaxy: en0
Enter the NIC for the VCS Notifier to use on galaxy:
[b,q,?] (en0)
Is en0 to be the public NIC used by all systems?
[y,n,q,b,?] (y)
■ Enter the SMTP server’s host name.
Enter the domain-based hostname of the SMTP server
(example: smtp.yourcompany.com): [b,q,?] smtp.example.com
■ Enter the email address of each recipient.
Enter the full email address of the SMTP recipient
(example: [email protected]): [b,q,?] [email protected]
■ Enter the minimum security level of messages to be sent to each recipient.
Enter the minimum severity of events for which mail should be
sent to [email protected] [I=Information, W=Warning,
E=Error, S=SevereError]: [b,q,?] w
4 Add more SMTP recipients, if necessary.
■ If you want to add another SMTP recipient, enter y and provide therequired information at the prompt.
Would you like to add another SMTP recipient? [y,n,q,b] (n) y
Enter the full email address of the SMTP recipient
135Configuring SF Oracle RACConfiguring the SF Oracle RAC components using the script-based installer

(example: [email protected]): [b,q,?] [email protected]
Enter the minimum severity of events for which mail should be
sent to [email protected] [I=Information, W=Warning,
E=Error, S=SevereError]: [b,q,?] E
■ If you do not want to add, answer n.
Would you like to add another SMTP recipient? [y,n,q,b] (n)
5 Verify and confirm the SMTP notification information.
NIC: en0
SMTP Address: smtp.example.com
Recipient: [email protected] receives email for Warning or
higher events
Recipient: [email protected] receives email for Error or
higher events
Is this information correct? [y,n,q] (y)
Configuring SNMP trap notificationYou can choose to configure VCS to send event notifications to SNMP managementconsoles. You need to provide the SNMP management console name to be notifiedand message severity levels.
Note that you can also configure the notification after installation.
Refer to the Veritas Cluster Server Administrator’s Guide for more information.
To configure the SNMP trap notification
1 Review the required information to configure the SNMP notification featureof VCS.
2 Specify whether you want to configure the SNMP notification.
Do you want to configure SNMP notification? [y,n,q,?] (n) y
If you skip this option and if you had installed a valid HA/DR license, theinstaller presents you with an option to configure this cluster as global cluster.If you did not install an HA/DR license, the installer proceeds to configureSF Oracle RAC based on the configuration details you provided.
See “Configuring global clusters” on page 138.
Configuring SF Oracle RACConfiguring the SF Oracle RAC components using the script-based installer
136

3 Provide information to configure SNMP trap notification.
Provide the following information:
■ Enter the NIC information.
Active NIC devices discovered on galaxy: en0
Enter the NIC for the VCS Notifier to use on galaxy:
[b,q,?] (en0)
Is en0 to be the public NIC used by all systems?
[y,n,q,b,?] (y)
■ Enter the SNMP trap daemon port.
Enter the SNMP trap daemon port: [b,q,?] (162)
■ Enter the SNMP console system name.
Enter the SNMP console system name: [b,q,?] saturn
■ Enter the minimum security level of messages to be sent to each console.
Enter the minimum severity of events for which SNMP traps
should be sent to saturn [I=Information, W=Warning, E=Error,
S=SevereError]: [b,q,?] E
4 Add more SNMP consoles, if necessary.
■ If you want to add another SNMP console, enter y and provide the requiredinformation at the prompt.
Would you like to add another SNMP console? [y,n,q,b] (n) y
Enter the SNMP console system name: [b,q,?] jupiter
Enter the minimum severity of events for which SNMP traps
should be sent to jupiter [I=Information, W=Warning,
E=Error, S=SevereError]: [b,q,?] S
■ If you do not want to add, answer n.
137Configuring SF Oracle RACConfiguring the SF Oracle RAC components using the script-based installer

Would you like to add another SNMP console? [y,n,q,b] (n)
5 Verify and confirm the SNMP notification information.
NIC: en0
SNMP Port: 162
Console: saturn receives SNMP traps for Error or
higher events
Console: jupiter receives SNMP traps for SevereError or
higher events
Is this information correct? [y,n,q] (y)
Configuring global clustersIf you had installed a valid HA/DR license, the installer provides you an option toconfigure this cluster as global cluster. If not, the installer proceeds with otherset of questions for CVM and CFS.
You can configure global clusters to link clusters at separate locations and enablewide-area failover and disaster recovery. The installer adds basic global clusterinformation to the VCS configuration file. You must perform additionalconfiguration tasks to set up a global cluster.
See the Veritas Cluster Server Administrator’s Guide for instructions to set up SFOracle RAC global clusters.
Note: If you installed a HA/DR license to set up campus cluster, skip this installeroption.
To configure the global cluster option
1 Review the required information to configure the global cluster option.
2 Specify whether you want to configure the global cluster option.
Do you want to configure the Global Cluster Option? [y,n,q] (n) y
If you skip this option, the installer proceeds to configure VCS based on theconfiguration details you provided.
Configuring SF Oracle RACConfiguring the SF Oracle RAC components using the script-based installer
138

3 Provide information to configure this cluster as global cluster.
The installer prompts you for a NIC, a virtual IP address, and value for thenetmask.
If you had entered virtual IP address details, the installer discovers the valuesyou entered. You can use the same virtual IP address for global clusterconfiguration or enter different values.
4 Verify and confirm the configuration of the global cluster.
Global Cluster Option configuration verification:
NIC: en0
IP: 192.168.1.16
Netmask: 255.255.240.0
Is this information correct? [y,n,q] (y)
Creation of SF Oracle RAC configuration filesThe program consolidates all the information gathered in the precedingconfiguration tasks and creates configuration files.
If you chose to configure the cluster in secure mode, the installer also configuresthe Symantec Product Authentication Service. Depending on the mode you choseto set up Authentication Service, the installer creates security principal or executesthe encrypted file to create security principal on each node in the cluster. Theinstaller creates the VxSS service group, creates Authentication Server credentialson each node in the cluster, and Web credentials for VCS users, and sets up trustwith the root broker. Then, the installer proceeds to start SF Oracle RAC in securemode.
Review the output as the configuration program creates security principal, startsVCS, creates VCS configuration files, and copies the files to each node.
Stopping and starting SF Oracle RAC processesThe installer stops and starts SF Oracle RAC processes and configures the SFOracle RAC agents.
139Configuring SF Oracle RACConfiguring the SF Oracle RAC components using the script-based installer

Note:To use aggregated interfaces that the installer has not discovered for privateheartbeats, do not opt to start SF Oracle RAC.
To stop SF Oracle RAC processes
1 Enter y to stop SF Oracle RAC processes.
Do you want to stop SF Oracle RAC processes now? [y,n,q,?] (y)
2 Review the output as the installer stops and starts the SF Oracle RACprocesses.
Note that SF Oracle RAC configuration program starts I/O fencing feature indisabled mode. SF Oracle RAC requires you to configure and enable I/O fencingfeature.
Configuring SF Oracle RAC using the Web-basedinstaller
Before you begin to configure SF Oracle RAC using the Web-based installer, reviewthe configuration requirements.
Note: If you want to reconfigure SF Oracle RAC, before you start the installer youmust stop all the resources that are under VCS control using the hastop commandor the hagrp -offline command.
By default, the communication between the systems is selected as SSH. If SSH isused for communication between systems, the SSH commands execute withoutprompting for passwords or confirmations.
Note: To configure I/O fencing, you must either use the script-based installer ormanually configure.
You can click Quit to quit the Web-installer at any time during the configurationprocess.
Configuring SF Oracle RACConfiguring SF Oracle RAC using the Web-based installer
140

To configure SF Oracle RAC on a cluster
1 Start the Web-based installer.
See “Starting the Veritas Web-based installer” on page 91.
2 On the Select a task and a product page, select the task and the product asfollows:
Configure a ProductTask
Veritas Storage Foundation for Oracle RACProduct
Click Next.
3 On the Select Systems page, enter the system names where you want toconfigure SF Oracle RAC, and click Validate.
Example: galaxy nebula
The installer performs the initial system verification. It checks for the systemcommunication. It also checks for release compatibility, installed productversion, platform version, and performs product prechecks.
Click Next after the installer completes the system verification successfully.
141Configuring SF Oracle RACConfiguring SF Oracle RAC using the Web-based installer

4 On the Set Cluster Name/ID page, specify the following information for thecluster.
Enter a unique cluster name.Cluster Name
Enter a unique cluster ID.Cluster ID
Select an LLT type from the list. You can choose to configureLLT over UDP or over Ethernet.
If you choose Auto detect over Ethernet, the installerauto-detects the LLT links over Ethernet. Verify the linksand click Yes in the Confirmation dialog box. Skip to step6. If you click No, you must manually enter the details toconfigure LLT over Ethernet.
LLT Type
Choose the number of heartbeat links you want to configure.Number of Heartbeats
Select the check box if you want to configure a low prioritylink. The installer configures one heartbeat link as lowpriority link.
LowPriorityHeartbeatNIC
For LLT over Ethernet, select the check box if you do notwant to use the same NIC details to configure privateheartbeat links on other systems.
For LLT over UDP, this check box is selected by default.
UniqueHeartbeatNICsper system
Click Next.
5 On the Set Cluster Heartbeat page, select the heartbeat link details for theLLT type you chose on the Set Cluster Name/ID page.
Do the following:
■ If you are using the same NICs on all the systems, selectthe NIC for each private heartbeat link.
■ If you had selected Unique Heartbeat NICs per systemon the Set Cluster Name/ID page, provide the NIC detailsfor each system.
For LLT over Ethernet:
Select the NIC, Port, and IP address for each privateheartbeat link. You must provide these details for eachsystem.
For LLT over UDP:
Click Next.
Configuring SF Oracle RACConfiguring SF Oracle RAC using the Web-based installer
142

6 In the Confirmation dialog box that appears, choose whether or not toconfigure the cluster in secure mode using Symantec Product AuthenticationService (AT).
To configure the cluster in secure mode, click Yes.
If you want to perform this task later, click No. You can use the installsfrac-security command. Go to step 8.
7 On the Security Options page, choose an option to enable security and specifythe required information.
Choose this option if you do not want to enable security.
The installer takes you to the next page to configure optionalfeatures of SF Oracle RAC.
Do not configuresecurity services
Choose this option to use an external root broker.
Enter the name of the root broker that is already configuredfor your enterprise environment, and click Validate. Theinstaller configures the cluster in secure mode.
Configure securityautomatically
Select the system that you want to configure as RAB node.The installer configures the cluster in secure mode.
Configure one node asRAB and the others asAB
Click Next.
8 On the Optional Configuration page, decide the optional VCS features thatyou want to configure. Click the corresponding tab to specify the details foreach option:
■ Select the Configure Virtual IP check box.
■ If each system uses a separate NIC, select the ConfigureNICsfor every system separately check box.
■ Select the interface on which you want to configure the virtualIP.
■ Enter a virtual IP address and value for the netmask.
Virtual IP
■ Reset the password for the Admin user, if necessary.
■ Click Add to add a new user.
Specify the user name, password, and user privileges for thisuser.
VCS Users
143Configuring SF Oracle RACConfiguring SF Oracle RAC using the Web-based installer

■ Select the Configure SMTP check box.
■ If each system uses a separate NIC, select the ConfigureNICsfor every system separately check box.
■ If all the systems use the same NIC, select the NIC for the VCSNotifier to be used on all systems. If not, select the NIC to beused by each system.
■ In the SMTP Server box, enter the domain-based hostnameof the SMTP server. Example: smtp.yourcompany.com
■ In the Recipient box, enter the full email address of the SMTPrecipient. Example: [email protected].
■ In the Event list box, select the minimum security level ofmessages to be sent to each recipient.
■ Click Add to add more SMTP recipients, if necessary.
SMTP
■ Select the Configure SNMP check box.
■ If each system uses a separate NIC, select the ConfigureNICsfor every system separately check box.
■ If all the systems use the same NIC, select the NIC for the VCSNotifier to be used on all systems. If not, select the NIC to beused by each system.
■ In the SNMP Port box, enter the SNMP trap daemon port:(162).
■ In the Console System Name box, enter the SNMP consolesystem name.
■ In the Event list box, select the minimum security level ofmessages to be sent to each console.
■ Click Add to add more SNMP consoles, if necessary.
SNMP
If you installed a valid HA/DR license, you can now enter thewide-area heartbeat link details for the global cluster that youwould set up later.
See the Veritas Storage Foundation for Oracle RAC InstallationandConfigurationGuide for instructions to set up SF Oracle RACglobal clusters.
■ Select the Configure GCO check box.
■ If each system uses a separate NIC, select the ConfigureNICsfor every system separately check box.
■ Select a NIC.
■ Enter a virtual IP address and value for the netmask.
GCO
Click Next.
9 On the Stop Processes page, click Next after the installer stops all theprocesses successfully.
Configuring SF Oracle RACConfiguring SF Oracle RAC using the Web-based installer
144

10 On the Start Processes page, click Next after the installer performs theconfiguration based on the details you provided and starts all the processessuccessfully.
11 Click Next to complete the process of configuring SF Oracle RAC.
On the Completion page, view the summary file, log file, or response file, ifneeded, to confirm the configuration.
12 Select the checkbox to specify whether you want to send your installationinformation to Symantec.
Click Finish. The installer prompts you for another task.
145Configuring SF Oracle RACConfiguring SF Oracle RAC using the Web-based installer

Configuring SF Oracle RACConfiguring SF Oracle RAC using the Web-based installer
146

Configuring SF Oracle RACclusters for data integrity
This chapter includes the following topics:
■ Setting up disk-based I/O fencing using installsfrac program
■ Setting up disk-based I/O fencing manually
■ Setting up server-based I/O fencing using installsfrac program
■ Setting up server-based I/O fencing manually
Setting up disk-based I/O fencing using installsfracprogram
You can configure I/O fencing using the -fencing option of the installsfracprogram.
Initializing disks as VxVM disksPerform the following procedure to initialize disks as VxVM disks.
To initialize disks as VxVM disks
1 Scan for the new hdisk devices.
# /usr/sbin/cfgmgr
2 List the new external disks or the LUNs as recognized by the operating system.On each node, enter:
# lsdev -Cc disk
9Chapter

3 Determine the VxVM name by which a disk drive (or LUN) is known.
In the following example, VxVM identifies a disk with the AIX device name/dev/rhdisk75 as EMC0_17:
# vxdmpadm getdmpnode nodename=hdisk75
NAME STATE ENCLR-TYPE PATHS ENBL DSBL ENCLR-NAME
============================================================
EMC0_17 ENABLED EMC 1 1 0 EMC0
Notice that in the example command, the AIX device name for
the block device was used.
As an option, you can run the command vxdisk list vxvm_device_name tosee additional information about the disk like the AIX device name. Forexample:
# vxdisk list EMC0_17
4 To initialize the disks as VxVM disks, use one of the following methods:
■ Use the interactive vxdiskadm utility to initialize the disks as VxVM disks.For more information see the Veritas VolumeManager Administrator’sGuide.
■ Use the vxdisksetup command to initialize a disk as a VxVM disk.
vxdisksetup -i device_name
The example specifies the CDS format:
# vxdisksetup -i EMC0_17
Repeat this command for each disk you intend to use as a coordinatordisk.
Identifying disks to use as coordinator disksMake sure you initialized disks as VxVM disks.
See “Initializing disks as VxVM disks” on page 147.
Review the following procedure to identify disks to use as coordinator disks.
Configuring SF Oracle RAC clusters for data integritySetting up disk-based I/O fencing using installsfrac program
148

To identify the coordinator disks
1 List the disks on each node.
For example, execute the following commands to list the disks:
# vxdisk -o alldgs list
2 Pick three SCSI-3 PR compliant shared disks as coordinator disks.
See “Checking shared disks for I/O fencing” on page 149.
Checking shared disks for I/O fencingMake sure that the shared storage you set up while preparing to configure SFOracle RAC meets the I/O fencing requirements. You can test the shared disksusing the vxfentsthdw utility. The two nodes must have ssh (default) or rshcommunication. To confirm whether a disk (or LUN) supports SCSI-3 persistentreservations, two nodes must simultaneously have access to the same disks.Because a shared disk is likely to have a different name on each node, check theserial number to verify the identity of the disk. Use the vxfenadm command withthe -i option. This command option verifies that the same serial number for theLUN is returned on all paths to the LUN.
Make sure to test the disks that serve as coordinator disks.
You can use the vxfentsthdw utility to test disks either in DMP format or in rawformat.
■ If you test disks in DMP format, use the VxVM command vxdisk list to getthe DMP path name.
■ If you test disks in raw format for Active/Passive disk arrays, you must use anactive enabled path with the vxfentsthdw command. Run the vxdmpadm
getsubpaths dmpnodename=enclosure-based_name command to list the activeenabled paths.DMP opens the secondary (passive) paths with an exclusive flag inActive/Passive arrays. So, if you test the secondary (passive) raw paths of thedisk, the vxfentsthdw command may fail due to DMP’s exclusive flag.
The vxfentsthdw utility has additional options suitable for testing many disks.Review the options for testing the disk groups (-g) and the disks that are listedin a file (-f). You can also test disks without destroying data using the -r option.
See the Veritas Storage Foundation for Oracle RAC Administrator's Guide.
Checking that disks support SCSI-3 involves the following tasks:
■ Verifying the Array Support Library (ASL)
149Configuring SF Oracle RAC clusters for data integritySetting up disk-based I/O fencing using installsfrac program
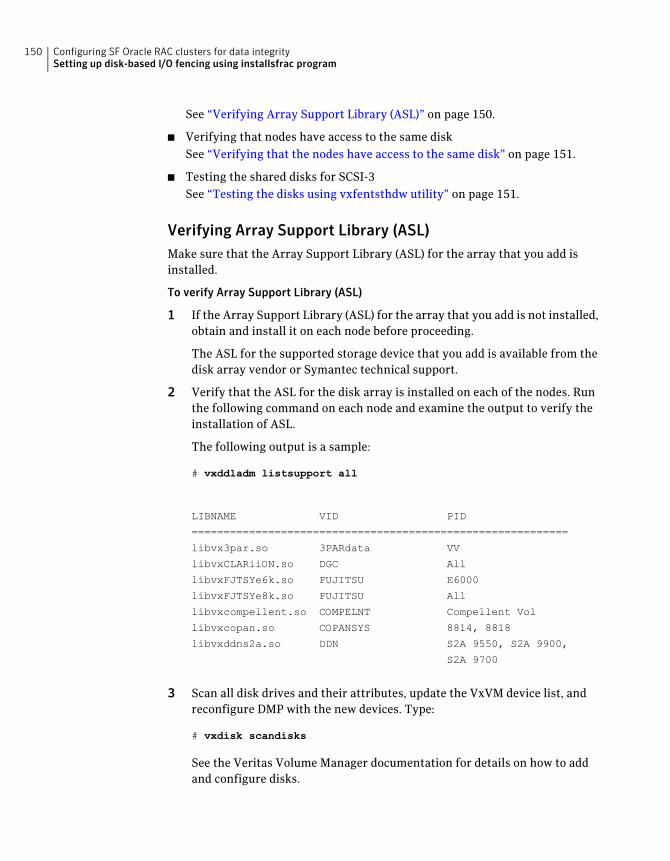
See “Verifying Array Support Library (ASL)” on page 150.
■ Verifying that nodes have access to the same diskSee “Verifying that the nodes have access to the same disk” on page 151.
■ Testing the shared disks for SCSI-3See “Testing the disks using vxfentsthdw utility” on page 151.
Verifying Array Support Library (ASL)Make sure that the Array Support Library (ASL) for the array that you add isinstalled.
To verify Array Support Library (ASL)
1 If the Array Support Library (ASL) for the array that you add is not installed,obtain and install it on each node before proceeding.
The ASL for the supported storage device that you add is available from thedisk array vendor or Symantec technical support.
2 Verify that the ASL for the disk array is installed on each of the nodes. Runthe following command on each node and examine the output to verify theinstallation of ASL.
The following output is a sample:
# vxddladm listsupport all
LIBNAME VID PID
===========================================================
libvx3par.so 3PARdata VV
libvxCLARiiON.so DGC All
libvxFJTSYe6k.so FUJITSU E6000
libvxFJTSYe8k.so FUJITSU All
libvxcompellent.so COMPELNT Compellent Vol
libvxcopan.so COPANSYS 8814, 8818
libvxddns2a.so DDN S2A 9550, S2A 9900,
S2A 9700
3 Scan all disk drives and their attributes, update the VxVM device list, andreconfigure DMP with the new devices. Type:
# vxdisk scandisks
See the Veritas Volume Manager documentation for details on how to addand configure disks.
Configuring SF Oracle RAC clusters for data integritySetting up disk-based I/O fencing using installsfrac program
150

Verifying that the nodes have access to the same diskBefore you test the disks that you plan to use as shared data storage or ascoordinator disks using the vxfentsthdw utility, you must verify that the systemssee the same disk.
To verify that the nodes have access to the same disk
1 Verify the connection of the shared storage for data to two of the nodes onwhich you installed SF Oracle RAC.
2 Ensure that both nodes are connected to the same disk during the testing.Use the vxfenadm command to verify the disk serial number.
vxfenadm -i diskpath
For A/P arrays, run the vxfentsthdw command only on secondary paths.
Refer to the vxfenadm (1M) manual page.
For example, an EMC disk is accessible by the /dev/rhdisk75 path on node Aand the /dev/rhdisk76 path on node B.
From node A, enter:
vxfenadm -i /dev/rhdisk75
Vendor id : EMC
Product id : SYMMETRIX
Revision : 5567
Serial Number : 42031000a
The same serial number information should appear when you enter theequivalent command on node B using the /dev/rhdisk76 path.
On a disk from another manufacturer, Hitachi Data Systems, the output isdifferent and may resemble:
# vxfenadm -i /dev/rhdisk77
Vendor id : HITACHI
Product id : OPEN-3
Revision : 0117
Serial Number : 0401EB6F0002
Testing the disks using vxfentsthdw utilityThis procedure uses the /dev/rhdisk75 disk in the steps.
151Configuring SF Oracle RAC clusters for data integritySetting up disk-based I/O fencing using installsfrac program

If the utility does not show a message that states a disk is ready, the verificationhas failed. Failure of verification can be the result of an improperly configureddisk array. The failure can also be due to a bad disk.
If the failure is due to a bad disk, remove and replace it. The vxfentsthdw utilityindicates a disk can be used for I/O fencing with a message resembling:
The disk /dev/rhdisk75 is ready to be configured for I/O Fencing on
node galaxy
For more information on how to replace coordinator disks, refer to the VeritasStorage Foundation for Oracle RAC Administrator's Guide.
To test the disks using vxfentsthdw utility
1 Make sure system-to-system communication functions properly.
See “Setting up inter-system communication” on page 644.
2 From one node, start the utility.
Run the utility with the -n option if you use rsh for communication.
# vxfentsthdw [-n]
3 The script warns that the tests overwrite data on the disks. After you reviewthe overview and the warning, confirm to continue the process and enter thenode names.
Warning: The tests overwrite and destroy data on the disks unless you usethe -r option.
******** WARNING!!!!!!!! ********
THIS UTILITY WILL DESTROY THE DATA ON THE DISK!!
Do you still want to continue : [y/n] (default: n) y
Enter the first node of the cluster: galaxy
Enter the second node of the cluster: nebula
Configuring SF Oracle RAC clusters for data integritySetting up disk-based I/O fencing using installsfrac program
152

4 Enter the names of the disks that you want to check. Each node may knowthe same disk by a different name.
Enter the disk name to be checked for SCSI-3 PGR on node
IP_adrs_of_galaxy in the format:
for dmp: /dev/vx/rdmp/DiskXX
for raw: /dev/rhdiskXX
Make sure it's the same disk as seen by nodes
IP_adrs_ofgalaxy and IP_adrs_of_nebula
/dev/rhdisk75
Enter the disk name to be checked for SCSI-3 PGR on node
IP_adrs_of_nebula in the format:
for dmp: /dev/vx/rdmp/DiskXX
for raw: /dev/rhdiskXX
Make sure it's the same disk as seen by nodes
IP_adrs_ofgalaxy and IP_adrs_of_nebula
/dev/rhdisk75
If the serial numbers of the disks are not identical. then the test terminates.
5 Review the output as the utility performs the checks and report its activities.
6 If a disk is ready for I/O fencing on each node, the utility reports success foreach node. For example, the utility displays the following message for thenode galaxy.
The disk is now ready to be configured for I/O Fencing on node
galaxy
ALL tests on the disk /dev/rhdisk75 have PASSED
The disk is now ready to be configured for I/O Fencing on node
galaxy
7 Run the vxfentsthdw utility for each disk you intend to verify.
Configuring disk-based I/O fencing using installsfrac program
Note: The installer stops and starts SF Oracle RAC to complete I/O fencingconfiguration. Make sure to unfreeze any frozen VCS service groups in the clusterfor the installer to successfully stop SF Oracle RAC.
153Configuring SF Oracle RAC clusters for data integritySetting up disk-based I/O fencing using installsfrac program

To set up disk-based I/O fencing using the installsfrac program
1 Start the installsfrac program with -fencing option.
# /opt/VRTS/install/installsfrac -fencing
The installsfrac program starts with a copyright message and verifies thecluster information.
Note the location of log files which you can access in the event of any problemwith the configuration process.
2 Confirm that you want to proceed with the I/O fencing configuration at theprompt.
The program checks that the local node running the script can communicatewith remote nodes and checks whether SF Oracle RAC 5.1 Service Pack 1Platform Release 1 is configured properly.
3 Review the I/O fencing configuration options that the program presents.Type 2 to configure disk-based I/O fencing.
Select the fencing mechanism to be configured in this
Application Cluster [1-3,b,q] 2
4 Review the output as the configuration program checks whether VxVM isalready started and is running.
■ If the check fails, configure and enable VxVM before you repeat thisprocedure.
■ If the check passes, then the program prompts you for the coordinatordisk group information.
5 Choose whether to use an existing disk group or create a new disk group toconfigure as the coordinator disk group.
The program lists the available disk group names and provides an option tocreate a new disk group. Perform one of the following:
■ To use an existing disk group, enter the number corresponding to the diskgroup at the prompt.The program verifies whether the disk group you chose has an odd numberof disks and that the disk group has a minimum of three disks.
■ To create a new disk group, perform the following steps:
■ Enter the number corresponding to the Createanewdiskgroup option.The program lists the available disks that are in the CDS disk formatin the cluster and asks you to choose an odd number of disks with atleast three disks to be used as coordinator disks.
Configuring SF Oracle RAC clusters for data integritySetting up disk-based I/O fencing using installsfrac program
154

Symantec recommends that you use three disks as coordination pointsfor disk-based I/O fencing.
■ Enter the numbers corresponding to the disks that you want to use ascoordinator disks.
■ Enter the disk group name.
6 Verify that the coordinator disks you chose meet the I/O fencing requirements.
You must verify that the disks are SCSI-3 PR compatible using the vxfentsthdwutility and then return to this configuration program.
See “Checking shared disks for I/O fencing” on page 149.
7 After you confirm the requirements, the program creates the coordinatordisk group with the information you provided.
8 Enter the I/O fencing disk policy that you chose to use. For example:
Enter fencing mechanism name (raw/dmp): [b,q,?] raw
The program also does the following:
■ Populates the /etc/vxfendg file with this disk group information
■ Populates the /etc/vxfenmode file on each cluster node with the I/O fencingmode information and with the SCSI-3 disk policy information
9 Verify and confirm the I/O fencing configuration information that the installersummarizes.
10 Review the output as the configuration program does the following:
■ Stops VCS and I/O fencing on each node.
■ Configures disk-based I/O fencing and starts the I/O fencing process.
■ Updates the VCS configuration file main.cf if necessary.
■ Copies the /etc/vxfenmode file to a date and time suffixed file/etc/vxfenmode-date-time. This backup file is useful if any future fencingconfiguration fails.
■ Starts VCS on each node to make sure that the SF Oracle RAC is cleanlyconfigured to use the I/O fencing feature.
11 Review the output as the configuration program displays the location of thelog files, the summary files, and the response files.
12 Configure the Coordination Point agent to monitor the coordinator disks.
See “Configuring Coordination Point agent to monitor coordination points”on page 181.
155Configuring SF Oracle RAC clusters for data integritySetting up disk-based I/O fencing using installsfrac program

Setting up disk-based I/O fencing manuallyTable 9-1 lists the tasks that are involved in setting up I/O fencing.
Table 9-1 Tasks to set up I/O fencing manually
ReferenceTask
See “Initializing disks as VxVM disks” on page 147.Initializing disks as VxVMdisks
See “Identifying disks to use as coordinator disks”on page 148.
Identifying disks to use ascoordinator disks
See “Checking shared disks for I/O fencing” on page 149.Checking shared disks for I/Ofencing
See “Setting up coordinator disk groups” on page 156.Setting up coordinator diskgroups
See “Creating I/O fencing configuration files” on page 157.Creating I/O fencingconfiguration files
See “Modifying VCS configuration to use I/O fencing”on page 158.
Modifying SF Oracle RACconfiguration to use I/Ofencing
See “Configuring Coordination Point agent to monitorcoordination points” on page 181.
Configuring Coordination Pointagent to monitor coordinationpoints
See “Starting SF Oracle RAC on all nodes” on page 159.Starting SF Oracle RAC on allnodes
See “Verifying I/O fencing configuration” on page 161.Verifying I/O fencingconfiguration
Setting up coordinator disk groupsFrom one node, create a disk group named vxfencoorddg. This group must containthree disks or LUNs. You must also set the coordinator attribute for the coordinatordisk group. VxVM uses this attribute to prevent the reassignment of coordinatordisks to other disk groups.
Note that if you create a coordinator disk group as a regular disk group, you canturn on the coordinator attribute in Volume Manager.
Refer to theVeritas VolumeManager Administrator’s Guide for details on how tocreate disk groups.
Configuring SF Oracle RAC clusters for data integritySetting up disk-based I/O fencing manually
156

The following example procedure assumes that the disks have the device namesEMC0_12, EMC0_16, and EMC0_17.
To create the vxfencoorddg disk group
1 On any node, create the disk group by specifying the device names:
# vxdg init vxfencoorddg EMC0_12 EMC0_16 EMC0_17
2 Set the coordinator attribute value as "on" for the coordinator disk group.
# vxdg -g vxfencoorddg set coordinator=on
3 Deport the coordinator disk group:
# vxdg deport vxfencoorddg
4 Import the disk group with the -t option to avoid automatically importing itwhen the nodes restart:
# vxdg -t import vxfencoorddg
5 Deport the disk group. Deporting the disk group prevents the coordinatordisks from serving other purposes:
# vxdg deport vxfencoorddg
Creating I/O fencing configuration filesAfter you set up the coordinator disk group, you must do the following to configureI/O fencing:
■ Create the I/O fencing configuration file /etc/vxfendg
■ Update the I/O fencing configuration file /etc/vxfenmode
To update the I/O fencing files and start I/O fencing
1 On each nodes, type:
# echo "vxfencoorddg" > /etc/vxfendg
Do not use spaces between the quotes in the "vxfencoorddg" text.
This command creates the /etc/vxfendg file, which includes the name of thecoordinator disk group.
2 On all cluster nodes depending on the SCSI-3 mechanism, type one of thefollowing selections:
157Configuring SF Oracle RAC clusters for data integritySetting up disk-based I/O fencing manually

■ For DMP configuration:
# cp /etc/vxfen.d/vxfenmode_scsi3_dmp /etc/vxfenmode
■ For raw device configuration:
# cp /etc/vxfen.d/vxfenmode_scsi3_raw /etc/vxfenmode
3 To check the updated /etc/vxfenmode configuration, enter the followingcommand on one of the nodes. For example:
# more /etc/vxfenmode
4 Edit the following file on each node in the cluster to change the values of theVXFEN_START and the VXFEN_STOP environment variables to 1:
/etc/default/vxfen
Modifying VCS configuration to use I/O fencingAfter you add coordination points and configure I/O fencing, add the UseFence= SCSI3 cluster attribute to the VCS configuration file/etc/VRTSvcs/conf/config/main.cf. If you reset this attribute to UseFence = None,VCS does not make use of I/O fencing abilities while failing over service groups.However, I/O fencing needs to be disabled separately.
To modify VCS configuration to enable I/O fencing
1 Save the existing configuration:
# haconf -dump -makero
2 Stop VCS on all nodes:
# hastop -all
3 If the I/O fencing driver vxfen is already running, stop the I/O fencing driver.
# /etc/init.d/vxfen.rc stop
4 Make a backup copy of the main.cf file:
# cd /etc/VRTSvcs/conf/config
# cp main.cf main.orig
Configuring SF Oracle RAC clusters for data integritySetting up disk-based I/O fencing manually
158

5 On one node, use vi or another text editor to edit the main.cf file. To modifythe list of cluster attributes, add the UseFence attribute and assign its valueas SCSI3.
cluster rac_cluster101(
UserNames = { admin = "cDRpdxPmHpzS." }
Administrators = { admin }
HacliUserLevel = COMMANDROOT
CounterInterval = 5
UseFence = SCSI3
)
Regardless of whether the fencing configuration is disk-based or server-based,the value of the cluster-level attribute UseFence is set to SCSI3.
6 Save and close the file.
7 Verify the syntax of the file /etc/VRTSvcs/conf/config/main.cf:
# hacf -verify /etc/VRTSvcs/conf/config
8 Using rcp or another utility, copy the VCS configuration file from a node (forexample, galaxy) to the remaining cluster nodes.
For example, on each remaining node, enter:
# rcp galaxy:/etc/VRTSvcs/conf/config/main.cf \
/etc/VRTSvcs/conf/config
Starting SF Oracle RAC on all nodesYou must start SF Oracle RAC on each node to bring up the cluster configurationwith I/O fencing enabled.
Starting I/O fencing, VCS, CVM, and CFSYou must start I/O fencing, VCS, CVM, and CFS on all nodes in the cluster.
159Configuring SF Oracle RAC clusters for data integritySetting up disk-based I/O fencing manually
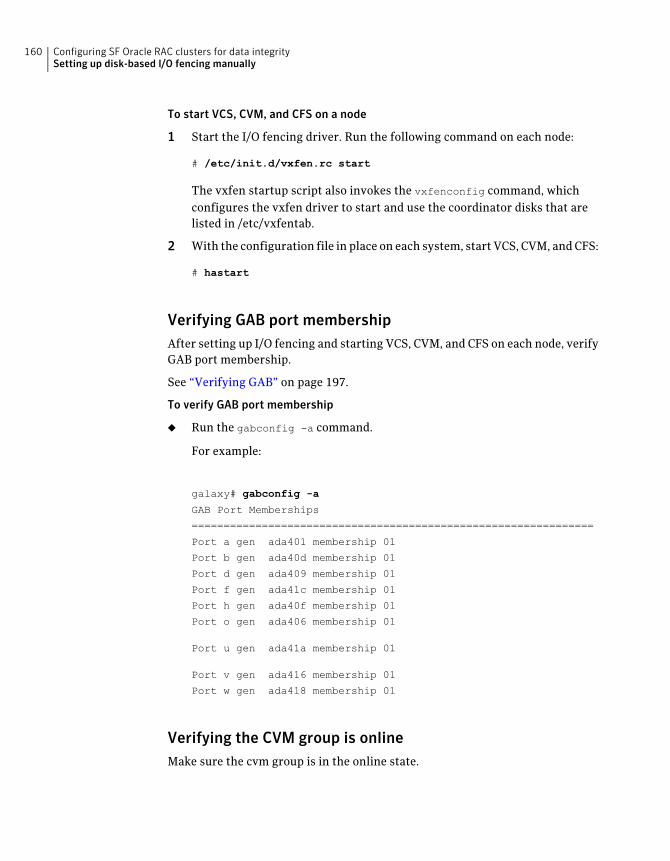
To start VCS, CVM, and CFS on a node
1 Start the I/O fencing driver. Run the following command on each node:
# /etc/init.d/vxfen.rc start
The vxfen startup script also invokes the vxfenconfig command, whichconfigures the vxfen driver to start and use the coordinator disks that arelisted in /etc/vxfentab.
2 With the configuration file in place on each system, start VCS, CVM, and CFS:
# hastart
Verifying GAB port membershipAfter setting up I/O fencing and starting VCS, CVM, and CFS on each node, verifyGAB port membership.
See “Verifying GAB” on page 197.
To verify GAB port membership
◆ Run the gabconfig -a command.
For example:
galaxy# gabconfig -a
GAB Port Memberships
===============================================================
Port a gen ada401 membership 01
Port b gen ada40d membership 01
Port d gen ada409 membership 01
Port f gen ada41c membership 01
Port h gen ada40f membership 01
Port o gen ada406 membership 01
Port u gen ada41a membership 01
Port v gen ada416 membership 01
Port w gen ada418 membership 01
Verifying the CVM group is onlineMake sure the cvm group is in the online state.
Configuring SF Oracle RAC clusters for data integritySetting up disk-based I/O fencing manually
160

To verify CVM group
1 On any node, run the following command to verify that the cvm group isonline:
# hagrp -state cvm
2 On any node, run the following command to make sure CVM has startedproperly:
# vxclustadm nidmap
Verifying I/O fencing configurationVerify from the vxfenadm output that the SCSI-3 disk policy reflects theconfiguration in the /etc/vxfenmode file.
To verify I/O fencing configuration
1 On one of the nodes, type:
# vxfenadm -d
Output similar to the following appears if the SCSI3 disk policy is dmp:
I/O Fencing Cluster Information:
================================
Fencing Protocol Version: 201
Fencing Mode: SCSI3
Fencing SCSI3 Disk Policy: dmp
Cluster Members:
* 0 (galaxy)
1 (nebula)
RFSM State Information:
node 0 in state 8 (running)
node 1 in state 8 (running)
2 Verify that the disk-based I/O fencing is using the specified disks.
# vxfenconfig -l
161Configuring SF Oracle RAC clusters for data integritySetting up disk-based I/O fencing manually

Setting up server-based I/O fencing using installsfracprogram
If SF Oracle RAC cluster is configured to run in secure mode, then verify that theconfiguration is correct before you configure CP server-based I/O fencing.
See “Verifying the security configuration on the SF Oracle RAC cluster to use CPserver coordination point” on page 162.
See “Configuring server-based I/O fencing using the installsfrac program”on page 164.
Verifying the security configuration on the SF Oracle RAC cluster touse CP server coordination point
After configuring security using the installsfrac -security command, followthe procedure below on each SF Oracle RAC cluster node to confirm that securityis correctly configured.
Configuring SF Oracle RAC clusters for data integritySetting up server-based I/O fencing using installsfrac program
162
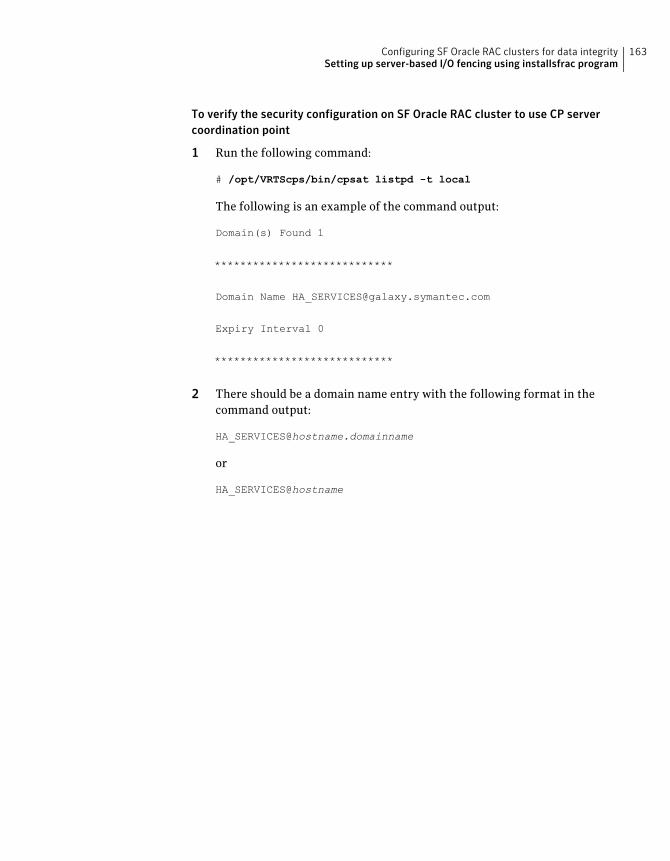
To verify the security configuration on SF Oracle RAC cluster to use CP servercoordination point
1 Run the following command:
# /opt/VRTScps/bin/cpsat listpd -t local
The following is an example of the command output:
Domain(s) Found 1
****************************
Domain Name [email protected]
Expiry Interval 0
****************************
2 There should be a domain name entry with the following format in thecommand output:
or
HA_SERVICES@hostname
163Configuring SF Oracle RAC clusters for data integritySetting up server-based I/O fencing using installsfrac program

3 There should not be duplicate entries for HA_SERVICES domain.
The following is an example of an incorrect configuration:
showdomains
Domain(s) Found : 3
*************************************
Domain Name: [email protected]
Domain Type: vx
*************************************
Domain Name: [email protected]
Domain Type: vx
*************************************
Domain Name: HA_SERVICES@galaxy
Domain Type: vx
*************************************
Proceed to reconfigure security in case duplicate entries appear as shown inthe above example.
Configuring server-based I/O fencing using the installsfrac programYou can configure server-based I/O fencing for the SF Oracle RAC cluster usingthe installsfrac program.
With server-based fencing, you can have the coordination points in yourconfiguration as follows:
■ Combination of CP servers and SCSI-3 compliant coordinator disks
■ CP servers onlySymantec also supports server-based fencing with a single highly availableCP server that acts as a single coordination point.
See “About planning to configure I/O fencing” on page 63.
Configuring SF Oracle RAC clusters for data integritySetting up server-based I/O fencing using installsfrac program
164

See “Recommended CP server configurations” on page 66.
This section covers the following example procedures:
See “To configure server-based fencing for the SF OracleRAC cluster (one CP server and two coordinator disks)”on page 165.
Mix of CP servers andcoordinator disks
See “To configure server-based fencing for the SF OracleRAC cluster (single CP server)” on page 170.
Single CP server
To configure server-based fencing for the SF Oracle RAC cluster (one CP server andtwo coordinator disks)
1 Depending on the server-based configuration model in your setup, make sureof the following:
■ CP servers are configured and are reachable from the SF Oracle RACcluster. The SF Oracle RAC cluster is also referred to as the applicationcluster or the client cluster.See “Setting up the CP server” on page 106.
■ The coordination disks are verified for SCSI3-PR compliance.See “Checking shared disks for I/O fencing” on page 149.
2 Start the installsfrac program with -fencing option.
# /opt/VRTS/install/installsfrac -fencing
The installsfrac program starts with a copyright message and verifies thecluster information.
Note the location of log files which you can access in the event of any problemwith the configuration process.
3 Confirm that you want to proceed with the I/O fencing configuration at theprompt.
The program checks that the local node running the script can communicatewith remote nodes and checks whether SF Oracle RAC 5.1 Service Pack 1Platform Release 1 is configured properly.
4 Review the I/O fencing configuration options that the program presents.Type 1 to configure server-based I/O fencing.
Select the fencing mechanism to be configured in this
Application Cluster [1-3,b,q] 1
165Configuring SF Oracle RAC clusters for data integritySetting up server-based I/O fencing using installsfrac program

5 Make sure that the storage supports SCSI3-PR, and answer y at the followingprompt.
Does your storage environment support SCSI3 PR? [y,n,q] (y)
6 Provide the following details about the coordination points at the installerprompt:
■ Enter the total number of coordination points including both servers anddisks. This number should be at least 3.
Enter the total number of co-ordination points including both
CP servers and disks: [b] (3)
■ Enter the total number of coordinator disks among the coordination points.
Enter the total number of disks among these:
[b] (0) 2
7 Provide the following CP server details at the installer prompt:
■ Enter the virtual IP addresses or host names of the virtual IP address foreach of the CP servers. The installer assumes these values to be identicalas viewed from all the application cluster nodes.
Enter the Virtual IP address/fully qualified host name
for the Co-ordination Point Server #1:
[b] 10.209.80.197
■ Enter the port that the CP server would be listening on.
Enter the port in the range [49152, 65535] which the
Co-ordination Point Server 10.209.80.197
would be listening on or simply accept the default port suggested:
[b] (14250)
8 Provide the following coordinator disks-related details at the installer prompt:
■ Enter the I/O fencing disk policy for the coordinator disks.
Enter fencing mechanism for the disk(s) (raw/dmp):
[b,q,?] raw
■ Choose the coordinator disks from the list of available disks that theinstaller displays. Ensure that the disk you choose is available from allthe SF Oracle RAC (application cluster) nodes.
Configuring SF Oracle RAC clusters for data integritySetting up server-based I/O fencing using installsfrac program
166

The number of times that the installer asks you to choose the disks dependson the information that you provided in step 6. For example, if you hadchosen to configure two coordinator disks, the installer asks you to choosethe first disk and then the second disk:
Select disk number 1 for co-ordination point
1) rhdisk75
2) rhdisk76
3) rhdisk77
Please enter a valid disk which is available from all the
cluster nodes for co-ordination point [1-3,q] 1
■ If you have not already checked the disks for SCSI-3 PR compliance instep 1, check the disks now.The installer displays a message that recommends you to verify the disksin another window and then return to this configuration procedure.Press Enter to continue, and confirm your disk selection at the installerprompt.
■ Enter a disk group name for the coordinator disks or accept the default.
Enter the disk group name for coordinating disk(s):
[b] (vxfencoorddg)
9 Verify and confirm the coordination points information for the fencingconfiguration.
For example:
Total number of coordination points being used: 3
CP Server (Port):
1. 10.209.80.197 (14250)
SCSI-3 disks:
1. rhdisk75
2. rhdisk76
Disk Group name for the disks in customized fencing: vxfencoorddg
Disk mechanism used for customized fencing: raw
The installer initializes the disks and the disk group and deports the diskgroup on the SF Oracle RAC (application cluster) node.
10 If the CP server is configured for security, the installer sets up securecommunication between the CP server and the SF Oracle RAC (applicationcluster):
167Configuring SF Oracle RAC clusters for data integritySetting up server-based I/O fencing using installsfrac program

■ Make sure that the security configuration in the application cluster andthe CP server is the same. If CP server is configured for security, ensurethat the application cluster also runs in secure mode.
■ If the CP server is configured for security, perform the following steps:
■ Review the output as the installer verifies if the SF Oracle RAC(application cluster) nodes have already established trust with an ATroot broker.
■ If the SF Oracle RAC (application cluster) nodes and the CP server usedifferent AT root brokers, enter y at the installer prompt and providethe following information:
■ Hostname for the authentication broker for any one of the CPservers
■ Port number where the authentication broker for the CP server islistening for establishing trust
■ Hostname for the authentication broker for any one of the SF OracleRAC (application cluster) nodes
■ Port number where the authentication broker for the SF OracleRAC (application cluster) is listening for establishing trust
After the installer establishes trust between the authentication brokersof the CP servers and the application cluster nodes, press Enter tocontinue.
11 Verify and confirm the I/O fencing configuration information.
CPS Admin utility location: /opt/VRTScps/bin/cpsadm
Cluster ID: 2122
Cluster Name: rac_cluster101
UUID for the above cluster: {ae5e589a-1dd1-11b2-dd44-00144f79240c}
Configuring SF Oracle RAC clusters for data integritySetting up server-based I/O fencing using installsfrac program
168

12 Review the output as the installer updates the application cluster informationon each of the CP servers to ensure connectivity between them. The installerthen populates the /etc/vxfenmode file with the appropriate details in eachof the application cluster nodes.
Updating client cluster information on CP Server 10.210.80.199
Adding the client cluster to the CP Server 10.210.80.199 .................. Done
Registering client node galaxy with CP Server 10.210.80.199.............. Done
Adding CPClient user for communicating to CP Server 10.210.80.199 ......... Done
Adding cluster rac_cluster101 to the CPClient user on CP Server 10.210.80.199 ... Done
Registering client node nebula with CP Server 10.210.80.199 ............. Done
Adding CPClient user for communicating to CP Server 10.210.80.199 ......... Done
Adding cluster rac_cluster101 to the CPClient user on CP Server 10.210.80.199 ... Done
Updating /etc/vxfenmode file on galaxy .................................. Done
Updating /etc/vxfenmode file on nebula ......... ........................ Done
See “About I/O fencing configuration files” on page 616.
13 Configure the CP agent on the SF Oracle RAC (application cluster).
Do you want to configure CP Agent on the client cluster? [y,n,q]
(y)
Enter a non-existing name for the service group for CP Agent:
[b] (vxfen)
Adding CP Agent via galaxy ........................ Done
14 Review the output as the installer stops and restarts the VCS and the fencingprocesses on each application cluster node, and completes the I/O fencingconfiguration.
15 Note the location of the configuration log files, summary files, and responsefiles that the installer displays for later use.
169Configuring SF Oracle RAC clusters for data integritySetting up server-based I/O fencing using installsfrac program

To configure server-based fencing for the SF Oracle RAC cluster (single CP server)
1 Make sure that the CP server is configured and is reachable from the SF OracleRAC cluster. The SF Oracle RAC cluster is also referred to as the applicationcluster or the client cluster.
See “Setting up the CP server” on page 106.
2 Start the installsfrac program with -fencing option.
# /opt/VRTS/install/installsfrac -fencing
The installsfrac program starts with a copyright message and verifies thecluster information.
Note the location of log files which you can access in the event of any problemwith the configuration process.
3 Confirm that you want to proceed with the I/O fencing configuration at theprompt.
The program checks that the local node running the script can communicatewith remote nodes and checks whether SF Oracle RAC 5.1 Service Pack 1Platform Release 1 is configured properly.
4 Review the I/O fencing configuration options that the program presents.Type 1 to configure server-based I/O fencing.
Select the fencing mechanism to be configured in this
Application Cluster [1-3,b,q] 1
5 Make sure that the storage supports SCSI3-PR, and answer y at the followingprompt.
Does your storage environment support SCSI3 PR? [y,n,q] (y)
6 Enter the total number of coordination points as 1.
Enter the total number of co-ordination points including both
CP servers and disks: [b] (3) 1
Read the installer warning carefully before you proceed with the configuration.
7 Provide the following CP server details at the installer prompt:
■ Enter the virtual IP address or the host name of the virtual IP address forthe CP server. The installer assumes these values to be identical as viewedfrom all the application cluster nodes.
Configuring SF Oracle RAC clusters for data integritySetting up server-based I/O fencing using installsfrac program
170
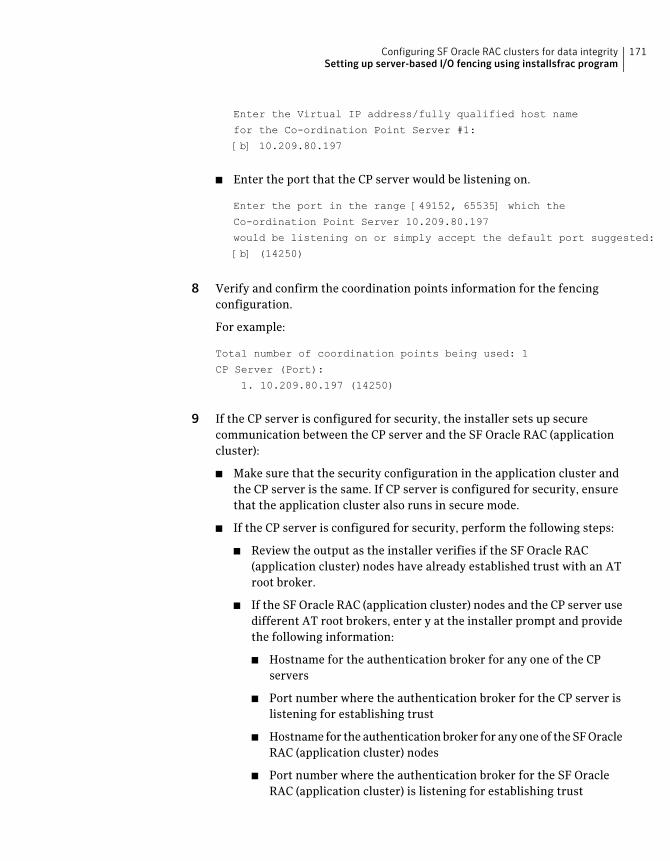
Enter the Virtual IP address/fully qualified host name
for the Co-ordination Point Server #1:
[b] 10.209.80.197
■ Enter the port that the CP server would be listening on.
Enter the port in the range [49152, 65535] which the
Co-ordination Point Server 10.209.80.197
would be listening on or simply accept the default port suggested:
[b] (14250)
8 Verify and confirm the coordination points information for the fencingconfiguration.
For example:
Total number of coordination points being used: 1
CP Server (Port):
1. 10.209.80.197 (14250)
9 If the CP server is configured for security, the installer sets up securecommunication between the CP server and the SF Oracle RAC (applicationcluster):
■ Make sure that the security configuration in the application cluster andthe CP server is the same. If CP server is configured for security, ensurethat the application cluster also runs in secure mode.
■ If the CP server is configured for security, perform the following steps:
■ Review the output as the installer verifies if the SF Oracle RAC(application cluster) nodes have already established trust with an ATroot broker.
■ If the SF Oracle RAC (application cluster) nodes and the CP server usedifferent AT root brokers, enter y at the installer prompt and providethe following information:
■ Hostname for the authentication broker for any one of the CPservers
■ Port number where the authentication broker for the CP server islistening for establishing trust
■ Hostname for the authentication broker for any one of the SF OracleRAC (application cluster) nodes
■ Port number where the authentication broker for the SF OracleRAC (application cluster) is listening for establishing trust
171Configuring SF Oracle RAC clusters for data integritySetting up server-based I/O fencing using installsfrac program
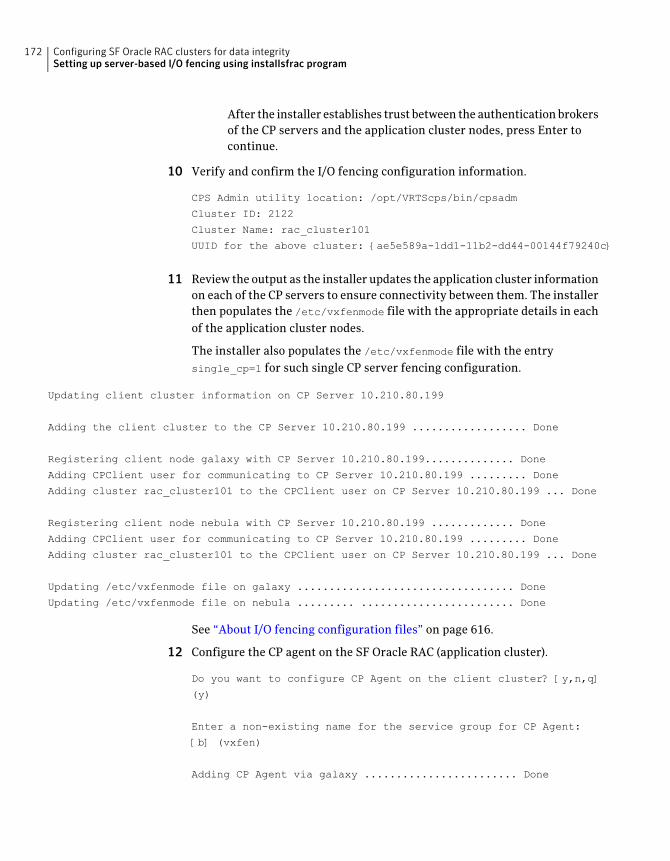
After the installer establishes trust between the authentication brokersof the CP servers and the application cluster nodes, press Enter tocontinue.
10 Verify and confirm the I/O fencing configuration information.
CPS Admin utility location: /opt/VRTScps/bin/cpsadm
Cluster ID: 2122
Cluster Name: rac_cluster101
UUID for the above cluster: {ae5e589a-1dd1-11b2-dd44-00144f79240c}
11 Review the output as the installer updates the application cluster informationon each of the CP servers to ensure connectivity between them. The installerthen populates the /etc/vxfenmode file with the appropriate details in eachof the application cluster nodes.
The installer also populates the /etc/vxfenmode file with the entrysingle_cp=1 for such single CP server fencing configuration.
Updating client cluster information on CP Server 10.210.80.199
Adding the client cluster to the CP Server 10.210.80.199 .................. Done
Registering client node galaxy with CP Server 10.210.80.199.............. Done
Adding CPClient user for communicating to CP Server 10.210.80.199 ......... Done
Adding cluster rac_cluster101 to the CPClient user on CP Server 10.210.80.199 ... Done
Registering client node nebula with CP Server 10.210.80.199 ............. Done
Adding CPClient user for communicating to CP Server 10.210.80.199 ......... Done
Adding cluster rac_cluster101 to the CPClient user on CP Server 10.210.80.199 ... Done
Updating /etc/vxfenmode file on galaxy .................................. Done
Updating /etc/vxfenmode file on nebula ......... ........................ Done
See “About I/O fencing configuration files” on page 616.
12 Configure the CP agent on the SF Oracle RAC (application cluster).
Do you want to configure CP Agent on the client cluster? [y,n,q]
(y)
Enter a non-existing name for the service group for CP Agent:
[b] (vxfen)
Adding CP Agent via galaxy ........................ Done
Configuring SF Oracle RAC clusters for data integritySetting up server-based I/O fencing using installsfrac program
172

13 Review the output as the installer stops and restarts VCS with the fencingprocesses on each application cluster node, and completes the I/O fencingconfiguration.
14 Note the location of the configuration log files, summary files, and responsefiles that the installer displays for later use.
Setting up server-based I/O fencing manuallyTasks that are involved in setting up server-based I/O fencing manually include:
Table 9-2 Tasks to set up server-based I/O fencing manually
DescriptionAction
See “Preparing the CP servers manually for use by the SFOracle RAC cluster” on page 173.
Preparing the CP servers foruse by the SF Oracle RACcluster
See “Configuring server-based fencing on the SF OracleRAC cluster manually” on page 177.
Modifying I/O fencingconfiguration files to configureserver-based I/O fencing
See “Modifying VCS configuration to use I/O fencing”on page 158.
Modifying SF Oracle RACconfiguration to use I/Ofencing
See “Configuring Coordination Point agent to monitorcoordination points” on page 181.
Configuring Coordination Pointagent to monitor coordinationpoints
See “Verifying server-based I/O fencing configuration”on page 183.
Verifying the server-based I/Ofencing configuration
Preparing the CP servers manually for use by the SF Oracle RAC clusterUse this procedure to manually prepare the CP server for use by the SF OracleRAC cluster or clusters.
Table 9-3 displays the sample values used in this procedure.
Table 9-3 Sample values in procedure
Sample nameCP server configuration component
mycps1.symantecexample.comCP server
galaxyNode #1 - SF Oracle RAC cluster
173Configuring SF Oracle RAC clusters for data integritySetting up server-based I/O fencing manually

Table 9-3 Sample values in procedure (continued)
Sample nameCP server configuration component
nebulaNode #2 - SF Oracle RAC cluster
rac_cluster101Cluster name
{f0735332-1dd1-11b2}Cluster UUID
To manually configure CP servers for use by the SF Oracle RAC cluster
1 Determine the cluster name and uuid on the SF Oracle RAC cluster.
For example, issue the following commands on one of the SF Oracle RACcluster nodes (galaxy):
# grep cluster /etc/VRTSvcs/conf/config/main.cf
cluster rac_cluster101
# cat /etc/vx/.uuids/clusuuid
{f0735332-1dd1-11b2}
2 Use the cpsadm command to check whether the SF Oracle RAC cluster andnodes are present in the CP server.
For example:
# cpsadm -s mycps1.symantecexample.com -a list_nodes
ClusName UUID Hostname(Node ID) Registered
rac_cluster101 {f0735332-1dd1-11b2} galaxy(0) 0
rac_cluster101 {f0735332-1dd1-11b2} nebula(1) 0
If the output does not show the cluster and nodes, then add them as describedin the next step.
For detailed information about the cpsadm command, see theVeritas StorageFoundation for Oracle RAC Administrator's Guide.
Configuring SF Oracle RAC clusters for data integritySetting up server-based I/O fencing manually
174
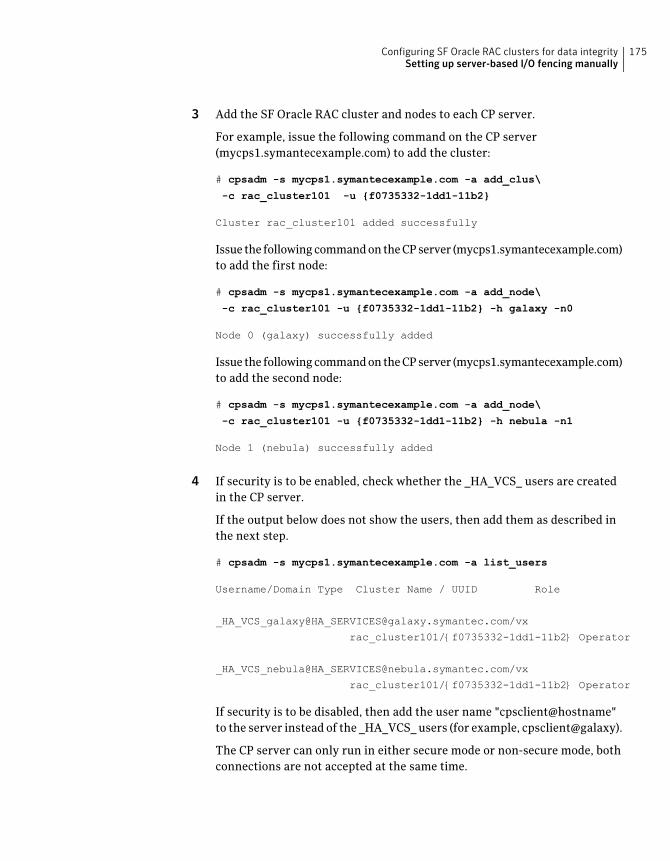
3 Add the SF Oracle RAC cluster and nodes to each CP server.
For example, issue the following command on the CP server(mycps1.symantecexample.com) to add the cluster:
# cpsadm -s mycps1.symantecexample.com -a add_clus\
-c rac_cluster101 -u {f0735332-1dd1-11b2}
Cluster rac_cluster101 added successfully
Issue the following command on the CP server (mycps1.symantecexample.com)to add the first node:
# cpsadm -s mycps1.symantecexample.com -a add_node\
-c rac_cluster101 -u {f0735332-1dd1-11b2} -h galaxy -n0
Node 0 (galaxy) successfully added
Issue the following command on the CP server (mycps1.symantecexample.com)to add the second node:
# cpsadm -s mycps1.symantecexample.com -a add_node\
-c rac_cluster101 -u {f0735332-1dd1-11b2} -h nebula -n1
Node 1 (nebula) successfully added
4 If security is to be enabled, check whether the _HA_VCS_ users are createdin the CP server.
If the output below does not show the users, then add them as described inthe next step.
# cpsadm -s mycps1.symantecexample.com -a list_users
Username/Domain Type Cluster Name / UUID Role
_HA_VCS_galaxy@[email protected]/vx
rac_cluster101/{f0735332-1dd1-11b2} Operator
_HA_VCS_nebula@[email protected]/vx
rac_cluster101/{f0735332-1dd1-11b2} Operator
If security is to be disabled, then add the user name "cpsclient@hostname"to the server instead of the _HA_VCS_ users (for example, cpsclient@galaxy).
The CP server can only run in either secure mode or non-secure mode, bothconnections are not accepted at the same time.
175Configuring SF Oracle RAC clusters for data integritySetting up server-based I/O fencing manually

5 Add the users to the CP server.
First, determine the user@domain to be added on the SF Oracle RAC cluster(application cluster).
The user for fencing should be of the form _HA_VCS_short-hostname anddomain name is that of HA_SERVICES user in the output of command:
# /opt/VRTScps/bin/cpsat listpd -t local
Next, issue the following commands on the CP server(mycps1.symantecexample.com):
# cpsadm -s mycps1.symantecexample.com -a add_user -e\
_HA_VCS_galaxy@[email protected]\
-f cps_operator -g vx
User _HA_VCS_galaxy@[email protected]
successfully added
# cpsadm -s mycps1.symantecexample.com -a add_user -e\
_HA_VCS_nebula@[email protected]\
-f cps_operator -g vx
User _HA_VCS_nebula@[email protected]
successfully added
Configuring SF Oracle RAC clusters for data integritySetting up server-based I/O fencing manually
176

6 Authorize the CP server user to administer the SF Oracle RAC cluster. Youmust perform this task for the CP server users corresponding to each nodein the SF Oracle RAC cluster.
For example, issue the following command on the CP server(mycps1.symantecexample.com) for SF Oracle RAC cluster rac_cluster101with two nodes galaxy and nebula:
# cpsadm -s mycps1.symantecexample.com -a\
add_clus_to_user -c rac_cluster101\
-u {f0735332-1dd1-11b2}\
-e _HA_VCS_galaxy@[email protected]\
-f cps_operator -g vx
Cluster successfully added to user
_HA_VCS_galaxy@[email protected] privileges.
# cpsadm -s mycps1.symantecexample.com -a\
add_clus_to_user -c rac_cluster101\
-u {f0735332-1dd1-11b2}\
-e _HA_VCS_nebula@[email protected]\
-f cps_operator -g vx
Cluster successfully added to user
_HA_VCS_nebula@[email protected] privileges.
Configuring server-based fencing on the SF Oracle RAC cluster manuallyThe configuration process for the client or SF Oracle RAC cluster to use CP serveras a coordination point requires editing the /etc/vxfenmode file.
You need to edit this file to specify the following information for yourconfiguration:
■ Fencing mode
■ Fencing mechanism
■ Fencing disk policy (if applicable to your I/O fencing configuration)
■ Appropriate value for the security configuration
■ CP server or CP servers
■ Coordinator disk group (if applicable to your I/O fencing configuration)
177Configuring SF Oracle RAC clusters for data integritySetting up server-based I/O fencing manually

Note: Whenever coordinator disks are used as coordination points in your I/Ofencing configuration, you must create a disk group (vxfendg). You must specifythis disk group in the /etc/vxfenmode file.
See “Setting up coordinator disk groups” on page 156.
The customized fencing framework also generates the /etc/vxfentab file whichhas security setting and the coordination points (all the CP servers and disks fromdisk group specified in /etc/vxfenmode file).
To configure server-based fencing on the SF Oracle RAC cluster manually
1 Use a text editor to edit the following file on each node in the cluster:
/etc/default/vxfen
You must change the values of the VXFEN_START and the VXFEN_STOPenvironment variables to 1.
2 Use a text editor to edit the /etc/vxfenmode file values to meet yourconfiguration specifications.
If your server-based fencing configuration uses a single highly available CPserver as its only coordination point, make sure to add the single_cp=1 entryin the /etc/vxfenmode file.
The following sample file output displays what the /etc/vxfenmode filecontains:
See “Sample vxfenmode file output” on page 178.
3 After editing the/etc/vxfenmode file, run the vxfen init script to start fencing.
For example:
# /etc/init.d/vxfen.rc start
Sample vxfenmode file outputThe following sample file output displays
#
# vxfen_mode determines in what mode VCS I/O Fencing should work.
#
# available options:
# scsi3 - use scsi3 persistent reservation disks
# customized - use script based customized fencing
# disabled - run the driver but don't do any actual fencing
#
Configuring SF Oracle RAC clusters for data integritySetting up server-based I/O fencing manually
178

vxfen_mode=customized
# vxfen_mechanism determines the mechanism for customized I/O
# fencing that should be used.
#
# available options:
# cps - use a coordination point server with optional script
# controlled scsi3 disks
#
vxfen_mechanism=cps
#
# scsi3_disk_policy determines the way in which I/O Fencing
# communicates with the coordination disks. This field is
# required only if customized coordinator disks are being used.
#
# available options:
# dmp - use dynamic multipathing
# raw - connect to disks using the native interface
#
scsi3_disk_policy=dmp
# security when enabled uses secure communication to the cp server
# using VxAT (Veritas Authentication Service)
# available options:
# 0 - don't use Veritas Authentication Service for cp server
# communication
# 1 - use Veritas Authentication Service for cp server
# communication
security=1
#
# Specify 3 or more odd number of coordination points in this file,
# one in each row. They can be all-CP servers, all-SCSI-3 compliant
# coordinator disks, or a combination of CP servers and SCSI-3
# compliant coordinator disks. Please ensure that the CP server
# coordination points are numbered sequentially and in the same
# order on all the cluster nodes.
#
# Coordination Point Server(CPS) is specified as:
#
# cps<number>=<Virtual IP/ Virtual hostname of cp server> in
# square brackets ([]), followed by ":" and CPS port number.
179Configuring SF Oracle RAC clusters for data integritySetting up server-based I/O fencing manually

#
# Examples:
# cps1=[192.168.0.23]:14250
# cps2=[mycps.company.com]:14250
#
# SCSI-3 compliant coordinator disks are specified as:
#
# vxfendg=<coordinator disk group name>
# Example:
# vxfendg=vxfencoorddg
#
# Examples of different configurations:
# 1. All CP server coordination points
# cps1=
# cps2=
# cps3=
#
# 2. A combination of CP server and a disk group having two SCSI-3
# coordinator disks
# cps1=
# vxfendg=
# Note: The disk group specified in this case should have two disks
#
# 3. All SCSI-3 coordinator disks
# vxfendg=
# Note: The disk group specified in case should have three disks
#
Table 9-4 defines the vxfenmode parameters that must be edited.
Table 9-4 vxfenmode file parameters
Descriptionvxfenmode FileParameter
Fencing mode of operation. This parameter must be set to“customized”.
vxfen_mode
Fencing mechanism. This parameter defines the mechanismthat is used for fencing. If one of the three coordination pointsis a CP server, then this parameter must be set to “cps”.
vxfen_mechanism
Configure the vxfen module to use either DMP devices, "dmp"or the underlying raw character devices, "raw".
Note: The configured disk policy is applied on all the nodes.
scsi3_disk_policy
Configuring SF Oracle RAC clusters for data integritySetting up server-based I/O fencing manually
180

Table 9-4 vxfenmode file parameters (continued)
Descriptionvxfenmode FileParameter
Security parameter 1 indicates that Symantec ProductAuthentication Service is used for CP server communications.
Security parameter 0 indicates that communication with theCP server is made in non-secure mode.
The default security value is 1.
Note: Symantec only supports a configuration where boththe CP server and client sides have the same security setting.The security setting on both sides must be either enabled ordisabled.
security
Coordination point parameters.
Enter either the Virtual IP address or FQHN (whichever isaccessible) of the CP server.
Note: Whenever coordinator disks are used in an I/O fencingconfiguration, a disk group has to be created (vxfendg) andspecified in the /etc/vxfenmode file. Additionally, thecustomized fencing framework also generates the/etc/vxfentab file which specifies the security setting and thecoordination points (all the CP servers and the disks from diskgroup specified in /etc/vxfenmode file).
cps1, cps2, cps3, orvxfendg
Value 1 for single_cp parameter indicates that theserver-based fencing uses a single highly available CP serveras its only coordination point.
Value 0 for single_cp parameter indicates that theserver-based fencing uses at least three coordination points.
single_cp
Configuring Coordination Point agent to monitor coordination pointsThe following procedure describes how to manually configure the CoordinationPoint agent to monitor coordination points (CP server or SCSI-3 disks).
181Configuring SF Oracle RAC clusters for data integritySetting up server-based I/O fencing manually

To configure Configuration Point agent to monitor coordination points
1 Ensure that your SF Oracle RAC cluster has been properly installed andconfigured with fencing enabled.
2 Create a parallel service group vxfen and add a coordpoint resource to thevxfen service group using the following commands:
# haconf -makerw
# hagrp -add vxfen
# hagrp -modify vxfen SystemList galaxy 0 nebula 1
# hagrp -modify vxfen AutoFailOver 0
# hagrp -modify vxfen Parallel 1
# hagrp -modify vxfen SourceFile "./main.cf"
# hares -add coordpoint CoordPoint vxfen
# hares -modify coordpoint FaultTolerance 1
# hares -modify coordpoint Enabled 1
# haconf -dump -makero
Configuring SF Oracle RAC clusters for data integritySetting up server-based I/O fencing manually
182

3 Verify the status of the agent on the SF Oracle RAC cluster using the hares
commands. For example:
# hares -state coordpoint
The following is an example of the command and output:
# hares -state coordpoint
# Resource Attribute System Value
coordpoint State galaxy ONLINE
coordpoint State nebula ONLINE
4 Access the engine log to view the agent log. The agent log is written to theengine log.
The agent log contains detailed Coordination Point agent monitoringinformation; including information about whether the Coordination Pointagent is able to access all the coordination points, information to check onwhich coordination points the Coordination Point agent is reporting missingkeys, etc.
To view all such information in the engine log, change the dbg level for thatnode using the following commands:
# haconf -makerw
# hatype -modify Coordpoint LogDbg 10
# haconf -dump -makero
The agent log can now be viewed at the following location:
/var/VRTSvcs/log/engine_A.log
See the Veritas Cluster Server Bundled Agents Reference Guide for moreinformation on the agent.
Verifying server-based I/O fencing configurationFollow the procedure described below to verify your server-based I/O fencingconfiguration.
183Configuring SF Oracle RAC clusters for data integritySetting up server-based I/O fencing manually

To verify the server-based I/O fencing configuration
1 Verify that the I/O fencing configuration was successful by running thevxfenadm command.
For example, run the following command:
# vxfenadm -d
Note: For troubleshooting any server-based I/O fencing configuration issues,refer to theVeritas StorageFoundation forOracleRACAdministrator'sGuide.
2 Verify that I/O fencing is using the specified coordination points by runningthe vxfenconfig command.
For example, run the following command:
# vxfenconfig -l
If the output displays single_cp=1, it indicates that the application clusteruses a CP server as the single coordination point for server-based fencing.
Configuring SF Oracle RAC clusters for data integritySetting up server-based I/O fencing manually
184

Performingpost-installation andconfiguration tasks
This chapter includes the following topics:
■ About enabling LDAP authentication for clusters that run in secure mode
■ Configuring Veritas Volume Replicator
■ Verifying SF Oracle RAC installation using VCS configuration file
■ Verifying LLT, GAB, and cluster operation
■ Running VRTSexplorer to diagnose issues in the cluster
About enabling LDAP authentication for clusters thatrun in secure mode
Symantec Product Authentication Service (AT) supports LDAP (LightweightDirectory Access Protocol) user authentication through a plug-in for theauthentication broker. AT supports all common LDAP distributions such as SunDirectory Server, Netscape, OpenLDAP, and Windows Active Directory.
For a cluster that runs in secure mode, you must enable the LDAP authenticationplug-in if the VCS users belong to an LDAP domain.
See “Enabling LDAP authentication for clusters that run in secure mode”on page 187.
If you have not already added VCS users during installation, you can add the userslater.
10Chapter

See the Veritas Cluster Server Administrator's Guide for instructions to add VCSusers.
Figure 10-1 depicts the SF Oracle RAC cluster communication with the LDAPservers when clusters run in secure mode.
Figure 10-1 Client communication with LDAP servers
VCS node(authentication broker)
VCS client
1. When a user runs HAcommands, AT initiates userauthentication with theauthentication broker.
4. AT issues the credentials to theuser to proceed with thecommand.
2. Authentication broker on VCSnode performs an LDAP bindoperation with the LDAP directory.
3. Upon a successful LDAP bind,AT retrieves group informationfrom the LDAP direcory.
LDAP server (such asOpenLDAP or WindowsActive Directory)
See the Symantec Product Authentication Service Administrator’s Guide.
The LDAP schema and syntax for LDAP commands (such as, ldapadd, ldapmodify,and ldapsearch) vary based on your LDAP implementation.
Before adding the LDAP domain in Symantec Product Authentication Service,note the following information about your LDAP environment:
■ The type of LDAP schema used (the default is RFC 2307)
■ UserObjectClass (the default is posixAccount)
■ UserObject Attribute (the default is uid)
■ User Group Attribute (the default is gidNumber)
■ Group Object Class (the default is posixGroup)
■ GroupObject Attribute (the default is cn)
Performing post-installation and configuration tasksAbout enabling LDAP authentication for clusters that run in secure mode
186

■ Group GID Attribute (the default is gidNumber)
■ Group Membership Attribute (the default is memberUid)
■ URL to the LDAP Directory
■ Distinguished name for the user container (for example,UserBaseDN=ou=people,dc=comp,dc=com)
■ Distinguished name for the group container (for example,GroupBaseDN=ou=group,dc=comp,dc=com)
Enabling LDAP authentication for clusters that run in secure modeThe following procedure shows how to enable the plug-in module for LDAPauthentication. This section provides examples for OpenLDAP and WindowsActive Directory LDAP distributions.
Before you enable the LDAP authentication, complete the following steps:
■ Make sure that the cluster runs in secure mode.
# haclus -value SecureClus
The output must return the value as 1.
■ Make sure that the AT version is 5.0.32.0 or later.
# /opt/VRTSat/bin/vssat showversion
vssat version: 5.0.32.0
See the vssat.1m and the atldapconf.1m manual pages.
187Performing post-installation and configuration tasksAbout enabling LDAP authentication for clusters that run in secure mode

To enable OpenLDAP authentication for clusters that run in secure mode
1 Add the LDAP domain to the AT configuration using the vssat command.
The following example adds the LDAP domain, MYENTERPRISE:
# /opt/VRTSat/bin/vssat addldapdomain \
--domainname "MYENTERPRISE.symantecdomain.com"\
--server_url "ldap://my_openldap_host.symantecexample.com"\
--user_base_dn "ou=people,dc=symantecdomain,dc=myenterprise,dc=com"\
--user_attribute "cn" --user_object_class "account"\
--user_gid_attribute "gidNumber"\
--group_base_dn "ou=group,dc=symantecdomain,dc=myenterprise,dc=com"\
--group_attribute "cn" --group_object_class "posixGroup"\
--group_gid_attribute "member"\
--admin_user "cn=manager,dc=symantecdomain,dc=myenterprise,dc=com"\
--admin_user_password "password" --auth_type "FLAT"
2 Verify that you can successfully authenticate an LDAP user on the SF OracleRAC nodes.
You must have a valid LDAP user ID and password to run the command. Inthe following example, authentication is verified for the MYENTERPRISEdomain for the LDAP user, vcsadmin1.
galaxy# /opt/VRTSat/bin/vssat authenticate
--domain ldap:MYENTERPRISE.symantecdomain.com
--prplname vcsadmin1 --broker galaxy:2821
Enter password for vcsadmin1: ##########
authenticate
----------------------
----------------------
Authenticated User vcsadmin1
----------------------
Performing post-installation and configuration tasksAbout enabling LDAP authentication for clusters that run in secure mode
188

3 Add the LDAP user to the main.cf file.
# haconf makerw
# hauser -add "CN=vcsadmin1/CN=people/\
DC=symantecdomain/DC=myenterprise/\
[email protected]" -priv Administrator
# haconf -dump -makero
If you want to enable group-level authentication, you must run the followingcommand:
# hauser -addpriv \
ldap_group@ldap_domain AdministratorGroup
4 Verify that the main.cf file has the following lines:
# cat /etc/VRTSvcs/conf/config/main.cf
...
...
cluster rac_cluster101 (
SecureClus = 1
Administrators = {
"CN=vcsadmin1/CN=people/DC=symantecdomain/DC=myenterprise/
AdministratorGroups = {
"CN=symantecusergroups/DC=symantecdomain/DC=myenterprise/
)
...
...
5 Set the VCS_DOMAIN and VCS_DOMAINTYPE environment variables asfollows:
■ VCS_DOMAIN=myenterprise.symantecdomain.com
■ VCS_DOMAINTYPE=ldap
For example, for the Bourne Shell (sh or ksh), run the following commands:
# export VCS_DOMAIN=myenterprise.symantecdomain.com
# export VCS_DOMAINTYPE=ldap
189Performing post-installation and configuration tasksAbout enabling LDAP authentication for clusters that run in secure mode

6 Verify that you can log on to VCS. For example
# halogin vcsadmin1 password
# hasys -state
VCS NOTICE V-16-1-52563 VCS Login:vcsadmin1
#System Attribute Value
galaxy Attribute RUNNING
nebula Attribute RUNNING
Similarly, you can use the same LDAP user credentials to log on to the SFOracle RAC node using the VCS Cluster Manager (Java Console).
7 To enable LDAP authentication on other nodes in the cluster, perform theprocedure on each of the nodes in the cluster.
Performing post-installation and configuration tasksAbout enabling LDAP authentication for clusters that run in secure mode
190

To enable Windows Active Directory authentication for clusters that run in securemode
1 Run the LDAP configuration tool atldapconf using the -d option. The -d optiondiscovers and retrieves an LDAP properties file which is a prioritized attributelist.
# /opt/VRTSat/bin/atldapconf -d
-s domain_controller_name_or_ipaddress
-u domain_user -g domain_group
For example:
# /opt/VRTSat/bin/atldapconf -d -s 192.168.20.32 \
-u Administrator -g "Domain Admins"
Search User provided is invalid or Authentication is required to
proceed further.
Please provide authentication information for LDAP server.
Username/Common Name: symantecdomain\administrator
Password:
Attribute file created.
2 Run the LDAP configuration tool atldapconf using the -c option. The -c optioncreates a CLI file to add the LDAP domain.
# /opt/VRTSat/bin/atldapconf -c -d windows_domain_name
For example:
# /opt/VRTSat/bin/atldapconf -c -d symantecdomain.com
Attribute list file not provided, using default AttributeList.txt.
CLI file name not provided, using default CLI.txt.
CLI for addldapdomain generated.
3 Run the LDAP configuration tool atldapconf using the -x option. The -x optionreads the CLI file and executes the commands to add a domain to the AT.
# /opt/VRTSat/bin/atldapconf -x
191Performing post-installation and configuration tasksAbout enabling LDAP authentication for clusters that run in secure mode

4 List the LDAP domains to verify that the Windows Active Directory serverintegration is complete.
# /opt/VRTSat/bin/vssat listldapdomains
Domain Name : symantecdomain.com
Server URL : ldap://192.168.20.32:389
SSL Enabled : No
User Base DN : CN=people,DC=symantecdomain,DC=com
User Object Class : account
User Attribute : cn
User GID Attribute : gidNumber
Group Base DN : CN=group,DC=symantecdomain,DC=com
Group Object Class : group
Group Attribute : cn
Group GID Attribute : cn
Auth Type : FLAT
Admin User :
Admin User Password :
Search Scope : SUB
5 Set the VCS_DOMAIN and VCS_DOMAINTYPE environment variables asfollows:
■ VCS_DOMAIN=symantecdomain.com
■ VCS_DOMAINTYPE=ldap
For example, for the Bourne Shell (sh or ksh), run the following commands:
# export VCS_DOMAIN=symantecdomain.com
# export VCS_DOMAINTYPE=ldap
Performing post-installation and configuration tasksAbout enabling LDAP authentication for clusters that run in secure mode
192

6 Verify that you can log on to VCS. For example
# halogin vcsadmin1 password
# hasys -state
VCS NOTICE V-16-1-52563 VCS Login:vcsadmin1
#System Attribute Value
galaxy Attribute RUNNING
nebula Attribute RUNNING
Similarly, you can use the same LDAP user credentials to log on to the SFOracle RAC node using the VCS Cluster Manager (Java Console).
7 To enable LDAP authentication on other nodes in the cluster, perform theprocedure on each of the nodes in the cluster.
Configuring Veritas Volume ReplicatorPerform this step only if you have not already configured VVR during theinstallation.
By default, the installer installs the required VVR configuration files irrespectiveof whether or not you choose to enable VVR. To configure VVR manually in SFOracle RAC, simply start VVR using the vxstart_vvr command . The commandstarts the VVR daemons and configures the ports. You may change the defaultsettings at any time.
For instructions on changing the default settings, see theVeritasVolumeReplicatorAdministrator's Guide.
To configure VVR
1 Log into each node in the cluster as the root user.
2 Start VVR:
# vxstart_vvr start
VxVM VVR INFO V-5-2-3935 Using following ports:
heartbeat: 4145
vradmind: 8199
vxrsyncd: 8989
data: Anonymous-Ports
To change, see vrport(1M) command
VxVM VVR V-5-2-3728 Starting Communication daemon: [OK]
VxVM VVR V-5-4-2415 Starting VRAS daemon: [OK]
VxVM VVR V-5-4-2415 Starting VxRSyncd daemon: [OK]
193Performing post-installation and configuration tasksConfiguring Veritas Volume Replicator

Verifying SF Oracle RAC installation using VCSconfiguration file
The configuration file, main.cf, is created on each node at/etc/VRTSvcs/conf/config/. Review the main.cf configuration file after the SFOracle RAC installation and before the Oracle installation.
Verify the following information in the main.cf file:
■ The cluster definition within the main.cf includes the cluster information thatwas provided during the configuration. The cluster information includes thecluster name, cluster address, and the names of cluster users andadministrators.
■ The UseFence = SCSI3 attribute is not automatically present; you mustmanually add it after the installation.
■ If you configured the cluster in secure mode, the main.cf includes the VxSSservice group and “SecureClus = 1” cluster attribute.
For more information on the configuration file:
See “About VCS configuration file ” on page 613.
Verifying LLT, GAB, and cluster operationVerify the operation of LLT, GAB, and the cluster using the VCS commands.
To verify LLT, GAB, and cluster operation
1 Log in to any node in the cluster as superuser.
2 Make sure that the PATH environment variable is set to run the VCScommands.
3 Verify LLT operation.
See “Verifying LLT” on page 195.
4 Verify GAB operation.
See “Verifying GAB” on page 197.
5 Verify the cluster operation.
See “Verifying the cluster” on page 198.
Performing post-installation and configuration tasksVerifying SF Oracle RAC installation using VCS configuration file
194

Verifying LLTUse the lltstat command to verify that links are active for LLT. If LLT isconfigured correctly, this command shows all the nodes in the cluster. Thecommand also returns information about the links for LLT for the node on whichyou typed the command.
Refer to the lltstat(1M) manual page for more information.
To verify LLT
1 Log in as superuser on the node galaxy.
2 Run the lltstat command on the node galaxy to view the status of LLT.
lltstat -n
The output on galaxy resembles:
LLT node information:
Node State Links
*0 galaxy OPEN 2
1 nebula OPEN 2
Each node has two links and each node is in the OPEN state. The asterisk (*)denotes the node on which you typed the command.
If LLT does not operate, the command does not return any LLT linksinformation: If only one network is connected, the command returns thefollowing LLT statistics information:
LLT node information:
Node State Links
* 0 galaxy OPEN 2
1 nebula OPEN 2
2 saturn OPEN 1
3 Log in as superuser on the node nebula.
4 Run the lltstat command on the node nebula to view the status of LLT.
lltstat -n
The output on nebula resembles:
LLT node information:
Node State Links
0 galaxy OPEN 2
*1 nebula OPEN 2
195Performing post-installation and configuration tasksVerifying LLT, GAB, and cluster operation
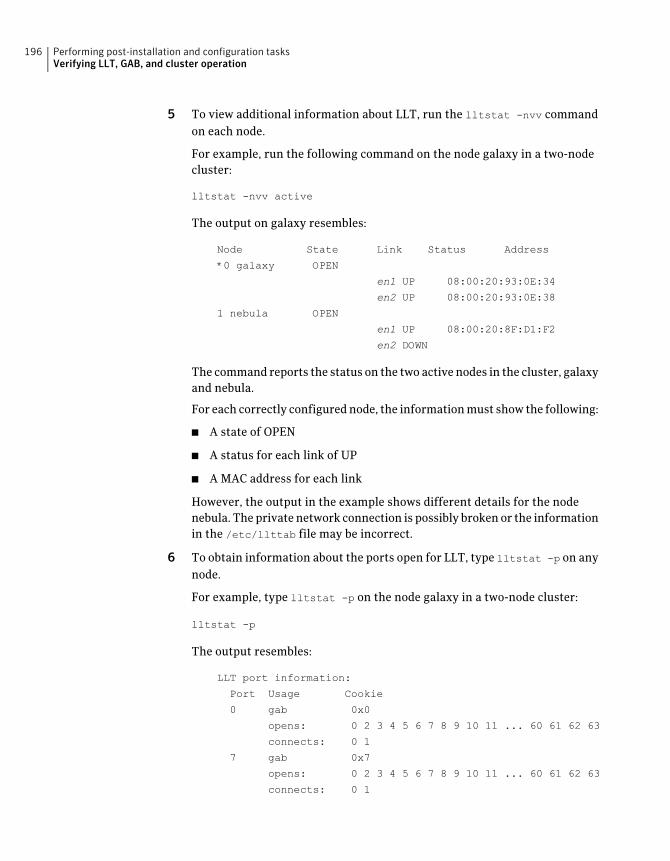
5 To view additional information about LLT, run the lltstat -nvv commandon each node.
For example, run the following command on the node galaxy in a two-nodecluster:
lltstat -nvv active
The output on galaxy resembles:
Node State Link Status Address
*0 galaxy OPEN
en1 UP 08:00:20:93:0E:34
en2 UP 08:00:20:93:0E:38
1 nebula OPEN
en1 UP 08:00:20:8F:D1:F2
en2 DOWN
The command reports the status on the two active nodes in the cluster, galaxyand nebula.
For each correctly configured node, the information must show the following:
■ A state of OPEN
■ A status for each link of UP
■ A MAC address for each link
However, the output in the example shows different details for the nodenebula. The private network connection is possibly broken or the informationin the /etc/llttab file may be incorrect.
6 To obtain information about the ports open for LLT, type lltstat -p on anynode.
For example, type lltstat -p on the node galaxy in a two-node cluster:
lltstat -p
The output resembles:
LLT port information:
Port Usage Cookie
0 gab 0x0
opens: 0 2 3 4 5 6 7 8 9 10 11 ... 60 61 62 63
connects: 0 1
7 gab 0x7
opens: 0 2 3 4 5 6 7 8 9 10 11 ... 60 61 62 63
connects: 0 1
Performing post-installation and configuration tasksVerifying LLT, GAB, and cluster operation
196

63 gab 0x1F
opens: 0 2 3 4 5 6 7 8 9 10 11 ... 60 61 62 63
connects: 0 1
Verifying GABVerify the GAB operation using the gabconfig -a command. This commandreturns the GAB port membership information. The output displays the nodesthat have membership with the modules you installed and configured.You canuse GAB port membership as a method of determining if a specific component ofthe SF Oracle RAC stack communicates with its peers.
Table 10-1 lists the different ports that the software configures for differentfunctions.
Table 10-1 GAB port description
FunctionPort
GABa
I/O fencingb
Oracle Disk Manager (ODM)d
Cluster File System (CFS)f
Veritas Cluster Server (VCS: High Availability Daemon)h
VCSMM drivero
Cluster Volume Manager (CVM)
(to ship commands from slave node to master node)
Port u in the gabconfig output is visible with CVM protocol version>= 100.
u
Cluster Volume Manager (CVM)v
vxconfigd (module for CVM)w
For more information on GAB, refer to theVeritas Cluster Server Administrator'sGuide.
197Performing post-installation and configuration tasksVerifying LLT, GAB, and cluster operation

To verify GAB
◆ To verify the GAB operation, type the following command on each node:
# /sbin/gabconfig -a
For example, the command returns the following output:
GAB Port Memberships
===============================================================
Port a gen ada401 membership 01
Port b gen ada40d membership 01
Port d gen ada409 membership 01
Port f gen ada41c membership 01
Port h gen ada40f membership 01
Port o gen ada406 membership 01
Port u gen ada41a membership 01
Port v gen ada416 membership 01
Port w gen ada418 membership 01
Verifying the clusterVerify the status of the cluster using the hastatus command. This commandreturns the system state and the group state.
Refer to the hastatus(1M) manual page.
Refer to the Veritas Cluster Server Administrator's Guide for a description ofsystem states and the transitions between them.
Performing post-installation and configuration tasksVerifying LLT, GAB, and cluster operation
198

To verify the cluster
1 To verify the status of the cluster, type the following command:
hastatus -summary
The output resembles:
-- SYSTEM STATE
-- System State Frozen
A galaxy RUNNING 0
A nebula RUNNING 0
-- GROUP STATE
-- Group System Probed AutoDisabled State
B cvm galaxy Y N ONLINE
B cvm nebula Y N ONLINE
B VxSS galaxy Y N ONLINE
B VxSS nebula Y N ONLINE
Note that the VxSS service group is displayed only if you have configured thecluster in secure mode.
2 Review the command output for the following information:
■ The system stateIf the value of the system state is RUNNING, the cluster is successfullystarted.
■ The cvm group stateIn the sample output, the group state lists the cvm group, which is ONLINEon both the nodes galaxy and nebula.
Verifying the cluster nodesVerify the information of the cluster systems using thehasys -display command.The information for each node in the output should be similar.
Refer to the hasys(1M) manual page.
Refer to the Veritas Cluster Server Administrator's Guide for information aboutthe system attributes for VCS.
To verify the cluster nodes
◆ On one of the nodes, type the hasys -display command:
199Performing post-installation and configuration tasksVerifying LLT, GAB, and cluster operation

hasys -display
The example shows the output when the command is run on the node galaxy.The list continues with similar information for nebula (not shown) and anyother nodes in the cluster.
ValueAttribute#System
0AgentsStoppedgalaxy
100AvailableCapacitygalaxy
Critical 90 Warning 80 Note 70
Info 60
CPUThresholdLevelgalaxy
0CPUUsagegalaxy
Enabled 0 ActionThreshold 0ActionTimeLimit 0 Action NONENotifyThreshold 0 NotifyTimeLimit 0
CPUUsageMonitoringgalaxy
100Capacitygalaxy
117ConfigBlockCountgalaxy
10844ConfigCheckSumgalaxy
CURRENTConfigDiskStategalaxy
/etc/VRTSvcs/conf/configConfigFilegalaxy
0ConfigInfoCntgalaxy
Wed 14 Oct 2009 17:22:48ConfigModDategalaxy
DownConnectorStategalaxy
CurrentLimitsgalaxy
DiskHbStatusgalaxy
0DynamicLoadgalaxy
0EngineRestartedgalaxy
5.1.10.0EngineVersiongalaxy
0FencingWeightgalaxy
0Frozengalaxy
Performing post-installation and configuration tasksVerifying LLT, GAB, and cluster operation
200

GUIIPAddrgalaxy
CPU 0 Swap 0HostUtilizationgalaxy
0LLTNodeIdgalaxy
DEMOLicenseTypegalaxy
Limitsgalaxy
LinkHbStatusgalaxy
0LoadTimeCountergalaxy
600LoadTimeThresholdgalaxy
80LoadWarningLevelgalaxy
0NoAutoDisablegalaxy
0NodeIdgalaxy
1OnGrpCntgalaxy
ShutdownTimeoutgalaxy
./main.cfSourceFilegalaxy
Critical 90 Warning 80 Note 70
Info 60
SwapThresholdLevelgalaxy
Aix:galaxy,5,2,00023BDA4C00SysInfogalaxy
galaxySysNamegalaxy
RUNNINGSysStategalaxy
SystemLocationgalaxy
SystemOwnergalaxy
0TFrozengalaxy
0TRSEgalaxy
UpUpDownStategalaxy
0UserIntgalaxy
UserStrgalaxy
DRVCSFeaturesgalaxy
201Performing post-installation and configuration tasksVerifying LLT, GAB, and cluster operation

VCS_RACVCSModegalaxy
Running VRTSexplorer to diagnose issues in thecluster
Perform this step if you encounter issues in your cluster environment that requireprofessional support.
VRTSexplorer, also known as Veritas Explorer, is a tool provided by Symantec togather system and configuration information from a node to diagnose or analyzeissues in the cluster. The utility is located at /opt/VRTSspt/VRTSexplorer.
Note: The utility collects only technical information such as the serverconfiguration and installed Veritas products information required to troubleshootissues. No user data is collected by the utility. For more details on the informationthat is collected by the utility, refer to the README located in the/opt/VRTSspt/VRTSexplorer directory.
To run the utility:
# cd /opt/VRTSspt/VRTSexplorer
# ./VRTSexplorer
For information on various command options, see VRTSexplorer (1M).
If you find issues in the cluster that require professional help, run the utility andsend the compressed tar file output to Symantec Technical Support to resolve theissue.
Performing post-installation and configuration tasksRunning VRTSexplorer to diagnose issues in the cluster
202

Upgrade of SF Oracle RAC
■ Chapter 11. Preparing to upgrade to SF Oracle RAC 5.1 SP1 PR1
■ Chapter 12. Performing a full upgrade to SF Oracle RAC 5.1 SP1 PR1
■ Chapter 13. Performing a phased upgrade to SF Oracle RAC 5.1 SP1 PR1
■ Chapter 14. Performing a rolling upgrade to SF Oracle RAC 5.1 SP1 PR1
■ Chapter 15. Upgrading from Storage Foundation products to SF Oracle RAC5.1 SP1 PR1
■ Chapter 16. Migrating from single instance Storage Foundation for Oracle HAto SF Oracle RAC
■ Chapter 17. Performing post-upgrade tasks
3Section

204

Preparing to upgrade to SFOracle RAC 5.1 SP1 PR1
This chapter includes the following topics:
■ About upgrading SF Oracle RAC
■ About types of upgrade
■ Supported upgrade paths
■ Preparing to upgrade to SF Oracle RAC 5.1 SP1 PR1
■ Pre-upgrade tasks for migrating the SFDB repository database
About upgrading SF Oracle RACSF Oracle RAC supports various ways of upgrading your cluster to the latestversion. Choose a method that best suits your environment and planned upgradepath.
For the supported types of upgrade:
See “About types of upgrade” on page 206.
For the supported upgrade paths:
Note: SF Oracle RAC software must be at the same version across all nodes in anSF Oracle RAC cluster after the upgrade, that is 5.1 Service Pack 1 Platform Release1.
11Chapter

About types of upgradeTable 11-1 lists the supported types of upgrade.
Table 11-1 Types of upgrade
ProceduresMethod of upgradeType of upgrade
Complete the following steps:
■ Preparing to upgrade
See “Preparing to upgrade to SF Oracle RAC5.1 SP1 PR1” on page 207.
■ Upgrading to SF Oracle RAC 5.1 SP1 PR1
See the chapter Performing a full upgradeto SF Oracle RAC 5.1 SP1 PR1.
■ Completing post-upgrade tasks
See the chapter "Performing post-upgradetasks".
Veritas script-basedinstallation programs
■ Interactive mode
■ Non-interactivemode usingresponse files
Full upgrade
Complete the steps in the chapter Performinga phased upgrade to SF Oracle RAC 5.1 SP1PR1.
Combination ofmanual steps and theVeritas script-basedinstallation programs
Phased upgrade
Complete the steps in the chapter Performinga rollingupgrade toSFOracleRAC5.1SP1PR1.
Veritas script-basedinstallation programs
Rolling upgrade
Complete the following steps:
■ Upgrading to SF Oracle RAC 5.1 SP1 PR1
See the chapterUpgrading toSFOracleRAC5.1 SP1 PR1 using an alternate disk.
■ Completing post-upgrade tasks
See the chapter "Performing post-upgradetasks".
Combination of nativeoperating systemupgrade mechanismand the Veritasscript-basedinstallation programs
Alternate DiskUpgrade
Supported upgrade pathsTable 11-2 lists the supported upgrade paths.
Preparing to upgrade to SF Oracle RAC 5.1 SP1 PR1About types of upgrade
206

Table 11-2 Supported upgrade paths
Supported upgrade typeTo SF Oracle RACversion
From SF Oracle RAC version
Full or phased upgrade5.1 SP1PR15.0 and later (includingmaintenance packs and rollingpatches on 5.0 )
Full or rolling upgrade5.1 SP1PR15.1 and later (includingmaintenance packs and rollingpatches on 5.0 )
Preparing to upgrade to SF Oracle RAC 5.1 SP1 PR1Perform the preparatory steps in this section if you are performing a full upgradeof the cluster. Before you upgrade, make sure that your systems meet the hardwareand software requirements for this release.
To prepare to upgrade SF Oracle RAC
1 Log in as superuser to one of the nodes in the cluster.
2 Back up the following configuration files on your system:main.cf, types.cf,
CVMTypes.cf, CFSTypes.cf, OracleTypes.cf, OracleASMTypes.cf, ,
PrivNIC.cf, MultiPrivNIC.cf, /etc/llttab, /etc/llthosts,
/etc/gabtab, /etc/vxfentab, /etc/vxfendg, /etc/vxfenmode
For example:
# cp /etc/VRTSvcs/conf/config/main.cf \
/etc/VRTSvcs/conf/config/main.cf.save
# cp /etc/VRTSvcs/conf/config/types.cf \
/etc/VRTSvcs/conf/config/types.cf.save
# cp /etc/VRTSvcs/conf/config/OracleTypes.cf \
/etc/VRTSvcs/conf/config/OracleTypes.cf.save
# cp /etc/VRTSvcs/conf/config/PrivNIC.cf \
/var/tmp/PrivNIC.cf.save
# cp /etc/VRTSvcs/conf/config/MultiPrivNIC.cf \
/var/tmp/MultiPrivNIC.cf.save
207Preparing to upgrade to SF Oracle RAC 5.1 SP1 PR1Preparing to upgrade to SF Oracle RAC 5.1 SP1 PR1
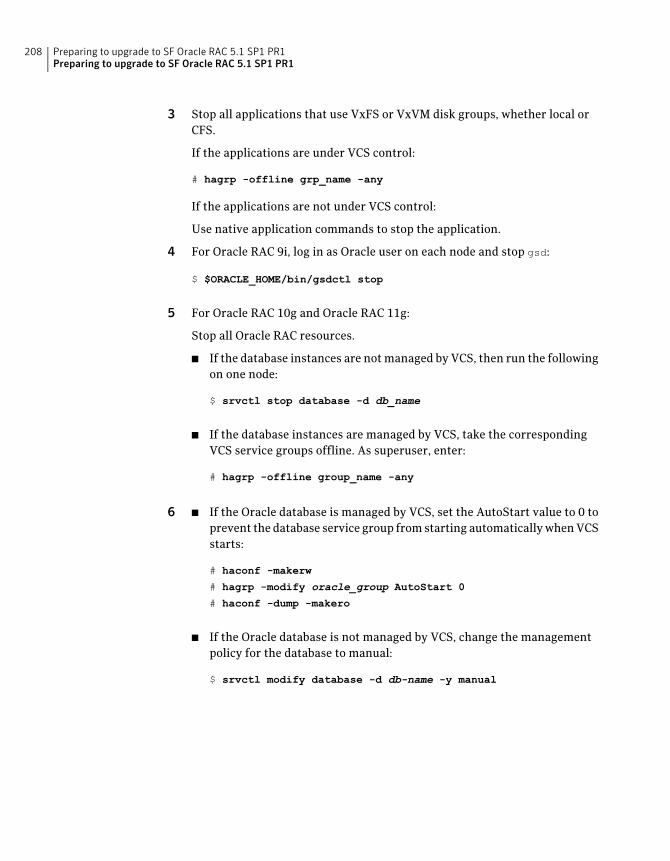
3 Stop all applications that use VxFS or VxVM disk groups, whether local orCFS.
If the applications are under VCS control:
# hagrp -offline grp_name -any
If the applications are not under VCS control:
Use native application commands to stop the application.
4 For Oracle RAC 9i, log in as Oracle user on each node and stop gsd:
$ $ORACLE_HOME/bin/gsdctl stop
5 For Oracle RAC 10g and Oracle RAC 11g:
Stop all Oracle RAC resources.
■ If the database instances are not managed by VCS, then run the followingon one node:
$ srvctl stop database -d db_name
■ If the database instances are managed by VCS, take the correspondingVCS service groups offline. As superuser, enter:
# hagrp -offline group_name -any
6 If the Oracle database is managed by VCS, set the AutoStart value to 0 toprevent the database service group from starting automatically when VCSstarts:
■
# haconf -makerw
# hagrp -modify oracle_group AutoStart 0
# haconf -dump -makero
■ If the Oracle database is not managed by VCS, change the managementpolicy for the database to manual:
$ srvctl modify database -d db-name -y manual
Preparing to upgrade to SF Oracle RAC 5.1 SP1 PR1Preparing to upgrade to SF Oracle RAC 5.1 SP1 PR1
208

7 Unmount the VxFS file system, which is not under VCS control.
# mount |grep vxfs
# fuser -c /mount_point
# umount /mount_point
Make sure that no processes are running which make use of mounted sharedfile system or shared volumes.
# fuser -cu /mount_point
8 Stop VCS on all nodes:
# hastop -all
9 If you plan to continue using the Storage Foundation for Databases (SFDB)tools, you must prepare to migrate the SFDB repository database beforeupgrading to SF Oracle RAC 5.1 SP1 PR1.
Pre-upgrade tasks formigrating the SFDB repositorydatabase
If you plan to continue using checkpoints or SmartTier for Oracle policies youcreated with a 5.0x or earlier version of Storage Foundation for Oracle RAC, youmust migrate the SFDB repository database to 5.1 Service Pack 1 Platform Release1.
If you are upgrading from 5.1 to 5.1 Service Pack 1 Platform Release 1, no upgradesteps are required for the SFDB tools.
Note: The Sfua_Base repository resource group will be removed from the main.cffile. It is not required as a separate service group for SF Oracle RAC 5.1 ServicePack 1 Platform Release 1.
Perform the following before upgrading SF Oracle RAC.
209Preparing to upgrade to SF Oracle RAC 5.1 SP1 PR1Pre-upgrade tasks for migrating the SFDB repository database
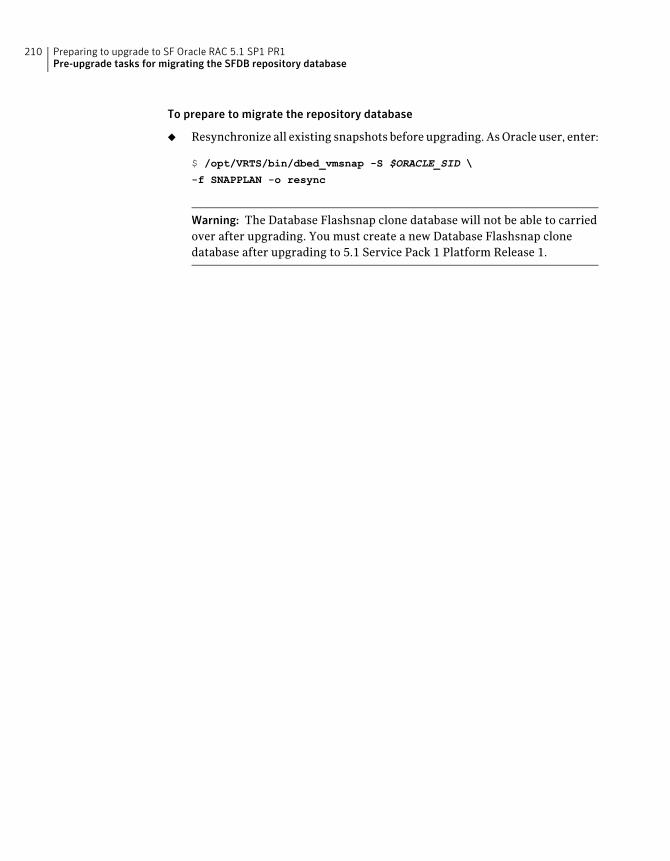
To prepare to migrate the repository database
◆ Resynchronize all existing snapshots before upgrading. As Oracle user, enter:
$ /opt/VRTS/bin/dbed_vmsnap -S $ORACLE_SID \
-f SNAPPLAN -o resync
Warning: The Database Flashsnap clone database will not be able to carriedover after upgrading. You must create a new Database Flashsnap clonedatabase after upgrading to 5.1 Service Pack 1 Platform Release 1.
Preparing to upgrade to SF Oracle RAC 5.1 SP1 PR1Pre-upgrade tasks for migrating the SFDB repository database
210
Performing a full upgradeto SF Oracle RAC 5.1 SP1PR1
This chapter includes the following topics:
■ About full upgrades
■ Upgrading to SF Oracle RAC 5.1 SP1 PR1
About full upgradesA full upgrade involves upgrading all the nodes in the cluster at the same time.The cluster remains unavailable for the duration of the upgrade.
You can perform the upgrade using one of the following Veritas script-basedinstallation programs:
■ Common product installer (installer)
The common product installer provides menu options for installing andconfiguring multiple Veritas products.
■ SF Oracle RAC installation script (installsfrac)
The SF Oracle RAC installation script provides menu options for installingand configuring SF Oracle RAC.
Note: If you obtained SF Oracle RAC from an electronic download site, youmust use the product installer (installsfrac) instead of the common productinstaller (installer).
12Chapter
You can also perform a full upgrade using a response file. You can create a responsefile using the response file template or customize an installer-generated responsefile.
Note: After you upgrade to version 5.1 SP1PR1 from version 5.1 or related 5.1rolling patches, Symantec recommends that you do not roll back to version 5.1or corresponding rolling patches.
For more information about response files:
See “About response files” on page 367.
Upgrading to SF Oracle RAC 5.1 SP1 PR1Perform the steps in the following procedure to upgrade to SF Oracle RAC 5.1 SP1PR1.
Note: If you are upgrading from SF Oracle RAC version 4.0 MP4 or earlier, firstupgrade to SF Oracle RAC version 5.0, then upgrade to SF Oracle RAC 5.1 SP1PR1.
Contact Technical Support to obtain the software media or to download thesoftware for version 5.0.
For instructions, see the Veritas Storage Foundation for Oracle RAC Installationand Configuration Guide (5.0).
To upgrade to SF Oracle RAC 5.1 SP1 PR1
1 Upgrade to SF Oracle RAC 5.1 SP1 PR1.
See “Upgrading SF Oracle RAC using the Veritas script-based installationprogram” on page 214.
You can also perform a silent upgrade:
See “Upgrading SF Oracle RAC using a response file” on page 216.
2 Upgrade the operating system, if required.
For instructions, see the operating system documentation.
After the operating system upgrade, all the nodes join the cluster; all theservices groups managed by VCS, except the Oracle service group, startautomatically.
3 Manually mount the VxFS and CFS file systems that are not managed by VCS.
Performing a full upgrade to SF Oracle RAC 5.1 SP1 PR1Upgrading to SF Oracle RAC 5.1 SP1 PR1
212

4 Relink the SF Oracle RAC libraries with Oracle.
See “Relinking Oracle RAC libraries with the SF Oracle RAC libraries”on page 257.
5 Bring the Oracle database service group online.
■ If the Oracle database is managed by VCS:
# hagrp -online oracle_group -any
■ If the Oracle database is not managed by VCS:
# srvctl start database -d db_name
6 Start all applications that are not managed by VCS. Use native applicationcommands to start the applications.
7 If the Oracle database is managed by VCS, reset the AutoStart value to 1to enable VCS to bring the database service group online automaticallywhen VCS starts:
■
# haconf -makerw
# hagrp -modify oracle_group AutoStart 1
# haconf -dump -makero
■ If the Oracle database is not managed by VCS, change the managementpolicy for the database to automatic:
$ srvctl modify database -d db_name -y AUTOMATIC
8 Complete other post-upgrade steps.
For instructions, see the chapter Performing post-upgrade tasks in thisdocument.
9 Upgrade Oracle RAC.
For instructions, see the chapter Upgrading Oracle RAC in this document.
10 If you want to upgrade VCS or SFHA 5.1 on the CP server systems to version5.1 SP1PR1, make sure you upgraded all application clusters to 5.1 SP1PR1.Then, upgrade VCS or SFHA on the CP server systems.
For instructions to upgrade VCS or SFHA on the CP server systems, see theVCS or SFHA installation guide.
213Performing a full upgrade to SF Oracle RAC 5.1 SP1 PR1Upgrading to SF Oracle RAC 5.1 SP1 PR1

Upgrading SF Oracle RAC using the Veritas script-based installationprogram
Use one of the following Veritas script-based sinstallation programs to upgradeSF Oracle RAC: installer or installsfrac
The installer performs the following tasks to upgrade SF Oracle RAC:
■ Verifies the compatibility of the systems before the upgrade.
■ Stops the SF Oracle RAC processes before the upgrade.
■ Uninstalls SF Oracle RAC.
■ Installs the SF Oracle RAC 5.1 SP1 PR1 filesets on the nodes.
■ Starts SF Oracle RAC 5.1 SP1 PR1 on all the nodes.
■ Displays the location of the log files, summary file, and response file.
During the installation, you may see the following error, which you may ignore:
VRTSgms: old driver is still loaded...
VRTSgms: You must reboot the system after installation...
Note: If you upgrade from version 5.0x, you need not manually restart the nodesin the cluster. The SF Oracle RAC processes are started automatically after theupgrade completes successfully.
If you upgrade to version 5.1 SP1PR1 from version 5.1 or related 5.1 rollingpatches, Symantec recommends that you do not roll back to version 5.1 orcorresponding rolling patches.
Performing a full upgrade to SF Oracle RAC 5.1 SP1 PR1Upgrading to SF Oracle RAC 5.1 SP1 PR1
214

To upgrade to SF Oracle RAC 5.1 SP1 PR1 using the installsfrac program
1 Start the installation program using one of the following ways:
Navigate to the directory that contains the installation program:
# cd /download_dir/sfrac
where download_dir is the directory where you downloaded thesoftware.
Run the program:
# ./installsfrac galaxy nebula
SF Oracle RACinstaller
Navigate to the directory that contains the installation program:
# cd /download_dir
where download_dir is the directory where you downloaded thesoftware.
Run the program:
# ./installer galaxy nebula
From the opening Selection Menu, choose G for "Upgrade aProduct."
From the displayed list of products, choose Veritas StorageFoundation for Oracle RAC.
Common productinstaller
The installer displays the copyright message and specifies the directory wherethe running logs are created.
215Performing a full upgrade to SF Oracle RAC 5.1 SP1 PR1Upgrading to SF Oracle RAC 5.1 SP1 PR1

2 Enter 3 to install all the SF Oracle RAC filesets.
Before you select an option, you can view the list of packages that are installedfor each option by choosing option 4.
1) Install minimal required Veritas Storage Foundation for Oracle RAC
filesets
2) Install recommended Veritas Storage Foundation for Oracle RAC
filesets
3) Install all Veritas Storage Foundation for Oracle RAC
filesets
4) Display filesets to be installed for each option
Select the filesets to be installed on all systems? [1-4,q,?] (2) 3
The installer verifies the systems for compatibility.
Review the messages displayed and make sure that you meet the requirementsbefore proceeding with the upgrade.
3 Press Enter to continue with the upgrade.
Depending on the package installation option selected, the installer displaysthe list of packages that will be installed and prompts for the stoppage of SFOracle RAC processes before the upgrade.
4 Enter y to stop the SF Oracle RAC processes.
Do you want to stop SF Oracle RAC processes now? [y,n,q,?] (y)
The installer stops the processes and uninstalls SF Oracle RAC. After theuninstallation, the installer installs SF Oracle RAC 5.1 SP1 PR1 and starts SFOracle RAC 5.1 SP1 PR1 on all the nodes.
5 Complete the remaining tasks to finish the upgrade:
See “Upgrading to SF Oracle RAC 5.1 SP1 PR1” on page 212.
Upgrading SF Oracle RAC using a response fileYou can upgrade from SF Oracle RAC version 5.0 and later using a response file.
Perform the steps in the following procedure to upgrade to SF Oracle RAC 5.1 SP1PR1 using a response file.
Performing a full upgrade to SF Oracle RAC 5.1 SP1 PR1Upgrading to SF Oracle RAC 5.1 SP1 PR1
216

To upgrade SF Oracle RAC using a response file
1 Create a response file using one of the available options.
Note:Make sure that you replace the host names in the response file with thenames of the systems that you plan to upgrade.
For information on various options available for creating a response file:
See “About response files” on page 367.
For response file variable definitions:
See “Response file variables to upgrade SF Oracle RAC” on page 217.
For a sample response file:
See “Sample response file for upgrading SF Oracle RAC” on page 219.
2 Navigate to the directory containing the SF Oracle RAC installation program.
3 Start the installation:
# ./installsfrac -responsefile /tmp/response_file
Where /tmp/response_file is the full path name of the response file.
4 Upgrade the operating system, if required.
For instructions, see the operating system documentation.
5 Complete the post-upgrade steps.
See the chapter "Performing post-upgrade tasks" in this document.
Response file variables to upgrade SF Oracle RACTable 12-1 lists the response file variables that you can define to upgrade SF OracleRAC.
Table 12-1 Response file variables specific to upgrading SF Oracle RAC
DescriptionList or ScalarVariable
Upgrades SF Oracle RAC filesets.
(Required)
ScalarCFG{opt}{upgrade}
Specifies whether you agree withEULA.pdf on the media.
(Required)
ScalarCFG{accepteula}
217Performing a full upgrade to SF Oracle RAC 5.1 SP1 PR1Upgrading to SF Oracle RAC 5.1 SP1 PR1

Table 12-1 Response file variables specific to upgrading SF Oracle RAC(continued)
DescriptionList or ScalarVariable
List of systems on which theproduct is to be upgraded.
(Required)
ListCFG{opt}{systems}
Defines the product to be upgraded.
(Required)
ScalarCFG{prod}
Indicates whether or not to startLLT and GAB when you set up asingle-node cluster. The value canbe 0 (do not start) or 1 (start).
(Required)
ScalarCFG{vcs_allowcomms}
Defines the location of an sshkeyfile that is used to communicatewith all remote systems.
(Optional)
ScalarCFG{opt}{keyfile}
Defines a location, typically an NFSmount, from which all remotesystems can install productpatches. The location must beaccessible from all target systems.
(Optional)
ScalarCFG{opt}{patchpath}
Defines a location, typically an NFSmount, from which all remotesystems can install product filesets.The location must be accessiblefrom all target systems.
(Optional)
ScalarCFG{opt}{pkgpath}
Defines the location where aworking directory is created tostore temporary files and thefilesets that are needed during theinstall. The default location is/var/tmp.
(Optional)
ScalarCFG{opt}{tmppath}
Performing a full upgrade to SF Oracle RAC 5.1 SP1 PR1Upgrading to SF Oracle RAC 5.1 SP1 PR1
218
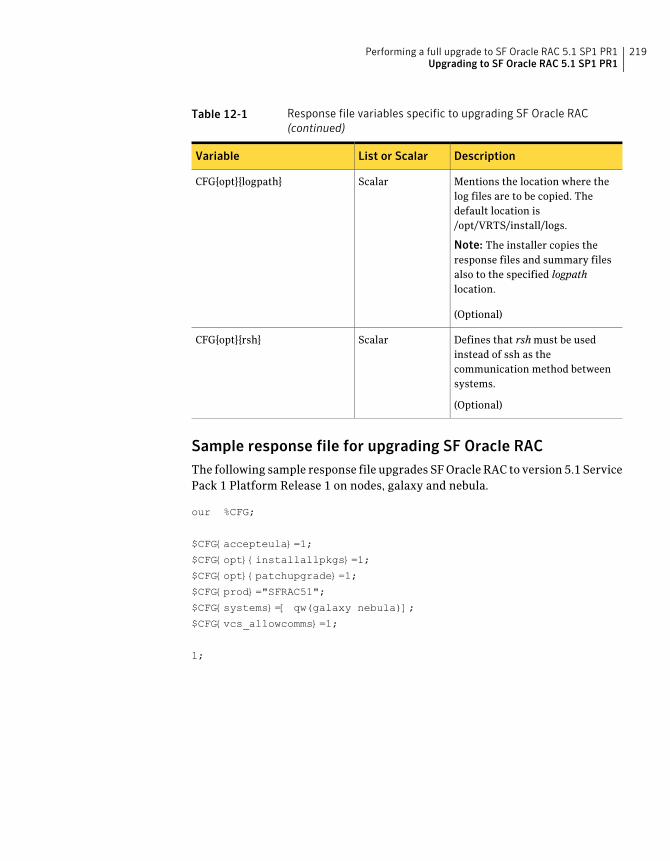
Table 12-1 Response file variables specific to upgrading SF Oracle RAC(continued)
DescriptionList or ScalarVariable
Mentions the location where thelog files are to be copied. Thedefault location is/opt/VRTS/install/logs.
Note: The installer copies theresponse files and summary filesalso to the specified logpathlocation.
(Optional)
ScalarCFG{opt}{logpath}
Defines that rsh must be usedinstead of ssh as thecommunication method betweensystems.
(Optional)
ScalarCFG{opt}{rsh}
Sample response file for upgrading SF Oracle RACThe following sample response file upgrades SF Oracle RAC to version 5.1 ServicePack 1 Platform Release 1 on nodes, galaxy and nebula.
our %CFG;
$CFG{accepteula}=1;
$CFG{opt}{installallpkgs}=1;
$CFG{opt}{patchupgrade}=1;
$CFG{prod}="SFRAC51";
$CFG{systems}=[ qw(galaxy nebula)];
$CFG{vcs_allowcomms}=1;
1;
219Performing a full upgrade to SF Oracle RAC 5.1 SP1 PR1Upgrading to SF Oracle RAC 5.1 SP1 PR1

Performing a full upgrade to SF Oracle RAC 5.1 SP1 PR1Upgrading to SF Oracle RAC 5.1 SP1 PR1
220

Performing a phasedupgrade to SF Oracle RAC5.1 SP1 PR1
This chapter includes the following topics:
■ About phased upgrade
■ Performing phased upgrade of SF Oracle RAC from version 5.0
About phased upgradeThe phased upgrade methodology involves upgrading half of the nodes in thecluster at a time.
Note: You can perform a phased upgrade only if the Oracle RAC binaries arepresent on the local file system.
Caution: There is a potential for dependency problems between productcomponents that no longer match when upgrading part of a cluster at a time.Follow the phased upgrade procedures carefully to avoid these problems.
Note:There will be some downtime involved. Review the procedures and carefullyplan your downtime before proceeding with any steps. The sample proceduresassume that Oracle RAC binaries are installed on local file systems for each nodein the cluster.
13Chapter

The examples in the procedures assume a four-node SF Oracle RAC cluster withthe nodes galaxy andnebula constituting the first half of the cluster and the nodesjupiter and mercury constituting the second half of the cluster.
Performing phased upgrade of SF Oracle RAC fromversion 5.0
Table 13-1 illustrates the phased upgrade process. Each column describes thesteps to be performed on the corresponding subcluster and the status of thesubcluster when operations are performed on the other subcluster.
Table 13-1 Summary of phased upgrade
Second half of the clusterFirst half of the cluster
SF Oracle RAC cluster before the upgrade:
galaxy nebula jupiter mercury
First half of the cluster Second half of the cluster
The second half of the cluster is up andrunning.
jupiter mercury
STEP 1: Perform the following pre-upgradesteps:
■ Switch failover applications.
■ Stop all parallel applications.
See “Step 1: Performing pre-upgrade taskson the first half of the cluster” on page 223.
STEP 2: Upgrade SF Oracle RAC.
See “Step 2: Upgrading the first half of thecluster” on page 226.
STEP 3: Perform the following pre-upgradesteps:
■ Stop all parallel and failover applications.
■ Stop SF Oracle RAC.
See “Step 3: Performing pre-upgrade taskson the second half of the cluster” on page 227.
The downtime starts now.
The first half of the cluster is not running.
galaxy nebula
Performing a phased upgrade to SF Oracle RAC 5.1 SP1 PR1Performing phased upgrade of SF Oracle RAC from version 5.0
222

Table 13-1 Summary of phased upgrade (continued)
Second half of the clusterFirst half of the cluster
The second half of the cluster is not running.
jupiter mercury
STEP4: Perform the following post-upgradesteps:
■ Start SF Oracle RAC.
■ Start all applications.
See “Step 4: Performing post-upgrade taskson the first half of the cluster” on page 229.
The downtime ends here.
STEP 5: Upgrade SF Oracle RAC.
See “Step 5: Upgrading the second half ofthe cluster” on page 231.
STEP6: Perform the following post-upgradesteps:
■ Start SF Oracle RAC.
■ Start all applications.
See “Step 6: Performing post-upgrade taskson the second half of the cluster” on page 231.
The first half of the cluster is up andrunning.
galaxy nebula
The phased upgrade is complete and both the first and the second half of the cluster arerunning.
galaxy nebula jupiter mercury
Step 1: Performing pre-upgrade tasks on the first half of the clusterPerform the following pre-upgrade steps on the first half of the cluster.
223Performing a phased upgrade to SF Oracle RAC 5.1 SP1 PR1Performing phased upgrade of SF Oracle RAC from version 5.0

To perform the pre-upgrade tasks on the first half of the cluster
1 Log in as the root user.
2 Back up the following configuration files:main.cf, types.cf, CVMTypes.cf,
CFSTypes.cf, OracleTypes.cf, OracleASMTypes.cf, , PrivNIC.cf,
MultiPrivNIC.cf, /etc/llttab, /etc/llthosts, /etc/gabtab,
/etc/vxfentab, /etc/vxfendg, /etc/vxfenmode
For example:
# cp /etc/VRTSvcs/conf/config/main.cf \
/etc/VRTSvcs/conf/config/main.cf.`date '+%m_%d_%y-%H_%M_%S'`
# cp /etc/VRTSvcs/conf/config/types.cf \
/etc/VRTSvcs/conf/config/types.cf.`date '+%m_%d_%y-%H_%M_%S'`
# cp /etc/VRTSvcs/conf/config/OracleTypes.cf \
/etc/VRTSvcs/conf/config/OracleTypes.cf.`date '+%m_%d_%y-%H_%M_%S'`
# cp /etc/VRTSvcs/conf/config/PrivNIC.cf \
/var/tmp/PrivNIC.cf.`date '+%m_%d_%y-%H_%M_%S'`
# cp /etc/VRTSvcs/conf/config/MultiPrivNIC.cf \
/var/tmp/MultiPrivNIC.cf.`date '+%m_%d_%y-%H_%M_%S'`
3 Switch all failover groups from the first half of the cluster, for example, fromgalaxy, to the second half of the cluster, for example, to jupiter and mercury.
# hagrp -switch failover_group1 -to jupiter
# hagrp -switch failover_group2 -to mercury
4 Stop all applications that are not configured under VCS. Use native applicationcommands to stop the application.
5 If you plan to continue using checkpoints or storage tiering policies youcreated with a 5.0x or earlier version of Storage Foundation for Oracle RAC,complete the following preparatory step before migrating the SFDB repositorydatabase to 5.1 Service Pack 1.
See “Pre-upgrade tasks for migrating the SFDB repository database”on page 209.
6 Stop the Oracle database instance on all nodes in the first half of the cluster:
■ If the Oracle RAC instance is not managed by VCS, log in as the Oracleuser on one of the nodes and shut down the instances:
$ srvctl stop instance -d database_name \
-i instance_name
Performing a phased upgrade to SF Oracle RAC 5.1 SP1 PR1Performing phased upgrade of SF Oracle RAC from version 5.0
224

■ If the Oracle RAC instance is managed by VCS:
# hagrp -offline oracle_group -sys galaxy
# hagrp -offline oracle_group -sys nebula
7 If the Oracle database is managed by VCS, set the AutoStart value to 0 toprevent the database service group from starting automatically when VCSstarts:
■
# haconf -makerw
# hagrp -modify oracle_group AutoStart 0
# haconf -dump -makero
■ If the Oracle database is not managed by VCS, change the managementpolicy for the database to manual:
$ srvctl modify database -d db-name -y manual
8 Unmount the VxFS and CFS file systems that are not managed by VCS.
■ Make sure that no processes are running which make use of mountedshared file system or shared volumes. To verify that no processes use theVxFS or CFS mount point:
# mount | grep vxfs
# fuser -cu /mount_point
■ Unmount the VxFS or CFS file system:
# umount /mount_point
9 Stop the VxVM and CVM volumes (for each disk group) that are not managedby VCS:
# vxvol -g disk_group stopall
Verify that no volumes remain open:
# vxprint -Aht -e v_open
225Performing a phased upgrade to SF Oracle RAC 5.1 SP1 PR1Performing phased upgrade of SF Oracle RAC from version 5.0

10 Stop the remaining parallel service groups, including the cvm Service Groupon the nodes:
# hagrp -offline parallel_group_name -sys node_name
# hagrp -offline cvm -sys node_name
11 Verify that only ports a, b, d, h, and o are open:
# gabconfig -a
Port a gen 867801 membership 0134
Port b gen 867803 membership 0134
Port d gen 86780d membership 0134
Port h gen 867806 membership 0134
Port o gen 867811 membership 0134
Step 2: Upgrading the first half of the clusterPerform the following steps to upgrade the first half of the cluster.
To upgrade the first half of the cluster
1 Make sure that you can run SSH or RSH from the node where you launchedthe installer to the nodes in the second subcluster without requests for apassword.
2 Upgrade SF Oracle RAC:
# cd /download_dir/sfrac
where download_dir is the directory where you downloaded the software.
# ./installsfrac galaxy nebula
Note: The installer will freeze all the service groups on the second half ofcluster while upgrading the first half of the cluster to avoid accidental offlineof service groups on the second half of the cluster.
After you complete the upgrade of the first half of the cluster, no GAB portswill be shown in the output when you run the gabconfig -a command onthe nodes in the first half of the cluster.
3 Change the/etc/default/llt file to prevent LLT from starting automaticallyafter reboot by setting the LLT_START attribute to 0:
LLT_START=0
Performing a phased upgrade to SF Oracle RAC 5.1 SP1 PR1Performing phased upgrade of SF Oracle RAC from version 5.0
226
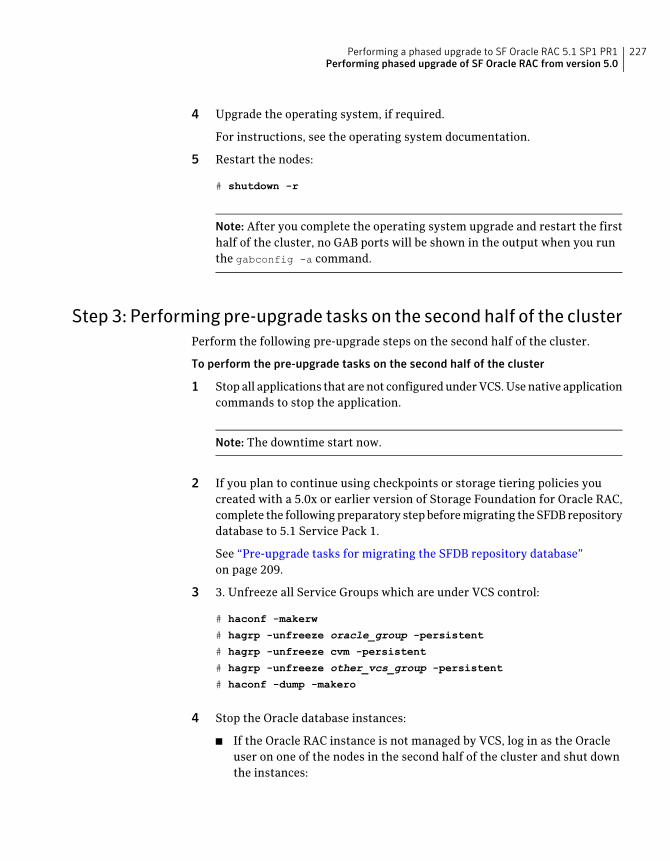
4 Upgrade the operating system, if required.
For instructions, see the operating system documentation.
5 Restart the nodes:
# shutdown -r
Note: After you complete the operating system upgrade and restart the firsthalf of the cluster, no GAB ports will be shown in the output when you runthe gabconfig -a command.
Step 3: Performing pre-upgrade tasks on the second half of the clusterPerform the following pre-upgrade steps on the second half of the cluster.
To perform the pre-upgrade tasks on the second half of the cluster
1 Stop all applications that are not configured under VCS. Use native applicationcommands to stop the application.
Note: The downtime start now.
2 If you plan to continue using checkpoints or storage tiering policies youcreated with a 5.0x or earlier version of Storage Foundation for Oracle RAC,complete the following preparatory step before migrating the SFDB repositorydatabase to 5.1 Service Pack 1.
See “Pre-upgrade tasks for migrating the SFDB repository database”on page 209.
3 3. Unfreeze all Service Groups which are under VCS control:
# haconf -makerw
# hagrp -unfreeze oracle_group -persistent
# hagrp -unfreeze cvm -persistent
# hagrp -unfreeze other_vcs_group -persistent
# haconf -dump -makero
4 Stop the Oracle database instances:
■ If the Oracle RAC instance is not managed by VCS, log in as the Oracleuser on one of the nodes in the second half of the cluster and shut downthe instances:
227Performing a phased upgrade to SF Oracle RAC 5.1 SP1 PR1Performing phased upgrade of SF Oracle RAC from version 5.0

$ srvctl stop instance -d database_name \
-i instance_name
■ If the Oracle RAC instance is managed by VCS:
# hagrp -offline oracle_group -sys jupiter
# hagrp -offline oracle_group -sys mercury
5 Unmount the VxFS or CFS file systems that are not managed by VCS.
■ Make sure that no processes are running which make use of mountedshared file system or shared volumes. To verify that no processes use theVxFS or CFS mount point:
# mount | grep vxfs
# fuser -cu /mount_point
■ Unmount the VxFS file system:
# umount /mount_point
6 Stop the VxVM and CVM volumes (for each disk group) that are not managedby VCS:
# vxvol -g disk_group stopall
Verify that no volumes remain open:
# vxprint -Aht -e v_open
Performing a phased upgrade to SF Oracle RAC 5.1 SP1 PR1Performing phased upgrade of SF Oracle RAC from version 5.0
228

7 Stop VCS on all nodes in the second half of the cluster:
# hastop -local
8 Stop the following SF Oracle RAC modules on all nodes in the second half ofthe cluster: Fencing, ODM, VCSMM, GAB, LMX, and LLT
# /etc/rc.d/rc2.d/S99odm stop
# /etc/methods/gmskextadm unload
# /etc/methods/glmkextadm unload
# /etc/init.d/lmx.rc stop
# /etc/methods/lmxext -stop
# /etc/init.d/vcsmm.rc stop
# /etc/init.d/vxfen.rc stop
# /etc/init.d/gab.rc stop
# /etc/init.d/llt.rc stop
Step 4: Performing post-upgrade tasks on the first half of the clusterPerform the following post-upgrade steps on the first half of the cluster.
To perform the post-upgrade tasks on the first half of the cluster
1 Change /etc/default/llt to start LLT on the nodes by setting theLLT_START attribute to 1:
LLT_START=1
2 On the first half of the cluster, force GAB to form a cluster.
# gabconfig -x
3 From one of the nodes on the first half of the cluster, start SF Oracle RAC:
# cd /opt/VRTS/install
# ./installsfrac -start galaxy nebula
229Performing a phased upgrade to SF Oracle RAC 5.1 SP1 PR1Performing phased upgrade of SF Oracle RAC from version 5.0
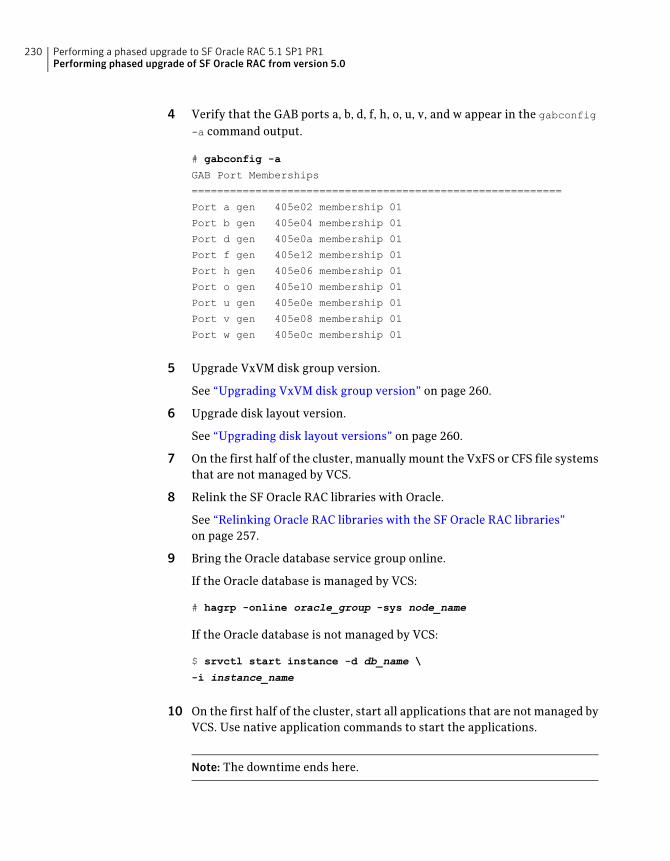
4 Verify that the GAB ports a, b, d, f, h, o, u, v, and w appear in the gabconfig
-a command output.
# gabconfig -a
GAB Port Memberships
==========================================================
Port a gen 405e02 membership 01
Port b gen 405e04 membership 01
Port d gen 405e0a membership 01
Port f gen 405e12 membership 01
Port h gen 405e06 membership 01
Port o gen 405e10 membership 01
Port u gen 405e0e membership 01
Port v gen 405e08 membership 01
Port w gen 405e0c membership 01
5 Upgrade VxVM disk group version.
See “Upgrading VxVM disk group version” on page 260.
6 Upgrade disk layout version.
See “Upgrading disk layout versions” on page 260.
7 On the first half of the cluster, manually mount the VxFS or CFS file systemsthat are not managed by VCS.
8 Relink the SF Oracle RAC libraries with Oracle.
See “Relinking Oracle RAC libraries with the SF Oracle RAC libraries”on page 257.
9 Bring the Oracle database service group online.
If the Oracle database is managed by VCS:
# hagrp -online oracle_group -sys node_name
If the Oracle database is not managed by VCS:
$ srvctl start instance -d db_name \
-i instance_name
10 On the first half of the cluster, start all applications that are not managed byVCS. Use native application commands to start the applications.
Note: The downtime ends here.
Performing a phased upgrade to SF Oracle RAC 5.1 SP1 PR1Performing phased upgrade of SF Oracle RAC from version 5.0
230

Step 5: Upgrading the second half of the clusterPerform the following steps to upgrade the second half of the cluster.
To upgrade the second half of the cluster
1 Make sure that you can run SSH or RSH from the node where you launchedthe installer to the nodes in the second subcluster without requests for apassword.
2 On the second half of the cluster, upgrade SF Oracle RAC:
# cd /download_dir/sfrac
where download_dir is the directory where you downloaded the software.
# ./installsfrac jupiter mercury
3 Upgrade the operating system, if required.
For instructions, see the operating system documentation.
4 Restart the nodes:
# shutdown -r
When the nodes in the second half of the cluster come up, all the GAB portsa, b, d, f, h, o, u, v, and w will be online. All the service groups excpt the Oracleservice group come online automatically.
Step 6: Performing post-upgrade tasks on the second half of the clusterPerform the following post-upgrade steps on the second half of the cluster.
To perform the post-upgrade tasks on the second half of the cluster
1 Manually mount the VxFS and CFS file systems that are not managed by VCS.
2 Relink the SF Oracle RAC libraries with Oracle.
See “Relinking Oracle RAC libraries with the SF Oracle RAC libraries”on page 257.
231Performing a phased upgrade to SF Oracle RAC 5.1 SP1 PR1Performing phased upgrade of SF Oracle RAC from version 5.0

3 Bring the Oracle database service group online.
If the Oracle database is managed by VCS:
# hagrp -online oracle_group -sys node_name
If the Oracle database is not managed by VCS:
$ srvctl start instance -d db_name \
-i instance_name
4 If the Oracle database is managed by VCS, reset the AutoStart value to 1to enable VCS to bring the database service group online automaticallywhen VCS starts:
■
# haconf -makerw
# hagrp -modify oracle_group AutoStart 1
# haconf -dump -makero
■ If the Oracle database is not managed by VCS, change the managementpolicy for the database to automatic:
$ srvctl modify database -d db-name -y AUTOMATIC
5 Start all applications that are not managed by VCS. Use native applicationcommands to start the applications.
6 Set or change the product license level, if required.
See “Setting or changing the product license level” on page 259.
7 Migrate the SFDB repository database.
See “Post upgrade tasks for migrating the SFDB repository database”on page 261.
8 Verify the cluster.
See “Verifying the cluster” on page 264.
9 If you want to upgrade VCS or SFHA 5.1 on the CP server systems to version5.1 SP1PR1, make sure you upgraded all application clusters to 5.1 SP1PR1.Then, upgrade VCS or SFHA on the CP server systems.
For instructions to upgrade VCS or SFHA on the CP server systems, see theVCS or SFHA installation guide.
Performing a phased upgrade to SF Oracle RAC 5.1 SP1 PR1Performing phased upgrade of SF Oracle RAC from version 5.0
232

Performing a rollingupgrade to SF Oracle RAC5.1 SP1 PR1
This chapter includes the following topics:
■ About rolling upgrades
■ Prerequisites for a rolling upgrade
■ Performing a rolling upgrade using the installer
About rolling upgradesYou can use rolling upgrades to upgrade one product from a release to the next.Rolling upgrades require less downtime. Rolling upgrades are not compatible withphased upgrades. Do not perform "mixed" rolling upgrades with phased upgrades.
Rolling upgrades take two discrete phases. In the first, you upgrade the productkernel filesets. In the second, you upgrade the non-kernel filesets such as VCSfilesets and agent filesets.
You can perform a rolling upgrade from SF Oracle RAC 5.1 and later.
Prerequisites for a rolling upgradeMeet the following prerequisites before performing a rolling upgrade:
■ Make sure the product that you want to upgrade supports rolling upgrades.
14Chapter

■ Split your clusters into sub-clusters for the upgrade to keep the service groupsavailable during upgrade.
■ Make sure you logged in as superuser.
■ SF Oracle RAC must be running before performing the rolling upgrade.
Limitation: During SF Oracle RAC and agents upgrade, you must bring down theapplication High Availability (HA) for few minutes. This does not affect theapplication running on the cluster. You can restore the application's highavailability after SF Oracle RAC and the agent packages are upgraded.
Performing a rolling upgrade using the installerYou can use rolling upgrades to upgrade one product from a release to the nextwith minimal application downtime.
Performing a rolling upgrade on kernel filesets: phase 1Note that in the following instructions that a sub-cluster can represent one ormore nodes in a full cluster, but is represented by nodeA, nodeB as subcluster1and nodeC, nodeD as subcluster2.
To perform the rolling upgrade on kernel filesets: phase 1
1 Log in as superuser to one of the nodes in the cluster.
2 Back up the following configuration files on your system:main.cf, types.cf,
CVMTypes.cf, CFSTypes.cf, OracleTypes.cf, OracleASMTypes.cf, ,
PrivNIC.cf, MultiPrivNIC.cf, /etc/llttab, /etc/llthosts,
/etc/gabtab, /etc/vxfentab, /etc/vxfendg, /etc/vxfenmode
For example:
# cp /etc/VRTSvcs/conf/config/main.cf \
/etc/VRTSvcs/conf/config/main.cf.`date '+%m_%d_%y-%H_%M_%S'`
# cp /etc/VRTSvcs/conf/config/types.cf \
/etc/VRTSvcs/conf/config/types.cf.`date '+%m_%d_%y-%H_%M_%S'`
# cp /etc/VRTSvcs/conf/config/OracleTypes.cf \
/etc/VRTSvcs/conf/config/OracleTypes.cf.`date '+%m_%d_%y-%H_%M_%S'`
# cp /etc/VRTSvcs/conf/config/PrivNIC.cf \
/var/tmp/PrivNIC.cf.`date '+%m_%d_%y-%H_%M_%S'`
# cp /etc/VRTSvcs/conf/config/MultiPrivNIC.cf \
/var/tmp/MultiPrivNIC.cf.`date '+%m_%d_%y-%H_%M_%S'`
Performing a rolling upgrade to SF Oracle RAC 5.1 SP1 PR1Performing a rolling upgrade using the installer
234

3 If the Oracle database is managed by VCS, set the AutoStart value to 0 toprevent the database service group from starting automatically when VCSstarts:
■
# haconf -makerw
# hagrp -modify oracle_group AutoStart 0
# haconf -dump -makero
■ If the Oracle database is not managed by VCS, change the managementpolicy for the database to manual:
$ srvctl modify database -d db_name -y manual
4 If you plan to continue using the Storage Foundation for Databases (SFDB)tools, you must prepare to migrate the SFDB repository database beforeupgrading to SF Oracle RAC 5.1 SP1 PR1.
See “Pre-upgrade tasks for migrating the SFDB repository database”on page 209.
5 Stop the applications that use VxFS or VxVM disk groups on each node ofthe first subcluster1, whether local or CFS.
If the applications are managed by VCS, fail over the service group:
# hagrp -switch group_name -sys node_name
If the applications are not under VCS control:
Use native application commands to stop the application.
6 Stop the Oracle RAC database resources on each node of sub-cluster1.
■ If the database instance is managed by VCS:
# hagrp -offline oracle_group -sys nodeA
# hagrp -offline oracle_group -sys nodeB
■ If the database instance is not managed by VCS, then run the followingon one node:
$ srvctl stop instance -d db_name -i instance_name
235Performing a rolling upgrade to SF Oracle RAC 5.1 SP1 PR1Performing a rolling upgrade using the installer

7 Unmount all the VxFS file system which is not under VCS control on eachnode of subcluster1.
# mount |grep vxfs
# fuser -c /mount_point
# umount /mount_point
8 On subcluster1, stop all VxVM and CVM volumes (for each disk group) thatare not managed by VCS:
# vxvol -g disk_group stopall
Verify that no volumes remain open:
# vxprint -Aht -e v_open
9 Stop the parallel service groups, including cvm, that are managed by VCS:
# hagrp -offline group_name -sys node_name
10 On the first sub-cluster, start the installer for the rolling upgrade with the-upgrade_kernelpkgs option.
# ./installer -upgrade_kernelpkgs nodeA nodeB
The installer checks system communications, fileset versions, productversions, and completes prechecks. It will stop or failover the applications,database instances, filesystems which are under VCS control. It then upgradesapplicable product kernel.
11 Exit the installer.
12 Upgrade the operating system. For instructions, see the operating systemdocumentation.
13 Reboot the nodes:
# shutdown -r
The new kernel modules are loaded and nodes of subcluster1 join the clusterautomatically after the reboot. All the service groups managed by VCS startautomatically.
Note:The Oracle service group will be offline as the AutoStart attribute is setto 0 to prevent the service group from starting automatically.
Performing a rolling upgrade to SF Oracle RAC 5.1 SP1 PR1Performing a rolling upgrade using the installer
236

14 Manually, mount the VxFS and CFS file systems that are not managed byVCS.
15 Relink the SF Oracle RAC libraries with Oracle by choosing the option RelinkOracle Database Binary from the program menu.
See “Relinking Oracle RAC libraries with the SF Oracle RAC libraries”on page 257.
16 Bring the Oracle database service group online.
■ If the Oracle database is managed by VCS:
# hagrp -online oracle_group -sys nodeA
# hagrp -online oracle_group -sys nodeB
■ If the Oracle database is not managed by VCS:
# srvctl start database -d db_name -I instance_name
17 Start all applications that are not managed by VCS. Use native applicationcommands to start the applications.
18 Complete steps 4 to 17 on subcluster 2.
19 If the Oracle database is managed by VCS, reset the AutoStart value to 1to enable VCS to bring the database service group online automaticallywhen VCS starts:
■
# haconf -makerw
# hagrp -modify oracle_group AutoStart 1
# haconf -dump -makero
■ If the Oracle database is not managed by VCS, change the managementpolicy for the database to automatic:
$ srvctl modify database -d db-name -y AUTOMATIC
20 Migrate the SFDB repository database.
See “Post upgrade tasks for migrating the SFDB repository database”on page 261.
Performing a rolling upgrade on non-kernel filesets: phase 2In this phase installer installs all non-kernel filesets on all the nodes in clusterand restarts VCS cluster.
237Performing a rolling upgrade to SF Oracle RAC 5.1 SP1 PR1Performing a rolling upgrade using the installer

To perform the rolling upgrade on non-kernel filesets: phase 2
1 Start the installer for the rolling upgrade with the -upgrade_nonkernelpkgsoption. Specify all the nodes in the cluster:
# ./installer -upgrade_nonkernelpkgs nodeA nodeB nodeC nodeD
2 The installer checks system communications, fileset versions, productversions, and completes prechecks. It verifies completion of phase 1.
Note: The installer stops the high availability daemon (had) on all the nodesin the cluster. The applications configured under VCS are not highly available(HA) though they remain online.
The installer upgrades non-kernel filesets. The new VCS agent binaries willalso be installed during this phase.
The installer starts the high availability daemon (had) on all nodes. Theapplications configured under VCS are now highly available (HA).
3 Verify the cluster's status:
# hastatus -sum
4 If you want to upgrade VCS or SFHA 5.1 on the CP server systems to version5.1 SP1PR1, make sure you upgraded all application clusters to 5.1 SP1PR1.Then, upgrade VCS or SFHA on the CP server systems.
For instructions to upgrade VCS or SFHA on the CP server systems, see theVCS or SFHA installation guide.
Performing a rolling upgrade to SF Oracle RAC 5.1 SP1 PR1Performing a rolling upgrade using the installer
238

Upgrading from StorageFoundation products to SFOracle RAC 5.1 SP1 PR1
This chapter includes the following topics:
■ About upgrading from Storage Foundation products to SF Oracle RAC 5.1 SP1PR1
■ Upgrading from Storage Foundation products to SF Oracle RAC 5.1 SP1 PR1
About upgrading from Storage Foundation productsto SF Oracle RAC 5.1 SP1 PR1
You can upgrade from earlier versions of the following Storage Foundationproducts to SF Oracle RAC 5.1 SP1 PR1:
■ Storage Foundation High Availability
■ Storage Foundation Cluster File System
Note:The installer does not support direct upgrade from earlier versions of StorageFoundation products, such as Storage Foundation Cluster File System 5.0, to SFOracle RAC 5.1 SP1 PR1. You must first upgrade to version 5.1 Service Pack 1Platform Release 1 of the installed product, then install SF Oracle RAC 5.1 SP1PR1.
15Chapter

Upgrading from Storage Foundation products to SFOracle RAC 5.1 SP1 PR1
Perform the steps in the following procedure to upgrade Storage Foundationproducts to SF Oracle RAC 5.1 SP1 PR1.
To upgrade Storage Foundation products to SF Oracle RAC 5.1 SP1 PR1
1 If you are running an earlier version of the product, upgrade to version 5.1Service Pack 1 Platform Release 1 of the product.
For instructions, see the installation guide of the product.
2 Install SF Oracle RAC 5.1 SP1 PR1.
See “About installing SF Oracle RAC ” on page 85.
3 When you are prompted to configure SF Oracle RAC, enter y at the prompt:
Would you like to configure SF Oracle RAC on galaxy? [y,n,q] (n) y
The program menu is displayed.
4 Select the option Configure SF Oracle RAC sub-components.
1) Configure SF Oracle RAC sub-components
2) SF Oracle RAC Installation and Configuration Checks
3) Prepare to Install Oracle
4) Install Oracle Clusterware/Grid Infrastructure and Database
5) Post Oracle Installation Tasks
6) Exit SF Oracle RAC Configuration
Choose option: [1-6,q] (1)
If VCS is configured in your environment, the installation program detectsthe VCS configuration.
Note: Do not reconfigure VCS when you are prompted by the installationprogram:
Do you want to re-configure VCS? [y,n,q] (n)
The installation program creates the VCS configuration file and the/etc/vcsmmtab file and starts all processes.
Upgrading from Storage Foundation products to SF Oracle RAC 5.1 SP1 PR1Upgrading from Storage Foundation products to SF Oracle RAC 5.1 SP1 PR1
240

5 Verify that all GAB ports are up and running.
# gabconfig -a
GAB Port Memberships
===============================================================
Port a gen 29d01 membership 01
Port b gen 29d0f membership 01
Port d gen 29d07 membership 01
Port f gen 29d17 membership 01
Port h gen 29d11 membership 01
Port o gen 29d12 membership 01
Port u gen 71520b membership 01
Port v gen 29d13 membership 01
Port w gen 29d15 membership 01
6 Restart ODM on all nodes. This will start ODM in clustered mode.
# /etc/rc.d/rc2.d/S99odm stop
# /etc/rc.d/rc2.d/S99odm start
7 If fencing is not configured, configure fencing.
For instructions, see the chapter Configuring SF Oracle RAC clusters for dataintegrity in this document.
8 ■ If you have neither single-instance Oracle nor Oracle RAC running in yourenvironment, install Oracle RAC.For instructions, see the chapter Installing and configuringOracle RAC inthis document.
■ If you have a single-instance Oracle database in your environment, migratethe database to Oracle RAC.For instructions, see the chapter Migrating from single instance StorageFoundation for Oracle HA to SF Oracle RAC in this document.
241Upgrading from Storage Foundation products to SF Oracle RAC 5.1 SP1 PR1Upgrading from Storage Foundation products to SF Oracle RAC 5.1 SP1 PR1

Upgrading from Storage Foundation products to SF Oracle RAC 5.1 SP1 PR1Upgrading from Storage Foundation products to SF Oracle RAC 5.1 SP1 PR1
242

Migrating from singleinstance StorageFoundation for Oracle HAto SF Oracle RAC
This chapter includes the following topics:
■ Migration overview
■ Migration requirements
■ Before you migrate
■ Migrating to SF Oracle RAC 5.1 SP1 PR1
■ Sample configuration files
Migration overviewThis chapter provides instructions for migrating from Veritas Storage Foundationfor Oracle High Availability to Veritas Storage Foundation for Oracle RAC (SFOracle RAC).
Figure 16-1 illustrates the migration from Storage Foundation for Oracle HA toSF Oracle RAC.
16Chapter

Figure 16-1 Migration from Storage Foundation for Oracle HA to SF Oracle RAC
Sample configuration before and after migrationTable 16-1 describes a sample existing configuration in a Storage Foundation forOracle HA database environment.
Table 16-1 Configuration in a Storage Foundation for Oracle HA databaseenvironment
Database filestorage
Oracle homeDatabasename
Instancename
Hostname
Shared storageusing VxFS
/u01/app/oracle/product/release/
dbhome_1
where release is 10.2.0 or 11.1.0depending on the Oracle RAC version
vrtsvrtsgalaxy
Shared storageusing VxFS
/u01/app/oracle/product/release/
dbhome_1
where release is 10.2.0 or 11.1.0depending on the Oracle RAC version
vrtsvrtsnebula
Table 16-2 describes a sample configuration in an SF Oracle RAC databaseenvironment.
Migrating from single instance Storage Foundation for Oracle HA to SF Oracle RACMigration overview
244

Table 16-2 Configuration in an SF Oracle RAC environment
OCR andvoting disk
Databasefilestorage
Oracle homeDatabasename
Instancename
Hostname
Reside onCVM or CFS
Sharedstorageusing CFS
/u01/app/oracle/
product/release/dbhome_1
where release is 10.2.0,11.1.0, or 11.2.0 dependingon the Oracle RAC version
vrtsvrts1galaxy
Reside onCVM or CFS
Sharedstorageusing CFS
/u01/app/oracle/
product/release/dbhome_1
where release is 10.2.0,11.1.0, or 11.2.0 dependingon the Oracle RAC version
vrtsvrts2nebula
Migration requirementsMake sure that you meet the following requirements before migrating to SF OracleRAC:
■ Storage Foundation for Oracle HA version 5.1 Service Pack 1 Platform Release1 is installed on the systems.
■ Oracle 10g Release 2, Oracle 11g Release 1, or Oracle 11g Release 2 is installedon the systems.
Before you migrateBefore you migrate to SF Oracle RAC, complete the following tasks:
■ Set up the single instance Storage Foundation for Oracle database with thefollowing configuration:
■ Storage Foundation for Oracle HA installed on all nodes
■ Oracle binaries installed on each node
■ Oracle database created on shared storage using Veritas File System (VxFS)
■ Back up the existing database before the migration.
245Migrating from single instance Storage Foundation for Oracle HA to SF Oracle RACMigration requirements

Migrating to SF Oracle RAC 5.1 SP1 PR1Perform the following steps to migrate from Storage Foundation for Oracle HAto SF Oracle RAC.
1. Migrate Storage Foundation for Oracle HA to SF Oracle RAC.
See “Migrating Storage Foundation for Oracle HA to SF Oracle RAC”on page 246.
2. Migrate single instance Oracle database to Oracle RAC database.
See “Migrating a single instance Oracle database to Oracle RAC database”on page 247.
3. Complete the post-migration tasks.
See “Completing post-migration tasks” on page 250.
Migrating Storage Foundation for Oracle HA to SF Oracle RACPerform the following steps to migrate from Storage Foundation for Oracle HAto SF Oracle RAC.
To migrate from Storage Foundation for Oracle HA to SF Oracle RAC
1 Log in as a superuser.
2 Back up the existing Storage Foundation for Oracle database HA resourceconfiguration:
# cp -rp /etc/VRTSvcs/conf/config config.old
3 Take the database service groups offline:
# hagrp -offline group_name –any
4 If the VxFS file systems are not managed by VCS, unmount them :
# umount mount_point
5 Stop all the other VCS service groups.
To view the current state of the service groups:
# hagrp -state
To stop each group:
# hagrp -offline servicegroup -sys node_name
Migrating from single instance Storage Foundation for Oracle HA to SF Oracle RACMigrating to SF Oracle RAC 5.1 SP1 PR1
246
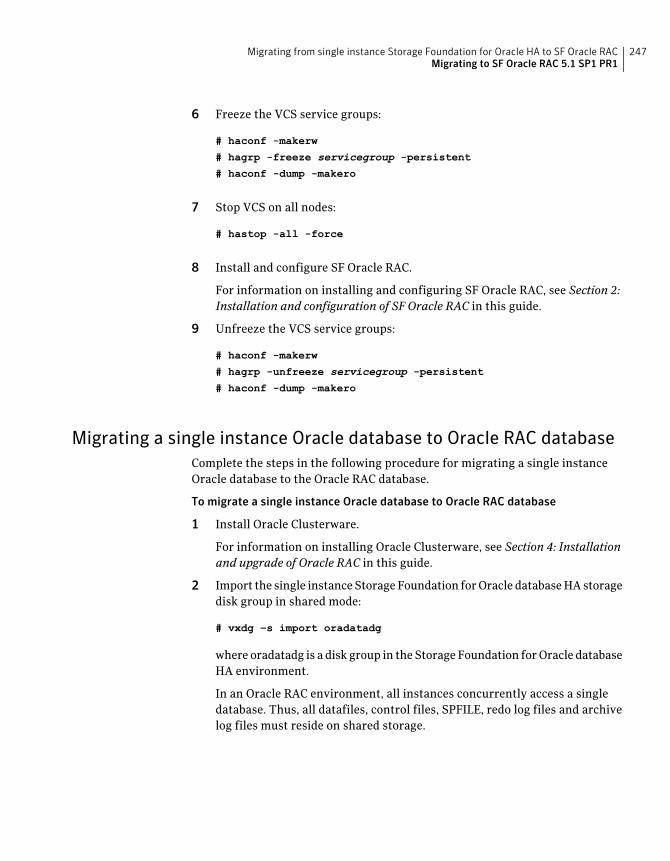
6 Freeze the VCS service groups:
# haconf -makerw
# hagrp -freeze servicegroup -persistent
# haconf -dump -makero
7 Stop VCS on all nodes:
# hastop -all -force
8 Install and configure SF Oracle RAC.
For information on installing and configuring SF Oracle RAC, see Section 2:Installation and configuration of SF Oracle RAC in this guide.
9 Unfreeze the VCS service groups:
# haconf -makerw
# hagrp -unfreeze servicegroup -persistent
# haconf -dump -makero
Migrating a single instance Oracle database to Oracle RAC databaseComplete the steps in the following procedure for migrating a single instanceOracle database to the Oracle RAC database.
To migrate a single instance Oracle database to Oracle RAC database
1 Install Oracle Clusterware.
For information on installing Oracle Clusterware, see Section 4: Installationand upgrade of Oracle RAC in this guide.
2 Import the single instance Storage Foundation for Oracle database HA storagedisk group in shared mode:
# vxdg –s import oradatadg
where oradatadg is a disk group in the Storage Foundation for Oracle databaseHA environment.
In an Oracle RAC environment, all instances concurrently access a singledatabase. Thus, all datafiles, control files, SPFILE, redo log files and archivelog files must reside on shared storage.
247Migrating from single instance Storage Foundation for Oracle HA to SF Oracle RACMigrating to SF Oracle RAC 5.1 SP1 PR1

3 Mount the file system in cluster mode on all nodes:
# mount -V vxfs -o cluster,largefiles \
/dev/vx/dsk/oradatadg/oradatavol /oradata
where oradata is a file system in the Storage Foundation for Oracle databaseHA environment.
4 Relink Oracle binaries with Veritas libraries.
See “Relinking Oracle RAC libraries with the SF Oracle RAC libraries”on page 257.
5 Start the database as an Oracle user from any one of the nodes in the clusterusing SQLPLUS:
$ export ORACLE_SID=vrts
$ export ORACLE_HOME=/oracle/dbhome
$ /oracle/dbhome/bin/sqlplus “/as sysdba”
where vrts is a database in the Storage Foundation for Oracle database HAenvironment.
6 Add redo logs. Each instance requires its own redo thread. The followingexample assumes a two node configuration, with galaxy and nebula as thenodes in the cluster. The existing redo thread will be used by galaxy.
To add a new redo thread, log on to nebula as Oracle user and run the followingcommands:
SQL> alter database add logfile thread 2
group 4 ('/oradata/vrts/redo04.log') size 50M REUSE;
Database altered
SQL> alter database add logfile thread 2
group 5 ('/oradata/vrts/redo05.log') size 50M REUSE;
Database altered.
SQL> alter database add logfile thread 2
group 6 ('/oradata/vrts/redo06.log') size 50M REUSE;
Database altered
7 Enable redo log thread.While enabling, it may be designated as a public threador a private thread:
SQL> ALTER DATABASE ENABLE PUBLIC THREAD 2;
OR
SQL> ALTER DATABASE ENABLE PRIVATE THREAD 2;
Migrating from single instance Storage Foundation for Oracle HA to SF Oracle RACMigrating to SF Oracle RAC 5.1 SP1 PR1
248

8 Add UNDO tablespaces for each additional instance:
SQL> create undo tablespace UNDOTBS2 datafile\
'/oradata/vrts/undotbs02.dbf' size 500M autoextend on;
9 Create the cluster views needed for Oracle RAC:
SQL> @?/rdbms/admin/catclust
10 If you are using an SPFILE, create a PFILE from it:
SQL> create pfile='/tmp/initORA.ora' from spfile
11 Edit the Oracle initialization parameter file/tmp/initORA.ora to includecluster parameters:
*.cluster_database_instances=2
*.cluster_database=TRUE
vrts1.instance_name=vrts1
vrts2.instance_name=vrts2
vrts1.instance_number=1
vrts2.instance_number=2
vrts1.thread=1
vrts2.thread=2
vrts1.undo_tablespace='UNDOTBS1'
vrts2.undo_tablespace='UNDOTBS2'
vrts1.local_listener= ‘LISTENER_GALAXY’
vrts2.local_listener= ‘LISTENER_NEBULA’
vrts1.remote_listener= ‘LISTENERS_VRTS'
vrts2.remote_listener= ‘LISTENERS_VRTS’
12 Start the Oracle initialization parameter file:
SQL> connect / as sysdba
SQL> shutdown immediate
SQL> startup pfile='/tmp/initORA.ora'
13 If the database starts successfully using the Oracle initialization parameterfile, create an spfile in a shared location:
SQL> create spfile='sharedlocation/spfiledbrac.ora'\
from pfile='/tmp/initORA.ora'
249Migrating from single instance Storage Foundation for Oracle HA to SF Oracle RACMigrating to SF Oracle RAC 5.1 SP1 PR1
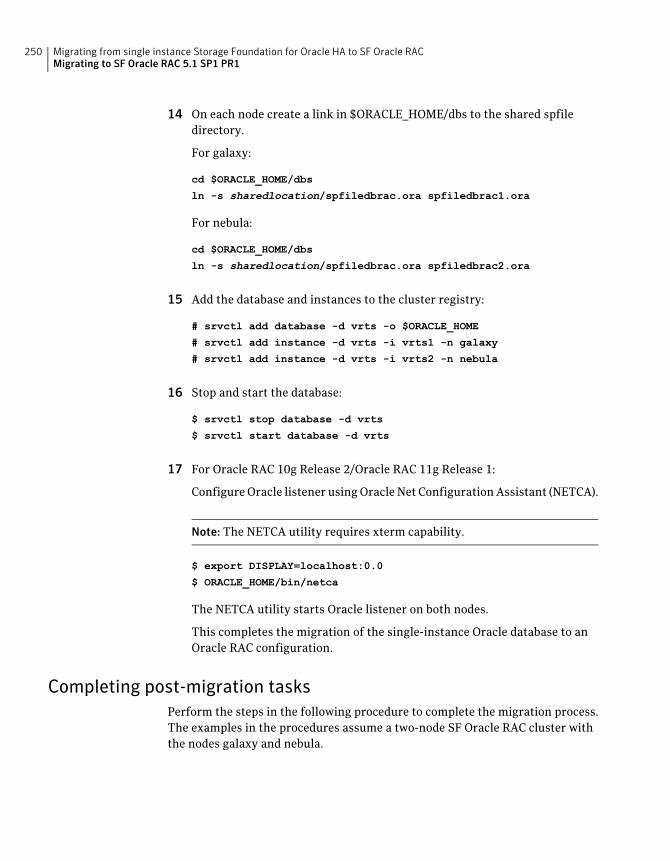
14 On each node create a link in $ORACLE_HOME/dbs to the shared spfiledirectory.
For galaxy:
cd $ORACLE_HOME/dbs
ln -s sharedlocation/spfiledbrac.ora spfiledbrac1.ora
For nebula:
cd $ORACLE_HOME/dbs
ln -s sharedlocation/spfiledbrac.ora spfiledbrac2.ora
15 Add the database and instances to the cluster registry:
# srvctl add database -d vrts -o $ORACLE_HOME
# srvctl add instance -d vrts -i vrts1 -n galaxy
# srvctl add instance -d vrts -i vrts2 -n nebula
16 Stop and start the database:
$ srvctl stop database -d vrts
$ srvctl start database -d vrts
17 For Oracle RAC 10g Release 2/Oracle RAC 11g Release 1:
Configure Oracle listener using Oracle Net Configuration Assistant (NETCA).
Note: The NETCA utility requires xterm capability.
$ export DISPLAY=localhost:0.0
$ ORACLE_HOME/bin/netca
The NETCA utility starts Oracle listener on both nodes.
This completes the migration of the single-instance Oracle database to anOracle RAC configuration.
Completing post-migration tasksPerform the steps in the following procedure to complete the migration process.The examples in the procedures assume a two-node SF Oracle RAC cluster withthe nodes galaxy and nebula.
Migrating from single instance Storage Foundation for Oracle HA to SF Oracle RACMigrating to SF Oracle RAC 5.1 SP1 PR1
250

To complete the post-migration tasks:
1 For Oracle RAC 10g Release 2/Oracle RAC 11g Release 1:
Copy the file tnsnames.ora to the directory $ORACLE_HOME/network/adminonall nodes. A sample tnsnames.ora file is given below:
VRTS =
(DESCRIPTION =
(ADDRESS = (PROTOCOL = TCP)(HOST = galaxy-vip)(PORT = 1521))
(ADDRESS = (PROTOCOL = TCP)(HOST = nebula-vip)(PORT = 1521))
(LOAD_BALANCE = yes)
(CONNECT_DATA =
(SERVER = DEDICATED)
(SERVICE_NAME = vrts)
)
)
VRTS1 =
(DESCRIPTION =
(ADDRESS = (PROTOCOL = TCP)(HOST = galaxy-vip)(PORT = 1521))
(CONNECT_DATA =
(SERVER = DEDICATED)
(SERVICE_NAME = vrts)
(INSTANCE_NAME = vrts1)
)
)
VRTS2 =
(DESCRIPTION =
(ADDRESS = (PROTOCOL = TCP)(HOST = nebula-vip)(PORT = 1521))
(CONNECT_DATA =
(SERVER = DEDICATED)
(SERVICE_NAME = vrts)
(INSTANCE_NAME = vrts2)
)
)
LISTENERS_VRTS =
(ADDRESS_LIST =
(ADDRESS = (PROTOCOL = TCP)(HOST = galaxy-vip)(PORT = 1521))
(ADDRESS = (PROTOCOL = TCP)(HOST = nebula-vip)(PORT = 1521))
)
For Oracle RAC 11g Release 2, see the Oracle documentation to update thetnsnames.ora file.
251Migrating from single instance Storage Foundation for Oracle HA to SF Oracle RACMigrating to SF Oracle RAC 5.1 SP1 PR1

2 Optional: Add services to a database and assign them to instances. You cancreate services manually or by using the Database Configuration Assistant(DBCA) utility.
In Real Application Clusters (RAC), a service can span one or more instancesand facilitate real workload balancing based on real transaction performance.You can control the instances in your cluster that are allocated to differentservices at different times.
To create the services manually:
# srvctl add service -d vrts -s ORA_TAF -r vrts1, vrts2
3 Configure the CSSD, PrivNIC or MultiPrivNIC and Oracle resource agents inthe VCS configuration file.
For more information see Section 4: Installation and upgrade of Oracle RACin this guide.
4 Depending on your deployment needs you may perform the following optionaltasks:
■ Update the application (database client) configuration to connect to OracleRAC database (if required) and to take advantage of Oracle RAC featureslike load balancing and scalability.
■ Update the VCS configuration file for any additional resources, whichwere present in the VCS configuration prior to the migration process.
Migrating Storage Foundation for Databases (SFDB) objectsfrom single instance Oracle to Oracle RACAfter migrating from Storage Foundation HA to Storage Foundation for OracleRAC, the Storage Foundation for Databases (SFDB) objects created in a singleinstance Oracle environment will not be available in the Oracle RAC environment.
To re-create the SFDB repository
1 After migrating from Storage Foundation HA to Storage Foundation for OracleRAC, run dbed_update.
2 Re-create the SFDB objects that existed in the Storage Foundation HAenvironment. They will now be supported for SFRAC.
For information on configuring SFDB objects, see the StorageFoundation: Storageand Availability Management for Oracle Databases guide.
Migrating from single instance Storage Foundation for Oracle HA to SF Oracle RACMigrating to SF Oracle RAC 5.1 SP1 PR1
252

Sample configuration filesThis section illustrates sample configurations for the following files:
See “VCS configuration file for StorageFoundation for Oracle HA” on page 253.
VCS configuration file
See “Oracle initialization parameter file forStorage Foundation for Oracle HA”on page 254.
Oracle initialization parameter file
See “tnsnames.ora for Storage Foundationfor Oracle HA” on page 255.
tnsnames.ora
See “listener.ora for Storage Foundation forOracle HA” on page 255.
listener.ora
VCS configuration file for Storage Foundation for Oracle HAThe sample VCS configuration file for Storage Foundation for Oracle HA is asfollows:
include "types.cf"
include "OracleTypes.cf"
cluster tyur (
UserNames = { admin = bQRjQLqNRmRRpZRlQO }
Administrators = { admin }
)
system galaxy (
)
system nebula (
)
group sfora (
SystemList = { galaxy = 0, nebula = 1 }
AutoStartList = { galaxy, nebula }
)
DiskGroup oradatadg (
Critical = 0
253Migrating from single instance Storage Foundation for Oracle HA to SF Oracle RACSample configuration files

DiskGroup = oradatadg
)
Mount oradatamnt (
Critical = 0
MountPoint = "/oradata"
BlockDevice = "/dev/vx/dsk/oradatadg/datavol"
FSType = vxfs
FsckOpt = "-y"
)
Oracle oradb (
Critical = 0
Sid = vrts
Owner = oracle
Home = "/oracle/dbhome"
)
oradatamnt requires oradatadg
oradb requires oradatamnt
Oracle initialization parameter file for Storage Foundation for OracleHA
The sample Oracle initialization parameter file for Storage Foundation for OracleHA is as follows:
vrts.__db_cache_size=1375731712
vrts.__java_pool_size=16777216
vrts.__large_pool_size=16777216
vrts.__oracle_base='/oracle/dbhome'\
#ORACLE_BASE set from environment
vrts.__pga_aggregate_target=1224736768
vrts.__sga_target=1811939328
vrts.__shared_io_pool_size=0
vrts.__shared_pool_size=385875968
vrts.__streams_pool_size=0
*.audit_file_dest='/oracle/dbhome/admin/vrts/adump'
*.audit_trail='none'
*.compatible='11.1.0.0.0'
*.control_files='/oradata/vrts/control01.ctl',
'/oradata/vrts/control02.ctl',
'/oradata/vrts/control03.ctl'
*.db_block_size=8192
Migrating from single instance Storage Foundation for Oracle HA to SF Oracle RACSample configuration files
254

*.db_domain=''
*.db_name='vrts'
*.diagnostic_dest='/oracle/dbhome'
*.dispatchers='(PROTOCOL=TCP) (SERVICE=dbracXDB)'
*.log_archive_dest_1='LOCATION=/oradata/archive'
*.log_archive_format='%t_%s_%r.dbf'
*.memory_target=3036676096
*.open_cursors=300
*.processes=150
*.remote_login_passwordfile='EXCLUSIVE'
*.undo_tablespace='UNDOTBS1'
tnsnames.ora for Storage Foundation for Oracle HAThe sample tnsnames.ora for Storage Foundation for Oracle HA is as follows:
Host : galaxy
VRTS =
(DESCRIPTION =
(ADDRESS_LIST =
(ADDRESS = (PROTOCOL = TCP)(HOST = galaxy)(PORT = 1521))
)
(CONNECT_DATA =
(SERVICE_NAME = vrts)
)
)
Host : Nebula
VRTS =
(DESCRIPTION =
(ADDRESS_LIST =
(ADDRESS = (PROTOCOL = TCP)(HOST = nebula)(PORT = 1521))
)
(CONNECT_DATA =
(SERVICE_NAME = vrts)
)
)
listener.ora for Storage Foundation for Oracle HAThe sample listener.ora for Storage Foundation for Oracle HA is as follows:
255Migrating from single instance Storage Foundation for Oracle HA to SF Oracle RACSample configuration files

Host : galaxy
LISTENER =
(DESCRIPTION_LIST =
(DESCRIPTION =
(ADDRESS = (PROTOCOL = TCP)(HOST = galaxy)(PORT = 1521))
(ADDRESS = (PROTOCOL = IPC)(KEY = EXTPROC1521))
)
)
Host : Nebula
LISTENER =
(DESCRIPTION_LIST =
(DESCRIPTION =
(ADDRESS = (PROTOCOL = TCP)(HOST = nebula)(PORT = 1521))
(ADDRESS = (PROTOCOL = IPC)(KEY = EXTPROC1521))
)
)
Migrating from single instance Storage Foundation for Oracle HA to SF Oracle RACSample configuration files
256
Performing post-upgradetasks
This chapter includes the following topics:
■ Relinking Oracle RAC libraries with the SF Oracle RAC libraries
■ Setting or changing the product license level
■ Changing permissions for Storage Foundation for Databases
■ Upgrading disk layout versions
■ Upgrading VxVM disk group version
■ Post upgrade tasks for migrating the SFDB repository database
■ Verifying the cluster
RelinkingOracle RAC librarieswith the SFOracle RAClibraries
You must relink the Oracle RAC libraries with the SF Oracle RAC libraries afterupgrading SF Oracle RAC.
The steps vary depending on the version of Oracle RAC in use before the upgrade:
■ If you upgraded from an SF Oracle RAC version running Oracle RAC 10g Release2 or Oracle RAC 11g:See “To relink Oracle RAC 10g Release 2 or Oracle RAC 11g using the installer”on page 258.
17Chapter

■ If you upgraded from an SF Oracle RAC version running Oracle RAC 9i orOracle RAC 10g Release 1 or if you want to relink the libraries manually forlater versions of Oracle RAC:See “To relink Oracle RAC 9i or Oracle RAC 10g Release 1” on page 258.
To relink Oracle RAC 10g Release 2 or Oracle RAC 11g using the installer
1 Run the installsfrac installer:
# cd /opt/VRTS/install
# ./installsfrac -configure galaxy nebula
2 Enter 5 to select the option Post Oracle Installation Tasks.
1) Configure SF Oracle RAC sub-components
2) SF Oracle RAC Installation and Configuration Checks
3) Prepare to Install Oracle
4) Install Oracle Clusterware/Grid Infrastructure and Database
5) Post Oracle Installation Tasks
6) Exit SF Oracle RAC Configuration
Choose option: [1-6,q] (1) 5
3 Select the option Relink Oracle Database Binary.
1) Configure CSSD agent
2) Relink Oracle Database Binary
3) Exit SF Oracle RAC Configuration
b) Back to previous menu
Choose option: [1-3,b,q] (1) 2
4 Provide the following information:
Enter Oracle UNIX user name: [b] (oracle)
Enter Oracle UNIX group name: [b] (oinstall)
Enter absolute path of Oracle Clusterware/Grid Infrastructure
Home directory: [b]
Enter absolute path of Oracle Database Home directory: [b]
The installer detects the Oracle version.
5 Enter y to proceed with relinking.
Do you want to continue? [y,n,q] (y)
To relink Oracle RAC 9i or Oracle RAC 10g Release 1
1 Replace the Oraclelibskgxp libraries with the corresponding Veritas libraries:
Performing post-upgrade tasksRelinking Oracle RAC libraries with the SF Oracle RAC libraries
258
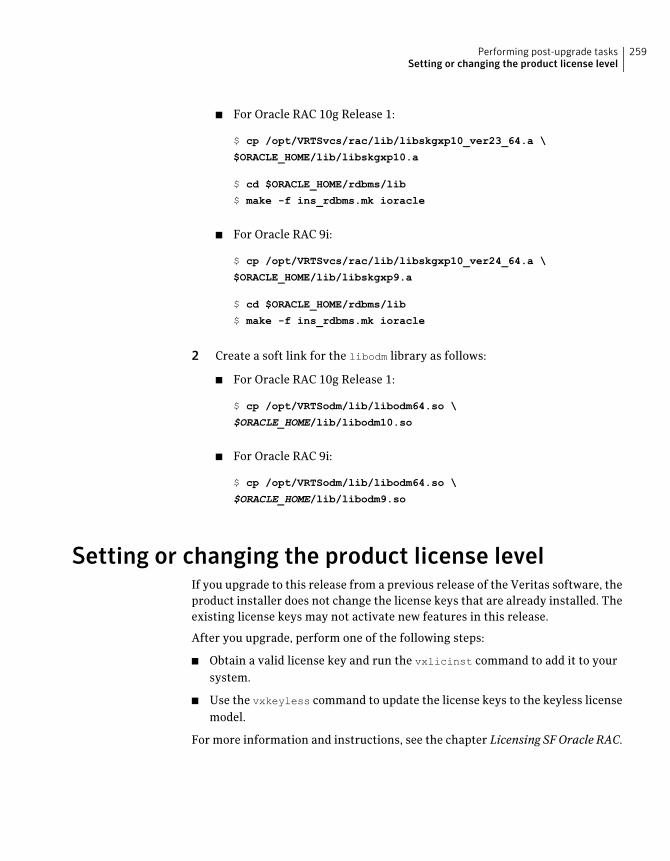
■ For Oracle RAC 10g Release 1:
$ cp /opt/VRTSvcs/rac/lib/libskgxp10_ver23_64.a \
$ORACLE_HOME/lib/libskgxp10.a
$ cd $ORACLE_HOME/rdbms/lib
$ make -f ins_rdbms.mk ioracle
■ For Oracle RAC 9i:
$ cp /opt/VRTSvcs/rac/lib/libskgxp10_ver24_64.a \
$ORACLE_HOME/lib/libskgxp9.a
$ cd $ORACLE_HOME/rdbms/lib
$ make -f ins_rdbms.mk ioracle
2 Create a soft link for the libodm library as follows:
■ For Oracle RAC 10g Release 1:
$ cp /opt/VRTSodm/lib/libodm64.so \
$ORACLE_HOME/lib/libodm10.so
■ For Oracle RAC 9i:
$ cp /opt/VRTSodm/lib/libodm64.so \
$ORACLE_HOME/lib/libodm9.so
Setting or changing the product license levelIf you upgrade to this release from a previous release of the Veritas software, theproduct installer does not change the license keys that are already installed. Theexisting license keys may not activate new features in this release.
After you upgrade, perform one of the following steps:
■ Obtain a valid license key and run the vxlicinst command to add it to yoursystem.
■ Use the vxkeyless command to update the license keys to the keyless licensemodel.
For more information and instructions, see the chapter Licensing SF Oracle RAC.
259Performing post-upgrade tasksSetting or changing the product license level

Changing permissions for Storage Foundation forDatabases
Change the permissions on the /opt/VRTSdbed directory and reset owner andgroup settings as appropriate. This is necessary to ensure that the Veritas StorageFoundation for Oracle commands work correctly.
To chang permissions for Storage Foundation for Databases
1 Change permissions for the /opt/VRTSdbed directory:
# chmod 550 /opt/VRTSdbed
2 Reset the owner to user "oracle" and the group to "dba":
# chown oracle:dba /opt/VRTSdbed
Upgrading disk layout versionsIn this release, you can create and mount only file systems with disk layout Version6, Version 7, and Version 8. No prior versions can be created or mounted.
Use the vxfsconvert or vxupgrade utilities to upgrade older disk layout versionsto disk layout Version 8.
See the vxfsconvert or vxupgrade man pages.
For more information about disk layouts, see the Veritas File SystemAdministrator's Guide.
Upgrading VxVM disk group versionAll Veritas Volume Manager disk groups have an associated version number. EachVxVM release supports a specific set of disk group versions and can import andperform tasks on disk groups with those versions. Some new features and taskswork only on disk groups with the current disk group version. Before you canperform the tasks, you need to upgrade existing disk group version to 160.
Run the following command on the master node to upgrade the disk group version:
# vxdg -T 160 upgrade diskgroup_name
The default Cluster Volume Manager protocol version is 100 and does not needto be upgraded.
Performing post-upgrade tasksChanging permissions for Storage Foundation for Databases
260

Run the following command to verify the CVM protocol version:
# /opt/VRTS/bin/vxdctl protocolversion
If the protocol version is not 100, run the following command to upgrade theversion:
# /opt/VRTS/bin/vxdctl upgrade
Post upgrade tasks formigrating the SFDB repositorydatabase
To continue using the checkpoints or tering policies you created with a 5.0x orearlier version of Storage Foundation for Oracle RAC, you must perform one ofthe following procedures after upgrading SF Oracle RAC to 5.1 Service Pack 1Platform Release 1:
■ After you upgrade from 5.0.x and before you migrate SFDB:
■ Migrating from a 5.0 SFDB repository database
■ Upgrading without migrating existing Database Storage Checkpoints andSmartTier parameters
Migrating from a 5.0 repository database to 5.1 Service Pack 1 PlatformRelease 1
Perform the following on one node only.
To migrate from a 5.0 repository database to 5.1 Service Pack 1 Platform Release1
1 Rename the startup script NO_S*vxdbms3 to S*vxdbms3.
2 As root, set the Oracle group permission for various directories used by Oracleon one node:
# /opt/VRTSdbed/common/bin/sfua_db_config
3 As root, dump out the old Sybase ASA repository. If you are using SFHA orSF Oracle RAC, you only need to this on one node.
# /opt/VRTSdbed/migrate/sfua_rept_migrate
261Performing post-upgrade tasksPost upgrade tasks for migrating the SFDB repository database

4 On the same node that you ran sfua_rept_migrate run the followingcommand as Oracle user. For each Oracle instance, migrate the old repositorydata to the SQLite repository.
$ dbed_update -S $ORACLE_SID -H $ORACLE_HOME
5 By default, the repository is created on the filesystem which contains theOracle SYSTEM tablespace. If you need an alternative repository path, firstverify the following requirements:
■ Repository path has to be a directory writable by Oracle user.
■ The repository must be accessible by all nodes. You can put it in a CFS filesystem, or put it in a resource group under VCS control so it can be failedover together with the Oracle database.
■ The update commands will not be able to verify accessibility of therepository path and will fail if you have not set up the path correctly.
To create an alternate repository path:
$ dbed_update -S $ORACLE_SID -H $ORACLE_HOME -R \
Alternate_path
6 If you are using Database Flashsnap for off-host processing, and if you havea repository on the secondary host that you need to migrate: perform theprevious steps on the secondary host.
If you do not have a repository that you need to migrate from 5.0:
As root, set the Oracle group permission for various directories used by Oracle:
# /opt/VRTSdbed/common/bin/sfua_db_config
Performing post-upgrade tasksPost upgrade tasks for migrating the SFDB repository database
262

7 On the primary host, edit your snapplans to remove the"SNAPSHOT_DG=SNAP_*" parameter and add“SNAPSHOT_DG_PREFIX=SNAP_*". The parameter can be any PREFIX valueand not necessarily "SNAP_*".
For example:
$ /usr/oracle> more SNAPPLAN1
SNAPSHOT_VERSION=5.0
PRIMARY_HOST=system1
SECONDARY_HOST=system1.pdx.symantec.com
PRIMARY_DG=system1_data
SNAPSHOT_DG=SNAP_system1_data
ORACLE_SID=HN1
ARCHIVELOG_DEST=/oracle/orahome/dbs/arch
SNAPSHOT_ARCHIVE_LOG=yes
SNAPSHOT_MODE=online
SNAPSHOT_PLAN_FOR=database
SNAPSHOT_PLEX_TAG=dbed_flashsnap
SNAPSHOT_VOL_PREFIX=SNAP_
ALLOW_REVERSE_RESYNC=no
SNAPSHOT_MIRROR=1
$ /usr/oracle> more SNAPPLAN1
SNAPSHOT_VERSION=5.0
PRIMARY_HOST=system1
SECONDARY_HOST=system1.pdx.symantec.com
PRIMARY_DG=judge_data
SNAPSHOT_DG_PREFIX=SNAP_system1_data
ORACLE_SID=HN1
ARCHIVELOG_DEST=/oracle/orahome/dbs/arch
SNAPSHOT_ARCHIVE_LOG=yes
SNAPSHOT_MODE=online
SNAPSHOT_PLAN_FOR=database
SNAPSHOT_PLEX_TAG=dbed_flashsnap
SNAPSHOT_VOL_PREFIX=SNAP_
ALLOW_REVERSE_RESYNC=no
SNAPSHOT_MIRROR=1
263Performing post-upgrade tasksPost upgrade tasks for migrating the SFDB repository database

8 On the primary host, revalidate your snapshots using the following command:
$ /opt/VRTS/bin/dbed_vmchecksnap -S $ORACLE_SID \
-H $ORACLE_HOME -f SNAPPLAN -o validate
This completes the migration of the repository for Database StorageCheckpoints and Database Tiered Storage parameters.
To begin using the Storage Foundation for Databases (SFDB) tools:
SeeStorageFoundation: StorageandAvailabilityManagement forOracleDatabases
Verifying the clusterThe installer performs the following checks on each node during the process:
■ Verifies that SF Oracle RAC is installed.
■ Verifies whether the Oracle process daemon (oprocd) is running or not.
■ If Oracle RAC 10g Release 2 or Oracle RAC 11g Release 1 is installed, verifiesthat LLT and Oracle Clusterware uses the same node IDs for each node in thecluster.
■ Verifies that the Veritas libraries (VCS IPC, ODM, and VCSMM) are linked withthe Oracle RAC libraries. The VCS IPC check is skipped if Oracle RAC 11g isinstalled.
■ Verifies whether the tunables for LLT/LMX/VCSMM tunables are set correctly.
■ Verifies that the CSSD resource is configured under the CVM service group.
■ Verifies whether the specified Oracle user has read permissions on the/etc/llttab and /etc/llthosts files.
■ Verifies that LLT and Oracle Clusterware/Grid Infrastructure have the sameview of the number of nodes in the cluster.
■ Verifies that the Oracle RAC database version is the same on all nodes in thecluster. The check fails if the version or patchset information varies acrossnodes.
For information on resolving issues that you may encounter during the checks,see theVeritas StorageFoundation forOracleRACAdministrator'sGuide, Chapter:Troubleshooting SF Oracle RAC, Section: Troubleshooting installation andconfiguration check failures.
The installer skips the following checks when LLT is configured over UDP:
■ LLT links' full duplex setting
■ LLT link jumbo frame setting (MTU)
Performing post-upgrade tasksVerifying the cluster
264

■ LLT links' cross connection
■ LLT links' speed and auto negotiation settings
Run the SF Oracle RAC installer to verify the functional health of the cluster.
To verify the cluster
1 Start the SF Oracle RAC installer:
# cd /opt/VRTS/install
# ./installsfrac -configure galaxy nebula
2 Select the option SF Oracle RAC Installation and Configuration Checks.
1) Configure SF Oracle RAC sub-components
2) SF Oracle RAC Installation and Configuration Checks
3) Prepare to Install Oracle
4) Install Oracle Clusterware/Grid Infrastructure and Database
5) Post Oracle Installation Tasks
6) Exit SF Oracle RAC Configuration
Choose option: [1-6,q] (1) 2
3 Enter y to confirm that Oracle RAC is installed on the nodes.
4 Enter the full path of the Oracle Clusterware/Grid Infrastructure homedirectory.
Note:The installer tries to discover the location of the Oracle Clusterware/GridInfrastructure home directory from the Oracle inventory. If the installerdiscovers the information, you are not prompted for this information.
The installer verifies the path information and re-prompts if the path isincorrect.
265Performing post-upgrade tasksVerifying the cluster

5 Enter the full path of the Oracle RAC database home directory.
Note: The installer tries to discover the location of the Oracle RAC databasehome directory from the Oracle inventory. If the installer discovers theinformation, you are not prompted for this information.
The installer verifies the path information.
6 Enter the Oracle user name.
The installer displays the location of the temporary log file and starts theverification process.
Performing post-upgrade tasksVerifying the cluster
266

Installation and upgrade ofOracle RAC
■ Chapter 18. Before installing Oracle RAC
■ Chapter 19. Installing Oracle RAC
■ Chapter 20. Performing Oracle RAC post-installation tasks
■ Chapter 21. Upgrading Oracle RAC
4Section

268

Before installing Oracle RAC
This chapter includes the following topics:
■ About preparing to install Oracle RAC
■ Preparing to install Oracle RAC using the SF Oracle RAC installer or manually
About preparing to install Oracle RACUse one of the following ways to perform the pre-installation tasks:
The SF Oracle RAC installer provides a menu-driven commandline interface to step you through the pre-installation tasks.
Note: Some of the pre-installation steps are not supported bythe SF Oracle RAC installer and must be done manually asdescribed in the manual procedures.
SF Oracle RAC installer
You need to perform the pre-installation tasks manually asdescribed in the manual procedures.
Manual
You can pre-configure the systems for Oracle RAC installationusing an SF Oracle RAC response file. The SF Oracle RAC responsefile in tandem with the Oracle RAC response files simplify theprocess of automating and standardizing Oracle RAC installations.
Note: You can use the response file to automate only thosepre-configuration tasks that are supported by the SF Oracle RACinstaller.
For instructions, see the chapter "Installing Oracle RAC using aresponse file" in this document.
Response file
The examples in this chapter assume a two-node cluster comprising the nodesgalaxy and nebula.
18Chapter

Before installing Oracle RAC, review the Oracle installation manuals and theappropriate Oracle support Web sites.
Note: Some of the pre-installation tasks, wherever indicated in the document,must be done in accordance with the instructions in the Oracle installationmanuals. The instructions for these tasks are not provided in this document.
Preparing to install Oracle RAC using the SF OracleRAC installer or manually
This section provides instructions for both manual as well as SF Oracle RACinstaller-based procedures.
To prepare to install Oracle RAC
1 Identify the public virtual IP addresses for use by Oracle.
See “Identifying the public virtual IP addresses for use by Oracle” on page 271.
2 Set the kernel parameters.
See “Setting the kernel parameters” on page 272.
3 Verify that the user nobody exists.
See “Verifying the user "nobody" exists” on page 272.
4 Launch the SF Oracle RAC installer.
See “Launching the SF Oracle RAC installer” on page 272.
5 Create Oracle user and groups.
See “Creating users and groups for Oracle RAC” on page 273.
6 Create the storage for OCR and voting disk.
See “Creating storage for OCR and voting disk ” on page 276.
7 Configure the private network for Oracle RAC.
See “Configuring private IP addresses for Oracle RAC” on page 288.
8 Create the Oracle Clusterware/Grid Infrastructure and Oracle database homedirectories manually.
See “Creating Oracle Clusterware/Grid Infrastructure and Oracle databasehome directories manually” on page 301.
9 Set up Oracle user equivalence on all nodes.
See “Setting up user equivalence” on page 317.
Before installing Oracle RACPreparing to install Oracle RAC using the SF Oracle RAC installer or manually
270
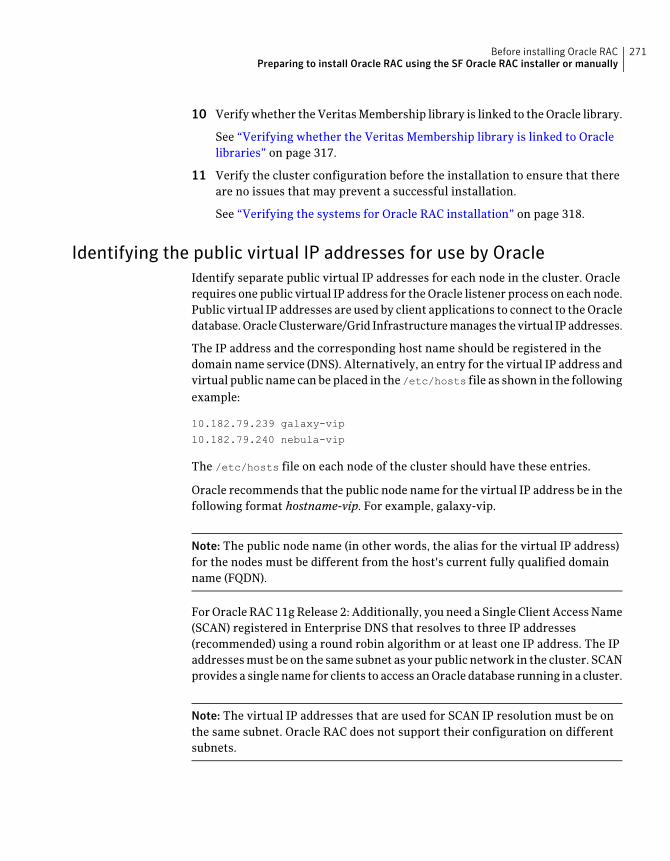
10 Verify whether the Veritas Membership library is linked to the Oracle library.
See “Verifying whether the Veritas Membership library is linked to Oraclelibraries” on page 317.
11 Verify the cluster configuration before the installation to ensure that thereare no issues that may prevent a successful installation.
See “Verifying the systems for Oracle RAC installation” on page 318.
Identifying the public virtual IP addresses for use by OracleIdentify separate public virtual IP addresses for each node in the cluster. Oraclerequires one public virtual IP address for the Oracle listener process on each node.Public virtual IP addresses are used by client applications to connect to the Oracledatabase. Oracle Clusterware/Grid Infrastructure manages the virtual IP addresses.
The IP address and the corresponding host name should be registered in thedomain name service (DNS). Alternatively, an entry for the virtual IP address andvirtual public name can be placed in the /etc/hosts file as shown in the followingexample:
10.182.79.239 galaxy-vip
10.182.79.240 nebula-vip
The /etc/hosts file on each node of the cluster should have these entries.
Oracle recommends that the public node name for the virtual IP address be in thefollowing format hostname-vip. For example, galaxy-vip.
Note: The public node name (in other words, the alias for the virtual IP address)for the nodes must be different from the host's current fully qualified domainname (FQDN).
For Oracle RAC 11g Release 2: Additionally, you need a Single Client Access Name(SCAN) registered in Enterprise DNS that resolves to three IP addresses(recommended) using a round robin algorithm or at least one IP address. The IPaddresses must be on the same subnet as your public network in the cluster. SCANprovides a single name for clients to access an Oracle database running in a cluster.
Note: The virtual IP addresses that are used for SCAN IP resolution must be onthe same subnet. Oracle RAC does not support their configuration on differentsubnets.
271Before installing Oracle RACPreparing to install Oracle RAC using the SF Oracle RAC installer or manually

Setting the kernel parametersSet the kernel parameter values to meet Oracle RAC deployment requirements.The Oracle Universal Installer (OUI) verifies the settings at the time of installationto ensure that they satisfy the minimum requirements. The Oracle RAC installationfails if the kernel parameters are not configured properly. The settings can alsobe tuned to optimize system performance.
For instructions and guidelines, see the Oracle Metalink document: 169706.1
Restart the nodes for the new values to take effect.
Verifying the user "nobody" existsTo verify the user "nobody" exists on each system in the cluster:
# id nobody
uid=4294967294(nobody) gid=4294967294(nobody)
If the user does not exist, create the user:
# mkgroup id=4294967294 nobody
# useradd -u 4294967294 nobody
Note: Make sure that the user ID and group ID are the same across the nodes inyour cluster.
Launching the SF Oracle RAC installerThe following procedure describes the steps to launch the SF Oracle RAC installerfor performing the Oracle RAC pre-installation tasks.
To launch the SF Oracle RAC installer
1 Log in as the root user on any one node and start the SF Oracle RAC installer:
# cd /opt/VRTS/install
# ./installsfrac -configure galaxy nebula
The program displays the Symantec copyright information as well as thelocation of the installation logs.
2 Review the installer instructions and press Enter to proceed. From theconfiguration program menu, select Prepare to Install Oracle.
3 Select the pre-installation task you want to perform.
Before installing Oracle RACPreparing to install Oracle RAC using the SF Oracle RAC installer or manually
272

■ Enter 1 to select the option Create Oracle User and Group:See “Creating users and groups for Oracle RAC” on page 273.
■ Enter 2 to select the option Create Storage for OCR and voting disk:See “Creating storage for OCR and voting disk ” on page 276.
■ Enter 3 to select the option Oracle Network Configuration:See “Configuring private IP addresses for Oracle RAC” on page 288.
Creating users and groups for Oracle RACDepending on the Oracle RAC version, create the required users and groups.
Create the following groups and users for Oracle RAC 10g Release 2/ Oracle RAC11g Release 1:
■ Oracle Inventory group
■ dba group
■ Oracle user
Create the following groups and users for Oracle RAC 11g Release 2:
■ Oracle Inventory group
■ dba group
■ Oracle grid user
■ Oracle user
Create additional users and groups as required by Oracle. Before creating Oracleusers and groups, see the Oracle documentation.
You must assign Oracle Inventory as the primary group and dba as the secondarygroup. Oracle requires secondary groups for identifying operating system accountsthat have database administrative (SYSDBA) privileges and for those accountsthat have limited sets of database administrative (SYSOPER) privileges. Createthe groups on all systems and assign the Oracle user to these groups.
Use one of the following ways to create the Oracle user and groups:
See “Creating Oracle user and groups using the SF Oracle RACinstaller” on page 274.
Using the SF Oracle RACinstaller
See “Creating the Oracle user and groups manually”on page 275.
Manual
273Before installing Oracle RACPreparing to install Oracle RAC using the SF Oracle RAC installer or manually

Creating Oracle user and groups using the SF Oracle RACinstallerThis procedure provides instructions for creating Oracle user and groups usingthe SF Oracle RAC installer.
To create Oracle user and groups on all nodes in the cluster
1 From the SF Oracle RAC installer menu, enter 1 to select the option CreateOracle User and Group.
2 Provide the following information for creating the Oracle user and groups:user name, group name, user ID, group ID, and the full path of the Oracleuser home directory.
The user ID and group ID must not be in use on any node in the cluster. Theinstaller suggests unused values, which you may use or change as required.The configuration program assigns the same values on all the nodes.
Note: If you are configuring GCO, then the user IDs and group IDs of all nodeson both the primary and secondary clusters must be the same. Whileconfiguring the user ID and group ID values on the secondary site, make surethat they are identical to the values used at the primary site.
Enter Oracle UNIX user name: [b] oracle
Enter Oracle UNIX group name: [b] oinstall
Enter Oracle user's ID (numerical): [b] (1165) 1000
Enter Oracle group's ID (numerical): [b] (1165) 1000
Enter absolute path of Oracle user's Home directory: [b] /home/oracle
If the specified user name does not exist on any node in the cluster, thefollowing prompt is displayed:
User oracle does not exist on any node. Do you want to create it
with the information provided [y,n,q] (y)
Enter y to create the Oracle user with the information provided.
Before installing Oracle RACPreparing to install Oracle RAC using the SF Oracle RAC installer or manually
274

3 Enter the information for the secondary group.
Do you want to create a secondary group
for Oracle user? [y,n,q,b,?] (n) y
Enter Oracle UNIX group name: [b] (dba, oper etc.) dba
Enter Oracle group's ID (numerical): [b] (1996) 1001
Creating secondary group dba for
Oracle user oracle on galaxy ..... Done
Creating secondary group dba for
Oracle user oracle on nebula ..... Done
Do you want to create another secondary group
for Oracle user? [y,n,q,b,?] (n)
4 For Oracle RAC 11g Release 2: Repeat the above steps to create the grid user.
Enter Oracle UNIX user name: [b] grid
Enter Oracle UNIX group name: [b] (oinstall)
Enter Oracle user's ID (numerical): [b] (1168) 1001
Enter Oracle group's ID (numerical): [b] (1000)
Enter absolute path of Oracle user's Home directory: [b] /home/grid
Creating the Oracle user and groups manuallyDepending on the Oracle RAC version, create the necessary Oracle groups andusers. Be sure to assign the same group ID, user ID, and home directory for theuser on each system.
Note: When you create the user and group, make sure that you specify a user andgroup ID that is not in use.
275Before installing Oracle RACPreparing to install Oracle RAC using the SF Oracle RAC installer or manually

To create the operating system Oracle user and group on each system
1 Create the 'oinstall' group on each system.
# mkgroup id=1000 oinstall
# mkgroup id=1001 dba
2 Create the Oracle user and the user home directory on each system:
# useradd -g oinstall -u 1000 \
-G dba -m -d /home/oracle oracle
3 For Oracle RAC 11g Release 2: Create the grid user and the user home directoryon each system:
# useradd -g oinstall -u 1001 \
-G dba -m -d /home/grid grid
Creating storage for OCR and voting diskCreate appropriate storage for Oracle Cluster Registry (OCR) and the voting diskdepending on the version of Oracle RAC.
The OCR and the voting disk can reside on CVM rawvolumes or in directories in a cluster file system.
Oracle RAC 10g Release 2/Oracle RAC 11g Release 1
The OCR and the voting disk can reside on ASM or indirectories in a cluster file system.
Note: You can use CVM raw volumes to create ASM diskgroups.
Oracle RAC 11g Release 2
Use one of the following ways to create the storage:
See “Creating storage for OCR and voting disk using theinstaller” on page 277.
SF Oracle RAC installer
See “Creating storage for OCR and voting disk manually”on page 282.
Manual
You need to create CVM volumes or a CFS mount point for database file storagelater in the installation process:
Before installing Oracle RACPreparing to install Oracle RAC using the SF Oracle RAC installer or manually
276

Creating storage for OCR and voting disk using the installerThe SF Oracle RAC installer enables you to create OCR and voting disk storageon CVM raw volumes or on a clustered file system. After creating the storage, theinstaller adds the storage configuration to VCS for high availability.
If you are creating the OCR and voting disk storage on CVM raw volumes, theinstaller performs the following tasks:
■ Creates CVM volume mirrors for OCR and voting disk
■ Creates the OCR and voting disk volumes and sets the ownership
■ Starts the volumes
■ Adds the CVMVolDg resource to the VCS configuration in the cvm group sothat the volumes are brought online automatically when the node starts
■ Brings the CVMVoIDg resource online
If you are creating the OCR and voting disk storage on CFS, the installer performsthe following tasks:
■ Creates CVM volume mirrors for OCR and voting disk
■ Creates the OCR and voting disk volumes and sets the ownership
■ Starts the volumes
■ Creates the mount point and mounts it on all the nodes
■ Sets the ownership for the CFS mount point
■ Adds the CFSMount and CVMVolDg resources to the VCS configuration in thecvm group so that the resources are brought online automatically when thenode starts
■ Brings the CFSMount and CVMVoIDg resources online
277Before installing Oracle RACPreparing to install Oracle RAC using the SF Oracle RAC installer or manually

To create storage for OCR and voting disk using the SF Oracle RAC installer
1 From the SF Oracle RAC installer menu, enter 2 to select the option CreateStorage for OCR and Voting disk.
The following menu displays:
1) Create Oracle User and Group
2) Create Storage for OCR and Voting disk
3) Oracle Network Configuration
4) Exit SF Oracle RAC Configuration
b) Back to previous menu
Choose option: [1-4,b,q] (1) 2
2 Enter y to create the storage.
Do you want the installer to assist you in creating disk groups,
volumes and file systems for Oracle? (Mirroring enabled
by default) [y,n,q] (n) y
If you want to create the storage manually, enter n. The installer displaysinstructions for creating the storage manually. You may skip the remainingsteps.
3 Select an appropriate option for the disk group.
1) Create a disk group
2) Use an existing disk group
b) Back to previous menu
Choose option: [1-2,b,q]
■ If you choose to create a disk group, the installer displays the list ofexisting disks that do not belong to any disk group. Specify the disks (byentering the serial numbers displayed next to the disk names) that youwant to use to create the disk group.Enter the name of the disk group.
Enter the disk group name: [b] (ocrvotedg)
■ If you choose to use an existing disk group, the installer displays theexisting disk groups that contain at least two disks for mirroring.
Before installing Oracle RACPreparing to install Oracle RAC using the SF Oracle RAC installer or manually
278

4 Review and confirm the configuration information displayed:
CVM Master node: galaxy
Selected disks (including mirroring):
1. Disk_2
2. Disk_3
Disk group name: ocrvotedg
Is this information correct? [y,n,q] (y)
The installer initializes the disk groups.
5 Choose the type of storage.
■ To create the storage on CVM raw volumesSee “Creating the OCR and voting disk storage on CVM raw volumes”on page 279.
■ To create the storage on CFS:See “Creating the OCR and voting disk storage on CFS” on page 280.
Creating the OCR and voting disk storage on CVM raw volumes
Perform the steps in the following procedure to create the storage for OCR andvoting disk on CVM raw volumes.
Note: For Oracle RAC 11g Release 2, you may create CVM raw volumes to createASM disk groups that may be used to store the OCR and voting disk information.
To create the OCR and voting disk storage on CVM raw volumes
1 Enter 1 to select the option CVM raw volumes.
1 CVM Raw Volume
2 Clustered File System
b Back to previous menu
Select the storage scheme to be used: [1-2,b,q] 1
2 Enter the name and size of the volume on which you want to store OCRinformation.
Enter the volume name for OCR: [b] (ocrvol)
Enter the volume size for OCR (in MB): [b] (320)
279Before installing Oracle RACPreparing to install Oracle RAC using the SF Oracle RAC installer or manually

3 Enter the name and size of the volume on which you want to store voting diskinformation.
Enter the volume name for Vote: [b] (votevol)
Enter the volume size for Vote (in MB): [b] (320)
4 Enter the Oracle UNIX user name.
For Oracle RAC 10g Release 2/Oracle RAC 11g Release 1:
Enter Oracle UNIX user name: [b] oracle
For Oracle RAC 11g Release 2:
Enter Oracle UNIX user name: [b] grid
5 Enter the Oracle UNIX group name.
Enter Oracle UNIX group name: [b] (oinstall)
6 Press Return to continue.
7 Review and confirm the configuration information. The installer creates thevolumes and brings the corresponding resources online.
Press Return to continue.
8 Verify that the resource is online on all nodes in the cluster.
Note: It takes a few minutes for the CVMVolDg resource to come online.
# hares -state ocrvote_voldg_ocrvotedg
Creating the OCR and voting disk storage on CFS
Perform the steps in the following procedure to create the storage for OCR andvoting disk on CFS.
Before installing Oracle RACPreparing to install Oracle RAC using the SF Oracle RAC installer or manually
280

To create the OCR and voting disk storage on CFS
1 Enter 2 to select the option CFS Mounted.
1 CVM Raw Volume
2 Clustered File System
b Back to previous menu
Select the storage scheme to be used: [1-2,b,q] 2
2 Enter the name and size of the volume on which you want to store OCR andvoting disk information.
Enter the volume name for OCR and Voting disk: [b] (ocrvotevol)
Enter the volume size for OCR and Voting disk (in MB): [b] (640)
3 Enter the Oracle UNIX user name.
The Oracle UNIX user name was previously set up when you performed thepre-installation task of creating Oracle user and group.
Enter Oracle UNIX user name: [b] oracle
4 Enter the Oracle UNIX group name.
The Oracle UNIX group name was previously set up when you performed thepre-installation task of creating Oracle user and group.
For Oracle RAC 10g Release 2/Oracle RAC 11g Release 1:
Enter Oracle UNIX group name: [b] (oinstall)
For Oracle RAC 11g Release 2:
Enter Oracle UNIX group name: [b] (oinstall)
5 Press Return to continue.
6 Review and confirm the configuration information. The installer creates andstarts the volumes on all nodes in the cluster.
281Before installing Oracle RACPreparing to install Oracle RAC using the SF Oracle RAC installer or manually

7 Enter the CFS mount point for OCR and voting disk information.
Enter the mount point location for CFS (common for all the nodes) [b]
(/ocrvote)
The installer creates the CFS mount points and sets the ownership. PressReturn to continue.
8 Verify that the ocrvote_mnt_ocrvotedg and ocrvote_voldg_ocrvotedgresources are online on all nodes in the cluster:
Note: It takes a few minutes for the CVMVolDg resource to come online.
# hares -state ocrvote_mnt_ocrvotedg
# hares -state ocrvote_voldg_ocrvotedg
Creating storage for OCR and voting disk manuallyUse one of the following storage options to create the OCR and voting disk storage:
See “To create OCR and voting disk volumes on raw volumes”on page 282.
CVM raw volumes
See “To create the storage for OCR and voting disks on CFS”on page 283.
CFS
Note: Whether you create volumes or file system directories, you can add themto the VCS configuration to make them highly available.
To create OCR and voting disk volumes on raw volumes
1 Log in as the root user.
2 Determine the CVM master:
# vxdctl -c mode
3 On the master node, create a shared disk group:
# vxdg -s init ocrvotedg Disk_2 Disk_3
Before installing Oracle RACPreparing to install Oracle RAC using the SF Oracle RAC installer or manually
282

4 Create mirrored volumes in the shared group for OCR and voting disk:
# vxassist -g ocrvotedg make ocrvol 300M nmirrors=2
# vxassist -g ocrvotedg make votevol 300M nmirrors=2
5 Set the ownership for the volumes:
For Oracle RAC 10g Release 2/Oracle RAC 11g Release 1:
# vxedit -g ocrvotedg set group=oinstall user=oracle mode=660
ocrvol
# vxedit -g ocrvotedg set group=oinstall user=oracle mode=660
votevol
For Oracle RAC 11g Release 2:
# vxedit -g ocrvotedg set group=oinstall user=grid mode=660
ocrvol
# vxedit -g ocrvotedg set group=oinstall user=grid mode=660
votevol
6 Add the storage resources to the VCS configuration to make them highlyavailable.
See “Adding the storage resources to the VCS configuration” on page 284.
To create the storage for OCR and voting disks on CFS
1 Determine the CVM master:
# vxdctl -c mode
2 On the master node, create a shared VxVM disk group:
# vxdg -s init ocrvotedg Disk_2 Disk_3
3 From the CVM master, create a mirrored volume ocrvotevol:
# vxassist -g ocrvotedg make ocrvotevol 640M nmirrors=2
4 From the CVM master, create a file system with the volume ocrvotevol.
# mkfs -V vxfs /dev/vx/rdsk/ocrvotedg/ocrvotevol
5 On each system, create a directory /ocrvote:
# mkdir /ocrvote
283Before installing Oracle RACPreparing to install Oracle RAC using the SF Oracle RAC installer or manually

6 On each system, mount the directory /ocrvote:
# mount -V vxfs -o cluster /dev/vx/dsk/ocrvotedg/ocrvotevol
/ocrvote
7 From any system, change permissions on /ocrvote:
For Oracle RAC 10g Release 2/Oracle RAC 11g Release 1:
# chown -R oracle:oinstall /ocrvote
For Oracle RAC 11g Release 2:
# chown -R grid:oinstall /ocrvote
8 Add the storage resources to the VCS configuration to make them highlyavailable.
See “Adding the storage resources to the VCS configuration” on page 284.
Adding the storage resources to the VCS configuration
The type of storage resource you add to the VCS configuration depends on whetheryou chose to create the OCR and voting disk storage on raw volumes or CFS. Ifyou chose to create the storage on raw volumes, you need to add a CVMVolDgresource to the VCS configuration. If you chose to create the storage on CFS, youneed to add the CVMVolDg and CFSMount resources to the VCS configuration.
Depending on the type of storage, follow the steps in one of the followingprocedures to add the storage resources to the VCS configuration using thecommand line interface (CLI):
See “To add the storage resources created on raw volumesto the VCS configuration” on page 287.
For storage resources on CVMraw volumes
See “To add the storage resources created on CFS to theVCS configuration” on page 285.
For storage resources on CFS
Note: Set the attribute "Critical" to "0" for all the resources in the cvm servicegroup. This ensures that critical CVM and CFS resources are always online.
Before installing Oracle RACPreparing to install Oracle RAC using the SF Oracle RAC installer or manually
284

To add the storage resources created on CFS to the VCS configuration
1 Change the permissions on the VCS configuration file:
# haconf -makerw
2 Configure the CVM volumes under VCS:
# hares -add ocrvote_voldg_ocrvotedg CVMVolDg cvm
# hares -modify ocrvote_voldg_ocrvotedg Critical 0
# hares -modify ocrvote_voldg_ocrvotedg CVMDiskGroup ocrvotedg
# hares -modify ocrvote_voldg_ocrvotedg CVMVolume -add ocrvotevol
# hares -modify ocrvote_voldg_ocrvotedg CVMActivation sw
3 Set up the file system under VCS:
# hares -add ocrvote_mnt_ocrvotedg CFSMount cvm
# hares -modify ocrvote_mnt_ocrvotedg Critical 0
# hares -modify ocrvote_mnt_ocrvotedg MountPoint "/ocrvote"
# hares -modify ocrvote_mnt_ocrvotedg BlockDevice \
"/dev/vx/dsk/ocrvotedg/ocrvotevol"
# hares -modify ocrvote_mnt_ocrvotedg
4 Link the parent and child resources:
# hares -link ocrvote_voldg_ocrvotedg cvm_clus
# hares -link ocrvote_mnt_ocrvotedg ocrvote_voldg_ocrvotedg
# hares -link ocrvote_mnt_ocrvotedg vxfsckd
5 Enable the resources:
# hares -modify ocrvote_voldg_ocrvotedg Enabled 1
# hares -modify ocrvote_mnt_ocrvotedg Enabled 1
# haconf -dump -makero
285Before installing Oracle RACPreparing to install Oracle RAC using the SF Oracle RAC installer or manually

6 Verify the configuration of the ocrvote_mnt_ocrvotedg andocrvote_voldg_ocrvotedg resources in main.cf.
CFSMount ocrvote_mnt_ocrvotedg (
Critical = 0
MountPoint = "/ocrvote"
BlockDevice = "/dev/vx/dsk/ocrvotedg/ocrvotevol"
MountOpt= "mincache=direct"
)
CVMVolDg ocrvote_voldg_ocrvotedg (
Critical = 0
CVMDiskGroup = ocrvotedg
CVMVolume = { ocrvotevol }
CVMActivation = sw
)
ocrvote_mnt_ocrvotedg requires ocrvote_voldg_ocrvotedg
ocrvote_mnt_ocrvotedg requires vxfsckd
ocrvote_voldg_ocrvotedg requires cvm_clus
7 Bring the ocrvote_mnt_ocrvotedg and ocrvote_voldg_ocrvotedg resourcesonline on all systems in the cluster:
# hares -online ocrvote_voldg_ocrvotedg -sys sys_name
# hares -online ocrvote_mnt_ocrvotedg -sys sys_name
Verify that the resources are online on all systems in the cluster:
# hares -state ocrvote_voldg_ocrvotedg
# hares -state ocrvote_mnt_ocrvotedg
Before installing Oracle RACPreparing to install Oracle RAC using the SF Oracle RAC installer or manually
286

To add the storage resources created on raw volumes to the VCS configuration
1 Change the permissions on the VCS configuration file:
# haconf -makerw
2 Configure the CVM volumes under VCS:
# hares -add ocrvote_voldg_ocrvotedg CVMVolDg cvm
# hares -modify ocrvote_voldg_ocrvotedg Critical 0
# hares -modify ocrvote_voldg_ocrvotedg CVMDiskGroup ocrvotedg
# hares -modify ocrvote_voldg_ocrvotedg CVMVolume -add ocrvol
# hares -modify ocrvote_voldg_ocrvotedg CVMVolume -add votevol
# hares -modify ocrvote_voldg_ocrvotedg CVMActivation sw
3 Link the parent and child resources:
# hares -link ocrvote_voldg_ocrvotedg cvm_clus
4 Enable the resources:
# hares -modify ocrvote_voldg_ocrvotedg Enabled 1
# haconf -dump -makero
5 Verify the configuration of the ocrvote_voldg_ocrvotedg resource in main.cf.
CVMVolDg ocrvote_voldg_ocrvotedg (
Critical = 0
CVMDiskGroup = ocrvotedg
CVMVolume = { ocrvol, votevol }
CVMActivation = sw
)
ocrvote_voldg_ocrvotedg requires cvm_clus
6 Bring the ocrvote_voldg_ocrvotedg resource online on all systems in thecluster:
# hares -online ocrvote_voldg_ocrvotedg -sys sys_name
Verify that the resource is online on all systems in the cluster:
# hares -state ocrvote_voldg_ocrvotedg
287Before installing Oracle RACPreparing to install Oracle RAC using the SF Oracle RAC installer or manually
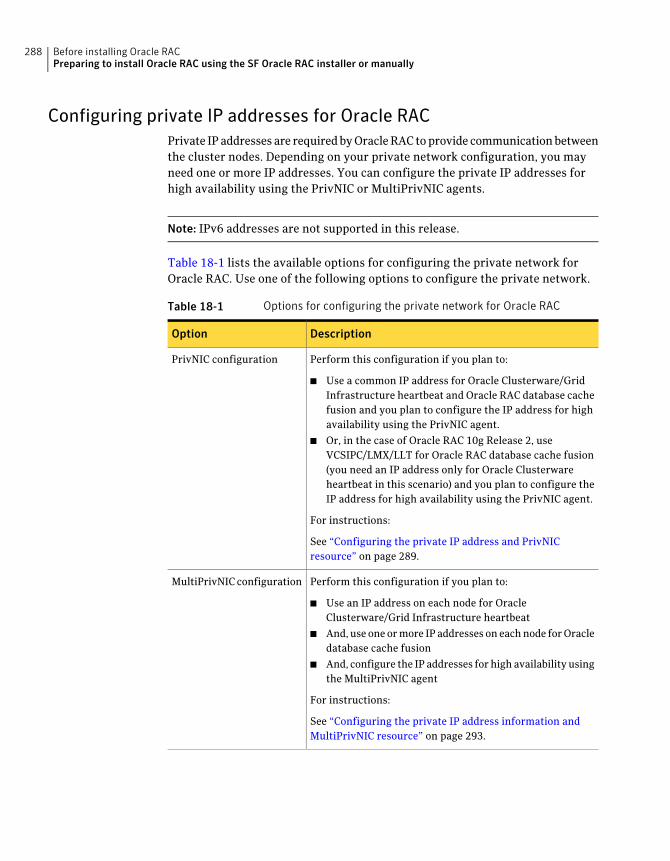
Configuring private IP addresses for Oracle RACPrivate IP addresses are required by Oracle RAC to provide communication betweenthe cluster nodes. Depending on your private network configuration, you mayneed one or more IP addresses. You can configure the private IP addresses forhigh availability using the PrivNIC or MultiPrivNIC agents.
Note: IPv6 addresses are not supported in this release.
Table 18-1 lists the available options for configuring the private network forOracle RAC. Use one of the following options to configure the private network.
Table 18-1 Options for configuring the private network for Oracle RAC
DescriptionOption
Perform this configuration if you plan to:
■ Use a common IP address for Oracle Clusterware/GridInfrastructure heartbeat and Oracle RAC database cachefusion and you plan to configure the IP address for highavailability using the PrivNIC agent.
■ Or, in the case of Oracle RAC 10g Release 2, useVCSIPC/LMX/LLT for Oracle RAC database cache fusion(you need an IP address only for Oracle Clusterwareheartbeat in this scenario) and you plan to configure theIP address for high availability using the PrivNIC agent.
For instructions:
See “Configuring the private IP address and PrivNICresource” on page 289.
PrivNIC configuration
Perform this configuration if you plan to:
■ Use an IP address on each node for OracleClusterware/Grid Infrastructure heartbeat
■ And, use one or more IP addresses on each node for Oracledatabase cache fusion
■ And, configure the IP addresses for high availability usingthe MultiPrivNIC agent
For instructions:
See “Configuring the private IP address information andMultiPrivNIC resource” on page 293.
MultiPrivNIC configuration
Before installing Oracle RACPreparing to install Oracle RAC using the SF Oracle RAC installer or manually
288

Configuring the private IP address and PrivNIC resourceYou need to configure the following information:
■ An IP address on each nodeIf you plan to install Oracle RAC 10g Release 2 or Oracle RAC 11g Release 1,the IP addresses configured must be added to the /etc/hosts file (using theSF Oracle RAC installer or manually) on all the nodes before installing OracleClusterware/Grid Infrastructure.
■ The PrivNIC agent for failing over IP addresses in the event of link failures.The Oracle Clusterware/Grid Infrastructure interconnects need to be protectedagainst NIC failures and link failures. The installer discovers the existingprivate NICs on which LLT is configured. For maximum failover options, allavailable LLT links are used for PrivNIC configuration.
Use one of the following ways to configure the PrivNIC and private IP addressinformation:
See “Configuring the private IP address and PrivNIC usingthe SF Oracle RAC installer” on page 289.
SF Oracle RAC installer
See “Configuring the private IP address and PrivNIC resourcemanually” on page 292.
Manual
Configuring the private IP address and PrivNIC using the SF Oracle RACinstaller
The SF Oracle RAC installer performs the following tasks:
■ Backs up the /etc/hosts file and adds the IP address information to the file(only if you specified that the installer update the file).
■ Adds the PrivNIC resource in the CVM group.
Perform the steps in the following procedure to configure the PrivNIC and privateIP address using the installer.
289Before installing Oracle RACPreparing to install Oracle RAC using the SF Oracle RAC installer or manually

To configure the PrivNIC and private IP address information
1 From the SF Oracle RAC menu, enter 3 to select the option Oracle NetworkConfiguration.
1) Create Oracle User and Group
2) Create Storage for OCR and Voting disk
3) Oracle Network Configuration
4) Exit SF Oracle RAC Configuration
b) Back to previous menu
Choose option: [1-4,b,q] (1) 3
2 Enter 1 to select the option Configure private IP addresses (PrivNICConfiguration).
1) Configure private IP addresses (PrivNIC Configuration)
2) Configure private IP addresses (MultiPrivNIC Configuration)
3) Exit SF Oracle RAC Configuration
b) Back to previous menu
Choose option: [1-3,b,q] (1) 1
The installer discovers available LLT links and PrivNIC resources.
If PrivNIC resources exist, you can choose to delete and reconfigure theresources using the installer.
Note: The installer only removes the corresponding PrivNIC resources fromthe configuration file. You must manually disassociate the IP addresses fromthe corresponding network interfaces and remove the IP addresses from the/etc/hosts file.
3 Enter the name for the PrivNIC resource.
Enter the PrivNIC resource name: [b] (ora_priv)
4 Enter y to modify the priority of the PrivNIC interfaces.
Note: The priority you set determines the interface that the PrivNIC agentchooses during failover.
Do you want to update the priority of the PrivNIC
interfaces? [y,n,q] (n) y
Before installing Oracle RACPreparing to install Oracle RAC using the SF Oracle RAC installer or manually
290

5 Set the interface priority in decreasing order. The PrivNIC agent will assignthe highest priority to the first interface specified in the list.
Enter the interface name in the decreasing priority order,
separated by a space: [b] (en2 en3) en3 en2
6 Enter y to add the IP addresses to the /etc/hosts file.■
Do you want the installer to add IP addresses in
/etc/hosts file? [y,n,q] (y)
■ Enter n if you choose to add the IP addresses to the file manually. Go tostep 8.
7 Perform this step only if you enabled the installer to add the IP address tothe /etc/hosts file in the previous step.
Provide the private IP address and the private node name for the IP addressthat must be added to the file.
Note: All IP addresses must be in the same subnet, failing which OracleClusterware/Grid Infrastructure will not be able to communicate properlyacross the nodes.
If the private IP address entries are already present in the /etc/hosts file onone of nodes in the cluster, the installer does not update the file with thespecified IP addresses on any of the nodes in the cluster.
Enter the private IP for galaxy: [b] 192.168.12.1
Enter Hostname alias for the above IP address: [b] galaxy-priv
Enter the private IP for nebula: [b] 192.168.12.2
Enter Hostname alias for the above IP address: [b] nebula-priv
Go to step 9.
8 Perform this step only if you have chosen to add the IP address to the/etc/hosts file manually.
Enter the private IP address information.
Enter the private IP for galaxy: [b] 192.168.12.1
Enter the private IP for nebula: [b] 192.168.12.2
291Before installing Oracle RACPreparing to install Oracle RAC using the SF Oracle RAC installer or manually

9 Enter the netmask information for the private network:
Enter the Netmask for private network: [b] (255.255.255.0)
The SF Oracle RAC installer now displays the configuration information.
10 Enter y to review and confirm the configuration information. The installeradds the PrivNIC resources to the VCS configuration and updates the/etc/hosts file (if you chose an installer-based update).
11 If you chose to add the IP address information to the /etc/hosts file manually,proceed to update the file as described in the following procedure.
See “Adding private IP addresses to the /etc/hosts file manually” on page 299.
12 Verify the PrivNIC configuration updates made by the program in the main.cffile.
See “Verifying the VCS configuration for PrivNIC and MultiPrivNIC”on page 300.
Configuring the private IP address and PrivNIC resource manually
Perform the steps in the following procedure to configure the private IP addressand PrivNIC resource manually. Configure the PrivNIC resource in the VCS groupwhere you have configured the OCR and voting disk resources.
The sample procedure creates the PrivNIC resource in the cvm group. The PrivNICagent plumbs the IP address to the specified network interface.
To configure the private IP address and PrivNIC resource manually
1 Log in as the root user on one of the nodes in the cluster.
2 Change the cluster configuration to read-write mode:
# haconf -makerw
3 Create the PrivNIC resource and add the resource to the cvm group:
# hares -add ora_priv PrivNIC cvm
Before installing Oracle RACPreparing to install Oracle RAC using the SF Oracle RAC installer or manually
292

4 Modify the PrivNIC resource:
# hares -modify ora_priv Critical 0
# hares -local ora_priv Device
# hares -local ora_priv Address
# hares -modify ora_priv \
Device -add en1 0 -sys galaxy
# hares -modify ora_priv \
Device -add en2 1 -sys galaxy
# hares -modify ora_priv \
Address 192.168.12.1 -sys galaxy
# hares -modify ora_priv \
Device -add en1 0 -sys nebula
# hares -modify ora_priv \
Device -add en2 1 -sys nebula
# hares -modify ora_priv \
Address 192.168.12.2 -sys nebula
# hares -modify ora_priv \
NetMask 255.255.255.0
# hares -modify ora_priv Enabled 1
5 Change the cluster configuration to read-only mode:
# haconf -dump -makero
Configuring the private IP address information andMultiPrivNIC resourceYou need to configure the following information:
■ An IP address on each node for Oracle Clusterware/Grid Infrastructureheartbeats
■ One or more IP addresses on each node for the Oracle database
■ The MultiPrivNIC agent for failing over IP addresses in the event of linkfailures.The Oracle Clusterware/Grid Infrastructure interconnects need to be protectedagainst NIC failures and link failures. The MultiPrivNIC agent protects thelinks against failures, if multiple links are available. The installer discoversthe existing private NICs on which LLT is configured. For maximum failoveroptions, all available LLT links are used for MultiPrivNIC configuration.
If you plan to use Oracle RAC 10g Release 2 or Oracle RAC 11g Release 1, the IPaddresses configured must be added to the /etc/hosts file (using the SF Oracle
293Before installing Oracle RACPreparing to install Oracle RAC using the SF Oracle RAC installer or manually

RAC installer or manually) on all the nodes before installing OracleClusterware/Grid Infrastructure.
Use one of the following ways to configure the MultiPrivNIC and private IP addressinformation:
See “Configuring the MultiPrivNIC and private IP addressinformation using the SF Oracle RAC installer” on page 294.
SF Oracle RAC installer
See “Configuring MultiPrivNIC and private IP addressesmanually ” on page 297.
Manual
Configuring theMultiPrivNIC and private IP address information using theSF Oracle RAC installer
Perform the steps in the following procedure to configure the MultiPrivNIC andprivate IP address using the installer.
The installer performs the following tasks:
■ Backs up the /etc/hosts file and adds the IP address information to the file(only if you specified that the installer update the file).
■ Adds the MultiPrivNIC resource in the CVM group.
Before installing Oracle RACPreparing to install Oracle RAC using the SF Oracle RAC installer or manually
294
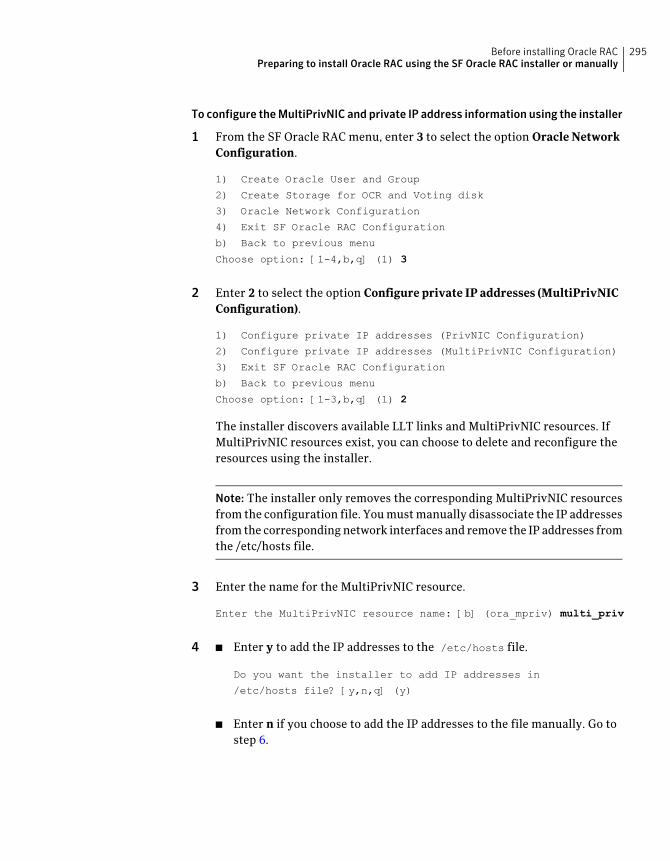
To configure theMultiPrivNIC and private IP address information using the installer
1 From the SF Oracle RAC menu, enter 3 to select the option Oracle NetworkConfiguration.
1) Create Oracle User and Group
2) Create Storage for OCR and Voting disk
3) Oracle Network Configuration
4) Exit SF Oracle RAC Configuration
b) Back to previous menu
Choose option: [1-4,b,q] (1) 3
2 Enter 2 to select the option Configure private IP addresses (MultiPrivNICConfiguration).
1) Configure private IP addresses (PrivNIC Configuration)
2) Configure private IP addresses (MultiPrivNIC Configuration)
3) Exit SF Oracle RAC Configuration
b) Back to previous menu
Choose option: [1-3,b,q] (1) 2
The installer discovers available LLT links and MultiPrivNIC resources. IfMultiPrivNIC resources exist, you can choose to delete and reconfigure theresources using the installer.
Note: The installer only removes the corresponding MultiPrivNIC resourcesfrom the configuration file. You must manually disassociate the IP addressesfrom the corresponding network interfaces and remove the IP addresses fromthe /etc/hosts file.
3 Enter the name for the MultiPrivNIC resource.
Enter the MultiPrivNIC resource name: [b] (ora_mpriv) multi_priv
4 Enter y to add the IP addresses to the /etc/hosts file.■
Do you want the installer to add IP addresses in
/etc/hosts file? [y,n,q] (y)
■ Enter n if you choose to add the IP addresses to the file manually. Go tostep 6.
295Before installing Oracle RACPreparing to install Oracle RAC using the SF Oracle RAC installer or manually
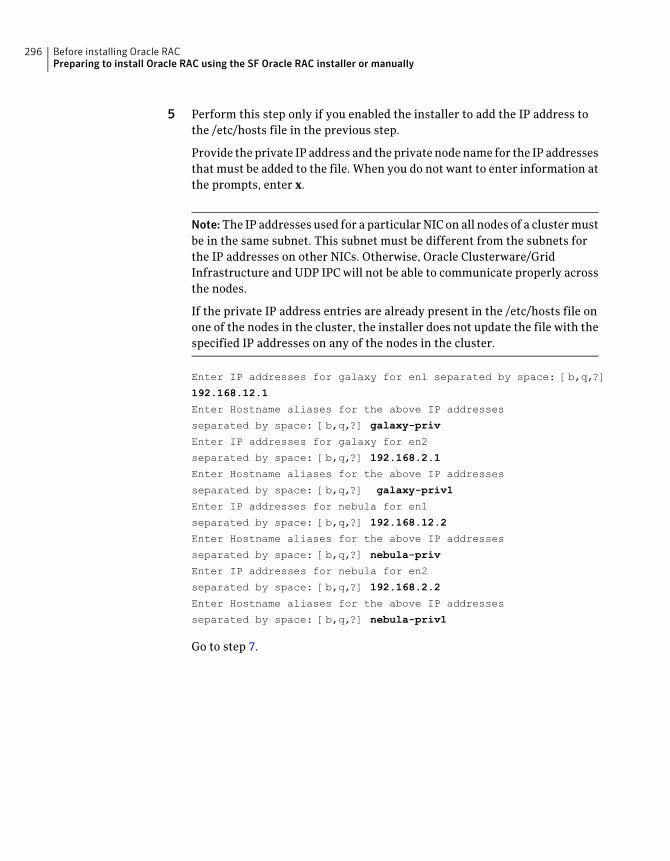
5 Perform this step only if you enabled the installer to add the IP address tothe /etc/hosts file in the previous step.
Provide the private IP address and the private node name for the IP addressesthat must be added to the file. When you do not want to enter information atthe prompts, enter x.
Note:The IP addresses used for a particular NIC on all nodes of a cluster mustbe in the same subnet. This subnet must be different from the subnets forthe IP addresses on other NICs. Otherwise, Oracle Clusterware/GridInfrastructure and UDP IPC will not be able to communicate properly acrossthe nodes.
If the private IP address entries are already present in the /etc/hosts file onone of the nodes in the cluster, the installer does not update the file with thespecified IP addresses on any of the nodes in the cluster.
Enter IP addresses for galaxy for en1 separated by space: [b,q,?]
192.168.12.1
Enter Hostname aliases for the above IP addresses
separated by space: [b,q,?] galaxy-priv
Enter IP addresses for galaxy for en2
separated by space: [b,q,?] 192.168.2.1
Enter Hostname aliases for the above IP addresses
separated by space: [b,q,?] galaxy-priv1
Enter IP addresses for nebula for en1
separated by space: [b,q,?] 192.168.12.2
Enter Hostname aliases for the above IP addresses
separated by space: [b,q,?] nebula-priv
Enter IP addresses for nebula for en2
separated by space: [b,q,?] 192.168.2.2
Enter Hostname aliases for the above IP addresses
separated by space: [b,q,?] nebula-priv1
Go to step 7.
Before installing Oracle RACPreparing to install Oracle RAC using the SF Oracle RAC installer or manually
296

6 Perform this step only if you have chosen to add the IP address to the/etc/hosts file manually.
Enter the private IP address information.
Enter IP addresses for galaxy for en1
separated by space: [b,q,?] 192.168.12.1
Enter IP addresses for galaxy for en2
separated by space: [b,q,?] 192.168.2.1
Enter IP addresses for nebula for en1
separated by space: [b,q,?] 192.168.12.2
Enter IP addresses for nebula for en2
separated by space: [b,q,?] 192.168.2.2
7 Enter the netmask information for the private network:
Enter the Netmask for private network: [b] (255.255.255.0)
The SF Oracle RAC installer displays the configured parameters.
8 Enter y to review and confirm the configuration information. The installeradds the MultiPrivNIC resources and updates the /etc/hosts file (if you choseinstaller-based update).
9 If you chose to add the IP address information to the /etc/hosts file manually,proceed to update the file as described in the following procedure.
See “Adding private IP addresses to the /etc/hosts file manually” on page 299.
10 Verify the MultiPrivNIC configuration updates made by the program in themain.cf file.
See “Verifying the VCS configuration for PrivNIC and MultiPrivNIC”on page 300.
Configuring MultiPrivNIC and private IP addresses manually
Perform the steps in the following procedure to configure MultiPrivNIC and privateIP addresses for Oracle Clusterware/Grid Infrastructure and UDP IPC manually.Configure the MultiPrivNIC resource in the VCS group where you have configuredthe OCR and voting disk resources.
Make sure that the number of links are the same for every node. For example, inthe following configuration, if the en1 and en2 links fail, the MultiPrivNIC agentfails over the IP addresses to the en3 link on galaxy; On nebula, the absence of athird link results in the agent failing over the link to en1, which is already down.This results in loss of communication between the nodes and causes OracleClusterware/Grid Infrastructure to reboot the cluster.
297Before installing Oracle RACPreparing to install Oracle RAC using the SF Oracle RAC installer or manually

MultiPrivNIC multi_priv (
Critical = 0
Device@galaxy = {en1 = 0, en2 = 1, en3 = 2}
Device@nebula = {en1 = 0, en2 = 1}
Address@galaxy = {"192.168.12.1" = 0,"192.168.2.1" = 1}
Address@nebula = {"192.168.12.2" = 0,"192.168.2.2" = 1}
NetMask = "255.255.255.0"
)
Note: Avoid configurations where the number of links differ between the nodes.
The sample procedure creates the MultiPrivNIC resource in the cvm group. TheMultiPrivNIC agent plumbs the IP addresses to the appropriate network interfaces.
To configure the private IP address and MultiPrivNIC manually
1 Log in as the root user on one of the nodes in the cluster.
2 Change the cluster configuration to read-write mode:
# haconf -makerw
3 Create the MultiPrivNIC resource and add the resource to the cvm group:
# hares -add multi_priv MultiPrivNIC cvm
Before installing Oracle RACPreparing to install Oracle RAC using the SF Oracle RAC installer or manually
298

4 Modify the MultiPrivNIC resource:
# hares -modify multi_priv Critical 0
# hares -local multi_priv Device
# hares -local multi_priv Address
# hares -modify multi_priv \
Device -add en1 0 -sys galaxy
# hares -modify multi_priv \
Device -add en2 1 -sys galaxy
# hares -modify multi_priv \
Address -add 192.168.12.1 0 -sys galaxy
# hares -modify multi_priv \
Address -add 192.168.2.1 1 -sys galaxy
# hares -modify multi_priv \
Device -add en1 0 -sys nebula
# hares -modify multi_priv \
Device -add en2 1 -sys nebula
# hares -modify multi_priv \
Address -add 192.168.12.2 0 -sys nebula
# hares -modify multi_priv \
Address -add 192.168.2.2 1 -sys nebula
# hares -modify multi_priv \
NetMask 255.255.255.0
# hares -modify multi_priv Enabled 1
5 Change the cluster configuration to read-only mode:
# haconf -dump -makero
Adding private IP addresses to the /etc/hosts file manuallyPerform the steps in the following procedure only if you plan to install OracleRAC 10g Release 2 or Oracle RAC 11g Release 1 and you chose to add the privateIP address information manually to the /etc/hosts file at the time of configuringthem using the SF Oracle RAC installer.
299Before installing Oracle RACPreparing to install Oracle RAC using the SF Oracle RAC installer or manually

To add private IP addresses to the /etc/hosts file manually
1 Log in to each system as the root user.
2 For a configuration using the PrivNIC agent, add the following entries to the/etc/hosts file:
192.168.12.1 galaxy-priv
192.168.12.2 nebula-priv
For a configuration using the MultiPrivNIC agent, add the following entriesto the /etc/hosts file:
192.168.12.1 galaxy-priv
192.168.2.1 galaxy-priv1
192.168.12.2 nebula-priv
192.168.2.2 nebula-priv1
Verifying the VCS configuration for PrivNIC and MultiPrivNICAfter you complete the steps for configuring PrivNIC/MultiPrivNIC and the privateIP addresses, verify the configuration in the VCS main.cf configuration file.
To verify the VCS configuration for PrivNIC and MultiPrivNIC
1 View the main.cf file located in the directory /etc/VRTSvcs/conf/config:
# more /etc/VRTSvcs/conf/config/main.cf
2 For a configuration using the PrivNIC agent:
■ Verify that the PrivNIC resource ora_priv displays in the file:
PrivNIC ora_priv (
Critical = 0
Device @galaxy = {en1= 0, en2= 1}
Device @nebula = {en1= 0, en2= 1}
Address @galaxy = "192.168.12.1"
Address @nebula = "192.168.12.2"
NetMask = "255.255.255.0"
)
■ Verify that the ora_priv resource is online on all systems in the cluster:
Before installing Oracle RACPreparing to install Oracle RAC using the SF Oracle RAC installer or manually
300
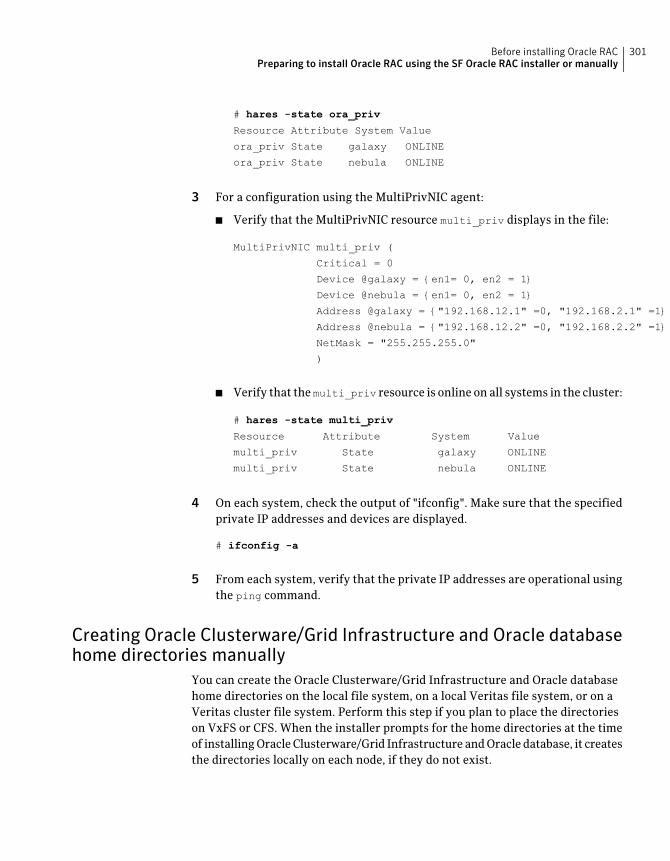
# hares -state ora_priv
Resource Attribute System Value
ora_priv State galaxy ONLINE
ora_priv State nebula ONLINE
3 For a configuration using the MultiPrivNIC agent:
■ Verify that the MultiPrivNIC resource multi_priv displays in the file:
MultiPrivNIC multi_priv (
Critical = 0
Device @galaxy = {en1= 0, en2 = 1}
Device @nebula = {en1= 0, en2 = 1}
Address @galaxy = {"192.168.12.1" =0, "192.168.2.1" =1}
Address @nebula = {"192.168.12.2" =0, "192.168.2.2" =1}
NetMask = "255.255.255.0"
)
■ Verify that the multi_priv resource is online on all systems in the cluster:
# hares -state multi_priv
Resource Attribute System Value
multi_priv State galaxy ONLINE
multi_priv State nebula ONLINE
4 On each system, check the output of "ifconfig". Make sure that the specifiedprivate IP addresses and devices are displayed.
# ifconfig -a
5 From each system, verify that the private IP addresses are operational usingthe ping command.
Creating Oracle Clusterware/Grid Infrastructure and Oracle databasehome directories manually
You can create the Oracle Clusterware/Grid Infrastructure and Oracle databasehome directories on the local file system, on a local Veritas file system, or on aVeritas cluster file system. Perform this step if you plan to place the directorieson VxFS or CFS. When the installer prompts for the home directories at the timeof installing Oracle Clusterware/Grid Infrastructure and Oracle database, it createsthe directories locally on each node, if they do not exist.
301Before installing Oracle RACPreparing to install Oracle RAC using the SF Oracle RAC installer or manually

Note: Symantec recommends that you install the Oracle RAC binaries local toeach node in the cluster.
Table 18-2 lists the Oracle RAC directories you need to create:
Table 18-2 List of directories
DescriptionDirectory
The path to the home directory that stores the OracleClusterware binaries. The Oracle Universal Installer (OUI)installs Oracle Clusterware into this directory, also referred toas CRS_HOME.
The directory must be owned by the installation owner of OracleClusterware (oracle), with the permission set to 755.
Follow Oracle Optimal Flexible Architecture (OFA) guidelineswhile choosing the path.
Oracle Clusterware HomeDirectory (CRS_HOME)
(For Oracle RAC 10gRelease 2/Oracle RAC11g Release 1)
The path to the home directory that stores the Oracle GridInfrastructure binaries. The Oracle Universal Installer (OUI)installs Oracle Grid Infrastructure and Oracle ASM into thisdirectory, also referred to as GRID_HOME.
The directory must be owned by the installation owner of OracleGrid Infrastructure (oracle or grid), with the permission set to755.
The path to the grid home directory must be the same on allnodes.
Follow Oracle Optimal Flexible Architecture (OFA) guidelineswhile choosing the path.
Oracle GridInfrastructure HomeDirectory (GRID_HOME)
(For Oracle RAC 11gRelease 2)
The base directory that contains all the Oracle installations. ForOracle RAC 11g Release 2, create separate Oracle base directoriesfor the grid user and the Oracle user.
It is recommended that installations of multiple databasesmaintain an Optimal Flexible Architecture (OFA) configuration.
The path to the Oracle base directory must be the same on allnodes. The permission on the Oracle base directory must be atleast 755.
Oracle base directory(ORACLE_BASE)
The directory in which the Oracle database software is installed.The path to the Oracle home directory must be the same on allnodes. The permission on the Oracle home directory must beat least 755.
Oracle home directory(ORACLE_HOME)
Before installing Oracle RACPreparing to install Oracle RAC using the SF Oracle RAC installer or manually
302
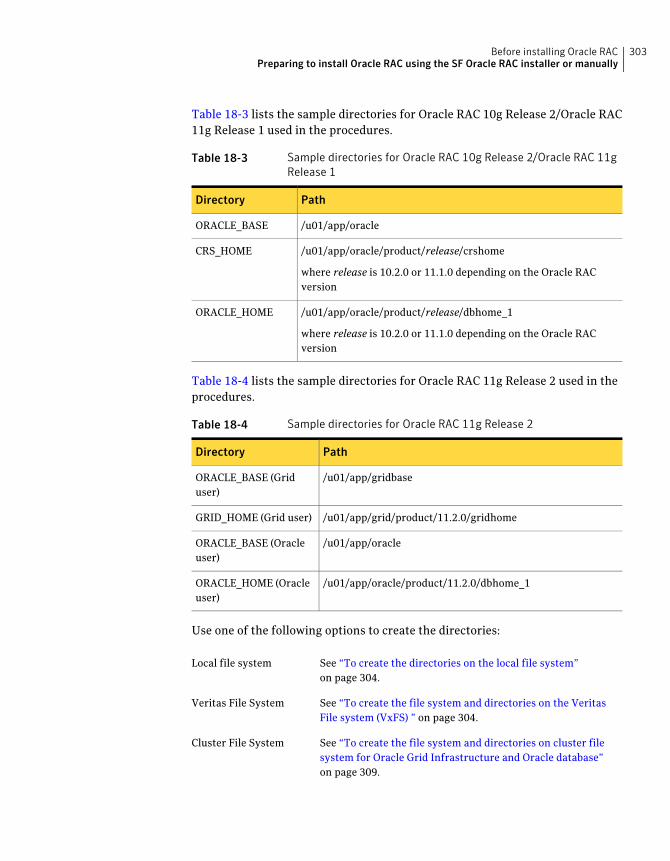
Table 18-3 lists the sample directories for Oracle RAC 10g Release 2/Oracle RAC11g Release 1 used in the procedures.
Table 18-3 Sample directories for Oracle RAC 10g Release 2/Oracle RAC 11gRelease 1
PathDirectory
/u01/app/oracleORACLE_BASE
/u01/app/oracle/product/release/crshome
where release is 10.2.0 or 11.1.0 depending on the Oracle RACversion
CRS_HOME
/u01/app/oracle/product/release/dbhome_1
where release is 10.2.0 or 11.1.0 depending on the Oracle RACversion
ORACLE_HOME
Table 18-4 lists the sample directories for Oracle RAC 11g Release 2 used in theprocedures.
Table 18-4 Sample directories for Oracle RAC 11g Release 2
PathDirectory
/u01/app/gridbaseORACLE_BASE (Griduser)
/u01/app/grid/product/11.2.0/gridhomeGRID_HOME (Grid user)
/u01/app/oracleORACLE_BASE (Oracleuser)
/u01/app/oracle/product/11.2.0/dbhome_1ORACLE_HOME (Oracleuser)
Use one of the following options to create the directories:
See “To create the directories on the local file system”on page 304.
Local file system
See “To create the file system and directories on the VeritasFile system (VxFS) ” on page 304.
Veritas File System
See “To create the file system and directories on cluster filesystem for Oracle Grid Infrastructure and Oracle database”on page 309.
Cluster File System
303Before installing Oracle RACPreparing to install Oracle RAC using the SF Oracle RAC installer or manually
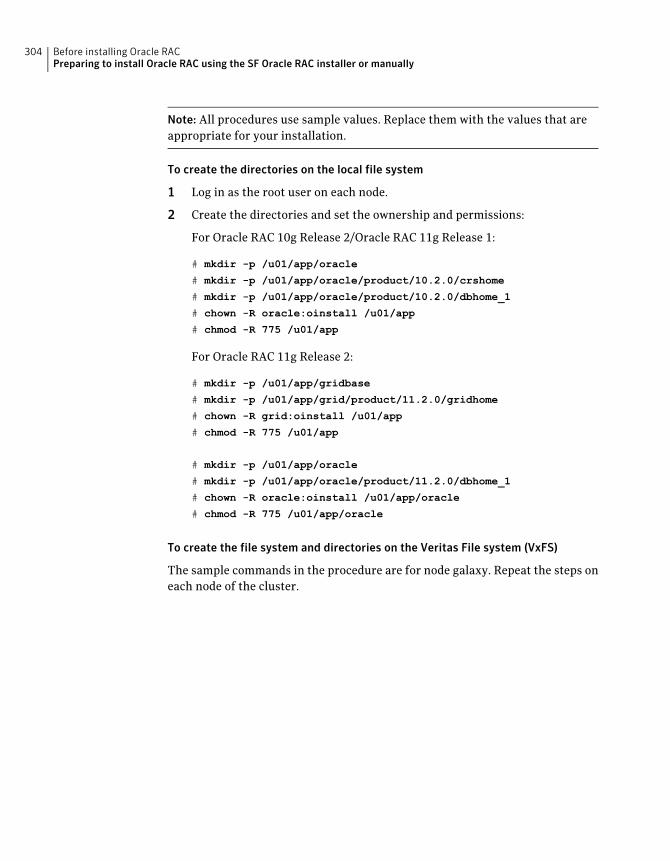
Note: All procedures use sample values. Replace them with the values that areappropriate for your installation.
To create the directories on the local file system
1 Log in as the root user on each node.
2 Create the directories and set the ownership and permissions:
For Oracle RAC 10g Release 2/Oracle RAC 11g Release 1:
# mkdir -p /u01/app/oracle
# mkdir -p /u01/app/oracle/product/10.2.0/crshome
# mkdir -p /u01/app/oracle/product/10.2.0/dbhome_1
# chown -R oracle:oinstall /u01/app
# chmod -R 775 /u01/app
For Oracle RAC 11g Release 2:
# mkdir -p /u01/app/gridbase
# mkdir -p /u01/app/grid/product/11.2.0/gridhome
# chown -R grid:oinstall /u01/app
# chmod -R 775 /u01/app
# mkdir -p /u01/app/oracle
# mkdir -p /u01/app/oracle/product/11.2.0/dbhome_1
# chown -R oracle:oinstall /u01/app/oracle
# chmod -R 775 /u01/app/oracle
To create the file system and directories on the Veritas File system (VxFS)
The sample commands in the procedure are for node galaxy. Repeat the steps oneach node of the cluster.
Before installing Oracle RACPreparing to install Oracle RAC using the SF Oracle RAC installer or manually
304

1 As the root user, create a VxVM local diskgroup bindg_hostname on eachnode.
For Oracle RAC 11g Release 2, make sure that the size of the disk group isapproximately 22 GB; if not, add another disk to the disk group.
For Oracle RAC 10g Release 2 and Oracle RAC 11g Release 1, make sure thatthe size of the disk group is approximately 12 GB; if not, add another disk tothe disk group.
# vxdg init bindg_galaxy Disk_1
2 Create separate volumes for Oracle Clusterware/Oracle Grid Infrastructure(crsbinvol) binaries and Oracle binaries (orabinvol):
For Oracle RAC 10g Release 2/Oracle RAC 11g Release 1:
# vxassist -g bindg_galaxy make crsbinvol 5G
# vxassist -g bindg_galaxy make orabinvol 7G
For Oracle RAC 11g Release 2:
# vxassist -g bindg_galaxy make crsbinvol 10G
# vxassist -g bindg_galaxy make orabinvol 12G
3 Create the directories for Oracle RAC.
For Oracle RAC 10g Release 2/Oracle RAC 11g Release 1:
# mkdir -p /u01/app/oracle
# mkdir -p /u01/app/oracle/product/10.2.0/crshome
# mkdir -p /u01/app/oracle/product/10.2.0/dbhome_1
For Oracle RAC 11g Release 2:
# mkdir -p /u01/app/gridbase
# mkdir -p /u01/app/grid/product/11.2.0/gridhome
# mkdir -p /u01/app/oracle
# mkdir -p /u01/app/oracle/product/11.2.0/dbhome_1
4 Create file systems with the volumes crsbinvol and orabinvol:
# mkfs -V vxfs /dev/vx/rdsk/bindg_galaxy/crsbinvol
# mkfs -V vxfs /dev/vx/rdsk/bindg_galaxy/orabinvol
305Before installing Oracle RACPreparing to install Oracle RAC using the SF Oracle RAC installer or manually

5 Mount the file systems. Perform this step on each node.
For Oracle RAC 10g Release 2/Oracle RAC 11g Release 1:
# mount -V vxfs /dev/vx/dsk/bindg_galaxy/crsbinvol \
/u01/app/oracle/product/10.2.0/crshome
# mount -V vxfs /dev/vx/dsk/bindg_galaxy/orabinvol \
/u01/app/oracle/product/10.2.0/dbhome_1
For Oracle RAC 11g Release 2:
# mount -V vxfs /dev/vx/dsk/bindg_galaxy/crsbinvol \
/u01/app/grid/product/11.2.0/gridhome
# mount -V vxfs /dev/vx/dsk/bindg_galaxy/orabinvol \
/u01/app/oracle/product/11.2.0/dbhome_1
6 Set appropriate ownership and permissions for the directories.
Note: For Oracle RAC 10g Release 2/Oracle RAC 11g Release 1: The ownershipand permissions must be changed on all nodes of the cluster because/u01/app/oracle must be owned by oracle:oinstall, otherwise/u01/app/oracle/oraInventory does not get created correctly on all thenodes. This can cause the Oracle Universal Installer to fail.
For Oracle RAC 11g Release 2: The ownership and permissions must bechanged on all nodes of the cluster because /u01/app must be owned bygrid:oinstall, otherwise/u01/app/oraInventory is not created correctly onall the nodes. This can cause the Oracle Universal Installer to fail.
For Oracle RAC 10g Release 2/Oracle RAC 11g Release 1:
# chown -R oracle:oinstall /u01/app
# chmod -R 775 /u01/app
For Oracle RAC 11g Release 2:
# chown -R grid:oinstall /u01/app
# chmod -R 775 /u01/app
# chown -R oracle:oinstall /u01/app/oracle
# chmod -R 775 /u01/app/oracle
Before installing Oracle RACPreparing to install Oracle RAC using the SF Oracle RAC installer or manually
306

7 Add the resources to the VCS configuration.
See “To add the storage resources created on VxFS to the VCS configuration”on page 307.
8 Repeat all the steps on each node of the cluster.
To add the storage resources created on VxFS to the VCS configuration
1 Change the permissions on the VCS configuration file:
# haconf -makerw
2 Configure the VxVM volumes under VCS:
# hares -add bin_dg DiskGroup cvm
# hares -modify bin_dg DiskGroup bindg_galaxy -sys galaxy
# hares -modify bin_dg DiskGroup bindg_nebula -sys nebula
# hares -modify bin_dg Enabled 1
307Before installing Oracle RACPreparing to install Oracle RAC using the SF Oracle RAC installer or manually

3 Set up the file system under VCS:
# hares -add crsbin_mnt Mount cvm
For Oracle RAC 10g Release 2/Oracle RAC 11g Release 1:
# hares -modify crsbin_mnt MountPoint \
"/u01/app/oracle/product/10.2.0/crshome"
For Oracle RAC 11g Release 2:
# hares -modify crsbin_mnt MountPoint \
"/u01/app/grid/product/11.2.0/gridhome"
The following commands are common to all Oracle RAC versions:
# hares -modify crsbin_mnt BlockDevice \
"/dev/vx/dsk/bindg_galaxy/crsbinvol" -sys galaxy
# hares -modify crsbin_mnt BlockDevice \
"/dev/vx/dsk/bindg_nebula/crsbinvol" -sys nebula
# hares -modify crsbin_mnt FSType vxfs
# hares -modify crsbin_mnt FsckOpt "-n"
# hares -modify crsbin_mnt Enabled 1
# hares -add orabin_mnt Mount cvm
For Oracle RAC 10g Release 2/Oracle RAC 11g Release 1:
# hares -modify orabin_mnt MountPoint \
"/u01/app/oracle/product/10.2.0/dbhome_1"
For Oracle RAC 11g Release 2:
# hares -modify orabin_mnt MountPoint \
"/u01/app/oracle/product/11.2.0/dbhome_1"
The following commands are common to all Oracle RAC versions:
# hares -modify orabin_mnt BlockDevice \
"/dev/vx/dsk/bindg_galaxy/orabinvol" -sys galaxy
# hares -modify orabin_mnt BlockDevice \
"/dev/vx/dsk/bindg_nebula/orabinvol" -sys nebula
# hares -modify orabin_mnt FSType vxfs
# hares -modify orabin_mnt FsckOpt "-n"
# hares -modify orabin_mnt Enabled 1
Before installing Oracle RACPreparing to install Oracle RAC using the SF Oracle RAC installer or manually
308

4 Link the parent and child resources:
# hares -link crsbin_mnt bin_dg
# hares -link orabin_mnt bin_dg
To create the file system and directories on cluster file system for Oracle GridInfrastructure and Oracle database
Perform the following steps on the CVM master node in the cluster.
1 As the root user, create a VxVM shared disk group bindg:
# vxdg -s init bindg Disk_1
2 Create separate volumes for Oracle Clusterware/Oracle Grid Infrastructure(crsbinvol) and Oracle database (orabinvol):
For Oracle RAC 10g Release 2/Oracle RAC 11g Release 1:
# vxassist -g bindg make crsbinvol 5G
# vxassist -g bindg make orabinvol 7G
For Oracle RAC 11g Release 2:
# vxassist -g bindg make crsbinvol 10G
# vxassist -g bindg make orabinvol 12G
309Before installing Oracle RACPreparing to install Oracle RAC using the SF Oracle RAC installer or manually

3 Create the following directories for Oracle. The file system and directoriescreated on shared storage in this procedure are based on the following layout:
/u01/app/oracle
/u01/app/oracle is on local storage.
For Oracle RAC 11g Release 2, create a separate Oracle basedirectory for the grid user, in addition to the directory forthe Oracle user:
/u01/app/gridbase
/u01/app/gridbase is on local storage.
$ORACLE_BASE
/u01/app/oracle/product/10.2.0/crshome
/u01/app/oracle/product/10.2.0 is on local storage.
/u01/app/oracle/product/10.2.0/crshome is on sharedstorage.
$CRS_HOME
(For Oracle RAC 10gRelease 2/Oracle RAC11g Release 1)
/u01/app/grid/product/11.2.0/gridhome
/u01/app/grid/product/11.2.0 is on local storage.
/u01/app/grid/product/11.2.0/gridhome is on sharedstorage.
$GRID_HOME
(For Oracle RAC 11gRelease 2)
/u01/app/oracle/product/release/dbhome_1
where release is 10.2.0, 11.1.0, or 11.2.0 depending on theOracle RAC version
/u01/app/oracle/product/release is on local storage.
/u01/app/oracle/product/release/dbhome_1 is on sharedstorage.
$ORACLE_HOME
For Oracle RAC 10g Release 2/Oracle RAC 11g Release 1:
# mkdir -p /u01/app/oracle
# mkdir -p /u01/app/oracle/product/10.2.0/crshome
# mkdir -p /u01/app/oracle/product/10.2.0/dbhome_1
For Oracle RAC 11g Release 2:
# mkdir -p /u01/app/gridbase
# mkdir -p /u01/app/grid/product/11.2.0/gridhome
# mkdir -p /u01/app/oracle
# mkdir -p /u01/app/oracle/product/11.2.0/dbhome_1
Before installing Oracle RACPreparing to install Oracle RAC using the SF Oracle RAC installer or manually
310

4 Create file systems with the volumes crsbinvol and orabinvol:
# mkfs -V vxfs /dev/vx/rdsk/bindg/crsbinvol
# mkfs -V vxfs /dev/vx/rdsk/bindg/orabinvol
5 Mount the file systems. Perform this step on each node.
For Oracle RAC 10g Release 2/Oracle RAC 11g Release 1:
# mount -V vxfs -o cluster /dev/vx/dsk/bindg/crsbinvol \
/u01/app/oracle/product/10.2.0/crshome
# mount -V vxfs -o cluster /dev/vx/dsk/bindg/orabinvol \
/u01/app/oracle/product/10.2.0/dbhome_1
For Oracle RAC 11g Release 2:
# mount -V vxfs -o cluster /dev/vx/dsk/bindg/crsbinvol \
/u01/app/grid/product/11.2.0/gridhome
# mount -V vxfs -o cluster /dev/vx/dsk/bindg/orabinvol \
/u01/app/oracle/product/11.2.0/dbhome_1
311Before installing Oracle RACPreparing to install Oracle RAC using the SF Oracle RAC installer or manually

6 Change the ownership and permissions on all nodes of the cluster.
Note: For Oracle RAC 10g Release 2/Oracle RAC 11g Release 1: The ownershipand permissions must be changed on all nodes of the cluster because/u01/app/oracle must be owned by oracle:oinstall, otherwise/u01/app/oracle/oraInventory does not get created correctly on all thenodes. This can cause the Oracle Universal Installer to fail.
For Oracle RAC 11g Release 2: The ownership and permissions must bechanged on all nodes of the cluster because /u01/app must be owned bygrid:oinstall, otherwise/u01/app/oraInventorydoes not get created correctlyon all the nodes. This can cause the Oracle Universal Installer to fail.
For Oracle RAC 10g Release 2/Oracle RAC 11g Release 1:
# chown -R oracle:oinstall /u01/app
# chmod -R 775 /u01/app
For Oracle RAC 11g Release 2:
# chown -R grid:oinstall /u01/app
# chmod -R 775 /u01/app
# chown -R oracle:oinstall /u01/app/oracle
# chmod -R 775 /u01/app/oracle
7 Add the CVMVolDg and CFSMount resources to the VCS configuration.
See “To add the CFSMount and CVMVolDg resources to the VCS configurationusing CLI” on page 313.
Before installing Oracle RACPreparing to install Oracle RAC using the SF Oracle RAC installer or manually
312
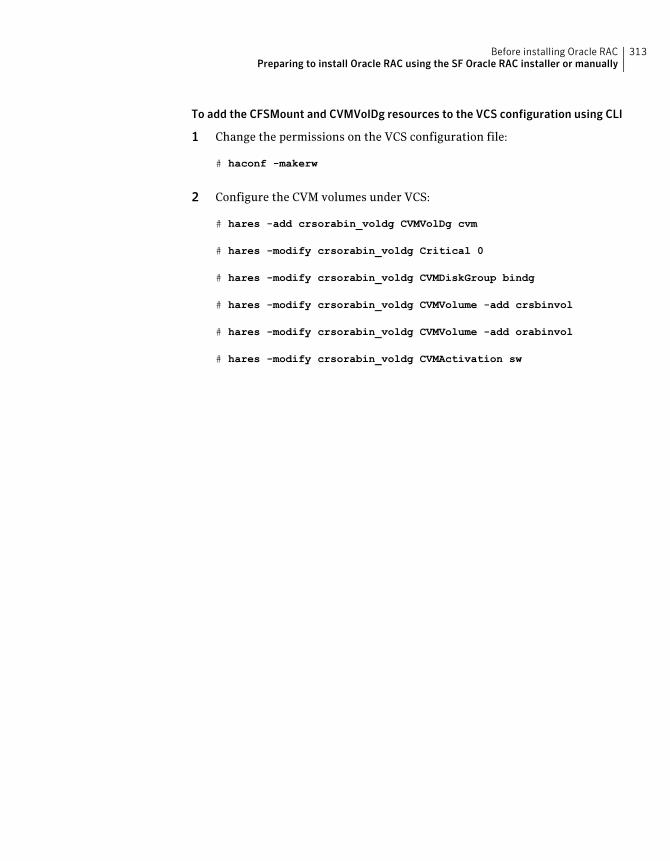
To add the CFSMount and CVMVolDg resources to the VCS configuration using CLI
1 Change the permissions on the VCS configuration file:
# haconf -makerw
2 Configure the CVM volumes under VCS:
# hares -add crsorabin_voldg CVMVolDg cvm
# hares -modify crsorabin_voldg Critical 0
# hares -modify crsorabin_voldg CVMDiskGroup bindg
# hares -modify crsorabin_voldg CVMVolume -add crsbinvol
# hares -modify crsorabin_voldg CVMVolume -add orabinvol
# hares -modify crsorabin_voldg CVMActivation sw
313Before installing Oracle RACPreparing to install Oracle RAC using the SF Oracle RAC installer or manually

3 Set up the file system under VCS:
For Oracle RAC 10g Release 2/Oracle RAC 11g Release 1:
# hares -add crsbin_mnt CFSMount cvm
# hares -modify crsbin_mnt Critical 0
# hares -modify crsbin_mnt MountPoint \
"/u01/app/oracle/product/10.2.0/crshome"
# hares -modify crsbin_mnt BlockDevice \
"/dev/vx/dsk/bindg/crsbinvol"
# hares -add orabin_mnt CFSMount cvm
# hares -modify orabin_mnt Critical 0
# hares -modify orabin_mnt MountPoint \
"/u01/app/oracle/product/10.2.0/dbhome_1"
# hares -modify orabin_mnt BlockDevice \
"/dev/vx/dsk/bindg/orabinvol"
For Oracle RAC 11g Release 2:
# hares -add crsbin_mnt CFSMount cvm
# hares -modify crsbin_mnt Critical 0
# hares -modify crsbin_mnt MountPoint \
"/u01/app/grid/product/11.2.0/gridhome"
# hares -modify crsbin_mnt BlockDevice \
"/dev/vx/dsk/bindg/crsbinvol"
# hares -add orabin_mnt CFSMount cvm
# hares -modify orabin_mnt Critical 0
# hares -modify orabin_mnt MountPoint \
"/u01/app/oracle/product/11.2.0/dbhome_1"
# hares -modify orabin_mnt BlockDevice \
"/dev/vx/dsk/bindg/orabinvol"
4 Link the parent and child resources:
# hares -link crsorabin_voldg cvm_clus
# hares -link crsbin_mnt crsorabin_voldg
# hares -link crsbin_mnt vxfsckd
# hares -link orabin_mnt crsorabin_voldg
# hares -link orabin_mnt vxfsckd
Before installing Oracle RACPreparing to install Oracle RAC using the SF Oracle RAC installer or manually
314

5 Enable the resources:
# hares -modify crsorabin_voldg Enabled 1
# hares -modify crsbin_mnt Enabled 1
# hares -modify orabin_mnt Enabled 1
# haconf -dump -makero
315Before installing Oracle RACPreparing to install Oracle RAC using the SF Oracle RAC installer or manually

6 Verify the resource configuration in the main.cf file.
The following is a sample resource configuration for Oracle RAC 11g Release2:
CFSMount crsbin_mnt (
Critical = 0
MountPoint = "/u01/app/grid/product/11.2.0/gridhome"
BlockDevice = "/dev/vx/dsk/bindg/crsbinvol"
)
CFSMount orabin_mnt (
Critical = 0
MountPoint = "/u01/app/oracle/product/11.2.0/dbhome_1"
BlockDevice = "/dev/vx/dsk/bindg/orabinvol"
)
CVMVolDg crsorabin_voldg (
Critical = 0
CVMDiskGroup = bindg
CVMVolume = { crsbinvol, orabinvol }
CVMActivation = sw
)
crsbin_mnt requires crsorabin_voldg
crsbin_mnt requires vxfsckd
orabin_mnt requires crsorabin_voldg
orabin_mnt requires vxfsckd
crsorabin_voldg requires cvm_clus
Before installing Oracle RACPreparing to install Oracle RAC using the SF Oracle RAC installer or manually
316

7 Verify that the resources are online on all systems in the cluster.
# hares -state crsorabin_voldg
# hares -state crsbin_mnt
# hares -state orabin_mnt
Note: At this point, the crsorabin_voldg resource is reported offline, and theunderlying volumes are online. Therefore, you need to manually bring theresource online on each node.
To bring the resource online manually:
# hares -online crsorabin_voldg -sys galaxy
# hares -online crsorabin_voldg -sys nebula
Setting up user equivalenceYou must establish grid user (Oracle RAC 11g Release 2) and Oracle userequivalence on all nodes to allow the Oracle Universal Installer to securely copyfiles and run programs on the nodes in the cluster without requiring passwordprompts.
Set up passwordless SSH communication between the cluster nodes for the Oracleuser and the grid user.
For more information, see the Oracle documentation.
Verifying whether the Veritas Membership library is linked to Oraclelibraries
The Veritas Membership library (VCSMM) must be linked with Oracle libraries toenable coordinated exchange of cluster membership information and protectionof data integrity. Oracle uses the linked skgxn library (libskgxn) to make ioctl callsto VCSMM, which in turn obtains membership information for clusters andinstances.
317Before installing Oracle RACPreparing to install Oracle RAC using the SF Oracle RAC installer or manually
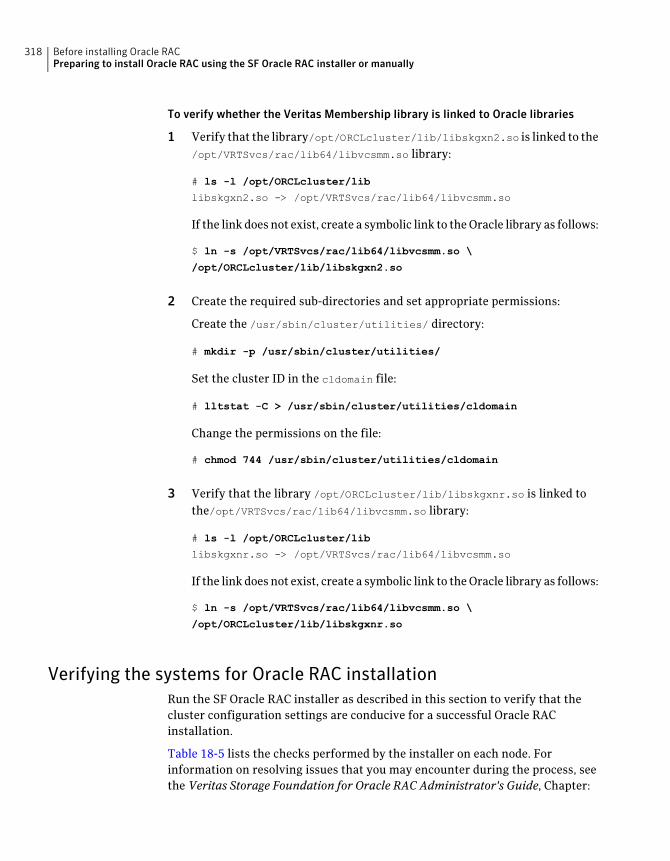
To verify whether the Veritas Membership library is linked to Oracle libraries
1 Verify that the library/opt/ORCLcluster/lib/libskgxn2.so is linked to the/opt/VRTSvcs/rac/lib64/libvcsmm.so library:
# ls -l /opt/ORCLcluster/lib
libskgxn2.so -> /opt/VRTSvcs/rac/lib64/libvcsmm.so
If the link does not exist, create a symbolic link to the Oracle library as follows:
$ ln -s /opt/VRTSvcs/rac/lib64/libvcsmm.so \
/opt/ORCLcluster/lib/libskgxn2.so
2 Create the required sub-directories and set appropriate permissions:
Create the /usr/sbin/cluster/utilities/ directory:
# mkdir -p /usr/sbin/cluster/utilities/
Set the cluster ID in the cldomain file:
# lltstat -C > /usr/sbin/cluster/utilities/cldomain
Change the permissions on the file:
# chmod 744 /usr/sbin/cluster/utilities/cldomain
3 Verify that the library /opt/ORCLcluster/lib/libskgxnr.so is linked tothe/opt/VRTSvcs/rac/lib64/libvcsmm.so library:
# ls -l /opt/ORCLcluster/lib
libskgxnr.so -> /opt/VRTSvcs/rac/lib64/libvcsmm.so
If the link does not exist, create a symbolic link to the Oracle library as follows:
$ ln -s /opt/VRTSvcs/rac/lib64/libvcsmm.so \
/opt/ORCLcluster/lib/libskgxnr.so
Verifying the systems for Oracle RAC installationRun the SF Oracle RAC installer as described in this section to verify that thecluster configuration settings are conducive for a successful Oracle RACinstallation.
Table 18-5 lists the checks performed by the installer on each node. Forinformation on resolving issues that you may encounter during the process, seethe Veritas Storage Foundation for Oracle RAC Administrator's Guide, Chapter:
Before installing Oracle RACPreparing to install Oracle RAC using the SF Oracle RAC installer or manually
318

Troubleshooting SF Oracle RAC, Section: Troubleshooting installation andconfiguration check failures.
Table 18-5 List of checks
DescriptionCheck
The time settings are synchronized across nodes. If the timedifference exceeds five seconds, the check fails.
Time synchronization
All the nodes in the cluster have the same architecture.
All the nodes in the cluster have the same number and typeof processors.
System checks
All the nodes in the cluster have the same operating systemversion and patch levels.
Operating system andpatch level checks
Verifies that the kernel parameter settings and tunables arein accordance with Oracle RAC recommendations.
Kernel parameter
319Before installing Oracle RACPreparing to install Oracle RAC using the SF Oracle RAC installer or manually

Table 18-5 List of checks (continued)
DescriptionCheck
The LLT checks are performed on only two links, the first andthe last link specified in the /etc/llttab file.
Verifies that the media speed setting for the links are set tofull duplex. If the links are not set to full duplex, the checkfails.
Verifies that the media speed and auto-negotiation settingsare the same across all nodes in the cluster.
The check fails if the settings vary across the nodes and ifauto-negotiation is enabled for the interface on any node inthe cluster.
Verifies that the payload (MTU) for the jumbo frames isbetween 1500 and 9000 bytes. Verifies that this setting is thesame for all LLT links in the cluster. The check fails if thevalue is different for different LLT links in the cluster.
Verifies that the links are not cross-connected. If the linksare cross-connected, the check fails. Make sure that the linksdo not have a direct path of communication through switchinterconnects.
Verifies that the cluster has at least two high-priority linksthat do not belong to the public network.
Verifies that the cluster configuration in the/etc/llthostsfile is the same on all nodes in the cluster.
Verifies that the cluster ID in the /etc/llttab file is thesame on all the nodes.
Note: The following checks are skipped if LLT is configuredover UDP:
LLT links' full duplex setting
LLT link jumbo frame setting (MTU)
LLT links' cross connection
LLT links' speed and auto negotiation settings
LLT checks
Before installing Oracle RACPreparing to install Oracle RAC using the SF Oracle RAC installer or manually
320

Table 18-5 List of checks (continued)
DescriptionCheck
Verifies that I/O fencing is enabled on each node in the cluster.
Note: The verification applies only for disk-based fencing.
Verifies that all nodes in the cluster have registered keys withthe coordinator disks. If registration keys are missing for anynode in the cluster, the check fails for that node.
The possible causes for check failure are:
■ Fencing is not configured on the cluster.
■ Fencing is configured in disabled mode.
■ Fencing is configured using CPS.
I/O fencing checks
Verifies that port d is up and running on the nodes.The checkfails if the port is not up.
The possible causes for check failure are:
■ ODM is not running in the cluster.
■ ODM is running in standalone mode.
ODM checks
Verifies that port o is up and running on the nodes.The checkfails if port o is not up.
VCSMM checks
Verifies that the ports a, b, d, f, h, o, v, w are up and runningon the nodes. The check fails if any of the SF Oracle RACcomponents are not running.
GAB checks
Verifies that the LMX helper thread is disabled. The checkfails if the helper thread is enabled.
LMX checks
321Before installing Oracle RACPreparing to install Oracle RAC using the SF Oracle RAC installer or manually

To verify the systems for Oracle RAC installation
1 Start the SF Oracle RAC installer:
# cd /opt/VRTS/install
# ./installsfrac -configure galaxy nebula
2 Enter 2 to select the option SF Oracle RAC Installation and ConfigurationChecks.
1) Configure SF Oracle RAC sub-components
2) SF Oracle RAC Installation and Configuration Checks
3) Prepare to Install Oracle
4) Install Oracle Clusterware/Grid Infrastructure and Database
5) Post Oracle Installation Tasks
6) Exit SF Oracle RAC Configuration
Choose option: [1-6,q] (1) 2
The installer displays the location of the temporary log file and starts theverification process.
3 Enter n to return to the menu.
Is Oracle installed on the system(s) [y,n,q] (y) n
Before installing Oracle RACPreparing to install Oracle RAC using the SF Oracle RAC installer or manually
322

Installing Oracle RAC
This chapter includes the following topics:
■ About installing Oracle RAC
■ Installing the Oracle Clusterware/Grid Infrastructure software
■ Configuring LLT links in the GPnP profile
■ Installing the Oracle RAC database software
■ Verifying the Oracle Clusterware/Grid Infrastructure and database installation
About installing Oracle RACYou can install Oracle RAC on shared storage or locally on each node.
Use one of the following ways to install Oracle RAC:
The SF Oracle RAC installer starts the installation process andprompts for information that is required by the Oracle UniversalInstaller. The Oracle Universal Installer launches with theseinstallation values pre-filled and installs Oracle RAC.
You need to invoke the SF Oracle RAC installer to start theinstallation.
SF Oracle RAC installer
The Oracle Universal Installer installs Oracle RAC. Theinstallation values must be manually entered at the time ofinstallation.
You need to invoke the Oracle Universal Installer to install OracleRAC.
Oracle UniversalInstaller
19Chapter

The SF Oracle RAC installer supports silent installation of OracleRAC using its own response files. You need to modify the SFOracle RAC response files to include the path information of theOracle RAC software binaries and the Oracle RAC response files.
For more information and instructions:
See “About response files” on page 367.
For instructions, see the chapter "Installing Oracle RAC using aresponse file" in this document.
Response files
Before you start the installation:
■ Keep the Oracle worksheets handy as you perform the installation tasks.See “Required installation information for Oracle Clusterware/GridInfrastructure” on page 606.See “Required installation information for Oracle database” on page 610.
■ Review your Oracle installation manuals and the appropriate Oracle supportWeb sites for additional information required during the installation.
Installing theOracle Clusterware/Grid Infrastructuresoftware
This section provides instructions for installing Oracle Clusterware/GridInfrastructure using the SF Oracle RAC installer. The SF Oracle RAC installerprompts for information required to invoke the Oracle Universal Installer andlaunches it. The responses provided to the SF Oracle RAC installer are pre-filledin the Oracle Universal Installer wizard. When you step through the installation,review or change these installation values in the Oracle Universal Installer.
Note: Before you begin the installation, verify that the nodes in the cluster areconnected with network links using similar network devices. For example, if youuse en0 as a public link on one node in the cluster, all other nodes in the clustermust also use en0 as the public link. Similarly, if you use en1 as a private link onone node in the cluster, all other nodes in the cluster must also use en1 as theprivate link.
Oracle Clusterware/Grid Infrastructure software is installed on each node in theCRS_HOME or GRID_HOME location, depending on the version of Oracle RACyou install.
Installing Oracle RACInstalling the Oracle Clusterware/Grid Infrastructure software
324

Note: If you want to install Oracle Clusterware/Grid Infrastructure on VxFS orCFS, make sure that you created the appropriate storage before proceeding withthe installation.
See “Creating Oracle Clusterware/Grid Infrastructure and Oracle database homedirectories manually” on page 301.
Install the software using one of the following methods:
See “Installing Oracle Clusterware/GridInfrastructure using the SF Oracle RAC installer”on page 325.
SF Oracle RAC installer
See “Installing Oracle Clusterware/GridInfrastructure using the Oracle Universal Installer”on page 328.
Oracle Universal Installer
Installing Oracle Clusterware/Grid Infrastructure using the SF OracleRAC installer
The SF Oracle RAC installer performs the following tasks:
■ Invokes the Oracle Universal Installer to install Oracle Clusterware/GridInfrastructure
■ Verifies the Oracle Oracle Clusterware/Grid Infrastructure installation
To install Oracle Clusterware/Grid Infrastructure using the SF Oracle RAC installer
1 Make sure that you completed the required pre-installation steps.
2 Return to the following SF Oracle RAC installer menu and select the optionInstall Oracle Clusterware/Grid Infrastructure and Database.
1) Configure SF Oracle RAC sub-components
2) SF Oracle RAC Installation and Configuration Checks
3) Prepare to Install Oracle
4) Install Oracle Clusterware/Grid Infrastructure and Database
5) Post Oracle Installation Tasks
6) Exit SF Oracle RAC Configuration
Choose option: [1-6,q] (1) 4
325Installing Oracle RACInstalling the Oracle Clusterware/Grid Infrastructure software

3 Select the option Install Oracle Clusterware/Grid Infrastructure.
1) Install Oracle Clusterware/Grid Infrastructure
2) Install Oracle Database
3) Exit SF Oracle RAC Configuration
b) Back to previous menu
Choose option: [1-3,b,q] (1) 1
4 Verify that the nodes in the cluster are connected with network links usingsimilar network devices. Review the related information on screen and pressEnter to confirm.
Do you want to continue? [y,n,q] (y)
5 Set the DISPLAY environment variable that is required for the OracleUniversal Installer:
Enter DISPLAY environment variable: [b] 10.20.12.150:0.0
where 10.20.12.150 is the IP address of X client where you want to export thedisplay for the installer.
6 Enter the Oracle UNIX user name. The Oracle UNIX user name was previouslyset up during the pre-installation process.
For Oracle RAC 10g Release 2/Oracle RAC 11g Release 1:
Enter Oracle UNIX user name: [b] (oracle)
For Oracle RAC 11g Release 2:
Enter Oracle UNIX user name: [b] (grid)
7 Enter Oracle UNIX group name. The Oracle UNIX group name was previouslyset up during the pre-installation process.
Enter Oracle UNIX group name: [b] (oinstall)
8 Enter the full path of the Oracle base directory.
Note: The ORACLE_BASE directory must be a local directory.
Installing Oracle RACInstalling the Oracle Clusterware/Grid Infrastructure software
326

9 Enter the full path of the Oracle Clusterware/Grid Infrastructure homedirectory.
If the Oracle Clusterware/Grid Infrastructure home directory you specifieddoes not exist, the installer creates the directory locally on each node andsets appropriate permissions for the Oracle user.
10 Enter the full path of the Oracle Clusterware/Grid Infrastructure installationimage. Press Return to proceed.
The installer detects the version of the Oracle Clusterware/Grid Infrastructuresoftware.
11 Enter y to continue with the installation.
12 Review and confirm the configuration information. The installer invokes theOracle Universal Installer:
13 Enter the required information when prompted by the Oracle UniversalInstaller.
See “Required installation information for Oracle Clusterware/GridInfrastructure” on page 606.
14 Review the configuration summary presented by the Oracle UniversalInstaller. The Oracle Universal Installer begins the Oracle Clusterware/GridInfrastructure installation.
15 At the end of the Oracle Clusterware/Grid Infrastructure installation, runthe following configuration scripts as the root user from each node of thecluster, in the listed order.
■ orainstRoot.sh (located in the oraInventory directory)
Make sure the script exists on each node before proceeding.
■ root.sh (located in the CRS_HOME or GRID_HOME directory, dependingon your Oracle RAC version)
Do not run the scripts simultaneously on the cluster nodes.
Note: For Oracle RAC 10g Release 2: If vipca fails to run silently, run the scriptmanually on one of the nodes as the root user.
# export DISPLAY=10.20.12.150:0.0
# cd $CRS_HOME/bin
# ./vipca
327Installing Oracle RACInstalling the Oracle Clusterware/Grid Infrastructure software
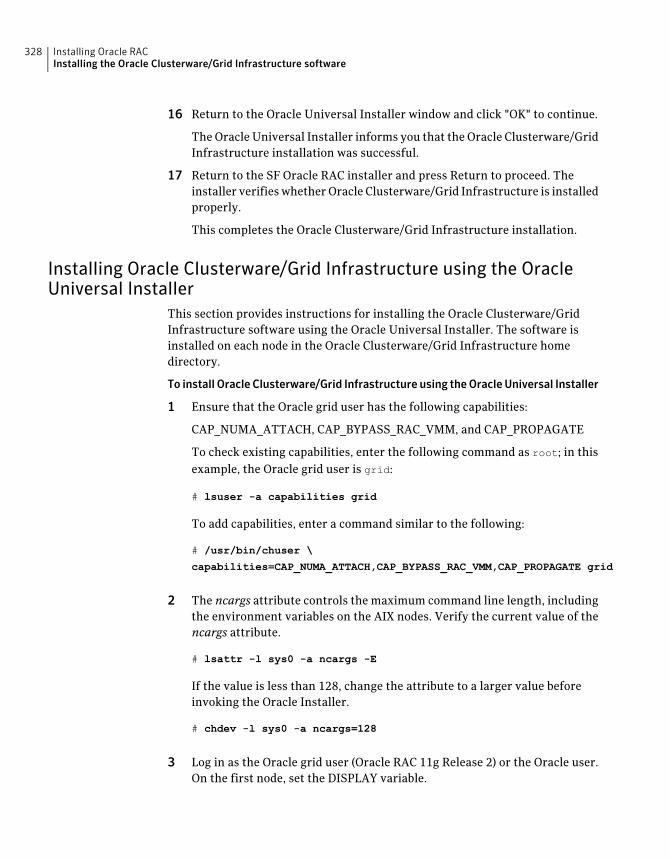
16 Return to the Oracle Universal Installer window and click "OK" to continue.
The Oracle Universal Installer informs you that the Oracle Clusterware/GridInfrastructure installation was successful.
17 Return to the SF Oracle RAC installer and press Return to proceed. Theinstaller verifies whether Oracle Clusterware/Grid Infrastructure is installedproperly.
This completes the Oracle Clusterware/Grid Infrastructure installation.
Installing Oracle Clusterware/Grid Infrastructure using the OracleUniversal Installer
This section provides instructions for installing the Oracle Clusterware/GridInfrastructure software using the Oracle Universal Installer. The software isinstalled on each node in the Oracle Clusterware/Grid Infrastructure homedirectory.
To install Oracle Clusterware/Grid Infrastructure using theOracleUniversal Installer
1 Ensure that the Oracle grid user has the following capabilities:
CAP_NUMA_ATTACH, CAP_BYPASS_RAC_VMM, and CAP_PROPAGATE
To check existing capabilities, enter the following command as root; in thisexample, the Oracle grid user is grid:
# lsuser -a capabilities grid
To add capabilities, enter a command similar to the following:
# /usr/bin/chuser \
capabilities=CAP_NUMA_ATTACH,CAP_BYPASS_RAC_VMM,CAP_PROPAGATE grid
2 The ncargs attribute controls the maximum command line length, includingthe environment variables on the AIX nodes. Verify the current value of thencargs attribute.
# lsattr -l sys0 -a ncargs -E
If the value is less than 128, change the attribute to a larger value beforeinvoking the Oracle Installer.
# chdev -l sys0 -a ncargs=128
3 Log in as the Oracle grid user (Oracle RAC 11g Release 2) or the Oracle user.On the first node, set the DISPLAY variable.
Installing Oracle RACInstalling the Oracle Clusterware/Grid Infrastructure software
328

■ For Bourne Shell (bash), type:
$ DISPLAY=10.20.12.150:0.0;export DISPLAY
where 10.20.12.150 is the IP address of X client where you want to exportthe display for the installer.
■ For C Shell (csh or tcsh), type:
$ setenv DISPLAY 10.20.12.150:0.0
where 10.20.12.150 is the IP address of X client where you want to exportthe display for the installer.
4 Start the Oracle Universal Installer on the first node.
$ cd /dvd_mount
$ ./runInstaller
5 Enter the required information when prompted by the Oracle UniversalInstaller.
See “Required installation information for Oracle Clusterware/GridInfrastructure” on page 606.
6 Review the configuration summary presented by the Oracle UniversalInstaller. The Oracle Universal Installer begins the Oracle Clusterware/GridInfrastructure installation.
Note: For Oracle RAC 11g Release 2: If you want to save the Oracle GridInfrastructure installation configuration into a response file for futureinstallations, click the Save Response File option on the Summary page ofthe Oracle Universal Installer.
7 Run the orainstRoot.sh script as prompted by the Oracle Universal Installer.
8 Run the root.sh script on each node as prompted by the Oracle UniversalInstaller:
The Oracle Clusterware daemons are started on the node.
Note: The Oracle Cluster Verification Utility fails during the installation ofthe Oracle Clusterware/Grid Infrastructure software. You may ignore thiserror. This is a known issue with Oracle.
329Installing Oracle RACInstalling the Oracle Clusterware/Grid Infrastructure software

Configuring LLT links in the GPnP profilePerform this step only for Oracle RAC 11g Release 2 installations.
Update the GPnP profile to include the remaining LLT links that were not addedto the profile during the Oracle Grid Infrastructure installation.
To configure the LLT links in the GPnP profile
1 View the currently configured interfaces:
# $GRID_HOME/bin/oifcfg getif
en0 10.2.156.0 global public
en1 192.168.12.0 global cluster_interconnect
The interfaces that are currently stored in the GPnP profile, their subnets,and their role (public or cluster_interconnect) are displayed.
2 Add the remaining LLT links to the GPnP profile:
# $GRID_HOME/bin/oifcfg setif -global \
en2/192.168.12.0:cluster_interconnect
If you are using multiple IP addresses on different subnet for clusterinterconnect (for load balancing), add the remaining interface subnets to theGPnP profile.
# $GRID_HOME/bin/oifcfg setif -global \
en2/192.168.2.0:cluster_interconnect
# $GRID_HOME/bin/oifcfg setif -global \
en1/192.168.2.0:cluster_interconnect
3 Verify that the correct interface subnet is in use:
# $GRID_HOME/bin/oifcfg getif
en0 10.2.156.0 global public
en1 192.168.12.0 global cluster_interconnect
en2 192.168.12.0 global cluster_interconnect
en1 192.168.2.0 global cluster_interconnect
en2 192.168.2.0 global cluster_interconnect
Make sure all the LLT links are configured and listed in the GPnP profile.
Installing Oracle RACConfiguring LLT links in the GPnP profile
330

Installing the Oracle RAC database softwareBefore you start the installation of Oracle database, make sure that OracleClusterware/Grid Infrastructure is up and running. Symantec recommends youto install the Oracle database locally on each node.
Note: For Oracle RAC 11g: Check if the "rootpre" directory and the "rootpre.sh"script are available in the Oracle RAC 11g installation media. If they are notavailable, download them as described in the Oracle metalink document: 468472.1.
Note: If you want to install Oracle database on VxFS or CFS, make sure that youcreated the appropriate storage before proceeding with the installation.
See “Creating Oracle Clusterware/Grid Infrastructure and Oracle database homedirectories manually” on page 301.
Install the software using one of the following methods:
See “Installing the Oracle RAC database using the SFOracle RAC installer” on page 331.
SF Oracle RAC installer
See “Installing the Oracle RAC database using the OracleUniversal Installer” on page 333.
Oracle Universal Installer
Installing the Oracle RAC database using the SF Oracle RAC installerThe SF Oracle RAC installer performs the following tasks:
■ Verifies the status of Oracle Clusterware/Grid Infrastructure on all nodes
■ Runs the rootpre.sh script on all nodes to ensure POSIX compliance by enablingasynchronous I/O (AIO).
■ Invokes the Oracle Universal Installer to install the Oracle database
■ Verifies the Oracle RAC database installation
331Installing Oracle RACInstalling the Oracle RAC database software

To install the Oracle RAC database
1 Return to the SF Oracle RAC installer and type 4 to select the option InstallOracle Clusterware/Grid Infrastructure and Database.
1) Configure SF Oracle RAC sub-components
2) SF Oracle RAC Installation and Configuration Checks
3) Prepare to Install Oracle
4) Install Oracle Clusterware/Grid Infrastructure and Database
5) Post Oracle Installation Tasks
6) Exit SF Oracle RAC Configuration
Choose option: [1-6,q] (1) 4
2 Select the option Install Oracle Database.
1) Install Oracle Clusterware/Grid Infrastructure
2) Install Oracle Database
3) Exit SF Oracle RAC Configuration
b) Back to previous menu
Choose option: [1-3,b,q] (1) 2
3 Set the DISPLAY environment variable that is required for the OracleUniversal Installer.
Enter the DISPLAY environment variable: [b] 10.20.12.150:0.0
4 Enter Oracle UNIX user name. The Oracle UNIX user name was previouslyset up during the pre-installation process.
Enter Oracle UNIX user name: [b] (oracle)
5 Enter Oracle UNIX group name. The Oracle UNIX group name was previouslyset up during the pre-installation process.
Enter Oracle UNIX group name: [b] (oinstall)
6 Enter the full path of the Oracle base directory.
Enter absolute path of Oracle Base directory: [b]
7 Enter the full path of the Oracle Clusterware/Grid Infrastructure homedirectory.
Enter absolute path of Oracle Clusterware/Grid Infrastructure
Home directory: [b]
Installing Oracle RACInstalling the Oracle RAC database software
332

8 Enter the full path of the Oracle database home directory.
Enter absolute path of Oracle Database Home directory: [b]
If the Oracle RAC database home directory you specified does not exist, theinstaller creates the directory locally on each node and sets appropriatepermissions for the Oracle user.
9 Enter the full path of the database installation image.
Enter absolute path of Oracle Database install image: [b]
The installer determines the version of the Oracle software from the binaries.
10 Enter y to proceed with the installation.
11 Review and confirm the configuration information.
The installer verifies that Oracle Clusterware/Grid Infrastructure is runningand invokes the Oracle Universal Installer:
12 Enter the required information when prompted by the Oracle UniversalInstaller.
See “Required installation information for Oracle database” on page 610.
13 Review the configuration summary presented by the Oracle UniversalInstaller. The Oracle Universal Installer begins the Oracle databaseinstallation.
14 Run the root.sh script as the root user on the cluster nodes:
Return to the Oracle Universal Installer window and click "OK" to continue.
15 Return to the SF Oracle RAC installer and press Return to continue. Theinstaller verifies the Oracle database installation.
Note: Symantec recommends you to relink the SF Oracle RAC libraries onlyafter completing all the required patch additions.
Installing the Oracle RAC database using the Oracle Universal InstallerThe following procedure describes how to install the Oracle RAC database usingthe Oracle Universal Installer. Symantec recommends that you install the OracleRAC database locally on each node.
333Installing Oracle RACInstalling the Oracle RAC database software

Note: For Oracle RAC 11g Release 1: Check if the "rootpre" directory and the"rootpre.sh" script are available in the Oracle RAC 11g installation media. If theyare not available, download them as described in the Oracle metalink document:468472.1.
To install Oracle RAC database using the Oracle Universal Installer
1 Log in as the Oracle user. On the first node, set the DISPLAY variable.
■ For Bourne Shell (bash), type:
$ DISPLAY=10.20.12.150:0.0;export DISPLAY
■ For C Shell (csh or tcsh), type:
$ setenv DISPLAY 10.20.12.150:0.0
2 Start the Oracle Universal Installer.
$ cd /dvd_mount
$ ./runInstaller
3 Open another console and run the rootpre.sh script as the root user. Thelocation of the script is indicated by the Oracle Universal Installer.
4 Return to the console where you started the installation and confirm theexecution of the script.
Has 'rootpre.sh' been run by root? [y/n] (n) y
5 Enter the required information when prompted by the Oracle UniversalInstaller.
See “Required installation information for Oracle database” on page 610.
Installing Oracle RACInstalling the Oracle RAC database software
334

6 Review the configuration summary presented by the Oracle UniversalInstaller.
Note: For Oracle RAC 11g Release 2: If you want to save the Oracle RACdatabase installation configuration into a response file for future installations,click the Save Response File option on the Summary page of the OracleUniversal Installer.
The Oracle Universal Installer begins the Oracle database installation.
7 Run the root.sh script as prompted by the Oracle Universal Installer.
# cd $ORACLE_HOME
# ./root.sh
Verifying the Oracle Clusterware/Grid Infrastructureand database installation
The following procedure verifies the Oracle Clusterware/Grid Infrastructure andOracle RAC database installation by verifying that the Oracle processes are runningon all nodes.
To verify the installation, run the following command from any node in the cluster.Verify in the command output that the Oracle Clusterware/Grid Infrastructureprocesses are online on the nodes.
For Oracle RAC 10g Release 2/Oracle RAC 11g Release 1:
# $CRS_HOME/bin/crs_stat
Name Type Target State Host
ora.galaxy.vip application ONLINE ONLINE galaxy
ora.galaxy.gsd application ONLINE ONLINE galaxy
ora.galaxy.ons application ONLINE ONLINE galaxy
ora.nebula.vip application ONLINE ONLINE nebula
ora.nebula.gsd application ONLINE ONLINE nebula
ora.nebula.ons application ONLINE ONLINE nebula
For Oracle RAC 11g Release 2:
# $GRID_HOME/bin/crsctl stat res -t
335Installing Oracle RACVerifying the Oracle Clusterware/Grid Infrastructure and database installation

-----------------------------------------------------------
NAME TARGET STATE SERVER STATE_DETAILS
-----------------------------------------------------------
Local Resources
-----------------------------------------------------------
ora.LISTENER.lsnr
ONLINE ONLINE galaxy
ONLINE ONLINE nebula
ora.asm
OFFLINE OFFLINE galaxy
OFFLINE OFFLINE nebula
.
.
.
-------------------------------------------------------------
Cluster Resources
-------------------------------------------------------------
ora.LISTENER_SCAN1.lsnr
1 ONLINE ONLINE nebula
ora.LISTENER_SCAN2.lsnr
1 ONLINE ONLINE galaxy
ora.LISTENER_SCAN3.lsnr
1 ONLINE ONLINE galaxy
.
.
.
To verify the Oracle RAC database installation, check the oraInventory logs locatedin the ORACLE_BASE directory.
Node numbering discrepancies in Oracle RAC 11g Release 2For Oracle RAC 11g Release 2, you will observe that the output of the lsnodes
command (used to obtain membership information from SF Oracle RAC) and theolsnodes command (used to obtain membership information from Oracle GridInfrastructure) differ. Oracle RAC starts the count at 1 while SF Oracle RAC startsthe count at 0.
For example, in a two-node cluster:
The lsnodes command produces the following output:
Installing Oracle RACVerifying the Oracle Clusterware/Grid Infrastructure and database installation
336

# lsnodes -n
Node1 0
Node2 1
The olsnodes command produces the following output:
# olsnodes -n
Node1 1
Node2 2
In previous Oracle RAC releases (starting with Oracle RAC 10g Release 1), thecommands produced the same output unless there were configuration issues inthe cluster. Whenever node numbering discrepancies were observed, furtherissues were seen in the cluster.
However, the discrepancy in node numbering in Oracle RAC 11g Release 2 isconformant with the design change in Oracle Grid Infrastructure. It does notindicate any configuration issues in the cluster.
337Installing Oracle RACVerifying the Oracle Clusterware/Grid Infrastructure and database installation

Installing Oracle RACVerifying the Oracle Clusterware/Grid Infrastructure and database installation
338
Performing Oracle RACpost-installation tasks
This chapter includes the following topics:
■ Adding Oracle RAC patches or patchsets
■ Configuring the CSSD resource
■ Preventing automatic startup of Oracle Clusterware/Grid Infrastructure
■ Relinking the SF Oracle RAC libraries with Oracle RAC
■ Creating the Oracle RAC database
■ Adding Oracle UDP IPC private IP addresses to the Oracle initializationparameter file
■ Preventing automatic database startup
■ Configuring VCS service groups for Oracle RAC
■ Removing permissions for communication
■ Configuring the SFDB repository database after installation
Adding Oracle RAC patches or patchsetsTo install the required patches or patchsets, review the notes that accompany thepatch or patchset.
Before installing any Oracle RAC patch or patchset software:
■ Review the latest information on supported Oracle RAC patches and patchsets:http://www.symantec.com/docs/TECH44807
20Chapter

■ You must have installed the base version of the Oracle RAC software.
Configuring the CSSD resourceYou must configure the CSSD resource to ensure that the CSSD dependencies onthe resources that manage OCR and voting disk and the private IP address aresatisfied before Oracle Clusterware/Grid Infrastructure starts.
Note: It is mandatory to use CSSD agent in SF Oracle RAC installations. Using theCSSD agent ensures adequate handling of inter-dependencies, thus preventingthe premature startup of Oracle Clusterware/Grid Infrastructure, which causescluster failures.
Use one of the following ways to configure the CSSD resource:
See “Configuring the CSSD resource using the SF OracleRAC installer” on page 340.
SF Oracle RAC installer
See “Configuring the CSSD resource manually”on page 342.
Manual
Configuring the CSSD resource using the SF Oracle RAC installerConfigure the CSSD resource using the SF Oracle RAC installer if the OCR andvoting disk storage is configured on CVM raw volumes or CFS.
Note: If the OCR and voting disk storage is configured on ASM disk groups,configure the CSSD resource manually.
Before you configure the CSSD resource, make sure that the following requirementsare satisfied:
1. Oracle Clusterware/Grid Infrastructure is up and running.
2. OCR and voting disk is configured on CVM raw volumes or CFS and managedby VCS.
3. The private IP address for Oracle Clusterware/Grid Infrastructure isconfigured under the PrivNIC or MultiPrivNIC resource in the same VCSgroup as that of OCR and voting disk.
Performing Oracle RAC post-installation tasksConfiguring the CSSD resource
340
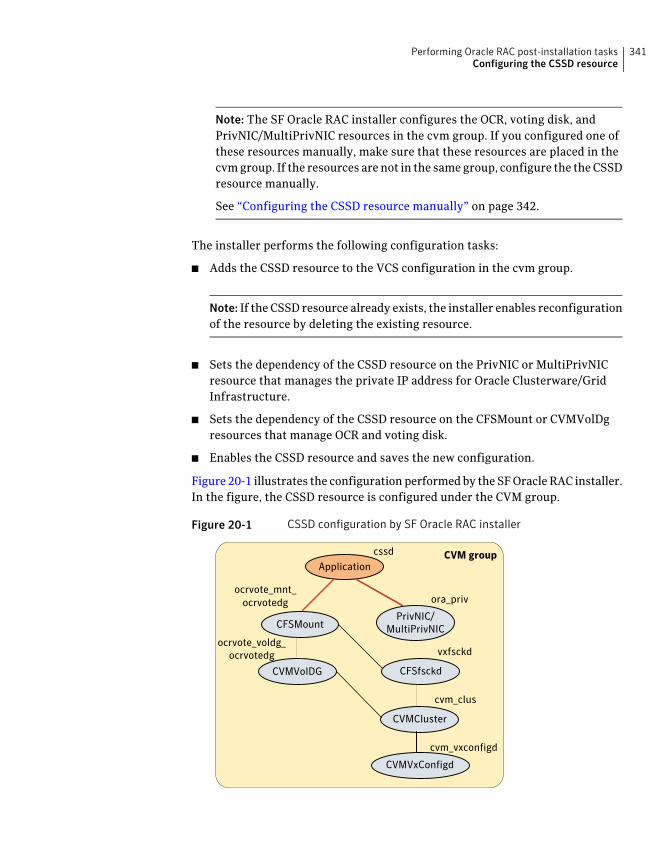
Note: The SF Oracle RAC installer configures the OCR, voting disk, andPrivNIC/MultiPrivNIC resources in the cvm group. If you configured one ofthese resources manually, make sure that these resources are placed in thecvm group. If the resources are not in the same group, configure the the CSSDresource manually.
See “Configuring the CSSD resource manually” on page 342.
The installer performs the following configuration tasks:
■ Adds the CSSD resource to the VCS configuration in the cvm group.
Note: If the CSSD resource already exists, the installer enables reconfigurationof the resource by deleting the existing resource.
■ Sets the dependency of the CSSD resource on the PrivNIC or MultiPrivNICresource that manages the private IP address for Oracle Clusterware/GridInfrastructure.
■ Sets the dependency of the CSSD resource on the CFSMount or CVMVolDgresources that manage OCR and voting disk.
■ Enables the CSSD resource and saves the new configuration.
Figure 20-1 illustrates the configuration performed by the SF Oracle RAC installer.In the figure, the CSSD resource is configured under the CVM group.
Figure 20-1 CSSD configuration by SF Oracle RAC installer
CVMCluster
PrivNIC/MultiPrivNIC
Application
CFSfsckd
cssd
ora_priv
vxfsckd
cvm_clus
cvm_vxconfigd
CFSMount
ocrvote_voldg_ocrvotedg
CVMVoIDG
CVMVxConfigd
CVM group
ocrvote_mnt_ocrvotedg
341Performing Oracle RAC post-installation tasksConfiguring the CSSD resource

To configure the CSSD resource
1 Start the SF Oracle RAC installer, if it is not already running. Select the optionPost Oracle Installation Tasks.
1) Configure SF Oracle RAC sub-components
2) SF Oracle RAC Installation and Configuration Checks
3) Prepare to Install Oracle
4) Install Oracle Clusterware/Grid Infrastructure and Database
5) Post Oracle Installation Tasks
6) Exit SF Oracle RAC Configuration
Choose option: [1-6,q] (1) 5
2 Select the option Configure CSSD agent.
The installer verifies that Oracle Clusterware/Grid Infrastructure is runningon all the nodes.
3 Press Return to continue with the configuration. The installer reads theresource and group mappings for the CSSD agent from the VCS configurationfile and displays the information.
4 Enter y to continue with the configuration. Review the messages as theinstaller configures the CSSD agent and sets the appropriate dependencies.
5 Press Return to return to the installer menu.
6 If the Oracle Clusterware/Grid Infrastructure and the Oracle database binariesare on CFS, set the dependencies between the cssd resource and the CFSMountresources for the binaries manually:
# hares -link cssd crsbin_mnt
# hares -link cssd orabin_mnt
Configuring the CSSD resource manuallyAdd the cssd resource to the VCS configuration and set CSSD dependencies onthe resources that manage OCR and voting disk and the private IP addresses forOracle Clusterware/Grid Infrastructure.
Note: It is recommended that the OCR, voting disk, and PrivNIC/MultiPrivNICresources be configured in the same VCS group as that of the cssd resource. If theresources are not in the same group, set the appropriate dependencies betweenthe service groups.
Performing Oracle RAC post-installation tasksConfiguring the CSSD resource
342

To configure the CSSD resource
1 Change the permission on the VCS configuration file to read-write mode:
# haconf -makerw
2 Add the CSSD resource to the cvm group:
# hares -add cssd Application cvm
3 Modify the CSSD resource attributes:
# hares -modify cssd StartProgram /opt/VRTSvcs/rac/bin/cssd-online
# hares -modify cssd StopProgram /opt/VRTSvcs/rac/bin/cssd-offline
# hares -modify cssd MonitorProgram /opt/VRTSvcs/rac/bin/cssd-monitor
# hares -modify cssd CleanProgram /opt/VRTSvcs/rac/bin/cssd-clean
# hares -modify cssd Critical 0
# hares -override cssd OnlineWaitLimit
# hares -modify cssd OnlineWaitLimit 5
4 Enable the CSSD resource:
# hares -modify cssd Enabled 1
5 Set the dependency of the CSSD resource on the CFSMount or CVMVolDgresources that manage OCR and voting disk.
If you configured OCR and voting disk on CVM raw volumes:
# hares -link cssd ocr_voldg_ocrvotedg
# hares -link cssd vote_voldg_ocrvotedg
If you configured OCR and voting disk on CFS:
# hares -link cssd ocrvote_mnt_ocrvotedg
6 Set the dependency of the CSSD resource on the PrivNIC or MultiPrivNICresources that manage the private IP address for Oracle Clusterware/GridInfrastructure.
If you configured the PrivNIC or MultiPrivNIC resource:
# hares -link cssd resource_name
where resource_name is the name of the PrivNIC or MultiPrivNIC resource.
343Performing Oracle RAC post-installation tasksConfiguring the CSSD resource

7 If the Oracle Clusterware/Grid Infrastructure and the Oracle database binariesare on CFS, set the dependencies between the CSSD resource and theCFSMount resources for the binaries manually:
# hares -link cssd crsbin_mnt
# hares -link cssd orabin_mnt
8 Change the permission on the VCS configuration file to read-only mode:
# haconf -dump -makero
Preventing automatic startup of OracleClusterware/Grid Infrastructure
The use of the CSSD agent is mandatory to ensure adequate handling of servicegroup inter-dependencies and thereby prevent the premature startup of OracleClusterware/Grid Infrastructure. Therefore, disable automatic startup of OracleClusterware/Grid Infrastructure when the system starts.
To prevent automatic startup of Oracle Clusterware/Grid Infrastructure
1 Log in as the root user on each node in the cluster.
2 Disable automatic startup of Oracle Clusterware/Grid Infrastructure.
For Oracle RAC 10g Release 2/Oracle RAC 11g Release 1:
# $CRS_HOME/bin/crsctl disable crs
For Oracle RAC 11g Release 2:
# $GRID_HOME/bin/crsctl disable crs
Relinking the SFOracle RAC librarieswithOracle RACIf you added or upgraded the Oracle patches, you must relink the SF Oracle RAClibraries to Oracle. If you are using Oracle RAC 10g, you need to link Oracle RACwith VCSIPC, VCSMM, and ODM libraries. If you are using Oracle RAC 11g, youneed to link Oracle RAC with VCSMM and ODM libraries. Relinking the librariesenables coordinated exchange of cluster membership information and protectionof data.
Performing Oracle RAC post-installation tasksPreventing automatic startup of Oracle Clusterware/Grid Infrastructure
344

Note: Symantec recommends that you relink the SF Oracle RAC libraries onlyafter completing all the required patch additions.
Use one of the following ways to relink the libraries:
See “Relinking the SF Oracle RAC libraries with Oracle RAC usingthe SF Oracle RAC installer” on page 345.
SF Oracle RAC installer
See “Relinking SF Oracle RAC libraries with Oracle RAC manually”on page 346.
Manual
Relinking the SF Oracle RAC libraries with Oracle RAC using the SFOracle RAC installer
Perform the steps in the following procedure to relink the libraries using the SFOracle RAC installer.
To relink the SF Oracle RAC libraries with Oracle RAC
1 Return to the SF Oracle RAC installer menu, and select the option PostOracleInstallation.
1) Configure SF Oracle RAC sub-components
2) SF Oracle RAC Installation and Configuration Checks
3) Prepare to Install Oracle
4) Install Oracle Clusterware/Grid Infrastructure and Database
5) Post Oracle Installation Tasks
6) Exit SF Oracle RAC Configuration
Choose option: [1-6,q] (1) 5
2 Select the option Relink Oracle Database Binary.
345Performing Oracle RAC post-installation tasksRelinking the SF Oracle RAC libraries with Oracle RAC

3 Provide the Oracle environment information—user name, group name,CRS_HOME (or GRID_HOME), ORACLE_HOME. Based on this information,the installer detects the version of Oracle installed.
Note: You need to provide the Oracle environment information only if youquit the installer after installing Oracle Clusterware/Grid Infrastructure andthe Oracle database.
Enter Oracle UNIX user name: [b] oracle
Enter Oracle UNIX group name: [b] (oinstall)
Enter absolute path of Oracle Clusterware/Grid Infrastructure
Home directory: [b]
Enter absolute path of Oracle Database Home directory: [b]
.
.
Do you want to continue? [y,n,q] (y)
4 Review and confirm the Oracle database information.
The installer starts relinking the libraries.
Relinking SF Oracle RAC libraries with Oracle RAC manuallyThe relinking process involves the following tasks:
■ Copying VCS IPC libraries for an Oracle RAC 10g installation
■ Linking the ODM library
The Oracle RAC and Veritas library locations for linking the Oracle libraries withSF Oracle RAC are listed in the following tables. You may use these tables asreference when you relink the libraries as described in this section.
Note: VCS IPC is not applicable to Oracle RAC 11g.
Table 20-1 lists the Oracle RAC and Veritas library locations for Oracle RAC 10gRelease 2.
Table 20-1 Oracle RAC and Veritas library locations for VCS IPC and ODM -Oracle RAC 10g Release 2
Veritas libraryOracle RAC libraryLibraries
/opt/ORCLcluster/lib/libskgxn2.so
$CRS_HOME/lib/libskgxn2.soVCSMM
Performing Oracle RAC post-installation tasksRelinking the SF Oracle RAC libraries with Oracle RAC
346
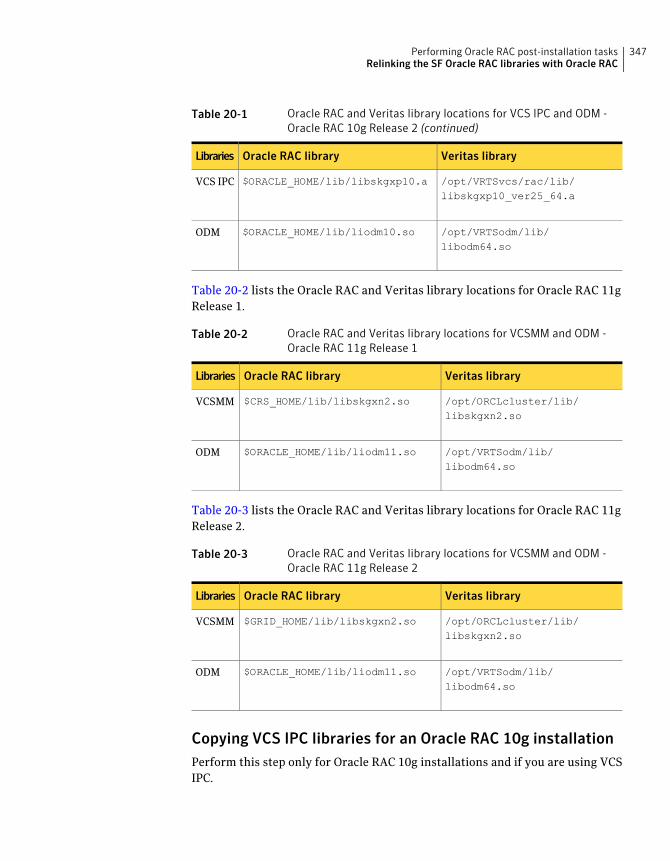
Table 20-1 Oracle RAC and Veritas library locations for VCS IPC and ODM -Oracle RAC 10g Release 2 (continued)
Veritas libraryOracle RAC libraryLibraries
/opt/VRTSvcs/rac/lib/libskgxp10_ver25_64.a
$ORACLE_HOME/lib/libskgxp10.aVCS IPC
/opt/VRTSodm/lib/libodm64.so
$ORACLE_HOME/lib/liodm10.soODM
Table 20-2 lists the Oracle RAC and Veritas library locations for Oracle RAC 11gRelease 1.
Table 20-2 Oracle RAC and Veritas library locations for VCSMM and ODM -Oracle RAC 11g Release 1
Veritas libraryOracle RAC libraryLibraries
/opt/ORCLcluster/lib/libskgxn2.so
$CRS_HOME/lib/libskgxn2.soVCSMM
/opt/VRTSodm/lib/libodm64.so
$ORACLE_HOME/lib/liodm11.soODM
Table 20-3 lists the Oracle RAC and Veritas library locations for Oracle RAC 11gRelease 2.
Table 20-3 Oracle RAC and Veritas library locations for VCSMM and ODM -Oracle RAC 11g Release 2
Veritas libraryOracle RAC libraryLibraries
/opt/ORCLcluster/lib/libskgxn2.so
$GRID_HOME/lib/libskgxn2.soVCSMM
/opt/VRTSodm/lib/libodm64.so
$ORACLE_HOME/lib/liodm11.soODM
Copying VCS IPC libraries for an Oracle RAC 10g installationPerform this step only for Oracle RAC 10g installations and if you are using VCSIPC.
347Performing Oracle RAC post-installation tasksRelinking the SF Oracle RAC libraries with Oracle RAC

Perform the steps in the procedure on each node if the Oracle libraries are onlocal storage. If the Oracle libraries are installed on shared storage, copy thelibraries on one node only. Use the mount command to check that the file systemcontaining the Oracle libraries are mounted.
To copy VCS IPC libraries
1 Log in as the Oracle user.
2 Change to the $ORACLE_HOME/lib directory:
$ cd $ORACLE_HOME/lib
3 Back up Oracle's libskgxp10 library:
$ mv libskgxp10.a libskgxp10.a.oracle.`date `+%m_%d_%Y-%H_%M_%S'`
4 Replace the file $ORACLE_HOME/lib/libskgxp10.a with the Veritas VCS IPClibrary:
$ cp /opt/VRTSvcs/rac/lib/libskgxp10_ver25_64.a libskgxp10.a
5 Relink Oracle:
$ cd $ORACLE_HOME/rdbms/lib
$ make -f ins_rdbms.mk ioracle
Linking the ODM libraryPerform the steps in the procedure on each node if the Oracle libraries are onlocal storage. If the Oracle libraries are installed on shared storage, copy thelibraries on one node only. Use the mount command to check that the file systemcontaining the Oracle libraries are mounted.
To link the Veritas ODM library
1 Log in as the Oracle user.
2 Change to the $ORACLE_HOME/lib directory:
$ cd $ORACLE_HOME/lib
Performing Oracle RAC post-installation tasksRelinking the SF Oracle RAC libraries with Oracle RAC
348

3 Back up Oracle's ODM library:
For Oracle RAC 10g:
$ mv libodm10.so libodm10.so.oracle-`date +%m_%d_%Y-%H_%M_%S`
For Oracle RAC 11g:
$ mv libodm11.so libodm11.so.oracle-`date +%m_%d_%Y-%H_%M_%S`
4 Link the Veritas ODM library with Oracle's libodm library:
For Oracle RAC 10g:
$ cp /opt/VRTSodm/lib/libodm64.so libodm10.so
For Oracle RAC 11g:
$ cp /opt/VRTSodm/lib/libodm64.so libodm11.so
Creating the Oracle RAC databaseCreate the Oracle RAC database on shared raw VxVM volumes or shared VxFSfile systems. Use your own tools or scripts or review the guidelines on using theOracle DBCA (Database Creation Assistant) tool to create the database.
For instructions on creating an Oracle RAC database:
See “About creating a test database” on page 661.
For more information, see the Oracle RAC documentation.
Note: If you plan to configure global clusters, then set up the Oracle RAC databaseonly on the primary site. On the secondary site, the database will be replicated.
Note: For Oracle RAC 10g Release 2/Oracle RAC 11g Release 1: Make sure thatyou configure the database for availability if the database cache fusion traffic isconfigured to use Oracle UDP IPC private IP addresses and if these addresses areconfigured as a PrivNIC or MultiPrivNIC resource.
See “Adding Oracle UDP IPC private IP addresses to the Oracle initializationparameter file” on page 350.
349Performing Oracle RAC post-installation tasksCreating the Oracle RAC database

Adding Oracle UDP IPC private IP addresses to theOracle initialization parameter file
Perform this step only for Oracle RAC 10 Release 2/Oracle RAC 11 Release 1installations.
Add the Oracle UDP IPC private IP addresses to the Oracle initialization parameterfile (for example, pfile or spfile) if the database cache fusion traffic is configuredto use Oracle UDP IPC private IP addresses and if these addresses are configuredas a PrivNIC or MultiPrivNIC resource for high availability. You need to configurethe cluster_interconnectsparameter in the Oracle initialization parameter fileto use the appropriate private IP addresses.
To add Oracle UDP IPC private IP addresses to the initialization parameter file
1 Log in as the Oracle user on one of the nodes in the cluster.
2 Set the cluster_interconnects parameter in the Oracle initializationparameter file to use the Oracle UDP IPC private IP addresses that are usedfor database cache fusion and are managed by PrivNIC or MultiPrivNIC.
Note: Configure multiple IP addresses for each database instance in thecluster_interconnects parameter to distribute the database cache fusiontraffic across multiple links.
$ sqlplus '/ as sysdba'
SQL> alter system set cluster_interconnects='192.168.2.1:192.168.3.1' \
scope=spfile sid='vrts1';
SQL> alter system set cluster_interconnects='192.168.2.2:192.168.3.2' \
scope=spfile sid='vrts2';
SQL> exit;
3 Stop the Oracle database on all nodes:
If the database is configured under VCS:
# hares -offline oracle_resource -sys system_name
If the database is not configured under VCS:
$ srvctl stop database -d db-name
Performing Oracle RAC post-installation tasksAdding Oracle UDP IPC private IP addresses to the Oracle initialization parameter file
350

4 For Oracle RAC 10g: Unlink the Veritas VCS IPC library, if you have alreadylinked the library.
Perform this step on each node if the Oracle libraries are on local storage. Ifthe Oracle libraries are installed on shared storage, perform the step on onenode only.
$ cd $ORACLE_HOME/lib
Locate the most recent backed up copy of Oracle's$ORACLE_HOME/lib/libskgxpg.a library or$ORACLE_HOME/lib/libskgxpu.alibrary.
You can identify Oracle's libskgxp10.a library by running the followingcommand.
$ strings libskgxpg.a.timestamp | grep VRTS
For the Oracle library, the command does not generate any output.
Replace the file $ORACLE_HOME/lib/libskgxpg.a or$ORACLE_HOME/lib/libskgxpu.a with the most recent backed up copy.
Locate the most recent backed up copy of Oracle's makefile env_rdbms.mk.You can identify it by running the following command:
$ cd $ORACLE_HOME/rdbms/lib
$ grep ha_gs env_rdbms.mk.timestamp
The above command will generate some output for the Oracle makefile.
Replace the file $ORACLE_HOME/rdbms/lib/env_rdbms.mk with the backedup copy.
Relink Oracle:
$ cd $ORACLE_HOME/rdbms/lib
$ make -f ins_rdbms.mk rac_on
$ make -f ins_rdbms.mk ioracle
5 As the Oracle user on one of the nodes in the cluster, restart the Oracledatabase:
$ srvctl start database -d db-name
6 As the root user on each node in the cluster, verify that the private IPaddresses are running.
# ifconfig en1
351Performing Oracle RAC post-installation tasksAdding Oracle UDP IPC private IP addresses to the Oracle initialization parameter file
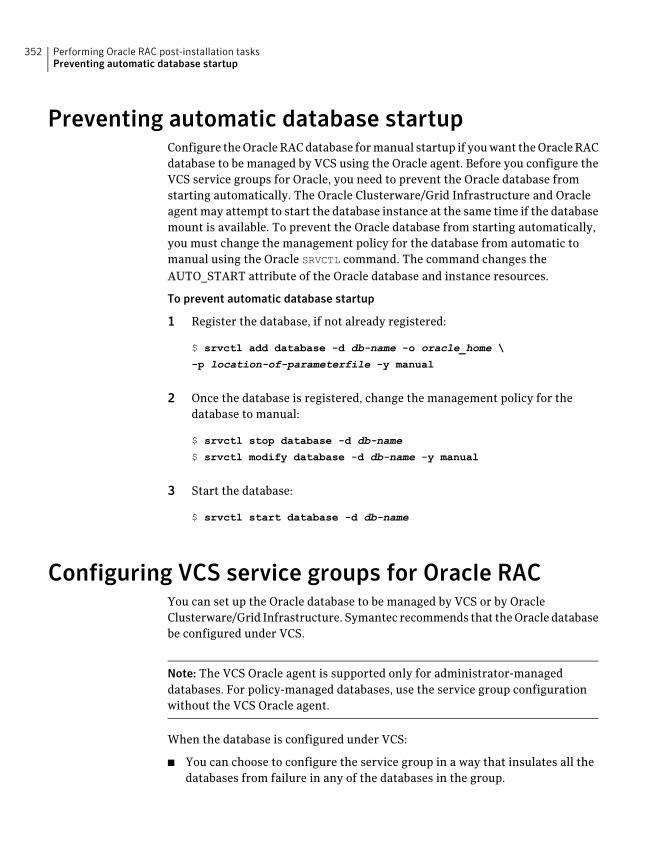
Preventing automatic database startupConfigure the Oracle RAC database for manual startup if you want the Oracle RACdatabase to be managed by VCS using the Oracle agent. Before you configure theVCS service groups for Oracle, you need to prevent the Oracle database fromstarting automatically. The Oracle Clusterware/Grid Infrastructure and Oracleagent may attempt to start the database instance at the same time if the databasemount is available. To prevent the Oracle database from starting automatically,you must change the management policy for the database from automatic tomanual using the Oracle SRVCTL command. The command changes theAUTO_START attribute of the Oracle database and instance resources.
To prevent automatic database startup
1 Register the database, if not already registered:
$ srvctl add database -d db-name -o oracle_home \
-p location-of-parameterfile -y manual
2 Once the database is registered, change the management policy for thedatabase to manual:
$ srvctl stop database -d db-name
$ srvctl modify database -d db-name -y manual
3 Start the database:
$ srvctl start database -d db-name
Configuring VCS service groups for Oracle RACYou can set up the Oracle database to be managed by VCS or by OracleClusterware/Grid Infrastructure. Symantec recommends that the Oracle databasebe configured under VCS.
Note: The VCS Oracle agent is supported only for administrator-manageddatabases. For policy-managed databases, use the service group configurationwithout the VCS Oracle agent.
When the database is configured under VCS:
■ You can choose to configure the service group in a way that insulates all thedatabases from failure in any of the databases in the group.
Performing Oracle RAC post-installation tasksPreventing automatic database startup
352

■ VCS manages the start and stop sequence of the applications and the database.
Figure 20-2 illustrates a service group configuration with the VCS Oracle agent.
Figure 20-2 Service group configuration with the VCS Oracle agent
Oracle groups (parallel)
CVM group (parallel)
Oracleora1
CFSMount
CVMVoIDG
oradata_mnt1
oradata_voldg1
ora2
oradata_mnt2
oradata_voldg2
Oracle
CFSMount
CVMVoIDG
CVMCluster
CFSfsckd
vxfsckd
cvm_clus
cvm_vxconfigd
CFSMount
ocrvote_mnt
ocrvote_voldg
CVMVoIDG
CVMVxConfigd
multi_priv
MultiPrivNIC
Applicationcssd
If your configuration does not use the VCS Oracle agent, you need to modify theexisting configuration as illustrated.
Figure 20-3 illustrates a sample configuration in the absence of the VCS Oracleagent for single database configurations.
353Performing Oracle RAC post-installation tasksConfiguring VCS service groups for Oracle RAC

Figure 20-3 Service group configuration without VCS Oracle agent (singledatabase)
CVM group
CVMCluster
CFSfsckd
vxfsckd
cvm_clus
cvm_vxconfigd
CVMVxConfigd
multi_priv
MultiPrivNIC
Applicationcssd
CFSMount
ocrvote_mnt
ocrvote_voldg
CVMVoIDG
Figure 20-4 illustrates a sample service group configuration in the absence of theVCS Oracle agent for multiple database configurations.
Performing Oracle RAC post-installation tasksConfiguring VCS service groups for Oracle RAC
354

Figure 20-4 Service group configuration without the VCS Oracle agent (multipledatabases)
MultiPrivNIC
Applicationcssd
mpriv
CVMVoIDG
ocrvote_voldg
CFSMount
ocrvote_mnt
crs_grp(parallel)
cvm group (parallel)
CVMCluster
CFSfsckd
vxfsckd
cvm_clus
cvm_vxconfigd
CFSMountoradata_mnt
Critical=0
oradata_voldgCritical=0
CVMVoIDG
CVMVxConfigd
racdata_voldgCritical=0CVMVoIDG
CFSMountracdata_mntCritical=0
In a service group configuration without the VCS Oracle agent, OracleClusterware/Grid Infrastructure controls the database. An online local firmdependency exists between the Oracle Clusterware/Grid Infrastructure group andthe CVM group. When the system starts, the CVM group brings up the volumeand mount points for the databases. The Oracle Clusterware/Grid Infrastructuregroup brings up the OCR and voting disk, configures the private IP address forOracle Clusterware/Grid Infrastructure, and starts Oracle Clusterware/GridInfrastructure. Oracle Clusterware/Grid Infrastructure starts the database andthe application is brought online.
Note: In a service group configuration without the VCS Oracle agent, when thesystem starts, all volumes and mount points MUST be online for the dependentservice groups to be online.
To configure the Oracle database under VCS, create Oracle service groups afterinstalling Oracle RAC and creating a database.
See “Using the CLI to configure VCS service groups for Oracle RAC” on page 356.
355Performing Oracle RAC post-installation tasksConfiguring VCS service groups for Oracle RAC

Using the CLI to configure VCS service groups for Oracle RACThis section describes how to configure the Oracle service group using the CLI.
The following procedure assumes that you have created the database.
To configure the Oracle service group using the CLI
1 Change the cluster configuration to read-write mode:
# haconf -makerw
2 Add the service group to the VCS configuration:
# hagrp -add oradb1_grp
3 Modify the attributes of the service group:
# hagrp -modify oradb1_grp Parallel 1
# hagrp -modify oradb1_grp SystemList galaxy 0 nebula 1
# hagrp -modify oradb1_grp AutoStartList galaxy nebula
4 Add the CVMVolDg resource for the service group:
# hares -add oradata_voldg CVMVolDg oradb1_grp
5 Modify the attributes of the CVMVolDg resource for the service group:
# hares -modify oradata_voldg CVMDiskGroup oradatadg
# hares -modify oradata_voldg CVMActivation sw
# hares -modify oradata_voldg CVMVolume oradatavol
6 Add the CFSMount resource for the service group:
# hares -add oradata_mnt CFSMount oradb1_grp
7 Modify the attributes of the CFSMount resource for the service group:
# hares -modify oradata_mnt MountPoint "/oradata"
# hares -modify oradata_mnt BlockDevice \
"/dev/vx/dsk/oradatadg/oradatavol"
8 Add the Oracle RAC database instance to the service group:
# hares -add ora1 Oracle oradb1_grp
Performing Oracle RAC post-installation tasksConfiguring VCS service groups for Oracle RAC
356

9 Modify the attributes of the Oracle resource for the service group:
# hares -modify ora1 Owner oracle
# hares -modify ora1 Home "/app/oracle/orahome"
# hares -modify ora1 StartUpOpt SRVCTLSTART
# hares -modify ora1 ShutDownOpt SRVCTLSTOP
10 Localize the Sid attribute for the Oracle resource:
# hares -local ora1 Sid
11 Set the Sid attributes for the Oracle resource on each system:
# hares -modify ora1 Sid vrts1 -sys galaxy
# hares -modify ora1 Sid vrts2 -sys nebula
12 Set the dependencies between the CFSMount resource and the CVMVolDgresource for the Oracle service group:
# hares -link oradata_mnt oradata_voldg
13 Set the dependencies between the Oracle resource and the CFSMount resourcefor the Oracle service group:
# hares -link ora1 oradata_mnt
14 Create an online local firm dependency between the oradb1_grp service groupand the cvm service group:
# hagrp -link oradb1_grp cvm online local firm
15 Enable the Oracle service group:
# hagrp -enableresources oradb1_grp
16 Change the cluster configuration to the read-only mode:
# haconf -dump -makero
17 Bring the Oracle service group online on all the nodes:
# hagrp -online oradb1_grp -any
For more information and instructions on configuring the service groups usingthe CLI:
357Performing Oracle RAC post-installation tasksConfiguring VCS service groups for Oracle RAC

See the Veritas Cluster Server Administrator’s Guide.
Location of VCS log filesYou may want to review the log files at /var/VRTSvcs/log/engine_A.log forerrors or status messages. When large amounts of data are written, multiple logfiles may be written, such as engine_B.log, engine_C.log, and so on. Theengine_A.log contains the most recent data.
Removing permissions for communicationMake sure you completed the installation of SF Oracle RAC and the verificationof disk support for I/O fencing. If you used rsh, remove the temporary rsh accesspermissions that you set for the nodes and restore the connections to the publicnetwork.
If the nodes use ssh for secure communications, and you temporarily removedthe connections to the public network, restore the connections.
Configuring the SFDB repository database afterinstallation
If you want to use the Storage Foundation Database (SFDB) tools, you must setup the SFDB repository after installing and configuring SF Oracle RAC and Oracle.For SFDB repository set up procedures:
See Veritas Storage Foundation: Storage and Availability Management for OracleDatabases
Performing Oracle RAC post-installation tasksRemoving permissions for communication
358
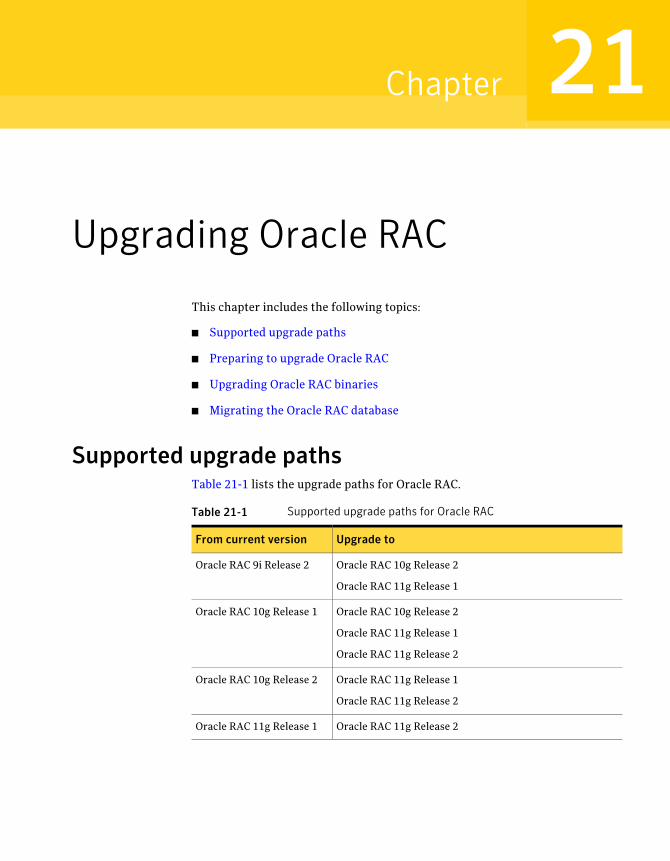
Upgrading Oracle RAC
This chapter includes the following topics:
■ Supported upgrade paths
■ Preparing to upgrade Oracle RAC
■ Upgrading Oracle RAC binaries
■ Migrating the Oracle RAC database
Supported upgrade pathsTable 21-1 lists the upgrade paths for Oracle RAC.
Table 21-1 Supported upgrade paths for Oracle RAC
Upgrade toFrom current version
Oracle RAC 10g Release 2
Oracle RAC 11g Release 1
Oracle RAC 9i Release 2
Oracle RAC 10g Release 2
Oracle RAC 11g Release 1
Oracle RAC 11g Release 2
Oracle RAC 10g Release 1
Oracle RAC 11g Release 1
Oracle RAC 11g Release 2
Oracle RAC 10g Release 2
Oracle RAC 11g Release 2Oracle RAC 11g Release 1
21Chapter

Note: When you upgrade to a different version of Oracle RAC, make sure that thefull path of the Oracle Clusterware/Grid Infrastructure home directory and theOracle database home directory is different from the path where the existingversion of Oracle RAC resides.
The upgrade procedure assumes that the beginning configuration includes thefollowing components, and that these components are running on the clusternodes:
■ SF Oracle RAC 5.1 SP1 PR1
■ A supported version of the operating system
Preparing to upgrade Oracle RACComplete the following preparatory tasks before you upgrade Oracle RAC:
1. Depending on the version you are upgrading from, perform the steps in oneof the following sections:
See “Preparing to upgrade from Oracle RAC 10g or Oracle RAC 11g ”on page 360.
See “Preparing to upgrade from Oracle RAC 9i” on page 361.
2. Verify that the cluster configuration is compatible for upgrading Oracle RAC.
See “Verifying the systems for Oracle RAC installation” on page 318.
Preparing to upgrade from Oracle RAC 10g or Oracle RAC 11gPerform the following tasks before upgrading Oracle RAC.
To prepare for upgrade from Oracle RAC 10g or Oracle RAC 11g
1 Take a hot or cold backup of the existing database.
2 Back up the existing Oracle home and central inventory.
Upgrading Oracle RACPreparing to upgrade Oracle RAC
360

3 If the Oracle RAC database is under VCS control, freeze the Oracle servicegroups to prevent VCS from reporting the resource as faulted when OracleRAC stops and starts the database during the upgrade:
# haconf -makerw
# hagrp -freeze oracle_group -persistent
4 Freeze the cvm service group to prevent VCS from reporting the resource asfaulted when Oracle Clusterware is stopped and started during the upgrade:
# hagrp -freeze cvm_group -persistent
# haconf -dump -makero
Preparing to upgrade from Oracle RAC 9iPerform the following pre-upgrade tasks before upgrading from Oracle RAC 9i.
To prepare for upgrade from Oracle RAC 9i
1 Take a hot or cold backup of the existing Oracle RAC 9i Release 2 database.
2 Back up the existing Oracle Home and Central Inventory.
3 If the Oracle RAC database is under VCS control, freeze the Oracle servicegroups to prevent VCS from reporting the resource as faulted when OracleRAC stops and starts the database during the upgrade:
# haconf -makerw
# hagrp -freeze oracle_group -persistent
4 Freeze the CVM service group to prevent VCS from reporting the resourceas faulted when Oracle Clusterware is stopped and started during the upgrade:
# hagrp -freeze cvm_group -persistent
# haconf -dump -makero
5 Perform the following pre-installation steps:
■ Identify the public virtual addresses for use by Oracle
■ Set the kernel tunables and other parameters
■ Configure private IP addresses for Oracle RAC
■ Create voting disk volumes and mount points
361Upgrading Oracle RACPreparing to upgrade Oracle RAC

■ Set up Oracle user equivalence
For instructions on performing the tasks, see the chapter Before installingOracle RAC in this guide.
Upgrading Oracle RAC binariesReview your Oracle installation manuals and the appropriate Oracle support Websites before upgrading Oracle RAC.
Note: If you upgrade to Oracle RAC 11g Release 2, make sure that you upgradewith the same user credentials as that of the existing installation.
To upgrade Oracle RAC binaries
1 Upgrade Oracle Clusterware.
Note: If you upgrade to Oracle RAC 11g Release 2, upgrade Oracle Clusterwareto a new directory called the Oracle grid infrastructure home directory(GRID_HOME).
Starting with Oracle RAC 11g Release 2, ASM must reside in the Oracle GridInfrastructure home directory. If you plan to upgrade ASM to Release 11gR2, make sure that you upgrade it to run in the Oracle Grid Infrastructurehome directory.
For instructions, see the Oracle RAC documentation.
2 Make sure that Oracle Clusterware is running.
3 Install the Oracle RAC database binaries.
For instructions, see the Oracle RAC documentation.
4 Complete the following post-installation tasks:
■ Add Oracle RAC patches or patchsets.See “Adding Oracle RAC patches or patchsets” on page 339.
■ Relink the SF Oracle RAC libraries with Oracle RAC.See “Relinking the SF Oracle RAC libraries with Oracle RAC” on page 344.
■ For upgrades from Oracle RAC 9i: Add the CSSD resource to the VCSconfiguration.
Upgrading Oracle RACUpgrading Oracle RAC binaries
362

Migrating the Oracle RAC databaseFor instructions on migrating the existing Oracle RAC database, see the Oraclemetalink documentation.
After migrating the database, complete the post-upgrade tasks:
See “Performing post-upgrade tasks” on page 363.
Performing post-upgrade tasksPerform the steps in the following procedure to complete the upgrade.
To perform post-upgrade tasks
1 Change the cluster configuration to read-write mode:
# haconf -makerw
2 For upgrades from Oracle RAC 9i: Modify the resources in the Oracle servicegroups:
# hares -modify oracle_resource StartUpOpt SRVCTLSTART
# hares -modify oracle_resource ShutDowmOpt SRVCTLSTOP
# hares -modify oracle_resource pfile "" -sys galaxy
# hares -modify oracle_resource pfile "" -sys nebula
3 Add the Oracle UDP IPC private IP addresses to the Oracle init.ora file ifthe database cache fusion traffic is configured to use Oracle UDP IPC privateIP addresses and if these addresses are configured as a PrivNIC orMultiPrivNIC resource for high availability.
See “Adding Oracle UDP IPC private IP addresses to the Oracle initializationparameter file” on page 350.
4 Modify the Oracle RAC configuration to prevent automatic startup of OracleClusterware.
See “Preventing automatic startup of Oracle Clusterware/Grid Infrastructure”on page 344.
5 Modify the Oracle RAC database configuration to prevent automatic databasestartup if you want the Oracle RAC database to be managed by VCS using theOracle agent.
See “Preventing automatic database startup” on page 352.
363Upgrading Oracle RACMigrating the Oracle RAC database
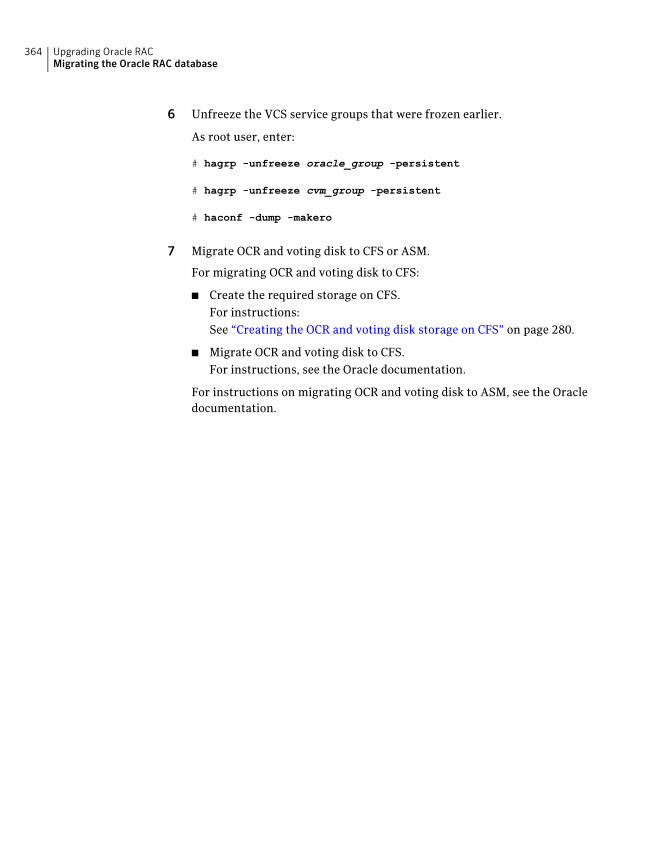
6 Unfreeze the VCS service groups that were frozen earlier.
As root user, enter:
# hagrp -unfreeze oracle_group -persistent
# hagrp -unfreeze cvm_group -persistent
# haconf -dump -makero
7 Migrate OCR and voting disk to CFS or ASM.
For migrating OCR and voting disk to CFS:
■ Create the required storage on CFS.For instructions:See “Creating the OCR and voting disk storage on CFS” on page 280.
■ Migrate OCR and voting disk to CFS.For instructions, see the Oracle documentation.
For instructions on migrating OCR and voting disk to ASM, see the Oracledocumentation.
Upgrading Oracle RACMigrating the Oracle RAC database
364

Installation of SF Oracle RACand Oracle RAC using aresponse file
■ Chapter 22. About response files
■ Chapter 23. Installing and configuring SF Oracle RAC using a response file
■ Chapter 24. Configuring I/O fencing using a response file
■ Chapter 25. Installing Oracle RAC using a response file
■ Chapter 26. Installing SF Oracle RAC and Oracle RAC using a response file
■ Chapter 27. Response file variable definitions
5Section

366

About response files
This chapter includes the following topics:
■ About response files
■ Response file syntax
■ Guidelines for creating the SF Oracle RAC response file
■ Installation scenarios for response files
About response filesUse response files to standardize and automate installations on multiple clusters.
You can perform the following installation activities using a response file:
■ Installing and configuring SF Oracle RAC
■ Preparing the nodes for installation of Oracle RAC
■ Installing Oracle RAC
■ Relinking the SF Oracle RAC libraries with Oracle RAC
■ Configuring the CSSD agent
■ Upgrading SF Oracle RAC
■ Uninstalling SF Oracle RAC
You can perform end-to-end installations or modular deployments.
For more information on modular deployments:
See “Modular deployments using response files” on page 369.
Table 22-1 lists the various options available for creating or obtaining a responsefile.
22Chapter

Table 22-1 Options for obtaining a response file
DescriptionOption
Create a response file based on the response file template providedwith SF Oracle RAC.
The file is located at /opt/VRTSvcs/rac/install.
Create a response file
The Veritas installation programs generate a response file duringthe installation, configuration, upgrade, or uninstallation of SFOracle RAC and for installer-based pre-installation tasks for OracleRAC.
The response file generated by the installer is located in thefollowing directory:
/opt/VRTS/install/logs/installsfrac-installernumber\/installsfrac-installernumber.response file
You can reuse or customize the response files to perform a completeend-to-end installation or to perform a specialized activity, such assetting up the PrivNIC or MultiPrivNIC configuration on yourclusters. All you need to do is update the response file variabledefinitions to enable or disable the options, depending on the taskyou want to perform.
Note:Response files are not created if the tasks terminated abruptlyor if you entered q to quit the installation. To generate the responsefile when you plan to discontinue a task, use the ExitSFOracleRACconfiguration option.
Reuse or customizethe response filesgenerated by aninstallation
Create a response file by specifying the-makeresponsefileoptionwith the SF Oracle RAC installer.
Mount the product disc and navigate to the folder that contains theinstallation program. Start the installation program.
# ./installsfrac -makeresponsefile
The option creates a response file by simulating an installation. Theresponse file is created in the directory/opt/VRTS/install/logs/.
Note: You can use the -makeresponsefile option to createresponse files only for installing, configuring, and uninstalling SFOracle RAC.
For more information:
See “About the installation simulator” on page 370.
Use the installationsimulator
About response filesAbout response files
368

At the end of the SF Oracle RAC installation, the following files are created:
■ A log file that contains executed system commands and output.
■ A summary file that contains the output of the installation scripts.
■ Response files to be used with the -responsefile option of the installer.
Note: The SF Oracle RAC response files also contain VCS variables used for theinstallation and configuration of VCS.
For the VCS variable definitions, see theVeritas Cluster Server InstallationGuide.
Modular deployments using response filesModular deployments offer flexibility in planning your installation andconfiguration activities. You can choose to perform any installation orconfiguration task independent of other related activities. For example, you candisable Oracle user and group creation across all nodes in a cluster while installingOracle RAC.
Modular deployments are supported for the following installation andconfiguration activities:
■ Installing SF Oracle RAC
■ Configuring SF Oracle RAC
■ Creating Oracle user and group
■ Creating storage for OCR and voting disk
■ Configuring private IP addresses for Oracle RAC
■ Installing Oracle Clusterware
■ Installing Oracle database
■ Oracle post-installation tasks:Configuring CSSD agentRelinking Oracle RAC libraries
The variables required for each of the above tasks are described in the chapter"Response file variable definitions".
All modular deployment activities require the following variable definitions:
$CFG{prod}
$CFG{systems}
369About response filesAbout response files

About the installation simulatorThe SF Oracle RAC installer includes the option (-makeresponsefile) to simulatethe installation, configuration, or uninstallation of the product. The simulationoption steps through the installation script, including all of the preinstallationchecks on the systems. However, the simulation does not actually install thefilesets, uninstall previously installed filesets, or start or stop any processes.
Use the installation simulator in the following situations:
■ To understand the information that is required when you install, configure,or uninstall SF Oracle RACAs the simulator steps through the same code that is used by the installer, youcan use the simulation process to preview the installation or configurationsteps without disrupting your existing installation. You can skip thepreinstallation checks, if not required.
■ To create a response fileThe simulation process enables you to create a response file that can be usedas a template for installing, configuring, or uninstalling SF Oracle RAC. Youcan customize the response file, as required.
To simulate an installation or configuration, specify the -makeresponsefile
option with the installer or product installation script at the command line.
To simulate an uninstallation, specify the -makeresponsefile option with theinstaller or the product uninstall script at the command line.
Response file syntaxThe Perl statement syntax that is included in the response file varies, dependingon whether “Scalar” or “List” values are required by the variables.
For example,
$CFG{Scalar_variable}="value";
or, in the case of an integer value:
$CFG{Scalar_variable}=123;
or, in the case of a list:
$CFG{List_variable}=["value", "value", "value"];
About response filesResponse file syntax
370

Guidelines for creating the SF Oracle RAC responsefile
This section provides guidelines for creating the SF Oracle RAC response file.
1. Create a response file using one of the available options.
For various options on creating or obtaining an SF Oracle RAC response file:
See “About response files” on page 367.
2. Set the following master values to 1 to enable SF Oracle RAC installation andconfiguration.
Note: The master settings must be set to 1 to enable the installer to readdependent variable definitions. For example, if the value$CFG{opt}{install}is not set to 1, the other dependent installation values in the response filewill be disregarded. This is true for any master setting.
The following is the list of master values that must be set for installing andconfiguring SF Oracle RAC.
$CFG{opt}{install}=1;Installing SF Oracle RAC
$CFG{opt}{configure}=1;$CFG{config_sfrac_subcomponents} = 1;
Configuring SF OracleRAC
3. Now, set the appropriate value in the dependent variable definitions forinstalling and configuring SF Oracle RAC.
The set of minimum definitions for a successful installation and configurationis as follows:
$CFG{accepteula}=1;
$CFG{opt}{install}=1;
$CFG{opt}{configure}=1;
$CFG{config_sfrac_subcomponents} = 1;
$CFG{opt}{installallpkgs}=1;
$CFG{opt}{vxkeyless}=1;
$CFG{prod}="SFRAC51";
$CFG{systems}=[ qw(galaxy nebula) ];
$CFG{vcs_allowcomms}=1;
$CFG{vcs_clusterid}=101;
371About response filesGuidelines for creating the SF Oracle RAC response file

$CFG{vcs_clustername}="rac_cluster101";
$CFG{vcs_lltlink1}{galaxy}="en1";
$CFG{vcs_lltlink1}{nebula}="en1";
$CFG{vcs_lltlink2}{galaxy}="en2";
$CFG{vcs_lltlink2}{nebula}="en2";
$CFG{vcs_userenpw}=[ qw(gpqIpkPmqLqqOyqKpn) ];
$CFG{vcs_username}=[ qw(admin) ];
$CFG{vcs_userpriv}=[ qw(Administrators) ];
You can add more variable definitions, as required.
4. Set the following master values to 1 to enable the Oracle pre-installationtasks.
Note: This step assumes that you have already set the master value$CFG{opt}{configure} to 1 in the previous step.
The following is the list of additional master values that must be set forcompleting Oracle pre-installation tasks:
If you plan to use the PrivNIC agent, use the following mastersettings:
$CFG{config_privnic}=1;$CFG{config_multiprivnic}=0;
If you plan to use the MultiPrivNIC agent, use the followingmaster settings:
$CFG{config_multiprivnic}=1;$CFG{config_privnic}=0;
Private IP addressconfiguration
$CFG{create_ocr_vote_storage}=1;OCR and voting diskstorage
$CFG{install_oracle_clusterware}=1;OracleClusterware/GridInfrastructureinstallation
$CFG{install_oracle_database}=1;Oracle databaseinstallation
$CFG{config_cssd_agent}=1;$CFG{relink_oracle_database}=1;
Post Oracle tasks
About response filesGuidelines for creating the SF Oracle RAC response file
372

Set the master value for the $CFG{create_oracle_user_group} variable to0 as follows:
$CFG{create_oracle_user_group}=0;
Note: If you are performing an end-to-end installation, the creation of Oracleuser and group must be completed before starting the installation. This isbecause user equivalence must be manually established on all nodes to allowthe Oracle Universal Installer to securely copy files and run programs on thenodes in the cluster without requiring password prompts.
5. Set the appropriate value for the dependent variable definitions for the Oraclepre-installation tasks.
Note: The following table discusses variable definitions with correspondingsample values. Replace the sample values with those that are appropriate foryour installation requirements.
373About response filesGuidelines for creating the SF Oracle RAC response file

If you plan to use the PrivNIC agent, provide the followingdefinitions:
$CFG{privnic_resname} = "ora_priv";$CFG{privnic_interface_priority}="en2 en3";$CFG{galaxy}{privnicip} = "192.168.12.1";$CFG{galaxy}->{hostname_for_ip} = "galaxy-priv";$CFG{nebula}{privnicip} = "192.168.12.2";$CFG{nebula}->{hostname_for_ip} = "nebula-priv";$CFG{nic_netmask} = "255.255.255.0";$CFG{nic_add_ip_to_files} = 1;
If you plan to use the MultiPrivNIC agent, use the followingmaster settings:
$CFG{multiprivnic_resname} = "ora_priv";$CFG{nic_add_ip_to_files} = 1;$CFG{galaxy}->{en1}->{multiprivnicip}= "192.168.12.1";$CFG{galaxy}->{en1}->{hostname_for_ip}= "galaxy-priv";$CFG{galaxy}->{en2}->{multiprivnicip}= "192.168.2.1";$CFG{galaxy}->{en2}->{hostname_for_ip}= "galaxy-priv1";$CFG{nebula}->{en1}->{multiprivnicip}= "192.168.12.2";$CFG{nebula}->{en1}->{hostname_for_ip}= "nebula-priv";$CFG{nebula}->{en2}->{multiprivnicip}= "192.168.2.2";$CFG{nebula}->{en2}->{hostname_for_ip}= "nebula-priv1";$CFG{nic_netmask} = "255.255.255.0";
Private IP addressconfiguration
About response filesGuidelines for creating the SF Oracle RAC response file
374
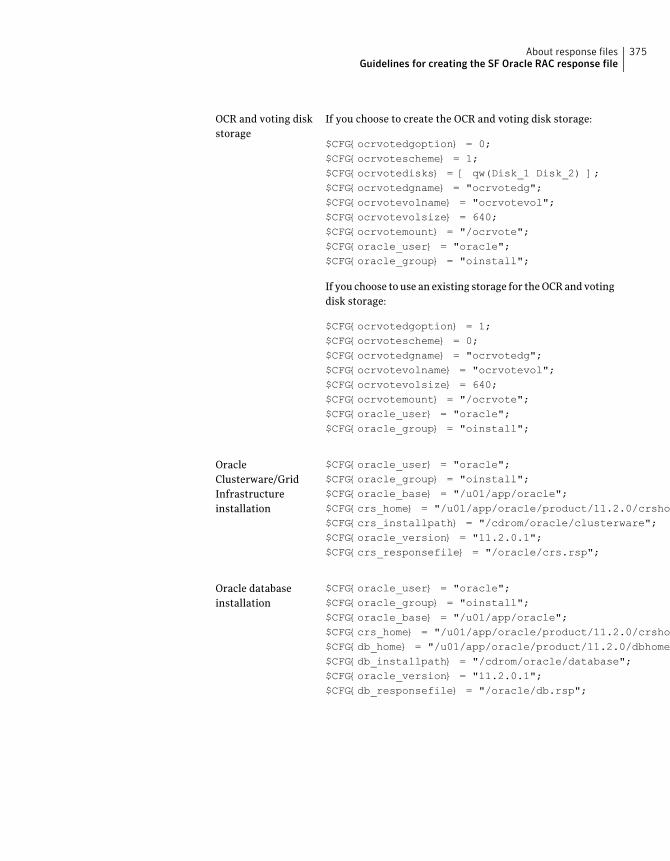
If you choose to create the OCR and voting disk storage:
$CFG{ocrvotedgoption} = 0;$CFG{ocrvotescheme} = 1;$CFG{ocrvotedisks} = [ qw(Disk_1 Disk_2) ];$CFG{ocrvotedgname} = "ocrvotedg";$CFG{ocrvotevolname} = "ocrvotevol";$CFG{ocrvotevolsize} = 640;$CFG{ocrvotemount} = "/ocrvote";$CFG{oracle_user} = "oracle";$CFG{oracle_group} = "oinstall";
If you choose to use an existing storage for the OCR and votingdisk storage:
$CFG{ocrvotedgoption} = 1;$CFG{ocrvotescheme} = 0;$CFG{ocrvotedgname} = "ocrvotedg";$CFG{ocrvotevolname} = "ocrvotevol";$CFG{ocrvotevolsize} = 640;$CFG{ocrvotemount} = "/ocrvote";$CFG{oracle_user} = "oracle";$CFG{oracle_group} = "oinstall";
OCR and voting diskstorage
$CFG{oracle_user} = "oracle";$CFG{oracle_group} = "oinstall";$CFG{oracle_base} = "/u01/app/oracle";$CFG{crs_home} = "/u01/app/oracle/product/11.2.0/crshome";$CFG{crs_installpath} = "/cdrom/oracle/clusterware";$CFG{oracle_version} = "11.2.0.1";$CFG{crs_responsefile} = "/oracle/crs.rsp";
OracleClusterware/GridInfrastructureinstallation
$CFG{oracle_user} = "oracle";$CFG{oracle_group} = "oinstall";$CFG{oracle_base} = "/u01/app/oracle";$CFG{crs_home} = "/u01/app/oracle/product/11.2.0/crshome";$CFG{db_home} = "/u01/app/oracle/product/11.2.0/dbhome_1";$CFG{db_installpath} = "/cdrom/oracle/database";$CFG{oracle_version} = "11.2.0.1";$CFG{db_responsefile} = "/oracle/db.rsp";
Oracle databaseinstallation
375About response filesGuidelines for creating the SF Oracle RAC response file

The master value (set in the previous step) suffices for CSSDresource configuration.
For relinking libraries, the dependent variable settings are asfollows:
$CFG{oracle_user} = "oracle";$CFG{oracle_group} = "oinstall";$CFG{crs_home} = "/u01/app/oracle/product/11.2.0/crshome";$CFG{db_home} = "/u01/app/oracle/product/11.2.0/dbhome_1";$CFG{oracle_version} = "11.2.0.1";
Post Oracle tasks
Installation scenarios for response filesThe chapters in this section cover the following installation scenarios usingresponse files:
■ Installing and configuring SF Oracle RACSee “Installing and configuring SF Oracle RAC” on page 377.
■ Installing Oracle RACSee “About installing Oracle RAC using response files” on page 385.
■ Installing both SF Oracle RAC and Oracle RACSee “Installing SF Oracle RAC and Oracle RAC” on page 394.
About response filesInstallation scenarios for response files
376

Installing and configuringSF Oracle RAC using aresponse file
This chapter includes the following topics:
■ Installing and configuring SF Oracle RAC
■ Sample response file for installing and configuring SF Oracle RAC
Installing and configuring SF Oracle RACYou can create a single response file or separate response files for installing andconfiguring SF Oracle RAC.
The installer performs the following tasks:
■ Installs SF Oracle RAC.
■ Configures SF Oracle RAC.
Note: Fencing is configured in disabled mode. You must configure I/O fencingafter the installation.
The following sample procedure uses a single response file for installing andconfiguring SF Oracle RAC.
To install and configure SF Oracle RAC using response files
1 Make sure that the systems meet the installation requirements.
23Chapter

2 Complete the preparatory steps before starting the installation.
For instructions, see the chapter "Preparing to install SF Oracle RAC" in thisdocument.
3 Create a response file using one of the available options.
For information on various options available for creating a response file:
See “About response files” on page 367.
Note: You must replace the host names in the response file with that of thenew systems in the cluster.
For guidelines on creating a response file:
See “Guidelines for creating the SF Oracle RAC response file” on page 371.
For a sample response file:
See “Sample response file for installing and configuring SF Oracle RAC”on page 379.
4 Mount the product disc and navigate to the product directory that containsthe installation program.
5 Start the installation and configuration:
# ./installsfrac -responsefile /tmp/response_file
Where /tmp/response_file is the full path name of the response file.
Note: Fencing is configured in disabled mode. You need to configure fencingafter the configuration.
6 Configure I/O fencing.
Note: Before you configure I/O fencing, make sure that you complete therequired pre-configuration tasks. For instructions, see the chapterPreparingto configure SF Oracle RAC in this document.
For instructions on configuring I/O fencing using a response file, see thechapter Configuring I/O fencing using a response file in this document.
7 Complete the SF Oracle RAC post-installation tasks.
For instructions, see the chapter Performing post-installation andconfiguration tasks in this document.
Installing and configuring SF Oracle RAC using a response fileInstalling and configuring SF Oracle RAC
378

Sample response file for installing and configuringSF Oracle RAC
The following sample response file installs and configures SF Oracle RAC on twonodes, galaxy and nebula.
our %CFG;
$CFG{accepteula}=1;
$CFG{opt}{vxkeyless}=1;
$CFG{opt}{install}=1;
$CFG{opt}{installallpkgs}=1;
$CFG{prod}="SFRAC51";
$CFG{systems}=[ qw(galaxy nebula) ];
$CFG{opt}{configure}=1;
$CFG{config_sfrac_subcomponents} = 1;
$CFG{vcs_allowcomms}=1;
$CFG{vcs_clusterid}=101;
$CFG{vcs_clustername}="rac_cluster101";
$CFG{vcs_lltlink1}{galaxy}="en1";
$CFG{vcs_lltlink1}{nebula}="en1";
$CFG{vcs_lltlink2}{galaxy}="en2";
$CFG{vcs_lltlink2}{nebula}="en2";
$CFG{vcs_username}=[ qw(admin) ];
$CFG{vcs_userpriv}=[ qw(Administrators) ];
$CFG{vcs_userenpw}=[ qw(gpqIpkPmqLqqOyqKpn) ];
$CFG{uploadlogs}=0;
1;
379Installing and configuring SF Oracle RAC using a response fileSample response file for installing and configuring SF Oracle RAC

Installing and configuring SF Oracle RAC using a response fileSample response file for installing and configuring SF Oracle RAC
380

Configuring I/O fencingusing a response file
This chapter includes the following topics:
■ Configuring I/O fencing using response files
■ Sample response file for configuring disk-based I/O fencing
■ Sample response file for configuring server-based I/O fencing
Configuring I/O fencing using response filesTypically, you can use the response file that the installer generates after youperform I/O fencing configuration to configure I/O fencing for SF Oracle RAC.
To configure I/O fencing using response files
1 Make sure that SF Oracle RAC is configured.
2 Based on whether you want to configure disk-based or server-based I/Ofencing, make sure you have completed the preparatory tasks.
See “About planning to configure I/O fencing” on page 63.
3 Copy the response file to one of the cluster systems where you want toconfigure I/O fencing.
See “Sample response file for configuring disk-based I/O fencing” on page 382.
See “Sample response file for configuring server-based I/O fencing”on page 382.
24Chapter

4 Edit the values of the response file variables as necessary.
See “Response file variables to configure disk-based I/O fencing” on page 411.
See “Response file variables to configure server-based I/O fencing” on page 413.
5 Start the configuration from the system to which you copied the responsefile. For example:
# /opt/VRTS/install/installsfrac -responsefile /tmp/response_file
Where /tmp/response_file is the response file’s full path name.
Sample response file for configuring disk-based I/Ofencing
Review the disk-based I/O fencing response file variables and their definitions.
See “Response file variables to configure disk-based I/O fencing” on page 411.
#
# Configuration Values:
#
our %CFG;
$CFG{opt}{configure}=1;
$CFG{opt}{fencing}=1;
$CFG{prod}="SFRAC51";
$CFG{systems}=[ qw(galaxy nebula) ];
$CFG{vcs_clusterid}=13221;
$CFG{vcs_clustername}="rac_cluster101";
$CFG{vxfen_config_fencing_dg}="fendg";
$CFG{vxfen_config_fencing_mechanism}="dmp";
$CFG{vxfen_config_fencing_newdg_disks}=
[ qw(rhdisk75 rhdisk76 rhdisk77) ];
$CFG{vxfen_config_fencing_option}=2;
Sample response file for configuring server-basedI/O fencing
The following is a sample response file used for server-based I/O fencing :
Configuring I/O fencing using a response fileSample response file for configuring disk-based I/O fencing
382

$CFG{fencing_cpc_config_cpagent}=0;
$CFG{fencing_cpc_cps}=[ qw(10.200.117.145) ];
$CFG{fencing_cpc_dgname}="vxfencoorddg";
$CFG{fencing_cpc_diffab}=0;
$CFG{fencing_cpc_disks}=[ qw(emc_clariion0_37 emc_clariion0_13) ];
$CFG{fencing_cpc_mechanism}="raw";
$CFG{fencing_cpc_ncps}=3;
$CFG{fencing_cpc_ndisks}=2;
$CFG{fencing_cpc_ports}{"10.200.117.145"}=14250;
$CFG{fencing_cpc_reusedg}=1;
$CFG{fencing_cpc_security}=1;
$CFG{opt}{configure}=1;
$CFG{opt}{fencing}=1;
$CFG{prod}="SFRAC51";
$CFG{systems}=[ qw(galaxy nebula) ];
$CFG{vcs_clusterid}=1256;
$CFG{vcs_clustername}="rac_cluster101";
$CFG{vxfen_config_fencing_option}=1;
383Configuring I/O fencing using a response fileSample response file for configuring server-based I/O fencing

Configuring I/O fencing using a response fileSample response file for configuring server-based I/O fencing
384
Installing Oracle RAC usinga response file
This chapter includes the following topics:
■ About installing Oracle RAC using response files
■ Before you install
■ Installing Oracle RAC
■ Sample response file for installing Oracle RAC
About installing Oracle RAC using response filesYou can perform an unattended pre-configuration of your systems by runningthe SF Oracle RAC installer with the -responsefile option. This capability intandem with the Oracle response files for Oracle Clusterware and Oracle databaseinstallation enables you to standardize and automate Oracle RAC deploymentsin your cluster.
Before you installMake sure that you complete the tasks in the following procedure before startingthe silent installation of Oracle RAC.
To prepare the systems for installing Oracle RAC using response files
1 Complete the following preparatory tasks on the nodes manually or by usingthe SF Oracle RAC installer:
■ Identify the public virtual IP addresses for use by Oracle
■ Plan for the storage and the private network configuration for Oracle RAC
25Chapter

■ Set the kernel parameters
■ Verify the user "nobody" exists
■ Create Oracle user and groups
■ Set up Oracle user equivalence
■ Edit the Oracle user profile
For instructions:
See “About preparing to install Oracle RAC” on page 269.
2 Create response files for Oracle Clusterware/Grid Infrastructure and Oracledatabase installation using the response file template provided by OracleRAC.
For instructions on using the response file template, see the Oracle RACdocumentation.
Note: Keep at hand the full path of the directory where these response fileswill be saved. The full path of the Oracle Clusterware/Grid Infrastructureresponse file must be set in the SF Oracle RAC response file variable$CFG{crs_responsefile};. The full path of the Oracle database responsefile must be set in the SF Oracle RAC response file variable$CFG{db_responsefile};.
3 Create an SF Oracle RAC response file.
For information on various options available for creating a response file:
See “About response files” on page 367.
Make sure that you provide the full path information of the OracleClusterware/Grid Infrastructure and Oracle database response files.
For guidelines on creating a response file:
See “Guidelines for creating the SF Oracle RAC response file” on page 371.
For information on the list of required and optional variables:
See “Response file variable definitions for Oracle RAC” on page 415.
For a sample response file:
See “Sample response file for installing Oracle RAC” on page 388.
Installing Oracle RAC using a response fileBefore you install
386

4 Make sure that the Oracle user has appropriate read and write permissionson the response files.
5 Make sure that passwordless communication between Oracle users is set upon the nodes of the cluster.
Installing Oracle RACTo perform a silent installation of Oracle RAC, run the SF Oracle RAC installer.
The installer supports completion of the following tasks using the response file:
■ Creates storage for OCR and voting disk
■ Configures the private network for Oracle RAC
■ Installs Oracle Clusterware/Grid Infrastructure by leveraging the correspondingOracle response file
■ Installs Oracle database by leveraging the Oracle database response file
■ Relinks the Oracle RAC libraries with SF Oracle RAC libraries
■ Configures the CSSD agent
The sample procedure assumes that Oracle user equivalence is established on allthe nodes in the cluster.
To perform Oracle pre-installation and installation on the nodes
1 Navigate to the directory containing the SF Oracle RAC installer:
# cd /opt/VRTS/install
2 Start the installation:
# ./installsfrac -responsefile /tmp/response_file
Where /tmp/response_file is the full path name of the SF Oracle RACresponse file.
3 Run the root.sh script as the root user on the cluster nodes.
Note: Do not run the script simultaneously on your cluster nodes.
4 Complete the following Oracle post-installation tasks:
■ Add any patches or patchsets required by Oracle RAC .
■ Create the Oracle RAC database.
387Installing Oracle RAC using a response fileInstalling Oracle RAC
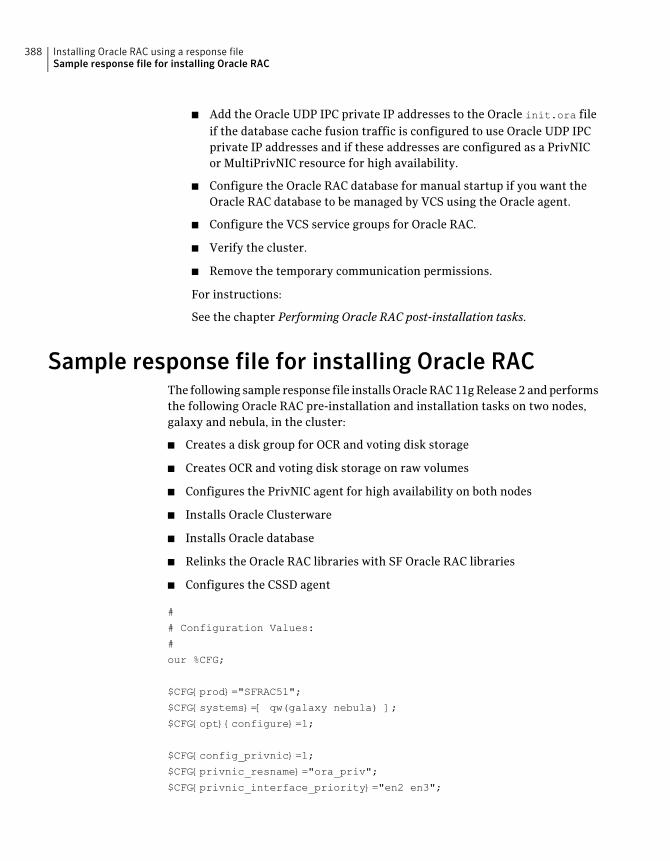
■ Add the Oracle UDP IPC private IP addresses to the Oracle init.ora fileif the database cache fusion traffic is configured to use Oracle UDP IPCprivate IP addresses and if these addresses are configured as a PrivNICor MultiPrivNIC resource for high availability.
■ Configure the Oracle RAC database for manual startup if you want theOracle RAC database to be managed by VCS using the Oracle agent.
■ Configure the VCS service groups for Oracle RAC.
■ Verify the cluster.
■ Remove the temporary communication permissions.
For instructions:
See the chapter Performing Oracle RAC post-installation tasks.
Sample response file for installing Oracle RACThe following sample response file installs Oracle RAC 11g Release 2 and performsthe following Oracle RAC pre-installation and installation tasks on two nodes,galaxy and nebula, in the cluster:
■ Creates a disk group for OCR and voting disk storage
■ Creates OCR and voting disk storage on raw volumes
■ Configures the PrivNIC agent for high availability on both nodes
■ Installs Oracle Clusterware
■ Installs Oracle database
■ Relinks the Oracle RAC libraries with SF Oracle RAC libraries
■ Configures the CSSD agent
#
# Configuration Values:
#
our %CFG;
$CFG{prod}="SFRAC51";
$CFG{systems}=[ qw(galaxy nebula) ];
$CFG{opt}{configure}=1;
$CFG{config_privnic}=1;
$CFG{privnic_resname}="ora_priv";
$CFG{privnic_interface_priority}="en2 en3";
Installing Oracle RAC using a response fileSample response file for installing Oracle RAC
388
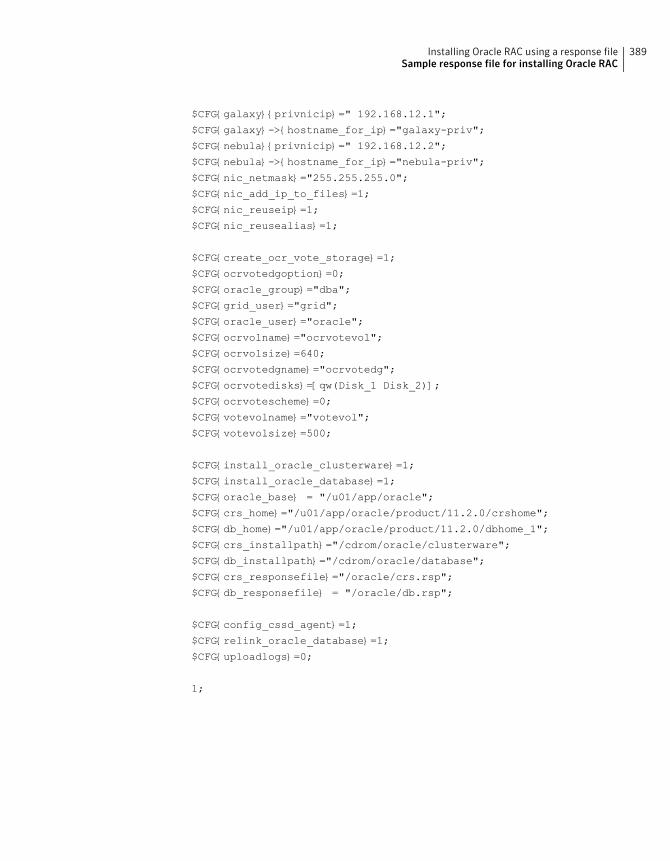
$CFG{galaxy}{privnicip}=" 192.168.12.1";
$CFG{galaxy}->{hostname_for_ip}="galaxy-priv";
$CFG{nebula}{privnicip}=" 192.168.12.2";
$CFG{nebula}->{hostname_for_ip}="nebula-priv";
$CFG{nic_netmask}="255.255.255.0";
$CFG{nic_add_ip_to_files}=1;
$CFG{nic_reuseip}=1;
$CFG{nic_reusealias}=1;
$CFG{create_ocr_vote_storage}=1;
$CFG{ocrvotedgoption}=0;
$CFG{oracle_group}="dba";
$CFG{grid_user}="grid";
$CFG{oracle_user}="oracle";
$CFG{ocrvolname}="ocrvotevol";
$CFG{ocrvolsize}=640;
$CFG{ocrvotedgname}="ocrvotedg";
$CFG{ocrvotedisks}=[qw(Disk_1 Disk_2)];
$CFG{ocrvotescheme}=0;
$CFG{votevolname}="votevol";
$CFG{votevolsize}=500;
$CFG{install_oracle_clusterware}=1;
$CFG{install_oracle_database}=1;
$CFG{oracle_base} = "/u01/app/oracle";
$CFG{crs_home}="/u01/app/oracle/product/11.2.0/crshome";
$CFG{db_home}="/u01/app/oracle/product/11.2.0/dbhome_1";
$CFG{crs_installpath}="/cdrom/oracle/clusterware";
$CFG{db_installpath}="/cdrom/oracle/database";
$CFG{crs_responsefile}="/oracle/crs.rsp";
$CFG{db_responsefile} = "/oracle/db.rsp";
$CFG{config_cssd_agent}=1;
$CFG{relink_oracle_database}=1;
$CFG{uploadlogs}=0;
1;
389Installing Oracle RAC using a response fileSample response file for installing Oracle RAC

Installing Oracle RAC using a response fileSample response file for installing Oracle RAC
390

Installing SF Oracle RACand Oracle RAC using aresponse file
This chapter includes the following topics:
■ About installing SF Oracle RAC and Oracle RAC using response files
■ Before you install
■ Installing SF Oracle RAC and Oracle RAC
■ Sample response file for installing SF Oracle RAC and Oracle RAC
About installing SF Oracle RAC and Oracle RAC usingresponse files
SF Oracle RAC integrates with the silent installation capabilities of the OracleUniversal Installer (OUI) to perform an end-to-end silent installation of SF OracleRAC and Oracle RAC. The installation process uses the SF Oracle RAC responsefile to perform the installation, configuration, and Oracle pre-installation tasksin tandem with the Oracle RAC response files to install Oracle Clusterware andOracle database. The SF Oracle RAC response file must be supplied with the fullpath of the location where the Oracle Clusterware and Oracle database responsefiles reside.
You must have the following response files to perform a complete end-to-endinstallation:
26Chapter

Contains the information listed in the followingsection:
See “Information required in the SF Oracle RACresponse file” on page 392.
For various options on creating or obtaining an SFOracle RAC response file:
See “About response files” on page 367.
An SF Oracle RAC installation andconfiguration response file
Contains Oracle Clusterware installation information
The response file may be created as described in theOracle RAC documentation.
An Oracle Clusterware installationresponse file
Contains Oracle database installation information
The response file may be created as described in theOracle RAC documentation.
An Oracle database installationresponse file
To perform the installation, you need to invoke the SF Oracle RAC installer withthe -responsefile option.
Note: Some pre-installation and post-installation tasks must be manuallycompleted before and after the installation, respectively. Complete these tasks asdescribed in the procedures in this chapter.
Information required in the SF Oracle RAC response fileThe SF Oracle RAC response file must contain the following information for anend-to-end installation:
■ SF Oracle RAC installation information
■ SF Oracle RAC configuration information
■ Oracle RAC pre-installation information, such as follows:
■ Grid user information
■ Oracle user and group information
■ OCR and voting disk storage information
■ Private IP address configuration information
■ Full path to the Oracle Clusterware and Oracle database installation binaries
■ Full path of the Oracle Clusterware and Oracle database home directories
■ Full path of the Oracle Clusterware response file
Installing SF Oracle RAC and Oracle RAC using a response fileAbout installing SF Oracle RAC and Oracle RAC using response files
392

■ Full path of the Oracle database response file
■ Oracle RAC post-installation information, such as follows:
■ CSSD resource configuration
■ Relinking Oracle RAC libraries with SF Oracle RAC
Before you installSF Oracle RAC integrates with the silent installation capabilities of the OracleUniversal Installer (OUI) to provide an end-to-end installation of SF Oracle RACand Oracle RAC. Complete the steps in the following procedure before you installSF Oracle RAC and Oracle RAC using response files.
To prepare to install SF Oracle RAC and Oracle RAC using response files
1 Make sure that the systems meet the installation requirements.
2 Complete the preparatory tasks for installing SF Oracle RAC.
See “Preparing to install Oracle RAC using the SF Oracle RAC installer ormanually” on page 270.
3 Set the kernel parameters for Oracle RAC.
For instructions, see the Oracle RAC documentation.
4 Create the users and groups required by Oracle.
See “Creating users and groups for Oracle RAC” on page 273.
5 Set up Oracle user equivalence on all nodes.
See “Setting up user equivalence” on page 317.
393Installing SF Oracle RAC and Oracle RAC using a response fileBefore you install
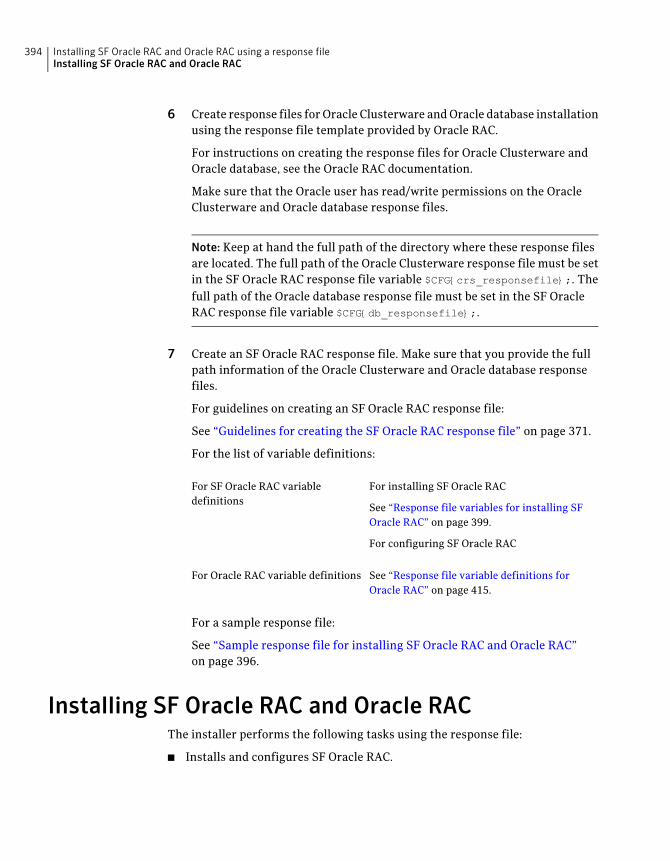
6 Create response files for Oracle Clusterware and Oracle database installationusing the response file template provided by Oracle RAC.
For instructions on creating the response files for Oracle Clusterware andOracle database, see the Oracle RAC documentation.
Make sure that the Oracle user has read/write permissions on the OracleClusterware and Oracle database response files.
Note: Keep at hand the full path of the directory where these response filesare located. The full path of the Oracle Clusterware response file must be setin the SF Oracle RAC response file variable $CFG{crs_responsefile};. Thefull path of the Oracle database response file must be set in the SF OracleRAC response file variable $CFG{db_responsefile};.
7 Create an SF Oracle RAC response file. Make sure that you provide the fullpath information of the Oracle Clusterware and Oracle database responsefiles.
For guidelines on creating an SF Oracle RAC response file:
See “Guidelines for creating the SF Oracle RAC response file” on page 371.
For the list of variable definitions:
For installing SF Oracle RAC
See “Response file variables for installing SFOracle RAC” on page 399.
For configuring SF Oracle RAC
For SF Oracle RAC variabledefinitions
See “Response file variable definitions forOracle RAC” on page 415.
For Oracle RAC variable definitions
For a sample response file:
See “Sample response file for installing SF Oracle RAC and Oracle RAC”on page 396.
Installing SF Oracle RAC and Oracle RACThe installer performs the following tasks using the response file:
■ Installs and configures SF Oracle RAC.
Installing SF Oracle RAC and Oracle RAC using a response fileInstalling SF Oracle RAC and Oracle RAC
394

Note: Fencing is configured in disabled mode. Configure fencing after theinstallation of SF Oracle RAC and Oracle RAC is complete.
■ Installs Oracle Clusterware/Grid Infrastructure and Oracle database.
Note: The SF Oracle RAC installer pauses the installation if VIPCA fails to runsilently during the installation of Oracle RAC 10g Release 2. Run the scriptmanually on one of the nodes as the root user:
# export DISPLAY=10.20.12.150:0.0
# cd $CRS_HOME/bin
# ./vipca
Resume the installation.
■ Configures the CSSD agent.
■ Relinks the Oracle RAC libraries with SF Oracle RAC.
If any of the installation tasks fail, the installer quits the installation. To resumethe installation:
■ Review the log file to identify the cause of failure.
■ Resolve the issue.
■ Review the messages on the console to identify the tasks that have completedsuccessfully. Disable these tasks in the response file.
■ Run the installer again using the modified response file.
To install and configure SF Oracle RAC and Oracle RAC using a response file
1 Mount the product disc and navigate to the product directory that containsthe installation program.
2 Start the installation and configuration:
# ./installsfrac -responsefile /tmp/response_file
Where /tmp/response_file is the full path name of the response file.
Note: Fencing is configured in disabled mode. You need to configure fencingafter the configuration.
395Installing SF Oracle RAC and Oracle RAC using a response fileInstalling SF Oracle RAC and Oracle RAC

3 Run the root.sh script as the root user on the cluster nodes.
Note: Do not run the script simultaneously on your cluster nodes.
4 After the installation completes, initialize disks as VxVM disks and configurefencing.
See “Initializing disks as VxVM disks” on page 147.
For instructions on configuring I/O fencing using a response file, see thechapter Configuring I/O fencing using a response file in this document.
5 Complete the SF Oracle RAC post-installation tasks.
For instructions, see the chapter Performing post-installation andconfiguration tasks in this document.
6 Complete the following Oracle post-installation tasks:
■ Add any patches or patchsets required by Oracle RAC .
■ Create the Oracle RAC database.
■ Add the Oracle UDP IPC private IP addresses to the Oracle init.ora fileif the database cache fusion traffic is configured to use Oracle UDP IPCprivate IP addresses and if these addresses are configured as a PrivNICor MultiPrivNIC resource for high availability.
■ Configure the Oracle RAC database for manual startup if you want theOracle RAC database to be managed by VCS using the Oracle agent.
■ Configure the VCS service groups for Oracle RAC.
■ Verify the cluster.
■ Remove the temporary communication permissions.
For instructions:
See the chapter Performing Oracle RAC post-installation tasks in thisdocument.
Sample response file for installing SFOracle RACandOracle RAC
The sample response file installs SF Oracle RAC 5.1 SP1 PR1 and Oracle RAC 11gRelease 2 and performs the following installation and configuration tasks on twonodes, galaxy and nebula, in the cluster:
Installing SF Oracle RAC and Oracle RAC using a response fileSample response file for installing SF Oracle RAC and Oracle RAC
396

■ Installs all SF Oracle RAC filesets
■ Configures SF Oracle RAC with two private interconnects on each node
■ Creates a disk group for OCR and voting disk storage
■ Creates OCR and voting disk storage on CFS
■ Configures the PrivNIC agent for high availability on both nodes
■ Installs Oracle Clusterware
■ Installs Oracle database
■ Relinks the Oracle RAC libraries with SF Oracle RAC libraries
■ Configures the CSSD agent
#
# Configuration Values:
#
our %CFG;
$CFG{accepteula}=1;
$CFG{prod}="SFRAC51";
$CFG{systems}=[ qw(galaxy nebula) ];
$CFG{opt}{install}=1;
$CFG{opt}{installallpkgs}=1;
$CFG{opt}{vxkeyless}=1;
$CFG{opt}{configure}=1;
$CFG{config_sfrac_subcomponents} = 1;
$CFG{vcs_allowcomms}=1;
$CFG{vcs_clusterid}=101;
$CFG{vcs_clustername}="rac_cluster101";
$CFG{vcs_lltlink1}{galaxy}="en1";
$CFG{vcs_lltlink1}{nebula}="en1";
$CFG{vcs_lltlink2}{galaxy}="en2";
$CFG{vcs_lltlink2}{nebula}="en2";
$CFG{create_oracle_user_group}=0;
$CFG{config_privnic}=1;
$CFG{privnic_resname}="ora_priv";
$CFG{privnic_interface_priority}="en2 en3";
$CFG{galaxy}{hostname_for_ip}="galaxy-priv";
$CFG{galaxy}{privnicip}="192.168.12.1";
$CFG{nebula}{hostname_for_ip}="nebula-priv";
397Installing SF Oracle RAC and Oracle RAC using a response fileSample response file for installing SF Oracle RAC and Oracle RAC

$CFG{nebula}{privnicip}="192.168.12.2";
$CFG{nic_netmask}="255.255.255.0";
$CFG{nic_add_ip_to_files}=1;
$CFG{create_ocr_vote_storage}=1;
$CFG{ocrvotedgoption}=0;
$CFG{oracle_group}="dba";
$CFG{grid_user}="grid";
$CFG{oracle_user}="oracle";
$CFG{ocrvotedgname}="ocrvotedg";
$CFG{ocrvotedisks}=[ qw(Disk_1 Disk_2) ];
$CFG{ocrvotemount}="/ocrvote";
$CFG{ocrvotescheme}=1;
$CFG{ocrvotevolname}="ocrvotevol";
$CFG{ocrvotevolsize}=640;
$CFG{install_oracle_clusterware}=1;
$CFG{install_oracle_database}=1;
$CFG{oracle_base}="/u01/app/oracle";
$CFG{crs_home}="/u01/app/oracle/product/11.2.0/crshome";
$CFG{db_home}="/u01/app/oracle/product/11.2.0/dbhome_1";
$CFG{crs_installpath}="/cdrom/oracle/clusterware";
$CFG{db_installpath}="/cdrom/oracle/database";
$CFG{crs_responsefile} ="/oracle/crs.rsp";
$CFG{db_responsefile} = "/oracle/db.rsp";
$CFG{oracle_display}="10.20.12.150:0.0";
$CFG{config_cssd_agent}=1;
$CFG{relink_oracle_database}=1;
$CFG{uploadlogs}=0;
1;
Installing SF Oracle RAC and Oracle RAC using a response fileSample response file for installing SF Oracle RAC and Oracle RAC
398

Response file variabledefinitions
This chapter includes the following topics:
■ Response file variables for installing SF Oracle RAC
■ Response file variables to configure SF Oracle RAC
■ Response file variables to configure disk-based I/O fencing
■ Response file variables to configure server-based I/O fencing
■ Response file variable definitions for Oracle RAC
Response file variables for installing SF Oracle RACTable 27-1 lists the response file variables that you can define to install SF OracleRAC.
Table 27-1 Response file variables for installing SF Oracle RAC
DescriptionList or ScalarVariable
Required
Installs SF Oracle RAC filesets.
ScalarCFG{opt}{install}
Required
List of systems on which theproduct is to be installed.
ListCFG{opt}{systems}
Required for the installer
Defines the product to be installed.
ScalarCFG{opt}{upi}
27Chapter

Table 27-1 Response file variables for installing SF Oracle RAC (continued)
DescriptionList or ScalarVariable
Required
Instructs the installer to install SFOracle RAC filesets based on thevariable that has the value set to 1:
■ installallpkgs: Installs allfilesets
■ installrecpkgs: Installsrecommended filesets
■ installminpkgs: Installsminimum filesets
Note: Set only one of these variablevalues to 1. In addition to settingthe value of one of these variables,you must set the variable$CFG{opt}{install} to 1.
ScalarCFG{opt}{installallpkgs}
or
CFG{opt}{installrecpkgs}
or
CFG{opt}{installminpkgs}
Optional
Defines that remote shell must beused instead of ssh as thecommunication method betweensystems.
ScalarCFG{opt}{rsh}
Optional
Defines that the installer mustenable the global cluster option.You must set this variable value to1 if you want to configure globalclusters.
ScalarCFG{opt}{gco}
Optional
Defines the location of an sshkeyfile that is used to communicatewith all remote systems.
ScalarCFG{opt}{keyfile}
Optional
Defines a location, typically an NFSmount, from which all remotesystems can install productpatches. The location must beaccessible from all target systems.
ScalarCFG{opt}{patchpath}
Response file variable definitionsResponse file variables for installing SF Oracle RAC
400

Table 27-1 Response file variables for installing SF Oracle RAC (continued)
DescriptionList or ScalarVariable
Optional
Defines a location, typically an NFSmount, from which all remotesystems can install product filesets.The location must be accessiblefrom all target systems.
ScalarCFG{opt}{pkgpath}
Optional
Defines the location where aworking directory is created tostore temporary files and thedepots that are needed during theinstall. The default location is/var/tmp.
ScalarCFG{opt}{tmppath}
Optional
Mentions the location where thelog files are to be copied. Thedefault location is/opt/VRTS/install/logs.
Note: The installer copies theresponse files and summary filesalso to the specified logpathlocation.
ScalarCFG{opt}{logpath}
Optional
Instructs the installation to notinstall the optional filesets in thelist.
ListCFG{opt}{donotinstall}
{fileset}
Optional
Defines a Boolean value 0 or 1.
The value 1 indicates keylessinstallation.
The value 0 indicates that a licensekey is required for the product. Youmust set the variable$CFG{keys}{hostname} withappropriate values.
Scalar$CFG{opt}{vxkeyless}
401Response file variable definitionsResponse file variables for installing SF Oracle RAC

Table 27-1 Response file variables for installing SF Oracle RAC (continued)
DescriptionList or ScalarVariable
Optional
List of keys to be registered on thesystem if the variable$CFG{opt}{vxkeyless} is set to 0.
ScalarCFG{keys}
{hostname}
Optional
Defines a Boolean value 0 or 1.
The value 1 indicates that theinstallation logs are uploaded to theSymantec Web site.
The value 0 indicates that theinstallation logs are not uploadedto the Symantec Web site.
Scalar$CFG{uploadlogs}
Response file variables to configure SF Oracle RACTable 27-2 lists the response file variables that you can define to configure SFOracle RAC.
Table 27-2 Response file variables specific to configuring SF Oracle RAC
DescriptionList or ScalarVariable
Performs the configuration if thefilesets are already installed.
(Required)
ScalarCFG{opt}{configure}
Set the variable to 1 to configurethe SF Oracle RAC components.
(Required)
Note: You must set the$CFG{opt}{configure} variable to 1.
Scalar$CFG{config_sfrac_subcomponents}
Specifies whether you agree withEULA.pdf on the media.
(Required)
ScalarCFG{accepteula}
Response file variable definitionsResponse file variables to configure SF Oracle RAC
402

Table 27-2 Response file variables specific to configuring SF Oracle RAC(continued)
DescriptionList or ScalarVariable
List of systems on which theproduct is to be configured.
(Required)
ListCFG{systems}
Defines the product to beconfigured.
(Required)
ScalarCFG{prod}
Defines the location of an sshkeyfile that is used to communicatewith all remote systems.
(Optional)
ScalarCFG{opt}{keyfile}
Defines that rsh must be usedinstead of ssh as thecommunication method betweensystems.
(Optional)
ScalarCFG{opt}{rsh}
Mentions the location where thelog files are to be copied. Thedefault location is/opt/VRTS/install/logs.
Note: The installer copies theresponse files and summary filesalso to the specified logpathlocation.
(Optional)
ScalarCFG{opt}{logpath}
Defines Boolean value 0 or 1.
The value 1 indicates that theinstallation logs are uploaded to theSymantec Web site.
The value 0 indicates that theinstallation logs are not uploadedto the Symantec Web site.
(Optional)
Scalar$CFG{uploadlogs}
403Response file variable definitionsResponse file variables to configure SF Oracle RAC

Note that some optional variables make it necessary to define other optionalvariables. For example, all the variables that are related to the cluster servicegroup (the csgnic, csgvip, and csgnetmask variables) must be defined if any aredefined. The same is true for the SMTP notification (the smtpserver, smtprecp,and smtprsev variables), the SNMP trap notification (the snmpport, snmpcons,and snmpcsev variables), and the Global Cluster Option (the gconic, gcovip, andgconetmask variables).
Table 27-3 lists the response file variables that specify the required informationto configure a basic SF Oracle RAC cluster.
Table 27-3 Response file variables specific to configuring a basic SF Oracle RACcluster
DescriptionList or ScalarVariable
An integer between 0 and 65535that uniquely identifies the cluster.
(Required)
ScalarCFG{vcs_clusterid}
Defines the name of the cluster.
(Required)
ScalarCFG{vcs_clustername}
Indicates whether or not to startLLT and GAB when you set up asingle-node cluster. The value canbe 0 (do not start) or 1 (start).
(Required)
ScalarCFG{vcs_allowcomms}
Table 27-4 lists the response file variables that specify the required informationto configure LLT over Ethernet.
Response file variable definitionsResponse file variables to configure SF Oracle RAC
404

Table 27-4 Response file variables specific to configuring private LLT overEthernet
DescriptionList or ScalarVariable
Defines the NIC to be used for aprivate heartbeat link on eachsystem. Two LLT links are requiredper system (lltlink1 and lltlink2).You can configure up to four LLTlinks.
You must enclose the system namewithin double quotes.
(Required)
ScalarCFG{vcs_lltlink#}
{"system"}
Defines a low-priority heartbeatlink. Typically, lltlinklowpri is usedon a public network link to providean additional layer ofcommunication.
If you use different media speed forthe private NICs, you can configurethe NICs with lesser speed aslow-priority links to enhance LLTperformance. For example,lltlinklowpri1, lltlinklowpri2, andso on.
You must enclose the system namewithin double quotes.
(Optional)
ScalarCFG{vcs_lltlinklowpri#}
{"system"}
Table 27-5 lists the response file variables that specify the required informationto configure LLT over UDP.
Table 27-5 Response file variables specific to configuring LLT over UDP
DescriptionList orScalar
Variable
Indicates whether to configure heartbeat linkusing LLT over UDP.
(Required)
ScalarCFG{lltoverudp}=1
405Response file variable definitionsResponse file variables to configure SF Oracle RAC

Table 27-5 Response file variables specific to configuring LLT over UDP(continued)
DescriptionList orScalar
Variable
Stores the IP address (IPv4 or IPv6) that theheartbeat link uses on node1.
You can have four heartbeat links and <n>for this response file variable can take values1 to 4 for the respective heartbeat links.
(Required)
ScalarCFG{vcs_udplink<n>_address}
{<system1>}
Stores the IP address (IPv4 or IPv6) that thelow-priority heartbeat link uses on node1.
You can have four low-priority heartbeat linksand <n> for this response file variable cantake values 1 to 4 for the respectivelow-priority heartbeat links.
(Required)
ScalarCFG
{vcs_udplinklowpri<n>_address}
{<system1>}
Stores the UDP port (16-bit integer value) thatthe heartbeat link uses on node1.
You can have four heartbeat links and <n>for this response file variable can take values1 to 4 for the respective heartbeat links.
(Required)
ScalarCFG{vcs_udplink<n>_port}
{<system1>}
Stores the UDP port (16-bit integer value) thatthe low-priority heartbeat link uses on node1.
You can have four low-priority heartbeat linksand <n> for this response file variable cantake values 1 to 4 for the respectivelow-priority heartbeat links.
(Required)
ScalarCFG{vcs_udplinklowpri<n>_port}
{<system1>}
Stores the netmask (prefix for IPv6) that theheartbeat link uses on node1.
You can have four heartbeat links and <n>for this response file variable can take values1 to 4 for the respective heartbeat links.
(Required)
ScalarCFG{vcs_udplink<n>_netmask}
{<system1>}
Response file variable definitionsResponse file variables to configure SF Oracle RAC
406
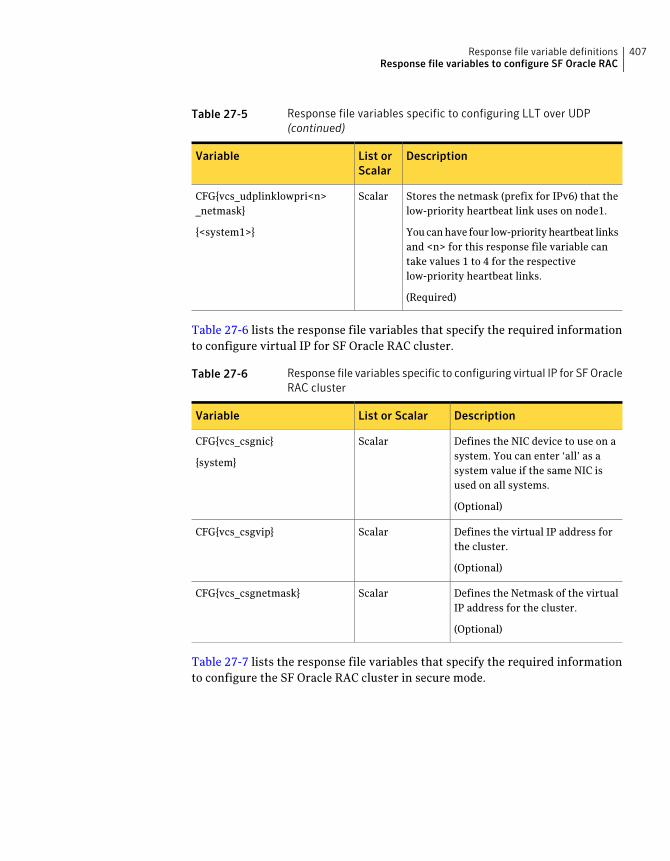
Table 27-5 Response file variables specific to configuring LLT over UDP(continued)
DescriptionList orScalar
Variable
Stores the netmask (prefix for IPv6) that thelow-priority heartbeat link uses on node1.
You can have four low-priority heartbeat linksand <n> for this response file variable cantake values 1 to 4 for the respectivelow-priority heartbeat links.
(Required)
ScalarCFG{vcs_udplinklowpri<n>_netmask}
{<system1>}
Table 27-6 lists the response file variables that specify the required informationto configure virtual IP for SF Oracle RAC cluster.
Table 27-6 Response file variables specific to configuring virtual IP for SF OracleRAC cluster
DescriptionList or ScalarVariable
Defines the NIC device to use on asystem. You can enter ‘all’ as asystem value if the same NIC isused on all systems.
(Optional)
ScalarCFG{vcs_csgnic}
{system}
Defines the virtual IP address forthe cluster.
(Optional)
ScalarCFG{vcs_csgvip}
Defines the Netmask of the virtualIP address for the cluster.
(Optional)
ScalarCFG{vcs_csgnetmask}
Table 27-7 lists the response file variables that specify the required informationto configure the SF Oracle RAC cluster in secure mode.
407Response file variable definitionsResponse file variables to configure SF Oracle RAC

Table 27-7 Response file variables specific to configuring SF Oracle RAC clusterin secure mode
DescriptionList or ScalarVariable
Defines the name of the systemwhere the root broker is installed.
(Optional)
ScalarCFG{at_rootdomain}
Defines the root broker's name.ScalarCFG{at_rootbroker}
Specifies the menu option to chooseto configure the cluster in securemode.
■ 1—Automatic
■ 2—Semi-automatic
■ 3—Manual
(Optional)
ScalarCFG{vcs_securitymenuopt}
Specifies the default port addressof the root broker.
(Optional)
ScalarCFG{vcs_vssdefport}
Specifies the path of the root hashfile.
(Optional)
ScalarCFG{vcs_roothashpath}
Specifies the authenticationbroker's principal name on system.
(Optional)
ScalarCFG{vcs_ab_prplname}
{system}
Specifies the authenticationbroker's password on system.
(Optional)
ScalarCFG{vcs_ab_password}
{system}
Specifies the path of the encryptedBLOB file for system.
(Optional)
ScalarCFG{vcs_blobpath}
{system}
Table 27-8 lists the response file variables that specify the required informationto configure VCS users.
Response file variable definitionsResponse file variables to configure SF Oracle RAC
408

Table 27-8 Response file variables specific to configuring VCS users
DescriptionList or ScalarVariable
List of encoded passwords for VCSusers.
The value in the list can be"Administrators Operators Guests."
Note: The order of the values forthe vcs_userenpw list must matchthe order of the values in thevcs_username list.
(Optional)
ListCFG{vcs_userenpw}
List of names of VCS users.
(Optional)
ListCFG{vcs_username}
List of privileges for VCS users.
Note: The order of the values forthe vcs_userpriv list must matchthe order of the values in thevcs_username list.
(Optional)
ListCFG{vcs_userpriv}
Table 27-9 lists the response file variables that specify the required informationto configure VCS notifications using SMTP.
Table 27-9 Response file variables specific to configuring VCS notificationsusing SMTP
DescriptionList or ScalarVariable
Defines the domain-basedhostname (example:smtp.symantecexample.com) of theSMTP server to be used for Webnotification.
(Optional)
ScalarCFG{vcs_smtpserver}
List of full email addresses(example:[email protected]) ofSMTP recipients.
(Optional)
ListCFG{vcs_smtprecp}
409Response file variable definitionsResponse file variables to configure SF Oracle RAC

Table 27-9 Response file variables specific to configuring VCS notificationsusing SMTP (continued)
DescriptionList or ScalarVariable
Defines the minimum severity levelof messages (Information, Warning,Error, and SevereError) that listedSMTP recipients are to receive.Note that the ordering of severitylevels must match that of theaddresses of SMTP recipients.
(Optional)
ListCFG{vcs_smtprsev}
Table 27-10 lists the response file variables that specify the required informationto configure VCS notifications using SNMP.
Table 27-10 Response file variables specific to configuring VCS notificationsusing SNMP
DescriptionList or ScalarVariable
Defines the SNMP trap daemonport (default=162).
(Optional)
ScalarCFG{vcs_snmpport}
List of SNMP console systemnames.
(Optional)
ListCFG{vcs_snmpcons}
Defines the minimum severity levelof messages (Information, Warning,Error, and SevereError) that listedSNMP consoles are to receive. Notethat the ordering of severity levelsmust match that of the SNMPconsole system names.
(Optional)
ListCFG{vcs_snmpcsev}
Table 27-11 lists the response file variables that specify the required informationto configure SF Oracle RAC global clusters.
Response file variable definitionsResponse file variables to configure SF Oracle RAC
410

Table 27-11 Response file variables specific to configuring SF Oracle RAC globalclusters
DescriptionList or ScalarVariable
Defines the NIC for the Virtual IPthat the Global Cluster Option uses.You can enter ‘all’ as a system valueif the same NIC is used on allsystems.
(Optional)
ScalarCFG{vcs_gconic}
{system}
Defines the virtual IP address tothat the Global Cluster Option uses.
(Optional)
ScalarCFG{vcs_gcovip}
Defines the Netmask of the virtualIP address that the Global ClusterOption uses.
(Optional)
ScalarCFG{vcs_gconetmask}
Response file variables to configure disk-based I/Ofencing
Table 27-12 lists the response file variables that specify the required informationto configure disk-based I/O fencing for SF Oracle RAC.
Table 27-12 Response file variables specific to configuring disk-based I/O fencing
DescriptionList or ScalarVariable
Performs the I/O fencing configuration.
(Required)
ScalarCFG{opt}{fencing}
Specifies the I/O fencing configurationmode.
■ 1—Coordination Point Server-basedI/O fencing
■ 2—Coordinator disk-based I/Ofencing
■ 3—Disabled mode
(Required)
ScalarCFG{vxfen_config_fencing_option}
411Response file variable definitionsResponse file variables to configure disk-based I/O fencing

Table 27-12 Response file variables specific to configuring disk-based I/O fencing(continued)
DescriptionList or ScalarVariable
Specifies the I/O fencing mechanism.
This variable is not required if you hadconfigured fencing in disabled mode.For disk-based fencing, you mustconfigure the vxfen_config_fencing_mechanism variable andeither the vxfen_config_fencing_dgvariable or the vxfen_config_fencing_newdg_disks variable.
(Optional)
ScalarCFG {vxfen_config_fencing_mechanism}
Specifies the disk group for I/O fencing.
(Optional)
Note: You must define thevxfen_config_fencing_dg variable touse an existing disk group. If you wantto create a new disk group, you mustuse both the vxfen_config_fencing_dgvariable and thevxfen_config_fencing_newdg_disksvariable.
ScalarCFG{vxfen_config_fencing_dg}
Specifies the disks to use to create anew disk group for I/O fencing.
(Optional)
Note: You must define thevxfen_config_fencing_dg variable touse an existing disk group. If you wantto create a new disk group, you mustuse both the vxfen_config_fencing_dgvariable and thevxfen_config_fencing_newdg_disksvariable.
ListCFG{vxfen_config_fencing_newdg_disks}
Response file variable definitionsResponse file variables to configure disk-based I/O fencing
412

Response file variables to configure server-based I/Ofencing
You can use a CP server response file to configure server-based customized I/Ofencing. The installer uses the CP server response file for the following types ofI/O fencing configurations:
■ Client cluster fencing (server-based I/O fencing configuration itself)The installer configures server-based customized I/O fencing on the SF OracleRAC cluster without prompting for user input.
■ Disk-based fencing with the disk group already createdThe installer configures fencing in disk-based mode on the SF Oracle RACcluster without prompting for user input.Disk-based fencing configuration is one in which SCSI-3 disks are used as theonly coordination points.Disk-based fencing with the disk group already created means that the diskgroup consisting of the coordinating disks already exists on the SF Oracle RACcluster nodes.
■ Disk-based fencing with the disk group to be createdThe installer creates the disk group and configures fencing properly on all thenodes in the SF Oracle RAC cluster without user intervention.Disk-based fencing with the disk group to be created means that the disk groupdoes not exist yet, but will be created with the disks mentioned as coordinationpoint.
Table 27-13 lists the fields in the response file that are relevant for server-basedcustomized I/O fencing.
Table 27-13 CP server response file definitions
DefinitionResponse file field
Enter '1' or '0' depending upon whether you want toconfigure the Coordination Point agent using theinstaller or not.
Enter "0" if you do not want to configure theCoordination Point agent using the installer.
Enter "1" if you want to use the installer to configurethe Coordination Point agent.
fencing_cpc_config_cpagent
413Response file variable definitionsResponse file variables to configure server-based I/O fencing
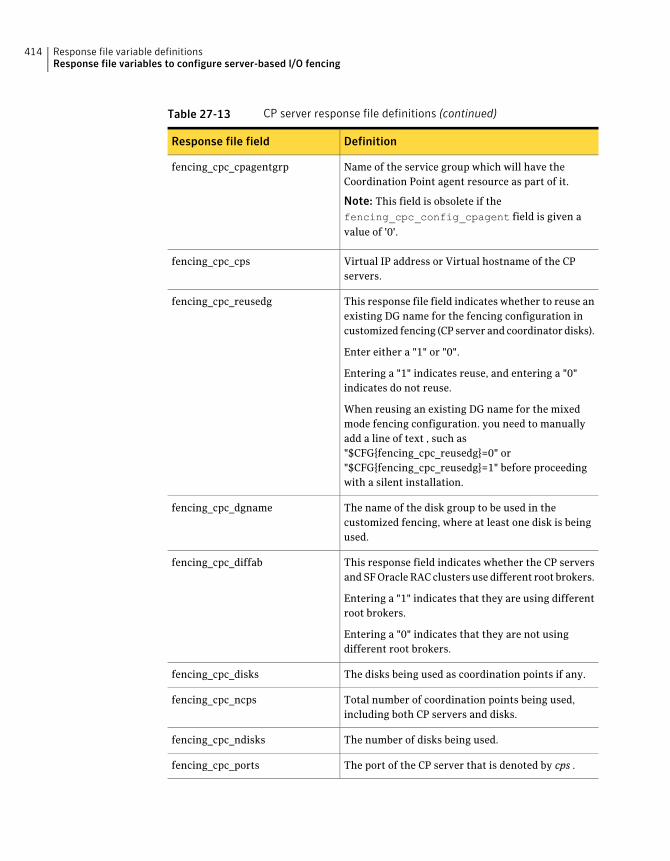
Table 27-13 CP server response file definitions (continued)
DefinitionResponse file field
Name of the service group which will have theCoordination Point agent resource as part of it.
Note: This field is obsolete if thefencing_cpc_config_cpagent field is given avalue of '0'.
fencing_cpc_cpagentgrp
Virtual IP address or Virtual hostname of the CPservers.
fencing_cpc_cps
This response file field indicates whether to reuse anexisting DG name for the fencing configuration incustomized fencing (CP server and coordinator disks).
Enter either a "1" or "0".
Entering a "1" indicates reuse, and entering a "0"indicates do not reuse.
When reusing an existing DG name for the mixedmode fencing configuration. you need to manuallyadd a line of text , such as"$CFG{fencing_cpc_reusedg}=0" or"$CFG{fencing_cpc_reusedg}=1" before proceedingwith a silent installation.
fencing_cpc_reusedg
The name of the disk group to be used in thecustomized fencing, where at least one disk is beingused.
fencing_cpc_dgname
This response field indicates whether the CP serversand SF Oracle RAC clusters use different root brokers.
Entering a "1" indicates that they are using differentroot brokers.
Entering a "0" indicates that they are not usingdifferent root brokers.
fencing_cpc_diffab
The disks being used as coordination points if any.fencing_cpc_disks
Total number of coordination points being used,including both CP servers and disks.
fencing_cpc_ncps
The number of disks being used.fencing_cpc_ndisks
The port of the CP server that is denoted by cps .fencing_cpc_ports
Response file variable definitionsResponse file variables to configure server-based I/O fencing
414
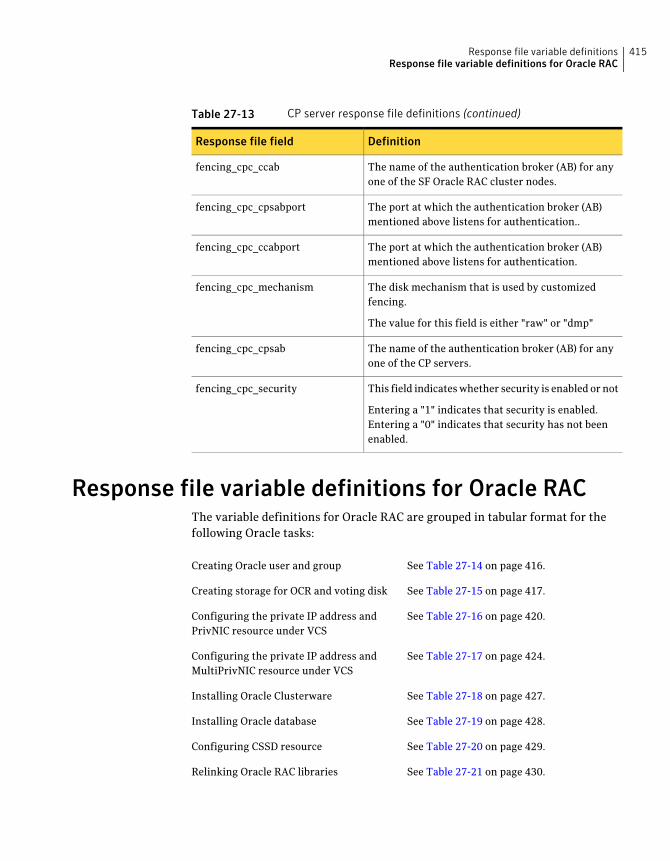
Table 27-13 CP server response file definitions (continued)
DefinitionResponse file field
The name of the authentication broker (AB) for anyone of the SF Oracle RAC cluster nodes.
fencing_cpc_ccab
The port at which the authentication broker (AB)mentioned above listens for authentication..
fencing_cpc_cpsabport
The port at which the authentication broker (AB)mentioned above listens for authentication.
fencing_cpc_ccabport
The disk mechanism that is used by customizedfencing.
The value for this field is either "raw" or "dmp"
fencing_cpc_mechanism
The name of the authentication broker (AB) for anyone of the CP servers.
fencing_cpc_cpsab
This field indicates whether security is enabled or not
Entering a "1" indicates that security is enabled.Entering a "0" indicates that security has not beenenabled.
fencing_cpc_security
Response file variable definitions for Oracle RACThe variable definitions for Oracle RAC are grouped in tabular format for thefollowing Oracle tasks:
See Table 27-14 on page 416.Creating Oracle user and group
See Table 27-15 on page 417.Creating storage for OCR and voting disk
See Table 27-16 on page 420.Configuring the private IP address andPrivNIC resource under VCS
See Table 27-17 on page 424.Configuring the private IP address andMultiPrivNIC resource under VCS
See Table 27-18 on page 427.Installing Oracle Clusterware
See Table 27-19 on page 428.Installing Oracle database
See Table 27-20 on page 429.Configuring CSSD resource
See Table 27-21 on page 430.Relinking Oracle RAC libraries
415Response file variable definitionsResponse file variable definitions for Oracle RAC

Note: Some of the variable definitions may occur in multiple sections, for example$CFG{oracle_user}. These variables need not be repeated if all the tasks areperformed as a single installation activity. However, if you perform these tasksindependently, make sure that all the required variables, as indicated in the tablefor each task, are supplied in the response file.
Table 27-14 lists the variables that are used to create the Oracle user and group.
Table 27-14 Variables for creating Oracle user and group
DescriptionListorScalar
Variable
Required
Defines a Boolean value 0 or 1.
The value 1 indicates that Oracle user andgroup will be created.
The value 0 indicates that Oracle user andgroup will not be created.
Scalar$CFG{create_oracle_user_group}
Required
Defines the name of the grid user.
Scalar$CFG{grid_user}
Required
Defines the name of the Oracle user.
Scalar$CFG{oracle_user}
Required
Defines the user ID of the Oracle user.
Scalar$CFG{oracle_uid}
Required
Defines the primary group of the Oracleuser.
Scalar$CFG{oracle_group}
Required
Defines the group ID of the Oracle user.
Scalar$CFG{oracle_gid}
Required
Defines the full path of the Oracle user'shome directory.
Scalar$CFG{oracle_user_home}
Response file variable definitionsResponse file variable definitions for Oracle RAC
416

Table 27-14 Variables for creating Oracle user and group (continued)
DescriptionListorScalar
Variable
Optional
Defines the list of secondary groups for theOracle user.
List$CFG{oracle_secondary_group}
Optional
Defines the list of secondary group IDs forthe Oracle user. The elements of thisvariable must be in the same order as thatof the elements in the variable$CFG{oracle_secondary_group}.
List$CFG{oracle_secondary_gid}
Table 27-15 lists the variables that are used to create the storage for OCR andvoting disk.
Table 27-15 Variables for creating storage for OCR and voting disk
DescriptionListorScalar
Variable
Required
Defines a Boolean value 0 or 1.
The value 1 indicates that the storage forOCR and voting disk will be created.
The value 0 indicates that the storage forOCR and voting disk will not be created.
Scalar$CFG{create_ocr_vote_storage}
417Response file variable definitionsResponse file variable definitions for Oracle RAC

Table 27-15 Variables for creating storage for OCR and voting disk (continued)
DescriptionListorScalar
Variable
Required
Defines a Boolean value 0 or 1.
The value 1 indicates that an existing diskgroup will be used to create the storage forOCR and voting disk.
Note: If you choose to use an existing diskgroup, use the $CFG{ocrvotedgname}variable to specify the name of an existingdisk group that has a minimum of two disks(for mirroring).
The value 0 indicates that a new disk groupwill be created for OCR and voting diskstorage.
Note: If you choose to create a disk group,you must set the following variables:$CFG{ocrvotedisks},$CFG{ocrvotedgname}
Scalar$CFG{ocrvotedgoption}
Required
Defines the storage scheme to be used forOCR and voting disk.
The value 1 indicates Clustered File System.
The value 0 indicates CVM raw volumes.
Scalar$CFG{ocrvotescheme}
Required
Defines the list of shared disks to be usedfor OCR and voting disk.
List$CFG{ocrvotedisks}
Required
Defines the name of the disk group to beused for OCR and voting disk.
Scalar$CFG{ocrvotedgname}
Response file variable definitionsResponse file variable definitions for Oracle RAC
418

Table 27-15 Variables for creating storage for OCR and voting disk (continued)
DescriptionListorScalar
Variable
Required
Defines the volume name for OCR andvoting disk. This variable must be used onlyif you have set the storage scheme to 1(Clustered File System).
Scalar$CFG{ocrvotevolname}
Required
Defines the size of the OCR and voting diskvolume. This variable must be used only ifyou have set the storage scheme to 1(Clustered File System).
Scalar$CFG{ocrvotevolsize}
Required
Defines the full path to the CFS mount point.This variable must be used only if you haveset the storage scheme to 1 (Clustered FileSystem).
Scalar$CFG{ocrvotemount}
Required
Defines the volume name for OCR. Thisvariable must be used only if you have setthe storage scheme to 0 (CVM RawVolumes).
Scalar$CFG{ocrvolname}
Required
Defines the size of the OCR volume. Thisvariable must be used only if you have setthe storage scheme to 0 (CVM RawVolumes).
Scalar$CFG{ocrvolsize}
Required
Defines the volume name for voting disk.This variable must be used only if you haveset the storage scheme to 0 (CVM RawVolumes).
Scalar$CFG{votevolname}
419Response file variable definitionsResponse file variable definitions for Oracle RAC

Table 27-15 Variables for creating storage for OCR and voting disk (continued)
DescriptionListorScalar
Variable
Required
Defines the size of the voting disk volume.This variable must be used only if you haveset the storage scheme to 0 (CVM RawVolumes).
Scalar$CFG{votevolsize}
Required
Defines the name of the Oracle user.
Scalar$CFG{oracle_user}
Required
Defines the primary group of the Oracleuser.
Scalar$CFG{oracle_group}
Table 27-16 lists the variables that are used to configure the private IP addressand PrivNIC resource under VCS.
Table 27-16 Variables for configuring the private IP address and PrivNIC resourceunder VCS
DescriptionListorScalar
Variable
Required
Defines a Boolean value 0 or 1.
The value 1 indicates that the PrivNIC andprivate IP address information will beconfigured for Oracle Clusterware.
The value 0 indicates that the PrivNIC andprivate IP address information will not beconfigured for Oracle Clusterware.
Scalar$CFG{config_privnic}
Required
Defines the PrivNIC resource name in themain.cf file.
Scalar$CFG{privnic_resname}
Response file variable definitionsResponse file variable definitions for Oracle RAC
420

Table 27-16 Variables for configuring the private IP address and PrivNIC resourceunder VCS (continued)
DescriptionListorScalar
Variable
Required
Defines the priority that determines whichNIC will be used in the event of a failover.Set the priority in decreasing order.
For example, the following priority settingindicates that en2 will be given priority inthe event of a failover:
$CFG{privnic_interface_priority}="en2en3";
String$CFG{privnic_interface_priority}
Required
Defines the IP address to be configured forthe PrivNIC resource on the node.
Repeat this variable for each node in thecluster. For example, if you have two nodesin the cluster, you must provide this variablefor each node.
For example:
$CFG{galaxy}{privnicip}="192.168.12.1"
$CFG{nebula}{privnicip}="192.168.12.2"
Scalar$CFG{host1}{privnicip}
Required
Defines a Boolean value 0 or 1.
The value 1 indicates that the existing IPaddresses in the /etc/hosts or/etc/inet/ipnodes files will be used.
The value 0 indicates that the IP addresseswill not be reused.
Scalar$CFG{nic_reuseip}
421Response file variable definitionsResponse file variable definitions for Oracle RAC

Table 27-16 Variables for configuring the private IP address and PrivNIC resourceunder VCS (continued)
DescriptionListorScalar
Variable
Required
Defines the private node name of the IPaddress (hostname_for_ip) for the PrivNICresource and the node (system) for whichthe resource is configured.
Repeat this variable for each node in thecluster. For example, if you have two nodesin the cluster, you must provide this variablefor each node.
For example:
$CFG{galaxy}{hostname_for_ip}="galaxy-priv"
$CFG{nebula}{hostname_for_ip}="galaxy-priv"
Scalar$CFG{host}{hostname_for_ip}
Required
Defines the netmask for the private network.
Scalar$CFG{nic_netmask}
Required
Defines a Boolean value 0 or 1.
The value 1 indicates that the IP addressesare added to the /etc/hosts file.
Note: Make sure that the IP addresses forthe NIC resource are not already present inthe files or set the $CFG{nic_reuseip} and$CFG{nic_reusealias} variables, otherwisethe network configuration step fails.
The value 0 indicates that the IP addressesmay already be present in the file.
Scalar$CFG{nic_add_ip_to_files}
Response file variable definitionsResponse file variable definitions for Oracle RAC
422

Table 27-16 Variables for configuring the private IP address and PrivNIC resourceunder VCS (continued)
DescriptionListorScalar
Variable
Optional
Defines a Boolean value 0 or 1.
The value 1 indicates that the existingPrivNIC resource in the main.cf file willbe deleted and reconfigured.
The value 0 indicates that the existingPrivNIC resource in the main.cf file willbe reused.
Scalar$CFG{nic_reconfigure_existing_resource}
Required
Defines a Boolean value 0 or 1.
The value 1 indicates that the installer willnot check the/etc/hosts file to determinewhether the host name alias for the privateIP addresses exist or not. The installerassumes that the host names aliasinformation is present in the file. Make surethat the alias information is present in thefile.
The value 0 indicates that the installerchecks whether the host name aliasinformation is present in the /etc/hostsfile. Make sure that the alias information ispresent in the file otherwise the installationfails.
Scalar$CFG{nic_reusealias}
Table 27-17 lists the variables that are used to configure the private IP addressesand the MultiPrivNIC resource under VCS.
423Response file variable definitionsResponse file variable definitions for Oracle RAC

Table 27-17 Variables for configuring the private IP addresses and theMultiPrivNIC resource under VCS
DescriptionListorScalar
Variable
Required
Defines a Boolean value 0 or 1.
The value 1 indicates that the MultiPrivNICand private IP address information will beconfigured for Oracle Clusterware.
The value 0 indicates that the MultiPrivNICand private IP address information will notbe configured for Oracle Clusterware.
Scalar$CFG{config_multiprivnic}
Required
Defines the MultiPrivNIC resource name inthe main.cf file.
Scalar$CFG{multiprivnic_resname}
Required
Defines a Boolean value 0 or 1.
The value 1 indicates that the IP addressesare added to the /etc/hosts file.
Note: Make sure that the IP addresses forthe NIC resource are not already present inthe files or set the $CFG{nic_reuseip} and$CFG{nic_reusealias} variables, otherwisethe network configuration step fails.
The value 0 indicates that the IP addressesmay already be present in the file.
Scalar$CFG{nic_add_ip_to_files}
Response file variable definitionsResponse file variable definitions for Oracle RAC
424

Table 27-17 Variables for configuring the private IP addresses and theMultiPrivNIC resource under VCS (continued)
DescriptionListorScalar
Variable
Required
Defines the list of IP addresses for theMultiPrivNIC resource.
Note: The private IP addresses must beconfigured for each node and each interfacein the cluster.
For example, if you have two nodes galaxyand nebula in the cluster:
$CFG{galaxy}{en1}{multiprivnicip}="192.168.12.1";$CFG{galaxy}{en2}{multiprivnicip}=="192.168.2.1";$CFG{nebula}{en1}{multiprivnicip}="192.168.12.2";$CFG{nebula}{en2}{multiprivnicip}="192.168.2.2";
List$CFG{host1}->{NIC1}->{multiprivnicip}
Required
Defines the list of private node names(hostname_for_ip) for the IP addressesconfigured in the MultiPrivNIC resource forthe interface (inf) on the node (system) .
Note: The private IP address must beconfigured for each node and each interfacein the cluster.
For example, if you have two nodes galaxyand nebula in the cluster:
$CFG{galaxy}{en1}{hostname_for_ip}="galaxy-priv";$CFG{galaxy}{en2}{hostname_for_ip}="galaxy-priv1";$CFG{nebula}{en1}{hostname_for_ip}="nebula-priv";$CFG{nebula}{en2}{hostname_for_ip}="nebula-priv1";
List$CFG{host1}->{NIC1}->{hostname_for_ip}
425Response file variable definitionsResponse file variable definitions for Oracle RAC
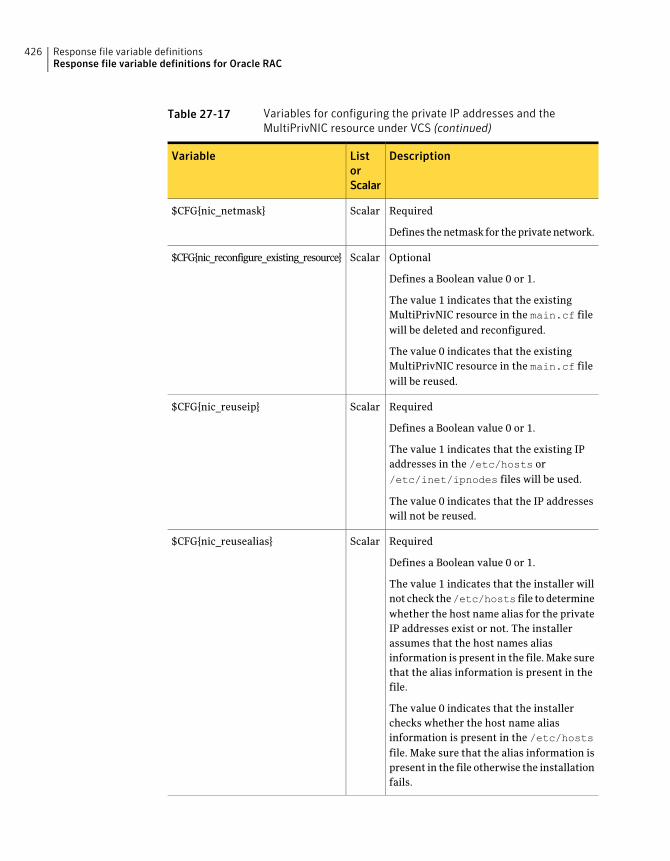
Table 27-17 Variables for configuring the private IP addresses and theMultiPrivNIC resource under VCS (continued)
DescriptionListorScalar
Variable
Required
Defines the netmask for the private network.
Scalar$CFG{nic_netmask}
Optional
Defines a Boolean value 0 or 1.
The value 1 indicates that the existingMultiPrivNIC resource in the main.cf filewill be deleted and reconfigured.
The value 0 indicates that the existingMultiPrivNIC resource in the main.cf filewill be reused.
Scalar$CFG{nic_reconfigure_existing_resource}
Required
Defines a Boolean value 0 or 1.
The value 1 indicates that the existing IPaddresses in the /etc/hosts or/etc/inet/ipnodes files will be used.
The value 0 indicates that the IP addresseswill not be reused.
Scalar$CFG{nic_reuseip}
Required
Defines a Boolean value 0 or 1.
The value 1 indicates that the installer willnot check the/etc/hosts file to determinewhether the host name alias for the privateIP addresses exist or not. The installerassumes that the host names aliasinformation is present in the file. Make surethat the alias information is present in thefile.
The value 0 indicates that the installerchecks whether the host name aliasinformation is present in the /etc/hostsfile. Make sure that the alias information ispresent in the file otherwise the installationfails.
Scalar$CFG{nic_reusealias}
Response file variable definitionsResponse file variable definitions for Oracle RAC
426

Table 27-18 lists the variables that are used to install Oracle Clusterware.
Table 27-18 Variables for installing Oracle Clusterware
DescriptionListorScalar
Variable
Required
Defines a Boolean value 0 or 1.
The value 1 indicates that OracleClusterware will be configured.
The value 0 indicates that OracleClusterware will not be configured.
Scalar$CFG{install_oracle_clusterware}
Required
Defines the name of the Oracle user.
Scalar$CFG{oracle_user}
Required
Defines the primary group of the Oracleuser.
Scalar$CFG{oracle_group}
Required
Defines the base directory for the OracleRAC installation.
Scalar$CFG{oracle_base}
Required
Defines the Oracle Clusterware homedirectory.
The value in this variable must be the sameas that of the 'ORACLE_HOME' variable inthe Oracle Clusterware response file.
Scalar$CFG{crs_home}
Required
Defines the full path of the OracleClusterware installation binaries.
Scalar$CFG{crs_installpath}
Required
Defines the version of the Oracle RACbinaries (for example, 11.2.0.1.0). Thisdefinition is overridden if a different OracleRAC version is detected during theinstallation.
Scalar$CFG{oracle_version}
427Response file variable definitionsResponse file variable definitions for Oracle RAC

Table 27-18 Variables for installing Oracle Clusterware (continued)
DescriptionListorScalar
Variable
Required
Defines the full path of the OracleClusterware response file.
Scalar$CFG{crs_responsefile}
Table 27-19 lists the variables that are used to install Oracle database.
Table 27-19 Variables for installing Oracle database
DescriptionListorScalar
Variable
Required
Defines a Boolean value 0 or 1.
The value 1 indicates that the Oracle RACdatabase will be configured.
The value 0 indicates that the Oracle RACdatabase will not be configured.
Scalar$CFG{install_oracle_database}
Required
Defines the name of the Oracle user.
Scalar$CFG{oracle_user}
Required
Defines the primary group of the Oracleuser.
Scalar$CFG{oracle_group}
Required
Defines the base directory for the OracleRAC installation.
Scalar$CFG{oracle_base}
Required
Defines the Oracle Clusterware homedirectory.
The value in this variable must be the sameas that of the 'ORACLE_HOME' variable inthe Oracle Clusterware response file.
Scalar$CFG{crs_home}
Response file variable definitionsResponse file variable definitions for Oracle RAC
428

Table 27-19 Variables for installing Oracle database (continued)
DescriptionListorScalar
Variable
Required
Defines the Oracle RAC database homedirectory.
The value in this variable must be the sameas that of the 'ORACLE_HOME' variable inthe Oracle RAC database response file.
Scalar$CFG{db_home}
Required
Defines the full path of the Oracle RACdatabase installation binaries.
Scalar$CFG{db_installpath}
Required
Defines the version of the Oracle RACbinaries (for example, 11.2.0.1.0). Thisdefinition is overridden if a different OracleRAC version is detected during theinstallation.
Scalar$CFG{oracle_version}
Required
Defines the full path of the Oracle databaseresponse file.
Scalar$CFG{db_responsefile}
Table 27-20 lists the variables that are used to configure CSSD resource.
Table 27-20 Variables for configuring CSSD resource
DescriptionListorScalar
Variable
Required
Defines a Boolean value 0 or 1.
The value 1 indicates that the CSSD agentwill be configured after Oracle RACinstallation.
The value 0 indicates that the CSSD agentwill not be configured after Oracle RACinstallation.
Scalar$CFG{config_cssd_agent}
429Response file variable definitionsResponse file variable definitions for Oracle RAC
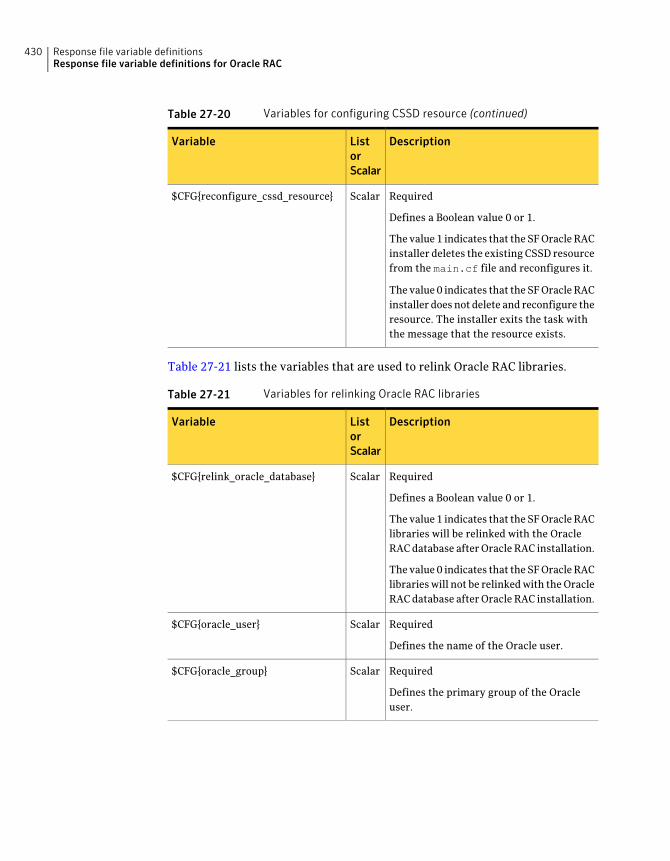
Table 27-20 Variables for configuring CSSD resource (continued)
DescriptionListorScalar
Variable
Required
Defines a Boolean value 0 or 1.
The value 1 indicates that the SF Oracle RACinstaller deletes the existing CSSD resourcefrom the main.cf file and reconfigures it.
The value 0 indicates that the SF Oracle RACinstaller does not delete and reconfigure theresource. The installer exits the task withthe message that the resource exists.
Scalar$CFG{reconfigure_cssd_resource}
Table 27-21 lists the variables that are used to relink Oracle RAC libraries.
Table 27-21 Variables for relinking Oracle RAC libraries
DescriptionListorScalar
Variable
Required
Defines a Boolean value 0 or 1.
The value 1 indicates that the SF Oracle RAClibraries will be relinked with the OracleRAC database after Oracle RAC installation.
The value 0 indicates that the SF Oracle RAClibraries will not be relinked with the OracleRAC database after Oracle RAC installation.
Scalar$CFG{relink_oracle_database}
Required
Defines the name of the Oracle user.
Scalar$CFG{oracle_user}
Required
Defines the primary group of the Oracleuser.
Scalar$CFG{oracle_group}
Response file variable definitionsResponse file variable definitions for Oracle RAC
430

Table 27-21 Variables for relinking Oracle RAC libraries (continued)
DescriptionListorScalar
Variable
Required
Defines the Oracle Clusterware homedirectory.
The value in this variable must be the sameas that of the 'ORACLE_HOME' variable inthe Oracle Clusterware response file.
Scalar$CFG{crs_home}
Required
Defines the Oracle RAC database homedirectory.
The value in this variable must be the sameas that of the 'ORACLE_HOME' variable inthe Oracle RAC database response file.
Scalar$CFG{db_home}
Required
Defines the version of the Oracle RACbinaries (for example, 11.2.0.1.0). Thisdefinition is overridden if a different OracleRAC version is detected during theinstallation.
Scalar$CFG{oracle_version}
431Response file variable definitionsResponse file variable definitions for Oracle RAC

Response file variable definitionsResponse file variable definitions for Oracle RAC
432

Adding or removing nodesfrom an SF Oracle RACcluster
■ Chapter 28. Adding a node to SF Oracle RAC clusters
■ Chapter 29. Removing a node from SF Oracle RAC clusters
6Section

434

Adding a node to SF OracleRAC clusters
This chapter includes the following topics:
■ About adding a node to a cluster
■ Before adding a node to a cluster
■ Preparing to add a node to a cluster
■ Adding a node to a cluster
■ Preparing the new node for installing Oracle RAC
■ Adding the new node to Oracle RAC
■ Updating the Storage Foundation for Databases (SFDB) repository after addinga node
■ Sample configuration file for adding a node to the cluster
About adding a node to a clusterAfter you install SF Oracle RAC and create a cluster, you can add and removenodes from the cluster.You can create clusters of up to 16 nodes.
You can add a node:
■ Using the product installer
■ Using the Web installer
■ Manually
28Chapter
The example procedures describe how to add a node to an existing cluster withtwo nodes.
Before adding a node to a clusterBefore preparing to add the node to an existing SF Oracle RAC cluster, verify thefollowing:
■ Hardware and software requirements are met.See “Meeting hardware and software requirements” on page 436.
■ Hardware is set up for the new node.See “Setting up the hardware” on page 436.
■ The existing cluster is an SF Oracle RAC cluster and that SF Oracle RAC isrunning on the cluster.
■ The new system has the same identical operating system versions and patchlevels as that of the existing cluster.
Meeting hardware and software requirementsThe system you add to the cluster must meet the hardware and softwarerequirements.
Setting up the hardwareFigure 28-1 shows that before you configure a new system on an existing cluster,you must physically add the system to the cluster.
Adding a node to SF Oracle RAC clustersBefore adding a node to a cluster
436

Figure 28-1 Adding a node to a two-node cluster using two switches
Public network
Privatenetwork
New node:saturn
To set up the hardware
1 Connect the SF Oracle RAC private Ethernet controllers.
Perform the following tasks as necessary:
■ When you add nodes to a cluster, use independent switches or hubs forthe private network connections. You can only use crossover cables for acluster, so you might have to swap out the cable for a switch or hub.
■ If you already use independent hubs, connect the two Ethernet controllerson the new node to the independent hubs.
Figure 28-1 illustrates a new node being added to an existing two-node clusterusing two independent hubs.
2 Make sure that you meet the following requirements:
■ The node must be connected to the same shared storage devices as theexisting nodes.
■ The node must have private network connections to two independentswitches for the cluster.For more information, see the Veritas Cluster Server Installation Guide.
437Adding a node to SF Oracle RAC clustersBefore adding a node to a cluster
■ The network interface names used for the private interconnects on thenew node must be the same as that of the existing nodes in the cluster.
Preparing to add a node to a clusterComplete the following preparatory steps on the new node before you add thenode to an existing SF Oracle RAC cluster.
To prepare the new node
1 Verify that the new node meets installation requirements.
# ./installsfrac -precheck saturn
2 Install SF Oracle RAC on the new system.
Note: Use the -install option to install SF Oracle RAC. Do not configure SFOracle RAC after the installation.
Would you like to configure SF Oracle RAC on saturn [y, n, q] (n)
You can configure the new node later using the configuration from the existingcluster nodes.
See “About installing SF Oracle RAC ” on page 85.
Adding a node to a clusterYou can use one of the following methods to add a node to an existing SF OracleRAC cluster:
See “Adding a node to a cluster using the SF Oracle RACinstaller” on page 438.
SF Oracle RAC installer
See “Adding the node to a cluster manually” on page 442.Manual
Note: Before you add the node, make sure that SF Oracle RAC is not configuredon the node.
Adding a node to a cluster using the SF Oracle RAC installerYou can add a node using the –addnode option with the SF Oracle RAC installer.
The SF Oracle RAC installer performs the following tasks:
Adding a node to SF Oracle RAC clustersPreparing to add a node to a cluster
438

■ Verifies that the node and the existing cluster meet communicationrequirements.
■ Verifies the products and packages installed on the new node.
■ Discovers the network interfaces on the new node and checks the interfacesettings.
■ Creates the following files on the new node:/etc/llttab
/etc/VRTSvcs/conf/sysname
■ Updates the following configuration files and copies them on the new node:/etc/llthosts
/etc/gabtab
/etc/VRTSvcs/conf/config/main.cf
■ Copies the following files from the existing cluster to the new node:/etc/vxfenmode
/etc/vxfendg
/etc/vcsmmtab
/etc/vx/.uuids/clusuuid
/etc/default/llt
/etc/default/gab
/etc/default/vxfen
■ Configures security on the new node if the existing cluster is a secure cluster.
Warning: If the root broker system has failed, then you must recover orreconfigure the root broker system before you add a new node to the cluster.
■ Configures disk-based or server-based fencing depending on the fencing modein use on the existing cluster.
■ Adds the new node to the CVM, ClusterService, and VxSS service groups inthe VCS configuration.
Note:For other service groups configured under VCS, update the configurationfor the new node manually.
■ Starts SF Oracle RAC processes and configures CVM and CFS on the new node.
At the end of the process, the new node joins the SF Oracle RAC cluster.
439Adding a node to SF Oracle RAC clustersAdding a node to a cluster

Note: If you have configured server-based fencing on the existing cluster, makesure that the CP server does not contain entries for the new node. If the CP serveralready contains entries for the new node, remove these entries before adding thenode to the cluster, otherwise the process may fail with an error.
Caution: If you plan to use the SF Oracle RAC installer for completing the Oraclepre-installation tasks on the new node, do not quit the installer after adding thenode to the cluster. If you quit the installer, you must perform the Oraclepre-installation tasks manually.
To add the node to an existing cluster using the installer
1 Log in as the root user on one of the nodes of the existing cluster.
2 Run the SF Oracle RAC installer with the -addnode option.
# cd /opt/VRTS/install
# ./installsfrac -addnode
The installer displays the copyright message and the location where it storesthe temporary installation logs.
3 Enter the name of a node in the existing SF Oracle RAC cluster. The installeruses the node information to identify the existing cluster.
Enter one node of the SF Oracle RAC cluster to which
you would like to add one or more nodes: galaxy
4 Review and confirm the cluster information.
5 Enter the name of the systems that you want to add as new nodes to thecluster.
Enter the system names separated by spaces
to add to the cluster: saturn
The installer checks the installed products and packages on the nodes anddiscovers the network interfaces.
Adding a node to SF Oracle RAC clustersAdding a node to a cluster
440

6 Enter the name of the network interface that you want to configure as thefirst private heartbeat link.
Note:The network interface names used for the private interconnects on thenew node must be the same as that of the existing nodes in the cluster. TheLLT configuration for the new node must be the same as that of the existingcluster.
Enter the NIC for the first private heartbeat
link on saturn: [b,q,?] en1
7 Enter y to configure a second private heartbeat link.
Note: At least two private heartbeat links must be configured for highavailability of the cluster.
Would you like to configure a second private
heartbeat link? [y,n,q,b,?] (y)
8 Enter the name of the network interface that you want to configure as thesecond private heartbeat link.
Enter the NIC for the second private heartbeat link
on saturn: [b,q,?] en2
9 Depending on the number of LLT links configured in the existing cluster,configure additional private heartbeat links for the new node.
The installer verifies the network interface settings and displays theinformation.
10 Review and confirm the information.
11 If you have configured SMTP, SNMP, or the global cluster option in theexisting cluster, you are prompted for the NIC information for the new node.
Enter the NIC for VCS to use on saturn: en3
441Adding a node to SF Oracle RAC clustersAdding a node to a cluster

12 If the existing cluster uses server-based fencing in secure mode, provideresponses to the following installer prompts.
If you are using different root brokers for the CP server and the client SFOracle RAC cluster, enter y to confirm the use of different root brokers. Theinstaller attempts to establish trust between the new node being added to thecluster and the authentication broker of the CP server.
Are you using different Root Brokers for the CP Server(s) and the
client cluster? (If so then installer will try to establish trust
between the new node(s) being added and CP Server's
Authentication Broker) [y,n,q] (n) y
Enter the host name of the authentication broker used for any one of the CPservers.
Enter hostname of the Authentication Broker being used for any one
of the CP Server(s): [b] mycps1.symantecexample.com
Enter the port number where the authentication broker for the CP serverlistens to establish trust with the new node:
Enter the port where the Authentication Broker
mycps1.symantecexample.com for the CP Server(s) is listening
for establishing trust: [b] (2821)
The installer then starts all the required Veritas processes and joins the newnode to cluster.
Note: Do not quit the installer if you want to perform the Oraclepre-installation tasks using the SF Oracle RAC installer.
13 Confirm using lltstat -n and gabconfig -a.
Adding the node to a cluster manuallyPerform this procedure after you install SF Oracle RAC only if you plan to add thenode to the cluster manually.
Adding a node to SF Oracle RAC clustersAdding a node to a cluster
442

To add the node manually to the cluster
1 Start the Volume Manager.
See “Starting Volume Manager on the new node” on page 443.
2 Configure LLT, GAB, and VCSMM.
See “Configuring LLT, GAB, and VCSMM on the new node” on page 444.
3 If the existing cluster is a secure cluster, set up the new node to run in securemode.
See “Setting up the node to run in secure mode” on page 446.
4 If the existing cluster is configured to use server-based I/O fencing, configureserver-based I/O fencing on the new node.
See “Starting fencing on the new node” on page 451.
5 Start VCS.
See “To start VCS on the new node” on page 452.
6 Configure CVM and CFS.
See “Configuring CVM and CFS on the new node” on page 452.
7 If the ClusterService group is configured on the existing cluster, add the nodeto the group.
See “Configuring the ClusterService group for the new node” on page 454.
Starting Volume Manager on the new nodeVolume Manager uses license keys to control access. As you run the vxinstall
utility, answer n to prompts about licensing. You installed the appropriate licensewhen you ran the installsfrac program.
To start Volume Manager on the new node
1 To start Veritas Volume Manager on the new node, use the vxinstall utility:
# vxinstall
2 Enter n when prompted to set up a system wide disk group for the system.
The installation completes.
3 Verify that the daemons are up and running. Enter the command:
# vxdisk list
Make sure the output displays the shared disks without errors.
443Adding a node to SF Oracle RAC clustersAdding a node to a cluster
Configuring LLT, GAB, and VCSMM on the new nodePerform the steps in the following procedure to configure LLT, GAB, and VCSMMon the new node.
To configure LLT, GAB, and VCSMM on the new node
1 Edit the /etc/llthosts file on the existing nodes. Using vi or another texteditor, add the line for the new node to the file. The file resembles:
0 galaxy
1 nebula
2 saturn
2 Copy the /etc/llthosts file from one of the existing systems over to thenew system. The /etc/llthosts file must be identical on all nodes in thecluster.
3 Create an /etc/llttab file on the new system. For example:
set-node saturn
set-cluster 101
link en1 /dev/dlpi/en:1 - ether - -
link en2 /dev/dlpi/en:2 - ether - -
Except for the first line that refers to the node, the file resembles the/etc/llttab files on the existing nodes. The second line, the cluster ID, mustbe the same as in the existing nodes.
4 Use vi or another text editor to create the file /etc/gabtab on the new node.This file must contain a line that resembles the following example:
/sbin/gabconfig -c -nN
Where N represents the number of systems in the cluster. For a three-systemcluster, N would equal 3.
5 Edit the /etc/gabtab file on each of the existing systems, changing thecontent to match the file on the new system.
6 Copy the following files from one of the nodes in the existing cluster to thenew node:
/etc/default/llt
/etc/default/gab
/etc/default/vcs
/etc/vcsmmtab
Adding a node to SF Oracle RAC clustersAdding a node to a cluster
444

7 Use vi or another text editor to create the file /etc/VRTSvcs/conf/sysname
on the new node. This file must contain the name of the new node added tothe cluster.
For example:
saturn
8 Create the Unique Universal Identifier file /etc/vx/.uuids/clusuuid on thenew node:
# uuidconfig.pl -rsh -clus -copy \
-from_sys galaxy -to_sys saturn
9 Start the LLT, GAB, VCSMM, LMX, and ODM drivers on the new node:
# /etc/init.d/llt.rc start
# /etc/init.d/gab.rc start
# /etc/init.d/vcsmm.rc start
# /etc/init.d/lmx.rc start
# /etc/methods/gmskextadm load
# /etc/rc.d/rc2.d/S99odm start
10 On the new node, verify that the GAB port memberships are a, d, and o:
# gabconfig -a
GAB Port Memberships
===============================================================
Port a gen df204 membership 012
Port d gen df20a membership 012
Port o gen df207 membership 012
Port h may also be present.In that case, run:
# hastop -local
445Adding a node to SF Oracle RAC clustersAdding a node to a cluster

Setting up the node to run in secure modeYou must follow this procedure only if you are adding a node to a cluster that isrunning in secure mode. If you are adding a node to a cluster that is not runningin a secure mode, proceed with configuring LLT and GAB.
Table 28-1 uses the following information for the following command examples.
Table 28-1 The command examples definitions
FunctionFully-qualified host name(FQHN)
Name
The new node that you areadding to the cluster.
saturn.nodes.example.comsaturn
The root broker for thecluster
RB1.brokers.example.comRB1
Another root broker, not thecluster's RB
RB2.brokers.example.comRB2
To verify the existing security setup on the node
1 If node saturn is configured as an authentication broker (AB) belonging to aroot broker, perform the following steps. Else, proceed to configuring theauthentication broker on node saturn.
2 Find out the root broker to which the node saturn belongs using the followingcommand.
# vssregctl -l -q -b \
"Security\Authentication\Authentication Broker" \
-k "BrokerName"
3 If the node saturn already belongs to root broker RB1, it is configured as partof the cluster. Proceed to setting up VCS related security configuration.
4 If the node saturn belongs to a different root broker (for example RB2),perform the following steps to remove the security credentials from nodesaturn.
■ Kill /opt/VRTSat/bin/vxatd process.
■ Remove the credential that RB2 has given to AB on node saturn.
# vssat deletecred --domain type:domainname \
--prplname prplname
Adding a node to SF Oracle RAC clustersAdding a node to a cluster
446

For example:
# vssat deletecred --domain vx:[email protected] \
--prplname saturn.nodes.example.com
Configuring the authentication broker on node saturn
Configure a new authentication broker (AB) on node saturn. This AB belongs toroot broker RB1.
To configure the authentication broker on node saturn
1 Create a principal for node saturn on root broker RB1. Execute the followingcommand on root broker RB1.
# vssat addprpl --pdrtype root --domain domainname \
--prplname prplname --password password \
--prpltype service
For example:
# vssat addprpl --pdrtype root \
--domain [email protected] \
--prplname saturn.nodes.example.com \
--password flurbdicate --prpltype service
2 Ensure that there is no clock skew between the times on node saturn and RB1.
3 Copy the /opt/VRTSat/bin/root_hash file from RB1 to node saturn.
4 Configure AB on node saturn to talk to RB1.
# vxatd -o -a -n prplname -p password -x vx -y domainname -q \
rootbroker -z 2821 -h roothash_file_path
For example:
# vxatd -o -a -n saturn.nodes.example.com -p flurbdicate \
-x vx -y [email protected] -q RB1 \
-z 2821 -h roothash_file_path
5 Verify that AB is configured properly.
# vssat showbrokermode
The command should return 1, indicating the mode to be AB.
447Adding a node to SF Oracle RAC clustersAdding a node to a cluster

Setting up SF Oracle RAC related security configuration
Perform the following steps to configure SF Oracle RAC related security settings.
Setting up SF Oracle RAC related security configuration
1 Start /opt/VRTSat/bin/vxatd process.
2 Create HA_SERVICES domain for SF Oracle RAC.
# vssat createpd --pdrtype ab --domain HA_SERVICES
3 Add SF Oracle RAC and webserver principal to AB on node saturn.
# vssat addprpl --pdrtype ab --domain HA_SERVICES --prplname
webserver_VCS_prplname --password new_password --prpltype
service --can_proxy
4 Create /etc/VRTSvcs/conf/config/.secure file.
# touch /etc/VRTSvcs/conf/config/.secure
Adding a node in a VxSS group
Perform the following procedure when adding a node in a VxSS group.
To add a node in the VxSS group using the CLI
1 Make a backup copy of the main.cf file. For example:
# cd /etc/VRTSvcs/conf/config
# cp main.cf main.cf.2node
2 On one of the nodes in the existing cluster, set the cluster configuration toread-write mode:
# haconf -makerw
3 Add the new node to the VCS configuration:
# hasys -add saturn
Adding a node to SF Oracle RAC clustersAdding a node to a cluster
448

4 Add the node saturn to the existing VxSS group.
# hagrp -modify VxSS SystemList -add saturn 2
# hagrp -modify VxSS AutoStartList -add saturn
5 Save the configuration by running the following command from any node inthe cluster:
# haconf -dump -makero
Configuring server-based fencing on the new nodePerform this step if your existing cluster uses server-based I/O fencing.
To configure server-based fencing on the new node
1 Log in to each CP server as the root user.
2 Update each CP server configuration with the new node information:
# /opt/VRTScps/bin/cpsadm -s thunderbolt \
-a add_node -c clus1 -u {f0735332-1dd1-11b2} -h saturn -n2
Node 2 (saturn) successfully added
3 Verify that the new node is added to the CP server configuration:
# /opt/VRTScps/bin/cpsadm -s thunderbolt -a list_nodes
The new node must be listed in the output.
4 Add the VCS user cpsclient@saturn to each CP server:
# /opt/VRTScps/bin/cpsadm -s thunderbolt \
-a add_user -e cpsclient@saturn \
-f cps_operator -g vx
User cpsclient@saturn successfully added
To configure server-based fencing with security on the new node
1 As the root user, create the VCS user and the domain on the new node:
■ Create a dummy configuration file /etc/VRTSvcs/conf/config/main.cfthat resembles the following example:
# cat main.cf
include "types.cf"
cluster clus1 {
449Adding a node to SF Oracle RAC clustersAdding a node to a cluster
SecureClus = 1
}
system saturn {
}
■ Start VCS in one node mode on the new node:
# /opt/VRTSvcs/bin/hastart -onenode
2 Verify that the VCS user and the domain are created on the new node:
# /opt/VRTScps/bin/cpsat showcred | grep _HA_VCS_
# /opt/VRTScps/bin/cpsat listpd -t local | grep HA_SERVICES
3 Stop VCS if the VCS user and domain are created successfully on the newnode:
# /opt/VRTSvcs/bin/hastop
4 If the root broker for the CP server and the new node are different, run thefollowing command to establish trust between the authentication broker ofthe CP Server and the new node:
# /usr/bin/echo y | /opt/VRTScps/bin/cpsat setuptrust \
-b thunderbolt -s high
5 Log in to each CP server as the root user.
6 Update each CP server configuration with the new node information:
# /opt/VRTScps/bin/cpsadm -s thunderbolt \
-a add_node -c clus1 -u {f0735332-1dd1-11b2} -h saturn -n2
Node 2 (saturn) successfully added
Adding a node to SF Oracle RAC clustersAdding a node to a cluster
450

7 Verify that the new node is added to the CP server configuration:
# /opt/VRTScps/bin/cpsadm -s thunderbolt -a list_nodes
The new node must be listed in the output.
8 Add the VCS user _HA_VCS_saturn@[email protected] toeach CP server:
# /opt/VRTScps/bin/cpsadm -s thunderbolt \
-a add_user -e _HA_VCS_saturn@[email protected] \
-f cps_operator -g vx
User _HA_VCS_saturn@[email protected] successfully added
Starting fencing on the new nodePerform the following steps to start fencing on the new node.
To start fencing on the new node
1 If you are using disk-based fencing on at least one node, copy the followingfiles from one of the nodes in the existing cluster to the new node:
/etc/default/vxfen
/etc/vxfendg
/etc/vxfenmode
If you are using pure CP server-based fencing on the existing cluster, thenonly the /etc/vxfenmode file needs to be copied on the new node.
2 Start fencing on the new node:
# /etc/init.d/vxfen.rc start
3 On the new node, verify that the GAB port memberships are a, b, d, h and o:
# gabconfig -a
GAB Port Memberships
===============================================================
Port a gen df204 membership 012
Port b gen df20d membership 012
Port d gen df20a membership 012
Port o gen df207 membership 012
451Adding a node to SF Oracle RAC clustersAdding a node to a cluster

After adding the new nodeIf you added the new node to the cluster manually, before you starting VCS youmust create the file cssd-pretend-offline on the new node and make the cssd
resource non-critical. Failing this, the cssd resource lapses into an UNKNOWNstate until Oracle Clusterware is installed on the new node, thus preventing thecvm group from coming online.
If you used the product installer to add the new node to the cluster, you will notneed to perform this step.
Note: The cssd resource will remain in FAULTED/OFFLINE state till OracleClusterware is installed on the new node.
Start VCS on the new node.
To start VCS on the new node
1 If you installed the new node manually:
■ On one of the nodes in the existing cluster, configure the cssd resourceas a non-critical resource:
# haconf -makerw
# hares -modify cssd Critical 0
# haconf -dump -makero
■ Create the file cssd-pretend-offline on the new node:
# touch /var/VRTSvcs/lock/cssd-pretend-offline
2 Start VCS on the new node:
# hastart
VCS brings the CVM and CFS groups online.
3 Verify that the CVM and CFS groups are online:
# hagrp -state
Configuring CVM and CFS on the new nodeModify the existing cluster configuration to configure CVM and CFS for the newnode.
Adding a node to SF Oracle RAC clustersAdding a node to a cluster
452

To configure CVM and CFS on the new node
1 Make a backup copy of the main.cf file on the existing node, if not backed upin previous procedures. For example:
# cd /etc/VRTSvcs/conf/config
# cp main.cf main.cf.2node
2 On one of the nodes in the existing cluster, set the cluster configuration toread-write mode:
# haconf -makerw
3 Add the new node to the VCS configuration, if not already added:
# hasys -add saturn
4 To enable the existing cluster to recognize the new node, run the followingcommands on one of the existing nodes:
# hagrp -modify cvm SystemList -add saturn 2
# hagrp -modify cvm AutoStartList -add saturn
# hares -modify cvm_clus CVMNodeId -add saturn 2
# haconf -dump -makero
# /etc/vx/bin/vxclustadm -m vcs reinit
# /etc/vx/bin/vxclustadm nidmap
5 On the remaining nodes of the existing cluster, run the following commands:
# /etc/vx/bin/vxclustadm -m vcs reinit
# /etc/vx/bin/vxclustadm nidmap
6 Copy the configuration files from one of the nodes in the existing cluster tothe new node:
# rcp /etc/VRTSvcs/conf/config/main.cf \
saturn:/etc/VRTSvcs/conf/config/main.cf
# rcp /etc/VRTSvcs/conf/config/CFSTypes.cf \
saturn:/etc/VRTSvcs/conf/config/CFSTypes.cf
# rcp /etc/VRTSvcs/conf/config/CVMTypes.cf \
saturn:/etc/VRTSvcs/conf/config/CVMTypes.cf
453Adding a node to SF Oracle RAC clustersAdding a node to a cluster

Configuring the ClusterService group for the new nodeIf the ClusterService group is configured on the existing cluster, add the node tothe group by performing the steps in the following procedure on one of the nodesin the existing cluster.
To configure the ClusterService group for the new node
1 On an existing node, for example galaxy, write-enable the configuration:
# haconf -makerw
2 Add the node saturn to the existing ClusterService group.
# hagrp -modify ClusterService SystemList -add saturn 2
# hagrp -modify ClusterService AutoStartList -add saturn
3 Modify the IP address and NIC resource in the existing group for the newnode.
# hares -modify gcoip Device en0 -sys saturn
# hares -modify gconic Device en0 -sys saturn
4 Save the configuration by running the following command from any node.
# haconf -dump -makero
Preparing the new node for installing Oracle RACYou must complete certain pre-installation tasks before you add the node to OracleRAC.
Use one of the following ways to complete the preparatory tasks:
See “Preparing the new nodes for installing Oracle RACusing the SF Oracle RAC installer” on page 455.
Using the SF Oracle RAC installer
See “Preparing the new node manually for installingOracle RAC” on page 462.
Manual
Note: Some of the pre-installation tasks can be completed using the SF OracleRAC installer while some of the tasks must be completed manually as indicatedin the procedures.
Adding a node to SF Oracle RAC clustersPreparing the new node for installing Oracle RAC
454

Preparing the new nodes for installing Oracle RAC using the SF OracleRAC installer
The SF Oracle RAC installer performs the following tasks:
■ Creates the Oracle user and groups on the new node
■ Configures the private IP addresses and the PrivNIC or MultiPrivNIC resources(if they are configured in the existing cluster).
■ If the CFSMount and CVMVolDg resources for OCR and voting disk areconfigured under the cvm service group, the installer brings them online afteradding the node to the cluster.If the resources are configured in any other service group, make sure that youmodify the service group to include the new node and bring the service grouponline.
Note: If OCR and voting disk are not configured under VCS, manually mountthe OCR and voting disk after you finish the steps in the following procedure.
■ Starts the CVM group on the new node.
To prepare to install Oracle RAC on the new node using the SF Oracle RAC installer
1 After you configure SF Oracle RAC on the new node, the installer displaysthe following options for configuring Oracle RAC:
1) Create Oracle User and Group
2) Configure private IP addresses (PrivNIC configuration)
3) Configure private IP addresses (MultiPrivNIC configuration)
4) Finish
Note: The options 2 and 3 are displayed only if you have configured privateIP addresses as PrivNIC or MultiPrivNIC resources in the existing cluster.
Enter 1 to select the option CreateOracleUserandGroup from the SF OracleRAC installer menu.
See “Creating Oracle user and groups on the new node” on page 458.
2 Configure the private IP addresses and the PrivNIC resource for OracleClusterware (only if the IP addresses on the existing cluster are configuredas PrivNIC resources).
You must manually update the PrivNIC resource configuration in the followingcases:
455Adding a node to SF Oracle RAC clustersPreparing the new node for installing Oracle RAC

■ If the PrivNIC resource on the existing cluster is configured under a groupother than cvm.
■ If the Device attribute in the PrivNIC resource configuration on theexisting cluster is not configured for each node as follows:Device@galaxy = {en1=0, en2=1}
Device@nebula = {en1=0, en2=1}
Enter 2 to select the option Configure private IP addresses (PrivNICconfiguration).
See “Configuring the private IP addresses and PrivNIC resource for OracleClusterware” on page 458.
3 Configure private IP addresses and the MultiPrivNIC resource for OracleClusterware and Oracle UDP IPC (only if the IP addresses on the existingcluster are configured as MultiPrivNIC resources).
You must manually update the MultiPrivNIC resource configuration in thefollowing cases:
■ If the MultiPrivNIC resource on the existing cluster is configured undera group other than cvm.
■ If the Device attribute in the MultiPrivNIC resource configuration on theexisting cluster is not configured for each node as follows:Device@galaxy = {en1=0, en2=1, en3=2}
Device@nebula = {en1=0, en2=1, en3=2}
Enter 3 to select the option Configure private IP addresses (MultiPrivNICconfiguration).
See “Configuring the private IP addresses and MultiPrivNIC resource forOracle Clusterware and Oracle UDP IPC” on page 460.
4 Select Finish to start the cvm group on the new node.
Note: The cssd resource appears FAULTED until the new node is added toOracle Clusterware.
5 If the cssd resource is configured as a critical resource, the cvm group willbe brought offline on the new node. Modify the configuration to make thecssd resource non-critical and bring the cvm group online.
■ On one of the nodes in the existing cluster, configure the cssd resourceas a non-critical resource:
Adding a node to SF Oracle RAC clustersPreparing the new node for installing Oracle RAC
456
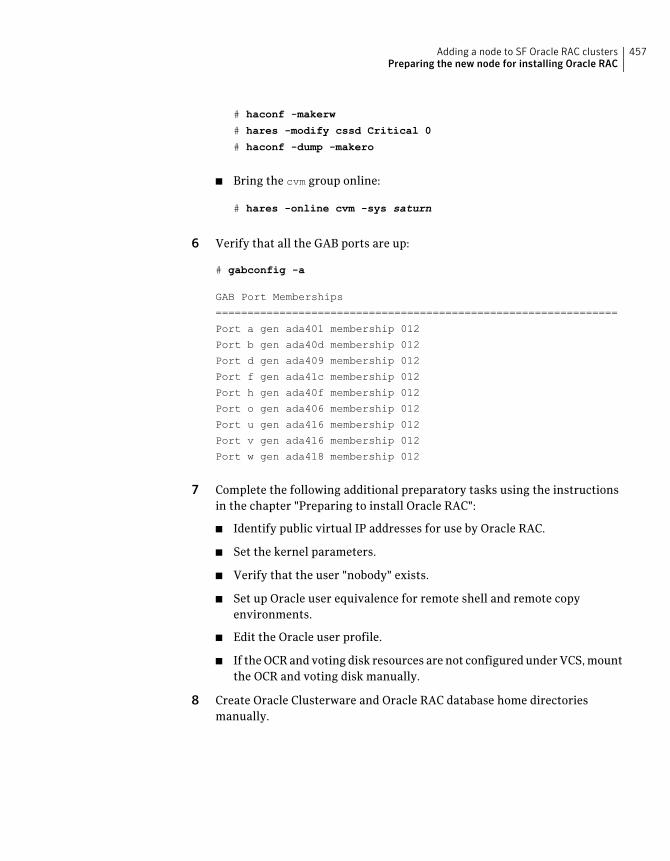
# haconf -makerw
# hares -modify cssd Critical 0
# haconf -dump -makero
■ Bring the cvm group online:
# hares -online cvm -sys saturn
6 Verify that all the GAB ports are up:
# gabconfig -a
GAB Port Memberships
===============================================================
Port a gen ada401 membership 012
Port b gen ada40d membership 012
Port d gen ada409 membership 012
Port f gen ada41c membership 012
Port h gen ada40f membership 012
Port o gen ada406 membership 012
Port u gen ada416 membership 012
Port v gen ada416 membership 012
Port w gen ada418 membership 012
7 Complete the following additional preparatory tasks using the instructionsin the chapter "Preparing to install Oracle RAC":
■ Identify public virtual IP addresses for use by Oracle RAC.
■ Set the kernel parameters.
■ Verify that the user "nobody" exists.
■ Set up Oracle user equivalence for remote shell and remote copyenvironments.
■ Edit the Oracle user profile.
■ If the OCR and voting disk resources are not configured under VCS, mountthe OCR and voting disk manually.
8 Create Oracle Clusterware and Oracle RAC database home directoriesmanually.
457Adding a node to SF Oracle RAC clustersPreparing the new node for installing Oracle RAC

Creating Oracle user and groups on the new nodePerform the steps in the following procedure to create Oracle user and groups onthe new node.
Note: Set the password of the Oracle user manually before you configure secureshell or remote shell connection on the node.
To create Oracle user and groups on the new node
1 Enter the Oracle user name that is used for Oracle RAC operations on theexisting cluster.
Note: If the Oracle user and groups already exist on the new node, make surethat the UID and GID of the Oracle user and groups are the same as that onthe current cluster.
Enter Oracle UNIX user name: [b] Oracle
The installer obtains the existing group and identifier information based onthe Oracle user name.
2 Review and confirm the information.
The installer adds the user and groups to the new node.
3 Press Return to continue with the other configuration tasks.
Configuring the private IP addresses and PrivNIC resource forOracle ClusterwarePerform this step only if the private IP addresses are configured as PrivNICresources in the existing cluster.
Note: Make sure that the network interface names of the private interconnectson the new node are the same as those of the existing cluster. For maximumfailover options, all available LLT links are used for PrivNIC configuration.
Review the pre-configuration information displayed by the installer and ensurethat you meet the requirements.
Adding a node to SF Oracle RAC clustersPreparing the new node for installing Oracle RAC
458

To configure the private IP addresses and PrivNIC resource for Oracle Clusterware
1 Enter the name for the PrivNIC resource. The installer displays the names ofthe existing PrivNIC resources. Specify the name of an existing resource.
Enter the PrivNIC resource name: [b] (ora_priv)
2 Enter y if you want the installer to add the IP address to the /etc/hosts file.
Do you want the Installer to add IP addresses in
/etc/hosts file? [y,n,q] (y)
You can also add the IP address to the file manually after the configuration.
The installer displays the existing PrivNIC resource configuration on thecluster.
Resource name: ora_priv
System: galaxy
Private Interfaces: en1 en2
Private IP address: 192.168.12.1
Alias for above IP: galaxy-priv
System: nebula
Private Interfaces: en1 en2
Private IP address: 192.168.12.2
Alias for above IP: nebula-priv
Is this information correct? [y,n,q] (y)
3 Review and confirm the information.
4 Enter the private IP address and its private node name for the new node.
Enter the private IP for saturn: [b] 192.168.12.5
Enter Hostname alias for the above IP address: [b] saturn-priv
The installer displays the resource configuration for the new node.
Resource name: ora_priv
System: saturn
Private Interfaces: en1 en2
Private IP address: 192.168.12.5
Alias for above IP: saturn-priv
Is this information correct? [y,n,q] (y)
459Adding a node to SF Oracle RAC clustersPreparing the new node for installing Oracle RAC

5 Review and confirm the information.
The installer updates the existing PrivNIC resource with the resourceconfiguration for the new node and updates the /etc/hosts file on the newnode as well as on the existing nodes (if you chose to update the file throughthe installer).
6 Press Return to continue with the other configuration tasks.
Configuring theprivate IP addresses andMultiPrivNIC resourcefor Oracle Clusterware and Oracle UDP IPCPerform this step only if the private IP addresses are configured as MultiPrivNICresources in the existing cluster.
Note: Make sure that you configure the same interfaces (as those on theexistinnebulag cluster) for private interconnects on the new node. For maximumfailover options, all available LLT links are used for MultiPrivNIC configuration.
Review the pre-configuration information displayed by the installer and ensurethat you meet the requirements.
Adding a node to SF Oracle RAC clustersPreparing the new node for installing Oracle RAC
460
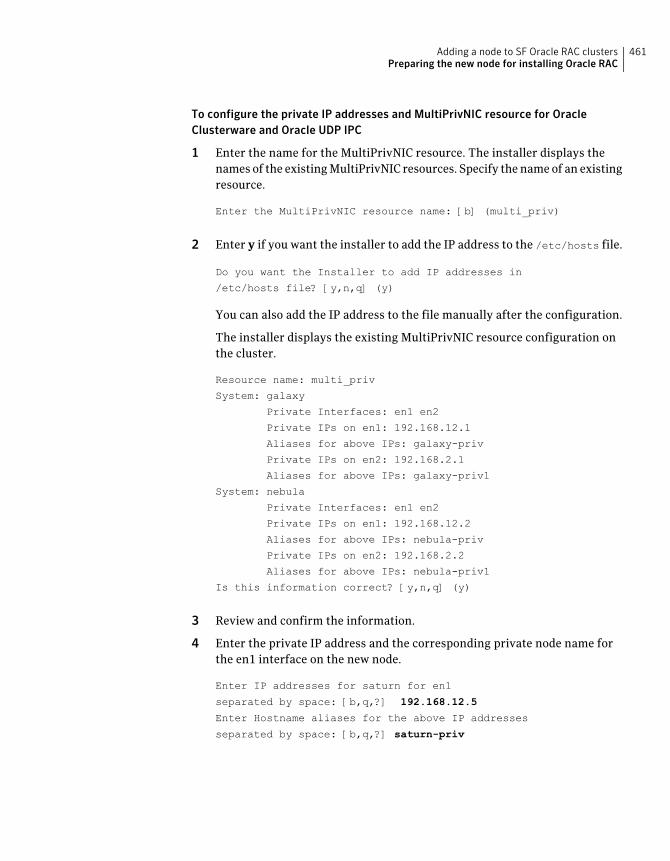
To configure the private IP addresses and MultiPrivNIC resource for OracleClusterware and Oracle UDP IPC
1 Enter the name for the MultiPrivNIC resource. The installer displays thenames of the existing MultiPrivNIC resources. Specify the name of an existingresource.
Enter the MultiPrivNIC resource name: [b] (multi_priv)
2 Enter y if you want the installer to add the IP address to the /etc/hosts file.
Do you want the Installer to add IP addresses in
/etc/hosts file? [y,n,q] (y)
You can also add the IP address to the file manually after the configuration.
The installer displays the existing MultiPrivNIC resource configuration onthe cluster.
Resource name: multi_priv
System: galaxy
Private Interfaces: en1 en2
Private IPs on en1: 192.168.12.1
Aliases for above IPs: galaxy-priv
Private IPs on en2: 192.168.2.1
Aliases for above IPs: galaxy-priv1
System: nebula
Private Interfaces: en1 en2
Private IPs on en1: 192.168.12.2
Aliases for above IPs: nebula-priv
Private IPs on en2: 192.168.2.2
Aliases for above IPs: nebula-priv1
Is this information correct? [y,n,q] (y)
3 Review and confirm the information.
4 Enter the private IP address and the corresponding private node name forthe en1 interface on the new node.
Enter IP addresses for saturn for en1
separated by space: [b,q,?] 192.168.12.5
Enter Hostname aliases for the above IP addresses
separated by space: [b,q,?] saturn-priv
461Adding a node to SF Oracle RAC clustersPreparing the new node for installing Oracle RAC
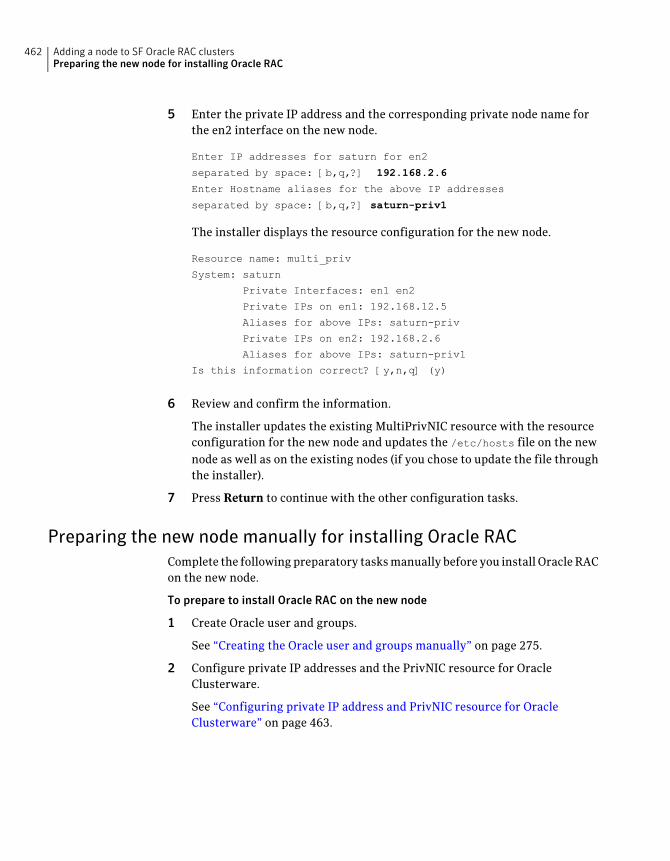
5 Enter the private IP address and the corresponding private node name forthe en2 interface on the new node.
Enter IP addresses for saturn for en2
separated by space: [b,q,?] 192.168.2.6
Enter Hostname aliases for the above IP addresses
separated by space: [b,q,?] saturn-priv1
The installer displays the resource configuration for the new node.
Resource name: multi_priv
System: saturn
Private Interfaces: en1 en2
Private IPs on en1: 192.168.12.5
Aliases for above IPs: saturn-priv
Private IPs on en2: 192.168.2.6
Aliases for above IPs: saturn-priv1
Is this information correct? [y,n,q] (y)
6 Review and confirm the information.
The installer updates the existing MultiPrivNIC resource with the resourceconfiguration for the new node and updates the /etc/hosts file on the newnode as well as on the existing nodes (if you chose to update the file throughthe installer).
7 Press Return to continue with the other configuration tasks.
Preparing the new node manually for installing Oracle RACComplete the following preparatory tasks manually before you install Oracle RACon the new node.
To prepare to install Oracle RAC on the new node
1 Create Oracle user and groups.
See “Creating the Oracle user and groups manually” on page 275.
2 Configure private IP addresses and the PrivNIC resource for OracleClusterware.
See “Configuring private IP address and PrivNIC resource for OracleClusterware” on page 463.
Adding a node to SF Oracle RAC clustersPreparing the new node for installing Oracle RAC
462

3 Configure private IP addresses and the MultiPrivNIC resource for OracleClusterware and Oracle UDP IPC.
See “Configuring private IP addresses and MultiPrivNIC resource for OracleClusterware and UDP IPC” on page 464.
4 Start VCS on the new node.
See “Starting VCS on the new node” on page 465.
5 Create the Oracle Clusterware/Grid Infrastructure and Oracle RAC databasehome directories for installation.
See “Creating Oracle Clusterware/Grid Infrastructure and Oracle databasehome directories on the new node ” on page 466.
6 Complete the following additional preparatory tasks using the instructionsin the chapter "Preparing to install Oracle RAC":
■ Identify public virtual IP addresses for use by Oracle RAC.
■ Set the kernel parameters.
■ Verify that the user "nobody" exists.
■ Set up Oracle user equivalence for remote shell and remote copyenvironments.
■ Edit the Oracle user profile.
Configuring private IP address and PrivNIC resource for OracleClusterwareThis section provides instructions for configuring private IP address and PrivNICresource for Oracle Clusterware.
Identify a private IP address that you want to use for the new node. Make surethat the IP address is in the same subnet as the existing cluster.
The procedure uses the following IP address for the new node:
192.168.12.5On saturn:
463Adding a node to SF Oracle RAC clustersPreparing the new node for installing Oracle RAC

To configure private IP addresses for Oracle Clusterware
1 Make a backup copy of the main.cf file. For example:
# cd /etc/VRTSvcs/conf/config
# cp main.cf main.cf.2node
2 Add the private IP address to the the ora_priv resource on the active node:
# haconf -makerw
# hares -modify ora_priv Device -add en1 0 -sys saturn
# hares -modify ora_priv Device -add en2 1 -sys saturn
# hares -modify ora_priv Address "192.168.12.5" -sys saturn
# haconf -dump -makero
Configuring private IP addresses and MultiPrivNIC resourcefor Oracle Clusterware and UDP IPCThis section provides instructions for configuring private IP addresses andMultiPrivNIC resource for Oracle Clusterware and UDP IPC.
Identify the private IP addresses that you want to use for the new node. Make surethat the IP addresses are in the same subnet as the existing cluster.
The procedure uses the following IP addresses for the new node:
192.168.12.5
192.168.2.6
On saturn:
Adding a node to SF Oracle RAC clustersPreparing the new node for installing Oracle RAC
464

To configure private IP addresses for Oracle Clusterware
◆ Use the following commands to add private IP into multi_priv resource onthe active node:
# haconf -makerw
# hares -modify multi_priv Device -add en1 0 -sys saturn
# hares -modify multi_priv Device -add en2 1 -sys saturn
# hares -modify multi_priv Address -add 192.168.12.5 0 -sys saturn
# hares -modify multi_priv Address -add 192.168.2.6 1 -sys saturn
# haconf -dump -makero
Starting VCS on the new nodeBefore you start VCS, create the file cssd-pretend-offline on the new node andmake the cssd resource non-critical. Failing this, the cssd resource lapses intoan UNKNOWN state until Oracle Clusterware is installed on the new node, thuspreventing the cvm group from coming online.
Note: The cssd resource will remain in FAULTED/OFFLINE state till OracleClusterware is installed on the new node.
To start VCS on the new node
1 On one of the nodes in the existing cluster, configure the cssd resource as anon-critical resource:
# haconf -makerw
# hares -modify cssd Critical 0
# haconf -dump -makero
2 Create the file cssd-pretend-offline on the new node:
# touch /var/VRTSvcs/lock/cssd-pretend-offline
3 Start VCS on the new node:
# hastart
465Adding a node to SF Oracle RAC clustersPreparing the new node for installing Oracle RAC

Creating Oracle Clusterware/Grid Infrastructure and Oracledatabase home directories on the new nodeThe Oracle Clusterware/Grid Infrastructure and Oracle database home directoriesmust be located on the same storage as that on the existing nodes.
Depending on the storage in the existing cluster, use one of the following optionsto create the directories:
See “To create the directories on the local file system”on page 466.
Local file system
See “To create the file system and directories on the VeritasFile system (VxFS) ” on page 466.
Veritas File System
See “To create the file system and directories on cluster filesystem” on page 471.
Cluster File System
To create the directories on the local file system
1 Log in as the root user on each node.
2 Create the directories and set the ownership and permissions:
For Oracle RAC 10g Release 2/Oracle RAC 11g Release 1:
# mkdir -p /u01/app/oracle
# mkdir -p /u01/app/oracle/product/10.2.0/crshome
# mkdir -p /u01/app/oracle/product/10.2.0/dbhome_1
# chown -R oracle:oinstall /u01/app
# chmod -R 775 /u01/app
For Oracle RAC 11g Release 2:
# mkdir -p /u01/app/gridbase
# mkdir -p /u01/app/grid/product/11.2.0/gridhome
# chown -R grid:oinstall /u01/app
# chmod -R 775 /u01/app
# mkdir -p /u01/app/oracle
# mkdir -p /u01/app/oracle/product/11.2.0/dbhome_1
# chown -R oracle:oinstall /u01/app/oracle
# chmod -R 775 /u01/app/oracle
To create the file system and directories on the Veritas File system (VxFS)
The sample commands in the procedure are for node saturn. Repeat the steps oneach node of the cluster.
Adding a node to SF Oracle RAC clustersPreparing the new node for installing Oracle RAC
466
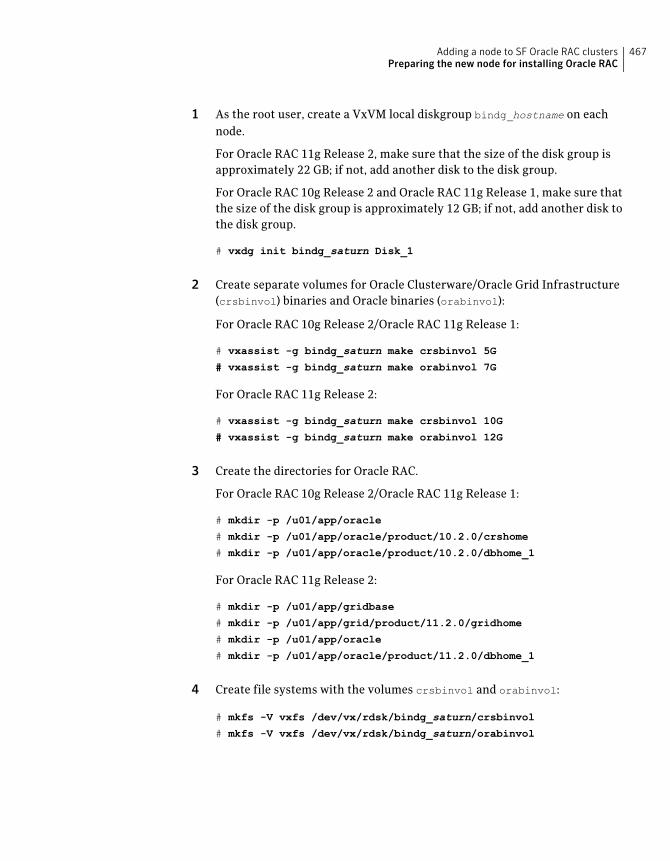
1 As the root user, create a VxVM local diskgroup bindg_hostname on eachnode.
For Oracle RAC 11g Release 2, make sure that the size of the disk group isapproximately 22 GB; if not, add another disk to the disk group.
For Oracle RAC 10g Release 2 and Oracle RAC 11g Release 1, make sure thatthe size of the disk group is approximately 12 GB; if not, add another disk tothe disk group.
# vxdg init bindg_saturn Disk_1
2 Create separate volumes for Oracle Clusterware/Oracle Grid Infrastructure(crsbinvol) binaries and Oracle binaries (orabinvol):
For Oracle RAC 10g Release 2/Oracle RAC 11g Release 1:
# vxassist -g bindg_saturn make crsbinvol 5G
# vxassist -g bindg_saturn make orabinvol 7G
For Oracle RAC 11g Release 2:
# vxassist -g bindg_saturn make crsbinvol 10G
# vxassist -g bindg_saturn make orabinvol 12G
3 Create the directories for Oracle RAC.
For Oracle RAC 10g Release 2/Oracle RAC 11g Release 1:
# mkdir -p /u01/app/oracle
# mkdir -p /u01/app/oracle/product/10.2.0/crshome
# mkdir -p /u01/app/oracle/product/10.2.0/dbhome_1
For Oracle RAC 11g Release 2:
# mkdir -p /u01/app/gridbase
# mkdir -p /u01/app/grid/product/11.2.0/gridhome
# mkdir -p /u01/app/oracle
# mkdir -p /u01/app/oracle/product/11.2.0/dbhome_1
4 Create file systems with the volumes crsbinvol and orabinvol:
# mkfs -V vxfs /dev/vx/rdsk/bindg_saturn/crsbinvol
# mkfs -V vxfs /dev/vx/rdsk/bindg_saturn/orabinvol
467Adding a node to SF Oracle RAC clustersPreparing the new node for installing Oracle RAC
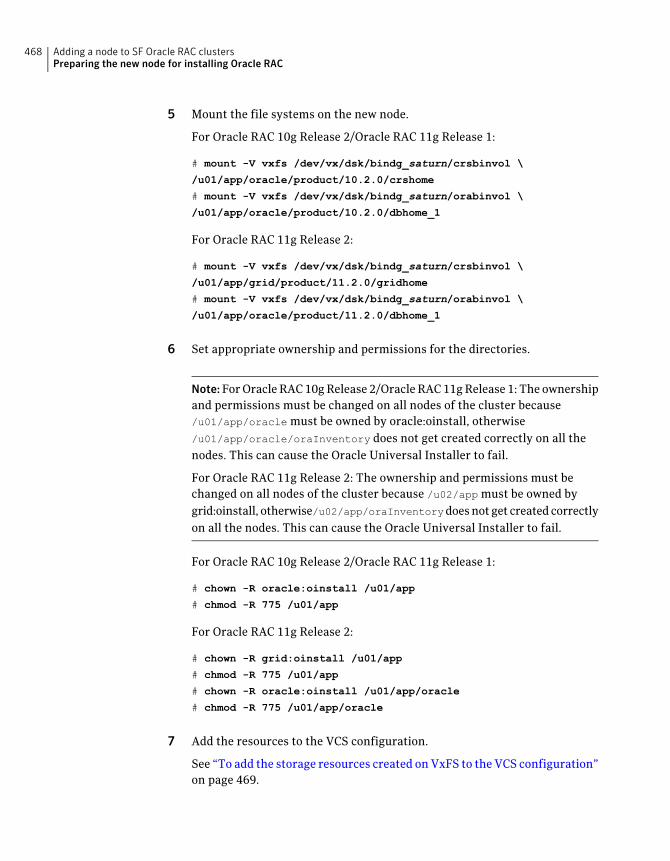
5 Mount the file systems on the new node.
For Oracle RAC 10g Release 2/Oracle RAC 11g Release 1:
# mount -V vxfs /dev/vx/dsk/bindg_saturn/crsbinvol \
/u01/app/oracle/product/10.2.0/crshome
# mount -V vxfs /dev/vx/dsk/bindg_saturn/orabinvol \
/u01/app/oracle/product/10.2.0/dbhome_1
For Oracle RAC 11g Release 2:
# mount -V vxfs /dev/vx/dsk/bindg_saturn/crsbinvol \
/u01/app/grid/product/11.2.0/gridhome
# mount -V vxfs /dev/vx/dsk/bindg_saturn/orabinvol \
/u01/app/oracle/product/11.2.0/dbhome_1
6 Set appropriate ownership and permissions for the directories.
Note: For Oracle RAC 10g Release 2/Oracle RAC 11g Release 1: The ownershipand permissions must be changed on all nodes of the cluster because/u01/app/oracle must be owned by oracle:oinstall, otherwise/u01/app/oracle/oraInventory does not get created correctly on all thenodes. This can cause the Oracle Universal Installer to fail.
For Oracle RAC 11g Release 2: The ownership and permissions must bechanged on all nodes of the cluster because /u02/app must be owned bygrid:oinstall, otherwise/u02/app/oraInventorydoes not get created correctlyon all the nodes. This can cause the Oracle Universal Installer to fail.
For Oracle RAC 10g Release 2/Oracle RAC 11g Release 1:
# chown -R oracle:oinstall /u01/app
# chmod -R 775 /u01/app
For Oracle RAC 11g Release 2:
# chown -R grid:oinstall /u01/app
# chmod -R 775 /u01/app
# chown -R oracle:oinstall /u01/app/oracle
# chmod -R 775 /u01/app/oracle
7 Add the resources to the VCS configuration.
See “To add the storage resources created on VxFS to the VCS configuration”on page 469.
Adding a node to SF Oracle RAC clustersPreparing the new node for installing Oracle RAC
468

To add the storage resources created on VxFS to the VCS configuration
1 Change the permissions on the VCS configuration file:
# haconf -makerw
2 Configure the VxVM volumes under VCS:
# hares -add bin_dg DiskGroup cvm
# hares -modify bin_dg DiskGroup bindg_saturn -sys saturn
# hares -modify bin_dg Enabled 1
469Adding a node to SF Oracle RAC clustersPreparing the new node for installing Oracle RAC

3 Set up the file system under VCS:
# hares -add crsbin_mnt Mount cvm
For Oracle RAC 10g Release 2/Oracle RAC 11g Release 1:
# hares -modify crsbin_mnt MountPoint \
"/u01/app/oracle/product/10.2.0/crshome"
For Oracle RAC 11g Release 2:
# hares -modify crsbin_mnt MountPoint \
"/u01/app/grid/product/11.2.0/gridhome"
The following commands are common to all Oracle RAC versions:
# hares -modify crsbin_mnt BlockDevice \
"/dev/vx/dsk/bindg_saturn/crsbinvol" -sys saturn
# hares -modify crsbin_mnt FSType vxfs
# hares -modify crsbin_mnt FsckOpt "-n"
# hares -modify crsbin_mnt Enabled 1
# hares -add orabin_mnt Mount cvm
For Oracle RAC 10g Release 2/Oracle RAC 11g Release 1:
# hares -modify orabin_mnt MountPoint \
"/u01/app/oracle/product/10.2.0/dbhome_1"
For Oracle RAC 11g Release 2:
# hares -modify orabin_mnt MountPoint \
"/u01/app/oracle/product/11.2.0/dbhome_1"
The following commands are common to all Oracle RAC versions:
# hares -modify orabin_mnt BlockDevice \
"/dev/vx/dsk/bindg_saturn/orabinvol" -sys saturn
# hares -modify orabin_mnt FSType vxfs
# hares -modify orabin_mnt FsckOpt "-n"
# hares -modify orabin_mnt Enabled 1
4 Link the parent and child resources:
# hares -link crsbin_mnt bin_dg
# hares -link orabin_mnt bin_dg
Adding a node to SF Oracle RAC clustersPreparing the new node for installing Oracle RAC
470

To create the file system and directories on cluster file system
1 As the root user, create a VxVM shared disk group bindg:
# vxdg -s init bindg Disk_1
2 Create separate volumes for Oracle Clusterware/Oracle Grid Infrastructure(crsbinvol) and Oracle database (orabinvol):
For Oracle RAC 10g Release 2/Oracle RAC 11g Release 1:
# vxassist -g bindg make crsbinvol 5G
# vxassist -g bindg make orabinvol 7G
For Oracle RAC 11g Release 2:
# vxassist -g bindg make crsbinvol 10G
# vxassist -g bindg make orabinvol 12G
471Adding a node to SF Oracle RAC clustersPreparing the new node for installing Oracle RAC

3 Create the following directories for Oracle. The file system and directoriescreated on shared storage in this procedure are based on the following layout:
/u01/app/oracle
/u01/app/oracle is on local storage.
For Oracle RAC 11g Release 2, create a separate Oracle basedirectory for the grid user, in addition to the directory forthe Oracle user:
/u01/app/gridbase
/u01/app/gridbase is on local storage.
$ORACLE_BASE
/u01/app/oracle/product/10.2.0/crshome
/u01/app/oracle/product/10.2.0 is on local storage.
/u01/app/oracle/product/10.2.0/crshome is on sharedstorage.
$CRS_HOME
(For Oracle RAC 10gRelease 2/Oracle RAC11g Release 1)
/u01/app/grid/product/11.2.0/gridhome
/u01/app/grid/product/11.2.0 is on local storage.
/u01/app/grid/product/11.2.0/gridhome is on sharedstorage.
$GRID_HOME
(For Oracle RAC 11gRelease 2)
/u01/app/oracle/product/release/dbhome_1
where release is 10.2.0, 11.1.0, or 11.2.0 depending on theOracle RAC version
/u01/app/oracle/product/release is on local storage.
/u01/app/oracle/product/release/dbhome_1 is on sharedstorage.
$ORACLE_HOME
For Oracle RAC 10g Release 2/Oracle RAC 11g Release 1:
# mkdir -p /u01/app/oracle
# mkdir -p /u01/app/oracle/product/10.2.0/crshome
# mkdir -p /u01/app/oracle/product/10.2.0/dbhome_1
For Oracle RAC 11g Release 2:
# mkdir -p /u01/app/gridbase
# mkdir -p /u01/app/grid/product/11.2.0/gridhome
# mkdir -p /u01/app/oracle
# mkdir -p /u01/app/oracle/product/11.2.0/dbhome_1
Adding a node to SF Oracle RAC clustersPreparing the new node for installing Oracle RAC
472

4 Create file systems with the volumes crsbinvol and orabinvol:
# mkfs -V vxfs /dev/vx/rdsk/bindg/crsbinvol
# mkfs -V vxfs /dev/vx/rdsk/bindg/orabinvol
5 Mount the file systems on the new node.
For Oracle RAC 10g Release 2/Oracle RAC 11g Release 1:
# mount -V vxfs -o cluster /dev/vx/dsk/bindg/crsbinvol \
/u01/app/oracle/product/10.2.0/crshome
# mount -V vxfs -o cluster /dev/vx/dsk/bindg/orabinvol \
/u01/app/oracle/product/10.2.0/dbhome_1
For Oracle RAC 11g Release 2:
# mount -V vxfs -o cluster /dev/vx/dsk/bindg/crsbinvol \
/u01/app/grid/product/11.2.0/gridhome
# mount -V vxfs -o cluster /dev/vx/dsk/bindg/orabinvol \
/u01/app/oracle/product/11.2.0/dbhome_1
473Adding a node to SF Oracle RAC clustersPreparing the new node for installing Oracle RAC

6 Change the ownership and permissions on the new node.
Note: For Oracle RAC 10g Release 2/Oracle RAC 11g Release 1: The ownershipand permissions must be changed on all nodes of the cluster because/u01/app/oracle must be owned by oracle:oinstall, otherwise/u01/app/oracle/oraInventory does not get created correctly on all thenodes. This can cause the Oracle Universal Installer to fail.
For Oracle RAC 11g Release 2: The ownership and permissions must bechanged on all nodes of the cluster because /u01/app must be owned bygrid:oinstall, otherwise/u01/app/oraInventorydoes not get created correctlyon all the nodes. This can cause the Oracle Universal Installer to fail.
For Oracle RAC 10g Release 2/Oracle RAC 11g Release 1:
# chown -R oracle:oinstall /u01/app
# chmod -R 775 /u01/app
For Oracle RAC 11g Release 2:
# chown -R grid:oinstall /u01/app
# chmod -R 775 /u01/app
# chown -R oracle:oinstall /u01/app/oracle
# chmod -R 775 /u01/app/oracle
7 Add the CVMVolDg and CFSMount resources to the VCS configuration.
See “To add the CFSMount and CVMVolDg resources to the VCS configurationusing CLI” on page 313.
Adding the new node to Oracle RACInstall Oracle Clusterware and Oracle RAC database on the node using the OracleRAC add node procedure.
For instructions, see the Oracle RAC documentation.
After installing Oracle Clusterware and Oracle RAC database, perform the followingpost-installation tasks:
1. Delete the file/var/VRTSvcs/lock/cssd-pretend-offline to bring the CSSDresource online.
2. If CSSD is not configured under the cvm group, add the new node informationto the service group containing the CSSD resource.
Adding a node to SF Oracle RAC clustersAdding the new node to Oracle RAC
474

3. Add new Oracle RAC database instances for the new node.
For instructions, see the Oracle RAC documentation.
4. Add Oracle UDP IPC private IP addresses to the Oracle init.ora file.
5. Update the Oracle RAC database service groups to include the new databaseinstances in the VCS configuration file.
6. For other service groups that are configured under VCS, manually updatethe service group configuration for the new node.
Updating the Storage Foundation for Databases(SFDB) repository after adding a node
If you are using Database Checkpoints, Database Flashsnap, or Adding a Node inyour configuration, update the SFDB repository to enable access for the new nodeafter it is added to the cluster.
To update the SFDB repository after adding a node
1 Run the following to change permission, owner, group of various SFDBdirectories on the newly added node:
# sfua_db_config
2 Run the dbed_update command on any one node in the cluster. For example:
$ dbed_update -S $ORACLE_SID -H $ORACLE_HOME
This completes the addition of the node to the SFDB repository.
For information on using SFDB tools features:
See the Storage Foundation guide:StorageFoundation:StorageandAvailabilityManagement for Oracle Databases.
Sample configuration file for adding a node to thecluster
You may use this sample file as reference information to understand theconfiguration changes that take place when you add a node to a cluster.
The existing sample configuration before adding the node saturn is as follows:
475Adding a node to SF Oracle RAC clustersUpdating the Storage Foundation for Databases (SFDB) repository after adding a node

■ The existing cluster rac_cluster101 comprises two nodes galaxy and nebula
and hosts a single database.
■ The Oracle database is stored on CFS.
■ The database is managed by the VCS agent for Oracle.The agent starts, stops, and monitors the database.
■ Only one private IP address is configured for Oracle Clusterware. The privateIP address is managed by the PrivNIC agent for high availability.
■ The Oracle Cluster Registry (OCR) and voting disk are stored on CFS.
The following sample configuration file shows the changes (in bold) effected inthe configuration after adding a node "saturn" to the cluster.
include "types.cf"
include "CFSTypes.cf"
include "CVMTypes.cf"
include "OracleTypes.cf"
include "PrivNIC.cf"
cluster rac_cluster101 (
UserNames = { admin = bopHo }
Administrators = { admin }
UseFence = SCSI3
)
system galaxy (
)
system nebula (
)
system saturn (
)
Note: In the following group oradb1_grp, the saturn node has been added.
group oradb1_grp (
SystemList = { galaxy = 0, nebula = 1, saturn = 2 }
AutoFailOver = 0
Parallel = 1
AutoStartList = { galaxy, nebula, saturn }
)
Adding a node to SF Oracle RAC clustersSample configuration file for adding a node to the cluster
476

Note: In the following Oracle resource, the saturn node information has beenadded.
Oracle ora1 (
Critical = 0
Sid @galaxy = vrts1
Sid @nebula = vrts2
Sid @saturn = vrts3
Owner = oracle
Home = "/app/oracle/orahome"
StartUpOpt = "SRVCTLSTART"
ShutDownOpt = "SRVCTLSTOP"
)
CFSMount oradata_mnt (
Critical = 0
MountPoint = "/oradata"
BlockDevice = "/dev/vx/dsk/oradatadg/oradatavol"
)
CVMVolDg oradata_voldg (
Critical = 0
CVMDiskGroup = oradatadg
CVMVolume = { oradatavol }
CVMActivation = sw
)
requires group cvm online local firm
ora1 requires oradata_mnt
oradata_mnt requires oradata_voldg
Note: In the following CVM and CVMCluster resources, the saturn node informationhas been added.
group cvm (
SystemList = { galaxy = 0, nebula = 1, saturn =2}
AutoFailOver = 0
Parallel = 1
AutoStartList = { galaxy, nebula, saturn }
)
477Adding a node to SF Oracle RAC clustersSample configuration file for adding a node to the cluster

Application cssd (
Critical = 0
StartProgram = "/opt/VRTSvcs/rac/bin/cssd-online"
StopProgram = "/opt/VRTSvcs/rac/bin/cssd-offline"
CleanProgram = "/opt/VRTSvcs/rac/bin/cssd-clean"
MonitorProgram = "/opt/VRTSvcs/rac/bin/cssd-monitor"
OnlineRetryLimit = 20
)
CFSMount ocrvote_mnt (
Critical = 0
MountPoint = "/ocrvote"
BlockDevice = "/dev/vx/dsk/ocrvotedg/ocrvotevol"
MountOpt= "mincache=direct"
)
CVMVolDg ocrvote_voldg (
Critical = 0
CVMDiskGroup = ocrvotedg
CVMVolume = { ocrvotevol }
CVMActivation = sw
)
CFSfsckd vxfsckd (
)
CVMCluster cvm_clus (
CVMClustName = rac_cluster101
CVMNodeId = { galaxy = 0, nebula = 1, saturn =2 }
CVMTransport = gab
CVMTimeout = 200
)
CVMVxconfigd cvm_vxconfigd (
Critical = 0
CVMVxconfigdArgs = { syslog }
)
Adding a node to SF Oracle RAC clustersSample configuration file for adding a node to the cluster
478

Note: In the following PrivNIC resource, the saturn node information has beenadded.
PrivNIC ora_priv (
Critical = 0
Device@galaxy = { en1 = 0, en2 = 1}
Device@nebula = { en1 = 0, en2 = 1}
Device@saturn = { en1 = 0, en2 = 1}
Address@galaxy = "192.168.12.1"
Address@nebula = "192.168.12.2"
Address@saturn = "192.168.12.5"
NetMask = "255.255.255.0"
)
cssd requires ocrvote_mnt
cssd requires ora_priv
ocrvote_mnt requires ocrvote_voldg
ocrvote_mnt requires vxfsckd
ocrvote_voldg requires cvm_clus
vxfsckd requires cvm_clus
cvm_clus requires cvm_vxconfigd
479Adding a node to SF Oracle RAC clustersSample configuration file for adding a node to the cluster

Adding a node to SF Oracle RAC clustersSample configuration file for adding a node to the cluster
480

Removing a node from SFOracle RAC clusters
This chapter includes the following topics:
■ About removing a node from a cluster
■ Removing a node from a cluster
■ Modifying the VCS configuration files on existing nodes
■ Removing the node configuration from the CP server
■ Removing security credentials from the leaving node
■ Updating the Storage Foundation for Databases (SFDB) repository afterremoving a node
■ Sample configuration file for removing a node from the cluster
About removing a node from a clusterYou can remove one or more nodes from an SF Oracle RAC cluster if the node nolonger needs to be part of the cluster.
Removing a node from a cluster requires:
■ Taking Oracle service groups offline.
■ Stopping applications that use File System or Cluster File System mount pointsnot configured under VCS.
■ Removing database instances and software from the node.
■ Stopping VCS on the node to be removed.
■ Remove Oracle Clusterware from the node.
29Chapter

■ Unmounting the File System and Cluster File System file systems notconfigured under VCS.
■ Uninstalling SF Oracle RAC from the node.Modifying the VCS configuration files on the existing nodes.
■ Removing the node configuration from the CP server if it is configured.
■ Removing the security credentials from the node if it is part of a secure cluster.
■ Updating the SFDB repository if you use SFDB tools.
The Veritas product installer does not support removing a node. You must removea node manually. The example procedures describe how to remove a node froma cluster with three nodes.
Removing a node from a clusterPerform the following steps to remove a node from a cluster. The procedure canbe done from any node remaining in the cluster or from a remote host.
To remove a node from a cluster
1 Take the Oracle service groups offline (if under VCS control) on the node youwant to remove.
# hagrp -offline oracle_group -sys saturn
2 Stop the applications that use VxFS/CFS mount points and are not configuredunder VCS. Use native application commands to stop the applications.
3 Remove the Oracle RAC database instance from the node.
For instructions, see the Oracle RAC documentation.
4 Remove the Oracle RAC database software from the node.
For instructions, see the Oracle RAC documentation.
5 Stop VCS on the node:
# hastop -local
6 Remove Oracle Clusterware from the node.
For instructions, see the Oracle RAC document.
7 Unmount the VxFS/CFS file systems that are not configured under VCS.
# umount mount_point
Removing a node from SF Oracle RAC clustersRemoving a node from a cluster
482

8 Uninstall SF Oracle RAC from the node using the SF Oracle RAC installer.
# cd /opt/VRTS/install
# ./uninstallsfrac saturn
The installer stops all SF Oracle RAC processes and uninstalls the SF OracleRAC packages.
9 Modify the VCS configuration files on the existing nodes to remove referencesto the deleted node.
See “Modifying the VCS configuration files on existing nodes” on page 483.
Modifying the VCS configuration files on existingnodes
Modify the configuration files on the remaining nodes of the cluster to removereferences to the deleted nodes.
The process involves:
■ Editing the /etc/llthosts file
■ Editing the /etc/gabtab file
■ Modifying the VCS configuration to remove the node
For an example main.cf:
Editing the /etc/llthosts fileOn each of the existing nodes, edit the /etc/llthosts file to remove lines thatcontain references to the removed nodes.
For example, if saturn is the node removed from the cluster, remove the line "2saturn" from the file:
0 galaxy
1 nebula
2 saturn
Change to:
0 galaxy
1 nebula
483Removing a node from SF Oracle RAC clustersModifying the VCS configuration files on existing nodes

Editing the /etc/gabtab fileModify the following command in the /etc/gabtab file to reflect the number ofsystems after the node is removed:
/sbin/gabconfig -c -nN
where N is the number of remaining nodes in the cluster.
For example, with two nodes remaining, the file resembles:
/sbin/gabconfig -c -n2
Modifying the VCS configuration to remove the nodeModify the VCS configuration file main.cf to remove all references to the deletednode.
Use one of the following methods to modify the configuration:
■ Edit the /etc/VRTSvcs/conf/config/main.cf file
This method requires application down time.
■ Use the command line interfaceThis method allows the applications to remain online on all remaining nodes.
The following procedure uses the command line interface and modifies the sampleVCS configuration to remove references to the deleted node. Run the steps in theprocedure from one of the existing nodes in the cluster. The procedure allows youto change the VCS configuration while applications remain online on the remainingnodes.
To modify the VCS configuration using the CLI
1 Back up the /etc/VRTSvcs/conf/config/main.cf file.
# cd /etc/VRTSvcs/conf/config
# cp main.cf main.cf.3node.bak
2 Change the cluster configuration to read-write mode:
# haconf -makerw
3 Remove the node from the AutoStartList attribute of the service group byspecifying the remaining nodes in the desired order:
# hagrp -modify cvm AutoStartList galaxy nebula
Removing a node from SF Oracle RAC clustersModifying the VCS configuration files on existing nodes
484
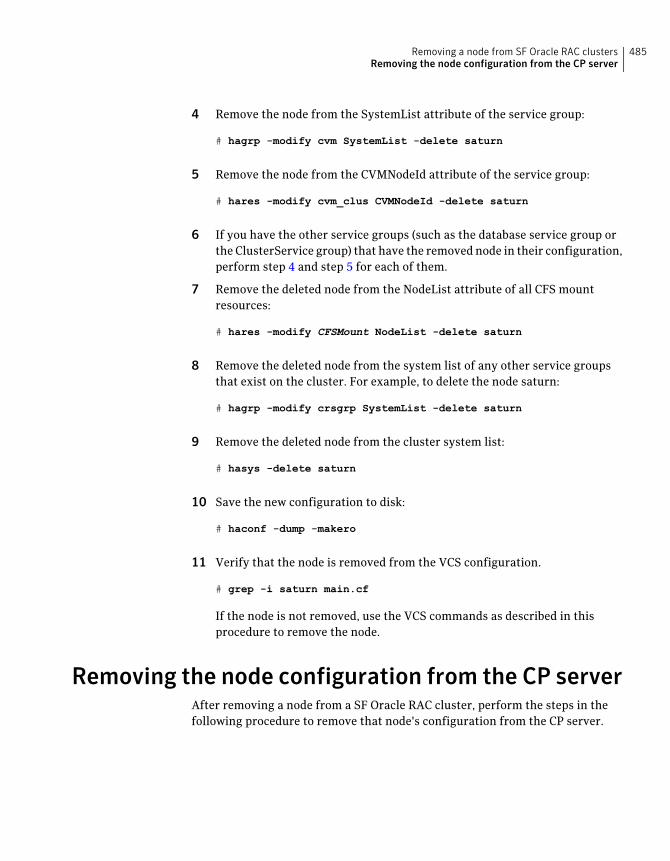
4 Remove the node from the SystemList attribute of the service group:
# hagrp -modify cvm SystemList -delete saturn
5 Remove the node from the CVMNodeId attribute of the service group:
# hares -modify cvm_clus CVMNodeId -delete saturn
6 If you have the other service groups (such as the database service group orthe ClusterService group) that have the removed node in their configuration,perform step 4 and step 5 for each of them.
7 Remove the deleted node from the NodeList attribute of all CFS mountresources:
# hares -modify CFSMount NodeList -delete saturn
8 Remove the deleted node from the system list of any other service groupsthat exist on the cluster. For example, to delete the node saturn:
# hagrp -modify crsgrp SystemList -delete saturn
9 Remove the deleted node from the cluster system list:
# hasys -delete saturn
10 Save the new configuration to disk:
# haconf -dump -makero
11 Verify that the node is removed from the VCS configuration.
# grep -i saturn main.cf
If the node is not removed, use the VCS commands as described in thisprocedure to remove the node.
Removing the node configuration from the CP serverAfter removing a node from a SF Oracle RAC cluster, perform the steps in thefollowing procedure to remove that node's configuration from the CP server.
485Removing a node from SF Oracle RAC clustersRemoving the node configuration from the CP server

Note: The cpsadm command is used to perform the steps in this procedure. Fordetailed information about the cpsadm command, see the Veritas StorageFoundation for Oracle RAC Administrator's Guide.
To remove the node configuration from the CP server
1 Log into the CP server as the root user.
2 View the list of VCS users on the CP server, using the following command:
# cpsadm -s cp_server -a list_users
Where cp_server is the virtual IP/ virtual hostname of the CP server.
3 Remove the VCS user associated with the node you previously removed fromthe cluster.
For CP server in secure mode:
# cpsadm -s cp_server -a rm_user \
-e _HA_VCS_saturn@[email protected] \
-f cps_operator -g vx
For CP server in non-secure mode:
# cpsadm -s cp_server -a rm_user \
-e cpsclient@saturn -f cps_operator -g vx
4 Remove the node entry from the CP server:
# cpsadm -s cp_server -a rm_node -h saturn -c rac_cluster101 -n 2
5 View the list of nodes on the CP server to ensure that the node entry wasremoved:
# cpsadm -s cp_server -a list_nodes
Removing security credentials from the leaving nodeIf the leaving node is part of a cluster that is running in a secure mode, you mustremove the security credentials from node saturn. Perform the following steps.
Removing a node from SF Oracle RAC clustersRemoving security credentials from the leaving node
486

To remove the security credentials
1 Kill the /opt/VRTSat/bin/vxatd process.
2 Remove the root credentials on node saturn.
# vssat deletecred --domain type:domainname --prplname prplname
Updating the Storage Foundation for Databases(SFDB) repository after removing a node
If you are using Database Checkpoints, Database Flashsnap, or SmartTier forOracle in your configuration, update the SFDB repository to remove the referencefor the node after removing the node from the cluster.
Note: If you have not created an SFDB repository, you do not need to perform thefollowing steps.
To update the SFDB repository after removing a node
1 As Oracle user, list the nodes in the cluster:
$ /opt/VRTSdbed/bin/dbed_rept_node -S $ORACLE_SID -o list
2 Run the following command after physically removing the node from thecluster.
For example:
$ /opt/VRTSdbed/bin/dbed_rept_node -S $ORACLE_SID -n NODE -o remove
This completes the removal of the node from the SFDB repository.
Sample configuration file for removing a node fromthe cluster
You may use this sample file as reference information to understand theconfiguration changes involved when you remove a node from a cluster.
The existing sample configuration before removing the node saturn is as follows:
■ The existing cluster rac_cluster101 comprises three nodes galaxy, nebula,and saturn and hosts a single database.
■ The Oracle database is stored on CFS.
487Removing a node from SF Oracle RAC clustersUpdating the Storage Foundation for Databases (SFDB) repository after removing a node

■ The database is managed by the VCS agent for Oracle.The agent starts, stops, and monitors the database.
■ Only one private IP address is configured for Oracle Clusterware. The privateIP address is managed by the PrivNIC agent for high availability.
■ The Oracle Cluster Registry (OCR) and voting disk are stored on CFS.
Note: The following sample file shows in bold the configuration information thatis removed when the node "saturn" is removed from the cluster.
include "types.cf"
include "CFSTypes.cf"
include "CVMTypes.cf"
include "OracleTypes.cf"
include "PrivNIC.cf"
cluster rac_cluster101 (
UserNames = { admin = bopHo }
Administrators = { admin }
UseFence = SCSI3
)
system galaxy (
)
system nebula (
)
system saturn (
)
Note: In the following group oradb1_grp, the saturn node must be removed.
group oradb1_grp (
SystemList = { galaxy = 0, nebula = 1, saturn = 2 }
AutoFailOver = 0
Parallel = 1
AutoStartList = { galaxy, nebula, saturn }
)
Removing a node from SF Oracle RAC clustersSample configuration file for removing a node from the cluster
488

Note: In the following Oracle resource, the saturn node information must beremoved.
Oracle ora1 (
Critical = 0
Sid @galaxy = vrts1
Sid @nebula = vrts2
Sid @saturn = vrts3
Owner = oracle
Home = "/app/oracle/orahome"
StartUpOpt = "SRVCTLSTART"
ShutDownOpt = "SRVCTLSTOP"
)
CFSMount oradata_mnt (
Critical = 0
MountPoint = "/oradata"
BlockDevice = "/dev/vx/dsk/oradatadg/oradatavol"
)
CVMVolDg oradata_voldg (
Critical = 0
CVMDiskGroup = oradatadg
CVMVolume = { oradatavol }
CVMActivation = sw
)
requires group cvm online local firm
ora1 requires oradata_mnt
oradata_mnt requires oradata_voldg
Note: In the following CVM and CVMCluster resources, the saturn node informationmust be removed.
group cvm (
SystemList = { galaxy = 0, nebula = 1, saturn =2}
AutoFailOver = 0
Parallel = 1
AutoStartList = { galaxy, nebula, saturn }
)
489Removing a node from SF Oracle RAC clustersSample configuration file for removing a node from the cluster

Application cssd (
Critical = 0
StartProgram = "/opt/VRTSvcs/rac/bin/cssd-online"
StopProgram = "/opt/VRTSvcs/rac/bin/cssd-offline"
CleanProgram = "/opt/VRTSvcs/rac/bin/cssd-clean"
MonitorProgram = "/opt/VRTSvcs/rac/bin/cssd-monitor"
OnlineRetryLimit = 20
)
CFSMount ocrvote_mnt (
Critical = 0
MountPoint = "/ocrvote"
BlockDevice = "/dev/vx/dsk/ocrvotedg/ocrvotevol"
MountOpt= "mincache=direct"
)
CVMVolDg ocrvote_voldg (
Critical = 0
CVMDiskGroup = ocrvotedg
CVMVolume = { ocrvotevol }
CVMActivation = sw
)
CFSfsckd vxfsckd (
)
CVMCluster cvm_clus (
CVMClustName = rac_cluster101
CVMNodeId = { galaxy = 0, nebula = 1, saturn =2 }
CVMTransport = gab
CVMTimeout = 200
)
CVMVxconfigd cvm_vxconfigd (
Critical = 0
CVMVxconfigdArgs = { syslog }
)
Removing a node from SF Oracle RAC clustersSample configuration file for removing a node from the cluster
490

Note: In the following PrivNIC resource, the saturn node information must beremoved.
PrivNIC ora_priv (
Critical = 0
Device@galaxy = { en1 = 0, en2 = 1}
Device@nebula = { en1 = 0, en2 = 1}
Device@saturn = { en1 = 0, en2 = 1}
Address@galaxy = "192.168.12.1"
Address@nebula = "192.168.12.2"
Address@saturn = "192.168.12.5"
NetMask = "255.255.255.0"
)
cssd requires ocrvote_mnt
cssd requires ora_priv
ocrvote_mnt requires ocrvote_voldg
ocrvote_mnt requires vxfsckd
ocrvote_voldg requires cvm_clus
vxfsckd requires cvm_clus
cvm_clus requires cvm_vxconfigd
491Removing a node from SF Oracle RAC clustersSample configuration file for removing a node from the cluster

Removing a node from SF Oracle RAC clustersSample configuration file for removing a node from the cluster
492

Configuration of disasterrecovery environments
■ Chapter 30. Configuring a campus cluster setup for disaster recovery
■ Chapter 31. Setting up a replicated global cluster
■ Chapter 32. Configuring a global cluster using VVR
7Section

494

Configuring a campuscluster setup for disasterrecovery
This chapter includes the following topics:
■ Requirements for an SF Oracle RAC campus cluster
■ Setting up an SF Oracle RAC campus cluster for disaster recovery
■ Tuning guidelines for campus clusters
■ Best practices for a campus cluster
Requirements for an SF Oracle RAC campus clusterYou will need the following to setup an SF Oracle RAC campus cluster:
■ Hardware requirements for SF Oracle RAC:See “Hardware requirements” on page 46.
■ License requirements: in addition to SF Oracle RAC with HA/DR, you will need:
■ FlashSnap license
■ Site awareness license
With keyless licensing, SF Oracle RAC enterprise keys enable all of the abovefeatures.
30Chapter

Setting up an SF Oracle RAC campus cluster fordisaster recovery
Perform the following high-level tasks to setup an SF Oracle RAC campus cluster:
■ Preparing to set up campus cluster configuration
■ Configuring I/O fencing to prevent data corruption
■ Preparing to install Oracle RAC Clusterware and database binaries
■ Configuring VxVM disk groups for campus cluster
■ Installing Oracle RAC Clusterware and database binaries
■ Configuring VCS service groups
The sample configuration used to illustrate the configuration procedures includesa four-node SF Oracle RAC campus cluster with two nodes at each site. Each nodehas SF Oracle RAC 5.1 Service Pack 1 Platform Release 1 on AIX.
Table 30-1 Sample setup for campus cluster
Hardware descriptionSite
Servers: galaxy and nebula
Shared LUNs:
disk01
disk02
disk03
disk04 (used as coordinator disk)
disk5
Site 1: SFRAC1
Servers: mercury and jupiter
Shared LUNs:
disk06
disk07
disk08
disk09 (used as coordinator disk)
Site 2: SFRAC2
Shared LUN disk10 (used as coordinatordisk)
Site 3
Configuring a campus cluster setup for disaster recoverySetting up an SF Oracle RAC campus cluster for disaster recovery
496

Preparing to set up a campus clusterThe following preparation must be completed before configuring the campuscluster.
To prepare to set up a campus cluster
1 Configure the physical infrastructure for campus cluster:
■ Set up access to the local storage arrays and to remote storage arrays oneach node. The storage link will extend to the third site as well.
■ Set up the private heartbeat networkSee the Veritas Cluster Server Administrator's Guide
2 Install the operating system on all the nodes of the cluster.
See your operating system documenation.
3 Install and configure SF Oracle RAC on all nodes on both the sites.
See “About configuring SF Oracle RAC” on page 123.
In the sample setup, install and configure SF Oracle RAC 5.1 Service Pack 1Platform Release 1 on all four nodes.
Configuring VxVM disk groups for Oracle RAC on a campus clusterAfter configuring I/O fencing for data integrity, you must configure the VxVMdisk groups for a campus cluster before installing Oracle RAC by configuringVxVM disk groups for remote mirroring.
To configure VxVM disk groups for Oracle RAC on a campus cluster
1 Initialize the disks as CDS disks
# vxdisksetup -i disk01 format=cdsdisk
# vxdisksetup -i disk02 format=cdsdisk
# vxdisksetup -i disk03 format=cdsdisk
# vxdisksetup -i disk05 format=cdsdisk
# vxdisksetup -i disk06 format=cdsdisk
# vxdisksetup -i disk07 format=cdsdisk
# vxdisksetup -i disk08 format=cdsdisk
2 Set the site name for each host:
# vxdctl set site=sitename
The site name is stored in the /etc/vx/volboot file. To display the site names:
# vxdctl list | grep siteid
497Configuring a campus cluster setup for disaster recoverySetting up an SF Oracle RAC campus cluster for disaster recovery

For example, for a four node cluster with two nodes at each site, mark thesites as follows:
On the nodes at first site:
# vxdctl set site= SFRAC1
On the nodes at second site:
# vxdctl set site= SFRAC2
3 Set the site name for all the disks in an enclosure.
# vxdisk settag site=sitename encl:enclosure
4 Run the following command if you want to tag only the specific disks:
# vxdisk settag site=sitename disk
For example:
# vxdisk settag site=SFRAC1 disk01
# vxdisk settag site=SFRAC1 disk02
# vxdisk settag site=SFRAC1 disk03
# vxdisk settag site=SFRAC2 disk06
# vxdisk settag site=SFRAC2 disk08
5 Verify that the disks are registered to a site.
# vxdisk listtag
For example:
# vxdisk listtag
DEVICE NAME VALUE
disk01 site SFRAC1
disk02 site SFRAC1
disk03 site SFRAC1
disk06 site SFRAC2
disk08 site SFRAC2
6 Create a disk group for OCR and Vote Disks and another for Oracle data, withdisks picked from both the sites. While the example below shows a single diskgroup, you can create as many as you need.
# vxdg -s init ocrvotedg disk05 disk07
# vxdg -s init oradatadg disk01 disk06
Configuring a campus cluster setup for disaster recoverySetting up an SF Oracle RAC campus cluster for disaster recovery
498

For the disks used in ocrvotedg, do not set site consistency to on.
7 Enable site-based allocation on the disk groups for each site.
# vxdg -g oradata addsite SFRAC1
# vxdg -g oradata addsite SFRAC2
8 Set site consistency on the disk groups.
# vxdg -g oradatadg set siteconsistent=on
# vxedit -g oradatadg set dgdetpolicy=global
# vxedit -g oradatadg set dgfailpolicy=leave
# vxedit -g ocrvotedg set dgdetpolicy=global
# vxedit -g ocrvotedg set dgfailpolicy=leave
9 If you are using an enclosure, set the tag on the enclosure for both sites.
# vxdg -o retain -g oradatadg setting encl:3pardata0 site=SFRAC1
# vxdg -o retain -g oradatadg setting encl:3pardata1 site=SFRAC2
10 Create one or more mirrored volumes in the disk group.
# vxassist -g ocrvotedg make ocrvotevol 2048m nmirror=2
# vxassist -g oradatadg make oradatavol 10200m nmirror=2
With the Site Awareness license installed on all hosts, the volume createdhas the following characteristics by default.
■ The all sites attribute is set to ON; the volumes have at least one mirrorat each site.
■ The volumes are automatically mirrored across sites.
■ The read policy (rdpol) is set to siteread.
■ The volumes inherit the site consistency value that is set on the disk group.
11 From the CVM master, start the volumes for all the disk groups.
# vxvol -g ocrvotedg startall
# vxvol -g oradatadg startall
12 Create a file system on each volume and mount the same.
# mkfs -F vxfs /dev/vx/rdsk/ocrvotedg/ocrvotevol
499Configuring a campus cluster setup for disaster recoverySetting up an SF Oracle RAC campus cluster for disaster recovery

# mkfs -F vxfs /dev/vx/rdsk/oradatadg/oradatavol
# mount -F vxfs -o cluster /dev/vx/dsk/ocrvotedg/ocrvotevol /ocr
# mount - vxfs -o cluster /dev/vx/dsk/oradatadg/oradatavol /oradata
13 Touch two files, one for OCR and another for Vote Disk.
# touch /ocr/ocr /ocr/vote
Note: One Vote Disk is sufficient since it is already mirrored by VxVM.
Tuning guidelines for campus clustersAn important consideration while tuning an SF Oracle RAC campus cluster issetting the LLT peerinact time. Follow the guidelines below to determine theoptimum value of peerinact time:
■ Calculate the roundtrip time using lltping (1M).
■ Evaluate LLT heartbeat time as half of the round trip time.
■ Set the LLT peer trouble time as 2-4 times the heartbeat time.
■ LLT peerinact time should be set to be more than 4 times the heart beat time.
Best practices for a campus clusterThe following best practices ensure a robust SF Oracle RAC campus cluster:
■ Tag all the mirrored volumes in the campus cluster with appropriate sitenames. VxVM allocates storage from the correct site when creating or resizinga volume and when changing a volume’s layout if the volume is tagged withsite name.
■ All volumes that have data required by the application must be evenly mirrored.Each site must have at least one mirror of all volumes hosting application data,including the FlashSnap log volume.
■ Do not enable site consistency on VxVM snapshot volumes.
■ Use redundant links for storage and private interconnects. DWDM can be usedfor storage and heartbeat together. Another redundant DWDM link can beused to prevent single point of failure. Separate switches and multiplexer /de-multiplexer devices should be used.
Configuring a campus cluster setup for disaster recoveryTuning guidelines for campus clusters
500

■ Use Coordination Point Server as the third coordination point.
■ Use the procedure for online replacement of coordination points, to replacedisk based or Coordination Point Server based coordination points.
501Configuring a campus cluster setup for disaster recoveryBest practices for a campus cluster

Configuring a campus cluster setup for disaster recoveryBest practices for a campus cluster
502

Setting up a replicatedglobal cluster
This chapter includes the following topics:
■ Replication in the SF Oracle RAC environment
■ Requirements for SF Oracle RAC global clusters
■ About setting up a global cluster in an SF Oracle RAC environment
■ Configuring a cluster at the primary site
■ Configuring a cluster at the secondary site
■ Configuring replication on clusters at both sites
■ Modifying the ClusterService group for global clusters
■ Defining the remote cluster and heartbeat objects
■ Configuring the VCS service groups for global clusters
Replication in the SF Oracle RAC environmentYou can set up a primary SF Oracle RAC cluster for replication to a secondary SFOracle RAC cluster by configuring global VCS service groups and using a replicationtechnology. The Oracle RAC cluster at the secondary site can be a single nodecluster. For example, you can have a two-node cluster on the primary site and atwo-node or single-node cluster on the secondary site.
You can use one of the following replication technologies:
31Chapter

■ Veritas Volume Replicator (VVR), which provides host-based volumereplication. Using VVR you can replicate data volumes on a shared disk groupin SF Oracle RAC.
■ Supported hardware-based replication technologies. Using hardware-basedreplication you can replicate data from a primary array to a secondary array.
■ Using SF Oracle RAC with VVR you can run a fire drill to verify the disasterrecovery capability of your configuration.See the Veritas Storage Foundation for Oracle RAC Administrator's Guide.
Requirements for SF Oracle RAC global clustersReview the requirements information to make sure your configuration is supportedfor SF Oracle RAC.
For product licensing information:
See “About Veritas product licensing” on page 73.
Supported software and hardware for SF Oracle RACFor supported hardware and software:
■ See “Important preinstallation information” on page 45.
■ See the current compatibility list in the Veritas Technical Support website toconfirm the compatibility of your hardware:http://entsupport.symantec.com/docs/283161
Supported replication technologies for SF Oracle RACSF Oracle RAC supports the following replication technologies through the useof Veritas replication agents:
Table 31-1 Supported replication options for SF Oracle RAC global clusters
Supported softwareSupported modesReplicationtechnology
Host-based replication■ Asynchronousreplication
■ Synchronousreplication
Veritas VolumeReplicator (VVR)
Supporting agents
■ RVGShared
■ RVGSharedPri
■ RVGLogOwner
Setting up a replicated global clusterRequirements for SF Oracle RAC global clusters
504
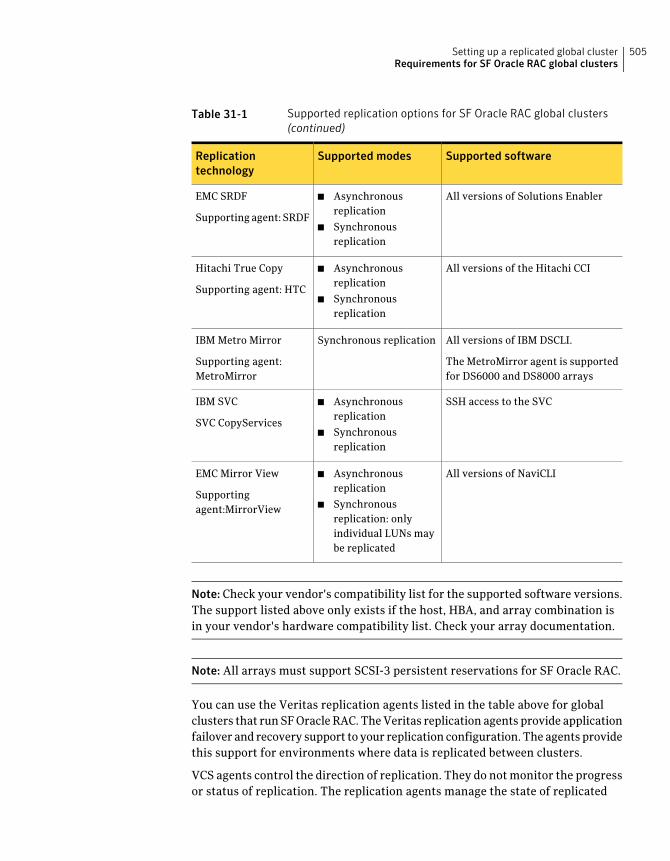
Table 31-1 Supported replication options for SF Oracle RAC global clusters(continued)
Supported softwareSupported modesReplicationtechnology
All versions of Solutions Enabler■ Asynchronousreplication
■ Synchronousreplication
EMC SRDF
Supporting agent: SRDF
All versions of the Hitachi CCI■ Asynchronousreplication
■ Synchronousreplication
Hitachi True Copy
Supporting agent: HTC
All versions of IBM DSCLI.
The MetroMirror agent is supportedfor DS6000 and DS8000 arrays
Synchronous replicationIBM Metro Mirror
Supporting agent:MetroMirror
SSH access to the SVC■ Asynchronousreplication
■ Synchronousreplication
IBM SVC
SVC CopyServices
All versions of NaviCLI■ Asynchronousreplication
■ Synchronousreplication: onlyindividual LUNs maybe replicated
EMC Mirror View
Supportingagent:MirrorView
Note: Check your vendor's compatibility list for the supported software versions.The support listed above only exists if the host, HBA, and array combination isin your vendor's hardware compatibility list. Check your array documentation.
Note: All arrays must support SCSI-3 persistent reservations for SF Oracle RAC.
You can use the Veritas replication agents listed in the table above for globalclusters that run SF Oracle RAC. The Veritas replication agents provide applicationfailover and recovery support to your replication configuration. The agents providethis support for environments where data is replicated between clusters.
VCS agents control the direction of replication. They do not monitor the progressor status of replication. The replication agents manage the state of replicated
505Setting up a replicated global clusterRequirements for SF Oracle RAC global clusters

devices that are attached to SF Oracle RAC nodes. The agents make sure that thesystem which has the resource online also has safe and exclusive access to theconfigured devices.
This information is current at the time this document is released. For more currentinformation on the replicated agents, see:
■ VeritasClusterServerAgent forEMCSRDFInstallationandConfigurationGuide
■ VeritasClusterServerAgent forHitachiTrueCopy InstallationandConfigurationGuide
■ VeritasClusterServerAgent for IBMMetroMirror InstallationandConfigurationGuide
■ Veritas Cluster Server Agent for IBMSVC Installation and ConfigurationGuide
■ VeritasClusterServerAgent forEMCMirrowViewInstallationandConfigurationGuide
■ Veritas Cluster Server Agent for Oracle Data Guard Installation andConfiguration Guide
■ Technical Support TechNote for the latest updates or software issues forreplication agents:http://entsupport.symantec.com/docs/282004htm
About setting up a global cluster in an SF Oracle RACenvironment
Configuring a global cluster for Oracle RAC requires the coordination of manycomponent setup tasks. The procedures provided in this document are guidelines.
The tasks required to set up a global cluster:
■ Configure an SF Oracle RAC cluster at the primary site
■ Configure an SF Oracle RAC cluster at the secondary site
■ Configure replication on clusters at both sites
■ Configure VCS service groups for replication
■ Test the HA/DR configuration
■ Upon successful testing, bring the environment into production
Some SF Oracle RAC HA/DR configuration tasks may require adjustmentsdepending upon your particular starting point, environment, and configuration.Review the installation requirements and sample cluster configuration files forprimary and secondary clusters.
Setting up a replicated global clusterAbout setting up a global cluster in an SF Oracle RAC environment
506

For requirements:
For instructions for configuring AT in a global cluster:
See the Veritas Cluster Server Administrator's Guide
Configuring a cluster at the primary siteYou can use an existing SF Oracle RAC cluster or you can install a new SF OracleRAC cluster for your primary site.
For planning information:
See “Typical configuration of SF Oracle RAC global clusters for disaster recovery”on page 43.
If you are using an existing cluster as the primary and you want to set up a globalcluster, skip the steps below and proceed to configure your secondary cluster.
See “Configuring a cluster at the secondary site” on page 509.
Note: You must have a GCO license enabled for a global cluster. If you are usingVVR for replication, you must have a VVR license enabled.
If you do not have an existing cluster and you are setting up two new sites for anSF Oracle RAC global cluster, follow the steps below.
To set up the cluster and database at the primary site
1 Install and configure servers and storage.
2 If you are using hardware-based replication, install the sofware for managingyour array.
3 Verify that you have the correct installation options enabled, whether youare using keyless licensing or installing keys manually. You must have theGCO option for a global cluster. If you are using VVR for replication, you musthave it enabled.
4 Install and configure SF Oracle RAC. Prepare for your installation accordingto your configuration needs.
For preparation:
For installation:
See “About installing SF Oracle RAC ” on page 85.
5 For a multi-node cluster, configure I/O fencing.
507Setting up a replicated global clusterConfiguring a cluster at the primary site
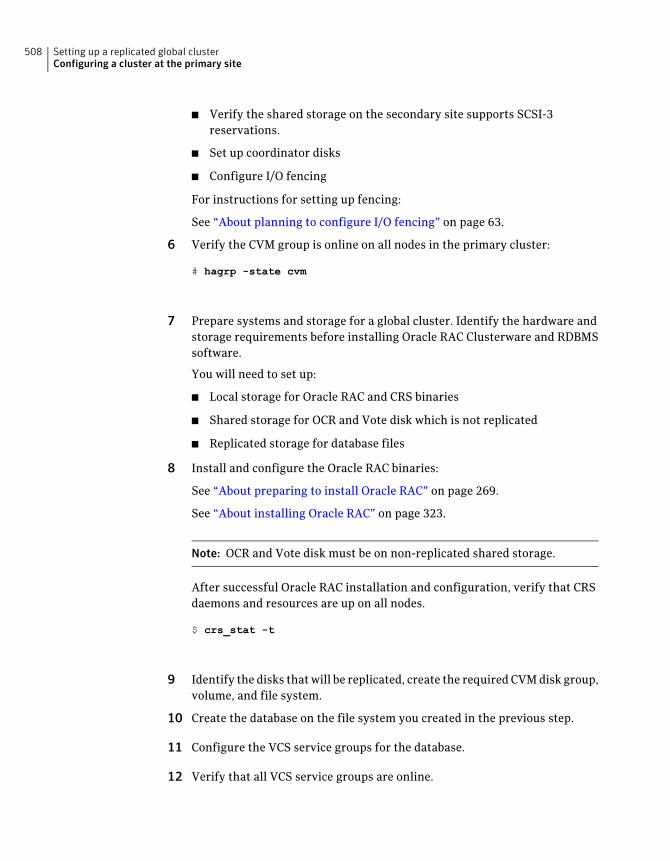
■ Verify the shared storage on the secondary site supports SCSI-3reservations.
■ Set up coordinator disks
■ Configure I/O fencing
For instructions for setting up fencing:
See “About planning to configure I/O fencing” on page 63.
6 Verify the CVM group is online on all nodes in the primary cluster:
# hagrp -state cvm
7 Prepare systems and storage for a global cluster. Identify the hardware andstorage requirements before installing Oracle RAC Clusterware and RDBMSsoftware.
You will need to set up:
■ Local storage for Oracle RAC and CRS binaries
■ Shared storage for OCR and Vote disk which is not replicated
■ Replicated storage for database files
8 Install and configure the Oracle RAC binaries:
See “About preparing to install Oracle RAC” on page 269.
See “About installing Oracle RAC” on page 323.
Note: OCR and Vote disk must be on non-replicated shared storage.
After successful Oracle RAC installation and configuration, verify that CRSdaemons and resources are up on all nodes.
$ crs_stat -t
9 Identify the disks that will be replicated, create the required CVM disk group,volume, and file system.
10 Create the database on the file system you created in the previous step.
11 Configure the VCS service groups for the database.
12 Verify that all VCS service groups are online.
Setting up a replicated global clusterConfiguring a cluster at the primary site
508
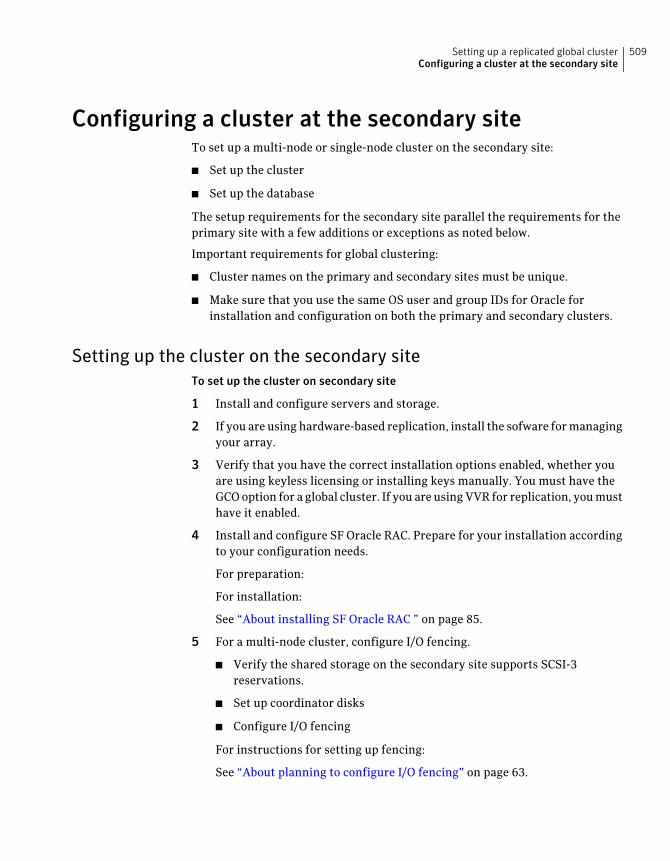
Configuring a cluster at the secondary siteTo set up a multi-node or single-node cluster on the secondary site:
■ Set up the cluster
■ Set up the database
The setup requirements for the secondary site parallel the requirements for theprimary site with a few additions or exceptions as noted below.
Important requirements for global clustering:
■ Cluster names on the primary and secondary sites must be unique.
■ Make sure that you use the same OS user and group IDs for Oracle forinstallation and configuration on both the primary and secondary clusters.
Setting up the cluster on the secondary siteTo set up the cluster on secondary site
1 Install and configure servers and storage.
2 If you are using hardware-based replication, install the sofware for managingyour array.
3 Verify that you have the correct installation options enabled, whether youare using keyless licensing or installing keys manually. You must have theGCO option for a global cluster. If you are using VVR for replication, you musthave it enabled.
4 Install and configure SF Oracle RAC. Prepare for your installation accordingto your configuration needs.
For preparation:
For installation:
See “About installing SF Oracle RAC ” on page 85.
5 For a multi-node cluster, configure I/O fencing.
■ Verify the shared storage on the secondary site supports SCSI-3reservations.
■ Set up coordinator disks
■ Configure I/O fencing
For instructions for setting up fencing:
See “About planning to configure I/O fencing” on page 63.
509Setting up a replicated global clusterConfiguring a cluster at the secondary site

6 For a single-node cluster, do not enable I/O fencing. Fencing will run indisabled mode.
7 Prepare systems and storage for a global cluster. Identify the hardware andstorage requirements before installing Oracle RAC Clusterware and RDBMSsoftware.
You will need to set up:
■ Local storage for Oracle RAC and CRS binaries
■ Shared storage for OCR and Vote disk which is not replicated
■ Replicated storage for database files
8 Install and configure the Oracle RAC binaries:
See “About preparing to install Oracle RAC” on page 269.
See “About installing Oracle RAC” on page 323.
Note: OCR and Vote disk must be on non-replicated shared storage.
After successful Oracle RAC installation and configuration, verify that CRSdaemons and resources are up on all nodes.
$ crs_stat -t
Setting up the database for the secondary siteTo set up the database for the secondary site
1 Do not create the database. The database will be replicated from the primarysite.
■ If you are using hardware-based replication, the database, disk group, andvolumes will be replicated from the primary site.Create the directory for the CFS mount point which will host the databasedata and control files.
■ If you are using VVR for replication, create an identical disk group andvolumes for the replicated content with the same names and size as listedon the primary site.
Setting up a replicated global clusterConfiguring a cluster at the secondary site
510

Create the directories for the CFS mount points as they are on the primarysite. These will be used to host the database and control files when thefailover occurs and the secondary is promoted to become the primary site.
2 Copy the init$ORACLE_SID.ora file from $ORACLE_HOME/dbs at the primaryto $ORACLE_HOME/dbs at the secondary.
3 Create the following subdirectories on the secondary site as you did on theprimary site:
For Oracle RAC 10g:
$ mkdir -p /$ORACLE_BASE/admin/adump
$ mkdir -p /$ORACLE_BASE/admin/database_name/bdump
$ mkdir -p /$ORACLE_BASE/admin/database_name/cdump
$ mkdir -p /$ORACLE_BASE/admin/database_name/dpdump
$ mkdir -p /$ORACLE_BASE/admin/database_name/hdump
$ mkdir -p /$ORACLE_BASE/admin/database_name/udump
$ mkdir -p /$ORACLE_BASE/admin/database_name/pfile
For Oracle 11gR1:
$ mkdir -p $ORACLE_BASE/admin
$ mkdir -p $ORACLE_BASE/admin $database_name
$ cd $ORACLE_BASE/admin/$database_name
$ mkdir adump dpdump hdump pfile
For oracle 11gR2 release only, on both the primary and secondary sites, editthe file:
$ORACLE_HOME/dbs/init$ORACLE_SID.ora
as
remote_listener = 'SCAN_NAME:1521'
SPFILE=<SPFILE NAME>
4 Configure listeners on the secondary site with same name as on primary. Youcan do this by one of the following methods:
■ Copy the listener.ora and tnsnames.ora files from the primary site andupdate the names as appropriate for the secondary site.
■ Use Oracle's netca utility to to configure the listener.ora and tnsnames.orafiles on the secondary site.
511Setting up a replicated global clusterConfiguring a cluster at the secondary site

5 On the secondary site, register the database using the srvctl command asOracle user.
$ srvctl add database -d database_name -o oracle_home -p sp_file
To prevent automatic database instance restart, change the Managementpolicy for the database (automatic, manual) to MANUAL using the srvctl
command:
$ srvctl modify database -d database_name -y manual
6 Register the instances using srvctl command. Execute the following commandon each node:
$ srvctl add instance -d database_name \
-i instance_name -n node-name
Configuring replication on clusters at both sitesYou must configure replication for the database files. Once replication isconfigured, make sure it is functioning correctly by testing before proceeding.
To configure replication at both sites
1 If you are using hardware-based replication, make sure that the replicationmanagement software for managing replication is installed on all nodes inboth clusters.
2 At both sites, identify the disks on which the database resides at the primarysite and associate them with the corresponding disks at the secondary site.
For VVR:
See “Setting up replication using VVR on the primary site” on page 520.
For Hardware-based replication:
See your hardware documentation for details on setting up replication betweenthe two sites.
3 Start replication between the sites.
For VVR:
See “Starting replication of Oracle RAC database volume” on page 527.
See your hardware documentation for the appropriate procedures.
Setting up a replicated global clusterConfiguring replication on clusters at both sites
512

Modifying theClusterService group for global clustersYou have configured VCS service groups for SF Oracle RAC on each cluster. Eachcluster requires an additional virtual IP address associated with the cluster forcross-cluster communication. The VCS installation and creation of theClusterService group typically involves defining this IP address.
Configure a global cluster by setting:
■ Heartbeat
■ Wide area cluster (wac)
■ GCO IP (gcoip)
■ remote cluster resources
See theVeritasClusterServerUser’sGuide for complete details on global clustering.
Modifying the global clustering configuration using the wizardThe global clustering wizard completes the following tasks:
■ Validates the ability of the current configuration to support a global clusterenvironment.
■ Creates the components that enable the separate clusters, each of whichcontains a different set of GAB memberships, to connect and operate as asingle unit.
■ Creates the ClusterService group, or updates an existing ClusterService group.
Run the global clustering configuration wizard on each of the clusters; you musthave the global clustering license in place on each node in the cluster.
To modify the ClusterService group for global clusters using the global clusteringwizard
1 On the primary cluster, start the GCO Configuration wizard:
# /opt/VRTSvcs/bin/gcoconfig
2 The wizard discovers the NIC devices on the local system and prompts youto enter the device to be used for the global cluster. Specify the name of thedevice and press Enter.
3 If you do not have NIC resources in your configuration, the wizard asks youwhether the specified NIC will be the public NIC used by all the systems. Entery if it is the public NIC; otherwise enter n. If you entered n, the wizard promptsyou to enter the names of NICs on all systems.
513Setting up a replicated global clusterModifying the ClusterService group for global clusters

4 Enter the virtual IP address for the local cluster.
5 If you do not have IP resources in your configuration, the wizard promptsyou for the netmask associated with the virtual IP. The wizard detects thenetmask; you can accept the suggested value or enter another one.
The wizard starts running commands to create or update the ClusterServicegroup. Various messages indicate the status of these commands. After runningthese commands, the wizard brings the ClusterService group online.
Defining the remote cluster and heartbeat objectsAfter configuring global clustering, add the remote cluster object to define the IPaddress of the cluster on the secondary site, and the heartbeat object to definethe cluster-to-cluster heartbeat.
Heartbeats monitor the health of remote clusters. VCS can communicate with theremote cluster only after you set up the heartbeat resource on both clusters.
To define the remote cluster and heartbeat
1 On the primary site, enable write access to the configuration:
# haconf -makerw
2 Define the remote cluster and its virtual IP address.
In this example, the remote cluster is rac_cluster102 and its IP address is10.11.10.102:
# haclus -add rac_cluster102 10.11.10.102
3 Complete step 1 and step 2 on the secondary site using the name and IPaddress of the primary cluster.
In this example, the primary cluster is rac_cluster101 and its IP address is10.10.10.101:
# haclus -add rac_cluster101 10.10.10.101
Setting up a replicated global clusterDefining the remote cluster and heartbeat objects
514

4 On the primary site, add the heartbeat object for the cluster. In this example,the heartbeat method is ICMP ping.
# hahb -add Icmp
5 Define the following attributes for the heartbeat resource:
■ ClusterList lists the remote cluster.
■ Arguments enables you to define the virtual IP address for the remotecluster.
For example:
# hahb -modify Icmp ClusterList rac_cluster102
# hahb -modify Icmp Arguments 10.11.10.102 -clus rac_cluster102
6 Save the configuration and change the access to read-only on the local cluster:
# haconf -dump -makero
7 Complete step 4-6 on the secondary site using appropriate values to definethe cluster on the primary site and its IP as the remote cluster for thesecondary cluster.
515Setting up a replicated global clusterDefining the remote cluster and heartbeat objects

8 Verify cluster status with the hastatus -sum command on both clusters.
# hastatus -sum
The final output should resemble the output displayed below, fromrac_cluster101 (primary):
# hastatus -sum
.........
-- WAN HEARTBEAT STATE
-- Heartbeat To State
L Icmp rac_cluster102 ALIVE
-- REMOTE CLUSTER STATE
-- Cluster State
M rac_cluster102 RUNNING
-- REMOTE SYSTEM STATE
-- cluster:system State Frozen
N rac_cluster102:mercury RUNNING 0
N rac_cluster102:jupiter RUNNING 0
Setting up a replicated global clusterDefining the remote cluster and heartbeat objects
516
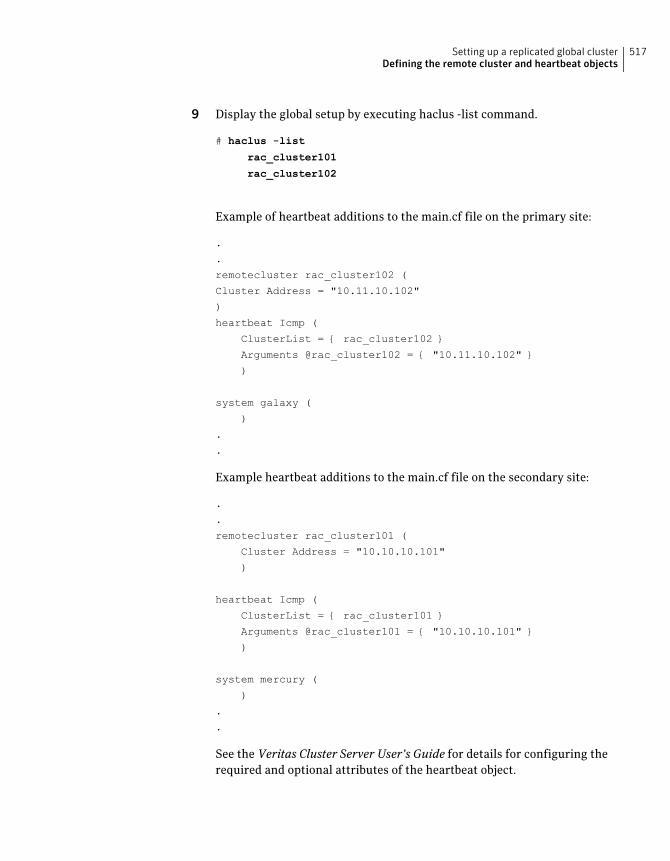
9 Display the global setup by executing haclus -list command.
# haclus -list
rac_cluster101
rac_cluster102
Example of heartbeat additions to the main.cf file on the primary site:
.
.
remotecluster rac_cluster102 (
Cluster Address = "10.11.10.102"
)
heartbeat Icmp (
ClusterList = { rac_cluster102 }
Arguments @rac_cluster102 = { "10.11.10.102" }
)
system galaxy (
)
.
.
Example heartbeat additions to the main.cf file on the secondary site:
.
.
remotecluster rac_cluster101 (
Cluster Address = "10.10.10.101"
)
heartbeat Icmp (
ClusterList = { rac_cluster101 }
Arguments @rac_cluster101 = { "10.10.10.101" }
)
system mercury (
)
.
.
See the Veritas Cluster Server User’s Guide for details for configuring therequired and optional attributes of the heartbeat object.
517Setting up a replicated global clusterDefining the remote cluster and heartbeat objects

Configuring theVCS service groups for global clustersTo configure VCS service groups for global clusters
1 Configure and enable global groups for databases and resources.
■ Configure VCS service groups at both sites.
■ Configure the replication agent at both sites.
■ Make the RAC service group a global service group, enabling failoveracross clusters.
■ For example:
2 To test real data in an environment where HA/DR has been configured,schedule a planned migration to the secondary site for testing purposes.
For example:
See “Migrating the role of primary site to the secondary site” on page 543.
See “Migrating the role of new primary site back to the original primary site”on page 544.
3 Upon successful testing, bring the environment into production.
For more information see:
■ Veritas Cluster Server Installation Guide
■ VeritasClusterServerAgent forEMCSRDFInstallationandConfigurationGuide
■ VeritasClusterServerAgent forHitachiTrueCopy InstallationandConfigurationGuide
■ VeritasClusterServerAgent for IBMMetroMirror InstallationandConfigurationGuide
■ VeritasClusterServerAgent forEMCMirrowViewInstallationandConfigurationGuide
■ Veritas Cluster Server Agent for IBMSVC Installation and ConfigurationGuide
■ VeritasClusterServerAgents forVeritasVolumeReplicatorConfigurationGuide
■ Technical Support TechNote for the latest updates or software issues forreplication agents:http://entsupport.symantec.com/docs/282004htm
For complete details on VVR in a shared disk environment:
See the Veritas Volume Replicator Administrator’s Guide.
Setting up a replicated global clusterConfiguring the VCS service groups for global clusters
518

Configuring a global clusterusing VVR
This chapter includes the following topics:
■ About configuring global clustering using VVR
■ Setting up replication using VVR on the primary site
■ Setting up replication using VVR on the secondary site
■ Starting replication of Oracle RAC database volume
■ Configuring VCS to replicate the database volume using VVR
■ Using VCS commands on SF Oracle RAC global clusters
■ Using VVR commands on SF Oracle RAC global clusters
About configuring global clustering using VVRBefore configuring clusters for global clustering, make sure both clusters haveproduct and database software installed and configured.
Verify that you have the correct installation options enabled, whether you areusing keyless licensing or installing keys manually. You must have the GCO optionfor a global cluster and VVR enabled.
See “About Veritas product licensing” on page 73.
After setting up two clusters running SF Oracle RAC, you can configure a globalcluster environment with VVR. You must modify both cluster configurations tosupport replication in the global cluster environment.
Configuring SF Oracle RAC for global clusters requires:
32Chapter

■ Setting up both clusters as part of a global cluster environment.See “About setting up a global cluster in an SF Oracle RAC environment”on page 506.
■ Setting up replication for clusters at both sites.See “Setting up replication using VVR on the primary site” on page 520.See “Setting up replication using VVR on the secondary site” on page 523.
■ Starting replication of the database.See “Starting replication of Oracle RAC database volume” on page 527.
■ Configuring VCS for replication on clusters at both sites.See “Configuring VCS to replicate the database volume using VVR” on page 529.
Setting up replication using VVR on the primary siteSetting up replication with VVR in a global cluster environment involves thefollowing tasks:
■ If you have not already done so, create a disk group on the storage on theprimary site.For example:
■ Creating the Storage Replicator Log (SRL) in the disk group for the database.See “Creating the SRL volume on the primary site” on page 520.
■ Creating the Replicated Volume Group (RVG) on the primary site.See “Setting up the Replicated Volume Group (RVG) on the primary site”on page 521.
Creating the SRL volume on the primary siteCreate the SRL. The SRL is a volume in the RVG. The RVG also holds the datavolumes for replication.
■ The data volume on the secondary site has the same name and the same sizeas the data volume on the primary site.
■ The SRL on the secondary site has the same name and the same size as theSRL on the primary site.
■ The data volume and SRL volume should exist in the same disk group.
■ If possible, create SRLs on disks without other volumes.
■ Mirror SRLs and data volumes in the absence of hardware-based mirroring.
Configuring a global cluster using VVRSetting up replication using VVR on the primary site
520

To create the SRL volume on the primary site
1 On the primary site, determine the size of the SRL volume based on theconfiguration and amount of use.
See the Veritas Volume Replicator documentation for details.
2 Using the following command, determine whether a node is the master orthe slave:
# vxdctl -c mode
3 From the master node, issue the following command:
# vxassist -g oradatadg make rac1_srl 1500M nmirror=2 disk4 disk5
# vxassist -g sybdata_101 make syb_srl 1500M nmirror=2 disk4 disk5
4 Using the following command, start the SRL volume by starting all volumesin the disk group:
# vxvol -g oradatadg startall
Setting up the Replicated Volume Group (RVG) on the primary siteBefore creating the RVG on the primary site, make sure the volumes and CVMgroup are active and online.
521Configuring a global cluster using VVRSetting up replication using VVR on the primary site
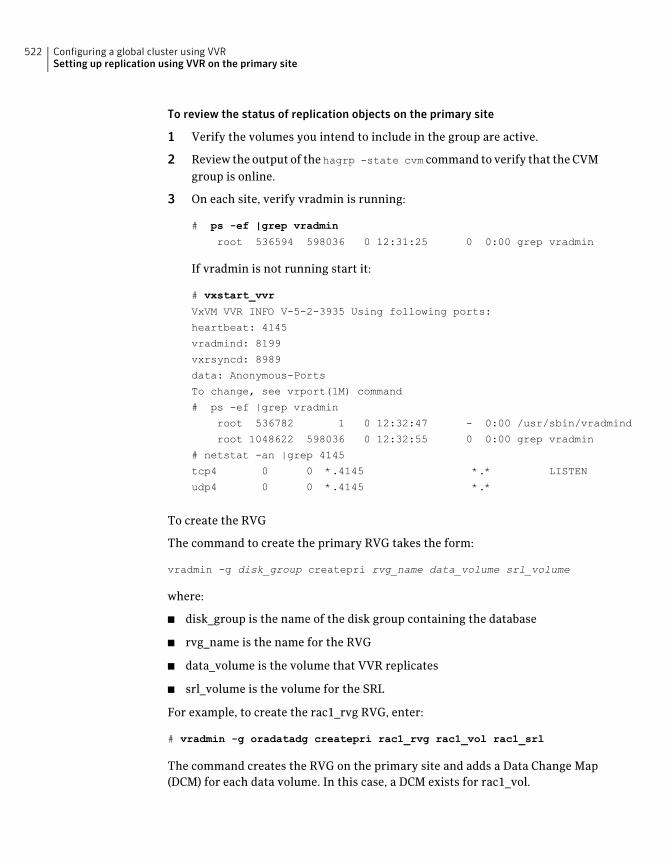
To review the status of replication objects on the primary site
1 Verify the volumes you intend to include in the group are active.
2 Review the output of the hagrp -state cvm command to verify that the CVMgroup is online.
3 On each site, verify vradmin is running:
# ps -ef |grep vradmin
root 536594 598036 0 12:31:25 0 0:00 grep vradmin
If vradmin is not running start it:
# vxstart_vvr
VxVM VVR INFO V-5-2-3935 Using following ports:
heartbeat: 4145
vradmind: 8199
vxrsyncd: 8989
data: Anonymous-Ports
To change, see vrport(1M) command
# ps -ef |grep vradmin
root 536782 1 0 12:32:47 - 0:00 /usr/sbin/vradmind
root 1048622 598036 0 12:32:55 0 0:00 grep vradmin
# netstat -an |grep 4145
tcp4 0 0 *.4145 *.* LISTEN
udp4 0 0 *.4145 *.*
To create the RVG
The command to create the primary RVG takes the form:
vradmin -g disk_group createpri rvg_name data_volume srl_volume
where:
■ disk_group is the name of the disk group containing the database
■ rvg_name is the name for the RVG
■ data_volume is the volume that VVR replicates
■ srl_volume is the volume for the SRL
For example, to create the rac1_rvg RVG, enter:
# vradmin -g oradatadg createpri rac1_rvg rac1_vol rac1_srl
The command creates the RVG on the primary site and adds a Data Change Map(DCM) for each data volume. In this case, a DCM exists for rac1_vol.
Configuring a global cluster using VVRSetting up replication using VVR on the primary site
522

Setting up replication using VVR on the secondarysite
To create objects for replication on the secondary site, use the vradmin commandwith the addsec option. To set up replication on the secondary site, perform thefollowing tasks:
■ If you have not already done so, create a disk group to hold data volume, SRL,and RVG on the storage on the secondary site.For example:
■ Create volumes for the database and SRL on the secondary site.See “Creating the data and SRL volumes on the secondary site” on page 523.
■ Edit the /etc/vx/vras/.rdg file on the secondary site.See “Editing the /etc/vx/vras/.rdg files” on page 524.
■ Use resolvable virtual IP addresses that set network RLINK connections ashost names of the primary and secondary sites.See “Setting up IP addresses for RLINKs on each cluster” on page 524.
■ Create the replication objects on the secondary site.See “Setting up the disk group on secondary site for replication” on page 525.
Creating the data and SRL volumes on the secondary siteNote the following when creating volumes for the data and SRL:
■ The sizes and names of the volumes must reflect the sizes and names of thecorresponding volumes in the primary site.
■ Create the data and SRL volumes on different disks in the disk group. Use thevxdisk -g diskgroup list command to list the disks in the disk group.
■ Mirror the volumes.
To create the data and SRL volumes on the secondary site
1 In the disk group created for the Oracle RAC database, create a data volumeof same size as that in primary for data; in this case, the rac_vol1 volume onthe primary site is 6.6 GB:
# vxassist -g oradatadg make rac_vol1 6600M nmirror=2 disk1 disk2
523Configuring a global cluster using VVRSetting up replication using VVR on the secondary site
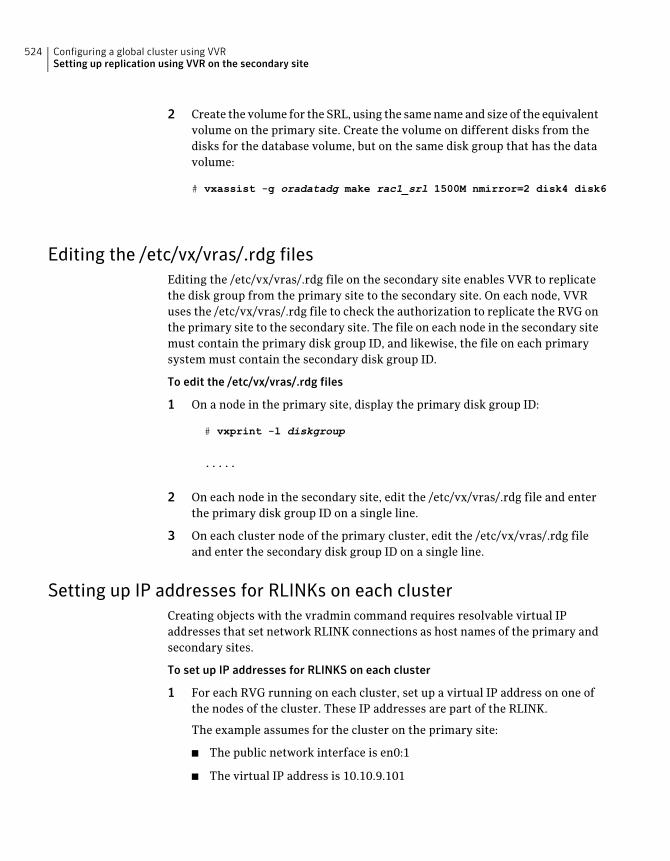
2 Create the volume for the SRL, using the same name and size of the equivalentvolume on the primary site. Create the volume on different disks from thedisks for the database volume, but on the same disk group that has the datavolume:
# vxassist -g oradatadg make rac1_srl 1500M nmirror=2 disk4 disk6
Editing the /etc/vx/vras/.rdg filesEditing the /etc/vx/vras/.rdg file on the secondary site enables VVR to replicatethe disk group from the primary site to the secondary site. On each node, VVRuses the /etc/vx/vras/.rdg file to check the authorization to replicate the RVG onthe primary site to the secondary site. The file on each node in the secondary sitemust contain the primary disk group ID, and likewise, the file on each primarysystem must contain the secondary disk group ID.
To edit the /etc/vx/vras/.rdg files
1 On a node in the primary site, display the primary disk group ID:
# vxprint -l diskgroup
.....
2 On each node in the secondary site, edit the /etc/vx/vras/.rdg file and enterthe primary disk group ID on a single line.
3 On each cluster node of the primary cluster, edit the /etc/vx/vras/.rdg fileand enter the secondary disk group ID on a single line.
Setting up IP addresses for RLINKs on each clusterCreating objects with the vradmin command requires resolvable virtual IPaddresses that set network RLINK connections as host names of the primary andsecondary sites.
To set up IP addresses for RLINKS on each cluster
1 For each RVG running on each cluster, set up a virtual IP address on one ofthe nodes of the cluster. These IP addresses are part of the RLINK.
The example assumes for the cluster on the primary site:
■ The public network interface is en0:1
■ The virtual IP address is 10.10.9.101
Configuring a global cluster using VVRSetting up replication using VVR on the secondary site
524
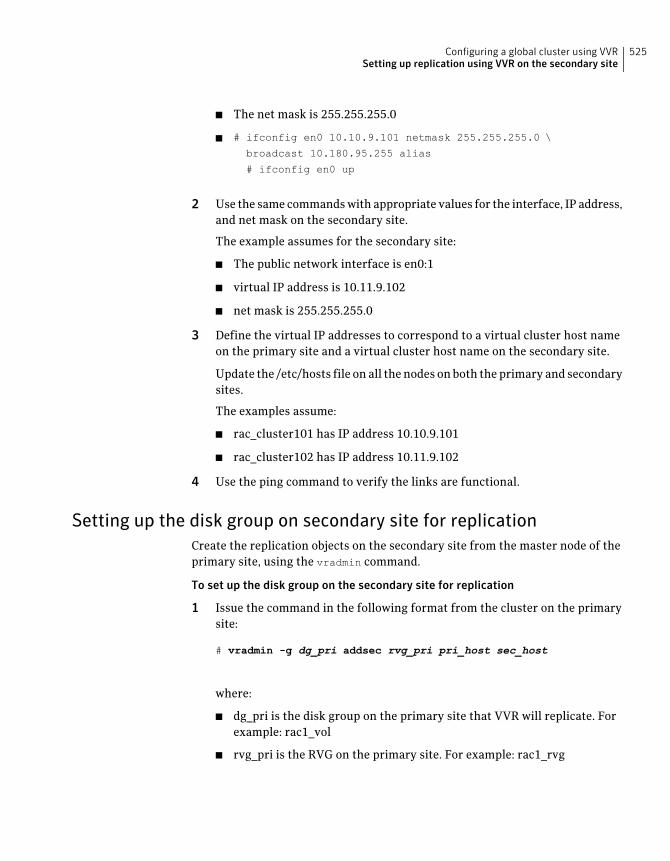
■ The net mask is 255.255.255.0
■ # ifconfig en0 10.10.9.101 netmask 255.255.255.0 \
broadcast 10.180.95.255 alias
# ifconfig en0 up
2 Use the same commands with appropriate values for the interface, IP address,and net mask on the secondary site.
The example assumes for the secondary site:
■ The public network interface is en0:1
■ virtual IP address is 10.11.9.102
■ net mask is 255.255.255.0
3 Define the virtual IP addresses to correspond to a virtual cluster host nameon the primary site and a virtual cluster host name on the secondary site.
Update the /etc/hosts file on all the nodes on both the primary and secondarysites.
The examples assume:
■ rac_cluster101 has IP address 10.10.9.101
■ rac_cluster102 has IP address 10.11.9.102
4 Use the ping command to verify the links are functional.
Setting up the disk group on secondary site for replicationCreate the replication objects on the secondary site from the master node of theprimary site, using the vradmin command.
To set up the disk group on the secondary site for replication
1 Issue the command in the following format from the cluster on the primarysite:
# vradmin -g dg_pri addsec rvg_pri pri_host sec_host
where:
■ dg_pri is the disk group on the primary site that VVR will replicate. Forexample: rac1_vol
■ rvg_pri is the RVG on the primary site. For example: rac1_rvg
525Configuring a global cluster using VVRSetting up replication using VVR on the secondary site

■ pri_host is the virtual IP address or resolvable virtual host name of thecluster on the primary site.For example: rac_cluster101_1You could also use 10.10.9.101
■ sec_host is the virtual IP address or resolvable virtual host name of thecluster on the secondary site.For example: rac_cluster102_1You could also use 10.11.9.102
For example, the command to add the cluster on the primary site to theReplicated Data Set (RDS) is:
# vradmin -g oradatadg addsec rac1_rvg \
10.10.9.101
10.11.9.102
On the secondary site, the above command performs the following tasks:
■ Creates an RVG within the specified disk group using the same name asthe one for the primary site
■ Associates the data and SRL volumes that have the same names as theones on the primary site with the specified RVG
■ Adds a data change map (DCM) for the data volume
■ If you use 10.10.9.101 and 10.11.9.102, creates cluster RLINKS for theprimary and secondary sites with the default names; for example, the"primary" RLINK created for this example is rlk_10.11.9.102_rac1_rvgand the "secondary" RLINK created is rlk_10.10.9.101_rac1__rvg.
2 Verify the list of RVGs in the RDS by executing the following command.
# vradmin -g oradatadg -l printrvg
For example:
Replicated Data Set: rac1_rvg
Primary:
HostName: 10.180.88.187 <localhost>
RvgName: rac1_rvg
DgName: rac1_vol
datavol_cnt: 1
vset_cnt: 0
srl: rac1_srl
RLinks:
Configuring a global cluster using VVRSetting up replication using VVR on the secondary site
526

name=rlk_rac_cluster102_1_rac1_rvg, detached=on,
synchronous=off
Secondary:
HostName: 10.190.99.197
RvgName: rac1_rvg
DgName: oradatadg
datavol_cnt: 1
vset_cnt: 0
srl: rac1_srl
RLinks:
name=rlk_rac_cluster101_1_rac1_rvg, detached=on,
synchronous=off
Note:Once the replication is started the value of the detached flag will changethe status from OFF to ON.
Starting replication of Oracle RAC database volumeWhen you have both the primary and secondary sites set up for replication, youcan start replication from the primary site to the secondary site.
Start with the default replication settings:
■ Mode of replication: synchronous=off
■ Latency Protection: latencyprot=off
■ SRL overflow protection: srlprot_autodcm
■ Packet size: packet_size=8400
■ Network protocol: protocol=UDP
Method of initial synchronization:
■ Automatic synchronization
■ Full synchronization with Checkpoint
For guidelines on modifying these settings and information on choosing themethod of replication for the initial synchronization:
See the Veritas Volume Replicator Administrator’s Guide
527Configuring a global cluster using VVRStarting replication of Oracle RAC database volume

Starting replication using automatic synchronizationUse the vradmin command to start replication or the transfer of data from theprimary site to the secondary site over the network. Because the cluster on thesecondary site uses only one host name, the command does not require the sec_hostargument.
To start replication using automatic synchronization
◆ From the primary site, use the following command to automaticallysynchronize the RVG on the secondary site:
vradmin -g disk_group -a startrep pri_rvg sec_host
where:
■ disk_group is the disk group on the primary site that VVR will replicate
■ pri_rvg is the name of the RVG on the primary site
■ sec_host is the virtual host name for the secondary site
For example:
# vradmin -g oradatadg -a startrep rac1_rvg
rac_cluster102
Starting replication using full synchronization with CheckpointUse the vradmin command with the Checkpoint option to start replication usingfull synchronization with Checkpoint.
To start replication using full synchronization with Checkpoint
1 From the primary site, synchronize the RVG on the secondary site with fullsynchronization (using the -c checkpoint option):
vradmin -g disk_group -full -c ckpt_name syncrvg pri_rvg sec_host
where:
■ disk_group is the disk group on the primary site that VVR will replicate
■ ckpt_name is the name of the checkpoint on the primary site
■ pri_rvg is the name of the RVG on the primary site
■ sec_host is the virtual host name for the secondary site
Configuring a global cluster using VVRStarting replication of Oracle RAC database volume
528

For example:
# vradmin -g oradatadg -c rac1_ckpt syncrvg rac1_rvg
rac_cluster102
2 To start replication after full synchronization, enter the following command:
# vradmin -g oradatadg -c rac1_ckpt startrep rac1_rvg
rac_cluster102
Verifying replication statusVerify that replication is properly functioning.
To verify replication status
1 Check the status of VVR replication:
# vradmin -g disk_group_name repstatus rvg_name
2 Review the flags output for the status. The output may appear as connectedand consistent. For example:
# vxprint -g oradatadg -l rlk_rac_cluster102_1_rac1_rvg
Rlink: rlk_rac_cluster102_1_rac1_rvg
info: timeout=500 packet_size=8400 rid=0.1078
latency_high_mark=10000 latency_low_mark=9950
bandwidth_limit=none
state: state=ACTIVE
synchronous=off latencyprot=off srlprot=autodcm
.
.
protocol: UDP/IP
checkpoint: rac1_ckpt
flags: write enabled attached consistent connected
asynchronous
Configuring VCS to replicate the database volumeusing VVR
After configuring both clusters for global clustering and setting up the OracleRAC database for replication, configure VCS to provide high availability for the
529Configuring a global cluster using VVRConfiguring VCS to replicate the database volume using VVR

database. Specifically, configure VCS agents to control the cluster resources,including the replication resources.
To view the sample main.cf files on your system:
# cd /etc/VRTSvcs/conf/sample_rac
The following files include CVM/VVR configuration examples:
sfrac_07_main.cf sfrac_08_main.cf
The following sample main.cf files illustrate the VCS configuration changes aftersetting up an existing Oracle RAC database for replication:
See “sfrac07_main.cf and sample08_main.cf files” on page 626.
About modifying the VCS configuration for replicationThe following resources must be configured or modified for replication:
■ Log owner group
■ RVG group
■ CVMVolDg resource
■ RVGSharedPri resource
■ Oracle RAC database service group
For detailed examples of service group modification:
For more information on service replication resources:
See theVeritas Cluster Server Agents for Veritas VolumeReplicator ConfigurationGuide.
Log owner groupCreate a log owner group including the RVGLogowner resources. TheRVGLogowner resources are used by:
■ RLINKs for the RVG
■ RVGLogowner resource. The RVG and its associated disk group are defined asattributes for the RVGLogowner resource.
The RVG log owner service group has an online local firm dependency on theservice group containing the RVG.
The VCS uses the following agents to control the folllowing resources:
■ RVGLogowner agent to control the RVGLogowner resource
Configuring a global cluster using VVRConfiguring VCS to replicate the database volume using VVR
530

■ RVGShared agent to control the RVGShared resource
RVG groupCreate an RVG group that includes the RVGShared resource replication objects.Define the RVGShared resource and CVMVolDg resource together within a parallelservice group. The group is defined as parallel because it may be online at thesame time on all cluster nodes.
CVMVolDg resourceThe CVMVolDg resource does not have volumes specified for the CVMVolumeattribute; the volumes are contained in the RVG resource. The CVMVolumeattribute for the CVMVolDg resource is empty because all volumes in the RVGare defined by the RVG attribute of the RVGShared resource. The RVG servicegroup has an online local firm dependency on the CVM service group.
For a detailed description of the CVMVolDg agent in this guide:
See “ CVMVolDg agent” on page 674.
RVGSharedPri resourceAdd the RVGSharedPri resource to the existing Oracle RAC database service group.The CVMVolDg resource must be removed from the existing Oracle RAC databaseservice group.
Oracle RAC database service groupThe existing Oracle RAC database service group is a parallel group consisting ofthe Oracle RAC database resource, CVMVolDg resource, and CFSMount resource(if the database resides in a cluster file system). Define the Oracle RAC servicegroup as a global group by specifying the clusters on the primary and secondarysites as values for the ClusterList group attribute.
Configuration examples before and after modificationReview the following illustrations that display the changes to the VCSconfiguration, after setting up replication on the existing Oracle RAC database.
■ Configuration before modification:Figure 32-1
■ Configuration after modification:Figure 32-2
531Configuring a global cluster using VVRConfiguring VCS to replicate the database volume using VVR

All of the dependencies between parent and child groups are online local firm.The CVM service group is the same in all illustrations because its definitionrequires no changes.
Configuration before modification for replication:
Figure 32-1 Illustration of dependencies before modification for replication(Oracle RAC 10g)
Oracle Group (Parallel)
CVMCluster
PrivNIC
Application
CVMVxconfigd
cssd
ora_privnic
vxfsckd
cvm_clus
cvm_vxconfigd
CVM (Parallel)
crs_ora_mnt
crs_voldg
CVMVoIDG
Oracleora_db1
CFSMount
CVMVoIDG
ora_db1_mnt
ora_db1_voldg1
CVMVoIDG
orabin_mnt
orabbin_voldg
CFS_Mount CFSMount
CFSfsckd
Configuration after modification for replication:
Configuring a global cluster using VVRConfiguring VCS to replicate the database volume using VVR
532

Figure 32-2 Illustration of dependencies after modification for replication (OracleRAC 10g)
CVMCluster
PrivNIC
Application
CVMVxconfigd
cssd
ora_privnic
vxfsckd
cvm_clus
cvm_vxconfigd
CVM (Parallel)
crs_ora_mnt
crs_voldg
CVMVoIDG
RVGShared
CVMVoIDG
racdata_rvg
racdata_voldg
CVMVoIDG
orabin_mnt
orabbin_voldg
CFS_Mount CFSMount
CFSfsckd
Oraclerac_db
CFSMount
RVGSharedPri
oradata_mnt
ora_vvr_shpri
RVGLogowner
rvg_logowner
IP
NIC
logowner_ip
nic
Oracle Group (parallel) Logowner Group (failover)
RVG Group (parallel)
533Configuring a global cluster using VVRConfiguring VCS to replicate the database volume using VVR

Modifying the VCS Configuration on the Primary SiteThe following are the procedural highlights required to modify the existing VCSconfiguration on the primary site:
■ Configure two service groups:
■ A log owner group including the RVGLogowner resource.
■ An RVG group including the RVGShared resource replication objects.
■ Add the RVGSharedPri resource to the existing Oracle RAC database servicegroup and define this group as a global group by setting the ClusterList andClusterFailOverPolicy attributes.
■ Move the CVMVolDg resource from the existing Oracle RAC database servicegroup to the newly created RVG group.
To modify VCS on the primary site
1 Log into one of the nodes on the primary cluster.
2 Use the following command to save the existing configuration to disk, andmake the configuration read-only while you make changes:
# haconf -dump -makero
3 Use the following command to make a backup copy of the main.cf file:
# cd /etc/VRTSvcs/conf/config
# cp main.cf main.orig
4 Use vi or another text editor to edit the main.cf file. Review the sampleconfiguration file after the SF Oracle RAC installation.
Add a failover service group using the appropriate values for your clusterand nodes. Include the following resources:
■ RVGLogowner resource. The node on which the group is online functionsas the log owner (node connected to the second cluster for the purpose ofreplicating data).
■ IP resource
■ NIC resources
The following are examples of RVGLogowner service group for the differentplatforms.
group rlogowner (
SystemList = { galaxy = 0, nebula = 1 }
Configuring a global cluster using VVRConfiguring VCS to replicate the database volume using VVR
534

AutoStartList = { galaxy,nebula }
)
IP logowner_ip (
Device = en0
Address = "10.10.9.101"
NetMask = "255.255.255.0"
)
NIC nic (
Device = en0
NetworkType = ether
NetworkHosts = "10.10.8.1"
)
RVGLogowner logowner (
RVG = rac1_rvg
DiskGroup = oradatadg
)
requires group RVGgroup online local firm
logowner requires logowner_ip
logowner_ip requires nic
5 Add the RVG service group using the appropriate values for your cluster andnodes.
Example RVGgroup service group:
group RVGgroup (
SystemList = { galaxy = 0, nebula = 1 }
Parallel = 1
AutoStartList = { galaxy,nebula }
)
RVGShared racdata_rvg (
RVG = rac1_rvg
DiskGroup = oradatadg
)
CVMVolDg racdata_voldg (
CVMDiskGroup = oradatadg
CVMActivation = sw
)
requires group cvm online local firm
racdata_rvg requires racdata_voldg
535Configuring a global cluster using VVRConfiguring VCS to replicate the database volume using VVR
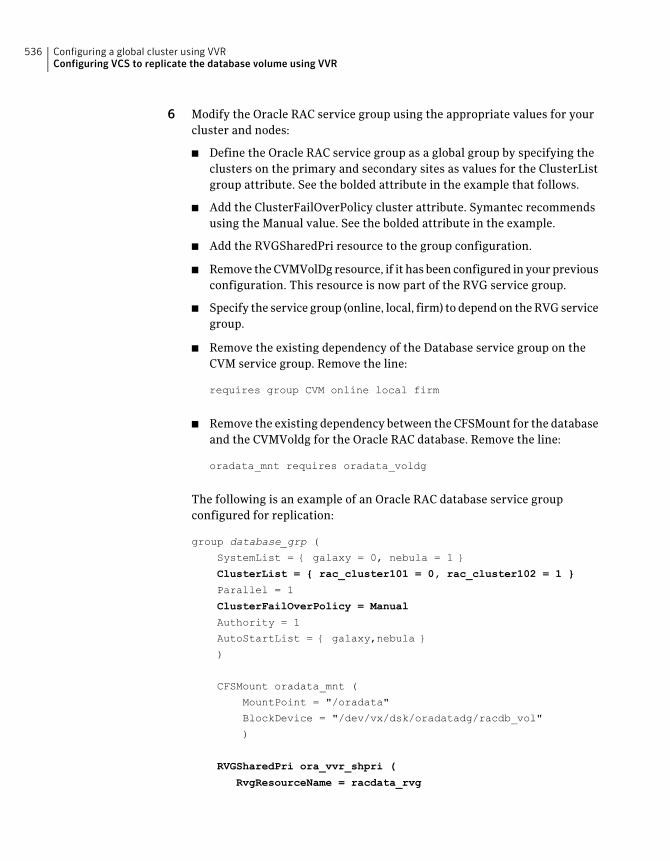
6 Modify the Oracle RAC service group using the appropriate values for yourcluster and nodes:
■ Define the Oracle RAC service group as a global group by specifying theclusters on the primary and secondary sites as values for the ClusterListgroup attribute. See the bolded attribute in the example that follows.
■ Add the ClusterFailOverPolicy cluster attribute. Symantec recommendsusing the Manual value. See the bolded attribute in the example.
■ Add the RVGSharedPri resource to the group configuration.
■ Remove the CVMVolDg resource, if it has been configured in your previousconfiguration. This resource is now part of the RVG service group.
■ Specify the service group (online, local, firm) to depend on the RVG servicegroup.
■ Remove the existing dependency of the Database service group on theCVM service group. Remove the line:
requires group CVM online local firm
■ Remove the existing dependency between the CFSMount for the databaseand the CVMVoldg for the Oracle RAC database. Remove the line:
oradata_mnt requires oradata_voldg
The following is an example of an Oracle RAC database service groupconfigured for replication:
group database_grp (
SystemList = { galaxy = 0, nebula = 1 }
ClusterList = { rac_cluster101 = 0, rac_cluster102 = 1 }
Parallel = 1
ClusterFailOverPolicy = Manual
Authority = 1
AutoStartList = { galaxy,nebula }
)
CFSMount oradata_mnt (
MountPoint = "/oradata"
BlockDevice = "/dev/vx/dsk/oradatadg/racdb_vol"
)
RVGSharedPri ora_vvr_shpri (
RvgResourceName = racdata_rvg
Configuring a global cluster using VVRConfiguring VCS to replicate the database volume using VVR
536

OnlineRetryLimit = 0
)
Oracle rac_db (
Sid @galaxy = vrts1
Sid @nebula = vrts2
Owner = Oracle
Home = "/oracle/orahome"
StartUpOpt = SRVCTLSTART
ShutDownOpt = SRVCTLSTOP
)
requires group RVGgroup online local firm
oradata_mnt requires ora_vvr_shpri
rac_db requires oradata_mnt
7 Save and close the main.cf file.
8 Use the following command to verify the syntax of the/etc/VRTSvcs/conf/config/main.cf file:
# hacf -verify /etc/VRTSvcs/conf/config
9 Stop and restart VCS.
# hastop -all -force
Wait for port h to stop on all nodes, and then restart VCS with the newconfiguration on all primary nodes:
# hastart
Modifying the VCS Configuration on the Secondary SiteThe following are highlights of the procedure to modify the existing VCSconfiguration on the secondary site:
■ Add the log owner and RVG service groups.
■ Add a service group to manage the Oracle RAC database and the supportingresources.
■ Define the replication objects and agents, such that the cluster at the secondarysite can function as a companion to the primary cluster.
The following steps are similar to those performed on the primary site.
537Configuring a global cluster using VVRConfiguring VCS to replicate the database volume using VVR

To modify VCS on the secondary site
1 Log into one of the nodes on the secondary site as root.
2 Use the following command to save the existing configuration to disk, andmake the configuration read-only while making changes:
# haconf -dump -makero
3 Use the following command to make a backup copy of the main.cf file:
# cd /etc/VRTSvcs/conf/config
# cp main.cf main.orig
4 Use vi or another text editor to edit the main.cf file. Edit the CVM group onthe secondary site.
Review the sample configuration file after the SF Oracle RAC installation tosee the CVM configuration.
In our example, the secondary site has rac_cluster102 consisting of the nodesmercury and jupiter. To modify the CVM service group on the secondary site,use the CVM group on the primary site as your guide.
5 Add a failover service group using the appropriate values for your clusterand nodes. Include the following resources:
■ RVGLogowner resource. The node on which the group is online functionsas the log owner (node connected to the second cluster for the purpose ofreplicating data).
■ IP resource
■ NIC resources
Example RVGLogowner service group:
group rlogowner (
SystemList = { mercury = 0, jupiter = 1 }
AutoStartList = { mercury, jupiter }
)
IP logowner_ip (
Device = en0
Address = "10.11.9.102"
NetMask = "255.255.255.0"
)
Configuring a global cluster using VVRConfiguring VCS to replicate the database volume using VVR
538

NIC nic (
Device = en0
NetworkHosts = { "10.10.8.1" }
NetworkType = ether
)
RVGLogowner logowner (
RVG = rac1_rvg
DiskGroup = oradatadg
)
requires group RVGgroup online local firm
logowner requires logowner_ip
logowner_ip requires nic
6 Add the RVG service group using the appropriate values for your cluster andnodes.
The following is an example RVGgroup service group:
group RVGgroup (
SystemList = { mercury = 0, jupiter = 1 }
Parallel = 1
AutoStartList = { mercury, jupiter }
)
RVGShared racdata_rvg (
RVG = rac1_rvg
DiskGroup = oradatadg
)
CVMVolDg racdata_voldg
CVMDiskGroup = oradatadg
CVMActivation = sw
)
requires group cvm online local firm
racdata_rvg requires racdata_voldg
7 Add an Oracle RAC service group. Use the Oracle RAC service group on theprimary site as a model for the Oracle RAC service group on the secondarysite.
539Configuring a global cluster using VVRConfiguring VCS to replicate the database volume using VVR

■ Define the Oracle RAC service group as a global group by specifying theclusters on the primary and secondary sites as values for the ClusterListgroup attribute.
■ Assign this global group the same name as the group on the primary site;for example, database_grp.
■ Include the ClusterList and ClusterFailOverPolicy cluster attributes.Symantec recommends using the Manual value.
■ Add the RVGSharedPri resource to the group configuration.
■ Remove the CVMVolDg resource, if it has been configured in your previousconfiguration. This resource is now part of the RVG service group.
■ Specify the service group to depend (online, local, firm) on the RVG servicegroup.
Example of the Oracle RAC group on the secondary site:
group database_grp (
SystemList = { mercury = 0, jupiter = 1 }
ClusterList = { rac_cluster102 = 0, rac_cluster101 = 1 }
Parallel = 1
OnlineRetryInterval = 300
ClusterFailOverPolicy = Manual
Authority = 1
AutoStartList = { mercury, jupiter }
)
RVGSharedPri ora_vvr_shpri (
RvgResourceName = racdata_rvg
OnlineRetryLimit = 0
)
CFSMount oradata_mnt (
MountPoint = "/oradata"
BlockDevice = "/dev/vx/dsk/oradatadg/racdb_vol"
Critical = 0
)
RVGSharedPri ora_vvr_shpri (
RvgResourceName = racdata_rvg
OnlineRetryLimit = 0
)
Configuring a global cluster using VVRConfiguring VCS to replicate the database volume using VVR
540

Oracle rac_db (
Sid @mercury = vrts1
Sid @jupiter = vrts2
Owner = Oracle
Home = "/oracle/orahome"
Pfile @mercury = "/oracle/orahome/dbs/initvrts1.ora"
Pfile @jupiter = "/oracle/orahome/dbs/initvrts2.ora"
StartUpOpt = SRVCTLSTART
ShutDownOpt = SRVCTLSTOP
)
requires group RVGgroup online local firm
oradata_mnt requires ora_vvr_shpri
rac_db requires oradata_mnt
8 Save and close the main.cf file.
9 Use the following command to verify the syntax of the/etc/VRTSvcs/conf/config/main.cf file:
# hacf -verify /etc/VRTSvcs/conf/config
10 Stop and restart VCS.
# hastop -all -force
Wait for port h to stop on all nodes, and then restart VCS with the newconfiguration on all primary nodes:
# hastart
541Configuring a global cluster using VVRConfiguring VCS to replicate the database volume using VVR

11 Verify that VCS brings all resources online. On one node, enter the followingcommand:
# hagrp -display
The Oracle RAC, RVG, and CVM groups are online on both nodes of theprimary site. The RVGLogOwner group is online on one node of the cluster.If either the RVG group or the RVGLogOwner group is partially online,manually bring the groups online using the hagrp -online command. Thisinformation applies to the secondary site, except for the Oracle RAC groupwhich must be offline.
On the primary site, enter the following commands:
# hagrp -online rlogowner -sys galaxy
# hagrp -online database_grp -sys galaxy
VCS WARNING V-16-1-50817 Please use hagrp -online -force to
online a global group for the first time
# hagrp -online -force database_grp -sys galaxy
On the secondary site, enter the following command:
# hagrp -online rlogowner -sys mercury
12 Verify the service groups and their resources that are brought online. On onenode, enter the following command:
# hagrp -display
The Oracle RAC service group is offline on the secondary site, but the CVM,RVG log owner, and RVG groups are online.
This completes the setup for an SF Oracle RAC global cluster using VVR forreplication. Symantec recommends testing a global cluster before putting itinto production.
UsingVCScommandsonSFOracleRACglobal clustersFor information on the VCS commands for global clusters:
See the Veritas Cluster Server Administrator's Guide.
Configuring a global cluster using VVRUsing VCS commands on SF Oracle RAC global clusters
542

Using VVR commands on SF Oracle RAC globalclusters
If you have two SF Oracle RAC clusters configured to use VVR for replication, thefollowing administrative functions are available:
■ Migration of the role of the primary site to the remote site
■ Takeover of the primary site role by the secondary site
About migration and takeover of the primary site roleMigration is a planned transfer of the role of primary replication host from onecluster to a remote cluster. This transfer enables the application on the remotecluster to actively use the replicated data. The former primary cluster becomesfree for maintenance or other activity.
Takeover occurs when an unplanned event (such as a disaster) causes a failure,making it necessary for the applications using the replicated data to be broughtonline on the remote cluster.
Migrating the role of primary site to the secondary siteAfter configuring the replication objects within VCS, you can use VCS commandsto migrate the role of the cluster on the primary site to the remote cluster. In theprocedure below, VCS takes the replicated database service group, database_grp,offline on the primary site and brings it online on the secondary site; the secondarysite now assumes the role of the primary site.
Note: The hagrp -switch command cannot migrate a parallel group within acluster or between clusters in a global cluster environment.
543Configuring a global cluster using VVRUsing VVR commands on SF Oracle RAC global clusters

To migrate the role of primary site to the remote site
1 From the primary site, use the following command to take the Oracle servicegroup offline on all nodes.
# hagrp -offline database_grp -any
Wait for VCS to take all Oracle service groups offline on the primary site.
2 Verify that the RLINK between the primary and secondary is up to date. Usethe vxrlink -g command with the status option and specify the RLINK forthe primary cluster. You can use the command from any node on the primarycluster.
For example:
# vxrlink -g data_disk_group status rlk_rac_cluster101_priv_rac1_rvg
Where rlk_rac_cluster101_priv_rac1_rvg is the RLINK.
3 On the secondary site, which is now the new primary site, bring the Oracleservice group online on all nodes:
# hagrp -online database_grp -any
Migrating the role of new primary site back to the original primary siteAfter migrating the role of the primary site to the secondary site, you can use VCScommands to migrate the role of the cluster on the new primary site to the originalprimary site. In the procedure below, VCS takes the replicated database servicegroup, database_grp, offline on the new primary (former secondary) site andbrings it online on the original primary site; the original primary site now resumesthe role of the primary site.
Note: The hagrp -switch command cannot migrate a parallel group within acluster or between clusters in a global cluster environment.
Configuring a global cluster using VVRUsing VVR commands on SF Oracle RAC global clusters
544

To migrate the role of new primary site back to the original primary site
1 Make sure that all CRS resources are online, and switch back the groupdatabase_grp to the original primary site.
Issue the following command on the remote site:
# hagrp -offline database_grp -any
2 Verify that the RLINK between the primary and secondary is up to date. Usethe vxrlink -g command with the status option and specify the RLINK forthe primary cluster. You can use the command from any node on the primarycluster.
For example:
# vxrlink -g data_disk_group status rlk_rac_cluster101_priv_rac1_rvg
Where rlk_rac_cluster101_priv_rac1_rvg is the RLINK.
3 Make sure that database_grp is offline on the new primary site. Then, executethe following command on the original primary site to bring thedatabase_grponline:
# hagrp -online database_grp -any
Taking over the primary role by the remote clusterTakeover occurs when the remote cluster on the secondary site starts theapplication that uses replicated data. This situation may occur if the secondarysite perceives the primary site as dead, or when the primary site becomesinaccessible (perhaps for a known reason). For a detailed description of conceptsof taking over the primary role:
See the Veritas Volume Replicator Administrator’s Guide.
Before enabling the secondary site to take over the primary role, the administratoron the secondary site must "declare" the type of failure at the remote (primary,in this case) site and designate the failure type using one of the options for thehaclus command.
Takeover options are:
■ Disaster
■ Outage
545Configuring a global cluster using VVRUsing VVR commands on SF Oracle RAC global clusters

■ Disconnect
■ Replica
DisasterWhen the cluster on the primary site is inaccessible and appears dead, theadministrator declares the failure type as "disaster." For example, fire may destroya data center, including the primary site and all data in the volumes. After makingthis declaration, the administrator can bring the service group online on thesecondary site, which now has the role as "primary" site.
OutageWhen the administrator of a secondary site knows the primary site is inaccessiblefor a known reason, such as a temporary power outage, the administrator maydeclare the failure as an "outage." Typically, an administrator expects the primarysite to return to its original state.
After the declaration for an outage occurs, the RVGSharedPri agent enables DCMlogging while the secondary site maintains the primary replication role. After theoriginal primary site becomes alive and returns to its original state, DCM loggingmakes it possible to use fast fail back resynchronization when data isresynchronized to the original cluster.
Before attempting to resynchronize the data using the fast fail back option fromthe current primary site to the original primary site, take the precaution at theoriginal primary site of making a snapshot of the original data. This action providesa valid copy of data at the original primary site for use in the case the currentprimary site fails before the resynchronization is complete.
See “Examples for takeover and resynchronization” on page 547.
See “Replica” on page 547.
DisconnectWhen both clusters are functioning properly and the heartbeat link between theclusters fails, a split-brain condition exists. In this case, the administrator candeclare the failure as "disconnect," which means no attempt will occur to takeover the role of the primary site at the secondary site. This declaration is merelyadvisory, generating a message in the VCS log indicating the failure results froma network outage rather than a server outage.
Configuring a global cluster using VVRUsing VVR commands on SF Oracle RAC global clusters
546

ReplicaIn the rare case where the current primary site becomes inaccessible while datais resynchronized from that site to the original primary site using the fast failback method, the administrator at the original primary site may resort to usinga data snapshot (if it exists) taken before the start of the fast fail back operation.In this case, the failure type is designated as "replica".
Examples for takeover and resynchronizationThe examples illustrate the steps required for an outage takeover andresynchronization.
To take over after an outage
1 From any node of the secondary site, issue the haclus command:
# haclus -declare outage -clus rac_cluster101
2 After declaring the state of the remote cluster, bring the Oracle service grouponline on the secondary site. For example:
# hagrp -online -force database_grp -any
547Configuring a global cluster using VVRUsing VVR commands on SF Oracle RAC global clusters

To resynchronize after an outage
1 On the original primary site, create a snapshot of the RVG beforeresynchronizing it in case the current primary site fails during theresynchronization. Assuming the disk group isdata_disk_group and the RVGis rac1_rvg, type:
# vxrvg -g data_disk_group -F snapshot rac1_rvg
See the Veritas Volume Replicator Administrator’s Guide for details on RVGsnapshots.
2 Resynchronize the RVG. From the CVM master node of the current primarysite, issue the hares command and the -action option with the fbsync actiontoken to resynchronize the RVGSharedPri resource. For example:
# hares -action ora_vvr_shpri fbsync -sys mercury
To determine which node is the CVM master node, type:
# vxdctl -c mode
3 Perform one of the following commands, depending on whether theresynchronization of data from the current primary site to the originalprimary site is successful:
■ If the resynchronization of data is successful, use the vxrvg commandwith the snapback option to reattach the snapshot volumes on the originalprimary site to the original volumes in the specified RVG:
# vxrvg -g data_disk_group snapback rac1_rvg
■ A failed attempt at the resynchronization of data (for example, a disasterhits the primary RVG when resynchronization is in progress) couldgenerate inconsistent data.You can restore the contents of the RVG data volumes from the snapshottaken in step 1:
# vxrvg -g data_disk_group snaprestore rac1_rvg
Configuring a global cluster using VVRUsing VVR commands on SF Oracle RAC global clusters
548
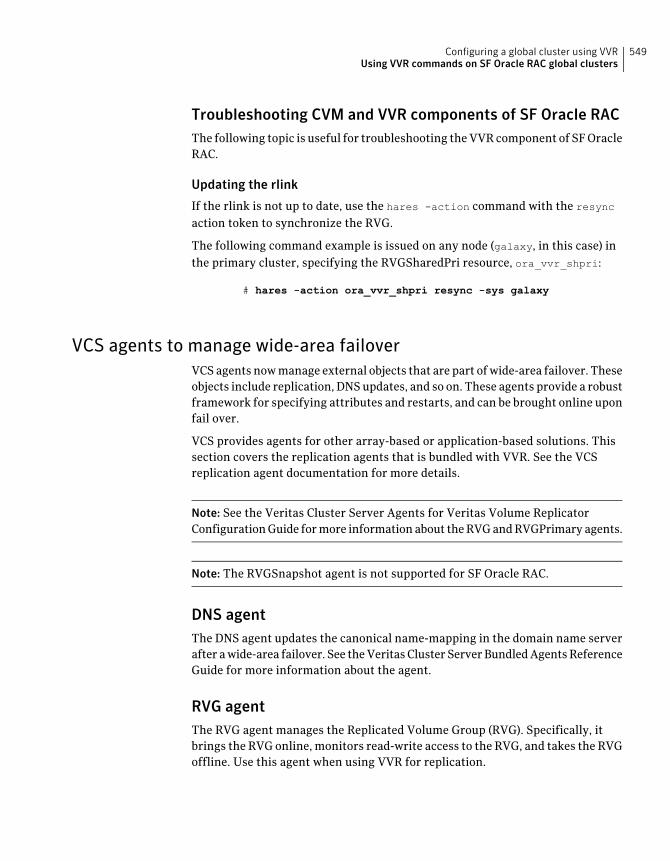
Troubleshooting CVM and VVR components of SF Oracle RACThe following topic is useful for troubleshooting the VVR component of SF OracleRAC.
Updating the rlink
If the rlink is not up to date, use the hares -action command with the resync
action token to synchronize the RVG.
The following command example is issued on any node (galaxy, in this case) inthe primary cluster, specifying the RVGSharedPri resource, ora_vvr_shpri:
# hares -action ora_vvr_shpri resync -sys galaxy
VCS agents to manage wide-area failoverVCS agents now manage external objects that are part of wide-area failover. Theseobjects include replication, DNS updates, and so on. These agents provide a robustframework for specifying attributes and restarts, and can be brought online uponfail over.
VCS provides agents for other array-based or application-based solutions. Thissection covers the replication agents that is bundled with VVR. See the VCSreplication agent documentation for more details.
Note: See the Veritas Cluster Server Agents for Veritas Volume ReplicatorConfiguration Guide for more information about the RVG and RVGPrimary agents.
Note: The RVGSnapshot agent is not supported for SF Oracle RAC.
DNS agentThe DNS agent updates the canonical name-mapping in the domain name serverafter a wide-area failover. See the Veritas Cluster Server Bundled Agents ReferenceGuide for more information about the agent.
RVG agentThe RVG agent manages the Replicated Volume Group (RVG). Specifically, itbrings the RVG online, monitors read-write access to the RVG, and takes the RVGoffline. Use this agent when using VVR for replication.
549Configuring a global cluster using VVRUsing VVR commands on SF Oracle RAC global clusters

RVGPrimary agentThe RVGPrimary agent attempts to migrate or take over a Secondary to a Primaryfollowing an application failover. The agent has no actions associated with theoffline and monitor routines.
Configuring a global cluster using VVRUsing VVR commands on SF Oracle RAC global clusters
550
Uninstallation of SF OracleRAC
■ Chapter 33. Preparing to uninstall SF Oracle RAC from a cluster
■ Chapter 34. Uninstalling SF Oracle RAC from a cluster
8Section

552

Preparing to uninstall SFOracle RAC from a cluster
This chapter includes the following topics:
■ About uninstalling SF Oracle RAC from a cluster
■ Options for uninstalling SF Oracle RAC
■ Preparing to uninstall SF Oracle RAC from a cluster
About uninstalling SF Oracle RAC from a clusterYou can uninstall SF Oracle RAC using the uninstallsfrac program.
Note: After you uninstall SF Oracle RAC, you cannot access the Oracle databaseas Veritas Volume Manager and Veritas File System are uninstalled from thecluster. Make sure that you back up the Oracle database before you uninstall SFOracle RAC.
Figure 33-1 illustrates the steps that are required to uninstall SF Oracle RAC froma cluster.
33Chapter

Figure 33-1 SF Oracle RAC uninstallation
Reboot the nodes
Yes
Stop Oracle instances on each node
Are apps usingCFS and CVM
controlledby VCS?
Unmount CFS on each node
No
Back up the Oracle database
Stop VCS on all nodes
Stop the applications using VxVM/VxFS (not under VCScontrol)
Unlink libraries (optional)
Uninstall Oracle RAC binaries (optional)
Unmount VxFS on each node (not under VCS control)
Remove SF Oracle RAC from all nodes
Stop the applications usingCVM/CFS
Options for uninstalling SF Oracle RACTable 33-1 lists the available options for uninstalling SF Oracle RAC:
Table 33-1 Options for uninstalling SF Oracle RAC
DescriptionOptions
Use the uninstallsfrac program to uninstall SF Oracle RAC.
See “Preparing to uninstall SF Oracle RAC from a cluster”on page 555.
SF Oracle RACuninstallation program
Preparing to uninstall SF Oracle RAC from a clusterOptions for uninstalling SF Oracle RAC
554

Table 33-1 Options for uninstalling SF Oracle RAC (continued)
DescriptionOptions
Use a response file to automate or perform an unattendeduninstallation of SF Oracle RAC.
See “Uninstalling SF Oracle RAC using a response file”on page 573.
Response file
Preparing to uninstall SF Oracle RAC from a clusterPerform the steps in the following procedure before you uninstall SF Oracle RACfrom a cluster.
To prepare to uninstall SF Oracle RAC from a cluster
1 Stop Oracle instances.
See “Stopping Oracle instances” on page 556.
2 Back up the Oracle database.
See “Backing up the Oracle database” on page 556.
3 Unlink the SF Oracle RAC libraries from Oracle RAC libraries (optional).
See “Unlinking the SF Oracle RAC libraries from Oracle RAC” on page 557.
4 Uninstalling Oracle RAC (optional)
See “Uninstalling Oracle RAC (optional)” on page 559.
5 Stop the applications that use CFS (outside of VCS control).
See “Stopping the applications that use CVM or CFS (outside of VCS control)”on page 559.
6 Unmount CFS file systems (outside of VCS control).
See “Unmounting CFS file systems (outside of VCS control)” on page 559.
7 Stop VCS.
See “Stopping VCS” on page 560.
8 Stop the applications that use VxFS (outside of VCS control).
See “Stopping the applications that use VxVM or VxFS (outside of VCScontrol)” on page 561.
9 Unmount VxFS file systems (outside of VCS control).
See “Unmounting VxFS file systems (outside of VCS control)” on page 561.
555Preparing to uninstall SF Oracle RAC from a clusterPreparing to uninstall SF Oracle RAC from a cluster

Stopping Oracle instancesYou need to stop Oracle Clusterware and the Oracle instances on the cluster nodeswhere you want to uninstall SF Oracle RAC. Before you stop the Oracle instances,stop the applications that are dependent on the service groups that contain Oracle.
The procedure in this section provides instructions to stop the instances on atwo-node cluster; the nodes are galaxy and nebula. Depending on the VCSconfiguration, the procedure to stop Oracle instances may vary.
To stop Oracle instances
1 Log in as the superuser on one of the nodes in the cluster.
2 On each node, take the Oracle resources in the VCS configuration file (main.cf)offline.
# hagrp -offline oracle_group -sys node_name
For example:
# hagrp -offline ora1 -sys galaxy
# hagrp -offline ora1 -sys nebula
These commands stop the Oracle resources under VCS control.
If the database is not managed by VCS, stop the Oracle database as follows:
$ srvctl stop database -d db_name
3 Verify that the state of the Oracle (if the database is managed by VCS) andCVM service groups are offline and online respectively.
# hagrp -state
Group Attribute System Value
ora1 State galaxy |OFFLINE|
ora1 State nebula |OFFLINE|
cvm State galaxy |ONLINE|
cvm State nebula |ONLINE|
Backing up the Oracle databaseIf you plan to retain the Oracle database, you must back up the Oracle database.
For instructions on backing up the Oracle database, see the Oracle documentation.
Preparing to uninstall SF Oracle RAC from a clusterPreparing to uninstall SF Oracle RAC from a cluster
556
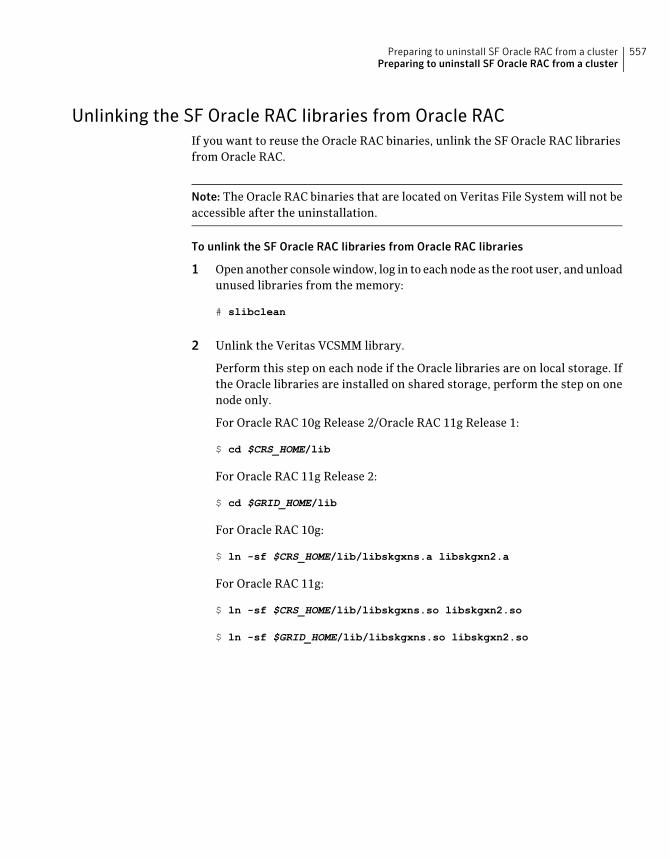
Unlinking the SF Oracle RAC libraries from Oracle RACIf you want to reuse the Oracle RAC binaries, unlink the SF Oracle RAC librariesfrom Oracle RAC.
Note: The Oracle RAC binaries that are located on Veritas File System will not beaccessible after the uninstallation.
To unlink the SF Oracle RAC libraries from Oracle RAC libraries
1 Open another console window, log in to each node as the root user, and unloadunused libraries from the memory:
# slibclean
2 Unlink the Veritas VCSMM library.
Perform this step on each node if the Oracle libraries are on local storage. Ifthe Oracle libraries are installed on shared storage, perform the step on onenode only.
For Oracle RAC 10g Release 2/Oracle RAC 11g Release 1:
$ cd $CRS_HOME/lib
For Oracle RAC 11g Release 2:
$ cd $GRID_HOME/lib
For Oracle RAC 10g:
$ ln -sf $CRS_HOME/lib/libskgxns.a libskgxn2.a
For Oracle RAC 11g:
$ ln -sf $CRS_HOME/lib/libskgxns.so libskgxn2.so
$ ln -sf $GRID_HOME/lib/libskgxns.so libskgxn2.so
557Preparing to uninstall SF Oracle RAC from a clusterPreparing to uninstall SF Oracle RAC from a cluster

3 For Oracle RAC 10g: Unlink the Veritas VCS IPC library.
Perform this step on each node if the Oracle libraries are on local storage. Ifthe Oracle libraries are installed on shared storage, perform the step on onenode only.
$ cd $ORACLE_HOME/lib
Locate the most recent backed up copy of Oracle's$ORACLE_HOME/lib/libskgxpu.a library.
You can identify Oracle's libskgxpu.a library by running the followingcommand.
$ strings libskgxpu.a.timestamp | grep VRTS
For the Oracle library, the command does not generate any output.
Replace the file $ORACLE_HOME/lib/libskgxpu.a with the backed up copy.
Locate the most recent backed up copy of Oracle's makefile env_rdbms.mk.You can identify it by running the following command:
$ cd $ORACLE_HOME/rdbms/lib
$ grep ha_gs env_rdbms.mk.timestamp
The above command will generate some output for the Oracle makefile.
Replace the file $ORACLE_HOME/rdbms/lib/env_rdbms.mk with the backedup copy.
Relink Oracle:
$ cd $ORACLE_HOME/rdbms/lib
$ make -f ins_rdbms.mk rac_on
$ make -f ins_rdbms.mk ioracle
Preparing to uninstall SF Oracle RAC from a clusterPreparing to uninstall SF Oracle RAC from a cluster
558

4 Unlink the Veritas ODM library.
Perform this step on each node if the Oracle libraries are on local storage. Ifthe Oracle libraries are installed on shared storage, perform the step on onenode only.
$ cd $ORACLE_HOME/lib
For Oracle RAC 10g:
$ ln -sf $ORACLE_HOME/lib/libodmd10.so libodm10.so
For Oracle RAC 11g:
$ ln -sf $ORACLE_HOME/lib/libodmd11.so libodm11.so
Uninstalling Oracle RAC (optional)You cannot use the Oracle database after you uninstall SF Oracle RAC. However,you can continue using the Oracle RAC software, provided the Oracle Clusterwareand database binaries are not installed on Veritas file system. To continue usingOracle RAC, unlink the SF Oracle RAC libraries from Oracle RAC as described inthe preceding topic.
For instructions on uninstalling Oracle RAC, see the Oracle documentation.
Stopping the applications that use CVM or CFS (outside of VCS control)You need to stop the applications that use CVM volumes or CFS mount points notcontrolled by VCS.
To stop the applications that use CVM or CFS (outside of VCS control)
1 Using native application commands, stop the applications that use CVM ora CFS.
2 Verify that no processes use the CFS mount point:
# fuser -c mount_point
Unmounting CFS file systems (outside of VCS control)You need to unmount CFS file systems that are not under VCS control on all nodes.
559Preparing to uninstall SF Oracle RAC from a clusterPreparing to uninstall SF Oracle RAC from a cluster
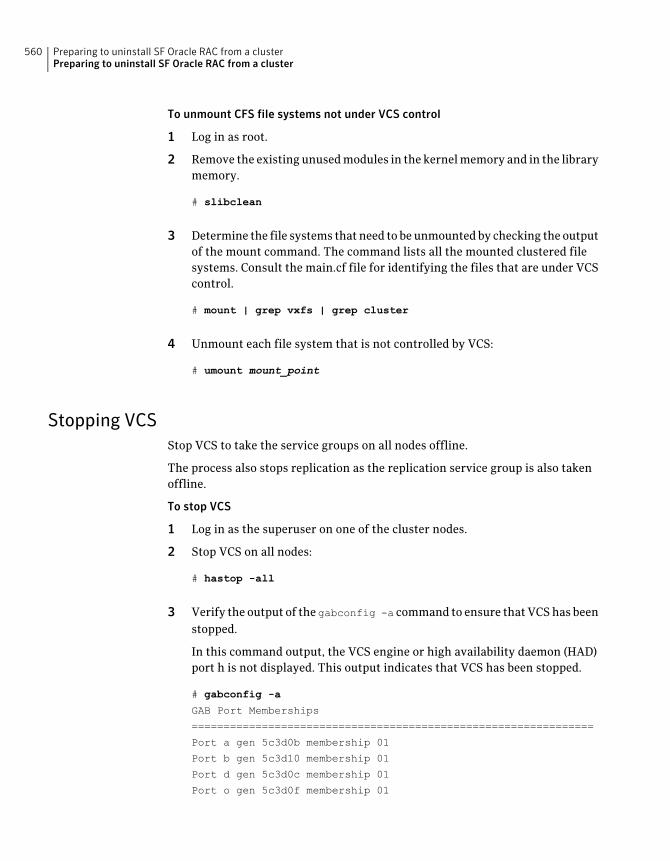
To unmount CFS file systems not under VCS control
1 Log in as root.
2 Remove the existing unused modules in the kernel memory and in the librarymemory.
# slibclean
3 Determine the file systems that need to be unmounted by checking the outputof the mount command. The command lists all the mounted clustered filesystems. Consult the main.cf file for identifying the files that are under VCScontrol.
# mount | grep vxfs | grep cluster
4 Unmount each file system that is not controlled by VCS:
# umount mount_point
Stopping VCSStop VCS to take the service groups on all nodes offline.
The process also stops replication as the replication service group is also takenoffline.
To stop VCS
1 Log in as the superuser on one of the cluster nodes.
2 Stop VCS on all nodes:
# hastop -all
3 Verify the output of the gabconfig -a command to ensure that VCS has beenstopped.
In this command output, the VCS engine or high availability daemon (HAD)port h is not displayed. This output indicates that VCS has been stopped.
# gabconfig -a
GAB Port Memberships
===============================================================
Port a gen 5c3d0b membership 01
Port b gen 5c3d10 membership 01
Port d gen 5c3d0c membership 01
Port o gen 5c3d0f membership 01
Preparing to uninstall SF Oracle RAC from a clusterPreparing to uninstall SF Oracle RAC from a cluster
560

Stopping the applications that use VxVM or VxFS (outside of VCScontrol)
You need to stop all applications that use VxVM volumes or VxFS mount pointsnot under VCS control.
To stop the applications that use VxVM or VxFS (outside of VCS control)
1 Using native application commands, stop the applications that use VxVM orVxFS.
2 Verify that no processes use the VxFS mount point:
# fuser -c mount_point
Unmounting VxFS file systems (outside of VCS control)You need to unmount VxFS file systems that are not under VCS control on allnodes.
Note: To avoid issues on rebooting, you must remove all entries of VxFS from the/etc/filesystem directory.
To unmount VxFS file systems not under VCS control
1 Log in as the root user on each node in the cluster.
2 Remove the existing unused modules in the kernel memory and in the librarymemory.
# slibclean
3 Determine the file systems that need to be unmounted by checking the outputof the mount command. The command lists all the mounted file systems.
# mount | grep vxfs | grep cluster
4 Unmount each file system that is not under VCS control:
# umount mount_point
561Preparing to uninstall SF Oracle RAC from a clusterPreparing to uninstall SF Oracle RAC from a cluster

Preparing to uninstall SF Oracle RAC from a clusterPreparing to uninstall SF Oracle RAC from a cluster
562

Uninstalling SF Oracle RACfrom a cluster
This chapter includes the following topics:
■ Uninstalling SF Oracle RAC from a cluster
■ Uninstalling SF Oracle RAC with the Veritas Web-based installer
■ Uninstalling SF Oracle RAC using a response file
Uninstalling SF Oracle RAC from a clusterYou can remove the SF Oracle RAC filesets from all nodes in the SF Oracle RACcluster using the uninstallsfrac program. The uninstallsfrac program can beaccessed from the product disc or from the /opt/VRTS/install directory.
Perform the steps in the following procedure to remove SF Oracle RAC from acluster.
To remove SF Oracle RAC from a cluster
1 Remove the CP server configuration using the removal script.
See “ Removing the CP server configuration using the removal script”on page 564.
2 Remove the SF Oracle RAC filesets. You can remove the filesets using theuninstallation program or using the response file.
Using the uninstallation program:
See “Removing the SF Oracle RAC filesets” on page 568.
Using the response file:
See “Uninstalling SF Oracle RAC using a response file” on page 573.
34Chapter
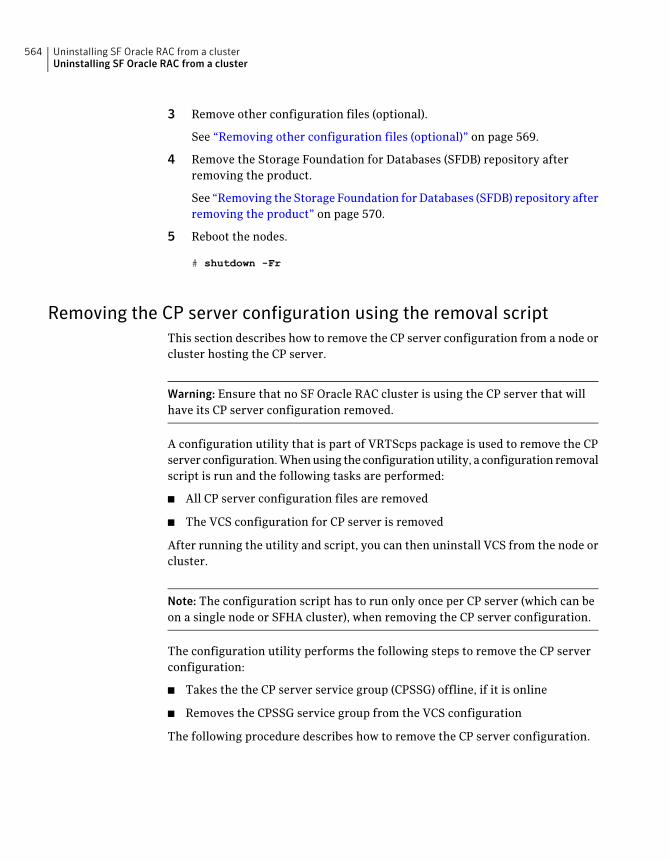
3 Remove other configuration files (optional).
See “Removing other configuration files (optional)” on page 569.
4 Remove the Storage Foundation for Databases (SFDB) repository afterremoving the product.
See “Removing the Storage Foundation for Databases (SFDB) repository afterremoving the product” on page 570.
5 Reboot the nodes.
# shutdown -Fr
Removing the CP server configuration using the removal scriptThis section describes how to remove the CP server configuration from a node orcluster hosting the CP server.
Warning: Ensure that no SF Oracle RAC cluster is using the CP server that willhave its CP server configuration removed.
A configuration utility that is part of VRTScps package is used to remove the CPserver configuration. When using the configuration utility, a configuration removalscript is run and the following tasks are performed:
■ All CP server configuration files are removed
■ The VCS configuration for CP server is removed
After running the utility and script, you can then uninstall VCS from the node orcluster.
Note: The configuration script has to run only once per CP server (which can beon a single node or SFHA cluster), when removing the CP server configuration.
The configuration utility performs the following steps to remove the CP serverconfiguration:
■ Takes the the CP server service group (CPSSG) offline, if it is online
■ Removes the CPSSG service group from the VCS configuration
The following procedure describes how to remove the CP server configuration.
Uninstalling SF Oracle RAC from a clusterUninstalling SF Oracle RAC from a cluster
564

To remove the CP server configuration
1 To run the configuration removal script, enter the following command onthe node where you want to remove the CP server configuration:
[email protected] # /opt/VRTScps/bin/configure_cps.pl
2 The Veritas Coordination Point Server Configuration utility appears with anoption menu.
VERITAS COORDINATION POINT SERVER CONFIGURATION UTILITY
=======================================================
Select one of the following:
[1] Configure Coordination Point Server on single node VCS system
[2] Configure Coordination Point Server on SFHA cluster
[3] Unconfigure Coordination Point Server
3 Select option 3 to unconfigure the Coordination Point Server.
4 A warning appears and prompts you to confirm the action to unconfigure theCoordination Point Server.
Enter "y" to proceed.
WARNING: Unconfiguring Coordination Point Server stops the
vxcpserv process. VCS clusters using this server for
coordination purpose will have one less coordination point.
Are you sure you want to bring down the cp server? (y/n)
(Default:n) :y
565Uninstalling SF Oracle RAC from a clusterUninstalling SF Oracle RAC from a cluster

5 After entering "y" to proceed, messages appear informing you of the progressin removing the CP server configuration.
When the CP server configuration has been unconfigured, a success messageappears.
For an example of the messages from a single node VCS cluster:
A single node VCS cluster is currently configured.
Stopping the CP server ...
Removing the CP Server from VCS configuration..
Removing resource dependencies...
Deleting the resources configured under CPSSG service group...
Deleting the CPSSG service group...
Successfully unconfigured the Veritas Coordination Point Server.
For an example of the messages from a CP server on an SFHA cluster:
A multinode CP Server cluster is currently configured.
Stopping the CP server ...
Removing the CP Server from VCS configuration..
Removing resource dependencies...
Deleting the resources configured under CPSSG service group...
Deleting the CPSSG service group...
Successfully unconfigured the Veritas Coordination Point Server.
6 You are then prompted to delete the CP server database. Enter "y" to deletethe database. For example:
Do you want to delete the CP Server database? (y/n) (Default:n) :
7 Enter "y" at the prompt to confirm the deletion of the CP server database.
Warning: This database won't be available if CP server
is reconfigured on the cluster. Are you sure you want to
proceed with the deletion of database? (y/n) (Default:n) :
Uninstalling SF Oracle RAC from a clusterUninstalling SF Oracle RAC from a cluster
566

8 Enter "y" to delete the CP server configuration file and log files. For example:
Do you want to delete the CP Server configuration file
(/etc/vxcps.conf) and log files (in /var/VRTScps)? (y/n)
(Default:n) : y
9 Run the hagrp -state command to ensure that the CPSSG service group hasbeen removed from the node. For example:
[email protected] # hagrp -state CPSSG
VCS WARNING V-16-1-40131 Group CPSSG does not exist
in the local cluster
Manually remove the CP server fencing configurationThe following procedure describes how to manually remove the CP server fencingconfiguration from the CP server. This procedure is performed as part of theprocess to stop and remove server-based IO fencing.
Note:This procedure must be performed after the SF Oracle RAC cluster has beenstopped, but before the SF Oracle RAC cluster software is uninstalled.
This procedure is required so that the CP server database can be reused in thefuture for configuring server-based fencing on the same SF Oracle RAC cluster(s).
Perform the steps in the following procedure to manually remove the CP serverfencing configuration.
Note: The cpsadm command is used in the following procedure. For detailedinformation about the cpsadm command, see the Veritas Storage Foundation forOracle RAC Administrator's Guide.
567Uninstalling SF Oracle RAC from a clusterUninstalling SF Oracle RAC from a cluster

To manually remove the CP server fencing configuration
1 Unregister all SF Oracle RAC cluster nodes from all CP servers using thefollowing command:
# cpsadm -s cp_server -a unreg_node -u uuid -n nodeid
2 Remove the SF Oracle RAC cluster from all CP servers using the followingcommand:
# cpsadm -s cp_server -a rm_clus -u uuid
3 Remove all the SF Oracle RAC cluster users communicating to CP serversfrom all the CP servers using the following command:
# cpsadm -s cp_server -a rm_user -e user_name -g domain_type
4 Proceed to uninstall the SF Oracle RAC cluster software.
Removing the SF Oracle RAC filesetsThe installer offers the option to remove the Veritas Volume Manager filesets.The uninstallsfrac program can remove these filesets only if the root disk is notunder VxVM control and there are no open volumes.
The installer performs the following tasks:
■ Removes the SF Oracle RAC filesets.
■ Removes the language filesets, if installed.
Note: The following directories remain after uninstallation: /opt/VRTS,/opt/VRTSperl, /etc/VRTSvcs, /var/VRTSvcs, /var/VRTSat_lhc,
/var/VRTSat. They contain logs and configuration information for futurereference. You may or may not remove them.
To remove the SF Oracle RAC filesets
1 Log in as the superuser on any node in the cluster.
2 Navigate to the directory that contains the uninstallsfrac program:
# cd /opt/VRTS/install
Uninstalling SF Oracle RAC from a clusterUninstalling SF Oracle RAC from a cluster
568
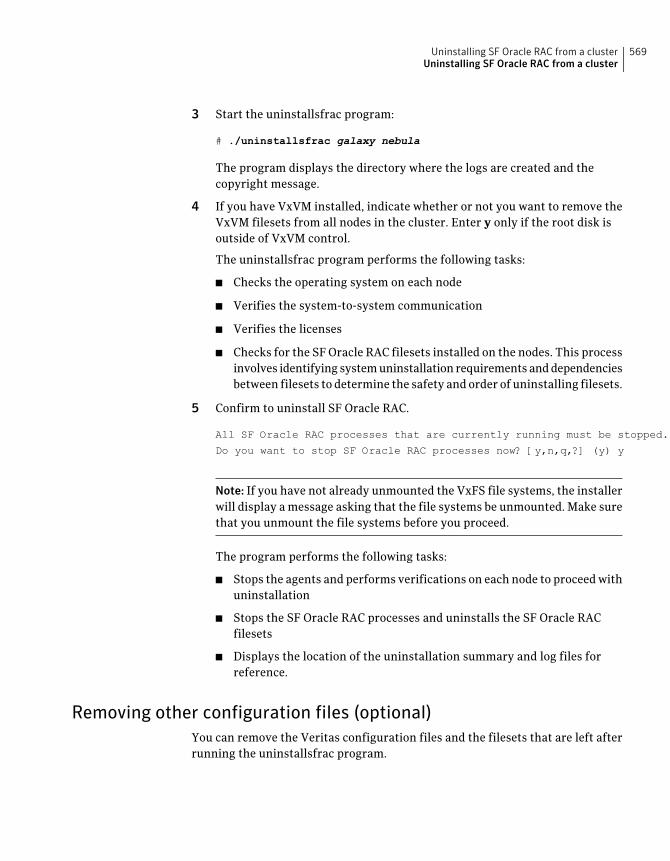
3 Start the uninstallsfrac program:
# ./uninstallsfrac galaxy nebula
The program displays the directory where the logs are created and thecopyright message.
4 If you have VxVM installed, indicate whether or not you want to remove theVxVM filesets from all nodes in the cluster. Enter y only if the root disk isoutside of VxVM control.
The uninstallsfrac program performs the following tasks:
■ Checks the operating system on each node
■ Verifies the system-to-system communication
■ Verifies the licenses
■ Checks for the SF Oracle RAC filesets installed on the nodes. This processinvolves identifying system uninstallation requirements and dependenciesbetween filesets to determine the safety and order of uninstalling filesets.
5 Confirm to uninstall SF Oracle RAC.
All SF Oracle RAC processes that are currently running must be stopped.
Do you want to stop SF Oracle RAC processes now? [y,n,q,?] (y) y
Note: If you have not already unmounted the VxFS file systems, the installerwill display a message asking that the file systems be unmounted. Make surethat you unmount the file systems before you proceed.
The program performs the following tasks:
■ Stops the agents and performs verifications on each node to proceed withuninstallation
■ Stops the SF Oracle RAC processes and uninstalls the SF Oracle RACfilesets
■ Displays the location of the uninstallation summary and log files forreference.
Removing other configuration files (optional)You can remove the Veritas configuration files and the filesets that are left afterrunning the uninstallsfrac program.
569Uninstalling SF Oracle RAC from a clusterUninstalling SF Oracle RAC from a cluster
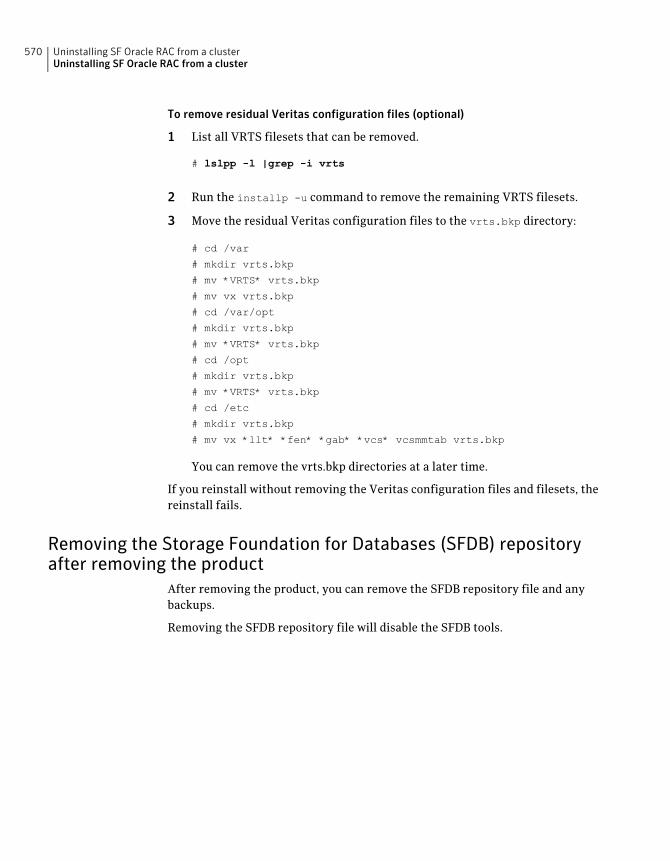
To remove residual Veritas configuration files (optional)
1 List all VRTS filesets that can be removed.
# lslpp -l |grep -i vrts
2 Run the installp -u command to remove the remaining VRTS filesets.
3 Move the residual Veritas configuration files to the vrts.bkp directory:
# cd /var
# mkdir vrts.bkp
# mv *VRTS* vrts.bkp
# mv vx vrts.bkp
# cd /var/opt
# mkdir vrts.bkp
# mv *VRTS* vrts.bkp
# cd /opt
# mkdir vrts.bkp
# mv *VRTS* vrts.bkp
# cd /etc
# mkdir vrts.bkp
# mv vx *llt* *fen* *gab* *vcs* vcsmmtab vrts.bkp
You can remove the vrts.bkp directories at a later time.
If you reinstall without removing the Veritas configuration files and filesets, thereinstall fails.
Removing the Storage Foundation for Databases (SFDB) repositoryafter removing the product
After removing the product, you can remove the SFDB repository file and anybackups.
Removing the SFDB repository file will disable the SFDB tools.
Uninstalling SF Oracle RAC from a clusterUninstalling SF Oracle RAC from a cluster
570

To remove the SFDB repository
1 Change directories to the location of the local lookup information for theOracle SID.
For example:
# cd /var/vx/vxdba/$ORACLE_SID
2 Identify the SFDB repository file and any associated links:
For example:
# ls -al
lrwxrwxrwx 1 oracle oinstall 26 Jul 21 13:58 .sfdb_rept -> \
/ora_data1/TEST/.sfdb_rept
# cd /ora_data1/TEST
Follow the symlink of .sfdb_rept.
3 Remove the repository directory containing the repository file and all backups.
For example:
# rm -rf .sfdb_rept
4 Remove the local lookup directory for the Oracle SID:
# cd /var/vx/vxdba
# rm -rf $ORACLE_SID
This completes the removal of the SFDB repository.
Uninstalling SF Oracle RAC with the VeritasWeb-based installer
This section describes how to uninstall with the Veritas Web-based installer.
571Uninstalling SF Oracle RAC from a clusterUninstalling SF Oracle RAC with the Veritas Web-based installer
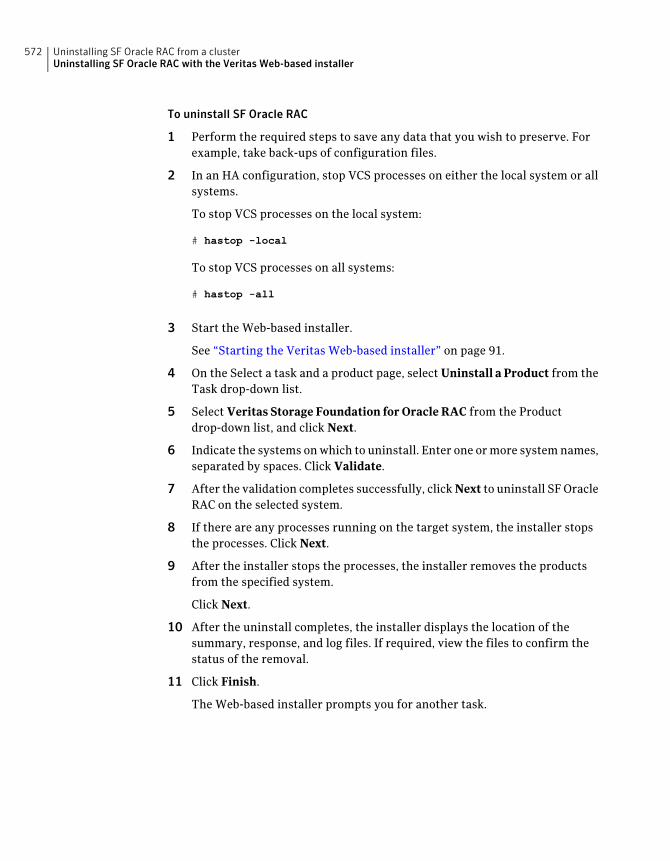
To uninstall SF Oracle RAC
1 Perform the required steps to save any data that you wish to preserve. Forexample, take back-ups of configuration files.
2 In an HA configuration, stop VCS processes on either the local system or allsystems.
To stop VCS processes on the local system:
# hastop -local
To stop VCS processes on all systems:
# hastop -all
3 Start the Web-based installer.
See “Starting the Veritas Web-based installer” on page 91.
4 On the Select a task and a product page, select Uninstall a Product from theTask drop-down list.
5 Select Veritas Storage Foundation for Oracle RAC from the Productdrop-down list, and click Next.
6 Indicate the systems on which to uninstall. Enter one or more system names,separated by spaces. Click Validate.
7 After the validation completes successfully, click Next to uninstall SF OracleRAC on the selected system.
8 If there are any processes running on the target system, the installer stopsthe processes. Click Next.
9 After the installer stops the processes, the installer removes the productsfrom the specified system.
Click Next.
10 After the uninstall completes, the installer displays the location of thesummary, response, and log files. If required, view the files to confirm thestatus of the removal.
11 Click Finish.
The Web-based installer prompts you for another task.
Uninstalling SF Oracle RAC from a clusterUninstalling SF Oracle RAC with the Veritas Web-based installer
572

Uninstalling SF Oracle RAC using a response filePerform the steps in the following procedure to uninstall SF Oracle RAC using aresponse file.
To uninstall SF Oracle RAC using a response file
1 Make sure that you have completed the pre-uninstallation tasks.
2 Create a response file using one of the available options.
For information on various options available for creating a response file:
See “About response files” on page 367.
Note: You must replace the host names in the response file with that of thesystems from which you want to uninstall SF Oracle RAC.
For a sample response file:
See “Sample response file for uninstalling SF Oracle RAC” on page 574.
3 Navigate to the directory containing the SF Oracle RAC uninstallationprogram:
# cd /opt/VRTS/install
4 Start the uninstallation:
# ./uninstallsfrac -responsefile /tmp/response_file
Where /tmp/response_file is the full path name of the response file.
5 Remove other Veritas configuration files and filesets that may be present.
6 Reboot the nodes:
# shutdowm -Fr
Response file variables to uninstall SF Oracle RACTable 34-1 lists the response file variables that you can define to uninstall SFOracle RAC.
573Uninstalling SF Oracle RAC from a clusterUninstalling SF Oracle RAC using a response file

Table 34-1 Response file variables specific to uninstalling SF Oracle RAC
DescriptionList or ScalarVariable
Uninstalls SF Oracle RAC filesets.
(Required)
ScalarCFG{opt}{uninstall}
List of systems on which theproduct is to be uninstalled.
(Required)
ListCFG{systems}
Defines the product to beuninstalled.
(Required)
ScalarCFG{prod}
Defines the location of an sshkeyfile that is used to communicatewith all remote systems.
(Optional)
ScalarCFG{opt}{keyfile}
Defines that rsh must be usedinstead of ssh as thecommunication method betweensystems.
(Optional)
ScalarCFG{opt}{rsh}
Mentions the location where thelog files are to be copied. Thedefault location is/opt/VRTS/install/logs.
Note: The installer copies theresponse files and summary filesalso to the specified logpathlocation.
(Optional)
ScalarCFG{opt}{logpath}
Sample response file for uninstalling SF Oracle RACThe following sample response file uninstalls SF Oracle RAC from nodes, galaxyand nebula.
our %CFG;
$CFG{opt}{uninstall}=1;
Uninstalling SF Oracle RAC from a clusterUninstalling SF Oracle RAC using a response file
574

$CFG{prod}="SFRAC51";
$CFG{systems}=[ qw(galaxy nebula) ];
1;
575Uninstalling SF Oracle RAC from a clusterUninstalling SF Oracle RAC using a response file

Uninstalling SF Oracle RAC from a clusterUninstalling SF Oracle RAC using a response file
576

Installation reference
■ Appendix A. SF Oracle RAC installation filesets
■ Appendix B. Installation scripts
■ Appendix C. SF Oracle RAC installation and configuration sample values
■ Appendix D. Sample configuration files
■ Appendix E. Setting up inter-system communication
■ Appendix F. Automatic Storage Management
■ Appendix G. Creating a test database
■ Appendix H. High availability agent information
■ Appendix I. SF Oracle RAC deployment scenarios
9Section

578
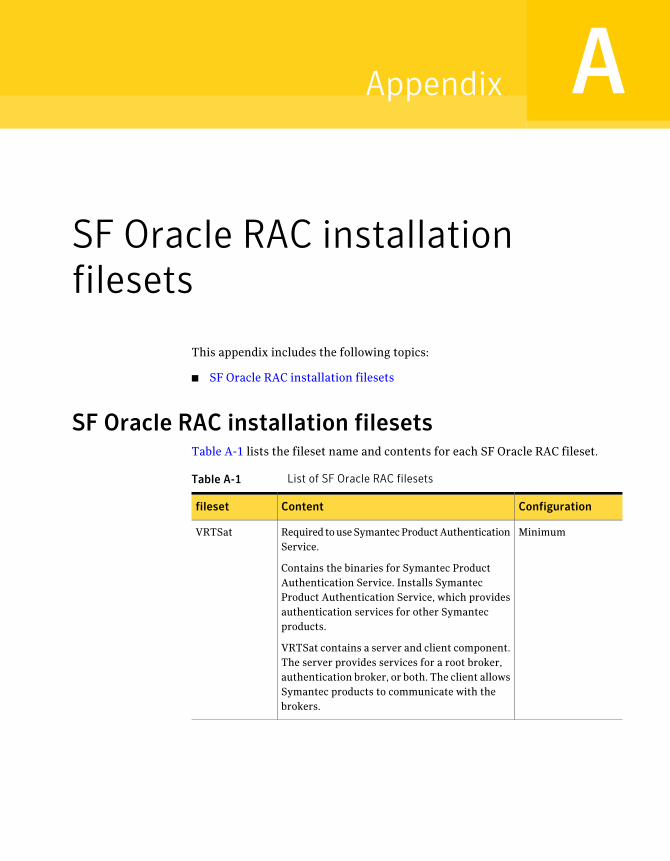
SF Oracle RAC installationfilesets
This appendix includes the following topics:
■ SF Oracle RAC installation filesets
SF Oracle RAC installation filesetsTable A-1 lists the fileset name and contents for each SF Oracle RAC fileset.
Table A-1 List of SF Oracle RAC filesets
ConfigurationContentfileset
MinimumRequired to use Symantec Product AuthenticationService.
Contains the binaries for Symantec ProductAuthentication Service. Installs SymantecProduct Authentication Service, which providesauthentication services for other Symantecproducts.
VRTSat contains a server and client component.The server provides services for a root broker,authentication broker, or both. The client allowsSymantec products to communicate with thebrokers.
VRTSat
AAppendix

Table A-1 List of SF Oracle RAC filesets (continued)
ConfigurationContentfileset
RecommendedRequired for Coordination Point Server (CPS).
Depends on VRTSvxfen.
Contains the binaries for the Veritas CoordinationPoint Server.
VRTScps
MinimumDepends on VRTSgab, VRTSllt, VRTSvcs,VRTSvxfen
Contains the cluster membership and IPCcomponents and VCS agents for Oracle RAC.
VRTSdbac
MinimumDepends on VRTSllt.
Contains the binaries for Veritas Cluster Servergroup membership and atomic broadcast services.
VRTSgab
MinimumContains the binaries for Veritas Cluster Serverlow-latency transport.
VRTSllt
MinimumContains the binaries for the VeritasAsynchronous Monitoring Framework kerneldriver functionality for the process and mountbased agents.
VRTSamf
MinimumContains Perl for Veritas.VRTSperl
RecommendedContains the binaries for Veritas SoftwareSupport Tools.
VRTSspt
MinimumDepends on VRTSvxfen, VRTSgab, and VRTSllt.
Contains the following components:
■ Contains the binaries for Veritas ClusterServer.
■ Contains the binaries for Veritas ClusterServer manual pages.
■ Contains the binaries for Veritas ClusterServer English message catalogs.
■ Contains the binaries for Veritas ClusterServer utilities. These utilities includesecurity services.
VRTSvcs
MinimumDepends on VRTSvcs.
Contains the binaries for Veritas Cluster Serverbundled agents.
VRTSvcsag
SF Oracle RAC installation filesetsSF Oracle RAC installation filesets
580

Table A-1 List of SF Oracle RAC filesets (continued)
ConfigurationContentfileset
RecommendedRequired for VCS with the high availability agentfor Oracle.
VRTSvcsea contains the binaries for Veritas highavailability agents for DB2, Sybase, and Oracle.
VRTSvcsea
MinimumContains the binaries for Symantec LicenseUtilities.
VRTSvlic
MinimumDepends on VRTSgab.
Contains the binaries for Veritas I/O fencing.
VRTSvxfen
MinimumVeritas Cluster Server Agents for StorageFoundation Cluster File System
VRTScavf
MinimumVeritas Storage Foundation for OracleVRTSdbed
AllVeritas File System Software Developer Kit
For VxFS APIs, the fileset contains the publicSoftware Developer Kit (SDK), which includesheaders, libraries, and sample code. The SDK isrequired if some user programs use VxFS APIs.
VRTSfssdk
MinimumVeritas Group Lock Manager for StorageFoundation Cluster File System
VRTSglm
MinimumVeritas Group Messaging Services for StorageFoundation Cluster File System
VRTSgms
RecommendedVeritas Enterprise AdministratorVRTSob
MinimumODM Driver for VxFS
Oracle Disk Manager allows Oracle to improveperformance and manage system bandwidth.
VRTSodm
MinimumVeritas File System binariesVRTSvxfs
MinimumVeritas Volume Manager binariesVRTSvxvm
MinimumVolume Manager ASL/APMVRTSaslapm
RecommendedVeritas Storage Foundation Managed HostVRTSsfmh
581SF Oracle RAC installation filesetsSF Oracle RAC installation filesets

SF Oracle RAC installation filesetsSF Oracle RAC installation filesets
582
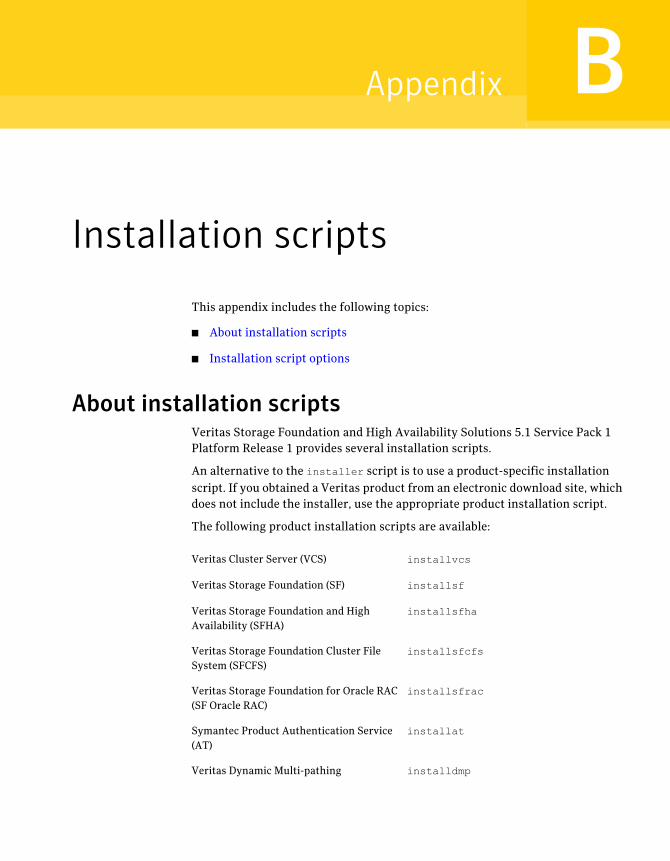
Installation scripts
This appendix includes the following topics:
■ About installation scripts
■ Installation script options
About installation scriptsVeritas Storage Foundation and High Availability Solutions 5.1 Service Pack 1Platform Release 1 provides several installation scripts.
An alternative to the installer script is to use a product-specific installationscript. If you obtained a Veritas product from an electronic download site, whichdoes not include the installer, use the appropriate product installation script.
The following product installation scripts are available:
installvcsVeritas Cluster Server (VCS)
installsfVeritas Storage Foundation (SF)
installsfhaVeritas Storage Foundation and HighAvailability (SFHA)
installsfcfsVeritas Storage Foundation Cluster FileSystem (SFCFS)
installsfracVeritas Storage Foundation for Oracle RAC(SF Oracle RAC)
installatSymantec Product Authentication Service(AT)
installdmpVeritas Dynamic Multi-pathing
BAppendix

To use the installation script, enter the script name at the prompt. For example,to install Veritas Storage Foundation, type ./installsf at the prompt.
Installation script optionsTable B-1 shows command line options for the installation script. For an initialinstall or upgrade, options are not usually required. The installation script optionsapply to all Veritas Storage Foundation product scripts, except where otherwisenoted.
See “About installation scripts” on page 583.
Table B-1 Available command line options
FunctionCommand Line Option
Specifies the systems on which to run theinstallation options. A system name is requiredfor all options. If not specified, the commandprompts for a system name.
system1 system2...
Adds a node to a high availability cluster.–addnode
Displays all filesets and patches required for thespecified product. The filesets and patches arelisted in correct installation order. The outputcan be used to create scripts for command lineinstalls, or for installations over a network.
–allpkgs
The-comcleanup option removes the ssh or rshconfiguration added by installer on the systems.The option is only required when installationroutines that performed auto-configuration ofssh or rsh are abruptly terminated.
–comcleanup
Configures the product after installation.–configure
Installation scriptsInstallation script options
584

Table B-1 Available command line options (continued)
FunctionCommand Line Option
Use this option when you manually installproducts and want to use the intallation scriptsthat are stored on the system to perform productconfiguration, uninstallation, and licensing taskswithout the product media.
Use this option to copy the installation scripts toan alternate rootpath when you use it with the-rootpath option.
The following examples demonstrate the usagefor this option:
■ ./installer -copyinstallscripts
Copies the installation and uninstallationscripts for all products in the release to/opt/VRTS/install. It also copies theinstallation Perl libraries to/opt/VRTSperl/lib/site_perl/release_name
.
■ ./installproduct_name
-copyinstallscripts
Copies the installation and uninstallationscripts for the specified product and anysubset products for the product to/opt/VRTS/install. It also copies theinstallation Perl libraries to/opt/VRTSperl/lib/site_perl/release_name
.
■ ./installer -copyinstallscripts
-rootpath alt_root_path
The path alt_root_path can be a directory like/rdisk2. In that case, this command copiesinstallation and uninstallation scripts for allthe products in the release to/rdisk2/opt/VRTS/install. CPI perllibraries are copied to/rdisk2/opt/VRTSperl/lib/site_perl/release_name,where the release_name is a string that startswith UXRT and includes the release versionwith no punctuation.
-copyinstallscripts
Configures I/O fencing in a running cluster.–fencing
585Installation scriptsInstallation script options
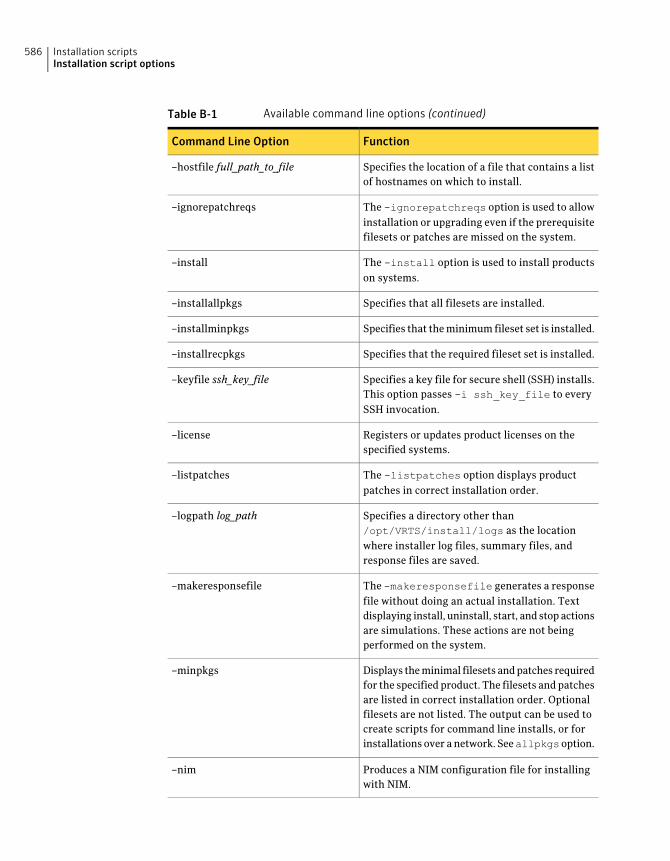
Table B-1 Available command line options (continued)
FunctionCommand Line Option
Specifies the location of a file that contains a listof hostnames on which to install.
–hostfile full_path_to_file
The -ignorepatchreqs option is used to allowinstallation or upgrading even if the prerequisitefilesets or patches are missed on the system.
–ignorepatchreqs
The -install option is used to install productson systems.
–install
Specifies that all filesets are installed.–installallpkgs
Specifies that the minimum fileset set is installed.–installminpkgs
Specifies that the required fileset set is installed.–installrecpkgs
Specifies a key file for secure shell (SSH) installs.This option passes -i ssh_key_file to everySSH invocation.
–keyfile ssh_key_file
Registers or updates product licenses on thespecified systems.
–license
The -listpatches option displays productpatches in correct installation order.
–listpatches
Specifies a directory other than/opt/VRTS/install/logs as the locationwhere installer log files, summary files, andresponse files are saved.
–logpath log_path
The -makeresponsefile generates a responsefile without doing an actual installation. Textdisplaying install, uninstall, start, and stop actionsare simulations. These actions are not beingperformed on the system.
–makeresponsefile
Displays the minimal filesets and patches requiredfor the specified product. The filesets and patchesare listed in correct installation order. Optionalfilesets are not listed. The output can be used tocreate scripts for command line installs, or forinstallations over a network. Seeallpkgsoption.
–minpkgs
Produces a NIM configuration file for installingwith NIM.
–nim
Installation scriptsInstallation script options
586

Table B-1 Available command line options (continued)
FunctionCommand Line Option
Designates the path of a directory that containsall patches to install. The directory is typically anNFS-mounted location and must be accessible byall specified installation systems.
–patchpath patch_path
Displays a list of filesets and the order ofinstallation in a human-readable format. Thisoption only applies to the individual productinstallation scripts. For example, use the -pkginfooption with the installvcs script to display VCSfilesets.
–pkginfo
Designates the path of a directory that containsall filesets to install. The directory is typically anNFS-mounted location and must be accessible byall specified installation systems.
–pkgpath package_path
Discovers and displays the fileset group(minimum, recommended, all) and filesets thatare installed on the specified systems.
–pkgset
Displays product's filesets in correct installationorder by group.
–pkgtable
Checks for different HA and file system-relatedprocesses, the availability of different ports, andthe availability of cluster-related service groups.
–postcheck
Performs a preinstallation check to determine ifsystems meet all installation requirements.Symantec recommends doing a precheck beforeinstalling a product.
–precheck
Displays the recommended filesets and patchesrequired for the specified product. The filesetsand patches are listed in correct installation order.Optional filesets are not listed. The output can beused to create scripts for command line installs,or for installations over a network. See allpkgsoption.
–recpkgs
Displays progress details without showing theprogress bar.
–redirect
587Installation scriptsInstallation script options

Table B-1 Available command line options (continued)
FunctionCommand Line Option
The -requirements option displays requiredOS version, required patches, file system space,and other system requirements in order to installthe product.
–requirements
Automates installation and configuration by usingsystem and configuration information stored ina specified file instead of prompting forinformation. The response_filemust be a full pathname. You must edit the response file to use it forsubsequent installations. Variable field definitionsare defined within the file.
–responsefile response_file
Specify this option when you want to use rsh andrcp for communication between systems insteadof the default ssh and scp.
–rsh
Enable or disable Symantec ProductAuthentication Service in a VCS cluster that isrunning.
You can specify this option with theinstallvcs,installsfha or installsfcfs scripts.
For more information about Symantec ProductAuthentication Service in a VCS cluster, see theVeritas Cluster Server Installation Guide.
–security
Specifies that the installation script performsinstall, uninstall, start, and stop operations oneach system in a serial fashion. If this option isnot specified, these operations are performedsimultaneously on all systems.
–serial
Starts the daemons and processes for the specifiedproduct.
–start
Stops the daemons and processes for the specifiedproduct.
–stop
Specifies a directory other than/var/tmp as theworking directory for the installation scripts. Thisdestination is where initial logging is performedand where filesets are copied on remote systemsbefore installation.
–tmppath tmp_path
Installation scriptsInstallation script options
588

Table B-1 Available command line options (continued)
FunctionCommand Line Option
The -uninstall option is used to uninstallproducts from systems.
–uninstall
Specifies that an existing version of the productexists and you plan to upgrade it.
–upgrade
The -upgrade_kernelpkgs option is used toperform rolling upgrade Phase-I. In the phase,the product kernel filesets get upgraded to thelatest version
–upgrade_kernelpkgs
The -upgrade_nonkernelpkgs option is usedto perform rolling upgrade Phase-II. In the phase,VCS and other agent filesets upgrade to the latestversion. Product kernel drivers arerolling-upgraded to the latest protocol version."
–upgrade_nonkernelpkgs
Checks and reports the installed products andtheir versions. Identifies the installed and missingfilesets and patches where applicable for theproduct. Provides a summary that includes thecount of the installed and any missing filesets andpatches where applicable.
–version
589Installation scriptsInstallation script options

Installation scriptsInstallation script options
590

SF Oracle RAC installationand configuration samplevalues
This appendix includes the following topics:
■ About the installation and configuration worksheets
■ SF Oracle RAC worksheet
■ Oracle RAC worksheet
■ Replicated cluster using VVR worksheet
■ Replicated cluster using SRDF worksheet
■ Required installation information for Oracle Clusterware/Grid Infrastructure
■ Required installation information for Oracle database
About the installation and configuration worksheetsThe installation programs prompt you for information during the installationand configuration of SF Oracle RAC and Oracle RAC. The installation andconfiguration worksheets provide sample values that you can use as examples ofthe information required when you run the Veritas installation programs or theOracle Universal Installer.
Symantec recommends using the worksheets to record values for your systemsbefore you begin the installation and configuration process.
CAppendix

SF Oracle RAC worksheetThis section provides worksheets for installing and configuring SF Oracle RAC,its component products, and features.
Table C-1 contains the sample values that may be used when you install andconfigure SF Oracle RAC. Enter the SF Oracle RAC values for your systems in thefollowing table:
Table C-1 SF Oracle RAC worksheet
Assigned valueSample valueInstallation information
2Number of nodes in thecluster
galaxy and nebula
Note: Do not use the underscorecharacter in host names. Host namesthat use the underscore character arenot compliant with RFC standardsand cause issues.
Host names for Primarycluster
saturn
Note: Do not use the underscorecharacter in host names. Host namesthat use the underscore character arenot compliant with RFC standardsand cause issues.
Host names for added orremoved node
License keys can be one of thefollowing types:
■ Valid license keys for each systemin the cluster
■ Valid site license key
■ Valid demo license key
If you want to configure VeritasVolume Replicator to enable disasterrecovery, you must enter appropriatelicense keys.
Note: You can choose between SFOracle RAC and SF Oracle RACDisaster Recovery and HighAvailability options for license keys.
License keys
SF Oracle RAC installation and configuration sample valuesSF Oracle RAC worksheet
592

Table C-1 SF Oracle RAC worksheet (continued)
Assigned valueSample valueInstallation information
Select one of the following options:
■ Install minimal required VeritasStorage Foundation for OracleRAC filesets
■ Install recommended VeritasStorage Foundation for OracleRAC filesets
■ Install all Veritas StorageFoundation for Oracle RACfilesets
Install only the required filesets ifyou do not want to configure anyoptional components or features.
Default option is to install therecommended filesets.
SF Oracle RAC filesets to beinstalled on the cluster
rac_cluster101Primary cluster name
101Primary cluster ID number
en1, en2Private network links
en0Cluster Manager NIC(Primary NIC)
10.10.12.1, 10.10.12.2Cluster Manager IP
255.255.240.0Netmask for the virtual IPaddress
VCS usernames must not exceed 1024characters.
Example: smith
VCS user name (notrequired if you configureyour cluster in securemode)
VCS passwords must not exceed 512characters.
VCS user password
Users have three levels of privileges:A=Administrator, O=Operator, orG=Guest.
Example: A
VCS user privileges
593SF Oracle RAC installation and configuration sample valuesSF Oracle RAC worksheet
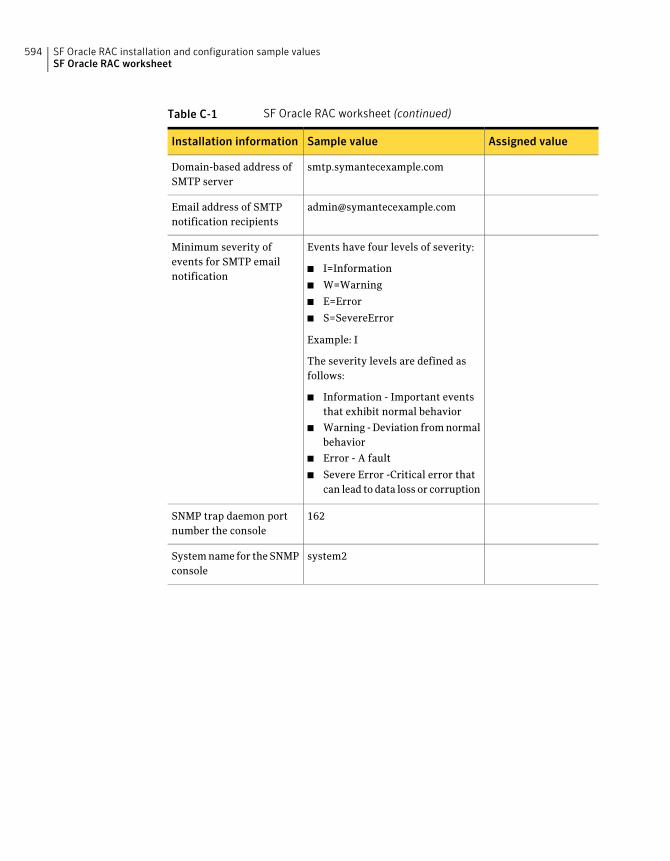
Table C-1 SF Oracle RAC worksheet (continued)
Assigned valueSample valueInstallation information
smtp.symantecexample.comDomain-based address ofSMTP server
[email protected] address of SMTPnotification recipients
Events have four levels of severity:
■ I=Information
■ W=Warning
■ E=Error
■ S=SevereError
Example: I
The severity levels are defined asfollows:
■ Information - Important eventsthat exhibit normal behavior
■ Warning - Deviation from normalbehavior
■ Error - A fault
■ Severe Error -Critical error thatcan lead to data loss or corruption
Minimum severity ofevents for SMTP emailnotification
162SNMP trap daemon portnumber the console
system2System name for the SNMPconsole
SF Oracle RAC installation and configuration sample valuesSF Oracle RAC worksheet
594

Table C-1 SF Oracle RAC worksheet (continued)
Assigned valueSample valueInstallation information
Events have four levels of severity:
■ I=Information
■ W=Warning
■ E=Error
■ S=SevereError
Example: I
The severity levels are defined asfollows:
■ Information - Important eventsthat exhibit normal behavior
■ Warning - Deviation from normalbehavior
■ Error - A fault
■ Severe Error -Critical error thatcan lead to data loss or corruption
Minimum severity ofevents for SNMP trapnotification
rhdisk75 rhdisk76 rhdisk77Vxfen disks
These values are requiredif SCSI-3 disks are used ascoordination points foryour configuration.
vxfencoordgVxfen disk group
Veritas Cluster Server component informationTable C-2 displays the information that is required to configure the Veritas ClusterServer component.
Table C-2 Veritas Cluster Server component information
Assigned valuesExampleInformation
The name must begin with aletter of the alphabet (a-z,A-Z) and contain only thecharacters a through z, Athrough Z, and 1 through 0,hyphen (-), and underscore (_).
Example: rac_cluster101
Name of the cluster
595SF Oracle RAC installation and configuration sample valuesSF Oracle RAC worksheet

Table C-2 Veritas Cluster Server component information (continued)
Assigned valuesExampleInformation
Number in the range of0-65535. Within the site thatcontains the cluster, eachcluster must have a unique ID.
Example: 101
Unique ID number for thecluster
You can choose a networkinterface card that is not partof any aggregated interface,or you can choose anaggregated interface.
The interface names that areassociated with each NIC foreach network link must be thesame on all nodes.
For example:
■ en1
■ en2
Do not use the networkinterface card that is used forthe public network, which istypically en0.
Device names of the NICsused by the privatenetworks among systems
I/O fencing informationTable C-3 displays the information that is required to configure I/O fencing.
Table C-3 I/O fencing information
Assigned valuesSample valuesInformation
The following are examples ofdisk names:
■ rhdisk75
■ rhdisk76
■ rhdisk77
The name of threedisks that form thecoordinator disk group.
SF Oracle RAC installation and configuration sample valuesSF Oracle RAC worksheet
596
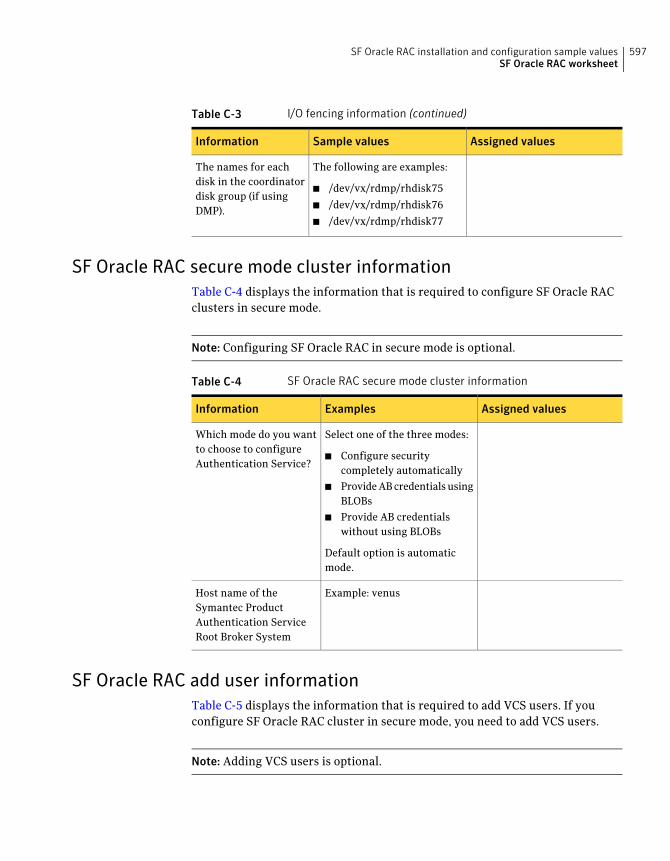
Table C-3 I/O fencing information (continued)
Assigned valuesSample valuesInformation
The following are examples:
■ /dev/vx/rdmp/rhdisk75
■ /dev/vx/rdmp/rhdisk76
■ /dev/vx/rdmp/rhdisk77
The names for eachdisk in the coordinatordisk group (if usingDMP).
SF Oracle RAC secure mode cluster informationTable C-4 displays the information that is required to configure SF Oracle RACclusters in secure mode.
Note: Configuring SF Oracle RAC in secure mode is optional.
Table C-4 SF Oracle RAC secure mode cluster information
Assigned valuesExamplesInformation
Select one of the three modes:
■ Configure securitycompletely automatically
■ Provide AB credentials usingBLOBs
■ Provide AB credentialswithout using BLOBs
Default option is automaticmode.
Which mode do you wantto choose to configureAuthentication Service?
Example: venusHost name of theSymantec ProductAuthentication ServiceRoot Broker System
SF Oracle RAC add user informationTable C-5 displays the information that is required to add VCS users. If youconfigure SF Oracle RAC cluster in secure mode, you need to add VCS users.
Note: Adding VCS users is optional.
597SF Oracle RAC installation and configuration sample valuesSF Oracle RAC worksheet

Table C-5 SF Oracle RAC add user information
Assigned valuesExamplesInformation
smithUser name
*****User password
Users have three levels ofprivileges:
■ A=Administrator
■ O=Operator
■ G=Guest
Example: A
VCS privilege levels include:
■ Administrators— Canperform all operations,including configurationoptions on the cluster,service groups, systems,resources, and users.
■ Operators—Can performspecific operations on acluster or a service group.
■ Guests—Can view specifiedobjects.
User privilege
Global cluster informationTable C-6 displays the information that is required to configure global clusters.
Note: Global clusters are an optional feature that requires a license.
Table C-6 Global cluster information
Assigned valuesExampleInformation
You must specify appropriatevalues for the NIC when youare prompted.
Example: en0
Name of the public NIC
SF Oracle RAC installation and configuration sample valuesSF Oracle RAC worksheet
598

Table C-6 Global cluster information (continued)
Assigned valuesExampleInformation
You must specify appropriatevalues for the virtual IPaddress when you areprompted.
Example: 10.10.12.1
Virtual IP address of theNIC
You must specify appropriatevalues for the netmask whenyou are prompted.
Example: 255.255.255.0
Netmask for the virtualIP address
Oracle RAC worksheetThis section provides a worksheet with sample values for installing and configuringOracle RAC.
Table C-7 displays examples of information required for Oracle RAC.
Table C-7 Required information for Oracle RAC
Assigned valueSample valueInformation
oracleOracle user name
gridGrid user name
(For Oracle RAC 11gRelease 2)
1000Oracle user ID
For inventory group as primary group:oinstall
For dba group as secondary group: dba
Oracle group name
For inventory group as primary group:1000
For dba group as secondary group: 1001
Oracle group ID
/home/oracleOracle user homedirectory
/home/gridGrid user home directory
599SF Oracle RAC installation and configuration sample valuesOracle RAC worksheet

Table C-7 Required information for Oracle RAC (continued)
Assigned valueSample valueInformation
10.20.12.150:0.0
Note: You can provide the host name orIP address of the system that you wantto use to display the Oracle installer.
DISPLAY environmentvariable value
ora_privVCS resource name forPrivNIC
■ On galaxy: 192.168.12.1
■ On nebula: 192.168.12.2
Note:The IP addresses must not containleading zeroes in any of the octets thatcomprise the address for example0X.X.X.X or X0X.X.X, or X.X.0X.X, orX.X.X.0X. Make sure that the private IPaddresses have a format as displayed inthe above examples for galaxy andnebula.
Private IP addresses foreach node
galaxy-priv, nebula-privPrivate hostnames (set in/etc/hosts)
You have to choose an LLT device as adevice for the Oracle Clusterwareheartbeat. The interfaces specified shouldbe exactly the same in name and totalnumber as those which have been usedfor LLT configuration.
For example, if the LLT devices are en1,en2:
■ On galaxy: en1, en2
■ On nebula: en1, en2
Then the PrivNIC or MultiPrivNIC devicenames will be as follows:
■ Device@galaxy= { en1 = 0, en2 = 1 }
■ Device@nebula= { en1 = 0, en2 = 1 }
NIC address for networkon each node
multi_privVCS resource name forMultiPrivNIC
SF Oracle RAC installation and configuration sample valuesOracle RAC worksheet
600

Table C-7 Required information for Oracle RAC (continued)
Assigned valueSample valueInformation
On galaxy:
■ 192.168.12.1 (Oracle Clusterware)
■ 192.168.2.1 (UDP to use for theCLUSTER_INTERCONNECTparameter)
■ 192.168.3.1 (Second UDP to use forthe CLUSTER_INTERCONNECTparameter)
On nebula:
■ 192.168.12.2 (Oracle Clusterware)
■ 192.168.2.2 (UDP to use for theCLUSTER_INTERCONNECTparameter)
■ 192.168.3.2 (Second UDP to use forthe CLUSTER_INTERCONNECTparameter)
Note:The IP addresses must not containleading zeroes in any of the octets thatcomprise the address for example0X.X.X.X or X.0X.X.X, or X.X.0X.X, orX.X.X.0X. Make sure that the private IPaddresses have a format as displayed inthe above examples for galaxy andnebula.
Symantec recommends that all OracleClusterware and UDP cache-fusion linksbe LLT links.
Private IP addresses foreach node
(MultiPrivNIC)
On galaxy:
■ galaxy-priv
■ galaxy-priv1
On nebula:
■ nebula-priv
■ nebula-priv1
Private hostnames (set in/etc/hosts)
255.255.255.0Netmask for cluster
601SF Oracle RAC installation and configuration sample valuesOracle RAC worksheet

Table C-7 Required information for Oracle RAC (continued)
Assigned valueSample valueInformation
Disk_1Disk for each node thatcontains the OracleClusterware and databasebinaries
■ On galaxy: bindg_galaxy
■ On nebula: bindg_nebula
VxVM disk group
■ On galaxy: crsbinvol
■ On nebula: orabinvol
Volume for each localdisk group
■ On galaxy:
/dev/vx/rdsk/\bindg_galaxy/crsbinvol
/dev/vx/rdsk/\bindg_galaxy/orabinvol
■ On nebula:
/dev/vx/rdsk/\bindg_nebula/crsbinvol
/dev/vx/rdsk/\bindg_nebula/orabinvol
File system on each localvolume
■ Oracle RAC 10g Release 2/Oracle RAC11g Release 1:
/u01/app/oracle
■ Oracle RAC 11g Release 2:
/u01/app/gridbase
Oracle base directory(ORACLE_BASE)
/u01/app/oracle/product/release/dbhome_1
where release is 10.2.0, 11.1.0, or 11.2.0depending on the Oracle RAC version
Oracle home directory(ORACLE_HOME)
/u01/app/oracle/product/10.2.0/crshomeOracle Clusterware homedirectory (CRS_HOME)
/u01/app/grid/product/11.2.0/gridhomeGrid home directory(GRID_HOME)
SF Oracle RAC installation and configuration sample valuesOracle RAC worksheet
602

Table C-7 Required information for Oracle RAC (continued)
Assigned valueSample valueInformation
■ Oracle RAC 10g Release 2/Oracle RAC11g Release 1:
/u01/app/oracle (for crsbinvol andorabinvol)
■ Oracle RAC 11g Release 2:
/u01/app/grid (crsbinvol)
/u01/app/oracle (orabinvol)
File system mount point(VxFS)
■ Oracle RAC 10g Release 2/Oracle RAC11g Release 1:
/u01/app/oracle/product/10.2.0/crshome(for crsbinvol)
/u01/app/oracle/product/10.2.0/dbhome_1(for orabinvol)
■ Oracle RAC 11g Release 2:
/u01/app/grid/product/11.2.0/gridhome(crsbinvol)
/u01/app/oracle/product/11.2.0/dbhome_1(orabinvol)
File system mount point(CFS)
oradatadg (Shared)Disk group for OracleDatabase
oradatavolVolume for OracleDatabase
layout=striped-mirrorVolume options forOracle Database
/oradata (Shared)Mount point for OracleDatabase
oradata_voldg, oradata_mntVCS resource names forOracle Database
db.symantecexample.com (databasename.domain)
Global Database Name
ora1SID prefix
ocrvotedgShared disk group forOCR and voting disk
603SF Oracle RAC installation and configuration sample valuesOracle RAC worksheet

Table C-7 Required information for Oracle RAC (continued)
Assigned valueSample valueInformation
■ CVM raw volumes
OCR: ocrvol
Voting disk: votevol
■ CFS
ocrvotevol
Volume for shared diskgroup
nmirror=2Volume options for OCRand voting disk
/dev/vx/rdsk/ocrvotedg/ocrvotevolFile system on sharedvolume (CFS)
/ocrvoteMount point for sharedfile system
ocrvote_voldg_ocrvotedg
ocrvote_mnt_ocrvotedg
VCS resource names forVotedisk and OCR
/oradataMount point for archivelogs
Replicated cluster using VVR worksheetTable C-8 contains the sample values that may be used when you install andconfigure CVM and VVR. If applicable, enter the CVM/VVR values for your systemsin the following table:
Table C-8 Replicated cluster using VVR worksheet
Assigned valueSample valueInstallation information
mercury, jupiterHost names for SecondaryCluster
rac_cluster102Secondary Cluster Name
102Secondary cluster ID number
10.10.10.101Primary Cluster Address
10.10.9.101Primary Cluster Logowner IP
10.11.10.102Secondary Cluster Address
SF Oracle RAC installation and configuration sample valuesReplicated cluster using VVR worksheet
604

Table C-8 Replicated cluster using VVR worksheet (continued)
Assigned valueSample valueInstallation information
10.11.9.102Secondary Cluster LogownerIP
rac1_rvgRVG Name
vrtsGlobal Database Name
ora1Database Resource Name
oradb1_grpDatabase Group Name(depends on cvm, includesresources oracle agent etc.)
rac1_srlSrl Volume Name
rac_clus101_privResolvable Virtual Hostnameof the cluster on Primary Site(for VVR)
rac_clus102_privResolvable Virtual Hostnameof the cluster on SecondarySite (for VVR)
192.168.12.3 - 192.168.12.4Private IP addresses forSecondary Cluster
Replicated cluster using SRDF worksheetTable C-9 contains the sample values that may be used when you install andconfigure CVM and VVR. If applicable, enter the CVM/VVR values for your systemsin the following table:
Table C-9 Replicated cluster using SRDF worksheet
Assigned valueSample valueInstallationinformation
mercury, jupiterHost names forSecondary Cluster
rac_cluster102Secondary Cluster Name
102Secondary cluster IDnumber
605SF Oracle RAC installation and configuration sample valuesReplicated cluster using SRDF worksheet

Table C-9 Replicated cluster using SRDF worksheet (continued)
Assigned valueSample valueInstallationinformation
10.10.10.101Primary Cluster Address
10.10.9.101Primary ClusterLogowner IP
10.11.10.102Secondary ClusterAddress
10.11.9.102Secondary ClusterLogowner IP
rac1_rvgRVG Name
vrtsGlobal Database Name
ora1Database ResourceName
oradb1_grpDatabase Group Name(depends on cvm,includes resourcesoracle agent etc.)
rac1_srlSrl Volume Name
rac_clus101_privResolvable VirtualHostname of the clusteron Primary Site (forVVR)
rac_clus102_privResolvable VirtualHostname of the clusteron Secondary Site (forVVR)
192.168.12.3 -192.168.12.4
Private IP addresses forSecondary Cluster
Required installation information for OracleClusterware/Grid Infrastructure
This section describes the information required by the Oracle Universal Installerfor installing the Oracle Clusterware/Grid Infrastructure software.
SF Oracle RAC installation and configuration sample valuesRequired installation information for Oracle Clusterware/Grid Infrastructure
606

Table C-10 lists the information required by the Oracle Universal Installer whenyou install Oracle Clusterware.
Table C-10 Required installation information for Oracle Clusterware - OracleRAC 10g Release 2/Oracle RAC 11g Release 1
DescriptionOUI menu
Enter the full path of the inventory directory and theoperating system group name.
Note: Retain the directory paths and operating systemgroup name suggested by the installer. Changing theinformation results in failure of certain post-verificationtasks.
Specify Inventory Detailsand Credentials
Enter the path to the CRS home directory.
The Oracle Universal Installer performs product-specificprerequisite checks and verifies that your environmentmeets all of the minimum requirements for installingOracle RAC. You must manually verify and confirm theitems that are flagged with warnings and items that requiremanual checks.
The OUI displays the full path of the oraInventory logs.Make a note of the log file path to verify the installation ata later time.
Specify Home Details
Verify the cluster name and the nodes to be managed byOracle Clusterware.
Specifyclusterconfiguration
Identify the planned use for each interface: Public, Private,or Do Not use.
Note: Make sure that the same private interfaces that youspecified at the time of configuring PrivNIC andMultiPrivNIC are listed on the screen.
Note: Mark the interfaces for the subnet containing theprivate IP addresses managed by the PrivNIC/MultiPrivNICagents as ‘Private’.
The interfaces that are Private are stored in OCR as a'cluster_interconnect' for database cache fusion traffic.Oracle recommends the use of a common private interfacefor both Oracle Clusterware and Oracle RAC database.
Specify network interfaceusage
607SF Oracle RAC installation and configuration sample valuesRequired installation information for Oracle Clusterware/Grid Infrastructure
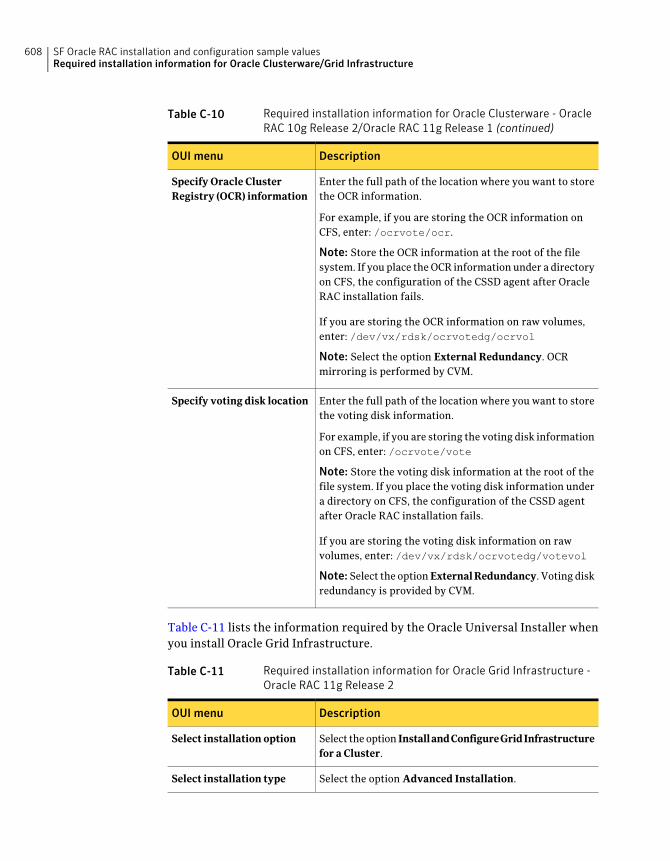
Table C-10 Required installation information for Oracle Clusterware - OracleRAC 10g Release 2/Oracle RAC 11g Release 1 (continued)
DescriptionOUI menu
Enter the full path of the location where you want to storethe OCR information.
For example, if you are storing the OCR information onCFS, enter: /ocrvote/ocr.
Note: Store the OCR information at the root of the filesystem. If you place the OCR information under a directoryon CFS, the configuration of the CSSD agent after OracleRAC installation fails.
If you are storing the OCR information on raw volumes,enter: /dev/vx/rdsk/ocrvotedg/ocrvol
Note: Select the option External Redundancy. OCRmirroring is performed by CVM.
Specify Oracle ClusterRegistry (OCR) information
Enter the full path of the location where you want to storethe voting disk information.
For example, if you are storing the voting disk informationon CFS, enter: /ocrvote/vote
Note: Store the voting disk information at the root of thefile system. If you place the voting disk information undera directory on CFS, the configuration of the CSSD agentafter Oracle RAC installation fails.
If you are storing the voting disk information on rawvolumes, enter: /dev/vx/rdsk/ocrvotedg/votevol
Note: Select the option ExternalRedundancy. Voting diskredundancy is provided by CVM.
Specify voting disk location
Table C-11 lists the information required by the Oracle Universal Installer whenyou install Oracle Grid Infrastructure.
Table C-11 Required installation information for Oracle Grid Infrastructure -Oracle RAC 11g Release 2
DescriptionOUI menu
Select the option InstallandConfigureGridInfrastructurefor a Cluster.
Select installation option
Select the option Advanced Installation.Select installation type
SF Oracle RAC installation and configuration sample valuesRequired installation information for Oracle Clusterware/Grid Infrastructure
608

Table C-11 Required installation information for Oracle Grid Infrastructure -Oracle RAC 11g Release 2 (continued)
DescriptionOUI menu
Enter the SCAN name for the cluster that will be used bythe database clients to connect to databases within thecluster.
Specifyclusterconfiguration
Provide the following information:
■ Name of the cluster
■ SCAN name
The SCAN address on the domain name server (DNS)must resolve to three addresses (recommended) or atleast one address.
■ SCAN port
Grid Plug and Playinformation
Identify the planned use for each interface: Public, Private,or Do Not use.
Note: Make sure that the same private interfaces that youspecified at the time of configuring PrivNIC andMultiPrivNIC are listed on the screen.
Note: Mark the interfaces for the subnet containing theprivate IP addresses managed by the PrivNIC/MultiPrivNICagents as ‘Private’.
The interfaces that are Private are stored in GPnP profileas a 'cluster_interconnect' for Oracle Grid Infrastructurecommunication and database cache fusion traffic.
Specify network interfaceusage
Select the option Shared File System.Storage option information
Enter the full path of the location where you want to storethe OCR information.
For example, if you are storing the OCR information onCFS, enter: /ocrvote/ocr.
Note: Select the option External Redundancy when youinstall Oracle Clusterware/Grid Infrastructure. Mirroringis performed by CVM.
If you are storing the OCR information on an ASM diskgroup that uses CVM raw volumes, enter:/dev/vx/rdsk/ocrvotedg/ocrvol
Note: Select the option External when you create the ASMdisk group and instances. Mirroring is performed by CVM.
OCR storage option
609SF Oracle RAC installation and configuration sample valuesRequired installation information for Oracle Clusterware/Grid Infrastructure
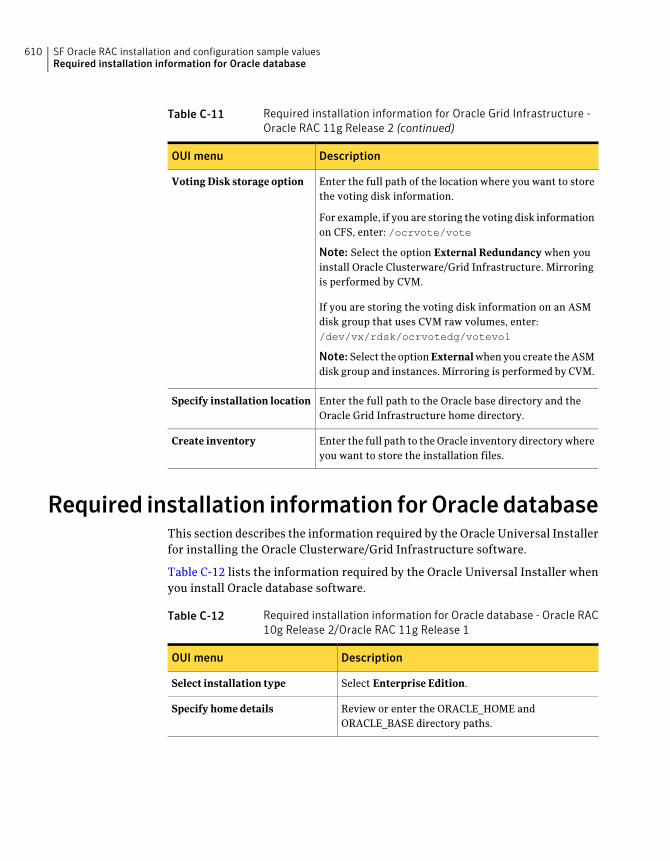
Table C-11 Required installation information for Oracle Grid Infrastructure -Oracle RAC 11g Release 2 (continued)
DescriptionOUI menu
Enter the full path of the location where you want to storethe voting disk information.
For example, if you are storing the voting disk informationon CFS, enter: /ocrvote/vote
Note: Select the option External Redundancy when youinstall Oracle Clusterware/Grid Infrastructure. Mirroringis performed by CVM.
If you are storing the voting disk information on an ASMdisk group that uses CVM raw volumes, enter:/dev/vx/rdsk/ocrvotedg/votevol
Note: Select the option External when you create the ASMdisk group and instances. Mirroring is performed by CVM.
Voting Disk storage option
Enter the full path to the Oracle base directory and theOracle Grid Infrastructure home directory.
Specify installation location
Enter the full path to the Oracle inventory directory whereyou want to store the installation files.
Create inventory
Required installation information forOracle databaseThis section describes the information required by the Oracle Universal Installerfor installing the Oracle Clusterware/Grid Infrastructure software.
Table C-12 lists the information required by the Oracle Universal Installer whenyou install Oracle database software.
Table C-12 Required installation information for Oracle database - Oracle RAC10g Release 2/Oracle RAC 11g Release 1
DescriptionOUI menu
Select Enterprise Edition.Select installation type
Review or enter the ORACLE_HOME andORACLE_BASE directory paths.
Specify home details
SF Oracle RAC installation and configuration sample valuesRequired installation information for Oracle database
610

Table C-12 Required installation information for Oracle database - Oracle RAC10g Release 2/Oracle RAC 11g Release 1 (continued)
DescriptionOUI menu
Select Cluster Installation.
Select the nodes on which you want to install theOracle RAC database software.
The Oracle Universal Installer runs a product-specificprerequisite check. Any items that are flagged mustbe manually checked and configured. The OUI displaysthe full path of the oraInventory logs. Make a note ofthe log file path to verify the installation at a latertime.
Specify Hardware ClusterInstallation Mode
Select the option Install database software only.
Note: Do not select the option Create a database.Symantec recommends that you create the databaselater.
Select Configuration Option
Table C-13 lists the information required by the Oracle Universal Installer whenyou install Oracle database software.
Table C-13 Required installation information for Oracle database - Oracle RAC11g Release 2
DescriptionOUI menu
Select the option Install database software only.Select installation option
Select Real Application Clusters databaseinstallation.
Select the nodes on which the Oracle RAC databasesoftware must be installed.
Node selection
Select Enterprise Edition.Select database edition
Review or enter the ORACLE_BASE andORACLE_HOME directory paths.
The Oracle Universal Installer runs product-specificprerequisite checks. Any items that are flagged mustbe manually checked and configured.
Specify installation location
611SF Oracle RAC installation and configuration sample valuesRequired installation information for Oracle database

SF Oracle RAC installation and configuration sample valuesRequired installation information for Oracle database
612

Sample configuration files
This appendix includes the following topics:
■ About VCS configuration file
■ About the LLT and GAB configuration files
■ About I/O fencing configuration files
■ Sample configuration files
About VCS configuration fileThis section provides a high-level overview of the contents of the VCSconfiguration file after the SF Oracle RAC installation. Review the configurationfile after the SF Oracle RAC installation and before the Oracle installation.
The configuration file includes the following information:
■ The "include" statements list the various VCS types files (.cf) for SF OracleRAC.The files are located in the /etc/VRTSvcs/conf/config directory. These filesdefine the agents that control the resources in the cluster.
■ The cluster definition, with the cluster name provided during installation (forexample, rac_cluster101), includes the names of users and administrators ofthe cluster. The UseFence = SCSI3 attribute is not automatically present; youmust manually add it after the installation.See “Setting up disk-based I/O fencing manually” on page 156.
■ The main.cf includes the cvm service group. The service group includesdefinitions for monitoring the CFS and the CVM resources. The CVMClusteragent resource definition indicates that the nodes use GAB for messagingoperations.
DAppendix

The cvm group has the Parallel attribute set to 1. This value enables theresources to run in parallel on each node in the system list.
About the LLT and GAB configuration filesLow Latency Transport (LLT) and Group Membership and Atomic Broadcast (GAB)are VCS communication services. LLT requires /etc/llthosts and /etc/llttab
files. GAB requires /etc/gabtab file.
Table D-1 lists the LLT configuration files and the information that these filescontain.
Table D-1 LLT configuration files
DescriptionFile
This file stores the start and stop environment variables for LLT:
■ LLT_START—Defines the startup behavior for the LLT module after a system reboot. Validvalues include:
1—Indicates that LLT is enabled to start up.
0—Indicates that LLT is disabled to start up.
■ LLT_STOP—Defines the shutdown behavior for the LLT module during a system shutdown.Valid values include:
1—Indicates that LLT is enabled to shut down.
0—Indicates that LLT is disabled to shut down.
The installer sets the value of these variables to 1 at the end of SF Oracle RAC configuration.
/etc/default/llt
The file llthosts is a database that contains one entry per system. This file links the LLTsystem ID (in the first column) with the LLT host name. This file must be identical on each nodein the cluster. A mismatch of the contents of the file can cause indeterminate behavior in thecluster.
For example, the file /etc/llthosts contains the entries that resemble:
0 galaxy1 nebula
/etc/llthosts
Sample configuration filesAbout the LLT and GAB configuration files
614

Table D-1 LLT configuration files (continued)
DescriptionFile
The file llttab contains the information that is derived during installation and used by theutilitylltconfig(1M). After installation, this file lists the LLT network links that correspondto the specific system.
For example, the file /etc/llttab contains the entries that resemble:
set-node galaxyset-cluster 2link en1 /dev/dlpi/en:1 - ether - -link en2 /dev/dlpi/en:2 - ether - -
set-node galaxyset-cluster 2link en1 /dev/en:1 - ether - -link en2 /dev/en:2 - ether - -
The first line identifies the system. The second line identifies the cluster (that is, the clusterID you entered during installation). The next two lines begin with the link command. Theselines identify the two network cards that the LLT protocol uses.
If you configured a low priority link under LLT, the file also includes a "link-lowpri" line.
Refer to the llttab(4) manual page for details about how the LLT configuration may bemodified. The manual page describes the ordering of the directives in the llttab file.
/etc/llttab
Table D-2 lists the GAB configuration files and the information that these filescontain.
Table D-2 GAB configuration files
DescriptionFile
This file stores the start and stop environment variables for GAB:
■ GAB_START—Defines the startup behavior for the GAB moduleafter a system reboot. Valid values include:
1—Indicates that GAB is enabled to start up.
0—Indicates that GAB is disabled to start up.
■ GAB_STOP—Defines the shutdown behavior for the GAB moduleduring a system shutdown. Valid values include:
1—Indicates that GAB is enabled to shut down.
0—Indicates that GAB is disabled to shut down.
The installer sets the value of these variables to 1 at the end of SFOracle RAC configuration.
/etc/default/gab
615Sample configuration filesAbout the LLT and GAB configuration files

Table D-2 GAB configuration files (continued)
DescriptionFile
After you install SF Oracle RAC, the file /etc/gabtab contains agabconfig(1) command that configures the GAB driver for use.
The file /etc/gabtab contains a line that resembles:
/sbin/gabconfig -c -nN
The -c option configures the driver for use. The -nN specifies thatthe cluster is not formed until at least N nodes are ready to form thecluster. Symantec recommends that you set N to be the total numberof nodes in the cluster.
Note: Symantec does not recommend the use of the -c -x option for/sbin/gabconfig. Using -c -x can lead to a split-brain condition.
/etc/gabtab
About I/O fencing configuration filesTable D-3 lists the I/O fencing configuration files.
Table D-3 I/O fencing configuration files
DescriptionFile
This file stores the start and stop environment variables for I/O fencing:
■ VXFEN_START—Defines the startup behavior for the I/O fencing module after a systemreboot. Valid values include:
1—Indicates that I/O fencing is enabled to start up.
0—Indicates that I/O fencing is disabled to start up.
■ VXFEN_STOP—Defines the shutdown behavior for the I/O fencing module during a systemshutdown. Valid values include:
1—Indicates that I/O fencing is enabled to shut down.
0—Indicates that I/O fencing is disabled to shut down.
The installer sets the value of these variables to 1 at the end of SF Oracle RAC configuration.
/etc/default/vxfen
This file includes the coordinator disk group information.
This file is not applicable for server-based fencing.
/etc/vxfendg
Sample configuration filesAbout I/O fencing configuration files
616

Table D-3 I/O fencing configuration files (continued)
DescriptionFile
This file contains the following parameters:
■ vxfen_mode
■ scsi3—For disk-based fencing
■ customized—For server-based fencing
■ disabled—To run the I/O fencing driver but not do any fencing operations.
■ vxfen_mechanism
This parameter is applicable only for server-based fencing. Set the value as cps.
■ scsi3_disk_policy
■ dmp—Configure the vxfen module to use DMP devices
The disk policy is dmp by default. If you use iSCSI devices, you must set the disk policyas dmp.
■ raw—Configure the vxfen module to use the underlying raw character devices
Note: You must use the same SCSI-3 disk policy on all the nodes.
■ security
This parameter is applicable only for server-based fencing.
1—Indicates that Symantec Product Authentication Service is used for CP servercommunications. This setting is the default.
0—Indicates that communication with the CP server is in non-secure mode.
Note: The CP server and the SF Oracle RAC clusters must have the same security setting.
■ List of coordination points
This list is required only for server-based fencing configuration.
Coordination points in a server-based fencing can include coordinator disks, CP servers, ora mix of both. If you use coordinator disks, you must create a coordinator disk group withthe coordinator disk names.
Refer to the sample file /etc/vxfen.d/vxfenmode_cps for more information on how to specifythe coordination points.
■ single_cp
This parameter is applicable only for server-based fencing which uses a single highly availableCP server as its coordination point.
/etc/vxfenmode
617Sample configuration filesAbout I/O fencing configuration files

Table D-3 I/O fencing configuration files (continued)
DescriptionFile
When I/O fencing starts, the vxfen startup script creates this /etc/vxfentab file on eachnode. The startup script uses the contents of the /etc/vxfendg and /etc/vxfenmode files.Any time a system is rebooted, the fencing driver reinitializes the vxfentab file with thecurrent list of all the coordinator points.
Note: The /etc/vxfentab file is a generated file; do not modify this file.
For disk-based I/O fencing, the /etc/vxfentab file on each node contains a list of all paths toeach coordinator disk. An example of the /etc/vxfentab file in a disk-based fencingconfiguration on one node resembles as follows:
■ Raw disk:
/dev/rhdisk75/dev/rhdisk76/dev/rhdisk77
■ DMP disk:
/dev/vx/rdmp/rhdisk75/dev/vx/rdmp/rhdisk76/dev/vx/rdmp/rhdisk77
For server-based fencing, the /etc/vxfentab file also includes the security settingsinformation.
For server-based fencing with single CP server, the /etc/vxfentab file also includes thesingle_cp settings information.
/etc/vxfentab
Sample configuration filesSF Oracle RAC provides several sample configuration files illustrating variousscenarios. You may use the sample files as a guideline for setting up your clusterenvironment. These sample files are located at /etc/VRTSvcs/conf/sample_rac/.
This section briefly describes each of the sample files and illustrates the servicegroup configuration for each of them. The section does not include a copy of themain.cf files.
The following sample files are discussed in this section:
■ sfrac01_main.cf file
■ sfrac02_main.cf file
■ sfrac03_main.cf file
Sample configuration filesSample configuration files
618

■ sfrac04_main.cf file
■ sfrac05_main.cf file
■ sfrac06_main.cf file
■ sfrac07_main.cf and sample08_main.cf files
■ sfrac09_main.cf and sample10_main.cf files
■ sfrac11_main.cf file
■ sfrac12_main.cf and sample13_main.cf files
■ sfrac14_main.cf file
sfrac01_main.cf fileThe sample configuration is applicable only for Oracle RAC 10g installations.
This sample file describes the following configuration:
■ A two node SF Oracle RAC cluster hosting single database.
■ The Oracle database is stored on CFS.
■ The database is managed by the VCS agent for Oracle.The agent starts, stops, and monitors the database.
■ The database uses the VCSIPC for database cache fusion.
■ Only one private IP address is configured for Oracle Clusterware. The privateIP address is managed by the PrivNIC agent for high availability.
■ The Oracle Cluster Registry (OCR) and voting disk are stored on CFS.
Figure D-1 illustrates the configuration.
619Sample configuration filesSample configuration files

Figure D-1 Service group configuration for sfrac01_main.cf file
oradb_grp (parallel)
cvm (parallel)
CVMCluster
Application
CFSfsckd
cssd
ora_privvxfsckd
cvm_clus
cvm_vxconfigd
CFSMount
ocrvote_mnt
ocrvote_voldg
CVMVoIDG
Oracleora_db
CFSMount
CVMVoIDG
oradata_mnt
oradata_voldg
CVMVxConfigd
PrivNIC
sfrac02_main.cf fileThis sample file describes the following configuration:
■ A two node SF Oracle RAC cluster hosting single database.
■ The Oracle database is stored on CFS.
■ The database is managed by the VCS agent for Oracle.The agent starts, stops, and monitors the database.
■ The database uses the Oracle UDP IPC for database cache fusion.
■ A common IP address is used by Oracle Clusterware and database cache fusion.The private IP address is managed by the PrivNIC agent for high availability.
■ The Oracle Cluster Registry (OCR) and voting disk are stored on CVM rawvolumes.
Figure D-2 illustrates the configuration.
Sample configuration filesSample configuration files
620

Figure D-2 Service group configuration for sfrac02_main.cf file
oradb_grp (parallel)
cvm (parallel)
CVMCluster
Application
CFSfsckd
cssd
ora_privvxfsckd
cvm_clus
cvm_vxconfigd
ocrvote_voldg
CVMVoIDG
Oracleora_db
CFSMount
CVMVoIDG
oradata_mnt
oradata_voldg
CVMVxConfigd
PrivNIC
sfrac03_main.cf fileThis sample file describes the following configuration:
■ A two node SF Oracle RAC cluster hosting two databases.
■ The Oracle database is stored on CFS.
■ The database is managed by the VCS agent for Oracle.The agent starts, stops, and monitors the database.
■ The database uses the Oracle UDP IPC for database cache fusion.
■ One IP address (on en1) is shared by Oracle Clusterware and one of thedatabases for cache fusion.The second IP address (on en2) is used by the second database for cache fusion.The private IP addresses are managed by the MultiPrivNIC agent for highavailability.
■ The Oracle Cluster Registry (OCR) and voting disk are stored on CFS.
621Sample configuration filesSample configuration files

Figure D-3 illustrates the configuration.
Figure D-3 Service group configuration for sfrac03_main.cf file
oradb_grp (parallel)
cvm (parallel)
CVMCluster
Application
CFSfsckd
cssd
ora_mprivvxfsckd
cvm_clus
cvm_vxconfigd
CFSMount
ocrvote_mnt
ocrvote_voldg
CVMVoIDG
Oracleora_db
CFSMount
CVMVoIDG
oradata_mnt
oradata_voldg
CVMVxConfigd
MultiPrivNIC
Oraclerac_db
CFSMount
CVMVoIDG
racdata_mnt
racdata_voldg
racdb_grp (parallel)
sfrac04_main.cf fileThis sample file describes the following configuration:
■ A two node SF Oracle RAC cluster hosting two databases.
■ The Oracle database is stored on CFS.
■ Database is not managed by VCS. Oracle Clusterware starts, stops, and monitorsthe databases.The CRSResource agent monitors the status of the database, the VIP resource,and the listener resource configured under Oracle Clusterware.
Sample configuration filesSample configuration files
622

Note: The CFSMount and CVMVolDg resources for Oracle database can not beset as critical resources in the group.
The CRSResource agent appears FAULTED until Oracle Clusterware brings upthe database.
■ The database uses the Oracle UDP IPC for database cache fusion.
■ One IP address (on en1) is shared by Oracle Clusterware and one of thedatabases for cache fusion.The second IP address (on en2) is used by the second database for cache fusion.The private IP addresses are managed by the MultiPrivNIC agent for highavailability.
■ The Oracle Cluster Registry (OCR) and voting disk are stored on CFS.
Figure D-4 illustrates the configuration.
623Sample configuration filesSample configuration files

Figure D-4 Service group configuration for sfrac04_main.cf file
MultiPrivNIC
Applicationcssd
mpriv
CVMVoIDG
ocrvote_voldg
CFSMount
ocrvote_mnt
crs_grp(parallel)
cvm group (parallel)
CVMCluster
CFSfsckd
vxfsckd
cvm_clus
cvm_vxconfigd
CFSMountoradata_mnt
Critical=0
oradata_voldgCritical=0
CVMVoIDG
CVMVxConfigd
racdata_voldgCritical=0CVMVoIDG
CFSMountracdata_mntCritical=0
app1_grp (parallel)
app2
crsr_racdb_lsnr
Application
app1
crsr_oradb_db crsr_oradb_vip crsr_oradb_lsnr
Application
crsr_racdb_db crsr_racdb_vip
CRSResource CRSResource CRSResource CRSResource CRSResource CRSResource
app2_grp (parallel)
sfrac05_main.cf fileThis sample file describes the following configuration:
■ A two node SF Oracle RAC cluster hosting single database.
■ The Oracle database is stored on ASM.
■ The database is managed by the VCS agent for Oracle.The agent starts, stops, and monitors the database.
■ The database uses the Oracle UDP IPC for database cache fusion.
Sample configuration filesSample configuration files
624

■ A common IP address is used by Oracle Clusterware and database cache fusion.The private IP address is managed by the PrivNIC agent for high availability.
■ The Oracle Cluster Registry (OCR) and voting disk are stored on CFS.
Figure D-5 illustrates the configuration.
Figure D-5 Service group configuration for sfrac05_main.cf file
dbgrp (parallel)
cvm group (parallel)
CVMCluster
Application
CFSfsckd
cssd
ora_privvxfsckd
cvm_clus
cvm_vxconfigd
CFSMount
ocrvote_mnt
ocrvote_voldg
CVMVoIDG
Oracleasm_db
CVMVoIDG
asm_dg
rac_voldg
CVMVxConfigd
PrivNIC
ASMDG
sfrac06_main.cf fileThis sample file describes the following configuration:
■ A two node SF Oracle RAC cluster hosting two databases.
■ The Oracle database is stored on CFS.
■ The database is managed by the VCS agent for Oracle.The agent starts, stops, and monitors the database.
■ The database uses Oracle UDP IPC for cache fusion. A dedicated link is usedfor each database .
■ One private IP address (on en1) is used by Oracle Clusterware.
625Sample configuration filesSample configuration files

The private IP address on en2 is used by one of the databases for cache fusion.The private IP address on NIC3 is used by the other database for cache fusion.The private IP addresses are managed by the MultiPrivNIC agent for highavailability.
■ The Oracle Cluster Registry (OCR) and voting disk are stored on CFS.
Figure D-6 illustrates the configuration.
Figure D-6 Service group configuration for sfrac06_main.cf file
oradb_grp (parallel)
cvm (parallel)
CVMCluster
Application
CFSfsckd
cssd
ora_mprivvxfsckd
cvm_clus
cvm_vxconfigd
CFSMount
ocrvote_mnt
ocrvote_voldg
CVMVoIDG
Oracleora_db
CFSMount
CVMVoIDG
oradbdata_mnt
oradbdata_voldg
CVMVxConfigd
MultiPrivNIC
Oraclerac_db
CFSMount
CVMVoIDG
racdbdata_mnt
racdbdata_voldg
racdb_grp (parallel)
sfrac07_main.cf and sample08_main.cf filesThe sample configuration, sfrac07_main.cf, describes a disaster recoveryconfiguration for the primary site. The sample configuration, sample08_main.cf,describes a disaster recovery configuration for the secondary site. Theconfiguration uses VVR for replicating data between the sites.
This sample file describes the following configuration:
■ Two SF Oracle RAC clusters, comprising two nodes each, hosted at differentgeographical locations.
Sample configuration filesSample configuration files
626

■ A single Oracle database that is stored on CFS.
■ The database is managed by the VCS agent for Oracle.The agent starts, stops, and monitors the database.
■ The database uses the Oracle UDP IPC for database cache fusion.
■ A common IP address is used by Oracle Clusterware and database cache fusion.The private IP address is managed by the PrivNIC agent for high availability.
■ One virtual IP address must be configured under the ClusterService groupon each site for inter-cluster communication.
■ The Oracle Cluster Registry (OCR) and voting disk are stored on CFS.
■ Veritas Volume Replicator (VVR) is used to replicate data between the sites.
■ The shared volumes replicated across the sites are configured under the RVGgroup.
■ The replication link used by VVR for communicating log information betweensites are configured under the rlogowner group. This is a failover group thatwill be online on only one of the nodes in the cluster at each site.
■ The database group will be online on the primary cluster. The RVGSharedPriresource determines where the database group will be brought online.
■ The database group is configured as a global group by specifying the clusterson the primary and secondary sites as values for the ClusterList group attribute.
Figure D-7 illustrates the configuration. The service group configuration is thesame on the primary and secondary site. The availability of groups (online/offline)differ between the sites.
627Sample configuration filesSample configuration files

Figure D-7 Service group configuration for sfrac07_main.cf and sfrac08_main.cffiles
oradb_grp (parallel)
cvm (parallel)
CVMCluster
Application
CFSfsckd
cssd
ora_privvxfsckd
cvm_clus
cvm_vxconfigd
CFSMount
ocrvote_mnt
ocrvote_voldg
CVMVoIDG
Oracleora_db
CFSMount
RVGSharedPri
oradata_mnt
ora_vvr_sharedpri
CVMVxConfigd
PrivNIC
logowner
logowner_ip
nic
rlogowner (failover)
RVGLogowner
IP
NIC
racdata_rvg
RVGgroup (Parallel)
RVGShared
CVMVoIDG
racdata_voldg
sfrac09_main.cf and sample10_main.cf filesThe sample configuration, sfrac09_main.cf, describes a disaster recoveryconfiguration for the primary site. The sample configuration, sample10_main.cf,describes a disaster recovery configuration for the secondary site. The sampleconfiguration uses EMC SRDF technology for replicating data between the sites.
Sample configuration filesSample configuration files
628
Note: You can use other supported hardware-based replication technologies withthis configuration.
This sample file describes the following configuration:
■ Two SF Oracle RAC clusters, comprising two nodes each, hosted at differentgeographical locations.
■ A single Oracle database that is stored on CFS.
■ The database is managed by the VCS agent for Oracle.The agent starts, stops, and monitors the database.
■ The database uses the Oracle UDP IPC for database cache fusion.
■ A common IP address is used by Oracle Clusterware and database cache fusion.The private IP address is managed by the PrivNIC agent for high availability.
■ One virtual IP address must be configured under the ClusterService groupon each site for inter-cluster communication.
■ The Oracle Cluster Registry (OCR) and voting disk are stored on CFS.
■ EMC SRDF is used to replicate data between the sites.
■ The SRDF disk groups that are replicated across the sites using SRDFtechnology and the replication mode are specified under the SRDF resourcein the database group. The CVM disk group that comprises the SRDF disk groupmust be configured under the CVMVolDg resource in the database group.
■ The database group will be online on the primary cluster. The SRDF resourcedetermines where the database group will be brought online.
■ The database group is configured as a global group by specifying the clusterson the primary and secondary sites as values for the ClusterList group attribute.
Figure D-8 illustrates the configuration on the primary site.
629Sample configuration filesSample configuration files

Figure D-8 Service group configuration for sfrac09_main.cf file
oradb_grp (parallel)
cvm (parallel)
CVMCluster
Application
CFSfsckd
cssd
ora_privvxfsckd
cvm_clus
cvm_vxconfigd
CFSMount
ocrvote_mnt
ocrvote_voldg
CVMVoIDG
Oracleora_db
CFSMount
oradata_mnt
oradata_voldg
CVMVxConfigd
PrivNIC
CVMVolDG
SRDF
gc_srdf
Figure D-9 illustrates the configuration on the secondary site.
Sample configuration filesSample configuration files
630

Figure D-9 Service group configuration for sfrac10_main.cf file
cvm (parallel)
CVMCluster
Application
CFSfsckd
cssd
ora_privvxfsckd
cvm_clus
cvm_vxconfigd
CFSMount
ocrvote_mnt
ocrvote_voldg
CVMVoIDG
Oracleora_db
CFSMount
oradata_mnt
oradata_voldg
CVMVxConfigd
PrivNIC
CVMVolDG
SRDF
gc_srdf
Async_ReplicatedDataGroup (parallel)
sfrac11_main.cf fileThis sample file describes the following configuration:
■ An SF Oracle RAC campus cluster with four nodes hosted across two sites.
■ Each site comprises two nodes of the cluster hosting a single database.
■ The Oracle database is stored on CFS.
■ The database is managed by the VCS agent for Oracle.The agent starts, stops, and monitors the database.
■ The database uses the Oracle UDP IPC for database cache fusion.
■ The IP address on en1 is used by Oracle Clusterware.The second IP address on NIC2 is used for Oracle database cache fusion.
631Sample configuration filesSample configuration files
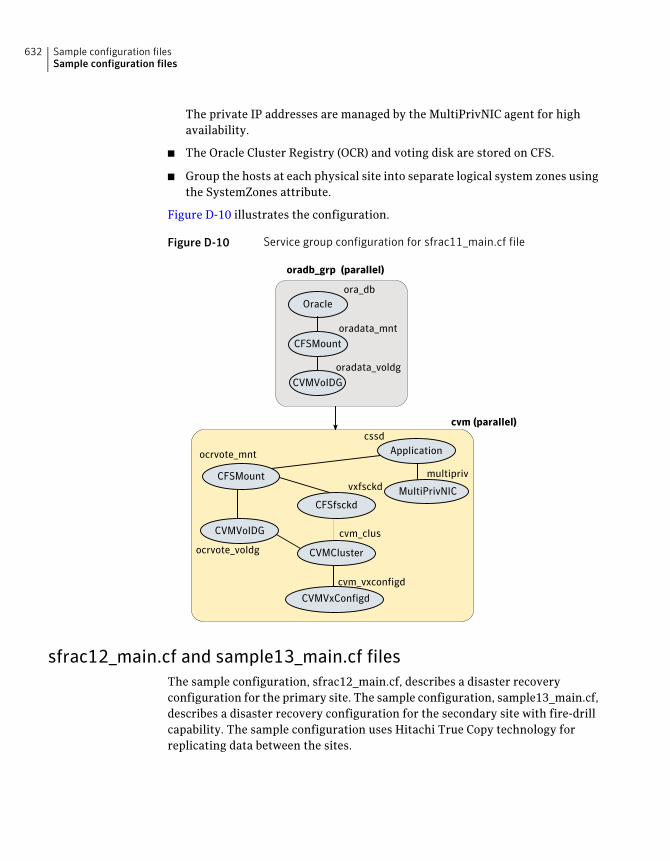
The private IP addresses are managed by the MultiPrivNIC agent for highavailability.
■ The Oracle Cluster Registry (OCR) and voting disk are stored on CFS.
■ Group the hosts at each physical site into separate logical system zones usingthe SystemZones attribute.
Figure D-10 illustrates the configuration.
Figure D-10 Service group configuration for sfrac11_main.cf file
oradb_grp (parallel)
cvm (parallel)
CVMCluster
Application
CFSfsckd
cssd
multiprivvxfsckd
cvm_clus
cvm_vxconfigd
ocrvote_voldg
CVMVoIDG
Oracleora_db
CFSMount
CVMVoIDG
oradata_mnt
oradata_voldg
CVMVxConfigd
MultiPrivNICCFSMount
ocrvote_mnt
sfrac12_main.cf and sample13_main.cf filesThe sample configuration, sfrac12_main.cf, describes a disaster recoveryconfiguration for the primary site. The sample configuration, sample13_main.cf,describes a disaster recovery configuration for the secondary site with fire-drillcapability. The sample configuration uses Hitachi True Copy technology forreplicating data between the sites.
Sample configuration filesSample configuration files
632

Note: You can use other supported hardware-based replication technologies withthis configuration.
This sample file describes the following configuration:
■ Two SF Oracle RAC clusters, comprising two nodes each, hosted at differentgeographical locations.
■ A single Oracle database that is stored on CFS.
■ The database is managed by the VCS agent for Oracle.The agent starts, stops, and monitors the database.
■ The database uses the Oracle UDP IPC for database cache fusion.
■ A common IP address is used by Oracle Clusterware and database cache fusion.The private IP address is managed by the PrivNIC agent for high availability.
■ One virtual IP address must be configured under the ClusterService groupon each site for inter-cluster communication.
■ The Oracle Cluster Registry (OCR) and voting disk are stored on CFS.
■ Hitachi True Copy is used to replicate data between the sites.
■ The HTC disk groups that are replicated across the sites using HTC technologyand the replication mode are specified under the HTC resource in the databasegroup. The CVM disk group that comprises the HTC disk group must beconfigured under the CVMVolDg resource in the database group.
■ The database group will be online on the primary cluster. The HTC resourcedetermines where the database group will be brought online.
■ The database group is configured as a global group by specifying the clusterson the primary and secondary sites as values for the ClusterList group attribute.
■ The database group oradb_grp_fd on the secondary is configured for fire drill.
■ When the group oradb_grp_fd is brought online, the HTCSnap creates asnapshot of the disk group configured under the HTC resource in the databasegroup oradg_grp.Further, the Oracle database and the associated volumes and mount pointsconfigured under the service group oradb_grp_fd are brought online using thesnapshots created by HTCSnap.
Figure D-11 illustrates the configuration on the primary site.
633Sample configuration filesSample configuration files

Figure D-11 Service group configuration for sfrac12_main.cf file
oradb_grp (parallel)
cvm (parallel)
CVMCluster
Application
CFSfsckd
cssd
ora_privvxfsckd
cvm_clus
cvm_vxconfigd
CFSMount
ocrvote_mnt
ocrvote_voldg
CVMVoIDG
Oracleora_db
CFSMount
oradata_mnt
oradata_voldg
CVMVxConfigd
PrivNIC
CVMVolDG
HTC
gc_htc
Figure D-12 illustrates the configuration on the secondary site.
Sample configuration filesSample configuration files
634

Figure D-12 Service group configuration for sfrac13_main.cf file
oradb_grp (parallel)
cvm (parallel)
CVMCluster
Application
CFSfsckd
cssd
ora_privvxfsckd
cvm_clus
cvm_vxconfigd
CFSMount
ocrvote_mnt
ocrvote_voldg
CVMVoIDG
Oracleora_db
CFSMount
oradata_mnt
oradata_voldg
CVMVxConfigd
PrivNIC
CVMVolDG
HTC
gc_htc
oradb_grp_fd (parallel)
Oracleora_db_fd
CFSMount
oradata_mnt_fd
oradata_voldg_fd
CVMVolDG
HTCSnap
HTCSnap-gc_htc
sfrac14_main.cf fileThis sample file describes the following configuration:
■ A two node SF Oracle RAC cluster hosting single database.
■ The Oracle database is stored on CFS.
■ The database is managed by the VCS agent for Oracle.The agent starts, stops, and monitors the database.
■ The database uses the Oracle UDP IPC for database cache fusion.
■ A common IP address is used by Oracle Clusterware and database cache fusion.The private IP address is managed by the PrivNIC agent for high availability.
■ The Oracle Cluster Registry (OCR) and voting disk are stored on CFS.
■ The cluster is configured as a secure cluster by setting the SecureClus attributeto 1. The VxSS group starts the authentication daemon vxatd.
635Sample configuration filesSample configuration files

Figure D-13 illustrates the configuration.
Figure D-13 Service group configuration for sfrac14_main.cf file
oradb_grp (parallel)
cvm (parallel)
CVMCluster
Application
CFSfsckd
cssd
ora_privvxfsckd
cvm_clus
cvm_vxconfigd
CFSMount
ocrvote_mnt
ocrvote_voldg
CVMVoIDG
Oracleora_db
CFSMount
CVMVoIDG
oradata_mnt
oradata_voldg
CVMVxConfigd
PrivNIC
VxSS (parallel)
phantom_vxss
vxatd
Phantom
ProcessOnOnly
Sample configuration files for CP serverThis following are example main.cf files for a CP server that is hosted on a singlenode, and a CP server that is hosted on an SFHA cluster.
■ The main.cf file for a CP server that is hosted on a single node:See “Sample main.cf file for CP server hosted on a single node that runs VCS”on page 637.
■ The main.cf file for a CP server that is hosted on an SFHA cluster:See “Sample main.cf file for CP server hosted on a two-node SFHA cluster”on page 639.
Note: The CP server supports Internet Protocol version 4 or version 6 (IPv4 orIPv6 addresses) when communicating with SF Oracle RAC clusters. The followingexample main.cf files use IPv4 addresses.
Sample configuration filesSample configuration files
636

Sample main.cf file for CP server hosted on a single node thatruns VCSThe following is an example of a single CP server node main.cf.
For this CP server single node main.cf, note the following values:
■ Cluster name: cps1
■ Node name: mycps1
include "types.cf"
// cluster name: cps1
// CP server: mycps1
cluster cps1 (
UserNames = { admin = bMNfMHmJNiNNlVNhMK, haris = fopKojNvpHouNn,
"mycps1.symantecexample.com@root@vx" = aj,
"[email protected]" = hq }
Administrators = { admin, haris,
"mycps1.symantecexample.com@root@vx",
SecureClus = 1
HacliUserLevel = COMMANDROOT
)
system mycps1 (
)
group CPSSG (
SystemList = { mycps1 = 0 }
AutoStartList = { mycps1 }
)
IP cpsvip (
Device @mycps1 = en0
Address = "10.209.3.1"
NetMask = "255.255.252.0"
)
NIC cpsnic (
Device @mycps1 = en0
)
637Sample configuration filesSample configuration files

Process vxcpserv (
PathName = "/opt/VRTScps/bin/vxcpserv"
ConfInterval = 30
RestartLimit = 3
)
cpsvip requires cpsnic
vxcpserv requires cpsvip
// resource dependency tree
//
// group CPSSG
// {
// Process vxcpserv
// {
// IP cpsvip
// {
// NIC cpsnic
// }
// }
// }
group VxSS (
SystemList = { mycps1 = 0 }
Parallel = 1
AutoStartList = { mycps1 }
OnlineRetryLimit = 3
OnlineRetryInterval = 120
)
Phantom phantom_vxss (
)
ProcessOnOnly vxatd (
IgnoreArgs = 1
PathName = "/opt/VRTSat/bin/vxatd"
)
// resource dependency tree
Sample configuration filesSample configuration files
638

//
// group VxSS
// {
// Phantom phantom_vxss
// ProcessOnOnly vxatd
// }
Sample main.cf file for CP server hosted on a two-node SFHAclusterThe following is an example of a main.cf, where the CP server is hosted on anSFHA cluster.
For this CP server hosted on an SFHA cluster main.cf, note the following values:
■ Cluster name: cps1
■ Nodes in the cluster: mycps1, mycps2
include "types.cf"
include "CFSTypes.cf"
include "CVMTypes.cf"
// cluster: cps1
// CP servers:
// mycps1
// mycps2
cluster cps1 (
UserNames = { admin = ajkCjeJgkFkkIskEjh,
"mycps1.symantecexample.com@root@vx" = JK,
"mycps2.symantecexample.com@root@vx" = dl }
Administrators = { admin, "mycps1.symantecexample.com@root@vx",
"mycps2.symantecexample.com@root@vx" }
SecureClus = 1
)
system mycps1 (
)
system mycps2 (
)
group CPSSG (
639Sample configuration filesSample configuration files

SystemList = { mycps1 = 0, mycps2 = 1 }
AutoStartList = { mycps1, mycps2 } )
DiskGroup cpsdg (
DiskGroup = cps_dg
)
IP cpsvip (
Device @mycps1 = en0
Device @mycps2 = en0
Address = "10.209.81.88"
NetMask = "255.255.252.0"
)
Mount cpsmount (
MountPoint = "/etc/VRTScps/db"
BlockDevice = "/dev/vx/dsk/cps_dg/cps_volume"
FSType = vxfs
FsckOpt = "-y"
)
NIC cpsnic (
Device @mycps1 = en0
Device @mycps2 = en0
)
Process vxcpserv (
PathName = "/opt/VRTScps/bin/vxcpserv"
)
Volume cpsvol (
Volume = cps_volume
DiskGroup = cps_dg
)
cpsmount requires cpsvol
cpsvip requires cpsnic
cpsvol requires cpsdg
vxcpserv requires cpsmount
vxcpserv requires cpsvip
// resource dependency tree
Sample configuration filesSample configuration files
640

//
// group CPSSG
// {
// Process vxcpserv
// {
// Mount cpsmount
// {
// Volume cpsvol
// {
// DiskGroup cpsdg
// }
// }
// IP cpsvip
// {
// NIC cpsnic
// }
// }
// }
group VxSS (
SystemList = { mycps1 = 0, mycps2 = 1 }
Parallel = 1
AutoStartList = { mycps1, mycps2 }
OnlineRetryLimit = 3
OnlineRetryInterval = 120
)
Phantom phantom_vxss (
)
ProcessOnOnly vxatd (
IgnoreArgs = 1
PathName = "/opt/VRTSat/bin/vxatd"
)
// resource dependency tree
//
// group VxSS
// {
// Phantom phantom_vxss
641Sample configuration filesSample configuration files

// ProcessOnOnly vxatd
// }
Sample configuration filesSample configuration files
642

Setting up inter-systemcommunication
This appendix includes the following topics:
■ About configuring ssh or rsh using the Veritas installer
■ Setting up inter-system communication
About configuring ssh or rsh using the Veritasinstaller
The installer can configure passwordless secure shell (ssh) or remote shell (rsh)communications among systems. The installer uses the ssh or rsh daemon thatcomes bundled with the operating system. During an installation, you choose thecommunication method that you want to use. You then provide the installer withthe superuser passwords for the systems where you plan to install. The ssh or rshcommunication among the systems is removed when the installation processcompletes, unless the installation abruptly terminates. If installation terminatedabruptly, use the installation script's -comcleanup option to remove the ssh orrsh configuration from the systems.
See “Installation script options” on page 584.
In most installation, configuration, upgrade (where necessary), and uninstallationscenarios, the installer can configure ssh or rsh on the target systems. In thefollowing scenarios, you need to set up ssh or rsh manually:
■ When the root broker is outside of the cluster that you plan to configure.
■ When you add new nodes to an existing cluster.
■ When the nodes are in a sub-cluster during a phased upgrade.
EAppendix

■ When you perform installer sessions using a response file.
Setting up inter-system communicationIf you manually need to set up a communication mode, refer to these procedures.You must have root privilege to issue ssh or rsh commands on all systems in thecluster. If ssh is used to communicate between systems, it must be configured ina way such that it operates without requests for passwords or passphrases.Similarly, rsh must be configured in such a way to not prompt for passwords.
If system communication is not possible between systems using ssh or rsh, contactSymantec Support. See http://support.symantec.com.
Setting up ssh on cluster systemsUse the Secure Shell (ssh) to install SF Oracle RAC on all systems in a cluster froma system outside of the cluster. Before you start the installation process, verifythat ssh is configured correctly.
Use Secure Shell (ssh) to do the following:
■ Log on to another system over a network
■ Execute commands on a remote system
■ Copy files from one system to another
The ssh shell provides strong authentication and secure communications overchannels. It is intended to replace rlogin, rsh, and rcp.
Configuring sshThe procedure to configure ssh uses OpenSSH example file names and commands.
Note: You can configure ssh in other ways. Regardless of how ssh is configured,complete the last step in the example to verify the configuration.
To configure ssh
1 Log on to the system from which you want to install SF Oracle RAC.
2 Generate a DSA key pair on this system by running the following command:
# ssh-keygen -t dsa
3 Accept the default location of ~/.ssh/id_dsa.
Setting up inter-system communicationSetting up inter-system communication
644

4 When the command prompts, enter a passphrase and confirm it.
5 Change the permissions of the .ssh directory by typing:
# chmod 755 ~/.ssh
6 The file ~/.ssh/id_dsa.pub contains a line that begins with ssh_dss and endswith the name of the system on which it was created. Copy this line to the/root/.ssh/authorized_keys2 file on all systems where you plan to install SFOracle RAC.
If the local system is part of the cluster, make sure to edit theauthorized_keys2 file on that system.
7 Run the following commands on the system where you are installing:
# exec /usr/bin/ssh-agent $SHELL
# ssh-add
This step is shell-specific and is valid for the duration the shell is alive.
8 To verify that you can connect to the systems where you plan to install SFOracle RAC, type:
# ssh -x -l root north ls
# ssh -x -l root south ifconfig
The commands should execute on the remote system without having to entera passphrase or password.
645Setting up inter-system communicationSetting up inter-system communication

Setting up inter-system communicationSetting up inter-system communication
646

Automatic StorageManagement
This appendix includes the following topics:
■ About ASM in SF Oracle RAC environments
■ ASM configuration with SF Oracle RAC
■ Configuring ASM in SF Oracle RAC environments
■ Sample configuration file Veritas CVM and ASM main.cf file
About ASM in SF Oracle RAC environmentsASM is an integrated storage management solution from Oracle RAC that combinesfile system and volume management capabilities.
ASM can be configured with Cluster Volume Manager (CVM) for better performanceand availability. CVM mirrored volumes with dynamic multipathing improvesdata access performance and offers continuous data availability in largeheterogeneous SAN environments. You can create CVM disk groups and volumesfor use as ASM disks groups and configure the ASM disk groups to be managedby the Veritas ASMDG agent. The ASMDG agent mounts, unmounts, and monitorsthe ASM disk groups.
Depending on the Oracle RAC version installed, the following are supported onASM for that version:
Data files, control files, online redo logs, archive logfiles, and backup files
Oracle RAC 10g Release 2/OracleRAC 11g Release 1
FAppendix

Oracle Cluster Registry devices (OCR), voting disk,data files, control files, online redo logs, archive logfiles, and backup files
Oracle RAC 11g Release 2
Depending on the Oracle RAC version installed, the following are not supportedon ASM for that version:
Oracle binaries, trace files, alert logs, export files, tarfiles, core files, Oracle Cluster Registry devices (OCR),voting disk, application binaries and application data
Oracle RAC 10g Release 2/OracleRAC 11g Release 1
Oracle binaries, trace files, alert logs, export files, tarfiles, core files, application binaries and applicationdata
Oracle RAC 11g Release 2
ASM configuration with SF Oracle RACConfigure ASM disk groups over CVM volumes in SF Oracle RAC environments.The CVM volumes are mirrored for high availability of data and leverage dynamicmultipathing to access the shared storage.
Figure F-1 illustrates the configuration of ASM disk groups over CVM.
Figure F-1 ASM disk groups over CVM
Veritas VolumeManager
Mirrored volumes
ASM disk groups
Multiple paths toshared storage
Shared storage
Mirrored volumes Mirrored volumes
Automatic Storage ManagementASM configuration with SF Oracle RAC
648

Figure F-2 illustrates the following supported configuration for all supportedversions of Oracle RAC:
■ ASM disk groups configured over CVM volumes
■ Oracle Clusterware and database binaries stored locally
■ Oracle database files stored on ASM configured over CVMThe Oracle databases are managed by Oracle Clusterware.
■ Oracle Cluster Registry and voting disk stored on CFS
Figure F-2 Supported Oracle RAC configuration (all supported Oracle RACversions)
Oracle RAC Instance
CFS ASM
CVM
DMP
Data files, OCR, voting disk, non-oracle files on shared storage
Multiple paths toshared storage Data files storage
over ASM
OCR, voting disk, andnon-oracle files storageover CVM or CFS
Figure F-3 illustrates the following supported configuration for Oracle RAC 11gRelease 2:
■ ASM disk groups configured over CVM volumes
■ Oracle Clusterware and database binaries stored locally
■ Oracle database files stored on ASM configured over CVMThe Oracle databases are managed by Oracle Clusterware.
■ Oracle Cluster Registry and voting disk stored on ASM over CVM volumes
649Automatic Storage ManagementASM configuration with SF Oracle RAC

Figure F-3 Supported Oracle RAC configuration (Oracle RAC 11g Release 2)
Oracle RAC Instance
CFS ASM
CVM
DMP
Data files, OCR, voting disk, non-oracle files on shared storage
Multiple paths toshared storage
OCR, voting disk,and data filesstorage over ASM
Non-oracle filesstorage over CVM orCFS
Configuring ASM in SF Oracle RAC environmentsBefore you configure ASM, review the planning guidelines for ASM:
See “Planning for Oracle ASM over CVM” on page 60.
Note: Make sure that you have installed SF Oracle RAC and Oracle RAC beforeconfiguring ASM.
Depending on the Oracle RAC version, the ASM home directory varies as follows:
Use a home directory distinct from theORACLE_HOME directory.
Oracle RAC 10g Release 2/OracleRAC 11g Release 1
The ASM home directory is the same as the OracleGrid Infrastructure home directory (GRID_HOME).
Oracle RAC 11g Release 2
Automatic Storage ManagementConfiguring ASM in SF Oracle RAC environments
650
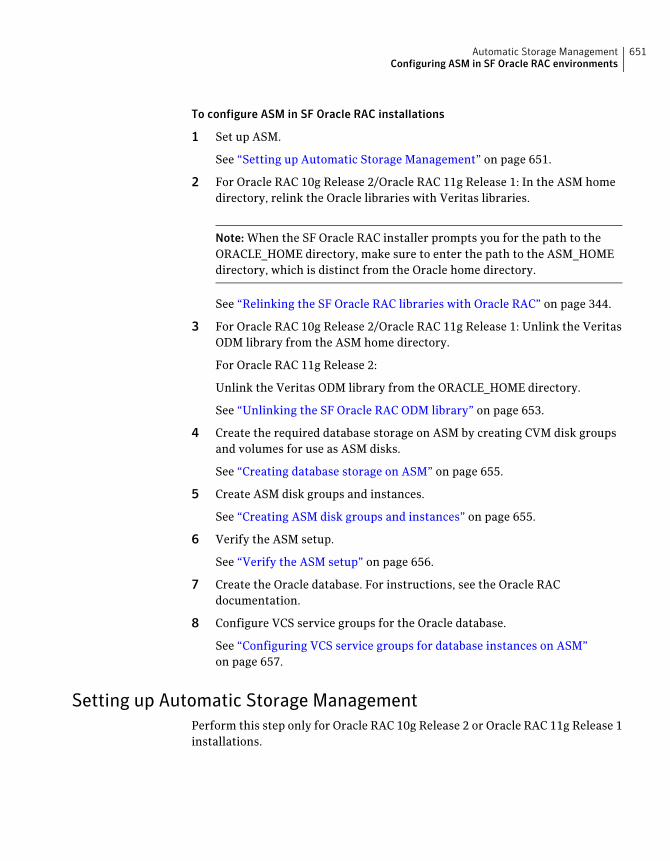
To configure ASM in SF Oracle RAC installations
1 Set up ASM.
See “Setting up Automatic Storage Management” on page 651.
2 For Oracle RAC 10g Release 2/Oracle RAC 11g Release 1: In the ASM homedirectory, relink the Oracle libraries with Veritas libraries.
Note: When the SF Oracle RAC installer prompts you for the path to theORACLE_HOME directory, make sure to enter the path to the ASM_HOMEdirectory, which is distinct from the Oracle home directory.
See “Relinking the SF Oracle RAC libraries with Oracle RAC” on page 344.
3 For Oracle RAC 10g Release 2/Oracle RAC 11g Release 1: Unlink the VeritasODM library from the ASM home directory.
For Oracle RAC 11g Release 2:
Unlink the Veritas ODM library from the ORACLE_HOME directory.
See “Unlinking the SF Oracle RAC ODM library” on page 653.
4 Create the required database storage on ASM by creating CVM disk groupsand volumes for use as ASM disks.
See “Creating database storage on ASM” on page 655.
5 Create ASM disk groups and instances.
See “Creating ASM disk groups and instances” on page 655.
6 Verify the ASM setup.
See “Verify the ASM setup” on page 656.
7 Create the Oracle database. For instructions, see the Oracle RACdocumentation.
8 Configure VCS service groups for the Oracle database.
See “Configuring VCS service groups for database instances on ASM”on page 657.
Setting up Automatic Storage ManagementPerform this step only for Oracle RAC 10g Release 2 or Oracle RAC 11g Release 1installations.
651Automatic Storage ManagementConfiguring ASM in SF Oracle RAC environments

Set up ASM in a directory distinct from the Oracle database home (ORACLE_HOME)directory. A separate ASM home directory enables you to upgrade or uninstallthe software independent of the Oracle database home.
The following procedure describes how to set up ASM using the Oracle UniversalInstaller. Symantec recommends that you set up ASM locally on each node.
To set up ASM using the Oracle Universal Installer
1 Log in as the Oracle user. On the first node, set the DISPLAY variable.
■ For Bourne Shell (bash), type:
$ DISPLAY=10.20.12.150:0.0 export DISPLAY
■ For C Shell (csh or tcsh), type:
$ setenv DISPLAY 10.20.12.150:0.0
2 Start the Oracle Universal Installer.
$ cd /dvd_mount
$ ./runInstaller
3 Enter the following information when prompted by the Oracle UniversalInstaller:
Select Enterprise Edition.Select installation type
Enter the full path of the ASM home directory.
Note: Oracle recommends that the ASM homedirectory be different from the ORACLE_HOMEdirectory used for installing the Oracle database.
Oracle Home location: The installation destination($ORACLE_HOME). Depending on where you installOracle binaries, this location is either on sharedstorage or an identical location on each of the localcluster nodes.
Specify home details
Select Cluster Installation.
Select the nodes on which you want to install theOracle RAC database software.
Specify Hardware ClusterInstallation Mode
Automatic Storage ManagementConfiguring ASM in SF Oracle RAC environments
652

4 Click Next.
The Oracle Universal Installer runs a product-specific prerequisite check.Any items that are flagged must be manually checked and configured.
5 On the SelectConfigurationOption screen, select the option Installdatabasesoftware only.
Note: Do not select the option Configure Automatic Storage Management(ASM). Symantec recommends that you configure ASM later.
6 Review the configuration summary presented by the Oracle UniversalInstaller. The Oracle Universal Installer begins the installation.
7 Run the root.sh script as prompted by the Oracle Universal Installer.
# cd /app/oracle/orahome
# ./root.sh
Unlinking the SF Oracle RAC ODM libraryODM is a disk management interface for data files that reside on the Veritas Filesystem.
You need to unlink the ODM library from the ORACLE_HOME directory for ASMbefore you configure the database storage on ASM with SF Oracle RAC.
For Oracle RAC 10g Release 2/Oracle RAC 11g Release 1, the Oracle home directoryfor ASM is separate from the ORACLE_HOME directory.
For Oracle RAC 11g Release 2, the Oracle home directory for ASM is the same asthe GRID_HOME directory.
Note:Depending on the Oracle version installed, provide the appropriate path for$ORACLE_HOME.
Perform the steps in the procedure on each node in the cluster.
653Automatic Storage ManagementConfiguring ASM in SF Oracle RAC environments

To unlink the Veritas ODM library
1 Log in as the Oracle user.
2 Shut down the ASM instance if it is running:
$ srvctl stop asm -n galaxy
$ srvctl stop asm -n nebula
3 From another window, login to each node as root, and issue the followingcommand:
# /usr/sbin/slibclean
4 Change to the Oracle home directory for ASM:
$ cd $ORACLE_HOME/lib
5 Unlink the Veritas ODM libraries:
For Oracle RAC 10g:
$ ln -sf libodmd10.so libodm10.so
For Oracle RAC 11g:
$ ln -sf libodmd11.so libodm11.so
6 On each node, enter the following commands as oracle user.
For Oracle RAC 11g:
$ cd $ORACLE_HOME/lib
$ rm libodm11.so
$ cp libodmd11.so libodm11.so
For Oracle RAC 10g:
$ cd /app/oracle/ORACLE_HOME/lib
$ rm libodm10.so
$ cp libodmd10.so libodm10.so
Automatic Storage ManagementConfiguring ASM in SF Oracle RAC environments
654

Creating database storage on ASMThis step creates the database storage on ASM using CVM volumes. To create thestorage for Oracle databases on ASM, first create the required CVM disk groupsand volumes. Then, use these CVM volumes to create ASM disk groups for storingthe database files.
To create database storage on ASM
1 Log in as the root user to the CVM master:
To determine the CVM master:
# vxdctl -c mode
2 Initialize the disks as VxVM disks:
# vxdisksetup -i rhdisk75 format=cdsdisk
3 Create the CVM disk group and volume:
# vxdg -s init ora_asm_dg rhdisk75
# vxassist -g ora_asm_dg make ora_asm_vol 2000M
4 Set the permissions for the Oracle user on the volume:
# vxedit -g ora_asm_dg \
set group=dba user=oracle mode=660 ora_asm_vol
Configure ASM using DBCA (Oracle RAC 10g Release 2/Oracle RAC 11g Release1), ASMCA (Oracle RAC 11g Release 2), or OEM.
Creating ASM disk groups and instancesDepending on the Oracle RAC version, use one of the following ways to createASM disk groups:
Database Configuration Assistant (DBCA)
Oracle Enterprise Manager (OEM)
Manual
Oracle RAC 10g Release 2/Oracle RAC 11gRelease 1
ASM Configuration Assistant (ASMCA)
Manual
Oracle RAC 10g Release 2
The following tasks are performed:
655Automatic Storage ManagementConfiguring ASM in SF Oracle RAC environments

■ The ASM disk group and instance is created.
■ The ASM instance is started and the disk group is mounted on all nodes in thecluster. The default ASM instance name is +ASMn where n is the instancenumber depending on the number of ASM instances.
Note: For ASM instances that use a pfile, if you restart a node, make sure thatthe underlying volumes are available before the ASM disk group is mounted.Then, update the ASM init.ora parameter with the full path that contains theVxVM volumes created for ASM.
For ASM instances that use an spfile, the parameter is updated automaticallyby the Oracle Configuration Assistant.
In either case, dependencies must be managed manually. Symantecrecommends the use of the ASMDG agent for easier management of ASM diskgroups.
SF Oracle RAC requires the following settings when you create ASM disk groupsand instances:
server parameter file (spfile)Type of parameter file for theASM instance
Enter the full path that contains the VxVM volumes createdfor ASM, for example/dev/vx/rdsk/ora_asm_dg/ora_asm_vol.
Disk Discovery Path
Select the option External. Mirroring is performed by CVM.Redundancy
Select the VxVM disks you want to use; You may need toselect the Force checkbox next to the ASM disks you wantto use if the disk group creation fails.
Select member disks
For detailed instructions, see the Oracle documentation.
Verify the ASM setupVerify that the database services for ASM are up and running after the installation.
Automatic Storage ManagementConfiguring ASM in SF Oracle RAC environments
656

To verify the ASM installation
1 Change to the Oracle Clusterware/Grid Infrastructure home directory:
For Oracle RAC 10g Release 2/Oracle RAC 11g Release 1:
# cd $CRS_HOME/bin
For Oracle RAC 11g Release 2:
# cd $GRID_HOME/bin
2 Verify the status of ASM on all the nodes in the cluster:
# ./srvctl status asm
ASM instance +ASM1 is running on node galaxy
The sample output shows that there is one ASM instance running on the localnode.
Configuring VCS service groups for database instances on ASMThis section describes how to configure the Oracle service group using the CLIfor databases on ASM.
For sample service group illustration:
See “sfrac05_main.cf file” on page 624.
For a sample configuration file describing the configuration, see the filesfrac05_main.cf in the directory /etc/VRTSvcs/conf/sample_rac/.
The following procedure assumes that you have created the database.
To configure the Oracle service group using the CLI
1 Change the cluster configuration to read-write mode:
# haconf -makerw
2 Add the service group to the VCS configuration:
# hagrp -add dbgrp
657Automatic Storage ManagementConfiguring ASM in SF Oracle RAC environments

3 Modify the attributes of the service group:
# hagrp -modify dbgrp Parallel 1
# hagrp -modify dbgrp SystemList galaxy 0 nebula 1
# hagrp -modify dbgrp AutoStartList galaxy nebula
4 Add the CVMVolDg resource for the service group:
# hares -add oradata_voldg CVMVolDg dbgrp
5 Modify the attributes of the CVMVolDg resource for the service group:
# hares -modify oradata_voldg CVMDiskGroup ora_asm_dg
# hares -modify oradata_voldg CVMActivation sw
# hares -modify oradata_voldg CVMVolume ora_asm_vol
6 Add the ASMDG resource for the service group:
# hares -add asmdg ASMDG dbgrp
Automatic Storage ManagementConfiguring ASM in SF Oracle RAC environments
658
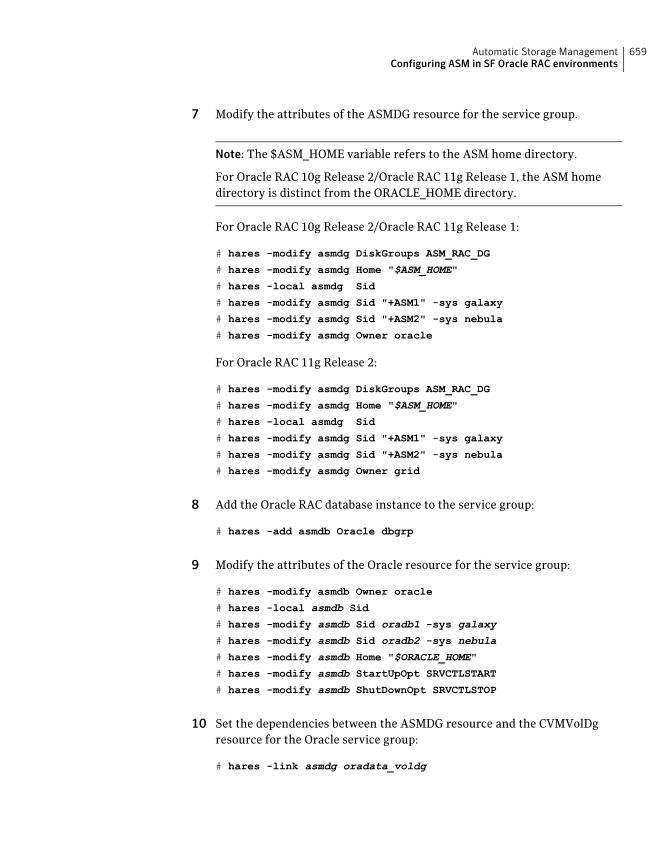
7 Modify the attributes of the ASMDG resource for the service group.
Note: The $ASM_HOME variable refers to the ASM home directory.
For Oracle RAC 10g Release 2/Oracle RAC 11g Release 1, the ASM homedirectory is distinct from the ORACLE_HOME directory.
For Oracle RAC 10g Release 2/Oracle RAC 11g Release 1:
# hares -modify asmdg DiskGroups ASM_RAC_DG
# hares -modify asmdg Home "$ASM_HOME"
# hares -local asmdg Sid
# hares -modify asmdg Sid "+ASM1" -sys galaxy
# hares -modify asmdg Sid "+ASM2" -sys nebula
# hares -modify asmdg Owner oracle
For Oracle RAC 11g Release 2:
# hares -modify asmdg DiskGroups ASM_RAC_DG
# hares -modify asmdg Home "$ASM_HOME"
# hares -local asmdg Sid
# hares -modify asmdg Sid "+ASM1" -sys galaxy
# hares -modify asmdg Sid "+ASM2" -sys nebula
# hares -modify asmdg Owner grid
8 Add the Oracle RAC database instance to the service group:
# hares -add asmdb Oracle dbgrp
9 Modify the attributes of the Oracle resource for the service group:
# hares -modify asmdb Owner oracle
# hares -local asmdb Sid
# hares -modify asmdb Sid oradb1 -sys galaxy
# hares -modify asmdb Sid oradb2 -sys nebula
# hares -modify asmdb Home "$ORACLE_HOME"
# hares -modify asmdb StartUpOpt SRVCTLSTART
# hares -modify asmdb ShutDownOpt SRVCTLSTOP
10 Set the dependencies between the ASMDG resource and the CVMVolDgresource for the Oracle service group:
# hares -link asmdg oradata_voldg
659Automatic Storage ManagementConfiguring ASM in SF Oracle RAC environments
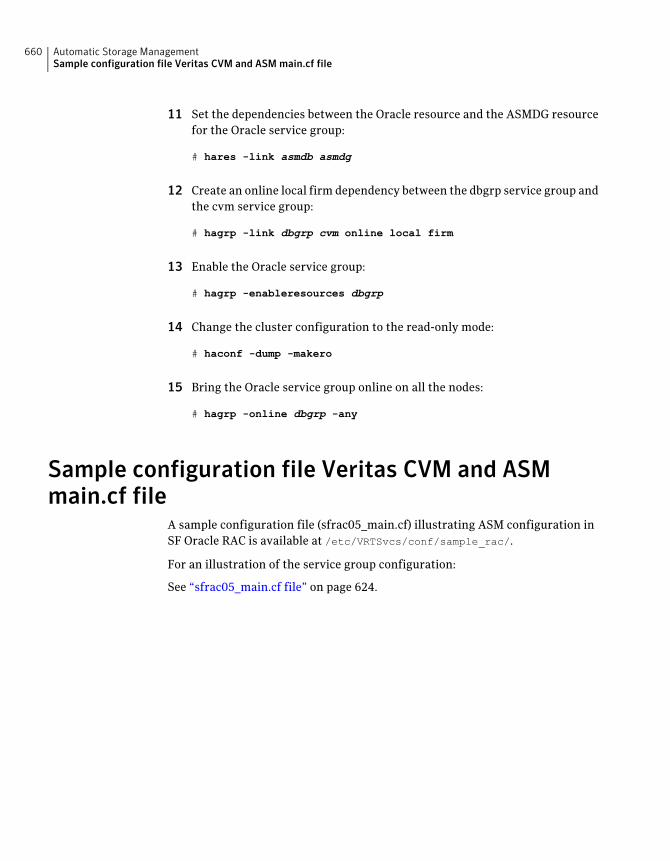
11 Set the dependencies between the Oracle resource and the ASMDG resourcefor the Oracle service group:
# hares -link asmdb asmdg
12 Create an online local firm dependency between the dbgrp service group andthe cvm service group:
# hagrp -link dbgrp cvm online local firm
13 Enable the Oracle service group:
# hagrp -enableresources dbgrp
14 Change the cluster configuration to the read-only mode:
# haconf -dump -makero
15 Bring the Oracle service group online on all the nodes:
# hagrp -online dbgrp -any
Sample configuration file Veritas CVM and ASMmain.cf file
A sample configuration file (sfrac05_main.cf) illustrating ASM configuration inSF Oracle RAC is available at /etc/VRTSvcs/conf/sample_rac/.
For an illustration of the service group configuration:
See “sfrac05_main.cf file” on page 624.
Automatic Storage ManagementSample configuration file Veritas CVM and ASM main.cf file
660
Creating a test database
This appendix includes the following topics:
■ About creating a test database
■ Creating a database for Oracle
About creating a test databaseA test database can be created and used for both testing and troubleshootingpurposes.
The following optional procedures describe the methods for creating a testdatabase.
Creating a database for OracleBefore you begin to create the database, ensure that the following prerequisitesare met:
■ The CRS daemons must be running.To verify the status of Oracle Clusterware, type the following command:
# $CRS_HOME/bin/crs_stat
■ All private IP addresses on each node must be up.Use the ping command to verify that all private IP addresses on each node areup.
Refer to your Oracle documentation for instructions on how to install the Oracledatabase.
You can create the database on one of the following types of storage:
GAppendix

■ Shared raw volumeSee “Creating the database storage on raw volumes” on page 662.
■ Cluster File System (CFS)See “Creating the database storage on CFS” on page 663.
■ ASMSee “Creating database storage on ASM” on page 655.
Creating the database storage on raw volumesYou can create the database storage on shared raw volume.
To create the database storage on shared raw volumes
1 Log in as root user.
2 On the master node, create a shared disk group:
# vxdg -s init oradatadg Disk_1
3 Create a volume in the shared group for each of the required tablespaces.
Refer to the Oracle documentation to determine the tablespace requirements.
For example, type:
# vxassist -g oradatadg make VRT_galaxy 1000M
# vxassist -g oradatadg make VRT_spfile1 10M
.
.
4 Define the access mode and permissions for the volumes storing the Oracledata.
For each volume listed in $ORACLE_HOME/raw_config, use the vxedit(1M)command:
# vxedit -g disk_group set group=group user=user mode=660 volume
For example:
# vxedit -g oradatadg set group=dba user=oracle mode=660 \
VRT_galaxy
In this example, VRT_galaxy is the name of one of the volumes. Repeat thecommand to define access mode and permissions for each volume in theoradatadg.
5 Create the database using the Oracle documentation.
Creating a test databaseCreating a database for Oracle
662

Creating the database storage on CFSIf you plan to use a cluster file system to store the Oracle database, use thefollowing procedure to create the file system.
To create the database storage on CFS
1 Create a disk group (for example, oradatadg):
# vxdg -s init oradatadg Disk_1
2 Create a single shared volume (for example, oradatavol) that is large enoughto contain a file system for all tablespaces.
For example, assuming 6.8 GB is required for database storage, type:
# vxassist -g oradatadg make oradatavol 6800M
3 Start the volume in the disk group:
# vxvol -g oradatadg startall
4 Create a VxFS file system in this volume. From one node, type:
# mkfs -V vxfs /dev/vx/rdsk/oradatadg/oradatavol
5 Create a mount point for the shared file system:
# mkdir /oradata
6 From the same node, mount the file system:
# mount -V vxfs -o cluster /dev/vx/dsk/oradatadg/oradatavol \
/oradata
7 Set "oracle" as the owner of the file system, and set "755" as the permissions:
# chown oracle:oinstall /oradata
# chmod 755 /oradata
8 On the other node(s), complete step 5 and step 6.
9 Create the database using the Oracle documentation.
663Creating a test databaseCreating a database for Oracle

Creating a test databaseCreating a database for Oracle
664
High availability agentinformation
This appendix includes the following topics:
■ About agents
■ CVMCluster agent
■ CVMVxconfigd agent
■ CVMVolDg agent
■ CFSMount agent
■ CFSfsckd agent
■ PrivNIC agent
■ MultiPrivNIC agent
■ CSSD agent
■ VCS agents for Oracle
■ CRSResource agent
About agentsAn agent is defined as a process that starts, stops, and monitors all configuredresources of a type, and reports their status to Veritas Cluster Server (VCS). Agentshave both entry points and attributes. Entry points are also known as agentfunctions and are referred to as "agent functions" throughout the document.
HAppendix

Attributes contain data about the agent. An attribute has a definition and a value.You change attribute values to configure resources, which are defined as theindividual components that work together to provide application services to thepublic network. For example, a resource may be a physical component such as adisk or a network interface card, a software component such as Oracle or a Webserver, or a configuration component such as an IP address or mounted file system.
Attributes are either optional or required, although sometimes the attributes thatare optional in one configuration may be required in other configurations. Manyoptional attributes have predefined or default values, which you should changeas required. A variety of internal use only attributes also exist. Do not modifythese attributes—modifying them can lead to significant problems for your clusters.Attributes have type and dimension. Some attribute values can accept numbers,others can accept alphanumeric values or groups of alphanumeric values, whileothers are simple boolean on/off values.
The entry points and attributes for each SF Oracle RAC agent are described inthis appendix.
VCS agents included within SF Oracle RACSF Oracle RAC includes the following VCS agents:
■ CVMCluster agent
■ CVMVxconfigd agent
■ CVMVolDg agent
■ CFSMount agent
An SF Oracle RAC installation automatically configures the CVMCluster resourceand the CVMVxconfigd resource.
You must configure the CVMVolDg agent for each shared disk group. If thedatabase uses cluster file systems, configure the CFSMount agent for each volumein the disk group.
Use the information in this appendix about the entry points and attributes of thelisted agents to make necessary configuration changes. For information on howto modify the VCS configuration:
See the Veritas Cluster Server Administrator’s Guide
VCS agents for Oracle included within SF Oracle RACSF Oracle RAC includes the following VCS agents for Oracle:
■ Oracle agent
High availability agent informationAbout agents
666
The Oracle agent monitors the database processes.
■ Netlsnr agentThe Netlsnr agent brings the listener services online, monitors their status,and takes them offline.
■ PrivNIC agentThe PrivNIC agent provides high availability to a single private IP addressacross LLT Ethernet interfaces for a system.
■ MultiPrivNIC agentThe MultiPrivNIC agent provides high availability to multiple private IPaddresses across LLT Ethernet interfaces for a system.
■ CSSD agentThe CSSD (Cluster Synchronization Services daemon) agent provides theresources to monitor Oracle Clusterware. The agent ensures that thedependency of cssd on the OCR and the VOTE resources and the PrivNIC(optional) resource are satisfied.
■ ASMDG agentThe ASMDG agent mounts and unmounts the ASM disk groups onto an ASMinstance.
See the Veritas Cluster Server Agent for Oracle Installation and ConfigurationGuide
CVMCluster agentThe CVMCluster agent controls system membership on the cluster port that isassociated with Veritas Volume Manager (VxVM).
The CVMCluster agent performs the following functions:
■ Joins a node to the CVM cluster port.
■ Removes a node from the CVM cluster port.
■ Monitors the node's cluster membership state.
Entry points for CVMCluster agentTable H-1 describes the entry points used by the CVMCluster agent.
667High availability agent informationCVMCluster agent

Table H-1 CVMCluster agent entry points
DescriptionEntry Point
Joins a node to the CVM cluster port. Enables the Volume Managercluster functionality by automatically importing the shared diskgroups.
Online
Removes a node from the CVM cluster port.Offline
Monitors the node’s CVM cluster membership state.Monitor
Attribute definition for CVMCluster agentTable H-2 describes the user-modifiable attributes of the CVMCluster resourcetype.
Table H-2 CVMCluster agent attributes
DescriptionDimensionAttribute
Name of the cluster.string-scalarCVMClustName
List of host names and IP addresses.string-associationCVMNodeAddr
Associative list. The first part names thesystem; the second part contains the LLTID number for the system.
string-associationCVMNodeId
Specifies the cluster messaging mechanism.
Default = gab
Note: Do not change this value.
string-scalarCVMTransport
The port number that is used by CVM forvxconfigd-level communication.
integer-scalarPortConfigd
The port number that is used by CVM forkernel-level communication.
integer-scalarPortKmsgd
Timeout in seconds used for CVM clusterreconfiguration. Default = 200
integer-scalarCVMTimeout
CVMCluster agent type definitionThe following type definition is included in the file, CVMTypes.cf:
High availability agent informationCVMCluster agent
668

type CVMCluster (
static int InfoTimeout = 0
static int NumThreads = 1
static int OnlineRetryLimit = 2
static int OnlineTimeout = 400
static str ArgList[] = { CVMTransport, CVMClustName,
CVMNodeAddr, CVMNodeId, PortConfigd, PortKmsgd,
CVMTimeout }
NameRule = ""
str CVMClustName
str CVMNodeAddr{}
str CVMNodeId{}
str CVMTransport
int PortConfigd
int PortKmsgd
int CVMTimeout
)
Note: The attributes CVMNodeAddr, PortConfigd, and PortKmsgd are not used inan SF Oracle RAC environment. GAB, the required cluster communicationmessaging mechanism, does not use them.
CVMCluster agent sample configurationThe following is an example definition for the CVMCluster service group:
CVMCluster cvm_clus (
Critical = 0
CVMClustName = rac_cluster101
CVMNodeId = { galaxy = 0, nebula = 1 }
CVMTransport = gab
CVMTimeout = 200
)
CVMVxconfigd agentThe CVMVxconfigd agent starts and monitors the vxconfigd daemon. Thevxconfigd daemon maintains disk and disk group configurations, communicatesconfiguration changes to the kernel, and modifies the configuration informationthat is stored on disks. CVMVxconfigd must be present in the CVM service group.
669High availability agent informationCVMVxconfigd agent

The CVMVxconfigd agent is an OnOnly agent; the agent starts the resource whenthe cluster starts up and VCS restarts the resource when necessary. The Operationsattribute specifies these default aspects of startup.
Symantec recommends starting the vxconfigd daemon with the syslog option,which enables logging of debug messages. Note that the SF Oracle RAC installationconfigures the syslog option for the CVMVxconfigd agent.
This agent is IMF-aware and uses asynchronous monitoring framework (AMF)kernel driver for IMF notification. For more information about the IntelligentMonitoring Framework (IMF) and intelligent resource monitoring, refer to theVeritas Cluster Server Administrator’s Guide.
Entry points for CVMVxconfigd agentTable H-3 describes the entry points for the CVMVxconfigd agent.
Table H-3 CVMVxconfigd entry points
DescriptionEntry Point
Starts the vxconfigd daemonOnline
N/AOffline
Monitors whether vxconfigd daemon is runningMonitor
Initializes the agent to interface with the AMF kernel module.This function runs when the agent starts up.
imf_init
Gets notification about the vxconfigd process state. Thisfunction runs after the agent initializes with the AMF kernelmodule. This function continuously waits for notification. If thevxconfigd process fails, the function initiates a traditionalCVMVxconfigd monitor entry point.
imf_getnotification
Registers or unregisters the vxconfigd process id (pid) with theAMF kernel module. This function runs after the resource goesinto steady online state.
imf_register
Attribute definition for CVMVxconfigd agentTable H-4 describes the modifiable attributes of the CVMVxconfigd resource type.
High availability agent informationCVMVxconfigd agent
670

Table H-4 CVMVxconfigd agent attribute
DescriptionDimensionAttribute
List of the arguments that are sent to theonline entry point.
Symantec recommends always specifying thesyslog option.
keylistCVMVxconfigdArgs
671High availability agent informationCVMVxconfigd agent

Table H-4 CVMVxconfigd agent attribute (continued)
DescriptionDimensionAttribute
integer-associationIMF
High availability agent informationCVMVxconfigd agent
672
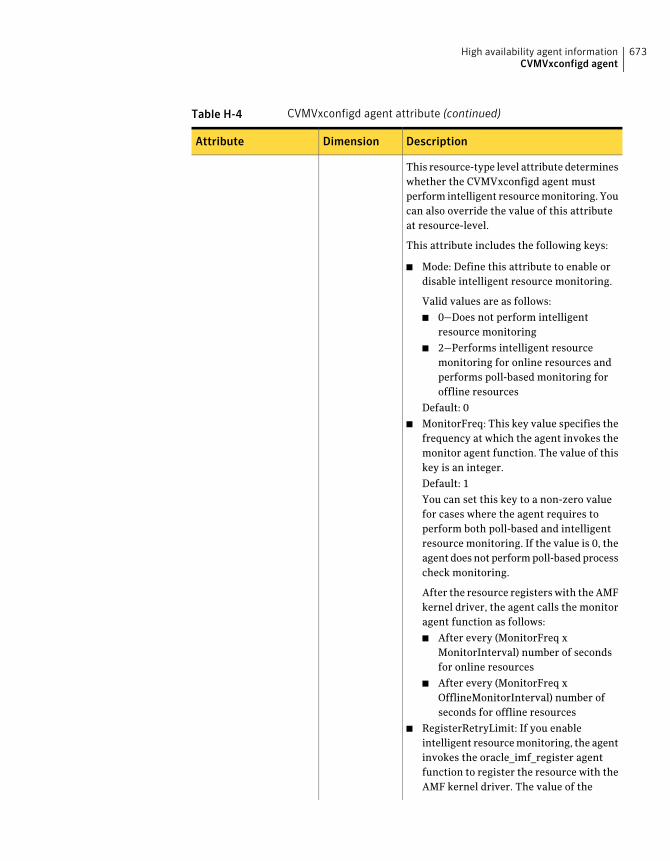
Table H-4 CVMVxconfigd agent attribute (continued)
DescriptionDimensionAttribute
This resource-type level attribute determineswhether the CVMVxconfigd agent mustperform intelligent resource monitoring. Youcan also override the value of this attributeat resource-level.
This attribute includes the following keys:
■ Mode: Define this attribute to enable ordisable intelligent resource monitoring.
Valid values are as follows:
■ 0—Does not perform intelligentresource monitoring
■ 2—Performs intelligent resourcemonitoring for online resources andperforms poll-based monitoring foroffline resources
Default: 0
■ MonitorFreq: This key value specifies thefrequency at which the agent invokes themonitor agent function. The value of thiskey is an integer.
Default: 1
You can set this key to a non-zero valuefor cases where the agent requires toperform both poll-based and intelligentresource monitoring. If the value is 0, theagent does not perform poll-based processcheck monitoring.
After the resource registers with the AMFkernel driver, the agent calls the monitoragent function as follows:
■ After every (MonitorFreq xMonitorInterval) number of secondsfor online resources
■ After every (MonitorFreq xOfflineMonitorInterval) number ofseconds for offline resources
■ RegisterRetryLimit: If you enableintelligent resource monitoring, the agentinvokes the oracle_imf_register agentfunction to register the resource with theAMF kernel driver. The value of the
673High availability agent informationCVMVxconfigd agent

Table H-4 CVMVxconfigd agent attribute (continued)
DescriptionDimensionAttribute
RegisterRetyLimit key determines thenumber of times the agent must retryregistration for a resource. If the agentcannot register the resource within thelimit that is specified, then intelligentmonitoring is disabled until the resourcestate changes or the value of the Mode keychanges.
Default: 3.
For more details of IMF attribute for the agenttype, refer to the Veritas Cluster ServerAdministrator’s Guide.
CVMVxconfigd agent type definitionThe following type definition is included in the CVMTypes.cf file:
type CVMVxconfigd (
static int FaultOnMonitorTimeouts = 2
static int RestartLimit = 5
static str ArgList[] { CVMVxconfigdArgs }
static str Operations = OnOnly
keylist CVMVxconfigdArgs
)
CVMVxconfigd agent sample configurationThe following is an example definition for the CVMVxconfigd resource in the CVMservice group:
CVMVxconfigd cvm_vxconfigd (
Critical = 0
CVMVxconfigdArgs = { syslog }
)
CVMVolDg agentThe CVMVolDg agent manages the CVM disk groups and CVM volumes and volumesets within the disk groups by performing the following functions:
High availability agent informationCVMVolDg agent
674

■ Imports the shared disk group from the CVM master node
■ Starts the volumes and volume sets in the disk group
■ Monitors the disk group, volumes, and volume sets
■ Optionally, deports the disk group when the dependent applications are takenoffline. The agent deports the disk group only if the appropriate attribute isset.
Configure the CVMVolDg agent for each disk group used by a Oracle service group.A disk group must be configured to only one Oracle service group.If cluster filesystems are used for the database, configure the CFSMount agent for each volumeor volume set in the disk group.
Entry points for CVMVolDg agentTable H-5 describes the entry points used by the CVMVolDg agent.
Table H-5 CVMVolDg agent entry points
DescriptionEntry Point
Imports the shared disk group from the CVM master node, if thedisk group is not already imported.
Starts all volumes and volume sets in the shared disk groupspecified by the CVMVolume attribute.
Sets the disk group activation mode to shared-write if the valueof the CVMActivation attribute is sw. You can set the activationmode on both slave and master systems.
Online
Removes the temporary files created by the online entry point.
If theCVMDeportOnOffline attribute is set to 1 and if the shareddisk group does not contain open volumes on any node in thecluster, the disk group is deported from the CVM master node.
Offline
675High availability agent informationCVMVolDg agent

Table H-5 CVMVolDg agent entry points (continued)
DescriptionEntry Point
Determines whether the disk group, the volumes, and the volumesets are online.
The agent takes a volume set offline if the file system metadatavolume of a volume set is discovered to be offline in a monitorcycle.
Note: If the CFSMount resource goes offline and the file systemon the volume set is unmounted, the agent retains the online stateof the volume set even if the file system metadata volume in thevolume set is offline. This is because the CVMVolDg agent is unableto determine whether or not the volumes that are offline aremetadata volumes.
Monitor
Removes the temporary files created by the online entry point.Clean
Attribute definition for CVMVolDg agentTable H-6 describes the user-modifiable attributes of the CVMVolDg resourcetype.
Table H-6 CVMVolDg agent attributes
DescriptionDimensionAttribute
Shared disk group name.string-scalarCVMDiskGroup (required)
Name of shared volumes or volume sets.This list is used to check that the volumesor volume sets are in the correct statebefore allowing the resource to comeonline, and that the volumes remain in anenabled state.
string-keylistCVMVolume (required)
Activation mode for the disk group.
Default = sw (shared-write)
This is a localized attribute.
string-scalarCVMActivation (required)
High availability agent informationCVMVolDg agent
676

Table H-6 CVMVolDg agent attributes (continued)
DescriptionDimensionAttribute
List of volumes and volume sets that willbe periodically polled to test availability.The polling is in the form of 4 KB readsevery monitor cycle to a maximum of 10of the volumes or volume sets in the list.For volume sets, reads are done on amaximum of 10 component volumes ineach volume set.
string-keylistCVMVolumeIoTest(optional)
Indicates whether or not the shared diskgroup must be deported when the lastonline CVMVolDg resource for a diskgroup is taken offline.
The value 1 indicates that the agent willdeport the shared disk group from theCVM master node, if not already deported,when the last online CVMVolDg resourcefor the disk group is taken offline.
The value 0 indicates that the agent willnot deport the shared disk group whenthe CVMVolDg resource is taken offline.
The default value is set to 0.
Note: If multiple CVMVolDg resourcesare configured for a shared disk group,set the value of the attribute to either 1or 0 for all of the resources.
The CVM disk group is deported based onthe order in which the CVMVolDgresources are taken offline. If theCVMVolDg resources in the disk groupcontain a mixed setting of 1 and 0 for theCVMDeportOnOfflineattribute, the diskgroup is deported only if the attributevalue is 1 for the last CVMVolDg resourcetaken offline. If the attribute value is 0 forthe last CVMVolDg resource taken offline,the disk group is not deported.
The deport operation fails if the shareddisk group contains open volumes.
integer-scalarCVMDeportOnOffline(optional)
677High availability agent informationCVMVolDg agent
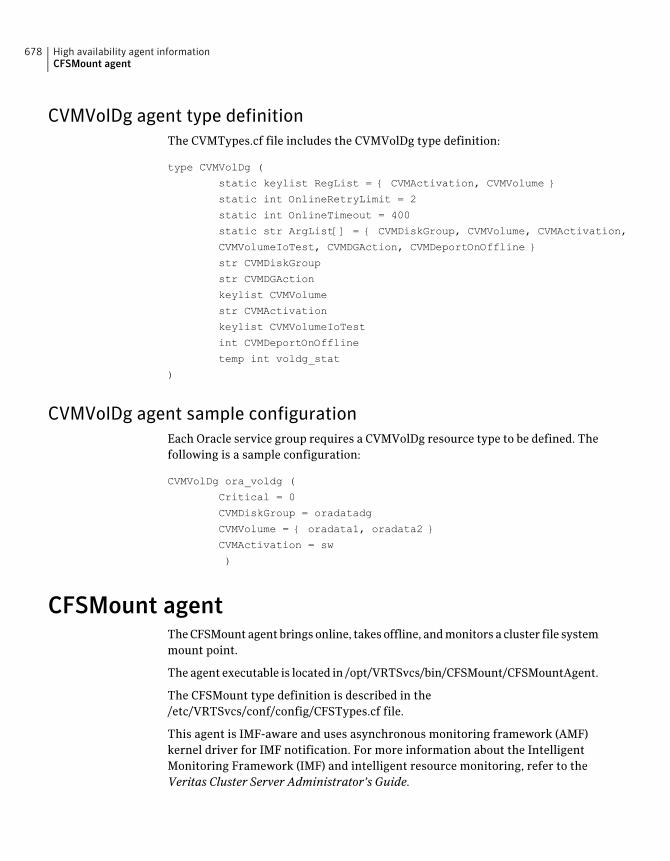
CVMVolDg agent type definitionThe CVMTypes.cf file includes the CVMVolDg type definition:
type CVMVolDg (
static keylist RegList = { CVMActivation, CVMVolume }
static int OnlineRetryLimit = 2
static int OnlineTimeout = 400
static str ArgList[] = { CVMDiskGroup, CVMVolume, CVMActivation,
CVMVolumeIoTest, CVMDGAction, CVMDeportOnOffline }
str CVMDiskGroup
str CVMDGAction
keylist CVMVolume
str CVMActivation
keylist CVMVolumeIoTest
int CVMDeportOnOffline
temp int voldg_stat
)
CVMVolDg agent sample configurationEach Oracle service group requires a CVMVolDg resource type to be defined. Thefollowing is a sample configuration:
CVMVolDg ora_voldg (
Critical = 0
CVMDiskGroup = oradatadg
CVMVolume = { oradata1, oradata2 }
CVMActivation = sw
)
CFSMount agentThe CFSMount agent brings online, takes offline, and monitors a cluster file systemmount point.
The agent executable is located in /opt/VRTSvcs/bin/CFSMount/CFSMountAgent.
The CFSMount type definition is described in the/etc/VRTSvcs/conf/config/CFSTypes.cf file.
This agent is IMF-aware and uses asynchronous monitoring framework (AMF)kernel driver for IMF notification. For more information about the IntelligentMonitoring Framework (IMF) and intelligent resource monitoring, refer to theVeritas Cluster Server Administrator’s Guide.
High availability agent informationCFSMount agent
678

Entry points for CFSMount agentTable H-7 provides the entry points for the CFSMount agent.
Table H-7 CFSMount agent entry points
DescriptionEntry Point
Mounts a block device in cluster mode.Online
Unmounts the file system, forcing unmount if necessary, and setsprimary to secondary if necessary.
Offline
Determines if the file system is mounted. Checks mount status usingthe fsclustadm command.
Monitor
Generates a null operation for a cluster file system mount.Clean
Initializes the agent to interface with the AMF kernel driver, whichis the IMF notification module for the agent. This function runs whenthe agent starts up.
imf_init
Gets notification about resource state changes. This function runsafter the agent initializes with the AMF kernel module. This functioncontinuously waits for notification and takes action on the resourceupon notification.
imf_getnotification
Registers or unregisters resource entities with the AMF kernel module.This function runs for each resource after the resource goes into steadystate (online or offline).
imf_register
Attribute definition for CFSMount agentTable H-8 lists user-modifiable attributes of the CFSMount Agent resource type.
Table H-8 CFSMount Agent attributes
DescriptionDimensionAttribute
Directory for the mount point.string-scalarMountPoint
Block device for the mount point.string-scalarBlockDevice
List of nodes on which to mount. If NodeList isNULL, the agent uses the service group systemlist.
string-keylistNodeList
679High availability agent informationCFSMount agent

Table H-8 CFSMount Agent attributes (continued)
DescriptionDimensionAttribute
integer-associationIMF
High availability agent informationCFSMount agent
680

Table H-8 CFSMount Agent attributes (continued)
DescriptionDimensionAttribute
Resource-type level attribute that determineswhether the CFSMount agent must performintelligent resource monitoring. You can alsooverride the value of this attribute atresource-level.
This attribute includes the following keys:
■ Mode: Define this attribute to enable or disableintelligent resource monitoring.
Valid values are as follows:
■ 0—Does not perform intelligent resourcemonitoring
■ 1—Performs intelligent resourcemonitoring for offline resources andperforms poll-based monitoring for onlineresources
■ 2—Performs intelligent resourcemonitoring for online resources andperforms poll-based monitoring for offlineresources
■ 3—Performs intelligent resourcemonitoring for both online and for offlineresources
Default: 0
■ MonitorFreq: This key value specifies thefrequency at which the agent invokes themonitor agent function. The value of this keyis an integer.
Default: 1
You can set this key to a non-zero value forcases where the agent requires to performboth poll-based and intelligent resourcemonitoring. If the value is 0, the agent doesnot perform poll-based process checkmonitoring.
After the resource registers with the AMFkernel driver, the agent calls the monitoragent function as follows:
■ After every (MonitorFreq xMonitorInterval) number of seconds foronline resources
681High availability agent informationCFSMount agent

Table H-8 CFSMount Agent attributes (continued)
DescriptionDimensionAttribute
After every (MonitorFreq xOfflineMonitorInterval) number of secondsfor offline resources
■
■ RegisterRetryLimit: If you enable intelligentresource monitoring, the agent invokes theoracle_imf_register agent function to registerthe resource with the AMF kernel driver. Thevalue of the RegisterRetyLimit key determinesthe number of times the agent must retryregistration for a resource. If the agent cannotregister the resource within the limit that isspecified, then intelligent monitoring isdisabled until the resource state changes orthe value of the Mode key changes.
Default: 3.
Options for the mount command. To create a validMountOpt attribute string:
■ Use the VxFS type-specific options only.
■ Do not use the -o flag to specify theVxFS-specific options.
■ Do not use the-v vxfs file system type option.
■ Be aware the cluster option is not required.
■ Specify options in comma-separated list:
roro,clusterblkclear,mincache=closesync
string-scalarMountOpt
(optional)
List of nodes to assume the primaryship of thecluster file system if the primary fails. If set toNULL or if none of the hosts specified in the listis active when the primary fails, a node israndomly selected from the set of active nodes toassume primaryship.
string-scalarPolicy (optional)
CFSMount agent type definitionThe CFSTypes.cf file includes the CFSMount agent type definition:
High availability agent informationCFSMount agent
682

type CFSMount (
static keylist RegList = { MountOpt, Policy, NodeList, ForceOff, SetPrimary }
static keylist SupportedActions = { primary }
static int FaultOnMonitorTimeouts = 1
static int OnlineWaitLimit = 1
static str ArgList[] = { MountPoint, BlockDevice, MountOpt, Primary, AMFMountType }
str MountPoint
str MountType
str BlockDevice
str MountOpt
keylist NodeList
keylist Policy
temp str Primary
str SetPrimary
temp str RemountRes
temp str AMFMountType
str ForceOff
)
CFSMount agent sample configurationEach Oracle service group requires a CFSMount resource type to be defined:
CFSMount ora_mount (
MountPoint = "/oradata"
BlockDevice = "/dev/vx/dsk/oradatadg/oradatavol1"
Primary = nebula;
)
CFSfsckd agentThe CFSfsckd agent starts, stops, and monitors the vxfsckdprocess. The CFSfsckdagent executable is /opt/VRTSvcs/bin/CFSfsckd/CFSfsckdAgent. The typedefinition is in the /etc/VRTSvcs/conf/config/CFSTypes.cf file. Theconfiguration is added to the main.cf file after running the cfscluster config
command.
This agent is IMF-aware and uses asynchronous monitoring framework (AMF)kernel driver for IMF notification. For more information about the IntelligentMonitoring Framework (IMF) and intelligent resource monitoring, refer to theVeritas Cluster Server Administrator’s Guide.
683High availability agent informationCFSfsckd agent
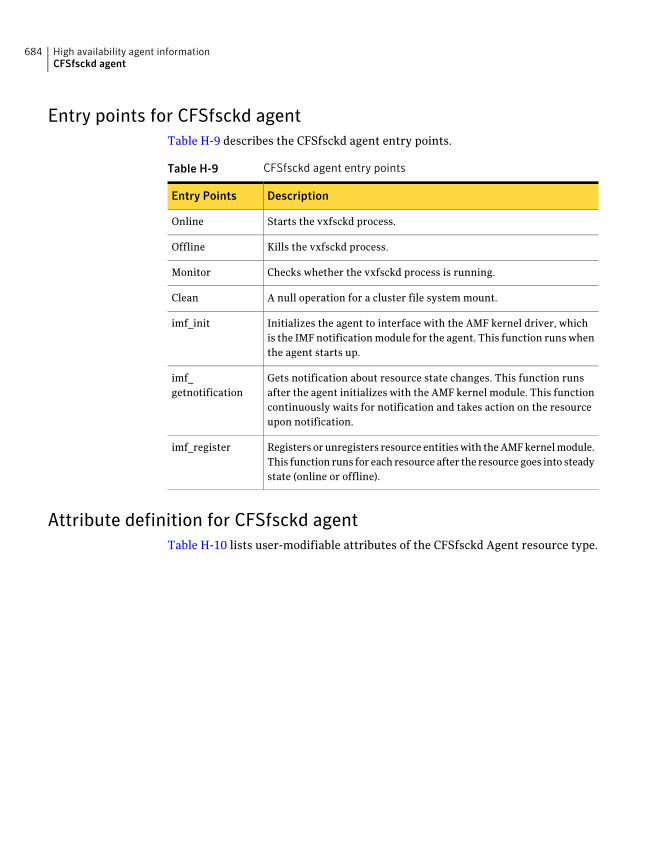
Entry points for CFSfsckd agentTable H-9 describes the CFSfsckd agent entry points.
Table H-9 CFSfsckd agent entry points
DescriptionEntry Points
Starts the vxfsckd process.Online
Kills the vxfsckd process.Offline
Checks whether the vxfsckd process is running.Monitor
A null operation for a cluster file system mount.Clean
Initializes the agent to interface with the AMF kernel driver, whichis the IMF notification module for the agent. This function runs whenthe agent starts up.
imf_init
Gets notification about resource state changes. This function runsafter the agent initializes with the AMF kernel module. This functioncontinuously waits for notification and takes action on the resourceupon notification.
imf_getnotification
Registers or unregisters resource entities with the AMF kernel module.This function runs for each resource after the resource goes into steadystate (online or offline).
imf_register
Attribute definition for CFSfsckd agentTable H-10 lists user-modifiable attributes of the CFSfsckd Agent resource type.
High availability agent informationCFSfsckd agent
684

Table H-10 CFSfsckd Agent attributes
DescriptionDimensionAttribute
integer-associationIMF
685High availability agent informationCFSfsckd agent
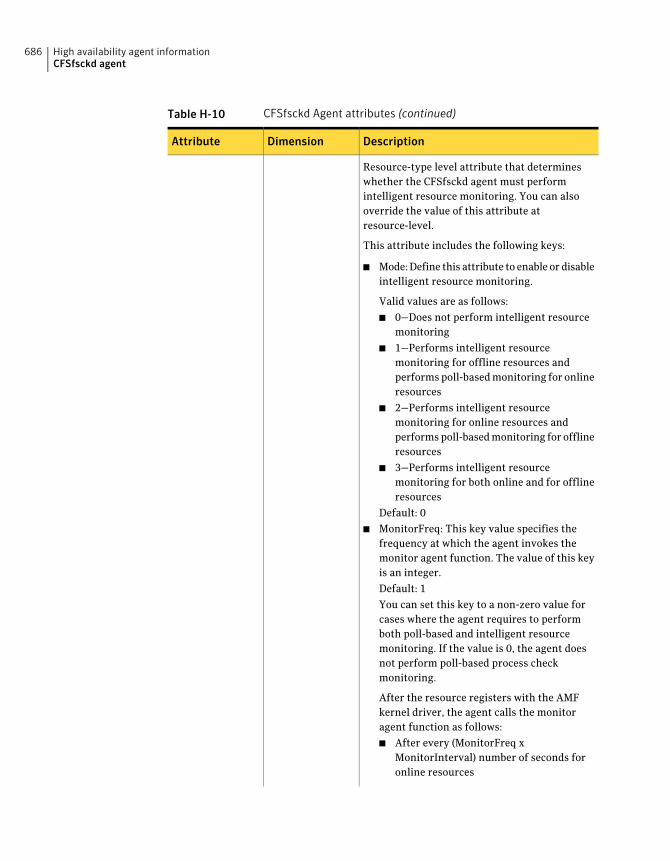
Table H-10 CFSfsckd Agent attributes (continued)
DescriptionDimensionAttribute
Resource-type level attribute that determineswhether the CFSfsckd agent must performintelligent resource monitoring. You can alsooverride the value of this attribute atresource-level.
This attribute includes the following keys:
■ Mode: Define this attribute to enable or disableintelligent resource monitoring.
Valid values are as follows:
■ 0—Does not perform intelligent resourcemonitoring
■ 1—Performs intelligent resourcemonitoring for offline resources andperforms poll-based monitoring for onlineresources
■ 2—Performs intelligent resourcemonitoring for online resources andperforms poll-based monitoring for offlineresources
■ 3—Performs intelligent resourcemonitoring for both online and for offlineresources
Default: 0
■ MonitorFreq: This key value specifies thefrequency at which the agent invokes themonitor agent function. The value of this keyis an integer.
Default: 1
You can set this key to a non-zero value forcases where the agent requires to performboth poll-based and intelligent resourcemonitoring. If the value is 0, the agent doesnot perform poll-based process checkmonitoring.
After the resource registers with the AMFkernel driver, the agent calls the monitoragent function as follows:
■ After every (MonitorFreq xMonitorInterval) number of seconds foronline resources
High availability agent informationCFSfsckd agent
686

Table H-10 CFSfsckd Agent attributes (continued)
DescriptionDimensionAttribute
After every (MonitorFreq xOfflineMonitorInterval) number of secondsfor offline resources
■
■ RegisterRetryLimit: If you enable intelligentresource monitoring, the agent invokes theoracle_imf_register agent function to registerthe resource with the AMF kernel driver. Thevalue of the RegisterRetyLimit key determinesthe number of times the agent must retryregistration for a resource. If the agent cannotregister the resource within the limit that isspecified, then intelligent monitoring isdisabled until the resource state changes orthe value of the Mode key changes.
Default: 3.
CFSfsckd agent type definitionThe CFSfsckd type definition:
type CFSfsckd (
static int RestartLimit = 1
str ActivationMode{}
)
CFSfsckd agent sample configurationThis is a sample of CFSfsckd configuration:
CFSfsckd vxfsckd (
)
PrivNIC agentThe PrivNIC agent provides high availability to a single private IP address acrossLLT Ethernet interfaces for a system. Private IP addresses are required by OracleClusterware and the Oracle database to provide communication between thecluster nodes.
687High availability agent informationPrivNIC agent

Note: The PrivNIC agent operates over LLT links. To use the agent, the OracleClusterware interconnects and the Oracle RAC database communication linksmust be configured as LLT links.
The PrivNIC agent relies on LLT to monitor the LLT Ethernet interfaces. It queriesLLT for the number of visible nodes on each of the LLT Ethernet interfaces.
The PrivNIC agent provides a reliable alternative when operating systemlimitations prevent you from using NIC bonding to provide increased bandwidthusing multiple network interfaces. In the event of a NIC failure or link failure, theagent fails over the private IP address from the failed link to the connected oravailable LLT link. If the preferred link becomes available, the IP address is failedback to the preferred link.
Functions of the PrivNIC agentTable H-11 describes the PrivNIC agent's monitor entry point.
Note:Because the resource is persistent, only the monitor entry point is required.
Table H-11 PrivNIC agent entry point
DescriptionEntry Point
The PrivNIC agent queries LLT to create a list of nodes visible on everyLLT network interface. The PrivNIC agent then applies various filtersto this list to arrive at a most desired failover decision and calculatesa "winner" device on which to configure the IP address. The"winner"device is compared to the currently active device where theIP address is currently configured. If the active and "winner" devicesare different, the PrivNIC agent initiates a failover to the "winner"device.
Monitor
Attributes of the PrivNIC agentTable H-12 describes the user-modifiable attributes of the PrivNIC agent.
High availability agent informationPrivNIC agent
688

Table H-12 Required attributes for PrivNIC agent
DescriptionDimensionAttribute
Specifies the network interface device as shownby the ifconfig command and the network IDassociated with the interface. Network IDs of theinterfaces connected to the same physical networkmust match. The interface with the lowernetwork-id has the higher preference for failover.Interfaces specified in the PrivNIC configurationshould be exactly the same in name and totalnumber as those which have been used for LLTconfiguration.
At least one interface device must be specified.
Example:
Device@galaxy = {en1=0, en2=1, en3=2}Device@nebula = {en1=0, en2=1, en3=2}
string - associationDevice
The numerical private IP address.
Checks are performed to determine if this is avalid IP address.
When configuring private IPv4 addresses forOracle Clusterware, make sure that there are noleading zeroes in any of the octets that comprisethe IP address, for example X.X.X.01 or X.X.0X.1or X.0X.X.1 or 0X.X.X.1.
Ensure that the IPv4 addresses have the formatas " X.X.X.1".
The following is an example of an IPv4 address:
Address = "192.168.12.1"
string-scalarAddress
The numerical netmask for the private IP address.For example:
Address = "255.255.255.0"
string - associationNetMask
689High availability agent informationPrivNIC agent

Optional attributes of the PrivNIC agent
Table H-13 Optional attributes for PrivNIC agent
DescriptionDimensionAttribute
Associates an LLT device "tag" with device via thenetwork-id. If an LLT device tag (as specified inthe /etc/llttab file) differs from the name ofthe network interface as shown in "ifconfig," thenDeviceTag must be specified for that interface.
string - associationDeviceTag
A single lower-case letter specifying the name ofthe GAB port to be used for filtering. "o" is thedefault. NULL disables GAB port filtering.
Example: GabPort = "b"
string-scalarGabPort
The default is 0, which specifies that the agentuse the physical interface for configuring theprivate IP address when possible.
The value 1 specifies that the agent always usethe virtual interface for configuring the privateIP address.
The value 2 (which includes the functionality ofthe value 1) specifies the agent should complainif the private IP address already exists on aphysical interface.
integer-scalarUseVirtualIP
The value 1 specifies that the agent use theSystemList of the service group to filter the nodelist. Default = 0.
integer-scalarUseSystemList
List of nodes to permanently exclude fromcalculation.
integer-vectorExcludeNode
States of the PrivNIC agentTable H-14 lists the states of the PrivNIC agent.
Table H-14 States of the PrivNIC agent
DescriptionState
Indicates that the private IP address is available.Online
Indicates the inability to determine the state of the resourcedue to incorrect attribute settings or other configuration issues.
Unknown
High availability agent informationPrivNIC agent
690

Sample service group configuration with the PrivNIC agentFigure H-1 illustrates a basic service group configuration with the PrivNIC agent.
Figure H-1 Basic service group configuration with the PrivNIC agent
Application
cssd
ora_priv
CVMVoIDG
ocrvote_voldg
CFSMount
ocrvote_mnt
PrivNIC
This configuration shows the dependency of the CSSD resource on the private IPaddress configured as a PrivNIC resource along with the OCR and voting diskvolume and mount point dependencies.
For sample deployment scenarios, see the appendix SF Oracle RAC deploymentscenarios.
Type definition of the PrivNIC resourceThe following extract shows the type definition of the PrivNIC resource in thePrivNIC.cf file:
type PrivNIC (
static str ArgList[] = { Device, DeviceTag, Address,
NetMask, UseVirtualIP, GabPort, UseSystemList,
ExcludeNode }
static int OfflineMonitorInterval = 60
static int MonitorTimeout = 300
static str Operations = None
str Device{}
str DeviceTag{}
str Address = ""
str NetMask = ""
int UseVirtualIP = 0
str GabPort = "o"
int UseSystemList = 0
int ExcludeNode[]
)
691High availability agent informationPrivNIC agent
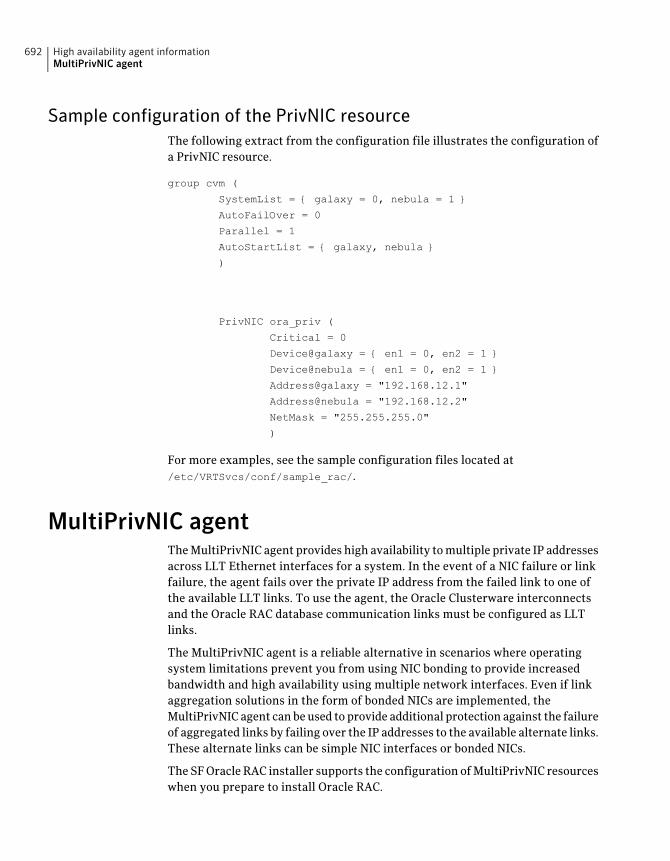
Sample configuration of the PrivNIC resourceThe following extract from the configuration file illustrates the configuration ofa PrivNIC resource.
group cvm (
SystemList = { galaxy = 0, nebula = 1 }
AutoFailOver = 0
Parallel = 1
AutoStartList = { galaxy, nebula }
)
PrivNIC ora_priv (
Critical = 0
Device@galaxy = { en1 = 0, en2 = 1 }
Device@nebula = { en1 = 0, en2 = 1 }
Address@galaxy = "192.168.12.1"
Address@nebula = "192.168.12.2"
NetMask = "255.255.255.0"
)
For more examples, see the sample configuration files located at/etc/VRTSvcs/conf/sample_rac/.
MultiPrivNIC agentThe MultiPrivNIC agent provides high availability to multiple private IP addressesacross LLT Ethernet interfaces for a system. In the event of a NIC failure or linkfailure, the agent fails over the private IP address from the failed link to one ofthe available LLT links. To use the agent, the Oracle Clusterware interconnectsand the Oracle RAC database communication links must be configured as LLTlinks.
The MultiPrivNIC agent is a reliable alternative in scenarios where operatingsystem limitations prevent you from using NIC bonding to provide increasedbandwidth and high availability using multiple network interfaces. Even if linkaggregation solutions in the form of bonded NICs are implemented, theMultiPrivNIC agent can be used to provide additional protection against the failureof aggregated links by failing over the IP addresses to the available alternate links.These alternate links can be simple NIC interfaces or bonded NICs.
The SF Oracle RAC installer supports the configuration of MultiPrivNIC resourceswhen you prepare to install Oracle RAC.
High availability agent informationMultiPrivNIC agent
692

Managing high availability of private interconnectsThe MultiPrivNIC agent operates over LLT links and relies on LLT to monitor thecluster interfaces. It queries LLT to count and report the number of visible nodeson each of the LLT interfaces. In the event that a preferred link goes down, the IPaddress is failed over to the private link on which maximum number of peer nodesare visible. If multiple links see maximum nodes and if load-balancing is enabled,the agent considers the current traffic on all devices and calculates a "winner"device with lower traffic. If load balancing is not enabled, the IP address is failedover to the link with the lower network-id.
The failover decision for an IP address is made only when the link hosting the IPaddress fails. If the preferred link becomes available, the IP address is failed backto the preferred link regardless of whether load-balancing is enabled or disabled.
Functions of the MultiPrivNIC agentTable H-15 describes the MultiPrivNIC agent's monitor entry point.
Note:Because the resource is persistent, only the monitor entry point is required.
Table H-15 MultiPrivNIC agent entry point
DescriptionEntry point
The MultiPrivNIC agent queries LLT to create a list of the visible nodeson each LLT network interface.
The agent applies various filters to this list and calculates a winnerdevice on which to configure the IP address.
If the active device on which the IP address is configured does not seethe same number of nodes as the winner device, the agent fails overthe IP address to the winner device.
Monitor
Attributes of the MultiPrivNIC agentTable H-16 below describes the user-modifiable attributes of the MultiPrivNICresource type.
693High availability agent informationMultiPrivNIC agent

Table H-16 MultiPrivNIC agent attribute definitions
DescriptionDimensionAttribute
The device attribute specifies the networkinterface displayed by the ifconfig commandand the network ID associated with the interface.
The network IDs of the interfaces connected tothe same physical network must match. Theinterfaces specified in the MultiPrivNICconfiguration should be exactly the same in nameand total number as those which have been usedfor LLT configuration.
An example of the device attribute is as follows:
Device@galaxy = {en1=0, en2=1, en3=2}Device@nebula = {en1=0, en2=1, en3=2}
string-associationDevice
The numerical private IP address and its preferreddevice.
The agent verifies that the IP addresses are validaddresses. When you configure private IPaddresses, ensure that the addresses do not havea leading 0 in any of the octets that comprise theIP address. The IP address must be in the format" X.X.X.1".
In the following example, 0 and 1 indicates the IDof the device on which the IP address is hosted.If the device is unavailable, the agentautomatically reconfigures the IP address on oneof the available devices. The available device isdetermined based on the UseLoadBalanceattribute setting.
An example of the address attribute is as follows:
Address @galaxy ={ "192.168.12.1" =0,"192.168.2.1" =0,"192.168.3.1" =1 }Address @nebula ={ "192.168.12.2" =0,"192.168.2.2" =0,"192.168.3.2" =1 }
string-associationAddress
High availability agent informationMultiPrivNIC agent
694

Table H-16 MultiPrivNIC agent attribute definitions (continued)
DescriptionDimensionAttribute
The netmask attribute is the numerical netmaskfor the private IP address.
For example, Address = "255.255.255.0".
string-associationNetmask
A boolean value 0 or 1.
In the event that the preferred device isunavailable and multiple links see maximumnodes during failover:
■ Setting the attribute to 1 fails over the IPaddress to the device with lower traffic.
■ Setting the attribute to 0 fails over the IPaddress to the device with lower network ID.
Note: If the preferred device becomes available,the IP address is failed back to the preferreddevice regardless of the value of UseLoadBalance.
UseLoadBalance
States of the MultiPrivNIC agentTable H-17 lists the states of the MultiPrivNIC agent.
Table H-17 States of the MultiPrivNIC agent
DescriptionState
Indicates that the private IP addresses are available.Online
Indicates the inability to determine the state of the resourcedue to incorrect attribute settings or other configuration issues.
Unknown
Sample service group configuration with the MultiPrivNIC agentFigure H-2 illustrates a sample service group configuration with the MultiPrivNICagent.
695High availability agent informationMultiPrivNIC agent

Figure H-2 Basic service group configuration with MultiPrivNIC agent
Application
cssd
ora_priv
CVMVoIDG
ocrvote_voldg
CFSMount
ocrvote_mnt
MultiPrivNIC
The illustrated configuration shows the dependency of the CSSD resource on theprivate IP address configured as a MultiPrivNIC resource along with the OCR andvoting disk volume and mount point dependencies.
For sample deployment scenarios, see the appendix SF Oracle RAC deploymentscenarios.
Type definition of the MultiPrivNIC resourceThe following extract shows the type definition of the MultiPrivNIC resource inthe MultiPrivNIC.cf file:
type MultiPrivNIC (
static int MonitorTimeout = 300
static int OfflineMonitorInterval = 60
static str ArgList[] = { Device, DeviceTag, Address, NetMask,
UseVirtualIP, GabPort, UseSystemList,
ExcludeNode, UseLoadBalance }
static str Operations = None
str Device{}
str DeviceTag{}
str Address{}
str NetMask
int UseVirtualIP
str GabPort = o
int UseSystemList
int ExcludeNode[]
int UseLoadBalance
)
High availability agent informationMultiPrivNIC agent
696

Sample configuration of the MultiPrivNIC resourceThe following extract from the configuration file illustrates the configuration ofa MultiPrivNIC resource.
MultiPrivNIC multi_priv (
Critical = 0
Device @galaxy = { en1 = 0, en2 = 1 }
Device @nebula = { en1 = 0, en2 = 1 }
Address @galaxy = { "192.168.12.1" =0, "192.168.2.1" =0,
"192.168.3.1" =1 }
Address @nebula = { "192.168.12.2" =0, "192.168.2.2" =0,
"192.168.3.2" =1 }
NetMask = "255.255.255.0"
UseLoadBalance = 1
)
For more examples, see the sample configuration files located at/etc/VRTSvcs/conf/sample_rac/.
In the above example, the interface next to the IP address is the preferred devicefor that particular IP address. If the same number of nodes are visible on each ofthe LLT interfaces, the IP addresses are configured on the preferred interfaces.
CSSD agentThe CSSD agent starts, stops, and monitors Oracle Clusterware/Grid Infrastructure.It ensures that the OCR, the voting disk and the private IP address resourcesrequired by Oracle Clusterware/Grid Infrastructure are online before OracleClusterware/Grid Infrastructure starts. For this purpose, the cssd resource mustbe configured as a parent of the resources that manage the OCR, the voting disk,and the private IP address used by Oracle Clusterware/Grid Infrastructure. Usingthe CSSD agent in SF Oracle RAC installations ensures adequate handling ofinter-dependencies and thus prevents the premature startup of OracleClusterware/Grid Infrastructure, which causes cluster failures.
For Oracle RAC 10g Release 2 and Oracle RAC 11g Release 1, during system startup,the Oracle Clusterware init scripts invoke the clsinfo script provided by Veritassoftware. The clsinfo script ensures that the dependent resources of cssd resourceconfigured under VCS are online, thus ensuring that the OCR, the voting disk,and the private IP address resources are online before the cssd resource comesonline. After the underlying resources are online, the CSSD agent starts OracleClusterware.
697High availability agent informationCSSD agent
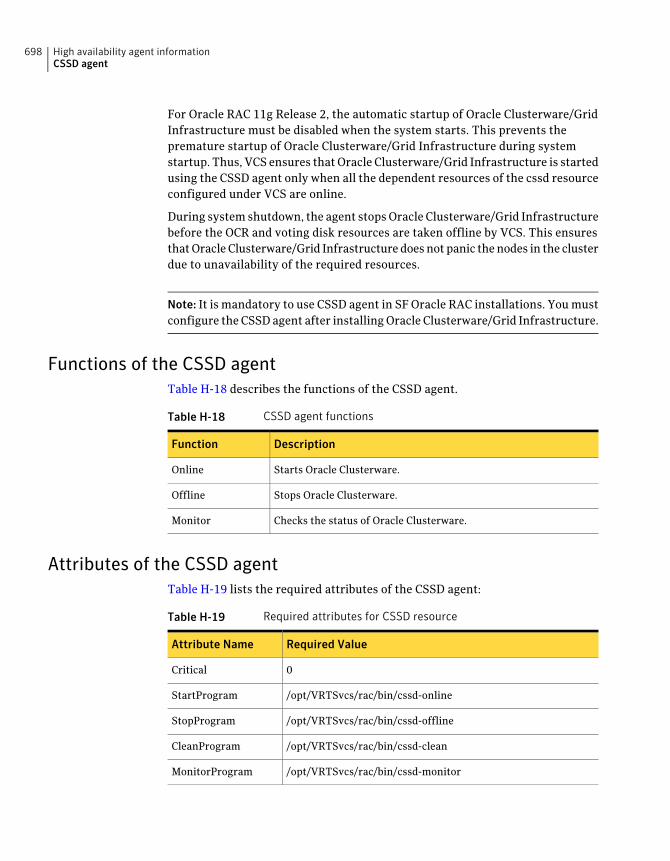
For Oracle RAC 11g Release 2, the automatic startup of Oracle Clusterware/GridInfrastructure must be disabled when the system starts. This prevents thepremature startup of Oracle Clusterware/Grid Infrastructure during systemstartup. Thus, VCS ensures that Oracle Clusterware/Grid Infrastructure is startedusing the CSSD agent only when all the dependent resources of the cssd resourceconfigured under VCS are online.
During system shutdown, the agent stops Oracle Clusterware/Grid Infrastructurebefore the OCR and voting disk resources are taken offline by VCS. This ensuresthat Oracle Clusterware/Grid Infrastructure does not panic the nodes in the clusterdue to unavailability of the required resources.
Note: It is mandatory to use CSSD agent in SF Oracle RAC installations. You mustconfigure the CSSD agent after installing Oracle Clusterware/Grid Infrastructure.
Functions of the CSSD agentTable H-18 describes the functions of the CSSD agent.
Table H-18 CSSD agent functions
DescriptionFunction
Starts Oracle Clusterware.Online
Stops Oracle Clusterware.Offline
Checks the status of Oracle Clusterware.Monitor
Attributes of the CSSD agentTable H-19 lists the required attributes of the CSSD agent:
Table H-19 Required attributes for CSSD resource
Required ValueAttribute Name
0Critical
/opt/VRTSvcs/rac/bin/cssd-onlineStartProgram
/opt/VRTSvcs/rac/bin/cssd-offlineStopProgram
/opt/VRTSvcs/rac/bin/cssd-cleanCleanProgram
/opt/VRTSvcs/rac/bin/cssd-monitorMonitorProgram
High availability agent informationCSSD agent
698

States of the CSSD agentTable H-20 describes the states of the CSSD agent.
Table H-20 CSSD agent states
DescriptionState
Indicates that Oracle Clusterware is running.Online
Indicates that Oracle Clusterware is not running.Offline
Indicates the inability to determine the state of the resourcedue to incorrect attribute settings or other configurationissues.
Unknown
Sample service group configurations with the CSSD agentFigure H-3 illustrates a basic service group configuration with the CSSD agent.
Figure H-3 Basic service group configuration with the CSSD agent
Application
cssd
ora_priv
CVMVoIDG
ocrvote_voldg
CFSMount
ocrvote_mnt
MultiPrivNIC
In this basic configuration, the OCR and voting disk volumes/mount points andIP addresses are configured under the CSSD resource. This ensures that theseresources are online before the CSSD agent starts Oracle Clusterware.
Note:Depending on whether the Oracle database is started by Oracle Clusterwareor by the VCS agent for Oracle, you must configure the Oracle database mountssuch that they are online before the database starts.
For more sample configurations:
See “Sample configuration files” on page 618.
699High availability agent informationCSSD agent

Type definition of the CSSD resourceThe CSSD agent is an application agent. You can determine the name of the CSSDresource.
The following extract shows the type definition of the CSSD resource in thetypes.cf file.
type Application (
static keylist SupportedActions =
{ "program.vfd", "user.vfd", "cksum.vfd", getcksum }
static str ArgList[] =
{ User, StartProgram, StopProgram, CleanProgram,
MonitorProgram, PidFiles, MonitorProcesses }
static int ContainerOpts{} = { RunInContainer=1, PassCInfo=0 }
str User
str StartProgram
str StopProgram
str CleanProgram
str MonitorProgram
str PidFiles[]
str MonitorProcesses[]
)
Sample configuration of the CSSD resourceThe following extract from the main.cf file illustrates a sample CSSD agentconfiguration:
Application cssd (
Critical = 0
StartProgram = "/opt/VRTSvcs/rac/bin/cssd-online"
StopProgram = "/opt/VRTSvcs/rac/bin/cssd-offline"
CleanProgram = "/opt/VRTSvcs/rac/bin/cssd-clean"
MonitorProgram = "/opt/VRTSvcs/rac/bin/cssd-monitor"
)
VCS agents for OracleThe VCS agents for Oracle include the following agents that work together tomake Oracle highly available:
■ The Oracle agent monitors the Oracle database processes.See “Oracle agent functions” on page 701.
High availability agent informationVCS agents for Oracle
700

See “Resource type definition for the Oracle agent” on page 706.
■ The Netlsnr agent monitors the listener process.See “Netlsnr agent functions” on page 712.
■ The ASMDG agent monitors the Oracle ASM disk groups.See “ASMDG agent functions” on page 718.See “Resource type definition for the ASMDG agent” on page 718.
Refer to theVeritas Cluster ServerAgent forOracle Installation andConfigurationGuide for more details on the agent functions and the resource types.
Oracle agent functionsThe Oracle agent monitors the database processes.
Table H-21 lists the Oracle agent functions.
Table H-21 Oracle agent functions
DescriptionAgent operation
Starts the Oracle database.
The agent uses the default startup option STARTUP_FORCE. ForRAC clusters, you must manually change the value of theStartUpOpt attribute to SRVCTLSTART.
If you set the option to SRVCTLSTART, the agent uses thefollowing srvctl command to start the Oracle database:
srvctl start database -d database_name
Online
Stops the Oracle database.
The agent uses the default shutdown option IMMEDIATE. ForRAC clusters, you must manually change the value of theShutDownOpt attribute to SRVCTLSTOP.
If you set the option to SRVCTLSTOP, the agent uses the followingsrvctl command to stop the Oracle database:
srvctl stop database -d database_name
Offline
Verifies the status of the Oracle processes. The Oracle agentprovides two levels of monitoring: basic and detail.
See “Monitor options for the Oracle agent” on page 702.
Monitor
701High availability agent informationVCS agents for Oracle

Table H-21 Oracle agent functions (continued)
DescriptionAgent operation
Initializes the agent to interface with the AMF kernel driver, whichis the IMF notification module for Oracle agent. This functionruns when the agent starts up.
oracle_imf_init
Gets notification about resource state changes. This function runsafter the agent initializes with the AMF kernel module. Thisfunction continuously waits for notification and takes action onthe resource upon notification.
oracle_imf_getnotification
Registers or unregisters resource entities with the AMF kernelmodule. This function runs for each resource after the resourcegoes into steady state (online or offline).
oracle_imf_register
Forcibly stops the Oracle database.
If you set the shutdown option to SRVCTLSTOP, the agent usesthe following srvctl command:
srvctl stop database -d database_name
If the process does not respond to the srvctl command, then theagent does the following:
■ Scans the process table for the processes that are associatedwith the configured instance
■ Kills the processes that are associated with the configuredinstance
Clean
Provides the static and dynamic information about the state ofthe database.
See “Info entry point for SF Oracle RAC agent for Oracle”on page 704.
Info
Performs the predefined actions on a resource.
See “Action entry point for SF Oracle RAC agent for Oracle”on page 705.
Action
Monitor options for the Oracle agentThe Oracle agent provides two levels of monitoring: basic and detail. By default,the agent does a basic monitoring.
The basic monitoring mode has the following options:
■ Process check
High availability agent informationVCS agents for Oracle
702

■ Health check
The MonitorOption attribute of the Oracle resource determines whether the agentmust perform basic monitoring in Process check or Health check mode.
Table H-22 describes the basic monitoring options.
Table H-22 Basic monitoring options
DescriptionOption
Process check
The agent scans the process table for the ora_dbw0, ora_smon,ora_pmon, and ora_lgwr processes to verify that Oracle is running.
In this mode, the agent also supports intelligent resource monitoring.
0
(Default)
Health check (supported on Oracle 10g and later)
The agent uses the Health Check APIs from Oracle to monitor the SGAand retrieve the information about the instance.
If you want to use the Oracle agent's intentional offline functionality,you must enable Health check monitoring.
The agent does not support intelligent resource monitoring in thismode.
1
Review the following considerations if you want to configure basic monitoring:
■ Basic monitoring of Oracle processes is user-specific. As a result, an Oracleinstance started under the context of another user cannot be detected as online.For example, if an Oracle instance is started under the user "oraVRT" and theagent is configured for a user "oracle", the agent will not detect the instancestarted by "oraVRT" as online.This could lead to situations where issuing a command to online a resourceon a node might online an already running instance on that node (or any othernode).So, Symantec recommends that instances started outside SF Oracle RAC controlbe configured with the correct Owner attribute corresponding to the OS userfor that instance.
■ Within a failover service group, when the administrator onlines an Oracleresource on a node and if the Oracle instance is online on any other node withina cluster, the instance would come up. However, the database does not getmounted. In such circumstances, this failure is detected only by health checkmonitoring option of basic monitoring or detail monitoring. Detail monitoringupdates the database table after detecting a failure whereas health checkmonitoring does not.
703High availability agent informationVCS agents for Oracle
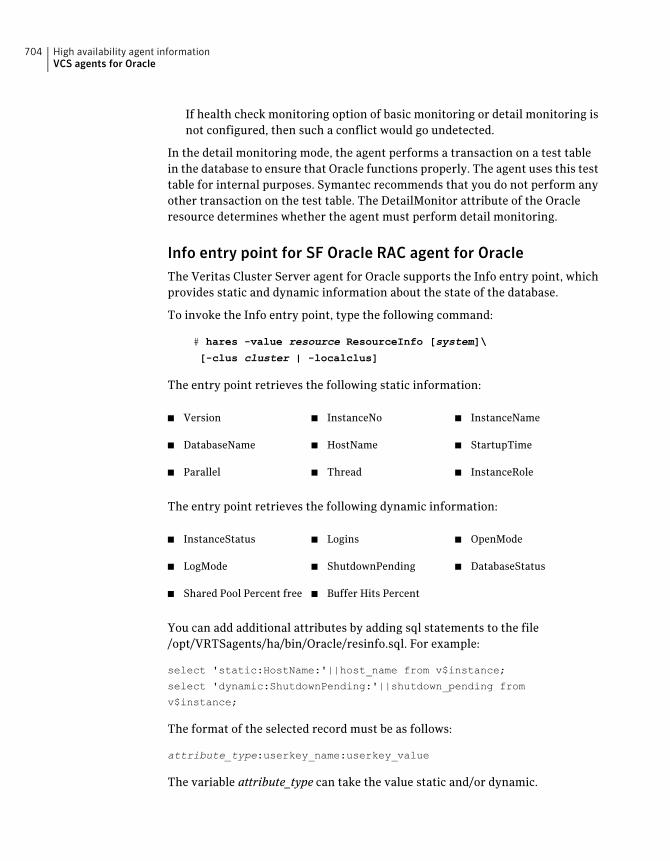
If health check monitoring option of basic monitoring or detail monitoring isnot configured, then such a conflict would go undetected.
In the detail monitoring mode, the agent performs a transaction on a test tablein the database to ensure that Oracle functions properly. The agent uses this testtable for internal purposes. Symantec recommends that you do not perform anyother transaction on the test table. The DetailMonitor attribute of the Oracleresource determines whether the agent must perform detail monitoring.
Info entry point for SF Oracle RAC agent for OracleThe Veritas Cluster Server agent for Oracle supports the Info entry point, whichprovides static and dynamic information about the state of the database.
To invoke the Info entry point, type the following command:
# hares -value resource ResourceInfo [system]\
[-clus cluster | -localclus]
The entry point retrieves the following static information:
■ InstanceName■ InstanceNo■ Version
■ StartupTime■ HostName■ DatabaseName
■ InstanceRole■ Thread■ Parallel
The entry point retrieves the following dynamic information:
■ OpenMode■ Logins■ InstanceStatus
■ DatabaseStatus■ ShutdownPending■ LogMode
■ Buffer Hits Percent■ Shared Pool Percent free
You can add additional attributes by adding sql statements to the file/opt/VRTSagents/ha/bin/Oracle/resinfo.sql. For example:
select 'static:HostName:'||host_name from v$instance;
select 'dynamic:ShutdownPending:'||shutdown_pending from
v$instance;
The format of the selected record must be as follows:
attribute_type:userkey_name:userkey_value
The variable attribute_type can take the value static and/or dynamic.
High availability agent informationVCS agents for Oracle
704

Action entry point for SF Oracle RAC agent for OracleThe Veritas Cluster Server agent for Oracle supports the Action entry point, whichenables you to perform predefined actions on a resource.
To perform an action on a resource, type the following command:
# hares -action res token [-actionargs arg1 ...] \
[-sys system] [-clus cluster]
You can also add custom actions for the agent.
For further information, refer to the Veritas Cluster Server Agent Developer'sGuide.
See Table H-24 on page 706.
Table H-23 describes the agent’s predefined actions.
Table H-23 Predefined agent actions
DescriptionAction
Retrieves the name of the configured instance. You canuse this option for the Oracle and the Netlsnr resources.
VRTS_GetInstanceName
Retrieves the list of processes that the agent monitors.You can use this option for the Oracle and the Netlsnrresources.
VRTS_GetRunningServices
Changes the database session to enable the RESTRICTEDmode.
DBRestrict
Changes the database session to disable the RESTRICTEDmode.
DBUndoRestrict
Suspends a database.DBSuspend
Resumes a suspended database.DBResume
Backs up a tablespace;actionargs contains name of thetablespace to be backed up.
DBTbspBackup
Table H-24 lists the virtual fire drill actions of the Veritas Cluster Server agentfor Oracle lets you run infrastructure checks and fix specific errors.
705High availability agent informationVCS agents for Oracle

Table H-24 Predefined virtual fire drill actions
DescriptionVirtual fire drill action
Verifies that the Oracle Owner exists on the node.getid
(Oracle agent)
Verifies the following:
■ ORACLE_HOME is mounted on the node andcorresponding entry is in the fstab.
If the ORACLE_HOME is not mounted, the action entrypoint checks if any other resource has already mountedORACLE_HOME.
■ Pfile is provided and it exists on the node.
■ Password file from $ORACLE_HOME/dbs/orapw[SID]is present.
home.vfd
(Oracle agent)
Verifies the uid and gid of the Oracle Owner attribute.Checks if uid and gid of Owner attribute is the same onthe node where the Oracle resource is currently ONLINE.
owner.vfd
(Oracle agent)
Checks for the presence of pfile or spfile on the local disk.If both pfile and spfile are not present, the agent functionexits. If the Oracle resource is online in the cluster, theagent function logs a message that the spfile must be onthe shared storage because the Oracle resource is online.
pfile.vfd
(Oracle agent)
Checks if listener.ora file is present. If the listener.ora fileis not present, it checks if ORACLE_HOME is mountedand displays appropriate messages.
tnsadmin.vfd
(Netlsnr agent)
Resource type definition for the Oracle agentThe Oracle agent of the Veritas Cluster Server agent for Oracle is represented bythe Oracle resource type in SF Oracle RAC.
type Oracle (
static str AgentDirectory = "/opt/VRTSagents/ha/bin/Oracle"
static keylist SupportedActions = { VRTS_GetInstanceName,
VRTS_GetRunningServices, DBRestrict, DBUndoRestrict, DBResume,
DBSuspend, DBTbspBackup, "home.vfd", "owner.vfd", "getid",
"pfile.vfd" }
static str ArgList[] = { Sid, Owner, Home, Pfile, StartUpOpt,
ShutDownOpt, DBAUser, DBAPword, EnvFile, AutoEndBkup,
DetailMonitor, User, Pword, Table, MonScript, AgentDebug,
Encoding, MonitorOption }
High availability agent informationVCS agents for Oracle
706

static str IMFRegList[] = { Home, Owner, Sid, MonitorOption }
static int ContainerOpts{} = { RunInContainer=1, PassCInfo=0 }
str Sid
str Owner
str Home
str Pfile
str StartUpOpt = STARTUP_FORCE
str ShutDownOpt = IMMEDIATE
str DBAUser
str DBAPword
str EnvFile
boolean AutoEndBkup = 1
int DetailMonitor = 0
str MonScript = "./bin/Oracle/SqlTest.pl"
str User
str Pword
str Table
boolean AgentDebug = 0
str Encoding
int MonitorOption = 0
static boolean IntentionalOffline = 0
)
Attribute definition for the Oracle agentReview the description of the Oracle agent attributes. The agent attributes areclassified as required, optional, and internal.
Table H-25 lists the required attributes. You must assign values to the requiredattributes.
Table H-25 Required attributes for Oracle agent
DefinitionType anddimension
Requiredattributes
The variable $ORACLE_SID that represents the Oracle instance. The Sidis considered case-sensitive by the Oracle agent and by the Oracle databaseserver.
string-scalarSid
The Oracle user who has privileges to start or stop the database instance.
The agent also supports LDAP users as Oracle user.
string-scalarOwner
707High availability agent informationVCS agents for Oracle

Table H-25 Required attributes for Oracle agent (continued)
DefinitionType anddimension
Requiredattributes
The $ORACLE_HOME path to Oracle binaries and configuration files. Forexample, you could specify the path as /opt/ora_home.
Note: Do not append a slash (/) at the end of the path.
string-scalarHome
Table H-26 lists the optional attributes for Oracle agent. You can configure theoptional attributes if necessary.
Table H-26 Optional attributes for Oracle agent
DefinitionType andDimension
OptionalAttributes
The database user who has sysdba privileges to start or stop the database.string-scalarDBAUser
Encrypted password for DBAUser.
Encrypt passwords only when entering them using the command-line.Passwords must be encrypted using the SF Oracle RAC Encrypt utility.
string-scalarDBAPword
Startup options for the Oracle instance. This attribute can take the followingvalues:
■ STARTUP
■ STARTUP_FORCE
■ RESTRICTED
■ RECOVERDB
■ SRVCTLSTART
■ CUSTOM
Default is STARTUP_FORCE.
string-scalarStartUpOpt
Shut down options for the Oracle instance. This attribute can take thefollowing values:
■ IMMEDIATE
■ TRANSACTIONAL
■ SRVCTLSTOP
■ CUSTOM
Default is IMMEDIATE.
string-scalarShutDownOpt
High availability agent informationVCS agents for Oracle
708

Table H-26 Optional attributes for Oracle agent (continued)
DefinitionType andDimension
OptionalAttributes
The full path name of the file that is sourced by the entry point scripts.This file contains the environment variables set by the user for the Oracledatabase server environment such as LD_LIBRARY_PATH,NLS_DATE_FORMAT, and so on.
The syntax for the contents of the file depends on the login shell of Owner.File must be readable by Owner. The file must not contain any prompts foruser input.
string-scalarEnvFile
The name of the initialization parameter file with the complete path of thestartup profile.
You can also use the server parameter file. Create a one-line textinitialization parameter file that contains only the SPFILE parameter. Seethe Oracle documentation for more information.
string-scalarPfile
Setting the AutoEndBkup attribute to a non-zero value takes the datafilesin the database out of the backup mode, during Online.
Default = 1
integer-scalarAutoEndBkup
Monitor options for the Oracle instance. This attribute can take values 0or 1.
■ 0—Process check monitoring (recommended)
■ 1—Health check monitoring
The agent supports intelligent resource monitoring only when this attributevalue is set to 0.
Default = 0
See “Monitor options for the Oracle agent” on page 702.
integer-scalarMonitorOption
709High availability agent informationVCS agents for Oracle

Table H-26 Optional attributes for Oracle agent (continued)
DefinitionType andDimension
OptionalAttributes
This resource-type level attribute determines whether the Oracle agentmust perform intelligent resource monitoring. You can also override thevalue of this attribute at resource-level.
This attribute includes the following keys:
■ Mode: Define this attribute to enable or disable intelligent resourcemonitoring.
Valid values are as follows:
■ 0—Does not perform intelligent resource monitoring
■ 1—Performs intelligent resource monitoring for offline resourcesand performs poll-based monitoring for online resources
■ 2—Performs intelligent resource monitoring for online resourcesand performs poll-based monitoring for offline resources
■ 3—Performs intelligent resource monitoring for both online and foroffline resources
Default: 0
■ MonitorFreq: This key value specifies the frequency at which the agentinvokes the monitor agent function. The value of this key is an integer.
Default: 1
You can set this key to a non-zero value for cases where the agentrequires to perform both poll-based and intelligent resource monitoring.If the value is 0, the agent does not perform poll-based process checkmonitoring.
After the resource registers with the AMF kernel driver, the agent callsthe monitor agent function as follows:
■ After every (MonitorFreq x MonitorInterval) number of seconds foronline resources
■ After every (MonitorFreq x OfflineMonitorInterval) number ofseconds for offline resources
■ RegisterRetryLimit: If you enable intelligent resource monitoring, theagent invokes the oracle_imf_register agent function to register theresource with the AMF kernel driver. The value of the RegisterRetryLimitkey determines the number of times the agent must retry registrationfor a resource. If the agent cannot register the resource within the limitthat is specified, then intelligent monitoring is disabled until theresource state changes or the value of the Mode key changes.
Default: 3.
integer-associationIMF
High availability agent informationVCS agents for Oracle
710

Table H-26 Optional attributes for Oracle agent (continued)
DefinitionType andDimension
OptionalAttributes
Determines whether or not detail monitoring is enabled. The attributevalue 1 indicates that detail monitoring for Oracle is enabled.
You must set the value of the LevelTwoMonitorFreq attribute to specifythe frequency at which the agent must perform detailed monitoring.
Default = 0
integer-scalarDetailMonitor
Pathname to the script provided for detail monitoring. The default (basicmonitoring) is to monitor the database PIDs only.
Note: Detail monitoring is disabled if the value of the attribute MonScriptis invalid or is set to an empty string.
The pathname to the supplied detail monitor script is /opt/VRTSagents/ha/bin/Oracle/SqlTest.pl.
MonScript also accepts a pathname relative to /opt/VRTSagents/ha. Arelative pathname should start with "./", as in the path./bin/Oracle/SqlTest.pl.
string-scalarMonScript
Internal database user. Connects to the database for detail monitoring.string-scalarUser
Specifies the frequency at which the agent for this resource type mustperform second-level or detailed monitoring. You can also override thevalue of this attribute at resource-level.
The value indicates the number of monitor cycles after which the agentwill monitor Oracle in detail. For example, the value 5 indicates that theagent will monitor Oracle in detail every five online monitor intervals.
If you manually upgraded to the SF Oracle RAC 5.1 SP1 PR1 agent, and ifyou had enabled detail monitoring in the previous version, then do thefollowing:
■ Set the value of the LevelTwoMonitorFreq attribute to the same valueof that of the DetailMonitor attribute.
■ Reset the value of the DetailMonitor attribute to 1
Note: If you set the AutoEndBkup attribute value to 0, then make sure thatthe LevelTwoMonitorFreq attribute value is 1 for detail monitoring.
Default = 0
integer-scalarLevelTwoMonitorFreq
Encrypted password for internal database-user authentication.
Encrypt passwords only when entering them using the command-line.Passwords must be encrypted using the SF Oracle RAC Encrypt utility.
string-scalarPword
711High availability agent informationVCS agents for Oracle

Table H-26 Optional attributes for Oracle agent (continued)
DefinitionType andDimension
OptionalAttributes
Table for update by User/Pword.string-scalarTable
Specifies operating system encoding that corresponds to Oracle encodingfor the displayed Oracle output.
Default is "".
string-scalarEncoding
This resource-type level attribute defines how VCS reacts when Oracle isintentionally stopped outside of VCS control.
If you stop Oracle out of VCS control, the agent behavior is as follows:
■ 0—The Oracle agent registers a fault and initiates the failover of theservice group.
■ 1—The Oracle agent takes the Oracle resource offline when Health checkmonitoring is enabled.
If Health check monitoring is not enabled, the agent registers a faultand initiates the failover of the service group.
Note: If you want to use the intentional offline functionality of the agent,you must set the value of the MonitorOption attribute as 1 to enable Healthcheck monitoring.
See the Veritas Cluster Server Administrator’s Guide.
IntentionalOffline
Additional debug messages are logged when this flag is set.
Default = 0
boolean-scalarAgentDebug
Table H-27 lists the internal attribute for Oracle agent. This attribute is for internaluse only. Symantec recommends not to modify the value of this attribute.
Table H-27 Internal attributes for Oracle agent
DefinitionType andDimension
OptionalAttributes
Specifies the location of binaries, scripts, and other files related to theOracle agent.
Default is /opt/VRTSagents/ha/bin/Oracle.
static-stringAgentDirectory
Netlsnr agent functionsThe Netlsnr agent is IMF-aware.
High availability agent informationVCS agents for Oracle
712

The listener is a server process that listens to incoming client connection requestsand manages traffic to the database. The Netlsnr agent brings the listener servicesonline, monitors their status, and takes them offline.
Table H-28 lists the Netlsnr agent functions.
Table H-28 Netlsnr agent functions
DescriptionAgent operation
Starts the listener process by using the following command:
lsnrctl start $LISTENER
Online
Stops the listener process by using the following command:
lsnrctl stop $LISTENER
If the listener is configured with a password, the agent uses thepassword to stop the listener.
Offline
Verifies the status of the listener process.
The Netlsnr agent provides two levels of monitoring, basic anddetail:
■ In the basic monitoring mode, the agent scans the process tablefor the tnslsnr process to verify that the listener process isrunning.
■ In the detail monitoring mode, the agent uses the lsnrctlstatus $LISTENER command to verify the status of theListener process. (Default)
Monitor
Initializes the agent to interface with the AMF kernel driver, whichis the IMF notification module for Netlsnr agent. This functionruns when the agent starts up.
netlsnr_imf_init
Gets notification about resource state changes. This function runsafter the agent initializes with the AMF kernel module. Thisfunction continuously waits for notification and takes action onthe resource upon notification.
netlsnr_imf_getnotification
Registers or unregisters resource entities with the AMF kernelmodule. This function runs for each resource after the resourcegoes into steady state (online or offline).
netlsnr_imf_register
Scans the process table for tnslsnr $LISTENER and kills it.Clean
Performs the predefined actions on a resource.
See “Action entry point for SF Oracle RAC agent for Oracle”on page 705.
Action
713High availability agent informationVCS agents for Oracle
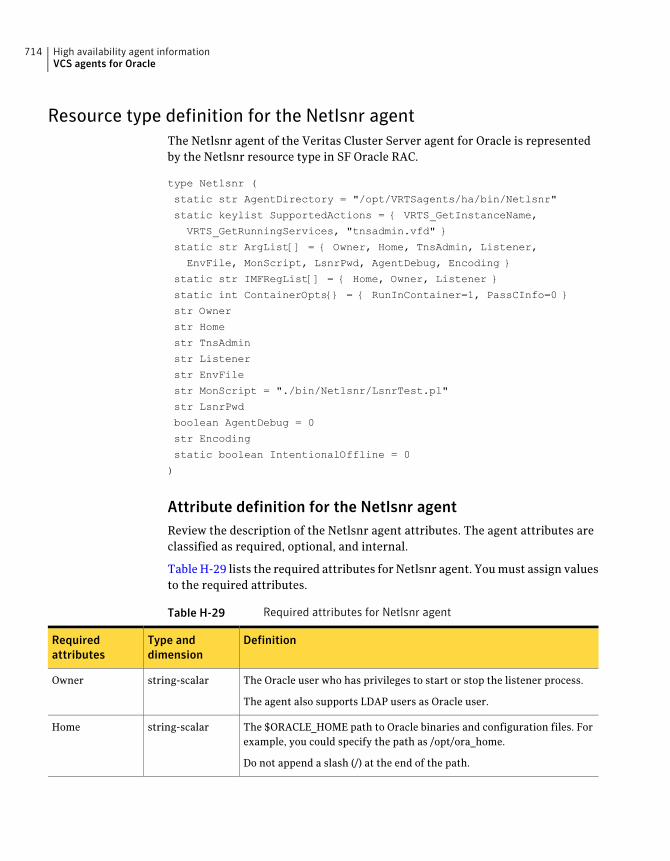
Resource type definition for the Netlsnr agentThe Netlsnr agent of the Veritas Cluster Server agent for Oracle is representedby the Netlsnr resource type in SF Oracle RAC.
type Netlsnr (
static str AgentDirectory = "/opt/VRTSagents/ha/bin/Netlsnr"
static keylist SupportedActions = { VRTS_GetInstanceName,
VRTS_GetRunningServices, "tnsadmin.vfd" }
static str ArgList[] = { Owner, Home, TnsAdmin, Listener,
EnvFile, MonScript, LsnrPwd, AgentDebug, Encoding }
static str IMFRegList[] = { Home, Owner, Listener }
static int ContainerOpts{} = { RunInContainer=1, PassCInfo=0 }
str Owner
str Home
str TnsAdmin
str Listener
str EnvFile
str MonScript = "./bin/Netlsnr/LsnrTest.pl"
str LsnrPwd
boolean AgentDebug = 0
str Encoding
static boolean IntentionalOffline = 0
)
Attribute definition for the Netlsnr agentReview the description of the Netlsnr agent attributes. The agent attributes areclassified as required, optional, and internal.
Table H-29 lists the required attributes for Netlsnr agent. You must assign valuesto the required attributes.
Table H-29 Required attributes for Netlsnr agent
DefinitionType anddimension
Requiredattributes
The Oracle user who has privileges to start or stop the listener process.
The agent also supports LDAP users as Oracle user.
string-scalarOwner
The $ORACLE_HOME path to Oracle binaries and configuration files. Forexample, you could specify the path as /opt/ora_home.
Do not append a slash (/) at the end of the path.
string-scalarHome
High availability agent informationVCS agents for Oracle
714
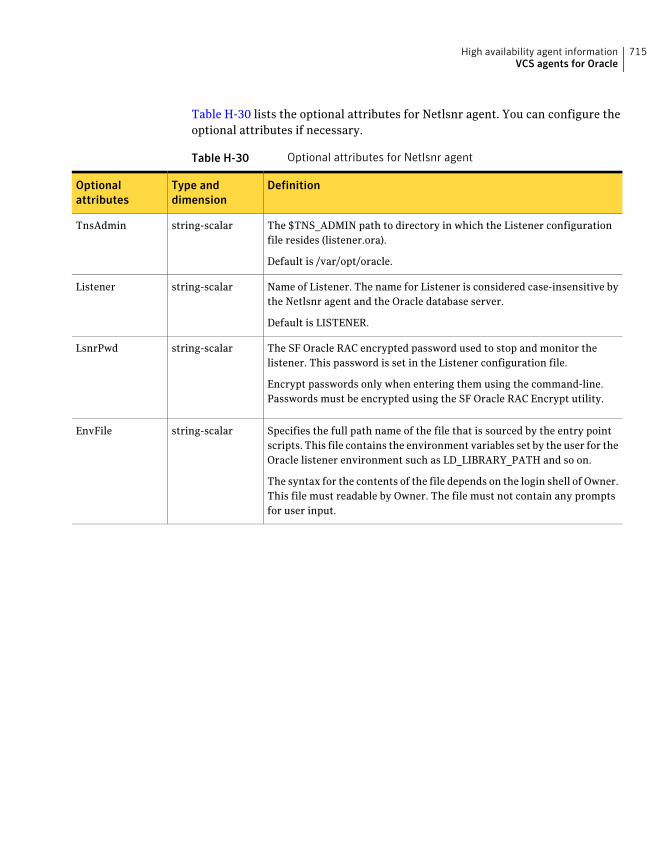
Table H-30 lists the optional attributes for Netlsnr agent. You can configure theoptional attributes if necessary.
Table H-30 Optional attributes for Netlsnr agent
DefinitionType anddimension
Optionalattributes
The $TNS_ADMIN path to directory in which the Listener configurationfile resides (listener.ora).
Default is /var/opt/oracle.
string-scalarTnsAdmin
Name of Listener. The name for Listener is considered case-insensitive bythe Netlsnr agent and the Oracle database server.
Default is LISTENER.
string-scalarListener
The SF Oracle RAC encrypted password used to stop and monitor thelistener. This password is set in the Listener configuration file.
Encrypt passwords only when entering them using the command-line.Passwords must be encrypted using the SF Oracle RAC Encrypt utility.
string-scalarLsnrPwd
Specifies the full path name of the file that is sourced by the entry pointscripts. This file contains the environment variables set by the user for theOracle listener environment such as LD_LIBRARY_PATH and so on.
The syntax for the contents of the file depends on the login shell of Owner.This file must readable by Owner. The file must not contain any promptsfor user input.
string-scalarEnvFile
715High availability agent informationVCS agents for Oracle

Table H-30 Optional attributes for Netlsnr agent (continued)
DefinitionType anddimension
Optionalattributes
This resource-type level attribute determines whether the Netlsnr agentmust perform intelligent resource monitoring. You can also override thevalue of this attribute at resource-level.
This attribute includes the following keys:
■ Mode: Define this attribute to enable or disable intelligent resourcemonitoring.
Valid values are as follows:
■ 0—Does not perform intelligent resource monitoring
■ 1—Performs intelligent resource monitoring for offline resourcesand performs poll-based monitoring for online resources
■ 2—Performs intelligent resource monitoring for online resourcesand performs poll-based monitoring for offline resources
■ 3—Performs intelligent resource monitoring for both online and foroffline resources
Default: 0
■ MonitorFreq: This key value specifies the frequency at which the agentinvokes the monitor agent function. The value of this key is an integer.
Default: 1
You can set this attribute to a non-zero value in some cases where theagent requires to perform poll-based resource monitoring in additionto the intelligent resource monitoring.
After the resource registers with the AMF kernel driver, the agent callsthe monitor agent function as follows:
■ After every (MonitorFreq x MonitorInterval) number of seconds foronline resources
■ After every (MonitorFreq x OfflineMonitorInterval) number ofseconds for offline resources
■ RegisterRetryLimit: If you enable intelligent resource monitoring, theagent invokes the netlsnr_imf_register agent function to register theresource with the AMF kernel driver. The value of the RegisterRetryLimitkey determines the number of times the agent must retry registrationfor a resource. If the agent cannot register the resource within the limitthat is specified, then intelligent monitoring is disabled until theresource state changes or the value of the Mode key changes.
Default: 3.
integer-associationIMF
High availability agent informationVCS agents for Oracle
716

Table H-30 Optional attributes for Netlsnr agent (continued)
DefinitionType anddimension
Optionalattributes
Pathname to the script provided for detail monitoring. By default, the detailmonitoring is enabled to monitor the listener process.
Note: If the value of the attribute MonScript is set to an empty string, theagent disables detail monitoring.
The pathname to the supplied detail monitoring script is/opt/VRTSagents/ha/bin/Netlsnr/LsnrTest.pl.
MonScript also accepts a pathname relative to /opt/VRTSagents/ha. Arelative pathname should start with "./", as in the path./bin/Netlsnr/LsnrTest.pl.
string-scalarMonScript
Specifies the frequency at which the agent for this resource type mustperform second-level or detailed monitoring.
If you enabled detail monitoring, then set the value of theLevelTwoMonitorFreq attribute.
Default = 0
integer-scalarLevelTwoMonitorFreq
Specifies operating system encoding that corresponds to Oracle encodingfor the displayed Oracle output.
Default is "".
string-scalarEncoding
For future use.
Do not change the value of this attribute.
Default = 0
IntentionalOffline
Additional debug messages are logged when this flag is set.
Default = 0
booleanAgentDebug
Table H-31 lists the internal attribute for Netlsnr agent. This attribute is forinternal use only. Symantec recommends not to modify the value of this attribute.
Table H-31 Internal attributes for Netlsnr agent
DefinitionType andDimension
OptionalAttributes
Specifies the location of binaries, scripts, and other files related to theNetlsnr agent.
Default is /opt/VRTSagents/ha/bin/Netlsnr.
static-stringAgentDirectory
717High availability agent informationVCS agents for Oracle

ASMDG agent functionsThe ASMDG agent mounts the ASM disk groups that the Oracle databases use,monitors the status, unmounts the ASM disk groups.
You must have specified the disk group names in the DiskGroups attribute of theASMDG agent.
Table H-32 lists the ASMDG agent operations.
Table H-32 ASMDG agent operations
DescriptionAgent operation
Mounts the specified Oracle ASM disk groups to an ASM instanceby using the following SQL command:
alter diskgroup dg_name1, dg_name2 mount
Online
Unmounts the specified Oracle ASM disk groups from an ASMinstance by using the following SQL command:
alter diskgroup dg_name1, dg_name2 dismount
Note: The following Oracle message appears in the VCS log whenan ASM instance with no ASM disk groups mounted is shut down:
ORA-15100: invalid or missing diskgroup name
Offline
Verifies the status of the specified ASM disk groups.
The disk groups can be in one of the following states:
■ mounted
■ dismounted
■ unknown
■ broken
■ connected
If multiple ASM disk groups are configured for a resource, thenthe ASMDG agent returns the resource state considering the statusof all the specified ASM disk groups.
Monitor
Forcibly unmounts the Oracle ASM disk groups by using thefollowing SQL command:
alter diskgroup dg_name1, dg_name2 dismount force
Clean
Resource type definition for the ASMDG agentThe ASMDG agent of the Veritas Cluster Server agent for Oracle is representedby the ASMDG resource type in SF Oracle RAC.
High availability agent informationVCS agents for Oracle
718

type ASMDG (
static str AgentDirectory = "/opt/VRTSagents/ha/bin/ASMDG"
static str ArgList[] = { Sid, Owner, Home, DBAUser,
DBAPword, DiskGroups, EnvFile, Encoding }
str Sid
str Owner
str Home
str DBAUser
str DBAPword
keylist DiskGroups
str EnvFile
str Encoding
)
Attribute definition for the ASMDG agentReview the description of the ASMDG agent attributes. The agent attributes areclassified as required, optional, and internal.
Table H-33 lists the required attributes. You must assign values to the requiredattributes.
Table H-33 Required attributes for ASMDG agent
DefinitionType and dimensionRequired attributes
The ASM disk groups, where youstore the Oracle database files.
keylistDiskGroups
The variable $ORACLE_SID thatrepresents the ASM instance.
string-scalarSid
The Oracle user who has privilegesto mount or unmount the ASM diskgroup.
The agent also supports LDAPusers as Oracle user.
string-scalarOwner
The $ORACLE_HOME path toOracle ASM binaries andconfiguration files. For example,you could specify the path as/opt/ora_home.
Note: Do not append a slash (/) atthe end of the path.
string-scalarHome
719High availability agent informationVCS agents for Oracle

Table H-34 lists the optional attributes for ASMDG agent. You can configure theoptional attributes if necessary.
Table H-34 Optional attributes for ASMDG agent
DefinitionType and DimensionOptional Attributes
The ASM user who has sysasmprivileges to start or stop the ASMinstance. You can create ASM usersfor Oracle 11g R1 and later.
string-scalarDBAUser
Encrypted password for DBAUser.
Encrypt passwords only whenentering them using thecommand-line. Passwords must beencrypted using the SF Oracle RACEncrypt utility.
string-scalarDBAPword
The full path name of the file thatis sourced by the entry pointscripts. This file contains theenvironment variables set by theuser for the Oracle database serverenvironment such asLD_LIBRARY_PATH,NLS_DATE_FORMAT, and so on.
The syntax for the contents of thefile depends on the login shell ofOwner. File must be readable byOwner. The file must not containany prompts for user input.
string-scalarEnvFile
Specifies operating systemencoding that corresponds toOracle encoding for the displayedOracle output. Default is "".
string-scalarEncoding
Table H-35 lists the internal attribute for ASMDG agent. This attribute is forinternal use only. Symantec recommends not to modify the value of this attribute.
High availability agent informationVCS agents for Oracle
720
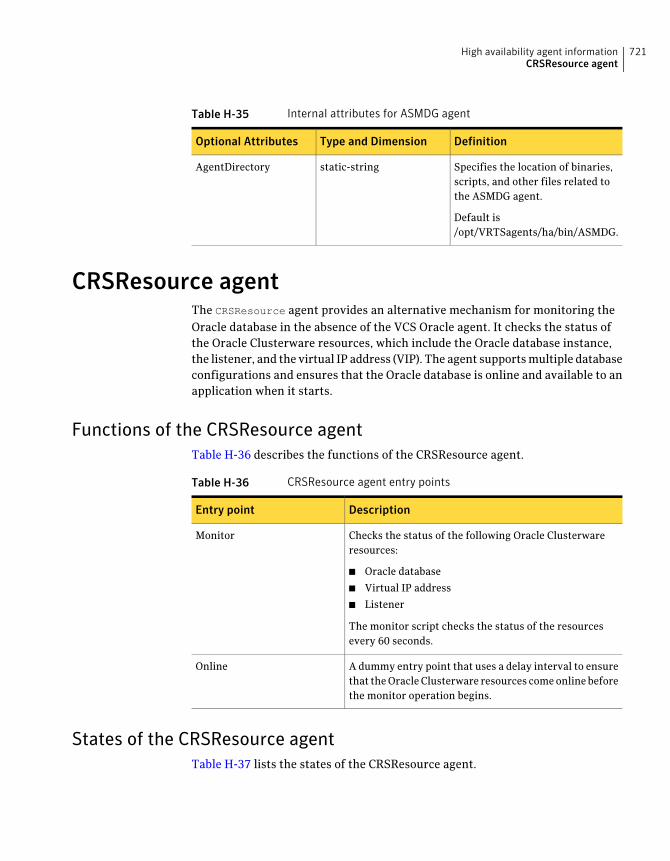
Table H-35 Internal attributes for ASMDG agent
DefinitionType and DimensionOptional Attributes
Specifies the location of binaries,scripts, and other files related tothe ASMDG agent.
Default is/opt/VRTSagents/ha/bin/ASMDG.
static-stringAgentDirectory
CRSResource agentThe CRSResource agent provides an alternative mechanism for monitoring theOracle database in the absence of the VCS Oracle agent. It checks the status ofthe Oracle Clusterware resources, which include the Oracle database instance,the listener, and the virtual IP address (VIP). The agent supports multiple databaseconfigurations and ensures that the Oracle database is online and available to anapplication when it starts.
Functions of the CRSResource agentTable H-36 describes the functions of the CRSResource agent.
Table H-36 CRSResource agent entry points
DescriptionEntry point
Checks the status of the following Oracle Clusterwareresources:
■ Oracle database
■ Virtual IP address
■ Listener
The monitor script checks the status of the resourcesevery 60 seconds.
Monitor
A dummy entry point that uses a delay interval to ensurethat the Oracle Clusterware resources come online beforethe monitor operation begins.
Online
States of the CRSResource agentTable H-37 lists the states of the CRSResource agent.
721High availability agent informationCRSResource agent

Table H-37 States of the CRSResource agent
DescriptionState
Indicates that the Oracle database, VIP, and listener are running.Online
Indicates that the Oracle database, VIP, and listener are notrunning or are faulted.
Faulted
Indicates the inability to determine the state of the resourcedue to incorrect attributes settings or other configuration issues.
Unknown
Attributes of the CRSResource agent
Table H-38 Attributes of the CRSResource agent
DescriptionDimensionAttribute
Indicates the type of the Oracle Clusterwareresource.
The types of resources are as follows:
■ DB
■ VIP
■ Listener
string-scalarResType
The path to ORACLE_HOME containing the Oraclebinaries and configuration files. For example, youcould specify the path as /app/oracle/orahome.
Note: Do not append a slash (/) at the end of thepath.
string-scalarDBHome
The path to CRS_HOME containing the OracleClusterware binaries.
string-scalarCRSHome
The name of the database on which the servicesare configured.
This attribute is optional if you are configuringCRSResource to monitor VIP or listener.
string-scalarDBName
The name of the Oracle instance in the variable$ORACLE_SID. The SID is case-sensitive.
This attribute is optional if you are configuringCRSResource to monitor VIP or listener.
string-scalarSID
High availability agent informationCRSResource agent
722
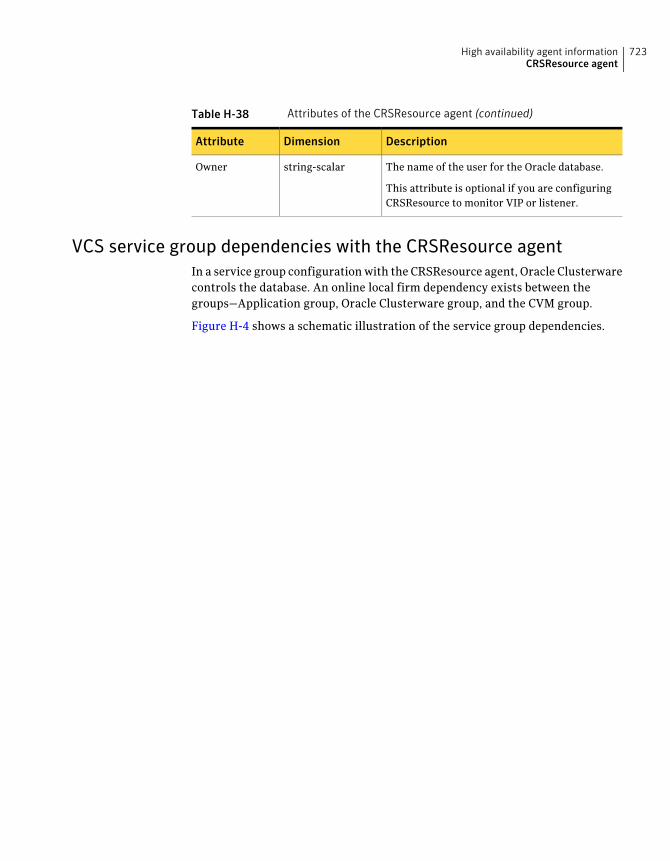
Table H-38 Attributes of the CRSResource agent (continued)
DescriptionDimensionAttribute
The name of the user for the Oracle database.
This attribute is optional if you are configuringCRSResource to monitor VIP or listener.
string-scalarOwner
VCS service group dependencies with the CRSResource agentIn a service group configuration with the CRSResource agent, Oracle Clusterwarecontrols the database. An online local firm dependency exists between thegroups—Application group, Oracle Clusterware group, and the CVM group.
Figure H-4 shows a schematic illustration of the service group dependencies.
723High availability agent informationCRSResource agent

Figure H-4 Service group dependencies with CRSResource agent
MultiPrivNIC
Applicationcssd
mpriv
CVMVoIDG
ocrvote_voldg
CFSMount
ocrvote_mnt
crs_grp(parallel)
cvm group (parallel)
CVMCluster
CFSfsckd
vxfsckd
cvm_clus
cvm_vxconfigd
CFSMountoradata_mnt
Critical=0
oradata_voldgCritical=0
CVMVoIDG
CVMVxConfigd
racdata_voldgCritical=0CVMVoIDG
CFSMountracdata_mntCritical=0
app1_grp (parallel)
app2
crsr_racdb_lsnr
Application
app1
crsr_oradb_db crsr_oradb_vip crsr_oradb_lsnr
Application
crsr_racdb_db crsr_racdb_vip
CRSResource CRSResource CRSResource CRSResource CRSResource CRSResource
app2_grp (parallel)
In the configuration:
■ When the system starts, the CVM group brings up the volume and mountpoints for the databases. The Oracle Clusterware group brings up the OCR andvoting disk, configures the private IP address for Oracle Clusterware, and startsOracle Clusterware. Oracle Clusterware starts the database and the applicationis brought online. CRSResource comes online when the Oracle Clusterwareresources (database/VIP/listener) are started by Oracle Clusterware.
Note: When the system starts, all volumes and mount points MUST be onlinefor the dependent service groups to be online.
High availability agent informationCRSResource agent
724

■ The oradata_mnt and oradata_voldg resources are configured as non-criticalresources (critical=0) for managing failure scenarios.See “How CRSResource agent handles failures” on page 725.
■ When CRSResource faults for any of the Oracle Clusterware resources, theapplication is brought offline.
The limitations of this configuration are as follows:
■ The CFSMount and CVMVolDg resources can not be set as critical resourcesin the group.If the mount points and volume disk groups for all the databases are configuredas critical in a single service group, then failure of any of them results in thewhole group being FAULTED or brought offline. To ensure that a resourcefailure does not affect other resources in the group, the attribute Critical isset to zero for the CFSMount and CVMVolDg resources.However, if any of the database mounts fail to come online or a volume doesnot start, the whole service group fails to come online.
■ CRSResource reports as FAULTED until Oracle Clusterware brings up thedatabase instance, VIP, and listener. Even after Oracle Clusterware starts thedatabase instance, VIP and listener, CRSResource remains in the FAULTEDstate for the OfflineMonitorInterval period. The status of CRSResource cannotbe changed.
How CRSResource agent handles failuresThe CRSResource agent ensures that faults in the resources of an application donot adversely impact other applications running on the system. To isolate failures,the oradata_mnt and oradata_voldg resources are configured as non-criticalresources (critical=0). This ensures that storage issues in either of these resourcesdo not affect the other databases and the dependent application continues to beonline.
Note:The resources are considered non-critical only for the purpose of managingfailure scenarios.
Figure H-5 illustrates a failure scenario.
725High availability agent informationCRSResource agent

Figure H-5 How CRSResource agent handles failures
MultiPrivNIC
Applicationcssd
mpriv
CVMVoIDG
ocrvote_voldg
CFSMount
ocrvote_mnt
crs_grp(parallel)
cvm group (parallel)
CVMCluster
CFSfsckd
vxfsckd
cvm_clus
cvm_vxconfigd
CFSMountoradata_mnt
Critical=0
oradata_voldgCritical=0
CVMVoIDG
CVMVxConfigd
racdata_voldgCritical=0CVMVoIDG
CFSMountracdata_mntCritical=0
app1_grp (parallel)
app2
crsr_racdb_lsnr
Application
app1
crsr_oradb_db crsr_oradb_vip crsr_oradb_lsnr
Application
crsr_racdb_db crsr_racdb_vip
CRSResource CRSResource CRSResource CRSResource CRSResource CRSResource
app2_grp (parallel)
Fault configurations with CRSResource agentThis section discusses scenarios that cause CRSResource to report FAULTED.
Scenario 1: CRSResource fault at system startup
1. The CVM group brings online the volume and mount points for the databaseswhen the system starts.
2. The Oracle Clusterware group brings up the OCR and voting disk, configuresthe private IP address for Oracle Clusterware and starts Oracle Clusterware.
High availability agent informationCRSResource agent
726

Oracle Clusterware is unable to bring the database or other resources onlinewithin the start duration configured in the agent.
3. The agent starts the monitoring operation after the set duration.
If the Oracle Clusterware resources are not brought online yet, theCRSResource appears faulted.
Figure H-6 illustrates the scenario.
Figure H-6 CRSResource fault at system startup
MultiPrivNIC
Applicationcssd
mpriv
CVMVoIDG
ocrvote_voldg
CFSMount
ocrvote_mnt
crs_grp(parallel)
cvm group (parallel)
CVMCluster
CFSfsckd
vxfsckd
cvm_clus
cvm_vxconfigd
CFSMountoradata_mnt
Critical=0
oradata_voldgCritical=0
CVMVoIDG
CVMVxConfigd
racdata_voldgCritical=0CVMVoIDG
CFSMountracdata_mntCritical=0
app1_grp (parallel)
app2
crsr_racdb_lsnr
Application
app1
crsr_oradb_db crsr_oradb_vip crsr_oradb_lsnr
Application
crsr_racdb_db crsr_racdb_vip
CRSResourceFaulted
CRSResourceFaulted
CRSResourceFaulted
CRSResourceFaulted
CRSResourceFaulted
CRSResourceFaulted
app2_grp (parallel)
1
2
3
Exceedsstart
duration
727High availability agent informationCRSResource agent
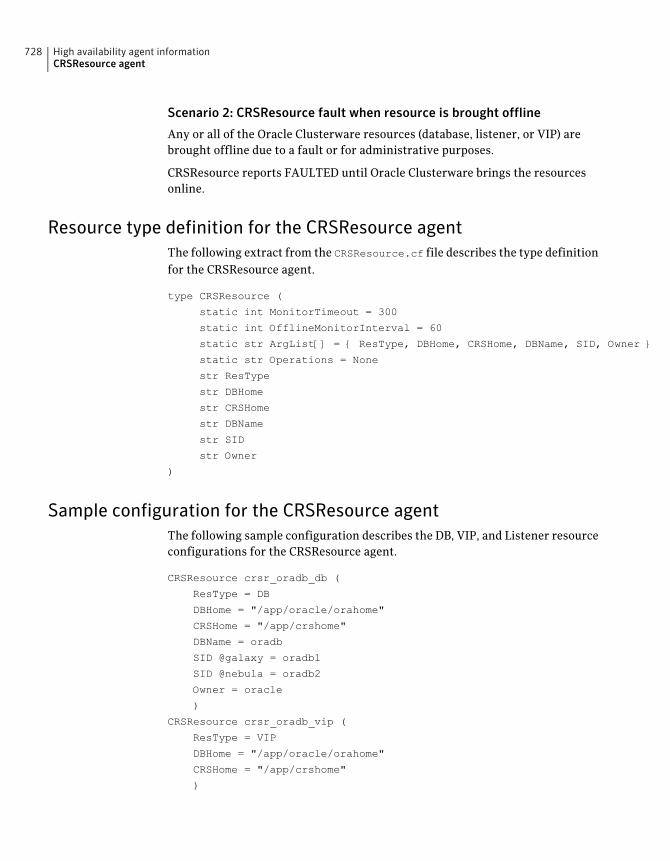
Scenario 2: CRSResource fault when resource is brought offline
Any or all of the Oracle Clusterware resources (database, listener, or VIP) arebrought offline due to a fault or for administrative purposes.
CRSResource reports FAULTED until Oracle Clusterware brings the resourcesonline.
Resource type definition for the CRSResource agentThe following extract from the CRSResource.cf file describes the type definitionfor the CRSResource agent.
type CRSResource (
static int MonitorTimeout = 300
static int OfflineMonitorInterval = 60
static str ArgList[] = { ResType, DBHome, CRSHome, DBName, SID, Owner }
static str Operations = None
str ResType
str DBHome
str CRSHome
str DBName
str SID
str Owner
)
Sample configuration for the CRSResource agentThe following sample configuration describes the DB, VIP, and Listener resourceconfigurations for the CRSResource agent.
CRSResource crsr_oradb_db (
ResType = DB
DBHome = "/app/oracle/orahome"
CRSHome = "/app/crshome"
DBName = oradb
SID @galaxy = oradb1
SID @nebula = oradb2
Owner = oracle
)
CRSResource crsr_oradb_vip (
ResType = VIP
DBHome = "/app/oracle/orahome"
CRSHome = "/app/crshome"
)
High availability agent informationCRSResource agent
728

CRSResource crsr_oradb_lsnr (
ResType = Listener
DBHome = "/app/oracle/orahome"
CRSHome = "/app/crshome"
)
729High availability agent informationCRSResource agent

High availability agent informationCRSResource agent
730

SF Oracle RAC deploymentscenarios
This appendix includes the following topics:
■ SF Oracle RAC cluster with VCS IPC and PrivNIC agent
■ SF Oracle RAC cluster with UDP IPC and PrivNIC agent
■ SF Oracle RAC cluster for multiple databases with UDP IPC and MultiPrivNICagent
■ SF Oracle RAC cluster with isolated Oracle traffic and MultiPrivNIC agent
■ SF Oracle RAC cluster with NIC bonding, VCS IPC and PrivNIC agent
■ SF Oracle RAC cluster with NIC bonding, UDP IPC, and PrivNIC agent
■ Configuration diagrams for setting up server-based I/O fencing
■ Deploying Storage Foundation for Databases (SFDB) tools in a StorageFoundation for Oracle RAC environment
SFOracle RAC clusterwith VCS IPC andPrivNIC agentThis section illustrates the recommended configuration for the following scenario:
Oracle RAC 10g database cache fusion traffic is distributed overmultiple LLT links using VCS IPC over LMX/LLT.
Deployment scenario
Use the PrivNIC agent.Recommendation
The following sample main.cf file describes the configuration:
/etc/VRTSvcs/conf/sample_rac/sfrac01_main.cf
Sample main.cfconfiguration file
IAppendix

In the illustrated configuration:
■ Oracle uses VCS IPC over LMX/LLT for cache fusion.
■ One private network IP address is used for Oracle Clusterware communicationthat takes place over one of the LLT private interconnect links.
■ The CFS/CVM/VCS metadata and the Oracle database cache fusion traffictravels through LLT over the two physical links that are configured as LLTlinks.
■ In the event of a NIC failure or link failure, the PrivNIC agent fails over theprivate network IP address from the failed link to the available LLT link. Whenthe link is restored, the IP address is failed back to the original link.
Figure I-1 illustrates the logical view of a two-node SF Oracle RAC cluster withVCS IPC and PrivNIC agent (Oracle RAC 10g).
SF Oracle RAC deployment scenariosSF Oracle RAC cluster with VCS IPC and PrivNIC agent
732

Figure I-1 SF Oracle RAC cluster with VCS IPC and PrivNIC agent (Oracle RAC10g)
NIC
2N
IC1
Cluster node 1 Cluster node 2
NIC
2N
IC1
VCSIPC/LMX
VCSIPC/LMX
LLT
LLT
LLT
LLT
Public IP
EthernetSwitch
Ethernet
Switch Ethernet
SwitchLAN
ClientApplications
PrivNICagent
PrivNICagent
PrivateIP
PrivateIP
OracleIPC
Public IP
Oracle Clusterware HeartbeatOracle DB Cache Fusion
CFS /CVM / VCS Metadata
Active connectionFailover connection forPrivNIC Agent
Private Interconnect (GigE)Public link (GigE)
Legends
Oracle inter-processcommunication
OracleIPC
733SF Oracle RAC deployment scenariosSF Oracle RAC cluster with VCS IPC and PrivNIC agent

SFOracle RAC clusterwithUDP IPC andPrivNIC agentThis section illustrates the recommended configuration for the following scenario:
Oracle RAC configured with UDP IPC for database cache fusion.Deployment scenario
Use the PrivNIC agent.Recommendation
The following sample main.cf file describes the configuration:
/etc/VRTSvcs/conf/sample_rac/sfrac02_main.cf
Sample main.cfconfiguration file
In the illustrated configuration:
■ A common IP address is used for Oracle Clusterware communication and Oracledatabase cache fusion.
■ Oracle Clusterware communication and Oracle database cache fusion trafficflows over one of the LLT private interconnect links.
■ The CFS/CVM/VCS metadata travels through LLT over the two physical linksthat are configured as LLT links.
■ In the event of a link failure, the PrivNIC agent fails over the private networkIP address from the failed link to the available LLT link. When the link isrestored, the IP address is failed back to the original link.
Figure I-2 illustrates the logical view of a two-node SF Oracle RAC cluster withUDP IPC and PrivNIC agent.
SF Oracle RAC deployment scenariosSF Oracle RAC cluster with UDP IPC and PrivNIC agent
734

Figure I-2 SF Oracle RAC cluster with UDP IPC and PrivNIC agent
NIC
2N
IC1
Cluster node 1 Cluster node 2
NIC
2N
IC1LLT
LLT
LLT
LLT
Public IP
EthernetSwitch
Ethernet
Switch Ethernet
SwitchLAN
ClientApplications
PrivNICagent
PrivNICagent
PrivateIP
PrivateIP
OracleIPC
Public IP
Oracle Clusterware HeartbeatOracle DB Cache Fusion
CFS /CVM / VCS Metadata
Active connectionFailover connection forPrivNIC Agent
Private Interconnect (GigE)Public link (GigE)
Legends
Oracle inter-processcommunication
OracleIPC
UDPIPC
UDPIPC
SF Oracle RAC cluster for multiple databases withUDP IPC and MultiPrivNIC agent
This section illustrates the recommended configuration for the following scenario:
735SF Oracle RAC deployment scenariosSF Oracle RAC cluster for multiple databases with UDP IPC and MultiPrivNIC agent

Oracle RAC is configured with UDP IPC for database cache fusion.Deployment scenario
Use the MultiPrivNIC agent.Recommendation
The following sample main.cf file describes the configuration:
/etc/VRTSvcs/conf/sample_rac/sfrac03_main.cf
Sample main.cfconfiguration file
In the illustrated configuration:
■ One private IP address is used for each database for database cache fusion.One of the private IP addresses used for the database cache fusion is sharedby Oracle Clusterware communication.The CFS/CVM/VCS metadata also travels through these links.
■ In the event of a link failure, the MultiPrivNIC agent fails over the privatenetwork IP address from the failed link to the available LLT link. When thelink is restored, the IP address is failed back to the original link.
Figure I-3 illustrates the logical view of a two-node SF Oracle RAC cluster formultiple databases with UDP IPC and MultiPrivNIC agent.
SF Oracle RAC deployment scenariosSF Oracle RAC cluster for multiple databases with UDP IPC and MultiPrivNIC agent
736

Figure I-3 SF Oracle RAC cluster for multiple databases with UDP IPC andMultiPrivNIC agent
NIC
2N
IC1
Cluster node 1 Cluster node 2
NIC
2N
IC1
LLT LLT
PublicIP
Ethernet
Switch
ClientApplications
PrivateIP 2
UDPIPC
Ethernet
Switch
LAN
Ethernet Switch
UDPIPC
PublicIPPrivate
IP 1Private
IP 1
PrivateIP 2
Oracle Clusterware Heartbeat
Oracle DB Cache Fusion -Database -1
CFS / CVM / VCS Metadata
Active connection
Failover connection forMultiPrivNIC Agent
Private Interconnect (Gige)
Oracle DB Cache Fusion -Database -2
MultiPrivNICAgent
LLTLLT
Public link (GigE)
MultiPrivNICAgent
Legends
Oracle interprocesscommunication
OracleIPC
OracleIPC
737SF Oracle RAC deployment scenariosSF Oracle RAC cluster for multiple databases with UDP IPC and MultiPrivNIC agent

SFOracle RAC clusterwith isolatedOracle traffic andMultiPrivNIC agent
This section illustrates the recommended configuration for the following scenario:
Oracle RAC database cache fusion traffic is isolated from theCFS/CVM/VCS metadata.
Deployment scenario
Use the MultiPrivNIC agent.Recommendation
The following sample main.cf file describes the configuration:
/etc/VRTSvcs/conf/sample_rac/sfrac06_main.cf
Sample main.cfconfiguration file
In the illustrated configuration:
■ The private network IP address used for database cache fusion is configuredover a dedicated link for each database. These links are configured aslow-priority LLT links.
■ The private network IP address used for Oracle Clusterware communicationis configured over a high-priority LLT link. This link is also used for theCFS/CVM/VCS metadata transfer.
■ In the event of a link failure, the MultiPrivNIC agent fails over the privatenetwork IP address from the failed link to the available LLT link. When thelink is restored, the IP address is failed back to the original link.
Figure I-4 illustrates the logical view of a two-node SF Oracle RAC cluster withOracle traffic isolated from VCS / CVM / CFS traffic.
SF Oracle RAC deployment scenariosSF Oracle RAC cluster with isolated Oracle traffic and MultiPrivNIC agent
738
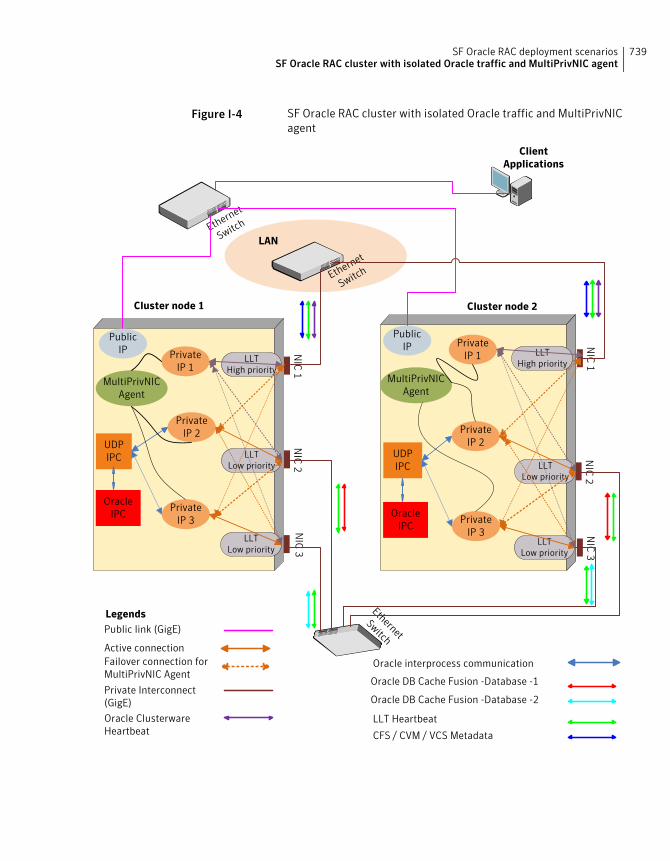
Figure I-4 SF Oracle RAC cluster with isolated Oracle traffic and MultiPrivNICagent
Ethernet
Switch
ClientApplications
Ethernet
Switch
LAN
EthernetSwitch
Oracle ClusterwareHeartbeat
Oracle DB Cache Fusion -Database -1
LLT Heartbeat
Active connectionFailover connection forMultiPrivNIC Agent
Private Interconnect(GigE)
Public link (GigE)
NIC
2N
IC1
Cluster node 1 Cluster node 2
NIC
2N
IC1LLT
High priority
PublicIP
PrivateIP 2
UDPIPC UDP
IPC
MultiPrivNICAgent
PrivateIP 3
PublicIP
PrivateIP 3
PrivateIP 1
PrivateIP 1
PrivateIP 2
NIC
3
NIC
3
LLTLow priority LLT
Low priority
LLTHigh priority
LLTLow priority
LLTLow priority
MultiPrivNICAgent
Oracle DB Cache Fusion -Database -2
CFS / CVM / VCS Metadata
Legends
Oracle interprocess communication
OracleIPC Oracle
IPC
739SF Oracle RAC deployment scenariosSF Oracle RAC cluster with isolated Oracle traffic and MultiPrivNIC agent

SF Oracle RAC cluster with NIC bonding, VCS IPC andPrivNIC agent
This section illustrates the recommended configuration for the following scenario:
A bonded NIC interface is used along with another NIC interfaceto distribute Oracle RAC 10g database cache fusion traffic usingVCS IPC over LMX/LLT.
Deployment scenario
Use the PrivNIC agent.Recommendation
The following sample main.cf file describes the configuration:
/etc/VRTSvcs/conf/sample_rac/sfrac01_main.cf
Note: You must replace the en1 interface in the sample file withthe bonded NIC interface you use in the scenario and en2 in thesample file with the NIC3 interface in the scenario.
Sample main.cfconfiguration file
In the illustrated configuration:
■ Oracle uses VCS IPC over LMX/LLT for cache fusion.
■ One common private network IP address is used for Oracle database cachefusion and Oracle Clusterware communication that takes place over the bondedNIC interface, configured as an LLT link.
■ The Oracle Clusterware communication takes place over the other LLT privateinterconnect link.
■ The Oracle database cache fusion as well as the CFS/CVM/VCS metadata travelsthrough LLT over the three physical links.
■ In the event of a bonded NIC interface failure, the PrivNIC agent fails over theprivate network IP address from the failed link to the other available LLT link.When the link is restored, the IP address is failed back to the original link.
Figure I-5 illustrates the logical view of a two-node SF Oracle RAC cluster withNIC bonding, VCS IPC, and PrivNIC agent (Oracle RAC 10g).
SF Oracle RAC deployment scenariosSF Oracle RAC cluster with NIC bonding, VCS IPC and PrivNIC agent
740

Figure I-5 SF Oracle RAC cluster with NIC bonding, VCS IPC and PrivNIC agent(Oracle RAC 10g)
NIC
2N
IC1
Cluster node 1
NIC
2N
IC1
LLT LLT
PublicIP
ClientApplications
PrivateIP
PublicIP
VCSIPC/LMX
VCSIPC/LMX
PrivNICagent
PrivNICagent
Bon
ded
NIC
NIC
3LLT
NIC
3LLT
Bon
ded
NIC
PrivateIP
Ethernet Switch
Ethernet
Switch
Ethernet
SwitchLAN
Ethernet
Switch
Cluster node 2
Oracle Clusterware HeartbeatOracle DB Cache Fusion
Private Interconnect (GIgE)Public link (GIgE) CFS / CVM / VCS MetadataLegends:
Active connection
Failover connection forPrivNIC Agent
Oracle interprocesscommunication
OracleIPC
OracleIPC
741SF Oracle RAC deployment scenariosSF Oracle RAC cluster with NIC bonding, VCS IPC and PrivNIC agent

SFOracle RAC clusterwithNIC bonding, UDP IPC, andPrivNIC agent
This section illustrates the recommended configuration for the following scenario:
Oracle RAC with UDP IPC is configured to use a bonded NICinterface for distribution of Oracle database cache fusion traffic.
A second link is configured as a standby link.
Deployment scenario
Use the PrivNIC agent.Recommendation
The following sample main.cf file describes the configuration:
/etc/VRTSvcs/conf/sample_rac/sfrac02_main.cf
Note: You must replace the en1 interface in the sample file withthe bonded NIC interface you use in the scenario and en2 in thesample file with the NIC3 interface in the scenario.
Sample main.cfconfiguration file
In the illustrated configuration:
■ A common IP address is used for Oracle Clusterware communication and Oracledatabase cache fusion that is distributed over two underlying physical linksof the bonded NIC interface. The bonded NIC interface is configured as a singleLLT link.
■ The CFS/CVM/VCS metadata also travels through the bonded link.
■ In the event of a bonded link failure, the PrivNIC agent fails over the privatenetwork IP address from the failed link to the available standby LLT link. Whenthe link is restored, the IP address is failed back to the original link.
Figure I-6 illustrates the logical view of a two-node SF Oracle RAC cluster withNIC bonding, UDP IPC, and PrivNIC agent.
SF Oracle RAC deployment scenariosSF Oracle RAC cluster with NIC bonding, UDP IPC, and PrivNIC agent
742
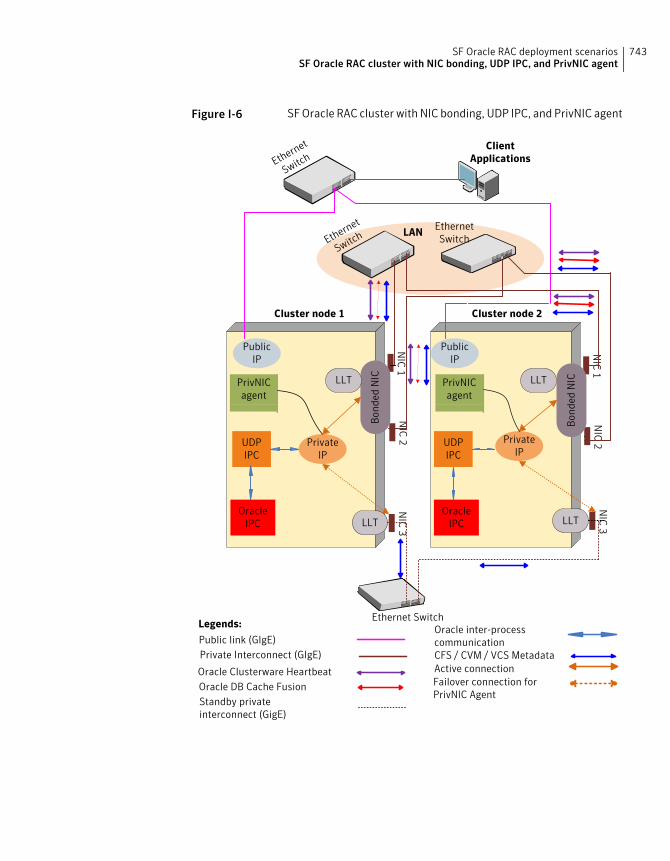
Figure I-6 SF Oracle RAC cluster with NIC bonding, UDP IPC, and PrivNIC agent
NIC
2N
IC1
Cluster node 1 Cluster node 2
NIC
2N
IC1
LLT
PublicIP
ClientApplications
PrivateIP
PublicIP
Bon
ded
NIC
NIC
3LLT
NIC
3LLT
Bon
ded
NIC
PrivateIP
EthernetSwitch
LANEthernet
Switch
Ethernet Switch
Ethernet
Switch
UDPIPC
UDPIPC
LLTPrivNICagent
PrivNICagent
Oracle Clusterware HeartbeatOracle DB Cache Fusion
Private Interconnect (GIgE)Public link (GIgE)
CFS / CVM / VCS Metadata
Legends:
Active connectionFailover connection forPrivNIC Agent
Oracle inter-processcommunication
Standby privateinterconnect (GigE)
OracleIPC
OracleIPC
743SF Oracle RAC deployment scenariosSF Oracle RAC cluster with NIC bonding, UDP IPC, and PrivNIC agent
Configuration diagrams for setting up server-basedI/O fencing
The following CP server configuration diagrams can be used as guides when settingup CP server within your configuration:
■ Two unique client clusters that are served by 3 CP servers:See Figure I-7 on page 745.
■ Client cluster that is served by highly available CP server and 2 SCSI-3 disks:
■ Two node campus cluster that is served be remote CP server and 2 SCSI-3 disks:
■ Multiple client clusters that are served by highly available CP server and 2SCSI-3 disks:
Two unique client clusters served by 3 CP serversFigure I-7 displays a configuration where two unique client clusters are beingserved by 3 CP servers (coordination points). Each client cluster has its own uniqueuser ID (UUID1 and UUID2).
In the vxfenmode file on the client nodes, vxfenmode is set to customized withvxfen mechanism set to cps.
SF Oracle RAC deployment scenariosConfiguration diagrams for setting up server-based I/O fencing
744

Figure I-7 Two unique client clusters served by 3 CP servers
NIC
1
Cluster -1node 1
NIC
2
NIC
1Cluster-1node 2
NIC
2
Ethern
et
Switch Eth
ernet
Switch
NIC
1
Cluster -2node 1
NIC
2
NIC
1
Cluster-2node 2
NIC
2
Ethern
et
Switch Eth
ernet
Switch
NIC
CP Server 1
Ethern
et
Switch
Intranet/InternetPublic network
CP Server 2
NIC
CP Server 3
NIC
NIC3 NIC
3 NIC3 NIC
3
VCS clientcluster(UUID1)
SFRAC clientcluster(UUID2)
SinglenodeVCSclusterhostingCPS-1
SinglenodeVCSclusterhostingCPS-2
SinglenodeVCSclusterhostingCPS-3
/etc/VRTScps/db/etc/VRTScps/db/etc/VRTScps/db
vxcpserv
VIP 1
vxcpserv
VIP 2
vxcpserv
VIP 3
HBA
HBA HB
A
HBA
GigE
GigE
GigE
GigE GigE
GigE
GigE
GigE
VLANPrivatenetwork
VLANPrivatenetwork
mycps1.company.com
mycps2.company.com
mycps3.company.com
vxfenmode= customizedvxfen_mechanism = cpscps1=[mycps1.company.com]=14250cps2=[mycps2company.com]=14250cps3=[mycps3.company.com]=14250
vxfenmode= customizedvxfen_mechanism = cpscps1=[mycps1.company.com]=14250cps2=[mycps2company.com]=14250cps3=[mycps3.company.com]=14250
Client cluster served by highly available CPS and 2 SCSI-3 disksFigure I-8 displays a configuration where a client cluster is served by one highlyavailable CP server and 2 local SCSI-3 LUNs (disks).
In the vxfenmode file on the client nodes, vxfenmode is set to customized withvxfen mechanism set to cps.
745SF Oracle RAC deployment scenariosConfiguration diagrams for setting up server-based I/O fencing

The two SCSI-3 disks are part of the disk group vxfencoorddg. The thirdcoordination point is a CP server hosted on an SFHA cluster, with its own shareddatabase and coordinator disks.
Figure I-8 Client cluster served by highly available CP server and 2 SCSI-3disks
SAN
FCSw
itch
CPS database/etc/VRTScps/db
NIC
1
Cluster -1node 1
NIC
2
NIC
1
Cluster-1node 2
NIC
2
Ethern
et
Switch Eth
ernet
Switch
VLANPrivatenetwork
Ethern
et
Switch
Intranet/InternetPublic network
NIC3 NIC
3Client cluster
NIC
1
CPS-Primarynode
NIC
2
NIC
1
CPS-standbynode
NIC
2
Ethern
et
Switch Eth
ernet
Switch
VLANPrivate network
NIC3
NIC3
SFHAcluster
VIPvxc
pserv
vxcpserv
VIP
DataLUNs
CoordinatorLUNs
SAN
FCSw
itch
SCSI-3 LUNs as 2coordination points
disk1
disk2
CPS hosted onSFHA clustercp1=[VIP]:14250(port no.)
HBA HB
A
HBA
HBA
GigE
GigE
GigE GigE
GigE
GigE
GigE
GigE
mycps1.company.com
mycps
2.com
pany.co
m
vxfenmode=customizedvxfen_mechanism=cpscps1=[VIP]:14250vxfendg=vxfencoorddg
The coordinator disk groupspecified in /etc/vxfenmodeshould have these 2 disks.
SF Oracle RAC deployment scenariosConfiguration diagrams for setting up server-based I/O fencing
746

Two node campus cluster served by remote CP server and 2 SCSI-3disks
Figure I-9 displays a configuration where a two node campus cluster is beingserved by one remote CP server and 2 local SCSI-3 LUN (disks).
In the vxfenmode file on the client nodes, vxfenmode is set to customized withvxfen mechanism set to cps.
The two SCSI-3 disks (one from each site) are part of disk group vxfencoorddg.The third coordination point is a CP server on a single node VCS cluster.
747SF Oracle RAC deployment scenariosConfiguration diagrams for setting up server-based I/O fencing

Figure I-9 Two node campus cluster served by remote CP server and 2 SCSI-3
LAN
LAN
Dark Fibre
SITE 1 SITE 2
SITE 3
NIC
1 NIC
2H
BA
2H
BA
1
Clusternode 1
NIC
1 NIC
2H
BA
2H
BA
1
Clusternode 2
NIC
1 NIC
2H
BA
2H
BA
1
Clusternode 3
NIC
1 NIC
2H
BA
2H
BA
1
Clusternode 4
ClientApplications
ClientApplications
Ethernet
Switch
Ethernet
Switch
Ethernet
Switch
Ethernet
Switch
Ethernet
Switch
Ethernet
Switch
FC SwitchFC Switch
FC Switch
FC Switch
CoordinatorLUN 1 Data
LUNsStorage Array
CoordinatorLUN 2 Data
LUNsStorage Array
DWDM
Private Interconnects(GigE)
San 2 Connections
Legends
Dark FiberConnections
San 1 Connections
Public Links (GigE)
SANSAN
CPS hostedon single nodeVCS cluster
NIC
VIPvxc
pserv
CPS database/etc/VRTScps/db
mycps
.comp
any.com
Ethernet
Switch
NIC3 NI
C3
cps1=[VIP]:14250 (port no.)
NIC3 NI
C3
The coordinator disk groupspecified in /etc/vxfenmodeshould have one SCSI3 diskfrom site1 and another fromsite2.
On the client cluster:vxfenmode=customizedvxfen_mechanism=cpscps1=[VIP]:14250vxfendg=vxfencoorddg
SF Oracle RAC deployment scenariosConfiguration diagrams for setting up server-based I/O fencing
748
Multiple client clusters served by highly available CP server and 2SCSI-3 disks
Figure I-10 displays a configuration where multiple client clusters are being servedby one highly available CP server and 2 local SCSI-3 LUNS (disks).
In the vxfenmode file on the client nodes, vxfenmode is set to customized withvxfen mechanism set to cps.
The two SCSI-3 disks are are part of the disk group vxfencoorddg. The thirdcoordination point is a CP server, hosted on an SFHA cluster, with its own shareddatabase and coordinator disks.
749SF Oracle RAC deployment scenariosConfiguration diagrams for setting up server-based I/O fencing

Figure I-10 Multiple client clusters served by highly available CP server and 2SCSI-3 disks
CPS database/etc/VRTScps/
db
NIC
1
Cluster -1node 1
NIC
2
NIC
1Cluster-1node 2
NIC
2
Ethern
et
Switch Eth
ernet
Switch
VLANPrivatenetwork
Ethern
et
SwitchIntranet/
InternetPublicnetwork
NIC3 NIC
3VCS client cluster
NIC
1
CPS-Primarynode
NIC
2
NIC
1
CPS-standbynode
NIC
2
Ethern
et
Switch Eth
ernet
Switch
VLANPrivatenetwork
NIC3
NIC3
SFHA cluster
VIPvxc
pserv
vxcpserv
VIP
Data LUNs CoordinatorLUNs
SAN
FCSw
itch
SCSI-3 LUNsas 2 coordinator disks
SAN
FCSw
itch
disk1
disk2
NIC
1
Cluster -2node 1
NIC
2
NIC
1
Cluster-2node 2
NIC
2
Ethern
et
Switch Eth
ernet
Switch
VLANPrivatenetwork
NIC3 NIC
3SFRAC clientcluster
SAN
FCSw
itch
c2t0d0s2
c2t1d0s2
CPS hostedon SFHAcluster
HBA HB
A
HBA
HBA
HBA
HBA
SCSI-3 LUNsas 2 coordinatordisks
GigE
GigE
GigE
GigE
GigE
GigE
GigEGigE
GigE
GigE
GigE
mycps
1.com
pany.co
m
mycps
2.com
pany.co
m
vxfenmode=customizedvxfen_mechanism=cpscps1=[VIP]:14250vxfendg=vxfencoorddg
vxfenmode=customizedvxfen_mechanism=cpscps1=[VIP]:14250vxfendg=vxfencoorddg
The coordinator disk groupspecified in /etc/vxfenmodeshould have these 2 disks.
SF Oracle RAC deployment scenariosConfiguration diagrams for setting up server-based I/O fencing
750

Deploying Storage Foundation for Databases (SFDB)tools in a Storage Foundation for Oracle RACenvironment
If you are deploying the SFDB tools with Storage Foundation for Oracle RAC(multiple instance Oracle) your setup configuration will reflect the followingconditions:
■ A highly available parallel cluster with a multiple instances of Oracle is set upon galaxy and nebula with SF for Oracle RAC.
■ The database is online on galaxy, nebula, and mercury.
■ The datafiles are mounted and shared on galaxy, nebula, and mercury.
■ The SFDB tools is mounted and shared on galaxy, nebula, and mercury.
■ You can run the SFDB tools commands on galaxy, nebula, and mercury.
■ Clustered ODM is supported for this configuration.
In the figure below the repository directory resides in the Oracle mount points.
751SF Oracle RAC deployment scenariosDeploying Storage Foundation for Databases (SFDB) tools in a Storage Foundation for Oracle RAC environment

Figure I-11 Deploying the database repository with Storage Foundation
system2 system3
(online) (online)
(online) (online)
system1
(online)
(online)
Oracle
OraclemountpointsRepository
Oracle
OraclemountpointsRepository
Oracle
OraclemountpointsRepository
DatabasevolumeRepository
For an SF Oracle RAC configuration, the systems are online in parallel and do notuse failover mechanisms within the cluster.
SF Oracle RAC deployment scenariosDeploying Storage Foundation for Databases (SFDB) tools in a Storage Foundation for Oracle RAC environment
752
Agent A process that starts, stops, and monitors all configured resources of a type, andreports their status to VCS.
Authentication Broker The Veritas Security Services component that serves, one level beneath the rootbroker, as an intermediate registration authority and a certification authority.The authentication broker can authenticate clients, such as users or services, andgrant them a certificate that will become part of the Veritas credential. Anauthentication broker cannot, however, authenticate other brokers. That taskmust be performed by the root broker.
Cluster A cluster is one or more computers that are linked together for the purpose ofmultiprocessing and high availability. The term is used synonymously with VCScluster, meaning one or more computers that are part of the same GABmembership.
CVM (cluster volume
manager)
The cluster functionality of Veritas Volume Manager.
Disaster Recovery Administrators with clusters in physically disparate areas can set the policy formigrating applications from one location to another if clusters in one geographicarea become unavailable due to an unforeseen event. Disaster recovery requiresheartbeating and replication.
disk array A collection of disks logically arranged into an object. Arrays tend to providebenefits such as redundancy or improved performance.
DMP (Dynamic
Multi-Pathing)
A feature designed to provide greater reliability and performance by using pathfailover and load balancing for multiported disk arrays connected to host systemsthrough multiple paths. DMP detects the various paths to a disk using a mechanismthat is specific to each supported array type. DMP can also differentiate betweendifferent enclosures of a supported array type that are connected to the samehost system.
SmartTier A feature with which administrators of multi-volume VxFS file systems can managethe placement of files on individual volumes in a volume set by defining placementpolicies that control both initial file location and the circumstances under whichexisting files are relocated. These placement policies cause the files to which theyapply to be created and extended on specific subsets of a file system’s volume set,known as placement classes. The files are relocated to volumes in other placement
Glossary

classes when they meet specified naming, timing, access rate, and storagecapacity-related conditions.
Failover A failover occurs when a service group faults and is migrated to another system.
GAB (Group Atomic
Broadcast)
A communication mechanism of the VCS engine that manages cluster membership,monitors heartbeat communication, and distributes information throughout thecluster.
HA (high availability) The concept of configuring the product to be highly available against systemfailure on a clustered network using Veritas Cluster Server (VCS).
IP address An identifier for a computer or other device on a TCP/IP network, written as foureight-bit numbers separated by periods. Messages and other data are routed onthe network according to their destination IP addresses.
See also virtual IP address
Jeopardy A node is in jeopardy when it is missing one of the two required heartbeatconnections. When a node is running with one heartbeat only (in jeopardy), VCSdoes not restart the applications on a new node. This action of disabling failoveris a safety mechanism that prevents data corruption.
latency For file systems, this typically refers to the amount of time it takes a given filesystem operation to return to the user.
LLT (Low Latency
Transport)
A communication mechanism of the VCS engine that provides kernel-to-kernelcommunications and monitors network communications.
logical volume A simple volume that resides on an extended partition on a basic disk and is limitedto the space within the extended partitions. A logical volume can be formattedand assigned a drive letter, and it can be subdivided into logical drives.
See also LUN
LUN A LUN, or logical unit, can either correspond to a single physical disk, or to acollection of disks that are exported as a single logical entity, or virtual disk, bya device driver or by an intelligent disk array’s hardware. VxVM and other softwaremodules may be capable of automatically discovering the special characteristicsof LUNs, or you can use disk tags to define new storage attributes. Disk tags areadministered by using the vxdisk command or the graphical user interface.
main.cf The file in which the cluster configuration is stored.
mirroring A form of storage redundancy in which two or more identical copies of data aremaintained on separate volumes. (Each duplicate copy is known as a mirror.) AlsoRAID Level 1.
Node The physical host or system on which applications and service groups reside.When systems are linked by VCS, they become nodes in a cluster.
Glossary754

resources Individual components that work together to provide application services to thepublic network. A resource may be a physical component such as a disk group ornetwork interface card, a software component such as a database server or a Webserver, or a configuration component such as an IP address or mounted file system.
Resource Dependency A dependency between resources is indicated by the keyword "requires" betweentwo resource names. This indicates the second resource (the child) must be onlinebefore the first resource (the parent) can be brought online. Conversely, the parentmust be offline before the child can be taken offline. Also, faults of the childrenare propagated to the parent.
Resource Types Each resource in a cluster is identified by a unique name and classified accordingto its type. VCS includes a set of pre-defined resource types for storage, networking,and application services.
root broker The first authentication broker, which has a self-signed certificate. The root brokerhas a single private domain that holds only the names of brokers that shall beconsidered valid.
SAN (storage area
network)
A networking paradigm that provides easily reconfigurable connectivity betweenany subset of computers, disk storage and interconnecting hardware such asswitches, hubs and bridges.
Service Group A service group is a collection of resources working together to provide applicationservices to clients. It typically includes multiple resources, hardware- andsoftware-based, working together to provide a single service.
Service Group
Dependency
A service group dependency provides a mechanism by which two service groupscan be linked by a dependency rule, similar to the way resources are linked.
Shared Storage Storage devices that are connected to and used by two or more systems.
shared volume A volume that belongs to a shared disk group and is open on more than one nodeat the same time.
SNMP Notification Simple Network Management Protocol (SNMP) developed to manage nodes on anIP network.
State The current activity status of a resource, group or system. Resource states aregiven relative to both systems.
Storage Checkpoint A facility that provides a consistent and stable view of a file system or databaseimage and keeps track of modified data blocks since the last Storage Checkpoint.
System The physical system on which applications and service groups reside. When asystem is linked by VCS, it becomes a node in a cluster.
See Node
types.cf A file that describes standard resource types to the VCS engine; specifically, thedata required to control a specific resource.
755Glossary

VCS (Veritas Cluster
Server)
An open systems clustering solution designed to eliminate planned and unplanneddowntime, simplify server consolidation, and allow the effective management ofa wide range of applications in multiplatform environments.
Virtual IP Address A unique IP address associated with the cluster. It may be brought up on anysystem in the cluster, along with the other resources of the service group. Thisaddress, also known as the IP alias, should not be confused with the base IP address,which is the IP address that corresponds to the host name of a system.
VxFS (Veritas File
System)
A component of the Veritas Storage Foundation product suite that provides highperformance and online management capabilities to facilitate the creation andmaintenance of file systems. A file system is a collection of directories organizedinto a structure that enables you to locate and store files.
VxVM (Veritas Volume
Manager)
A Symantec product installed on storage clients that enables management ofphysical disks as logical devices. It enhances data storage management bycontrolling space allocation, performance, data availability, device installation,and system monitoring of private and shared systems.
VVR (Veritas Volume
Replicator)
A data replication tool designed to contribute to an effective disaster recoveryplan.
Glossary756

Symbols$CRS_HOME
setting up 301$ORACLE_HOME
setting up 301
Aadding
users 134agent operations
Netlsnr agent 712Oracle agent 701
agentsabout 665CFSfsckd 683CFSMount 678, 683CSSD 697CVMCluster 667CVMVolDg 674CVMVxconfigd 669log files 358MultiPrivNIC 692of VCS 666of VCS for Oracle 666PrivNIC 687
ASMabout 647configuring with CVM
about 650configuring disk group 655creating shared raw volumes 655installing ASM 651
main.cf 660SF Oracle RAC configuration 648unlinking ODM 653verifying setup 656
ASMDG agentattribute definitions 719resource type 718
ASMDG agent attributesAgentDirectory 719
ASMDG agent attributes (continued)DBAPword 719DBAUser 719DiskGroups 719Encoding 719EnvFile 719Home 719Owner 719Sid 719
attribute definitionsASMDG agent 719Netlsnr agent 714Oracle agent 707
attributesabout agent attributes 666CFSMount agent 679, 684CVMCluster agent 668CVMVolDg agent 668, 676CVMVxconfigd agent 670MultiPrivNIC agent 693PrivNIC agent
optional 690required 688
UseFence 158Automatic Storage Management. See ASM
Bbasic monitoring 702
health check 702process 702
Ccables
cross-over Ethernet 437CFS
creating databases 663stopping applications 559unmounting file systems 559
CFSfsckd agent 683attributes 684
Index

CFSMount agent 678, 683attributes 679entry points 679sample configuration 682–683type definition 682
CFSTypes.cf 682cluster
removing a node from 482verifying operation 198
cluster configuration 126Cluster File System. See CFSCluster Manager 37Cluster Volume Manager. See CVMclusters
basic setup 38four-node illustration 38
commandsgcoconfig 513hastatus 198hasys 199lltconfig 614lltstat 195vradmin 528vxassist 521, 523, 663vxdisksetup (initializing disks) 147vxedit 662vxvol 521, 663
configurationrequired information
for global clusters 598for I/O fencing 596for secure clusters 597for VCS 595
configuration filesremoving 569
See also main.cf samplesconfiguring
rsh 643ssh 643–644
Configuring global clustersfor SF Oracle RAC 506
configuring VCSadding users 134event notification 134, 136global clusters 138secure mode 130
coordinator diskssetting up 156
CP server database 33
CP server user privileges 33CSSD agent 697
attributes 698CVM
configuration worksheet 604CVMTypes.cf file 668installation worksheet 604–605upgrading protocol version 260
CVMCluster agent 667attributes 668entry points 667sample configuration 669type definition 668
CVMTypes.cfdefinition, CVMCluster agent 668definition, CVMVolDg agent 678definition, CVMVxconfigd agent 674
CVMVolDg agent 674attributes 676entry points 675sample configuration 678type definition 678
CVMVxconfigd agent 669attributes 670CVMTypes.cf 674entry points 670sample configuration 674type definition 674
Ddatabases
creating 661creating tablespaces
on CFS 663on raw volumes 662
detail monitoring 702disks
adding and initializing 147coordinator 156testing with vxfentsthdw 149verifying node access 151
Eenvironment variables
MANPATH 82Ethernet controllers 437
Index758

Ffiles. See configuration files
GGAB
port memberships 197GAB ports 197gabtab file
verifying after installation 614gcoconfig command 513Global Cluster Option (GCO)
overview 43global clusters
about 35configuration 138
using VVR 513configuration examples 531configuring VCS service groups 513illustration of dependencies 529migration 543–544overview 506replicating database volumes 529required information
for configuration 598requirements 504
groupslog owner 530RVG 531
Hhastatus -summary command 198hasys -display command 199health check APIs 702health check monitoring 702hubs
independent 437
II/O fencing
checking disks 149required information
for configuration 596setting up 156shared storage 149
installationof Oracle Clusterware 325of Oracle Grid Infrastructure 325of Oracle RAC 269
installation (continued)preparation 591
installation worksheets 591installing
Root Broker 101installsfrac
installing Clusterware 325installing Oracle Grid Infrastructure 325installing Oracle RAC 272installing SF Oracle RAC 88upgrading SF Oracle RAC 214
JJava Console 37
Llinks
private network 614LLT
interconnects 83verifying 195
lltconfig command 614llthosts file
verifying after installation 614lltstat command 195llttab file
verifying after installation 614
Mmain.cf
after SF Oracle RAC installation 613main.cf files 636main.cf samples
for CSSD resource 700MANPATH environment variable 82media speed 83
optimizing 83migration, of Oracle 359monitoring
basic 702detail 702
MultiPrivNICfor UDP 297
MultiPrivNIC agent 692attributes 693entry point 693type definition 696
759Index

MultiPrivNIC.cf 696sample configuration 697
NNetlsnr agent
attribute definitions 714operations 712resource type 714
Netlsnr agent attributesAgentDebug 714AgentDirectory 714EnvFile 714Home 714Listener 714LsnrPwd 714MonScript 714Owner 714TnsAdmin 714
nodesadding Oracle RAC nodes
configuring GAB 444configuring LLT 444configuring VCSMM 444configuring VXFEN 444starting Volume Manager 443
preparing Oracle RAC nodesconfiguring CVM 452configuring private IP addresses 464preparing $CRS_HOME 466preparing $ORACLE_HOME 466
removing Oracle RAC 11g nodesediting VCS configuration files 483GAB configuration 484LLT configuration 483modifying VCS configuration 484
removing Oracle RAC nodesOracle procedure 482
removing Oracle RACnodesworkflow 481
nodes, removing 481
OOCR
creatingon raw volumes 282
creating file systemusing CLI 283
operationsNetlsnr agent 712Oracle agent 701
optimizingmedia speed 83
optionsSF Oracle RAC configuration 123
Oracleagent log file 358creating databases 662–663stopping instances 556supported versions 51
Oracle 11gmigration from Oracle RAC 10g
installing Oracle RAC 10g 362post-upgrade tasks 363
Oracle 11g Release 2migration from Oracle RAC 10g
of existing database 363pre-upgrade tasks 360
Oracle 11gRelease 2migration from Oracle 9i 2
pre-upgrade tasks 361Oracle agent
attribute definitions 707operations 701resource type 706
Oracle agent attributesAgentDebug 707AgentDirectory 707AutoEndBkup 707DBAPword 707DBAUser 707DetailMonitor 707EnvFile 707Home 707IMF 707MonitorOption 707MonScript 707Owner 707Pfile 707Pword 707ShutDownOpt 707Sid 707StartUpOpt 707Table 707User 707
Oracle Grid Infrastructureinstalling 325
Index760
Oracle RACdatabase replication 527installation
installing database 331workflow 323
manual installationinstalling database binaries 333installing Oracle Clusterware 328installing Oracle Grid Infrastructure 328linking ODM library 348
post-installationadding UDP IP addresses 350
pre-installationcreating OCR 282creating Oracle disk groups 276creating Oracle users and groups 273creating voting disk volumes 282identifying public virtual IP addresses 271setting system parameters 272setting up Oracle user equivalence 317setting up storage 57starting installsfrac 272workflow 269
Oracle RAC 11gagent log file 358configuring service groups
preventing automatic starting ofdatabase 352
installationconfiguring service groups 352setting environment variables 325verifying 335
post-installationadding patches 339creating database 349relinking SF Oracle RAC libraries 344
pre-installationconfiguring MultiPrivNIC 297preparing $CRS_HOME 301preparing $ORACLE_HOME 301
setting environment variables 325Oracle RAC 11g Clusterware
creating file system 304, 466verifying installation 335
Oracle RAC 11g Release 1 Clusterwarecreating file system 309, 471
Ppatches
adding 339patchsets
adding 339PATH variable
VCS commands 194ports
GAB 197primary site
creating SRL volume 520setting up 507setting up replication objects 521VCS configuration 534, 537
PrivNIC agent 687attributes 688entry point 688sample configuration 692type definition 691
PrivNIC.cf 691process monitoring 702
Rraw volumes
creatingOracle DBCA procedure 655
remote shell 644removing a node from a cluster 482replication
automatic synchronization 528configuring on both sites 512full synchronization with Checkpoint 528modifying VCS configuration 530options 505setting up primary site 507setting up secondary site 509supported hardware 504supported software 504supported technologies 504using VVR 520verifying status 529
resource typeASMDG 718Netlsnr 714Oracle 706
resourcesCVMVolDg 531RVGSharedPri 531
761Index
response fileabout 367syntax 370
Root Broker 36installing 101
rshconfiguration 643
SSCSI-3 persistent reservations
verifying 156secondary site
configuring replication 523creating SRL volume 523setting up 509setting up disk groups 525setting up RLINKs 524
secure clustersadding users 597required information
for configuration 597secure shell 644service groups
configuring 352VCS, for global clusters 513
setting umask, before installing 81SF Oracle RAC
about 27coordinator disks 156high-level view 38illustration of global cluster dependencies 529takeover 545
SF Oracle RAC configurationabout 123configuring clusters 126creating configuration files 139of components 124options 123preparation
worksheets 591starting processes 139verifying 197
SF Oracle RAC installationpre-installation tasks
setting MANPATH 82setting umask 81setting up shared storage 82synchronizing time settings 81verifying systems 83
SF Oracle RAC installation (continued)preinstallation information 45preparation
worksheets 591requirements
hardware 46software 51
using installsfrac 88verifying
cluster operations 194GAB operations 194LLT operations 194
SF Oracle RAC uninstallationpreparation
stopping applications, CFS 559stopping applications, VxFS 561stopping Oracle instances 556stopping VCS 560uninstalling 559unmounting CFS file systems 559unmounting VxFS file systems 561
removing configuration files 569removing filesets 568using uninstallsfrac program 568workflow 553
SF Oracle RAC upgradepost-upgrade tasks
relinking Oracle RAC libraries 258upgrading CVM protocol version 260upgrading disk group version 260
preparation 207restoring configuration files 215stopping cluster resources 207stopping Oracle RAC 207upgrading licenses 239using installsfrac 214
shared storagesetting up 82
SMTP email notification 134SNMP trap notification 136ssh
configuration 643configuring 644
Symantec Product Authentication Service 36, 101, 130
synchronizing time settings, before installing 81system communication using remote shell
secure shell 644system state attribute value 198
Index762

Uuninstallation
of SF Oracle RAC 563uninstallsfrac program
removing filesets 568users
creating 273for &ProductNameShort;, adding 597
VVCS
agent log file 358command directory path variable 194configuration, for database volume
replication 529configuring service groups 513notifications 35required information
for configuration 595stopping 560
VCS configurationfor replication 530
VCS Global cluster option. See GCOVCS notifications
SMTP notification 35SNMP notification 35
Veritas File Systemstopping applications 561unmounting 561
Veritas Operations Manager 36Veritas Volume Replicator. See VVRvirtual fire drill 705voting disk
creatingon raw volumes 282
voting diskscreating file system
using CLI 283vradmin command 528VVR
about 35configuration examples 531configuration worksheet 604configuring global clusters 513configuring on both sites 512database volume replication
configuring VCS 529defining heartbeat cluster objects 514defining remote clusters 514
VVR (continued)global cluster overview 519installation worksheet 604–605Oracle RAC database replication 527primary site
creating SRL volume 520setting up replication objects 521
replicationusing automatic synchronization 528using full synchronization with
Checkpoint 528replication agents 505secondary site
configuring replication 523creating SRL volume 523setting up disk groups 525setting up RLINKs 524
setting up primary site 507setting up replication 520setting up secondary site 509types of replication 505VCS configuration
CVMoIDG resource 531log owner group 530Oracle RAC database service group 531primary site 534RVG group 531RVGSharedPri resource 531secondary site 537
verifying replication 529vxassist command 521, 523, 663vxdisksetup command 147VxFS. See Veritas File Systemvxvol command 521, 663
Wworksheets
for &ProductNameShort; 592for CVM 604for replication
SRDF 605VVR 604
for VVR 604
763Index