version 1 - sunburst digitalttl4.sunburst.com/docs/user_guide.pdf · the type to learn ® series...
TRANSCRIPT
®
Teacher’s
Guideand Installation Instructions
Version 1.2
X9500041
Published by
v1.2 2
Table of Contents Software End User License Agreement (“EULA”) ......................................................................5
Questions and Answers ...........................................................................................................5 EULA Terms and Conditions ..................................................................................................7
21st Century Skills.......................................................................................................................9 Type to Learn® 4: Agents of Information ..................................................................................10 Proper Keyboarding Technique.................................................................................................11 Standards Alignments ...............................................................................................................12 Lesson Scope and Sequence ......................................................................................................13 Quick-Blends and Quick-Words................................................................................................14 Activities per Lesson.................................................................................................................15 The Type to Learn® Series ........................................................................................................16 Installation ................................................................................................................................17
System Requirements ............................................................................................................17 Windows Server Installation..................................................................................................18 Windows Client Installation ..................................................................................................20 Windows Client-Server Connectivity Setup...........................................................................23
Permissions .......................................................................................................................24 NetSupport (Remote) Application .....................................................................................24 Launching the Program .....................................................................................................25 Uninstall............................................................................................................................25
Macintosh Server Installation ................................................................................................25 Macintosh Client Installation.................................................................................................27 Macintosh Client-Server Connectivity Setup .........................................................................31
Permissions .......................................................................................................................32 Launching the Program .....................................................................................................32 Uninstall............................................................................................................................32
Using the Program ....................................................................................................................33 Logging In ............................................................................................................................33
Lost Password ...................................................................................................................33 Logging Out..........................................................................................................................33 Main Menu............................................................................................................................34
Options..............................................................................................................................35 Access Medallion ..............................................................................................................35 Call Agent .........................................................................................................................35
Lessons .................................................................................................................................36 Activities...............................................................................................................................36
Big Ideas Activity..............................................................................................................37 Dig This Activity...............................................................................................................37 Drone Control Activity......................................................................................................38 Message Master Activity ...................................................................................................38 Reconnect Activity ............................................................................................................39 Activity Payoffs ................................................................................................................39
New Training ........................................................................................................................40 Final Challenge .....................................................................................................................40
Goal Minimums ................................................................................................................40 Certificates............................................................................................................................41
Teacher Management Area........................................................................................................42
v1.2 3
User Management .................................................................................................................42 Advanced Usage – Groups ................................................................................................43 Create Student ...................................................................................................................43 Create Teacher (Admin Only)............................................................................................44 Edit Student.......................................................................................................................44 Edit Teacher (Admin Only) ...............................................................................................44 Delete Student ...................................................................................................................44 Delete Teacher (Admin Only)............................................................................................44 Promote Grade ..................................................................................................................45 Import Students .................................................................................................................45 Import Teachers (Admin Only)..........................................................................................46 Export Users......................................................................................................................47 Search Filters.....................................................................................................................47
Class Management ................................................................................................................48 Create New Class ..............................................................................................................49 Edit Class ..........................................................................................................................49 Adding Students to Class...................................................................................................49 Student Filters ...................................................................................................................49 Remove Student ................................................................................................................50 Move Student ....................................................................................................................50 Delete Class ......................................................................................................................50 Move Class (Admin Only).................................................................................................50 View Only Current Classes................................................................................................51
User Options .........................................................................................................................51 General Options ................................................................................................................53 Lessons Options ................................................................................................................54 Activities Options..............................................................................................................56 Assessments Options .........................................................................................................57 Accessibility Options.........................................................................................................58
Student Reports.....................................................................................................................61 Status Report .....................................................................................................................62 Detailed Report .................................................................................................................63 Original Writing................................................................................................................64 Error Report ......................................................................................................................64 Assessment Report ............................................................................................................65 Narrative Report................................................................................................................66
Graphs...................................................................................................................................66 Summary Graph ................................................................................................................66 Student Graph ...................................................................................................................67 Lesson Graph ....................................................................................................................68
Reports and Graphs for the Student .......................................................................................69 Detailed Report .................................................................................................................70 Assessment Report ............................................................................................................70 Parent Report.....................................................................................................................71 Student Graph ...................................................................................................................71
Top Scores ............................................................................................................................72 Custom Content.....................................................................................................................73
Assigning Custom Content ................................................................................................75 Account Settings ...................................................................................................................76
Semesters/School Years ....................................................................................................76

v1.2 4
Keyboarding Rubrics ................................................................................................................78 Ergonomic Tips and Exercises ..................................................................................................79 Use at Home Tips......................................................................................................................80 Certificate of Completion..........................................................................................................81 Appendix A: Passages...............................................................................................................82
Grades 3-6.............................................................................................................................82 Title: Thinkin’ Long..........................................................................................................82 Dessert Menu ....................................................................................................................83 Excerpt from: The Library of Work and Play, Outdoor Sports And Games, By Claude H. Miller, PH.B. – edited from the original.............................................................................84 Black Bean and Corn Salsa................................................................................................84 Excerpt from: Rollo at Play; Safe Amusements, by Jacob Abbott ......................................85 Laughing Song ..................................................................................................................86 Coffee Cake ......................................................................................................................86 Excerpt from: Lincoln’s Gettysburg Address .....................................................................87 Holiday Weekend Sale! .....................................................................................................87 Title: Uncle Robert’s Visit.................................................................................................88 The Table And The Chair ..................................................................................................88
Grades 7-12...........................................................................................................................89 Title: The Beggar ..............................................................................................................89 Breakfast Menu .................................................................................................................90 Excerpt from the United States Constitution ......................................................................91 Roasted Vegetable Pasta....................................................................................................93 Excerpt from: President Nixon’s Announcement on the Development of the Space Shuttle..........................................................................................................................................94 Title: The Double Aspect of Goodness ..............................................................................95 Holiday Weekend Sale! .....................................................................................................95 Excerpt from: Ocean Steam Navigation and the Ocean Post, by Thomas Rainey ...............95 Sushi Dipping Sauce..........................................................................................................96 Excerpt from: Patriotic Readings, by Jasper L. McBrien, A. M..........................................96
Appendix B: Writing Prompts...................................................................................................97 Grade 2 .................................................................................................................................97 Grades 3-6.............................................................................................................................98 Grades 7-12...........................................................................................................................99
Appendix C: Assessments .......................................................................................................101 Assessment #1: Covering lessons 1-3 ..................................................................................101 Assessment #2: Covering lessons 1-5 ..................................................................................104 Assessment #3: Covering lessons 1-9 ..................................................................................107 Assessment #4: Covering lessons 1-15 ................................................................................110 Assessment #5: Covering lessons 1-20 ................................................................................113 Assessment #6: Covering lessons 1-32 ................................................................................116
Contact Us ..............................................................................................................................119 Before Calling Technical Support........................................................................................119
Credits ....................................................................................................................................120

v1.2 5
Sunburst Technology Corporation Software End User License Agreement (“EULA”)
YOU SHOULD CAREFULLY READ THE FOLLOWING END USER LICENSE AGREEMENT (“EULA”) BEFORE INSTALLING OR USING THE TYPE TO LEARN 4 SOFTWARE APPLICATION (THE “SOFTWARE”). BY INSTALLING OR USING THIS SOFTWARE, YOU ACCEPT THIS EULA AND UNDERSTAND THAT ITS TERMS WILL BE LEGALLY BINDING ON YOU AND ANY END USER. IF AN INDIVIDUAL IS INSTALLING OR USING THIS SOFTWARE ON BEHALF OF A SCHOOL OR DISTRICT, BY DOING SO, SUCH INDIVIDUAL REPRESENTS THAT THEY HAVE THE LEGAL CAPACITY AND AUTHORITY TO BIND SUCH SCHOOL OR DISTRICT TO THIS END USER LICENSE AGREEMENT. "USER" OR "YOU" SHALL REFER BOTH TO THE INDIVIDUAL INSTALLING OR USING THIS SOFTWARE ON BEHALF OF A SCHOOL OR DISTRICT, IF ANY, AND ANY SUCH SCHOOL OR DISTRICT ITSELF. All products and Software of Sunburst Technology Corporation are copyrighted and may only be used as permitted by this EULA. Any use, reproduction, transmission, or distribution in excess of what is permitted by this EULA constitutes copyright infringement and may expose you and your school or district to litigation, damages and costs.
Questions and Answers
Q: IS THIS SOFTWARE SOLD IN DIFFERENT VERSIONS WITH DIFFERENT RIGHTS? A: Yes. Read below to ensure you understand your rights as pertains to the license you purchased. You may
only use the Software in accordance with the specific license you purchased, as set forth below. The term “site” referenced in the EULA means a singular location where the Software is to be used. A site may include but is not limited to a school building or a home location. If more than one school (such as a junior high and a high school) shares the same campus location, this is considered two (2) sites.
Type to Learn 4 may be sold as the following types of licenses:
Single User Standalone License: You have the right to install and use the one (1) CD-ROM Software
on only one (1) computer at one (1) site. No copies may be made except for backup purposes. Lab Pack of 5 License (“Lab Pack License”): You have the right to install and use the five (5) CD-
ROM Software you received, onto no more than five (5) computers at one (1) site. The computers must all be at the same site. No copies may be made except for backup purposes.
School Unlimited Site License: You have the right to install and use the one (1) CD-ROM Software you received on an unlimited number of computers at one (1) site only. The computers must all be at the same site. No copies may be made except for backup purposes.
Network License: You have the right to install this CD-ROM Software onto one (1) school’s server and then use it with an unlimited number of computers at the one (1) site only. The computers must all be at the same site. No copies may be made except for backup purposes.
School Unlimited Web License: You have the right to download and install the Software from the Internet or from a CD-ROM you receive, onto an unlimited number of computers at one (1) site, in addition to students’ home computers. You must have specified at the time of purchase the designated site’s student enrollment.
Single User Web License: You have the right to download and install the software from the Internet or from a CD-ROM you receive, for use by one (1) student user and one (1) teacher user only.
Volume Savings Plan: This applies to schools and districts for use of the Software at multiple building sites within the designated school complex or district. You must have specified at the time of purchase how many building sites intend to use the Software.

v1.2 6
Q: HOW MAY I USE THE SOFTWARE? A: You may use the Software as follows:
You may print, transmit and/or modify the contents only for your individual use or for use in the classroom, lab, network, school, district, or home for which the Software was purchased.
Classroom worksheets contained in the teacher manual and activity workbook (but not any other contents of the manual or workbook) may be copied, but only for use in the classroom, lab, network, school, district, or home for which the Software was purchased and not for further sale or distribution.
The Software identifies any contents owned by rights holders other than Sunburst Technology Corporation and you may only use those contents in accordance with current copyright law.
You may install the software onto a single computer for use on that computer and you may make one archival copy of the Software for backup purposes only. If you purchased the Software as part of a Lab Pack License, you may install the Software onto the number of computers designated in the lab pack. If you purchased the Software as part of a Network License, you may install the Software onto the server for use on multiple computers located at the designated single site only. If you purchased the Software as part of an Unlimited Site License, you may install the Software for unlimited use at the designated single site only. If you purchased the Software as part of a School Unlimited Web License, you may download and install the Software onto multiple computers at one designated school site, in addition to students’ home computers. If you purchased the Software as part of a Single User Web License, you may download and install the Software for use by one student and one teacher only. If you purchased the Volume Savings Plan for a school or district, you may install the Software at multiple building sites within your school complex or your district only as designated in the volume savings plan.
Student works printed from the Software that contain images, print, or audio from the software may be used only in the classroom, lab, network, school, or district for which the Software was purchased and may not be sold or distributed outside the classroom, lab, network, school, or district respectively.
You may not remove or obscure any copyright, trademark, proprietary rights disclaimer, or warning notice included on or embedded in any part of the Software or any copy of all or any part of the Software.
It is illegal to reverse compile, reverse assemble, reverse engineer, modify, or merge the software. You may not modify, rent, lease, loan, distribute, sell or create derivative works based upon the software or printed materials in whole or in part.
Q: MAY I USE THE SOFTWARE ON MORE THAN ONE COMPUTER? A: You may use the Software on more than one computer only if your purchased license permits it. If you
purchased the Software as part of a Lab Pack License, School Unlimited Site License, Network License, or School Unlimited Web License then you may use the Software on more than one computer, as defined by your license. All computers must be at the single designated site only, unless multiple sites are designated at the time of purchase.
Q: MAY I USE THE SOFTWARE ON A NETWORK? A: If you have purchased the Network License for this Software, you may provide access to the Software via
your network to the designated computers as long as you have a reasonable mechanism in place to ensure that only the designated stations will have access to the Software.
Q: WHO OWNS THE SOFTWARE? A: You own the CD-ROMs or DVD-ROMs on which the Software and its contents are recorded. Most
licenses will continue in perpetuity. However, for those who have purchased the School Unlimited Web License or the Single User Web License, there is a required annual data maintenance fee. If you fail to pay the School Unlimited/Single User Web License’s annual data maintenance fee, your account will be disabled. As further explained in Section 1 below, Sunburst Technology Corporation grants you a non-exclusive, revocable, non-transferable limited license to use the Software and its contents recorded on the CD-ROMs or DVD-ROMs in accordance with the terms and conditions set forth in this EULA. Sunburst Technology and its subsidiaries and their licensors own and retain all title, copyright, trademark, and other proprietary rights in and to the Software and its contents.
v1.2 7
Q: WHAT CAN I DO IF THE SOFTWARE IS DEFECTIVE? A: You may return a defective CD-ROM or DVD-ROM within 90 days after you acquire it by sending it
postage prepaid to Sunburst Technology Returns Department, 1550 Executive Drive, Elgin, IL 60123. Prior authorization is required for returns. Call: 800-321-7511 or Fax: 888-800-3028 with details (Software name, title, price, and quantity) of your return request. Provided the CD-ROM or DVD-ROM has not been physically damaged, Sunburst Technology Corporation will replace the defective CD-ROM or DVD-ROM.
Q: ARE THERE ANY RESTRICTIONS ON U.S. GOVERNMENT USE OF THE SOFTWARE? A: Sunburst Technology Corporation provides this Software to Government agencies subject to restricted
rights. Notice—Notwithstanding any lease or license agreement that may pertain to, or accompany the delivery of, this software, the rights of the Government regarding its use, reproduction or disclosure are set forth in subparagraph (c)(1)(ii) of the Rights in Technical Data and Computer Software clause at DFARS 252.227-7013 and subparagraph (c)(1) and (2) of the Commercial Computer Software—Restricted Rights clause at FAR 52.227-19.
Q: IF I HAVE QUESTIONS ABOUT THIS LICENSE AGREEMENT, WHOM MAY I CONTACT? A: If you have any questions about this license agreement, you may call Sunburst Technology Corporation at
800-321-7511.
EULA Terms and Conditions 1. LICENSE AND OWNERSHIP All products of Sunburst Technology Corporation (“we”, “us” or “Sunburst Technology”) are copyrighted and may only be used pursuant to this EULA. Sunburst Technology hereby grants you a non-exclusive, revocable, non-transferable limited license to install and use the Software in accordance with the specific license you purchased provided that: (i) the Software is not modified; (ii) all copyright notices are maintained on the Software; and (iii) you agree to be bound by the terms of this EULA. The Software shall be used only in accordance with the license you purchased and for your own internal use. Unless otherwise permitted by this EULA, the Software may not be distributed by you to any third party. The Software is owned exclusively by Sunburst Technology or its licensors. All rights not granted to you herein are expressly reserved by Sunburst Technology. You may not remove any proprietary notice of Sunburst Technology from any copy of the Software. 2. RESTRICTIONS Unless otherwise expressly permitted by this EULA, you may not publish, display, disclose, rent, lease, modify, loan, distribute, or create derivative works based on the Software or any part thereof. You may not reverse engineer, decompile, translate, adapt, or disassemble the Software, nor shall you attempt to create the source code from the object code for the Software. You may not transmit the Software over any network or between any devices. End User shall not sublicense, assign, or transfer the EULA or the Software. Any attempt otherwise to sublicense, assign, or transfer any of the rights, duties, or obligations hereunder renders this EULA void. Unless expressly agreed to by Sunburst Technology, End User shall not be entitled to any support, maintenance or updates with respect to the Software. 3. LIMITED WARRANTY Any installation and use by you of the software is at your own risk. THE SOFTWARE IS PROVIDED "AS IS." TO THE MAXIMUM EXTENT PERMITTED BY LAW, SUNBURST TECHNOLOGY CORPORATION DISCLAIMS ALL WARRANTIES OF ANY KIND, EITHER EXPRESSED OR IMPLIED, INCLUDING, WITHOUT LIMITATION, IMPLIED WARRANTIES OF MERCHANTABILITY, FITNESS FOR A PARTICULAR PURPOSE OR NON-INFRINGEMENT. SUNBURST TECHNOLOGY CORPORATION DOES NOT WARRANT THAT THE FUNCTIONS CONTAINED IN THE SOFTWARE WILL MEET ANY REQUIREMENTS OR NEEDS YOU MAY HAVE, OR THAT THE SOFTWARE WILL OPERATE ERROR FREE, OR IN AN UNINTERRUPTED FASHION, OR THAT ANY DEFECTS OR ERRORS IN THE SOFTWARE WILL BE CORRECTED, OR THAT THE SOFTWARE IS COMPATIBLE WITH ANY PARTICULAR PLATFORM. YOUR SOLE REMEDY IS THE REPLACEMENT OF A DEFECTIVE CD-ROM OR DVD-ROM, AS PROVIDED ABOVE.
v1.2 8
4. NO LIABILITY FOR DAMAGES IN NO EVENT SHALL SUNBURST TECHNOLOGY CORPORATION OR ANYONE ELSE WHO HAS BEEN INVOLVED IN THE CREATION, PRODUCTION, OR DELIVERY OF THE SOFTWARE BE LIABLE TO YOU OR ANY THIRD PARTY FOR ANY INCIDENTAL OR CONSEQUENTIAL DAMAGES (INCLUDING, WITHOUT LIMITATION, INDIRECT, SPECIAL, PUNITIVE, OR EXEMPLARY DAMAGES FOR LOSS OF BUSINESS, LOSS OF PROFITS, BUSINESS INTERRUPTION, OR LOSS OF BUSINESS INFORMATION) ARISING OUT OF THE USE OF OR INABILITY TO USE THE SOFTWARE OR SERVICES, OR FOR ANY CLAIM BY ANY OTHER PARTY, EVEN IF SUNBURST TECHNOLOGY CORPORATION HAS BEEN ADVISED OF THE POSSIBILITY OF SUCH DAMAGES. SUNBURST TECHNOLOGY CORPORATION’S AGGREGATE LIABILITY WITH RESPECT TO ITS OBLIGATIONS UNDER THIS EULA, OR OTHERWISE SHALL NOT EXCEED THE REPLACEMENT PRICE OF THE SOFTWARE. SOME STATES DO NOT PERMIT EXCLUSION OF IMPLIED WARRANTIES OR EXCLUSION OF INCIDENTAL OR CONSEQUENTIAL DAMAGES. THE ABOVE EXCLUSIONS MAY NOT APPLY TO YOU. THIS WARRANTY PROVIDES YOU WITH SPECIFIC LEGAL RIGHTS. 5. GOVERNING LAW This EULA shall be deemed to have been made and executed in the State of Illinois, and any dispute arising hereunder shall be resolved in accordance with the law of the State of Illinois. All products of Sunburst Technology Corporation are copyrighted and may only be used as specified. Any use, reproduction, transmission, or distribution in excess of those specified above as permitted constitutes copyright infringement and may expose you and your school or district to litigation, damages and costs. 6. CONFIDENTIALITY You acknowledge that the Software contains proprietary trade secrets of Sunburst Technology Corporation and you hereby agree to maintain the confidentiality of the Software using at least as great a degree of care as you use to maintain the confidentiality of your own most confidential information. 7. INDEMNIFICATION You agree to defend, hold harmless and indemnify Sunburst Technology Corporation, its partners, subsidiaries, affiliates, licensors, successors and assigns, and each of their officers, directors, agents, contractors, subcontractors and employees, and each of them, against and from any and all third party claims, liabilities, damages, fines, penalties or costs of whatsoever nature (including reasonable attorney’s fees), arising out of or in any way connected with End User's use of the Software. 8. TERMINATION This EULA is effective until it is terminated. You may terminate this EULA at any time by destroying or returning to Sunburst Technology Corporation all copies of the Software in your possession or under your control. Sunburst Technology Corporation may terminate this EULA for any reason, including but not limited to, if Sunburst Technology finds that you have violated any of the terms of this EULA. Upon notification of termination, you agree to destroy or return to Sunburst Technology all copies of the Software and to certify in writing that all known copies, including backup copies, have been destroyed. Notwithstanding the foregoing, any provisions which by their nature are intended to survive, shall survive the termination of this EULA. 9. GENERAL This EULA shall constitute the entire agreement between the parties hereto and any waiver or modification of this EULA shall only be effective if it is in writing and signed by both parties hereto. This EULA may not be assigned by End User without the prior written consent of Sunburst Technology Corporation. If any part of this EULA is found invalid or unenforceable by a court of competent jurisdiction, the remainder of this EULA shall be interpreted so as to reasonably affect the intention of the parties.
Macintosh is a registered trademark of Apple Computer, Inc. Windows is a registered trademark of Microsoft Corporation.
Type to Learn is a registered trademark of Sunburst Technology Corporation.
Copyright © 2009 Sunburst Technology Corporation. All Rights Reserved.
v1.2 9
21st Century Skills Why teach keyboarding? Because computing is a way of life today. Not only in school or in the workforce, but as a means for communicating with others, sharing ideas, and expressing thoughts. The keyboard is the primary means of interfacing with a computer. Keyboarding is therefore an essential, 21st Century skill that students must develop in order to use computers effectively and efficiently. Even very young children are actively involved with using technology and computers on a regular basis. Research shows that keyboarding is and should be taught to students at an earlier age, before bad habits form. This early introduction reduces bad habit development and provides additional benefits that include improvements in spelling, writing, and reading comprehension. Student writing develops faster through word processing because it facilitates the review and revision process. Efficient keyboarding skills allow students to emphasize concept development instead of focusing on key location. Students who become efficient keyboarders “compose better, are prouder of their work, produce documents with a neater appearance, and have better motivation,” (Nieman, 1996). Language arts skills are further developed by the lessons and activities in Type to Learn 4, which reinforce phonics, grammar, vocabulary, proper usage of punctuation, sight words, frequently misspelled words, and other elements of written language. Cross-curricular activity payoffs provide grade-appropriate incidental learning in the areas of: science, literature, social studies, and other general knowledge topics. Mastering keyboarding involves learning technique (physical positioning and movement), ergonomics (safe and comfortable keyboard interaction), and key location. Learning key location requires a sequential introduction of the keys along with a great deal of repetition and reinforcement to develop the kinesthetic memory traces leading to keyboarding automaticity. Efficiency is expanded if keyboarders type short letter clusters and words as single units instead of groups of individual letters (e.g., er, ing, the, my). Type to Learn 4 calls these clusters Quick-Blends and Quick-Words. With Type to Learn 4: Agents of Information, using the keyboard will become as natural to your students as writing with pen and paper. Its research-based, interactive learning environment will engage all K-12 keyboarding learners.
v1.2 10
Type to Learn® 4: Agents of Information
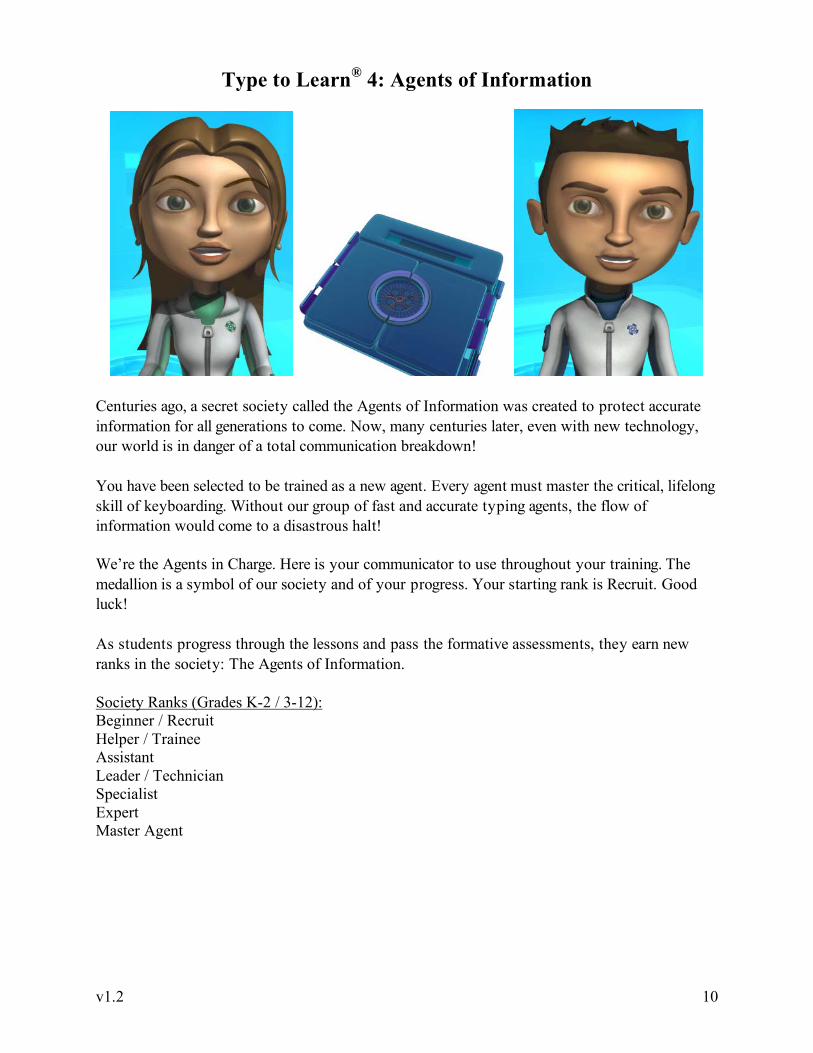
Centuries ago, a secret society called the Agents of Information was created to protect accurate information for all generations to come. Now, many centuries later, even with new technology, our world is in danger of a total communication breakdown! You have been selected to be trained as a new agent. Every agent must master the critical, lifelong skill of keyboarding. Without our group of fast and accurate typing agents, the flow of information would come to a disastrous halt! We’re the Agents in Charge. Here is your communicator to use throughout your training. The medallion is a symbol of our society and of your progress. Your starting rank is Recruit. Good luck! As students progress through the lessons and pass the formative assessments, they earn new ranks in the society: The Agents of Information. Society Ranks (Grades K-2 / 3-12): Beginner / Recruit Helper / Trainee Assistant Leader / Technician Specialist Expert Master Agent
v1.2 11
Proper Keyboarding Technique
Use two hands to type. Your right hand goes on the right side of the keyboard, and your left hand goes on the left
side. Put your right hand on J K L and ; and your left hand on F D S and A. This is the Home
Row.
The bumps on the J and F keys should be under your index fingers.
Curve your fingers.
Keep your wrists straight, not bent down.
Sit up straight!
Put your feet flat on the floor.
Look straight ahead at the screen.
When you type, hit each key with a quick, strong tap.
Keep your fingers close to the keyboard.
Have fun!

v1.2 12
Standards Alignments Type to Learn 4: Agents of Information aligns with Keyboarding and Technology standards in all 50 states, the District of Columbia, and Ontario, Canada. Type to Learn 4 also meets the ISTE 2007 National Educational Technology Standards for Students (NETS-S): 2007 Standards:
1. Creativity and Innovation
Students demonstrate creative thinking, construct knowledge, and develop innovative products and processes using technology. Students:
a. apply existing knowledge to generate new ideas, products, or processes. b. create original works as a means of personal or group expression.
6. Technology Operations and Concepts
Students demonstrate a sound understanding of technology concepts, systems, and operations. Students:
a. understand and use technology systems. b. select and use applications effectively and productively. c. troubleshoot systems and applications. d. transfer current knowledge to learning of new technologies.
NETS for Students 2007 Profiles:
Grades PK–2 (Ages 4–8) The following experiences with technology and digital resources are examples of learning activities in which students might engage during PK-Grade 2 (Ages 4-8): 1. Illustrate and communicate original ideas and stories using digital tools and media-rich
resources. (1,2) 7. Demonstrate safe and cooperative use of technology. (5) 8. Independently apply digital tools and resources to address a variety of tasks and
problems. (4,6) 9. Communicate about technology using developmentally appropriate and accurate
terminology. (6) 10. Demonstrate the ability to navigate in virtual environments such as electronic books,
simulation software, and Web sites. (6)
Grades 3–5 (Ages 8–11) The following experiences with technology and digital resources are examples of learning activities in which students might engage during Grades 3-5 (Ages 8-11): 8. Practice injury prevention by applying a variety of ergonomic strategies when using
technology. (5)

v1.2 13
Lesson Scope and Sequence Type to Learn 4: Agents of Information covers not only letter and number keys but all symbols, the numeric keypad, the arrow keys, and several keyboard commands: Diagnostic Pre-Test Lesson A Keyboarding awareness – lowercase alphabet Lesson B Keyboarding awareness – numbers, capital letters, punctuation Lesson 1 J F Space Bar Lesson 2 U R Lesson 3 K D Assessment 1 Lesson 4 I E Lesson 5 H G Assessment 2 Lesson 6 L S Right Shift Lesson 7 Quick-Blends and Quick-Words Lesson 8 O W Left Shift Lesson 9 ; A Enter/Return Assessment 3 Lesson 10 P Q Backspace/Delete Lesson 11 Quick-Blends and Quick-Words Lesson 12 Y T Tab Lesson 13 Arrow Keys Lesson 14 B N Lesson 15 Quick-Blends and Quick-Words Assessment 4 Lesson 16 M V Lesson 17 , C Lesson 18 Quick-Blends and Quick-Words Lesson 19 . X Lesson 20 / Z ? Assessment 5 Lesson 21 ctrl-C, ctrl-V, ctrl-S (cmd-C, cmd-V, cmd-S) Lesson 22 ctrl-X, ctrl-Z (cmd-X, cmd-Z) Lesson 23 : ' " Lesson 24 6 7 ^ & Lesson 25 5 4 % $ Lesson 26 8 3 * # Lesson 27 9 2 ( @ Lesson 28 0 1 ) ! Lesson 29 Numeric Keypad 4 5 6 7 8 9 Enter Lesson 30 Numeric Keypad 1 2 3 0 . + - * / Lesson 31 < > [ ] { } Lesson 32 - = _ + Assessment 6 Lesson 33 Passages Lesson 34 Original Writing
v1.2 14
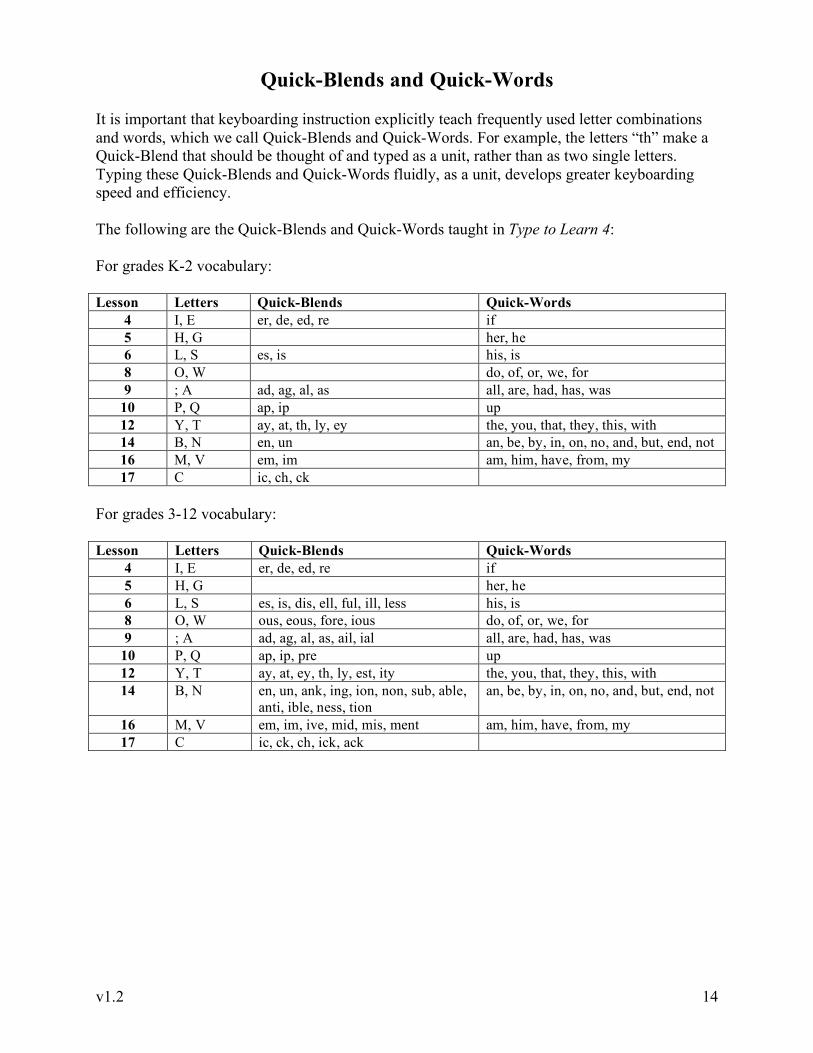
Quick-Blends and Quick-Words It is important that keyboarding instruction explicitly teach frequently used letter combinations and words, which we call Quick-Blends and Quick-Words. For example, the letters “th” make a Quick-Blend that should be thought of and typed as a unit, rather than as two single letters. Typing these Quick-Blends and Quick-Words fluidly, as a unit, develops greater keyboarding speed and efficiency. The following are the Quick-Blends and Quick-Words taught in Type to Learn 4: For grades K-2 vocabulary: Lesson Letters Quick-Blends Quick-Words
4 I, E er, de, ed, re if 5 H, G her, he 6 L, S es, is his, is 8 O, W do, of, or, we, for 9 ; A ad, ag, al, as all, are, had, has, was
10 P, Q ap, ip up 12 Y, T ay, at, th, ly, ey the, you, that, they, this, with 14 B, N en, un an, be, by, in, on, no, and, but, end, not 16 M, V em, im am, him, have, from, my 17 C ic, ch, ck
For grades 3-12 vocabulary: Lesson Letters Quick-Blends Quick-Words
4 I, E er, de, ed, re if 5 H, G her, he 6 L, S es, is, dis, ell, ful, ill, less his, is 8 O, W ous, eous, fore, ious do, of, or, we, for 9 ; A ad, ag, al, as, ail, ial all, are, had, has, was
10 P, Q ap, ip, pre up 12 Y, T ay, at, ey, th, ly, est, ity the, you, that, they, this, with 14 B, N en, un, ank, ing, ion, non, sub, able,
anti, ible, ness, tion an, be, by, in, on, no, and, but, end, not
16 M, V em, im, ive, mid, mis, ment am, him, have, from, my 17 C ic, ck, ch, ick, ack

v1.2 15
Activities per Lesson Every lesson has 5 practice activities corresponding to the keys learned in that lesson. Each activity focuses on a specific keyboarding skill:
Activity Skill Description
Big Ideas Left hand – Right hand Coordination
Students type what they see in thought bubbles to save ideas from being lost forever. Thought bubbles are typed by the right hand or the left hand, exclusively.
Dig This Accuracy & Smooth Typing Cadence
Students type accurately to carefully break the ice or stone and uncover what’s underneath. An optional metronome beat helps them type in a smooth cadence.
Drone Control
Speed Students type commands to pilot an unmanned drone vehicle and deliver important information.
Message Master
Accuracy, Dictation, & Original Writing
Students send important messages by typing text, dictation, and original writing prompts.
Reconnect Shift Keys Students use the Shift keys to type lines of secret code, including capital letters, symbols, and punctuation, and rebuild infrastructure in the process.
v1.2 16
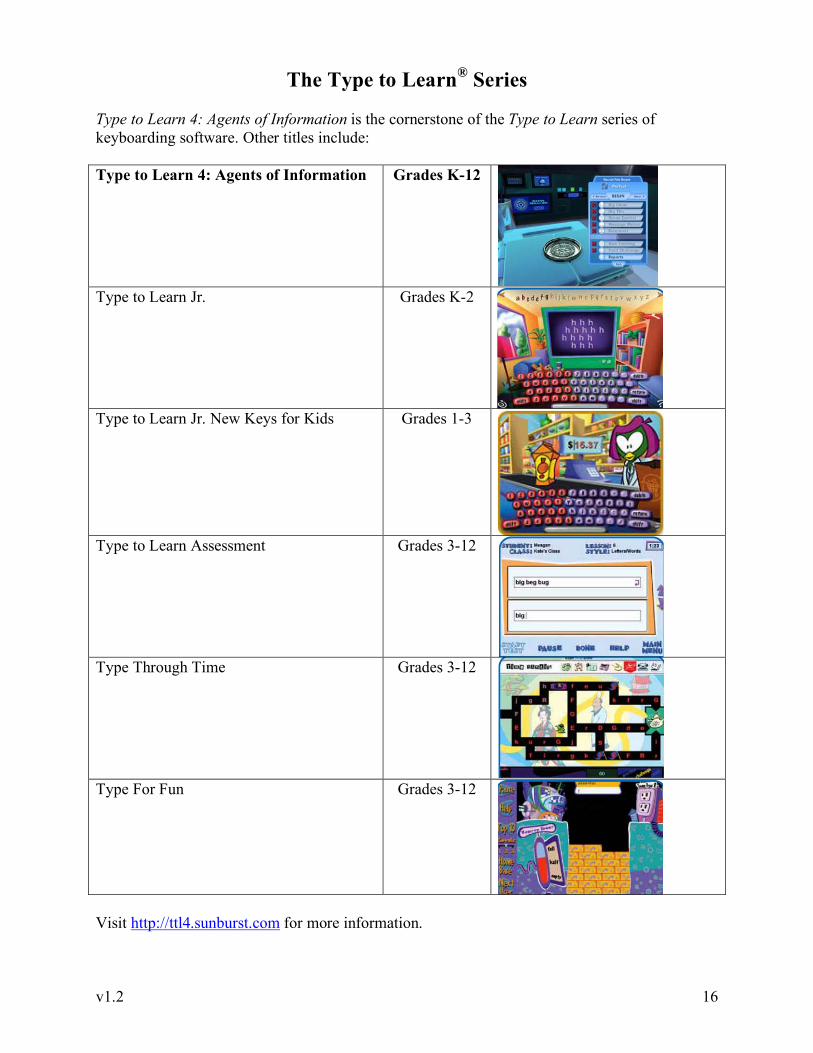
The Type to Learn® Series Type to Learn 4: Agents of Information is the cornerstone of the Type to Learn series of keyboarding software. Other titles include: Type to Learn 4: Agents of Information Grades K-12
Type to Learn Jr. Grades K-2
Type to Learn Jr. New Keys for Kids Grades 1-3
Type to Learn Assessment Grades 3-12
Type Through Time Grades 3-12
Type For Fun Grades 3-12
Visit http://ttl4.sunburst.com for more information.
v1.2 17
Installation
System Requirements Macintosh: Intel and PowerPC MacOS X 10.3.9, 10.4.x, 10.5.x, 10.6 Minimum Specs: PowerPC G4 or higher, 800 MHz or faster; 512 MB RAM or more; OS X 10.3.9 or higher; Minimum screen resolution 1024x768; U.S. English keyboard. Recommended: Intel Processor, 1 GB RAM or more. Windows: Windows 2000 Service Pack 4; Windows XP Service Pack 2; Windows Vista (32-bit and 64-bit). Minimum Specs: Pentium 3 or higher, 1 GHz processor or faster; 512 MB RAM or more; Windows 2000 Service Pack 4 or higher; DirectX 9.0c; Minimum screen resolution 1024x768 at 32 bits; U.S. English keyboard. Recommended: Pentium 4 or higher; 1.5 GHz processor or faster; 1 GB RAM or more; Windows XP Service Pack 2 or better. Hard Drive Space (Macintosh and Windows): Client – 1.5 GB Server – 400 MB Server Requirements (Macintosh and Windows): At least the recommended specs above, or better; Windows 2000 server; Windows 2003 server; Intel or PowerPC Macintosh or any XServe running at least MacOS X 10.4 or 10.5; It is also possible to run the server on a Windows XP Pro or Vista machine, on networks which do not have any machines using Windows Server. Note: Cannot be installed to a Novell server. Web Browser Requirements: Microsoft Internet Explorer 6 and above; Firefox 2 and above; Safari 3.1.2 and above (OS X 10.3.9 users must use Firefox or Internet Explorer); Pop-ups must be allowed for printing; High-speed Internet connection.
v1.2 18
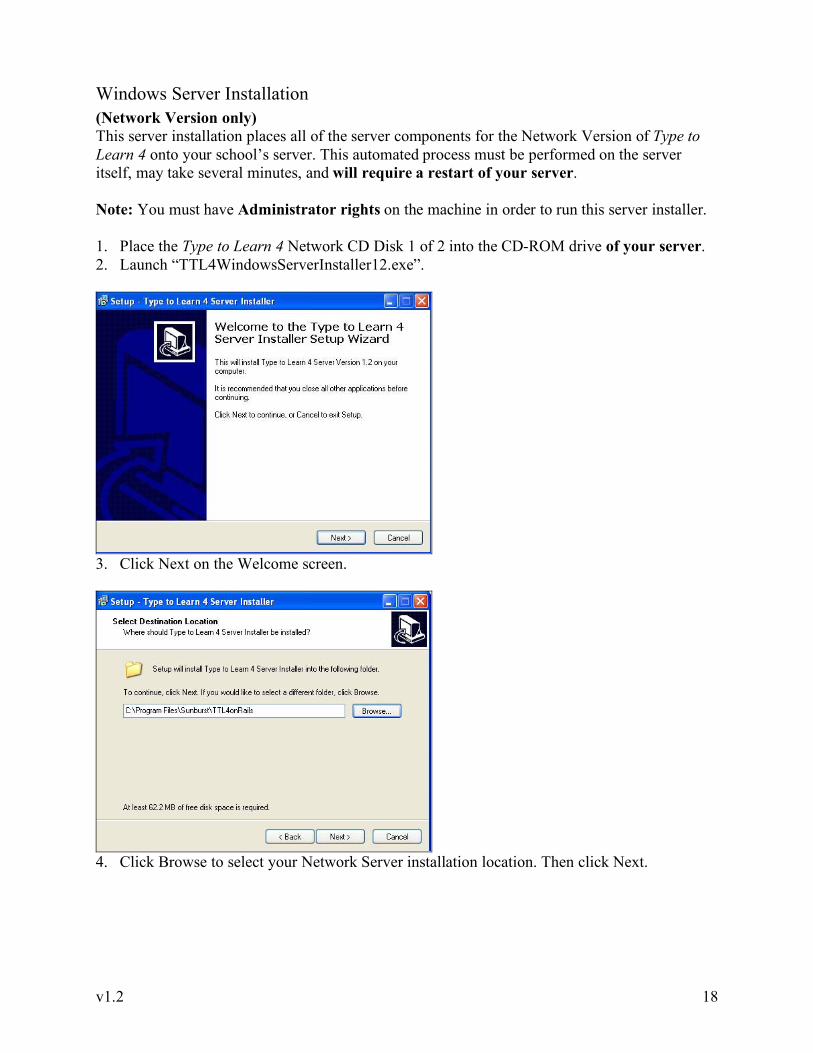
Windows Server Installation (Network Version only) This server installation places all of the server components for the Network Version of Type to Learn 4 onto your school’s server. This automated process must be performed on the server itself, may take several minutes, and will require a restart of your server. Note: You must have Administrator rights on the machine in order to run this server installer. 1. Place the Type to Learn 4 Network CD Disk 1 of 2 into the CD-ROM drive of your server. 2. Launch “TTL4WindowsServerInstaller12.exe”.
3. Click Next on the Welcome screen.
4. Click Browse to select your Network Server installation location. Then click Next.

v1.2 19
5. Review the installation location, and then click Install.
6. The installation process begins. It may take several minutes depending on the computer.
Even when the progress bar looks to be completely finished, the installation is still going.
7. Your server must be restarted for installation to be completed. Select “Yes, restart the
computer now” and click Finish.

v1.2 20
Windows Client Installation (All Versions) Every Type to Learn 4 purchaser must do this Client Installation. Note: You must have Administrator rights on the machine in order to run this installer. This client installation places the Type to Learn 4 client application onto your computer. The installation should be performed on every client machine that needs to run Type to Learn 4, including Web version computers. Installation may take about 10-20 minutes and may require a restart of your computer. Important: Do not simply copy the Type to Learn 4 files from one computer to another. This will cause permissions problems and the program may not run. Make sure to use the installer to install the product onto each client machine. Before installing Type to Learn 4 we recommend that you close all open applications on your computer. 1. Place the Type to Learn 4 CD Disk 1 of 2 into the CD-ROM drive of your client machine and
launch the CD-ROM. 2. Launch the “Type to Learn 4 v1.2 Setup_Win” installer.
3. On the Welcome screen click Next.
4. Read the End User License Agreement and click Yes if you agree to the terms.
v1.2 21
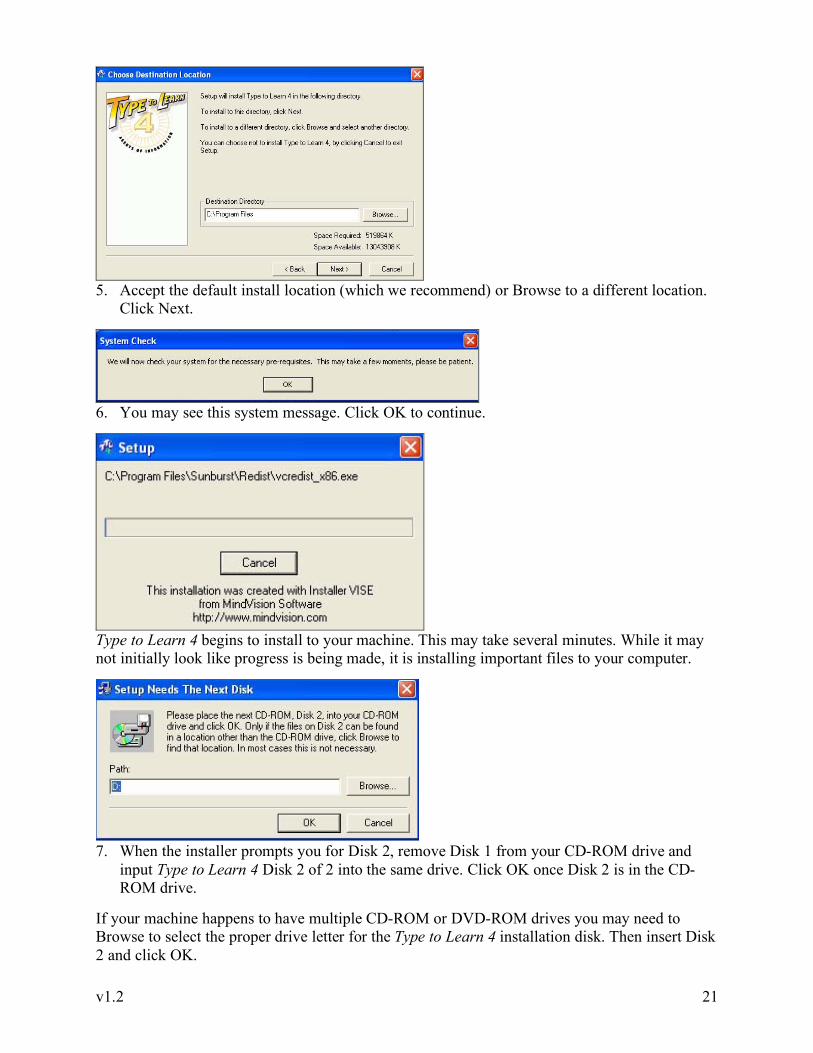
5. Accept the default install location (which we recommend) or Browse to a different location.
Click Next.
6. You may see this system message. Click OK to continue.
Type to Learn 4 begins to install to your machine. This may take several minutes. While it may not initially look like progress is being made, it is installing important files to your computer.
7. When the installer prompts you for Disk 2, remove Disk 1 from your CD-ROM drive and
input Type to Learn 4 Disk 2 of 2 into the same drive. Click OK once Disk 2 is in the CD-ROM drive.
If your machine happens to have multiple CD-ROM or DVD-ROM drives you may need to Browse to select the proper drive letter for the Type to Learn 4 installation disk. Then insert Disk 2 and click OK.

v1.2 22
The installation automatically continues.
8. Click Close on the Installation Finished screen. You can automatically launch Type to Learn
4 right away or uncheck that box to launch the program later.
Important! Proxy Servers: If you use a proxy server to connect to the internet, Type to Learn 4 needs to know your proxy settings. Go to the folder on your client machine where Type to Learn 4 was installed (C:\Program Files\Sunburst\Type to Learn 4 is the default). There is another application there called “Type to Learn 4 Proxy Settings.exe”. Use this application to configure your Type to Learn 4 proxy settings. Turn on/off using a proxy server with Type to Learn 4, specify the address and port of your proxy, and if your proxy server requires a username and password those can be set here. The Proxy Settings application saves your information in a file called "ProxySettings.ini" in the same folder. As a shortcut, copy this file to every client machine that needs to run Type to Learn 4, replacing the original ProxySettings file. Be sure to place it in the same folder as the Type to Learn 4 application: (C:\Program Files\Sunburst\Type to Learn 4) on every machine.

v1.2 23
Windows Client-Server Connectivity Setup (Network Version only) In order for the client machines to connect to the Type to Learn 4 server on the local-area network, they need to know its IP Address. Simply modify one preference file on each client machine to point to that server. 1. Locate Your Server’s IP Address On your server machine, click Start Menu and select Network Connections. Network Connections may also be located inside the Control Panel.
Double-click the Local Area Connection which says it is “Connected”. Then select the Support tab in the window that opens. The IP address of the machine is displayed:
2. Static IP It should also say, “Address Type: Static IP”, not “Assigned by DHCP”. A static IP address is important so it does not change over time, which would cause the client machines to lose connectivity to the Type to Learn 4 server. 3. Firewall Note Be sure that your server’s firewall software is configured to allow access on port 3000 (decimal). If it is not open, the Type to Learn 4 application will fail to detect the presence of the server.

v1.2 24
4. Client Machine Settings Edit the “Settings.ini” file on each client machine, located in the same folder as the Type to Learn 4 client executable you installed (C:/Program Files/Sunburst/Type to Learn 4 is the default). Open the Settings.ini file:
One line in this file needs to be edited to contain the IP address of your server machine. Change the line “serverUrl=” to equal your server machine’s IP address in the form http://your.server.IP.address:3000. It is important that the port number be 3000. It is also important that no extra slashes or dots be added to this line anywhere. Save the file. Copy this Settings.ini file to each client machine that needs to run Type to Learn 4 Network, overwriting the existing Settings.ini file in the C:/Program Files/Sunburst/Type to Learn 4 folder. The client machines will then be able to see your server. As a test of client-server connectivity, launch a web browser on any of the client machines and enter the serverUrl you copied into the Settings.ini file (http://your.server.IP.address:3000). The Type to Learn 4 Welcome page should display. This is not how you access the application; it is only to test client-server connectivity.
Permissions The installer will ensure that all users have both read and write permissions to the Type to Learn 4 directories. This is very important. If you alter user permissions Type to Learn 4 may not work properly. Programs like Deep Freeze and Parental Control which restrict user access may cause problems. For Standalone customers only, it is critical that all student users have read and write permissions to the Type to Learn 4 database on the client machine, which resides in this location:
Windows XP: C:\Documents and Settings\All Users\Application Data\ Sunburst\Type to Learn 4\development.sqlite3
Windows Vista: C:\ProgramData\Sunburst\Type to Learn 4\development.sqlite3 (The Application Data and ProgramData folders are hidden folders.)
NetSupport (Remote) Application Type to Learn 4 is a DirectX application. If you are using NetSupport (Remote) Application on your Windows workstations, please be aware of the following note from the NetSupport Technical Library (http://www.netsupport-inc.com/support/td.asp?td=268&Site=NSI&Lang):
“Some Programs that utilize OpenGL and DirectX have been reported to no longer function correctly after the installation of NetSupport. In order to fix the DirectX issues,

v1.2 25
you will need to use NetSupport Manager 7.01 or later and tick the "Enable DVD Support" in the Client Configurator.”
Launching the Program Double-click the Type to Learn 4 icon on your desktop. You can also go to Start > Programs > Type to Learn 4. Standalone and Network Users: If you have purchased a Standalone or Network version of Type to Learn 4, you must first login as a default administrator using the username: admin and the password: welcome. Web Version Users: If you purchased a Web version of Type to Learn 4, then your master account “superuser” username and password were emailed or shipped directly to you. Web Version users must also enter a valid Account Code, sent to you along with your username and password. This Account Code only needs to be entered once on each client machine, and after that it is remembered by the program.
Uninstall To uninstall the client application, go to Start > Programs > Type to Learn 4 > Uninstall. This should be done on every machine from which you’d like to remove the Type to Learn 4 program.
Macintosh Server Installation (Network Version only) This server installation places all of the server components for the Network Version of Type to Learn 4 onto your school’s server. This automated process must be performed on the server itself, may take several minutes, and will require a restart of your server. Note: You must have Administrator rights on the machine in order to run this server installer. 1. Place the Type to Learn 4 Network CD Disk 1 of 2 into the CD-ROM drive of your server.
Note: There are two versions of the Mac server installer: one for Intel (X86) and one for PowerPC (PPC) Macintosh. Be sure to select the correct one. The installers themselves do not check to ensure that you are running on a supported machine. You can use the “About this Mac” function in the Apple menu to determine which type of Macintosh you are using. 2. Double-click to launch the appropriate installer.
v1.2 26
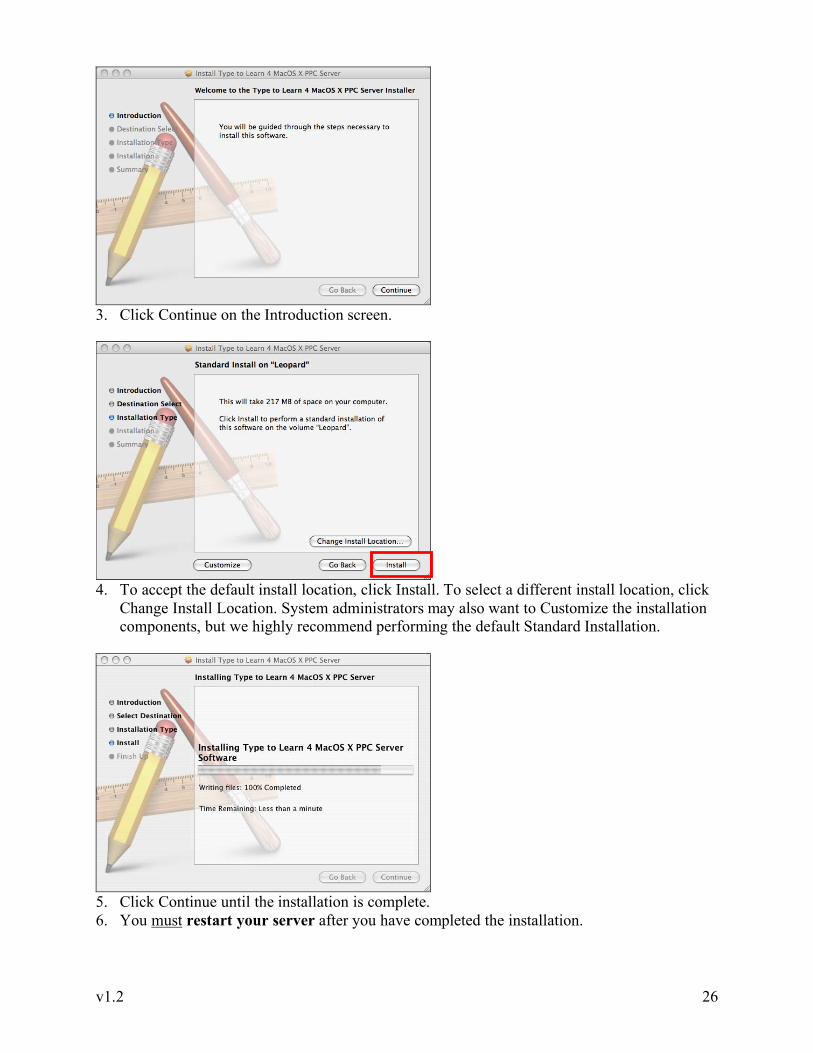
3. Click Continue on the Introduction screen.
4. To accept the default install location, click Install. To select a different install location, click
Change Install Location. System administrators may also want to Customize the installation components, but we highly recommend performing the default Standard Installation.
5. Click Continue until the installation is complete. 6. You must restart your server after you have completed the installation.
v1.2 27
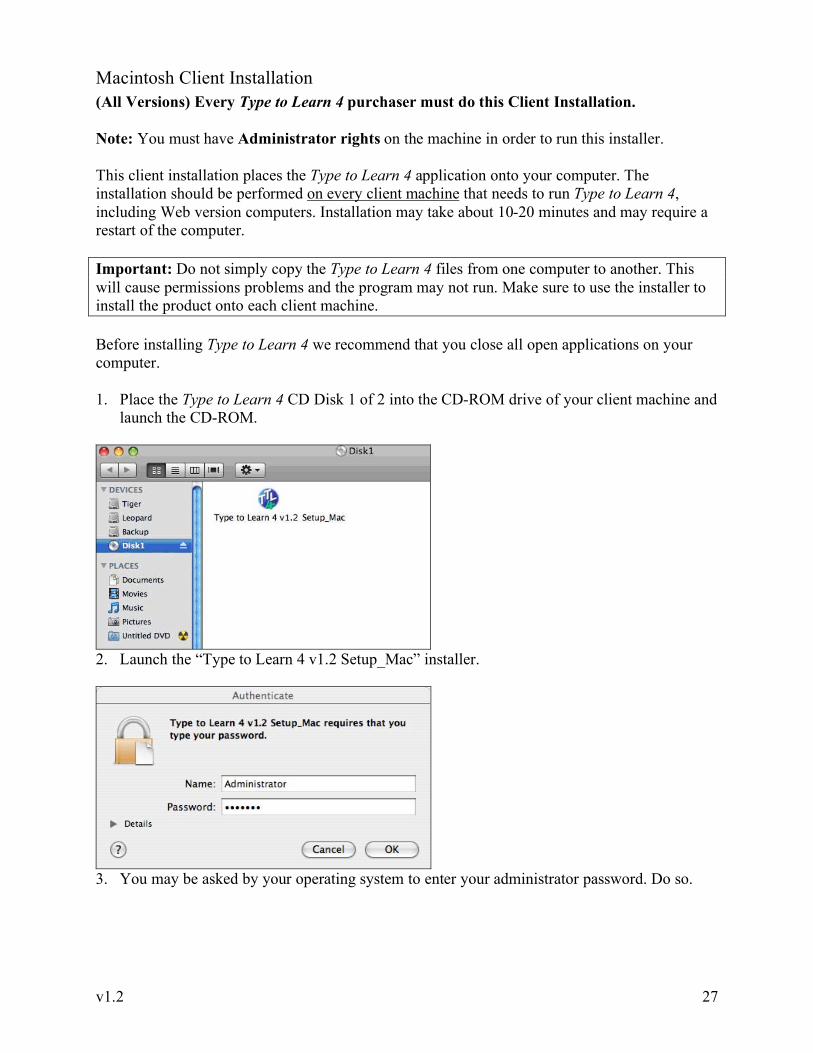
Macintosh Client Installation (All Versions) Every Type to Learn 4 purchaser must do this Client Installation. Note: You must have Administrator rights on the machine in order to run this installer. This client installation places the Type to Learn 4 application onto your computer. The installation should be performed on every client machine that needs to run Type to Learn 4, including Web version computers. Installation may take about 10-20 minutes and may require a restart of the computer. Important: Do not simply copy the Type to Learn 4 files from one computer to another. This will cause permissions problems and the program may not run. Make sure to use the installer to install the product onto each client machine. Before installing Type to Learn 4 we recommend that you close all open applications on your computer. 1. Place the Type to Learn 4 CD Disk 1 of 2 into the CD-ROM drive of your client machine and
launch the CD-ROM.
2. Launch the “Type to Learn 4 v1.2 Setup_Mac” installer.
3. You may be asked by your operating system to enter your administrator password. Do so.

v1.2 28
4. Click Continue on the Introduction screen.
5. Read the End User License Agreement and click Continue if you agree to the terms.
6. Click Agree if you agree to the software license terms.
v1.2 29
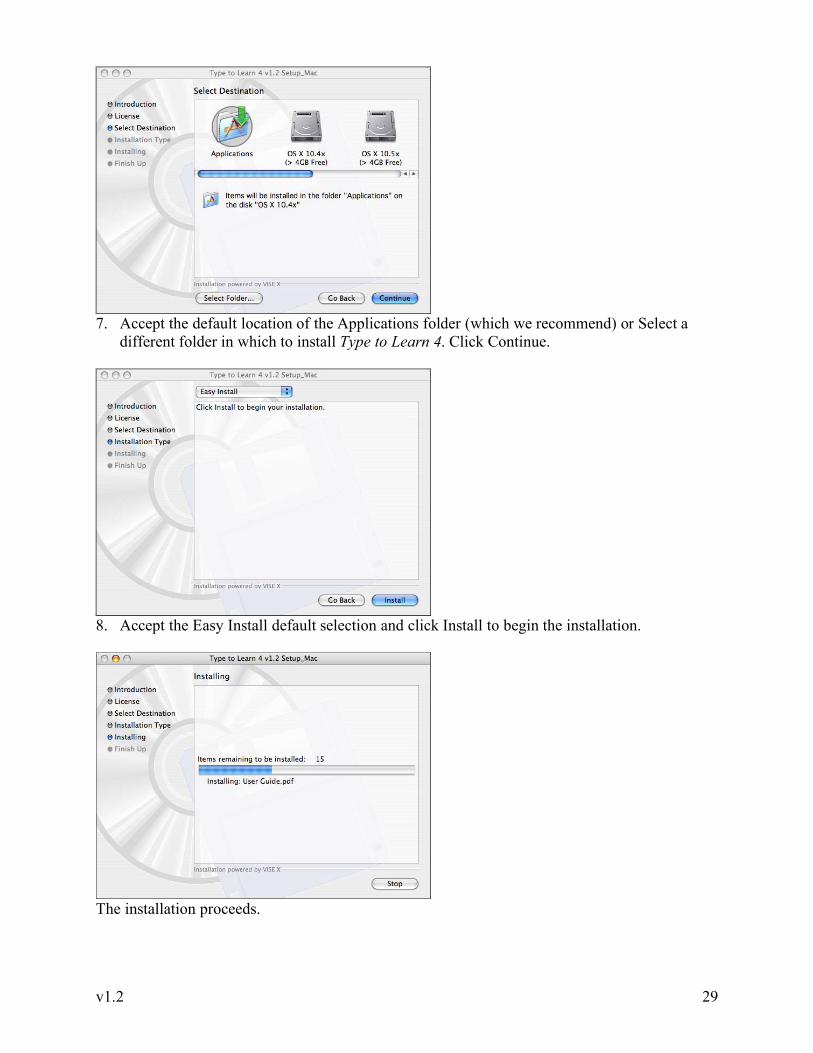
7. Accept the default location of the Applications folder (which we recommend) or Select a
different folder in which to install Type to Learn 4. Click Continue.
8. Accept the Easy Install default selection and click Install to begin the installation.
The installation proceeds.

v1.2 30
9. When the installer asks for Disk 2, remove Disk 1 from your CD-ROM drive and input the
Type to Learn 4 Disk 2 of 2 into the same drive. The installer will automatically continue.
10. Click Quit when installation is complete.
Important! Proxy Servers: If you use a proxy server to connect to the internet, Type to Learn 4 needs to know your proxy settings. Go to the folder on your client machine where Type to Learn 4 was installed (Applications/Type to Learn 4 is the default). There is another application called “Type to Learn 4 Proxy Settings”. Use this application to configure your Type to Learn 4 proxy settings. Turn on/off using a proxy server with Type to Learn 4, specify the address and port of your proxy, and if your proxy server requires a username and password those can be set here. The Proxy Settings application saves your information in a file called "ProxySettings.ini" in the same folder. As a shortcut, copy this file to every client machine that needs to run Type to Learn 4, replacing the original ProxySettings file. Be sure to place it in the same folder as the Type to Learn 4 application: (Applications/Type to Learn 4) on every machine.
v1.2 31
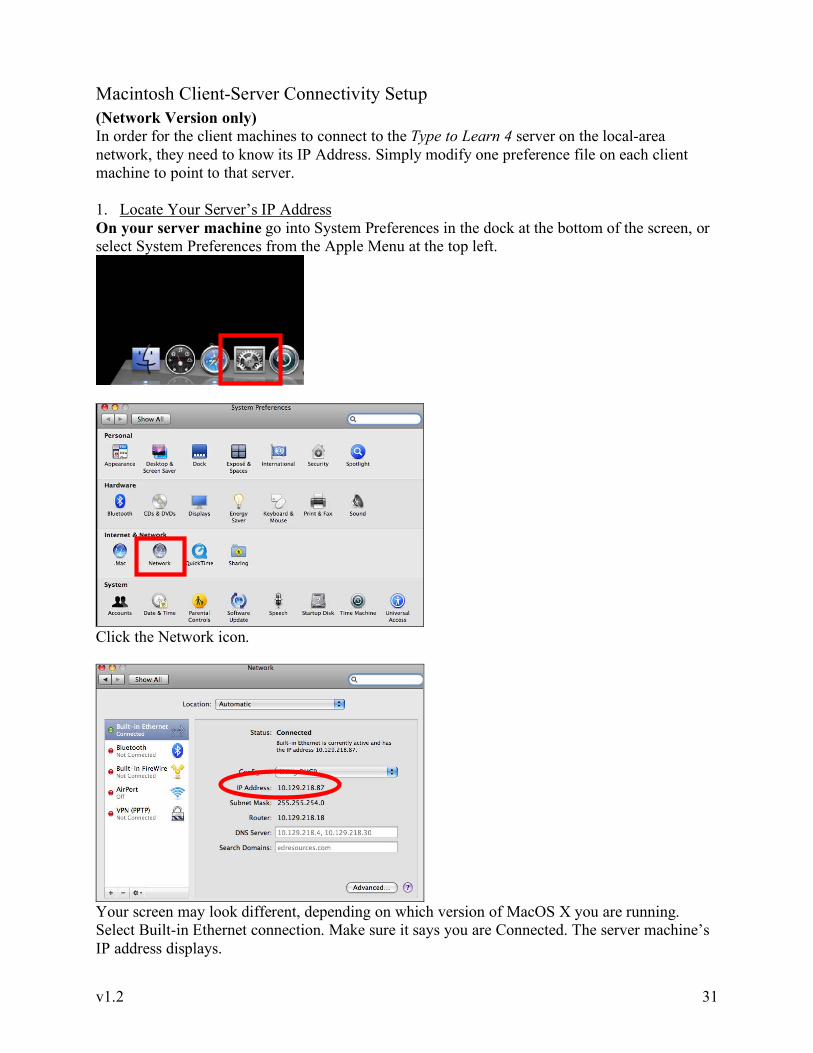
Macintosh Client-Server Connectivity Setup (Network Version only) In order for the client machines to connect to the Type to Learn 4 server on the local-area network, they need to know its IP Address. Simply modify one preference file on each client machine to point to that server. 1. Locate Your Server’s IP Address On your server machine go into System Preferences in the dock at the bottom of the screen, or select System Preferences from the Apple Menu at the top left.
Click the Network icon.
Your screen may look different, depending on which version of MacOS X you are running. Select Built-in Ethernet connection. Make sure it says you are Connected. The server machine’s IP address displays.
v1.2 32
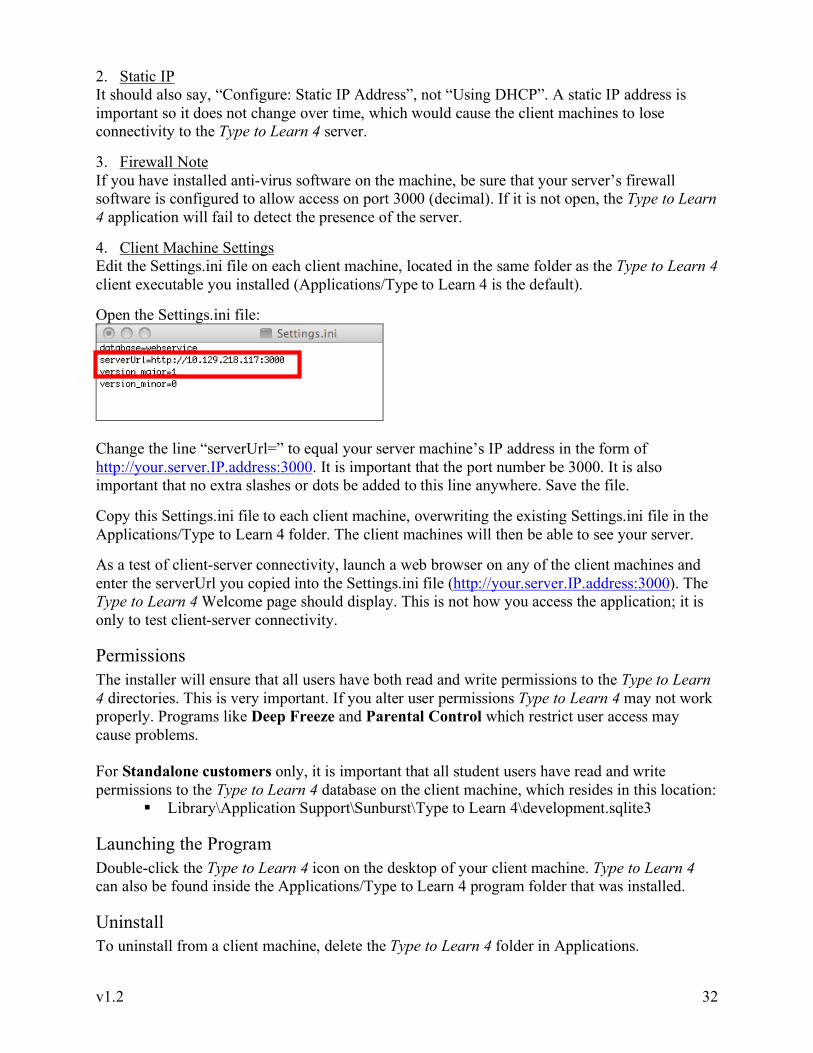
2. Static IP It should also say, “Configure: Static IP Address”, not “Using DHCP”. A static IP address is important so it does not change over time, which would cause the client machines to lose connectivity to the Type to Learn 4 server. 3. Firewall Note If you have installed anti-virus software on the machine, be sure that your server’s firewall software is configured to allow access on port 3000 (decimal). If it is not open, the Type to Learn 4 application will fail to detect the presence of the server. 4. Client Machine Settings Edit the Settings.ini file on each client machine, located in the same folder as the Type to Learn 4 client executable you installed (Applications/Type to Learn 4 is the default). Open the Settings.ini file:
Change the line “serverUrl=” to equal your server machine’s IP address in the form of http://your.server.IP.address:3000. It is important that the port number be 3000. It is also important that no extra slashes or dots be added to this line anywhere. Save the file. Copy this Settings.ini file to each client machine, overwriting the existing Settings.ini file in the Applications/Type to Learn 4 folder. The client machines will then be able to see your server. As a test of client-server connectivity, launch a web browser on any of the client machines and enter the serverUrl you copied into the Settings.ini file (http://your.server.IP.address:3000). The Type to Learn 4 Welcome page should display. This is not how you access the application; it is only to test client-server connectivity.
Permissions The installer will ensure that all users have both read and write permissions to the Type to Learn 4 directories. This is very important. If you alter user permissions Type to Learn 4 may not work properly. Programs like Deep Freeze and Parental Control which restrict user access may cause problems. For Standalone customers only, it is important that all student users have read and write permissions to the Type to Learn 4 database on the client machine, which resides in this location:
Library\Application Support\Sunburst\Type to Learn 4\development.sqlite3
Launching the Program Double-click the Type to Learn 4 icon on the desktop of your client machine. Type to Learn 4 can also be found inside the Applications/Type to Learn 4 program folder that was installed.
Uninstall To uninstall from a client machine, delete the Type to Learn 4 folder in Applications.
v1.2 33
Using the Program
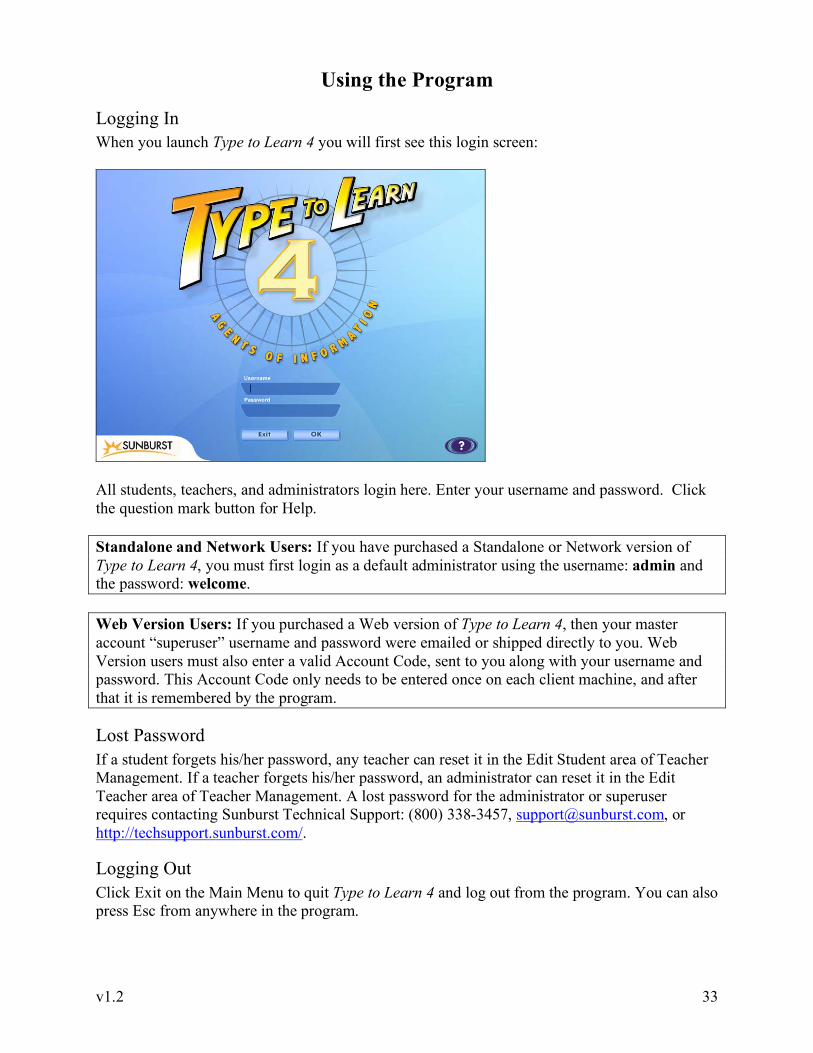
Logging In When you launch Type to Learn 4 you will first see this login screen:
All students, teachers, and administrators login here. Enter your username and password. Click the question mark button for Help. Standalone and Network Users: If you have purchased a Standalone or Network version of Type to Learn 4, you must first login as a default administrator using the username: admin and the password: welcome. Web Version Users: If you purchased a Web version of Type to Learn 4, then your master account “superuser” username and password were emailed or shipped directly to you. Web Version users must also enter a valid Account Code, sent to you along with your username and password. This Account Code only needs to be entered once on each client machine, and after that it is remembered by the program.
Lost Password If a student forgets his/her password, any teacher can reset it in the Edit Student area of Teacher Management. If a teacher forgets his/her password, an administrator can reset it in the Edit Teacher area of Teacher Management. A lost password for the administrator or superuser requires contacting Sunburst Technical Support: (800) 338-3457, [email protected], or http://techsupport.sunburst.com/.
Logging Out Click Exit on the Main Menu to quit Type to Learn 4 and log out from the program. You can also press Esc from anywhere in the program.

v1.2 34
Main Menu After logging in you are brought to the Type to Learn 4 Main Menu:
Teacher/Admin main menu Student main menu The only difference between the teacher/admin main menu and the student main menu is the Management button on the teacher/admin screen, which provides access to the Teacher Management area. Students, instead, have a Reports button where they can generate reports and graphs of their own scores. By providing the teacher with all of the same features as the student, we’ve allowed you to experience the lessons, activities, and assessments, as well as the various options and settings, for yourself. By default, all students begin with a pretest. They click Begin to start the pretest. If the pretest has been made optional by the teacher, then students can click Next to begin their first lesson. As students progress through the lessons, they must complete the lesson, any required activities (determined by the teacher), and pass the Final Challenge before they are allowed to progress to the next sequential lesson. Click Review and Next to cycle through the lessons and assessments. Teachers can cycle through and access all lessons, at any time. Students never have access to lessons they have not yet completed or progressed to. The 5 activities may also be accessed from the main menu:
Teachers can determine whether activities should be available at any time, only once the corresponding lesson is passed, or never. Individual activities can be Optional, Required, or Off.
An empty checkmark indicates a required activity that is not yet done.
A filled-in checkmark indicates an activity that has been successfully completed.
A red X indicates an activity or task that is unavailable at that time.
v1.2 35
Options Click Options on the main menu to bring up the student Options screen (teachers have access to many more options and settings in the Management area):
Students can select the Master Agent host they prefer, change the color of the reference hands on the keyboard during lessons, turn music and sound effects on or off, and adjust the volume.
Access Medallion Students can click Access Medallion on the main menu screen to personalize the colors of their progress medallion. Click the left and right arrows to see the color set choices. Click OK to select a color set. The medallion can be changed at any time from the student’s main menu.
As students complete lessons and assessments, their medallion fills in to show their progress.
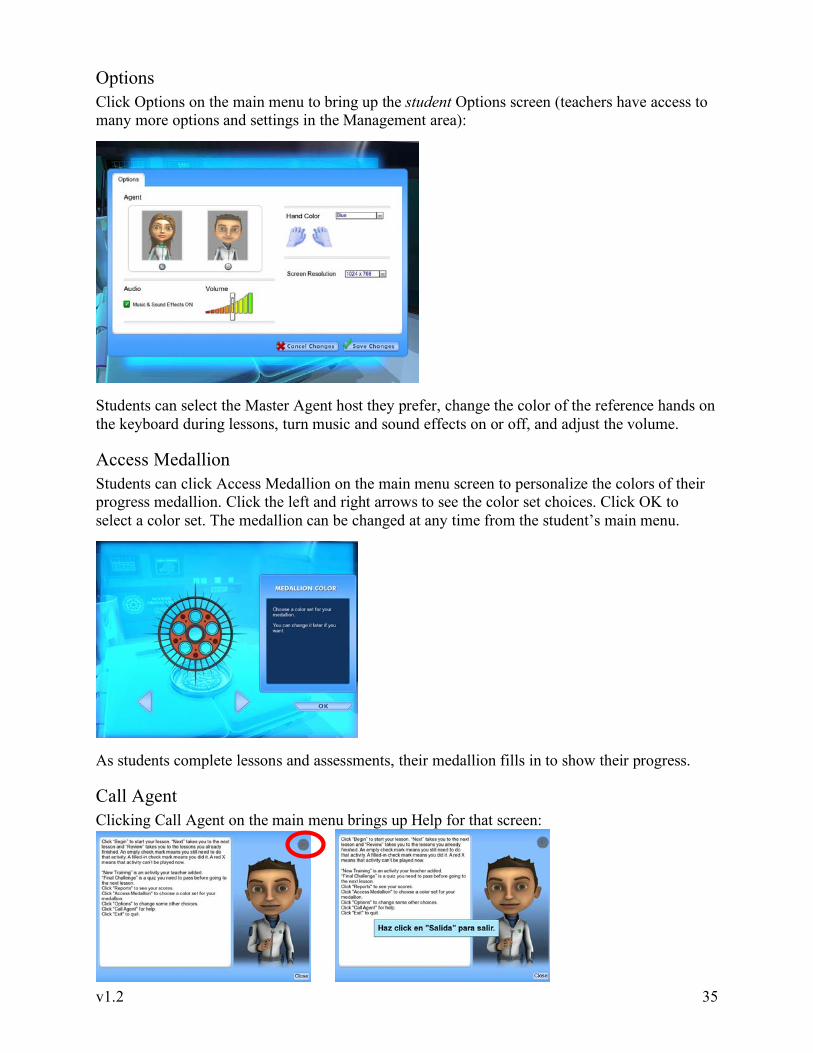
Call Agent Clicking Call Agent on the main menu brings up Help for that screen:

v1.2 36
Students can click the speaker button in the top right corner to hear the Help read aloud. Students can also roll their cursor over the text on screen to see a Spanish ESL translation, larger text size, different font colors, and to trigger ESL audio. All of these accessibility options are turned on or off by the teacher in the Management area.
Lessons Click Begin to start a lesson.
Every lesson follows these steps:
1. Home Row Reminder 2. Warm Up 3. Security Check 4. Learn New Keys 5. Exercises 1-3 or 4
The student’s current WPM and Accuracy goals display in the left-side panel, and their medallion progress and current rank are on the right. Buttons on the right side of the keyboard take you to the activities, if available. Buttons on the left side of the keyboard are:
Main Menu Help A progress bar shows students the progress they’re making through the current lesson:
Activities There are 5 practice activities with each lesson. These activities teach specific keyboarding skills and contain content corresponding to the keys learned in each lesson. Activities can be accessed from the main menu, from the lesson screen, or from another activity screen.

v1.2 37
Big Ideas Activity This is a timed activity focusing on right hand and left hand coordination. Students need to type the words inside the thought bubbles. All thought bubbles are on the right or left side of the screen, and contain content typed with either the right hand or the left hand, exclusively.
The speed of the thought bubbles is related to the student’s WPM goal, so it is always an appropriate challenge. Students get a point for each correctly typed character. Their WPM and accuracy are also recorded. Time limits may be adjusted by the teacher. Defaults are:
30 sec for grades K-2 45 sec for grades 3-6 60 sec for grades 7-12
Dig This Activity This activity focuses on accuracy and typing to a beat to encourage a smooth typing cadence. Students type the text displayed in order to break the ice or stones and reveal what’s hidden beneath. The metronome beat for cadence can be turned on or off by the teacher in settings, as well as by the student in the game itself, by clicking on the music icon: .
WPM and accuracy are always recorded.
v1.2 38
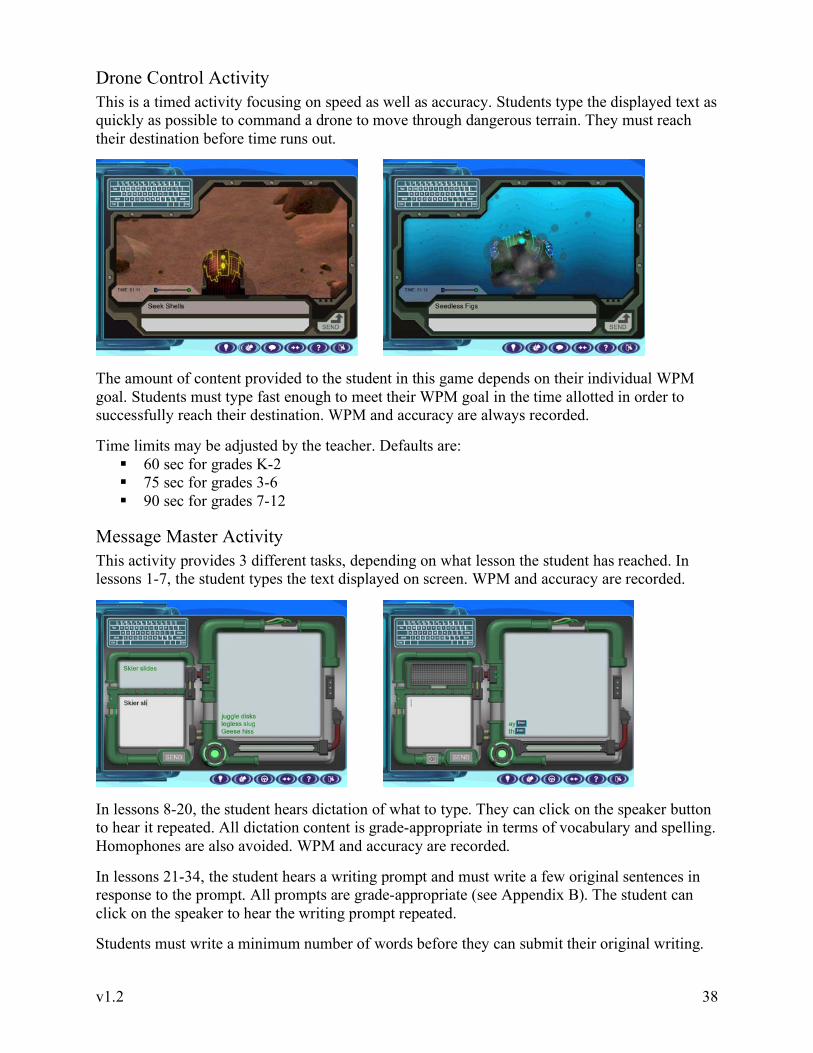
Drone Control Activity This is a timed activity focusing on speed as well as accuracy. Students type the displayed text as quickly as possible to command a drone to move through dangerous terrain. They must reach their destination before time runs out.
The amount of content provided to the student in this game depends on their individual WPM goal. Students must type fast enough to meet their WPM goal in the time allotted in order to successfully reach their destination. WPM and accuracy are always recorded. Time limits may be adjusted by the teacher. Defaults are:
60 sec for grades K-2 75 sec for grades 3-6 90 sec for grades 7-12
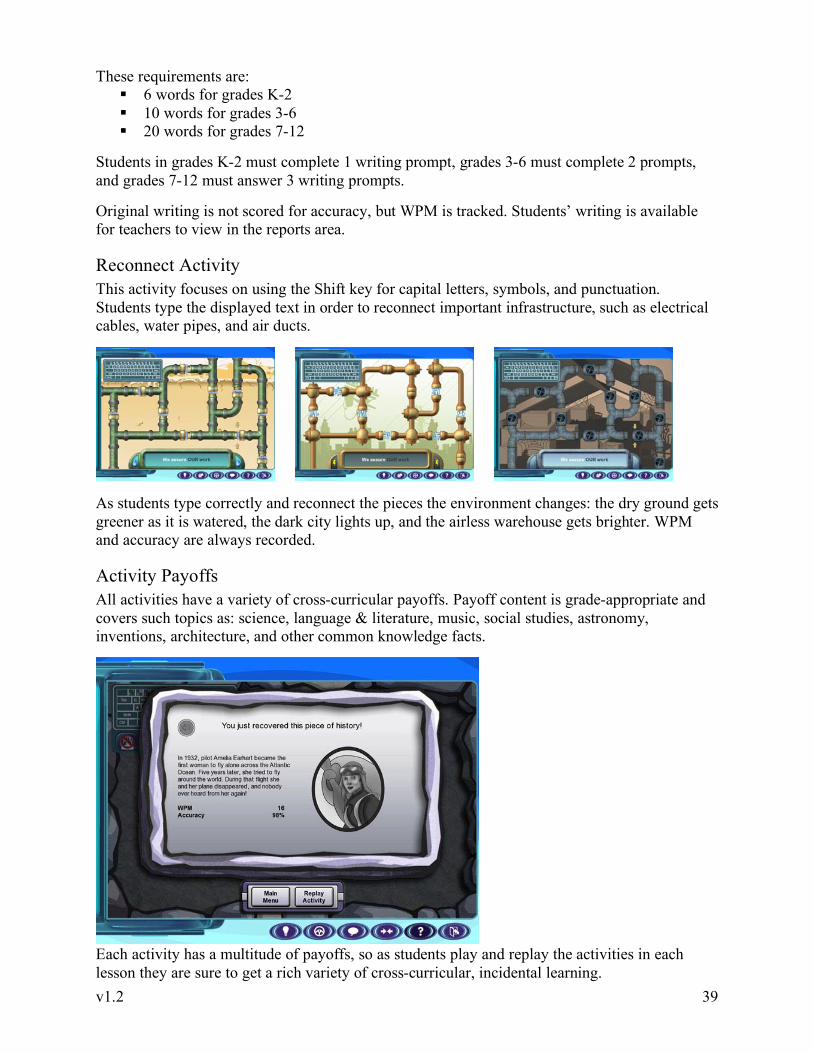
Message Master Activity This activity provides 3 different tasks, depending on what lesson the student has reached. In lessons 1-7, the student types the text displayed on screen. WPM and accuracy are recorded.
In lessons 8-20, the student hears dictation of what to type. They can click on the speaker button to hear it repeated. All dictation content is grade-appropriate in terms of vocabulary and spelling. Homophones are also avoided. WPM and accuracy are recorded. In lessons 21-34, the student hears a writing prompt and must write a few original sentences in response to the prompt. All prompts are grade-appropriate (see Appendix B). The student can click on the speaker to hear the writing prompt repeated. Students must write a minimum number of words before they can submit their original writing.
v1.2 39
These requirements are: 6 words for grades K-2 10 words for grades 3-6 20 words for grades 7-12
Students in grades K-2 must complete 1 writing prompt, grades 3-6 must complete 2 prompts, and grades 7-12 must answer 3 writing prompts. Original writing is not scored for accuracy, but WPM is tracked. Students’ writing is available for teachers to view in the reports area.
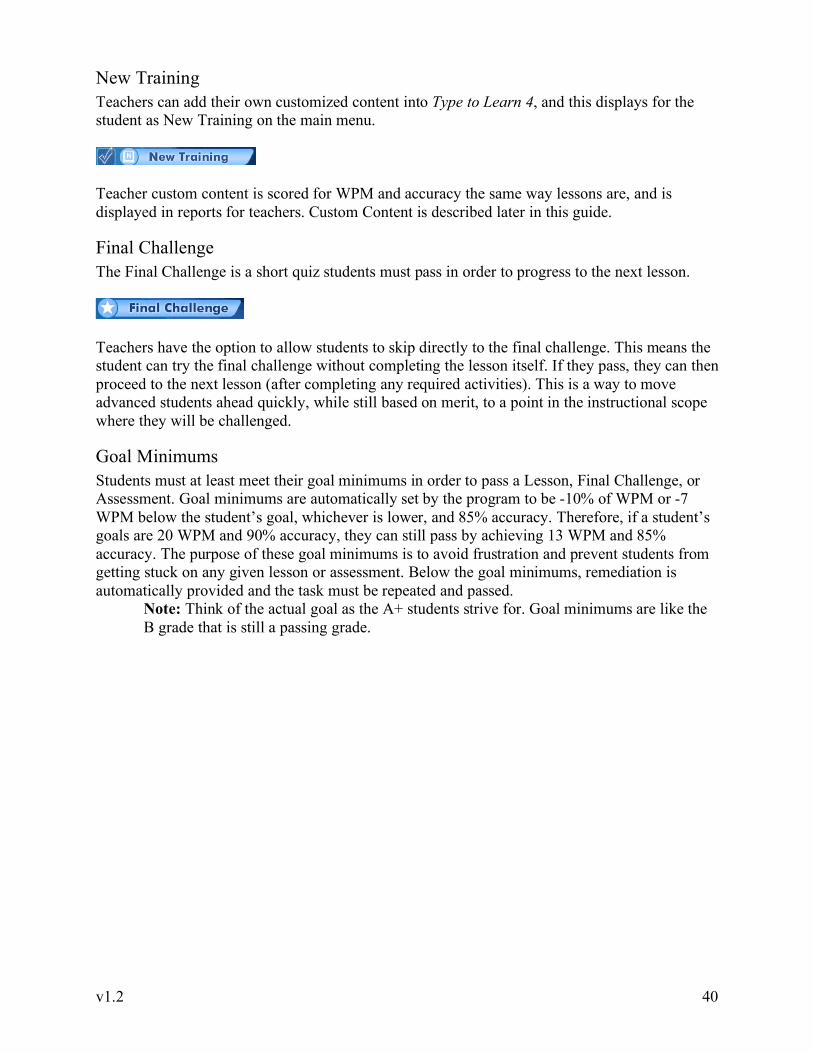
Reconnect Activity This activity focuses on using the Shift key for capital letters, symbols, and punctuation. Students type the displayed text in order to reconnect important infrastructure, such as electrical cables, water pipes, and air ducts.
As students type correctly and reconnect the pieces the environment changes: the dry ground gets greener as it is watered, the dark city lights up, and the airless warehouse gets brighter. WPM and accuracy are always recorded.
Activity Payoffs All activities have a variety of cross-curricular payoffs. Payoff content is grade-appropriate and covers such topics as: science, language & literature, music, social studies, astronomy, inventions, architecture, and other common knowledge facts.
Each activity has a multitude of payoffs, so as students play and replay the activities in each lesson they are sure to get a rich variety of cross-curricular, incidental learning.
v1.2 40
New Training Teachers can add their own customized content into Type to Learn 4, and this displays for the student as New Training on the main menu.
Teacher custom content is scored for WPM and accuracy the same way lessons are, and is displayed in reports for teachers. Custom Content is described later in this guide.
Final Challenge The Final Challenge is a short quiz students must pass in order to progress to the next lesson.
Teachers have the option to allow students to skip directly to the final challenge. This means the student can try the final challenge without completing the lesson itself. If they pass, they can then proceed to the next lesson (after completing any required activities). This is a way to move advanced students ahead quickly, while still based on merit, to a point in the instructional scope where they will be challenged.
Goal Minimums Students must at least meet their goal minimums in order to pass a Lesson, Final Challenge, or Assessment. Goal minimums are automatically set by the program to be -10% of WPM or -7 WPM below the student’s goal, whichever is lower, and 85% accuracy. Therefore, if a student’s goals are 20 WPM and 90% accuracy, they can still pass by achieving 13 WPM and 85% accuracy. The purpose of these goal minimums is to avoid frustration and prevent students from getting stuck on any given lesson or assessment. Below the goal minimums, remediation is automatically provided and the task must be repeated and passed.
Note: Think of the actual goal as the A+ students strive for. Goal minimums are like the B grade that is still a passing grade.

v1.2 41
Certificates When the student passes each assessment they receive a certificate congratulating them on their newly earned rank in the society, and displaying their WPM and Accuracy scores.
These certificates can be saved to the computer’s hard drive for printing. Since Type to Learn 4 is a full screen application it is not possible to print directly from the program. Certificates are automatically saved as .png images to the following location:
Windows – My Documents/Sunburst/Type to Learn 4/Certificates Mac – User’s Home/Documents/Sunburst/Type to Learn 4/Certificates
File names include the student’s name, the date, and the time: “Billy Jones 09-17-08 15-27”. This keeps the file names unique. Students cannot change the file name or the save location.

v1.2 42
Teacher Management Area Teachers and administrators can access the Management area by clicking the Management button on the main menu. If you have purchased the Web Version license you can also access the Teacher Management Area online from any computer at: http://teacher.ttl4.com. Use your same username, password, and account code on the website. Note: If you do not have a web license, your login will not work on the website.
User Management This is where you can create, edit, delete, and import students and teachers. Click User Management along the top of the screen. A list of students displays. The list will be blank if you have not entered any users yet.
Two drop-down menus at the top control which users display in the list. 1. Users menu - on the right:
My Users refers to only those students who have been placed into your classes. If you have no classes set up this list will be blank.
All Students refers to all students in your Type to Learn 4 license. All Teachers refers to all teachers in your license.
The list of users shows names, usernames, and grades. Passwords are encrypted in this view. Click on any column header to sort the list by that column.
v1.2 43
Advanced Usage – Groups 2. Groups menu - on the left: Another drop-down menu at the top of the screen controls which Group of users you want to see and manage. A Group is just what it sounds like, a grouping of users in your account license.
Standalone Version users have just 1 default Group and may not see this menu. Network Version users have 10 default Groups labeled Group 1 – Group 10. Web Version users may have 1 or more Groups depending on the number of students and
school buildings in your license. These Groups are created at the time of purchase. Only Web Version master account users may edit group names in the Account Settings tab. Standalone and Network users cannot edit Group names.
For optimal performance, Groups are limited to 2000 students. Therefore, a Group might be your entire school building, or it might be a portion of students in your school, such as a grade. All students and teachers belong to a Group. By default, when you login you are automatically brought to the group to which you personally belong. In most cases this will be the Default group or Group 1. You can view and manage students or teachers from that screen. Or, you can select a different group from the Group drop-down menu to view and manage other users in another Group. Only one Group can be viewed at a time. You will notice the list of users change when you select a different Group. Each student or teacher can only be in one Group.
Example: Group menu says Group 1 and Users menu says All Students. This will show you all students who are in Group 1. Change the Group menu selection to be Group 2, and the list of All Students will change to now show all students who are in Group 2.
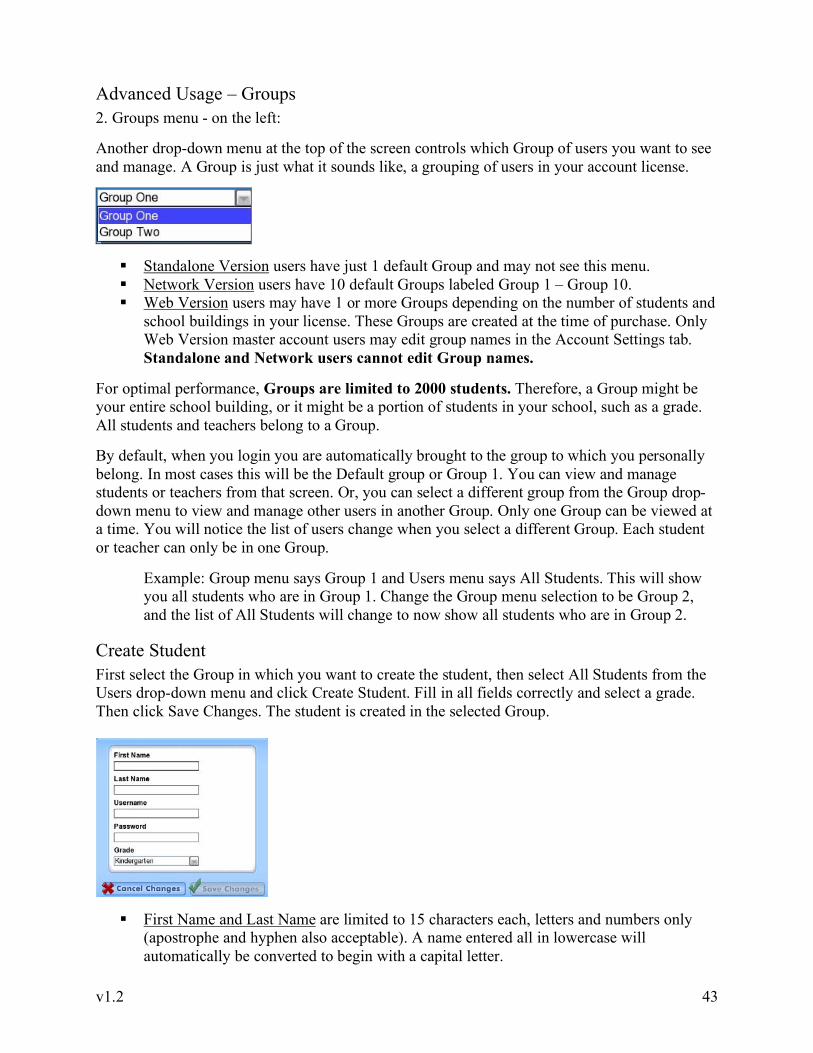
Create Student First select the Group in which you want to create the student, then select All Students from the Users drop-down menu and click Create Student. Fill in all fields correctly and select a grade. Then click Save Changes. The student is created in the selected Group.
First Name and Last Name are limited to 15 characters each, letters and numbers only (apostrophe and hyphen also acceptable). A name entered all in lowercase will automatically be converted to begin with a capital letter.
v1.2 44
Username and Password must be between 3-12 characters, letters and numbers only. Usernames and passwords are not case-sensitive and will automatically be converted to all lowercase letters. The program will then accept either uppercase or lowercase letters when logging in (i.e., asmith4 and ASMITH4 will both work). This is so that younger students do not get tripped up by capital letters when logging in.
Every user needs a unique username. If the username you select is already in use you will receive a message. Note: Once usernames are created they cannot be edited or changed.
Passwords may be left blank but we do not recommend this for security reasons. Remember, a group can have a maximum of 2000 students. Teachers are not limited.
Create Teacher (Admin Only) First select the Group in which you want to create the teacher. Then select All Teachers from the Users drop-down menu and click Create Teacher. All other instructions are the same as for creating a student. The teacher is created in the selected Group.
Edit Student Select a Group, select All Students from the drop-down menu, then select a single student in the list and click Edit Student. You can only edit one student at a time. You may change any of their information except their username. Once created a username cannot be edited. Change Password: If a student forgets his/her password the teacher can reset it here. Change Group: You can change a student’s group affiliation here.
Edit Teacher (Admin Only) Select a Group, select All Teachers from the drop-down menu, then select a single teacher from the list and click Edit Teacher. Only administrators can edit other teachers. You may change any of the information except the username. Once created a username cannot be edited. Change Password: If a teacher forgets his/her password, their administrator can reset it in the Edit Teacher window. Teachers may also change their own passwords here. Change Group: You can change a teacher’s group affiliation here.
Delete Student Select a Group, select All Students from the drop-down menu, then select one or more students in the list and click Delete Student. You will be prompted to confirm the deletion. All deletions are final and irreversible. This deletes the student(s) and all of their scores. Multiple Selection of Users: You can select multiple students by holding down the Control or Command key, or Shift. Lists of users are loaded dynamically, so you may need to scroll through to load all users first before multiple selecting, to ensure they are all present.
Delete Teacher (Admin Only) Select a Group, select All Teachers from the drop-down menu, then select one or more teachers in the list and click Delete Teacher. Only those with administrator access may delete teachers. You will be prompted to confirm the deletion. All deletions are final and irreversible. This deletes the teacher(s) and their classes. Students in the classes and their scores are unharmed.
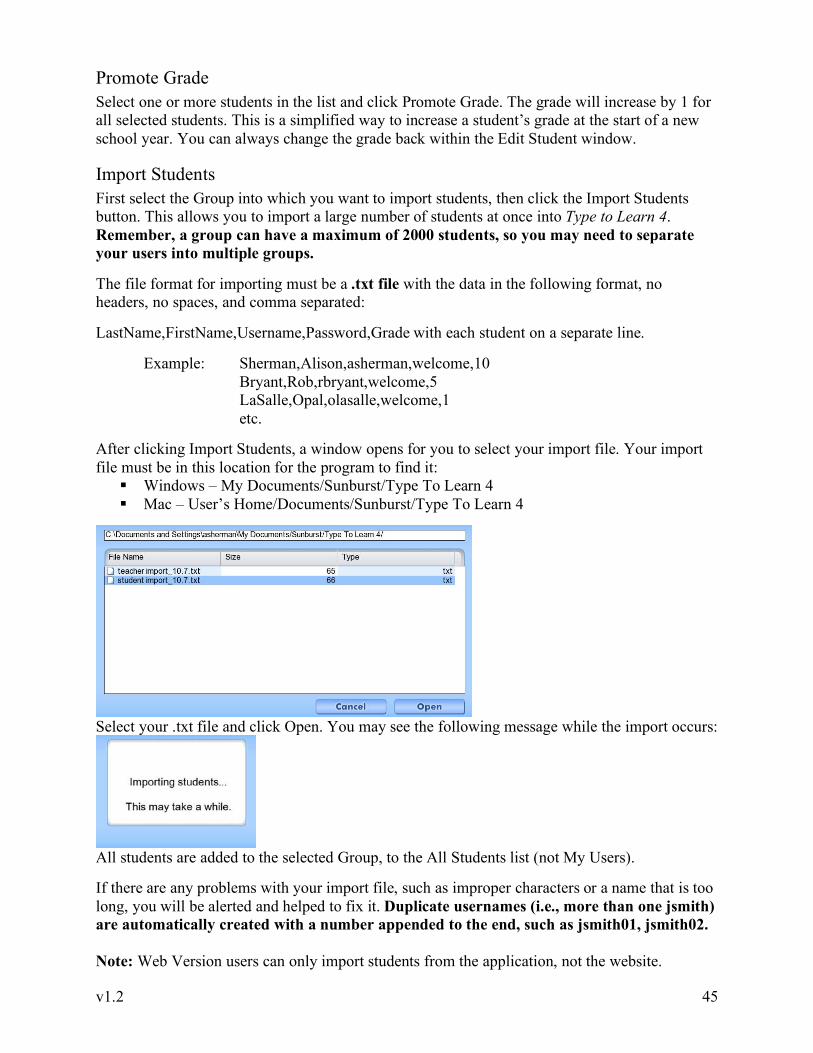
v1.2 45
Promote Grade Select one or more students in the list and click Promote Grade. The grade will increase by 1 for all selected students. This is a simplified way to increase a student’s grade at the start of a new school year. You can always change the grade back within the Edit Student window.
Import Students First select the Group into which you want to import students, then click the Import Students button. This allows you to import a large number of students at once into Type to Learn 4. Remember, a group can have a maximum of 2000 students, so you may need to separate your users into multiple groups. The file format for importing must be a .txt file with the data in the following format, no headers, no spaces, and comma separated: LastName,FirstName,Username,Password,Grade with each student on a separate line.
Example: Sherman,Alison,asherman,welcome,10 Bryant,Rob,rbryant,welcome,5 LaSalle,Opal,olasalle,welcome,1 etc.
After clicking Import Students, a window opens for you to select your import file. Your import file must be in this location for the program to find it:
Windows – My Documents/Sunburst/Type To Learn 4 Mac – User’s Home/Documents/Sunburst/Type To Learn 4
Select your .txt file and click Open. You may see the following message while the import occurs:
All students are added to the selected Group, to the All Students list (not My Users). If there are any problems with your import file, such as improper characters or a name that is too long, you will be alerted and helped to fix it. Duplicate usernames (i.e., more than one jsmith) are automatically created with a number appended to the end, such as jsmith01, jsmith02. Note: Web Version users can only import students from the application, not the website.

v1.2 46
Advanced Usage – Groups You can import students (up to 2000 per group) one group at a time as explained above. Alternatively, you can import all students at once and use the import.txt file to separate them into groups automatically. Add a GroupID to the end of each entry in the .txt file to place students into different groups during the import process. GroupID is a number from 1 to n, depending on how many Groups you have in your account license. Look in the Account Settings area of the application to see how many groups you have and what each group’s GroupID is.
Open the drop-down menu to see all your Groups. Select each one individually to see that Group’s ID. By default, Group 1 will have an ID of 1, Group 2 has an ID of 2, etc. The import file format is then: LastName,FirstName,Username,Password,Grade,GroupID with each student on a separate line. Make sure there are no headers, no spaces, and the data is comma separated.
Example: Sherman,Alison,asherman,welcome,10,1 Bryant,Rob,rbryant,welcome,5,1 LaSalle,Opal,olasalle,welcome,1,2 etc.
Students are then imported into the group corresponding to their GroupID in the file. If the GroupID is left blank then those students are automatically imported into the Group that was selected on the User Management screen at the time of import. Remember, if any Group in the import file has more than 2000 students, the import will fail to add any student after #2000 for that Group.
Import Teachers (Admin Only) When importing teachers, first select the Group into which you want to import the teachers, then select All Teachers from the drop-down menu. Click the Import Teachers button. The file format must be a .txt file with the following information: LastName,FirstName,Username,Password with no headers, no spaces, and comma separation. Steps for importing teachers are then the same as for students. The .txt file must be in this specific location for the program to find it:
Windows – My Documents/Sunburst/Type To Learn 4 Mac – User’s Home/Documents/Sunburst/Type To Learn 4
Note: Web Version users can only import teachers from the application, not the website.
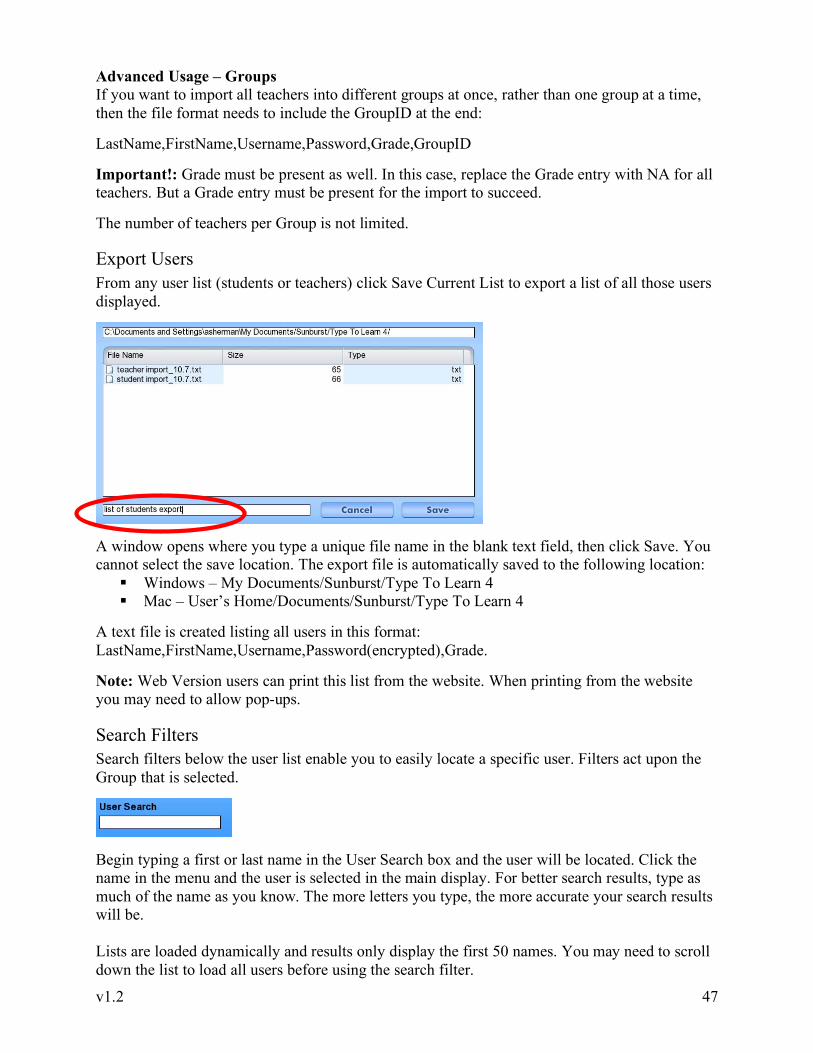
v1.2 47
Advanced Usage – Groups If you want to import all teachers into different groups at once, rather than one group at a time, then the file format needs to include the GroupID at the end: LastName,FirstName,Username,Password,Grade,GroupID Important!: Grade must be present as well. In this case, replace the Grade entry with NA for all teachers. But a Grade entry must be present for the import to succeed. The number of teachers per Group is not limited.
Export Users From any user list (students or teachers) click Save Current List to export a list of all those users displayed.
A window opens where you type a unique file name in the blank text field, then click Save. You cannot select the save location. The export file is automatically saved to the following location:
Windows – My Documents/Sunburst/Type To Learn 4 Mac – User’s Home/Documents/Sunburst/Type To Learn 4
A text file is created listing all users in this format: LastName,FirstName,Username,Password(encrypted),Grade. Note: Web Version users can print this list from the website. When printing from the website you may need to allow pop-ups.
Search Filters Search filters below the user list enable you to easily locate a specific user. Filters act upon the Group that is selected.
Begin typing a first or last name in the User Search box and the user will be located. Click the name in the menu and the user is selected in the main display. For better search results, type as much of the name as you know. The more letters you type, the more accurate your search results will be. Lists are loaded dynamically and results only display the first 50 names. You may need to scroll down the list to load all users before using the search filter.
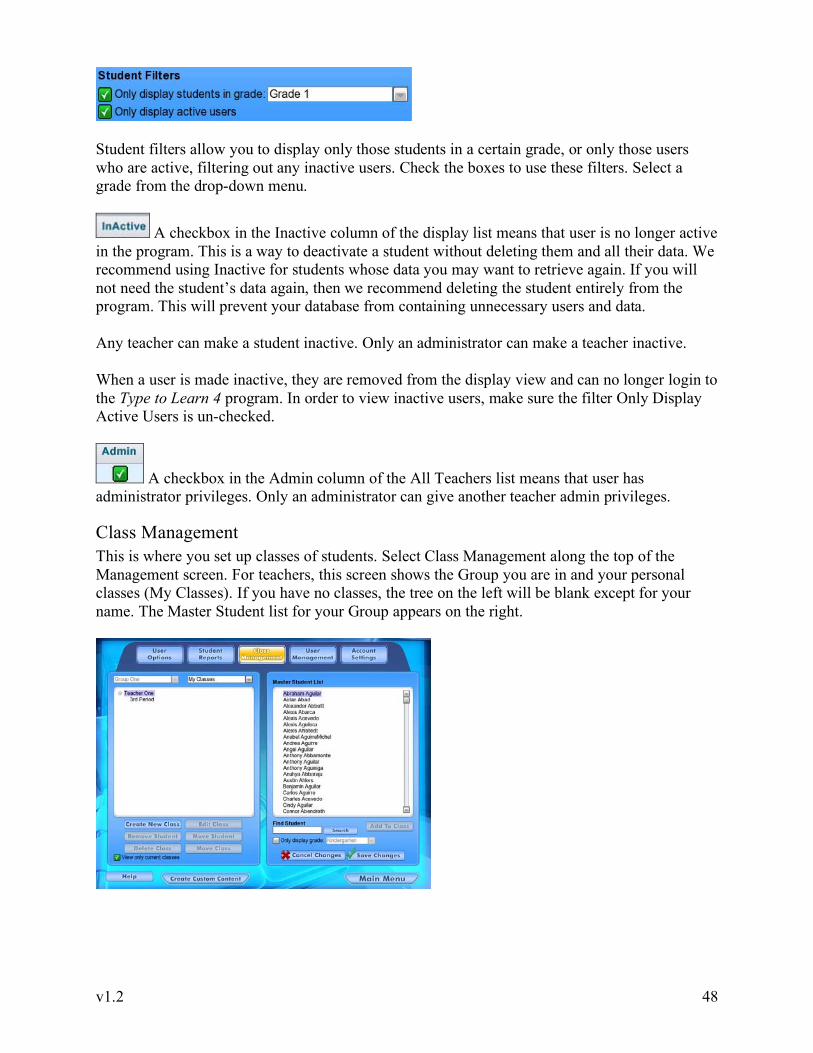
v1.2 48
Student filters allow you to display only those students in a certain grade, or only those users who are active, filtering out any inactive users. Check the boxes to use these filters. Select a grade from the drop-down menu.
A checkbox in the Inactive column of the display list means that user is no longer active in the program. This is a way to deactivate a student without deleting them and all their data. We recommend using Inactive for students whose data you may want to retrieve again. If you will not need the student’s data again, then we recommend deleting the student entirely from the program. This will prevent your database from containing unnecessary users and data. Any teacher can make a student inactive. Only an administrator can make a teacher inactive. When a user is made inactive, they are removed from the display view and can no longer login to the Type to Learn 4 program. In order to view inactive users, make sure the filter Only Display Active Users is un-checked.
A checkbox in the Admin column of the All Teachers list means that user has administrator privileges. Only an administrator can give another teacher admin privileges.
Class Management This is where you set up classes of students. Select Class Management along the top of the Management screen. For teachers, this screen shows the Group you are in and your personal classes (My Classes). If you have no classes, the tree on the left will be blank except for your name. The Master Student list for your Group appears on the right.
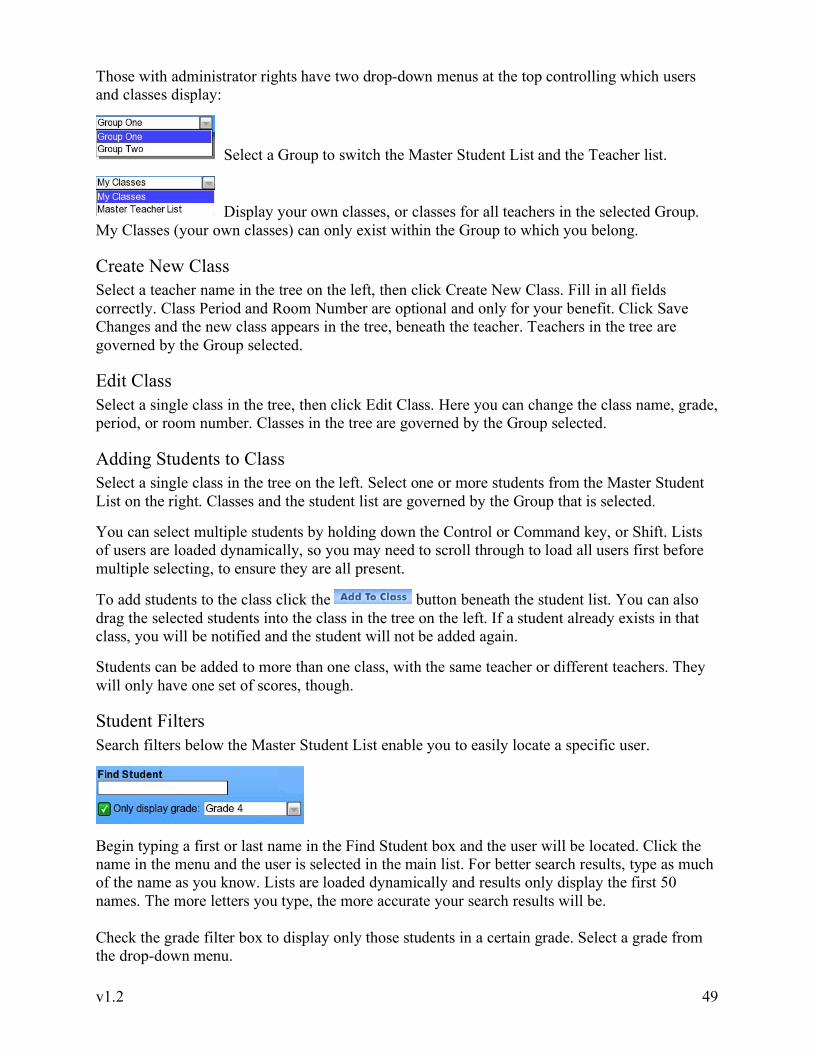
v1.2 49
Those with administrator rights have two drop-down menus at the top controlling which users and classes display:
Select a Group to switch the Master Student List and the Teacher list.
Display your own classes, or classes for all teachers in the selected Group. My Classes (your own classes) can only exist within the Group to which you belong.
Create New Class Select a teacher name in the tree on the left, then click Create New Class. Fill in all fields correctly. Class Period and Room Number are optional and only for your benefit. Click Save Changes and the new class appears in the tree, beneath the teacher. Teachers in the tree are governed by the Group selected.
Edit Class Select a single class in the tree, then click Edit Class. Here you can change the class name, grade, period, or room number. Classes in the tree are governed by the Group selected.
Adding Students to Class Select a single class in the tree on the left. Select one or more students from the Master Student List on the right. Classes and the student list are governed by the Group that is selected. You can select multiple students by holding down the Control or Command key, or Shift. Lists of users are loaded dynamically, so you may need to scroll through to load all users first before multiple selecting, to ensure they are all present.
To add students to the class click the button beneath the student list. You can also drag the selected students into the class in the tree on the left. If a student already exists in that class, you will be notified and the student will not be added again. Students can be added to more than one class, with the same teacher or different teachers. They will only have one set of scores, though.
Student Filters Search filters below the Master Student List enable you to easily locate a specific user.
Begin typing a first or last name in the Find Student box and the user will be located. Click the name in the menu and the user is selected in the main list. For better search results, type as much of the name as you know. Lists are loaded dynamically and results only display the first 50 names. The more letters you type, the more accurate your search results will be. Check the grade filter box to display only those students in a certain grade. Select a grade from the drop-down menu.
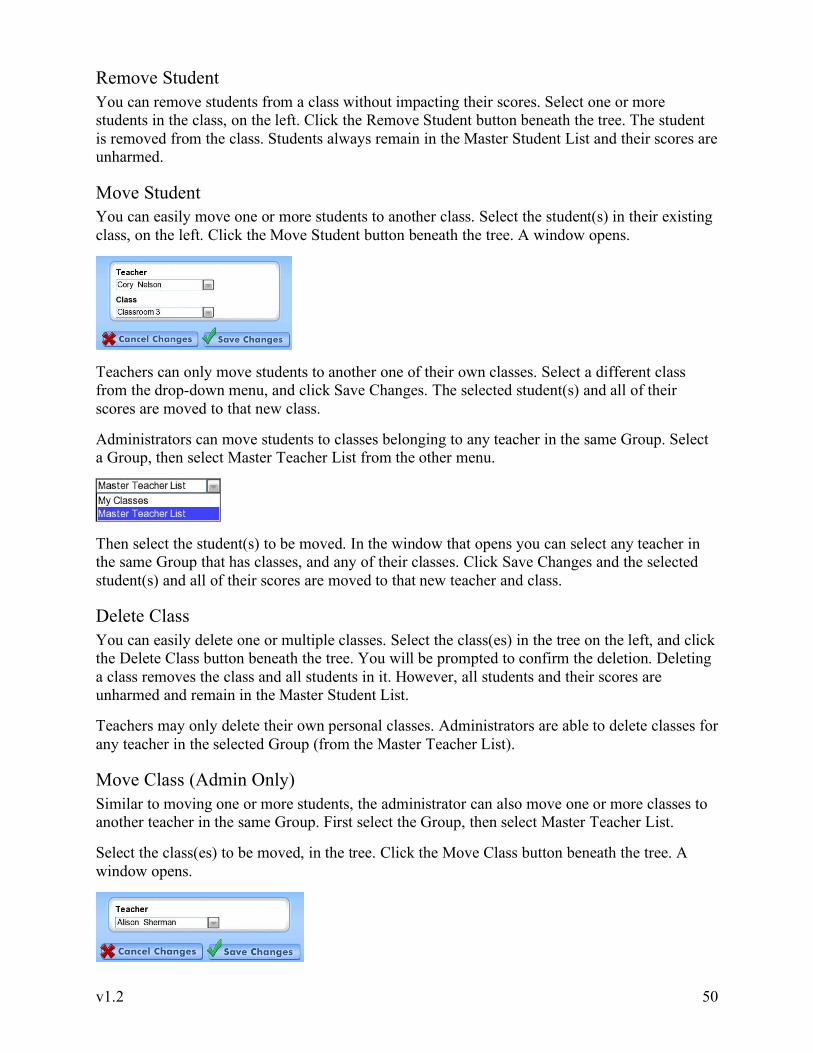
v1.2 50
Remove Student You can remove students from a class without impacting their scores. Select one or more students in the class, on the left. Click the Remove Student button beneath the tree. The student is removed from the class. Students always remain in the Master Student List and their scores are unharmed.
Move Student You can easily move one or more students to another class. Select the student(s) in their existing class, on the left. Click the Move Student button beneath the tree. A window opens.
Teachers can only move students to another one of their own classes. Select a different class from the drop-down menu, and click Save Changes. The selected student(s) and all of their scores are moved to that new class. Administrators can move students to classes belonging to any teacher in the same Group. Select a Group, then select Master Teacher List from the other menu.
Then select the student(s) to be moved. In the window that opens you can select any teacher in the same Group that has classes, and any of their classes. Click Save Changes and the selected student(s) and all of their scores are moved to that new teacher and class.
Delete Class You can easily delete one or multiple classes. Select the class(es) in the tree on the left, and click the Delete Class button beneath the tree. You will be prompted to confirm the deletion. Deleting a class removes the class and all students in it. However, all students and their scores are unharmed and remain in the Master Student List. Teachers may only delete their own personal classes. Administrators are able to delete classes for any teacher in the selected Group (from the Master Teacher List).
Move Class (Admin Only) Similar to moving one or more students, the administrator can also move one or more classes to another teacher in the same Group. First select the Group, then select Master Teacher List. Select the class(es) to be moved, in the tree. Click the Move Class button beneath the tree. A window opens.

v1.2 51
Select any teacher in the Group from the drop-down menu and click Save Changes. The selected class(es), all students in those classes, and all of their scores are moved to that new teacher.
View Only Current Classes (Web and Network versions only) There is a checkbox filter beneath the classes tree called View Only Current Classes.
By default, this filter is checked. This means you will only see classes from the current school year or semester. If you want to see older classes from past years, uncheck this box. All classes are created anew when a semester or school year begins. The Type to Learn 4 administrator controls this process by determining when the new semester or year starts. At that time, all existing classes are automatically archived and filtered out of the tree as “old” and teachers create new classes. This is not a mandatory feature, and administrators can very easily leave the program on the same semester/year all the time. However, it may be useful for old classes to be archived so as to avoid confusion with your current classes. The Master Student List always remains unchanged when a new school year or semester begins. Students’ data always remains unchanged.
User Options Once you have created your students and classes, you can set a variety of options for those students, in order to individualize the learning environment for their different needs. Click User Options along the top of the screen.
All options are in tabs across the screen: General, Lessons, Activities, Assessments, and Accessibility. You may switch tabs while making your selections. But be sure to click Save Changes before navigating away from the User Options screen itself.

v1.2 52
Control which users display by using the drop-down menus at the top:
My Classes displays all classes for the teacher who is logged in. A teacher’s classes can only be in one group, so the Group menu is disabled when My Classes is selected.
Master Student List displays all students in the selected Group. Master Teacher List (Admin Only) displays all teachers in the selected Group and their
classes. Select one or more students in the tree and then make your option selections. You can select an entire class of students at once by selecting the class name. You can select multiple students by holding down the Control or Command key, or Shift. Lists of users are loaded dynamically, so you may need to scroll through to load all users first before multiple selecting, to ensure they are all present.
You can select classes from previous semesters or school years by un-checking the box for View Only Current Classes . Note: When you have multiple students selected, some settings may highlight red. This means that the settings are different for the multiple students selected. You can keep the differences, or override them by choosing the setting you want. Note: If a teacher changes options for a student while that student happens to be logged into the Type to Learn 4 program on another machine, the student will need to logout and back in for the changes to take effect.
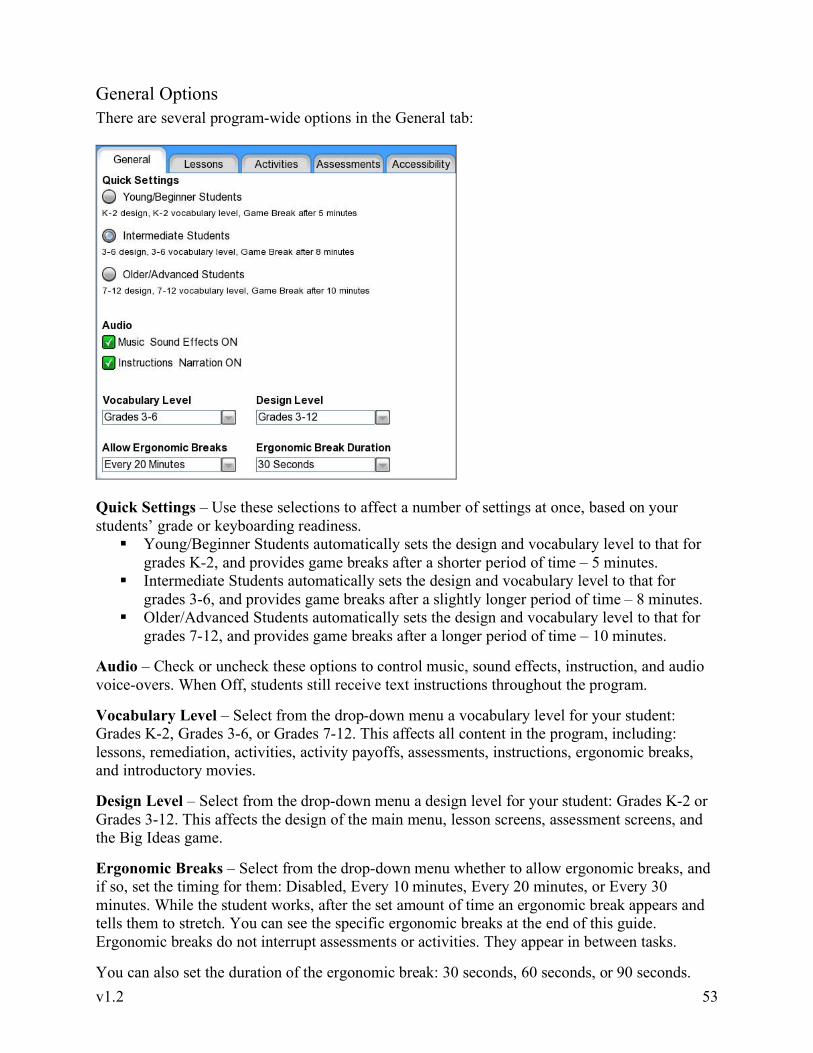
v1.2 53
General Options There are several program-wide options in the General tab:
Quick Settings – Use these selections to affect a number of settings at once, based on your students’ grade or keyboarding readiness.
Young/Beginner Students automatically sets the design and vocabulary level to that for grades K-2, and provides game breaks after a shorter period of time – 5 minutes.
Intermediate Students automatically sets the design and vocabulary level to that for grades 3-6, and provides game breaks after a slightly longer period of time – 8 minutes.
Older/Advanced Students automatically sets the design and vocabulary level to that for grades 7-12, and provides game breaks after a longer period of time – 10 minutes.
Audio – Check or uncheck these options to control music, sound effects, instruction, and audio voice-overs. When Off, students still receive text instructions throughout the program. Vocabulary Level – Select from the drop-down menu a vocabulary level for your student: Grades K-2, Grades 3-6, or Grades 7-12. This affects all content in the program, including: lessons, remediation, activities, activity payoffs, assessments, instructions, ergonomic breaks, and introductory movies. Design Level – Select from the drop-down menu a design level for your student: Grades K-2 or Grades 3-12. This affects the design of the main menu, lesson screens, assessment screens, and the Big Ideas game. Ergonomic Breaks – Select from the drop-down menu whether to allow ergonomic breaks, and if so, set the timing for them: Disabled, Every 10 minutes, Every 20 minutes, or Every 30 minutes. While the student works, after the set amount of time an ergonomic break appears and tells them to stretch. You can see the specific ergonomic breaks at the end of this guide. Ergonomic breaks do not interrupt assessments or activities. They appear in between tasks. You can also set the duration of the ergonomic break: 30 seconds, 60 seconds, or 90 seconds.

v1.2 54
Lessons Options There are several lesson-specific options in the Lessons tab:
Prevent Going Past Lesson – You can select a lesson or assessment from the drop-down menu to set an upper limit past which a student cannot progress. This may be useful if students are accessing the program from home and you do not want them to speed through too many lessons too quickly, without getting the proper practice time. By default this setting is disabled. Game Breaks – Select from the drop-down menu whether you want to allow game breaks, and if so, set the timing for them. This means that while the student is working in a lesson, after the set amount of time a game break will appear giving the student an option to play one of the 5 activities. The activity choice is randomized and the student then returns to the lesson where they left off. They can also say No to the break. Game breaks do not interrupt assessments or activities. They only appear in between lesson tasks. The default timings are:
Grades K-2: every 5 minutes Grades 3-6: every 8 minutes Grades 7-12: every 10 minutes
Game breaks might be useful if you have students who are easily frustrated or have a hard time focusing on a lesson task for very long. These breaks help to maintain interest.
v1.2 55
Custom Content – Select a Custom Content package to assign to the selected students, or select None for no custom content to be available. Teachers create the custom content. See that section of this guide for more information. Security Check – Select whether the Security Check part of lessons should require 100% accuracy with errors returning the student to the beginning, or if errors should be allowed. The default setting is to require 100% accuracy during this short Security Check. Reference Hand Support – This checkbox option turns the animated hands support on or off in lessons. By default it is On. Allow Skip to Final Challenge – This setting allows students to try the final challenge for a lesson without completing the lesson itself. If they pass by meeting their goals, they can then proceed to the next sequential lesson. This is a way to allow advanced students to move ahead quickly, while still based on merit. By default this option is On. Younger Lessons A & B – This setting allows you to turn on or off lessons A and B which focus on keyboarding awareness for the youngest learners. These introductory lessons do not teach touch-typing, but rather provide a foundation for the other lessons. By default lessons A and B are on only for students in grades K-2. Skip Lessons 29 and 30 on Numeric Keypad – Type to Learn 4 includes two lessons teaching the numeric keypad. However, we recognize that not all keyboards will have a numeric keypad (i.e., laptops). Therefore this setting allows you to skip these lessons, if desired. By default these lessons are On (unchecked setting). Check the box only if you want to skip them. Manually Set Goals – This option allows the teacher to manually set WPM and Accuracy goals for individuals or groups of students. However, we strongly encourage you not to manually change these goals. The pretest and formative assessments in the product will automatically set goals for each individual student, based on their own personal performances. If you should changes these goals and then want to reset them to the program’s individualized goals, click the Use Assessment Goals button. If you want to change these goals to the standard defaults for a grade range (K-2, 3-6, 7-12), click the Use Grade Goals button. Goals for each grade range are defaulted to:
Grades K-2: 6 WPM and 60% accuracy Grades 3-6: 15 WPM and 85% accuracy Grades 7-12: 20 WPM and 90% accuracy
Important: We recommend not manually changing students’ goals. Even the grade level defaults will not be perfectly suited to all students in those grade ranges. The best method is to allow the program’s pretest and formative assessments to automatically set individualized goals for each student. The WPM goal must be between 1-200 WPM. The accuracy percentage goal must be between 1-100%. If you set a goal outside its designated range, it will be set back to the previous number by default.

v1.2 56
Activities Options There are several activity-specific options in the Activities tab:
Allow Activities – Select from this menu when activities should be accessible by students: Never, Anytime, Before the lesson is complete, or only After the lesson is complete. The default setting is for activities to only be allowed After the lesson has been completed. Required or Optional – Select from the 5 drop-down menus whether each activity should be Required, Optional, or Off. Required means the student must play the activity before they can proceed to the next lesson. The default setting is for all activities to be Required. Big Ideas Time Limit – The Big Ideas activity has a time limit. Teachers can manually set the time limit from 20-120 seconds. If you set a time limit outside its designated range, it will be set back to the previous number automatically. The default time limits for each grade range are:
Grades K-2: 30 seconds Grades 3-6: 45 seconds Grades 7-12: 60 seconds
Drone Control Time Limit – The Drone Control activity has a time limit that can be manually set from 20-120 seconds. If you set the time limit outside its designated range, it will be set back to the previous number automatically. The default time limits for each grade range are:
Grades K-2: 60 seconds Grades 3-6: 75 seconds Grades 7-12: 90 seconds
Dig This Metronome – The Dig This activity has an optional metronome beat for cadence. This can help students type in a smooth rhythm. Teachers can turn this metronome beat On or Off. By default it is On. Students have the option of turning the metronome Off from the activity screen.
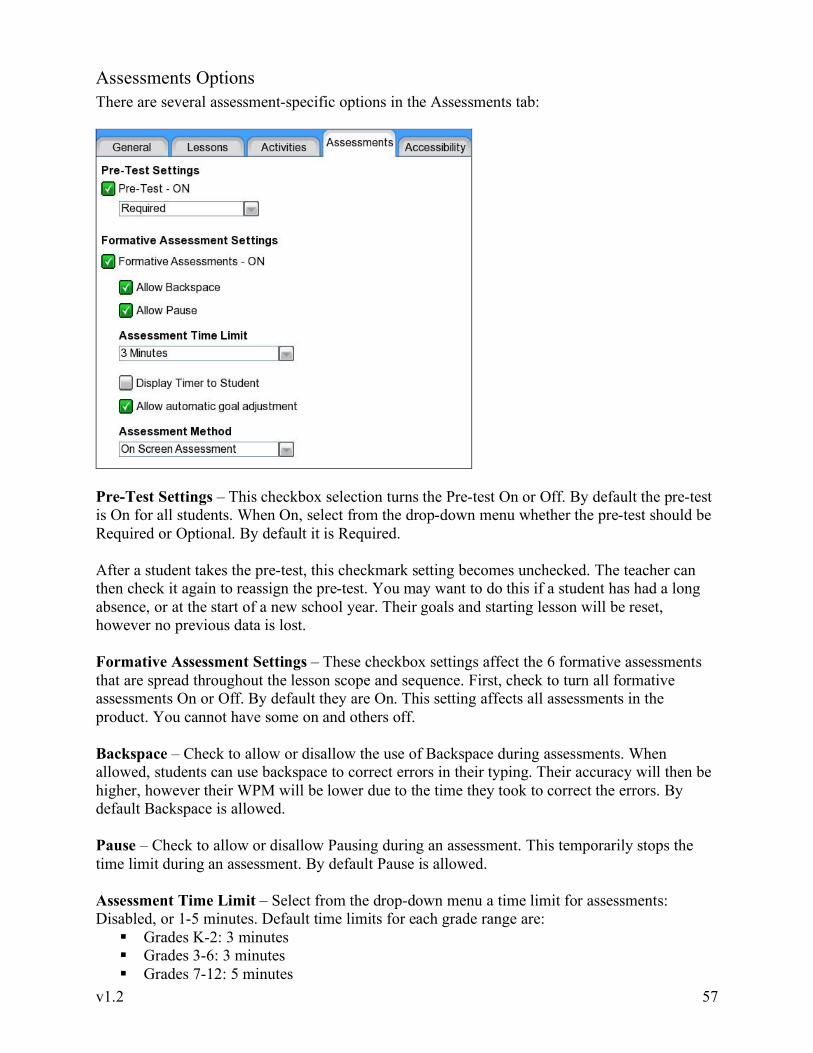
v1.2 57
Assessments Options There are several assessment-specific options in the Assessments tab:
Pre-Test Settings – This checkbox selection turns the Pre-test On or Off. By default the pre-test is On for all students. When On, select from the drop-down menu whether the pre-test should be Required or Optional. By default it is Required. After a student takes the pre-test, this checkmark setting becomes unchecked. The teacher can then check it again to reassign the pre-test. You may want to do this if a student has had a long absence, or at the start of a new school year. Their goals and starting lesson will be reset, however no previous data is lost. Formative Assessment Settings – These checkbox settings affect the 6 formative assessments that are spread throughout the lesson scope and sequence. First, check to turn all formative assessments On or Off. By default they are On. This setting affects all assessments in the product. You cannot have some on and others off. Backspace – Check to allow or disallow the use of Backspace during assessments. When allowed, students can use backspace to correct errors in their typing. Their accuracy will then be higher, however their WPM will be lower due to the time they took to correct the errors. By default Backspace is allowed. Pause – Check to allow or disallow Pausing during an assessment. This temporarily stops the time limit during an assessment. By default Pause is allowed. Assessment Time Limit – Select from the drop-down menu a time limit for assessments: Disabled, or 1-5 minutes. Default time limits for each grade range are:
Grades K-2: 3 minutes Grades 3-6: 3 minutes Grades 7-12: 5 minutes

v1.2 58
Assessment content has been created so that students type for the full time but do not necessarily complete the entire assessment. This is intentional. An assessment may even end in the middle of a sentence. Students are scored based on what they were able to type in the time allowed. Check to display a timer to the student as they take the assessment. By default a timer is not displayed (unchecked). Automatic Goal Adjustment – Check this setting to allow or disable the program’s automatic goal adjustment feature. This means that a student’s performance on the pre-test and formative assessments will determine their goals in the program. This is an incredibly individualized way to set students’ goals. By default this is checked to be allowed. After taking the pre-test, goals are set to be 2 WPM and 2% higher than the student’s performance. After each formative assessment, students’ goals are again adjusted to be 2 WPM and 2% higher than their performance on that assessment. Goals are never adjusted downward, even if a student’s performance drops. The maximum accuracy percentage is 96% and there is no maximum goal for WPM. Assessment Method – Select from this drop-down menu if assessments should be given on screen, or off a printed copy. All assessments for each grade range are provided in Appendix C of this guide. If printed assessment is selected, then no text will display on screen. Students will need to type off the printed copy. Be sure to print out the correct assessment number and grade, to ensure accuracy in the program.
Accessibility Options There are several accessibility options available in the Accessibility tab to help support students with different needs:
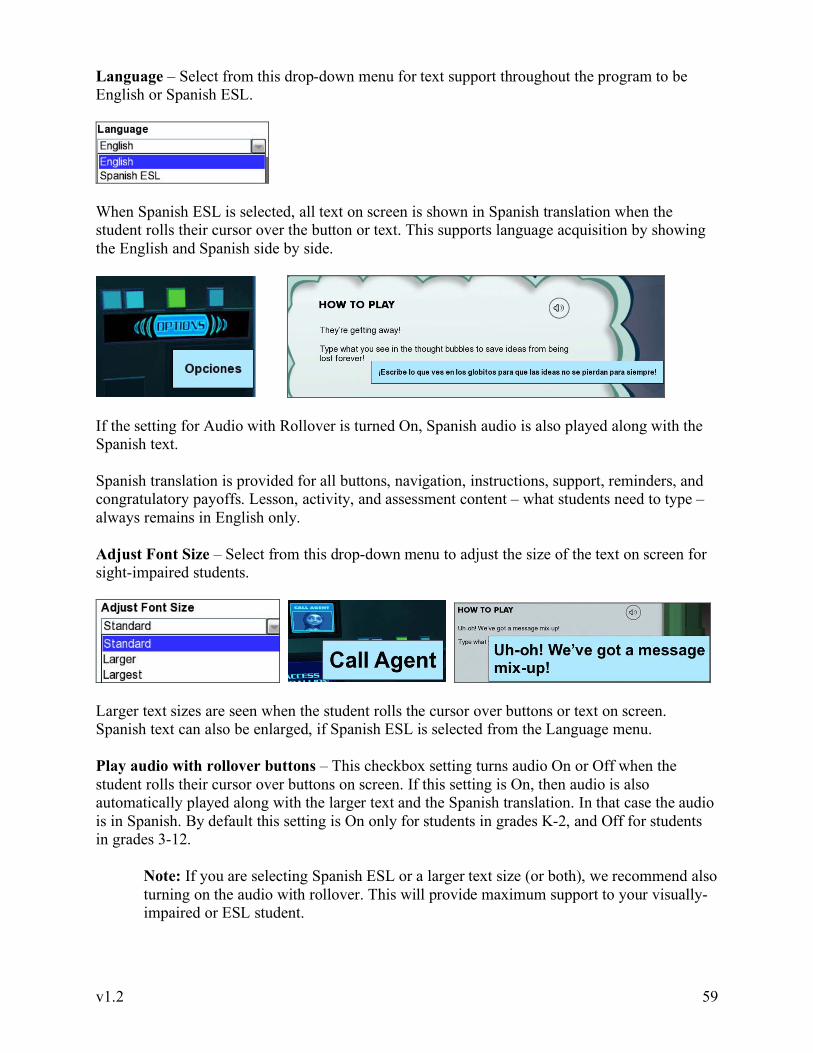
v1.2 59
Language – Select from this drop-down menu for text support throughout the program to be English or Spanish ESL.
When Spanish ESL is selected, all text on screen is shown in Spanish translation when the student rolls their cursor over the button or text. This supports language acquisition by showing the English and Spanish side by side.
If the setting for Audio with Rollover is turned On, Spanish audio is also played along with the Spanish text. Spanish translation is provided for all buttons, navigation, instructions, support, reminders, and congratulatory payoffs. Lesson, activity, and assessment content – what students need to type – always remains in English only. Adjust Font Size – Select from this drop-down menu to adjust the size of the text on screen for sight-impaired students.
Larger text sizes are seen when the student rolls the cursor over buttons or text on screen. Spanish text can also be enlarged, if Spanish ESL is selected from the Language menu. Play audio with rollover buttons – This checkbox setting turns audio On or Off when the student rolls their cursor over buttons on screen. If this setting is On, then audio is also automatically played along with the larger text and the Spanish translation. In that case the audio is in Spanish. By default this setting is On only for students in grades K-2, and Off for students in grades 3-12.
Note: If you are selecting Spanish ESL or a larger text size (or both), we recommend also turning on the audio with rollover. This will provide maximum support to your visually-impaired or ESL student.
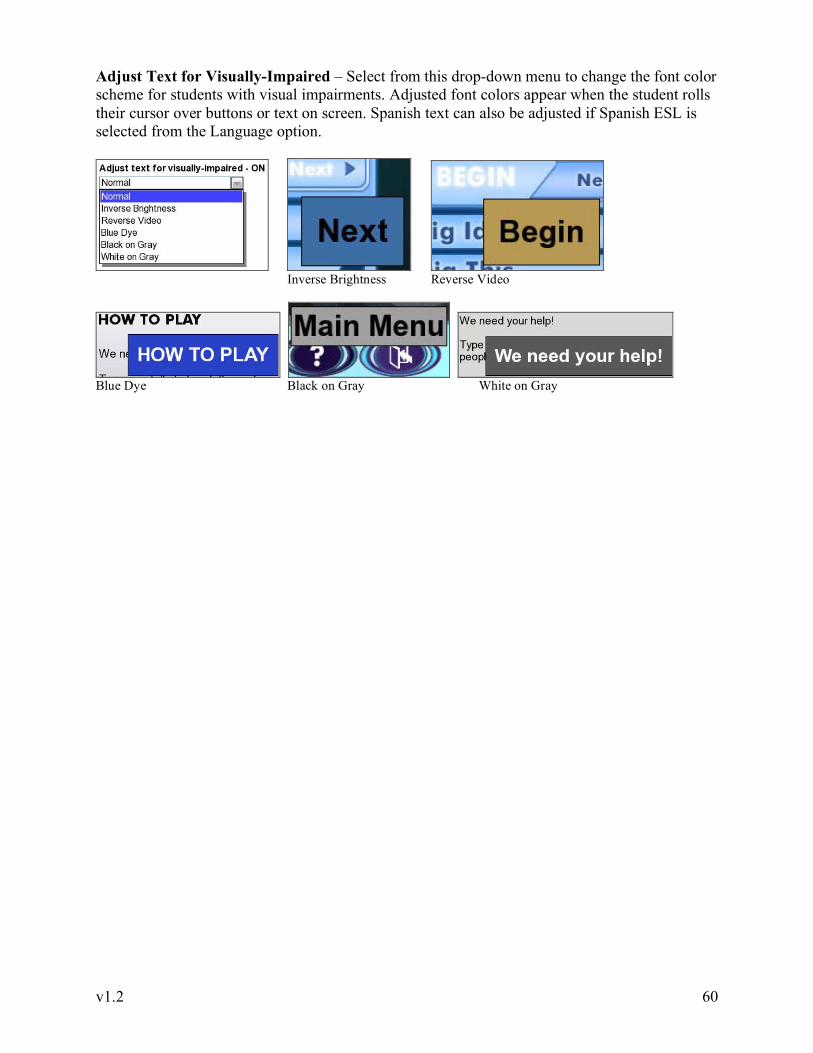
v1.2 60
Adjust Text for Visually-Impaired – Select from this drop-down menu to change the font color scheme for students with visual impairments. Adjusted font colors appear when the student rolls their cursor over buttons or text on screen. Spanish text can also be adjusted if Spanish ESL is selected from the Language option.
Inverse Brightness Reverse Video
Blue Dye Black on Gray White on Gray

v1.2 61
Student Reports Several reports and graphs are available to both teachers and students. Teachers and administrators should select Student Reports along the top of the Management screen. Then select the Reports tab.
Control which users display in the tree on the left by using the drop-down menus at the top:
My Classes displays all classes and students for the teacher logged in. A teacher’s classes can only be in one group, so the Group menu is disabled when My Classes is selected.
Master Student List displays all students in the selected Group. Master Teacher List (Admin Only) displays all teachers in the selected Group and their
classes. Select one or more students in the tree. You can select an entire class of students at once by selecting the class name. You can select multiple students by holding down the Control or Command key, or Shift. Lists of users are loaded dynamically, so you may need to scroll through to load all users first before multiple selecting, to ensure they are all present.
Be sure to make a selection of user(s) before generating a report or graph. You can select classes from previous semesters or school years by un-checking the box for View Only Current Classes .

v1.2 62
Status Report Select Status Report from the Report Type drop-down menu. Then select a Date Range for the report: All Dates, Last 7 Days, Last 30 Days, or Last 365 Days. Other filters are unavailable for the Status Report.
Click the Create Report button. This report shows you the progress each student has made through the Type to Learn 4 lessons, as well as their most recent WPM and Accuracy scores against their goals.
Click on the report column headers to sort by that column. You can change the date range right from the report itself. Save Report Click Save Report to save the report to your computer. This allows you to easily print, email, or paste the data into a spreadsheet or other document (by copy/paste). The report saves as an html file, viewable in any browser.
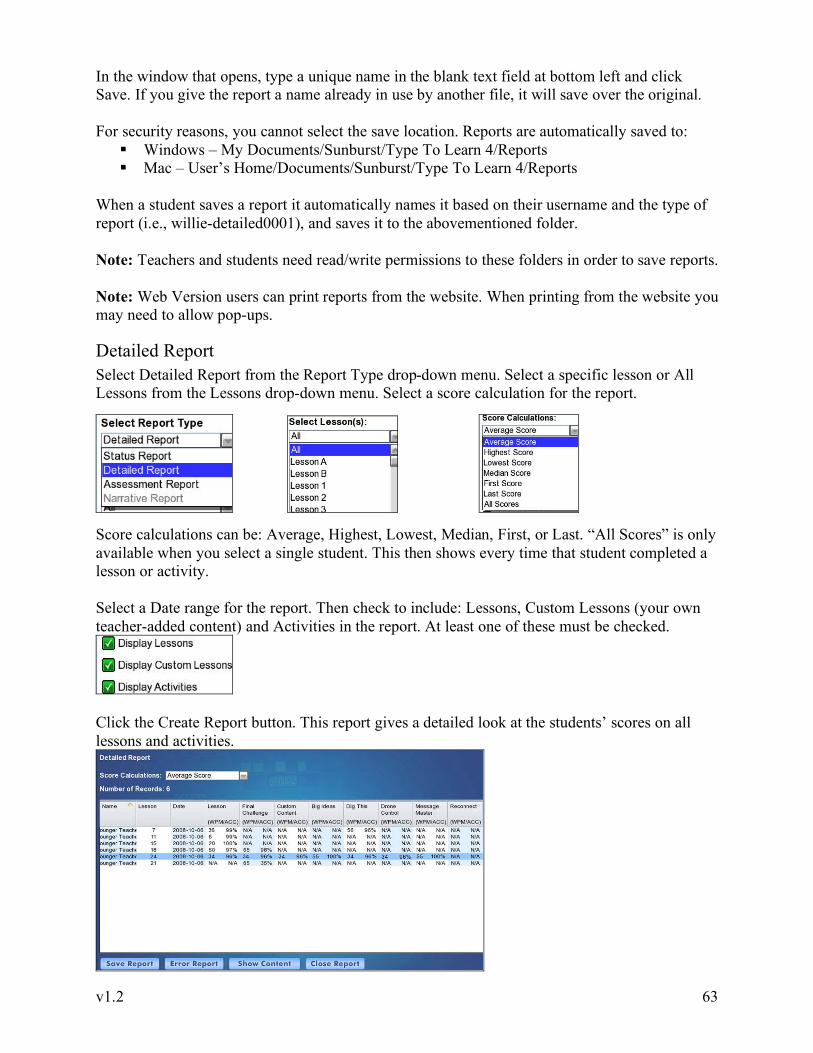
v1.2 63
In the window that opens, type a unique name in the blank text field at bottom left and click Save. If you give the report a name already in use by another file, it will save over the original. For security reasons, you cannot select the save location. Reports are automatically saved to:
Windows – My Documents/Sunburst/Type To Learn 4/Reports Mac – User’s Home/Documents/Sunburst/Type To Learn 4/Reports
When a student saves a report it automatically names it based on their username and the type of report (i.e., willie-detailed0001), and saves it to the abovementioned folder. Note: Teachers and students need read/write permissions to these folders in order to save reports. Note: Web Version users can print reports from the website. When printing from the website you may need to allow pop-ups.
Detailed Report Select Detailed Report from the Report Type drop-down menu. Select a specific lesson or All Lessons from the Lessons drop-down menu. Select a score calculation for the report.
Score calculations can be: Average, Highest, Lowest, Median, First, or Last. “All Scores” is only available when you select a single student. This then shows every time that student completed a lesson or activity. Select a Date range for the report. Then check to include: Lessons, Custom Lessons (your own teacher-added content) and Activities in the report. At least one of these must be checked.
Click the Create Report button. This report gives a detailed look at the students’ scores on all lessons and activities.
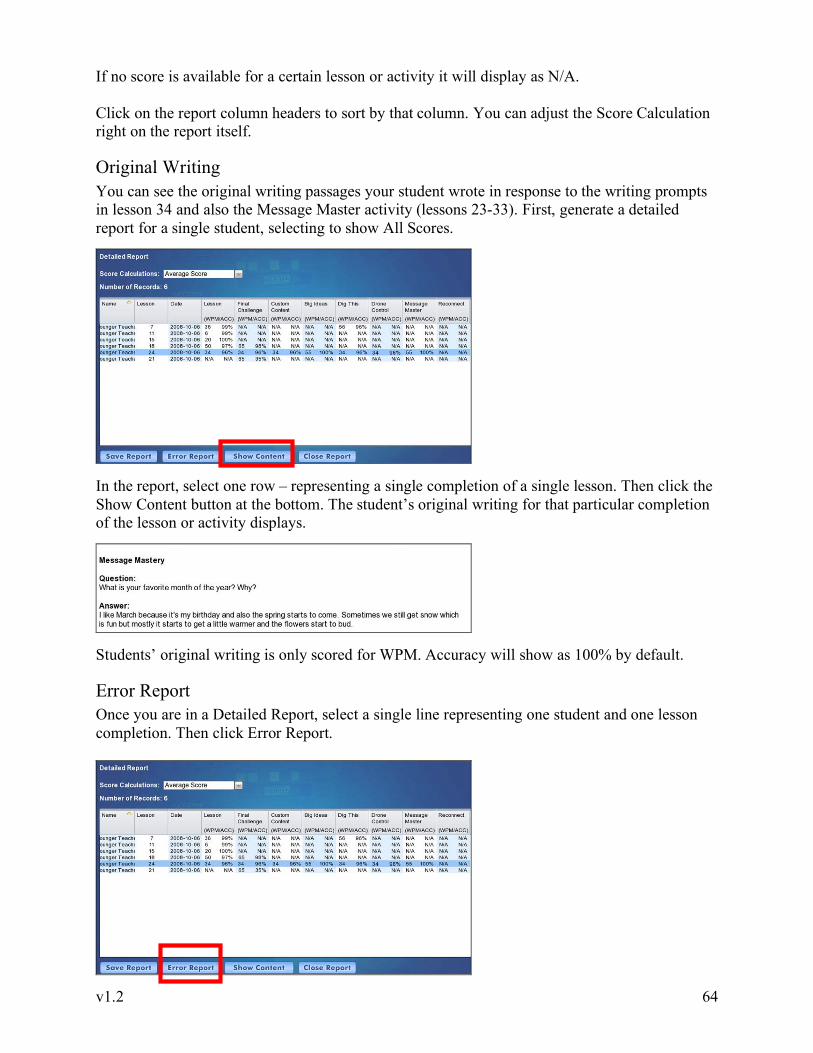
v1.2 64
If no score is available for a certain lesson or activity it will display as N/A. Click on the report column headers to sort by that column. You can adjust the Score Calculation right on the report itself.
Original Writing You can see the original writing passages your student wrote in response to the writing prompts in lesson 34 and also the Message Master activity (lessons 23-33). First, generate a detailed report for a single student, selecting to show All Scores.
In the report, select one row – representing a single completion of a single lesson. Then click the Show Content button at the bottom. The student’s original writing for that particular completion of the lesson or activity displays.
Students’ original writing is only scored for WPM. Accuracy will show as 100% by default.
Error Report Once you are in a Detailed Report, select a single line representing one student and one lesson completion. Then click Error Report.

v1.2 65
A graph opens displaying the student’s errors on that single lesson. Errors can be shown by Hand, Finger, or Key. Make that selection in the drop-down menu on the report itself.
Bars going across the graph represent Accuracy percentage. The numbers on each bar of the graph tell the number of correct key presses out of the total (such as 19/21).
Assessment Report Select Assessment Report from the Report Type drop-down menu. Then select a Date Range for the report. Other filters are unavailable for the Assessment Report.
Click the Create Report button. This report shows only assessment scores, including the pre-test, for all selected students.
Click on the report column headers to sort by that column. You can change the date range right from the report itself. If an assessment has not been taken it will not display at all.
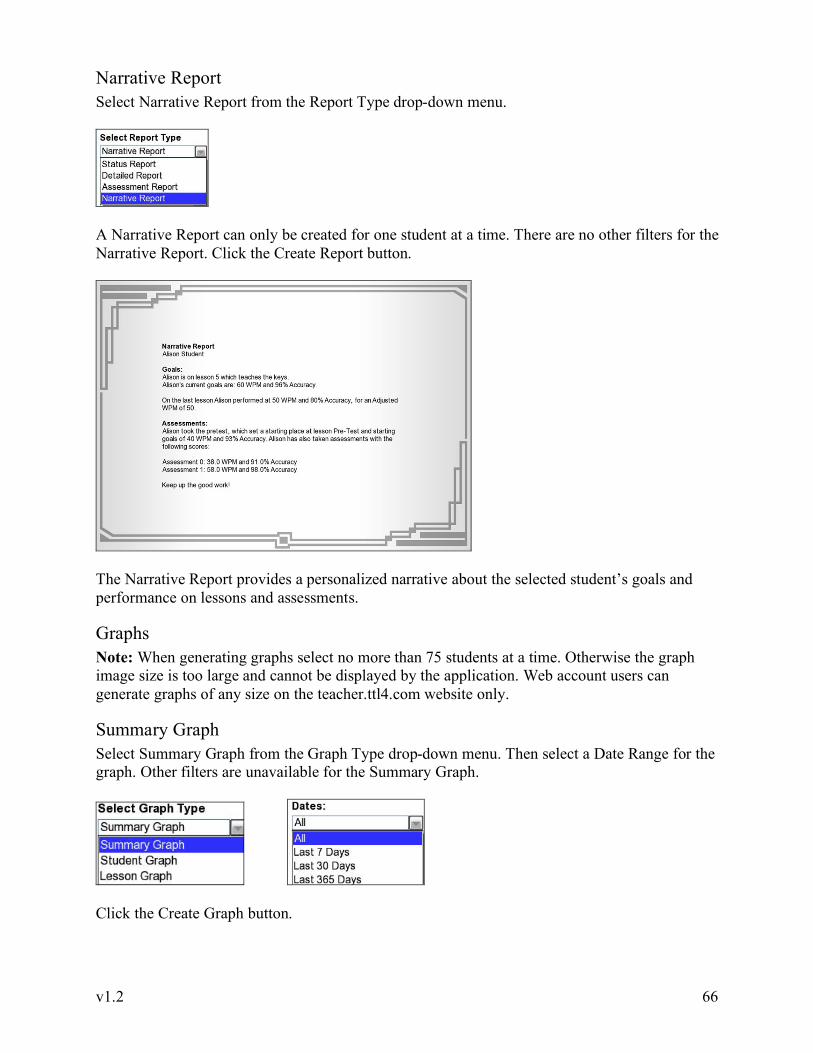
v1.2 66
Narrative Report Select Narrative Report from the Report Type drop-down menu.
A Narrative Report can only be created for one student at a time. There are no other filters for the Narrative Report. Click the Create Report button.
The Narrative Report provides a personalized narrative about the selected student’s goals and performance on lessons and assessments.
Graphs Note: When generating graphs select no more than 75 students at a time. Otherwise the graph image size is too large and cannot be displayed by the application. Web account users can generate graphs of any size on the teacher.ttl4.com website only.
Summary Graph Select Summary Graph from the Graph Type drop-down menu. Then select a Date Range for the graph. Other filters are unavailable for the Summary Graph.
Click the Create Graph button.

v1.2 67
The Summary Graph provides a visual for how far students have progressed through the Type to Learn 4 lessons. Use the drop-down menu on the graph to sort by Last Name or First Name. This allows you to easily see which students are falling behind and which are far ahead of the class. Save Graph Graphs are saved as jpg images to the same location as reports:
Windows – My Documents/Sunburst/Type To Learn 4/Reports Mac – User’s Home/Documents/Sunburst/Type To Learn 4/Reports
Note: Web Version users can print graphs from the website. When printing from the website you may need to allow pop-ups.
Student Graph Select Student Graph from the Graph Type drop-down menu. The Student Graph can only be created for one student at a time.
Select the Scores to Show from that drop-down menu. The Student Graph can show: Lesson Accuracy, Accuracy Improvement, Lesson WPM, WPM Improvement, Adjusted WPM, Final Challenge WPM, and Final Challenge Accuracy. Select one score type to display in the graph. You can adjust this selection at any time from the graph itself.

v1.2 68
Then select a Score Calculation from that drop-down menu. This can be Average, Highest, Lowest, Median, First, or Last. Finally, select a Date Range for the graph.
The Student Graph displays a single student’s scores across all lessons they have completed. From the graph itself you can use the drop-down menus to select another Score to show, or change the calculation or date range. The graph automatically updates to your new selection.
Lesson Graph Select Lesson Graph from the Graph Type drop-down menu. Select a single lesson or assessment to show in the graph.
Select the Scores to Show from that drop-down menu. The Lesson Graph can show: Lesson Accuracy, Lesson WPM, Adjusted WPM, Final Challenge WPM, and Final Challenge Accuracy. Select one score type to display in the graph. You can adjust this selection at any time from the graph itself.
Then select a Score Calculation from that drop-down menu. This can be Average, Highest, Lowest, Median, First, or Last. Finally, select a Date Range for the graph.

v1.2 69
The Lesson Graph visually displays students’ scores for the single lesson, based on the type of score you selected.
Reports and Graphs for the Student Students and their parents have access to reports and graphs on their own scores only. Login as a student and access reports from the main menu Reports button. Students’ reports and graphs are simplified versions of the teacher’s reports, with fewer options and filters.

v1.2 70
Detailed Report Select Detailed Report from the Report Type drop-down menu. Also select a date range for scores. These are the only filters available to the student.
The Detailed Report that generates shows that student’s scores on all lessons and activities they have completed. You can sort any column by clicking on the column header. Students can save the report, which automatically saves as an html file to the computer they’re working on. Student do not select a save location or file name; it is automatically:
Windows – My Documents/Sunburst/Type To Learn 4/Reports Mac – User’s Home/Documents/Sunburst/Type To Learn 4/Reports
Note: Students must have read and write permissions to these folders in order to save reports.
Assessment Report Select Assessment Report from the Report Type drop-down menu. Also select a Date Range. These are the only filters available to the student.
The Assessment Report that generates shows that student’s scores on all assessments they have completed so far, including the Pre-Test. Report data includes the lessons the assessment tests, the time spent on the test, accuracy, WPM, and adjusted WPM. All assessments are cumulative, testing back to lesson 1 each time.

v1.2 71
Parent Report There is a special Parent Report accessible from the student’s login area. Login as your child and then click Reports on the Main Menu. Select Parent Report from the Report Type drop-down menu. There are no other filters for this report. Click Create Report.
This generates a Narrative Report for Parents outlining their child’s goals and performance on lessons and assessments. Parents can learn how their child is progressing through the Type to Learn 4 program and the successes they’re having.
Parents can save the Parent Report to their computer. The report automatically saves as a jpg image labeled with the student’s name (i.e., kstudent-narrative0001) to the following location:
Windows – My Documents/Sunburst/Type To Learn 4/Reports Mac – User’s Home/Documents/Sunburst/Type To Learn 4/Reports
You cannot select a save location or rename the Parent Report; it is automatic.
Student Graph The student can generate a Student Graph on their own scores. From the Scores to Show drop-down menu, select to display Lesson Accuracy, Accuracy Improvement, Lesson WPM, WPM Improvement, Adjusted WPM, Final Challenge WPM, or Final Challenge Accuracy. This selection can be changed later from the graph itself. Also select a Date Range.
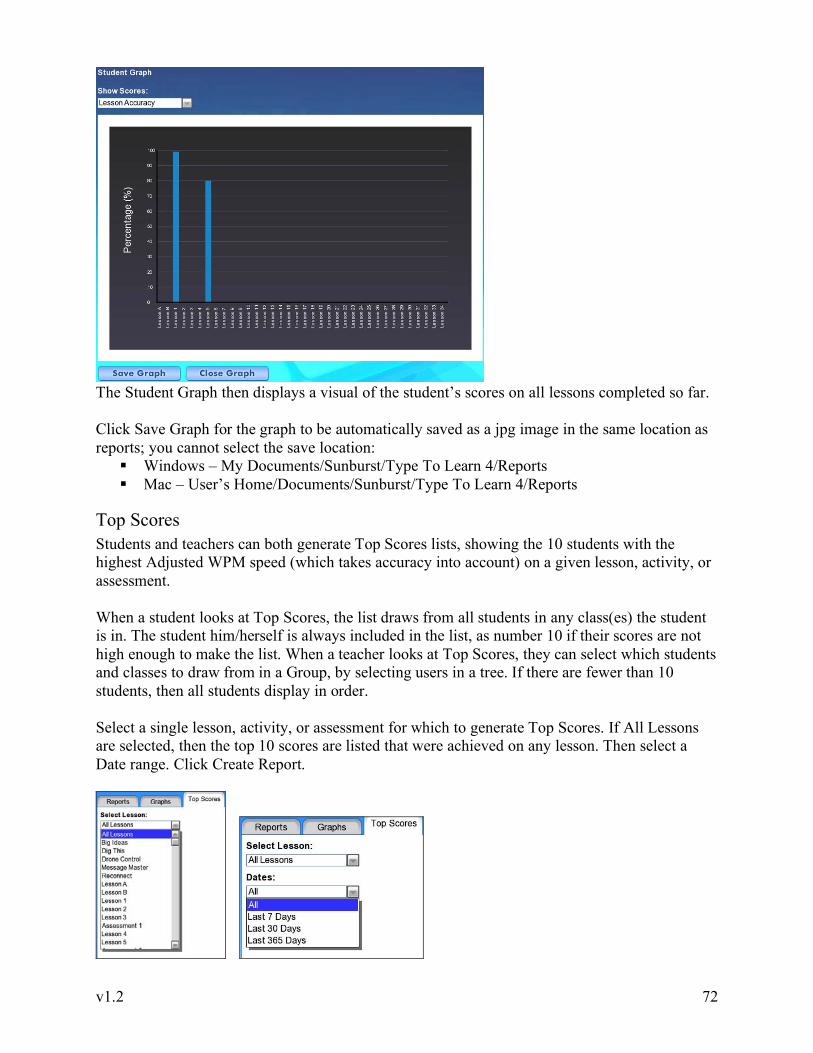
v1.2 72
The Student Graph then displays a visual of the student’s scores on all lessons completed so far. Click Save Graph for the graph to be automatically saved as a jpg image in the same location as reports; you cannot select the save location:
Windows – My Documents/Sunburst/Type To Learn 4/Reports Mac – User’s Home/Documents/Sunburst/Type To Learn 4/Reports
Top Scores Students and teachers can both generate Top Scores lists, showing the 10 students with the highest Adjusted WPM speed (which takes accuracy into account) on a given lesson, activity, or assessment. When a student looks at Top Scores, the list draws from all students in any class(es) the student is in. The student him/herself is always included in the list, as number 10 if their scores are not high enough to make the list. When a teacher looks at Top Scores, they can select which students and classes to draw from in a Group, by selecting users in a tree. If there are fewer than 10 students, then all students display in order. Select a single lesson, activity, or assessment for which to generate Top Scores. If All Lessons are selected, then the top 10 scores are listed that were achieved on any lesson. Then select a Date range. Click Create Report.

v1.2 73
The Top Scores list is sorted by Adjusted WPM. You can click on a column header to sort by that column. The lesson where the high score was achieved is displayed, along with the date.
Custom Content Teachers can add their own content into Type to Learn 4 to then be typed by students. Click the Create Custom Content button at the bottom of any screen in the Management area.
Custom content is created in “packages” or sets. A package consists of custom content for all 34 lessons. Content can be different for each lesson, and does not need to be provided for every lesson. To create a new “package” of content, click New.
A small window opens in which you give your package a name:
There is a 20 character limit on the package name. The package you create displays in the drop-down menu and all 34 lessons display on the left side. Select one lesson at a time and add your custom content on the right. Type directly into the text area or paste text from another document.
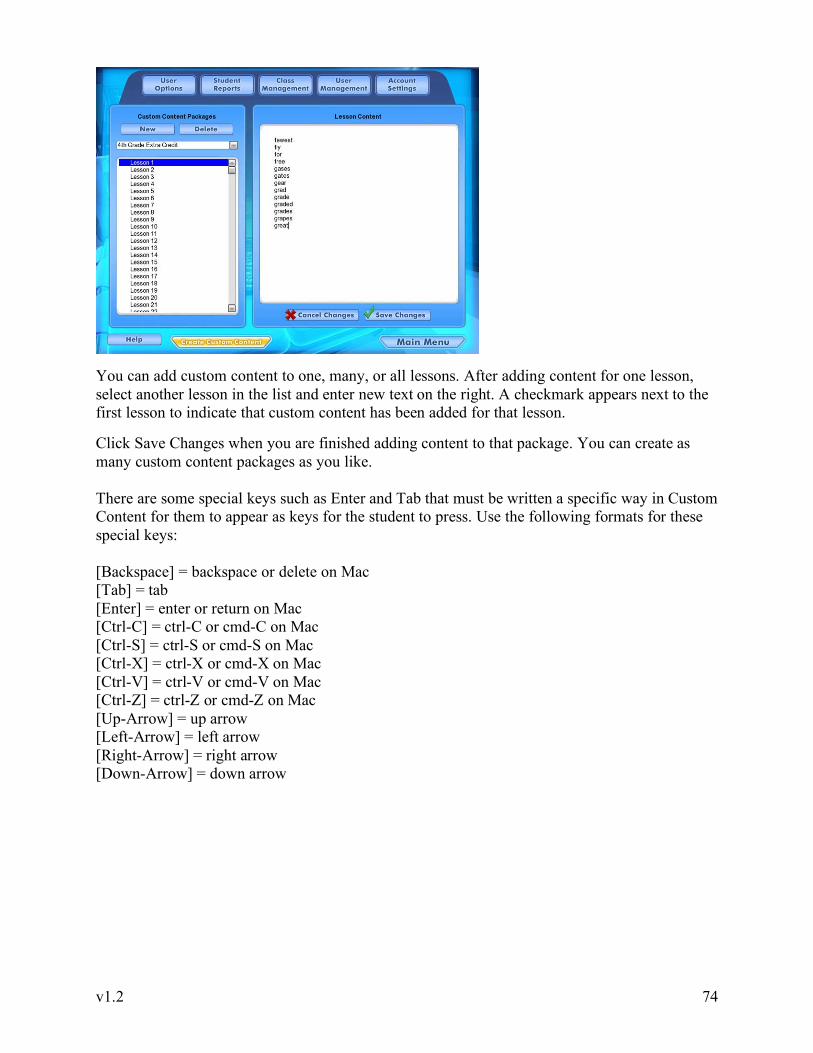
v1.2 74
You can add custom content to one, many, or all lessons. After adding content for one lesson, select another lesson in the list and enter new text on the right. A checkmark appears next to the first lesson to indicate that custom content has been added for that lesson. Click Save Changes when you are finished adding content to that package. You can create as many custom content packages as you like. There are some special keys such as Enter and Tab that must be written a specific way in Custom Content for them to appear as keys for the student to press. Use the following formats for these special keys: [Backspace] = backspace or delete on Mac [Tab] = tab [Enter] = enter or return on Mac [Ctrl-C] = ctrl-C or cmd-C on Mac [Ctrl-S] = ctrl-S or cmd-S on Mac [Ctrl-X] = ctrl-X or cmd-X on Mac [Ctrl-V] = ctrl-V or cmd-V on Mac [Ctrl-Z] = ctrl-Z or cmd-Z on Mac [Up-Arrow] = up arrow [Left-Arrow] = left arrow [Right-Arrow] = right arrow [Down-Arrow] = down arrow

v1.2 75
Assigning Custom Content When assigning a custom content package to a student or class, students receive your content for all lessons for which it was provided. Custom content appears in the student’s main menu as New Training when they reach each lesson. To assign your custom content to students, click the User Options button along the top of the Management screen, and then select the Lessons tab.
Select one or more students or a class from the tree on the left. Then select your custom content package from the Custom Content drop-down menu. Click Save Changes. If you do not want any custom content to be assigned, select None. Teachers and administrators can only assign their own custom content. You may select students from your own classes or the master student list of all students in a Group. Administrators can assign custom content to any class in any Group. Note: For an administrator to assign custom content to another teacher’s class, the content package must have been created by that administrator. A student can have just one custom content package assigned to them at a time. Teachers can create multiple packages for different students, classes, grade levels, and ability levels. Custom content can be used to tie the keyboarding curriculum to other subject area curricula, for remediation, enrichment, extra credit, additional practice, or other purposes. To remove a custom content package from a student’s view, go to User Options, Lessons tab, select the student(s), and select None from the Custom Content drop-down menu. The custom content will no longer be assigned to those students. Note: Web Version users can add custom content in the application only, and can assign it to students from both the application and the website management areas.

v1.2 76
Account Settings (Web and Network Versions only) Select Account Settings along the top of the Management screen.
This area allows teachers and administrators to view, but not edit, the account settings for your school/district account. Useful information includes:
The name and contact information for the account holder “superuser” (Web only) The activation date and maintenance fee date for your account (Web only) Limits, if any, on student users against your current number of users. Group IDs and names (Web only) Semester/school year selection
(Web only): Only the master account “superuser” can edit the information here. To edit a Group name, select that Group in the menu and click Edit. Edit other areas by typing over the data. (Web only): Some information, such as user limits and maintenance fee dates, can only be edited by Sunburst. Contact your account representative for assistance.
Semesters/School Years (Web and Network Versions only) (Master user and Admin user only)
“Semesters” in Type to Learn 4 can correspond to semesters, school years, sessions, or not be used at all. The purpose is to provide a way to filter out old classes from the display in the Management area. By default, the classes you create are in the Current Semester. You may create as many classes as you want in this semester. When you create a new semester and make it current, all old classes are automatically archived and you create new classes of students.

v1.2 77
Here are a few examples of ways you can use the Semester feature in Type to Learn 4:
Example 1: You create classes and use the program for a full school year. When the new school year begins you leave the semester the same (do nothing), delete the existing classes and create new classes. Students’ scores always remain unchanged even when deleting classes.
Example 2: You create classes and use the program for a full school year. When the new school year (or semester or session) begins you create a new Semester, naming it differently (i.e., 2010-2011 year). You set this new semester to be Current. Old classes from the previous year are automatically archived (removed from view) and you create new classes for the new school year.
Only administrators and the master account superuser can manage semesters. Teachers do not have this access. To create a new semester, click New. A window opens:
By default the new semester is named “New Semester”. Type over this to rename your semester. Semester names are limited to 15 characters. You can create as many semesters as you want. Note that semesters cannot be deleted, but they can be edited. Creating a new semester does not automatically make it the current one. To rename a semester or to make it current, select it in the drop-down menu and then click Edit. Check the box in this window to make the selected semester the current one. When changing the current semester, all older classes are automatically archived and removed from view throughout the Management area. To undo a change of semester and bring archived classes back to view, select the desired older semester, click Edit, and set it to be the current semester. Classes will display corresponding to whichever semester is set to be current. Any semester can be selected as the current one. In all Management areas, check or uncheck the box labeled View Only Current Classes to see or hide the older archived classes. Student scores do not get archived along with the classes. Student data always remains unchanged.

v1.2 78
Keyboarding Rubrics The following sample rubric may be used by teachers or parents for assessing students’ keyboarding technique: Always Sometimes Needs
Work Does the student exhibit proper body position:
placing both feet flat on the floor? sitting centered in front of the keyboard? sitting in a relaxed position, back straight,
touching the back of the chair?
sitting a comfortable distance from the keyboard? (A hand-span is suggested.)
Does the student exhibit proper arm and hand position:
holding arms relaxed, elbows naturally close to the body?
keeping fingers curved, tips of fingers resting lightly on keys?
keeping wrists low and straight, not resting on the keyboard or table?
hands correctly positioned on the home row keys, with index fingers on J and F?
Does the student demonstrate proper key stroking: beginning and ending all keystrokes at home row
position?
striking keys with quick, strong, tapping keystrokes?
tapping each key with the correct finger? tapping the space bar with the thumb? pressing the Shift key with the appropriate
opposite little finger?
pressing the Enter/Return key with the right little finger?
keeping eyes on the screen at all times? maintaining a steady typing rhythm?
This sample rubric may be used by students as a self-assessment of their own technique: Always Sometimes Needs
Work I keep my feet flat on the floor. I sit up straight. My wrists are straight, not bent down, and not touching the keyboard or table.
I keep my eyes on the screen. I keep my hands on the home row. I hit each key with a quick, strong tap. I use the correct fingering.
v1.2 79
Ergonomic Tips and Exercises The following Ergonomic Breaks have been incorporated into Type to Learn 4 and appear after teacher-controlled time limits: 1. Time for a quick stretch! Stay seated, clasp your hands together, and reach as high as you
can toward the ceiling. 1, 2, 3, 4, 5. Then lean slightly over to one side. 1, 2, 3, 4, 5. Lean slightly over to the other side. 1, 2, 3, 4, 5.
2. Take a break! Close your eyes and gently cover them with your hands. 1, 2, 3, 4, 5, 6, 7, 8, 9,
10. Then look at the wall across the room. 1, 2, 3, 4, 5, 6, 7, 8, 9, 10. Take a deep breath in through your nose 1, 2, 3 and out through your mouth 1, 2, 3.
3. Let’s stretch your wrists! Hold one arm straight out in front of you and use your other hand to
gently pull back on your hand. 1, 2, 3, 4, 5, 6, 7, 8, 9, 10. Then gently pull your hand downward. 1, 2, 3, 4, 5, 6, 7, 8, 9, 10. Switch arms and stretch your other wrist. Gently pull back, 1, 2, 3, 4, 5, 6, 7, 8, 9, 10 and gently pull downward 1, 2, 3, 4, 5, 6, 7, 8, 9, 10.
4. Time to stretch! Stay seated, lean forward and touch your feet. Relax your back and let your
body hang. 1, 2, 3, 4, 5, 6, 7, 8, 9, 10. Sit up and breathe in through your nose 1, 2, 3 and out through your mouth 1, 2, 3.
5. Time for a quick stretch! Stay seated and clasp your hands behind your head. Bring your
elbows back, take a deep breath, and lean back and stretch. 1, 2, 3, 4, 5, 6, 7, 8, 9, 10, 11, 12, 13, 14, 15, 16, 17, 18, 19, 20.
6. Let’s stretch your ankles! In your seat, pick up one foot and move it in a circle, 1, 2, 3 times
one way and 1, 2, 3 times the other way. Then do it with the other foot. 1, 2, 3 times one way and 1, 2, 3 times the other way.
7. Let’s give your arms a rest! In your seat, let your arms hang down at your sides. Shake your
hands and arms very gently. 1, 2, 3, 4, 5, 6, 7, 8, 9, 10.
v1.2 80
Use at Home Tips Type to Learn 4: Agents of Information is available as a Web Version which can be installed on students’ home computers. This allows them to access the remote database so their scores and progress are maintained consistently with the work they do in school. Teachers can then assign Type to Learn 4 lessons and activities as keyboarding homework! Here are some tips for using Type to Learn 4 at home:
Assign students to complete certain lesson or lessons for homework. Set activities to be Required, and assign them for students to practice at home.
Assign an assessment test to be taken at home.
Use settings to prevent students from progressing past a certain point in the program, so
they don’t get too far ahead without you confirming their performance.
Assign students to complete exercises from the Type to Learn 4 Workbook (sold separately) corresponding to the lessons they’ve completed in the software.
Educate parents on proper keyboarding technique, posture, and ergonomics, so they can
observe and correct students as they work.

v1.2 81
Certificate of Completion

v1.2 82
Appendix A: Passages The following passages and documents are provided for students in grades 3-12 to type in Lesson #33. Students need to copy the formatting and punctuation exactly.
Grades 3-6
Title: Thinkin’ Long Oh thinkin’ long’s the weary work! It breaks my heart from dawn Till all the wee, wee, friendly stars Come out at dayli’gone. An’ thinkin’ long’s the weary work, When I must spin and spin, To drive the fearsome fancies out, An’ hold the hopeful in! Ah, sure my lad is far away! My lad who left our glen When from the soul of Ireland came A call for fightin’ men; I miss his gray eyes glancin’ bright, I miss his liltin’ song, And that is why, the lonesome day, I’m always thinkin’ long. May the kind angels guard him When the fray is fierce and grim, And blunt the point of every sword That turns its hate on him. Where round the torn yet dear green flag The brave and lovin’ throng— But the lasses of Glenwherry smile At me for thinkin’ long. By Anna MacManus (_Ethna Carbery_) – edited from the original

v1.2 83
Dessert Menu ANGELO’S FUDGE CAKE $3.95 Rich Chocolate Cake and Fudge Frosting CARROT CAKE $4.25 Heavenly Layers of Carrot Cake and Smooth Cream Cheese Icing BLACK FOREST CAKE $4.79 Rich, Chocolate Cake with Cherry Swirls Sprinkled with Sugar and Chocolate Chips LEMON DELIGHT $3.80 Vanilla Cake with Lemon Whipped Cream Topping Served with Raspberries and Fresh Cream HOT APPLE CRISP $2.68 Crisp, Sweet Apples Baked to Perfection Served with Vanilla Ice Cream FUDGE TRUFFLE CAKE $2.37 Fudge Cake with Chocolate Truffle Cream Topped with Fresh Cream and a Cherry STRAWBERRY SHORTCAKE $3.55 Homemade Shortcake Topped with Vanilla Ice Cream, Fresh Strawberries, and Whipped Cream TIRAMISU $3.92 Individual Cakes Dipped in Coffee and Cream Topped with Whipped Cream and Powdered Cocoa FRESH STRAWBERRIES AND CREAM $4.10 HOT FUDGE SUNDAE $3.87 Decadent Hot Fudge Over Vanilla Ice Cream Topped with Whipped Cream CHOCOLATE BROWNIE SUNDAE $4.69 Warm Chocolate Brownie, Vanilla Ice Cream, Hot Fudge, and Whipped Cream LIZANO MUD PIE $4.45 Black Forest Cake with Vanilla and Cherry Ice Creams, Hot Fudge, Whipped Cream, and Almonds DISH OF ICE CREAM $2.81
v1.2 84
Excerpt from: The Library of Work and Play, Outdoor Sports And Games, By Claude H. Miller, PH.B. – edited from the original
Besides fresh air, another important thing in keeping well is to eat slowly and to chew your food thoroughly. Boys and girls often develop a habit of rapid eating because they are anxious to get back to play or to school. Slow eating is largely a matter of habit as well, and while it may seem hard at first it will soon become second nature to us. Remember to chew your food thoroughly. The stomach has no teeth. We have all heard of Mr. Horace Fletcher, that wonderful old man who made himself young again by chewing his food. There is no fun in life unless we are well, and a sensible boy should realize that his parents’ interest in him is for his own benefit. It may seem hard sometimes to be obliged to do without things that we want, but as a rule the judgment of the older people is better than our own. A growing boy will often eat too much candy or too many sweet things and then suffer from his lack of judgment. To fill our stomachs with indigestible food is just as foolish as it would be to put sand in the bearings of our wheel, or to interfere with the delicate adjustment of our watch until it refuses to keep time. While we play, our muscles are developed, our lungs filled with fresh air and the whole body is made stronger and more vigorous. Some boys play too hard. Over-exertion will sometimes cause a strain on the delicate machinery of the body that will be very serious. The heart is especially subject to the dangers of overstrain in growing boys. We are not all equally strong, and it is no discredit to a boy that he cannot run as far or lift as much as some of his playmates or companions. You all remember the fable of the frog who tried to make himself as big as the ox and finally burst. The idea of exercise is not to try to excel every one in what you do, but to do your best without over-exertion. If a boy has a rugged frame and well developed muscles, it is perfectly natural that he should be superior in most sports to a boy that is delicate or undersized.
Black Bean and Corn Salsa Ingredients: - 30 ounces black beans, drained - 15 ounces whole sweet corn, drained - 10 ounces diced tomatoes with green chilies - 2 large red bell peppers, chopped - 2 medium fresh jalapeno peppers, chopped - 1/2 cup sweet onion, diced - 1/3 cup fresh cilantro, diced - 1 tsp salt - 1/8 cup lime juice - 0.6 ounce package of dry zesty Italian dressing
v1.2 85
Directions: 1. Prepare the salad dressing according to package directions (use the lighter version, if you
like). 2. Remove the seeds from the peppers and chop. 3. Dice the onion and cilantro. 4. In a large bowl, combine all the dry ingredients and stir. 5. Add lime juice and Italian dressing and stir gently. 6. Cover and refrigerate for a least 4 hours or overnight. 7. Serve with chips or as a side dish.
Excerpt from: Rollo at Play; Safe Amusements, by Jacob Abbott Rollo went on, down the green lane, till he came to the turn-stile, and then went through into the field. He then followed a winding path until he came to the edge of the trees, and there stopped to listen. He heard the brook gurgling along over the stones, and that was all at first; but presently he began to hear the strokes of an axe. He called out as loud as he could, “Jonas! Jonas!” But Jonas did not hear. Then he walked along the edge of the woods till he came nearer the place where he heard the axe. He found here a little opening among the trees and bushes, so that he could look in. He saw the brook, and over beyond it, on the opposite bank, was Jonas, cutting down a small tree. So Rollo walked on until he came to the brook, and then asked Jonas how he should get over. The brook was pretty wide and deep. Jonas said, if he would wait a few minutes, he would build him a bridge. “You cannot build a bridge,” said Rollo. “Wait a little and see.” So Rollo sat down on a mossy bank, and Jonas, having cut down the small tree, began to work on a larger one that stood near the bank. After he had cut a little while, Rollo asked him why he did not begin the bridge. “I am beginning it,” said he. Rollo laughed at this, but in a minute Jonas called to him to stand back, away from the bank; and then, after a few strokes more, the top of the tree began to bend slowly over, and then it fell faster and faster, until it came down with a great crash, directly across the brook. “There!” said Jonas, “there is your bridge.” Rollo looked at it with astonishment and pleasure. “Now,” said Jonas, “I will come and help you over.” “No,” said Rollo, “I can come over myself. I can take hold of the branches for a railing.”
v1.2 86
So Rollo began to climb along the stem of the tree, holding on carefully by the branches. When he reached the middle of the stream, he stopped to look down into the water. “This is a capital bridge of yours, Jonas,” said he. “How beautiful the water looks down here! O, I see a little fish! He is swimming along by a great rock. Now he is standing perfectly still. O, Jonas, come and see him.”
Laughing Song When the green woods laugh with the voice of joy, And the dimpling stream runs laughing by. When the air does laugh with our merry wit, And the green hill laughs with the noise of it. When the meadows laugh with lively green, And the grasshopper laughs in the merry scene, When Mary and Susan and Emily With their sweet round mouths sing “Ha, ha he!” When the painted birds laugh in the shade, Where our table with cherries and nuts is spread. Come live, and be merry, and join with me, To sing the sweet chorus of “Ha, ha, he!” Poem from: Laughing Song, by William Blake
Coffee Cake - 17 to 18 unbaked frozen dinner rolls - 1 3-ounce package regular butterscotch pudding mix (not instant) - 1/2 cup packed brown sugar - 1/3 cup chopped pecans - 2/3 cup melted butter Prepare 10 hours ahead of serving. Place frozen rolls in well-greased ring-shaped pan. Sprinkle dry pudding mix over rolls. Sprinkle brown sugar over pudding mix. Sprinkle chopped pecans over brown sugar. Pour melted butter over all. Cover with a damp towel or tightly seal with plastic wrap. Let rise at room temperature 8 to 10 hours. Preheat oven to 350 degrees Fahrenheit. Bake in oven for 30 minutes. Cool, invert pan, remove, and serve.

v1.2 87
Excerpt from: Lincoln’s Gettysburg Address Prepare 10 hours ahead of serving. Place frozen rolls in well-greased ring-shaped pan. Sprinkle dry pudding mix over rolls. Sprinkle brown sugar over pudding mix. Sprinkle chopped pecans over brown sugar. Pour melted butter over all. Cover with a damp towel or tightly seal with plastic wrap. Let rise at room temperature 8 to 10 hours. Preheat oven to 350 degrees Fahrenheit. Bake in oven for 30 minutes. Cool, invert pan, remove, and serve. Four score and seven years ago, our fathers brought forth upon this continent a new nation: conceived in liberty, and dedicated to the proposition that all men are created equal. Now we are engaged in a great civil war . . . testing whether that nation, or any nation so conceived and so dedicated . . . can long endure. We are met on a great battlefield of that war. We have come to dedicate a portion of that field as a final resting place for those who here gave their lives that this nation might live. It is altogether fitting and proper that we should do this. Excerpt from: Lincoln’s Gettysburg Address, given November 19, 1863 on the battlefield near Gettysburg, Pennsylvania, USA
Holiday Weekend Sale! 5/26-5/31 Stonewashed Jeans $29.99 5/26-5/31 Tees $4.99 5/26-5/31 Sundresses $25.99 5/26-5/31 Solid Capris $19.99 5/26-5/31 Canvas Sneakers $14.99 5/26-5/31 Ladies’ Dress Shoes $39.99 5/26-5/31 Bermuda Shorts $17.99 5/26-5/31 Men’s Loafers $49.99 5/26-5/31 Trench Coats $44.99

v1.2 88
Title: Uncle Robert’s Visit “Don’t you want to see Susie’s garden, Robert?” asked Mrs. Leonard. “Yes, indeed,” said Uncle Robert. “Susie wrote me some nice little letters about that garden.” As they walked along the narrow paths Susie showed him where the seeds were already planted, and told him what she thought she would have in the other beds. “This is phlox,” said Susie, leading Uncle Robert by the hand, “and marigolds are here, and sweet peas over there by the fence. That place between mother’s garden and mine is filled with rosebushes, syringas, and hollyhocks.” "I still call the vegetable garden mine, but the boys do most of the work," said Mrs. Leonard. "That big bush at the end of the row is an elder." Excerpt from: Uncle Robert’s Visit, Chapter I, by Francis W. Parker and Nellie Lathrop Helm
The Table And The Chair Said the Table to the Chair, "You can hardly be aware How I suffer from the heat And from chilblains on my feet. If we took a little walk, We might have a little talk; Pray let us take the air," Said the Table to the Chair. Said the Chair unto the Table, "Now, you know we are not able: How foolishly you talk, When you know we cannot walk!" Said the Table with a sigh, "It can do no harm to try. I've as many legs as you: Why can't we walk on two?" So they both went slowly down, And walked about the town With a cheerful bumpy sound As they toddled round and round; And everybody cried, As they hastened to their side, "See! the Table and the Chair Have come out to take the air!"
v1.2 89
But in going down an alley, To a castle in a valley, They completely lost their way, And wandered all the day; Till, to see them safely back, They paid a Ducky-quack, And a Beetle, and a Mouse, Who took them to their house. Then they whispered to each other, "O delightful little brother, What a lovely walk we've taken! Let us dine on beans and bacon." So the Ducky and the leetle Browny-Mousy and the Beetle Dined, and danced upon their heads Till they toddled to their beds. From Nonsense Song: Stories, Botany, and Alphabets by Edward Lear
Grades 7-12
Title: The Beggar Pity the sorrows of a poor old man! Whose trembling limbs have borne him to your door, Whose days are dwindled to the shortest span, O, give relief, and bless your store. These tattered clothes my poverty bespeak, These hoary locks proclaim my lengthened years; And many a furrow in my grief-worn cheek Has been the channel to a stream of tears. Yon house, erected on the rising ground, With tempting aspect drew me from my road, For plenty there a residence has found, And grandeur a magnificent abode. (Hard is the fate of the infirm and poor!) Here craving for a morsel of their bread, A pampered menial drove me from the door, To seek a shelter in the humble shed. O, take me to your hospitable dome, Keen blows the wind, and piercing is the cold! Short is my passage to the friendly tomb, For I am poor and miserably old.
v1.2 90
Should I reveal the source of every grief, If soft humanity e’er touched your chest, Your hands would not withhold the kind relief, And tears of pity could not be repressed. Life sends misfortunes,—why should we repine? ’T is Life has brought me to the state you see: And your condition may be soon like mine, The child of sorrow and of misery. A little farm was my paternal lot, Then, like the lark, I sprightly hailed the morn; But ah! oppression forced me from my cot; My cattle died, and blighted was my corn. My daughter,—once the comfort of my age! Lured by a villain from her native home, Is cast, abandoned, on the world’s wild stage, And doomed in scanty poverty to roam. My tender wife,—sweet soother of my care!— Struck with sad anguish at the stern decree, Fell,—lingering fell, a victim to despair, And left the world to wretchedness and me. Pity the sorrows of a poor old man! Whose trembling limbs have born him to your door, Whose days are dwindled to the shortest span, O, give relief, and bless your store. Author: Thomas Moss – edited from the original
Breakfast Menu FARM FRESH EGGS $5.95 Two Farm Fresh Eggs Served with Hash Browns, Toast, Bagel, or English Muffin, with Bacon or Canadian Bacon MEXICAN MORNING $6.25 Corn Tortillas with Black Beans, Fried Eggs, Cheddar Cheese, Salsa, and a Dash of Hot Sauce YOUR CHOICE OMELETTE $7.80 Choose Any Six Fixings: Bacon, Ham, Cheese, Fresh Mushrooms, Spinach, Peppers, Red or Green Onions

v1.2 91
LINDSAY’S SPECIAL $7.44 Scrambled Eggs with Sweet Pork Sausage, Fresh Spinach, Mushrooms, and Onions OMELETTE ON THE LIGHT SIDE $5.76 Avocado, Spring Onion, Tomato, Sour Cream, Cheddar and Swiss Cheese SUNRISE QUESADILLA $7.13 Flour Tortilla with Scrambled Eggs, Bacon, Peppers, Black Beans, Cilantro, Cheddar and Jack Cheese, served with Guacamole, Sour Cream, and Salsa CRANBERRY PANCAKES $6.38 Homemade Pancakes with Wisconsin Cranberries, Real Butter, and a Hint of Cinnamon and Nutmeg FRENCH TOAST $6.80 Wheat Bread Grilled and Topped with Sliced Bananas, Yogurt, and Granola WAFFLE—A FAVORITE $5.52 Golden, Hot, and Crisp Waffle Served with Real Butter, Maple Syrup, and a Side of Bacon or Grilled Ham
Excerpt from the United States Constitution Section 8. The Congress shall have Power to lay and collect Taxes, Duties, Imposts and Excises, to pay the Debts and provide for the common Defence and general Welfare of the United States; but all Duties, Imposts and Excises shall be uniform throughout the United States; To borrow Money on the credit of the United States; To regulate Commerce with foreign Nations, and among the several States, and with the Indian Tribes; To establish an uniform Rule of Naturalization, and uniform Laws on the subject of Bankruptcies throughout the United States; To coin Money, regulate the Value thereof, and of foreign Coin, and fix the Standard of Weights and Measures; To provide for the Punishment of counterfeiting the Securities and current Coin of the United States; To establish Post Offices and Post Roads;

v1.2 92
To promote the Progress of Science and useful Arts, by securing for limited Times to Authors and Inventors the exclusive Right to their respective Writings and Discoveries; To constitute Tribunals inferior to the supreme Court; To define and punish Piracies and Felonies committed on the high Seas, and Offenses against the Law of Nations; To declare War, grant Letters of Marque and Reprisal, and make Rules concerning Captures on Land and Water; To raise and support Armies, but no Appropriation of Money to that Use shall be for a longer term than two Years; To provide and maintain a Navy; To make Rules for the Government and Regulation of the land and naval Forces; To provide for calling forth the Militia to execute the Laws of the Union, suppress Insurrections and repel Invasions; To provide for organizing, arming, and disciplining, the Militia, and for governing such Part of them as may be employed in the Service of the United States, reserving to the States respectively, the Appointment of the Officers, and the Authority of training the militia according to the discipline prescribed by Congress; To exercise exclusive Legislation in all Cases whatsoever, over such District (not exceeding ten Miles square) as may, by Cession of particular States, and the Acceptance of Congress, become the Seat of the Government of the United States, and to exercise like Authority over all Places purchased by the Consent of the Legislature of the State in which the Same shall be, for the Erection of Forts, Magazines, Arsenals, Dockyards, and other needful Buildings;—And To make all Laws which shall be necessary and proper for carrying into Execution the foregoing Powers, and all other Powers vested by this Constitution in the Government of the United States, or in any Department or Officer thereof.

v1.2 93
Roasted Vegetable Pasta -8 Ounces Penne Pasta -2 Cups Zucchini Cut into 2 Inch Pieces -2 Cups Eggplant Cut into 2 Inch Pieces -1 Large Red Pepper, Cored and Cut Into 2 Inch Pieces -1 Medium Red Onion, Peeled and Cut Into 1 Inch Pieces -12 Asparagus Spears Cut into 2 inch Lengths -2 Portabello Mushroom Caps Cut into 1 Inch Pieces -2 Cloves Garlic, Peeled and Sliced -5 Campari Tomatoes, Quartered -1/4 Cup Fresh Chopped Basil -3 Tablespoons Olive Oil -1 Teaspoon Salt -1/8 Teaspoon Black Pepper Sauce: -2 Tablespoons Balsamic Vinegar -1 Tablespoon Olive Oil -2 Ounces Soft Goat Cheese - Additional Crumbled Goat Cheese - Chopped Fresh Basil Preheat the oven to 425 degrees Fahrenheit. Toss all of the vegetables together with the olive oil and seasonings and spread onto a large baking sheet. Roast the vegetables for 25 minutes or until fork tender and lightly browned. Cool the vegetables. Heat a large pot of salted water for the pasta. Cook the pasta until it is al dente and drain, reserving a half cup of the pasta water. In a separate bowl, mix the sauce ingredients. Move the pasta to a large serving bowl and add the sauce. Add the vegetables to the pasta and stir gently to mix well. Add a small amount of pasta water if the mixture seems a little dry. Mix well and top with crumbled goat cheese and chopped basil. Variation: Add 2 cups chopped rotisserie or 2 cups diced, cooked ham. You could also add 1 2/3 cups warm tomato sauce to the vegetable mixture for a change. Substitute as needed in order to use the season’s freshest vegetables.

v1.2 94
Excerpt from: President Nixon’s Announcement on the Development of the Space Shuttle
I have decided today that the United States should proceed at once with the development of an entirely new type of space transportation system designed to help transform the space frontier of the 1970’s into familiar territory, easily accessible for human endeavor in the 1980’s and ’90’s.
This system will center on a space vehicle that can shuttle repeatedly from Earth to orbit and back. It will revolutionize transportation into near space, by routinizing it. It will take the astronomical costs out of astronautics. In short, it will go a long way toward delivering the rich benefits of practical space utilization and the valuable spinoffs from space efforts into the daily lives of Americans and all people.
The new year 1972 is a year of conclusion for America’s current series of manned flights to the Moon. Much is expected from the two remaining Apollo missions—in fact, their scientific results should exceed the return from all the earlier flights together. Thus they will place a fitting capstone on this vastly successful undertaking. But they also bring us to an important decision point—a point of assessing what our space horizons are as Apollo ends, and of determining where we go from here.
In the scientific arena, the past decade of experience has taught us that spacecraft are an irreplaceable tool for learning about our near-Earth space environment, the Moon, and the planets, besides being an important aid to our studies of the Sun and stars. In utilizing space to meet needs on Earth, we have seen the tremendous potential of satellites for international communications and world-wide weather forecasting. We are gaining the capability to use satellites as tools in global monitoring and management of nature resources, in agricultural applications, and in pollution control. We can foresee their use in guiding airliners across the oceans and in bringing TV education to wide areas of the world.
However, all these possibilities, and countless others with direct and dramatic bearing on human betterment, can never be more than fractionally realized so long as every single trip from Earth to orbit remains a matter of special effort and staggering expense. This is why commitment to the Space Shuttle program is the right step for America to take, in moving out from our present beach-head in the sky to achieve a real working presence in space—because the Space Shuttle will give us routine access to space by sharply reducing costs in dollars and preparation time.
The new system will differ radically from all existing booster systems, in that most of this new system will be recovered and used again and again—up to 100 times. The resulting economies may bring operating costs down as low as one-tenth of those present launch vehicles.

v1.2 95
Title: The Double Aspect of Goodness In undertaking the following discussion I foresee two grave difficulties. My reader may well feel that goodness is already the most familiar of all the thoughts we employ, and yet he may at the same time suspect that there is something about it perplexingly abstruse and remote. Familiar it certainly is. It attends all our wishes, acts, and projects as nothing else does, so that no estimate of its influence can be excessive. When we take a walk, read a book, make a dress, hire a worker, visit a friend, attend a concert, choose a wife, cast a vote, enter into business, we always do it in the hope of attaining something good. Excerpt by: George Herbert Palmer; Alford Professor of Philosophy (Harvard University) – edited from the original
Holiday Weekend Sale! 5/26-5/31 Stainless Steel Dishwasher $269.99 5/26-5/31 Energy-compliant Dishwasher $349.99 5/26-5/31 18.2 cu. ft. Refrigerator $483.99 5/26-5/31 25.4 cu. ft. Refrigerator $875.99 Crushed Ice and Water Dispenser 5/26-5/31 30 in. Self-cleaning Electric Range $449.99 5/26-5/31 30 in. True Convection Electric Range $790.99 5/26-5/31 7.0 cu. ft. Super-Capacity Dryer $399.99 5/26-5/31 5.8 cu. ft. Front-load Electric Dryer $449.99 7 Drying Cycles
Excerpt from: Ocean Steam Navigation and the Ocean Post, by Thomas Rainey 2. Assumed (Section II.) that fast ocean mails are exceedingly desirable for our commerce, our defenses, our diplomacy, the management of our squadrons, our national standing, and that they are demanded by our people at large: 3. Assumed (Section III.) that fast steamers alone can furnish rapid transport to the mails; that these steamers can not rely on freights; that sailing vessels will ever carry staple freights at a much lower figure, and sufficiently quickly; that while steam is eminently successful in the coasting trade, it can not possibly be so in the transatlantic freighting business; and that the rapid transit of the mails, and the slower and more deliberate transport of freight is the law of nature:
v1.2 96
Sushi Dipping Sauce - 1/8 teaspoon wasabi powder - 2 tablespoons water - 1/8 teaspoon crushed red pepper flakes - 1/8 teaspoon minced pickled ginger - 1 teaspoon minced scallion, green part only - 1/3 cup white wine vinegar - 3 tablespoons soy sauce - 1 teaspoon sesame oil Mix the wasabi powder and water to form a paste. Stir together red pepper flakes, ginger, scallions, vinegar, soy sauce, and sesame oil. Serve with sushi at room temperature.
Excerpt from: Patriotic Readings, by Jasper L. McBrien, A. M. MR. SHERMAN (studying the Declaration). You have covered all our grievances in the twenty-seven distinct charges you have made against the present king of Great Britain. We can well afford to submit these facts to a candid world. That paragraph on slavery, Mr. Jefferson, meets with my approval heartily, but I fear some of the Southern delegates will oppose it strongly. We can certainly appeal to the Supreme Judge of the world for the rectitude of our intentions. I believe with you that divine Providence will support us in making this Declaration good. Therefore, I am willing to stand with you in pledging our lives, our fortunes, and our sacred honor to this end. I do not see how I could make any suggestions that would improve it. Mr. Jefferson, I congratulate you on the great work you have done in this paper for our country and for humanity.

v1.2 97
Appendix B: Writing Prompts The following grade-leveled writing prompts are provided to students in Lesson #34 and in the Message Master activity from Lessons 23-34. Students need to write original answers in response to the prompts. K-2 students must write a minimum of 6 words before they can submit their answer. Students in grades 3-6 must write at least 10 words. And students in grades 7-12 must write at least 20 words for the response to be accepted as final. Students’ original writing is scored for WPM, but not accuracy, and is available to the teacher in the Reports area.
Grade 2 What kind of pet would you like to have? What would you name it? What are you wearing today? What colors are your clothes? What is your favorite holiday? Why do you like it? What are some different ways a person can get to school? Tell about three ways. If monkeys went to school, what do you think their favorite class would be? Why? Why do you think ants walk in a line? What things could you find in an old house? Tell about your favorite family trip. Where did you go? What fun things did you do? What are two foods you like to eat? What do these foods look like? How do they taste? What is your favorite month of the year? Why? What is your favorite toy? Why? Tell about three animals you find on a farm. What do they look like? What do they do? If you were going on a trip to the moon, what would you take with you? If animals could talk, what questions would you ask them? What do you think they would
say? What job would you like to have when you grow up? What would you do in this job? Why do you think some people are scared of snakes? What is your favorite class in school? What do you like about it? Tell about your first day in this school. What did you do? If you had a robot, what would you tell it to do? What is your favorite book? Who are the characters in that book? If you could be an animal for one day, what kind of animal would you like to be? Why would
you like to be this animal? Would you like to have a dragon for a pet? Why or why not? Tell what students should do if they hear the fire alarm in school. What are some fun things to do inside on a rainy day? Tell how to make a peanut butter and jelly sandwich. Give every step.
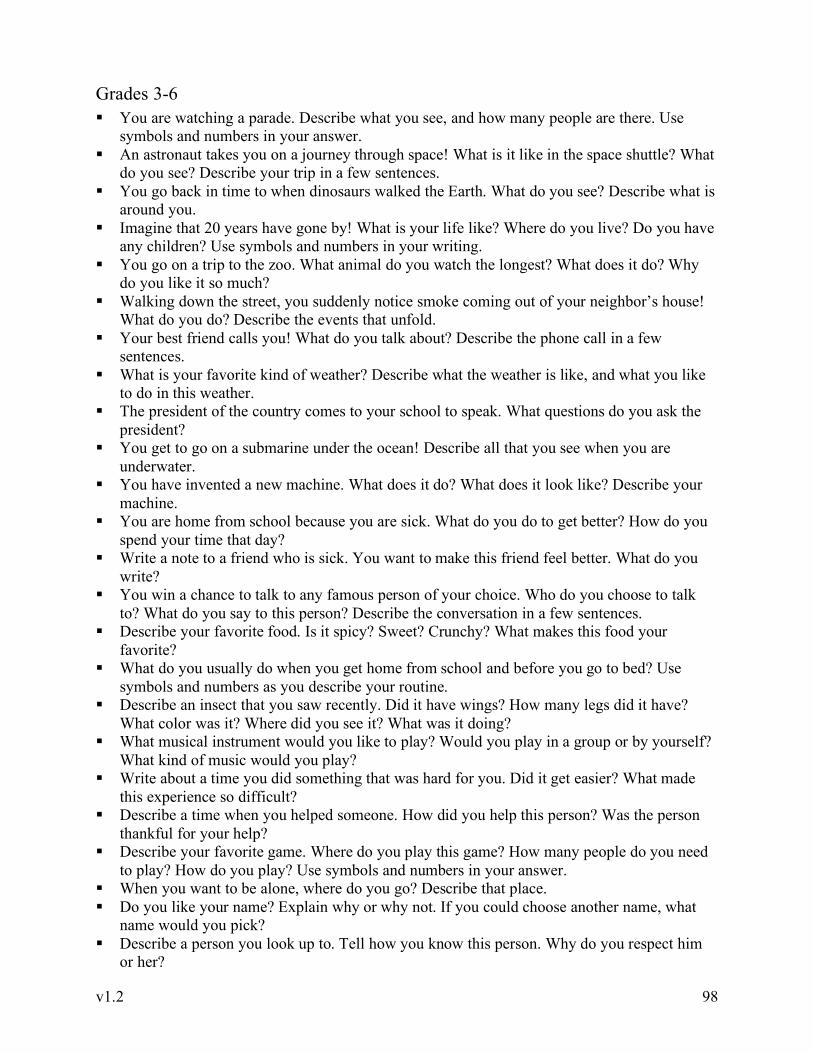
v1.2 98
Grades 3-6 You are watching a parade. Describe what you see, and how many people are there. Use
symbols and numbers in your answer. An astronaut takes you on a journey through space! What is it like in the space shuttle? What
do you see? Describe your trip in a few sentences. You go back in time to when dinosaurs walked the Earth. What do you see? Describe what is
around you. Imagine that 20 years have gone by! What is your life like? Where do you live? Do you have
any children? Use symbols and numbers in your writing. You go on a trip to the zoo. What animal do you watch the longest? What does it do? Why
do you like it so much? Walking down the street, you suddenly notice smoke coming out of your neighbor’s house!
What do you do? Describe the events that unfold. Your best friend calls you! What do you talk about? Describe the phone call in a few
sentences. What is your favorite kind of weather? Describe what the weather is like, and what you like
to do in this weather. The president of the country comes to your school to speak. What questions do you ask the
president? You get to go on a submarine under the ocean! Describe all that you see when you are
underwater. You have invented a new machine. What does it do? What does it look like? Describe your
machine. You are home from school because you are sick. What do you do to get better? How do you
spend your time that day? Write a note to a friend who is sick. You want to make this friend feel better. What do you
write? You win a chance to talk to any famous person of your choice. Who do you choose to talk
to? What do you say to this person? Describe the conversation in a few sentences. Describe your favorite food. Is it spicy? Sweet? Crunchy? What makes this food your
favorite? What do you usually do when you get home from school and before you go to bed? Use
symbols and numbers as you describe your routine. Describe an insect that you saw recently. Did it have wings? How many legs did it have?
What color was it? Where did you see it? What was it doing? What musical instrument would you like to play? Would you play in a group or by yourself?
What kind of music would you play? Write about a time you did something that was hard for you. Did it get easier? What made
this experience so difficult? Describe a time when you helped someone. How did you help this person? Was the person
thankful for your help? Describe your favorite game. Where do you play this game? How many people do you need
to play? How do you play? Use symbols and numbers in your answer. When you want to be alone, where do you go? Describe that place. Do you like your name? Explain why or why not. If you could choose another name, what
name would you pick? Describe a person you look up to. Tell how you know this person. Why do you respect him
or her?
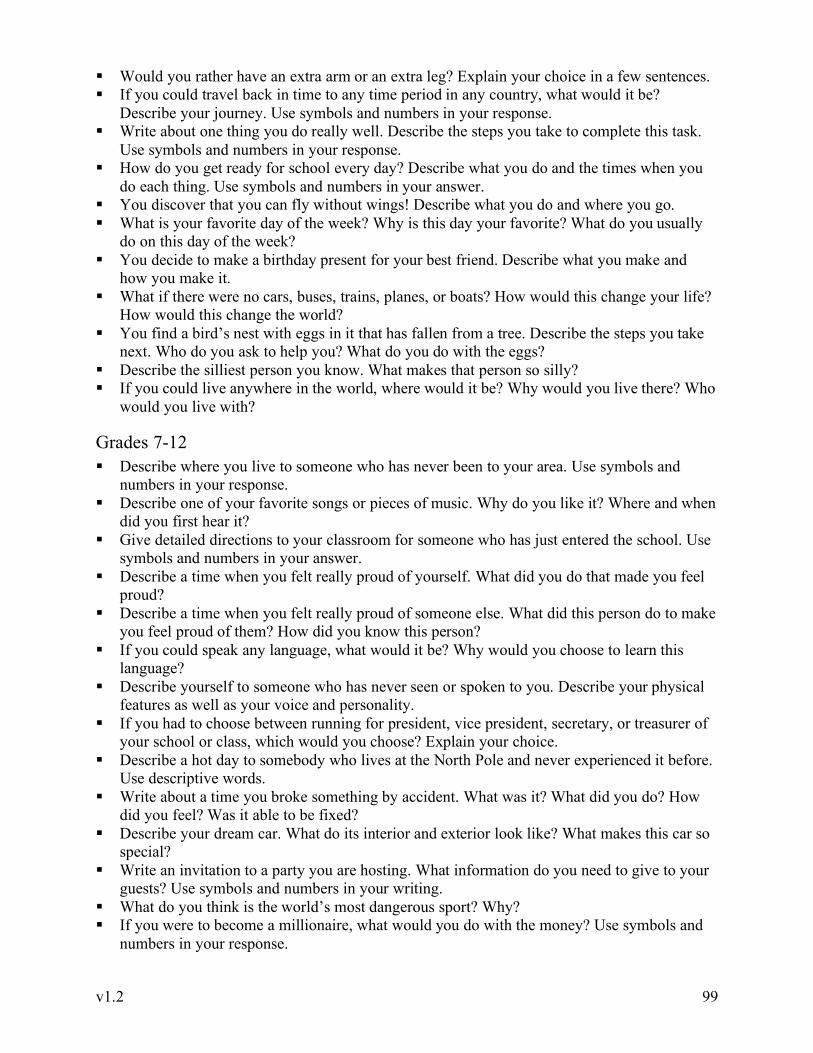
v1.2 99
Would you rather have an extra arm or an extra leg? Explain your choice in a few sentences. If you could travel back in time to any time period in any country, what would it be?
Describe your journey. Use symbols and numbers in your response. Write about one thing you do really well. Describe the steps you take to complete this task.
Use symbols and numbers in your response. How do you get ready for school every day? Describe what you do and the times when you
do each thing. Use symbols and numbers in your answer. You discover that you can fly without wings! Describe what you do and where you go. What is your favorite day of the week? Why is this day your favorite? What do you usually
do on this day of the week? You decide to make a birthday present for your best friend. Describe what you make and
how you make it. What if there were no cars, buses, trains, planes, or boats? How would this change your life?
How would this change the world? You find a bird’s nest with eggs in it that has fallen from a tree. Describe the steps you take
next. Who do you ask to help you? What do you do with the eggs? Describe the silliest person you know. What makes that person so silly? If you could live anywhere in the world, where would it be? Why would you live there? Who
would you live with?
Grades 7-12 Describe where you live to someone who has never been to your area. Use symbols and
numbers in your response. Describe one of your favorite songs or pieces of music. Why do you like it? Where and when
did you first hear it? Give detailed directions to your classroom for someone who has just entered the school. Use
symbols and numbers in your answer. Describe a time when you felt really proud of yourself. What did you do that made you feel
proud? Describe a time when you felt really proud of someone else. What did this person do to make
you feel proud of them? How did you know this person? If you could speak any language, what would it be? Why would you choose to learn this
language? Describe yourself to someone who has never seen or spoken to you. Describe your physical
features as well as your voice and personality. If you had to choose between running for president, vice president, secretary, or treasurer of
your school or class, which would you choose? Explain your choice. Describe a hot day to somebody who lives at the North Pole and never experienced it before.
Use descriptive words. Write about a time you broke something by accident. What was it? What did you do? How
did you feel? Was it able to be fixed? Describe your dream car. What do its interior and exterior look like? What makes this car so
special? Write an invitation to a party you are hosting. What information do you need to give to your
guests? Use symbols and numbers in your writing. What do you think is the world’s most dangerous sport? Why? If you were to become a millionaire, what would you do with the money? Use symbols and
numbers in your response.
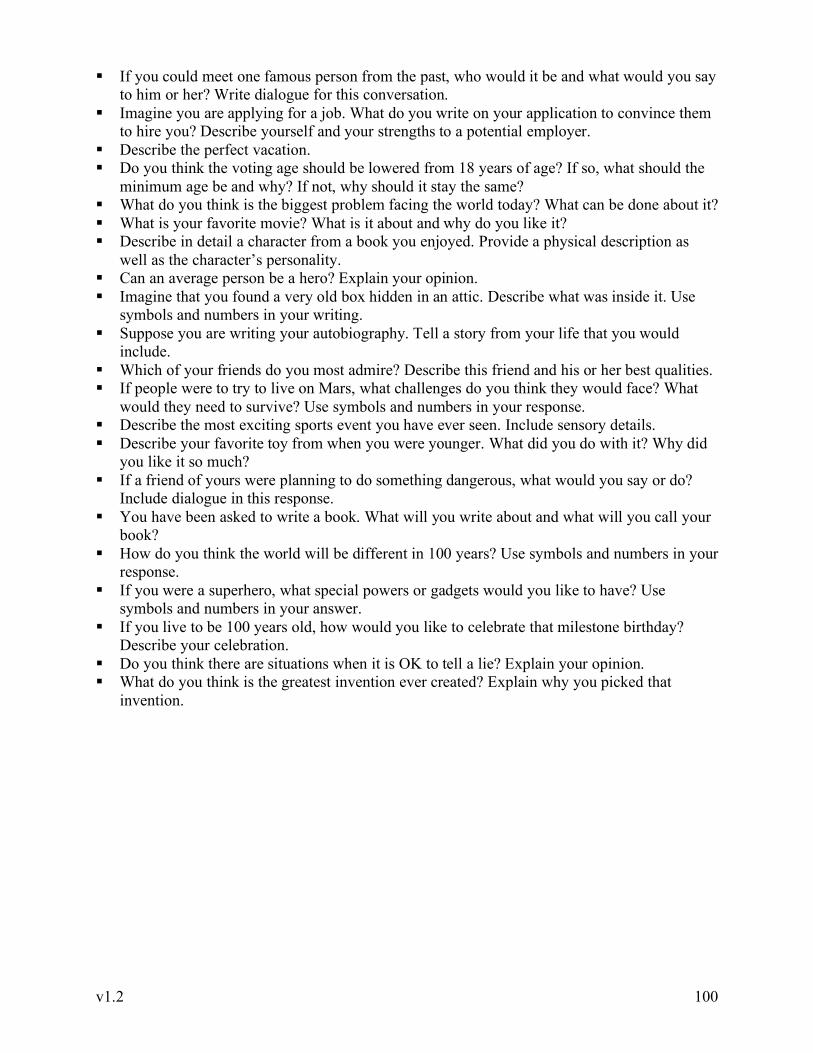
v1.2 100
If you could meet one famous person from the past, who would it be and what would you say to him or her? Write dialogue for this conversation.
Imagine you are applying for a job. What do you write on your application to convince them to hire you? Describe yourself and your strengths to a potential employer.
Describe the perfect vacation. Do you think the voting age should be lowered from 18 years of age? If so, what should the
minimum age be and why? If not, why should it stay the same? What do you think is the biggest problem facing the world today? What can be done about it? What is your favorite movie? What is it about and why do you like it? Describe in detail a character from a book you enjoyed. Provide a physical description as
well as the character’s personality. Can an average person be a hero? Explain your opinion. Imagine that you found a very old box hidden in an attic. Describe what was inside it. Use
symbols and numbers in your writing. Suppose you are writing your autobiography. Tell a story from your life that you would
include. Which of your friends do you most admire? Describe this friend and his or her best qualities. If people were to try to live on Mars, what challenges do you think they would face? What
would they need to survive? Use symbols and numbers in your response. Describe the most exciting sports event you have ever seen. Include sensory details. Describe your favorite toy from when you were younger. What did you do with it? Why did
you like it so much? If a friend of yours were planning to do something dangerous, what would you say or do?
Include dialogue in this response. You have been asked to write a book. What will you write about and what will you call your
book? How do you think the world will be different in 100 years? Use symbols and numbers in your
response. If you were a superhero, what special powers or gadgets would you like to have? Use
symbols and numbers in your answer. If you live to be 100 years old, how would you like to celebrate that milestone birthday?
Describe your celebration. Do you think there are situations when it is OK to tell a lie? Explain your opinion. What do you think is the greatest invention ever created? Explain why you picked that
invention.

v1.2 101
Appendix C: Assessments These assessments may be printed and provided to students, in place of the text displaying on screen. Assessments are timed, and students are not required to type all lines of each assessment. They are required to meet minimum WPM and Accuracy goals in order to pass.
Assessment #1: Covering lessons 1-3 (J F Space U R K D) (Grades K-2) jjj fff uuu rrr kkkk ddd jfur jfur fjru fjru uf jr uf jr jjj fff uju rfr fur frju kd kd kk kk dd dd dk dk jjj fff jjj fff kk dd kk dd uuu rrr uuu rrr kk dd dd kk kk dd jkj fdf jkj fdf fdf jkj fdf jkj kdjf kdjf kdjf dkfj dkfj dkfj duk kud duk kud ruff fur ruff fur dd kk ff jj uu rr fff jjj ddd kk rrr uuu ddd kk jfj kdk uru rkr krk frf juj jkj duk kud fur ruf ruk fur dru fru kud kuf duf fud ruff kurk jurr jurd

v1.2 102
Assessment #1: Covering lessons 1-3 (J F Space U R K D) (Grades 3-6) jjjj ffff kkkk dddd uuuu rrrr ffff jjjj dddd kkkk fdjf jukj frdf jukj kdjuf krdjf kudjf dkfjr dkfjd dkfjk kudd furd durd ruff furd ruff durk kurj durk kurj fudd dukk fudd dukk jkdj jfkj fdfd jffj kkdk uuru rkkr udur furr ruff furd frud rurr kurk fudd duff ruff judd dukk kuff juff rudd rukk durrk frudd durjj krujj drukk kurju jurrd rudud krurd druff drurk frudd kurff ruddrk durfud jfjf rkrk djdj ufuf dudd furd judd ruff frud kurr druf rudr furr furd durf jduk durk kurk furd kurf druu druk kurj durf frudu durfu jurdu druff drurk furdd furdu jurrd frudd ruddr durku rujudd kurffd

v1.2 103
Assessment #1: Covering lessons 1-3 (J F Space U R K D) (Grades 7-12) jjjj ffff jjjj ffff kkkk dddd kkkk dddd uuuu rrrr uuuu rrrr jkdj fjdf jfkj fdfd jkdf fdjf jukj frdf jukj kdur kdjuf krdjf dudjf kdjuf dkfjr dkfjd dkfjk dkjfd durk dukr jurd rukd fudd dukk furd durr drujj druff frurd jrudd drurkf krujj kruff ruddrr jurrf ruffu udud jffj ddkd rruu kkdd ruru fjfj ddkd kddk rrur ddrr kkuu uruu ffuu jjuu rruu uujj kkff ddjj ufuf rjrj krkr dkdk juj fuf ruf fur fru dud rur juk fud duk urd kuj kru jru ruk urf ruffu frurf jurff druff krujj jrukk furrd jurrf ududk kurjud ruddrr jj ff dd kk rr uu jf ur kd uf jd kr rk dj uf dk ru fj kd kf jfjf urur kdkd uuff jdjd krkr rkrk djdj ufuf dkdk ruru fjfj jfrk urdj kduf rukr krfj jdru fudk kduf rkur rkdj ufdk rufj jrj kdk rjr jrj dkd ufu rjr jfj uku dud jrjr fkfk rkr udu fjf kjk krk fuf judu kdkd rjrj kfkf udud dkdk jrrj fkkf duud kddk jfjf rkrk djdj ufuf udud kudu furd judd kuff dkud ruff frud kurj druf rudr drkr furr juff furd dukk durk kurk furd kurf fudj druu druk kruj durfu jurdu kurk durk kruk rurd frudu druff urdur drurk furdd furdu jurrd rukkr kurrd frudd ruddr rujud kurff durfuj durkur jrudd drurkf jrukk ufdk kduf
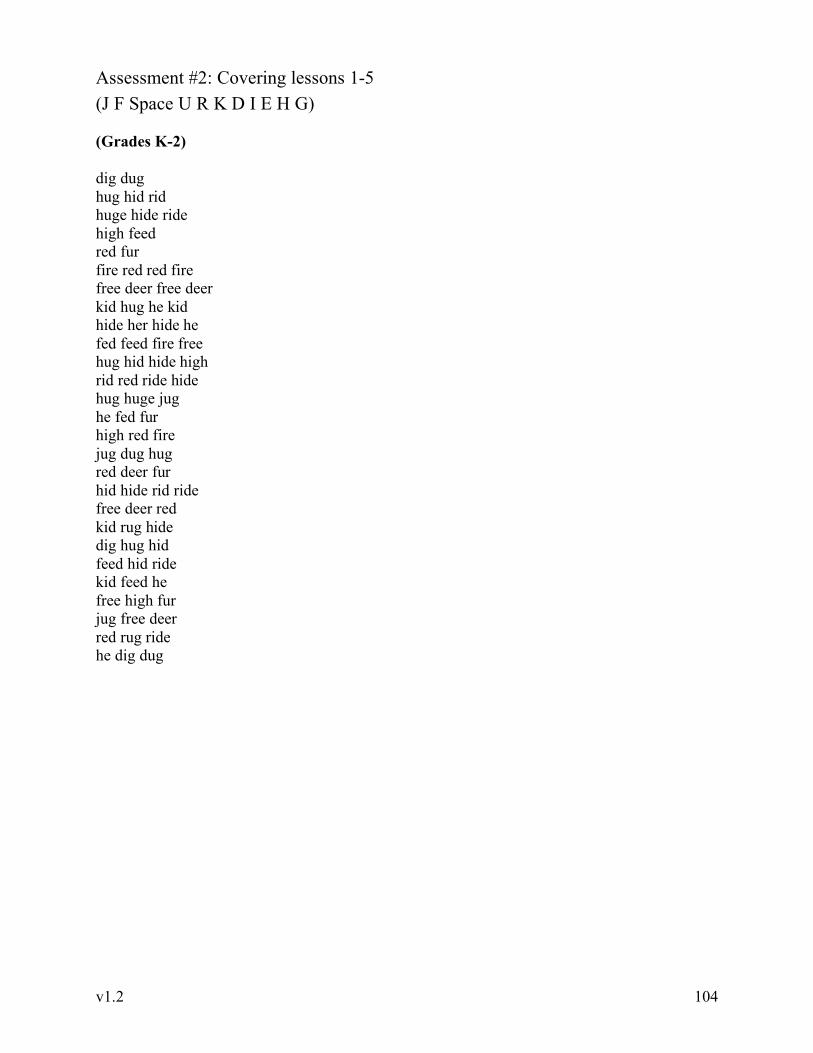
v1.2 104
Assessment #2: Covering lessons 1-5 (J F Space U R K D I E H G) (Grades K-2) dig dug hug hid rid huge hide ride high feed red fur fire red red fire free deer free deer kid hug he kid hide her hide he fed feed fire free hug hid hide high rid red ride hide hug huge jug he fed fur high red fire jug dug hug red deer fur hid hide rid ride free deer red kid rug hide dig hug hid feed hid ride kid feed he free high fur jug free deer red rug ride he dig dug
v1.2 105
Assessment #2: Covering lessons 1-5 (J F Space U R K D I E H G) (Grades 3-6) fee fur fudge fridge freed greed guide grudge guided grudged jig jug jeer judge jigged jugged judged hid her huff hike herd huffed hiked herded rug rig rude ride red reed rider ridge rugged rigged ridged fee fed jug jig rug reef freed greed feed deer huff huffed hike hiked ridge fridge judge grudge hiked hike huffed huff fudge fridge guide freed ridged jigged judged fee feed free freed fired rug rugged ridge ridged guided hiked huffed guided ridged ridge rugged rug grudge judge fridge ridge freed free feed fee fudge jug rig rigged jigged judged rigged ridged rigged rig jugged jug jigged judged ridged rugged fridge fee freed fur fudge rugged rigged judged jigged ridged ridge judged judge jigged jig

v1.2 106
Assessment #2: Covering lessons 1-5 (J F Space U R K D I E H G) (Grades 7-12) feed feeder fed feud feuded grid greed dirk dire deed heed heir huff reek rigid frigid heir hire hired reef refer referee hired hire heir heeded reeked referee reeked heeded hired furrier feed dirk hire higher heir reek feud dire deed grid grudge judge fridge heed heeded reef refer hire hired referred refereed grid greed grief jeered hired reeked heeded grid refereed hire feed heed hire hirer hired freed feud fife fifer fifed fed feed feeder heed heir feud hue heeded judge feuded hurried heir reef feud furred fur hire heed jeer fife reek heed huff drier jeered hire feud heed fife hired heeded fifed fig figure figured feuded feed heed deed greed freed greed rid grid ridded jig jigged judge judged hire hired heed heeded fife fifed feud feuded feed freed greed grid jigged judge drudge grudge judged drudged grudged fudge fudged fridge frigid ferried huge hedge hug high hide heed hue rue rude rugged hired heeded hedged hugged juried feed heed hire dirk heed hedge jeer dirge rife heeded hired jeered fired ferried feuded ferried grid ridded reef hire hired girded rude hedge judge fridge feud grid reef hire hired feuded feed higher hire jeered judged grudged fudged hire judge fife jeer fired judged fifed jeered greed grid rid ruddier high higher furred fudge gird greed dried deer huffed irked feed jugged freed hiked hiker hired reef referred deer reed dirk dire heir hire reef refer feud feed fed irk ferried hide juried heir reef feud dirk referee feed dire hurried rigged refer huff huge frigid reef here high higher

v1.2 107
Assessment #3: Covering lessons 1-9 (J F Space U R K D I E H G L S Right Shift O W Left Shift ; A Return/Enter) (Grades K-2) Sheila is a real dear[Enter] Hal raked for his dad[Enter] Jorge digs holes for seeds[Enter] Al hears his dog howl[Enter] Her owl glides[Enter] Rose sees a far off fire[Enter] Deer are flashes of fur[Enter] He did well for his solo[Enter] She will sail for a while[Enter] Our sour food was gross [Enter] We saw a wood full of firs[Enter] Edgar has red hair[Enter] Willa wore a frilled dress[Enter] Lori was a slow worker [Enter] Laila would wear red shoes[Enter] His dog woke his dad[Enter] Jesse is a girl who has red hair[Enter] A dog shakes his head[Enter] Our house is real wide[Enter] Gail hides as Jahir seeks[Enter]

v1.2 108
Assessment #3: Covering lessons 1-9 (J F Space U R K D I E H G L S Right Shift O W Left Shift ; A Return/Enter) (Grades 3-6) Our grill is full of grease[Enter] Josie saw a lake full of reeds[Enter] I like willows as well as oaks[Enter] He had a whiff of a flower[Enter] Louisa held a jar lid as she walked[Enter] Our fridge was full of grilled fish[Enter] She heard a radio while she rowed[Enter] Ari is a kid who likes egg rolls[Enter] A selfless lad aided a rider[Enter] Elsa likes huge waffles[Enter] I asked for a doll for Larissa who is ill[Enter] Fish go free as hooks fail[Enter] Large whales swallow krill for food[Enter] A huge lake holds geese who glide[Enter] Darla was our old referee[Enter] A dark old owl flew higher[Enter] She rids flowers of weeds[Enter] Kora fed her hawk a large fish[Enter] He is sure we will see rows of roses[Enter] Jolie was gleeful for good fudge[Enter] I would guess war is awful for all of us[Enter] Dale said he would wash his goalie gear[Enter] Our grass is a sea of daffodils[Enter]
v1.2 109
Assessment #3: Covering lessons 1-9 (J F Space U R K D I E H G L S Right Shift O W Left Shift ; A Return/Enter) (Grade 7-12) Large giraffes look high for good food[Enter] Helga dragged her sled as Sid followed[Enter] She was so full of rage she wailed aloud[Enter] Delilah likes folklore while I read horror[Enter] We had a solid deal so our house was sold[Enter] Leigh was older so he was a real idol for Jose[Enter] We heard far off roars as herds of deer fled[Enter] We used a dishwasher for our soiled dishes[Enter] Kaela held her sides as she laughed hard[Enter] Daria asked for a folder so she saw her files[Enter] His fellows would lead as he held a flag high[Enter] As she hikes a ridge she sees a dreadful gorge[Enter] Dofi shirks her work as she sews herself a shawl[Enter] A glass jar fell off a dresser so Kadie used glue[Enter] Adroa released a wild eagle whose leg had healed[Enter] Jia Li was red as a radish as she heard of her gaffe[Enter] Alessio welded a door so he would seal a useless hall[Enter] Giada is also afraid of his false laughs or rude jeers[Enter] Sadie swallows fried eggs as she sees her waffles[Enter] A gold dollar will wake a selfish desire like greed[Enter] His head is held high as he walks while I look low[Enter] Ella reads for a half hour as Les looks for his shoe[Enter] Grass like jade is full of odd life like larks or frogs[Enter] Eli used large fallow fields as he grew his radishes[Enter] Allie said his joke was hilarious as all laughed hard[Enter] A lawless rogue guided a raid for a high wage[Enter] We were awed as he glowered so we heeded his words[Enter] A ruler showed his heir how ideal leaders should lead[Enter] A referee sees a hard rodeo rider urge his horse[Enter] He had a swagger as he swore his ride was arduous[Enter] Lawful sheriffs guard jailed losers who used ruses or wiles[Enter] We were all agog as Fajga rode a saddled horse[Enter] Allegra wishes she would follow her serious soldier[Enter]
v1.2 110
Assessment #4: Covering lessons 1-15 (J F Space K D I E H G L S Right Shift O W Left Shift ; A Return/Enter P Q Backspace Y T Tab Arrow Keys B N) (Grades K-2) Birds and beasts use language too[Enter] They talk just like people do[Enter] Puppies bark; a wolf will howl[Enter] Kittens purr but bears will growl[Enter] Rodents squeak while horses neigh[Enter] Night owls hoot and sleep by day[Enter] Turtles hide; hyenas sneer[Enter] A splash shows that a fish is near[Enter] Bugs will sing all through the night[Enter] Larks begin at the first light[Enter] Butterflies spread radiant wings[Enter] The dolphin squeals; the blue whale sings[Enter] Geese will honk while fireflies glow[Enter] People grin and say hello[Enter]

v1.2 111
Assessment #4: Covering lessons 1-15 (J F Space K D I E H G L S Right Shift O W Left Shift ; A Return/Enter P Q Backspace Y T Tab Arrow Keys B N) (Grades 3-6) People talk in quite a lot of different ways[Enter] Talking aloud is just one way to speak;[Enter] Another way is to use gestures or signs[Enter] Not all people are able to hear or speak[Enter] These people use Sign Language to talk[Enter] Sign Language uses hand gestures instead of words[Enter] A few of these signs are easy to understand;[Enter] Others are hard if you do not know the language[Enter] One gesture that lots of people know is the sign for hunger;[Enter] To do this sign you put your hands on top of your belly[Enter] Other signs are a little bit harder to do;[Enter] If you want to show you are happy you open your hand and strike your heart[Enter] To show anger you need to look angry first;[Enter] Then you bend your fingers slightly and put your hand on top of your heart;[Enter] Let your fingers suddenly fly away to finish the sign[Enter]

v1.2 112
Assessment #4: Covering lessons 1-15 (J F Space K D I E H G L S Right Shift O W Left Shift ; A Return/Enter P Q Backspace Y T Tab Arrow Keys B N) (Grades 7-12) We all know that authors write books[Enter] But the authors do not print books on their own[Enter] Before a written book ends up on the shelf of a library or bookstore it has to be printed; this is done using a printing press[Enter] The first printing press was built by Johannes Gutenberg[Enter] Before this press was built people had to write books by hand[Enter] If you wanted two sets of a single book you had to rewrite the whole thing[Enter] The new press allowed Gutenberg to print a single page again and again[Enter] The press was a fast and easy way to generate written books for people to read[Enter] As another bonus the printed letters were easier for people to understand[Enter] The Gutenberg press altered history[Enter] Initially only a tiny handful of people were able to read and write[Enter] As other people learned to read there was a greater need for printed books[Enter] With the help of the printing press the words of kings and priests were passed down to readers;[Enter] The ideas of great thinkers were likewise easily distributed[Enter] As history went on a lot of people helped to upgrade the original printing press[Enter] The Gutenberg press had to be operated by hand; later presses were faster[Enter] As printing presses got faster people started printing newspapers as well as books[Enter] Newspapers needed to be printed daily[Enter] Faster printing presses allowed people to learn about what was happening in the world on a daily basis[Enter] Today a lot of traditional presses are going up against new ways to print[Enter] Digital data is used to print books and newspapers[Enter] Ink jet and laser printers no longer require typeset presses for printing[Enter] Older printing presses are going out of style[Enter] Still it is good to know that the art of printing is flourishing in a new age[Enter]
v1.2 113
Assessment #5: Covering lessons 1-20 (J F Space K D I E H G L S Right Shift O W Left Shift ; A Return/Enter P Q Backspace Y T Tab Arrow Keys B N M V , C . X / Z ?) (Grades K-2) I talk on the phone with my friends. We tell stories to each other. One story was about a quick brown fox. He jumps over lazy dogs. The dogs do not like it. They want to sleep. The fox wakes them up. Then the dogs run after the fox. They run down a hill to the school. The teacher stops the fox. The dogs stop too. They play on the swings. Dogs look funny when they swing. They swing high and low. The fox slides down the slide. The teacher laughs out loud. Do you like my funny story?
v1.2 114
Assessment #5: Covering lessons 1-20 (J F Space K D I E H G L S Right Shift O W Left Shift ; A Return/Enter P Q Backspace Y T Tab Arrow Keys B N M V , C . X / Z ?) (Grades 3-6) What if you saw a zebra and a kangaroo playing soccer? It would be quite a sight to see. The zebras and kangaroos are practicing to compete in the Animal Olympics. The zebras race across the soccer field as fast as they can. The kangaroos hop very quickly across the field with their powerful legs. As the animals kick the soccer ball, it soars far through the air. Both teams stop every few minutes to graze on the green grass.
All kinds of animals from around the world compete in the Animal Olympics. The zebras and kangaroos play soccer with penguins from Antarctica. They ski with chimps from Cameroon. They even wrestle with tigers from Russia. It was exciting to go to the Animal Olympics in Beijing, China. The animals took home many medals and good memories.
v1.2 115
Assessment #5: Covering lessons 1-20 (J F Space K D I E H G L S Right Shift O W Left Shift ; A Return/Enter P Q Backspace Y T Tab Arrow Keys B N M V , C . X / Z ?) (Grades 7-12)
The crowd was amazed to view the quickness of the juggler, as well as her dexterity. She was able to juggle six balls at once. It was astounding to see her juggle clubs, rings, beanbags, balls, and pieces of fruit without dropping any of them. It was even more exciting when she juggled while balancing on a unicycle. She juggled for several minutes without stopping.
Juggling was first documented in ancient wall paintings found in Egypt. Juggling has also been recorded in many other ancient civilizations, including Greek, Indian, Chinese, and Aztec. In the Middle Ages, juggling performers were looked down upon. Sometimes, jugglers would get into trouble for juggling in the streets. Interestingly, many of the kings at that time had jesters who juggled in their courts for entertainment.
In the eighteenth century, Philip Astley began the first modern circus in Great Britain. He employed jugglers, along with the rest of his acts, to entertain the crowds as they traveled through Europe.
Jugglers were used to perform between acts during the nineteenth century in theaters. Bringing the jugglers to indoor stages allowed them to execute more precise feats of nimbleness. This made juggling much more interesting to do and watch.
The International Jugglers Association, IJA, began in the middle of the twentieth century. It was designed for professional performers, but soon involved many people who just liked to juggle but not perform for audiences. The IJA even sponsors a World Juggling Day.
Juggling is a popular hobby today. To begin juggling, all one needs is three balls and a willingness to chase after them. What are you waiting for?
v1.2 116
Assessment #6: Covering lessons 1-32 (J F Space K D I E H G L S Right Shift O W Left Shift ; A Return/Enter P Q Backspace Y T Tab Arrow Keys B N M V , C . X / Z ? ctrl-C ctrl-V ctrl-S : ‘ “ 6 7 ^ & 5 4 % $ 8 3 * # 9 2 ( @ 0 1 ) ! Numeric Keypad 5 4 6 7 8 9 Enter 1 2 3 0 . + - * / < > [ ] { } - = _ +) (Grades K-2) Did you know that lighthouses are tall towers? Their size can be more than 100 feet! They are built near the sea. Many are on high cliffs. They have bright, flashing lights. A lighthouse might give a quick flash every 10 or 15 seconds. The light can be seen from far away. This helps boats in bad weather. Ships can see the light. It tells them where the rocky shore is. (That way, they don’t crash!) One sailor said, “I can see the light from the sea. It makes my job easier. I feel safe and can relax.”
v1.2 117
Assessment #6: Covering lessons 1-32 (J F Space K D I E H G L S Right Shift O W Left Shift ; A Return/Enter P Q Backspace Y T Tab Arrow Keys B N M V , C . X / Z ? ctrl-C ctrl-V ctrl-S : ‘ “ 6 7 ^ & 5 4 % $ 8 3 * # 9 2 ( @ 0 1 ) ! Numeric Keypad 5 4 6 7 8 9 Enter 1 2 3 0 . + - * / < > [ ] { } - = _ +) (Grades 3-6)
Have you ever heard of Morse code? This system was invented by Samuel Morse in the 1830s. Unlike an alphabet, Morse code only has two characters; they are the “dot” and the “dash.” The “dot” is a quick burst of sound. The “dash” is a longer tone. Different patterns of dots and dashes are organized into letters, numbers, and symbols.
Before telephones, Morse code was used to send messages. These “telegrams” were made of electric pulses. The pulses were sent from person to person. The job of the receiver was to interpret the message and not mix up the dots and dashes.
Ships used Morse code to talk to each other. One important message was “S.O.S.” This was a call for help, meaning “Save Our Ship”. It was sent if a ship was sinking. In Morse code, “S.O.S.” is dot-dot-dot (S), dash-dash-dash (O), dot-dot-dot (S).
v1.2 118
Assessment #6: Covering lessons 1-32 (J F Space K D I E H G L S Right Shift O W Left Shift ; A Return/Enter P Q Backspace Y T Tab Arrow Keys B N M V , C . X / Z ? ctrl-C ctrl-V ctrl-S : ‘ “ 6 7 ^ & 5 4 % $ 8 3 * # 9 2 ( @ 0 1 ) ! Numeric Keypad 5 4 6 7 8 9 Enter 1 2 3 0 . + - * / < > [ ] { } - = _ +) (Grades 7-12)
Jodi was strolling through the mall when she received a text message from her friend Sam. “Do u want 2 meet for dinner 2nite?” Sam asked. Jodi sat down on a bench as she typed her reply. “I can’t,” she responded. “I’m meeting Cynthia l8r. We r going 2 the movies. Want 2 come?”
She waited for Sam to answer. “Sure,” he responded. “What time?” Jodi thought for a moment. Her dad had promised to drop her off at Cynthia’s house at 7:00. They were going to grab a quick bite to eat, and then head over to the theater at 8:30. She bent over her keypad. “Meet us @ the theater @ 8:45.” She added, “Bring $ for snacks.”
Once she received a confirmation from Sam, Jodi shut her phone and stood up. She had a few hours to kill before she needed to be home. She walked towards the bookstore. A book on the “New Fiction” rack caught her eye; the cover looked a lot like the poster of the movie they planned to see. She flipped through a few pages and realized the novel and the film were the same story. She shut the book quickly, to avoid seeing any spoilers, and texted Cynthia. “Wow,” she typed. “Looks like the novel of the movie is out already. Good thing we r going to see it 2nite.”
“Haha, wow indeed,” Cynthia responded. “R we still on for 7:00?” Jodi quickly responded in the affirmative and added, “p.s. Sam’s coming.” There was a pause, and then Jodi’s phone started ringing loudly. Blushing as heads in the store turned, she scurried out of the bookstore. “Sam’s coming?” Cynthia’s gasped. “THE Sam? How’d you ever manage that one?”
“Simple,” Jodi laughed. “I invited him. Of course, I didn’t say that it would be a romantic comedy.”
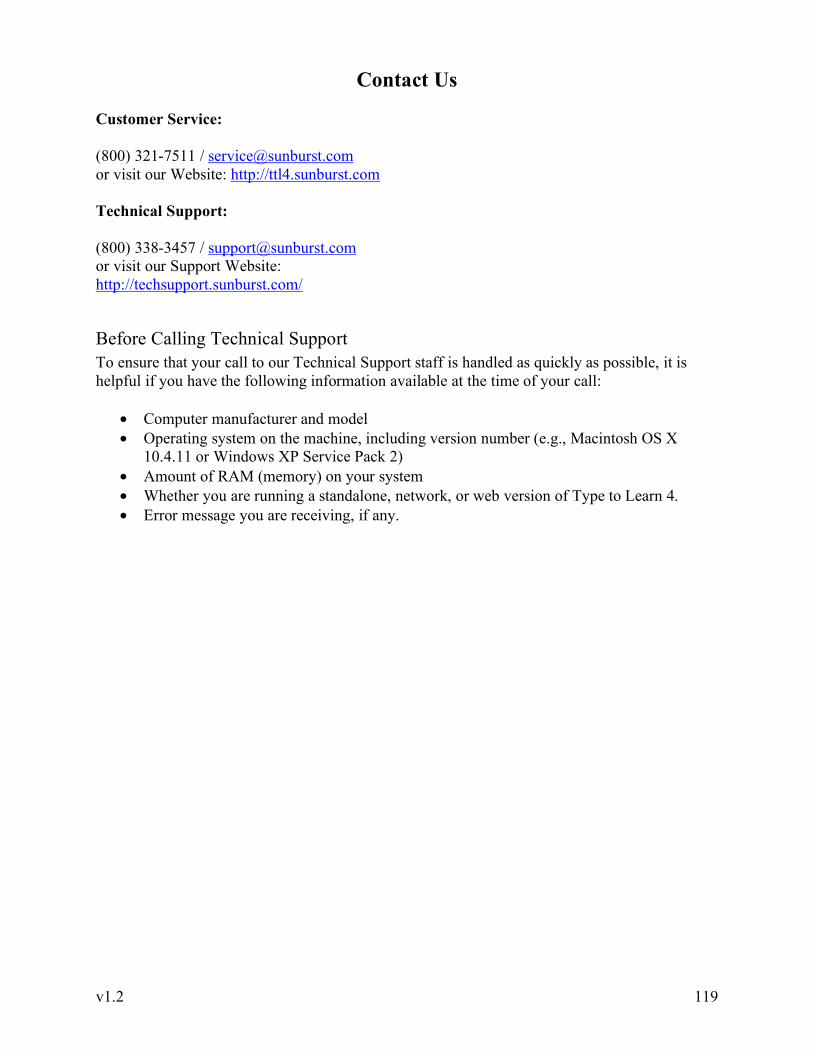
v1.2 119
Contact Us Customer Service: (800) 321-7511 / [email protected] or visit our Website: http://ttl4.sunburst.com Technical Support: (800) 338-3457 / [email protected] or visit our Support Website: http://techsupport.sunburst.com/
Before Calling Technical Support To ensure that your call to our Technical Support staff is handled as quickly as possible, it is helpful if you have the following information available at the time of your call:
• Computer manufacturer and model • Operating system on the machine, including version number (e.g., Macintosh OS X
10.4.11 or Windows XP Service Pack 2) • Amount of RAM (memory) on your system • Whether you are running a standalone, network, or web version of Type to Learn 4. • Error message you are receiving, if any.
v1.2 120
Credits Project Management:
Cory Nelson Alison Sherman
Educational Consultants:
Dr. Leigh E. Zeitz - University of Northern Iowa Bruce McClanahan - WA State School for the Blind
Content:
Katie Fisher Alison Sherman
Words & Numbers, Inc. Dr. Leigh E. Zeitz
Art and Design:
Dexter Abad David Budlong Elisabeth Cherry Chris Ferguson David Ham
Rantz Hoseley Gil Marquez Frank Peak Michelle Scrimpsher Daniel Taylor
Engineering:
Justin Chu Chris Crowe Bill Fisher Cory Nelson Nick Olsen
Scott Scaccianoce Otmar Schlunk Alex Sramek David Swift Greg Woodson
Quality Assurance:
LogiGear Corporation
Voice Over Sound Services Provided By: Scorpio Sound, LLC (Los Angeles)
Voice Over Casting, Directing, and Recording: Gregory J. Hainer
Voice Over Editing:
Gregory J. Hainer Stephen Neal
Scott Purvis Jacques Slade
Voice Over Cast:
Ashley Bell Ben Diskin Leyla Hoyle
Patty Isas Shalim Ortiz Salli Saffioti
Standards Alignments:
Six Things, Inc.