version 1.2 (public) - sarawak energy · version 1.2 (public) user manual ... 1 - 2 chapter 2: ......
TRANSCRIPT

Prepared by: SAINS Sarawak Information Systems Sdn. Bhd. (213181-W)
Copyright © 2012 SAINS. All rights reserved All parts of this manual are the property of SAINS Sdn. Bhd. No parts of this manual may be reproduced in any manner whatsoever including mechanical or electronic media such as disk or tape. No part of this manual may be transmitted in any form by any means without the written permission of SAINS Sdn. Bhd.
Syarikat SESCO Berhad
eTender System Version 1.2 (PUBLIC)
User Manual Version 1.3

TABLE OF CONTENTS
CHAPTER 1: SYSTEM OVERVIEW Introduction ..................................................................................................... 1 - 2
CHAPTER 2: USING THE SYSTEM User ................................................................................................................ 2 - 1
Assumption ..................................................................................................... 2 - 1
Using Calendar View....................................................................................... 2 - 1
Using Radio Buttons ....................................................................................... 2 - 1
Using Drop Down List ..................................................................................... 2 - 2
Message Box .................................................................................................. 2 – 2
CHAPTER 3: HOW TO GET HELP Contacting SAINS Call Centre ........................................................................ 3 – 1
CHAPTER 4: SYSTEM ACCESS Getting Started ................................................................................................ 4 – 1
Page Navigation .............................................................................................. 4 – 5
CHAPTER 5: USING THE eTENDER SYSTEM Log in .............................................................................................................. 5 – 1
Tender Document ........................................................................................... 5 – 2
Search ............................................................................................................ 5 – 7
Payment.......................................................................................................... 5 – 8
Purchased Tender Document ......................................................................... 5 – 10
Download ........................................................................................................ 5 – 14
User Info ......................................................................................................... 5 – 15
Change Password ........................................................................................... 5 – 17
Log out ............................................................................................................ 5 – 18
CHAPTER 6: SEND APPLICATION IMPROVEMENT FEEDBACK Application Improvement Feedback Function .................................................. 6 – 1
Stand A Chance To Win A Surprise Gift .......................................................... 6 – 1
Send A Suggestion/Feedback ......................................................................... 6 – 1

CHAPTER 1
SYSTEM OVERVIEW
CONTENTS
1.1. Introduction ............................................................................ 1-1

eTender System System Overview
Version: 1.2 Page: 1-1
1.1. Introduction The eTender System (Phase IV) aims to aid Syarikat SESCO Berhad in managing the
delivery of tender documents in a more effective and efficient manner through the use of
the eTender website.
The eTender System was designed to: -
1. Reduce the administration costs of printing and delivering tender documents.
2. Enable Syarikat SESCO Berhad to upload, track and monitor tender documents
for online downloading and online payment.
3. Allow the vendor greater flexibility and speed in obtaining tender documents.
4. Facilitate the purchase of tender documents through the website using the
payment services provided by EBPP. 5. Facilitate Online Tender Bid Submissions.

CHAPTER 2
ABOUT THIS MANUAL
CONTENTS
2.1. User ....................................................................................... 2-1
2.2. Assumption ............................................................................ 2-1
2.3. Using Calendar View .............................................................. 2-1
2.4. Using Radio Buttons............................................................... 2-1
2.5. Using Drop Down List ............................................................. 2-2
2.6. Message Box ......................................................................... 2-2

eTender System
About This Manual Version: 1.2 Page: 2-1
2.1. User This manual is written specifically for anyone who is given access to etender
System. In addition, users should have basic knowledge of computer usage.
2.2. Assumption
If you have a multiple-button mouse, this manual assumes that you have
configured the left mouse button as the primary mouse button.
2.3. Using Calendar View 1. Click on the calendar button to display the calendar view as shown by figure
below.
Figure 2-1 : Calendar View
2.4. Using Radio Buttons 1. Radio buttons are round buttons that represent mutually exclusive options. Only
one radio button can be selected in each group at any one time. When a radio
button is selected, the centre is darkened; when it is not selected,the centre is
blank. The following shows a sample of radio buttons.
Figure 2-2 : Radio Button

eTender System
About This Manual Version: 1.2 Page: 2-2
2.5. Using Drop Down List 1. Below is an example of a function screen with a Drop Down List Box.
Figure 2-3 : Drop Down List
2. When user clicks the right hand side of the box where the arrow is pointing
downward, a list of options appear as below:
Figure 2-4 : Drop Down List
3. The selection can be made by highlighting the chosen option with the mouse or
by pressing up and down arrows keys on the keyboard.
2.6. Message Box 1. Message box may appear on the screen for specific reasons.
Figure 2-5 : Message Box
The cause of message box being displayed could be due to the following:
- Error in operation. E.g wrong userid/password,
- Provides information regarding the business process. E.g notify user when
there is no record found in the database.
- Prompt for user’s attention before continuing the next action.

CHAPTER 3
CONTACTING SAINS CALL CENTRE
CONTENTS
3.1. Contacting SAINS Call Centre ................................................ 3-1 3.2. Online Customer Survey ........................................................ 3-1

eTender System
Contacting SAINS Call Centre Version: 1.2 Page: 3-1
3.1. Contacting SAINS Call Centre SAINS Call Centre is a one-stop phone-in, fax-in, email and online submission
centre that enables SAINS customers to reach us with required service requests. It
provides online support for software and hardware as well as after-sales service in
training and Service Level Agreements.
With SAINS call centre, service requests can be responded to quickly and
effectively. All the reported services are tracked and monitored under a centralized
system.
If you have information requests, technical complaints or feedback, SAINS Call
Centre [24 hours Customer Service Line] has provided you with an infrastructure
where you can communicate with the centre via various channels, as listed below..
Email [email protected]
Online Submission http://callcentre.sains.com.my
SAINS Call Centre
(24 hours x 7 days) Tel: 1-300-88-SAINS or 1-300-88-7246 Fax: (60) 82-442522
Sabah Support Centre
(8.00am–5.30pm; Mon – Fri) Tel: (60)88-734550 or 734560 Fax: (60)88-734580
3.2. Online Customer Survey
This is a continual online customer survey to help us collect your feedback and
invaluable inputs on the quality of our Customer Care. The feedback will help to
improve our services to you and go a long way in helping us transform your
customer experience.
Please take a few moments to fill in this feedback form at http://cats.sains.com.my.

CHAPTER 4
SYSTEM ACCESS
CONTENTS
4.1. Getting Started ....................................................................... 4-1
4.2. Page Navigation ..................................................................... 4-5
eTender System System Access
Version: 1.2 Page: 4-1
4.1. Getting Started
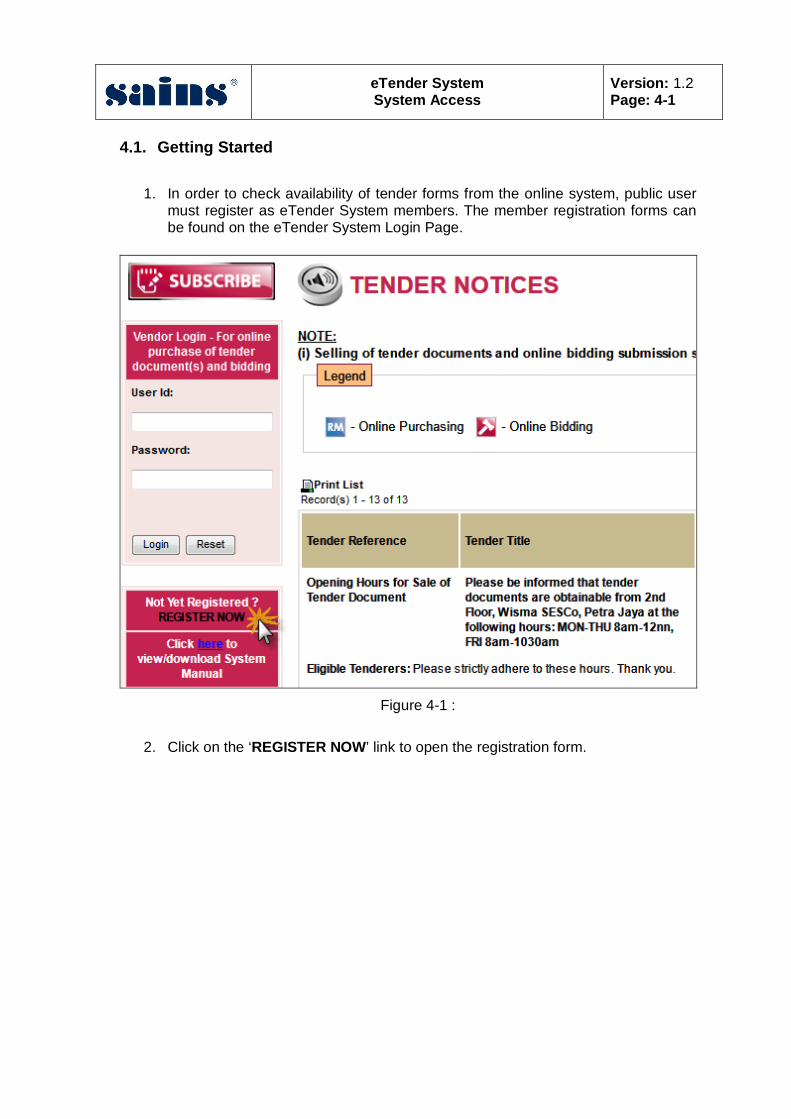
1. In order to check availability of tender forms from the online system, public user must register as eTender System members. The member registration forms can be found on the eTender System Login Page.
Figure 4-1 :
2. Click on the ‘REGISTER NOW’ link to open the registration form.

eTender System System Access
Version: 1.2 Page: 4-2
3. The ‘Terms and Conditions’ page will be displayed. You must read through the terms and conditions.
Figure 4-2 : Terms and Conditions
4. When you have read through the terms and conditions, tick the checkbox to indicate that you understanding and accept the terms and conditions.
5. Once you have ticked the checkbox, click the button to proceed to the next step of the registration process.

eTender System System Access
Version: 1.2 Page: 4-3
6. The registration form will be as shown below. Fill in your details accordingly.
Figure 4-3 : Registration
7. Once the form has been filled in, public click on the button to submit
the form for further processing.

eTender System System Access
Version: 1.2 Page: 4-4
8. Once the “Registration Successful” message appears, you will be a registered user to the eTender System.
Figure 4-4 :
9. To access the eTender System, login into the system by clicking on the
button. NOTE: To purchase a tender document, you must be registered with ‘PaybillsMalaysia’ service before you can complete the purchasing process. URL: http://www.paybillsmalaysia.com

eTender System System Access
Version: 1.2 Page: 4-5
4.2. Page Navigation 1. This chapter will describe some of the features that is accessible via the main
tender page.
Figure 4-1 : Tender Notices Main Page
4.2.1. Subscribe Mailing List
1. To be notified on new tender notices, click on button.
2. Enter the required details in the screen as shown in figure below.
Figure 4-2 : Subscribe Mailing List
3. Click on Subscribe button to proceed.
eTender System System Access
Version: 1.2 Page: 4-6
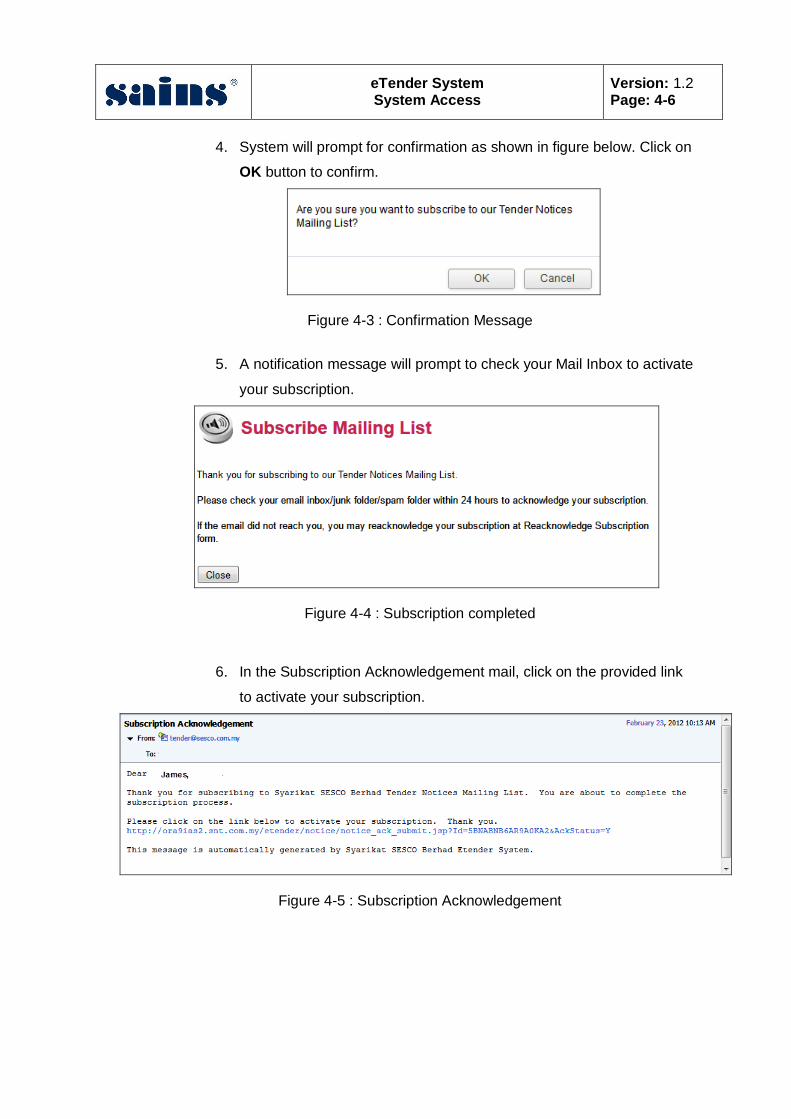
4. System will prompt for confirmation as shown in figure below. Click on
OK button to confirm.
Figure 4-3 : Confirmation Message
5. A notification message will prompt to check your Mail Inbox to activate
your subscription.
Figure 4-4 : Subscription completed
6. In the Subscription Acknowledgement mail, click on the provided link
to activate your subscription.
Figure 4-5 : Subscription Acknowledgement
eTender System System Access
Version: 1.2 Page: 4-7
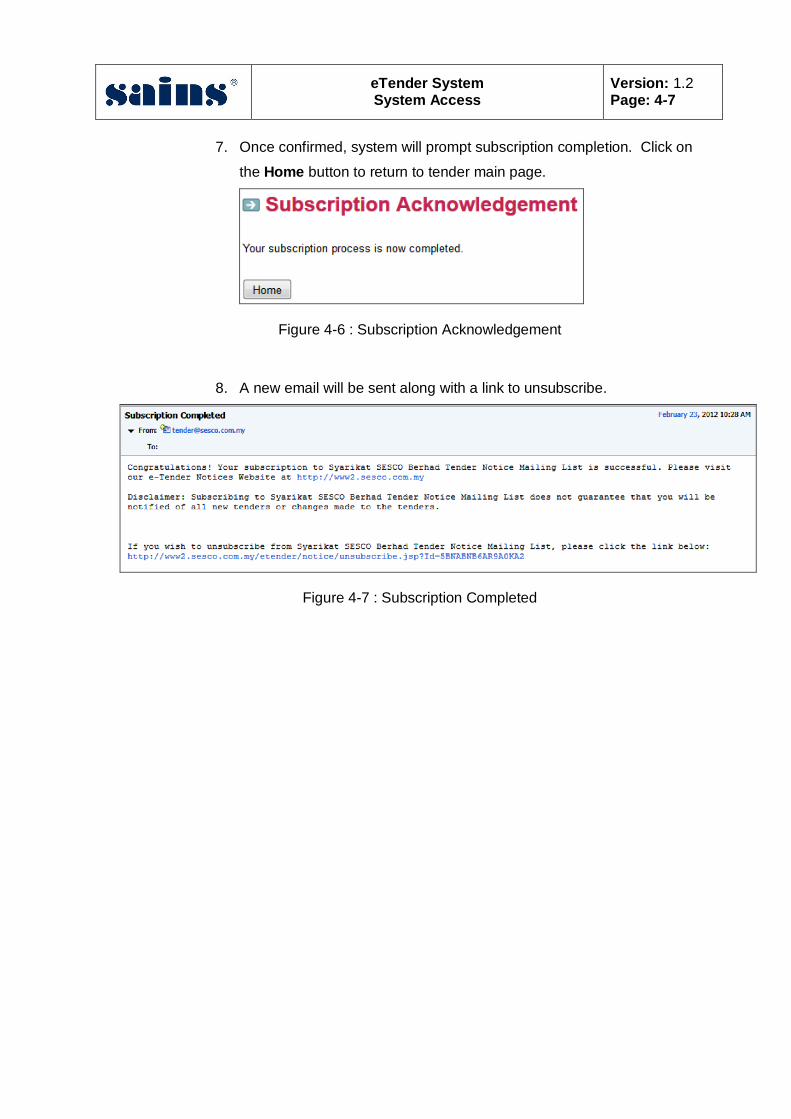
7. Once confirmed, system will prompt subscription completion. Click on
the Home button to return to tender main page.
Figure 4-6 : Subscription Acknowledgement
8. A new email will be sent along with a link to unsubscribe.
Figure 4-7 : Subscription Completed

eTender System System Access
Version: 1.2 Page: 4-8
4.2.2. Tender Notice Details 1. To view the tender details, click on any tender title as shown in figure
below.
Figure 4-8 : Tender Details
2. The tender notice will display in a new window with links to download
the documents as shown in figure below.
Figure 4-9 : Tender Notice File(s)

eTender System System Access
Version: 1.2 Page: 4-9
4.2.3. 1. Click on this button to return to main page.
4.2.4. 1. Click on this button to perform a search on tender notices.
2. The search box will display as shown in figure below.
Figure 4-10 : Search Tender
3. Fill in the search criteria and click on Search button.
eTender System System Access
Version: 1.2 Page: 4-10
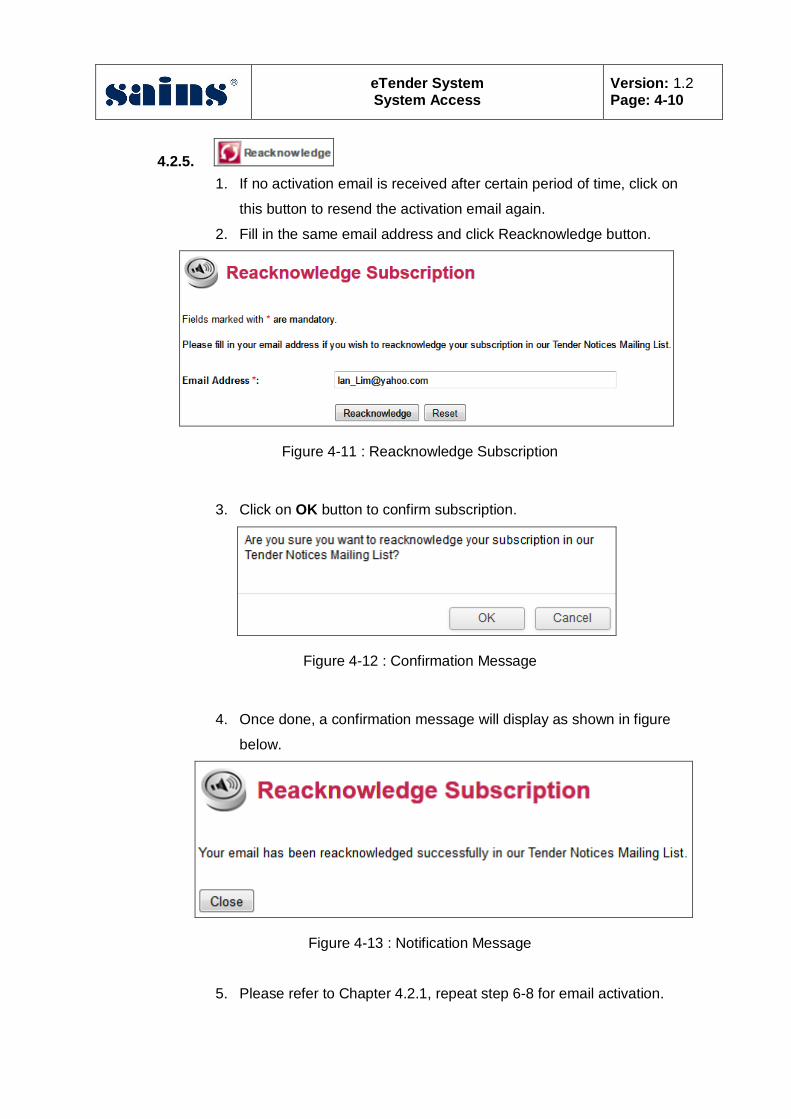
4.2.5. 1. If no activation email is received after certain period of time, click on
this button to resend the activation email again.
2. Fill in the same email address and click Reacknowledge button.
Figure 4-11 : Reacknowledge Subscription
3. Click on OK button to confirm subscription.
Figure 4-12 : Confirmation Message
4. Once done, a confirmation message will display as shown in figure
below.
Figure 4-13 : Notification Message
5. Please refer to Chapter 4.2.1, repeat step 6-8 for email activation.

CHAPTER 5
USING eTENDER SYSTEM
CONTENTS
5.1. Log in ..................................................................................... 5-1
5.2. Tender Document .................................................................. 5-2
5.3. Search.................................................................................... 5-7
5.4. Payment ................................................................................. 5-8
5.5. Purchased Tender Document ............................................... 5-10
5.6. Download ............................................................................. 5-14
5.7. User Info .............................................................................. 5-15
5.8. Change Password ................................................................ 5-17
5.9. Log Out ................................................................................ 5-18

eTender System
Using eTender System Version: 1.2 Page: 5-1
5.1. Log in
1. Key in your registered ‘User ID’ and ‘Password’ as shown below.
Figure 5-1 : eTender Login
2. Click on the button to get into the system. 3. An invalid user id or password will prompt the following error message.
Figure 5-2 : Invalid user id or password
4. You must login using the correct user ID and password. Should you forget your
user ID and password, kindly contact the agency to reset the password. 5. Once you have successfully logged into the eTender System, the vendor main
page will be displayed.
Figure 5-3 : eTender Vendor Page

eTender System
Using eTender System Version: 1.2 Page: 5-2
5.2. Tender Document
The ‘Tender Document’ function allows member to view all the tender documents available and their complete information such as tender reference, tender title, tender class, closing date and fees. From this page, members can select the tender document that they wish to purchase and then key in the quantity to be purchased. The ‘Tender Document’ page is as shown below.
Figure 5-4 : eTender Document
1. To select a tender document, tick the checkbox and then key in the quantity to be
purchased.
2. To add in purchases to cart, click on the button.

eTender System
Using eTender System Version: 1.2 Page: 5-3
3. Adding a purchase to the cart will save the chosen item into the cart, however,
the purchase will not be confirmed until you proceed to the confirmation section. 4. The summary of the current selection will be shown on the top right corner of the
page, as shown below:
Figure 5-5 : eTender Document
Figure 5-6 : Current Selection
5. To view the current selection, click on the button.
Summary of the current selection

eTender System
Using eTender System Version: 1.2 Page: 5-4
6. After clicking on the ‘Add to Cart’ or ‘View Cart’ button, you will be brought to the ‘View Selection Cart’ page.
Figure 5-7 : Selection Cart
7. To confirm your purchase, click on the button. This will bring you to the ‘PayBillsMalaysia’ login page to complete the payment process.
8. To return to the tender list, you should click on the button.
9. By clicking on the button, the existing selection will be cleared and you will have to re-select the tenders you wish to purchase.
10. To delete only one of the selected items, click on the icon provided at the end of the listed item.
Figure 5-8 : eTender Selection

eTender System
Using eTender System Version: 1.2 Page: 5-5
5.2.1. Confirm Purchase
1. Upon clicking on the 'Confirm' button, payment details will be sent to ‘PaybillsMalaysia Payment Service’, an acknowledge page will be displayed as shown below.
Figure 5-9 : Confirm Purchase
2. In cases where the payment transaction process is unable to be completed, click
on the 'Re-Submit' button to re-submit the payment request for processing. 3. Upon confirmation of the purchase, the ‘PaybillsMalaysia Payment Service’ login
page will appear as shown below;
Figure 5-10 : PaybillsMalaysia
4. Click on button to continue.

eTender System
Using eTender System Version: 1.2 Page: 5-6
5. Click on button to complete your payment transaction at the bank site.
Figure 5-11 : Payment Acknowledgement

eTender System
Using eTender System Version: 1.2 Page: 5-7
5.3. Search
The ‘Search’ function allows members to search for existing and new tender documents. The Search page is as shown below.
Figure 5-12 : Search eTender
1. Member can choose to search by one or more criteria. To indicate the criteria
chosen, tick the checkbox provided. Altogether, there are four types of criteria provided; Reference Number (Member to key in), Title (Member to key in), Originating Station (Member to choose from drop down list) and Closing Date (Member to choose the month from drop down list and key in the year).
2. To submit the search request, click on the button.
3. The page shown will be the same as ‘5.2 – Tender Document’ page and the
process is the same.
4. To reset the criteria specified, click on the button.
eTender System
Using eTender System Version: 1.2 Page: 5-8
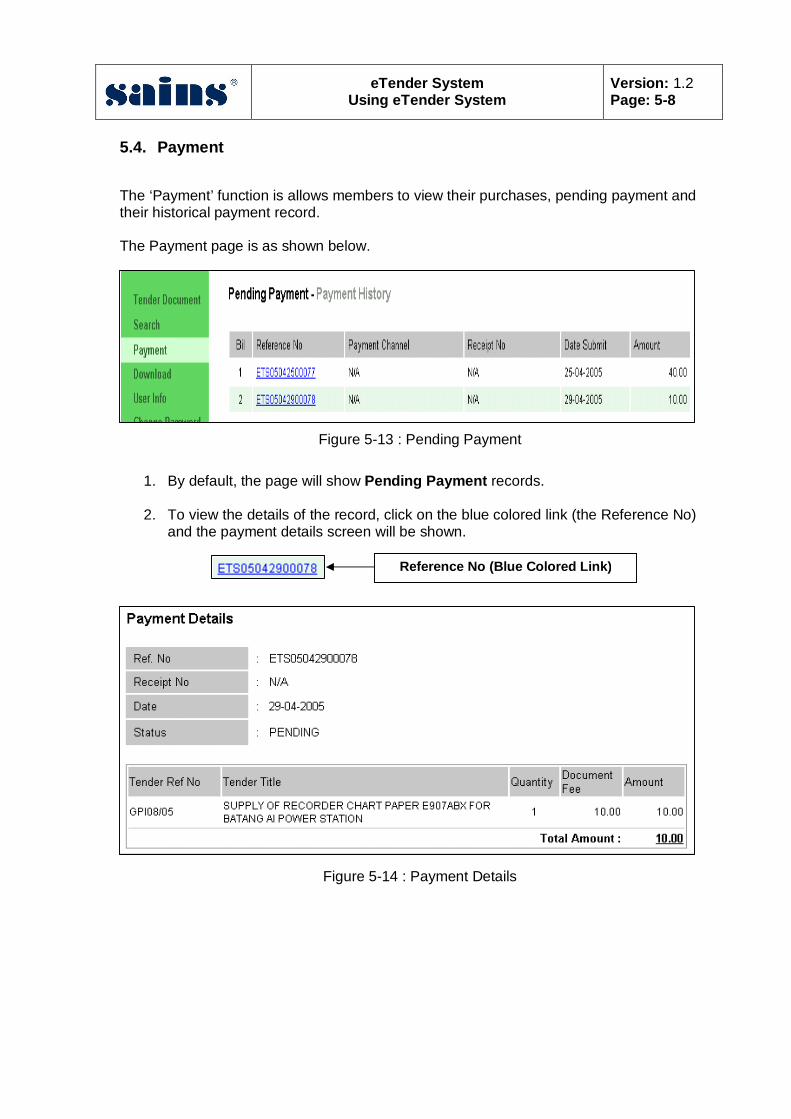
5.4. Payment
The ‘Payment’ function is allows members to view their purchases, pending payment and their historical payment record. The Payment page is as shown below.
Figure 5-13 : Pending Payment
1. By default, the page will show Pending Payment records.
2. To view the details of the record, click on the blue colored link (the Reference No)
and the payment details screen will be shown.
Figure 5-14 : Payment Details
Reference No (Blue Colored Link)
eTender System
Using eTender System Version: 1.2 Page: 5-9
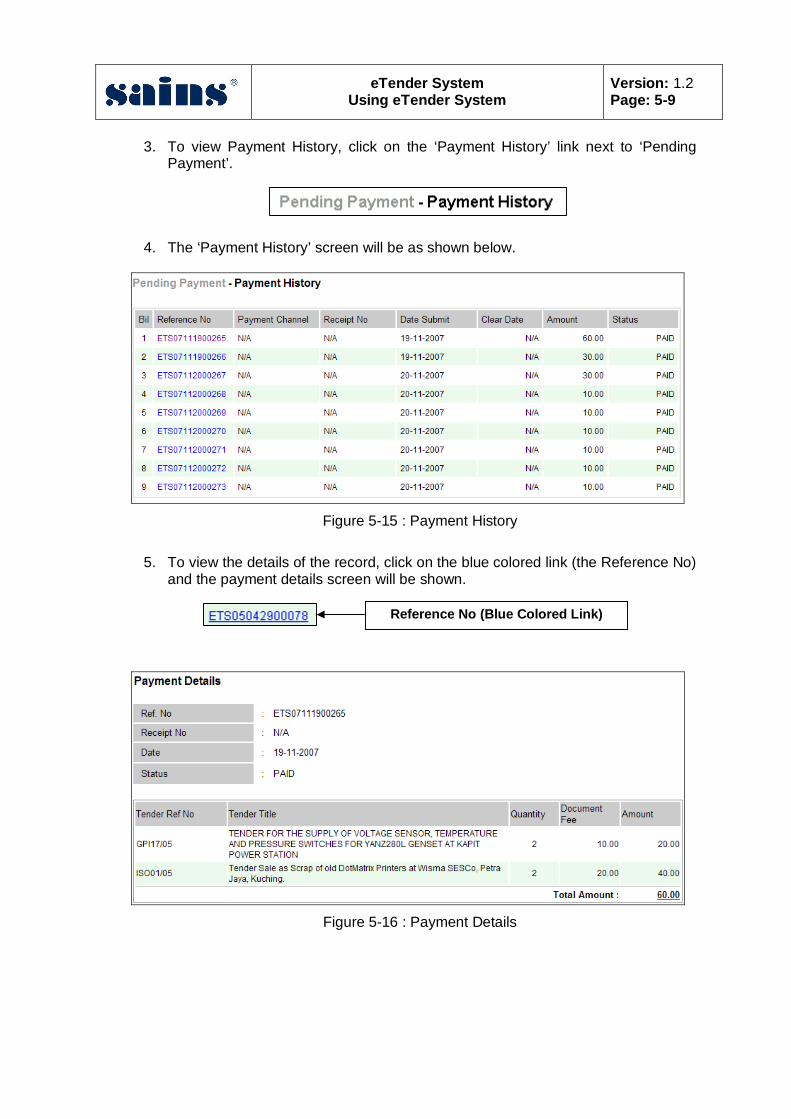
3. To view Payment History, click on the ‘Payment History’ link next to ‘Pending Payment’.
4. The ‘Payment History’ screen will be as shown below.
Figure 5-15 : Payment History
5. To view the details of the record, click on the blue colored link (the Reference No)
and the payment details screen will be shown.
Figure 5-16 : Payment Details
Reference No (Blue Colored Link)

eTender System
Using eTender System Version: 1.2 Page: 5-10
5.5. Purchased Tender Document The ‘Purchased Tender Document’ allow members to view the tenders that they have purchased and can bid upon. The screen shows information such as online bidding closing date, tender closing date, current bid price and your current bid price.
Figure 5-17 : Purchased eTender Document
1. To create a new bid, click on the icon.
2. The bidding page will be displayed as shown below. Online bidding closing date and time is shown on the top right for reference.

eTender System
Using eTender System Version: 1.2 Page: 5-11
Figure 5-18 : eTender Bidding
3. Fill in the bid price in the ‘Bidding Price’ entry box as shown below.
Figure 5-19 : Bidding Price entry
4. Click on the button to place your bid price. 5. Click on the button to undo the changes. 6. Click on the button to return to the previous page.

eTender System
Using eTender System Version: 1.2 Page: 5-12
7. After clicking on ‘Bid’ button, a confirmation window will appear as shown below.
8. Click on the ‘OK’ button to confirm the bidding price.
Figure 5-20 : Confirmation message
9. A notification message will be displayed after the bid price has been submitted.
Click on the provided link to return to the purchased tender document screen.
Figure 5-21 : Notification message
10. Members are allowed to amend the bid price as many times as they wish before
the closing.
11. The current bidding price column will always show the lowest bid price offered.
12. A new bid amount less than the current bid must be in the minimum decrement of RM100.00 or an error message will be prompted as shown below.
Figure 5-22 : Error Message

eTender System
Using eTender System Version: 1.2 Page: 5-13
13. Click on the icon to view the bidding history list in a new window pop up as shown below.
Figure 5-23 : Bidding History List
14. The ‘Purchased Tender Document(s) History’ page is used to display the
archives of previously purchased document and the bid amount for previous closed tender.
Figure 5-24 : Purchased History

eTender System
Using eTender System Version: 1.2 Page: 5-14
5.6. Download
The ‘Download’ function allows members to download the tender documents which they have purchased. The Download page is as shown below.
Figure 5-25 : Download List
1. The files listed for downloading are based on the tender documents that have
been purchased.
2. To download each file, click on icon provided at the end of the listed files.

eTender System
Using eTender System Version: 1.2 Page: 5-15
5.7. User Info
The ‘User Info’ function allows members to edit and update information about their company profile, contact person, UPK License No. and CIDB. The User Info page is as shown below.
Figure 5-26 : User Info
1. To edit user info such as ‘Company Profile’, ‘Contact Person’, ‘UPK License No.’
and ‘CIDB’, click on the button.
2. The screen will be open for editing such as shown below.
Figure 5-27 : User Details

eTender System
Using eTender System Version: 1.2 Page: 5-16
Figure 5-28 : Contact Person
Figure 5-29 : UPK License
Figure 5-30 : CIDB
3. Member can edit their latest information into the screen.
4. After updating, member must click on the button to save changes.
5. The button is used when member wishes to terminate the updating process.

eTender System
Using eTender System Version: 1.2 Page: 5-17
5.8. Change Password
The ‘Change Password’ function allows members to frequently change their password for security purposes. Passwords should consist of six or more alphanumeric digits. The Change Password page is as shown below.
Figure 5-31 : Change Password
1. Key the old password into the ‘Old Password’ column.
2. Then key the new password into the ‘New Password’ column.
3. Retype the new password in the ‘Re-type New Password’ column.
4. Once everything has been keyed in, click on the button to save the new password.
5. The button is used to terminate the password changing process.

eTender System
Using eTender System Version: 1.2 Page: 5-18
5.9. Log Out
1. To log out from the system, click on the link.
2. The logout screen is as shown below.
Figure 5-32 : Logout
3. Members can click on the link if they wish to re-enter into the system.

CHAPTER 6
SEND APPLICATION IMPROVEMENT
FEEDBACK
CONTENTS
6.1. Application Improvement Feedback Function.................................... 6-1
6.2. Stand A Chance To Win A Surprise Gift ............................................ 6-1
6.3. Send A Suggestion/Feedback ........................................................... 6-1

eTender System
Send Application Improvement Feedback Version: 1.2 Page: 6-1
6.1. Application Improvement Feedback Function To help us improve the system, we have prepared a feedback form for users to
submit their comments, questions and provide suggestions/feedback related to
applications.
Note: Please use this feedback function to send comments/suggestions on the
application or service only. If you wish to feedback on any technical problems
encountered while using the system, please contact our SAINS Call Center as
specified in Chapter 3.
6.2. Stand A Chance To Win A Surprise Gift Every six months in June and December, the user with the best comment or
suggestion will be awarded a surprise gift. Send your comment/suggestion on the
application and you will stand a chance to win a surprise gift!
6.3. Send A Suggestion/Feedback Send us your comment/suggestion by completing the Online Application
Improvement Feedback form or by email to [email protected] .
The online form can be obtained from the following :
Web Application Window (WAW)
SarawakNet Portal
System Main Page (for web-based applications)
6.3.1. Web Application Window (WAW)
Click this button on the toolbar to open the feedback form. Fill up the
form and click on the Save button to submit the completed form. An
email will be automatically triggered to SAINS Application Support Unit
(ASU) for follow up action.

eTender System
Send Application Improvement Feedback Version: 1.2 Page: 6-2
Figure 8-1 : Application Improvement Feedback Form (WAW)
6.3.2. SarawakNet Portal
On the Sarawaknet main page, go to menu ‘Hubungi Kami’ and click the
link ‘Kotak Cadangan’ to open the feedback form. Fill up the form and
click on the button to submit the completed form.

eTender System
Send Application Improvement Feedback Version: 1.2 Page: 6-3
Figure 8-2 : Application Improvement Feedback Form (Web)
6.3.3. System Main Page (for web-based application) A feedback link is available on the system main page. Click on the link
to open the feedback form. Fill up the form and click on the
button to submit the completed form.