version 2018.11 readme - avid...
TRANSCRIPT

Avid® MediaCentral | Editorial ManagementVersion 2018.11 ReadMe
This ReadMe describes how to use the components of the MediaCentral Editorial Management module. It also includes information on supported playback formats, known limitations, and more.
Revision History
c Before configuring the virtual machine settings, disable any NIC(s) that are not on the NEXIS network. You will re-enable them after you update the software, and press the Configure button a second time.
Contents
Welcome to MediaCentral | Editorial Management . . . . . . . . . . . . . . . . . . . . . . . . . . . . . . . . . . . . . . . . 2
Join Us on Facebook . . . . . . . . . . . . . . . . . . . . . . . . . . . . . . . . . . . . . . . . . . . . . . . . . . . . . . . . . . . . . . . . 2
New Features for Version 2018.11 . . . . . . . . . . . . . . . . . . . . . . . . . . . . . . . . . . . . . . . . . . . . . . . . . . . . . 3
Installing MediaCentral Editorial Management Software. . . . . . . . . . . . . . . . . . . . . . . . . . . . . . . . . . . . 4
Updating Editorial Management Software . . . . . . . . . . . . . . . . . . . . . . . . . . . . . . . . . . . . . . . . . . . . . . . 5
Media Formats Supported for Playback . . . . . . . . . . . . . . . . . . . . . . . . . . . . . . . . . . . . . . . . . . . . . . . . . 6
Working with MediaCentral | Cloud UX . . . . . . . . . . . . . . . . . . . . . . . . . . . . . . . . . . . . . . . . . . . . . . . 11
MediaCentral | Panel for Media Composer . . . . . . . . . . . . . . . . . . . . . . . . . . . . . . . . . . . . . . . . . . . . . . 20
MediaCentral | Cloud UX Web Client . . . . . . . . . . . . . . . . . . . . . . . . . . . . . . . . . . . . . . . . . . . . . . . . . 24
Fixed in Version 2018.11 . . . . . . . . . . . . . . . . . . . . . . . . . . . . . . . . . . . . . . . . . . . . . . . . . . . . . . . . . . . 34
Limitations and Defects in Version 2018.11. . . . . . . . . . . . . . . . . . . . . . . . . . . . . . . . . . . . . . . . . . . . . 35
Date Revised Changes Made
December 10, 2018 Updated wording on limitation MCEM-767 to better reflect the issue.
November 30, 2018 Initial Release.

Welcome to MediaCentral | Editorial Management
2
Welcome to MediaCentral | Editorial Management
MediaCentral Editorial Management is a MediaCentral workflow module designed for small to mid-size creative teams that use Media Composer with Avid NEXIS shared storage. Editors working on Media Composer can use the embedded MediaCentral Panel to work with assets stored on an Avid NEXIS system, through shared projects and bins. Additionally, producers and others can use the MediaCentral Cloud UX web client to work with these same assets without opening Media Composer.
Working with Shared Projects and Bins
Media Composer lets users create and work with projects and bins that are shared through Avid shared-storage systems. For example, an editor can create sequences in one bin while an assistant creates subclips in another bin. At the same time, other users add audio effects or titles to other bins in the project.
Media Composer includes bin locking and other features to make it easy for creative teams to efficiently collaborate on shared projects. Bin locking allows one user to write to a bin; multiple users can read the files in that bin. For more information, see “Working with Bins and Projects in an Avid Shared Storage Environment” in the Avid Media Composer | Software Editing Guide or the Media Composer Help.
Bins use icons to identify clips, sequences, and other media objects that they display. For information on all of the possible object icons that you might see in a bin, see “Object Icons in Bins” in the Avid Media Composer | Software Editing Guide or the Media Composer Help.
User Management
When you sign in to an Editorial Management server (either through Media Composer or the MediaCentral web portal), you enter user credentials that are managed in the associated Avid NEXIS shared-storage system. Your Avid NEXIS credentials determine what shared-storage workspaces you can access and use. For more information, see the Avid NEXIS documentation.
Join Us on Facebook
Looking for the latest information on MediaCentral, what’s the latest update, have a tip to share or need assistance? We have created a place just for you. The Avid MediaCentral for Post Facebook group is for all users of Avid MediaCentral Editorial Management. This group is for peer-to-peer discussions of Avid products from: How To’s to installing and upgrades, getting started, and troubleshooting to what gear to buy. See the following link to get started and get connected with Avid and fellow users in post production organizations as they share their insight to what works best for them.
https://www.facebook.com/groups/avidmediacentralforpost/

New Features for Version 2018.11
3
New Features for Version 2018.11
The following new features have been added for Editorial Management v2018.11.
Sequence Creation
In this release, we have added the ability to create a sequence from a selection of master clips or subclips in a bin in the Editorial Management Browse App. The resulting sequence is saved in the bin where the selected master clips and/or subclips reside.
n The edit rate of the sequence is based on the first master clip or subclip in the sequence.
For more information, see “Creating Sequences” on page 32.
Sequence Playback Support
In this release, we have added a way to playback sequences created by Media Composer from a bin in the Editorial Management Browse App.
Sequences must have the following criteria to be played:
• In order for the sequence to play, all effects must be rendered, including dissolve.
• The sequence can support up to sixteen audio tracks.
• AMA media is supported.
• Cross-rate sequences are not supported (i.e., the sequence is in a different edit rate than the master clips). However, cross-rate sequences can be played if they are rendered.
• Audio pan/vol is not supported.
For more information, see “Playing Sequences” on page 33.
Updated Licensing Procedure
We have updated the procedure for licensing MediaCentral Editorial Management.
For more information, see the topic “Importing a License” in the Avid MediaCentral Editorial Management v2018.11 Beta 3 Installation Guide.
Update Button Added to the Configuration Tool
In this release, we have added an easier way to update Editorial Management software versions. Once you download and run the installer, there will be an Update button in the MediaCentral Cloud UX section of the Configuration Tool.
Once you click the button, you will be prompted to browse to the .zip file and update the Editorial Management software to that latest version.
For more information, see “Updating Editorial Management Software” on page 5.
n Updating MediaCentral | Editorial Management assumes that a previous version has been installed and configured, and that a license has been activated.

Installing MediaCentral Editorial Management Software
4
Create Subclips
In this release, the MediaCentral Editorial Management Browse App now provides the ability to create subclips and save them to a bin.
n If Mark In or Out is not selected, the beginning/end of the clip is used for In/Out.
For more information, see “Creating Subclips” on page 30.
Playback Subclips
In this release, the MediaCentral Editorial Management Browse App now provides the ability to play subclips created by Media Composer users in bins.
For more information, see “Playing Subclips” on page 31.
EM Cache Bulk Load Option
In previous versions of Editorial Management, Search was only listing clips that were previously opened in the Browse App.
You now have the ability to index a project that is already on your NEXIS workspace so you can add current projects to MC|EM. To do so, select a project, right-click, and select the Add to Cache option.
EM Cache Bulk Unload Option
In previous versions of Editorial Management, there was no way to delete the cache being used in a project if the cache became corrupt.
You now have the ability to delete the cache in a Project by selecting a Project or bin, right-clicking on it, and selecting the Remove from Cache option.
Installing MediaCentral Editorial Management Software
Avid MediaCentral Editorial Management is delivered as a Hyper-V virtual disk image that includes the CentOS operating system and the MediaCentral Editorial Management software.
The software can be downloaded from the Avid Download Center. If you have not already created an Avid.com user account, you must do so now. This Master Account enables you to sync your Avid Video Download and Avid Video Community accounts as well as gain access to the Avid Support Center.
For first time installations, you need to perform a clean installation. Installation and configuration instructions, as well as hardware and software requirements, can be found in the Avid MediaCentral | Editorial Management Installation Guide.
n Before configuring the virtual machine settings, disable any NIC(s) that are not on the NEXIS network. You will re-enable them after you update the software, and press the Configure button a second time.
If you have already installed MediaCentral Editorial Management v2018.6 software, and activated a license, you should perform an update, instead of a full installation.

Updating Editorial Management Software
5
For information on updating a previously installed software version to MC|EM v2018.11, see “Updating Editorial Management Software” on page 5.
Updating Editorial Management Software
If you have already installed a previous version of Editorial Management, you can perform an update to install the new software version.
However, if you have not installed a previous version of Editorial Management software, you must perform the entire installation and configuration process as detailed in the Avid MediaCentral | Editorial Management Installation Guide.
n Updating MediaCentral | Editorial Management assumes that version 2018.6 or later has been installed and configured, and that a license has been activated.
To update Editorial Management software:
1. Make sure that the Bin Index Service is stopped and the MediaCentral Editorial Management Configuration Tool is not running.
2. Obtain the latest software build (e.g., 2018.11), and double-click on the installer (setup.exe) and follow the installation instructions. Click Finish when done.
3. Open the Editorial Management Configuration Tool using one of the following methods:
t Double-click the shortcut added to the Windows desktop
t Launch the application directly from the source directory at: C:/Program Files/Avid/MCEM
If you are prompted with a Windows Security Warning regarding the file’s digital signature, click the Run button to launch the MediaCentral Editorial Management Configuration Tool.
4. Check to see if the VMs are running. If the VMs are not running, start them.
5. Click the Update button in the MediaCentral Cloud UX section of the dialog box.
A dialog box opens asking if you are sure you want to update MediaCentral | Editorial Management.
The dialog box will prompt you to select the provided ZIP file for the update.
6. Click the Browse button, navigate to C:\Program Files\Avid\MCEM\Updates, and find the .zip file that was installed by the update.
7. Click Ok to perform the update.
When the update is applied, a message displays saying “Update completed. New packages have been successfully installed”.
8. If the Bin Index Service is not running, start the Bin Index service.

Media Formats Supported for Playback
6
The MediaCentral | Editorial Management system should be updated to the new version and be fully operational.
Media Formats Supported for Playback
Avid supports a variety of media and container formats for playback. As long as your media is in a supported media format and is wrapped in a supported container format, you should be able to play that media through MediaCentral Editorial Management.
For example, if you have DNxHD 1080 145 media that is wrapped in a MOV container, that media can be played back through Editorial Management because both the media format and the container format are supported.
Container Formats
The following tables list the container types that Avid has verified for playback through the MediaCentral Editorial Management player in a web browser. For more information on playback formats supported in Media Composer, see the Avid Media Composer documentation.
• Audio and video container formats:
• Image container formats:
n It is possible that additional container formats might also play back, but these formats have not been specifically tested by Avid.
AVI MP4 MTS
MOV MPEG MXF
MP3 MPG WAV
BMP JPEG PNG TGA
Media Formats Supported for Playback
7
Media Formats
The following tables list which media formats are supported for playback through MediaCentral Editorial Management. Also note the following:
• For 23.98 SD (NTSC), the timecode reference will be shown on 24 frame instead of 30.
Audio Media Formats (codec)
AAC MPEG-2 PCM
DNxHD Format Support
Media Format Support for Playback
DNxHD 1080 36-45 All frame rates
DNxHD 1080 80-85-100 All frame rates
DNxHD 1080 115-120-145 All frame rates
DNxHD 1080 175-185-220 All frame rates
DNxHD 1080 175X-185X-220X All frame rates
DNxHD 720p 40 Not Supported
DNxHD 720p 45-50 25, 29.97
DNxHD 720p 60-75 25, 29.97
DNxHD 720p 90-110 25, 29.97
DNxHD 720p 90X-110X 25, 29.97
DNXHD 720p 85-100 50, 59.94
DNXHD 720p 120-145 50, 59.94
DNXHD 720p 185-220 50, 59.94
DNXHD 720p 185X-220X 50, 59.94
DNxHD 1080p 75-90 50, 59.94
DNxHD 1080p 165-200 50, 59.94
DNxHD 1080p 240-290 50, 59.94
DNxHD 1080p 365-440 50, 59.94
DNxHD 1080p 365X-440X 50, 59.94

Media Formats Supported for Playback
8
Other Format Support
Media Format Support for Playback
Apple ProRes Unsupported
AVC-Intra 50, 1080i All frame rates
AVC-Intra 50, 720p 50, 59.94
AVC-Intra 100, 1080i All frame rates
AVC-Intra 100, 720p 50, 59.94
AVC Long GOP 12, 720p 50, 59.94
AVC Long GOP 12, 1080i 50, 59.94
AVC Long GOP 25, 720p 50, 59.94
AVC Long GOP 25, 1080i 50, 59.94
AVC Long GOP 50, 720p 50, 59.94
AVC Long GOP 50, 1080i 50, 59.94
AVC Long GOP 12, 1080p 25, 29.97
AVC Long GOP 25, 1080p 25, 29.97
AVC Long GOP 50, 1080p 25, 29.97
XAVC Intra 50, 1080i 50, 60, 23.98
XAVC-Intra 100, 1080i 50, 60, 23.98
XAVC Long GOP 25, 1080i* 50, 59.94
XAVC Long GOP 35, 1080i* 50, 59.94
XAVC Long GOP 50, 1080i* 50, 59.94
XAVC Long GOP 50, 720p* 50, 59.94
Avid JFIF 2:1, 3:1, 10:1, 20:1 25, 29.97
DV 25 411 25, 29.97
DV 25 420 25
DV 50 25, 29.97
DV100 HD 1080i (DVCPro HD) All frame rates
DV100 HD 720p (DVCPro HD) 50, 59.94
H.263 (MPEG-1 Layer 2 proxy) 25, 29.97
H.264 (MPEG-1 Layer 2 proxy) 800 Kbps, 2 Mbps, 3 Mbps
25, 29.97
HDV 1080i All frame rates
HDV 720p 50, 59.94

Media Formats Supported for Playback
9
* Frame rate not guaranteed. Frame rate might temporarily be reduced during playback.
Resolutions and Stream Counts for Supported Systems
During the MediaCentral Editorial Management development process, Avid worked with multiple media formats to determine the maximum number of concurrent playback streams for each format. Testing was completed using a Dell PowerEdge R640 connected via a 10 Gb network to a single Avid NEXIS E4 with one media pack. For more information on the Dell server configuration, see “Hardware and Software Requirements — Recommended Hardware” in the Avid MediaCentral | Editorial Management Installation Guide.
n Avid is currently qualifying these systems with the latest software package. Therefore, the number of streams listed in the following table might vary compared to your actual environment. The configuration of your server, the size of your Avid NEXIS system, the quality of your network, and other factors can all affect system performance. In some cases, your environment might be capable of more steams than the number listed in the table below.
Use the following table as a guideline for the number of concurrent media streams for each format.
All systems are equipped with the following:
• CloudUX
- Good and Better systems have 12 Cores dedicated
- Better system has 12 Cores dedicated and Hyper-threaded for a total of 24 Cores.
- Best system has 21 Cores dedicated and Hyper-threaded for a total of 42 Cores
• Intel X710 10GB NIC
JPEG 2000 No support
MPEG (IMX) 30 25, 29.97
MPEG (IMX) 40 25, 29.97
MPEG (IMX) 50 25, 29.97
MPEG-2 Long GOP 25, 29.97
RGB No support
XDCAM-HD 17.5/35/50 Mbps 1080i All frame rates
XDCAM-HD 50 Mbps 1080p All frame rates
XDCAM-HD 17.5/35/50 Mbps 720p 50, 59.94
XDCAM-EX 35 Mbps 1080i All frame rates
XDCAM-EX 35 Mbps 720p 50, 59.94
Other Format Support(Continued)
Media Format Support for Playback

Media Formats Supported for Playback
10
* Stream counts not guaranteed.
Good (5 Users)Dual Intel® Xeon® Bronze 3106 1.7G48GB RAM (6x8GB)Windows Essentials
Better (15 Users)Dual Intel® Xeon® Silver 4110 2.1G48GB RAM (6x8GB)Windows Essentials
Best - (25 Users)Dual Intel® Xeon® Gold 5120 2.2G96GB RAM (6x16GB)Windows Standard
Media Format Number of Playback Streams for each Format (Stream Count)
XDCAM HD 50 5 11 24
XDCAM HD 35 - 15 35
DNxHD 45 6 14 26
DNxHD 145 - 7 7
JFIF 15:1s - 87 103
AVC-I50 - 7 12
AVCI-100 - 4 8
ProRes HQ 1080i - 4 6
ProRes Proxy 1080 - 11 21
XAVC LongG 25 0* 2* 3*
XAVC LongG 50 0* 0* 1*
Proxy H264 2Mbits 40 70 87
DNxHR LB 5 6 7

Working with MediaCentral | Cloud UX
11
Working with MediaCentral | Cloud UX
MediaCentral Cloud UX is a browser-based application that gives you access to projects, tasks, media, and more across the MediaCentral Platform. When you work with MediaCentral Editorial Management, you are working with an implementation of MediaCentral Cloud UX that is especially designed for shared projects and bins. You can work with MediaCentral Cloud UX in two ways:
• Through the MediaCentral Panel for Media Composer, a companion window that you open when working in Media Composer.
• Through the MediaCentral Cloud UX web client, which you open through a browser window.
The MediaCentral Cloud UX user interface appears similar in both the MediaCentral Panel and the MediaCentral Cloud UX web client, with some differences. This topic describes how to work with features that are common to both. For more information on features that are specific to the Panel for Media Composer or the Web Client, see the following topics:
• “MediaCentral | Panel for Media Composer” on page 20
• “MediaCentral | Cloud UX Web Client” on page 24
For complete information about using MediaCentral Cloud UX, see the MediaCentral | Cloud UX User’s Guide, which is available on the Avid Knowledge Base:
http://avid.force.com/pkb/articles/en_US/user_guide/MediaCentral-CloudUX-Documentation
The MediaCentral | Cloud UX User’s Guide is also available as a Help system, which you can access through the User Profile button.
The Fast Bar
The Fast Bar is located at the top of the MediaCentral Cloud UX window and provides easy access to all available apps. If the Browse app is open, the Browse icon is highlighted and colored dark blue (each app has its own color). Hover your mouse pointer over an icon and a tooltip with the name of the app is displayed. Click the icon to open the app. The following illustration and table describe the available apps and the User Profile.
1 Dashboard The Dashboard is displayed when you dock an app. The Dashboard currently functions as a background panel only.
2 Browse App The Browse app lets you browse through projects, bins, and folders in whatever workspaces you have access to. The Browse app is opened by default when you sign into a MediaCentral Cloud UX server. See “Browsing the Shared-Storage System” on page 12.
3 Search App The Search app lets you locate assets in the shared-storage system. See “Searching for Assets” on page 17.

Working with MediaCentral | Cloud UX
12
Browsing the Shared-Storage System
You can use the Browse app to view assets on your shared-storage system.
The Browse App
You use the Browse app to navigate through the contents of your shared-storage system. The Browse app is divided into three sections: the app header at the top, the directory sidebar on the left, and the tool bar and results area on the right. The following illustration shows these three areas and the contents of a folder.
Top: App header. Left: Directory sidebar. Right: Tool bar and results area.
• The app header displays the Browse icon, the path to the open folder (breadcrumbs), the docking button, the menu button, and the close button.
• The directory sidebar displays the shared-storage workspaces to which you have access.The directory uses a familiar tree structure. Use the turn-down arrows to navigate through the tree structure and display the contents of a folder.
4 User Profile The User Profile menu includes the following entries.
• About: Opens a screen with information about the product.
• Help: Opens the MediaCentral Cloud UX Help system, an HTML-based version of the MediaCentral | Cloud UX User’s Guide (requires Internet access).
Working with MediaCentral | Cloud UX
13
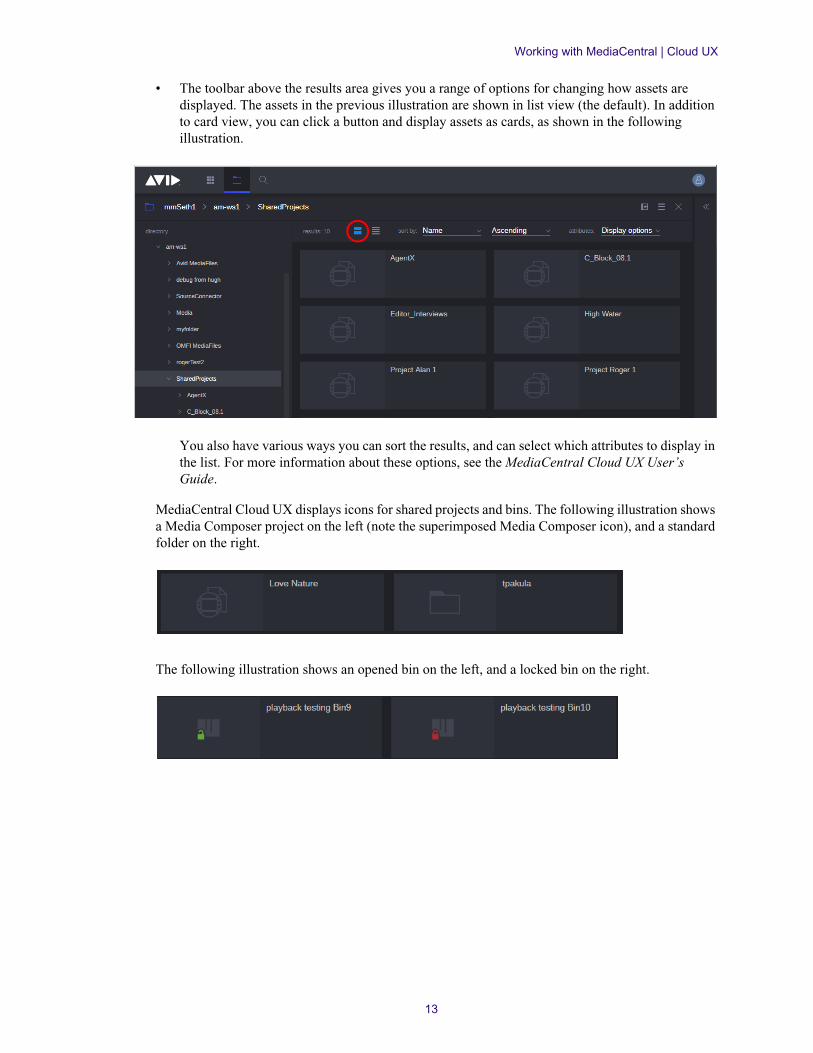
• The toolbar above the results area gives you a range of options for changing how assets are displayed. The assets in the previous illustration are shown in list view (the default). In addition to card view, you can click a button and display assets as cards, as shown in the following illustration.
You also have various ways you can sort the results, and can select which attributes to display in the list. For more information about these options, see the MediaCentral Cloud UX User’s Guide.
MediaCentral Cloud UX displays icons for shared projects and bins. The following illustration shows a Media Composer project on the left (note the superimposed Media Composer icon), and a standard folder on the right.
The following illustration shows an opened bin on the left, and a locked bin on the right.

Working with MediaCentral | Cloud UX
14
When you open a bin in card view, thumbnails and icons are shown for items in the bin. The following illustration shows master clips and a sequence, with creation dates displayed. Hover over an item to show additional information, as shown for the sequence.
You can browse for both Avid assets (master clips, subclips, and sequences) and non-Avid assets (QuickTime files, still images, documents).
For more information about browsing in MediaCentral Cloud UX, see the MediaCentral | Cloud UX User’s Guide or the MediaCentral Cloud Help.
Working with Locked Bins
Users of shared projects in Media Composer are most likely familiar with the concept of locked bins. If you open a bin that is located on shared storage in Media Composer, you get exclusive write access to that bin. Any other user that attempts to access that same bin sees a lock icon to alert them to the fact that the bin is currently owned by another user. When the original user closes the bin, the lock is released and another user can obtain write access.
For more information on working with shared projects in Media Composer, see “Working with Bins and Projects in an Avid Shared Storage Environment” in the Avid Media Composer Editing Guide.
MediaCentral Editorial Management extends the bin lock concept to users of the Browse app. However, the methods used to obtain a bin lock in MC|EM are slightly different. Since Editorial Management users might open a variety of bins across multiple projects, the bins can be opened automatically in Blue mode. This is an intentional design decision to avoid excessive bin locking which could impact the productivity of other users. Instead, users of Editorial Management must specifically obtain the lock status when they know they want exclusive write access to a bin.

Working with MediaCentral | Cloud UX
15
The purpose of locking a bin is to obtain exclusive access to the bin for an extended period of time. For instance if you have a bin that includes a large number of assets and your task is to review and add markers to each asset, you might want to lock the bin so that another user does not impact your work.
When locking and unlocking bins, use the following table to determine the lock status of the bin:
Note the following when locking or unlocking bins:
• When working in the web client, you can only lock or unlock bins through the Browse app.
• If you add a lock to a bin through MediaCentral Cloud UX (web client or Panel for Media Composer, you must unlock the bin through that interface.
• If two users are accessing the same project and User1 locks a bin, User2 is not alerted to the change in the bin’s status automatically. In this case, User 2 must refresh the user interface to see the updated bin icon.
Lock Color Description
Green When you lock a bin, the icon appears green for you, but will appear red for other users to indicate that it is locked.
Red Indicates the bin is locked by another user.
Blue Indicates that the owner of the shared bin lock has released the lock and the bin is now available for read/write. Note the following:
- If you double-click the blue icon or bin name, the bin opens, and you can make changes.
- If you want exclusive access of the bin, or will be using it for an extensive amount of time, you can right-click and select Lock Bin. You now control the bin and the icon turns green for you (red for other users). You can make changes in the bin until you release the lock or close the bin.

Working with MediaCentral | Cloud UX
16
• If User1 locks a bin in Media Composer and then User2 attempts to lock the same bin in the web client (or two users in the inverse workflow), User2 is presented with an error message to indicate that the current action is not allowed.
• Special case: If User1 locks a bin through the web client and then User2 attempts to unlock the same bin through the web client, the action is allowed. Although you sign in to MediaCentral Cloud UX with your Avid NEXIS credentials, the Editorial Management server identifies each user of the web client as the “Cloud UX” user.
The following procedures contain information on locking and unlocking bins:
To lock a bin:
1. Use the directory sidebar to find a shared project on the Avid NEXIS system.
The list of bins contained in the project appears in the results area on the right.
2. Select one or more bins using any of the following methods:
t Single-click to select a single bin.
t Click on a bin and then Shift+click on another bin to select all bins between the two selections.
t Click on a bin and then Ctrl+click one or more bins to select a group of non-sequential bins.
3. Lock the bin using one of the following methods:
t Right-click on your selection and select the Lock Bin option from the context menu.
t Select the Lock Bin option from the context menu in the app header.
The bin icon appears green to show the locked status.
If the lock can not be obtained, the system displays a warning similar to the following:
In this example another user already has already obtained the lock. The “Cloud UX” user referenced in this error refers to any user that is signed into Editorial Management through the Web Client. You can click anywhere outside of the error window to dismiss the message.
If you attempt to lock a group of bins and one or more of the bins are already locked, the lock is only applied to any bins that are unlocked.
4. After you have finished working with your bin or bins, you should release the bin lock so that other users can obtain write access if desired.
To unlock a bin:
1. Select one or more bins using any of the following methods:
t Single-click to select a single bin.
t Click on a bin and then Shift+click on another bin to select all bins between the two selections.
t Click on a bin and then Ctrl+click one or more bins to select a group of non-sequential bins.
2. Unlock the bin using one of the following methods:
t Right-click on your selection and select the Unlock Bin option from the context menu.

Working with MediaCentral | Cloud UX
17
t Select the Unlock Bin option from the context menu in the app header.
The bin icon changes back to show the standard blue (available) bin icon.
Searching for Assets
The Search app lets you use a set of criteria to search for assets in your shared-storage workspaces. When you search for an asset, the system accesses an index of standard text-based metadata fields to return the desired assets. You can then filter and sort the assets to further refine the results.
The app is divided between five primary sections, as shown in the following illustration for the MediaCentral Cloud UX web client:
The following table describes each section:
When you open the Search app, all assets are displayed. You can either use the “add phrase” field to search for text, or use the filters to display a subset.
ww
eett
rr
Section Description
1 Search Header Defines custom search parameters.
2 Search Sidebar Provides tools and quick links related to the Search app.
3 Search Toolbar and Results area
Lists all assets returned by a given search.
4 Asset Editor(Media Viewer)
Displays selected assets in the monitor for review.(MediaCentral Cloud UX web client only)
5 Asset Editor(Tabs)
When you load an asset from the results area into the Media Viewer, the Search app adds a custom “Hits” tab with information about the loaded asset.(MediaCentral Cloud UX web client only)

Working with MediaCentral | Cloud UX
18
Partial Phrase Searches
If you create a Phrase search with the intention of searching for metadata, the search might not always return your desired results. As an example, consider how a new Phrase search returns results for an asset that includes “London” in the name (title) metadata field:
• Example 1: You search for “London” and set the search type to metadata.
Result: The search returns the desired asset. This works because you searched for the fully tokenized form of the word (the whole word).
• Example 2: You search for “Lon” and set the search type to metadata.
Result: The search returns the desired asset. The search engine is capable of returning assets that start with the partial form of a phrase. Since “l-o-n” are the first three letters of the title of the asset, the search returns the desired asset.
• Example 3: You search for “ndo” and set the search type to metadata.
Result: The search does not return the asset. The search engine is not capable of returning a match for this partial form of the word London because it is neither a fully tokenized form of the word nor does the asset contain a metadata field that starts with the search text.
In this case, you might want to use a Filter to search for the partial metadata — such as a filter for a Common Title that contains the partial text.
There are many options to use for a search. See “Searching for Assets” in the MediaCentral | Cloud User’s Guide.
Properties Used for Search Queries
When you enter a value in the Search app, the engine searches the following metadata fields:
• Audio Bit Depth
• Audio Format
• Audio Sample Rate
• Aux TC 1
• Cadence
• CFPS
• Comments
• Custom bin columns
• Data Format
• Disk Label
• DRM
• Duration
• End
• Format
• In to Out
• KN Dur
• KN In to Out
• MarkIn
• MarkOut
• Name (or Title)
• Start
• Tape
• Tracks
• VideoID

Working with MediaCentral | Cloud UX
19
Docking an App
If you want to keep an app open while you open a second app, you can dock the app on the left side of the MediaCentral Cloud UX window. For example, you can dock the Browse app while you work with the Search app. To dock an app, click the Dock button (circled in the following illustration).
The app collapses to a narrow view to the left side, available for use but not occupying primary screen real estate. After you dock the app, you can open the Search app. The following illustration shows the Browse app docked and the Search app opened, and the Dock buttons circled.
To restore the app to take up the full screen, click the Dock button again.
After you dock an app, you see a panel that shows the Avid logo. This is the Dashboard, which is displayed when there is unused space in the MediaCentral Panel. Currently, the Dashboard app functions as a background panel, but future versions will add more features.
MediaCentral | Panel for Media Composer
20
MediaCentral | Panel for Media Composer
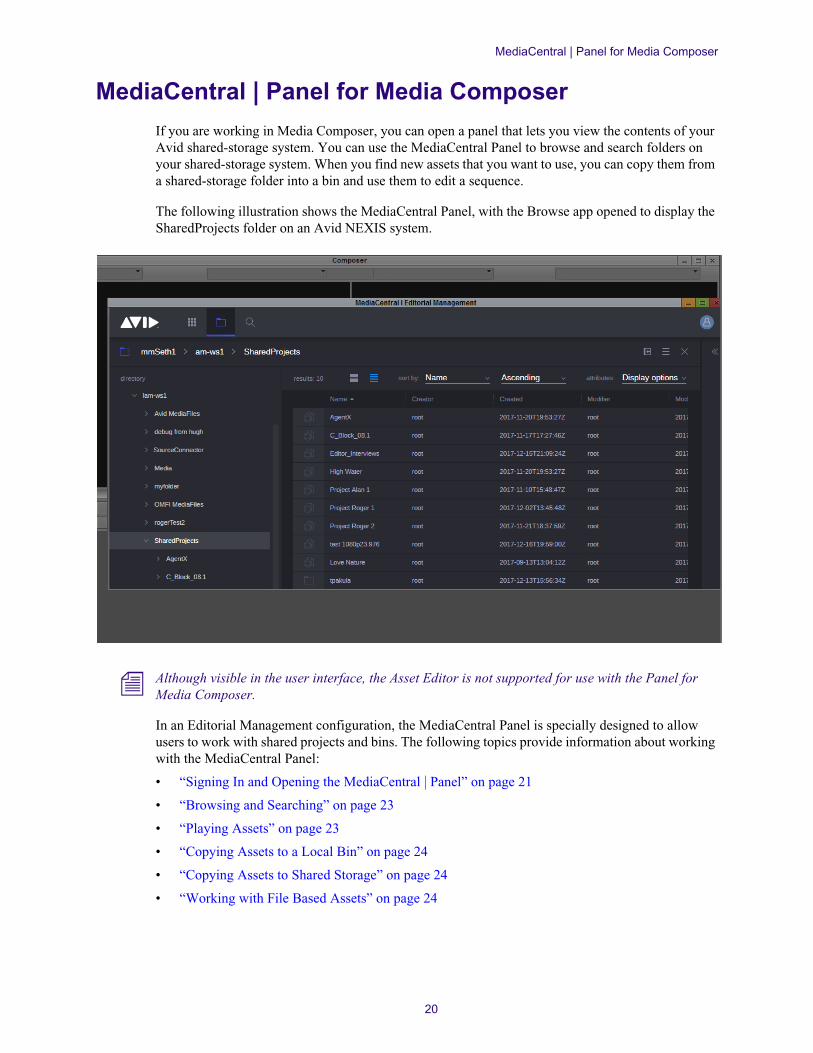
If you are working in Media Composer, you can open a panel that lets you view the contents of your Avid shared-storage system. You can use the MediaCentral Panel to browse and search folders on your shared-storage system. When you find new assets that you want to use, you can copy them from a shared-storage folder into a bin and use them to edit a sequence.
The following illustration shows the MediaCentral Panel, with the Browse app opened to display the SharedProjects folder on an Avid NEXIS system.
n Although visible in the user interface, the Asset Editor is not supported for use with the Panel for Media Composer.
In an Editorial Management configuration, the MediaCentral Panel is specially designed to allow users to work with shared projects and bins. The following topics provide information about working with the MediaCentral Panel:
• “Signing In and Opening the MediaCentral | Panel” on page 21
• “Browsing and Searching” on page 23
• “Playing Assets” on page 23
• “Copying Assets to a Local Bin” on page 24
• “Copying Assets to Shared Storage” on page 24
• “Working with File Based Assets” on page 24

MediaCentral | Panel for Media Composer
21
Signing In and Opening the MediaCentral | Panel
Before you can open and work with the MediaCentral Panel, you need to sign in to a MediaCentral Cloud UX server that is configured for your shared-storage system. Your user name and password are managed by the shared-storage system, and your access to particular workspaces is controlled by these credentials.
n You can also use the MediaCentral Panel with a Production Management module. See the Avid MediaCentral | Cloud UX User’s Guide for information about working with Production Management).
To sign in to a MediaCentral Cloud UX server and open the MediaCentral Panel:
1. Start Media Composer.
2. In the MediaCentral Login section of the Select Project window, enter the following information:
- Hostname: The name of your MediaCentral Editorial Management server
- User Name and Password: The credentials for your Avid shared-storage account
Then click Login.
When a green light is displayed, you are connected to the shared-storage server. Click OK to open the selected project.

MediaCentral | Panel for Media Composer
22
n The Select Project dialog displays the Hostname that is specified in the MediaCentral Server Settings and the User Name that is specified in the MediaCentral User Settings. If you enter a Hostname or a User Name, these entries are written in the settings files.
3. Select MediaCentral | Editorial Management from the Tools menu.
The MediaCentral Panel opens, and the top level of your shared-storage server is displayed in the Browse app.
How Opened Bins Work in the MediaCentral Panel
When you double-click a bin asset in the MediaCentral Panel, or drag a bin asset to a monitor from the MediaCentral Panel, the asset's bin is automatically opened and displayed in Media Composer. In MediaCentral Editorial Management, you can put the first bin in a convenient location, and subsequent bins that open will be added as tabs to the first bin.
Note the following:
• The first bin that opens acts like a magnet for the subsequent bins, unless you close the bin. You can tab the bin or position it somewhere and the other bins will tab with it.
• If you close the first bin, or the tabbed window containing it, the next bin that opens will become the magnet for other bins, starting the process again.
• If you leave the tabbed bin open when you change projects or quit Media Composer, the next time you open the project, any bins that open will continue to join the tabbed window. In other words, the magnet bin is remembered across sessions.
• If you minimize the tabbed window, any bins that open will be tabbed with the minimized window. This is helpful if you don’t want to see these bins.
• After you double-click or drag a clip from the MediaCentral Panel, the relevant bin is opened and added to the tabbed window, or comes forward in the tabbed window, and the clip is highlighted there. After you drag multiple clips to a monitor or bin, only the last clip dragged will be highlighted in the tabbed bin. This works whether the bin is already open or is being opened at this time.
• After you double-click or drag a clip that is in an unopened bin that belongs to the project, the bin opens as determined by the project and is not be automatically added to the tabbed external bin window. You can drag the bin to the tabbed window, as usual.
• After you double-click or drag a clip to load it in a monitor, and the clip is highlighted in the relevant bin, the keyboard focus passes to the monitor so that the keyboard controls playback. As a result, after you double-click or drag to load an asset, you can press the space bar to start play. This works whether the bin is already open or is being opened at this time.
• As before, any external bins that are opened are added to the Avid NEXIS Bins list in the Project Window.

MediaCentral | Panel for Media Composer
23
Browsing and Searching
See “Browsing the Shared-Storage System” on page 12 and “Searching for Assets” on page 17.
When you double-click a bin asset in the MediaCentral Panel, or drag a bin asset from the MediaCentral Panel, if the asset's bin is not already open, it is opened in the project and listed in the NEXIS bins folder in the Project Window.
Playing Assets
You can play assets that you locate in a shared-storage folder in the same way that you play assets from a bin in Media Composer:
• Double-click an asset. A clip opens in the Source monitor, and a sequence opens in the Record monitor.
• Drag an asset to a monitor. You can drag a clip to the Source monitor, and a sequence to the Record monitor. If you drag several assets to a monitor, they appear in the Monitor Clip List or Monitor Sequence List.
To edit clips into a sequence, drag the clips to the Timeline or Alt-drag them to the Record monitor.

MediaCentral | Cloud UX Web Client
24
Copying Assets to a Local Bin
You can work with assets in a remote bin, but you might want to copy some assets to a local bin. To copy assets to a local bin, select one or more clips and drag them to the bin.
Copying Assets to Shared Storage
Local assets created in Media Composer cannot be dragged to a shared-storage folder. They need to be added to a bin in Media Composer, which is then synced with the shared-storage folder.
Working with File Based Assets
You can browse, search for, and preview file-based assets. If you double-click a file-based asset, the asset is loaded into the Media Composer Source monitor, but it is not automatically added to a bin. However if you add a marker to a file-based asset, add the asset to a sequence, or otherwise interact with the asset, it is added to a bin as linked media.
If you drag an asset into a bin, the file is imported and converted into an Avid MXF media file. Alternatively, you can Alt+drag (Option+drag on a Mac keyboard) the asset to create a link.
MediaCentral | Cloud UX Web Client
You can use the MediaCentral Cloud UX web client to connect to shared project and bins on a shared-storage server. You can use the web client independently of Media Composer, which makes it ideal for producers and other staff who support the editorial team to review footage and organize projects and bins.
The following topics provide information about working with the Web Client:
• “Signing In and Opening the MediaCentral | Cloud UX Web Client” on page 25
• “Browsing and Searching” on page 26
• “Using the Asset Editor” on page 27
• “Organizing Folders and Bins” on page 29
• “Adding Clips To Cache” on page 30
• “Removing Clips From Cache” on page 30
• “Creating Subclips” on page 30
• “Playing Subclips” on page 31
• “Creating Sequences” on page 32
• “Playing Sequences” on page 33

MediaCentral | Cloud UX Web Client
25
Signing In and Opening the MediaCentral | Cloud UX Web Client
To sign into Avid MediaCentral Cloud UX:
1. Launch a supported web browser on your Mac or Windows client.
For a list of supported browsers, see the Avid MediaCentral | Editorial Management Installation Guide.
2. Enter the URL of the MediaCentral Editorial Management server in the address bar:
https://<hostname>
Where <hostname> is the Fully Qualified Domain Name (FQDN) of the server.
The MediaCentral Cloud UX sign-in page appears.

MediaCentral | Cloud UX Web Client
26
In place of the sign-in screen, you might see a warning indicating that the connection is not private:
Example image from Google Chrome.
If you are presented with this or a similar page, it indicates that a security certificate has not been created for the MediaCentral server. If desired, system administrators can create a trusted certificate to eliminate this page from appearing.
t To create a trusted certificate, see “Configuring a Self-Signed Certificate” and “Importing Self-Signed Certificates” in the Avid MediaCentral Cloud UX Installation Guide.
t To continue to the MediaCentral sign-in page without a trusted certificate, simply click on the ADVANCED link and select the option to Proceed.
3. Enter your user name and password (The credentials for your Avid shared-storage account). Then click Sign In.
The Avid MediaCentral Cloud UX application opens, and the top level of your shared-storage server is displayed. This display of folders and contents is called the Browse app.
Browsing and Searching
See “Browsing the Shared-Storage System” on page 12 and “Searching for Assets” on page 17.

MediaCentral | Cloud UX Web Client
27
Using the Asset Editor
The expand/collapse icon on the right side of the window opens and closes the Asset Editor.
The MediaCentral Cloud UX web client displays a monitor and three tabs: Metadata, Markers, and Audio.
After browsing or searching, you can load an asset into the Asset Editor by double-clicking on the asset in the Browse or Search app’s Results pane. After the asset is loaded, you can use the controls in the Media Viewer and the Audio tab to view and play assets.
Currently, master clips and subclips are supported for playback.

MediaCentral | Cloud UX Web Client
28
The Metadata Tab
The Metadata tab lets you view and edit properties that are associated with a selected asset. The properties displayed depends on which type of asset is loaded. Some properties are editable. If a property is editable, a text box or drop-down menu is displayed.
The Markers Tab
A marker is an indicator that is added to a selected frame to mark a particular location in a clip. Markers can have icons of different colors and can be associated with user-defined comments. Markers display in the timeline and in the Markers tab below the Media viewer.
The Markers tab found in Editorial Management allows you to read and write markers. By default, the markers are listed in chronological order according to the asset’s time code. However, you can reorder the markers by clicking on any of the column headers in the tab.

MediaCentral | Cloud UX Web Client
29
In a collaborative workflow where another user is adding new markers to the asset, you can click the reload button to refresh the marker list and access the newly created markers.
You can add markers to any master clip found through Editorial Management — as long as that clip is not contained in a locked bin. You do not need to lock a bin to add markers. However if you want to work in a bin for an extended period of time, you might want to lock the bin to grant yourself exclusive access to it. For more information on locking and unlocking bins, see “Working with Locked Bins” on page 14.
The Audio Tab
The Audio tab provides tools for monitoring audio. Use the sliders to adjust the volume, or type a number in text box below the slider. The voice-over function is not currently supported.
Organizing Folders and Bins
In addition to browsing, searching, and viewing assets in MediaCentral Cloud UX, a user with the proper privileges can create folders and bins, and copy assets from one bin to another.
Creating Media Composer projects is not supported.
To create a new folder:
1. In the directory sidebar, right-click a folder and select Create Folder.
2. Type the name of the folder in the dialog box and click Create.
The folder is created in the folder you selected.
To create a new bin in a Media Composer project:
1. Right-click a Media Composer project folder and select Create Bin.
2. Type the name of the bin in the dialog box and click Create.
The bin is created in the project folder you selected.
To copy assets from one bin into another:
t Drag a clip (single-select) or clips (multi-select) to a bin in the directory sidebar.
t Drag a folder from the results area of the Browse app to a different folder in the Results area or in the directory sidebar on the left.

MediaCentral | Cloud UX Web Client
30
Adding Clips To Cache
You can create add clips to a project using the EM Cache Bulk Load option.
EM Cache Bulk Load Option
Since Search only lists clips that were previously opened in the Browse App, you can use this feature to index a project that is already on your NEXIS workspace so you can add current projects to MC|EM. Once added, you be able to use Search to locate the clips.
To add clips to a project:
t Select a project, right-click, and select the Add to cache option. You can now use the Search feature to locate the clips.
Removing Clips From Cache
You can delete the cache from a project by using the EM Cache Bulk Unload option.
EM Cache Bulk Unload Option
This feature is helpful when the cache being used in a project becomes corrupt. The EM Cache Bulk Unload option enables you delete the cache from a project.
To delete the cache from a project:
t Select a Project or bin, right-click, and select the Remove from cache option.
Creating Subclips
You can create a subclip from a master clip that you load in the Media Viewer and store it in an existing folder in the database.
After you create a subclip, the original clip remains in the Media Viewer. This is useful if you are creating a series of subclips from the same master clip.
n Creation of subclips from sequences or group clips is not currently supported. You can create a subclip from a subclip.
To create a subclip by using a dialog box:
1. Set an In point and an Out point for a clip that is loaded in the Media Viewer.
2. With focus in the Media Viewer, press the S key.
The Create Subclip dialog box opens.

MediaCentral | Cloud UX Web Client
31
The path and folder displayed defaults to where the master clip resides.
A default name is supplied, with the extension .Sub added to the clip name. Any other subclips you create from the same master clip include an incremented extension — for example, .Sub.01, .Sub.02, and so on.
3. (Optional) Rename the clip if you want by typing over the default name.
4. Click OK.
The subclip is added to the database.
Playing Subclips
The MediaCentral Editorial Management Browse App provides the ability to play subclips created by Media Composer users in bins.
To playback subclips in the Browse App, simply double-click a subclip.
The subclip to be played opens in the Browse App. As the subclip plays in the Browse App, you have all the functionality that you have with clips, including the ability to:
• Add Markers
• Change the name of the subclip
• Add Comments regarding the subclip

MediaCentral | Cloud UX Web Client
32
Creating Sequences
You can create a sequence from multiple master clips or subclips in a bin. The resulting sequence is saved in the bin where the selected masterclips and/or subclips reside.
n The edit rate of the sequence is based on the first master clip or subclip in the sequence.
To create a sequence:
1. Open a bin that has the master clips and/or subclips you want to use to create a sequence.
2. Select the master clips and/or subclips that you want to use to create the sequence, right-click and select Create Sequence.
The Create Sequence dialog box opens. The clips you selected will appear in the Clip order field (in the order you selected them).
3. (Option) Rename the sequence by clicking on the “New sequence” name, and typing a new name for the sequence in the *Sequence name field.
4. (Option) The order of the master clips/subclips can be changed by selecting one and moving it up or down in the list. You can repeat this step until the clips are in the order you want.
5. Click the Submit button. A new sequence will be created using the selected master clips and/or subclips.
The path and folder displayed defaults to where the selected master clips and/or subclips reside.

MediaCentral | Cloud UX Web Client
33
A default name is supplied.
6. Playback the sequence. For more information, see “Playing Sequences” on page 33
Playing Sequences
The MediaCentral Editorial Management Browse App provides the ability to play sequences created by Media Composer users in bins.
Sequences must have the following criteria to be played:
• In order for the sequence to play, all effects must be rendered, including dissolve.
• The sequence can support up to sixteen audio tracks.
• AMA media is supported.
• Cross-rate sequences are not supported (i.e., the sequence is in a different edit rate than the master clips). However, cross-rate sequences can be played if they are rendered.
• Audio pan/vol is not supported.
To playback sequences in the Browse App, simply double-click a sequence.
The sequence to be played opens in the Media Viewer in the Browse App. As the sequence plays, you have all the functionality that you have with clips, including the ability to:
• Add Markers
• Change the name of the sequence
• Add Comments regarding the sequence
In cases where the sequence does not playback, the following error conditions might display:
Handling Error Conditions related to Playback of Sequences
Error Message Resolution
AMA media file not found Find the AMA file, and relocate it, or relink it.
MediaDescriptor not found (corrupt bin) Open Media Composer and re-save the bin.
Unsupported track (Sound master track and etc.)
Open Media Composer and re-save the bin.
Failed to find filemob for either clip or rendered effects (corrupt bin)
Open Media Composer and re-save the bin.
Unsupported track (Sound master track and etc.)
Open Media Composer and remove the unsupported track from the sequence.

Fixed in Version 2018.11
34
Fixed in Version 2018.11
The following items were fixed in the 2018.11 release of Editorial Management:
a Bug Number: MCEM-621. The Configure button in the MediaCentral |Cloud UX section does not configure the NIC properly.
Workaround: Before installing the virtual machine, disable any NIC(s) that you do not want to use.
a Bug Number: MCEM-1020. The Browse App does not handle media offline in sequences properly. If media is offline, it displays an error “clip information not retrieved from database”, rather than displaying the “Media Offline” slide.
a Bug Number: MCEM-842. After applying a patch, the Linux Installer Version number does not update.
a Bug Number: MCEM-888. Adding a marker to a subclip in Media Composer, will make the referenced master clip disappear from the bin in the MC|EM Browse App.
a Bug Number: MCEM-870. You cannot create a subclip of a master clip from the search results. If you search for a clip, set Mark In and Mark Out points, and press “s” on the keyboard, you receive an error message saying “A valid subclip target folder has not been set”. There is no option to set the target folder for subclips in MediaCentral Editorial Management as there is in Cloud UX.
a Bug Number: MCEM-896. Running the Editorial Management v2018.11 Installer over a previously installed and configured Editorial Management 2018.6 installation does not update the Config tool.
Workaround: Uninstall the 2018.6 software using the Uninstall button in the Config tool, and then reinstall the 2018.10 build on a clean system. For more information, see “Updating Editorial Management Software” on page 5.
a Bug Number: MCEM-890. There are two “Update” folders in Program Files (C:\Program Files\Avid\MCEM). One is called “Updates” and the other is called “update”.
Here are the actual paths:
C:\Program Files\Avid\MCEM\Updates contains the zip file: MediaCentral_Services_Patch_2018.6.0.0_Build_3_Linux.zip
C:\Program Files\Avid\MCEM\update contain the tar file: MediaCentral_Services_Patch_2018.6.0.0_Build_3_Linux.tar.gz.
a Bug Number: MCEM-836. If you delete all assets from a bin and save it, you get an error in avid-bin-cache. To reproduce, create a bin in the Media Composer project, add some clips, then save the bin. When you open the bin in the Chrome browser, the clips are visible. Then, open the bin again in Media Composer, delete all the clips, and save the bin.
When you open the bin in the Chrome browser again, the clips are still there, not deleted.

Limitations and Defects in Version 2018.11
35
Limitations and Defects in Version 2018.11
The following sections list known limitations and defects for MediaCentral Editorial Management.
Asset Editor
The following limitations apply in Editorial Management when working with the Asset Editor:
a Bug Number: JP-5209. When you select an asset and press the Enter key (or the Return key on a Mac keyboard) the asset is not loaded into the Asset Editor. This issue affects the Search app’s Card view and both views in the Browse app.
Workaround: Use your mouse to double-click on an asset to load it into the Asset Editor.
a Bug Number: ASSETS-1272, MCEM-41. Copying a folder from one location to another in the Browse app does not copy the contents of the folder.
Browse App
The following limitations apply in Editorial Management when working with the Browse App:
a Bug Number: MCEM-1057. Adding comment to a newly added marker results in an error message if the comment is added while add marker request is still pending.
Workaround: Wait until the add marker request has finished before adding your comment. However, if you do get an error, you can try again after refreshing the page (F5), or opening the asset again (double clicking on it).
a Bug Number: MCEM-1051. Although simple sequences (string outs) play really well, sequences that are more complex might suffer dropouts, black frames, or might not play at all.
a Bug Number: MCEM-1054. Editing a comment (e.g., Description) the second time for the same asset results in an error message.
a Bug Number: MCEM-1055. Renaming an asset on a locked bin returns the wrong error message saying “The selected asset cannot be renamed”. The error message instead should say “The bin is locked / asset is being used, by another user.”
a Bug Number: MCEM-1018. Subclips made from Linked clips can have problems in the player (e.g., slow loading, stuttering playback).
a Bug Number: MCEM-1030. You cannot create subclips or sequences from 3rd party files in the Browse App. However, you can play 3rd party files directly from the Nexis workspace (QTs, mp4's, mxf, etc) without being linked inside Media Composer, but you cannot create subclips or sequences out of them.
a Bug Number: MCEM-825. You can create a bin in Media Composer or in the Browse App with '+' characters (e.g., “apples+oranges”). However, when you try to open that bin in the Browse App, you get a spinning donut that does not time out.

Limitations and Defects in Version 2018.11
36
a Bug Number: MCEM-688. When loading a clip, and pressing the Refresh button (or F5), occasionally results in the following error message: “Module loading failed because of a backend issue.”
Workaround: To work around this issue, refresh the page again.
a Bug Number: MCEM-356. The system becomes unresponsive after moving a large amount of clips to a bin in the Browse App.
Workaround: To work around this issue, copy no more than 10 clips at a time when moving clips to another bin.
If the system becomes unresponsive, and you need to reinstall the software, you must manually uninstall all MC|EM components prior to running the installer application. For more information on uninstalling MediaCentral Editorial Management, see “Uninstalling MediaCentral Editorial Management” in the Avid MediaCentral | Editorial Management Installation Guide.
a Bug Number: MCEM-548. It appears that you can add markers to a clip in a locked bin. However, the markers will not be saved. Instead, an error message appears telling you that the bin is locked. Refreshing the bin makes the markers disappear.
a Bug Number: MCEM-689. When trying to add markers to a clip in which the bin is locked, you will get the Bin Locked error message. However, instead of being removed, the markers are still displayed in the Marker App until you reload the clip.
Workaround: To work around this issue, reload the clip, or refresh the app (press F5).
a Bug Number: MCEM-715. After completing new installations, you cannot browse Avid NEXIS.
Workaround: Refresh your web browser to update the Browse app.
a Bug Number: MCEM-767. Some of the attributes like (Captured frames per second, Source Item Type, Ancillary Data, Audio Sample Rate (Hz), Audio Sample Count, Media Status, Media Size, Media File Format, Video Starting Frame Number, Tape, Original Machine Name, Playable in Access Flag, Video ID) are not displayed because they are not set for any clips.
Configuration Tool
The following limitations apply in Editorial Management with regards to the Configuration tool:
a Bug Number: MCEM-741. If you access the Kibana application (click Go to Kibana button) before you have setup licensing on your Editorial Management system, you will get an error message upon opening Kibana.
Workaround: To work around this, do not start Kibana until you have licensed your Editorial Management system.
a Bug Number: MCEM-308. You can not pin the MediaCentral Editorial Management Configuration Tool to the Windows Task Bar. If you attempt to launch the Configuration Tool from the task bar, Windows responds with an error indicating that the executable no longer exists.

Limitations and Defects in Version 2018.11
37
a Bug Number: MCEM-508. When updating the NEXIS client on the Virtual Machine, after finishing the configuration and updating the NEXIS client, all the content of the NEXIS appears offline until you restart the pmr-service.
Workaround: Use the Configuration tool to trigger configuration. A reconfigure will trigger the pmr-service.
a Bug Number: MCEM-239, MCEM-510. After using the Configuration Tool to configure the MC|EM settings, the Logs panel might indicate that some services are not running. For example:
Check servicesBin cache not workingCTC not runningNexis not connectedAvid login service running
Workaround: If this occurs, you must restart the services on the Cloud UX virtual machine manually. For more information, see “Restarting the Services on the Cloud UX VM” in the Avid MediaCentral | Editorial Management Installation Guide.
Installer
The following limitations apply in Editorial Management when working with the Installer:
a Bug Number: MCDEV-8716. If you launch the MediaCentral Editorial Management installer application on a system that already has the software installed, the installer quits silently.
Workaround: If you need to reinstall the software, you must manually uninstall all MC|EM components prior to running the installer application. For more information on uninstalling MediaCentral Editorial Management, see “Uninstalling MediaCentral Editorial Management” in the Avid MediaCentral | Editorial Management Installation Guide.
Language Support
The following limitations apply in Editorial Management with regards to language support:
a Bug Number: MCEM-21. Media Composer can support English plus one other language, but not a mix of languages other than English. For example, Chinese and English or Arabic and English are supported, but not Chinese and Arabic. If a mix of languages is entered in a text field in MediaCentral Cloud UX, some non-Latin characters are mapped to random characters.
Media Composer Projects
The following limitations apply in Editorial Management when working with Media Composer projects:
• Support is limited to external or shared Media Composer projects. Local Media Composer projects are not supported.
• There is no support for scripts.

Limitations and Defects in Version 2018.11
38
MediaCentral Cloud UX Apps
The following limitations apply in Editorial Management when working with MediaCentral Cloud UX apps:
• Hoverscrub is not available for playing assets.
• MCEM-493. The Results area of the Browse app does not allow you to move columns while in List view.
• Phonetic search is not available in the Search app.
• Voice-over recording is not available in the Audio tab.
• Search can currently return master clips only. It cannot return subclips, sequences, group clips, or other asset types.
• Search does not respect workspace permissions and will expose all content from all bins. A workspace filter can be supplied to address this.
• Master clips and subclips can be played back in the web client.
• There is no sequence editing available and subclip creation is limited.
MediaCentral Panel for Media Composer
The following limitations apply in Editorial Management when working with MediaCentral Panel for Media Composer:
a Bug Number: MCEM-682. When working with the MediaCentral Panel for Media Composer, Search results do not load in the monitor when double-clicked.
Workaround: To workaround this issue, try the following:
• Drag the clip into the source monitor.
• Double-click from card view (not table view).
Playback
The following limitations apply in Editorial Management with regards to Playback:
a Bug Number: MPLAY-3563. After a few minutes of playback in the browser, if you switch focus to a different application, the audio might drift and become out of sync with the video.
Workaround: If this occurs, Scrub, and then Play.
Search App
The following limitations apply in Editorial Management with regards to the Search App:
a Bug Number: MCEM-773. Dragging a clip from the Search pane to a bin should result in the new clip showing in the bin, but instead the destination bin is empty/does not update.
Workaround: Refresh the bin to see the new clip.
a Bug Number: MCEM-419. Search is only listing Clips that were previously opened in the Browse App.

Limitations and Defects in Version 2018.11
39
Shared Storage Workspaces
The following limitations apply in Editorial Management when working with shared storage workspaces:
• You cannot drag a bin to a folder.
• You cannot drag a local clip to the MediaCentral Panel to move it to a shared location. You need to drag it to an already open shared bin.
• You cannot create Media Composer Projects.
• You cannot rename folders or bins.
• You cannot delete files or other bin items.
• You cannot move bin items (only copy items).
• You cannot move files between workspaces.
• Avid ISIS is not currently supported for MediaCentral Editorial Management.
Copyright © 2018 Avid Technology, Inc. and its licensors. All rights reserved. Created 12/10/18