version 2021-1
TRANSCRIPT

Team PRP Operations Guide, Version 2021-1
3/11/21 INTERNAL COMPANY DOCUMENT Page 1
Version 2021-1
The standards and guidelines specified in this document may change from time to time to
reflect better practices implemented to improve efficiency, minimize part damage and reduce
overall operating costs. The Board of Directors may issue or approve changes to the
standards and guidelines and such changes will be reflected in updated versions of the
guide. To ascertain that you are using the latest version, compare the version of this Guide
with the most current version posted on the Team PRP members only web site or consult
with your Regional Director. The version can be seen at the top of each page and the date is
at the bottom left.

Team PRP Operations Guide, Version 2021-1
3/11/21 INTERNAL COMPANY DOCUMENT Page 2
1. Introduction and General Standards ___________________________________________________ 4 1.1. About this Guide __________________________________________________________ 4 1.2. Appearance Standards _____________________________________________________ 4 1.3. Behavior Standards ________________________________________________________ 4 1.4. Standards for Placing Orders within Team PRP __________________________________ 5 1.5. Staying Connected ________________________________________________________ 5
2. Operational Standards ______________________________________________________________ 9 2.1. Marketing, Advertising and Sales Promotion Standards ____________________________ 9 2.2. Hiring Policy _____________________________________________________________ 11 2.3. Sales Practices __________________________________________________________ 14 2.4. Inventory Standards ______________________________________________________ 15 2.5. Production Standards _____________________________________________________ 18 2.6. Quality Assurance Standards and Part Testing _________________________________ 19 2.7. Part Preparation, Packaging and Shipping General Standards _____________________ 21
3. Part Type Specific Standards and Guidelines ___________________________________________ 32 3.1. Engines ________________________________________________________________ 32 3.2. Transmissions ___________________________________________________________ 35 3.3. Transfer Case and Carrier Assembly _________________________________________ 38 3.4. Axle Assembly ___________________________________________________________ 40 3.5. Suspension, Steering Gear & Drive Shafts _____________________________________ 42 3.6. Crossmembers and Frames ________________________________________________ 44 3.7. Body Panels - Doors, Fenders, Hoods, Bumpers, Decklids ________________________ 46 3.8. Large Body Sections - Front Ends, Section Cuts, Roof Panels, Cabs and Beds ________ 49 3.9. Lighting and Mirrors _______________________________________________________ 52 3.10. Glass __________________________________________________________________ 54 3.11. Electronics - A/V, ECMs, Instrument Cluster, etc. ________________________________ 56 3.12. Wheels _________________________________________________________________ 58 3.13. Coolers, Radiators and Condensers __________________________________________ 59 3.14. Interior Parts - Seats, Consoles, Miscellaneous _________________________________ 60 3.15. Small Mechanical - Power Steering Pump, Alternator, ABS, Compressor, etc. _________ 61
4. Shipping, Receiving Standards and Part Return Guidelines ________________________________ 62 4.1. Shipping ________________________________________________________________ 62 4.2. Receiving Parts __________________________________________________________ 69 4.3. 60-Days “No Hassle” Part Returns (RMA Process) ______________________________ 74
5. Warranties ______________________________________________________________________ 76 5.1. Team PRP Standard Warranties _____________________________________________ 76
6. Core Charges ____________________________________________________________________ 79 6.1. Partner-to-Partner Core Charges ____________________________________________ 79
7. Credits and Credit Memos __________________________________________________________ 81 7.1. Credits Not Managed Using the RMA Process __________________________________ 81 7.2. Manual Request for Credit (not managed using the RMA process) __________________ 81 7.3. Issuing a Credit __________________________________________________________ 82 7.4. Restocking charges _______________________________________________________ 82
8. Financial Practices and Standards____________________________________________________ 83 8.1. Invoicing _______________________________________________________________ 83 8.2. Part Returns and Credit Memos _____________________________________________ 83 8.3. Accounts Payables and Exceptions Regarding Payments _________________________ 83 8.4. Payment to Team PRP ____________________________________________________ 84 8.5. Accounts Receivables _____________________________________________________ 84
9. Dispute Resolution ________________________________________________________________ 85 9.1. Objectives relating to dispute resolution _______________________________________ 85 9.2. Disputes Subject to Resolution ______________________________________________ 85
Team PRP Operations Guide, Version 2021-1
3/11/21 INTERNAL COMPANY DOCUMENT Page 3
9.3. Process Overview ________________________________________________________ 86 9.4. Expected member action ___________________________________________________ 86 9.5. Effects of a Finding _______________________________________________________ 86
10. Continuing Training and Skill Improvement __________________________________________ 88 10.1. Conferences ____________________________________________________________ 88 10.2. Profit Groups ____________________________________________________________ 89 10.3. Team PRP Skills and Programs Training ______________________________________ 89 10.4. Technical Skills Training ___________________________________________________ 90
Team PRP Operations Guide, Version 2021-1
3/11/21 INTERNAL COMPANY DOCUMENT Page 4
1. Introduction and General Standards
1.1. About this Guide Team PRP was formed
• to promote the interests of the automotive recycled parts industry,
• to promote and encourage the practice of the highest standards or professional conduct among the members, and
• to promote and encourage the development of competitive, free market enterprise solutions in the automotive alternative, recycled parts and salvage industry.
The purpose of this Guide is to provide the necessary details of the Team PRP operational
standards and guidelines that will help Team PRP achieve its objectives. The sections that
follow represent the standards approved by the Team PRP Board of Directors for a wide variety
of activities, and the Board as well as all Team PRP members expect fellow members to abide
by them. Please make sure all members of your staff are familiar with and trained to implement
these standards.
1.2. Appearance Standards As indicated in a later section of this guide, Team PRP expects that the appearance of your
facility, your equipment exposed to customers and the public, your employees and all forms of
communication will present a positive and progressive image. Please review these sections
carefully and take whatever actions are necessary to meet or exceed the standards defined. As a
part of this, make sure that steps are taken to maintain or improve this going forward to let
everyone know that you are on a team of the best recyclers in North America.
1.3. Behavior Standards Mutual NDA1: All members have a signed Mutual Non-Disclosure Agreement (NDA) under which
they may not disclose certain confidential, personal, technical and business information that
Team PRP considers confidential. Likewise, by countersigning the NDA form, Team PRP has
similar responsibilities to keep your information confidential.
• Competitive ethics: Automotive recycling has always been and will continue to be a very competitive business. There is nothing wrong with competition, even when you are competing against fellow Team PRP members but when you do, make sure you do it on an ethical basis. Statements about your competitors must always be positive. They must be factual and objective. Refrain from statements based on rumors or innuendos and these rules apply to and be implemented by everyone in your organization.
• Anti-competitive behavior: Team PRP members and prospective members agree not to engage in any anti-competitive practices as stipulated in the Antitrust Guidelines1 and the Shareholder Rules and Operational Policies1.
• Customer experience: Think about your personal experience when shopping at a high-end retailer. Why should your customers’ experience be any different simply because they are buying something used (recycled) instead of new? Today’s retailers – who compete for business just as hard as you do – have set a very high bar that your customer – wholesale and retail – expect you to match. Think back of the day when recyclers would accept returns only reluctantly and notice how the liberal return policies of retailers have now spread throughout our industry. Likewise, look how part preparation, part presentation, warranties and other services have changed over time to come up to the standards of other industries. From time to time review your own policies and practices and make the changes necessary to make sure your organization meets or exceeds high standards.
1 Some of the documents mentioned herein are included in the Team PRP Membership Guide.

Team PRP Operations Guide, Version 2021-1
3/11/21 INTERNAL COMPANY DOCUMENT Page 5
• Inside and outside sales people: There are few jobs within an auto recycling business as stressful as that of the sales person. And yet, in most cases, they are the first exposure to the outside of how you do business. Whether by phone, email or in person, their first contact regardless of the situation must be with a smile and a positive attitude. Their response to complaints must be positive, objective and with the aim of a successful win-win-win situation that includes your customer, your organization and the sales person. Make sure your sales staff has successfully completed some of the many programs for phone etiquette and salesmanship available from Team PRP and over the internet or in-class and keep reminding them of the basic principles of customer care at some of your staff meetings. A gentle reminder works wonders.
• Fielding sales calls: Listen to how your sales staff responds to part inquiries. The best responses include the benefits offered by your parts and your company, the warranty, the condition of the part (in positive terms) and any other assistance you may offer the customer. That is “salesmanship”. Anyone assisted by a computer and some knowledge can look up parts but it is the person with “salesmanship: that will get the order and keep the customer satisfied to generate future sales.
• Alternate forms of communication: emails, instant messages, letters and even your invoices and statements are a reflection of your organization even when sent by individuals. Monitor them and ensure that they project a professional image in line with the high standards of Team PRP. Other sections in this Guide detail promotional materials, emails and even phone answering etiquette. These are by no means mandatory but they reflect the goals and objectives of Team PRP. We are a premier organization of premier recyclers and as a part of it your communications must support it.
1.4. Standards for Placing Orders within Team PRP You don’t appreciate when repairers place orders for parts “just in case” or place orders with
more than one recycler that allows them to select the best and return the rest. When placing an
order with a fellow Team PRP member there must be a clear understanding on both sides of the
conditions under which the order is placed and the perception on the condition of the parts must
be about the same on both sides of the order.
The basic guidelines for placing an order with another Team PRP member are as follows:
• The following damage must be disclosed by the seller: o Plastic parts with tears, scratches, or scuffs; o Any parts that are missing or damaged on an assembly; o Parts that have been previously repaired or painted; and o Sheet metal damage as described by ARA “credit card size” grading system.
• Accurate and correct mileage shall be provided for all mechanical parts.
• If something is not needed, or wanted, this must be communicated by the buyer; otherwise, the following part types come in accordance with industry standards defined by the ARA:
1.5. Staying Connected
1.5.1. Regularly Scheduled Members’ Meetings As directed by the Bylaws posted in the Team PRP member’s only web site and included in
the Team PRP Membership Guide, Team PRP holds an annual meeting of the owners and
general managers in conjunction with its Fall National Conference. This is a very important
event in which Team PRP elects new Board of Directors members, reviews past
performance and its strategic initiatives for the coming year. All member business owners
and general managers are encouraged to attend.
Team PRP Operations Guide, Version 2021-1
3/11/21 INTERNAL COMPANY DOCUMENT Page 6
1.5.2. Communications from Team PRP Team PRP utilizes several mediums to get communication to all Owners and Managers,
Sales Staff, Production and other staff using contact management software. It is important
to notify your Regional Director when changes in personnel take place within your
organization so that they may update the contact management application. Not doing so
may result in unintended people receiving notifications and current employees intended to
be notified not getting it.
In addition, take steps to ensure that Team PRP communications don’t end up in people’s
Junk E-mail boxes. Over the past couple of years, we have encountered many members
and employees who claim to not have received important notices from Team PRP that upon
further search were found in the Junk E-mail boxes. Check your security and email settings
to ensure that Team PRP emails are not considered junk
1.5.3. Team PRP Newsletter Team PRP publishes a newsletter twice a month. It is released to members every other
Thursday and then repeated the following Monday. Each newsletter issue includes a
message from the Executive Director, featured member profiles, industry news, articles
from contributors and members, new programs and projects, special offers, calendar of
upcoming events and more. In addition, past copies of the newsletter are stored in Team
PRP’s members only web site and accessible any time.
The newsletter is distributed via email using the same contact management application as
mass emails.
1.5.4. Communicating with Fellow Members Providing feedback to one another as often as necessary is a crucial factor in pushing Team
PRP and its members to improve and in some cases innovate. Sometimes two facilities may
not agree on an issue as it relates to a particular sale - perhaps a parcel grade is issued that
the vendor yard doesn’t agree with. In all cases it is absolutely critical that we communicate
with one another, remembering that we are EQUAL PARTNERS and TEAMMATES.
A clearly and purposefully articulated Skype message or email outlining your thoughts is a
great starting point and a minimum requirement for opening up conversation with your fellow
member. Even better, and perhaps quicker, is a phone call when possible. Sometimes issues
are detailed and intricate; these types of problems are almost always better suited to be
resolved with a quick phone conversation.
Things to remember when communicating with one another:
• We are all on the same team.
• Provide all available info to your partner and be clear about your reason for reaching out.
• Not every interaction will have a favorable result for both buyer and vendor. Disagreements on part conditions and other subjective circumstances will arise sometimes; as long as we’re respectful to each other it’s best to move on after discussion and explanations.
1.5.5. Email Team PRP requires that all its members and most of the members’ employees be able to
receive emailed messages that Team PRP generates. This includes acceptance of mass
emails without them being relegated to a junk email file or settings to prevent them from
being sent to a junk file even when they are generated using a mass email application. It is
important to check your Junk email folder from time to time to ensure you receive Team PRP
emails.
Team PRP Operations Guide, Version 2021-1
3/11/21 INTERNAL COMPANY DOCUMENT Page 7
Members also use email to communicate with fellow members, some even using email to
distribute transaction documents (like invoices and POs) and even monthly statements. As a
member, make sure that the email addresses of your employees are entered into the Team
PRP database by providing them to your Regional Director on a regular basis, particularly
when email addresses change such as when you change server or email provider or when
you add or remove employees.
Team PRP makes available current contact information about its members using
spreadsheets posted in the Team PRP members only web site. However, members must
refrain from using these lists to generate mass emails without the express approval of the
Team PRP Executive Director or its Regional Directors. Violations are subject to submittal to
Dispute Resolution.
IMPORTANT NOTE ABOUT MASS EMAILS: The Team PRP Director of Logistics
communicates important information about status or issues in the Team PRP transportation
network using mass emails. These include information about system delays that could impact
your ability to fulfill orders to your customers on a timely basis. Therefore, make sure that at
least one individual in your organization is included in our mass email database for logistics
and that the individual’s email settings will not interfere with the receipt of these emails.
A lot has been said and written about emails and their comparison with phone calls as they
relate to interpersonal communications and possible misunderstandings. Here are 13 tips for
better email etiquette:
• Be informal, not sloppy, and use abbreviations you know your audience understands
• Keep messages brief and to the point
• Use sentence case, not upper case or lower case only. Avoid using underline, bold face or colors
• Use the blind copy (BCC) and courtesy copy (CC) appropriately. Use judgment in selecting who to copy
• Don’t use email as an excuse to avoid personal contact
• Remember that email isn’t private
• Be sparing with group emails making sure you only send it to those impacted by your message
• Use the subject field to indicate content and purpose since most readers use the subject to determine urgency
• Don’t send chain letters, virus warnings or junk mail (many of them may contain viruses)
• Remember that your tone can’t be heard in an email so avoid sarcasm
• Use a signature that includes contact information
• Summarize long discussions, keep it objective and be clear about needed action
• Avoid mass mailing unless they relate to a topic applicable to all recipients.
There are many other articles available on the web relating to effective email and instant
messaging and they might be worth reviewing with your employees.
1.5.6. Distributing and Forwarding Emails When communicating with fellow members via email, the overall objective is to make sure all
communications/emails from Team PRP staff and Committees2 or between members is
professional looking and that they only contain the relevant information. They must not
include chains that contain dialogue and multiple sets of email addresses.
2 Details about Team PRP Committees are included in the Team PRP members-only web site and summarized in the
Team PRP Membership Guide
Team PRP Operations Guide, Version 2021-1
3/11/21 INTERNAL COMPANY DOCUMENT Page 8
The basic procedure for distributing or forwarding group emails is as follows:
• Create a group or distribution list. Instructions for creating a group are available in the Help program associated with whatever email program you use.
• When forwarding an existing email o Delete all non-relevant information (i.e., previous forwards, dialogues, email addresses)
so that you are just sending the original content o Use your own email address to identify you as the sender o In the “BCC” field, enter the appropriate group or distribution list or the separate email
addresses you are sending to. o In the subject line, delete the “FW:” that is in front of the subject line text
Keep in mind that you, along with all other members of Team PRP are subject to the non-
disclosure agreement that forbids the communication of any confidential information which
was signed upon initial application.
1.5.7. Using Instant Messaging Like in all other businesses, instant messaging is now a preferred method of communication
and Team PRP has encouraged its members to use Skype for instant messaging. For most
instances where it is necessary or advisable to have a paper trail, email is the preferred
method of communication over IM. All members of Team PRP are encouraged to sign up
their salespeople and accounting staff for Skype as its instant messaging (“IM”) service. This
will facilitate better communication without requiring lengthy hold times or returning missed
phone calls. When creating Skype IDs, we recommend that the Skype ID include the facility’s
name, the state it is located in and the individual’s name (i.e., Bionic IL John, or Art @ Bionic
IL)

Team PRP Operations Guide, Version 2021-1
3/11/21 INTERNAL COMPANY DOCUMENT Page 9
2. Operational Standards The operational standards defined in this Guide are intended to be dynamic and may change from
time to time depending on what the Board of Directors determines to be a high priority in order to
retain Team PRP’s position of leadership. As a member, these changes will be communicated to you
and it is expected, for you as well as all other members, to comply with these conditions. Failure to do
so may result in corrective action and/or termination of membership.
2.1. Marketing, Advertising and Sales Promotion Standards
2.1.1. Using the Team PRP Logo
It is the objective of Team PRP to expose its name and logo as widely as possible
maintaining consistency in appearance across all mediums and to achieve that, new Team
PRP members must integrate the Team PRP logo into their marketing and advertising
within 180 days of joining. It is also our objective to control the use of the name and logo to
avoid potential misunderstandings, misapplication and trademark infringement. Team PRP
reserves the right to grant or deny permission to use its logo and trademarks at its
discretion. Member businesses of Team PRP agree to follow all the logo usage guidelines
and approval processes spelled out in this document.
2.1.2. Request for Permission to use the Team PRP Logo All persons or businesses that would like to use the Team PRP logo in promotional efforts,
advertising or other publications must contact the Regional Director in advance of the use
of the logo and must provide a sample of how the logo will be used.
2.1.2.1. Logo Usage Policy To ensure proper and consistent use of the Team PRP name and logo, the following rules
apply:
• The logo may not be augmented or changed in any way (i.e., cropping, altering the layout, replacing the font, changing the color or any other modifications that impact the integrity of the logo.) Additionally, no graphic elements may be added to the Team PRP logo or graphic.
• The Team PRP logo must appear in Pantone numbers: PMS185 Red plus black or black and white only. Reversed (white) may be utilized on black background.
• Final PDF draft of all artwork must be submitted to the Regional Director or Team PRP Marketing Committee chair for approval of ANY logo usage prior to printing or production.
• When appearing in print, the Team PRP logo must not appear in dimensions smaller than ¼” in height.
• The Team PRP logo is required on the items listed in the next section. Recommended Team PRP logo size and placement guidelines are outlined.
• Proper logo file must be used and final art approval must be obtained from the Regional Director or Team PRP’s Marketing Committee prior to actual printing or production of any item displaying the Team PRP logo.
2.1.2.2. Standards for Using the Team PRP Logo Final art approval must be obtained from your Regional Director.
• On invoices and statements: The Team PRP logo must be printed on the invoice in either 2‐color (PMS185 red/black) or 1‐color (black). Minimum logo width is 1.5”.

Team PRP Operations Guide, Version 2021-1
3/11/21 INTERNAL COMPANY DOCUMENT Page 10
• On business cards: The Team PRP logo must appear on the business card in either 2‐color (PMS185 red/black) or 1‐color (black). Minimum logo height is ¼”.
• On email signature: The Team PRP logo must appear on the email signature in 2‐color
(PMS185 red/black). Minimum logo height is ¼”.
• On envelopes: The Team PRP logo must be printed on envelopes (window & non‐window) in either 2‐color (PMS185 red/black) or 1‐color (black). Minimum logo height is
¼”. Recommended logo placement is on the back flap or horizontally centered to the right of the addressee’s window.
• On letterhead: Team PRP logo must appear on letterhead in either 2‐color (PMS185
red/black) or 1‐color (black). Minimum logo width is 1.5”.
• On clothing3: o On Polo Shirts/Dress Shirts/Jackets/Sweatshirts the Team PRP logo must appear
on the right or left sleeve or on opposite chest from member’s own logo in 2‐color
(PMS185 red/black). Minimum logo width 1.5”. Team PRP website address may appear on back of shirt below collar in PMS185 red, 12pt Arial font.
o On Patch for Uniform Shirts the Team PRP logo must appear below members’ own logo in 2‐color (PMS 185 red/black). Minimum logo width 1.5”.
o On Baseball Hats the Team PRP logo is to appear on right or left side or back of
hat in 2‐color (PMS185 red/black). Minimum logo width 1.5”
• On vehicles and trucks3 Team PRP logo must be prominently displayed on both sides of delivery vehicles. Minimum logo width is 18”. Magnetic Team PRP logo decals are available for vehicle door placement.
• On promotional and give-away items3, the Team PRP logo must appear on the item in either 2‐color (PMS185 red/black) or 1‐color (black). Minimum logo height is ¼”
• On print advertising, the Team PRP logo must appear in any advertisement in either 2‐color (PMS185 red/black) or 1‐color (black). Minimum logo height is 1/2”. Yellow page advertising is excluded. Team PRP logo is not to be displayed in yellow page advertisement
• On a website, the Team PRP logo must appear on member business’s website home page in 2‐color (PMS185 red/black) Minimum logo height is ½” and must include a hyperlink to the Team PRP external web site (www.teamprp.com).
• On packaging list envelopes3: These are available for order from your marketing director
• On pre-printed tape or cartons3: These are available for order from your marketing director or via the Team PRP members-only web site. Tape is preferred if member business wants to print their own printed carton. The Team PRP logo must be printed on the box in either 2‐color (PMS185 red/black) or 1‐color (black). Minimum Team PRP logo size must be 25% of member’s own logo size.
• On door glass stickers3: These are available for order from the Team PRP Marketing Committee or via the Team PRP members-only web site.
• On building signs3, the Team PRP logo must be prominently displayed on the building sign. Minimum Team PRP logo size must be 25% of the member’s own logo size.
2.1.3. Telephone Scripts While the objective of Team PRP is to expose the Team PRP name and logo nationally
while maintaining consistency in appearance across all mediums, the most immediate
national representation is best achieved at the local level. One way to accomplish this is by
having a uniform telephone script announcing your facility name and that you are a member
of Team PRP. Another way is to explain the Team PRP affiliation in your on-hold
recordings. As part of our branding effort, we request each Team PRP facility adopt these
uniform scripts to answer incoming calls and to add the Team PRP information to your on-
hold recording.
3 Team PRP branded clothing and signage can be ordered using links in the Members-only web site.

Team PRP Operations Guide, Version 2021-1
3/11/21 INTERNAL COMPANY DOCUMENT Page 11
The latest version of telephone answering scripts are posted in the Team PRP’s members
only web site.
In addition, Team PRP provides you with examples of short speeches you can use to
explain who Team PRP is. The speech examples vary depending on the audience and they
are also posted in Team PRP’s members only web site.
2.1.4. Team PRP Promotional Materials Team PRP has produced a number of promotional materials and has made them available
to its members at cost savings when compared to producing similar materials from scratch.
The promotional and branding items available are posted on the PRP members-only web
site, and include:
• Branded embroidered apparel, including shirts, jackets, sweatshirts and caps.
• Installation tags for a wide variety of parts.
• Team PRP branded shipping supplies including packaging tape, plastic parts bags, bumper bags, packing list envelopes and labels.
• Team PRP signage.
• Production materials, including heat tabs, torque converter brackets, part and ID tags, engine and transmission posters, QC labels.
• Sales and marketing materials including stickers, thank you cards, books, brochures, scripts, flyers, posters and logos.
• Promotional giveaways and gifts for you to use at events.
2.1.5. Restrictions on Advertising in Drop Shipments When drop shipping parts to another Team PRP member’s customer, Team PRP members
must refrain from putting any facility branded advertising into drop ship parts orders. The
use of limited (facility logo and web address) branded cartons is allowed providing Team
PRP logo tape is used in sealing the cartons. All cartons must have the Team PRP logo
applied in some manner and shall include the approved Team PRP Parts Installation Tags.
Branded Team PRP shipping supplies, tags and instruction labels are posted and can be
ordered using Team PRP’s members only web site.
2.2. Hiring Policy
2.2.1. Policy and Required Action In recognition of the high potential financial loss and disruption to a partner’s business from
the loss of an employee, Team PRP strongly discourages competing Team PRP partners
from approaching, soliciting, recruiting or hiring employees from each other. Owners and
managers of a Team PRP facility must never, under any circumstance, solicit or recruit an
employee at another Team PRP facility or in any way encourage the employee to leave that
facility for the purpose of being hired.
a. This process does not apply to employees who, at the time of employment with a Team
PRP member, are laid off and not working or have been terminated by a Team PRP
Partner.
b. If a situation does arise where a Team PRP member believes it is necessary to hire
another Team PRP member’s employee, Team PRP requires the two partners to
proceed as follows:
• Advise the other Team PRP facility of your intent to recruit the employee well in
advance to give the other facility the opportunity to retain the employee or prepare for
the departure.
• Offer the other facility to compensate it, at least in part, for the loss of the employee.
• In your discussions with the owner or manager of the other Team PRP facility where
the applicant is employed, you must make every effort to accommodate the needs
and requirements of the other facility.
Team PRP Operations Guide, Version 2021-1
3/11/21 INTERNAL COMPANY DOCUMENT Page 12
• If the decision is made to recruit and hire the other member’s employee, and the
applicant is currently employed at their facility, negotiate a starting date that can help
the current employer minimize the impact of the departure. It would not be unusual
for the current employer to request that the applicant not be allowed to start work at
your facility for at least 30 working days, or less if approved by the current employer.
This will help improve the transition and allow the current employer to initiate its
search for a replacement
c. For instances where an employee of a Team PRP facility initiates solicitation for
employment from another Team PRP facility, Team PRP requires the two partners to
proceed as follows in addition to the terms and conditions stipulated above.
I. When contacted by an applicant or potential employee for employment and as soon
as you know the applicant currently works at, or has recently left another competing
Team PRP facility, tell the applicant you are required by Team PRP standards and
policy to let the other Team PRP partner know of the applicant’s interest in
employment.
II. Initiate communication with the owner or manager of the other Team PRP facility to
inform them of the fact that the employee has inquired, solicited or applied at your
facility.
III. If the applicant currently works for a Team PRP member that participates in your
Profit Team, assume that the employee has had access to data and customers
information that is critical to their business. Therefore, you are to make every effort
to discourage the employee from leaving and your consultation with the owner or
manager of the other Team PRP facility must give every opportunity to retain the
employee. Therefore, do not discuss the position with the applicant or offer the
applicant a position until you have been given an explicit indication from the other
owner that its efforts to retain the employee have failed.
2.2.2. Remediation Process Team PRP members agree not to file legal action in court or any other administrative
agency or dispute resolution provider against a partner who violates its hiring policy or in
favor of a partner who believes it has been negatively impacted, financially or otherwise, by
another partner who violated Team PRP’s hiring policy. The only remediation and relief
available is via the existing Dispute Resolution Process since such violation is construed to
be an ethics violation and/or a violation of Team PRP standards both of which are subject to
the dispute resolution process.
A Team PRP member who believes and can substantiate that it has been harmed by the
hiring practices of another Team PRP member in violation of the policies described above
can proceed as follows:
a. File a complaint in accordance with the dispute resolution process described in a
separate section of this guide. The complaint is to be filed with the Dispute Resolution
Coordinator who will then request a response from the other facility and then submit it to
the Dispute Resolution Committee. The complaint must include substantiating
documents as defined in the Dispute Resolution Process.
b. In addition to the resolutions described in the Dispute Resolution Section, upon finding
that the policies have been violated, the committee may also impose a penalty of:
• For a non-management or non-supervisory position, the larger of $5,000 or up to 1.5
times the monthly salary being offered to the new employee or, if the employee will
be in a pay for performance program, 1.5 times the average monthly pay for other
employees in a similar position at the previous employment.
Team PRP Operations Guide, Version 2021-1
3/11/21 INTERNAL COMPANY DOCUMENT Page 13
• For a management position, the sum equivalent to 6 months of salary, averaging the
salaries of an equal number of months at the old and new position, if not the same. If
the manager will be in a pay for performance or bonus position, the calculation must
include the performance or bonus portion allocated for six months of wages,
calculated using an average of similar salary positions at the old and new companies.
• For sales positions, the sum equivalent to 6 months of salary, averaging the salaries
of an equal number of months at the old and new position, if not the same. If the
sales person will be in a pay for performance or bonus position, the calculation must
include the performance or bonus portion allocated for six months of wages,
calculated using an average of similar salary positions at the old and new companies.
c. The two parties are free to negotiate a different penalty and Team PRP will agree to
those terms if both parties agree.
d. The dispute resolution case will be assumed to be closed when the complaining party
indicates it has been resolved to its satisfaction and proof of payment of the penalty or
resolution of the case is provided to Team PRP.

Team PRP Operations Guide, Version 2021-1
3/11/21 INTERNAL COMPANY DOCUMENT Page 14
2.3. Sales Practices Salespeople must represent your store first, but as a member of the Team PRP network.
Members must educate their customers, sales staff, and other personnel about why doing
business with your facility is the best choice. Team PRP’s service and quality care4 are
unmatched in the industry due to the reputable trading partners that work as a team to best
serve the customer’s needs, by providing access to a larger insurance-quality inventory, and
by providing a quick delivery network.
2.3.1. Sales Ethics and Etiquette When comparing your business to other recyclers in conversations or communications with
prospects, customers or anyone else, it is important to remember that factual and positive
comments are always better than derogatory comments about competitors. That will extend
even more so to your Team PRP trading partners. Consider that as fellow Team PRP
members, any negative comment about another Team PRP member will reflect poorly on
Team PRP and therefore on you as a member of Team PRP. Speak only about the facts
publicly, and keep Team PRP problems and opinions within the Team PRP organization. If
you have an issue with a particular fellow partner relating to ethics please contact your
Regional Director or take advantage of Team PRPs Dispute Resolution process.
Educate your outside salespeople about Team PRP and how it enhances your facility by
strengthening the facility’s ability to serve the customers. Training and education programs
are to include but not limited to the following:
• Outside salespeople must be trained to use the Team PRP website, and be able to train the shops to use it. Their primary focus must be on the collision repair and mechanical shops and on insurance adjusters and extended warranty providers.
• Outside salespeople are to contact adjusters in the area to get their input on how Team PRP and its members (your organization included) can help them and to answer any questions.
• All Team PRP members must keep the Team PRP managers informed of the most active adjusters in their areas as well as their Claims Manager’s contact information so sales calls can be arranged on behalf of the entire group.
2.3.2. Telephone Etiquette When answering phones, members’ employees are expected to be professional by
speaking concisely, identifying themselves, and allowing the caller to respond. It is common
courtesy to ask the caller “Can you hold please?” if necessary, thus showing some respect
for their time. Always allow the caller to respond in case they cannot hold or simply need to
be connected to a specific extension. This prevents them from waiting unnecessarily. Also
keep in mind that the Team PRP members’ collective goal is to complete the sale and take
care of the customers. Members must cooperate to facilitate the completion of sales.
2.3.3. Accurate Quotes • At the time of sale or quote, parts are to be described as accurately as possible to
avoid surprises upon arrival. Avoid descriptions that may lead the buyer to believe that parts are in better condition than actual.
• All Team PRP facilities must follow the established uniform guidelines in describing damage, based on the ARA Condition Codes, so all personnel within their facility are consistent when describing and entering parts into the inventory management system. This will allow the salespeople to accurately describe the part when the order is placed.
4 For a list of features and benefits offered by Team PRP, consult the Membership Guide or the Team PRP web site
Team PRP Operations Guide, Version 2021-1
3/11/21 INTERNAL COMPANY DOCUMENT Page 15
• At the time a vehicle is inventoried, we recommend that all Team PRP members include photo(s) so visible damage can be assessed by the purchasing member from a website and, whenever possible, share the images when submitting a quote. Details on part description standards are included in a later section.
• When capturing images of areas with damage, use the Team PRP “unit of damage” descriptor tool described in the inventory section.
• If the condition of the part upon the pre-shipping inspection is different than what was described when the order was placed, the seller must call to accurately describe the part and allow the buyer to make the decision, prior to shipment, if they wish to continue with the purchase.
• Prices on the quote must include all costs related to the part, either built into the selling price or as separate line items. This includes any shipping charges and extended warranties.
• All conditions related to the sale must be included in the quote. For example, if the customer requests expedited shipping, clearly indicate this condition and its related costs on the quote and invoice.
2.4. Inventory Standards
2.4.1. Inventory Criteria and Tips
2.4.1.1. General Criteria and Tips • Above all, be consistent. There is no question that two people looking at the same part
will see it differently but it is also true that your trading partners will soon understand your method of evaluating a part. As you define your own style and criteria, apply it consistently across the board to eliminate doubt, questions and second guessing.
• Be positive but realistic. Give the sales staff ammunition to sell the part but avoid overstating its quality to avoid returns due to condition.
• Inventory affects your purchasing but that data is only accurate if the sales staff records all inquiries, sales and returns. Insist that they do so.
• Make sure you install Interchange updates and resolve inventory changes as soon as possible after they are received. It will give you the latest information on fitment and will keep your inventory numbers in synch with everyone else.
• On a periodic basis and at least once a year, spot audit your actual on-site inventory with what is listed in your system. This will help eliminate damaged parts or ghost inventory and you may find parts you didn’t know you had. Some systems allow you to perform this task using bar code readers or other accessory tools.
• When it is confirmed that parts were returned due to errors or condition make sure the inventory records are corrected to prevent the parts from being sold and returned again. Take corrective action by coaching/training the appropriate personnel to minimize recurrence.
2.4.1.2. Condition Description Criteria and Tips • When inventorying parts, you are expected to use the following descriptors of condition
o ARA damage codes description in all descriptions o ARA Units of damage o ARA part grade
• Descriptions are expected to abide by ARA part definition and condition standards
• Use an indicator of whether the grade was automatic or manually calculated (if available on your system)
• Use standardized nomenclature o Any part with “re” in the parts comment (reconditioned, re-chromed, rebuilt, etc.) is
assumed to have come from a refurbishing source rather than a dismantled vehicle
o Any part with “new am” or “new aftermarket” in the description is assumed to have been manufactured or sold as new by someone other than the OEM.

Team PRP Operations Guide, Version 2021-1
3/11/21 INTERNAL COMPANY DOCUMENT Page 16
o Any part with “new OEM” in the parts comment is assumed to be original equipment and to have come from a source other than a dismantled vehicle.
o Bumper assemblies with parts comment “as-is”, “assembly less cover”, or “reinforcement only” are assumed to be incomplete bumper assemblies where the cover is most likely damaged beyond usability in its present condition.
o Bumper assemblies with guaranteed cover (new OE, refurbished, reconditioned) it is assumed that the selling partner will either furnish reconditioned or new cover or credit the buyer for the cost as discussed at time of quote/sale.
o Aftermarket components are not acceptable unless agreeable at the time of the sale. If a bumper assembly with a parts comment of “nice” is available without a cover for a discount negotiated price (at the option of the supplier) it must be noted as such or clearly discussed at the time of quote or sale.
o Avoid subjective terminology and emphasize objective terminology. For example, when describing an engine avoid subjective terms such as “runs nice” and use an objective measure such as compression readings instead. See Recommended Quality Assurance Standards for more details.
o When using abbreviations in your text descriptions make every effort to use the abbreviations defined and approved by the ARA. You can find the list of abbreviations at the ARA web site, under Standards and click to open the ARA Standards & Codes Brochure.
2.4.1.3. Body Parts Criteria and Tips • When checking for dents or scratches make sure to view the part from multiple angles
to detect damage as shown by shadows or run your hand along the surface to detect imperfections.
• When inventorying sheet metal parts use a magnet to detect body filler.
• If there is any indication that a part was replaced with aftermarket – even when it was painted – indicate this in the condition field.
2.4.1.4. Mechanical, Electrical and Electronic Parts Criteria and Tips • Whenever possible, enter part ID for electronic and mechanical components.
• Mechanical components to a body assembly – such as a power window motor in a
door – are expected to be tested when the vehicle is inventoried and/or prior to
shipping.
• Whenever possible, indicate ratios on carrier and axle assemblies.
• If your inventory system automatically applies a grade based on mileage, make sure
to inspect the part and over-ride the automatic grade so it reflects the true condition
of the part.
2.4.1.5. Components and Assemblies • Assemblies are assumed to include all the components defined by the ARA.
Components expected to be included in an assembly are also listed in some of the
individual part types section.
• Bumpers that are not assemblies must be inventoried using the part type for the
saleable assembly (i.e., reinforcement) and not as an assembly. Likewise, for any
other incomplete assembly where individual or sub-assembly components have their
own part type.
• Missing or damaged components that are assumed to be included in an assembly
must be clearly noted in the conditions field or the buyer may assume that they will
be included.
• When inventorying an assembly and its components as available for sale, make sure
you have a mechanism to update your inventory when one or the other are sold.
2.4.2. Vehicle and Part Images

Team PRP Operations Guide, Version 2021-1
3/11/21 INTERNAL COMPANY DOCUMENT Page 17
▪ Team PRP recommends that every vehicle record have between 8 and 12 images. Recommended images positions include: o Straight front o Left ¾ rear o Right front ¾ o Interior shot of dash o Left front ¾ o Close up on mileage reading o Full right side o Engine compartment o Full left side o Either VIN tag under the windshield or o Straight rear production tag on the door frame o Right ¾ rear showing the VIN ▪ It is best if all major body assemblies have at least one image available to a potential
customer. Major assemblies, such as front end or rear end, are to have at least 3 images.
▪ Set your capturing device so that the images have sufficient resolution to clearly see damage when enlarged.
▪ While it is important to show images that show a good and salable part, it is also important that the image objectively depict damage as well.
▪ Under no circumstance should images be modified with a photo editing program to hide damage or enhance the condition of a part. It is OK to process an image using a photo editing program to correct exposure errors or distortion.
2.4.3. Inventoried Part Types Team PRP recommends you inventory as many parts with interchange as possible. You
may limit how many are dismantled from the vehicle to minimize dismantling and storage
costs but the incremental cost for having a part in the computer is negligible and the
chances of selling it increase tremendously when it is in the system.
When entering parts with no interchange, make sure your text description includes as
much as possible to provide fitment data. This may include the side of the vehicle, body
code, trim level, color, material and options. Consult with your inventory system provider
on the proper procedure for entering parts with no Interchange.
Since Interchange is being added to part types that previously had none, make sure your
system has a mechanism –automatic or manual - to assign Interchange numbers to parts
already in your system that were entered with no interchange. Such changes would
normally be a part of the instructions you receive for installing the interchange release or
conducting resolution.
2.4.4. Paint and Glass Codes Customers, particularly body shops, want to
complete repairs with minimal delay and, in
many cases, this includes trying to eliminate
the need for some preparation and painting
tasks. Because of this it is important to note
external paint codes on body parts. A benefit
to you is that matching the paint codes on the
vehicle being repaired may help you secure a sale since it can save the shop time and
money. External paint codes are usually included in the VIN plate of the vehicle’s driver
side door jamb. Once you know the code, there are several web sites that decode the
code.

Team PRP Operations Guide, Version 2021-1
3/11/21 INTERNAL COMPANY DOCUMENT Page 18
Likewise, it is important to note the tint code on glass in each of
windshields, door and quarter glass you enter into inventory. Tint
codes are usually found with the manufacturer’s name and glass
manufacturer’s name imprinted on side glass. As with paint codes,
there are several web sites that can help you decode the tint color.
2.4.5. Inventory Pricing Criteria and Tips Pricing is a critical aspect of any business and it is not the intent of this section to limit a member’s freedom to price their parts any way they want5. However, since inventory data is shared across the entire network and to external parties, the only intent here is to standardize the criteria for pricing to eliminate misunderstandings. Team PRP’s policy is also to prevent even the perception of price fixing5. The assumptions about pricing are:
• In accordance with the ARA standards, prices are assumed to be for the perfect part, perfectly functioning and in undamaged condition or Grade A, excluding freight and with the standard warranty.
• When quoting to insurers or for repairs that are part of an insurance claim, delivery costs are assumed to be included in the price unless otherwise stated. When defining your prices, keep in mind that estimating systems provide prices for recycled parts that assume freight is included within their immediate geographic area.
• Prices shown to others – regardless of whether they are displayed via your locating mechanism or an inventory sharing site such as Car-Part – are assumed to include your standard Team PRP warranty but not the cost of any optional extended warranty. You are free to quote different pricing that includes an optional extended warranty once a potential buyer inquires about the part. Keep in mind that inventory sharing sites will provide your price to estimators, insurance adjusters and consumers and that the price they will see only includes your standard warranty.
• Since many PRP members use systems that display a single price field, if your inventory has more than one price field and you have an option on which price to display, make sure the price displayed conforms with the pricing criteria stated above.
• Pricing tips:
o Don’t leave part listings in your system with no price. It will slow the sales process
down and discourage trading partners from ordering your parts.
o Maintain or adjust your prices on a regular and frequent basis to keep them
competitive and to reflect the most current data on demand and supply.
2.5. Production Standards Depending on their type of operation, different recyclers have different practices relating to
production of parts or processing of vehicles. Some of the variables that help define
production processes may include the market served, the age of vehicles purchased, the
availability of storage for parts, the volume of vehicles processed and speed of delivery. Team
PRP does not dictate production practices. Over time, as Team PRP members participate in
Profit Teams and visit each other’s’ facilities, new ideas and new concepts come into play.
However, since the goal of Team PRP is to facilitate the trade of parts between its members,
certain production standards are necessary to ensure good customer service. Team PRP’s
standards include the following:
5 Team PRP’s Anti-Trust guidelines are posted in the Supporting Documents section of Team PRP’s Members-Only
web site.
Team PRP Operations Guide, Version 2021-1
3/11/21 INTERNAL COMPANY DOCUMENT Page 19
2.5.1. Production Process Standards Team PRP recommends that its members have a well-conceived and written process for
production that spans the entire cycle from vehicle purchase to parts sale. Team PRP further
recommends that its members use this written process to train new or existing employees so
everyone is familiar with and aware of its obligation to abide by the drafted process.
• The process is to include quality control and/or quality assurance elements.
• If the production process implemented at your facility calls for parts being marked
with the stock number, part number or side flag, the notation must not be placed
somewhere where it diminishes the value of the part or requires excessive effort on
the part of the customer to clean it up.
• At every step in the dismantling process, everyone who touches the part must be
mindful of the end user and attempt to ease part installation.
• At every step in the process, employees handling a part are expected to verify the
condition of the part as described on the inventory record or tag and call variances to
the attention of whoever can maintain the record in the computer system.
2.5.2. Dismantling Standards • Mechanical components are assumed to be free of fluids other than what is required
to prevent moving parts from seizing up.
• Fluids and other hazardous materials are to be recycled or disposed of in accordance
with EPA and state guidelines.
• Parts are assumed to be prepared in accordance with the Team PRP part
preparation and quality assurance guidelines in the Part Types section of this Guide.
• Assemblies are to be removed so as to include all the components expected to be in
the assembly as stipulated in the Inventory section of this guide and industry
standards. Damaged or missing parts are to be replaced if at all possible or the
inventory record must indicate they are damaged or missing.
• Hoses and wires must not be cut and must be dismantled from the assembly or part
at the point of contact with the part.
• Avoid using cutting torches.
• Removal of a part is to be performed so as to not cause damage to any other
adjacent or connected parts. If the part cannot be properly removed from the vehicle
or assembly it must not be sold without customer approval. If a dismantler cannot
remove the part properly most likely the customer won’t either. The part is assumed
to be ready for installation.
• Make every effort to confirm the desired side of the part on the vehicle at every step
of the transaction (inventory, production, sale and shipping). Even when a customer
asks for the right side, confirm that they want passenger side.
2.6. Quality Assurance Standards and Part Testing
2.6.1. Quality Assurance versus Quality Control No part warranty is good, for you or your customer; unless the part has been properly tested
to make sure it functions as designed. While Team PRP features the best standard warranty
in the auto recycling industry, it is important that it be supported by solid and effective testing
procedures before the part is even shipped.
Quality Assurance vs. Quality Control
Quality Assurance is process oriented and focuses on defect prevention,
while Quality Control is product oriented and focuses on defect identification.

Team PRP Operations Guide, Version 2021-1
3/11/21 INTERNAL COMPANY DOCUMENT Page 20
There is a distinct difference between Quality Assurance and Quality Control. The difference
is that Quality Assurance, what we want in Team PRP, is process oriented whereas Quality
Control is product or part oriented.
• Under quality assurance, everyone who has anything to do with the part, from inventory to final delivery invest their skill, experience and effort to make sure the part meets or exceeds the customer’s expectations. To achieve this, everyone involved in the quality assurance process must be knowledgeable, experienced and conscientious and keep the customers’ ultimate interest in mind. Example: As the vehicle is being inventoried, the inventory person inspects and describes the condition of the headlight assembly. Then, as it is being dismantled, the dismantler reads the description as entered during inventory, and makes sure the condition of the light is still as described, including inspecting mounting tabs not visible during inventory. After dismantling, the person cleaning and polishing the light again inspects it to make sure it is as described, and so on until the part is being packaged for shipment.
• In quality control, the parts are inspected and tested to make sure they function as expected by the installer and ultimate customer. Example: after being entered into an invoice, the warehouse person retrieves the headlight and checks it to make sure it meets the description on the invoice then hands it to the person who will package it. Under quality control there may or may not be other steps where the headlight is inspected but it not guaranteed unless it is part of the process.
2.6.2. Implementing a Quality Assurance Program Team PRP recommends that all its facilities implement a Quality Assurance process as
described. Five steps are recommended for creating and maintaining an effective Quality
Assurance culture in your organization:
• Step 1: Set clear standards for your business where quality is a major consideration and define the criteria for meeting those standards.
• Step 2: Define policies and procedures to meet those standards and make them specific to every department that impacts quality. It is recommended that the employees responsible for implementing quality assurance also meet on a regular basis to make sure no issues
fall between the cracks. Develop tracking reports to measure and validate the progress and success of your company’s adherence to the program, like reduction in part returns or quality related discounts or scores in parcel grading.
• Step 3: Create a description of the Quality Assurance program that is easy to understand and include it as the opening point of your company-wide training program. The description is to include the objectives of the QA program and the top-level criteria necessary to adhere to the program
• Step 4: Create and support the efforts of a quality committee that includes employees from every department that touches the parts. This will make them empowered to implement change and take action. The committee should meet on a regular basis and share in the roll-out of the QA program.
• Step 5: This could be the most important step. Implement change – companywide and in individual departments – based on the QA standards and institute a system of rewards based on achieving or exceeding QA standards.
2.6.3. Using the Team PRP “unit of damage” tool
Team PRP Operations Guide, Version 2021-1
3/11/21 INTERNAL COMPANY DOCUMENT Page 21
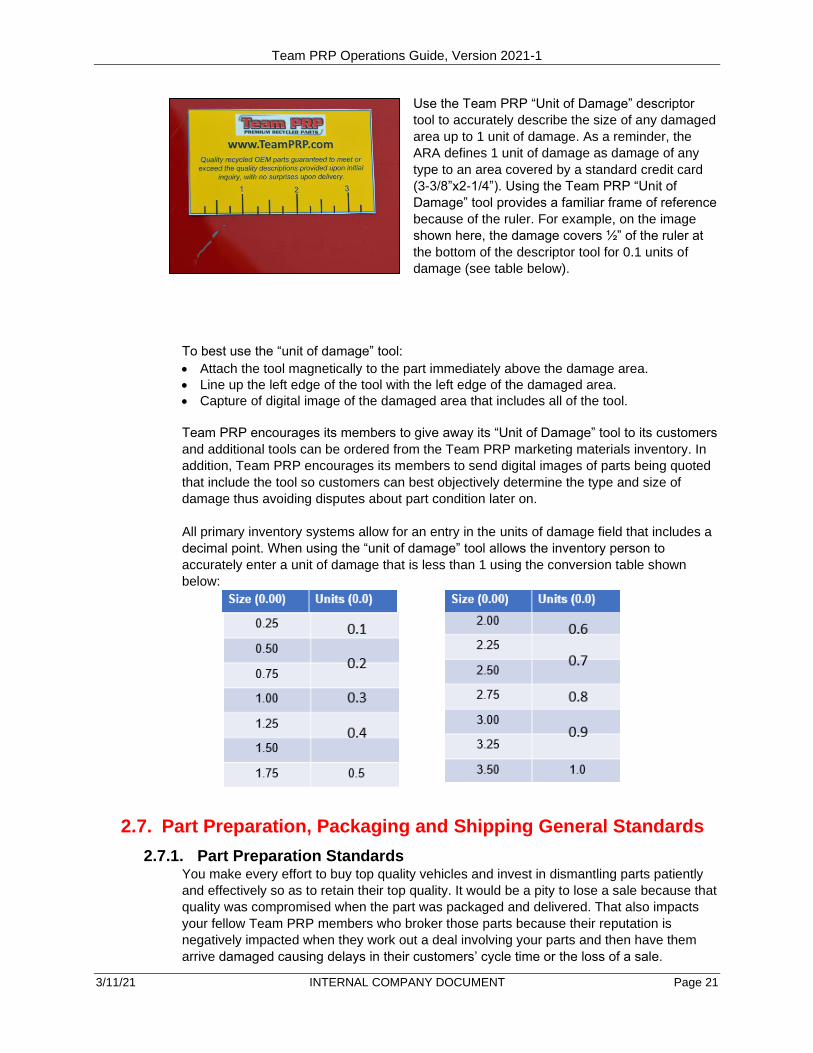
Use the Team PRP “Unit of Damage” descriptor
tool to accurately describe the size of any damaged
area up to 1 unit of damage. As a reminder, the
ARA defines 1 unit of damage as damage of any
type to an area covered by a standard credit card
(3-3/8”x2-1/4”). Using the Team PRP “Unit of
Damage” tool provides a familiar frame of reference
because of the ruler. For example, on the image
shown here, the damage covers ½” of the ruler at
the bottom of the descriptor tool for 0.1 units of
damage (see table below).
To best use the “unit of damage” tool:
• Attach the tool magnetically to the part immediately above the damage area.
• Line up the left edge of the tool with the left edge of the damaged area.
• Capture of digital image of the damaged area that includes all of the tool.
Team PRP encourages its members to give away its “Unit of Damage” tool to its customers
and additional tools can be ordered from the Team PRP marketing materials inventory. In
addition, Team PRP encourages its members to send digital images of parts being quoted
that include the tool so customers can best objectively determine the type and size of
damage thus avoiding disputes about part condition later on.
All primary inventory systems allow for an entry in the units of damage field that includes a
decimal point. When using the “unit of damage” tool allows the inventory person to
accurately enter a unit of damage that is less than 1 using the conversion table shown
below:
2.7. Part Preparation, Packaging and Shipping General Standards
2.7.1. Part Preparation Standards You make every effort to buy top quality vehicles and invest in dismantling parts patiently
and effectively so as to retain their top quality. It would be a pity to lose a sale because that
quality was compromised when the part was packaged and delivered. That also impacts
your fellow Team PRP members who broker those parts because their reputation is
negatively impacted when they work out a deal involving your parts and then have them
arrive damaged causing delays in their customers’ cycle time or the loss of a sale.

Team PRP Operations Guide, Version 2021-1
3/11/21 INTERNAL COMPANY DOCUMENT Page 22
This section of the Guide is dedicated to the general process and standards defined by
Team PRP for preparation, packaging and shipping various parts. More details for specific
part types are included in a later section. A later portion deals with shipping. While there
may be slight differences in how a part is packaged, depending on how it will be shipped,
the general assumption – unless it is addressed relating to a specific part – is that part
preparation and packaging is generally the same for all.
2.7.2. General Packaging Guidelines Team PRP strives to deliver a damage free quality part to the end customer in a
professional appearing package. Team PRP members audit shipments upon arrival.
Team PRP parcel grading includes parts that arrive damaged in transit as well as parts
that do not conform to the preparation and packaging standards as well as part quality.
This section presents the general packaging processes and supplies needed to achieve
Team PRP quality packaging standards. More detail is included within the individual part
types.
2.7.2.1. Boxed Parts • Outer package: When packaging parts use clean, undamaged boxes, labels and tape
that prominently feature the Team PRP logo.
• When packaging parts in boxes do not use boxes branded with your business name
or another brand instead of Team PRP as that hinders the fellow member’s ability to
deliver the part in the box you provided. The same applies to labeling boxes with
labels with your name on them. If there is anything on the box, label or tag on the
outside it must be Team PRP. In addition, make sure that there is no other
identification or notation inside the box or on the part itself that would indicate the
source of the part, particularly on drop shipments.
• When purchasing boxes and bubble wrap for shipments to fellow Team PRP
members, regardless of whether you are shipping via the Team PRP logistics
network or a common carrier, make sure you purchase boxes that comply with the
sturdiness and durability required by Team PRP and defined in this section or the
section for the individual part type.
2.7.2.2. Acceptable and Recommended Packing Materials Team PRP has awarded a Preferred Vendor6 relationship to STOROpack, an
international provider of packaging materials that has an important presence in the
automotive industry providing packaging for spare parts in North America.
▪ Paper padding, packing peanuts, shredded paper, inflatable plastic bags, packaging pads or bubble wrap are acceptable when shipping fragile parts including but not limited to lights, mirrors, and electronics. Bubble wrap is preferred since several Team PRP members report housekeeping issues with peanuts and shredded paper.
▪ Team PRP and the Transportation Committee strongly recommend the use of foam cushioning for maximum protection since the process calls for the hardening of liquid foam to form a protective enclosure for the part for a perfect fit even for awkward shapes or parts with sharp edges. Yet the foam adds minimum weight and can be dispensed using equipment right at the shipping station that requires minimum floor space compared to other packing materials.
6 A complete listing of the process and vendors that have qualified as Preferred Vendors and details about their
programs is included in the Team PRP members-only web site,
Team PRP Operations Guide, Version 2021-1
3/11/21 INTERNAL COMPANY DOCUMENT Page 23
2.7.2.3. Palletization and Use of Pallet Jacks/Forklifts • When a part needs to be transported on a pallet choose from the recommended
pallets shown in the next section.
• The pallet construction must be sturdy enough to support the part traveling over long
distances and numerous transfers and sometimes, exposed to the weather.
• Parts must be adequately secured to the pallet with weight-appropriate banding or
wire to prevent shifting during transport and handling.
• To protect parts from side impact damage during transportation body parts must not
overhang the sides of the pallet.
• In order to conserve space on the Team PRP transportation network, the pallet must
not be significantly larger than the part.
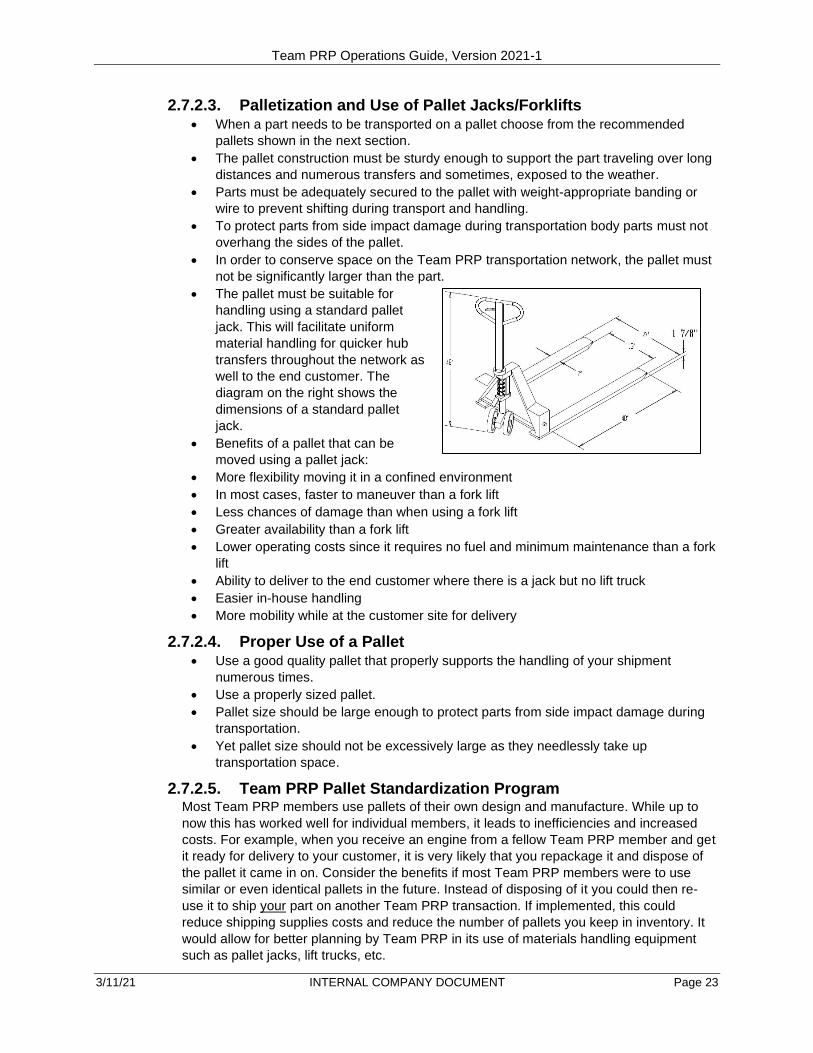
• The pallet must be suitable for
handling using a standard pallet
jack. This will facilitate uniform
material handling for quicker hub
transfers throughout the network as
well to the end customer. The
diagram on the right shows the
dimensions of a standard pallet
jack.
• Benefits of a pallet that can be
moved using a pallet jack:
• More flexibility moving it in a confined environment
• In most cases, faster to maneuver than a fork lift
• Less chances of damage than when using a fork lift
• Greater availability than a fork lift
• Lower operating costs since it requires no fuel and minimum maintenance than a fork
lift
• Ability to deliver to the end customer where there is a jack but no lift truck
• Easier in-house handling
• More mobility while at the customer site for delivery
2.7.2.4. Proper Use of a Pallet • Use a good quality pallet that properly supports the handling of your shipment
numerous times.
• Use a properly sized pallet.
• Pallet size should be large enough to protect parts from side impact damage during
transportation.
• Yet pallet size should not be excessively large as they needlessly take up
transportation space.
2.7.2.5. Team PRP Pallet Standardization Program Most Team PRP members use pallets of their own design and manufacture. While up to
now this has worked well for individual members, it leads to inefficiencies and increased
costs. For example, when you receive an engine from a fellow Team PRP member and get
it ready for delivery to your customer, it is very likely that you repackage it and dispose of
the pallet it came in on. Consider the benefits if most Team PRP members were to use
similar or even identical pallets in the future. Instead of disposing of it you could then re-
use it to ship your part on another Team PRP transaction. If implemented, this could
reduce shipping supplies costs and reduce the number of pallets you keep in inventory. It
would allow for better planning by Team PRP in its use of materials handling equipment
such as pallet jacks, lift trucks, etc.

Team PRP Operations Guide, Version 2021-1
3/11/21 INTERNAL COMPANY DOCUMENT Page 24
With the help of a leading provider of pallets (designs courtesy of Universal Forest
Products) and after a review by the Team PRP Transportation Committee, we would like to
pursue the use of the following as plans for uniform pallets. Each of the drawings below are
thumbnails and more detailed plans for each are available from Team PRP’s members
only 7.
•
• Engine Pallet - Small 28x24
• Engine Pallet – Medium 27x32
7 More detailed plans for the uniform pallets are included in the Team PRP members-only web site.

Team PRP Operations Guide, Version 2021-1
3/11/21 INTERNAL COMPANY DOCUMENT Page 25
• Engine Pallet – Large 30x20
• Front End Pallet 78x78

Team PRP Operations Guide, Version 2021-1
3/11/21 INTERNAL COMPANY DOCUMENT Page 26
• Rear End Pallet – Small 64x20
• Rear End Pallet – Large 72x24

Team PRP Operations Guide, Version 2021-1
3/11/21 INTERNAL COMPANY DOCUMENT Page 27
• Standard Pallet – Small 48x40
• Standard Pallet – Large 72x40

Team PRP Operations Guide, Version 2021-1
3/11/21 INTERNAL COMPANY DOCUMENT Page 28
• Transmission Pallet – Small 24x32
• Transmission Pallet – Medium 26x40

Team PRP Operations Guide, Version 2021-1
3/11/21 INTERNAL COMPANY DOCUMENT Page 29
• Transmission Pallet – Large 30x20
2.7.2.6. Other Pallet Designs and Sizes If you have a pallet design that is well built and able to be handled with a standard pallet
jack you can submit the design with photos to Mark Canapa ([email protected]),
the Director of Logistics, and the Transportation Committee for review and approval.
2.7.3. Labeling and Marking Properly marking, labeling and tagging parcels will ensure proper parcel tracking,
minimize transit delays, lost parts, and notify material handlers of fragile parts. This
section outlines the labeling, marking and tagging process.
• Team PRP has some members with the same or similar business names, and some of our members have multiple facilities that share the same business name with different addresses. When preparing shipping documents verify that you are sending the part to the correct member or address.
• Up to date hardware and software requirements for printing shipping labels when using EZ Runner are listed on the Team PRP members-only website under the Logistics tab.
• When packaging and labeling a shipment consider the possibility that all outer identifying elements might get lost. Place some identifying elements either on the part (like stock number, part number, etc.) or on a secondary label or tag protected against wind or rain.
• Shipping labels must be easily visible by material handlers; and firmly affixed to the package or pallet.
• Paper labels must be enclosed in a moisture protecting packing envelop with a clear outer face. The complete bar code and shipping destination must be clearly visible. Do not obstruct the view of the bar code by placing the invoice on top of the shipping label.
• When shipping a part on a pallet. The label must be stapled to the pallet face side up. Do this in addition to affixing a label to the part (in case the part and pallet get separated).
• Delicate or fragile parts must be labeled or marked “FRAGILE”. Lettering must be highly visible and placed on two opposite sides of the packaging.
• Directional markings or labels indicating which “end up” must be used on all doors and as required on other parts to reduce damage from mishandling or loading incorrectly.

Team PRP Operations Guide, Version 2021-1
3/11/21 INTERNAL COMPANY DOCUMENT Page 30
2.7.4. Banding When banding parts on to a pallet, keep in mind that the objective is to protect your
parts and other parts or other packages around it from damage that could occur if your
part slides around or comes loose from the pallet and that your part is likely to travel a
long distance with multiple stops and handling by a variety of people with a variety of
material handling equipment.
• Any banding material other than steel or polyester is prohibited from use in the
transportation network since other banding materials have not withstood the rigors
of our network. Steel or polyester banding work well for most parts and are
preferred over bailing wire because the end result looks more professional but there
are situations where baling wire works better.
• When using steel or polyester banding make sure you use a quality clamping device
that will hold the banding in place but also not scratch or damage the part.
• When banding sheet metal parts ensure that you have sufficient padding to prevent
damage when tightened. Also make sure that your shipping staff is properly trained
on handling and packaging with banding.
• Tighten the banding sufficiently to hold the part in place without damaging
components, particularly on engines.
2.7.5. Using Panel Armor Team PRP is currently using Panel Armor door protection
enclosures for doors shipped between Team PRP members
via the Team PRP logistics network8. Panel Armor panels
have been distributed to members based on their volume of
shipments of doors and a backup supply of panels is stored in
each of the hubs. Logistics participants who have been
provided with Panel Armor panels are responsible for the
panels assigned and for ensuring they have sufficient supply
for their needs. In addition, for the past several years, Team
PRP members have been using Panel Armor door protection
packaging in their own deliveries using the Team PRP group purchase arrangement
described in Team PRP’s members-only web site under the Vendor Relations tab.
• If your facility is purchasing or using Panel Armor enclosures: o Make sure your enclosures are clearly marked with your name and location so
they can be returned to you. o The expected useful life of the enclosures is about 75 to 100 uses. However,
some enclosures may deteriorate faster due to harsher environment or less careful treatment. Make sure you inspect your enclosures periodically to make sure you don’t exceed useful life and expose your parts to possible damage.
o Team PRP recommends that shipment of doors within the Team PRP network use the Team PRP panel armor. However, if you have to use your own, make sure the receiving member knows they must return the panel armor and you may charge a core charge to ensure their enclosures are returned. Also, it is up to you to track your enclosures.
• If you receive a part in an enclosure that belongs to another facility: o Please return it to its owner as soon as possible unless other arrangements have
been made in advance. The shipping member may have charged you a core charge for the enclosure which will not be refunded unless you return it.
o If you wish to order enclosures as part of the Team PRP group purchase program please review the process and documentation in the Team PRP members-only web site or contact the Team PRP staff member responsible for Vendor Relations.
o If you are placing an order for enclosures, please make sure you either request that they be identified for you or make plans for identifying them as soon as you receive them.
Team PRP Operations Guide, Version 2021-1
3/11/21 INTERNAL COMPANY DOCUMENT Page 31
• If you receive an enclosure as part of a Team PRP logistics shipment: o Panel Armor enclosures owned by Team PRP are identified with the Team PRP
name and have a shipping label attached in addition to the shipping label assigned to the part. Make sure you scan both since that is how Team PRP manages the use of the enclosures.
o Please handle the enclosure with care. They represent a sizeable investment by Team PRP and we want to make sure we maximize their useful life.
o Please return the enclosure to circulation as soon as possible as instructed by the Team PRP Logistics Director.
o The expected life expectancy of Panel Armor panels is estimated at about 75 to 100 trips. If you receive a Team PRP Panel Armor that you suspect may not prevent damage to the door, must be brought to the attention of your shipping manager of the Team PRP Logistics Director. This includes straps that fail to hold or damaged protective surfaces or interior packaging. Do not dispose of the panel until instructed to do so. Based on such reports Team PRP will then determine whether to repair or retire and dispose of the panel and have it replaced by a new one to maintain inventory levels.
2.7.6. Packaging and Returning Cores All valuable “NCB” (Need Core Back) cores must be given a P.O. or other IMS
document in order to be sent back on the Team PRP transportation system.
Frequently returned parts and cores are not drained by the end customer prior to
returning them for credit. If that is the case, they must be drained of all fluids and
properly palletized and or packaged or will not be accepted for the return to the
original Team PRP member. They will only be loaded on the trailers when space is
available either at the point of origin or at an intermediate hub.
All cores being returned via the Team PRP Logistics Network will be shipped on a
cargo space available basis only. Sellers must invoice any core they expect to have
returned and notify the buyer at the time of the sale that a core deposit and invoice will
be issued. A second PO or invoice for the amount of the core charge must be issued by
the purchasing facility and received by the selling facility at the time of purchase.
8 The use of Panel Armor door panels in our transportation network is detailed in the Team PRP members-only
website under the Logistics tab.
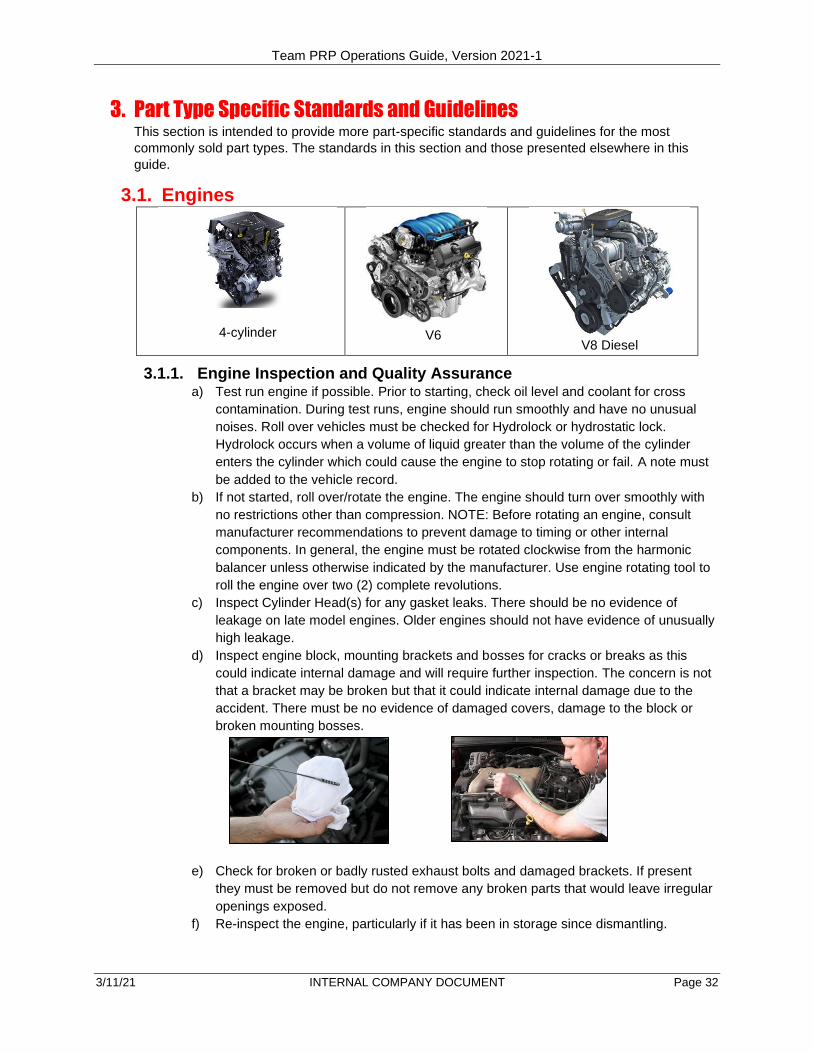
Team PRP Operations Guide, Version 2021-1
3/11/21 INTERNAL COMPANY DOCUMENT Page 32
3. Part Type Specific Standards and Guidelines This section is intended to provide more part-specific standards and guidelines for the most
commonly sold part types. The standards in this section and those presented elsewhere in this
guide.
3.1. Engines
4-cylinder
V6
V8 Diesel
3.1.1. Engine Inspection and Quality Assurance a) Test run engine if possible. Prior to starting, check oil level and coolant for cross
contamination. During test runs, engine should run smoothly and have no unusual
noises. Roll over vehicles must be checked for Hydrolock or hydrostatic lock.
Hydrolock occurs when a volume of liquid greater than the volume of the cylinder
enters the cylinder which could cause the engine to stop rotating or fail. A note must
be added to the vehicle record.
b) If not started, roll over/rotate the engine. The engine should turn over smoothly with
no restrictions other than compression. NOTE: Before rotating an engine, consult
manufacturer recommendations to prevent damage to timing or other internal
components. In general, the engine must be rotated clockwise from the harmonic
balancer unless otherwise indicated by the manufacturer. Use engine rotating tool to
roll the engine over two (2) complete revolutions.
c) Inspect Cylinder Head(s) for any gasket leaks. There should be no evidence of
leakage on late model engines. Older engines should not have evidence of unusually
high leakage.
d) Inspect engine block, mounting brackets and bosses for cracks or breaks as this
could indicate internal damage and will require further inspection. The concern is not
that a bracket may be broken but that it could indicate internal damage due to the
accident. There must be no evidence of damaged covers, damage to the block or
broken mounting bosses.
e) Check for broken or badly rusted exhaust bolts and damaged brackets. If present
they must be removed but do not remove any broken parts that would leave irregular
openings exposed.
f) Re-inspect the engine, particularly if it has been in storage since dismantling.

Team PRP Operations Guide, Version 2021-1
3/11/21 INTERNAL COMPANY DOCUMENT Page 33
g) Make sure that all fluids are drained and that oil does not have metal filings. If not
drained, drain all fluids. NOTICE - Any mechanical component not drained could
subject the part to refusal on behalf of transportation company(s)
h) Remove all broken or damaged parts. Do not remove good parts that would make
installation easier for the customer.
i) Remove the following if damaged or cut (after having been approved for sale)
i. Wire(s)/Wire Harness, Throttle-body, Hose(s)
ii. Coil Pack(s)
iii. Bracket(s)
iv. Sensor(s)
j) Use properly sized red plugs to cover any critical openings (including accessory
items). Use adhesive tape where plugs don’t fit.
k) When prepping the engine, disconnect it from the wiring harness at the nearest plug.
However, some facilities prefer to leave a short portion of the wiring harness with the
part. While this may ruin part of the wiring harness, it offers the customer more
options when installing the replacement part. If this is the process followed at your
facility and your facility inventories wiring harnesses, make sure that, if the harness is
cut, a note to that effect is entered into the inventory record or the harness is deleted
from inventory.
3.1.2. Engine Tagging and identification a. Apply your store’s custom stamp on the back of cylinder heads and the bell housing
area using a customized metal stamp
b. Apply either Team PRP, URG, or customized heat tabs using heat tab glue. Place in
an inconspicuous location. A minimum of one heat tab on the block is recommended.
Cover the back of the heat tab with glue and apply it to a clean surface area. Note
that there are different tabs for diesel and gasoline engines.
c. Use wire or zip tie to secure the Team PRP engine installation, Drain warning &
warranty tags
3.1.3. Engine Fulfillment at Time of Order a. Ensure stock # matches the work order
b. Confirm the interchange description or stock number on the work order matches the
part
c. Confirm work order comments match or special instructions have been completed
3.1.4. Cleaning an Engine a. Pressure-wash the entire engine to remove any oil or grease.
b. Use an air hose with air chuck, or an air hose with a blow gun equipped with a rubber
tip to remove excess moisture.
c. Complete a final check for cracks or breaks that might have gone unnoticed prior to
cleaning
d. Some Team PRP members turn the engines over again after cleaning to confirm
everything is OK and no moisture has penetrated the engine.
NOTICE - Any mechanical component found to leak fluid will be subject to the part being
refused on behalf of transportation company(s)

Team PRP Operations Guide, Version 2021-1
3/11/21 INTERNAL COMPANY DOCUMENT Page 34
3.1.5. Packaging and Shipping and Engine a. Due to the various sizes, weights and shapes of engines well-built customized pallets
must be used when shipping engines on the Team PRP transportation system. Any
one of the three options for preferred pallet designs shown in the section on
palletizing must be used unless the Transportation Committee reviews, approves and
publishes your alternative designs.
I. Use a PRP approved engine pallet for shipping. If the engine is already banded
to a pallet of a different size and that pallet is not suitable for use with a pallet
jack, attach the engine and pallet to an approved pallet conveyable with a pallet
jack.
II. It is OK to use a smaller pallet for smaller engines but no part of the engine
assembly must be outside the outer dimension of the pallet and the pallet must
be accessible using a pallet jack.
III. If the unit is oversized or uncommon in shape, pallet reinforcement / alteration or
the use of a larger pallet is recommended to ensure stabilization during
transportation.
b. When shipping an engine via a common carrier (LTL), Use your custom engine pallet
and band it to a 48” x 40” standard shipping pallet using the instructions below.
I. Use at least two banding straps to secure the unit. Use extra banding when
necessary to avoid the engine tipping on the pallet.
II. Ensure straps are not tightened over critical fragile exterior components like
plugs or sensors that may break when pressure is applied.
III. Banding must go around the runners of the pallet not just the top boards and
must go from one runner, over the part, then around the other runner and back
over the part. The banding is to form a double “U” over the part, not a circle
around it. This forms a secure hold that is not subject to damage by fork lift forks
or other lifting equipment that can cause the banding to loosen or break.

Team PRP Operations Guide, Version 2021-1
3/11/21 INTERNAL COMPANY DOCUMENT Page 35
3.2. Transmissions
4-speed automatic
GM 9-speed automatic
9-speed automatic
3.2.1. Transmission Inspection and Quality Assurance a. Automatic transmissions are to be test engaged if possible. Prior to testing make
sure the fluid level is correct and the cooler lines are not restricted. Move the
selector through all positions to check for smooth operation and detents.
b. Inspect the transmission for cracks in the case/housing, damage to the pan, and
any cut wiring or damaged sensors/external parts
i. If damage is found, contact supervisor or salesperson before continuing
ii. If the pan was dented check for broken wires or sensors.
iii. When prepping the part, disconnect it from the wiring harness at the
nearest plug. However, some facilities prefer to leave a short portion of the
wiring harness with the part. While this may ruin part of the wiring harness,
it offers the customer more options when installing the replacement part. If
this is the process followed at your facility and your facility inventories
wiring harnesses, make sure that if the harness is cut a note to that effect
is entered into the inventory record or the harness is deleted from
inventory.
c. Inspect the transmission for any cut wiring, unnecessary hoses or brackets,
broken sensors, and any other loose, broken, or damaged external parts.
Remove these pieces to create a clean presentation.
d. When possible, remove the pan to completely drain all oil, and
proceed with the following defect checks:
i. No more than ¼ teaspoon of metal shavings
ii. No more than ½ teaspoon of friction plate material
iii. No shaving larger than a grain of rice
iv. No distinct “Burnt” smell
Any metal parts or chunks found on inspection may indicate possible failure and
the transmission must not be sold.
e. Before reinstalling the pan make sure the unit is completely drained or it may leak
during transportation and cause damage. If silicon is used to reseal the pan make
sure to use just a thin layer to prevent excess sealer from going inside the pan and
causing a failure.
f. If ANY of the above issues are discovered, contact supervisor or salesperson
before continuing.
NOTICE - Any mechanical component found to leak fluid will be subject to the part
being refused on behalf of transportation company(s)

Team PRP Operations Guide, Version 2021-1
3/11/21 INTERNAL COMPANY DOCUMENT Page 36
g. On automatic transmissions, the torque converter must be properly installed to fully
engage the pump and then secured with a bracket. Failure to do so could result in
a broken pump.
h. Few if any modern manual transmissions have a removable cover that allows for
any meaningful inspection.
i. Drain fluid through a filter or shop rag to catch any metal fragments that would
indicate a failure. Many types of modern synchromesh fluids have silver flecks
of friction modifier that must not be mistaken for metal fillings.
ii. Manipulate the shift rod to engage reverse, neutral, and all forward gears
while turning the input shaft by hand. Make sure the shift rod is not bent.
iii. On trucks and rear wheel drive vehicles inspect the internal shift rails before
reinstalling the shifter and engaging the gears. Also check the output shaft or
shafts to make sure they rotate true.
i. Following inspection clean the pan and reseal. Note on the pan with "O/I" at
completion of the process.
3.2.2. Transmission Preparation a. Remove any of the following (after having been approved for sale):
i. Unnecessary hoses, wiring, or brackets
ii. Broken sensors
iii. Any other loose, broken, or damaged external parts
iv. Cooler lines and install plugs in all openings that could allow moisture,
small bolts, or dirt to enter the transmission.
b. Use properly sized red plugs to cover any critical openings (including accessory
items). Use adhesive tape where plugs don’t fit.
c. After the inspection, wipe the pan clean and return it to the transmission. d. Make sure the torque converter has been drained. e. Ensure torque converter is set in the transmission and secured with a properly fit
bracket using a Team PRP branded or approved torque converter bracket.
f. When prepping the transmission, disconnect it from the wiring harness at the
nearest plug. However, some facilities prefer to leave a short portion of the wiring
harness with the part. While this may ruin part of the wiring harness, it offers the
customer more options when installing the replacement part. If this is the process
followed at your facility and your facility inventories wiring harnesses, make sure
that if the harness is cut a note to that effect is entered into the inventory record or
the harness is deleted from inventory.
3.2.3. Transmission Tagging and Identification a. Ensure the correct stock number is visible on the torque converter and the
transmission.
b. Tag the Transmission with Team PRP installation guidelines tag, placing the tag between the transmission case and the oil pan through the hole in the tag. Also place delivery/QC tags at this time the same way.
c. Apply your store’s custom stamp on the housing where appropriate.
3.2.4. Transmission Fulfillment at Time of Order a. Ensure stock # markings on trans case or bell housing match.
b. Confirm stock number/ purchase order number matches the work order.
c. Confirm the interchange description on the work order matches the part.
d. Confirm work order comments match or special instructions have been completed.

Team PRP Operations Guide, Version 2021-1
3/11/21 INTERNAL COMPANY DOCUMENT Page 37
3.2.5. Transmission Cleaning a. Pressure-wash the entire unit to remove any oil or grease. Team PRP
recommends using a hot pressure washer, commercial degreaser or non-heated
pressure washer or a combination of these to properly wash the transmission.
b. Use an air hose with air chuck or an air hose with a blow gun equipped with a
rubber tip to remove excess moisture.
c. Complete a final check for cracks or breaks that might have gone unnoticed prior
to cleaning.
3.2.6. Transmission Packaging and Shipping
a. Use one of the following standard pallets:
i. Small Transmission - 24x32
ii. Medium Transmission - 26x40
iii. Large Standard Engine / Transmission - 30x20
b. If the transmission is oversized or uncommon in shape, pallet reinforcement /
alteration is recommended to ensure stabilization during transportation
c. Use no fewer than two banding straps to secure the unit. Ensure straps are not
tightened over critical fragile exterior components, like plugs or sensors, that may
break when pressure is applied

Team PRP Operations Guide, Version 2021-1
3/11/21 INTERNAL COMPANY DOCUMENT Page 38
3.3. Transfer Case and Carrier Assembly
Chevrolet Transfer Case
GM Transfer Case
Ford F150 Transfer Case
Transfer cases can be gear or chain-driven, can be “married” or independent of the
transmission and can have manual shift on the fly (MSOF) or electronic shift on the fly
(ESOF).
3.3.1. Transfer Case & Carrier Inspection a. Inspect the unit for cracks/damage to the case/housing, and any cut wiring or damaged
sensors/external parts.
b. Check the fluid for particles, color and burnt smell.
c. Check the seals for leakage.
d. Check input/output shafts for extended play, both side to side and also end play.
e. Rotate the gears to make sure its rotation is true and feel for play or noise that could
indicate bearing damage.
For inspection instructions for axle assemblies see Axle Assemblies.
3.3.2. Transfer Case & Carrier Preparation a. Remove any of the following (after having been approved for sale):
i. Unnecessary hoses, wiring, or brackets
ii. Broken sensors
iii. Any other loose, broken, or damaged external parts
b. Drain all fluids.
c. Use properly sized red plugs to cover any critical openings (including accessory items).
Use adhesive tape where plugs don’t fit.
d. When prepping the part, disconnect it from the wiring harness at the nearest plug.
However, some facilities prefer to leave a short portion of the wiring harness with the
part. While this may ruin part of the wiring harness, it offers the customer more options
when installing the replacement part. If this is the process followed at your facility and
your facility inventories wiring harnesses, make sure that if the harness is cut a note to
that effect is entered into the inventory record or the harness is deleted from inventory.
3.3.3. Transfer Case & Carrier Tagging and Identification a. Ensure the correct stock number is visible on the unit.
b. Use wire or zip tie to secure the Team PRP warranty and drain warning.
c. Apply your store’s custom stamp on the housing where appropriate.
3.3.4. Transfer Case & Carrier Fulfillment at Time of Order a. Ensure stock # matches the work order.
b. Confirm the interchange description on the work order matches the part.
c. Confirm work order comments match or special instructions have been completed.
d. On electric shift transfer cases, verify the work order or invoice to determine if
shift motor is included or not. PRP assumes that it is not.

Team PRP Operations Guide, Version 2021-1
3/11/21 INTERNAL COMPANY DOCUMENT Page 39
3.3.5. Transfer Case & Carrier Cleaning a. Pressure-wash the entire unit to remove any oil, dirt or grease. Team PRP
recommends using a hot pressure washer, commercial degreaser or non-heated
pressure washer or a combination of these to properly wash the unit.
b. Complete a final check for cracks or breaks that might have gone unnoticed prior to
cleaning.
3.3.6. Transfer Case & Carrier Packaging and Shipping a. Use one of the following standard pallets:
i. Small Transmission - 24x32
ii. Medium Transmission - 26x40
iii. Large Standard Engine / Transmission - 30x20
b. When placing the unit on the pallet make sure the vent tube is facing up.
c. If the unit is oversized or uncommon in shape, pallet reinforcement / alteration is
recommended to ensure stabilization during transportation
d. Use no fewer than two banding straps to secure the unit
e. Ensure straps are not tightened over critical fragile exterior components like plugs or
sensors that may break when pressure is applied
NOTICE - Any mechanical component found to leak fluid will be subject to the part being
refused on behalf of transportation company(s)

Team PRP Operations Guide, Version 2021-1
3/11/21 INTERNAL COMPANY DOCUMENT Page 40
3.4. Axle Assembly
Jeep front axle assembly
Ford rear axle assembly
3.4.1. Axle Assembly Inspection a. For a list of components assumed to be included in an axle assembly consult the ARA
Parts Specifications Standards.
b. Controls arms, sway bars and steering linkage are assumed not to be included with an
axle assembly. However, make sure there is a clear understanding regarding them
and that the invoice clearly reflects what is included.
c. Check tubes & brackets for symmetry between two halves. Assess the housing and
dust shields (backing plates) for excessive rust.
d. Remove the axle cover to drain all oil, and proceed with the following defect checks:
i. No discolored or mixed oil, or distinct “burnt” smell.
ii. No presence of metal debris.
iii. If possible, spin the axle link to ensure there is no grinding/lockups.
iv. No extensive pitting of pinion/ring gears.
vi. Inspect the interior gears or spider gears for wear, pitting, rust, chips or cracks.
Then check the pinion gear’s edges, ends and surface looking for scoring, cracks,
pitting, rust or breaks.
vii. Slowly spin the gears to make sure they mesh smoothly.
viii. Check the outer end of each axle for excessive play. ix. At the time of inspection, verify the gear ratio to make sure it matches the
inventory record or Interchange number selected. Make every effort to verify the exact interchange for the axle assemblies. Even after verifying one differential, inspect and verify the other on 4-wheel drive vehicles and don’t assume they are the same – it may have been changed. While doing this, verify limited slip and ABS.
e. Check the axle shaft flanges to make sure they are true and uniformly perpendicular to the shaft.
f. Clean the cover and replace.
3.4.2. Axle Assembly Preparation a. Remove all broken, cut, damaged, or non-useable items.
b. If the dust shield (backing plate) is either rusted or damaged this must be noted in the
part condition as it may require considerable time to replace.
c. Double check for broken or missing mounting tabs (like the shock mounts).
d. If sold with drums or rotors, make sure they are secured to the assembly by
tightening at least one lug nut so they cannot come off during travel. Not doing this is
very dangerous and is a serious safety hazard. Leaving the drum or rotor on also
helps protect the dust shield (backing plate).
e. If any fluid was removed during dismantling it is recommended that the axle
assembly be stored with fluid to prevent internal rusting and to re-inspect it and drain
fluids prior to shipping.

Team PRP Operations Guide, Version 2021-1
3/11/21 INTERNAL COMPANY DOCUMENT Page 41
f. If painting the unit:
i. Ensure it is completely descaled prior to spraying.
ii. Ensure it is dry prior to spraying.
iii. Use low gloss black paint only.
iv. Re-apply stock numbers immediately after drying is complete.
g. Plug any critical openings to prevent moisture from getting inside unit.
3.4.3. Axle Assembly Tagging and Identification a. Ensure the correct stock number is visible on the beam and axle pan.
b. Write “O/I” (Open and Inspected) or some other notation on the pan to indicate
inspection was completed.
c. Use wire or zip tie to secure the Team PRP warranty and drain warning.
3.4.4. Axle Assembly Fulfillment at Time of Order a. Ensure stock # markings on rear are correct and matching across entire unit with the
work order.
b. Confirm interchange description on work order matches the part and any special
instructions have been completed.
3.4.5. Axle Assembly Cleaning a. Pressure-wash the entire unit to remove any oil, dirt or grease. Team PRP
recommends using a hot pressure washer, commercial degreaser or non-heated
pressure washer or a combination of these to properly wash the transmission.
b. Complete a final check for any issues that might have gone unnoticed prior to
cleaning.
3.4.6. Axle Assembly Packaging and Shipping
a. Use one of the following PRP standard pallets:
i. Small Rear End - 64x20.
ii. Large Rear End - 72x24.
b. If the rear axle is oversized or uncommon in shape, pallet reinforcement / alteration is
recommended to ensure stabilization during transportation.
c. Use no fewer than two banding straps to secure the unit.
d. Ensure straps are not tightened over any critical fragile exterior components like plugs
or sensors that may break when pressure is applied.
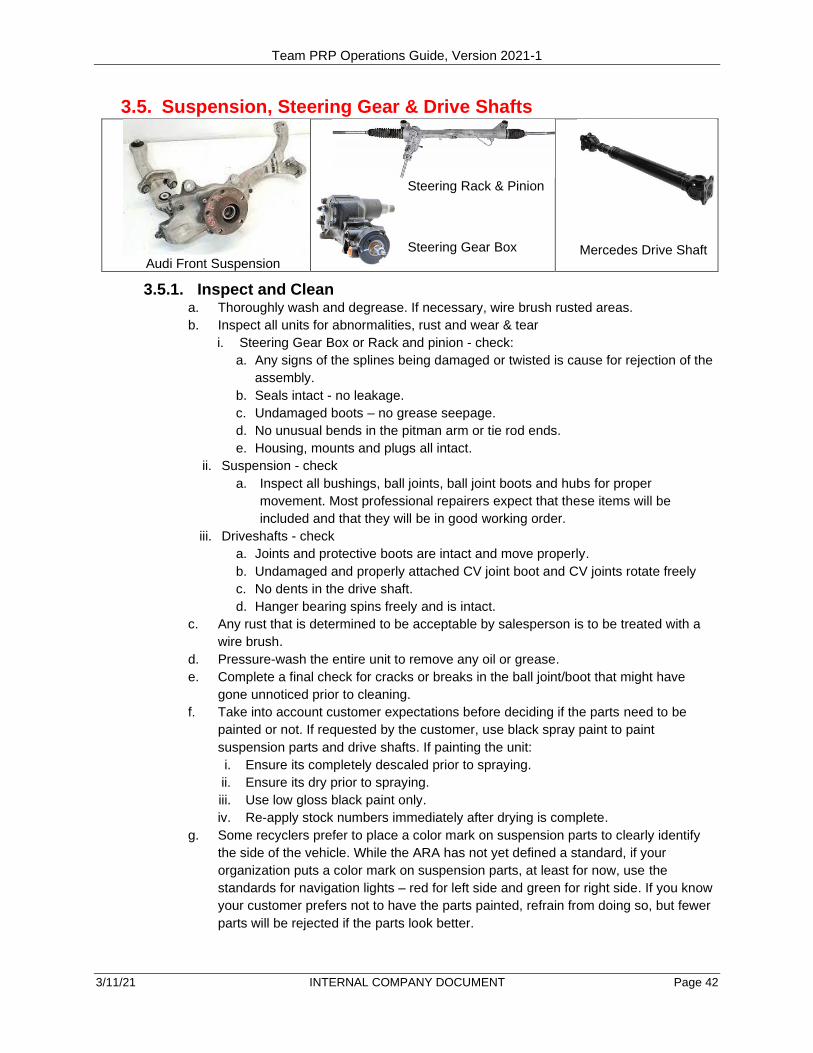
Team PRP Operations Guide, Version 2021-1
3/11/21 INTERNAL COMPANY DOCUMENT Page 42
3.5. Suspension, Steering Gear & Drive Shafts
Audi Front Suspension
Steering Rack & Pinion Steering Gear Box
Mercedes Drive Shaft
3.5.1. Inspect and Clean a. Thoroughly wash and degrease. If necessary, wire brush rusted areas.
b. Inspect all units for abnormalities, rust and wear & tear
i. Steering Gear Box or Rack and pinion - check:
a. Any signs of the splines being damaged or twisted is cause for rejection of the
assembly.
b. Seals intact - no leakage.
c. Undamaged boots – no grease seepage.
d. No unusual bends in the pitman arm or tie rod ends.
e. Housing, mounts and plugs all intact.
ii. Suspension - check
a. Inspect all bushings, ball joints, ball joint boots and hubs for proper
movement. Most professional repairers expect that these items will be
included and that they will be in good working order.
iii. Driveshafts - check
a. Joints and protective boots are intact and move properly.
b. Undamaged and properly attached CV joint boot and CV joints rotate freely
c. No dents in the drive shaft.
d. Hanger bearing spins freely and is intact.
c. Any rust that is determined to be acceptable by salesperson is to be treated with a
wire brush.
d. Pressure-wash the entire unit to remove any oil or grease.
e. Complete a final check for cracks or breaks in the ball joint/boot that might have
gone unnoticed prior to cleaning.
f. Take into account customer expectations before deciding if the parts need to be
painted or not. If requested by the customer, use black spray paint to paint
suspension parts and drive shafts. If painting the unit:
i. Ensure its completely descaled prior to spraying.
ii. Ensure its dry prior to spraying.
iii. Use low gloss black paint only.
iv. Re-apply stock numbers immediately after drying is complete.
g. Some recyclers prefer to place a color mark on suspension parts to clearly identify
the side of the vehicle. While the ARA has not yet defined a standard, if your
organization puts a color mark on suspension parts, at least for now, use the
standards for navigation lights – red for left side and green for right side. If you know
your customer prefers not to have the parts painted, refrain from doing so, but fewer
parts will be rejected if the parts look better.

Team PRP Operations Guide, Version 2021-1
3/11/21 INTERNAL COMPANY DOCUMENT Page 43
3.5.2. Assemblies include a. For a list of components assumed to be included in a knee or rear suspension
assembly consult the ARA Parts Specifications Standards Book.
3.5.3. Tagging and Identification a. Ensure the correct stock number is visible on the unit.
3.5.4. Fulfilment at time of order a. Ensure stock # and/or tag # match the work order.
b. Confirm the interchange description on the work order matches the part.
c. Confirm that the part you are picking is as stated on the work order (correct side of
the vehicle if right or left).
d. Confirm work order comments match or special instructions have been completed.
3.5.5. Packaging and Shipping a. Knees / Complete Assemblies
I. Use one of the following standard pallets (choose the smallest pallet but one that
encloses the entire unit where no part of it extends beyond the pallet):
• Small Transmission - 24x32.
• Medium Transmission - 26x40.
• Large Standard Engine / Transmission - 30x20.
II. Use no fewer than two banding straps to secure the unit.
b. Steering Gear Rack
• Housing must be protected and wrapped with packing material.
• Joints & boots must be protected with packing material.
• Smaller racks may be boxed.
c. Hubs / Arms / Individual Suspension parts
• If the part is small, it is not required to be palletized.
• When shipping, have it wrapped and boxed.
d. Drive shafts
• Joints & boots must be protected with packing material.
• Attach the unit to a 2x4 to prevent shipping damage.
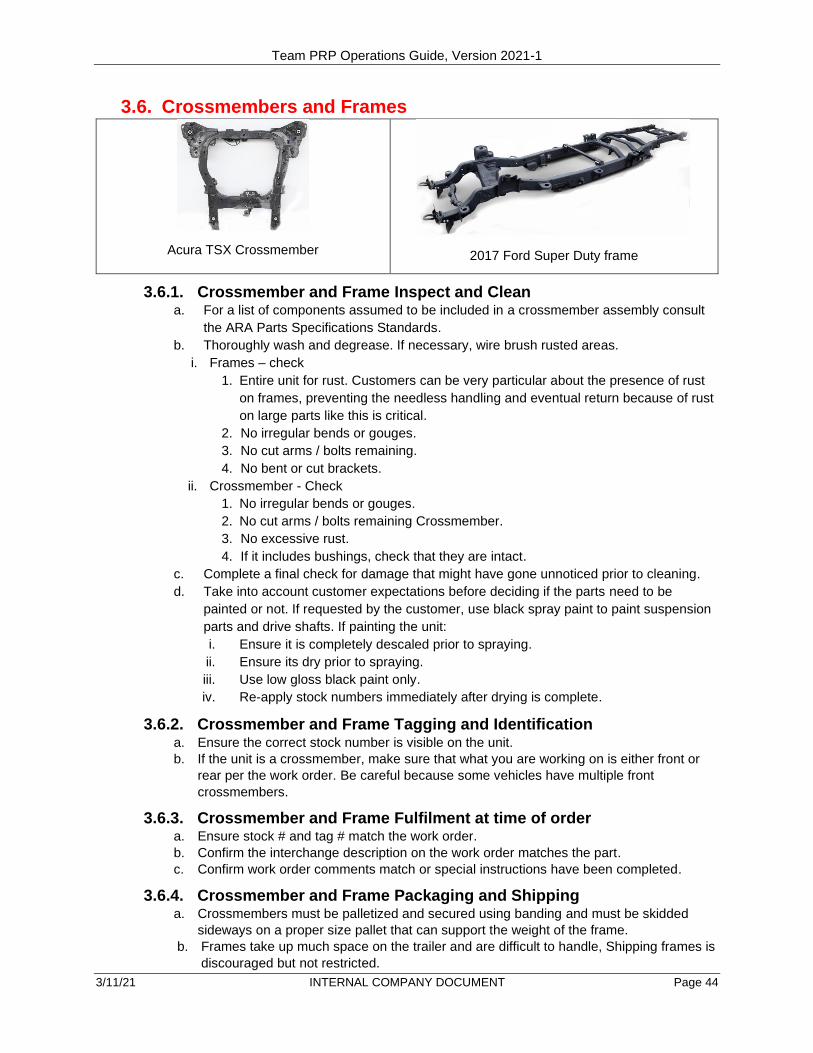
Team PRP Operations Guide, Version 2021-1
3/11/21 INTERNAL COMPANY DOCUMENT Page 44
3.6. Crossmembers and Frames
Acura TSX Crossmember
2017 Ford Super Duty frame
3.6.1. Crossmember and Frame Inspect and Clean a. For a list of components assumed to be included in a crossmember assembly consult
the ARA Parts Specifications Standards.
b. Thoroughly wash and degrease. If necessary, wire brush rusted areas.
i. Frames – check
1. Entire unit for rust. Customers can be very particular about the presence of rust
on frames, preventing the needless handling and eventual return because of rust
on large parts like this is critical.
2. No irregular bends or gouges.
3. No cut arms / bolts remaining.
4. No bent or cut brackets.
ii. Crossmember - Check
1. No irregular bends or gouges.
2. No cut arms / bolts remaining Crossmember.
3. No excessive rust.
4. If it includes bushings, check that they are intact.
c. Complete a final check for damage that might have gone unnoticed prior to cleaning.
d. Take into account customer expectations before deciding if the parts need to be
painted or not. If requested by the customer, use black spray paint to paint suspension
parts and drive shafts. If painting the unit:
i. Ensure it is completely descaled prior to spraying.
ii. Ensure its dry prior to spraying.
iii. Use low gloss black paint only.
iv. Re-apply stock numbers immediately after drying is complete.
3.6.2. Crossmember and Frame Tagging and Identification a. Ensure the correct stock number is visible on the unit.
b. If the unit is a crossmember, make sure that what you are working on is either front or
rear per the work order. Be careful because some vehicles have multiple front
crossmembers.
3.6.3. Crossmember and Frame Fulfilment at time of order a. Ensure stock # and tag # match the work order.
b. Confirm the interchange description on the work order matches the part.
c. Confirm work order comments match or special instructions have been completed.
3.6.4. Crossmember and Frame Packaging and Shipping a. Crossmembers must be palletized and secured using banding and must be skidded
sideways on a proper size pallet that can support the weight of the frame.
b. Frames take up much space on the trailer and are difficult to handle, Shipping frames is
discouraged but not restricted.

Team PRP Operations Guide, Version 2021-1
3/11/21 INTERNAL COMPANY DOCUMENT Page 45
c. Before shipping a frame check the entire truck routing.
I. Frames that are entirely routed on a 53’ trailer are not required to be palletized.
II. Frames that will be transported on an open top trailer must be palletized.
III. If you have a question about the type trailer used on a route, contact the Team
PRP Director of Logistics.
d. Do not wrap the crossmember or frame with bubble wrap or plastic.
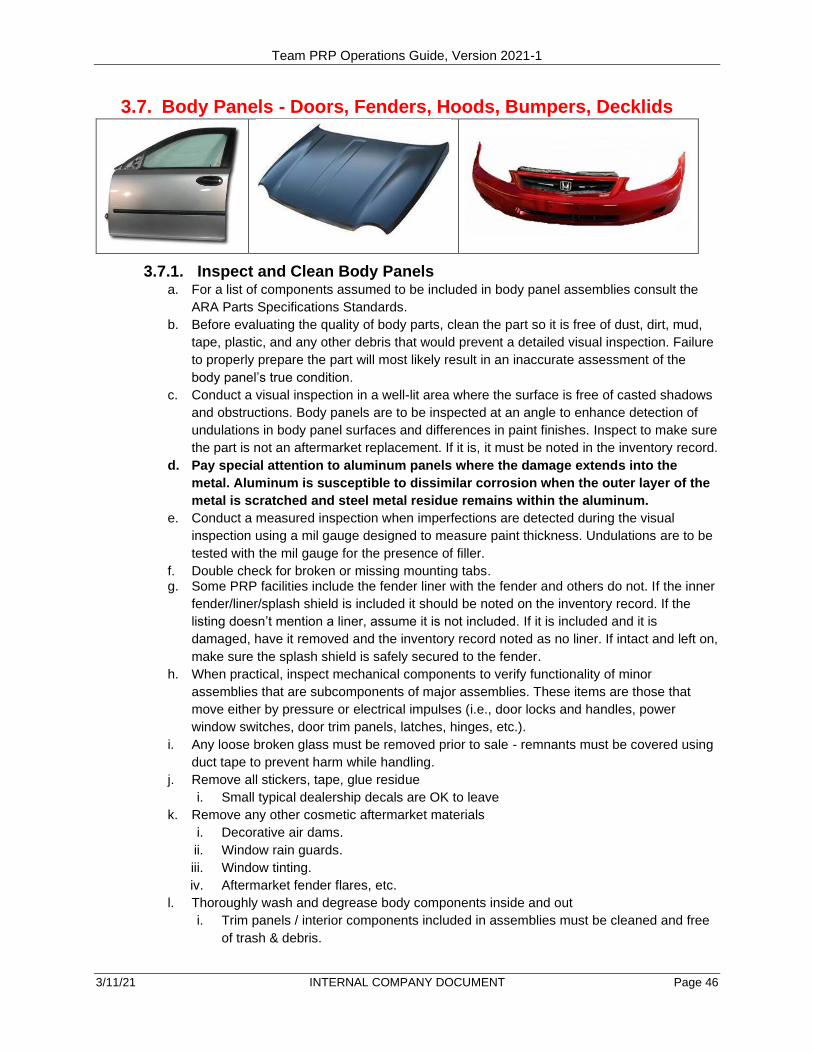
Team PRP Operations Guide, Version 2021-1
3/11/21 INTERNAL COMPANY DOCUMENT Page 46
3.7. Body Panels - Doors, Fenders, Hoods, Bumpers, Decklids
3.7.1. Inspect and Clean Body Panels a. For a list of components assumed to be included in body panel assemblies consult the
ARA Parts Specifications Standards.
b. Before evaluating the quality of body parts, clean the part so it is free of dust, dirt, mud,
tape, plastic, and any other debris that would prevent a detailed visual inspection. Failure
to properly prepare the part will most likely result in an inaccurate assessment of the
body panel’s true condition.
c. Conduct a visual inspection in a well-lit area where the surface is free of casted shadows
and obstructions. Body panels are to be inspected at an angle to enhance detection of
undulations in body panel surfaces and differences in paint finishes. Inspect to make sure
the part is not an aftermarket replacement. If it is, it must be noted in the inventory record.
d. Pay special attention to aluminum panels where the damage extends into the
metal. Aluminum is susceptible to dissimilar corrosion when the outer layer of the
metal is scratched and steel metal residue remains within the aluminum.
e. Conduct a measured inspection when imperfections are detected during the visual
inspection using a mil gauge designed to measure paint thickness. Undulations are to be
tested with the mil gauge for the presence of filler.
f. Double check for broken or missing mounting tabs. g. Some PRP facilities include the fender liner with the fender and others do not. If the inner
fender/liner/splash shield is included it should be noted on the inventory record. If the
listing doesn’t mention a liner, assume it is not included. If it is included and it is
damaged, have it removed and the inventory record noted as no liner. If intact and left on,
make sure the splash shield is safely secured to the fender.
h. When practical, inspect mechanical components to verify functionality of minor
assemblies that are subcomponents of major assemblies. These items are those that
move either by pressure or electrical impulses (i.e., door locks and handles, power
window switches, door trim panels, latches, hinges, etc.).
i. Any loose broken glass must be removed prior to sale - remnants must be covered using
duct tape to prevent harm while handling.
j. Remove all stickers, tape, glue residue
i. Small typical dealership decals are OK to leave
k. Remove any other cosmetic aftermarket materials
i. Decorative air dams.
ii. Window rain guards.
iii. Window tinting.
iv. Aftermarket fender flares, etc.
l. Thoroughly wash and degrease body components inside and out
i. Trim panels / interior components included in assemblies must be cleaned and free
of trash & debris.

Team PRP Operations Guide, Version 2021-1
3/11/21 INTERNAL COMPANY DOCUMENT Page 47
m. When prepping the part, disconnect it from the wiring harness at the nearest plug.
However, some facilities prefer to leave a short portion of the wiring harness with the
part. While this may ruin part of the wiring harness, it offers the customer more options
when installing the replacement part. If this is the process followed at your facility and
your facility inventories wiring harnesses, make sure that if the harness is cut a note to
that effect is entered into the inventory record or the harness is deleted from inventory.
3.7.2. Body Panels Tagging and Identification a. Ensure the stock number is written in an inconspicuous place so as not to interfere when
the panel is painted.
b. Do not use self-sticking labels or clear envelopes directly on the part since it may also
impact the panel’s final finish or may be difficult for the customer to remove.
3.7.3. Body Panels Fulfillment at Time of Order a. Confirm part description and interchange information on work order matches the part and
any special instructions have been completed.
b. Check for any missing components as listed on the work order against the ARA parts standards.
3.7.4. Body Panels Packaging and Shipping c. Large unbolted body panels must be shipped using appropriately sized pallets. Avoid
using pallets that are too big for the part being shipped as they needlessly take up
transportation space. To protect parts from side impact damage during transportation,
body parts must not overhang the sides of the pallet.
d. Use no fewer than two binding straps to secure the part to the pallet - use a buffer like
cardboard or Styrofoam to prevent the strap from damaging painted surfaces.
e. Any door or tailgate which fits inside Panel Armor shipped via the PRP network must be
shipped as such unless Panel Armor is not available.
f. When shipping body panels, see the examples below as to how they are to be packaged.
Palletized and wrapped decklid
Boxed and wrapped decklid

Team PRP Operations Guide, Version 2021-1
3/11/21 INTERNAL COMPANY DOCUMENT Page 48
Boxed hood
Hood on a pallet
g. Fenders, decklids and hoods are required to be wrapped for shipping. They are to be
secured and enclosed between padding for transport. Edge protectors serve as a simple
form of protection against the most typical types of damage incurred when shipping body
panels.
h. Bumpers
i. Plastic bumpers found on modern vehicles do not need to be palletized. Depending
on the contents of the assembly, they could be wrapped or boxed but the covering
must be commensurate with the size and weight of the bumper. The bumper’s inner
structure must be secured compete with the cover. Then bumper must be wrapped
covering on all surfaces with bubble wrap or cardboard and then stretch wrapped.
ii. Large heavy truck chrome and steel bumpers must be palletized on a quarter panel
type pallet or axle pallet and banded in addition to bubble wrap and stretch wrap.

Team PRP Operations Guide, Version 2021-1
3/11/21 INTERNAL COMPANY DOCUMENT Page 49
3.8. Large Body Sections - Front Ends, Section Cuts, Roof Panels,
Cabs and Beds
3.8.1. Inspect and Clean Large Body Sections a. For a list of components assumed to be included in large body section assemblies
consult the ARA Parts Specifications Standards Book.
b. Remove all stickers, tape, glue residue
i. Small typical dealership decals are OK to leave.
c. Remove any other cosmetic aftermarket materials
i. Decorative air dams.
ii. Window rain guards.
iii. Loose bed covers.
iv. Window tinting.
v. Aftermarket fender flares, etc.
d. Any loose broken glass must be removed prior to shipping; remnants must be covered
using duct tape to prevent harm while handling.
e. Any sharp edges from section cuts must be covered with duct tape to prevent harm while
handling.
f. Thoroughly wash and degrease body components inside and out. Trim panels / interior
components included in assemblies must be cleaned and free of trash & debris.
g. When prepping the part, disconnect it from the wiring harness at the nearest plug.
However, some facilities prefer to leave a short portion of the wiring harness with the
part. While this may ruin part of the wiring harness, it offers the customer more options
when installing the replacement part. If this is the process followed at your facility and
your facility inventories wiring harnesses, make sure that if the harness is cut a note to
that effect is entered into the inventory record or the harness is deleted from inventory.
3.8.2. Large Body Sections Tagging and Identification a. Ensure the stock number is written in an inconspicuous place so as not to interfere when
the panel is painted.
b. Do not use self-sticking labels or clear envelopes directly on the part since it may also
impact the panel’s final finish or may be difficult for the customer to remove.
3.8.3. Large Body Sections Fulfillment a. Confirm part description and interchange information on work order matches the part and
any special instructions have been completed.
3.8.4. Large Body Sections Packaging and Shipping a. Use a pallet that is appropriately sized to match the part being shipped
i. Avoid using pallets that are too big for the part being shipped as they needlessly
take up transportation space.

Team PRP Operations Guide, Version 2021-1
3/11/21 INTERNAL COMPANY DOCUMENT Page 50
ii. To protect parts from side impact damage during transportation, body parts must not
overhang the sides of the pallet.
b. Front Clips & Rear Clips must be strapped down to the pallet with at least two metal straps. Pallets should be generally 72”’x72” or 78”x78”. Make sure the strapping goes through structural areas (such as the strut towers, hinge pillars, core supports, etc.) of the assembly for greater stability and security but not across the hood or fenders. Hoods should be secured either while on the assembly or separately. Any loose parts, such as lamps, coolers, bumpers, deck lid, etc. that are separated from an assembly, they must be boxed and given separate tracking label and have their own shipping tags and tracking numbers or be securely attached to the main assembly or pallet. Any loose debris like carpets, plastic panels must be removed prior to shipping. Note: Do not wrap these items with bubble wrap or plastic. As previously noted, remove all broken glass prior to shipping.
c. Quarter & Post Cuts must be upright on the pallet not laying down in order to conserve space on the Team PRP trailer and securely strapped with at least two metal straps. NOTE: Do not wrap these items with bubble wrap or plastic.
d. As previously noted, remove all broken glass prior to shipping.
e. Total height of the assembly (including pallet) may not exceed 5’6” if loading on top decks. Larger cuts can be laid down, if necessary, to meet the height requirements.
f. Use no fewer than two binding straps to secure the part to the pallet - use a buffer like
cardboard or Styrofoam to prevent the strap from damaging painted surfaces.
NOTES REAGRDING TRUCK BEDS:
• Truck beds that exceed 92 inches in width are at high risk of damage when transported
on enclosed trailers. Beds that exceed 92” are excluded from transport on the Team
PRP network UNLESS the entire shipping route is exclusively utilizing open trailers. If
the box exceeds 92” but the size could be reduced to comply by removing fenders or
flares, then that is the process you could try. Ship any removed parts the same as
when shipping loose box parts.
• When selling the box AND the tailgate, the tailgate should be a separate line item on the invoice, it should have a separate shipping label from the box and should be shipped separately. See the tailgate section of this guide for instructions on how to package the tailgate.
• When preparing the truck bed for shipping on the Team PRP transportation network, place the truck bed upside down on the pallet with padding between the pallet and the bed rails. Top rail must be protected
• Carefully strap or band the truck bed to the pallet with at least two straps going either
crosswise across the wheel wells or lengthwise; use caution when applying tension so
as not to overtighten.
• When strapping the truck bed lengthwise, make sure the straps or bands clear the
forks of a forklift or lift truck.
• Here is how to ship a bed if your company uses metal racks. Truck beds should not be
shipped using only metal racks. Instead, if stored using a metal rack, the bed and rack
should be mounted on a proper sized pallet and banded so that the bed doesn’t move
itself or with the racking attached.

Team PRP Operations Guide, Version 2021-1
3/11/21 INTERNAL COMPANY DOCUMENT Page 51
g. It is not recommended that you ship a pickup box via an LTL carrier due to the high
probability of damage during shipment. However, if this is unavoidable, it is
recommended that you build a perimeter around the outside that looks like a 78”x78”x48”
wooden box, then stretch wrap it.

Team PRP Operations Guide, Version 2021-1
3/11/21 INTERNAL COMPANY DOCUMENT Page 52
3.9. Lighting and Mirrors
3.9.1. Inspect and Clean Lighting and Mirrors a. For a list of components assumed to be included in headlight, tail light or mirror consult
the ARA Parts Specifications Standards.
b. When practical, headlamps, tail lights, marker lamps, fog lights, mirrors, etc. should have
been removed to facilitate an inspection of the entire assembly. This is especially
important if there is impact damage in or adjacent to the area of the assembly. In most
cases, the impact damage may have broken or cracked a mount which is not visible until
the assembly is removed.
c. Inspect the lens for scratches, cracks, fading, crazing, cloudiness, etc. Inspect mounting
holes, alignment pins, ballast mounts, etc. for structural integrity and completeness.
Inspect interior for water or evidence of water accumulation indicating a bad seal or
invisible crack.
d. Inspect to make sure the part is not an aftermarket replacement. It must be noted when it
is.
e. When practical, the lights are to be energized during the inventory process to ensure they
function as designed.
f. Thoroughly wash and degrease as necessary to remove dirt and debris.
g. Lens and mirror surfaces may be buffed (if necessary) and polished, and the housing
must be cleaned thoroughly.
h. Glass that had been previously marked with liquid pen or grease markets may retain
remnants of the markings that are difficult to remove. Inspect for these as well by tilting
the glass in different angles.
i. When prepping the part, disconnect it from the wiring harness at the nearest plug.
However, some facilities prefer to leave a short portion of the wiring harness with the
part. While this may ruin part of the wiring harness, it offers the customer more options
when installing the replacement part. If this is the process followed at your facility and
your facility inventories wiring harnesses, make sure that if the harness is cut a note to
that effect is entered into the inventory record or the harness is deleted from inventory
3.9.2. Lighting and Mirrors Tagging and Identification a. Engrave or write the stock number or PO number on the housing in a non-visible and
inconspicuous location.
3.9.3. Lighting and Mirrors Fulfillment a. Confirm part and lens description, as well as interchange information on work order,
matches the part and any special instructions have been completed.
3.9.4. Lighting and Mirrors Packaging and Shipping a. Do NOT shrink wrap lights as this often leads to broken housing components except
when needed to protect the lens only.
b. All lighting and mirrors must be padded and placed in a box (see packaging section).

Team PRP Operations Guide, Version 2021-1
3/11/21 INTERNAL COMPANY DOCUMENT Page 53
c. At least 2-3 inches worth of packing space must surround the unit inside the box. HINT:
to quickly assess your box size - use your index, middle, and ring finger as a minimum
width check between the outer box wall and the light.
d. Be careful not to overpack with material as this can apply pressure to housing
components ultimately leading to breakage. To ensure you’ve included enough packing
material, make sure the unit doesn’t move around inside the box after sealing with tape.
If you can feel weight shifting around it may be a good idea to add more material to
stabilize the unit.
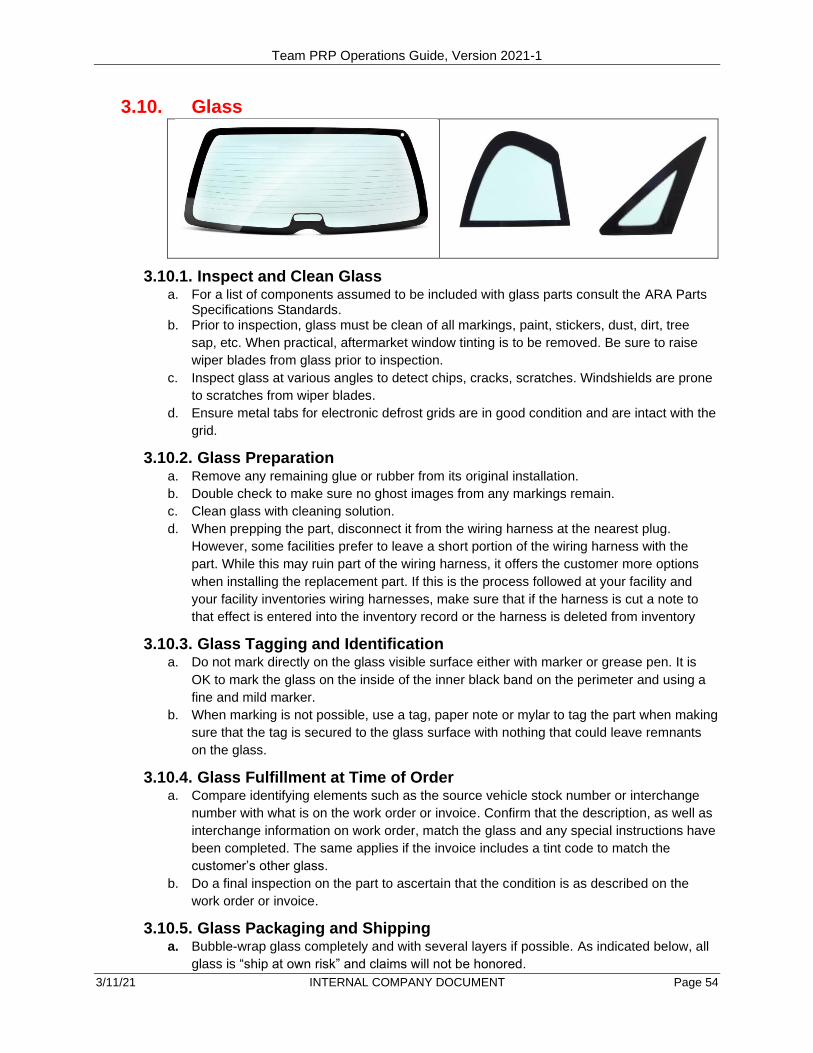
Team PRP Operations Guide, Version 2021-1
3/11/21 INTERNAL COMPANY DOCUMENT Page 54
3.10. Glass
3.10.1. Inspect and Clean Glass a. For a list of components assumed to be included with glass parts consult the ARA Parts
Specifications Standards. b. Prior to inspection, glass must be clean of all markings, paint, stickers, dust, dirt, tree
sap, etc. When practical, aftermarket window tinting is to be removed. Be sure to raise
wiper blades from glass prior to inspection.
c. Inspect glass at various angles to detect chips, cracks, scratches. Windshields are prone
to scratches from wiper blades.
d. Ensure metal tabs for electronic defrost grids are in good condition and are intact with the
grid.
3.10.2. Glass Preparation a. Remove any remaining glue or rubber from its original installation.
b. Double check to make sure no ghost images from any markings remain.
c. Clean glass with cleaning solution.
d. When prepping the part, disconnect it from the wiring harness at the nearest plug.
However, some facilities prefer to leave a short portion of the wiring harness with the
part. While this may ruin part of the wiring harness, it offers the customer more options
when installing the replacement part. If this is the process followed at your facility and
your facility inventories wiring harnesses, make sure that if the harness is cut a note to
that effect is entered into the inventory record or the harness is deleted from inventory
3.10.3. Glass Tagging and Identification a. Do not mark directly on the glass visible surface either with marker or grease pen. It is
OK to mark the glass on the inside of the inner black band on the perimeter and using a
fine and mild marker.
b. When marking is not possible, use a tag, paper note or mylar to tag the part when making
sure that the tag is secured to the glass surface with nothing that could leave remnants
on the glass.
3.10.4. Glass Fulfillment at Time of Order a. Compare identifying elements such as the source vehicle stock number or interchange
number with what is on the work order or invoice. Confirm that the description, as well as
interchange information on work order, match the glass and any special instructions have
been completed. The same applies if the invoice includes a tint code to match the
customer’s other glass.
b. Do a final inspection on the part to ascertain that the condition is as described on the
work order or invoice.
3.10.5. Glass Packaging and Shipping a. Bubble-wrap glass completely and with several layers if possible. As indicated below, all
glass is “ship at own risk” and claims will not be honored.
Team PRP Operations Guide, Version 2021-1
3/11/21 INTERNAL COMPANY DOCUMENT Page 55
IMPORTANT NOTE: Due to the fragile nature of glass and the high risk of shipping it, all
unframed glass shipped via the Team PRP transportation network is considered to be at your
own risk. Framed glass that is part of an assembly (for example glass in a door or hatch) is
reviewable but unframed glass that is shipped by itself (such as a quarter glass or windshield)
is not.

Team PRP Operations Guide, Version 2021-1
3/11/21 INTERNAL COMPANY DOCUMENT Page 56
3.11. Electronics - A/V, ECMs, Instrument Cluster, etc.
3.11.1. Inspect and Clean Electronics a. Inspect to make sure the part is not an aftermarket replacement. If it is it should be noted
in the inventory record.
b. Remove any plug-in wires at their connection point. However, some facilities prefer to
leave a short portion of the wiring harness with the part. While this may ruin part of the
wiring harness, it offers the customer more options when installing the replacement part.
If this is the process followed at your facility and your facility inventories wiring harnesses,
make sure that if the harness is cut a note to that effect is entered into the inventory
record or the harness is deleted from inventory.
c. Check the unit for signs of water damage coming from the inside of the unit or damaged
plugs or connecting points. If any epoxy or other sealant material is used in the module
and is visible make sure there are no cracks.
d. Check for broken/ missing components
i. Broken mounting tabs.
ii. Missing, broken or worn dials / buttons.
iii. Cut integral wires or broken plugs.
e. Wipe and dust the component avoiding heavy liquid usage. Polish any interior facing
lenses.
3.11.2. Electronics Tagging and Identification a. Engrave or write the stock number or PO number on hidden/inward facing portion of part
only.
b. Make sure the ID is included on the tag.
c. On radios and instruments clusters make sure you mark the part in an area not visible to
the ultimate customer.
d. If it is the practice at your facility, place tamper evidence marking on the unit.
3.11.3. Electronics Fulfillment at Time of Order a. Confirm part description, any available ID #’s as well as interchange information on work
order matches the part and any special instructions have been completed.
b. Check the ID numbers on modules if the order requires matching the number.
Discrepancies should be discussed with whoever created the order to define further
action. When the numbers don’t match report the number on the module to whoever
created the order.
3.11.4. Electronics Packaging and Shipping a. All electronic components must be bubble wrapped and boxed.

Team PRP Operations Guide, Version 2021-1
3/11/21 INTERNAL COMPANY DOCUMENT Page 57
b. At least 1-2 inches worth of packing space must surround the unit inside the box and the
space between the unit and the box should be filled with packaging. To quickly assess
your box size: Use your index, middle, and ring finger as a minimum width-check
between the outer box wall and the mirror.

Team PRP Operations Guide, Version 2021-1
3/11/21 INTERNAL COMPANY DOCUMENT Page 58
3.12. Wheels
3.12.1. Inspect and Clean Wheels a. For a list of components assumed to be included with a wheel consult the ARA Parts
Specifications Standards.
b. Visually inspect to make sure the lug holes are round and not oblong.
c. Inspect wheel for corrosion or curb rash that is in excess of the inventory description.
d. Inspect for corrosion on the bead surface that would cause air leaks and make notes if
the wheel does or does not have a tire pressure sensor (TPS).
e. Visibly inspect the front and back lips for any bends
3.12.2. Wheel Preparation a. All tires (unless otherwise noted or SPARE) must be removed from wheel prior to
shipping. This is also a good time to mark the tire mounting surface of the wheel with the
stock number, interchange number or other identifying element.
b. Thoroughly wash and degrease as necessary to remove dirt and debris.
c. Some members and customers expect wheels to be polished to minimize any surface
imperfections. Do so if requested on the order.
d. Some members recommend that all wheels be spun prior to the sale and/or shipping.
e. Aluminum wheels with lip damage can be repaired but must be done by experienced
professionals.
3.12.3. Wheels Tagging and Identification a. Engrave or write the stock number or PO number using small lettering on the inside of
the wheel close to the valve stem when possible.
3.12.4. Wheels Fulfillment at the Time of Order a. Confirm part description and interchange information on the work order matches the part
and any special instructions have been completed.
3.12.5. Wheels Packaging and Shipping a. Team PRP recommends that all wheels shipped between members must be protected
with bubble wrap and be boxed with packing material to protect the outer face. At least 1-
2 inches worth of packing space must surround the unit inside the box.
b. Consider using a small pallet when shipping 3 or more wheels.
c. If shipping multiples of the same wheel, each must be packaged separately with each
having an individual tracking number. If shipping using a pallet make sure the shipping
labels are available for easy scanning.
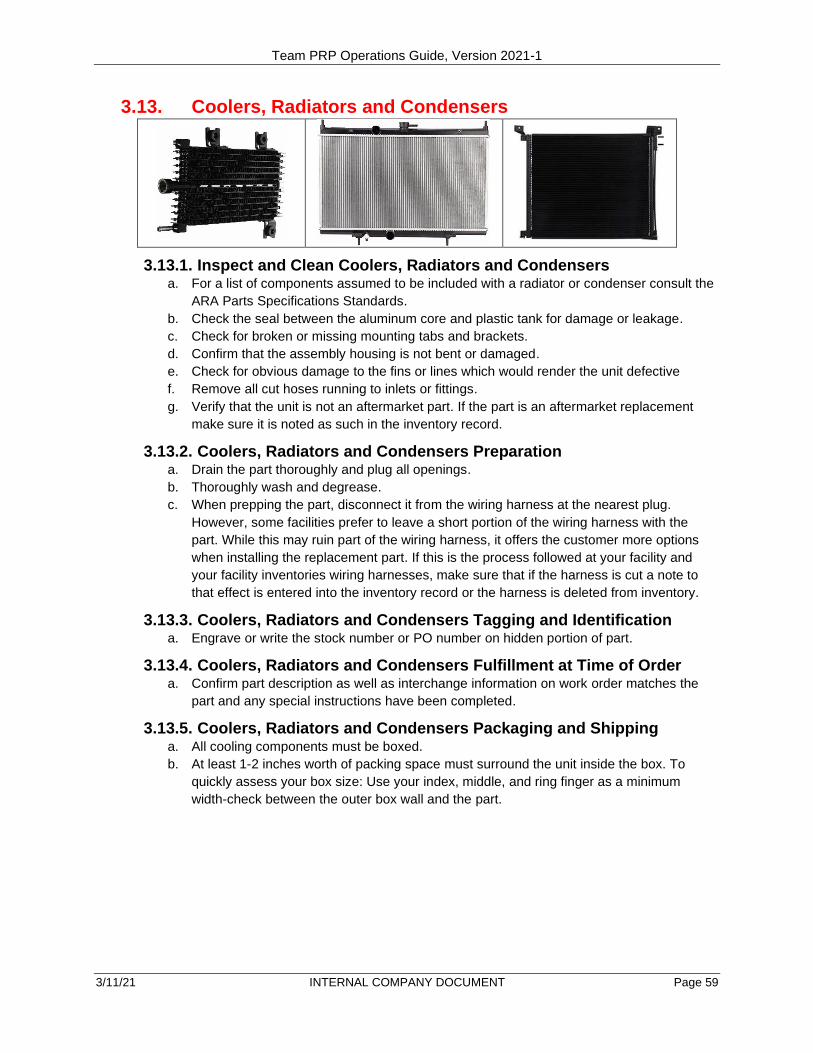
Team PRP Operations Guide, Version 2021-1
3/11/21 INTERNAL COMPANY DOCUMENT Page 59
3.13. Coolers, Radiators and Condensers
3.13.1. Inspect and Clean Coolers, Radiators and Condensers a. For a list of components assumed to be included with a radiator or condenser consult the
ARA Parts Specifications Standards.
b. Check the seal between the aluminum core and plastic tank for damage or leakage.
c. Check for broken or missing mounting tabs and brackets.
d. Confirm that the assembly housing is not bent or damaged.
e. Check for obvious damage to the fins or lines which would render the unit defective
f. Remove all cut hoses running to inlets or fittings.
g. Verify that the unit is not an aftermarket part. If the part is an aftermarket replacement
make sure it is noted as such in the inventory record.
3.13.2. Coolers, Radiators and Condensers Preparation a. Drain the part thoroughly and plug all openings.
b. Thoroughly wash and degrease.
c. When prepping the part, disconnect it from the wiring harness at the nearest plug.
However, some facilities prefer to leave a short portion of the wiring harness with the
part. While this may ruin part of the wiring harness, it offers the customer more options
when installing the replacement part. If this is the process followed at your facility and
your facility inventories wiring harnesses, make sure that if the harness is cut a note to
that effect is entered into the inventory record or the harness is deleted from inventory.
3.13.3. Coolers, Radiators and Condensers Tagging and Identification a. Engrave or write the stock number or PO number on hidden portion of part.
3.13.4. Coolers, Radiators and Condensers Fulfillment at Time of Order a. Confirm part description as well as interchange information on work order matches the
part and any special instructions have been completed.
3.13.5. Coolers, Radiators and Condensers Packaging and Shipping a. All cooling components must be boxed.
b. At least 1-2 inches worth of packing space must surround the unit inside the box. To
quickly assess your box size: Use your index, middle, and ring finger as a minimum
width-check between the outer box wall and the part.

Team PRP Operations Guide, Version 2021-1
3/11/21 INTERNAL COMPANY DOCUMENT Page 60
3.14. Interior Parts - Seats, Consoles, Miscellaneous
3.14.1. Inspect and Clean Interior Parts a. Clean the part as thoroughly as possible. Ensure irreversible wear and tear has been
described
i. Grease marks.
ii. Heavy cushion denting.
iii. Rips or tears in material.
iv. Broken adjustable components / levers.
v. Broken mounting tabs or brackets.
b. Avoid spraying or heavily washing seats or other interior components which may absorb
water.
c. When prepping the part, disconnect it from the wiring harness at the nearest plug.
However, some facilities prefer to leave a short portion of the wiring harness with the
part. While this may ruin part of the wiring harness, it offers the customer more options
when installing the replacement part. If this is the process followed at your facility and
your facility inventories wiring harnesses, make sure that if the harness is cut a note to
that effect is entered into the inventory record or the harness is deleted from inventory.
3.14.2. Interior Parts Tagging and Identification a. Engrave or write the stock number or PO number on an inconspicuous side of the part - if
this is not possible then no stock number is to be applied.
3.14.3. Interior Parts Fulfillment at the Time of the Order a. Confirm part description as well as interchange information on work order matches the
part and any special instructions have been completed. For example, often times seats
will be sold for the use of the attached motor and track assemblies. If that is noted on the
order avoid investing too much time in cleaning the upholstered area.
3.14.4. Interior Parts Packaging and Shipping a. Seats and upholstered parts must be strapped to a pallet and wrapped and protected in
whatever manner is necessary to shield it from the weather or from other parcels being
shipped while in transit.
b. Larger components like bench seats, large cumbersome seats, or dash panels must be
wrapped and palletized if they can’t be easily carried by one person.
c. When shipping seats and other large components on a pallet, make sure the part is
secured with banding but place the banding so as not to damage or indent the part. For
example, when banding a seat, place the banding between the seat tracks and the seat.
d. Use no fewer than two binding straps to secure the part to the pallet; use a buffer like
cardboard or Styrofoam to prevent the strap from damaging upholstery/finished materials.
e. Small interior components must be boxed.
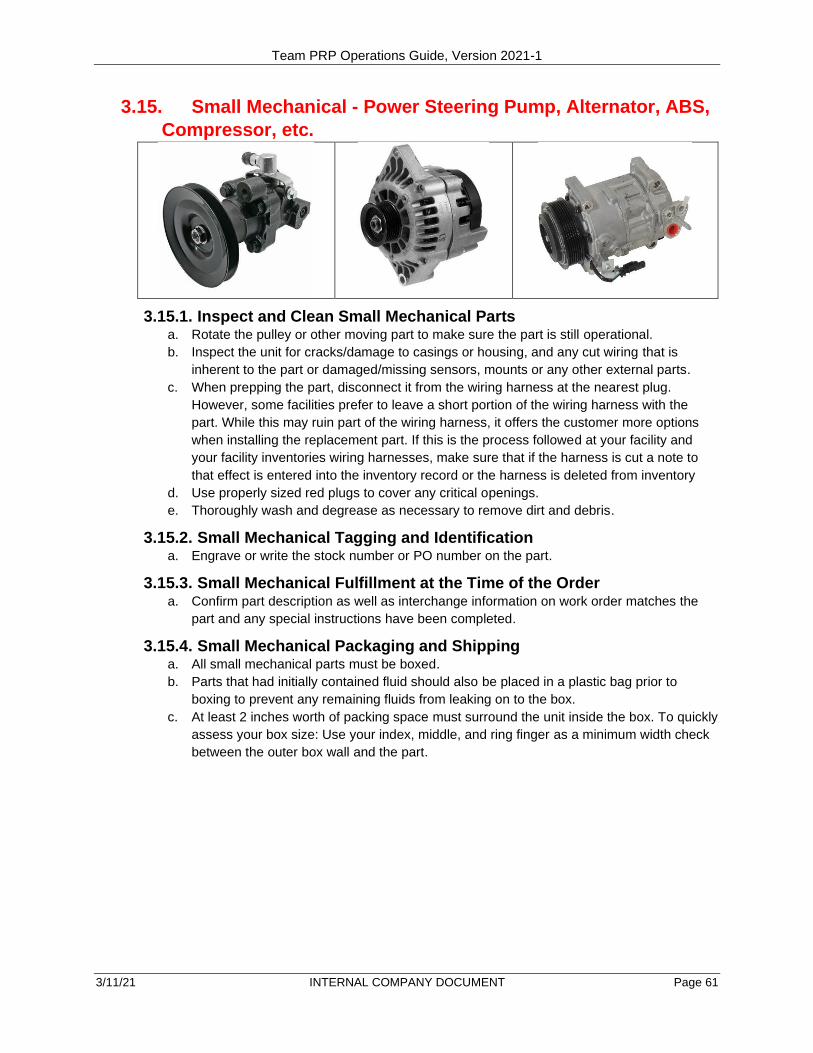
Team PRP Operations Guide, Version 2021-1
3/11/21 INTERNAL COMPANY DOCUMENT Page 61
3.15. Small Mechanical - Power Steering Pump, Alternator, ABS,
Compressor, etc.
3.15.1. Inspect and Clean Small Mechanical Parts a. Rotate the pulley or other moving part to make sure the part is still operational.
b. Inspect the unit for cracks/damage to casings or housing, and any cut wiring that is
inherent to the part or damaged/missing sensors, mounts or any other external parts.
c. When prepping the part, disconnect it from the wiring harness at the nearest plug.
However, some facilities prefer to leave a short portion of the wiring harness with the
part. While this may ruin part of the wiring harness, it offers the customer more options
when installing the replacement part. If this is the process followed at your facility and
your facility inventories wiring harnesses, make sure that if the harness is cut a note to
that effect is entered into the inventory record or the harness is deleted from inventory
d. Use properly sized red plugs to cover any critical openings.
e. Thoroughly wash and degrease as necessary to remove dirt and debris.
3.15.2. Small Mechanical Tagging and Identification a. Engrave or write the stock number or PO number on the part.
3.15.3. Small Mechanical Fulfillment at the Time of the Order a. Confirm part description as well as interchange information on work order matches the
part and any special instructions have been completed.
3.15.4. Small Mechanical Packaging and Shipping a. All small mechanical parts must be boxed.
b. Parts that had initially contained fluid should also be placed in a plastic bag prior to
boxing to prevent any remaining fluids from leaking on to the box.
c. At least 2 inches worth of packing space must surround the unit inside the box. To quickly
assess your box size: Use your index, middle, and ring finger as a minimum width check
between the outer box wall and the part.

Team PRP Operations Guide, Version 2021-1
3/11/21 INTERNAL COMPANY DOCUMENT Page 62
4. Shipping, Receiving Standards and Part Return Guidelines The shipping and receiving functions play a very important role in Team PRP’s Quality Assurance
process and its effort to maximize part quality and reduce or eliminate negative surprises in trades
between partners. Shipping is the last chance to inspect the part before it leaves the facility. A final
inspection and a comparison of the part relative to what is on the invoice or other transaction
documents is necessary regardless of whether the part is being shipped to another Team PRP
partner or to the ultimate user and it is to be conducted regardless of whether the part is traveling via
the Team PRP system, a common carrier or your own truck. Likewise, receiving a shipment is the first
chance for the receiving facility to spot any possible issues with an incoming part so as to allow for
timely actions to prevent or correct issues on a part sold to a customer.
4.1. Shipping
4.1.1. Team PRP transportation system
The Team PRP transportation network has grown steadily over the years since its inception
in 1998 and continues to grow as new members join Team PRP and as the network expands.
The most current versions of the route map, participants and shipping contacts, and timelines
for all the routes on the network are posted in the Team PRP’s members-only web site.
Team PRP is constantly expanding and modifying its routes and hubs to maximize efficiency.
For the latest route map and other details, please consult the Logistics tab in Team PRP’s
members-only web site or contact the Team PRP Director of Logistics.
4.1.1.1. Network Management and Parcel Tracking The Team PRP
transportation network and
all its shipments are
managed and tracked using
EZ Runner web-based
software that can be
accessed using any web
enabled device such as
standard and laptop PCs,
tablets and smart phones.
The data necessary to
create a shipment, documents such as shipping labels, etc. are automatically extracted
from Pinnacle, Powerlink or Checkmate systems requiring minimal intervention.

Team PRP Operations Guide, Version 2021-1
3/11/21 INTERNAL COMPANY DOCUMENT Page 63
All parcels are identified with a tracking number printed on each shipping label that also
displays on-screen. Tracking at every stage of travel, from label creation to arrival and
beyond can be performed using a small bar code scanner or any device equipped with a
scanner that is connected to a smart phone or tablet. The left pane of the screen displays
all the active parcels for the facility, the center pane shows parcel details and the right
pane displays scan Team PRP’s members only activity tracking the progress towards
ultimate delivery. More information about the software system’s details, hardware
requirements and how-to documents and videos are included in the Logistics tab of the
Team PRP’S members-only web site or contact the Team PRP Director of Logistics for
details.
4.1.1.2. Metrics-driven Logistics Management The extensive use of EZ Runner to manage all
aspects of the Team PRP logistics network and
the resulting data accumulated in the EZ Runner
database allows our Director of Logistics to
analyze the data to help PRP and the
Transportation Committee make critical decisions
to maximize the effectiveness and efficiency of
the network. To make the data easier to
understand, the EZ Runner data is extracted from
the database and processed using SmartCycle
and SmartDash data analytics programs. The
resulting charts, called cards, created in SmartCycle are only available to Team PRP
management, the cards published using SmartDash are accessible by all Team PRP
members even if they don’t otherwise participate in SmartDash. To see some examples
of how the EZ Runner data is used contact your Team PRP staff member to receive a
login to SmartDash.
4.1.1.3. Shipping via the Team PRP Logistics Network There is a reason why each of the part types listed in the part specifics sections of this
Guide include specific directions on packaging and shipping. Some may consider that
unnecessary since most of the staff dedicated to part preparation, packaging and
shipping at Team PRP facilities are very professional and have been doing their job well
for years. The reason for including such details is that Team PRP facilities, on average,
generated nearly 35% of their 2020 revenue from brokered parts and nearly 70% of those
parts came from fellow Team PRP members and were transported through the Team
PRP logistics network. Not only is the volume of parcels traveling through the network
high (on average over 50,000 parts are sold and shipped via our network each month)
but these shipments are dramatically different from what members encounter when
shipping or delivering their own parts. Here is how:

Team PRP Operations Guide, Version 2021-1
3/11/21 INTERNAL COMPANY DOCUMENT Page 64
Criteria Parts sold and transported on
member’s fleet truck to final customer Parts traded and transported on
the Team PRP network
Distance traveled 200 miles or less Average 575 miles; up to 2,000 miles
Number of times part is “handled” between source and destination
Twice on one truck Up to 12 times; parts travel on numerous truck routes and through numerous hubs.
Number of routes One Up to 8
Days of travel Same day 1 to 5 days
Transfer points None 1 - 7 hubs
Material handling equipment
Forklift, pallet jack, carts, hand trucks
Forklift, pallet jack, specialized carts, hand trucks.
Trailering equipment
16’ – 40’ Box trucks, some with lift gates
Specialized auto parts trailers; Including 28’ and 40’ double deck open trailers; enclosed 48’ - 50’moving van and 53’ standard vans with load platforms.
Degree of shipper’s control
Direct control Indirect control
Here is an example of how a part can travel as well as how many times it can be
handled. The example below is between two Team PRP facilities, in this example
between a Team PRP member in Denver, CO and another in Bomoseen, VT (total
distance of about 2,000 miles)
Transf. #
Load Transported by Unload
1 Starting point (insert) Yard’s enclosed truck Denver hub (volunteer)
2 & 3 Denver (volunteer) Cross Country enclosed North Platt NE (volunteer) hub
4 & 5 North Platt (volunteer) Cross Country enclosed Omaha (volunteer) hub
6 & 7 Omaha (volunteer) OOTB* Open trailer Kansas City (dedicated) hub
8 & 9 Kansas City (dedic.) OOTB* Open trailer Collinsville (dedicated) hub
10 & 11 Collinsville (dedic.) Midwest enclosed trailer Mansfield (dedicated) hub
12 & 13 Mansfield (dedic.) Midwest enclosed trailer Albany (dedicated) hub
14 & 15 Albany (dedic.) hub Yard’s enclosed truck Ending point (insert yard) * OOTB is Out of the Box
Consider that at each transfer on the table there could be multiple touches, once when
the part is unloaded into a staging area, once when it is loaded and could even include
moving the part while at the hub. In the example above, the parcel would be touched
(loaded and unloaded) at least 15 times, travel in 2 trucks owned by members, go
through 7 hubs (2 volunteer and 5 dedicated) and a mix of equipment including boxed
trucks, open trailers and enclosed trailers. At each location and depending on the parcel
type, packaging, size and weight, it may be moved using hand trucks, forklifts, wheeled
carts and by hand. In each truck, the part may share space with dozens of other parts -
some sales and some returns - ranging in size from small boxes containing a tail light or
electrical parts, a few engines and transmissions on pallets, maybe one or two rear ends
and countless sheet metal parts including doors, rear quarters, rear gates, maybe a front
end or a pickup box, assorted suspension assemblies and maybe even a frame. In
addition, and particularly considering the travel on open trailers and during transfers, the
trip and stops may include considerable travel in difficult weather such as wind, rain, sleet
or snow.

Team PRP Operations Guide, Version 2021-1
3/11/21 INTERNAL COMPANY DOCUMENT Page 65
The detailed specification on how parts should be packaged and secured are driven by
many years of experience in transporting parts under the conditions described above and
are intended to not only protect the parts you are shipping by also the rest of the parts
being transported and the safety of the equipment, the drivers, hub personnel and other
vehicles and drivers sharing the road.
Please pay close attention to the requirements listed for each part type and, when in
doubt, ask for advice from the Director of Logistics. When making a decision as to
whether to use plastic wrap to protect your part, consider what will happen to that wrap
under windy conditions in an open trailer traveling at 60 MPH. When deciding how to
secure an engine to a pallet consider the damage it could cause to sheet metal parts
(some that may include glass) adjacent to it if the engine were to come loose and roll
over. In all instances when shipping via the Team PRP logistics network use an
abundance of caution and follow or exceed the recommended procedures.
4.1.1.4. PRP Route System Damage Claims
4.1.1.4.1. Loss or Damage Claim Responsibilities
Team PRP and the carriers selected for the dedicated route system strive to deliver parts
fast and economically but also with an aim to keep part damage to an absolute minimum.
But despite their best efforts, damage does occasionally occur. The following section
defines the claims process, responsibilities and timelines so you can achieve the best
outcome when filing a claim.
4.1.1.4.2. Keys to a successful resolution of a claim:
• Education: Know and follow the claims process and timelines when filing your claim.
When starting a claim using EZ Runner, one or more statements may display on
screen that must be approved before proceeding with filing a claim. Prior to noting
agreement with the statement make sure you read it thoroughly to avoid
misconceptions.
• Communication: Team PRP provides a claim help desk; If you have any questions
contact the help desk immediately, Email [email protected] or reach out
the Team PRP Director of Logistics via email at [email protected].
• Documentation: As a Team PRP member using the service, we recommend that,
regardless of whether you are shipping or receiving, you document the shipment with
digital images when you want to have digital proof of condition in case of a claim. The
inherent assumptions are that a sold part is in good condition and that a return part
may not be in good condition. Digital images can help support a claim that this was
not the case. If shipping, take pictures of the parts before and after packaging, which
includes parts being returned to the original shipper. If receiving, take pictures of the
part still wrapped, boxed or palletized, and then again once uncovered with detailed
photos of the damage area. This is always a good idea even when using other
methods of shipping.
4.1.1.4.3. Damage claims responsibilities and procedure
This section outlines the responsibilities and procedure for lost part and damage claims
on the Team PRP transportation network. It does not include common carrier or DLS
freight program claims. Claims are to be filed through TFWW (formerly known as DLS) if
the shipment took place using the Team PRP LTL Discount Program.
• Damage Claims (Original Shipment): The Buyer / Consignee notifies the Seller of
transportation damage within 48 hours of receipt. The Buyer / Consignee provides
Seller supporting documentation and clear digital images of damaged parts within 72
hours of the receipt. The Seller / Shipper may file a damage claim no later than 5
business days after Buyers original receipt date of the damaged part.
Team PRP Operations Guide, Version 2021-1
3/11/21 INTERNAL COMPANY DOCUMENT Page 66
• Lost Part Claims (Original Shipment): The Seller / Shipper may file a lost part
claim within 15 days of the last part scan. It is recommended a lost part claim be filed
even if the transportation provider is actively searching for the part. The Seller /
Shipper is ultimately responsible for parts tracking to achieve timely filing of lost part
claims; however, the Buyer / Consignee and Transportation Providers share the
responsibility for notifying the Seller when a part is missing.
• Lost Part and Damage Claim (Returns): The original Buyer of the part shall acquire
a Return Authorization from the original Seller. The original Buyer shall provide the
original Seller evidence the part is being returned in the same condition as received
by providing clear digital images. If needed, the part is to be removed from the
packaging then repacked. This is especially important if the part has been in the
possession of the original Buyer for over 5 business days. The repackaged part must
meet Team PRP packaging standards.
• Claims Review & Determination: The Claims Committee is responsible for weekly
review and disposition of claims. It is composed of a representative from each of the
transportation providers and the Team PRP Director of Logistics
• Claims Administration: Out of the Box Logistics provides administration services for
all claims and will conduct searches for missing / lost parts upon request.
4.1.1.4.4. Freight Claims Instructions
• General: a. A claim can only be filed through EZ Runner by the original shipper and through
the tracking number for which the claim is to be filed.
b. The claims process is intended and reserved for product that was properly
skidded or packaged and may have been severely damaged due to negligent
handling while in possession of the transportation company.
c. Due to industry inconsistencies in standardized packaging and physical handling
of products shipped through the transportation system, minor damage may
occur occasionally and should be resolved between the shipping and receiving
facilities. Minor claims submitted will be declined.
• Claim filing requirements / timeline:
a. Claims for damage must be filed within 5 business days of final scanned receipt
on either the initial or return shipment. It is the responsibility of the original
seller to track the part shipment and/or the part return. If a part is
suspected missing a lost part claim must be submitted on or before 15
business days has elapsed from the date of the last scanning receipt.
b. If part received is damaged as a result of mishandling by the transportation
provider, then the damaged part must be graded through EZ Runner with
comments and photo documentation. Grading documentation must be
added to EZ Runner within 48 hours of receipt.
c. When entering a claim, the claimant must 1) select the claim type (Repair Claim
or Total Loss Claim); 2) enter the dollar amount; 3) attach a copy of the original
invoice; and 4) attach photo documentation and any additional documents
supporting the claim.
• Requirements when returning a part:
a. If part is being returned to Seller for any reason, the Return Authorization
function in EZ Runner must be used. To document condition of return parts, the
returning facility should upload photos of the part and packaging into EZ Runner
prior to shipping on the network. Failure to do so may adversely impact any
damage claims against the transportation provider(s) and the returning facility
may be found responsible for any damage claim. Parts returned to Seller on
manually added tags and/or without documentation or notification will be
shipped at the returning facilities risk.

Team PRP Operations Guide, Version 2021-1
3/11/21 INTERNAL COMPANY DOCUMENT Page 67
• Claims determination:
a. Claims will be reviewed and determinations will be made within 14 days of
receipt whenever possible. Claim decisions will be documented in EZ Runner
and the Transportation Company will settle with claimant within 14 days after
determination.
• Carrier right to possession:
a. If total loss claim is accepted, Transportation Company reserves the right to
possession of claim item.
• Claim settlements:
a. Total loss claims that are accepted will be paid at 50% of net invoiced amount.
Repair claims that are accepted will be paid at 100% of agreed repair cost
estimates not to exceed 50% of the invoice amount.
• Claim payout:
a. When it is determined of the singular responsibility for the loss of damage, the
responsible Transportation Company will pay claimant.
b. In the case of a shipment interlined between two Team PRP contracted carriers,
and it is determined to be dual responsibility for the loss or damage, each
Transportation Company will pay claimant their share of the settlement on
separate checks.
c. When an insert yard’s truck is part of a route; the insert yard assumes an equal
portion of the damage risk and a proportion payout of an approved claim.
Exceptions are made when there is evidence the Transportation Company
damaged the part while in their possession. To mitigate an insert yard’s portion
of the damage liability, the insert yard and / or their driver should photo
document part damage and upload the photo(s) in the EZ Runner system during
the transfer of such damaged part from the Transportation Company. When it
cannot be determined where the damage occurred on the route, the
Transportation Company(s) and Insert yard(s) will pay their share of the
settlement. The insert yard should reimburse the claimant for their share of the
claim.
4.1.1.4.5. Loss or Damage Settlement
• For a settlement to take place, a fault determination and claim approval must be made by the Claims Committee that meets weekly to review claims.
• Damage claim payments are made at cost of goods sold or for cost of repair. Lost parts claims are paid at cost of goods sold. Cost of goods sold is assumed to be 50% of invoiced value.
• Responsibility for payment of the claim rests with each of the parties that transported the part unless one or more of the parties can provide proof it was not responsible, such as images of the part while in its possession showing no damage.
• In addition to the transportation contractors, the parties responsible for payment include an insert facility that either delivered the part to another location for transport or collected the part from a location for transport to its facility.

Team PRP Operations Guide, Version 2021-1
3/11/21 INTERNAL COMPANY DOCUMENT Page 68
4.1.2. Cross Platform Shipping Team PRP has a standing agreement with Midwest Runner9 that allows recyclers who
are not members of both trading groups the ability to buy and sell within either group.
Starting March 2nd, 2020 any current member of Team PRP who wishes to participate, is
able to trade with any member of the Midwest Runner and visa-versa. This is an opt-in
program designed to enhance sales opportunities for the members. There is a separate
billing structure for those who choose to participate in cross-platform shipments. Previous
billing structures within PRP and Midwest remain the same for everyone within their
respective group and for those who are members of both networks. Please refer to Team
PRP’s members-only web site for further details9.
▪ Warranties on cross-platform transactions are between buyer and seller and warranty provisions pertaining to Team PRP only transactions included in this guide do not apply. If you are buying cross-platform make sure you ask about warranties, and if you are selling make sure you clearly indicate warranty provisions.
▪ As with warranties, return policies are also between buyer and seller. ▪ If you are shipping parts in a cross-platform transaction you must still package your
parts in accordance with Team PRP standards to protect your parts properly. ▪ Do not use Team PRP provided panel armor to ship doors cross-platform. ▪ Cross-platform transactions do not require you to follow Team PRP guidelines and
standards for quality or part preparation but use common sense and courtesy to your trading partner.
4.1.3. PRP TFWW (formerly known as DLS) Discount Program and other LTL Team PRP TFWW is a program for
LTL (Less Than Load) shipments
under terms negotiated between
Team PRP and TFWW (TForce
Worldwide) that provides better
shipping rates and conditions
available only to Team PRP
members. Under this program, the
shipping rates are heavily discounted
from “retail” rates and even below
rates negotiated by individual members with selected carriers. In addition, the carriers do
not require engines and transmissions to be boxed since, abiding by the standards
established by Team PRP, the carriers know the parts will be clean and drained of any
fluid.
Rates are published using an easy-
to-use web site powered by Mercury
Gate, a leading technology provider
for the transportation industry. Here
are some of the benefits available
when shipping parts using Team
PRP DLS Discount Program:
9 Consult the Team PRP members-only web site for details on cross-platform shipping or contact the Team PRP
Director of Logistics or your Regional Director.

Team PRP Operations Guide, Version 2021-1
3/11/21 INTERNAL COMPANY DOCUMENT Page 69
• Over 40 LTL carriers nationwide to choose from, offering a wide variety of rates and
delivery timelines.
• Discounted accessorial fee's (lift gate and residential deliveries)
• Some of the lowest LTL rates in the industry exclusively for Team PRP members to
help reduce freight costs.
• Up to a 5% total shipping revenue share for Team PRP to help fund additional Team
PRP programs.
• Use of the TFWW website to price, request and easily track shipments.
• Live customer support team that is exclusive for Team PRP members.
In addition, Team PRP and TFWW also facilitate the shipment of commodities and cores in
Gaylord boxes at very favorable rates.
An optional feature of the PRP DLS Discount Program with TFWW is the availability of an
insurance program. This zero-deductible policy insures goods and/or merchandise
consisting of new and recycled general commodities (such as recycled automotive parts)
that have been properly packaged for transit. Consult your TFWW representative for
details.
Damages: If a part is shipped by a freight company and arrives damaged or is lost, then
the seller can pursue a claim as follows:
• The shipping facility must contact the TFWW program coordinator to start the claims
process. TFWW will handle the claims process from start to finish.
• After receiving the member’s damage or loss claim, the TFWW coordinator will then
forward a copy of our claims form. The claim must include the following:
o One or more images of the part prior to shipping
o One or more image of the damaged area
o A copy of the sales invoice
o The TFWW Claims form completed by the customer (request the claims form
from the TFWW program coordinator or from the Team PRP’s members-only
web page for PRP LTL Discount Program
• If there is concealed damage noticed after the time of delivery the customer must
notify DLS of the concealed damage within 5 business days of discovery. Carriers will
deny concealed damage claims that are not presented to them within 5 business
days. In cases like this DLS steps up and will give the PRP shipping yard credit to
offset their loss.
For more information about PRP LTL Discount Program via TFWW consult with the
program web site or contact the program coordinator from TFWW for part types accepted
under this program and current rates.
4.2. Receiving Parts
4.2.1. Receiving and Part Inspection Arriving parts must be inspected immediately upon arrival or as soon as possible
following arrival in order to meet the tight deadlines for the processes for part grading and
damage claims. Team PRP standards stipulate inspection before the part is moved for
final delivery or within one working day of arrival at your facility, whichever comes first.
Specific receiving and initial inspection tasks must include:
Team PRP Operations Guide, Version 2021-1
3/11/21 INTERNAL COMPANY DOCUMENT Page 70
• Report receipt: regardless of your company’s processes, the shipping method for
the incoming parts or the type of part received, you need to report that the part has
arrived. For parcels that have an EZ Runner tracking record, you need to scan the
bar-coded tag to log the arrival into EZ Runner. For parcels transported by you as an
insert yard, the scan must be recorded when the part is picked up by your driver as
well as when it arrives at your facility.
• External inspection: thoroughly examine the packaging looking for any damage
(one would assume that damaged packaging would not have been used by the
shipping facility and if there is damage upon arrival this assumption must be
confirmed by contacting the shipping facility). If the packaging is damaged, this needs
to be included in your grading.
• Removal of packaging and part inspection: remove all packaging materials and/or
remove the part from its container or packaging and thoroughly inspect it. You are
looking for any evidence of damage regardless of whether it may have been caused
during shipment or that it was shipped damaged. While the cause of damage may not
ultimately matter to your customer, the process to remedy the situation does change.
You may try to preserve the packaging for further use when you ship the part but it is
better to have to repackage the part than to assume that is OK and ship it without
inspecting it first.
• Compare documentation: The vast majority of arriving parts include some sort of
documentation, probably included in a box or in an envelope attached to the
shipment. This could be an invoice, a delivery ticket or even a work order. Compare
this document to your company’s purchase order to make sure that what was
shipped was what your company agreed to purchase. Then compare the
documentation to the parts received to make sure that the part itself, the quantity and
the condition are what was expected. If there any deviations, discuss them with your
manager, your buyer or the sales person who agreed to the transaction. Report the
deviations and ask for further instructions prior to getting the part ready to ship to
your customer.
When receiving parts, it is tempting to try to save time and money by preserving the
packaging of the part just received, considering that most parts purchased from fellow
recyclers are probably going to be delivered to your ultimate customer. At the extreme,
the packaging is left relatively intact, only removing any labels, tags or other packaging
that identifies the original source. An example of this would be an engine that arrives via
the Team PRP trailer on a pallet and properly banded, or a tail light that arrives in an
intact and sealed box.
While this effort is commendable, it does represent a conflict with the objective of
thoroughly inspecting arriving parts prior to sending them on to your customer. The part
may be incorrect, may not match the description on the invoice or may have damage that
is not visible due to the positioning or packaging.
4.2.2. Reporting receiving discrepancies
IMPORTANT NOTE: Currently the EZ Runner software does not notify the shipping yard
when a part has been graded by the receiving yard. In order to allow the shipping yard to
file a damage claim, when grading a received part please notify the shipping yard as well.
This is only a temporary solution until the EZ Runner software is enhanced to provide
notification.

Team PRP Operations Guide, Version 2021-1
3/11/21 INTERNAL COMPANY DOCUMENT Page 71
• If the part received does not match the description or quantity on the invoice or if the
invoice does not match the items as defined on the PO, the receiving facility must
notify the shipping facility within one working day and request instructions on the
ultimate disposition of the part received. The easiest way to do this and the
recommended process by Team PRP is to use EZ Runner’s parcel grading program.
• If the part received shows any evidence of damage not described in the shipping
documents or if the packaging or the part itself shows evidence of possible damage
in transit, the receiving facility must notify the shipping facility within one working day
to allow the shipping facility to file a damage claim within the prescribed deadline.
• Regardless of the discrepancy or the possible cause, such discrepancies must be
logged into the parcel grading process defined by Team PRP as defined below.
4.2.3. Parcel or Shipment Grading (Exception Reporting)
IMPORTANT NOTE: Currently the EZ Runner software does not notify the shipping yard
when a part has been graded by the receiving yard. In order to allow the shipping yard to
file a damage claim, when grading a received part please notify the shipping yard as well.
This only a temporary need until the EZ Runner software is enhanced to provide
notification.
The primary method used by Team PRP to ensure compliance with its standards is the
parcel or shipment grading also referred to as the exception report. When a part is received
(and in some cases when the part is transferred at a Team PRP route system hub) an
individual receiving the part can create a parcel grade (also known as an exception report)
to indicate that something was amiss. This could include reporting that the quality of the
part was not as expected, that the part was not prepped properly, the packaging did not
conform to Team PRP standards, etc. Exception reports are used in a number of ways
including but not limited to the evaluation of how Team PRP members comply with the
standards. Team PRP maintains a database of such exception reports and, when a
member shows a pattern in not implementing the standards, corrective action can be taken
to help define the areas of deficiency and to offer help so the issues can be resolved. As
such, exception reports are not intended for use as a punitive tool but rather as a means to
help resolve issues so the member can improve compliance.
If the part is not going to be delivered in the condition described and you want to avoid a
negative parcel grade, you must disclose the special conditions when the order is placed
and note it on the invoice. If an item is not properly cleaned or prepared according to Team
PRP standards when it arrives, the individual receiving the part must consult the invoice for
special instructions or contact the selling facility to discuss the issue and resolve it. If there
is a dispute, it is to be reported based on the Dispute Resolution process and pictures
taken of the part in the exact condition it arrived.
All parcel grading for shipments between Team PRP members are recorded using the
parcel grading mechanism built into the EZ Runner software.
The Shipment Grading Reports generated from the system allow Team PRP to continually
measure member performance. For the reporting to be accurate and meaningful, it must
rely on an accurate count of all shipments between members along with those that resulted
in an exception. For this reason, it is extremely important that all shipments between
members be logged into the system and the best way to do this is to automatically upload
all shipments directly from your yard management system into the EZ Runner database.
Please refer to the documentation and training videos posted in TEAM PRP’S members
only web site.

Team PRP Operations Guide, Version 2021-1
3/11/21 INTERNAL COMPANY DOCUMENT Page 72
4.2.3.1. When to Grade a Parcel or Shipment • Parcels are to be graded by the facility receiving the parcel or part.
• Parcels are to be graded whenever the receiving facility determines that the parcel or
part does not meet Team PRP standards defined in this guide or elsewhere by Team
PRP as approved by either the Board of Directors or the Transportation Committee.
• The grading of a parcel or part is to take place immediately upon receipt of the parts
or as soon as an issue with the parcel or part has been determined.
• It is best that the grade includes digital images that show the issue when reporting an
exception along with a description and a selection of the reason and sub-reason for
the exception (see next section).
4.2.3.2. Parcel Grade Definitions What follows are the various reasons and sub-reasons available in the software for defining
exceptions along with a definition indicating under what conditions the reason or sub-
reason was selected.
Reason/ sub-reason Definition
Improper Packaging Packaging used was not according to Ops Guide, either increasing risk of damage or resulting in damage.
Improper box Box used was too light or not according to Ops Guide, either increasing risk of damage or resulting in damage.
Improper fill material Packing or fill material used was insufficient or not according to Ops Guide, either increasing risk of damage or resulting in damage.
Improper skid Pallet or skid used was too small (could cause the part to topple), too large (taking up excessive space), too light (causing the part to come off the skid) or unsuitable for handling with handling equipment or not according to Ops Guide, either increasing risk of damage or resulting in damage.
Incorrect part sent The part shipped doesn’t match or is not the same as the part ordered as indicated in the purchase order or communicated verbally or in writing by the buyer to the seller.
Completely wrong part Seller shipped a part that is completely wrong (wrong part type, wrong vehicle, wrong trim level, etc.) compared to the purchase order.
Incorrect features Seller shipped a part that, while it may interchange, lacks some of the features requested by the seller and specified by the ultimate buyer based on the purchase order.
Incorrect year Seller shipped a part from a vehicle year that doesn’t match the PO and may not interchange (with or without significant modifications) or may make the part unsuitable for the ultimate buyer.
Left/Right discrepancy Seller shipped the wrong side as defined in the PO.
Late part-shipped late Shipping records (EZ Runner’s tracking record) indicates the part was shipped later than stipulated or expected, possibly negatively impacting on-time delivery to the ultimate customer.
Shipped late by supplier Shipping records created by the supplier (EZ Runner’s tracking record) indicates the part was shipped later than stipulated or expected, possibly negatively impacting on-time delivery to the ultimate customer.

Team PRP Operations Guide, Version 2021-1
3/11/21 INTERNAL COMPANY DOCUMENT Page 73
Not cleaned/prepped The shipper did not clean or prep the part according to Ops Guide standards prior to packaging or shipping.
Fluids not drained Upon arrival, receiving member noticed that fluids had not been drained from one or more parts as required in the Ops Guide.
Not packaged per guide. Not packaged as required or suggested by the Operations Guide.
Part not cleaned The part was not degreased or cleaned as specified in the Ops. Guide. The part will require further cleaning by the receiving yard prior to delivery to the ultimate customer.
Part not prepped properly The part was not prepped as specified in the Ops Guide. The Guide clearly defines that broken or damaged parts that don’t belong in the assembly should be removed, that wires should not be cut with remnants still on the assembly and red plugs or tape should be used to cap open orifices where fluids normally flow.
Part mislabeled, not marked The part was not marked, was mismarked or not labeled. While this is optional per the Ops Guide it is recommended just in case the delivery tag goes missing or the part needs to be traced.
Incomplete part Components that were either assumed to be included, or are specified as included in the PRP definition of an assembly in the Ops Guide or other PRP documentation were missing when the part was received (either in the same packaging or separately).
Missing core comp. One or more of the components of the order as defined in the Ops Guide were not included with the parcel or elsewhere in the same shipment.
Missing incl. accessories Accessories that were either assumed to be included or are specified as included in the PRP definition of an assembly in the Ops Guide or other PRP documentation were missing when the part was received.
Wiring cut or Other Wiring or another element (such as connecting hose or line, etc.) that are built into the part or assembly or must be intact for it to be installed was received cut, possibly rendering the part as unusable.
More damage than described
The part received varies substantially and negatively when compared to the description on the invoice and/or PO, or what was described in writing prior to purchase.
Missing parts The part or assembly received is missing some parts that were expected, were to be included according to the invoice or were promised as included either in writing or verbally.
Excessive rust The part has more rust that originally described
Excessive bondo or other coverup
The part has been repaired and has more bondo or other cover substance than previously described
Excessive damage to mechanical part
A mechanical part or component has excessive damage that may impact its performance or customer acceptance
Aftermarket part The part or one of its components is aftermarket and not acceptable to the customer
Improper prior repair or paint
The part has been previously repaired improperly and or painted with paint that hinders its acceptance by the customer
More damage by 1 unit The condition of the part is about 1 unit of damage worse than the condition as described on the invoice or in writing.
More damage by 2 units The condition of the part is about 2 units of damage worse than the condition as described on the invoice or in writing.
More damage by 3+ units The condition of the part is about 3 or more units of damage worse than the condition as described on the invoice or in writing.
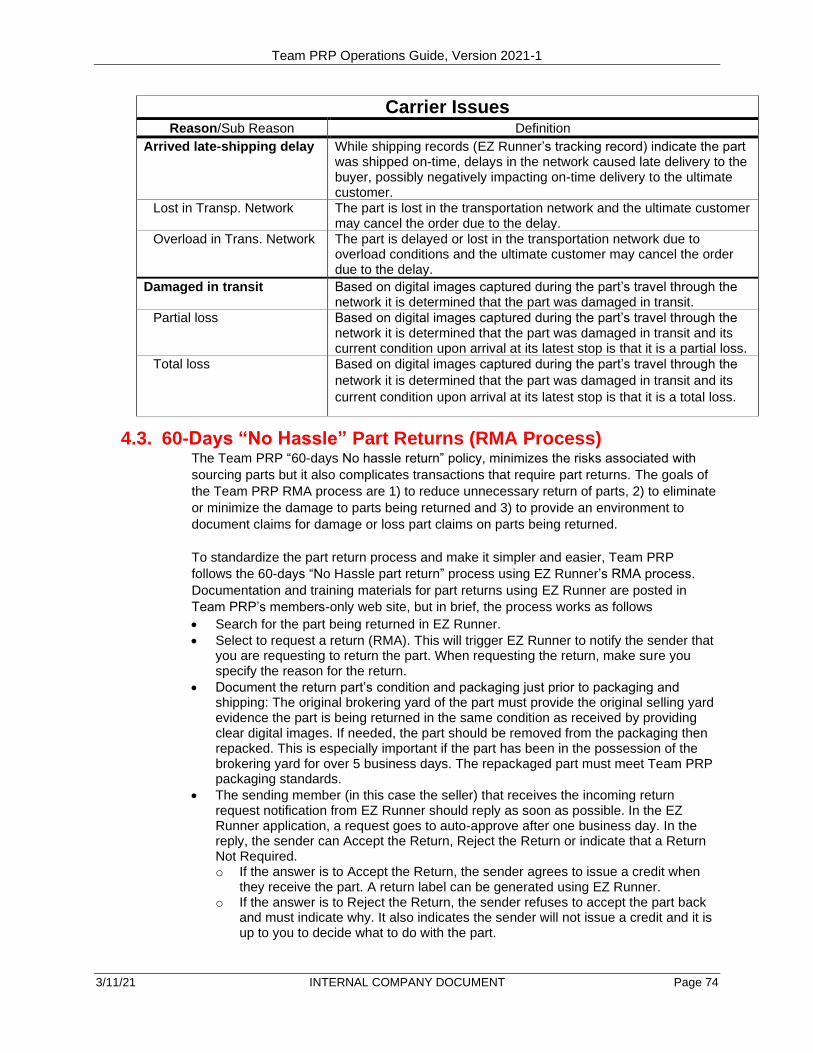
Team PRP Operations Guide, Version 2021-1
3/11/21 INTERNAL COMPANY DOCUMENT Page 74
Carrier Issues Reason/Sub Reason Definition
Arrived late-shipping delay While shipping records (EZ Runner’s tracking record) indicate the part was shipped on-time, delays in the network caused late delivery to the buyer, possibly negatively impacting on-time delivery to the ultimate customer.
Lost in Transp. Network The part is lost in the transportation network and the ultimate customer may cancel the order due to the delay.
Overload in Trans. Network The part is delayed or lost in the transportation network due to overload conditions and the ultimate customer may cancel the order due to the delay.
Damaged in transit Based on digital images captured during the part’s travel through the network it is determined that the part was damaged in transit.
Partial loss Based on digital images captured during the part’s travel through the network it is determined that the part was damaged in transit and its current condition upon arrival at its latest stop is that it is a partial loss.
Total loss
Based on digital images captured during the part’s travel through the
network it is determined that the part was damaged in transit and its
current condition upon arrival at its latest stop is that it is a total loss.
4.3. 60-Days “No Hassle” Part Returns (RMA Process) The Team PRP “60-days No hassle return” policy, minimizes the risks associated with
sourcing parts but it also complicates transactions that require part returns. The goals of
the Team PRP RMA process are 1) to reduce unnecessary return of parts, 2) to eliminate
or minimize the damage to parts being returned and 3) to provide an environment to
document claims for damage or loss part claims on parts being returned.
To standardize the part return process and make it simpler and easier, Team PRP
follows the 60-days “No Hassle part return” process using EZ Runner’s RMA process.
Documentation and training materials for part returns using EZ Runner are posted in
Team PRP’s members-only web site, but in brief, the process works as follows
• Search for the part being returned in EZ Runner.
• Select to request a return (RMA). This will trigger EZ Runner to notify the sender that you are requesting to return the part. When requesting the return, make sure you specify the reason for the return.
• Document the return part’s condition and packaging just prior to packaging and shipping: The original brokering yard of the part must provide the original selling yard evidence the part is being returned in the same condition as received by providing clear digital images. If needed, the part should be removed from the packaging then repacked. This is especially important if the part has been in the possession of the brokering yard for over 5 business days. The repackaged part must meet Team PRP packaging standards.
• The sending member (in this case the seller) that receives the incoming return request notification from EZ Runner should reply as soon as possible. In the EZ Runner application, a request goes to auto-approve after one business day. In the reply, the sender can Accept the Return, Reject the Return or indicate that a Return Not Required. o If the answer is to Accept the Return, the sender agrees to issue a credit when
they receive the part. A return label can be generated using EZ Runner. o If the answer is to Reject the Return, the sender refuses to accept the part back
and must indicate why. It also indicates the sender will not issue a credit and it is up to you to decide what to do with the part.
Team PRP Operations Guide, Version 2021-1
3/11/21 INTERNAL COMPANY DOCUMENT Page 75
o If the answer is that Return Not Required, you have the sender’s authorization to dispose of the part and a credit will be issued for the value of the part (which may be a negotiated value).
• EZ Runner sends an email notification to the sender when an RMA was created and instructs the user to respond.
When the authorization to return the part is received, it is to be returned in the same
condition as when received (unless otherwise negotiated). Granted, there are instances
where a part was partially disassembled or otherwise prepped and is now being returned,
or the time lag for the return is greater than 60 days, but whenever possible the condition
is expected to be the same as when received and the request to return is expected to be
initiated within 60 days of the date of invoice. If it is not, it is required to let the seller
know. The part must also be shipped with care. When packaging a returning part, use the
same care as for a part being shipped to protect it from shipping damage. See the
packaging and shipping guidelines for the part in another section of this Guide for further
details. When being returned, doors, like other parts being returned, must be packaged
the same way as when being shipped. If lamps, hinges, etc. are separated from the
assembly, they need to be prepared separateley and have shipping tags and tracking
numbers of their own
Details relating to the timing and value of credits being issued due to a return or from an
authorization to dispose of the part in lieu of a return are included in the Credit Memo
section of this guide.
Team PRP Operations Guide, Version 2021-1
3/11/21 INTERNAL COMPANY DOCUMENT Page 76
5. Warranties
5.1. Team PRP Standard Warranties The purpose of a warranty, regardless of whether it is between a seller and a customer or from
one seller to another seller, is to give one party the assurance that the other party will provide
goods or services in accordance with specific facts and/or conditions.
Team PRP encourages members to engage in positive and constructive dialog with fellow
members and customers in order to maintain the goodwill of our members as well as the
customer and to negotiate additional terms, discounts or refunds depending on the individual
circumstances of each transaction and the members’ relationship with each other and with the
customer. The goal is to help increase sales for all Team PRP members and to help sustain a
high and positive image for Team PRP and all its members. In many cases, a financial
adjustment goes a long way toward keeping the other party happy.
5.1.1. Partner-to-Partner Warranty Let’s assume a situation for a sale between Team PRP partners. Member A (the seller)
sells an engine to Member B (the broker) who, in turn, sells the engine to a repairer who
then installs it in the owner’s vehicle. It is assumed that Member B will provide the repairer
and/or vehicle owner with their standard or an optional extended warranty (covered in the
section below), but the key difference is that Member B was not the initial provider of the
engine and may have no way to verify the engine’s condition. Member B will likely assume
that Member A followed quality assurance processes to minimize the chances of engine
failure within the warranty period extended by Member B, otherwise a notation would have
been made to the inventory record or the condition of the part so as to have been included
as part of the sale.
Since the sale of the part is taking place under the umbrella of Team PRP and following
Team PRP standards defined in this Guide and elsewhere, it is imperative that Team PRP
define the conditions under which the sale is taking place to minimize risk for both
members and to set forth the criteria under which a warranty claim relating to the sale is to
be handled so as to be fair to both members as well as the customer and Team PRP (since
the customer may associate the results of the transaction with Team PRP as an
organization).
5.1.1.1. Terms of the Partner-to-Partner Warranty • Unless noted on the invoice or other transaction documents, the minimum length of the
warranty for mechanical parts sold between partners is 6 months, parts only.
o If the Seller provides a warranty that is longer than 6 months and this is stated in
transaction documents (i.e., the invoice), then that will be the length of the warranty.
o If the Broker has purchased an extended warranty that is specifically listed as a
separate line item on the invoice or there are indications on the invoice or other
transaction documents that the extended warranty is built into the price, and the
length of the extended warranty is longer than the 6 months minimum required by
Team PRP then that will be the length of the warranty.
o The warranty covers only the parts purchased and not any associated parts.
o The warranty does not cover labor (either by the broker, installer or another party) or
freight costs unless negotiated in advance between the Seller and the Broker.

Team PRP Operations Guide, Version 2021-1
3/11/21 INTERNAL COMPANY DOCUMENT Page 77
o The warranty does not cover any other costs, such as car rental, labor by a third
party or the cost of an inspector to determine the cause of failure. Such costs,
however, could be subject of negotiation between the Seller and the Broker.
o The warranty will be in effect provided that the part is installed and maintained by a
qualified person in accordance with the processes and procedures defined the by
vehicle’s manufacturer.
o The warranty is in effect provided the installation is carried out in the US or Canada.
o For the warranty to be in effect, the part’s functionality must not be altered other
than as required to be installed and in accordance with the Interchange notes (as in
B fits A by changing some parts).
• The warranty between partners begins on the date of the invoice unless otherwise
defined on the invoice. This is even if the part is delayed in shipping or there is a lag
before the part is installed.
• In the event that a part is replaced during the warranty period, the warranty for the
replacement will be the balance of the time left from the original warranty and will not
restart another 6-month warranty period.
• The warranty covers any part sold from one Team PRP member to another where both
were members in good standing at the time of the sale.
5.1.1.2. Warranty Inspection Team PRP does not require a warranty inspection prior to the filing of a warranty claim
between partners. However, should the partners agree that an inspection is to be made
and have agreed on how to pay for the inspection, Team PRP has preferred vendor
relationships with two inspection services: Warranty Inspection Services and Southwest
Inspections. Both offer preferred rates and benefits to Team PRP members.
In addition, URG offers a subscriber-based warranty claims program with its dedicated
toll-free number, the use of ASE certified mechanics and support staff, a tracking
mechanism to manage claims and dedicated URG claims software. Contact URG for
details or consult the Warranty Claims Program tools in the URG web site.
5.1.1.3. Partner-to-Partner Warranty Indemnification The only indemnification or compensation REQUIRED by Team PRP is for a credit to be
issued for the net value of a part that was sold with a Partner-to-Partner warranty as
defined in this document and which subsequently failed during the warranty period for
which the brokering member requests a credit. The selling member must approve the
credit and indicate if the part is to be returned or disposed of.
5.1.2. Team PRP’s Coast to Coast Customer Warranty Policy Team PRP members have agreed to abide by the high-quality standards defined in this
Guide and pride themselves in providing the highest level of quality relating to the
recycled OEM parts they sell. Parts are performance-tested using the most current
industry practices and in accordance with the best uniform standards in the industry. This
permeates throughout the process from the purchase of the source vehicle, through
inventory and dismantling, to quality assurance and quality control and to part
preparation, packaging and shipping. However, since each member is independent and
since how the quality standards are carried out varies, the “standard” and extended
warranties each offers vary as well.
• To professionals (insurers, auto body repairers and mechanical repairers) a customer warranty is important because their reputation is on the line with every repair they
Team PRP Operations Guide, Version 2021-1
3/11/21 INTERNAL COMPANY DOCUMENT Page 78
pay for or carry out and failure of a part will likely reflect on their work, their KPI’s, and will require additional labor to correct.
• To a consumer, a customer warranty provides confidence when purchasing an OEM recycled part which, in their mind and regardless of how we as recyclers feel about it, represents a higher risk than when purchasing new.
In short, a superior customer warranty gives Team PRP an opportunity to prove to the
industry and consumers that Team PRP is the very best.
5.1.2.1. Team PRP Customer Warranty Policy Team PRP requires that each of its members:
• Offer a variety of standard and extended warranties designed to fit virtually any need
and budget.
• One of the warranties offered must be at no additional cost to the customer.
• Their sales staffs must be trained to explain each of the warranties available for the
customer to choose from.
• Must ensure that the warranty terms are clearly stated on the invoice.
• The stated warranty must stipulate a length of time, what is covered under the
customer warranty, what to do in case of failure and any conditions or limitations.
• In the event of a customer warranty replacement, the term of the warranty does not
begin again with the replacement part and it is valid until the expiration of the original
warranty.
5.1.2.2. Why does Team PRP Need a Coast-to-Coast Customer
Warranty Having a national presence offers Team PRP and its members a strategic advantage
over most other recyclers. With most large insurers having a regional or national
presence and with consolidation in the auto body and mechanical repair business placing
related shops in wide regional areas, a Coast-to-Coast customer warranty offers
assurance that the part has been subject to uniform high quality standards regardless of
its original source and that the supplier(s) will stand behind the part even if the ultimate
customer were to move or be traveling away from home. To achieve this, it is necessary
that all Team PRP members agree with and abide by the standards and criteria defined
by Team PRP in this Guide.
5.1.2.3. Coast-to-Coast Customer Warranty Claims • If a customer warranty claim is made to you and you were the original seller of the
part, you are expected to make every effort to meet or exceed the terms of your
customer warranty. Keep in mind that, compared to the total number of parts sold,
warranty claims represent a minimal number of events. Look at this as an opportunity
to prove to your customers that customer care and ensuring quality is a primary goal
and that a negative image created by the failure of the part could damage your image
and that of Team PRP.
• As a member of Team PRP there is the possibility that you may be contacted for a
part failure on a part you did not sell. It is one of the strategic advantages of Team
PRP to provide customers with the added assurance that warranty claims will be
honored coast-to-coast. Should such an unlikely event occur, identify the selling
member and contact them proactively to assist in coordinating the necessary
activities to satisfy the needs of the customer and your Team PRP partner.

Team PRP Operations Guide, Version 2021-1
3/11/21 INTERNAL COMPANY DOCUMENT Page 79
6. Core Charges Like with any other auto recycler, the sale of cores to rebuilders and part recyclers is an integral
part of the revenue stream of a Team PRP member. As recyclers, we tend to think of cores
relating to engines, transmissions, many electrical parts, ECM and so on but, in today’s market,
any part could be an opportunity for core charges and sales. Therefore, core charges and the
return of cores to the Team PRP member selling a part to another member is likely to be a part of
the transaction. To simplify the process, Team PRP has established a set of rules or guidelines to
make the understanding of cores more implicit thus also simplifying the transaction itself since
both the seller and the buyer understand what the rules are.
6.1. Partner-to-Partner Core Charges
6.1.1. Need Core Back (NCB) • If you, as the selling facility, want the core back, indicate this during initial discussions about
the part and enter NCB (Need Core Back) in the part description.
• If the selling facility wants to get the core back from the brokering facility, the line item on the invoice must be identified as NCB which stands for “Needs the Core Back”, and the value of the core must still be included in the invoice for the event that the brokering facility does not get the core back from the customer or the core is unusable by the selling facility.
• The Team PRP partner that indicates NCB on a part expects to receive a rebuildable core – known as “like for core” back. If the core has damage and is not rebuildable or if the core being returned is not the same interchange number as the original part sold, the selling and brokering partners will negotiate the value of the returned core and agree on a core refund amount.
• An NCB notation requesting that a core be returned applies even if the value of the core is below the minimum value as defined in the next section.
• The Hollander interchange number for the NCB part must be noted on the core in paint pen before sending it back. The number entered must reflect, as accurately as possible, the interchange number for the core regardless of whether it is the same as the original part sold or not.
• It is the responsibility of the facility that wants the core back to pay for the return freight for the core unless otherwise negotiated in advance.
6.1.2. Minimum Core Value • Team PRP has established a minimum value of $100 for a core to be subject to its core
policy. Core valued at less than $100 based on the URG core value tables (see section below) should not be included in a transaction between Team PRP partners.
• The value of the core will be as defined by the latest version of the URG core values table (see URG section below)
• When participating in the URG core values program, please make sure the updates to the core values are automatically downloaded and installed or do so manually or a routine and frequent basis as the values can change drastically very quickly.
6.1.3. 50-50 Core Split (Core Revenue Sharing Program) • All cores (except those identified as NCB or those valued at less than $100) will be handled
using the Team PRP revenue sharing plan and are not to be returned to the vendor facility for credit.
• Under this revenue sharing program, the selling member charges the brokering member 50% of the value of the core as defined by the URG core value table. The brokering member agrees to pay the 50% of the core value when paying for the part. The brokering member is expected to charge its customer for at least 100% of the core value. If and when the brokering member receives the core back from the customer, they are free to sell the core to any of the core buyers. If the core has not been identified as NCB, and in an effort to minimize part traffic using the trailering system, there is no need to return the core.

Team PRP Operations Guide, Version 2021-1
3/11/21 INTERNAL COMPANY DOCUMENT Page 80
• The core charge must be entered into the invoice as a separate line item so the core revenue does not impact brokered profit margin.
• Under no circumstance should the brokering member return the core back to the selling member unless the part was noted as NCB and meets the criteria defined above for NCB parts. That is the case even if the current value of the core is considerably below the value at the time of sale as defined by the URG core values table.
6.1.4. URG’s Core Program Team PRP in conjunction with URG has established a program whereby the most current core values are entered into a member’s recycler management system keyed to the corresponding Hollander number. As a Team PRP member you need to contact URG to have the core values populated in your recycler management system. For core values not keyed to a Hollander number a generic value table defines the core value and the core charges between members (or half of the core value per the 50-50 Core Split Section above).
Team PRP has a preferred vendor relationship with several core and commodities companies. In
addition to the core and commodities programs negotiated between Team PRP and selected core
buyers, the URG has negotiated favorable rates with several core companies and receives
current core prices from them. Under this program, the URG captures all the core prices and
creates a master database with the highest core price for each part and Interchange number.
This, in turn, can be loaded into the recycler management systems of participating URG
members. For each system, the status is as follows:
System Status
Pinnacle Classic
and Pinnacle Pro
Core prices are imported into their system and you can also have URG –
Core Value as a URGnet member. This allows you to see which core
company’s price are being displayed.
Powerlink Core prices are imported into their system and you can add URG – Core
Value as an EDEN exchange partner. This allows you to see which core
company’s price are being displayed.
Check Mate Core prices DO NOT import into their system. You can add URG – Core
Value as an EDEN exchange partner to see the core prices
To participate in the URG Core Values Program:
• You must be a URG member to sign up for this program and the fee for participation is $50/month.
• Integration: Team PRP publishes a generic core value table for instances where a Hollander number or core doesn’t have a core value. The table can be accessed via the Team PRP members-only web site. The core values can be entered into any one of the leading inventory management systems via a download and installation as indicated above. For specific instructions on how to perform this task please consult the Team PRP Commodities/Core Program guide posted in Team PRP’s members only web site.
• When participating in the URG core values program, please make sure the updates to the core values are automatically downloaded and installed or do so manually or a routine and frequent basis as the values can change drastically very quickly.
Team PRP Operations Guide, Version 2021-1
3/11/21 INTERNAL COMPANY DOCUMENT Page 81
7. Credits and Credit Memos Please review the section on the Part Returns (RMA Process) at the end of the Shipping and
Receiving Standards section of this Guide. That section defined the process to be used for requesting
and informing both parties in a transaction of the need to return a part. The process uses data already
in the EZ Runner tracking system to facilitate the request and authorization of a return.
Once an RMA request is issued and approved, defined in the resolution is the disposition of the part.
The sending member may either request that the part be returned or that the part should be disposed
of if its value doesn’t justify the cost of the return. An important issue when discussing credits is the
timing of the issuing of the credit itself which is not addressed by the RMA process.
7.1. Credits Not Managed Using the RMA Process There are instances where credit is requested and granted that are not within the scope of the RMA
process. Examples include:
• Partial credit for a part that is not being returned (for example, credit due to the condition of a part
that was accepted by the ultimate er at a lower price).
• Parts that were not tracked using EZ Runner (such as the seller delivering the part directly to the
brokering member, shipped using a common carrier or drop shipped directly to the ultimate buyer).
• Credit for a part that was supposed to be part of the sale but was not shipped so there was no
tracking number issued (for example, the sale of an engine that was to include an alternator still on
the engine but was never shipped).
• Credit, full or partial and negotiated, for a core deposit either miscalculated, unwarranted or for a
core whose real market value is substantially lower than the core deposit, even after a 50-50 split.
7.2. Manual Request for Credit (not managed using the RMA
process) Even when requesting or approving a credit not using the RMA process, it is recommended that the
request and approval follow the RMA process and timing as close as possible. Common courtesy
dictates that it is best to begin communicating with the seller immediately upon learning that a credit
may be in order and allow the seller an opportunity to review the situation. As stated elsewhere in this
Guide, Team PRP trading partners are to be treated as your best customers. The request for a credit
must be clear and preferably in writing and a record of the request must be retained in case of
disagreement. If the facility receiving the credit request believes only partial or no credit is to be
issued, this must be communicated immediately and resolved. If this cannot be resolved between the
two Team PRP members, then the problem is to be addressed with the Team PRP Regional Director.
If the Team PRP Regional Director cannot facilitate a compromise, then the problem may be
submitted for dispute resolution.
• The brokering member is expected to contact the seller and provide details such as invoice
number, date of sale, part type and Interchange number, pertinent part description and the reason
why you are requesting a credit or a refund.
• If the part was received and it is not in the condition as described, the receiving member must
contact the sending member immediately or within one working day to allow the selling yard to file
a damage claim if warranted. This is also the case where an NCB core is received but is not in
usable condition and therefore not justified a core credit.
• If the request is for a damage partial credit, the process must start within one working day of receiving the part, if possible. If the part was delivered to the er who then requests a credit, the process must start immediately upon hearing from the er. It is NOT acceptable to seek a credit from the seller if the part matches the condition described.
• Prior to agreeing to a credit – partial or full – there must be discussion and agreement between the two parties unless arrangements were made in advance.
Team PRP Operations Guide, Version 2021-1
3/11/21 INTERNAL COMPANY DOCUMENT Page 82
• Regardless of whether you are the seller or the broker, keep in mind that one of the goals of Team
PRP is to help the repairer minimize cycle time so a decision on the outcome of the credit, sending
a replacement part and the disposition of the original part must be made quickly. Of course,
another goal of Team PRP is to establish and maintain a positive image in the mind of the
customer so, in the discussions, keep in mind what is best for the er and aim to exceed the
customer’s expectations in the handling of the credit. It is advisable to send the credit to the er
immediately upon implementing the resolution.
• All credit memos for damage issued after the sale terms were agreed upon will be split equally between the buyer and the seller, unless otherwise agreed upon, with a copy sent to the seller. The buyer will not ask the seller to reimburse the credit memo amount if it is past sixty (60) days from the date of the invoice. Credit requests for lost sale requests is expected to be initiated within 60 days.
7.3. Issuing a Credit Credit memos must be issued immediately after discussions and negotiations regarding the part in
question are concluded, and if at all possible, within the same statement period as the original
charge. A copy of all credit memos must be sent to the other Team PRP member by fax or email. The
telephone call authorizing the credit must be documented with the date, time, and reason for
return/credit, original invoice number, and the person’s name that authorized the credit.
• Credit memos must have notes explaining the reason for the credit, the original invoice number,
and any other pertinent information that might be helpful to accounting in resolving any issue at
the time of payment.
• If the credit is for repair time or replacement components, this is to be noted on the credit memo,
and the credit shall be issued for the amount agreed upon when the seller was notified that a
credit would be necessary.
• Part condition credits: As stated elsewhere in this Guide, brokered parts must be fully inspected
upon arrival. If the part condition does not meet the description on the invoice, an exception report
must be initiated and the seller must be notified immediately and credit negotiated. NOTE: If an
agreement for part condition credit is arrived at between the two parties there is expected
to be no subsequent request for credit – in other words, no double dipping for the same
condition issue.
• In the event that the brokering member requests a credit from the shipping member for
compensation due to part condition, the selling member of the sourced part reserves the right to
request that the brokering member provide substantiating evidence that a credit was issued to the
customer.
7.4. Restocking charges For the vast majority of parts, Team PRP members are not to charge fellow members for restocking
charges. The only exception would be the return of parts that were cuts, where the buying member
approved the cut via signed cut sheets and the reason for the return is that the ultimate buyer did not
need or want to use the part or lost the job even though the part is as described by the original seller
as supported by data in EZ Runner. The amount of the restocking charge is intended to compensate
the original seller for the labor of preparing, cutting, packaging and shipping the part and for the fact
that the cut part is, for the most part, unsaleable. The amount of the restocking charge is $ 150.
(NOTE: cuts are considered non-returnable in transaction between Northeast members only).
Team PRP Operations Guide, Version 2021-1
3/11/21 INTERNAL COMPANY DOCUMENT Page 83
8. Financial Practices and Standards
8.1. Invoicing Invoices must include the
• PO number,
• an accurate part description,
• any helpful notes,
• the name of the person who placed the order. The part description must minimally include
• The interchange number. If the part does not have an interchange number, or is sold as a miscellaneous part, then the part description must include the year, make, model, stock number, and part description as indicated by the buyer. If this is not the same as the source vehicle, include source vehicle information as well (for example, left door panel for a 2010 Chevy Pickup 2 door, taken for the left door of a 2011 Chevy 1500 Silverado 2 door).
• VIN is mandatory on major components, when possible on other parts. When inclusion of the VIN is not possible, such as selling a new take off part or one that was acquired by brokering, including the VIN on the invoice is not required but a reason for no VIN must be included.
• Odometer reading of the source vehicle whenever possible
8.2. Part Returns and Credit Memos Credits and returns guidelines are defined in detail in the Credits and Returns section. Please
refer to that section for details.
8.3. Accounts Payables and Exceptions Regarding Payments As part of your participation in Team PRP, you agree to make sure that all of your company
pays fellow Team PRP partners no later than the end of the month. This means that your
payment checks for brokered parts needs to ARRIVE to your Team PRP partners, PRIOR to
the end of the month in which you received the statement. Remember that every part you
purchase from your partners carries a substantial discount, and it is both courteous and
expected that you pay Team PRP partners as quickly as possible after you receive your
statement.
Team PRP holds its members accountable for paying their partner’s statements quickly and
correctly. However, any individual invoices in dispute must be notated along with your
payments for documentation and as reminders to each other that there may be credits that
remain un-issued. It is the goal for each of the members to have their partner’s statements
reconciled by the 10th and checks mailed so they arrive no later than the end of the month.
Failure to pay your Team PRP partners on a timely basis as defined herein may be subject to
dispute resolution.
When submitting payments to another Team PRP facility, a listing of all the invoices and the
amount being paid on each invoice must be submitted with the check. If there are invoices on
a member’s statement that are not being paid, include an explanation accompanying the
payment indicating why the check does not total the amount due. If you do not receive a
statement please request one so both members can reconcile their records to the others and
proactively take care of any issues. You may not deduct cleanup costs without prior
authorization from the seller.
Payments from all Team PRP facilities must be applied as the paying facility specifies on their
payment remittance.

Team PRP Operations Guide, Version 2021-1
3/11/21 INTERNAL COMPANY DOCUMENT Page 84
• You are expected to pay other Team PRP facilities so the payment is received by the 28th of the month. If payment is not received by the beginning of the following month, then the member can contact the past due member’s accounting department to make immediate payment arrangements.
• If payment is not made within seven (7) business days of that phone call, the member’s Owner/Manager that is due payment can then escalate the issue to the member’s Owner/Manager that is past due to arrange payment. If it is still not received within seven (7) business days of that documented call, then a “Final Request” email needs to be sent to the past due Owner/Manager with a copy to the Team PRP Regional Manager documenting the failure to resolve or by submitting the issue for Dispute Resolution or Corrective Action.
• If the debt is not settled within sixty (60) days of the statement date then the delinquent member will be considered out of compliance with the Team PRP guidelines. At this time, the issue will be brought up for the Board of Directors for appropriate action.
• The only exception to this process is invoices that are in dispute. If payment is received from another Team PRP member and there are outstanding invoices that were not included in the payment, communicate with your salesperson to make sure there is not an issue with the transaction or a credit pending. In the event a dispute remains unresolved, the resolution process described in the Dispute Resolution Section, below, shall be followed. If the issue cannot be resolved within a reasonable amount of time, a mediation request can be submitted. Partners that have chronic past due account as a result of disputes may be subject to dispute resolution or investigated by the Board and appropriate action taken at their discretion.
8.4. Payment to Team PRP Payments to Team PRP are managed via automatic ACH withdrawals.
• Members receive a statement, usually via email, indicating the amount of the withdrawal and the date when the amount due will be withdrawn.
• The statement is sent to members at least one working day prior to the date of the withdrawal. The withdrawal is executed directly from the Team PRP financial offices.
• If a member’s dues or other charges are more than ninety (90) days in arrears, then that
owner’s voting privileges will be suspended and the right to attend meetings terminated by
the Boar, and may have his shares redeemed by the Company upon the vote of a majority
of the Board of Directors. In the event of any redemption, the share shall then be
cancelled and the owner shall receive no return of capital and shall have no further
interest or participation in Team PRP. Further details are included in the Involuntary
Termination section of the Team PRP Membership Guide.
8.5. Accounts Receivables See Accounts Payable section above that includes standards for Accounts Receivables.
Team PRP Operations Guide, Version 2021-1
3/11/21 INTERNAL COMPANY DOCUMENT Page 85
9. Dispute Resolution
9.1. Objectives relating to dispute resolution The main objective for the Team PRP Dispute Resolution process is to improve trading
conditions between Team PRP members by reducing transaction risks through a process
whereby disputes between members and between Team PRP and a member can be resolved
in a fair and friendly way. An additional goal is to improve the overall performance of members
by holding them accountable for failure to meet Team PRP standards as defined in this and the
Team PRP Operations Guide or others approved by the Board. The process does not include
disputes with non-members, disputes with customers, disputes with transportation contractors,
disputes with vendors or suppliers (even if they are preferred suppliers), or disputes by
members against Team PRP. Additional information about the Dispute Resolution process is
included in Team PRP members-only web site. What follows is a summary intended only as a
basic description of the process.
9.2. Disputes Subject to Resolution Any disagreement or dispute between members or between Team PRP and a member can be
submitted to Team PRP for the purpose of resolution. Typical examples of issues that could be
subject to resolution include but are not limited to:
• Lack of or insufficient payment
• Consistent late payment
• Disputes over part condition where the dispute exceeds $500
• Disputes relating to the receipt of parts purchased or sold
• Disputes regarding negotiated credits where the difference exceeds $500
• Disputes regarding the terms of a sale
• Disputes regarding who is to pay for certain costs where the discrepancy exceeds $500
• Disputes regarding ethics violations
• Disputes relating to the disposition of parts being or having been returned or cores where the value exceeds $500
• Complaints over the behavior of employees
• Complaints for refusing to meet or inability to meet performance standards
• Complaints for failure to abide by dispute resolution decisions
• Unwillingness to honor terms of a warranty where the warranty claim exceeds $500
The following are examples of issues that are excluded from this process:
• Disputes between Team PRP members and non-member recyclers, even if the non-member was a Team PRP member at the time of the transaction. Likewise, if the transaction occurred while the party was not a member and then joins Team PRP, the dispute resolution claim cannot be filed retroactively.
• Disputes between Team PRP members and vendors even if the vendors were defined as preferred vendors by the Vendor Relations committee. Such disputes should be directed to the Vendors Relations Committee chair or the Team PRP staff member assigned to the Vendor Relations Committee who will then bring the issue to the attention of the committee for review and action.
• Disputes brought by members against Team PRP or members of the Team PRP staff. Such issues should be brought to the attention of the Team PRP Executive Director or, if the issue involves the Executive Director it should be directed to the current Chairman of the Board.
• Disputes between Team PRP members and one or more of the transportation contractors. Such issues should be directed to the chairman of the Transportation Committee or the Team PRP Director of Logistics for review and possible action.
• For claims in the above section that have a cap of $500, claims for less than $500 will be rejected. Team PRP may still to proceed with Stages 1 and 2 in such cases but they will not be submitted to an arbitration task force and will be left unresolved.

Team PRP Operations Guide, Version 2021-1
3/11/21 INTERNAL COMPANY DOCUMENT Page 86
9.3. Process Overview The process relies on a combination of Team PRP staff and the Dispute Resolution Committee to
execute the process. When a dispute is reported to Team PRP, it will proceed in three stages:
1. Team PRP will first encourage both parties to resolve the issue without intervention. If that is not successful it is escalated to the next stage.
2. A mediator appointed by Team PRP meets with the disputing parties to try to resolve it. If that is not successful it is escalated once again.
3. A group of 6 Team PRP member owner/managers (5 principal members and one alternate) steps in to settle it. To arrive at a resolution, the group reviews documents about the claim submitted by both parties (the documents are redacted of names, addresses or other data that could help identify them so as to maintain objectivity). The group meets via teleconference to review the facts as submitted by the two parties then decides on and submits a course of action. The group will rule in favor of one party or even against both parties. Each case will be assigned severity (ranging from a minimum of 0.5 “flags” to 3 “flags”) by the review team and the severity will reflect their view of the potential action to be taken.
Once a decision has been made relating to the dispute, both parties are told of the decision and
one (or both) is instructed to take action to remedy it. It is assumed that the parties to the dispute
agree to abide by the terms and decisions of those trying to resolve it. All aspects of the dispute
are tracked by Team PRP using data entered into the Team PRP database. A case can only be
closed when the party found in favor indicates that the issue has been rectified to its satisfaction.
If either party fails to or refuses to abide by the decision or take the necessary action, a notation
is made on their record, including the date and severity. If a Team PRP member receives the
equivalent of 3 “flags” of severity in unresolved complaints a request is made to the Board to
terminate their Team PRP membership involuntarily10.
From the date the issue is first reported to Team PRP to its conclusion with a decision by the
group of arbitrators, the process is expected to take less than 30 days provided both parties
provide documentation on a timely basis and are willing to meet to resolve the issues without
delay. Decisions by the arbitration panel are not subject to appeal and are final.
9.4. Expected member action The expectation is that the two parties will act on a timely basis in accordance with the
resolution submitted by the Task Force.
• If the resolution is financial, settlement is to take place within 30 days of the notification of the results.
• If the resolution is other than financial, the notification will define the timeline for appropriate action and deadline for its implementation.
Failure to take action on the recommendation of the Task Force will be subject to corrective
action as defined by the Board.
9.5. Effects of a Finding For a detailed definition of actions consult the document posted in Team PRP members-only
web site. What follows is just a summary. Following a decision on a specific case:
• Participation and results of disputes are available upon request via email submitted to
either a Team PRP Regional Director or the Team PRP staff member assigned to manage
the Dispute Resolution process. An answer will be provided via a reply email. In certain
situations, and at the discretion of the Executive Director, a notification may be sent to all
Team PRP members advising of a decision.
• Refusal to implement a solution as decided using the process results in a penalty as
defined in the program document posted in Team PRP member’s only web site.

Team PRP Operations Guide, Version 2021-1
3/11/21 INTERNAL COMPANY DOCUMENT Page 87
• A repeated or constant refusal to implement the solutions as directed may result in a
member being submitted to the Board of Directors for possible involuntary termination as a
Team PRP member10.
10 A definition of involuntary termination is included in the Team PRP Membership Guide.
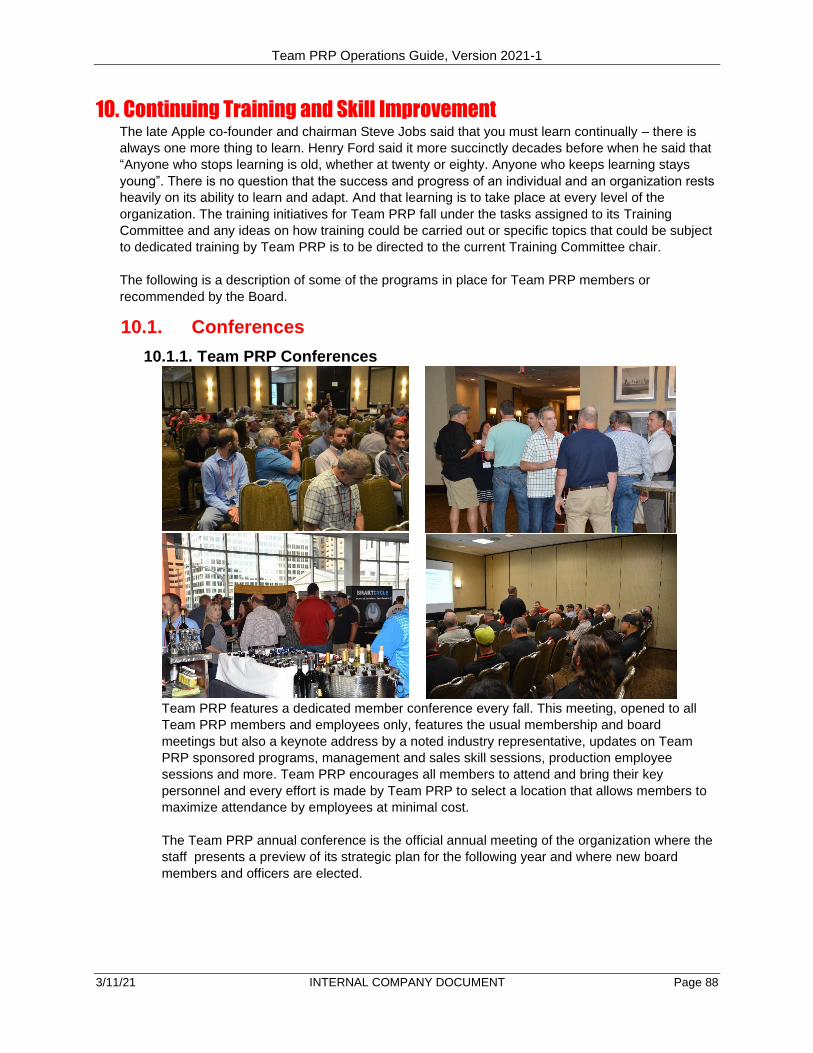
Team PRP Operations Guide, Version 2021-1
3/11/21 INTERNAL COMPANY DOCUMENT Page 88
10. Continuing Training and Skill Improvement The late Apple co-founder and chairman Steve Jobs said that you must learn continually – there is
always one more thing to learn. Henry Ford said it more succinctly decades before when he said that
“Anyone who stops learning is old, whether at twenty or eighty. Anyone who keeps learning stays
young”. There is no question that the success and progress of an individual and an organization rests
heavily on its ability to learn and adapt. And that learning is to take place at every level of the
organization. The training initiatives for Team PRP fall under the tasks assigned to its Training
Committee and any ideas on how training could be carried out or specific topics that could be subject
to dedicated training by Team PRP is to be directed to the current Training Committee chair.
The following is a description of some of the programs in place for Team PRP members or
recommended by the Board.
10.1. Conferences
10.1.1. Team PRP Conferences
Team PRP features a dedicated member conference every fall. This meeting, opened to all
Team PRP members and employees only, features the usual membership and board
meetings but also a keynote address by a noted industry representative, updates on Team
PRP sponsored programs, management and sales skill sessions, production employee
sessions and more. Team PRP encourages all members to attend and bring their key
personnel and every effort is made by Team PRP to select a location that allows members to
maximize attendance by employees at minimal cost.
The Team PRP annual conference is the official annual meeting of the organization where the
staff presents a preview of its strategic plan for the following year and where new board
members and officers are elected.

Team PRP Operations Guide, Version 2021-1
3/11/21 INTERNAL COMPANY DOCUMENT Page 89
10.1.2. Team PRP Sessions at URG Conferences The URG Conference is held every spring. Since many Team PRP owners and managers
generally attend the URG Conference, Team PRP usually holds an owners’ meeting in
conjunction with the URG Conference. During this session, Team PRP staff provide updates
on the state of the organization, updates on strategic initiatives and plans for existing or new
programs.
Both the URG and the ARA annual conferences include ample time to socialize and share
new ideas or gather information from fellow participants and industry vendors that can help
implement improvements back home.
10.2. Profit Groups Team PRP has negotiated agreements with two leading industry consulting firms to provide in
depth management training for Team PRP partners. This training is Team PRP specific,
reflecting the unique set of principles and strategies outlined in this guide. The overall goal is
to help Team PRP members give customers a superior buying experience - nationwide, which
will give Team PRP the opportunity to compete on a national level. Best Business Practices
for all Team PRP recyclers, when achieved, adds value to each recycling facility, in turn
paying dividends each and every day.
The primary form of management training is in the form of peer study groups called “PROFIT
GROUPS”. The groups meet on a regular basis two to three times per year to compare
performance and financial data, study their numbers, and learn from each other, to help each
grow their businesses. Some group meetings rotate among group members, so each facility
gets the opportunity to be the center of attention for that meeting and has the pleasure of
hosting the group giving them an opportunity for all others to get to know them better. In
addition to the in-person meetings, some profit groups may meet regularly by phone and on-
line to discuss progress toward goals defined at the meetings.
10.3. Team PRP Skills and Programs Training As new programs are implemented, Team PRP implements program-specific training sessions
to ensure that all members and their corresponding associates are familiar with the details and
know how to best apply the new programs to their operations. This ensures maximum
participation. The format of the training varies depending on the need and may range from
video tutorials posted on the Team PRP members-only web site, to webinars (some of which
are also recorded) to on-site training. Below are some examples of such training programs.
10.3.1. Parcel grading Team PRP, its regions and individual members rely heavily on exception reports to determine
which areas of a specific facility may warrant further improvement. Parcel Grading, also known
as exception reports can be created within the logistics tracking platform whenever a part
arrives and is fully inspected or at a later time. There can be a wide range of reasons for
creating an parcel grade, including but not limited to part preparation or packaging that does
not meet Team PRP standards, parts in conditions that vary from what was described at the
time of the order or as described on the invoice, etc. Team PRP has the ability to generate
reports from the parcel grading database that focus on a facility, a mode of transportation, the
part type, the type of packaging and more. These reports can then be used to implement
training programs specifically geared to reducing the incidence of exceptions. The training can
vary from webinars, seminars at the Team PRP Convention, video tutorials or even training
sessions at a facility where individuals can not only learn the skills but also practice them.
Consult with your Team PRP Regional Director for specific parcel grading-based training being
held at this time.

Team PRP Operations Guide, Version 2021-1
3/11/21 INTERNAL COMPANY DOCUMENT Page 90
10.3.2. Commodities Training Due to the increasing importance of commodities and core sales in increasing business
revenue, Team PRP implemented a training program focusing on this topic in 2015. Staged in
conjunction with one of Team PRP’s strategic partners for cores and commodities, the training
consists of a full-day session held at the partner’s facilities. During these sessions, individuals
designated as the commodities and cores coordinators at each facility learn how to value
various cores, how to market cores and commodities, how to find the best revenue sources and
how to manage the entire process from core charges to core sales. Consult with your Team
PRP Regional Director for specific details on how to designate an individual as the
Commodities and Cores Coordinator and when/where the next Commodities Seminar is to take
place.
10.3.3. Warranties Training:
Team PRP prides itself in having the best warranty on recycled OEM parts, a set of warranties
that have helped Team PRP members attract and retain professional repairers as their
customers as well as add incremental revenue from the sale of extended warranties. Team
PRP has implemented a dedicated training program consisting of videos and webinars that
help sales people define warranties, sell extended warranties and manage warranty claims in a
manner consistent with Team PRP standards. Consult with your Team PRP Regional Director
for specific details on training on warranties.
10.3.4. Participation in APU To encourage Team PRP members to participate in APU programs, APU Solutions developed
and produced a series of training videos on Shared Inventory Partners and on providing parts
to the APU network specifically for Team PRP members. These videos are posted in Team
PRP’s members-only web site and are available for play on any computer with play capabilities.
APU will continue to provide Team PRP with additional training materials as the need arises or
as programs change.
10.3.5. Miscellaneous Training Videos A wide variety of training videos produced by Team PRP or its strategic partners are posted in
and available for download and viewing from the Team PRP members-only web site. These
change from time to time so it is a good idea to visit the page occasionally to seen what new
videos have been posted that could be useful to your organization. The page provides access
to videos such as Basic of Fundamental Selling, Remanufactured Engines, Creating an
Exception Report, Following Up on Quotes, Parts Brokering Techniques, Sales Add-On and
much more.
10.4. Technical Skills Training There are currently very limited resources for the training of technical skills relative to recycled
auto parts. Team PRP monitors developments in this area on a continuing basis weighing
members’ needs to train their technical staff (dismantling, inventorying, buying, sales, receiving
and shipping, bookkeeping, etc.) versus the cost of developing programs of our own. The
estimated resources needed for our own program are considerably high. The continuing review
of needs versus resources currently resides with the Training Committee and the Board of
Directors and receives considerable attention from the Executive Director and the Team PRP
professional staff.
10.4.1. Resources Available To be effective, many topics that require training don’t need to be reinvented. A wealth of training
resources, tools and topics are already available via the internet. Some, like the ARA University,
require subscription and are subject to participation fees. In some of these cases, Team PRP has
negotiated special rates that make the programs more affordable for Team PRP members, thus
expanding participation and opening up new training opportunities.
Team PRP Operations Guide, Version 2021-1
3/11/21 INTERNAL COMPANY DOCUMENT Page 91
10.4.1.1. ARA University. ARA University offers training to Team PRP members at a negotiated rate. For details on all
the courses offered by the ARA University online go to the ARA University web site and click
on the Courses tab. In the site you will find modules for inventory specialists, plant
production, sales training, health, safety and compliance and more. These are learning
modules that a participant can take anytime and anywhere and most feature an achievement
test to provide the participant and his or her manager a clear indication of what was learned.
Because of the special arrangement between Team PRP and ARA with greatly reduced
participation fees, consult with your Regional Director for details on how to sign up for an
account and how to register employees.
10.4.1.2. Inventory and Yard Management System Providers Either in-person or via the web, the various yard management system providers offer classes
that focus on the use of their systems. For example, Hollander stages an annual conference
that includes training for Powerlink and posts training videos and other material on their web
site. CCC offers training programs and also stages an annual conference. More information
for Pinnacle training is available from their web site. Likewise, you can find training tools for
Checkmate on the Car-Parts web site and also stages conferences for their products.
10.4.1.3. Other Vendors and Suppliers Likewise, suppliers of services and equipment like forklifts, specialized machines for draining
fluids or body saws offer training on the use of their products and equipment and most of it is
free to their customers. And for URG members don’t forget the valuable training sessions
available every spring at the URG Conference. Finally, don’t overlook the benefits of
belonging to state or regional associations that stage meetings at least once a year with
training sessions and yard visits.
In addition to the resources mentioned above, there are countless others available such as
organizations like I-CAR or local training and educational entities such as local technical
schools, etc. that are available to Team PRP members to satisfy their training needs.