version: 5.5.0 repository administrator's guide
TRANSCRIPT
Kofax Communications ManagerRepository Administrator's GuideVersion: 5.5.0
Date: 2021-08-16

© 2013–2021 Kofax. All rights reserved.
Kofax is a trademark of Kofax, Inc., registered in the U.S. and/or other countries. All other trademarks are the property of their respective owners. No part of this publication may be reproduced, stored, or transmitted in any form without the prior written permission of Kofax.

Document revision history
Date Revision Description
June 7, 2021 1.0 Initial version
August 16, 2021 1.1 Fixed errors and typos
3

Table of ContentsPreface...........................................................................................................................................................6
Related documentation.......................................................................................................................6Getting help with Kofax products.......................................................................................................7
Chapter 1: Administer KCM Repository................................................................................................... 9Administrative account........................................................................................................................9
Default password................................................................................................................... 10After installation................................................................................................................................ 10
Enter licenses........................................................................................................................ 11Administrative tasks..........................................................................................................................11
User management................................................................................................................. 11User authentication in LDAP mode.......................................................................................14Configure the password policy.............................................................................................. 14Project management..............................................................................................................16
Administrator tools............................................................................................................................ 18Dump and load the Repository database............................................................................. 18New database........................................................................................................................20PDF preview for Rich Text Blocks........................................................................................ 20
Undo Publish feature........................................................................................................................21Perform the Undo Publish operation.....................................................................................22Configure Undo Publish feature............................................................................................ 22Restore a saved publication state.........................................................................................22Publication states list.............................................................................................................23Publication state cleanup.......................................................................................................24
Chapter 2: Configuration..........................................................................................................................26General............................................................................................................................................. 26Syntax............................................................................................................................................... 26
Initialization file sections........................................................................................................ 26Shared configuration.........................................................................................................................27
[Configuration]........................................................................................................................ 27Server configuration..........................................................................................................................27
[Server]...................................................................................................................................27Unified logon..........................................................................................................................27Licenses................................................................................................................................. 28[ODBC]................................................................................................................................... 28
4

Kofax Communications Manager Repository Administrator's Guide
[Network]................................................................................................................................ 29Timeouts.................................................................................................................................29
Client configuration........................................................................................................................... 30[server]................................................................................................................................... 30
Chapter 3: Batch & Output Management metadata.............................................................................. 31Load Batch & Output Management metadata................................................................................. 31Save Batch & Output Management metadata................................................................................. 32Clear Batch & Output Management metadata.................................................................................33Check Batch & Output Management metadata............................................................................... 34
5

Preface
This administrator's guide contains a description of common administrative tasks and configuration of the Repository for Kofax Communications Manager (KCM), a communication development and document management system.
Related documentationThe documentation set for Kofax Communications Manager is available here:1
https://docshield.kofax.com/Portal/Products/KCM/5.5.0-3py4cyc64a/KCM.htm
In addition to this guide, the documentation set includes the following items:
Kofax Communications Manager Release NotesContains late-breaking details and other information that is not available in your other Kofax Communications Manager documentation.
Kofax Communications Manager Technical SpecificationsProvides information on supported operating system and other system requirement for Kofax Communications Manager.
Kofax Communications Manager Installation GuideContains instructions on installing and configuring Kofax Communications Manager and its components.
Kofax Communications Manager Getting Started GuideDescribes how to use Contract Manager to manage instances of Kofax Communications Manager.
Kofax Communications Manager Batch & Output Management Getting Started GuideDescribes how to start working with Batch & Output Management.
Kofax Communications Manager Repository User's GuideIncludes user instructions for Kofax Communications Manager Repository and Kofax Communications Manager Designer for Windows.
Help for Kofax Communications Manager DesignerContains general information and instructions on using Kofax Communications Manager Designer, which is an authoring tool and content management system for Kofax Communications Manager.
1 You must be connected to the Internet to access the full documentation set online. For access without an Internet connection, see "Offline documentation" in the Installation Guide.
6

Kofax Communications Manager Repository Administrator's Guide
Kofax Communications Manager Template Scripting Language Developer's GuideDescribes the KCM Template Script used in Master Templates.
Kofax Communications Manager Core Developer's GuideProvides a general overview and integration information for Kofax Communications Manager Core.
Kofax Communications Manager Core Scripting Language Developer's GuideDescribes the KCM Core Script.
Kofax Communications Manager Batch & Output Management Developer's GuideDescribes the Batch & Output Management scripting language used in KCM Studio related scripts.
Kofax Communications Manager Repository Developer's GuideDescribes various features and APIs to integrate with Kofax Communications Manager Repository and Kofax Communications Manager Designer for Windows.
Kofax Communications Manager ComposerUI for ASP.NET Developer's GuideDescribes the structure and configuration of KCM ComposerUI for ASP.NET.
Kofax Communications Manager ComposerUI for J2EE Developer's GuideDescribes JSP pages and lists custom tugs defined by KCM ComposerUI for J2EE.
Kofax Communications Manager ComposerUI for ASP.NET and J2EE Customization GuideDescribes the customization options for KCM ComposerUI for ASP.NET and J2EE.
Kofax Communications Manager DID Developer's GuideProvides information on the Database Interface Definitions (referred to as DIDs), which is a deprecated method to retrieve data from a database and send it to Kofax Communications Manager.
Kofax Communications Manager API GuideDescribes Contract Manager, which is the main entry point to Kofax Communications Manager.
Getting help with Kofax productsThe Kofax Knowledge Base repository contains articles that are updated on a regular basis to keep you informed about Kofax products. We encourage you to use the Knowledge Base to obtain answers to your product questions.
To access the Kofax Knowledge Base, go to the Kofax website and select Support on the home page.
Note The Kofax Knowledge Base is optimized for use with Google Chrome, Mozilla Firefox or Microsoft Edge.
7

Kofax Communications Manager Repository Administrator's Guide
The Kofax Knowledge Base provides:• Powerful search capabilities to help you quickly locate the information you need.
Type your search terms or phrase into the Search box, and then click the search icon.• Product information, configuration details and documentation, including release news.
Scroll through the Kofax Knowledge Base home page to locate a product family. Then click a product family name to view a list of related articles. Please note that some product families require a valid Kofax Portal login to view related articles.
• Access to the Kofax Customer Portal (for eligible customers).Click the Customer Support link at the top of the page, and then click Log in to the Customer Portal.
• Access to the Kofax Partner Portal (for eligible partners).Click the Partner Support link at the top of the page, and then click Log in to the Partner Portal.
• Access to Kofax support commitments, lifecycle policies, electronic fulfillment details, and self-service tools.Scroll to the General Support section, click Support Details, and then select the appropriate tab.
8

Chapter 1
Administer KCM Repository
KCM Repository is a component that stores and manages the Document Template definitions. Each KCM Repository has a Repository server and a Repository database that contains data for one particular tenant (that is, a partner-customer combination). Every KCM instance uses its own Repository database.
This chapter explains how to manage the KCM Repository installation using the KCM Designer for Windows administrative interface.
Administrative accountKCM Repository has a built-in user account called ITP Admin, which is used for administrative purposes. The ITP Admin account has a number of advanced features:• Enter and review KCM Repository licenses• Manage active user sessions• Manage user accounts and global user authorization• Break locks on objects• Set installation properties• Remove deleted items from the database
The ITP Admin account cannot perform common development tasks.
The ITP Admin account and its user sessions do not count against the number of users specified in the license. If a license violation occurs, you can use the ITP Admin account to resolve it.
Other users can be granted the "Allow login as Admin" right (for more information, see Create user accounts). The users with this right have the same rights as ITP Admin, without their standard advanced features. Such user sessions do not count against the license.
To log in as ITP Admin, follow these steps:
1. Start KCM Designer for Windows.
2. In the login dialog, enter the ITP Admin credentials and click Login.KCM Designer for Windows is opened.
To log in as administrator using a different account, follow these steps:
1. Start KCM Designer for Windows.
2. In the login dialog, enter your credentials and click Login.KCM Designer for Windows is opened.
3. On the menu, click File > Log in as administrator and enter the same credentials.
9

Kofax Communications Manager Repository Administrator's Guide
When the LDAP mode is enabled on the system, in the login dialog, select Logon using One Time Token and use a token generated in KCM Designer (for Web). To log in as administrator, on the KCM Designer for Windows menu, click File > Log in as administrator, generate another token in KCM Designer (for Web), and then use it in the login dialog. For more information, see "Log in to KCM Designer and KCM Designer for Windows" in Help for KCM Designer.
Default passwordThe ITP Admin (itpadmin) user account has a default built-in password, which is www.aia-itp.com. For security reasons, KCM Repository forces you to change this password when you first log in as KCM Admin.
If the password to the KCM Admin account is lost, you can use another user account with administrative rights to reset the KCM Admin password.
If no user account is configured with administrative rights, you can use KCM Repository to regenerate the default password. To do so, you need access to the KCM Repository database and a tool to execute SQL commands against that database, as shown below.
1. Execute the following SQL statement. Place the statement on a new line. DELETE FROM T1200 WHERE C1201=1
The statement removes the KCM Admin account.
2. Locate the itprep.ini file for the KCM instance, which is located in <deploy root>\KCM\Work\<version>\Instance_<num>\designer\Config. Keep a note of this file path.
3. In the <deploy root>\KCM\Programs\<version>\ITPMDKRepositoryServer folder, locatecvc.exe.
4. Restart KCM Repository Server.
5. Within 10 seconds after starting the server, run cvc.exe , providing the file path you obtained at step 2 as a parameter:cvc /cfg=<path>
This command regenerates the KCM Admin account.
6. Once cvc.exe is finished, start KCM Designer for Windows, and then log in as KCM Admin with the default password.You are prompted to change the password.
After installationThe following section describes steps to perform after KCM Repository is installed, according to the instructions in the Kofax Communications Manager Installation Guide.
Note The database attached to KCM Repository contains important production data. Make sure that you perform a database backup on a regular basis.
10

Kofax Communications Manager Repository Administrator's Guide
Enter licenses1. Start KCM Designer for Windows.2. Log in as ITP Admin (see Administrative account).3. On the menu, click View > License.
The License information window appears.4. For the "KCM Repository base license," "KCM Repository model development license," and "KCM
Repository textblock editing license," click Edit.
Note The "DID development (SDK/MP) license" is only needed to develop DIDs in KCM Repository.
The Model Development License and the Text Block Editing License come with a number of users. This is the number of user accounts and simultaneous user sessions that are allowed to develop Master Templates and edit Text Blocks, respectively.
Note By default, the maximum storage size is 25 MB for Text Blocks, Master Templates, and other objects stored in the KCM Repository. To learn how to adjust this limit, see the section "Configure Tomcat settings" in the Kofax Communications Manager API Guide.
Administrative tasksThe following sections describe the tasks specific to ITP Admin or to users with administrative rights.
User managementOnly the ITP Admin user or a user with administrative rights can create, delete or change user accounts. The user accounts reside in the Users folder.
Create user accountsThe KCM Admin account is intended for administrative purposes only. To participate in the development of Master Templates or perform other common KCM Repository tasks, you need to create one or more user accounts.
1. In the tree view, click Users.2. On the menu, click File > New User.
The New User window appears.3. Enter a name, a full name, and a password, and then click Add User.
A password must correspond to the password policy requirements. For more information on the requirements, see Configure the password policy.
4. At least one user account must have the right to create projects and assign roles to users. For more information, see Allow login as Admin right.
11

Kofax Communications Manager Repository Administrator's Guide
Allow login as Admin right1. To allow the user to log in with the same rights as ITP Admin, in the tree view, click Users.2. Right-click a user name in the right pane and then click Configuration.3. To allow the user to log in with the same rights as ITP Admin, select the Authorization tab and
select Allow login as Admin. When selected, the user can assign roles and create projects.4. Click OK.
Unified logonKCM Designer for Windows prompts the user to enter a name and password when starting. Optionally, the user may enter a Microsoft Windows account user name to log in to KCM Repository. This unified logon is performed automatically when KCM Designer for Windows is started. A verification is performed to ensure that the user name on the client is mapped to the same account on the server.
Note You cannot use unified logon when the LDAP mode is enabled in KCM Designer. For more information on LDAP, see User authentication in LDAP mode in this guide and the "User authorization" topic in Help for KCM Designer.
To use unified logon:• Make sure the user accounts are created in KCM Repository with the names matching Windows user
accounts.• Configure KCM Repository Server to allow unified logon. To do so:
1. Locate the itprep.ini file on the KCM server instance at: <deploy root>\KCM\Work\<version>\Instance_<num>\designer\Config
2. Open the file for editing and add the following line:[Configuration] AllowUnifiedLogon=Y
When KCM Repository Server is configured to use unified logon, you can force KCM Designer for Windows to prompt the user to log in. For that, do any of the following:• Start KCM Designer for Windows with the /asklogin flag.• Add the following line to the itprep.ini file of the KCM Repository clients:
[Configuration] Asklogin=Y
If you are already logged in to KCM Designer for Windows, click File > Switch user to switch to another user.
Note If you switch to another user, your rights also change.
Rename a user account1. In the tree view, click Users, and in the right pane, right-click the user name, and then click
Configuration.The Configuration window appears.
12

Kofax Communications Manager Repository Administrator's Guide
2. In the General tab, change the login name and/or the full name of the user account.The user name has a maximum length of 254 characters. The full name has a maximum length of 79 characters.
3. Click Apply and click OK.
Authorize a user accountKCM Repository provides a role-based authorization functionality. A user can be assigned a role for all KCM Repository projects or for a specific project, folder, or document. A role defines the actions a user is allowed to perform.
1. In the tree view, click Users, and in the right pane, select the user account.2. Right-click the user account and click Configuration.
The Configuration window appears.3. On the Authorization tab, in the Global roles pane, select or deselect roles assigned to the user.
To create new projects, at least one user must be assigned a Project Administrator role.4. Click Apply and click OK.
Note The roles assigned to a user account in the Global roles pane apply to all projects in KCM Repository. To assign roles for a specific project, folder or document, use the Configuration window for this project/folder/document.
Note When a new role is assigned to a user, the user must log out and then log in.
Reset a passwordThe Administrator can reset the user's password if it is lost. After a password change, the user's sessions will be ended. Ensure that the user has saved all changes before continuing.
1. In the tree view, click Users, and in the right pane, select the user account.2. Right-click the user account and click Change user password.
The Change the user password window appears.3. Enter and repeat the new password and click OK.
Delete a user accountAfter a user account is deleted, the user's session will be ended. Ensure that the user has saved all changes before continuing.
1. In the tree view, click Users, and in the right pane, select the user account.2. Right-click the user account, click Delete, and then click Yes to confirm the action.
This user account can no longer be used to log in to KCM Repository. Also, the user account no longer counts against the maximum number of users in the license.To see deleted users, click View on the menu and then click Show deleted items.
13
Kofax Communications Manager Repository Administrator's Guide
Manage user sessionsTo view and manage user sessions that are currently active:
1. On the menu, click View > Sessions.The Active sessions window appears.
2. Click a user session and click Refresh or Disconnect to refresh or close the session, respectively.
User authentication in LDAP modeWhen the LDAP mode is enabled, you can organize user accounts in LDAP groups and associate the groups with a role or a set of roles in KCM Designer.
To enable the mode for KCM Designer, follow the procedure described in the "Set LDAP authentication mode for Contract Manager" section in the Kofax Communications Manager Getting Started Guide.
Note• When the LDAP mode is enabled, you cannot create or modify user accounts.• When you switch from the non-LDAP to LDAP mode, ensure that no objects that are not shown in
KCM Designer for Windows, such as Libraries or Resources, are left with status [in development]. In the LDAP mode, you cannot break lock on such objects.
• The Authorization tab in the Configuration window is not available in the LDAP mode.
Configure the password policyITP Admin, or other user who manages KCM installation, can shape the password policy. This can be done through configuration options in the itprep.ini file of the KCM Repository server of the instance.
Requirements for passwordA password must meet the following requirements in a standard configuration. These requirements are enforced when changing a password.• Be at least 12 characters long.• If less than 20 characters long, it should contain at least three of the following character types:
lowercase letters, uppercase letters, digits, and other (symbols, punctuation, and so on).• For languages without lowercase/uppercase distinction, all three following character types should be
present: letters, digits, and other (symbols, punctuation, and so on).• Not be used earlier by this user in the previous 12 months.• Additionally, if the organization has a list with forbidden passwords, the password should not be on this
list. For information on how to configure a list of forbidden passwords, see Configure a list of forbidden passwords.
You can configure the two password lengths (12 and 20 by default) and the retention period for old passwords. For more information, see Adjust the password policy settings.
14

Kofax Communications Manager Repository Administrator's Guide
Note When an incorrect password is provided, the user account will be locked out for five consecutive times (default setting) at login. To unlock it, the administrator has to reset the password of this user account. For more information on how to reset a user's password, see Reset a password.
Adjust the password policy settingsOpen the itprep.ini file and adjust the following settings, if necessary.
All values given in the following examples represent the default values.
1. Password length settingsYou can change the minimum acceptable length of a password with the MinPasswordLengthsetting.[Security] MinPasswordLength=12
With the MinSafePasswordLength setting, you can define the minimum password length for which the requirement of three different characters types is omitted.[Security] MinSafePasswordLength=20
If MinSafePasswordLength is set to 0, all passwords require three different character types regardless of their length. If this setting is set to a value less than or equal to MinPasswordLength, passwords that satisfy the minimal length requirement do not need three different character types.Example 1[Security]MinPasswordLength=12MinSafePasswordLength=20
This example allows "a really long password" (22 characters) and "TestPassw0rd" (12 characters, 3 character types) but does not allow "testpassword" (12 characters, 1 character type).Example 2[Security] MinPasswordLength=12 MinSafePasswordLength=0
This example allows "TestPassw0rd" (12 characters, 3 character types) but does not allow "testpassword" (12 characters, 1 character type) and "a really long password" (24 characters, 1 character type).Example 3[Security]MinPasswordLength=12MinSafePasswordLength=12
This example allows "a really long password" (24 characters), "TestPassw0rd" (12 characters, 3 character types), and "testpassword" (12 characters, 1 character type).
2. Password reuse settingWith the PasswordReuseAge setting, you can configure the number of months that an old password is retained and forbidden to be reused.[Security]
15

Kofax Communications Manager Repository Administrator's Guide
PasswordReuseAge=12
If PasswordReuseAge is set to 0, it disables password reuse memory.
3. Lockout count settingWith the MaxFailedLogins setting, you can configure the number of times a user can provide wrong password before the user's account is locked out. If MaxFailedLogins is set to 0, the user account is never locked out due to providing the wrong password.[Security] MaxFailedLogins=5
4. Failed logon delay settingWhen a logon attempt fails, there is a waiting period measured in seconds before it can be attempted again. You can configure this waiting period with FailedLoginDelay.The value ofFailedLoginDelay should be at least 0 and at most 15.[Security] FailedLoginDelay=3
Note Restart the KCM Repository Server and Content Management API after changing these settings in the itprep.ini file.
Configure a list of forbidden passwordsTo prevent use of common passwords, the administrator can configure a list of passwords that will be rejected as a new password for a user.
1. Create a .txt file with forbidden passwords, or download such a list from the Internet.
2. Make sure each password is on its own line.
Note The blacklisted passwords will be processed in a case-insensitive way: "password" in the blacklist will also block "Password", "PASSWORD", and "PassWord."
The file must be named pwdblacklist.txt and must be in UTF-8 format, with a Byte Order Mark.
3. Place the file in the KCM Repository configuration directory at: <deploy root>\KCM\Work\<version>\Instance_<num>\designer\Config
Note When prompted to replace the existing pwdblacklist.txt, you can confirm the replacement. Alternatively, you can modify the existing file by appending your own list of passwords to it.
4. Restart the KCM Repository Server after you finish changing this file.
Note A very large list of forbidden passwords may cause the first login and changing passwords to slow down after restart.
Project managementThis section describes project management functions that may be useful to administrators.
16

Kofax Communications Manager Repository Administrator's Guide
Note Only the ITP Admin user or a user with administrative rights can perform the project management tasks.
Break locks on objectsThe Administrator can break locks on objects locked by users. The Administrator can both break a lock on a specific object or break all locks made by a user.
1. To break a lock on a specific object, in the tree view, locate and right-click the object and then clickBreak lock.• If the Administrator is breaking a lock on a folder or a project, the "Break lock" window appears.
Select the user who locked the folder/project and click OK. All objects belonging to the folder are now unlocked.
2. To break all locks made by a user, in the tree view, click Users.3. In the right pane, right-click the user account, and then click Break lock.
All objects in KCM Repository that are locked by this user are now unlocked.
Purge deleted itemsObjects that were marked as deleted can be restored. If you need, however, to permanently remove such objects, you can use the Purge function.
This can be helpful, for example, to optimize disk space: a document revision takes up the same amount of disk space as the original document. If you delete and purge a revision, it is removed from the database and frees up disk space.
Note You cannot restore items once they are removed using the Purge function.
To purge an item, click it, and then click File > Purge
Note There are certain cases when Purge does not remove all objects marked for deletion. For example, when a user deletes a source document and does not delete the Master Template that was created based on it, the source document is not purged until the Master Template is deleted as well.
Blocked purging
Also, there can be objects that prevent the revision from being removed. They are included in a subfolder called "purging blocked by", available to the administrative user (that is, a user account that has the "Allow login as Admin" KCM right).
The "purging blocked by" subfolder is located under the revisions and objects marked for deletion. It may comprise the objects themselves, or those configured in them — for example, in folders and projects.
To enable the administrative user to view this subfolder, click View > Show Deleted Items.
View an audit logThe Administrator can view the Audit Log Entries to track important activities.
17
Kofax Communications Manager Repository Administrator's Guide
To view the Audit Log Entries, in the tree view, click Audit Log Entries and see the right pane.
Obtain a reportThe ITP Admin administrative user can obtain reports on the contents of KCM Repository. Several predefined reports are available in the Reports project present in the tree view. The reports are implemented as Master Templates.
You can create your own reports so that they appear in the Reports when you open a new KCM Designer for Windows browser window.
1. To get a report, when logged in as ITP Admin, select the necessary report under Repository Reports in the tree view. For example, select User Reports > All Users Reports.
2. In the right pane, click the user account you need the report for.
3. On the menu, click Report and then click User authorization.
Clear a projectTo free up disk space, the Administrator can perform a cleanup.
Important You should back up your data before performing a cleanup.
• The cleanup deletes labels and redundant versions of the documents used in a project.• Versions are considered redundant if they have no status or are not in use.• When the cleanup is complete, the document versions are marked for deletion and can be restored, but
labels are removed permanently.• To remove the document versions completely, use the Purge function (for more information, see Purge
deleted items).
To perform a cleanup:
1. Select the project in the tree view.
2. On the menu, click File > Clean up Project.
Administrator toolsThis section gives a description of the tools that are available to the Administrator.
Dump and load the Repository databaseRepository content can be dumped and loaded into a new or existing database using the repdump andrepload tools. This can help, for example, to migrate the KCM Repository database to another DBMS.• The repdump tool helps you to dump the entire contents of the KCM Repository database to a file.• The repload tool can load dump files from a KCM Repository installation version 5.2.0 and later.
18

Kofax Communications Manager Repository Administrator's Guide
Note For versions earlier than 5.2.0, you must use the same repload tool version as the version used to create the dump.
Both tools reside in: <deploy root>\KCM\Programs\<version>\ITPMDKRepositoryServer.
Syntax of the toolsRepdump /cfg=<path-to-config> "path\database dumpfile name" [/dbpwd=<password>]
Repload /cfg=<path-to-config> "path\dumped file name" [/cleardatabase] [/dbpwd=<password>]
Where• cfg=<path-to-config> — the path to the itprep.ini file for the KCM instance: <deploy root>\KCM\Work\<version>\Instance_<num>\designer\Config\itprep.ini.
• dbpwd=<password> — the database password necessary to connect to the KCM Repository database.
Note If you change the database password to a plain text in the itprep.ini file, the password will be encrypted once connected to the database (see [ODBC]). If you do so for the repdump tool or reploadtool, the password of the account your tool is running under will be encrypted. In case it is a different account than KCM Repository is running under, it might prevent KCM Repository from decrypting the password again if you use the same itprep.ini file.
Using the tools• You must run repdump.exe and repload.exe on the server that runs KCM Repository.• Both tools need to be run under the same account as the KCM Repository Server. If this is not
possible, you can run them supplying the password for database access in the /dbpwd=<password>parameter.
• Before using repload.exe, create a new database or select an existing database that can be emptied and refilled. If you use an existing database, use the /cleardatabase flag to empty the database, since the content of a database dump file cannot be added to the content of an existing KCM Repository database.
Important The /cleardatabase flag deletes all content in the database of the loading KCM Repository. Use it with caution.
• Before loading a file, stop the KCM Repository service.• After loading the contents of a previous version, you need to upgrade the database to the current
version.
1. Locate cvc.exe, which resides in the <deploy root>\KCM\Programs\<version>\ITPMDKRepositoryServer folder.
2. Restart KCM Repository Server and run cvc.exe.
Note The repdump tool creates a Repdump.log file, which resides in the same folder as the tool.
19

Kofax Communications Manager Repository Administrator's Guide
New databaseYou can create a new database for KCM Repository and a connection string to connect to it.
Note The database attached to KCM Repository contains important production data. Make sure to make a backup of the database on a regular basis.
Configure a new databaseA new database must be configured on the KCM Repository Server. For that, use theSetInstanceDatabase tool, as described in the "Specify KCM Repository database" section of theKofax Communications Manager Getting Started Guide.
Initialize a new database and upload reportsUse the cvc.exe tool to prepare the database and upload the Reports.
1. Start a command prompt.2. Change the folder to the folder where you installed the KCM Repository Server.3. Execute the following command.
cvc reportsdump /cfg=<path to itprep.inifile>
Note You can only see reports if one of your roles allows access to them. If you cannot see any reports, or you can see only some reports, check your authorization.
Now you can open the client and start working with the new database.
PDF preview for Rich Text BlocksYou can preview your Rich Text Blocks as PDF documents: when a Rich Text Block is saved, KCM will automatically generate a PDF preview for it. However, if you have upgraded to the latest version or imported a project that had been exported by a previous version of KCM, the older Rich Text Blocks will have no automatically generated PDF previews.
Note For Rich Text Blocks that have no preview yet, users will get the following message: "Currently, no preview is available for this Text Block. Contact your administrator for more information."
To address this, you can use the CreateRichTextBlockPreviews.exe tool to generate PDF previews whenever you need them. The tool resides in the <deploy root>\KCM\Programs\<version>\Management\Instance folder on the KCM instance. You can execute it manually from the command line or use Windows Task Scheduler to schedule its launch, for example, to off-peak hours.
Note If one preview is generated at a time, this does not take too much resources, but for a large number of Rich Text Blocks, their immediate processing might affect the KCM Core and KCM Repository performance.
You can instruct the tool to generate PDF previews for the Rich Text Blocks that do not have such preview yet or also include the Rich Text Blocks whose previous preview creation attempts have failed. For that, use the Action!IncludeFailed parameter described below.
20
Kofax Communications Manager Repository Administrator's Guide
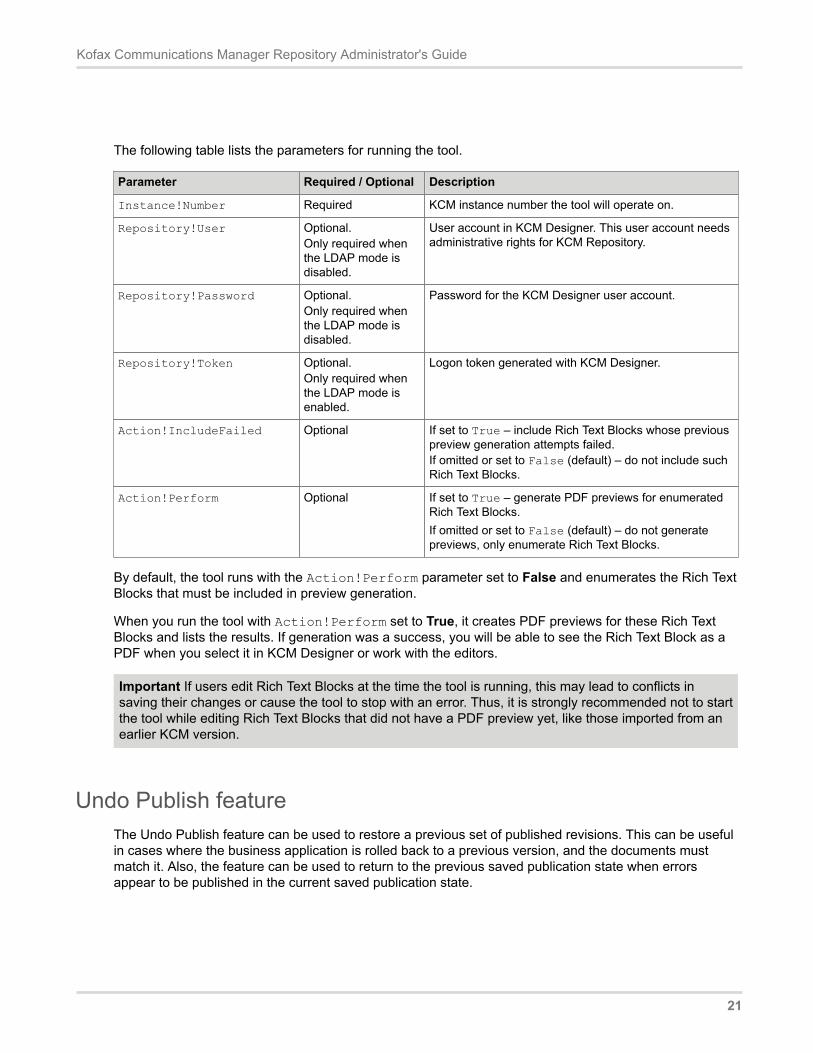
The following table lists the parameters for running the tool.
Parameter Required / Optional Description
Instance!Number Required KCM instance number the tool will operate on.
Repository!User Optional.Only required when the LDAP mode is disabled.
User account in KCM Designer. This user account needs administrative rights for KCM Repository.
Repository!Password Optional.Only required when the LDAP mode is disabled.
Password for the KCM Designer user account.
Repository!Token Optional.Only required when the LDAP mode is enabled.
Logon token generated with KCM Designer.
Action!IncludeFailed Optional If set to True – include Rich Text Blocks whose previous preview generation attempts failed.If omitted or set to False (default) – do not include such Rich Text Blocks.
Action!Perform Optional If set to True – generate PDF previews for enumerated Rich Text Blocks.If omitted or set to False (default) – do not generate previews, only enumerate Rich Text Blocks.
By default, the tool runs with the Action!Perform parameter set to False and enumerates the Rich Text Blocks that must be included in preview generation.
When you run the tool with Action!Perform set to True, it creates PDF previews for these Rich Text Blocks and lists the results. If generation was a success, you will be able to see the Rich Text Block as a PDF when you select it in KCM Designer or work with the editors.
Important If users edit Rich Text Blocks at the time the tool is running, this may lead to conflicts in saving their changes or cause the tool to stop with an error. Thus, it is strongly recommended not to start the tool while editing Rich Text Blocks that did not have a PDF preview yet, like those imported from an earlier KCM version.
Undo Publish featureThe Undo Publish feature can be used to restore a previous set of published revisions. This can be useful in cases where the business application is rolled back to a previous version, and the documents must match it. Also, the feature can be used to return to the previous saved publication state when errors appear to be published in the current saved publication state.
21

Kofax Communications Manager Repository Administrator's Guide
Perform the Undo Publish operationTo perform Undo Publish, start the Windows command prompt and use the following tools that reside in:<deploy root>\KCM\Programs\<version>\Management\Instance:• RollbackPublication.exe
• ListPublications.exe
• PurgePublications.exe
Configure Undo Publish featureYou must configure Undo Publish to make it available. For that, open the itprep.ini file for KCM Repository Server that resides in: <deploy root>\KCM\Work\<version\Instance_<num>\designer\Config.
The following setting needs to be configured in the [Configuration] section of this file.
Parameter Required / Optional
Description
MaxUndoPublicationDays Optional Indicates how long a published revision is retained after it is replaced with a newer revision.If omitted or set to 0, no publication states are saved.
After modifying and saving the itprep.ini file, restart the KCM Repository Server and the Content Management API.
After you configure the Undo Publish feature, the first publication creates the first saved publication state you can roll back to. Also, every action that creates a project, such as Import or Duplicate, generates an initial saved publication state for that project.
Restore a saved publication stateWhen an object, a Changeset or a set of objects gets the published status, KCM Repository records all published revisions in a project after another publication is performed. Every new publication produces another saved publication state.
Old saved publication states are discarded when more recent publications appear.
Note For more information on the publication states validity period, see Configure Undo Publish feature.
You can use the RollbackPublication.exe command-line tool to perform a rollback.• You cannot undo a rollback.• You can restore only the publication that precedes the current one. To roll back to older saved
publication states, repeat the action until the desired saved publication state is restored.
22

Kofax Communications Manager Repository Administrator's Guide
ParametersThe tool has the following parameters:
Parameter Required / Optional Description
Instance!Number Required KCM instance number the tool should operate on.For Docker, it is always set to 1.
Repository!User OptionalOnly required when the LDAP mode is disabled.
User account in KCM Designer. This account needs the authorization to perform the Publish action on the project.
Repository!Password OptionalOnly required when the LDAP mode is disabled.
Password for the KCM Designer user account.
Repository!Token OptionalOnly required when the LDAP mode is enabled.
Logon token generated with KCM Designer. For more information, see "Log in to KCM Designer and KCM Designer for Windows" inHelp for KCM Designer.
Repository!Project Required Name of the project with the last saved publication state to roll back to.
Action!Perform Optional If set to True, the rollback is performed.If omitted or set to another value, the actions that the rollback would perform are shown, but not executed.
Example 1: LDAP mode is disabledRollbackPublication.exe Instance!Number=1Repository!User=administrator Repository!Password=******Repository!Project=InstallationTest Action!Perform=true
Example 2: LDAP mode is enabledRollbackPublication.exe Instance!Number=1Repository!Token=1n2Z58JXRepository!Project=InstallationTest Action!Perform=true
Publication states listUse the ListPublications.exe tool to list the saved publication states for one or all projects. Start the Windows command prompt and execute the tool.
ParametersThe tool has the following parameters:
Parameter Required / Optional Description
Instance!Number Required Instance number the tool should operate on.For Docker, it is always set to 1.
23

Kofax Communications Manager Repository Administrator's Guide
Parameter Required / Optional Description
Repository!User Optional Only required when the LDAP mode is disabled. User account in KCM Designer. This account needs no special authorization.
Repository!Password Optional Only required when the LDAP mode is disabled. Password for the KCM Designer user account.
Repository!Token Optional Only required when the LDAP mode is enabled. Logon token generated with KCM Designer. For more information, see "Log in to KCM Designer and KCM Designer for Windows" in Help for KCM Designer.
Repository!Project Optional Name of the project with the saved publication states to list. If omitted, the saved publication states for all projects are listed.
ExamplesExample 1: LDAP mode is disabledListPublications.exe Instance!Number=1 Repository!User=administrator Repository!Password=****** Repository!Project=InstallationTest
Example 2: LDAP mode is enabled
ListPublications.exe Instance!Number=1 Repository!Token=1n2Z58JXRepository!Project=InstallationTest
The list is chronologically ordered and shows the difference between the saved publication state and the current publication state with the following markings:• The [cur] marking indicates the current published state.• The [prv] marking signifies the previous published state.
Also, the list shows the date and time a saved publication state was created, the user who performed the publish action, and the date and time it was superseded by a newer saved publication state.
Publication state cleanupWhen a publication is performed, KCM Repository automatically removes all saved publication states that have been superseded before the configured threshold.
You may need to perform a cleanup of old saved publication states without creating a new publication. For example, when the system becomes inactive, you can manually trigger the cleanup. For that, use the PurgePublications.exe command-line tool that resides in: <deploy root>\KCM\Programs\<version>\Management\Instance.
ParametersThe tool has the following parameters:
24

Kofax Communications Manager Repository Administrator's Guide
Parameter Required / Optional Description
Instance!Number Required KCM instance number the tool should operate on.For Docker, it is always set to 1.
Repository!User OptionalOnly required when the LDAP mode is disabled.
User account in KCM Designer. This account needs no special authorization.
Repository!Password OptionalOnly required when the LDAP mode is disabled.
Password for the KCM Designer user account.
Repository!Token OptionalOnly required when the LDAP mode is enabled.
Logon token generated with KCM Designer. For more information, see "Log in to KCM Designer and KCM Designer for Windows" inHelp for KCM Designer.
Action!Perform Optional If set to True, the cleanup is performed.If omitted or set to another value, the actions that the cleanup would perform are shown, but not executed.
Example 1: LDAP mode is disabledPurgePublications.exe Instance!Number=1 Repository!User=administrator Repository!Password=****** Action!Perform=true
Example 2: LDAP mode is enabled
PurgePublications.exe Instance!Number=1 Repository!Token=1n2Z58JXAction!Perform=true
25

Chapter 2
Configuration
This chapter describes configuration items.
GeneralConfiguration of KCM Repository Server and KCM Designer for Windows is stored in the .iniconfiguration files. One .ini file exists per server (that is, KCM Repository Server), and another exists for each client (that is, KCM Designer for Windows). Both files are named itprep.ini and use the same syntax but have different content and settings.
The configuration file for KCM Repository Server is located at: <deploy root>\KCM\Work\<version>\Instance_<num>\designer\Config.
Example C:\KCM\Work\5.5\Instance_01\designer\Config
You can edit these .ini files in a text editor of your choice.
The configuration files are read at startup. You need to restart KCM Designer for Windows on the client once you edit the client configuration file. Restart the KCM Repository Server once you edit the server configuration file.
Syntax
Initialization file sectionsOptions and settings are arranged in sections in the configuration file. A section starts with the section name in square brackets on a separate line.
[Configuration]
Settings are added in "Name=value" format.
Note If a setting is not listed in the .ini file, it is set to the default value.
You can use a semicolon to comment out a line in the configuration file. It must be the first character on a line.
26

Kofax Communications Manager Repository Administrator's Guide
Shared configurationThe following configuration options are valid for both the client and the server.
[Configuration]This example shows the "Set logging" options.
logfile = itprep.loglogsize = 10485760logrotate = 10
Relevant information is recorded to a file specified by the log file settings.
You can use the logrotate setting to determine how many obsolete log files should be kept (renamed to itprep.log.1, itprep.log.2, and so on). A new log file is created every time KCM Repository starts, or when the size of the log file exceeds the value in bytes set with the logsize setting.
The following is the folder where temporary files are placed.
temppath = %TMP%
Defaults to the temp folder are specified by Microsoft Windows. You can specify another path. Sufficient disk space must be allocated for the temp folder.
Server configurationAll required settings are configured during installation. To edit the itprep.ini configuration file, navigate to: <deploy root>\KCM\Work\<version>\Instance_<num>\designer\Config.
Restart KCM Repository Server after editing this .ini file.
[Server]This section specifies connection settings (host and port number) used by the server for requests.[Server] port=<port number> host=<server name or IP address>
• The host value is added to the configuration file by the installer from other KCM programs that use the same configuration file.
• Any port number below 65536 is valid. Default is 2587.
Unified logonThe following setting allows the user to log in to KCM Designer using the Windows account name.
[Configuration]AllowUnifiedLogon=Y
27

Kofax Communications Manager Repository Administrator's Guide
LicensesTo provide license settings, use the SetInstanceLicense tool described in the "Specify KCM license" section of the Kofax Communications Manager Getting Started Guide.
Note For KCM versions earlier than 5.5.0, you can specify the license settings using KCM Designer for Windows. For more information, see Enter licenses.
The following sections of configuration file contain license settings: [Base license], [Model development license], and [Text Block development license].
The following keys occur for each of the three license sections.
company=certificate=environment=date=users=key=
The date= value is the expiration date for the license given on the license certificate. Format: yyyymmdd.
The users= setting defines the maximum number of users that can be created and connected to the server. This number is on the license certificate. The Administrator is not considered as a user in terms of the license. For the base license, this value is 1.
[ODBC]The [ODBC] section contains configuration settings for the database connection.• The ConnString (connection string) entry specifies the ODBC driver to use, the database to connect
to, and various database options. This entry is set during the installation and can be modified with theSetInstanceDatabase.exe tool. See the "Specify KCM Repository database" section of the Kofax Communications Manager Getting Started Guide for details.Example: ConnString=Driver=ODBC Driver 17 for SQL Server;Server=CH01KCMSQADB\CH01KCMSQA;Database=kcm_01_5.5
• The DSN entry specifies a data source name to store KCM Repository data.• DSN = <data source name>
• The user and password entries can be provided as separate settings, not included in the connection string (in this case, password will be encrypted).user = <user to connect to the ODBC DSN>
28

Kofax Communications Manager Repository Administrator's Guide
password = <password to connect to the ODBC DSN>
If the password is present in the configuration file in plain text, it is encrypted once a connection with the database is created. You can recognize the encrypted password by its encrypted: prefix.To change the database password in the configuration file, replace the encrypted: string with a new plain text password.
Note The user account used to access the DBMS must be configured so that its password does not expire, especially because it affects client access.
[Network]The [Network] section contains the msgsize parameter that specifies the size of the packages sent over the network.
Important You should add the [Network] section to any client connecting to the KCM Repository Server with an edited .ini file.
msgsize= <packet size in kilobytes>
The default packet size limit is 512 KB.
This setting helps you to optimize network load: if a network load error occurs, you can decrease package size to 64 KB. if the problems persists, use packages of 32 or 16 KB in size, and so on.
Important Restart the KCM Repository Server after editing the .ini file.
TimeoutsLarge and complex documents may encounter a timeout. These limits can be configured in the [ITP] section of the itprep.ini file on the KCM Repository Server.• The ConversionTimeout setting specifies the time that it takes KCM Repository to analyze
documents. Default is 60 seconds.• The CompilationTimeout setting specifies the time that it takes KCM Repository to compile Master
Templates. Default is 900 seconds.
You can use these settings to optimize processing:• If the 'crtmdl timed out' error message is issued, increment the CompilationTimeout value.• If the 'idoc2unc timed out', 'Generation timed out' or 'Analysis timed out' message is issued, increment
the ConversionTimeout value.
Note Also, consider the Global timeout configured in the KCMTools.ini file in the <deploy root>\KCM\Work\<version>\Management\Config folder. See the "Timeouts during components installation or start" section in the Kofax Communications Manager Installation Guide.
Restart KCM Repository Server to activate the changes.
29

Kofax Communications Manager Repository Administrator's Guide
Client configurationAll required settings are configured during installation. Restart KCM Designer for Windows after editing the .ini file.
[server]The [server] section contains the settings used to connect to the KCM Repository Server host and port.• Host is the computer that KCM Repository Server runs on. Default value for host is localhost.host=<server name or IP address>
• Port is the TCP/IP port number used to send requests to the Server. This port number should match the port value set in the [server] setting of the KCM Repository Server .ini file.port=2587
30
Chapter 3
Batch & Output Management metadata
You can manage the Batch & Output Management metadata loaded into a KCM Repository instance using the following tools located at <deploy root>\KCM\Programs\<version>\Management\Instance:• LoadOutputManagementMetadata.exe• SaveOutputManagementMetadata.exe• ClearOutputManagementMetadata.exe• CheckOutputManagementMetadata.exe
To execute any of these tools, do the following:
1. Start a command prompt.
2. Navigate to: <deploy root>\KCM\Programs\<version>\Management\Instance.
3. Run the tool you need, using the necessary parameters.
Load Batch & Output Management metadataYou can load the metadata into KCM Repository using the LoadOutputManagementMetadatacommand-line tool. It is located at: <deploy root>\KCM\Programs\<version>\Management\Instance.
Prior to loading the metadata, export the metadata XML file from a Batch & Output Management installation. To do so:
1. In KCM Studio, select the Administration tab.
2. Click Configuration export.
3. Select the location to export the XML file.
Parameters
The tool uses the following parameters.
Parameter Required / Optional Description
Instance!Number Required Specifies the number of the instance for which the management task should be applied.For Docker, it is always set to 1.
Repository!User OptionalOnly required when the LDAP mode is disabled.
Specifies the name of a KCM Repository user with the "Allow login as Admin" right.
31

Kofax Communications Manager Repository Administrator's Guide
Repository!Password OptionalOnly required when the LDAP mode is disabled.
Specifies the password of the KCM Repository user.
Repository!Token OptionalOnly required when the LDAP mode is enabled.
Specifies the logon token generated with KCM Designer. For more information, see "Log in to KCM Designer and KCM Designer for Windows" inHelp for KCM Designer.
Report!File Optional Specifies the name of the report file written by the management action. If omitted, the default value isoutput-management-metadata-report.txt.
Note If the path or file name given in this parameter already exists, it is overwritten.
Source!Path Required Path to the metadata XML file to load.
The resulted report file contains a list of Document Pack Templates that refer to the Batch & Output Management metadata that no longer exists in the newly loaded metadata.
Example
Execute the following command, adding the actual parameter values..\LoadOutputManagementMetadata.exe Instance!Number=1 Repository!User=<username> Repository!Password=<password> Source!Path=<metadata filepath> Report!File=<report filename>
Save Batch & Output Management metadataYou can save the metadata using the SaveOutputManagementMetadata tool. It is located at: <deploy root>\KCM\Programs\<version>\Management\Instance.
The tool retrieves the stored values from KCM Repository and saves them to a disk.
Parameters
The tool uses the following parameters.
Parameter Required / Optional Description
Instance!Number Required Specifies the number of the instance for which the management task should be applied.For Docker, it is always set to 1.
Repository!User OptionalOnly required when the LDAP mode is disabled.
Specifies the name of a KCM Repository user with the "Allow login as Admin" right.
Repository!Password OptionalOnly required when the LDAP mode is disabled.
Specifies the password of the KCM Repository user.
32

Kofax Communications Manager Repository Administrator's Guide
Repository!Token OptionalOnly required when the LDAP mode is enabled.
Specifies the logon token generated with KCM Designer. For more information, see "Log in to KCM Designer and KCM Designer for Windows" inHelp for KCM Designer.
Report!File Optional Specifies the name of the report file written by the management action. If omitted, the default value isoutput-management-metadata-report.txt.
Note If the path or file name given in this parameter already exists, it is overwritten.
Destination!Path Required Path to a file where the retrieved metadata will be stored. If no metadata is present, the file is not written.
Note If the path or file name given in this parameter already exists, it is overwritten.
The resulted report file contains information on whether the metadata is retrieved successfully.
Example
Execute the following command, adding the actual parameter values..\SaveOutputManagementMetadata.exe Instance!Number=1 Repository!User=<username> Repository!Password=<password> Destination!Path=<metadata destination path> Report!File=<report filename>
Clear Batch & Output Management metadataYou can clear all Batch & Output Management metadata from KCM Repository using theClearOutputManagementMetadata command-line tool. It is located at: <deploy root>\KCM\Programs\<version>\Management\Instance.
Parameters
The tool uses the following parameters.
Parameter Required / Optional Description
Instance!Number Required Specifies the number of the instance for which the management task should be applied.For Docker, it is always set to 1.
Repository!User OptionalOnly required when the LDAP mode is disabled.
Specifies the name of a KCM Repository user with the "Allow login as Admin" right.
Repository!Password OptionalOnly required when the LDAP mode is disabled.
Specifies the password of the KCM Repository user.
33

Kofax Communications Manager Repository Administrator's Guide
Repository!Token OptionalOnly required when the LDAP mode is enabled.
Specifies the logon token generated with KCM Designer. For more information, see "Log in to KCM Designer and KCM Designer for Windows" inHelp for KCM Designer.
Report!File Optional Specifies the name of the report file written by the management action. The use of this file depends on the specific task, as described in this chapter. If omitted, the default value is output-management-metadata-report.txt.
Note If the path or file name given in this parameter already exists, it is overwritten.
The resulted report file contains a list of Document Pack Templates that refer to the Batch & Output Management metadata. If no such Document Pack Templates exist, the tool reports that the metadata is cleared successfully.
Example
Execute the following command, adding the actual parameter values..\ClearOutputManagementMetadata.exe Instance!Number=1 Repository!User=<username> Repository!Password=<password> Report!File=<report filename>
Check Batch & Output Management metadataYou can use the CheckOutputManagementMetadata command-line tool to check for Document Pack Templates that use non-existent Batch & Output Management metadata. The tool is located at: <deploy root>\KCM\Programs\<version>\Management\Instance.
Parameters
The tool has the following parameters.
Parameter Required / Optional Description
Instance!Number Required Specifies the number of the instance for which the management task should be applied.For Docker, it is always set to 1.
Repository!User OptionalOnly required when the LDAP mode is disabled.
Specifies the name of a KCM Repository user with the "Allow login as Admin" right.
Repository!Password OptionalOnly required when the LDAP mode is disabled.
Specifies the password of the KCM Repository user.
Repository!Token OptionalOnly required when the LDAP mode is enabled.
Specifies the logon token generated with KCM Designer. For more information, see "Log in to KCM Designer and KCM Designer for Windows" inHelp for KCM Designer.
34

Kofax Communications Manager Repository Administrator's Guide
Report!File Optional Specifies the name of the report file written by the management action. The use of this file depends on the specific task, as described in this chapter. If omitted, the default value is output-management-metadata-report.txt.
Note If the path or file name given in this parameter already exists, it is overwritten.
The resulted report file contains a list of Document Pack Templates that refer to the Batch & Output Management metadata that no longer exists in the currently loaded metadata.
Example
Execute the following command, adding the actual parameter values..\CheckOutputManagementMetadata.exe Instance!Number=1 Repository!User=<username> Repository!Password=<password> Report!File=<report filename>
35