vibe space 3d speakers instruction manuals
DESCRIPTION
VIBE Space 3D Speakers Instruction ManualsTRANSCRIPT
Instruction ManualTo ensure maximum performance and safety,
please follow this manual. Please retain the
manual for future reference after installation.
Model: SPACE 3D
In order to protect your purchase and aid your
warranty please fill in the following form and
keep it safe for your future reference:
Model Number:
Serial Number:
Purchased From:
Date of Purchase:
KE
EP
IT
SA
FE
Sta
ple
yo
ur
rec
eip
t h
ere
:
Limited Warranty
All VIBE products carry a full twelve months warranty, valid fromthe date of the original receipt / proof of purchase. In order tovali-
date this warranty, the warranty card should be returned to VIBEwithin seven days of the original purchase date. The original receipt
and packaging should also be retained for this twelve month period.
If at any stage during the warranty period you have a problem with the product then it should be returned to the point of purchase,
with proof of purchase in its original packaging, complete with no items missing.
If the store is unable to fix the product it may have to be returned to VIBE this process takes around 7 working days. A full description
of VIBE's warranty information can be found on our website:
www.vibeaudio.co.uk/warrantyA written version can also be obtained from
VIBE warranty Dept, PO BOX 11000, B75 7WG
Technical enquires call 09067031420
call cost 50p per minute
call costs correct at date of publication (01/01/07)
Hours of business 9.00am - 5.30pm
all calls are recorded for training purposes
MIDbASS Distribution
PO Box 11000
B75 7WG
3d temp manual:Layout 1 21/10/2008 16:23 Page 1
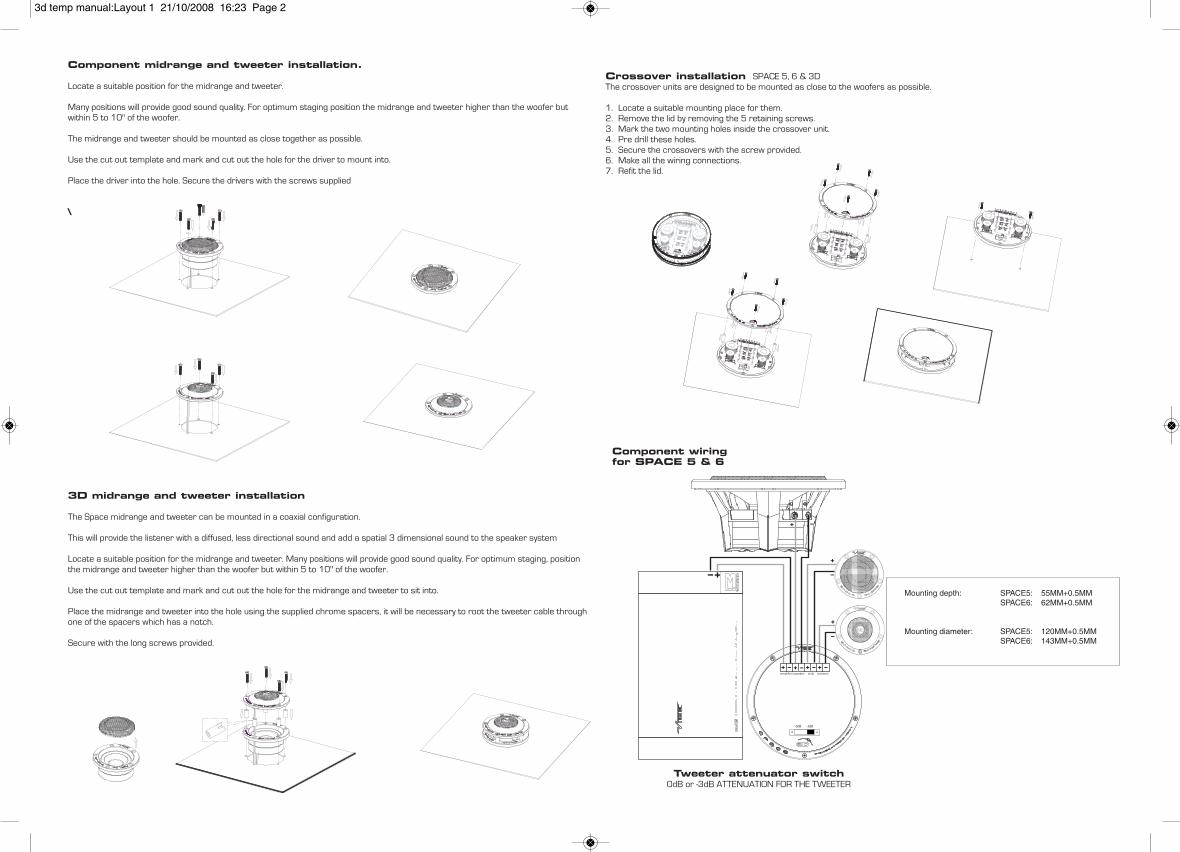
Component midrange and tweeter installation.
Locate a suitable position for the midrange and tweeter.
Many positions will provide good sound quality. For optimum staging position the midrange and tweeter higher than the woofer but
within 5 to 10" of the woofer.
The midrange and tweeter should be mounted as close together as possible.
Use the cut out template and mark and cut out the hole for the driver to mount into.
Place the driver into the hole. Secure the drivers with the screws supplied
\
3D midrange and tweeter installation
The Space midrange and tweeter can be mounted in a coaxial configuration.
This will provide the listener with a diffused, less directional sound and add a spatial 3 dimensional sound to the speaker system
Locate a suitable position for the midrange and tweeter. Many positions will provide good sound quality. For optimum staging, position
the midrange and tweeter higher than the woofer but within 5 to 10" of the woofer.
Use the cut out template and mark and cut out the hole for the midrange and tweeter to sit into.
Place the midrange and tweeter into the hole using the supplied chrome spacers, it will be necessary to root the tweeter cable through
one of the spacers which has a notch.
Secure with the long screws provided.
Crossover installation SPACE 5, 6 & 3D
The crossover units are designed to be mounted as close to the woofers as possible.
1. Locate a suitable mounting place for them.
2. Remove the lid by removing the 5 retaining screws.
3. Mark the two mounting holes inside the crossover unit.
4. Pre drill these holes.
5. Secure the crossovers with the screw provided.
6. Make all the wiring connections.
7. Refit the lid.
0dB -3dB
Tweeter attenuator switch0dB or -3dB ATTENUATION FOR THE TWEETER
Component wiringfor SPACE 5 & 6
Mounting depth: SPACE5: 55MM+0.5MMSPACE6: 62MM+0.5MM
Mounting diameter: SPACE5: 120MM+0.5MMSPACE6: 143MM+0.5MM
3d temp manual:Layout 1 21/10/2008 16:23 Page 2