view hyper terminal instructions - wps
TRANSCRIPT

Set Up Windows Hyper Terminal to Dial from PC-Ace Pro32 WINDOWS HYPERTERMINAL
CREATING A SEND-RECEIVE PROGRAM
Windows 95 through current version comes with free software, called HyperTerminal, that you can use to transmit your claims and receive claim reports and other information from the WPS Bulletin Board System (BBS). This excludes Windows Vista programs.
To access:
At your Desktop:
1. Click on START button 2. Click on PROGRAM FILES 3. Click on ACCESSORIES 4. Click on COMMUNICATIONS 5. Click on HYPERTERMINAL
You may get a screen asking you if you would like to make Hyperterminal your default. Select NO A screen will appear where you will be asked to enter a name for the new connection and choose an ICON.
At the Name line Type: WPS BBS You can choose any icon that is shown but the first one (with two telephones) is fine. Then press OK The next screen asks for a phone number. Type: 608 in the Area Code, Type: 287-1581 in the Phone Number, (The Connect using box should indicate a brand name of your modem, do not change.) Then press OK
10/01/07
Page 1 of 23
The next screen shows the phone number you created on the previous screen. Verify the number is correct. If correct, skip the next 3 screens.
If you need to dial 9 (i.e.) for an outside line, or enter an access code for long distance continue: click on Dialing Properties
Highlight your location, then click on Edit
Make additions, then click OK
10/01/07 Page 2 of 23

If phone number is correct, click on cancel.
Click on the “X” at the upper right of the screen. You
will be asked if you want to save the changes you have made. Press the “YES” button.
The HyperTerminal folder will now contain an additional ICON named “WPSBBS”
The path for this folder is shown at this time. Make a note as to location. TO LINK THIS TO PC-ACE
1. Open the PC_ACE program 2. Enter your User id and Password 3. Click on OK
Click on the Data Communications Functions option Select the Edit Configuration button
10/01/07 Page 3 of 23

Select the button to the right of the Option 1 Program Locate the “WPS BBS” file using the file path you noted earlier Select Open Enter “WPS BBS” in the Button Caption Line if not already present Select OK This will now allow you to click on “WPS BBS” to go to your Hyper Terminal connect screen where you will choose Dial to connect with the WPS Bulletin Board.
10/01/07 Page 4 of 23

Logging On to the WPS EDI BBS Once you have utilized your telecommunications software and modem to dial the WPS EDI BBS the following prompts will appear in sequence:
PROMPT 1: Please Enter your User-ID:
Type the User ID (Submitter ID) assigned to you by WPS EDI staff and press <enter>.
PROMPT 2: Enter your password:
Key in your password (initially assigned to you by WPS EDI staff) and press <enter>.
Change Your Password The first time you log in to the WPS EDI BBS, you will be forced to change your password. Type a new password in the field provided and press <enter>. You will be asked to retype your password for confirmation. Do so and press <enter>. (Note: The password you type will not be visible on your screen. It will appear as asterisks (***).
10/01/07 Page 5 of 23

To meet WPS corporate and fed
1. All passwords must 2. All passwords must 3. All passwords must 4. All passwords must 5. All passwords must 6. Passwords will expexpires. 7. Passwords cannot b8. 24 passwords are ‘r
10/01/07
WPS EDI PASSWORD POLICIES
eral security mandates, the following password policies are in place:
be at least 8 characters. contain at least one UPPER CASE letter. contain at least one lower case letter. contain at least one number. contain at least one special character (i.e. #, $, @, &) ire after 90 days. You must change your password before it
e changed more than one time within a 24 hour period.
emembered’ and cannot be reused until 24 others have been utilized.Page 6 of 23

Uploading EDI Files (Transmitting Files To WPS) Once you have logged on to the WPS EDI BBS, the following Main Menu will appear:
Complete the following steps to upload an electronic data interchange (EDI) file (transmit your claim file):
STEP 1: Press <U>, <enter> to select "Upload EDI Files". The following upload options menu will appear:
NOTE: Menu choices will reflect the specific user's access level. STEP 2: Press <T>, <enter> to upload a TEST file. Press <P>, <enter> to upload a
PRODUCTION file. The following will now appear on your screen:
STEP 3: At the prompt "Enter your Selection, ? for more help, or X to exit:", key a file name and
press <enter>.
IMPORTANT NOTE: Your File Name Should Be Your Submitter Number (User ID) Followed By ".Dat" Or ".Zip". For example, if your User ID is 99999, you should key <99999.DAT> and press <enter>.
NOTE: WPS only accepts compressed files if they are compressed using the zip format (PKZIP or WinZip, for example).
10/01/07 Page 7 of 23

The following will now appear on your screen:
STEP 4: At the prompt "Choose an upload option (or 'X' to exit):", key the letter corresponding to
the correct upload protocol for your telecommunications software and press <enter>. STEP 5: When you receive the message "Beginning upload of the file <filename>" you need to
initiate the file transfer (upload) on your system by telling your telecommunications software to begin sending your file to WPS. The procedure to initiate the file transfer will vary depending on your telecommunications software.
EXAMPLE: ProComm Plus uses the "Page Up" key to initiate the transfer. After pressing <Page Up> you are asked to select the correct protocol. The file name must indicate where the file is located and the name of the actual file to upload.
The file transfer will now begin. When completed, you will receive the message:
You will also see a message indicating your file was logged and copied into a file library.
The following will once again appear on your screen:
10/01/07 Page 8 of 23

STEP 6: At the prompt "Enter your selection, ? for more help, or X to exit:" type the file name of another file to upload and complete the upload process -OR- press <X>, <enter> to exit. If you select <X> to exit, the following upload options menu will once again be presented:
STEP 7: At the prompt, "Make your selection ...", press <X> to exit to the BBS Main Menu. You
can now logoff the WPS BBS, download files, upload another file, etc.
NOTE: If you have more than one file to upload in a day, you can upload them consecutively by adding a letter after your submitter number and before ".DAT" or ".ZIP".
EXAMPLE: Submitter 99999 wants to upload 3 files:
File 1 Name: 99999A.DAT File 2 Name: 99999B.DAT File 3 Name: 99999C.DAT
10/01/07 Page 9 of 23

Logoff The WPS EDI BBS Complete the following instructions to logoff the WPS EDI Bulletin Board System:
STEP 1: From anywhere in the WPS EDI BBS menu tree, type X to exit until you access the following WPS EDI BBS Main Menu:
STEP 2: At the prompt "Make your selection..." press <X>, <enter> to logoff the system. STEP 3: When you are informed that you are about to terminate the telephone connection,
press <Y> to indicate that you are sure this is what you want to do. STEP 4: You now need to complete the appropriate procedures to disconnect. These
procedures will vary depending on your telecommunications software. Refer to the User Guide for your software to locate the appropriate procedures.
10/01/07 Page 10 of 23

Download Files From WPS After you transmit your Medicare, WPS Commercial Insurance, EPIC or TRICARE claim files, the data is subjected to two edit checks. The results of these edits will be posted to a Private Download Library on the WPS EDI Bulletin Board for you to download. It is VERY IMPORTANT that you download these files to obtain the results of these edits on a regular basis to ensure that all of your claims have been accepted into the appropriate claims processing system for adjudication. Other files such as WPS Commercial Insurance, Medicare and Tricare Remittance (ANSI835) files will be posted to your private file library for downloading as well.
10/01/07 Page 11 of 23
IMPORTANT NOTE: WPS uses file names to indicate the type of file that is posted for you. File names will include the following information:
• Your User ID • Time and date the file was created • Test or Production • Line of Business • Information regarding the type of file (i.e. report, 835 remittance, 997
acknowledgement, etc.) • A .TXT extension indicates the file is a message regarding processing of a file or
the availability of other files for download. • A .DAT extension indicates the file is a report, 835 remittance file, 997
acknowledgement file, etc.)
Initial Edit Check - Files to be downloaded
The initial edit check ensures that the file you uploaded to the WPS BBS is in the correct format. The results of this edit step, in the form of text files, are posted to your private file library for download shortly after the transmission of your file.
If your file was submitted in an ANSI X12 format, 997 Acknowledgement transaction files will also be posted for you to download.
NOTE: These files will be posted to your private file library as soon as the WPS EDI processor
has run your file. The time period you will have to wait for the files will vary depending on how many files are in queue to be read and processed before yours.
This edit step checks the ENTIRE BATCH OF CLAIMS transmitted, not data on individual claims. If the initial edits are passed, the entire batch is sent on to the next edit step.
If the initial edits are NOT PASSED, the ENTIRE BATCH OF CLAIMS IS REJECTED and must be resubmitted with any necessary corrections.
WPS Commercial Insurance, Medicare , EPIC and TRICARE Batch/Error Reports
Reports are available for test and production electronic claim files.
Reports will appear in your private download file library the evening of the day the file was transmitted provided the file was received and processed by WPS prior to 4:00 p.m. (12:00 p.m. for TRICARE files) (Monday through Friday). If file is processed after 4:00 p.m. the reports will be available the following evening.
Reports must be viewed and/or printed at your office.
Rejected claims appearing on these reports must be corrected and resubmitted.
WPS Commercial Insurance, Medicare and Tricare Remittance (ANSI 835 or National Standard Format)
Usually available by 9:00 am CST.
Must contact WPS Electronic Data Services to test and receive electronic remittance.
You must have appropriate software to process the electronic remittance files.
Complete the following steps to locate and download single files posted to your private download library:
NOTE: Once files are downloaded, they will be removed from your main private file library and archived to a private archive library where they can be accessed for 30 days. Refer to the “File Libraries” section of this document for instructions to locate your archive library.
STEP 1: Before you access the WPS BBS, identify the download directory (path) on your
system. This is where downloaded files can be located in your system and will vary depending on your telecommunication software.
If you are unsure of the download directory (path) specified in your system, consult the user guide for your telecommunications software.
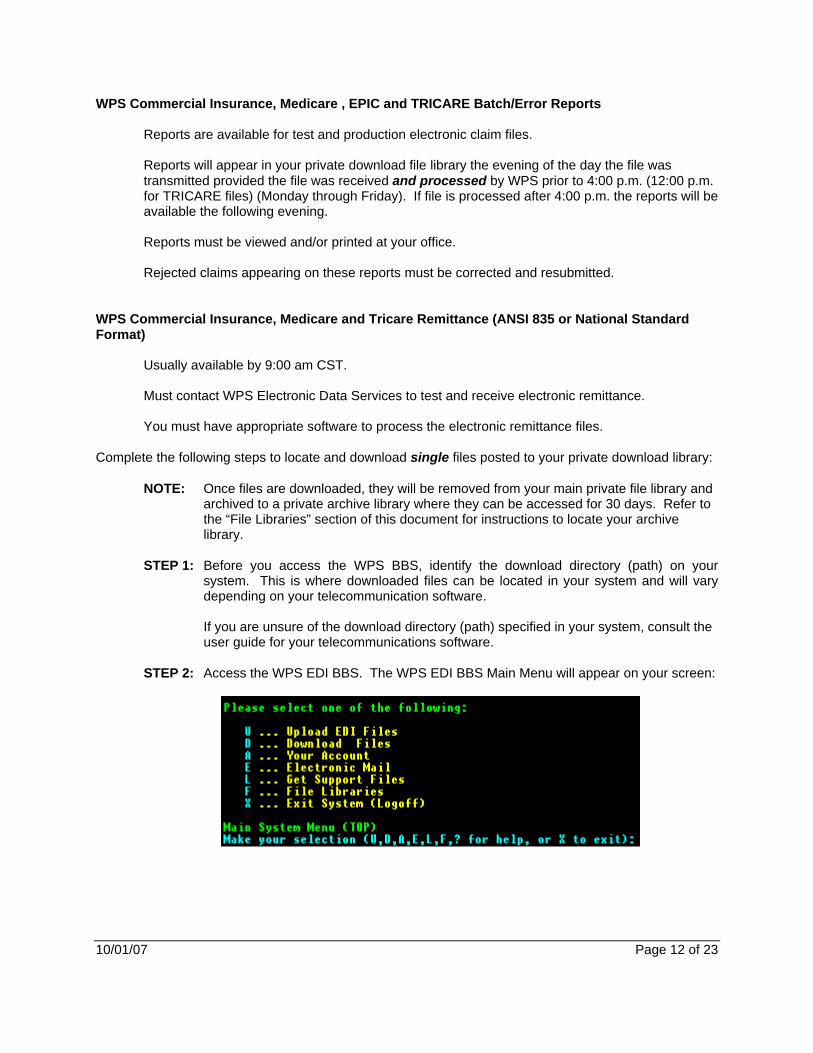
STEP 2: Access the WPS EDI BBS. The WPS EDI BBS Main Menu will appear on your screen:
10/01/07 Page 12 of 23

STEP 3: At the prompt “Make your selection…”, type <D>, <enter> to access your private ‘Download’ file library. The following Private Download Library selection menu will appear on your screen.
Step 4: To get a listing of files that are available for download, type <F>, <enter>. The
following DOS File listing will appear:
STEP 5: Follow the instructions at the bottom of the screen to select the file you wish to
download. Once the file has been selected, hold down the Ctrl key and press <D>. The following protocol menu will appear:
STEP 6: At the prompt "Choose a download option...", select the download protocol that
matches your current system and press <enter>.
10/01/07 Page 13 of 23

STEP 7: When you receive the message "Beginning <protocol> download of the file <filename>"
you need to initiate the file transfer (download) on your system by telling your telecommunications software to begin receiving the file from WPS. The procedure to initiate the file transfer will vary depending on your telecommunications software.
EXAMPLE: When using the ZMODEM protocol with some telecommunications software packages, the transfer (download) of the file will be automatically initiated. Other software packages/protocols require you to initiate the file transfer yourself (look for an option allowing you to receive a file).
STEP 8: Once the file has been transferred, a message indicating the download is complete will
appear on your screen.
Type <C> to continue and you will be returned to the list of files available for you to download. If you wish to select and download another file, do so or press <X> to exit from the list back to the Private File Library selection menu.
Press <X>, <enter> to return to the WPS EDI BBS Main Menu.
You may also choose to download all files that have been posted to your Private Download Library. Doing so eliminates the need can to locate and download files individually. As with single-file downloads, downloaded files will be deleted from your Private Download Library and moved to your Archive library. Complete The Following Steps To Download All Available Files From Your Private Download Library:
STEP 1: Before you access the WPS BBS, identify the download directory (path) on your
system. This is where downloaded files can be located in your system and will vary depending on your telecommunication software.
If you are unsure of the download directory (path) specified in your system, consult the user guide for your telecommunications software.
10/01/07 Page 14 of 23

STEP 2: Access the WPS BBS. The following WPS EDI BBS Main Menu will be presented.
STEP 3: At the prompt “Make your selection…”, type <D>, <enter> to access your private
‘Download’ file library. The following Private Download Library selection menu will appear on your screen.
STEP 4: At the prompt “Select a letter from this list, or ? for help”, type <D> (for Download a file)
and press <enter> . A prompt instructing you to enter a file name will appear. Type *.* and press <enter>.
All of the files that are available in your Private Download Library will now be displayed on your screen.
10/01/07 Page 15 of 23

If there are too many files to be displayed on one screen, press <C> to continue when prompted to do so.
STEP 5: Once all files have been listed, you will see the total number of files and total number of
bytes that will be downloaded. You will now need to select the appropriate download protocol.
STEP 6: At the prompt "Choose a download option...", select the download protocol that
matches your current system and press <enter>. STEP 7: When you receive the message "Beginning <Protocol> download of the ## files
matching “*.*” in the Download Library", you need to initiate the file transfer (download) on your system by telling your telecommunications software to begin receiving the file from WPS. The procedure to initiate the file transfer will vary depending on your telecommunications software.
EXAMPLE: When using the ZMODEM protocol with some telecommunications software packages, the transfer (download) of the file will be automatically initiated. Other software packages/protocols require you to initiate the file transfer yourself (look for an option allowing you to receive a file).
10/01/07 Page 16 of 23

STEP 8: Once the files have been transferred, a message indicating the download is complete will appear on your screen.
You can now press <X>, <enter> to exit file libraries and return to the WPS EDI BBS
Main Menu.
10/01/07 Page 17 of 23

Your Account You have access to view and modify your account information (Name, Address, Telephone Number, Passwords, etc.) on the WPS EDI BBS. WPS EDI asks that all users access their account information to ensure that it is correct and current. WPS Electronic Data Services also asks that all users access their account information on a regular basis to change their password*. Changing your password for the WPS EDI BBS helps protect the integrity of the electronic data that is transferred between you and WPS.
10/01/07
To meet WPS corporate andin place:
1. All passwords m2. All passwords m3. All passwords m4. All passwords m5. All passwords m6. Passwords wilit expires. 7. Passwords cann8. 24 passwords autilized.
Complete The Following Steps To Acc
STEP 1: From the WPS BBS
The Account Inform
STEP 2: At the prompt "Your
information. Informaappear on your scre
NOTE: Your passw
STEP 3: Use the <Tab> key
Type the correct/updcursor is in the "Exit
WPS EDI PASSWORD POLICIES
federal security mandates, the following password policies are
ust be at least 8 characters. ust contain at least one UPPER CASE letter. ust contain at least one lower case letter. ust contain at least one number. ust contain at least one special character (i.e. #, $, @, &)
l expire after 90 days. You must change your password before
ot be changed more than one time within a 24 hour period. re ‘remembered’ and cannot be reused until 24 others have been
Page 18 of 23
ess And Update Your Account Information:
Main Menu, select option A (“Your Account”) and press <enter>.
ation selection menu will appear on your screen:
choice (or X to Exit)" type <A>, <enter> to display your account tion such as your name, address, telephone number, etc. will now en.
ord will always appear as ******** for security purposes.
to highlight any information you would like to correct or modify. ated information and continue to use the <Tab> key until your
" field at the bottom of your account information display.

10/01/07 Page 19 of 23
NOTE: If you modify your password for the WPS EDI BBS, you will be asked to enter it a second time for verification. It will always appear as ******** on your screen.
STEP 4: At the "Exit" prompt, key <S> and press <enter> to save the account information. The
following menu will once again appear on your screen:
User-ID: 99999 Language: English/ANSI
S Display statistics on your account A Display or edit account information (address/phone/password) L Change language/protocol preferences
Your choice (or 'X' to exit):
STEP 5: At the prompt "Your Choice (or ‘X’ to exit):" type <X> and press <enter> to return to the
WPS EDI BBS Main Menu.

Electronic Mail (e-mail)
Tf
1
IMPORTANT NOTE TO PREVIOUS BBS USERS: WPS no longer uses the Electronic Mail functionto distribute files (as attachments) for downloads. All reports, remittance files, initial edit responses, etc. are now posted to your private download library.
he WPS EDI BBS provides the capability to send Email messages to the WPS EDI Staff. Complete the
ollowing steps if you wish to send a message:
STEP 1: Access the WPS EDI BBS and select option E for "Electronic Mail". The following menu will appear:
**The following selections may be updated in the future to reflect additional WPS EDI area’s to send emails to**
STEP 2: At the prompt "Make your selection...", press <S>,<enter>. The following will appear on your screen:
STEP 3: Type the letter that corresponds with the WPS EDI area you wish to send the message to. (EX: Press <W>, <enter> to send a message regarding WPS commercial insurance or Tricare EDI).
The following will appear in the middle of your screen:
STEP 4: Type the topic of your message and press <enter>. The topic window will disappear
and your cursor will be in the upper left corner of the screen.
STEP 5: Type your message.
0/01/07 Page 20 of 23

STEP 6: Once you have completed typing your message, hold down the <Ctrl> key and press <G>. The following menu will appear:
Select an option or press <enter> to send the message.
STEP 7: Once the message has been sent, a confirmation will appear on your screen and the
following menu will, once again appear:
STEP 8: Press <X>, <enter> to exit.
10/01/07 Page 21 of 23

EDI File Libraries EDI File Libraries are directories containing programs, files and documents that WPS EDI BBS users can download. The format of each document will be indicated in the description of the document. You must have appropriate software to use the files that are downloaded. Complete the following steps to select a specific file library. Once a library is selected, downloading files from that directory follows the same process as listed above (“Download Files From WPS”).
STEP 1: Access the WPS EDI BBS and select option F from the WPS EDI BBS Main Menu. The name of the file library you are currently in will be displayed and the following menu will appear:
STEP 2: Press <F>, <enter> for a list of the files in the current file library or Press <S>, <enter>
to select a different file library.
10/01/07 Page 22 of 23

If you choose option "S" to select a different file library, you will be prompted for the name of the library you wish to access. Pressing <?>, <enter>will display a list of available file libraries:
• The “DOWNLOAD” library is your private/main download library where new files are placed for you. Files will be automatically deleted after 30 days.
• PROD and TESTLIB locations are where files are uploaded for TEST or PRODUCTION submission. You will not be able to download files from either of these libraries.
• “PrevDnld” is where files are automatically moved to after you download files from your private library. If a file should accidentally be deleted, please look here for the missing file. Files will be automatically deleted after 30 days.
• “Main” is an all-purpose library for public downloads.
STEP 3: To select a library, type the name of the library, for example PrevDnld, at the prompt. From here, you may download files just as you would following the instructions in “Download Files From WPS”).
Important Note:
10/01/07
You may find it necessary to reselect your private download location, “Download”, as your download file library. Even after log off, the BBS may remember your previous choice
Page 23 of 23