viewer guide
DESCRIPTION
asaTRANSCRIPT

http://www.intelliadmin.com Page 1
Remote Control 5.4 Setup Guide
A remote control solution designed for Network Administrators
Copyright 2014, IntelliAdmin, LLC
Revision 5/15/2014

http://www.intelliadmin.com Page 2
Table of Contents
Quick Start Guide ................................................................................................................................... 4
Connecting to a remote host ............................................................................................................. 9
Alternate Ports....................................................................................................................................... 10
Automatic Installation of the Agent .............................................................................................. 11
Hotkeys .................................................................................................................................................... 14
Disabling Copy and Paste .................................................................................................................. 16
Automatic Reconnect .......................................................................................................................... 17
Computer Lists ...................................................................................................................................... 18
Backing up and Restoring Computer Lists .................................................................................. 26
Finding Computers ............................................................................................................................... 28
Multiple Monitor Support ........................................................................................................................... 31
Request Permission before Connecting ....................................................................................... 32
Watch Mode – Keeping users from knowing you are connected ....................................... 35
Disabling remote user input ............................................................................................................. 37
Uninstalling Agent Software on Disconnect ............................................................................... 38
Locking, or Logging off on Disconnect ......................................................................................... 39
Active Connection Indicators ........................................................................................................... 40
Disabling the remote screen saver ................................................................................................ 41
Creating Shortcuts ............................................................................................................................... 42
Launching From the Command Line ............................................................................................. 44
Viewing in full screen .......................................................................................................................... 47
Stretching the view of the remote host ....................................................................................... 48
Apply Settings While Connected..................................................................................................... 49
Resolving screen refresh issues...................................................................................................... 50
Controlling Remote Desktop Sessions ......................................................................................... 51
Capturing the Screen .......................................................................................................................... 52
Saving your screen positions ........................................................................................................... 53

http://www.intelliadmin.com Page 3
Passwords................................................................................................................................................ 55
Resolving Connection Problems ...................................................................................................... 56

http://www.intelliadmin.com Page 4
Quick Start Guide
If you have not done it already, download the latest version of IntelliAdmin
Remote Control from here:
http://www.intelliadmin.com/setupex.exe
The software consists of two components: an agent, and a viewer.
The agent is installed on the machine, or machines you would like to control.
The viewer is then used to connect and control those remote machines.
In many cases it is not necessary to install the agent. If you have windows
administrator access to the remote machine and it is on your LAN, the
viewer will automatically push the agent to the remote machine for you (As
long as file and printer sharing is enabled)
Let us begin by installing the agent on the machine you would like to control.
Download and install the setup package, and pick the agent install option:

http://www.intelliadmin.com Page 5
Once you have finished the install the setup program will ask you what type
of username you would like to use:
1. Standard Account- this selection allows you to pick any username and
password combination to control the machine. (Does not use the Windows security
system for authentication)
2. Windows Account or group – this selection allows you use windows to
authenticate. Any Windows username or group will work. If a group is
selected, any member of that group will be allowed to access the machine.
Now that you have installed the agent, you can connect to it from the
viewer.
http://www.intelliadmin.com Page 6
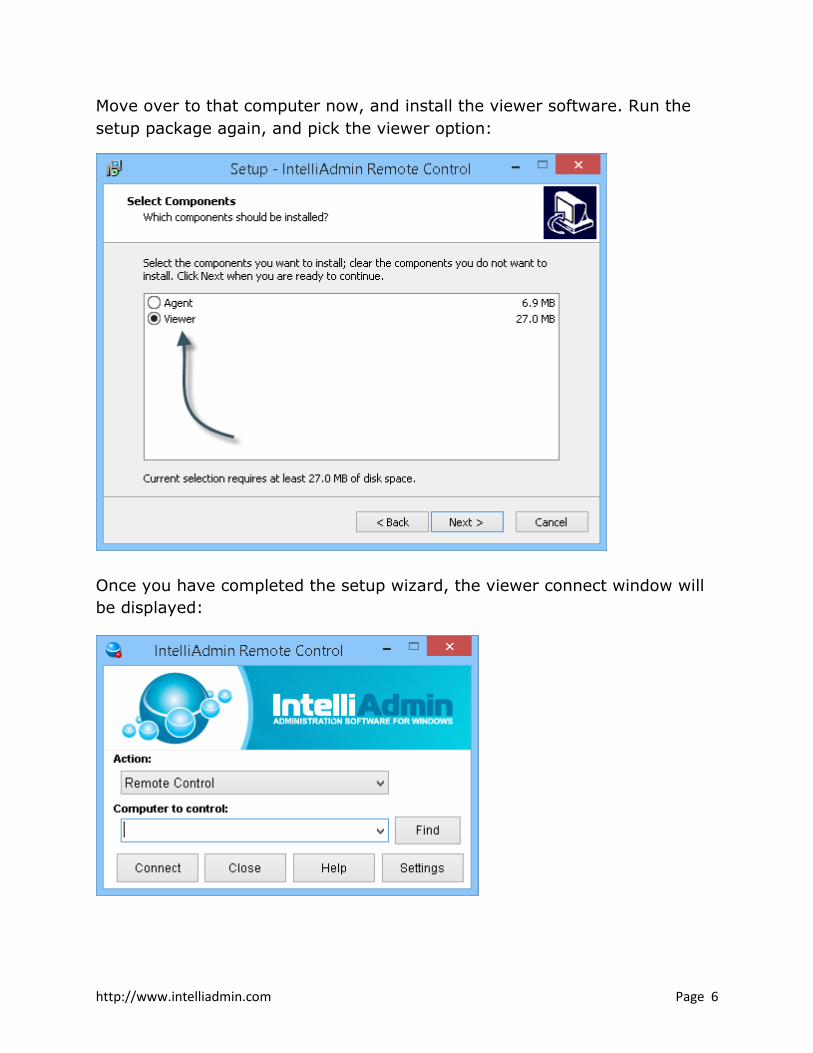
Move over to that computer now, and install the viewer software. Run the
setup package again, and pick the viewer option:
Once you have completed the setup wizard, the viewer connect window will
be displayed:

http://www.intelliadmin.com Page 7
To connect, you can type in a hostname or IP in that edit box, or click on the
find button to search for computers on your local network:
Select a computer from the list, or start typing text to find the name of the
computer you are looking for and click connect.

http://www.intelliadmin.com Page 8
Remote Control, will start trying to connect to the remote computer
When you connect, the remote control client will ask for the password:
Type in your username and password, and you will be connected to the
remote computer. When this happens, the viewer will automatically save the
name of the current user, operating system, and service pack – making it
easier to find the machine the next time you connect.
This concludes the quick start guide. Continue to read for more detailed
information about Remote Control. If you have any questions, please free to
email us at [email protected]

http://www.intelliadmin.com Page 9
Connecting to a remote host
To connect to a remote host, type the host name or IP address of the
machine in the connect window, and press connect:
To connect successfully, the remote control agent software must be installed
on the remote machine, or file and printer sharing needs to be properly
configured to allow automatic agent installation.

http://www.intelliadmin.com Page 10
Alternate Ports
Sometimes you may have an agent that is configured to listen on a port
other than the default 2792 (TCP ) port. In this case, you can specify a port
by placing it after the host name with a colon.
For Example, if we wanted to connect to 192.168.0.1 on port 8080, it would
have this syntax:

http://www.intelliadmin.com Page 11
Automatic Installation of the Agent
The viewer can automatically install the agent over your local area network.
This feature is enabled by default. You can enable or disable it in the settings
window:
This feature has a few requirements:
-You need to have local administrator rights on the remote machine.
-Your password must be set. Blank passwords will be denied.
-File and printer sharing must be properly configured, and allowed in the
firewall

http://www.intelliadmin.com Page 12
Security features in newer version of Windows disable file and printer
sharing by default. This is needed for the automatic install process.
These articles will walk you through re-enabling it:
File and printer sharing in Windows 8
File and printer sharing in Windows 7
File and printer sharing in Vista
File and printer sharing is Windows XP
If you have a larger network, you can make these changes using group
policy. This article shows you how to do it:
Using group policy to enable file and printer sharing
To initiate an automatic install, simply type in the name of the computer you
would like to control, and click connect:

http://www.intelliadmin.com Page 13
The configuration that will be pushed during the install, can be changed in
the viewer settings, under the connection options:
With these settings you can:
-Disable/Enable the configure button on the information window that is
displayed when the user clicks on the tray icon of the agent
-Disable/Enable the tray icon that is shown when the remote control service
is active (Not to be confused with the blinking connected tray icon)
-Disable/Enable the uninstall application in “Add/Remove” programs on the
remote machine.
-Get the remote agent to automatically register with your Enterprise server

http://www.intelliadmin.com Page 14
Hotkeys
Hotkeys are a great way to save time. There are 7 hotkeys that can be customized,
plus additional mouse support.
You can set the hot key modifier to Ctrl, Shift, or Alt. The modifier is the key you
hold down to activate the actual hotkey itself:

http://www.intelliadmin.com Page 15
The hotkeys available are:
Full Screen – Allows you to toggle full screen
Ctrl-Alt-Del – Sends the control, alternate, delete key sequence.
Watch Mode – Allows you to toggle watch mode
Monitor Switching – Cycles through the remote computers’ monitors.
Zoom In – Zooms in the current view
Zoom Out – Zooms out the current view
Screen Shot – Takes a screen shot and allows you to save as a jpeg file.
In addition to the hotkeys themselves, the mouse also has hotkey functionality. If
you hold down the hotkey modifier (Ctrl, Alt, or Shift) and drag the window around,
it will allow you to scroll the window.
If you hold down the modifier key, and use the mouse wheel it will allow you to
zoom in and out.

http://www.intelliadmin.com Page 16
Disabling Copy and Paste
Sometimes it is necessary to disable copy and paste between you and the remote
host.
You can determine what directions are allowed in the settings:
This allows you to disable sending, or receiving of clipboard data – depending on
your security needs.

http://www.intelliadmin.com Page 17
Automatic Reconnect
When a connection is lost, the viewer will try to automatically reconnect to the
remote host. Sometimes you might want it to try longer because the remote
machine takes longer to reboot, or get back online.
You can modify the reconnect options in the settings:

http://www.intelliadmin.com Page 18
Computer Lists
The computers that are shown in the find window can be pulled from a
number of locations. The options for this are in the settings window, under
the ‘Computer Lists’ tab.
You can add computers to this list programmatically using XML files.
The files could be local, on a network share, or on a webserver.
Here is an example XML file:
<?xml version="1.0" encoding="UTF-8"?>
<computer>
<host>10.10.12.20</host>
<friendlyname>server1.intelliadmin.com</friendlyname>
<description>Steve Wiseman. Extension: 1212</description>
</computer>
<computer>
<host>10.10.12.21</host>
<friendlyname>server2.intelliadmin.com</friendlyname>
<description>Sam Smith. Extension:1213</description>
</computer>
Each computer is indicated by the <COMPUTER> tag. The supported sub
tags for each computer entry are:
{HOST} – The host that the viewer will connect to.
{FriendlyName} – A name that is displayed to the user
{Description} – A full description of the host

http://www.intelliadmin.com Page 19
In the previous XML example, we have two computers. Here is how they
would show up in the viewer:
Note that information such as the operating system, service pack, and
username are not provided by the XML file. This information is provided
automatically by the agent to the viewer after you connect to a computer at
least once.

http://www.intelliadmin.com Page 20
There are a few different ways an XML file can be used to pull computers for
the find window. The first is HTTP, or HTTPS. The viewer will check this URL
for computers each time the user opens the find window.
Once you have entered a URL, you can click on the test button to make sure
it works properly.
Note that Internet Explorer settings are used to determine proxy values.

http://www.intelliadmin.com Page 21
Another way to provide a list of computers, is using a local file, or a file on a
network share. The viewer will load the file each time the find button is
clicked:
http://www.intelliadmin.com Page 22
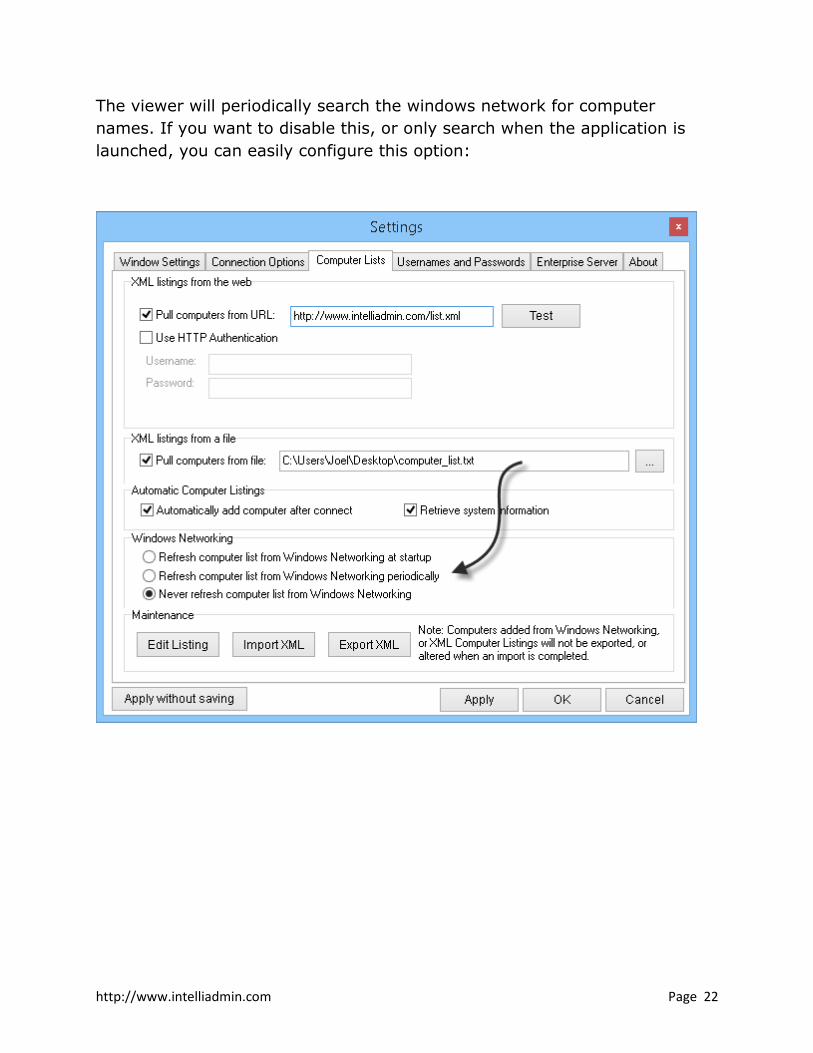
The viewer will periodically search the windows network for computer
names. If you want to disable this, or only search when the application is
launched, you can easily configure this option:

http://www.intelliadmin.com Page 23
When the viewer connects to the remote server, it will automatically add the
hostname, and other information to a local database. This information will
then show up in the find window.
It pulls the current username, computer name, operating system, and
service pack. All of this can be used to quickly find the host. You can disable
this by changing the settings under the “Automatic Computer Listings”
section:

http://www.intelliadmin.com Page 24
Computers in the find window can be edited. To manage the computer
entires, click on the “Edit Listing” button in the settings window. It will bring
up the address book management:

http://www.intelliadmin.com Page 25
You can manually edit current computer listings, and add new ones by
clicking on the add or edit button:
Note that all items are searchable. In the above example, there is a phone
extension. Now you can search by that extension number:

http://www.intelliadmin.com Page 26
Backing up and Restoring Computer Lists
Computer information is stored automatically in the viewer when you
connect to remote hosts. Sometimes you may want to move this information
to another computer. You can back it up by exporting it to XML:

http://www.intelliadmin.com Page 27
If you want to load a previous packup, restore it by clicking on the import
XML button:

http://www.intelliadmin.com Page 28
Finding Computers
To find computers on your local network, or computers you have connected
to before – simply click the find button:

http://www.intelliadmin.com Page 29
A find window will be displayed and it is sorted by the last time you accessed
them:

http://www.intelliadmin.com Page 30
If you want to narrow down the list, simply start typing any information
related to the computer you want to find, and only computers that match
will be displayed:

http://www.intelliadmin.com Page 31
Multiple Monitor Support
When you are connected to a remote system that has more than one monitor, you
can view an individual monitor, or all of them at once.
This is done by selecting the monitor at the top of the viewer:
You can also cycle through the monitors by holding Ctrl and pressing Tab. (This
hotkey can be changed in the settings)

http://www.intelliadmin.com Page 32
Request Permission before Connecting
You can ask the remote user for permission before connecting. To do this,
simply check the “Ask Permission” checkbox in the viewer, under connection
options in the settings:
If you want to force this option (lock it down), group policy is the best way.
This article will walk you through it.

http://www.intelliadmin.com Page 33
When you connect, you will be asked to wait until the user gives you
permission:
http://www.intelliadmin.com Page 34
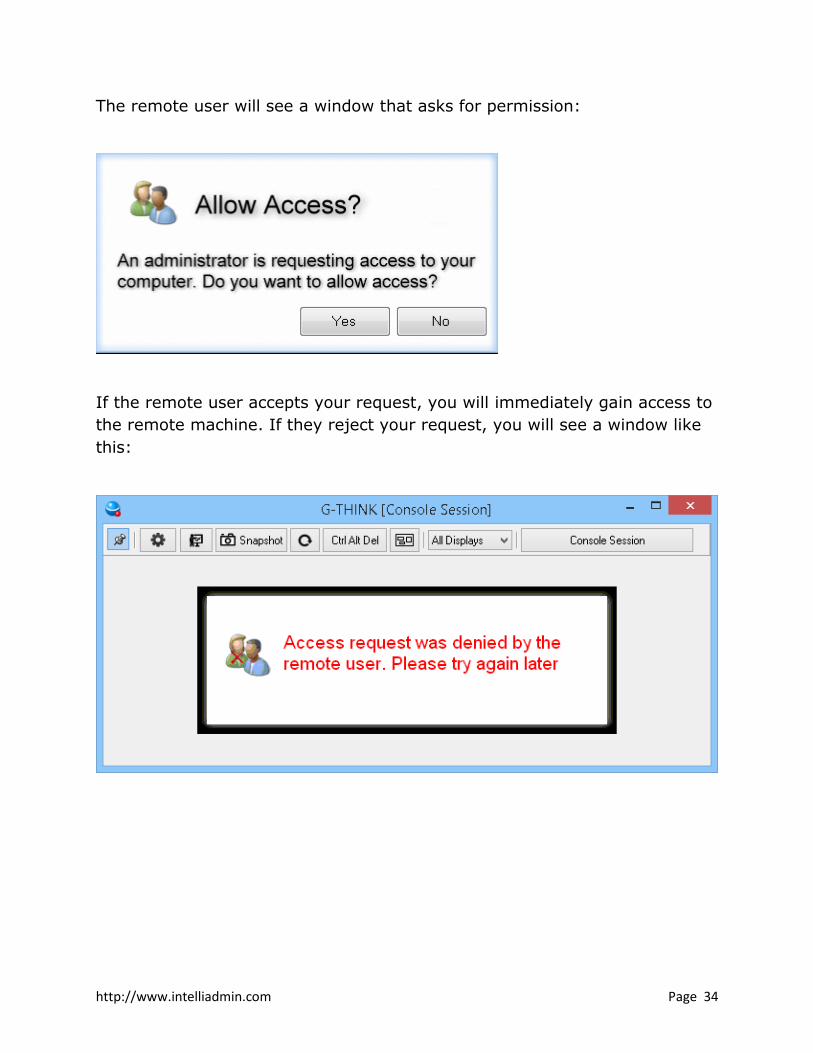
The remote user will see a window that asks for permission:
If the remote user accepts your request, you will immediately gain access to
the remote machine. If they reject your request, you will see a window like
this:

http://www.intelliadmin.com Page 35
Watch Mode – Keeping users from knowing you are
connected
There are times when you need to observe a remote machine, and keep the remote
user from knowing you are connected. This can be achieved using ‘Watch Mode’.
Watch Mode can be enabled by changing the connection action before you connect:
Or, it can be turned on after you connect by pressing the ‘Spy Mode’ button at the
top of the viewer:
You can also toggle it by using the keyboard combination of Ctrl-F1 (This can be
changed in the main settings page)

http://www.intelliadmin.com Page 36
If you are noticing the watch mode button is not showing in the viewer, it could be
disabled for a few reasons:
-The remote machine is running an agent with a build number that is before 5.531
-The user account has a policy restriction in place not allowing watch mode
-The user account has a policy forcing them to show a status window, tray icon, or
view only
-A policy is set to ask permission before connecting
The reason for not allowing watch mode in these situations is to prevent its
operation when a covert connection is not possible.
If you have an organizational policy that does not allow a feature like watch mode,
you can use group policy to prevent it from being used.

http://www.intelliadmin.com Page 37
Disabling remote user input
There are times when you want to keep remote users from typing on the
keyboard, or moving the mouse. You can prevent this by picking the
“Disable remote user’s mouse and keyboard” option:
http://www.intelliadmin.com Page 38
Uninstalling Agent Software on Disconnect
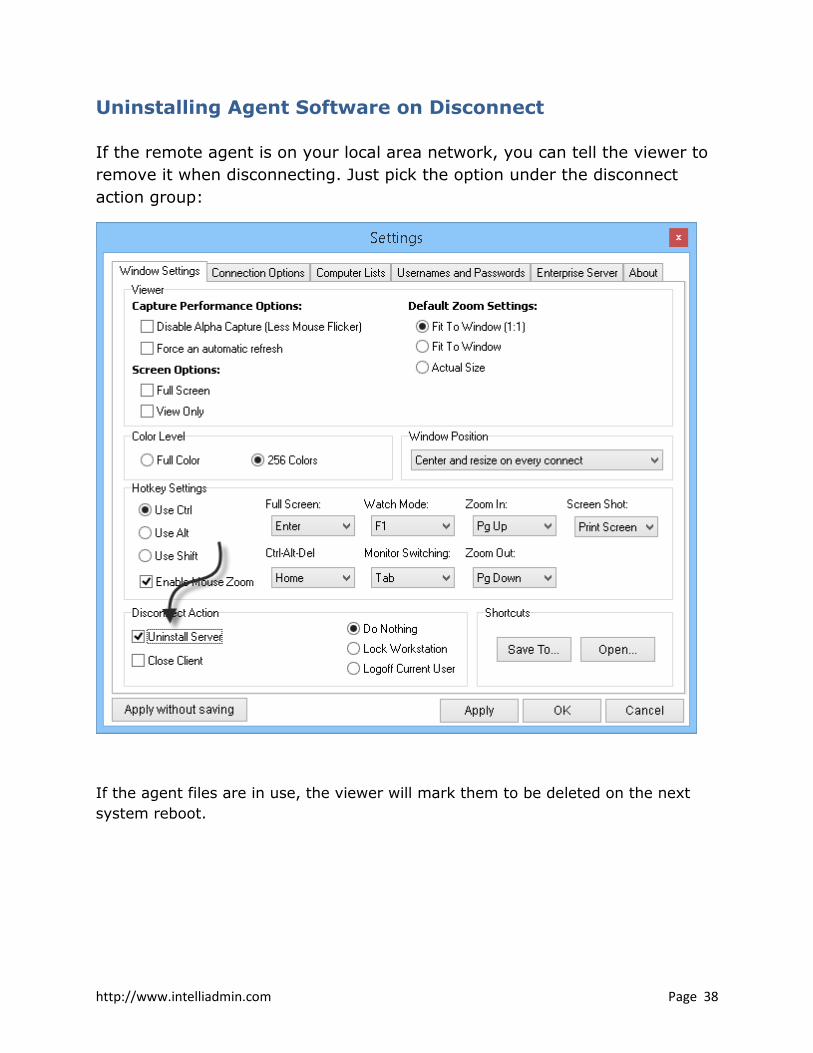
If the remote agent is on your local area network, you can tell the viewer to
remove it when disconnecting. Just pick the option under the disconnect
action group:
If the agent files are in use, the viewer will mark them to be deleted on the next
system reboot.

http://www.intelliadmin.com Page 39
Locking, or Logging off on Disconnect
You can lock the workstation or even logoff the current user when you
disconnect. Just pick the appropriate option under the disconnect action
group in the settings:
http://www.intelliadmin.com Page 40
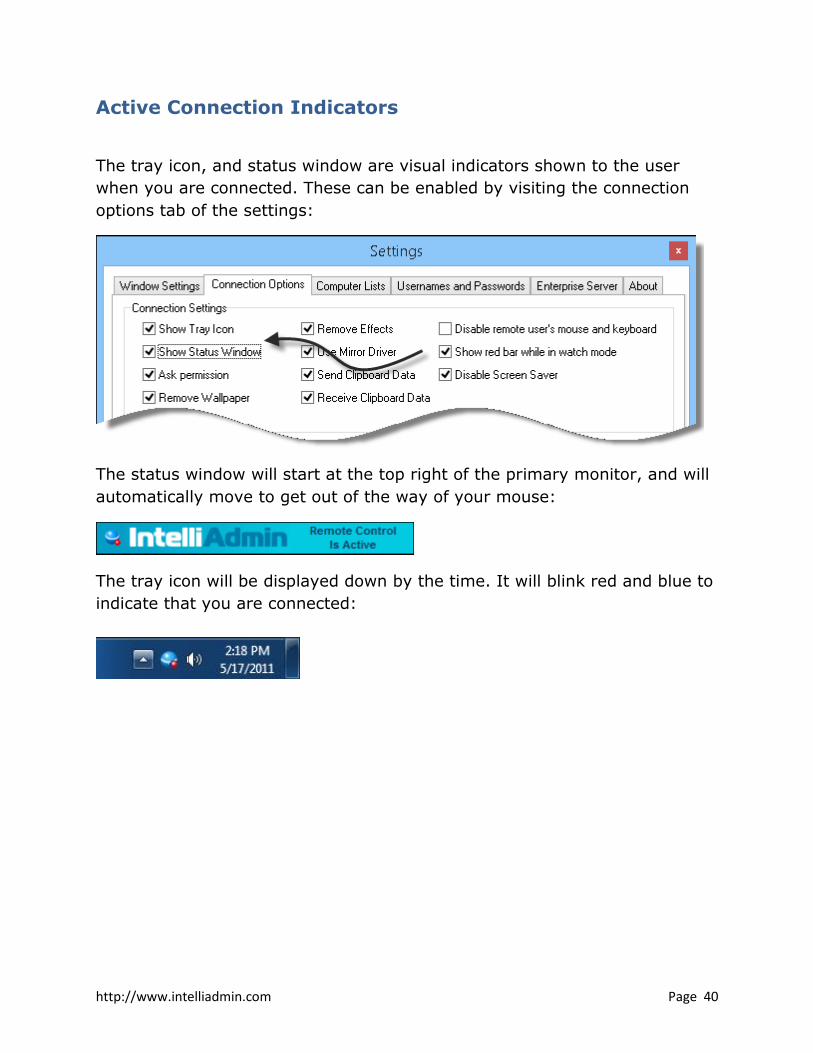
Active Connection Indicators
The tray icon, and status window are visual indicators shown to the user
when you are connected. These can be enabled by visiting the connection
options tab of the settings:
The status window will start at the top right of the primary monitor, and will
automatically move to get out of the way of your mouse:
The tray icon will be displayed down by the time. It will blink red and blue to
indicate that you are connected:

http://www.intelliadmin.com Page 41
Disabling the remote screen saver
When you are connected to a remote machine, you might not want the
screen saver to activate. To prevent it from activating while you are
connected, simply check the disable screen saver option in the settings:
When this option is enabled, the screen saver will not activate until you have
disconnected from the remote host.

http://www.intelliadmin.com Page 42
Creating Shortcuts
If you want to create a shortcut to a remote machine, pick the settings you
would like to embed in that shortcut. Instead of applying them or pressing
OK, click the “Save To” button in the settings:

http://www.intelliadmin.com Page 43
You will then be asked for the host name that will be saved inside the
shortcut:
Once the shortcut is saved, you can simply double click on the icon to
connect
When the connection is launched, it will read the custom settings and
automatically connect to the specified host.

http://www.intelliadmin.com Page 44
Launching From the Command Line
Remote Control 5 can be called with arguments in the format of
name=value. For example, if we wanted to connect to 5.5.5.5’ on launch, it
would look like this:
Another way to use command line arguments is to launch it via the URL
iadmin://
Like this:
iadmin://10.10.27.65
The URL follows windows specifications for Internet URLs. If you want to set
additional parameters, you need to use this format:
iadmin://computer1?Name1=Value1&Name2=Value2&Name3=Value3
Supported variables that can be set from the command line, or a URL:
HostName - The hostname IntelliAdmin will connect to when launched (TEXT)
FullScreen - Viewer will be maximized to full screen when connected
(TRUE/FALSE)
ShowTray - Displays the tray icon to the remote user (TRUE/FALSE)
WatchMode – Enables or disables watch mode on connect (TRUE/FALSE)

http://www.intelliadmin.com Page 45
DisableScreenSaver – Enables or disables the remote screen saver.
(TRUE/FALSE)
ShowStatus - Displays a status window at all times while an administrator
is connected (TRUE/FALSE)
RequestAccess - Asks permission from the remote user before controlling
their machine. (TRUE/FALSE)
AutoUninstall - Automatically removes the agent after disconnect
(TRUE/FALSE)
AllowInstall - Automatically installs agent if connection fails (TRUE/FALSE)
ExitOnDisconnect - Closes client on disconnect (TRUE/FALSE)
LogOff - Log off system after disconnect (TRUE/FALSE)
LockWorkstation - Lock workstation after disconnect (TRUE/FALSE)
DisableRemoteInputs - Disable mouse and keyboard for remote user
while connected (TRUE/FALSE)
DisableLocalInputs - Do not send mouse or keyboard events to remote
machine (TRUE/FALSE)
DisableEffects - Disable user interface effects that tend to slow down
remote control screen updates (TRUE/FALSE)
RemoveWallpaper - Turn off wallpaper while connected to remote users
machine (TRUE/FALSE)
DisableAlphaCapture - Turn off alpha capture when controlling remote
host (TRUE/FALSE)
ColorDepth - Set the color Depth that the remote machine is displayed.
(0=TrueColor, 1 = 256 Colors, 2 = 64 Colors, 3 = 16 Colors)
InstallServerTrayIcon - Indicates the default setting of the server tray
icon when the client installs the server software (TRUE/FALSE)

http://www.intelliadmin.com Page 46
InstallShowUninstall - Indicates that when installing the server, show an
entry in add/remove programs if set to true. (TRUE/FALSE)
InstallShowConfigureButton - Indicates that when installing the server,
the configure button should be displayed if set to true. (TRUE/FALSE)
MirrorDriver – Tells the viewer to use the mirror driver when set to true.
(TRUE/FALSE)
AutomaticRefresh – Tells the viewer to automatically refresh the screen
every ½ second when set to true. (TRUE/FALSE)
DisableScreenSaver – Tells the viewer to prevent the screen saver from
activating on the remote machine when set to true. (TRUE/FALSE)
ReconnectMax – Indicates the maximum number of times the viewer
should try reconnecting when a connection is lost. (Integer)
ReconnectInterval – The number of seconds between reconnects.
(Integer)
ReconnectInterval – The number of seconds between reconnects.
(Integer)
SendClipboard – Allows the viewer to send the clipboard data to the
remote host when set to true. (TRUE/FALSE)
RecvClipboard – Allows the viewer to receive clipboard data from the
remote host when set to true. (TRUE/FALSE)
WatchModeBar – Shows the red bar at the top of the viewer when watch
mode is active. (TRUE/FALSE)
MouseZoom – Enables the mouse zoom feature that will zoom in and out
when the primary hotkey is held down. (TRUE/FALSE)

http://www.intelliadmin.com Page 47
Viewing in full screen
The viewer can easily be switched to full screen mode by pressing Ctrl-Enter.
This is the default setting. It can be changed if you want to use a different
key combination. Just go to settings, and pick the key you would like to use:

http://www.intelliadmin.com Page 48
Stretching the view of the remote host
Once you are connected to the remote host, you can tell the viewer to
stretch the view to fit the current window. Just click the settings button at
the top of the viewer window, and pick your options:
You can fine tune the stretch by forcing a 1:1 aspect ratio, or even allow
smaller screens to zoom to the size of your viewer.

http://www.intelliadmin.com Page 49
Apply Settings While Connected
If the agent is at least version 5.531, you can apply settings while
connected. Just click the settings button in the top left of the viewer:
You can apply the settings to just this remote control session, or make them
default by picking the appropriate option at the bottom:

http://www.intelliadmin.com Page 50
Resolving screen refresh issues
Some applications make it difficult for our remote control agent to capture
changes on the screen. There are two ways you can resolve this.
First you can install the mirror driver. The mirror driver is software that sits
between the video card and all other applications. It allows Remote Control
to grab all screen changes efficiently. You can install it by downloading the
setup package from here:
http://www.intelliadmin.com/setupex.exe
Install this package on remote machines where you need the mirror driver.
After a reboot, remote control will be able to use it to grab screen changes.
Another option is to automatically refresh the screen at a regular interval.
You can pick this in the main settings, or in the viewer settings while
connected:
This should only be used as a last resort, since using this on older machines
will take up quite a bit of CPU time.

http://www.intelliadmin.com Page 51
Controlling Remote Desktop Sessions
When you connect to a remote machine, it is possible to ‘jump’ into any
active remote desktop session and control them just like the desktop.
To do this, click on the button that says “Console Session”. It will show you
the list of currently active remote desktop sessions on the remote machine:
If you have a long list, the edit box will allow you to narrow it down. Just
start typing and it will only show the session names that match.
Once you select the session, the viewer will automatically switch to that
users’ desktop.

http://www.intelliadmin.com Page 52
Capturing the Screen
The viewer can capture the current screen and save it as a jpeg file. To grab
a screen shot of the current view, just click the snapshot button at the top of
the viewer:
Another way is to use the hotkey. The default setting for this is Ctrl + Print Screen.

http://www.intelliadmin.com Page 53
Saving your screen positions
You can configure the viewer to remember screen positions by the host you
are connected to.
For example, if you have a few computers you connect to all the time, you
might want to arrange them on your screen in a specific way:
http://www.intelliadmin.com Page 54
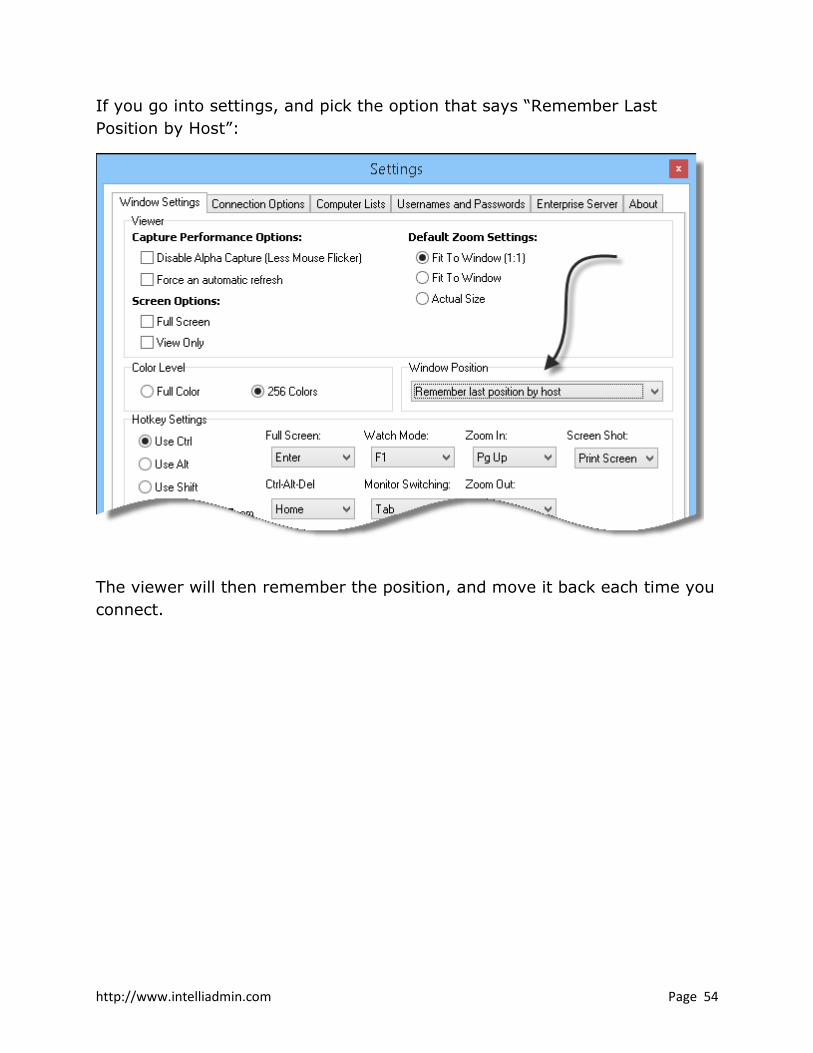
If you go into settings, and pick the option that says “Remember Last
Position by Host”:
The viewer will then remember the position, and move it back each time you
connect.

http://www.intelliadmin.com Page 55
Passwords
If you are using windows accounts for authentication, make sure the
username has a password set or it will reject it for security reasons.
If you are using the viewer to control computers on a domain, you can set a
default username and password so it does not constantly ask for your
credentials.
To set the default username and password, open the settings form and go to
the ‘Usernames and Passwords’ tab. Check the option that says “Use default
username and password”. After it is checked you can enter your default
credentials:
http://www.intelliadmin.com Page 56
Resolving Connection Problems
There can be a few reasons why you cannot connect to a remote computer:
-A firewall or router is blocking port 2792
-The remote machine is not running the IntelliAdmin Remote Control Agent
-Antivirus software is blocking it.
If the remote machine is not running the agent, you can get on the remote
computer and install it manually from this download link:
http://www.intelliadmin.com/setupex.exe
Another way to install the agent is pushing it from the viewer over your local
area network. File and printer sharing needs to be enabled and added as an
exception in the firewall, or windows will block the install. These articles will
walk you through this:
File and printer sharing in Windows 8
File and printer sharing in Windows 7
File and printer sharing in Vista
File and printer sharing is Windows XP
If you are still having trouble connecting, please make sure your anti-virus
software is not blocking the agent.
Send us an email at [email protected] and we will be glad to help
out.