tutorials.render-test.comtutorials.render-test.com/worddocs/rain_window.docx · web viewi have...
TRANSCRIPT

Rain on WindowIn this tutorial we are going to use particle flow to create some rain droplets that you might see on a window, windshield, or camera lens.
You can see a finished animated preview of this effect by downloading the .mov here:http://animation.diclementi.com/rainlens.mov
I will once again be providing you with a starter file, so we don't have to waste time building some things and we can get right into the particle effects. You can find the file here:http://tutorials.diclementi.com/start_files/rainonlens_start.zip
It will be a .zip file because it includes the image of dark grey clouds that you can assign to the group of planes you will find in the .max file named "Reflectors". This is a silly contraption to get the best results out of reflective and refractive surfaces (like water droplets) in 3D space. They are simply planes placed in an array around the main image of clouds so that our drops can reflect clouds and black on the sides and behind. You will also find a Wind, a Gravity, and a Drag spacewarp which we will use to direct the movement of our droplets. A Camera, and a light for the scene, and a Deflector at the bottom which we will use to kill any particles that reach the bottom of our scene.
These are all pretty straight forward objects but if you don't understand how to create these things or why I have chosen to then you may be better off starting with a tutorial more aimed for beginners than the advanced Particle Flow stuff.
To begin, we can go ahead and open Particle View by pressing 6 on your keyboards or by finding it in the Graph Editors menu at the top of the screen.
1

For this effect we will actually be creating 3 separate particle systems all sitting on top of one another doing different things. We will start out the exact same way however as any other system we have build.
Drag and drop an empty flow from the depot at the bottom of the screen to the empty light grey stage area then selecting the title bar of the box it creates labeled PF Source 001 to adjust the icons settings to the right in the command panel.
We will use the Rectangular icon for an emitter, it will basically be our windshield for this example.
I have given it a Length and Width based on the Aspect ration of HDTV video because that is what our render size is. A Length of 108 and Width of 192 will fit perfectly inside our safe frames and match the height and width of our render which can be HD anything.
I am also setting my Viewport % to 100. So I can see all my particles in the viewports.
Our next step is to rotate the icon, and fit it so that the orange edges of the icon fill up our Camera view in the lower right viewport.
Rotate the emitter 90 degrees in the X Axis so you can see the rectangular shape in your Camera viewport. Then simply pull it back towards the camera until the Orange edges of the Icon have barely vanished on all sides of the safe frames.
2

When you have done it right you won't see any orange edges from the icon, and the logo of the PFSource001 Icon will be right in the center of your screen... like this:
Perfect, just like our icon is the window pane and we are looking right through it.
Then we can jump back into Particle View (6)
We will end up with 3 Separate Birth events all tied to this one PF Source001 box, we will start with the best raindrops ... the ones that slide down the window leaving trails of water behind them.
Drag and drop a Birth operator from the depot and place it in the empty grey stage area below the PF Source box, then attach the blue node from the first box to the empty circle node from the second.
We will want to create particles for our entire length of our scene which is 250 frames for now. So my Emit Start is 0 and Stop is 250.
I have chosen to make 50 of these kind of raindrops. We will fill the rest of the window in with other kinds don't worry.
I have also taken the time to go ahead and change the top dropdown in the Display operator that came with the Birth to Geometry.
3

Next, Add a Position Icon to the Event 001 box below the Birth.
The default value of Volume is good for this one, so no changes needed to this operator's settings.
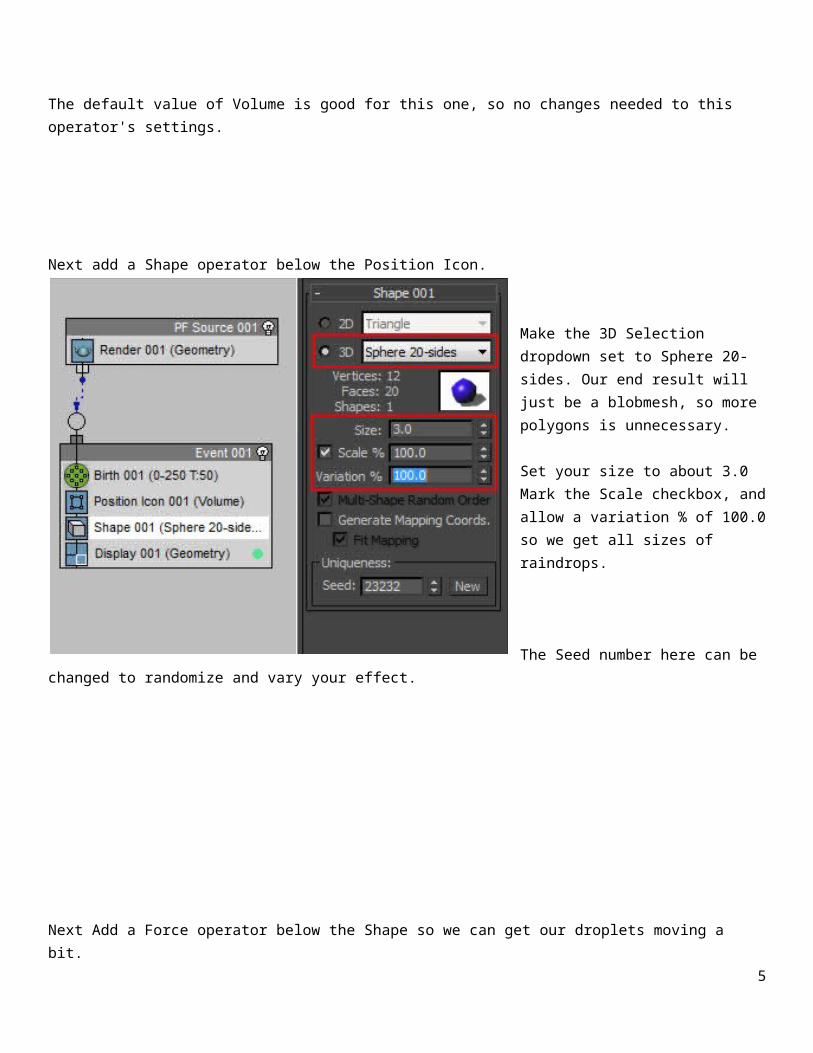
Next add a Shape operator below the Position Icon.
Make the 3D Selection dropdown set to Sphere 20-sides. Our end result will just be a blobmesh, so more polygons is unnecessary.
Set your size to about 3.0Mark the Scale checkbox, and allow a variation % of 100.0 so we get all sizes of raindrops.
The Seed number here can be changed to randomize and vary your effect.
4
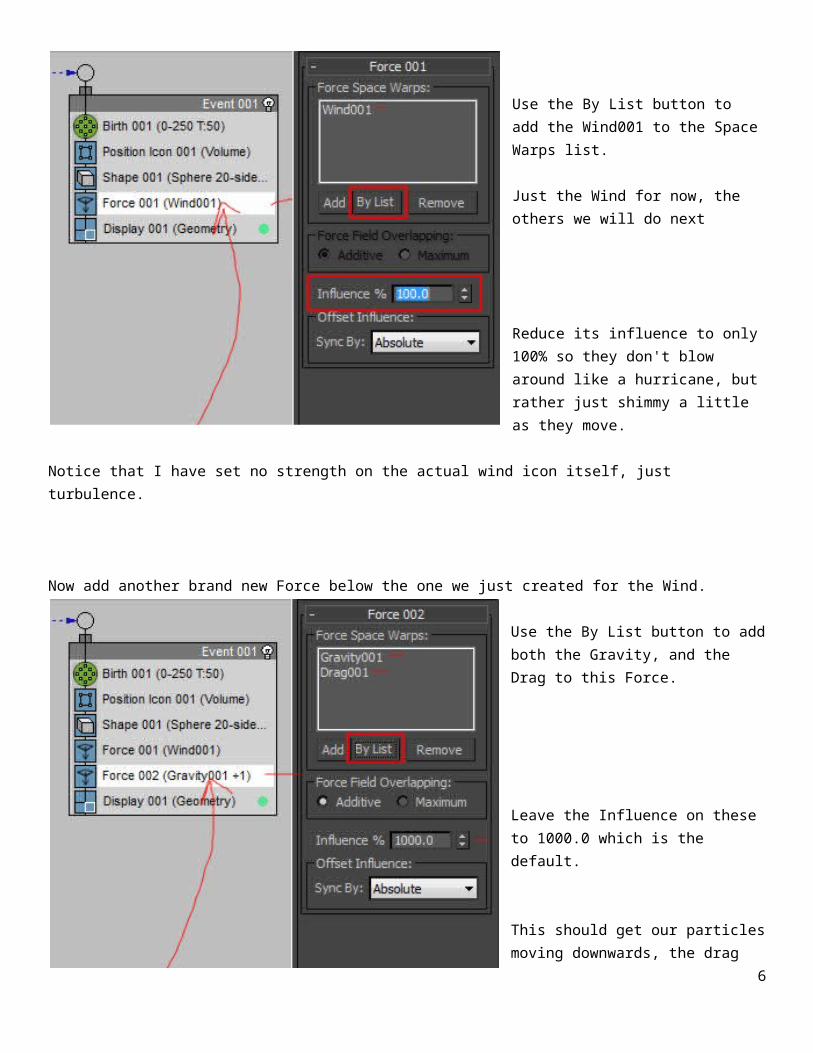
Next Add a Force operator below the Shape so we can get our droplets moving a bit.
Use the By List button to add the Wind001 to the Space Warps list.
Just the Wind for now, the others we will do next
Reduce its influence to only 100% so they don't blow around like a hurricane, but rather just shimmy a little as they move.
Notice that I have set no strength on the actual wind icon itself, just turbulence.
Now add another brand new Force below the one we just created for the Wind.
Use the By List button to add both the Gravity, and the Drag to this Force.
Leave the Influence on these to 1000.0 which is the default.
This should get our particles moving downwards, the drag slows them a bit and the wind makes them a little more unpredictable as to their movement.
5
These droplets are going to be our biggest ones, and fastest ones. So in order to keep things clean we will add a Collision operator below the second Force for this one so we can kill the particles off once they have left the camera view. No need in calculating things after we can't see them anymore after all.
Add the Deflector in your scene via the By List button.
set the Collision to Collides with a Speed of Continue.
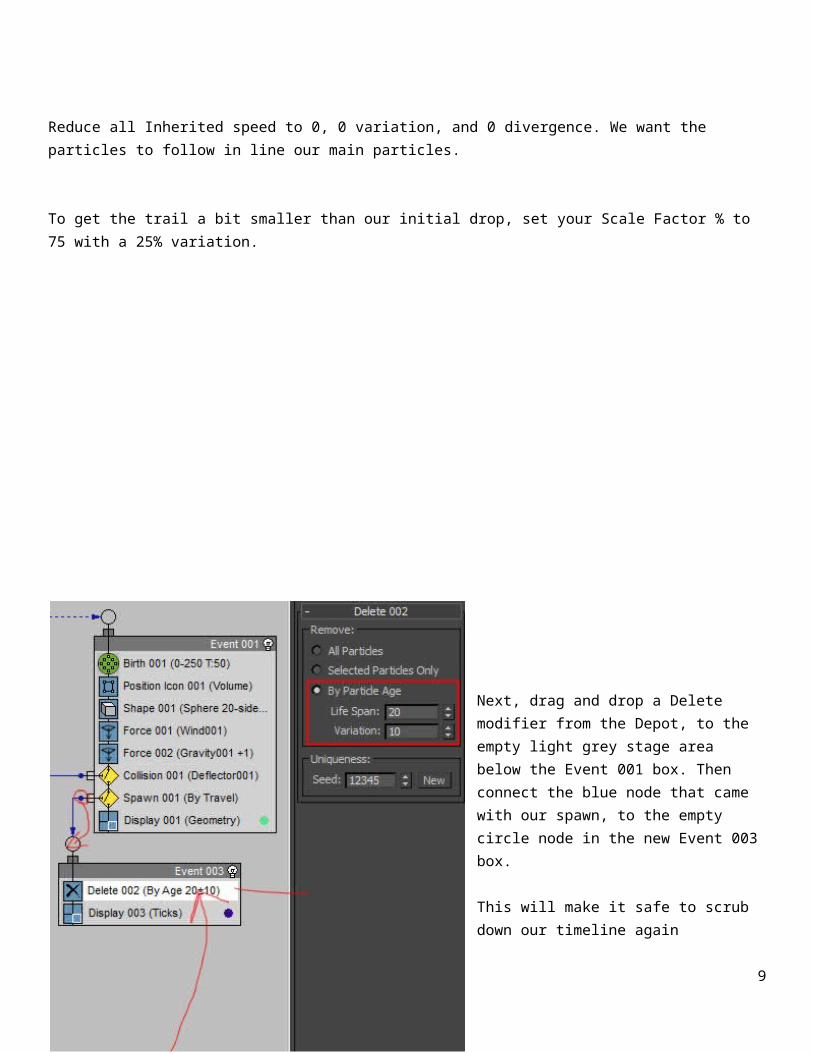
Next, drag and drop a Delete modifier from the depot, and drop it into the empty light grey stage area to the left of the Collision operator. Then connect the blue node from our collision to the empty circle node in our new Event 002 box.
The default settings for the Delete of (All) is exactly what we need, so no changes need to be made to our delete operator's settings.
6

Next, we will create the trails of water dragging behind these large wet drops. I recommend putting your Timeline slider at frame 0 if you haven't already. So we don't risk crashing our computers.
Then add a Spawn to the Event 001 box underneath our collision operator.
Set the spawn to By Travel Distance.
Defaults are ok for Step Size, Spawnable %, and Offspring.
Reduce all Inherited speed to 0, 0 variation, and 0 divergence. We want the particles to follow in line our main particles.
To get the trail a bit smaller than our initial drop, set your Scale Factor % to 75 with a 25% variation.
7

Next, drag and drop a Delete modifier from the Depot, to the empty light grey stage area below the Event 001 box. Then connect the blue node that came with our spawn, to the empty circle node in the new Event 003 box.
This will make it safe to scrub down our timeline again otherwise we would have huge infinite trails of particles and the risk of a crash goes up considerably.
Change the Delete to By Particle Age
Give it a lifespan around 20, and a Variation of half that.
Next, we will add a Force operator above the Delete. Add the Drag to this one but nothing else so our trails stay put while the main particles continue downward.
8
Finally, we will tell our new trails to shrink as the main drop gets farther from the trail is leaves. Which will give us our teardrop shapes.
Add a Scale above the Force we just created.
Set the Scale type to Relative Successive.
And the Scale Factor %'s to 96.
This says that after about 25 frames the trails will be at 0% size which will taper right down to the end and give us our teardrops.
I have also gone ahead and set my newest Display to Geometry so we can see this effect happening.
9

These are our first,
biggest, and fastest droplets... they will be the only ones with big long tails. On to the next droplets! Slightly smaller and much slower so they will look more like big beaded droplets instead of trails that might slowly move down the window but never produce a trail.
Move your Original particle system off to the left side so you have room to build a new one.
Then off to the right of our original system, drag and drop a new Birth operator next to the Event 001 box.
10

Drag a second arrow from the blue node on our PF Source 001 Box, to the new circle node on Event 004 to attach.Then select the birth operator and adjust its settings in the command panel to the right.
Set the Emit Start and Stop to the same as our first one, 0 and 250.
This time give it an Amount of about 150 or so, they will be a little smaller so we can have more of them.
I have also gone ahead and changed the new Display operator that came along with the Birth to Geometry in the top dropdown.
Now, Hold control to select more than one of our Operators in the Event 001 box. Ctrl + click and select the Position Icon, the Shape, and the first Force only.
11

Once selected, hold down the Shift key until you see a + sign above your mouse.
Then simply click and drag them over until you see a blue line under the new Birth and drop them.
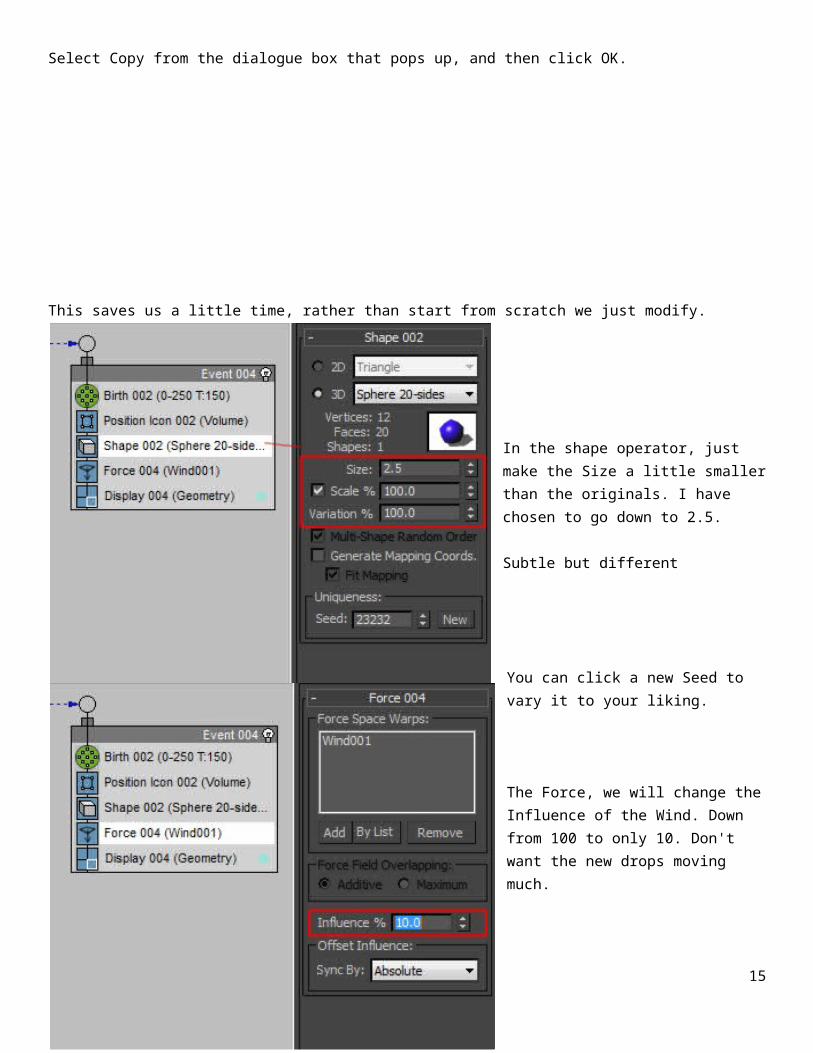
Select Copy from the dialogue box that pops up, and then click OK.
This saves us a little time, rather than start from scratch we just modify.
In the shape operator, just make the Size a little smaller than the originals. I have chosen to go down to 2.5.
Subtle but different
You can click a new Seed to vary it to your liking.
12

The Force, we will change the Influence of the Wind. Down from 100 to only 10. Don't want the new drops moving much.
Only ten, so they can shimmy ... but stay mostly put.
Next add a new force from the Depot, to below the one we just altered.
Unlike our first force, just add the Drag to this one.
Default of 1000 can stay for it.
13

Then, add yet another new Force below the one we just made.
Add the Gravity only to this one via the By List button.
Reduce its Influence down to 50% from 1000.
This will let them move, but not much!
That's it for the second set of droplets. Now we will make one final set of drops, to fill in the area even further. Some very tiny ones that hardly move at all.
Move the Event 004 box over next to the Event 001 box to make room for one last Event. Hold Ctrl to select the Birth from Event 004, the Position Icon, the Shape, and the Force with the Gravity in it only.
14
Then when they are highlighted white, Hold the shift key until you see a + sign hovering above your mouse cursor.
While holding shift, click the highlighted operator and drag over until you see an outline of a blue box like above and drop them.
Select copy from the dialogue box that pops up, and then click ok.
Then drag and drop the blue node from the PF Source001 box once again, and drop it in the new empty circle node on our last Event 005 box to attach it to the system.
Now select the new Birth operator in Event 005 and change its settings to the right.
15

These ones will be even smaller and slower, so we can have twice as many of them.
I have set this Birth to 300 in the amount.
Keeping the Emit Start and Stop values the same.
The Position Icon needs no changes, but select the Shape and adjust its values a bit.
I have reduced them even further down to a size of 1.5.
Click the New Seed for variation.
16

Finally, change the Force with the Gravity in it in this Event to only Influence these particles by about 3%
This will keep them relatively still.
I have also gone ahead and changed my Display 005 to Geometry in the top dropdown as well.
Last but not least we are going to make these particles un-renderable and then coat them in a blobmesh to make them look more like water.
Go back to your PF Source 001 box where we have attached all 3 of these Birth events. Click the Render 001 (Geometry) Icon to turn it off.
Great! now our particle system is fully built and our silly spheres will not show up in the final rendered animation.
17

Close down Particle View, and go to your Create tab. Under Geometry in the dropdown menu, find Compound Objects.
Find and toggle on the BlobMesh button, then click anywhere in your scene to create a BlobMesh.
18

With the Blobmesh still selected, move over to your Modify Tab to change its settings and assign it to our particles.
Reduce the Render value to 0.6 or 0.5
Leave the Viewport at 1.0 so the computer doesn't choke.
Check the Large Data Optimization setting
and via the Add button, add the PF Source 001 to the Blob Objects list.
19

Now with your blobmesh still selected, go up to the Modifier List and add a Relax modifier to the BlobMesh.
Give the Relax an Iteration of 4, it's ok for this modifier as it does not add any new geometry, just gives the original geometry some slack and further streamlines our blobs to make them look like water.
That's it, simply texture your blobmesh, adjust your lights and hit the render button! You have raindrops on a window like surface.
20

You can see an animated preview of this effect in motion here: http://animation.diclementi.com/rainlens.mov
21