eightyscouts.orgeightyscouts.org/docs/leadership/agendabookfold.doc · web viewversion 3.00.00. for...
TRANSCRIPT

Agenda Book
Version 3.00.00
For Use in___________________
Troop 80, BSA © 2009
All rights reserved
This Book Belongs to: ___________________
1

2

Excerpt from Introduction to First Edition
This course of study was inspired by a highly successful summer camp conducted by Troop 80 in the Kit Carson National Forest in the summer of 1980. That camp emphasized a pioneering theme which included the cutting and trimming of tall fir trees to construct major camp improvements, towers and bridges. However, in preparation of the dramatic construction, each boy was systematically trained in the use of his woos tools, the making of rope and the tying of knots. When he was ready for the construction projects, he was carefully guided in their accomplishment so that he would be guaranteed success in a safe atmosphere. The camp was highly structured, and skills were carefully developed. Interestingly enough, the boys later asked to return to the same are for a repeat of that summer camp for themselves and the boys who had joined the troop during the ensuing months. Their basic comments were that the 1980 camp was so “free of restraint” that they were able to have a good time.
I pondered this reaction in the light of the highly structured nature of the camp and the practical impact on the attitude of the boys. I concluded that the success and sense of freedom were directly related to the preparation of the men and youth leaders, the obvious direction and purpose of the training and the skills achievement and rank advancement that were afforded the boys.
Coinciding with the impact of the 1980 summer camp was the realization that Troop 80 was not retaining a very
3
high percentage of its annual recruits. During conversations with other leaders in the troop, we surmised that there was a correlation to orderly advancement and longevity of the boys in the troop. Thereupon, our advancement committee did a statistical study of the new boys in the troop, their advancement and their longevity. What we had surmised was corroborated by the advancement committee’s findings in a most startling way. A copy of that study accompanies these materials.
In the spring 1981, your writer had the distinct opportunity to participate in a Wood Badge course. One of the obligations of the participants is to prepare and implement a “Ticket.” That is, to prepare a scouting related project that utilizes the leadership skills taught in the Wood Badge course, and it occurred to me that the basic approach to the 1980 summer camp materials and systematic studies, training and advancement could be adapted to the needs of new scouts, utilizing the skills of Wood Badge training, a series of interrelated problems could find a mutual solution.
The project was proposed to a meeting of the Scoutmaster and his assistants and was met with enthusiastic support. Later, the entire troop committee was informed of the project and they added their support.
The materials were produced over an eight month period of time. Agendas were laid out, implemented, reviewed and reworked. Major changes were made in the use of the “intermission” time game. Previously, the troop had presented and “intermission” game for the purpose of entertaining the Boy Scouts without regard to its utility purpose.
4

From Wood Badge experience, I realized that good, fun games could be used to test whether the training sessions were effective. When the games were adapted to this usage, they were actually more fun because they provided a quick implementation of the newly acquired skills in a competitive arena, and the boys reacted enthusiastically.
The materials have now been prepared and gathered into this workbook. I only trust that the reader will accept them as a basic format for the presentation of a scout training and advancement program; and that the reader will feel free to make such usage as his circumstances will permit – changing, adapting, enlarging and refining wherever possible.
The materials which have been gathered and organized in this presentation include the basic scouting skills and requirements for a Boy Scout to achieve the rank of First Class in an orderly fashion, passing through the ranks of Tenderfoot and Second Class within the minimum times allowed for each rank.
If any Boy Scout will attend 50% of the meetings, campouts and patrol meetings during the span covered by the training materials, he will be exposed to training, experience and testing, whereby – if he will properly apply himself – he can achieve all the requirements through and including the rank of First Class Scout.
The basic Scouting Program of Troop 80 lends itself to the integration of certain selected skill awards more than others. However, it is not the intent of these materials to exclude any opportunity for Boy Scout to broaden his accomplishments, skills and knowledge in the area of skill
5

awards; it is only an attempt to present an integrated training program that emphasizes certain skill awards and merit badges in order to adequately prepare the Boy Scout for an exciting outdoor hiking and camping program.
Walter Wolfram, Sr. [1981]
Introduction to 1992 Supplement
Since the appearance in 1983 of the original Boy Scout Advancement Course, there have been significant changes in the arrangement of lower rand advancement, most significantly, the elimination of skill awards. These changes have necessitated some revisions in the Advancement Course, which have been done in Troop 80 on an ad hoc basis. This Supplement is designed to formalize the changes already in use, and to bring the materials up to date with current advancement requirements. Also, some of the revisions reflect practical experience over the last nine (9) years in the actual use of the materials in a scout program. Finally, agendas for the completion of the Camping Merit Badge have been added so that a scout who attends meetings for one year (and goes on requisite campouts) can reasonably finish the First Aid, Camping, Swimming, and Pioneering Merit Badges, as well as advance to First Class. Requirements for the partial completion of other merit badges (Cooking and Emergency Preparedness) are also noted.
Because of the expense of a complete revision and reprinting of the original work, a supplementary volume was thought more expedient at the present time. Perhaps some poor soul in need of a Wood Badge ticket will tackle
6

the task of a complete revision of the original work. Until that time, this Supplement is offered with the hope that it will be of use to real scouters who work in the trenches with the young me of our great nation.
Amarillo, TexasDecember 31, 1992
Introduction to Second Edition
This Agenda Book is the revision of the Boy Scout Advancement Course, and replaces both the First Edition, and its 1992 Supplement. The agendas have been updated to reflect current rank requirements and obsolete agendas have been eliminated (such as the one on signaling). Also, the agendas have been expanded so that most, if not all, requirements for Swimming, First Aid, Cooking, Camping and Pioneering Merit Badges can be finished on regular campouts. The purpose of the Second Edition remains the same as the original, to facilitate training of Boy Scouts and the achievement of the First Class rank on a systematic basis using the Scout Handbook as the basic resource, and the patrol method at the weekly meetings as the basic vehicle. Due to advances in computer software and hardware, future updates to the Agenda Book itself should be more easily achieved, which should also help keep the materials current and relevant to future generations of scouts. However, since the current editor is not as industrious as his predecessor. The cross-reference tables found in the First Edition and the 1992 Supplement have been omitted.
As an aside, it should be noted that even the youngest scouts who began to use the First Edition of this work are now about 30 years old. The impact of scouting upon the
7

youth of this country should never be underestimated by those who are charged with carrying forward the program while they are called upon to be leaders.
Amarillo, TexasJanuary 3, 2002
8

Table of Contents
Excerpt from Introduction to First Edition....................3Introduction to 1992 Supplement.....................................6Introduction to Second Edition........................................7AGENDA 1 – Map and Compass......................................15
GOALS:.....................................................................16MATERIALS:...........................................................16
GAME 1 – Map Symbol Relay.....................................17GAOLS:.....................................................................17MATERIALS:...........................................................17
GAME 2 – Points of Compass Relay............................18GOALS:.....................................................................18MATERIALS:...........................................................18
AGENDA 2 – Orienteering Course...................................21GOALS:.....................................................................21MATERIALS:...........................................................21
GAME 3 – Orienteering Course....................................22AGENDA 3 – Plan and Draw Hiking Course on Map......28
GOALS:.....................................................................28MATERIALS:...........................................................28
AGENDA 4 – Campout Safety Procedures and Practices; Safe Hike; What to Do if Lost...........................................30
GOALS:.....................................................................30MATERIALS:...........................................................30
GAME 4 – What to Do When Lost or Hiking...................31GOALS:.....................................................................31MATERIALS:...........................................................31
AGENDA 5 – Preparing for a Weekend Campout............34GOALS:.....................................................................35MATERIALS:...........................................................35
AGENDA 6 – Clean-Up and Camp Recap........................38GOALS:.....................................................................38MATERIALS:...........................................................39
AGENDA 7 – Tent Pitching..............................................40
9

GOALS:.....................................................................40MATERIALS:...........................................................41
GAME 5 – Pitch and Fold up a Canadian Tent.............43AGENDA 8 – Basic Knots and Tarp Pitching..................46
GOALS:.....................................................................46MATERIALS:...........................................................47
GAME 6 – Knot Relay..................................................49GOALS;.....................................................................49MATERIALS:...........................................................49
AGENDA 9 – Advanced Knots.........................................52GOALS:.....................................................................52MATERIALS:...........................................................52
AGENDA 10 – Basic Lashings.........................................56GOALS:.....................................................................56MATERIALS:...........................................................56
AGENDA 11 – Advanced Lashing Project.......................63GOALS:.....................................................................63MATERIALS:...........................................................63
AGENDA 12 – Rope Making and Kinds of Rope............64GOALS:.....................................................................64MATERIALS:...........................................................64
AGENDA 13 – Splices, Eye Splice...................................66GOALS:.....................................................................66MATERIALS:...........................................................66
AGENDA 14 – Knife and Ax (Totin’ Chip).....................69GOALS:.....................................................................69MATERIALS:...........................................................70
GAME 9 – Parts of the Ax Relay..................................71GOALS:.....................................................................71MATERIALS:...........................................................71
AGENDA 15 – Knife, Ax and Fire Building....................74GOALS:.....................................................................75MATERIALS:...........................................................76GOALS:.....................................................................81MATERIALS:...........................................................81
10

AGENDA 16.2 – Fire by Flint and Steel...........................82GOALS:.....................................................................82MATERIALS:...........................................................82
AGENDA 16.3 – Fire Lays...............................................83GOALS:.....................................................................84MATERIALS:...........................................................84
AGENDA 16 – Menu Planning.........................................86GOALS:.....................................................................87MATERIALS:...........................................................87
AGENDA 17 – Cooking on Light Weight Stove..............88GOALS:.....................................................................88MATERIALS:...........................................................89
AGENDA 17.1 – Cooking on an Open Fire......................90GOALS:.....................................................................90MATERIALS:...........................................................91
AGENDA 17.2 – Cooking with a Dutch Oven.................92GOALS:.....................................................................92MATERIALS:...........................................................93
AGENDA 17.3 – Cooking with Aluminum Foil...............94GOALS;.....................................................................94MATERIALS:...........................................................95
AGENDA 17.4 – Cooking Without Utensils....................96GOALS:.....................................................................96MATERIALS:...........................................................97
AGENDA 18 – Plants and Animals..................................98GOALS:.....................................................................98MATERIALS:...........................................................98
GAME 11 – Nature Game: Identify Plants and Animals.......................................................................................99
MATERIALS:...........................................................99AGENDA 19 – Swimming..............................................101
GOALS:...................................................................102MATERIALS:.........................................................102
GAME 12 - Swimming Race.......................................102GOALS:...................................................................103
11

AGENDA 20 – Swimming Merit Badge.........................104GOALS:...................................................................106MATERIALS:.........................................................106
AGENDA 20.1 – Lifesaving Merit Badge......................107GOALS:...................................................................111MATERIALS:.........................................................111
AGENDA 21 – First Aid for Campout............................112GOALS:...................................................................113MATERIALS:.........................................................113
GAME 13 – First Aid Relay........................................113GOALS:...................................................................114MATERIALS:.........................................................114
AGENDA 22 – First Aid for Fractures............................116GOALS:...................................................................116MATERIALS:.........................................................116
AGENDA 23 – First Aid for Hurry Cases.......................117GOALS:...................................................................117MATERIALS:.........................................................117
GAME 13.1 – First Aid for Hurry Cases.....................117GOALS:...................................................................118MATERIALS:.........................................................118
AGENDA 24 – First Aid Bandages and Special Injuries120GOALS:...................................................................120MATERIALS:.........................................................120
AGENDA 25 – First Aid Carries.....................................122GOALS:...................................................................122MATERIALS:.........................................................122
AGENDA 26 – First Aid – Miscellaneous......................123GOALS:...................................................................123MATERIALS:.........................................................123
AGENDA 27 – Scoutsmanship.......................................124GOALS:...................................................................124MATERIALS:.........................................................125
GAME 14 – Scoutsmanship Relay..............................126AGENDA 28 – Citizenship.............................................128
12

GOALS:...................................................................128MATERIALS:.........................................................128
GAME 15 – Citizenship Relay....................................130AGENDA 29 – Game Night............................................133
GOALS:...................................................................133MATERIALS:.........................................................133
Patrol/Points.................................................................136Softball.........................................................................136Basketball....................................................................136Long Jump...................................................................136Weight Lifting.............................................................136Pushups........................................................................136Sit-ups..........................................................................13650 yd............................................................................136Total.............................................................................136GAME 16 – Physical Fitness Contest, Relays.............137
GOALS:...................................................................137MATERIALS:.........................................................137
AGENDA 30 – Child Abuse Video.................................138GOALS:...................................................................138MATERIALS:.........................................................138
AGENDA 31 – Tour........................................................139GOALS:...................................................................139
AGENDA 32 – Merit Badges..........................................140GOALS:...................................................................140MATERIALS:.........................................................141
AGENDA 33 – Rank Advancement................................142GOALS:...................................................................142MATERIALS:.........................................................142
AGENDA 34 – Uniform Inspection................................144GOAL:.....................................................................144MATERIALS:.........................................................144
OTHER PARTS OF THE MEETING.............................145Opening:..................................................................145Patrol Corners:.........................................................145
13

Final Assembly:.......................................................145
14

AGENDA 1 – Map and Compass
1. Using a map, describe and point out contour lines and what they mean (Handbook, p. 69). Point out and identify map symbols most likely to be encountered by the scouts in your area (Handbook, pp. 67-68; Req.: SC-1a).
2. Using a compass, describe how and why it works and demonstrate its use (Handbook, pp. 70-71; Requirement: SC-1a). Describe its principle parts (Handbook, p. 66). Describe its 16 primary directions.
15

3. Point on a map your location; show how a map and compass are used together. Orient the map with your location on it (Handbook, pp. 71-71; Req.: SC-1a).
4. Teach the patrol members and have them demonstrate how to find directions during the day and night without using a compass (Handbook, pp. 114-117; Req.: FC-1).
GOALS:1. To introduce the Scout to the basic qualities of a
compass and how it works.2. To introduce Scouts to the use of a map and
how to understand and read a map.3. To teach Scouts how to use a map and compass,
together, to get to a predetermined destination.4. To teach Scouts how to find directions without
using a compass.5. To test for competency and recycle where
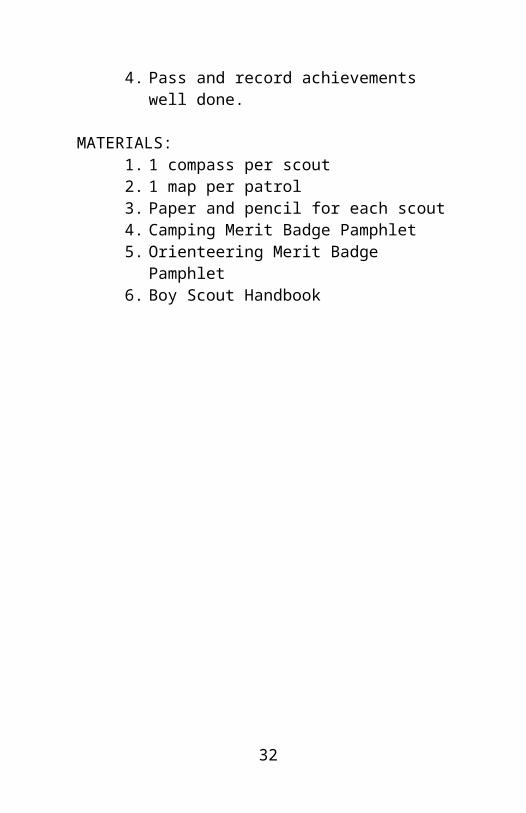
necessary.6. Pass and record achievements well done.
MATERIALS:1. 1 compass per scout2. 1 map per patrol3. Paper and pencil for each scout4. Camping Merit Badge Pamphlet5. Orienteering Merit Badge Pamphlet6. Boy Scout Handbook
16

GAME 1 – Map Symbol Relay
The patrols line up at one end of the building side by side in patrol file, patrol leader in front. They face the judges who are seated opposite them at the other end of the building. When the competition starts, the first member of each patrol walks forward to his respective judge. The judge asks the patrol member to identify the first map symbol on the game sheet. The patrol member then identifies the map symbol. The patrol member then walks forward to the judge. If the previous patrol member correctly identified the map symbol, then the next patrol member is asked to identify the next map symbol. Otherwise, the next patrol member is asked to identify the next map symbol. Otherwise, the next patrol member attempts to identify the same map symbol. This process is continued until either all members of a patrol cannot identify the same map symbol (resulting in disqualification), or until all map symbols have been identified by the patrol. The first patrol to successfully answer all questions wins.
GAOLS:1. To have fun2. To give patrols an inter-patrol competition
opportunity3. To test the troop level of knowledge in this area
MATERIALS:1. Chairs for judges2. Game sheets – “Map Symbols”3. Boy Scout Handbook
17

GAME 2 – Points of Compass Relay
The patrols line up at one end of the building side by side in patrol file, patrol leader in front. They face the judges who are seated opposite them at the other end of the building. Each judge shuffles the points of the compass cards and stacks them in a pile, face down on the table. When the competition starts, the first member of each patrol walks forward to his respective judge. The judge asks the patrol member to turn over and position face up the compass point in the correct position. The patrol member then walks back to his patrol and goes to the end of his patrol line. The next patrol member then walks forward to the judge. The next patrol member can either move the compass point or may turn over another compass point and position it in the correct position. This process is continued until either all members of a patrol cannot properly position all 16 compass points (resulting in disqualification), or until all compass points have been properly positioned by the patrol. The first patrol to successfully position all compass points wins.
GOALS:1. To have fun2. To give patrols an inter-patrol competition
opportunity3. To test the troop level of knowledge in this area
MATERIALS:1. Tables and chairs for judges2. “Compass Points” set for each patrol
18

19

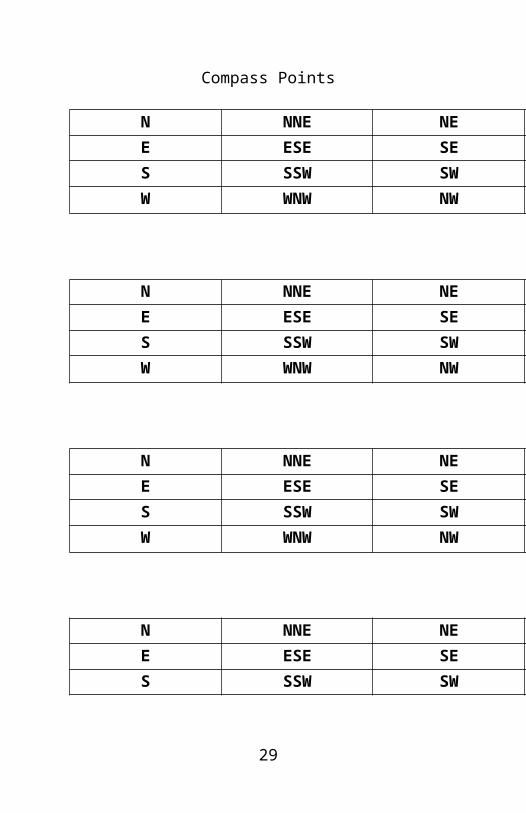
Compass Points
N NNE NEE ESE SES SSW SWW WNW NW
N NNE NEE ESE SES SSW SWW WNW NW
N NNE NEE ESE SES SSW SWW WNW NW
N NNE NEE ESE SES SSW SWW WNW NW
20

AGENDA 2 – Orienteering Course
1. Point on a map your location; show a map and compass are used together. Orient the map with your location on it (Handbook, pp. 71-72; Req.: SC-1a).
2. Follow an orienteering course on the map; using map and compass, show skill in their use (Handbook, pp 119-121; Req.: FC-2).
3. At conclusion of orienteering course, measure height of width of designate item (Handbook, pp. 122-125; Req.: FC-2).
GOALS:1. To teach Scouts how to use a map and compass
together, to get to a predetermined destination.2. To teach Scouts how to navigate over a course
using compass bearings and pre-set distances.3. To test for competency and recycle where
necessary.4. Pass and record achievements well done.
MATERIALS:1. 1 compass per scout2. 1 map per patrol3. Paper and pencil for each scout4. Camping Merit Badge Pamphlet5. Orienteering Merit Badge Pamphlet6. Boy Scout Handbook
21
GAME 3 – Orienteering Course
Each patrol will take a map of the local area, with a course pre-marked on it, and using a compass, will orient the map, take the bearings off of the map and follow the course, noting bearings, distance and course.
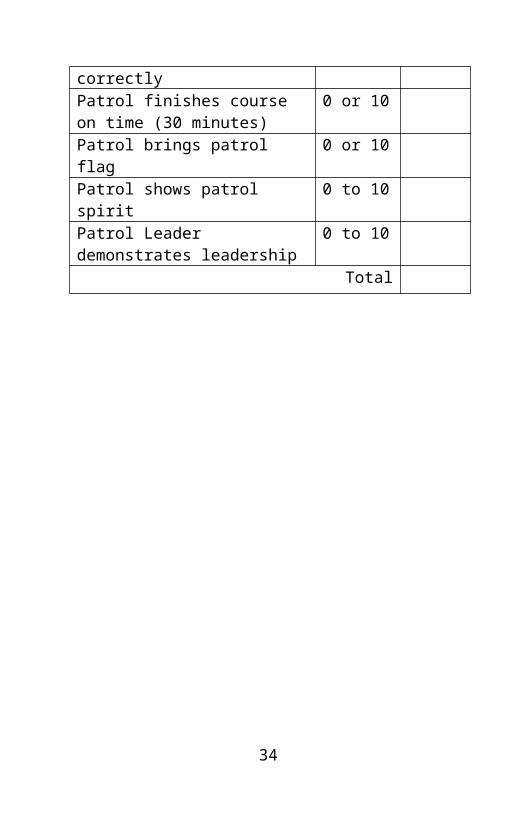
Score Sheet
Patrol: _______________________ Judge: _____________________
Skill Tested Range of Score
Score
Each scout has a compass 0 to 10
Each member of patrol selects directions of travel
0 to 10
Each member of patrol measures distances correctly
0 to 10
Each member of patrol arrives at destination correctly
0 to 10
Each member of patrol measures height of pole correctly
0 to 10
Patrol finishes course on time (30 minutes)
0 or 10
Patrol brings patrol flag 0 or 10
Patrol shows patrol spirit 0 to 10
Patrol Leader demonstrates leadership
0 to 10
Total
22

Bearing Distance Bearing Distance
Bearing Distance Bearing Distance
Patrol Name: Patrol Code:
Date: __________________ Score:
Place:
23

MAP & COMPASS COURSE #1
BEARINGS, degrees DISTANCE, feet
303 270
247 500
180 710
90 230
180 1090
263 180
0 1100
90 150
0 790
67 550
180 240
MAP & COMPASS COURSE #2
BEARINGS, degrees DISTANCE, feet
180 630
90 580
180 800
90 150
180 100
195 330
24

270 610
0 1200
90 560
0 110
313 780
MAP & COMPASS COURSE #3
BEARINGS, degrees DISTANCE, feet
0 240
67 980
180 1400
312 410
0 400
90 160
180 540
312 200
180 120
270 570
0 630
25

MAP & COMPASS COURSE #4
BEARINGS, degrees DISTANCE, feet
105 140
180 160
127 950
0 660
270 310
180 400
127 190
0 520
270 160
180 530
270 570
0 640
MAP & COMPASS COURSE #5
BEARINGS, degrees DISTANCE, feet
27 320
67 150
180 690
127 350
180 120
26
270 570
180 140
270 250
0 920
124 270
180 880
90 570
0 120
312 790
27

AGENDA 3 – Plan and Draw Hiking Course on Map
1. At a meeting prior to a hiking camp, point out on a map your starting location. Orient the map with your starting location on it (Handbook, pp. 71-72; Req.: SC-1a).
2. Show how a map and compass are used together (Handbook, pp. 72, 74).
3. On the map, draw one hour “legs” (2 miles long each), showing the bearing for each leg, from your starting point to the camp location (Handbook, p. 73).
4. After drawing in legs, return the map to an adult leader for use by the patrol on the campout.
5. Make a written plan for an overnight hike and explain how to get to you camp using map and compass (Req.: Camping MB 3).
GOALS:1. To teach Scouts how to use a map and compass
together, to plan to get to a predetermined destination.
2. To teach Scouts how to navigate over a course using compass bearings and pre-set distances.
3. To test for competency and recycle where necessary.
4. Pass and record achievements well done.
MATERIALS:1. 1 compass per patrol2. 1 map of campout location per patrol
28
3. Pen or pencil for each patrol4. Camping Merit Badge Pamphlet5. Orienteering Merit Badge Pamphlet6. Boy Scout Handbook
29

AGENDA 4 – Campout Safety Procedures and Practices; Safe Hike; What to Do if Lost
1. Discuss good camping practices that apply on any campout. Discuss anticipated problems and areas where improvement in patrol may be needed. Perhaps there was a need for additional or different equipment; perhaps there was timing or training problems on the last campout. Discuss possible solutions to the problems for the next campout.
2. Tell Scouts how to make a safe hike (Handbook, pp. 38-41; Req.: T-5).
3. Cross-country day or night.4. Along a highway or road, day or night.
5. Tell scouts how to keep from getting lost; and the have Scout tell what to do when lost (Handbook, pp. 38-41; Req.: T-5).
6. Go over and identify the principals of Leave No Trace (Handbook, pp. 244-245).
GOALS:1. To provide the Scout with information in
preparation for a safe hike.2. To test for competency and recycle if necessary.3. To pass and record achievement well done.
MATERIALS:1. Camping Merit Badge Pamphlet2. Boy Scout Handbook
30

GAME 4 – What to Do When Lost or Hiking
The patrols line up at one end of the building side by side in patrol file, patrol leader in front. They face the judges who are seated opposite them at the other end of the building. When the competition starts, the first member of each patrol walks forward to his respective judge. The judge asks the patrol member the first patrol member then walks back to his patrol and goes to the end of his patrol line. The next patrol member then walks forward to the judge. If the previous patrol member correctly answered the question, then the next patrol member is asked the next question. Otherwise, the next patrol member attempts the same question. This process is continued until either all members of a patrol cannot answer the same question (resulting in disqualification), or until all questions have been answered by the patrol. The first patrol to successfully answer all questions wins.
GOALS:1. To have fun.2. To give patrols an inter-patrol competition
opportunity.3. To test the troop’s level of knowledge in this
area.
MATERIALS:1. Tables and chairs for the judges2. Game Sheets – “What to Do When Lost or
Hiking”
31
What to Do When Los or Hiking Game SheetRelay Game – First Patrol to Answer All Correctly Wins
Handbook, pp. 38-41
1. What side of the road do you hike on?
Answer: Left side
2. What is the “best” rule for not getting lost?
Answer: Know at all times where you are
3. What do you do first when you are lost?
Answer: Stay calm or stay where you are
(either is correct since both are given as the first
thing to do by the Boy Scout Handbook)
4. How do you let someone know that you are
lost?
Answer: Three shouts or three whistle blasts or
smoky fire. Any is correct
5. What is one precaution to take before leaving on
a hike?
Answer: Tell someone where you are going
and when you will return (make a trip plan)
6. Why do you not hike alone?
Answer: Because you can become lost or for
safety. Either answer is correct.
7. What do you do if someone is hurt seriously
while you are hiking?
32

Answer: Treat “hurry cases” first, and then send
two (2) people for help.
8. What do you do if you must stay out overnight
while lost?
Answer: Find a shelter, build a fire.
9. What safety precautions do you take if you hike
at night?
Answer: Tie white cloth around right arm or leg,
and use flashlights
10. What is one rule for taking a save hike?
Travel single file or stay with patrol or
watch where you put your feet and hands. Any of
these answers is correct.
33
AGENDA 5 – Preparing for a Weekend Campout
1. Patrol Leader is to discuss and demonstrate how to pack personal gear for a weekend campout, including camp gear, shelter, and proper clothing (Handbook, pp. 224-231). Prepare personal and patrol gear checklist for summer and winter (Handbook, pp. 224-225; Req.: Camping MB 5(a) and 7(a)). Discuss and inspect footwear (Handbook, pp. 200-201; Req.: Camping MB 5(b)). Waterproof as necessary.
2. Show how to pack gear with each scout having his share of the gear and food (Handbook, p. 227). Show how to pack to guard equipment and food against the weather and animals and insects. Explain proper care and storage of camping equipment (Req.: Camping MB 5(c)).
3. Have Scouts then do the same with their own gear, etc. Scouts will stand for inspection by Assistant Scoutmasters (Req.: T-1, Camping MB 5(e) and 7(c)).
4. Teach good health, sanitation, survival, public health, conservation, citizenship, and safety practices for weekend campouts (Req.: Camping MB 10). Adapt safety practices to the time of year:a. Winter type of clothing to prevent frostbite,
etc.b. Summer type of gear and clothing to prevent
sunburn, mosquito bites, snake bite, etc.c. All times minor first aid
34

5. Discuss the term “layering” as it relates to dressing for a campout (Req.: Camping MB 5(d)).
6. Inspect patrol gear to make sure it is ready for campout.
GOALS:1. To “show, tell and do” on packing the boys’
own gear. This gives the Scout a pre-camp experience that will help him understand the how’s and why’s. Cuts down anxiety and mistakes and increases excitement and anticipation.
2. To teach the scouts the importance of goo health and safety practices on a campout.
MATERIALS:1. List of personal gear for the next campout2. Each boy is to have all the gear listed for next
campout3. Paper and pencil for each scout4. Camping Merit Badge Pamphlet5. Boy Scout Handbook
35

Personal Backpacking Equipment List
1. Back pack w/ padded hip belt and/or belly band
2. Warm sleeping bag in water proof stuff sack with two web straps to attach to pack
3. Foam pad (closed-cell), or Thermarest pad with two web straps to attach to pack
4. Ground cloth for sleeping bag – plastic 4’ X 8’ (Troop issues)
5. Clothing (Winter listed below – for summer delete heavy clothes and add swimsuit and towel)a. 1 pair cotton socksb. 1 pair heavy wool socksc. 1 raincoat or rain jacketd. 1 long-sleeve wool or flannel shirte. 1 pair long pantsf. 1 short sleeve shirtg. 1 suit underwearh. 1 pair hiking bootsi. 1 pair warm pajamas or insulated underwearj. 1 heavy jacket and cap (for warmth and best
packing, we recommend an insulated vest, or wool sweater, and a wind breaker jacket)
6. Mess Gear – plastic plate, sierra cup, or plastic cup/bowl, fork and spoon
7. Toilet kita. 1 soap (motel size)b. 1 washcloth
36

c. 1 toothbrush and toothpasted. 1 chap sticke. 1 hand towel
8. Miscellaneous Itemsa. Small first aid kitb. Pocketknife – No Fixed Blade Hunting
Knives!!c. Waterproof pack cover or large plastic trash
bagd. Flashlight – w/ new size C batteries
(maximum size)e. Plastic Canteen (1 qt. minimum)f. Personal medicineg. Compass (optional)h. 25’ of 1/8” Nylon cord (optional)i. Sunglasses (optional)j. Insect repellant (optional)k. Sunscreen (optional)l. Bible (optional)m. Camera and film (optional)
Each item should be clearly labeled with scout’s name!rev. January 03, 2007
37

AGENDA 6 – Clean-Up and Camp Recap
1. Check for damage to tents, stakes and poles. If there is damage, invert stuff sack and pack tent. Set it aside for the quartermaster to take charge of repairs. Roll, pack and store tents correctly after use. Check for damage to patrol tarps and tarp poles. Fold tarps and store in patrol boxes (Req.: Camping MB 5(c) partial).
2. Assemble complete patrol cook kit; mark it for patrol identification if needed. Clean entire cook kit and store for next campout.
3. Take time to sign off all requirements (rank and merit badge) that were passed during the recent campout.
4. Discuss good camping practices of the last campout; also discuss any problems and areas where improvement is needed. Perhaps there was a need for additional or different equipment; perhaps there were timing or training problems. Discuss possible solutions to the problems for the next campout.
5. Discuss how the things you learned on this and other campouts have taught you personal health and safety, survival, public health, conservation and good citizenship (Req.: Camping MB 10).
GOALS:1. To teach the scouts the desire for and necessity
of maintaining their equipment in good order and in good repair.
38

2. To teach the scouts the desire for and necessity of cleanliness in food preparation and service.
3. To locate, mark for identification, and store all equipment in readiness for the next campout
4. To test for competency and recycle where necessary
5. Pass and record achievements well done
MATERIALS:1. All tents, tarps and poles used by the patrol
members on the last campout2. Patrol cook kit, all parts3. Liquid soap in small container, scouring pad,
cooking oil in small container and zip-lock plastic bag (To be placed in the cook kit bag as permanent materials for each hike).
4. Camping Merit Badge Pamphlet5. Boy Scout Handbook
39

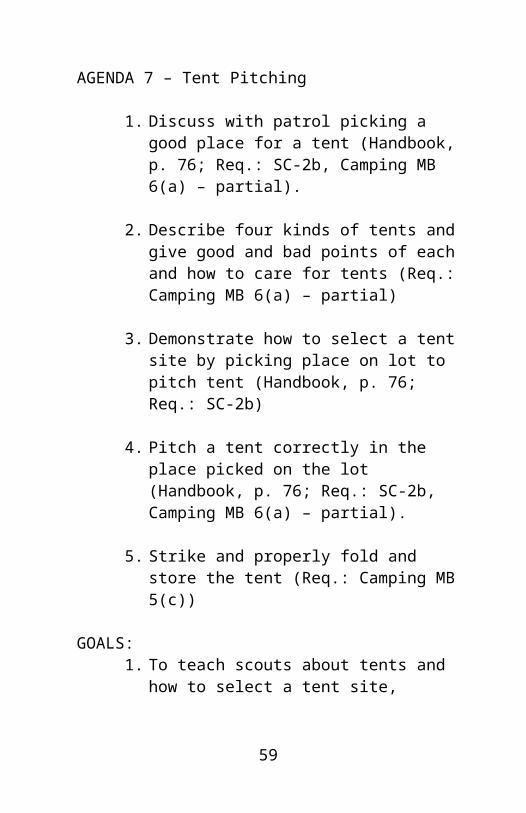
AGENDA 7 – Tent Pitching
1. Discuss with patrol picking a good place for a tent (Handbook, p. 76; Req.: SC-2b, Camping MB 6(a) – partial).
2. Describe four kinds of tents and give good and bad points of each and how to care for tents (Req.: Camping MB 6(a) – partial)
3. Demonstrate how to select a tent site by picking place on lot to pitch tent (Handbook, p. 76; Req.: SC-2b)
4. Pitch a tent correctly in the place picked on the lot (Handbook, p. 76; Req.: SC-2b, Camping MB 6(a) – partial).
5. Strike and properly fold and store the tent (Req.: Camping MB 5(c))
GOALS:1. To teach scouts about tents and how to select a
tent site, taking into consideration flood plain problems if it rains, animal trails that might be interfered with, comfort, etc.
2. To teach scouts how to manage their tents, how to set tent up correctly with a “buddy”, and how to care for the tents.
3. To give the scouts the experience of setting up their tents in advance of having to use them on a campout
4. To check for damaged tens5. To test for competency and recycle where
necessary
40

6. Pass and record achievements well done
MATERIALS:1. Troop tents (either base camp or backpacking,
depending on camping program)2. Troop hammers (for base camp tents)3. Spare tent parts (when using backpacking tents)4. Camping Merit Badge Pamphlet5. Boy Scout Handbook
Eureka Timberline 4 Tent (Backpacking tent)
Specifications/Parts includedCAPACITY 4Min Wt 7 lbs. 13 oz.Pkg Wt 8 lbs. 8 oz.Dimensions 8 ft 9 in x 7 ft 2 inArea (Sq. Ft.) 63Int Height 4 ft. 10 in.Pack Size 7 in. X 24 in.No. of Poles 5 + 2 Fly RodsPole Size 1/2 in.Pole Material AluminumNo. of Doors 1
41

Hooded Fly YesNo. of Windows 2Gear Loft OptionalFloor Material 1.9 oz. Taffeta nylon w/ 800 mm coatingFly Material 1.9 oz. Polyester w/ 800 mm coatingWall Material 1.9 oz. breathable nylonRoof Material 1.9 oz. Permeable Taffeta nylonNetting 40D No-see-umColor Eureka! Green Floor + FlyStyle 5 pole A-frameActivities Scouting, canoeing , campingUse 3.5 seasonSpecial Features
Hooded fly for protected ventilation, optional 14 sq. ft. vestibule.
Poles and pole connectors (should be included in each tent bag, if not set aside for quartermaster)
42

GAME 5 – Pitch and Fold up a Canadian Tent
1. Open up tent out of bag and spread out on the ground in a circle, with all ropes going straight out
2. Each Scout takes two ropes and pulls on tent at the same time and lifts the tent up to about two feet off the ground
3. Rotate the tent to face the door of the tent where you want it
4. Carefully set tent straight down
5. Adjust each rope so that the connector is ½ of the way between end of loop and edge of tent
6. Pull each rope straight out from tent and set on the ground
7. Make sure that the ropes around the door are spaced so that the door will overlap and close
8. Stake each rope with a rebar stake and loop end of rope around stake
9. Put center pole into tent
Teardown:
1. Take out the center pole first
2. Pull out all stakes and stack them
43

3. Pull top of tent and drag along the ground until the tent is on its side
4. Spread out the ten in a pie shape, with all the ropes pulled straight down
5. Fold the edges of the tent to the middle twice
6. Throw all the ropes on top of the canvas
7. Fold the top of the tent down to the bottom corner of the tent
8. Roll the tent up and place in the bag
Scoring:
Description Points (Maximum)Patrol follows the sequence on handout
20
Tent is pitched correctly 20Tent is taken down and put up correctly
20
Patrol Leader shows leadership skills
20
Patrol works as a group 20Maximum score 100 points
44

45

AGENDA 8 – Basic Knots and Tarp Pitching
1. The Patrol Leader shall demonstrate how to whip the ends of a rope and teach his patrol how to do likewise, and have the scouts do it (Handbook, p. 34; Req.: T-4a)
2. The Patrol Leader shall demonstrate and teach his patrol members to tie the following knots:a. Square knot (Handbook, p. 8; Req.: S-4,
Pioneering MB 3 – partial)b. Half Hitches (Handbook, p. 36; Req.: T-4b,
Pioneering MB 3 – partial)c. Taut-line hitch (Handbook, p. 37; Req.: T-
4b, Pioneering MB 3 – partial)d. Timber Hitch (Handbook, p. 138; Req.: FC-
7b, Pioneering MB 3 – partial)e. Clove Hitch (Handbook, p. 139; Req.: FC-
7b, Pioneering MB 3 – partial)f. Bowline (Handbook, p. 149; Req.: FC-8a,
Pioneering MB 3 – partial)
3. The Patrol Leader shall explain and show the correct use of each knot on a horizontal or vertical rail, tent-line or suspension rope as indicated in the Boy Scout Handbook
4. Using the appropriate knots (2 half hitches, clove hitch, and taut line hitch), the Patrol Leader shall teach the patrol members how to pitch a tarp for use as a cooking area, using two poles, nylon ropes, and 6 nail stakes
GOALS:
46

1. To give the Patrol Leader and adequate opportunity to teach basic skills to his patrol and to demonstrate that he has adequate skills for leadership
2. To teach Scouts or re-enforce their teaching of the basic knots used in camping
3. To teach Scouts how to pitch and use a patrol tarp
4. To test for competency and recycle if necessary5. To pass and record achievements well done
MATERIALS:1. Eight feet (8’) of ¼” sisal rope per boy2. Roll of whipping thread3. Roll of duct tape4. Four (4) four foot (4’) poles per patrol5. Two blue backpacking tarps per patrol6. Twenty-five feet (25’) of 1/8” nylon rope per
boy (brought by each scout)7. Pioneering Merit Badge Pamphlet8. Boy Scout Handbook
47

Steps in whipping a rope
48

GAME 6 – Knot Relay
The patrols line up at one end of the building side by side in patrol file, patrol leader in front. They face the judges who are seated opposite them at the other end of the building. When the competition starts, the first member of each patrol walks forward to his respective judge. The judge asks the patrol member to tie the first knot on the game sheet. The patrol member then ties the knot. The patrol member then walks back to his patrol and goes to the end of his patrol line. The next patrol member then walks forward to the judge. It the previous patrol member correctly tied the knot, the next patrol member is asked to tie the next knot on the list. Otherwise, the next patrol member attempts the same knot. This process is continued until either all members of a patrol cannot tie the same knot (resulting in disqualification), or until all knots have been correctly tied by the patrol. The first patrol to successfully tie all knots wins.
GOALS;1. To have fun2. To give patrols an inter-patrol competition
opportunity3. To test the troop’s level of knowledge in this area.
MATERIALS:1. Tables and chairs for judges2. Game Sheets = “Knot Relay”
Square knot (Handbook, p. 8; Req.: S-4, Pioneering MB 3 – partial)
Half Hitches (Handbook, p. 36; Req.: T-4b, Pioneering MB 3 – partial)
49

Taut-line hitch (Handbook, p. 37; Req.: T-4b, Pioneering MB 3 – partial)
Timber Hitch (Handbook, p. 138; Req.: FC-7b, Pioneering MB 3 – partial)
Clove Hitch (Handbook, p. 139; Req.: FC-7b, Pioneering MB 3 – partial)
Bowline (Handbook, p. 149; Req.: FC-8a, Pioneering MB 3 – partial)
50

51

AGENDA 9 – Advanced Knots
1. The Patrol Leader shall demonstrate and teach his patrol members to tie the following knots:a. Sheet bend knot (Pioneering MB 3 – partial)b. Sheepshank knot (Pioneering MB 3 –
partial)c. Stevedore knot (Pioneering MB 3 – partial)d. Figure 8 knot (Pioneering MB 3 – partial)e. Overhand knot (Pioneering MB 3 – partial)
2. The Patrol Leader shall explain and show the correct use of each knot on a horizontal or vertical rail, tent-line or suspension rope as indicated in the Pioneering Merit Badge Pamphlet
GOALS:1. To give the Patrol Leader an adequate
opportunity to teach advanced skill to his patrol and to demonstrate that he has adequate skills for leadership
2. To teach Scouts or re-enforce their teaching of advanced knots used in camping
3. To test for competency and recycle if necessary4. To pass and record achievements well done
MATERIALS:1. Eight feet (8’) of ¼” sisal rope per boy2. Roll of whipping thread3. Roll of duct tape4. Four (4) four foot (4’) poles per patrol5. Pioneering Merit Badge Pamphlet6. Boy Scout Handbook
52

53

GAME 7 – Name That KnotWhere or How Used
Name of Knot Identified Tied
Tie a rope around a post
Two Half Hitches (Handbook, p. 36)
Knot that is tied on a line that is tight, Used on down ropes on tents
Taut Line Hitch (Handbook, p. 37)
The “rescue” knot – Ties a knot that will not slip
Bowline Knot (Handbook, p. 148-149)
Used for tying two ropes together, either of same size or different sizes
Sheet Bend (Handbook, p. 150)
Joining knot – used in first aid bandages
Square Knot (Handbook, p. 8, 300)
Used to start square and other lashings or to secure rope to a standing pole
Clove Hitch (Handbook, p. 139)
Used to start diagonal lashing or drag a log across the ground
Timber Hitch (Handbook, p. 138)
Simplest knotStopper knot
Overhand Knot (Pioneering MB Pamphlet)
Stopper knot used to keep ropes from going through pulleys. Also used in climbing
Figure Eight Knot (Pioneering MB Pamphlet)
Used to make a rope shorter without cutting the rope
Sheepshank Knot (Pioneering MB Pamphlet)
54

Scoring:
Each knot named correctly: 5 pointsEach knot tied correctly: 5 pointsMaximum score: 100 pointsTie Breaker: Time to finish
55

AGENDA 10 – Basic Lashings
1. Discuss when to use and not to use lashings (Handbook, p. 137; Req.: FC-7z)
2. Teach the basic lashingsa. Square (Handbook, p. 141; Req.: FC-7b;
Pioneering MB 8 – partial)b. Shear (Handbook, p. 142; Req.: FC-7b;
Pioneering MB 8 – partial)c. Diagonal (Handbook, p. 143; Req.: FC-7b;
Pioneering MB 8 – partial)
3. Show their correct use (Handbook, pp. 140-148)
4. Demonstrate how to make a simple useful camp gadget for the next campout (Handbook, pp. 144-145)
5. Have the scouts build a simple useful camp gadget using at least two of the lashings (Req.: FC-7c)
GOALS:1. To teach Boy Scouts the use of basic
construction lashings with compliment tying knots of the Basic Knots Agenda
2. To prepare Boy Scouts to construct a useful camp gadget during upcoming campouts
3. To test for competency and recycle where necessary
4. Pass and record achievements well done
MATERIALS:1. Large amount of ¼” sisal rope for lashing
56

2. 2” diameter poles, 6’ long (6 poles per patrol)3. Duct tape for “whipping” the rope ends4. Scout knife – 1 per scout5. Boy Scout Handbook
Square Lashing
57

Diagonal Lashing
Sheer Lashing
58
GAME 8 – Tripod Lashing Game
Each patrol will have Four (4) fifteen foot long (15’) ropes One (1) six foot long (6’) rope One (1) large cooking pot from a patrol cooking kit
The patrol is to tie a tripod lashing and set up the tripod. Either the method shown in the Handbook on page 146 or the method taught by the Troop may be used (3 poles side by side, start with clove hitch on the middle pole, wrap 8 times, going over and under each pole, frap twice, and finish with a clove hitch on an outside pole).
The other pole is to be lashed horizontally on two of the tripod legs using square lashings (See Handbook, pp. 140-141).
The short piece of rope is to be looped over the standing tripod and two half hitches tied at the top. The bottom end of the rope is to be looped through the handle of the large pot and a taut line hitch tied, suspending the pot off the ground (See Handbook, pp. 36-37).
59

http://www.4thtyldesley.co.uk/lashings/tripod_lashing.php
http://www.4thtyldesley.co.uk/lashings/tripod_lashing.php
60

http://www.4thtyldesley.co.uk/lashings/tripod_lashing.php
61

Score Sheet
Description PointsStarting knot on tripod lashing correct 10Ending knot on tripod lashing correct 10Tripod lashing tied correctly (except for knots)
10
Tripod stands up 10Two half hitches knot tied correctly 10Taut line hitch tied correctly 10Large pot stays suspended off the ground 10First square lashing is tied correctly 10Second square lashing is tied correctly 10Horizontal pole is able to hold up two scouts
10
Total 100 (Maximum)
Tiebreaker: Time to Finish
62

AGENDA 11 – Advanced Lashing Project
The entire Troop will assemble on the lot and will build a large tripod tower with a raised platform using square and diagonal lashings as needed, as well as a floor lashing (Handbook, p. 145; Pioneering MB 9)
GOALS:1. Provide older boys a teaching experience with
new scouts2. To build a large project using only rope and
lashings3. Test for competency and recycle if necessary4. Pass and record achievements well done
MATERIALS:1. Lashing poles2. ¼” sisal rope3. Pioneering Merit Badge Pamphlet4. Boy Scout Handbook
http://www.pioneeringprojects.org/projects/images/pion47.gif
63

AGENDA 12 – Rope Making and Kinds of Rope
1. Hand coil and throw a 40’ piece of ¼” rope (Req.: Pioneering MB 1)
2. Describe the following:a. Show and describe 5 kinds of rope (Req.:
Pioneering MB 2 – partial)b. Explain where and how each kind of rope
can be used in pioneering (Req.: Pioneering MB 2 – partial)
3. Make a three strand, 6” long rope (Req.: Pioneering MB 5 – partial)
4. Whip the ends of the newly made rope (Req.: T-4a, Pioneering MB 5 – partial)
GOALS:1. To acquaint the scout with the types of rope
sufficiently that he can identify to counselor and can recall to his patrol the types of rope on sight and can coil a rope for carrying or storing.
2. To teach the scout how to use a rope machine and how to make his own rope, whip the ends of it, and have pride in his accomplishment and ownership. (He will take his newly made rope home with him at the end of the meeting.)
3. To test for competency and recycle if necessary4. Pass and record achievements well done
MATERIALS:1. Rope machine and paraphernalia for each patrol2. Ball of binder-twine3. 1 roll of whipping thread
64

4. Scout knife of its equivalent5. 5 kinds of rope6. 40’ of ¼” for coiling7. Pioneering Merit Badge Pamphlet8. Boy Scout Handbook
65

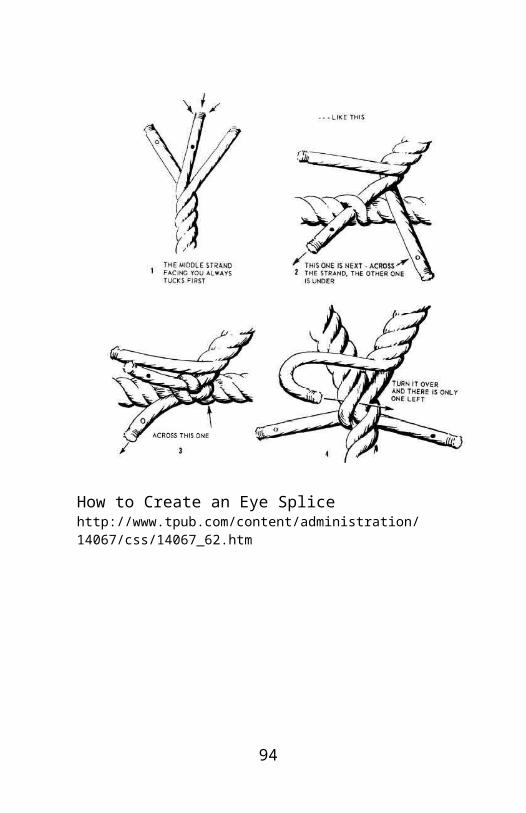
AGENDA 13 – Splices, Eye Splice
1. The Patrol Leader of Troop Guide shall demonstrate and teach his patrol members how to tie the eye splice (Req.; Pioneering MB 4 – partial)
2. If there is time, the Patrol Leader or Troop Guide shall demonstrate and teach his patrol members how to tie the end and short splices (Req.: Pioneering MB 4 – partial)
GOALS:1. Provide older boys a teaching experience with
new scouts2. To achieve the ability to tie one splice necessary
for the Pioneering Merit Badge3. Test for competency and recycle if necessary4. Pass and record achievements well done
MATERIALS:1. 8’ of ¼” rope per scout2. Pioneering Merit Badge Pamphlet3. Boy Scout Handbook
66

How to Create a Back Splicehttp://www.walawi.com/marlinspike.htm
67

How to Create an Eye Splicehttp://www.tpub.com/content/administration/14067/css/14067_62.htm
68

AGENDA 14 – Knife and Ax (Totin’ Chip)
(If the Totin’ Chip is taught to a Scout using a hand ax, a knife, and a saw, the teacher earns the preamble requirement to the Paul Bunyan Award.)
1. Read and understand woods tools use and safety rules from the Boy Scout Handbook
2. Demonstrate the proper care, sharpening, and use of a knife, saw and ax
3. Tell when a knife, saw and ax should be used
4. Teach the scouts how to sharpen a knife, ax and saw properly and give rules for their safe and proper use
5. Respect all safety rules, respect property and do nut cut living trees
6. Subscribe to the Outdoor Code
7. Use these tools to prepare tinder, kindling and fuel for a fire
(Handbook, pp. 77-85; Req.: SC2c, Totin’ Chip Award)
GOALS:1. To give older boys an opportunity to start on the
Paul Bunyan Award2. To give younger boys an opportunity to work on
and ear the Totin’ Chip Award3. To teach scouts proper methods of safely
sharpening woods tools
69

4. To have an older boy have fun and experience of teaching a younger boy “knife and ax”
5. To test for competency and recycle if necessary6. To pass and record achievements well done
MATERIALS:1. Boy Scout of other suitable knife for each scout2. Sharpening stones for each boy3. Oil for the stones4. Hand ax for each patrol5. 9” bastard type files for each patrol6. Totin’ Chip Award cards7. Boy Scout Handbook
The Totin’ Chip Awardhttp://www.bsatroop113.org/advancement/images/34234b.jpg
70

GAME 9 – Parts of the Ax Relay
The patrols line up at one end of the building side by side in patrol file, with the patrol leader in front. They face the judges who are seated opposite them at the other end of the building. When the competition starts, the first member of each patrol walks forward to his respective judge. The judge asks the patrol member the first question on the game sheet. The patrol member then answers the question. The patrol member then walks back to his patrol and goes to the end of his patrol line. The next patrol member then walks forward to the judge. If the previous patrol member correctly answered the question, then the next patrol member is asked the next question. Otherwise, the next patrol member attempts the same question. This process is continued until either all members of a patrol cannot answer the same question (resulting in disqualification), or until all questions have been answered by the patrol. The first patrol to successfully answer all questions wins.
GOALS:1. To have fun2. To give patrols an inter-patrol competition
opportunity3. To test the Troop’s level of knowledge in this
area
MATERIALS:1. Tables and chairs for the judges2. Game Sheets – “Parts of Ax Relay”
71

Parts of the Ax Relay
All patrol members will point to the location of the following points of an ax: handle (haft), heel, shoulder, bit, blade, toe, face, head, butt (or poll).
**The HANDLE is the entire piece of wood attached to the iron
**The HEAD is the entire iron (or steel) part
72

Parts of the Ax Relay Game SheetRelay Game – First Patrol to Answer All Correctly Wins
Handbook, p. 81
Point to the correct part of the ax for the following:
Handle/Haft
Head
Butt/Poll
Shoulder
Heel
Blade
Bit
Face
Toe
73

AGENDA 15 – Knife, Ax and Fire Building
1. The Patrol Leader of each patrol will lead his patrol through a teaching and doing session on the following:
a. Teach each Scout how to use a knife, ax and to correctly to prepare tender, kindling and firewood (Handbook, pp. 77-85, 249-251; Req.: SC-2c, 2d)
b. Teach each Scout how to locate and prepare a suitable site, build and light a cooking fire, using not more than two matches (Handbook, p. 249)
2. Each patrol lead and taught by the patrol leader shall:
a. Locate a suitable site for a cooking fire and explain how to prepare the site for safety (Fire pail, full of water, for each fire in place)
b. Prepare a fireplace in which to lay a tepee-type fire
c. Lay a tepee-type fire in the fireplace in preparation for string burning game (Keep in mind that only two patches per patrol will be allowed)
3. ASPLs shall set up string burning paraphernalia with horizontal binder twine strings 18” and 24” off the ground on stakes 3 feet apart, 1 set per patrol
4. The Patrol Leader shall explain to the patrol members as they lay the fire about the three phases of fire building materials, which are:
74

a. Tender woody material that flares up when you touch it to the flame of a burning match. It may consist of dry bark strips off cedar or juniper trees, inner bark fibers from dead cottonwood trees, or prepare shavings
b. Kindling, small sticks, twigs, or split wood that catches fire from the burning tender. Dead branches still on the tree (squaw wood) are superior. Use wood from pencil-size to finger-size.
c. Fuel catches fire from the burning kindling. Sizes from 1” to 2” in diameter by 1’ long are preferred.
5. Teach safety procedures for and when to use fires and light weight cooking stoves (Handbook, pp. 248-255; Req.: SC-2e)
GOALS:1. To have the Patrol Leader have an adequate
opportunity to teach his patrol members a specific skill and to demonstrate to them that he has the requisite skills to be their leader
2. To prepare the Scouts in the skills of fire building using the woods tools of knife, ax and saw
3. To prepare the Scouts, by experience, for the next weekend campout
4. To give the Patrol Leader an effective opportunity to lead his patrol in a learning experience in the
a. Selection of a proper fire siteb. Preparation of a save a proper fireplacec. Selection of the type of fire materials to be
usedd. Understanding the three types and phases of
fire building materials
75

5. Test for competency and recycle, if necessary6. To pass and record achievements well done
MATERIALS:1. Scout or folding sheath knife for each boy2. One or more sharp hand axes per patrol3. One or more camping saws per patrol4. Wood for tender, kindling and firewood for each
patrol 5. Two matches per patrol6. Water cans, full, for each patrol – safety first!7. Boy Scout Handbook
AGENDA 15.1 – Firem’N Chit
To earn this certification, the Scout must show his Scout leader, or someone designated by his leader, that he understands his responsibility to do the following:
1. Read and understand fire use and safety rules from the Boy Scout Handbook
2. Secure necessary permits (regulations vary by location)
3. Clear all flammable vegetation at least 5 feet in all directions from the fire site (total 10 feet)
4. Attend to the fire at all times5. Keep fire-fighting tools (water and/or shovel)
readily available6. Leave the fire when it is cold out7. Subscribe to the Outdoor Code and Leave-No-Trace
The Scout’s “Firem’N Chit Rights” can be taken from him if he fails in his responsibility
76

77

78

GAME 10 – String Burning
ASPLs shall set up string burning paraphernalia next to the drainage ditch on the West side of Bellaire. Set steel stakes 3 feet apart, 1 set per patrol, in a row. Tie horizontal binder twine strings 18” and 24” off the ground to the stakes. The patrols are to build the fire lay between the two stakes. The fire lay must be below the bottom string.
When the SPL says to start, each patrol will try to light its fire. The patrols finish when the top string is burned through.
The stakes are to be pulled and put back in the main equipment shed. The fires are put out and the burned wood is thrown into the dumpster.
Equipment:
1. Vertical steel stakes2. Binder twine3. Water hose4. Wheel barrow5. Shovels6. Rakes
79

80

AGENDA 16.1 – Fire by Friction
Scouts are instructed in how to build items for use in fire by friction
Scouts practice using fire by friction kits to make a “bug”
Scouts practice taking a bug and making a fire with a bird’s next and fire lay
GOALS:1. To learn a new skill and have fun2. To give patrols an inter patrol competition
opportunity3. To test the troop’s level of knowledge in this area
MATERIALS:1. Fire by Friction kit for each patrol2. Punk and bird’s nest material3. Hand ax4. Pocket knife5. Firewood6. Boy Scout Handbook
81

AGENDA 16.2 – Fire by Flint and Steel
Scouts are instructed in how to use flint and wrist pins, making sparks to make a “bug” in the punk
Scouts practice using fire by flint and steel kits to make a “bug”
Scouts practice taking a bug and making a fire with a bird’s nest and fire lay
GOALS:1. To learn a new skill and have fun2. To give patrols an inter-patrol competition
opportunity3. To test the troop’s level of knowledge in this area
MATERIALS:1. Flint and steel wrist pins for each patrol2. Punk and bird’s next material3. Hand ax4. Pocket knife5. Firewood6. Boy Scout Handbook
82

AGENDA 16.3 – Fire Lays
Scouts are instructed in how to build different types of fire lays
Scouts learn to build tee-pee, log cabin, and lean-to fire lays
Scouts learn how to build charcoal fire Scouts practice making the fire lays
Types of Fire Lays
Tepee – The traditional “camp-fire” arranged in a cone shape and light at the center. This fire lay is easy to construct and works well with damp wood.
Lean-to – Place a green stick into the ground pointing approximately 30 degrees into the wind. Place your tinder far back under this stick and add fine kindling lean-to fashion along the sides. Ignite your tinder and as the kindling catches add more, thicker kindling.
Cross-Ditch – Scrape a cross about 30 cm across and 7 cm deep into the ground, place your tinder in the center and build a pyramid of kindling over the top. The cross provides a good draft regardless of wind direction. Note: build the “ditch” with rocks. Do not dig holes for fires.
Pyramid (or Log Cabin) – A long burning fire requiring little attention to keep alight, useful through the night. Lay two logs parallel on the ground. Bridge these with smaller logs. Follow up with another layer – smaller and at right angles to the last. Build up several layers until you have a flat surface of wood a bit thicker than your thumb. Either light a starter fire on this or carry burning fuel from your cooking fire. This fire will burn downwards.
83

Fire lighting basics: Carry as many strike-anywhere matches/cigarette
lighters as you can Select and dry tinder in advance where possible,
collect as you travel Keep firewood dry Dry damp wood near the fire Bank up fires to keep them in at night Ensure fire is totally dead before leaving camp Guard against risk of fire spreading
GOALS:1. To learn a new skill and have fun2. To give patrols an inter-patrol competition
opportunity3. To test the troop’s level of knowledge in this area
MATERIALS:1. Hand Ax2. Pocket Knife3. Firewood4. Charcoal5. Camping Merit Badge Pamphlet6. Boy Scout Handbook
84

85

AGENDA 16 – Menu Planning
1. Patrol Leader is to demonstrate and teach scouts how to plan a balanced campout menu using four basic food groups for Saturday lunch and supper, and Sunday breakfast, that requires cooking (Handbook, pp. 257-262, 265-277; Req.: SC-2g – partial; Camping MB 7(b) – partial; Cooking MB 2 – partial)
2. Patrol leader is to demonstrate and teach how to make and price a food list, based on the plan, for three or more scouts (Handbook, pp. 257-262; Req.: FC4b – partial)
86
3. Each scout is to visit the grocery store and secure the food on the list and bring it to a patrol meeting, or campout (Req.: FC-4b – partial; Cooking MB 3(a) – partial)
4. Teach what cooking utensils and patrol gear will be needed to cook and serve the meals (Handbook, p. 264; Req.: FC-4c; Cooking MB 3(b))
5. Explain safe handling of different types of foods (Handbook, p. 263). Teach how to properly dispose of camp trash (Handbook, pp. 281-283; Req.: FC-4d)
6. Discuss hot to protect food against weather, animals and contamination (Handbook, p. 263; Camping MB 7(b) – partial)
GOALS:1. To teach a Scout how to plan a campout menu for
three consecutive meals:a. Well-balanced for food value (nutrition)b. Amount per boyc. Amount per patrold. Cost
2. To give the scouts a practical opportunity to learn to “cost” campouts
3. To test for competency and recycle where necessary4. Pass and record achievements well done
MATERIALS:1. Pencil and paper for each scout2. Boy Scout Handbook3. Camping Merit Badge Pamphlet
87

AGENDA 17 – Cooking on Light Weight Stove
1. The Patrol Leader of each patrol will lead his patrol through a teaching and doing session on the following:
a. Teach each scout how to locate and prepare a suitable site for cooking on a light weight stove (Handbook, p. 249)
b. Explain how to prepare the site for safety (fire pail, full of water, for each stove)
c. Teach safety procedures for and when to use fires and light weight cooking stoves (Handbook, pp. 248-255; Req.: SC-2e)
d. Teach how to use light weight cooking stove and safety procedures for its use (Handbook, pp. 253-254; Req.: SC-2f; Camping MB 8(a))
e. Discuss advantages and disadvantages of different types of light weight cooking stoves (Camping MB 8(c))
2. Using a light weight stove, cook a meal (Camping MB 8(c))
GOALS:1. To have the Patrol Leader have an adequate
opportunity to teach his patrol members a specific skill and to demonstrate to them that he has the requisite skills to be their leader
2. To prepare the Scouts in the skills of cooking on a light weight fuel stove
3. To prepare the Scouts, by experience, for the next weekend campout
4. To give the Patrol Leader an effective opportunity to lead his patrol in a learning experience in the
88

a. Selection of a proper cooking stoveb. Test for competency and recycle, if
necessaryc. To pass and record achievements well done
MATERIALS:1. Light weight cooking stove for each patrol2. Cook kit for each patrol 3. Food to cook4. Camping Merit Badge Pamphlet5. Boy Scout Handbook
89

AGENDA 17.1 – Cooking on an Open Fire
1. The Patrol Leader of each patrol will lead his patrol through a teaching and doing session on the following:
a. Teach each scout how to locate and prepare a suitable site for cooking on an open fire (Handbook, p. 249)
b. Explain how to prepare the site for safety (Fire pail, full or water, for each site)
c. Teach safety procedures for and when to use fires (Handbook, pp. 248-255; Req.: SC-2e)
d. Teach how to light fire and safety procedures for its use (Handbook, pp. 253-254; Req.: SC-2f; Camping MB 8(a))
e. Discuss advantages and disadvantages of different types of fire lays
2. Using an open fire, cook a meal (Req.: Camping MB 8(c))
GOALS:1. To have the Patrol Leader have an adequate
opportunity to teach his patrol members a specific skill and to demonstrate to them that he has the requisite skills to be their leader
2. To prepare the Scouts in the skills of cooking on an open fire
3. To prepare the Scouts, by experience, for the next weekend campout
4. To give the Patrol Leader an effective opportunity to lead his patrol in a learning experience in the:
5. Selection of a proper cooking site6. Test for competency and recycle, if necessary7. To pass and record achievements well done
90
MATERIALS:1. Firewood2. Knife3. Ax or saw4. Cook kit for each patrol5. Food to cook6. Camping Merit Badge Pamphlet7. Boy Scout Handbook
91

AGENDA 17.2 – Cooking with a Dutch Oven
1. The Patrol Leader of each patrol will lead his patrol through a teaching and doing session on the following:
a. Teach each scout how to locate and prepare a suitable site for cooking on an open fire (Handbook, p. 249)
b. Explain how to prepare the site for safety (Fire pail, full of water, for each site)
c. Teach safety procedures for and when to use fires (Handbook, pp. 248-255; Req.: SC-2e)
d. Teach how to light fire and safety procedures for its use (Handbook, pp. 253-254; Req.: SC-2f; Camping MB 8(a))
e. Discuss advantages and disadvantages of different types of fire lays
2. The Patrol Leader of each patrol will go over:a. The types of Dutch Ovens
(www.macsouter.com)b. The preparation of a Dutch Oven (Troop 80
Dutch Oven Cooking Handbook)c. The proper cleaning of a Dutch ovend. The Troop 80 “no-no’s” in Dutch oven
cooking
3. Using an open fire or charcoal, cook a meal
GOALS:1. To teach and provide Scouts another means of
cooking2. To practice and successfully cook a quality meal
using a Dutch oven
92

MATERIALS:1. Cast Iron Dutch Oven2. Cooking Utensils3. Food and Ingredients4. Wood or charcoal5. Leather gloves6. Troop 80 Dutch Oven Cooking Handbook
93
AGENDA 17.3 – Cooking with Aluminum Foil
1. The Patrol Leader of each patrol will lead his patrol through a teaching and doing session on the following:
a. Teach each scout how to locate and prepare a suitable site for cooking on an open fire (Handbook, p. 249)
b. Explain how to prepare the site for safety (Fire pail, full of water, for each site)
c. Teach safety procedures for and when to use fires (Handbook, pp. 248-255; Req.: SC-2e)
d. Teach how to light fire and safety procedures for its use (Handbook, pp. 253-254; Req.: SC-2f; Camping MB 8(a))
e. Discuss advantages and disadvantages of different types of fire lays
2. The Patrol Leader of each patrol will go over:a. What type of aluminum foil to useb. How to fold the foil to hold in steam
3. Use a bed of coals or charcoal to cook:a. Hobo dinnerb. Stewc. Chickend. Corn on the cobe. Potato dinnerf. Fishg. Fruit meals
GOALS;1. To teach and provide Scouts another means of
cooking
94

2. To practice and successfully cook a quality meal using foil
MATERIALS:1. Aluminum foil (heavy duty)2. Cooking utensils3. Food and ingredients4. Leather gloves or patrol shovel
95

AGENDA 17.4 – Cooking Without Utensils
1. The Patrol Leader of each patrol will lead his patrol through a teaching and doing session on the following:
a. Teach each scout how to locate and prepare a suitable site for cooking on an open fire (Handbook, p. 249)
b. Explain how to prepare the site for safety (fire pail, full of water, for each site)
c. Teach safety procedures for and when to use fires (Handbook, pp. 248-255; Req.: SC-2e)
d. Teach how to light fire and safety procedures for its use (Handbook, pp. 253-254; Req.: SC-2f; Camping MB 8(a))
e. Discuss advantages and disadvantages of different types of fire lays
2. The Patrol Leader of each patrol will go overa. Ways to cook without using utensils
(Handbook, pp. 279-280)b. The secret of cooking without using utensils
3. Use a bed of coals or charcoal to cook;c. Roast potatoesd. Broiled steake. Kabobf. Fishg. Chickenh. Bread twisti. Bread cups
GOALS:1. To teach and provide Scouts another means of
cooking
96

2. To practice and successfully cook a quality meal without using pots, pans, foil, or utensils
MATERIALS:1. Food and ingredients2. Leather gloves or patrol shovel3. Coals or charcoal
97

AGENDA 18 – Plants and Animals
1. Teach Scouts how to identify poison ivy, poison oak and poison sumac. Explain which ones are local, and where they are found. Teach Scouts how to treat for exposure to these plants (Handbook, p. 59; Req.: T-11)
2. Teach Scouts how to identify ten (10) local animals (Handbook, pp. 89-96; Req.: SC-5)
3. Teach Scouts how to identify ten (10) local plants (Handbook, pp. 131-136; Req.: FC-6)
GOALS:1. Provide older boys a teaching experience with new
scouts2. To achieve the ability to recognize common plants
and animals, and poisonous plants; achieve knowledge of how to treat for exposure to poisonous plants
3. Test for competency and recycle if necessary4. Pass and record achievements well done
MATERIALS:1. Slide projector, projector screen, extension cord2. Slides of plants and animals; photographs;
specimens3. Test forms, pencils4. Boy Scout Handbook
98

GAME 11 – Nature Game: Identify Plants and Animals
All patrols are set down at the front with forms and pencils. Each Scout participates. Slides are shown of poisonous plants, ten other local plant species and ten local animal species. The Scouts are to write down the names of the plants and animals as they appear. The patrol with the highest average percentage correct answers wins. Each Scout who correctly identifies all the plants or animals in any group passes that requirement.
MATERIALS:1. Slides of plants and animals, with identification of
slides2. Slide projector and screen3. Nature check list forms4. Pencils
99

Nature Test Form
Nature TestName: ______________________
10 Plants (Req.: TC-6)
1. 6.
2. 7.
3. 8.
4. 9.
5. 10.
Nature Test
Name: ___________________________
10 animals (Req.: SC-5)
1. 6.2. 7.3. 8.4. 9.5. 10.
100

AGENDA 19 – Swimming
1. Assistant Scoutmasters will work with youth who need the Second and First Class swimming requirements and/or the swimming and Life Saving Merit Badge
2. Teach Scouts about and have them explain how the Safe Swim Defense plan is used to protect Scout Troops and other groups when they are swimming (Handbook, pp. 98-99; Req.: SC-7a
3. Teach Scouts and have them explain what precautions must be taken for a safe trip afloat (Handbook, pp. 152-153; Req.: FC-9a)
4. Each Scout is to jump feet first into water over his head in depth level, level off and swim 25 feet on the surface, stop, turn sharply, resume swimming, then return to the starting place (Handbook, pp. 100-104; Req.: SC-7b)
5. Teach Scouts and have them explain why swimming rescues should not be attempted when a reaching or throwing rescue is possible, and explain why and how a rescue swimmer should avoid contact with the victim. Each Scout is to demonstrate water rescue methods by reaching with your arm or leg, by reaching with a suitable object, and by throwing lines and objects (Handbook, pp. 104-107; Req.: SC-7c)
6. Each Scout is to jump feet first into water over his head in depth, swim 75 yards or 75 meters in a strong manner using one or more of the following
101

strokes: side stroke, breast stoke, trudge, or crawl; then swim 25 yards or 25 meters using an easy resting backstroke. The 100 yards or 100 meters must be swum continuously and include at least one sharp turn. After completing the swim, the Scout is to rest by floating as motionless as possible (Handbook, pp. 154-159; Req.: FC-9b)
7. Each Scout is to, with a helper and a practice victim, show a line rescue both as tender and rescuer. The practice victim should be approximately 30 feet from shore in deep water. (Handbook, pp. 162-163; Req.: FC-9d)
GOALS:1. To take advantage of the waterfront2. To teach swimming and rescue skills3. To teach swimming safety4. To test for competency and recycle where necessary5. Pass and record achievements well done
MATERIALS:1. Swim suits2. Towels3. Street clothes and shoes4. Life Saving Merit Badge Pamphlet5. Swimming Merit Badge Pamphlet6. Boy Scout Handbook
GAME 12 - Swimming Race
102

Each patrol selects one swimmer. Half of the patrols swim in the first heat. The other half of the patrols swim in the second heat. The top three finishers in each heat advance to the finals. In the final heat, the top three finishers win, and patrols receive ribbons for winning. Do not use starting blocks due the chance of injury.
GOALS:1. To have fun2. To give patrols an inter-patrol competition
opportunity3. To test the troop’s level of swimming skill
103

AGENDA 20 – Swimming Merit Badge
1. Teach the Scouts how to identify the conditions that must exist before performing CPR on a person. Explain how such conditions are recognized. Demonstrate proper CPR technique (Req.: Swimming MB 2)
2. Teach the Scouts about and have them explain how the Safe Swim Defense plan is used to protect Scout Troops and other groups when they are swimming (Req.: Swimming MB 2)
3. Each Scout is to demonstrate water rescue methods by reaching with your arm or leg, reaching with a suitable object, and by throwing lines and objects. Explain why swimming rescues should not be attempted when a reaching or throwing rescue is possible, and explain why and how a rescue swimmer should avoid contact with the victim (Req.: Swimming MB 3)
4. Demonstrate survival skills by leaping into deep water wearing clothes (shoes, socks, swim trunks, long pants, belt, and long-sleeved shirt). Remove shoes and socks. Remove and inflate the shirt, and show that you can float using the shirt for support. Remove and inflate the pants for support. Swim 50 feet using the inflated pants for support. Then, show how to re-inflate the pants while using them for support (Req.: Swimming MB 4)
5. Each Scout is to swim 150 yards as follows: (Swimming MB 5)
a. Side stroke 25 yards
104

b. Front crawl 25 yardsc. Back crawl 25 yardsd. Breast stroke 25 yardse. Elementary back stroke 25 yards
6. Each Scout is to float face up for one minute (Req.: Swimming MB 6a)
7. Each Scouts is to use face down float, “survival floating” for five minutes (Req.: Swimming MB 6b)
8. While wearing a personal floatation device, each Scout is to demonstrate the “HELP” and “huddle” positions. Each Scout is to explain their purpose (Req.: Swimming MB 6c)
9. Each Scout is to surface dive and retrieve an object in water over his head, but not over 10’ deep. Repeat using a foot first entry (Req.: Swimming MB 7a, 7b)
10. Each Scout is to demonstrate in water at least 8’ deep: (Req.: Swimming MB 8d)
a. Long shallow dock diveb. Head first dock divec. Plain board front dive
11. In water at least 8’ deep, show a head first dive (kneeling start, bent-knee start, or standing dive) from a dock or pool deck. Show a long shallow dive, also from the dock or pool deck. If a low board (not to exceed 40 inches above water at least 9’ deep) is available, show a plain front dive (Req.: Swimming MB 9)
105

12. Each Scout is to explain the health benefits of regular aerobic exercise, and explain why many people today do not get enough of the beneficial kinds of exercise; discuss why swimming is favored as both a fitness and a therapeutic exercise. Write a plan for a swimming exercise program that will promote aerobic/vascular fitness, strength and muscle tone, body flexibility, and weight control for a person of Scout age. Identify resources and facilities available in your home community that would be needed for such a program. Discuss with your counselor the incentives and obstacles for adherence to the fitness program you created in requirement, and explain the unique benefits that could be gained from this program. Also discuss how personal health awareness and self discipline would relate to your willingness and ability to pursue such a program (Req.: Swimming MB 10)
GOALS:1. Provide older boys a teaching experience with new
scouts2. To achieve swimming skills necessary to pass
Swimming Merit Badge3. To acquire knowledge of safety and procedures
necessary to pass Swimming Merit Badge4. Test for competency and recycle if necessary5. Pass and record achievements well done
MATERIALS:1. Swimming Pool2. Swimming Merit Badge Pamphlet3. Boy Scout Handbook
106
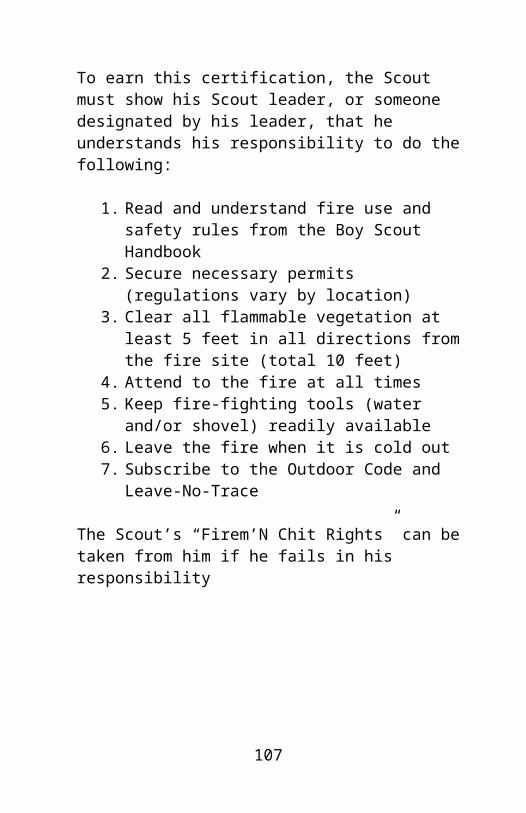
AGENDA 20.1 – Lifesaving Merit Badge
1. Before doing requirements 2 through 16 Complete Second Class rank requirements 7a through 7c and First Class rank requirements 9a through 9c
a. Second Class rank requirements 7a through 7c:
i. (7a) Tell what precautions must be taken for a safe swim
ii. (7b) Demonstrate your ability to jump feet first into water over your head in depth, level off and swim 25 feet on the surface, stop, turn sharply, resume swimming, then return to your starting place
iii. (7c) Demonstrate water rescue methods by reaching with your arm or leg, by reaching with a suitable object, and by throwing lines and objects. Explain why swimming rescues should not be attempted when a reaching or throwing rescue is possible, and explain why and how a rescue swimmer should avoid contact with the victim
b. First Class rank requirements 9a through 9c:i. (9a) Tell what precautions should be
taken for a safe trip afloatii. (9b) Successfully complete the BSA
swimmer testiii. (9c) With a helper and a practice
victim, show a line rescue both as tender and as rescuer. The practice
107

victim should be approximately 30 feet from shore in deep water)
2. Swim continuously for 400 yards using each of the following strokes in a strong manner for at least 50 continuous yards: front crawl, side stroke, breast stroke, and elementary back stroke
3. Explain the following:a. Common drowning situations and how to
prevent themb. How to identify persons in the water who
need assistancec. The order of methods in water rescued. How rescue techniques vary depending on
the setting and the condition of the person needing assistance
e. Situations for which in-water rescues should not be undertaken
4. Demonstrate “reaching” rescues using various items such as arms, legs, towels, shirts, paddles, and poles
5. Demonstrate “throwing” rescues using various items such as lines, ring buoys, rescue bags, and free-floating supports. Successfully place at least one such aid within reach of a practice victim 25 feet from shore.
6. Show or explain the use of rowboats, canoes, and other small craft in performing rescues.
7. List various items that can be used as rescue aids in a non-contact swimming rescue. Explain why buoyant aids are preferred.
108

8. Perform the following equipment-based rescues for a conscious practice subject 30 feet from shore. Use a proper entry and a strong approach stroke. Speak to the subject to determine his condition and to provide instructions and encouragement.
a. Present a rescue tube to the subject, release it, and escort the victim to safety.
b. Present a rescue tube to the subject and use it to tow the victim to safety.
c. Present a buoyant aid other than a rescue tube to the subject, release it, and escort the victim to safety.
d. Remove street clothes in 20 seconds or less and use a non-buoyant aid, such as a shirt or towel, to tow the subject to safety. Explain when it is appropriate to remove heavy clothing before attempting a swimming rescue.
9. Explain the importance of avoiding contact with an active victim and describe lead-and-wait tactics.
10. Perform the following non-equipment rescues for a conscious practice subject 30 feet from shore. Begin in the water from a position near the subject. Speak to the subject to determine his condition and to provide instructions and encouragement.
a. Provide a swim-along assist for a calm, responsive, tired swimmer moving with a weak forward stroke
b. Perform an armpit tow for a calm, responsive, tire swimmer resting with a back float.
109

c. Perform a cross-chest carry for an exhausted, passive victim who does not respond to instructions to aid himself.
11. In deep water, show how to escape from a victim’s grasp on your wrist. Repeat for front and rear holds about the head and shoulders.
12. Perform the following rescues for an unconscious practice subject at or near the surface 30 feet from shore. Use a proper entry and strong approach stroke. Speak to the subject and splash water on him to determine his condition before making contact. Remove the victim from the water, with assistance if needed, and position for CPR.
a. Perform an equipment assist using a buoyant aid.
b. Perform a front approach and wrist tow.c. Perform a rear approach and armpit tow.
13. Describe how to respond if a victim submerges before being reached by a rescuer, and do the following:
a. Recover a 10-pound weight in 8’ to 10’ of water using a feet first surface dive.
b. Repeat using a head first surface dive.
14. Demonstrate knowledge of resuscitation procedures:
a. Describe how to recognize the need for rescue breathing and CPR.
b. Demonstrate proper CPR technique for at least 3 minutes using a mannequin designed to simulate ventilations and compressions.
110

15. Demonstrate management of a spinal injury:a. Explaining the signs and symptoms of a
spinal injuryb. Support a face up victim in calm, shallow
waterc. Turn a subject from a face down to a face up
position while maintaining support
16. Show that you know first aid for other injuries or illnesses that could occur while swimming or boating, including hypothermia, heat reactions, muscle cramps, sunburn, stings, and hyperventilation.
GOALS:1. Provide older boys a teaching experience with new
scouts2. To achieve swimming skills necessary to pass the
Lifesaving Merit Badge3. To acquire knowledge of safety and procedures
necessary to pas the Lifesaving Merit Badge4. Pass and record achievements well done
MATERIALS:1. Swimming pool2. Lifesaving Merit Badge Pamphlet3. Boy Scout Handbook
111

AGENDA 21 – First Aid for Campout
1. Explain what first aid is. Tell how to act in an emergency.
a. Show and teach first aid for the following:b. Simple cuts and scratchesc. Blisters on the hand and footd. Minor burns or scalds (1st degree) & serious
burns (2nd degree)e. Bites or stings of insectsf. Poisonous snake biteg. Nose bleedh. Frostbite and sunburni. Hypothermiaj. Heatstrokek. Heat exhaustionl. Dehydrationm. Hyperventilationn. Shock o. Object in the eyep. Puncture woundsq. Convulsionsr. Bruises, strains, sprainss. Abdominal paint. Broken, chipped, or loosened toothu. Knocked out toothv. Muscle cramps
2. Make a list of things you should have in a personal first aid kit for you home and for a campout.
3. Describe or identify local poisonous plants and tell how to treat for exposure to them.
112

4. First Class Scouts are to help teach younger Scouts.
GOALS:1. To introduce the Scouts to the basic concepts of
first aid2. To prepare the Scouts for their upcoming campout
and the type of injuries and first aid they can expect3. To give candidate Scouts for the First Aid Merit
Badge a teaching experience for advancement4. To test for competency and recycle where necessary5. Pass and record achievements well done
MATERIALS:1. Pencil and paper for each Scout2. First Aid Merit Badge Pamphlet3. Camping Merit Badge Pamphlet4. Swimming Merit Badge Pamphlet5. Boy Scout Handbook
GAME 13 – First Aid Relay
The patrols line up at one end of the building side by side in patrol file, patrol leader in front. They face the judges who are seated opposite them at the other end of the building. When the competition starts, the first member of each patrol walks forward to his respective judge. The judge asks the patrol member the first question on the game sheet. The patrol member then answers the question. The patrol member then walks back to his patrol and goes to the end of his patrol line. The next patrol member then walks forward to the judge. If the previous patrol member correctly answered the question, the next patrol member is asked the next question. Otherwise, the next patrol
113
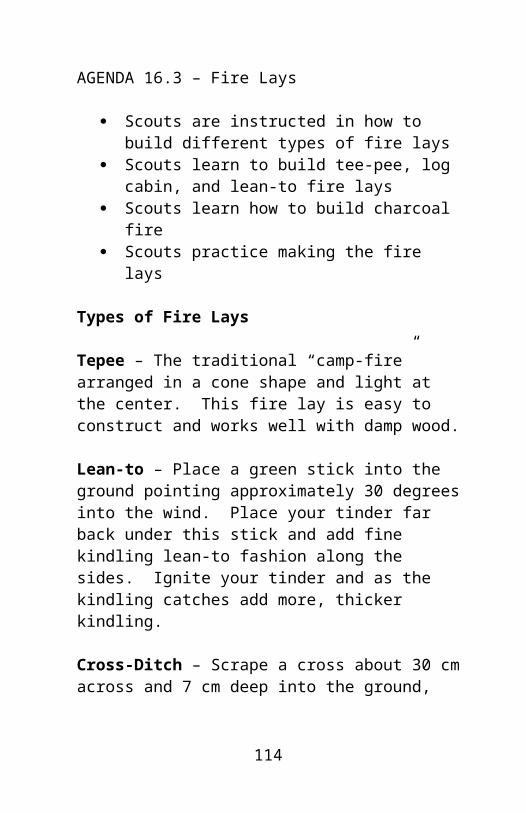
member attempts the same question. This process is continued until either all members of a patrol cannot answer the same question (resulting in disqualification), or until all questions have been answered by the patrol. The first patrol to successfully answer all the questions wins.
GOALS:1. To have fun2. To give patrols an inter-patrol competition
opportunity3. To test the troop’s level of knowledge in this area
MATERIALS:1. Tables and chairs for the judges2. Game Sheets – “First Aid Relay”
114

First Aid Relay Game SheetRelay Game – First patrol to answer all questions wins
1. What is the Heimlich maneuver use for?Answer: Choking (Handbook, pp. 296-297)
2. Demonstrate the Heimlich maneuver.Answer: Hold victim from behind and force fist back into the diaphragm by pulling your arms toward you
3. What are they symptoms of mild hypothermia?Answer: Uncontrollable shivering, lethargy (Handbook, p. 323)
4. How do you treat hypothermia?Answer: Warm drinks, place in a warm dry sleeping bag, get victim out of the cold (Handbook, p. 323)
5. What are the symptoms of dehydration?Answer: Flushed face, headache, body aches, dryness of mouth (Handbook, p. 321)
6. How do you treat dehydration?Answer: lots of fluids (electrolytes are better), keep the victim cool and out of the sun (Handbook, p. 321)
7. What are the symptoms of mild frostbite?Answer: skin or affected area is numb, skin is pale and cold to touch (Handbook, p. 324)
8. How do you treat mild frostbite?Answer: place hand over affected area. Gradually warm up with heated dry towel. Get the victim out of the cold. (Handbook, p. 324)
115

AGENDA 22 – First Aid for Fractures
1. Describe signs of a broke bone.
2. Having a person lying down and using improvised materials, show the first aid for the following fractures (including compound fractures):
a. Forearmb. Upper armc. Wristd. Upper lege. Lower leg
3. Demonstrate and then have the Scouts do it.
GOALS:1. To teach Scouts first aid for the more common bone
fractures they are likely to encounter in life and to give them an opportunity to demonstrate their skill in applying first aid
2. To test for competency and recycle, if necessary3. To pass and record achievements well done
MATERIALS:1. “Improvised materials” per patrol
a. Pillowb. Boardsc. Magazine or newspapersd. Strips of clothe. Beltsf. Whatever you can conjure up
2. First Aid Merit Badge Pamphlet3. Boy Scout Handbook
116
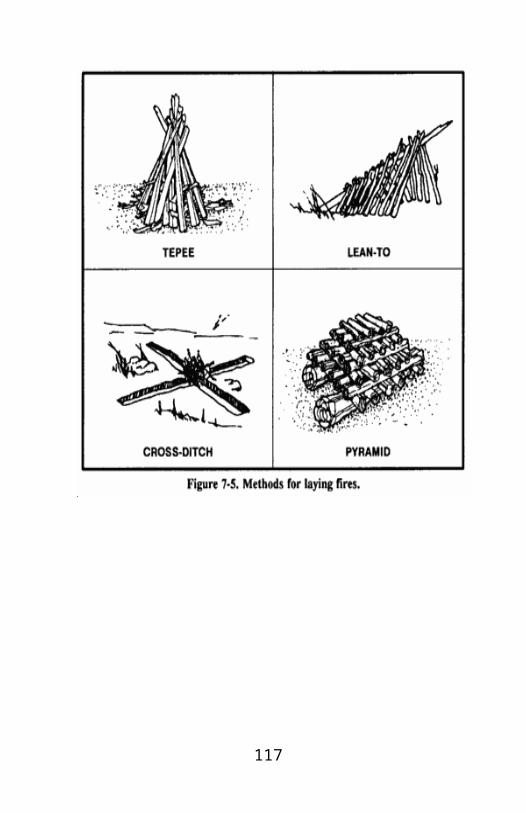
AGENDA 23 – First Aid for Hurry Cases
1. Demonstrate the Heimlich maneuver and tell when it should be used.
2. Show what to do for stopped breathing, serious bleeding, and internal poisoning
3. Tell the five most common signs of heart attack. Explain the step in performing CPR
4. Explain what to do for someone having a heart attack
5. Identify conditions that must exist before performing CPR
6. Demonstrate CPR on a CPR training dummy
GOALS:1. To prepare Scouts to handle certain emergency
medical situations2. To teach CPR3. To test for competency and recycle, if necessary4. Pass and record achievements well done
MATERIALS:1. Pencil and paper for each Scout2. CPR training dummy3. First Aid Merit Badge Pamphlet4. Boy Scout Handbook
GAME 13.1 – First Aid for Hurry Cases
The patrols line up at one end of the building side by side in patrol file, patrol leader in front. They face the judges who are seated opposite them at the other end of the building. When the competition starts, the first member of each patrol walks forward to his respective judge. The
117

judge asks the patrol member the first question on the game sheet. The patrol member then answers the question. The patrol member then walks back to his patrol and goes to the end of his patrol line. The next patrol member then walks forward to the judge. If the previous patrol member correctly answered the question, the next patrol member attempts the same question. This process is continued until either all members of a patrol cannot answer the same question (resulting in disqualification), or until all questions have been answered by the patrol. The first patrol to successfully answer all questions correctly wins.
GOALS:To have funTo give patrols an inter-patrol competition opportunityTo test the troop’s level of knowledge in this area
MATERIALS:Chairs for judgesGame Sheets – “First Aid for Hurry Cases”
Game Sheet for First Aid for Hurry Cases (Game 13.1)
1. Name 4 hurry cases Stopped heart Stopped breathing Sever bleeding Internal poisoning
2. What is the number on step before rescue breathing? Open the airway
3. After opening the airway, what do you do next?
118

Start rescue breathing
4. What are the 5 signs of a heart attack? Uncomfortable pressure of chest Unusual sweating Shortness of breath Nausea Feeling of weakness
5. What does “CPR” stand for? Cardio-Pulmonary Resuscitation
6. Name the steps of CPR. Check for breathing Check for a pulse breaths 15 compressions
7. When do you use a tourniquet? As a last resort in severe bleeding
8. What do you do for internal poisoning? Call poison control Treat for shock Save vomit
119

AGENDA 24 – First Aid Bandages and Special Injuries
1. Show how to place and use a bandage for a sprained ankle, head, upper arm, and collar bone and how to make an arm sling (Handbook, pp. 309, 316-317; Req.: FC-8b)
2. Show treatment for sever laceration on leg and on wrist (Req.: First Aid MB 3d – partial)
3. Tell when to use a tourniquet and the dangers of using a tourniquet (Req.: First Aid MB 3d – partial)
4. Describe symptoms and complications for injuries to back, neck and head (Req.: First Aid MB 4b – partial)
5. Demonstrate how to treat injuries to back, neck and head (Req.: First Aid MB 4b – partial)
6. Explain what to do to reduce the possibility of making injuries to back, neck and head worse (Req.: First Aid MB 4b – partial)
GOALS:1. To give Scouts practical training in how to tie
bandages2. To teach scouts how to treat certain special injuries3. To give candidate Scouts for the First Aid Merit
Badge a teaching experience for advancement4. Pass and record achievements well done
MATERIALS:1. Triangle bandage (cravat) for each boy2. First Aid Merit Badge Pamphlet
120

3. Boy Scout Handbook
121

AGENDA 25 – First Aid Carries
1. Show how to transport by yourself, and with another person, a person from a smoke filled room (Handbook, pp. 326-328; Req.: FC-8c)
2. Show how to transport by yourself, and with another person, a person with a sprained ankle for at least 75 feet (Handbook, pp. 326-328; Req.: FC-8c)
3. Tell how to decide how to move a sick or injured person who must be moved (Req.: First Aid MB 6a – partial)
4. Supervise one or two people, improvise a stretcher, and move an “unconscious” person (Req.: First Aid Merit MB 6a – partial)
GOALS:1. To teach Scouts when and how to move sick or
injured persons2. To demonstrate and teach how to make and use a
stretcher3. To test for competency and recycle, if necessary4. To pass and record achievements well done
MATERIALS:1. Lasing poles2. Wool blanket3. First Aid Merit Badge Pamphlet4. Boy Scout Handbook
122

AGENDA 26 – First Aid – Miscellaneous
1. Patrol Leader reviews Tenderfoot, Second Class and First Class first aid requirements with Scouts (Req.: First Aid MB 1)
2. Have each Scout display the home first aid kit they have made and brought to the meeting. The will need to be told in advance to do this requirement (Req.: First Aid MB 2(b))
3. Teach each Scout the symptoms and demonstrate treatment for back, neck and head injuries. Explain how further complications of these injuries can be avoided. Have the Scouts state the symptoms and demonstrate proficiency in these skills (Req.: First Aid MB 4(b))
4. Have the Scouts teach a younger Scout some first aid skill necessary for Tenderfoot, Second Class or First Class (Req.: First Aid MB 7)
GOALS:1. Provide older boys a teaching experience with new
Scouts2. To achieve competency in various first aid skills
necessary for the First Aid Merit Badge3. Test for competency and recycle if necessary4. Pass and record achievements well done
MATERIALS:1. First Aid Merit Badge Pamphlet2. Boy Scout Handbook
123

AGENDA 27 – Scoutsmanship
1. Teach the Pledge of Allegiance (Handbook, p. 6; Req.: S-4)
2. Teach the Scout Salute, Scout Sign, and the Scout Handshake (Handbook, p. 7; Req.: S-5)
3. Explain the Outdoor Code (Handbook, pp. 9, 218-219; Req.: S-7)
4. Teach the Scout Oath, Scout Law, Scout Motto and the Scout Slogan. Have the Scouts agree to abide by these sayings (Handbook, p. 9, 45 -55; Req.: S-7, T-7)
5. Teach the parts of the Scout Badge. Have Scouts describe the Scout badge (Handbook, p. 10; Req.: S-8)
6. Teach how to display, raise, lower and fold the U. S. flag (Handbook, pp. 42-44; Req.: T-6)
7. Have Scout tell his patrol name, say patrol yell and describe the patrol flag (Handbook, p. 56; Req.: T-8)
8. Teach the Principals of Leave No Trace (Handbook, pp. 244-245)
GOALS:1. Provide older boys a teaching experience with new
scouts2. To achieve an immediate memory for candidates for
the classification of Scout
124
3. To instill in the candidates for Scout the basic principles of scouting as evidenced by the foregoing matters
4. Test for competency and recycle, if necessary5. Pass and record achievements well done
MATERIALS:1. United States Flag2. Boy Scout Handbook
125

GAME 14 – Scoutsmanship Relay
Patrols will line up in patrol file behind the starting point, facing the judges who are seated in a row across the room, on judge for each patrol.
The judges each have an identical list with words on them signifying an aspect of scoutsmanship that each scout should know:
1. Oath2. Law3. Motto4. Slogan5. Outdoor Code6. Leave No Trace7. Handshake8. Salute9. Pledge of Allegiance10. Parts of the Scout Badge (each one is a
separate question)a. Trefoilb. starsc. Eagle and shield Shape of the badged. Scrolle. Knot
11. Name of patrol12. Patrol yell
Patrol members will approach the judge one at a time and give the appropriate response to the next item on the list. Each Scout will attempt to answer one item. If answered correctly, the next Scout will attempt to answer the next item. If answered incorrectly, the next Scout will
126

answer the same item. The first patrol to correctly answer all items will win.
127

AGENDA 28 – Citizenship
1. Fall the Troop in up at the front of the building and have a qualified person discuss with them basic constitutional rights and obligations as U. S. Citizens. Answer any questions that the Scouts have (Handbook, p. 130; Req.: FC-5)
2. In patrol corners, each patrol leader will go over the following:
a. Our Nation’s Motto (Handbook, p. 335)b. Our Nation’s Flag (Handbook, p. 336)c. Our National Anthem (Handbook, pp. 338-
339)d. The United States Constitution (Handbook,
pp. 332-333)e. The Declaration of Independence
(Handbook, p. 337)f. State of Texas Facts:g. Name h. Capital Cityi. State Mottoj. State Flowerk. State Birdl. Title of the State Song
GOALS:1. To expose Scouts to basic concepts of citizenship2. To encourage an understanding and acceptance of
rights and duties of citizenship3. To encourage and reinforce good citizenship4. Pass and record achievements well done
MATERIALS:1. Pen and paper for each Scout
128

2. Boy Scout Handbook3. U. S. Flag
129

GAME 15 – Citizenship Relay
1. What’s our nation’s motto?Answer: In God We Trust
2. How many red stripes are on our nation’s flag?Answer: 7
3. How many white stripes are on our nation’s flag?Answer: 6
4. How many stars are on our nation’s flag?Answer: 50
5. The first official flag of the United States was created by a resolution of the Continental Congress in what year?Answer: 1777
6. What is the first paragraph of the U. S. Constitution called?Answer: Preamble
7. What document gave democracy in which citizens vote for officials who then represent them in government?Answer: The U. S. Constitution
8. What document set in motion the creation of the United States of America?Answer: The Declaration of Independence
9. In what year was the Declaration of Independence written?Answer: 1776
10. What’s the capital of Texas?
130

Answer: Austin
11. What’s the Texas state motto?Answer: “Friendship”
12. What is the Texas state flower?Answer: Bluebonnet
13. What is the Texas state bird?Answer: Mockingbird
14. What is the title of the Texas state song?Answer: “Texas Our Texas”
15. The 13 stripes on the U. S. flag represent what?Answer: the original 13 colonies
16. What is the title of the national anthem?Answer: “The Star-Spangled Banner”
17. The national anthem was written by whom?Answer: Francis Scott Key
18. The “White” stripes on the U. S. flag signify what?Answer: Purity and innocence
19. The “Red” stripes on the U. S. flag signify what?Answer: Hardiness and valor
20. The “Blue” on the U. S. flag signifies what?Answer: Vigilance, perseverance, and justice
21. What is the Texas state tree?Answer: Pecan tree
131
22. What is the nickname of Texas?Answer: The Lone Start State
23. What is the Texas state fruit?Answer: Texas Red Grapefruit
24. What is the Texas state pepper?Answer: Jalapeño
25. What is the Texas state stone?Answer: petrified wood
26. What is the Texas state fish?Answer: Guadalupe Bass
27. What is the Texas state food dish?Answer: Chili
132

AGENDA 29 – Game Night
The Scouts will compete by patrols in the following events. The patrols will select a member to compete in each event. Each Scout must participate in an event unless there are more Scouts than events (Handbook, pp. 57-58; Req.: T-10a – partial)
Winners will be recognized in each event. The overall patrol winner is based upon 10 points for 1st, 7 points for 2nd, and 5 points for 3rd place finish in an event. Individual Scouts receive ribbons for individual events. Overall patrol winners receive ribbons for patrols.
Events: Softball throw Basketball throw Standing long jump Weight lifting Pushups (2 minute time limit) Sit ups (2 minute time limit) 50 yard dash
GOALS:1. To have fun2. To test physical abilities3. Challenge yourself against other Scouts4. Test planning skills to best divide talent of patrol
for competitions
MATERIALS:1. Forms and pencils2. Weights and weight lifting bench3. Tape measure4. Softball
133

5. Basketball6. Stop watch7. Ribbons
134

EVENT:Patrol Scout Score Place
135

Patrol/Points
Softball
Basketball
Long Jump
Weight Lifting
Pushups
Sit-ups
50 yd.
Total
136

GAME 16 – Physical Fitness Contest, Relays
Each patrol is to select a push-up and sit-up champion. All contestants begin each competition at the same time. Most repetitions wins. Sit up contest is timed for two (2) minutes, to see who can do the most within that time. Other events have no preset limit.
Line up patrols side by side in patrol file at one end of the main room (or outside if weather permits). Have relay races for “crab walk,” two man “chariot race,” bear crawl, and sprint. Fastest times win.
Patrols receive ribbons (1st, 2nd and 3rd) at the closing ceremony.
GOALS:1. To have fun2. To give patrols an inter-patrol competition
opportunity3. To challenge the Scouts’ level of physical ability
MATERIALS:1. Competition area2. Ribbons
137

AGENDA 30 – Child Abuse Video
Set up the DVD/VCR and the television and show the child abuse video to all Scouts.
GOALS:1. To give Scouts practical training in how to avoid
child abuse2. To comply with national requirements of showing
the video
MATERIALS:1. BSA child abuse video (obtain from the Council
office)2. DVD player/VCR3. Television
138

AGENDA 31 – Tour
Assemble the Troop in patrol cornersLoad the busGo to tour site
Tours ContactsPolice Station Police Community Liaison
OfficerFire Station Local Station CommanderMilitary reserve centers Local CommanderSewage treatment facility City HallCity Hall Mayor
GOALS:1. To provide opportunity to get out of the building
and have some fun2. To achieve an understanding of the area toured
139

AGENDA 32 – Merit Badges
This agenda is an invitation to explore an exciting hands-on subject. Some merit badges encourage you to increase your skill in subjects you already like, while merit badges challenge you to learn about new areas of knowledge.
This agenda doesn’t have to fulfill all the requirements for a merit badge but can simply serve as a partial. It is recommended to the current Greenbar that they pick merit badges that can be completed in a two hour time frame.
Some hands-on merit badges that are suggested:
Archery Auto MechanicsBasketry ElectricityElectronics FingerprintingGolf HorsemanshipIndian Lore LeatherworkMetalwork Model Design and BuildingMotor boating PioneeringPlumbing Rifle ShootingSculpture Shotgun ShootingSkating Space ExplorationSports Water SkiingWood Carving Woodwork
GOALS:1. To give more skill in things Scouts love to do2. To give a chance to try out new activities, so that
Scouts can find new things which they really like3. To promote advancement and give hands-on
activities that kids like
140

MATERIALS: Depending on which merit badge is selected
141

AGENDA 33 – Rank Advancement
Although Scouts advance at their own pace, each Scout should be at least First Class rank within being in Scouts for their first year. It is proven that if a Scout falls behind, he will become discouraged and eventually will drop out due to feeling unsuccessful. This agenda is designed as a “catch-up” on rank advancement in the event that Scouts aren’t getting the opportunity to either do it on their own or find themselves behind of where they should be.
All Scouts, for the 2 hour session, will work on:1. Scout Rank2. Tenderfoot Rank3. Second Class Rank4. First Class Rank
GOALS:1. To prepare the Scout to be a better Scout, hiker,
camper, and citizen2. To gain knowledge to use on patrol or troop outings3. To make the Scout feel successful and to give
immediate recognition
MATERIALS:1. Individual Scout advancement report2. Boy Scout Handbook3. Pen, pencil and paper4. Rope and twine5. U. S. flag6. Map and compass7. Stop watch8. Knife, ax and saw9. Wet stone and file
142

10. Lighter or matches11. Lightweight stove12. Lashing poles13. Wool blankets14. CPR mannequin
143
AGENDA 34 – Uniform Inspection
Each patrol will line up in their patrol corners in a single file line while the Assistant Senior Patrol Leader of that squad checks each patrol member’s uniform.
GOAL:1. To verify that Scouts have a proper Class A uniform2. To display pride and unity as a Troop and follow
the National BSA Uniform Guide
MATERIALS:1. Uniform Inspection Forms2. Pen and paper
144

OTHER PARTS OF THE MEETING
The following activities need to be done at each meeting. For planning purposes, the agendas and games which are selected for a meeting should be inserted after Patrol Corners and before the Final Assembly.
Opening:1. Color Guard: American Flag (Handbook, p. 87;
Req.: SC-3)2. Pledge of Allegiance (Handbook, p. 6; Req.: S-4)3. Announcements
Patrol Corners:1. Take roll2. Set the date for the monthly patrol meeting3. Announcements and re-affirmation of planned
events4. Schedule scoutmaster conferences5. Sign needed merit badge applications6. Check for needed boards of review and schedule
with advancement committee
Final Assembly:1. Final evening assembly for presentation of ranks
and awards2. Announcements3. Investiture ceremony for new Scouts and
Tenderfoot Scouts4. Scoutmaster’s minute5. Scout Benediction6. Clean up by clean-up patrols
145