virtual alpha user guide - migration · pdf filevirtual alpha user guide for avanti,...
TRANSCRIPT
Migration Specialties International, Inc. 217 West 2nd Street, Florence, CO 81226-1403 +1 719-784-9196 E-mail: [email protected]
www.MigrationSpecialties.com
Continuity in Computing
Copyright 2018, Migration Specialties. International, Inc. All trademarks and registered names used in this document are the property of their respective owners.
Virtual Alpha User Guide for Avanti, AvantiFlex, & FreeAXP 17-FEB-2018
Version 3.0: This manual covers all releases of Avanti™, AvantiFlex™ and FreeAXP™.
This manual describes how to install and use Avanti, AvantiFlex, and FreeAXP, Migration Specialties' AlphaServer 400 hardware emulators.
AvantiFlex and Avanti are commercial products that require purchase of a product license. AvantiFlex and Avanti include 30 days of manufacturer support after purchase and the option to buy an extended support contract.
FreeAXP can be used for personal and commercial purposes. FreeAXP is unsupported without purchase of a support contract. If you have questions or problems with FreeAXP and have not purchased a support contract, visit the FreeAXP forum at the OpenVMS Hobbyist web site.
Avanti & Avanti Flex Links
Product Info: http://www.migrationspecialties.com/Emulator-Alpha.html
User Guide: http://www.migrationspecialties.com/pdf/VirtualAlpha_UserGuide.pdf
Release Notes: http://www.migrationspecialties.com/pdf/VirtualAlpha_ReleaseNotes.pdf
License: http://www.migrationspecialties.com/pdf/AvantiLicense.pdf
SPD: http://www.migrationspecialties.com/pdf/Avanti_SPD.pdf Pricing Guide: http://www.migrationspecialties.com/pdf/VirtualAlphaPricingGuide.pdf
FreeAXP Links
Product Info: http://www.migrationspecialties.com/FreeAXP.html
User Guide: http://www.migrationspecialties.com/pdf/VirtualAlpha_UserGuide.pdf
Release Notes: http://www.migrationspecialties.com/pdf/VirtualAlpha_ReleaseNotes.pdf
License: http://www.migrationspecialties.com/pdf/FreeAXP_License.pdf
SPD: http://www.migrationspecialties.com/pdf/FreeAXP_SPD.pdf
User Forum: http://www.vmshobbyist.com/forum/viewforum.php?forum_id=163
Download: http://www.migrationspecialties.com/FreeAXP.html
Migration Specialties International, Inc. MigrationSpecialties.com
Copyright 2018
Migration Specialties International, Inc. 217 W 2nd Street Florence, Colorado 81226-1403 +1 719-784-9196 Email: [email protected] Web-Site: www.MigrationSpecialties.com
First Printing: February 2011
The software described in this manual is furnished under a license and may only be used or copied in accordance with the terms of that license.
No responsibility is assumed by Migration Specialties or its affiliated companies for use or reliability of this software or for errors in this manual or in the software.
Restricted Rights Legend
Use, duplication, or disclosure by the Government is subject to restrictions as set forth in subdivision (b) (3) (ii) of the Rights in Technical Data and Computer Software clause in 52.227-7013, or other applicable Federal Acquisition Regulations.
This manual is subject to change without notice and does not constitute a commitment by Migration Specialties.
The following are trademarks of Migration Specialties:
Avanti FreeAXP Avanti Flex Digital Emulator Collection
The following are trademarks of Microsoft Corporation:
Windows Windows XP Windows Vista Windows 7 Windows 8 Windows 10 Windows Server 2003 Windows Server 2008 Windows Server 2012
The following are trademarks of Hewlett Packard Corporation:
VAX DEC Alpha OpenVMS Tru64 UNIX Integrity OSF ULTRIX-32 ULTRIX
All other trademarks and registered names used in this document are the property of their respective owners.
Migration Specialties International, Inc. [email protected]
1
Contents
1. DOCUMENT CONVENTIONS 10
1.1 Virtual Alpha Product References 10
1.2 Size Designations: K, M, G 10
1.3 Migration Specialties Virtualization Products 10
1.4 Retired O/S 10
2. QUICK START 11
2.1 Porting Services 11
3. AVANTI LICENSING 12
3.1 Transitioning from FreeAXP to Avanti 12
3.2 USB License Key Installation Confirmation 12
3.3 License Key Grace Period 13
3.4 Avanti Version and License Key Information 13
3.4.1 Temporary License Example 13
3.4.2 Permanent License Example 14
3.5 Moving a Temporary Avanti License Key 14
3.6 USB License Key Troubleshooting 15
3.6.1 USB 3.0 Port 15
3.6.2 Native to the Board Ports 15
4. INSTALLATION 16
4.1 Windows Installation 16
4.1.1 Prerequisites 16
4.1.1.1 Operating Systems 16
4.1.1.2 Hardware 16
4.1.1.2.1 Sizing Host Memory 16
4.1.2 Rights 17
4.1.3 Installation Restrictions 17
4.1.4 Windows Installation Steps 18
4.1.5 Windows Installation Details 20
4.1.5.1 Installation Folder 20
4.1.5.2 Firewall Exception 20
4.1.5.3 Installation Log 20
Migration Specialties International, Inc. MigrationSpecialties.com
2
5. DE-INSTALLING AVANTI 21
5.1 Windows Uninstall 21
6. VIRTUAL ALPHA CONFIGURATIONS 22
7. AVANTI CONFIGURATION UTILITY 23
7.1 Avanti Configuration Files 23
7.1.1 Manually Modified Configuration Files 23
7.1.2 Updating Avanti Path Names 23
7.2 Specifying Sizes 23
7.3 Configuration Utility Layout 24
7.4 Running the Configuration Utility 24
7.5 Configuration Drop-down Menus 25
7.5.1 File 25
7.5.2 Help 26
7.6 Virtual Alpha Components 26
7.6.1 Advanced Features 26
7.6.2 <base> 26
7.6.3 VLC 27
7.6.3.1 Logfile 27
7.6.3.2 keep 27
7.6.4 Virtual Alpha Base Settings 27
7.6.4.1 Main Memory 28
7.6.4.2 JIT 28
7.6.5 Serial Ports: OPA0/tty00 – TTA0/tty01 29
7.6.5.1 Telnet server 29
7.6.5.1.1 Port 29
7.6.5.1.2 Start session automatically 29
7.6.5.2 Physical Port 29
7.6.5.3 Log file 30
7.6.5.4 keep 30
7.6.6 PCI Slots 30
7.6.7 SCSI Controllers: KZPAA and KZPCA 31
7.6.7.1 Type 31

Migration Specialties International, Inc. [email protected]
3
7.6.7.2 Disk0.n 31
7.6.7.2.1 image file 32
7.6.7.2.1.1 Creating a Disk Image File 32
7.6.7.2.1.2 Assigning an Existing Image File 32
7.6.7.2.2 raw device 32
7.6.7.2.3 tape image 32
7.6.7.2.3.1 Creating a Tape Image File 33
7.6.7.2.3.2 Assigning an Existing Tape Image File 33
7.6.7.2.4 CD-ROM 33
7.6.8 NIC 33
7.6.8.1 Type 34
7.6.8.2 Interface 34
7.6.8.3 Set MAC address 34
7.6.8.4 Single Avanti Instance and MAC Addressing 35
7.6.8.5 Multiple Avanti Instances and MAC Addressing 35
7.6.9 show units 35
7.7 Advanced Configuration Features 36
7.7.1 VLC [+] 37
7.7.1.1 extra_threads 37
7.7.1.2 fixed_threads 37
7.7.1.3 win32_limit_cache_yn 37
7.7.1.4 win32_limit_cache_size 37
7.7.1.5 forbidden_cpus 37
7.7.1.6 startup_delay 37
7.7.2 Logfile [+] 38
7.7.2.1 wmi 38
7.7.3 JIT [+] 38
7.7.3.1 image 38
7.7.3.2 jit_memory 38
7.7.4 PCI bus [+] 38
7.7.4.1 data 38
7.7.4.2 shadow_on_disk 38
7.7.5 Serial Ports (OPA0/tty00, TTA0/tty01) [+] 39
Migration Specialties International, Inc. MigrationSpecialties.com
4
7.7.5.1 log 39
7.7.5.2 buffersize 39
7.7.5.3 chunksize 39
7.7.5.4 chunktime 39
7.7.5.5 Telnet Port [+] 39
7.7.5.5.1 action 39
7.7.5.6 Device (Physical serial port) [+] 40
7.7.5.6.1 linesettings 40
7.7.5.6.2 readbuflen 40
7.7.5.6.3 debug 40
7.7.5.6.4 debugv 40
7.7.5.7 dumpbuffer 40
7.7.5.8 Log file [+] 40
7.7.5.8.1 wmi 40
7.7.6 SCSI Disk [+] 41
7.7.6.1 vendor 41
7.7.6.2 model_num 41
7.7.6.3 rev_num 41
7.7.6.4 serial_num 41
7.7.6.5 autocreate_size (image file only) 41
7.7.6.6 sparse (image file only) 41
7.7.6.7 write_share 41
7.7.6.8 tcq 41
7.7.6.9 disconnect 42
7.7.6.10 sync_io 42
7.7.6.11 round_up 42
7.7.6.12 heads 42
7.7.6.13 cylinders 42
7.7.6.14 sectors 42
7.7.6.15 read_delay 42
7.7.6.16 write_delay 42
7.7.6.17 write_through 43
7.7.7 SCSI Tape [+] 43
Migration Specialties International, Inc. [email protected]
5
7.7.7.1 vendor 43
7.7.7.2 model_num 43
7.7.7.3 rev_num 43
7.7.7.4 serial_num 43
7.7.7.5 advanced_behavior 43
7.7.7.6 disconnect 43
8. RUNNING AVANTI 44
8.1 Key Requirements 44
8.2 Host Network Configuration 44
8.3 Avoiding Avanti Crashes 44
8.3.1 Avanti Warning on Windows Shutdown 44
8.4 Launching Avanti 44
8.5 Avanti Control Icon 45
8.5.1 Control Menu Layout 45
8.6 Launching Avanti from a Shortcut 46
8.7 Launching Avanti Manually 46
8.7.1 Launching Avanti from a Batch File 46
8.8 Running Avanti From a Non-Administrator Account 47
8.9 First Launch Messages 47
8.10 Console Operations 48
8.10.1 Console Help 48
8.11 Launching Avanti Without the Console 48
8.11.1 OpenVMS Auto Boot 48
8.11.2 Tru64 Auto Boot 48
8.11.3 Ambiguous Boot Device 49
8.12 Exiting Avanti 49
8.13 Multiple Avanti Instances on a Single Host 49
8.13.1 Overloading a Host System with Multiple Avanti Instances 50
8.13.2 Avanti and FreeAXP on a Single Host 50
8.13.2.1 FreeAXP / Avanti Selection Box 50
8.14 Installing Avanti as a Service 50
8.14.1 Service Creation 51
Migration Specialties International, Inc. MigrationSpecialties.com
6
8.14.2 Service Removal 51
8.14.3 Service Errors 52
9. VIRTUAL HOST ENVIRONMENTS 53
9.1 USB Key Support 53
9.2 VMware USB Key Support 53
9.3 Migrating Virtual USB Support 53
9.4 NIC Configuration 53
9.4.1 VMware Virtual NICs 53
9.5 Allocating CPU Resources 53
9.5.1 Allocation of Virtual Alpha CPUs 54
9.6 General VM Resource Management 54
10. NETWORKING AVANTI 55
10.1 Adding a Host NIC 55
10.2 Dedicating a NIC 55
10.3 NICs and Multiple Instances of Avanti 55
10.4 Networking Avanti on a System with a Single NIC 56
10.4.1 Microsoft Loopback Connector 56
10.5 Manually Modifying the Avanti MAC Address 56
10.6 DE435 for Older O/S 57
10.7 Networking with Wireless Ethernet 57
10.7.1 Wireless Ethernet and Avanti 57
10.8 Installing a New NIC 58
10.9 VMware NICs 58
10.10 Hyper-V Virtual NICs 59
10.11 Network Issues 59
10.11.1 TCP Offload Features May Cause Network Instability 59
10.11.2 Switch Drops DECnet and SCS Packets 59
11. AVANTI DEFAULT SERIAL PORTS 60
11.1 Serial Port Telnet Port Numbers 60
11.2 Serial Port Logging 60
11.3 Console Port 60
11.4 Physical Serial Devices 60
Migration Specialties International, Inc. [email protected]
7
12. 5-PORT SERIAL CARD SUPPORT (OPENVMS) 61
12.1 Defining the Serial Card to the Firmware 62
12.2 Defining the Serial Card to OpenVMS 64
12.2.1 Serial Card Configuration Prior to OpenVMS 7.1 64
12.2.2 OpenVMS 7.1 and Higher Serial Card Configuration 65
12.3 Sample Configuration File With Serial Card 66
13. VIRTUAL TAPES 68
13.1.1 Changing Tapes 68
13.1.2 Virtual Tape File Space Allocation 69
13.1.3 Make Tape Utility 69
14. AVANTI PERFORMANCE 70
14.1 CPU Instruction Sets 70
14.1.1 Compiling for Performance 70
14.2 Memory 70
14.3 Disk I/O 70
14.4 Using CDs and DVDs 71
14.5 Virtual Tape Performance 71
14.6 TCQ and Performance 71
14.7 Floating Point Calculation Performance 71
14.8 Hyperthreading 71
14.9 Parking Cores 71
15. OPENVMS SPECIFIC NOTES 72
15.1 Porting an OpenVMS System 72
15.2 OpenVMS Auto Boot 72
15.3 Reconfiguring the Network 72
15.4 Bypassing a NIC 73
15.5 Maximum Physical Disk Size Under OpenVMS 73
15.6 OpenVMS Clustering 73
15.6.1 Quorum Disk and TCQ 73
15.6.2 Clusters and Disk Sharing 73
15.7 VMS 6.n and Large Disk Support 74
15.8 VMS 6.2 Installation 74

Migration Specialties International, Inc. MigrationSpecialties.com
8
15.9 VMS 6.2 Image Backups 75
15.10 VMS 6.2 Network Support 75
15.11 VMS 7.0 Login After Installation 75
15.11.1 VMS 7.0 Conversational Boot 76
15.12 VMS 7.1 Installation Halt 76
15.13 VMS 7.3 Install from Virtual RRD42 76
15.14 OpenVMS 8.3 76
15.15 OpenVMS Alpha V8.4-2L2 77
15.16 VSI OpenVMS Rebranding Error 77
15.17 OpenVMS SCSI Support Limitations 77
15.18 Serial Devices 77
15.19 Reflection 2011 & E-Term32 Virtual Sessions 77
15.20 OpenVMS PuTTY Settings 78
15.20.1 Transferring PuTTY Settings 78
15.21 UNXSIGNAL Bug Check 79
16. TRU64 UNIX SPECIFIC NOTES 80
16.1 Porting a Tru64 System 80
16.2 Tru64 Auto Boot 80
16.3 Tru64 Version Support 80
16.4 Network Notes 81
16.4.1 NIC Support in V3.2X Releases 81
16.4.2 NIC Console Variables 81
16.4.3 Sharing NICs with Windows 81
16.4.4 LAT and Dual NICs 81
16.4.5 Switching NICs 81
16.4.6 SCSI Support Limitations 82
16.5 V5 and Large Disks 82
16.6 Maximum Physical Volume Size Under Tru64 UNIX 82
16.7 TRU64 Unix Virtual Tape Support 82
16.8 Tru64 UNIX PuTTY Settings 83
16.8.1 Transferring PuTTY Settings 84
17. MISCELLANEOUS NOTES 85
Migration Specialties International, Inc. [email protected]
9
17.1 Boot Console Variables 85
17.2 Floating Point Values 85
17.3 Container File Compatibility 85
17.3.1 PersonalAlpha & Charon Container File 85
17.4 FreeAXP 32-bit PuTTY String 86
17.5 Lantronix Serial to Ethernet Device Support 86
17.6 Graphics Support 86
17.7 Shared CD-ROMs 86
17.8 Halt on Guest O/S Boot 86
17.8.1 XDELTA not loaded 87
17.8.2 Unexpected exception/interrupt through vector 420 87
17.9 JIT Memory Error 88
18. TROUBLESHOOTING 89
18.1 Log Files 89
18.1.1 Avanti Log File 89
18.1.2 Terminal Log Files 89
18.1.3 PuTTY Log Files 89
18.2 Avanti Crash Dump File 89
18.3 Halting a Hung System 90
18.4 Problem Submission 90
APPENDIX A: GLOSSARY 91
APPENDIX B: AVANTI EMULATOR FILES 92
APPENDIX C: UPDATING A WINDOWS LICENSE KEY 93
C.1 LICENSE UPDATE FILE 93
C.2 LICENSE UPDATE PHRASE 93
C.3 RUNNING THE LICENSE UPDATE UTILITY 94
C.3.1 STEPS TO APPLY A LICENSE UPDATE 94
APPENDIX D: AVANTI COMMAND LINE OPTIONS 96
Migration Specialties International, Inc. MigrationSpecialties.com
10
1. DOCUMENT CONVENTIONS
This document uses the following conventions.
1.1 VIRTUAL ALPHA PRODUCT REFERENCES
Throughout this manual, Avanti will be used to represent the Migration Specialties virtual Alpha products Avanti, AvantiFlex, and FreeAXP. Most installation, configuration, and runtime tasks are the same for all three products. Where distinctions are necessary, the products are referenced by name.
1.2 SIZE DESIGNATIONS: K, M, G
Some parameters used by the configuration utility designate file or buffer sizes. The suffixes K, M, and G are used to designate Kilo, Mega, and Giga. For example, to set the autocreate size of a disk to 4 gigabytes, the user would enter 4G in the autocreate_size box.
1.3 MIGRATION SPECIALTIES VIRTUALIZATION PRODUCTS
Product Description
Avanti/AvantiFlex Commercial Alpha emulator
FreeAXP Free Alpha emulator
SimH VAX Free open source VAX emulator
1.4 RETIRED O/S
The following host O/S are no longer supported. Documentation references are retained to support legacy installations.
Windows XP Windows Vista Windows Server 2003 Windows Server 2008 Std
Migration Specialties International, Inc. [email protected]
11
2. QUICK START
This section describes the basic steps required to get up and running with Avanti.
1) Download and install the Avanti software: Chapter 4, Installation
2) Install the License Key (Avanti & AvantiFlex only): Chapter 3, Avanti Licensing
3) Launch the Configuration Utility: Chapter 6, Virtual Alpha Configurations
4) Configure a virtual Alpha system containing at least one…
a) Serial Port: Section 7.6.5, Serial Ports: OPA0/tty00 – TTA0/tty01
b) Disk Controller: Section 7.6.7, SCSI Controllers: KZPAA and KZPCA
c) Disk Drive: Section 7.6.7.2, Disk0.n
d) CD-ROM: Section 7.6.7.2.4, CD-ROM
e) NIC: Section 7.6.8, NIC
5) Save the configuration file: Section 7.5.1, File
6) Load a Tru64 UNIX or OpenVMS installation CD in the CD-ROM device.
7) Launch Avanti and install Tru64 UNIX or OpenVMS.
2.1 PORTING SERVICES
Migration Specialties provides comprehensive fee-based Tru64 UNIX and OpenVMS porting services. We are available to help you build and port to virtual Alpha systems. Contact us for additional information.
Migration Specialties International, Inc. MigrationSpecialties.com
12
3. AVANTI LICENSING
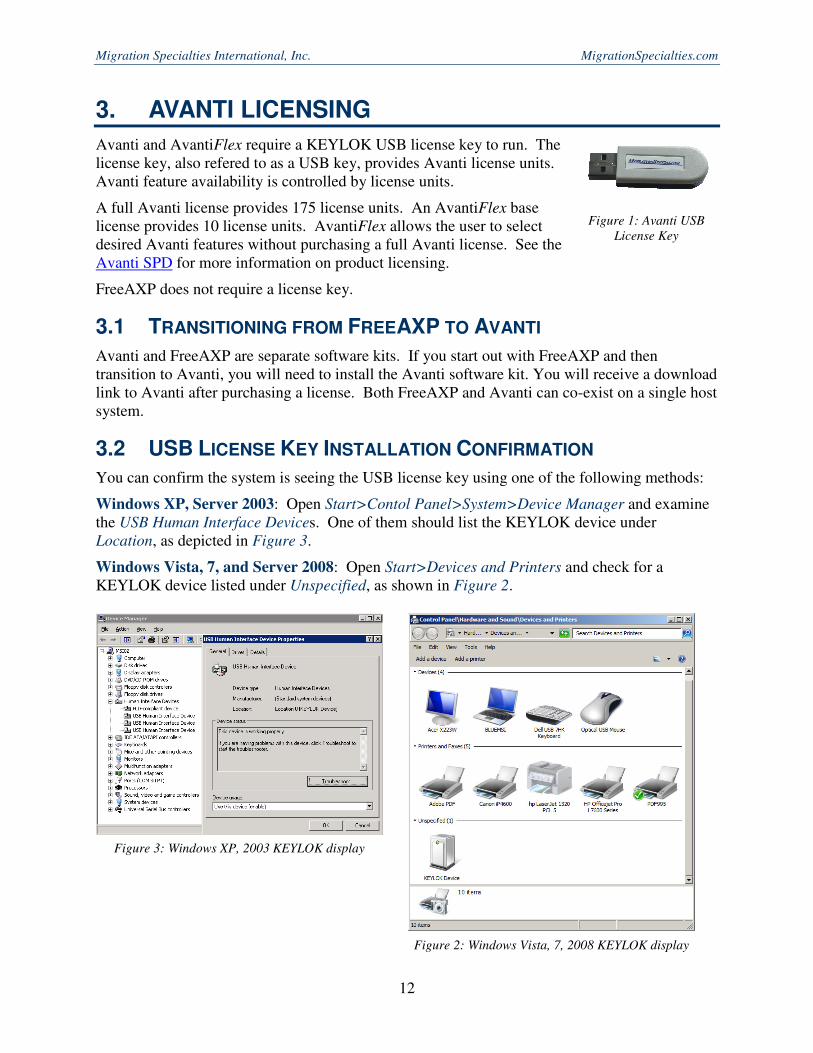
Avanti and AvantiFlex require a KEYLOK USB license key to run. The license key, also refered to as a USB key, provides Avanti license units. Avanti feature availability is controlled by license units.
A full Avanti license provides 175 license units. An AvantiFlex base license provides 10 license units. AvantiFlex allows the user to select desired Avanti features without purchasing a full Avanti license. See the Avanti SPD for more information on product licensing.
FreeAXP does not require a license key.
3.1 TRANSITIONING FROM FREEAXP TO AVANTI
Avanti and FreeAXP are separate software kits. If you start out with FreeAXP and then transition to Avanti, you will need to install the Avanti software kit. You will receive a download link to Avanti after purchasing a license. Both FreeAXP and Avanti can co-exist on a single host system.
3.2 USB LICENSE KEY INSTALLATION CONFIRMATION
You can confirm the system is seeing the USB license key using one of the following methods:
Windows XP, Server 2003: Open Start>Contol Panel>System>Device Manager and examine the USB Human Interface Devices. One of them should list the KEYLOK device under Location, as depicted in Figure 3.
Windows Vista, 7, and Server 2008: Open Start>Devices and Printers and check for a KEYLOK device listed under Unspecified, as shown in Figure 2.
Figure 1: Avanti USB
License Key
Figure 2: Windows Vista, 7, 2008 KEYLOK display
Figure 3: Windows XP, 2003 KEYLOK display

Migration Specialties International, Inc. [email protected]
13
3.3 LICENSE KEY GRACE PERIOD
Avanti provides a 60 minute grace period if an Avanti license key is removed from a running system. If a license key is removed, or a remote USB device looses communication with the Avanti host server, the user has 60 minutes to restore communications with the key before Avanti shuts down.
3.4 AVANTI VERSION AND LICENSE KEY INFORMATION
The Avanti log file header contains Avanti version and license keys information. The log file can be open by any text editor, such as Microsoft Notepad. Figure 4 and Figure 5 provide examples of log headers for temporary and permanent Avanti license keys.
Note: Avanti keys always ship with a temporary license installed. Once receipt of the key has been confirmed and payment received, a permanent license update is provided via e-mail.
3.4.1 Temporary License Example
Avanti Virtual Alpha x64 version 2.4.3.533 (Sep 30 2013 10:35:35)
Windows workstation version 6.1 SP 1.0, build 7601 (Service Pack 1) suite 100 (WMI
Name: Microsoft Windows 7 Professional N |C:\Windows|\Device\Harddisk0\Partition1)
4 processor cores of family 25, stepping 05 (WMI Name: Intel(R) Core(TM) i5 CPU
M 450 @ 2.40GHz)
File opened at 2013-09-30 07:34:50
00008.97: License key: s/n 67r5 (v. 1) 400 units
00008.97: Expires in 92 days
00008.97: Valid for releases up to 2013-12-31
00008.97: %XNV-I-RESTST:
Figure 4: Temporary License Key
• Avanti Virtual Alpha x64 version 2.4.3.533 (Sep 30 2013 10:35:35)
- Avanti version 2.4.3.522 built September 20, 2013
• License key: s/n 67r5 (v. 1) 400 units
- Key # 67 configured with 400 unit license
• Expires in 92 days
- Temporary key expiring in 92 days
• Valid for releases up to 2013-12-31
- Avanti updates released before 2014/01/01 can be applied to this key.
- The date reflects the support contract period purchased for the key. When the support contract is renewed, this field is updated.
Migration Specialties International, Inc. MigrationSpecialties.com
14
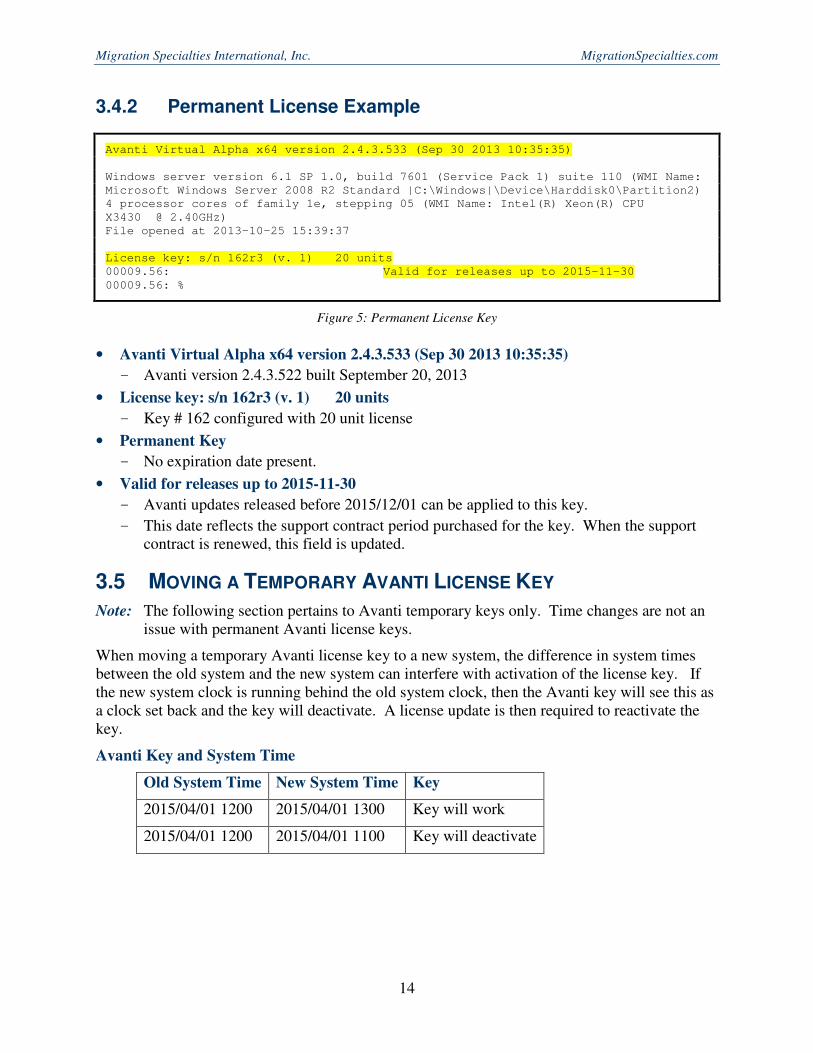
3.4.2 Permanent License Example
Avanti Virtual Alpha x64 version 2.4.3.533 (Sep 30 2013 10:35:35)
Windows server version 6.1 SP 1.0, build 7601 (Service Pack 1) suite 110 (WMI Name:
Microsoft Windows Server 2008 R2 Standard |C:\Windows|\Device\Harddisk0\Partition2)
4 processor cores of family 1e, stepping 05 (WMI Name: Intel(R) Xeon(R) CPU
X3430 @ 2.40GHz)
File opened at 2013-10-25 15:39:37
License key: s/n 162r3 (v. 1) 20 units
00009.56: Valid for releases up to 2015-11-30
00009.56: %
Figure 5: Permanent License Key
• Avanti Virtual Alpha x64 version 2.4.3.533 (Sep 30 2013 10:35:35)
- Avanti version 2.4.3.522 built September 20, 2013
• License key: s/n 162r3 (v. 1) 20 units
- Key # 162 configured with 20 unit license
• Permanent Key
- No expiration date present.
• Valid for releases up to 2015-11-30
- Avanti updates released before 2015/12/01 can be applied to this key.
- This date reflects the support contract period purchased for the key. When the support contract is renewed, this field is updated.
3.5 MOVING A TEMPORARY AVANTI LICENSE KEY
Note: The following section pertains to Avanti temporary keys only. Time changes are not an issue with permanent Avanti license keys.
When moving a temporary Avanti license key to a new system, the difference in system times between the old system and the new system can interfere with activation of the license key. If the new system clock is running behind the old system clock, then the Avanti key will see this as a clock set back and the key will deactivate. A license update is then required to reactivate the key.
Avanti Key and System Time
Old System Time New System Time Key
2015/04/01 1200 2015/04/01 1300 Key will work
2015/04/01 1200 2015/04/01 1100 Key will deactivate
Migration Specialties International, Inc. [email protected]
15
3.6 USB LICENSE KEY TROUBLESHOOTING
In rare instances the USB license key may not be recognized by the host system. Check for these issues if this problem is encountered.
3.6.1 USB 3.0 Port
If utilizing a USB 3.0 port, make sure it is configured to be backward compatible specifically to support the USB 2.0 protocol. This is particularly important when defining passthru ports for VMware installations.
3.6.2 Native to the Board Ports
The USB license key needs to be plugged into a port that is "native to the board". USB ports on PCI or PCIe cards are sometime not native to the board. If in doubt, ensure the USB key is plugged into a USB port directly connected to the system motherboard.
Migration Specialties International, Inc. MigrationSpecialties.com
16
4. INSTALLATION
4.1 WINDOWS INSTALLATION
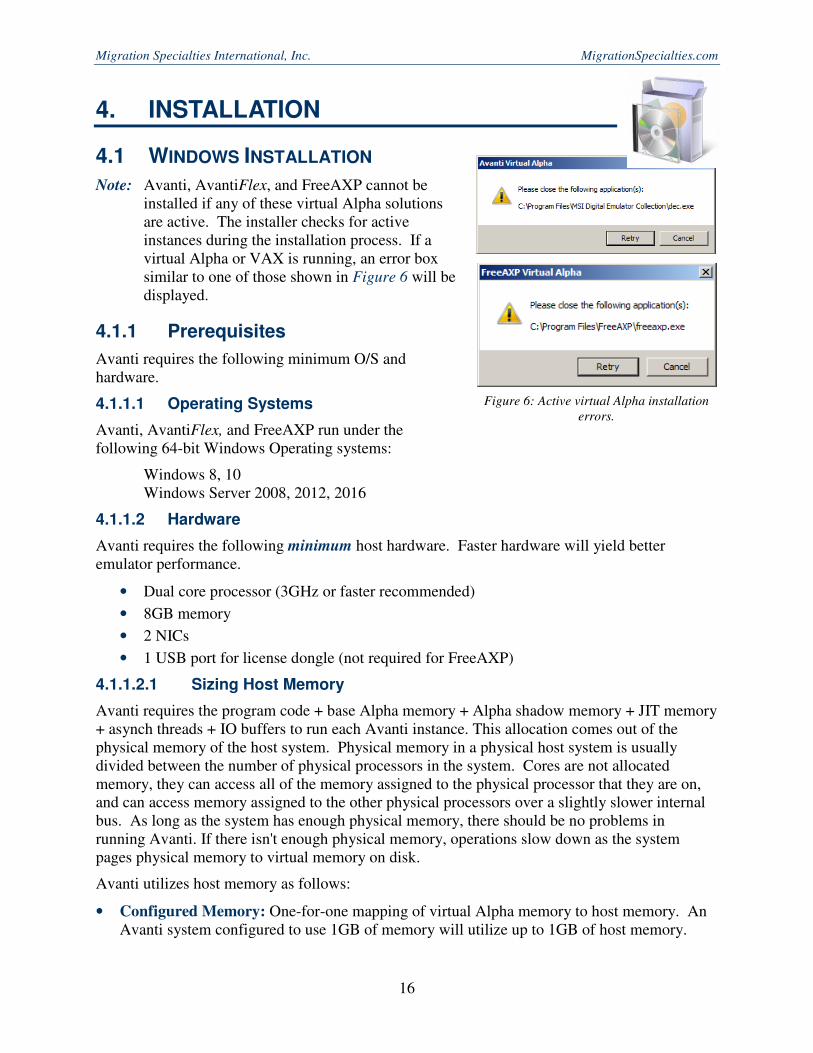
Note: Avanti, AvantiFlex, and FreeAXP cannot be installed if any of these virtual Alpha solutions are active. The installer checks for active instances during the installation process. If a virtual Alpha or VAX is running, an error box similar to one of those shown in Figure 6 will be displayed.
4.1.1 Prerequisites
Avanti requires the following minimum O/S and hardware.
4.1.1.1 Operating Systems
Avanti, AvantiFlex, and FreeAXP run under the following 64-bit Windows Operating systems:
Windows 8, 10 Windows Server 2008, 2012, 2016
4.1.1.2 Hardware
Avanti requires the following minimum host hardware. Faster hardware will yield better emulator performance.
• Dual core processor (3GHz or faster recommended)
• 8GB memory
• 2 NICs
• 1 USB port for license dongle (not required for FreeAXP)
4.1.1.2.1 Sizing Host Memory
Avanti requires the program code + base Alpha memory + Alpha shadow memory + JIT memory + asynch threads + IO buffers to run each Avanti instance. This allocation comes out of the physical memory of the host system. Physical memory in a physical host system is usually divided between the number of physical processors in the system. Cores are not allocated memory, they can access all of the memory assigned to the physical processor that they are on, and can access memory assigned to the other physical processors over a slightly slower internal bus. As long as the system has enough physical memory, there should be no problems in running Avanti. If there isn't enough physical memory, operations slow down as the system pages physical memory to virtual memory on disk.
Avanti utilizes host memory as follows:
• Configured Memory: One-for-one mapping of virtual Alpha memory to host memory. An Avanti system configured to use 1GB of memory will utilize up to 1GB of host memory.
Figure 6: Active virtual Alpha installation
errors.
Migration Specialties International, Inc. [email protected]
17
• Shadow Memory: One-for-one mapping of shadow memory to host memory. Avanti pre-processes Alpha instructions, optimizing them to achieve better performance upon execution. These optimized instructions are referred to as shadow code. Shadow code is retained in memory as long as the Alpha code remains in emulated memory.
Shadow memory matches the memory configured for an Avanti instance. An Avanti system configured with 1GB of memory will utilize up to 1GB of host memory for shadow memory.
• JIT Memory: Default maximum size is 2GB or ½ of physical memory, whichever is less. JIT memory utilization can be limited with the jit_memory advanced configuration option.
Note: If running on a Windows host system equipped with more than 32GB of memory and the following error is encountered, set the jit_memory parameter to 2GB.
Unable to reserve JIT buffer area: error 87: The parameter is incorrect.
Optimum host memory on a heavily utilized Avanti virtual Alpha system configured with 1GB of virtual memory would break down as follows:
Memory Avanti Host
Host O/S 2GB
Avanti Configuration 1GB 1GB
Shadow Memory 1GB 1GB
JIT 2GB 2GB
Total 6GB
All the caveats of a Windows paging file apply. For most situations, and our testing supports this, a host system with 4GB of memory and a properly configured Windows paging file would be more than adequate to support a 1GB Avanti configuration. Only in situations where very high demand is put upon the Avanti virtual Alpha would maximizing physical memory be required
4.1.2 Rights
Avanti should be installed from an Administrative account. Users of Windows O/S beyond XP and Server 2003 will need administrative rights to run the Avanti configuration utility and to launch Avanti from the command line or a batch procedure.
4.1.3 Installation Restrictions
FreeAXP and Avanti cannot be installed if another instance of FreeAXP or Avanti is running. All instances of these products must be shut down before a new installation can be made.
Migration Specialties International, Inc. MigrationSpecialties.com
18
4.1.4 Windows Installation Steps
1) FreeAXP users can download the FreeAXP installation package from:
http://www.migrationspecialties.com/FreeAXP.html
Avanti and AvantiFlex users will receive their installation kits via download.
2) Run the installation program as an administrator. Right click the installation program, then select "Run as administrator" from the pop-up menu.
Note: Failure to run the installation as an administrator may result in no access to network devices.
Installation Programs
• FreeAXP: FreeAXPsetup.exe
• Avanti & AvantiFlex: DECsetup.exe
Avanti and FreeAXP can be installed on the same system. The FreeAXP installer automatically determines if a 32- or 64-bit installation is required. Avanti and AvantiFlex only support a 64-bit O/S.
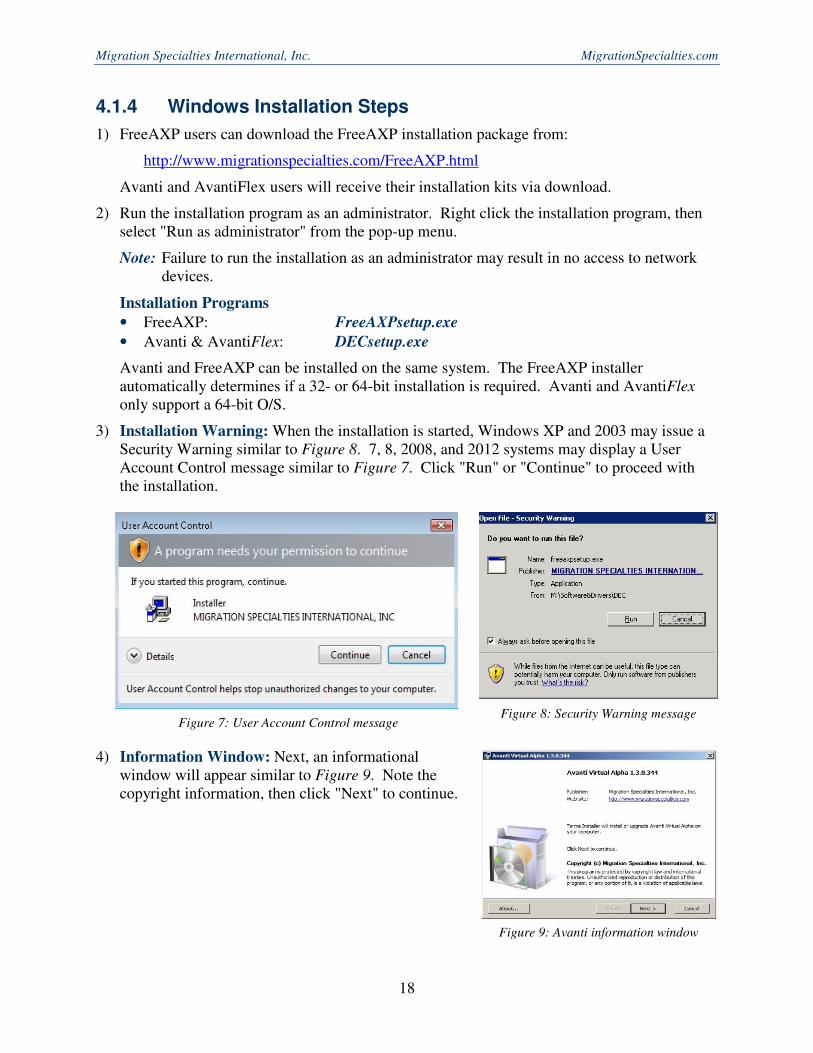
3) Installation Warning: When the installation is started, Windows XP and 2003 may issue a Security Warning similar to Figure 8. 7, 8, 2008, and 2012 systems may display a User Account Control message similar to Figure 7. Click "Run" or "Continue" to proceed with the installation.
4) Information Window: Next, an informational window will appear similar to Figure 9. Note the copyright information, then click "Next" to continue.
Figure 8: Security Warning message Figure 7: User Account Control message
Figure 9: Avanti information window

Migration Specialties International, Inc. [email protected]
19
5) License Window: Figure 10 provides an example of the license window. The eminently fair and reasonable license terms should be read. Check the "I agree to these terms and condition" box and click "Next" to continue the installation. If the license terms are not acceptable, do not install the product.
6) Installation Options: Figure 11 provides an example of the Installation Options window. The window lists the following components:
Emulator executable: The virtual Alpha program. Emulator installation is required and cannot be unchecked.
MSI Network driver: The PCAP based network driver. Installation of the network driver is optional. If the network driver is not installed, the emulator cannot be configured with a NIC. The network driver is installed by default.
Desktop Shortcuts: Adds desktop shortcuts for PuTTY and the Avanti Configuration Utility.
Installation folder: Allows a different installation folder to be specified.
Previous Installation Warning: If a previous version of Avanti is installed on the system, the Avanti installer will remove it before installing the current version. Figure 12 depicts a typical installation warning message box. Click "OK" to de-install the previous version of Avanti and install the current version or click "Cancel" to abort the installation process.
As the previous version of Avanti is de-installed, a command window will flash past. This is normal.
Active Instance Abort: If an instance of FreeAXP or Avanti is running, the installation will abort with a Cancel/Retry dialog.
Figure 10: Avanti license window
Figure 12: Previous installation warning
Figure 11: Avanti installation options
Migration Specialties International, Inc. MigrationSpecialties.com
20
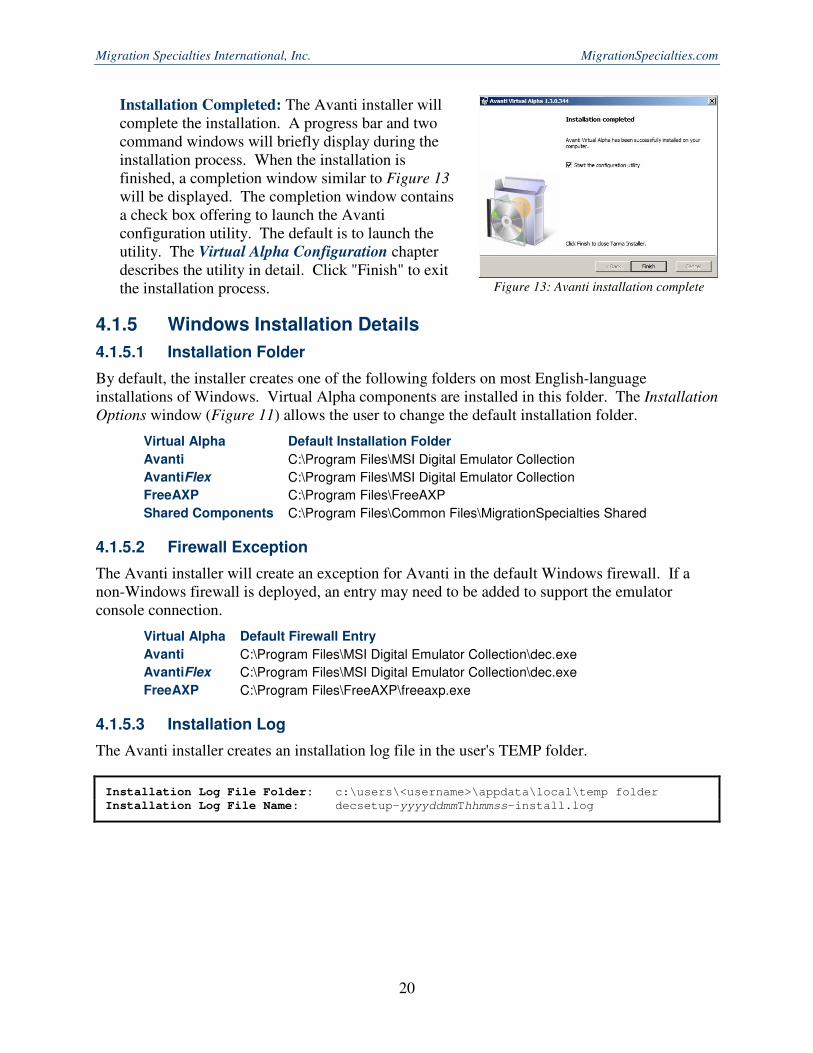
Installation Completed: The Avanti installer will complete the installation. A progress bar and two command windows will briefly display during the installation process. When the installation is finished, a completion window similar to Figure 13 will be displayed. The completion window contains a check box offering to launch the Avanti configuration utility. The default is to launch the utility. The Virtual Alpha Configuration chapter describes the utility in detail. Click "Finish" to exit the installation process.
4.1.5 Windows Installation Details
4.1.5.1 Installation Folder
By default, the installer creates one of the following folders on most English-language installations of Windows. Virtual Alpha components are installed in this folder. The Installation
Options window (Figure 11) allows the user to change the default installation folder.
Virtual Alpha Default Installation Folder
Avanti C:\Program Files\MSI Digital Emulator Collection
AvantiFlex C:\Program Files\MSI Digital Emulator Collection
FreeAXP C:\Program Files\FreeAXP
Shared Components C:\Program Files\Common Files\MigrationSpecialties Shared
4.1.5.2 Firewall Exception
The Avanti installer will create an exception for Avanti in the default Windows firewall. If a non-Windows firewall is deployed, an entry may need to be added to support the emulator console connection.
Virtual Alpha Default Firewall Entry
Avanti C:\Program Files\MSI Digital Emulator Collection\dec.exe
AvantiFlex C:\Program Files\MSI Digital Emulator Collection\dec.exe
FreeAXP C:\Program Files\FreeAXP\freeaxp.exe
4.1.5.3 Installation Log
The Avanti installer creates an installation log file in the user's TEMP folder.
Installation Log File Folder: c:\users\<username>\appdata\local\temp folder
Installation Log File Name: decsetup-yyyyddmmThhmmss-install.log
Figure 13: Avanti installation complete

Migration Specialties International, Inc. [email protected]
21
5. DE-INSTALLING AVANTI
5.1 WINDOWS UNINSTALL
Avanti can be de-installed from Windows XP and Server 2003 systems using the Control Panel function Add or Remove Programs. On Windows Vista, 7, 8, 2008, and 2012 use the Control Panel function Programs and Features.
When Avanti is de-installed, all configuration files created using the Configuration Utility are retained. Files created outside of the installation directory are also retained.

Migration Specialties International, Inc. MigrationSpecialties.com
22
6. VIRTUAL ALPHA CONFIGURATIONS
Avanti virtual Alpha configurations are easily created using the Avanti Configuration Utility. Multiple configurations can be created and stored on a system. Avanti configurations support the following virtual hardware. See the Avanti SPD for addition information on Avanti and AvantiFlex capabilities.
• 1 CPU supporting the EV4, EV5, and EV6 instruction sets.
• Two virtual or physical serial ports, one of which is also the console port.
• 32MB to 3GB1.
• 1 - 3 NICs.
• 1 – 3 disk controllers supporting up to 45 disk devices, including multiple physical CD-ROM drives or hard drives.
AvantiFlex has the same maximum limits as Avanti. AvantiFlex installation capabilities are controlled by the number of available license units.
FreeAXP configurations are limited to the following virtual hardware. See the FreeAXP SPD for addition information on FreeAXP capabilities and limitations.
• 1 CPU supporting the EV4, EV5, and EV6 instruction sets.
• Two virtual serial ports, one of which is also the console port.
• 32MB to 128MB.
• 1 - 2 NICs.
• 1 disk controller supporting up to 7 disk devices on one controller, one of which can be a physical CD-ROM drive.
1 Avanti Tru64 UNIX installations are only able to utilize a maximum of 1GB of memory.
Migration Specialties International, Inc. [email protected]
23
7. AVANTI CONFIGURATION UTILITY
The Avanti Configuration Utility provides an intuitive GUI interface to define virtual Alpha hardware. The configuration utility provides a common configuration interface across all virtual Alpha products. Configurations are stored in ASCII text files that are easily transferred to other systems. This chapter describes the Avanti Configuration Utility in detail.
7.1 AVANTI CONFIGURATION FILES
The Avanti Configuration Utility generates a text file containing a script that defines the desired hardware configuration for a virtual Alpha system. This script can be viewed and modified using any text editor. Manually modifying a script may introduce errors that prevent the emulator from launching. Existing configuration scripts are automatically parsed for manual modifications and errors by the Configuration Utility when opened.
7.1.1 Manually Modified Configuration Files
There are cases where manually modifying a configuration file is required. Adding a 5-port serial card is one example. Entering debug options under the guidance of a Migration Specialties support specialist is another. The Configuration Utility detects configuration files that have been manually modified with options that are not accessible through the GUI when the file is open and issue a warning message. Using the Configuration Utility to update manually modified configurations is not advised.
7.1.2 Updating Avanti Path Names
When moving an Avanti configuration file to a new location, the path names embedded in the file often change. Using the Configuration Utility to update each path reference in the configuration file can be a tedious process. The path names can be easily updated in one operation by opening the configuration file using a text utility such as Notepad and employing its Replace function. Manual modification such as path name changes are not flagged by the Configuration Utility GUI.
7.2 SPECIFYING SIZES
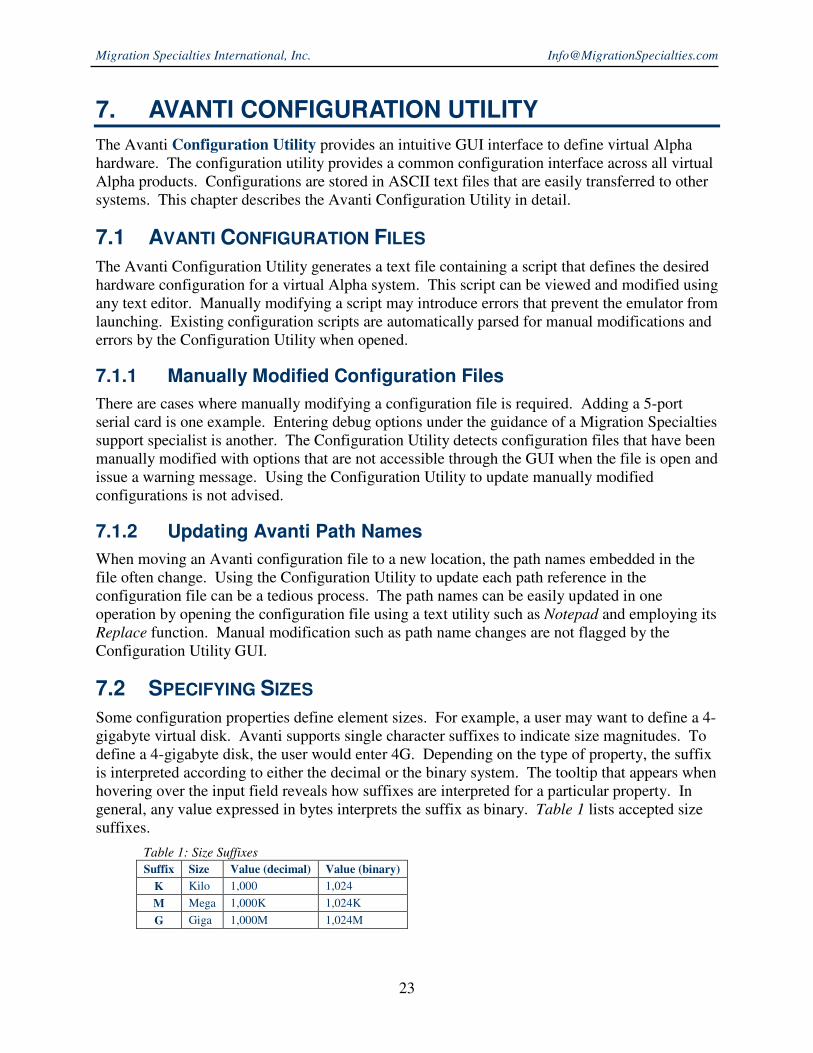
Some configuration properties define element sizes. For example, a user may want to define a 4-gigabyte virtual disk. Avanti supports single character suffixes to indicate size magnitudes. To define a 4-gigabyte disk, the user would enter 4G. Depending on the type of property, the suffix is interpreted according to either the decimal or the binary system. The tooltip that appears when hovering over the input field reveals how suffixes are interpreted for a particular property. In general, any value expressed in bytes interprets the suffix as binary. Table 1 lists accepted size suffixes.
Table 1: Size Suffixes
Suffix Size Value (decimal) Value (binary)
K Kilo 1,000 1,024
M Mega 1,000K 1,024K
G Giga 1,000M 1,024M
Migration Specialties International, Inc. MigrationSpecialties.com
24
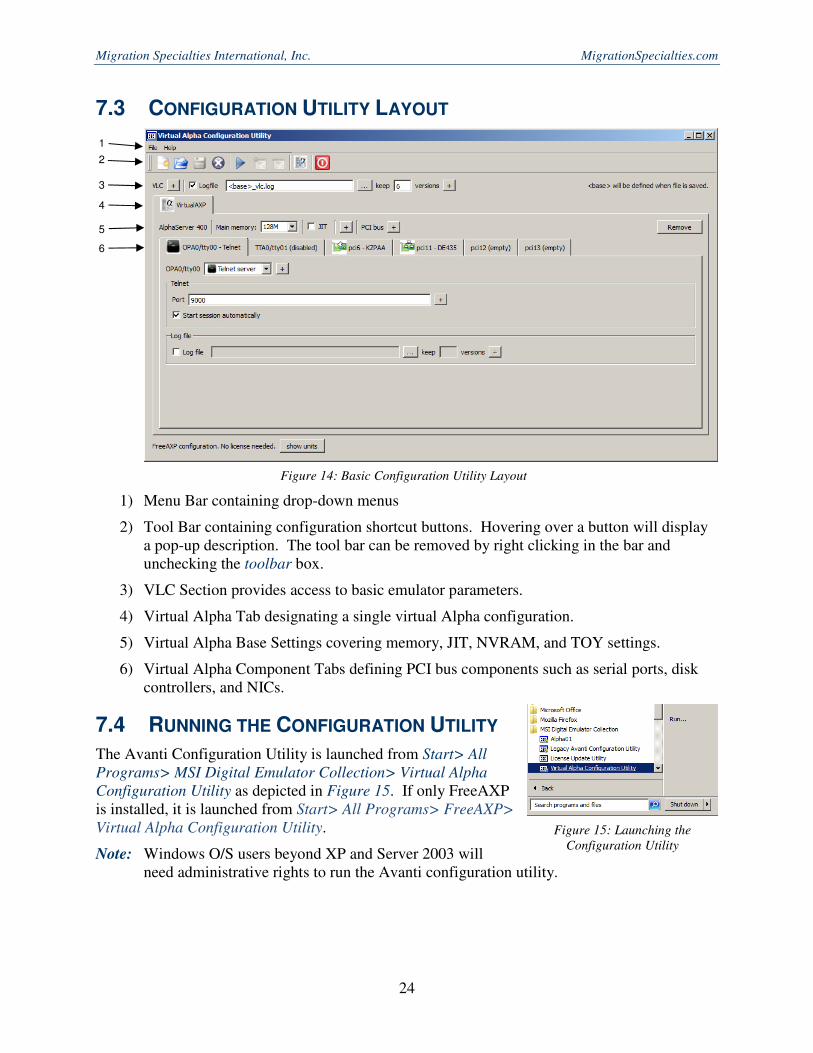
7.3 CONFIGURATION UTILITY LAYOUT
1) Menu Bar containing drop-down menus
2) Tool Bar containing configuration shortcut buttons. Hovering over a button will display a pop-up description. The tool bar can be removed by right clicking in the bar and unchecking the toolbar box.
3) VLC Section provides access to basic emulator parameters.
4) Virtual Alpha Tab designating a single virtual Alpha configuration.
5) Virtual Alpha Base Settings covering memory, JIT, NVRAM, and TOY settings.
6) Virtual Alpha Component Tabs defining PCI bus components such as serial ports, disk controllers, and NICs.
7.4 RUNNING THE CONFIGURATION UTILITY
The Avanti Configuration Utility is launched from Start> All
Programs> MSI Digital Emulator Collection> Virtual Alpha
Configuration Utility as depicted in Figure 15. If only FreeAXP is installed, it is launched from Start> All Programs> FreeAXP>
Virtual Alpha Configuration Utility.
Note: Windows O/S users beyond XP and Server 2003 will need administrative rights to run the Avanti configuration utility.
Figure 15: Launching the
Configuration Utility
1
2
3
4
5
6
Figure 14: Basic Configuration Utility Layout
Migration Specialties International, Inc. [email protected]
25
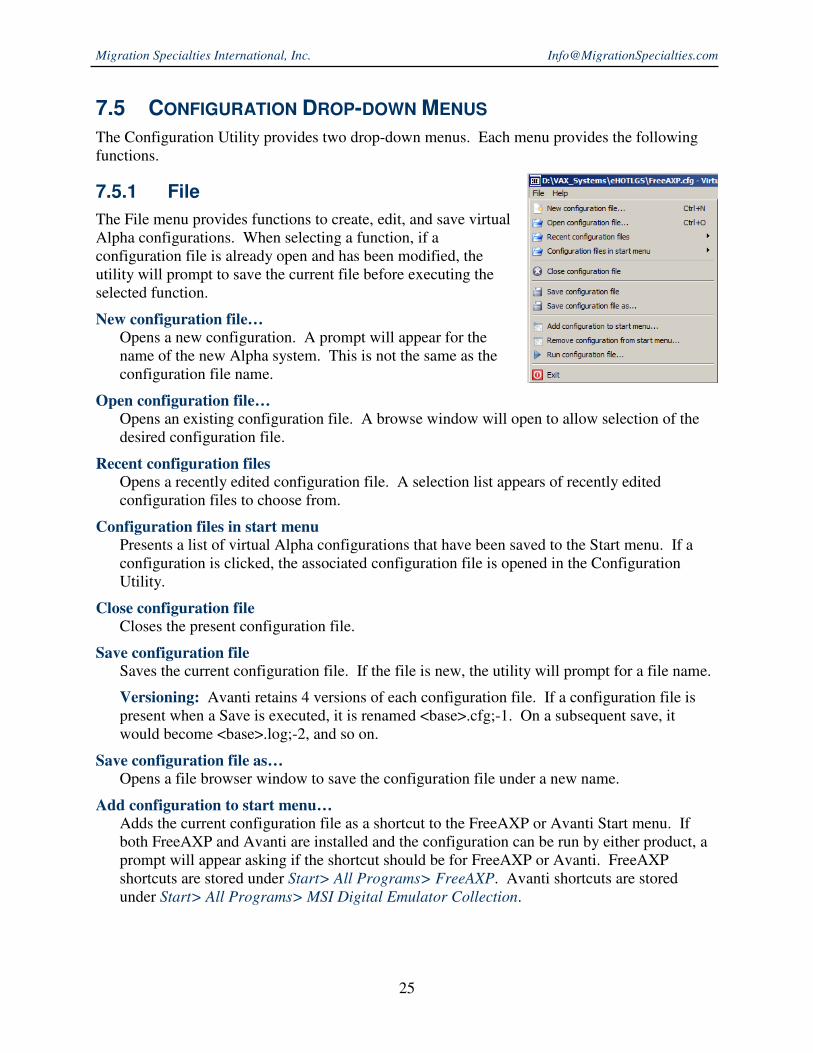
7.5 CONFIGURATION DROP-DOWN MENUS
The Configuration Utility provides two drop-down menus. Each menu provides the following functions.
7.5.1 File
The File menu provides functions to create, edit, and save virtual Alpha configurations. When selecting a function, if a configuration file is already open and has been modified, the utility will prompt to save the current file before executing the selected function.
New configuration file…
Opens a new configuration. A prompt will appear for the name of the new Alpha system. This is not the same as the configuration file name.
Open configuration file…
Opens an existing configuration file. A browse window will open to allow selection of the desired configuration file.
Recent configuration files
Opens a recently edited configuration file. A selection list appears of recently edited configuration files to choose from.
Configuration files in start menu
Presents a list of virtual Alpha configurations that have been saved to the Start menu. If a configuration is clicked, the associated configuration file is opened in the Configuration Utility.
Close configuration file
Closes the present configuration file.
Save configuration file
Saves the current configuration file. If the file is new, the utility will prompt for a file name.
Versioning: Avanti retains 4 versions of each configuration file. If a configuration file is present when a Save is executed, it is renamed <base>.cfg;-1. On a subsequent save, it would become <base>.log;-2, and so on.
Save configuration file as…
Opens a file browser window to save the configuration file under a new name.
Add configuration to start menu…
Adds the current configuration file as a shortcut to the FreeAXP or Avanti Start menu. If both FreeAXP and Avanti are installed and the configuration can be run by either product, a prompt will appear asking if the shortcut should be for FreeAXP or Avanti. FreeAXP shortcuts are stored under Start> All Programs> FreeAXP. Avanti shortcuts are stored under Start> All Programs> MSI Digital Emulator Collection.
Migration Specialties International, Inc. MigrationSpecialties.com
26
Remove configuration from start menu…
If present, all shortcuts associated with the current configuration file are removed from the Start menu.
Run configuration file…
Runs the current configuration file.
Exit Exits the Configuration Utility.
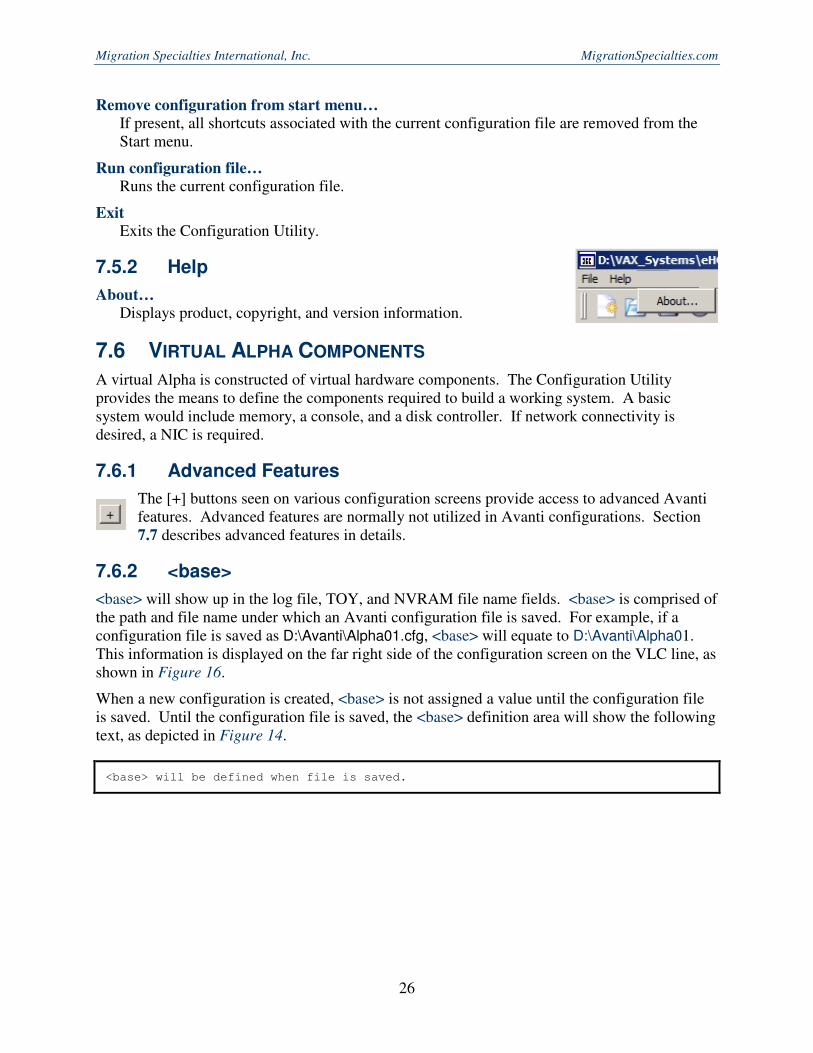
7.5.2 Help
About… Displays product, copyright, and version information.
7.6 VIRTUAL ALPHA COMPONENTS
A virtual Alpha is constructed of virtual hardware components. The Configuration Utility provides the means to define the components required to build a working system. A basic system would include memory, a console, and a disk controller. If network connectivity is desired, a NIC is required.
7.6.1 Advanced Features
The [+] buttons seen on various configuration screens provide access to advanced Avanti features. Advanced features are normally not utilized in Avanti configurations. Section 7.7 describes advanced features in details.
7.6.2 <base>
<base> will show up in the log file, TOY, and NVRAM file name fields. <base> is comprised of the path and file name under which an Avanti configuration file is saved. For example, if a configuration file is saved as D:\Avanti\Alpha01.cfg, <base> will equate to D:\Avanti\Alpha01. This information is displayed on the far right side of the configuration screen on the VLC line, as shown in Figure 16.
When a new configuration is created, <base> is not assigned a value until the configuration file is saved. Until the configuration file is saved, the <base> definition area will show the following text, as depicted in Figure 14.
<base> will be defined when file is saved.

Migration Specialties International, Inc. [email protected]
27
7.6.3 VLC
The VLC line defines basic emulator parameters.
7.6.3.1 Logfile
Checking the Logfile box enables emulator logging. By default, the log file name will be <base>.log. The user has the option to modify the file name and location via the file name field and browse […] button.
7.6.3.2 keep
By default, Avanti retains 6 log files. If a log file is present when Avanti is launched, it is renamed <base>.log;-1. On a subsequent Avanti launch, it would become <base>.log;-2, and so on. The user can increase or decrease the number of log files retained using the keep field.
7.6.4 Virtual Alpha Base Settings
Virtual Alpha Base Settings covering memory, JIT, NVRAM, and TOY settings.
Figure 16: VLC line
Figure 17: Virtual Alpha Base Settings
Migration Specialties International, Inc. MigrationSpecialties.com
28
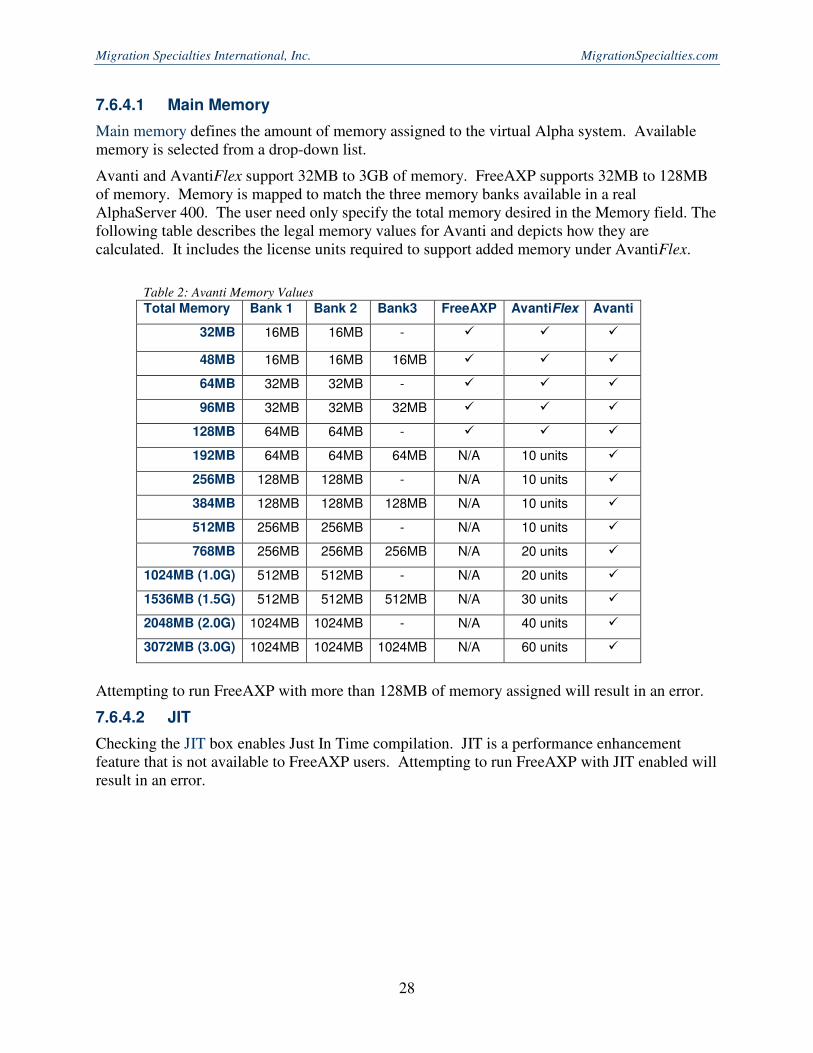
7.6.4.1 Main Memory
Main memory defines the amount of memory assigned to the virtual Alpha system. Available memory is selected from a drop-down list.
Avanti and AvantiFlex support 32MB to 3GB of memory. FreeAXP supports 32MB to 128MB of memory. Memory is mapped to match the three memory banks available in a real AlphaServer 400. The user need only specify the total memory desired in the Memory field. The following table describes the legal memory values for Avanti and depicts how they are calculated. It includes the license units required to support added memory under AvantiFlex.
Table 2: Avanti Memory Values
Total Memory Bank 1 Bank 2 Bank3 FreeAXP AvantiFlex Avanti
32MB 16MB 16MB - � � �
48MB 16MB 16MB 16MB � � �
64MB 32MB 32MB - � � �
96MB 32MB 32MB 32MB � � �
128MB 64MB 64MB - � � �
192MB 64MB 64MB 64MB N/A 10 units �
256MB 128MB 128MB - N/A 10 units �
384MB 128MB 128MB 128MB N/A 10 units �
512MB 256MB 256MB - N/A 10 units �
768MB 256MB 256MB 256MB N/A 20 units �
1024MB (1.0G) 512MB 512MB - N/A 20 units �
1536MB (1.5G) 512MB 512MB 512MB N/A 30 units �
2048MB (2.0G) 1024MB 1024MB - N/A 40 units �
3072MB (3.0G) 1024MB 1024MB 1024MB N/A 60 units �
Attempting to run FreeAXP with more than 128MB of memory assigned will result in an error.
7.6.4.2 JIT
Checking the JIT box enables Just In Time compilation. JIT is a performance enhancement feature that is not available to FreeAXP users. Attempting to run FreeAXP with JIT enabled will result in an error.
Migration Specialties International, Inc. [email protected]
29
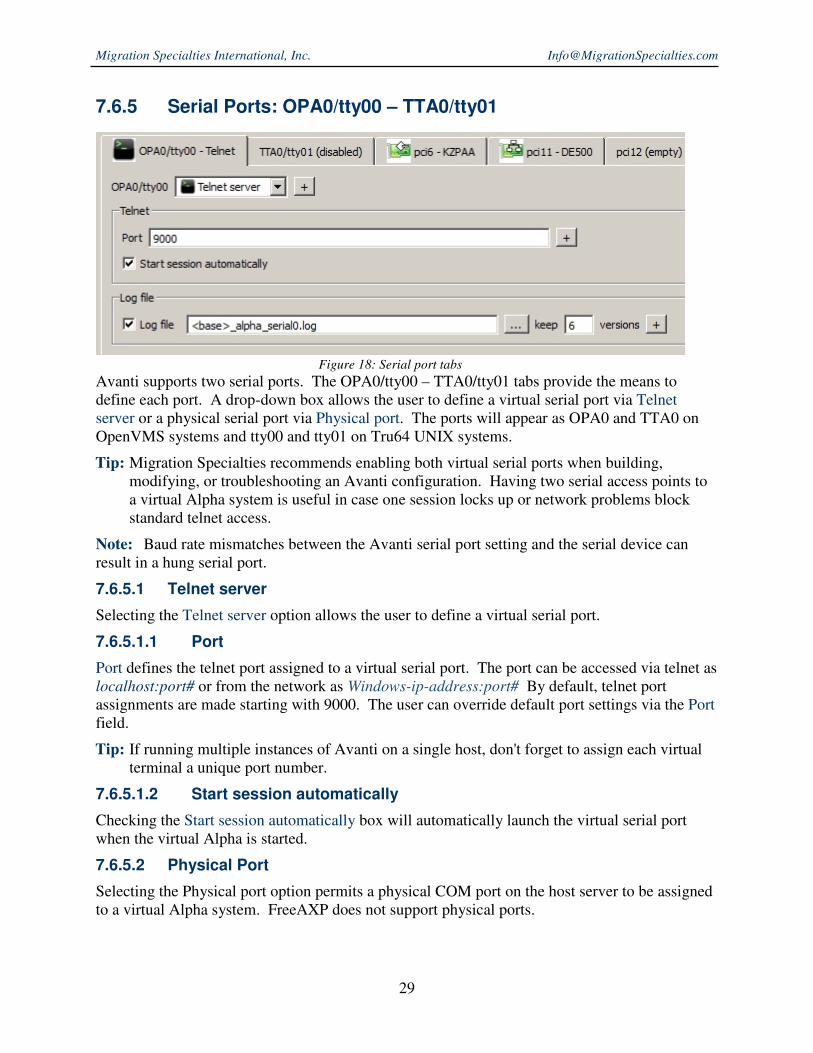
7.6.5 Serial Ports: OPA0/tty00 – TTA0/tty01
Avanti supports two serial ports. The OPA0/tty00 – TTA0/tty01 tabs provide the means to define each port. A drop-down box allows the user to define a virtual serial port via Telnet server or a physical serial port via Physical port. The ports will appear as OPA0 and TTA0 on OpenVMS systems and tty00 and tty01 on Tru64 UNIX systems.
Tip: Migration Specialties recommends enabling both virtual serial ports when building, modifying, or troubleshooting an Avanti configuration. Having two serial access points to a virtual Alpha system is useful in case one session locks up or network problems block standard telnet access.
Note: Baud rate mismatches between the Avanti serial port setting and the serial device can result in a hung serial port.
7.6.5.1 Telnet server
Selecting the Telnet server option allows the user to define a virtual serial port.
7.6.5.1.1 Port
Port defines the telnet port assigned to a virtual serial port. The port can be accessed via telnet as localhost:port# or from the network as Windows-ip-address:port# By default, telnet port assignments are made starting with 9000. The user can override default port settings via the Port field.
Tip: If running multiple instances of Avanti on a single host, don't forget to assign each virtual terminal a unique port number.
7.6.5.1.2 Start session automatically
Checking the Start session automatically box will automatically launch the virtual serial port when the virtual Alpha is started.
7.6.5.2 Physical Port
Selecting the Physical port option permits a physical COM port on the host server to be assigned to a virtual Alpha system. FreeAXP does not support physical ports.
Figure 18: Serial port tabs
Migration Specialties International, Inc. MigrationSpecialties.com
30
7.6.5.3 Log file
Checking the Log file box enables serial port logging. Data appearing on the serial port will also be written to an ASCII log file. By default, the log file name is <base>_VirtualAlphaName_serial#.log.
VirtualAlphaName: The name of the virtual Alpha definition as it appears on the definition tab.
serial#: serial0 or serial1, depending upon the serial port being logged.
Note: Caution should be used when logging serial port activity. A heavily used port will produce a large log file which may impact disk resources on the host system.
7.6.5.4 keep
By default, Avanti retains six serial log files. If a serial log file is present when Avanti is launched, it is renamed<base>_VirtualAlphaName_serial#.log;-1. On a subsequent Avanti launch, it would become <base>_VirtualAlphaName_serial#.log;-2, and so on. The user can increase or decrease the number of serial log files retained using the keep field.
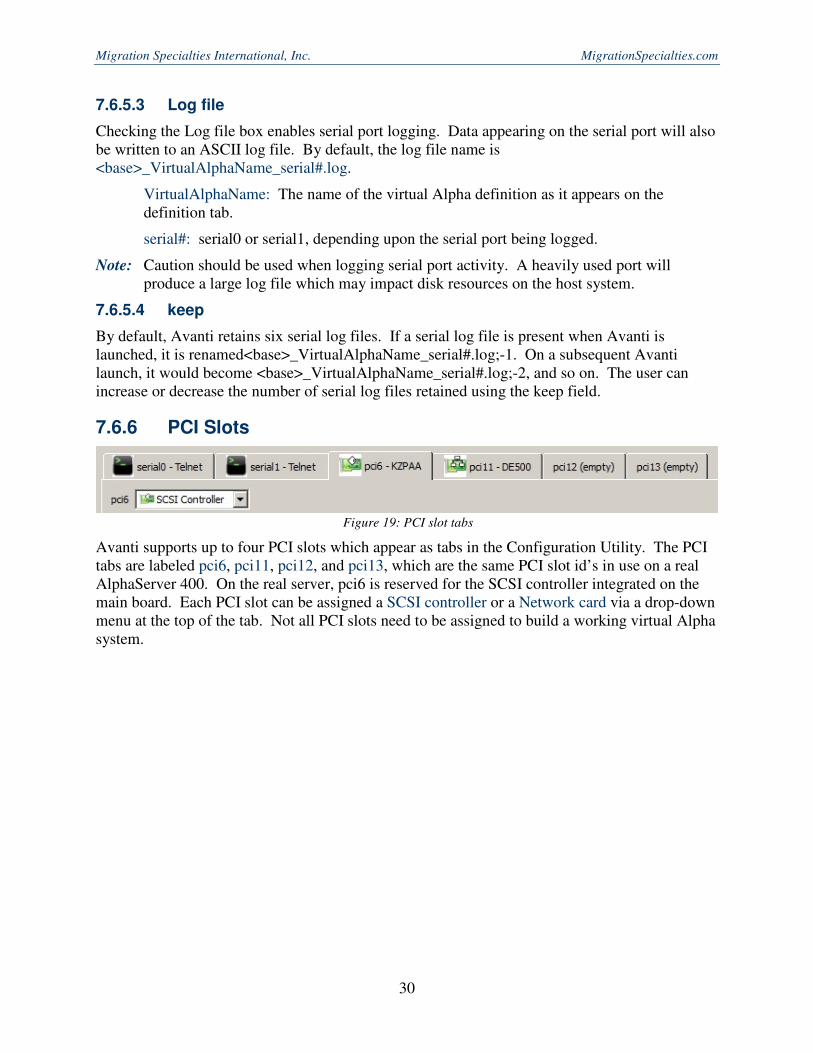
7.6.6 PCI Slots
Avanti supports up to four PCI slots which appear as tabs in the Configuration Utility. The PCI tabs are labeled pci6, pci11, pci12, and pci13, which are the same PCI slot id’s in use on a real AlphaServer 400. On the real server, pci6 is reserved for the SCSI controller integrated on the main board. Each PCI slot can be assigned a SCSI controller or a Network card via a drop-down menu at the top of the tab. Not all PCI slots need to be assigned to build a working virtual Alpha system.
Figure 19: PCI slot tabs
Migration Specialties International, Inc. [email protected]
31
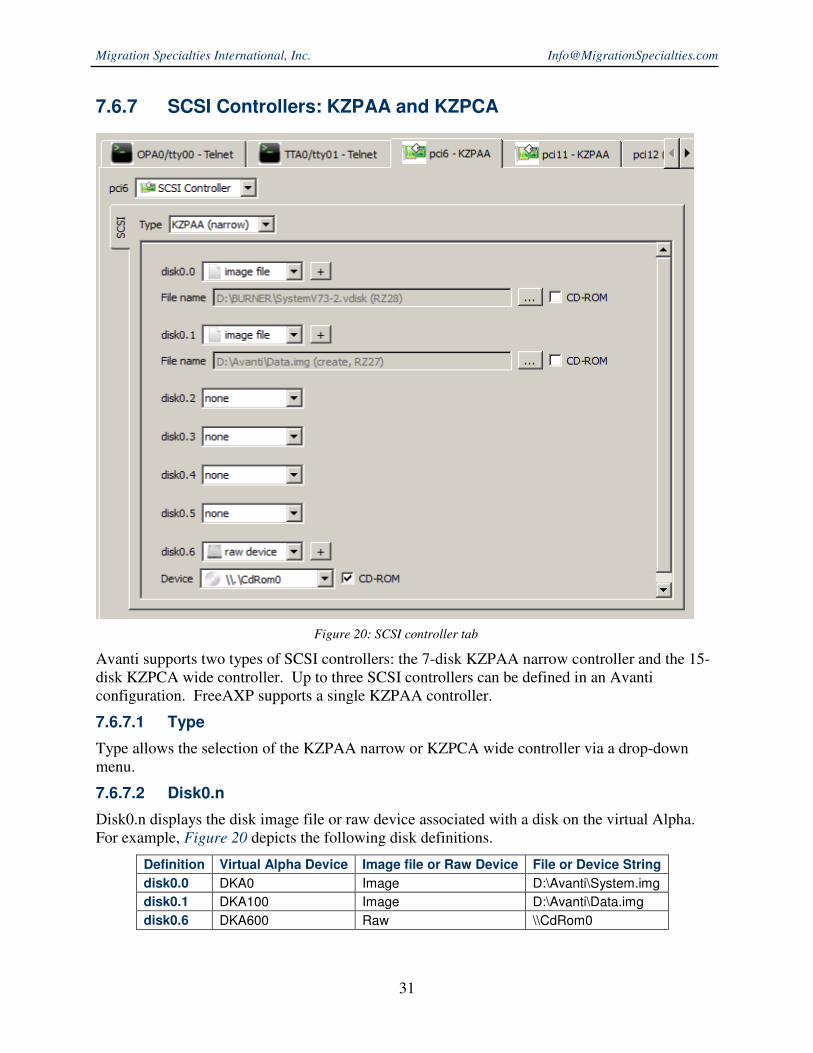
7.6.7 SCSI Controllers: KZPAA and KZPCA
Avanti supports two types of SCSI controllers: the 7-disk KZPAA narrow controller and the 15-disk KZPCA wide controller. Up to three SCSI controllers can be defined in an Avanti configuration. FreeAXP supports a single KZPAA controller.
7.6.7.1 Type
Type allows the selection of the KZPAA narrow or KZPCA wide controller via a drop-down menu.
7.6.7.2 Disk0.n
Disk0.n displays the disk image file or raw device associated with a disk on the virtual Alpha. For example, Figure 20 depicts the following disk definitions.
Definition Virtual Alpha Device Image file or Raw Device File or Device String
disk0.0 DKA0 Image D:\Avanti\System.img
disk0.1 DKA100 Image D:\Avanti\Data.img
disk0.6 DKA600 Raw \\CdRom0
Figure 20: SCSI controller tab

Migration Specialties International, Inc. MigrationSpecialties.com
32
Note: When using the KZPCA wide controller, disk numbering jumps from disk0.6 to disk0.8. This is normal and is due to the SCSI controller itself occupying slot 7.
7.6.7.2.1 image file
Image files are Windows container files that contain the image of Alpha disks. These show up as virtual disks on the virtual Alpha system. Image files can be created by Avanti, copied from another Alpha emulator, or ported from a real Alpha system. By default, Avanti assigns a .vdisk extension to disk image files.
Note: Image files need to be sized in multiples of 512 bytes to ensure they are properly recognized by Avanti. The configuration utility will display an error and will not map an image file with an invalid size.
7.6.7.2.1.1 Creating a Disk Image File
Avanti can create new image files, essentially creating new virtual disks, on startup. To create a new virtual disk, select image file in an unused disk location and click the browse button […]. Navigate to the desired host system folder and type in the new disk file name. A disk type selection box will be displayed, as shown in Figure 21. If a custom disk size is required, click the Custom disk size button and enter the desired size in Megabytes (M) or Gigabytes (G).
7.6.7.2.1.2 Assigning an Existing Image File
To assign an existing disk container file to a virtual disk, select image file in an unused disk location and click the browse button […]. Navigate to the desired host system folder and select the desired disk image file.
7.6.7.2.2 raw device
Raw devices are defined using the Windows raw device name. Available host system raw devices are listed in the Device drop-down box. FreeAXP does not support raw disk devices. FreeAXP supports one raw CD-ROM or DVD-ROM device.
7.6.7.2.3 tape image
Tape image files are Windows container files that contain the image of Alpha tapes. These show up as virtual tape devices on the virtual Alpha system. Tape image files can be created by Avanti, copied from another Alpha emulator, or ported from a real Alpha system. By default, Avanti assigns a .vtape extension to tape image files. FreeAXP does not support virtual tapes.
Figure 21: Disk type selection box
Migration Specialties International, Inc. [email protected]
33
The vtape format utilized by Avanti is fully compatible with the vtape format used in SimH. Avanti virtual tape devices default to a DEC DLT2000 device type.
Note: Avanti puts no limit on the size of a vtape file. Continuously appending to a tape will eventually fill the host system disk.
7.6.7.2.3.1 Creating a Tape Image File
Avanti will create a tape image file at startup if the file does not already exist. To create a new virtual tape, select tape image in an unused disk location and click the browse button […]. Navigate to the desired host system folder and type in the new tape file name. When Avanti is started, an empty tape file will be created.
7.6.7.2.3.2 Assigning an Existing Tape Image File
To assign an existing tape file to a virtual tape device, select tape image in an unused disk location and click the browse button […]. Navigate to the desired host system folder and select the desired tape image file.
7.6.7.2.4 CD-ROM
Checking the CD-ROM box will define the device as a CD-ROM. Image files with an .iso extension are automatically assumed to be CD-ROM devices. FreeAXP supports one raw CD-ROM or DVD-ROM device. CD-ROM devices are mounted read-only and can be shared between FreeAXP and Avanti instances.
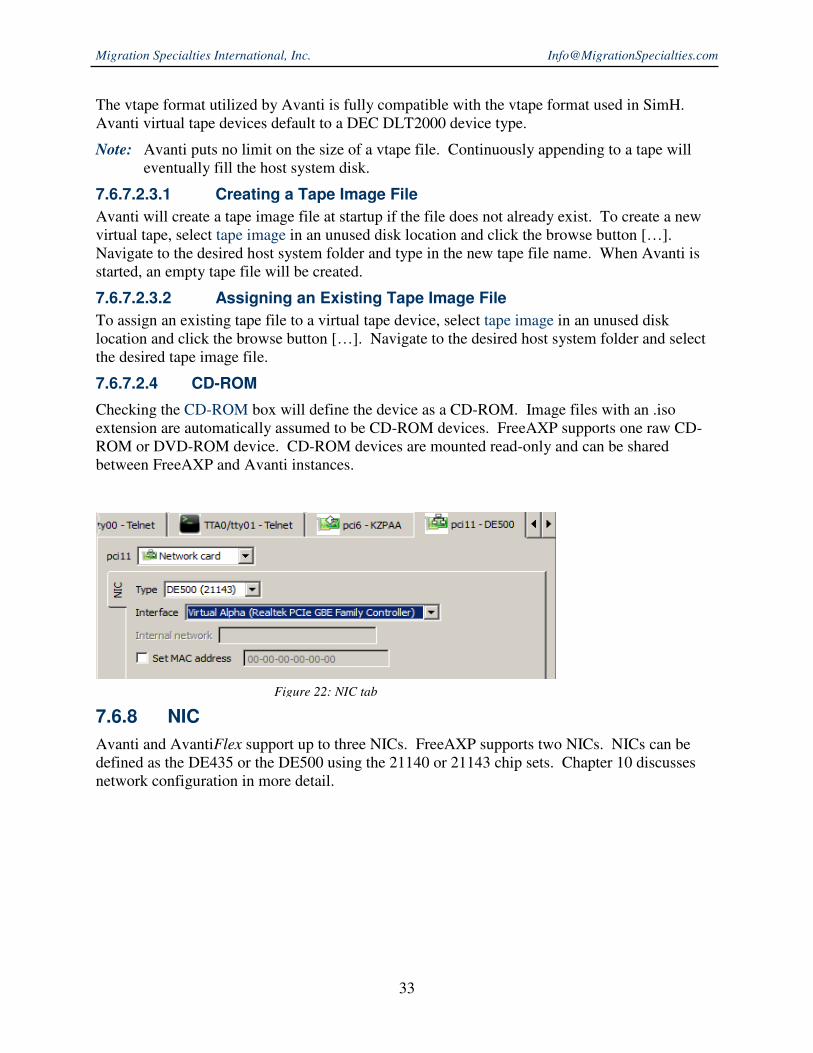
7.6.8 NIC
Avanti and AvantiFlex support up to three NICs. FreeAXP supports two NICs. NICs can be defined as the DE435 or the DE500 using the 21140 or 21143 chip sets. Chapter 10 discusses network configuration in more detail.
Figure 22: NIC tab
Migration Specialties International, Inc. MigrationSpecialties.com
34
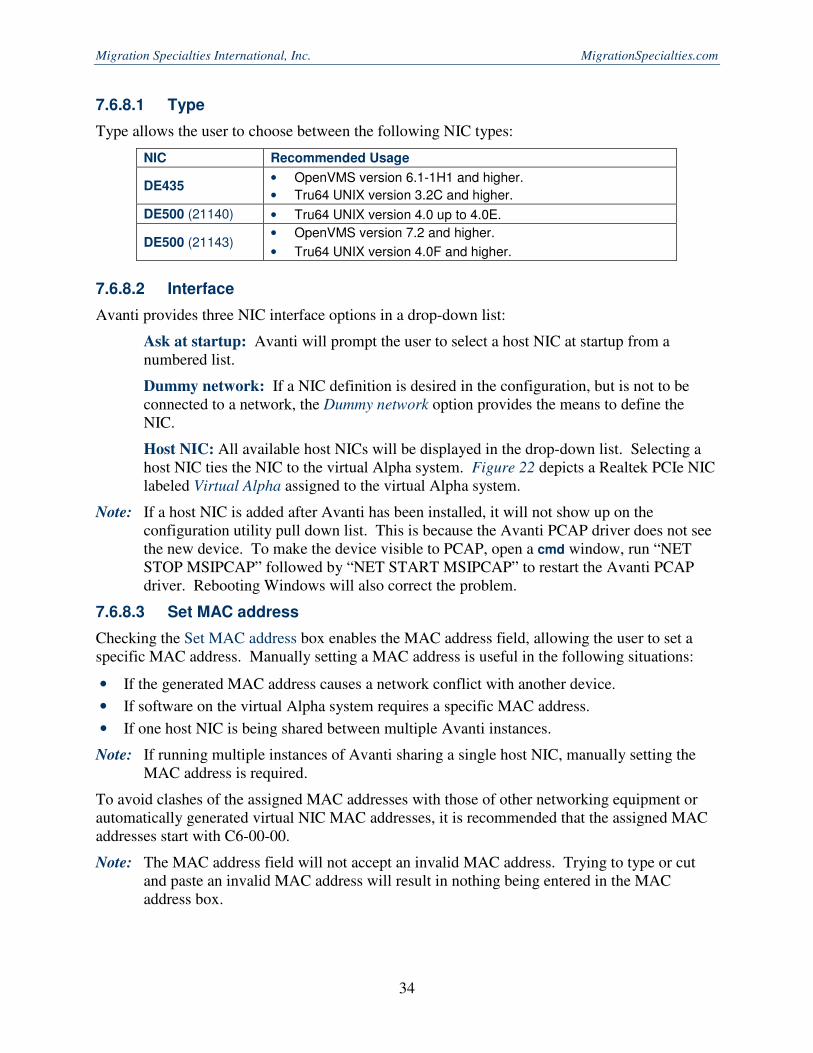
7.6.8.1 Type
Type allows the user to choose between the following NIC types:
NIC Recommended Usage
DE435 • OpenVMS version 6.1-1H1 and higher.
• Tru64 UNIX version 3.2C and higher.
DE500 (21140) • Tru64 UNIX version 4.0 up to 4.0E.
DE500 (21143) • OpenVMS version 7.2 and higher.
• Tru64 UNIX version 4.0F and higher.
7.6.8.2 Interface
Avanti provides three NIC interface options in a drop-down list:
Ask at startup: Avanti will prompt the user to select a host NIC at startup from a numbered list.
Dummy network: If a NIC definition is desired in the configuration, but is not to be connected to a network, the Dummy network option provides the means to define the NIC.
Host NIC: All available host NICs will be displayed in the drop-down list. Selecting a host NIC ties the NIC to the virtual Alpha system. Figure 22 depicts a Realtek PCIe NIC labeled Virtual Alpha assigned to the virtual Alpha system.
Note: If a host NIC is added after Avanti has been installed, it will not show up on the configuration utility pull down list. This is because the Avanti PCAP driver does not see the new device. To make the device visible to PCAP, open a cmd window, run “NET STOP MSIPCAP” followed by “NET START MSIPCAP” to restart the Avanti PCAP driver. Rebooting Windows will also correct the problem.
7.6.8.3 Set MAC address
Checking the Set MAC address box enables the MAC address field, allowing the user to set a specific MAC address. Manually setting a MAC address is useful in the following situations:
• If the generated MAC address causes a network conflict with another device.
• If software on the virtual Alpha system requires a specific MAC address.
• If one host NIC is being shared between multiple Avanti instances.
Note: If running multiple instances of Avanti sharing a single host NIC, manually setting the MAC address is required.
To avoid clashes of the assigned MAC addresses with those of other networking equipment or automatically generated virtual NIC MAC addresses, it is recommended that the assigned MAC addresses start with C6-00-00.
Note: The MAC address field will not accept an invalid MAC address. Trying to type or cut and paste an invalid MAC address will result in nothing being entered in the MAC address box.
Migration Specialties International, Inc. [email protected]
35
7.6.8.4 Single Avanti Instance and MAC Addressing
By default, Avanti assigns a unique MAC address to each virtual Alpha NIC in a single Avanti instance. The addressing scheme uses the host NIC MAC address as a base address to generate the virtual NIC addressing. As long as the generated MAC addresses do not conflict with another network device, there should be no need to manually configure MAC addressing.
7.6.8.5 Multiple Avanti Instances and MAC Addressing
If running multiple instances of Avanti, it is recommended that each instance be assigned its own host NIC. If this is the case, then the MAC addressing scheme described in section 7.6.8.4 holds true and manual MAC assignments should not be necessary.
If multiple instances of Avanti share a single host NIC, then the MAC addressing scheme will assign each instance the same set of MAC addresses. This will lead to network address conflicts and block network access on all but the first instance. If a single host NIC is to be shared between Avanti instances, then manual configuration of the MAC addresses on each instance is required to ensure proper network functionality.
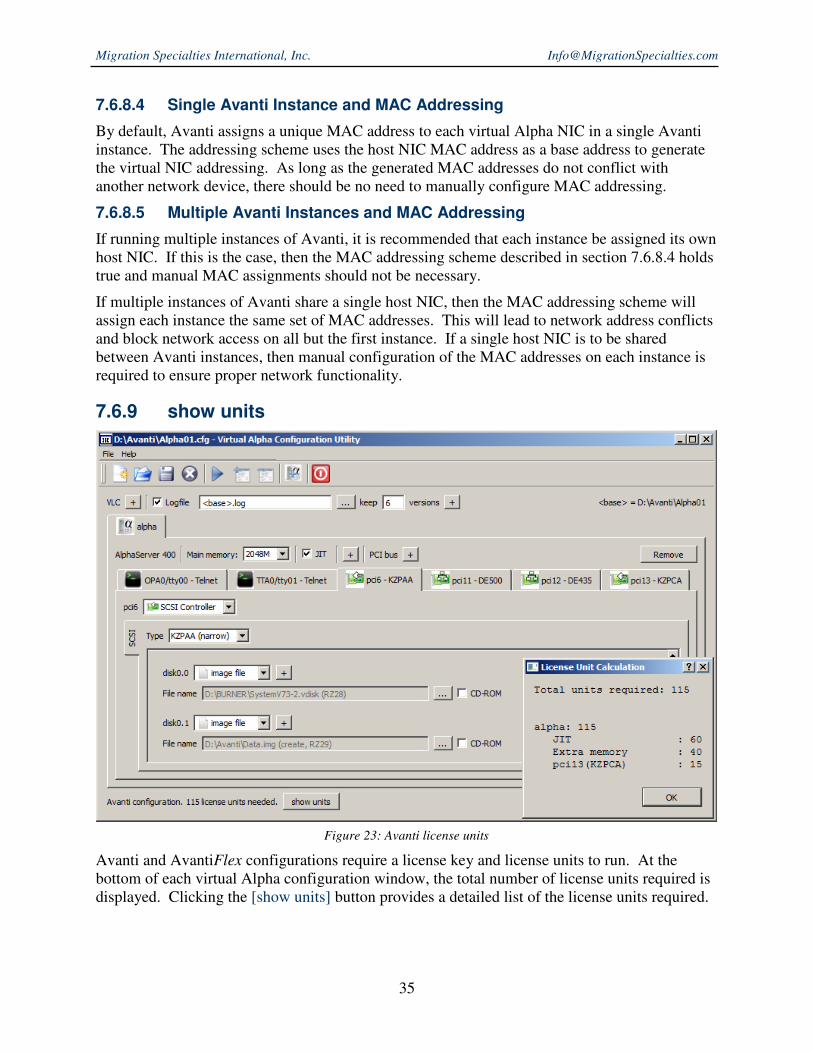
7.6.9 show units
Avanti and AvantiFlex configurations require a license key and license units to run. At the bottom of each virtual Alpha configuration window, the total number of license units required is displayed. Clicking the [show units] button provides a detailed list of the license units required.
Figure 23: Avanti license units
Migration Specialties International, Inc. MigrationSpecialties.com
36
Figure 23 depicts an Avanti configuration that requires 115 license units. Note the summary of required license units at the bottom of the configuration window. Clicking the [show units] button displays the License Unit Calculation box which details the required license units.
Trying to run a virtual Alpha configuration that requires license units with FreeAXP will result in an error.
7.7 ADVANCED CONFIGURATION FEATURES
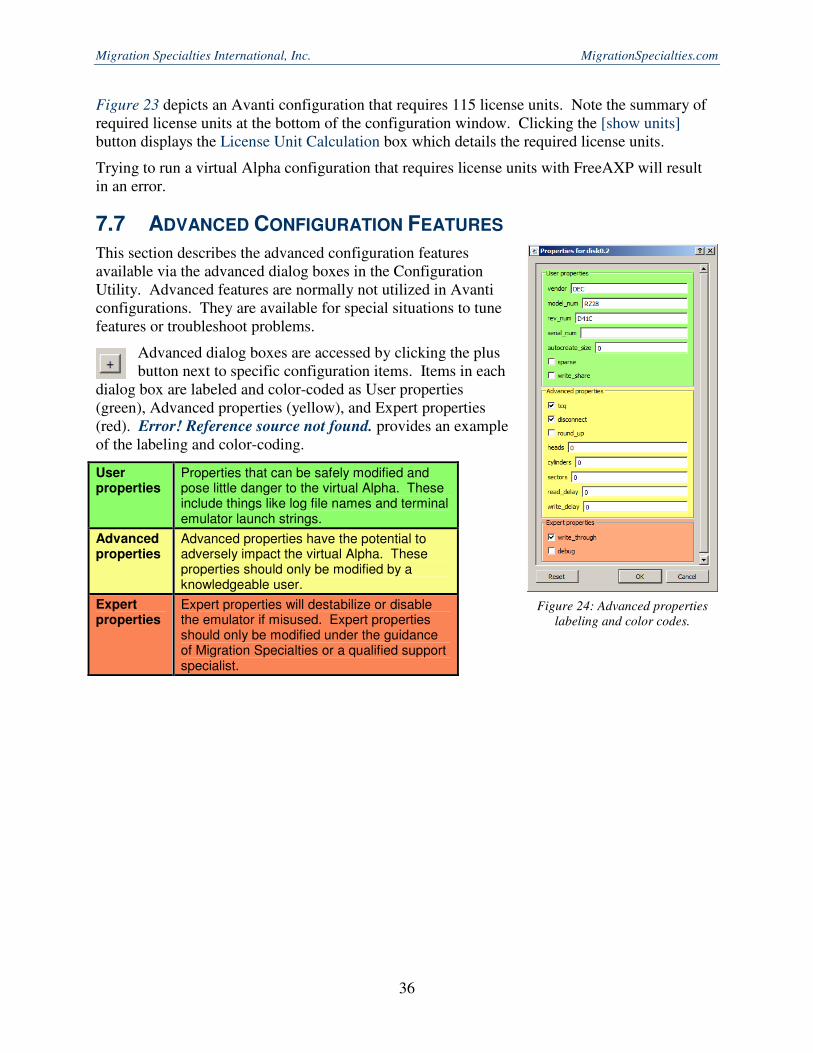
This section describes the advanced configuration features available via the advanced dialog boxes in the Configuration Utility. Advanced features are normally not utilized in Avanti configurations. They are available for special situations to tune features or troubleshoot problems.
Advanced dialog boxes are accessed by clicking the plus button next to specific configuration items. Items in each
dialog box are labeled and color-coded as User properties (green), Advanced properties (yellow), and Expert properties (red). Error! Reference source not found. provides an example of the labeling and color-coding.
User properties
Properties that can be safely modified and pose little danger to the virtual Alpha. These include things like log file names and terminal emulator launch strings.
Advanced properties
Advanced properties have the potential to adversely impact the virtual Alpha. These properties should only be modified by a knowledgeable user.
Expert properties
Expert properties will destabilize or disable the emulator if misused. Expert properties should only be modified under the guidance of Migration Specialties or a qualified support specialist.
Figure 24: Advanced properties
labeling and color codes.
Migration Specialties International, Inc. [email protected]
37
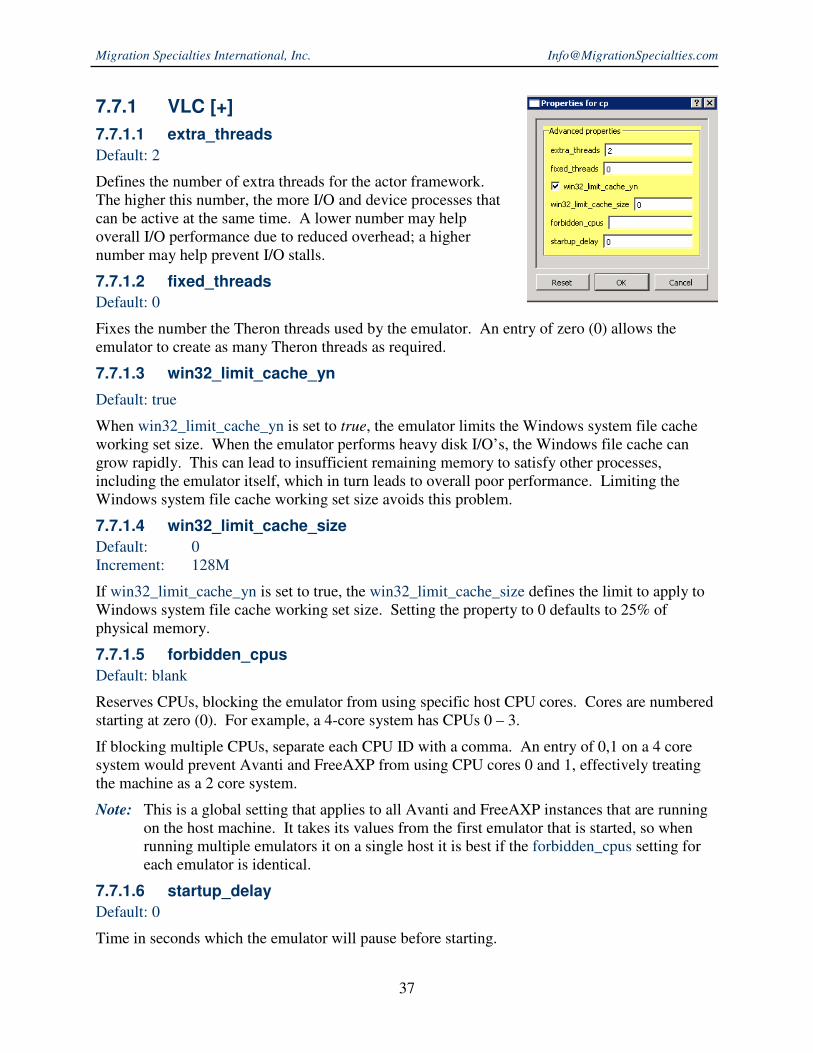
7.7.1 VLC [+]
7.7.1.1 extra_threads
Default: 2
Defines the number of extra threads for the actor framework. The higher this number, the more I/O and device processes that can be active at the same time. A lower number may help overall I/O performance due to reduced overhead; a higher number may help prevent I/O stalls.
7.7.1.2 fixed_threads
Default: 0
Fixes the number the Theron threads used by the emulator. An entry of zero (0) allows the emulator to create as many Theron threads as required.
7.7.1.3 win32_limit_cache_yn
Default: true
When win32_limit_cache_yn is set to true, the emulator limits the Windows system file cache working set size. When the emulator performs heavy disk I/O’s, the Windows file cache can grow rapidly. This can lead to insufficient remaining memory to satisfy other processes, including the emulator itself, which in turn leads to overall poor performance. Limiting the Windows system file cache working set size avoids this problem.
7.7.1.4 win32_limit_cache_size
Default: 0 Increment: 128M
If win32_limit_cache_yn is set to true, the win32_limit_cache_size defines the limit to apply to Windows system file cache working set size. Setting the property to 0 defaults to 25% of physical memory.
7.7.1.5 forbidden_cpus
Default: blank
Reserves CPUs, blocking the emulator from using specific host CPU cores. Cores are numbered starting at zero (0). For example, a 4-core system has CPUs 0 – 3.
If blocking multiple CPUs, separate each CPU ID with a comma. An entry of 0,1 on a 4 core system would prevent Avanti and FreeAXP from using CPU cores 0 and 1, effectively treating the machine as a 2 core system.
Note: This is a global setting that applies to all Avanti and FreeAXP instances that are running on the host machine. It takes its values from the first emulator that is started, so when running multiple emulators it on a single host it is best if the forbidden_cpus setting for each emulator is identical.
7.7.1.6 startup_delay
Default: 0
Time in seconds which the emulator will pause before starting.

Migration Specialties International, Inc. MigrationSpecialties.com
38
7.7.2 Logfile [+]
7.7.2.1 wmi
Default: true
When checked, wmi instructs the emulator to retrieve the Windows version, hardware platform, and related information and place it in the log file header. This information takes a small amount of time to gather, which may interfere with automated interaction with the emulator.
7.7.3 JIT [+]
7.7.3.1 image
Default: <base>_<virtual alpha name>.nvr
Full path to the NVRAM image file. This file serves as the equivalent of non-volatile RAM on a real Alpha, storing configuration settings such as boot parameters.
7.7.3.2 jit_memory
Default: 0 Range: 0 – 2G Increment: 64M
Maximum amount of memory to use for JIT. Specifying 0 enables dynamic allocation which will utilize up to half of physical memory or 2GB, whichever is less.
Note: If running on a Windows host system equipped with more than 32GB of memory and the following error is encountered, set the jit_memory parameter to 2GB.
Unable to reserve JIT buffer area: error 87: The parameter is incorrect.
7.7.4 PCI bus [+]
7.7.4.1 data
Default: <base>_<virtual alpha name>.toy
Full path to the TOY image file. This file replaces the Time Of Year RAM on a legacy Alpha, storing configuration settings such as Time of Year and the time offset between the host system and the virtual Alpha.
7.7.4.2 shadow_on_disk
Default: true
Determines whether or not shadow code translations are generated when data is read from disk. Turning this off reduces memory utilization at the expense of emulator performance.
Migration Specialties International, Inc. [email protected]
39
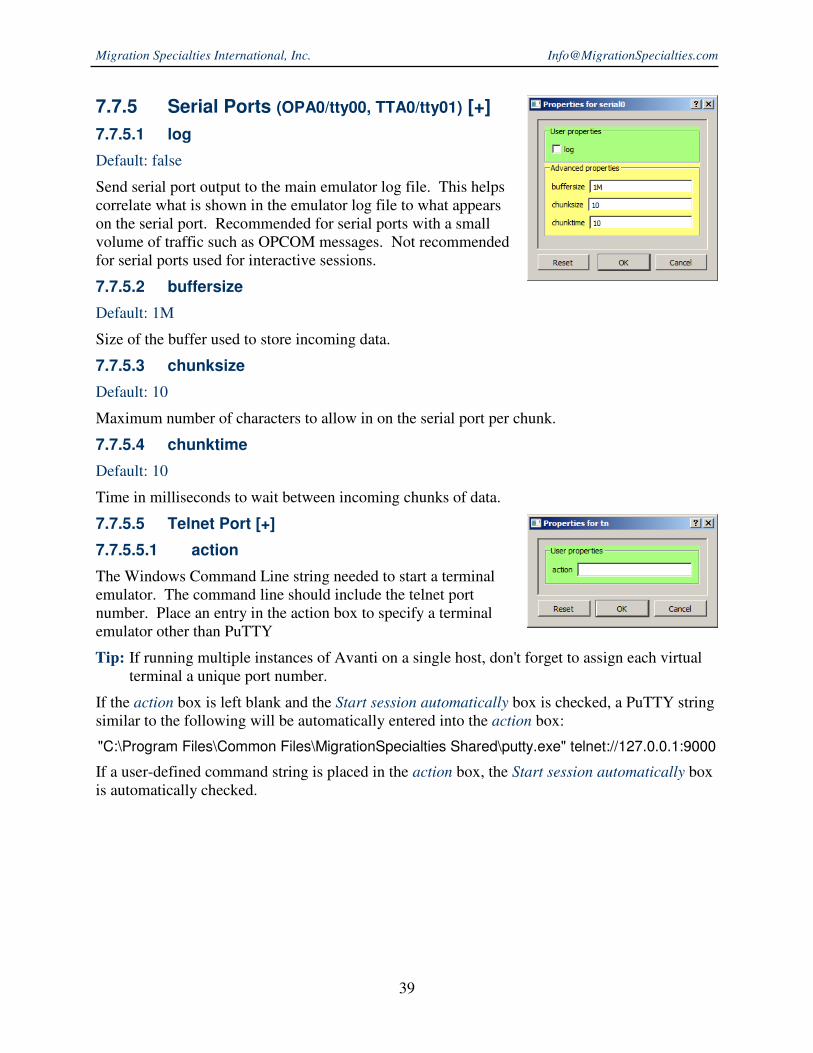
7.7.5 Serial Ports (OPA0/tty00, TTA0/tty01) [+]
7.7.5.1 log
Default: false
Send serial port output to the main emulator log file. This helps correlate what is shown in the emulator log file to what appears on the serial port. Recommended for serial ports with a small volume of traffic such as OPCOM messages. Not recommended for serial ports used for interactive sessions.
7.7.5.2 buffersize
Default: 1M
Size of the buffer used to store incoming data.
7.7.5.3 chunksize
Default: 10
Maximum number of characters to allow in on the serial port per chunk.
7.7.5.4 chunktime
Default: 10
Time in milliseconds to wait between incoming chunks of data.
7.7.5.5 Telnet Port [+]
7.7.5.5.1 action
The Windows Command Line string needed to start a terminal emulator. The command line should include the telnet port number. Place an entry in the action box to specify a terminal emulator other than PuTTY
Tip: If running multiple instances of Avanti on a single host, don't forget to assign each virtual terminal a unique port number.
If the action box is left blank and the Start session automatically box is checked, a PuTTY string similar to the following will be automatically entered into the action box:
"C:\Program Files\Common Files\MigrationSpecialties Shared\putty.exe" telnet://127.0.0.1:9000
If a user-defined command string is placed in the action box, the Start session automatically box is automatically checked.
Migration Specialties International, Inc. MigrationSpecialties.com
40
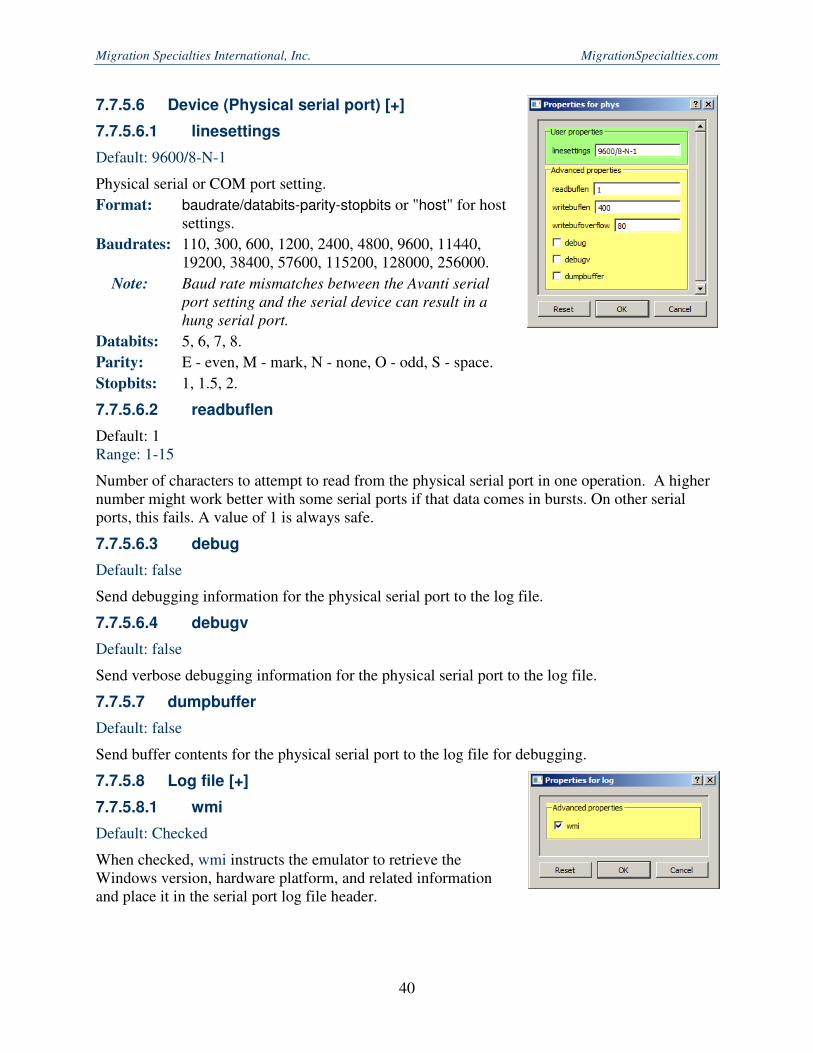
7.7.5.6 Device (Physical serial port) [+]
7.7.5.6.1 linesettings
Default: 9600/8-N-1
Physical serial or COM port setting.
Format: baudrate/databits-parity-stopbits or "host" for host settings.
Baudrates: 110, 300, 600, 1200, 2400, 4800, 9600, 11440, 19200, 38400, 57600, 115200, 128000, 256000.
Note: Baud rate mismatches between the Avanti serial
port setting and the serial device can result in a
hung serial port.
Databits: 5, 6, 7, 8.
Parity: E - even, M - mark, N - none, O - odd, S - space.
Stopbits: 1, 1.5, 2.
7.7.5.6.2 readbuflen
Default: 1 Range: 1-15
Number of characters to attempt to read from the physical serial port in one operation. A higher number might work better with some serial ports if that data comes in bursts. On other serial ports, this fails. A value of 1 is always safe.
7.7.5.6.3 debug
Default: false
Send debugging information for the physical serial port to the log file.
7.7.5.6.4 debugv
Default: false
Send verbose debugging information for the physical serial port to the log file.
7.7.5.7 dumpbuffer
Default: false
Send buffer contents for the physical serial port to the log file for debugging.
7.7.5.8 Log file [+]
7.7.5.8.1 wmi
Default: Checked
When checked, wmi instructs the emulator to retrieve the Windows version, hardware platform, and related information and place it in the serial port log file header.
Migration Specialties International, Inc. [email protected]
41
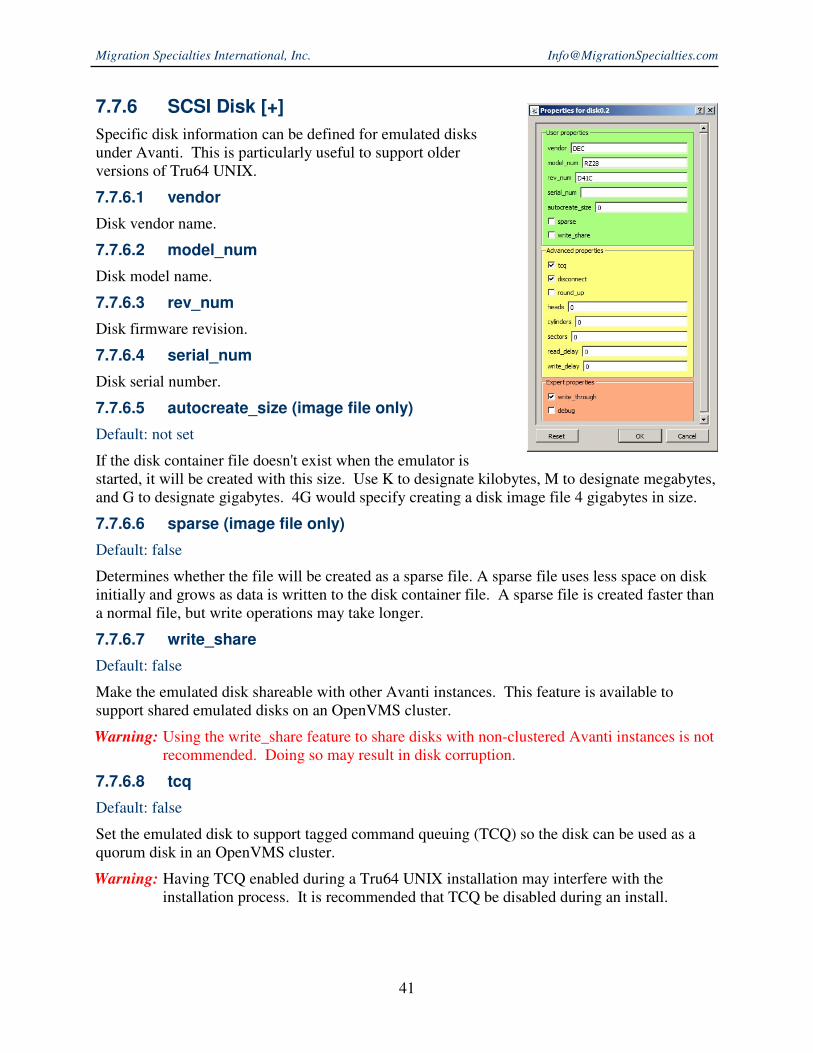
7.7.6 SCSI Disk [+]
Specific disk information can be defined for emulated disks under Avanti. This is particularly useful to support older versions of Tru64 UNIX.
7.7.6.1 vendor
Disk vendor name.
7.7.6.2 model_num
Disk model name.
7.7.6.3 rev_num
Disk firmware revision.
7.7.6.4 serial_num
Disk serial number.
7.7.6.5 autocreate_size (image file only)
Default: not set
If the disk container file doesn't exist when the emulator is started, it will be created with this size. Use K to designate kilobytes, M to designate megabytes, and G to designate gigabytes. 4G would specify creating a disk image file 4 gigabytes in size.
7.7.6.6 sparse (image file only)
Default: false
Determines whether the file will be created as a sparse file. A sparse file uses less space on disk initially and grows as data is written to the disk container file. A sparse file is created faster than a normal file, but write operations may take longer.
7.7.6.7 write_share
Default: false
Make the emulated disk shareable with other Avanti instances. This feature is available to support shared emulated disks on an OpenVMS cluster.
Warning: Using the write_share feature to share disks with non-clustered Avanti instances is not recommended. Doing so may result in disk corruption.
7.7.6.8 tcq
Default: false
Set the emulated disk to support tagged command queuing (TCQ) so the disk can be used as a quorum disk in an OpenVMS cluster.
Warning: Having TCQ enabled during a Tru64 UNIX installation may interfere with the installation process. It is recommended that TCQ be disabled during an install.
Migration Specialties International, Inc. MigrationSpecialties.com
42
7.7.6.9 disconnect
Default: true
Let the emulated disk disconnect from the SCSI bus on large I/Os. Requires sync_io to be false. Disconnecting is normal SCSI behavior that allows other devices on the SCSI bus to be active while an I/O for this disk is in progress.
7.7.6.10 sync_io
Default: false
Perform all I/O’s synchronously. Asynchronous I/O’s provide the ability to have more than one I/O active at the same time.
7.7.6.11 round_up
Default: false
By default, the size of a disk container file needs to be a multiple of 512 (the sector size). When round_up is set to “true”, this is no longer necessary and the disk image is padded with zeroes to the next biggest multiple of 512 bytes. This feature can be used to transfer files from the guest operating system to the host operating system.
7.7.6.12 heads
Default: 0
Number of read/write heads on drive.
7.7.6.13 cylinders
Default: 0
Number of cylinders on drive.
7.7.6.14 sectors
Default: 0
Number of sectors per track.
7.7.6.15 read_delay
Default: 0
Delay disk reads by specified number of microseconds. A 1 millisecond delay would be indicated by an entry of 1000.
7.7.6.16 write_delay
Default: 0
Delay disk writes by specified number of microseconds. A 1 millisecond delay would be indicated by an entry of 1000.
Migration Specialties International, Inc. [email protected]
43
7.7.6.17 write_through
Default: true
Enable write-through caching. Changes are written directly to the raw disk or container file. If write through is disabled, there is a risk of losing data if the host system goes down unexpectedly.
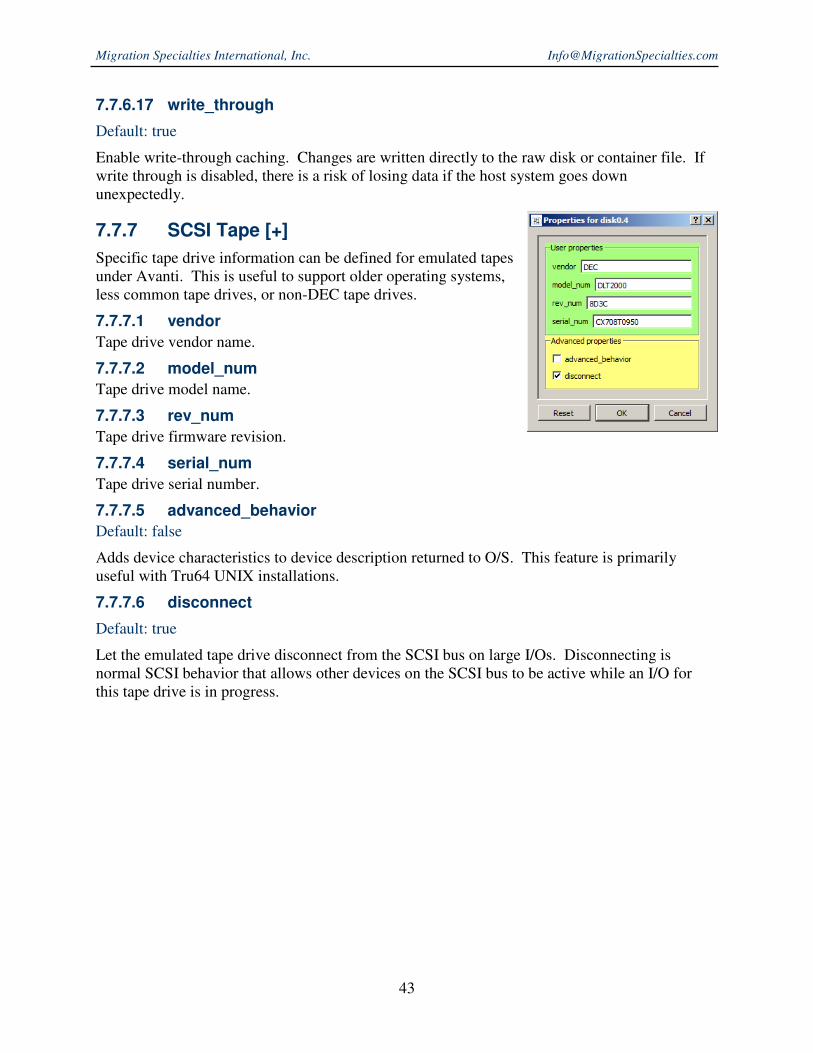
7.7.7 SCSI Tape [+]
Specific tape drive information can be defined for emulated tapes under Avanti. This is useful to support older operating systems, less common tape drives, or non-DEC tape drives.
7.7.7.1 vendor
Tape drive vendor name.
7.7.7.2 model_num
Tape drive model name.
7.7.7.3 rev_num
Tape drive firmware revision.
7.7.7.4 serial_num
Tape drive serial number.
7.7.7.5 advanced_behavior
Default: false
Adds device characteristics to device description returned to O/S. This feature is primarily useful with Tru64 UNIX installations.
7.7.7.6 disconnect
Default: true
Let the emulated tape drive disconnect from the SCSI bus on large I/Os. Disconnecting is normal SCSI behavior that allows other devices on the SCSI bus to be active while an I/O for this tape drive is in progress.
Migration Specialties International, Inc. MigrationSpecialties.com
44
8. RUNNING AVANTI
8.1 KEY REQUIREMENTS
Avanti and AvantiFlex require a KEYLOK USB license key to run. FreeAXP can be run without a license key. The Avanti license key defines the number of license units available. Avanti configurations check available units against requested units before they start. If sufficient units are not available, an error message is displayed and the virtual Alpha will not start.
8.2 HOST NETWORK CONFIGURATION
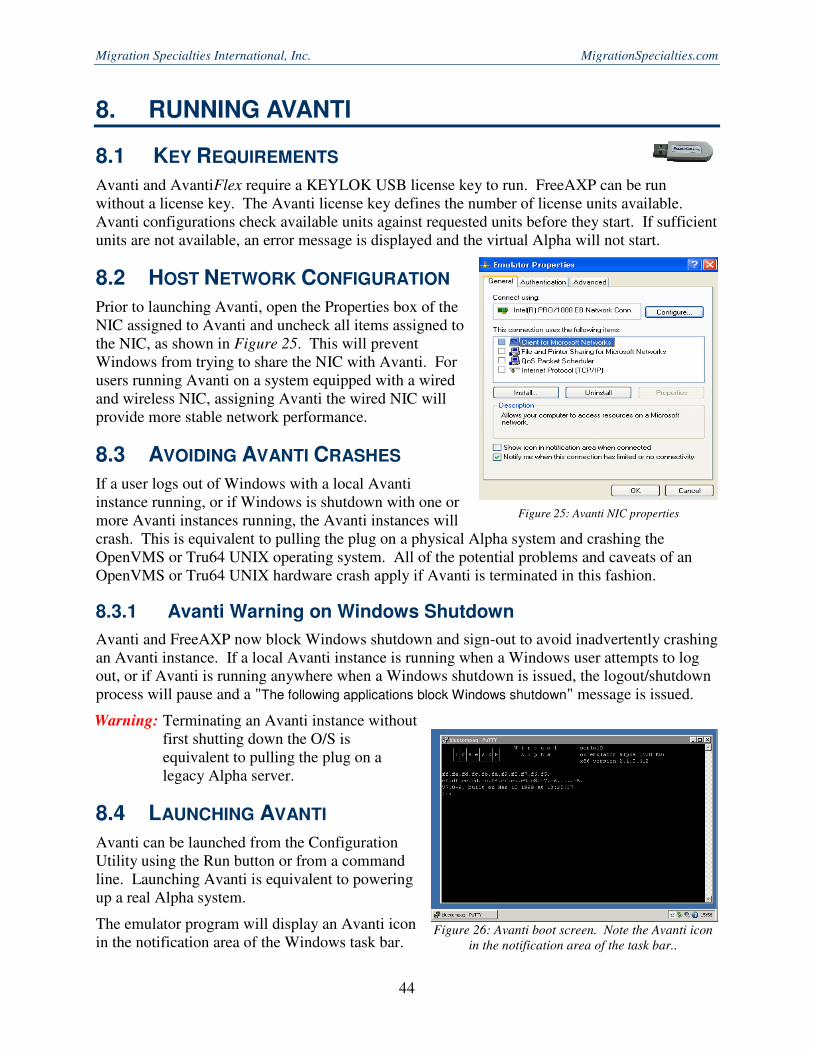
Prior to launching Avanti, open the Properties box of the NIC assigned to Avanti and uncheck all items assigned to the NIC, as shown in Figure 25. This will prevent Windows from trying to share the NIC with Avanti. For users running Avanti on a system equipped with a wired and wireless NIC, assigning Avanti the wired NIC will provide more stable network performance.
8.3 AVOIDING AVANTI CRASHES
If a user logs out of Windows with a local Avanti instance running, or if Windows is shutdown with one or more Avanti instances running, the Avanti instances will crash. This is equivalent to pulling the plug on a physical Alpha system and crashing the OpenVMS or Tru64 UNIX operating system. All of the potential problems and caveats of an OpenVMS or Tru64 UNIX hardware crash apply if Avanti is terminated in this fashion.
8.3.1 Avanti Warning on Windows Shutdown
Avanti and FreeAXP now block Windows shutdown and sign-out to avoid inadvertently crashing an Avanti instance. If a local Avanti instance is running when a Windows user attempts to log out, or if Avanti is running anywhere when a Windows shutdown is issued, the logout/shutdown process will pause and a "The following applications block Windows shutdown" message is issued.
Warning: Terminating an Avanti instance without first shutting down the O/S is equivalent to pulling the plug on a legacy Alpha server.
8.4 LAUNCHING AVANTI
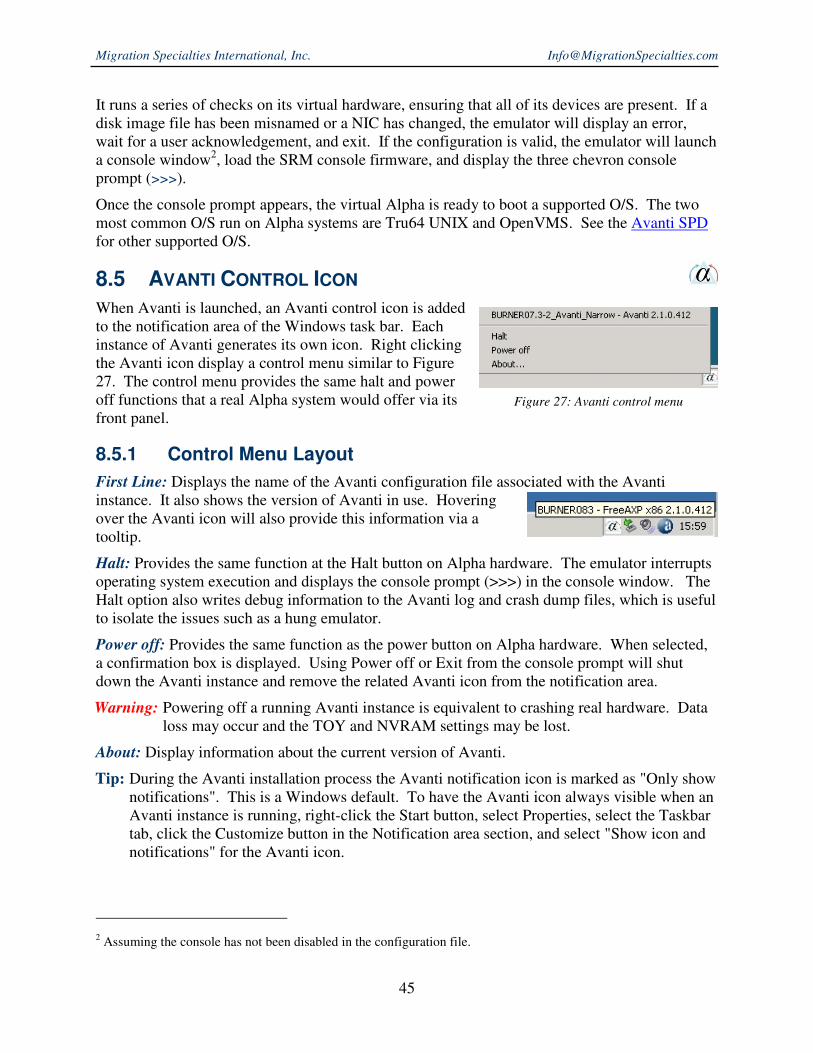
Avanti can be launched from the Configuration Utility using the Run button or from a command line. Launching Avanti is equivalent to powering up a real Alpha system.
The emulator program will display an Avanti icon in the notification area of the Windows task bar.
Figure 25: Avanti NIC properties
Figure 26: Avanti boot screen. Note the Avanti icon
in the notification area of the task bar..
Migration Specialties International, Inc. [email protected]
45
It runs a series of checks on its virtual hardware, ensuring that all of its devices are present. If a disk image file has been misnamed or a NIC has changed, the emulator will display an error, wait for a user acknowledgement, and exit. If the configuration is valid, the emulator will launch a console window2, load the SRM console firmware, and display the three chevron console prompt (>>>).
Once the console prompt appears, the virtual Alpha is ready to boot a supported O/S. The two most common O/S run on Alpha systems are Tru64 UNIX and OpenVMS. See the Avanti SPD for other supported O/S.
8.5 AVANTI CONTROL ICON
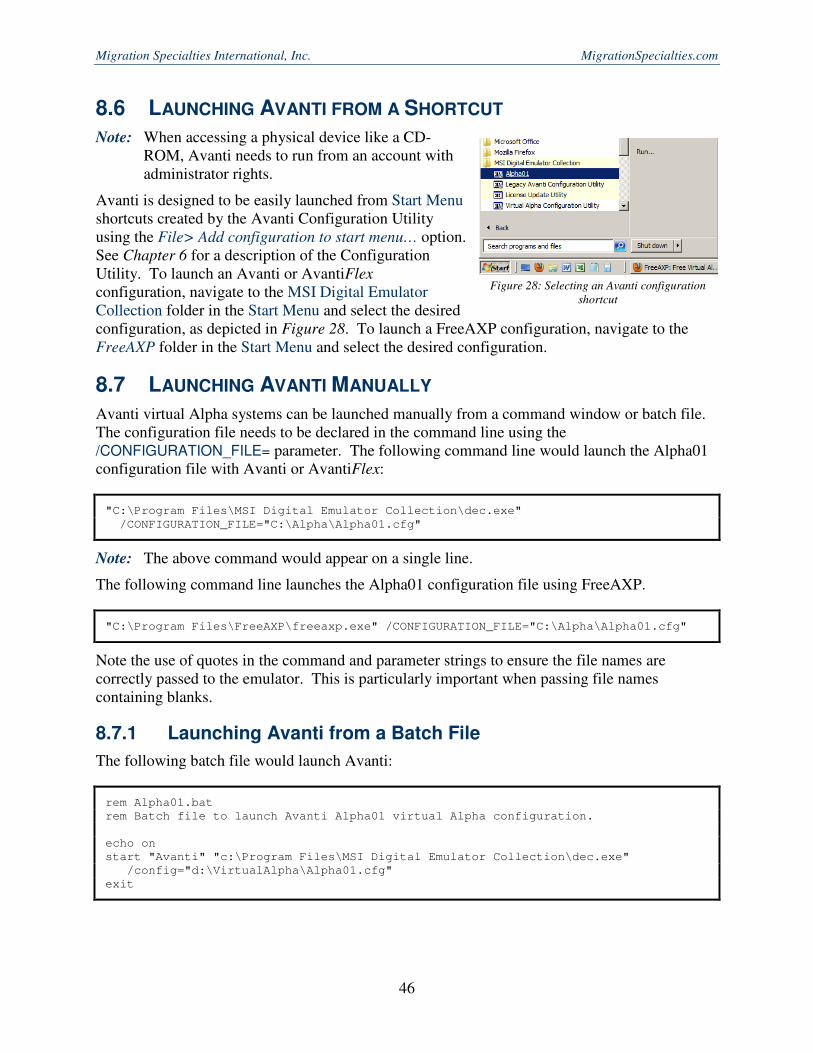
When Avanti is launched, an Avanti control icon is added to the notification area of the Windows task bar. Each instance of Avanti generates its own icon. Right clicking the Avanti icon display a control menu similar to Figure 27. The control menu provides the same halt and power off functions that a real Alpha system would offer via its front panel.
8.5.1 Control Menu Layout
First Line: Displays the name of the Avanti configuration file associated with the Avanti instance. It also shows the version of Avanti in use. Hovering over the Avanti icon will also provide this information via a tooltip.
Halt: Provides the same function at the Halt button on Alpha hardware. The emulator interrupts operating system execution and displays the console prompt (>>>) in the console window. The Halt option also writes debug information to the Avanti log and crash dump files, which is useful to isolate the issues such as a hung emulator.
Power off: Provides the same function as the power button on Alpha hardware. When selected, a confirmation box is displayed. Using Power off or Exit from the console prompt will shut down the Avanti instance and remove the related Avanti icon from the notification area.
Warning: Powering off a running Avanti instance is equivalent to crashing real hardware. Data loss may occur and the TOY and NVRAM settings may be lost.
About: Display information about the current version of Avanti.
Tip: During the Avanti installation process the Avanti notification icon is marked as "Only show notifications". This is a Windows default. To have the Avanti icon always visible when an Avanti instance is running, right-click the Start button, select Properties, select the Taskbar tab, click the Customize button in the Notification area section, and select "Show icon and notifications" for the Avanti icon.
2 Assuming the console has not been disabled in the configuration file.
Figure 27: Avanti control menu
Migration Specialties International, Inc. MigrationSpecialties.com
46
8.6 LAUNCHING AVANTI FROM A SHORTCUT
Note: When accessing a physical device like a CD-ROM, Avanti needs to run from an account with administrator rights.
Avanti is designed to be easily launched from Start Menu shortcuts created by the Avanti Configuration Utility using the File> Add configuration to start menu… option. See Chapter 6 for a description of the Configuration Utility. To launch an Avanti or AvantiFlex configuration, navigate to the MSI Digital Emulator Collection folder in the Start Menu and select the desired configuration, as depicted in Figure 28. To launch a FreeAXP configuration, navigate to the FreeAXP folder in the Start Menu and select the desired configuration.
8.7 LAUNCHING AVANTI MANUALLY
Avanti virtual Alpha systems can be launched manually from a command window or batch file. The configuration file needs to be declared in the command line using the /CONFIGURATION_FILE= parameter. The following command line would launch the Alpha01 configuration file with Avanti or AvantiFlex:
"C:\Program Files\MSI Digital Emulator Collection\dec.exe"
/CONFIGURATION_FILE="C:\Alpha\Alpha01.cfg"
Note: The above command would appear on a single line.
The following command line launches the Alpha01 configuration file using FreeAXP.
"C:\Program Files\FreeAXP\freeaxp.exe" /CONFIGURATION_FILE="C:\Alpha\Alpha01.cfg"
Note the use of quotes in the command and parameter strings to ensure the file names are correctly passed to the emulator. This is particularly important when passing file names containing blanks.
8.7.1 Launching Avanti from a Batch File
The following batch file would launch Avanti:
rem Alpha01.bat
rem Batch file to launch Avanti Alpha01 virtual Alpha configuration.
echo on
start "Avanti" "c:\Program Files\MSI Digital Emulator Collection\dec.exe"
/config="d:\VirtualAlpha\Alpha01.cfg"
exit
Figure 28: Selecting an Avanti configuration
shortcut
Migration Specialties International, Inc. [email protected]
47
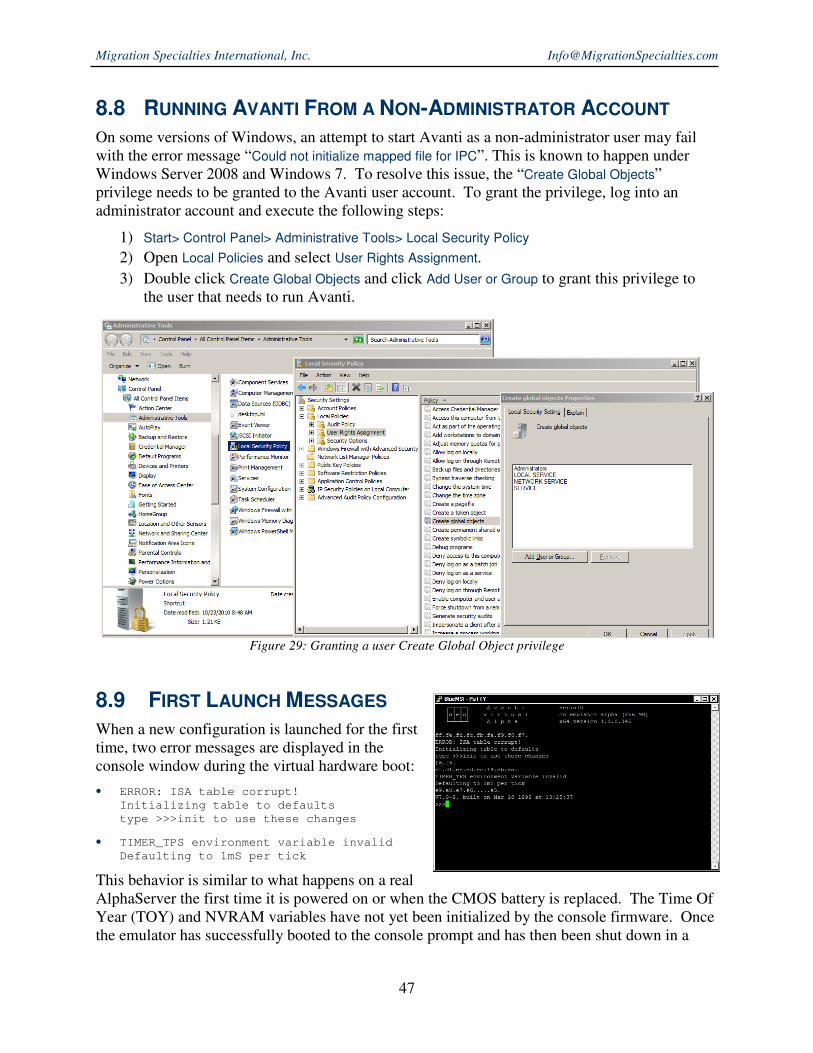
8.8 RUNNING AVANTI FROM A NON-ADMINISTRATOR ACCOUNT
On some versions of Windows, an attempt to start Avanti as a non-administrator user may fail with the error message “Could not initialize mapped file for IPC”. This is known to happen under Windows Server 2008 and Windows 7. To resolve this issue, the “Create Global Objects” privilege needs to be granted to the Avanti user account. To grant the privilege, log into an administrator account and execute the following steps:
1) Start> Control Panel> Administrative Tools> Local Security Policy
2) Open Local Policies and select User Rights Assignment.
3) Double click Create Global Objects and click Add User or Group to grant this privilege to the user that needs to run Avanti.
8.9 FIRST LAUNCH MESSAGES
When a new configuration is launched for the first time, two error messages are displayed in the console window during the virtual hardware boot:
• ERROR: ISA table corrupt!
Initializing table to defaults
type >>>init to use these changes
• TIMER_TPS environment variable invalid
Defaulting to 1mS per tick
This behavior is similar to what happens on a real AlphaServer the first time it is powered on or when the CMOS battery is replaced. The Time Of Year (TOY) and NVRAM variables have not yet been initialized by the console firmware. Once the emulator has successfully booted to the console prompt and has then been shut down in a
Figure 29: Granting a user Create Global Object privilege
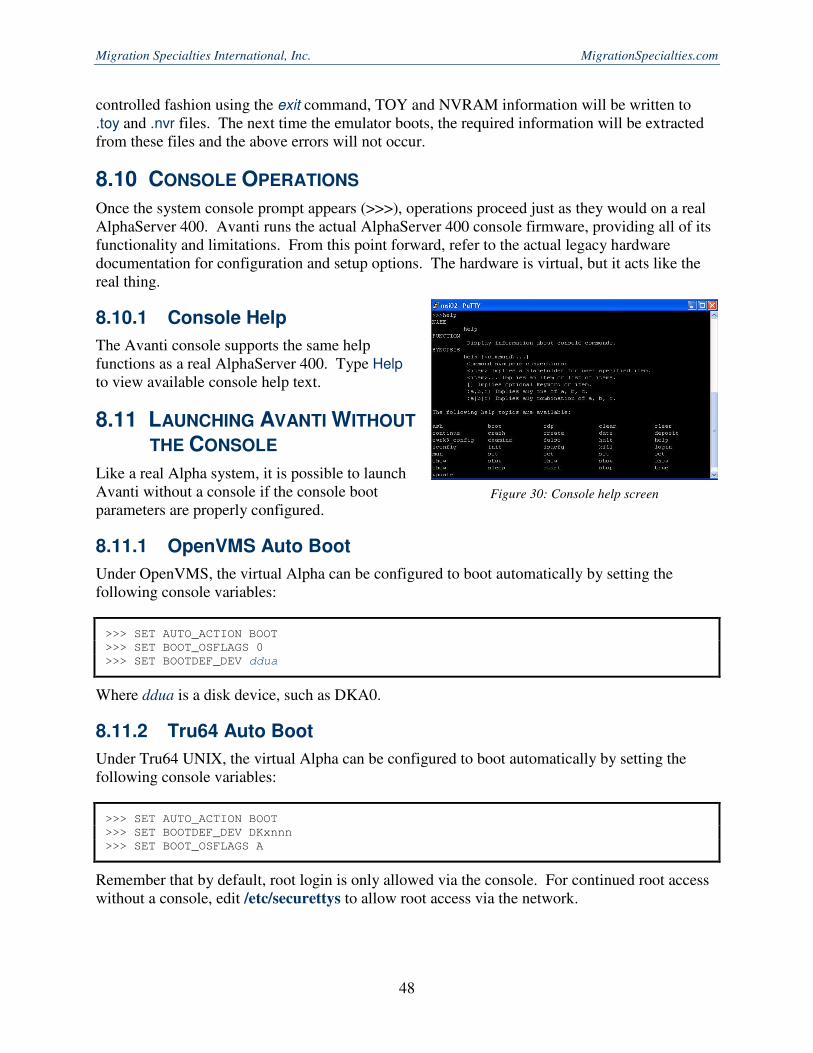
Migration Specialties International, Inc. MigrationSpecialties.com
48
controlled fashion using the exit command, TOY and NVRAM information will be written to .toy and .nvr files. The next time the emulator boots, the required information will be extracted from these files and the above errors will not occur.
8.10 CONSOLE OPERATIONS
Once the system console prompt appears (>>>), operations proceed just as they would on a real AlphaServer 400. Avanti runs the actual AlphaServer 400 console firmware, providing all of its functionality and limitations. From this point forward, refer to the actual legacy hardware documentation for configuration and setup options. The hardware is virtual, but it acts like the real thing.
8.10.1 Console Help
The Avanti console supports the same help functions as a real AlphaServer 400. Type Help to view available console help text.
8.11 LAUNCHING AVANTI WITHOUT
THE CONSOLE
Like a real Alpha system, it is possible to launch Avanti without a console if the console boot parameters are properly configured.
8.11.1 OpenVMS Auto Boot
Under OpenVMS, the virtual Alpha can be configured to boot automatically by setting the following console variables:
>>> SET AUTO_ACTION BOOT
>>> SET BOOT_OSFLAGS 0
>>> SET BOOTDEF_DEV ddua
Where ddua is a disk device, such as DKA0.
8.11.2 Tru64 Auto Boot
Under Tru64 UNIX, the virtual Alpha can be configured to boot automatically by setting the following console variables:
>>> SET AUTO_ACTION BOOT
>>> SET BOOTDEF_DEV DKxnnn
>>> SET BOOT_OSFLAGS A
Remember that by default, root login is only allowed via the console. For continued root access without a console, edit /etc/securettys to allow root access via the network.
Figure 30: Console help screen
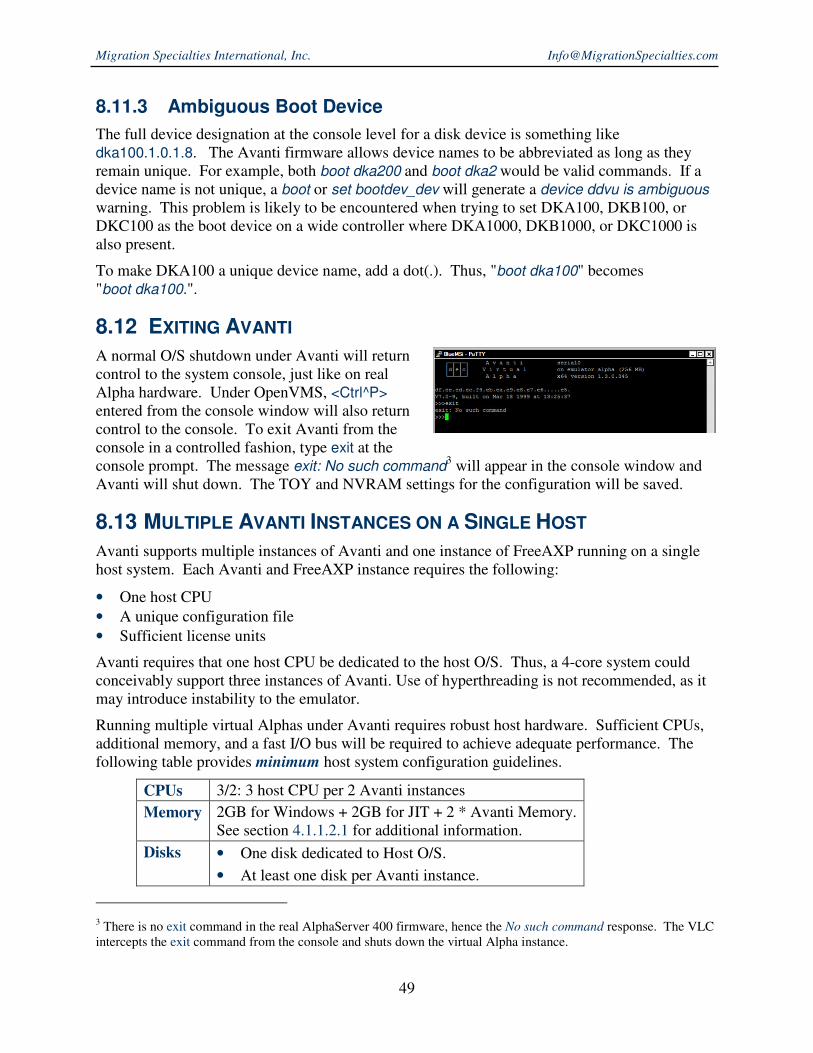
Migration Specialties International, Inc. [email protected]
49
8.11.3 Ambiguous Boot Device
The full device designation at the console level for a disk device is something like dka100.1.0.1.8. The Avanti firmware allows device names to be abbreviated as long as they remain unique. For example, both boot dka200 and boot dka2 would be valid commands. If a device name is not unique, a boot or set bootdev_dev will generate a device ddvu is ambiguous warning. This problem is likely to be encountered when trying to set DKA100, DKB100, or DKC100 as the boot device on a wide controller where DKA1000, DKB1000, or DKC1000 is also present.
To make DKA100 a unique device name, add a dot(.). Thus, "boot dka100" becomes "boot dka100.".
8.12 EXITING AVANTI
A normal O/S shutdown under Avanti will return control to the system console, just like on real Alpha hardware. Under OpenVMS, <Ctrl^P> entered from the console window will also return control to the console. To exit Avanti from the console in a controlled fashion, type exit at the console prompt. The message exit: No such command
3 will appear in the console window and Avanti will shut down. The TOY and NVRAM settings for the configuration will be saved.
8.13 MULTIPLE AVANTI INSTANCES ON A SINGLE HOST
Avanti supports multiple instances of Avanti and one instance of FreeAXP running on a single host system. Each Avanti and FreeAXP instance requires the following:
• One host CPU
• A unique configuration file
• Sufficient license units
Avanti requires that one host CPU be dedicated to the host O/S. Thus, a 4-core system could conceivably support three instances of Avanti. Use of hyperthreading is not recommended, as it may introduce instability to the emulator.
Running multiple virtual Alphas under Avanti requires robust host hardware. Sufficient CPUs, additional memory, and a fast I/O bus will be required to achieve adequate performance. The following table provides minimum host system configuration guidelines.
CPUs 3/2: 3 host CPU per 2 Avanti instances
Memory 2GB for Windows + 2GB for JIT + 2 * Avanti Memory. See section 4.1.1.2.1 for additional information.
Disks • One disk dedicated to Host O/S.
• At least one disk per Avanti instance.
3 There is no exit command in the real AlphaServer 400 firmware, hence the No such command response. The VLC intercepts the exit command from the console and shuts down the virtual Alpha instance.
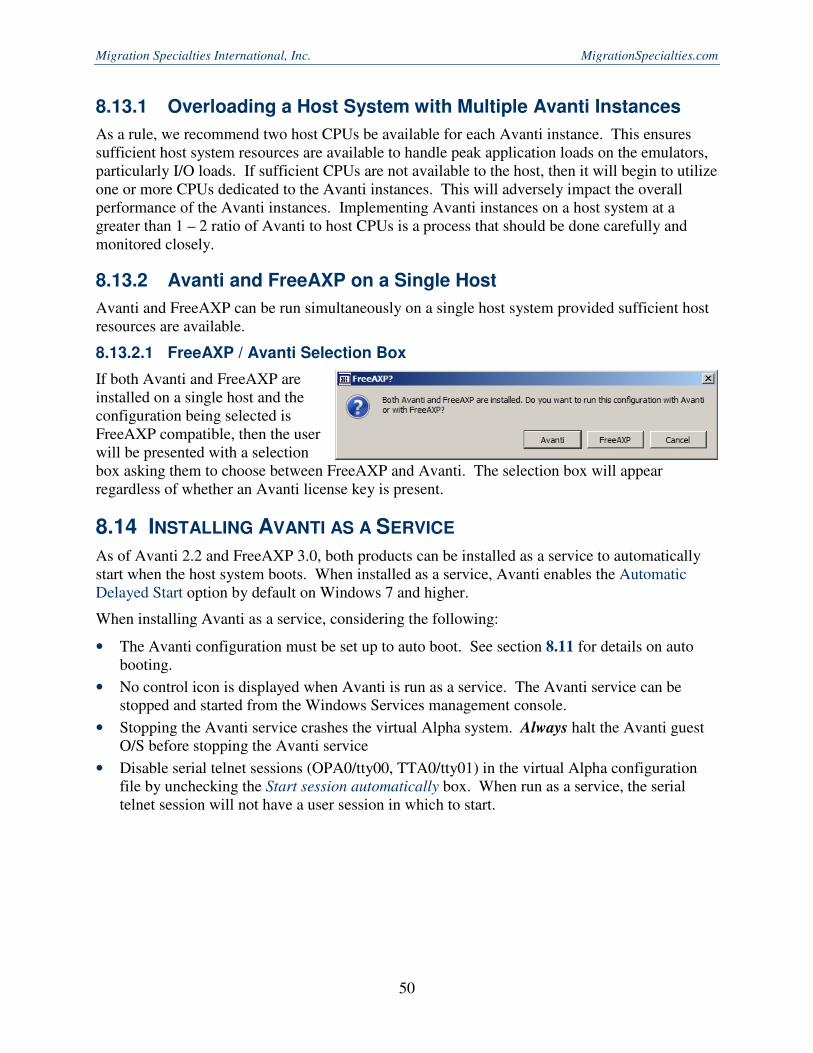
Migration Specialties International, Inc. MigrationSpecialties.com
50
8.13.1 Overloading a Host System with Multiple Avanti Instances
As a rule, we recommend two host CPUs be available for each Avanti instance. This ensures sufficient host system resources are available to handle peak application loads on the emulators, particularly I/O loads. If sufficient CPUs are not available to the host, then it will begin to utilize one or more CPUs dedicated to the Avanti instances. This will adversely impact the overall performance of the Avanti instances. Implementing Avanti instances on a host system at a greater than 1 – 2 ratio of Avanti to host CPUs is a process that should be done carefully and monitored closely.
8.13.2 Avanti and FreeAXP on a Single Host
Avanti and FreeAXP can be run simultaneously on a single host system provided sufficient host resources are available.
8.13.2.1 FreeAXP / Avanti Selection Box
If both Avanti and FreeAXP are installed on a single host and the configuration being selected is FreeAXP compatible, then the user will be presented with a selection box asking them to choose between FreeAXP and Avanti. The selection box will appear regardless of whether an Avanti license key is present.
8.14 INSTALLING AVANTI AS A SERVICE
As of Avanti 2.2 and FreeAXP 3.0, both products can be installed as a service to automatically start when the host system boots. When installed as a service, Avanti enables the Automatic Delayed Start option by default on Windows 7 and higher.
When installing Avanti as a service, considering the following:
• The Avanti configuration must be set up to auto boot. See section 8.11 for details on auto booting.
• No control icon is displayed when Avanti is run as a service. The Avanti service can be stopped and started from the Windows Services management console.
• Stopping the Avanti service crashes the virtual Alpha system. Always halt the Avanti guest O/S before stopping the Avanti service
• Disable serial telnet sessions (OPA0/tty00, TTA0/tty01) in the virtual Alpha configuration file by unchecking the Start session automatically box. When run as a service, the serial telnet session will not have a user session in which to start.
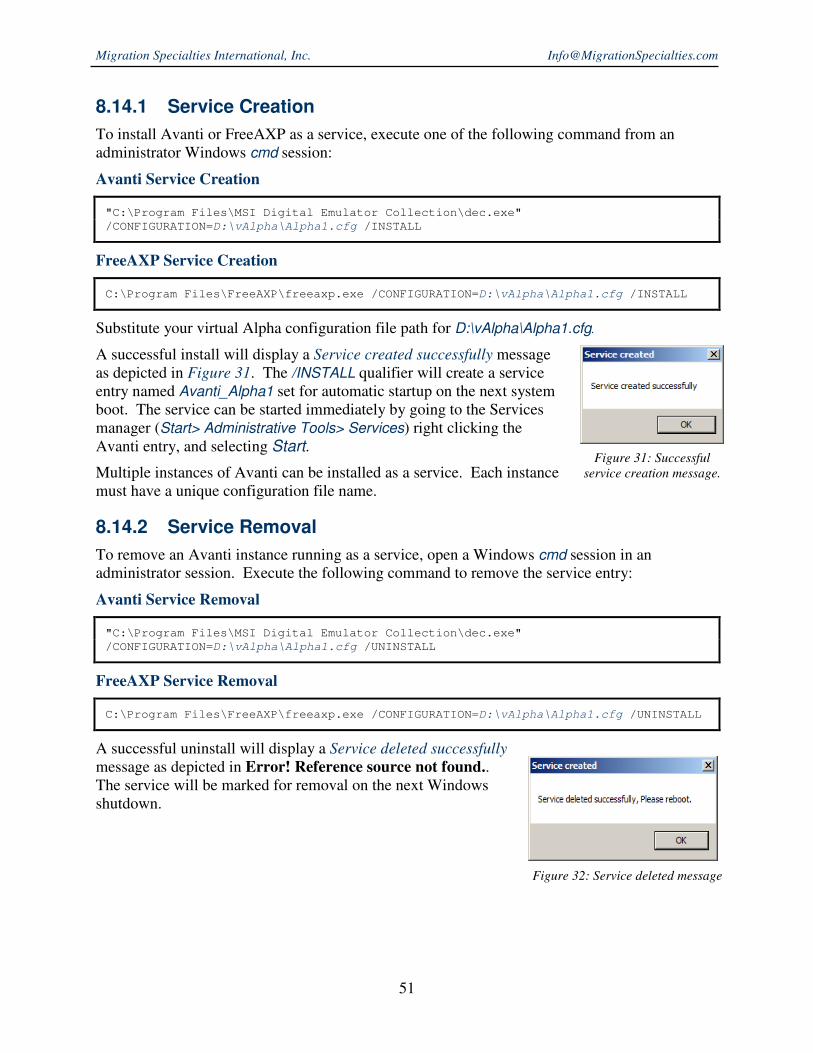
Migration Specialties International, Inc. [email protected]
51
8.14.1 Service Creation
To install Avanti or FreeAXP as a service, execute one of the following command from an administrator Windows cmd session:
Avanti Service Creation
"C:\Program Files\MSI Digital Emulator Collection\dec.exe"
/CONFIGURATION=D:\vAlpha\Alpha1.cfg /INSTALL
FreeAXP Service Creation
C:\Program Files\FreeAXP\freeaxp.exe /CONFIGURATION=D:\vAlpha\Alpha1.cfg /INSTALL
Substitute your virtual Alpha configuration file path for D:\vAlpha\Alpha1.cfg.
A successful install will display a Service created successfully message as depicted in Figure 31. The /INSTALL qualifier will create a service entry named Avanti_Alpha1 set for automatic startup on the next system boot. The service can be started immediately by going to the Services manager (Start> Administrative Tools> Services) right clicking the Avanti entry, and selecting Start.
Multiple instances of Avanti can be installed as a service. Each instance must have a unique configuration file name.
8.14.2 Service Removal
To remove an Avanti instance running as a service, open a Windows cmd session in an administrator session. Execute the following command to remove the service entry:
Avanti Service Removal
"C:\Program Files\MSI Digital Emulator Collection\dec.exe"
/CONFIGURATION=D:\vAlpha\Alpha1.cfg /UNINSTALL
FreeAXP Service Removal
C:\Program Files\FreeAXP\freeaxp.exe /CONFIGURATION=D:\vAlpha\Alpha1.cfg /UNINSTALL
A successful uninstall will display a Service deleted successfully message as depicted in Error! Reference source not found.. The service will be marked for removal on the next Windows shutdown.
Figure 31: Successful
service creation message.
Figure 32: Service deleted message

Migration Specialties International, Inc. MigrationSpecialties.com
52
8.14.3 Service Errors
In the event Avanti encounters a problem such as loss of the license key while running as a service, behavior differs between Windows XP/Server 2003/Vista and Windows /7/Server 2008. Under XP and Server 2003 there is no indication of a problem, Avanti will simply stop working. Under Windows 7 and Server 2008 messages similar to Figure 33 are displayed to administrator accounts.
Figure 33: Windows 7 Avanti service failure message.

Migration Specialties International, Inc. [email protected]
53
9. VIRTUAL HOST ENVIRONMENTS
FreeAXP and Avanti will run under virtual hosts such as VMware, Hyper-V, and VirtualBox. When running Avanti, a USB port must be assigned to the virtual host to support the Avanti license key. Avanti supports dynamic VM environments such as VMware vMotion.
9.1 USB KEY SUPPORT
When running Avanti, a USB port must be assigned to the virtual host to support the Avanti license key. See the Avanti Release Notes for current information on technologies supporting USB key migration in multi-hosted virtual environments.
9.2 VMWARE USB KEY SUPPORT
When configuring a USB device to support the Avanti license dongle in a VMware instance, avoid enabling USB 3.0 support. Set the port up for USB 1.1 and USB 2.0 support only.
9.3 MIGRATING VIRTUAL USB SUPPORT
A useful feature with virtual hosts is the ability to migrate a virtual server from one physical platform to another without shutting it down. VMware vMotion is an example of this technology. With Avanti, the USB key must follow the virtual host so that Avanti continues to run. A network USB device is required to allow the USB key to follow the Avanti instance. The following solutions are known to accomplish this and are in use at Avanti customer sites.
• Digi AnywhereUSB: http://www.digi.com/products/usb/anywhereusb
• SEH myUTN Deviceserver http://www.seh-technology.com/products/usb-device-servers.html
9.4 NIC CONFIGURATION
If DECnet support is desired under a virtual host, the NIC must be configured to support promiscuous mode. See Chapter 10 for additional information about networking Avanti.
9.4.1 VMware Virtual NICs
The following VMware virtual NIC devices are known to work well with Avanti:
VMware NIC Type Guest O/S
E1000 VMS & Tru64 UNIX
VMXNET 3 VMS
9.5 ALLOCATING CPU RESOURCES
Avanti requires a minimum of 2 host server CPU cores. One CPU is dedicated to emulating the Alpha CPU and will run at 100% when Avanti is active. Plan adequate VM resources to support this requirement.
It is important to allocate sufficient CPU resources on a VM to support Avanti. If a VM manager throttles CPU resources to a VM hosting Avanti, poor performance and slow clock
Migration Specialties International, Inc. MigrationSpecialties.com
54
speeds resulting in time drift will occur. Recommend best practice is to put a CPU reservation on the Avanti host VM such that two full CPUs are always available to the Avanti system. I.E.: if running on a VM host equipped with 3.0GHz CPUs, reserve 6000MHz of CPU to the host.
9.5.1 Allocation of Virtual Alpha CPUs
In Windows, a program cannot allocate or dedicate cores for execution; it is the responsibility of the operating system to allocate processes and threads across cores. Avanti requests that each simulated Alpha CPU thread be run on a separate physical core by setting the affinity of the virtual CPU thread to the desired core number and requesting that the simulated Alpha CPU thread run at highest priority. This should give the virtual Alpha CPU thread exclusive access to that core, provided Windows honors the requests.
There are various other threads created by Avanti which take care of asynchronous IO to disks and Ethernet controllers, but these are requested at normal priority, and can be freely scheduled across various cores.
Note that Windows is free to ignore Avanti affinity and priority requests. Also note that if there are enough physical cores to run the desired workloads, system performance can be increased by disabling hyper-threads, which will give a speed boost to the physical cores since they no longer have to co-schedule the hyper-threaded virtual cores.
9.6 GENERAL VM RESOURCE MANAGEMENT
Care must be taken not to overload the VM host hardware supporting the Avanti instance. An overloaded host will result in poor performance on the Avanti system which can lead to VMS bug checks.
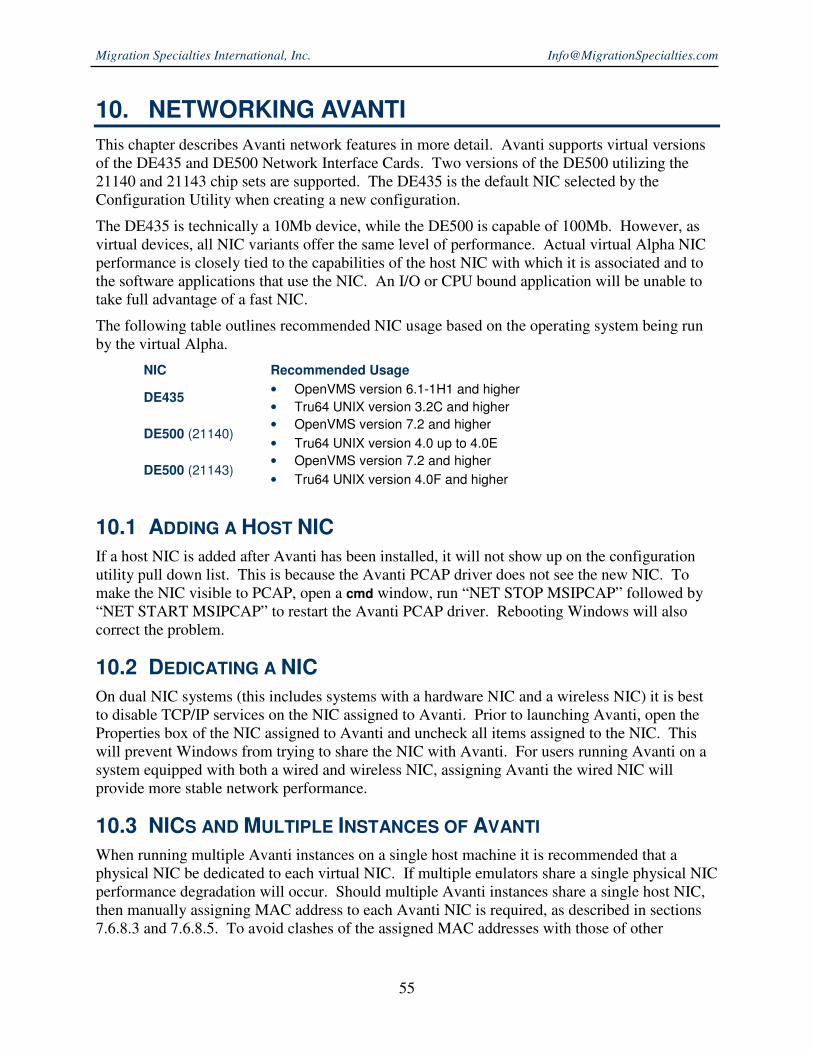
Migration Specialties International, Inc. [email protected]
55
10. NETWORKING AVANTI
This chapter describes Avanti network features in more detail. Avanti supports virtual versions of the DE435 and DE500 Network Interface Cards. Two versions of the DE500 utilizing the 21140 and 21143 chip sets are supported. The DE435 is the default NIC selected by the Configuration Utility when creating a new configuration.
The DE435 is technically a 10Mb device, while the DE500 is capable of 100Mb. However, as virtual devices, all NIC variants offer the same level of performance. Actual virtual Alpha NIC performance is closely tied to the capabilities of the host NIC with which it is associated and to the software applications that use the NIC. An I/O or CPU bound application will be unable to take full advantage of a fast NIC.
The following table outlines recommended NIC usage based on the operating system being run by the virtual Alpha.
NIC Recommended Usage
DE435 • OpenVMS version 6.1-1H1 and higher
• Tru64 UNIX version 3.2C and higher
DE500 (21140) • OpenVMS version 7.2 and higher
• Tru64 UNIX version 4.0 up to 4.0E
DE500 (21143) • OpenVMS version 7.2 and higher
• Tru64 UNIX version 4.0F and higher
10.1 ADDING A HOST NIC
If a host NIC is added after Avanti has been installed, it will not show up on the configuration utility pull down list. This is because the Avanti PCAP driver does not see the new NIC. To make the NIC visible to PCAP, open a cmd window, run “NET STOP MSIPCAP” followed by “NET START MSIPCAP” to restart the Avanti PCAP driver. Rebooting Windows will also correct the problem.
10.2 DEDICATING A NIC
On dual NIC systems (this includes systems with a hardware NIC and a wireless NIC) it is best to disable TCP/IP services on the NIC assigned to Avanti. Prior to launching Avanti, open the Properties box of the NIC assigned to Avanti and uncheck all items assigned to the NIC. This will prevent Windows from trying to share the NIC with Avanti. For users running Avanti on a system equipped with both a wired and wireless NIC, assigning Avanti the wired NIC will provide more stable network performance.
10.3 NICS AND MULTIPLE INSTANCES OF AVANTI
When running multiple Avanti instances on a single host machine it is recommended that a physical NIC be dedicated to each virtual NIC. If multiple emulators share a single physical NIC performance degradation will occur. Should multiple Avanti instances share a single host NIC, then manually assigning MAC address to each Avanti NIC is required, as described in sections 7.6.8.3 and 7.6.8.5. To avoid clashes of the assigned MAC addresses with those of other
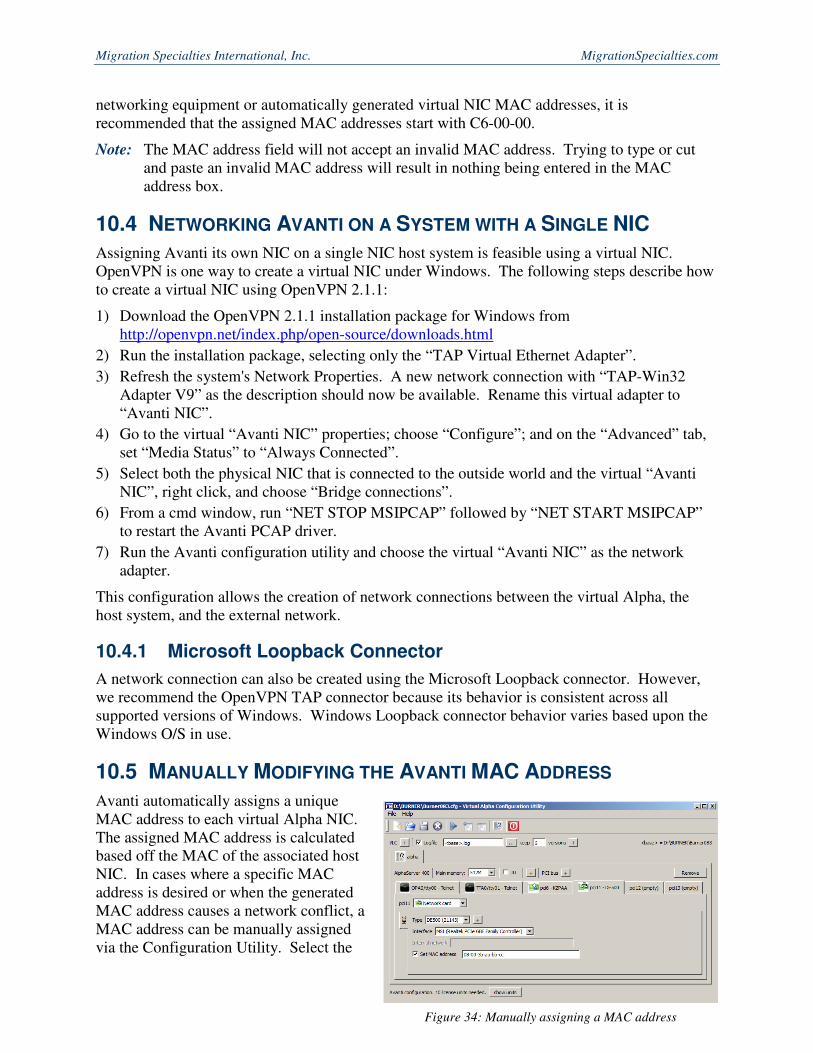
Migration Specialties International, Inc. MigrationSpecialties.com
56
networking equipment or automatically generated virtual NIC MAC addresses, it is recommended that the assigned MAC addresses start with C6-00-00.
Note: The MAC address field will not accept an invalid MAC address. Trying to type or cut and paste an invalid MAC address will result in nothing being entered in the MAC address box.
10.4 NETWORKING AVANTI ON A SYSTEM WITH A SINGLE NIC
Assigning Avanti its own NIC on a single NIC host system is feasible using a virtual NIC. OpenVPN is one way to create a virtual NIC under Windows. The following steps describe how to create a virtual NIC using OpenVPN 2.1.1:
1) Download the OpenVPN 2.1.1 installation package for Windows from http://openvpn.net/index.php/open-source/downloads.html
2) Run the installation package, selecting only the “TAP Virtual Ethernet Adapter”.
3) Refresh the system's Network Properties. A new network connection with “TAP-Win32 Adapter V9” as the description should now be available. Rename this virtual adapter to “Avanti NIC”.
4) Go to the virtual “Avanti NIC” properties; choose “Configure”; and on the “Advanced” tab, set “Media Status” to “Always Connected”.
5) Select both the physical NIC that is connected to the outside world and the virtual “Avanti NIC”, right click, and choose “Bridge connections”.
6) From a cmd window, run “NET STOP MSIPCAP” followed by “NET START MSIPCAP” to restart the Avanti PCAP driver.
7) Run the Avanti configuration utility and choose the virtual “Avanti NIC” as the network adapter.
This configuration allows the creation of network connections between the virtual Alpha, the host system, and the external network.
10.4.1 Microsoft Loopback Connector
A network connection can also be created using the Microsoft Loopback connector. However, we recommend the OpenVPN TAP connector because its behavior is consistent across all supported versions of Windows. Windows Loopback connector behavior varies based upon the Windows O/S in use.
10.5 MANUALLY MODIFYING THE AVANTI MAC ADDRESS
Avanti automatically assigns a unique MAC address to each virtual Alpha NIC. The assigned MAC address is calculated based off the MAC of the associated host NIC. In cases where a specific MAC address is desired or when the generated MAC address causes a network conflict, a MAC address can be manually assigned via the Configuration Utility. Select the
Figure 34: Manually assigning a MAC address
Migration Specialties International, Inc. [email protected]
57
desired NIC definition in the Configuration Utility; check the Set MAC address box; and enter a valid, unique MAC address, as depicted in Figure 34.
Warning: Do not set the LSB (multicast bit) of the first octet. Doing so makes the first number odd (ex. "09-00-2b-aa-bb-cc"), which violates the Ethernet MAC standard and will interfere with NIC functionality.
Note: The MAC address field will not accept an invalid MAC address. Trying to type or cut and paste an invalid MAC address will result in nothing being entered in the MAC address box.
10.6 DE435 FOR OLDER O/S
If you are experiencing network problems with older versions of OpenVMS or Tru64, ensure you are using the DE435. The DE435 offers better compatibility with older O/S. Use the DE435 with versions of OpenVMS prior to VMS 7.2 and Tru64 UNIX prior to 4.0.
10.7 NETWORKING WITH WIRELESS ETHERNET
Using a wireless NIC with Avanti requires special handling. Try one of the following options:
• Create a bridge TAP adapter as described in section 10.4.
• Set the virtual Alpha NIC MAC address to the same MAC address as the wireless card. THIS SOLUTION IS INCOMPATIBLE WITH DECNET PHASE IV and DECnet
Phase V running in compatibility mode. DECnet Phase IV will forcibly change the virtual Alpha NIC's MAC address to the DECnet phase IV address (AA-00-04-xx-xx-xx), breaking the wireless connection. Do not share the same TCP/IP address between the wireless host and the virtual Alpha system or it will confuse both systems.
10.7.1 Wireless Ethernet and Avanti
Wireless Ethernet looks like Ethernet, but it isn't Ethernet. Using a wireless NIC with Avanti can be problematic. Here’s why.
If the standard MAC of the Avanti NIC is used and the virtual NIC is attached to a wireless controller, then any packets which are not addressed to/from the "registered" PC's wireless MAC address may be legally dropped by the wireless router to conserve bandwidth.
The best way to debug a wireless router connection is to run a packet sniffer like WireShark on the host PC and watch the packet traffic, while also running a packet sniffer on a wired PC on the network to see if all the packets are traversing the wireless link correctly. It almost never operates as expected, because wireless routers are allowed to drop non-essential packets to conserve bandwidth. Non-TCP protocols like DECnet tend to get axed because modern routers, particularly consumer routers, usually don't need to deal with non-TCP packets.
Spoofing the MAC address by assigning the PC wireless MAC to the Avanti NIC will avoid the wireless packet dropping, but only if DECnet Phase IV or DECnet Phase V (DECnet OSI) running in compatibility mode are not in use. DECnet Phase IV forcibly changes the hardware MAC to a DECnet-encoded value, which overrides the manually configured Avanti MAC address.
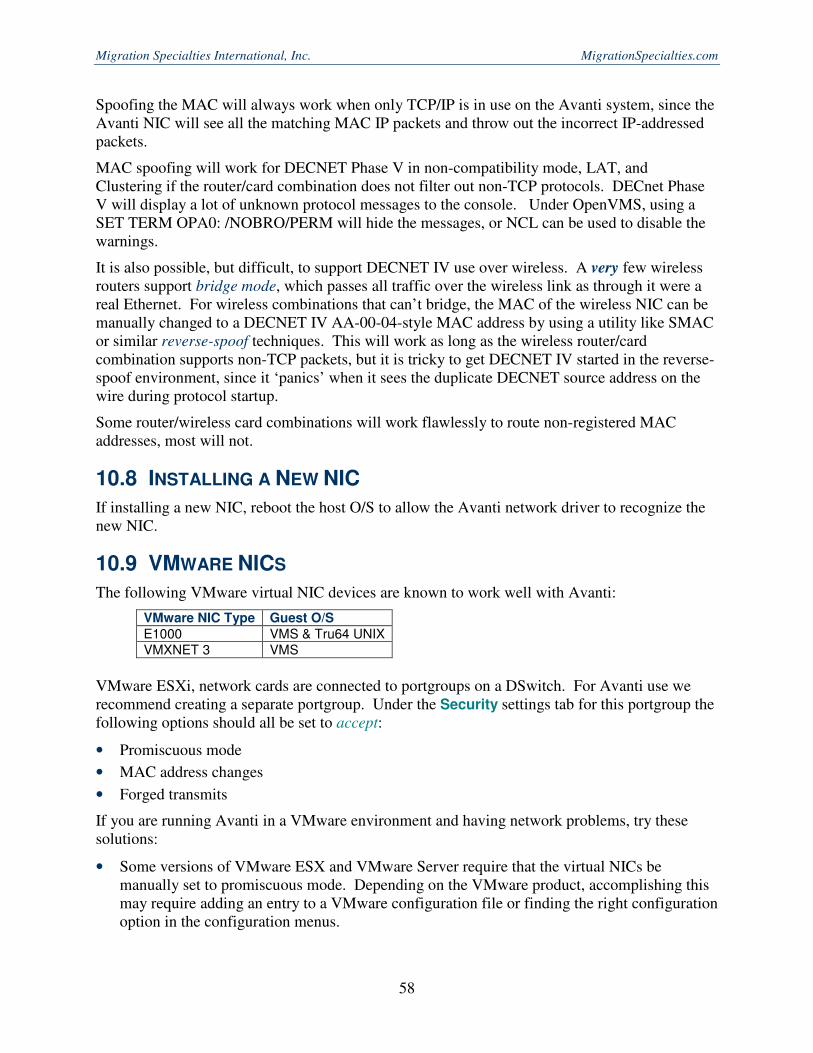
Migration Specialties International, Inc. MigrationSpecialties.com
58
Spoofing the MAC will always work when only TCP/IP is in use on the Avanti system, since the Avanti NIC will see all the matching MAC IP packets and throw out the incorrect IP-addressed packets.
MAC spoofing will work for DECNET Phase V in non-compatibility mode, LAT, and Clustering if the router/card combination does not filter out non-TCP protocols. DECnet Phase V will display a lot of unknown protocol messages to the console. Under OpenVMS, using a SET TERM OPA0: /NOBRO/PERM will hide the messages, or NCL can be used to disable the warnings.
It is also possible, but difficult, to support DECNET IV use over wireless. A very few wireless routers support bridge mode, which passes all traffic over the wireless link as through it were a real Ethernet. For wireless combinations that can’t bridge, the MAC of the wireless NIC can be manually changed to a DECNET IV AA-00-04-style MAC address by using a utility like SMAC or similar reverse-spoof techniques. This will work as long as the wireless router/card combination supports non-TCP packets, but it is tricky to get DECNET IV started in the reverse-spoof environment, since it ‘panics’ when it sees the duplicate DECNET source address on the wire during protocol startup.
Some router/wireless card combinations will work flawlessly to route non-registered MAC addresses, most will not.
10.8 INSTALLING A NEW NIC
If installing a new NIC, reboot the host O/S to allow the Avanti network driver to recognize the new NIC.
10.9 VMWARE NICS
The following VMware virtual NIC devices are known to work well with Avanti:
VMware NIC Type Guest O/S
E1000 VMS & Tru64 UNIX
VMXNET 3 VMS
VMware ESXi, network cards are connected to portgroups on a DSwitch. For Avanti use we recommend creating a separate portgroup. Under the Security settings tab for this portgroup the following options should all be set to accept:
• Promiscuous mode
• MAC address changes
• Forged transmits
If you are running Avanti in a VMware environment and having network problems, try these solutions:
• Some versions of VMware ESX and VMware Server require that the virtual NICs be manually set to promiscuous mode. Depending on the VMware product, accomplishing this may require adding an entry to a VMware configuration file or finding the right configuration option in the configuration menus.
Migration Specialties International, Inc. [email protected]
59
• If the VMware NIC cannot be set to promiscuous mode, treat the VMware NIC like a wireless NIC. Create a bridged TAP adapter or assign the NICs MAC address to the virtual Alpha NIC. All the caveats in section 10.7 apply.
• VMware has a bad habit of disabling a NIC if an IP is not assigned to it. The symptoms are the NIC is still visible to the host system and to Avanti, but no longer communicates on the network. If this problem is encountered, enable Windows IVP4 services on the NIC and allow it to be assigned an IP on the Windows side.
10.10 HYPER-V VIRTUAL NICS
If DECnet Phase IV support is required under Hyper-V, MAC address spoofing must be enable. However, Microsoft Hyper-V versions prior to Windows Server 2008 R2 Hyper-V and Hyper-V
Server 2008 R2 do not support MAC address spoofing. This prevents the MAC address change inherent in a DECnet Phase IV installation. DECnet Phase IV support under Hyper-V requires a Hyper-V release that supports MAC address spoofing.
10.11 NETWORK ISSUES
10.11.1 TCP Offload Features May Cause Network Instability
Many modern NICs include offload features to reduce the load on a host system CPU. These features occasionally cause problems with DECnet, TCP/IP, and System Communications Services (SCS) communications. If one of the following problems is encountered, try turning off TCP related offloading under the Windows Configuration> Advance tab for the NIC assigned to Avanti, starting with TCP Connection Offloading.
• Unable to establish communications to the Avanti NIC.
• Communications with Avanti are unstable (time outs, packet loss)
• Cluster communications are unstable (cluster time outs, packet loss)
10.11.2 Switch Drops DECnet and SCS Packets
Some modern switches drop DECnet and cluster (SCS) packets. Older Cisco Catalyst 4000 series switches were infamous for this. Often, when a switch gets busy, it will prioritize traffic and start dropping packets it does not recognize. Many modern switches do not recognize SCS and DECnet packets.
If you encounter this problem, try the following solutions:
• If using a managed switch, limit speeds to 10/100 on the port assigned to the Avanti NIC.
• If using an unmanaged gigabit switch, try replacing it with a 10/100 switch.
• If the first two options do not work, try substituting a different switch brand or model.
In-house, we have had good luck with Netgear, Linksys, and HP Procurve equipment. However, we have had issues with Netgear gigabit equipment in clustered environments. Cisco and Netgear 10/100 switches have worked well with clusters.
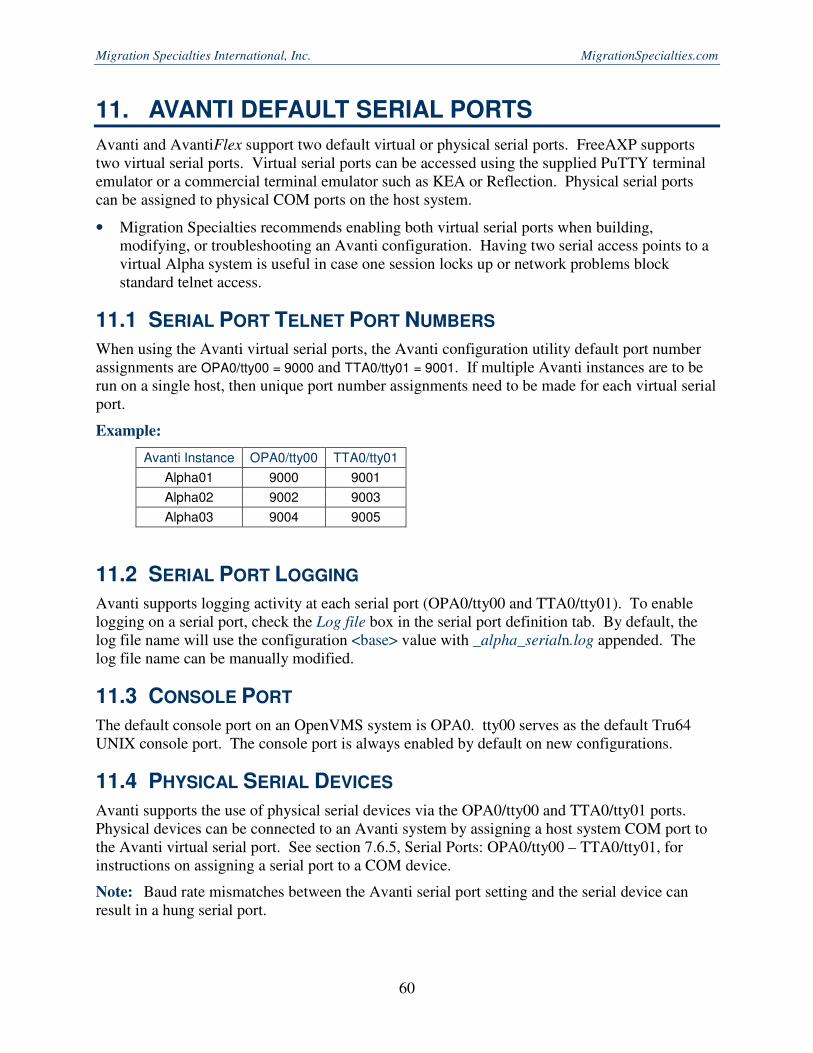
Migration Specialties International, Inc. MigrationSpecialties.com
60
11. AVANTI DEFAULT SERIAL PORTS
Avanti and AvantiFlex support two default virtual or physical serial ports. FreeAXP supports two virtual serial ports. Virtual serial ports can be accessed using the supplied PuTTY terminal emulator or a commercial terminal emulator such as KEA or Reflection. Physical serial ports can be assigned to physical COM ports on the host system.
• Migration Specialties recommends enabling both virtual serial ports when building, modifying, or troubleshooting an Avanti configuration. Having two serial access points to a virtual Alpha system is useful in case one session locks up or network problems block standard telnet access.
11.1 SERIAL PORT TELNET PORT NUMBERS
When using the Avanti virtual serial ports, the Avanti configuration utility default port number assignments are OPA0/tty00 = 9000 and TTA0/tty01 = 9001. If multiple Avanti instances are to be run on a single host, then unique port number assignments need to be made for each virtual serial port.
Example:
Avanti Instance OPA0/tty00 TTA0/tty01
Alpha01 9000 9001
Alpha02 9002 9003
Alpha03 9004 9005
11.2 SERIAL PORT LOGGING
Avanti supports logging activity at each serial port (OPA0/tty00 and TTA0/tty01). To enable logging on a serial port, check the Log file box in the serial port definition tab. By default, the log file name will use the configuration <base> value with _alpha_serialn.log appended. The log file name can be manually modified.
11.3 CONSOLE PORT
The default console port on an OpenVMS system is OPA0. tty00 serves as the default Tru64 UNIX console port. The console port is always enabled by default on new configurations.
11.4 PHYSICAL SERIAL DEVICES
Avanti supports the use of physical serial devices via the OPA0/tty00 and TTA0/tty01 ports. Physical devices can be connected to an Avanti system by assigning a host system COM port to the Avanti virtual serial port. See section 7.6.5, Serial Ports: OPA0/tty00 – TTA0/tty01, for instructions on assigning a serial port to a COM device.
Note: Baud rate mismatches between the Avanti serial port setting and the serial device can result in a hung serial port.
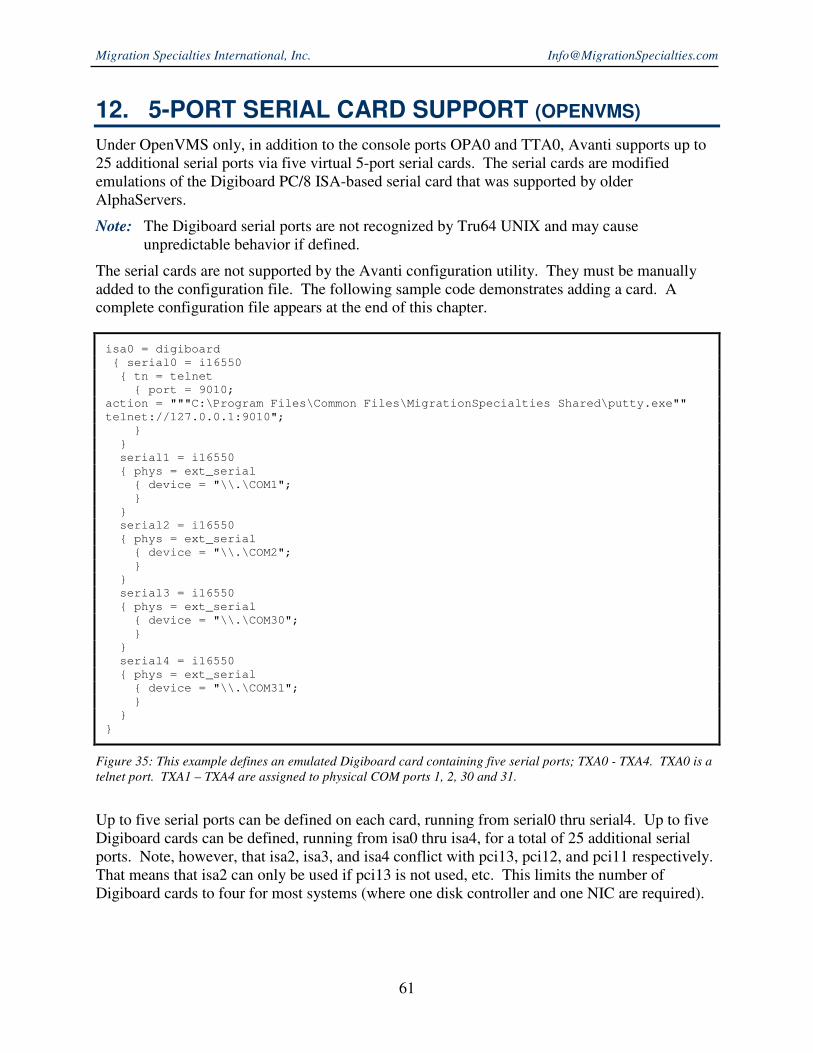
Migration Specialties International, Inc. [email protected]
61
12. 5-PORT SERIAL CARD SUPPORT (OPENVMS)
Under OpenVMS only, in addition to the console ports OPA0 and TTA0, Avanti supports up to 25 additional serial ports via five virtual 5-port serial cards. The serial cards are modified emulations of the Digiboard PC/8 ISA-based serial card that was supported by older AlphaServers.
Note: The Digiboard serial ports are not recognized by Tru64 UNIX and may cause unpredictable behavior if defined.
The serial cards are not supported by the Avanti configuration utility. They must be manually added to the configuration file. The following sample code demonstrates adding a card. A complete configuration file appears at the end of this chapter.
isa0 = digiboard
{ serial0 = i16550
{ tn = telnet
{ port = 9010;
action = """C:\Program Files\Common Files\MigrationSpecialties Shared\putty.exe""
telnet://127.0.0.1:9010";
}
}
serial1 = i16550
{ phys = ext_serial
{ device = "\\.\COM1";
}
}
serial2 = i16550
{ phys = ext_serial
{ device = "\\.\COM2";
}
}
serial3 = i16550
{ phys = ext_serial
{ device = "\\.\COM30";
}
}
serial4 = i16550
{ phys = ext_serial
{ device = "\\.\COM31";
}
}
}
Figure 35: This example defines an emulated Digiboard card containing five serial ports; TXA0 - TXA4. TXA0 is a
telnet port. TXA1 – TXA4 are assigned to physical COM ports 1, 2, 30 and 31.
Up to five serial ports can be defined on each card, running from serial0 thru serial4. Up to five Digiboard cards can be defined, running from isa0 thru isa4, for a total of 25 additional serial ports. Note, however, that isa2, isa3, and isa4 conflict with pci13, pci12, and pci11 respectively. That means that isa2 can only be used if pci13 is not used, etc. This limits the number of Digiboard cards to four for most systems (where one disk controller and one NIC are required).

Migration Specialties International, Inc. MigrationSpecialties.com
62
The sections within “serial = i16550 { … }” follow the same rules as the regular serial ports, so in addition to defining them as telnet server ports, they can also be assigned to physical serial ports (COMn) on the host server.
The emulated Digiboard PC/8 is supported by the VMS SYS$YSDRIVER. As on a real Alpha system, the card is not recognized by VMS by default. It requires additional set up steps to make it work.
12.1 DEFINING THE SERIAL CARD TO THE FIRMWARE
First, the card must be made known to VMS through the firmware ISACFG utility. Once the serial cards and ports are defined within the configuration file, the exact ISACFG invocations to be used will be written to the emulator log file along with the associated VMS 7.1 and higher configuration commands. After creating the configuration file, start the emulator and type “exit” at the >>> prompt, then open the log file in a text editor to determine the correct set up commands for each Digiboard card. The following section of log file was generated from the configuration code in Figure 35.
00011.78: Digiboard multi-serial card configured.
00011.78: Firmware configuration commands:
00011.78: >>> isacfg -mk -slot 1 -dev 0 -etyp 1 -enadev 1 -handle DIGI
00011.78: >>> isacfg -mod -slot 1 -dev 0 -iobase0 100 -iobase1 108 -iobase2 110
-iobase3 118 -iobase4 120 -iobase5 128 -irq0 15
00011.78: Add these lines to SYS$SYSTEM:SYS$USER_CONFIG.DAT:
00011.78: device = "Digiboard Serial Port"
00011.78: name = TX
00011.78: driver = SYS$YSDRIVER
00011.78: adapter = ISA
00011.78: id = DIGI
00011.78: end_device
00011.78: Add these lines to your startup procedure:
00011.78: $ mcr sysman io connect /vector=60 /driver=sys$ysdriver txa1:
00011.78: $ mcr sysman io connect /vector=60 /driver=sys$ysdriver txa2:
00011.78: $ mcr sysman io connect /vector=60 /driver=sys$ysdriver txa3:
00011.78: $ mcr sysman io connect /vector=60 /driver=sys$ysdriver txa4:
Figure 36: Log file output providing the firmware and VMS commands required to complete the configuration of the
serial ports defined in Figure 35. These lines will appear near the beginning of the Avanti log file.
Using the commands provided in Figure 36, the following console commands define the first serial card. These command only need to be entered once. Their settings are retained in the Avanti configuration's .nvr file.
>>> isacfg -mk -slot 1 -dev 0 -etyp 1 -enadev 1 -handle DIGI
>>>init
>>> isacfg -mod -slot 1 -dev 0 -iobase0 100 -iobase1 108 -iobase2 110 -iobase3 118
-iobase4 120 -iobase5 128 -irq0 15
>>>init
Figure 37:Cut and paste the isacfg commands from the Avanti log file as shown in Figure 36 to the console to define
the serial card in the firmware.

Migration Specialties International, Inc. [email protected]
63
A "sh config" or "isacfg –all" command can be used to confirm the presence of the ISA card definition in the firmware.
>>>sh config
Firmware
SRM Console: V7.0-9
show_arc: Can't find Flash Rom containing ARC console.
PALcode: VMS PALcode V5.56-2, OSF PALcode X1.46-2
Serial Rom: V4.6
Diag Rom: V1.7
Processor
DECchip (tm) 21064-3 166Mhz 512KB Cache
MEMORY
512 Meg of System Memory
Bank 0 = 256 Mbytes(128 MB Per Simm) Starting at 0x0
Bank 1 = 256 Mbytes(128 MB Per Simm) Starting at 0x10000000
Bank 2 = No Memory Detected
PCI Bus
Bus 00 Slot 06: NCR 810A Scsi Controller
pka0.7.0.6.0 SCSI Bus ID 7
dka200.2.0.6.0 RZ28
dka300.3.0.6.0 COMPAQ BA03611C9B
dka600.6.0.6.0 RRD42
Bus 00 Slot 07: Intel SIO 82378
Bus 00 Slot 11: DECchip 21040 Network Controller
ewa0.0.0.11.0 02-13-46-6A-94-24
ISA
Slot Device Name Type Enabled BaseAddr IRQ DMA
0
0 MOUSE Embedded Yes 60 12
1 KBD Embedded Yes 60 1
2 COM1 Embedded Yes 3f8 4
3 COM2 Embedded Yes 2f8 3
4 LPT1 Embedded Yes 3bc 7
5 FLOPPY Embedded Yes 3f0 6 2
1
0 DIGI Singleport Yes 100 15
108
110
118
120
128
>>>
Figure 38: Results of a sh config after a serial card has been defined. The serial card results are highlighted in
blue.
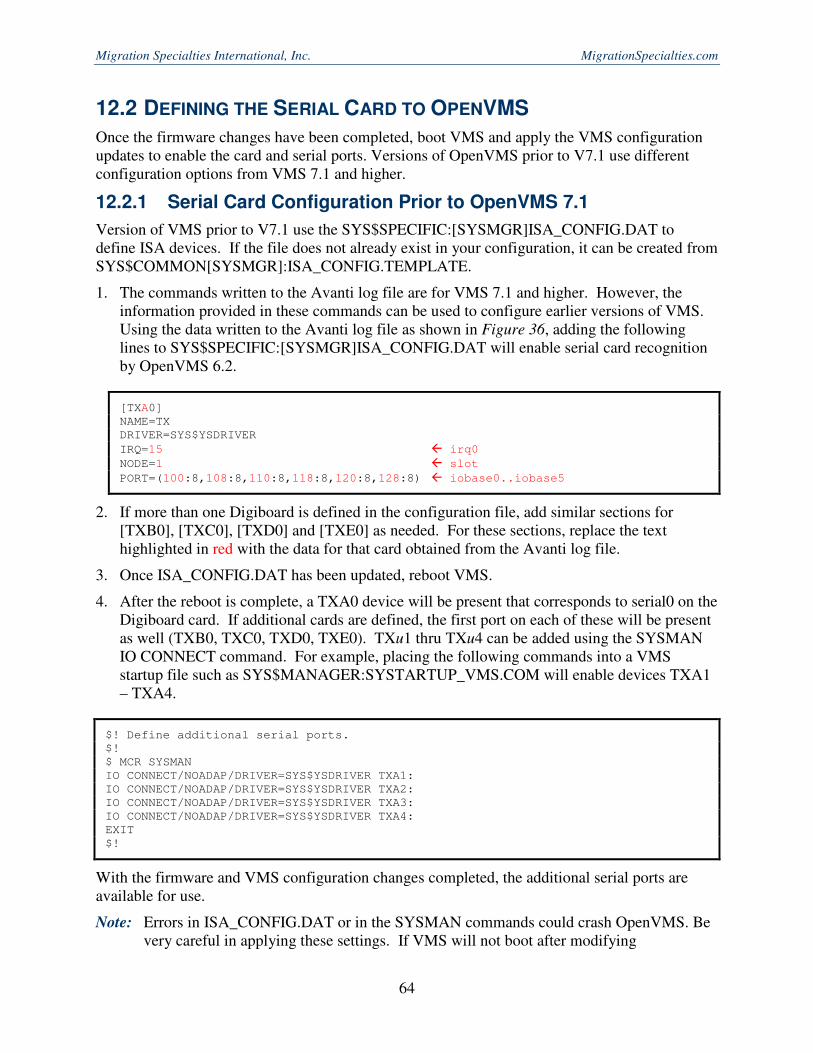
Migration Specialties International, Inc. MigrationSpecialties.com
64
12.2 DEFINING THE SERIAL CARD TO OPENVMS
Once the firmware changes have been completed, boot VMS and apply the VMS configuration updates to enable the card and serial ports. Versions of OpenVMS prior to V7.1 use different configuration options from VMS 7.1 and higher.
12.2.1 Serial Card Configuration Prior to OpenVMS 7.1
Version of VMS prior to V7.1 use the SYS$SPECIFIC:[SYSMGR]ISA_CONFIG.DAT to define ISA devices. If the file does not already exist in your configuration, it can be created from SYS$COMMON[SYSMGR]:ISA_CONFIG.TEMPLATE.
1. The commands written to the Avanti log file are for VMS 7.1 and higher. However, the information provided in these commands can be used to configure earlier versions of VMS. Using the data written to the Avanti log file as shown in Figure 36, adding the following lines to SYS$SPECIFIC:[SYSMGR]ISA_CONFIG.DAT will enable serial card recognition by OpenVMS 6.2.
[TXA0]
NAME=TX
DRIVER=SYS$YSDRIVER
IRQ=15 � irq0
NODE=1 � slot
PORT=(100:8,108:8,110:8,118:8,120:8,128:8) � iobase0..iobase5
2. If more than one Digiboard is defined in the configuration file, add similar sections for [TXB0], [TXC0], [TXD0] and [TXE0] as needed. For these sections, replace the text highlighted in red with the data for that card obtained from the Avanti log file.
3. Once ISA_CONFIG.DAT has been updated, reboot VMS.
4. After the reboot is complete, a TXA0 device will be present that corresponds to serial0 on the Digiboard card. If additional cards are defined, the first port on each of these will be present as well (TXB0, TXC0, TXD0, TXE0). TXu1 thru TXu4 can be added using the SYSMAN IO CONNECT command. For example, placing the following commands into a VMS startup file such as SYS$MANAGER:SYSTARTUP_VMS.COM will enable devices TXA1 – TXA4.
$! Define additional serial ports.
$!
$ MCR SYSMAN
IO CONNECT/NOADAP/DRIVER=SYS$YSDRIVER TXA1:
IO CONNECT/NOADAP/DRIVER=SYS$YSDRIVER TXA2:
IO CONNECT/NOADAP/DRIVER=SYS$YSDRIVER TXA3:
IO CONNECT/NOADAP/DRIVER=SYS$YSDRIVER TXA4:
EXIT
$!
With the firmware and VMS configuration changes completed, the additional serial ports are available for use.
Note: Errors in ISA_CONFIG.DAT or in the SYSMAN commands could crash OpenVMS. Be very careful in applying these settings. If VMS will not boot after modifying
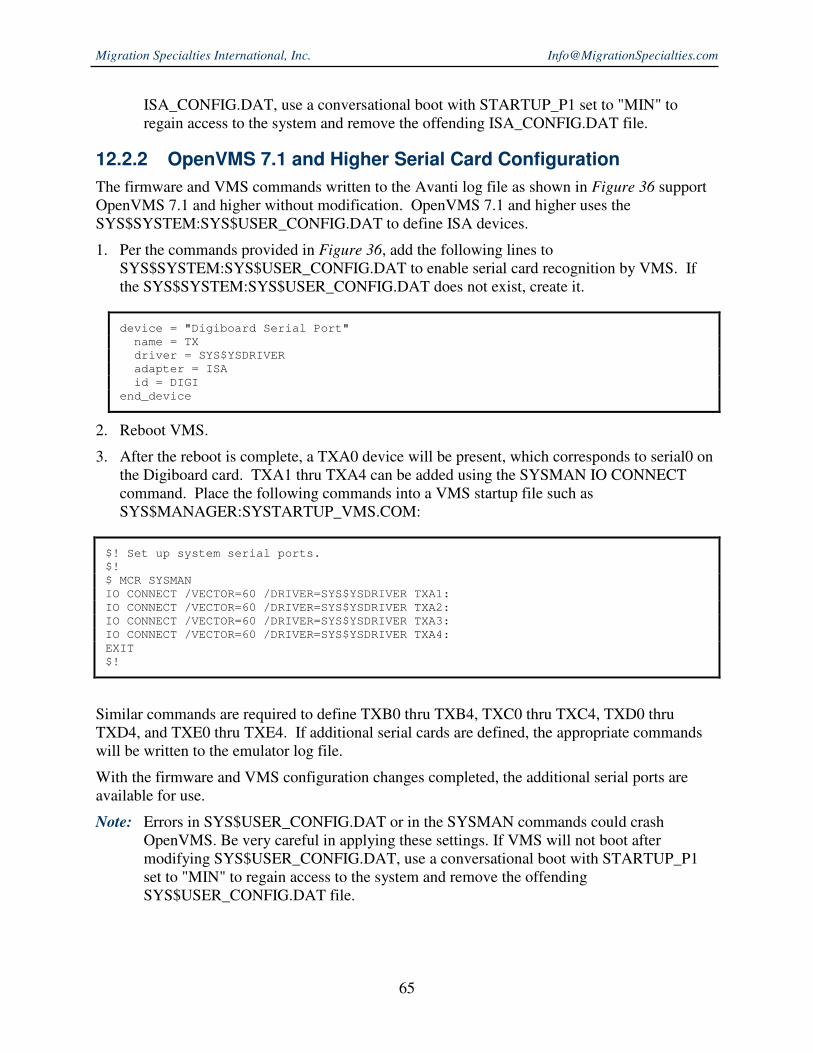
Migration Specialties International, Inc. [email protected]
65
ISA_CONFIG.DAT, use a conversational boot with STARTUP_P1 set to "MIN" to regain access to the system and remove the offending ISA_CONFIG.DAT file.
12.2.2 OpenVMS 7.1 and Higher Serial Card Configuration
The firmware and VMS commands written to the Avanti log file as shown in Figure 36 support OpenVMS 7.1 and higher without modification. OpenVMS 7.1 and higher uses the SYS$SYSTEM:SYS$USER_CONFIG.DAT to define ISA devices.
1. Per the commands provided in Figure 36, add the following lines to SYS$SYSTEM:SYS$USER_CONFIG.DAT to enable serial card recognition by VMS. If the SYS$SYSTEM:SYS$USER_CONFIG.DAT does not exist, create it.
device = "Digiboard Serial Port"
name = TX
driver = SYS$YSDRIVER
adapter = ISA
id = DIGI
end_device
2. Reboot VMS.
3. After the reboot is complete, a TXA0 device will be present, which corresponds to serial0 on the Digiboard card. TXA1 thru TXA4 can be added using the SYSMAN IO CONNECT command. Place the following commands into a VMS startup file such as SYS$MANAGER:SYSTARTUP_VMS.COM:
$! Set up system serial ports.
$!
$ MCR SYSMAN
IO CONNECT /VECTOR=60 /DRIVER=SYS$YSDRIVER TXA1:
IO CONNECT /VECTOR=60 /DRIVER=SYS$YSDRIVER TXA2:
IO CONNECT /VECTOR=60 /DRIVER=SYS$YSDRIVER TXA3:
IO CONNECT /VECTOR=60 /DRIVER=SYS$YSDRIVER TXA4:
EXIT
$!
Similar commands are required to define TXB0 thru TXB4, TXC0 thru TXC4, TXD0 thru TXD4, and TXE0 thru TXE4. If additional serial cards are defined, the appropriate commands will be written to the emulator log file.
With the firmware and VMS configuration changes completed, the additional serial ports are available for use.
Note: Errors in SYS$USER_CONFIG.DAT or in the SYSMAN commands could crash OpenVMS. Be very careful in applying these settings. If VMS will not boot after modifying SYS$USER_CONFIG.DAT, use a conversational boot with STARTUP_P1 set to "MIN" to regain access to the system and remove the offending SYS$USER_CONFIG.DAT file.
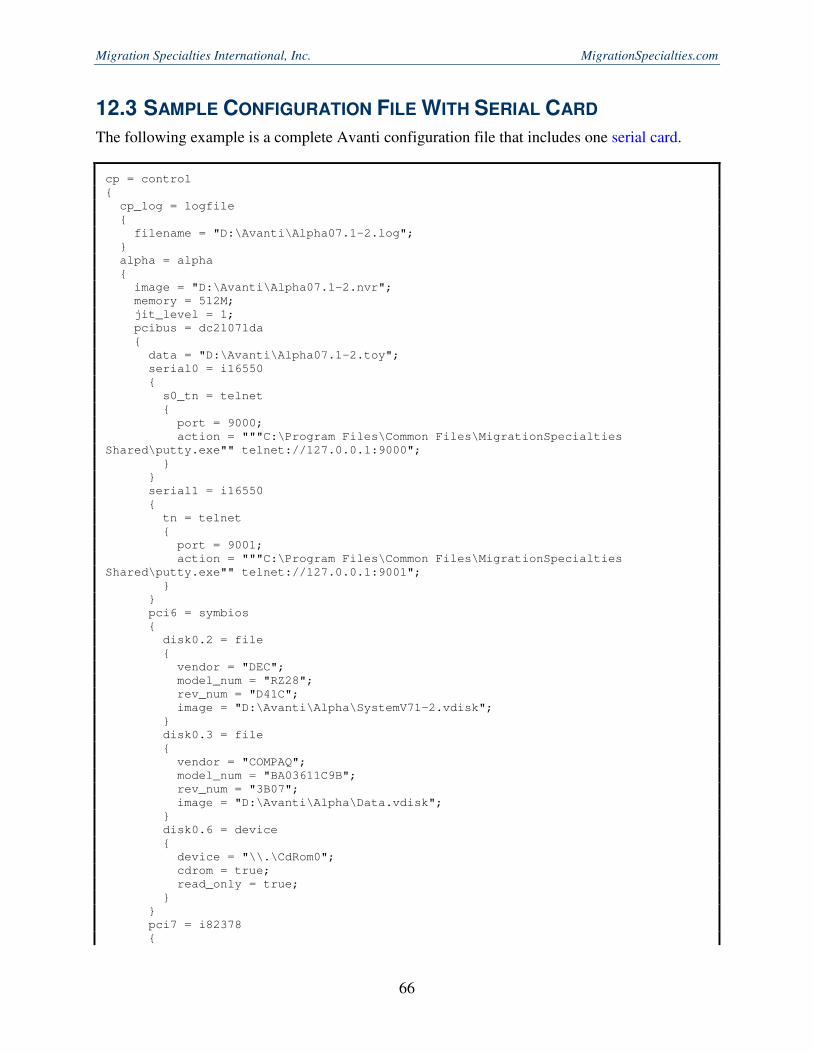
Migration Specialties International, Inc. MigrationSpecialties.com
66
12.3 SAMPLE CONFIGURATION FILE WITH SERIAL CARD
The following example is a complete Avanti configuration file that includes one serial card.
cp = control
{
cp_log = logfile
{
filename = "D:\Avanti\Alpha07.1-2.log";
}
alpha = alpha
{
image = "D:\Avanti\Alpha07.1-2.nvr";
memory = 512M;
jit_level = 1;
pcibus = dc21071da
{
data = "D:\Avanti\Alpha07.1-2.toy";
serial0 = i16550
{
s0_tn = telnet
{
port = 9000;
action = """C:\Program Files\Common Files\MigrationSpecialties
Shared\putty.exe"" telnet://127.0.0.1:9000";
}
}
serial1 = i16550
{
tn = telnet
{
port = 9001;
action = """C:\Program Files\Common Files\MigrationSpecialties
Shared\putty.exe"" telnet://127.0.0.1:9001";
}
}
pci6 = symbios
{
disk0.2 = file
{
vendor = "DEC";
model_num = "RZ28";
rev_num = "D41C";
image = "D:\Avanti\Alpha\SystemV71-2.vdisk";
}
disk0.3 = file
{
vendor = "COMPAQ";
model_num = "BA03611C9B";
rev_num = "3B07";
image = "D:\Avanti\Alpha\Data.vdisk";
}
disk0.6 = device
{
device = "\\.\CdRom0";
cdrom = true;
read_only = true;
}
}
pci7 = i82378
{
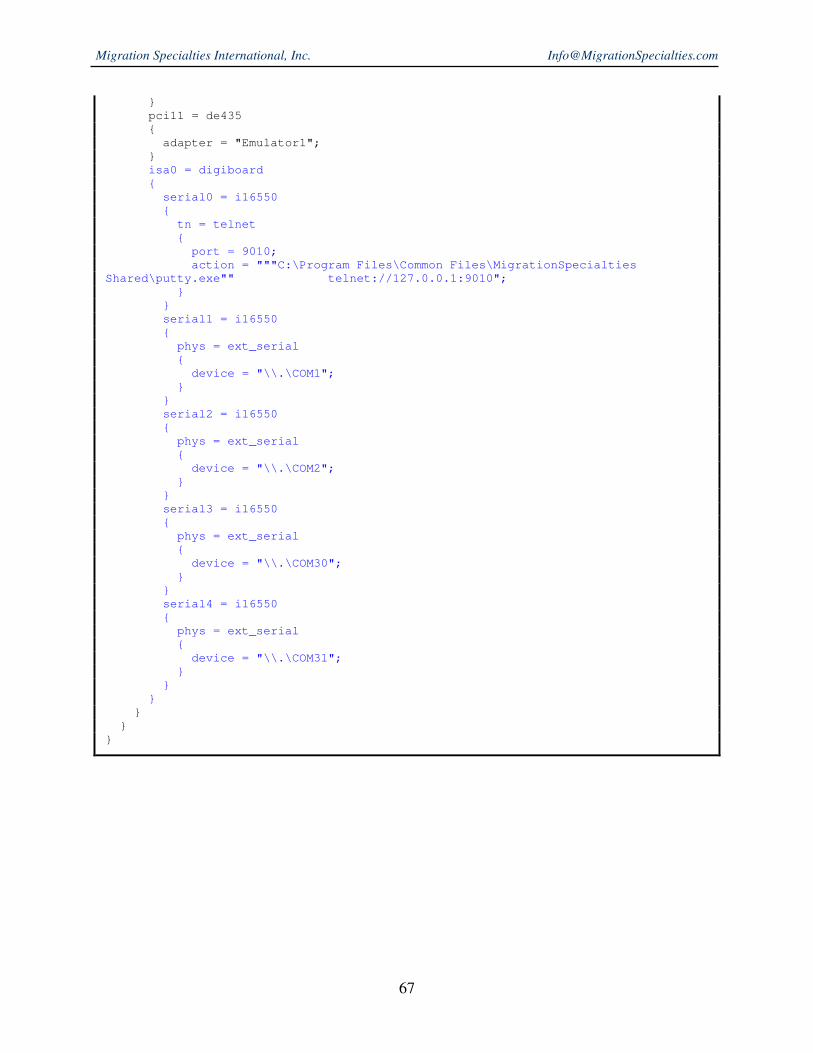
Migration Specialties International, Inc. [email protected]
67
}
pci11 = de435
{
adapter = "Emulator1";
}
isa0 = digiboard
{
serial0 = i16550
{
tn = telnet
{
port = 9010;
action = """C:\Program Files\Common Files\MigrationSpecialties
Shared\putty.exe"" telnet://127.0.0.1:9010";
}
}
serial1 = i16550
{
phys = ext_serial
{
device = "\\.\COM1";
}
}
serial2 = i16550
{
phys = ext_serial
{
device = "\\.\COM2";
}
}
serial3 = i16550
{
phys = ext_serial
{
device = "\\.\COM30";
}
}
serial4 = i16550
{
phys = ext_serial
{
device = "\\.\COM31";
}
}
}
}
}
}
Migration Specialties International, Inc. MigrationSpecialties.com
68
13. VIRTUAL TAPES
Like virtual disks, virtual tape devices appear as files to the host system. By default, Avanti assigns the extension .vtape to a vtape file. The vtape format utilized by Avanti is fully compatible with the vtape format used in SimH. Avanti virtual tape devices default to a DEC DLT2000 device type.
Note: Avanti puts no limit on the size of a vtape file. Continuously appending to a tape will eventually fill the host system disk.
Avanti treats virtual tape files as follows:
• If a virtual tape files does not exist on Avanti startup, it is created.
• If a virtual tape file is removed while Avanti is running, Avanti will create a new tape file then next time the associated tape device is accessed. See Changing Tapes below for more on this feature.
• If a virtual tape file exists on Avanti startup, it is used.
• Avanti locks access to a tape file upon the following operations:
- Tru64: Tape read/write operations commence.
- VMS: Tape INITIALIZE or MOUNT operation is executed. If a tape is INITIALIZE'd, its underlying file will not be unlocked until a MOUNT/DISMOUNT operation is performed or VMS is shutdown.
• Avanti releases a tape file when an UNLOAD command is sent to the virtual tape drive. The following operations issue an UNLOAD command:
- Tru64: mt unload or mt offline operation is executed.
- VMS: Tape DISMOUNT operation is executed.
• Under VMS, when a tape is initialized, the underlying tape file is reduced to a few Kbytes in size.
13.1.1 Changing Tapes
Virtual tapes can be changed while Avanti is running by renaming the virtual tape file. Avanti will recreate the original tape file the next time the tape device is accessed. To change the virtual tape Tape1.vtape, follow these steps:
1) Stop tape access.
a) Tru64: Stop writing to the tape.
b) VMS: DISMOUNT the tape device.
2) From the host O/S, rename the file Tape1.vtape to a new name, such as AUG03_Backup.vtape.
3) The next time a tape operation takes place against the virtual tape device, the Tape1.vtape file will be recreated.
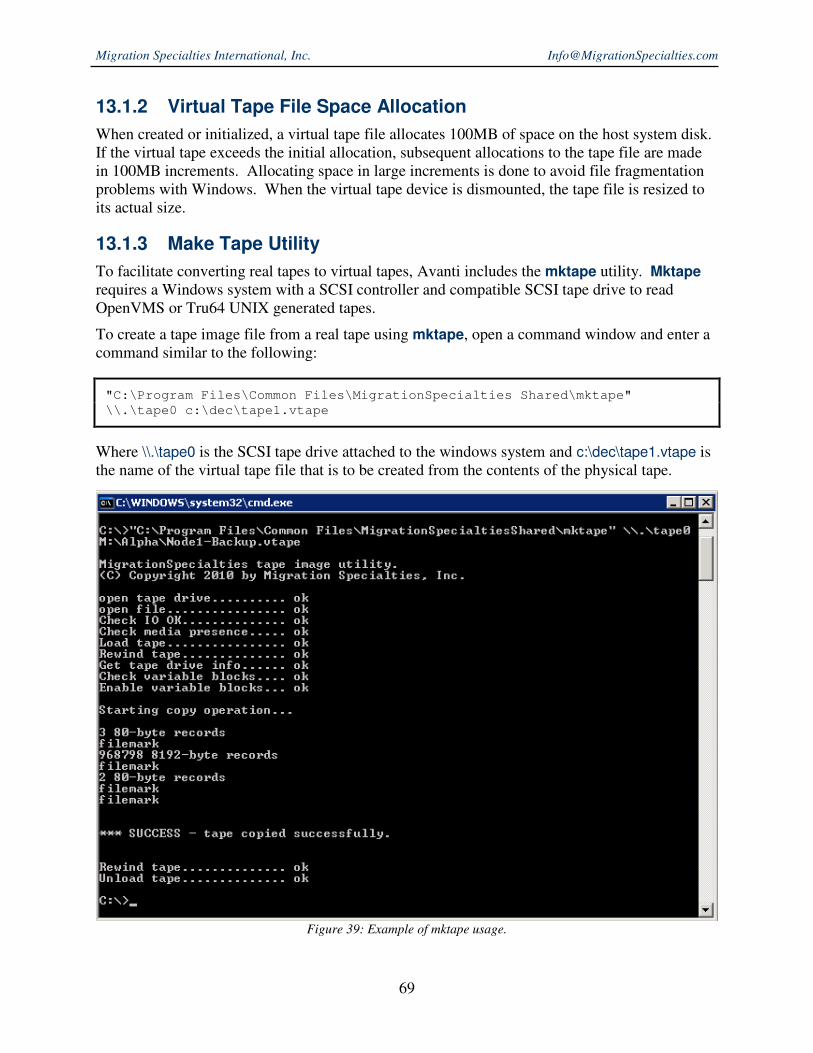
Migration Specialties International, Inc. [email protected]
69
13.1.2 Virtual Tape File Space Allocation
When created or initialized, a virtual tape file allocates 100MB of space on the host system disk. If the virtual tape exceeds the initial allocation, subsequent allocations to the tape file are made in 100MB increments. Allocating space in large increments is done to avoid file fragmentation problems with Windows. When the virtual tape device is dismounted, the tape file is resized to its actual size.
13.1.3 Make Tape Utility
To facilitate converting real tapes to virtual tapes, Avanti includes the mktape utility. Mktape requires a Windows system with a SCSI controller and compatible SCSI tape drive to read OpenVMS or Tru64 UNIX generated tapes.
To create a tape image file from a real tape using mktape, open a command window and enter a command similar to the following:
"C:\Program Files\Common Files\MigrationSpecialties Shared\mktape"
\\.\tape0 c:\dec\tape1.vtape
Where \\.\tape0 is the SCSI tape drive attached to the windows system and c:\dec\tape1.vtape is the name of the virtual tape file that is to be created from the contents of the physical tape.
Figure 39: Example of mktape usage.
Migration Specialties International, Inc. MigrationSpecialties.com
70
14. AVANTI PERFORMANCE
No specific tuning is required to run OpenVMS or Tru64 UNIX on Avanti. Use of the fastest available host hardware will help improve overall performance. Using quality host hardware components will improve overall system reliability.
Alpha CPU's process commands sequentially. There is no known method of distributing CPU commands across multiple host CPUs that provides any performance gains.
Utilizing a low-performance host system, overloading the amount of memory available to the virtual Alpha system, and excessive I/O will have negative performance consequences, just as on a real Alphaserver. Tuning the O/S may help rectify the situation. If not, consider using a more powerful host system or reducing the workload. If FreeAXP is in use, consider upgrading to Avanti with the JIT option.
14.1 CPU INSTRUCTION SETS
In addition to the standard Alpha EV4 instruction set, the Avanti CPU also supports the BWX, CIX, FIX, and MVI instruction. These instructions were not natively supported on the EV4 CPU. They were introduced on the EV56, EV6, and EV68 series Alpha CPUs. Native EV4 systems running code generated for EV5 and EV6 processors would trap to the operating system and emulate these instructions. Adding the instructions to Avanti's emulated EV4 CPU allows the instructions to be processed "natively", resulting in improved performance.
For example, Python is compiled by default for the EV56 processor. Most of what the Python interpreter does is string manipulation and it uses the byte/word-extension instructions to do so. These instructions do not exist on an EV4 system, so each of these instructions takes a TRAP, firmware passes the trap to VMS, and VMS emulates the instructions. This is very slow, both on real and virtual EV4 hardware. See this Python forum thread for additional information regarding this issue: http://www.pi-net.dyndns.org/piforum/viewtopic.php?t=89
The addition of the EV56 instruction set to Avanti eliminates the EV4 performance issue.
14.1.1 Compiling for Performance
If an application is being ported from an EV5 or EV6 system and source code is available, recompiling the application using the /ARCH=EV4 compiler qualifier will optimize the code for Avanti's emulated EV4 processor. This will confer a small performance gain.
14.2 MEMORY
See section 4.1.1.2.1, Sizing Host Memory for tips on ensuring adequate memory in the host system.
14.3 DISK I/O
Avanti and AvantiFlex allow simultaneous access against up to 45 virtual disks. FreeAXP supports simultaneous access against up to seven disks. These disks can all exist as container files on a single physical disk on the host system. If an application running under Avanti puts high I/O loads on multiple virtual Alpha disks, the host system physical disk controller can easily

Migration Specialties International, Inc. [email protected]
71
be saturated, which in turn will adversely impact performance on Avanti and the host system. To alleviate this problem, spread virtual disks across multiple physical disks and controllers if the Avanti application is I/O intensive across multiple volumes simultaneously.
14.4 USING CDS AND DVDS
Avanti permits mounting and using real OpenVMS and Tru64 UNIX CDs and DVDs. However, better performance can be obtained by creating an ISO image of these devices. I/O on virtual CDs and DVDs is very fast, speeding up installations and data access.
ImgBurn, freely available at http://www.imgburn.com/, has proven a good tool to create Tru64 and VMS ISO images.
14.5 VIRTUAL TAPE PERFORMANCE
Where possible, is recommended that virtual tape devices be placed on the KZPCA (wide) SCSI controller for better performance. OpenVMS versions prior to 7.1-2 and Tru64 UNIX versions prior to V4.0E do not support the KZPCA wide controller.
14.6 TCQ AND PERFORMANCE
Tagged command queuing's (TCQ) primary purpose is to enable quorum disk support in OpenVMS clusters. TCQ is disabled by default because it can interfere with the Tru64 UNIX installation process. In-house OpenVMS and Tru64 UNIX performance benchmarking indicates that enabling TCQ on all disks provides a small overall improvement in Avanti performance. Tru64 UNIX versions 4.n and 5.n along with all supported versions of OpenVMS see a benefit. If performance is critical, test enabling TCQ on all disks.
14.7 FLOATING POINT CALCULATION PERFORMANCE
Applications heavily dependent upon floating point calculations will not perform well on emulators such as Avanti. Floating point calculations are handled quickly in special hardware on real legacy systems, but must be emulated in software on virtual systems.
14.8 HYPERTHREADING
If there are enough physical cores to run the desired workloads, system performance can be increased by disabling hyper-threads, which will give a speed boost to the physical cores since they no longer have to co-schedule the hyper-threaded virtual cores.
14.9 PARKING CORES
Parking cores is a feature that allows the BIOS or Windows decides not to run all of the cores in a system, usually for power, performance, or cooling reasons. Parking cores can impact Avanti performance, as it overrides Avanti's affinity requests. Ensure that there are no BIOS or Power Manager settings reducing power to the CPUs or forcing Turbo Boost mode to be enabled if maximum Avanti performance is desired.
Migration Specialties International, Inc. MigrationSpecialties.com
72
15. OPENVMS SPECIFIC NOTES
15.1 PORTING AN OPENVMS SYSTEM
Porting an OpenVMS system to Avanti can be as simple as backing up the legacy Alpha system across a network to an Avanti system. If you are comfortable in the OpenVMS environment, this is a straightforward process.
If this is more than you want to take on, Migration Specialties offers turnkey OpenVMS porting services. Contact us for more information at [email protected].
15.2 OPENVMS AUTO BOOT
Under OpenVMS, the virtual Alpha can be configured to boot automatically by setting the following console variables:
>>> SET AUTO_ACTION BOOT
>>> SET BOOT_OSFLAGS 0
>>> SET BOOTDEF_DEV ddua
Where ddua is a disk device such as DKA0. Use the exit command to save console parameters in the .nvr file.
15.3 RECONFIGURING THE NETWORK
Avanti uses the EWA0, EWB0, and EWC0 network devices. Porting a system that uses different network controllers will require reconfiguration of the network settings in VMS to support the EWx adapters. Here is a simple set of steps to accomplish this for DECnet Phase IV and Digital/Compaq/HP TCP/IP services.
1) Disable the DECnet (STARTNET.COM) and TCP/IP (UCX$STARTUP.COM) startups in SYSTARTUP_VMS.COM. Comment out commands similar to these:
$ IF F$SEARCH("SYS$SYSTEM:NETACP.EXE") .NES. "" -
THEN @SYS$MANAGER:STARTNET
⋮
$ @SYS$MANAGER:UCX$STARTUP.COM
⋮
$ @SYS$MANAGER:TCPIP$STARTUP.COM
2) Reboot VMS.
3) Run NETCONFIG.COM and reset the DECnet parameters.
4) Enable DECnet startup in SYSTARTUP_VMS.COM (STARTNET.COM).
Note: It is very important that DECnet services start before TCP/IP services. Some VMS startup configurations submit DECnet and TCP/IP startup commands as batch procedures. This practice should be discontinued; the startup calls should be executed directly from the SYSTARTUP_VMS procedure as inline commands.
5) Reboot. DECnet and LAT should now come up normally.
Migration Specialties International, Inc. [email protected]
73
6) Run UCX$CONFIG.COM or TCPIP$CONFIG.COM and reset the TCP/IP configuration.
7) Enable TCP/IP in SYSTARTUP_VMS.COM (UCX$STARTUP or TCPIO$STARTUP).
8) Reboot. TCP/IP should now come up normally.
15.4 BYPASSING A NIC
If porting a system with two NICs installed, but only one in use, the Dummy network option can be used to define a NIC to the emulator to retain the existing system's network configuration. For example, if a system has NICs EWA and EWB defined, but only EWB is used, EWA can be assigned to Dummy network. EWB can be assigned to a host NIC. The original Alpha configuration is thus preserved, which may negate the necessity of updating the VMS network configuration.
15.5 MAXIMUM PHYSICAL DISK SIZE UNDER OPENVMS
OpenVMS V6.0 through V8.3 support a maximum physical disk size of 1TB. OpenVMS V8.4 introduced a maximum physical disk size of 2TB. See section 9.5 of the OpenVMS FAQ for more details: http://h71000.www7.hp.com/faq/vmsfaq_013.html
Caveats:
• Pre 7.2 version have a maximum of 1 million clusters, so for an n-GB drive the cluster size will be 2*n, which may get rather large.
• The SWXCR RAID controllers had their own hardware limitations.
15.6 OPENVMS CLUSTERING
• OpenVMS NI clusters between Avanti and real Alpha and Itanium hardware have been successfully created and are stable.
• Avanti supports satellite booting into a cluster.
15.6.1 Quorum Disk and TCQ
When a cluster is configured with a quorum disk, Tagged Command Queuing (TCQ4) must be enabled on the quorum disk. See Section 7.7.6, SCSI Disk [+] for instructions on enabling TCQ.
15.6.2 Clusters and Disk Sharing
Avanti supports shared SCSI busses for clustering, where several nodes share one or more disk drives. Disk sharing between Avanti instances running on the same host system is enabled using the write_share option in the advance disk options (see Section 7.7.6, SCSI Disk [+]).
Warning: Using the write_share feature to share disks with non-clustered Avanti instances is not recommended. Doing so may result in disk corruption.
If Avanti is running on separate host systems, disk sharing is only possible using physical devices such as SAN disks that are physically shared between the host systems.
4 TCQ was introduced in Avanti 2.6.4.594.
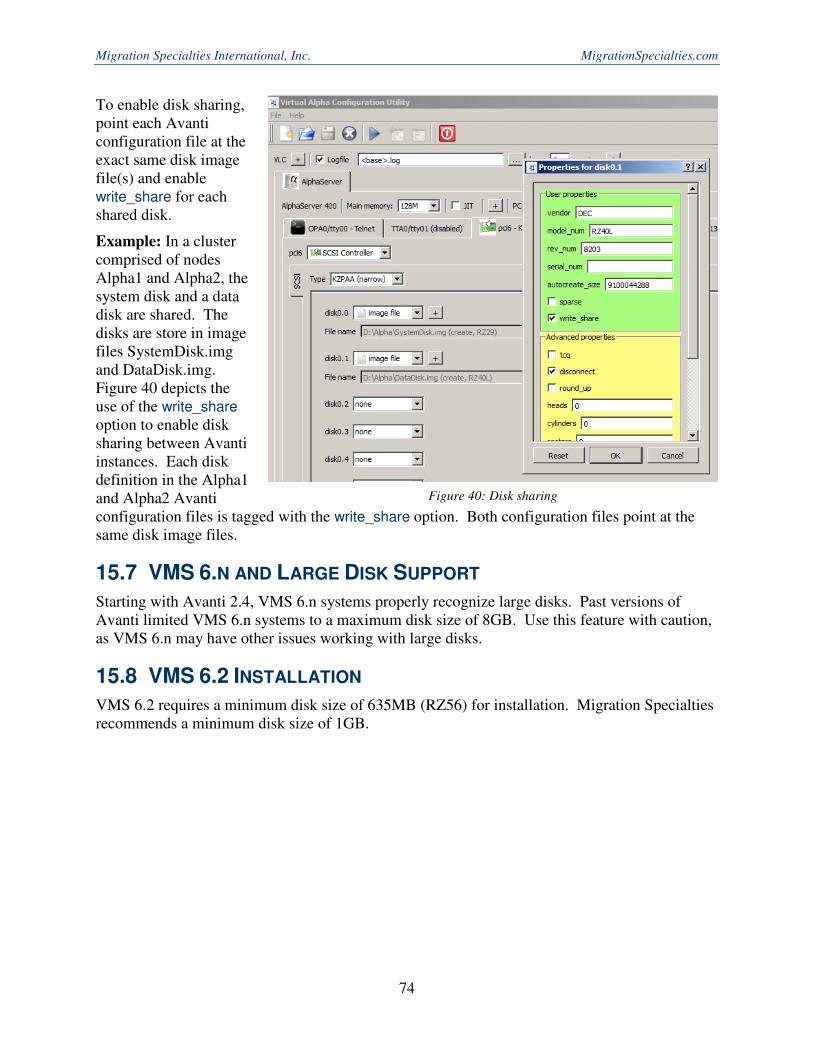
Migration Specialties International, Inc. MigrationSpecialties.com
74
To enable disk sharing, point each Avanti configuration file at the exact same disk image file(s) and enable write_share for each shared disk.
Example: In a cluster comprised of nodes Alpha1 and Alpha2, the system disk and a data disk are shared. The disks are store in image files SystemDisk.img and DataDisk.img. Figure 40 depicts the use of the write_share option to enable disk sharing between Avanti instances. Each disk definition in the Alpha1 and Alpha2 Avanti configuration files is tagged with the write_share option. Both configuration files point at the same disk image files.
15.7 VMS 6.N AND LARGE DISK SUPPORT
Starting with Avanti 2.4, VMS 6.n systems properly recognize large disks. Past versions of Avanti limited VMS 6.n systems to a maximum disk size of 8GB. Use this feature with caution, as VMS 6.n may have other issues working with large disks.
15.8 VMS 6.2 INSTALLATION
VMS 6.2 requires a minimum disk size of 635MB (RZ56) for installation. Migration Specialties recommends a minimum disk size of 1GB.
Figure 40: Disk sharing
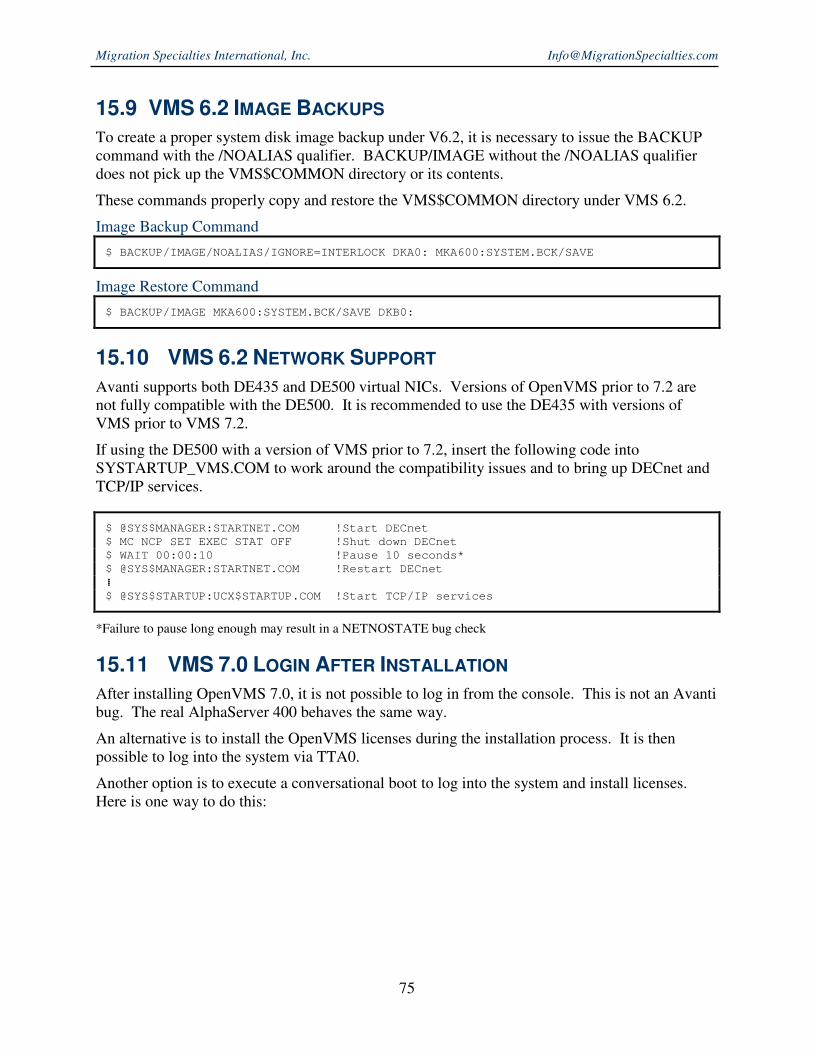
Migration Specialties International, Inc. [email protected]
75
15.9 VMS 6.2 IMAGE BACKUPS
To create a proper system disk image backup under V6.2, it is necessary to issue the BACKUP command with the /NOALIAS qualifier. BACKUP/IMAGE without the /NOALIAS qualifier does not pick up the VMS$COMMON directory or its contents.
These commands properly copy and restore the VMS$COMMON directory under VMS 6.2.
Image Backup Command
$ BACKUP/IMAGE/NOALIAS/IGNORE=INTERLOCK DKA0: MKA600:SYSTEM.BCK/SAVE
Image Restore Command
$ BACKUP/IMAGE MKA600:SYSTEM.BCK/SAVE DKB0:
15.10 VMS 6.2 NETWORK SUPPORT
Avanti supports both DE435 and DE500 virtual NICs. Versions of OpenVMS prior to 7.2 are not fully compatible with the DE500. It is recommended to use the DE435 with versions of VMS prior to VMS 7.2.
If using the DE500 with a version of VMS prior to 7.2, insert the following code into SYSTARTUP_VMS.COM to work around the compatibility issues and to bring up DECnet and TCP/IP services.
$ @SYS$MANAGER:STARTNET.COM !Start DECnet
$ MC NCP SET EXEC STAT OFF !Shut down DECnet
$ WAIT 00:00:10 !Pause 10 seconds*
$ @SYS$MANAGER:STARTNET.COM !Restart DECnet
⁞
$ @SYS$STARTUP:UCX$STARTUP.COM !Start TCP/IP services
*Failure to pause long enough may result in a NETNOSTATE bug check
15.11 VMS 7.0 LOGIN AFTER INSTALLATION
After installing OpenVMS 7.0, it is not possible to log in from the console. This is not an Avanti bug. The real AlphaServer 400 behaves the same way.
An alternative is to install the OpenVMS licenses during the installation process. It is then possible to log into the system via TTA0.
Another option is to execute a conversational boot to log into the system and install licenses. Here is one way to do this:
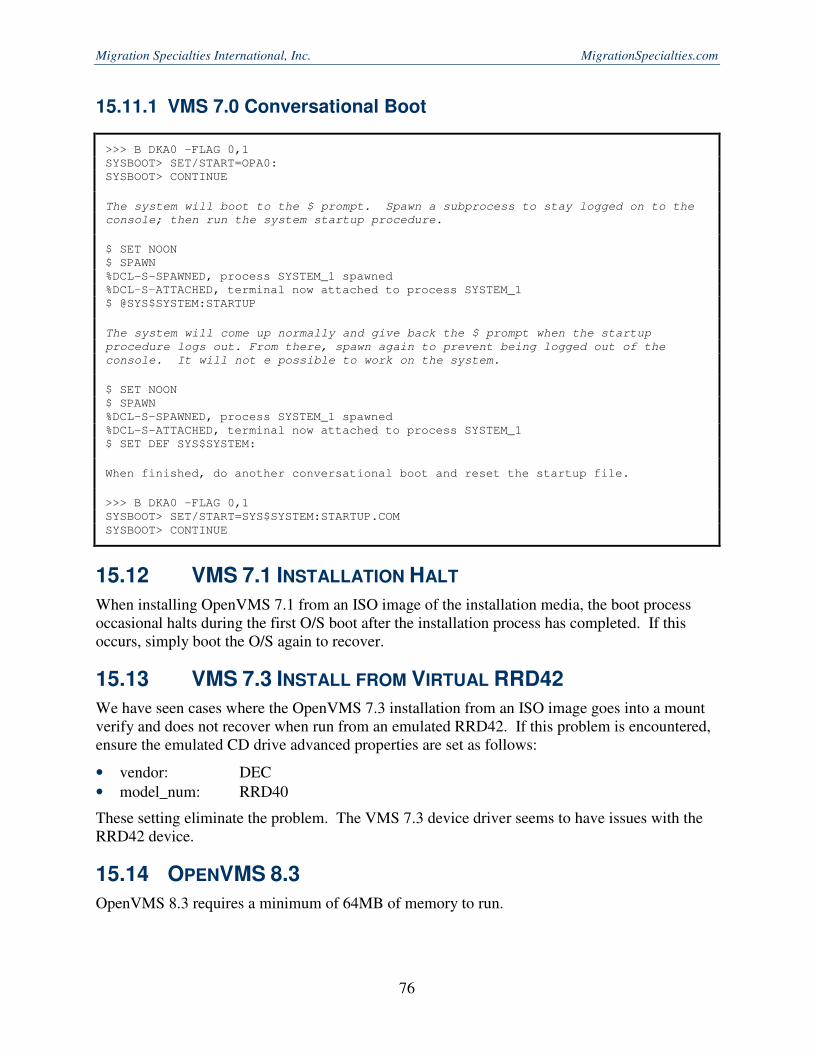
Migration Specialties International, Inc. MigrationSpecialties.com
76
15.11.1 VMS 7.0 Conversational Boot
>>> B DKA0 –FLAG 0,1
SYSBOOT> SET/START=OPA0:
SYSBOOT> CONTINUE
The system will boot to the $ prompt. Spawn a subprocess to stay logged on to the
console; then run the system startup procedure.
$ SET NOON
$ SPAWN
%DCL-S-SPAWNED, process SYSTEM_1 spawned
%DCL-S-ATTACHED, terminal now attached to process SYSTEM_1
$ @SYS$SYSTEM:STARTUP
The system will come up normally and give back the $ prompt when the startup
procedure logs out. From there, spawn again to prevent being logged out of the
console. It will not e possible to work on the system.
$ SET NOON
$ SPAWN
%DCL-S-SPAWNED, process SYSTEM_1 spawned
%DCL-S-ATTACHED, terminal now attached to process SYSTEM_1
$ SET DEF SYS$SYSTEM:
When finished, do another conversational boot and reset the startup file.
>>> B DKA0 –FLAG 0,1
SYSBOOT> SET/START=SYS$SYSTEM:STARTUP.COM
SYSBOOT> CONTINUE
15.12 VMS 7.1 INSTALLATION HALT
When installing OpenVMS 7.1 from an ISO image of the installation media, the boot process occasional halts during the first O/S boot after the installation process has completed. If this occurs, simply boot the O/S again to recover.
15.13 VMS 7.3 INSTALL FROM VIRTUAL RRD42
We have seen cases where the OpenVMS 7.3 installation from an ISO image goes into a mount verify and does not recover when run from an emulated RRD42. If this problem is encountered, ensure the emulated CD drive advanced properties are set as follows:
• vendor: DEC
• model_num: RRD40
These setting eliminate the problem. The VMS 7.3 device driver seems to have issues with the RRD42 device.
15.14 OPENVMS 8.3
OpenVMS 8.3 requires a minimum of 64MB of memory to run.

Migration Specialties International, Inc. [email protected]
77
15.15 OPENVMS ALPHA V8.4-2L2
VSI's OpenVMS V8.4-2L2 Performance Release for Alpha requires Avanti version 3.0.0.617 or higher.
15.16 VSI OPENVMS REBRANDING ERROR
If a rebranding error is encountered while upgrading a non-VSI OpenVMS system disk to a VSI version of OpenVMS, try one of the following solutions:
• Upgrade the disk to ODS-5 and enable hard links.
• Check and repair the SYSCOMMON/VMS$COMMON directory aliasing. Read the following article for details: ftp://ftp.hp.com/%2F/pub/enterprise/programming_code/c00811161Checking_the_Alias_Directory....txt
• Use the DFU utility off the OpenVMS Freeware CD to analyze and repair the disk file structure.
15.17 OPENVMS SCSI SUPPORT LIMITATIONS
OpenVMS versions prior to 7.1-2 do not support the KZPCA wide SCSI controller. VMS 7.1-1H2 and earlier are limited to the KZPAA narrow controller and seven disks per controller.
15.18 SERIAL DEVICES
By default, FreeAXP and Avanti present two serial ports under OpenVMS, OPA0 and TTA0. Procedures the check for serial devices by scanning for a TX device will need to be updated to reflect the ports presented by Avanti.
Example of obtaining the terminal device name:
$ TERM = F$GETDVI("SYS$INPUT","DEVNAM")
$ SH SYM TERM
T = "_TTA0:"
Note: TX serial devices can be added using the Digiboard serial card.
15.19 REFLECTION 2011 & E-TERM32 VIRTUAL SESSIONS
Prior to Avanti 2.4, OpenVMS login using Reflection 2011 or E-Term32 VT terminal emulators to the OPA0 or TTA0 virtual serial ports may not be possible. The Reflection and E-Term32 emulators may seem to skip password entry. PuTTY, SmarTerm, KEA, Hyperterm, and most other VT terminal emulators do not exhibit this behavior.
The Telnet standard states that a <CR> that is not followed by an <LF> should instead be followed by a <NULL>. Most VT terminal emulators do not conform to this standard. However, Reflection and E-Term32 closely follow the Telnet standard and do implement this feature. VMS does not handle the <NULL> on the serial port very well. Avanti has been updated to handle the <NULL> properly, which resolves the problem with Reflection and E-Term32 logins against virtual serial ports.
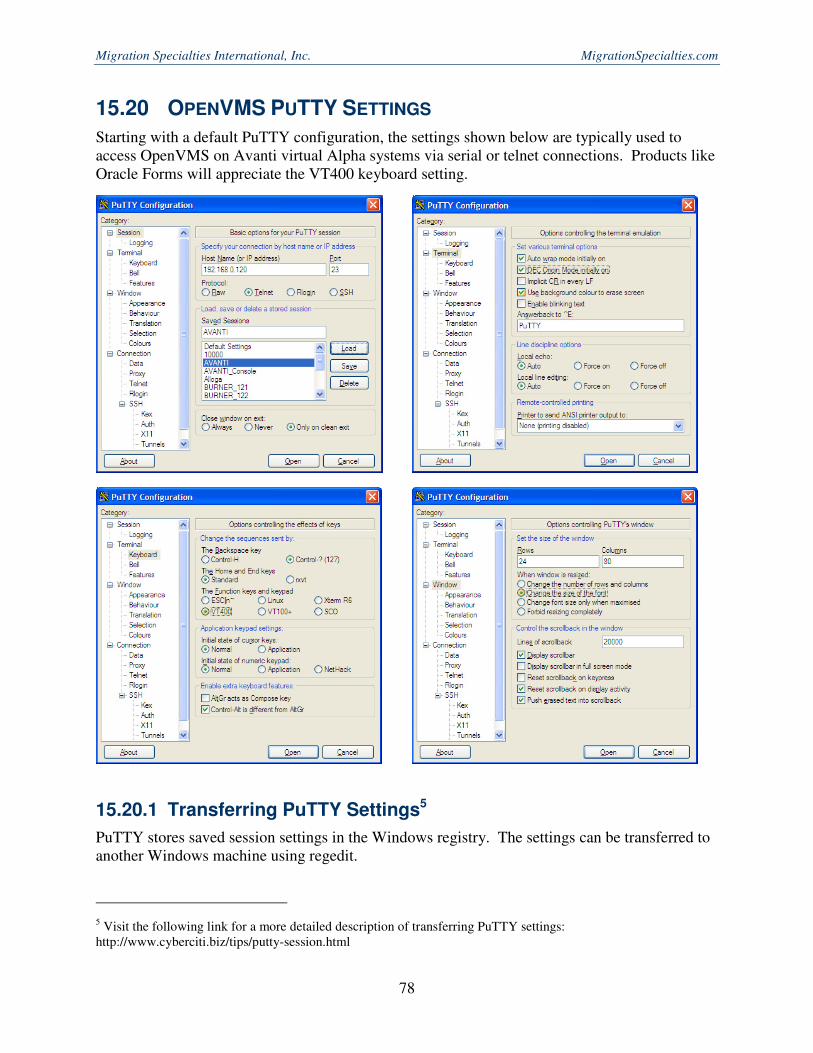
Migration Specialties International, Inc. MigrationSpecialties.com
78
15.20 OPENVMS PUTTY SETTINGS
Starting with a default PuTTY configuration, the settings shown below are typically used to access OpenVMS on Avanti virtual Alpha systems via serial or telnet connections. Products like Oracle Forms will appreciate the VT400 keyboard setting.
15.20.1 Transferring PuTTY Settings5
PuTTY stores saved session settings in the Windows registry. The settings can be transferred to another Windows machine using regedit.
5 Visit the following link for a more detailed description of transferring PuTTY settings: http://www.cyberciti.biz/tips/putty-session.html

Migration Specialties International, Inc. [email protected]
79
To export the PuTTY registry key on the source Windows machine, click on Start> Run> and enter the following regedit command in the run dialog box:
regedit /e "%userprofile%\desktop\putty-registry.reg"
HKEY_CURRENT_USER\Software\Simontatham
This command places the PuTTY registry key on the desktop in the file putty-registry.reg. Note that the name of the registry key (Simon Thatham) is the author of PuTTY.
Copy the putty-registry.reg file to the new Windows system. Right click the file and select the Merge option to add the key to the Windows registry. The PuTTY sessions defined in the transfer file will be added to any existing PuTTY sessions already saved on the machine.
15.21 UNXSIGNAL BUG CHECK
The UNXSIGNAL bug check has been observed on versions of VMS prior to OpenVMS 7.3 when attempting to write to a new disk.
**** OpenVMS (TM) Alpha Operating System V6.2 - BUGCHECK ****
** Code=0000041C: UNXSIGNAL, Unexpected signal name in ACP
** Crash CPU: 00 Primary CPU: 00 Active CPUs: 00000001
** Current Process = BPCD_BG30
** Image Name = BUILD$DKC0:[OPENV.NETBACKUP]BPCD_AXP.EXE;1
This crash is due to an old disk geometry problem. The problem causes an overflow in one of the following UCB fields:
UCB$B_SECTORS UCB$B_TRACKS UCB$W_CYLINDERS
This results in the VCB$L_BLOCKFACT field in the VCB being zero. The first space allocation on the volume generates a divide-by-zero error, which crashes the system with a UNXSIGNAL bugcheck.
The fix is in MOUNTSHR.EXE in V7.3 (VAX and Alpha).
Fixes are also available in the following patch kits:
MOUNTSHR.EXE_V62R VMOUNT.EXE_V62R VMS73_F11X-V0200 VMS73_F11X-V0300
The workaround is to change the size of the virtual disk. For example, if an RZ25 generates the bug check, change the disk to an RZ56.
Migration Specialties International, Inc. MigrationSpecialties.com
80
16. TRU64 UNIX SPECIFIC NOTES
16.1 PORTING A TRU64 SYSTEM
From a hardware perspective, porting a Tru64 UNIX system to Avanti is equivalent to moving it to an AlphaServer 400. There are two choices when moving from one Alpha type to another:
1) Boot from the O/S CD, build a new system disk, and restore/merge the files from your original system or disks.
2) Boot from the old system disk using the Generic kernel, genvmunix, and build a new kernel that supports the new Alpha's architecture (i.e. the platform type).
To boot the generic kernel, use something like:
>>> boot dkaXXX -flags 1 -file /genvmunix
This should boot single user with the hardware recognized and root mounted read-only. If it works, then you have the option of running from genvmunix going forward or rebuilding a new kernel.
Section 5 of the Tru64 System Admininstrator's Guide has good discussion of how to do this. The V4 documentation set is available online at HP. The following link is a good starting point:
http://h30097.www3.hp.com/docs/base_doc/DOCUMENTATION/V40F_HTML/APS2RFTE/CNFGMNTC.HTM#device-config-sec
You will need to run bcheckrc, sizer -n, do some editing of the new config file, and use doconfig to build a new 'vmunix', as per section 5.4.1 of the V4 manual above. Do not delete or overwrite genvmunix.
If this is more than you want to take on, Migration Specialties offers turnkey Tru64 UNIX porting services. Contact us for more information at [email protected].
16.2 TRU64 AUTO BOOT
Under Tru64 UNIX, the virtual Alpha can be configured to boot automatically by setting the following console variables.
>>> SET AUTO_ACTION BOOT
>>> SET BOOTDEF_DEV DKxnnn
>>> SET BOOT_OSFLAGS A
Where DKxnnn equates to a disk device such as DKA0. Use the exit command to save console parameters in the .nvr file.
16.3 TRU64 VERSION SUPPORT
Avanti supports Tru64 UNIX V3.2C and higher. Avanti has not been tested with unqualified External Field Test (EFT) or pre-Release versions of Tru64 UNIX.

Migration Specialties International, Inc. [email protected]
81
16.4 NETWORK NOTES
16.4.1 NIC Support in V3.2X Releases
Tru64 versions in the V3.2X family require that the DE435 NIC be used since they pre-date the introduction of the DE500 NIC. A DE500 will not be recognized by a V3.2x release.
16.4.2 NIC Console Variables
Regardless of the settings of the physical NIC used in Windows, set and lock the DE500 mode to 'Fast', and the DE435 to 'Twisted Pair'. Do NOT use Auto at any time.
>>> set ewa0_mode Fast
>>> set ewb0_mode Twisted Pair
>>> init
Failing to select and lock the NIC speed from the console may result in unpredictable behavior by the Tru64 Tulip NIC driver. Symptoms may include not recognizing the card, poor performance, and only uni-directional traffic. Use the exit command to save console parameters in the .nvr file.
16.4.3 Sharing NICs with Windows
In a dual-NIC configuration, some Windows NIC drivers do not behave properly when sharing the Windows active NIC with the primary NIC for Tru64. Symptoms may include poor throughput, packet loss/re-transmission, or even Tru64 UNIX 0x670 Machine Checks associated with incoming broadcast packets. The solution is to use the recommended configuration of dedicated NICs for the virtual Alpha. Note that there is a wide range of NICs and associated drivers available for Windows and many will not exhibit this shortcoming.
16.4.4 LAT and Dual NICs
When operating with dual NICs and running LAT, if both NICs are on the same segment or switch, exclude one NIC from LAT. This prevents creation of ghost services or nodes.
# latcp -E tu1
16.4.5 Switching NICs
If the Tru64 system being ported to Avanti does not already use a DE435 or DE500 NIC, then a new kernel will need to be built which includes 'tu' support before it recognizes Avanti's DE435/500 hardware. There is a section on doing this in the Tru64 Administration Guide.
• Tru64 UNIX V5.1B System Admin Guide AA-RH9FE-TE
Sections 4.6.1, 4.6.2 and 4.6.2 - Building the Kernel under various circumstances.
Or
• Tru64 UNIX V4.0F System Admin Guide AA-PS2RF-TE
Sections 5.4.1, 5.4.2 and 5.4.3 - Building the Kernel under various circumstances.

Migration Specialties International, Inc. MigrationSpecialties.com
82
16.4.6 SCSI Support Limitations
Tru64 V3.2x does not support the KZPCA wide SCSI controller. Both V3.2x and V4 do not support SCSI IDs greater than 7; therefore, these versions of Tru64 are limited to seven disks per SCSI controller.
16.5 V5 AND LARGE DISKS
All V5 releases of Tru64 UNIX attempt to interrogate HP/Compaq storage arrays to acquire essential capability information. Consequently, whenever an HSG, HSZ, EVA or XP disk unit is detected, V5 will request the appropriate array specific code pages containing the unit information. However, when Avanti is using disk volume files there is no array information to be discovered. Therefore, when using Tru64 V5 on Avanti we do not recommend labeling disk volume files as array volumes. Instead, for disks above 18GB, use the default RZ58 catch-all type. For all other volumes you can use one of the supplied disk types.
Warning: Labeling a volume as an HSZ, HSG, etc. unit will often cause Tru64 UNIX V5 to mis-identify or reject the volume because the additional array information does not exist.
16.6 MAXIMUM PHYSICAL VOLUME SIZE UNDER TRU64 UNIX
The version of Tru64 UNIX deployed dictates the maximum allowed physical volume size. The table below shows the maximum volume sizes allowed according to the Tru64 UNIX SPDs. Check the SPD for the version of Tru64 in use to verify actual supported maximum values.
Tru64 Version
Maximum Volume Size Details
V3 128GB V3.2C & V3.2G both state 128GB for AdvFs and UFS
V4 512GB V4.0A states 512GB for AdvFs and UFS
V5 1TB V5.0A, V5.1, V5.1B-6 state 1TB for AdvFs and UFS and add a total domain size of 16TB for AdvFs, that is 16 x 1TB volumes
16.7 TRU64 UNIX VIRTUAL TAPE SUPPORT
Avanti virtual tape support for Tru64 UNIX is limited in scope.
• Tru64 UNIX V3.X - No support
• Tru64 UNIX V4.X - Limited support
• Tru64 UNIX V5.X - Limited support
Avanti does not implement or support tapes in their fullest form under Tru64 UNIX.
Read/write operations can be made to a virtual tape file via the /dev/*mt* or /dev/tape/* device special files. The resultant file cannot be detached from Avanti, nor can a new file be attached 'on the fly'. However, the tape file can be copied from the Windows side.
Tru64's mt unload or mt offline both serve to close the tape drive's file. They do not detach the tape file. Once closed, the file can be copied via Windows processes.

Migration Specialties International, Inc. [email protected]
83
Limited Support
• Tape operations are only supported with explicitly set block sizes. IE. explicit i/o sizes MUST be specified on write operations (tar, cpio, vdump), and read operations MUST use dd with an explicit read size (eg. bs=50k) with a pipe to tar, cpio, vrestore, etc.
• The virtual tape does not differentiate between high and low densities.
• The virtual tape does not support compression.
While the KZPCA wide controller is recommended as the as the HBA of choice, support for that device only arrives with Tru64 UNIX V4.0E.
16.8 TRU64 UNIX PUTTY SETTINGS
Starting with a default PuTTY configuration, the settings shown below are typically used to access Tru64 UNIX on Avanti virtual Alpha systems via serial or telnet connections:
Migration Specialties International, Inc. MigrationSpecialties.com
84
16.8.1 Transferring PuTTY Settings6
PuTTY stores saved session settings in the Windows registry. The settings can be transferred to another Windows machine using regedit.
To export the PuTTY registry key on the source Windows machine, click on Start> Run> and enter the following regedit command in the run dialog box:
regedit /e "%userprofile%\desktop\putty-registry.reg"
HKEY_CURRENT_USER\Software\Simontatham
This command places the PuTTY registry key on the desktop in the file putty-registry.reg. Note that the name of the registry key (Simon Thatham) is the author of PuTTY.
Copy the putty-registry.reg file to the new Windows system. Right click the file and select the Merge option to add the key to the Windows registry. The PuTTY sessions defined in the transfer file will be added to any existing PuTTY sessions already saved on the machine.
6 Visit the following link for a more detailed description of transferring PuTTY settings: http://www.cyberciti.biz/tips/putty-session.html
Migration Specialties International, Inc. [email protected]
85
17. MISCELLANEOUS NOTES
17.1 BOOT CONSOLE VARIABLES
Avanti emulates the Alphaserver 400/166 and its boot variables behave exactly as the real Alphaserver. To save the boot variables between boots, ensure the emulator writes them to the NVRAM file via an exit.
>>> set bootdef_dev DKA0
>>> set boot_osflags 0
>>> exit
While running Avanti saves the NVRAM contents to the NVRAM file approximately every 10 seconds.
17.2 FLOATING POINT VALUES
Extensive tests have been run against the VAX and IEEE floating point instructions. There are two minor deviations under Avanti from the behavior of real AlphaServer 400 hardware.
1. With IEEE floating point instructions, the least significant bit of the fraction may differ between Avanti and a real AlphaServer 400. This is due to a rounding difference. There should be very few applications where this difference is significant.
2. After an overflow occurs in a multiplication or division instruction, the result (which is always invalid) differs between Avanti and a real AlphaServer 400. The overflow condition is properly signaled, so this should not be a problem for a well-behaved application.
17.3 CONTAINER FILE COMPATIBILITY
Other than as noted in the following sections, Avanti provides full compatibility with disk container files created by other hardware emulators that support OpenVMS, Digital UNIX, and Tru64 UNIX. This includes container files created under SimH VAX.
17.3.1 PersonalAlpha & Charon Container File
If attempting to boot a PersonalAlpha or CHARON-AXP system container file using Avanti, the following changes may need to be made to achieve a successful boot:
• Disable the CHARON Accelerator utility. As with real Alpha hardware, this extension will cause a boot check under OpenVMS.
• PersonalAlpha's NIC device shows up as ESA0. Avanti's NIC device shows up as EWA0. If booting from a PersonalAlpha image, LAT, DECnet, and TCP/IP services will need to be reconfigured.
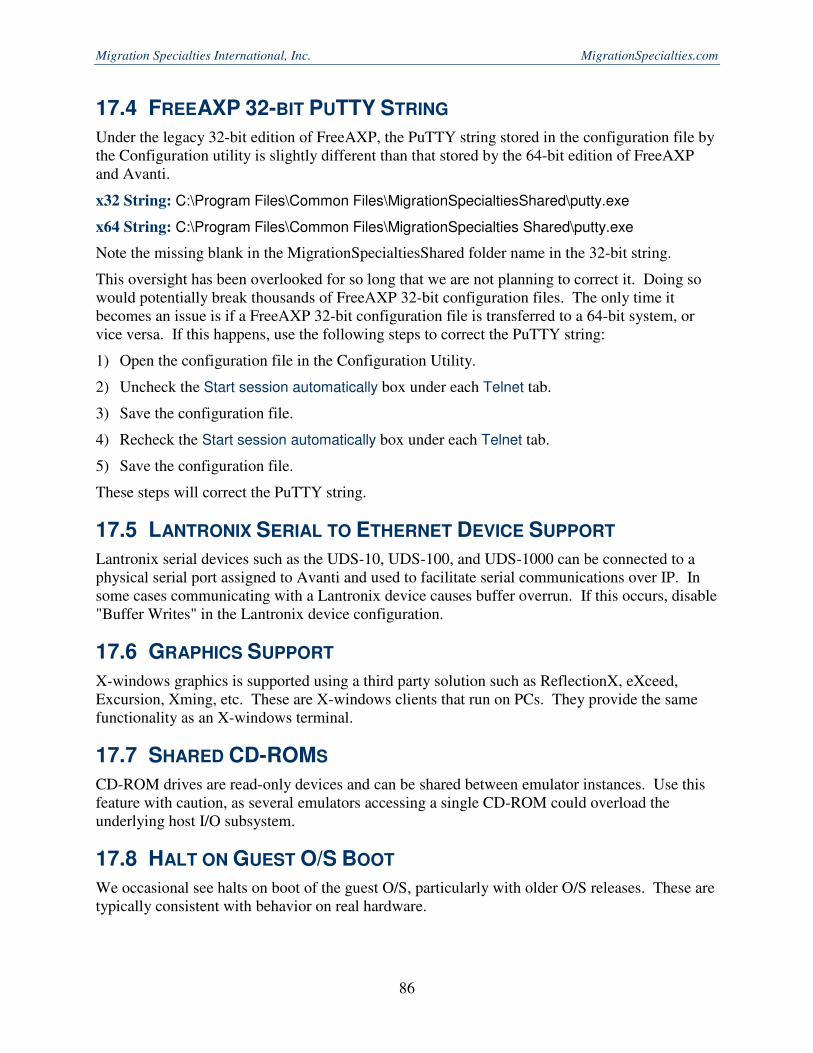
Migration Specialties International, Inc. MigrationSpecialties.com
86
17.4 FREEAXP 32-BIT PUTTY STRING
Under the legacy 32-bit edition of FreeAXP, the PuTTY string stored in the configuration file by the Configuration utility is slightly different than that stored by the 64-bit edition of FreeAXP and Avanti.
x32 String: C:\Program Files\Common Files\MigrationSpecialtiesShared\putty.exe
x64 String: C:\Program Files\Common Files\MigrationSpecialties Shared\putty.exe
Note the missing blank in the MigrationSpecialtiesShared folder name in the 32-bit string.
This oversight has been overlooked for so long that we are not planning to correct it. Doing so would potentially break thousands of FreeAXP 32-bit configuration files. The only time it becomes an issue is if a FreeAXP 32-bit configuration file is transferred to a 64-bit system, or vice versa. If this happens, use the following steps to correct the PuTTY string:
1) Open the configuration file in the Configuration Utility.
2) Uncheck the Start session automatically box under each Telnet tab.
3) Save the configuration file.
4) Recheck the Start session automatically box under each Telnet tab.
5) Save the configuration file.
These steps will correct the PuTTY string.
17.5 LANTRONIX SERIAL TO ETHERNET DEVICE SUPPORT
Lantronix serial devices such as the UDS-10, UDS-100, and UDS-1000 can be connected to a physical serial port assigned to Avanti and used to facilitate serial communications over IP. In some cases communicating with a Lantronix device causes buffer overrun. If this occurs, disable "Buffer Writes" in the Lantronix device configuration.
17.6 GRAPHICS SUPPORT
X-windows graphics is supported using a third party solution such as ReflectionX, eXceed, Excursion, Xming, etc. These are X-windows clients that run on PCs. They provide the same functionality as an X-windows terminal.
17.7 SHARED CD-ROMS
CD-ROM drives are read-only devices and can be shared between emulator instances. Use this feature with caution, as several emulators accessing a single CD-ROM could overload the underlying host I/O subsystem.
17.8 HALT ON GUEST O/S BOOT
We occasional see halts on boot of the guest O/S, particularly with older O/S releases. These are typically consistent with behavior on real hardware.
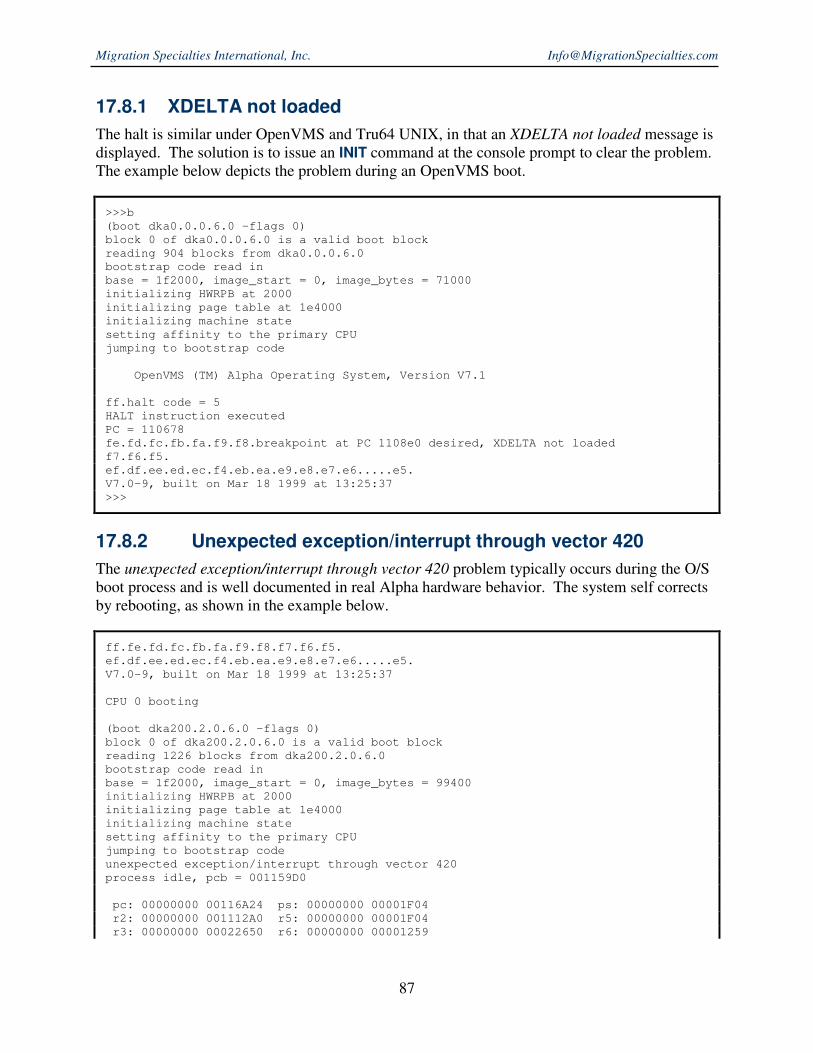
Migration Specialties International, Inc. [email protected]
87
17.8.1 XDELTA not loaded
The halt is similar under OpenVMS and Tru64 UNIX, in that an XDELTA not loaded message is displayed. The solution is to issue an INIT command at the console prompt to clear the problem. The example below depicts the problem during an OpenVMS boot.
>>>b
(boot dka0.0.0.6.0 -flags 0)
block 0 of dka0.0.0.6.0 is a valid boot block
reading 904 blocks from dka0.0.0.6.0
bootstrap code read in
base = 1f2000, image_start = 0, image_bytes = 71000
initializing HWRPB at 2000
initializing page table at 1e4000
initializing machine state
setting affinity to the primary CPU
jumping to bootstrap code
OpenVMS (TM) Alpha Operating System, Version V7.1
ff.halt code = 5
HALT instruction executed
PC = 110678
fe.fd.fc.fb.fa.f9.f8.breakpoint at PC 1108e0 desired, XDELTA not loaded
f7.f6.f5.
ef.df.ee.ed.ec.f4.eb.ea.e9.e8.e7.e6.....e5.
V7.0-9, built on Mar 18 1999 at 13:25:37
>>>
17.8.2 Unexpected exception/interrupt through vector 420
The unexpected exception/interrupt through vector 420 problem typically occurs during the O/S boot process and is well documented in real Alpha hardware behavior. The system self corrects by rebooting, as shown in the example below.
ff.fe.fd.fc.fb.fa.f9.f8.f7.f6.f5.
ef.df.ee.ed.ec.f4.eb.ea.e9.e8.e7.e6.....e5.
V7.0-9, built on Mar 18 1999 at 13:25:37
CPU 0 booting
(boot dka200.2.0.6.0 -flags 0)
block 0 of dka200.2.0.6.0 is a valid boot block
reading 1226 blocks from dka200.2.0.6.0
bootstrap code read in
base = 1f2000, image_start = 0, image_bytes = 99400
initializing HWRPB at 2000
initializing page table at 1e4000
initializing machine state
setting affinity to the primary CPU
jumping to bootstrap code
unexpected exception/interrupt through vector 420
process idle, pcb = 001159D0
pc: 00000000 00116A24 ps: 00000000 00001F04
r2: 00000000 001112A0 r5: 00000000 00001F04
r3: 00000000 00022650 r6: 00000000 00001259
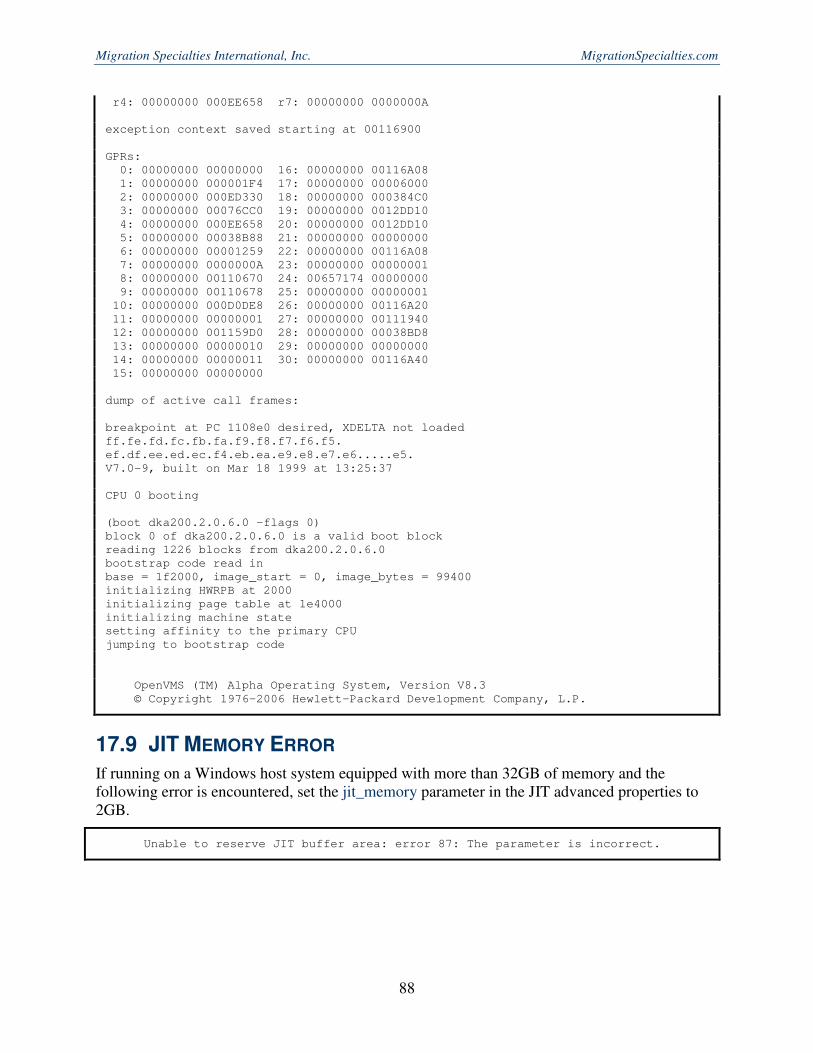
Migration Specialties International, Inc. MigrationSpecialties.com
88
r4: 00000000 000EE658 r7: 00000000 0000000A
exception context saved starting at 00116900
GPRs:
0: 00000000 00000000 16: 00000000 00116A08
1: 00000000 000001F4 17: 00000000 00006000
2: 00000000 000ED330 18: 00000000 000384C0
3: 00000000 00076CC0 19: 00000000 0012DD10
4: 00000000 000EE658 20: 00000000 0012DD10
5: 00000000 00038B88 21: 00000000 00000000
6: 00000000 00001259 22: 00000000 00116A08
7: 00000000 0000000A 23: 00000000 00000001
8: 00000000 00110670 24: 00657174 00000000
9: 00000000 00110678 25: 00000000 00000001
10: 00000000 000D0DE8 26: 00000000 00116A20
11: 00000000 00000001 27: 00000000 00111940
12: 00000000 001159D0 28: 00000000 00038BD8
13: 00000000 00000010 29: 00000000 00000000
14: 00000000 00000011 30: 00000000 00116A40
15: 00000000 00000000
dump of active call frames:
breakpoint at PC 1108e0 desired, XDELTA not loaded
ff.fe.fd.fc.fb.fa.f9.f8.f7.f6.f5.
ef.df.ee.ed.ec.f4.eb.ea.e9.e8.e7.e6.....e5.
V7.0-9, built on Mar 18 1999 at 13:25:37
CPU 0 booting
(boot dka200.2.0.6.0 -flags 0)
block 0 of dka200.2.0.6.0 is a valid boot block
reading 1226 blocks from dka200.2.0.6.0
bootstrap code read in
base = 1f2000, image_start = 0, image_bytes = 99400
initializing HWRPB at 2000
initializing page table at 1e4000
initializing machine state
setting affinity to the primary CPU
jumping to bootstrap code
OpenVMS (TM) Alpha Operating System, Version V8.3
© Copyright 1976-2006 Hewlett-Packard Development Company, L.P.
17.9 JIT MEMORY ERROR
If running on a Windows host system equipped with more than 32GB of memory and the following error is encountered, set the jit_memory parameter in the JIT advanced properties to 2GB.
Unable to reserve JIT buffer area: error 87: The parameter is incorrect.

Migration Specialties International, Inc. [email protected]
89
18. TROUBLESHOOTING
This chapter outlines troubleshooting tools and techniques.
18.1 LOG FILES
18.1.1 Avanti Log File
The Avanti log file is enabled by default. This file logs the emulator startup, shutdown, runtime, and error messages. 6 log files are retained by default. A version number appended to each log file name denotes past log files. A fresh log file is created each time the emulator is launched.
Current Log: .log Previous Log: .log;-1 Oldest Retained Log: .log;-5
18.1.2 Terminal Log Files
The OPA0/tty00 and TTA0/tty01 serial terminals each provide a logging option. Terminal logging is disabled by default. Logging can be enabled on each terminal to a user specified file. Terminal logging records everything entered and received by the terminal to a text file. Care should be taken when using terminal logging, as the logs have the potential to become very large. A fresh log file is created each time the emulator is launched.
18.1.3 PuTTY Log Files
PuTTY sessions can be configured to log activity, as can most other terminal emulators. Such logs can be used in conjunction with the Avanti logs for problem diagnosis.
Tip: Capturing History
Two changes to the PuTTY configuration are useful when capturing information. Similar changes are recommended if using other terminal emulators.
1) Under Change Settings> Window modify "Lines of scrollback" to 20000. PuTTY then retains 20,000 lines of history in the scroll back buffer.
2) Under Change Settings> Sessions select "Never" for "Close window on exit". This preserves the PuTTY window if the virtual Alpha crashes.
3) Once these changes have been made, highlight "Default Settings" under the Saved Sessions box and click the [Save] button. PuTTY will then retain the setting for future console sessions.
18.2 AVANTI CRASH DUMP FILE
In the unlikely event of an emulator crash, Avanti may write a crash dump file comprised of the configuration file name and a .cra extension. The file will be located in the same folder as the configuration file. Certain VMS bug checks may also produce an Avanti crash dump file. If you are experiencing a problem with Avanti or VMS crashes, check for a .cra file. If found, send it to Migration Specialties for analysis.
Using the Halt option on the Avanti Control Icon in the Windows Notification Area always generates an Avanti crash dump file.
Migration Specialties International, Inc. MigrationSpecialties.com
90
18.3 HALTING A HUNG SYSTEM
Using the Halt option on the Avanti Control Icon in the Windows Notification Area forces output to the Avanti log file and generates an Avanti crash dump file.
18.4 PROBLEM SUBMISSION
Avanti, AvantiFlex, and FreeAXP users with current support contracts can contact Migration Specialties directly for support. Users without support contacts can seek help at the FreeAXP Support Forum (http://vmshobbyist.org/forum/viewforum.php?forum_id=163).
When posting a problem report, please provide the following information:
1) Avanti configuration file (.cfg) 2) Avanti log file (.log) 3) Avanti crash dump file (.cra), if produced. 4) Host System Information
a) Windows O/S b) Hardware information:
i) CPU Type ii) Number of CPU's iii) Memory Installed
Migration Specialties International, Inc. [email protected]
91
Appendix A: GLOSSARY
Avanti Commercial Alpha emulator
AvantiFlex Commercial Alpha emulator
EUP Emulator Units of Performance: One EUP is roughly equivalent to 700,000 VAX instructions executed per second. Some of the instructions the emulator executes are not real VAX instructions, but custom instructions replacing firmware or PALcode components. These custom instructions may replace multiple VAX instructions.
FreeAXP Free Alpha emulator
GUI Graphical User Interface
JIT Just In Time compilation
NIC Network Interface Card
NVRAM Non-Volatile RAM
Shadow
Code Avanti pre-processes Alpha instructions, optimizing them to achieve better performance upon execution. These optimized instructions are referred to as shadow code. Shadow code is retained in memory until it is executed.
Shadow
Memory Holds shadow code, which is optimized Alpha instructions.
SimH VAX Free open source VAX emulator
SPD Software Product Description: A document providing detailed product specifications.
TOY Time Of Year

Migration Specialties International, Inc. MigrationSpecialties.com
92
Appendix B: AVANTI EMULATOR FILES
Each Avanti emulator configuration has a set of files associated with it. By default, the files are stored in the same folder as the configuration file and use the configuration file name. If the emulator configuration is moved, these files should be moved with it.
File Extension
Example Function Created by…
.cfg Alpha01.cfg Configuration file. Defines the emulator's virtual hardware.
User
.log Alpha01.log Log file. Records launch and runtime information during an emulator session.
Avanti at configuration launch. The file is replaced each time the configuration is launched. By default, logging is enabled and 6 versions of the log file are retained.
.nvr Alpha01.nvr NVRAM information storage. This file takes the place of non-volatile RAM. It stores boot configuration parameters.
Avanti at normal exit.
.toy Alpha01.toy Time Of Year information storage. The toy file stores the date and time offset for the virtual Alpha system
Avanti at normal exit.
Disk and CD-ROM image files are also a user-defined part of an Avanti configuration. If these files are moved, the associated Avanti configuration file must be updated.
Migration Specialties International, Inc. [email protected]
93
Appendix C: UPDATING A WINDOWS LICENSE KEY
Migration Specialties' commercial Alpha virtualization solutions rely on a USB dongle to enforce product licensing under Microsoft Windows operating systems. Customers may need to update their license dongle under the following circumstances:
• A service contract renewal.
• A demonstration key is about to expire.
• A demonstration key is being upgraded to a permanent license.
• A permanent key is being updated with additional license units.
A License Update Utility is provided with the Virtual Alpha software kits. The following section describes how to update a license key.
Why Update a Permanent License Key?
A permanent license never expires, so why update the key? The benefit to updating the key is that the support date field on the key gets updated to the new support expiration date. If you try to apply an Avanti software update that was issued after the support date recorded on the key, the update will fail.
C.1 LICENSE UPDATE FILE
A license update file will be provided by Migration Specialties via e-mail. Each license update file is unique to the key for which it is generated and can be applied only once. If multiple updates are generated for a key, they must be applied in the order they were generated.
The license update file name will have the following format:
Keynnn_yyyymmdd[_hhmmss].upd
• nnn – License key number. This corresponds to the number on the USB dongle. The license key number is also written to the emulator log file when an emulator is launched.
• _yyyymmdd – Date update was generated.
• _hhmmss – Time update was generated. This component is optional and will only be supplied if multiple updates are being applied to a key in a single day. This would be very unusual.
C.2 LICENSE UPDATE PHRASE
For sites unable to accept a license update file, a license update phrase can also be supplied via e-mail. The License Update Phrase is a string of alphanumeric characters that must be cut and pasted or keyed into the license update program.
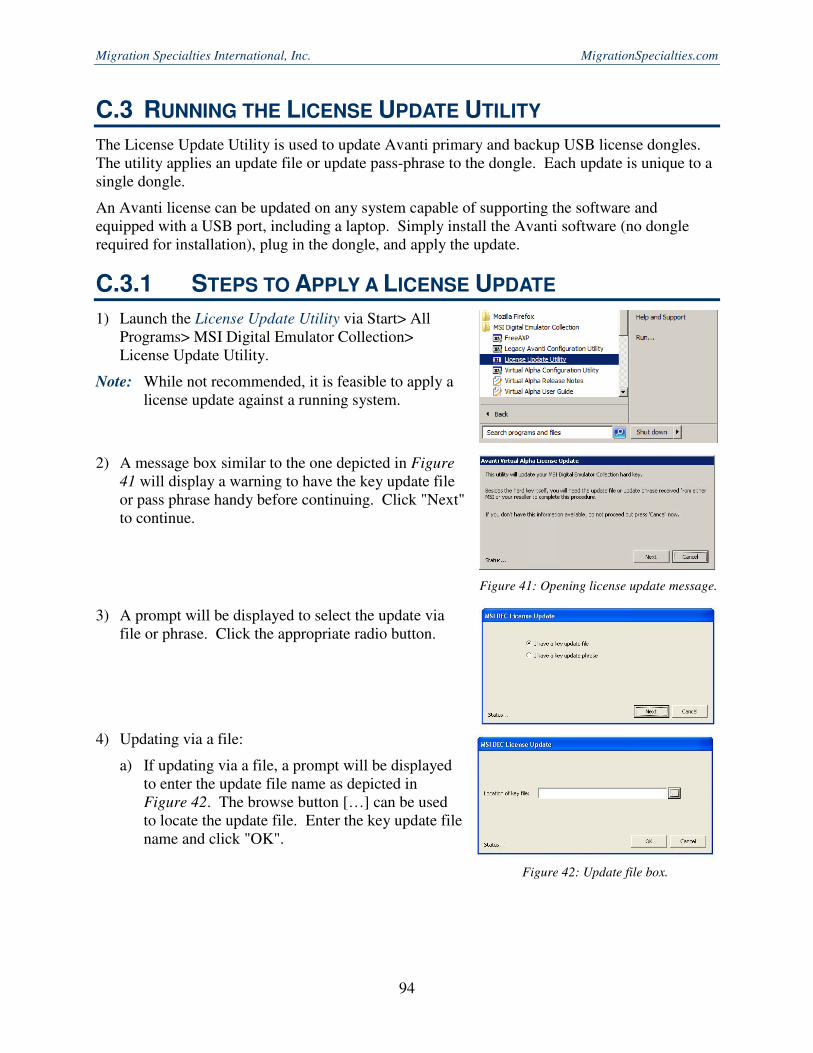
Migration Specialties International, Inc. MigrationSpecialties.com
94
C.3 RUNNING THE LICENSE UPDATE UTILITY
The License Update Utility is used to update Avanti primary and backup USB license dongles. The utility applies an update file or update pass-phrase to the dongle. Each update is unique to a single dongle.
An Avanti license can be updated on any system capable of supporting the software and equipped with a USB port, including a laptop. Simply install the Avanti software (no dongle required for installation), plug in the dongle, and apply the update.
C.3.1 STEPS TO APPLY A LICENSE UPDATE
1) Launch the License Update Utility via Start> All Programs> MSI Digital Emulator Collection> License Update Utility.
Note: While not recommended, it is feasible to apply a license update against a running system.
2) A message box similar to the one depicted in Figure
41 will display a warning to have the key update file or pass phrase handy before continuing. Click "Next" to continue.
3) A prompt will be displayed to select the update via
file or phrase. Click the appropriate radio button.
4) Updating via a file:
a) If updating via a file, a prompt will be displayed to enter the update file name as depicted in Figure 42. The browse button […] can be used to locate the update file. Enter the key update file name and click "OK".
Figure 41: Opening license update message.
Figure 42: Update file box.
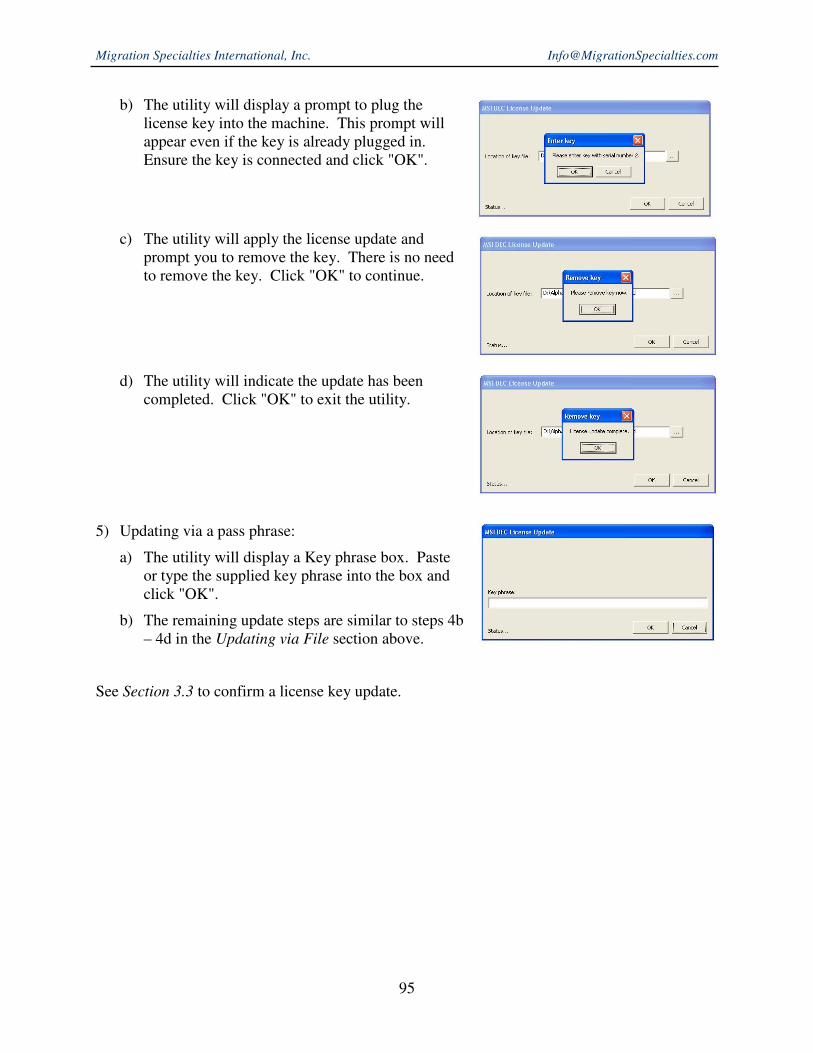
Migration Specialties International, Inc. [email protected]
95
b) The utility will display a prompt to plug the license key into the machine. This prompt will appear even if the key is already plugged in. Ensure the key is connected and click "OK".
c) The utility will apply the license update and prompt you to remove the key. There is no need to remove the key. Click "OK" to continue.
d) The utility will indicate the update has been completed. Click "OK" to exit the utility.
5) Updating via a pass phrase:
a) The utility will display a Key phrase box. Paste or type the supplied key phrase into the box and click "OK".
b) The remaining update steps are similar to steps 4b – 4d in the Updating via File section above.
See Section 3.3 to confirm a license key update.
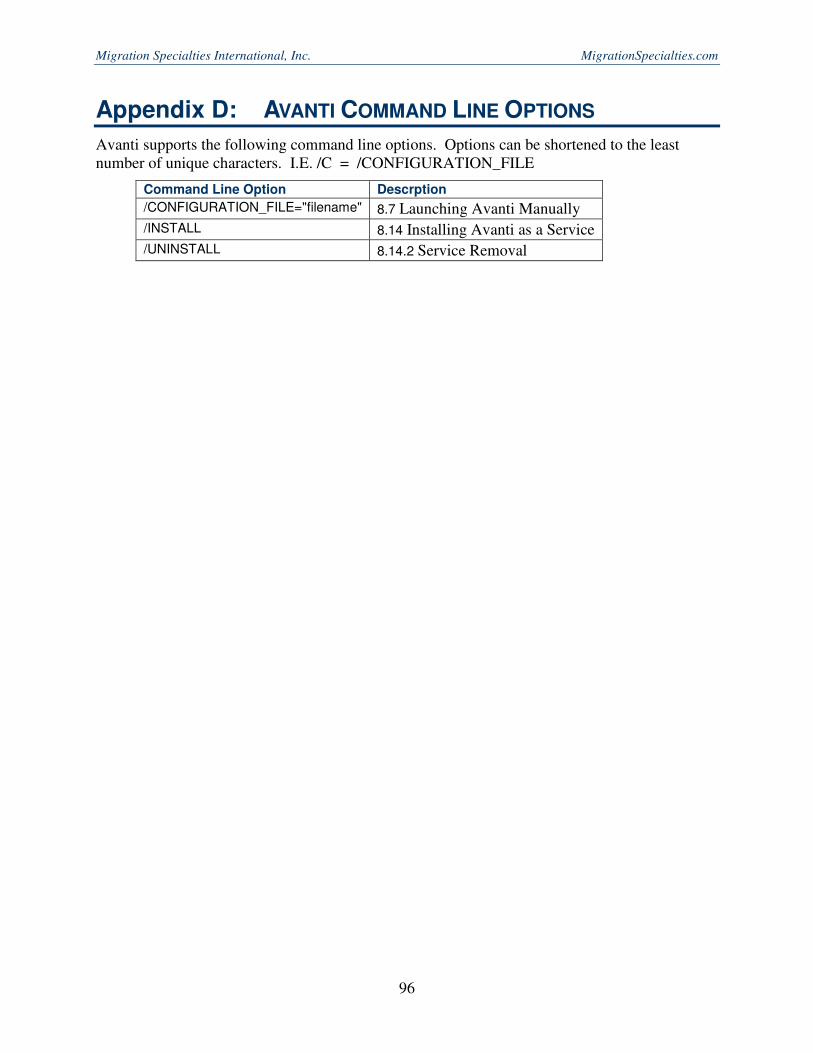
Migration Specialties International, Inc. MigrationSpecialties.com
96
Appendix D: AVANTI COMMAND LINE OPTIONS
Avanti supports the following command line options. Options can be shortened to the least number of unique characters. I.E. /C = /CONFIGURATION_FILE
Command Line Option Descrption
/CONFIGURATION_FILE="filename" 8.7 Launching Avanti Manually
/INSTALL 8.14 Installing Avanti as a Service
/UNINSTALL 8.14.2 Service Removal