virtual contact center - packet8 - support information...
TRANSCRIPT
Virtual Contact Center
NetSuite Integration – Configuration Guide
Version 8.0 Revision 1.0
Copyright © 2014, 8x8, Inc. All rights reserved.
This document is provided for information purposes only and the contents hereof are subject to change without notice. This document is not warranted to be error-free, nor subject to any other warranties or conditions, whether expressed orally or implied in law, including implied warranties and conditions of merchantability or fitness for a particular purpose. We specifically disclaim any liability with respect to this document and no contractual obligations are formed either directly or indirectly by this document. This document may not be reproduced or transmitted in any form or by any means, electronic or mechanical, for any purpose, without our prior written permission.
8x8® is a registered trademark of 8x8, Inc.
NetSuite® is a registered trademark of NetSuite Corporation. Microsoft® Internet Explorer is a registered trademark of Microsoft Corporation in the United States and other countries.
All other trademarks, service marks, registered trademarks, or registered service marks are the property of their respective owner/s. All other brands and/or product names are the trademarks (or registered trademarks) and property of their respective owner/s.
8x8, Inc NetSuite Integration – Configuration
i
Preface
Use this document to learn about the configuration of NetSuite Integration with the Virtual Contact Center.
About 8x8, Inc
Virtual Contact Center from 8x8 is the fastest and easiest way to deploy a world class contact center.
Virtual Contact Center makes it easy to manage all of your customer interactions – phone, email and chat - through a single system. Our award-winning solution is 100% web-based and was developed by industry-leading designers to be extremely easy to use, thus speeding the adoption process for both agents and supervisors. The Virtual Contact Center includes all of the functionality you need to provide an exceptional customer experience: skills based routing, multi-media interaction management, IVR, CTI, case & contact management, call recording, real-time monitoring, desktop sharing, reporting, and much more.
8x8, Inc 2125, O’Nel Drive, San Jose, CA 95131 USA SALES: 1.877.725.2621 SUPPORT: 1.866.975.2273 [email protected] www.8x8.com
8x8, Inc NetSuite Integration – Configuration
ii
Contents OVERVIEW ........................................................................................................................................................................... 3
Features .............................................................................................................................................................................. 3 Limitations........................................................................................................................................................................... 3
WHAT’S CHANGED? ..................................................................................................................................................................... 4 INTEGRATION............................................................................................................................................................................... 5 BROWSER REQUIREMENTS ............................................................................................................................................................. 5 INSTALLATION REQUIREMENTS ........................................................................................................................................................ 5 NETSUITE CRM ACCOUNT REQUIREMENTS ....................................................................................................................................... 5
CONFIGURING VIRTUAL CONTACT CENTER INTEGRATION WITH NETSUITE ......................................................................... 6 DEFINING SCREEN POP SETTINGS .................................................................................................................................................... 6
Understanding Screen Pop .................................................................................................................................................. 7 Understanding Auto Log ..................................................................................................................................................... 7
ENABLING AGENT ACCOUNTS FOR INTEGRATION .............................................................................................................................. 13 CUSTOMIZATION ........................................................................................................................................................................ 14 TROUBLESHOOTING .................................................................................................................................................................... 14
SETTING UP CLICK TO DIAL FUNCTIONALITY ...................................................................................................................... 15 ENABLING NETSUITE WEB AND TELEPHONY INTEGRATION ................................................................................................................. 15 ENABLING CLICK TO DIAL FOR AGENT ACCOUNTS ............................................................................................................................. 16 CONFIGURING CLICK TO DIAL IN NETSUITE AGENT ACCOUNT .............................................................................................................. 17 CONCLUSION ............................................................................................................................................................................. 17
APPENDIX .......................................................................................................................................................................... 18 Setting up Access to Web Services .................................................................................................................................... 18
NetSuite Integration - Configuration
3
Overview
Virtual Contact Center offers multichannel integration with NetSuite CRM. The integration supports phone, voicemail, chat, and email channels allowing you to access data from NetSuite CRM through an integrated Agent Console.
Virtual Contact Center’s ability to integrate with external CRM offers the following benefits:
• Provides out-of-the-box integration with minimal configuration.
• Increases agent productivity with integrated one-click dialing out of the CRM application.
• Informs an agent about the caller by popping the caller's account information to the agent as soon as a call is offered.
Features
The CRM integration allows you to perform your NetSuite account activities using the integrated Agent Console with the following features:
• Multi-media interaction support
• Complete Telephony Integration
• Single Sign-on functionality
• Visibility to queue status and agent presence
• Availability of custom landing pages for customers and cases
• Integrated Chat Management
• Embedded Call recording
• Click-to-Dial capability directly from native NetSuite account
• Screen Pop of the customer’s CRM record during inbound interactions
• Support for Screen Pop for Web Callback transactions
• Creates auto logs for inbound and outbound interactions
• Ability to associate auto logs to matching records for inbound interactions
• Ability for agents to toggle between the Agent Console and NetSuite accounts
Limitations
• Outbound call log does not associate with any record.
• Inability to associate an activity to a matching contact record if the contact is not associated with a company.
• Integration limited to standard objects only. Custom objects are not supported, while custom fields are supported.
NetSuite Integration - Configuration
4
• Lack of support for CRM operations other than creating and querying custom fields.
What’s Changed?
Due to security compliance with NetSuite, the integration has ceased support for iFraming. As a result, you must set up screen pop to occur in a separate browser window. This can be configured by:
• Administrator in Configuration Manager
• Agent in Agent Console
NetSuite Integration - Configuration
5
Integration
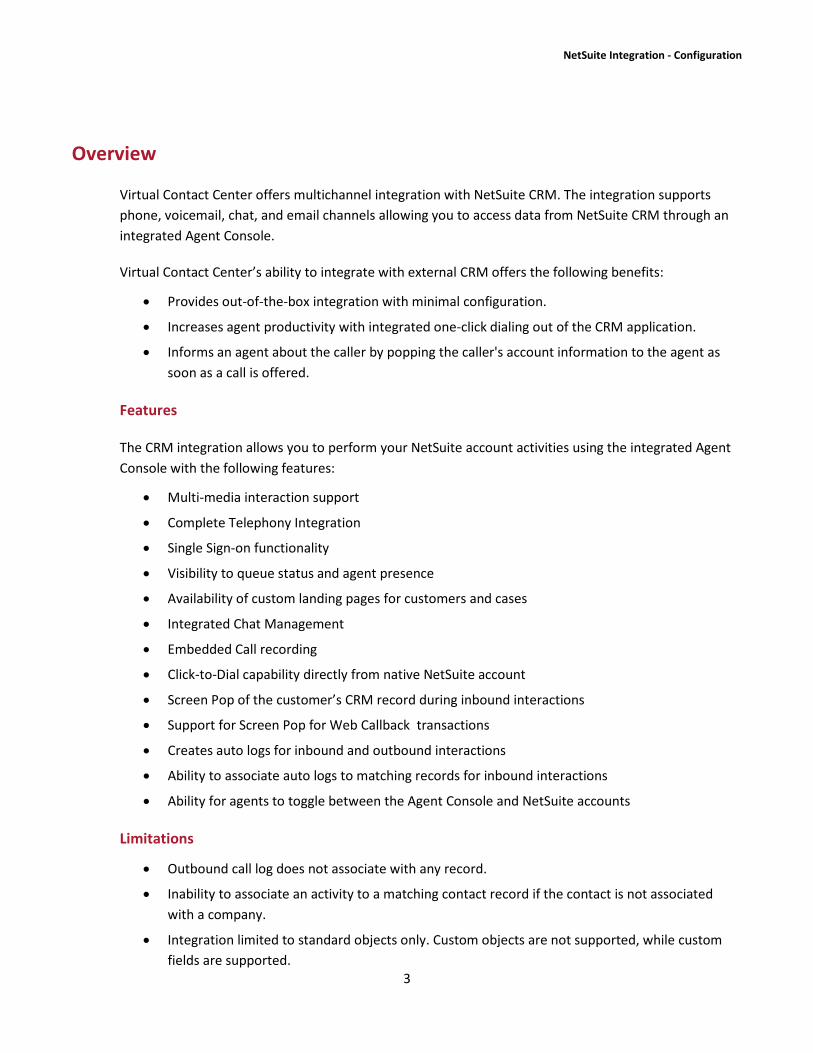
The integration with NetSuite requires agents to initiate NetSuite CRM instance in a separate browser window. The integration enables screen pop of records with matching caller ID, case ID, or email ID and presents them to agents for an efficient work flow. The integration also generates call logs, chat logs, and email logs automatically. The Screen pop is based on caller ID for phone calls, case Id for chats and email ID for email interactions.
Agent Console with Netsuite Integration
Browser Requirements
• Internet Explorer 8,9,10
• Chrome
• Firefox
Installation Requirements
To enable your NetSuite CRM instance to interoperate with your Virtual Contact Center, you must have administrative access to:
• NetSuite CRM account
• Configuration Manager of Virtual Contact Center
NetSuite CRM Account Requirements
NetSuite CRM User account with access to web services
NetSuite Integration - Configuration
6
Configuring Virtual Contact Center Integration with NetSuite
Integrating NetSuite CRM with Virtual Contact Center requires:
• Enabling and defining Screen Pop settings in the Configuration Manager
• Enabling agent accounts for integration
Defining Screen Pop Settings
To enable CRM integration for a tenant, an administrator has to configure Screen Pop settings in the Configuration Manager. The configuration requires you to select a target CRM, specify events that trigger screen population of CRM records, and specify popup window properties in the Configuration Manager. An agent has to then save the login credentials of the external CRM account in the agent’s profile. Integration enables searching for records containing phone data matching caller ID, and pops up the corresponding record/s for specific events.
The events triggering a Screen Pop may be one or all of the following:
• An agent is offered an interaction
• An agent has accepted an interaction
• An agent has completed an interaction
NetSuite Integration - Configuration
7
Understanding Screen Pop
Screen Pop refers to the process of presenting customer data to an agent automatically during an interaction eliminating the need to manually search for the customer data. The process involves searching for records with:
• Phone field matching caller ANI (Automatic Number Identification) for Phone and Voicemail media
• Case numbers matching case ID for Chat media
• Email field matching email ID for Email media and
• Displaying the search results on the agent’s screen
The Screen Pop applies to:
• Inbound transactions including phone, voicemail, chat, and email
• Web Callback transactions
If the search retrieves multiple records, the Screen Pop lists all matches in a table, and displays the details of the first record. If the search fails to find matching records, then pops a blank record to create a new customer record, or a case, or a new contact.
Understanding Auto Log
The integration now supports automatic generation of call logs, chat logs, and email logs for all inbound as well as outbound transactions. An Auto Log is a record that automatically logs transaction details of all interactions across all media and relates to an appropriate object. For example, a call log includes information such as call duration, call answered time, call hang up time, transaction ID, and call type. An auto log generates automatically at the end of post processing of a transaction.
An auto log is created for
• Inbound transactions
• Outbound transactions
• Web Callback transactions
• Click to Dial transactions
An inbound auto log automatically associates with a matching contact record provided the contact is associated with a company, while an outbound auto log creates an independent task.
Note: If a contact record is not associated with a company, an auto log does not associate with the contact record. The log saves as a standalone phone call/task.
NetSuite Integration - Configuration
8
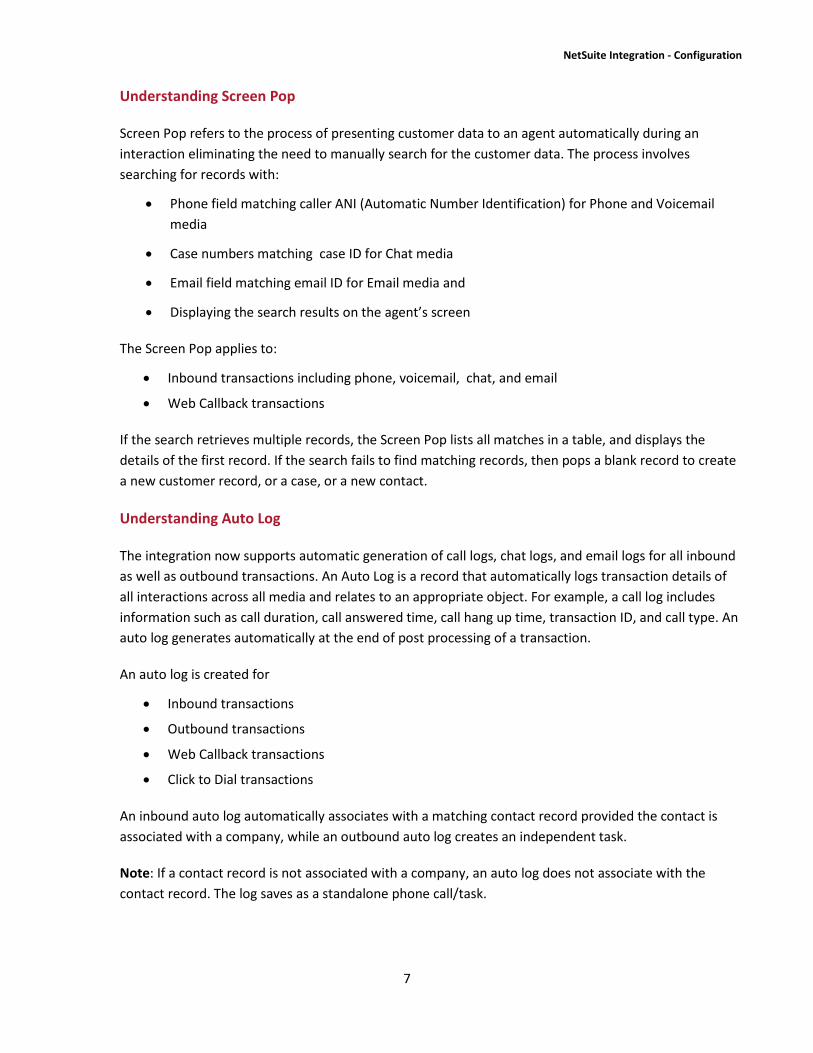
Auto Call Log
Configuring NetSuite CRM involves defining Screen Pop settings, and setting up external CRM properties in an agent’s profile.
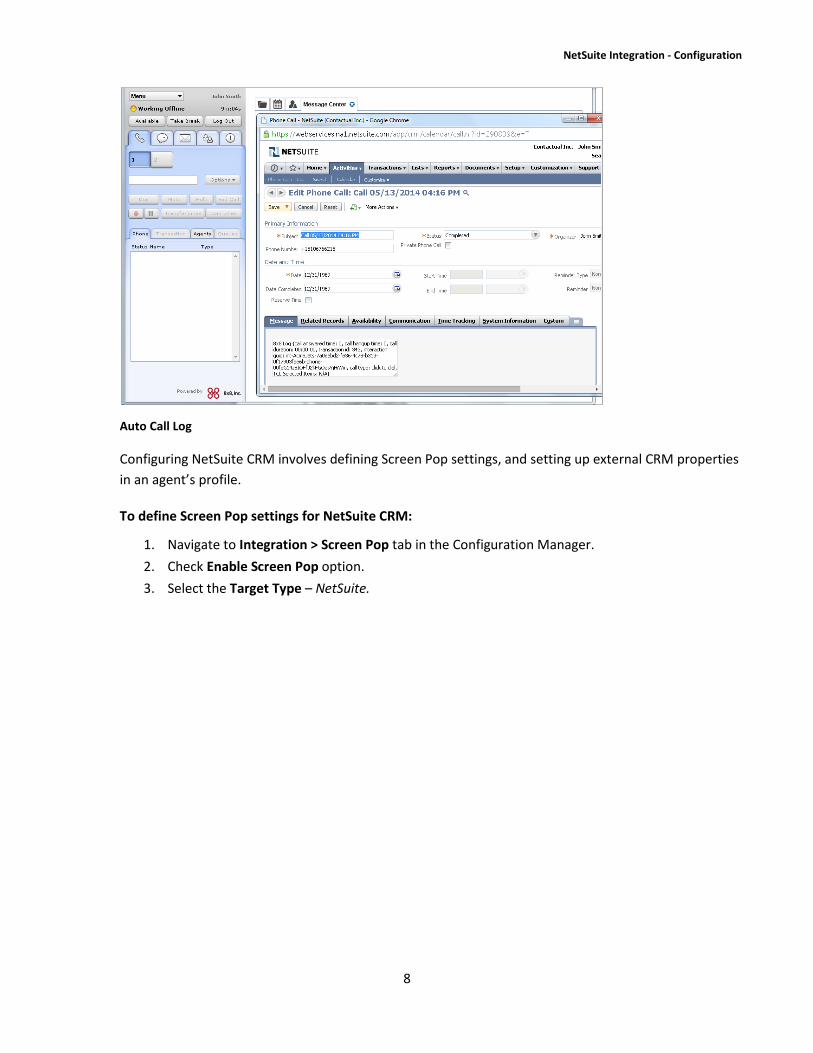
To define Screen Pop settings for NetSuite CRM:
1. Navigate to Integration > Screen Pop tab in the Configuration Manager. 2. Check Enable Screen Pop option. 3. Select the Target Type – NetSuite.
NetSuite Integration - Configuration
9
Integration, Screen Pop tab
4. Enter the Account information. The Account refers to your NetSuite account ID accessible to you if you are an administrator. For an example: QSDERF115234
NetSuite Integration - Configuration
10
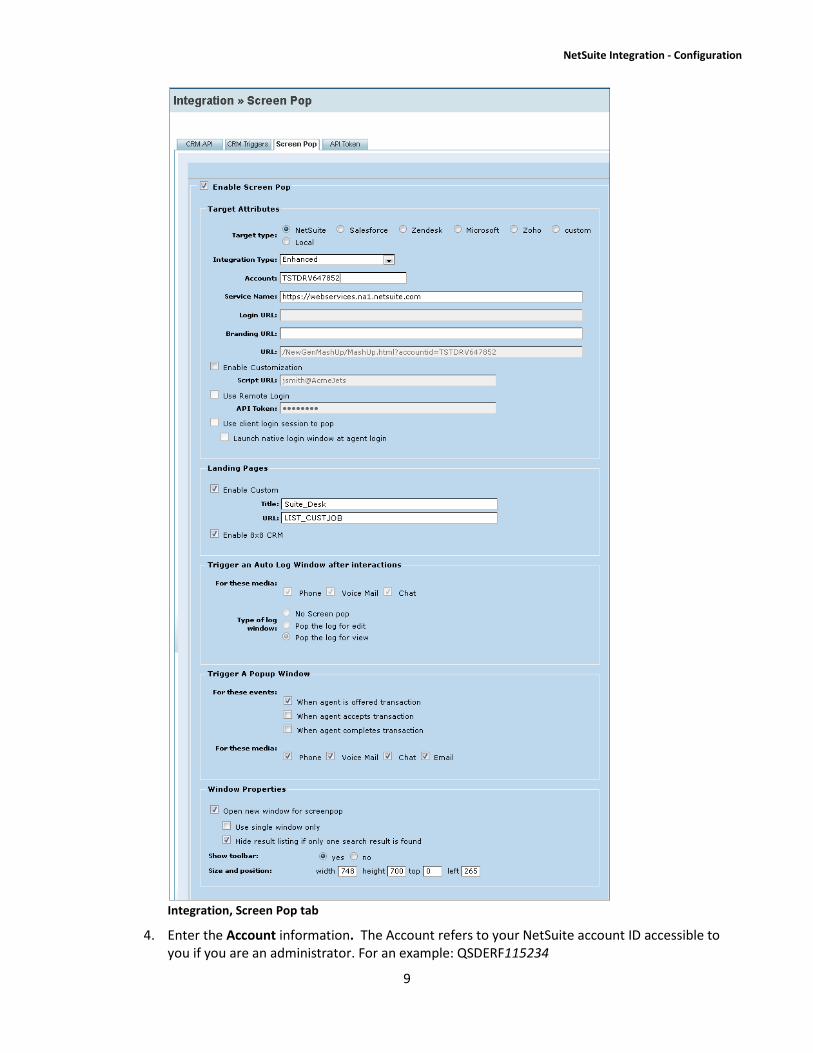
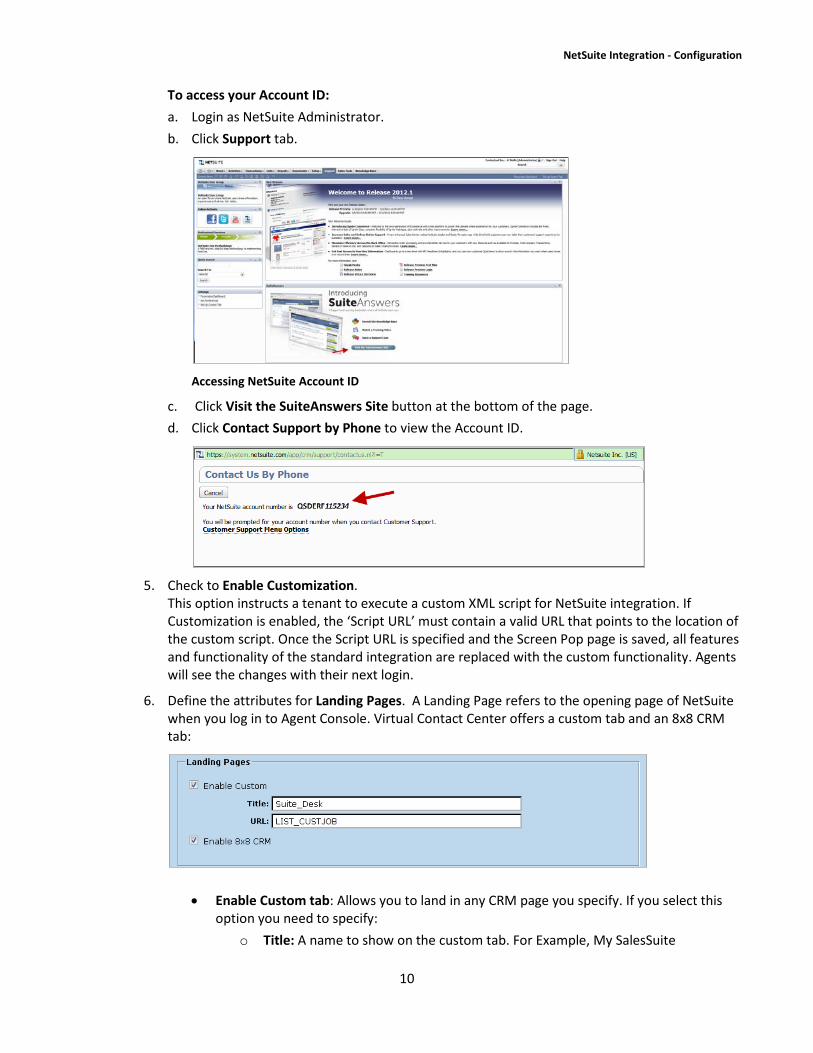
To access your Account ID: a. Login as NetSuite Administrator. b. Click Support tab.
Accessing NetSuite Account ID
c. Click Visit the SuiteAnswers Site button at the bottom of the page. d. Click Contact Support by Phone to view the Account ID.
5. Check to Enable Customization.
This option instructs a tenant to execute a custom XML script for NetSuite integration. If Customization is enabled, the ‘Script URL’ must contain a valid URL that points to the location of the custom script. Once the Script URL is specified and the Screen Pop page is saved, all features and functionality of the standard integration are replaced with the custom functionality. Agents will see the changes with their next login.
6. Define the attributes for Landing Pages. A Landing Page refers to the opening page of NetSuite when you log in to Agent Console. Virtual Contact Center offers a custom tab and an 8x8 CRM tab:
• Enable Custom tab: Allows you to land in any CRM page you specify. If you select this option you need to specify:
o Title: A name to show on the custom tab. For Example, My SalesSuite
NetSuite Integration - Configuration
11
o URL: the landing URL which launches when agent logs in to Agent Console. Enter LIST_CUSTJOB in this field to launch Customers Lists page. Modify this link to point to any other location within NetSuite.
• Enable 8x8 CRM: allows access to the Virtual Contact Center CRM by opening Cases, Customers, and Tasks tabs.
7. Define events that trigger a Screen Pop for a transaction. You can configure a Screen Pop of a corresponding record for the following events:
a. When an agent is offered an interaction b. When an agent accepts an interaction c. When an agent ends an interaction
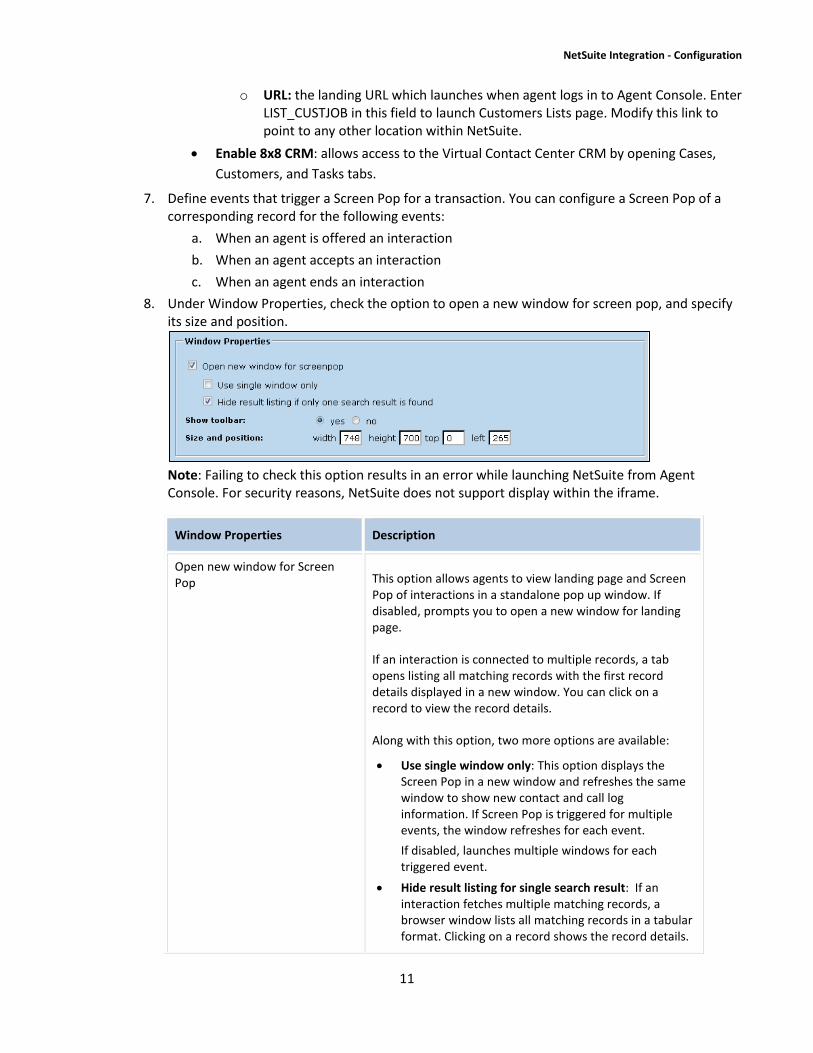
8. Under Window Properties, check the option to open a new window for screen pop, and specify its size and position.
Note: Failing to check this option results in an error while launching NetSuite from Agent Console. For security reasons, NetSuite does not support display within the iframe.
Window Properties Description
Open new window for Screen Pop
This option allows agents to view landing page and Screen Pop of interactions in a standalone pop up window. If disabled, prompts you to open a new window for landing page.
If an interaction is connected to multiple records, a tab opens listing all matching records with the first record details displayed in a new window. You can click on a record to view the record details.
Along with this option, two more options are available:
• Use single window only: This option displays the Screen Pop in a new window and refreshes the same window to show new contact and call log information. If Screen Pop is triggered for multiple events, the window refreshes for each event. If disabled, launches multiple windows for each triggered event.
• Hide result listing for single search result: If an interaction fetches multiple matching records, a browser window lists all matching records in a tabular format. Clicking on a record shows the record details.
NetSuite Integration - Configuration
12
Window Properties Description
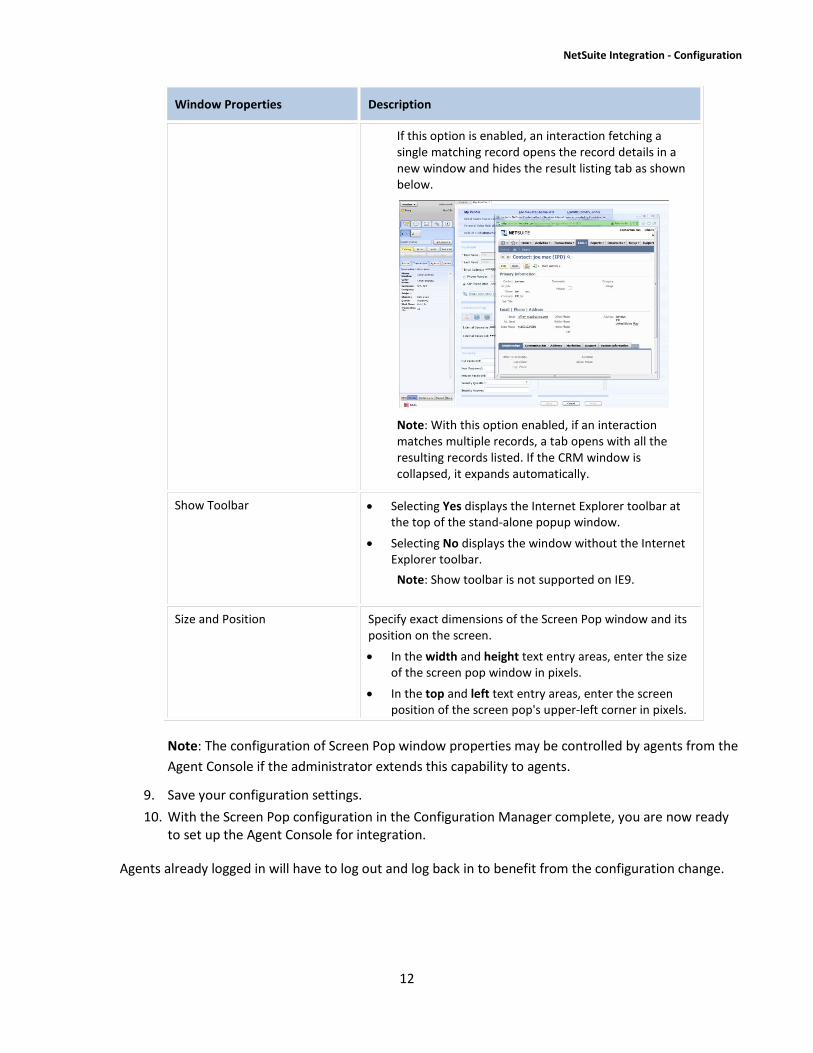
If this option is enabled, an interaction fetching a single matching record opens the record details in a new window and hides the result listing tab as shown below.
Note: With this option enabled, if an interaction matches multiple records, a tab opens with all the resulting records listed. If the CRM window is collapsed, it expands automatically.
Show Toolbar • Selecting Yes displays the Internet Explorer toolbar at the top of the stand-alone popup window.
• Selecting No displays the window without the Internet Explorer toolbar. Note: Show toolbar is not supported on IE9.
Size and Position Specify exact dimensions of the Screen Pop window and its position on the screen.
• In the width and height text entry areas, enter the size of the screen pop window in pixels.
• In the top and left text entry areas, enter the screen position of the screen pop's upper-left corner in pixels.
Note: The configuration of Screen Pop window properties may be controlled by agents from the Agent Console if the administrator extends this capability to agents.
9. Save your configuration settings. 10. With the Screen Pop configuration in the Configuration Manager complete, you are now ready
to set up the Agent Console for integration.
Agents already logged in will have to log out and log back in to benefit from the configuration change.
NetSuite Integration - Configuration
13
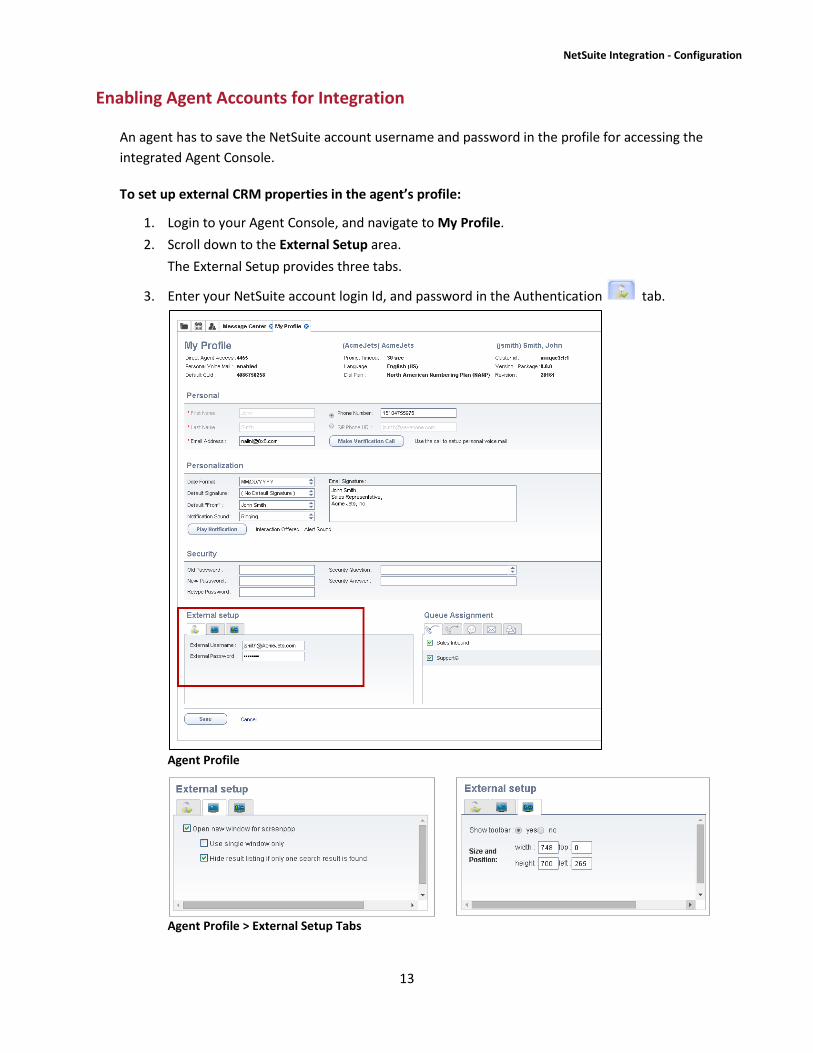
Enabling Agent Accounts for Integration
An agent has to save the NetSuite account username and password in the profile for accessing the integrated Agent Console.
To set up external CRM properties in the agent’s profile:
1. Login to your Agent Console, and navigate to My Profile. 2. Scroll down to the External Setup area.
The External Setup provides three tabs.
3. Enter your NetSuite account login Id, and password in the Authentication tab.
Agent Profile
Agent Profile > External Setup Tabs
NetSuite Integration - Configuration
14
Note: If your external password contains special characters, the integration fails. Please reset the NetSuite account password to exclude any special character.
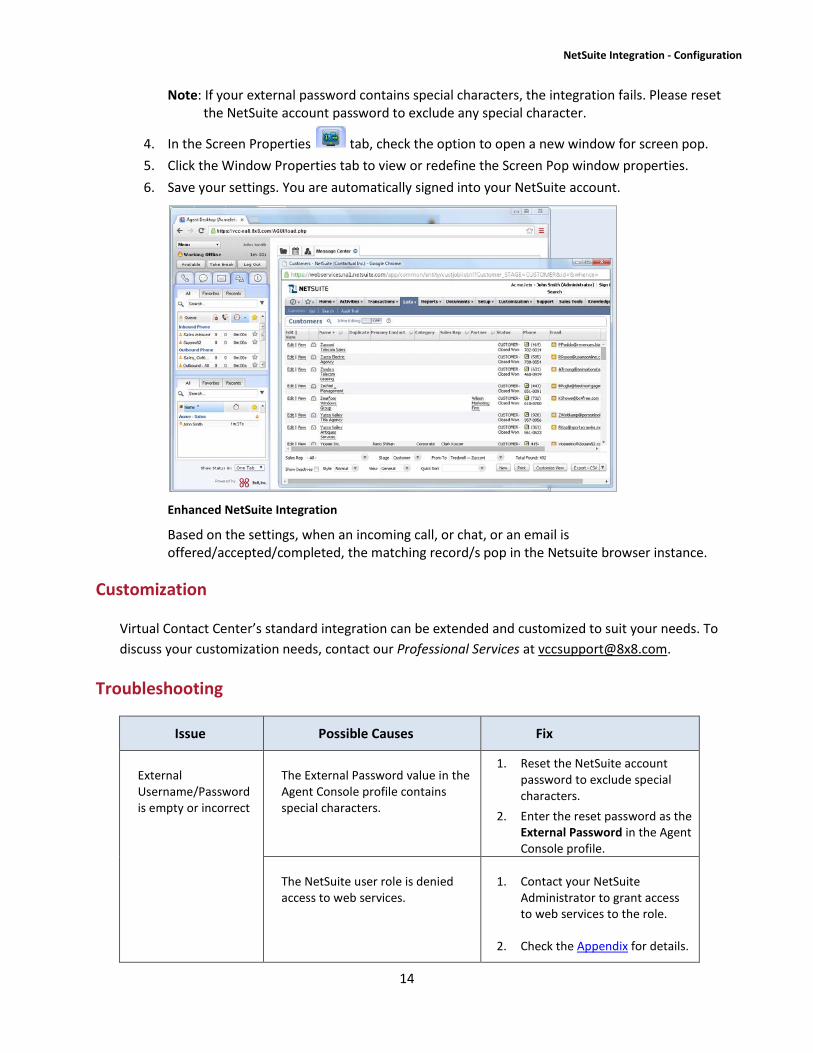
4. In the Screen Properties tab, check the option to open a new window for screen pop. 5. Click the Window Properties tab to view or redefine the Screen Pop window properties. 6. Save your settings. You are automatically signed into your NetSuite account.
Enhanced NetSuite Integration
Based on the settings, when an incoming call, or chat, or an email is offered/accepted/completed, the matching record/s pop in the Netsuite browser instance.
Customization
Virtual Contact Center’s standard integration can be extended and customized to suit your needs. To discuss your customization needs, contact our Professional Services at [email protected].
Troubleshooting
Issue Possible Causes Fix
External Username/Password is empty or incorrect
The External Password value in the Agent Console profile contains special characters.
1. Reset the NetSuite account password to exclude special characters.
2. Enter the reset password as the External Password in the Agent Console profile.
The NetSuite user role is denied access to web services.
1. Contact your NetSuite Administrator to grant access to web services to the role.
2. Check the Appendix for details.
Setting up Click to Dial
15
Setting up Click to Dial Functionality
Virtual Contact Center offers Click to Dial API, which allows you to click hyperlinked phone numbers in CRM records to initiate outbound calls from the native NetSuite interface. This eliminates the need to enter an outbound phone number in the Agent Console Control Panel. The typical usage of Click-To-Dial is to create clickable hyperlink on CRM record to dial out on corresponding customer phone number.
Setting up a NetSuite account to use Click to Dial functionality requires following configuration:
1. Enabling NetSuite Web and Telephony integration 2. Enabling Click to Dial for agent accounts in the Configuration Manager 3. Setting up Telephony preferences in each agent account from NetSuite
Enabling NetSuite Web and Telephony Integration
Configuring the NetSuite web services and telephony features is essential to enable individual NetSuite agent accounts to use Click to Dial. You must have access to NetSuite account administrator role to perform this procedure.
To enable NetSuite web services and telephony integration:
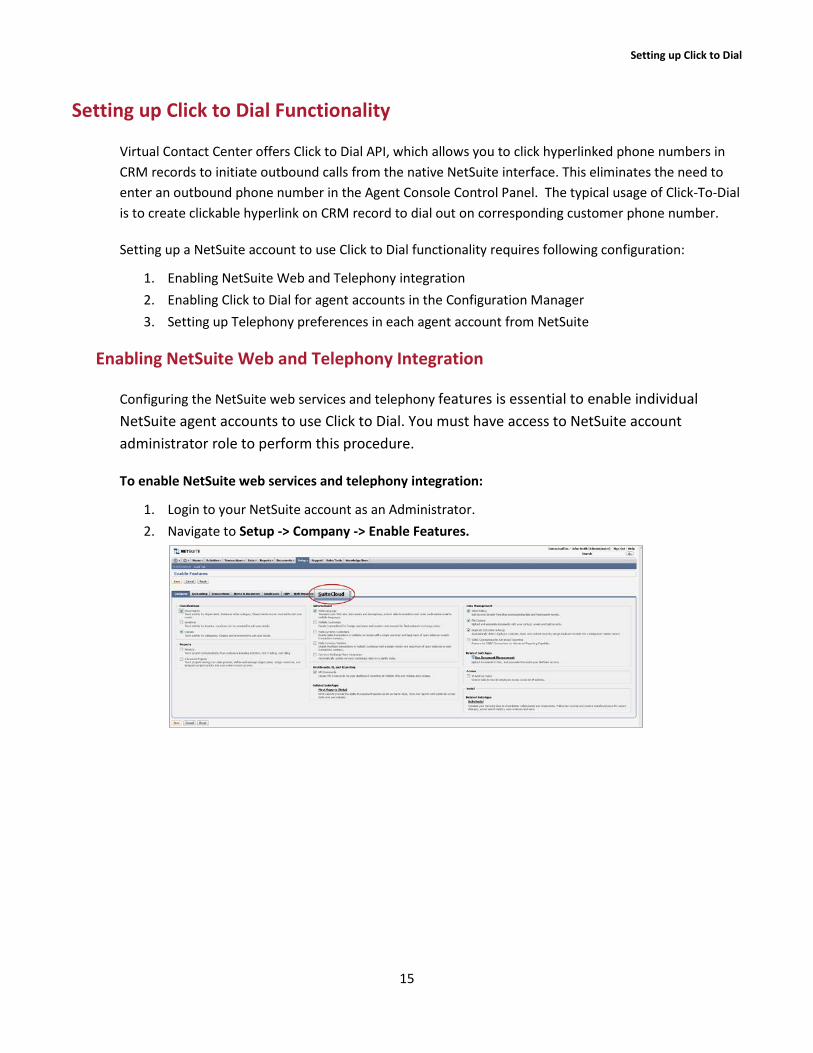
1. Login to your NetSuite account as an Administrator. 2. Navigate to Setup -> Company -> Enable Features.
Setting up Click to Dial
16
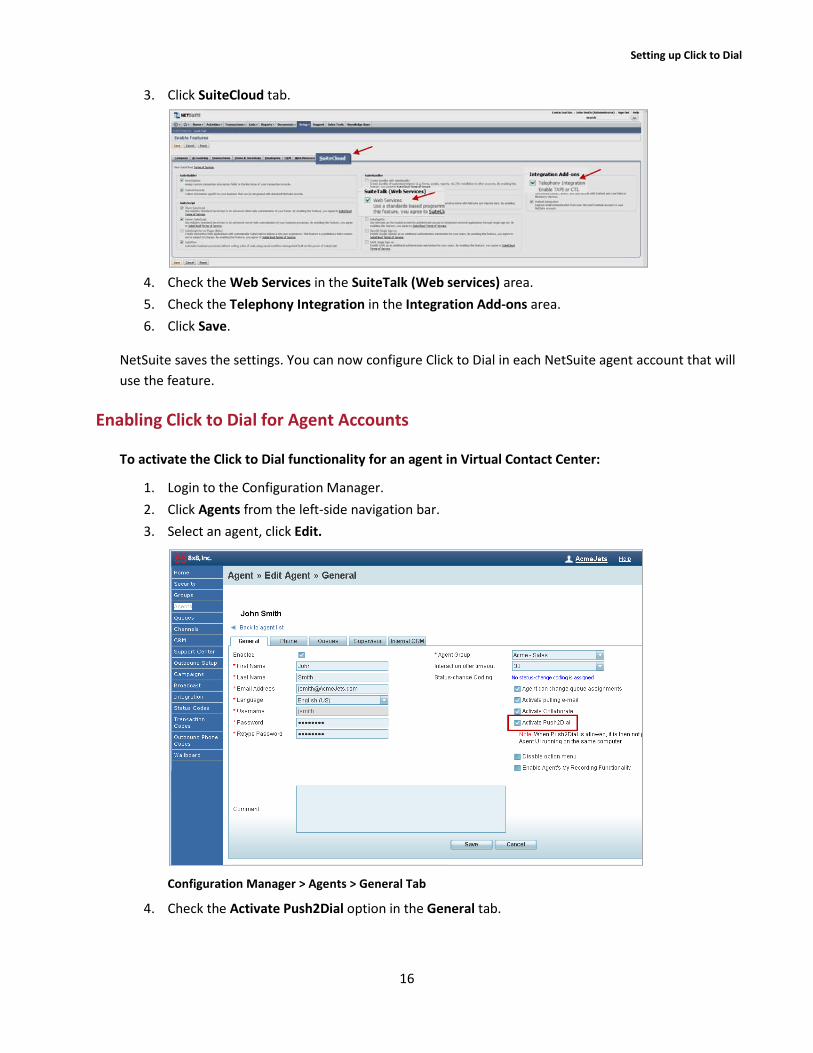
3. Click SuiteCloud tab.
4. Check the Web Services in the SuiteTalk (Web services) area. 5. Check the Telephony Integration in the Integration Add-ons area. 6. Click Save.
NetSuite saves the settings. You can now configure Click to Dial in each NetSuite agent account that will use the feature.
Enabling Click to Dial for Agent Accounts
To activate the Click to Dial functionality for an agent in Virtual Contact Center:
1. Login to the Configuration Manager. 2. Click Agents from the left-side navigation bar. 3. Select an agent, click Edit.
Configuration Manager > Agents > General Tab
4. Check the Activate Push2Dial option in the General tab.
8x8, Inc Setting up Click to Dial
17
Configuring Click to Dial in NetSuite Agent Account
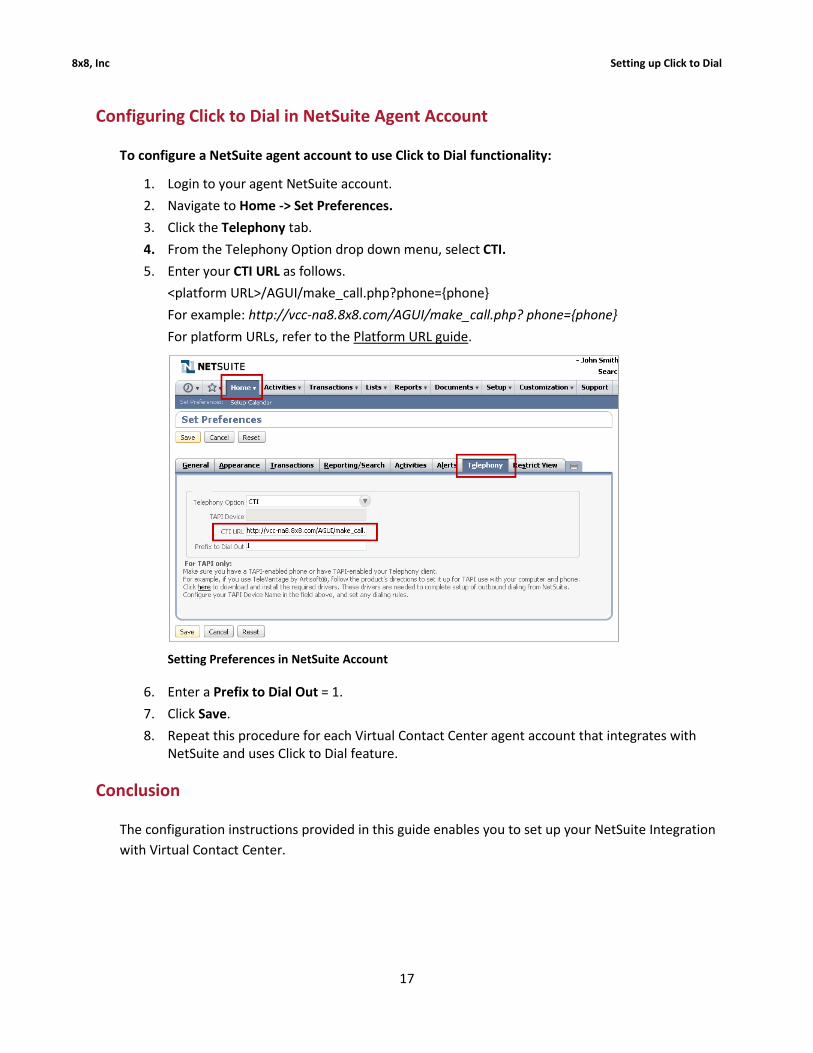
To configure a NetSuite agent account to use Click to Dial functionality:
1. Login to your agent NetSuite account. 2. Navigate to Home -> Set Preferences. 3. Click the Telephony tab. 4. From the Telephony Option drop down menu, select CTI. 5. Enter your CTI URL as follows.
<platform URL>/AGUI/make_call.php?phone={phone} For example: http://vcc-na8.8x8.com/AGUI/make_call.php? phone={phone} For platform URLs, refer to the Platform URL guide.
Setting Preferences in NetSuite Account
6. Enter a Prefix to Dial Out = 1. 7. Click Save. 8. Repeat this procedure for each Virtual Contact Center agent account that integrates with
NetSuite and uses Click to Dial feature.
Conclusion
The configuration instructions provided in this guide enables you to set up your NetSuite Integration with Virtual Contact Center.
8x8, Inc Appendix
18
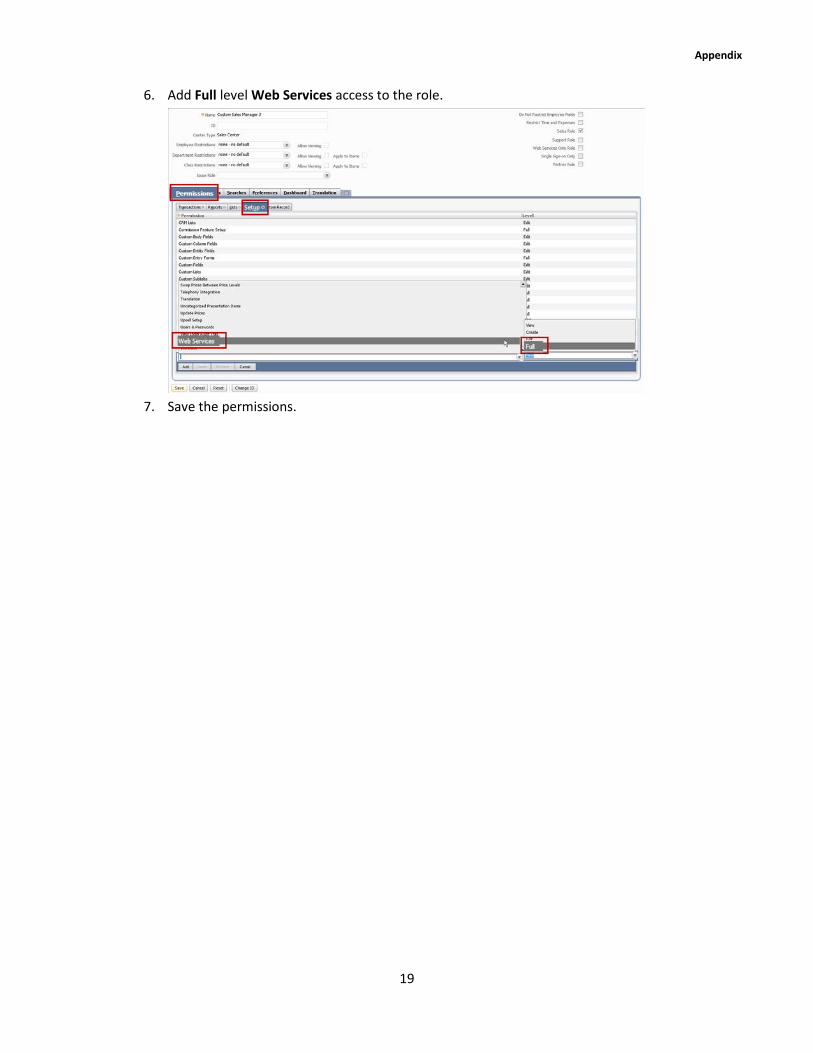
Appendix
Setting up Access to Web Services
The NetSuite integration with Virtual Contact Center requires access to the web services. If your NetSuite User role does not have permissions to the web services, the integration fails. To resolve this issue, the NetSuite CRM Administrator should grant the role access to the web services.
To grant web services access to a role:
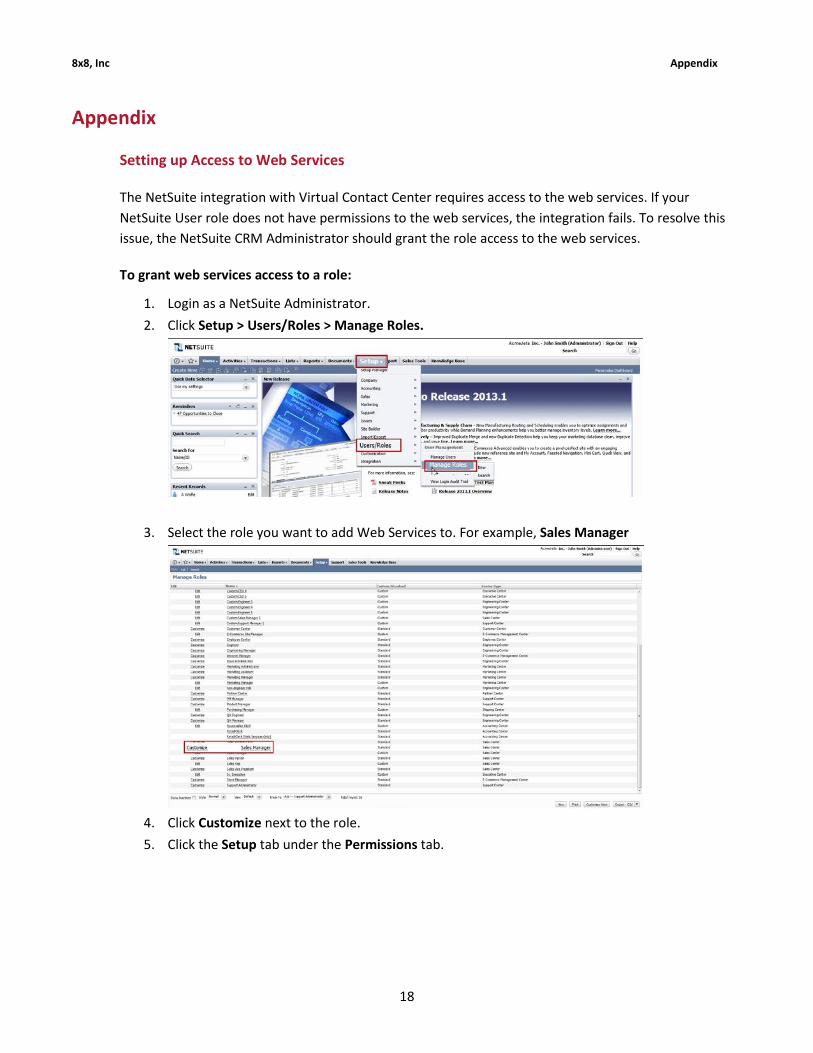
1. Login as a NetSuite Administrator. 2. Click Setup > Users/Roles > Manage Roles.
3. Select the role you want to add Web Services to. For example, Sales Manager
4. Click Customize next to the role. 5. Click the Setup tab under the Permissions tab.
Appendix
19
6. Add Full level Web Services access to the role.
7. Save the permissions.