virtual gms server - silver peak · pn 200471-001 rev h » r5.2 1 of 15 quick start guide gx-v ·...
TRANSCRIPT

PN 200471-001 Rev H » R5.2 1 of 15
Quick Start Guide
GX-V· VIRTUAL GMS SERVER ·
VMware vSphere / vSphere Hypervisor
Silver Peak Systems, Inc.4500 Great America ParkwaySuite 100Santa Clara, CA 95054
1.877.210.7325 (toll-free in USA)+1.408.935.1850www.silver-peak.com/support
© 2
012
Silv
er P
eak
Syst
ems,
Inc.
Before You Begin
Comply with the GX-V Host System Requirements [PN 200496-001]
From the Silver Peak Support portal, download the GX-V OVF template file:
Identify the IP address for the VMware vSphere server
Obtain a GX-V activation license key
If you’re not using VMware vSphere Client 4.0, your screens may vary.
This example uses a domain name for the VMware Host.
SUMMARY OF TASKS
1 Install the vSphere Client
2 Verify that the VMware Host meets system requirements
3 Deploy the GX-V OVF template
4 Power on the GX-V Virtual Appliance
5 Configure the Virtual GMS Server
6 Launch the Silver Peak GMS client
7 Install the License Key
WORKSHEET
ITEM YOUR DATA
OVA file destination
Datastore name
mgmt0
(revealed in Step 4c)
VMware Host

GX-V Virtual GMS Server / VMware vSphere / vSphere Hypervisor
1 Install the vSphere Client
a. In a browser, enter the IP address for the VMware vSphere host. This is where to go to download the vSphere Client.
The host interface appears.
b. Click Download vSphere Client and Save the file. After the file downloads, the installation wizard for the VMware vSphere Client appears.
c. Click Next to begin going through the wizard.
The screens sequence through the License Agreement, Customer Information, Custom Setup, and Destination Folder screens.
d. Click Install. When the task is complete, the Installation Completed screen appears.
2 of 15 PN 200471-001 Rev H » R5.2

Quick Start Guide
e. Click Finish. A dialog box appears, asking you to restart your computer so that changes made to the client can take effect.
f. Click Yes.
PN 200471-001 Rev H » R5.2 3 of 15

GX-V Virtual GMS Server / VMware vSphere / vSphere Hypervisor
2 Verify that the VMware Host meets system requirements
Before deploying the OVF template, the VMware host must meet system requirements.
a. On your computer desktop, double-click the shortcut for the VMware vSphere Client. The client login screen appears.
b. Complete the fields and click Login.
In the IP address / Name field, enter the same IP address (or DNS name) that you used for the VMware vSphere host in Step 1a.
Enter your VMware user name and password.
c. The vSphere Client screen appears. Double-click the Inventory icon.
4 of 15 PN 200471-001 Rev H » R5.2

Quick Start Guide
The Getting Started tab appears.
Now, with the following two screens, verify that the VMware host’s hardware meets the minimum system requirements for the GX-V virtual appliance.
(Reference the GX-V Host System Requirements, PN 200476-001)
Item Where to verify the information
1 CPU Summary tab
2 Memory Summary tab
3 Storage Summary tab
4 Network Interfaces Configuration tab > Network Adapters
d. To verify the first three items, click the Summary tab.
1 2
3
PN 200471-001 Rev H » R5.2 5 of 15

GX-V Virtual GMS Server / VMware vSphere / vSphere Hypervisor
e. To verify the last item, click the Configuration tab and, under Hardware on the left, click Network Adapters.
4
6 of 15 PN 200471-001 Rev H » R5.2

Quick Start Guide
3 Deploy the GX-V OVF template
Verify that you know where the destination directory is.
Before this point, you’ll have downloaded the OVA file from the Silver Peak Support portal. The OVA file is a .tar file containing the OVF template and other required content.
NOTE: If Internet Explorer saved the template as a winRAR (.tar) file, then be sure to change the extension back to .ova before using the file.
a. From the File menu, select Deploy OVF Template. The following screen appears.
b. Depending on where you put the OVA filter after you downloaded it from the Silver Peak Support portal, select the appropriate source and click Next.
The OVF Template details display.
c. Click Next. In the Name and Location screen, either accept the virtual appliance’s default name, GX-V, or change it. This is the name by which the hypervisor knows the virtual appliance.
PN 200471-001 Rev H » R5.2 7 of 15

GX-V Virtual GMS Server / VMware vSphere / vSphere Hypervisor
d. Click Next. The Ready to Complete screen summarizes the GX-V’s deployment settings.
e. Review the data, and click Finish.
While showing a progress bar, the GX-V completes deployment and returns to the Summary screen.
8 of 15 PN 200471-001 Rev H » R5.2

Quick Start Guide
4 Power on the GX-V Virtual Appliance
a. In the vSphere Client, expand the VMware host node [in this example, it’s tallinn2] to display the GX-V.
b. To power on the virtual appliance, first select GX-V, and then click in the menu bar above it or near the bottom of the window, under Basic Tasks.
c. Click the Console tab. After the power sequences on, the console displays the mgmt0 IP address for the virtual GMS server — in other words, it’s the GMS server’s IP address. You’ll need that for the next step.
If your environment is not configured for DHCP, then you’ll need to run the script on the right, and assign your own variables. Use admin for both the username and the password.
PN 200471-001 Rev H » R5.2 9 of 15

GX-V Virtual GMS Server / VMware vSphere / vSphere Hypervisor
SCRIPT for non-DHCP environment
gmsserver login: admin
gms@demo-gms’s password: admin
-bash-2.05b$
-bash-2.05b$ cd gms
-bash-2.05b$ ipsetup.sh
Fri May 20 14:41:21 PDT 2011 Warning: Using ...
====Start at Fri May 20 14:41:22 PDT 2011
Enter IP address: 10.10.10.10
Enter mask (e.g. 255.255.252.0): 255.255.255.0
Enter default gateway: 10.10.10.1
Enter hostname: pod1gms
IP = 10.10.10.10
Mask = 255.255.255.0
Gateway = 10.10.10.1
Host = pod1gms
Please confirm (y/n)? y
10 of 15 PN 200471-001 Rev H » R5.2
Quick Start Guide
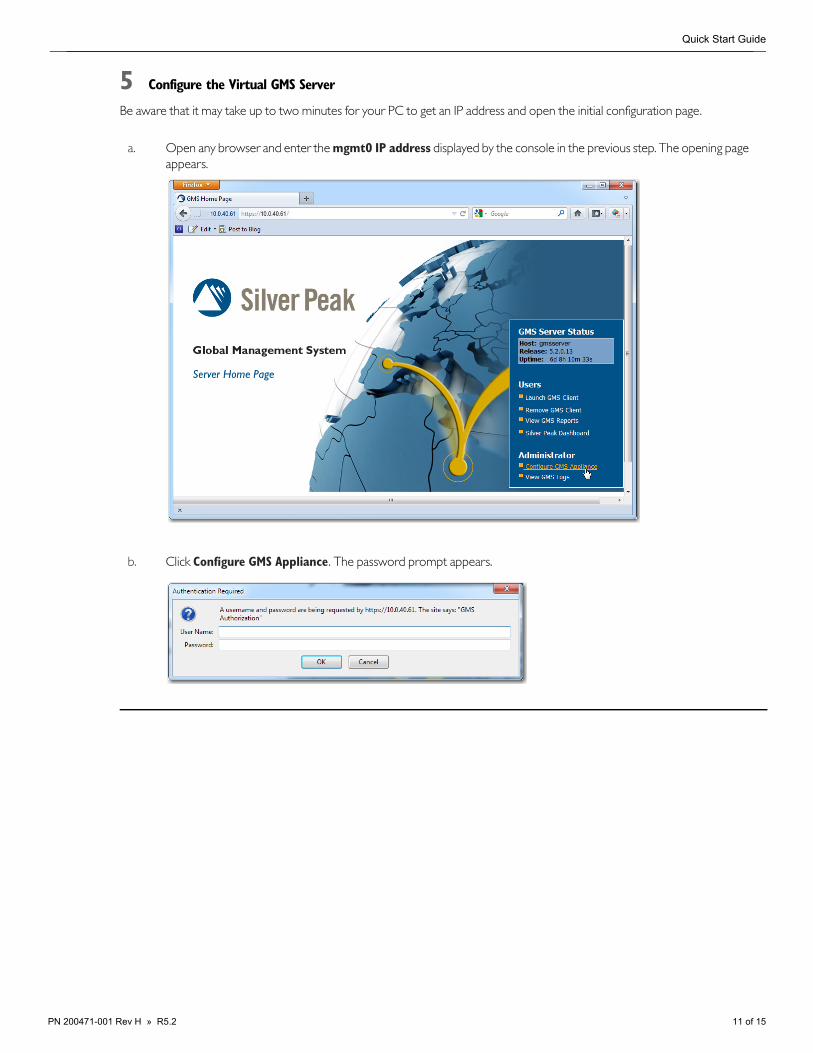
5 Configure the Virtual GMS Server
Be aware that it may take up to two minutes for your PC to get an IP address and open the initial configuration page.
a. Open any browser and enter the mgmt0 IP address displayed by the console in the previous step. The opening page appears.
b. Click Configure GMS Appliance. The password prompt appears.
PN 200471-001 Rev H » R5.2 11 of 15

GX-V Virtual GMS Server / VMware vSphere / vSphere Hypervisor
c. Enter the default user name and password: admin / admin. Click OK.
The GMS Appliance Configuration page appears.
d. Set the following parameters according to your network settings:
Hostname Enter the GX-V hostname. Limited to length of 24 characters.
DHCP By default, DHCP is enabled.
IP Address IP address for the GX-V’s mgmt0 physical interface
Netmask Netmask for the GX-V’s mgmt0 physical interface
Default Gateway The mgmt0 next-hop IP address
Primary DNS Server IP address of your domain name server
Secondary DNS Server [optional] Alternate IP address of your domain name server
Domain name For example, msn.com.
Troubleshooting For verifying the GX-V-s network connectivity
Time Zone Select one of the following:
Manual – to enter a specific timeNTP – to get the time from a specified NTP server
GMS Release Selection Partitioned drive accommodates one active and five inactive software images, each with its own most recent database
Troubleshooting For verifying the GX-V’s network connectivity.
Password Configuration[not required]
This password is only for this initial configuration wizard, not for client software configuration or log in.
System Restart These options — Shutdown, Restart, and Reboot — are provided for maintenance and troubleshooting.
e. Click Apply. It may take up to 30 seconds for the virtual appliance to configure.
12 of 15 PN 200471-001 Rev H » R5.2

Quick Start Guide
6 Launch the Silver Peak GMS client
a. Return to the GMS Server Home Page. Select Launch GMS Client.
b. In this screen, inter the GMS server’s IP address (or its hostname as defined on your DNS server), and click OK.
The Login screen appears.
PN 200471-001 Rev H » R5.2 13 of 15

GX-V Virtual GMS Server / VMware vSphere / vSphere Hypervisor
c. Enter the default username and password: admin / admin.
The GMS client dashboard appears.
If any GMS configuration tasks need completion, a Getting Started window appears. If any tasks need addressing, they are highlighted in red.
If yo choose to close this window now, you can access it again later with GMS Administration > Getting Started.
14 of 15 PN 200471-001 Rev H » R5.2

Quick Start Guide
7 Install the License Key
To continue, you must install the License Key.
a. From the menu bar, select GMS Administration > License Management. The License Configuration window appears.
b. Cut and paste the license key into the field and click Apply. The GX serial number updates.
You’re now ready to deploy, manage, and monitor your physical and virtual Silver Peak appliances.
To launch the client as needed, return to the GMS Server home page.
PN 200471-001 Rev H » R5.2 15 of 15