virtual matrix display controller software installation · virtual matrix display controller...
TRANSCRIPT

www.vicon-security.com
XX212-01-00
Virtual Matrix Display ControllerSoftware Installation
Vicon Industries Inc. does not warrant that the functions contained in this equipment will meet your requirements or that the operation will be entirely error free or perform precisely as described in the documentation. This system has not been designed to be used in life-critical situations and must not be used for this purpose.
Vicon Industries Inc.Tel: 631-952-2288 Fax: 631-951-2288 Toll Free: 800-645-9116
24-Hour Technical Support: 800-34-VICON (800-348-4266) UK: 44/(0) 1489-566300
Document Number: 8009-8212-01-00Product specifications subject to change without notice.
Issued: 714 Copyright © 2014 Vicon Industries Inc. All rights reserved.
Installation Guide

Virtual Matrix Display Controller Installation Guide
Topic Page
General 2 Prerequisites 2 Contents of Installation Package 3 Installation 4 Registration 11

2 | Virtual Matrix Display Controller Installation Guide
General This manual describes how to install the Virtual Matrix Display Controller (VMDC) software. It also provides instructions on upgrading a prior version of the VMC/VMDC software to VMDC Version 7.x
Prerequisites The following are minimum hardware and operating system requirements for installation.
Windows 7
Operating System: Microsoft® Windows® 7 Ultimate.
CPU: Intel® Core™ i7-930 processor.
Motherboard: GIGABYTE GA-X58A.
BIOS: X58A-UD3R F5 or X58A-UD3R FA.
RAM: 4 GB.
Hard Drive: 250 GB minimum.
Video Card: Sapphire ATI HD 4650 with 1 DVI/HDMI and 1 VGA output each.
Power Supply: 750 W minimum.
Windows XP
Operating System: Microsoft Windows XP Professional or Embedded, SP 3.
CPU: Intel Core™ 2 Duo 3 GHz minimum.
RAM: 2-4 GB.
Hard Drive: 250 GB minimum.
Power Supply: 510 W minimum.
Notes:
1. Do not install the VMDC software on a machine running ViconNet®.
2. On Windows 7, User Authorization Control must be turned off.
3. The minimum hardware and operating system requirements are subject to change. For the latest requirements, refer to the Tech Support section on Vicon’s website at www.vicon-cctv.com.

Virtual Matrix Display Controller Installation Guide | 3
Important
Installation on a Windows XP machine, including prior versions of the VMDC software, installs the Virtual Matrix Control software only and does not provide any internal decoding capability. The Vicon VN-DECODER-2V7 hardware decoder(s) or another VMDC running Windows 7 will be required to direct the video to the monitor(s).
Contents of Installation Package The installation CD contains the VMDC software and a license. The system provides for operation of 2, 4 or 6 monitors. Two monitors can be driven per video card; therefore a total of 3 cards would be required for 6 monitors.
4 | Virtual Matrix Display Controller Installation Guide
Installation
The software is typically installed from the VMDC Installation CD and will autorun once the CD is inserted in the drive.
Important Note
When an upgrade from an older version is being performed, be sure to upgrade all the VMDCs and decoders that are set with receive only (or RX monitors) prior to updating the main units running the VMDC GUI.
Notes
The installation described below shows a typical Windows 7 installation. The installation is essentially similar for a Windows XP machine and for an upgrade to the VMC software, with the differences noted in the procedure.
Screens may vary in look but are the same or similar in functionality; follow onscreen prompts.
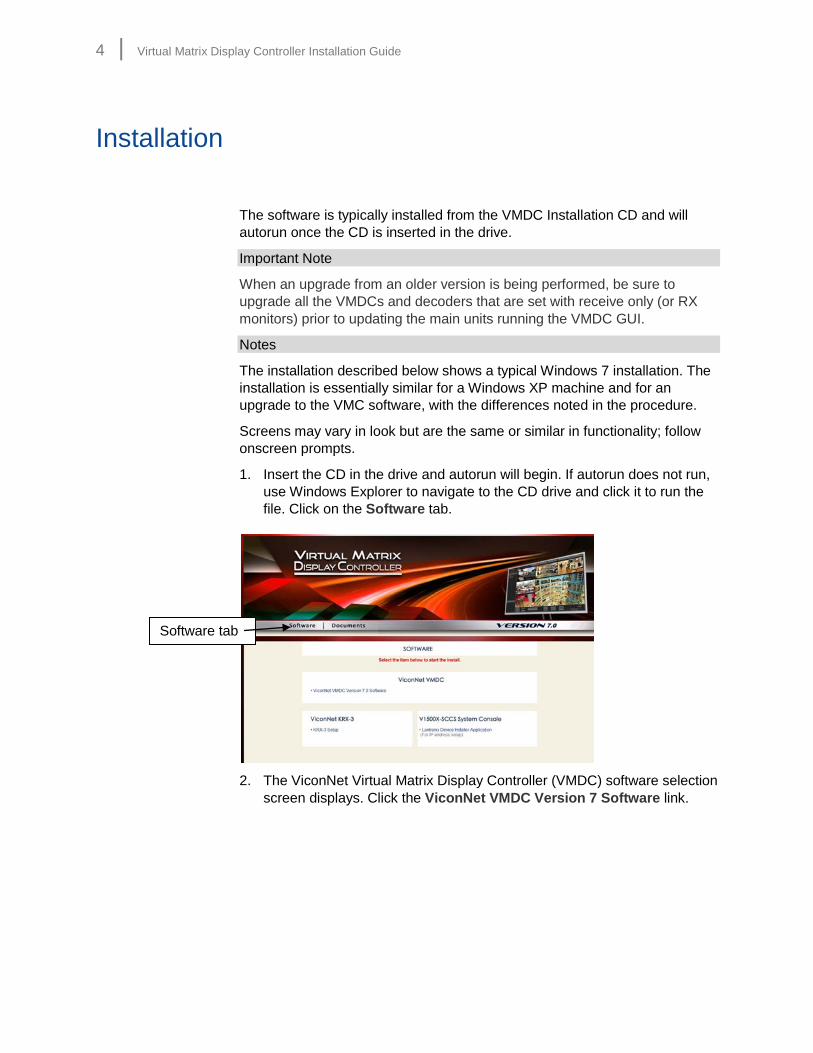
1. Insert the CD in the drive and autorun will begin. If autorun does not run, use Windows Explorer to navigate to the CD drive and click it to run the file. Click on the Software tab.
2. The ViconNet Virtual Matrix Display Controller (VMDC) software selection screen displays. Click the ViconNet VMDC Version 7 Software link.
Software tab

Virtual Matrix Display Controller Installation Guide | 5
Important Note
The Installation and Upgrade process may require several reboots. Do not be alarmed; this is part of the normal upgrade process and can take some time, but the application will finally start up. After the first reboot, VMDC will start again; it may appear that the process is complete but VMDC will not have been upgraded. Several messages may appear; follow the instructions to reboot if necessary. Several reboots may occur, which can be lengthy. After the final reboot the upgraded VMDC will start; although the initialization may take a while.
Software link

6 | Virtual Matrix Display Controller Installation Guide
3. The Preparing Setup screen displays.
4. After setup loads, the VICON-ViconNet-VMDC SW Installation screen displays.
5. Click Next.

Virtual Matrix Display Controller Installation Guide | 7
Note: If the software is being installed on a Windows XP machine, the following screen will display. Click OK to continue installation.
Note: If you are upgrading a prior version of the VMC software, the following dialog box displays:
6. Click Yes. The old software will automatically be uninstalled and the VMDC software will be installed along with any required drivers or framework packages. Proceed to step 13 of this procedure.
7. The License Agreement displays (new installations). Select the I accept radio button and click Next.
8. Select the folder where the VMDC software is to be installed, or choose the default folder. Click Next.

8 | Virtual Matrix Display Controller Installation Guide
9. Click Install. The installation begins. Note that the Windows XP screens will look different than the Windows 7 screens.

Virtual Matrix Display Controller Installation Guide | 9
10. The Autostart ViconNet dialog box displays. Click Yes.
11. The installation continues.
12. Several screens display during this process, including installing VNAgent and ViconNet Drivers.

10 | Virtual Matrix Display Controller Installation Guide
13. The VMDC Setup Complete screen displays. Click Finish to reboot the system. If you selected Yes to have the unit restart in an unattended installation, this screen will not display. The system will reboot automatically.
14. After the system reboots, the Virtual Matrix icon will display on the desktop.
15. Click the icon to start the VMDC application.

Virtual Matrix Display Controller Installation Guide | 11
16. The Virtual Matrix application displays.
Registration
If you have a factory-certified VMDC unit with preinstalled software, VMDC software is pre-registered and will automatically start that way on boot-up. If the new installation is on a customer-supplied unit, the VMDC software must be registered to access the full functionality of the Virtual Matrix application; a license is provided with the software kit. Prior to registration, it will only function as a viewer.
Go to Vicon’s website at www.vicon-security.com or go to http://ftp.vicon-security.com/regkeyoutside (this URL can be used if registering from a mobile device). At the website, click on the ViconNet Registration button (link) and follow the online instructions.
If you encounter any difficulties in the registration process, call Vicon at 1-800-645-9116 (US only) or 1-631-952-2288. Select the software registration option (Hours of Operation: Monday-Friday, 8:30 AM - 5:00 PM EDT).
The directions for opening the Registration Dialog Box in the software are located in Chapter 3 of the Software Manual for ViconNet under the heading “Registering Your System.” Be sure to open this dialog box before calling. You will be asked for information found in the registration dialog box as well as the information contained on the License ID label.
Note: After entering the License ID and Password, the License Information Form will display. Fill this form out accurately. This is how you will be identified in Vicon’s database for future reference. In the serial number field, enter the serial number of the PC on which the software is being installed.

Shipping Instructions Use the following procedure when returning a unit to the factory:
1. Call or write Vicon for a Return Authorization (R.A.) at one of the locations listed below. Record the name of the Vicon employee who issued the R.A.
Vicon Industries Inc. 131 Heartland Boulevard Edgewood, NY 11717 Phone: 631-952-2288; Toll-Free: 1-800-645-9116; Fax: 631-951-2288
For service or returns from countries in Europe, contact:
Vicon Industries (U.K.) Ltd Brunel Way Fareham, PO15 5TX United Kingdom Phone: +44 (0)1489/566300; Fax: +44 (0)1489/566322
2. Attach a sheet of paper to the unit with the following information:
a. Name and address of the company returning the unit
b. Name of the Vicon employee who issued the R.A.
c. R. A. number
d. Brief description of the installation
e. Complete description of the problem and circumstances under which it occurs
f. Unit’s original date of purchase, if still under warranty
3. Pack the unit carefully. Use the original shipping carton or its equivalent for maximum protection.
4. Mark the R.A. number on the outside of the carton on the shipping label.

Vicon Standard Equipment Warranty Vicon Industries Inc. (the “Company”) warrants your equipment to be free from defects in material and workmanship under Normal Use from the date of original retail purchase for a period of three years, with the following exceptions:
1. Uninterruptible Power Supplies: Two years from date of original retail purchase. 2. VDR-700 Recorder Series: One year from date of original retail purchase. 3. V5616MUX: One year from date of original retail purchase. 4. Arecont Cameras: One year from date of original retail purchase. 5. FMC series fiber-optic media converters and associated accessories: Lifetime warranty. 6. For PTZ cameras, “Normal Use” excludes prolonged use of lens and pan-and-tilt motors, gear
heads, and gears due to continuous use of “autopan” or “tour” modes of operation. Such continuous operation is outside the scope of this warranty.
7. Any product sold as “special” or not listed in Vicon’s commercial price list: One year from date of original retail purchase.
Date of retail purchase is the date original end-user takes possession of the equipment, or, at the sole discretion of the Company, the date the equipment first becomes operational by the original end-user. The sole remedy under this Warranty is that defective equipment be repaired or (at the Company’s option) replaced, at Company repair centers, provided the equipment has been authorized for return by the Company, and the return shipment is prepaid in accordance with policy. The Company will not be obligated to repair or replace equipment showing abuse or damage, or to parts which in the judgment of the Company are not defective, or any equipment which may have been tampered with, altered, misused, or been subject to unauthorized repair. Software supplied either separately or in hardware is furnished on an “As Is” basis. Vicon does not warrant that such software shall be error (bug) free. Software support via telephone, if provided at no cost, may be discontinued at any time without notice at Vicon’s sole discretion. Vicon reserves the right to make changes to its software in any of its products at any time and without notice. This Warranty is in lieu of all other conditions and warranties express or implied as to the Goods, including any warranty of merchantability or fitness and the remedy specified in this Warranty is in lieu of all other remedies available to the Purchaser. No one is authorized to assume any liability on behalf of the Company, or impose any obligations on it in connection with the sale of any Goods, other than that which is specified above. In no event will the Company be liable for indirect, special, incidental, consequential, or other damages, whether arising from interrupted equipment operation, loss of data, replacement of equipment or software, costs or repairs undertaken by the Purchaser, or other causes. This warranty applies to all sales made by the Company or its dealers and shall be governed by the laws of New York State without regard to its conflict of laws principles. This Warranty shall be enforceable against the Company only in the courts located in the State of New York. The form of this Warranty is effective July 1, 2014. THE TERMS OF THIS WARRANTY APPLY ONLY TO SALES MADE WHILE THIS WARRANTY IS IN EFFECT. THIS WARRANTY SHALL BE OF NO EFFECT IF AT THE TIME OF SALE A DIFFERENT WARRANTY IS POSTED ON THE COMPANY’S WEBSITE, WWW.VICON-SECURITY.COM. IN THAT EVENT, THE TERMS OF THE POSTED WARRANTY SHALL APPLY EXCLUSIVELY. Vicon Part Number: 8006-9010-03-11 Rev 0714

Vicon Industries Inc.
For office locations, visit the website:
www.vicon-security.com