virtual view manager administration guide
TRANSCRIPT

IBM Cognos Business Intelligence Virtual View Manager
Version 10.1.0
Administration Guide

Product InformationThis document applies to IBM Cognos Business Intelligence Version 10.1.0 and may also apply to subsequent releases. To check for newer versionsof this document, visit the IBM Cognos Information Centers (http://publib.boulder.ibm.com/infocenter/cogic/v1r0m0/index.jsp).
CopyrightLicensed Materials - Property of IBM© Copyright IBM Corp. 2008, 2010.US Government Users Restricted Rights – Use, duplication or disclosure restricted by GSA ADP Schedule Contract with IBM Corp.IBM, the IBM logo, ibm.com, and Cognos are trademarks or registered trademarks of International Business Machines Corp., in many jurisdictionsworldwide. Other product and service names might be trademarks of IBM or other companies. A current list of IBM trademarks is available onthe Web at www.ibm.com/legal/copytrade.shtml.Microsoft, Windows, Windows NT, and the Windows logo are trademarks of Microsoft Corporation in the United States, other countries, or both.Linux is a registered trademark of Linus Torvalds in the United States, other countries, or both.UNIX is a registered trademark of The Open Group in the United States and other countries.Java and all Java-based trademarks and logos are trademarks of Sun Microsystems, Inc. in the United States, other countries, or both.

Table of Contents
Introduction 7
Chapter 1: Post-Installation Tasks 9Configuring IBM Cognos Virtual View Manager to Display Unicode Fonts 9SSL Management 10Installing and Using Special JDBC Drivers 10
Installing Pre-Configured JDBC Drivers 11Connecting Through JDBC Drivers 14Adding, Editing, and Removing JDBC Drivers 17
Using the IBM Cognos Virtual View Manager ODBC Driver 18Using the ODBC Driver on Windows Operating Sytems 18Adding ODBC Data Sources on Windows Operating Systems 19Overriding the Configured Settings 20Code Sample for Connecting to IBM Cognos Virtual View Manager Server 20Supported/Non-Supported Features 21Using the ODBC Driver on UNIX and Linux Operating Systems 21Creating a DSN with driverConfig 22
Configuring IBM Cognos Virtual View Manager for use of a JMS Broker 23Add JMS Connectors to IBM Cognos Virtual View Manager 24
Configuring LDAP 26
Chapter 2: Virtual View Manager Configuration 27Configuration Rights and Privileges 27The Configuration Window 27Fine Tuning Memory 29
Paging 29Case Sensitivity 29
Case Sensitivity and Trailing Spaces Mismatches 29Determining Whether Settings Are Affecting Query Performance 30Dealing with Settings Mismatches 31Impact on String Comparison 31Trailing Spaces 32IBM Cognos Virtual View Manager Policy 32Impact on String Comparison 32Impact on Server Performance 33Studio Locking 33
Chapter 3: IBM Cognos Virtual View Manager Domain Administration 35About the Cognos Domain 35Domain Management 36Group Management 36
Built-in Groups 36Adding Groups to the Cognos Domain 37Removing Groups 37
User Management 38
Licensed Materials – Property of IBM3© Copyright IBM Corp. 2008, 2010.

Built-in Users and Their Privileges 38Adding Users to the Cognos Domain 39Removing Users from the Cognos Domain 40Managing Group Membership 40View Group Membership 40
Changing a Password 41Changing Ownership of Resources 41Manage User and Group Privileges 42
Chapter 4: LDAP Domain Administration 43About the LDAP Domain 43Configuring LDAP Properties File 43
Structure of the LDAP Properties File 44Example of an ldap.properties File 45LDAP Properties File Symbols and Attributes 46Query Examples 47
Domain Administration 50Adding an LDAP Domain 50Working with Groups from an LDAP domain 50Adding a Group to an LDAP Domain 51Removing a Group from an LDAP Domain 52Viewing Group Membership 53Adding and Removing LDAP Users from a Group 53Editing LDAP Domain Connection Parameters 53Removing an LDAP Domain 54
LDAP User Management 54Adding Users to IBM Cognos Virtual View Manager from an LDAP Domain 54Removing LDAP Users from IBM Cognos Virtual View Manager 55Adding Users to Groups 56
Chapter 5: Dynamic Domain Administration 57About Dynamic Domains 57Domain Administration 57
Enabling the Dynamic Domain 58Group Administration 58
Granting Privileges to Dynamic Domain Users 58User Administration 59
Adding Users to the Dynamic Domain 60Removing Users from the Dynamic Domain 60Dynamic Users Group Membership 60Viewing Dynamic User Group Membership 60
Chapter 6: System Monitoring 63Working with IBM Cognos Virtual View Manager Administrator 63
Launching IBM Cognos Virtual View Manager Administrator 64Using IBM Cognos Virtual View Manager Administrator 64
Administrator Home Page 66Server Info Panel 66Server Status Panel 67Quick Links Panel 67
4 IBM Cognos Business Intelligence Virtual View Manager
Table of Contents

Server Overview Page 67Server Status Information 67Session and Request Information 68Privilege, User, and Repository Caches 69Server Status Indicators 69Working with the Server Overview Page 69
Cached Resources 70Working with the Cached Resources Page 70The Cached Resources Table 70Cached Resource Details 71
Data Sources 72Data Sources Summary Information 72Working with the Data Sources Page 72The Data Sources Table 72Data Source Details 73
Requests 74Requests Summary Information 75Working with the Requests Page 75The Requests Table 75
Sessions 77Sessions Summary Information 78Working with the Sessions Page 78The Sessions Table 78
Transactions 79Transaction Summary Information 80Working with the Transactions Page 80The Transactions Table 80
Triggers 81Trigger Summary Information 81Working with the Triggers Page 81The Triggers Table 81
Events 82Server Event Attributes 83Event Log Summary Information 83Working with the Event Log Page 84The Event Log Table 84
Event and Log Files 84Server, Monitor, and Studio Log Files 84
Chapter 7: Utilities 87backup_export and backup_import 87
Backup Program Commands 88virtualviewmanager 96
Stopping and Starting the Server on Windows Startup Program 98install_services 98pkg_export and pkg_import 99
Package Export Command Line Utility 100Package Import Command Line Utility 113
remove_services 128
Administration Guide 5
Table of Contents

repo_util 128server_util 131
Sample Commands to Use server_util 132
Chapter 8: Setting Up a Metadata Repository 133System Requirements 133
Pre-requisites and Limitations for Database Types 133Using Sybase ASE 12.5 as a Repository Database 133Using Oracle Call Interface (OCI) as a Repository Database 134
Creating a Database for the Metadata Repository 134Create an IBM Informix Metadata Repository 134Create a MySQL Metadata Repository 135Create a Sybase Metadata Repository 135Creating an Oracle Metadata Repository 136
Additional Database Configuration Requirements 137Configure the MySQL Repository 137Configure the Sybase Repository 137
Configuring the IBM Cognos Virtual View Manager Metadata Repository 139Sample repo.properties File 139
Chapter 9: SNMP Traps 145SNMP Log Settings 145SNMP Details 145
Index 161
6 IBM Cognos Business Intelligence Virtual View Manager
Table of Contents

Introduction
This guide is designed for first-time users that are not administrators and are interested in addressing
business issues presented by their disparate business systems.
The purpose of this guide is:
● To demonstrate how you can use IBM® Cognos® Virtual View Manager to address your business
needs
● To introduce the data modeling aspect of Virtual View Manager
Audience
This documentation is for information technology professionals who want to use IBM® Cognos®
Virtual View Manager to model data resources. Knowledge of relational data sources, hierarchical
data sources, and data modeling is recommended.
Finding information
To find IBM® Cognos® product documentation on the web, including all translated documentation,
access one of the IBM Cognos Information Centers at http://publib.boulder.ibm.com/infocenter/
cogic/v1r0m0/index.jsp. Updates to Release Notes are published directly to Information Centers.
You can also read PDF versions of the product release notes and installation guides directly from
IBM Cognos product disks.
Accessibility features
This product does not currently support accessibility features that help users who have a physical
disability, such as restricted mobility or limited vision, to use this product.
Forward-looking statements
This documentation describes the current functionality of the product. References to items that are
not currently available may be included. No implication of any future availability should be inferred.
Any such references are not a commitment, promise, or legal obligation to deliver any material,
code, or functionality. The development, release, and timing of features or functionality remain at
the sole discretion of IBM.
Samples disclaimer
The Great Outdoors Company, GO Sales, any variation of the Great Outdoors name, and Planning
Sample depict fictitious business operations with sample data used to develop sample applications
for IBM and IBM customers. These fictitious records include sample data for sales transactions,
product distribution, finance, and human resources. Any resemblance to actual names, addresses,
contact numbers, or transaction values is coincidental. Other sample files may contain fictional
data manually or machine generated, factual data compiled from academic or public sources, or
data used with permission of the copyright holder, for use as sample data to develop sample appli-
Licensed Materials – Property of IBM7© Copyright IBM Corp. 2008, 2010.

cations. Product names referenced may be the trademarks of their respective owners. Unauthorized
duplication is prohibited.
8 IBM Cognos Business Intelligence Virtual View Manager
Introduction

Chapter 1: Post-Installation Tasks
This chapter describes some basic tasks that enable secure computing and client connections. These
tasks must be performed sometime soon after installation of IBM® Cognos® Virtual View Manager
before serious design and resources may be published.
The following topics are covered in this chapter:
● "Configuring IBM Cognos Virtual View Manager to Display Unicode Fonts" (p. 9)
Update Virtual View Manager to support unicode fonts.
● "SSL Management" (p. 10)
Install a JavaTM Key Store for use with Virtual View Manager.
Note that this task does not need to be done immediately. However, it is strongly recommended
that all server instances are configured with their own certificate prior to deployment with
sensitive data.
● "Installing and Using Special JDBC Drivers" (p. 10)
Make sure that you have installed the appropriate JDBC drivers for the relational data sources
that you plan to use.
You can use Virtual View Manager’s JDBC driver (and edit it if necessary) or install a specific
JDBC driver for your installation.
● "Using the IBM Cognos Virtual View Manager ODBC Driver" (p. 18)
Configure the Virtual View Manager ODBC driver to connect with ODBC data sources and
to receive connections from ODBC clients. If you installed the ODBC Client with Virtual View
Manager then ODBC Client applications can use a 32-bit driver to connect with the server.
The computer on which the ODBC client application resides must be configured to use the
Virtual View Manager drivers to properly connect with the server.
● "Configuring IBM Cognos Virtual View Manager for use of a JMS Broker" (p. 23)
By default Virtual View Manager supports both Sonic and TIBCO JMS brokers, however some
non-distributable JARs must be copied to the installation directory from the JMS installation(s)
that will be used.
Configuring IBM Cognos Virtual View Manager to DisplayUnicode Fonts
IBM® Cognos® Virtual View Manager Server returns Unicode characters in all messages carrying
data. The server also transforms messages with other UTF encoding formats to Unicode.
Licensed Materials – Property of IBM9© Copyright IBM Corp. 2008, 2010.
To display all Unicode true type fonts, you must manually configure Virtual View Manager.
Steps
1. On the Windows® computer where Virtual View Manager is installed, create a folder named
fallback in the installation_location\jre\lib\fonts\ directory.
For example, installation_location\jre\lib\fonts\fallback
2. From C:/Windows/fonts or C:/WINNT/fonts directory, copy the Arial Unicode MS (TrueType)
font file (ARIALUNI.TTF) to the installation_location\jre\lib\fonts\fallback directory you just
created.
3. Restart Virtual View Manager.
SSL ManagementIBM® Cognos® Virtual View Manager enables specification of the JavaTM Key Store (JKS) used to
initiate and establish SSL communications over both HTTPS ports used for secured web services
and secured JDBC communications.
Viewing the SSL Management page requires a user profile that has the Read All Resources right
and change of any of the JKS digital certificate file location, type, or password requires the Modify
All Resources right.
A generic JKS file is provided so that development and testing of Web services and JDBC secured
over HTTPS ports may proceed without need for immediate installation of a JKS file.
You should configure all Virtual View Manager instancestheir own JKS certificate prior to
deployment with sensitive data.
Obtain your JKS digital certificate(s) from a Certificate Authority (CA) or generate your own and
install it using on the SSL Management page in Virtual View Manager Administrator.
Steps
1. In Virtual View Manager Administrator, click Configuration > SSL.
2. The SSL Management page appears.
3. In theNewValue column, enter the absolute path to the new JKS file (X.509 compliant certificate
file) on the server and click Apply.
4. Change the Java Keystore File Type and the Java Keystore Password values in the same way
described above so that the values on server restart match the digital certificate being installed.
5. Restart the server to apply the changes.
Installing and Using Special JDBC DriversThe following relational data sources require additional JDBC drivers to enable connection, intro-
spection, and use.
10 IBM Cognos Business Intelligence Virtual View Manager
Chapter 1: Post-Installation Tasks

● IBM® DB2® (type 2 and type 4)
● IBM DB2 (Mainframe)
● IBM Informix®
● Microsoft® SQL Server
● Netezza
● Teradata
● MySQL
● Sybase
● Neoview
● Oracle (type 2 and type 4)
These data source drivers must be installed separately from the IBM® Cognos® Virtual View Manager.
You must install the necessary driver(s) in the appropriate location(s) so that the Virtual View
Manager server and the data source can interact. Each particular data source has a directory within
the Virtual View Manager installation directory, which is specified below.
Virtual View Manager provides a JDBC interface and provides methods to connect to relational
data sources that may not be formally supported. Custom jars may be written to direct the server
to connect using the custom jar. Simply specify the JDBC driver and direct the server to upload it
to the system.
One driver is sufficient to connect to any number of the same type of data sources. Once uploaded,
the JDBC driver will function like any other JDBC driver, such as Oracle, SQL Server, or MySQL.
Virtual View Manager server assumes that JDBC drivers conform to the JDBC 2.0 standard. The
server does not make any accommodations for JDBC drivers that don’t supply correct metadata
about the data source. The server does not retrieve result sets that are not consistent with the
metadata supplied.
Installing Pre-Configured JDBC DriversThis section describes how to install pre-configured JDBC drivers from specific locations for con-
necting to specific data sources.
The IBM® Cognos® Virtual View Manager location to copy the JAR files into is:
installation_directory\apps\dlm\cis_ds_<datasource_type>\lib
For example, the location for the IBM® Informix® data source is c:\vvm\apps\dlm\cis_ds_informix\
lib.
Steps to install pre-configured JDBC drivers for DB2 (Type 2 or Type 4)
1. Obtain the appropriate driver file for your version of DB2.
● Use db2jcc.jar and the accompanying license file, for example, db2jcc_license_cisuz.jar or
db2jcc_license_cu.jar
Administration Guide 11
Chapter 1: Post-Installation Tasks

2. Copy the jar file, and license file, to the following Virtual View Manager directory:
installation_directory\apps\dlm\cis_ds_db2\lib
3. Restart the server.
Steps to install pre-configured JDBC driver for DB2 z/OS
1. The driver for DB2 z/OS is the same as the driver for DB2 on UNIX®. Obtain db2jcc.jar, its
accompanying license file, for example, db2jcc_license_cisuz.jar or db2jcc_license_cu.jar, and
common.jar.
2. Copy the files to the Virtual View Manager installation directory:
installation_directory\apps\dlm\cis_ds_db2_mainframe\lib
3. Restart the server.
Steps to install the pre-configured JDBC driver for IBM Informix
1. Obtain the IBM Informix JDBC driver for your version of Infomix.
2. Copy the ifxjdbc.jar driver file to the Virtual View Manager installation directory:
installation_directory\apps\dlm\cis_ds_informix\lib
3. Restart the server.
Steps to install pre-configured Microsoft SQL ServerJDBC Driver
1. Obtain the driver file for your version of Microsoft SQL Server.
2. Download the driver version for the appropriate platform.
3. Run the setup.exe installation program, and do the following:
● For Microsoft SQL 2000, extract mssqlserver.jar, msutil.jar, and msbase.jar to a locally
accessible folder.
● For Microsoft SQL 2005, extract the sqljdbc.jar file.
● For Microsoft SQL 2008, extract sqljdbc4.jar, msbase.jar, mssqlserver.jar, and msutil.jar.
4. Copy the JAR file(s) to the Virtual View Manager directory:
installation_directory\apps\dlm\cis_ds_mssql\lib
5. Restart the server.
Steps to install the pre-configured JDBC driver for Netezza
1. Obtain the JDBC driver for Netezza from the CDs that you received with the NPS system or
by contacting the support group at Netezza.
2. Copy the nzjdbc.jar driver file to the Virtual View Manager installation directory:
12 IBM Cognos Business Intelligence Virtual View Manager
Chapter 1: Post-Installation Tasks

installation_directory\apps\dlm\cis_ds_netezza/lib
Steps to install the pre-configured JDBC driver for Teradata
1. Obtain the JDBC driver for your version of Teradata.
2. Copy the driver files named tdgssconfig.jar, tdgssjava.jar, and terajdbc4.jar to the Virtual View
Manager installation directory:
installation_directory\apps\dlm\cis_ds_teradata/lib
3. Restart the server.
Steps to install the pre-configured JDBC driver for MySQL
1. Obtain the JDBC driver for your version of MySQL.
2. Copy the mysql-connector-java-3_1_10_1-bin.jar driver file to the Virtual View Manager
installation directory:
installation_directory\apps\dlm\cis_ds_mysql/lib
3. Restart the server.
Steps to install the pre-configured JDBC driver for Sybase
1. Obtain the JDBC driver for your version of Sybase.
2. Copy the jconn3.jar and jTDS3.jar driver files to the Virtual View Manager installation directory:
installation_directory\apps\dlm\cis_ds_mysql/lib
3. Restart the server.
Steps to install the pre-configured JDBC driver for Neoview
1. Obtain the JDBC driver for your version of Neoview.
2. Copy the driver files to the Virtual View Manager installation directory:
installation_directory\apps\dlm\cis_ds_neoview/lib
3. Restart the server.
Steps to install the pre-configured JDBC driver for Oracle (Type 2 or Type 4)
1. Obtain the JDBC driver for your version of Oracle.
2. Copy the ojdbcXX.jar, xdb.jar, xmlparservX.jar driver files to the Virtual View Manager
installation directory:
installation_directory\apps\dlm\cis_ds_db2/lib
3. Restart the server.
Administration Guide 13
Chapter 1: Post-Installation Tasks

Connecting Through JDBC DriversIBM® Cognos® Virtual View Manager connects to and introspects underlying data sources so that
a virtual, integrated data layer may be created, selectively published, and queried as a single data
source.
JDBC connection service requests are created and maintained between the end-user client applications
and the Virtual View Manager server and from the server to the underlying data sources.
This administrative section describes the generic JDBC connection URLs between the Virtual View
Manager server and the native data sources. The information could also be generally applied to the
client-server JDBC connection, though the end-user JDBC client typically connects only to the Virtual
View Manager server data source and not directly to the underlying data sources. There are
exceptions such as test cases to specify additional attributes for complex transaction handling or
to verify proper driver functionality.
Defining New Data Sources
When the required data source driver is installed and ready for use, developers may create connections
with the desired data sources.
You define new data sources in the user home directory or in any appropriate directory. The JDBC
driver connection URL is built dynamically using a wizard. The Add Physical Data Source wizard
enables selection of the data source driver to build the connection URL according to the URL format
specifications of that driver class. Custom configurations, URL attribute additions, and implemen-
tation specific attributes may be set using the wizard as well.
Each data source driver supports URL service requests with a specific binding format. The general
JDBC connection URL format is:
jdbc:<jdbc-subprotocol>:[implementation specific URL attributes]
where <jdbc-sub-protocol> identifies the JDBC implementation and typically identifies the JDBC
driver vendor. The implementation specific URL attributes vary widely depending on the vendor
data source and implementation specific configurations. A table listing the different data source
driver JDBC URL formats and addressable driver class names is provided in "Sample JDBC Driver
Connection URL Formats" (p. 15).
JDBC Driver Connection URL Format
Knowing the connection URL format and driver class name also enables a direct connection to the
underlying data source utilizing the drivers supported by the IBM® Cognos® Virtual View Manager
server. JDBC clients may connect directly with new data sources mediated by the JDBC port.
The driver connection URL format is a template for data source definitions. It contains three literal
strings:
<HOST>, <PORT>, and <DATABASE_NAME>
When you add a data source to Virtual View Manager using this driver, the server substitutes the
literals <HOST>, <PORT>, and <DATABASE_NAME> with the values you supply for the host
name, port number, and database name respectively in the Add Physical Data Source window.
The complete syntax of the URL:
14 IBM Cognos Business Intelligence Virtual View Manager
Chapter 1: Post-Installation Tasks
jdbc:cognos:dbapi@<HOST>:<PORT>?domain=<domain>& dataSource=<DATASOURCE>
[&NAME=VALUE]*
where
● HOST — valid host name or IP address
● PORT — integer setting on which Virtual View Manager and the host database will communicate
● DOMAIN — user domain (cognos is the default domain)
● DATASOURCE — data source name
and zero or more optional NAME=<VALUE> pairs may be specified depending on the target data
source and driver. Refer to the next table to see the generic URL format used by the Virtual View
Manager server to connect to the data source.
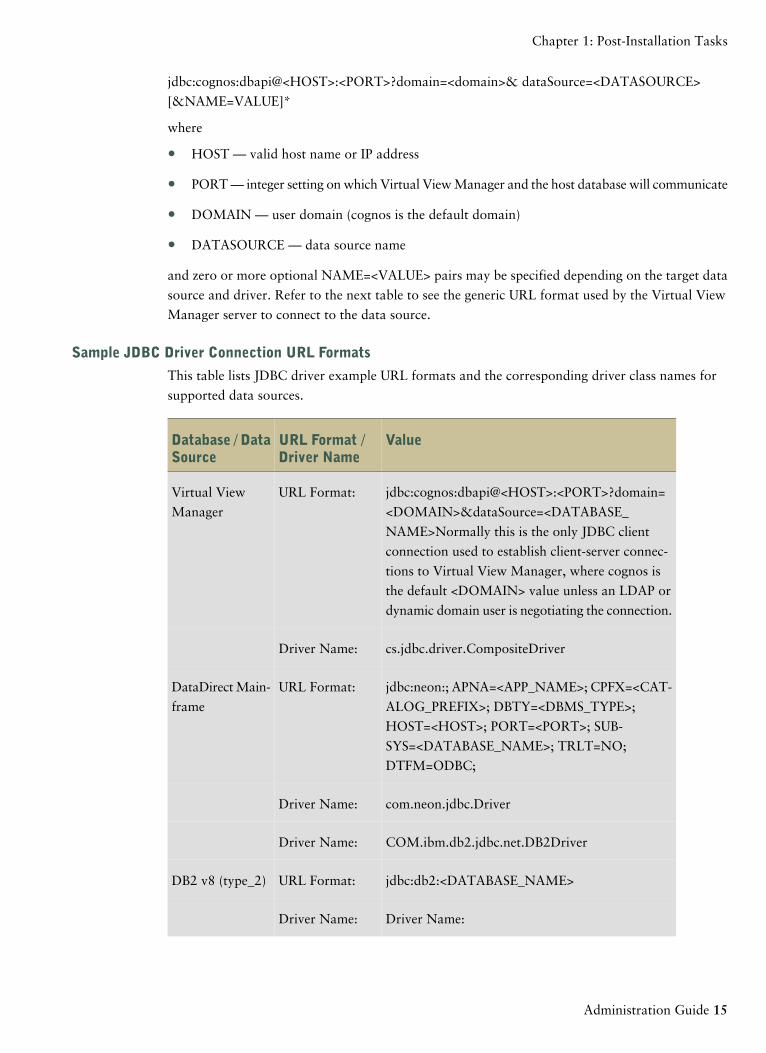
Sample JDBC Driver Connection URL Formats
This table lists JDBC driver example URL formats and the corresponding driver class names for
supported data sources.
ValueURL Format /Driver Name
Database / DataSource
jdbc:cognos:dbapi@<HOST>:<PORT>?domain=
<DOMAIN>&dataSource=<DATABASE_
NAME>Normally this is the only JDBC client
connection used to establish client-server connec-
tions to Virtual View Manager, where cognos is
the default <DOMAIN> value unless an LDAP or
dynamic domain user is negotiating the connection.
URL Format:Virtual View
Manager
cs.jdbc.driver.CompositeDriverDriver Name:
jdbc:neon:; APNA=<APP_NAME>; CPFX=<CAT-
ALOG_PREFIX>; DBTY=<DBMS_TYPE>;
HOST=<HOST>; PORT=<PORT>; SUB-
SYS=<DATABASE_NAME>; TRLT=NO;
DTFM=ODBC;
URL Format:DataDirect Main-
frame
com.neon.jdbc.DriverDriver Name:
COM.ibm.db2.jdbc.net.DB2DriverDriver Name:
jdbc:db2:<DATABASE_NAME>URL Format:DB2 v8 (type_2)
Driver Name:Driver Name:
Administration Guide 15
Chapter 1: Post-Installation Tasks

ValueURL Format /Driver Name
Database / DataSource
jdbc:db2://<HOST>:<PORT>/<DATABASE_
NAME>
URL Format:DB2 v8 (type_4)
com.ibm.db2.jcc.DB2DriverDriver Name:
jdbc:db2://<HOST>:<PORT>/<DATABASE_
NAME>
URL Format:DB2 z/os v8
(type_4)
mainframe
com.ibm.db2.jcc.DB2DriverDriver Name:
jdbc:informix-sqli://<HOST>:<PORT>/
<DATABASE_NAME>: informixserver=<IBM
Informix instance name>;user=<user_name>;
password=<password>
URL Format:IBM® Informix®
The informixserver variable is the name of the IBM
Informix instance, and not the server host name,
and <user_name> and <password> are recognized
by the IBM Informix server.
com.informix.jdbc.IfxDriverDriver Name:
jdbc:mysql://<HOST>:<PORT>/<DATABASE_
NAME>
URL Format:MySQL
Driver Name:
jdbc:netezza://<HOST>:<PORT>/<DATABASE_
NAME>
URL Format:Netezza
org.netezza.DriverDriver Name:
jdbc:oracle:thin@<HOST>:<PORT>:<DATABASE_
NAME>
URL Format:Oracle (thin), 9i,
and 10g
oracle.jdbc.driver.OracleDriverDriver Name:
jdbc:oracle:oci:@<DATABASE_NAME>URL Format:Oracle type2
(OCI) 9i, and 10g
oracle.jdbc.OracleDriverDriver Name:
16 IBM Cognos Business Intelligence Virtual View Manager
Chapter 1: Post-Installation Tasks

ValueURL Format /Driver Name
Database / DataSource
jdbc:microsoft:sqlserver://<HOST>:<PORT>;
databaseName= <DATABASE_NAME>;
SelectMethod=<SELECT_MODE>
URL Format:Microsoft® SQL
Server
com.microsoft.jdbc.sqlserver.SQLServerDriverDriver Name:
jdbc:sybase:Tds:<HOST>:<PORT>/<DATABASE_
NAME>
URL Format:Sybase
com.sybase.jdbc3.jdbc.SybDriverDriver Name:
jdbc:teradata://<HOST>/DBS_PORT=<PORT>/
DATABASE= <DATABASE_NAME>/
CHARSET=UTF8,COMPAT_DBS=true
URL Format:Teradata
com.ncr.teradata.TeraDriverDriver Name:
Adding, Editing, and Removing JDBC DriversYou can install your own JDBC driver on the server. You can also edit or remove the drivers you
create.
Note: You can only edit or remove user-installed drivers.
Steps to add a new JDBC driver
1. The data source wizard lets you add your own JDBC driver to the Virtual View Manager
metadata environment. Right-click at an appropriate location in the resource tree, and click
New Data Source.
2. In the Add Physical Data Source window, click New Driver.
3. In the New Driver Information window, enter the driver information in the fields as follows:
● Name: User-defined name for the driver. Type the name. This is a user-defined name for
the driver. After adding it to the server, this name will be listed along with other data source
drivers listed on the first window of the Add Physical Data Source wizard.
● Type: Type of the JDBC driver. Accept Jdbc.
● Jar File: Click the Browse button to locate the JAR file(s) where the driver class is stored.
You can also type the name (with path) in the Jar File field. You can only upload a JDBC
driver JAR file that is visible to Virtual View Manager. For example: installation_directory\
apps\jdbc\lib\<jar_file>
● Driver Class Name: Fully-qualified name of the driver class. For example: oracle.jdbc.driver.
OracleDriver
Administration Guide 17
Chapter 1: Post-Installation Tasks

● Connection URL Pattern: Format of the URL to connect to the database. For details on
the connection URL format, see "Connecting Through JDBC Drivers" (p. 14).
JDBC drivers are installed in their respective directory, as described in the beginning of the
section "Installing and Using Special JDBC Drivers" (p. 10). For example, DB2 driver JAR files
(db2jcc.jar and the accompanying license file) are installed in the following directory:
installation_directory\apps\dlm\db2\lib\
4. Click OK.
The driver is displayed with other data source drivers in the first window of the Add Physical
Data Source window. You can use this driver to add JDBC type data sources to the server.
Steps to edit a JDBC driver
1. You can only edit user-installed drivers.
Open the data source wizard.
2. In the Select Data Source Driver section, select the user-installed driver that you want to edit.
3. Click Edit Driver.
4. In the editing window, make the necessary changes, and click OK.
Use the Browse button to locate the JAR file(s) if the location of the file(s) has changed. For
example, DB2 driver JAR files are installed in the following directory:
installation_directory\apps\dlm\ds_db2\lib\
Steps to remove a data source driver
1. You can only remove user-installed drivers.
Open the data source wizard.
2. In the Select Data Source Driver section, select the driver which you want to remove.
3. Click Delete Driver.
Using the IBM Cognos Virtual View Manager ODBC DriverIf the option to install the ODBC driver is specified during the installation process, the driver is
installed.
Using the ODBC Driver on Windows Operating SytemsThe rest of this section covers the following topics:
● "Adding ODBC Data Sources on Windows Operating Systems" (p. 19).
● "Overriding the Configured Settings" (p. 20).
● "Code Sample for Connecting to IBM Cognos Virtual View Manager Server" (p. 20).
18 IBM Cognos Business Intelligence Virtual View Manager
Chapter 1: Post-Installation Tasks

● "Supported/Non-Supported Features" (p. 21).
Adding ODBC Data Sources on Windows Operating SystemsThe native Windows® driver managers are supported by IBM® Cognos® Virtual View Manager.
Steps
1. From the Windows Control Panel, open Administrative Tools > Data Sources (ODBC).
2. Click the User DSN tab or the System DSN tab.
A User DSN is accessible only to the current user. A System DSN is accessible to all the users
on the system and requires special permission to create and modify.
3. Click the Add button.
4. In the Create New Data Source screen, select the Virtual View Manager driver, and then click
Finish.
5. In the Driver Configuration window, enter the following information that is required for con-
figuring the driver:
● DSNName: Name of the data source to which the clients will refer. Once a DSN is created,
its name cannot be changed.
● Host: Server name (or IP address) on which Virtual View Manager is running.
● Port: TCP port used to communicate with Virtual View Manager Server, which must match
the port that the server is listening on. With default installation settings, the server listens
to port 9401. To confirm the port number, click Virtual View Manager Server > JDBC
and ODBC Drivers > Communications > Port in Virtual View Manager.
● User Name, Password, and Domain: A Virtual View Manager user name and password.
The Password is nullable.
● Datasource: Name of the Virtual View Manager data source that the ODBC connection
will access This entry sets the default scope of client queries to a particular datasource.
Note that querying outside the scope of this data source requires super-qualified tables or
stored procedures.
● Catalog: Connects with default data-source catalog
6. Use the Refresh button to retrieve the Catalogs available to this user on the server.
7. Use the Test button to test the settings in the configuration dialog box.
8. Click OK.
The configured settings you entered are saved, and the data source is added to your computer.
Administration Guide 19
Chapter 1: Post-Installation Tasks

Overriding the Configured SettingsA client connecting to the server through the ODBC driver can override the configured settings on
a data source by adding the appropriate parameters in the connection string.
For example, clients can use a connection string such as
DSN=<value>;UID=<value>;PWD=<value>;DOMAIN=<value>; HOST=<value>;PORT=<value>;
DATASOURCE=<value>; CATALOG=<value>;
Note that for these parameters:
● The original DSN value cannot be overridden.
● Upon creation of a DSN, you are prompted for a PWD entry.
● HOST is the host name where the server is running.
● CATALOG is optional.
Code Sample for Connecting to IBM Cognos Virtual View Manager ServerHere is a sample Visual Basic for Applications (VBA) Script for connecting from a Microsoft® client
(such as Excel) through ADO. The line rendered in bold renders the connection string.
Sub demo()On Error Resume NextErr.Cleardsn = "DS-Virtualviewmanager"Set conn = CreateObject("ADODB.Connection")conn.Open "DSN=" & dsnIf Err.Number <> 0 Then
' process errorExit Sub
End If
Err.ClearSet rs = CreateObject("ADODB.Recordset")rs.Open "SELECT * FROM CUSTOMER", connIf Err.Number <> 0 Then
' process errorExit Sub
End If
' get column namesFor Each Column In rs.fields
colname = Column.NameNext
' get first 100 rowsCount = 0maxcount = 100
Err.ClearDo While Not rs.EOF And Err.Number = 0 And Count < maxcount
Count = Count + 1For Each Record In rs.fields
colvalue = Record.ValueNextrs.movenext
LoopEnd Sub
20 IBM Cognos Business Intelligence Virtual View Manager
Chapter 1: Post-Installation Tasks

Supported/Non-Supported FeaturesThe IBM® Cognos® Virtual View Manager ODBC driver supports the following features:
● Data types: CHAR, VARCHAR, SHORT, LONG, DOUBLE, FLOAT, TIME, DATE,
TIMESTAMP
Conversions (indicated by “->” below):
CHAR, VARCHAR -> VARCHAR BIT, TINYINT, SMALLINT -> SMALLINT BIGINT, INT
-> INT DECIMAL, REAL, FLOAT, NUMERIC -> FLOAT
All other types are converted to VARCHAR.
The ODBC driver does not support the following feature:
● Parameters in prepared statements.
Known Issue
Fixed width: All CHAR and VARCHAR data types are reported by the driver to be 256 characters.
However, the driver supports the retrieval of longer values if the client provides adequate memory
for doing so.
Using the ODBC Driver on UNIX and Linux Operating SystemsEnsure that you know the following details:
● To install the ODBC driver at anytime after server installation you can log into the installation
machine as the same user that installed the IBM® Cognos® Virtual View Manager server and
the driver.
● To configure the ODBC driver, ensure that you have Read and Write permissions on the
following files, which are in the C:\Windows directory:
vvm<version>.xml
odbc.ini
odbcinst.ini
The configuration is done by an interactive utility, driverConfig, which is in the <installation_
directory>/apps/odbc/<platform>/bin.
● Creating a DSN is done through the configuration utility driverConfig, which helps users to
reconfigure the driver files (in case, file-location is changed after installation), and create, edit,
list, or delete DSN entries.
The rest of this section describes the following tasks for using the ODBC driver on UNIX®:
● Setting the Environment Variables.
● Creating a DSN with driverConfig.
Setting the Environment Variables
1. Log into the installation machine as the same user that installed Virtual View Manager.
Administration Guide 21
Chapter 1: Post-Installation Tasks
2. Set the following environment variables:
● VVM_HOME
The location where the driver is installed. This is the full path to the top-level installation
directory for Virtual View Manager server.
● VVM_DSN_XML
This is an optional variable. It allows you to specify an alternate location for the DSN
(Data Source Name) configuration file, so different users on the same computer can have
different sets of DSNs configured. It is the full path to the ODBC DSN configuration file
for the Virtual View Manager server. The DSN defaults to the following value, but it can
be configured using the driverConfig utility:
$VVM_HOME/vvm<version>.xml
● ODBCINI
odbc.ini defines the DSN entries. This value is the full path to the odbc.ini file. It is generated
by the DSN configuration with driverConfig:
<installation_directory>/odbc.ini
● ODBCINSTINI
odbcinst.ini defines the ODBC drivers. This value is the full path to the configuration file
odbcinst.ini, which is generated during DSN configuration with driverConfig:
<installation_directory>/odbcinst.ini
● LD_LIBRARY_PATH
This is specific to Solaris-based machines and Linux®-based machines. This path refers to
the location of the iODBC driver manager files. The default location is:
<installation_directory>/apps/odbc/lib
● LIBPATH
This is specific to AIX-based computers. This path refers to the location of the iODBC
driver manager files. The default location is:
<installation_directory>/apps/odbc/lib
● SHLIB_PATH
This is specific to HP-UX-based computers. This path refers to the location of the iODBC
driver manager files. The default location is:
<installation_directory>/apps/odbc/lib
Creating a DSN with driverConfigThis section describes how to create a DSN by running the driverConfig utility program on a UNIX®
platform.
driverConfig is located in the $VVM_HOME/apps/odbc/<platform>/bin directory.
22 IBM Cognos Business Intelligence Virtual View Manager
Chapter 1: Post-Installation Tasks

To create a DSN with driverConfig
Run driverConfig using the following command:
driverConfig
A sample interaction between the system and user is given below:
Main Menu0 Exit this utility1 Configure ODBC administrator2 View configuration and DSNs on this system3 Create/edit a DSNEnter command> 3---------Create/edit a DSN0 Return to main menu1 Create a DSN2 Edit an existing DSN3 Delete an existing DSNEnter command> 1Enter DSN name> testdsnEnter host [localhost]>Enter port [9401] (Thisis the default port setting)>Enter user> adminEnter password> adminEnter domain> cognosEnter datasource> dsEnter catalog> catKeep this information?[testdsn]host = localhostport = 9401uid = adminpassword = admindomain = cognosdatasource = dscatalog = catEnter (y)es or (n)o > y
The details for the newly created DSN are saved.
Configuring IBM Cognos Virtual View Manager for use of aJMS Broker
JMS provides a way to publish asynchronous message-based web services.
IBM® Cognos® Virtual View Manager supports both Sonic and TIBCO JMS brokers, but a few
drivers must be copied from the JMS broker installation to the Virtual View Manager installation
directory in order to properly connect the two servers.
Administration Guide 23
Chapter 1: Post-Installation Tasks

To enable communications between Virtual View Manager and the JMS broker several compiled
library files, jars, will have to be copied to the server installation directory and the server will have
to be restarted.
Steps to enable connection with TIBCO JMS
1. Find and copy the file named tibjms.jar from the TIBCO installation to the following Virtual
View Manager directory:
<installation_directory>/apps/server/lib
2. Restart the Virtual View Manager server.
Steps to enable connection with Sonic JMS
1. Find and copy the file named mfcontext.jar and the all jar files that begin with the prefix sonic_
to the following Virtual View Manager directory:
<installation dir>/apps/server/lib
2. Restart the Virtual View Manager server.
Steps to create and configure a queue and queue connection factory in JMS Broker
1. For either JMS broker, if you haven't already, configure your JMS broker according to the
respective manufacturer’s instructions.
Create a suitable Queue Connection Factory (QCF).
2. Create a suitable Queue.
3. Register the Queue Connection Factory and the Queue with the JNDI.
Note: Connection to JMS via JNDI is currently supported by Virtual View Manager. Virtual
View Manager supports queues, but not JMS topic connection factories.
Add JMS Connectors to IBM Cognos Virtual View ManagerConnectors must be configured for use by IBM® Cognos® Virtual View Manager. Use Virtual View
Manager Administrator to create connectors so that the server can publish JMS data services.
For more information on publishing Virtual View Manager Data Services to JMS queues, refer to
the "Publishing Resources" of the IBM® Cognos® Virtual View Manager User Guide.
Steps
1. Start Virtual View Manager Administrator:
2. Click Configuration > Connectors to open the Connector Management page.
3. Add a Connector using the provided button.
The Add a JMS via JNDI Connector window is displayed.
Almost all fields in the Add a JMS via JNDI Connector window must have some value for the
Connector to function properly. Many of the fields do have defaults.
24 IBM Cognos Business Intelligence Virtual View Manager
Chapter 1: Post-Installation Tasks

4. Enter values in the fields displayed by the Info tab.
● Connector Name — convenient, identifier label for the connector
● Group Name — connectors that share an identical group name share a common connection
pool. Connector grouping has failover connection pooling because the connection pool is
shared. If a connector instance fails other connectors in the group will be able to send and
receive messages using the same connection pool.
● Annotation — (optional) adds notes on the JNDI connector. Annotations will be visible
on the Connector Management page.
5. Enter values in the fields displayed by the JMS via JNDI tab.
● Initial Context Factory — Sonic and TIBCO context factories are supported by default,
but other context factories may be supported. Other JMS compliant brokers and their
respective JNDI context factories may be used to connect with Virtual View Manager. See
the documentation for your particular JMS broker for specifics on what is needed to support
a JNDI initial context factory. The JNDI initial context factory is usually the class name.
Type "c" to see the default, suggested string values that may be used with Sonic JMS and
TIBCO JMS as values for the initial context factories.
For Sonic: com.sonicsw.jndi.mfcontext.MFContextFactory
For TIBCO: com.tibco.tibjms.naming.TibjmsInitialContextFactory
● JNDI Provider URL — URL for connection with the JNDI. TCP protocol is generally used.
TIBCO default port is 7222, and Sonic default port is 2506. Make sure the appropriate
port in the firewall is opened to allow connections with the JNDI provider.
● JNDI User and JNDI Password — JMS JNDI user profile must have sufficient permissions
to look up JMS destinations. Passwords are not stored in clear text.
● JMS Client ID — (optional) name the Virtual View Manager connections with the JMS
broker.
6. Enter values for additional name-value pairs on the JNDI Properties tab.
The JNDI Properties tab enables specification of additional name value pairs.
Click the plus button to add name value pairs.
In particular, Sonic requires specification of a domain name, while TIBCO does not require
further specification.
7. Enter values for additional name-value pairs on the Pool tab.
The Pool tab enables specification of the connection thread timeout and pool size parameters.
The default values will be generally adequate for development needs.
● Pool Timeout specifies the maximum waiting time (in seconds) for a new connection. If a
connection is not provided within the pool timeout period specified, then a check is made
for an available connection using the proper user and uses that, or if that is not available
Administration Guide 25
Chapter 1: Post-Installation Tasks

then the least recently used connection for some other user is dropped and a new connection
for the required user is opened.
● Minimum Pool Size specifies the number of connections that should remain in the connection
pool even when the pool becomes inactive.
The connection pool is initially empty. When there is a need to connect to JMS via JNDI,
the pool creates one connection based on the information provided in the Info panel.
Connections remain available even when there is no activity because the time to negotiate
new connections can add a significant amount to the query response time.
If the JMS connection pool has been inactive for a while, the connector pool size will start
to shrink based upon the connection inactivity. The Minimum Pool Size specifies the min-
imum number of connections to remain in the pool, to maintain a minimum number of
available connections.
● Maximum Pool Size specifies the number of connections (both active and idle) allowed to
access the data source. When the connection pool limit is reached new incoming requests
must wait until the next connection is made available.
The connection pool is initially empty. When there is a need to connect to the data source,
the pool creates a connection based on the information provided in the Info panel. As
making new connections can take some time and resources, these connections remain
available even if they become idle.
Connectors with identical group names will share the same pool of connections.
Configuring LDAPYou can use LDAP for domain administration. You can also use LDAP as a datasource.
Steps to use LDAP
1. Obtain the ldapbp.jar file.
2. Copy the ldapbp.jar file to the Virtual View Manager installation directory:
installation_directory\apps\common\lib
3. Restart the server.
26 IBM Cognos Business Intelligence Virtual View Manager
Chapter 1: Post-Installation Tasks
Chapter 2: Virtual View Manager Configuration
IBM® Cognos® Virtual View Manager provides a large number of configuration parameters that
display configuration settings, usage data, and allow administrator modification of settings and
behavior. Usually none of the configuration settings require modification for development environ-
ments, but certain settings enable optimal implementation for various production settings.
This chapter introduces some of the configuration tasks you can perform to track information and
control Virtual View Manager behavior.
The following topics are covered in this chapter:
● The Configuration Window
● Fine Tuning Memory
● Case Sensitivity
● Case Sensitivity and Trailing Spaces Mismatches
● Dealing with Settings Mismatches
● Trailing Spaces
Configuration Rights and PrivilegesAll IBM® Cognos® Virtual View Manager users (users with the Access Tools right) may display the
Configuration panel from the Studio > Administration menu.
Display of all parameters in the Configuration panel requires both the Access Tools right and the
Read All Config right. If a different set of rights are held by the user, then only an appropriate
subset of the available parameters will be visible as read-only settings.
Modification of configuration parameters requires the Modify All Config right in addition to the
Access Tools right.
The Configuration WindowThe Configuration window provides access to all IBM® Cognos® Virtual View Manager configuration
parameters. You access the Configuration window by selecting Administration > Configuration.
The configuration parameters are grouped into three main categories: Virtual View Manager Server,
Data Sources, and Studio. When you open the subfolders in each category and select a parameter
indicated by the configuration parameter icon, studio displays the current configuration setting for
that parameter along with a description in the right pane.
The configuration parameters, grouped by type, are listed in the following table.
Licensed Materials – Property of IBM27© Copyright IBM Corp. 2008, 2010.

Configuration Parameters - Server
Configuration ParametersFolder
Current and supported API protocol versionsAPI > Protocol
DN, JavaTM Keystore file and settingsCommunications
Repository, Debug, E-mail, Files, Hooks, General Info (host name,
IP, version,...), License, Metadata (change log, cache sizes, purge
thresholds), Monitor settings, Network (HTTPS hostname verifi-
cation, FTP, HTTP, and HTTPS proxy settings), Security
(Anonymous and Dynamic logins), and transaction logging
Configuration
Storage conditions, Event Generation (Cache, Data Source,
Request, Resource, Session, Storage, System Overview, Transac-
tion and Trigger events), and Logging (custom logger, database
logger, file logger, memory, and SNMP settings)
Events and Logging
Client communications settings, data fetch default, requests and
session time-outs
JDBC and ODBC
Drivers
Java heap (current and total available memory), managed memory
settings, maximum memory for a request
Memory
I/O samples, Repository (Privilege, Resource, and User cache
usage), Requests tracking, Sessions, Storage, Transactions,
Triggers, and Wait Queue settings
Runtime Processing
Information
Cardinality, Query Plan, Prepared Statement, and Runtime Stats
caches, Case Sensitivity, Ignore Trailing Spaces, Logging for
resource usage, and query statistics, SQL optimization settings,
and overrides
SQL Engine
All parameters, whether read-only or configurable, have a type and a description that make their
function and purpose clear. Read-only parameter values are grayed out and labeled (Current). If
the value may be changed with the associated parameter is appropriately labeled (On Server Restart).
Those parameters that require the server to be restarted are clearly marked in the parameter
description.
Virtual View Manager is optimized for a typical development environment where an individual or
a moderately sized team work together to prepare prototypes for test and later for a production
deployment. Some configuration settings should be assessed prior to test and production deployment
so that performance for a particular implementation environment is optimal.
28 IBM Cognos Business Intelligence Virtual View Manager
Chapter 2: Virtual View Manager Configuration

Fine Tuning MemoryIf you want to change the default memory setting, (512 MB), use the Configuration window
(Administration > Configuration menu option), and navigate to Memory (Configuration > Virtual
ViewManager Components >Virtual ViewManager Server >Memory). You can modify the settings
for JavaTM heap.
Consider the following to determine the configuration for optimal memory:
● Queries run faster with more memory. So, giving the server as much memory as possible is
highly desirable.
● However, giving the server too much memory can cause excessive paging (see "Paging" (p. 29)),
which can degrade performance significantly.
PagingPaging occurs if the total amount of memory of all the running applications exceeds the amount of
physical memory. In this situation, the operating system temporarily moves parts of the running
applications onto the disk so that the applications won’t crash when memory is exhausted. When
a paged-out memory location is accessed, the operating system will restore that area of memory
from disk and then, to make room, move some other part of memory to disk. Consequently, what
should be a simple memory access becomes two disk operations and performance suffers. Some
amount of paging is fine on the client side. But on the server, where things are a lot more controlled
and optimal performance is desired, paging must be minimized.
Case SensitivityBy default, IBM® Cognos® Virtual View Manager is set to be not case sensitive. While the SQL
specification encourages the use of case-sensitive string comparison, many databases default to a
non-case sensitive comparison. Getting the correct results from a query requires knowledge of which
type of comparison is used. For example, the test ('abc' = 'ABC') returns FALSE for a case sensitive
comparison and TRUE for a non-case sensitive comparison.
Changing the case sensitivity setting might impact existing queries, in that the results they return
may be changed or performance may be affected.
Case Sensitivity and Trailing Spaces MismatchesCase sensitivity and trailing space mismatches are often encountered in enterprise environments
with many different database systems. With IBM® Cognos® Virtual View Manager, case sensitivity
and trailing spaces mismatches only occur under the following conditions:
● There is a mismatch between Virtual View Manager and the underlying data source’s case
sensitivity and/or trailing spaces settings.
● There is a WHERE clause with a CHAR or VARCHAR in the clause.
Virtual View Manager handles case sensitivity and trailing space mismatches by following the
conventions defined under Administration > Configuration.
Administration Guide 29
Chapter 2: Virtual View Manager Configuration

These settings may be overridden on a query by query basis; however, this practice should be con-
sidered very carefully to avoid providing queries to clients that could produce unexpected results.
Consider the following example.
A client submits a simple SQL statement such as:
SELECT v1.balance FROM accounts v1 WHERE v1.account_name= 'bob'
The client is aware of what case sensitivity it wants to use. If it submits this to a case sensitive
database, then it expects to only get accounts with exactly 'bob' as the name. If it submits this to
a case insensitive database, it expects to get accounts with 'bob', 'BOB', and 'Bob'. If the client
knows the database is case sensitive and it wants an insensitive compare then it would submit:
WHERE UPPER(v1.account_name) = UPPER('bob')
The same is true of Virtual View Manager. However, in the case where Virtual View Manager is
not case sensitive and the underlying database is case sensitive, Virtual View Manager will add the
UPPER function to the SQL sent to the underlying database. Unfortunately, doing this will invalidate
an existing index—in the previous example, the index on account_name would be invalidated,
causing a table scan.
Determining Whether Settings Are Affecting Query PerformanceTo determine if your configuration settings are affecting query performance, you can evaluate any
filter nodes or the SQL underlying each FETCH node in the Execution Plan to determine if case
sensitivity or trailing spaces settings are impacting the query. Focus primarily on the WHERE clause
or any filter nodes.
One of the two major issues that can come up is that some string comparisons in the WHERE clause
have RTRIM or UPPER functions applied to them which is manifested in the FETCH node.
Wrapping a column with a function such as UPPER or RTRIM will prevent the underlying system
from using an index on that column. This is necessary to provide correct results, but it can affect
performance.
If a filter is applied at the server level, rather than the database level, all rows must be returned
from the underlying table which may also affect performance on large tables.
Review the following matrix to determine the possible impact of different case sensitivity and
trailing spaces settings:
Virtual View ManagerQuery Behavior
Underlying Data SourceSetting
Virtual View ManagerSetting
Nonecase_sensitivity=truecase_sensitivity=true
Performs WHERE clause
string comparison in Virtual
View Manager instead of
pushing down to database.
case_sensitivity=falsecase_sensitivity=true
Adds UPPER to both sidescase_sensitivity=truecase_sensitivity=false
30 IBM Cognos Business Intelligence Virtual View Manager
Chapter 2: Virtual View Manager Configuration

Virtual View ManagerQuery Behavior
Underlying Data SourceSetting
Virtual View ManagerSetting
Nonecase_sensitivity=falsecase_sensitivity=false
Noneignore_trailing_spaces=trueignore_trailing_spaces=true
Performs WHERE clause
string comparison in Virtual
View Manager instead of
pushing down to database.
ignore_trailing_spaces=trueignore_trailing_spaces=false
Noneignore_trailing_spaces=falseignore_trailing_spaces=false
The Virtual View Manager query engine is designed to get the correct and consistent answer
regardless of the configurations of the underlying data sources. If you find an RTRIM in the WHERE
clause, it is because Virtual View Manager is configured to ignore trailing spaces while the under-
lying data source does not ignore them. Likewise if you find an UPPER, it means that Virtual View
Manager is configured to ignore case while the underlying database is sensitive to case.
Dealing with Settings MismatchesThere are two ways to deal with settings mismatches. First, the system wide configuration values
for case sensitivity and trailing spaces can be modified via the Administration > Configurationmenu. This is only useful if the data sources are fairly homogeneous in regard to this behavior.
Changes to this setting should be well-considered or avoided as they will cause all other query plans
to be re-evaluated to accommodate the new setting.
Second, if the data sources have varying policies for case sensitivity and/or trailing spaces, these
values can be modified on a per-query basis by using SQL query options. This facility is useful when
numerous types of data sources are used with varying case-sensitivity and/or trailing space settings.
Warning! These query hints should be used with an understanding that the global contract provided
by IBM® Cognos® Virtual View Manager is overridden. It must be communicated to clients querying
this published resource that the contractual behavior has been overridden.
In the previous example, the developer would use this syntax immediately after the SELECT keyword:
{option ignore_trailing_spaces="false", case_sensitive="true"}
Impact on String ComparisonThe case-sensitive policy affects all forms of string comparison. The impacted functions and operators
include:
● Comparison operators in WHERE and JOIN ON: = < <= >= > <>
● REPLACE(src,pattern,escape)
The pattern is matched according to the policy.
● MIN(column)
Administration Guide 31
Chapter 2: Virtual View Manager Configuration
The strings ABC and abc are considered the same, so either may be chosen by this function.
● MAX(column)
The strings ABC and abc are considered the same, so either may be chosen by this function.
● GROUP BY
The strings ABC and abc are considered the same, so the group will include both sets of values.
● ORDER BY
The strings ABC and abc are considered the same, so they will sort together and may be inter-
mixed.
Case sensitivity does not affect the actual value of strings. Case is preserved in all cases. It only
affects the comparison between strings.
Trailing SpacesMost databases perform string comparisons while ignoring any spaces at the end of the string values.
For example, the test ('abc' = 'abc') is TRUE. Some databases do make use of trailing spaces, so
this test would return FALSE.
IBM Cognos Virtual View Manager PolicyIBM® Cognos® Virtual View Manager’s default policy is to ignore trailing spaces. Changing the
policy may affect existing queries, in that the results they return may be changed or performance
may be affected.
Impact on String ComparisonThe trailing spaces policy affects all forms of string comparison. The affected functions and operators
include:
● Comparison operators in WHERE and JOIN ON: = < <= >= > <>
● LENGTH(column)
The string length returned does not count trailing spaces.
● MIN(column)
he strings 'abc ' and 'abc' considered the same, so either may be chosen by this function.
● MAX(column)
The strings 'abc ' and 'abc' are considered the same, so either may be chosen by this function.
● GROUP BY
The strings 'abc ' and 'abc' are considered the same, so the group will include both sets of
values.
● ORDER BY
32 IBM Cognos Business Intelligence Virtual View Manager
Chapter 2: Virtual View Manager Configuration

The strings 'abc ' and 'abc' are considered the same, so they will sort together and may be
intermixed.
The trailing spaces policy does not affect the actual value of strings. Trailing spaces are preserved
in all cases. It only affects the comparison between strings.
Impact on Server PerformancePerformance may be impacted by the choice of policy. IBM® Cognos® Virtual View Manager makes
every attempt to run as much of the query as possible in the underlying database. This is always
possible when the Virtual View Manager policy is set to match the database’s policy, but when the
policies are different, some portions of the query may be executed in Virtual View Manager instead
of in the database.
Whenever possible, you should match the policy of the server to that of the underlying database.
If this is not desirable because you want to present a different policy or because there are multiple
underlying databases with different policies, the following performance guidelines apply:
● If Virtual View Manager ignores trailing spaces and the database does not, comparisons can
only be pushed to the database if the data is known to be without trailing spaces for both values.
You can force this condition by wrapping values in TRIM() or RTRIM() functions.
● If Virtual View Manager does not ignore trailing spaces and the database ignores trailing spaces,
and the data is not known to be without trailing spaces for both values, the server will add an
RTRIM() function to both values to ensure the underlying database performs a ignore trailing
spaces compare. This should not affect server performance.
Studio LockingWhen the configuration setting Studio > Locking > Enabled is set to true, IBM® Cognos® Virtual
View Manager users are forced to acquire a lock prior to changing a resource. The server web services
API does not honor this configuration setting.
Changing the configuration requires the Modify All Config and of course the Access Tools rights.
Steps
1. From Studio, click Administration > Configuration.
2. Click Studio > Locking at the bottom of the configuration window and set Enabled to True.
3. Apply the changes, and click OK.
This configuration change is not immediately propagated to other instances connected to the server,
but any attempt to save resources will force a check to see whether the lock is enabled.
The requirement for resource locking prior to changing and saving resources may be disabled for
the entire server by any administrator with the Modify All Resources right. Disable locking by
toggling of the value of Enabled to False.
Existing locks will persist regardless of whether Virtual View Manager is requiring locks prior to
modification. When locking is disabled users may still optionally use resource locks so that simul-
taneous changes are not made to a resource being revised by more than one person at a time.
Administration Guide 33
Chapter 2: Virtual View Manager Configuration

34 IBM Cognos Business Intelligence Virtual View Manager
Chapter 2: Virtual View Manager Configuration

Chapter 3: IBM Cognos Virtual View ManagerDomain Administration
IBM® Cognos® Virtual View Manager supports the Cognos, dynamic, and LDAP domains, each
of which controls a particular set of users and groups that can access Virtual View Manager. This
chapter describes the Cognos domain and how to create and manage its users and groups.
The following topics are covered in this chapter:
● "About the Cognos Domain" (p. 35).
● "Domain Management" (p. 36).
● "Group Management" (p. 36).
● "User Management" (p. 38).
● "Changing a Password" (p. 41).
● "Changing Ownership of Resources" (p. 41).
● "Manage User and Group Privileges" (p. 42).
Configuration and management of the LDAP and dynamic domains are documented in the following
chapters:
● LDAP Domain Administration
● Dynamic Domain Administration
About the Cognos DomainThe cognos domain comprises users and groups defined within IBM® Cognos® Virtual View Manager.
Virtual View Manager has predefined specific users and groups in the cognos domain which you
can use and modify as appropriate. You can create additional users and groups within the cognos
domain to meet your specific needs.
Administration of the cognos domain involves creating new users and groups, changing user pass-
words, and granting privileges to users and groups to access the resources.
The main tool used to manage domain users and groups is Virtual View Manager Administrator.
You can access Virtual View Manager Administrator in two ways:
● From Virtual View Manager, click Administration > Launch Virtual View Manager Adminis-
trator.
● From a web browser using the following URL:
http://server_name:port_number/manager
The default port number is 9400.
Licensed Materials – Property of IBM35© Copyright IBM Corp. 2008, 2010.

The Users page in Virtual View Manager Administrator is where you manage users and groups in
the cognos domain as well as in the LDAP and dynamic domains.
Domain ManagementDomain management entails adding and removing domains and the users and groups assigned to
a domain. Two domains — cognos and dynamic — are already defined for use when IBM® Cognos®
Virtual View Manager is installed. The Domain Management page in Virtual View Manager
Administrator lists the defined domains and provides links to view the groups and users within
those respective domains.
The Domain Management page is used primarily for the specification of LDAP domains and for
the selection and deselection of those external groups that will have rights and privileges to view
and use defined resources.
Domain management for LDAP domain configurations are described in LDAP Domain Administra-
tion. For more information on dynamic domain administration refer to Dynamic Domain Admin-
istration.
Group ManagementYou can create groups of users who need similar rights to perform administrative tasks on the
server, and groups who need access to create, view, access, and change objects defined with IBM®
Cognos® Virtual View Manager. Developers, operations personnel, and administrators should each
have their own groups to access Virtual View Manager Administrator and other tools and options.
Group rights templates enable quick assignment of rights based on an expected level of interaction
with Virtual View Manager. Group rights templates exist for: Administrators, Developers, Opera-
tions, Backup, Restore, Backup & Restore, and End Users. For more information, see "Group and
User Rights Templates" in the Security chapter of the Virtual View Manager User Guide.
As an example, end users should belong to groups with no group rights. Typically end users are
not allowed to change data source definitions, change server configuration settings, or back up
servers. End users simply use JDBC, ODBC, or web service-enabled applications to trigger data
requests and procedure calls that get executed in the background without further user interaction
or need for additional rights.
Built-in GroupsThere are three built-in groups — admin, all (cognos), and all (dynamic) — which are created by
the system and cannot be deleted.
● admin (cognos) — this group has administrative privileges. The admin user is a system-provided
member of this group. Other users can be added to or removed from this group by anyone with
administrative privileges.
● all (cognos) — this group contains all users except for the following: anonymous, nobody,
system, and users of the dynamic domain. User membership is automatically maintained by
the system.
36 IBM Cognos Business Intelligence Virtual View Manager
Chapter 3: IBM Cognos Virtual View Manager Domain Administration
● all (dynamic) — This group contains all users in the dynamic domain.
Adding Groups to the Cognos DomainYou can add any number of groups to the cognos domain. When you add a group, you define the
rights for that group. After you’ve created a group, you can add users to it.
Steps
1. Start Virtual View Manager Administrator.
2. Click the Users tab, and click Group Management.
3. Click the Add Group button.
4. In the Add a Group window, enter the name for the new group.
5. Select the group rights template that is most appropriate for the new group. Customize the
rights as required. Refer to the IBM® Cognos® Virtual View Manager User Guide description
of “Group and User Rights Templates” for more information on the rights and what they will
allow.
6. Add notes in the Annotation field to help developers identify the users, usage, and rights asso-
ciated with the group. This will help with the setting of permissions on new resources and other
future administration.
7. Click OK.
The group is added to the Group Management page.
Removing GroupsAdministrators with the Modify All Users and the Access Tools rights may remove groups from
the cognos domain. Removing a group deletes any associated rights and privileges from group
members.
Cognos users who were members of a deleted group might still have the rights and privileges that
were associated with that group. If this is the case, the rights and privileges are present because of
membership in other groups or the rights and privileges were explicitly assigned directly to the user.
Note: Deletion of a cognos domain group does not remove its member users from the Virtual View
Manager.
Steps to remove a group from the Cognos domain
1. In Virtual View Manager Administrator, click Users > Group Management.
2. Select one or more groups using the check box and click Remove Groups.
Administration Guide 37
Chapter 3: IBM Cognos Virtual View Manager Domain Administration

Removing LDAP groups does nothing to LDAP configurations and definitions, but it does remove
LDAP users and any group associated rights and privileges from the Virtual View Manager system.
Steps to remove an externally defined LDAP group
1. In Virtual View Manager Administrator, click Users > Domain Management.
2. Select the LDAP domain using the left most column radio button, and click Edit External
Groups.
User ManagementUser administration involves adding a user to the domain, removing a user from the domain, adding
users to a group, removing users from a group, and changing passwords.
Built-in Users and Their PrivilegesThe cognos domain has the following users that are automatically created: admin, anonymous,
nobody, and system. These users are permanent in the system and cannot be removed.
● admin — This user has privileges to access and use any resource in the system. admin can also
grant/revoke privileges to other users. The admin user cannot be removed from the system. The
admin user has a home folder (/users/admin).
● anonymous — This user is provided for anonymous login for JDBC clients and Web service
clients. By default, anonymous logins are disabled. anonymous users must be explicitly given
privileges to access IBM® Cognos® Virtual View Manager resources.
● nobody — This user cannot log in or be removed. Abandoned resources owned previously by
a user that no longer exists in the system are given to nobody.
● system — This user cannot log in or be removed. It owns items that even the users with
administrative privileges cannot modify.
Members of the all group, meaning all cognos users and all dynamic users, have Read privileges
for all folders created with the installation. Newly created folders and resources do not include
privileges for members of the all group. Privileges must be assigned by the creator/owner of the
resource, or by an administrator or user explicitly given the Grant right on that object.
All semi-editable folders, such as /shared, /services/databases and /services/webservices, have no
privileges but they can be edited.
All pre-created tables/procedures have Select and Execute privileges for the all groups (in the cognos
and dynamic domains) and the anonymous user in cognos; for example, /services/databases/system,
/services/webservices/system, and /lib.
● By default anonymous users cannot invoke any Web services. To make Web services available
to anonymous users, grant the Read privilege to /services/webservices, then grant Read to the
both the data service and the port that you want the anonymous user to access and use.
● anonymous users cannot connect to the server using JDBC because no Virtual View Manager
data service of the type database is automatically available. To enable them, you should grant
38 IBM Cognos Business Intelligence Virtual View Manager
Chapter 3: IBM Cognos Virtual View Manager Domain Administration

Read privileges to services/databases, the data service, and any catalogs or schemas that you
want to make available.
● Resources in the Virtual View Manager Data Services area point to the resources in the work
area. In order to access a resource in the Virtual View Manager Data Services area, the
anonymous user needs permission to read all the folders above that item and have appropriate
permission (such as SELECT, INSERT, UPDATE, DELETE, or EXECUTE) on the item to
which the resource points.
In order to expose a resource to either Web services or JDBC clients, you should grant the Read
privilege to all the folders above the resource and the appropriate permission to the resource itself.
If the resource uses other resources, then you have to repeat the process with those resources as
well.
This is similar to what you would do for any other user, except that some folders have the Read
privilege by default for the all group and you need to override those folders.
The anonymous user is denied any access to the /users folder and admin cannot change it. This
means that all published resources you want anonymous to use must reside in the /shared folder.
Adding Users to the Cognos DomainIBM® Cognos® Virtual View Manager administrators with the Modify All Users and Modify All
Resources rights can add users to the cognos domain.
Steps to add a user to the Cognos domain
1. In Virtual View Manager Administrator, click Users > User Management.
2. Click Add User.
3. Enter the new user name and password.
The user name is the login name for the user and can only contain alphanumeric characters
and the underscore character.
The password must be at least six characters long and it may have selected symbols and upper
case alphanumeric characters. The following are some examples of valid passwords:
joe-./:;<=>?@[\]^_`|~
123_joe
!23Abcd-+23
!"#$%&'{}*+
4. Select a base template to begin rights assignment and select rights as appropriate for the local
security policy and the expected level of user interaction with the server and underlying data
sources.
5. Enter notes in the Annotation field to give future administrators an indication of the user’s role
in the system or organization.
6. Click OK.
Administration Guide 39
Chapter 3: IBM Cognos Virtual View Manager Domain Administration

The newly added user name is added to the cognos domain.
Note: LDAP users are managed entirely by the LDAP server. Virtual View Manager adds the
LDAP domain and selected groups. Members of those groups inherit Virtual View Manager
rights and privileges for tools and resources from the rights and privileges assigned to the group
from the Manager Group page and resources.
Removing Users from the Cognos DomainRemoving a user from the cognos domain removes the user from IBM® Cognos® Virtual View
Manager.
Steps
1. In IBM® Cognos® Virtual View Manager Administrator, click Users > User Management.
2. Select check box to the left of the each user to be removed from the domain and click Remove
User(s).
Note: Removing a user who is derived from an LDAP domain/group does not prohibit the user
from logging into the system again. See RemovingLDAP Users from IBM Cognos Virtual View
Manager for more information.
Managing Group MembershipA group must exist in the cognos domain before you can try to add a user to that group. See "Adding
Groups to the Cognos Domain" (p. 37).
Steps
1. In IBM® Cognos® Virtual View Manager Administrator, click Users > User Management.
2. Select the link in the # Groups column for the desired user.
The Edit the User’s Group Membership window is displayed.
3. Select the desired groups in which the user will be a member, and click OK.
All rights and privileges are inherited by group definition and user membership in that group.
If a user belongs to multiple groups, no special rights and privileges are gained from having
duplicate rights and privileges.
If a user is added to the group named admin, it means that this user obtains administrative
privileges in Virtual View Manager. In order to use the new privileges as an administrator, the
user must log in again.
View Group MembershipIBM® Cognos® Virtual View Manager Administrator displays the groups in which a selected user
belongs, and it also provides filtering to see all the members of a single selected group.
Steps to view a user’ s group membership in the cognos domain
1. In Virtual View Manager Administrator, click Users > User Management.
40 IBM Cognos Business Intelligence Virtual View Manager
Chapter 3: IBM Cognos Virtual View Manager Domain Administration

2. If the user belongs to a single group, it is displayed in the Groups column listing for that user.
Otherwise expand the Groups column to show the groups.
Steps to view a group’s membership
1. In Virtual View Manager Administrator, click Users > User Management.
2. Select the link in the # Users column.
The users in that group are then listed on the User Management page using the appropriate
group filter.
Alternatively, go directly to the User Management page and use the Domain and Group filters
to show the groups.
Changing a PasswordIBM® Cognos® Virtual View Manager administrators with the Modify All Users and Modify All
Resources rights can also change any cognos domain user password, whereas non-admin cognos
domain users may only change their own passwords.
Step to change your own password
● Click File > Change Password.
Steps to change a user’s password or setting explicit user rights
1. In Virtual View Manager Administrator, click Users > User Management.
2. Select a user name.
The resulting window allows you to change the user’s password and enables assignment of
rights.
Note: Changes made to the user rights profile take effect nearly immediately as Virtual View
Manager checks for appropriate rights every time feature access is attempted.
Changing Ownership of ResourcesAdministrators can change the ownership of resources one by one or as a group of resources within
a container resource.
Abandoned resources owned previously by a user that no longer exists in the system are re-assigned
to the nobody user. The nobody user cannot log in or be removed. The administrator can change
the ownership to a valid user.
Steps to change the ownership of a resource
1. In the resource tree, select a resource, and click Administration > Change Owner of <resource>.
Or, right-click a resource, and click Change Resource Owner.
Administration Guide 41
Chapter 3: IBM Cognos Virtual View Manager Domain Administration

The current owner’s user name and domain are displayed, and a list of new owners with their
user names and domains is presented.
Ownership cannot be changed for system-owned resources or home folders.
2. Select a new owner’s user name from the User drop-down list.
3. Optionally, select the Apply the change recursively check box.
The Apply the change recursively check box is checked by default if the selected resource is a
container. This box is unchecked for leaf resources. It is checked and disabled if the owner
cannot be changed or if the resource is a physical data source. All resources within a physical
data source and the data source itself are always owned by one user.
The Apply the change recursively check box is enabled when the resource is not in one’s home
folder.
4. To selectively change the ownership, select the Change if the current owner is box.
5. Click OK to see the list of resources ready to be transferred to the new owner.
6. View the list of resources, and click Commit to apply the changes.
Manage User and Group PrivilegesResource developers, owners, and users delegated Grant privilege on a resource may also set resource
specific privileges for that object. Administrators with Modify All Users or Modify All Resources
privileges may also review, set, and revoke privileges for any resources and define rights for any
groups and users in Virtual View Manager.
Management of user and group privileges on resources is generally best left to the developer who
created and owns the resource, providing access for a security audit by an administrator at any
time. It is more efficient to let the resource developers and owners set privileges for the native sources
that they define, configure, and manage from within Virtual View Manager.
To facilitate decentralized management of specific resource privileges it is helpful to define groups
of users with similar and well-defined roles where possible. Group assignment of privileges on the
resource is encouraged for any large deployment.
See the "Privileges" section in the Security chapter of the User Guide for more details on access
privileges.
42 IBM Cognos Business Intelligence Virtual View Manager
Chapter 3: IBM Cognos Virtual View Manager Domain Administration

Chapter 4: LDAP Domain Administration
IBM® Cognos® Virtual View Manager supports the following types of domains: Cognos, LDAP,
and dynamic. This chapter focuses on how to configure and administer LDAP domains for use with
Virtual View Manager.
The following topics are covered in this chapter:
● "About the LDAP Domain" (p. 43)
● "Configuring LDAP Properties File" (p. 43)
● "Domain Administration" (p. 50)
● "LDAP User Management" (p. 54)
About the LDAP DomainIBM® Cognos® Virtual View Manager can leverage enterprise LDAP implementations of Active
Directory and iPlanet domains, groups, and users to authorize views and use, creation and manage-
ment of Virtual View Manager defined resources. Currently supported LDAP authentication servers
are:
● iPlanet 5.1 sp2
● Windows Server 2003 Active Directory
Virtual View Manager configuration and management for use of LDAP domains requires the Read
and Modify All Users rights in addition to the Access Tools right to give the administrator the
ability to create and modify domains, groups, and users. Those rights also enable specification and
modification of rights given to LDAP groups and users.
Manager also enables quick configuration and provisioning of LDAP (Active Directory and iPlanet)
domains, groups, and users with rights and privileges enabling use, view, and change of Virtual
View Manager defined resources. LDAP configurations and usage are described in the next chapter.
Configuring LDAP Properties FileQuery searches for retrieving user and group information are controlled by a properties file named
ldap.properties in the following installation directory:
<installation_directory>/conf/server/ldap.properties
The file contains relevant query parameters for the two supported LDAP directory servers, Active
Directory and iPlanet.
If you add LDAP domains to IBM® Cognos® Virtual View Manager, you should configure the
ldap.properties file after a successful installation.
Licensed Materials – Property of IBM43© Copyright IBM Corp. 2008, 2010.
This section describes the structure of the LDAP properties file and also gives an example of the
default LDAP properties file.
Structure of the LDAP Properties FileThe LDAP properties file (ldap.properties) has four sections which are described below using these
conventions:
● TYPE must be replaced with either "iplanet" or "activedirectory".
● Property file variables are designated with a capital letter enclosed by angled brackets: <A>,
<B>,... <X>.
● A description of each line in the ldap.properties file is provided.
Section 1: (used for querying all users)TYPE.all.users.search.context=<A>
Search-context used to find all users.
TYPE.all.users.filter=<B>
Filter to pass to a query for finding all users.
TYPE.all.users.username.attribute=<C>
Username attribute to retrieve the name of user found from a query.
TYPE.all.users.search.timeout=<D>
Search timeout value to limit the time for infinite search. 0 (zero) means infinite timeout, timeout
is in milliseconds and should be greater than 0 (zero).
Section 2: (used for querying all groups)TYPE.all.groups.search.context=<A>
Search-context used to find all groups.
TYPE.all.groups.filter=<B>
Filter to pass to a query for finding all groups.
TYPE.all.groups.groupname.attribute=<C>
Group name attribute to retrieve the name of a group found from a query.
TYPE.all.groups.search.timeout=<D>
Search timeout value to limit the time for infinite search. 0 (zero) means infinite timeout, timeout
is in milliseconds and should be greater than 0 (zero).
Section 3: (used for authenticating LDAP users)TYPE.user.username.comparison.is.case.sensitive=<A>
Sets the user name comparison to be case-sensitive or not. By default the value of <A> is true but
it may be set to false.
TYPE.user.search.context=<B>
44 IBM Cognos Business Intelligence Virtual View Manager
Chapter 4: LDAP Domain Administration

Search-context used to find the user attempting authentication.
TYPE.user.filter=<C>
Filter used to authenticate user in LDAP directory server. The USERNAME keyword will be replaced
at runtime with the appropriate username.
TYPE.user.username.attribute=<D>
User name attribute to retrieve the name of the user attempting authentication from a query.
TYPE.user.search.timeout=<E>
Search timeout value to limit the time for infinite searches. 0 (zero) means infinite timeout, timeout
is in milliseconds and should be greater than 0 (zero).
Section 4: (used for querying all groups for a user)TYPE.user.groups.search.context=<A>
Search-context used to find all the groups for a user.
TYPE.user.groups.filter=<B>
Filter to pass to a query for finding the members of a group. The USERDN keyword will be replaced
at runtime with the appropriate user distinguished name.
TYPE.user.groups.groupname.attribute=<C>
Group name attribute for finding the name of a group to which a user belongs.
TYPE.user.groups.search.timeout=<D>
Search timeout value to limit the time for infinite searches. 0 (zero) means infinite timeout, timeout
is in milliseconds and should be greater than 0 (zero).
Example of an ldap.properties FileThis section presents an example of the operational lines in the default ldap.properties file. Following
the file is a key for the symbols and attributes that can be used.
iplanet.all.users.search.context=ou=people
iplanet.all.users.filter=(&(objectclass=person))
iplanet.all.users.username.attribute=uid
iplanet.all.users.search.timeout=0
iplanet.all.groups.search.context=ou=groups
iplanet.all.groups.filter=(&(objectclass=groupofuniquenames))
iplanet.all.groups.groupname.attribute=cn
iplanet.all.groups.search.timeout=0
iplanet.user.username.comparison.is.case.sensitive=true
iplanet.user.search.context=ou=people
iplanet.user.filter=(&(uid=USERNAME)(objectclass=person))
iplanet.user.username.attribute=uid iplanet.user.search.timeout=1000
iplanet.user.groups.search.context=ou=groups
Administration Guide 45
Chapter 4: LDAP Domain Administration

iplanet.user.groups.filter=(&(uniquemember=USERDN)
(objectclass=groupofuniquenames))
iplanet.user.groups.groupname.attribute=cn
iplanet.user.groups.search.timeout=1000
activedirectory.all.users.search.context=cn=users
activedirectory.all.users.filter=(&(objectclass=user))
activedirectory.all.users.username.attribute=samaccountname
activedirectory.all.users.search.timeout=0
activedirectory.all.groups.search.context=cn=users
activedirectory.all.groups.filter=(&(objectclass=group))
activedirectory.all.groups.groupname.attribute=cn
activedirectory.all.groups.search.timeout=0
activedirectory.user.username.comparison.is.case.sensitive=true
activedirectory.user.search.context=cn=users
activedirectory.user.filter=(&(samaccountname=USERNAME)(objectclass=user))
activedirectory.user.username.attribute=samaccountname
activedirectory.user.search.timeout=1000
activedirectory.user.groups.search.context=cn=users
activedirectory.user.groups.filter=(&(member=USERDN)(objectclass=group))
activedirectory.user.groups.groupname.attribute=cn
activedirectory.user.groups.search.timeout=1000
LDAP Properties File Symbols and AttributesThe following symbols can be used in an ldap.properties file.
LDAP Search Context Symbols
| The pipe character may be used to separate multiple search context property values. This may be
interpreted as a disjunction: or.
LDAP Seach Filter Symbols
& Conjunction (for example, and - all in the list must be true)
| Disjunction (for example, or - one or more alternatives must be true)
! Negation (for example, not - item being negated must not be true)
= Equality (according to the matching rule of the attribute)
~= Approximate equality (according to the matching rule of the attribute)
>= Greater than (according to the matching rule of the attribute)
<= Less than (according to the matching rule of the attribute)
46 IBM Cognos Business Intelligence Virtual View Manager
Chapter 4: LDAP Domain Administration

=* Presence (for example, the entry must have the attribute returning whatever that value is)
* Wildcard (indicates zero or more characters can occur in the position); used when specifying
attribute values to match
\ Escape (for escaping "*", "(", ")" when they occur inside an attribute value)
LDAP Attribute Key
o = Organization
ou = Organization Unit
cn = Common Name
dn= Distinguished Name
dc = Domain Component
Query ExamplesThis section shows example iPlanet or Active Directory LDAP server query examples. The iPlanet
or Active Directory LDAP server configurations are similar except where the object class values,
search contexts, and user/group attribute values may be different where:
TYPE = { iplanet | activedirectory }
Search for specific groups with a group filter
All group filters can use the search filter syntax described above in the above Search Filter Syntax
area.
Example: Find all groups that have a prefix "cs_" in their name where "Y" is a group object class
for the domain type, and "Z" is a group name attribute:
Example solution:
TYPE.all.groups.filter=(&(objectclass=Y)(Z=cs_*))
Note: This same method can be used for finding specific users also.
Specify multiple locations to find users or groups
All search context attributes can support looking for LDAP objects in multiple search contexts. Use
the pipe character (|) to separate multiple search contexts. For example,
TYPE.all.groups.search.context=cn=users|cn=users2
Disable case sensitivity for LDAP authentication
By default, IBM® Cognos® Virtual View Manager is case sensitive when used with either an iPlanet
or ActiveDirectory domain. However, you can change this in the ldap.properties file. For example,
TYPE.user.username.comparison.is.case.sensitive=false
When the LDAP user name comparison is not case sensitive, then the user
cn=foo,ou=users,dc=domain,dc=com can login to a Virtual View Manager LDAP domain with
user name foo or FOO. All variations of the user name used to login to Virtual View Manager tools
will map to the actual user name stored in the LDAP server.
Administration Guide 47
Chapter 4: LDAP Domain Administration

Note: If you disable case sensitive mode and have multiple users with the same name (but with
variations in capitalization) login will be disabled for that user name. Search context may be specified
to find user attribute values that differentiate the users affected. For instance in Active Directory,
the samaccountname attribute for a user object is unique in the entire LDAP server, but cn (common
name) is not.
iPlanet get all users
To start a search from the root node and get all users use a blank (null) value in the search context.
TYPE.all.users.search.context=
To find groups that match the objectclass filter use the following:
TYPE.all.users.filter=(&(objectclass=person))
To get user names from the user object name attribute:
TYPE.all.users.username.attribute=uid
To perform a search without a timeout:
TYPE.all.users.search.timeout=0
iPlanet get all users (under container ou=people)
This search context will find only groups under container ou=people:
TYPE.all.groups.search.context=ou=people
This search will find only groups that match the objectclass filter:
TYPE.all.groups.filter=(&(objectclass=person))
This search will get group names from this group object name attribute:
TYPE.all.groups.groupname.attribute=cn
To specify a search that does not have a timeout (infinite search timeout):
TYPE.all.groups.search.timeout=0
iPlanet get all groups
Using a null value (blank) will start search from the root node and get all groups:
TYPE.all.groups.search.context=
To find only those groups that match the objectclass filter:
TYPE.all.groups.filter=(&(objectclass=groupofuniquenames))
To get group names within this group object name attribute:
TYPE.all.groups.groupname.attribute=cn
To specify a search that does not have a timeout (infinite search timeout):
TYPE.all.groups.search.timeout=0
iPlanet get all groups (under container ou=groups)
This search context will find only groups under the container ou=groups
TYPE.all.groups.search.context=ou=groups
48 IBM Cognos Business Intelligence Virtual View Manager
Chapter 4: LDAP Domain Administration

To find only groups that match the objectclass filter
TYPE.all.groups.filter=(&(objectclass=groupofuniquenames))
To get group names from this group object name attribute:
TYPE.all.groups.groupname.attribute=cn
To specify a search that does not have a timeout (infinite search timeout):
TYPE.all.groups.search.timeout=0
iPlanet and Active Directory User Authentication
IBM® Cognos® Virtual View Manager LDAP user authentication dependent on either iPlanet or
Active Directory servers depends on several configurations prior to successful user authentication
through a Virtual View Manager interface.
● The LDAP server must be configured for use
● The LDAP domain must be configured for use in Virtual View Manager Administrator
● Specific Active Directory or iPlanet groups within the specified domain must be authorized to
use Virtual View Manager defined resources.
Note: All members of Virtual View Manager authorized LDAP groups get the basic set of
privileges granted to the all group. Other resource privileges and Virtual View Manager rights
must be assigned explicitly to the LDAP group or to the individual user.
● Only users who are members of the specified domain and authorized groups may authenticate
properly using Virtual View Manager resources.
All LDAP users trying to authenticate against an LDAP server need to use the same username
attribute value in the both settings below:
TYPE.user.filter=(&(uid=USERNAME)(objectclass=person))
TYPE.user.username.attribute=uid
For example, a Virtual View Manager log in using an iPlanet LDAP domain with group=‘g1‘ defined
locally on the server will take this login:
username=user1 password=password domainname=iplanet_domain
and generate an LDAP authentication request as follows:
uid=user1,ou=people,dc=DOMAIN_NAME,dc=COM
The example above assumes the following:
● Virtual View Manager LDAP domain “iplanet_domain” already exists where LDAP domain
"iplanet_domain" has group "g1" in its group list.
● User "user1" exists in LDAP server at:
ou=people,dc=DOMAIN_NAME,dc=COM
● Group "g1" exists in LDAP server at:
ou=groups,dc=DOMAIN_NAME,dc=COM
Administration Guide 49
Chapter 4: LDAP Domain Administration
● User "user1" is a member of the group "g1"
Domain AdministrationLDAP domain administration involves these kinds of tasks:
● Adding an LDAP domain to the IBM® Cognos® Virtual View Manager server.
● Adding users and groups to an LDAP domain.
● Removing users or groups from an LDAP domain.
● Changing the LDAP domain connection parameters.
● Removing an LDAP domain.
Adding an LDAP DomainYou can add more than one LDAP domain to IBM® Cognos® Virtual View Manager, provided that
each of those domains has a unique name. The names dynamic and cognos are reserved domain
names in Virtual View Manager. They cannot be used as LDAP domain names.
Steps1. In Virtual View Manager Administrator, click Users > Domain Management
2. Click Add Domain.
3. Enter the Domain Name.
The domain name will be part of the login.
When the process of adding the domain is complete, this name is displayed in the Domain
Name column and as part of the login (lower case only).
4. Specify the LDAP directory type as either Active Directory or iPlanet.
5. Type the path to the LDAP server in the Server URL field using the format:
ldap://<hostname:port>/< suffix>
6. Enter an administrative LDAP user name and password.
7. Click OK.
Working with Groups from an LDAP domainWhen you are adding groups from an LDAP domain to IBM® Cognos® Virtual View Manager, it
means that you are selecting groups or users from the LDAP server and adding them to the Virtual
View Manager Server. This enables differentiated group and user access, use, creation, and modifi-
cation of Virtual View Manager resources as LDAP authenticated users.
50 IBM Cognos Business Intelligence Virtual View Manager
Chapter 4: LDAP Domain Administration

LDAP domain users must belong to at least one LDAP group selected to use Virtual View Manager
Server as an authenticated user enabling implicit assignment of rights, privileges, and ownership of
defined resources.
Similarly when an LDAP domain group is deselected from use with Virtual View Manager Server,
that group and all users defined exclusively by that group are removed locally from Virtual View
Manager disallowing access as an authenticated user. The external LDAP server is unaffected by
these Virtual View Manager definition changes.
After adding an LDAP group to Virtual View Manager, members of that group can be authenticated
with the LDAP server. Rights may be assigned to members and data sources may define privileges
for the group or individual members of the group to use resource definitions and data.
A security check on user rights and privileges is made every time any request is made by Virtual
View Manager and any defined resources. Authentication status with the LDAP domain is checked
and maintained with a non-persistent session.
Authenticated users may own and use resources as defined by the rights and privileges assigned to
them either explicitly as individuals or implicitly by membership in one or more groups. Members
of a group defined for use within Virtual View Manager inherit all the rights and privileges defined
for that group.
When the Edit/Add External Groups window is displayed, the currently available LDAP groups
are displayed and those groups already selected for use within Virtual View Manager are shown
with a marked check box.
Adding a Group to an LDAP DomainAdding external groups from an LDAP domain gives the IBM® Cognos® Virtual View Manager
system a way to support differentiated access and use of Virtual View Manager defined resources
for selected user groups without including the entire domain.
Note: Adding a group is the only way to add users to Virtual View Manager from an LDAP server.
User and group management is performed on the LDAP server and Virtual View Manager rights
and privileges are assigned to LDAP groups and users.
LDAP users are given rights and privileges to use Virtual View Manager resources by explicit
addition of the groups in which those members belong. Ensure that appropriate groupings of users
will be enabled to use Virtual View Manager resources by management of users on the LDAP
servers.
Steps
1. In Virtual View Manager Administrator, click Users > Domain Management.
2. Select the LDAP domain., and click Edit External Groups at the bottom of the table.
The Add External Groups window displays all groups in the LDAP or iPlanet domain.
3. Select those groups that you wish to grant access to Virtual View Manager resources.
You can use the navigation arrows and page numbers at the bottom of the window to display
additional groups. You can also change the sort order by clicking the sort icon.
Administration Guide 51
Chapter 4: LDAP Domain Administration

4. Click OK and refer to the notes that follow.
Initially no users are shown as members of the selected groups. Users from the groups appear
in the system after the initial use of any Virtual View Manager resource.
Set appropriate rights and privileges for LDAP groups in the same way that Virtual View
Manager groups and users get assigned rights and privileges. Pure end-users should receive no
rights but get privileges which are assigned at the individual resource level to groups and users
to use data via JDBC, ODBC, or Web services clients. Unauthenticated users, anonymous, and
dynamic users using pass-through authentication may be given privileges to view, access, and
execute procedures on data resources, but they may not receive rights to change Virtual View
Manager definitions and settings.
Groups of developers, operations users, and administrators should get explicit rights to access
tools and rights to read and/or modify Virtual View Manager resources at design time.
After initial Virtual View Manager use, LDAP domain users may be added directly to specifically
defined Virtual View Manager groups granting the user implicit rights and privileges assigned
by group membership, or they may be given explicit individual rights and privileges. Managing
rights and privileges by group assignment is encouraged as role based access control enables
better control of large groups of users.
Refer to "Rights" and "Privileges" in the User Guide for more information.
To add users to LDAP domains and groups, see "Adding Users to IBM Cognos Virtual View
Manager from an LDAP Domain" (p. 54), and "Adding Users to Groups" (p. 56).
Removing a Group from an LDAP DomainRemoving a group from an LDAP domain means that you are removing the LDAP group, all the
users within that group, and all the implicit rights and privileges given to that group definition for
resources and uses on the IBM® Cognos® Virtual View Manager server.
Resource definitions for /shared resources owned by users removed by a group deletion retain most
configurations and access privilege information for remaining groups after the LDAP based owner
is removed. Resource ownership is shifted to a special system user named nobody. Those data
sources should be assigned a new owner and connections to those data sources should be tested
and re-introspected to ensure that the resource remains accessible.
Group deletion also removes all access privilege information for the deleted group and affected
members. Group deletion also clears any personal work space associated with deleted user profiles
in the /users node.
As stated earlier, the external LDAP server is unaffected by these Virtual View Manager definition
changes.
Steps
1. In Virtual View Manager Administrator, click Users > Domain Management.
2. Select the LDAP domain.
3. Click Edit External Groups at the bottom of the table.
52 IBM Cognos Business Intelligence Virtual View Manager
Chapter 4: LDAP Domain Administration

The Add External Groups window displays all groups in the LDAP or iPlanet domain.
4. Deselect those groups that you wish to remove. You can use the navigation arrows and page
numbers at the bottom of the window to display additional groups.
5. Click OK.
Viewing Group MembershipThe IBM® Cognos® Virtual View Manager administrator with Read All Users right may review and
monitor user group membership from the Virtual View Manager Administrator.
Steps
1. In Virtual View Manager Administrator, click Users > User Management.
The table of users may be filtered by domain and group, and sorted on multiple attributes.
2. In the Groups column click the + icon to expand the list of groups to which the selected LDAP
user belongs.
Adding and Removing LDAP Users from a Group
Steps
1. In Virtual View Manager Administrator, click Users > Group Management.
2. Click Edit Users ( ) from the group to which a user should be added or removed.
The Edit Group Membership window is displayed.
3. Add or remove users by checking or unchecking the users who should or should not belong to
the group.
LDAP users get all the rights and privileges inherited from the groups in which they belong.
Note: The Virtual View Manager server and Virtual View Manager Administrator do not manage
LDAP group membership. LDAP users may be added to Virtual View Manager groups as described
above, but LDAP groups are not modifiable from Virtual View Manager Administrator.
Editing LDAP Domain Connection ParametersEditing an LDAP domain enables change of connection parameters required to connect and read
data from an LDAP authentication server. Everything but the nominal, domain name display text
may be modified.
Change of the LDAP password in the Virtual View Manager domain profile requires entry of the
old password to unlock the encrypted cipher text.
Steps
1. In Virtual View Manager Administrator, click Users > Domain Management.
2. Click the domain name.
Administration Guide 53
Chapter 4: LDAP Domain Administration

3. Modify any field as required and click OK.
Removing an LDAP DomainRemoving an LDAP domain means that you are removing it from use by IBM® Cognos® Virtual
View Manager. When an LDAP domain is removed, all the users, groups, rights, and privileges
associated with that domain are deleted and removed from Virtual View Manager. Ownership of
shared Virtual View Manager resources that were created and owned by users who will be deleted
with the removal of the LDAP instance are moved to ownership by the user named nobody. The
LDAP users and groups will be untouched on the LDAP server.
Steps
1. In Virtual View Manager Administrator, click Users > Domain Management.
2. Select the domain name.
3. Click Remove Domain.
4. Click OK.
The domain, groups and users from that domain are no longer configured for use of Virtual
View Manager resources.
Resources that were created or owned exclusively by a deleted user are assigned to the nobody
user. Privileges to utilize resources owned by nobody remain the same for those groups and
users who remain after the LDAP domain is removed.
LDAP User ManagementBy default, without additional rights and privileges, all members of LDAP groups selected for use
with IBM® Cognos® Virtual View Manager will be able to log into JDBC, ODBC, and Web services
clients configured for use with Virtual View Manager. Rights to use Virtual View Manager tools
and to view and use other resources must be added to group definitions or assigned explicitly to
the user.
Assignment of rights and privileges to users from an LDAP domain is much the same as assignment
of rights to users from a Virtual View Manager domain.
Only a user with Read/Modify All Users, and Access Tools rights may add/modify an LDAP domain,
add/remove groups, and clear and reset LDAP users to group settings.
Adding Users to IBM Cognos Virtual View Manager from an LDAP DomainUnder most conditions, LDAP users are added indirectly by addition of the groups to which they
belong. Group management of rights and privileges may be assigned for users depending on the
role performed by members of the group. To add users to an LDAP domain, the IBM® Cognos®
Virtual View Manager administrator first has to add that LDAP domain to the Virtual View Manager
Server, and then add groups to that domain.
54 IBM Cognos Business Intelligence Virtual View Manager
Chapter 4: LDAP Domain Administration

To add a user to an LDAP domain, the user must belong to a group in the LDAP server. See "Adding
and Removing LDAP Users from a Group" (p. 53) for details.
When adding a user from an LDAP domain, three conditions must be satisfied to add a user to an
LDAP domain.
● The entered LDAP username and password for the user are authenticated with the LDAP server
successfully. If LDAP authentication fails or the LDAP user does not belong to any local group
definitions, the user is not added to the LDAP domain in the Virtual View Manager Server.
Consequently, this LDAP user is not allowed to log into Virtual View Manager successfully.
● The LDAP user is already a member of a group defined by the LDAP server.
● That pre-existing LDAP group is defined for use by Virtual View Manager.
If these conditions are met, the user is successfully added to the Virtual View Manager server. This
user will be added to each local LDAP group as a member where appropriate. The domain sync
process adds or removes LDAP users either to or from the appropriate local LDAP groups.
To add a user to an LDAP domain
Start Virtual View Manager, and log in with a valid LDAP username, password, and domain.
Removing LDAP Users from IBM Cognos Virtual View ManagerRemoving a user from a domain and group configured for use in IBM® Cognos® Virtual View
Manager only removes the user locally from Virtual View Manager Server while the user may still
exist in the LDAP server and possess implicit rights and privileges given by membership in the LDAP
domain and group. Simply removing a user who is derived from an LDAP domain/group does not
prohibit the user from logging into the system again. Removing and preventing an LDAP user from
gaining access to resources defined by Virtual View Manager requires one of three courses of action:
● The LDAP group membership can be redefined at the source directory to exclude the undesired
user.
● Rights and privileges for the entire LDAP group can be restricted to exclude access to resources
and permissions. If other members of that LDAP group require rights and privileges, then those
users may be given explicit rights and privileges or they may be made members of a Virtual
View Manager group that grants appropriate rights and privileges after they have been initialized
into the system.
● The entire LDAP group can be removed from those included in the Virtual View Manager
external groups list.
In normal usage individual LDAP users may only be removed from Virtual View Manager superfi-
cially. Virtual View Manager services are not normally used as interfaces to manage LDAP users
directly, though conceivably Virtual View Manager could be configured and given permissions to
change those tables directly and programmatically. Almost always it is more advantageous to
manage users and group memberships using the more familiar enterprise ready Active Directory or
iPlanet interfaces. For example, if an individual LDAP Active Directory user needs to be locked out
to prevent Virtual View Manager access, then a management task must be performed directly on
Administration Guide 55
Chapter 4: LDAP Domain Administration

the LDAP server to change the column values for memberOf to exclude that user from the group
given permission to authenticate for Virtual View Manager access.
In Virtual View Manager Administrator, users may be removed easily enough, but LDAP users
selected for removal are only removed temporarily because LDAP group membership will continue
to give implicit rights and privileges. Removing an LDAP user resets rights and privileges to those
rights and privileges inherited by group membership. Any user workspace in Virtual View Manager
is also deleted by user removal, but that space is recreated when the use logs in again.
Some possible workarounds:
● An LDAP group may be deleted to remove all group users, rights and privileges for that group.
See, "Working with Groups from an LDAP domain" (p. 50) for more information.
● Group rights and privileges may be restricted to initially grant nothing to all members of the
group, and then other members of the targeted group may be added to other better defined
groups of similar users with the desired set of rights and privileges.
Adding Users to GroupsLDAP users are added to LDAP groups by the LDAP administrator.
LDAP and dynamic users may be added to IBM® Cognos® Virtual View Manager groups to enable
assignment of rights and privileges by a group membership. Though in the case of dynamically
defined users it is recommended that they are not given any rights, nor any privileges to resources
outside of the public domain. For more information refer to the chapter on the Dynamic Domain.
Add LDAP users to Virtual View Manager groups using the Group Management page in Virtual
View Manager Administrator to add or remove users to and from the group.
Any users added to a group gain any additional rights and privileges associated with that group.
Rights and privileges accumulate based upon explicit assignment and group memberships.
56 IBM Cognos Business Intelligence Virtual View Manager
Chapter 4: LDAP Domain Administration

Chapter 5: Dynamic Domain Administration
IBM® Cognos® Virtual View Manager supports the following types of domains: Cognos, LDAP,
and dynamic. This chapter focuses on how to enable and administer dynamic domains for use with
Virtual View Manager. Virtual View Manager Domain Administration, and LDAP Domain
Administration are discussed in the previous chapters.
The following topics are covered in this chapter:
● "About Dynamic Domains" (p. 57)
● "Domain Administration" (p. 57)
● "Group Administration" (p. 58)
● "User Administration" (p. 59)
About Dynamic DomainsDynamic domains enable users to negotiate direct access to a secured data source by way of a IBM®
Cognos® Virtual View Manager server pass-through login. The Virtual View Manager system does
not store the password of dynamic users; it retains only an ephemeral encrypted copy in memory
available during the current user session (the timeout setting is configurable).
When a user requests a view or procedure that requires data from a source that has pass-through
login enabled (by using the Virtual View Manager data source driver configuration setting), the
user login and the parsed request for data are passed directly to the secured data source. This pass-
through allows existing data source security structures to handle the authentication and request
authorization. The dynamic domain lets the developer defer security authorization and enforcement
to the data source security which is presumed to be more stringent and tightly controlled.
With the dynamic domain, the Virtual View Manager solution may be made more transparent. The
end user may use their existing login information for authentication with a data source to gain the
same permissions they had in the past without needing to separately log into Virtual View Manager.
Note: Only one login (user name and password) is permitted for dynamic domain pass-through
authentication. So, more than one pass-through-enabled data source may be used for federated
queries if the data sources are set to authenticate using the same login.
Dynamic domains also enable a potentially large user base that does not require either a Virtual
View Manager or an LDAP domain structure.
Domain AdministrationAside from enabling the IBM® Cognos® Virtual View Manager configuration settings to enable the
dynamic domain no special user management is required to enable users to access resources given
proper privileges on resources that have been selected for exposure to dynamic domain users.
Licensed Materials – Property of IBM57© Copyright IBM Corp. 2008, 2010.
User login specifying the dynamic domain using JDBC, ODBC, or Web services is sufficient to
dynamically create a new user profile.
For security reasons, dynamic domain users are blocked from using Virtual View Manager utilities.
Dynamic domain users and the dynamic all group are given no rights by default. It is strongly rec-
ommended that no rights be assigned to dynamic users or groups so that they remain pure end-
users without rights for changing the system.
The dynamic domain is disabled by default Virtual View Manager configuration setting. Once
enabled, dynamic users have default Read access to basic resources in Virtual View Manager. See
Granting Privileges to Dynamic Domain Users for the specific resources.
Enabling the Dynamic DomainBy default, the dynamic domain is disabled and an attempt to log in using this domain will fail as
if the domain did not exist. This domain needs to be enabled before it can be used to log in.
Steps
1. In IBM Cognos Virtual View Manager, click Administration > Configuration.
2. In the Configuration window, expand Virtual ViewManager Server > Configuration > Security,
and select Enable Dynamic Domain Login.
3. In the right panel, set the Value to True to enable the dynamic domain, and click OK.
Group AdministrationThe dynamic domain has only one group named all. All dynamic users belong to the all group. No
additional dynamic groups may be created.
The dynamic domain cannot utilize groups for differentiation of user permissions by group assign-
ment of privileges or rights because no password is stored to authenticate who is currently using a
given user name. The data sources enabled with pass-through login perform the authentication and
authorization security.
Granting Privileges to Dynamic Domain UsersResources may be opened for use by anyone including dynamic domain users by granting privileges
to the dynamic all group on published resources.
Note: Dynamic all privileges open published resources to public access.
No rights should be given to dynamically authenticated users because anybody can log in as a
dynamic user; they are not authenticated by the IBM® Cognos® Virtual View Manager system.
When the dynamic domain is enabled, dynamic users have default Read access to the following
basic resources in Virtual View Manager:
● /services
● /services/databases
● /services/webservices
58 IBM Cognos Business Intelligence Virtual View Manager
Chapter 5: Dynamic Domain Administration

● /services/webservices/system
● /shared
● /lib
All other access privileges must be explicitly granted for either the dynamic all group or for the
individual dynamic user after initial login.
Note: Dynamic users cannot be authenticated by definition as the password is not stored. Assigning
resource privileges to individual dynamic users opens a resource to any user who may utilize that
user name.
Steps
1. In Virtual View Manager Administrator, click Users > Group Management.
2. In the # Users column, select the number representing the count of users in the all group row
of the dynamic domain.
Users in the all group of the dynamic domain are shown.
User AdministrationManagement of dynamic domain users is mostly passive as far as IBM® Cognos® Virtual View
Manager is concerned. Data sources enabled with a pass-through login must be configured to
authenticate the user and to authorize access to data.
Initial login of a dynamic domain user with a JDBC, ODBC, or Web services client creates a new
user profile on Virtual View Manager. The new user is assigned an ID and may be treated like a
normal user given proper caution to avoid inadvertent exposure of sensitive resources. Dynamic
domain users do not have a home directory, hence they cannot create or own resources.
Note: Assigning resource privileges to any dynamic user exposes that resource to potential public
access by any client using that user name. In sensitive environments dynamic users and the dynamic
all group should only get privileges to access public resources, while data sources enabled with pass-
through login may independently authenticate and authorize dynamic users to gain access to secured
data.
Individual users in the dynamic domain may be deleted, but the all group and the dynamic domain
are protected from deletion.
Note: Deletion of a dynamic user does not prevent that user name from being used to log in again.
The password for a dynamic domain user does not persist across sessions for logging purposes. But
the password used for the current session is kept in memory and is passed when a request is made
to data sources that have the pass-through option enabled.
Administration Guide 59
Chapter 5: Dynamic Domain Administration

Adding Users to the Dynamic DomainUse these steps to add users to the dynamic domain.
Steps
1. Enable the dynamic domain as described in Enabling the Dynamic Domain.
2. Connect to Virtual View Manager through JDBC/ODBC specifying dynamic as the domain
value in the connection string.
See the "Client Interfaces" chapter in the Virtual View Manager User Guide for information
on connecting via JDBC/ODBC.
The following sample command uses the JDBCSample.bat program to run from the command
line to create a user named newuser in the dynamic domain:
JdbcSample.bat system localhost 9401 newuser password dynamic "SELECT * FROM
ALL_USERS"
Removing Users from the Dynamic DomainRemoving users from the dynamic domain is mostly meaningless if the dynamic domain is enabled
for use. Dynamic users are not authenticated, nor prevented from accessing all resources provided
by privileges granted to the dynamic all group.
If you were to go through the motions to remove a user from the list of users registered by the
dynamic domain, then that would remove any group membership that had been assigned to the
user, but the user would still be able to use a client with that same user ID for login.
Dynamic Users Group MembershipDynamic users are created at first login. All dynamic domain users automatically becomes a member
of the dynamic all group. See Adding Users to the Dynamic Domain for details on adding users to
the dynamic domain.
It is not recommended to add dynamic users to Cognos domain groups unless the group privileges
are an entirely public set of permissions and no IBM® Cognos® Virtual View Manager rights are
given.
Viewing Dynamic User Group MembershipDynamic users should not get regular group membership because the user name may be used by
any individual using the same login name to gain access to group resources.
Steps
1. In Virtual View Manager Administrator, click Users > User Management.
2. Select the dynamic domain just above the table to filter the users.
If a user belongs to more than the dynamic all, then an integer will be displayed next to the
icon in the #Groups column.
3. Select the link in the #Groups column to view or edit that users group membership.
60 IBM Cognos Business Intelligence Virtual View Manager
Chapter 5: Dynamic Domain Administration

The Edit User’s Group Membership Information window displays a list of the groups to which
the user belongs. Though it is not shown, all users in the dynamic domain belong to the dynamic
all group.
Administration Guide 61
Chapter 5: Dynamic Domain Administration

62 IBM Cognos Business Intelligence Virtual View Manager
Chapter 5: Dynamic Domain Administration

Chapter 6: System Monitoring
IBM® Cognos® Virtual View Manager Administrator provides system management capabilities.
System management entails monitoring of system activities, system status, events, and system data
and performing administrative tasks such as licensing and user management. You access the system
monitoring information using Virtual View Manager Administrator. You can also access the same
information from the Administrator tab in Virtual View Manager.
Virtual View Manager Administrator displays summary views of status, server information, cached
resources, data sources, requests, sessions, transactions, triggers, and event logging. It also enables
domain, group, and user management including configuring LDAP servers and selected groups for
use with Virtual View Manager. License management, and SSL keystore management are also
provided.
The following topics are covered in this chapter:
● "Working with IBM Cognos Virtual View Manager Administrator" (p. 63)
● "Administrator Home Page" (p. 66)
● "Server Overview Page" (p. 67)
● "Cached Resources" (p. 70)
● "Data Sources Summary Information" (p. 72)
● "Requests" (p. 74)
● "Sessions" (p. 77)
● "Transaction Summary Information" (p. 80)
● "Triggers" (p. 81)
● "Events" (p. 82)
● "Event and Log Files" (p. 84)
Working with IBMCognos Virtual ViewManager AdministratorIBM® Cognos® Virtual View Manager Administrator enables users with appropriate rights to view,
monitor, and update selected summary views and status. Additionally, properly authorized users
may perform some server management tasks, and manage domains, groups, and users and their
associated rights.
This section describes how to launch Virtual View Manager Administrator and use its basic features.
Licensed Materials – Property of IBM63© Copyright IBM Corp. 2008, 2010.

Launching IBM Cognos Virtual View Manager AdministratorIBM® Cognos® Virtual View Manager Administrator runs as a Web browser process.
Steps to start Virtual View Manager Administrator:
1. Do one of the following:
● From Virtual View Manager, click Administration > Launch Administrator (Web).
● In a Web browser, enter:
http://server_name:port_number/manager
The default URL with default port setting from the localhost would be:
http://localhost:9400/manager
2. Enter a username and password.
Using IBM Cognos Virtual View Manager AdministratorMany IBM® Cognos® Virtual View Manager Administrator pages have features like adjustable page
refresh settings, tables with sort functionality, detail buttons to display more information about a
table row, row selection check boxes to specify the performance of an action, and table filters that
sharpen focus on the rows of the display. This section describes how you can use these features.
Refreshing the Current Page
Most IBM® Cognos® Virtual View Manager Administrator pages have a refresh mechanism in the
upper right corner of the page. The refresh rate specifies the time interval for an automatic refresh
of the data on the currently displayed page. When you set the refresh rate, keep these things in
mind:
● Page refresh rates are set independently of one another.
● Settings persist across sessions
● Different users have different refresh rate settings for each page.
You can manually refresh the page at any time by clicking Refresh Now .
Sorting
Table column header text displays a small white arrow in the column header row to show if the
table is sorted by that column in ascending or descending order. Secondary and higher order sorting
is indicated by a gray arrow in the columns used to further organize row display order.
Steps to sort columns
● Click Sort.
The Advanced Sort screen appears and allows you to define your sorting preferences.
Selecting a Row for an Action
Check box selection enables buttons that perform actions on the selected row or rows.
64 IBM Cognos Business Intelligence Virtual View Manager
Chapter 6: System Monitoring

Getting Additional Row Information
Click Show Row Details to see more information about that row.
Filtering Table Data
A table filter determines what rows are displayed based on the rules you specify for the data in the
table columns.
Steps to create a new filter
1. Above any table in Virtual View Manager Administrator, click Filter > Edit Filters.
The Advanced Filter screen appears.
2. Click Add Filter .
3. In the Name edit box, type a unique name for your filter.
4. Specify rules for your filter:
● Filter By specifies a column in the table on which to apply the rule. The drop-down menu
lists all the columns displayed in the table view.
● Operator specifies the operator for the rule. The drop-down lists all available operators
for type of data in the column (numeric, text, list of values, and so on).
● Condition specifies the value or condition the data in the column must match.
5. Click Add Rule to add another rule.
6. Click Remove Rule to remove a rule.
7. Click Match Any Rule or Match All Rules to specify how you want the filter to work.
● Match Any Rule — the filter is applied if any one of the rule conditions are met.
● Match All Rules — the filter is applied only if all of the rule conditions are met.
8. Click OK to save the filter.The filter is saved with this table and can be applied or edited any
time the table is viewed.
Steps to copy an existing filter
1. Above any table in Virtual View Manager Administrator, click Filter > Edit Filters.
The Advanced Filter screen appears.
2. Select the filter in the list box on the left.
Administration Guide 65
Chapter 6: System Monitoring
3. Click Copy Filter .
4. Edit the name of the new filter.
5. Make changes to the filter as desired.
6. Click OK to save the filter.
You cannot edit the default All Errors or All Warnings & Errors filters; however you can copy
and add to them if so desired.
Steps to remove an existing filter
1. Above any table in Virtual View Manager Administrator, click Filter > Edit Filters. The Advanced
Filter screen appears.
2. Select the filter in the list box on the left.
3. Click Remove Filter .
You cannot remove the default All Errors or All Warnings & Errors filters.
Navigating Table Data
The arrows at the bottom of many tables enable you to quickly navigate forward and backward
through the data.
Controlling the Number of Rows Displayed
The drop-down list in the lower right corner of many pages lets you select the number of rows that
are displayed on each page. You can choose to display 10, 20, 50, or 100 rows per page.
Administrator Home PageThe IBM® Cognos® Virtual View Manager Administrator home page is the first page displayed
when you log in. The page provides a quick summary of the current status.
Server Info PanelThe Server Info panel shows summary information and links to the Server Overview page.
● Server Name - the HTTP base port is displayed. All other ports are derived from the HTTP
base port as follows: base port +1 = JDBC and ODBC base port +2 = HTTP SSL base port +3
= JDBC SSL base port +6 = Monitor base port +8 = Default for Repository
● Total Memory Used
Percentage of total available JavaTM Heap Memory (RAM) currently in use. Java Heap Memory
is a configuration setting that requires restart to change. Total memory is further divided into
Managed and Reserved memory with a built in margin to prevent OOM errors.
● Sessions
The number of active sessions with a theoretical estimate of the total number of sessions that
could be supported.
66 IBM Cognos Business Intelligence Virtual View Manager
Chapter 6: System Monitoring

● Server Requests
Number of active requests made to the server. Active requests have been started but not yet
completed. The total count is cumulative of all requests.
● Datasource Requests
Active data source requests sent to other resources and the total number of outgoing requests
that the server has made on other resources. The total includes all requests completed or other-
wise.
● Transactions
Active transactions with the total number of transactions that the server has made on other
resources.
Server Status PanelThe Server Status panel displays simple indicators showing the current aggregate status of the
modules/consoles listed:
Status can be one of the following: OK (green), Disabled (grey), Warnings (yellow), Down or Errors(red). A single warning or critical error will change the status from green to yellow, or from yellow
to red depending on the failure severity and the module.
Quick Links PanelThe Quick Links panel provides direct links to the Event Log and User Management pages.
Server Overview PageIn IBM® Cognos® Virtual View Manager Administrator, you access server information from
Monitoring > Server Overview. The Server Overview page provides a consolidated overview of the
system, and the overall status of all of the other system components.
The Server Overview page shows statistics about the server that are grouped into four areas: server
status information, sessions and requests information, cache information, and server status indicators.
In addition, two server overview buttons are provided at the bottom of the page. Each of these page
elements are described below.
Server Status InformationThe upper left section of the Server Overview page displays server status information. Each item
listed is described in this section. Where appropriate, the related configuration parameter in IBM®
Cognos® Virtual View Manager Administrator is also described.
Status
Status reports the presence and count of errors and warnings from all pages under the Monitoring
tab. Status can be:
● OK — no errors or warnings exist.
Administration Guide 67
Chapter 6: System Monitoring
● Warnings — the total number of warnings on the server. If there are also errors, they are shown
in place of showing a count of warnings.
● Errors — the total number of errors.
Server Name
Server Name with the HTTP base port is displayed. All other Virtual View Manager ports are
derived from the HTTP base port as follows:
base port +1 = JDBC and ODBC
base port +2 = HTTP SSL
base port +3 = JDBC SSL
base port +4 = Reserved
base port +5 = Reserved
base port +6 = Monitor
base port +7 = Reserved
base port +8 = Default for Repository
Total Memory Used
Percentage of total available JavaTM heap memory currently in use. Changing the Java heap memory
requires the server to be restarted. Total memory is further divided into Managed and Reserved
memory with a built in margin to prevent Out of Memory (OOM) errors
Maximum Viewable Events
Maximum number of events that may be viewed from the Events console.
This number also controls the maximum number of rows of information displayed in the table in
each console. Additional entries may be viewed in the log files.
Maximum Event Entries
Maximum number of events to be stored in the repository. When the number of events reaches this
threshold the oldest events are discarded. The log files are generally configured to retain a more
expansive archive of event entries.
Session and Request InformationThe Server Overview page also displays summary information about sessions and requests.
● Sessions - The number of currently connected user sessions, and the total number of sessions
started since the server started to run, including closed sessions.
● Requests - Active requests, started but not completed, and the total number of incoming requests
made to the server. Includes the requests that have been completed.
● Data Source Requests - Active data source requests sent to other resources versus the total
number of outgoing requests that the server has made on other resources. The total is the
68 IBM Cognos Business Intelligence Virtual View Manager
Chapter 6: System Monitoring

resource cache storing resource meta data number of resources loaded on the server.includes
all requests completed or otherwise.
Privilege, User, and Repository CachesSummary cache information on the Server Overview page displays usage of system caches for
security privileges on defined data resources, user privileges, and data source metadata repository
stores. These system caches are not to be confused with the data source caches which store materi-
alized views specifically configured at the data source level. The system caches store data such as
user session values of privileges, recently introspected data source meta data, and execution plans.
Access (Hits/ Accesses) displays a percentage that for all three rows should be relatively high, as it
is a fair indicator of enhanced performance obtained by system cache usage.
Access is any request to access an object in the repository, and Hits are inquiries sent to the cache
or successful cache usages.
A miss is an access attempt that was required to look beyond the cache for a particular entity,
meaning a disk access, LDAP or data source query.
Thus a high percentage of hits to total access attempts is one indicator of enhanced performance
meaning that most of the entity access attempts are hitting the cache without requirement of disk
or source data retrieval.
The second column in the sub-section is the Capacity (Entries/Max) which shows the amount of
repository usage by each of the system caches. Each of the system cache sizes is configurable.
● Privilege Cache - Privilege cache refers to repository storage of explicit privileges for resources.
● User Cache - Current user cache data stored in the repository.
● Repository Cache - Repository cache is a resource meta data store enabling quick use of con-
figured resources.
Server Status IndicatorsThe Server Status summary box displays a summary status for other Administrator pages which
are all available for display from the Monitoring and Logging tabs. The red, green, and yellow
indicators give you a quick idea of the status of key system components. You can click on any of
the links to go to the related page for detailed information.
Working with the Server Overview PageYou can start and stop a server or clear the repository cache for the server by clicking these buttons:
● Stop - Stops the server after acknowledgement of a verification prompt. Stopping the server
requires the Modify All Status right.
● Clear Repository Cache - Immediately empties the repository cache. Clearing the repository
cache requires the Modify All Status right.
Administration Guide 69
Chapter 6: System Monitoring

Cached ResourcesIn IBM® Cognos® Virtual View Manager Administrator, you access cache resources information
by clicking Cached Resources from the Monitoring menu. The Cached Resources page is displayed,
providing information about the cached views and procedures. Summary information is displayed
at the top of the Cached Resources page, and information about each individual cache is displayed
in the table below.
The following sections describe the data displayed in the Cached Resources table and how you can
work with this data.
Working with the Cached Resources PageYou can enable or disable cached tables and procedures and you can refresh them manually if
necessary. Each row has a check box to selectively choose the cache you want to enable, disable,
or refresh. After selecting the cache(s), you can click these buttons:
● Change Enabling — toggles the enabled/disabled status of selected caches. You must have the
Modify All Status right.
● Refresh Cache(s) — refreshes the selected caches. You must have the Write privilege on the
selected resource.
You can also change the number of rows displayed at once, quickly navigate through the pages
using the arrows at the bottom of the table, and sort and refresh the data. These actions are described
in "Using IBM Cognos Virtual View Manager Administrator " (p. 64).
The Cached Resources TableThe Cached Resources table displays summary information with cache details available. Click
Show Row Details to view the Details window.
● Name — the display name of the view or the procedure.
● Status — current status of the cached view. The status of a cached resource can be any one
listed in the following table:
EventStatus
Cache has not been loaded.Not Loaded
Cache has been loaded successfully.Up
Cache is not loaded and the most recent refresh failed.Down
Cache is loaded with valid data, but the most recent
refresh failed. However, reads against the cache can
succeed.
Stale
Cache has been disabled.Disabled
70 IBM Cognos Business Intelligence Virtual View Manager
Chapter 6: System Monitoring

EventStatus
Cache cannot operate due to a configuration error.Config Errors
● Type — values may be Table or Procedure.
● Variant — unique set of procedure input parameter values. Every set of procedure input
parameters have a different storage table result set.
● Owner — resource owner. The cache is refreshed and cleared using the owner’s identity.
● Last Access — date and time of the last end-user invocation of a view or procedure, also includes
last refresh of data by timer, or last change of meta-data.
● Last Refresh End — completion date and time of last query refresh.
● Last Fail End — date and time when the last refresh attempt failed.
● Storage Used — disk space used to store result of table or procedure variant.
Cached Resource DetailsEach row also has a Show Row Details button which you can use to display the fully qualified
path and other details about cached resources.
In addition to the information presented in the Cached Resources table (and described in"The
Cached Resources Table" (p. 70)), these details are provided:
● Path — resource location, fully qualified path.
● Owner domain — domain of the user who created the resource, or who is currently designated
as owner.
● Total Accesses — count of the number of times the cache resource is used since last server
restart.
● Last Success End — last successful completion date and time.
● Last Success Duration — time (seconds) required for last successful refresh.
● Last Fail Duration — time recorded for last failure.
● Total Successes — count of successful refreshes since last sever restart.
● Total Failures — count of failed refreshes since last server restart.
● Message — error message returned from cache refresh failure.
Administration Guide 71
Chapter 6: System Monitoring

Data SourcesYou can access data source information by clicking Data Sources from the Monitoring menu. The
Data Sources page is displayed, providing information about all data sources added to the server,
including:
● A consolidated overview of all the data sources in the repository.
● The overall status of the data sources with a count of warnings if any.
● An aggregated count of the active requests and an accumulated count of the total number of
requests handled by the server since the last restart.
● Estimations of the total volume of data passed from the server to all data sources and back to
since the last restart.
Data Sources Summary InformationSummary information at the top of the Data Sources page includes:
● Status — displays the current status which can be OK (green), Disabled (grey), Warnings (yel-
low), Down or Errors (red). A single warning or critical error will change the status from green
to yellow, or from yellow to red depending on the failure severity and the module.
● Requests — displays the number of active requests and the total number of requests since server
restart.
● Bytes — displays the number of bytes sent to the data sources and number of bytes received
from the data sources.
Working with the Data Sources PageYou can select one or more data sources by check box and then perform the following actions those
data source(s):
● Enable or disable the data source
The Change Enabling button toggles the status of the data source. Enabling makes the data
source accessible via IBM® Cognos® Virtual View Manager definitions and configurations.
Disabled takes the data source offline and makes it inaccessible to defined channels.
● Clear the currently allocated pool connections.
The Clear Connection Pool(s) button drops the current connection pool allowing current pro-
cesses to restart connections when necessary.
● Verify the data source connection using the Test Data Source(s) button.
You can also test the current status all data sources by clicking the Test All button. An administrator
user with the Modify All Status right may use the Test All button.
The Data Sources TableThe following columns are shown for each data source in IBM® Cognos® Virtual View Manager.
72 IBM Cognos Business Intelligence Virtual View Manager
Chapter 6: System Monitoring

● Name — User-defined name for the datasource.
● Status — Overall status for the data source, which may be one of the following:
IndicatesStatus
The data source is disabled; represented by a grey
circle.Disabled
The data source is inaccessible; represented by a red
circle.Down
The status of the data source has not been tested.Not Tested
The data source is connected to the server; repre-
sented by a green circle.Up
● Type — Native data source type, some of the more common supported data sources categories
include: IBM® DB2®, Custom JavaTM Procedure, Infirmity, FileCache, LDAP, Microsoft® Access,
Microsoft Excel, Microsoft SQL Server, MySQL, Netezza, Oracle, Sybase, Teradata, Virtual
View Manager, Wsdl, XML, and XmlHttp
● Total Requests — Cumulative count of all requests made on data sources via the server since
the server was started.
● Active Requests — Current count of all outstanding data source requests
● Pool Size (In Use) — Current connection-pool size for relational data sources
● Allocated Pool Size — Current number of connections allocated for the server for a particular
relational data source
● Max Pool Size — Maximum connection-pool size for a relational data source, zero is unlimited
or not applicable.
● Pool Utilization — Utilization of pool represented as a percentage where allocated connections
is divided maximum connections for a relational data source.
Data Source DetailsTo display the following read-only detail information for a data source in the repository, click Show
Row Details .
● Name — User-defined name for the data source.
● Path — Fully-qualified path to the data source. For example, if the data source ds_orders reside
in /shared/sources, the path to ds_orders would be: /shared/sources.
● Status — Current status, which can be Up, Down, or Not Tested.
● Category — Category, which can be File, LDAP, Relational, WSDL, XML/HTTP.
Administration Guide 73
Chapter 6: System Monitoring

● Type — Type of the data source within the category to which it belongs.
● Total Requests — Total number of requests, including active requests, made to the server since
last startup.
● Active Requests — Number of in-progress requests to the server.
● Bytes FromData Source (Estimated) — An estimate of the total number of bytes of data received
by the server from this data source.
● Bytes Into Data Source (Estimated) — An estimate of the total number of bytes of data sent to
this data source from the server.
● Pool Size (In Use) — Current connection-pool size, if the data source is relational.
● Allocated Pool Size — Current number of actual connections both idle and active allocated by
the server for a particular relational data source.
● Max Pool Size — Configurable setting for maximum connection-pool size used to limit the
number of connections allowed to burden a relational data source.
● Pool Utilization — Utilization of pool represented in percentage, if the data source is relational.
● Number of Logins — The number of times a connection to the data source is made in the
connection pool.
● Number of Logouts — The number of connections to the data source that were manually
destroyed by logout from the connection pool.
RequestsYou access requests information by clicking Requests from the Monitoring menu. The Requestspage provides information about all current requests for service including:
● Inbound requests through a data service.
● Outbound requests against physical data sources.
● Internal requests against internal views.
Summary information is displayed at the top of the page, and information about each individual
request is displayed in the table below. Operational information about queued, in process, and
recently completed requests gives the administrative user an idea about what requests are taking
inordinate amounts of time or memory resources to complete.
Note that some of the information displayed on the page is controlled by the configuration settings
in Virtual View Manager. To view these settings, open Virtual View Manager and click Adminis-
tration > Configuration. You can also access request information from:
● Virtual View Manager Server > Configuration > Events and Logging > Event Generation >
Request Events
● Virtual View Manager Server > Runtime Processing Information > Requests
74 IBM Cognos Business Intelligence Virtual View Manager
Chapter 6: System Monitoring

Requests are removed from the table periodically, based upon the purge period configuration setting
found at Virtual View Manager Server > Runtime Processing Information > Requests > Request
Purge Period. The default setting purges requests every 5 minutes.
Requests Summary InformationThe Requests page provides the following summary information:
● Status — Aggregated status of all requests can be OK, Warning, Error, or Unknown. A single
warning or error supersedes display of a status of OK.When failed requests or waiting requests
are present, a count of those warnings or errors will be shown.
● Waiting Requests— Current number of requests waiting in the queue due to memory constraints.
● Waiting Requests Threshold — An event trigger threshold that causes an event. The event may
be used for notification.
● Server Requests — The number of currently active requests, and the total number of requests
made to the server since the server was started.
● Data Source Requests — The number of currently active requests, and the total number of
requests made to the data sources since the server was started.
Working with the Requests PageYou can select one or more requests in the Requests table by check box and then perform the fol-
lowing actions on those requests:
● Clear Plan Caches — Clears all query plan caches, in the event that current statistics gathering
may have significantly changed information sufficient to change the query execution plan.
Forces recalculation of all query plans at next time of execution which will be an initial perfor-
mance hit.
● Purge Completed Requests — Immediately removes all completed and failed requests. This is
useful to reset the view, removing any noise, just prior to testing a set of requests.
● Cancel Requests — Clears all requests.
The Requests TableThe Requests table displays these columns for each request:
● ID — Unique request identifier.
● Status — Can be any one of the following values:
DescriptionStatus
The request was created but not invoked or executed.STARTED
The request is executing.RUNNING
Administration Guide 75
Chapter 6: System Monitoring

DescriptionStatus
The request is in a wait queue.WAITING
The request successfully completed but is not yet
closed.
COMPLETED
The request is in the process of closing.CLOSING
The request successfully executed and is closed.SUCCESS
The request execution failed.FAILED
The request was cancelled and closed.TERMINATED
Changes were committed to the database.COMMITTED
Changes that might have been made were rolled back.ROLLED_BACK
Is in the group of requests that took the longest
amount of time to complete. The number of requests
in this group is configurable using this property:
Virtual View Manager Server > Runtime Processing
Information > Requests > Number of Top Requests
Tracked The default is 10 requests.
TOP_TIME
Is in the group of requests that took the largest
amount of managed memory. The number of requests
in this group is controlled by the same property
described for TOP_TIME above.
TOP_MEMORY
● Owner — Userid of the user who submitted the request.
● Parent ID — Unique ID for the request’s parent process.
● Session Type — STUDIO, HTTP (Web service), INTERNAL, or client procedure.
● Session Name — Name of the component that initiated this request.
● Start Time — Time the request started to execute.
● End Time — Time the request was completed. Blank if the request is unfinished.
● Total Duration — Amount of time elapsed between Start Time and End Time.
● Rows Affected — The number of rows affected by this request.
● MaxMemory— Maximum memory utilized by this request, blocks of 2MB are initially reserved
and then if additional memory is required 2MB blocks are incrementally assigned.
76 IBM Cognos Business Intelligence Virtual View Manager
Chapter 6: System Monitoring
● Max Disk — The maximum amount of memory ever occupied by the request
● Summary — The SQL statement or procedure made by this request.
Request Details
Every individual request has additional detailed information that might help in troubleshooting
failed requests. To view the read-only details, click Show Row Details for the desired row.
In addition to the information presented in the Requests table (and described in "The Requests
Table" (p. 75)), these details are provided:
● Request Type — Either SQL or Procedure.
● Owner domain — Name of the domain to which this owner belongs.
● Session Type — The type of session: STUDIO, HTTP (Web service), INTERNAL, or client
procedure.
● Transaction ID — Unique ID for the request’s session.
● Duration — Amount of time elapsed between Start Time and End Time.
● Server Duration — Represents the actual time spent by the server processing this request. The
difference between Server Duration and Total Duration is the overhead on the server.
● Current Memory — Memory utilization of this request.
● Current Disk — The amount of current memory occupied by the request.
● Description — a more complete description of the summary.
● Message — Displays an error message if the request caused an error.
SessionsYou access sessions information by clicking Sessions from the Monitoring menu. The Sessions page
provides information about the current and recently active sessions. Summary information is dis-
played at the top of the page, and information about each individual session is displayed in the
table below.
Note that some of the information displayed on the Sessions page is controlled by the configuration
settings in IBM® Cognos® Virtual View Manager. To view these settings, open Virtual View Manager
and click Administration > Configuration. The following locations also have configuration settings
for transactions:
● Virtual View Manager Server > Configuration > Events and Logging > Event Generation >
Session Events
● Virtual View Manager Server > Runtime Processing Information > Sessions
Sessions are removed from the table periodically, based upon the configuration setting Virtual View
Manager Server > Runtime Processing Information > Sessions. The default setting purges sessions
every 30 minutes.
Administration Guide 77
Chapter 6: System Monitoring

Sessions Summary InformationThe Summary page provides the following information:
● Status — Aggregated status of all sessions can be OK, Warning, Error, or Unknown. A single
warning or error supersedes display of a status of OK.
● Studio Session Timeout — The amount of time the session can be inactive before it times out.
● Sessions — The number of currently active sessions, and the total number of sessions since the
server was started.
Working with the Sessions PageIf you want to limit the display of sessions to only active sessions, you can quickly remove the
completed sessions by clicking the Purge Completed Sessions button.
If you want to terminate a session, you can select one or more sessions in the Sessions table by check
box and then click the End Sessions button.
The Sessions TableThe Sessions table displays these columns for each session:
● ID — Unique session identifier.
● Status — Can be any one of the following values:
DescriptionStatus
The session is currently active.ACTIVE
The session has timed out. The Session Timeout
configuration setting determines how long the session
can remain idle before it times out. See Virtual View
Manager Server > Runtime Processing Information
> Sessions > Session Timeout.
TIME_OUT
The session is closed.CLOSED
● Name — The session name.
● Type — The session type: STUDIO, HTTP (Web service), INTERNAL, or client procedure.
● Owner — Userid of the user who initiated the session.
● Host — The IP address or name of the host server.
● Login Time — Time the user logged in.
● Idle Duration — Amount of time the session has been idle.
78 IBM Cognos Business Intelligence Virtual View Manager
Chapter 6: System Monitoring

● Total Duration — Amount of time elapsed since the user logged in.
● Active Requests — The number of active requests.
● Total Requests — Total number of requests processed for this session.
● Bytes To Client — The number of bytes in for all requests during this session.
● Bytes From Client — The number of bytes sent out for all requests during this session.
Session Details
Every individual session has additional detailed information available. To view the read-only details,
click the Show Row Details button for the desired row.
In addition to the information presented in the Session table (and described in "The Sessions
Table" (p. 78)), these details are provided:
● Owner domain — Name of the domain to which the session owner belongs.
● Data Service —
● Logout Time — The time this session logged out.
● Timeout Duration — The amount of time this session can be idle before it will time out.
● Active Transactions — The number of currently active transactions.
● Total Transactions — Total number of transactions processed in this session.
TransactionsYou access sessions information by choosing Transactions from the Monitoring menu. The
Transaction page provides information about the current and recently active transactions. Summary
information is displayed at the top of the page, and information about each individual transaction
is displayed in the table below.
By default, the Transactions page displays transactions that occurred within the last 5 minutes.
Note that some of the information displayed on the Transactions page is controlled by the config-
uration settings in IBM® Cognos® Virtual View Manager. To view these settings, open Virtual View
Manager and click Administration > Configuration. The following locations have configuration
settings for transactions:
● Virtual View Manager Server > Configuration > Events and Logging > Event Generation >
Transaction Events
● Virtual View Manager Server > Runtime Processing Information > Transactions
Transactions are removed from the table periodically, based upon the configuration setting Virtual
ViewManager Server > Runtime Processing Information > Transactions > Transaction Purge Period.
The default setting purges transactions every 5 minutes.
Administration Guide 79
Chapter 6: System Monitoring

Transaction Summary InformationThe Transactions page provides the following summary information:
● Status — Aggregated status of all transactions can be OK, Warning, Error, or Unknown. A
single warning or error supersedes display of a status of OK.
● Total Transactions Run — The total number of transactions processed since the server was
started.
● Total Transactions Rolled Back — The total number of transactions that were rolled back
since the server was started.
● Total Transactions Failed — The total number of transactions that failed since the server was
started.
● Active Transactions — The total number of currently active transactions.
Working with the Transactions PageIf you want to limit the display of transactions to only active transactions, you can quickly remove
the completed transactions by clicking the Purge Completed Transactions button.
If you want to terminate a transaction, you can select one or more transactions in the Transactions
table by check box and then click the Cancel Transactions button.
The Transactions TableThe Transactions table displays these columns for each transaction:
● ID — Unique transaction identifier.
● Status — Can be any one of the following values:
DescriptionStatus
The transaction started.START
The transaction was committed.COMMITTED
The transaction failed.FAIL
The transaction was rolled back.ROLLBACK
The transaction was compensated.COMPENSATE
● Mode — Displays the mode for this transaction: AUTO or EXPLICIT.
● Owner — User who initiated this transaction.
● Session ID — Unique identifier for the transaction.
80 IBM Cognos Business Intelligence Virtual View Manager
Chapter 6: System Monitoring

● Session Name — Name of the component that issued the transaction.
● Start Time — Time at which the transaction was initiated.
● End Time — Time at which the transaction was completed.
● Duration — Amount of time for which the transaction has been running or ran.
Transaction Details
Every individual transaction has additional detailed information available. To view the read-only
details, click Show Row Details for the desired row.
TriggersYou access trigger information by choosing Triggers from the Monitoring menu. The Triggers page
provides information about the current and recently active triggers. Summary information is displayed
at the top of the page, and information about each individual trigger is displayed in the table below.
By default, the page displays triggers that occurred within the last 5 minutes.
Note that some of the information is controlled by the configuration settings in IBM® Cognos®
Virtual View Manager. To view these settings, open Virtual View Manager and chooseConfiguration
from the Administration menu. The following locations have configuration settings for triggers:
● Virtual View Manager Server > Configuration > Events and Logging > Event Generation >
Trigger Events
● Virtual View Manager Server > Runtime Processing Information > Triggers
Virtual View Manager provides a TestAllDataSources trigger by default.
Trigger Summary InformationThe Triggers page provides the following summary information:
● Status — Aggregated status of all triggers can be OK, Warning, Error, or Unknown. A single
warning or error supersedes display of a status of OK.
● Total Runs — Total number of trigger executions carried out since the server started.
● Total Failed Runs — Total number of trigger executions that failed since the server started.
Working with the Triggers PageIf you want to change the status of a trigger between enabled and disabled, you can select one or
more triggers in the Triggers table by check box and then click the Change Enabling button.
The Triggers TableThe Triggers table displays these columns for each trigger:
● Name — The name of the trigger.
Administration Guide 81
Chapter 6: System Monitoring

● Status — Can be any one of the following values:
DescriptionStatus
The trigger is processing.ACTIVE
The trigger is disabled.DISABLED
The trigger is not configured correctly.CONFIG ERROR
● Condition — Type of trigger. Time-event, system-event, or user-defined event.
● Action — The type of action this trigger generated.
● Owner — User who initiated this trigger.
● Next Time — Next time when the execution will occur.
● Frequency — Recurrence of execution.
● Last Time — Last time the execution occurred
● Last Success — Last time the execution was successful
● Total Attempts — Total number of times the this trigger was invoked.
EventsYou access information about the server events that have been logged by choosing Event Log from
the Logging menu. The Event Log page shows information about all of the events generated by
processes running on the server. Events originate from one of the following types of objects or
processes:
● cached views
● data sources
● requests for query executions
● schedules
● sessions
● transactions
Summary information is displayed at the top of the page, and information about each individual
event is displayed in the table below.
Note that some of the information displayed on the Event Log page is controlled by the configuration
settings in IBM® Cognos® Virtual View Manager. To view these settings, open Virtual View Manager,
choose Configuration from the Administration menu, and go to Virtual View Manager Server >
Configuration > Events and Logging.
82 IBM Cognos Business Intelligence Virtual View Manager
Chapter 6: System Monitoring

Server Event AttributesIBM® Cognos® Virtual View Manager creates SNMP events that are compliant with SNMPv1
protocol. The tables in SNMP Traps, contain details of these server events. The attributes listed
are: SNMP ID, short name for the event, and description.
The SNMP traps in the tables have the following OID prefix 1.3.6.1.4.1.18439.2.3.
Set the generic trap to 6. Virtual View Manager Server Monitor’s specific trap numbers range
between 10000 and 19999. Virtual View Manager Server’s specific trap numbers range between
20000 and 29999.
In the SNMP details tables, the SNMP ID is listed with the event name, and a description that
includes the names of the variables whose values are passed in the message with the text description.
The variable values in the description columns are passed in the MIB message payload with an
incremented, sequential number that follows the concatenation of the OID prefix and SNMP ID.
For example, the variables from the first MIB description are trapTime, trapServerHostName, and
trapServerPort.
The SNMP variables are sequentially assigned numbers for display in the MIB message payload.
Hence trapTime is assigned a numeric representation of 1, trapServerHostName is 2, and
trapServerPort is 3. All SNMP variables appear in the MIB, identified only with their numeric rep-
resentation.
Using this example, the line pictured below from a SNMP MIB shows an OID prefix, with a SNMP
ID designating a csMonitorStart event with a trapServerPort (represented by the numeral 3) opened
on port 9406
Good SNMP software will parse this message into a human readable format according to the MIB
definitions set.
Event Log Summary InformationThe Event Log page provides the following summary information:
● Status — Aggregated status of all events can be OK, Warning, Error, or Unknown. A single
warning or error supersedes display of a status of OK.
● Maximum Viewable Events — The maximum number of event descriptions maintained in the
repository event table. The default maximum is 1000 entries. The number of events is config-
urable in IBM® Cognos® Virtual View Manager with the Administration menu Configuration
option by choosing Virtual View Manager Server > Events and Logging > Logging > Memory
> Maximum Viewable Entries in the Configuration window.
● Maximum Event Entries — Maximum number of events that can be stored in the server. This
number is set in Virtual View Manager with the Administration menu Configuration option
by choosing Virtual View Manager Server > Events and Logging > Logging > Database Logger
> Maximum Log Entries in the Configuration window.
Administration Guide 83
Chapter 6: System Monitoring

Working with the Event Log PageThe Event Log page is mainly an informational page. You can change the sort order, filter the data,
or get more details on a specific event, but there are no actions on the data itself.
The Event Log TableThe Event Log table displays these columns for each event:
● ID — Unique event identifier.
● Severity — The severity level of the event, represented by a colored circle, may be one of
DISABLED/OFF (gray circle), INFO (green circle), WARNING (yellow circle), or ERROR (red
circle). Refer to Description below.
● Category — The type of event, such as REQUEST, SESSION, or TRANSACTION.
● Type — The type of event that occurred.
● Owner — User who generated this event.
● Time — The date and time the event occurred.
● Description — A description of the event, such as the request id.
Event and Log FilesAll events in IBM® Cognos® Virtual View Manager are logged, but not all log entries are tied to
system events and visible through the Administrator. Also, there may be cases where an event is
associated with multiple log entries.
Virtual View Manager uses a number of log files to store information logged during system and
user activities. The sections below describe the installation and uninstallation log files and the server,
monitor, and studio log files.
Server, Monitor, and Studio Log FilesIBM® Cognos® Virtual View Manager provides the following log files for server, monitor, and user
activities. These log files can be found in the installation_directory\logs directory.
DescriptionFile Name
Standard out/error logscs_server.out.<TIMESTAMP>
Main server log.cs_server.log
Server events log.cs_server_events.log
Server monitor standard out log. Only available on
Windows systems.
cs_monitor.out
84 IBM Cognos Business Intelligence Virtual View Manager
Chapter 6: System Monitoring

DescriptionFile Name
Server monitor standard out/error log.Only available
on UNIX® operating systems. UNIX systems have
stdout and stderror go to this file, which is not the
case for the Windows systems.
cs_monitor.out
Server monitor main log.cs_monitor.log
Server monitor events log.cs_monitor_events.log
Virtual View Manager application main log.cs_studio.log
Administration Guide 85
Chapter 6: System Monitoring

86 IBM Cognos Business Intelligence Virtual View Manager
Chapter 6: System Monitoring

Chapter 7: Utilities
This chapter describes the command-line utility programs which are available in the installation_
location /bin directory. Generally to use these programs (with the exception of pkg_export, and
pkg_import), you need to have administrative rights to Access Tools, Read All Resources, and
Modify All Resources.
The following utility programs are described:
● "backup_export and backup_import" (p. 87)
● "virtualviewmanager" (p. 96)
● "install_services" (p. 98)
● "pkg_export and pkg_import" (p. 99)
● "remove_services" (p. 128)
● "repo_util" (p. 128)
● "server_util" (p. 131)
backup_export and backup_importIBM® Cognos® Virtual View Manager provides two ways to perform a full server backup of an
existing server instance. Either the Virtual View Manager interface or the backup_import command
line utility may be used to create or restore saved configurations from a full server backup CAR
file. By default the backup_export command exports every part of the server configuration,
including domains, users, groups, all resources, security settings (ownership of resources and privi-
leges on resources), cache configurations, scheduling, driver configurations, and server-level settings.
Note: For more information on how the Virtual View Manager interface can be used to export and
import a full server configuration, see the Virtual View Manager User Guide.
Use the command-line backup programs to backup and save all data source metadata, user-defined
resources, (published, shared, and other), and server settings. The file generated by a full server
backup export may be used to later restore the entire set of configurations (with the exception of
local machine based server configuration settings), data source meta-data, and all derived and child
resources.
Local computing environment based settings and configurations are excluded from a full server
backup export.
Options may be specified to either include or exclude custom JavaTM and data source statistics
regarding cardinality and table boundaries. Other command line utilities, namely pkg_export and
pkg_import, give greater flexibility and control over what and how aspects of the server may be
exported for purposes other than backup.
The following rights are required to perform a full server backup:
Licensed Materials – Property of IBM87© Copyright IBM Corp. 2008, 2010.

● Access Tools
● Read All Resources
● Read All Users and
● Read All Config
The following rights are required to import an archive:
● Access Tools
● Read and Modify All Resources
● Read and Modify All Users
● Read and Modify All Config
The command line programs are available in the installation_location /bin directory:
● backup_export.bat
● backup_import.bat
● backup_export.sh
● backup_import.sh
Backup Program Commands
Backup Export Syntaxbackup_export-server <hostname> [-port <port number>] [-encrypt]-pkgfile <file name>-user <user name> -password <password> [-domain <domain>][-pkgname <name>] [-description <text>][-optfile <file name>] [-excludejars][-includeStatistics] [-verbose]
Command-Line Options for backup_export
Options in the following table are listed alphabetically. Syntactical order of the options is relevant
in most cases.
Notes:
● The export does not include runtime history like log files or probe history.
● The -pkgname and -description flags are optional. They let you include a name and notes within
the contents.xml to assist in later identification.
88 IBM Cognos Business Intelligence Virtual View Manager
Chapter 7: Utilities

Options for the backup_export Command-Line Program
CommentsOptional/Mandatory
Option
Description of the exported archive file set as an
attribute of the contents.xml file within the exported
CAR.
optional-description <text>
User domain. The default value is cognos.optional-domain <domain>
Encrypts communication between the command line
and the server using SSL sent over the dedicated
HTTPS port.
optional-encrypt
NOTE: When using the -encrypt option, the HTTPS
port is automatically used. Use the -port option to
specify the HTTP web services base port and the
command line utility automatically switches the SSL
connection to the dedicated HTTPS port.
Suppresses export of custom jars. By default. the
export does not include binary files such as custom
JavaTM procedure JAR files or JDBC driver JAR files.
optional-excludejars
Includes any known resource cardinality statistics
about data source table boundaries, column bound-
aries, and configurations when statistics gathering is
enabled.
optional-includeStatistics
Administration Guide 89
Chapter 7: Utilities

CommentsOptional/Mandatory
Option
Specifies an option file providing a way to pass
options without using the command line. The options
file is useful for scripting and ensuring that sensitive
information does not display on the operating system
command line.
optional-optfile <file name>
The contents of the options file are the same strings
you would use on the command line, with the addition
of new lines being legal.
For example:
backup_export -server localhost -user test
-password password -pkgfile sample.car
is the same as:
backup_export -optfile sample.opt
where sample.opt contains mandatory arguments and
options:
-server localhost -user test -password
password -pkgfile sample.car
Password of the administrative user performing the
export.
mandatory-password <pass-
word>
Specifies the path and the file name created as the
backup archive file. The file path specified must be
accessible to the command line client. The server
passes data to the command line client and then the
client writes that CAR file to the location specified.
mandatory-pkgfile <file name>
Names an attribute in the contents.xml within the
exported backup file. This option is likely to depre-
cated in future releases.
optional-pkgname <name>
Specifies Web Services Base Port (HTTP) used to
communicate with the server. The default value is
9400. Specification is optional is the port setting has
not changed.
optional-port <port_number>
Note: Specify the Web Services HTTP port even if the
-encrypt option is specified. If -encrypt is specified
then the tool will automatically add two to the port
number specified here.
90 IBM Cognos Business Intelligence Virtual View Manager
Chapter 7: Utilities

CommentsOptional/Mandatory
Option
Target server to which the utility will connect.mandatory-server <hostname>
System administrative user name. To properly use
backup_export the administrative user must have at
least the following rights: Access Tools, Read All
Resources, Read All Users, and Read All Config.
mandatory-user <username>
Generates descriptive output describing the export in
the command line window.
optional-verbose
Backup Import Syntaxbackup_import-server <hostname> [-port<port number>] [-encrypt]-pkgfile <target/file name>-user<user name> -password <password>[-domain <domain>]-relocate <oldPath><newPath> ...[-optfile <filename>] ...[-set <path><type><attribute><value>][-printinfo] [-overwrite] [-verbose]
Command-Line Options for backup_import
Options for the backup_import Command-Line Program
CommentsOptional/Mandatory
Option
User domain. The default value is cognos.optional-domain <Domain>
Encrypts communication between the command line and
the server using SSL sent over the dedicated HTTPS port.
optional-encrypt
NOTE: When using the -encrypt option, the HTTPS port
is automatically used. Use the -port option to specify the
HTTP web services base port and the command line
utility automatically switches the SSL connection to the
dedicated HTTPS port.
Administration Guide 91
Chapter 7: Utilities

CommentsOptional/Mandatory
Option
Specifies an option file providing a way to pass options
without using the command line. The options file is useful
for scripting and ensuring that sensitive information does
not display on the operating system command line.
optional-optfile <FileName>
The contents of the options file are the same strings you
would use on the command line. Additionally line breaks
(new lines) are allowed in the options file, in contrast to
the command line which does not normally permit extra
line breaks or Enter keystrokes
For example:
backup_import-server localhost -user test -passwordpassword -pkgfilesample.car
is the same as:
backup_import -optfile sample.opt
where sample.opt contains mandatory arguments and
options:
-server localhost -usertest-password password -pkgfilesample.car
This option does a destructive import overwriting any
duplicate resources with the identical resource path.
optional-overwrite
Password of the administrative user performing the
import.
mandatory-password<Password>
Specifies the location and file name of the CAR file that
is to be read from as the backup archive file.
mandatory-pkgfile<FileName>
The -pkgfile target file must be a CAR file.
Specifies Web Services Base Port (HTTP) used to commu-
nicate with the server. The default value is 9400. Specifi-
cation is optional is the port setting has not changed.
optional-port<BasePortNum>
Note: Specify the Web Services HTTP port even if the -
encrypt option is specified. If -encrypt is specified then
the tool will automatically add two to the port number
specified here.
92 IBM Cognos Business Intelligence Virtual View Manager
Chapter 7: Utilities

CommentsOptional/Mandatory
Option
This option disables actual import, and instead allows
for inspection of the archive file. PrintInfo displays
properties of the CAR file to the command window and
exposes some impacts of import with information such
as user name, source server with port number, source
JavaTM version, user domain, creation date of the archive
file, source operating system, and archive type.
optional-printinfo
Specify a new location resource name path for top-level
items. Specify the old path and the new path using the
resource name.
optional-relocate <oldpath> <new path>
The -relocate option may be used to exclude specified
resources from import. Set the -relocate option with the
<new path> attribute set to "NOIMPORT" and the
resources designated by the <old path> attribute will not
be imported.
The following example option stops all resources in the
/shared/OldProject container from being imported from
the CAR. file.
-relocate/shared/OldProject NOIMPORT
Target server to which the utility will connect to for
import of the CAR file defined resources.
mandatory-server<HostName>
Administration Guide 93
Chapter 7: Utilities

CommentsOptional/Mandatory
Option
Enables resource attribute changes during import.optional-set <path><type><attribute><value>
Use the -set option to change the data source attribute
value(s) of classpath, host, port, database, user, or pass-
word when deploying a .car file to a new location like a
production server.
The resource name is the <path>.
The <type> is always equal to "DATA_SOURCE" when
using the set option with the attributes named above.
The <attribute> can be: classpath, host, port, database,
user, or password.
Set <value> to a valid entry for the selected attribute.
String values may be enclosed with double quotes to
allow for spaces in the <value>. Example:
./pkg_import.sh-pkgfile MyCustJavaDB.car
-optfile C:\X.opt -set /shared/datasources/DBCustom_JavaDATA_SOURCEclasspath "C:\Program Files\JavaDev;D:\MyDocuments\Java Joe"
The set option may be repeated as often as is necessary
to set different attributes.
Multiple classpaths can be set with a single statement.
When executing backup_import from a Windows system
use the semicolon as a delimiter where <value> could be:
C:\DevZone\ATeam\Jars\my.jar;D:\Current\Ref\classes
When executing the pkg_import from a UNIX/Linux
system use colons as the delimiter. For example:
/lib/ext/classes:/lib/src/jars
System administrative user name. To properly use
backup_import the administrative user must have at least
the following rights: Access Tools, Modify All Resources,
Modify All Users, and Modify All Config
mandatory-user <UserName>
Generates descriptive output describing the export in the
command line window. By default the verbose option is
not engaged and only error messages are displayed or
logged.
optional-verbose
94 IBM Cognos Business Intelligence Virtual View Manager
Chapter 7: Utilities

Notes
● The -pkgfile target file must be a .car file.
● The -verbose option causes informational messages to be displayed after importing. Without
this option, only error messages are displayed.
● The -set option allows data source connection information to be explicitly specified or changed
from the original during import.
[-set<path><attribute> <value>]
This option is typically used when deploying a .car file to a production server. The properties
most commonly changed are: host, port, database, user, password
Set option
The following attributes of the -set option may be invoked when importing data sources:
● user <login> or <username> or error depending on source type
● password <password> or error depending on source type
● user2 <appUserName> or error if not Oracle EBS
● password2 <appPassword> or error if not Oracle EBS
● host <urlIP> or <dsn> or <server> or <appServer> or <url> or <root> or error depending on
the source type
● port <urlPort> or <port> or error depending on source type
● database <urlDatabaseName> or <enterprise> or <appServer> or error depending on the source
type
● path <root> or <url> or error depending on source type
● annotation
Example usage to change the password property of a data source:
pkg_import mycar.car -set /shared/myDataSource DATA_SOURCEpassword myNewPassword
In this example, -set is the option; DATA_SOURCE is the type of the resource being imported, and
password is the property that is being changed.
Rules For Import
Importing follows some rules to resolve conflicts during import. These rules are:
1. If an imported resource does not exist, it is created. The person performing the import gets
appropriate privileges as the creator (such as READ|WRITE for a folder or
READ|WRITE|EXECUTE for a procedure). If the user is in the admin group and has requested
-includeaccess, then the owner of the resource is set as it was before and any privileges in the
import are also put in place.
Administration Guide 95
Chapter 7: Utilities

2. If a resource is imported to a non-existent folder, the folder (and any parent folders of that
folder that do not yet exist) is created with the importing user getting READ|WRITE privilege
and ownership of these folders. Auto-creation of missing folders is not supported in the Virtual
View Manager Data Services area.
3. If a resource already exists and it is also being imported, the old version is overwritten
(assuming you have the WRITE privilege) in all ways, except the following:
● The owner is not changed. The original owner retains ownership.
● Privileges for users that are not explicitly changed by the import are left intact. For example,
if abe has READ|WRITE and bob has READ|WRITE, and the import lists abe as READ
but does not mention bob then abe's privileges are updated but bob's are left intact.
● If the resource is a folder or data source, its children resources are not removed.
4. Restrictions
● The configuration settings (done through the Administration > Configuration menu option)
are not carried over when you export/import a resource.
● You cannot create a resource in a folder where you do not have the WRITE privilege.
● You cannot overwrite a resource unless you have the WRITE privilege for that resource.
● You cannot export just part of a physical data source. It is either all or nothing.
● You cannot import just part of a physical data source. If you import, you must include the
source definition itself.
● The Virtual View Manager Data Services area has strict structure rules that are enforced.
● You cannot import anything that was exported from the Virtual View Manager Data Ser-
vices area to outside of that area.
● You cannot import anything that was exported from outside the Virtual View Manager
Data Services area into that area.
virtualviewmanagerThe command-line program virtualviewmanager.bat (for Windows) or virtualviewmanager.sh (for
UNIX) can be used to stop or start the server from a command-line interface. Examples are given
here using the *.sh command.
Steps to start or stop, or restart the server
1. Make sure that the monitor is active.
2. Run the following command:
<installation_directory>/bin/virtualviewmanager.shserver <start|stop|restart> -user <username> -password <password>
96 IBM Cognos Business Intelligence Virtual View Manager
Chapter 7: Utilities

Steps to start, stop, or restart the monitor, use the following command
● Run the following command:
<installation_directory>/bin/virtualviewmanager.shmonitor <start|stop|restart>
Starting the monitor automatically starts the server.
Stopping the monitor automatically stops the server.
Restarting the monitor automatically stops and restarts the server.
Note: If you plan to run the monitor process manually and wish to keep the monitor process
running even after you log off the system, you need to run the following command:
nohup<installation_directory>/bin/virtualviewmanager.shmonitor <start|restart>
● On Windows, if you plan to run the monitor process manually and wish to keep the monitor
process running even after you log off the system, you need to set Server Ignore Signals to True,
as follows:
● Go to Administration > Configuration > Virtual View Manager Components > Virtual
View Manager Server > Configuration > Monitor > Server Ignore Signals (On Monitor
Restart).
● Set the Value to True and the restart the monitor.
Steps to run the server as a foreground process with no monitor
1. Stop the monitor.
2. Run the following commands, as needed:
<installation_directory>/bin/virtualviewmanager.shserver <run|debug>
<installation_directory>/bin/virtualviewmanager_server.sh<run|debug>
The commands with the debug option also enable JavaTM debugging on port 8000. All those
actions only output to log files. These commands may be used in order to obtain thread dumps
or debug a server issue without the monitor getting in the way.
If you are running the server with no monitor with one of the commands above, a monitor
start will kill that server process and restart a new one in the background.
Note: If you plan to run the server process manually and wish to keep the server process running
even after you log off the system, you need to run the following command:
nohup <command> &
where <command> refers to one of the commands listed above in this section.
3. On Windows, if you plan to run the server process manually and wish to keep the server process
running even after you log off the system, you need set Server Ignore Signals to True, as follows:
● Go to Administration > Configuration > Virtual View Manager Information Server Com-
ponents > Virtual ViewManager Server > Configuration > Monitor > Server Ignore Signals
(On Monitor Restart).
Administration Guide 97
Chapter 7: Utilities

● Set the Value to True and restart the monitor.
Steps to start, stop, or restart the repository that was installed during the installation,use the following command
● Run the following command:
virtualviewmanager.shrepo <start|stop|restart> -osuser <osusername> -user <username>-password <password >
where:
● osusername is the username of the account that will run the repository process
● username is the repository database user name
● password is the repository database user password
This command is only supported for a repository that was installed during the installation of Virtual
View Manager.
On Windows, the usage is as follows:
virtualviewmanager.bat repo <start|stop|restart|install|uninstall>
Stopping and Starting the Server on Windows Startup ProgramOn Windows, you can manually start or stop the server through the startup program without a
command-line interface.
● To stop Virtual View Manager server manually
● From the Start menu, click IBM® Cognos® Virtual View Manager, Server, Stop Virtual
View Manager Server.
● To start Virtual View Manager server manually
● From the Start menu, click IBM Cognos Virtual View Manager, ServerStart Virtual View
Manager Server.
install_servicesThe install_services.sh script can be used from a command-line interface to automatically re-start
the server and the repository on UNIX.
If at anytime after installing the software you re-start the installation machine, IBM® Cognos®
Virtual View Manager and the metadata repository will not start automatically. In order for the
installation machine to automatically start or stop the server during a re-start, run the script named
install_services.sh, which would install two service files (csw.repository and csw.server) and configure
them.
Steps
1. Log into the server computer with root privileges.
98 IBM Cognos Business Intelligence Virtual View Manager
Chapter 7: Utilities

2. Change to the installation_directory /bin directory.
3. Run the following command:
install_services.sh
You are prompted for a user name and other details to configure the service files.
Running install_services.sh does not interrupt any repository or server processes that are currently
running.
pkg_export and pkg_importThese command line utilities provide two ways of exporting and importing specified resources from
the server:
● Export to and import from a CAR file (-pkgfile option)
● Export to and import from a hierarchical directory (-pkgdir option)
Selected directories or individual resources may be exported to a single discrete CAR file or they
may be exported to a hierarchical directory that mirrors the IBM® Cognos® Virtual View Manager
resource tree directory structure.
Advantages of exporting and importing to a single CAR file include:
● Aggregates all metadata files and objects into a single file
● Multiple resource files are packaged in a single compressed archive.
● All resource and metadata objects may be exported/imported.
Disadvantages of CAR files include:
● No incremental update available. Any changes to a resource backed up to a CAR file requires
re-creation of the CAR file to capture modifications.
● Exported CAR file objects are in a proprietary format that is not easily modified.
Advantages of exporting and importing to a directory structure include:
● All incremental changes (additions, modifications, and deletions) made on the server may be
captured with a single pkg_export execution that updates only those files affected by the changes.
● Exported files are stored in a hierarchical directory structure that mimics the structure created,
using the server.
● SQL and metadata files are stored in file formats that may be modified.
● Directory and file updates compatible with many source code control systems
Disadvantages of directory package exports:
● JARs, users, groups, domains, and rights in the directory export are not supported.
The utilities, pkg_export and pkg_import, are available in the installation_location/bin directory.
Administration Guide 99
Chapter 7: Utilities

On Windows, the utilities are named pkg_export.bat and pkg_import.bat. On UNIX, they are
named pkg_export.sh and pkg_import.sh.
Note: The Virtual View Manager menu option to export selected resources to CAR files is equivalent
to using the pkg_export with the -pkgfile option. For details on using the Virtual View Manager
menu option, see the Resource Management Basics chapter in the Virtual View Manager User
Guide.
Package Export Command Line UtilityThis utility exports specified directories and resources. The package export command-line utility
can be thought of as if it were two different utilities because some of the options that are available
to each of the two primary types (CAR file -pkgfile and directory -pkgdir) of export are not inter-
operable.
Two sections follow to describe the various mandatory switches and options available for use with
each option of the package export command-line utility:
Package Export to a CAR file (-pkgfile option)
For export of specified resources to a CAR file:
pkg_export -pkgfile <FileName>
<NamespacePath> [...]
-server <hostname> [-port <port>][-encrypt]
-user <user> -password <password> [-domain <domain>]
[-pkgname <name>] [-description <text>]
[-optfile <filename>][...]
[-rebindable <path><description>]...
[-includeaccess] [-includecaching]
[-includesourceinfo] [-includejars]
[-includeAllUsers] [-includeUser <domain><user>]...
[-includeGroup <domain><group>]...
[-includeDomain <domain>]...
[-includeRequiredUsers] [-includeDependencies]
[-includeStatistics]
[-verbose] [-quiet]
Examplespkg_export -pkgfile MyExport.car
shared/procedures/myParameterizedQuery
-server localhost
-user admin -password AdminPassword
-includeDependencies
100 IBM Cognos Business Intelligence Virtual View Manager
Chapter 7: Utilities

-rebindable shared/sources/ds_orders/products "This needsrebinding to the production data source."
In the example above, myParameterizedQuery is exported with dependencies that in this case
includes the products table from the orders data source.
The -rebindable option is specified to notify or remind the user during an import that the products
resource will need to be rebound. During import a message prompt and the <description> get dis-
played within the command prompt and they also appear when the resulting export CAR file is
imported in Virtual View Manager. Rebinding must be done manually after the import unless the
-rebind option specifies the new resource for rebinding during import.
Another example:
pkg_export -pkgfile Sources_Backup.car
shared/sources
-optfile C:/BackupScripts/Sources/weekly.opt
-includeDependencies
-includesourceinfo
In this example shared/sources is backed up to Sources_Backup.car.
The option file, weekly.opt, must contain any mandatory arguments that were missing in the orig-
inal command:
-server localhost
-user DBASecure1
-password Password
-domain EnterpriseLDAP
An options file could be dynamically be generated to specify options and arguments including the
user name, password, and domain so that programmatic backups may be set while obfuscating the
DBA login from display on either the application window or in the file prior to running the scheduled
script.
The following table of pkg_export -pkgfile parameters and arguments is organized by the order of
appearance.
CommentsOptional /Mandatory
pkg_export -pkgfileParameters and Args
Specifies new CAR file name.mandatory-pkgfile <FileName>
Server host to which the utility will connect.mandatory-server <HostName>
Administration Guide 101
Chapter 7: Utilities

CommentsOptional /Mandatory
pkg_export -pkgfileParameters and Args
Specifies Web Services Base Port (HTTP) used to
communicate with the server. The default value is
9400. Specification is optional if the port setting has
not changed from the default.
optional-port <BasePortNum>
Note: Specify the Web Services HTTP port even if
the -encrypt option is specified. If -encrypt is speci-
fied then the tool will automatically add two to the
port number specified here.
Encrypts communication between the command line
and the server using SSL sent over the dedicated
HTTPS port.
optional-encrypt
Note: When using the -encrypt option, the HTTPS
port is automatically used. Use the -port option to
specify the HTTP web services base port and the
command line utility automatically switches the SSL
connection to the dedicated HTTPS port.
Virtual View Manager system administrative user
name. To properly use pkg_export the user must
have ownership of the specified resource or at least
read privilege on all the specified resources with:
Access Tools and Read All Config rights
mandatory-user <UserName>
Password for user profile used to export package.mandatory-password <Password>
User domain. The default value is cognos and does
not have to be stated unless the user profile used for
export has another value.
optional-domain <Domain>
From this row down the Parameters are listed alphabetically.
Package description of the archive file. Notation
appears when Virtual View Manager is used to
import the CAR.
optional-description "<Text>"
Exports all domains, groups, and users to the export
file. Requires the Read All Users right.
optional-includeAllUsers
102 IBM Cognos Business Intelligence Virtual View Manager
Chapter 7: Utilities

CommentsOptional /Mandatory
pkg_export -pkgfileParameters and Args
Includes the specified user in the export file. This
option may be repeated to export multiple users.
Repeat the option keyword -includeUser with argu-
ments for the new domain and user as many times
as is necessary.
optional-includeUser<DomainName><UserName>
Exports group information about the specified group
in the export file.
optional-includeGroup<DomainName><GroupName>
Export the specified domain metadata to the export
file.
optional-includeDomain<DomainName>
Includes the current user access controls (privilege
specifications) on the resources in the export file.
optional-includeaccess
Default setting does not include access control even
when exported by an administrator.
An error may occur if this option is used and the
exporting user is not a member of the admin group.
Includes the details of caching on views and proce-
dures in the export file.
optional-includecaching
Gathers and includes all dependent resources for the
resources you choose to export.
optional-includeDependencies
Includes the .JAR files in the export fileoptional-includejars
Includes the information about the required users in
the export file.
optional-includeRequiredUsers
Data source connection details such as user name,
password, host name, and port are not included by
default. Specify -includesourceinfo to include these.
optional-includesourceinfo
Includes any resource stats known about the table
boundaries, column boundaries, etc.
optional-includeStatistics
Administration Guide 103
Chapter 7: Utilities

CommentsOptional /Mandatory
pkg_export -pkgfileParameters and Args
Options file.optional-optfile <FileName>
The options file feature provides a way to pass
options without using the command line. Use the
options file for scripting and ensuring that sensitive
information is not displayed on the operating system
command line.
The contents of the options file are the same strings
you would use on the command line. Unlike most
command prompt windows, new lines in the text
file are legal.
For example,
backup_export-server localhost -user test -passwordpassword -pkgfilesample.car
is the same as:
backup_export -optfile sample.opt
where sample.opt contains either:
-server localhost
-user test
-password password
-pkgfile sample.car
or (this one with new lines):
-server localhost
-user test
-password password
-pkgfile sample.car
This option is also available for use in pkg_import.
Package name may be set, but this string is not cur-
rently used. Spaces are allowed but punctuation is
not.
optional-pkgname "<Name>"
Marks a resource dependency for rebinding on
import. When a rebindable resource is imported a
reminder and the <Description> are displayed on
the command line. The -rebind option must be
specified on import for that action to take place on
import. That message is also displayed in Virtual
View Manager to prompt designation of a new
resource (path) as the resource dependency.
optional-rebindable <Path><Description> ...
104 IBM Cognos Business Intelligence Virtual View Manager
Chapter 7: Utilities

CommentsOptional /Mandatory
pkg_export -pkgfileParameters and Args
This option causes verbose reporting of information
much like the GUI provides instead of the normal
terse reporting.
optional- verbose
Note: The pkg_export command exports each of the listed resources (as specified using a namespace
path such as /users/manager/sources or /shared/projects/pegasus). It does not include any domains,
users, groups, or server settings.
● This command can be used by any user. If you do not have the READ privilege to any of the
specified resources, the export will fail. If you do have the READ privilege for all of them, then
all resources that are children of those resources will also be included as long as you have the
READ privilege on those children.
Users who attempt export without the READ privilege on a child resource will not be able to
export the child resource, and they will not be notified of the omission of the child from the
export package.
● By default, access information (privilege settings) are not included in the export. The -
includeaccess option must be provided if you want privilege settings included in the archive
file. The -includeaccess option is ignored if you are not logged in as an administrator with the
Read All Resources right.
● By default, no caching configurations are included in the export. The -includecaching option
must be specified to include cached data from materialized views, configurations that include
scheduling for cache refreshes.
● By default, physical data source connection details such as usernames, passwords, host names,
and ports are blanked out during an export. The -includesourceinfo option must be provided
if you want those details included. Note that if passwords are included, they are encrypted.
● The -pkgname and -description flags are optional. They let you include your specific information
in the archive file for later identification.
● The -verbose option reports if problems are encountered during the export
Package Export to a Directory (-pkgdir option)
The -pkgdir option exports resources to a directory for incremental update. The resource definitions
and file objects are externalized from the server and they may be modified given certain precautions.
Since privilege settings and resource metadata are exported as files that may be modified, they must
be protected from intentional or inadvertent changes.
One of the primary advantages of externalizing resources with the -pkgdir option is that exports
may be quickly performed that incrementally update only those files that have been created, changed,
or deleted. This is great for source control systems that safeguard files and track version changes.
● Exporting to a new directory
Administration Guide 105
Chapter 7: Utilities

When a package export is made to a new directory all defined resources in the specified direc-
tories are exported to a hierarchical directory structure matching the Virtual View Manager
resource tree.
● Exporting to an existing externalized directory
To incrementally update an existing externalized directory use the pkg_export -pkgdir command
and exclude the resource namespace path. By default, the package export will incrementally
update only those files that have changed since the last export. Make sure to specify the existing
-pkgdir <existing_externalized_directory> without specifying the resource namespace path to
engage.
When exporting to an existing externalized directory, the resource namespace path should not
be specified as the directory already has a manifest file that specifies what resources will be
updated in the export directory. During the first -pkgdir export, the manifest file is initialized
and set with a specific set of resources and/or directories that will be updated in that -pkgdir
directory. The manifest file will always define those resources that will be stored in that particular
physical location. The manifest file should not be modified under normal conditions, but the
timestamp may be changed to enable an export of resources changed after a particular time.
Once defined, the manifest file is inspected and only those objects that have changed will be
exported and saved to the external directory.
● Exporting all with the -full option
Use the -full option to export everything (all resources changed or not) in the resource namespace
path. The -full option forces all defined resources named by the root directory in the manifest
file to be updated. All resources are exported, overwriting everything in the specified path
ensuring that the externalized files and the server are synchronized.
Note: When a lot of resources must be exported at once (or when exporting the entire directory)
on a Windows server under high load conditions, one must first modify the Windows server to
allow more sockets per user and reduce the TCP timed wait delay. Windows can safely accommodate
65534 sockets per user in the TCP/IP scheme and TCP timed wait can be decreased to 30 seconds
to release socket resources more quickly.
By default, most Windows operating systems do not have the following keys so they must be created
to tune the system for high-volume package exports.
Navigate to key HKEY_LOCAL_MACHINE\System\CurrentControlSet\Services\Tcpip\Parameters
And create the following two keys:
● DWORD Value Name="MaxUserPort", Value=65534 (Decimal)
● DWORD Value Name="TcpTimedWaitDelay", Value=30 (Decimal)
Once you've set the parameters, restart the computer for them to take affect.
Note: Limitation - Externalization (package export to a directory) does not support export and
import of JARs, users, groups, domains, and rights in the packaged directory export.
106 IBM Cognos Business Intelligence Virtual View Manager
Chapter 7: Utilities

Usage of Package Export to a directory (-pkgdir option)
As stated previously, the pkg_export utility is available in the installation_directory /bin directory.
Windows and Unix specific versions of the utility are available.
pkg_export-pkgdir <directory> <NamespacePath>[...]-server <hostname> [-port<port>] [-encrypt]-user <user> -password <password> [-domain<domain>][-pkgname <name>] [-description<text>][-optfile <filename>] ...[-full][-messagesOnly][-fileEncoding <encoding>][-listIgnored][-verbose] [-quiet]
Examples
The default administrative user profile is used to execute the following command which externalizes
all resources defined by the server instance on the localhost in the resource path /shared/examples/
ds_orders. All the metadata object definitions are exported as XML files to the C:/temp directory.
pkg_export.sh -pkgdir C:/temp /shared/examples/ds_orders-server localhost -user admin -password admin
The above example establishes a manifest file in C:/temp that will reserve the directory for sync of
all resources in /shared/examples/ds_orders path.
Later, to see what files have been changed and what would be exported the -messagesOnly option
may be specified so that nothing is actually exported on execution of the command:
pkg_export.sh -pkgdir C:/temp -server localhost -useradmin -password admin -messagesOnly
To incrementally synchronize that externalized directory execute this command:
pkg_export.sh -pkgdir C:/temp -server localhost -useradmin -password admin
Use the -encrypt option to securely backup a directory to some local or locally mapped drive from
across an unsecured network. For example,
pkg_export.sh -pkgdir Z:/Secure /shared/examples/ds_orders-server 111.123.456.99 -port 2220 -encrypt -user admin999 -passwordSecured999 -domain SomeLDAPDomain
With the above example command, an SSL/HTTPS connection with a Virtual View Manager Server
at the specified IP address is established. The specified port is the designated Virtual View Manager
Server HTTP base port, but the -encrypt option changes the actual connection to use the HTTPS
port. The encrypted connection enables a secured login authentication. The Virtual View Manager
Server exports the requested XML files securely over the SSL connection to the client application
and the client writes those files to the designated target directory Z:/Secure.
The following table of pkg_export -pkgfile parameters and arguments is organized by the both the
order of appearance and alphabetically.
Administration Guide 107
Chapter 7: Utilities

CommentsOptional/Mandatory
pkg_export -pkgdirParameters and Args
Specifies the absolute location for creation of a
directory and placement of the export files.
Example:
mandatory-pkgdir <Directory>
-pkgdirC:/SourceControl/ProjectI
Mapped directories must be available to the user
on the command line client
Uses the Virtual View Manager resource name
convention to specify one or many resource
directories for export.
mandatory<NamespacePath>
Example: /shared/examples/ds_orders
All resources within the specified Virtual View
Manager directory are exported to -pkgdir
C:/Directory/specified
Virtual View Manager Server host to which the
utility will connect. Default name is localhost.
mandatory-server <HostName>
Specifies Web Services Base Port (HTTP) used to
communicate with the Virtual View Manager
Server. The default value is 9400. Specification
is optional if the port setting has not changed.
optional-port <BasePortNum>
Note: Specify the Web Services HTTP port even
if the -encrypt option is specified. If -encrypt is
specified then the tool will automatically add two
to the port number specified here.
Encrypts communication between the command
line and the server using SSL sent over the dedi-
cated HTTPS port.
optional-encrypt
Note: When using the -encrypt option, the
HTTPS port is automatically used. Use the -port
option to specify the HTTP web services base
port and the command line utility automatically
switches the SSL connection to the dedicated
HTTPS port.
108 IBM Cognos Business Intelligence Virtual View Manager
Chapter 7: Utilities

CommentsOptional/Mandatory
pkg_export -pkgdirParameters and Args
User name for authorization of export. User must
have Access Tools and ownership of the resources
to be exported or the Read All Resources rights
for proper export of all configurations.
mandatory-user <UserName>
Password for user profile used to export package.mandatory-password <Password>
User domain. The default value is cognos and
does not have to be stated.
optional-domain <DomainName>
Textual description of the archive directory.
Visible when selected for import with the Virtual
View Manager interface.
optional-description <text>
Administration Guide 109
Chapter 7: Utilities

CommentsOptional/Mandatory
pkg_export -pkgdirParameters and Args
Encoding defaults to UTF-8, but a different
encoding option may be specified. Display a list
of valid encoding by entering an invalid encoding
value, or try to read the 8 point below. Valid
encoding values include the following:
optional-fileEncoding <encoding>
110 IBM Cognos Business Intelligence Virtual View Manager
Chapter 7: Utilities

CommentsOptional/Mandatory
pkg_export -pkgdirParameters and Args
Big5,Big5-HKSCS,Cp1252, EUC-JP, EUC-KR, GB18030, GB2312,GBK, IBM-Thai, IBM00858,IBM01140, IBM01141, IBM01142, IBM01143,IBM01144, IBM01145, IBM01146,IBM01147,IBM01148, IBM01149, IBM037, IBM1026,IBM1047, IBM273, IBM277, IBM278,IBM280, IBM284, IBM285, IBM297, IBM420,IBM424, IBM437, IBM500,IBM775, IBM850, IBM852, IBM855, IBM857,IBM860, IBM861, IBM862,IBM863, IBM864, IBM865, IBM866, IBM868,IBM869, IBM870, IBM871,IBM918, ISO-2022-CN, ISO-2022-JP,ISO-2022-KR, ISO-8859-1, ISO-8859-13,ISO-8859-15, ISO-8859-2, ISO-8859-3,ISO-8859-4, ISO-8859-5, ISO-8859-6,ISO-8859-7, ISO-8859-8, ISO-8859-9,JIS_X0201, JIS_X0212-1990, KOI8-R,Shift_JIS, TIS-620, US-ASCII, UTF-16,UTF-16BE, UTF-16LE, UTF-8, windows-1250,windows-1251, windows-1252,windows-1253, windows-1254,windows-1255,windows-1256,windows-1257, windows-1258, windows-31j,x-Big5-Solaris, x-euc-jp-linux,x-EUC-TW,x-eucJP-Open, x-IBM1006, x-IBM1025,x-IBM1046, x-IBM1097, x-IBM1098,x-IBM1112, x-IBM1122, x-IBM1123,x-IBM1124, x-IBM1381, x-IBM1383,x-IBM33722, x-IBM737, x-IBM834,x-IBM856, x-IBM874, x-IBM875, x-IBM921,x-IBM922, x-IBM930, x-IBM933, x-IBM935,x-IBM937, x-IBM939, x-IBM942,x-IBM942C,x-IBM943, x-IBM943C, x-IBM948, x-IBM949,x-IBM949C, x-IBM950, x-IBM964,x-IBM970, x-ISCII91, x-ISO-2022-CN-CNS,x-ISO-2022-CN-GB, x-iso-8859-11,x-JIS0208,x-JISAutoDetect, x-Johab, x-MacArabic,x-MacCentralEurope, x-MacCroatian,x-MacCyrillic, x-MacDingbat, x-MacGreek,x-MacHebrew, x-MacIceland,x-MacRoman, x-MacRomania, x-MacSymbol,x-MacThai, x-MacTurkish,x-MacUkraine, x-MS950-HKSCS,x-mswin-936, x-PCK, x-windows-50220,x-windows-50221, x-windows-874,x-windows-949, x-windows-950,x-windows-iso2022jp
Lists those items that are not exportedoptional-listIgnored
Administration Guide 111
Chapter 7: Utilities

CommentsOptional/Mandatory
pkg_export -pkgdirParameters and Args
Preview an export using this option. No files are
created, modified, or deleted but instead com-
mand line messages will list those files that will
be added, modified, and deleted.
optional-messagesOnly
Options file.optional-optfile <filename>
The options file feature provides a way to pass
options using a file instead of the command line.
The options file is useful for scripting and
ensuring that sensitive information does not dis-
play on the operating system command line.
The contents of the options file are the same
strings you would use on the command line, with
the addition of new lines being legal.
For example,
pkg_export -pkgdir-server localhost -userMyAdmin -password CleartextPassword-pkgfile Backup.car
is the same as:
backup_export -optfile sample.opt
where sample.opt contains either:
-server localhost
-user MyAdmin
-password CleartextPassword
-pkgfile Backup.car
or (this one with new lines):
-server localhost
-user test
-password password
-pkgfile Backup.car
This option is also available for use in
pkg_import.
Package name may be set to report a name
attribute in the manifest file. Otherwise this field
is not used. Spaces are allowed but punctuation
is not.
optional-pkgname <name>
Suppresses messaging in the command line.optional-quiet
112 IBM Cognos Business Intelligence Virtual View Manager
Chapter 7: Utilities
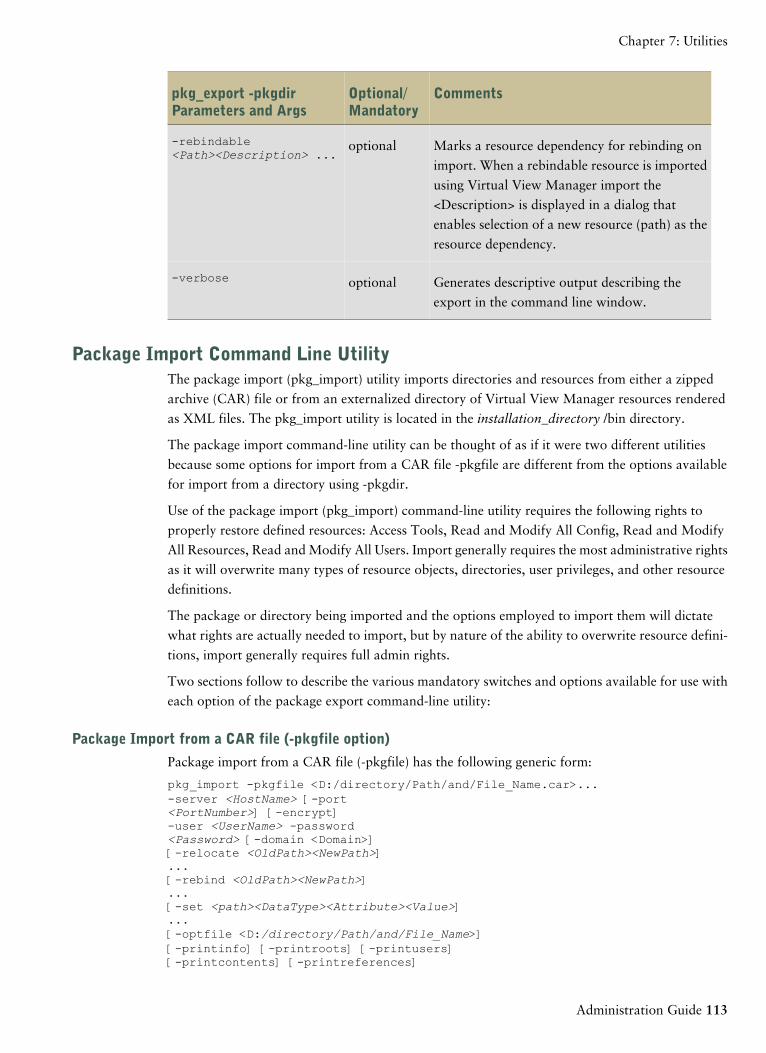
CommentsOptional/Mandatory
pkg_export -pkgdirParameters and Args
Marks a resource dependency for rebinding on
import. When a rebindable resource is imported
using Virtual View Manager import the
<Description> is displayed in a dialog that
enables selection of a new resource (path) as the
resource dependency.
optional-rebindable<Path><Description> ...
Generates descriptive output describing the
export in the command line window.
optional-verbose
Package Import Command Line UtilityThe package import (pkg_import) utility imports directories and resources from either a zipped
archive (CAR) file or from an externalized directory of Virtual View Manager resources rendered
as XML files. The pkg_import utility is located in the installation_directory /bin directory.
The package import command-line utility can be thought of as if it were two different utilities
because some options for import from a CAR file -pkgfile are different from the options available
for import from a directory using -pkgdir.
Use of the package import (pkg_import) command-line utility requires the following rights to
properly restore defined resources: Access Tools, Read and Modify All Config, Read and Modify
All Resources, Read and Modify All Users. Import generally requires the most administrative rights
as it will overwrite many types of resource objects, directories, user privileges, and other resource
definitions.
The package or directory being imported and the options employed to import them will dictate
what rights are actually needed to import, but by nature of the ability to overwrite resource defini-
tions, import generally requires full admin rights.
Two sections follow to describe the various mandatory switches and options available for use with
each option of the package export command-line utility:
Package Import from a CAR file (-pkgfile option)
Package import from a CAR file (-pkgfile) has the following generic form:
pkg_import -pkgfile <D:/directory/Path/and/File_Name.car>...-server <HostName> [-port<PortNumber>] [-encrypt]-user <UserName> -password<Password> [-domain <Domain>][-relocate <OldPath><NewPath>]...[-rebind <OldPath><NewPath>]...[-set <path><DataType><Attribute><Value>]...[-optfile <D:/directory/Path/and/File_Name>][-printinfo] [-printroots] [-printusers][-printcontents] [-printreferences]
Administration Guide 113
Chapter 7: Utilities

[-includeaccess] [-nocaching][-excludejars] [-nosourceinfo][-overwrite] [-overrideLocks] [-messagesonly][-verbose] [-quiet]
Examples
In this example, set is the option; DATA_SOURCE is the type of the resource being imported, and
password is the attribute being changed:
pkg_import.sh -pkgfile C:/Store/EnterpriseArchive/mycar.car-server localhost -user ProdAdmin -password AdminPassWeird -set/shared/myDataSource DATA_SOURCE password MyNewPassword
In the next example, only shared/procedures/myParameterizedQuery is imported with its associated
dependencies from the specified CAR file. The relocate option is used to move the query to a new
directory.
pkg_import -pkgfile Z:/Archive/QA_Image99999.car
shared/procedures/myParameterizedQuery -server localhost-user admin -password AdminPassword -includeDependencies-relocate shared/procedures/myParameterizedQuery shared/RestrictedUse_Procedures/myParameterizedQuery
Package Import (-pkgfile) Mandatory Switches and Options
CommentsOptional/Mandatory
pkg_import -pkgfileParameters and Args
Specifies the import CAR file. The file name should
be specified as an absolute path from a mapped
directory. Multiple CAR files may be specified.
mandatory-pkgfile <FileName>
Virtual View Manager server host to which the
utility will connect.
mandatory-server <HostName>
Specifies Web Services Base Port (HTTP) used to
communicate with the server. The default value is
9400. Specification is optional if the port setting
has not changed.
optional-port <BasePortNum>
Note: Specify the Web Services HTTP port even if
the -encrypt option is specified. If -encrypt is
specified then the tool will automatically add two
to the port number specified here.
114 IBM Cognos Business Intelligence Virtual View Manager
Chapter 7: Utilities

CommentsOptional/Mandatory
pkg_import -pkgfileParameters and Args
Encrypts communication between the command
line and the server using SSL sent over the dedicated
HTTPS port.
optional-encrypt
Note: When using the -encrypt option, the HTTPS
port is automatically used. Use the -port option to
specify the HTTP web services base port and the
command line utility automatically switches the
SSL connection to the dedicated HTTPS port.
User name of profile used to import. User rights
specified by the target server instance grant permis-
sion to import and may restrict write privilege to
import into designated directories only.
mandatory-user <UserName>
Password for user profile used to export package.mandatory-password <Password>
Enter domain for the user performing the import.
If it is omitted the assumed value is cognos.
optional-domain <domain>
Administration Guide 115
Chapter 7: Utilities

CommentsOptional/Mandatory
pkg_import -pkgfileParameters and Args
Options file.optional-optfile <FileName>
The options file feature provides a way to pass
options using a file instead of the command line.
The options file is useful for scripting and ensuring
that sensitive information does not display on the
operating system command line.
The contents of the options file are the same strings
you would use on the command line, with the
addition of new lines being legal.
For example,
backup_export-server localhost -user test-password password -pkgfile sample.car
is the same as:
backup_export -optfile sample.opt
where sample.opt contains either:
-server localhost -usertest -password password -pkgfilesample.car
or (this one with new lines):
-server localhost
-user test
-password password
-pkgfile sample.car
This option is also available for use in pkg_export.
This option can be used multiple times. It is used
to specify a new location for a top-level item.
optional-relocate <OldPath><NewPath>
An error will occur if you try to relocate something
that is not in the package or is not a top-level item.
Sets a new resource path for a dependency resource.
The option may be repeated for as many dependen-
cies as may be necessary. Migration from a devel-
opment or testing environment to a production
server deployment makes use of the -rebind option.
optional-rebind <OldPath><NewPath>
116 IBM Cognos Business Intelligence Virtual View Manager
Chapter 7: Utilities

CommentsOptional/Mandatory
pkg_import -pkgfileParameters and Args
Changes the data source attribute value(s) of class-
path, host, port, database, user, or password when
deploying a CAR file to a new location like a pro-
duction server.
optional-set <path> <type><attribute><value>
The Virtual View Manager resource name is the
<path>.
The <type> is always equal to DATA_SOURCE
when using the set option with the attributes named
above.
The <attribute> can be: classpath, host, port,
database, user, or password.
Set <value> to a valid entry for the selected
attribute.
String values may be enclosed with double quotes
to allow for spaces in the <value>. Example:
./pkg_import.sh-pkgfile MyCustJavaDB.car -optfileC:\X.opt -set /shared/datasources/DBCustom_JavaDATA_SOURCE classpath "C:\ProgramFiles\JavaDev;D:\My Documents\JavaJoe"
The set option may be repeated to set different
attributes.
Multiple classpaths can be set with a single state-
ment. When executing pkg_import from a Windows
system use the semicolon as a delimiter where
<value> could be something like:
C:\DevZone\ATeam\Jars\my.jar;D:\Current\Ref\classes
When executing the pkg_import from a
UNIX/Linux system use colons as the delimiter.
For example:
/lib/ext/classes:/lib/src/jars
Prints information such as user name, source server
with port number, source JavaTM version, user
domain, creation date of the archive file, source
operating system, and archive type.
optional-printinfo
Prints the new path(s) to the imported resources.optional-printroots
Administration Guide 117
Chapter 7: Utilities

CommentsOptional/Mandatory
pkg_import -pkgfileParameters and Args
Prints the user names of the owners of the imported
resource(s) and their associated user groups.
optional-printusers
Imports all users present in the exported package
car. By default domain, groups and user informa-
tion are not included in either export or import.
This option is also available for use in pkg_export.
optional-includeusers
This option disables actual import, and instead
allows for inspection of the archive file. Print con-
tents displays properties of the CAR file to the
command window and exposes some impacts of
import with information such as user name, source
server with port number, source JavaTM version,
user domain, creation date of the archive file, source
operating system, and archive type.
optional-printcontents
Prints a list of resources referred to by the imported
resource(s).
optional-printreferences
Includes the current user access controls on the
resources in the export file.
optional-includeaccess
It defaults to not including access control even if
you are an administrator. You get an error if you
use this flag and are not logged in as a member of
the admin group.
This option is also available for use in pkg_export.
Omits caching data and all caching configurations
as if the caching of the exported resource were
never set.
optional-nocaching
Does not import the jar files.optional-excludejars
118 IBM Cognos Business Intelligence Virtual View Manager
Chapter 7: Utilities

CommentsOptional/Mandatory
pkg_import -pkgfileParameters and Args
Suppresses import of the following pre-existing
connection attributes when an otherwise identical
resource is already present at the target: Driver,
ConnectionURL, Port, Database Name, Login,
Password, and Pass-through Login.
optional-nosourceinfo
Supports re-import without need for explicit
"-set" options and without altering original data
source attributes.
This option overwrites duplicated resources.optional-overwrite
Displays the messages generated in a package
import without actually performing the import.
optional-messagesonly
Port for the target server instance.optional-port <PortNumber>
Default=9400
This option causes verbose reporting of information
much like the GUI provides instead of the normal
terse reporting.
optional-verbose
● The pkg_import command imports the resources in the archive file into the server following
the import rules (). If this command is used on an archive created using backup_export , only
the resource information will be used.
● By default, access information (ownership and privileges) are not imported. Any resources that
are created as a result of the import are owned by you. Existing resources follow the import
rules (). The -includeaccess option must be used if you want to preserve ownership and privilege
information. This option is ignored if you are not logged in as a member of the admin group.
● By default, caching configuration is imported. The -nocaching option must be used if you want
to ignore cache configurations.
● By default, scheduling configuration is imported. The -noscheduling option must be used if you
want to ignore scheduling configurations. Note that if you are logged in as a member of the
admin group, then all scheduling is imported. If not, only the schedules owned by you are
imported.
● By default, physical data source connection details such as usernames, passwords, host names,
and ports are imported. The -nosourceinfo option must be used if you want to ignore those
details. When ignoring connection details and importing over an existing physical data source,
the previous values will be left unmodified instead of being overwritten. When creating a new
data source, these values are set to an empty string.
Administration Guide 119
Chapter 7: Utilities

● By default, all resources import into the same location in the namespace they were in when
exported. The -relocate option can be used to change the location for the import. You can issue
as many -relocate flags as desired and they are processed in order, with the first matching oldPath
being applied to each resource. Relocating a resource will modify (rebind) references made by
other resources being imported, but will not modify references on resources that are not part
of the import.
● As an additional option, resources can be rebound as a group during the import process using
the -rebind option. You can issue as many -rebind flags as desired and they are processed in
order. All imported resources will have the rebind performed. In case of conflict between rebinds
caused by the -relocate and -rebind flags, the -rebind ones are performed first.
● The -verbose option causes informational messages to be printed after importing. Without this
option, only error messages are displayed.
● The -printinfo option causes the archive file to be examined and for information about it to be
printed to the display. The archive file is not imported when this option is given.
● The -printcontents option causes the archive file to be examined and for the list of resources
in the file to be printed to the display. The archive file is not imported when this option is given.
● The -printroots option causes the archive file to be examined and for the list of top level resources
(generally the list provided to pkg_export on the command line) to be printed to the display.
This is useful for understanding what is in the archive without having to see the complete list.
The archive file is not imported when this option is given.
● The -printreferences option causes the archive file to be examined and for the list of resources
that are referenced within the import but are not actually part of the import to be printed to
the display. This is useful for identifying external dependencies for the archive. The archive file
is not imported when this option is given.
● The -printusers option causes the archive file to be examined and for the list of users that are
referenced as owners or in privileges on the resources to be printed to the display. This is useful
for identifying the users required to import with access information intact. The archive file is
not imported when this option is given.
● The -messagesonly option causes the archive file to generate all the messages it would generate
if you actually imported it, but does not commit the import to the server's storage.
● The -set option allows data source connection information to be explicitly specified or changed
from the original during import.
[-set<path><attribute> <value>]
This option is typically used when deploying a CAR file to a production server. The properties
most commonly changed are host, port, database, user, password.
The following attributes of the -set option may be invoked when importing data sources:
● user <login> or <username> or error depending on source type
● password <password> or error depending on source type
120 IBM Cognos Business Intelligence Virtual View Manager
Chapter 7: Utilities

● user2 <appUserName> or error if not Oracle EBS
● password2 <appPassword> or error if not Oracle EBS
● host <urlIP> or <dsn> or <server> or <appServer> or <url> or <root> or error depending
on the source type
● port <urlPort> or <port> or error depending on source type
● database <urlDatabaseName> or <enterprise> or <appServer> or error depending on the
source type
● path <root> or <url> or error depending on source type
● annotation
Example usage to change the password property of a data source:
pkg_import mycar.car -set /shared/myDataSource DATA_SOURCEpassword myNewPassword
In this example, -set is the option; DATA_SOURCE is the type of the resource being imported, and
password is the property that is being changed.
Rules For Import
Importing follows some rules to resolve conflicts during import. These rules are:
1. If an imported resource does not exist prior to import, then it is created. The user performing
the import gets all privileges as if they were the original creator (such as READ|WRITE for a
folder or READ|WRITE|EXECUTE for a procedure) unless the -includeaccess option is specified.
If an administrative user who has the Modify All Users right imports a resource using the -
includeaccess option, then the original owner of the resource is set as the owner and any pre-
existing privileges in the import package are also set for the newly imported resource.
2. If a resource is imported to a non-existent location, the new directory path and folder are created
with the import of the new resource. The user who performs the import is assigned ownership
of the new folders and gets READ|WRITE privilege on the resource and new container folders.
The Virtual View Manager Data Services area does not support auto-creation of new folders.
3. If a resource already exists and it is also being imported, the old version is overwritten
(assuming you have the WRITE privilege) in all ways, except the following:
● The owner is not changed. The original owner retains ownership.
● Privileges for users that are not explicitly changed by the import are left intact.
For example, two users, Abe and Bob, have READ|WRITE privileges on an existing resource
that will be overwritten by an import. If the imported resource overwrites Abe resource
privileges to READ only, but does not mention Bob, then Abe's privileges are updated but
Bob's are left intact.
● Child resources are not removed when the imported resource is a new folder or data source.
4. Restrictions
Administration Guide 121
Chapter 7: Utilities

● Server configuration settings (available in Virtual View Manager from Administration >
Configuration ) are not ported over when a resource is exported or imported.
● Import into a folder requires the WRITE privilege on the destination folder and READ
privileges on the parent directory path. Importing cannot create a resource in a folder where
the user does not have the WRITE privilege.
● Overwrite or deletion of a resource requires WRITE privilege on that target.
● Export of a physical data source is either all or nothing. Partial export of a data source
configuration is not permitted.
● You cannot import just part of a physical data source. If you import, you must include the
source definition itself.
● The Virtual View Manager Data Services area has strict structure rules that are enforced.
● You cannot import anything that was exported from the Virtual View Manager Data
Services area to outside of that area.
● You cannot import anything that was exported from outside the Virtual ViewManager
Data Services area into that area.
Package Import from an Externalized Directory (-pkgdir option)
Package import from an externalized directory (pkg_import -pkgdir ) takes the XML files that
represent the exported output of a directory and uses those files to restore that namespace path to
the state captured by the exported files. Importing an externalized directory will delete, overwrite,
and synchronize the server directory so that it has the same resource definitions as the externalized
directory.
The manifest file in the top level of the externalized directory will dictate what namespace path will
get updated with the XML rendered representations of metadata.
Overwrite of a resource requires WRITE privilege on that resource. If the importing user does not
have WRITE privileges on a resource or a folder then those resources in that path can not be deleted
or overwritten by an import action performed by that user. Resource locks do not impede resource
overwriting by package import.
Usage of Package Import to a directory (-pkgdir option)
As stated previously, the pkg_import utility is available in the installation_location /bin directory.
Windows and Unix specific versions of the utility are available.
The utility follows the following generic form:
pkg_import -pkgdir <directory>
-server <hostname> [-port <port>][-encrypt]
-user <user> -password <password> [-domain<domain>]
[-optfile <filename>]...
[-messagesonly]
122 IBM Cognos Business Intelligence Virtual View Manager
Chapter 7: Utilities

[-fileEncoding <encoding>]
[-listIgnored][-includeOwnership]
[-verbose] [-quiet]
Example
In the following example the user, BackupAdmin, assesses the impact of an import from externalized
directory that was saved to a disk. The -messagesonly, -listIgnored, and -verbose options are
employed to get a full accounting of what files would be replaced or ignored if the package import
were to actually get executed. The -messagesonly option disables the import and no changes are
actually made.
pkg_import -pkgdir E:/DiskArchive/Jan2008 -server localhost-user BackupAdmin -password becarefulnow -messagesonly -listIgnored-verbose
Verify Package Import Impact using the -messagesonly Option
It is always a best practice to execute the pkg_import -pkgdir using the -messagesonly option to
verify what resources will be overwritten by the import action. The messages only option of package
import reports what files will be imported into the server from the externalized directory without
actually deleting or overwriting any resources.
CommentsOptional/Mandatory
pkg_import -pkgdirParameters and Args
Specifies the externalized directory that will be
imported to overwrite and synchronize the cognos
namespace path(s) named in the manifest.
mandatory-pkgdir <directory>
Server host to which the utility will connect.mandatory-server <HostName>
Specifies Web Services Base Port (HTTP) used to
communicate with the server. The default value is
9400. Specification is optional if the port setting has
not changed.
optional-port <BasePortNum>
NOTE: Specify the Web Services HTTP port even if
the -encrypt option is specified. If -encrypt is specified
then the tool will automatically add two to the port
number specified here.
Encrypts communication between the command line
and the server using SSL sent over the dedicated
HTTPS port.
optional- encrypt
Note: When using the -encrypt option, the HTTPS
port is automatically used. Use the -port option to
specify the HTTP web services base port and the
command line utility automatically switches the SSL
connection to the dedicated HTTPS port.
Administration Guide 123
Chapter 7: Utilities

CommentsOptional/Mandatory
pkg_import -pkgdirParameters and Args
User name of profile used to import. User rights
specified by the target server instance grant permission
to import and may restrict write privileges on any
particular directory or resource path.
mandatory-user <UserName>
Password for user profile used to import the directory.mandatory-password <Password>
Enter domain for the user performing the import. If
it is omitted the assumed value is cognos.
optional-domain <domain>
124 IBM Cognos Business Intelligence Virtual View Manager
Chapter 7: Utilities

CommentsOptional/Mandatory
pkg_import -pkgdirParameters and Args
Encoding defaults to UTF-8, but a different encoding
option may be specified. Use the command line to
display a list of valid encodings by entering an invalid
encoding value, or try to read the 8 point below. Valid
encoding values include the following:
optional-FileEncoding<encoding>
Administration Guide 125
Chapter 7: Utilities
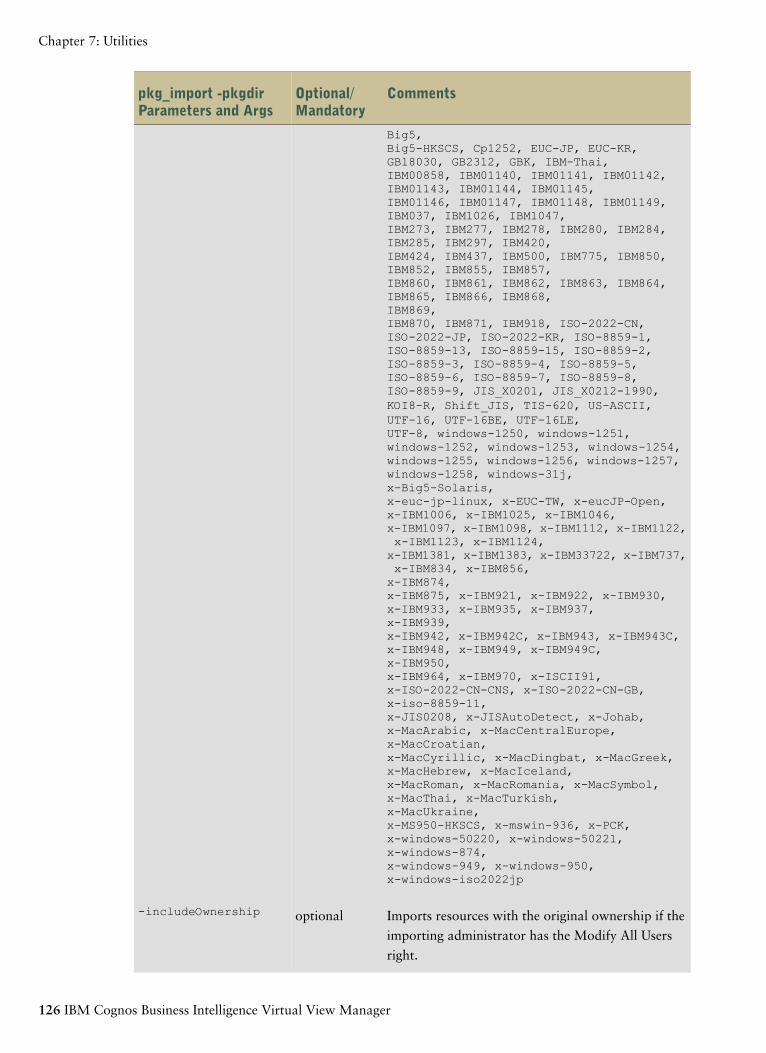
CommentsOptional/Mandatory
pkg_import -pkgdirParameters and Args
Big5,Big5-HKSCS, Cp1252, EUC-JP, EUC-KR,GB18030, GB2312, GBK, IBM-Thai,IBM00858, IBM01140, IBM01141, IBM01142,IBM01143, IBM01144, IBM01145,IBM01146, IBM01147, IBM01148, IBM01149,IBM037, IBM1026, IBM1047,IBM273, IBM277, IBM278, IBM280, IBM284,IBM285, IBM297, IBM420,IBM424, IBM437, IBM500, IBM775, IBM850,IBM852, IBM855, IBM857,IBM860, IBM861, IBM862, IBM863, IBM864,IBM865, IBM866, IBM868,IBM869,IBM870, IBM871, IBM918, ISO-2022-CN,ISO-2022-JP, ISO-2022-KR, ISO-8859-1,ISO-8859-13, ISO-8859-15, ISO-8859-2,ISO-8859-3, ISO-8859-4, ISO-8859-5,ISO-8859-6, ISO-8859-7, ISO-8859-8,ISO-8859-9, JIS_X0201, JIS_X0212-1990,KOI8-R, Shift_JIS, TIS-620, US-ASCII,UTF-16, UTF-16BE, UTF-16LE,UTF-8, windows-1250, windows-1251,windows-1252, windows-1253, windows-1254,windows-1255, windows-1256, windows-1257,windows-1258, windows-31j,x-Big5-Solaris,x-euc-jp-linux, x-EUC-TW, x-eucJP-Open,x-IBM1006, x-IBM1025, x-IBM1046,x-IBM1097, x-IBM1098, x-IBM1112, x-IBM1122,x-IBM1123, x-IBM1124,x-IBM1381, x-IBM1383, x-IBM33722, x-IBM737,x-IBM834, x-IBM856,x-IBM874,x-IBM875, x-IBM921, x-IBM922, x-IBM930,x-IBM933, x-IBM935, x-IBM937,x-IBM939,x-IBM942, x-IBM942C, x-IBM943, x-IBM943C,x-IBM948, x-IBM949, x-IBM949C,x-IBM950,x-IBM964, x-IBM970, x-ISCII91,x-ISO-2022-CN-CNS, x-ISO-2022-CN-GB,x-iso-8859-11,x-JIS0208, x-JISAutoDetect, x-Johab,x-MacArabic, x-MacCentralEurope,x-MacCroatian,x-MacCyrillic, x-MacDingbat, x-MacGreek,x-MacHebrew, x-MacIceland,x-MacRoman, x-MacRomania, x-MacSymbol,x-MacThai, x-MacTurkish,x-MacUkraine,x-MS950-HKSCS, x-mswin-936, x-PCK,x-windows-50220, x-windows-50221,x-windows-874,x-windows-949, x-windows-950,x-windows-iso2022jp
Imports resources with the original ownership if the
importing administrator has the Modify All Users
right.
optional-includeOwnership
126 IBM Cognos Business Intelligence Virtual View Manager
Chapter 7: Utilities
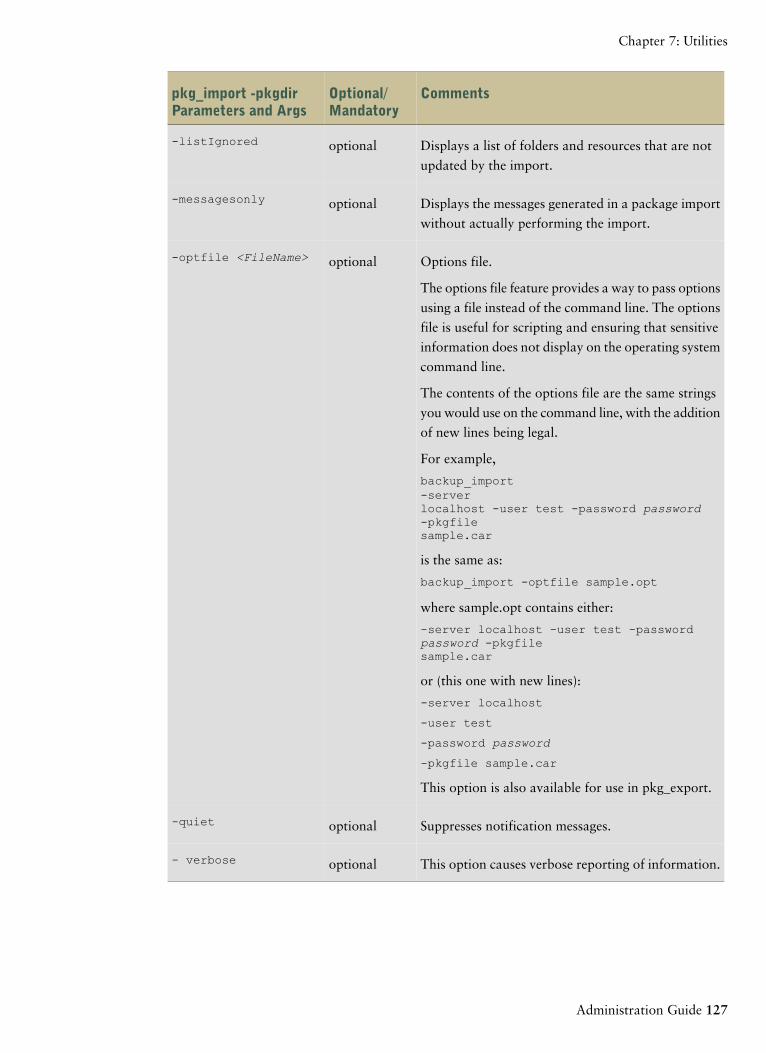
CommentsOptional/Mandatory
pkg_import -pkgdirParameters and Args
Displays a list of folders and resources that are not
updated by the import.
optional-listIgnored
Displays the messages generated in a package import
without actually performing the import.
optional-messagesonly
Options file.optional-optfile <FileName>
The options file feature provides a way to pass options
using a file instead of the command line. The options
file is useful for scripting and ensuring that sensitive
information does not display on the operating system
command line.
The contents of the options file are the same strings
you would use on the command line, with the addition
of new lines being legal.
For example,
backup_import-serverlocalhost -user test -password password-pkgfilesample.car
is the same as:
backup_import -optfile sample.opt
where sample.opt contains either:
-server localhost -user test -passwordpassword -pkgfilesample.car
or (this one with new lines):
-server localhost
-user test
-password password
-pkgfile sample.car
This option is also available for use in pkg_export.
Suppresses notification messages.optional-quiet
This option causes verbose reporting of information.optional- verbose
Administration Guide 127
Chapter 7: Utilities

remove_servicesThe remove_services.sh script can be used from the command-line interface to un-install the Virtual
View Manager services files that are used to automatically re-start the server and the repository on
UNIX.
To remove the service files
1. Log into the server computer with root privileges.
2. Change to the installation_directory/bin directory.
3. Run the following command:
remove_services.sh
This command does not interrupt any repository/server processes that are running, but removes
the service files.
repo_utilThis section describes the usage of Virtual View Manager's command-line program repo_util which
you can use to change the repository database.
The repo_util scripts, namely repo_util.bat and repo_util.sh, are available in the installation_location
/bin directory.
You can use this program to perform several tasks including the following:
● Test the connection to the repository database
● List the current repository configuration information
● Export the repository configuration
● Update the repository configuration
● Create/Drop the repository schema
● Print diagnostic information about the metadata repository
● Print debugging messages
The syntax to use repo_util on Windows:
repo_util.bat command [options] [database_configuration_options]
The following tables list the commands and options for running the repo_util program. of commands
are given at the end.
Commands for using repo_util
DescriptionCommands forrepo_util
Creates the repository schema.-createSchema
128 IBM Cognos Business Intelligence Virtual View Manager
Chapter 7: Utilities

DescriptionCommands forrepo_util
Drops the repository schema and all data contained within it.-dropSchema
This will permanently delete all of the server's data. Use with caution.
Prints diagnostic information about the repository database.-dumpDiagnosticInfo
Exports the repository database configuration in the JavaTM property
file format. The output is suitable for use as a repository configuration
file. See -configFile for details.
-exportConfig
Prints this help information.-help
Lists the repository database configuration in a human readable for-
mat.
-listConfig
Tests the connection to the repository database.-testConn
Changes the repository database configuration. Use this command to
change one or more configuration options.
-updateConfig
You may specify new configuration options individually using com-
mand line arguments or collectively, using the -configFile option.
Configuration options that are not specified are left unchanged.
Debug options for using repo_util
DescriptionDebug Options
Prints debug messages.-debug
Do not prompt for confirmation. Use with caution.-force
Database options for using repo_util
DescriptionDatabase Options
Read database configuration options from this JavaTM property file.
The property names in the file must match the database option names
defined in this section.
-configFile
Run repo_util.bat -exportConfig for an example of the contents
of this file.
Administration Guide 129
Chapter 7: Utilities
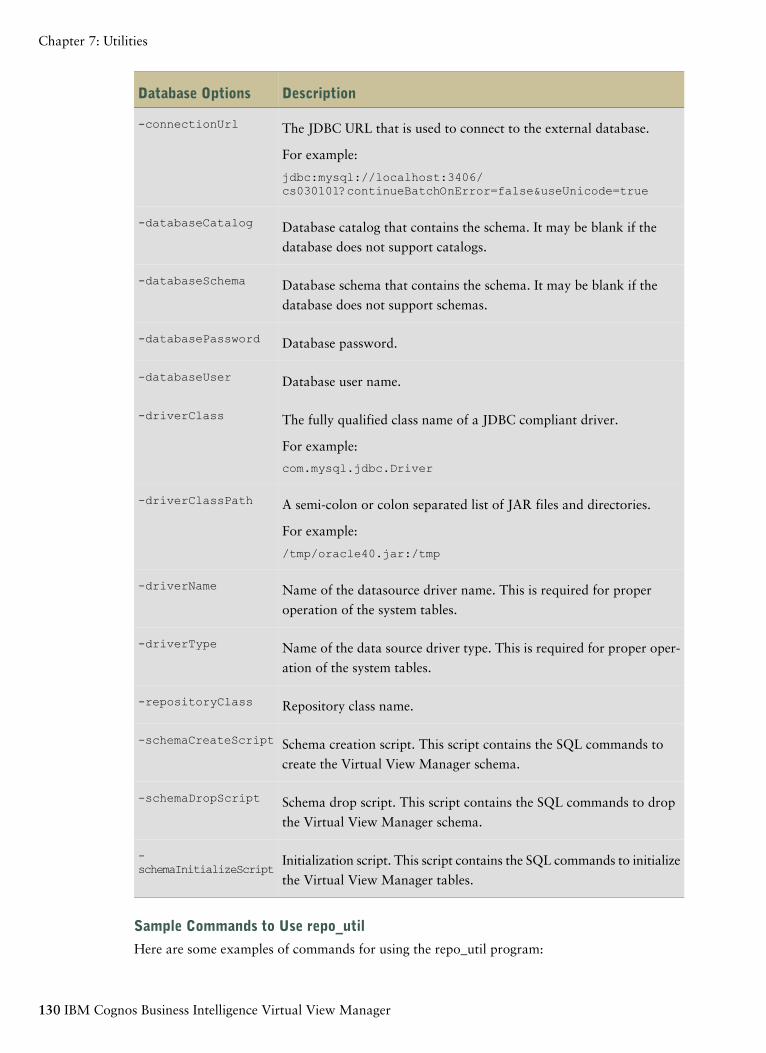
DescriptionDatabase Options
The JDBC URL that is used to connect to the external database.-connectionUrl
For example:
jdbc:mysql://localhost:3406/cs030101?continueBatchOnError=false&useUnicode=true
Database catalog that contains the schema. It may be blank if the
database does not support catalogs.
-databaseCatalog
Database schema that contains the schema. It may be blank if the
database does not support schemas.
-databaseSchema
Database password.-databasePassword
Database user name.-databaseUser
The fully qualified class name of a JDBC compliant driver.-driverClass
For example:
com.mysql.jdbc.Driver
A semi-colon or colon separated list of JAR files and directories.-driverClassPath
For example:
/tmp/oracle40.jar:/tmp
Name of the datasource driver name. This is required for proper
operation of the system tables.
-driverName
Name of the data source driver type. This is required for proper oper-
ation of the system tables.
-driverType
Repository class name.-repositoryClass
Schema creation script. This script contains the SQL commands to
create the Virtual View Manager schema.
-schemaCreateScript
Schema drop script. This script contains the SQL commands to drop
the Virtual View Manager schema.
-schemaDropScript
Initialization script. This script contains the SQL commands to initialize
the Virtual View Manager tables.
-schemaInitializeScript
Sample Commands to Use repo_util
Here are some examples of commands for using the repo_util program:
130 IBM Cognos Business Intelligence Virtual View Manager
Chapter 7: Utilities
● To list the server configuration information:
repo_util.bat-listConfig
● To export a repository configuration file:
repo_util.bat-exportConfig > repo.properties
● To update the repository database user name and password:
repo_util.bat-updateConfig -databaseUser someuser -databasePassword somepassword
● To update the repository configuration using a repository configuration file, overriding the
database password:
repo_util.bat-updateConfig -configFile repo.properties -databasePassword somepassword
server_utilThe server_util program is used for getting the server performance profile report and resetting the
system namespace.
Usage syntax:
server_util -server <hostname> [-port<port>] [-encrypt]-user <username> -password<password> [-domain <domain>]<command> [-verbose]
where <command> refers to one of the following options:
● -resetNamespace resets the server namespace to show changes to the system namespace, such
as a system table change after application of a patch.
● -profile displays current server profile performance profiling data.
Server profiling is always working in the background by default. Some of the report contents
will display performance metrics once that code path has been exercised. Some pertinent per-
formance profiling is detailed below.
● -clearProfile clear all existing profiling data.
● -regenerateFiles regenerate files that are based on configuration settings. Use of the Config-
uration window Apply button and server restart generally make this command obsolete.
● -createMemorySizeFile calculates and saves object memory sizes.
● -getServerName retrieves the server name.
● -setServerName -serverName <server name> sets server name, which must be a unique
display name.
Administration Guide 131
Chapter 7: Utilities

Sample Commands to Use server_utilThe following command would list the server profile for a default installation:
server_util -server HostName -useradmin -password admin-profile
The Server Performance Profile Report contains many different metrics of which only a few are
described here:
● request.setup.sql -- Time to construct the SQL sent to outside data sources.
● components.archive -- Import and Export detail
● request.data -- Aggregated amount of time required to send data to the requesting client after
SQL processing was underway.
● internal.repository -- Repository response time for metadata information gathering.
● components.operator -- Query engine processing time for SQL that could not be pushed to the
underlying data sources during.
● ds -- Aggregated time required to communicate with external data sources.
The following -clearProfile command clears the server profile information to start aggregate and
average statistics data with a clean slate.
server_util -server localhost -user admin -password admin-clearProfile
The following -resetNamespace command would reset the system namespace.
server_util -server localhost -user admin -password admin-resetNamespace
132 IBM Cognos Business Intelligence Virtual View Manager
Chapter 7: Utilities

Chapter 8: Setting Up a Metadata Repository
You can set up an IBM® Informix®, MySQL, Oracle or Sybase database as the IBM® Cognos®
Virtual View Manager metadata repository. IBM Informix is the default database for the Virtual
View Manager metadata repository.
The following topics are covered in this chapter:
● "System Requirements" (p. 133)
● "Creating a Database for the Metadata Repository" (p. 134)
● "Additional Database Configuration Requirements" (p. 137)
● "Configuring the IBM Cognos Virtual View Manager Metadata Repository" (p. 139)
System RequirementsThe following table lists the recommended space to allocate according to the size of your database
repository.
SpaceDatabase Size
250MBSmall-sized repository database
800MBMedium-sized repository database
2000MB (or 2GB)Large-sized repository database
Pre-requisites and Limitations for Database TypesThere are a couple of things to consider if you plan to use Sybase or Oracle as the metadata repos-
itory for Virtual View Manager.
Using Sybase ASE 12.5 as a Repository DatabaseIndexes are created on the IBM® Cognos® Virtual View Manager system tables in order to enhance
performance of querying these tables. These indexes consist of metadata ID-s and metadata names.
By default, Sybase ASE 12.5 has page size of 4K so it only allows each index to have a maximum
size of 1250 bytes. Therefore, you must limit the length of the metadata names.
Metadata names can be a maximum of 200 characters. If the metadata name is longer than 200
characters, the name will be trimmed to 200 characters when it is persisted into Sybase repository.
For this reason, when you create an index you must define each metadata name as UNIVAR-
CHAR(200).
Licensed Materials – Property of IBM133© Copyright IBM Corp. 2008, 2010.

Example - Index Sizing in a System Table
In this example, an index on the system columns table comprises the following:
● DATASOURCE_ID
● ORDINAL_POSITION
● COLUMN_ID
● CATALOG_NAME
● SCHEMA_NAME
● TABLE_NAME
If you set the name columns to UNIVARCHAR(200), then each UNIVARCHAR character requires
two bytes of storage. Since three of these name fields add up to 600 bytes (3 * 200 * 2 bytes = 1200
bytes), if you include the bytes for DATASOURCE_ID, COLUMN_ID, and ORDINAL_POSITION,
this index barely fits 1250 bytes. If no more columns are added to the index, the total bytes in the
index will exceed the maximum allowable size of an index. As a result, this index will not be created
in ASE 12.5.
Using Oracle Call Interface (OCI) as a Repository DatabaseTo use the Oracle 10g type 2 database as a metadata repository, the Oracle Call Interface (OCI)
client must be installed on the computer where Virtual View Manager is installed.
The PATH (Windows) or LD_LIBRARY_PATH (for most Unix systems) to OCI must be specified
for Virtual View Manager to properly recognize and use the OCI client.
For more detailed information, see the Oracle Instant Client documentation.
Creating a Database for the Metadata RepositoryThe following sections describe how to create an external database repository to work with IBM®
Cognos® Virtual View Manager.
Create an IBM Informix Metadata RepositoryYou can create an IBM® Informix® metadata repository for IBM® Cognos® Virtual View Manager.
Note: If you are using an external Informix repository, you must open <vvm_install_location>//
conf/repository/informix/composite_schema.sql and add a forward slash (/) after the first three SQL
statements:
CREATE FUNCTION PartialString(path LVARCHAR(2000)) RETURNSVARCHAR(255)WITH (NOT VARIANT);RETURN SUBSTR(path,1,255);END FUNCTION;/CREATE FUNCTION PartialString32(path VARCHAR(255)) RETURNS VARCHAR(32)WITH (NOT VARIANT);RETURN SUBSTR(path,1,32);END FUNCTION;/
134 IBM Cognos Business Intelligence Virtual View Manager
Chapter 8: Setting Up a Metadata Repository
CREATE FUNCTION PartialString64(path VARCHAR(255)) RETURNS VARCHAR(64)WITH (NOT VARIANT);RETURN SUBSTR(path,1,64);END FUNCTION;/
Steps
1. Connect to an Informix server instance by setting the following informix environment param-
eters:
set CLIENT_LOCALE=EN_US.utf8set DB_LOCALE=EN_US.utf8set SERVER_LOCALE=EN_US.utf8set DBLANG=EN_US.utf8
2. Create a database called VVM_REPO by using the following command:
create database "VVM_REPO" in VVM_REPO with log
Note: You need to allow log transactions.
3. Create a user for the VVM_REPO database, for example, you can create a user called cognos.
4. Grant DBA access to the cognos user by using the following command:
grant DBA to cognos
Create a MySQL Metadata RepositoryYou can create a MySQL metadata repository for IBM® Cognos® Virtual View Manager.
Steps
1. Create a MySQL database for the metadata repository by using the following command:
CREATE DATABASE “VVM_REPO”
2. Create a user for the VVM_REPO database, for example, you can create a user called cognos.
3. Grant access to the cognos user by using the following command:
grant usage on *.* to cognos@localhost identified by'password'
4. Grant privileges to the cognos user by using the following command:
grant all privileges on VVM_REPO.* to cognos@localhost
Create a Sybase Metadata RepositoryYou can create a Sybase metadata repository for IBM® Cognos® Virtual View Manager.
Steps
1. Create a Sybase database for the metadata repository. Use the following syntax to create a
database in Sybase ASE 12.5. Substitute the items in italics with appropriate values.
create database VVM_REPO[on {default | database_device} [= size]
[, database_device [= size]...][log on database_device [ = size ]
[, database_device [= size]]...]
Administration Guide 135
Chapter 8: Setting Up a Metadata Repository

[with {override | default_location = “pathname”}][for {load | proxy_update}]
For detailed information about the above syntax, refer to Sybase ASE 12.5 documentation.
2. To configure the database after creating it, run the following system procedures supplying
appropriate values for the items in italics:
sp_dboption VVM_REPO, 'abort tran on log full', truegosp_dboption VVM_REPO, 'trunc log on chkpt', truego
3. Increase the size of the tempdb database to be about 20 to 25 per cent of the main database
using ALTER DATABASE command.
4. Create a user to log into the newly created database, supplying appropriate values for the items
in italics.
Syntax for adding a new account to log into ASE 12.5:
sp_addlogin loginame,password [, defdb]
[, deflanguage [, fullname]]]
Syntax for adding the created login to a specific database so that the newly created user can
access the database:
sp_adduser login_name [, name_in_db [, group_name]]
The Sybase repository is created, and ready to be configured.
Creating an Oracle Metadata RepositoryThis section describes how to create a tablespace and user to use an Oracle repository database.
The examples in the steps use VVMRepo for the SID, VM_REPO for the tablespace, cognos or the
user.
For a complete syntax to create a tablespace in Oracle that fits your needs, refer to Oracle documen-
tation.
Steps
1. Contact your database administrator to obtain the Oracle server SID, since the SID is used as
the value of databaseName. You need to provide the database name and SID to create an
Oracle repository database. In this example, the SID is VVMRepo.
2. Ensure that the Oracle system supports the international character set. Set the database character
set to Unicode AL32UTF8, and the national character set to AL16UTF16.
3. Create a tablespace, named VVM_REPO in this example, with the following command:
CREATE TABLESPACE “VVM_REPO”LOGGINGDATAFILE ’C:\ORACLE\PRODUCT\10.2.0\ORADATA\VVMRepo\VVMRep.ora’
SIZE 250M
4. Create a user named cognos using the following command:
CREATE USER “cognos” PROFILE “DEFAULT”IDENTIFIED BY “password” DEFAULT TABLESPACE “VVM_REPO”
136 IBM Cognos Business Intelligence Virtual View Manager
Chapter 8: Setting Up a Metadata Repository
TEMPORARY TABLESPACE “TEMP”QUOTA UNLIMITEDON “VVM_REPO”ACCOUNT UNLOCK;
GRANT ALTER SESSION TO cognosGRANT CREATE ANY INDEX TO cognosGRANT CREATE PROCEDURE TO cognosGRANT CREATE TABLE TO cognosGRANT CREATE SESSION TO cognosGRANT CREATE SYNONYM TO cognosGRANT CREATE VIEW TO cognosGRANT DROP ANY INDEX TO cognosGRANT DROP ANY PROCEDURE TO cognosGRANT DROP ANY TABLE TO cognos;
This command creates a user named cognos that is granted access to the newly created tablespace,
VVM_REPO, with unlimited space quota. The user is also granted the privileges of creating
and dropping indexes, procedures, and tables.
5. Copy the ojdbc.jar file to intallation_location/VVM/apps/server/lib directory of the computer
where Virtual View Manager is installed.
The cognos user can be used as the value for the properties databaseUser and databaseSchema
described in "Configuring the IBM Cognos Virtual View Manager Metadata Repository" (p. 139).
Additional Database Configuration RequirementsIf you are using MySQL or Sybase as the metadata repository, then you need to perform additional
configurations for your database.
Configure the MySQL RepositoryYou must set up an external MySQL repository to work with Virtual View Manager.
Steps
1. Set the following variables in the my.ini file that MySQL system uses for initialization:
set-variable=max_connections=100set-variable=lower_case_table_names=1set-variable=max_allowed_packet=16Mdefault-character-set=utf8
If you modify the my.ini file to match the required settings, you need to restart the MySQL
server for the new settings to be effective.
2. The program MySQL Administrator can be used to set/change MySQL’s startup variables.
Enable Use concurrent inserts in MyISAM parameters.
Enable Activate InnoDB in InnoDB parameters.
Configure the Sybase RepositoryThe default installation of Sybase ASE 12.5 is not configured for enterprise applications. For
example, the tempdb size is 2MB. The maximum number of connections defaults to 25, and the
default maximum network package size is only 512 bytes. If you use such configuration to run
Administration Guide 137
Chapter 8: Setting Up a Metadata Repository

IBM® Cognos® Virtual View Manager, certain Sybase limits will be hit, causing the Sybase system
to hang. If you are not sure of your ASE 12.5 configuration, ask your Sybase DBA about it.
In order to run Virtual View Manager efficiently, Sybase ASE 12.5 needs to be configured appro-
priately.
To reconfigure ASE 12.5, you must have system administration privileges so you can execute a set
of system stored procedures.
Steps to configure memory and cache in Sybase ASE 12.5
1. Run the following system procedures in Sybase ASE 12.5:
sp_configure 'max memory', 128000gosp_configure 'lock shared memory', 1gosp_cacheconfig 'default data cache', '128M'gosp_cacheconfig 'procedure cache', '16M'gosp_cacheconfig 'cache01', '80M'go
2. Restart Sybase ASE 12.5 after these configuration parameters are applied.
Steps to configure processing limits in Sybase ASE 12.5
1. Run the following system procedures in Sybase ASE 12.5:
sp_configure 'number of user connections', 256gosp_configure 'number of worker processes', 100gosp_configure 'max parallel degree', 3gosp_configure 'max scan parallel degree', 3gosp_configure 'number of locks', 100000gosp_configure 'number of open objects', 50000gosp_configure 'number of open databases', 32gosp_configure 'number of devices', 32go
2. Restart Sybase ASE 12.5 after these configuration parameters are applied.
Steps to configure network parameters in Sybase ASE 12.5
1. Run the following system procedures in Sybase ASE 12.5:
sp_configure 'additional network memory', 8192gosp_configure 'max network packet size', 4096gosp_configure 'default network packet size', 2048gosp_configure 'heap memory per user', 4096go
138 IBM Cognos Business Intelligence Virtual View Manager
Chapter 8: Setting Up a Metadata Repository

2. Restart Sybase ASE 12.5 after these configuration parameters are applied.
Steps to configure the character set in Sybase ASE 12.5
1. In order for the multi-byte character set to persist correctly in the Sybase repository, configure
the Sybase server to use the utf-8 character set by opening the Server configuration tool for
Sybase.
2. Click Configure Adaptive Server.
3. Select the repository Sybase server, and log into that server.
4. In the Configure Adaptive Server window, click the Language button.
To change the character set to utf-8, you need to make sure that the utf-8 character set is
installed. If UTF-8 is not already installed, you need to add it.
5. To add the utf-8 character set, click the Add/Remove button in the Character Set group in the
section Change Options.
6. Select Unicode 3.1 UTF-8 Character Set in the Available character set section, and click Add.
7. When Unicode 3.1 UTF-8 Character Set is added to the section Selected, click OK to accept
the selection.
8. In the Language Options window, chooses Set Default button in the Character Set group in
the section Change Options. This command opens the Change Default Character Set window.
9. Make sure that Unicode 3.1 UTF-8 Character Set is selected, and click OK.
10. Click Save to make the UTF-8 character set to be the default.
The Save command requires a server restart. So, make sure that the server is not running any
critical tasks, and restart the server.
Configuring the IBM Cognos Virtual View Manager MetadataRepository
You can use the command line program repo_util to:
● list the configurations of the current repository database
● modify the configuration for the existing repository database
● change the repository database
The repo_util program is available in the installation_location/bin directory where IBM® Cognos®
Virtual View Manager is installed.You use this utility program to create the repo.properties file.
Sample repo.properties FileThe following is a sample of a repo.properties file for an IBM® Informix® repository.
#Virtual View Manager Informix Repository Configurationfor repo.properties
Administration Guide 139
Chapter 8: Setting Up a Metadata Repository

#Property Name Value#---------------------------------------------------------connectionUrl=jdbc:informix-sqli://localhost:9408/cognos080401:informixserver=VVMRepository;DB_LOCALE=EN_US.utf8connectionValidationQuery=SELECT * FROM metadata_versiondatabaseCatalog=cognos080401databaseHost=localhostdatabaseName=cognos080401databasePassword=ibm@123#123databasePort=9408databaseSchema=informixdatabaseUser=informixdriverClass=informix.jdbc.IfxDriverdriverClassPath=driverLibraryPath=driverName=Informix 9.xdriverType=InformixpoolInitialSize=5poolMaxSize=50poolMinSize=5repositoryClass=com.compositesw.server.repository.internal.InformixRepositoryschemaCreateScript=C:\ProgramFiles\\cognos\\vvm\\8.4.0\\conf\\repository\\informix\\composite_schema.sqlschemaDropScript=C:\Program Files\\cognos\\vvm\\8.4.0\\conf\\repository\\informix\\composite_clean.sqlschemaInitializeScript=C:\ProgramFiles\\cognos\\vvm\\8.4.0\\conf\\repository\\informix\\composite_data.sql
Steps
1. Stop Virtual View Manager Server, if it is running.
2. Use one of the following commands to list the current repository configuration:
repo_util.bat -listConfig (Windows command)
repo_util.sh -listConfig (UNIX command)
3. Export the current configurations into the repo.properties file using one of the following com-
mands:
repo_util.bat -exportConfig > repo.properties (Windows command)
repo_util.sh -exportConfig > repo.properties (UNIX commands)
4. Modify the repo.properties file. Use the following table to help you modify the properties.
140 IBM Cognos Business Intelligence Virtual View Manager
Chapter 8: Setting Up a Metadata Repository

DescriptionProperty
Enter a value for the JDBC connection.connectionUrl
For IBM Informix:
jdbc:informix-sqli://host_name:port_number/databasename:
INFORMIXSERVER=VVMRepository;DB_LOCALE=en_
us.utf8
For MySQL:
jdbc\:mysql\://hostname\:3306/<database_
name>?continueBatchOnError\=false&useUnicode\
=true&characterEncoding\=utf8&clobberStreamingResults\
=true&useReadAheadInput\=true
For Sybase:
jdbc\:sybase\:Tds\://localhost\:5000/pubs2
For Oracle OCI:
jdbc\:oracle\:oci\:@localhost\:1521\:orcl
For Oracle Thin:
jdbc\:oracle\:thin\:@localhost\:1521\:orcl
Enter a value for the database catalog. It may be blank if
the database does not support catalogs.
databaseCatalog
Enter the name of the database host. For example, local-
host.
databasehost
Enter the name of the database for your metadata reposi-
tory.databasePassword Enter the password for the
database.
databaseName
Enter the database that contains the schema. It may be
blank if the database does not support schemas.
databaseSchema
Enter the driver class for your database as follows:driverClass
● For IBM Informix, enter com.informix.IfxDriver
● For MySQL, enter com.mysql.jdbc.Driver
● For Sybase, enter net.sourceforge.jtds.jdbc.Driver
● For Oracle OCI and Oracle Thin, enter oracle.jdbc.
driver.OracleDriver
Enter location of the driver file.driverClassPath
Administration Guide 141
Chapter 8: Setting Up a Metadata Repository

DescriptionProperty
Enter the name of the driver.driverName
Enter the type of database driver.driverType
Enter the initial size for the buffer pool. The default value
is 5.
poolInitialSize
Enter the maximum size for the buffer pool. The default
value is 50.
poolMaxSize
Enter the minimum size for the buffer pool. The default
value is 25.
poolMinSize
Enter the repository class for your repository using the
following format:
repositoryClass
com.compositesw.server.repository.internal.
<database_type>Repository
For example, com.compositesw.server.repository.internal.InformixRepository
Enter the location of the initialization script. For example:schemaCreateScript
installation_location\:\\database_type\composite_schema.
sql
Enter the location of the script to delete the schema from
the repository. For example:
schemaDropScript
installation_location\:\\database_type\composite_clean.sql
Enter the location of the initialization script. For example:schemaInitializeScript
installation_location\:\\database_type\composite_data.sql
5. Update the repository configuration. Supply the real password in a command line as follows:
repo_util.bat -updateConfig -configFile repo.properties -databasePassword
password (Windows)
repo_util.sh -updateConfig -configFile repo.properties -databasePassword
password (UNIX)
6. After the repository database configuration has been updated, restart the Virtual View Manager
server.
7. Verify that the repository database is running on the database by running the repo_util
command with -listConfig option.
142 IBM Cognos Business Intelligence Virtual View Manager
Chapter 8: Setting Up a Metadata Repository

Note:You can view the server information in the cs_server.log file, located in the installation_
location/logs directory.
Administration Guide 143
Chapter 8: Setting Up a Metadata Repository

144 IBM Cognos Business Intelligence Virtual View Manager
Chapter 8: Setting Up a Metadata Repository

Chapter 9: SNMP Traps
IBM® Cognos® Virtual View Manager system supports SNMP v1 traps. This appendix provides a
complete list of events and their corresponding SNMP traps. The server generates traps for moni-
toring the events that occur in the server.
See Server Event Attributes for more information.
SNMP Log SettingsYou can modify SNMP log settings from the Configuration window. You open the Configuration
window by selecting the Administration > Configuration menu option, and navigating to the SNMP
folder.
SNMP DetailsThe SNMP details in the tables below are grouped into these categories:
● Monitor and server events
● Requests
● Transactions
● Cached resources
● Triggers
● Data Sources
● Sessions
● Resources
● Storage
SNMP Details for Monitor Events
DescriptionShort Name for the EventSNMP ID
Variables: { trapTime, trapServerHost-
Name, trapServerPort }
csMonitorStart10000
Description: "This trap is generated
when a server monitor was started."
Licensed Materials – Property of IBM145© Copyright IBM Corp. 2008, 2010.

DescriptionShort Name for the EventSNMP ID
Variables: { trapTime, trapServerHost-
Name, trapServerPort }
csMonitorStop10001
Description: "This trap is generated
when a server monitor was stopped."
Variables: { trapTime, trapServerHost-
Name, trapServerPort }
csMonitorFail10002
Description: "This trap is generated
when a server monitor had a failure."
Variables: { trapTime, trapServerHost-
Name, trapServerPort }Description:
"This trap is generated when a server
had an unplanned stop."
csServerStopUnplanned10003
Variables: { trapTime, trapServerHost-
Name, trapServerPort }
csServerStopPlanned10004
Description: "This trap is generated
when a server had a planned stop."
Variables: { trapTime, trapServerHost-
Name, trapServerPort }
csServerRestart10005
Description: "This trap is generated
when a server was restarted."
Variables: { trapTime, trapServerHost-
Name, trapServerPort }
csServerRestartFail10006
Description: "This trap is generated
when a server had a restart failure."
Variables: { trapTime, trapServerHost-
Name, trapServerPort }
csRepositoryUp10007
Description: "This trap is generated
when a server repository was started."
Variables: { trapTime, trapServerHost-
Name, trapServerPort }
csRepositoryDown10008
Description: "This trap is generated
when a server repository was stopped."
146 IBM Cognos Business Intelligence Virtual View Manager
Chapter 9: SNMP Traps

SNMP Details for Server Events
DescriptionShort Name for the EventSNMP ID
Variables: { trapTime, trapServerHost-
Name, trapServerPort }
csServerStart20000
Description: "This trap is generated
when a server was started."
Variables: { trapTime, trapServerHost-
Name, trapServerPort }
csServerStop20001
Description: "This trap is generated
when a server was stopped."
Variables: { trapTime, trapServerHost-
Name, trapServerPort, trapUserName,
trapDomainName }
csUserCreate20002
Description: "This trap is generated
when a user was created in a domain."
Variables: { trapTime, trapServerHost-
Name, trapServerPort, trapGroupName,
trapDomainName }
csGroupCreate20003
Description: "This trap is generated
when a group was created in a domain."
Variables: { trapTime, trapServerHost-
Name, trapServerPort, trapUserName,
trapDomainName }
csUserDelete20004
Description: "This trap is generated
when a user was deleted from a
domain."
Variables: { trapTime, trapServerHost-
Name, trapServerPort, trapGroupName,
trapDomainName }
csGroupDelete20005
Description: "This trap is generated
when a group was deleted from a
domain."
Administration Guide 147
Chapter 9: SNMP Traps

DescriptionShort Name for the EventSNMP ID
Variables: { trapTime, trapServerHost-
Name, trapServerPort, trapUserName,
trapUserDomainName, trapGroupName,
trapGroupDomainName }
csUserAddToGroup20006
Description: "This trap is generated
when a user was added to a group."
Variables: { trapTime, trapServerHost-
Name, trapServerPort, trapUserName,
trapUserDomainName, trapGroupName,
trapGroupDomainName }
csUserRemoveFromGroup20007
Description: "This trap is generated
when a user was removed from a group."
Variables: { trapTime, trapServerHost-
Name, trapServerPort, trapDomainName
}
csDomainCreate20008
Description: "This trap is generated
when a domain was created."
Variables: { trapTime, trapServerHost-
Name, trapServerPort, trapDomainName
}
csDomainDelete20009
Description: "This trap is generated
when a domain was deleted."
Variables: { trapTime, trapServerHost-
Name, trapServerPort, trapUserName,
trapDomainName }
csUserPasswordModify20010
Description: "This trap is generated
when a user password was modified."
148 IBM Cognos Business Intelligence Virtual View Manager
Chapter 9: SNMP Traps

SNMP Details for Requests
DescriptionShort Name for the EventSNMP ID
Variables: { trapTime, trapServerHost-
Name, trapServerPort, trapRequestId,
trapOptionalRequestParameter1,
trapOptionalRequestParameter2,
trapOptionalRequestParameter3,
trapOptionalRequestParameter4 }
csRequestStart20100
Description: "This trap is generated
when a request was started."
Variables: { trapTime, trapServerHost-
Name, trapServerPort, trapRequestId,
trapTransactionId, trapSessionId }
csRequestWait20101
Description: "This trap is generated
when a request was waiting to run."
Variables: { trapTime, trapServerHost-
Name, trapServerPort, trapRequestId,
trapTransactionId, trapSessionId }
csRequestEnd20102
Description: "This trap is generated
when a request was completed."
Variables: { trapTime, trapServerHost-
Name, trapServerPort, trapRequestId,
trapOptionalRequestParameter1,
trapOptionalRequestParameter2,
trapOptionalRequestParameter3 }
csRequestFail20103
Description: "This trap is generated
when a request has failed."
Variables: { trapTime, trapServerHost-
Name, trapServerPort, trapRequestId,
trapTransactionId, trapSessionId }
csRequestCancel20104
Description: "This trap is generated
when a request was cancelled."
Administration Guide 149
Chapter 9: SNMP Traps

DescriptionShort Name for the EventSNMP ID
Variables: { trapTime, trapServerHost-
Name, trapServerPort, trapRequestId,
trapTransactionId, trapSessionId }
csRequestWaitQueueThreshold-
Pass
20105
Description: "This trap is generated
when a request passed the wait queue
threshold."
Variables: { trapTime, trapServerHost-
Name, trapServerPort, trapRequestId,
trapTransactionId, trapSessionId }
csRequestWaitQueueThreshol-
dReset
20106
Description: "This trap is generated
when a request reset the wait queue
threshold."
Variables: { trapTime, trapServerHost-
Name, trapServerPort, trapTransac-
tionId, trapOptionalRequestParameter1,
trapOptionalRequestParameter2 }
csPreparedStatementSuccess20107
Description: "This trap is generated
when a prepared statement was success-
fully executed."
Variables: { trapTime, trapServerHost-
Name, trapServerPort, trapTransac-
tionId, trapSqlQuery, trapOptionalRe-
questParameter1, trapOptionalRequest-
Parameter2 }Description: "This trap is
generated when a prepared statement has
failed during execution."
csPreparedStatementFail20108
SNMP Details for Transactions
DescriptionShort Name for the EventSNMP ID
Variables: { trapTime, trapServerHost-
Name, trapServerPort, trapTransac-
tionId, trapSessionId }
csTransactionStart20200
Description: "This trap is generated
when a transaction was started."
150 IBM Cognos Business Intelligence Virtual View Manager
Chapter 9: SNMP Traps

DescriptionShort Name for the EventSNMP ID
Variables: { trapTime, trapServerHost-
Name, trapServerPort, trapTransac-
tionId, trapSessionId }
csTransactionCommit20201
Description: "This trap is generated
when a transaction was committed."
Variables: { trapTime, trapServerHost-
Name, trapServerPort, trapTransac-
tionId, trapMessage, trapStackTrace,
trapSessionId }
csTransactionFail20202
Description: "This trap is generated
when a transaction has failed."
Variables: { trapTime, trapServerHost-
Name, trapServerPort, trapTransac-
tionId, trapSessionId }
csTransactionRollBack20203
Description: "This trap is generated
when a transaction was rolled back."
Variables: { trapTime, trapServerHost-
Name, trapServerPort, trapTransac-
tionId, trapMessage, trapSessionId }
csTransactionCompensate20204
Description: "This trap is generated
when a transaction was compensated
for."
SNMP Details for Cached Resources
DescriptionShort Name for the EventSNMP ID
Variables: { trapTime, trapServerHost-
Name, trapServerPort, trapCacheName
}
csCacheEnable20300
Description: "This trap is generated
when a cache was enabled."
Variables: { trapTime, trapServerHost-
Name, trapServerPort, trapCacheName
}
csCacheDisable20301
Description: "This trap is generated
when a cache was disabled."
Administration Guide 151
Chapter 9: SNMP Traps
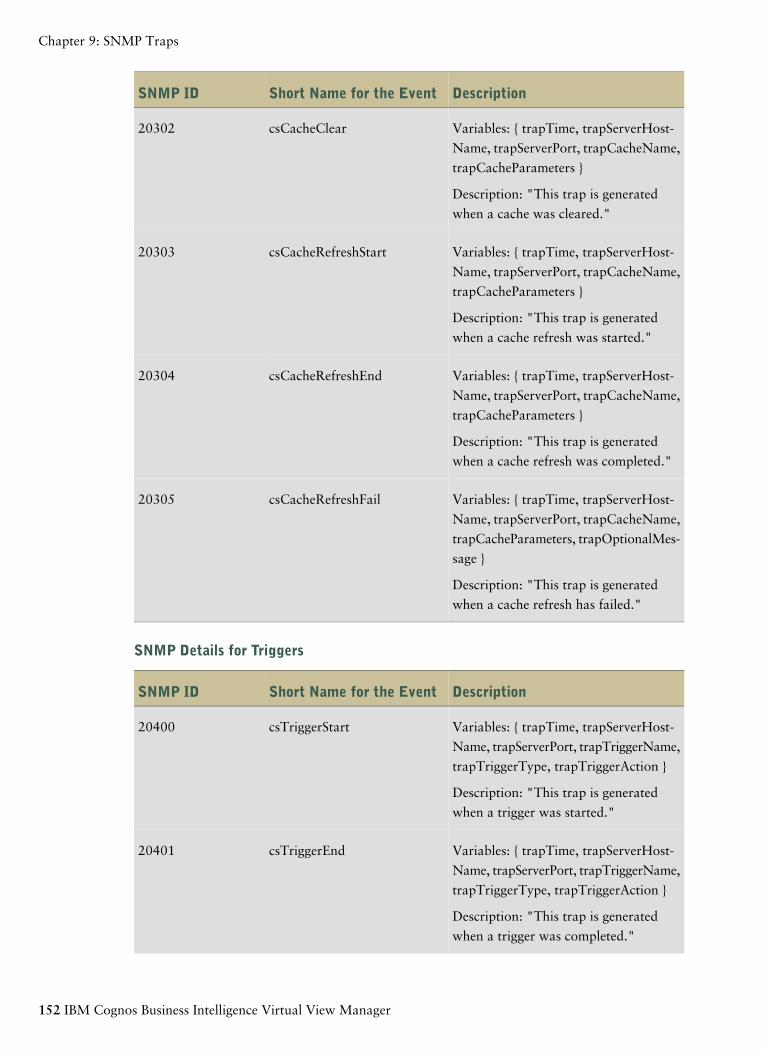
DescriptionShort Name for the EventSNMP ID
Variables: { trapTime, trapServerHost-
Name, trapServerPort, trapCacheName,
trapCacheParameters }
csCacheClear20302
Description: "This trap is generated
when a cache was cleared."
Variables: { trapTime, trapServerHost-
Name, trapServerPort, trapCacheName,
trapCacheParameters }
csCacheRefreshStart20303
Description: "This trap is generated
when a cache refresh was started."
Variables: { trapTime, trapServerHost-
Name, trapServerPort, trapCacheName,
trapCacheParameters }
csCacheRefreshEnd20304
Description: "This trap is generated
when a cache refresh was completed."
Variables: { trapTime, trapServerHost-
Name, trapServerPort, trapCacheName,
trapCacheParameters, trapOptionalMes-
sage }
csCacheRefreshFail20305
Description: "This trap is generated
when a cache refresh has failed."
SNMP Details for Triggers
DescriptionShort Name for the EventSNMP ID
Variables: { trapTime, trapServerHost-
Name, trapServerPort, trapTriggerName,
trapTriggerType, trapTriggerAction }
csTriggerStart20400
Description: "This trap is generated
when a trigger was started."
Variables: { trapTime, trapServerHost-
Name, trapServerPort, trapTriggerName,
trapTriggerType, trapTriggerAction }
csTriggerEnd20401
Description: "This trap is generated
when a trigger was completed."
152 IBM Cognos Business Intelligence Virtual View Manager
Chapter 9: SNMP Traps

DescriptionShort Name for the EventSNMP ID
Variables: { trapTime, trapServerHost-
Name, trapServerPort, trapTriggerName,
trapTriggerType, trapTriggerAction,
trapOptionalMessage }
csTriggerFail20402
Description: "This trap is generated
when a trigger has failed."
SNMP Details for Data Sources
DescriptionShort Name for the EventSNMP ID
Variables: { trapTime, trapServerHost-
Name, trapServerPort, trapDataSource-
Name, trapDataSourceType }
csDataSourceOn20500
Description: "This trap is generated
when a data source is enabled."
Variables: { trapTime, trapServerHost-
Name, trapServerPort, trapDataSource-
Name, trapDataSourceType }
csDataSourceOff20501
Description: "This trap is generated
when a data source is disabled."
Variables: { trapTime, trapServerHost-
Name, trapServerPort, trapDataSource-
Name, trapDataSourceType }
csDataSourceUp20502
Description: "This trap is generated
when a data source was started."
Variables: { trapTime, trapServerHost-
Name, trapServerPort, trapDataSource-
Name, trapDataSourceType }
csDataSourceDown20503
Description: "This trap is generated
when a data source was stopped."
Variables: { trapTime, trapServerHost-
Name, trapServerPort, trapDataSource-
Name, trapDataSourceType }
csDataSourceModify20504
Description: "This trap is generated
when a data source was modified."
Administration Guide 153
Chapter 9: SNMP Traps

DescriptionShort Name for the EventSNMP ID
Variables: { trapTime, trapServerHost-
Name, trapServerPort, trapDataSource-
Name, trapDataSourceType }
csIntrospectStart20505
Description: "This trap is generated
when a data source introspection was
started."
Variables: { trapTime, trapServerHost-
Name, trapServerPort, trapDataSource-
Name, trapDataSourceType, trapData-
SourceReport }
csIntrospectEnd20506
Description: "This trap is generated
when a data source introspection was
completed."
Variables: { trapTime, trapServerHost-
Name, trapServerPort, trapDataSource-
Name, trapDataSourceType }
csIntrospectCancel20507
Description: "This trap is generated
when a data source introspection was
cancelled."
Variables: { trapTime, trapServerHost-
Name, trapServerPort, trapDataSource-
Name, trapDataSourceType, trapMes-
sage}
csIntrospectFail20508
Description: "This trap is generated
when a data source introspection has
failed."
Variables: { trapTime, trapServerHost-
Name, trapServerPort, trapDataSource-
Name, trapDataSourceType }
csTestStart20509
Description: "This trap is generated
when a data source test was started."
Variables: { trapTime, trapServerHost-
Name, trapServerPort, trapDataSource-
Name, trapDataSourceType }
csTestSuccess20510
Description: "This trap is generated
when a data source test was successful."
154 IBM Cognos Business Intelligence Virtual View Manager
Chapter 9: SNMP Traps

DescriptionShort Name for the EventSNMP ID
Variables: { trapTime, trapServerHost-
Name, trapServerPort, trapDataSource-
Name, trapDataSourceType }
csTestFail20511
Description: "This trap is generated
when a data source test has failed."
Variables: { trapTime, trapServerHost-
Name, trapServerPort, trapConnection-
PoolId }
csConnPoolSizeIncrease20512
Description: "This trap is generated
when the size of a connection pool has
increased."
Variables: { trapTime, trapServerHost-
Name, trapServerPort, trapConnection-
PoolId }
csConnPoolSizeDecrease20513
Description: "This trap is generated
when the size of a connection pool has
decreased."
Variables: { trapTime, trapServerHost-
Name, trapServerPort, trapConnection-
PoolId }
csConnCheckOut20514
Description: "This trap is generated
when a connection was checked out a
connection pool."
Variables: { trapTime, trapServerHost-
Name, trapServerPort, trapConnection-
PoolId }
csConnCheckIn20515
Description: "This trap is generated
when a connection was checked in a
connection pool."
Variables: { trapTime, trapServerHost-
Name, trapServerPort, trapConnection-
PoolId }
csConnInvalid20516
Description: "This trap is generated
when a connection pool had an invalid
connection."
Administration Guide 155
Chapter 9: SNMP Traps
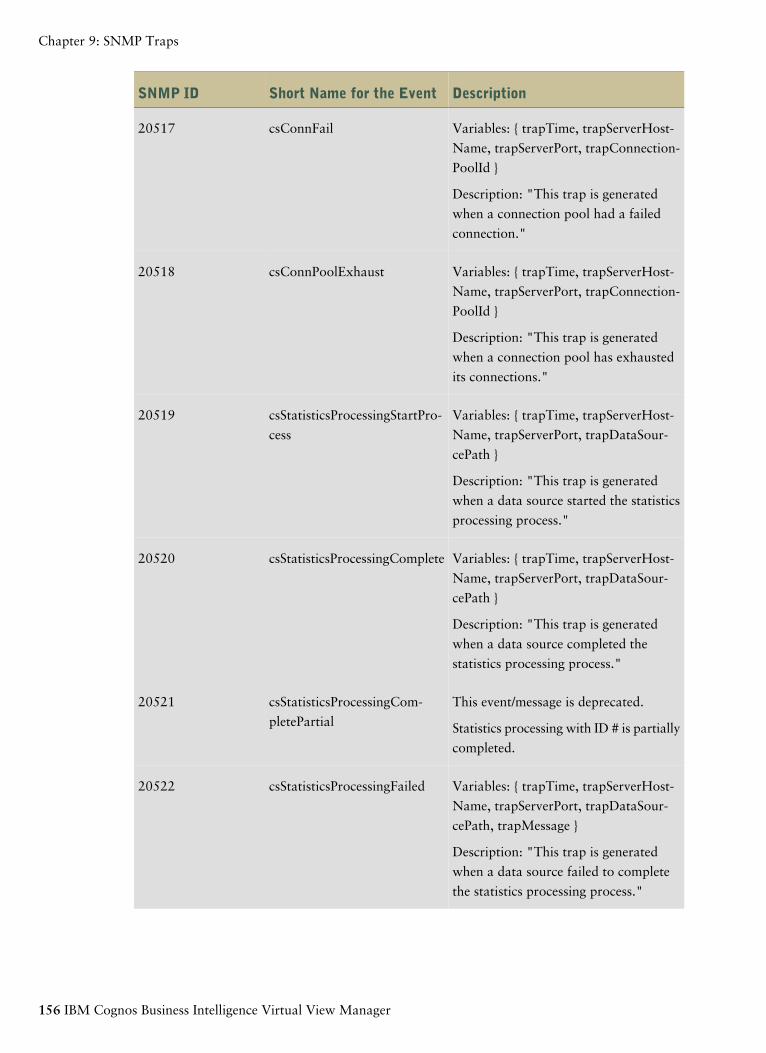
DescriptionShort Name for the EventSNMP ID
Variables: { trapTime, trapServerHost-
Name, trapServerPort, trapConnection-
PoolId }
csConnFail20517
Description: "This trap is generated
when a connection pool had a failed
connection."
Variables: { trapTime, trapServerHost-
Name, trapServerPort, trapConnection-
PoolId }
csConnPoolExhaust20518
Description: "This trap is generated
when a connection pool has exhausted
its connections."
Variables: { trapTime, trapServerHost-
Name, trapServerPort, trapDataSour-
cePath }
csStatisticsProcessingStartPro-
cess
20519
Description: "This trap is generated
when a data source started the statistics
processing process."
Variables: { trapTime, trapServerHost-
Name, trapServerPort, trapDataSour-
cePath }
csStatisticsProcessingComplete20520
Description: "This trap is generated
when a data source completed the
statistics processing process."
This event/message is deprecated.csStatisticsProcessingCom-
pletePartial
20521
Statistics processing with ID # is partially
completed.
Variables: { trapTime, trapServerHost-
Name, trapServerPort, trapDataSour-
cePath, trapMessage }
csStatisticsProcessingFailed20522
Description: "This trap is generated
when a data source failed to complete
the statistics processing process."
156 IBM Cognos Business Intelligence Virtual View Manager
Chapter 9: SNMP Traps

DescriptionShort Name for the EventSNMP ID
This event/message is deprecated.csStatisticsProcessingUpdate20523
Statistics processing with ID # updated
the information.
SNMP Details for Sessions
DescriptionShort Name for the EventSNMP ID
Variables: { trapTime, trapServerHost-
Name, trapServerPort, trapUserName,
trapDomainName }
csSessionLoginFail20700
Description: "This trap is generated
when a session login has failed for a
user."
Variables: { trapTime, trapServerHost-
Name, trapServerPort, trapSessionId,
trapUserName, trapDomainName }
csSessionStart20701
Description: "This trap is generated
when a session was started for a user."
Variables: { trapTime, trapServerHost-
Name, trapServerPort, trapSessionId,
trapUserName, trapDomainName }
csSessionEnd20702
Description: "This trap is generated
when a session was ended for a user."
Variables: { trapTime, trapServerHost-
Name, trapServerPort, trapSessionId,
trapUserName, trapDomainName }
csSessionTerminate20703
Description: "This trap is generated
when a session was terminated for a
user."
Variables: { trapTime, trapServerHost-
Name, trapServerPort, trapUserName,
trapDomainName, trapHostName,
trapLocalHostName, trapLocalHostIP }
csSessionMaxConnectionsEx-
haust
20705
Description: "This trap is generated
when a session creation request was
denied for a user."
Administration Guide 157
Chapter 9: SNMP Traps

SNMP Details for Resources
DescriptionShort Name for the EventSNMP ID
Variables: { trapTime, trapServerHost-
Name, trapServerPort, trapResource-
Name, trapDataSourcePath, trapRe-
sourceType }
csResourceCreate20800
Description: "This trap is generated
when a resource was created."
Variables: { trapTime, trapServerHost-
Name, trapServerPort, trapResource-
Name, trapDataSourcePath, trapRe-
sourceType }
csResourceDelete20801
Description: "This trap is generated
when a resource was deleted."
Variables: { trapTime, trapServerHost-
Name, trapServerPort, trapResourcePath
}
csStatisticsResourceProcess-
ingStartProcess
20802
Description: "This trap is generated
when a resource started the statistics
processing process."
Variables: { trapTime, trapServerHost-
Name, trapServerPort, trapResourcePath
}
csStatisticsResourceProcessing-
Complete
20803
Description: "This trap is generated
when a resource completed the statistics
processing process."
Variables: { trapTime, trapServerHost-
Name, trapServerPort, trapResourcePath,
trapMessage }
csStatisticsResourceProcessing-
Failed
20804
Description: "This trap is generated
when a resource failed to complete the
statistics processing process."
158 IBM Cognos Business Intelligence Virtual View Manager
Chapter 9: SNMP Traps
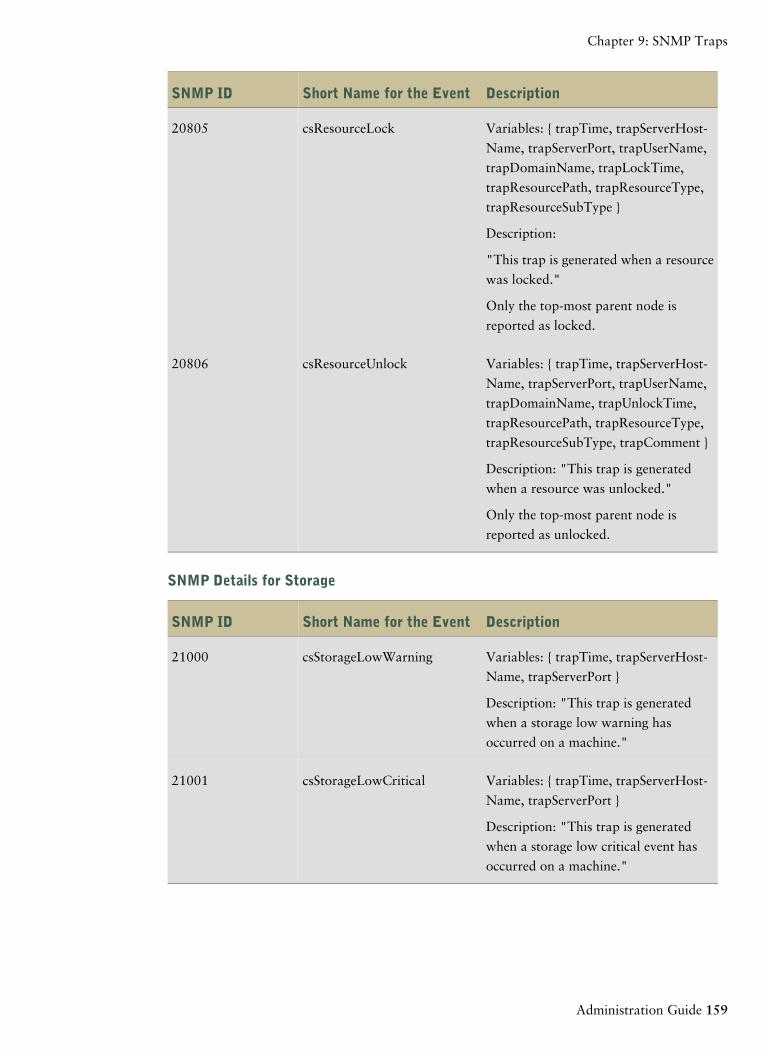
DescriptionShort Name for the EventSNMP ID
Variables: { trapTime, trapServerHost-
Name, trapServerPort, trapUserName,
trapDomainName, trapLockTime,
trapResourcePath, trapResourceType,
trapResourceSubType }
csResourceLock20805
Description:
"This trap is generated when a resource
was locked."
Only the top-most parent node is
reported as locked.
Variables: { trapTime, trapServerHost-
Name, trapServerPort, trapUserName,
trapDomainName, trapUnlockTime,
trapResourcePath, trapResourceType,
trapResourceSubType, trapComment }
csResourceUnlock20806
Description: "This trap is generated
when a resource was unlocked."
Only the top-most parent node is
reported as unlocked.
SNMP Details for Storage
DescriptionShort Name for the EventSNMP ID
Variables: { trapTime, trapServerHost-
Name, trapServerPort }
csStorageLowWarning21000
Description: "This trap is generated
when a storage low warning has
occurred on a machine."
Variables: { trapTime, trapServerHost-
Name, trapServerPort }
csStorageLowCritical21001
Description: "This trap is generated
when a storage low critical event has
occurred on a machine."
Administration Guide 159
Chapter 9: SNMP Traps

160 IBM Cognos Business Intelligence Virtual View Manager
Chapter 9: SNMP Traps

Index
Symbols68233, 36
-pkgdir, 105
AAccess
Privilege Cache, 69
Access (Hits/ Accesses)
Manager Server Overview, 69
Active Requests
data sources, 72
Active Server Requests, 66
admin
group, cognos domain, 36
user, 38
administration
dynamic domain, 57
Advanced Filter dialog, 65
all
group, cognos domain, 36
Allocated Pool Size
data sources, 72
anonymous, 38
audience of document, 7
Bbackup_export, 87
backup_import, 87
buttons
enabling, 64
Bytes summary
data sources, 72
CCached Resources
Change Enabling button, 70
Last Access, 70
Last Fail Duration, 71
Last Fail End, 70
Last Refresh End, 70
Last Success Duration, 71
Last Success End, 71
Owner, 70
Owner domain, 71
Path, 71
Refresh Cache button, 70
Status, 70
Storage Used, 70
Total Accesses, 71
Total Failures, 71
Total Successes, 71
Type, 70
Variant, 70
Capacity (Entries/Max)
Server Overview, 69
Change Enabling button, 81
changing ownership, 41
changing password, 41
cognos domain
built-in groups, 36
built-in users, privileges, 38
group membership, 40
user, 39
configuration settings
triggers, 81
configuring
databases, 137
MySQL repository, 137
Sybase repository, 137
Virtual View Manager metadata repository, 139
connection URL, 10
connection URL format, 14
Connection URL Pattern, 17
copy table filter, 65
create table filter, 65
creating
database, 134
Informix metadata repository, 134
MySQL metadata repository, 135
Oracle metadata repository, 136
Sybase metadata repository, 135
Licensed Materials – Property of IBM161© Copyright IBM Corp. 2008, 2010.

creating with driverConfig, 22
Ddatabase repository
system requirements, 133
data sources, 10
removing, 17
Data Sources
Active Requests, 73
Data Sources console, 72
DB2 type 2 JDBC driver, 10
DB2 z/OS, 11
DB2 z/OS JDBC driver, 11
description of product, 7
digital certificate, 10
Driver Class Name, 17
driverConfig, running, 22
drivers, 10, 14
dymanic domain
about, 57
enabling, 58
group administration, 58
dymanic domain administration, 57
dymanic domain user administration, 59
adding users, 60
removing users, 60
dymanic domain user group membership, 60
dymanic domain user privledges, 58
Eenabling buttons, 64
End Sessions button, 78
environment variables
setting on UNIX and Linux operating systems, 21
event log files, 84
events
and logs, 84
exporting or importing metadata, 87
exporting or importing programs, 87
exporting or importing resources, 87
Externalization, 105
Import, 122
pkg_export -pkgdir option, 105
Externalized Directory
import, 122
Ffilter
create, 65
filter rules, 65
Ggotolink, 10
group
removing from domain, 37
group privileges
managing, 42
group rights templates, 36
HHits
Privilege Cache Hits, 69
Iimporting
rules, 95, 121
importing or exporting full server, 87
indexes
Sybase, 133
information about rows, 65
Informix, 11
Informix JDBC driver, 11
Informix metadata repository
creating, 134
repo.properties file, 139
install_services, 98
installing for DB2, 10
installing for Informix, 10
installing for SQL Server, 10
JJava Key Store (JKS), 10
Java keystore digital certificate
configuring, 10
JDBC, 14
driver, 10, 17
installing, 17
new, 17
JDBC/ODBC secured over HTTPS, 10
JDBC driver, 11
JKS digital certificate, 10
JMS via JNDI Connector, 24
162 IBM Cognos Business Intelligence Virtual View Manager
Index

LLDAP
attribute key, 47
context search symbols, 46
properties file, 43
query examples, 47
search filter symbols, 46
users, adding, 56
LDAP/iPlanet users, 39
ldap.properties sample, 45
LDAP domain
adding, 51
adding group, 50
adding user, 54
editing, 53
removing, 54
viewing LDAP groups, 53
licensing, 9
limit the display of sessions, 78
log files, 84
logs
server, monitor, studio, 84
Mmanaging privileges, 42
Managing User Group Membership, 40
manifest file, 105
Max Memory
requests, 75
Max Pool Size
data sources, 72
membership
LDAP groups, 53
memory
fine tuning, 29
memory, used, 66, 67
metadata repository, 133
monitor
starting or stopping or restarting, 96
monitor log files, 84
MySQL metadata repository
configuring, 137
creating, 135
NName
cached resources, 70
data sources, 72
navigating rows, 66
Netezza, installation of driver, 11
Netezza JDBC driver, 11
New Driver Information window, 17
nobody, user, 38
nobody user, 41
nohup, for Telnet session, 97
nohup, usage, 96
number of rows displayed, 66
OODBC
adding, 19
data sources, 19
driver, 18
using on UNIX and Linux operating systems, 21
using on Windows operating system, 18
Oracle Call Interface (OCI), 134
Oracle metadata repository
creating, 136
prerequisites, 133
PPackage Export to a directory, 105
package import, 113
Package Import, 122
paging, 29
performance profile list, 132
pkg_export, 100, 105
-pkgdir, 99
-pkgfile, 99
pkg_export -pkgfile, 99
pkg_import, 113
usage, 113, 122
pkg_import -pkgdir, 122
Pool Size
data sources, 72
Pool Utilization
data sources, 72
privileges
changing, 40
managing, 42
Administration Guide 163
Index

Purge Completed Sessions button, 78
Purge Completed Transactions, 80
purge frequency
requests, 74
sessions, 77, 79
purpose of document, 7
Rremove_services, 128
Remove an LDAP group, 52
remove table filter, 65
Removing Users from the Cognos Domain, 40
repo_util, 128
repo_util, usage syntax, 130
repo.properties file, 139
repository
setting up, 133
system requirements, 133
Repository Cache, 69
repository database
changing, 128
restart automatically on UNIX, 98
requests, 66
data source, total, 66
purge period, 74
server, active, 66
Requests
Clear Plan Caches, 75
Purge Completed Requests, 75
Session Type, 77
waiting requests, 78
Waiting Requests, 75
Waiting Requests Threshold, 75
Requests console, 74
Requests summary
data sources, 72
resources
changing ownership, 41
respository
starting or stopping or restarting, 98
re-start server and repository automatically on UNIX, 98
row information, 65
row navigation, 66
rows
number displayed, 66
row selection, 64
rules for table filters, 65
Ssecured JDBC/ODBC, 10
security
Java Key Store, 10
server, 9
back-up from command line, 87
exporting or importing, 87
performance profile list, 132
running as foreground process, 97
starting or stopping or restarting, 96
stopping and starting on Windows, 98
server_util, 132
server log files, 84
Server Name, 66, 67
Server Overview, 68
Clear Repository Cache, 69
Maximum Event Entries, 67
Maximum Viewable Events, 67
Privilege Cache, 69
Repository Cache, 69
Requests - active and total, 68
Sessions - active and total number, 68
Stop, 69
Total Data Source Requests, 68
User Cache, 69
service files, removing, 128
sessions
purge period, 77, 79
Sessions, 66
Session Type
requests, 75
Show Row Details icon, 65
SNMP log settings, 145
SNMP traps, 145
cached resources, 151
data sources, 153
details, 145
monitor events, 145
requests, 149
resources, 158
server events, 147
sessions, 157
storage, 159
triggers, 152
164 IBM Cognos Business Intelligence Virtual View Manager
Index

Sonic JMS, 23
SQL Server, 11
SQL Server JDBC driver, 11
SSL communication, 10
SSL management page, 10
Status
data sources, 72
server, 67
Status summary
data sources, 72
Studio log files, 84
Sybase
indexes, 133
Sybase metadata repository
configuring, 137
creating, 135
prerequisites, 133
system
events and logs, 84
monitoring, 63
user, 38
system requirements
database repository, 133
Ttable filter
copy, 65
create, 65
remove, 65
table filter rules, 65
Teradata JDBC driver, 11
terminate a session, 78
TestAllDataSources trigger, 81
TIBCO JMS, 23
timing
changes to users, 41
Total Data Source Requests, 66
Total Memory Used, 66, 67
Total Requests
data sources, 72
trailing spaces
setting, 32
Transactions, 66
Type
data source, 72
UUser Cache, 69
user nobody, 41
user privileges
managing, 42
user rights profile changes, 41
users
adding, 39
membership, 40
VVirtual View Manager Administrator
cached resources, 70
Data Sources page, 72
event and log files, 84
Event Log, 82
home page, 66
overview, 63
refreshing current page, 64
Requests page, 74
Server Overview page, 67
server status information, 67
Sessions page, 77
sorting, 64
starting, 64
Transactions page, 79
Triggers page, 81
using, 64
Administration Guide 165
Index