virtualdj 8 behringer cmd pl-1 1 cmd pl1... · virtualdj 8 – behringer cmd pl-1 4 advanced setup...
TRANSCRIPT
VirtualDJ 8 – Behringer CMD PL-1 1
VirtualDJ 8 – Behringer CMD PL-1 2
Table of Contents
A. INSTALLATION .................................................................................................................... 3
Firmware & Drivers ................................................................................................................ 3
VirtualDJ 8 Setup ................................................................................................................... 3
Advanced Setup ..................................................................................................................... 4
B. EFFECTS & LOOPS ............................................................................................................. 5
C. HOTCUES ............................................................................................................................. 6
D. DECK .................................................................................................................................... 7
E. PITCH .................................................................................................................................... 8
VirtualDJ 8 – Behringer CMD PL-1 3
A. INSTALLATION
Firmware & Drivers
Firmware: No firmware update is currently available. However it is always advised to check
Behringer website http://www.behringer.com/EN/Products/CMD-PL-1.aspx
Drivers: No drivers are requires (class compliant device).
VirtualDJ 8 Setup
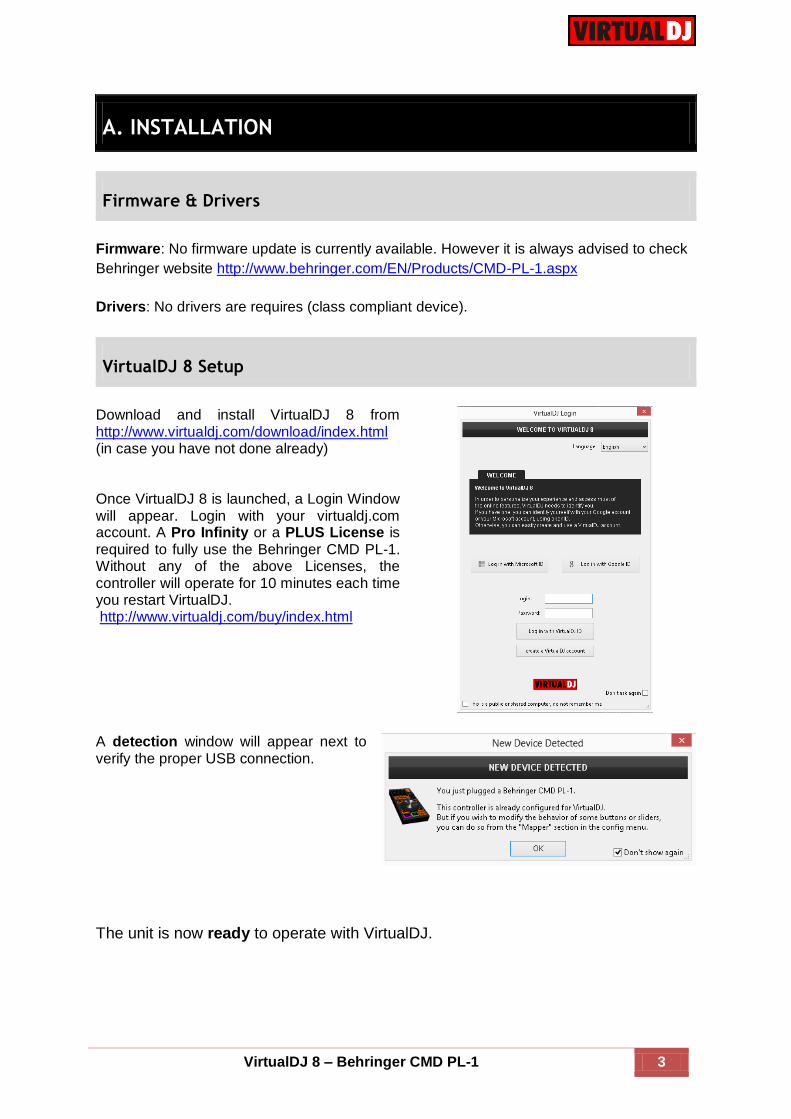
Download and install VirtualDJ 8 from http://www.virtualdj.com/download/index.html (in case you have not done already) Once VirtualDJ 8 is launched, a Login Window will appear. Login with your virtualdj.com account. A Pro Infinity or a PLUS License is required to fully use the Behringer CMD PL-1. Without any of the above Licenses, the controller will operate for 10 minutes each time you restart VirtualDJ. http://www.virtualdj.com/buy/index.html
A detection window will appear next to verify the proper USB connection.
The unit is now ready to operate with VirtualDJ.
VirtualDJ 8 – Behringer CMD PL-1 4
Advanced Setup
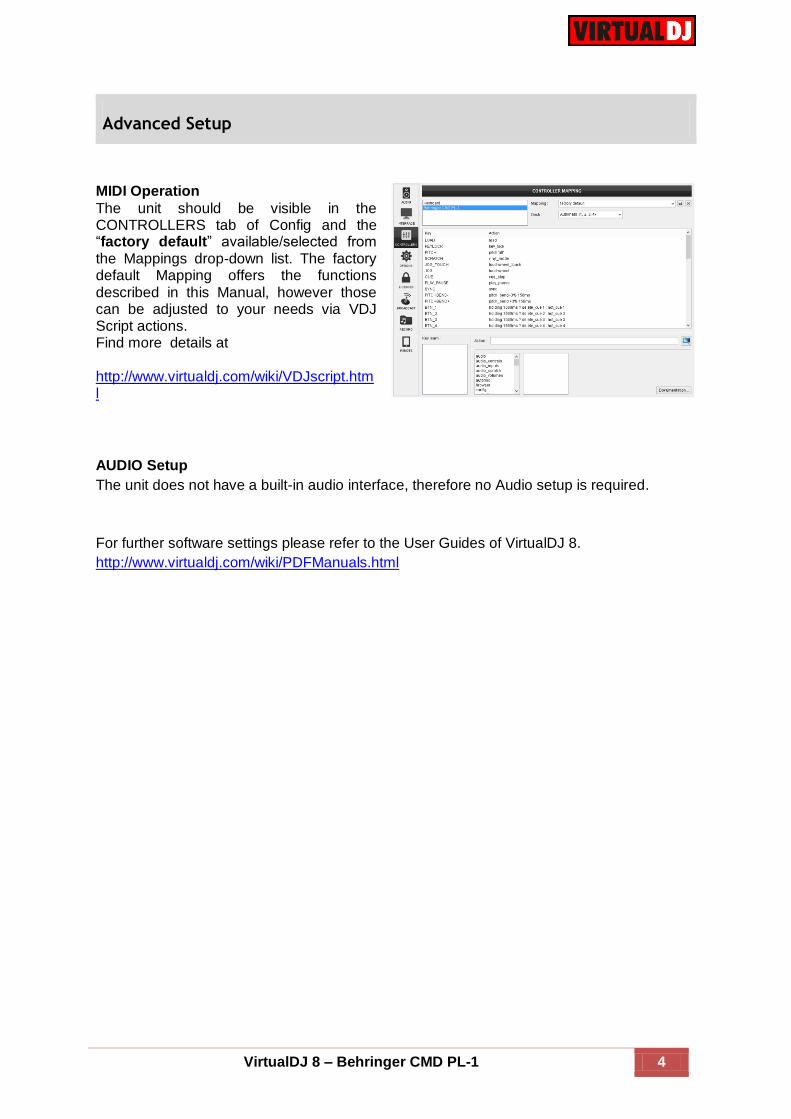
MIDI Operation
The unit should be visible in the CONTROLLERS tab of Config and the “factory default” available/selected from the Mappings drop-down list. The factory default Mapping offers the functions described in this Manual, however those can be adjusted to your needs via VDJ Script actions. Find more details at http://www.virtualdj.com/wiki/VDJscript.html
AUDIO Setup
The unit does not have a built-in audio interface, therefore no Audio setup is required.
For further software settings please refer to the User Guides of VirtualDJ 8.
http://www.virtualdj.com/wiki/PDFManuals.html
VirtualDJ 8 – Behringer CMD PL-1 5
B. EFFECTS & LOOPS
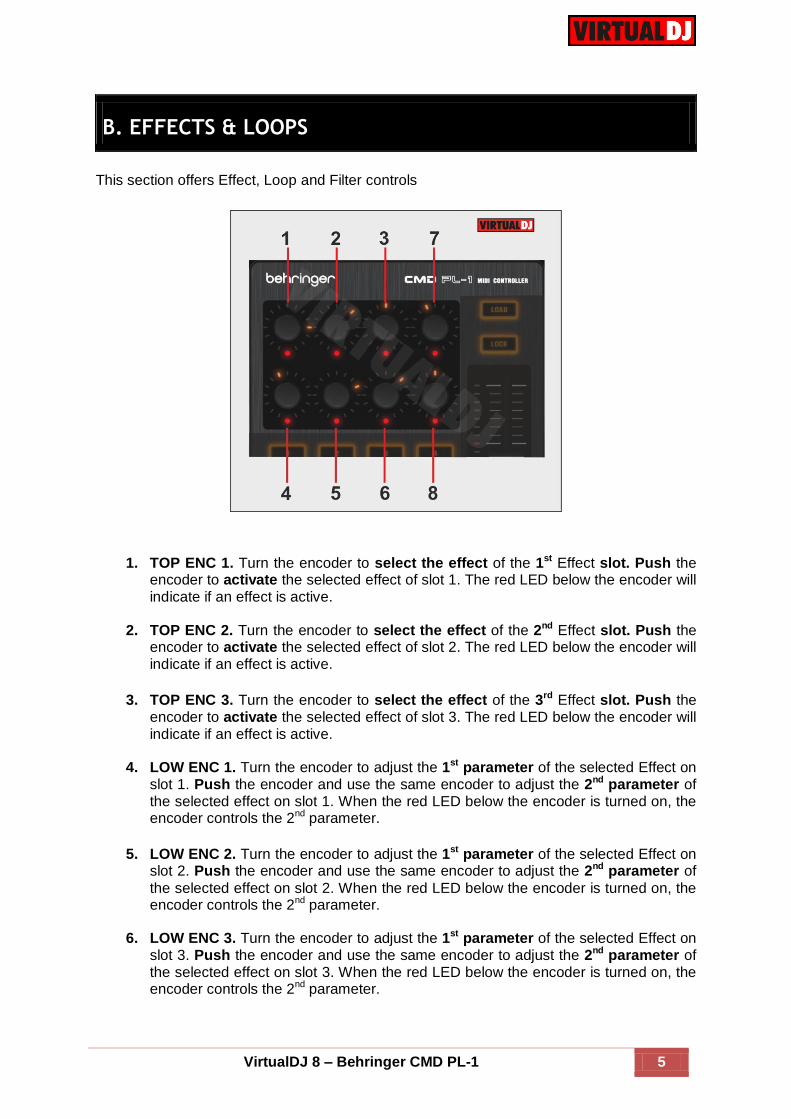
This section offers Effect, Loop and Filter controls
1. TOP ENC 1. Turn the encoder to select the effect of the 1st Effect slot. Push the encoder to activate the selected effect of slot 1. The red LED below the encoder will indicate if an effect is active.
2. TOP ENC 2. Turn the encoder to select the effect of the 2nd Effect slot. Push the
encoder to activate the selected effect of slot 2. The red LED below the encoder will indicate if an effect is active.
3. TOP ENC 3. Turn the encoder to select the effect of the 3rd Effect slot. Push the encoder to activate the selected effect of slot 3. The red LED below the encoder will indicate if an effect is active.
4. LOW ENC 1. Turn the encoder to adjust the 1st parameter of the selected Effect on
slot 1. Push the encoder and use the same encoder to adjust the 2nd parameter of the selected effect on slot 1. When the red LED below the encoder is turned on, the encoder controls the 2nd parameter.
5. LOW ENC 2. Turn the encoder to adjust the 1st parameter of the selected Effect on slot 2. Push the encoder and use the same encoder to adjust the 2nd parameter of
the selected effect on slot 2. When the red LED below the encoder is turned on, the encoder controls the 2nd parameter.
6. LOW ENC 3. Turn the encoder to adjust the 1st parameter of the selected Effect on
slot 3. Push the encoder and use the same encoder to adjust the 2nd parameter of the selected effect on slot 3. When the red LED below the encoder is turned on, the encoder controls the 2nd parameter.
VirtualDJ 8 – Behringer CMD PL-1 6
7. FILTER. Turn the encoder to apply a High Pass/Low Pass Filter on the track. Push the encoder to reset Filter (off position). The red LED below the encoder will be on if Filter is at off position.
8. LOOP. Push the encoder to trigger a loop. Use the encoder to half (anti-clockwise) or double (clockwise) the size of the loop. The red LED below the encoder will be on when a loop is active.
C. HOTCUES
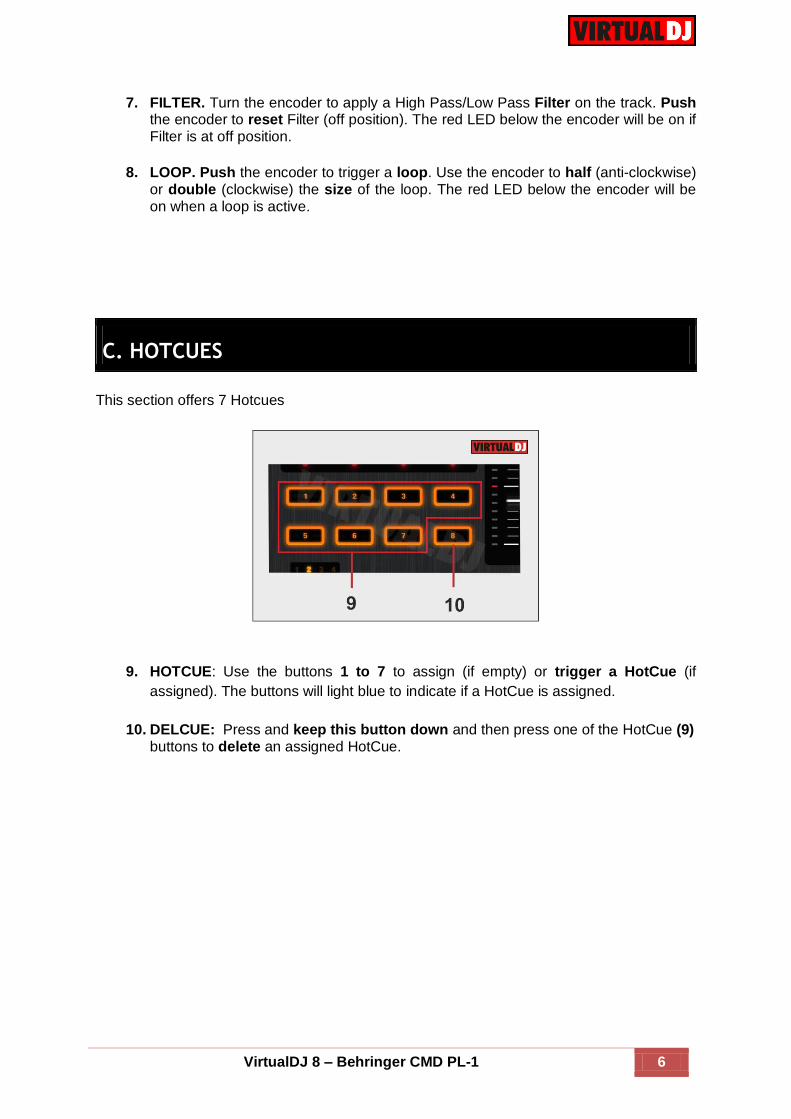
This section offers 7 Hotcues
9. HOTCUE: Use the buttons 1 to 7 to assign (if empty) or trigger a HotCue (if
assigned). The buttons will light blue to indicate if a HotCue is assigned.
10. DELCUE: Press and keep this button down and then press one of the HotCue (9) buttons to delete an assigned HotCue.
VirtualDJ 8 – Behringer CMD PL-1 7
D. DECK
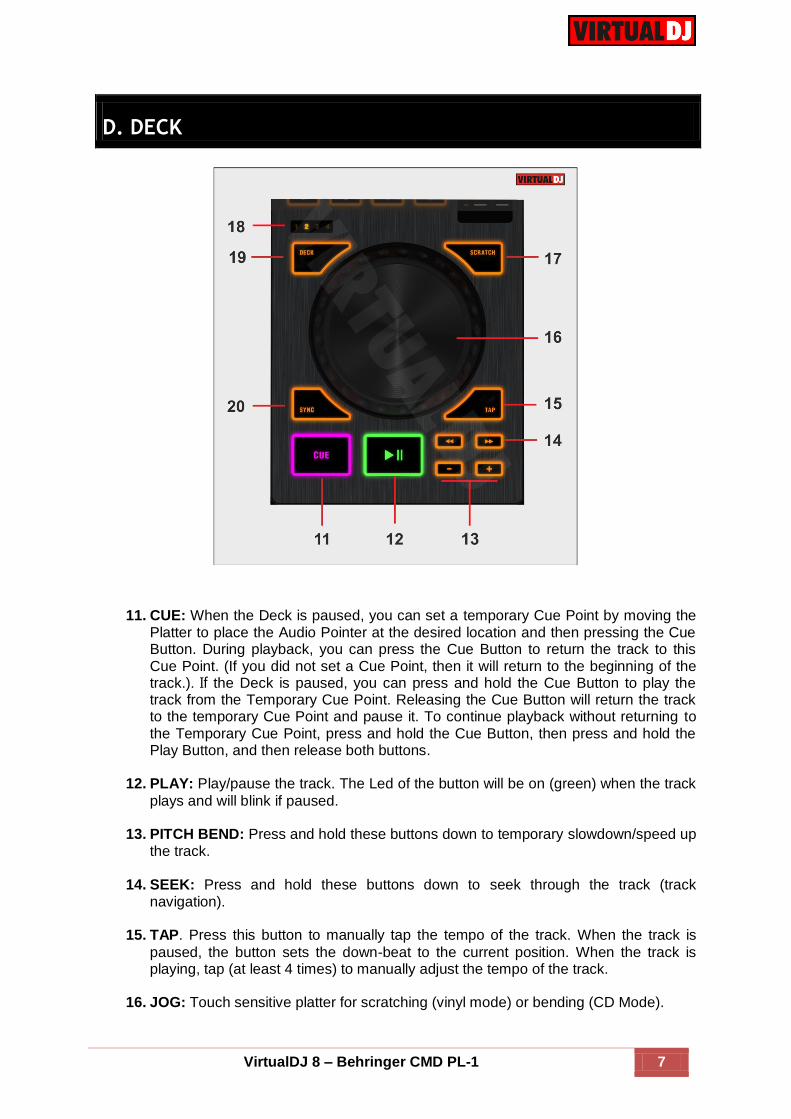
11. CUE: When the Deck is paused, you can set a temporary Cue Point by moving the Platter to place the Audio Pointer at the desired location and then pressing the Cue Button. During playback, you can press the Cue Button to return the track to this Cue Point. (If you did not set a Cue Point, then it will return to the beginning of the track.). If the Deck is paused, you can press and hold the Cue Button to play the track from the Temporary Cue Point. Releasing the Cue Button will return the track to the temporary Cue Point and pause it. To continue playback without returning to the Temporary Cue Point, press and hold the Cue Button, then press and hold the Play Button, and then release both buttons.
12. PLAY: Play/pause the track. The Led of the button will be on (green) when the track
plays and will blink if paused.
13. PITCH BEND: Press and hold these buttons down to temporary slowdown/speed up the track.
14. SEEK: Press and hold these buttons down to seek through the track (track
navigation).
15. TAP. Press this button to manually tap the tempo of the track. When the track is
paused, the button sets the down-beat to the current position. When the track is playing, tap (at least 4 times) to manually adjust the tempo of the track.
16. JOG: Touch sensitive platter for scratching (vinyl mode) or bending (CD Mode).

VirtualDJ 8 – Behringer CMD PL-1 8
17. SCRATCH: Sets the Jog of the deck to Bend (CD) or Scratch (Vinyl) Mode.
18. DECK SELECT LEDS: These Leds indicate which deck is controlled
19. DECK: Use this button to assign a software deck to this unit. The Leds above the button indicate which deck is selected. A single unit is capable to control all 4 decks.
20. SYNC: Syncs the deck with the opposite one.(if only 2 software decks are used) or
the Master Deck (if more than 2 software decks are used)
E. PITCH
21. LOAD: Press this button to load the selected track from the Browser to the selected deck.
22. KEYLOCK: Press this button to enable/disable the Master Tempo (Key Lock) of the deck.
23. PITCH: Use this fader to adjust the tempo of the
track. The red led will indicate the position of the software pitch fader. In case those do not match, move the actual fader of the unit until it catches the position of the software one. (Soft take-over).
Hardware Integration Department
2014 - ATOMIX PRODUCTIONS
Reproduction of this manual in full or in part without written permission from Atomix
Productions is prohibited.