vision vviissiionon vision ii pro p pro...
TRANSCRIPT

VISION VISION VISION VISION II PRO PRO PRO PROTM IMAGE PROCESSING
HEADLAMP AIMER
AMERICAN AIMERS, INC
3529 WEST 6TH Ave. Emporia, Kansas 66801
1-877-343-7703
INSTRUCTION MANUAL

Vision II ProTM Manual
Page 2 of 28
Introduction and Equipment Precautions
Congratulations! You now have the world’s most advanced headlamp aiming
technology available to the U.S. automotive aftermarket. The Vision II Pro™
Image Processing Headlamp Aimer provides factory-precise analysis to the
automotive aftermarket. Precision laser positioning, high technology photometric
analysis and computer quick calculations make the Vision II Pro™ the most
accurate headlight aiming device available.
The versatility of the Vision II Pro™ system enables you to aim nearly any
headlamp on any make of vehicle throughout the world. Standard, auxiliary, fog,
rectangular, round, or aerodynamic VOL, VOR, HIGH, LOW headlamps can be
precisely aimed, regardless of size.
The precision accuracy of laser technology is used to determine the vehicle
centerline and optical center of the headlamps. Computer-image processing
technologies form the basis for the Vision II Pro™ System. It analyzes and
displays the light pattern as it would appear on the roadway at twenty-five feet
(25’) ahead of the vehicle. Upon positioning the headlamp, a digital translation of
the headlight beam is displayed on the screen, graphically illustrating the ideal
alignment position in inches or centimeters. While viewing the screen, you adjust
the headlamp adjustment screws to align the beam pattern cross-hairs with the
visual aim indicators.
The Vision II Pro™ will never become obsolete. It will always be on the leading
edge of technology. The system can be expanded when new aim patterns
develop.
This user manual should be read in its entirety before operating the Vision II
Pro™ System. If you have any questions, please contact an American Aimers
Representative for further information at 1-877-343-7703.
FOR YOUR SAFETY, READ AND FOLLOW ALL CAUTION AND WARNING
LABELS AFFIXED TO YOUR EQUIPMENT.
Vision II ProTM Manual
Page 3 of 28
Table of Contents
Section One………………………………………….. 5
1.1 Unpacking & Inspection
1.2 Assembly Procedure
1.3 Select Language
1.4 Alignment Method
1.5 Printer Option
1.6 Aimer Preparation
1.7 Activation Screen
1.8 Select Measurement
1.9 Set-Up Aiming Bays
1.10 Set Number of Bays
Section Two……………………………………..…. 14
2.1 Set Floor Slope
2.2 Conversion Chart
2.3 Set Aim OK Window
Section Three…………………………….……..… 17
3.1 Area/Vehicle Set-up
Section Four……………………………………….. 18
4.1 Self Test
4.2 Printer Option
4.3 Alignment Track
4.4 Calibration
Section Five………………………………………….. 21
5.1 Aim Lamps
5.2 Align Aimer (Vehicle Centerline)
5.3 Set Bay Number
5.4 Position Aimer To Lamp
(Passenger Side)
5.5 Position Aimer To Lamp
(Driver Side)
Section Six……………………………………….…… 24
6.1 Glossary Listing
6.2 Equipment Maintenance
6.3 Equipment Optical Calibration
6.4 Equipment Specifications
6.5 Replacement Parts

Vision II ProTM Manual
Page 4 of 28
WARRANTY AND LIMITATION OF REMEDY
Seller warrants that the items sold will be free from defects in material and workmanship
for a period of one year from the date of purchase; provided, however, that Seller’s
maximum liability and Buyer’s exclusive remedy, for any goods which are or become
defective, shall be, at Seller’s option, the repair of the defective goods or the
replacement thereof with conforming goods, f.o.b. Seller’s plant, or the reimbursement
to the Buyer of the contract price for the defective goods. Repair or replacement of
defective goods or reimbursement for the contract price thereof, shall be made only
upon return of the defective goods to Seller at Seller’s cost, but only after inspection of
the goods by Seller and written instructions by Seller to Buyer regarding the shipment of
the goods to Seller.
Other than set forth above, SELLER MAKES NO WARRANTY OF ANY KIND,
WHATEVER, EXPRESS OR IMPLIED; AND ANY IMPLIED WARRANTY OF
MERCHANTABILITY OR FITNESS FOR A PARTICULAR PURPOSE IS HEREBY
DISCLAIMED BY THE SELLER.
Seller shall not be liable for any consequential damages, loss or expense arising from
the use or the inability to use the goods for any purpose whatsoever.
There are no warranties by Seller covering components, parts, or accessories specified
by the Buyer and manufactured by someone other than Seller. Such warranties as may
be furnished to Seller by the manufacturer of such items will be extended to the Buyer
by the Seller.
The Vision Headlamp Aiming Unit is an optical aiming device designed to aim
headlights that comply with the Society of Automotive Engineers recommended
practices described in J599 and J600. All lamp and lamp patterns do not conform to
these recommended practices.
SELLER MAKES NO REPRESENTATION OR WARRANTY OF ANY KIND,
WHATEVER, THAT THE VISION HEADLAMP AIMING UNIT WILL AIM HEADLAMPS
WHICH DO NOT CONFORM TO THE SOCIETY OF AUTOMOTIVE ENGINEERS
RECOMMENDED PRACTICES DESCRIBED IN J599 AND J600.
WARNING: Direct Sunlight Can Damage Unit Voiding Warranty.

Hardware — Small Bag (A) Contains:
1. Cable Plug / Qty. 1
2. 1/2” Cap Bolt with Nylon Insert / Qty. 2
3. Belleville Washer / Qty. 1
4. Strips of Velcro / Qty. 1
5. 5/16” x 1/2” Hex Head Bolt / Qty. 6
6. 3/8” Wheel Bolt / Qty. 1
7. 5/16” Flat Washer and Anti-Rotate Bracket
Base Bolts — Large Bag (B) Contains:
1. 3/8” - 16 X 6-1/2” Hex Head Bolt / Qty. 2
2. 3/8” - 16 Hex Nut / Qty. 2
3. 3/8” - 16 Hex Nylon Loc Nut / Qty. 4
4. 3/8” - 16 X 5” Hex Head Bolt / Qty. 2
5. 3/8” - 16 Flat Washer / Qty. 2
Box 2 - Boxed Base & Hardware
Box 2 contains the following: Wheels (3), Brake
Handle (1), T-Base Front (1), T-Base Rear (1)
Mast Cover (1), Charger (1), Small Bag A (1),
Large Bag B (1), Wheel & Cam Mount (1), Shaft
(1), Mast Support Column (1), & Anti-Rotate
Bracket (1), as shown in Figure 1 below.
Box 2
Boxed Base & Hardware Kit
Note: Some components are shipped inside T-Base legs.
Unpacking & Inspection UPON receipt open the boxes and check contents for
any shipping damage. If necessary, notify carrier of dam-
age and make a claim through the carrier. Check the
Boxes for the following content:
Box 1 — Vision II Pro Head contains: (1) Vision II Pro Head Manual; (1) Warranty Card; (1) Transit (1) Bundle of Laser Targets; (1) Vision II Pro Head As-
HEADLIGHT
Laser
Stickers
G2 Transit Laser
Targets
Vision II Pro Head
Box 1
Warranty Card
Manual
BOX 3 — The Counterweight is secured in the middle of the Mast
with two cardboard inserts. The inserts will need to be removed from
each end. Use caution when removing the inserts to prevent the
Counterweight from falling out. It may be necessary to hold the
Counterweight Cable to prevent the Counterweight from sliding out
of the mast.
NOTE: Counter weight is VERY heavy; use caution.
Remove 4’ sections of track (3 — 4’ sections of track).
Corrugated
Insert
Alignment Track
Protective Bags Corrugated Insert
Mast Box Mast with Counterweight
Box 3
Vision II Pro Optical Headlamp Aimer Unpacking & Inspection 1.1
Page 5 of 28
Wheels (3)
Charger
Brake Handle
Small
Bag (A)
Figure 1
Cam &
Wheel Mount
Large
Bag (B)
Mast
Support
Column
Shaft
Anti-Rotate
Bracket
Mast
Cover
T-Base Front
T-Base Rear
Wheels (3)
Charger
Brake Handle
Small
Bag (A)
Figure 1
Cam &
Wheel Mount
Large
Bag (B)
Mast
Support
Column
Shaft
Anti-Rotate
Bracket
Mast
Cover
T-Base Front
T-Base Rear

STEP 1. TOOLS REQUIRED
• 3/8” Allen Wrench
• ½” Socket
• ½” Box-end Wrench
• Torpedo Level
When facing towards
the front of the “T” base
Front “T should be ex-
tending further to the left
side than right to allow for
center holes to align.
(Picture 1)
Step 2. BASE ASSEMBLY
On a flat surface, position the two base legs to form a “T” Install the Anti Rotate
Bracket between the Front and Rear Base as shown. (Picture 2) There are “This Side
Up Stickers” located on both of the Base Legs to aid you in proper positioning of the
bases. With center holes aligned, install 5 inch Hex Head Bolts so the Washer and
Lock Nut are on the
backside of the Rear
“T” Base. At this time,
tighten bolts to be
snug, while keeping
pieces flush with top
surfaces. Adjustment
will be made later, at
this section , to level
the Aim Head.
T-Base Front
Extends Further Left
Picture 1
T-Base Rear 5” Hex Head
Bolts
Note:
Large
Hole on
Top
Using two 5/16” x 1/2” Hex Head
Bolts place the Cam Block assembly
into the Base and tighten. (Picture 4-
1)
Cam Block
Assembly
5/16” x
1/2” Hex
Head
Bolts
Picture 4-1
Picture
4-2 Brass
Washer
3/8” x 1-3/4”
Shoulder Bolt
Using a 3/8” Shoulder Bolt, install the
Wheel to the Cam Block assembly as
shown. (Picture 4-2)
Step 4 CAM BLOCK ASSEMBLY
Step 3. WHEEL ASSEMBLY
Using 6-1/2” Hex Head Bolts,
install the wheels so that they are
on the front side of the Base.
A Jam Nut is installed on the
inside of the Base while a Lock
Nut is placed on the outside.
NOTE: Bolt should be locked in
place to allow Wheel to spin
freely (without excess play in the
Wheel). This can be accomplished by pushing the Bolt through the Wheel and into
Base hole. Place Jam Nut on inside and while pushing Bolt and Wheel against
Base, tighten Jam Nut to inner surface and then turn nut one extra turn. Tighten
Lock Nut to secure bolt. (Picture 3)
Lock
Nut 6-1/2” Hex Head Bolt
Jam Nut
Picture 3
Base Wheel
Anti-
Rotate
Bracket
Picture 2
Washers
Lock-Nut
3/8” x 5”
Hex
Bolts
Vision II Pro Optical Headlamp Aimer Assembly Procedure 1.2.1
Page 6 of 28
Picture
4-2 Brass
Washer
3/8” x 1-3/4”
Shoulder Bolt
Picture
4-2

Step 5. MAST ASSEMBLY
1. Place Base on a sturdy flat
surface.
The large hole in the Base
must be in the up position. The
shaft fits through this hole ro-
tate the shaft until the two ex-
pansion pins align with the
holes in bottom of Base. Hold-
ing shaft, turn Base on its side
and install bolt and tighten
completely. (Picture 5-1)
2. After installing the Shaft, remove the
“This Side Up” stickers. (Picture 5-2)
3. Place Mast Support Column over Shaft. Note:
The Mast holes need to be positioned so that one
set of holes face the Anti Rotate Bracket and the
other set of holes are to the left. (See Picture for
proper positioning).
4. Secure Mast column in place us-
ing a ½” x 1” Socket Head Cap
Screw, tighten down to approxi-
mately 100 Inch lbs.
The Mast is supported on the mast support
column by 4 – 5/16“ x 1/2“ Hex Bolts. Care-
fully place the Mast over the support col-
umn and make sure the Mast goes inside
the Anti Rotate Bracket. Caution: It is nec-
essary to hold the counterweight cable
to keep Counterweight from falling out
of the Mast while installing to the Mast
Support Column.
First, using 1- 5/16” Flat Washer and 1-
5/16” Hex Head Bolt, attach the Anti Ro-
tate Bracket to the Mast. Then attach the
remaining 3 - 5/16” Hex Head Bolts after
all holes align, and tighten completely.
Note: Adjustments might need to be made
to get holes to align. This can be done by
loosening the Base Bolts or by slightly
bending the Anti Rotate Bracket.
5/16”
Hex Head
Bolts (4)
5/16”
Washer
(2)
Picture 5-6
Expansion Pins
Picture 5-1
1/2” x 1” Socket Head Cap Screw
Picture 5-4
Make sure gap is
the same on both
sides before
tightening
down.
Picture 5-5
Wide side of
Mast—This
Side Up.
Picture 5-2
THIS SIDE UP Stickers
Vision II Pro Optical Headlamp Aimer Assembly Procedure 1.2.2
Page 7 of 28
Make sure holes are facing front and left, as shown
Picture 5-3
Make sure holes are facing front and left, as shown
Picture 5-3
Make sure holes are facing front and left, as shown
Picture 5-3
Make sure holes are facing front and left, as shown.

The tension on the rollers is pre-
set at the factory, however, if the
unit does not roll smoothly or
rocks and wobbles, adjustments
can be made if necessary.
If adjustment is required, simply
loosen the Tension Wheel Lock-
ing Nut, loosen or tighten the Ten-
sion Adjustment Set Screw as
needed, and tighten down the
Tension Wheel Locking Nut.
Screw Brake Handle on to the Tension Adjusting Wheel bolt. The Brake Handle
only needs to be turned lightly to lock Aimer Head in position.
LEVELING HEAD, Left To Right
Place assembled unit on a known level surface. With the Aimer Head setting in the
operating position, move the Aimer Head up or down on the Mast so it is approxi-
mately in the center.
Locate the horizontal level on
the back edge of Aim Head
as shown in Picture 9.
Reading the level,
adjust the Base sections
by loosening the bolts and
moving the Mast Left or right
until the Aimer Head is level;
then tighten bolts.
6. Place the Aimer Head over
the top of the Mast. Align the
guide rollers with the mast groove
and pull down into position as
shown. (Picture 6) Note: It is
recommended to use two peo-
ple for this step —1 person to
hold the Mast from moving,
and the other to put the Aimer
Head on the Mast.
I
Insert the Counterweight Cable into the
Cable Support Notch. Lightly place the
Cable Plug into the Cable Support
Notch, to prevent the cable from pop-
ping out of the hole when the Aimer
Head is in the raised position.
(Picture 7)
Picture 6
Guide Roller Groove
Guide Roller Groove
Picture 7
Cable Plug
Cable
Notch
Picture 8
Brake Handle
Tension
Wheel Set
Screw
Vision II Pro Optical Headlamp Aimer Assembly Procedure 1.2.3
Page 8 of 28
Horizontal Level
Picture 9

Vision II ProTM Manual
Page 9 of 28
SECTION ONE
1.3 SELECT LANGUAGE
The Vision II ProTM has English set as its default language. However, if you would like to change the language to Spanish or French, you can easily do so by following these instructions.
1. Making sure the Aimer is off, press and hold Button 1; then turn the main power switch on. Continue pressing Button 1 until the language screen is displayed.
2. Select Language. This selection is automatically stored in memory.
Note: If you need to change the language simply turn the power off and repeat the process.
French
La mode d’emploi pour Vision II ProTM est en anglais. Si vous desirez changer et choisir soit l’espagnol, soit le francais, vous pouvez le faire en suivant les instructions ci-dessous.
1. Assurez vous que la machine est en position »off ». Pressez et tenez appuyee la touche 1 alors que vous mettez la machine en marche. Continuez d’appuyer la touche 1 jusqu'à ce que l’ecran pour le choix du language apparaisse.
2. Choisissez le language desire. La selection sera automatiquement conservee dans la mémoire de l’appareil.
Note: Si vous desirez changer le language, eteignez la machine et repetez le procede.
Spanish
Vision II ProTM automaticamente selecciona el Inglés como su idioma de preferencia . Si Ud prefiere cambiar a otro idioma como el Español o Frances, Ud. facilmente lo puede hacer siguiendo las siguientes instrucciones.
1. Asegurese de que el Aimer este apagado, presione y sostenga la tecla 1, luego presione el boton principal de encender. Continue presionando la tecla 1 hasta que aparesca en la pantalla la opcion de idiomas.
2. Seleccionar idioma. Esta seleccion esta automaticamente guardada en la memoria.
Nota: Si Ud. Desea cambiar a otro idioma, simplemente presione la tecla de apagar y repita el proceso.

Vision II ProTM Manual
Page 10 of 28
1.4 ALIGNMENT METHOD
There are two recommended methods to ensure the Vision II ProTM aimer is aligned with the
centerline of the vehicle.
The LASER ALIGNMENT method utilizes the on-board laser to align the Vision II ProTM unit
with the vehicle centerline. The LASER ALIGNMENT method is the most widely used method
and the Vision II ProTM is pre-set at the factory to this mode. The FIXED POSSITION method is
for permanently installed applications where the track is attached to floor and the perpendicular
alignment of the vehicle to the track is assured by the use of wheel stops and/or wheel guides.
IMPORTANT: Unless you have a fixed track and need to change the laser mode, please
proceed to Section 1.5 on the following page.
If you choose to change to the FIXED TRACK mode you can do so by following these steps:
1.) Press and hold in on Button 1 while turning the main power switch on. Keeping Button
1 pushed, the aimer will proceed to a calibration screen - wait approximately ten
seconds and release the button. The Select Language Screen will appear; select button
(5) Skip. The Select Track Style menu will appear; select button (3) Fixed. The
information will be saved. Note – If the screen does not appear, repeat the process
Vision II ProTM Manual
Page 11 of 28
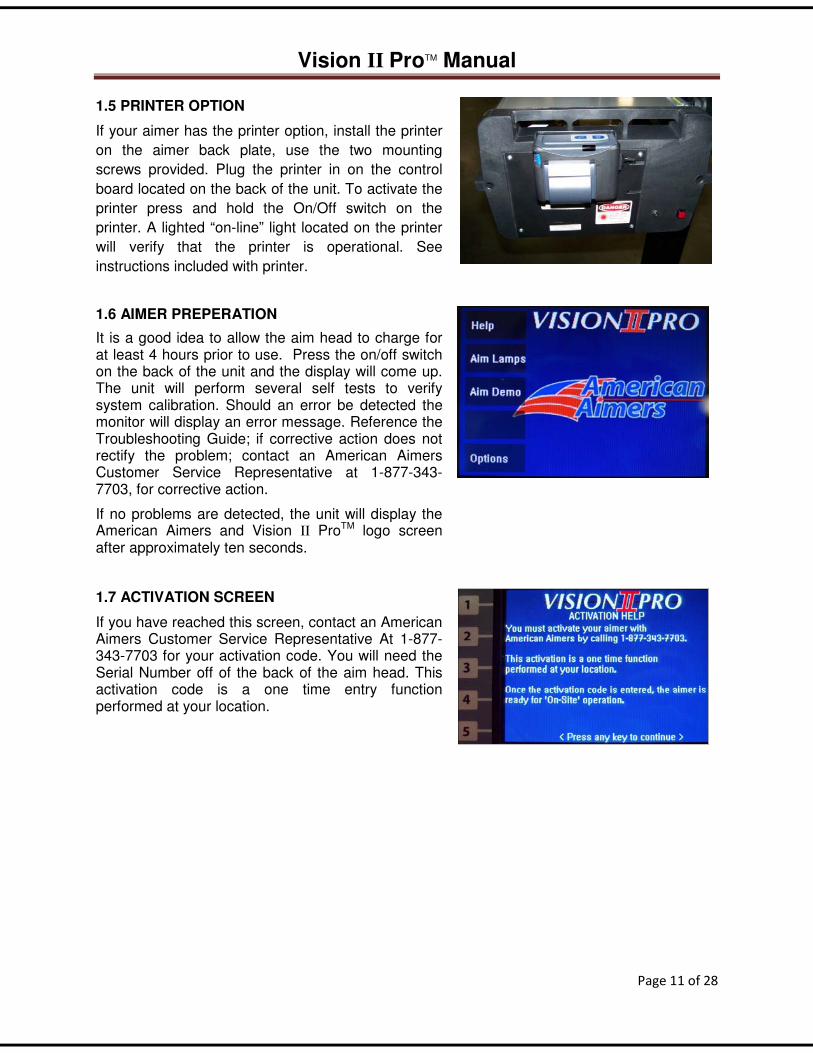
1.5 PRINTER OPTION
If your aimer has the printer option, install the printer
on the aimer back plate, use the two mounting
screws provided. Plug the printer in on the control
board located on the back of the unit. To activate the
printer press and hold the On/Off switch on the
printer. A lighted “on-line” light located on the printer
will verify that the printer is operational. See
instructions included with printer.
1.6 AIMER PREPERATION
It is a good idea to allow the aim head to charge for at least 4 hours prior to use. Press the on/off switch on the back of the unit and the display will come up. The unit will perform several self tests to verify system calibration. Should an error be detected the monitor will display an error message. Reference the Troubleshooting Guide; if corrective action does not rectify the problem; contact an American Aimers Customer Service Representative at 1-877-343-7703, for corrective action.
If no problems are detected, the unit will display the American Aimers and Vision II ProTM logo screen after approximately ten seconds.
1.7 ACTIVATION SCREEN
If you have reached this screen, contact an American Aimers Customer Service Representative At 1-877-343-7703 for your activation code. You will need the Serial Number off of the back of the aim head. This activation code is a one time entry function performed at your location.

Vision II ProTM Manual
Page 12 of 28
The Aimer Activation Code unlocks your Vision II ProTM Aiming System. Enter the activation code provided by American Aimers. The number to be changed is indicated with a red cursor. Using the plus/minus buttons change the number to the correct value, and then push next. The cursor will move to the next number, continue until all numbers are entered then press the Finish button.
Once the activation code is entered, the aimer is ready for “On-Site” preparation.
OPTIONS SCREEN
The Vision II ProTM has been calibrated for optical accuracy at the factory; however, you must input certain settings to tailor the aimer to your facility. The OPTIONS menu buttons will allow the operator to:
1. Determine unit of measurement, inches or centimeters.
2. Enter Floor slope for each of the aiming areas.
3. Adjust aim OK window as desired.
4. Select desired aiming method.
1.8 SELECT MEASUREMENT
From the OPTIONS Screen, press the IN/CM button. This will allow the user to select either inch increments, or centimeter increments. When the desired measurement is displayed as active, press *SAVE* to continue.

Vision II ProTM Manual
Page 13 of 28
1.9 SET-UP AIMING BAYS
For aiming areas select floor surfaces that are reasonably level. Avoid extremes and variable slopes caused by floor drains.
From OPTIONS screen, press BAYS button.
1.10 SET NUMBER OF BAYS
This menu allows the operator to select from one to fifteen areas to be designated as aiming bays.
Enter the number of separate aiming bays by pressing the “PLUS” and “MINUS” buttons. When the number displayed is the number of separate aiming areas used, press the “NEXT” button to continue with aimer preparation.

Vision II ProTM Manual
Page 14 of 28
SECTION TWO
2.1 SET FLOOR SLOPE
Since few shop areas have the same floor slope, the floor slope of each aiming bay must be individually measured and entered. A model G2 split image transit is provided to measure floor slope.
This function allows changing the floor slope for each
bay. To determine the floor slope of the aim bay area,
use the G2 split image transit and target provided.
Place the transit at the front wheel (either side) of the
vehicle (A) and place the target at the rear wheel (B) of
the same side. Looking through the viewing window on the top of the transit (C) turn the small
thumb screw knob (D) until the black lines on the target are in a straight line. Turn the level
indicator dial (E), on side of transit, until the bubble is centered (F). Floor slope reading is
indicated by level/indicator dial (E). A plus (+) reading indicates vehicle is nose high. Enter the
value measured by using the “Plus” button (Button 2) for a plus reading, or “Minus” button
(Button 3) for a minus (-) reading. Reading on level indicator dial should be rounded up to the
nearest (0.1) of degree. (See instruction sheet with transit for additional details). Press and hold
the appropriate button (Button 2 or Button 3) until the proper value is shown at the bottom of the
screen. When the proper value is displayed, press the “NEXT BAY” button, (Button 4), to enter
the floor slope values for other aiming bays, repeat the previous procedure for each bay. Press
the “FINISH” (Button 5) to exit bay setup and save new values.

Vision II ProTM Manual
Page 15 of 28
2.2 Conversion Chart
CONVERSION CHART
Degrees to Inches
Degrees Inches
0.1º +/- at 25 Feet 0.523" +/-
0.2º +/- at 25 Feet 1.046" +/-
0.3º +/- at 25 Feet 1.569" +/-
0.4º +/- at 25 Feet 2.092" +/-
0.5º +/- at 25 Feet 2.615" +/-
1% Deviation 0.6º +/- at 25 Feet 3.138" +/- 1% Deviation
0.7º +/- at 25 Feet 3.661" +/-
0.8º +/- at 25 Feet 4.184" +/-
0.9º +/- at 25 Feet 4.707" +/-
1.0º +/- at 25 Feet 5.230" +/-
1.1º +/- at 25 Feet 5.753" +/-
1.2º +/- at 25 Feet 6.276" +/-
1.3º +/- at 25 Feet 6.799" +/-
1.4º +/- at 25 Feet 7.322" +/-
1.5º +/- at 25 Feet 7.845" +/-

Vision II ProTM Manual
Page 16 of 28
2.3 AIM OK WINDOW
The AIM OK WINDOW defines the maximum allowable plus (+) or minus (-) measurement from zero of the horizontal and vertical aim axis at twenty-five (25) feet (7.6 meters). Lamps which measure within the allowable limits will register an “AIM OK” indicator at bottom of screen.
At the “OPTIONS” screen press the “AIM OK” button, (Button 3). At the “Aim OK Limit-Horizontal” screen, use the increase or decrease buttons to get the desired value, press the “NEXT” button
At the “OPTIONS” screen press the “AIM OK” button, (Button 3). At the “Aim OK Limit-Horizontal” screen, use the increase or decrease buttons to get the desired value, press the “NEXT” button.
At the Aim OK Limit-Vertical Screen, use the increase or decrease buttons to get the desired value, press the *SAVE* button.

Vision II ProTM Manual
Page 17 of 28
SECTION THREE
3.1 AREA/VEHICLE SETUP
The aiming area floor should be relatively clean and dry with no unusually excessively uneven areas which could affect the positioning of the vehicle or aimer.
Drive the vehicle to be checked into the aiming area, set the parking brake.
Vehicle preparation should include the following:
� Remove ice or mud from under fenders.
� See that no tire is noticeably deflated.
� Check vehicle springs for sag or broken leaves.
� See that there is no unusual load in the vehicle.
� Check functioning of “level ride” control, if applicable.
� Clean lamp lenses.
� Check for bulb burn-out, proper beam-switching, and moisture condensation inside headlamp assembly. If condensation present, replace lamp assembly.
� Stabilize suspension by rocking vehicle sideways.
Although the Vision II ProTM Aimer can “aim” the headlamps of a vehicle with the motor idling, it is recommended that the engine be turned off during the aiming process. The vehicle headlamps must be on. Locate the horizontal and vertical adjustment screws. In most cases the hood will need to be raised to access the adjustment screws.

Vision II ProTM Manual
Page 18 of 28
SECTION FOUR
4.1 SELF TEST
This feature is a diagnostic routine initiated by the computer at power up. The computer checks various operation functions, active memory, calibration, any installed options and video system.
The Vision II Pro™ is designed so that once the factory calibration has been performed the unit cannot become “un-calibrated” unless the unit has sustained physical damage. The calibration is checked as a part of the power-up self test.
If a calibration problem is noted, the monitor will display the error. Should the monitor display an error message upon start-up, reference the trouble-shooting guide, if corrective action does not rectify the problem; contact an American Aimers Customer Service Representative.
4.2 PRINTER OPTION
The optional printer provides hard copy documentation of before measurements and after aim alignment verification.
4.3 ALIGNMENT TRACK
An alignment track is provided with Vision II Pro™ to assure greater accuracy and repeatability. When placed under the front set of wheels of aimer it will roll straight and true over dirt and cracks. (Recommended for best results).

Vision II ProTM Manual
Page 19 of 28
4.4 CALLIBRATION PROCESS
The Vision II ProTM has been calibrated at the factory. However, it is recommended that you verify calibration before using your headlight aimer for the first time and on a monthly basis. There are three things that get calibrated during this process (1) Internal Digital Level (2) Vehicle Miss-Alignment Sensor (3) Vehicle Centerline Laser. To get started, from the Main Menu select the Options button (5) then select the CAL button (4).
STEP 1
Using a 5/32” T-Handle or Allen wrench loosen the set screw on the wheel cam. Adjust the cam until the vertical bubble vial on the top of the aim head is level, then tighten set screw.
STEP 2
Locate the calibration marks located on the back of the LCD screen and rotate the bezel until the 2 marks are perfectly aligned as shown.
STEP 3
Rotate the laser knob on the side of the bezel and verify the laser dot hits the 2 calibration targets on the top of the aimer case as shown. If adjustment is needed, you can adjust the set screws on the side of the laser knob until the dot hits both calibration targets.
Front Laser Target

Vision II ProTM Manual
Page 20 of 28
STEP 4
Verify that the bubble in the level vial is still level. Then Verify the bezel calibration marks are perfectly aligned and the Laser dot is hitting both calibration targets, then push button (5) Save. The calibration is stored in the internal memory and the aimer is ready for use.
Rear Laser Target

Vision II ProTM Manual
Page 21 of 28
SECTION FIVE
5.1 AIM LAMPS
From the main menu, press the “AIM LAMPS”
button (2).
5.2 ALIGN AIMER
Roll the aimer to the center of the vehicle and activate the centering laser by pressing button (3). When the alignment laser is energized, the aimer will continue to beep and display the message “LASER ON” at the bottom of the monitor screen. Rotate the LCD display to position the laser dot on the centerline point of the vehicle on the windshield (Rear view mirror, Laser target). Next, position laser on a point representative of the centerline of vehicle (Bumper, Hood Ornament, Center of Grill or point on facia) adjust the LCD display and roll aimer right to left until the laser is intersecting both center points by turning the laser knob up and down. Turn laser off button (4) then press the next button (5) this will save the offset value for this aim.

Vision II ProTM Manual
Page 22 of 28
5.3 SET BAY NUMBER
The number displayed in the middle of the screen is the active bay. To change to a different aiming bay, press the “PLUS” button, to increase the value or the “MINUS” button to decrease the value until the desired aiming bay number is displayed. When the desired aiming bay number is displayed, press the “NEXT” button (5). The next screen will display “Position Aimer” and will energize the center lamp laser.
NOTE: If only one bay is entered this screen will not be displayed.
5.4 POSITION AIMER TO LAMP (PASSENGER SIDE)
At this screen the lamp alignment laser is energized and will continue to beep and the screen will display the message “LASER ON”. Roll the aimer in front of the Passenger Side headlamp, place laser target sticker on lamp identifying the lamp optical center or fiduciary mark. Place laser on the middle of sticker. Set the Brake Handle. Select the lamp type to be aimed LOW/HIGH/VOL/VOR/FOG. After the headlamp type is selected it will de-energize the laser.
REMOVE LASER LOCATOR STICKER
Aim Lamp
The selected lamp type is displayed across the top of the aim screen above the lamp pattern. The approximate Candela “CD” (brightness) value and the measurement of the aim-point are displayed at the bottom of screen, these numbers represent how far the aim is off at 25’ in front of the vehicle. The value is either in inches or centimeters depending on what has been selected in the main menu screen. Adjust lamp as indicated on the screen, if aim is correct, the aimer will beep and you will get an **AIM OK** message on the display. NOTE: The hash marks on the Horizontal Line represent 2 inches between the Lines at 25’. The hash marks on the Vertical Line represent 4” inches between lines at 25’ feet.

Vision II ProTM Manual
Page 23 of 28
If the printer option is installed, press the (PRINT) button (4). The operator can generate a printout of the current aim information.
Press the “NEXT” button (5). The aiming cycle for that lamp is complete and the aimer displays instructions to move the aimer to the driver side lamp.
NOTE: PRESSING THE “NEXT” BUTTON (5) ENERGIZES THE LAMP CENTERING LASER
5.5 POSITION AIMER TO LAMP (DRIVER SIDE)
At this screen the lamp alignment laser is energized and will continue to beep and the screen will display the message “LASER ON”. Roll the aimer in front of the Driver Side headlamp, place laser target sticker on lamp identifying the lamp optical center or fiduciary mark. Place laser on middle of sticker. Set the Brake Handle. Select the lamp type to be aimed LOW/HIGH/VOL/VOR/FOG. After the headlamp type is selected it will de-energize the laser.
AFTER CENTERING, REMOVE LASER LOCATOR STICKER
Aim Lamp
The selected lamp type is displayed across the top of the aim screen above the aim pattern. The approximate Candela “CD” (brightness) value and the measurement of the aim point are displayed at the bottom of screen, these numbers represent how far the aim is off at 25’ in front of the vehicle. The value is either in inches or centimeters depending on what has been selected in the main menu screen. Adjust lamp as indicated on the screen, if aim is correct, the aimer will beep and you will get an **AIM OK** message on the display.
If the printer option is installed, press the (PRINT) button (4). The operator can generate a printout of the current aim information.
Press the “NEXT” button (5) after aim has been completed and the aimer will display “AIM COMPLETE” push the “NEXT” button (5) again returns you to the “MAIN MENU”.

Vision II ProTM Manual
Page 24 of 28
SECTION SIX
6.1 GLOSSARY LISTING
Activation Code - The numeric sequence used to activate the aiming unit.
Activation Screen - The screen in which the activation code is entered into the aiming unit.
Aerodynamic Headlamps - The type of headlamps that are specifically designed to fit the finished
design of the front of the vehicle. These lamps are typically sloped away at the center and the
bottom of the lamp. These lamps commonly have replaceable bulbs.
AIM OK Window - The “AIM OK” window defines the maximum allowable plus (+) or minus (-)
measurement from zero of the horizontal and vertical aim axis at twenty-five (25) feet. Lamps
which measure within the allowable limits will register an AIM OK indicator at the bottom of the
screen.
Aim Point - A predetermined point of placement within the projected light pattern measured at 25’
from the light source.
Aimer Head - The portion of the aiming unit that contains the video monitor, aimer lens, aimer
computer, lasers and housings.
Aimer Housing - The portion of the aiming unit that contains the aimer lens, and aimer computer.
Aimer Lens - The optical lens in front of the aimer housing. This lens allows the aimer to optically
simulate twenty-five feet within the confines of the aimer housing.
Aimer Preparation - The process of entering all pertinent information into the aimer at the time of
the aimer setup.
Aiming Bays - The area in which the aiming unit is to be used.
Aiming Method - A predetermined process of how the computer will calculate aim of a particular
beam pattern.
Lamp Alignment Laser - The laser mounted inside the aimer housing, to align to the optical center
of the headlamps.
Alignment Track - The floor track designed to aid the operator in keeping the aiming unit aligned
with the vehicle.
Anti-Static Video Cleaner - A spray cleaner available in most computer supply areas.
Area/Vehicle Setup - The process of preparing the aiming area and the vehicle for the aiming
process.
Auxiliary Lamps - Extra lamps on a vehicle. Also commonly called driving lamps.
Base Wheels- The wheels on the base of the aiming unit.
Beam Pattern - The image of light as it projects from a lamp.
Candela- The increment of measure for the brightness of a light.

Vision II ProTM Manual
Page 25 of 28
Computer Image Processing - The technology that allows the computer to analyze a video image
which has been translated into a digital signal.
Counterweight - The counterweight, located inside the vertical Mast tube, is designed to balance
the aim head for smooth movement and adjustment.
Counterweight Cable - The cable connecting the counterweights to the aim head side mount.
Current Bay - The aiming bay number that is displayed at the bottom of the monitor screen that has
had the floor slope entered.
Driver Side - The left side of the vehicle, or the side of the vehicle the driver is normally seated in a
vehicle built for the United States.
Face of the Headlamp - The outer lens of the lamp.
Factory Calibration - The tuning adjustment of the aiming unit at the manufacturing facility.
Fiduciary Mark - A manufacturer mark designating the optical center of a lamp.
Floor Slope - The deviation from “true level” of the floor of the aiming bay. This value is measured in
degrees.
Fog Lamps - Lamps specifically designed for use in foggy weather.
Headlamp Adjustment Screws - The screws used to adjust the position of the headlamp. There is
usually one horizontal and one vertical adjustment screw. VOL/VOR Lamps have no Horizontal
adjustment.
Help Screens - The explanatory screens that are made available to describe each step of the setup
or aiming process.
Horizontal Window - The horizontal tolerance value in which the aim of a lamp is acceptable.
Keyboard - The 5 button assembly on the left face of the aimer monitor.
Laser Alignment - The method of using the laser to align the aiming unit to the vehicle, by placing
the laser on a point representative of the centerline of the vehicle up high on vehicle rear view
mirror. Moving the laser up and down that centerline, while adjusting the Aimer and LCD Display.
This is repeated until the laser accurately follows the centerline of the vehicle.
Laser Locators - The adhesive stickers that are placed over the optical center of the lamps, so the
laser will be visible.
Level Vial - the bubble vial located on top of the aimer housing, used to level the aimer head during
calibration.
Main Menu - The main display screen on the aimer monitor.
Moisture Condensation - The vapor trapped inside a lamp. This moisture refracts the light pattern
before passing through the grid lines and lens of the face of the lamp. This causes the light
pattern to flare, making the lamp unusable.
LCD Display - The display unit on top of the aimer housing.

Vision II ProTM Manual
Page 26 of 28
Optical Center of a Lamp - The point on the face of the lamp that represents the center of the
reflective parabola of that lamp.
Passenger Side -The right side, or where the passenger normally seated in a vehicle built for the
United States.
Printer - The optional component used to create a written copy of the aiming unit statistics.
Self Tests - The software routine, run by the aimer CPU, which checks various functions of the
computer and the video systems.
Society of Automotive Engineers (SAE) - The primary administrative organization that designates
safety and operating standards to the automotive manufacturing industry.
Track Alignment - The method of attaining the same alignment angle relations between the aimer
and the vehicle through the use of a permanently mounted track system.
U.S. Headlamps - Lamps designed to U.S. recommended specifications.
Vehicle Centerline - The longitudinal center of the vehicle.
Vertical Window - The vertical tolerance value in which the aim of a lamp is acceptable.
Video System - The camera and related components, located in the aimer housing, which view the
lamp beam pattern.

Vision II ProTM Manual
Page 27 of 28
6.2 EQUIPMENT MAINTENANCE
The Vision II ProTM Image Processing Headlamp Aimer has been designed to provide a lifetime of care free performance. Maintenance is limited to occasional lubrication of the base wheels with light machine oil such as SAE 10w or similar. The aimer housing lens should periodically be cleaned with an anti-static video screen cleaner, taking care not to allow any abrasive substance to come in contact with the lens.
DO NOT ALLOW ANY SOLVENTS TO COME IN CONTACT WITH THE AIMER LENS.
DO NOT ALLOW ANY CONTACT BY WATER OR OTHER LIQUIDS TO THE AIMER OR MONITOR HOUSING.
THERE ARE NO USER SERVICEABLE COMPONENTS WITHIN THE AIMER HOUSING OR
MONITOR ASSEMBLY. REFER ANY NEEDED REPAIRS OF THESE COMPONENTS TO QUALIFIED FACTORY SERVICE PERSONNEL ONLY.
6.3 EQUIPMENT OPTICAL CALIBRATION
The Vision II ProTM Aimer’s main PC Board and Camera have been calibrated at the factory and require no further calibration on-site. The unit is designed so that once the factory calibration has been performed the unit cannot become "un-calibrated" unless the unit has sustained physical damage. The calibration is checked as part of the power-up self test to assure no problems are evident. If upon checking the calibration, the unit finds a malfunction, it will display "CALIBRATION CHECK FAILURE." If this happens, contact an American Aimers Customer Service Representative at 1-877-343-7703 for corrective action.

Vision II ProTM Manual
Page 28 of 28
6.4 EQUIPMENT SPECIFICATIONS
ELECTRICAL
Freq. Input: 60 HZ
Power: 120 VAC
MECHANICAL:
Height: 63 in.
Size (Base): 24-1/4 in. X 22 in.
Size (Aimer Head): 22 in. X 16 in.
Head box weight 27 Lbs.
Base box weight: 34 Lbs.
Mast box weight: 36 Lbs.
Total weight: 97lbs.
Track: 3 Sections (4 Ft. Each)
AMBIENT:
Operating Temp: 30-105 Degrees Fahrenheit
Storage Temp: 0-120 Degrees Fahrenheit
Humidity: 0-95% (Non-condensing)
6.5 REPLACEMENT PARTS
Vision II ProTM: Image Processing Aimer
Order #82002 Includes Floor Track & Battery Charger Ships in Three separate boxes Printer: Optional Rechargeable Thermal Printer Order # 3-100-20 Includes Charger Dust Cover: Optional Dust cover Order # 3-100-15
Battery Charger Order # 3-100-75
Battery Pack Order # 3-100-25
G2 Transit Kit Order # 0414
G2 Transit Target Order # 4-004-12
Headlamp Centering Targets
(Pkg. of 20) Order # 4-820-08
Laser Centering Targets
(Pkg. of 100) Order # 4-820-09
Thermal Printer Paper
(Pkg. of 4 rolls) Order # 0-000-00
To locate a distributor in your area, please
contact us by toll free telephone: 877-343-
7703 or Email: [email protected].