visualworks tools guide - cincomsmalltalk.com · other constructs to be entered outside visualworks...
TRANSCRIPT
Cincom Smalltalk™
Tool Guide
P46-0147-02
S I M P L I F I C A T I O N T H R O U G H I N N O V A T I O N ®
InstallGuide Cover 0107 1/17/07 10:19 AM Page 1
Copyright © 1995–2009 by Cincom Systems, Inc.
All rights reserved.
This product contains copyrighted third-party software.
Part Number: P46-0147-02
Software Release 7.7
This document is subject to change without notice.
RESTRICTED RIGHTS LEGEND:
Use, duplication, or disclosure by the Government is subject to restrictions as set forth in subparagraph (c)(1)(ii) of the Rights in Technical Data and Computer Software clause at DFARS 252.227-7013.
Trademark acknowledgments:
CINCOM, CINCOM SYSTEMS, the Cincom logo and Cincom Smalltalk logo are registered trademarks of Cincom Systems, Inc. ParcPlace and VisualWorks are trademarks of Cincom Systems, Inc., its subsidiaries, or successors and are registered in the United States and other countries. ObjectLens, ObjectSupport, Cincom Smalltalk, Database Connect, DLL & C Connect, COM Connect, and StORE are trademarks of Cincom Systems, Inc., its subsidiaries, or successors. ENVY is a registered trademark of Object Technology International, Inc. All other products or services mentioned herein are trademarks of their respective companies. Specifications subject to change without notice.
The following copyright notices apply to software that accompanies this documentation:
VisualWorks is furnished under a license and may not be used, copied, disclosed, and/or distributed except in accordance with the terms of said license. No class names, hierarchies, or protocols may be copied for implementation in other systems.This manual set and online system documentation copyright © 1995–2009 by Cincom Systems, Inc. All rights reserved. No part of it may be copied, photocopied, reproduced, translated, or reduced to any electronic medium or machine-readable form without prior written consent from Cincom.
Cincom Systems, Inc.
55 Merchant Street
Cincinnati, Ohio 45246
Phone: (513) 612-2300
Fax: (513) 612-2000
World Wide Web: http://www.cincom.com

Contents
About This Book ix
Overview .................................................................................................................... ixAudience ....................................................................................................... ix
Conventions ............................................................................................................... ixTypographic Conventions ............................................................................... xSpecial Symbols ............................................................................................. xMouse Buttons and Menus ........................................................................... xi
Getting Help ............................................................................................................... xiCommercial Licensees .................................................................................. xi
Before Contacting Technical Support ............................................... xiContacting Technical Support ..........................................................xii
Non-Commercial Licensees ..........................................................................xiiAdditional Sources of Information .............................................................................xiii
Online Help ..................................................................................................xiiiVisualWorks FAQ .........................................................................................xiiiNews Groups ...............................................................................................xiiiVisualWorks Wiki .........................................................................................xivCommercial Publications ..............................................................................xiv
Chapter 1 System Browser 1-1
Browser Navigator ....................................................................................................1-3Package View ..............................................................................................1-3Hierarchy View ............................................................................................1-3Class / Name Space View ...........................................................................1-3Instance, Class, and Variable Views ...........................................................1-4Icons in the Navigator ..................................................................................1-4
Working with the Browser .........................................................................................1-4Editing Source Code ...................................................................................1-5
Missing Source Code .....................................................................1-5Source Code Formatting ................................................................1-5
Searching ....................................................................................................1-6Drag and Drop .............................................................................................1-6
Tools Guide iii
Contents
Controlling Visibility of Methods .................................................................. 1-6Using Multiple Views ................................................................................... 1-7
Chapter 2 Code Rewrite Editor 2-1
Transformation Rules ............................................................................................... 2-2Using Meta-variables and Modifiers ........................................................... 2-2
Rewriting Methods ................................................................................................... 2-4Replacing Whole Methods ....................................................................................... 2-5
Chapter 3 Override Editor 3-1
Reviewing Overrides ................................................................................................ 3-1Selecting Overrides .................................................................................... 3-2Restoring an Overridden Definition ............................................................. 3-3Removing an Overridden Definition ............................................................ 3-3
Publishing Parcels and Packages with Overrides .................................................... 3-3
Chapter 4 Change Sets 4-1
Change Set Manager .............................................................................................. 4-2Selecting a Current Change Set ................................................................. 4-2Creating a New Change Set ....................................................................... 4-2Exploring Changes ..................................................................................... 4-3
Browse Methods ............................................................................ 4-3Edit ................................................................................................ 4-4Inspect ........................................................................................... 4-5Updating the Changes Display ...................................................... 4-5
Saving Changes ......................................................................................... 4-5Creating Install and Remove Scripts ....................................................................... 4-5Change Initialization Ordering ................................................................................. 4-6Clearing a Change Set ............................................................................................ 4-6
Chapter 5 Change List 5-1
The Change List Tool ............................................................................................... 5-1Using the Change List ............................................................................................. 5-3
Browsing a Change List .............................................................................. 5-3Reordering Items in the Change List .......................................................... 5-3Removing Items from the Change List ....................................................... 5-4Resolving Conflicts with the System ........................................................... 5-4
Using the Conflicts Filter ................................................................ 5-5Managing Conflicts ........................................................................ 5-5
Change/Change Back Changes ................................................................. 5-6
iv VisualWorks

Contents
Reverting to a Prior Version ........................................................................5-7Recovering from a Crash ............................................................................5-7Recovering Changes to a Clean Image ......................................................5-8Condensing the Change List File ................................................................5-9Changing the Change List File Name .........................................................5-9Filing Out a Set of Changes ......................................................................5-10
Chapter 6 Code Critic 6-1
Using the Code Critic ...............................................................................................6-1Filtering Results ..........................................................................................6-2Applying Transformation Rules ....................................................................6-3Limitations of the Code Critic ......................................................................6-3
Code Critic Rules .....................................................................................................6-3Bugs ............................................................................................................6-4Possible Bugs ..............................................................................................6-5Unnecessary Code .....................................................................................6-7Intention Revealing ......................................................................................6-8Miscellaneous .............................................................................................6-9
Code Transformations ............................................................................................6-11
Chapter 7 Unit Testing 7-1
Overview ..................................................................................................................7-1SUnit Framework Classes ...........................................................................7-2
Writing and Running SUnit Tests in VisualWorks .....................................................7-3Loading SUnit Support ................................................................................7-3Creating a Test Case ...................................................................................7-3
Writing Assertions in Test Methods ................................................7-3Defining Test Resources ................................................................7-5
Running Test Cases ....................................................................................7-6Strategies for Writing and Using SUnit Tests ...........................................................7-7
Extensions and Variants of SUnit in VisualWorks .......................................7-8
Chapter 8 Object Inspector 8-1
Basic Inspecting .......................................................................................................8-1Inspection Views .........................................................................................8-2
Expression Evaluator ...............................................................................................8-3Editing Objects .........................................................................................................8-4
Editing Variable Values ................................................................................8-4Copy and Paste ...........................................................................................8-5Add and Remove .........................................................................................8-5Undoing an Edit ...........................................................................................8-6
Tools Guide v
Contents
Editing with Drag-Drop ................................................................................ 8-6Protected Variables ..................................................................................... 8-7
Exploring Objects .................................................................................................... 8-8Diving into Object References .................................................................... 8-8Exploring Object Relationships ................................................................... 8-9
Siblings .......................................................................................... 8-9Parts ............................................................................................ 8-10History Views ............................................................................... 8-10Exploring a Window ..................................................................... 8-11Previewing a Visual Part .............................................................. 8-11Exploring an Object Hierarchy ..................................................... 8-11Viewing Related Objects .............................................................. 8-12
Customizing the Inspector ..................................................................................... 8-13Define the Object printOn: Representation ............................................... 8-13Add Displayed Attributes ........................................................................... 8-13Add Menu Actions ..................................................................................... 8-13Identify Hierarchies ................................................................................... 8-14Add an Inspector Page ............................................................................. 8-14Provide Custom Object Views .................................................................. 8-14
Prototype-based Programming .............................................................................. 8-14
Chapter 9 System Profilers 9-1
Loading the Profilers ................................................................................................ 9-1Opening a Profiler Window ...................................................................................... 9-2Profiling a Block of Code ......................................................................................... 9-2
Adjusting the Sample Size .......................................................................... 9-4Multi-process Profiling ................................................................................ 9-5
Analyzing the Profiler Report ................................................................................... 9-5Tree Report View ........................................................................................ 9-6Totals Report View ...................................................................................... 9-7Adjusting the Cutoff Percentage ................................................................. 9-7Contracting and Expanding the List ............................................................ 9-8Spawning a Method Browser ...................................................................... 9-9
Profiler Programmatic Interface ............................................................................... 9-9
Chapter 10 Benchmarks 10-1
Using the Benchmark Interface ............................................................................. 10-2Assembling the Test Suite ........................................................................ 10-2Selection Techniques ................................................................................ 10-2Setting the Report’s Granularity ................................................................ 10-3
Raw Measurements ..................................................................... 10-3
vi VisualWorks

Contents
Benchmark Results ......................................................................10-4Overall Suite Statistics .................................................................10-5
Choosing Types of Statistics .....................................................................10-5Setting the Report Destination ..................................................................10-6Setting the Number of Iterations ................................................................10-6
Creating a Benchmark Subclass ............................................................................10-7Benchmark Superclass .............................................................................10-7SystemBenchmark Subclass ....................................................................10-7BenchmakTable Class ...............................................................................10-8BenchDecompilerTestClass Class ............................................................10-8
Chapter 11 Class Reports 11-1
Creating Class Reports ..........................................................................................11-2Selecting the Target Classes .....................................................................11-2
Locating Coding Errors ..........................................................................................11-3Messages Sent but Not Implemented .......................................................11-4Messages Implemented but Not Sent .......................................................11-4Method Consistency .................................................................................11-5Subclass Responsibilities Not Implemented .............................................11-5Undeclared References ............................................................................11-5Instance Variables Not Referenced ...........................................................11-5Check Comment .......................................................................................11-5Backward Compatibility Message Sends ..................................................11-7Indefinite Backward Compatibility Message Sends ..................................11-7Backward Compatibility Class References ...............................................11-7
Estimating Memory Requirements .........................................................................11-7Documenting Your Code ........................................................................................11-8
Index Index-1
Tools Guide vii

Contents
viii VisualWorks

About This Book
OverviewVisualWorks documentation is designed to help both new and experienced application developers create application programs effectively using the VisualWorks® application frameworks, tools, and libraries.
This document, the VisualWorks Tool Guide, provides detailed information about the development tools and how to get the most functionality out of them.
Audience
The Tool Guide makes very few assumptions about your level of knowledge about object-oriented programming, but does assume you have a basic knowledge of computer programming in some environment.
For additional help, a large number of books and tutorials are available from commercial book sellers and on the world-wide web. In addition, Cincom and some of its partners provide VisualWorks training classes. See “Additional Sources of Information” below for a listing of some of these resources.
Conventions
We have followed a variety of conventions, which are standard in the VisualWorks documentation.
Tool Guide ix

About This Book
Typographic ConventionsThe following fonts are used to indicate special terms:
Special SymbolsThis book uses the following symbols to designate certain items or relationships:
Example Description
template Indicates new terms where they are defined, emphasized words, book titles, and words as words.
cover.doc Indicates filenames, pathnames, commands, and other constructs to be entered outside VisualWorks (for example, at a command line).
filename.xwd Indicates a variable element for which you must substitute a value.
windowSpec Indicates Smalltalk constructs; it also indicates any other information that you enter through the VisualWorks graphical user interface.
Edit menu Indicates VisualWorks user-interface labels for menu names, dialog-box fields, and buttons; it also indicates emphasis in Smalltalk code samples.
Examples Description
File > New Indicates the name of an item (New) on a menu (File).
<Return> key<Select> button
<Operate> menu
Indicates the name of a keyboard key or mouse button; it also indicates the pop-up menu that is displayed by pressing the mouse button of the same name.
<Control>-<g> Indicates two keys that must be pressed simultaneously.
<Escape> <c> Indicates two keys that must be pressed sequentially.
Integer>>asCharacter Indicates an instance method defined in a class.
Float class>>pi Indicates a class method defined in a class.
x VisualWorks

Getting Help
Mouse Buttons and MenusVisualWorks supports a one-, two-, or three-button mouse common on various platforms. Smalltalk traditionally expects a three-button mouse, where the buttons are denoted by the logical names <Select>, <Operate>, and <Window>:
These buttons correspond to the following mouse buttons or combinations:
Getting HelpThere are many sources of technical help available to users of VisualWorks. Cincom technical support options are available to users who have purchased a commercial license. Public support options are available to both commercial and non-commercial license holders.
Commercial LicenseesIf, after reading the documentation, you find that you need additional help, you can contact Cincom Technical Support. Cincom provides all customers with help on product installation. For other problems there are several service plans available. For more information, send email to [email protected].
Before Contacting Technical SupportWhen you need to contact a technical support representative, please be prepared to provide the following information:
<Select> button Select (or choose) a window location or a menu item, position the text cursor, or highlight text.
<Operate> button Bring up a menu of operations that are appropriate for the current view or selection. The menu that is displayed is referred to as the <Operate> menu.
<Window> button Bring up the menu of actions that can be performed on any VisualWorks window (except dialogs), such as move and close. The menu that is displayed is referred to as the <Window> menu.
3-Button 2-Button 1-Button
<Select> Left button Left button Button
<Operate> Right button Right button <Option>+<Select>
<Window> Middle button <Ctrl> + <Select> <Command>+<Select>
Tool Guide xi

About This Book
• The version id, which indicates the version of the product you are using. Choose Help > About VisualWorks in the VisualWorks main window. The version number can be found in the resulting dialog under Version Id:.
• Any modifications (patch files) distributed by Cincom that you have imported into the standard image. Choose Help > About VisualWorks in the VisualWorks main window. All installed patches can be found in the resulting dialog under Patches:.
• The complete error message and stack trace, if an error notifier is the symptom of the problem. To do so, select copy stack in the error notifier window (or in the stack view of the spawned Debugger). Then paste the text into a file that you can send to technical support.
Contacting Technical Support Cincom Technical Support provides assistance by:
Electronic MailTo get technical assistance on VisualWorks products, send email to [email protected].
WebIn addition to product and company information, technical support information is available on the Cincom website:
http://supportweb.cincom.comTelephone
Within North America, you can call Cincom Technical Support at (800) 727-3525. Operating hours are Monday through Friday from 8:30 a.m. to 5:00 p.m., Eastern time.
Outside North America, you must contact the local authorized reseller of Cincom products to find out the telephone numbers and hours for technical support.
Non-Commercial LicenseesVisualWorks Non-Commercial is provided “as is,” without any technical support from Cincom. There are, however, on-line sources of help available on VisualWorks and its add-on components. Be assured, you are not alone. Many of these resources are valuable to commercial licensees as well.
The University of Illinois at Urbana-Champaign very kindly provides several resources on VisualWorks and Smalltalk:
xii VisualWorks

Additional Sources of Information
• A mailing list for users of VisualWorks Non-Commercial, which serves a growing community of VisualWorks Non-Commercial users. To subscribe or unsubscribe, send a message to:
with the SUBJECT of "subscribe" or "unsubscribe". You can then address emails to [email protected].
• A Wiki (a user-editable web site) for discussing any and all things VisualWorks related at:
http://www.cincomsmalltalk.com/CincomSmalltalkWiki
The Usenet Smalltalk news group, comp.lang.smalltalk, carries on active discussions about Smalltalk and VisualWorks, and is a good source for advice.
Additional Sources of InformationThis is but one manual in the VisualWorks library. The Cincom Smalltalk publications website:
http://www.cincomsmalltalk.com/documentation/
is a resource for the most up to date versions of VisualWorks manuals and additional information pertaining to Cincom Smalltalk.
Online HelpVisualWorks includes an online help system. To display the online documentation browser, open the Help pull-down menu from the VisualWorks main menu bar and select one of the help options.
VisualWorks FAQAn accumulating set of answers to frequently asked questions about VisualWorks is being compiled in the VisualWorks FAQ, which accompanies this release and is available from the Cincom Smalltalk documentation site.
News GroupsThe Smalltalk community is actively present on the internet, and willing to offer helpful advice. A common meeting place is the comp.lang.smalltalk news group. Discussion of VisualWorks and solutions to programming issues are common.
Tool Guide xiii

About This Book
VisualWorks WikiA wiki server for VisualWorks is running and can be accessed at:
http://wiki.cs.uiuc.edu:8080/VisualWorksThis is becoming an active place for exchanges of information about VisualWorks. You can ask questions and, in most cases, get a reply in a couple of days.
Commercial PublicationsSmalltalk in general, and VisualWorks in particular, is supported by a large library of documents published by major publishing houses. Check your favorite technical bookstore or online book seller.
xiv VisualWorks

1
System BrowserThe principal programming tool in VisualWorks is the System Browser. You use it for “browsing” the code library, writing, editing, organizing, and other source code related operations. The browser also provides special-purpose tools for refactoring, rewriting, checking, and testing code, some of which are described in other chapters.
To open a browser, choose Browse > System or click on the Browser icon in the VisualWorks Launcher.
The System Browser provides both a Package and a Hierarchy view. To change the primary view for a browser, click the tab for that view.
Tools Guide 1-1

System Browser
Depending on the current view, the various lists show different items. It will take some experimentation and experience to get comfortable with the browser, but the following comments will guide your learning.
The browser window is composed of a navigator and a set of code tools. You select a view in the navigator by clicking on upper row of tab control buttons. Code tools are selected using the lower row of tab controls. The tab label indicates which view or tool it selects, and its current focus.
The VisualWorks system is organized as a class library. Classes are defined in an inheritance hierarchy, which you can browse by selecting the navigator’s Hierarchy tab.
For organizational purposes, classes are grouped into packages, and packages can be grouped into bundles. Packages and bundles can be saved, or “published,” as parcels, which are essentially a external file based representation of a package or bundle. This organization is described more fully in “Managing Smalltalk Source Code” in the Application Developer’s Guide.
You use the navigator to traverse the VisualWorks class library, viewing definitions for classes, namespaces, methods, and variables.
The Package and Hierarchy views each has its own <Operate> menu, offering commands that are appropriate to its contents. Many of the commands are obvious. Specific commands are explained
1-2 VisualWorks

Browser Navigator
throughout this document as the operation is discussed. For details on individual menu functions, view the online help available from the browser’s Help menu.
Browser NavigatorThe different parts of the browser’s navigator provide different views of the system. Here is a brief summary of their function and use:
Package ViewThe VisualWorks library is organized into packages and bundles. Each code definition is contained in a package, and can be viewed by selecting the package. Packages can also be grouped into bundles and the contained definitions browsed. The browser displays packages when Package tab is selected in the Browser.
When Store is loaded, packages and bundles support code revisioning and related mechanisms to assist in source code management. For information about working with packages, refer to the VisualWorks Source Code Management Guide.
Note that the use of packages has now replaced the use of class categories and parcels as units of organization, as they were used in previous versions.
Hierarchy ViewOccasionally it is useful to explore a class in terms of the other classes from which it inherits behavior, or that inherit behavior from it. The navigator allows you to do this by displaying the hierarchy of the selected class.
To view the entire class hierarchy, start by selecting class Object. You can then find and browse a class by navigating through the hierarchy to it. Although this is seldom very useful, it can be instructive.
Class / Name Space ViewClasses and name spaces are defined in packages, so the contents of the Class / Name space view depend upon the selected Package.
In addition to having a superclass, each class is defined in a name space. A name space is a name resolution scope for name space, class, and shared variable names. Typically, you create your own name space and then create your applications within that name space.
Tools Guide 1-3
System Browser
When the class hierarchy view is selected, this view shows the containing package for the selected item.
Instance, Class, and Variable ViewsThe Instance, Class, Shared Variable and Instance Variable tabs toggle the contents of the method category and method/variable views, selecting whether the categories and definitions of instance methods, class methods, shared or instance variables are shown. In some situations, such as when a namespace is selected that has only shared variables defined in it, only one of the buttons, in this case Shared Variables, is shown. Usually, any of the buttons can be selected, even though there may be no entries for that view.
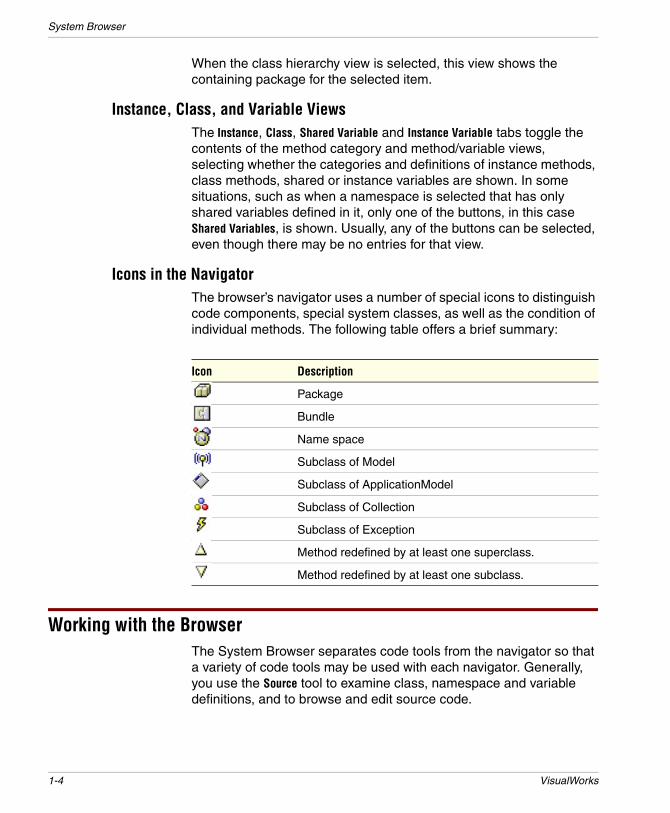
Icons in the NavigatorThe browser’s navigator uses a number of special icons to distinguish code components, special system classes, as well as the condition of individual methods. The following table offers a brief summary:
Working with the BrowserThe System Browser separates code tools from the navigator so that a variety of code tools may be used with each navigator. Generally, you use the Source tool to examine class, namespace and variable definitions, and to browse and edit source code.
Icon Description
Package
Bundle
Name space
Subclass of Model
Subclass of ApplicationModel
Subclass of Collection
Subclass of Exception
Method redefined by at least one superclass.
Method redefined by at least one subclass.
1-4 VisualWorks

Working with the Browser
The browser includes features for automated code refactoring (refer to “Refactoring,” in the Application Developer’s Guide, for details). For advanced development, the browser also provides special tools for code checking, rewriting, and unit testing, which are described in other chapters.
To encourage learning and experimentation, each operation in the browser can be reversed with the Undo function (on the Browser menu).
Editing Source CodeThe Source code tool in a System Browser is where you do most writing and editing of your application’s class and method definitions. Common editing operations, such as cut, paste, find and replace, are available on the <Operate> menu for this pane.
When you select a package but no class, a class definition template is displayed. Similarly, when you select a protocol but no method, a method definition template is displayed. To create a new class or method, edit the template with the appropriate definition. When you have edited a definition, you need to save, or accept, your changes. Select Accept from the code pane <Operate> menu.
Missing Source CodeYour Smalltalk image is associated with a sources file, as described in the Application Developer’s Guide. If the sources file is not correctly identified in the Settings Tool, or your VisualWorks home directory is not correctly set, or if the sources simply are not available, you may see code in the browser with a comment explaining that it is decompiled code. If you see this comment, set the home directory and/or edit the Source Files page of the Settings Tool, making sure the .sou file name agrees with the image name. (To open the Settings Tool, choose System > Settings in the Launcher window.)
Source Code FormattingTo format a method using the browser’s integrated code formatter, select Format from the source code tool’s <Operate> menu.
Many of the browser’s refactoring commands also invoke the code formatter, so you should expect a formatting change any time you refactor a method.
Tools Guide 1-5

System Browser
The formatting rules are user-accessible and may be changed. The rules are located in class RBConfigurableFormatter, and they may be changed using a special tool. To set the browser to use the configurable formatter by default, evaluate:
RBProgramNode formatterClass: RBConfigurableFormatterTo open configuration the tool, evaluate:
FormatterConfigurationTool openThe Configuration Tool presents about 20 separate rules. When changing a rule, you must Accept the changed value using the <Operate> menu in the value’s input field. To examine the effects of the rules on a test method, click on the tool’s embedded Format button. To save any changes you make to the rules, click on the OK button.
Method source in the browsers may also be color coded. To enable color coding, load the RBCodeHighlighting parcel (it can be found in the Parcel Manager’s Environment Enhancements category).
SearchingThe navigator tool bar includes an entry field to do a quick search by name for classes, variables, or methods:
To find a class, simply enter its name and select Accept from the <Operate> menu, or press the <Return> key. To find a method, enter its name, preceded by the # (pound) character. Wildcard searches are possible using the * (asterisk) character.
Drag and DropTo reorganize code, you can drag and drop methods on classes or protocols; protocols on other classes or on protocols; classes on other categories; and categories on other categories.
Controlling Visibility of MethodsBy default, the browser’s method list only displays those methods belonging to the currently selected class and protocol. Several options are provided for controlling and expanding the visibility of methods.
1-6 VisualWorks

Working with the Browser
When a class is selected, the browser may optionally be set to show all methods in the class when no protocol is selected. To enable this option, select Show all Methods when No Protocols Selected on the Browser page of the Settings Tool.
Just as it is often useful to see class inheritance using the Hierarchy view, so too it is often useful to see inherited methods. To expand the visibility of the Method List to include inherited methods located in a superclass, select the name of the superclass from the Method > Visibility menu. This setting remains active until you navigate to another class.
To fix the initial visibility setting so that it remains active while viewing different classes, select Show All Inherited or Show All Inherited Except for Object. To disable the expanded visibility, choose Show No Inherited.
Using Multiple ViewsThe System Browser can have with multiple active “views” on a method. For example, while editing one method, you can switch to a new view to look up some value in another method, and then return back to your edited method without opening a new browser.
To create a new view, use View > New or corresponding icon in the browser’s tool bar. Select the entries on the View menu to toggle rapidly between the different views you’ve created. Use View > Remove to delete the current view.
Tools Guide 1-7

System Browser
1-8 VisualWorks

2
Code Rewrite EditorThe rewrite rule editor, which is integrated into the System Browser, enables you to create search and replace patterns that work at the method’s structural level. Unlike simple string matching, these patterns are applied to the method’s parse tree.
The rewrite tool uses a special syntax to specify a transformation rule. When a transformation rule is applied, it affects the method(s) selected in the browser’s navigator. You may specify a single method, or any number of methods, protocols, or classes as the target of a single transformation.
The rewrite editor is available whenever you select the Rewrite tab of the browser’s code tool. Specify a search pattern in the upper input area of the tool, and a replacement pattern in the lower area.
Use the Search... button to locate all occurrences of the search pattern in the method, protocol, or classes selected in the browser navigator. Results are displayed in a new browser. No code is changed.
Tools Guide 2-1
Code Rewrite Editor
Use the Replace... button to locate all occurrences of the search pattern in the specified code, and then open a transformation editor on all matching methods. The transformation editor allows you to apply the rewrite rule.
The rewrite editor enables you to write your own transformation rules. A set of pre-defined transformation rules are also available, but as part of the Code Critic.
Transformation RulesA transformation rule is specified using a pattern that is iteratively applied to each expression in each method this is selected for rewriting.
Pattern-matching is performed against each node in the method’s parse tree. When the rewrite editor finds a node in the method’s parse tree that matches the node specified in the parse tree generated from the search pattern, it applies a transformation.
You may also specify a pattern for a whole method, rather than just a single node (for details, see Replacing Whole Methods).
When the rewrite tool scans for parse nodes that match the search pattern, it first converts the pattern into a collection of meta-variables. Each meta-variable is identified in the search pattern using a ` character.
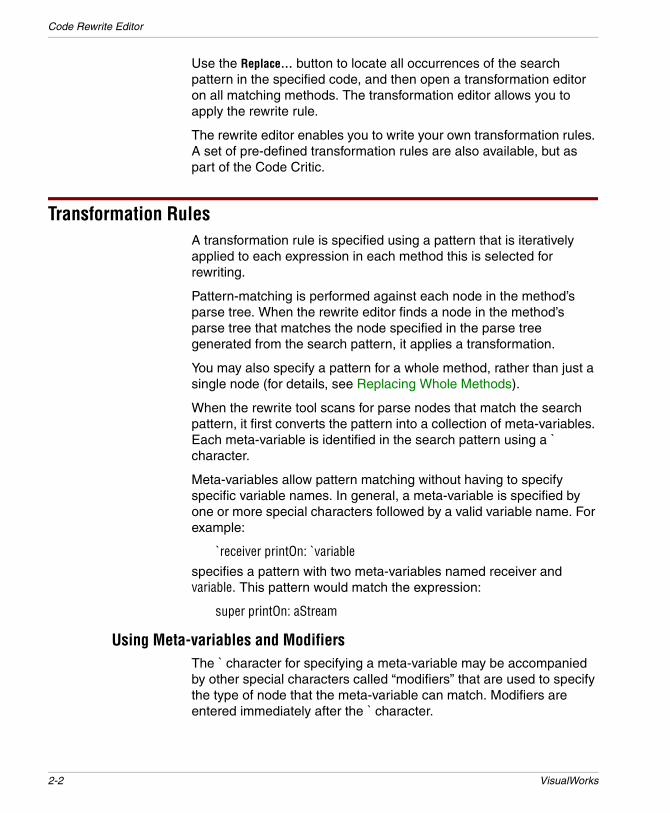
Meta-variables allow pattern matching without having to specify specific variable names. In general, a meta-variable is specified by one or more special characters followed by a valid variable name. For example:
`receiver printOn: `variablespecifies a pattern with two meta-variables named receiver and variable. This pattern would match the expression:
super printOn: aStream
Using Meta-variables and ModifiersThe ` character for specifying a meta-variable may be accompanied by other special characters called “modifiers” that are used to specify the type of node that the meta-variable can match. Modifiers are entered immediately after the ` character.
2-2 VisualWorks

Transformation Rules
For example, since it is often impractical to specify every possible match exactly, the modifier @ may be added after the ` character to specify a match for any type of node in the method’s parse-tree.
Suppose, to sustain the example, we want to replace every occurrence of the message printOn: with the message print:. Using @, we can specify a general pattern:
`@receiver printOn: `@variablewould now match the expression:
self name printOn: aStreamSlight variations of this pattern can be used to replace keyword messages with several arguments. Messages taking block arguments can be easily manipulated in this manner.
For example, to change:
maybeNil isNil ifTrue: [trueBlock] ifFalse: [falseBlock]to:
maybeNil ifNil: [trueBlock] ifNotNil: [falseBlock]We would use the following rules for search and replace:
`@maybeNil isNil ifTrue: `@trueBlock ifFalse: `@falseBlock`@maybeNil ifNil: `@trueBlock ifNotNil: `@falseBlock
Note that the @ modifier is polymorphic, i.e., it matches any subtree in the node. Depending upon where it appears in the pattern, it can specify anything from an individual node to a collection of statements.
Similarly, a list of temporary variables can be matched with `@Temps, e.g.:
| `@Temps |When a match is found, it is often necessary to search inside the node for more matches. The ` character may be used twice (e.g., ``@variable) to specify this pattern-matching behavior.
The . (period) character may be used to match a statement node, thus a list of statements may be matched by using ``@.Statements.
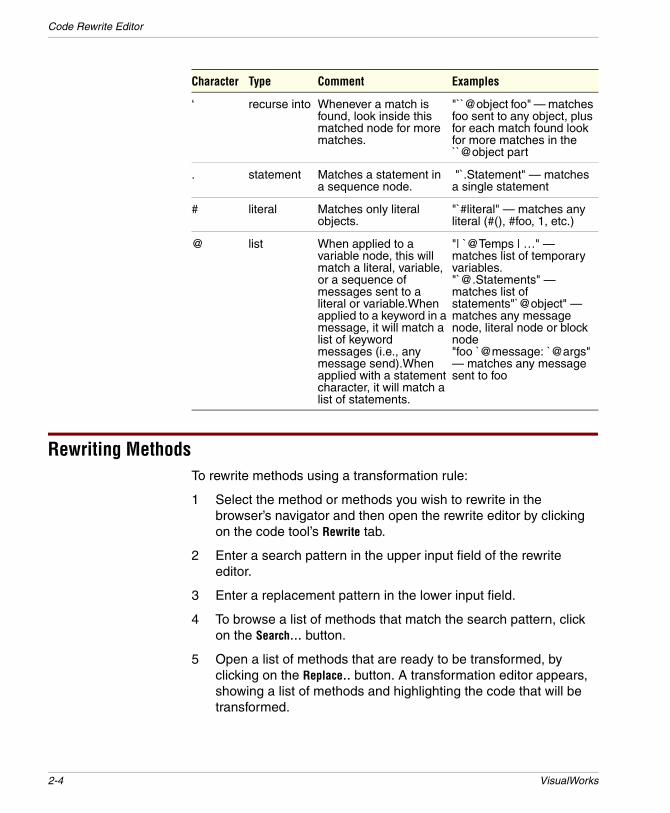
Four different modifiers are currently supported by the rewrite editor:
Tools Guide 2-3
Code Rewrite Editor
Rewriting MethodsTo rewrite methods using a transformation rule:
1 Select the method or methods you wish to rewrite in the browser’s navigator and then open the rewrite editor by clicking on the code tool’s Rewrite tab.
2 Enter a search pattern in the upper input field of the rewrite editor.
3 Enter a replacement pattern in the lower input field.
4 To browse a list of methods that match the search pattern, click on the Search... button.
5 Open a list of methods that are ready to be transformed, by clicking on the Replace.. button. A transformation editor appears, showing a list of methods and highlighting the code that will be transformed.
Character Type Comment Examples
‘ recurse into Whenever a match is found, look inside this matched node for more matches.
"``@object foo" — matches foo sent to any object, plus for each match found look for more matches in the ``@object part
. statement Matches a statement in a sequence node.
"`.Statement" — matches a single statement
# literal Matches only literal objects.
"`#literal" — matches any literal (#(), #foo, 1, etc.)
@ list When applied to a variable node, this will match a literal, variable, or a sequence of messages sent to a literal or variable.When applied to a keyword in a message, it will match a list of keyword messages (i.e., any message send).When applied with a statement character, it will match a list of statements.
"| `@Temps | …" — matches list of temporary variables. "`@.Statements" — matches list of statements"`@object" — matches any message node, literal node or block node "foo `@message: `@args" — matches any message sent to foo
2-4 VisualWorks

Replacing Whole Methods
6 To actually transform the method(s) that match the search pattern, select Execute or Execute All from the <Operate> menu in the transformation editor.
Replacing Whole MethodsThe rewrite tool also allows you to match and replace an entire method, not just single expressions. To enable entire-method transformations, select the Method check-box.
For example, you can search for methods that just return a super message, use the following pattern:
`@msg: `@args^super `@msg: `@args
To eliminate ifTrue: guard clauses, you might use this search pattern:
`@methodName: `@methodArgs| `@Temps |`@Condition ifTrue:
[`.Stmt1.`.Stmt2.`@.Statements]
with this replacement pattern:
`@methodName: `@methodArgs| `@Temps |`@Condition ifFalse: [^self].`.Stmt1.`.Stmt2.`@.Statements
Tools Guide 2-5

Code Rewrite Editor
2-6 VisualWorks

3
Override EditorThe Override List tool provides a view on overrides in the system. It is very much like the Change List tool, and most of the operations the same, so will not be repeated here (refer to Change List). There are differences, however, in command behavior that we will cover.
Reviewing OverridesTo open the an Override List showing only the overridden definitions, select Changes > Open Override List or Changes > Browse System Overrides from the System menu in the Launcher. Browse System Overrides opens a list of all overrides currently in the system. Open Override List opens an empty list to which you can selectively add parcels and/or packages containing overridden definitions.
To compare the overridden and overriding definitions, select the package to check in a browser and select:
• Package > Browse > Overrides of others, to browse method definitions that have been overridden, or
• Package > Browse > Overridden by others, to browse any methods defined in the package that have been overridden by another parcel or package.
Tools Guide 3-1

Override Editor
These options open comparison browser versions of the Override List, putting the overridden and overriding definitions side-by-side for easy comparison.
Selecting OverridesYou can select which overrides are displayed, by selecting the relevant parcels and packages. To list overrides related to a specific parcel or package, select File > Display Parcel... or File > Display Package... in the Override List. Then select the parcel or package to display in the displayed list and click OK.
To list all overrides in the system, select File > Display System Overrides. All definitions overridden by a parcel or package are then included in the list.
The check boxes at the right provide filters on the list, to help focus on specific sets of conflicts. With all boxes unchecked, all conflicts are shown. When any boxes are checked, only the items checked are shown.
3-2 VisualWorks

Publishing Parcels and Packages with Overrides
To show conflicts, select Show > Show Conflicts. The different versions of the selected item are then shown in separate panes, with conflicting code shown in red.
Restoring an Overridden DefinitionIf a definition has been overridden, and you want to restore it as the current definition in the system, use the Replay menu options. You have the option to replay a single definition, all displayed definitions, or all from the selected definition to the end of the list.
Once restored, the overridden package/parcel now “owns” the current definition, and competing definitions are removed from all the overbidding components. The parcels can now be saved, without the conflicts blocking the operation.
Removing an Overridden DefinitionAlternatively, the overridden definition may be the one that should be removed.
To remove a single overridden definition from a parcel or package, and so to remove the conflict between defining parcels or packages, select the definition in the list and choose Forget > Purge selection. The overrider now owns the definition, and the components can be saved. Note that if the overriding parcel/package is unloaded, the overridden definition will not be restored.
Other options are available for purging blocks of definitions. For example, marking definitions using the Remove menu items, and then selecting Forget > Purge these removes all of the selected definitions from their components.
Publishing Parcels and Packages with OverridesParcels and packages behave differently when publishing with overrides. The issue is how to publish code that has been overridden. What happens is:
• If a parcel contains an overridden definition, an attempt to publish will fail, and a notifier is displayed.
• If a package contains an overridden definition, an attempt to publish will succeed, although publishing binary is not allowed, and the package will include its overridden code.
Tools Guide 3-3

Override Editor
In a parcel, the result would be to publish the overriding code, and the overridden code would be lost. Rather than publish under these conditions, the operation is cancelled. To republish the parcel, you must remove the override condition, either by removing the overridden definition from the parcel, or by copying or moving the overriding definition into the parcel.
In a package, the mechanism allows keeping the overridden and the overriding code separate, and so the package can be published while retaining its original (overridden) code. To keep the original code, simply publish the package. To update the package with the overriding code, you must copy or move the code into the package.
Since publishing a package in binary creates a parcel format file, which cannot contain overridden definitions, the binary option is disabled if the code contains an overridden definition.
Due to differences in how parcels are constructed, this difference is unlikely to be removed in the future.
3-4 VisualWorks

4
Change SetsNamed change sets (or simply change sets) provide a “project-based” view of changes you make to the system. By using multiple change sets, you can keep the changes made for different applications or subsystems separate, while maintaining a single development environment. This is particularly useful if you work on multiple small projects as the same time, but do not want to maintain separate images for each.
Change set entries represent either new or changed class definitions and their methods, or individual methods that you create or change without modifying the class itself. These define a set of definitions that you can then file out as a group.
Unlike the Change List (see Change List), change sets do not record the evolution of those changes. Instead, a change set contains only the current definitions of changes assigned to the set.
Tools Guide 4-1

Change Sets
Change Set ManagerYou manage change sets by using the Change Sets Manager. In this tool, you set the current change set and access operations on change sets, using the menu options. To open the Manager, select System • Changes • Change Sets in the VisualWorks Launcher.
In addition to the list of change set names:
• The Classes column lists the number of classes in each change set that have changes to the class definition itself; filing out will include all methods.
• The Methods column indicates the number of loose methods that will be included when filing out (methods changed without changes to their classes).
Selecting a Current Change SetThe Change Set Manager always has the Default change set, plus any change sets that are defined in the image. If no change set is selected, or if Default is selected, all changes go to the default change set. Otherwise, they go to the selected change set.
To make a change set active or current, double-click on the name in the change set list, or select it and pick Set • Make Current. All changes you make to the system will then be saved in that change set.
You can also change the current change set by clicking on the change set icon on the status bar of the Launcher.
Creating a New Change SetTo add a new change set, select Set • New, or select New in the change set list <Operate> menu. Enter a name for the change set in the prompter, and click OK.
4-2 VisualWorks
Change Set Manager
To make this the current change set, double-click on its name.
Alternatively, click on the change set icon on the status bar of the Launcher, and select New Change Set.
Exploring ChangesHaving made changes that are assigned to a change set you can review them. Three menu options in the Change Set Manager Set (or <Operate>) menu to allow you to review your change set’s contents.
Change sets do not separately report changes to methods when the class that contains them is already in the change set. When you file out the new class, its methods are included. However, if you empty the change set or “forget” the class addition, successive method changes are recorded.
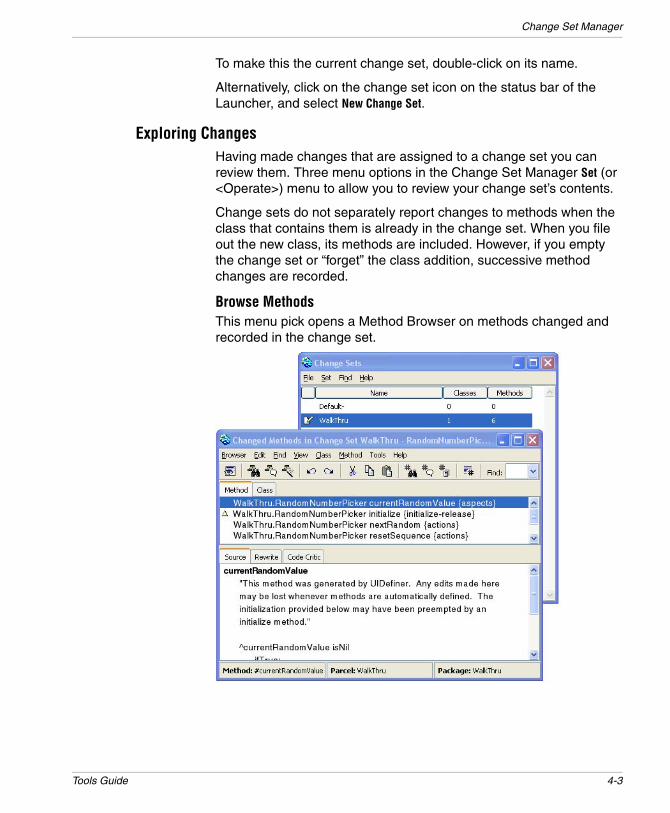
Browse MethodsThis menu pick opens a Method Browser on methods changed and recorded in the change set.
Tools Guide 4-3

Change Sets
EditThis menu pick opens an editor browser on the current change set. You can change the selected change set in the Change Set List, and the editor will update to show the changes for that change set.
The top-left pane lists classes that either have changed or contain loose methods that have changed, recorded in this change set. The top-right pane lists the named change sets, for information only; it is inactive.
The top center pane lists methods that have changed for the selected class, if any are recorded. Methods for classes whose definitions are in the change set are not listed, since a file-out will include them anyway.
You can edit the definitions in this editor, but the edits do not survive, either in the system or in the change set. To edit a definition, select it and then pick Browse or Spawn in the <Operate> menus to open a browser on the item. To remove just the one item from the change set, select Forget in its <Operate> menu.
The check boxes and radio buttons (depending on what is selected) at the bottom of the window indicate the kind of change recorded. You can change these annotations, and they are saved with the change set, but there is little value in doing so in most cases.
4-4 VisualWorks
Creating Install and Remove Scripts
InspectThis menu option opens an inspector on the change set. Here you can perform the usual inspector options.
Updating the Changes DisplayTo update an open Change Set browser after making a change to the system, select update in the <Operate> menu for a browser pane.
Saving ChangesChange sets are typically used to identify sets of changes that can then be distributed as file-out format files. Change sets are saved in source code format, and so can be browsed in the Changes List.
To write out all the changes in a change set, select the change set and select File • File Out... . You will be prompted for a file name.
As a shortcut, to file out all save sets, select File • File out All... . You will be prompted for a directory name. The directory will be created, if necessary, and a separate file-out file for each change set is written to it.
You can file out a single method by selecting it in the Change Set Editor (ChangeSet • Edit), then selecting File out as... in the <Operate> menu.
Note that, when filing out a change set that includes defining a class, all subsequent changes made to methods in that class are also (implicitly) assigned to the change set. This is true even if a different change set is “current” when those method changes are made. A file-out the first change set will include the method definitions.
Creating Install and Remove ScriptsTo assist in installing and removing the code filed-out from a change set, you can create import and removal scripts. Simply select the change set in the Change Set List, and select either ChangeSet • Import Script or ChangeSet • Remove Script.
To be effective, the scripts must be created from the change set while it is exactly the same as when the file-out was created.
Tools Guide 4-5

Change Sets
Change Initialization OrderingChange Sets have an initializationOrder instance variable which can be used to override the default class initialization ordering derived from the class hierarchy. This is useful in some complex change sets where initialization order is important.
Clearing a Change SetWhen a particular change or collection of changes is secure, so that you do not need to continue to hold it in the change set, you can remove it. For example, after filing-out a set of changes, you can purge the whole set, since you can restore them from the file-out file.
To empty all changes from the Change Set for the active project, select ChangeSet • Empty in the Change Set List.
To remove a single change from the change set, select the change in the Change Set Editor, and select forget in the item’s <Operate> menu.
4-6 VisualWorks
5
Change ListVisualWorks maintains and records a running list of changes made to the system, in the changes file. By default, the file has the same name as your image but with a .cha extension. The changes file is saved in source-code format.
The changes file records anything that changes the state of the system, such as: changes resulting from loading parcels and filing in code; added and modified class and method definitions; special doIts and related operations.
Changes are recorded as they are made, preserving a record of changes even if you exit VisualWorks without saving or if the system crashes. For this reason, the changes file provides a sure way of recovering lost work.
To work with the changes file, VisualWorks has a Change List Tool that allows you to build and manipulate a change list, which is based on the contents of the changes file, change sets, and other file-in format files containing descriptions of changes.
The Change List ToolThe Change List tool allows you to work with a change list. It provides a wide variety of operations for reading changes files, comparing the contents of files to the system, filtering the display, and installing changes into the system.
Tools Guide 5-1
Change List
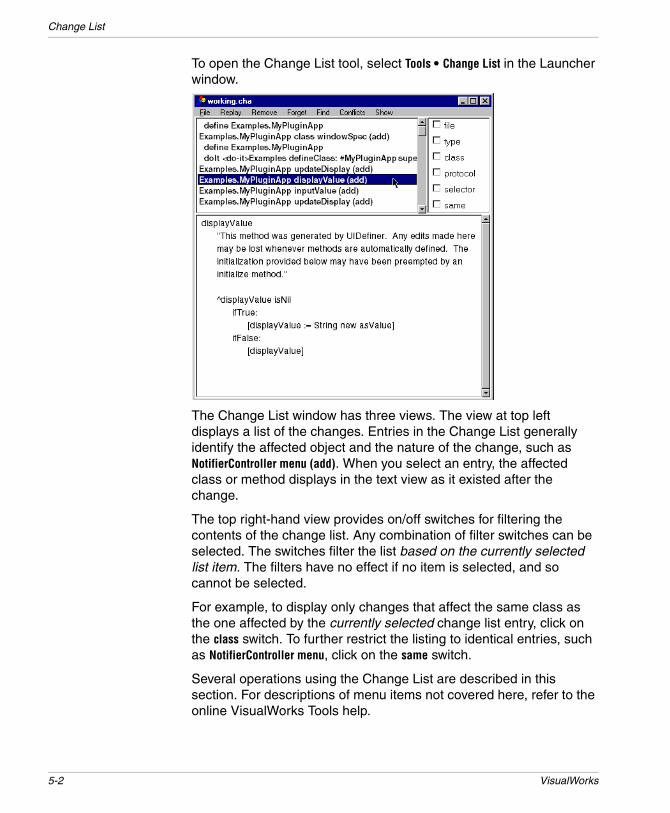
To open the Change List tool, select Tools • Change List in the Launcher window.
The Change List window has three views. The view at top left displays a list of the changes. Entries in the Change List generally identify the affected object and the nature of the change, such as NotifierController menu (add). When you select an entry, the affected class or method displays in the text view as it existed after the change.
The top right-hand view provides on/off switches for filtering the contents of the change list. Any combination of filter switches can be selected. The switches filter the list based on the currently selected list item. The filters have no effect if no item is selected, and so cannot be selected.
For example, to display only changes that affect the same class as the one affected by the currently selected change list entry, click on the class switch. To further restrict the listing to identical entries, such as NotifierController menu, click on the same switch.
Several operations using the Change List are described in this section. For descriptions of menu items not covered here, refer to the online VisualWorks Tools help.
5-2 VisualWorks

Using the Change List
Using the Change List
Browsing a Change ListThe Change List Browser is initially empty when it opens. This allows you to select what set of changes you want to view, whether in the current changes file or in some other file. To display changes, use one of the following options in the File menu:
Read File/Directory
This option reads into the browser the contents of a changes file you specify, or from all changes files in a directory you specify. If you specify a directory, the contents are added to the browser in the order read. To add files in a specific order, read them individually.
Recover Last Changes
This option reads in to the Change List Browser all changes to the system since the last image save. Use this option to recover lost work, such as from a a system crash.
Display System Changes
This option appends any changes in the current Change Set (project) to the list of changes in the browser. Unlike the Change Set browser, which displays only a summary, this shows the history of changes.
Display All System Changes
This option adds all changes in all Change Sets to the browser display.
Parcels
This option adds changes from a given parcel that is present in the system. This can be used to examine a parcel's unloaded code and its overridden extension methods as well as normal code.
Reordering Items in the Change ListSome errors may be caused by the order in which changes were made in the system. For example, one operation may require that an object be initialized to a state, but the initialization was neglected or
Tools Guide 5-3

Change List
performed too late. Rather than repeat the series of operations manually, the Change List can be used to reorder and then replay the operations.
To change the order of operations, display system changes. Select an operation item to move, click and hold it using the <Select> button, drag the item up or down in the list to an appropriate position, then release (drop) it.
You can now replay the operations to execute them in the new order.
Removing Items from the Change ListThe Remove and Forget menus provide a large number of options for selectively excluding items in the Change List for processing. For brief descriptions of each of these, refer to the VisualWorks Tools help topics.
The Remove options mark items for removal from the current list of changes. Marked items are shown in strike-out type style. Options allow you to mark either individual items or large groups of items.
Once a collection of items are marked for removal, you can remove them from the list. In the Forget menu, select either Forget these or Forget all, to remove the marked items from the change list. The difference is that Forget all removes even any marked items that are not showing at the moment due to the filtering selections; Forget these only removes those currently showing.
To clear removal markings, use the Restore... menu items in the Forget menu.
Note that removing items only removes them from the current change list, not from the change list file. You can always get back by re-reading the changes file.
Resolving Conflicts with the SystemSeveral options in the Change List tool help you assess the impact of a set of file-ins on the current system. These facilities filter changes based on their similarity or dissimilarity to the current system.
A major use of the conflicts view is to merge changes made by a collection of files, and so construct a single file containing only the desired changes. It can also be an aid in crash recovery, by filtering older changes from a changes file.
5-4 VisualWorks

Using the Change List
Using the Conflicts FilterSelecting the Show • Show conflicts splits the lower text view into two adjacent text views (vertically or horizontally, set by Show•Conflicts• Vertical view or Horizontal view). The left-hand or upper view shows the text for the selected change. The right-hand or lower view shows the text of the corresponding system entity (method or class definition, class comment or organization, etc.) or an explanatory message if this doesn't exist.
The differences between the two texts are high-lighted. This gives you a quick, graphic indication or what would be changed by filing-in a specific change.
Turning off the show conflicts filter hides the conflict text view and returns the change list view to its usual appearance.
Managing ConflictsSeveral items on the Conflicts menu allow adding or otherwise processing conflicts between the changes list and the system. The full set of menu items are briefly described in the VisualWorks Tools Help. Here we comment on a few of the more interesting options.
Tools Guide 5-5

Change List
Add system conflicts
For each displayed change that has a version in the system with which it conflicts, this option adds the corresponding system version of the change to the change list.
Add original versions
This option scans the system's source files (excluding the current changes file) and, for each displayed change for which a corresponding change exists in the sources file, add the sources file version to the change list. This is useful comparing your changes against the original sources.
Add to change set/Remove from change set
These options update the current change set to include or exclude the changes in the change list, without filing in the changes. This is useful when you have an old file-in representing a component that you wish to extract from the system. This can be used together with the System Browser's Parcel • Build • Add Changes and Parcel • Build • Remove Changes options.
Change/Change Back ChangesMethod changes check to see if they're filing in from the sources files. If so, they set the new compiled method's source pointer to the sources file, and remove the method from the current change set. This enables a technique for working with methods that you frequently change and then change back.
To revert changed-then-changed-back methods do the following:
1 Once you have a set of system changes, use Add originals to pull-in all corresponding changes from the sources files. These appear after the current changes.
2 While holding down the Shift key, choose Remove • Exact Duplicates to remove the changes in the sources files that are duplicates of the changes further up the list. Holding the Shift key down causes removal to happen at the end of the list rather than at the beginning.
3 Choose Remove • Exchange removed to select the set of source file changes that match the current system.
4 Select Forget • Forget these, and turn on Show • Show conflicts and Show • Show file to make sure that these changes are indeed on
5-6 VisualWorks

Using the Change List
the sources files and identical to the current versions in the system.
5 Select Replay • All from the top, and watch the transcript to see that each filed-in method change says “in sources file.”
Reverting to a Prior VersionDuring the course of development, a class or method may undergo several changes. The Change List tool makes it easy to see the evolution of, and to examine the details of, the code at any stage in its development. This is particularly useful when you need to see a prior version so you can change the code back.
To display the changes that have occurred since the last snapshot was taken, select Recover last changes in the <Operate> menu of the list view at the top. If you want to display changes that are in the Change Set, select Disp-lay system changes instead.
Once you have displayed the change you want to revert to, select that change and then select Replay selection in the <Operate> menu (or Replay • This Change).
To revert to a whole collection of changes, read in the necessary changes and set the filters to show exactly the changes you want to load. Then choose Repl-ay all.
Recovering from a CrashIf some change you made to the system causes it to crash, the Change List provides a way to recover changes up to, but excluding the change causing the crash. In this way it provides a powerful crash recovery tool.
To recover from a crash:
1 Launch the last saved image.
2 Open a Change List, and select File • Recover last changes.
3 Using a combination browsing and editing operations on the displayed list, remove unneeded items that may have contributed to the system crash.
This may involve a good deal of work, browsing the changes first and understanding what ultimately caused the crash, which was probably an interaction between several changes.
DoIts in particular are not usually necessary to recovering changes, and may easily contribute to system instability. To
Tools Guide 5-7

Change List
remove all doIts, select on, and then click the type checkbox. This filters the list to show only the doIts. You can then select Remove • All to clear all doIts from the list.
4 Once the list contains just those operations you wish to recover, select Replay • All from the top, or another appropriate replay option.
Recovering Changes to a Clean ImageIf your image file is damaged in a crash, you may need to recover your changes into a clean image. By “clean image” we mean a copy of the original visual.im that shipped with VisualWorks. If you have modified this image file, you will need to start with one from the distribution media.
The technique described here uses the changes file (myimage.cha) related to the damaged image. You should back up this file before proceeding. Then:
1 Backup your changes file.
2 Launch VisualWorks with the clean visual.im image file.
3 Load any parcels that were loaded in the lost image.
Parcel loading is not included in the .cha file, so they must be loaded to ensure that code required by the changes is available.
4 Save this image to a new name, different from the name of the damaged image.
If you use the same name as the damaged image, you will overwrite the changes file you need for recovering. You will be able to rename the original name later, after you have recovered your work.
5 Open a Change List (select Tools • Change List in the Launcher window), and load the changes file using File • Read file(s)... .
If your changes file is large, reading the file may be slow. Be patient.
6 Remove doIts from the change list by selecting a doIt line, clicking the Type check box to filter the list, then selecting Remove • All. Then, select Forget • Forget these to remove the doIts from the list.
Remove • All marks all of the doIts for removal. To unmark one, select it and choose Forget • Restore selection.
5-8 VisualWorks

Using the Change List
Remove at least doIts that you invoked from a workspace or browser, since this might fail. In general, you may be able to remove all doIts.
7 Uncheck Type, to show all the remaining changes.
8 Examine the list, especially near the end, to see if there is a change that might have caused the damage. If so, remove it from the list using Remove • Selection and Forget • Forget These.
There are a variety of changes you might wish to remove. For example, a method may be defined several times, which is okay as long as the last definition is the one you want.
9 Select Replay • All from the top, to restore all of your changes.
10 Save the resulting image.
At this point you have recovered your changes into the new image. Test it, and if you are satisfied that it is stable, you may save it to the original image name. Note that the old changes file will then be overwritten, so you will not be able to repeat the process using it.
It frequently takes a few tries to get exactly what you want into the restored image, so repeat the procedure until you have just what you want.
Condensing the Change List FileIn a large development effort, spanning months or years of programming, the changes file can become very large. To condense it so that it contains only the most recent change for each method, select System • Changes • Condense Changes in the Visual Launcher or evaluate the expression SourceFileManager default condenseChanges. Changes involving anything other than a method—such as a class addition or redefinition—will also be purged from the file permanently. VisualWorks will assist you by making a backup copy of the changes file before condensing it.
Changing the Change List File NameBy default, the change list is written to a file with the same file name as the image file, but with a .cha extension. It is seldom necessary to use a different file name. If you do need to change the file name, edit the file name in the Settings Tool, Source Files page.
Tools Guide 5-9

Change List
Filing Out a Set of ChangesWhen the code you want to share consists of fragments from many different classes and categories, it may be more convenient to use the Change List to Write file with the desired code. Begin by loading all changes into the Change List tool, as described in Browsing a Change List.
Next, remove the irrelevant changes. For example, doIts are likely candidates for removal because they rarely affect the image in a lasting way. Also, use Remove • Old Versions to remove duplicate entries, as when a method has undergone several changes, and leave only the last entry in each case. Use Remove • Selection and Remove • All to mark one or more changes for deletion, then use Forget to erase them from the list. Use the filter switches to control the affected range of entries.
For example, to remove all doIts, begin by selecting any doIt. Then turn on the type switch so all of the doIts are listed. Select Remove all in the <Operate> menu to mark them for deletion, then Forget to erase them. Then turn off the type switch to see the remaining entries.
When the displayed list of changes is the desired set, select Write file in the <Operate> menu and supply the name of a file in which to store the code. That file can then be loaded into another image via the File in command in a File Editor or File List.
Only the displayed changes are included in a Write file operation, so if it is possible to define the minimum set of changes by using the filter switches alone, it is not necessary to Remove and Forget the nondisplayed entries.When you write selections to a file, be sure to choose a file name that is different from any file that has been read into the change list. The change list maintains pointers to the code in the files that are read in, and these pointers become invalid when you overwrite a file.
5-10 VisualWorks

6
Code CriticThe VisualWorks browser includes a Code Critic tool that may be used to screen application code for over 60 common types of bugs.
The Code Critic also provides a mechanism for applying a set of pre-defined transformation rules to your application code. These rules express “best practices” for code development, and are almost always safe to apply.
To write your own transformation rules, refer to the discussion of the Code Rewrite Editor.
Using the Code CriticTo check a class, a protocol, method or methods:
1 Use the browser navigator to set the scope of the test. Select multiple classes, protocols or methods by holding down the <Shift> key.
Tools Guide 6-1

Code Critic
2 Select the tool using the Code Critic tab control in the lower part of the browser.
The Code Critic tool presents a hierarchical list of rules. You may select the entire list, or individual rules that you wish to check against. Select multiple rules by holding down the <Shift> key.
3 With both code and the rules chosen, run the critic by clicking on the Check... button.
Once the critic finishes checking your code, it presents a list of classes/methods that failed a check. If all checks pass without error, the message No results found appears in the lower portion of the browser.
All methods that fail a check are gathered together and displayed in a results window. Results are categorized by type, with a list of rules that failed to pass followed by the number of methods that failed to pass each rule (shown inside square brackets).
To open a Method List browser on all the methods that failed to pass a given rule, select a rule in the results window and click on the Browse... button.
Use the Remove button to remove items from the results list. This feature may be helpful for keeping track of items that have been fixed.
Filtering ResultsThe Code Critic includes a mechanism for creating and applying special rule filters. These enable you to ignore a particular rule for a particular class or method.
For example, during a session with the Critic, once problems associated with certain rules have been fixed, we may want to ignore those rules during subsequent checks with the Code Critic.
To filter out an item visible in the Critic’s results list, select it and choose Add Filter from the <Operate> menu or choose Class > Add Filter from the browser menu bar.
To save the current filter set, or load another one, select Save Filters... or Load Filters... from the browser’s Edit menu. To reset the filters used by the Critic, select Clear Filters.
6-2 VisualWorks

Code Critic Rules
Applying Transformation RulesTo view the available rules, select View > Transformation Rules from the browser’s Edit menu.
Follow the same general steps for applying the rules to your code:
1 Use the browser navigator to set the scope of the transformation. Select multiple classes, protocols or methods by holding down the <Shift> key.
2 Select the individual transformation rules you wish to apply. You may select multiple rules by holding down the <Shift> key.
3 With both code and the rules chosen, run the critic by clicking on the Check... button.
Once the critic finishes checking your code, it presents a list of classes/methods that may be transformed. If all checks pass without error, the message No results found appears in the lower portion of the browser.
To preview the effects of a code transformation, select a method in the upper portion of the results window. The current version of the method and the transformed result are displayed side-by-side in the lower half of the results window.
To apply the code transformation to the highlighted method, select Execute from the <Operate> menu. To apply all the transformations in the results window, select Execute All.
Limitations of the Code CriticAs with all automated tools, not everything flagged by Code Critic is necessary a bug, rather, they are potential problems that might merit further attention. Be aware that for some rules, the Code Critic may return false positives.
Code Critic RulesThis section summarizes the rules used by the browser’s Code Critic tool. The rules are organized in five groups:
• Bugs
• Possible Bugs
• Unnecessary Code
Tools Guide 6-3

Code Critic
• Intention Revealing
• Miscellaneous
Bugs
Rule Description
Messages sent but not implemented Checks for messages that are sent by a method, but no class in the system implements such a message. These will certainly cause a doesNotUnderstand: message when they are executed.
Self/Super sends not implemented Similar to the "Message sent but not implemented" check, but only checks messages sent to self or super since these can be statically typed.
Overrides a "special" message Checks that a class does not override a message that is essential to the base system (e.g., Object>>class).
References an undeclared variable Checks for references to a variable in the Undeclared dictionary. If you remove a variable from a class that is accessed by a method, you will create an undeclared variable reference for those methods that accessed the variable.
Subclass responsibility not defined Checks that all subclassResponsibility methods are defined in all leaf classes.
Uses A | B = C instead of A | (B = C) Checks precedence ordering of & and | with equality operators. Since | and & have the same precedence as =, there are common mistakes where parenthesis are missing around equality operators.
Uses True/False instead of true/false Checks for uses of the classes True and False instead of the objects true and false.
Variable used, but not defined anywhere Similar to the "References an undeclared variable" check, but looks for variables that are not defined in the class or in the Undeclared dictionary.
6-4 VisualWorks
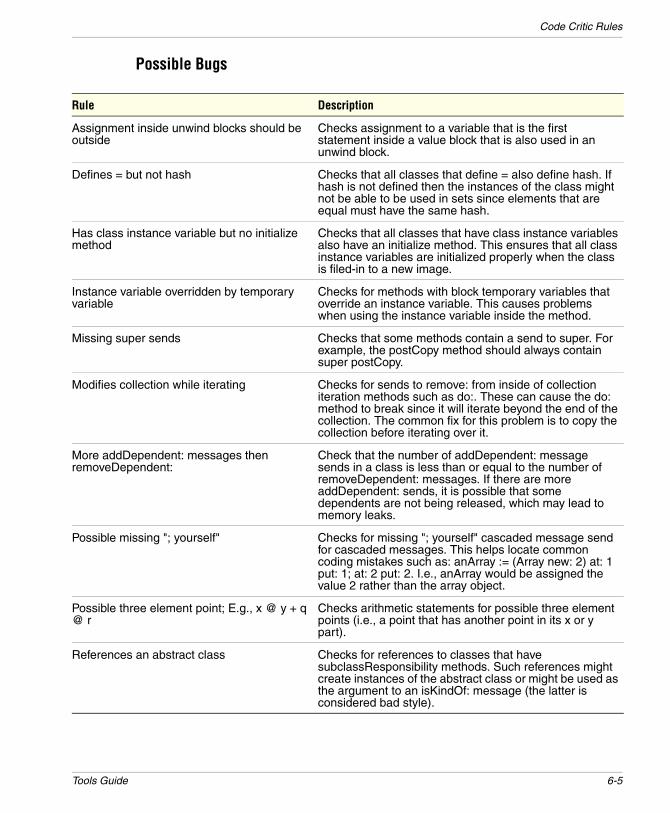
Code Critic Rules
Possible Bugs
Rule Description
Assignment inside unwind blocks should be outside
Checks assignment to a variable that is the first statement inside a value block that is also used in an unwind block.
Defines = but not hash Checks that all classes that define = also define hash. If hash is not defined then the instances of the class might not be able to be used in sets since elements that are equal must have the same hash.
Has class instance variable but no initialize method
Checks that all classes that have class instance variables also have an initialize method. This ensures that all class instance variables are initialized properly when the class is filed-in to a new image.
Instance variable overridden by temporary variable
Checks for methods with block temporary variables that override an instance variable. This causes problems when using the instance variable inside the method.
Missing super sends Checks that some methods contain a send to super. For example, the postCopy method should always contain super postCopy.
Modifies collection while iterating Checks for sends to remove: from inside of collection iteration methods such as do:. These can cause the do: method to break since it will iterate beyond the end of the collection. The common fix for this problem is to copy the collection before iterating over it.
More addDependent: messages then removeDependent:
Check that the number of addDependent: message sends in a class is less than or equal to the number of removeDependent: messages. If there are more addDependent: sends, it is possible that some dependents are not being released, which may lead to memory leaks.
Possible missing "; yourself" Checks for missing "; yourself" cascaded message send for cascaded messages. This helps locate common coding mistakes such as: anArray := (Array new: 2) at: 1 put: 1; at: 2 put: 2. I.e., anArray would be assigned the value 2 rather than the array object.
Possible three element point; E.g., x @ y + q @ r
Checks arithmetic statements for possible three element points (i.e., a point that has another point in its x or y part).
References an abstract class Checks for references to classes that have subclassResponsibility methods. Such references might create instances of the abstract class or might be used as the argument to an isKindOf: message (the latter is considered bad style).
Tools Guide 6-5

Code Critic
Returns a boolean and non boolean Checks for methods that return a boolean value (true or false) and return some other value such as (nil or self). If the method is supposed to return a boolean, this suggests there is a path through the method that might return a non-boolean. If the method doesn't need to return a boolean, you should probably rewrite it to return some non-boolean value since other programmers reading your method might assume that it returns a boolean.
Returns value of ifTrue:/ifFalse: without ifFalse:/ifTrue: block
Check for methods returning the value of an ifTrue: or ifFalse: message. These statements return nil when the block is not executed. For example, the following code will return nil when aBoolean is false:methodName ^aBoolean ifTrue: [0]If the code should return nil when aBoolean is false, then it should probably be written as: methodName ^aBoolean ifTrue: [0] ifFalse: [nil]
Sends different super message Checks for methods whose source sends a different super message. A common example of this is in creation methods. You might define a method such as: createInstance ^super new initializeIf the new method is not defined in the class, you should probably rewrite this to use self instead. Also, if the new method is defined, you might question why you need to use the superclass' new method instead of new method defined in the class.
Subclass of class that has instance variable but doesn't define copyEmpty
Checks that all subclasses of Collection classes that add an instance variable also redefine the copyEmpty method. This method is used when growing the collection. It copies over the necessary instance variables to the new, larger collection.
Temporaries read before written Checks that all temporaries are assigned before they are used. This can help find possible paths through the code where a variable might still be unassigned when it is used.
Uses the result of an add: message Check for possible uses of the result returned by the add: or addAll: messages. These messages return their arguments not the receiver. As a result, many uses of the results are wrong.
Rule Description
6-6 VisualWorks

Code Critic Rules
Unnecessary Code
Rule Description
Block immediately evaluated Check for blocks that are immediately evaluated. Since the block is immediately evaluated, there is no need for the statements to be in a block.
Check for same statements at end of ifTrue:ifFalse: blocks
Checks for ifTrue:ifFalse: blocks that have the same code at the beginning or end. Instead of having the same code in two places, it should be moved outside the blocks.
Class not referenced Check if a class is referenced either directly or indirectly by a symbol. If a class is not referenced, it can be removed.
Instance variables not read and written Checks that all instance variables are both read and written. This check does not work for data model classes since they use the instVarAt:put: messages to set instance variables.
Method just sends super message Check for methods that forward the message to its superclass. These methods can be removed.
Methods equivalently defined in superclass Check for methods that are equivalent to their superclass methods. Such methods don't add anything to the computation and can be removed, since the superclass's method will work just fine.
Methods implemented but not sent Check for methods that are never sent. If a method is not sent, it can be removed.
Unnecessary = true Check for an =, ==, ~=, or ~~ message being sent to true/false or with true/false as the argument. Many times these can be eliminated since their receivers are already booleans. For example, anObject isFoo == false could be replaced with anObject isFoo not if isFoo always returns a boolean. Sometimes variables might refer to true, false, and something else, but this is considered bad style since the variable has multiple types.
Variable referenced in only one method and always assigned first
Checks for instance variables that might better be defined as temporary variables. If an instance variable is only used in one method and it is always assigned before it is used, then that method could define that variable as a temporary variable of the method instead (assuming that the method is not recursive).
Variables not referenced Check for variables not referenced. If a variable isn’t used in a class, it should be deleted.
Tools Guide 6-7
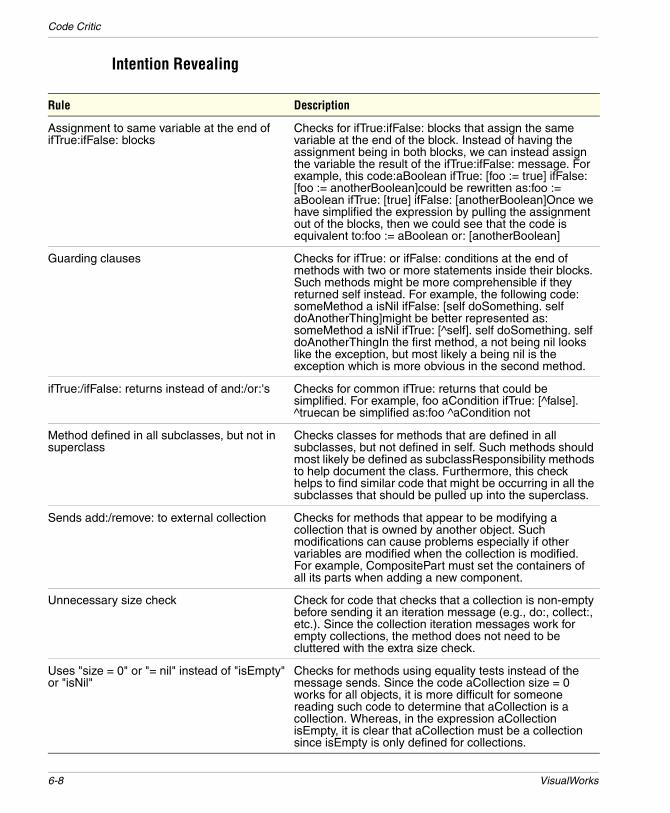
Code Critic
Intention Revealing
Rule Description
Assignment to same variable at the end of ifTrue:ifFalse: blocks
Checks for ifTrue:ifFalse: blocks that assign the same variable at the end of the block. Instead of having the assignment being in both blocks, we can instead assign the variable the result of the ifTrue:ifFalse: message. For example, this code:aBoolean ifTrue: [foo := true] ifFalse: [foo := anotherBoolean]could be rewritten as:foo := aBoolean ifTrue: [true] ifFalse: [anotherBoolean]Once we have simplified the expression by pulling the assignment out of the blocks, then we could see that the code is equivalent to:foo := aBoolean or: [anotherBoolean]
Guarding clauses Checks for ifTrue: or ifFalse: conditions at the end of methods with two or more statements inside their blocks. Such methods might be more comprehensible if they returned self instead. For example, the following code: someMethod a isNil ifFalse: [self doSomething. self doAnotherThing]might be better represented as: someMethod a isNil ifTrue: [^self]. self doSomething. self doAnotherThingIn the first method, a not being nil looks like the exception, but most likely a being nil is the exception which is more obvious in the second method.
ifTrue:/ifFalse: returns instead of and:/or:'s Checks for common ifTrue: returns that could be simplified. For example, foo aCondition ifTrue: [^false]. ^truecan be simplified as:foo ^aCondition not
Method defined in all subclasses, but not in superclass
Checks classes for methods that are defined in all subclasses, but not defined in self. Such methods should most likely be defined as subclassResponsibility methods to help document the class. Furthermore, this check helps to find similar code that might be occurring in all the subclasses that should be pulled up into the superclass.
Sends add:/remove: to external collection Checks for methods that appear to be modifying a collection that is owned by another object. Such modifications can cause problems especially if other variables are modified when the collection is modified. For example, CompositePart must set the containers of all its parts when adding a new component.
Unnecessary size check Check for code that checks that a collection is non-empty before sending it an iteration message (e.g., do:, collect:, etc.). Since the collection iteration messages work for empty collections, the method does not need to be cluttered with the extra size check.
Uses "size = 0" or "= nil" instead of "isEmpty" or "isNil"
Checks for methods using equality tests instead of the message sends. Since the code aCollection size = 0 works for all objects, it is more difficult for someone reading such code to determine that aCollection is a collection. Whereas, in the expression aCollection isEmpty, it is clear that aCollection must be a collection since isEmpty is only defined for collections.
6-8 VisualWorks

Code Critic Rules
Miscellaneous
Uses at:ifAbsent: instead of at:ifAbsentPut: Checks for uses of at:ifAbsent: in place of the shorter at:ifAbsentPut: message. For example:aDictionary at: aKey ifAbsent: [aDictionary at: aKey put: anObject]should be rewritten as:aDictionary at: aKey ifAbsentPut: [anObject].You may also use one of the Code Critic’s transformation rules to convert these methods.
Uses detect:ifNone: instead of contains: Checks for the common code fragment:(aCollection detect: [:each | 'some condition'] ifNone: [nil]) ~= nilwhich can be simplified and clarified as:aCollection contains: [:each | 'some condition'].
Uses do: instead of collect: or select:'s Checks for methods using do: instead of collect: or select:. The collect: and select: variants are preferred for clearly expressing intention.
Uses do: instead of contains: or detect: Checks for methods using do: instead of using contains: or detect:.
Uses ifTrue:/ifFalse: instead of min: or max: Checks for uses of ifTrue:/ifFalse: when it could use min: or max:. For example:a < b ifTrue: [a] ifFalse: [b]may be rewritten as:a min: b
Uses to:do: instead of do:, with:do:, or timesRepeat:
Checks for methods using to:do: when a do:, with:do: or timesRepeat: should be used.
Uses whileTrue: instead of to:do: Checks for methods using whileTrue: when the shorter to:do: would work. For example, this common C-like code:i := 1. [i <= size] whileTrue: ["self do something with i". i := i + 1]can be written as:1 to: size do: [:i | "self do something with i"]
Rule Description
Doesn't use the result of a yourself message Check for methods sending the yourself message unnecessarily. For example, the following statement doesn't need yourself, since it is not used:aCollection addAll: #(a b c); yourselfIf this statement were assigned to a variable, then the cascade with yourself would be needed to get the value of aCollection.
Inspect instances of "A + B * C" might be "A + (B * C)"
Checks for methods that might have precedence problems. Developers who are used to other languages often make mistakes when writing Smalltalk code since in Smalltalk all binary operations are performed left-to-right.
Instance variables defined in all subclasses Checks classes for instance variables that are defined in all subclasses. It is often better style to move the instance variable up into the class so that all the subclasses don’t have to define it.
Rule Description
Tools Guide 6-9

Code Critic
Long methods Checks for methods that have more 10 statements (this check counts statements, not lines.)
Methods with full blocks Checks for methods that contain full blocks or create a context with the thisContext keyword. These methods are a place where inefficiencies can creep in. For example, a common reason why a full block is created is because a block assigns a temporary variable that is not defined inside the block. If the temporary variable is only used inside the block, then the definition of the temporary should be moved inside the block. The "move to inner scope" refactoring can be used to correct this.
Non-blocks in ifTrue:/ifFalse: messages Checks for methods that don’t use blocks in the ifTrue:ifFalse: messages. Developers new to Smalltalk may write code such as: aBoolean ifTrue: (self doSomething).instead of the correct version:aBoolean ifTrue: [self doSomething].Even if such expressions are correct, they cannot be optimized by the compiler.
Redundant class name in selector Checks for the class name in a selector, e.g.:openHierarchyBrowserFrom:, which is a redundant name for HierarchyBrowser.
Refers to class name instead of "self class" Checks for classes that have their class name directly in the source instead of self class. Using self class allows you to create subclasses without needing to redefine the method.
Sends "questionable" message Check for methods that send messages which perform low level actions. For example, using become: throughout an application should be avoided. Also, messages such as isKindOf: suggest a lack of polymorphism.
String concatenation instead of streams Check for methods that use string concatenation inside an iteration message. Since string concatenation is O(n^2), it is better to use streaming since it is O(n) - assuming that n is large enough.
Unnecessary assignment or return in block Checks valueNowOrOnUnwindDo:, valueOnUnwindDo:, ensure:, and showWhile: blocks for assignments or returns that are the last statement in the block. These assignments or returns should be moved outside the block since they return the value of the block. For example, the code: someMethod | bos | bos := BinaryObjectStorage onOld: 'test' asFilename readStream. [^bos next] valueNowOrOnUnwindDo: [bos close]can be rewritten as: someMethod | bos | bos := BinaryObjectStorage onOld: 'test' asFilename readStream. ^[bos next] valueNowOrOnUnwindDo: [bos close]Having the assignment or return inside the block runs much slower than copying or optimizing blocks.
Rule Description
6-10 VisualWorks

Code Transformations
Code TransformationsThe following predefined code transformations are provided by the Code Critic (the patterns are defined in class ParseTreeTransformationRule):
Utility method Check for methods that have one or more arguments and do not refer to self or an instance variable. These methods might be better defined in some other class or as class methods.
Variable is only assigned a single literal value If a variable is only assigned a single literal value then that variable is either nil or that literal value. If the variable is always initialized with that literal value, then each variable reference could be replaced with a message send to get the value. If the variable can also be nil, then it might be better to replace that variable with another that stores true or false, depending on whether the old variable had been assigned.
Rule Description
Transformation Description
"a >= b and: [a <= c]" -> "a between: b and: c" Transform:a >= b and: [a <= c]to:a between: b and: c
= nil -> isNil AND ~= nil -> notNil Transform = nil to isNil and transform ~= nil to notNil.
at:ifAbsent: -> at:ifAbsentPut: Transform:aDictionary at: aKey ifAbsent: [aDictionary at: aKey put: anObject]to:aDictionary at: aKey ifAbsentPut: [anObject].
detect:ifNone: -> contains: Transform:(foo detect: [:a| a test] ifNone: [nil]) isNilto:(foo anySatisfy: [:a | a test])
Eliminate guarding clauses Transform methods ending with an ifTrue: or ifFalse: that have multiple statements inside the block, replacing them with ifFalse: [^self]. followed by straight-line code that was inside the block. For example: someMethod a isNil ifFalse: [self doSomething. self doAnotherThing]is transformed to:someMethod a isNil ifTrue: [^self]. self doSomething. self doAnotherThing
Eliminate unnecessary not Transform:aTest not ifTrue:to:aTest ifFalse:
Move assignment out of showWhile: blocks Transform:Cursor busy showWhile: [x := self someLongCalc].to:x := Cursor busy showWhile: [self someLongCalc]This eliminates a full block.
Move assignment out of ensure: blocks Transform:[x := self aCalc] ensure: [self close]to:x := [self aCalc] ensure: [self close]This eliminates a full block.Includes the ifCurtailed: variation.
Tools Guide 6-11

Code Critic
Move variable assignment outside of single statement ifTrue:ifFalse: blocks
Transform:aTest ifTrue: [x:=1] ifFalse: [x:=2]to:x := (aTest ifTrue: [1] ifFalse: [2])
Rewrite ifTrue:ifFalse: using min:/max: Transform:a < b ifTrue: [a] ifFalse: [b]to:a max: b(includes many variations)
Rewrite super messages to self messages when both refer to same method
Transform:Singleton class>>default ^super new initializeto:Singleton class>>default ^self new initializeif Singleton class does not define new.
Use cascaded nextPutAll: instead of #, in #nextPutAll:
Transform:aStream nextPutAll: 'any ', 'time ', 'now '.to:aStrean nextPutAll: 'any '; nextPutAll: 'time '; nextPutAll: 'now '.
Transformation Description
6-12 VisualWorks

7
Unit TestingOverviewSUnit (Smalltalk Unit Testing Framework) is a popular test framework for Smalltalk. It is the de facto industry standard in which developers build test suites. SUnit supports the test-driven development practice promoted by agile methodologies. It is suitable for writing tests at functional unit, application, and UI levels.
VisualWorks includes the current cross-dialect implementation of SUnit maintained by Camp Smalltalk. It also includes a VisualWorks specific version, called SUnitToo (in the contributed folder).
There is a rich literature on SUnit and unit testing. Here is a starting list:
• Various documents and papers are available at:
http://sunit.sourceforge.net/manual.htm
• “SUnit Explained,” Stephane Ducasse’s paper on SUnit 3.1:
www.iam.unibe.ch/~ducasse/Programmez/OnTheWeb/Eng-Art8-SUnit-V1.pdf .
• “Extreme UI Testing” in Smalltalk Solutions 2007 conference proceedings (whole conference archive is 97Mb):
www.stic.st/stsFiles/sts2007.zip
• Summary of Niall Ross’s paper on extending XP to UI testing (on page 64):
www.esug.org/data/ReportsFromNiallRoss/nfrStS2007andVendorReports.pdf
Tools Guide 7-1

Unit Testing
SUnit Framework ClassesThe SUnit testing framework primarily uses these classes:
TestCase
A test case is an instance of a class that inherits from TestCase. Each such class can be given methods setUp and tearDown, and some methods whose selectors begin with “test”. An instance holds one of these test selectors. Running the test case executes the setUp, test... and tearDown methods. These execute code and make assertions to check specific conditions.
TestSuite
A test suite is a collection of test cases or test suites. The most common kind of test suite holds all the tests of a test case class, or of all classes in a package, and is created automatically when you ask the UI to run the tests for that class or package. Suites can also be created programmatically to build up complex collections of tests.
TestResult
A test result captures the result of running test cases, classifying them into those that raise errors, those that fail their assertions and those that do neither, and so have passed.
TestResource
Normally, all the objects required by a test case are set up when it starts and torn down when it ends, to avoid one test polluting results from another. Sometimes, many tests can require something (e.g. a database connection or temporary file) that would be inconvenient or slow to set up and tear down for each test. A test resource represents something that is needed by many test cases in a suite. It is set up only once in the running of the suite, when requested by the first test that needs it, and torn down when the suite ends. Tests and resources are connected on the class-side: TestCase class method resources returns those subclasses of TestResource that it needs (see Defining Test Resources).
These classes are contained in the SUnit parcel.
7-2 VisualWorks

Writing and Running SUnit Tests in VisualWorks
Writing and Running SUnit Tests in VisualWorks
Loading SUnit SupportTests are classes and methods, like other code, and are written in the System Browser. The RBSUnitExtensions parcel adds a UI for running tests to the browser, providing an integrated interface for writing and tests against your applications.
Open the Parcel Manager (from the Launcher window’s System menu). Under Essentials on the Suggestions tab, choose RBSUnitExtensions and do Load... from the <Operate> menu. This loads both it and the SUnit parcel.
To view example test classes, you can load the SUnitTests parcel, in the contributed/SUnit/ directory.
Creating a Test CaseA class that inherits from TestCase represents a given test scenario. Its test methods verify behavior of aspects of this scenario. Its setUp and tearDown methods create and release whatever the scenario needs.
For example, to create a simple test case:
1 Create a subclass of TestCase (e.g., MatchTest)
2 In MatchTest, create a protocol to hold tests (typically called “running”)
3 Create a test method (e.g., testMatchAtEnd):
testMatchAtEndself assert: ('*TheEnd’ match: ‘SomeTextWithTheEndAtTheEnd')
description: 'Repeated end sequence not matched at end'.self deny: ('*TheEnd’ match: ‘SomeTextWithoutTheEndAtEnd')
description: 'Middle sequence matched at end'.
The method testMatchAtEnd now defines a single test case. Other test methods can be written to verify other behavior of the match: utility. To run this single test, select the method and press the Run button.
Writing Assertions in Test MethodsClass TestCase understands the following methods:
Tools Guide 7-3

Unit Testing
assert: anExpression
deny: anExpression
These show the description “Assertion failed!” on failure. Using the ...description: forms of these methods is generally more helpful, especially if others have to maintain your code and rerun your tests.
assert: anExpression description: aString
deny: anExpression description: aString
To pass the test, anExpression should return true (assert:...) or false (deny:...). In both cases, aString documents what failing the test means and will be displayed in the debugger notifier if the test fails.
assert: anExpression description: aString resumable: aBoolean
deny: anExpression description: aString resumable: aBoolean
A single failure aborts the rest of the test... method and proceeds immediately to tearDown if aBoolean is false (the default, since code in a test usually depends on earlier code having passed). However if the same check applies to several configurations or data points then when debugging, it may help to see the whole list of failures before starting to fix things. Using these methods allows you to resume a failed test you are debugging to see if its later assertions pass or fail. For example,
#('same' ‘*’ '*.txt' 'a*c') with: #('same' 'any' 'some.txt' 'abc') do: [:eachMeta :eachString |self assert: (eachMeta match: eachString)
description: ('<1s> does not match <2s>' expandMacrosWith: eachMeta with: eachString)
resumable: true ]
Class TestCase also has methods that take a block parameter. The methods should: and shouldnt: are deprecated. However, the following methods are useful to test error raising.
7-4 VisualWorks
Writing and Running SUnit Tests in VisualWorks
should: aBlock raise: anExceptionSubclass description: aString
shouldnt: aBlock raise: anExceptionSubclass description: aString
Requires a 0 argument block. To pass the test, aBlock should or shouldn’t raise an error of class anExceptionSubclass. For example,
self should: [RBParser parseExpression: '3 + .']raise: Error description: 'Parser did not reject an ill-formed expression'.
self shouldnt: [RBParser parseExpression: '3 + 4.']
raise: Errordescription: 'Parser rejected a well-formed expression'.
Defining Test ResourcesThe normal SUnit pattern is that all the data and infrastructure for a test is set up from scratch at the start of a test and torn down at its end. Usually, such state is held in instance variables of the class. In this way, you ensure that your tests do not pollute each other, and that they start from a well-known clean state. This pattern should be followed wherever possible.
However, some required state is constant over a suite of tests, and costly to initialize or finalize. For example, setting up a database connection, writing and deleting test data, etc. SUnit tests should be run frequently while coding, and doing such set up for each test can make running the suite very slow. In some cases, such as tests for an external system that is optimized for intermittent long high-volume transactions, the test might fail if connected, exercised and disconnected incessantly in short low-volume tests.
TestResource handles these cases by implementing the singleton pattern. When a test suite (or individual test case) is run, the first test that requires a resource attempts to set it up. Subsequent tests either note that it is set up or that this first attempt failed. A test case that needs a resource fails before starting if that resource is unavailable, and so is not run. Any tests in the suite that do not need the resource run as normal. All resources set up during the run of a suite are torn down when that run ends.
TestResource understands the same assertion protocol as TestCase, so whenever test performance needs it and test safety (the need for one test not to affect the running of another) allows it, code from the setUp and tearDown of a subclass of TestCase can simply be refactored to a
Tools Guide 7-5

Unit Testing
subclass of TestResource. Implement the instance-side setUp and tearDown methods for the resource to do the work, and an instance-side isAvailable method to report if setUp succeeded.
To assign resources to tests, give each requiring test a class-side resources method that returns a collection of those TestResource classes that your test needs. That is the only thing you have to do to ensure that resources are available when tests need them: the framework handles the rest.
Although it should not be done without care, it is possible to combine single-set-up for most tests with resetting a resource during a run. A test might alter a resource state such that it becomes unsafe for other tests to use. If the unsafe test sends MyTestResource reset in its tearDown method then the next test will set up the resource again, as if it were the first time. As this loses the performance point of resources, it should be exceptional.
To resolve resources that conflict, see Extensions and Variants of SUnit in VisualWorks.
Running Test CasesTo run tests, select one or more test methods defined in a subclass of TestCase. Alternatively, you can select or any method categories, classes, or packages that contains test methods. The browser then displays the unit testing interface at the foot of the code tool:
To run all the tests you have selected and see how many passed, failed or errored, click Run. The result is displayed by the testing interface:
A test fails if one of its assertions does not return the expected result. It errors if its code raises an walkback. It passes if it runs to completion without failures or errors.
If all the tests pass, the bar is green. Otherwise it is red and you can:
• click Run Defects to rerun just those tests that did not pass
• click List Defects and select a test from the list to debug it
(To enable the Profile button, you must load the AT Profiling parcel.)
7-6 VisualWorks

Strategies for Writing and Using SUnit Tests
Strategies for Writing and Using SUnit TestsThe general principle is to write tests to expose errors and/or to define features, then to refactor code until it passes tests for new features and exposed bugs, while ensuring that tests for existing features and fixed bugs continue to pass.
At what level should we aim our test cases? One approach, shown in the ExampleSetTest in the SUnitTests parcel, is to write test cases for classes or utilities. MyClassTest can verify that MyClass provides a robust, well-defined service. These are unit tests in the strict sense of the term.
Either in addition to or instead of the above, test cases can be aimed at the top of the model layer of a large application, using the same API as the application offers to its UI or to external systems that use it. Such a test case often corresponds to a use case for the application; its tests verify the various success and failure modes of that use case. Despite the name “SUnit,” the framework is well-suited to writing tests of this kind. In practice, the difference is often one of degree rather than kind, because a low-level utility class still uses other classes from base Smalltalk and a large application may offer top-level interface or facade classes that model-layer tests address.
A possible second stage in this approach is to get double value from these model-layer tests, by making them also exercise the UI directly. The UI layer acts on the model layer in a way very similarly to the way in which model-layer tests act on the model layer. In normal use, the model layer gets its values from the UI and returns its results to the UI. Under test, the model layer gets its values from the test and returns its results to the test. UI-layer tests can be created with little extra coding through refactoring test set up and completing the commutative diagram by subclassing or delegating top-level model-layer tests.
For more on this topic, see “Extreme UI Testing” .
Tools Guide 7-7

Unit Testing
Extensions and Variants of SUnit in VisualWorksThe description above is a basic overview of common ways to use SUnit. The SUnit parcel and classes provided in the distribution have comments that clarify points and guide usage. The code is there to be read.
Browsing SUnit* and *SUnit* in the Cincom open repository will reveal many extensions written by various people over the years. One that is the SUnitUtilities bundle, which supports:
• the CompetingResource pattern, which handles the situation when an overall suite contains tests that use two resources that cannot be active at the same time
• the CrossProcessTestCase pattern, which handles the situation when a test spawns subthreads whose errors and failures are not caught by the overall handler, so that the test seems to pass but opens a debugger.
Load the appropriate package within it for the features you need. Read the extensive package and class comments.
SUnit is common to all dialects of Smalltalk, and is maintained by Camp Smalltalk. Tests written for a utility in one dialect of Smalltalk can be loaded into another and verify that a port of the utility works there.
VisualWorks also provides the SUnitToo and SUnitToo(ls) parcels. SUnitToo was developed to improve tools support, provided by SUnitToo(ls). Currently, in addition to the obvious UI differences,
• SUnitToo groups its resources into unique sets used by tests and sets up each set in turn, so a resource in multiple sets will (re)start multiple times but no work is required to mark competing resources.
• SUnitToo(ls), unlike RBSUnitExtensions, currently enforces a random test-run order on each click of its run icon.
You can have both SUnit and SUnitToo loaded in your image. Each will show the tests that belong to each and the System Browser will show a coherent UI if you select test cases belonging to both.
Loading the SUnit-Bridge2SU2 parcel changes the parent of SUnit TestCase subclasses to be SUnitToo TestCase subclasses, reverting when unloaded. Since SUnit and SUnitToo use classes of the same name but that live in different namespaces (XProgramming.SUnit in
7-8 VisualWorks
Strategies for Writing and Using SUnit Tests
SUnit, SUnit in SUnitToo), it is strongly recommended that any user planning to use both get clear about these namespaces to avoid several opportunities for confusion which will otherwise present themselves.
Tools Guide 7-9

Unit Testing
7-10 VisualWorks
8
Object InspectorThe Inspector is used to examine the state of objects in the system. However, beyond that simple description, the Inspector provides a great deal of power, even functioning as an alternate code editor. This chapter describes and illustrates how to use the Inspector’s basic and advanced features.
Basic InspectingTo open an Inspector, either send an inspect message to the object, or select the object and pick the Inspect it menu action (Smalltalk > Inspect it in a workspace) or click the Inspect toolbar button. For example, evaluate these expressions in a workspace to inspect a Point and an OrderedCollection:
(3 @ 4) inspect.(1 to: 10) asOrderedCollection inspectThe two windows that open have the normal inspector layouts.
Tools Guide 8-1

Object Inspector
The list on the left shows the component parts of the object. The parts of a Point object are the point itself and its x and y instance variables. Parts of an OrderedCollection are its elements, from first to tenth.
Selecting a part shows the printString representation of the part in the right hand side text view. Selecting multiple parts is possible (hold down Ctrl or Shift while clicking). Selecting all parts at once is very handy to get a quick overview of an object, so there is a toolbar button and a keyboard shortcut Ctrl+A to do that.
Inspection ViewsAbove the parts list there is a set of tabs for selecting various views of the object being inspected.
All objects have a Basic view that shows all instance variables.
The OrderedCollection we look at also has the Elements view, which is initially selected. It is a higher-level "logical" view showing all elements of the collection but ignoring such implementation details as the firstIndex and lastIndex instance variables and unused indexed variables. These can be viewed in the Basic view
In relation to the traditional inspectors, the Elements view works like the OrderedCollectionInspector one would get when inspecting an OrderedCollection, while the Basic view is the same as doing the
8-2 VisualWorks

Expression Evaluator
basicIinspect to the OrderedCollectionInspector. A similar distinction applies to other objects that had special inspectors, such as Dictionary.
All objects also have a Methods view that displays a methods browser on the object’s class. The Inheritance menu allows you to control how far down the inheritance tree inherited methods are shown, just like you control the display in the system browser.
For some objects, the Basic view may include extra parts which are not its instance variables. In fact, -self, which is shown as a part, is always shown but is not an instance variable. For a less obvious example, inspect a compiled method:
(Object compiledMethodAt: #printString) inspectThe Basic view includes -bytecode and -source. These are not really parts of the receiver, but they are included in the basic view as "virtual" attributes. For other interesting examples are an Integer
1234 inspector a Character
Character space inspect
Expression EvaluatorThe text pane on the right of the inspector views is a normal VisualWorks text pane, so you can type a Smalltalk expression into the text view pane and evaluate it there. The evaluation context, the value of self, is the receiver object being inspected. However, whatever you type in this pane is lost as soon as you switch to another field.
Tools Guide 8-3
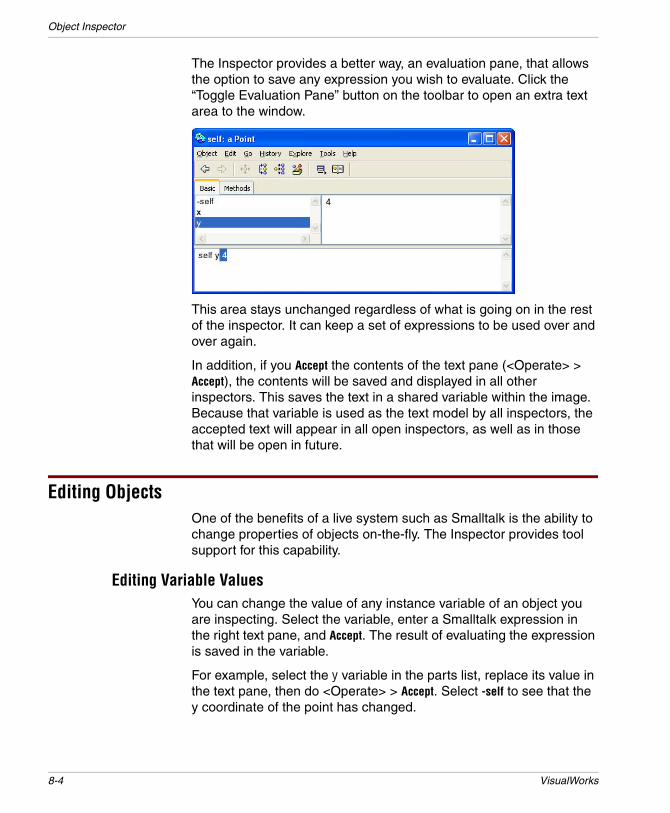
Object Inspector
The Inspector provides a better way, an evaluation pane, that allows the option to save any expression you wish to evaluate. Click the “Toggle Evaluation Pane” button on the toolbar to open an extra text area to the window.
This area stays unchanged regardless of what is going on in the rest of the inspector. It can keep a set of expressions to be used over and over again.
In addition, if you Accept the contents of the text pane (<Operate> > Accept), the contents will be saved and displayed in all other inspectors. This saves the text in a shared variable within the image. Because that variable is used as the text model by all inspectors, the accepted text will appear in all open inspectors, as well as in those that will be open in future.
Editing ObjectsOne of the benefits of a live system such as Smalltalk is the ability to change properties of objects on-the-fly. The Inspector provides tool support for this capability.
Editing Variable ValuesYou can change the value of any instance variable of an object you are inspecting. Select the variable, enter a Smalltalk expression in the right text pane, and Accept. The result of evaluating the expression is saved in the variable.
For example, select the y variable in the parts list, replace its value in the text pane, then do <Operate> > Accept. Select -self to see that the y coordinate of the point has changed.
8-4 VisualWorks

Editing Objects
The same happens if you change the value of an element of the OrderedCollection; The old element at the selected index is replaced with a new one.
You can even change the values of several variables or collection elements all at once. Use multi-select to select all of the parts you want to change, enter the new value into the right-hand text view, and Accept.
Copy and PasteThe Edit menu contains the usual Copy and Paste items. These actions copy and paste the object held by the instance variable or element in the selected parts list item.
Objects are copied to or pasted from the Inspector’s own clipboard, an instance of class Clipboard. To inspect the clipboard, evaluate:
Clipboard default inspectAlso, the printString representation of the object is copied to the system clipboard.
Note that these menu items do not copy or paste text from the text pane or evaluation pane. Copy and Paste operations on text in these panes can be performed using the usual <Ctrl-C> and <Ctrl-V> commands.
Add and RemoveThe Add and Remove actions on the Edit menu add and remove parts in the list.
When using these commands bear in mind that, depending on context, the change might affect either the instance or the class. For example, if you are inspecting a collection, adding a part (element) adds to the instance. On the other hand, if the new part is a named instance variable, it is added to the class definition of the object being inspected. In the latter case, adding an instance variable changes the structure (shape) of all current and future instances of the class. Also, adding and removing instance variables is not allowed for some objects.
The same kind of editing is possible with an Array. Even though strictly speaking, an Array is not resizeable, the Inspector makes it appear resizeable, allowing you to insert elements into an Array, or remove elements and make the Array smaller.
Tools Guide 8-5

Object Inspector
Undoing an EditIf you make a value change to a part and then change your mind, you can undo the edit. Select Edit > Undo.
Undo is multiple-level, remembering and allowing you to undo a sequence of edits. Suppose you had replaced the fifth element of an OrderedCollection with 0, and then replaced multiple element values with 555. If you do an Undo at this point, the multiple replacement will be undone, reverting to the previous values. But, because we replaced the fifth element with 0 before that, Undo is still enabled. Doing another Undo will restore the fifth element to its original value.
Editing with Drag-DropThe inspector is also enabled to allow editing using Drag-and-Drop actions, to either change the order of elements or to copy values of elements.
For example, open another inspector on this OrderedCollection:
(OrderedCollection with: 1 with: 2 with: 3 with: 4) inspectTo use drag-and-drop to change the order of elements in this collection, select the first two elements of the collection, drag them and drop after the last element in the list. Now select all elements to see the new order of elements. You can also drop the selections between elements.
To copy the value of one element to another, select one element, then drag and drop it onto another element. Dropping on an element replaces the element with the dropped value.
Drag-and-drop also works between inspectors. Open an inspector on another collection, such as:
(OrderedCollection with: 5 with: 6 with: 7 with: 8) inspectIf you select several elements in one OrderedCollection, then drag and drop them into the other collection, the elements are inserted, making the collection bigger.
The drop target can only be a single element or between elements. If you select several elements and attempt to drag and drop them onto a single element, whether in the same inspector or in another, a dialog prompts you to select the intended element from a list. Multiple-select targets are not supported.
8-6 VisualWorks
Editing Objects
Drag-and-drop is supported as widely as possible: between collections; between regular objects; between collections and regular objects.
Drag and drop is also extended to workspaces. You can add any object to a workspace as a local variable by dropping it onto the workspace or on the workspace's Variables page.
Protected VariablesThe Inspector allows any class to declare some or all of its instance variables as "protected," and indicates a protected variable with a hash mark.
For example, evaluate.
Object inspectNotice that all of the instance variables are marked as protected. (A class is itself an instance of its metaclass, so can have instance variables.) Accidentally changing the value of, for example, its methodDict variable, can crash the system.
Protected variables can be changed, but only after answering Yes to a confirmation dialog.
To protect a class’s instance variables, define a class method named protectedInstVarNames in the class that returns a collection of the names of the instance variables to collect.
Note that protectedInstVarNames methods that are defined throughout the superclass chain of a class are used to determine the variables of a given instance that need protection. Because of that, a method in a subclass can only add, but not remove, protection defined in a superclass. The method should answer a collection of variable names (Strings), possibly empty. Two useful ways to implement it are:
^self instVarNames to protect all variables defined in this class, but not those inherited from superclasses, and
^self allInstVarNamesto protect all variables an instance of this class has, including those inherited from superclasses.
Tools Guide 8-7

Object Inspector
Exploring ObjectsMost objects are complex, holding either other objects or references to other objects in instance variables or collection elements. The inspector is an object exploration tool that helps you examine these further objects, all in the context of the original object.
Diving into Object ReferencesA common action is to follow a reference to another object. Double-clicking on a variable or element in the parts list dives into that part. The inspector is then refocused on the selected object.
For example, inspect something more complex than a simple collection, such as:
Window activeController inspectThis inspects the controller, an ApplicationStandardSystemController, of the currently active window, which is a workspace. Double-click on model. The inspector is now inspecting the workspace, an instance of Workbook, which is the controller’s model. The title bar now shows the role of the new object—the name of the instance variable it was stored in or an index of an element—and the class of the object (model: a Workbook).
Notice that the first of two toolbar arrow buttons is now available. These buttons work like a web browser, moving the inspector focus forward and back along the trail of visited objects. Click the first one, the left-pointing arrow, to go back to the original controller. The right-pointing arrow button becomes available, because the model has been visited and so is now “ahead” on the visit trail. Click this button to return to scheduled controllers.
Now double-click the uiSession part to dive into it. The object under inspection is now a ControlManager. Open the History menu to see the trail of visited objects, described by their roles and class membership. Use this history list to jump to any object on the visit trail.
8-8 VisualWorks

Exploring Objects
Exploring Object RelationshipsDiving into objects and traversing the visit trail are important navigation aids but they are limited for exploring the wider network of relationships between objects. For example, if we wanted to inspect the window of the VisualLauncher, we would have to inspect something like
ApplicationStandardSystemController allInstances inspectwhich inspects a collection. Then we would have to repeatedly dive into elements of the collection, look at the models, back out to the collection, then dive back in on another element, until we find one with a VisualLauncher as its model.
Additional views allow us to explore the world outside any given object.
SiblingsIn the case mentioned above, for example, we want to be able to easily inspect all controllers in the collection.
Inspecting the collection above, dive into one of the collection elements, so the inspector is focused on an ApplicationStandardSystemController. Select the Explore > Siblings menu item. The inspector transforms, adding an extra list on the left that shows the parts of the previous object, in this case the collection we were inspecting before diving into the current controller.
When you select to explore siblings, the added list box lists the parts of the object of which the current object is a part; those are its “siblings.” Selecting an element in the list refocuses the inspector on the right so that it shows details of the newly selected element. Now,
Tools Guide 8-9

Object Inspector
to find the launcher, select model in the inspector and go through elements of the collection until you find the one with a VisualLauncher as the model.
Once the desired object is located, you can focus the inspector on that object, closing the siblings list, by selecting Explore > Focus.
PartsSimilar to the Siblings view, is the Parts view (Explore > Parts). This view adds a list of the parts of the current object’s parts. So, instead of adding a list to the left containing the current object’s siblings, it adds a list to the right listing the parts of the selected part of the object.
For example, instead of diving into one of the elements in the collection of ApplicationStandardSystemController instances and then displaying siblings, you can start with the list and display the parts. The same view is displayed. The difference is that instead of going through the siblings of the original object, we want to go through its parts.
History ViewsThe forward and back navigation buttons have already been described.
As you dive into objects, go back, dive into other objects, and so on, these visits form a tree.
The History menu provides a list of the current branch of that tree. Rather than stepping forward and back one node at a time, use the History menu to select a specific node.
To view the entire tree, select Explore > Visited.
8-10 VisualWorks

Exploring Objects
his adds a tree view to the top of the inspector showing the various objects you have inspected and the path you took getting to them. Select any of the nodes and the inspector displays it. You can then continue your explorations from that point.
Exploring a WindowWhen you are exploring a window, some additional inspection options are available.
The Object menu (and the part list popup menu when -self is selected) includes two extra items: Raise and Close. These options make the selected window active, or close and release it, respectively.
Previewing a Visual PartA preview pane is added to the inspector, whenever a visual component or image is inspected. For example, try
Image cincomSmalltalkLogo inspectThe preview pane shows the graphic, the window, the menu, or whatever the visual component is.
Exploring an Object HierarchyFor objects that form hierarchies, an extra item is added to the Explore menu: Component Hierarchy. For example, visual parts (e.g., windows and widgets), classes, exceptions (with exception classes being members of two hierarchies at the same time), parse tree nodes, UI
Tools Guide 8-11
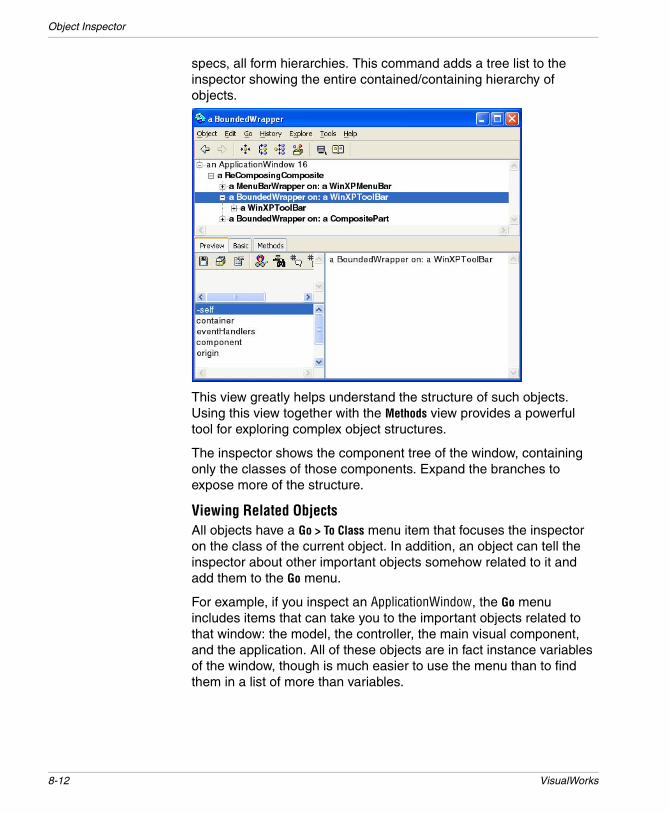
Object Inspector
specs, all form hierarchies. This command adds a tree list to the inspector showing the entire contained/containing hierarchy of objects.
This view greatly helps understand the structure of such objects. Using this view together with the Methods view provides a powerful tool for exploring complex object structures.
The inspector shows the component tree of the window, containing only the classes of those components. Expand the branches to expose more of the structure.
Viewing Related ObjectsAll objects have a Go > To Class menu item that focuses the inspector on the class of the current object. In addition, an object can tell the inspector about other important objects somehow related to it and add them to the Go menu.
For example, if you inspect an ApplicationWindow, the Go menu includes items that can take you to the important objects related to that window: the model, the controller, the main visual component, and the application. All of these objects are in fact instance variables of the window, though is much easier to use the menu than to find them in a list of more than variables.
8-12 VisualWorks
Customizing the Inspector
Customizing the InspectorAny object can publish actions to be added to the inspector menus.
By default, an object will have two views in the inspector: Basic and Methods, with Basic view showing -self and all named and indexed variables of the instance.
The Inspector is a flexible tool, and allows you to provide additional representations of objects, as described in this section.
Define the Object printOn: RepresentationObjects often reimplement the printOn: method to specify its print display. The inspector uses this method as well.
Add Displayed AttributesYou can add virtual attributes to the Basic view of an object by defining an instance-side method, inspectorExtraAttributes. The method should return a sequence of instances of either DerivedAttribute or TextAttribute (both classes are in the Tools.Trippy namespace).
A DerivedAttribute has an object value. Such a value can, for example, be dragged and dropped on a variable to store its value in that variable. An example of a DerivedAttribute is the asInteger attribute of a Character. -self, which shows up in any basic view, is a DerivedAttribute added by the inspector itself.
A TextAttribute is an attribute without an object value, but that displays informational text in the text view of the inspector. For example, the various radix print strings of an Integer are text attributes.
See implementors of inspectorExtraAttributes for examples.
Add Menu ActionsAdding selectable object actions to the Object and the part list <Operate> menus is done in a similar way: define an instance-side method inspectorActions answering a sequence of instances of class Action (defined in the Tools.Trippy namespace). See implementors of inspectorAction for examples.
To define objects to jump to using the Go menu, define a method inspectorCollaborators answering a sequence of instances of Collaborator.
Tools Guide 8-13

Object Inspector
Identify HierarchiesTo display an object as part of a hierarchy (or several hierarchies) in the hierarchy tree view, define a method inspectorHierarchies, answering a sequence of instances of Hierarchy. Browse implementors of inspectorHierarchies for examples in the system.
Add an Inspector PageYou can create your own inspector views to show special object properties and add them as pages. Several system objects do this, such as Dictionary, Array, and visual components.
To add your inspector, define an inspectorClasses method that returns a collection of inspector classes that can meaningfully display the object. Browse implements of this method for examples.
Provide Custom Object ViewsTo define your own view of an object, create a subclass of Tools.Trippy.Inspector and include it into the list of classes returned by inspectorClasses of your object.
Prototype-based ProgrammingBesides being an enhanced inspector, the Inspector is a good tool for prototype-based programming.
In the following example, we create a Library object to managing a collection of Book objects. We create it by modifying prototypical instances of Book and Library and testing the functionality as we proceed.
To begin, create two new classes, Library and Book, as usual.
To work on Book, inspect an instance of it. You can do this either by evaluating in a workspace:
Book new inspector, if an inspector is already open on the Book class, select Go > To New Instance" menu item. The menu command is available whenever you are inspecting a class, and it creates and focuses on a new instance of the class.
8-14 VisualWorks

Prototype-based Programming
So far the Book is just an empty shell. It needs, to start with, instance variables to store information like the title and the author. To add these, select Add... on the part list <Operate> menu of the variable list (or use Edit > Add...). In the dialog, enter the name “title” and click OK. The variable is added and selected. Repeat the process for “author.”
The variables are now created but their values are nil. You can add values to the variables in the inspector, as described earlier. For example, select title and type the String expression
'Moby Dick' in the text view, then Accept it. Similarly, assign the String 'Herman Melville' to the author variable. (Normal setter methods can be added later.)
When you select -self in the inspector, the text just shows “a Book.” We can change that to show the title and author by reimplementing the #printOn: method for Book, and we can do this in the Inspector. Switch to the Methods tab, add a “printing” protocol, and write a reasonable printOn: method, such as:
printOn: aStream aStream nextPutAll: (title, ', by', author)Switch back to the Basic tab and see the change to the display.
Changing the value of an instance variable of a prototype “by hand” as we did above is fine for testing, but real objects will need a proper API, with proper accessor methods. Switch back to the Methods tab, add an “accessing” protocol, and create setter and getter methods for the instance variables. These will be simple methods to set or return the variable value, such as:
title ^titleand
title: aString title := aStringTo test one of them, switch back to the Basics tab and select the title instance variable. Open the evaluation pane (Options > Evaluation Pane or hit <Ctrl>+<E>) and evaluate:
self title: 'Tempest'The value of title that the inspector shows does not change automatically, because the inspector does not know the code we have evaluated has changed it. To update the display, select Object > Refresh, or press <Ctrl>+<R>.
Tools Guide 8-15

Object Inspector
The implementation of Book is now reasonably complete. But before moving on to Library, create another Book prototype to add to our library. In the evaluation pane of the current inspector, type “self copy” and Inspect It. This second inspector now holds onto a copy of the original book, initially with the same title and author, but we can change that.
Now open a third inspector on a fresh instance of Library. In a workspace or the evaluation pane of an inspector, evaluate
Library new inspectSo the library can hold onto its books, add an instance variable, books. It is added and its value is nil.
Because the library will hold more than one book, its value should be a collection. We could create the value in the inspector, like we did before, but that is only temporary. Any instance of Library will have a collection in that variable. What we really need is an initialization method.
Switch to the Methods tab of the Library and add a “initialize-release” protocol at the instance side. Then write an initialize method to initialize books to hold an OrderedCollection, such as:
initializebooks := OrderedCollection newInstead of using the evaluation pane to try the new initialization logic, simply select the initialize method, open its <Operate> menu, and select Send It. Switch to the instance side and make sure the instance was initialized properly.
To finish with the initialization logic, add the usual new method with ^super new initialize on the class side of Library. This might already exist, if you had Initializer checked in the class creation dialog.
To add our books to the Library, dive into the books collection, so the empty collection is displayed. Now, drag and drop self from both Book inspectors into the collection. Switch back to Library and verify that the books are where they should be.
This ends this simple demonstration of using for protocol programming. As you continue your explorations, you will find additional ways to use this inspector to simplify your work.
8-16 VisualWorks
9
System ProfilersProfilers are tools that report system resource use by a block of code. The Time Profiler is useful for identifying portions of your code that consume large amounts of processing time. The Allocation Profiler performs a similar service for memory usage. Both single-process and multi-process profiling is supported.
All profilers rely upon a statistical sampling heuristic to estimate, rather than on instrumentation to directly measure, the resources consumed by a process. Multiprocess profilers distribute the probes that are used to estimate resource consumption over several processes, and the distribution may be uneven. Running multiprocess profilers does cause garbage collection and other maintenance processes to run more frequently than otherwise. These facts should be kept firmly in view when setting up multiprocess profiling runs and when estimating the reliability of their results. Within these limitations, multiprocess profilers have proven useful in tuning web applications involving many hundreds of processes.
Loading the ProfilersThe profiler tools are contained in two parcels: AT Profiling Core and AT Profiling UI. AT Profiling Core is a prerequisite for AT Profiling UI, so both parcels are loaded when you load AT Profiling UI (or when you load the All Advanced Tools).
For most development environments, load AT Profiling UI to get the entire profiling tool.
Tools Guide 9-1

System Profilers
In the future, a detachable, distributable profiler will be available, and only the core will need to be loaded in the image being profiled. Until then, the AT Profiling Core parcel is not independent.
Opening a Profiler WindowSeveral Profiler UIs are available as submenus of Tools • Advanced • Profiles in the Visual Launcher. For example, to open an Allocation Profiler, select the Allocations submenu item.
Each profiler window has a code view for entering the code to be analyzed, and a slider control for adjusting the sample size.
By default, the window shows explanatory text, as a guide to usage. To display only profiling code templates, evaluate in a workspace:
Profiler showTemplates: trueThe templates provide schematic expressions. Replace the place holders, for iterations, the expression to profile, and others as needed. The remainder of this section will assume the templates are displayed.
Profiling a Block of CodeTo profile either the time or memory usage of a block of code, open the appropriate profiler and enter the Smalltalk expressions in the code view of the profiler in a profile block. Templates are provided to help you.
9-2 VisualWorks

Profiling a Block of Code
For example, suppose you wanted to find out what proportion of the memory allocated by the Date today method. Open an Allocations profiler (Tools • Advanced • Profiles • Allocations). Several templates are displayed:
"((( self profile:[ ((anIntegerR)) timesRepeat:
[ ((anExpression)) ] ] )))""((( self
profile:[ ((anIntegerR)) timesRepeat:[ ((anExpression)) ] ]
reportTo: ((aFilename)) )))""((( self
keepStatistics: ((aBoolean));profile:[ ((anIntegerR)) timesRepeat:
[ ((anExpression)) ] ] )))""((( self
keepStatistics: ((aBoolean));samplingInterval: ((anIntegerS));yourself )profile:[ ((anIntegerR)) timesRepeat:
[ ((anExpression)) ] ] onExitDo: ((aBlock)) )))"
Because the profiler employs statistical sampling, several iterations should be used to produce results, so replace anIntegerR with an integer value sufficiently large to produce good results (some experimentation may be necessary). Then, replace anExpression with the expression to be profiled. That is sufficient for the first template; the others provide additional options.
To complete the example, then, you might use the first template with the following substitutions:
"(((self profile:[ (( 1000 )) timesRepeat:
[ (( Date today )) ] ] )))"Then select the expression and evaluate it with Do it in the <Operate> menu. After the expression is executed, the results of the analysis are displayed in a new window.
For an explanation of the report, see Analyzing the Profiler Report.
Tools Guide 9-3
System Profilers
Adjusting the Sample SizeRepeating the code to be profiled, as shown above, increases the accuracy of the sampling. An additional mechanism to control accuracy is to adjust the sampling size, using the slider control in the Profiler.
A profiler typically provides only an approximation of the time or memory being used by each method that is called. It does so, in effect, by monitoring the process at a regular interval, called the sampling interval. For example, if a baby-sitter checks in on children playing in their room every half hour, the sampling interval is 30 minutes.
At each 30 minute check point, the babysitter has to assume that the behavior of the moment has been going on for the past half hour. By reducing the sample size to 15 minutes, the babysitter will get a more accurate picture of the children’s activities, though it will cost more time and effort.
The sample size can affect the accuracy of the results dramatically. Reducing the sample size improves the accuracy, but may slow down the profiling run disproportionately. Setting the sample size to zero, for example, causes the profile to be updated after each indivisible chunk of time or memory is used, which can be very time-consuming. In most situations, the default sample size provides adequate accuracy without slowing things down unnecessarily.
To reduce the sample size (for brief processes), move the slider to the left until the desired numerical size is shown below the slider. To increase the sample size (for time- or memory-intensive processes), move the slider to the right. (To move the slider, place the cursor on the dark bar, press and hold the <Select> button on the mouse, then move the mouse to position the slider.)
In the example used above, printing today’s date in the transcript, the process is so light in its memory usage that the default sampling interval of 1024 bytes is inappropriate. The process is only monitored a few times, resulting in misleading allocation statistics. The obvious solution is to reduce the sample size so the process is checked more frequently.
9-4 VisualWorks

Analyzing the Profiler Report
Multi-process ProfilingMulti-process profiling provides profile reports for an expression being evaluated in multiple process rather than a single process. The multi-process profilers distribute the probes among several processes to evaluate the resources used by an expression running in a multi-processes context.
The expressions provided by the templates for MultiTime and MultiAllocations profiling reflect the difference between multi-process profiling and single-process profiling. Rather than evaluating the expression within a single profile block, the profiler is started, then the expression is evaluated, possibly repeatedly, and then the profiler is stopped:
"(((self startProfiling )))""((( ((anIntegerR)) timesRepeat: [ ((anExpression)) ] )))""((( self stopProfiling )))"
The report window opens once the profiler is stopped. The resulting report provides one more view option, tree grouped by priority.
Analyzing the Profiler ReportAfter the process that you are profiling has finished executing, the profile report is displayed in a window having the following components:
• A record of the sampling parameters.
• A slider for changing the cutoff percentage and a button for applying a new percentage.
• A text view for displaying the statistics.
• A list providing selections of a totals view or a tree view, for selecting the type of statistics to be displayed in the text view.
Tools Guide 9-5

System Profilers
At the top of the profile window, a set of statistics display useful information about the profiling run, which include:
• Number of samples
• Sample size
• Total bytes consumed (allocation profile)
• Total milliseconds consumed, in both elapsed and processor time (time profile)
This information is useful in judging whether a change in the sampling interval will prove fruitful—because relatively few samples were taken, for example. This information also serves to label the profile, distinguishing it from profiles generated by other sampling runs on the same code.
Tree Report ViewWhen the tree view is selected, the text view displays a listing of consuming methods that were called during the process. This listing is useful for locating the places in your code that consume the most time or memory, and therefore merit your optimizing attention.
9-6 VisualWorks

Analyzing the Profiler Report
Each method selector is preceded by a number representing the percentage of system resource (bytes or milliseconds) consumed by that method. The tree is displayed in the form of an indented list—each method is indented under its calling method.
Totals Report ViewWhen the totals switch is selected, the text view displays a list of the fundamental object-creating methods that were called, with the percentage of system resource consumed by each.
For example, a process that deals with graphics might make many calls to the x:y: method in the Point class. That activity would be summarized here. If you felt Point was taking an inordinate amount of time or memory to get the job done, you might investigate alternative coding paths that would generate fewer messages to Point.
Adjusting the Cutoff PercentageOnly those methods that consumed more than a threshold percentage of time or memory are shown. The default is 2 percent, meaning any method that consumed less than 2 percent of the time or memory is excluded from the listing. In effect: “If it’s smaller than this, don’t bother me with it.”
Tools Guide 9-7

System Profilers
To get finer detail in the profile, reduce the cutoff percentage by moving the slider to the left. To restrict the profile to the methods that consumed larger chunks of time or memory, move the slider to the right. After you have changed the position of the slider, apply the new cutoff by clicking on the apply cutoff button.
Contracting and Expanding the ListAnother means of making the list more manageable in size is to temporarily remove selected subhierarchies from the display. To do so, select the method above an unwanted subhierarchy and then use the contract fully command in the <Operate> menu. The selected method redisplays in boldface, indicating that it can be expanded to show more detail.
To restore detail under a contracted method, use either expand (for a single level of called methods) or expand fully (for the entire subhierarchy) in the <Operate> menu.
9-8 VisualWorks

Profiler Programmatic Interface
Spawning a Method BrowserTo examine the body of a method in the tree, select the desired method and then use spawn in the <Operate> menu. A method browser will be opened in a separate window. Besides the selected method, which is listed in boldface in the new window, the browser will list parent and child methods when appropriate.
While the browser offers most of the features of a code view, including text editing, you cannot recompile an edited method (via accept) in this window, because that could cause confusion about the state of the code at the time of the profile.
You can also browse senders of the selected message, implementors of the method, and implementors of messages contained in the selected method. These operations are the same as in the System Browser.
Profiler Programmatic InterfaceAt times it may be useful to profile larger blocks of code within the context of an application. The Profiler API allows you to do this, invoking the Profilers apart from the Profiler windows.
The interface classes are Profiler and its subclasses:
Tools Guide 9-9
System Profilers
ProfilerAllocationProfiler
MultiAllocationProfilerTimeProfiler
MultiTimeProfilerThe primary messages for invoking a profiler on code are the same as shown in the templates in the Profiler UI. The main difference is that, outside of the UI, you cannot simply refer to self, but have to send messages to either the appropriate Profiler class or an instance, depending on the message.
For example, to run the profile used earlier, an Allocation Profile on Date today, you would send:
AllocationProfiler profile:[ 1000 timesRepeat: [ Date today ] ] However, there is no class method for setting the sampling interval. To change the interval, do:
| profiler |profiler := AllocationProfiler new.profiler samplingInterval: 2056.profiler profile: [ 1000 timesRepeat: [Date today ] ]
For the complete API, browse the public api protocol on both the instance and class side of these classes.
9-10 VisualWorks

10
BenchmarksThe Benchmark class provides a framework and a convenient interface for running benchmarks to compare your application’s performance across versions and in various operating environments. A simple subclass of Benchmark can be built to run the benchmarking tests. As an example, we have provided a subclass called SystemBenchmark, which contains updated versions of the historic test suite we at Cincom use to compare system performance on different platforms.
This chapter describes the reusable interface and related mechanisms provided by the Benchmark class, using the SystemBenchmark subclass as an example. The final section then explains how to implement your own benchmarks.
Tools Guide 10-1

Benchmarks
Using the Benchmark InterfaceTo open the example System Benchmarks window, select Tools•Advanced•Benchmarks.
The System Benchmarks window has three views, arranged side by side. The benchmarks view, on the left side, lists the available benchmark tests. The parameters view, in the center, contains a variety of buttons and fill-ins for controlling report attributes. The Run button located below the list view begins execution of a test suite. The benchmark transcript, on the right, displays execution progress and the final benchmark report.
Assembling the Test SuiteAlthough a benchmarking run can be limited to a single type of test, such as adding 3 + 4 thousands of times, a run frequently involves a suite of several related tests. You can use the benchmarks view to select the tests you want to include in a run. To select an individual test, just click on it with the <Select> button; click again to deselect it. A check mark appears in the margin next to each selected test.
Selection TechniquesTo select multiple adjacent tests, hold down the <Shift> key while dragging the cursor through the desired tests (the check marks will appear after you release both the mouse button and the <Shift> key). To deselect multiple adjacent tests, hold down the <Control> key while dragging through the test names.
10-2 VisualWorks

Using the Benchmark Interface
To cancel all selections, use clear selections in the <Operate> menu; use select all to include all of the tests. The subclass can define a default suite of tests— in our example, SystemBenchmark uses as defaults the tests used by VisualWorks development for standard comparisons of platform performance. You can reset the test suite to the defaults at any time by selecting reset to default in the <Operate> menu. To summarize these operations:
Selection techniques for system benchmarks
Setting the Report’s GranularityAt the end of each benchmarking run, a report is generated containing statistics accumulated during the tests. Three buttons at the top of the parameters view control the level of detail in the report, as follows:
Raw MeasurementsDetails about each iteration of each test method. This information can be used to discover significant variations among iterations. The first iteration of an operation, for example, might consume a disproportionate amount of time because it might not take advantage of compiled-code caching.
The following times, for example, were reported for three iterations of two tests in the SystemBenchmark suite: text displaying and text replacement.
[display text]“First iteration”
10 repetition(s) in0.921 seconds92100.0 microseconds per repetition
[text replacement and redisplay]20 repetition(s) in5.1 seconds
Operation Description
click <select> button Select and deselect a single test
<Shift> + drag <select> Select multiple tests
<Control> + drag <select> Deselect multiple tests
select all Select all tests
clear selections Deselect all selected tests
reset to default Select default tests
Tools Guide 10-3

Benchmarks
255000.0 microseconds per repetition[display text]“Second iteration”
10 repetition(s) in0.88 seconds88000.0 microseconds per repetition
[text replacement and redisplay]20 repetition(s) in4.98 seconds249000.0 microseconds per repetition
[display text]“Third iteration”10 repetition(s) in0.94 seconds94000.0 microseconds per repetition
[text replacement and redisplay]20 repetition(s) in4.98 seconds249000.0 microseconds per repetition
Benchmark ResultsA summary of statistics for each test. In effect, this section of the report summarizes the details described above, whether or not the details themselves are included in the report. This information is useful for identifying the slow performers in a suite of tests, marking them as candidates for optimization.
Results are converted to rates (by the convert:toRateFor: method in the subclass) when the rates switch is selected. When the times switch is selected, no such conversion takes place. (The class comment for Benchmark discusses this mechanism and its implications further.) Types of statistics are described in Choosing Types of Statistics.
The following example reports the minimum, maximum, and median for the raw times reported in the example above:
Individual benchmark results (three iterations)
Benchmark Minimum Maximum Median
TextDisplay 136.170 145.455 138.979
TextEditing 82.7451 84.7389 84.7389
10-4 VisualWorks

Using the Benchmark Interface
Overall Suite StatisticsA summary for the entire suite, the purpose of creating a suite in the first place is to measure the performance of some subsystem. Benchmarking provides a weighted average for the performance of that subsystem, which you can then use to compare with an identical benchmarking run under different operating circumstances.
For the weighted average, the report displays the same columns as for the individual statistics. For example, if you elect to display only the median value for individual benchmarks, only the median value for the suite-wide statistic will be shown.
Benchmark suite results (three iterations)
Let’s use the minimum H-Mean (harmonic mean) to illustrate the derivation of these statistics further. Each time the test suite is performed, the individual test results are converted to rates and then combined mathematically to arrive at the harmonic mean score for that iteration.
The suite was performed three times, in our example, so three such harmonic means are derived. The minimum H-Mean represents the lowest of the three scores. Similarly, the maximum H-Mean is the highest of the three, and the median H-Mean is the median (or middle value) of the three.
Choosing Types of StatisticsThe two summary sections of the report can include different types of statistics. You control which types are included in the report by selecting buttons in the parameters view. The types of statistics are as follows (i represents the number of iterations):
• Minimum—the result from the best-performing iteration.
• Maximum—the result from the worst-performing iteration.
• Arithmetic mean—the average of all iterations; sum/i.
Rating Type Minimum Maximum Median
Minimum 118.539 126.309 125.558
Maximum 139.13 142.222 142.222
H-Mean 116.364 119.425 118.321
Median 118.539 126.309 125.558
Tools Guide 10-5

Benchmarks
• Harmonic mean—The number of iterations, divided by the sum of the inverses of the weighted results for the separate iterations.
i/[(1/result1) + (1/result2) + ...]• Median—the value that is midway through a ranked list of the
scores. For example, if you specify five iterations, the median is the third element in the sorted collection of scores.
The harmonic mean is only useful when summarizing overall performance, so it is only available under the Overall suite statistics check box. Under the heading Benchmark results check box, the arithmetic mean is only offered when you select the times switch; when the rates switch is selected, the harmonic mean is offered.
Setting the Report DestinationThe report can be displayed in the benchmark transcript view, stored in a disk file, or both. Use the buttons under the heading Write report to: in the parameters view to select one or both destinations. You can provide the name of a file in the input field. The file will be created in the start-up directory unless you specify an absolute or relative pathname.
Setting the Number of IterationsThe test suite can be repeated as a means of improving the accuracy of the results. By default, the iteration count is set to three. To change the number of iterations, type the desired number in the input field labeled Iterations.
The number of iterations represents the number of times the test suite will be repeated—this is not to be confused with repetitions that are hard-coded into a given method. For example, the test3plus4 method repeats the 3 + 4 operation 100,000 times for each iteration, so three iterations would cause the operation to be repeated 300,000 times.
In some situations, a single iteration may produce more interesting results. For example, a method might take a relatively long time to execute on its first pass, but run much faster subsequently. However, if your application calls the method only infrequently, the first-iteration results might prove more illuminating.
To begin execution of the testing run, click on the run button. If your window manager is configured to prompt you for placement of windows, you might consider turning off that feature before running
10-6 VisualWorks

Creating a Benchmark Subclass
the default test suite or other suites involving window-displaying operations. However, prompt-for-placement can be left on without affecting the results.
Creating a Benchmark SubclassThe benchmarks are implemented via the following four classes, all of which are subclasses of Object:
• Benchmark, and its subclass SystemBenchmark
• BenchmarkTable
• BenchDecompilerTestClass
Benchmark SuperclassBenchmark is an abstract superclass whose protocol provides the interface we have been describing, as well as the timing and statistical analysis facilities for a benchmarking run. It has instance variables for remembering the report parameters as selected in the interface, and the test results as they are accumulated. Benchmark also provides the reporting protocol, making use of BenchmarkTable (described further below).
SystemBenchmark SubclassSubclasses of Benchmark, such as SystemBenchmark, are responsible for providing the specific tests to be run. See the methods that begin with the word “test” in SystemBenchmark for examples.
In addition, subclasses must implement the following accessing messages:
benchmarkLabelForSelector:benchmarkSelectorsinitiallySelectedBenchmarks
Subclasses may also need to override Benchmark’s weighting protocol, to establish relative weights for test methods and to convert the results to an appropriate rate; and the defaults protocol, which determines the default selections in the user interface.
Tools Guide 10-7

Benchmarks
BenchmakTable ClassBenchmarkTable provides two-dimensional reporting capabilities that might well be useful to other applications, though the code requires extensions to make it more generally useful. It holds onto a report name, a collection of column labels, and a collection of rows. Each row is assumed to be a collection itself.
The protocol is tailored to the needs of the benchmark reports, though it provides a subset of a more generally useful set of behaviors.
BenchDecompilerTestClass ClassBenchDecompilerTestClass is a holder for methods that are decompiled during the SystemBenchmark>>testDecompiler benchmark. The code in the methods has no functional value—in fact, it is obsolete.
10-8 VisualWorks

11
Class ReportsThe Class Reports tool performs a variety of automated checks on specified classes and helps you:
• Repair common coding errors.
• Estimate memory requirements of your application.
• Document your code.
Class Reports is a specific tool that is built on top of a set of general system-analysis capabilities.
Tools Guide 11-1

Class Reports
Creating Class ReportsTo open a Class Reports window, select Tools•Advanced•Class Reports.
The Class Reports window contains the following components for defining the contents of the report:
• A Class Patterns view for roughly defining the classes to be checked.
• A Class List view for selecting individual target classes.
• Three switches for choosing a type of report.
• Depending on the type of report selected, two extra switches may be provided for choosing the output destination.
• Depending on the type of report and the output destination, additional options may be provided.
• A button labeled run for launching a scan-and-report sequence.
Selecting the Target ClassesYou can generate a report for a single class, all classes or any list of classes. Keep in mind as you assemble your list that the amount of time required to produce a report increases with each added class.
11-2 VisualWorks
Locating Coding Errors
Use the Class Patterns view to make a rough cut at the list. Enter one or more wildcard patterns, one per line. Each such entry can contain a class category component and/or a class component. If both components are present, separate them with a greater-than symbol (>). Then choose accept in the <Operate> menu, or click the run button, to display all classes matching those criteria in the Class List view.
Wildcard patterns are not case sensitive; an asterisk (*) stands for any string, and a number sign (#) stands for any single character. You can also use the paste command to insert a list of patterns that you use frequently.
The following examples are all valid class patterns:
Valid class patterns
Then, in the Class List view, click on the desired class or classes to highlight them for inclusion in the report. Use the add all command in the <Operate> menu to select all of the classes in the list at once; use clear all to deselect all of them. To select a range of classes, hold down the <Shift> key while dragging through the desired class names; to deselect a range of classes, hold down the <Control> key while dragging.
Locating Coding ErrorsTo scan the selected classes for coding errors, select the Correctness switch in the upper left corner of the Class Reports window. Two new switches will appear, labeled Report and Browse. When the Report switch is selected, ten report options are displayed. Each option has a check box, and you can check any number of them to build up the
Tools* Classes in categories beginning with ‘Tools’
tools* Same as above
Tools-Misc>* Classes in the Tools-Misc category
Tools*>Changes* Classes beginning with ‘Changes’ in categories beginning with ‘Tools’
Changes* Classes beginning with ‘Changes’
ChangesList The class name ChangeList
Tools Guide 11-3
Class Reports
desired report. When the Browse switch is selected, eight of the options are offered—the other two are only appropriate for report output.
Report options are described in the following paragraphs.
Messages Sent but Not ImplementedEach method in the class is checked to make sure that every message sent is implemented somewhere in the system. No attempt is made to assure the appropriateness of the implementor. For example, a self grok message is acceptable even if grok’s implementor is not in the target class or its superclass hierarchy.
Methods that send an unimplemented message are reported or, in Browse mode, listed in a browser for examination and possible correction.
Messages Implemented but Not SentEach method in the class is checked to make sure that its selector is sent by at least one calling method.
Defining what it means for a message to be “sent” is problematic. As an extreme example, one could have code that says self perform: (a,b) asSymbol, where a and b are variables that hold 'foo' and 'bar', respectively. This code, then, sends the message foobar, but no practical analyzer can figure this out. So system tools have to take a particular stand as to what it means for a message to be sent.
In the case of this facility, the stance taken is exactly the same as that taken by the senders and messages facilities in the System Browser: a message is sent if some compiled code has the message selector as a literal. It will be a literal if the selector is used in code (e.g., self foobar), or if the symbol exists in literal form (e.g., self perform: #foobar). (The exception to this rule is a set of special selectors known by the compiler classes. These selectors are always considered to be sent, even if they do not appear as literals anywhere.)
As a result, the facility may falsely report that some implemented messages are not sent, so the report should be used as a guide. The above example is, of course, poor programming style.
Methods that are not sent are reported or, in Browse mode, listed in a browser for examination.
11-4 VisualWorks
Locating Coding Errors
Method ConsistencyWhen two messages sent to the same instance or class variable assume different object types, a conflict is reported.
Similarly, when a temporary variable is used to hold two very different kinds of objects (considered bad form) and thus is sent incompatible messages, a conflict is reported.
The current value of each class variable, pool variable, and global variable is also tested to be sure its class implements the messages that are sent to it.
Finally, an inconsistency is reported when a message is sent to self that is not understood by the self object.
When inconsistent methods are found, they are reported or, in Browse mode, listed in a browser.
Subclass Responsibilities Not ImplementedEach method that consists of a self subclassResponsibility message motivates a check of each leaf subclass to make sure it owns or inherits a reimplementation of that message.
Note that abstract subclasses need not implement these messages—in such cases, the report will falsely report errors, so use the report as a guide.
Offending methods are reported or, in Browse mode, listed in a browser.
Undeclared ReferencesEach method in the class is checked to verify that no undeclared literals are used. Offending methods are reported or, in Browse mode, listed in a browser.
Instance Variables Not ReferencedEach instance variable is checked to make sure it is referenced by at least one method. Unreferenced variables are reported; this option is not available in Browse mode.
Check CommentThe class comment is checked to make sure it mentions all instance variables, class variables, and class instance variables that are in the class definition.
Tools Guide 11-5

Class Reports
The comment is expected to follow a particular syntax:
• Any amount of plain text followed by a line that says “Instance Variables:”.
• After that line, there should be a line for each instance variable, containing the variable’s name followed by one or more spaces and tabs, followed by a “type” specification in angle brackets, followed by one or more tabs and spaces, followed by text describing the variable.
• If the class has indexed instance variables, include another line as described above, substituting “(indexed instance variables)” for the variable name.
The type specification is typically one or more class names, or nil, separated by vertical bars. In place of class name, you can also use "ClassName of: OtherClassName", for example "Array of: Boolean". The syntax allows more complicated descriptions; for more information, see the method comments in Parser>>typeExpression and Parser>>simpleType.
If the class defines any class variables, the comment should have a section similar to the instance variable section. The heading line is expected to say "Class Variables:".
Finally, if the class has messages defined as self subclassResponsibility, these messages should be listed in a section with "Subclasses must implement the following messages:" as its heading.
The parsing of class comments is somewhat rigid and sometimes what appears to be a valid comment will generate errors in this report, so use the report as a guide. For example, if a type description does not fit on one line, or if the variable description does not start on the same line, the facility will report these as errors.
For instance variables, the facility performs a protocol test:
• All messages sent to each instance variable are verified as being implemented for the named class (or, if more than one class is named, for at least one of them).
• If the class has existing instances, each variable is expected to hold an object of the named type.
• For each class variable, the current value is expected to be an object of the named type.
11-6 VisualWorks

Estimating Memory Requirements
This option is not available in Browse mode. If a comment contains the words UNDER DEVELOPMENT (in capital letters), that fact is reported and no checking takes place for that class.
Backward Compatibility Message SendsThe methods are checked to see whether they send messages that exist (only) in a backward compatibility protocol.
Indefinite Backward Compatibility Message SendsSimilar to the preceding option, but the checker only pays attention to the ambiguous case, when a message send exists in both a backward compatibility category and another category. In this situation, static analysis cannot determine whether the message send is inappropriate, so it is reported as a candidate for your further investigation.
Backward Compatibility Class ReferencesThe methods are checked to see whether they refer to a class that is in a class category that contains the string ‘backward compat’ (without case sensitivity).
Estimating Memory RequirementsTo receive an estimate of the memory requirements of the target classes, select the Space switch in the upper-right portion of the Class Reports window. Three new switches will appear. Each button provides a different perspective on the estimated memory requirements, as follows:
• Class Size —For each target class, the report shows the estimated number of bytes required for the class definition, variables, methods, and class organization.
• Method Size—For each method in a target class, the following measurements are reported:
• Code Bytes—the memory occupied by the method’s byte code, the portable compiled form of the method that is used to create native machine code.
• Literals—the number of literal pointers created by the compiler to refer to such things as message selectors, arrays, strings, and floats. Each such literal pointer contributes 4 bytes to the total.
Tools Guide 11-7

Class Reports
• Literal Bytes—the number of bytes required by literal objects other than Symbols.
• Full Blocks—the number of full blocks in each method. Full blocks are blocks that contain out-of-scope references to temps, or nonlocal (^) returns. Full blocks are nonoptimal because they are slower and use more dynamic memory. This is only of concern in methods that are used frequently.
• Total—the estimated total number of bytes needed by each method, including overhead (20 bytes) not reported in the other columns. A total byte count for all methods is also displayed.
• Instance Size—For each target class, the following measurements are reported:
• Count—the number of instances that exist.
• TotBytes—the memory, in bytes, occupied by all instances.
• AveByte—the average number of bytes for each instance.
A summary line reports the same measurements for all target classes.
These reports are intended to help you optimize memory usage by identifying places in your code where memory usage is disproportionate to the functional contribution of the code.
Documenting Your CodeTo create a listing of some or all of the elements that make up the code in the target classes, select the Manual switch in the upper left portion of the Class Reports window. Two new switches will appear, labeled Report and Print. When the Report switch is selected, the documentation is displayed in a separate window. When Print is selected, the output is sent to a printer instead.
The following check-box options are provided for defining the code components to be included in the listing. The options are hierarchic and interconnected, as follows:
• class definition
• class comment
• include metaclass—include the metaclass definition.
11-8 VisualWorks

Documenting Your Code
• protocol names—instance protocol names are reported; class protocol names are included when the include metaclass check-box is selected.
• include private protocols—include any protocol beginning with the string “private.” Private protocols are made separable in this way because only public protocol is relevant for certain types of manuals.
• methods—list method selectors, including metaclass and private methods if those check-boxes are selected.
• method comments only
• method bodies—including method comments.
Various text emphases are used for the different components of documentation. For example, #italic is used for the class comment. To change one of these emphases, modify and recompile the appropriate method in the emphases protocol on the instance side of the ManualWriter class.
Tools Guide 11-9
Class Reports
11-10 VisualWorks

Index
Aadding
class definition 1-5method definition 1-5
BBenchmarks
Arithmetic mean 10-5BenchDecompilerTestClass 10-8Benchmark class 10-7BenchmarkTable class 10-8clear selections command 10-3creating a subclass 10-7Harmonic mean 10-6Maximum 10-5Median 10-6Minimum 10-5opening example 10-2Raw Mesurements 10-3report components 10-3reset to default command 10-3run button 10-2, 10-6select all command 10-3suite statistics 10-5SystemBenchmark class 10-1, 10-7types of statistics 10-5window components 10-2
CChange List
condensing 5-9change list 5-1Change Set
browsing changes 5-7clearing 4-6updating 4-5
changesbrowsing 5-7managing 5-1–5-9See also Change List, Change Set
classcreating 1-5
class button 1-4Class Reports
accept command 11-3
add all command 11-3Browse switch 11-3Check comment 11-5Class List view 11-3Class Patterns view 11-3Class Size 11-7clear all command 11-3Correctness reports 11-3finding coding errors 11-3Inst vars not referenced 11-5Instance Size 11-8Manual switch 11-8memory usage reports 11-7Messages implemented but not sent
11-4Messages sent but not implemented
11-4Method consistency 11-5Method Size 11-7opening 11-2Report switch 11-3Space switch 11-7SubclassResponsibilities not
implemented 11-5text emphases 11-9Undeclared references 11-5Wildcard patterns 11-3window components 11-2
crash recovery 5-7
Ddecompiled code 1-5
Eediting
source code 1-5
Ffiltering
change list 5-10
Iinstance button 1-4
Tools Guide Index-1

Index
Mmethod
creating 1-5
Nnamed change sets 4-1
Ooverrides
packages 3-3parcels 3-3
Ppackages
overrides 3-3parcels
overrides 3-3Profilers
apply cutoff button 9-8contract fully command 9-8cutoff percentage 9-7expand command 9-8expand fully command 9-8profile descriptors 9-6profile window 9-5spawn command 9-9threshold percentage 9-7totals switch 9-7tree list expansion 9-8tree switch 9-6window components 9-2
projectmanaging 5-1–5-9
Rrecover, from crash 5-7
Ssave source code 1-5shared variables button 1-4source code
editing 1-5missing 1-5saving 1-5
System Browser 1-1
Vversion control 5-1–5-9
Index-2 VisualWorks