vivotek smart motion detection user...
TRANSCRIPT

VIVOTEK
User's Manual - 1
Smart Motion DetectionUser Guide
The traditional motion detection relies heavily on the detection of pixel changes or motion vectors, and false alarms can be triggered by swaying trees, clouds floating by, or even the appearance of little animals. The Smart Motion detection, with Human detection and tunable time filter, can eliminate the defects of traditional motion detection and facilitate the configuration at a surveillance site.
A key feature in the Smart Motion detection is the Human detection. Based on a human silhouette database and the rapid responses via an artificial neural network technology, the Smart engine instantly recognizes human appearances in a video surveillance area. Since humans are the objects of interest in the majority of video surceillance, the Human detection feature enables users to quickly configure his installation.
With Human detection, light changes or swaying vegetation, vehicles passing by, or animal activities in the scene are not taken as event triggers. Only human activities will trigger an event. This helps reduce false alarms and the time and efforts for a camera configuration.
Swaying trees
Vehicles passing by
Moving shadowsNon-human moving objects
Humandetected as objects of interest
The activity data collected by the camera is displayed in comprehensive graphs and bar charts. You can monitor and compare the historical data acquired through a span of time and fine-tune the detection parameters with the ease of use of a graphical interface.

VIVOTEK
2 - User's Manual
Applicable Cameras:
Please refer to VIVOTEK’s VCA package and camera documentation on the website.The majority of VIVOTEK’s latest camera models will come embedded with this utility.
Revision History■ Rev. 1.0: Initial release■ Rev. 1.1:
* The Human Detection feature can be enabled/disabed on each individual motion window. * Supports configuration in the MS9390 panoramic field of view. * If the Motion window is located outside of the optimal human detection area, the Human
Detection feature checkbox is automatically disabled.
* Motion window statuses have been adjusted. See page 17.
Requirements for Running the Smart Motion Detection:
1. The embedded video tracking and counting analysis requires a monitoring session on Microsoft IE 10 or IE 11 browser.
If you open a console with a non-IE browser, the Smart Motion stream must be configured to be streaming in MJPEG.
2. Lens cleanliness is also required because dust spots or smears on dirty lens can produce miscalculation of pixels, correlation, and movements.
3. For other installation concerns, please refer to page 9, Considerations. 4. Avoid glass and reflective materials, such as aluminum foils, in the field of view. If
unavoidable, you can use the Exclusive area settings to get rid of the side effects. 5. Make sure the camera is installed appropriately above the area of your interest, e.g.,
an entrance to building. Installation at an extremely busy area, e.g., a square or cross road section with dozens of passengers per minute, may not apply due to the system computing load.
6. Due to the system load, do not open two configuration web consoles at the same time.
IMPORTANT:
The effectiveness of the Smart Motion detection slightly diminishes for objects lower than 130cm, such as children.
NOTE:

VIVOTEK
User's Manual - 3
Considerations Note the following when planning the camera installation: 1. The installation site must be adequately lighted for optimal accuracy with video
detection.
2. In the night mode, configure a schedule profile for the different lighting condition. In the night mode, the Smart Motion works if additional lighting is provided, e.g., using the on-board IR light.
Installationheight
Measured to the approx. lens position.Not to the ceiling.
6.5cm
3. Make sure you measure the height of your camera. The height information is important for the accuracy of the video analytics results. Some of the other perspective information are automatically collected by the onboard S-sensor. The height information enables the horizontal and vertical keystone corrections of the field of view. Measure the distance between camera lens and the ground.

VIVOTEK
4 - User's Manual
3. Because the horizontal and vertical keystone corrections are performed for an accurate detection, the height and tilt information of the camera must be correctly configured.
Use a laser distance meter to measure the installation height. The height information MUST BE correctly measured and entered in the camera's configuration page.
Only part of the human is covered by the detection area.
Field of View
Detection area
4. For Human detection, as long as a human silhouette is detected in the field of view, and his feet travelled through the Human detection area, he can be detected. Due to the visual perspective of lens, sometimes the entire body may not be all contained by the detection area.
OR
OR
Horizontal keystone correction
Vertical keystone correction

VIVOTEK
User's Manual - 5
5. A man sitting, squated, or men lying on the floor may not be detected as a human, because his silhouette has been destroyed. Detection may also be affected when a human form is changed, e.g., a man's body is hidden behind a counter, or a man showing only the upper half of his body by leaning on a desk.
• Due to the optic concave characteristics of a lens, men can be temporarily blocked behind other men. When a man's head-shoulder feature is consealed, he may not be detected for the short moment.
FOV
Detection area
6. If the Human detection feature is not used, unnecessary objects should be avoided. A door, a floating curtain, and moving objects such as an escalator can cause mistakes with the detection.
VIVOTEK
6 - User's Manual
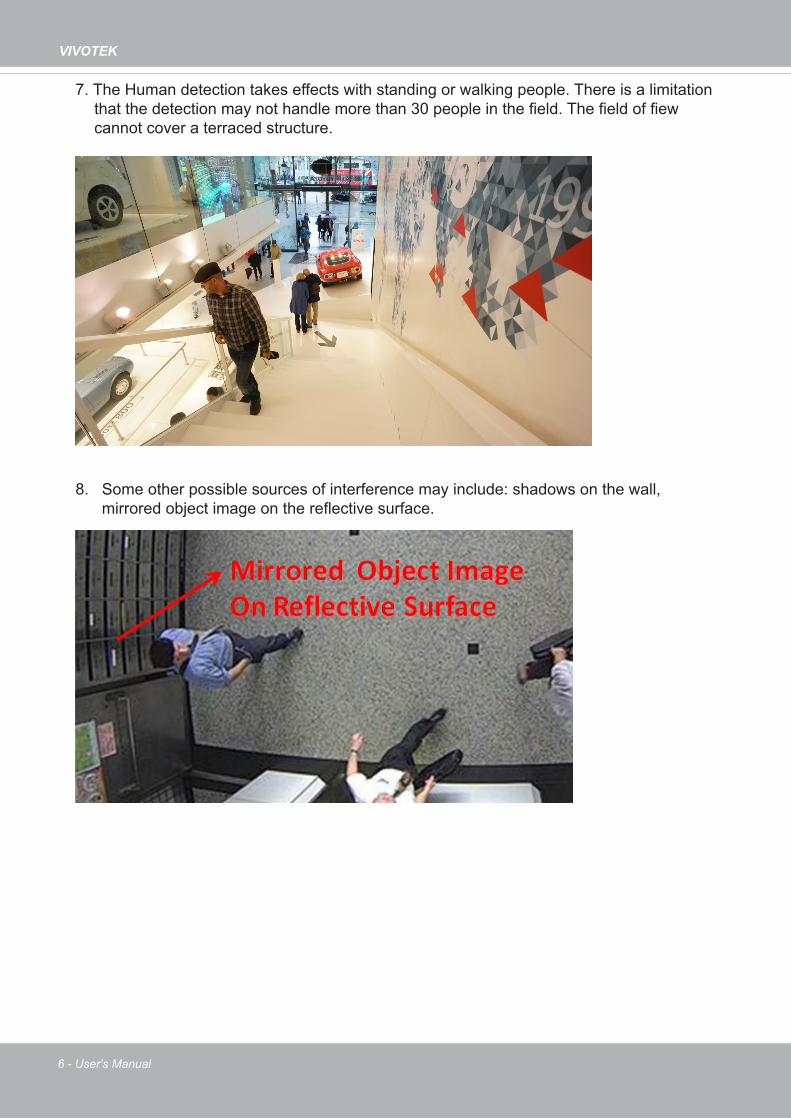
8. Some other possible sources of interference may include: shadows on the wall, mirrored object image on the reflective surface.
7. The Human detection takes effects with standing or walking people. There is a limitation that the detection may not handle more than 30 people in the field. The field of fiew cannot cover a terraced structure.
VIVOTEK
User's Manual - 7
Configuration:
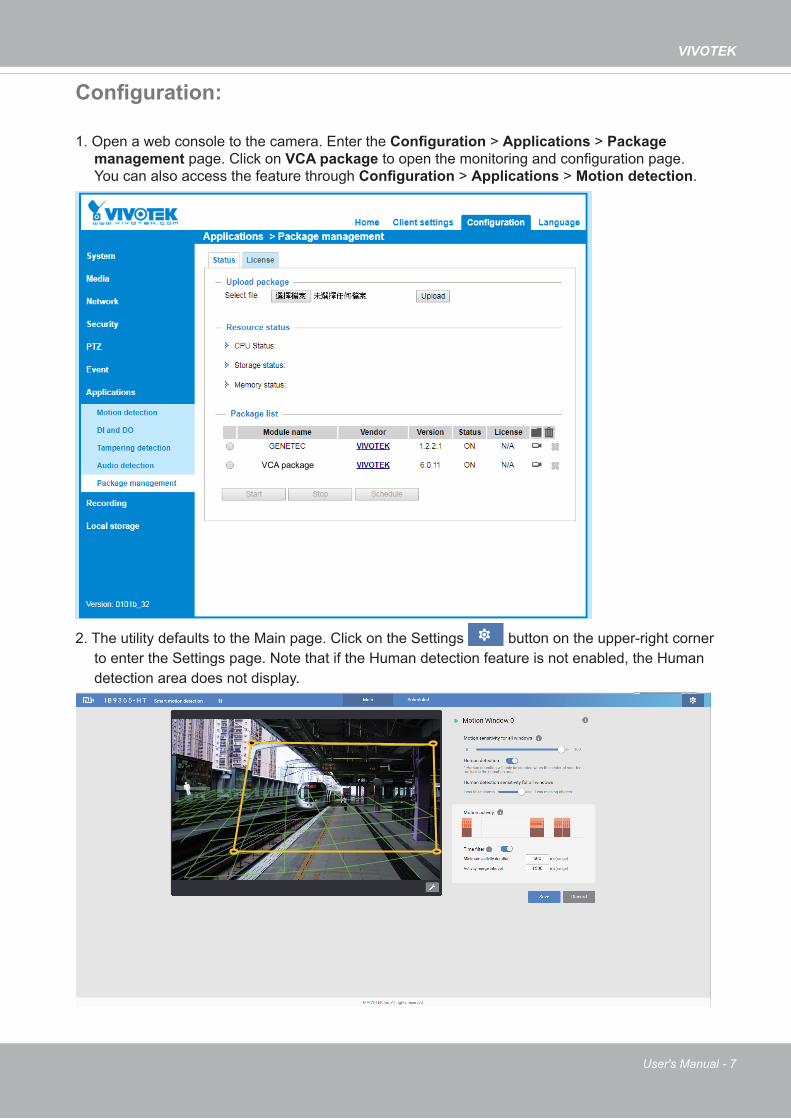
1. Open a web console to the camera. Enter the Configuration > Applications > Package management page. Click on VCA package to open the monitoring and configuration page.
You can also access the feature through Configuration > Applications > Motion detection.
VCA package
2. The utility defaults to the Main page. Click on the Settings button on the upper-right corner to enter the Settings page. Note that if the Human detection feature is not enabled, the Human detection area does not display.

VIVOTEK
8 - User's Manual
3. Enter the correct installation height. For the FD and IB 9xxx series that come with a G sensor, the Camera shooting angles (Tilt and Roll) can be automatically acquired. Select the Auto mode.
If using models that are not equipped with a G sensor, you can manually enter the tilt and roll angles.
Note that the tilt angle corelates to the absolute downward direction. If a camera is installed on a ceiling, and its lens points straight downward, its tilt angle is 0 degree. If your camera lens is tilted, enter the angle related to the vertical line, e.g., 60º as shown below.
30°
60°0°
The roll angle is one that refers to the horizontal level line.

VIVOTEK
User's Manual - 9
Exclusive Areas
Click the Add area button to add an Exclusive area. Sometimes there are non-related elements in your field of view, such as a white wall where no one can walk on it or a fish pond with reflective water surface. You can add exclusive areas to block out the unnecessary elements in scene.
Use mouse clicks on the screen to draw polygons to create Exclusive areas. Click Save to preserve your settings.
4. When done, click Save to preserve your settings.
5. Click on the Main tab to move to the main page.

VIVOTEK
10 - User's Manual
6. Click on the streaming window to create a detection window. If the need should arises, you can create up to 5 detection windows.
Green horizontal gridHuman detection area
Click to create.
Drag to change shape
Change the coverage area of the window by draging the corner marks. Note that the coverage area should comply with the Human detection area. The Human detection area is indicated by the red, dotted line.
The display elements can be configured in the Custom properties pane: * Tracking box: The vertical bounding box surrounding a standing or walking human form. * Motion cells: The alerted vectors that appear when a moving object appears in scene. * Exclusive Area: Displays the Exclusive area(s) you created in the Settings page. * Human detection area: The green horizontal grid mesh is automatically generated according to the
camera's FOV, installation height, tilt, and roll angles. It is designed to indicate the area where the effective human detection can take effect. Place your detection window within the green grid.
The approximate distance between any two of the green lines is 1 meter. The height of the little man on the upper left of the grid is approximately 1.7m.
Tracking box
Motion cells
VIVOTEK
User's Manual - 11
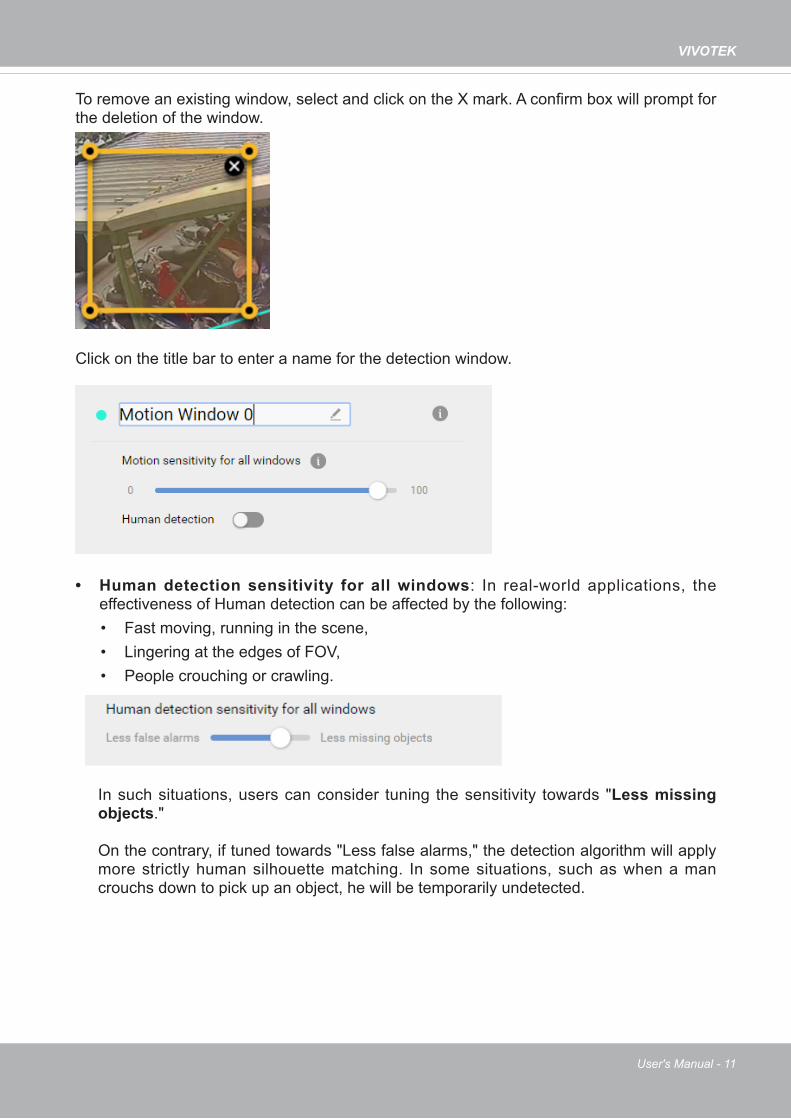
To remove an existing window, select and click on the X mark. A confirm box will prompt for the deletion of the window.
Click on the title bar to enter a name for the detection window.
• Human detection sensitivity for all windows: In real-world applications, the effectiveness of Human detection can be affected by the following: • Fast moving, running in the scene, • Lingering at the edges of FOV,• People crouching or crawling.
In such situations, users can consider tuning the sensitivity towards "Less missing objects."
On the contrary, if tuned towards "Less false alarms," the detection algorithm will apply more strictly human silhouette matching. In some situations, such as when a man crouchs down to pick up an object, he will be temporarily undetected.

VIVOTEK
12 - User's Manual
7. Observe the human traffic on screen and tune the sensitivity until the motion cells match the human figures on screen. If you aim to detect larger objects, such as vehicles, the same applies. Tune the sensitivity so that the appearance of motion cells better coordinates the appearance of the objects of your interest.
excessive cellscells too fewCoordinated
Click on the Tools button at the lower-right of the streaming window for the display options.
• Show Motion Cells: Displays the motion cells around a moving object. By default, when Human detection is enabled, the motion cells display is turned off.

VIVOTEK
User's Manual - 13
A real-world view of excessive motion cells is shown below. The higher the sensitivity, the higher the chance of generating more motion cells.
Sensitivity: 90 Sensitivity: 30
Shown below is the comparison of the same object detected through different sensitivity levels. At the sensitivity level 90, excessive motion cells can be observed; while at level 30, the detection ends up with insufficient motion cells.

VIVOTEK
14 - User's Manual
• Show Human Detection Area: Select to display the effective detection area currently detected by your camera.
Due to the visual perspective of the camera mounted on a ceiling or wall, a person enters the scene from the edge of the FOV with his feet appearing first, and then his/her head later. Only until he/she comes to a place within the perimeter of the detection area, the head and feet positions can be aligned. A person's feet are detected first, and if a detection area is configured too close to the edges of FOV, a person may not be appropriately recognized when his/her entire body profile has not entered the detection area.
People crossing the non-Detection area may not be properly recognized by the Human Detection function. Humans must have their feet stepping into or across the detection area.
Detection area
Head
Feet
FOV
8. Configure the other parameters,

VIVOTEK
User's Manual - 15
Tune the following if the need should arise.
Motion sensitivity: Use the slide bar to change the sensitivity. Default is 70%.
Human detection: Use this slide tab to enable or disable the Human detection feature. When Human detection is disable, different configuration options will appear.
Motion activity: The detected human activities is displayed on a 1-minute time line. The consecutive 4 standing man icons indicate a detected presence persisted for 4 seconds.
Note that when watching the activities, the Motion activity displays for a selected window. If you have multiple detection windows, and a window is currently not selected on screen, its activities do not display.
When activities occur, and the window is triggered, the window will be highlighted by turning the frame into red.
With a live view, you can observe the effectiveness of human detection on screen.

VIVOTEK
16 - User's Manual
Time filter: Minimum activity duration: A human activity (or moving objects) must persist for longer
than this duraction to be considered an effective trigger. This aims to avoid the situation when one enters and leaves the scene very quickly.
Activity merge interval: Setting this interval aims to avoid the stop-and-move maneuver by some thieves. The activities occurred during this duration is considered as one trigger. If activities occur before the end of the interval, the interval will be prolonged, e.g., 7 + 7 seconds.
If activities occur before the end of this interval, the inconsecutive actionswill be considered as one trigger.
7,000ms interval Prolonged interval

VIVOTEK
User's Manual - 17
Motion activity: (This option is available only if you disable Human detection)
Click and drag the slide bar to change the detection threshold while watching the activities on screen. The activity chart covers a 61 seconds time span. The Y-axis indicates the percentage of alarmed pixels in the field of view.
The Motion sensitivity can be associated with object sizes. The higher the sensitivity, the smaller the object size can be detected. Change the trigger level if necessary, judging from the live view of your scene.
If you do not want motions to be triggered by small objects, e.g., little animals such as birds, configure a higher threshold.
Human detection does not need this activity threshold setting. It works on the detection
of the silhouettes of human body by an AI engine.
The blue bars indicate the activities within the surveillance scene. An effective trigger is indicated by a semi-transparent red bar.

VIVOTEK
18 - User's Manual
Below are the statuses of the Smart Motion detection polygon:
Normal Selected by a mouse click. You can click on the delete button to remove a configured window.
When motion is triggered in the window. When moused over. You edit the end points.
Click and drag the end points to edit the coverage of the motion window.

VIVOTEK
User's Manual - 19
Scheduled mode:
Click the Scheduled tab to open the Scheduled configuration window. An illustrated work flow will prompt.
The Scheduled mode allows you to apply different motion detection configurations for different lighting conditions, such as in the night mode. Another 5 detection windows are available for the Scheduled mode. Individual trigger levels can be configured per window.
Use the same configuration methods as previously described to configure the detection in a scheduled mode. Note that In the night mode, the applicable sensitivity range tends to fall between middle and high.

VIVOTEK
20 - User's Manual
When Motion configuration is made, associate the event delivery with the occurence of motion events. For example, you can configure the camera to record the related video clips by the time the motion event occurs, or sending an Email containing the snapshot of the event.
Configure the motion event notification in Configuration > Event settings.

VIVOTEK
User's Manual - 21
Motion events prompt on VIVOTEK’s central management software, VAST2. A single click on the event prompt can play back the related video footage.
Motion events are tagged and can be retrieved from the event list using the Alarm list function.
Smart search II is available only for newer line of cameras that come with Smart Motion detection. Smart search II has the following benefits:
1. Faster search: Metadata is saved with videos coming from cameras running Smart
Motion detection. With the help of the metadata, the search focuses on the effective
alerted vectors and the adverse effects, e.g., headlights causing dramatic contrast
or small animals passing through, have already been eliminated by the camera. The
search can be more rapidly completed.
2. Human detection: The search can be conducted for human activities only. Activities
matching the silhouettes of human will be considered as effective results.
3. Multiple multi-point polygons: Users can more readily create flexible polygons on the
areas of their interest.
Note that the Smart Motion detection areas must have been configured on each camera before the Smart search can take effect.

VIVOTEK
22 - User's Manual
You can specify the time span, Human detection, Sensitivity level, and time filter parameters in a Smart Search II panel.
You can then click to open any clip of your interest. Each marked event clip will be indicated by a lighter color on the time line. You may then right-click to add a Bookmark or take a snapshot.

VIVOTEK
User's Manual - 23
If you find important events, use the Export function to mark the start and end points on the timeline to export a video clip. Use the pull tabs on time line to determine the export length. By default, the export length is 2 minutes long.
The playback control in the Alarm list window is identical to that on the Playback window.
PLAYBACK FE9391-EV2992x2992H26415.00 fps 0.04 Mbit/s2017/11/29 14:06:48