vlsm & route summarization · the solution: variable length subnet masking the solution to this...
TRANSCRIPT

University of Jordan
Faculty of Engineering & Technology
Computer Engineering Department
Computer Networks Laboratory
907528
VLSM & Route Summarization

2 VLSM & Route Summarization
IP Variable Length Subnet Masking (VLSM)
Normal Subnet masking replaces the two-level IP addressing scheme with a more flexible
three-level method. Since it lets network administrators assign IP addresses to hosts based on
how they are connected in physical networks, subnetting is a real breakthrough for those
maintaining large IP networks. It has its own weaknesses though, and still has room for
improvement. The main weakness of normal subnetting is in fact that the subnet ID
represents only one additional hierarchical level in how IP addresses are interpreted and used
for routing.
The Problem with Single-Level Subnetting
In large networks, the need to divide our entire network into only one level of subnetworks
doesn't represent the best use of our IP address block. Furthermore, we have already seen that
since the subnet ID is the same length throughout the network, we can have problems if we
have subnetworks with very different numbers of hosts on them—the subnet ID must be
chosen based on whichever subnet has the greatest number of hosts, even if most of subnets
have far fewer.
This is inefficient even in small networks, and can result in the need to use extra addressing
blocks while wasting many of the addresses in each block.
The Solution: Variable Length Subnet Masking The solution to this situation is an enhancement to the basic subnet addressing scheme
called Variable Length Subnet Masking (VLSM). VLSM seems complicated at first, but is
easy to comprehend if you understand basic subnetting. The idea is that you subnet the
network, and then subnet the subnets just the way you originally subnetted the network. In
fact, you can do this multiple times, creating subnets of subnets of subnets, as many times as
you need (subject to how many bits you have in the host ID of your address block). It is
possible to choose to apply this multiple-level splitting to only some of the subnets, allowing
you to selectively cut the "IP address pie" so that some of the slices are bigger than others.
3 VLSM & Route Summarization
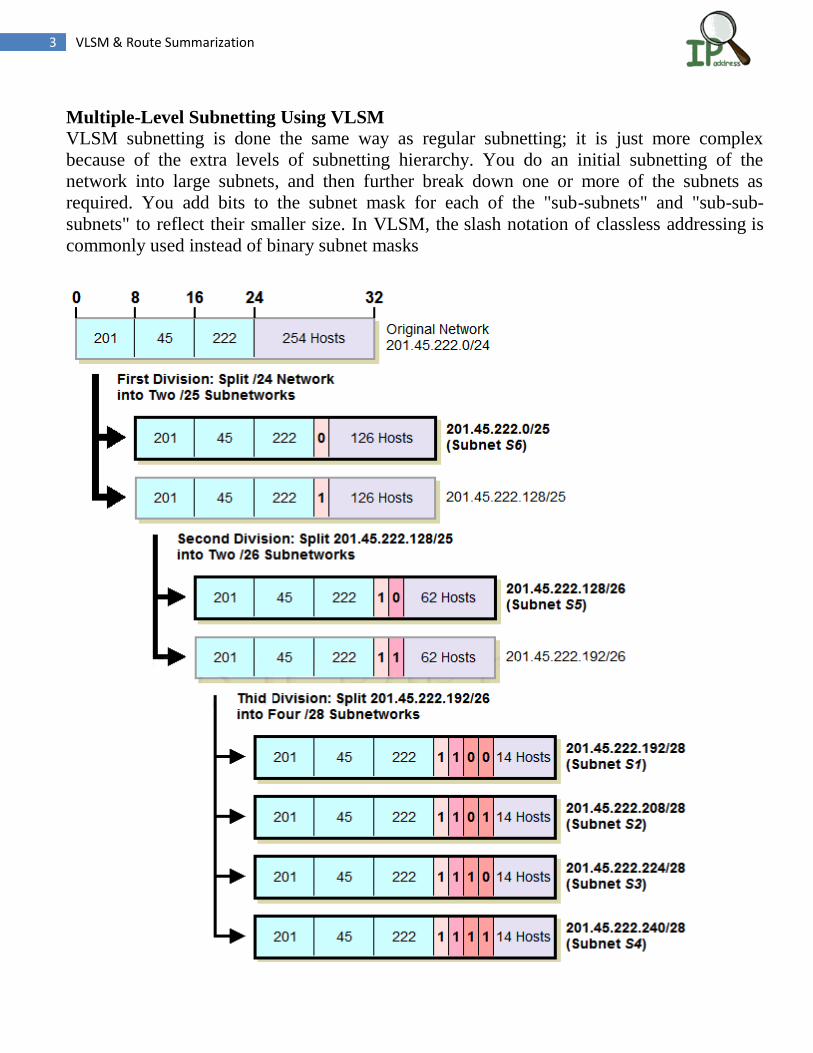
Multiple-Level Subnetting Using VLSM VLSM subnetting is done the same way as regular subnetting; it is just more complex
because of the extra levels of subnetting hierarchy. You do an initial subnetting of the
network into large subnets, and then further break down one or more of the subnets as
required. You add bits to the subnet mask for each of the "sub-subnets" and "sub-sub-
subnets" to reflect their smaller size. In VLSM, the slash notation of classless addressing is
commonly used instead of binary subnet masks
4 VLSM & Route Summarization
Let's take about the example above again and see how we can make everything fit using
VLSM. We start with our Class C network, 201.45.222.0/24. We then do three subnetting as
follows we first do initial subnetting by using one bit for the subnet ID, leaving us 7 bits for
the host ID. This gives us two subnets: 201.45.222.0/25 and 201.45.222.128/25. Each of
these can have a maximum of 126 hosts. We set aside the first of these for subnet S6 and its
100 hosts.
We take the second subnet, 201.45.222.128/25, and subnet it further into two sub-subnets.
We do this by taking one bit from the 7 bits left in the host ID. This gives us the sub-subnets
201.45.222.128/26 and 201.45.222.192/26, each of which can have 62 hosts. We set aside
the first of these for subnet S5 and its 50 hosts.
We take the second sub-subnet, 201.45.222.192/26, and subnet it further into four sub-sub-
subnets. We take 2 bits from the 6 that are left in the host ID. This gives us four sub-sub-
subnets that each can have a maximum of 14 hosts. These are used for S1, S2, S3 and S4.
VLSM greatly improves both the flexibility and the efficiency of subnetting. In order to use
it, routers that support VLSM-capable routing protocols must be employed. VLSM also
requires more care in how routing tables are constructed to ensure that there is no ambiguity
in how to interpret an address in the network.
IP Subnetting: Practical Subnet Design and Address Determination Example
This section divides subnetting into five relatively straight-forward stages that cover
determining requirements, making the design decision of how many bits to use for subnet ID
and host ID, and then determining important numbers such as the subnet mask, subnet
addresses and host addresses.
My focus in this section is on showing the practical “how” of subnetting. The topics here
work through two examples using a Class B and a Class C sample network to show you how
subnetting is done.
IP Subnetting Step #1: Requirements Analysis
When you are building or upgrading a network as a whole, the first step isn't buying
hardware, or figuring out protocols, or even design,its requirements analysis, the process of
determining what it is the network needs to do. Without this foundation, you risk
implementing a network that may perfectly match your design but not meet the needs of your
organization.
5 VLSM & Route Summarization
Analyzing the requirements of the network for subnetting isn't difficult, because there are
only a few issues that we need to consider. Since requirements analysis is usually done by
asking questions, here's a list of the most important questions in analyzing subnetting
requirements:
What class is our IP address block?
How many physical subnets are on the network? (A “physical subnet” generally refers to a
broadcast domain on a LAN; a set of hosts on a physical network bounded by routers.)
Do we adding any more physical networks in the near future, and if so, how many?
How many hosts do we have in the largest of our subnets today?
How many hosts do we having in the largest subnet in the near future?
We need to analyze the requirements above not only for the present network, but for the near
future as well. The current values for these two numbers represent how the network needs to
be designed today. However, designing only for the present is not a good idea. The term
“near future” is necessarily because it depends on how far into the future the organization
wants to look. On the one hand, planning for several years' growth can make sense, if you
have enough IP addresses to do it. On the other, you don't want to plan too far out, since
changes in the short term may cause you to completely redesign your network anyway.
IP Subnetting Step #2: Partitioning Network Address Host Bits
after we complete our brief requirements analysis, we should know the two critical
parameters that we must have in order to subnet our network: the number of subnets required
for the network, and the maximum number of hosts per subnetwork. In using these two
figures to design our Subnetted network, we will be faced with the key design decision in
subnetting: how to divide the 8, 16 or 24 bits in the “classful” host ID into subnet ID and host
ID.
We need to decide how many bits to borrow from the host ID to use for the subnet ID. The
fundamental trade-off in choosing this number is as follows:
Each bit taken from the host ID for the subnet ID doubles the number of subnets that are
possible in the network.
Each bit taken from the host ID for the subnet ID (approximately) halves the number of
hosts that are possible within each subnet on the network.
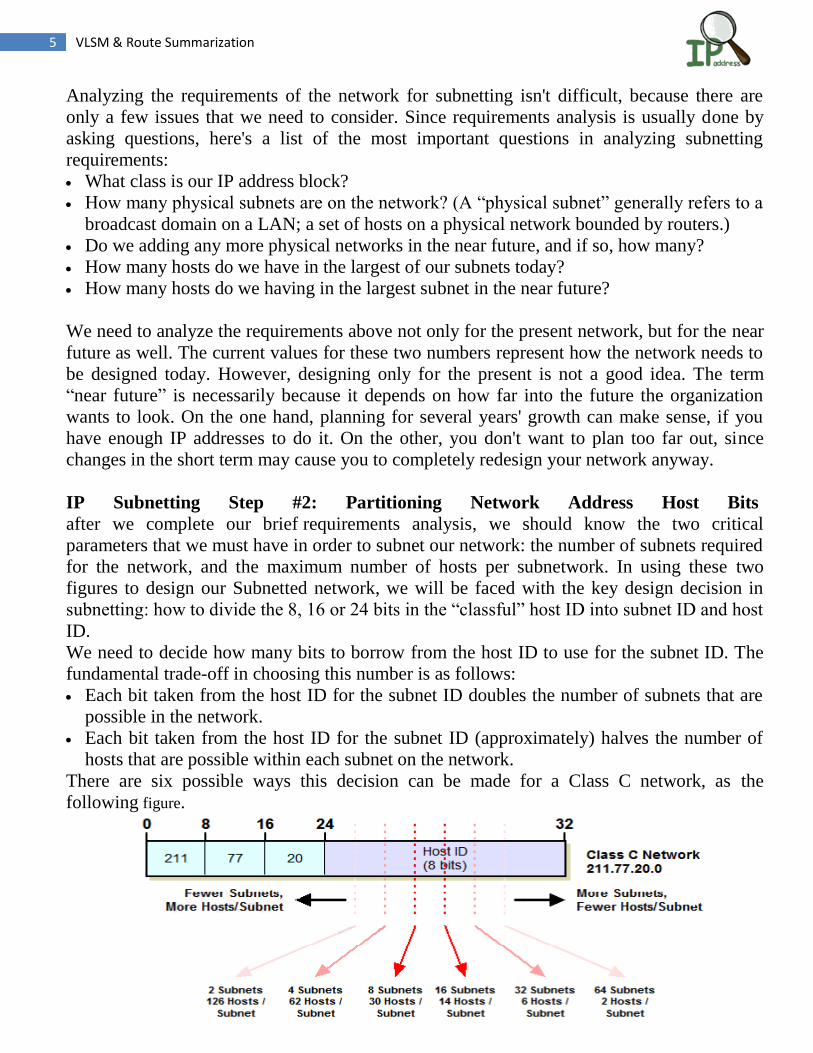
There are six possible ways this decision can be made for a Class C network, as the
following figure.

6 VLSM & Route Summarization
The relationship between the bits and the number of subnets and hosts is as follows:
o The number of subnets allowed in the network is two to the power of the number of subnet
ID bits.
o The number of hosts allowed per subnet is two to the power of the number of host ID bits,
less two.
We subtract two from the number of hosts in each subnet to exclude the “special meaning”
cases where the host ID is all zeroes or all ones. First we must calculate the number of
subnets and hosts when we use the subnet ID bits and leave the rest for the host ID.
Class B Subnetting Design Example In some cases, especially with larger networks, we may have multiple choices. Consider the
following example, the larger Class B network 166.113.0.0, where we have a total of 15
subnets and the largest has 450 hosts.

7 VLSM & Route Summarization
IP Subnetting Step #3: Determining the Custom Subnet Mask
Once we have decided how many bits to use for the subnet ID and how many to leave for the
host ID, we can determine the custom subnet mask for our network.
Calculating the Custom Subnet Mask
We determine the subnet mask in binary form from the information we already have about
our network, and then convert the mask to decimal. To refresh your memory and guide the
process, remember this: the subnet mask is a 32-bit binary number where a 1 represents each
bit that is part of the network ID or subnet ID, and a 0 represents each bit of the host ID.
Class C Custom Subnet Mask Calculation Example
Refer back to the Class C example in the previous topic. We decided to use 3 bits for the
subnet ID, leaving 5 bits for the host ID. Here are the steps we will follow to determine the
custom subnet mask for this network.
1. Determine Default Subnet Mask: Each of Classes A, B and C has a default subnet
mask, which is the subnet mask for the network prior to subnetting. It has a 1 for each
network ID bit and a 0 for each host ID bit. For Class C, the subnet mask is
255.255.255.0.
2. Change Left-Most Zeroes to Ones for Subnet Bits: We have decided to use 3 bits
for the subnet ID. The subnet mask has to have a 1 for each of the network ID or
subnet ID bits. The network ID bits are already 1 from the default subnet mask, so, we
change the 3 left-most 0 bits in the default subnet mask from a 0 to 1
3. Convert Subnet Mask To Dotted Decimal Notation: We take each of the octets in
the subnet mask and convert it to decimal. The result is our custom subnet mask in the
form we usually see it: 255.255.255.224.
4. Express Subnet Mask In “Slash Notation”: Alternately, we can express the subnet
mask in “slash notation”. This is just a slash followed by the number of ones in the
subnet mask. 255.255.255.224 is equivalent to “/27”.
8 VLSM & Route Summarization
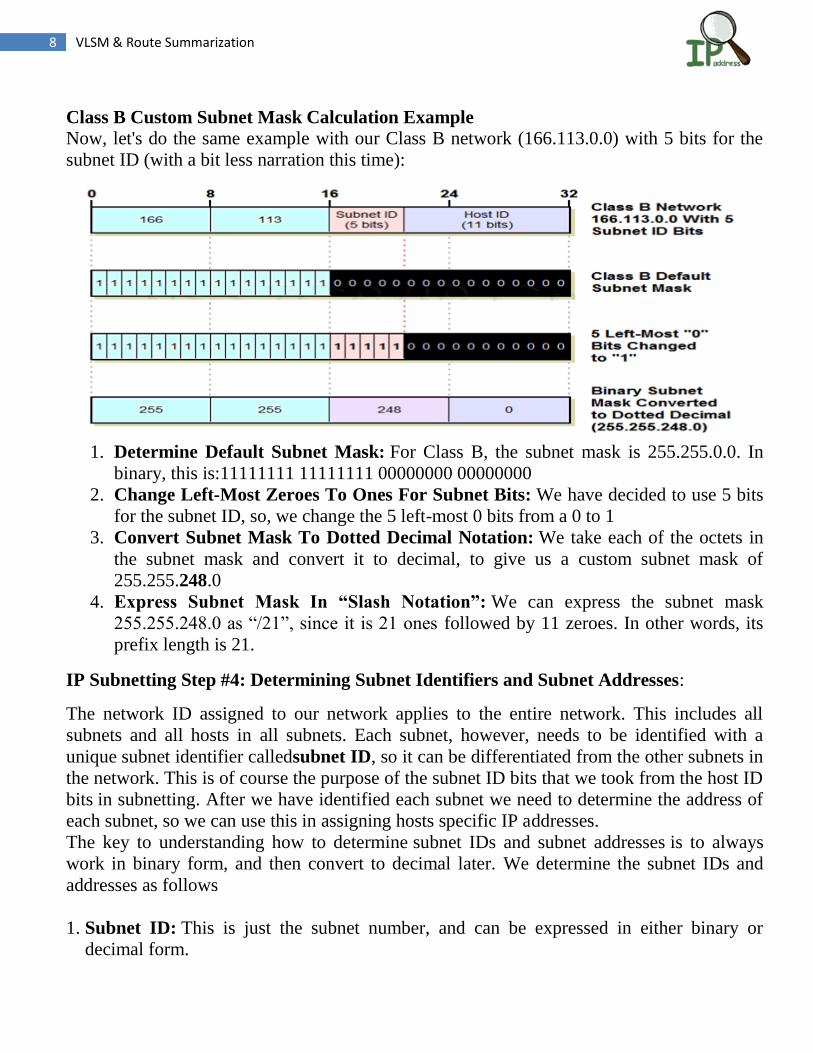
Class B Custom Subnet Mask Calculation Example Now, let's do the same example with our Class B network (166.113.0.0) with 5 bits for the
subnet ID (with a bit less narration this time):
1. Determine Default Subnet Mask: For Class B, the subnet mask is 255.255.0.0. In
binary, this is:11111111 11111111 00000000 00000000
2. Change Left-Most Zeroes To Ones For Subnet Bits: We have decided to use 5 bits
for the subnet ID, so, we change the 5 left-most 0 bits from a 0 to 1
3. Convert Subnet Mask To Dotted Decimal Notation: We take each of the octets in
the subnet mask and convert it to decimal, to give us a custom subnet mask of
255.255.248.0
4. Express Subnet Mask In “Slash Notation”: We can express the subnet mask
255.255.248.0 as “/21”, since it is 21 ones followed by 11 zeroes. In other words, its
prefix length is 21.
IP Subnetting Step #4: Determining Subnet Identifiers and Subnet Addresses:
The network ID assigned to our network applies to the entire network. This includes all
subnets and all hosts in all subnets. Each subnet, however, needs to be identified with a
unique subnet identifier calledsubnet ID, so it can be differentiated from the other subnets in
the network. This is of course the purpose of the subnet ID bits that we took from the host ID
bits in subnetting. After we have identified each subnet we need to determine the address of
each subnet, so we can use this in assigning hosts specific IP addresses.
The key to understanding how to determine subnet IDs and subnet addresses is to always
work in binary form, and then convert to decimal later. We determine the subnet IDs and
addresses as follows
1. Subnet ID: This is just the subnet number, and can be expressed in either binary or
decimal form.

9 VLSM & Route Summarization
2. Subnet Address: This is the address formed by taking the address of the network as a
whole, and substituting the (binary) subnet ID in for the subnet ID bits. We need to do this
in binary, but only for the octets where there are subnet ID bits; the ones where there are
only network ID bits or only host ID bits are left alone.
Class C Subnet ID and Address Determination Example
This diagram shows each of the 8 possible subnets created when we use 3 bits for the subnet
ID in a Class C network. The binary subnet ID is simply substituted for the subnet bits, and
the resulting 32-bit number converted to dotted decimal form. The address of any subnet can
be found by adding 32 to the last octet of the previous subnet. This pattern occurs for all
subnetting choices; the increment depends on how many bits we are using for the subnet ID.

10 VLSM & Route Summarization
Here, the increment is 32, which is 25; 5 is the number of host ID bits left after we took 3
subnet ID bits.
Class B Subnet ID and Address Determination Example Class B network 166.113.0.0. We are using 5 bits for the subnet ID, leaving 11 hosts ID bits.
IP Subnetting Step #5: Determining Host Addresses for Each Subnet
Once we know the addresses of each of the subnets in our network, we use these addresses as
the basis for assigning IP addresses to the individual hosts in each subnet. We start by
associating a subnet base address with each physical network (since at least in theory, our
subnets correspond to our physical networks). We then sequentially assign hosts particular IP
addresses within the subnet (or in a different manner, if we prefer!)
Determining host addresses is really quite simple, once we know the subnet address. All we
do is substitute the numbers 1, 2, 3… and so on for the host ID bits in the subnet address.

11 VLSM & Route Summarization
Class C Host Address Determination Example
Let's start with our Class C example again, 211.77.20.0, which we divided into 8 subnets
using 3 subnet bits.
This diagram shows how both subnet addresses and host addresses are determined in a two-
step process. The subnet addresses are found by substituting subnet ID values (shown in red)
for the subnet ID bits of the network. Then, for any given subnet address, we can determine a
host address by substituting a host number (shown in blue) for the host ID bits within that
subnet. So, for example, host #2 in subnet #6 has “110” for the subnet ID and “00010” for
the host ID, resulting in a final octet value of “11000010” or 194.

12 VLSM & Route Summarization
"Shortcuts" For Quickly Computing Host Addresses
Defining the host IDs is really quite straight-forward. If you can substitute bits and convert to
decimal, you have all you need to know. You can also see that as was the case with defining
the subnet addresses, there are patterns that you can use in defining host IDs and
understanding how they work. These generally define ways that we can more quickly
determine certain host addresses by working directly in decimal instead of bothering with
binary substitutions. The following are some of the “shortcuts” you can use in determining
host IP addresses in a subnet environment:
o First Host Address: The first host address is always the subnet address with the last octet
incremented by 1. So, in our class C example, subnet #3's base address is 211.77.20.96.
The first host address in subnet #3 is thus 211.77.20.97.
o Subsequent Host Addresses: After you find the first host address, to get the next one you
just add one to the last octet of the previous address. If this makes the last octet 256 (which
can happen only if there are more than 8 host ID bits) you “wrap around” this to zero and
increment the third octet.
o Directly Calculating Host Addresses: If the number of host ID bits is 8 or less, you can
find host #N's address by adding “N” to the last octet's decimal value. For example, in our
class C example, subnet #3's base address is 211.77.20.96. Therefore, host #23 in this
subnet has an address of 211.77.20.119.
If there are more than 8 bits in the host ID, this only works for the first 255 hosts, after
which you have to “wrap around” and increase the value of the third octet. Consider again
subnet #13 in our Class B example, which has a base address of 166.113.104.0. Host #214
on this subnet has address 166.113.104.214, but host #314 isn't 166.113.104.314. It is
166.113.105.58 (host #255 is 166.113.104.255, then host #256 is 166.113.105.0, and we
count up 58 more (314-256) to get to #314, 166.113.105.58).
Range Of Host Addresses:
The range of hosts for any subnet is determined as follows:
First Address: Base address of subnet with last octet incremented by one.
Last Address: Base address of next subnet after this one, less two in the last octet (which
may require changing a “0” in the last octet to “254” and reducing the value of the third
octet by 1).
Broadcast Address: The broadcast address for a subnet is always one less than the base
address of the subsequent subnet. Or alternately, one more than the last “real” host address
of the subnet. So, for subnet #17 in our Class B example, the broadcast address is
166.113.143.255.

13 VLSM & Route Summarization
Important note about subnetting:
The network ID is the same for all hosts in all subnets, and all subnets in the network.
The subnet ID is the same for all hosts in each subnet, but unique to each subnet in the
network.
The host ID is unique within each subnet. Each subnet has the same set of host IDs.
IP Classless Addressing: Classless Inter-Domain Routing (CIDR) / "Supernetting"
As the early Internet began to grow dramatically, three main problems arose with the original
“classful” addressing scheme. These difficulties were addressed partially through subnet
addressing, which provides more flexibility for the administrators of individual networks on
an internet. Subnetting doesn't really tackle the problems in general terms. Some of these
issues remain due to the use of classes even with subnets.
In order to extend the life of IP version 4 until the newer IP version 6 could be completed, it
was necessary to take a new approach to addressing IPv4 devices. This new system calls for
eliminating the notion of address classes entirely, creating a new classless addressing scheme
sometimes called Classless Inter-Domain Routing (CIDR).
A Better Solution: Eliminate Address Classes
It was clear that as long as there were only three sizes of networks, the allocation efficiency
problem could never be properly rectified. The solution was to get rid of the classes
completely, in favor of a classless allocation scheme. This system would solve both of the
main problems with “Classful” addressing: inefficient address space use, and the exponential
growth of routing tables.
The idea behind CIDR is to adapt the concept of subnetting a single network to the entire
internet. In essence, then, classless addressing means that instead of breaking a particular
network into subnets, we can aggregate networks into larger “supernets”. CIDR is sometimes
called Supernetting for this reason: it applies the principles of subnetting to larger networks.
It is this aggregation of networks into supernets that allowed CIDR to resolve the problem of
growing Internet routing tables.
When we are going to apply subnetting concepts to the entire internet, we need to be able to
have subnets of different sizes. After all, that's one of our primary goals in eliminating the
classes. So CIDR is an internet-wide application of not regular one-level subnetting, but
of Variable Length Subnet Masking (VLSM). Just as VLSM lets us split a network as many
times as we want to create subnets, “sub-subnets” and “sub-sub-subnets”, CIDR lets us do
this with the entire Internet, as many times as needed.
14 VLSM & Route Summarization
Benefits of Classless Addressing and Routing:
Efficient Address Space Allocation: Instead of allocating addresses in fixed-size blocks of
low granularity, under CIDR addresses are allocated in sizes of any binary multiple.
Elimination of Class Imbalances: There is no more class A, B and C networks, so there is
no problem with some portions of the address space being widely used while others are
neglected.
Efficient Routing Entries: CIDR's multiple-level hierarchical structure allows a small
number of routing entries to represent a large number of networks. Network descriptions
can be “aggregated” and represented by a single entry. Since CIDR is hierarchical, the
detail of lower-level, smaller networks can be hidden from routers that move traffic
between large groups of networks. This is discussed more completely in the section on IP
routing issues.
No Separate Subnetting Method: CIDR implements the concepts of subnetting within the
internet itself. An organization can use the same method used on the Internet to subdivide
its internal network into subnets of arbitrary complexity without needing a separate
subnetting mechanism.
The Main Disadvantage of CIDR: Complexity
One issue is that it is no longer possible to determine by looking at the first octet to
determine how many bits of an IP address represent the network ID and how many the host
ID. A bit more care needs to be used in setting up routers as well, to make sure that routing is
accomplished correctly.
Classless Inter-Domain Routing (CIDR) Hierarchical Addressing and Notation
With VLSM, we further Subnetted the subnets, taking more bits from the host ID to give us a
multiple-level hierarchy with “sub-subnets”, “sub-sub-subnets” and so forth.
In a classless environment, we completely change how we look at IP addresses, by applying
VLSM concepts not just to one network, but to the entire Internet. In essence, the Internet
becomes just one giant network that is “Subnetted” into a number of large blocks. Some of
these large blocks are then broken down into smaller blocks, which can in turn be broken
down further.
CIDR ("Slash") Notation Just as subnetting required the use of a subnet mask to show which bits belong to the
network ID or subnet ID and which to the host ID, CIDR uses a subnet mask to show where
the line is drawn between host ID and network ID. However, for simplicity, under CIDR we
don't usually work with 32-bit binary subnet masks. Instead, we use slash notation, more
properly called CIDR notation. In this method, we show the size of the network, sometimes
called the prefix length, by following an IP address by an integer that tells us how many bits
are used for the network ID (prefix).
15 VLSM & Route Summarization
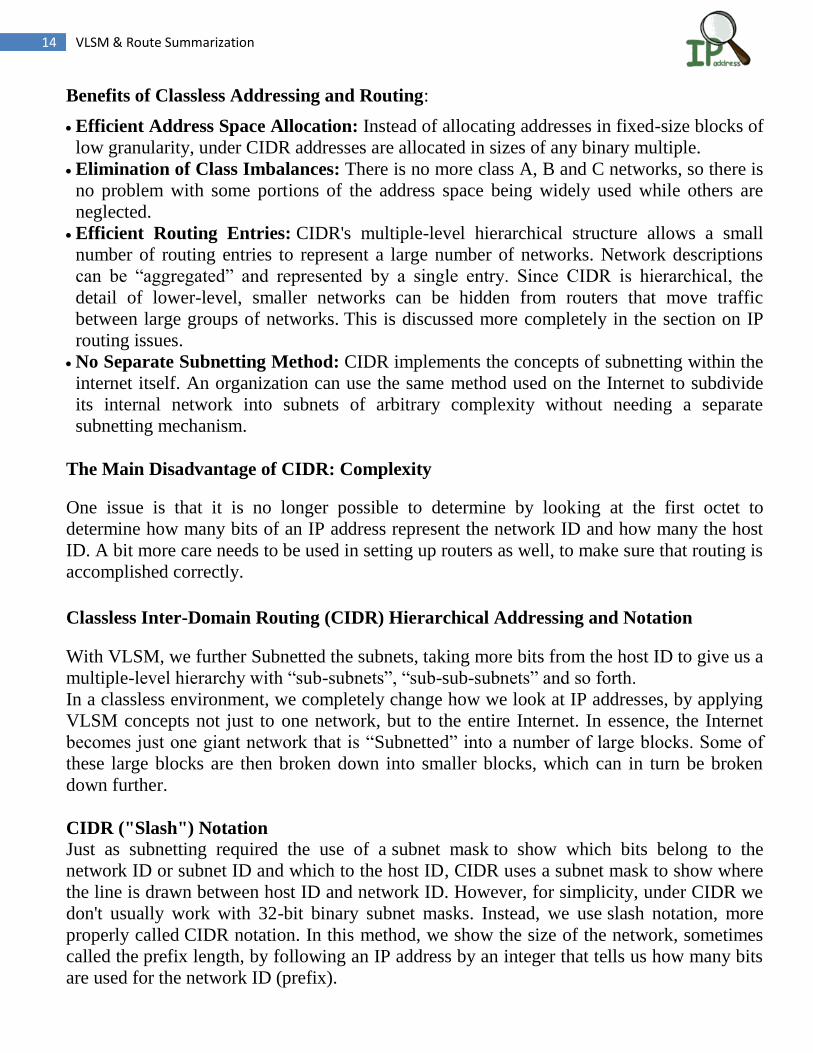
For example, consider the network specification 184.13.152.0/22. The “22” means this
network has 22 bits for the network ID and 10 bits for the host ID. This is equivalent to
specifying a network with an address of 184.13.152.0 and a subnet mask of 255.255.252.0.
This sample network provides a total of 1,022 hosts (210
minus 2). The table in the following
topic shows all the different possible network sizes that can be configured under CIDR.
IP Classless Addressing Block Sizes and "Classful" Network Equivalents
The following Table shows each of the possible theoretical ways to divide the 32 bits of an
IP address into network ID and host ID bits under CIDR. For each, the number of hosts in
each network, and the way a network of each size is represented in both slash notation and as
a conventional subnet mask. I have also shown the equivalent number of Class A, Class B
and Class C networks for each.
16 VLSM & Route Summarization
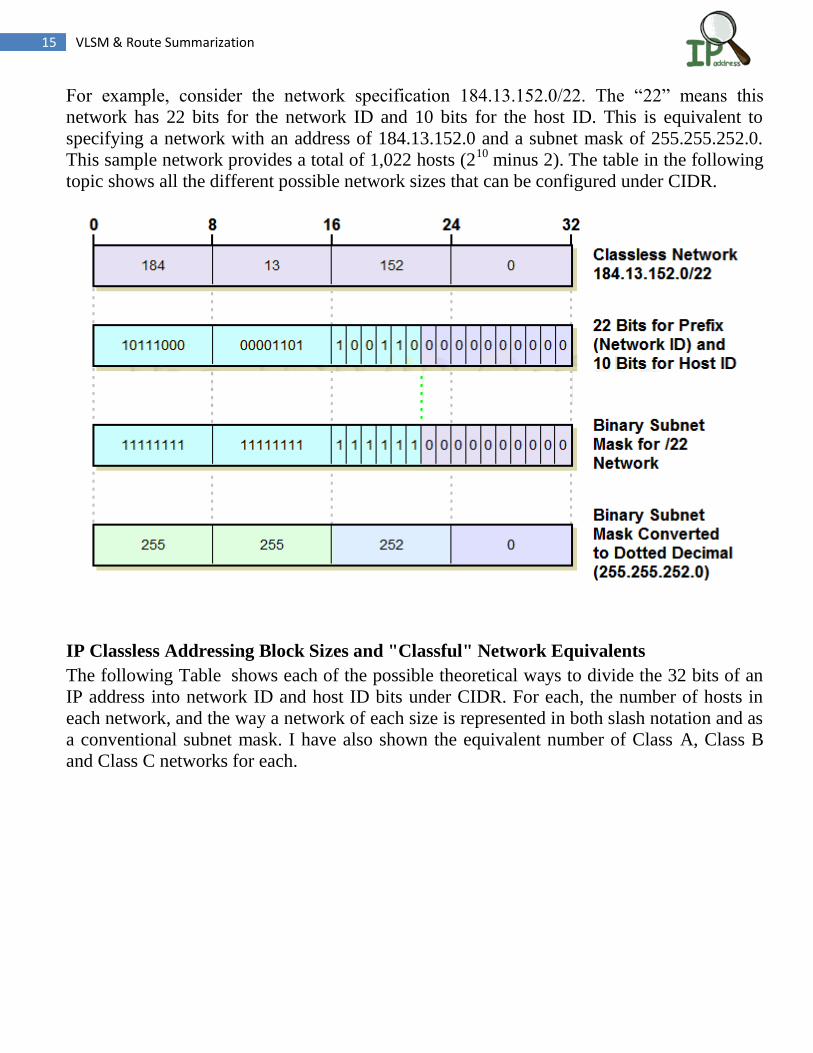
Route Summarization:
The process of advertising a set of addresses as a single address with a less-specific, shorter
subnet mask. Summarization helps reduce the number of entries in routing updates and
lowers the number of entries in local routing tables. It also helps reduce bandwidth utilization
for routing updates and results in faster routing table lookups.
The figure shows a single static route with the address 172.16.0.0 and the mask 255.248.0.0
summarizing all of the 172.16.0.0/16 to 172.23.0.0/16 classful networks. Although
172.22.0.0/16 and 172.23.0.0/16 are not shown in the graphic, these are also included in the
summary route. Notice that the /13 mask (255.248.0.0) is less than the default classful mask
/16 (255.255.0.0). It is possible that a router could have both a specific route entry and a
summary route entry covering the same network.
Calculating Summarized routes:
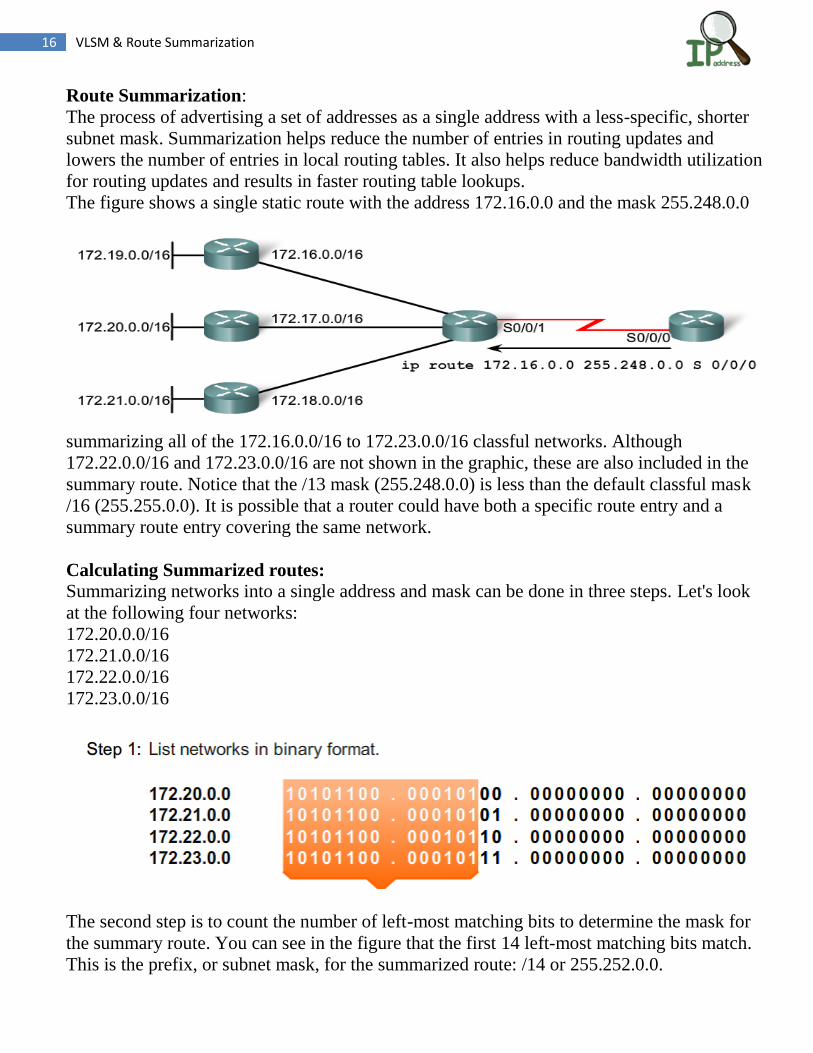
Summarizing networks into a single address and mask can be done in three steps. Let's look
at the following four networks:
172.20.0.0/16
172.21.0.0/16
172.22.0.0/16
172.23.0.0/16
The second step is to count the number of left-most matching bits to determine the mask for
the summary route. You can see in the figure that the first 14 left-most matching bits match.
This is the prefix, or subnet mask, for the summarized route: /14 or 255.252.0.0.

17 VLSM & Route Summarization
The third step is to copy the matching bits and then add zero bits to determine the
summarized network address. The figure shows that the matching bits with zeros at the end
results in the network address 172.20.0.0. The four networks - 172.20.0.0/16, 172.21.0.0/16,
172.22.0.0/16, and 172.23.0.0/16 - can be summarized into the single network address and
prefix 172.20.0.0/14.

18 VLSM & Route Summarization
Network
ID Bits
Host ID
Bits
Hosts Per
Network
CIDR Equivalent
Subnet Mask
# of “Classful” Networks
Class A Class B Class C
1 31 2,147,483,646 /1 128.0.0.0 128 — —
2 30 1,073,741,822 /2 192.0.0.0 64 — —
3 29 536,870,910 /3 224.0.0.0 32 — —
4 28 268,435,454 /4 240.0.0.0 16 — —
5 27 134,217,726 /5 248.0.0.0 8 — —
6 26 67,108,862 /6 252.0.0.0 4 — —
7 25 33,554,430 /7 254.0.0.0 2 — —
8 24 16,777,214 /8 255.0.0.0 1 256 —
9 23 8,388,606 /9 255.128.0.0 ½ 128 —
10 22 4,194,302 /10 255.192.0.0 ¼ 64 —
11 21 2,097,150 /11 255.224.0.0 1/8 32 —
12 20 1,048,574 /12 255.240.0.0 1/16 16 —
13 19 524,286 /13 255.248.0.0 1/32 8 —
14 18 262,142 /14 255.252.0.0 1/64 4 —
15 17 131,070 /15 255.254.0.0 1/128 2 —
16 16 65,534 /16 255.255.0.0 1/256 1 256
17 15 32,766 /17 255.255.128.0 — ½ 128
18 14 16,382 /18 255.255.192.0 — ¼ 64
19 13 8,190 /19 255.255.224.0 — 1/8 32
20 12 4,094 /20 255.255.240.0 — 1/16 16
21 11 2,046 /21 255.255.248.0 — 1/32 8
22 10 1,022 /22 255.255.252.0 — 1/64 4
23 9 510 /23 255.255.254.0 — 1/128 2
24 8 254 /24 255.255.255.0 — 1/256 1
25 7 126 /25 255.255.255.128 — — ½
26 6 62 /26 255.255.255.192 — — ¼
27 5 30 /27 255.255.255.224 — — 1/8
28 4 14 /28 255.255.255.240 — — 1/16
29 3 6 /29 255.255.255.248 — — 1/32
30 2 2 /30 255.255.255.252 — — 1/64