vmware vsphere 6.0 lab manual
TRANSCRIPT


i
VEPSUN TECHNOLOGIES
Lab Guide for
VMware vSphere 6.0

ii
About Vepsun Technologies:
Since 2010, Vepsun has grown to become the largest independent IT training
institutes. we offer most advanced technology than any other computer and
business training company. Businesses and individuals can choose from the course
offerings, delivered by experts.
Whether your organization is a large multinational or a small business, we can bring
the appropriate skills, experience and contacts to bear. Our marketing
communications department can advise on appropriate ways to communicate your
message, from a static brochure website, all the way through to hundreds of pages
on on-line information updated minute by minute.
We believe that Vepsun offers excellence at every level, whether it be the delivery
of technical consultancy, training, project implementation, or applying our
experience working and research into successful internet marketing techniques.
Our technical department has skills the equal of those anywhere in the world. There
is nobody with more knowledge and experience of internetworking technology and
its integration with business computer systems. for large projects we can draw on
extensive industry contacts to involve specialist systems architect, project
managers, analysts and programmers.
Before thinking about giving advice, we like to listen carefully to what our customers
want and from that understanding we work hard to provide the advice that we would
wish to receive if we were in the same situation.
We seek to form long term relationships with clients who take this medium
seriously. With a full understanding of your goals, our experience and effort can put
the refinement and achievement of those goals into practice. If you would like to
find out more about us, we would be delighted to hear from you. We think you will
find our ability to listen and think before proposing solutions makes a refreshing
change!

iii
INDEX
Lab Description Page No.
1 Installation of AD Server 1
2 Installation of ESXi Server 31
3 Installation of vCenter Server 47
4 Networking 79
5 Storage 111
6 vMotion 137
7 Cluster 145
8 VM Management 159
9 Resource Management 173
10 Roles and Permissions 183
11 Import/Export of Virtual Machines 199
12 Update manager 209

iv

1 | P a g e w w w . v e p s u n . i n
Lab 1
INSTALLATION OF AD SERVER

2 | P a g e w w w . v e p s u n . i n
INSTALLATION OF AD SERVER
Basic VM creation
Open your browser and login to https://192.168.1.20 which is Vepsun’s vCenter Server.
Click on the Log in to vSphere Web Client Link.
Login with the following credentials
Username: [email protected]
Password: Welcome@01

3 | P a g e w w w . v e p s u n . i n
After Login, click on the VMs and Templates tab.
Right click the Server 2012 template and select New VM from This Template.

4 | P a g e w w w . v e p s u n . i n
Give a name to your VM and click Next.
Note: It is recommended to use your name as Prefix for our identification.
Select the cluster and click Next.

5 | P a g e w w w . v e p s u n . i n
Select the Datastore and click Next.
Click on the “Customize this VM Hardware” and “Power on Virtual Machine after creation”.
Click Next.

6 | P a g e w w w . v e p s u n . i n
Click Finish.
Please wait for your VM to get deployed.

7 | P a g e w w w . v e p s u n . i n
Run Sysprep
After the VM is deployed, Open Console the VM

8 | P a g e w w w . v e p s u n . i n
Press the Send Ctrl+Alt+Delete button in right top corner of the screen
The default password is “Welcome@01”

9 | P a g e w w w . v e p s u n . i n
After login, goto “C:/Windows/System32/sysprep” and open the sysprep.exe file
Select Generalize and click OK.

10 | P a g e w w w . v e p s u n . i n
After the reboot, it will ask for language, click Next.
Accept the license

11 | P a g e w w w . v e p s u n . i n
Give a password for the administrator account and click Finish.
Initial Configuration
1) Change IP
Right click the network icon and click Open Network and Sharing center.

12 | P a g e w w w . v e p s u n . i n
Click Ethernet0
Click Properties.

13 | P a g e w w w . v e p s u n . i n
Double-Click the Internet Protocol Version 4 (TCP/IPv4).
Give a static IP.
Note: Please do not use an IP in the range of 192.168.1.x and 192.168.2.x series.

14 | P a g e w w w . v e p s u n . i n
2) Change Hostname
Right-Click This PC and click Properties.
Click Change Settings
15 | P a g e w w w . v e p s u n . i n
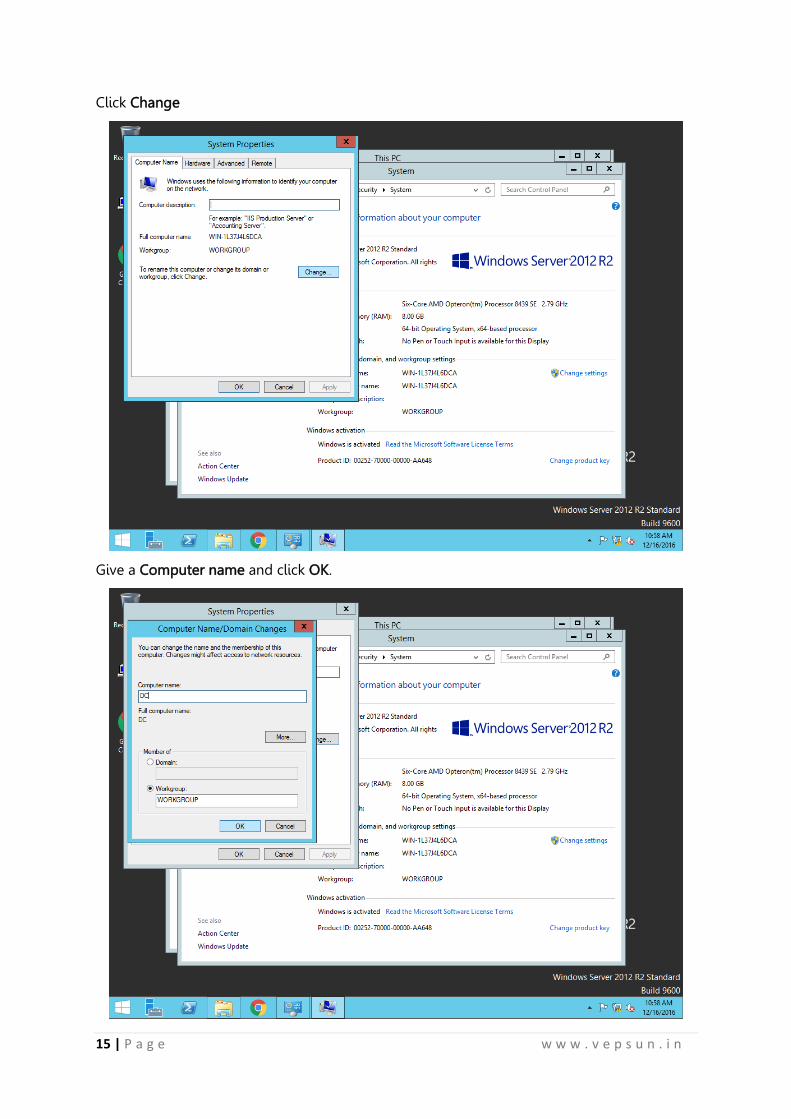
Click Change
Give a Computer name and click OK.

16 | P a g e w w w . v e p s u n . i n
Click OK.
It will prompt you to restart the computer, Click Restart Now.

17 | P a g e w w w . v e p s u n . i n
AD Configuration
After the server has rebooted, in the Server Manager click Add Roles and Features.
Click Next.

18 | P a g e w w w . v e p s u n . i n
Select Role-based or feature-based installation and Click Next.
Verify whether the hostname and IP address is correct and click Next.

19 | P a g e w w w . v e p s u n . i n
Select Active Directory Domain Services and click Next.
In the Features Tab, Click Next.

20 | P a g e w w w . v e p s u n . i n
Click Next.
Select “Restart the Destination Server automatically if required” and click Install.
21 | P a g e w w w . v e p s u n . i n
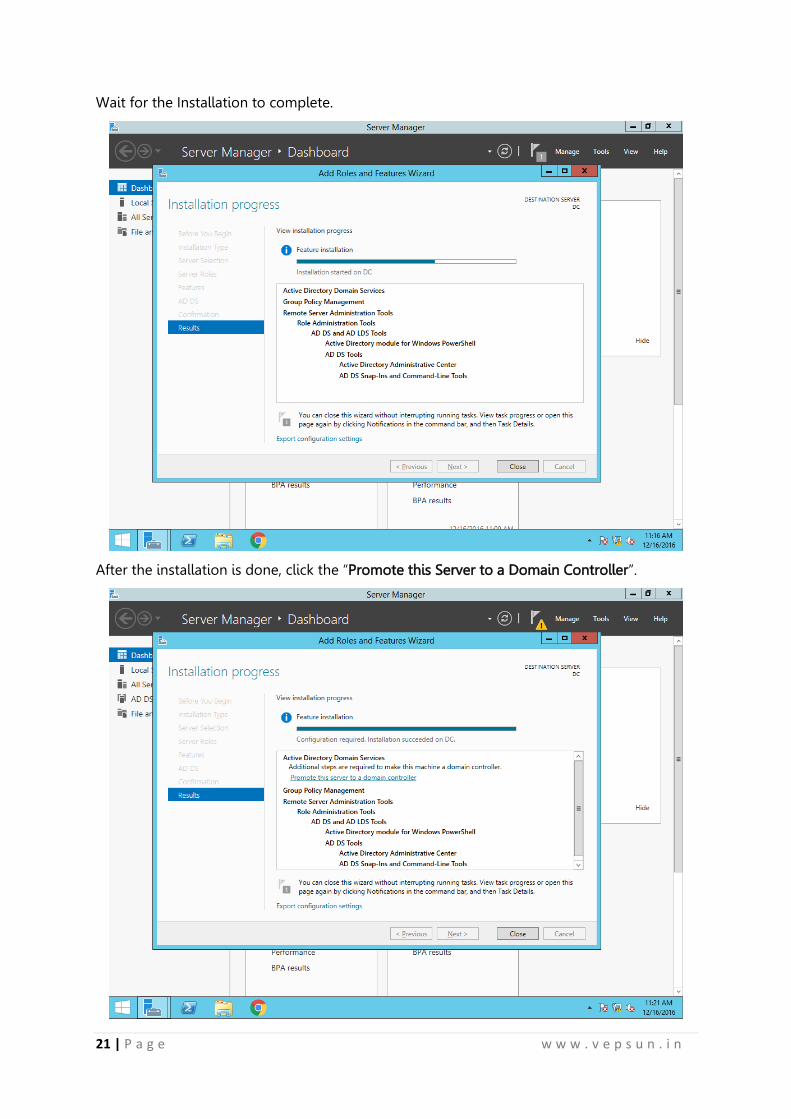
Wait for the Installation to complete.
After the installation is done, click the “Promote this Server to a Domain Controller”.

22 | P a g e w w w . v e p s u n . i n
Click “Add a new Forest” and give a domain Name.
Give a password for DSRM and click Next.

23 | P a g e w w w . v e p s u n . i n
Click Next.
Click Next.

24 | P a g e w w w . v e p s u n . i n
Click Next.
Click Next.

25 | P a g e w w w . v e p s u n . i n
Click Install.
After the installation is done, the server will reboot automatically.
Configure Reverse Lookup
Login to the Server and in the Server Manager, Click Tools and Select DNS.

26 | P a g e w w w . v e p s u n . i n
Right Click the Reverse Lookup Zone and click New Zone.
In the New Zone wizard, click Next.

27 | P a g e w w w . v e p s u n . i n
Select Primary Zone and click Next.
Click Next.

28 | P a g e w w w . v e p s u n . i n
Select IPv4 Reverse Lookup Zone and Click Next.
Give the IPv4 address Prefix and click Next.

29 | P a g e w w w . v e p s u n . i n
Click Next.
Click Finish.
30 | P a g e w w w . v e p s u n . i n
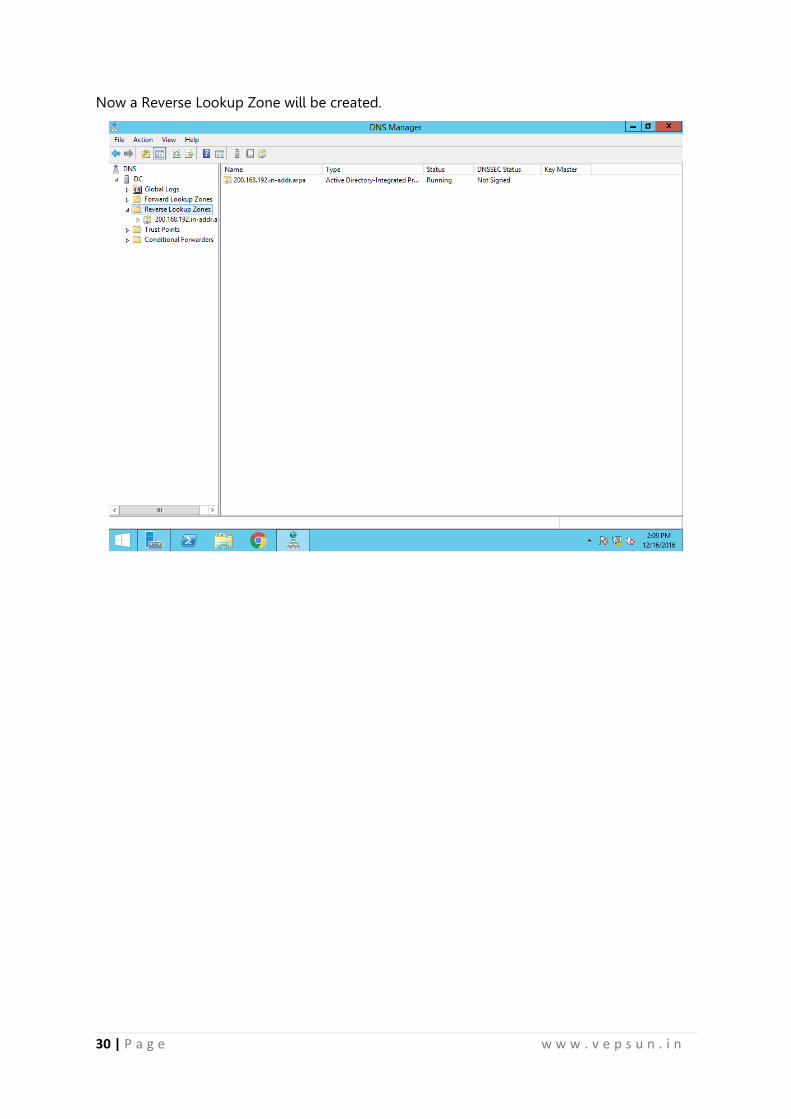
Now a Reverse Lookup Zone will be created.

31 | P a g e w w w . v e p s u n . i n
Lab 2
INSTALLATION OF ESXi SERVER

32 | P a g e w w w . v e p s u n . i n
INSTALLATION OF ESXI SERVER
VM Creation
Right-click the Datacenter -> New Virtual Machine
Select New Virtual Machine and click Next.

33 | P a g e w w w . v e p s u n . i n
Give a name for the VM.
Select the Cluster and click Next.

34 | P a g e w w w . v e p s u n . i n
Select the Datastore and click Next.
Click Next.

35 | P a g e w w w . v e p s u n . i n
Select the Guest OS as VMware ESXi 6.x and click Next.
Give the following configuration,
RAM - 4GB
CPU - 2
HDD - 20GB (Thin Provision)
CD Drive - Datastore ISO File (ESXi 6.0)

36 | P a g e w w w . v e p s u n . i n
Review the settings and click Finish.
Power On the VM.

37 | P a g e w w w . v e p s u n . i n
Right click the VM -> Open Console.
ESXi will start booting up.

38 | P a g e w w w . v e p s u n . i n
Press Enter.
Press F11.

39 | P a g e w w w . v e p s u n . i n
Select the HDD and press Enter.
Select the language and press Enter.

40 | P a g e w w w . v e p s u n . i n
Give a password for the root account.
Ignore the warning and press Enter.

41 | P a g e w w w . v e p s u n . i n
Press F11 to start the installation.
Wait for the installation to complete.

42 | P a g e w w w . v e p s u n . i n
Press Enter to reboot.
After the reboot is done, Press F2.

43 | P a g e w w w . v e p s u n . i n
Give the password.
Select Configure Management Network.

44 | P a g e w w w . v e p s u n . i n
Select IPv4 Configuration
Set a static IP to the ESXi Server in the same series of the AD Server.

45 | P a g e w w w . v e p s u n . i n
Goto DNS Configuration and mention the IP of AD Server.

46 | P a g e w w w . v e p s u n . i n
Press Esc to restart the management network.

47 | P a g e w w w . v e p s u n . i n
Lab 3
INSTALLATION OF VCENTER SERVER

48 | P a g e w w w . v e p s u n . i n
VCENTER INSTALLATION
Deploy a VM from Server 2012 Template.
Give a name and click Next.

49 | P a g e w w w . v e p s u n . i n
Select the Datacenter and click Next.
Select the Datastore and click Next.

50 | P a g e w w w . v e p s u n . i n
Select the appropriate checkbox and click Next.
Review the Settings and click Next.

51 | P a g e w w w . v e p s u n . i n
Click Finish.
Running Sysprep
After the VM is deployed, Open Console the VM and Goto C:/Windows/System32/sysprep
and open the sysprep.exe file

52 | P a g e w w w . v e p s u n . i n
Select Generalize and click OK.
After the reboot, it will ask for language, click Next.

53 | P a g e w w w . v e p s u n . i n
Accept the license
Give a password for the administrator account and click Finish.

54 | P a g e w w w . v e p s u n . i n
Initial Configuration
1) Change IP
Right click the network icon and click Open Network and Sharing center.
Click Ethernet0

55 | P a g e w w w . v e p s u n . i n
Click Properties.
Double-Click the Internet Protocol Version 4 (TCP/IPv4).

56 | P a g e w w w . v e p s u n . i n
Give a IP address for the vCenter Server.
Note: Give the IP of the AD Server as DNS IP.
To Validate the IP settings, ping the domain name.

57 | P a g e w w w . v e p s u n . i n
2) AD Migration
Right-Click This PC and click Properties
Click Change Settings

58 | P a g e w w w . v e p s u n . i n
Click Change
Give a name and give the domain name.

59 | P a g e w w w . v e p s u n . i n
Click OK. A window will popup. Give the administrator username and password of the AD
server.
You will get and Welcome message.

60 | P a g e w w w . v e p s u n . i n
Click Restart Now.
After the reboot, login with the Domain admin username and password.

61 | P a g e w w w . v e p s u n . i n
vCenter Installation
Right click the VM and click Edit Settings
Select the CD Drive to Datastore ISO.

62 | P a g e w w w . v e p s u n . i n
Select the vCenter ISO file.
Check the Connected Checkbox and click OK.
The vCenter ISO will be mounted on the OS.

63 | P a g e w w w . v e p s u n . i n
Double click the CD Drive to start the installation process. Click Install.
Wait for the vCenter installation to initialize and click OK for the warning message.

64 | P a g e w w w . v e p s u n . i n
Click Next.

65 | P a g e w w w . v e p s u n . i n
Accept the license and click Next.
Select the Deployment Method and click Next.
66 | P a g e w w w . v e p s u n . i n
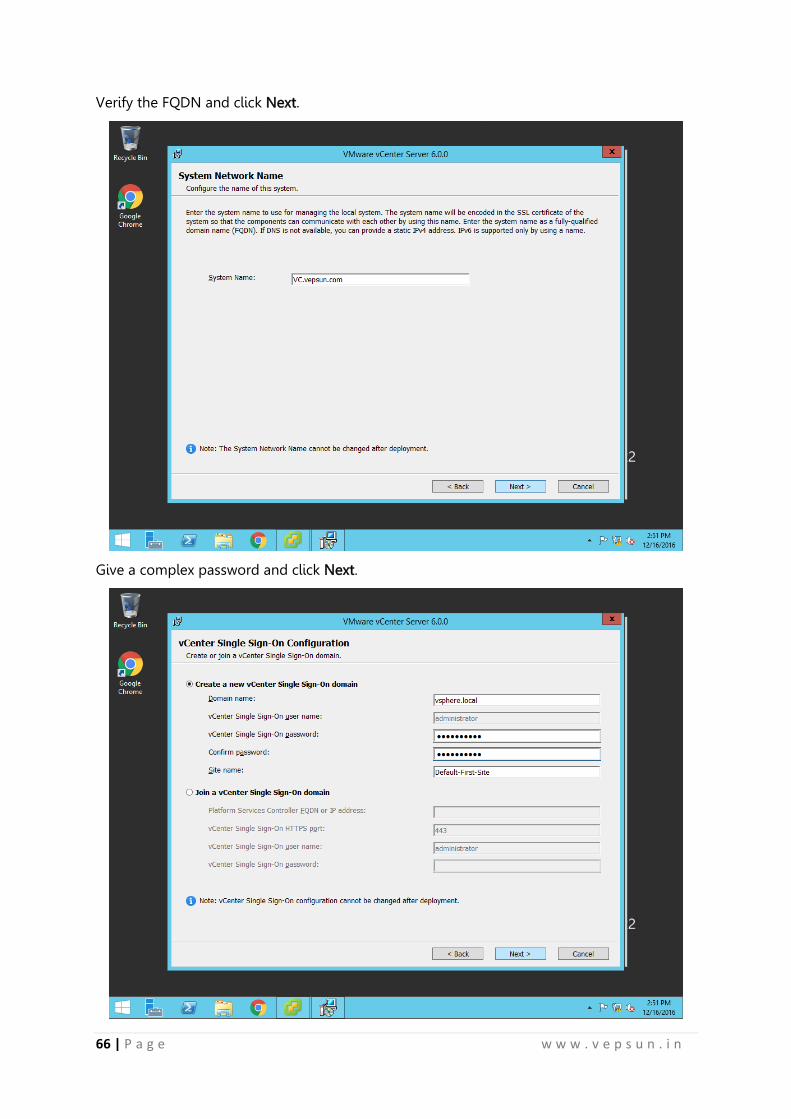
Verify the FQDN and click Next.
Give a complex password and click Next.

67 | P a g e w w w . v e p s u n . i n
Click Next.
Click Next.
68 | P a g e w w w . v e p s u n . i n
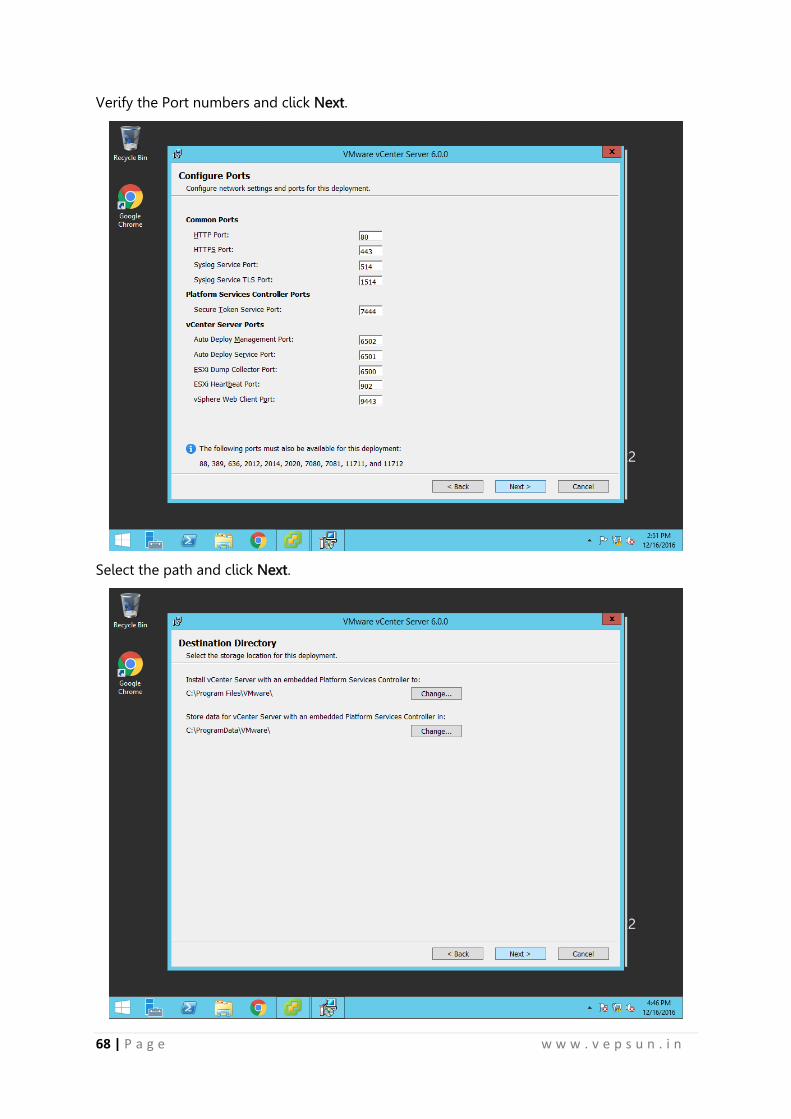
Verify the Port numbers and click Next.
Select the path and click Next.

69 | P a g e w w w . v e p s u n . i n
Verify the settings and click Install.
The Installation process will start.
Note: Installation may take a long time. Please be patient.

70 | P a g e w w w . v e p s u n . i n
After the installation is done, click Finish.
Adding ESXi Servers:
Open the browser inside your VMs and give the IP of the vCenter Server.

71 | P a g e w w w . v e p s u n . i n
Click Log in to the vSphere Web client.
Give the username as [email protected] and the SSO password which was given
during the installation of vCenter.

72 | P a g e w w w . v e p s u n . i n
You would be logged in to the vCenter Dashboard. Click “Hosts and Clusters”
Click “Create a Datacenter” link.

73 | P a g e w w w . v e p s u n . i n
Give a name for the Datacenter.
Click “Add Host” link.

74 | P a g e w w w . v e p s u n . i n
Give the IP address of the ESXi Servers and Click Next.
Give the credentials of the ESXi Server.

75 | P a g e w w w . v e p s u n . i n
Click Yes for the certificate validation.
Click Next.

76 | P a g e w w w . v e p s u n . i n
Click Next for the licensing. vSphere Environment will start running in evaluation mode.
Select the Lockdown mode policy and click Next.

77 | P a g e w w w . v e p s u n . i n
Select the Datacenter and click Next.
Click Finish.

78 | P a g e w w w . v e p s u n . i n
Now your ESXi server will be displayed and is under the management of the vCenter Server.
Do the same for the other ESXi Servers.

79 | P a g e w w w . v e p s u n . i n
Lab 4
NETWORKING

80 | P a g e w w w . v e p s u n . i n
NETWORKING
NIC Teaming
Power off the ESXi Server and click Edit settings of the VM.
Click the New Device and click Network. Click Add.

81 | P a g e w w w . v e p s u n . i n
Select the Network Adapter as VMXNET3.
Add 2-3 NIC cards and Power ON the ESXi Server.
82 | P a g e w w w . v e p s u n . i n
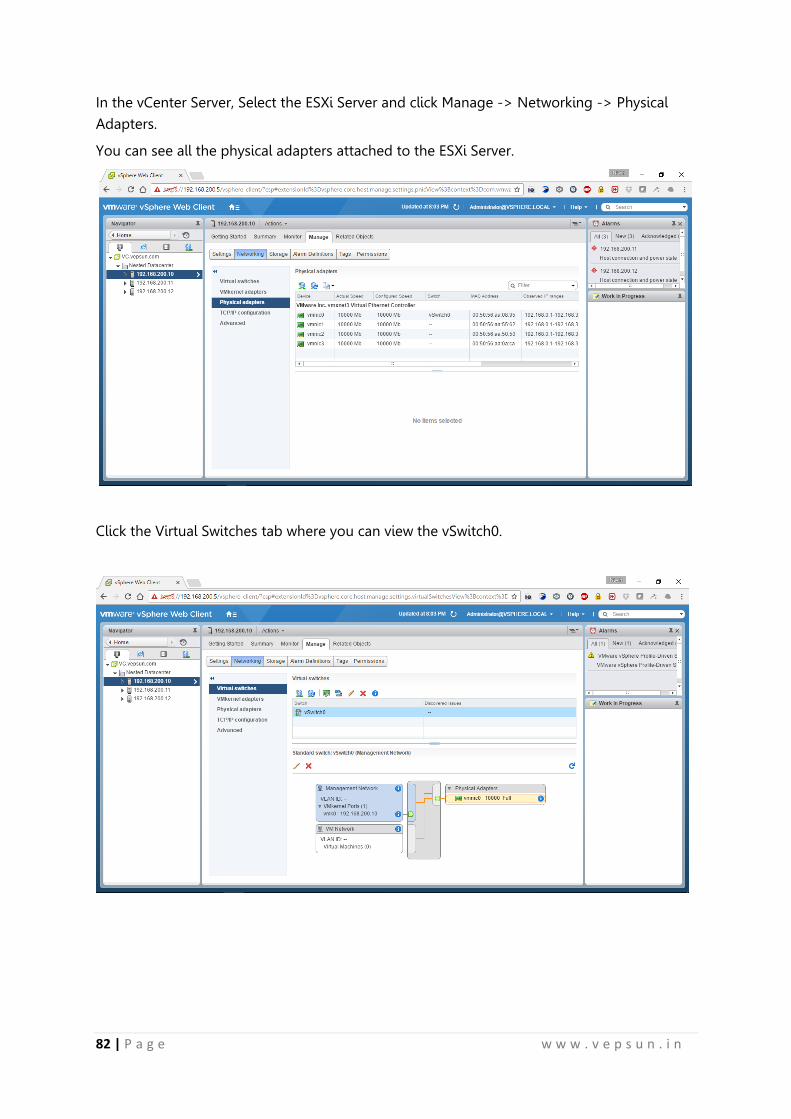
In the vCenter Server, Select the ESXi Server and click Manage -> Networking -> Physical
Adapters.
You can see all the physical adapters attached to the ESXi Server.
Click the Virtual Switches tab where you can view the vSwitch0.

83 | P a g e w w w . v e p s u n . i n
Click the “Add host networking” button.
Select “Physical Network Adapter” and click Next.

84 | P a g e w w w . v e p s u n . i n
Select the vSwitch0 and click Next.
Click the button.

85 | P a g e w w w . v e p s u n . i n
Select the Adapter and click OK.
Now the New NIC will be added.

86 | P a g e w w w . v e p s u n . i n
Do the same and add the other NIC cards. Click Next.
Click Finish.

87 | P a g e w w w . v e p s u n . i n
Done! NIC Team is configured.
Creating Portgroups
Select the vSwitch0 and click “Add Host Networking” button.

88 | P a g e w w w . v e p s u n . i n
Select the “Virtual Machine Port Group for a Standard Switch” and click Next.
Select vSwitch0 and click Next.

89 | P a g e w w w . v e p s u n . i n
Give a name to the Port group and click Next.
Click Finish.

90 | P a g e w w w . v e p s u n . i n
A Portgroup will be created in the Standard Switch.
Now you can create VMs in that Portgroup.

91 | P a g e w w w . v e p s u n . i n
Creating vSwitch
Click the “Add Host Networking” button.
Click “Physical Network Adapter” and click Next.

92 | P a g e w w w . v e p s u n . i n
Click “New Standard Switch” and click Next.
Select the unused adapter and click Next.

93 | P a g e w w w . v e p s u n . i n
Click Finish.
Now, vSwitch1 will be created.

94 | P a g e w w w . v e p s u n . i n
Creating VMKernel Portgroup
Click the “Add Host Networking” button.
Select the “VMKernel Network Adapter” and click Next.

95 | P a g e w w w . v e p s u n . i n
Select the necessary vSwitch and click Next.
Enable the necessary services and click Next.

96 | P a g e w w w . v e p s u n . i n
Provide an IP Address for the VMKernel Portgroup and click Next.
Click Finish.

97 | P a g e w w w . v e p s u n . i n
VMkernel Portgroup will be created.
Remove NIC from vSwitch0
Select the vSwitch and click the “Manage the Physical Network Adapters connected to the
selected switch” button.

98 | P a g e w w w . v e p s u n . i n
Push down the adapters to remove them.
Creating Distributed Switch
Select Networking in the Inventory and right click the Datacenter and select “New
Distributed Switch” under Distributed Switch.

99 | P a g e w w w . v e p s u n . i n
Give a name for the vDS.
Select the version and click Next.

100 | P a g e w w w . v e p s u n . i n
Select the Number of Uplinks and click Next.
Click Finish.

101 | P a g e w w w . v e p s u n . i n
Right-click the vDS and click “Add and Manage Hosts”.
Click Add Hosts and Click Next.

102 | P a g e w w w . v e p s u n . i n
Click the + button to add the Hosts.
Select all the Hosts and click OK.
Click Next.

103 | P a g e w w w . v e p s u n . i n
Select the appropriate required settings and click Next.

104 | P a g e w w w . v e p s u n . i n
Select the Network Adapter and click Assign Uplink.
Select the Uplink and click Next.

105 | P a g e w w w . v e p s u n . i n
Do the same for all the Hosts.
Select the VMkernel Network Adapters.

106 | P a g e w w w . v e p s u n . i n
Click Next.
Click the VM and click Assign Portgroup

107 | P a g e w w w . v e p s u n . i n
Select the Portgroup and click Next.
Click Next.

108 | P a g e w w w . v e p s u n . i n
Click Finish.
Creating Portgroup in vDS
Right click the vDS and select the New Distributed Portgroup.

109 | P a g e w w w . v e p s u n . i n
Give a name for the Port group.
Click Next.

110 | P a g e w w w . v e p s u n . i n
Click Finish.
Portgroup will be created and now you can create VMs in that portgroup.

111 | P a g e w w w . v e p s u n . i n
Lab 5
STORAGE

112 | P a g e w w w . v e p s u n . i n
STORAGE
In our lab environment, we are going to make a Windows Storage Server with the Windows
Server 2012 for iSCSi connectivity.
Right click the AD Server and click Edit Settings.
In the New Device, select New Hard Disk.

113 | P a g e w w w . v e p s u n . i n
Select as Thin Provision and click OK.
Login to the OS and run diskmgmt.msc

114 | P a g e w w w . v e p s u n . i n
Right click the new disk and click Online.
Right-click again and select Initialize Disk.

115 | P a g e w w w . v e p s u n . i n
Select MBR and click OK.
Right click the Volume and select “New Simple Volume”

116 | P a g e w w w . v e p s u n . i n
Click Next.
Click Next.

117 | P a g e w w w . v e p s u n . i n
Assign the Drive letter and click Next.
Click Next.

118 | P a g e w w w . v e p s u n . i n
Click Finish.
In the Server Manager, select File and Storage Services.

119 | P a g e w w w . v e p s u n . i n
Select iSCSI.
Click the Link which appears in the window.

120 | P a g e w w w . v e p s u n . i n
iSCSI role will be automatically selected. Click Next.
Click Next.

121 | P a g e w w w . v e p s u n . i n
Click Install.
Click Close after the installation is done.
122 | P a g e w w w . v e p s u n . i n
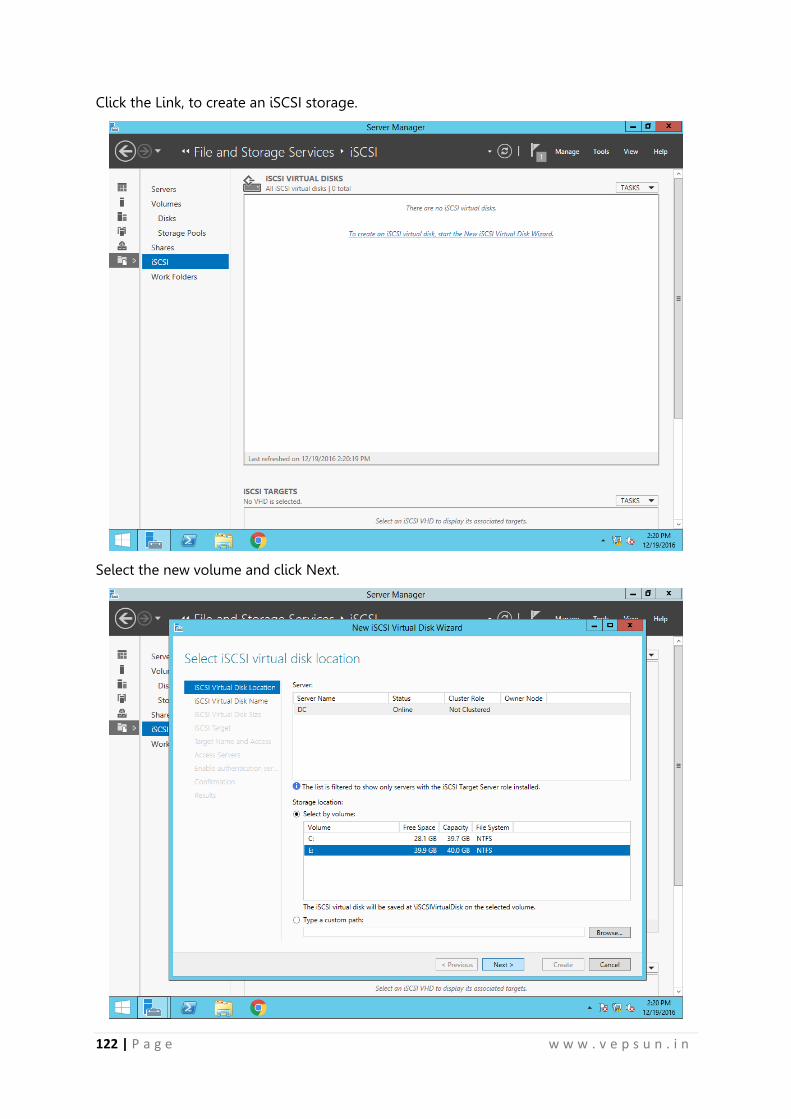
Click the Link, to create an iSCSI storage.
Select the new volume and click Next.

123 | P a g e w w w . v e p s u n . i n
Give a name and click Next.
Give a size for the iScsi Disk and Select Dynamically Expanding.

124 | P a g e w w w . v e p s u n . i n
Select “New iScsi Target”
Give a name to the Target and click Next.

125 | P a g e w w w . v e p s u n . i n
Click Add.
Select IP Address and give the IP of the ESXi Servers.

126 | P a g e w w w . v e p s u n . i n
Click Add again and add the remaining ESXi Servers.
Click Next.

127 | P a g e w w w . v e p s u n . i n
Click Create.
Click Close.

128 | P a g e w w w . v e p s u n . i n
iSCSI Target will be created.
Mapping LUN to ESXi
Select the ESXi and click Manage->Storage->Storage Adapters and click the + button to Add
new storage Adapter.

129 | P a g e w w w . v e p s u n . i n
Select Software iScsi Adapter.
Click OK.

130 | P a g e w w w . v e p s u n . i n
Select the iScsi Adapter and click Targets->Dynamic Discovery->Add
Give the IP of the iScsi Target.

131 | P a g e w w w . v e p s u n . i n
Click OK. It will ask you to Rescan all Adapters.
To do a rescan, select the Rescan button.

132 | P a g e w w w . v e p s u n . i n
Click OK.
Path will be displayed.

133 | P a g e w w w . v e p s u n . i n
In the Datastore inventory, click Add Datastore.
Click Next.

134 | P a g e w w w . v e p s u n . i n
Select VMFS Datastore.
Select the host and give a name for the Datastore.

135 | P a g e w w w . v e p s u n . i n
Select the LUN.
Give the LUN size and select Next.

136 | P a g e w w w . v e p s u n . i n
Click Finish.
Now the Datastore will be added.

137 | P a g e w w w . v e p s u n . i n
Lab 6
VMOTION

138 | P a g e w w w . v e p s u n . i n
VMOTION
Enable vMotion
Select the VMKernel portgroup and click Edit.
Enable the vMotion Traffic.

139 | P a g e w w w . v e p s u n . i n
Host Migration
Right click the VM and click Migrate
Select the option Change Compute Resource only and click Next.

140 | P a g e w w w . v e p s u n . i n
Select the destination ESXi and click Next.
Select the destination portgroup.

141 | P a g e w w w . v e p s u n . i n
Click Next.
Click Finish.

142 | P a g e w w w . v e p s u n . i n
Now the VM will get migrated to the other ESXi Server.
Storage vMotion
Right Click the VM and click Migrate.

143 | P a g e w w w . v e p s u n . i n
Click Change Datastore and click Next.
Select the Datastore and click Next.

144 | P a g e w w w . v e p s u n . i n
Review the settings and click Finish.

145 | P a g e w w w . v e p s u n . i n
Lab 7
CLUSTER

146 | P a g e w w w . v e p s u n . i n
CLUSTER
High Availability
To create a cluster, right-click the Datacenter and click New Cluster
Give a name to the cluster and select the vSphere HA option.

147 | P a g e w w w . v e p s u n . i n
After the cluster is created, Drag and Drop the ESXi Servers into the cluster to add them to
cluster.
Do the same for all the other ESXi Servers.

148 | P a g e w w w . v e p s u n . i n
To Test HA, select one VM and check the Host on which it is running.
Now, Power off that ESXi Server.

149 | P a g e w w w . v e p s u n . i n
When that ESXi Server is down, vSphere HA will power on that VM in other ESXi after 15
seconds.
Distributed Resource Scheduler
To enable DRS in a cluster, select the Cluster -> Manage -> Settings -> vSphere DRS -> Edit.

150 | P a g e w w w . v e p s u n . i n
Check the Turn on vSphere DRS checkbox.
DRS would be enabled and you could monitor them.

151 | P a g e w w w . v e p s u n . i n
Distributed Power Management
Edit the DRS cluster
In the Power management click Automatic.

152 | P a g e w w w . v e p s u n . i n
Select the Automation Level and click OK.
Click OK.

153 | P a g e w w w . v e p s u n . i n
To add iLO/DRAC settings of the ESXi server to vCenter, select the Host and Select Power
management in Settings.
In Vepsun Lab Environment, the iLO access is granted for both the servers and thus one server
would enter Standby mode if there is less usage of resources and power on automatically
when required.

154 | P a g e w w w . v e p s u n . i n
Fault Tolerance
Edit the VMkernel Portgroup
Enable the Fault Tolerance logging

155 | P a g e w w w . v e p s u n . i n
Create a very small VM with <10MB size else would take more time to deploy FT.
Right click the VM and select Turn on FT.

156 | P a g e w w w . v e p s u n . i n
Select the Datastore for the Secondary VM.
Select the host for the secondary VM.

157 | P a g e w w w . v e p s u n . i n
Click Finish.
FT is enabled for that VM. You can see the icon color change for that VM.

158 | P a g e w w w . v e p s u n . i n

159 | P a g e w w w . v e p s u n . i n
Lab 8
VM MANAGEMENT

160 | P a g e w w w . v e p s u n . i n
VM MANAGEMENT
Clone
Right-click the VM, select Clone -> Clone to Virtual Machine.
Give a name to the Clone VM.

161 | P a g e w w w . v e p s u n . i n
Select the Datacenter.
Select the Datastore

162 | P a g e w w w . v e p s u n . i n
Select the Appropriate required options
Click Finish.

163 | P a g e w w w . v e p s u n . i n
Now that Will get cloned.
Template
Create a master VM with all the required changes and power off the VM.

164 | P a g e w w w . v e p s u n . i n
Right Click the VM -> Template -> Convert to Template.
Click Yes.

165 | P a g e w w w . v e p s u n . i n
Goto VMs and Templates in the Inventory where you can find the Template
To deploy a VM, right click the Template -> Deploy VM from this Template

166 | P a g e w w w . v e p s u n . i n
Give a name to the new VM.
Select the Cluster.

167 | P a g e w w w . v e p s u n . i n
Select the Datastore.
Click Next.

168 | P a g e w w w . v e p s u n . i n
Click Finish.
A new VM will be deployed from that Template.

169 | P a g e w w w . v e p s u n . i n
Snapshot
To test Snapshot, I have a VM with some files on the Desktop.
Take a snapshot of the VM

170 | P a g e w w w . v e p s u n . i n
Give the snapshot a name.
Now delete those files

171 | P a g e w w w . v e p s u n . i n
To revert back the snapshot, Goto Snapshot manager
Select the snapshot and click Revert to

172 | P a g e w w w . v e p s u n . i n
Click Yes
Now that VM will get reverted back to the previous state where your files would appear
again.
173 | P a g e w w w . v e p s u n . i n
Lab 9
RESOURCE MANAGEMENT

174 | P a g e w w w . v e p s u n . i n
Resource Pools
Right click the cluster and click New -> Resource Pool
Give a name to the Resource Pool and give the CPU and RAM share values.

175 | P a g e w w w . v e p s u n . i n
Drag and Drop the VMs into the Resource Pool.

176 | P a g e w w w . v e p s u n . i n
vApp
Right click the Cluster and create a new vApp
Click Next.

177 | P a g e w w w . v e p s u n . i n
Select the Datacenter and click Next.
Give the Resource Allocation values and click Next.

178 | P a g e w w w . v e p s u n . i n
Click Finish.
Drag and Drop the VMs into the vApp

179 | P a g e w w w . v e p s u n . i n
Now, edit the vApp settings to change the startup order

180 | P a g e w w w . v e p s u n . i n
Use the arrow keys to change the startup order
Power on the vApp

181 | P a g e w w w . v e p s u n . i n
VMs will get started in the described order.

182 | P a g e w w w . v e p s u n . i n

183 | P a g e w w w . v e p s u n . i n
Lab 10
ROLES AND PERMISSIONS

184 | P a g e w w w . v e p s u n . i n
ROLES AND PERMISSIONS
SSO
1) Creating AD users
In the Server Manager of the AD server select “Active Directory Users and Computers”
Click Users and Right-click -> New -> User.

185 | P a g e w w w . v e p s u n . i n
Give the username and click Next.
Give the password and click Next.

186 | P a g e w w w . v e p s u n . i n
Click Finish.
A domain user will get created.

187 | P a g e w w w . v e p s u n . i n
2) Adding Identity Source
Click Home in the Web client and click Administration
Click Configuration under Single Sign On

188 | P a g e w w w . v e p s u n . i n
Click the + button in the Identity Sources.
Give the domain name and click OK.

189 | P a g e w w w . v e p s u n . i n
3) Giving Permission for the vCenter
Goto Global Permissions -> Manage -> Add permission
Click Add.

190 | P a g e w w w . v e p s u n . i n
Select the Domain name
Select the domain user.

191 | P a g e w w w . v e p s u n . i n
Select the appropriate Role and click OK.
That user is given the permission for that vCenter

192 | P a g e w w w . v e p s u n . i n
You can now login to the vCenter with that user.

193 | P a g e w w w . v e p s u n . i n
Creating Roles
Click Roles under Administration
Click Create Role action

194 | P a g e w w w . v e p s u n . i n
Give the role a name and select the appropriate permissions.
Add permissions
Select the object and click Add Permission

195 | P a g e w w w . v e p s u n . i n
Click Add
Select the user

196 | P a g e w w w . v e p s u n . i n
Select the Permission.
Click OK.

197 | P a g e w w w . v e p s u n . i n
Login with that user
That user will not be able to view other objects of the vCenter.

198 | P a g e w w w . v e p s u n . i n

199 | P a g e w w w . v e p s u n . i n
Lab 11
IMPORT/EXPORT OF VIRTUAL MACHINES

200 | P a g e w w w . v e p s u n . i n
EXPORT/IMPORT OF VIRTUAL MACHINES
Power off the VM
Right-click the VM -> Template -> Export OVF Template.

201 | P a g e w w w . v e p s u n . i n
Click Allow
Give a name for the OVA file and select OVA.

202 | P a g e w w w . v e p s u n . i n
Click OK.
OVA file will be exported

203 | P a g e w w w . v e p s u n . i n
Right-click the Datacenter -> Deploy OVF Template.
Select the OVA File

204 | P a g e w w w . v e p s u n . i n
Click Next.
Give a name, click Next.

205 | P a g e w w w . v e p s u n . i n
Select the Cluster and click Next.
Select the Datastore and click Next.

206 | P a g e w w w . v e p s u n . i n
Select the Destination Portgroup and click Finish.
Now that VM is Imported.

207 | P a g e w w w . v e p s u n . i n
Power on that VM

208 | P a g e w w w . v e p s u n . i n

209 | P a g e w w w . v e p s u n . i n
Lab 12
UPDATE MANAGER

210 | P a g e w w w . v e p s u n . i n
UPDATE MANAGER
Updating ESXi
Notice that the ESXi Build Version is 3380124.
Create a New Server 2012 for Update manager and move that into domain.

211 | P a g e w w w . v e p s u n . i n
Mount the vCenter ISO file
Click Install

212 | P a g e w w w . v e p s u n . i n
Wait for the SQL Server installation to complete
Click OK.

213 | P a g e w w w . v e p s u n . i n
Click Next.
Accept the License and click Next.

214 | P a g e w w w . v e p s u n . i n
Click Next.
Give the vCenter Credentials and click Next.

215 | P a g e w w w . v e p s u n . i n
Click Next.
Click Next.

216 | P a g e w w w . v e p s u n . i n
Ignore the warning and click OK.
Click Install

217 | P a g e w w w . v e p s u n . i n
After the installation is done, click Finish.
Login to your vCenter and click Client Plugins and click Check for new plugins

218 | P a g e w w w . v e p s u n . i n
Update Manager Plugin will show up.
You need to login again for the Update manger plugin to show up in vCenter.

219 | P a g e w w w . v e p s u n . i n
Open Update Manager

220 | P a g e w w w . v e p s u n . i n
Click Import Patches
Select the Patch which is available in the Utilities ISO. Click Upload.

221 | P a g e w w w . v e p s u n . i n
Wait for the Upload to get completed.
After it is uploaded, click Next.

222 | P a g e w w w . v e p s u n . i n
Click Finish.
Click the + icon to create a new baseline.

223 | P a g e w w w . v e p s u n . i n
Give a name to the baseline.
Select Fixed and click Next.

224 | P a g e w w w . v e p s u n . i n
Select the needed updates.
Click Finish.

225 | P a g e w w w . v e p s u n . i n
Create a Baseline Group.
Give a name to the baseline group.

226 | P a g e w w w . v e p s u n . i n
Click Next.
Select the Baseline and click Next.

227 | P a g e w w w . v e p s u n . i n
Click Next.
Click Finish

228 | P a g e w w w . v e p s u n . i n
A baseline group is created.
Select the ESXi Server and click the Update Manager Tab.
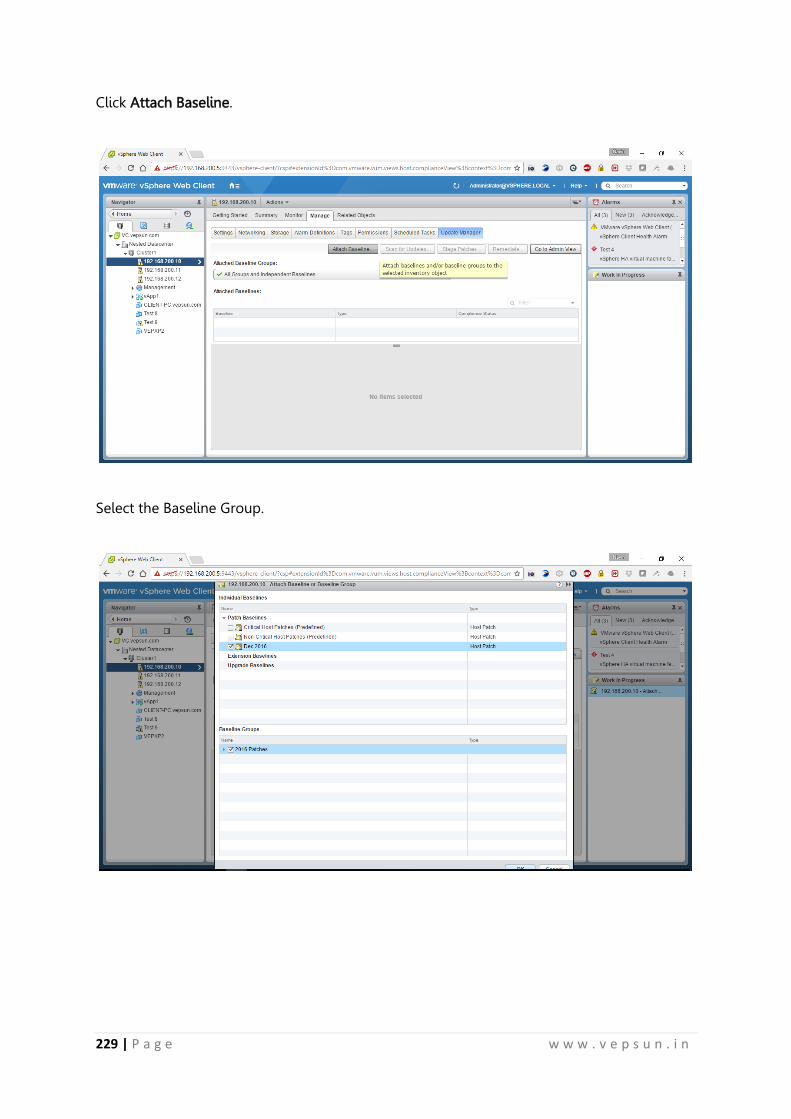
229 | P a g e w w w . v e p s u n . i n
Click Attach Baseline.
Select the Baseline Group.

230 | P a g e w w w . v e p s u n . i n
Click Scan for Updates.
Click OK.

231 | P a g e w w w . v e p s u n . i n
After the scan, it will show, whether that particular ESXi server is compliant or non-compliant.
Click Stage patches.

232 | P a g e w w w . v e p s u n . i n
Click Next.
Select the Host and click Next.

233 | P a g e w w w . v e p s u n . i n
Select the required updates and click Next.
Click Finish.

234 | P a g e w w w . v e p s u n . i n
Click Remediate to start the patching.
Click Next.

235 | P a g e w w w . v e p s u n . i n
Click Next.
Click Next.

236 | P a g e w w w . v e p s u n . i n
Give a name to the Task and click Next.
Click Next.

237 | P a g e w w w . v e p s u n . i n
Click Next.
Click Finish.

238 | P a g e w w w . v e p s u n . i n
Patching activity will start.
During the process, the ESXi server will get rebooted.

239 | P a g e w w w . v e p s u n . i n
Now you can see the Build number as 3620759
Upgrade vCenter
Verify the Version of vCenter in Web Client.

240 | P a g e w w w . v e p s u n . i n
Mount the vCenter 6.5 ISO file into the vCenter VM
Click Install

241 | P a g e w w w . v e p s u n . i n
Click Next.
Accept the License and click Next.

242 | P a g e w w w . v e p s u n . i n
Give the SSO password and click Next.
Verify the port numbers and click Next.

243 | P a g e w w w . v e p s u n . i n
Click Next.
Select the path and click Next.

244 | P a g e w w w . v e p s u n . i n
Click Next.
Click upgrade.

245 | P a g e w w w . v e p s u n . i n
It will take several minutes to upgrade please be patience. After the upgrade is done, click
Finish.
Login again into the vCenter.

246 | P a g e w w w . v e p s u n . i n
You could see that vCenter got upgraded to 6.5
Upgrade VUM
Do the same for the VUM server by mounting the 6.5 ISO and upgrade VUM server.

247 | P a g e w w w . v e p s u n . i n
Upgrade ESXi Servers
Notice that this ESXi Server is version 6.0
Click on the cluster -> Update Manager -> Goto Admin View.

248 | P a g e w w w . v e p s u n . i n
Click Manager -> ESXi Images -> Import ESXi Images
Select the ESXi 6.5 ISO file and click Upload.

249 | P a g e w w w . v e p s u n . i n
After the upload is done, click Close.

250 | P a g e w w w . v e p s u n . i n
Create a baseline for the Upgrade.
Give a name to the baseline and click Host Upgrade.

251 | P a g e w w w . v e p s u n . i n
Select the ESXi Image and click Next.
Click Finish.
252 | P a g e w w w . v e p s u n . i n
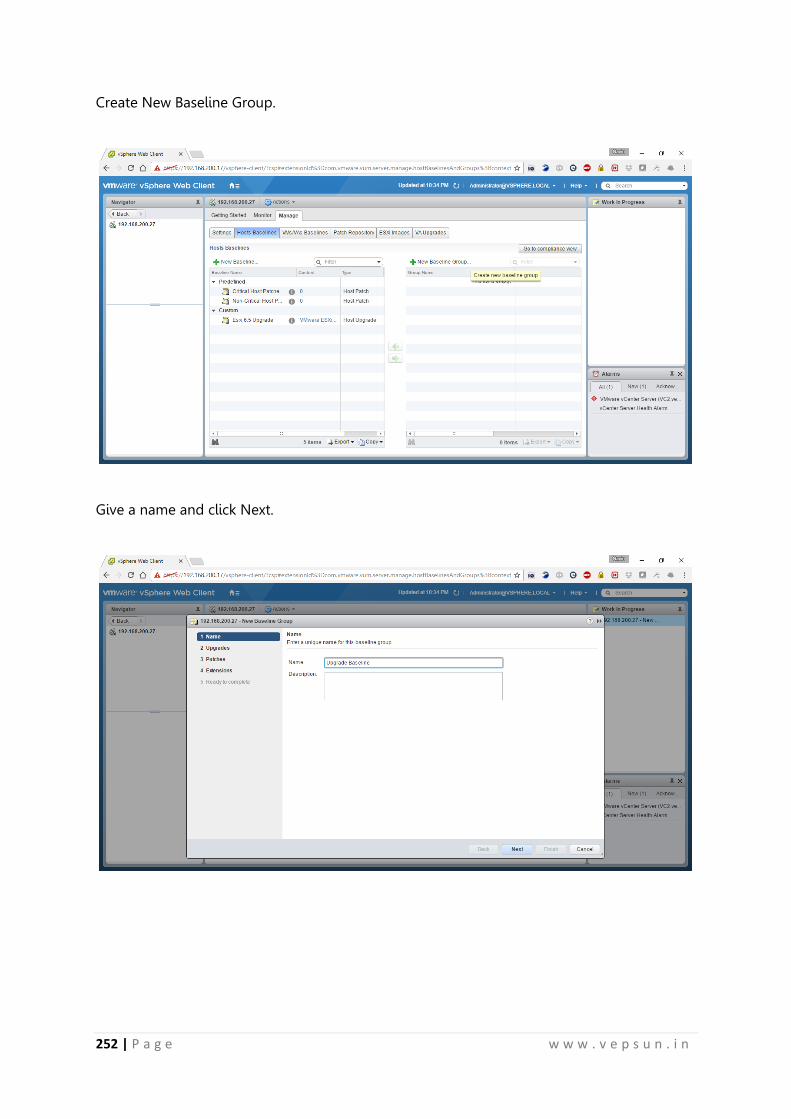
Create New Baseline Group.
Give a name and click Next.

253 | P a g e w w w . v e p s u n . i n
Select the Baseline and click Next.
Click Next.

254 | P a g e w w w . v e p s u n . i n
Click Next.
Click Finish.
Select the ESXi Server and attach the Baseline

255 | P a g e w w w . v e p s u n . i n
Select the Baseline.
Scan the inventory.

256 | P a g e w w w . v e p s u n . i n
Select Upgrades and click OK.
It will show as Non-compliant.

257 | P a g e w w w . v e p s u n . i n
Click Remediate
Click Next.

258 | P a g e w w w . v e p s u n . i n
Select the Host and click Next.
Accept the License and click Next.

259 | P a g e w w w . v e p s u n . i n
Check the Ignore Warnings checkbox and click Next
Click Next.

260 | P a g e w w w . v e p s u n . i n
Click Next.
Click Finish.

261 | P a g e w w w . v e p s u n . i n
Wait for the Upgrade to finish.
During the process ESXi Server gets rebooted.

262 | P a g e w w w . v e p s u n . i n
And it will begin the installation.
Done, the ESXi Server 6.0 is upgraded to ESXi 6.5.

