vpi3331 vme controller card (and pci 5331 … tutorial before you try to use the vpi 3331 to address...
TRANSCRIPT

HYTEC ELECTRONICS Ltd HEAD OFFICE: 5 CRADOCK ROAD, READING, BERKS. RG2 0JT, UK Telephone: +44 (0) 118 9757770 Fax: +44 (0)118 9757566
E-mail: [email protected]
VPI3331 VME CONTROLLER CARD
(and PCI 5331 Personality Card)
USERS MANUAL
PCB Issue 3
Document Nos.: 3331/UTM/G/?/6.0Date: 12/07/2007
Author: PJM

Hytec Electronics Ltd 3331/UTM/G/2/6.0
CONTENTS
1. PRODUCT DESCRIPTION .............................................................................................................................. 3
2. 3331 SETTING UP.............................................................................................................................................. 3 2.1 CRATE SELECT SWITCH................................................................................................................................. 3 2.2 PRIVATE BUS TERMINATION. ........................................................................................................................ 3 2.3 SLOT 1 ENABLE. ............................................................................................................................................ 3 2.4 IACK DRIVER SELECT. ................................................................................................................................. 3 2.5 BUS ERROR INTERRUPT SELECT. ................................................................................................................... 4 2.6 PC RESET ENABLE/DISABLE ......................................................................................................................... 4 2.7 3331 STANDARD CONFIGURATION ................................................................................................................ 4
3. 3331 FRONT PANEL ......................................................................................................................................... 4 3.1 PRIVATE BUS CONNECTOR ............................................................................................................................ 4 3.2 INDICATOR LEDS.......................................................................................................................................... 5 3.3 RESET PUSH-BUTTON .................................................................................................................................... 5
4. PCI 5331 PERSONALITY CARD - SETTING UP ......................................................................................... 5
5. INSTALLATION, OPERATING AND PROGRAMMING ........................................................................... 6 5.1 IBM PC/AT AND COMPATIBLES ................................................................................................................... 6 5.2 THE VME CRATE .......................................................................................................................................... 6
6. VME TUTORIAL ............................................................................................................................................... 7 6.1 HOW TO ADDRESS VME THROUGH THE VPI 3331......................................................................................... 7
7. CATY_VME SOFTWARE ................................................................................................................................ 8 7.1 CATY_VME COMMAND AND STATEMENT SUMMARY................................................................................. 9
8. SPECIAL OPERATIONAL FEATURES......................................................................................................... 9 8.1 ADDRESS AUTO-INCREMENT....................................................................................................................... 10
9. CIRCUIT DESCRIPTION............................................................................................................................... 10 9.1 PERSONALITY CARD.................................................................................................................................... 10 9.2 3331 VME MODULE ................................................................................................................................... 11
10. ON BOARD FEATURES............................................................................................................................. 13 10.1 DATA LOW REGISTER (READ/WRITE) ........................................................................................................ 13 10.2 DATA HIGH REGISTER (READ/WRITE)........................................................................................................ 13 10.3 ADDRESS LOW REGISTER (READ/WRITE)................................................................................................... 13 10.4 ADDRESS HIGH REGISTER (READ/WRITE) .................................................................................................. 13 10.5 ADDRESS MODIFIER (READ/WRITE)........................................................................................................... 14 10.6 INTERRUPT ACKNOWLEDGE (READ/WRITE) ............................................................................................... 14 10.7 CONTROL & STATUS REGISTER CARRIER BOARD (CSR CB) ...................................................................... 14 10.8 VME SYSTEM AND BOARD RESETS............................................................................................................. 15
10.8.1 A VME system reset will clear the following registers: ........................Error! Bookmark not defined. 10.8.2 A board reset generated from the CSR CB bit 0 will clear the following registers:......................... 15
11. INTERRUPT SETTINGS............................................................................................................................ 15
APPENDIX A PCB JUMPERS ............................................................................................................................ 15
APPENDIX B PARTS LIST AND ASSEMBLY DETAILS ................................................................................. 16
PRODUCT SPECIFICATIONS............................................................................................................................... 17
VME PIN ASSIGNMENTS ...................................................................................................................................... 18
Page 2

Hytec Electronics Ltd 3331/UTM/G/3/6.0
1. PRODUCT DESCRIPTION The VPI 3331 "VIPER" PC/VME Interface Set consists of a 3331 Personal Computer VME Interface/Controller module, a PCI personality card and an interconnecting cable three metres long. Normally, the 3331 interface and personality card will be supplied set up as the "first crate" i.e. Base Address - Assigned by PC BIOS Crate Select - Crate 0 Master/Slave Sel. - Master Controller (see sect. 2.3) Interrupt Request - Assigned by PC BIOS
2. 3331 Setting Up
2.1 Crate Select Switch. This is a 10-position rotary switch, only 0 to 7 are valid. Note that the standard configuration of the Personality Card Address Decode allows only FOUR Crates to be connected, i.e. Crate 0 to Crate 3. (Other arrangements to special order – contact Hytec for details).
2.2 Private Bus Termination. Except where multiple 3331's are "daisy-chained" onto the same private bus cable, the 3331 will be the only device on this bus, so terminating packs RN1, 2, 3, 4, 5, 6, 7 and 8 should be fitted. In multi-crate situations only the last controller on the bus should have the resistor packs fitted. The maximum recommended length for the bus is 20 metres.
2.3 Slot 1 Enable. JP 5 selects whether the 3331 is the Slot 1 Master/Arbiter or not. JP 5 IN (default) = Master/Arbiter enabled. Arbitration takes place on level 3, other request/grant signals are passed through. JP 5 OUT = Master acting with external level 3 Arbiter.
2.4 IACK Driver Select. JP 1 and JP 2 select the internal IACK Daisy Chain driver, which is also a Slot 1 function. JP 2 IN, JP 1 OUT - Slot 1 Driver enabled (default). JP 1 IN, JP 2 OUT - IACK bypassed, not Slot 1.
Page 3

Hytec Electronics Ltd 3331/UTM/G/4/6.0
2.5 Bus Error Interrupt Select. JP 3 and JP 4 decide whether Bus Error generates an Interrupt or not. JP 4 IN, JP 3 OUT - Bus Error gives Interrupt JP 3 IN, JP 4 OUT - No Interrupt for Bus Error. (default)
2.6 PC Reset Enable/Disable If JP 6 is fitted, then the RESET signal from the PC Main Board will generate an internal 3331 reset. If the 3331 is configured as Slot 1, then SYSRESET on the VME bus will also be generated. If JP 6 is OUT, PC Reset has no effect.
2.7 3331 Standard Configuration Crate Select Set for Crate 0 RN1-8 Fitted JP 5 IN Slot 1 Master JP 2 IN, JP 1 OUT IACK driver enabled JP 3 IN, JP 4 OUT No Interrupt for Bus Error
3. 3331 Front Panel The 3331 Front Panel carries the 50-way IDC plug private bus connector, a hole for access to the PCB-mounted Crate Select switch, six LED’s and a reset button.
3.1 Private Bus Connector Standard 50-way IDC header connector. Pin 1 is bottom right.
Page 4

Hytec Electronics Ltd 3331/UTM/G/5/6.0
3.2 Indicator LEDs ADDRESSED LED - flashes when the 3331 detects its own crate address from the personality card. Stretched to 10 mSec. MASTER LED - flashes when the 3331 is performing a VME cycle, stretched to 10 mSec. INTERRUPT LED - comes on to show that an interrupt is being sent to the computer. This will happen if the selected VME IRQ line is asserted while Interrupts are Enabled, or if there is a Bus Error - see sect. 2.5. BUS ERROR LED - shows the state of the Bus Error flag for the last VME cycle. Cleared by loading the Address Modifier. AM5, AM4 LEDs - show the last loaded top two bits of the address modifier, indicating Short, Standard or Long addressing.
3.3 Reset Push-button This performs a "Power-on-Reset" on the whole module. In particular, it resets the following: The BUSCON VME Bus Master chip The Control and Status Register The VME Cycle Sequencer Whilst pressed, therefore, it stops the 3331 doing anything. If the 3331 is configured as Slot 1, SYSRESET will also be output onto the VME bus.
4. PCI 5331 Personality Card - Setting Up The BASE ADDRESS and INTERRUPT REQUEST LEVEL selection is made automatically by the PC BIOS at boot time and is therefore not chosen by the user at all. All the user has to do is determine from the operating system what the actual base address and IRQ level are, once the system as started. Refer to PCI5331 Installation Guide for details. There are two jumper positions on the personality card – these are reserved for future use only and currently have no effect.
Page 5

Hytec Electronics Ltd 3331/UTM/G/6/6.0
5. Installation, Operating and Programming
5.1 IBM PC/AT and Compatibles Remove the top cover of the computer and install the personality card in a free PCI expansion slot. Having chosen the expansion slot in which to fit the Personality Card, install the card, securing it with the fixing screw. If fitting seems awkward, loosen the bracket fixing screws where some latitude is available for accommodating slight mechanical differences which do occur on some PC's. Plug in the private bus cable. Before replacing the cover, check that the personality card is seated correctly.
5.2 The VME Crate If the 3331 is in a "Stand-alone" system, i.e. it is the only Master, then fit JP 5, JP 2, and JP 3, leaving the other links out, and put it in Slot 1, otherwise place it in the arbitration chain to the right of the slot 1 Master, taking care that the Bus Grant IN/OUT chain is continuous. Plug in the private bus cable at both ends. Switch ON the computer, monitor and VME crate. Note that powering down the crate and 3331 will not affect the computer. IF THE COMPUTER FAILS TO BOOT, CHECK THAT THERE IS AN INTERRUPT AVAILABLE ON YOUR SYSTEM. THE 5331 REQUESTS AN INTERRUPT, AND IF NONE ARE AVAILABLE, THIS WILL CAUSE PROBLEMS. IT IS ALSO WORTH TRYING A DIFFERENT SLOT IF THE MACHINE FAILS TO START. When the computer has booted up into DOS or Windows, run BASIC or GWBASIC and type in this program: 10 VME=&HE000 '3331 REGISTERS START AT HEX E000 (for example) 20 OUT VME,0 'Send DATA 0, do a VME cycle 30 FOR I=1 TO 1000 'Delay loop 40 NEXT I 50 GOTO 20 'Do it again Running this program should flash the ADDRESSED and MASTER LEDs, provided the base address is selected to be HEX 300 (otherwise change line 10) and the 3331 should now be doing VME cycles. If you have a VME Bus Display Module, such as the Hytec VDS 2081, you will be able to observe this happening. BUS ERROR will be lit, since the address in the 3331's registers will be "garbage", as will the address modifier.
Page 6

Hytec Electronics Ltd 3331/UTM/G/7/6.0
If all is not well, check that the cable is firmly plugged in and all your selections on the 3331 and on the personality card are correct and try again. You are now ready to load your CATY_VME Software, which you will have received on a floppy disk. Install it in your machine and copy the two files CATY_VME.EXE and VKYMSG.TXT into a prepared sub-directory of your hard disk.
6. VME Tutorial Before you try to use the VPI 3331 to address a VME module, possibly with the CATY_VME Software, it is important that you understand the steps involved and the reasons behind them. Suppose for a moment that you wish to test a VME module which has some registers that you can read and write. The first thing you need to know is what bus address they are located at; the second is what address width to use, and hence what address modifier, and the third is what data width the registers have. Hopefully, you have a manual on the module and by looking at the tables and the jumper settings on the unit, you work out that it is set bus address 1C0000 HEX, say, which is a 24-bit or STANDARD address, which involves the use of address modifiers HEX 39 or 3D. In many circumstances, there will be a choice of Standard (24-bit) or Short (16-bit) addressing, so remember to change the modifier accordingly - 29 or 2D for SHORT addressing, 09 or 0D for LONG (32-bit) addressing. Using the CATY_VME Software, you can now address this module and write and read its registers. You know the crate address, set on the front panel switch, the bus address (HEX 1C0000 in our example) and the address modifier (HEX 39 in our example). CATY_VME uses <'X> as an abbreviation for HEX; <'> means OCTAL; no prefix means decimal.
6.1 How to address VME through the VPI 3331 Again, using CATY_VME, this is very straightforward. In the example above, suppose there is a register at the base address that we can write and read back and let's say it is 16 bits wide. Our program might look something like this: 10 MOD=0,'X1C0000,'X39 ;Crate 0, Addr 1C0000 HEX, AM 39 HEX 20 FOR D=0 TO 65535 ;FULL 16 BIT PATTERN 30 VW16 MOD,D ;WRITE THE DATA 40 VR16 MOD,X ;READ IT BACK 50 IF X=D GOTO 70 ;IS IT RIGHT? 60 PRINT "DATA ERROR, WROTE",D,"READ",X ;MESSAGE 70 NEXT D 80 STOP What happens here is that CATY_VME now knows where the module is and how to load up the 3331 registers to talk to it. The question at start-up told it what the base address is, so with the crate number, it knows the PC I/O page address of all the 3331 registers. Referring to the data sheet, we can see that it will load the Address Modifier into Base+8, then load the top and bottom halves of the bus address into Base+6 and Base+4. Since this is a 16-bit access, it will now either write or read a 16-bit word to or from the Data Low location at the base address, which will cause a VME cycle to take place. Had the PC done an 8-bit operation, then only 8 bits of data would have been passed, on either D0-7 or D8-15 on the VME bus, depending on the state of the least significant address
Page 7

Hytec Electronics Ltd 3331/UTM/G/8/6.0
bit (A00) in the 3331. A00 is not passed to the VMEbus, but it controls the routing of 8-bit data to either D00-D07 with strobe DS0 when A00 is '0' or D08-D15 with strobe DS1 when A00='1' (this is known as D08(EO) addressing). There are two other registers in the 3331, namely the Control and Status Register (CSR), at base address + C (HEX) and the Interrupt Acknowledge register (IACK) at base address + A (HEX). Looking at the data sheet, we see that the CSR allows us to select an IRQ line to handle VMEbus interrupts on, enable interrupts, generate a 'software interrupt', generate a 'reset', enable auto-address-increment (see section 8.1) and put the interface 'off-line'. All these are self-explanatory except off-line, which is used by Hytec for testing (it stops the 3331 doing a VME cycle when data is written or read at base address). The Interrupt Acknowledge register. When this is read, an IACK cycle is invoked, using the level selected in the CSR. Either 8 or 16 bits of data are requested from the slave, depending on whether the PC did an 8 or 16 bit IO operation. In the case of a Hytec slave module, a 16-bit read would obtain an 8-bit vector on D0-7 and 'reason' bits on D8-15.
7. CATY_VME Software CATY_VME is a form of compiled BASIC with embedded mnemonic commands for manipulating VME from a PC via the VPI 3331. First, start the software by typing CATY_VME <CR>, where <CR> means Carriage Return and <_> means the "underline" character. The compiler will start up and ask you a question about the selected address on the personality card. Hit return for 300 HEX (standard). You should now have the standard CATY_VME prompt <.>. Refer to the CATY_VME manual for a full description of the commands and syntax to use, a summary of commands and statements is included below.
Page 8

Hytec Electronics Ltd 3331/UTM/G/9/6.0
7.1 CATY_VME Command and Statement Summary Compiler Command Summary. (All start with <!>) !AB Abort to DOS !DU filename.ext Dump program to disk !RD filename.ext Read program from disk !PA Page-list program !ST Start program running !NE Clear program area 500!ED Edit line no. 500. Notes: The <ESC> or ESCAPE key stops a program running. To enter a program, simply type a line number and a statement, and auto line numbering is invoked. To exit line entry, simply delete the last line number offered or type !PA. Special CATY_VME statements (in addition to the usual BASIC statements, like FOR-NEXT, PRINT etc.). VR8 c,a,m,d VR16 8, 16 or 32 bit read of crate "c", VR32 at address "a", using modifier "m", putting result in variable "d". VW8 c,a,m,d VW16 8, 16 or 32 bit write, as above, using VW32 data from variable d. VRST c,x Read CSR of crate "c" controller into "x" VWST c,x Write CSR of crate "c" contr., data "x" IN8 8 or 16 bit IO read of a PC register. r,v Could be in 3331 or not. Similar to INP in IN16 BASIC. "r" is address of IO register. OUT8 8 or 16 bit IO write of a PC register, r,d could be in 3331 or not. Similar to OUT in OUT16 BASIC. INTR c,i,p,v Introduces Interrupt handling for crate "c" or c,i,* on IRQ level "i", expecting a returned or c,i,p vector pattern "p", with the full 16-bit or c,i,*,v IACK Status ID word passed in variable "v". Notes: "v" may be omitted "p" may be replaced by "*" for any pattern only one IRQ line may be used in a program. NOTE: ALWAYS REMEMBER - IF YOU GET STUCK OR DON'T UNDERSTAND SOMETHING, JUST RING AND WE WILL HELP!
8. Special Operational Features
Page 9

Hytec Electronics Ltd 3331/UTM/G/10/6.0
8.1 Address Auto-increment This is a hardware feature incorporated in the 3331 to allow a block of VME memory to be read out or written to without having to reload a new address for each cycle. It is invoked by setting the Auto-Increment bit to '1' in the 3331 CSR (bit 5), then after each VME cycle the counter which forms the bottom 8 bits of the address register will be incremented by either 1,2 or 4 depending on whether an 8,16 or 32-bit data cycle was performed. Every time a 256-byte boundary is crossed, a full new address will need to be reloaded. The intended use of this feature is for reading out a block of VME memory which does not have 'Block Mode' access, i.e. it does not have its own auto-incrementing pointer.
9. Circuit Description This circuit description should be read in conjunction with the following Circuit Diagrams: CCT/5331/A/1/2.0 5331 Personality Card Circuit Diagram Sheet 1 CCT/5331/A/2/2.0 5331 Personality Card Circuit Diagram Sheet 2 HL 1060 3331 Circuit Diagram - sheet 1 HL 1061 3331 Circuit Diagram - sheet 2
9.1 Personality Card Note: The 3331 Personality card is the same as that used for the HYTEC 1331 CAMAC controller - hence references to '1331' on circuit diagram and parts list. On the left of the diagram CCT/5331/A/1/2.0 we see the System Board PCI edge connectors. The card is powered from the System Board +5V (VCC) and GND (ground) power rails. It consumes about 200 mA. On the right of this sheet we see the PCI9052 PCI-Local Bus bridge chip which converts the PCI bus to our local bus for talking to the 3331. The left-hand side of the chip shows mainly the PCIbus connections, while the right-hand side shows the local bus signals. The local bus signals are: PD0-15 16-bit local data bus IA2-5 Local address bus for register and crate selection BE0-3 Byte enable signals (only 0 and 1 are used) /RD, /WR, /LW_R Local bus read/write control /LRDY Ready signal from local bus logic ALE, /AS Connected but not used. Notice also the SPROM, IC8, which loads up the 9052 registers at power-up so that is requests the correct resources and locates the local registers correctly. On sheet 2, we see IC3, the MACH local bus logic chip, which converts the 9052 local bus signals into the format required by the 3331 (and also the 1331 and 1330). Also there are drivers for the signal cable bus signals and connector positions for the 50-way CO1 for 1331/3331 and 34-way J1 for the 1330.
Page 10

Hytec Electronics Ltd 3331/UTM/G/11/6.0
9.2 3331 VME Module Starting with sheet HL 1060, bottom left we see the 50-way IO cable connector, bringing the data bus to its terminators and buffers, then to the ITB (Internal Transfer Bus) which is 16 bits wide. Above this, we see more terminators and buffers receiving the Crate Select lines (CS0-CS2) which are compared with the rotary switch setting to generate DS (Device Select); Register select lines RS0-RS2; /RD indicating a Read command; /WR – Write command; /RESET - reset from the PC; /CS16 - denoting a 16-bit operation and IMODE which comes from the personality card CSR and controls the Hold/release function of the BUSCON chip (IC 41). Two open-collector output drivers here send two signals to the PC - /BUSY - insert wait states in the PC IO cycle, and /INTR - Interrupt the processor. The Register Select signals (IRS0 - IRS2), together with Device Select (DS), and the read/write command lines /RD, /WR go to all three decoding PALs ICs 26, 27 and 28. These produce signals which either clock data into or enable outputs from various registers inside the 3331, as well as the following "special" signals: /ENXO - Enable crossover buffer, usually for an 8-bit read/write of the top half of a register. /VMECYC - Invoke the VME cycle sequencer /CLRBFLG - Clear the internal byte flag /RDINTR - Read Interrupt Acknowledge register, do IACK cycle /CKBFLAG - Toggle the byte flag for next 8-bit operation The names of the other signals are fairly self-explanatory, e.g. /RBA8-15 - read back address bits 8-15 /RA24-31 - read address bits 24-31 /CKABD16 - clock A to B register for data 16-23 /CKA8-15 - load address register for address 8-15 Just to the left of IC28, we see a monostable which produces a 200 nSec pulse at the beginning of all PC IO cycles. When the VME cycle generator is invoked, this signal is used to "hold up" the PC until the sequencer puts up its own BUSY signal. Top centre is the VME cycle sequencer itself, IC 44 a PLS105 logic sequencer. This responds to either /VMECYC or /RDINTR and invokes the BUSCON chip, IC 41, causing it to do a VME cycle. The sequencer's outputs are: /DSI - Internal Data Strobe /MAS - Master Address Strobe /IBUSY - Sequencer busy - hold PC cycle /VME - start VME cycle COUNT - enable auto-increment counter R/W - Read/Write select
Page 11

Hytec Electronics Ltd 3331/UTM/G/12/6.0
When it sees /VME and /MAS, the BUSCON chip arbitrates for the VME bus on level 3 and then cycles VMEEN (address and modifier driver enable), DEN (Data driver enable) and DSEN (data strobe enable). It expects to receive either /DTACK (data transfer acknowledge) or /BERR (bus error), which it sends back to the sequencer as LDTK and LBERR. Bottom right we see the clock oscillator, IC32, the CSR store and readback buffer (ICs 8 and 7) and latches for the byte flag and the 8/16-bit mode flag. On sheet 2 of the circuit diagram, HL 1061, starting on the right we see the VME bus connectors, then the bus drivers/receivers for all the address/data and modifier lines together with their stores/readback latches. Notice the 8-bit counter, an LS593, used for the bottom address lines A00-A07. Downwards from top left, we see the Bus Error Flag latch, set if /LBE (local bus error) ever becomes true while we are in charge of the bus (/MAS true). BERR FLAG is visible through the CSR and is also (if jumpered) a source of Interrupt. IC6 is a data selector, which chooses one of the VME IRQ lines, based on the state of CSR lines IPL0-2 (Interrupt Priority Level). Below this we can see Bus Error Timeout Counter together with bus drivers for SYSCLK, BG3IN, SYSRESET and BERR, all enabled if Slot 1 is enabled, and also for BIK, buffered IACK, used in our Slot 1 IACK daisy-chain driver, the remainder of which is just to the left. Further down we see IC38, the Data Strobe Decoding PAL which produces DS0, DS1 and LWORD depending on whether this is an 8 bit (Upper or Lower) 16 or 32 data bit cycle, and also enables upper or lower data bus drivers (DENLO, DENHI). Just below this is our IACK driver, and a buffer to put out our Interrupt Acknowledge code (IPL0-2) onto address lines A01-A03 during the cycle. Still further down we see some LED drivers and monostables for front panel displays and also the crossover buffer (top half to bottom half of Internal Transfer Bus) used during 8 bit cycles.
Page 12

Hytec Electronics Ltd 3331/UTM/G/13/6.0
10. ON BOARD FEATURES The configuration and control of the 3331 module is via registers: Base Offset Register Description
Base + 0 Data Low Register Lower 16 Bits of Data Register (Read / Write) Base + 2 Data High Register Upper 16 Bits of Data Register (Read / Write) Base + 4 Address Low Register Lower 16 Bits of Address Register (Read / Write) Base + 6 Address High Register Upper 16 Bits of Address Register (Read / Write) Base + 8 Address Modifier Address Register (Read / Write) Base + A Interrupt Acknowledgement Interrupt Vector Captured from Interrupting Device (Read) Base + C Control & Status Register Set up and Status Monitoring Register (Read / Write)
3331 On-Board Registers
10.1 Data Low Register (Read/Write) Address: Read = Base + 00, Write = Base + 00
D15 D14 D13 D12 D11 D10 D09 D08 D07 D06 D05 D04 D03 D02 D01 D00
Note: reading or writing data low causes a VME cycle to take place.
10.2 Data High Register (Read/Write) Address: Read = Base + 02, Write = Base + 02 D31 D30 D29 D28 D27 D26 D25 D24 D23 D22 D21 D20 D19 D18 D17 D16
X= don’t care
10.3 Address Low Register (Read/Write) Address: Read = Base + 04 Write = Base + 04
D15 D14 D13 D12 D11 D10 D09 D08 D07 D06 D05 D04 D03 D02 D01 D00
10.4 Address High Register (Read/Write) Address: Read = Base + 06 Write = Base + 06 D31 D30 D29 D28 D27 D26 D25 D24 D23 D22 D21 D20 D19 D18 D17 D16
X= don’t care
Page 13
Hytec Electronics Ltd 3331/UTM/G/14/6.0
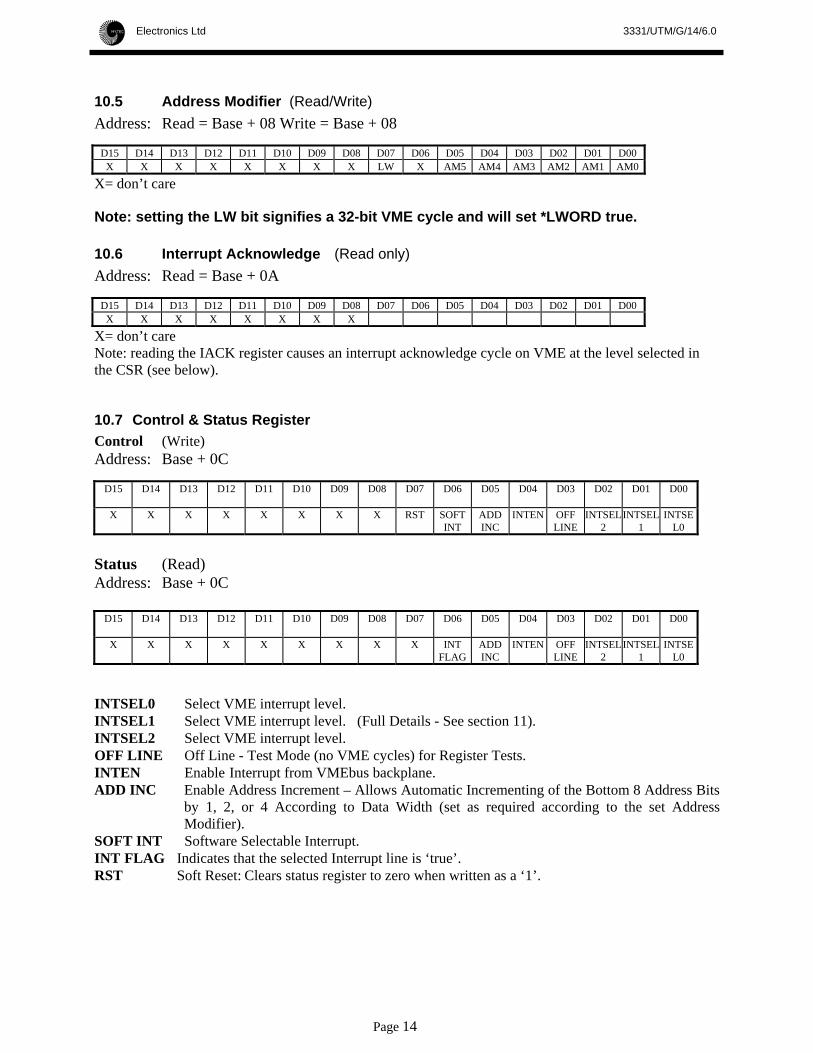
10.5 Address Modifier (Read/Write) Address: Read = Base + 08 Write = Base + 08
D15 D14 D13 D12 D11 D10 D09 D08 D07 D06 D05 D04 D03 D02 D01 D00 X X X X X X X X LW X AM5 AM4 AM3 AM2 AM1 AM0
X= don’t care
Note: setting the LW bit signifies a 32-bit VME cycle and will set *LWORD true.
10.6 Interrupt Acknowledge (Read only) Address: Read = Base + 0A
D15 D14 D13 D12 D11 D10 D09 D08 D07 D06 D05 D04 D03 D02 D01 D00 X X X X X X X X
X= don’t care Note: reading the IACK register causes an interrupt acknowledge cycle on VME at the level selected in the CSR (see below).
10.7 Control & Status Register Control (Write) Address: Base + 0C
D15 D14 D13 D12 D11 D10 D09 D08 D07 D06 D05 D04 D03 D02 D01 D00
X X X X X X X X RST SOFT INT
ADD INC
INTEN OFF LINE
INTSEL2
INTSEL1
INTSEL0
Status (Read) Address: Base + 0C
D15 D14 D13 D12 D11 D10 D09 D08 D07 D06 D05 D04 D03 D02 D01 D00
X X X X X X X X X INT FLAG
ADD INC
INTEN OFF LINE
INTSEL2
INTSEL1
INTSEL0
INTSEL0 Select VME interrupt level. INTSEL1 Select VME interrupt level. (Full Details - See section 11). INTSEL2 Select VME interrupt level. OFF LINE Off Line - Test Mode (no VME cycles) for Register Tests. INTEN Enable Interrupt from VMEbus backplane. ADD INC Enable Address Increment – Allows Automatic Incrementing of the Bottom 8 Address Bits
by 1, 2, or 4 According to Data Width (set as required according to the set Address Modifier).
SOFT INT Software Selectable Interrupt. INT FLAG Indicates that the selected Interrupt line is ‘true’. RST Soft Reset: Clears status register to zero when written as a ‘1’.
Page 14

Hytec Electronics Ltd 3331/UTM/G/15/6.0
10.8 VME Soft Reset
10.8.1 A reset generated from the CSR bit 7 will clear the following registers: • All writeable CSR bits. • The VME cycle generator • Address bits 0 to 7 • The bus error flag. • Generates SYSRESET on VME.
11. INTERRUPT SETTINGS The interrupt level monitored by the 3331 is set using the CSR register bits INTSEL0 (bit 0), INTSEL1 (bit 1) INTSEL2 (bit 2). These select the VME IRQ line as follows:
Interrupt Level INTSEL 2 INTSEL 1 INTSEL 0 None 0 0 0 IRQ 1 0 0 1 IRQ 2 0 1 0 IRQ 3 0 1 1 IRQ 4 1 0 0 IRQ 5 1 0 1 IRQ 6 1 1 0 IRQ 7 1 1 1
Interrupt Level Select Note that this selection allows only one VME interrupt line to be monitored at a time. The user must ensure that all slave modules generating interrupts use this line. This register also selects the level at which VME interrupt acknowledge cycles are performed when reading the IACK register at offset 0x0A. .
APPENDIX A PCB JUMPERS Hytec 3331 Board See section 2.
Page 15

Hytec Electronics Ltd 3331/UTM/G/16/6.0
APPENDIX B Parts List and Assembly Details VPI 3331 VME Module Integrated Circuits Type Qty Component Reference 74LS00 1 IC50 74LS04 1 IC25 74LS08 1 IC22 74LS14 2 IC43, IC45 74LS32 1 IC9 74F38 1 IC24 74LS74 3 IC34, IC36, IC42 74LS85 1 IC37 74LS123 1 IC40 74S132 1 IC32 74LS151 1 IC6 74LS174 1 IC35 74F244 1 IC39 74LS244 3 IC7, IC48, IC49 74LS245 4 IC20, IC29, IC46, IC47 74LS273 1 IC8 74LS373 2 IC16, IC17 74LS393 1 IC33 74LS593 1 IC21 74ALS645A-1 9 IC1, IC2, IC3, IC4, IC5, IC10, IC11, IC12, IC30 74LS652 6 IC13, IC14, IC15, IC18, IC19, IC31 SCB68172 1 IC41 (on socket) SN75452 1 IC23 PAL22V10 3 IC26 "3331 P26" (on socket) IC27 "3331 P27" (on socket) IC28 "3331 P28" (on socket) PAL18P8 1 IC38 "3331 P38" (on socket) PLS105 1 IC44 "3331 V5" (on socket) Discrete Semiconductors 1N4148 1 D1 BAT85 1 D2 Passive Components 470R x 8 Res.Pk 5 RN1,RN2,RN5,RN6 (on sockets), RN10 560R x 8 Res.Pk 4 RN3,RN4,RN7,RN8 (on sockets) 10K x 8 Res. Pk 1 RN9 470R 1 R8 560R 2 R11, R12 1K0 2 R5, R6 2K2 2 R2, R3 4K7 1 R1 10K 2 R7, R13 47K 1 R9 100K 2 R4, R10
Page 16

Hytec Electronics Ltd 3331/UTM/G/17/6.0
10pF cer. 1 C3 47pF cer. 1 C4 100pF cer. 2 C1, C5 100nF cer. 30 "C"- all decouplers 1uF 35V tant. 2 C6, C7 10uF 25V tant. 1 C2 100uF 20V tant. 1 C8 Miscellaneous Complementary BCD rotary switch "Crate Select" 1 50-way IDC header front panel connector 1 5331 Personality Card Integrated Circuits Type Qty Component Reference PCI9052 1 IC1 74LS14 1 IC2 M4-128N64 1 IC3 ‘5331V15’ 74LS245 4 IC4, IC5, IC6, IC7 NM93C46AN 1 IC8 ‘5331’ Discrete Semiconductors 1N4148 1 D1 Passive Components 470R x 8 SIL 3 RN1, RN2, RN3 680R x 8 SIL 3 RN4, RN5, RN6 47R 0.25W 1 R3. 470R 2 R8, R9. 680R 2 R10, R11. 1K0 3 R4, R6, R7 10K 7 R1, R5, R12, R13, R14, R15, R16. 33K 1 R2. 100nF cer. 16 C3, C4, C5, C6, C7, C8, C9, C10, C11, C12, C13, C14, C15, C16, C17, C18. 47uF 16V tant. 2 C1, C2.
PRODUCT SPECIFICATIONS Power Requirements +5V @ 1500mA typical Operating Temperature Range 0 to +45 deg Celsius ambient. Mechanical 6U single width VME module with access to 3-row P1 and P2 connectors.
Page 17
Hytec Electronics Ltd 3331/UTM/G/18/6.0
VME PIN ASSIGNMENTS
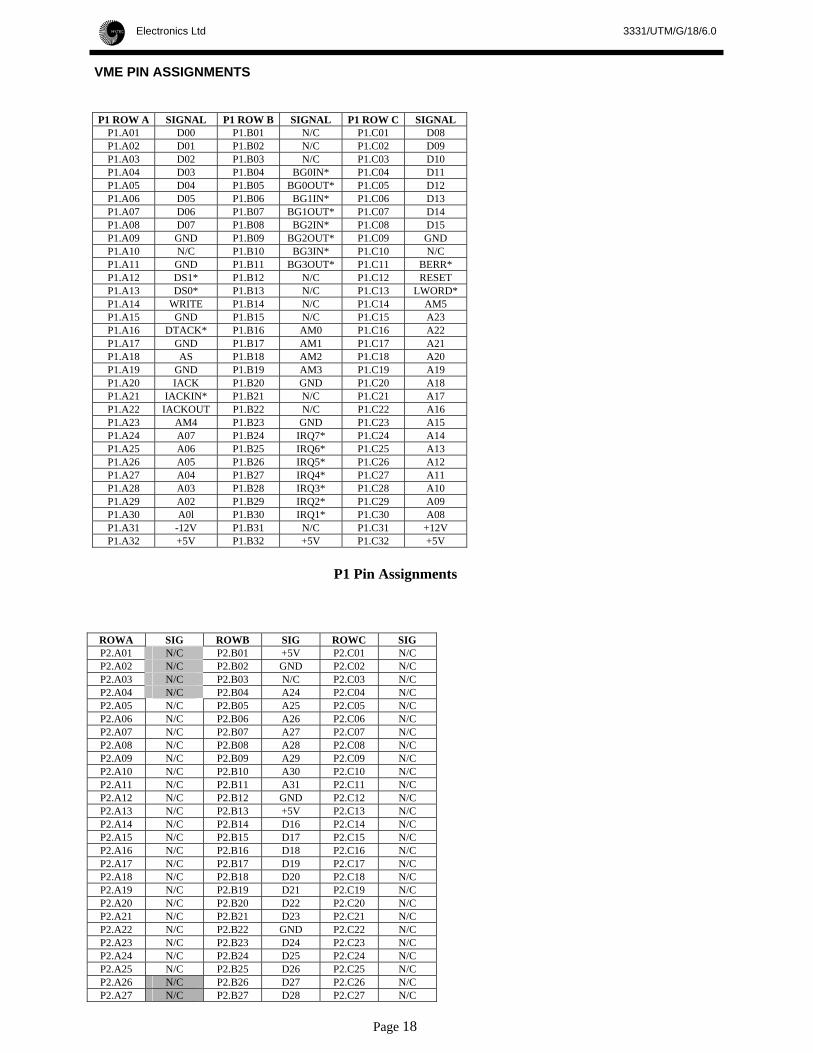
P1 ROW A SIGNAL P1 ROW B SIGNAL P1 ROW C SIGNAL
P1.A01 D00 P1.B01 N/C P1.C01 D08 P1.A02 D01 P1.B02 N/C P1.C02 D09 P1.A03 D02 P1.B03 N/C P1.C03 D10 P1.A04 D03 P1.B04 BG0IN* P1.C04 D11 P1.A05 D04 P1.B05 BG0OUT* P1.C05 D12 P1.A06 D05 P1.B06 BG1IN* P1.C06 D13 P1.A07 D06 P1.B07 BG1OUT* P1.C07 D14 P1.A08 D07 P1.B08 BG2IN* P1.C08 D15 P1.A09 GND P1.B09 BG2OUT* P1.C09 GND P1.A10 N/C P1.B10 BG3IN* P1.C10 N/C P1.A11 GND P1.B11 BG3OUT* P1.C11 BERR* P1.A12 DS1* P1.B12 N/C P1.C12 RESET P1.A13 DS0* P1.B13 N/C P1.C13 LWORD* P1.A14 WRITE P1.B14 N/C P1.C14 AM5 P1.A15 GND P1.B15 N/C P1.C15 A23 P1.A16 DTACK* P1.B16 AM0 P1.C16 A22 P1.A17 GND P1.B17 AM1 P1.C17 A21 P1.A18 AS P1.B18 AM2 P1.C18 A20 P1.A19 GND P1.B19 AM3 P1.C19 A19 P1.A20 IACK P1.B20 GND P1.C20 A18 P1.A21 IACKIN* P1.B21 N/C P1.C21 A17 P1.A22 IACKOUT P1.B22 N/C P1.C22 A16 P1.A23 AM4 P1.B23 GND P1.C23 A15 P1.A24 A07 P1.B24 IRQ7* P1.C24 A14 P1.A25 A06 P1.B25 IRQ6* P1.C25 A13 P1.A26 A05 P1.B26 IRQ5* P1.C26 A12 P1.A27 A04 P1.B27 IRQ4* P1.C27 A11 P1.A28 A03 P1.B28 IRQ3* P1.C28 A10 P1.A29 A02 P1.B29 IRQ2* P1.C29 A09 P1.A30 A0l P1.B30 IRQ1* P1.C30 A08 P1.A31 -12V P1.B31 N/C P1.C31 +12V P1.A32 +5V P1.B32 +5V P1.C32 +5V
P1 Pin Assignments
ROWA SIG ROWB SIG ROWC SIG P2.A01 N/C P2.B01 +5V P2.C01 N/C P2.A02 N/C P2.B02 GND P2.C02 N/C P2.A03 N/C P2.B03 N/C P2.C03 N/C P2.A04 N/C P2.B04 A24 P2.C04 N/C P2.A05 N/C P2.B05 A25 P2.C05 N/C P2.A06 N/C P2.B06 A26 P2.C06 N/C P2.A07 N/C P2.B07 A27 P2.C07 N/C P2.A08 N/C P2.B08 A28 P2.C08 N/C P2.A09 N/C P2.B09 A29 P2.C09 N/C P2.A10 N/C P2.B10 A30 P2.C10 N/C P2.A11 N/C P2.B11 A31 P2.C11 N/C P2.A12 N/C P2.B12 GND P2.C12 N/C P2.A13 N/C P2.B13 +5V P2.C13 N/C P2.A14 N/C P2.B14 D16 P2.C14 N/C P2.A15 N/C P2.B15 D17 P2.C15 N/C P2.A16 N/C P2.B16 D18 P2.C16 N/C P2.A17 N/C P2.B17 D19 P2.C17 N/C P2.A18 N/C P2.B18 D20 P2.C18 N/C P2.A19 N/C P2.B19 D21 P2.C19 N/C P2.A20 N/C P2.B20 D22 P2.C20 N/C P2.A21 N/C P2.B21 D23 P2.C21 N/C P2.A22 N/C P2.B22 GND P2.C22 N/C P2.A23 N/C P2.B23 D24 P2.C23 N/C P2.A24 N/C P2.B24 D25 P2.C24 N/C P2.A25 N/C P2.B25 D26 P2.C25 N/C P2.A26 N/C P2.B26 D27 P2.C26 N/C P2.A27 N/C P2.B27 D28 P2.C27 N/C
Page 18

Hytec Electronics Ltd 3331/UTM/G/19/6.0
P2.A28 N/C P2.B28 D29 P2.C28 N/C P2.A29 N/C P2.B29 D30 P2.C29 N/C P2.A30 N/C P2.B30 D31 P2.C30 N/C P2.A31 N/C P2.B31 GND P2.C31 N/C P2.A32 N/C P2.B32 Out+5V P2.C32 N/C
P2 pin assignments
Page 19