vpn configuration guide - welcome to equinux prerequisites your sonicwall sonicwall simple client...
TRANSCRIPT
SonicOS Standard
VPN Configuration GuideSonicWALL with SonicWALL Simple Client Provisioning
equinux AG and equinux USA, Inc.
© 2008 equinux USA, Inc. All rights reserved.
Under the copyright laws, this manual may not be copied, in whole or in part, without the written consent of equinux AG or equinux USA, Inc. Your rights to the software are governed by the accompanying software license agreement.
The equinux logo is a trademark of equinux AG and equinux USA, Inc., registered in the U.S. and other countries.
Every effort has been made to ensure that the information in this manual is accurate. equinux is not responsible for printing or clerical errors.
www.equinux.com
Apple, the Apple logo, iBook, Mac, Mac OS, MacBook, PowerBook are trademarks of Apple Computer, Inc., registered in the U.S. and other countries.
SonicWALL is a registered trademark of SonicWALL, Inc.
equinux shall have absolutely no liability for any direct or indirect, special or other consequential damages in connection with the use of the quick setup guide or any change to the router generally, including without limitation, any lost profits, business, or data, even if equinux has been advised of the possibility of such damages.
2
.....................................................................Introduction 5.....................................................................................Important Prerequisites 6
...................................................................................................................Scenario 8...........................................................................................................Terminology 9
.........................Task 1 – Configure your SonicWALL 10...............................................Step 1 – Enable VPN on your SonicWALL 10
....................................Step 2 – Check your GroupVPN Policy Settings 11...........................................................Step 3 – Configure DHCP over VPN 14
............................................Step 4 – Check your DHCP Server Settings 15................................................................................Step 5 – Add a VPN User 16
.................................Task 2 – Configure VPN Tracker 17............................................................Step 1 - Create a New Connection 17
.................................................Step 2 – Configure the VPN Connection 18
Task 3 – ............................Test the VPN Connection 19.............................................................................................It‘s time to go out! 19
.....................................................................................Start your connection 19
............................................................Troubleshooting 22..............................................................VPN Connection Fails to Establish 22
............................Cannot Access Resources on the Remote Network 23...........................................................................................Further Questions? 24
............................................Configuring Remote DNS 25.............................Distributing Remote DNS Settings through DHCP 25
...............................Setting up Remote DNS Manually in VPN Tracker 27
3

4
IntroductionThis document describes how VPN Tracker can be used to establish a connection between a Mac running Mac OS X and a SonicWALL VPN gateway.
SonicWALL ConfigurationThe first part of this document will show you how to configure a VPN tunnel on a SonicWALL that has not yet been configured for VPN. The configuration described is just one example for such a setup. It is not the only known working configuration, and also may not be suitable for all situations. However, it is a configuration which quickly provides you with a ready-to-use VPN tunnel, and it is still flexible enough to be easily extended if your VPN requirements grow in the future.
VPN Tracker ConfigurationIn the second part, this document will show you how to configure VPN Tracker to easily connect to your newly created VPN tunnel.
Note This documentation is only a supplement to, not a replacement for, the instructions that have been included with your SonicWALL device. Please be sure to read those instructions and understand them before starting.
Advanced Users While the instructions in this document describe how to set up VPN on your SonicWALL from scratch, they also apply if you are configuring VPN Tracker for your existing SonicWALL VPN setup. In this case, we recommend you follow the instructions to understand how the SonicWALL settings relate to the VPN Tracker settings, adapting the settings in VPN Tracker to your setup, if necessary.
5
Important Prerequisites
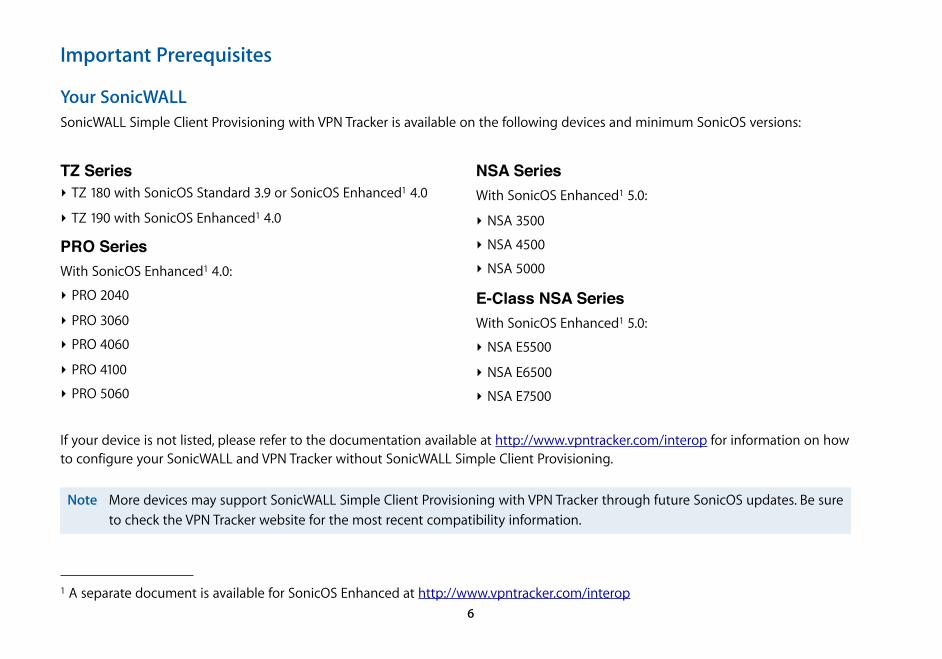
Your SonicWALLSonicWALL Simple Client Provisioning with VPN Tracker is available on the following devices and minimum SonicOS versions:
TZ Series‣ TZ 180 with SonicOS Standard 3.9 or SonicOS Enhanced1 4.0
‣ TZ 190 with SonicOS Enhanced1 4.0
PRO SeriesWith SonicOS Enhanced1 4.0:
‣ PRO 2040
‣ PRO 3060
‣ PRO 4060
‣ PRO 4100
‣ PRO 5060
NSA SeriesWith SonicOS Enhanced1 5.0:
‣ NSA 3500
‣ NSA 4500
‣ NSA 5000
E-Class NSA SeriesWith SonicOS Enhanced1 5.0:
‣ NSA E5500
‣ NSA E6500
‣ NSA E7500
If your device is not listed, please refer to the documentation available at http://www.vpntracker.com/interop for information on how to configure your SonicWALL and VPN Tracker without SonicWALL Simple Client Provisioning.
Note More devices may support SonicWALL Simple Client Provisioning with VPN Tracker through future SonicOS updates. Be sure to check the VPN Tracker website for the most recent compatibility information.
6
1 A separate document is available for SonicOS Enhanced at http://www.vpntracker.com/interop
Your Mac‣ VPN Tracker runs on Mac OS X 10.4 or 10.5
‣ The configuration described in this guide requires VPN Tracker 5.2 or higher. Make sure to use a recent VPN Tracker version, if possible. The latest VPN Tracker release can always be obtained from http://www.vpntracker.com
‣ To use SonicWALL Simple Client Provisioning, you will need a Professional Edition license for VPN Tracker. If you have a Personal Edition license, please refer to the documentation available at http://www.vpntracker.com/interop for information on how to configure your SonicWALL and VPN Tracker without SonicWALL Simple Client Provisioning.
Tip To easily upgrade your existing VPN Tracker Personal Edition licenses to VPN Tracker Professional Edition, use the equinux License Manager at http://my.equinux.com.
7
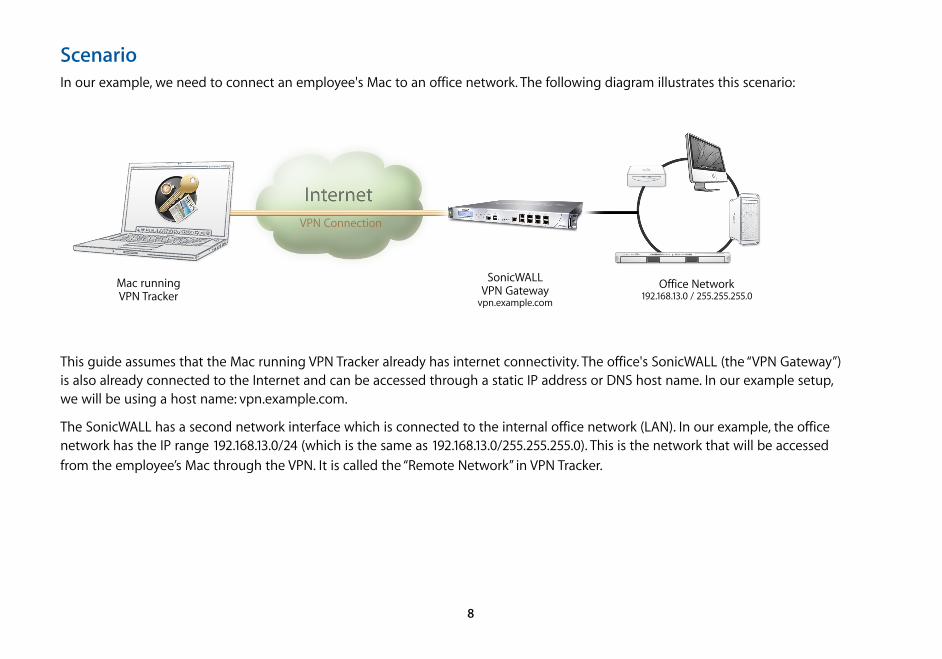
ScenarioIn our example, we need to connect an employee's Mac to an office network. The following diagram illustrates this scenario:
This guide assumes that the Mac running VPN Tracker already has internet connectivity. The office's SonicWALL (the “VPN Gateway”) is also already connected to the Internet and can be accessed through a static IP address or DNS host name. In our example setup, we will be using a host name: vpn.example.com.
The SonicWALL has a second network interface which is connected to the internal office network (LAN). In our example, the office network has the IP range 192.168.13.0/24 (which is the same as 192.168.13.0/255.255.255.0). This is the network that will be accessed from the employee’s Mac through the VPN. It is called the “Remote Network” in VPN Tracker.
VPN Connection
Mac running VPN Tracker
SonicWALL VPN Gateway
vpn.example.com
Office Network192.168.13.0 / 255.255.255.0
8
TerminologyA VPN connection is often called a “tunnel” (or “VPN tunnel”). Every VPN tunnel is established between two “endpoints”. In our example one endpoint is VPN Tracker and the other endpoint is the VPN gateway.
Please note that for each endpoint, the settings on the other endpoint are considered to be “remote”, while its own settings are considered to be “local”. That means a “local” setting from VPN Tracker’s perspective, is a “remote” setting from the VPN gateway’s perspective, and vice versa.
The sample configuration described in this guide is called a “Host to Network” configuration: A single computer, called a “Host” establishes a VPN tunnel to an entire “Network” behind the VPN gateway.
9
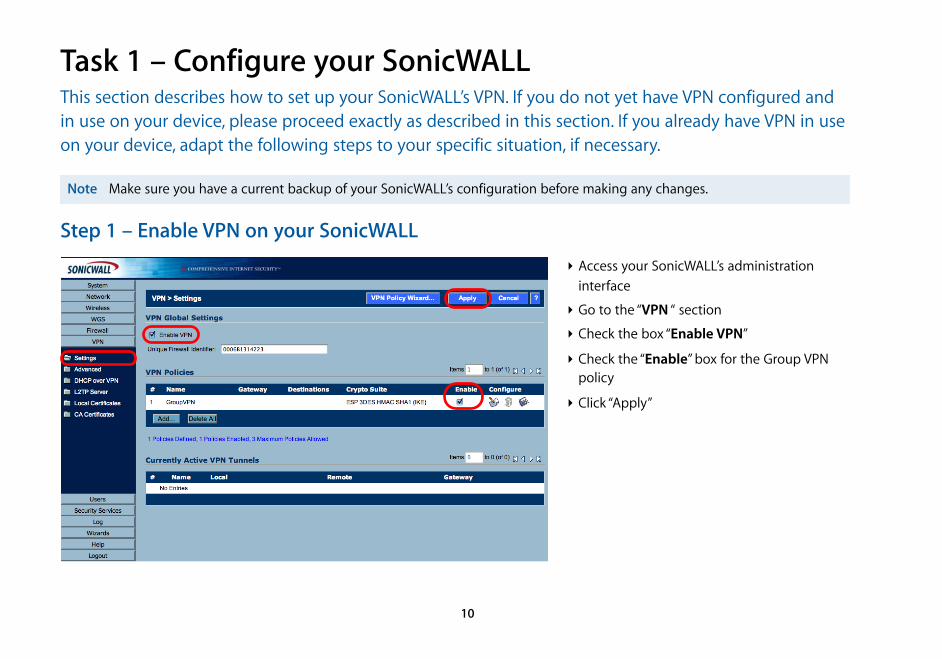
Task 1 – Configure your SonicWALLThis section describes how to set up your SonicWALL’s VPN. If you do not yet have VPN configured and in use on your device, please proceed exactly as described in this section. If you already have VPN in use on your device, adapt the following steps to your specific situation, if necessary.
Step 1 – Enable VPN on your SonicWALL
Note Make sure you have a current backup of your SonicWALL’s configuration before making any changes.
‣ Access your SonicWALL’s administration interface
‣ Go to the “VPN “ section
‣ Check the box “Enable VPN”
‣ Check the “Enable” box for the Group VPN policy
‣ Click “Apply”
10
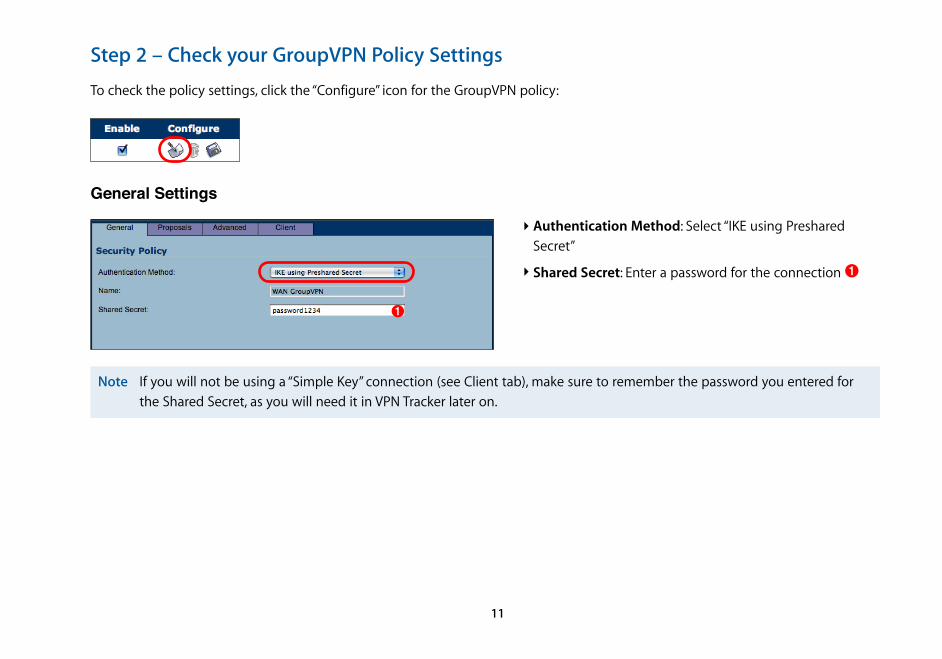
Step 2 – Check your GroupVPN Policy Settings
General Settings
To check the policy settings, click the “Configure” icon for the GroupVPN policy:
➊
‣ Authentication Method: Select “IKE using Preshared Secret”
‣ Shared Secret: Enter a password for the connection ➊
Note If you will not be using a “Simple Key” connection (see Client tab), make sure to remember the password you entered for the Shared Secret, as you will need it in VPN Tracker later on.
11
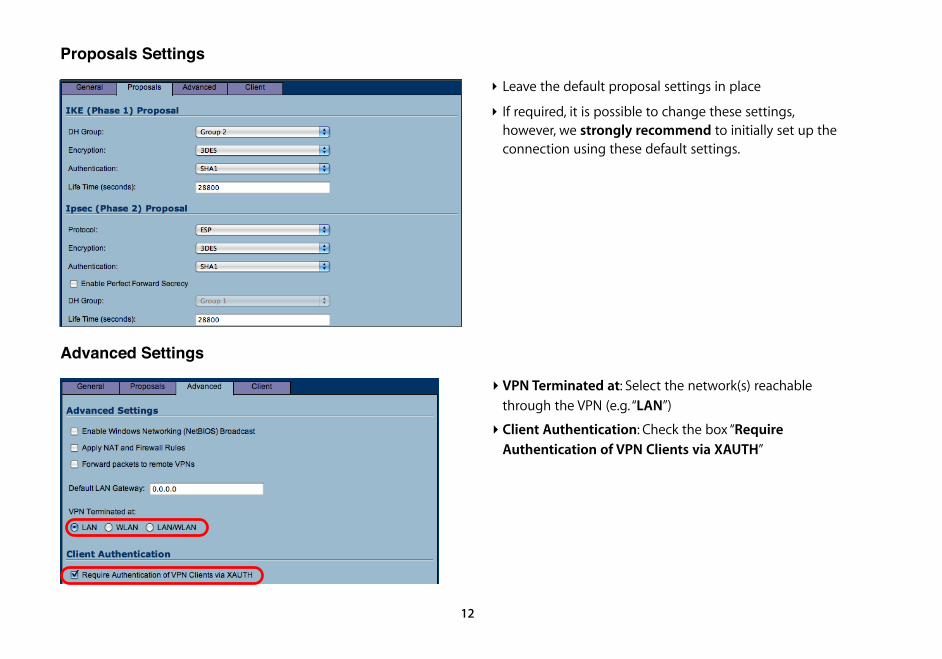
Proposals Settings
Advanced Settings
‣ Leave the default proposal settings in place
‣ If required, it is possible to change these settings, however, we strongly recommend to initially set up the connection using these default settings.
‣ VPN Terminated at: Select the network(s) reachable through the VPN (e.g. “LAN”)
‣ Client Authentication: Check the box “Require Authentication of VPN Clients via XAUTH”
12
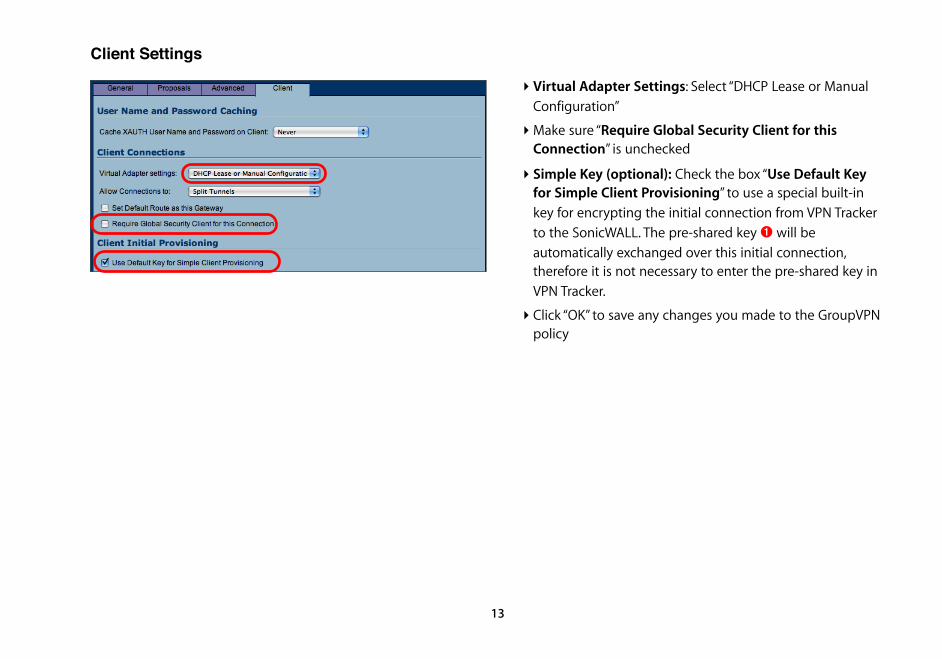
Client Settings
‣ Virtual Adapter Settings: Select “DHCP Lease or Manual Configuration”
‣ Make sure “Require Global Security Client for this Connection” is unchecked
‣ Simple Key (optional): Check the box “Use Default Key for Simple Client Provisioning” to use a special built-in key for encrypting the initial connection from VPN Tracker to the SonicWALL. The pre-shared key ➊ will be automatically exchanged over this initial connection, therefore it is not necessary to enter the pre-shared key in VPN Tracker.
‣ Click “OK” to save any changes you made to the GroupVPN policy
13
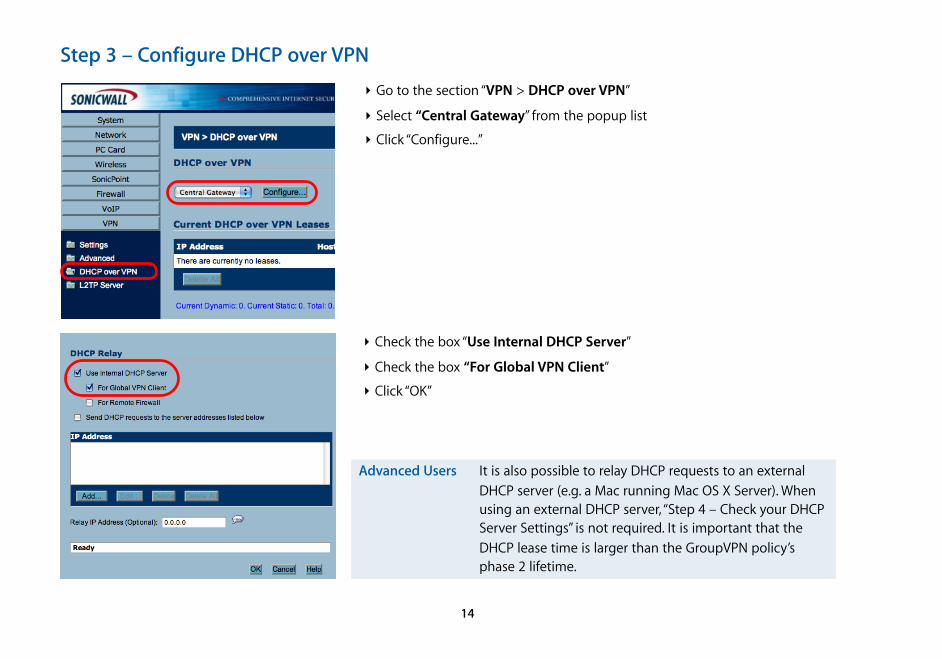
Step 3 – Configure DHCP over VPN
Advanced Users It is also possible to relay DHCP requests to an external DHCP server (e.g. a Mac running Mac OS X Server). When using an external DHCP server, “Step 4 – Check your DHCP Server Settings” is not required. It is important that the DHCP lease time is larger than the GroupVPN policy’s phase 2 lifetime.
‣ Go to the section “VPN > DHCP over VPN”
‣ Select “Central Gateway” from the popup list
‣ Click “Configure...”
‣ Check the box “Use Internal DHCP Server”
‣ Check the box “For Global VPN Client”
‣ Click “OK”
14
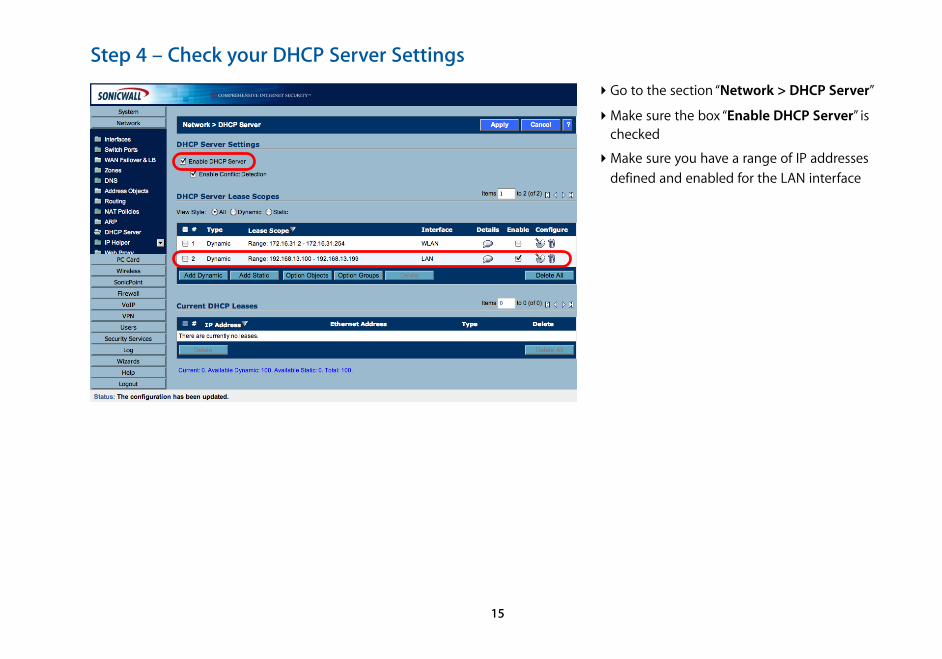
Step 4 – Check your DHCP Server Settings
‣ Go to the section “Network > DHCP Server”
‣ Make sure the box “Enable DHCP Server” is checked
‣ Make sure you have a range of IP addresses defined and enabled for the LAN interface
15
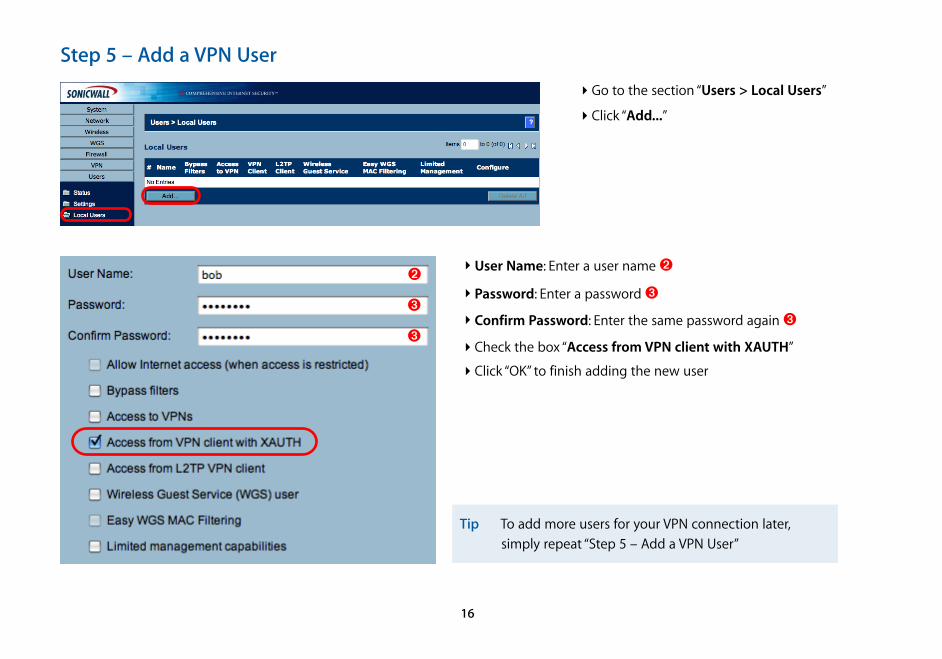
Step 5 – Add a VPN User
Tip To add more users for your VPN connection later, simply repeat “Step 5 – Add a VPN User”
‣ Go to the section “Users > Local Users”
‣ Click “Add...”
➌
➋
➌
‣ User Name: Enter a user name ➋
‣ Password: Enter a password ➌
‣ Confirm Password: Enter the same password again ➌
‣ Check the box “Access from VPN client with XAUTH”
‣ Click “OK” to finish adding the new user
16
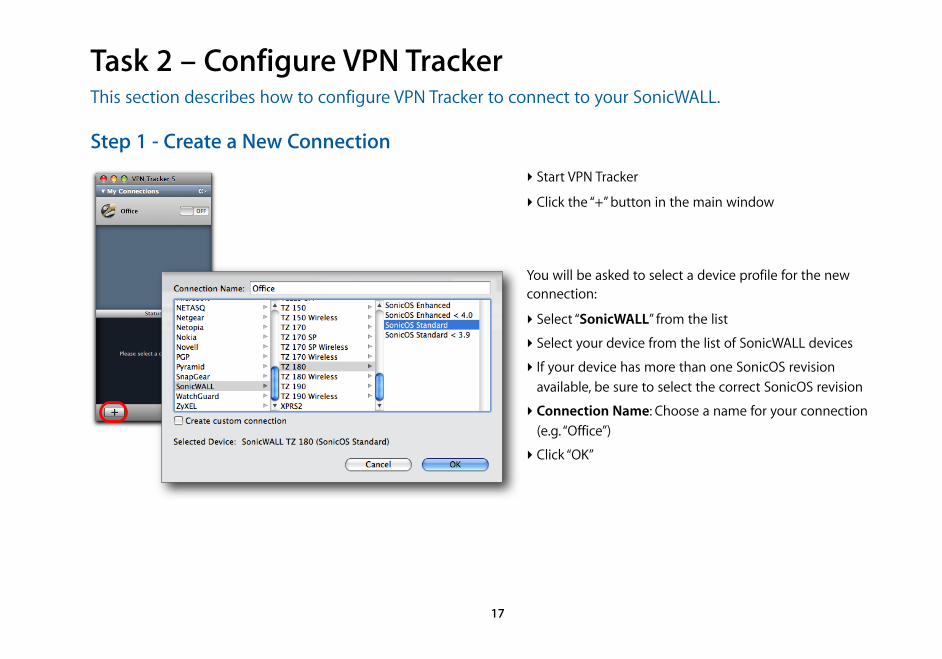
Task 2 – Configure VPN TrackerThis section describes how to configure VPN Tracker to connect to your SonicWALL.
Step 1 - Create a New Connection
‣ Start VPN Tracker
‣ Click the “+” button in the main window
You will be asked to select a device profile for the new connection:
‣ Select “SonicWALL” from the list
‣ Select your device from the list of SonicWALL devices
‣ If your device has more than one SonicOS revision available, be sure to select the correct SonicOS revision
‣ Connection Name: Choose a name for your connection (e.g. “Office”)
‣ Click “OK”
17
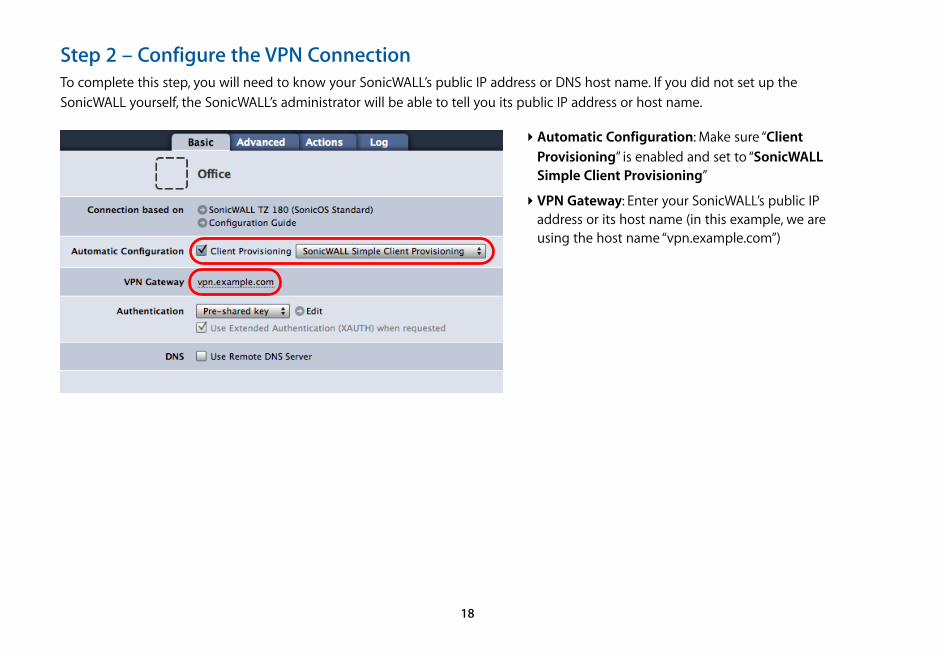
Step 2 – Configure the VPN ConnectionTo complete this step, you will need to know your SonicWALL’s public IP address or DNS host name. If you did not set up the SonicWALL yourself, the SonicWALL’s administrator will be able to tell you its public IP address or host name.
‣ Automatic Configuration: Make sure “Client Provisioning” is enabled and set to “SonicWALL Simple Client Provisioning”
‣ VPN Gateway: Enter your SonicWALL’s public IP address or its host name (in this example, we are using the host name “vpn.example.com”)
18
Task 3 – Test the VPN ConnectionThis section explains how to start and test your VPN connection.
It‘s time to go out!You will not be able to test and use your VPN connection from within the internal network that you want to connect to. In order to test your connection, you will need to connect from a different location. For example, if you are setting up a VPN connection to your office, test it from home. If you are setting up a VPN connection to your home network, test it from an Internet cafe, or go visit a friend.
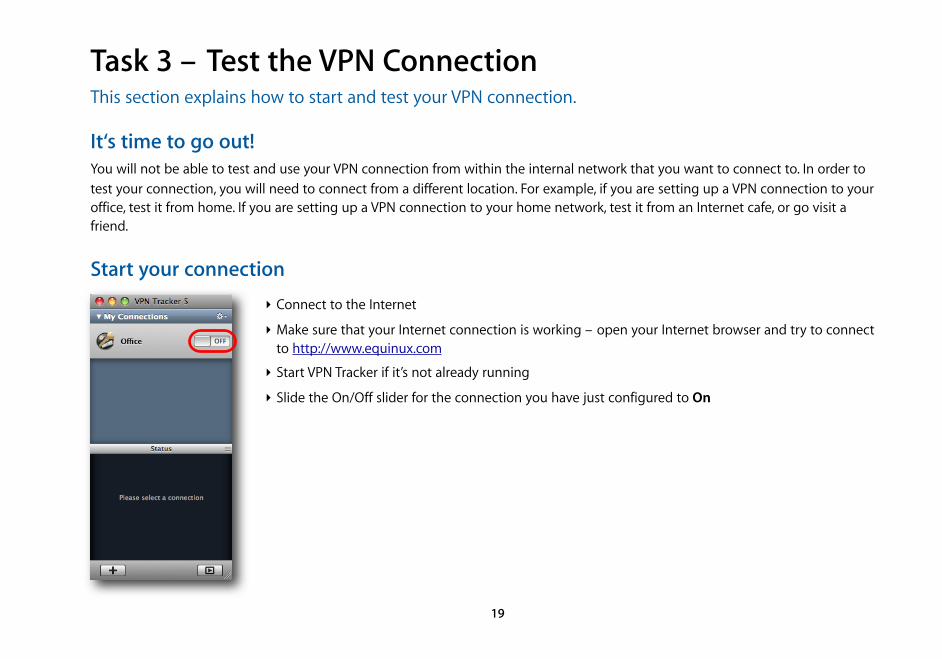
Start your connection
‣ Connect to the Internet
‣ Make sure that your Internet connection is working – open your Internet browser and try to connect to http://www.equinux.com
‣ Start VPN Tracker if it’s not already running
‣ Slide the On/Off slider for the connection you have just configured to On
19
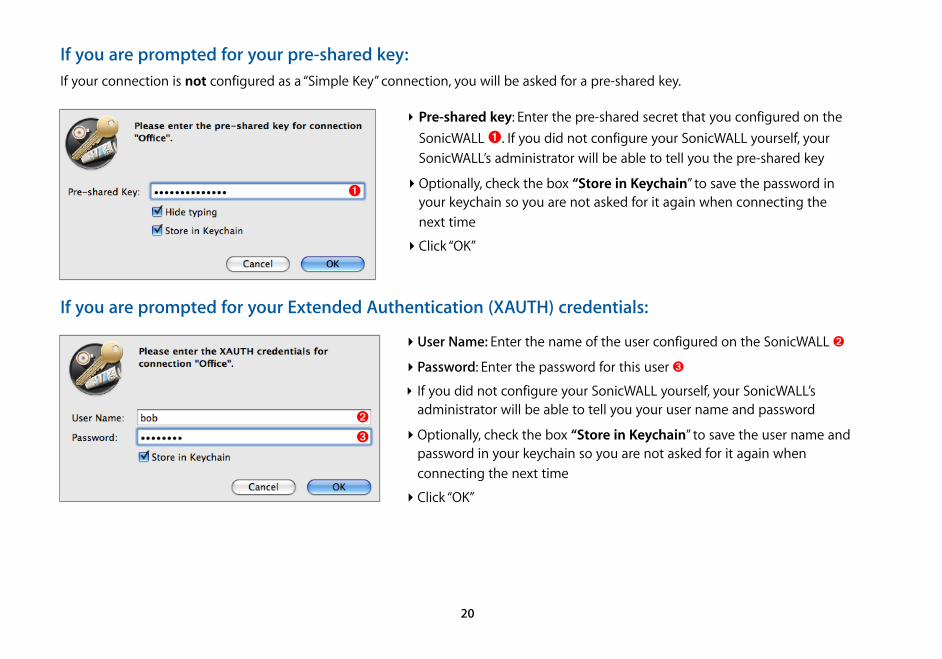
If you are prompted for your pre-shared key:If your connection is not configured as a “Simple Key” connection, you will be asked for a pre-shared key.
If you are prompted for your Extended Authentication (XAUTH) credentials:
➊
‣ Pre-shared key: Enter the pre-shared secret that you configured on the SonicWALL ➊. If you did not configure your SonicWALL yourself, your SonicWALL’s administrator will be able to tell you the pre-shared key
‣ Optionally, check the box “Store in Keychain” to save the password in your keychain so you are not asked for it again when connecting the next time
‣ Click “OK”
‣ User Name: Enter the name of the user configured on the SonicWALL ➋
‣ Password: Enter the password for this user ➌
‣ If you did not configure your SonicWALL yourself, your SonicWALL’s administrator will be able to tell you your user name and password
‣ Optionally, check the box “Store in Keychain” to save the user name and password in your keychain so you are not asked for it again when connecting the next time
‣ Click “OK”
➋
➌
20
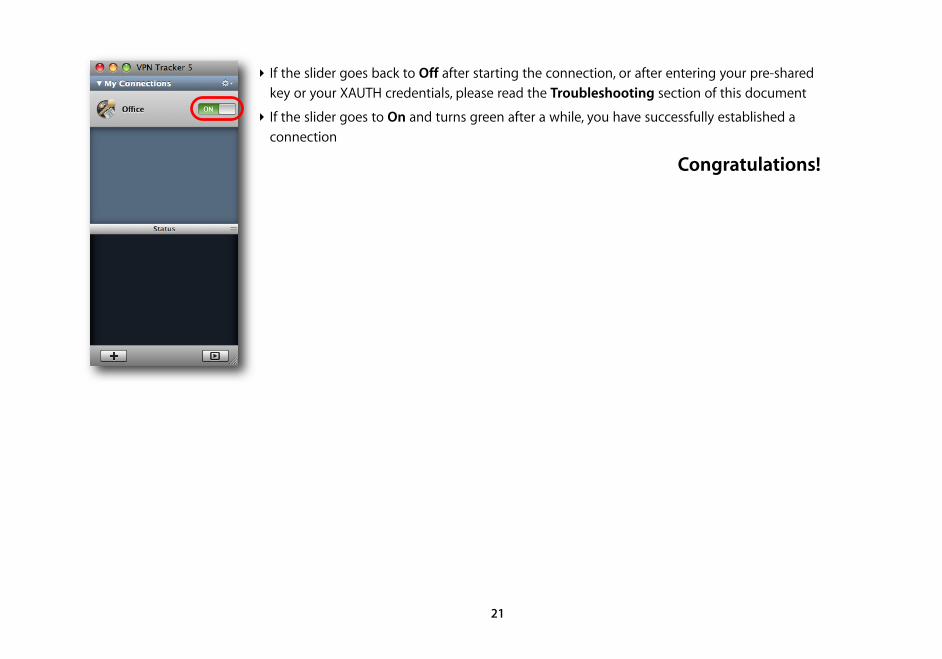
‣ If the slider goes back to Off after starting the connection, or after entering your pre-shared key or your XAUTH credentials, please read the Troubleshooting section of this document
‣ If the slider goes to On and turns green after a while, you have successfully established a connection
Congratulations!
21
TroubleshootingIn most cases, your connection should work fine if you follow the instructions above. If you cannot connect, please read on.
VPN Connection Fails to Establish
On/Off Slider goes back to “Off” right awayIf the slider goes back to “Off” right away, please make sure you have entered all the required information. VPN Tracker will highlight fields that are missing information.
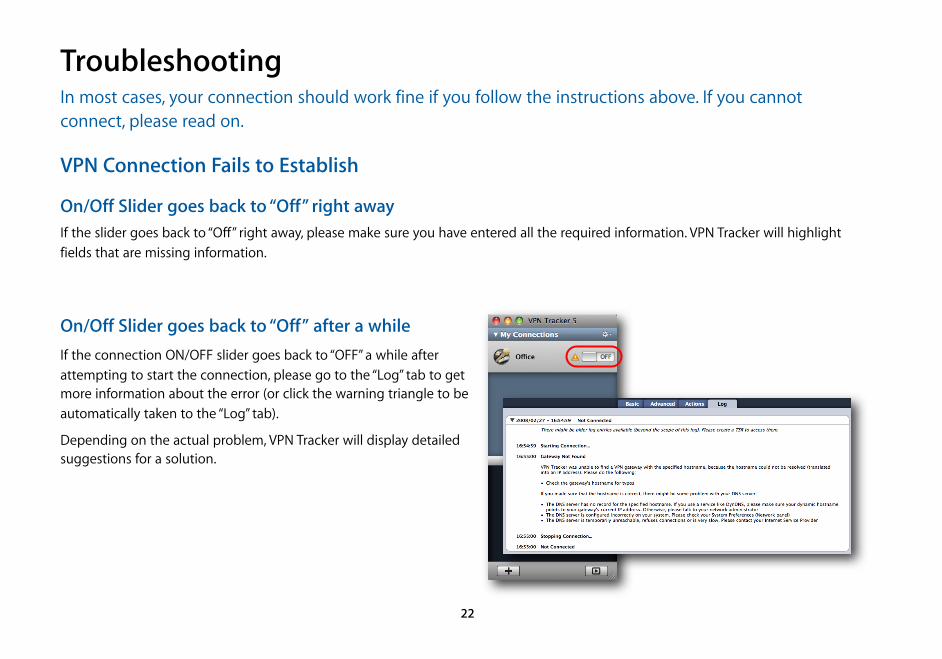
On/Off Slider goes back to “Off” after a whileIf the connection ON/OFF slider goes back to “OFF” a while after attempting to start the connection, please go to the “Log” tab to get more information about the error (or click the warning triangle to be automatically taken to the “Log” tab).
Depending on the actual problem, VPN Tracker will display detailed suggestions for a solution.
22
Cannot Access Resources on the Remote Network If the connection slider goes to ON and turns green, but you cannot access resources (servers, email, etc.) in the remote network, please check the following points.
Connect by IP address instead of host nameIf you are not connecting to the resource by IP address (e.g. 192.168.13.42), but are using a host name (e.g. server.example.com), please try using the resource’s IP address instead. If the connection works when using the IP address, but not when using a host name, please make sure that the DNS server configured on your Mac’s is able to resolve this host name to an IP address, or configure a “Remote DNS” server in VPN Tracker.
Run the VPN Environment ManagerIn many local networks your Mac will be behind a router that performs Network Address Translation (NAT). For a VPN connection to be established through such a router, VPN Tracker can use one of three different methods, but not all of them may be supported by your local router or your VPN gateway. In that case, your VPN connection may seem connected, but no connections to servers or other resources in the VPN are possible. VPN Tracker includes a tool to detect the right method for the local network:
‣ Stop all running VPN connections
‣ Select “Help > VPN Environment Manager”
‣ Click on “Continue”
‣ Wait until VPN Tracker has performed the tests
‣ Try to start the connection again
Tip You will only have to run the VPN Environment Manager once for each location that you are using VPN Tracker at.
23
Further Questions?You can find the latest news and compatibility information on our support and FAQ website:
http://www.equinux.com/support
If you need to contact equinux Technical SupportIf you can’t resolve your issue with the information available on our website or in this guide and would like to contact Technical Support through our website, please be sure to include at least the following information:
‣ The manufacturer and model and firmware revision of the VPN gateway
‣ A Technical Support Report from VPN Tracker (Help > Generate Technical Support Report)
‣ Screenshots of what you have configured on your VPN gateway, in particular all VPN settings
‣ A detailed description of the problem and the troubleshooting steps you have taken
24
Configuring Remote DNSIn many organizations, the host names of internal resources such as mail servers, internal websites, file servers etc. can only be looked up when using the internal name servers (DNS servers) of the organization. If you would like to access such resources by host names (e.g. intranet.example.com) instead of IP addresses, you should set up Remote DNS.
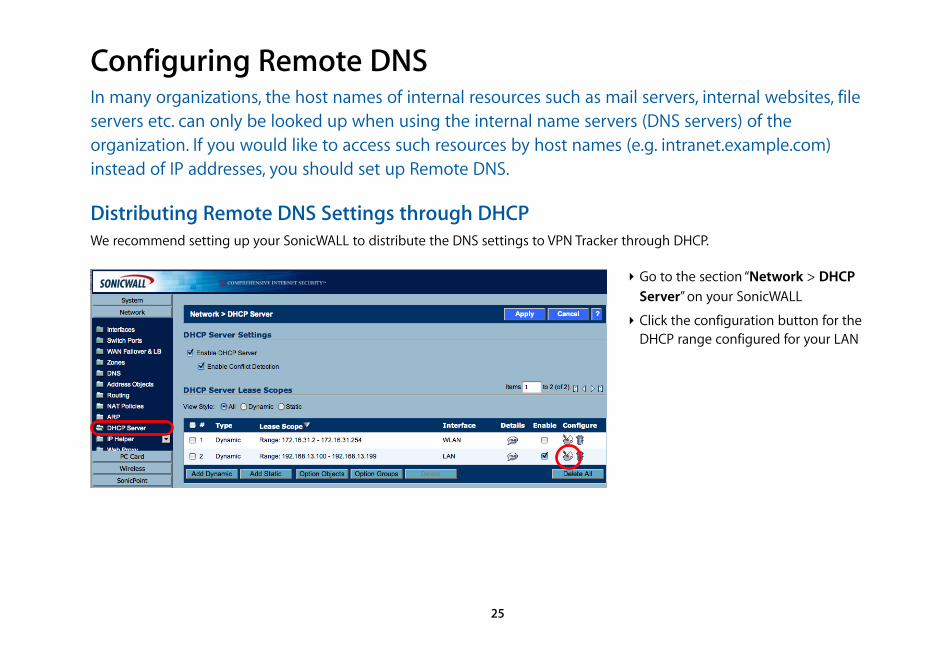
Distributing Remote DNS Settings through DHCPWe recommend setting up your SonicWALL to distribute the DNS settings to VPN Tracker through DHCP.
‣ Go to the section “Network > DHCP Server” on your SonicWALL
‣ Click the configuration button for the DHCP range configured for your LAN
25
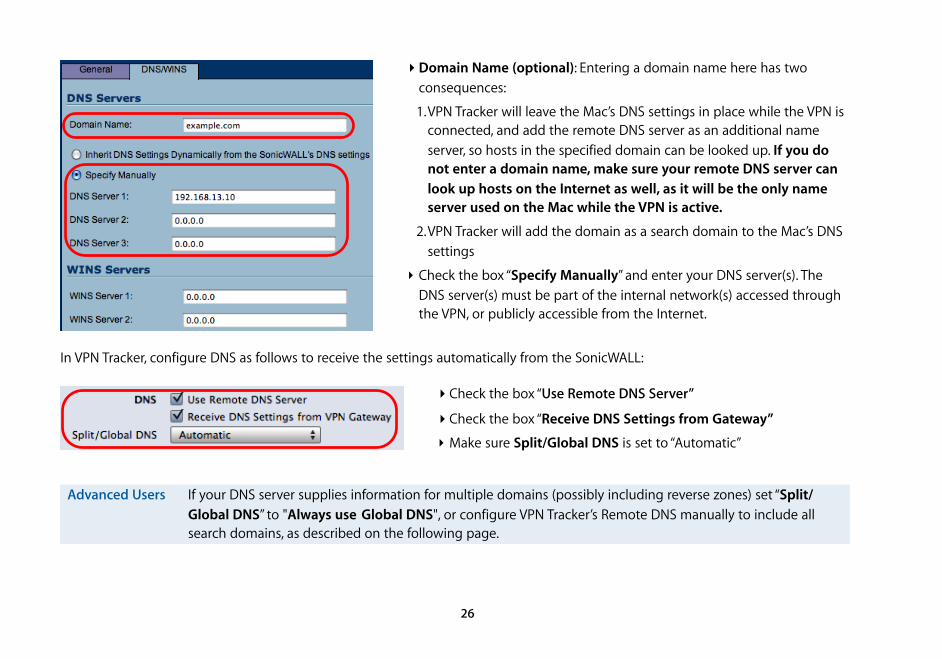
In VPN Tracker, configure DNS as follows to receive the settings automatically from the SonicWALL:
Advanced Users If your DNS server supplies information for multiple domains (possibly including reverse zones) set “Split/Global DNS” to "Always use Global DNS", or configure VPN Tracker’s Remote DNS manually to include all search domains, as described on the following page.
‣ Domain Name (optional): Entering a domain name here has two consequences:
1.VPN Tracker will leave the Mac’s DNS settings in place while the VPN is connected, and add the remote DNS server as an additional name server, so hosts in the specified domain can be looked up. If you do not enter a domain name, make sure your remote DNS server can look up hosts on the Internet as well, as it will be the only name server used on the Mac while the VPN is active.
2.VPN Tracker will add the domain as a search domain to the Mac’s DNS settings
‣ Check the box “Specify Manually” and enter your DNS server(s). The DNS server(s) must be part of the internal network(s) accessed through the VPN, or publicly accessible from the Internet.
‣ Check the box “Use Remote DNS Server”
‣ Check the box “Receive DNS Settings from Gateway”
‣ Make sure Split/Global DNS is set to “Automatic”
26
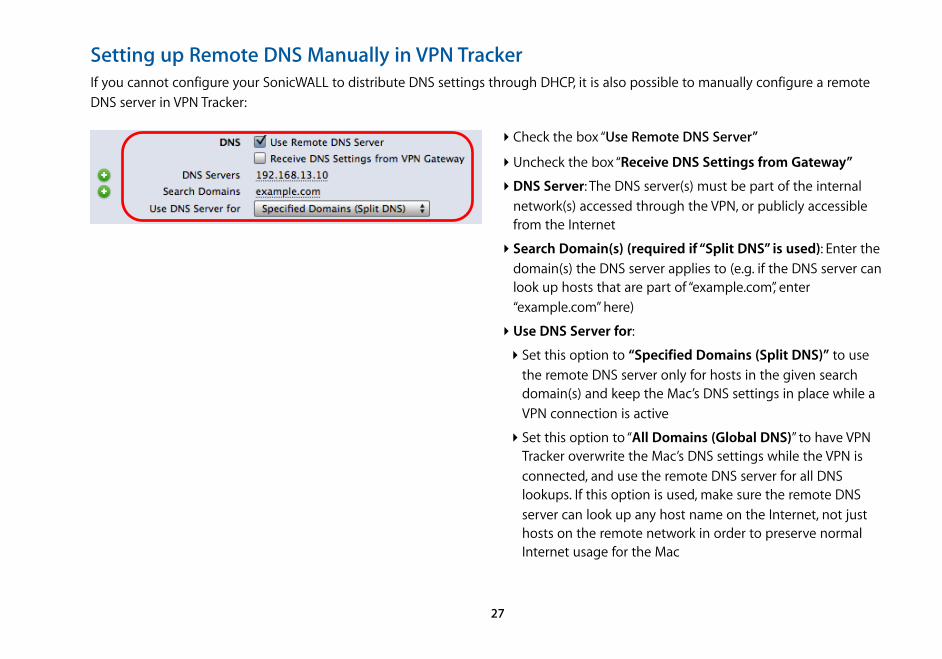
Setting up Remote DNS Manually in VPN TrackerIf you cannot configure your SonicWALL to distribute DNS settings through DHCP, it is also possible to manually configure a remote DNS server in VPN Tracker:
‣ Check the box “Use Remote DNS Server”
‣ Uncheck the box “Receive DNS Settings from Gateway”
‣ DNS Server: The DNS server(s) must be part of the internal network(s) accessed through the VPN, or publicly accessible from the Internet
‣ Search Domain(s) (required if “Split DNS” is used): Enter the domain(s) the DNS server applies to (e.g. if the DNS server can look up hosts that are part of “example.com”, enter “example.com” here)
‣ Use DNS Server for:
‣ Set this option to “Specified Domains (Split DNS)” to use the remote DNS server only for hosts in the given search domain(s) and keep the Mac’s DNS settings in place while a VPN connection is active
‣ Set this option to “All Domains (Global DNS)” to have VPN Tracker overwrite the Mac’s DNS settings while the VPN is connected, and use the remote DNS server for all DNS lookups. If this option is used, make sure the remote DNS server can look up any host name on the Internet, not just hosts on the remote network in order to preserve normal Internet usage for the Mac
27