vranger - usdownloads.quest.com.edgesuite.netusdownloads.quest.com.edgesuite.net/repository/... ·...
TRANSCRIPT
vRanger®
Version 5.2
Installation and Setup Guide

© 2011 Quest Software, Inc.ALL RIGHTS RESERVED.
This guide contains proprietary information protected by copyright. The software described in this guide is furnished under a software license or nondisclosure agreement. This software may be used or copied only in accordance with the terms of the applicable agreement. No part of this guide may be reproduced or transmitted in any form or by any means, electronic or mechanical, including photocopying and recording for any purpose other than the purchaser’s personal use without the written permission of Quest Software, Inc.
The information in this document is provided in connection with Quest products. No license, express or implied, by estoppel or otherwise, to any intellectual property right is granted by this document or in connection with the sale of Quest products. EXCEPT AS SET FORTH IN QUEST'S TERMS AND CONDITIONS AS SPECIFIED IN THE LICENSE AGREEMENT FOR THIS PRODUCT, QUEST ASSUMES NO LIABILITY WHATSOEVER AND DISCLAIMS ANY EXPRESS, IMPLIED OR STATUTORY WARRANTY RELATING TO ITS PRODUCTS INCLUDING, BUT NOT LIMITED TO, THE IMPLIED WARRANTY OF MERCHANTABILITY, FITNESS FOR A PARTICULAR PURPOSE, OR NON-INFRINGEMENT. IN NO EVENT SHALL QUEST BE LIABLE FOR ANY DIRECT, INDIRECT, CONSEQUENTIAL, PUNITIVE, SPECIAL OR INCIDENTAL DAMAGES (INCLUDING, WITHOUT LIMITATION, DAMAGES FOR LOSS OF PROFITS, BUSINESS INTERRUPTION OR LOSS OF INFORMATION) ARISING OUT OF THE USE OR INABILITY TO USE THIS DOCUMENT, EVEN IF QUEST HAS BEEN ADVISED OF THE POSSIBILITY OF SUCH DAMAGES. Quest makes no representations or warranties with respect to the accuracy or completeness of the contents of this document and reserves the right to make changes to specifications and product descriptions at any time without notice. Quest does not make any commitment to update the information contained in this document.
If you have any questions regarding your potential use of this material, contact:Quest Software World HeadquartersLEGAL Dept5 Polaris WayAliso Viejo, CA 92656www.quest.comemail: [email protected]
Refer to our Web site for regional and international office information.
Patents
This product includes patent pending technology.
Trademarks
Quest, Quest Software, the Quest Software logo, AccessManager, ActiveRoles, Aelita, Akonix, Benchmark Factory, Big Brother, BridgeAccess, BridgeAutoEscalate, BridgeSearch, BridgeTrak, BusinessInsight, ChangeAuditor, CI Discovery, Defender, DeployDirector, Desktop Authority, Directory Analyzer, Directory Troubleshooter, DS Analyzer, DS Expert, Foglight, GPOADmin, Help Desk Authority, Imceda, IntelliProfile, InTrust, Invirtus, iToken, JClass, JProbe, LeccoTech, LiteSpeed, LiveReorg, LogADmin, MessageStats, Monosphere, NBSpool, NetBase, NetControl, Npulse, NetPro, PassGo, PerformaSure, Point, Click, Done!, Quest vToolkit, Quest vWorkSpace, ReportADmin, RestoreADmin, ScriptLogic, SelfServiceADmin, SharePlex, Sitraka, SmartAlarm, Spotlight, SQL Navigator, SQL Watch, SQLab, Stat, StealthCollect, Storage Horizon, Tag and Follow, Toad, T.O.A.D., Toad World, vAutomator, vConverter, vEcoShell, VESI, vFoglight, vPackager, vRanger, vSpotlight, vStream, vToad, Vintela, Virtual DBA, VizionCore, Vizioncore vAutomation Suite, Vizioncore vEssentials, Vizioncore vWorkflow, WebDefender, Webthority, Xaffire, and XRT are trademarks and registered trademarks of Quest Software, Inc in the United States of America and other countries. Other trademarks and registered trademarks are property of their respective owners.
Installation and Setup GuideAugust 2011Version 5.2

Table of Contents
Introduction to this Guide ...................................................................................................6
About vRanger ............................................................................................................................... 7
About this Guide............................................................................................................................. 7
vRanger Documentation Suite ....................................................................................................... 8
Core Documentation Set......................................................................................................... 8
Text Conventions .................................................................................................................... 8
About Quest Software, Inc. ............................................................................................................ 9
Contacting Quest Software ..................................................................................................... 9
Contacting Quest Support....................................................................................................... 9
Before You Install...............................................................................................................11
Before Installing vRanger ............................................................................................................. 12
vRanger Licensing Levels ..................................................................................................... 12
vRanger Installation Options ........................................................................................................ 13
The vRanger Database ......................................................................................................... 15
vCenter Permissions .................................................................................................................... 18
Planning For The vRanger Virtual Appliance ............................................................................... 22
Upgrading vRanger............................................................................................................23
Before Upgrading vRanger........................................................................................................... 24
Licensing Changes in vRanger 5.2 ....................................................................................... 24
vRanger Editions................................................................................................................... 24
Upgrading a Previous vRanger Installation .................................................................................. 25
Upgrading a Previous vReplicator Installation.............................................................................. 30
Upgrading from vRanger Pro 3.x.................................................................................................. 31
Installation ..........................................................................................................................32

Table of Contents 4
vRanger Installation ......................................................................................................................33
Installing vRanger .........................................................................................................................33
Install vRanger on a New Instance of SQL Express 2005 .....................................................33
Install vRanger on an Existing SQL 2005/2008 Server..........................................................42
Install vRanger Catalog Manager..................................................................................................51
Configuration .....................................................................................................................56
Configuration.................................................................................................................................57
Configuration through the Startup Wizard.....................................................................................57
Select a License.....................................................................................................................58
VirtualCenter and Host Information........................................................................................60
Host Licensing Information ....................................................................................................61
Virtual Appliance Information .................................................................................................62
Add Repositories....................................................................................................................63
Set up Mail Server Information/Add Email Addresses ...........................................................65
Configuration without Using the Startup Wizard ...........................................................................66
Add a VirtualCenter................................................................................................................66
Add an ESX Server................................................................................................................66
Add a Repository ...................................................................................................................67
Configure an SMTP Server....................................................................................................68
Import License File.................................................................................................................70
Manage Host Licensing .........................................................................................................71
Manage Job Configuration Settings.......................................................................................72
Cataloging Options ................................................................................................................74
Configuring Linux File Level Restoration ...............................................................................74
Configuration Options ...................................................................................................................75
Catalog Filtering ............................................................................................................................77
Filtering Catalog Collections ..................................................................................................77
Configuring the Virtual Appliance....................................................................................78
Deploying the Virtual Appliance ....................................................................................................79
Deploying Multiple Virtual Appliances....................................................................................79
Configuring the Virtual Appliance..................................................................................................80
Optional Network Configurations ...........................................................................................84
Deploying Multiple VAs From a Template - VI Client .............................................................85

Table of Contents 5
Deploying Multiple VAs From a Template - PowerCLI...........................................................87
Disabling DRS for the vRanger Appliance .............................................................................90
Adding the Virtual Appliance to vRanger ......................................................................................90
Index....................................................................................................................................93
Introduction to this Guide
This chapter provides information about what is contained in Installation and Setup Guide. It also provides information about the vRanger documentation suite and Quest.
This chapter contains the following sections:
About vRanger................................................................................................... 7
About this Guide ................................................................................................ 7
vRanger Documentation Suite........................................................................... 8
Core Documentation Set ............................................................................. 8
Text Conventions......................................................................................... 8
About Quest Software, Inc................................................................................. 9
Contacting Quest Software ......................................................................... 9
Contacting Quest Support ........................................................................... 9

Introduction to this Guide 7About vRanger
About vRangervRanger is the market-leading backup, recovery and backup management solution for virtual environments. Featuring a new platform technology, vRanger reduces the backup window, provides smarter backup options, and offers more scalability features while using fewer resources.
vRanger Capabilities:
• Performs incremental, differential or full image backups of virtual machines.
• Quickly restores the entire virtual machine or just specific files.
• Manages disaster recovery strategies and protects critical data in virtual environments.
• Offers the ability to replicate virtual machines to more than one destination, thus allowing users to accomplish multiple High Availability and Disaster Recovery objectives based on their specific needs.
About this GuideThis guide walks you through a vRanger installation, including basic configurations.
This guide is organized as follows:
Before You Install - This chapter provides important information about vRanger installation options
Upgrading vRanger - This chapter provides information on upgrading a previous vRanger or vReplicator installation to vRanger 5.2.
Installation — This chapter describes the process for installing vRanger.
Configuration — This chapter outlines the process of starting vRanger for the first time, licensing the application, and configuring connections with the Virtual Infrastructure.
Configuring the Virtual Appliance - This chapter describes the process for deploying and configuring the vRanger virtual appliance, which is needed for Linux FLR and ESXi replication.

Introduction to this Guide 8vRanger Documentation Suite
vRanger Documentation SuiteThe documentation suite is made up of the core documentation set plus documents set for advanced configurations. Documentation is provided in a combination of online help and PDF.
• Online Help: You can open online help by selecting Help Contents in the Help menu.
• PDF: The Getting Started Guide, What’s New Guide, System Requirements Guide, Installation and Setup Guide, and User Guide, are provided as PDF files.
Core Documentation SetThe core documentation set consists of the following:
• Release Notes (PDF)
• Getting Started Guide (PDF)
• What’s New Guide (PDF)
• System Requirements Guide (PDF)
• Installation and Setup Guide set (PDF)
• User Guide (PDF and online help)
Text ConventionsThe following table summarizes how text styles are used in this guide:
Convention Description
Code Monospace text represents code, code objects, and command-line input. This includes:• Java language source code and examples of file contents• Classes, objects, methods, properties, constants, and events• HTML documents, tags, and attributes
Variables Monospace-plus-italic text represents variable code or command-line objects that are replaced by an actual value or parameter.

Introduction to this Guide 9About Quest Software, Inc.
About Quest Software, Inc.Quest Software simplifies and reduces the cost of managing IT for more than 100,000 customers worldwide. Our innovative solutions make solving the toughest IT management problems easier, enabling customers to save time and money across physical, virtual and cloud environments. For more information about Quest go to www.quest.com.
Contacting Quest Software
Refer to our web site for regional and international office information.
Contacting Quest SupportQuest Support is available to customers who have a trial version of a Quest product or who have purchased a Quest product and have a valid maintenance contract. Quest
Interface Bold text is used for interface options that you select (such as menu items) as well as keyboard commands.
Files, components, and documents
Italic text is used to highlight the following items:• Pathnames, file names, and programs• Figure captions• The names of other documents referenced in this guide
Convention Description
Email [email protected]
Mail Quest Software, Inc.World Headquarters5 Polaris WayAliso Viejo, CA 92656USA
Web site www.quest.com
Introduction to this Guide 10About Quest Software, Inc.
Support provides unlimited 24x7 access to SupportLink, our self-service portal. Visit SupportLink at http://support.quest.com.
From SupportLink, you can do the following:
• Retrieve thousands of solutions from our online Knowledgebase
• Download the latest releases and service packs
• Create, update and review Support cases
View the Global Support Guide for a detailed explanation of support programs, online services, contact information, policies and procedures. The guide is available at: http://support.quest.com.

Before You Install
This chapter provides information on vRanger installation options, as well as required permissions.
This chapter contains the following sections:
Before Installing vRanger ................................................................................ 12
vRanger Licensing Levels............................................................................ 12
vRanger Installation Options............................................................................ 13
vCenter Permissions........................................................................................ 18
Planning For The vRanger Virtual Appliance................................................... 22

Before You Install 12Before Installing vRanger
Before Installing vRangerBefore installing vRanger, you will need to decide the best architectural option for your environment. In addition, there are some preliminary configurations that should be made in order to get the most out of vRanger.
Note If you are upgrading a previous vRanger version, please see “Upgrading vRanger” on page 23.
vRanger Licensing LevelsThere are three levels of vRanger Licensing, each with different available features:
• vRanger Standard
• vRanger Pro
• vReplicator
A license for vRanger controls the number of source CPUs that you can configure for backup. For licensing purposes, a dual-core processor is counted as a single CPU.
vRanger Standard vRanger Pro vReplicator
Backup X X
Restore X X
Replication X X
CBT X X X
ABM X X X
Lan Free X
Catalog X
Windows FLR X X
Linux FLR X

Before You Install 13vRanger Installation Options
Therefore, one ESX Server with two dual-core processors would use two CPUs of a license.
Trial License
You may evaluate vRanger using the trial license included with the product. The trial provides license is limited to10 CPUs, and will expire 30 days after installation. The trial license provides vRanger Pro functionality. In order to continue using vRanger past the trial period, you must import the new license key provided to you by Quest Software. If you have not received your license key, please go to https://support.quest.com/LicenseKey.aspx.
Single License Limitation
vRanger is available in three versions: vRanger SE, vRanger Pro, and vReplicator. Please note that only one version of vRanger can be installed on a machine at any one time. For example, you cannot install vRanger SE and vReplicator on the same machine.
vRanger Installation OptionsvRanger is a multi-tiered application with both the client and server components installed on the same machine. vRanger will use a SQL Express database by default, but can easily be configured to use an existing SQL server -see “The vRanger Database” on page 15 for more information.
When installing vRanger, consideration must be given to where the application is installed, and what type of database to use. Use the recommendations below to guide you.
Installation Location
There are several key factors that determine the best location for vRanger in your environment:
VM or Physical Machine
vRanger utilizes (by default) a direct-to-target architecture, which means that backup traffic is not routed through the vRanger machine. A benefit of this feature is that vRanger can work quite well in a VM provided that it meets the hardware requirements listed in the vRanger System Requirements Guide.
Before You Install 14vRanger Installation Options
Some important considerations about installing vRanger in a VM:
• When installing vRanger in a VM, it is not supported to use vRanger to backup the VM in which it is installed. The merging of the backup snapshot for the installation VM may cause vRanger to momentarily lose connectivity, causing the backup to fail.
• When installed in a virtual machine, vRanger can use HotAdd for LAN-Free backups, resulting in improved ESXi network backup speeds.
vRanger and Cloned Virtual Machines
When creating the virtual machine for vRanger, it is recommended to create a fresh VM, rather than cloning an existing VM or template.
In recent versions of Windows, volumes are recognized by a serial number assigned by Windows. When VMs are cloned, the serial number for each VM volume is cloned as well.
During normal operations, this is not an issue, but when vRanger is cloned from the same source or template as a target VM, the vRanger volume will have the same serial number as the target volume.
For backup operations using HotAdd, target disk volumes are mounted to the vRanger VM. If the target VM volumes have the same disk serial number as the vRanger volume (which will be the case with cloned VMs), the target VM’s serial number will be changed by Windows when mounted to the vRanger VM. When restoring from these backups, the boot manger will not have the expected serial number, causing the restored VM not to boot until the boot information is corrected.
LAN-Free Backups
vRanger can perform LAN-Free backups in two different configurations. Using a traditional physical proxy approach, vRanger is installed on a physical server connected to the fibre or iSCSI infrastructure. The backup data and processing is off loaded from the host to the physical proxy (the vRanger machine), limiting the impact to the ESX servers.
If vRanger will be installed on a physical proxy server, the following apply:
• Disable automount on the vRanger machine:
• From the start menu, select “run” and enter diskpart.
• Run the automount disable command to disable automatic drive letter assignment.
Before You Install 15vRanger Installation Options
• Run the automount scrub command to clean any registry entries pertaining to previously mounted volumes.
• On your storage device, zone your LUNs so that the vRanger HBA (or iSCSI initiator) can see and read them.
• Only one proxy should see a set of VMFS LUN’s at one time. The proxy server should have only read-only access to the LUNs.
If vRanger is installed in a VM, lan-free backups can be processed via the HotAdd mechanism offered by VMware’s vStorage API. In this configuration, backup processing (compression, etc) is processed by the vRanger VM.
Installing with Other Applications
Customers often want to install vRanger on the same server as another application. Due to the wide variety of factors that may impact performance, it is impossible to make blanket recommendations. Some key concerns to keep in mind:
• If you do chose to install vRanger with any other application, please use the external SQL database method to facilitate moving vRanger to another location, should that be required.
• Many customers, in an effort to maximize their hardware investment, want to install vRanger on the same server as VMware vCenter. This practice is not recommended.
During testing, many customers install vRanger with other Quest products. In this case it is not recommended to install vRanger on the same machine as vFoglight.
Note Only one version of vRanger may be installed on a machine at one time. For example, you may not install vRanger SE and vReplicator on the same machine.
The vRanger DatabasevRanger utilizes a SQL database to store application and task configuration data. The database can be either SQL Express 2005, which is the default, or an external SQL database running on your own SQL Server 2005 or SQL Server 2008 database server.

Before You Install 16vRanger Installation Options
Database options
The database deployment occurs during the initial installation of vRanger. The default option installs a SQL Express database on the vRanger server. You may, if desired, install vRanger using an external SQL Server.
Note The cataloging function of vRanger requires that the application and catalog databases be installed on the vRanger server. For more information, see “Installing the Databases” on page 17
Default
The Installation Wizard will default with a selection to install vRanger with the embedded SQL Express 2005 database. The default database can only be installed on the vRanger server.
While the embedded SQL Express database is free and simple to install, there is a size limit of 4GB per database.
External SQL Server
The Installation Wizard will guide you through configuring vRanger with an external SQL database. There is also an option in the Install Wizard to configure the database connection manually, but the guided approach is recommended.
Using an external database makes it possible to move the vRanger installation with minimal effort.
The following versions of Microsoft SQL are supported for operation with vRanger.
Caution If you chose to use Microsoft SQL Server instead of SQL Express, the SQL Server application must be installed on the vRanger Machine in order for the cataloging feature to function. For more information, see Installing the Databases below.
SQL 2005SQL 2005 SP1SQL 2005 SP2SQL 2005 SP3
SQL 2008SQL 2008 R2

Before You Install 17vRanger Installation Options
Installing the Databases
When installing vRanger, consider the database selection carefully as migrating from a SQL Express installation to an external SQL database carries a risk of corrupting application data.
The cataloging function of vRanger requires that the application and catalog databases be installed on the vRanger server. There are two options to accomplish this:
• Use the default SQL Express 2005 installation, which will install vRanger, the vRanger database, and the Catalog database on the same machine. While this is the most straight forward option, SQL Express databases are limited in size to 4 GB.
• Install Microsoft SQL Server 2005 or 2008 (including R2) on the vRanger machine, and use that “external” database server to host the application and catalog database. While there is no hard-coded limit to database size, this is a more complicated installation that requires additional software.
If you will not be using cataloging, in order to provide the most flexibility, it is recommended to install vRanger using an external SQL database server. This will allow you to relocate the vRanger installation simply by installing the application in another location, and pointing the Install Wizard to the existing database.
Sizing the Catalog Database
The vRanger catalog process collects and records metadata and path information for files updated since the last backup and catalog entry. Depending on the number of VMs protected, and the number of files in each VM, the catalog database may grow quite rapidly.
Actual database growth will vary depending on the Guest OS and the number of files changed between backups, but the information below can be used as an approximate guide.
• With default filtering, the full catalog of a generic Windows 2008 VM is approximately 500 files, or approximately 0.2 MB.
Note Many Windows files are not cataloged due to filtering (see “Catalog Filtering” on page 77). An amount of data equal to a standard Windows 2008 installation will result in a larger catalog footprint.
• Incremental and differential backups will only catalog changed files, making the catalog record for these backups considerably smaller. Using incremental and/or differential backups will allow you to store catalog data for many more savepoints than if you used only full backups.

Before You Install 18vCenter Permissions
vCenter PermissionsvRanger requires a vCenter account to function properly. To comply with security best practices, Quest recommends creating a vCenter user account with the minimum required permissions for vRanger to use.
The procedures differ slightly depending on which version of vCenter you are using. For vCenter 2.5, see the section below. For vCenter 4.0, please see “To create a vRanger vCenter account - vCenter 4.0” on page 20.
To create a vRanger vCenter account - vCenter 2.5
1 Using the VI Client, navigate to Administrator>Roles.
2 Select Add Role.
3 Enter a name for the Role, such as “vRanger Non-Admin”.
4 In the Privileges section, set the permissions according the table below:
Section Privileges
Global • Log Event• Licenses
Datastore • Browse Datastore• File Management
Host > Local Operations Create Virtual Machine
Virtual Machine > Inventory Create
Virtual Machine > Interaction • Power On• Power Off• Device Connection• Configure CD Media• Configure Floppy Media
Virtual Machine > Configuration Select all options in this section.
Virtual Machine > State • Create Snapshot• Remove Snapshot
Before You Install 19vCenter Permissions
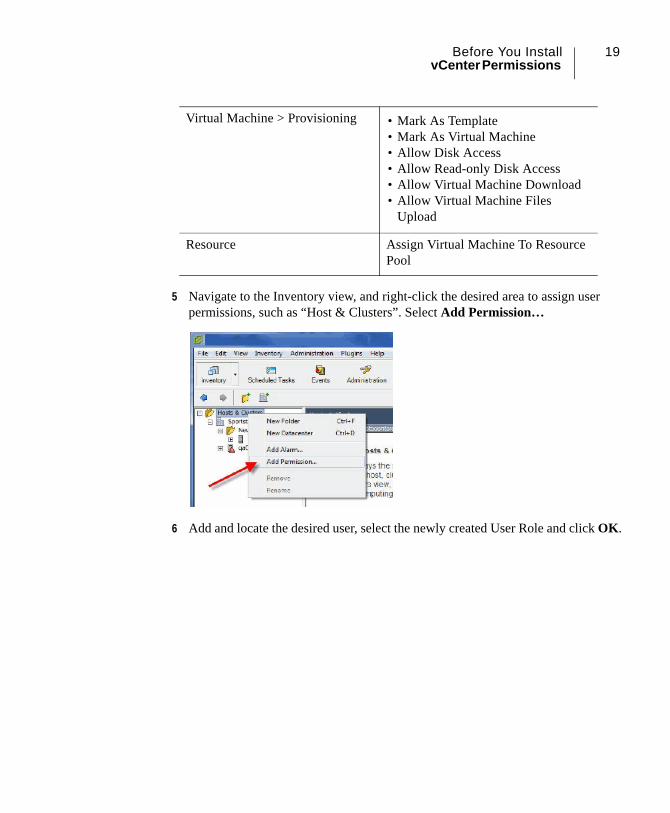
5 Navigate to the Inventory view, and right-click the desired area to assign user permissions, such as “Host & Clusters”. Select Add Permission…
6 Add and locate the desired user, select the newly created User Role and click OK.
Virtual Machine > Provisioning • Mark As Template• Mark As Virtual Machine• Allow Disk Access• Allow Read-only Disk Access• Allow Virtual Machine Download• Allow Virtual Machine Files
Upload
Resource Assign Virtual Machine To Resource Pool

Before You Install 20vCenter Permissions
To create a vRanger vCenter account - vCenter 4.0
1 Navigate to Administration > Roles.
2 Select Add Role.
3 Enter a name for the Role, such as “vRanger Non-Admin”.
4 In the Privileges section, set the permissions according the table below:
Section Privileges
Datastore • Allocate Space• Browse Datastore
Global • Licenses• Log Event
Host > Local Operations • Create Virtual Machine• Reconfigure Virtual Machine
Network • Assign Network

Before You Install 21vCenter Permissions
5 Navigate to the Inventory view
6 Right-click the desired level to grant user permission, such as the main VC level.
7 Add and locate the desired user account, and select the recently created User Role
Resource • Assign virtual machine to resource pool
Virtual Machine > Configuration • Select all options in this section.
Virtual Machine > Interaction • Configure CD Media• Configure floppy media• Device Connection• Power Off• Power On
Virtual Machine > Inventory • Create new
Virtual Machine > Provisioning • Allow disk access• Allow read-only disk access• Allow virtual machine download• Allow virtual machine files upload• Mark as template• Mark as virtual machine
Virtual Machine > State • Create Snapshot• Remove Snapshot

Before You Install 22Planning For The vRanger Virtual Appliance
Planning For The vRanger Virtual AppliancevRanger uses a virtual appliance for file-level recovery(FLR) from Linux machines, and for replication to and from ESXi hosts. Before installing vRanger, consider the best placement of the virtual appliance(s). For more information, please read “Configuring the Virtual Appliance” on page 78.

Upgrading vRanger
This chapter guides you through the process of upgrading a previous vRanger installation.
This chapter contains the following sections:
Before Upgrading vRanger .............................................................................. 24
Licensing Changes in vRanger 5.2.............................................................. 24
vRanger Editions ......................................................................................... 24
Upgrading a Previous vRanger Installation ..................................................... 25
Upgrading a Previous vReplicator Installation ................................................. 30
Upgrading from vRanger Pro 3.x ..................................................................... 31

Upgrading vRanger 24Before Upgrading vRanger
Before Upgrading vRangerBefore you upgrade an existing vRanger installation, please refer to the sections below for important information.
Licensing Changes in vRanger 5.2vRanger 5.2 and above uses a new license key that differs from previous vRanger versions. The license key file for 5.2 and above ends in .asc where the prior license key files ended in .lic and will not work with this version.
A new license key is required to upgrade to vRanger 5.2. If you have not received your license key, please go to https://support.quest.com/LicenseKey.aspx.
vRanger EditionsWith replication now integrated into vRanger, and vRanger being offered in multiple versions, there are several upgrade options available.
Note See “vRanger Licensing Levels” on page 12 for more information about what is included in each version of vRanger.
• Current vRanger customers - see “Upgrading a Previous vRanger Installation” on page 25.
• Current vReplicator customers - see “Upgrading a Previous vReplicator Installation” on page 30.
• Customers of both vRanger and vReplicator - the upgrade procedures differ depending on whether you want to manage replication from the D/R site, or combine backup and replication management on the production site.
• D/R site - if you want to manage replication from the D/R site (to ease failover), then follow both of the procedures referenced above, upgrading the vRanger installation on the production side and the vReplicator installation on the D/R site. You may use a combined license file for both installations, provided that the combined CPU count for each protection type (backup and replication) for both sites does not exceed the total licensed number of CPUs.
• Production site - when both backup and replication will be managed from the production site, start with “Upgrading a Previous vRanger Installation” on

Upgrading vRanger 25Upgrading a Previous vRanger Installation
page 25, then skip to step 4 step 4 of the Upgrading a Previous vReplicator Installation procedures.
If you purchase vRanger 5.2 -Standard Edition, you can purchase an upgrade to vRanger Pro. Similarly, you can also purchase an upgrade from vReplicator 5.0 to vRanger Pro 5.2.
Upgrading a Previous vRanger InstallationYou may upgrade a previous vRanger installation to the latest version by running the vRanger Upgrade installer. If you are upgrading from a vRanger 3.x installation, see the section: Upgrading from vRanger Pro 3.x.
Note Do not use the full installer to upgrade an existing installation.
The vRanger Upgrade installer supports upgrading from vRanger Pro versions 4.0 or later.
Upgrade from Beta versions is not supported, nor is operating a GA version in parallel with a Beta version. The beta version must be uninstalled before upgrading a previous GA version or performing a full installation.
Note It is recommended that you backup your vRanger Pro database before upgrading the application.

Upgrading vRanger 26Upgrading a Previous vRanger Installation
To upgrade a vRanger Pro installation:
1 Double-click the vRanger Upgrade executable. A confirmation prompt displays:
2 Click Yes to upgrade. A backup reminder prompt appears. Click Yes.
3 The Welcome Screen appears. Click Next.
4 The License Agreement dialog appears. Click I Agree.
5 The License Key Validation dialog appears.
This screen prevents you from continuing with the upgrade process if you do not have a valid vRanger 5.2 license. Import your vRanger 5.2 license, and click Next.
6 The Choose Components dialog appears.

Upgrading vRanger 27Upgrading a Previous vRanger Installation
vRanger includes a cataloging feature that requires an additional database and other components. The Catalog Manager installation is enabled by default. Click Next.
or
To disable the installation of the Catalog Manager, clear the checkbox. Click Next. You may install the components later by re-running the vRanger Upgrade installer.
7 A prompt displays. Click Ok.
The prompt states that some files will be relocated as part of the upgrade. To view the details, see C:\Program Files\Quest Software\vRanger\Upgradelog.log
Note On x64 systems, the path will be C:\Program Files (x86)\Quest Software\vRanger\Upgradelog.log
8 The User Credentials dialog displays. The user account needed for this step must have administrator privileges on the local machine.
If you chose to use Windows authentication for your SQL Express database, this is the account that will be used.

Upgrading vRanger 28Upgrading a Previous vRanger Installation
a In the Domain field, enter the domain in which the user account is located.
b In the Username field, enter the username for the account.
c In the Password field, enter the password for the account.
d Click Next.
9 The installation process continues. The Database Setup Wizard appears. Click Next.
10 The Upgrade Database dialog appears.
The installer will find the existing vRanger database, and default to Install/Upgrade on an existing SQL Server 2005/2008.
Select the Server Authentication method and click Next. Windows authentication is recommended and uses the credentials specified in step 8.

Upgrading vRanger 29Upgrading a Previous vRanger Installation
11 The Installation Database Credentials dialog appears. If Windows authentication was chosen, the fields will be pre-populated with the credentials entered in step 8. Click Verify.
Click Ok to close the confirmation dialog. Click Next.
12 A confirmation dialog appears. Click Yes.
13 Click the Automatic Setup button. The database upgrade will continue.
14 The Catalog Manager Database Installer dialog appears.
Select the authentication method chosen in step 11, and click Verify. Click Create.
15 The installation completes.

Upgrading vRanger 30Upgrading a Previous vReplicator Installation
Upgrading a Previous vReplicator InstallationvReplicator 3.x customers current on maintenance can migrate to vRanger 5 - Replication Only.
Due to the differences in application architecture, there is no upgrade path from vReplicator 3.x to vRanger 5. vRanger 5 will need to be installed fresh (using the full installer) and replication jobs will need to be re-created.
The high-level process for migrating from vReplicator to vRanger 5 is as follows:
1 Request a new vRanger 5.2 license.
A new license is required for vReplicator customers migrating to vRanger 5. Please request one using the Quest Software Licence Request form at: https://support.quest.com/LicenseKey.aspx.
Note Current vReplicator 3.x customers who are also vRanger customers may want to request a combined license file that includes backup and replication licensing.
2 Download and install vRanger using the Full installer. See “Installing vRanger” on page 33 for the installation procedures.
Caution If you will be re-creating your replication jobs, do not uninstall vReplicator 3.x. You may install and run vRanger on the same machine as vReplicator 3.x without issue.
3 Configure vRanger as appropriate. See ““Configuration through the Startup Wizard” on page 57 for more information.
4 Re-create replication jobs to match your vReplicator configuration.
vRanger 5 replication jobs can re-use the existing target VMs created by the vReplicator jobs. This eliminates the need to perform a full synchronization to start the new replication jobs. When configuring jobs, ensure that the host and datastore configuration matches the original job. vRanger will recognize the existing target VM and resume replication without sending the full VM.
Caution Disable the vReplicator job before enabling its vRanger counterpart.
5 After validating that all replication jobs have been properly migrated and are working correctly, uninstall vReplicator.

Upgrading vRanger 31Upgrading from vRanger Pro 3.x
Upgrading from vRanger Pro 3.xvRanger 5.2 and later versions do not support importing legacy jobs or restoring legacy archives. If you are a vRanger Pro 3.x customer and want to migrate to the current platform, you will need to
first upgrade to an intermediate build such as vRanger 5.0.

Installation
This chapter guides you through the process of installing vRanger using the application installer.
This chapter contains the following sections:
vRanger Installation ......................................................................................... 33
Install vRanger on a New Instance of SQL Express 2005 ........................ 33
Install vRanger on an Existing SQL 2005/2008 Server............................. 42
Install vRanger Catalog Manager .................................................................... 51

Installation 33vRanger Installation
vRanger InstallationThis version of the software can be installed on a physical or virtual machine. There are no plug-ins to install. When you complete one of these processes, three services will be installed: vRanger service, vRanger vAPI service, and vRanger FLR service.
You will need the following to install vRanger:
• A physical or virtual machine to host the installation.
You can perform Lan-free backups and restores either way. See “LAN-Free Backups” on page 14 for more information.
Note The vRanger VM should not be cloned from the same source as any target VMs. See “vRanger and Cloned Virtual Machines” on page 14 for more information.
• Administrator access to the machine on which the software will be installed.
• Administrator access to the target VMs.
Installing vRanger The vRanger Installer includes several options for database configuration. The procedures are included below. For computers running Windows Vista without an SP, the option to install the software with a new instance of SQL Express 2005 is not available.
Install vRanger on a New Instance of SQL Express 2005This procedure assumes that you have already downloaded the vRanger software and saved it to an accessible location.
Installation 34Installing vRanger
Step 1: vRanger Setup
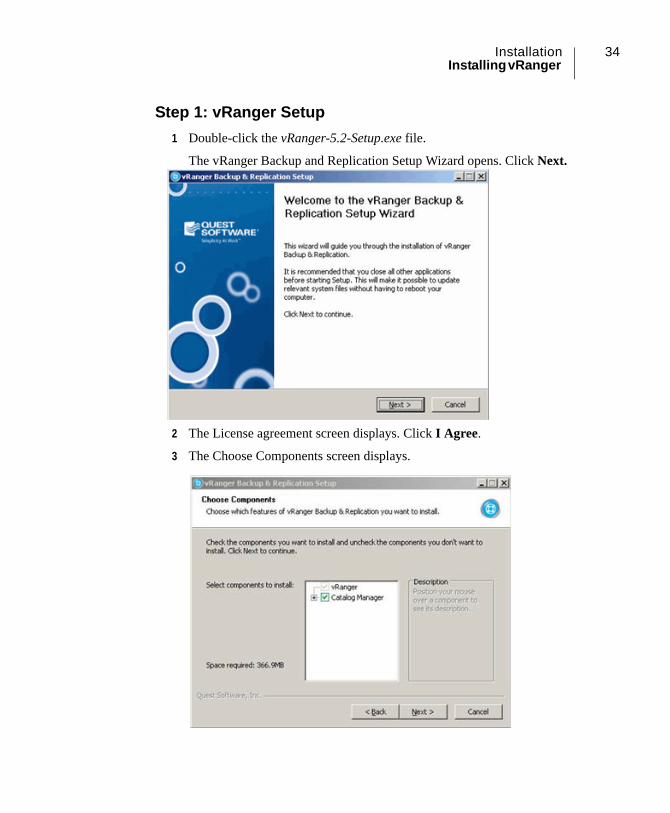
1 Double-click the vRanger-5.2-Setup.exe file.
The vRanger Backup and Replication Setup Wizard opens. Click Next.
2 The License agreement screen displays. Click I Agree.
3 The Choose Components screen displays.

Installation 35Installing vRanger
4 Select the components you wish to install.
Note Both vRanger and Catalog Manager are selected by default. You can choose to deselect catalog manager, and install it separately at a later time, if you wish.
5 Click Next.
6 The Choose Install Location screen displays.
7 You can accept the default folder, or browse to another location of your choice. Press Next.
Step 2: User Credentials
The User Credentials dialog displays. This configures the account that vRanger will use to run the vRanger Service. The user account needed for this step must have administrator privileges on the local machine.

Installation 36Installing vRanger
1 In the Domain field, enter the domain in which the user account is located.
2 In the Username field, enter the username for the account.
3 In the Password field, enter the password for the account.
4 Click Install.
Step 3: Install Database
1 The vRanger Database Setup screen displays. Press Next.

Installation 37Installing vRanger
2 The Install Database screen displays.
3 Click Install on new instance of SQL Express 2005.
4 Select a server authentication method.
• SQL Server: Enter and confirm the system administrator (sa) password when you select Mixed Mode authentication. Setting strong passwords is essential to the security of your system. Never set a blank or weak sa password.
• Windows: When a user connects through a Windows user account, SQL Server validates the account name and password using information in the Windows OS. Windows Authentication uses Kerberos security protocol, provides password policy enforcement (complexity validation for strong passwords), provides support for account lockout, and supports password expiration.
5 If you selected SQL Server, you will be prompted to enter a password for the SA account.

Installation 38Installing vRanger
or
If you selected Windows, the installation will continue using the account specified in Step 2: User Credentials.
6 Click Verify to test connectivity to the database.
7 When the Connection Successful display, click OK.
8 Click OK or Next, depending on your authentication method.
The Database User Credentials dialog displays.

Installation 39Installing vRanger
Note vRanger creates an account to connect to the Quest database. This account uses a default password of “V!ZionC0re”. Quest Software recommends changing this default password. You may enter a new password on this screen.
Caution Retain this password. You will need it during upgrades and when removing the application.
9 Click Next.
Step 4: Automatic Setup
The Install Database dialog displays.

Installation 40Installing vRanger
1 Click Automatic Setup.
The database is installed.
2 When the installation is completed, click Next.
3 Click Finish.
Step 5: Catalog Manager Database Installer
Note If you de-selected the Catalog Manger option during initial installation, Step 5 (catalog Manager Database Installer) will not appear.
Installation 41Installing vRanger
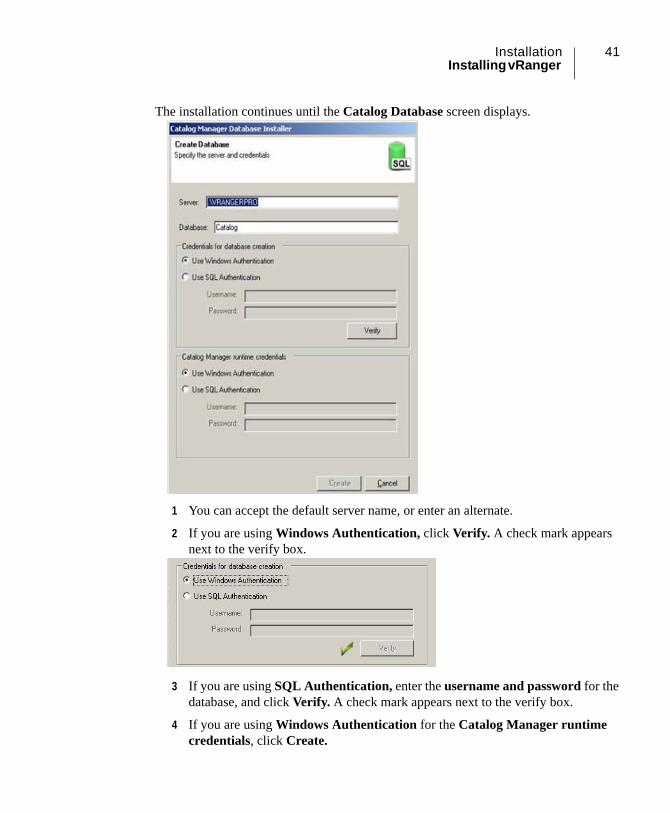
The installation continues until the Catalog Database screen displays.
1 You can accept the default server name, or enter an alternate.
2 If you are using Windows Authentication, click Verify. A check mark appears next to the verify box.
3 If you are using SQL Authentication, enter the username and password for the database, and click Verify. A check mark appears next to the verify box.
4 If you are using Windows Authentication for the Catalog Manager runtime credentials, click Create.

Installation 42Installing vRanger
5 If you are using SQL Authentication for the Catalog Manager runtime credentials, enter the username and password for the database, and click Create.
Step 5: Complete the Installation
The installation continues until the Completing the Setup Wizard Dialog displays.
1 Select Run vRanger Backup & Replication to launch the application immediately.
2 Click Finish.
Install vRanger on an Existing SQL 2005/2008 ServerThis procedure assumes that you have already downloaded the vRanger software and saved it to an accessible location.

Installation 43Installing vRanger
Step 1: vRanger Setup
1 Double-click the vRanger-5.2-Setup.exe file.
The vRanger Backup and Replication Setup Wizard opens. Click Next.
2 The License agreement screen displays. Click I Agree.
3 The Choose Components screen displays.

Installation 44Installing vRanger
4 Select the components you wish to install.
Note Both vRanger and Catalog Manager are selected by default. You can choose to deselect catalog manager, and install it separately at a later time, if you wish.
5 Click Next.
6 The Choose Install Location screen displays.
7 You can accept the default folder, or browse to another location of your choice. Press Next.
Step 2: User Credentials
The User Credentials dialog displays. This configures the account that vRanger will use to run the vRanger Service. The user account needed for this step must have administrator privileges on the local machine.
If you plan on using Windows Authentication for your SQL database, the account configured here will be used.

Installation 45Installing vRanger
1 In the Domain field, enter the domain in which the user account is located.
2 In the Username field, enter the username for the account.
3 In the Password field, enter the password for the account.
4 Click Install.
Step 3: Install Database
1 The vRanger Database Setup screen displays. Press Next.

Installation 46Installing vRanger
2 The Install Database screen displays.
3 Click Install/Upgrade on an existing SQLS Server 2005/2008.
4 Select a server authentication method.
• SQL Server: Enter and confirm the system administrator (sa) password when you select Mixed Mode authentication. Setting strong passwords is essential to the security of your system. Never set a blank or weak sa password.
• Windows: When a user connects through a Windows user account, SQL Server validates the account name and password using information in the Windows OS. Windows Authentication uses Kerberos security protocol, provides password policy enforcement (complexity validation for strong passwords), provides support for account lockout, and supports password expiration.
5 Enter your database connection information. Click Next. If you selected SQL Authentication, you will see the screen below:

Installation 47Installing vRanger
or
If you selected Windows Authentication, you will be prompted to select a SQL server. The credentials configured in Step 2: User Credentials. will be used.

Installation 48Installing vRanger
6 Click Verify to test connectivity to the database.
7 When the Connection Successful display, click OK.
8 Click OK or Next, depending on your authentication method.
The Database User Credentials dialog displays.
Note vRanger creates an account to connect to the Quest database. This account uses a default password of “V!ZionC0re”. Quest Software recommends changing this default password. You may enter a new password on this screen.
Caution Retain this password. You will need it during upgrades and when removing the application.
9 Click Next.
Step 4: Automatic Setup
The Install Database dialog displays.

Installation 49Installing vRanger
1 Click Automatic Setup.
The database is installed.
2 When the installation is completed, click Next.
3 Click Finish.
Step 5: Catalog Manager Database Installer
Note If you de-selected the Catalog Manger option during initial installation, Step 5 (catalog Manager Database Installer) will not appear.

Installation 50Installing vRanger
The installation continues until the Catalog Database screen displays.
1 The Server field must be the same as your SQL instance. This should populate correctly by default.
2 If you are using Windows Authentication, click Verify. A check mark appears next to the verify box.
3 If you are using SQL Authentication, enter the username and password for the database, and click Verify. A check mark appears next to the verify box.

Installation 51Install vRanger Catalog Manager
4 If you are using Windows Authentication for the Catalog Manager runtime credentials, click Create.
5 If you are using SQL Authentication for the Catalog Manager runtime credentials, enter the username and password for the database, and click Create.
Step 5: Complete the Installation
The installation continues until the Completing the Setup Wizard Dialog displays.
1 Select Run vRanger Backup & Replication to launch the application immediately.
2 Click Finish.
Install vRanger Catalog ManagerIf you wish to install the Catalog Manager after vRanger Backup & Replication is already installed, download the vRanger Upgrade file, and save it to an accessible location.

Installation 52Install vRanger Catalog Manager
Step 1: vRanger Setup
1 Double-click the vRanger-5.2-Upgrade-Setup.exe file. The Upgrade screen Displays. Click Next.
2 The License Agreement screen displays. Click I Agree.

Installation 53Install vRanger Catalog Manager
3 The Choose Components screen displays. Select Catalog Manager, and click Next.
4 The User Credentials Screen displays.
1 In the Domain field, enter the domain in which the user account is located.
2 In the Username field, enter the username for the account.
3 In the Password field, enter the password for the account.
4 Click Install.

Installation 54Install vRanger Catalog Manager
The installation continues until the Catalog Database screen displays.
1 The Server field must be the same as your SQL instance. This should populate correctly by default.
2 If you are using Windows Authentication, click Verify. A check mark appears next to the verify box
.
3 If you are using SQLAuthentication, enter the username and password for the database, and click Verify. A check mark appears next to the verify box.

Installation 55Install vRanger Catalog Manager
4 If you are using Windows Authentication for the Catalog Manager runtime credentials, click Create.
5 If you are using SQL Authentication for the Catalog Manager runtime credentials, enter the username and password for the database, and click Create.
6 The installation continues until the Completing the Setup Wizard Dialog displays.
7 Select Run vRanger Backup & Replication to launch the application immediately.
8 Click Finish.

Configuration
This chapter outlines the process of starting vRanger for the first time, licensing the application, and configuring connections with the Virtual Infrastructure.
This chapter contains the following sections:
Configuration ................................................................................................... 57
Configuration through the Startup Wizard........................................................ 57
Select a License .......................................................................................... 58
VirtualCenter and Host Information ............................................................. 60
Host Licensing Information .......................................................................... 61
Virtual Appliance Information....................................................................... 62
Add Repositories ......................................................................................... 63
Set up Mail Server Information/Add Email Addresses................................. 65
Configuration without Using the Startup Wizard .............................................. 66
Add a VirtualCenter ..................................................................................... 66
Add an ESX Server ..................................................................................... 66
Add a Repository ......................................................................................... 67
Configure an SMTP Server ......................................................................... 68
Import License File ...................................................................................... 70
Manage Host Licensing ............................................................................... 71
Manage Job Configuration Settings............................................................. 72
Configuring Linux File Level Restoration..................................................... 74
Configuration Options...................................................................................... 75
Catalog Filtering............................................................................................... 77

Configuration 57Configuration
ConfigurationBefore you begin configuring vRanger, confirm that you have access to all usernames, passwords, and root passwords for the ESX hosts that you intend to use.
vRanger requires some basic configurations to ensure that the software functions properly. You complete the initial configuration through the Startup Wizard, which launches when you first install vRanger. If you would rather configure settings through the menu commands and icons on the main vRanger screen, you can do so. In either case, you can revise the settings at any time.
After completing the basic configuration process, you can use either the Startup Wizard or the Configuration Options dialog to manage your settings. Although the Configuration Options dialog offers some functionality that the Startup Wizard does not, you can use either dialog to manage host licensing or email server data. Only the Configuration Options dialog lets you manage resources on the task level. Given the role that tasks play in making backup and restore jobs, this resource is vital.
• Configuration through the Startup Wizard
• Configuration without Using the Startup Wizard
• Configuration Options
Configuration through the Startup WizardYou must have an email SMTP server set up to enable notification during job creation. Later in this process, on the Notification Policy Selection dialog, you will have the option of choosing recipients. A plain text email will be sent when the job completes. The notification will include the job results, if you select that option.
• Select a License
• VirtualCenter and Host Information
• Host Licensing Information
• Virtual Appliance Information
• Add Repositories
• Set up Mail Server Information/Add Email Addresses

Configuration 58Configuration through the Startup Wizard
1 If you have just installed the software, click Next on the Startup Wizard. If not, access it through Tools-->Startup Wizard.
2 Click Next.
Select a LicenseThe Licenses dialog displays.

Configuration 59Configuration through the Startup Wizard
1 Click Add New License.
Note The license file for vRanger 5.2 is different from those used in version 5.1 and 5.0. Do not use a license file for previous versions of this software.
2 Select the license.
3 Click Open.
4 Click Save. Then, click Next.

Configuration 60Configuration through the Startup Wizard
VirtualCenter and Host InformationThe Virtual Center and Host Information dialog displays. Before vRanger can add targets to the My Inventory pane, you must configure a connection to a vCenter and/or an ESX(i) Server.
To add a vCenter:
1 In the VirtualCenters section, click Add.
2 In the DNS Name or IP field, enter the FQDN or IP address of the vCenter server.
3 In the User Name field, enter the user name of an account with administrator privileges on the vCenter server. See “vCenter Permissions” on page 18.
Note vRanger can only back up VMs that this user can “see.”
4 In the User Password field, enter the password for the account used above.
5 Click Save.
The vCenter will display in the VirtualCenters section and on the VirtualCenter Information dialog. The Hosts managed by that vCenter will display in the Hosts

Configuration 61Configuration through the Startup Wizard
section.
6 Click Next.
To add a Host not in vCenter:
1 In the Host section, click Add.
2 In the DNS Name or IP field, enter the FQDN or IP address of the Host.
3 In the User Name field, enter the user name of an account with administrator privileges on the Host.
4 In the User Password field, enter the password for the account used above.
5 In the Root Password field, enter the password for the root account.
Click Connect. The Host will be display in the Hosts section.
Host Licensing InformationThe Host Licensing Information dialog displays. It indicates the total number of licenses purchased, the number being used currently, and the number available.

Configuration 62Configuration through the Startup Wizard
1 View the CPUs Allowed value to confirm the number of sockets that are licensed for protection. The number of licenses currently allocated is shown in the CPUs Used column.
2 The Licensed Hosts section lists the managed hosts, the number of sockets for each host, and the licensed features for that host.
a The Sockets column indicates the license “cost” of each ESX Host.
b In the Pro Backup and/or Replication column, select or deselect ESX Hosts until you have used all of the available licenses, or until all of your ESX Hosts are protected.
3 Click Save.
4 Click Next.
Virtual Appliance InformationvRanger uses a virtual appliance for both Linux file-level recovery and for replication to and from VMware ESXi servers.

Configuration 63Configuration through the Startup Wizard
To simplify the startup procedure, the instructions for deploying and configuring the virtual appliances have been moved to “Configuring the Virtual Appliance” on page 78.
You may skip the virtual appliance configuration step now and continue with the Startup Wizard. You may access the Virtual Appliance Configuration dialog at any time via the Tools>Options menu.
Add RepositoriesvRanger uses repositories to store backup archives. Repositories can be either a CIFS NFS (version 3), FTP, or SFTP share. The procedure below shows mounting a CIFS share to the My Repositories pane. The steps for mounting any of the available

Configuration 64Configuration through the Startup Wizard
repositories are the same.
1 If the repository you want to add is listed on the left of the screen, click it to populate the fields on the right.Click Update and Next. If it is not listed, follow the steps below.
2 In the Repository Type section, select Windows Share (CIFS), if necessary.
3 Populate the Repository Name field.
This value will display in the My Repositories pane.
4 Populate the Description field.
5 Enter a Domain\username and password in the appropriate fields.
6 In the Server field, type the name of the server you want, or browse for the desired server.
Caution If you wish to use the Encrytp all backups feature, make certain to retain the password you enter in the following steps. There is no backdoor or admin-level password. If the password is unknown, the backups will not be usable.
7 Select Encrypt all backups to this repository if you wish these backups to be password-protected.

Configuration 65Configuration through the Startup Wizard
8 Enter a Password for the encrypted repository -- confirm the password by re-entering it.
9 Click Save -- the connection to the repository is tested and the repository is added to the My Repositories pane and the Repository Information dialog.
10 Click Next.
Set up Mail Server Information/Add Email Addresses
The Mail Server Information dialog displays. When you configure an SMTP server, select one that does not require authentication so that there are no obstacle to email notification transmission.
Step 1: SMTP Server
1 In the SMTP Server field, enter the DNS name or IP of an SMTP server.
2 In the From Address field, enter the email address that vRanger should use.
Note Make sure that you use a valid email account registered to the SMTP server that you added.
3 Click Send Test Email.
Step 2: Address Book
1 To add recipients, click Add.
2 Populate the Name and Email Address fields.
3 Click Save to add the information to the Email Addresses list.
4 Repeat steps 1-3 to include additional contacts.
5 Click Finish.
Options

Configuration 66Configuration without Using the Startup Wizard
Configuration without Using the Startup WizardThese instructions describe the process for configuring vRanger without using the Startup Wizard. During this process you will:
• Add a VirtualCenter
• Add an ESX Server
• Add a Repository
• Configure an SMTP Server
• Add Email Address
• Import License File
• Manage Host Licensing
• Manage Job Configuration Settings
• Configuring Linux File Level Restoration
Note To configure multiple hosts under the same vCenter, the system retains the data you entered to add credentials for the first host.
Add a VirtualCenter1 To add a VirtualCenter, navigate to the My Inventory view. From the Add icon
, select VirtualCenter.
2 On the VirtualCenter Credentials dialog, populate the DNS Name or IP, User Name, and User Password fields. Leave the Port Number default (443) as is. Click Connect.vRanger attempts to connect to the vCenter using the current configuration. If it is successful, the vCenter displays in the My Inventory pane.
Add an ESX Server1 From the My Inventory view, select the Add Icon-->ESX Host.
Note: If the connection is unsuccessful, confirm that the configuration settings are correct and that the vCenter is visible to the computer where vRanger is installed.
Configuration 67Configuration without Using the Startup Wizard
2 On the Add Host Credentials dialog, populate the DNS Name or IP, User Name, User Password, and Root Password fields. Leave the Port Number default (22). Click Connect.The host is added to the tree structure under the vCenter. Confirm this noting that a gold key icon displays adjacent to it in the My Inventory pane.
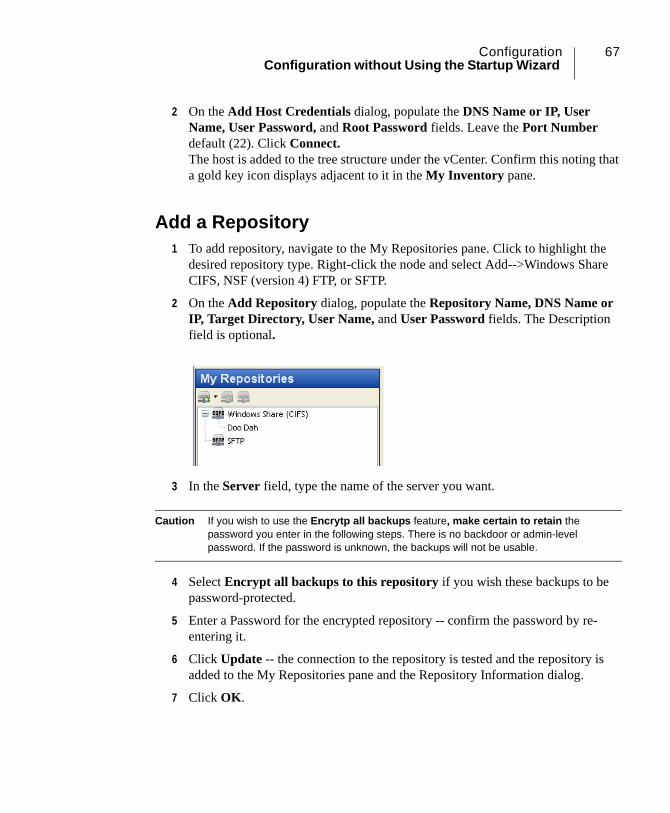
Add a Repository1 To add repository, navigate to the My Repositories pane. Click to highlight the
desired repository type. Right-click the node and select Add-->Windows Share CIFS, NSF (version 4) FTP, or SFTP.
2 On the Add Repository dialog, populate the Repository Name, DNS Name or IP, Target Directory, User Name, and User Password fields. The Description field is optional.
3 In the Server field, type the name of the server you want.
Caution If you wish to use the Encrytp all backups feature, make certain to retain the password you enter in the following steps. There is no backdoor or admin-level password. If the password is unknown, the backups will not be usable.
4 Select Encrypt all backups to this repository if you wish these backups to be password-protected.
5 Enter a Password for the encrypted repository -- confirm the password by re-entering it.
6 Click Update -- the connection to the repository is tested and the repository is added to the My Repositories pane and the Repository Information dialog.
7 Click OK.

Configuration 68Configuration without Using the Startup Wizard
Configure an SMTP Server1 Select Tools-->Options.
2 Under the General node on the Configuration Options dialog, click Email Configuration.
3 Populate the SMTP Server field.
4 Leave the default (25) in the Port field.
5 In the From Address field, enter an email address from which notifications should be sent.
6 Click Send Test Email. The confirmation message confirms the server connection and successful transmission to the email address you entered.
7 Click OK.
Add Email Address
1 Select Tools-->Options.
2 Under the General node on the Configuration Options dialog, click Email Configuration.

Configuration 69Configuration without Using the Startup Wizard
3 In the Email Addresses section, click Add.
4 Click the Add button.
5 Click OK.
Edit Email Address
1 Select Tools-->Options.
2 Under the General node, click Email Configuration.
3 In the Email Addresses section, select the email address that you want to edit. Click Edit.
4 Update the information and click Update.
5 The information is updated and moved to the Email Addresses section.
6 Click OK.
Remove Email Address
1 Select Tools-->Options.
2 Under the General node on the Configuration Options dialog, click Email Configuration.
3 In the Email Addresses section, select the email address that you want to delete.

Configuration 70Configuration without Using the Startup Wizard
4 Click Remove. The listing is deleted.
5 Click OK.
Import License FileBefore you start this process, confirm that you have placed your license file in a location that you can reach easily.
1 Select Tools-->Options.
2 Under the Licensing node on the Configuration Options dialog, click Product.
3 Click Add New License.
4 Browse to the location where you stored the license file. Click to select it and click Open.The new license information is added to the dialog.

Configuration 71Configuration without Using the Startup Wizard
5 Click Apply.The dialog refreshes with the new license information added.
6 Click OK.
Manage Host LicensingBefore you start this process, make sure that you have imported the license file and confirmed that it is adequate for managing the hosts that you want to use. The Host Licensing Summary section includes the total number of CPU licenses, the number being used currently, and the number of licenses remaining. These numbers will increment and decrement based on the selections you make on this dialog.
1 Select Tools-->Options.
2 Under the Licensing node, click Host.

Configuration 72Configuration without Using the Startup Wizard
3 In the Currently Installed Licenses section, view the CPUs Allowed value to confirm the number of sockets that are licensed for protection. The number of licenses currently allocated is shown in the CPUs Used column.
4 The Licensed Hosts section lists the managed hosts, the number of sockets for each host, and the licensed features for that host.
a The Sockets column indicates the license “cost” of each ESX Host.
b In the Pro Backup and/or Replication column, select or deselect ESX Hosts until you have used all of the available licenses, or until all of your ESX Hosts are protected.
5 Click OK.
Manage Job Configuration SettingsThrough the Configuration Options dialog, you can set limits for the number of tasks running, the timeframe for task execution, and the space allowed on a datastore to accommodate snapshot growth.

Configuration 73Configuration without Using the Startup Wizard
The maximum number of tasks fields are defined in the table below:
1 Select Tools-->Options.
2 Under the My Jobs node, click Configuration.
3 In the Resource Management section, set a maximum for the number of tasks that can be run:
• on vRanger (>=1) -- Default is 100.
• off a LUN (1-5) -- Default is 3.
• on a host (1-4) -- Default is 1.
• on each repository (>=1) -- Default is 3.
• locally (1 - 20) -- Default is 3.
• per VA (1 -18) -- Default is 2.
4 In the Timeout section, populate the Task Timeout (1-999 hours) field -- Default is 24
5 In the Space needed on host (in GBs) field, enter a number -- Default is 6.
6 Click OK.
On vRanger the maximum number of backup, restore and replication tasks running on this instance of vRanger at any one time
off a LUN the maximum number of tasks allowed on any particular logical storage device
on a host the maximum number of tasks running on a host at any given time
on each repository the maximum number of tasks allowed on any specific data store at any specific time
locally the number of backup, restore and replication tasks running on the machine on which vRanger is installed
per VA the number of backup, restore and replication tasks running on a vRanger virtual appliance.

Configuration 74Configuration without Using the Startup Wizard
Cataloging OptionsThe vRanger cataloging function must be enabled before data collection can begin. The Catalog dialog includes the option to enable or disable catalog collection, and displays the status of the Catalog Service.
In order for Catalog collections to function, the Catalog Service must display a status of “Running”.
1 Select Tools-->Options.
2 Under the My Jobs node, click Catalog.
3 Select Enable Catalog Data Collection.
4 Click OK.
Note Cataloging must also be enabled for each backup job for which you wish to collect catalog data.
Configuring Linux File Level RestorationTo simplify the startup procedure, the instructions for deploying and configuring the virtual appliances have been moved to “Configuring the Virtual Appliance” on page 78.

Configuration 75Configuration Options
Configuration OptionsThrough this dialog you can customize the basic settings that you selected in the Startup Wizard. You can access the Configuration Options dialog through Tools in the menu bar. The left pane of the dialog is set up in a nested structure.
General • Database: Use the Database dialog to enter a database server address and a username.
• Delete Jobs data: In order to reduce the size of your vRanger database, you may delete job data older than the configured date from the database.
Note Deleted data will no longer be available for reporting.
• Email Server: On this dialog, you can enter an SMTP server address and verify the connection to the port (default is 25). You can confirm successful transmission to the email address listed in the From Address field by clicking the Send Test Email button.
• Email Address Book: Here you can add and manage the email addresses of recipients to whom you would like reports sent.
Note The New Email Address Section becomes the Edit Email Address section when you select a listing in the Email Addresses section of the dialog.
Virtual Appliances • Configuration: This dialog links to the vRanger virtual appliance, and allows you to add configured VA’s for use by vRanger.
Licensing • Product License: On this dialog you can view the current product licensing details and import a license when your current one expires or needs to be replaced.
• Host: Use this dialog to allocate licensing to the hosts you added to the system. Refer to the Host Licensing Summary to view the total number of CPU licenses you are allowed, the number of licenses being used, and the number of licenses that remain.

Configuration 76Configuration Options
My Jobs Configuration• Resource Management: This section gives you access to
task management information.-Maximum number of tasks running on vRanger (>=1)Default is 100.-Maximum number tasks running off of a LUN (1 - 5)Default is 3.-Maximum number tasks running on a host (1- 4)Default is 1.-Maximum number tasks running per repository (>=1)Default is 3.-Maximum number tasks running locally (1 - 20)Default is 3.-Maximum number tasks running per VA (1 - 18)Default is 2.
• Timeout: In this section, you can set the period of time after which a task times out. The range is between 1 and 999 hours.
• Space needed on Hosts: You can define the additional datastore space needed for snapshot growth during backup. Populate this field in GB--Minimum space needed on host (in GBs). The snapshot log file grows on the source while the VM is archived and copied to the destination. The default value is 6.
Warning: If you allocate insufficient space, VMs on the datastore will power down and you could lose data.
Catalog• Catalog Service: Click the checkbox to enable catalog
data collection• Catalog Service Status: Status is listed as Available or
Unavailable – click Refresh to recheck the status.• Queue contents: lists catalog queues.
Transport FailoverUse this screen to set the relative priority for the available transport options. This priority will be used by vRanger to automatically address transport failures. These default
options can be changed at the job level.
Configuration 77Catalog Filtering
Catalog Filtering
Filtering Catalog CollectionsWhile there are thousands (or hundreds of thousands) of files in a typical VM, most are not relevant to file level recovery operations. In order to streamline cataloging operations, and reduce impact to the catalog database, vRanger filters files to be indexed in two ways:
• Path - by default, vRanger does not catalog any files in the directories listed below. Path filtering is determined by entries in the PathFilterTokens.txt file, located at C:\Program Files\Quest Software\vRanger\Service\Configuration.
• File - By default, vRanger does not catalog files of the type below. File filtering is determined by entries in the FilesFilterTokens.txt file, located at C:\Program Files\Quest Software\CatalogManager\Config\Files.
Note File filtering applies to un-filtered paths. If a path is filtered, files in that path do not need to be.
For most situations, the default filtering options will be sufficient. If you want to filter out additional paths or files, simply add the path or file to the appropriate text file.
Program FilesWindows$Extend$TxfLog
$TxfRECYCLER
System Volume InformationI386
.lnk$MFT
$Volume$AttrDef$BitMap
$Boot$BadClus$Secure$UpCase$Quota$ObjID
$Reparse$RmMetadata
$Repair$Tops
$TxfLog

Configuring the Virtual Appliance
This chapter outlines the process of deploying and configuring the vRanger Virtual Appliance.
This chapter contains the following sections:
Deploying the Virtual Appliance....................................................................... 79
Configuring the Virtual Appliance .................................................................... 80
Optional Network Configurations ................................................................. 84
Deploying Multiple VAs From a Template - VI Client.................................... 85
Deploying Multiple VAs From a Template - PowerCLI ................................. 87
Adding the Virtual Appliance to vRanger ......................................................... 90

Configuring the Virtual Appliance 79Deploying the Virtual Appliance
Deploying the Virtual AppliancevRanger uses a virtual appliance for both Linux file-level recovery and for replication to and from VMware ESXi servers. The vRanger virtual appliance is available via the Quest website: http://www.quest.com/landing/?id=5414.
Deploying Multiple Virtual AppliancesThe vRanger virtual appliance is required when replicating to or from an ESXi server. In addition, replication via virtual appliance requires that if a VA is used on one host in a replication job, then a VA must be used on both hosts. In other words, virtual appliances, when used for replication, must be used in pairs.
To streamline the deployment process, Quest recommends that you deploy and configure the virtual appliance once, then save it as a template to be used for additional deployments. The Configuring the Virtual Appliance procedures include an optional step for creating a template from the configured VA.
From this template, you have two options to deploy additional VA instances; a manual process using the VI Client, or a scripted process using PowerCLI. Regardless of which process you choose, if you wish to use a static IP address for the virtual appliances, you will need to configure that manually. Instructions for template deployment and network configuration can be found in the sections below:
• “Optional Network Configurations” on page 84
• “Deploying Multiple VAs From a Template - VI Client” on page 85
• “Deploying Multiple VAs From a Template - PowerCLI” on page 87
Note The procedures below were capture using VMware vCenter 4.1, update 1. The procedures may differ slightly for previous versions of vCenter. Consult your VMware documentation for the correct procedure for deploying a virtual appliance for your version of vCenter.
To deploy the virtual appliance:
1 On the website above, find the “Click to download OVF file” link. Right-click and select Copy Link Location.

Configuring the Virtual Appliance 80Configuring the Virtual Appliance
2 In your vSphere VI Client, click File, then Deploy OVF Template.
3 In the Deploy from a file or URL field, paste the link copied in step 1. Click Next.
4 Continue through the OVF import process, selecting the appropriate host and datastore configuration.
The OVF import process may take several minutes. When complete, continue to the configuration section below.
Configuring the Virtual ApplianceBefore using the virtual appliance, some changes must be made to the default configuration.
Step 1: Change the Default Password
1 From your VI Client, find the VA and power it on.
2 Using the console, login as root to the virtual appliance, using the default credentials below:
• username: root
• password: vzroot1

Configuring the Virtual Appliance 81Configuring the Virtual Appliance
3 At the prompt, enter passwd. Enter and re-type a new password for the root account.
Caution This is an important security step. Please ensure that you change the default password for the root account.
Step 2: Install VMware Tools
1 From the VI Client, right-click on the virtual appliance. Click Guest, then Install/Upgrade VMware Tools.
2 At the prompt, enter /root/bin/install_vmware_tools.sh.
The installer script will install VMware Tools. The installation is complete when you see the message:
Caution No input is necessary for the VMware Tools installation. All prompts will be answered by the installer script.
Step 3: Adding Second “Scratch” Disk
Before using the vRanger virtual appliance, you will need to add a second disk. There is no need to format, or prepare this disk - the virtual appliance will configure it after the first reboot.
The second disk of the virtual appliance is used to store an “undo” file for each replication task active on that VA. When a replication task completes, the space for the undo file is reclaimed. The only file stored in the scratch space is the .vzmap file, which is the data map file, and is usually a few MB in size.

Configuring the Virtual Appliance 82Configuring the Virtual Appliance
Sizing the Scratch Disk
As a basic rule for sizing the second disk - take the largest VM you will be replicating with this VA, and divide the disk size by two. Multiply that value by the number of concurrent replication tasks you will run on this virtual appliance.
As an example, if your largest VM is 80 GB, and you will be running up to 4 concurrent jobs, you would size the second disk at 160 GB ((80/2) x 4 = 160GB)).
When creating the second disk, make sure you place the disk on a datastore with block sizes large enough to support the expected VMDK. The list below shows the maximum file size available for each block size:
• 1MB block size – 256GB maximum file size
• 2MB block size – 512GB maximum file size
• 4MB block size – 1024GB maximum file size
• 8MB block size – 2048GB maximum file size
To add the scratch disk:
1 From the VI Client, right-click on the virtual appliance, and select Edit Settings.
2 On the Hardware tab, click Add.
3 Select Hard Disk. Click Next.
4 Select Create a new virtual disk.
5 Configure the size for the disk. Click Next.
6 Leave the Virtual Device Node setting as SCSI. Click Next.
7 Click Finish.
Step 4: Resource Configuration
The VA is configured by default with 1 vCPUs and 512 GB of RAM. This is sufficient to allow 2 concurrent tasks per VA. If you will need to run more than 2 tasks concurrently, increase the resources allocated to the VA.
Note If you observe consistent high CPU and Memory utilization on the virtual appliance, consider adding more resources ensure uninterrupted performance.
1 From the VI Client, right-click the virtual appliance and select Edit Settings.
2 In the Virtual Machine Properties dialog, select Memory. Move the slider, or use the up arrow in the Memory Size field to adjust the allocated memory.
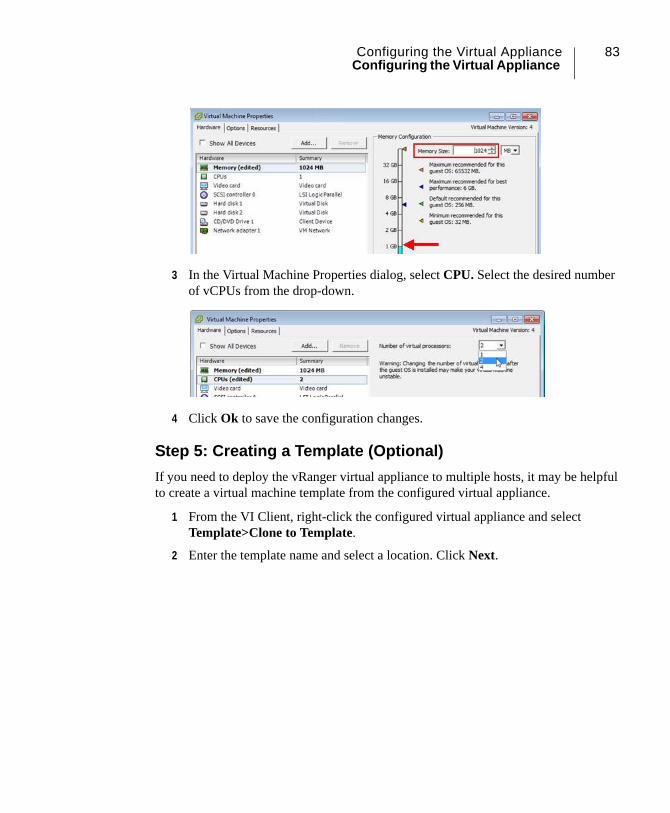
Configuring the Virtual Appliance 83Configuring the Virtual Appliance
3 In the Virtual Machine Properties dialog, select CPU. Select the desired number of vCPUs from the drop-down.
4 Click Ok to save the configuration changes.
Step 5: Creating a Template (Optional)
If you need to deploy the vRanger virtual appliance to multiple hosts, it may be helpful to create a virtual machine template from the configured virtual appliance.
1 From the VI Client, right-click the configured virtual appliance and select Template>Clone to Template.
2 Enter the template name and select a location. Click Next.

Configuring the Virtual Appliance 84Configuring the Virtual Appliance
3 Select the host or cluster on which the template is to be stored. Click Next.
4 Select the datastore in which the template is to be stored. Click Next.
5 On the Disk Format dialog, select Same format as source. Click Next.
6 Review the configurations and click Finish.
Optional Network ConfigurationsThe virtual appliance is configured by default to use DHCP. You may choose to re-configure network settings to change the hostname, or to use a static IP address.
Step 1: Changing the Hostname
1 Login to the virtual appliance.
2 Using the VI text editor, edit the network configuration file:
vi /etc/sysconfig/network
3 Change the hostname to the new value. Save the file.
4 Restart the VM by typing reboot at the prompt.
Step 2: Changing the Network Configuration
1 Login to the virtual appliance.
2 Using the VI text editor, create a configuration file for eth0:
vi /etc/sysconfig/network-devices/ifconfig.eth0/ipv4
Configuring the Virtual Appliance 85Configuring the Virtual Appliance
3 Enter the following text, substituting the appropriate IP address where indicated:
ONBOOT=yes
SERVICE=ipv4-static
IP=<static IP of VA>
GATEWAY=<IP of gateway>
PREFIX=<this is the subnet mask - your values may differ>
BROADCAST=<your broadcast IP- the highest IP in the VA’s subnet.>
4 Save the file.
5 Move the DCHP configuration file to the root directory. This will disable DHCP.
mv -v /etc/sysconfig/network-devices/ifconfig.eth0/dhcpcd /root/
6 Restart the VM by typing reboot at the prompt.
Step 3: Configuring DNS
It may be necessary, depending on your environment, to configure the virtual appliance with DNS nameserver information.
1 Login to the virtual appliance.
2 Using the VI text editor, edit the resolv.conf file:
vi /etc/resolv.conf
3 Enter the following text, substituting the appropriate values where indicated:
search <domain1> <domain2> <domain3>
nameserver <IP address>
nameserver <IP address>
4 Save the file.
5 Restart the VM by typing reboot at the prompt.
Deploying Multiple VAs From a Template - VI ClientUnless you have only one ESXi host, you will need to deploy multiple instances of the vRanger virtual appliance. You may deploy additional instances either by using the VI

Configuring the Virtual Appliance 86Configuring the Virtual Appliance
client (as documented below), or via a PowerCLI script as documented in “Deploying Multiple VAs From a Template - PowerCLI” on page 87
Note If you wish to use a static IP address, or need to configure DNS information, that must be done manually for each deployed instance - see “Optional Network Configurations” on page 84 for instructions.
To deploy an instance of the vRanger virtual appliance from the template created in Step 4: Resource Configuration, follow the procedures below.
1 In the VI Client, find the template you created previously. To view templates, click View>Inventory>VMs and Templates.
2 Right-click on the template, and select Deploy Virtual Machine from this Template.
3 In the Name and Location dialog, enter a name for the VA, and select the appropriate inventory location. Click Next.
4 In the Host/Cluster dialog, select the host on which the VA is to be run. Click Next.
Note You will need to deploy an instance of the vRanger VA to every ESXi host used as a replication source or target.
5 Select the datastore in which the VA files will be stored. Click Next.

Configuring the Virtual Appliance 87Configuring the Virtual Appliance
6 In the Disk Format dialog, select Same format as source. Click Next.
7 In the Guest Customization dialog, select Do not customize. Click Next.
8 Review the selections. Click Finish.
9 Repeat steps 1-8 as needed for other ESXi hosts.
Note After the virtual appliances have been deployed, refer to “Optional Network Configurations” on page 84 for instructions on how to configure IP and DNS information.
Deploying Multiple VAs From a Template - PowerCLIUsing vSphere PowerCLI and a pre-configured CSV file, you can automate the deployment of the vRanger virtual appliance to multiple hosts. This method requires the initial deployment using DHCP, although you can change the networking options for the virtual appliance after deployment using the instructions in “Optional Network Configurations” on page 84.
The high level steps required for this process are:
• Using the VI Client, create a Customization Specification
• Populate a CSV with VM, Host, and Datastore information
• Execute the PowerCLI Script
Step 1: Customization Specification
The Customization Specification provides basic configuration information used in creating the VMs.
1 From the VI Client, click View>Management>Customization Specifications Manager. Click New.
The New Customization Specification Wizard appears:
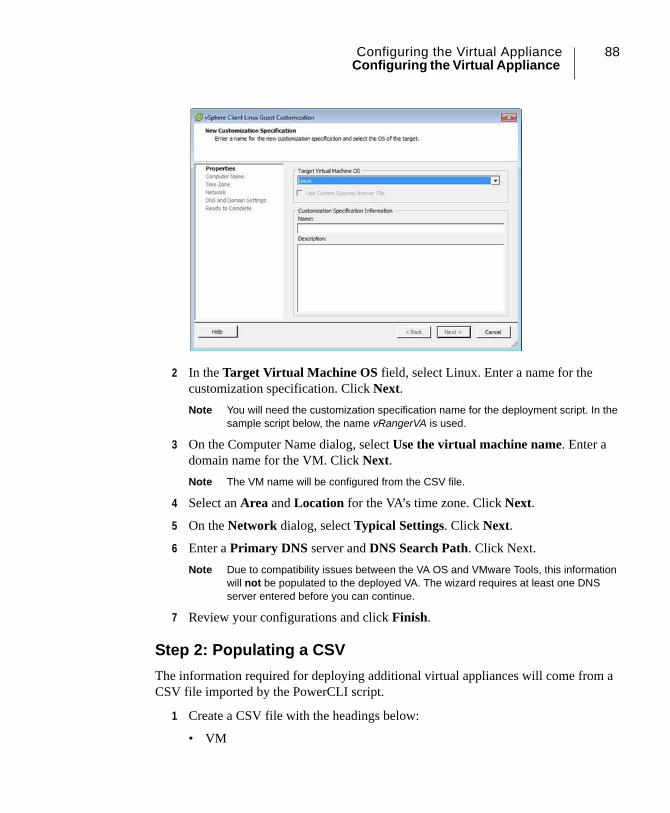
Configuring the Virtual Appliance 88Configuring the Virtual Appliance
2 In the Target Virtual Machine OS field, select Linux. Enter a name for the customization specification. Click Next.
Note You will need the customization specification name for the deployment script. In the sample script below, the name vRangerVA is used.
3 On the Computer Name dialog, select Use the virtual machine name. Enter a domain name for the VM. Click Next.
Note The VM name will be configured from the CSV file.
4 Select an Area and Location for the VA’s time zone. Click Next.
5 On the Network dialog, select Typical Settings. Click Next.
6 Enter a Primary DNS server and DNS Search Path. Click Next.
Note Due to compatibility issues between the VA OS and VMware Tools, this information will not be populated to the deployed VA. The wizard requires at least one DNS server entered before you can continue.
7 Review your configurations and click Finish.
Step 2: Populating a CSV
The information required for deploying additional virtual appliances will come from a CSV file imported by the PowerCLI script.
1 Create a CSV file with the headings below:
• VM

Configuring the Virtual Appliance 89Configuring the Virtual Appliance
• Datastore
• VMhost
• Template
Note It is easiest to create a CSV file in a spreadsheet program such as Microsoft Excel. Once you save the file as a CSV however, only open the file using Notepad.
2 Populate the rows below the headers with the appropriate information:
• VM - this is the name of the VA that will be deployed
• Datastore - the datastore to which the VA will be deployed
• Host - the Host on which the VA will run.
• Template - the name of the template created in “Step 4: Resource Configuration” on page 82.
3 Save the file as a CSV. For best results, open the file using Notepad (or similar) to verify formatting. In the sample script below, this file is named VADeploy.csv
Step 3: Executing the PowerCLI Script
The commands below are entered using vSphere PowerCLI.
1 Enter the command below to connect PowerCLI to your vCenter. Substitute the correct values for your environment.
Connect-VIServer <vCenter> -User <username>-Password <password>
2 Enter the following commands to deploy your virtual appliances:
Import-Csv VADeploy.csv | %{
Get-OSCustomizationSpec vRangerVA | Get-OSCustomizationNicMapping | Set-OSCustomizationNicMapping –IpMode UseDHCP
New-VM –Vmhost $_.VMhost –name $_.VM –Template $_.Template –Datastore $_.Datastore –OSCustomizationSpec vRangerVA
}
The example above uses information that will vary based on your environment, as highlighted in red and italics.
• VADeploy.csv - the name of your CSV file.
• vRangerVA - the name of your Customization Specification.

Configuring the Virtual Appliance 90Adding the Virtual Appliance to vRanger
A status bar indicates deployment progress:
Disabling DRS for the vRanger ApplianceIf the vRanger appliance is configured on hosts that are part of a DRS enabled cluster, the VA(s) may be migrated to a different host due to DRS/HA activity. This will cause replication failures as the virtual appliance is no longer in the expected location (as configured in vRanger). To prevent this disruption, it is important to disable DRS for the vRanger virtual appliances.
1 In your VI client, find the cluster(s) containing the vRanger virtual appliances.
2 Right-click on the cluster, and select Edit Settings.
3 In the Cluster Settings dialog, select Virtual Machine Options.
4 Search for or find the vRanger virtual appliances. Right-click on each virtual appliance, and select manual.
5 Click Ok.
Adding the Virtual Appliance to vRangerOnce the virtual appliance(s) are configured, you will need to add them to the vRanger Virtual Appliances inventory.
You may add one or more virtual appliances to vRanger during the Startup Wizard displayed when vRanger is first launched.
You may also launch the Startup Wizard at any point from the Tools menu, or use the Tools>Options to launch the Configuration Options dialog.
To add a virtual appliance to vRanger:
1 From the vRanger UI, select the My Inventory view, and click the refresh icon
to refresh the inventory.

Configuring the Virtual Appliance 91Adding the Virtual Appliance to vRanger
1 From the Configuration Options dialog, select Virtual Appliances.
2 Click Add. The Add virtual appliance configuration dialog appears, showing the vCenter inventory tree.
3 Browse the inventory tree, and select the virtual appliance.
4 Enter the root password for the virtual appliance, and click OK.
The virtual appliance will appear in the Deployed Virtual Appliances section:
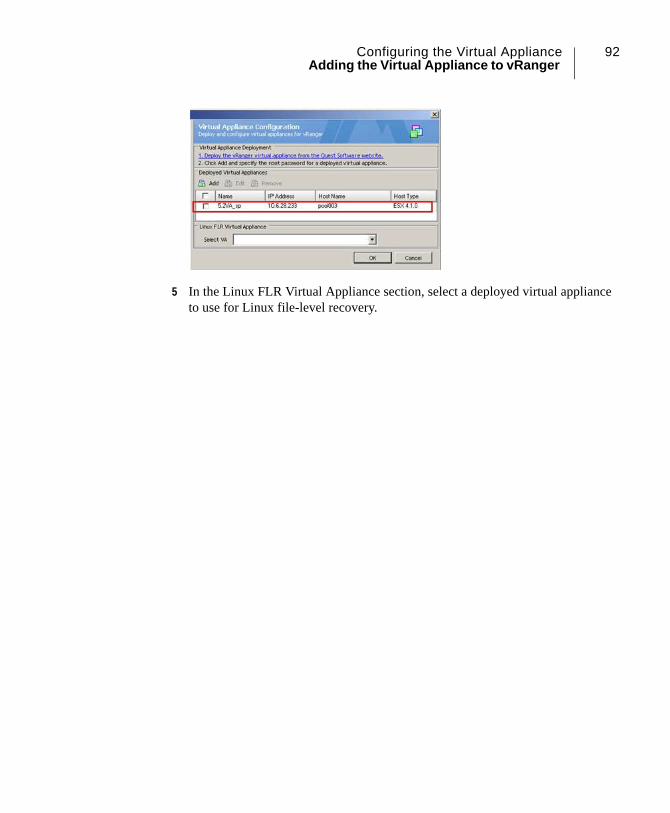
Configuring the Virtual Appliance 92Adding the Virtual Appliance to vRanger
5 In the Linux FLR Virtual Appliance section, select a deployed virtual appliance to use for Linux file-level recovery.

Index 93
Index
AAbout
vRanger 7
Ccataloging
filtering 77installing the catalog manager 51
configurationoptions 75with Startup Wizard 57without Startup Wizard 66
Ddatabase 15
sizing the catalog database 17documentation
core 8
Iinstallation
catalog manager 51database 15in a vm 13
using cloned VMs 14on new SQL Express 33on SQL server 42options 13
Llicensing
changes in vRanger 5.2 24during an upgrade 24
licensing levels 12single license limitation 13trial license 13
Linux FLR Configuration 74
SSQL
supported versions 16Startup Wizard
add repositories 63email notification 65select a license 58
support 9
Ttechnical support 9
VvCenter
required permissions 18virtual appliance
adding to vRanger 90deploying 79deploying mutltiple instances 79disabling DRS 90optional configurations 84required configurations 80sizing the scratch disk 82
vRangerinstallation
database 15deploying the virtual appliance 79on new SQL Express 33on SQL server 42

Index 94
options 13license changes 24supported SQL versions 16upgrading
from vRanger 25from vReplicator 30