vsphere esxi-vcenter-server-50-installation-setup-guide
TRANSCRIPT

vSphere Installation and SetupvSphere 5.0
ESXi 5.0vCenter Server 5.0
This document supports the version of each product listed andsupports all subsequent versions until the document is replacedby a new edition. To check for more recent editions of thisdocument, see http://www.vmware.com/support/pubs.
EN-000588-02

vSphere Installation and Setup
2 VMware, Inc.
You can find the most up-to-date technical documentation on the VMware Web site at:
http://www.vmware.com/support/
The VMware Web site also provides the latest product updates.
If you have comments about this documentation, submit your feedback to:
Copyright © 2009–2011 VMware, Inc. All rights reserved. This product is protected by U.S. and international copyright andintellectual property laws. VMware products are covered by one or more patents listed at http://www.vmware.com/go/patents.
VMware is a registered trademark or trademark of VMware, Inc. in the United States and/or other jurisdictions. All other marksand names mentioned herein may be trademarks of their respective companies.
VMware, Inc.3401 Hillview Ave.Palo Alto, CA 94304www.vmware.com

Contents
About vSphere Installation and Setup 7
Updated Information 9
1 Introduction to vSphere Installation and Setup 11
How vSphere 5.0 Differs from vSphere 4.x 11Overview of the vSphere Installation and Setup Process 13Options for Installing ESXi 14Media Options for Booting the ESXi Installer 15Using Remote Management Applications 26Required Information for ESXi Installation 26
2 System Requirements 29
ESXi Hardware Requirements 29ESXi Support for 64-Bit Guest Operating Systems 32vCenter Server and vSphere Client Hardware Requirements 33vCenter Server Software Requirements 36vSphere Client and vSphere Web Client Software Requirements 37Providing Sufficient Space for System Logging 37Required Ports for vCenter Server 38Required Ports for the vCenter Server Appliance 39Conflict Between vCenter Server and IIS for Port 80 40DNS Requirements for vSphere 40Supported Remote Management Server Models and Minimum Firmware Versions 41
3 Installing ESXi Interactively 43
Install ESXi Interactively 43Install ESXi on a Software iSCSI Disk 45
4 Installing, Upgrading, or Migrating Hosts Using a Script 47
Approaches for Scripted Installation 47Enter Boot Options to Start an Installation or Upgrade Script 48About Installation and Upgrade Scripts 50Install, Upgrade, or Migrate ESXi from a CD or DVD Using a Script 59Install, Upgrade, or Migrate ESXi from a USB Flash Drive Using a Script 60Performing a Scripted Installation or Upgrade of ESXi by PXE Booting the Installer 61
5 Installing ESXi Using vSphere Auto Deploy 63
Understanding vSphere Auto Deploy 63Auto Deploy Roadmap and Cmdlet Overview 70Preparing for vSphere Auto Deploy 73
VMware, Inc. 3

Managing Auto Deploy with PowerCLI Cmdlets 78Provisioning ESXi Systems with vSphere Auto Deploy 82Setting Up an Auto Deploy Reference Host 85Advanced Management Tasks 91Auto Deploy Best Practices and Security Consideration 97Troubleshooting Auto Deploy 100Auto Deploy Proof of Concept Setup 106
6 Using vSphere ESXi Image Builder CLI 123
Understanding Image Builder 123Image Builder Installation and Usage 130Image Builder Common Tasks 131Image Builder Workflows 135
7 Setting Up ESXi 141
ESXi Autoconfiguration 141About the Direct Console ESXi Interface 142Set the Password for the Administrator Account 144Configuring the BIOS Boot Settings 145Host Fails to Boot After You Install ESXi in UEFI Mode 146Network Access to Your ESXi Host 146Configure the Network Settings on a Host That Is Not Attached to the Network 147Managing ESXi Remotely 147Configuring Network Settings 148Storage Behavior 152View System Logs 155Configure Syslog on ESXi Hosts 155Enable Lockdown Mode Using the Direct Console 156Enable ESXi Shell and SSH Access with the Direct Console User Interface 157Set the Host Image Profile Acceptance Level 157Reset the System Configuration 158Remove All Custom Packages on ESXi 159Disable Support for Non-ASCII Characters in Virtual Machine File and Directory Names 159Disable ESXi 159
8 After You Install and Set Up ESXi 161
Managing the ESXi Host with the vSphere Client and the vSphere Web Client 161Licensing ESXi Hosts 161
9 Preparing vCenter Server Databases 165
vCenter Server Database Patch and Configuration Requirements 165Create a 64-Bit DSN 166Configure vCenter Server to Communicate with the Local Database 167About the Bundled Microsoft SQL Server 2008 R2 Express Database Package 167Maintaining a vCenter Server Database 167Configure DB2 Databases 168Configure Microsoft SQL Server Databases 176Configure Oracle Databases 186
vSphere Installation and Setup
4 VMware, Inc.

10 Before You Install vCenter Server 193
vCenter Server Prerequisites 193Using a User Account for Running vCenter Server 195Installing vCenter Server on IPv6 Machines 195JDBC URL Formats for the vCenter Server Database 196Configure the URLs on a Standalone vCenter Server System 197Running the vCenter Server and vSphere Client Installers from a Network Drive 198Required Information for Installing vCenter Server 198Microsoft SQL Database Set to Unsupported Compatibility Mode Causes vCenter Server Installation
or Upgrade to Fail 200
11 Installing vCenter Server 201
vCenter Server Components and Support Tools 201Download the vCenter Server Installer 202Install vCenter Server 202Install vCenter Server in a Virtual Machine 204Download and Deploy the VMware vCenter Server Appliance 205
12 After You Install vCenter Server 207
Install vCenter Server Components 208Creating vCenter Server Linked Mode Groups 216Using a License Server to Manage Version 3.5 ESX or ESXi Hosts 222VMware vCenter Management Webservices Service Fails to Start 222Back Up the Inventory Service Database on Windows 223Restore an Inventory Service Database Backup on Windows 223Back Up the Inventory Service Database on Linux 224Restore an Inventory Service Database Backup on Linux 224Update the vCenter Inventory Service URL Configuration 225Reset the vCenter Inventory Service Database 225
Index 227
Contents
VMware, Inc. 5

vSphere Installation and Setup
6 VMware, Inc.

About vSphere Installation and Setup
vSphere Installation and Setup describes how to install new configurations of VMware® vCenter Server andESXi.
Intended AudiencevSphere Installation and Setup is intended for anyone who needs to install and set up vCenter Server and ESXi5.0.
This information is written for experienced Windows or Linux system administrators who are familiar withvirtual machine technology and datacenter operations.
VMware, Inc. 7

vSphere Installation and Setup
8 VMware, Inc.

Updated Information
This vSphere Installation and Setup publication is updated with each release of the product or when necessary.
This table provides the update history of the vSphere Installation and Setup publication.
VMware, Inc. 9

Revision Description
EN-000588-02 n The topic “Required Ports for the vCenter Server Appliance,” on page 39 was added.n In the topic “Format a USB Flash Drive to Boot the ESXi Installation or Upgrade,” on page 16, a step
was added to determine how the USB flash device is identified by the operating system.n In the topic “Storage Behavior,” on page 152, in the table "Partitions Created by ESXi on the Host Drive,"
the text was revised in the entry for ESXi Installable.n In the topic “About the Scratch Partition,” on page 153, a note was added to advise users that the ESXi
installer requires 5.2GB of free space on the installation disk to create the VMFS volume and scratchpartition.
n The topic “vCenter Server Database Patch and Configuration Requirements,” on page 165 was updatedto remove outdated information about supported database configurations, and to add a link to theonline Product Interoperability Matrix for such information.
n Minor revisions were made throughout the publication.
EN-000588-01 n In the topic “Format a USB Flash Drive to Boot the ESXi Installation or Upgrade,” on page 16, thefollowing changes were made.n In step 4, "syslinux-3.82" was changed to "syslinux-3.86" and in the second line of the command,
"sdb1" was changed to "sdb."n An additional step was added after step 8.n A note was added to advise that the same USB flash drive cannot be used both to store the
installation script ks file and to boot the installation or upgrade.n In the topic “Create a USB Flash Drive to Store the ESXi Installation or Upgrade Script,” on page 17,
a note was added to advise that the same USB flash drive cannot be used both to store the installationscript ks file and to boot the installation or upgrade.
n In the topic “ESXi Hardware Requirements,” on page 29, the following changes were made.n The information about supported x64 multicore processors and ESXi memory requirements was
updated.n A note was added advising that support for hardware virtualization must be enabled on x64 CPUs
to support 64-bit virtual machines.n In the topic “vCenter Server and vSphere Client Hardware Requirements,” on page 33, the following
changes were made.n In the section "VMware vCenter Server Appliance Hardware Requirements and
Recommendations," a note was added to explain the inventory limits of the vCenter ServerAppliance embedded database.
n In the table "Recommended JVM Heap Settings for vCenter Server," the figures for Profile-DrivenStorage Service were corrected.
n In the topic “Download and Deploy the VMware vCenter Server Appliance,” on page 205, a note wasadded to explain the inventory limits of the vCenter Server Appliance embedded database.
n In the topic“Set Database Permissions By Manually Creating Database Roles and the VMW Schema,”on page 178, an error was corrected in step 12.
n In the topic “Configure IP Settings from the vSphere Client,” on page 149, an error was corrected instep 5.
n In the topic “Set Up Bulk Licensing,” on page 77, an error was corrected in step 3.n Minor revisions were made throughout the publication.
EN-000588-00 Initial release.
vSphere Installation and Setup
10 VMware, Inc.

Introduction to vSphere Installationand Setup 1
vSphere 5.0 provides various options for installation and setup. To ensure a successful vSphere deployment,understand the installation and setup options, and the sequence of tasks required.
You have several options for installing and setting up ESXi, for managing vSphere with vCenter Server, thevSphere Client, and the vSphere Web Client, and for the database setup that you use with vCenter Server.
This chapter includes the following topics:
n “How vSphere 5.0 Differs from vSphere 4.x,” on page 11
n “Overview of the vSphere Installation and Setup Process,” on page 13
n “Options for Installing ESXi,” on page 14
n “Media Options for Booting the ESXi Installer,” on page 15
n “Using Remote Management Applications,” on page 26
n “Required Information for ESXi Installation,” on page 26
How vSphere 5.0 Differs from vSphere 4.xvSphere 5.0 is a major upgrade from vSphere 4.x.
The following changes from vSphere 4.x affect vSphere installation and setup. For a complete list of newfeatures in vSphere 5.0, see the release notes.
Service Console isremoved
ESXi does not include a Service Console. You can perform most tasks that youperformed in the Service Console by using esxcli commands in the ESXi Shell,by using vCLI commands, and by using VMware PowerCLI commands. SeeCommand-Line Management in vSphere 5.0 for Service Console Users and GettingStarted with vSphere Command-Line Interfaces.
ESXi does not have agraphical installer
The graphical installer relied on the Service Console, which is not a part ofESXi. ESXi retains the text-based installer.
vSphere Auto Deployand vSphere ESXi ImageBuilder CLI
Before ESXi 5.0, ESXi was installed on the physical disk of each ESXi host. WithESXi 5.0, you can load an ESXi image directly into memory by using vSphereAuto Deploy. You can provision and reprovision large numbers of ESXi hostsefficiently with vCenter Server, and manage ESXi updates and patching byusing an image profile. You can save host configuration such as network orstorage setup as a host profile and apply it to the host by using Auto Deploy.You can use ESXi Image Builder CLI to create ESXi installation images with acustomized set of updates, patches, and drivers.
VMware, Inc. 11
For complete information on using vSphere Auto Deploy and ESXi ImageBuilder PowerCLI, see Chapter 5, “Installing ESXi Using vSphere AutoDeploy,” on page 63 and Chapter 6, “Using vSphere ESXi Image BuilderCLI,” on page 123.
Changes in the ESXiinstallation and upgradeprocess
ESXi 5.0 uses a single installer wizard for fresh installations and upgrades.ESXi 5.0 also provides a new option for deploying ESXi directly into the hostmemory with vSphere Auto Deploy. The vihostupdate and esxupdate utilitiesare not supported for ESXi 5.0. You cannot upgrade or migrate to ESXi 5.0 byusing any command-line utility. After you have upgraded or migrated toESXi 5.0, you can upgrade or patch ESXi 5.0 hosts using vCLI esxclicommands.
IMPORTANT After you upgrade or migrate your host to ESXi 5.0, you cannotroll back to your version 4.x ESX or ESXi software. Back up your host beforeyou perform an upgrade or migration, so that, if the upgrade or migration fails,you can restore your 4.x host.
If you are upgrading an existing ESX or ESXi host, see the vSphere Upgradedocumentation.
Installer caching Instead of using a binary image to install the system, whatever bits were usedat boot time are cached to the system. This caching reduces installationproblems caused by accessing installation files across networks that are underload.
NOTE Scripted installations cannot PXE boot a server and then obtain thebinary image from some other form of media.
Changes to partitioningof host disks
All freshly installed hosts in vSphere 5.0 use the GUID Partition Table formatinstead of the MSDOS-style partition label. This change supports ESXiinstallation on disks larger than 2TB.
Newly installed vSphere 5.0 hosts use VMFS5, an updated version of theVMware File System for vSphere 5.0. Unlike earlier versions, ESXi 5.0 does notcreate VMFS partitions in second and successive disks.
Upgraded systems do not use GUID Partition Tables (GPT), but retain the olderMSDOS-based partition label.
NOTE Partitioning for hosts that are upgraded to ESXi 5.0 differs significantlyfrom partitioning for new installations of ESXi 5.0. See the vSphere Upgradedocumentation.
VMware vCenter ServerAppliance
As an alternative to installing vCenter Server on a Windows machine, vSphere5.0 provides the VMware vCenter Server Appliance. The vCenter ServerAppliance is a preconfigured Linux-based virtual machine optimized forrunning vCenter Server and associated services.
vSphere Web Client The vSphere Web Client is a server application that provides a browser-basedalternative to the traditional vSphere Client. You can use a Web browser toconnect to the vSphere Web Client to manage an ESXi host through a vCenterServer.
vSphere Installation and Setup
12 VMware, Inc.

Installing ESXi on a Drive with an Existing ESX or ESXi Installation or VMFSDatastore
ESXi 5.0 uses the same installer for fresh installations and upgrades or migrations. If the installer finds anexisting ESX 4.x or ESXi 4.x installation, it provides the option to upgrade or to do a fresh installation.
See vSphere Upgrade.
Depending on the disk layout of your system, the ESXi installer offers a choice between preserving oroverwriting the VMFS datastore during installation.
Overview of the vSphere Installation and Setup ProcessvSphere is a sophisticated product with multiple components to install and set up. To ensure a successfulvSphere deployment, understand the sequence of tasks required.
Installing vSphere includes the following tasks:
1 Verify that your system meets vSphere hardware and software requirements. See Chapter 2, “SystemRequirements,” on page 29.
2 Determine the ESXi installation option to use. See “Options for Installing ESXi,” on page 14.
3 Determine where you will locate and boot the ESXi installer. See “Media Options for Booting the ESXiInstaller,” on page 15. If you are PXE-booting the installer, verify that your network PXE infrastructureis properly set up. See “PXE Booting the ESXi Installer,” on page 19.
4 Install ESXi:
n Chapter 3, “Installing ESXi Interactively,” on page 43
n Chapter 4, “Installing, Upgrading, or Migrating Hosts Using a Script,” on page 47
n Chapter 5, “Installing ESXi Using vSphere Auto Deploy,” on page 63
5 Configure ESXi boot and network settings, the direct console, and other settings. See Chapter 7, “SettingUp ESXi,” on page 141.
6 Install the vSphere Client to manage your ESXi host. License your host and back up your hostconfiguration. See Chapter 8, “After You Install and Set Up ESXi,” on page 161.
7 Consider setting up a syslog server for remote logging, to ensure sufficient disk storage for log files. Settingup logging on a remote host is especially important for hosts with limited local storage. Optionally, youcan install the vSphere Syslog Collector to collect logs from all hosts. See “Providing Sufficient Space forSystem Logging,” on page 37, “Configure Syslog on ESXi Hosts,” on page 155, “Set Up Syslog from theHost Profiles Interface,” on page 90, and “Install vSphere Syslog Collector,” on page 213.
8 (Optional) Perform these tasks if you are using vCenter Server to manage your vSphere deployment:
a Set up vCenter Server databases. See Chapter 9, “Preparing vCenter Server Databases,” onpage 165.
b Install vCenter Server and vCenter Server support tools. Connect to vCenter Server from the vSphereClient or the vSphere Web Client. See Chapter 11, “Installing vCenter Server,” on page 201 and Chapter 12, “After You Install vCenter Server,” on page 207.
c (Optional) Create a Linked Mode Group or join vCenter Server to a Linked Mode Group. See “Creating vCenter Server Linked Mode Groups,” on page 216.
Chapter 1 Introduction to vSphere Installation and Setup
VMware, Inc. 13

Options for Installing ESXiESXi can be installed in several ways. To ensure the best vSphere deployment, understand the optionsthoroughly before beginning the installation.
ESXi installations are designed to accommodate a range of deployment sizes.
Depending on the installation method you choose, different options are available for accessing the installationmedia and booting the installer.
Interactive ESXi InstallationInteractive installations are recommended for small deployments of fewer than five hosts.
You boot the installer from a CD or DVD, from a bootable USB device, or by PXE booting the installer from alocation on the network. You follow the prompts in the installation wizard to install ESXi to disk. See Chapter 3,“Installing ESXi Interactively,” on page 43.
Scripted ESXi InstallationRunning a script is an efficient way to deploy multiple ESXi hosts with an unattended installation.
The installation script contains the host configuration settings. You can use the script to configure multiplehosts with the same settings. See Chapter 4, “Installing, Upgrading, or Migrating Hosts Using a Script,” onpage 47.
The installation script must be stored in a location that the host can access by HTTP, HTTPS, FTP, NFS, CDROM,or USB. You can PXE boot the ESXi installer or boot it from a CD/DVD or USB drive.
Figure 1-1. Scripted Installation
scripted
HTTPHTTPS
FTPNFS
CDROMUSB
create installation script (kickstart file)and copy to appropriate location
issue command to specify location ofinstallation script and
start installation
PXE boot
startinstallation
boot from CD
boot from USB
vSphere Auto Deploy ESXi Installation OptionWith the vSphere Auto Deploy ESXi Installation, you can provision and reprovision large numbers of ESXihosts efficiently with vCenter Server.
Using the Auto Deploy feature, vCenter Server loads the ESXi image directly into the host memory. AutoDeploy does not store the ESXi state on the host disk. vCenter Server stores and manages ESXi updates andpatching through an image profile, and, optionally, the host configuration through a host profile. You cancreate image profiles with ESXi Image Builder CLI, and host profiles using the vSphere Client. See Chapter 6,“Using vSphere ESXi Image Builder CLI,” on page 123 and vSphere Host Profiles.
vSphere Installation and Setup
14 VMware, Inc.

The first time you install a host with Auto Deploy, the host PXE boots and establishes contact with the AutoDeploy server, which streams the image profile and any host profile to the host. The host starts, using the imageprofile, and Auto Deploy assigns the host to the appropriate vCenter Server system.
When you restart the host, vCenter Server uses the Auto Deploy feature to provision the host with theappropriate image and host profile. If the image profile changes, for example, for an update or patch, theadministrator can propagate the change to all hosts that are provisioned with Auto Deploy and managed bya vCenter Server system. This ability makes Auto Deploy an efficient way to provision and reprovision largenumbers of hosts, and to enforce compliance to a master ESXi image.
See “Understanding vSphere Auto Deploy,” on page 63.
Customizing Installations with ESXi Image Builder CLIYou can use ESXi Image Builder CLI to create ESXi installation images with a customized set of updates,patches, and drivers.
ESXi Image Builder CLI is a PowerShell CLI command set that you can use to create an ESXi installation imagewith a customized set of ESXi updates and patches. You can also include third-party network or storage driversthat are released between vSphere releases.
You can deploy an ESXi image created with Image Builder in either of the following ways:
n By burning it to an installation DVD.
n Through vCenter Server, using the Auto Deploy feature.
See Chapter 6, “Using vSphere ESXi Image Builder CLI,” on page 123 and Chapter 5, “Installing ESXi UsingvSphere Auto Deploy,” on page 63.
About ESXi Evaluation and Licensed ModesAfter you purchase a host license, VMware provides a serial number that you can use to license vSphere. Youcan use evaluation mode to access the full ESXi feature set, including features you have not purchased a licensefor.
For example, in evaluation mode, you can use vMotion, HA, DRS, and other features, even if you have notlicensed those features.
The installable version of ESXi is always installed in evaluation mode. ESXi Embedded is preinstalled on aninternal USB device by your hardware vendor. It might be in evaluation mode or prelicensed.
The evaluation period is 60 days and begins when you turn on the ESXi host, even if you start in licensed moderather than evaluation mode. Any time during the 60-day evaluation period, you can convert from licensedmode to evaluation mode. To take full advantage of the 60-day evaluation period, you should convert toevaluation mode as soon as possible after you first power on the host. See “Convert an ESXi Host to EvaluationMode,” on page 162.
For information about licensing the host, see the vCenter Server and Host Management.
Media Options for Booting the ESXi InstallerThe ESXi installer must be accessible to the system on which you are installing ESXi.
The following boot media are supported for the ESXi installer:
n Boot from a CD/DVD. See “Download and Burn the ESXi Installer ISO Image to a CD or DVD,” onpage 16.
n Boot from a USB flash drive. See “Format a USB Flash Drive to Boot the ESXi Installation or Upgrade,” onpage 16.
n PXE boot from the network. “PXE Booting the ESXi Installer,” on page 19
Chapter 1 Introduction to vSphere Installation and Setup
VMware, Inc. 15

n Boot from a remote location using a remote management application. See “Using Remote ManagementApplications,” on page 26
Download and Burn the ESXi Installer ISO Image to a CD or DVDIf you do not have an ESXi installation CD/DVD, you can create one.
You can also create an installer ISO image that includes a custom installation script. See “Create an InstallerISO Image with a Custom Installation or Upgrade Script,” on page 18.
Procedure
1 Download the ISO image for ESXi from the VMware download page at http://www.vmware.com/download/.
2 Burn the ISO image to a CD or DVD.
Format a USB Flash Drive to Boot the ESXi Installation or UpgradeYou can format a USB flash drive to boot the ESXi installation or upgrade.
These instructions assume that you are performing the procedure on a Linux machine and that the USB flashdrive is detected by the operating system as /dev/sdb.
NOTE The ks file containing the installation script cannot be located on the same USB flash drive that you areusing to boot the installation or upgrade.
Prerequisites
From the VMware Web site, download the ESXi ISO image VMware-VMvisor-Installer-5.0.0-XXXXXX.x86_64.iso, including the file isolinux.cfg,where XXXXXX is the build number of the installer ISOimage.
Procedure
1 If your USB flash drive is not detected as /dev/sdb, or you are not sure how your USB flash drive is detected,determine how it is detected.
a In a terminal window, run the following command.
tail -f /var/log/messages
This command displays current log messages in the terminal window.
b Plug in your USB flash drive.
The terminal window displays several messages identifying the USB flash drive, in a format similarto the following message.
Oct 25 13:25:23 ubuntu kernel: [ 712.447080] sd 3:0:0:0: [sdb] Attached SCSI removable
disk
In this example, "[sdb]" identifies the USB device. If your device is identified differently, use thatidentification, without the brackets, in place of sdb, in this procedure.
2 Create a partition table on the USB flash device.
/sbin/fdisk /dev/sdb
a Type d to delete partitions until they are all deleted.
b Type n to create primary partition 1 that extends over the entire disk.
c Type t to set the type to an appropriate setting for the FAT32 file system, such as c.
vSphere Installation and Setup
16 VMware, Inc.

d Type a to set the active flag on partition 1.
e Type p to print the partition table.
The result should be similar to the following text:
Disk /dev/sdb: 2004 MB, 2004877312 bytes
255 heads, 63 sectors/track, 243 cylinders
Units = cylinders of 16065 * 512 = 8225280 bytes
Device Boot Start End Blocks Id System
/dev/sdb1 * 1 243 1951866 c W95 FAT32 (LBA)
f Type w to write the partition table and quit.
3 Format the USB flash drive with the Fat32 file system.
/sbin/mkfs.vfat -F 32 -n USB /dev/sdb1
4 Run the following commands.
/path_to_syslinux-3.86_directory/syslinux-3.86/bin/syslinux /dev/sdb1
cat /path_to_syslinux-3.86_directory/syslinux-3.86/usr/share/syslinux/mbr.bin > /dev/sdb
5 Mount the USB flash drive.
mount /dev/sdb1 /usbdisk
6 Mount the ESXi installer ISO image.
mount -o loop VMware-VMvisor-Installer-5.0.0-XXXXXX.x86_64.iso /esxi_cdrom
7 Copy the contents of the ISO image to /usbdisk.
cp -r /esxi_cdrom/* /usbdisk
8 Rename the isolinux.cfg file to syslinux.cfg.
mv /usbdisk/isolinux.cfg /usbdisk/syslinux.cfg
9 In the file /usbdisk/syslinux.cfg, change the line APPEND -c boot.cfg to APPEND -c boot.cfg -p 1.
10 Unmount the USB flash drive.
umount /usbdisk
11 Unmount the installer ISO image.
umount /esxi_cdrom
The USB flash drive can now boot the ESXi installer.
Create a USB Flash Drive to Store the ESXi Installation or Upgrade ScriptYou can use a USB flash drive to store the ESXi installation or upgrade script that is used during scriptedinstallation or upgrade of ESXi.
When multiple USB flash drives are present on the installation machine, the installation software searches forthe installation script on all attached USB flash drives.
The instructions in this procedure assume that the USB flash drive is detected as /dev/sdb.
NOTE The ks file containing the installation script cannot be located on the same USB flash drive that you areusing to boot the installation or upgrade.
Prerequisites
n Linux machine
Chapter 1 Introduction to vSphere Installation and Setup
VMware, Inc. 17

n ESXi installation or upgrade script, the ks.cfg kickstart file
n USB flash drive
Procedure
1 Attach the USB flash drive to a Linux machine that has access to the installation or upgrade script.
2 Create a partition table.
/sbin/fdisk /dev/sdb
a Type d to delete partitions until they are all deleted.
b Type n to create primary partition 1 that extends over the entire disk.
c Type t to set the type to an appropriate setting for the FAT32 file system, such as c.
d Type a to set the active flag on partition 1.
e Type p to print the partition table.
The result should be similar to the following text:
Disk /dev/sdb: 2004 MB, 2004877312 bytes
255 heads, 63 sectors/track, 243 cylinders
Units = cylinders of 16065 * 512 = 8225280 bytes
Device Boot Start End Blocks Id System
/dev/sdb1 * 1 243 1951866 c W95 FAT32 (LBA)
f Type w to write the partition table and quit.
3 Format the USB flash drive with the Fat32 file system.
/sbin/mkfs.vfat -F 32 -n USB /dev/sdb1
4 Mount the USB flash drive.
mount /dev/sdb1 /usbdisk
5 Copy the ESXi installation script to the USB flash drive.
cp ks.cfg /usbdisk
6 Unmount the USB flash drive.
The USB flash drive contains the installation or upgrade script for ESXi.
What to do next
When you boot the ESXi installer, point to the location of the USB flash drive for the installation or upgradescript. See “Enter Boot Options to Start an Installation or Upgrade Script,” on page 48 and “About PXEConfiguration Files,” on page 22.
Create an Installer ISO Image with a Custom Installation or Upgrade ScriptYou can customize the standard ESXi installer ISO image with your own installation or upgrade script. Thisenables you to perform a scripted, unattended installation or upgrade when you boot the resulting installerISO image.
See also “About Installation and Upgrade Scripts,” on page 50 and “About the boot.cfg File,” on page 58.
Prerequisites
n Linux machine.
n The ESXi ISO image VMware-VMvisor-Installer-5.0.0-XXXXXX.x86_64.iso, where XXXXXX is the buildnumber of the installer ISO image.
vSphere Installation and Setup
18 VMware, Inc.

n Your custom installation or upgrade script, the ks_cust.cfg kickstart file.
Procedure
1 Download the ESXi ISO image from the VMware Web site.
2 Mount the ISO image into a folder:
mount -o loop VMware-VMvisor-Installer-5.0.0-XXXXXX.x86_64.iso /esxi_cdrom_mount
XXXXXX is the ESXi build number for the version that you are installing or upgrading to.
3 Copy the contents of cdrom to another folder:
cp -r /esxi_cdrom_mount /esxi_cdrom
4 Copy the kickstart file to /esxi_cdrom
cp ks_custom.cfg /esxi_cdrom
5 (Optional) Modify the boot.cfg file to specify the location of the installation or upgrade script using thekernelopt option.
This step makes the installation or upgrade completely automatic, without the need to specify the kickstartfile during the installation or upgrade.
6 Recreate the ISO image:
mkisofs -relaxed-filenames -J -R -o custom_esxi.iso -b isolinux.bin -c boot.cat -no-emul-boot
-boot-load-size 4 -boot-info-table /esxi_cdrom
The ISO image now includes your custom installation or upgrade script.
What to do next
Install ESXi from the ISO image.
PXE Booting the ESXi InstallerYou use the preboot execution environment (PXE) to boot a host and launch the ESXi installer from a networkinterface.
ESXi 5.0 is distributed in an ISO format that is designed to install to flash memory or to a local hard drive. Youcan extract the files and boot using PXE.
PXE uses DHCP and Trivial File Transfer Protocol (TFTP) to boot an operating system over a network.
PXE booting requires some network infrastructure and a machine with a PXE-capable network adapter. Mostmachines that are capable of running ESXi have network adapters that are able to PXE boot.
NOTE Ensure that the Auto Deploy server has an IPv4 address. PXE booting is supported only with IPv4.
About the TFTP Server, PXELINUX, and gPXETrivial File Transfer Protocol (TFTP) is similar to the FTP service, and is typically used only for network bootingsystems or loading firmware on network devices such as routers.
Most Linux distributions include a copy of the tftp-hpa server. If you require a supported solution, purchasea supported TFTP server from your vendor of choice.
If your TFTP server will run on a Microsoft Windows host, use tftpd32 version 2.11 or later. See http://tftpd32.jounin.net/. Earlier versions of tftpd32 were incompatible with PXELINUX and gPXE.
You can also acquire a TFTP server from one of the packaged appliances on the VMware Marketplace.
Chapter 1 Introduction to vSphere Installation and Setup
VMware, Inc. 19

The PXELINUX and gPXE environments allow your target machine to boot the ESXi installer. PXELINUX ispart of the SYSLINUX package, which can be found at http://www.kernel.org/pub/linux/utils/boot/syslinux/,although many Linux distributions include it. Many versions of PXELINUX also include gPXE. Somedistributions, such as Red Hat Enterprise Linux version 5.3, include earlier versions of PXELINUX that do notinclude gPXE.
If you do not use gPXE, you might experience problems while booting the ESXi installer on a heavily loadednetwork TFTP is sometimes unreliable for transferring large amounts of data. If you use PXELINUX withoutgPXE, the pxelinux.0 binary file, the configuration file, the kernel, and other files are transferred by TFTP. Ifyou use gPXE, only the gpxelinux.0 binary file and configuration file are transferred by TFTP. With gPXE, youcan use a Web server to transfer the kernel and other files required to boot the ESXi installer.
NOTE VMware tests PXE booting with PXELINUX version 3.86. This is not a statement of limited support. Forsupport of third-party agents that you use to set up your PXE booting infrastructure, contact the vendor.
Figure 1-2. Overview of PXE Boot Installation Process
DHCP server
DHCP server
Web server
ESXi target host
ESXi host
Give me an IPfor the virtual
network adapterUDP
IP & TFTP server
kernel
IP
TCP for gPXELINUXUDP for PXELINUX
UDP
Give methe kernel
Give me an IPfor the kernel
TFTP server gpxelinux.0 or pxelinux.0
UDPGive me the
network boot loader
scripts depot
Installer starts
ks.cfg
TCPGive me an
installation script
vSphere Installation and Setup
20 VMware, Inc.

Sample DHCP ConfigurationTo PXE boot the ESXi installer, the DHCP server must send the address of the TFTP server and a pointer tothe pxelinux.0 or gpxelinux.0 directory.
The DHCP server is used by the target machine to obtain an IP address. The DHCP server must be able todetermine whether the target machine is allowed to boot and the location of the PXELINUX binary (whichusually resides on a TFTP server). When the target machine first boots, it broadcasts a packet across the networkrequesting this information to boot itself. The DHCP server responds.
CAUTION Do not set up a new DHCP server if your network already has one. If multiple DHCP servers respondto DHCP requests, machines can obtain incorrect or conflicting IP addresses, or can fail to receive the properboot information. Talk to a network administrator before setting up a DHCP server. For support on configuringDHCP, contact your DHCP server vendor.
Many DHCP servers can PXE boot hosts. If you are using a version of DHCP for Microsoft Windows, see theDHCP server documentation to determine how to pass the next-server and filename arguments to thetarget machine.
gPXE Example
This example shows how to configure a ISC DHCP version 3.0 server to enable gPXE.
allow booting;
allow bootp;
# gPXE options
option space gpxe;
option gpxe-encap-opts code 175 = encapsulate gpxe;
option gpxe.bus-id code 177 = string
class "pxeclients" {
match if substring(option vendor-class-identifier, 0, 9) = "PXEClient";
next-server TFTP server address;
if not exists gpxe.bus-id {
filename "/gpxelinux.0";
}
}
subnet Network address netmask Subnet Mask {
range Starting IP Address Ending IP Address;
}
When a machine attempts to PXE boot, the DHCP server provides an IP address and the location of thegpxelinux.0 binary file on the TFTP server. The IP address assigned is in the range defined in the subnet sectionof the configuration file.
PXELINUX (without gPXE) Example
This example shows how to configure a ISC DHCP version 3.0 server to enable PXELINUX.
#
# DHCP Server Configuration file.
# see /usr/share/doc/dhcp*/dhcpd.conf.sample
#
ddns-update-style ad-hoc;
allow booting;
allow bootp;
class "pxeclients" {
match if substring(option vendor-class-identifier, 0, 9) = "PXEClient";
Chapter 1 Introduction to vSphere Installation and Setup
VMware, Inc. 21
next-server xxx.xxx.xx.xx;
filename = "pxelinux.0";
}
subnet 192.168.48.0 netmask 255.255.255.0 {
range 192.168.48.100 192.168.48.250;
}
When a machine attempts to PXE boot, the DHCP server provides an IP address and the location of thepxelinux.0 binary file on the TFTP server. The IP address assigned is in the range defined in the subnet sectionof the configuration file.
About PXE Configuration FilesThe PXE configuration file defines the menu displayed to the target ESXi host as it boots up and contacts theTFTP server. You need a PXE configuration file to PXE boot the ESXi installer.
The TFTP server constantly listens for PXE clients on the network. When it detects that a PXE client is requestingPXE services, it sends the client a network package that contains a boot menu.
Required Files
In the PXE configuration file, you must include paths to the following files:
n mboot.c32 is the boot loader.
n boot.cfg is the boot loader configuration file.
See “About the boot.cfg File,” on page 58
File Name for the PXE Configuration File
For the file name of the PXE configuration file, select one of the following options:
n 01-mac_address_of_target_ESXi_host. For example, 01-23-45-67-89-0a-bc
n The target ESXi host IP address in hexadecimal notation.
n default
The initial boot file, pxelinux.0 or gpxelinux.0, tries to load a PXE configuration file. It tries with the MACaddress of the target ESXi host, prefixed with its ARP type code, which is 01 for Ethernet. If that attempt fails,it tries with the hexadecimal notation of target ESXi system IP address. Ultimately, it tries to load a file nameddefault.
File Location for the PXE Configuration File
Save the file in var/lib/tftpboot/pxelinux.cfg/ on the TFTP server.
For example, you might save the file on the TFTP server at /tftpboot/pxelinux.cfg/01-00-21-5a-ce-40-f6.The MAC address of the network adapter on the target ESXi host is 00-21-5a-ce-40-f6.
PXE Boot the ESXi Installer by Using PXELINUX and a PXE Configuration FileYou can use a TFTP server to PXE boot the ESXi installer, using PXELINUX and a PXE configuration file.
See also “About Installation and Upgrade Scripts,” on page 50 and “About the boot.cfg File,” on page 58
Prerequisites
Verify that your environment has the following components:
n The ESXi installer ISO image downloaded from the VMware Web site.
n TFTP server that supports PXE booting with gPXE. See “About the TFTP Server, PXELINUX, andgPXE,” on page 19.
vSphere Installation and Setup
22 VMware, Inc.

n DHCP server configured for PXE booting. See “Sample DHCP Configuration,” on page 21.
n PXELINUX
n Server with a hardware configuration that is supported with ESXi 5.0. See the Hardware CompatibilityGuide at http://www.vmware.com/resources/compatibility/search.php.
n Network security policies to allow TFTP traffic (UDP port 69)
n (Optional) Installation script, the kickstart file. See “About Installation and Upgrade Scripts,” onpage 50.
n Network adapter with PXE support on the target ESXi host
n IPv4 networking. IPv6 is not supported for PXE booting.
Use a native VLAN in most cases. If you want to specify the VLAN ID to be used with PXE booting, check thatyour NIC supports VLAN ID specification.
Procedure
1 Create the /tftpboot/pxelinux.cfg directory on your TFTP server.
2 On the Linux machine, install PXELINUX.
PXELINUX is included in the SYSLINUX package. Extract the files, locate the pxelinux.0 file and copy itto the /tftpboot directory on your TFTP server.
3 Configure the DHCP server to send the following information to each client host:
n The name or IP address of your TFTP server.
n The name of your initial boot file. This is pxelinux.0.
4 Copy the contents of the ESXi installer image to the /var/lib/tftpboot directory on the TFTP server.
5 (Optional) For a scripted installation, in the boot.cfg file, add the kernelopt option on the line followingthe kernel command, to specify the location of the installation script.
Use the following code as a model, where XXX.XXX.XXX.XXX is the IP address of the server where theinstallation script resides, and esxi_ksFiles is the directory containing the ks.cfg file.
kernelopt=ks=http://XXX.XXX.XXX.XXX/esxi_ksFiles/ks.cfg
6 Create a PXE configuration file.
This file defines how the host boots when no operating system is present. The PXE configuration filereferences the boot files. Use the following code as a model, where XXXXXX is the build number of the ESXiinstaller image.
DEFAULT menu.c32
MENU TITLE ESXi-5.0.0-XXXXXX-full Boot Menu
NOHALT 1
PROMPT 0
TIMEOUT 80
LABEL install
KERNEL mboot.c32
APPEND -c location of boot.cfg
MENU LABEL ESXi-5.0.0-XXXXXX-full ^Installer
LABEL hddboot
LOCALBOOT 0x80
MENU LABEL ^Boot from local disk
7 Name the file with the MAC address of the target host machine: 01-mac_address_of_target_ESXi_host.
For example, 01-23-45-67-89-0a-bc.
Chapter 1 Introduction to vSphere Installation and Setup
VMware, Inc. 23

8 Save the PXE configuration file in /tftpboot/pxelinux.cfg on the TFTP server.
9 Boot the machine with the network adapter.
PXE Boot the ESXi Installer by Using PXELINUX and an isolinux.cfg PXEConfiguration FileYou can PXE boot the ESXi installer using PXELINUX, and use the isolinux.cfg file as the PXE configurationfile.
See also “About Installation and Upgrade Scripts,” on page 50 and “About the boot.cfg File,” on page 58
Prerequisites
Verify that your environment has the following components:
n The ESXi installer ISO image downloaded from the VMware Web site.
n TFTP server that supports PXE booting with PXELINUX. See “About the TFTP Server, PXELINUX, andgPXE,” on page 19.
n DHCP server configured for PXE booting. See “Sample DHCP Configuration,” on page 21.
n PXELINUX
n Server with a hardware configuration that is supported with ESXi 5.0. See the Hardware CompatibilityGuide at http://www.vmware.com/resources/compatibility/search.php.
n Network security policies to allow TFTP traffic (UDP port 69)
n (Optional) Installation script, the kickstart file. See “About Installation and Upgrade Scripts,” onpage 50.
n Network adapter with PXE support on the target ESXi host
n IPv4 networking. IPv6 is not supported for PXE booting.
Use a native VLAN in most cases. If you want to specify the VLAN ID to be used with PXE booting, check thatyour NIC supports VLAN ID specification.
Procedure
1 Create the /tftpboot/pxelinux.cfg directory on your TFTP server.
2 On the Linux machine, install PXELINUX.
PXELINUX is included in the SYSLINUX package. Extract the files, locate the file pxelinux.0 and copy itto the /tftpboot directory on your TFTP server.
3 Configure the DHCP server.
The DHCP server sends the following information to your client hosts:
n The name or IP address of your TFTP server.
n The name of your initial boot file. This is pxelinux.0.
4 Copy the contents of the ESXi installer image to the /var/lib/tftpboot directory on the TFTP server.
5 (Optional) For a scripted installation, in the boot.cfg file, add the kernelopt option on the next line afterthe kernel command, to specify the location fo the installation script.
In the following example, XXX.XXX.XXX.XXX is the IP address of the server where the installation scriptresides.
kernelopt=ks=http://XXX.XXX.XXX.XXX/esxi_ksFiles/ks.cfg
vSphere Installation and Setup
24 VMware, Inc.

6 Copy the isolinux.cfg file from the ESXi installer ISO image to the /tftpboot/pxelinux.cfg directory.
The isolinux.cfg file contains the following code, where XXXXXX is the build number of the ESXi installerimage:
DEFAULT menu.c32
MENU TITLE ESXi-5.0.0-XXXXXX-full Boot Menu
NOHALT 1
PROMPT 0
TIMEOUT 80
LABEL install
KERNEL mboot.c32
APPEND -c location of boot.cfg
MENU LABEL ESXi-5.0.0-XXXXXX-full ^Installer
LABEL hddboot
LOCALBOOT 0x80
MENU LABEL ^Boot from local disk
7 Rename the isolinux.cfg file with the MAC address of the target host machine: 01-mac_address_of_target_ESXi_host. For example, 01-23-45-67-89-0a-bc
8 Boot the machine with the network adapter.
PXE Boot the ESXi Installer Using gPXEYou can PXE boot the ESXi installer using gPXE.
See also “About Installation and Upgrade Scripts,” on page 50 and “About the boot.cfg File,” on page 58
Prerequisites
Verify that your environment has the following components:
n The ESXi installer ISO image downloaded from the VMware Web site
n HTTP Web server that is accessible by your target ESXi hosts
n DHCP server configured for PXE booting: /etc/dhcpd.conf is configured for client hosts with a TFTPserver and the initial boot file set to gpxelinux.0/undionly.kpxe. See “Sample DHCP Configuration,” onpage 21.
n Server with a hardware configuration that is supported with ESXi 5.0. See the Hardware CompatibilityGuide at http://www.vmware.com/resources/compatibility/search.php.
n gPXELINUX
n (Optional) ESXi installation script. See “About Installation and Upgrade Scripts,” on page 50.
Use a native VLAN in most cases. If you want to specify the VLAN ID to be used with PXE booting, check thatyour NIC supports VLAN ID specification.
Procedure
1 Copy the contents of the ESXi installer ISO image to the /var/www/html directory on the HTTP server.
Chapter 1 Introduction to vSphere Installation and Setup
VMware, Inc. 25
2 Modify the boot.cfg file with the information for the HTTP server.
Use the following code as a model, where XXX.XXX.XXX.XXX is the HTTP server IP address. Thekernelopt line is optional. Include that option to specify the location of the installation script for a scriptedinstallation.
title=Loading ESX installer
kernel=http://XXX.XXX.XXX.XXX/tboot.b00
kernelopt=ks=http://XXX.XXX.XXX.XXX/esxi_ksFiles/ks.cfg
modules=http://XXX.XXX.XXX.XXX/b.b00 --- http://XXX.XXX.XXX.XXX/useropts.gz ---
http://XXX.XXX.XXX.XXX/k.b00 --- http://XXX.XXX.XXX.XXX/a.b00 ---
http://XXX.XXX.XXX.XXX/s.v00 --- http://XXX.XXX.XXX.XXX/weaselin.v00 ---
http://XXX.XXX.XXX.XXX/tools.t00 --- http://XXX.XXX.XXX.XXX/imgdb.tgz ---
http://XXX.XXX.XXX.XXX/imgpayld.tgz
3 gPXE boot the host and press Ctrl+B to access the GPT menu.
4 Enter the following commands to boot with the ESXi installer, where XXX.XXX.XXX.XXX is the HTTPserver IP address.
dhcp net0 ( if dchp is not set)
kernel -n mboot.c32 http://XXX.XXX.XXX.XXX/mboot.c32
imgargs mboot.c32 -c http://XXX.XXX.XXX.XXX/boot.cfg
boot mboot.c32
Using Remote Management ApplicationsRemote management applications allow you to install ESXi on servers that are in remote locations.
Remote management applications supported for installation include HP Integrated Lights-Out (iLO), DellRemote Access Card (DRAC), IBM management module (MM), and Remote Supervisor Adapter II (RSA II).For a list of currently supported server models and remote management firmware versions, see “SupportedRemote Management Server Models and Minimum Firmware Versions,” on page 41. For support on remotemanagement applications, contact the vendor.
You can use remote management applications to do both interactive and scripted installations of ESXi remotely.
If you use remote management applications to install ESXi, the virtual CD might encounter corruptionproblems with systems or networks operating at peak capacity. If a remote installation from an ISO image fails,complete the installation from the physical CD media.
Required Information for ESXi InstallationIn an interactive installation, the system prompts you for the required system information. In a scriptedinstallation, you must supply this information in the installation script.
For future use, note the values you use during the installation. These notes are useful if you must reinstall ESXiand reenter the values that you originally chose.
Table 1-1. Required Information for ESXi Installation
InformationRequired orOptional Default Comments
Keyboard layout Required U.S. English
VLAN ID Optional None Range: 0 through 4094
IP address Optional DHCP You can allow DHCP to configure the networkduring installation. After installation, you canchange the network settings.Subnet mask Optional Calculated based on the IP
address
vSphere Installation and Setup
26 VMware, Inc.

Table 1-1. Required Information for ESXi Installation (Continued)
InformationRequired orOptional Default Comments
Gateway Optional Based on the configured IPaddress and subnet mask
Primary DNS Optional Based on the configured IPaddress and subnet mask
Secondary DNS Optional None
Host name Required forstatic IPsettings
None vSphere Clients can use either the host name orthe IP address to access the ESXi host.
Install location Required None Must be at least 5GB if you install thecomponents on a single disk.
Migrate existing ESXor ESXi settings.Preserve existingVMFS datastore.
Required ifyou areinstalling ESXion a drivewith anexisting ESXior ESXinstallation.
None See “Installing ESXi on a Drive with an ExistingESX or ESXi Installation or VMFS Datastore,” onpage 13.
Root password Optional None The root password must contain between 6 and64 characters.
Chapter 1 Introduction to vSphere Installation and Setup
VMware, Inc. 27

vSphere Installation and Setup
28 VMware, Inc.

System Requirements 2Systems running vCenter Server and ESXi instances must meet specific hardware and operating systemrequirements.
If you are using Auto Deploy to provision ESXi hosts, see also “Preparing for vSphere Auto Deploy,” onpage 73.
This chapter includes the following topics:
n “ESXi Hardware Requirements,” on page 29
n “ESXi Support for 64-Bit Guest Operating Systems,” on page 32
n “vCenter Server and vSphere Client Hardware Requirements,” on page 33
n “vCenter Server Software Requirements,” on page 36
n “vSphere Client and vSphere Web Client Software Requirements,” on page 37
n “Providing Sufficient Space for System Logging,” on page 37
n “Required Ports for vCenter Server,” on page 38
n “Required Ports for the vCenter Server Appliance,” on page 39
n “Conflict Between vCenter Server and IIS for Port 80,” on page 40
n “DNS Requirements for vSphere,” on page 40
n “Supported Remote Management Server Models and Minimum Firmware Versions,” on page 41
ESXi Hardware RequirementsMake sure the host meets the minimum hardware configurations supported by ESXi 5.0.
Hardware and System ResourcesTo install and use ESXi 5.0, your hardware and system resources must meed the following requirements:
n Supported server platform. For a list of supported platforms, see the VMware Compatibility Guide at http://www.vmware.com/resources/compatibility.
n ESXi 5.0 will install and run only on servers with 64-bit x86 CPUs.
n ESXi 5.0 requires a host machine with at least two cores.
n ESXi 5.0 supports only LAHF and SAHF CPU instructions.
n ESXi supports a broad range of x64 multicore processors. For a complete list of supported processors, seethe VMware compatibility guide at http://www.vmware.com/resources/compatibility.
VMware, Inc. 29

n ESXi requires a minimum of 2GB of physical RAM. VMware recommends 8GB of RAM to take fulladvantage of ESXi features and run virtual machines in typical production environments.
n To support 64-bit virtual machines, support for hardware virtualization (Intel VT-x or AMD RVI) mustbe enabled on x64 CPUs.
n One or more Gigabit or 10Gb Ethernet controllers. For a list of supported network adapter models, see theVMware Compatibility Guide at http://www.vmware.com/resources/compatibility.
n Any combination of one or more of the following controllers:
n Basic SCSI controllers. Adaptec Ultra-160 or Ultra-320, LSI Logic Fusion-MPT, or most NCR/SymbiosSCSI.
n RAID controllers. Dell PERC (Adaptec RAID or LSI MegaRAID), HP Smart Array RAID, or IBM(Adaptec) ServeRAID controllers.
n SCSI disk or a local, non-network, RAID LUN with unpartitioned space for the virtual machines.
n For Serial ATA (SATA), a disk connected through supported SAS controllers or supported on-board SATAcontrollers. SATA disks will be considered remote, not local. These disks will not be used as a scratchpartition by default because they are seen as remote.
NOTE You cannot connect a SATA CD-ROM device to a virtual machine on an ESXi 5.0 host. To use theSATA CD-ROM device, you must use IDE emulation mode.
Storage SystemsESXi 5.0 supports installing on and booting from the following storage systems:
n SATA disk drives. SATA disk drives connected behind supported SAS controllers or supported on-boardSATA controllers.
Supported SAS controllers include:
n LSI1068E (LSISAS3442E)
n LSI1068 (SAS 5)
n IBM ServeRAID 8K SAS controller
n Smart Array P400/256 controller
n Dell PERC 5.0.1 controller
Supported on-board SATA include:
n Intel ICH9
n NVIDIA MCP55
n ServerWorks HT1000
NOTE ESXi does not support using local, internal SATA drives on the host server to create VMFS datastoresthat are shared across multiple ESXi hosts.
n Serial Attached SCSI (SAS) disk drives. Supported for installing ESXi 5.0 and for storing virtual machineson VMFS partitions.
n Dedicated SAN disk on Fibre Channel or iSCSI
n USB devices. Supported for installing ESXi 5.0. For a list of supported USB devices, see the VMwareCompatibility Guide at http://www.vmware.com/resources/compatibility.
vSphere Installation and Setup
30 VMware, Inc.
ESXi Booting RequirementsvSphere 5.0 supports booting ESXi hosts from the Unified Extensible Firmware Interface (UEFI). With UEFIyou can boot systems from hard drives, CD-ROM drives, or USB media. Network booting or provisioning withVMware Auto Deploy requires the legacy BIOS firmware and is not available with UEFI.
ESXi can boot from a disk larger than 2TB provided that the system firmware and the firmware on any add-in card that you are using support it. See the vendor documentation.
NOTE Changing the boot type from legacy BIOS to UEFI after you install ESXi 5.0 might cause the host to failto boot. In this case, the host displays an error message similar to: Not a VMware boot bank. Changing the hostboot type between legacy BIOS and UEFI is not supported after you install ESXi 5.0.
Storage Requirements for ESXi 5.0 InstallationInstalling ESXi 5.0 requires a boot device that is a minimum of 1GB in size. When booting from a local disk orSAN/iSCSI LUN, a 5.2GB disk is required to allow for the creation of the VMFS volume and a 4GB scratchpartition on the boot device. If a smaller disk or LUN is used, the installer will attempt to allocate a scratchregion on a separate local disk. If a local disk cannot be found the scratch partition, /scratch, will be locatedon the ESXi host ramdisk, linked to /tmp/scratch. You can reconfigure /scratch to use a separate disk or LUN.For best performance and memory optimization, VMware recommends that you do not leave /scratch on theESXi host ramdisk.
To reconfigure /scratch, see “Set the Scratch Partition from the vSphere Client,” on page 154.
Due to the I/O sensitivity of USB and SD devices the installer does not create a scratch partition on these devices.As such, there is no tangible benefit to using large USB/SD devices as ESXi uses only the first 1GB. Wheninstalling on USB or SD devices, the installer attempts to allocate a scratch region on an available local disk ordatastore. If no local disk or datastore is found, /scratch is placed on the ramdisk. You shouldreconfigure /scratch to use a persistent datastore following the installation.
In Auto Deploy installations, the installer attempts to allocate a scratch region on an available local disk ordatastore. If no local disk or datastore is found /scratch is placed on ramdisk. You should reconfigure /scratchto use a persistent datastore following the installation.
For environments that boot from a SAN or use Auto Deploy, it is not necessary to allocate a separate LUN foreach ESXi host. You can co-locate the scratch regions for many ESXi hosts onto a single LUN. The number ofhosts assigned to any single LUN should be weighed against the LUN size and the I/O behavior of the virtualmachines.
Recommendation for Enhanced ESXi PerformanceTo enhance performance, install ESXi on a robust system with more RAM than the minimum required andwith multiple physical disks.
For ESXi system requirements, see “ESXi Hardware Requirements,” on page 29.
Chapter 2 System Requirements
VMware, Inc. 31

Table 2-1. Recommendations for Enhanced Performance
System Element Recommendation
RAM ESXi hosts require more RAM than typical servers. VMwarerecommends 8GB of RAM to take full advantage of ESXifeatures and run virtual machines in typical productionenvironments. An ESXi host must have sufficient RAM torun concurrent virtual machines. The following examples areprovided to help you calculate the RAM required by thevirtual machines running on the ESXi host.Operating four virtual machines withRed Hat Enterprise Linux or Windows XP requires at least3GB of RAM for baseline performance. This figure includesapproximately 1024MB for the virtual machines, 256MBminimum for each operating system as recommended byvendors.Running these four virtual machines with 512MB RAMrequires that the ESXi host have approximately 4GB RAM,which includes 2048MB for the virtual machines.These calculations do not take into account possible memorysavings from using variable overhead memory for eachvirtual machine. See vSphere Resource Management .
Dedicated Fast Ethernet adapters for virtual machines Place the management network and virtual machinenetworks on different physical network cards. DedicatedGigabit Ethernet cards for virtual machines, such as IntelPRO 1000 adapters, improve throughput to virtual machineswith high network traffic.
Disk location Place all data that your virtual machines use on physicaldisks allocated specifically to virtual machines. Performanceis better when you do not place your virtual machines on thedisk containing the ESXi boot image. Use physical disks thatare large enough to hold disk images that all the virtualmachines use.
VMFS5 partitioning The ESXi installer creates the initial VMFS volumes on thefirst blank local disk found. To add disks or modify theoriginal configuration, use the vSphere Client. This practiceensures that the starting sectors of partitions are 64K-aligned,which improves storage performance.NOTE For SAS-only environments, the installer might notformat the disks. For some SAS disks, it is not possible toidentify whether the disks are local or remote. After theinstallation, you can use the vSphere Client to set up VMFS.
Processors Faster processors improve ESXi performance. For certainworkloads, larger caches improve ESXi performance.
Hardware compatibility Use devices in your server that are supported by ESXi 5.0drivers. See the Hardware Compatibility Guide at http://www.vmware.com/resources/compatibility.
ESXi Support for 64-Bit Guest Operating SystemsESXi offers support for several 64-bit guest operating systems.
For a complete list of operating systems supported for ESXi, see the VMware Compatibiity Guide at http://www.vmware.com/resources/compatibility/search.php.
Hosts running virtual machines with 64-bit guest operating systems have the following hardwarerequirements:
n For AMD Opteron-based systems, the processors must be Opteron Rev E or later.
vSphere Installation and Setup
32 VMware, Inc.
n For Intel Xeon-based systems, the processors must include support for Intel Virtualization Technology(VT). Many servers that include CPUs with VT support might have VT disabled by default, so you mustenable VT manually. If your CPUs support VT ,but you do not see this option in the BIOS, contact yourvendor to request a BIOS version that lets you enable VT support.
To determine whether your server has 64-bit VMware support, you can download the CPU IdentificationUtility from the VMware Web site.
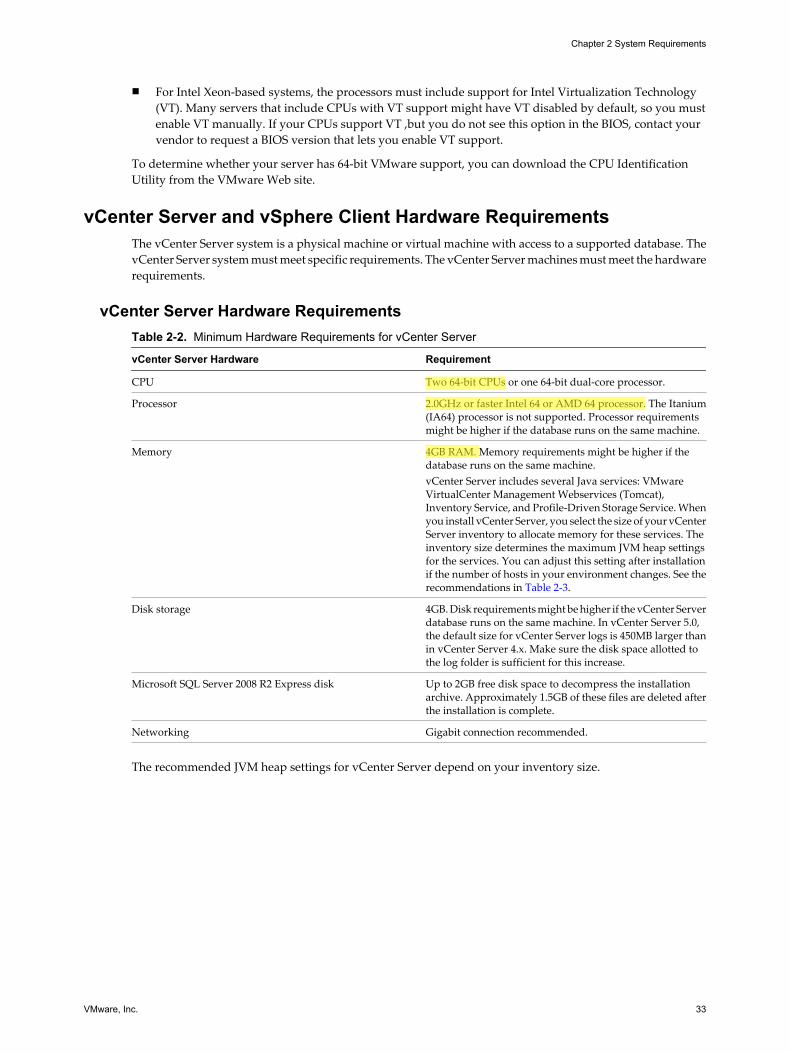
vCenter Server and vSphere Client Hardware RequirementsThe vCenter Server system is a physical machine or virtual machine with access to a supported database. ThevCenter Server system must meet specific requirements. The vCenter Server machines must meet the hardwarerequirements.
vCenter Server Hardware RequirementsTable 2-2. Minimum Hardware Requirements for vCenter Server
vCenter Server Hardware Requirement
CPU Two 64-bit CPUs or one 64-bit dual-core processor.
Processor 2.0GHz or faster Intel 64 or AMD 64 processor. The Itanium(IA64) processor is not supported. Processor requirementsmight be higher if the database runs on the same machine.
Memory 4GB RAM. Memory requirements might be higher if thedatabase runs on the same machine.vCenter Server includes several Java services: VMwareVirtualCenter Management Webservices (Tomcat),Inventory Service, and Profile-Driven Storage Service. Whenyou install vCenter Server, you select the size of your vCenterServer inventory to allocate memory for these services. Theinventory size determines the maximum JVM heap settingsfor the services. You can adjust this setting after installationif the number of hosts in your environment changes. See therecommendations in Table 2-3.
Disk storage 4GB. Disk requirements might be higher if the vCenter Serverdatabase runs on the same machine. In vCenter Server 5.0,the default size for vCenter Server logs is 450MB larger thanin vCenter Server 4.x. Make sure the disk space allotted tothe log folder is sufficient for this increase.
Microsoft SQL Server 2008 R2 Express disk Up to 2GB free disk space to decompress the installationarchive. Approximately 1.5GB of these files are deleted afterthe installation is complete.
Networking Gigabit connection recommended.
The recommended JVM heap settings for vCenter Server depend on your inventory size.
Chapter 2 System Requirements
VMware, Inc. 33

Table 2-3. Recommended JVM Heap Settings for vCenter Server
vCenter ServerInventory
VMware VirtualCenterManagement Webservices(Tomcat) Inventory Service
Profile-DrivenStorage Service
Small inventory (1-100hosts or 1-1000 virtualmachines)
1GB 2GB 512MB
Medium inventory(100-400 hosts or1000-4000 virtualmachines)
2GB 4GB 1GB
Large inventory (Morethan 400 hosts or 4000virtual machines)
3GB 6GB 2GB
NOTE Installing vCenter Server on a network drive or USB flash drive is not supported.
For the hardware requirements of your database, see your database documentation. The database requirementsare in addition to the vCenter Server requirements if the database and vCenter Server run on the same machine.
VMware vCenter Server Appliance Hardware Requirements andRecommendations
IMPORTANT The embedded database is not configured to manage an inventory that contains more than 5 hostsand 50 virtual machines. If you use the embedded database with the vCenter Server Appliance, exceedingthese limits can cause numerous problems, including causing vCenter Server to stop responding.
Table 2-4. Hardware Requirements for VMware vCenter Server Appliance
VMware vCenter Server Appliance Hardware Requirement
Disk storage on the host machine At least 7GB, and a maximum of 80GB
Memory in the VMware vCenter Server Appliance n Very small inventory (10 or fewer hosts, 100 or fewervirtual machines): at least 4GB.
n Small inventory (10-100 hosts or 100-1000 virtualmachines): at least 8GB.
n Medium inventory (100-400 hosts or 1000-4000 virtualmachines): at least 13GB.
n Large inventory (More than 400 hosts or 4000 virtualmachines): at least 17GB.
Table 2-5. Recommended JVM Heap Settings for VMware vCenter Server Appliance
vCenter ServerAppliance Inventory
VMware VirtualCenterManagement Webservices(Tomcat) Inventory Service
Profile-DrivenStorage Service
Small inventory (1-100hosts or 1-1000 virtualmachines)
1GB 2GB 512MB
Medium inventory(100-400 hosts or1000-4000 virtualmachines)
2GB 4GB 1GB
Large inventory (Morethan 400 hosts or 4000virtual machines)
3GB 6GB 2GB
vSphere Installation and Setup
34 VMware, Inc.
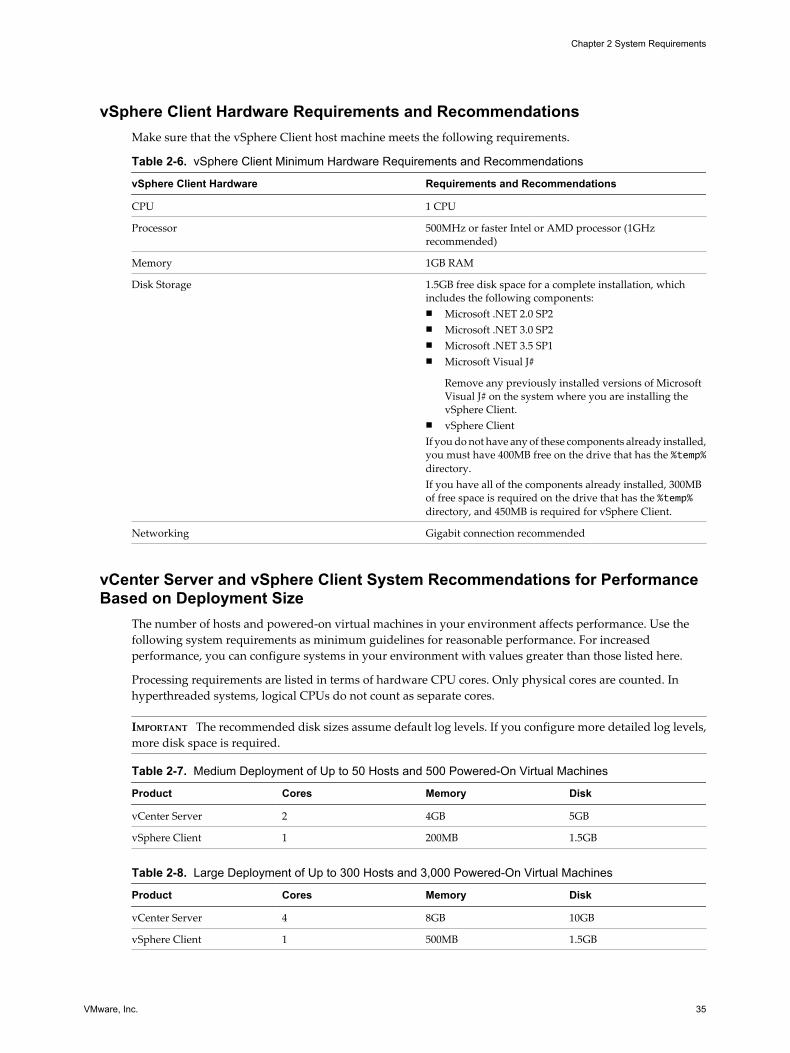
vSphere Client Hardware Requirements and RecommendationsMake sure that the vSphere Client host machine meets the following requirements.
Table 2-6. vSphere Client Minimum Hardware Requirements and Recommendations
vSphere Client Hardware Requirements and Recommendations
CPU 1 CPU
Processor 500MHz or faster Intel or AMD processor (1GHzrecommended)
Memory 1GB RAM
Disk Storage 1.5GB free disk space for a complete installation, whichincludes the following components:n Microsoft .NET 2.0 SP2n Microsoft .NET 3.0 SP2n Microsoft .NET 3.5 SP1n Microsoft Visual J#
Remove any previously installed versions of MicrosoftVisual J# on the system where you are installing thevSphere Client.
n vSphere ClientIf you do not have any of these components already installed,you must have 400MB free on the drive that has the %temp%directory.If you have all of the components already installed, 300MBof free space is required on the drive that has the %temp%directory, and 450MB is required for vSphere Client.
Networking Gigabit connection recommended
vCenter Server and vSphere Client System Recommendations for PerformanceBased on Deployment Size
The number of hosts and powered-on virtual machines in your environment affects performance. Use thefollowing system requirements as minimum guidelines for reasonable performance. For increasedperformance, you can configure systems in your environment with values greater than those listed here.
Processing requirements are listed in terms of hardware CPU cores. Only physical cores are counted. Inhyperthreaded systems, logical CPUs do not count as separate cores.
IMPORTANT The recommended disk sizes assume default log levels. If you configure more detailed log levels,more disk space is required.
Table 2-7. Medium Deployment of Up to 50 Hosts and 500 Powered-On Virtual Machines
Product Cores Memory Disk
vCenter Server 2 4GB 5GB
vSphere Client 1 200MB 1.5GB
Table 2-8. Large Deployment of Up to 300 Hosts and 3,000 Powered-On Virtual Machines
Product Cores Memory Disk
vCenter Server 4 8GB 10GB
vSphere Client 1 500MB 1.5GB
Chapter 2 System Requirements
VMware, Inc. 35

Table 2-9. Extra-Large Deployment of Up to 1,000 Hosts and 10,000 Powered-On Virtual Machines
Product Cores Memory Disk
vCenter Server 8 16GB 10GB
vSphere Client 2 500MB 1.5GB
vSphere Web Client Hardware RequirementsThe vSphere Web Client has two components: A Java server and an Adobe Flex client application running ina browser.
Table 2-10. Hardware Requirements for the vSphere Web Client Server Component
vSphere Web Client Server Hardware Requirement
Memory At least 2GB: 1GB for the Java heap, and 1GB forn The resident coden The stack for Java threadsn Global/bss segments for the Java process
CPU 2.00 GHz processor with 4 cores
Requirements for Installation of vCenter Server on a Custom DriveIf you install vCenter Server on a custom drive, note the following space requirements:
n 1GB on the custom drive for vCenter Server
n 1.13GB on the C:\ drive for Microsoft .NET 3.0 SP1, Microsoft ADAM, Microsoft SQL Server 2008 R2Express (optional), and Microsoft Visual C++ 2008 Redistributable
n 375MB for the custom drive %temp% directory
vCenter Server Software RequirementsMake sure that your operating system supports vCenter Server. vCenter Server requires a 64-bit operatingsystem, and the 64-bit system DSN is required for vCenter Server to connect to its database.
For a list of supported operating systems, see the VMware Compatibility Guide at http://www.vmware.com/resources/compatibility.
vCenter Server requires the Microsoft .NET 3.5 SP1 Framework. If it is not installed on your system, the vCenterServer installer installs it. The .NET 3.5 SP1 installation might require Internet connectivity to download morefiles.
NOTE If your vCenter Server host machine uses a non-English operating system, install both the Microsoft .NETFramework 3.5 SP1 and Microsoft .NET Framework 3.5 Language Pack through Windows Update. WindowsUpdate automatically selects the correct localized version for your operating system. The .NET Frameworkinstalled through the vCenter Server installer includes only the English version.
If you plan to use the Microsoft SQL Server 2008 R2 Express database that is bundled with vCenter Server,Microsoft Windows Installer version 4.5 (MSI 4.5) is required on your system. You can download MSI 4.5 fromthe Microsoft Web site. You can also install MSI 4.5 directly from the vCenter Server autorun.exe installer.
The VMware vCenter Server Appliance can be deployed only on hosts that are running ESX version 4.x orESXi version 4.x or later.
vSphere Installation and Setup
36 VMware, Inc.

vSphere Client and vSphere Web Client Software RequirementsMake sure that your operating system supports the vSphere Client.
For the most current, complete list of supported operating systems for the vSphere Client and thevSphere Web Client, see the VMware Compatibility Guide at http://www.vmware.com/resources/compatibility.
The vSphere Client requires the Microsoft .NET 3.5 SP1 Framework. If it is not installed on your system, thevSphere Client installer installs it. The .NET 3.5 SP1 installation might require Internet connectivity todownload more files.
The following browsers are supported for the vSphere Web Client:
n Microsoft Internet Explorer 7 and 8
n Mozilla Firefox 3.6
The vSphere Web Client requires the Adobe Flash Player version 10.1.0 or later to be installed with theappropriate plug-in for your browser.
Providing Sufficient Space for System LoggingESXi 5.0 uses a new log infrastructure. If your host is deployed with Auto Deploy, or if you set up a log directoryseparate from the default location in a scratch directory on the VMFS volume, you might need to change yourcurrent log size and rotation settings to ensure that enough space for system logging exists.
All vSphere components use this infrastructure. The default values for log capacity in this infrastructure vary,depending on the amount of storage available and on how you have configured system logging. Hosts thatare deployed with Auto Deploy store logs on a RAM disk, which means that the amount of space available forlogs is small.
If your host is deployed with Auto Deploy, reconfigure your log storage in one of the following ways:
n Redirect logs over the network to a remote collector.
n Redirect logs to a NAS or NFS store.
You might also want to reconfigure log sizing and rotations for hosts that are installed to disk, if you redirectlogs to nondefault storage, such as a NAS or NFS store.
You do not need to reconfigure log storage for ESXi hosts that use the default configuration, which stores logsin a scratch directory on the VMFS volume. For these hosts, ESXi 5.0 autoconfigures logs to best suit yourinstallation, and provides enough space to accommodate log messages.
Table 2-11. Recommended Minimum Size and Rotation Configuration for hostd, vpxa, and fdm Logs.
Log Maximum Log File SizeNumber of Rotations toPreserve Minimum Disk Space Required
Management Agent(hostd)
10240KB 10 100MB
VirtualCenter Agent(vpxa)
5120KB 10 50MB
vSphere HA agent (FaultDomain Manager, fdm)
5120KB 10 50MB
For information about setting up a remote log server, see “Configure Syslog on ESXi Hosts,” on page 155, “SetUp Syslog from the Host Profiles Interface,” on page 90, and “Install vSphere Syslog Collector,” onpage 213.
Chapter 2 System Requirements
VMware, Inc. 37

Required Ports for vCenter ServerThe VMware vCenter Server system must be able to send data to every managed host and receive data fromevery vSphere Client. To enable migration and provisioning activities between managed hosts, the source anddestination hosts must be able to receive data from each other.
For information about ports required for the vCenter Server Appliance, see “Required Ports for the vCenterServer Appliance,” on page 39.
VMware uses designated ports for communication. Additionally, the managed hosts monitor designated portsfor data from the vCenter Server system. If a firewall exists between any of these elements and Windowsfirewall service is in use, the installer opens the ports during the installation. For custom firewalls, you mustmanually open the required ports. If you have a firewall between two managed hosts and you want to performsource or target activities, such as migration or cloning, you must configure a means for the managed hosts toreceive data.
NOTE In Microsoft Windows Server 2008, a firewall is enabled by default.
Table 2-12. Ports Required for Communication Between Components
Port Description
80 vCenter Server requires port 80 for direct HTTP connections. Port 80 redirects requests to HTTPS port443. This redirection is useful if you accidentally use http://server instead of https://server.If you use a custom Microsoft SQL database (not the bundled SQL Server 2008 database) that is storedon the same host machine as the vCenter Server, port 80 is used by the SQL Reporting Service. Whenyou install vCenter Server, the installer will prompt you to change the HTTP port for vCenter Server.Change the vCenter Server HTTP port to a custom value to ensure a successful installation.Microsoft Internet Information Services (IIS) also use port 80. See “Conflict Between vCenter Server andIIS for Port 80,” on page 40.
389 This port must be open on the local and all remote instances of vCenter Server. This is the LDAP portnumber for the Directory Services for the vCenter Server group. The vCenter Server system needs tobind to port 389, even if you are not joining this vCenter Server instance to a Linked Mode group. Ifanother service is running on this port, it might be preferable to remove it or change its port to a differentport. You can run the LDAP service on any port from 1025 through 65535.If this instance is serving as the Microsoft Windows Active Directory, change the port number from 389to an available port from 1025 through 65535.
443 The default port that the vCenter Server system uses to listen for connections from the vSphere Client.To enable the vCenter Server system to receive data from the vSphere Client, open port 443 in thefirewall.The vCenter Server system also uses port 443 to monitor data transfer from SDK clients.If you use another port number for HTTPS, you must use ip-address:port when you log in to the vCenterServer system.
636 For vCenter Server Linked Mode, this is the SSL port of the local instance. If another service is runningon this port, it might be preferable to remove it or change its port to a different port. You can run theSSL service on any port from 1025 through 65535.
902 The default port that the vCenter Server system uses to send data to managed hosts. Managed hostsalso send a regular heartbeat over UDP port 902 to the vCenter Server system. This port must not beblocked by firewalls between the server and the hosts or between hosts.
902 Port 902 must not be blocked between the vSphere Client and the hosts. The vSphere Client uses thisports to display virtual machine consoles.
8080 Web Services HTTP. Used for the VMware VirtualCenter Management Web Services.
8443 Web Services HTTPS. Used for the VMware VirtualCenter Management Web Services.
60099 Web Service change service notification port
10443 vCenter Inventory Service HTTPS
vSphere Installation and Setup
38 VMware, Inc.

Table 2-12. Ports Required for Communication Between Components (Continued)
Port Description
10109 vCenter Inventory Service Management
10111 vCenter Inventory Service Linked Mode Communication
To have the vCenter Server system use a different port to receive vSphere Client data, see the vCenter Serverand Host Management documentation.
For a discussion of firewall configuration, see the vSphere Security documentation.
Required Ports for the vCenter Server ApplianceThe VMware vCenter Server system must be able to send data to every managed host and receive data fromevery vSphere Client. For migration and provisioning activities between managed hosts, the source anddestination hosts must be able to receive data from each other.
For information about ports required for vCenter Server on Windows, see “Required Ports for vCenterServer,” on page 38.
VMware uses designated ports for communication. Additionally, the managed hosts monitor designated portsfor data from the vCenter Server system. The vCenter Server Appliance is preconfigured to use the ports listedin Table 2-13. For custom firewalls, you must manually open the required ports. If you have a firewall betweentwo managed hosts and you want to perform source or target activities, such as migration or cloning, you mustconfigure a means for the managed hosts to receive data.
Table 2-13. Ports Required for the vCenter Server Appliance
Port Description
80 vCenter Server requires port 80 for direct HTTP connections. Port 80 redirects requests to HTTPS port443. This redirection is useful if you accidentally use http://server instead of https://server.
443 The default port that the vCenter Server system uses to listen for connections from the vSphere Client.To enable the vCenter Server system to receive data from the vSphere Client, open port 443 in thefirewall.The vCenter Server system also uses port 443 to monitor data transfer from SDK clients.If you use another port number for HTTPS, you must use ip-address:port when you log in to the vCenterServer system.
902 The default port that the vCenter Server system uses to send data to managed hosts. Managed hostsalso send a regular heartbeat over UDP port 902 to the vCenter Server system. This port must not beblocked by firewalls between the server and the hosts or between hosts.Port 902 must not be blocked between the vSphere Client and the hosts. The vSphere Client uses thisport to display virtual machine consoles.
8080 Web Services HTTP. Used for the VMware VirtualCenter Management Web Services.
8443 Web Services HTTPS. Used for the VMware VirtualCenter Management Web Services.
10080 vCenter Inventory Service HTTP.
10443 vCenter Inventory Service HTTPS.
10109 vCenter Inventory Service database.
514 vSphere Syslog Collector server.
1514 vSphere Syslog Collector server (SSL).
6500 Network coredump server (UDP).
6501 Auto Deploy service.
6502 Auto Deploy management.
9090 vSphere Web Client HTTP.
Chapter 2 System Requirements
VMware, Inc. 39

Table 2-13. Ports Required for the vCenter Server Appliance (Continued)
Port Description
9443 vSphere Web Client HTTPS.
5480 vCenter Server Appliance Web user interface HTTPS.
5489 vCenter Server Appliance Web user interface CIM service.
22 System port for SSHD.
To have the vCenter Server system use a different port to receive vSphere Client data, see the vCenter Serverand Host Management documentation.
For a discussion of firewall configuration, see the vSphere Security documentation.
Conflict Between vCenter Server and IIS for Port 80vCenter Server and Microsoft Internet Information Service (IIS) both use port 80 as the default port for directHTTP connections. This conflict can cause vCenter Server to fail to restart after the installation of vSphereAuthentication Proxy.
Problem
vCenter Server fails to restart after the installation of vSphere Authentication Proxy is complete.
Cause
If you do not have IIS installed when you install vSphere Authentication Proxy, the installer prompts you toinstall IIS. Because IIS uses port 80, which is the default port for vCenter Server direct HTTP connections,vCenter Server fails to restart after the installation of vSphere Authentication Proxy is complete. See “RequiredPorts for vCenter Server,” on page 38.
Solution
u To resolve a conflict between IIS and vCenter Server for port 80, take one of the following actions.
Option Description
If you installed IIS before installingvCenter Server
Change the port for vCenter Server direct HTTP connections from 80 toanother value.
If you installed vCenter Server beforeinstalling IIS
Before restarting vCenter Server, change the binding port of the IIS defaultWeb site from 80 to another value.
DNS Requirements for vSphereYou install vCenter Server, like any other network server, on a machine with a fixed IP address and well-knownDNS name, so that clients can reliably access the service.
Assign a static IP address and host name to the Windows server that will host the vCenter Server system. ThisIP address must have a valid (internal) domain name system (DNS) registration.
Ensure that the ESXi host management interface has a valid DNS resolution from the vCenter Server and allvSphere Clients and vSphere Web Clients. Ensure that the vCenter Server has a valid DNS resolution from allESXi hosts and all vSphere Clients and vSphere Web Clients.
Ensure that the vCenter Server is installed on a machine that has a resolvable fully qualified domain name(FQDN). To check that the FQDN is resolvable, type nslookup your_vCenter_Server_fqdn at a command lineprompt. If the FQDN is resolvable, the nslookup command returns the IP and name of the domain controllermachine.
vSphere Installation and Setup
40 VMware, Inc.

Ensure that DNS reverse lookup returns a fully qualified domain name when queried with the IP address ofthe vCenter Server. When you install vCenter Server, the installation of the web server component that supportsthe vSphere Client fails if the installer cannot look up the fully qualified domain name of the vCenter Serverfrom its IP address. Reverse lookup is implemented using PTR records. To create a PTR record, see thedocumentation for your vCenter Server host operating system.
If you use DHCP instead of a static IP address for vCenter Server, make sure that the vCenter Server computername is updated in the domain name service (DNS). Ping the computer name to test the connection. Forexample, if the computer name is host-1.company.com, run the following command in the Windows commandprompt:
ping host-1.company.com
If you can ping the computer name, the name is updated in DNS.
Supported Remote Management Server Models and Minimum FirmwareVersions
You can use remote management applications to install ESXi or for remote management of hosts.
Table 2-14. Supported Remote Management Server Models and Firmware Versions
Remote Controller Make andModel Firmware Version Java
Dell DRAC 6 1.54 (Build 15), 1.70 (Build 21) 1.6.0_24
Dell DRAC 5 1.0, 1.45, 1.51 1.6.0_20,1.6.0_203
Dell DRAC 4 1.75 1.6.0_23
HP ILO 1.81, 1.92 1.6.0_22, 1.6.0_23
HP ILO 2 1.8, 1.81 1.6.0_20, 1.6.0_23
IBM RSA 2 1.03, 1.2 1.6.0_22
Chapter 2 System Requirements
VMware, Inc. 41

vSphere Installation and Setup
42 VMware, Inc.

Installing ESXi Interactively 3Use the interactive installation option for small deployments of less than five hosts.
In a typical interactive installation, you boot the ESXi installer and respond to the installer prompts to installESXi to the local host disk. The installer reformats and partitions the target disk and installs the ESXi bootimage. If you have not installed ESXi on the target disk before, all data located on the drive is overwritten,including hardware vendor partitions, operating system partitions, and associated data.
NOTE To ensure that you do not lose any data, migrate the data to another machine before you install ESXi.
If you are installing ESXi on a disk that contains a previous installation of ESXi or ESX, or a VMFS datastore,the installer provides you with options for upgrading. See the vSphere Upgrade documentation.
This chapter includes the following topics:
n “Install ESXi Interactively,” on page 43
n “Install ESXi on a Software iSCSI Disk,” on page 45
Install ESXi InteractivelyYou use the ESXi CD/DVD or a USB flash drive to install the ESXi software onto a SAS, SATA, SCSI hard drive,or USB drive.
ESXi Embedded must not be on the host. ESXi Installable and ESXi Embedded cannot exist on the same host.
Prerequisites
n You must have the ESXi installer ISO in one of the following locations:n On CD or DVD. If you do not have the installation CD/DVD, you can create one. See “Download and
Burn the ESXi Installer ISO Image to a CD or DVD,” on page 16
n On a USB flash drive. See “Format a USB Flash Drive to Boot the ESXi Installation or Upgrade,” onpage 16.
NOTE You can also PXE boot the ESXi installer to launch an interactive installation or a scripted installation.See “PXE Booting the ESXi Installer,” on page 19.
n Verify that the server hardware clock is set to UTC. This setting is in the system BIOS.
n Verify that a keyboard and monitor are attached to the machine on which the ESXi software will beinstalled. Alternatively, use a remote management application. See “Using Remote ManagementApplications,” on page 26.
n Consider disconnecting your network storage. This action decreases the time it takes the installer to searchfor available disk drives. Note that when you disconnect network storage, any files on the disconnecteddisks are unavailable at installation.
VMware, Inc. 43

Do not disconnect a LUN that contains an existing ESX or ESXi installation. Do not disconnect a VMFSdatastore that contains the Service Console of an existing ESX installation. These actions can affect theoutcome of the installation.
n Gather the information required by the ESXi installation wizard. See “Required Information for ESXiInstallation,” on page 26.
Procedure
1 Insert the ESXi installer CD/DVD into the CD/DVD-ROM drive, or attach the Installer USB flash drive andrestart the machine.
2 Set the BIOS to boot from the CD-ROM device or the USB flash drive.
See your hardware vendor documentation for information on changing boot order.
3 On the Select a Disk page, select the drive on which to install ESXi and press Enter.
Press F1 for information about the selected disk.
NOTE Do not rely on the disk order in the list to select a disk. The disk order is determined by the BIOSand might be out of order. This might occur on systems where drives are continuously being added andremoved.
If the disk you selected contains data, the Confirm Disk Selection page appears.
If you are installing on a disc with a previous ESXi or ESX installation or VMFS datastore, the installerprovides several choices.
IMPORTANT If you are upgrading or migrating an existing ESX/ESXi installation, see the vSphere Upgradedocumentation. The instructions in this vSphere Installation and Setup documentation are for a freshinstallation of ESXi.
4 Select the keyboard type for the host.
You can change the keyboard type after installation in the direct console.
5 Enter the root password for the host.
You can leave the password blank, but to secure the system from the first boot, enter a password. You canchange the password after installation in the direct console.
6 Press F11 to start the installation.
7 When the installation is complete, remove the installation CD, DVD, or USB flash drive.
8 Press Enter to reboot the host.
If you are performing a new installation, or you chose to overwrite an existing VMFS datastore, duringthe reboot operation, VFAT scratch and VMFS partitions are created on the host disk.
9 Set the first boot device to be the drive on which you installed ESXi in Step 3.
For information about changing boot order, see your hardware vendor documentation.
NOTE UEFI systems might require additional steps to set the boot device. See “Host Fails to Boot AfterYou Install ESXi in UEFI Mode,” on page 146
After the installation is complete, you can migrate existing VMFS data to the ESXi host.
You can boot a single machine from each ESXi image. Booting multiple devices from a single shared ESXiimage is not supported.
vSphere Installation and Setup
44 VMware, Inc.

What to do next
Set up basic administration and network configuration for ESXi. See Chapter 8, “After You Install and Set UpESXi,” on page 161.
Install ESXi on a Software iSCSI DiskWhen you install ESXi to a software iSCSI disk, you must configure the target iSCSI qualified name (IQN).
During system boot, the system performs a Power-On Self Test (POST), and begins booting the adapters in theorder specified in the system BIOS. When the boot order comes to the iSCSI Boot Firmware Table (iBFT) adapter,the adapter attempts to connect to the target, but does not boot from it. See Prerequisites.
If the connection to the iSCSI target is successful, the iSCSI boot firmware saves the iSCSI boot configurationin the iBFT. The next adapter to boot must be the ESXi installation media, either a mounted ISO image or aphysical CD-ROM.
Prerequisites
n Verify that the target IQN is configured in the iBFT BIOS target parameter setting. This setting is in theoption ROM of the network interface card (NIC) to be used for the iSCSI LUN. See the vendordocumentation for your system.
n Disable the iBFT adapter option to boot to the iSCSI target. This action is necessary to make sure that theESXi installer boots, rather than the iSCSI target. When you start your system, follow the prompt to login to your iBFT adapter and disable the option to boot to the iSCSI target. See the vendor documentationfor your system and iBFT adapter. After you finish the ESXi installation, you can reenable the option toboot from the LUN you install ESXi on.
Procedure
1 Start an interactive installation from the ESXi installation CD/DVD or mounted ISO image.
2 On the Select a Disk screen, select the iSCSI target you specified in the iBFT BIOS target parameter setting.
If the target does not appear in this menu, make sure that the TCP/IP and initiator iSCSI IQN settings arecorrect. Check the network Access Control List (ACL) and confirm that the adapter has adequatepermissions to access the target.
3 Follow the prompts to complete the installation.
4 Reboot the host.
5 In the host BIOS settings, enter the iBFT adapter BIOS configuration, and change the adapter parameterto boot from the iSCSI target.
See the vendor documentation for your system.
What to do next
On your iBFT adapter, reenable the option to boot to the iSCSI target, so the system will boot from the LUNyou installled ESXi on.
Chapter 3 Installing ESXi Interactively
VMware, Inc. 45

vSphere Installation and Setup
46 VMware, Inc.
Installing, Upgrading, or MigratingHosts Using a Script 4
You can quickly deploy ESXi hosts using scripted, unattended installations or upgrades. Scripted installations,upgrades, or migrations provide an efficient way to deploy multiple hosts.
The installation or upgrade script contains the installation settings for ESXi. You can apply the script to allhosts that you want to have a similar configuration.
For a scripted installation, upgrade, or migration, you must use the supported commands to create a script.and edit the script to change settings that are unique for each host.
The installation or upgrade script can reside in one of the following locations:
n FTP
n HTTP/HTTPS
n NFS
n USB flash drive
n CDROM
This chapter includes the following topics:
n “Approaches for Scripted Installation,” on page 47
n “Enter Boot Options to Start an Installation or Upgrade Script,” on page 48
n “About Installation and Upgrade Scripts,” on page 50
n “Install, Upgrade, or Migrate ESXi from a CD or DVD Using a Script,” on page 59
n “Install, Upgrade, or Migrate ESXi from a USB Flash Drive Using a Script,” on page 60
n “Performing a Scripted Installation or Upgrade of ESXi by PXE Booting the Installer,” on page 61
Approaches for Scripted InstallationYou can install ESXi on multiple machines using a single script for all of them or a separate script for eachmachine.
For example, because disk names vary from machine to machine, one of the settings that you might want toconfigure in a script is the selection for the disk to install ESXi on.
Table 4-1. Scripted Installation Choices
Option Action
Always install on the first disk on multiple machines. Create one script.
Install ESXi on a different disk for each machine. Create multiple scripts.
VMware, Inc. 47

For information about the commands required to specify the disk to install on, see “Installation and UpgradeScript Commands,” on page 51.
Enter Boot Options to Start an Installation or Upgrade ScriptYou can start an installation or upgrade script by typing boot command-line options at the boot command line.
At boot time you might need to specify options to access the kickstart file. You can enter boot options bypressing Shift+O in the boot loader. For a PXE boot installation, you can pass options through thekernelopts line of the boot.cfg file. See “About the boot.cfg File,” on page 58 and “PXE Booting the ESXiInstaller,” on page 19.
A ks=... option must be given, to specify the location of the installation script. Otherwise, a scriptedinstallation or upgrade will not start. If ks=... is omitted, the text installer will proceed.
Supported boot options are listed in “Boot Options,” on page 49.
Procedure
1 Start the host.
2 When the ESXi installer window appears, press Shift+O to edit boot options.
3 At the runweasel command prompt, typeks=location of installation script plus boot command line options
Example: Boot OptionYou type the following boot options:
ks=http://00.00.00.00/kickstart/ks-osdc-pdp101.cfg nameserver=00.00.0.0 ip=00.00.00.000
netmask=255.255.255.0 gateway=00.00.00.000
vSphere Installation and Setup
48 VMware, Inc.

Boot OptionsWhen you perform a scripted installation, you might need to specify options at boot time to access the kickstartfile.
Supported Boot OptionsTable 4-2. Boot Options for ESXi Installation
Boot Option Description
BOOTIF=hwtype-MAC address Similar to the netdevice option, except in the PXELINUXformat as described in the IPAPPEND option underSYSLINUX at the syslinux.zytor.com site.
gateway=ip address Sets this network gateway as the default gateway to be usedfor downloading the installation script and installation media.
ip=ip address Sets up a static IP address to be used for downloading theinstallation script and the installation media. Note: thePXELINUX format for this option is also supported. See theIPAPPEND option under SYSLINUX at thesyslinux.zytor.com site.
ks=cdrom:/path Performs a scripted installation with the script at path, whichresides on the CD in the CD-ROM drive. Each CDROM ismounted and checked until the file that matches the path isfound.
ks=file://path Performs a scripted installation with the script at path.
ks=protocol://serverpath Performs a scripted installation with a script located on thenetwork at the given URL. protocol can be http, https, ftp,or nfs. The format of an NFS URL is specified in RFC 2224.
ks=usb Performs a scripted installation, accessing the script from anattached USB drive. Searches for a file named ks.cfg. The filemust be located in the root directory of the drive. If multipleUSB flash drives are attached, they are searched until theks.cfg file is found. Only FAT16 and FAT32 file systems aresupported.
ks=usb:/path Performs a scripted installation with the script file at thespecified path, which resides on USB.
ksdevice=device Tries to use a network adapter device when looking for aninstallation script and installation media. Specify as a MACaddress, for example, 00:50:56:C0:00:01. This location can alsobe a vmnicNN name. If not specified and files need to beretrieved over the network, the installer defaults to the firstdiscovered network adapter that is plugged in.
nameserver=ip address Specifies a domain name server to be used for downloadingthe installation script and installation media.
netdevice=device Tries to use a network adapter device when looking for aninstallation script and installation media. Specify as a MACaddress, for example, 00:50:56:C0:00:01. This location can alsobe a vmnicNN name. If not specified and files need to beretrieved over the network, the installer defaults to the firstdiscovered network adapter that is plugged in.
netmask=subnet mask Specifies subnet mask for the network interface thatdownloads the installation script and the installation media.
vlanid=vlanid Configure the network card to be on the specified VLAN.
Chapter 4 Installing, Upgrading, or Migrating Hosts Using a Script
VMware, Inc. 49

About Installation and Upgrade ScriptsThe installation/upgrade script is a text file, for example ks.cfg, that contains supported commands.
The command section of the script contains the ESXi installation options. This section is required and mustappear first in the script.
About the Default ks.cfg Installation ScriptThe ESXi installer includes a default installation script that performs a standard installation to the first detecteddisk.
The default ks.cfg installation script is located in the initial RAM disk at /etc/vmware/weasel/ks.cfg. You canspecify the location of the default ks.cfg file with the ks=file://etc/vmware/weasel/ks.cfg boot option. See “Enter Boot Options to Start an Installation or Upgrade Script,” on page 48.
When you install ESXi using the ks.cfg script, the default root password is mypassword.
You cannot modify the default script on the installation media. After the installation, you can log in to the ESXihost and use the vSphere Client to modify the default settings.
The default script contains the following commands:
#
# Sample scripted installation file
#
# Accept the VMware End User License Agreement
vmaccepteula
# Set the root password for the DCUI and Tech Support Mode
rootpw mypassword
# Install on the first local disk available on machine
install --firstdisk --overwritevmfs
# Set the network to DHCP on the first network adapter
network --bootproto=dhcp --device=vmnic0
# A sample post-install script
%post --interpreter=python --ignorefailure=true
import time
stampFile = open('/finished.stamp', mode='w')
stampFile.write( time.asctime() )
Locations Supported for Installation or Upgrade ScriptsIn scripted installations and upgrades, the ESXi installer can access the installation or upgrade script, also calledthe kickstart file, from several locations.
The following locations are supported for the installation or upgrade script:
n CD/DVD. See “Create an Installer ISO Image with a Custom Installation or Upgrade Script,” on page 18.
n USB Flash drive. See “Create a USB Flash Drive to Store the ESXi Installation or Upgrade Script,” onpage 17.
n A location accessible with the following protocols: NFS, HTTP, HTTPS, FTP
vSphere Installation and Setup
50 VMware, Inc.
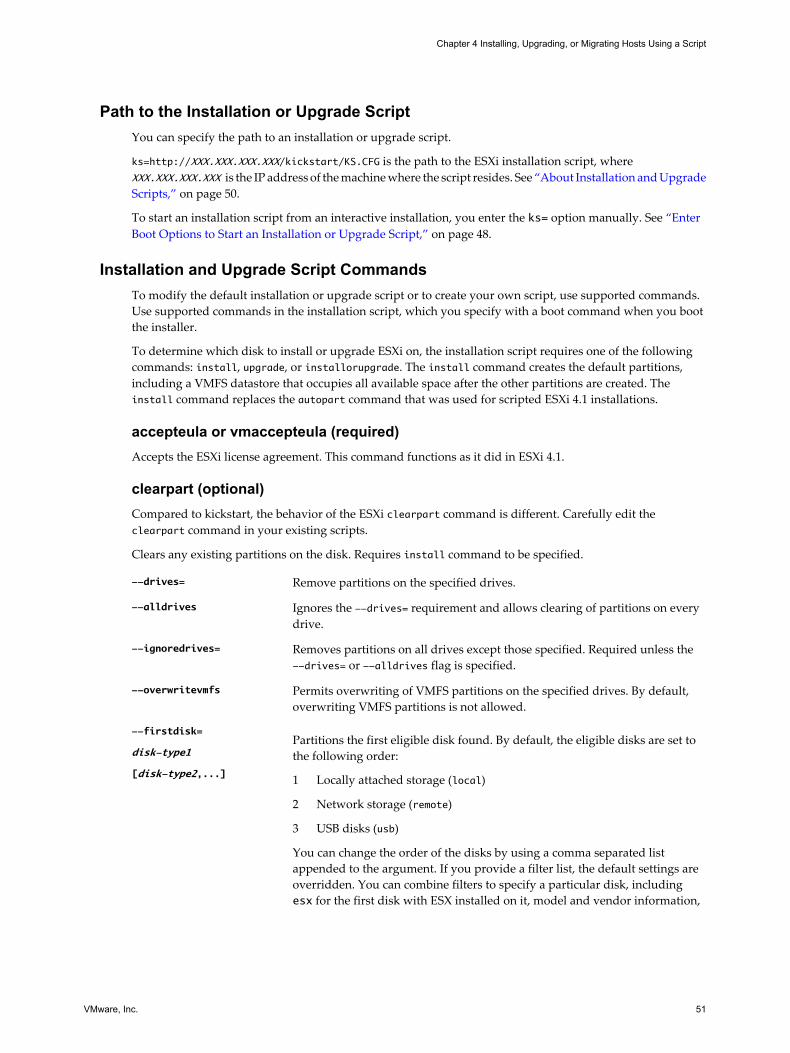
Path to the Installation or Upgrade ScriptYou can specify the path to an installation or upgrade script.
ks=http://XXX.XXX.XXX.XXX/kickstart/KS.CFG is the path to the ESXi installation script, whereXXX.XXX.XXX.XXX is the IP address of the machine where the script resides. See “About Installation and UpgradeScripts,” on page 50.
To start an installation script from an interactive installation, you enter the ks= option manually. See “EnterBoot Options to Start an Installation or Upgrade Script,” on page 48.
Installation and Upgrade Script CommandsTo modify the default installation or upgrade script or to create your own script, use supported commands.Use supported commands in the installation script, which you specify with a boot command when you bootthe installer.
To determine which disk to install or upgrade ESXi on, the installation script requires one of the followingcommands: install, upgrade, or installorupgrade. The install command creates the default partitions,including a VMFS datastore that occupies all available space after the other partitions are created. Theinstall command replaces the autopart command that was used for scripted ESXi 4.1 installations.
accepteula or vmaccepteula (required)Accepts the ESXi license agreement. This command functions as it did in ESXi 4.1.
clearpart (optional)Compared to kickstart, the behavior of the ESXi clearpart command is different. Carefully edit theclearpart command in your existing scripts.
Clears any existing partitions on the disk. Requires install command to be specified.
--drives= Remove partitions on the specified drives.
--alldrives Ignores the --drives= requirement and allows clearing of partitions on everydrive.
--ignoredrives= Removes partitions on all drives except those specified. Required unless the--drives= or --alldrives flag is specified.
--overwritevmfs Permits overwriting of VMFS partitions on the specified drives. By default,overwriting VMFS partitions is not allowed.
--firstdisk=
disk-type1
[disk-type2,...]
Partitions the first eligible disk found. By default, the eligible disks are set tothe following order:
1 Locally attached storage (local)
2 Network storage (remote)
3 USB disks (usb)
You can change the order of the disks by using a comma separated listappended to the argument. If you provide a filter list, the default settings areoverridden. You can combine filters to specify a particular disk, includingesx for the first disk with ESX installed on it, model and vendor information,
Chapter 4 Installing, Upgrading, or Migrating Hosts Using a Script
VMware, Inc. 51

or the name of the vmkernel device driver. For example, to prefer a disk withthe model name ST3120814A and any disk that uses the mptsas driver ratherthan a normal local disk, the argument is--firstdisk=ST3120814A,mptsas,local.
dryrun (optional)Parses and checks the installation script. Does not perform the installation.
installSpecifies that this is a fresh installation. Replaces the deprecated autopart command used for ESXi 4.1 scriptedinstallations. Either the install, upgrade, or installorupgrade command is required to determine which diskto install or upgrade ESXi on.
--disk= or --drive= Specifies the disk to partition. In the command --disk=diskname, the disknamecan be in any of the forms shown in the following examples:
n Path: --disk=/vmfs/devices/disks/mpx.vmhba1:C0:T0:L0
n MPX name: --disk=mpx.vmhba1:C0:T0:L0
n VML name: --disk=vml.000000034211234
n vmkLUN UID: --disk=vmkLUN_UID
For accepted disk name formats, see “Disk Device Names,” on page 58.
--firstdisk=
disk-type1,
[disk-type2,...]
Partitions the first eligible disk found. By default, the eligible disks are set tothe following order:
1 Locally attached storage (local)
2 Network storage (remote)
3 USB disks (usb)
You can change the order of the disks by using a comma separated listappended to the argument. If you provide a filter list, the default settings areoverridden. You can combine filters to specify a particular disk, includingesx for the first disk with ESX installed on it, model and vendor information,or the name of the vmkernel device driver. For example, to prefer a disk withthe model name ST3120814A and any disk that uses the mptsas driver ratherthan a normal local disk, the argument is--firstdisk=ST3120814A,mptsas,local.
--overwritevmfs Required to overwrite an existing VMFS datastore on the disk beforeinstallation.
--preservevmfs Preserves an existing VMFS datastore on the disk during installation.
--novmfsondisk Prevents a VMFS partition from being created on this disk. Must be used with--overwritevmfs if a VMFS partition already exists on the disk.
vSphere Installation and Setup
52 VMware, Inc.

installorupgradeEither the install, upgrade, or installorupgrade command is required to determine which disk to install orupgrade ESXi on.
--disk= or --drive= Specifies the disk to partition. In the command --disk=diskname, the disknamecan be in any of the forms shown in the following examples:
n Path: --disk=/vmfs/devices/disks/mpx.vmhba1:C0:T0:L0
n MPX name: --disk=mpx.vmhba1:C0:T0:L0
n VML name: --disk=vml.000000034211234
n vmkLUN UID: --disk=vmkLUN_UID
For accepted disk name formats, see “Disk Device Names,” on page 58.
--firstdisk=
disk-type1,
[disk-type2,...]
Partitions the first eligible disk found. By default, the eligible disks are set tothe following order:
1 Locally attached storage (local)
2 Network storage (remote)
3 USB disks (usb)
You can change the order of the disks by using a comma separated listappended to the argument. If you provide a filter list, the default settings areoverridden. You can combine filters to specify a particular disk, includingesx for the first disk with ESX installed on it, model and vendor information,or the name of the vmkernel device driver. For example, to prefer a disk withthe model name ST3120814A and any disk that uses the mptsas driver ratherthan a normal local disk, the argument is--firstdisk=ST3120814A,mptsas,local.
--overwritevmfs Install ESXi if a VMFS partition exists on the disk, but no ESX or ESXiinstallation exists. Unless this option is present, the installer will fail if a VMFSpartition exists on the disk, but no ESX or ESXi installation exists.
--forcemigrate If the host contains customizations, such as third-party VIBS or drivers, thatare not included in the installer .ISO, the installer exits with an error describingthe problem. The forcemigrate option overrides the error and forces theupgrade.
CAUTION Using the forcemigrate option might cause the upgraded host tonot boot properly, to exhibit system instability, or to lose functionality.
keyboard (optional)Sets the keyboard type for the system.
keyboardType Specifies the keyboard map for the selected keyboard type. keyboardType mustbe one of the following types.
n Belgian
n Brazilian
n Croatian
Chapter 4 Installing, Upgrading, or Migrating Hosts Using a Script
VMware, Inc. 53

n Czechoslovakian
n Danish
n Default
n Estonian
n Finnish
n French
n German
n Greek
n Icelandic
n Italian
n Japanese
n Latin American
n Norwegian
n Polish
n Portuguese
n Russian
n Slovenian
n Spanish
n Swedish
n Swiss French
n Swiss German
n Turkish
n US Dvorak
n Ukranian
n United Kingdom
network (optional)Specify a network address for the system.
--bootproto=[dhcp|
static]Specify whether to obtain the network settings from DHCP or set themmanually.
--device= Specifies either the MAC address of the network card or the device name, inthe form vmnicNN, as in vmnic0. This options refers to the uplink device for thevirtual switch.
--ip= Sets an IP address for the machine to be installed, in the formxxx.xxx.xxx.xxx. Required with the --bootproto=static option andignored otherwise.
--gateway= Designates the default gateway as an IP address, in the formxxx.xxx.xxx.xxx. Used with the --bootproto=static option.
vSphere Installation and Setup
54 VMware, Inc.

--nameserver= Designates the primary name server as an IP address. Used with the --bootproto=static option. Omit this option if you do not intend to use DNS.
The --nameserver option can accept two IP addresses. For example: --nameserver="10.126.87.104[,10.126.87.120]"
--netmask= Specifies the subnet mask for the installed system, in the form255.xxx.xxx.xxx. Used with the --bootproto=static option.
--hostname= Specifies the host name for the installed system.
--vlanid= vlanid Specifies which VLAN the system is on. Used with either the--bootproto=dhcp or --bootproto=static option. Set to an integer from 1 to4096.
--addvmportgroup=(0|1) Specifies whether to add the VM Network port group, which is used by virtualmachines. The default value is 1.
paranoid (optional)Causes warning messages to interrupt the installation. If you omit this command, warning messages arelogged.
part or partition (optional)Creates an additional VMFS datastore on the system. Only one datastore per disk can be created. Cannot beused on the same disk as the install command. Only one partition can be specified per disk and it can onlybe a VMFS partition
datastore name Specifies where the partition is to be mounted
--ondisk= or --ondrive= Specifies the disk or drive where the partition is created.
--firstdisk=
disk-type1,
[disk-type2,...]
Partitions the first eligible disk found. By default, the eligible disks are set tothe following order:
1 Locally attached storage (local)
2 Network storage (remote)
3 USB disks (usb)
You can change the order of the disks by using a comma separated listappended to the argument. If you provide a filter list, the default settings areoverridden. You can combine filters to specify a particular disk, includingesx for the first disk with ESX installed on it, model and vendor information,or the name of the vmkernel device driver. For example, to prefer a disk withthe model name ST3120814A and any disk that uses the mptsas driver ratherthan a normal local disk, the argument is--firstdisk=ST3120814A,mptsas,local.
reboot (optional)Reboots the machine after the scripted installation is complete.
<--noeject> The CD is not ejected after the installation.
Chapter 4 Installing, Upgrading, or Migrating Hosts Using a Script
VMware, Inc. 55

rootpw (required)Sets the root password for the system.
--iscrypted Specifies that the password is encrypted.
password Specifies the password value.
upgradeEither the install, upgrade, or installorupgrade command is required to determine which disk to install orupgrade ESXi on.
--disk= or --drive= Specifies the disk to partition. In the command --disk=diskname, the disknamecan be in any of the forms shown in the following examples:
n Path: --disk=/vmfs/devices/disks/mpx.vmhba1:C0:T0:L0
n MPX name: --disk=mpx.vmhba1:C0:T0:L0
n VML name: --disk=vml.000000034211234
n vmkLUN UID:--disk=vmkLUN_UID
For accepted disk name formats, see “Disk Device Names,” on page 58.
--firstdisk=
disk-type1,
[disk-type2,...]
Partitions the first eligible disk found. By default, the eligible disks are set tothe following order:
1 Locally attached storage (local)
2 Network storage (remote)
3 USB disks (usb)
You can change the order of the disks by using a comma separated listappended to the argument. If you provide a filter list, the default settings areoverridden. You can combine filters to specify a particular disk, includingesx for the first disk with ESX installed on it, model and vendor information,or the name of the vmkernel device driver. For example, to prefer a disk withthe model name ST3120814A and any disk that uses the mptsas driver ratherthan a normal local disk, the argument is--firstdisk=ST3120814A,mptsas,local.
--deletecosvmdk If the system is being upgraded from ESX, remove the directory that containsthe old Service Console VMDK file, cos.vmdk, to reclaim unused space in theVMFS datastore.
--forcemigrate If the host contains customizations, such as third-party VIBS or drivers, thatare not included in the installer .ISO, the installer exits with an error describingthe problem. The forcemigrate option overrides the error and forces theupgrade.
CAUTION Using the forcemigrate option might cause the upgraded host tonot boot properly, to exhibit system instability, or to lose functionality.
vSphere Installation and Setup
56 VMware, Inc.

%include or include (optional)Specifies another installation script to parse. This command is treated similarly to a multiline command, buttakes only one argument.
filename For example: %include part.cfg
%pre (optional)Specifies a script to run before the kickstart configuration is evaluated. For example, you can use it to generatefiles for the kickstart file to include.
--interpreter
=[python|busybox]
Specifies an interpreter to use. The default is busybox.
%post (optional)Runs the specified script after package installation is complete. If you specify multiple %post sections, they runin the order that they appear in the installation script.
--interpreter
=[python|busybox]
Specifies an interpreter to use. The default is busybox.
--timeout=secs Specifies a timeout for running the script. If the script is not finished when thetimeout expires, the script is forcefully terminated.
--ignorefailure
=[true|false]
If true, the installation is considered a success even if the %post scriptterminated with an error.
%firstbootCreates an init script that runs only during the first boot. The script has no effect on subsequent boots. Ifmultiple %firstboot sections are specified, they run in the order that they appear in the kickstart file.
NOTE You cannot check the semantics of %firstboot scripts until the system is booting for the first time. A%firstboot script might contain potentially catastrophic errors that are not exposed until after the installationis complete.
--interpreter
=[python|busybox]Specifies an interpreter to use. The default is busybox.
NOTE You cannot check the semantics of the %firstboot script until the system boots for the first time. If thescript contains errors, they are not exposed until after the installation is complete.
Differences Between ESXi 4.x and ESXi 5.0 Scripted Installation and UpgradeCommands
Before you perform a scripted ESXi installation or upgrade, if you are familiar with ESXi version 4.x scriptedinstallation, note the differences between ESXi 4.x and ESXi 5.0 scripted installation and upgrade commands.
In ESXi 5.0, because the installation image is loaded directly into the host RAM when the host boots, you donot need to include the location of the installation media in the installation script.
ESXi 5.0 supports scripted upgrades in addition to scripted installation.
Chapter 4 Installing, Upgrading, or Migrating Hosts Using a Script
VMware, Inc. 57

Command differences are noted in the following summary.
accepteula orvmaccepteula
Only in ESXi
autopart Deprecated and replaced with install, upgrade, or installorupgrade.
auth or authconfig Not supported in ESXi 5.0.
bootloader Not supported in ESXi 5.0.
esxlocation Deprecated and unused in ESXi.
firewall Not supported in ESXi 5.0.
firewallport Not supported in ESXi 5.0.
install,installorupgrade,upgrade
These commands replace the deprecated autopart command. Use one of thesecommand to specify the disk to partition, and the part command to create thevmfs datastore. installorupgrade and upgrade are newly supported in ESXi5.0.
serialnum or vmserialnum Deprecated in ESXi 5.0. You can license the host only after installation.
See “Licensing ESXi Hosts,” on page 161
timezone Not supported in ESXi 5.0.
virtualdisk Not supported in ESXi 5.0.
zerombr Not supported in ESXi 5.0.
%firstboot --level option not supported in ESXi 5.0.
%packages Not supported in ESXi 5.0.
Disk Device NamesThe install, upgrade, and installorupgrade installation script commands require the use of disk device names.
Table 4-3. Disk Device Names
Format Examples Description
VML vml.00025261 The device name as reported by thevmkernel
MPX mpx.vmhba0:C0:T0:L0 The device name
NOTE When you use a scripted upgrade to upgrade from ESX 4.x to ESXi 5.0, the MPX and VML disk nameschange, which might cause the upgrade to fail. To avoid this problem, use Network Address AuthorityIdentifiers (NAA IDs) for the disk device instead of MPX and VML disk names.
About the boot.cfg FileThe boot loader configuration file boot.cfg specifies the kernel, the kernel options, and the boot modules thatthe mboot.c32 boot loader uses in an ESXi installation.
The boot.cfg file is provided in the ESXi installer. You can modify the kernelopt line of the boot.cfg file tospecify the location of an installation script or to pass other boot options.
vSphere Installation and Setup
58 VMware, Inc.

The boot.cfg file has the following syntax:
# boot.cfg -- mboot configuration file
#
# Any line preceded with '#' is a comment.
title=STRING
kernel=FILEPATH
kernelopt=STRING
modules=FILEPATH1 --- FILEPATH2... --- FILEPATHn
# Any other line must remain unchanged.
The commands in boot.cfg configure the boot loader.
Table 4-4. Commands in boot.cfg .
Command Description
title=STRING Sets the boot loader title to STRING.
kernel=FILEPATH Sets the kernel path to FILEPATH.
kernelopt=STRING Appends STRING to the kernel boot options.
modules=FILEPATH1 --- FILEPATH2... --- FILEPATHn Lists the modules to be loaded, separated by three hyphens(---).
See “Create an Installer ISO Image with a Custom Installation or Upgrade Script,” on page 18, “PXE Boot theESXi Installer by Using PXELINUX and a PXE Configuration File,” on page 22, “PXE Boot the ESXi Installerby Using PXELINUX and an isolinux.cfg PXE Configuration File,” on page 24, and “PXE Booting the ESXiInstaller,” on page 19.
Install, Upgrade, or Migrate ESXi from a CD or DVD Using a ScriptYou can install, upgrade, or migrate ESXi from a CD/DVD drive using a script that specifies the installation orupgrade options.
You can start the installation or upgrade script by entering a boot option when you start the host. You can alsocreate an installer ISO image that includes the installation script. With an installer ISO image, you can performa scripted, unattended installation when you boot the resulting installer ISO image. See “Create an InstallerISO Image with a Custom Installation or Upgrade Script,” on page 18.
Prerequisites
Before you run the scripted installation, upgrade, or migration, verify that the following prerequisites are met:
n The system on which you are installing, upgrading, or migrating meets the hardware requirements. See “ESXi Hardware Requirements,” on page 29.
n You have the ESXi installer ISO on an installation CD/DVD. See “Download and Burn the ESXi InstallerISO Image to a CD or DVD,” on page 16.
n The default installation or upgrade script (ks.cfg) or a custom installation or upgrade script is accessibleto the system. See “About Installation and Upgrade Scripts,” on page 50.
n You have selected a boot command to run the scripted installation, upgrade or migration. See “Enter BootOptions to Start an Installation or Upgrade Script,” on page 48. For a complete list of boot commands, see“Boot Options,” on page 49.
Procedure
1 Boot the ESXi installer from the CD or DVD using the local CD/DVD-ROM drive.
Chapter 4 Installing, Upgrading, or Migrating Hosts Using a Script
VMware, Inc. 59
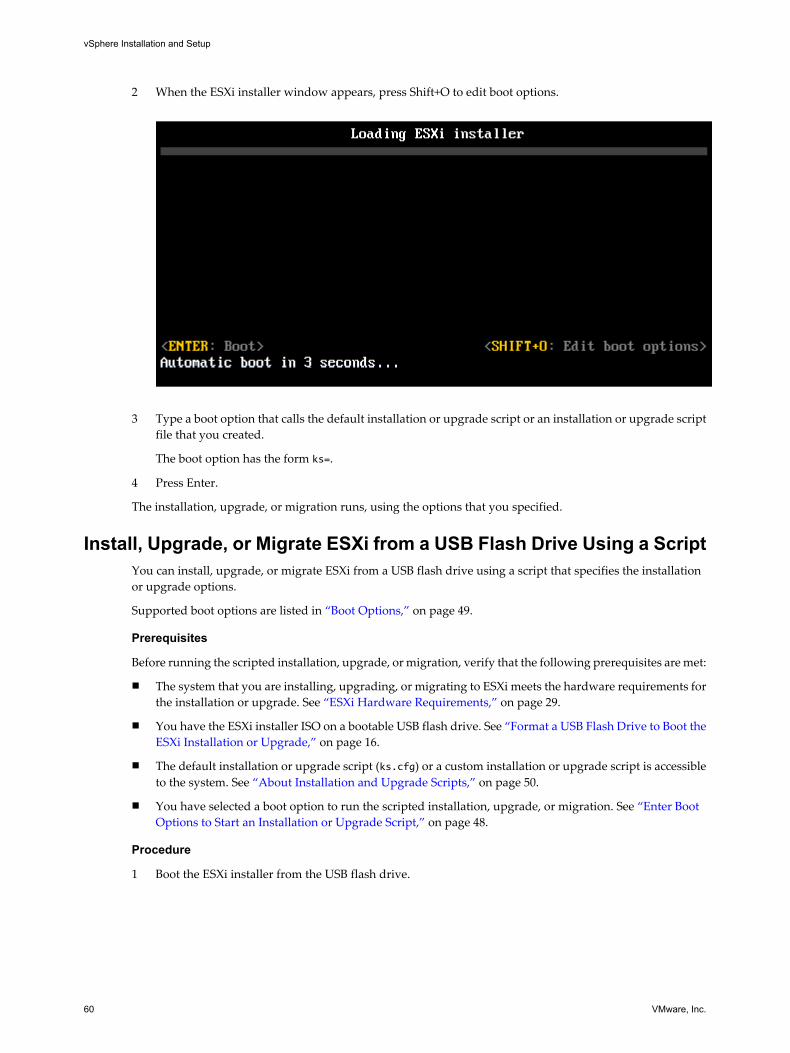
2 When the ESXi installer window appears, press Shift+O to edit boot options.
3 Type a boot option that calls the default installation or upgrade script or an installation or upgrade scriptfile that you created.
The boot option has the form ks=.
4 Press Enter.
The installation, upgrade, or migration runs, using the options that you specified.
Install, Upgrade, or Migrate ESXi from a USB Flash Drive Using a ScriptYou can install, upgrade, or migrate ESXi from a USB flash drive using a script that specifies the installationor upgrade options.
Supported boot options are listed in “Boot Options,” on page 49.
Prerequisites
Before running the scripted installation, upgrade, or migration, verify that the following prerequisites are met:
n The system that you are installing, upgrading, or migrating to ESXi meets the hardware requirements forthe installation or upgrade. See “ESXi Hardware Requirements,” on page 29.
n You have the ESXi installer ISO on a bootable USB flash drive. See “Format a USB Flash Drive to Boot theESXi Installation or Upgrade,” on page 16.
n The default installation or upgrade script (ks.cfg) or a custom installation or upgrade script is accessibleto the system. See “About Installation and Upgrade Scripts,” on page 50.
n You have selected a boot option to run the scripted installation, upgrade, or migration. See “Enter BootOptions to Start an Installation or Upgrade Script,” on page 48.
Procedure
1 Boot the ESXi installer from the USB flash drive.
vSphere Installation and Setup
60 VMware, Inc.

2 When the ESXi installer window appears, press Shift+O to edit boot options.
3 Type a boot option that calls the default installation or upgrade script or an installation or upgrade scriptfile that you created.
The boot option has the form ks=.
4 Press Enter.
The installation, upgrade, or migration runs, using the options that you specified.
Performing a Scripted Installation or Upgrade of ESXi by PXE Bootingthe Installer
ESXi 5.0 provides many options for PXE booting the installer and using an installation or upgrade script.
n For information about setting up a PXE infrastructure, see “PXE Booting the ESXi Installer,” on page 19.
n For information about creating and locating an installation script, see “About Installation and UpgradeScripts,” on page 50.
n For specific procedures to PXE boot the ESXi installer and use an installation script, see one of the followingtopics:
n “PXE Boot the ESXi Installer by Using PXELINUX and an isolinux.cfg PXE Configuration File,” onpage 24
n “PXE Boot the ESXi Installer by Using PXELINUX and a PXE Configuration File,” on page 22
n “PXE Boot the ESXi Installer Using gPXE,” on page 25
n For information about using Auto Deploy to perform a scripted installation by PXE booting, see Chapter 5,“Installing ESXi Using vSphere Auto Deploy,” on page 63.
Chapter 4 Installing, Upgrading, or Migrating Hosts Using a Script
VMware, Inc. 61

vSphere Installation and Setup
62 VMware, Inc.

Installing ESXi Using vSphere AutoDeploy 5
Using the vSphere Auto Deploy feature, you can provision hundreds of physical hosts with ESXi software.
Using Auto Deploy, experienced system administrators can manage large deployments efficiently. Unlike theother installation options, Auto Deploy does not store ESXi configuration or state on the host disk. Instead,state is managed through an image profile and other host attributes are managed through host profiles.
This chapter includes the following topics:
n “Understanding vSphere Auto Deploy,” on page 63
n “Auto Deploy Roadmap and Cmdlet Overview,” on page 70
n “Preparing for vSphere Auto Deploy,” on page 73
n “Managing Auto Deploy with PowerCLI Cmdlets,” on page 78
n “Provisioning ESXi Systems with vSphere Auto Deploy,” on page 82
n “Setting Up an Auto Deploy Reference Host,” on page 85
n “Advanced Management Tasks,” on page 91
n “Auto Deploy Best Practices and Security Consideration,” on page 97
n “Troubleshooting Auto Deploy,” on page 100
n “Auto Deploy Proof of Concept Setup,” on page 106
Understanding vSphere Auto DeployvSphere Auto Deploy can provision hundreds of physical hosts with ESXi software. You can specify the imageto deploy and the hosts to provision with the image. Optionally, you can specify host profiles to apply to thehosts, and a vCenter Server location (folder or cluster) for each host.
Introduction to Auto DeployWhen you start a physical host set up for Auto Deploy, Auto Deploy uses a PXE boot infrastructure inconjunction with vSphere host profiles to provision and customize that host. No state is stored on the hostitself, instead, the Auto Deploy server manages state information for each host.
State Information for ESXi HostsAuto Deploy stores the information for the ESXi hosts to be provisioned in different locations. Informationabout the location of image profiles and host profiles is initially specified in the rules that map machines toimage profiles and host profiles. When a host boots for the first time, the vCenter Server system creates acorresponding host object and stores the information in the database.
VMware, Inc. 63

Table 5-1. Auto Deploy Stores Information for Deployment
Information Type Description Source of State Information
Image state Executable software to run on an ESXi host. Image profile, created with Image BuilderPowerCLI.
Configurationstate
Configurable settings that determine how thehost is configured, for example, virtual switchesand their settings, driver settings, bootparameters, and so on.
Host profile, created by using the host profile UI.Often comes from a template host.
Dynamic state Runtime state that is generated by the runningsoftware, for example, generated private keys orruntime databases.
Stored in host memory and lost during reboot.
Virtual machinestate
Virtual machines stored on a host and virtualmachine autostart information (subsequent bootsonly).
Managed by vCenter Server system by default.n If the virtual machine is in a vSphere HA
cluster, deployment works even if the vCenterServer is unavailable because Auto Deployretains the virtual machine information.
n If the virtual machine is not in a vSphere HAcluster, vCenter Server must be available tosupply virtual machine information to AutoDeploy.
User input State that is based on user input, for example, anIP address that the user provides when thesystem starts up, cannot automatically beincluded in the host profile.
Custom information is stored in an answer file.You can create a host profile that requires userinput for certain values.When Auto Deploy applies a host profile thatrequires an answer to a newly-provisioned host,the host comes up in maintenance mode. You canright-click the host and select Update AnswerFile to be prompted for the information.The answer file information is stored with the host.Each host has one answer file that can includemultiple user input items.
Auto Deploy ArchitectureThe Auto Deploy infrastructure consists of several components.
vSphere Installation and Setup
64 VMware, Inc.
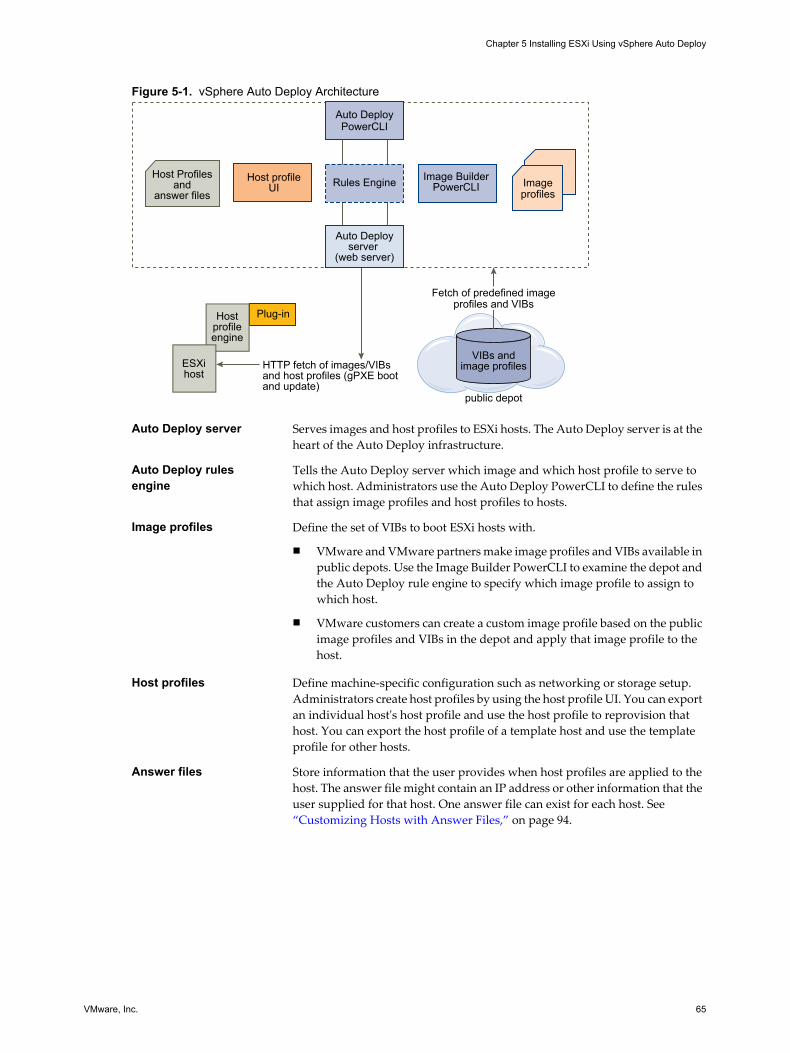
Figure 5-1. vSphere Auto Deploy Architecture
HTTP fetch of images/VIBsand host profiles (gPXE bootand update)
public depot
VIBs andimage profiles
Fetch of predefined imageprofiles and VIBs
Host Profilesand
answer filesImageprofiles
Auto DeployPowerCLI
Auto Deployserver
(web server)
Host profileUI
Image BuilderPowerCLIRules Engine
ESXihost
Plug-inHostprofileengine
Auto Deploy server Serves images and host profiles to ESXi hosts. The Auto Deploy server is at theheart of the Auto Deploy infrastructure.
Auto Deploy rulesengine
Tells the Auto Deploy server which image and which host profile to serve towhich host. Administrators use the Auto Deploy PowerCLI to define the rulesthat assign image profiles and host profiles to hosts.
Image profiles Define the set of VIBs to boot ESXi hosts with.
n VMware and VMware partners make image profiles and VIBs available inpublic depots. Use the Image Builder PowerCLI to examine the depot andthe Auto Deploy rule engine to specify which image profile to assign towhich host.
n VMware customers can create a custom image profile based on the publicimage profiles and VIBs in the depot and apply that image profile to thehost.
Host profiles Define machine-specific configuration such as networking or storage setup.Administrators create host profiles by using the host profile UI. You can exportan individual host's host profile and use the host profile to reprovision thathost. You can export the host profile of a template host and use the templateprofile for other hosts.
Answer files Store information that the user provides when host profiles are applied to thehost. The answer file might contain an IP address or other information that theuser supplied for that host. One answer file can exist for each host. See “Customizing Hosts with Answer Files,” on page 94.
Chapter 5 Installing ESXi Using vSphere Auto Deploy
VMware, Inc. 65

Rules and Rule SetsYou specify the behavior of the Auto Deploy server by using a set of rules written in Power CLI. The AutoDeploy rule engine checks the rule set for matching host patterns to decide which items (image profile, hostprofile, or vCenter Server location) to provision each host with.
The rule engine maps software and configuration settings to hosts based on the attributes of the host. Forexample, you can deploy image profiles or host profiles to two clusters of hosts by writing two rules, eachmatching on the network address of one cluster.
For hosts that have not yet been added to a vCenter Server system, the Auto Deploy server checks with therule engine before serving image profiles, host profiles, and inventory location information to hosts. For hoststhat are managed by a vCenter Server system, the image profile, host profile, and inventory location vCenterServer has stored in the host object is used. You can use Auto Deploy PowerCLI cmdlets to test and repair rulecompliance and to update the image profile and host profile assignments in the process.
NOTE You must test and repair rule compliance for any host managed by a vCenter Server system even ifthose hosts were not added to the vCenter Server system by Auto Deploy.
The rule engine includes rules and rule sets.
Rules Rules can assign image profiles and host profiles to a set of hosts, or specify thelocation (folder or cluster) of a host on the target vCenter Server system. A rulecan identify target hosts by boot MAC address, SMBIOS information, BIOSUUID, Vendor, Model, or fixed DHCP IP address. In most cases, rules applyto multiple hosts. You create rules by using the Auto Deploy PowerCLI. Afteryou create a rule, you must add it to a rule set. Only two rule sets, the activerule set and the working rule set, are supported. A rule can belong to both sets,the default, or only to the working rule set. After you add a rule to a rule set,you cannot edit the rule directly. Instead, you copy the rule and replace eitheritems or patterns. By default, Auto Deploy uses the name of the rule for thecopy and hides the original rule.
Active Rule Set When a newly started host contacts the Auto Deploy server with a request foran image profile, the Auto Deploy server checks the active rule set for matchingrules. The image profile, host profile, and vCenter Server inventory locationthat are mapped by matching rules are then used to boot the host. If more thanone item of the same type is mapped by the rules, the Auto Deploy server usesthe item that is first in the rule set.
Working Rule Set The working rule set allows you to test changes to rules before making themactive. For example, you can use Auto Deploy PowerCLI cmdlets for testingcompliance with the working rule set. The test verifies that hosts managed bya vCenter Server system are following the rules in the working rule set. Bydefault, cmdlets add the rule to both the working and the active rule set. Usethe NoActivate parameter to add a rule only to the working rule set.
Auto Deploy Boot ProcessWhen you turn on a host that you want to provision or reprovision with vSphere Auto Deploy, the Auto Deployinfrastructure supplies the image and, optionally, a host profile and a location for that host.
The process is different for hosts that have not yet been provisioned with Auto Deploy (first boot) and for hoststhat have been provisioned with Auto Deploy and added to a vCenter Server system (subsequent boot). Forsubsequent boots, the vCenter Server system stores the information for the host.
vSphere Installation and Setup
66 VMware, Inc.
First Boot PrerequisitesBefore a first boot process, you must set up your system. Setup includes the following tasks, which are discussedin more detail in “Preparing for vSphere Auto Deploy,” on page 73.
n Set up a DHCP server that assigns an IP address to each host upon startup and that points the host to theTFTP server to download the gPXE boot loader from.
n Ensure that the Auto Deploy server has an IPv4 address. PXE booting is supported only with IPv4.
n Identify an image profile to be used in one of the following ways.n Choose an ESXi image profile in a public depot.
n (Optional) Create a custom image profile using the Image Builder PowerCLI, and place the imageprofile in a depot the Auto Deploy server can access. The image profile must include a base ESXi VIB.
n (Optional) If you have a reference host in your environment, export the host profile of the reference hostand define a rule that applies the host profile to one or more hosts.
n Specify rules for the deployment of the host and add the rules to the Auto Deploy rules engine.
First Boot OverviewWhen a host that has not yet been provisioned with vSphere Auto Deploy boots (first boot), the host interactswith several Auto Deploy components.
1 When the administrator turns on a host, the host starts a PXE boot sequence.
The DHCP Server assigns an IP address to the host and instructs the host to contact the TFTP server.
2 The host contacts the TFTP server and downloads the gPXE file (executable boot loader) and a gPXEconfiguration file.
3 gPXE starts executing.
The configuration file instructs the host to make a HTTP boot request to the Auto Deploy server. The HTTPrequest includes hardware and network information.
4 In response, the Auto Deploy server performs these tasks:
a Queries the rule engine for information about the host.
b Streams the components specified in the image profile, the optional host profile, and optional vCenterServer location information.
5 The host boots using the image profile.
If the Auto Deploy server provided a host profile, the host profile is applied to the host.
6 Auto Deploy assigns the host to the vCenter Server system that Auto Deploy is registered with.
a If a rule specifies a target folder or cluster on the vCenter Server system, the host is placed in thatfolder or cluster.
b If no rule exists that specifies a vCenter Server inventory location, Auto Deploy adds the host to thefirst datacenter displayed in the vSphere Client UI.
7 (Optional) If the host profile requires the user to specify certain information, such as a static IP address,the host is placed in maintenance mode when the host is added to the vCenter Server system.
You must reapply the host profile and answer any questions to have the host exit maintenance mode. See“Applying a Host Profile to Prompt for User Input,” on page 85.
8 If the host is part of a DRS cluster, virtual machines from other hosts might be assigned to the host afterthe host has successfully been added to the vCenter Server system.
See “Provision a Host (First Boot),” on page 82.
Chapter 5 Installing ESXi Using vSphere Auto Deploy
VMware, Inc. 67

Figure 5-2. Auto Deploy Installation, First Boot
Auto Deploy first boot
host sends hardware & network
information toAuto Deploy server
Auto Deployserver streamshost & image
profiles to the host
host bootsusing image
profile
host assignedto vCenter Server,
which stores host &image profiles
PXE
Subsequent Boots Without UpdatesFor hosts that are provisioned with Auto Deploy and managed by a vCenter Server system, subsequent bootscan become completely automatic. The host is provisioned by the vCenter Server system, which storesinformation about the image profile and host profile for each host in the database.
The boot process proceeds as follows.
1 The administrator reboots the host.
2 As the host boots up, Auto Deploy provisions the host with its image profile and host profile, which arestored in vCenter Server.
3 Virtual machines are brought up or migrated to the host based on the settings of the host.
n Standalone host. Virtual machines are powered on according to autostart rules defined on the host.
n DRS cluster host. Virtual machines that were successfully migrated to other hosts stay there. Virtualmachines for which no host had enough resources are registered to the rebooted host.
If the vCenter Server system is unavailable, the host contacts the Auto Deploy server for image profiles andhost profiles and the host reboots. However, Auto Deploy cannot set up vSphere distributed switches if vCenterServer is unavailable, and virtual machines are assigned to hosts only if they participate in an HA cluster. Untilthe host is reconnected to vCenter Server and the host profile is applied, the switch cannot be created. Becausethe host is in maintenance mode, virtual machines cannot start. See “Reprovision Hosts with Simple RebootOperations,” on page 83.
Any hosts that are set up to require user input are placed in maintenance mode. See “Applying a Host Profileto Prompt for User Input,” on page 85.
vSphere Installation and Setup
68 VMware, Inc.

Subsequent Boots With UpdatesYou can change the image profile, host profile, or vCenter Server location for hosts. The process includeschanging rules and testing and repairing the host's rule compliance.
1 The administrator uses the Copy-DeployRule PowerCLI cmdlet to copy and edit one or more rules andupdates the rule set. See “Auto Deploy Roadmap,” on page 70 for an example.
2 The administrator runs the Test-DeployRulesetCompliance cmdlet to check whether each host is using theinformation the current rule set specifies.
3 The host returns a PowerCLI object that encapsulates compliance information.
4 The administrator runs the Repair-DeployRulesetCompliance cmdlet to update the image profile, hostprofile, or vCenter Server location the vCenter Server system stores for each host.
5 When the host reboots, it uses the updated image profile, host profile, or vCenter Server location for thehost.
If the host profile is set up to request user input, the host is placed in maintenance mode. Follow the stepsin “Applying a Host Profile to Prompt for User Input,” on page 85.
See “Test and Repair Rule Compliance,” on page 81.
Figure 5-3. Auto Deploy Installation, Subsequent Boots
Auto Deploy subsequent boots
vCenter Serverprovisions host
using host &image profiles
edit andupdate rule set
subsequent boot withimage update
subsequent bootwith no update
checkruleset
compliance
use updatedimage profile
update the host& image profile
associationsstored in
vCenter Server
reboothost
(optional)
Provisioning of Systems that Have Distributed SwitchesYou can configure the host profile of an Auto Deploy reference host with a distributed switch.
When you configure the distributed switch, the boot configuration parameters policy is automatically set tomatch the network parameters required for host connectivity after a reboot.
When Auto Deploy provisions the ESXi host with the host profile, the host goes through a two-step process.
1 The host creates a standard virtual switch with the properties specified in the boot configurationparameters field.
2 The host creates the VMkernel NICs. The VMkernel NICs allow the host to connect to Auto Deploy andto the vCenter Server system.
Chapter 5 Installing ESXi Using vSphere Auto Deploy
VMware, Inc. 69

When the host is added to vCenter Server, vCenter Server removes the standard switch and reapplies thedistributed switch to the host.
NOTE Do not change the boot configuration parameters to avoid problems with your distributed switch.
Auto Deploy Roadmap and Cmdlet OverviewTo be successful with Auto Deploy, you have to know the tasks involved in provisioning hosts, understandthe Auto Deploy components and their interaction, and know the PowerCLI cmdlets.
Auto Deploy RoadmapGetting started with Auto Deploy requires that you learn how Auto Deploy works, install the Auto Deployserver, install PowerCLI, write PowerCLI rules that provision hosts, and turn on your hosts to be booted withthe image profile you specify. Customizations of the image profile, host profile, and vCenter Server locationare supported.
See “Auto Deploy Proof of Concept Setup,” on page 106 for a step-by-step exercise that helps you set up yourfirst Auto Deploy environment on a Windows 2008 system.
To successfully provision the hosts in your environment with Auto Deploy you can follow a few steps discussedin more detail in this document.
1 Install the Auto Deploy server.
Windows The Auto Deploy server is included with the vCenter Server installationmedia. You can install the Auto Deploy server on the same system asvCenter Server or on a different system.
vCenter Serverappliance
The vCenter Server appliance includes vCenter Server and the Auto Deployserver. You can use both servers on the appliance, use a standalone vCenterServer installation with Auto Deploy on the appliance, or use a standaloneAuto Deploy installation with the vCenter Server appliance. The AutoDeploy server on the vCenter Server appliance is disabled by default. See “Using Auto Deploy with the VMware vCenter Server Appliance,” onpage 92 for configuration information.
NOTE You cannot use more than one Auto Deploy server with one vCenter Server system.
See “Prepare Your System and Install the Auto Deploy Server,” on page 73 for information on installingthe software, setting up the DHCP server, and downloading the TFTP configuration file.
2 Install PowerCLI, which includes Auto Deploy and Image Builder cmdlets, and set up remote signing.
See “Install PowerCLI and Prerequisite Software,” on page 75 and “Using Auto Deploy Cmdlets,” onpage 76.
3 Find the image profile that includes the VIBs you want to deploy to your hosts.n In most cases, you add the depots that contain the software you are interested in to your PowerCLI
session, and then select an image profile from one of those depots.
n To create a custom image profile, use Image Builder cmdlets to clone an existing image profile andadd the custom VIBs to the clone. Add the custom image profile to the PowerCLI session.
Using Image Builder for customization is required only if you have to add or remove VIBs. In most cases,you can add the depot where VMware hosts the image profiles as a URL to your PowerCLI session.
4 Use the New-DeployRule PowerCLI cmdlet to write a rule that assigns the image profile to one host, tomultiple hosts specified by a pattern, or to all hosts.
NewDeployRule -Name "testrule" -Item image-profile -AllHosts
vSphere Installation and Setup
70 VMware, Inc.

See “Assign an Image Profile to Hosts,” on page 78.
NOTE Auto Deploy is optimized for provisioning hosts that have a fixed MAC address to IP addressmapping in DHCP (sometimes called DHCP reservations). If you want to use static IP addresses, you mustcreate an answer file for each host. See “Use Hosts with Static IP Addresses,” on page 92.
5 Turn on the host to have Auto Deploy provision the host with the specified image profile.
6 Set up the host you provisioned as a reference host for your host profile.
You can specify the reference host syslog settings, firewall settings, storage, networking, and so on. See “Setting Up an Auto Deploy Reference Host,” on page 85.
7 Create and export a host profile for the reference host.
See the Host Profiles documentation.
8 To provision multiple hosts, you can use the Copy-DeployRule cmdlet.
You can revise the rule to assign not only an image profile but also a host profile and a cluster location .
CopyDeployRule -DeployRule "testrule" -ReplaceItem
my_host_profile_from_reference_host,my_targetcluster
-ReplacePattern "ipv4=192.XXX.1.10-192.XXX.1.20"
my_host_profile_from_reference_host is the name of the reference host profile. my_targetcluster is the nameof the target cluster.
9 Turn on the hosts you want to provision.
If the hosts specified by the pattern are not currently managed by a vCenter Server system, Auto Deployprovisions them with the already stored image profile and the specified host profile and adds them to thetarget cluster.
10 Check that the hosts you provisioned meet the following requirements.
n Each host is connected to the vCenter Server system.
n The hosts are not in maintenance mode.
n The hosts have no compliance failures.
n Each host with an answer file has an up-to-date answer file.
Remedy answer file and compliance problems and reboot hosts until all hosts meet the requirements.
Read “Understanding vSphere Auto Deploy,” on page 63 for an introduction to the boot process, a discussionof differences between first and subsequent boots, and an overview of using answer files.
Auto Deploy PowerCLI Cmdlet OverviewYou specify the rules that assign image profiles and host profiles to hosts using a set of PowerCLI cmdlets thatare included in VMware PowerCLI.
If you are new to PowerCLI, read the PowerCLI documentation and review “Using Auto Deploy Cmdlets,”on page 76. You can get help for any command at the PowerShell prompt.
n Basic help: Get-Help cmdlet_name
n Detailed help: Get-Help cmdlet_name -Detailed
NOTE When you run Auto Deploy cmdlets, provide all parameters on the command line when you invokethe cmdlet. Supplying parameters in interactive mode is not recommended.
Chapter 5 Installing ESXi Using vSphere Auto Deploy
VMware, Inc. 71
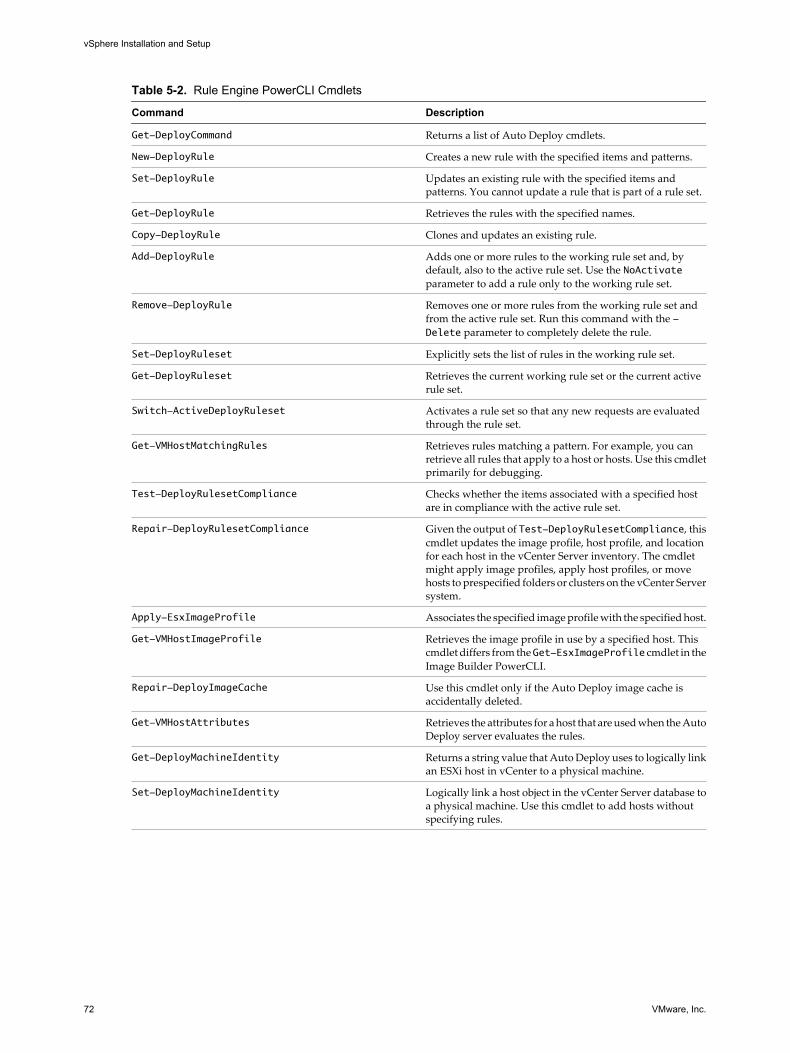
Table 5-2. Rule Engine PowerCLI Cmdlets
Command Description
Get-DeployCommand Returns a list of Auto Deploy cmdlets.
New-DeployRule Creates a new rule with the specified items and patterns.
Set-DeployRule Updates an existing rule with the specified items andpatterns. You cannot update a rule that is part of a rule set.
Get-DeployRule Retrieves the rules with the specified names.
Copy-DeployRule Clones and updates an existing rule.
Add-DeployRule Adds one or more rules to the working rule set and, bydefault, also to the active rule set. Use the NoActivateparameter to add a rule only to the working rule set.
Remove-DeployRule Removes one or more rules from the working rule set andfrom the active rule set. Run this command with the -Delete parameter to completely delete the rule.
Set-DeployRuleset Explicitly sets the list of rules in the working rule set.
Get-DeployRuleset Retrieves the current working rule set or the current activerule set.
Switch-ActiveDeployRuleset Activates a rule set so that any new requests are evaluatedthrough the rule set.
Get-VMHostMatchingRules Retrieves rules matching a pattern. For example, you canretrieve all rules that apply to a host or hosts. Use this cmdletprimarily for debugging.
Test-DeployRulesetCompliance Checks whether the items associated with a specified hostare in compliance with the active rule set.
Repair-DeployRulesetCompliance Given the output of Test-DeployRulesetCompliance, thiscmdlet updates the image profile, host profile, and locationfor each host in the vCenter Server inventory. The cmdletmight apply image profiles, apply host profiles, or movehosts to prespecified folders or clusters on the vCenter Serversystem.
Apply-EsxImageProfile Associates the specified image profile with the specified host.
Get-VMHostImageProfile Retrieves the image profile in use by a specified host. Thiscmdlet differs from the Get-EsxImageProfile cmdlet in theImage Builder PowerCLI.
Repair-DeployImageCache Use this cmdlet only if the Auto Deploy image cache isaccidentally deleted.
Get-VMHostAttributes Retrieves the attributes for a host that are used when the AutoDeploy server evaluates the rules.
Get-DeployMachineIdentity Returns a string value that Auto Deploy uses to logically linkan ESXi host in vCenter to a physical machine.
Set-DeployMachineIdentity Logically link a host object in the vCenter Server database toa physical machine. Use this cmdlet to add hosts withoutspecifying rules.
vSphere Installation and Setup
72 VMware, Inc.

Preparing for vSphere Auto DeployBefore you can start to use vSphere Auto Deploy, you must prepare your environment. You start with serversetup and hardware preparation. You must register the Auto Deploy software with the vCenter Server systemthat you plan to use for managing the hosts you provision, and install the VMware PowerCLI.
Prepare Your System and Install the Auto Deploy ServerBefore you turn on a host for PXE boot with vSphere Auto Deploy, you must install prerequisite software andset up the DHCP and TFTP servers that Auto Deploy interacts with.
CAUTION If you set up Auto Deploy to boot a host, vSphere checks each of the local storage devices on thesystem for existing partitions. To avoid the possibility of data loss, vSphere does not create partitions underthe following conditions:
n A local storage device contains a GPT partition map.
n A local storage device contains an MBR partition table that defines at least one partition.
n Storage is remote.
If hosts have local storage with a partition table that vSphere does not recognize, such as Linux Logical VolumeManager, vSphere overwrites the storage and creates new partitions. To make sure local storage is notconsidered for partitioning, you can physically disconnect that storage.
Prerequisites
n Ensure that the hosts you will provision with Auto Deploy meet the hardware requirements for ESXi 5.0.
See “ESXi Hardware Requirements,” on page 29.
NOTE You cannot provision EFI hosts with Auto Deploy unless you switch the EFI system to BIOScompatibility mode.
n Ensure that the ESXi hosts have network connectivity to vCenter Server and that all port requirements aremet.
See “Required Ports for vCenter Server,” on page 38.
n Do not use VLAN tagged networks at the boot NIC. If you want to specify VLAN IDs, you must makesure that the host can reach the DHCP server when the host starts the boot process. Check with yournetwork administrator how VLAN IDs are used in your environment.
n Ensure that you have enough storage for the Auto Deploy repository. The Auto Deploy server uses therepository to store data it needs, including the rules and rule sets you create and the VIBs and imageprofiles that you specify in your rules.
Best practice is to allocate 2GB to have enough room for four image profiles and some extra space. Eachimage profile requires approximately 350MB. Determine how much space to reserve for the Auto Deployrepository by considering how many image profiles you expect to use.
n Obtain the vCenter Server installation media, which include the Auto Deploy installer, or deploy thevCenter Server Appliance.
See Chapter 11, “Installing vCenter Server,” on page 201.
n Ensure that a TFTP server is available in your environment. If you require a supported solution, purchasea supported TFTP server from your vendor of choice.
n Obtain administrative privileges to the DHCP server that manages the network segment you want to bootfrom. You can use a DHCP server already in your environment, or install a DHCP server.
Chapter 5 Installing ESXi Using vSphere Auto Deploy
VMware, Inc. 73
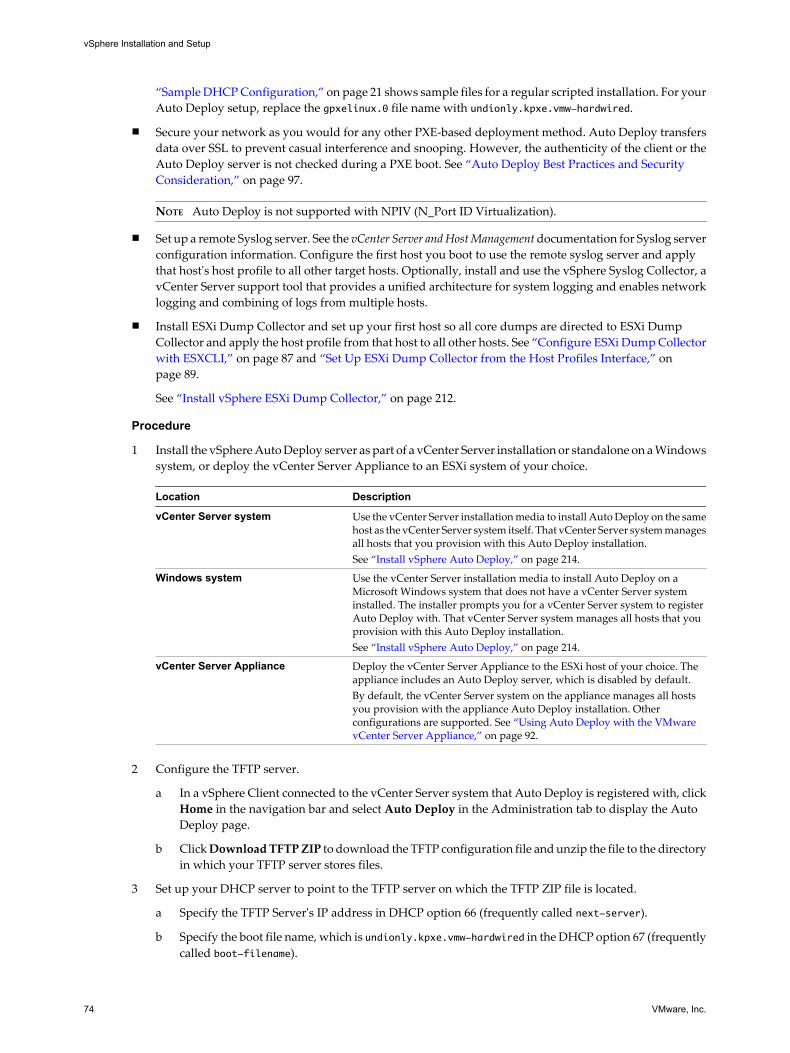
“Sample DHCP Configuration,” on page 21 shows sample files for a regular scripted installation. For yourAuto Deploy setup, replace the gpxelinux.0 file name with undionly.kpxe.vmw-hardwired.
n Secure your network as you would for any other PXE-based deployment method. Auto Deploy transfersdata over SSL to prevent casual interference and snooping. However, the authenticity of the client or theAuto Deploy server is not checked during a PXE boot. See “Auto Deploy Best Practices and SecurityConsideration,” on page 97.
NOTE Auto Deploy is not supported with NPIV (N_Port ID Virtualization).
n Set up a remote Syslog server. See the vCenter Server and Host Management documentation for Syslog serverconfiguration information. Configure the first host you boot to use the remote syslog server and applythat host's host profile to all other target hosts. Optionally, install and use the vSphere Syslog Collector, avCenter Server support tool that provides a unified architecture for system logging and enables networklogging and combining of logs from multiple hosts.
n Install ESXi Dump Collector and set up your first host so all core dumps are directed to ESXi DumpCollector and apply the host profile from that host to all other hosts. See “Configure ESXi Dump Collectorwith ESXCLI,” on page 87 and “Set Up ESXi Dump Collector from the Host Profiles Interface,” onpage 89.
See “Install vSphere ESXi Dump Collector,” on page 212.
Procedure
1 Install the vSphere Auto Deploy server as part of a vCenter Server installation or standalone on a Windowssystem, or deploy the vCenter Server Appliance to an ESXi system of your choice.
Location Description
vCenter Server system Use the vCenter Server installation media to install Auto Deploy on the samehost as the vCenter Server system itself. That vCenter Server system managesall hosts that you provision with this Auto Deploy installation.See “Install vSphere Auto Deploy,” on page 214.
Windows system Use the vCenter Server installation media to install Auto Deploy on aMicrosoft Windows system that does not have a vCenter Server systeminstalled. The installer prompts you for a vCenter Server system to registerAuto Deploy with. That vCenter Server system manages all hosts that youprovision with this Auto Deploy installation.See “Install vSphere Auto Deploy,” on page 214.
vCenter Server Appliance Deploy the vCenter Server Appliance to the ESXi host of your choice. Theappliance includes an Auto Deploy server, which is disabled by default.By default, the vCenter Server system on the appliance manages all hostsyou provision with the appliance Auto Deploy installation. Otherconfigurations are supported. See “Using Auto Deploy with the VMwarevCenter Server Appliance,” on page 92.
2 Configure the TFTP server.
a In a vSphere Client connected to the vCenter Server system that Auto Deploy is registered with, clickHome in the navigation bar and select Auto Deploy in the Administration tab to display the AutoDeploy page.
b Click Download TFTP ZIP to download the TFTP configuration file and unzip the file to the directoryin which your TFTP server stores files.
3 Set up your DHCP server to point to the TFTP server on which the TFTP ZIP file is located.
a Specify the TFTP Server's IP address in DHCP option 66 (frequently called next-server).
b Specify the boot file name, which is undionly.kpxe.vmw-hardwired in the DHCP option 67 (frequentlycalled boot-filename).
vSphere Installation and Setup
74 VMware, Inc.

4 Set each host you want to provision with Auto Deploy to network boot or PXE boot, following themanufacturer's instructions.
5 Locate the image profile you want to use and the depot in which it is located.
In most cases, you point to an image profile VMware makes available in a public depot. If you want toinclude custom VIBs with the base image, you can use the Image Builder PowerCLI create an image profileand use that image profile. See the Image Builder PowerCLI documentation.
6 Write a rule that assigns an image profile to hosts.
7 (Optional) You can use your own Certificate Authority (CA) by replacing the OpenSSL certificate (rbd-ca.crt) and the OpenSSL private key (rbd-ca.key) with your own certificate and key file.
n On Windows, the files are in the SSL subfolder of the Auto Deploy installation directory. For example,on Windows 7 the default is C:\ProgramData\VMware\VMware vSphere Auto Deploy\ssl.
n On the vCenter Server Appliance, the files are in /etc/vmware-rbd/ssl/.
When you start a host that is set up for Auto Deploy, it contacts the DHCP server and is directed to the AutoDeploy server, which provisions the host with the image specified in the active rule set.
What to do next
n Install PowerCLI. See “Install PowerCLI and Prerequisite Software,” on page 75.
n Use the PowerCLI cmdlets to define a rule that assigns an image profile and optional host profile to thehost. See “Prepare Your System and Install the Auto Deploy Server,” on page 73.
n Configure the first host your provision to use the storage, networking, and other settings you want foryour target hosts to share. Create a host profile for that host and write a rule that assigns both the alreadytested image profile and the host profile to target hosts.
n If you have to configure host-specific information, set up the host profile of the reference host to promptfor user input. See “Customizing Hosts with Answer Files,” on page 94.
Install PowerCLI and Prerequisite SoftwareBefore you can run Auto Deploy cmdlets to create and modify the rules and rule sets that govern Auto Deploybehavior, you must install vSphere PowerCLI and all prerequisite software. The Auto Deploy cmdlets areincluded with the PowerCLI installation.
You install vSphere PowerCLI and prerequisite software on a Microsoft Windows system. See the MicrosoftWeb site for information about installing the Microsoft software. See the vSphere PowerCLI Installation Guidefor detailed instructions for PowerCLI installation.
Procedure
1 Verify that Microsoft .NET 2.0 is installed, or install it from the Microsoft Web site following theinstructions on that Web site.
2 Verify that Microsoft Powershell 2.0 is installed, or install it from the Microsoft website following theinstructions on that Web site.
3 Install vSphere vSphere PowerCLI, which includes the Auto Deploy cmdlets.
What to do next
Review “Using Auto Deploy Cmdlets,” on page 76. If you are new to PowerCLI, read the PowerCLIdocumentation.
Use Auto Deploy cmdlets and other PowerCLI cmdlets and PowerShell cmdlets to manage Auto Deploy rulesand rule sets. Use Get-Help <cmdlet_name> at any time for command-line help.
Chapter 5 Installing ESXi Using vSphere Auto Deploy
VMware, Inc. 75

Using Auto Deploy CmdletsAuto Deploy cmdlets are implemented as Microsoft PowerShell cmdlets and included in vSphere PowerCLI.Users of Auto Deploy cmdlets can take advantage of all PowerCLI features.
Experienced PowerShell users can use Auto Deploy cmdlets just like other PowerShell cmdlets. If you are newto PowerShell and PowerCLI, the following tips might be helpful.
You can type cmdlets, parameters, and parameter values in the PowerCLI shell.
n Get help for any cmdlet by running Get-Help cmdlet_name.
n Remember that PowerShell is not case sensitive.
n Use tab completion for cmdlet names and parameter names.
n Format any variable and cmdlet output by using Format-List or Format-Table or their short forms fl orft. See Get-Help Format-List.
Passing Parameters by NameYou can pass in parameters by name in most cases and surround parameter values that contain spaces or specialcharacters with double quotes.
Copy-DeployRule -DeployRule testrule -ReplaceItem MyNewProfile
Most examples in the documentation pass in parameters by name.
Passing Parameters as ObjectsYou can pass parameters as objects if you want to do scripting and automation. Passing in parameters as objectsis useful with cmdlets that return multiple objects and with cmdlets that return a single object. Consider thefollowing example.
1 Bind the object that encapsulates rule set compliance information for a host to a variable.
$tr = Test-DeployRuleSetCompliance MyEsxi42
2 Display the itemlist property of the object to see the difference between what is in the rule set and whatthe host is currently using.
$tr.itemlist
3 Remediate the host to use the revised rule set by passing the object to a call to Repair-DeployRuleSetCompliance.
Repair-DeployRuleSetCompliance $tr
The example remediates the host the next time you boot the host.
Setting Properties to Support Remote SigningFor security reasons, Windows PowerShell supports an execution policy feature. It determines whether scriptsare allowed to run and whether they must be digitally signed. By default, the execution policy is set toRestricted, which is the most secure policy. If you want to run scripts or load configuration files, you can changethe execution policy by using the Set-ExecutionPolicy cmdlet. To do this, type the following in the vSpherePowerCLI console window.
Set-ExecutionPolicy RemoteSigned
If the command is successful, you can run scripts and load configuration files. For more information about theexecution policy and digital signing in Windows PowerShell, use the following command.
Get-Help About_Signing
vSphere Installation and Setup
76 VMware, Inc.

Set Up Bulk LicensingYou can use the vSphere Client or ESXi Shell to specify individual license keys, or you can set up bulk licensingby using PowerCLI cmdlets. Bulk licensing works for all ESXi hosts, but is especially useful for hostsprovisioned with Auto Deploy.
The following example assigns licenses to all hosts in a data center. You can also associate licenses with hostsand clusters.
The following example is for advanced PowerCLI users who know how to use PowerShell variables.
Prerequisites
Install PowerCLI. See “Install PowerCLI and Prerequisite Software,” on page 75.
Assigning license keys through the vSphere Client or assigning licensing by using PowerCLI cmdlets functiondifferently.
Assign license keys withvSphere Client
You can assign license keys to a host when you add the host to the vCenterServer system or when the host is managed by a vCenter Server system.
Assign license keys withLicenseDataManagerPowerCLI
You can specify a set of license keys to be added to a set of hosts. The licensekeys are added to the vCenter Server database. Each time a host is added to thevCenter Server system or reconnects to the vCenter Server system, the host isassigned a license key. A license key that is assigned through the PowerCLI istreated as a default license key. When an unlicensed host is added orreconnected, it is assigned the default license key. If a host is already licensed,it keeps its license key.
Procedure
1 Connect to the vCenter Server system you want to use and bind the associated license manager to avariable.
Connect-VIServer -Server 192.XXX.X.XX -User username -Password password
$licenseDataManager = Get-LicenseDataManager
2 Run a cmdlet that retrieves the datacenter in which the hosts for which you want to use the bulk licensingfeature are located.
$hostContainer = Get-Datacenter -Name Datacenter-X
You can also run a cmdlet that retrieves a cluster to use bulk licensing for all hosts in a cluster, or retrievesa folder to use bulk licensing for all hosts in a folder.
3 Create a new LicenseData object and a LicenseKeyEntry object with associated type ID and license key.
$licenseData = New-Object VMware.VimAutomation.License.Types.LicenseData
$licenseKeyEntry = New-Object Vmware.VimAutomation.License.Types.LicenseKeyEntry
$licenseKeyEntry.TypeId = "vmware-vsphere”
$licenseKeyEntry.LicenseKey = "XXXXX-XXXXX-XXXXX-XXXXX-XXXXX"
4 Associate the LicenseKeys attribute of the LicenseData object you created in step 3 with theLicenseKeyEntry object.
$licenseData.LicenseKeys += $licenseKeyEntry
5 Update the license data for the data center with the LicenseData object and verify that the license isassociated with the host container.
$licenseDataManager.UpdateAssociatedLicenseData($hostContainer.Uid, $licenseData)
$licenseDataManager.QueryAssociatedLicenseData($hostContainer.Uid)
Chapter 5 Installing ESXi Using vSphere Auto Deploy
VMware, Inc. 77

6 Provision one or more hosts with Auto Deploy and assign them to the data center or cluster that youassigned the license data to.
7 Verify that the host is successfully assigned to the default license XXXXX-XXXXX-XXXXX-XXXXX-XXXXX.
a Using a vSphere Client, log in to the vCenter Server system.
b Navigate to the Configuration > License Features tab for the host and check that the correct licenseis displayed.
All hosts that you assigned to the data center are now licensed automatically.
Managing Auto Deploy with PowerCLI CmdletsYou can use Auto Deploy PowerCLI cmdlets to create rules that associate hosts with image profiles, hostprofiles, and a location on the vCenter Server target. You can also update hosts by testing rule compliance andrepairing compliance issues.
Assign an Image Profile to HostsBefore you can provision a host, you must create rules that assign an image profile to each host that you wantto provision by using Auto Deploy.
Prerequisites
n Install VMware PowerCLI and all prerequisite software.
n If you encounter problems running PowerCLI cmdlets, consider changing the execution policy. See “UsingAuto Deploy Cmdlets,” on page 76.
Procedure
1 Run the Connect-VIServer PowerCLI cmdlet to connect to the vCenter Server system that Auto Deploy isregistered with.
Connect-VIServer 192.XXX.X.XX
The cmdlet might return a server certificate warning. In a production environment, make sure no servercertificate warnings result. In a development environment, you can ignore the warning.
2 Determine the location of a public software depot, or define a custom image profile using the Image BuilderPowerCLI.
3 Run Add-EsxSoftwareDepot to add the software depot that contains the image profile to the PowerCLIsession.
Depot Type Cmdlet
Remote depot Run Add-EsxSoftwareDepot depot_url.
ZIP file a Download the ZIP file to a local file path.b Run
Add-EsxSoftwareDepot C:\file_path\my_offline_depot.zip.
4 In the depot, find the image profile you want to use by running the Get-EsxImageProfile cmdlet.
By default, the ESXi depot includes one base image profile that includes VMware tools and has the stringfull in its name, and one base image profile that does not include VMware tools.
vSphere Installation and Setup
78 VMware, Inc.

5 Define a rule in which hosts with certain attributes, for example a range of IP addresses, are assigned tothe image profile.
New-DeployRule -Name "testrule" -Item "My Profile25" -Pattern "vendor=Acme,Zven",
"ipv4=192.XXX.1.10-192.XXX.1.20"
Double quotes are required if a name contains spaces, optional otherwise. Specify -AllHosts instead of apattern to apply the item to all hosts.
The cmdlet creates a rule named testrule. The rule assigns the image profile named My Profile25 to allhosts with a vendor of Acme or Zven that also have an IP address in the specified range.
6 Add the rule to the rule set.
Add-DeployRule testrule
By default, the rule is added to both the working rule set and the active rule set. If you use theNoActivate parameter, the working rule set does not become the active rule set.
When the host boots from gPXE, it reports attributes of the machine to the console. Use the same format of theattributes when writing deploy rules.
******************************************************************
* Booting through VMware AutoDeploy...
*
* Machine attributes:
* . vendor=VMware, Inc.
* . asset=No Asset Tag
* . domain=
* . serial=VMware-XX XX XX XX XX XX...
* . uuid=XXXXXXX-XXXX-XXXX-XXXX-XXXXXXXXXX
* . hostname=myhost.mycompany.com
* . ipv4=NN.NN.NNN.NNN
* . model=VMware Virtual Platform
* . mac=00:NN:NN:NN:NN:NN
*
******************************************************************
What to do next
n For hosts already provisioned with Auto Deploy, perform the compliance testing and repair operationsto provision them with the new image profile. See “Test and Repair Rule Compliance,” on page 81.
n Turn on unprovisioned hosts to provision them with the new image profile.
Assign a Host to a Folder or ClusterAuto Deploy can assign a host to a folder or cluster. When the host boots, Auto Deploy adds it to the specifiedlocation on the vCenter Server. Hosts assigned to a cluster inherit the cluster's host profile.
The following procedure explains how to write a rule that assigns a host to a folder or cluster. To assign a hostalready provisioned with Auto Deploy to a new folder or cluster, you must also perform a test and repair cycle.See “Test and Repair Rule Compliance,” on page 81.
Prerequisites
n Install VMware PowerCLI and all prerequisite software.
n If you encounter problems running PowerCLI cmdlets, consider changing the execution policy. See “UsingAuto Deploy Cmdlets,” on page 76.
Chapter 5 Installing ESXi Using vSphere Auto Deploy
VMware, Inc. 79
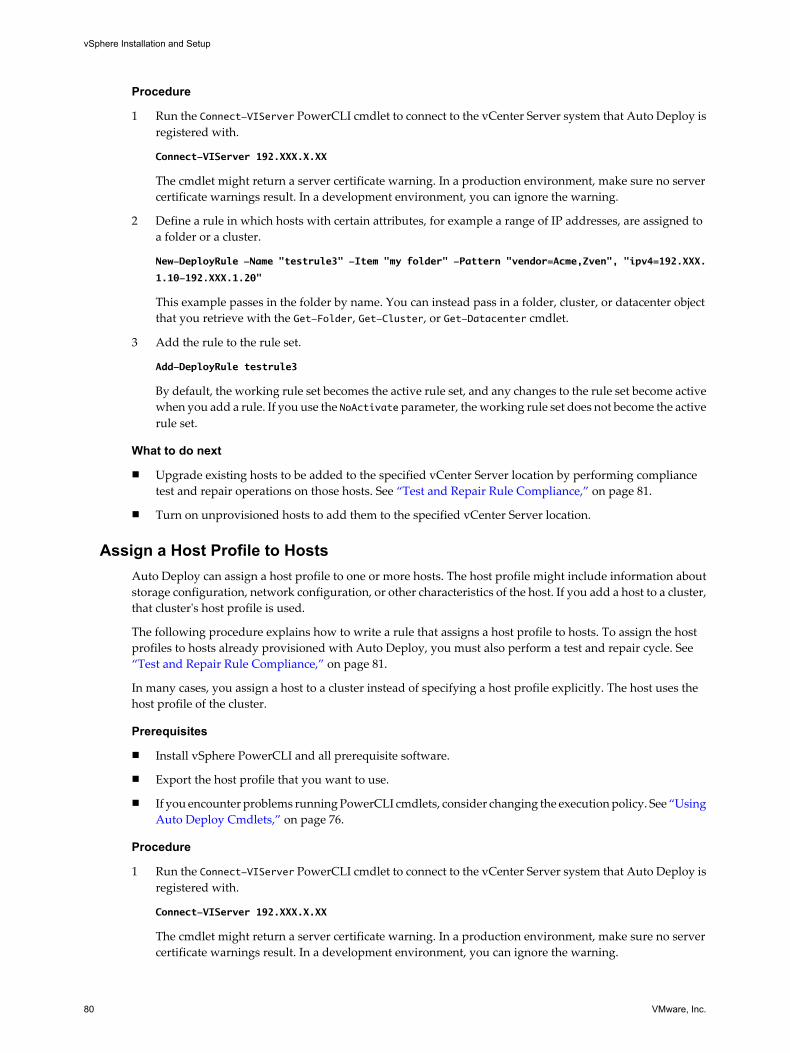
Procedure
1 Run the Connect-VIServer PowerCLI cmdlet to connect to the vCenter Server system that Auto Deploy isregistered with.
Connect-VIServer 192.XXX.X.XX
The cmdlet might return a server certificate warning. In a production environment, make sure no servercertificate warnings result. In a development environment, you can ignore the warning.
2 Define a rule in which hosts with certain attributes, for example a range of IP addresses, are assigned toa folder or a cluster.
New-DeployRule -Name "testrule3" -Item "my folder" -Pattern "vendor=Acme,Zven", "ipv4=192.XXX.
1.10-192.XXX.1.20"
This example passes in the folder by name. You can instead pass in a folder, cluster, or datacenter objectthat you retrieve with the Get-Folder, Get-Cluster, or Get-Datacenter cmdlet.
3 Add the rule to the rule set.
Add-DeployRule testrule3
By default, the working rule set becomes the active rule set, and any changes to the rule set become activewhen you add a rule. If you use the NoActivate parameter, the working rule set does not become the activerule set.
What to do next
n Upgrade existing hosts to be added to the specified vCenter Server location by performing compliancetest and repair operations on those hosts. See “Test and Repair Rule Compliance,” on page 81.
n Turn on unprovisioned hosts to add them to the specified vCenter Server location.
Assign a Host Profile to HostsAuto Deploy can assign a host profile to one or more hosts. The host profile might include information aboutstorage configuration, network configuration, or other characteristics of the host. If you add a host to a cluster,that cluster's host profile is used.
The following procedure explains how to write a rule that assigns a host profile to hosts. To assign the hostprofiles to hosts already provisioned with Auto Deploy, you must also perform a test and repair cycle. See “Test and Repair Rule Compliance,” on page 81.
In many cases, you assign a host to a cluster instead of specifying a host profile explicitly. The host uses thehost profile of the cluster.
Prerequisites
n Install vSphere PowerCLI and all prerequisite software.
n Export the host profile that you want to use.
n If you encounter problems running PowerCLI cmdlets, consider changing the execution policy. See “UsingAuto Deploy Cmdlets,” on page 76.
Procedure
1 Run the Connect-VIServer PowerCLI cmdlet to connect to the vCenter Server system that Auto Deploy isregistered with.
Connect-VIServer 192.XXX.X.XX
The cmdlet might return a server certificate warning. In a production environment, make sure no servercertificate warnings result. In a development environment, you can ignore the warning.
vSphere Installation and Setup
80 VMware, Inc.

2 In the vSphere Client, select View > Management > Host Profiles to display the Host Profiles panel andexport the host profile that you want to use from there.
3 Find the location of the host profile by running Get-VMhostProfile, passing in the server on which thehost profile is located.
4 At the PowerCLI prompt, define a rule in which hosts with certain attributes, for example a range of IPaddresses, are assigned to the host profile.
New-DeployRule -Name "testrule2" -Item my_host_profile -Pattern "vendor=Acme,Zven",
"ipv4=192.XXX.1.10-192.XXX.1.20"
The specified item is assigned to all hosts with the specified attributes. This example specifies a rule namedtestrule2. The rule assigns the specified host profile my_host_profile to all hosts with an IP address insidethe specified range and with a manufacturer of Acme or Zven.
5 Add the rule to the rule set.
Add-DeployRule testrule2
By default, the working rule set becomes the active rule set, and any changes to the rule set become activewhen you add a rule. If you use the NoActivate parameter, the working rule set does not become the activerule set.
What to do next
n Upgrade existing hosts to use the new host profile by performing compliance test and repair operationson those hosts. See “Test and Repair Rule Compliance,” on page 81.
n Turn on unprovisioned hosts to provision them with the host profile.
Test and Repair Rule ComplianceWhen you add a rule to the Auto Deploy rule set or make changes to one or more rules, unprovisioned hoststhat you boot are automatically provisioned according to the new rules. For all other hosts, Auto Deploy appliesthe new rules only when you test their rule compliance and perform remediation.
This task assumes that your infrastructure includes one or more ESXi hosts provisioned with Auto Deploy,and that the host on which you installed VMware PowerCLI can access those ESXi hosts.
Prerequisites
n Install VMware PowerCLI and all prerequisite software.
n If you encounter problems running PowerCLI cmdlets, consider changing the execution policy. See “UsingAuto Deploy Cmdlets,” on page 76.
Procedure
1 Check which Auto Deploy rules are currently available.
Get-DeployRule
The system returns the rules and the associated items and patterns.
2 Make a change to one of the available rules, for example, you might change the image profile and the nameof the rule.
Copy-DeployRule -DeployRule testrule -ReplaceItem MyNewProfile
You cannot edit a rule already added to a rule set. Instead, you copy the rule and replace the item youwant to change.
3 Verify that the host that you want to test rule set compliance for is accessible.
Get-VMHost -Name MyEsxi42
Chapter 5 Installing ESXi Using vSphere Auto Deploy
VMware, Inc. 81
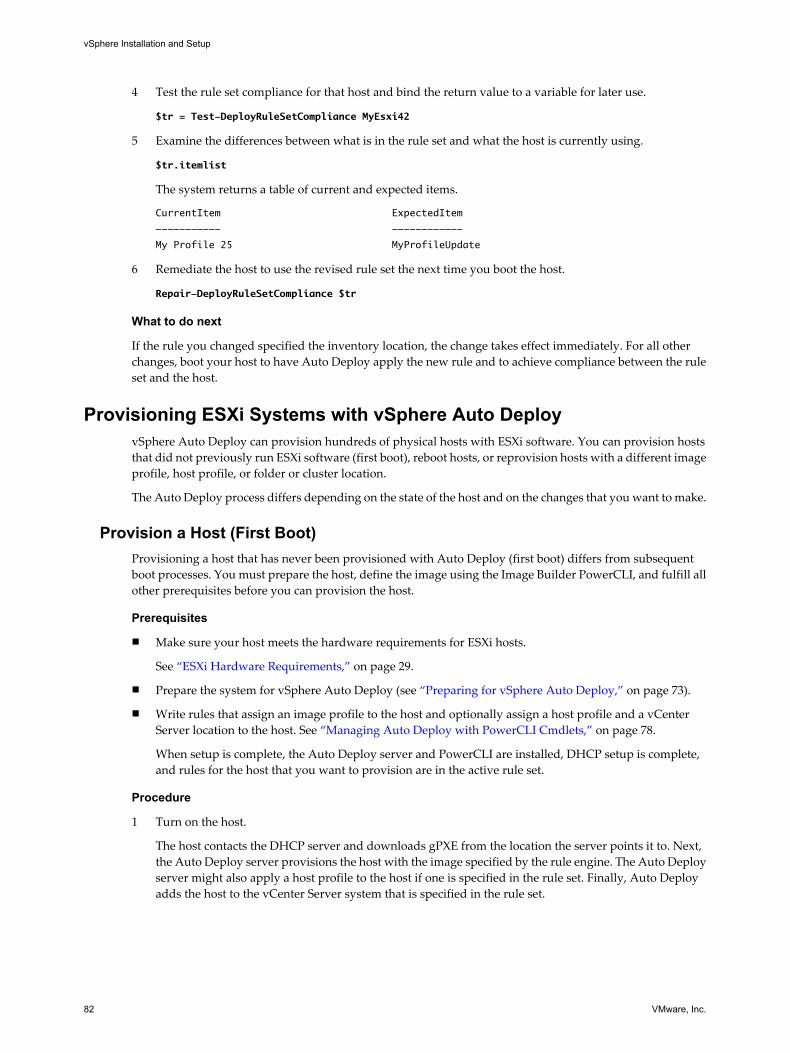
4 Test the rule set compliance for that host and bind the return value to a variable for later use.
$tr = Test-DeployRuleSetCompliance MyEsxi42
5 Examine the differences between what is in the rule set and what the host is currently using.
$tr.itemlist
The system returns a table of current and expected items.
CurrentItem ExpectedItem
----------- ------------
My Profile 25 MyProfileUpdate
6 Remediate the host to use the revised rule set the next time you boot the host.
Repair-DeployRuleSetCompliance $tr
What to do next
If the rule you changed specified the inventory location, the change takes effect immediately. For all otherchanges, boot your host to have Auto Deploy apply the new rule and to achieve compliance between the ruleset and the host.
Provisioning ESXi Systems with vSphere Auto DeployvSphere Auto Deploy can provision hundreds of physical hosts with ESXi software. You can provision hoststhat did not previously run ESXi software (first boot), reboot hosts, or reprovision hosts with a different imageprofile, host profile, or folder or cluster location.
The Auto Deploy process differs depending on the state of the host and on the changes that you want to make.
Provision a Host (First Boot)Provisioning a host that has never been provisioned with Auto Deploy (first boot) differs from subsequentboot processes. You must prepare the host, define the image using the Image Builder PowerCLI, and fulfill allother prerequisites before you can provision the host.
Prerequisites
n Make sure your host meets the hardware requirements for ESXi hosts.
See “ESXi Hardware Requirements,” on page 29.
n Prepare the system for vSphere Auto Deploy (see “Preparing for vSphere Auto Deploy,” on page 73).
n Write rules that assign an image profile to the host and optionally assign a host profile and a vCenterServer location to the host. See “Managing Auto Deploy with PowerCLI Cmdlets,” on page 78.
When setup is complete, the Auto Deploy server and PowerCLI are installed, DHCP setup is complete,and rules for the host that you want to provision are in the active rule set.
Procedure
1 Turn on the host.
The host contacts the DHCP server and downloads gPXE from the location the server points it to. Next,the Auto Deploy server provisions the host with the image specified by the rule engine. The Auto Deployserver might also apply a host profile to the host if one is specified in the rule set. Finally, Auto Deployadds the host to the vCenter Server system that is specified in the rule set.
vSphere Installation and Setup
82 VMware, Inc.

2 (Optional) If Auto Deploy applies a host profile that requires user input such as an IP address, the host isplaced in maintenance mode. In the vSphere Client, check the answer file or reapply the host profile andprovide the user input when prompted.
The information is stored in an answer file that is associated with the host.
After the first boot process, the host is running and managed by a vCenter Server system. The vCenter Serverstores the host's image profile, host profile, and location information.
You can now reboot the host as needed. Each time you reboot, the host is reprovisioned by the vCenter Serversystem.
What to do next
Reprovision hosts as needed. See “Reprovisioning Hosts,” on page 83.
If you want to change the image profile, host profile, or location of the host, update the rules and perform atest and repair compliance operation. See “Test and Repair Rule Compliance,” on page 81.
Reprovisioning HostsvSphere Auto Deploy supports multiple reprovisioning options. You can perform a simple reboot orreprovision with a different image or a different host profile.
A first boot using Auto Deploy requires that you set up your environment and add rules to the rule set. See “Preparing for vSphere Auto Deploy,” on page 73.
A first boot using Auto Deploy requires that you set up your environment and add rules to the rule set. See .
The following reprovisioning operations are available.
n Simple reboot.
n Reboot of hosts for which the user answered questions during the boot operation.
n Reprovision with a different image profile.
n Reprovision with a different host profile.
Reprovision Hosts with Simple Reboot OperationsA simple reboot requires only that all prerequisites are still met. The process uses the previously assignedimage profile, host profile, and location.
Setup includes DHCP server setup, writing rules, and making an image available to the Auto Deployinfrastructure.
Prerequisites
Make sure the setup you performed during the first boot operation is in place.
Procedure
1 Check that the image profile and host profile for the host are still available, and that the host has theidentifying information (asset tag, IP address) it had during previous boot operations.
2 Place the host in maintenance mode.
Host Type Action
Host is part of a DRS cluster VMware DRS migrates virtual machines to appropriate hosts when youplace the host in maintenance mode.
Host is not part of a DRS cluster You must migrate all virtual machines to different hosts and place each hostin maintenance mode.
Chapter 5 Installing ESXi Using vSphere Auto Deploy
VMware, Inc. 83

3 In the vSphere Client, right-click the host and choose Reboot.
The host shuts down. When the host starts up, it uses the image profile and host profile that Auto Deploystored on the vCenter Server system in the reboot process.
Reprovision a Host with a New Image ProfileYou can reprovision the host with a new image profile, host profile, or vCenter Server location by changingthe rule for the host and performing a test and repair operation.
Several options for reprovisioning hosts exist.
n If the VIBs that you want to use support live update, you can use an esxcli software vib command. Inthat case, you must also update the rule set to use an image profile that includes the new VIBs upon reboot.
n During testing, you can to apply an image profile to an individual host with the Apply-EsxImageProfilecmdlet and reboot the host so the change takes effect. The Apply-EsxImageProfile cmdlet updates theassociation between the host and the image profile but does not install VIBs on the host.
n In all other cases, use this procedure.
Prerequisites
n Create the image you want to run on the host. Use the Image Builder PowerCLI, discussed in Chapter 6,“Using vSphere ESXi Image Builder CLI,” on page 123.
n
n Make sure the setup that you performed during the first boot operation is in place.
Procedure
1 At the PowerShell prompt, run the Connect-VIServer PowerCLI cmdlet to connect to the vCenter Serversystem that Auto Deploy is registered with.
Connect-VIServer myVCServer
The cmdlet might return a server certificate warning. In a production environment, make sure no servercertificate warnings result. In a development environment, you can ignore the warning.
2 Determine the location of a public software depot that contains the image profile that you want to use, ordefine a custom image profile with the Image Builder PowerCLI.
3 Run Add-EsxSoftwareDepot to add the software depot that contains the image profile to the PowerCLIsession.
Depot Type Cmdlet
Remote depot Run Add-EsxSoftwareDepot depot_url.
ZIP file a Download the ZIP file to a local file path.b Run
Add-EsxSoftwareDepot C:\file_path\my_offline_depot.zip.
4 Run Copy-DeployRule and specify the ReplaceItem parameter to change the rule that assigns an imageprofile to hosts.
The following cmdlet replaces the current image profile that the rule assigns to the host with themy_new_imageprofile profile. After the cmdlet completes, myrule assigns the new image profile to hosts.The old version of myrule is renamed and hidden.
Copy-DeployRule myrule -ReplaceItem my_new_imageprofile
vSphere Installation and Setup
84 VMware, Inc.

5 Test and repair rule compliance for each host that you want to deploy the image to.
See “Test and Repair Rule Compliance,” on page 81.
When you reboot hosts after compliance repair, Auto Deploy provisions the hosts with the new image profile.
Applying a Host Profile to Prompt for User InputIf a host required user input during a previous boot, the answers are saved with the vCenter Server in ananswer file. If you want to prompt the user for new information, you reapply the host profile.
Prerequisites
Attach a host profile that prompts for user input to the host.
Procedure
1 Place the host in maintenance mode. Migrate all virtual machines to different hosts, and place the hostinto maintenance mode.
Host Type Action
Host is part of a DRS cluster VMware DRS migrates virtual machines to appropriate hosts when youplace the host in maintenance mode.
Host is not part of a DRS cluster You must migrate all virtual machines to different hosts and place each hostin maintenance mode.
2 In the vSphere Client, choose Host Profiles > Apply Profile and choose the host profile that requires user
input when prompted.
3 When prompted, provide the user input.
You can now direct the host to exit maintenance mode.
The user input information is saved in an answer file. The next time you boot, the answer file information isapplied to the host. One answer file per host is available.
Setting Up an Auto Deploy Reference HostIn an environment where no state is stored on the host, a reference host helps you set up multiple hosts withthe same configuration. You configure the reference host with the logging, coredump, and other settings thatyou want, save the host profile, and write a rule that applies the host profile to other hosts as needed.
You can configure the storage, networking, and security settings on the reference host and set up services suchas syslog and NTP.
Chapter 5 Installing ESXi Using vSphere Auto Deploy
VMware, Inc. 85

Understanding Reference Host SetupA well-designed reference host connects to all services such as Syslog, NTP, and so on. The reference hostmight also include setup of security, storage, networking, and ESXi Dump Collector.
The exact setup of your reference host depends on your environment, but you might consider the followingcustomization.
NTP Server Setup When you collect logging information in large environments, you must makesure that log times are coordinated. Set up the reference host to use the NTPserver in your environment that all hosts can share. You can specify an NTPserver with the vicfg-ntp command. You can start and stop the NTP servicefor a host with the vicfg-ntp command or the vSphere Client.
Syslog Server Setup All ESXi hosts run a syslog service (vmsyslogd), which logs messages from theVMkernel and other system components to a file. You can specify the log hostand manage the log location, rotation, size, and other attributes with the esxclisystem syslog vCLI command or with the vSphere Client. Setting up loggingon a remote host is especially important for hosts provisioned with AutoDeploy that have no local storage. You can optionally install the vSphere SyslogCollector to collect logs from all hosts.
Core Dump Setup You can set up your reference host to send core dumps to a shared SAN LUN,or you can install ESXi Dump Collector in your environment and set up thereference host to use ESXi Dump Collector. See “Configure ESXi DumpCollector with ESXCLI,” on page 87. You can either install ESXi DumpCollector by using the vCenter Server installation media or use the ESXi DumpCollector that is included in the vCenter Server Appliance. After setup iscomplete, VMkernel memory is sent to the specified network server when thesystem encounters a critical failure.
Security Setup In most deployments, all hosts that you provision with Auto Deploy must havethe same security settings. Make any customization in your reference host. Youcan, for example, set up the firewall to allow certain services access to the ESXisystem. See the vSphere Security documentation. Security setup includes shareduser access settings for all hosts. You can achieve unified user access by settingup your reference host for Microsoft Active Directory. If you set up ActiveDirectory by using host profiles, the passwords are not protected. Use thevSphere Authentication Service to set up Active Directory to avoid exposingthe Active Directory password.
Networking and StorageSetup
If you reserve a set of networking and storage resources for use by hostsprovisioned with Auto Deploy, you can set up your reference host to use thoseresources.
In very large deployments, the reference host setup supports an Enterprise Network Manager, which collectsall information coming from the different monitoring services in the environment.
vSphere Installation and Setup
86 VMware, Inc.

Figure 5-4. Auto Deploy Reference Host Setup
ESXiESXi
DHCP Server
TFTP Server
VC
Auto DeployServer
ESXi
localstorage
SANstorage
reference host setup
DNSNTPsyslogmonitoringsecuritynetworking/IO filtersDHCP or static IP
DNSServer
NTP Server
Enterprise Network Manager
syslogServer
Switch
ADServer
“Configuring an Auto Deploy Reference Host,” on page 87 explains how to perform this setup.
Configuring an Auto Deploy Reference HostvSphere allows you to configure a reference host by using the vSphere Client, by using vCLI, or by using hostprofiles.
To set up a host profile, you can use the approach that suits you best.
vSphere Client The vSphere Client supports setup of networking, storage, security, and mostother aspects of an ESXi host. You can completely set up your environment andexport the host profile for use by Auto Deploy.
vSphere Command-LineInterface
You can use vCLI commands for setup of many aspects of your host. vCLI isespecially suitable for configuring some of the services in the vSphereenvironment. Commands include vicfg-ntp (set up an NTP server), esxclisystem syslog (set up a syslog server), and vicfg-route (set up the defaultroute). See “Configure ESXi Dump Collector with ESXCLI,” on page 87.
Host Profiles Interface You can either set up a host with vSphere Client or vCLI and save the hostprofile for that host, or you can configure the host profiles directly with theHost Profiles interface in the vSphere Client. See “Configure Host Profiles foran Auto Deploy Reference Host,” on page 88.
Configure ESXi Dump Collector with ESXCLIA core dump is the state of working memory in the event of host failure. By default, a core dump is saved tothe local disk. You can use ESXi Dump Collector to keep core dumps on a network server for use duringdebugging. ESXi Dump Collector is especially useful for Auto Deploy, but is supported for any ESXi host. ESXiDump Collector supports other customization, including sending core dumps to the local disk.
Prerequisites
Install the ESXi Dump Collector, a support tool included with the vCenter Server autorun.exe application andalso included in the vCenter Server Appliance.
Install vCLI if you want to configure the host to use ESXi Dump Collector. In troubleshooting situations, youcan use ESXCLI in the ESXi Shell instead.
Chapter 5 Installing ESXi Using vSphere Auto Deploy
VMware, Inc. 87
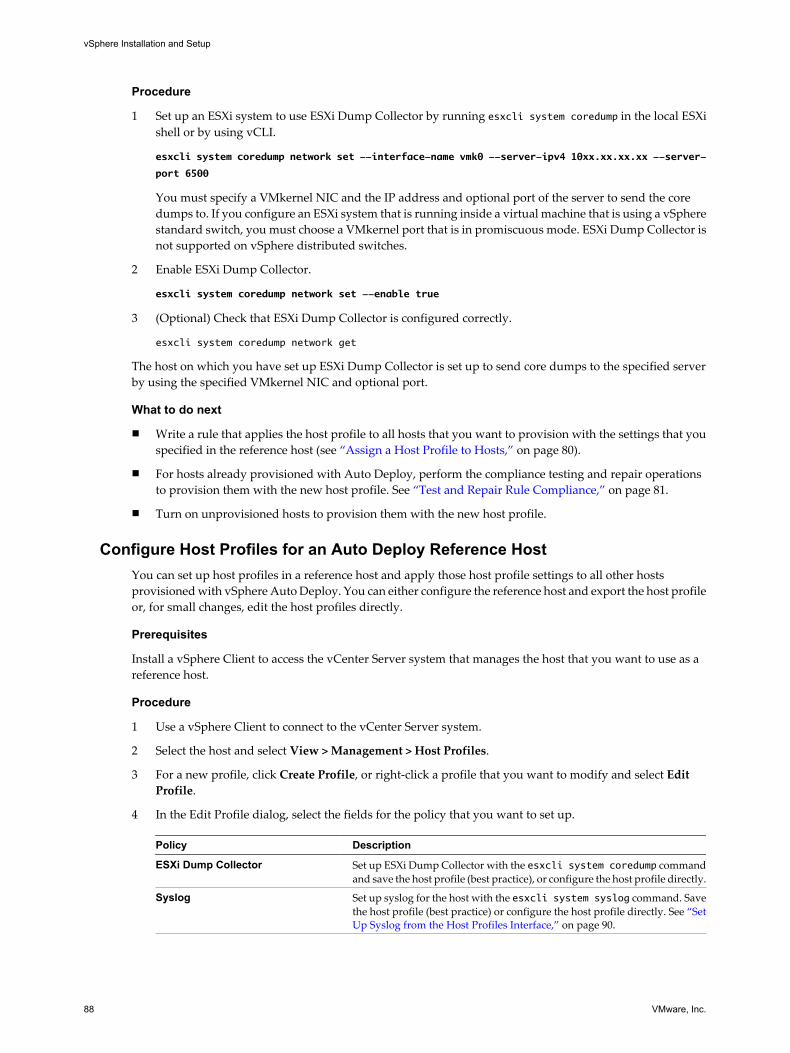
Procedure
1 Set up an ESXi system to use ESXi Dump Collector by running esxcli system coredump in the local ESXishell or by using vCLI.
esxcli system coredump network set --interface-name vmk0 --server-ipv4 10xx.xx.xx.xx --server-
port 6500
You must specify a VMkernel NIC and the IP address and optional port of the server to send the coredumps to. If you configure an ESXi system that is running inside a virtual machine that is using a vSpherestandard switch, you must choose a VMkernel port that is in promiscuous mode. ESXi Dump Collector isnot supported on vSphere distributed switches.
2 Enable ESXi Dump Collector.
esxcli system coredump network set --enable true
3 (Optional) Check that ESXi Dump Collector is configured correctly.
esxcli system coredump network get
The host on which you have set up ESXi Dump Collector is set up to send core dumps to the specified serverby using the specified VMkernel NIC and optional port.
What to do next
n Write a rule that applies the host profile to all hosts that you want to provision with the settings that youspecified in the reference host (see “Assign a Host Profile to Hosts,” on page 80).
n For hosts already provisioned with Auto Deploy, perform the compliance testing and repair operationsto provision them with the new host profile. See “Test and Repair Rule Compliance,” on page 81.
n Turn on unprovisioned hosts to provision them with the new host profile.
Configure Host Profiles for an Auto Deploy Reference HostYou can set up host profiles in a reference host and apply those host profile settings to all other hostsprovisioned with vSphere Auto Deploy. You can either configure the reference host and export the host profileor, for small changes, edit the host profiles directly.
Prerequisites
Install a vSphere Client to access the vCenter Server system that manages the host that you want to use as areference host.
Procedure
1 Use a vSphere Client to connect to the vCenter Server system.
2 Select the host and select View > Management > Host Profiles.
3 For a new profile, click Create Profile, or right-click a profile that you want to modify and select EditProfile.
4 In the Edit Profile dialog, select the fields for the policy that you want to set up.
Policy Description
ESXi Dump Collector Set up ESXi Dump Collector with the esxcli system coredump commandand save the host profile (best practice), or configure the host profile directly.
Syslog Set up syslog for the host with the esxcli system syslog command. Savethe host profile (best practice) or configure the host profile directly. See “SetUp Syslog from the Host Profiles Interface,” on page 90.
vSphere Installation and Setup
88 VMware, Inc.

Policy Description
NTP Use the vicfg-ntp vCLI command or the vSphere Client to set up a host. Ifyou use the vSphere Client to start the NTP Server, make sure the startuppolicy for the NTP Daemon is set appropriately.a In the vSphere Client, select the Configuration tab and click Time
Configuration in the Software panel.b Click Properties, click the NTP Client Enabled check box and click
Options.c Select the Start and stop with host button.
Security Set up the Firewall configuration, Security configuration, User configuration,and User Group configuration for the reference host with the vSphere Clientor with vCLI commands.
Networking and Storage Set up the Networking and Storage policies for the reference host with thevSphere Client or vCLI command.
5 Click OK to save the host profile settings.
What to do next
Write a rule that applies the host profile to all hosts that you want to provision with the settings that youspecified in the reference host (see “Assign a Host Profile to Hosts,” on page 80), and perform a test and repaircompliance operation.
Set Up ESXi Dump Collector from the Host Profiles InterfaceYou can set up ESXi Dump Collector for a reference host with esxcli or directly in the Host Profiles panels ofthe vSphere Client. You can export the host profile and write a rule that applies the profile to all hostsprovisioned with Auto Deploy.
Best practice is to set up hosts to use ESXi Dump Collector with the esxcli system coredump command andsave the host profile (see “Configure ESXi Dump Collector with ESXCLI,” on page 87). In some situations,setting up ESXi Dump Collector from the Host Profiles interface is an alternative.
Prerequisites
You must have a host that has sufficient storage capability for core dumps from multiple hosts provisionedwith vSphere Auto Deploy.
Procedure
1 Select Network Configuration.
2 Select Network Coredump Settings and click Edit.
3 Specify the server port and IP address and the host NIC to use and click the check box to enable ESXiDump Collector.
4 Click OK to save the host profile settings.
What to do next
n Write a rule that applies the host profile to all hosts that you want to provision with the settings that youspecified in the reference host (see “Assign a Host Profile to Hosts,” on page 80).
n For hosts already provisioned with Auto Deploy, perform the compliance testing and repair operationsto provision them with the new host profile. See “Test and Repair Rule Compliance,” on page 81.
n Turn on unprovisioned hosts to provision them with the new host profile.
Chapter 5 Installing ESXi Using vSphere Auto Deploy
VMware, Inc. 89
Set Up Syslog from the Host Profiles InterfaceHosts provisioned with Auto Deploy usually do not have sufficient local storage to save system logs. You canspecify a remote syslog server for those hosts by setting up a reference host, saving the host profile, andapplying that host profile to other hosts as needed.
Best practice is to set up the syslog server on the reference host with the vSphere Client or the esxcli systemsyslog command and save the host profile. In some situations, setting up syslog from the Host Profiles interfaceis an alternative.
Prerequisites
If you intend to use a remote syslog host, set up that host before you customize host profiles.
Procedure
1 Use a vSphere Client to connect to the vCenter Server system.
2 Select the host and select View > Management > Host Profiles.
3 For a new profile, click Create Profile, or right-click a profile you want to modify and select Edit Profile.
4 In the Edit Profile dialog, set up the syslog server host profile.
n If you configure a remote syslog server with the vSphere Client or the esxcli system syslogcommand before you edit host profiles, you can change the remote server and all other syslog options.
a Select Advanced configuration option.
b Select the syslog server settings that you want to use for the hosts provisioned with Auto Deploy.
n If you do not configure a remote syslog server before you edit host profiles, you must add an advancedoption.
a Right-click Advanced configuration option and select Add Profile.
b Open the Advanced configuration option folder and scroll to the bottom.
c Click Option Profile, click Edit, and select Configure a fixed option.
d Specify Syslog.global.logHost as the option name and the name or IP address of the syslogserver as the option value.
You must specify a valid syslog server or you cannot save the host profile policy.
5 Click OK to save the host profile settings.
What to do next
n Write a rule that applies the host profile to all hosts that you want to provision with the settings that youspecified in the reference host (see “Assign a Host Profile to Hosts,” on page 80).
n For hosts already provisioned with Auto Deploy, perform the compliance testing and repair operationsto provision them with the new image profile. See “Test and Repair Rule Compliance,” on page 81.
n Turn on unprovisioned hosts to provision them with the new image profile.
Set Up Networking for Your Auto Deploy HostYou can set up networking for your Auto Deploy reference host and apply the host profile to all other hoststo guarantee a fully functional networking environment.
Prerequisites
Provision the host you wish to use as your reference host with an ESXi image by using Auto Deploy.
vSphere Installation and Setup
90 VMware, Inc.

Procedure
1 In the vSphere Client select Configuration, click Networking in the Hardware panel, and verify that vmk0is connected to the Management Network.
2 If you are using virtual switches and not vSphere Distributed Switch, do not add other VMkernel NICsto vSwitch0.
3 After the reference host is completely configured, reboot the system to verify that vmk0 is connected tothe Management Network.
4 Export the Host Profile.
What to do next
n Write a rule that applies the host profile to all hosts that you want to provision with the settings that youspecified in the reference host (see “Assign a Host Profile to Hosts,” on page 80).
n For hosts already provisioned with Auto Deploy, perform the compliance testing and repair operationsto provision them with the new host profile. See “Test and Repair Rule Compliance,” on page 81.
n Turn on unprovisioned hosts to provision them with the new host profile.
Advanced Management TasksIn most cases, you manage your Auto Deploy environment by preparing system setup, writing rules, andprovisioning hosts. In some cases, you might perform advanced management tasks such as reregistering theAuto Deploy server or assigning a static IP address to each host.
Reregister Auto DeployIf the IP address of the vCenter Server changes, you must reregister Auto Deploy.
Regardless of whether you are using the vCenter Server Appliance or a vCenter Server system installed onWindows, you must reregister Auto Deploy if the vCenter Server IP address changes.
Procedure
u Perform the reregistration task depending on the operating system.
Operating system Task
Windows a Edit the setup file located at c:\ProgramData\VMware\VMwarevCenter Auto Deploy\vmconfig-autodeploy.xml and specify thenew IP address.
You do not have to edit the file if you reregister for other reasons than anew IP address.
b Run the autodepoy-register.exe command-line tool, specifying allrequired options.
autodeploy-register.exe -R -a vCenter-IP -p vCenter-Port-u user_name -w password -s setup-file-path
VMware vCenter Server Appliance Restart the Auto Deploy daemon /etc/init.d/vmware-rbd-watchdog.You can start the daemon directly or use the Start ESXi Services and StopESXi Services vCenter Server Appliance buttons.
Chapter 5 Installing ESXi Using vSphere Auto Deploy
VMware, Inc. 91

Use Hosts with Static IP AddressesBy default, hosts provisioned with Auto Deploy are assigned DHCP addresses by a DHCP server. You can usethe Auto Deploy answer file mechanism to assign static IP addresses to hosts.
You can configure your DHCP server to return a fixed IP address for each machine's MAC address so that theIP address is consistent across boots. See your DHCP server documentation for more information.
Prerequisites
Set up your Auto Deploy environment.
Procedure
1 Boot a host using Auto Deploy.
2 With vSphere Client, connect to the vCenter Server that manages the Auto Deploy host, select the host,and select View > Management > Host Profiles to display the host profile.
3 Select a host, select Edit Profile, and select Networking configuration > Host port group > ManagementNetwork > IP address settings > IP address.
4 Select User specified IP address to be used while applying the configuration.
5 Select Networking configuration > DNS configuration > DNS settings and make sure the Flag indicatingif DHCP should be used check box is not selected.
6 Export the host profile and modify the rule that assigns a host profile to the hosts for which you want touse a static IP address.
7 In the vSphere Client, apply the host profile to be prompted for the information without rebooting.
a Right-click the host, select Host Profiles > Manage Profile, select the profile to attach, and click OK.
b Right-click the host and select Enter Maintenance Mode.
c Right-click the host and select Host Profiles > Apply Profile.
d When prompted, provide the IP address.
e Right-click the host and select Exit Maintenance Mode.
The IP address is saved in an answer file. The next time you boot, the answer file information is applied to thehost. One answer file per host is available.
Using Auto Deploy with the VMware vCenter Server ApplianceThe VMware vCenter Server Appliance is a preconfigured Linux-based virtual machine optimized for runningvCenter Server and associated services. The appliance includes an Auto Deploy server that is disabled bydefault.
You can use Auto Deploy with the vCenter Server Appliance in different ways.
n Use the vCenter Server system on the appliance in conjunction with the Auto Deploy server on theappliance.
n Use the vCenter Server system on the appliance in conjunction with an Auto Deploy server that you installseparately on a Windows system.
n Use the Auto Deploy server on the appliance in conjunction with a vCenter Server system that you installon a different vCenter Server appliance.
n Use the Auto Deploy server on the appliance in conjunction with a vCenter Server system that you installseparately on a Windows system.
vSphere Installation and Setup
92 VMware, Inc.

If you want to use the Auto Deploy server on the vCenter Server appliance, you must start the service first.You can start the service from the Services tab of the appliance.
In all cases, you are responsible for setting up your DHCP server. See “Prepare Your System and Install theAuto Deploy Server,” on page 73.
NOTE You can register only one Auto Deploy instance with a vCenter Server system, and only one vCenterServer system with an Auto Deploy server.
Set Up the vCenter Server Appliance to Use a Standalone Auto Deploy ServerThe vCenter Server Appliance includes an Auto Deploy server. You can also use the appliance with astandalone Auto Deploy server.
Prerequisites
n Deploy the vCenter Server Appliance.
n Obtain the vCenter Server installation media, which include the Auto Deploy installer.
n Verify that the Windows system that you want to use meets the requirements for vCenter Serverinstallation. Auto Deploy has the same requirements.
Procedure
1 On the vCenter Server Appliance, unregister the built-in Auto Deploy server from a Linux commandprompt.
autodeploy-register --unregister -a localhost -l
2 If you already used Auto Deploy on the appliance, stop the Auto Deploy daemon on the appliance.
chkconfig vmware-rbd-watchdog off
By default, the Auto Deploy daemon is not running.
3 Using the vCenter Server installation media, install Auto Deploy on a Windows system and provide thevCenter Server Appliance information when prompted for the vCenter Server.
Your standalone Auto Deploy installation is now associated with the vCenter Server on the vCenter Serverappliance.
Set Up Auto Deploy on the vCenter Server ApplianceBy default, Auto Deploy on the vCenter Server Appliance is preconfigured to use the vCenter Server systemrunning on the appliance. You can set up Auto Deploy to use a different vCenter Server system.
Prerequisites
n Deploy the vCenter Server Appliance.
n Install a vCenter Server system to use with Auto Deploy.
Procedure
u At the Linux command prompt on the vCenter Server appliance, specify the target vCenter Server system,and provide the user name and password for the vCenter Server system.
autodeploy-register --register -a vcenter-ip -u username -w password
Chapter 5 Installing ESXi Using vSphere Auto Deploy
VMware, Inc. 93

Customizing Hosts with Answer FilesTo customize hosts with shared attributes, you can create a host profile in a reference host. To customizeindividual hosts, you can set up some fields in the host profile to prompt the user for input for each host. Afterthe user has specified the information, the system generates a host-specific answer file and stores it with theAuto Deploy cache and the vCenter Server host object.
Setting Host Profiles to Prompt for User InputHost profiles allow you to prespecify information, for example, the storage setup or Syslog setup in a referencehost and apply the host profile to a set of target hosts that share the same settings. You can also use host profilesto specify that certain settings are host-dependent. If you do so, the host comes up in maintenance mode whenyou provision it with Auto Deploy. Apply the host profile or update the answer file to be prompted for input.The system stores your input and uses it the next time the host boots.
NOTE The answer file is not stored in a location or format that administrators can access. Use the Host ProfilesUI in the vSphere Client to manage answer files.
When the host profile is set to prompt for user input, you must specify a value in the dialog that appears. Anerror results if you do not specify a value.
Table 5-3. Host Profile Options for iSCSI
Information to Request User Input For Setting the Host Profile Option
When you apply a host profile on a system that includes aprofile for iSCSI, you are prompted for several properties.For many of the properties, a system default is available. Forsome properties, you must specify a value or an error results.
IQN name If the iSCSI setup uses an IQN name,you are prompted when you apply thehost profile. You cannot continue untilyou provide the name.
CHAPinformation
If you set up iSCSI to require CHAPauthentication, you are prompted forCHAP information including the username and the secret when you applythe host profile. You cannot continueuntil you provide the name.
1 Select Storage configuration and click iSCSI InitiatorConfiguration
2 If the HBA you want to configure is not in the list, Right-click the folder that corresponds to the initiator you wantto configure and select Add Profile.
You have to add a profile, for example, if software iSCSIwas not enabled during host profile creation and youwant to configure the software iSCSI initiator.
3 Set up the initiator. For many fields, the user is promptedwhen you apply the profile.
vSphere Installation and Setup
94 VMware, Inc.

Table 5-4. Host Profile Options that Prompt for Storage User Input
Information to Request User Input For Setting the Host Profile Option
You are setting up the Fixed PSP configuration and want toprompt for the adapter and target IDs for the storage arraysthat should use the Fixed PSP.
1 Create a subprofile.a Click Storage configuration.b Click Native Multipathing (NMP).c Click Path Selection Policy (PSP) configuration.d Right-click Fixed PSP Configuration and select Add
Profile.2 In the profile's Preferred Path window, select Prompt the
user for adapter and target IDs on the host.
Configure FCoE adapter activation based on a user-specifiedMAC address.
1 Open Storage configuration.2 Open Software FCoE configuration.3 Open Adapter Configuration.4 If no activation profile exists, right-click Activation
Profile and select New Profile.5 Open the profile and click Policy Profile.6 Select Activation policy based on adapter MAC
address from the drop-down menu.
Table 5-5. Host Profile Options that Prompt for Security User Input
Information to Request User Input For Setting the Host Profile Option
Administrator password for ESXi host when the host bootsfor the first time.
1 Open Security configuration.2 Click Administrator password.3 Select User Input Password to be Used to Configure
Administrator Password.
Preconfigures a user for the ESXi host but prompts for thepassword for that user on each host when the host boots forthe first time.
1 Create a user profile by right-clicking UserConfiguration and selecting Add Profile.
2 Configure the user by selecting one of the options.n Assigned fixed user configurations is available for
compatibility with ESX/ESXi 4.1 system, this optiondisplays the password in the clear.
n Assign advanced fixed user configurations is forusers of ESXi 5.0 systems.
n Specify the user configuration in the profile butprompt for password during host configurationallows you to specify the information about the userbut prompt for a password on each host.
Prompt the user for credentials when the host joins the ActiveDirectory domain.
1 Set the Authentication configuration profile to use afixed domain.a Open Authentication configuration.b Open Active Directory configuration.c Click Domain Name.d Select Configure a fixed domain name.
2 Set the method for joining the domain to prompt theuser.a Open Authentication configuration.b Open Active Directory configuration.c Click JoinDomain Method.d Select Use user specified AD credentials to join the
host to domain.
Chapter 5 Installing ESXi Using vSphere Auto Deploy
VMware, Inc. 95
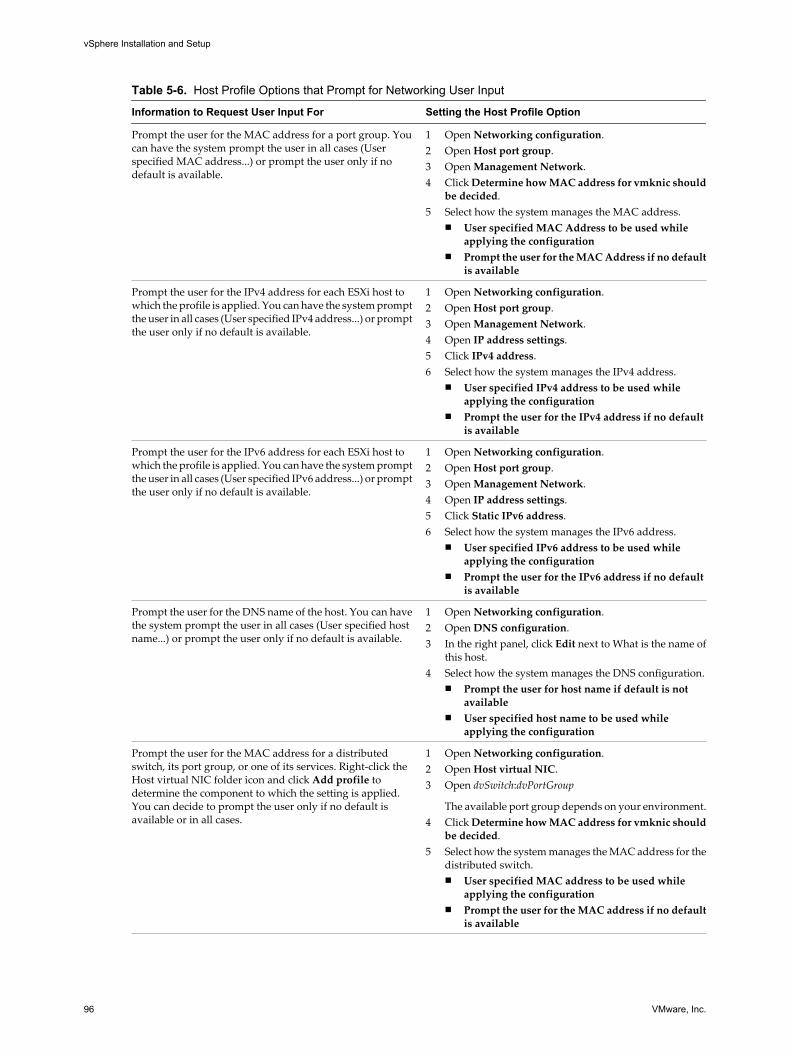
Table 5-6. Host Profile Options that Prompt for Networking User Input
Information to Request User Input For Setting the Host Profile Option
Prompt the user for the MAC address for a port group. Youcan have the system prompt the user in all cases (Userspecified MAC address...) or prompt the user only if nodefault is available.
1 Open Networking configuration.2 Open Host port group.3 Open Management Network.4 Click Determine how MAC address for vmknic should
be decided.5 Select how the system manages the MAC address.
n User specified MAC Address to be used whileapplying the configuration
n Prompt the user for the MAC Address if no defaultis available
Prompt the user for the IPv4 address for each ESXi host towhich the profile is applied. You can have the system promptthe user in all cases (User specified IPv4 address...) or promptthe user only if no default is available.
1 Open Networking configuration.2 Open Host port group.3 Open Management Network.4 Open IP address settings.5 Click IPv4 address.6 Select how the system manages the IPv4 address.
n User specified IPv4 address to be used whileapplying the configuration
n Prompt the user for the IPv4 address if no defaultis available
Prompt the user for the IPv6 address for each ESXi host towhich the profile is applied. You can have the system promptthe user in all cases (User specified IPv6 address...) or promptthe user only if no default is available.
1 Open Networking configuration.2 Open Host port group.3 Open Management Network.4 Open IP address settings.5 Click Static IPv6 address.6 Select how the system manages the IPv6 address.
n User specified IPv6 address to be used whileapplying the configuration
n Prompt the user for the IPv6 address if no defaultis available
Prompt the user for the DNS name of the host. You can havethe system prompt the user in all cases (User specified hostname...) or prompt the user only if no default is available.
1 Open Networking configuration.2 Open DNS configuration.3 In the right panel, click Edit next to What is the name of
this host.4 Select how the system manages the DNS configuration.
n Prompt the user for host name if default is notavailable
n User specified host name to be used whileapplying the configuration
Prompt the user for the MAC address for a distributedswitch, its port group, or one of its services. Right-click theHost virtual NIC folder icon and click Add profile todetermine the component to which the setting is applied.You can decide to prompt the user only if no default isavailable or in all cases.
1 Open Networking configuration.2 Open Host virtual NIC.3 Open dvSwitch:dvPortGroup
The available port group depends on your environment.4 Click Determine how MAC address for vmknic should
be decided.5 Select how the system manages the MAC address for the
distributed switch.n User specified MAC address to be used while
applying the configurationn Prompt the user for the MAC address if no default
is available
vSphere Installation and Setup
96 VMware, Inc.

Table 5-6. Host Profile Options that Prompt for Networking User Input (Continued)
Information to Request User Input For Setting the Host Profile Option
Prompt the user for the IPv4 address for a distributed switch,its port group, or one of its services. Right-click the Hostvirtual NIC folder icon and click Add profile to determinethe component to which the setting is applied. You candecide to prompt the user only if no default is available or inall cases.
1 Open Networking configuration.2 Open Host virtual NIC.3 Open dvSwitch:dvPortGroup
The available port group depends on your environment.4 Open IP address settings.5 Click IPv4 address.6 Select how the system handles the IPv4 address for the
distributed switch.n User specified IPv4 address to be used while
applying the configurationn Prompt the user for IPv4 address if no default is
available
Prompt the user for the IPv6 address for a distributed switch,its port group, or one of its services. Right-click the Hostvirtual NIC folder icon and click Add profile to determinethe component to which the setting is applied. You candecide to prompt the user only if no default is available or inall cases.
1 Open Networking configuration.2 Open Host virtual NIC.3 Open dvSwitch:dvPortGroup
The available port group depends on your environment.4 Open IP address settings.5 Click Static IPv6 address.6 Select how the system manages the IPv6 address for the
distributed switch.n User specified IPv6 address to be used while
applying the configurationn Prompt the user for IPv6 address if no default is
available
Auto Deploy Best Practices and Security ConsiderationFollow best practices when installing vSphere Auto Deploy and when using Auto Deploy with other vSpherecomponents. Follow security guidelines you would follow in a PXE boot environment, and consider therecommendations in this chapter.
Auto Deploy Best PracticesThis section discusses several Auto Deploy best practices. See the VMware Knowledge Base for additional bestpractice information.
Auto Deploy and vSphere HA Best PracticesYou can improve the availability of the virtual machines running on hosts provisioned with Auto Deploy byfollowing best practices.
n For hosts that can be part of a vSphere cluster, follow these steps.
a Enable vSphere HA on the cluster.
b Include the vmware-fdm VIB in the image profile you want to use.
c Use PowerCLI to write a rule that assigns that image profile to the target hosts.
If the image profile does not include the vmware-fdm VIB, a warning message appears on the PowerCLIconsole when you run the New-DeployRule or Copy-DeployRule cmdlet. The message includesinformation on how to add the VIB. See “vmware-fdm Warning Message When You Assign an ImageProfile to Auto Deploy Host,” on page 101.
Chapter 5 Installing ESXi Using vSphere Auto Deploy
VMware, Inc. 97
n Some environments configure the hosts provisioned with Auto Deploy with a distributed switch orconfigure virtual machines running on the hosts with Auto Start Manager. In those environments, deploythe vCenter Server system so that its availability matches the availability of the Auto Deploy server. Severalapproaches are possible.
n Deploy the vCenter Server system and the Auto Deploy server on the same system. This approach isespecially well suited for a proof of concept environment.
n Deploy vCenter Server Heartbeat.
VMware vCenter Server Heartbeat delivers high availability for VMware vCenter Server, protectingthe virtual and cloud infrastructure from application, configuration, operating system, or hardwarerelated outages.
n Deploy the vCenter Server system in a virtual machine. Run the vCenter Server virtual machine in avSphere HA enabled cluster and configure the virtual machine with a vSphere HA restart priority ofhigh. Include two or more hosts in the cluster that are not managed by Auto Deploy and pin thevCenter Server virtual machine to these hosts by using a rule (vSphere HA DRS required VM to hostrule). You can set up the rule and then disable DRS if you do not wish to use DRS in the cluster. Thegreater the number of hosts that are not managed by Auto Deploy the greater your resilience to hostfailures.
NOTE This approach is not suitable if you use Auto Start Manager because Auto Start Manager is notsupported in a cluster enabled for vSphere HA.
Auto Deploy Networking Best PracticesPrevent networking problems by following Auto Deploy networking best practices.
IP Address Allocation Using DHCP reservations is highly recommended for address allocation. FixedIP addresses are supported by the answer file mechanism, but providing inputfor each host is cumbersome and not recommended.
VLAN Considerations Using Auto Deploy in environments that do not use VLANs is highlyrecommended. Do not use VLAN tagged networks at the boot NIC.
If you intend to use Auto Deploy in an environment that uses VLANs, youmust make sure that the hosts you want to provision can reach the DHCPserver. How hosts are assigned to a VLAN depends on the setup at your site.The VLAN ID might be assigned by the switch or by the router, or you mightbe able to set the VLAN ID in the host's BIOS or through the host profile.Contact your network administrator to determine the steps for allowing hoststo reach the DHCP server.
Auto Deploy and VMware Tools Best PracticesSee the VMware Knowledge Base for Auto Deploy and VMware Tools best practices.
Auto Deploy Load Management Best PracticeSimultaneously booting large numbers of hosts places a significant load on the Auto Deploy server. BecauseAuto Deploy is a web server at its core, you can use existing web server scaling technologies to help distributethe load. For example, one or more caching reverse proxies can be used with Auto Deploy to serve up the staticfiles that make up the majority of an ESXi boot image. Configure the reverse proxy to cache static content andpass requests through to the Auto Deploy server.
Configure the hosts to boot off the reverse proxy by modifying the TFTP tramp file. When you click DownloadTFTP ZIP in the vSphere Client, the system downloads the ZIP file that contains the tramp file. See “PrepareYour System and Install the Auto Deploy Server,” on page 73. Change the URLs in that file to refer to theaddress of the reverse proxy.
vSphere Installation and Setup
98 VMware, Inc.

After a massive power outage, VMware recommends that you bring up the hosts on a per-cluster basis. If youbring up multiple clusters simultaneously, the Auto Deploy server might experience CPU bottlenecks. Allhosts come up after a potential delay. The bottleneck is less severe if you set up the reverse proxy.
vSphere Auto Deploy Logging and Troubleshooting Best PracticesTo resolve problems you encounter with vSphere Auto Deploy, use the Auto Deploy logging information fromthe vSphere Client and set up your environment to send logging information and core dumps to remote hosts.
Auto Deploy Logs 1 From a vSphere Client, connect to the vCenter Server system that AutoDeploy is associated with.
2 When the Certificate warning appears, select the check box, click Ignoreand repeat if a second warning appears.
3 In the vSphere Client, click Home.
An Auto Deploy icon is included in the display.
4 Click the Auto Deploy icon to display the Auto Deploy page.
5 In the Auto Deploy page, click Download AutoDeploy Log Files.
Setting Up Syslog Set up a remote Syslog server. See the vCenter Server and Host Managementdocumentation for Syslog server configuration information. Configure the firsthost you boot to use the remote syslog server and apply that host's host profileto all other target hosts. Optionally, install and use the vSphere SyslogCollector, a vCenter Server support tool that provides a unified architecture forsystem logging and enables network logging and combining of logs frommultiple hosts.
Setting Up ESXi DumpCollector
Hosts provisioned with Auto Deploy do not have a local disk to store coredumps on. Install ESXi Dump Collector and set up your first host so all coredumps are directed to ESXi Dump Collector, and apply the host profile fromthat host to all other hosts. See “Configure ESXi Dump Collector withESXCLI,” on page 87 and “Set Up ESXi Dump Collector from the Host ProfilesInterface,” on page 89.
Using Auto Deploy in a Production EnvironmentWhen you move from a proof of concept setup to a production environment, take care to make the environmentresilient.
n Protect the Auto Deploy server. “Auto Deploy and vSphere HA Best Practices,” on page 97 gives anoverview of the options you have.
n Protect all other servers in your environment including the DHCP server and the TFTP server.
n Follow VMware security guidelines, including those outlined in “Auto Deploy SecurityConsiderations,” on page 100.
Chapter 5 Installing ESXi Using vSphere Auto Deploy
VMware, Inc. 99

Auto Deploy Security ConsiderationsUnderstanding potential security risks helps you set up your environment in a secure manner.
Secure your network as you would for any other PXE-based deployment method. Auto Deploy transfers dataover SSL to prevent casual interference and snooping. However, the authenticity of the client or of the AutoDeploy server is not checked during a PXE boot.
The boot image that the Auto Deploy server downloads to a machine can have the following components.
n The VIB packages that the image profile consists of are always included in the boot image.
n The host profile and answer file are included in the boot image if Auto Deploy rules are set up to provisionthe host with a host profile or answer file.
n The administrator (root) password and user passwords that are included with host profile and answerfiles are MD5 encrypted.
n Any other passwords associated with profiles are in the clear. If you set Active Directory by usinghost profiles, the passwords are not protected.
Use the vSphere Authentication Service for setting up Active Directory to avoid exposing the ActiveDirectory passwords.
n The host's public and private SSL key and certificate are included in the boot image.
The files that contain the host profile and answer file information are stored on disk in an obfuscated form.The files can be retrieved only as part of the waiter.tgz file that is generated for each host. The raw files arenot accessible through the web server. However, malicious code can pretend to be a particular host anddownload a host's waiter.tgz file. The information in the waiter.tgz file can then be used to compromise theESXi host.
You can greatly reduce the security risk of Auto Deploy by completely isolating the network where AutoDeploy is used.
Troubleshooting Auto DeployThe Auto Deploy troubleshooting topics offer solutions for situations when provisioning hosts with AutoDeploy does not work as expected.
Auto Deploy TFTP Timeout Error at Boot TimeA TFTP Timeout error message appears when a host provisioned by Auto Deploy boots. The text of the messagedepends on the BIOS.
Problem
A TFTP Timeout error message appears when a host provisioned by Auto Deploy boots. The text of the messagedepends on the BIOS.
Cause
The TFTP server is down or unreachable.
Solution
u Ensure that your TFTP service is running and reachable by the host that you are trying to boot.
vSphere Installation and Setup
100 VMware, Inc.
Auto Deploy Host Boots with Wrong ConfigurationA host is booting with a different ESXi image, host profile, or folder location than the one specified in the rules.
Problem
A host is booting with a different ESXi image profile or configuration than the image profile or configurationthat the rules specify. For example, you change the rules to assign a different image profile, but the host stilluses the old image profile.
Cause
After the host has been added to a vCenter Server system, the boot configuration is determined by the vCenterServer system. The vCenter Server system associates an image profile, host profile, or folder location with thehost.
Solution
u Use the Test-DeployRuleSetCompliance and Repair-DeployRuleSetCompliance PowerCLI cmdlets toreevalute the rules and to associate the correct image profile, host profile, or folder location with the host.
Host Is Not Redirected to Auto Deploy ServerDuring boot, a host that you want to provision with Auto Deploy loads gPXE. The host is not redirected to theAuto Deploy server.
Problem
During boot, a host that you want to provision with Auto Deploy loads gPXE. The host is not redirected to theAutoDeploy server.
Cause
The tramp file that is included in the TFTP ZIP file has the wrong IP address for the Auto Deploy server.
Solution
u Correct the IP address of the Auto Deploy server in the tramp file, as explained in the vSphere Installationand Setup documentation.
vmware-fdm Warning Message When You Assign an Image Profile to Auto DeployHost
When users run PowerCLI cmdlets that assign an image profile to one or more hosts, an error results if thevmware-fdm package is not part of the image profile. This package is required if you use the Auto Deploy hostwith vSphere HA.
Problem
When users write or modify rules to assign an image profile to one or more Auto Deploy hosts, the followingerror appears:
WARNING: The supplied image profile does not contain the "vmware-fdm" software
package, which is required for the vSphere HA feature. If this image profile
is to be used with hosts in a vSphere HA cluster, you should add the vmware-fdm
package to the image profile. The vmware-fdm package can be retrieved from the
software depot published by this vCenter Server at the following URL:
http://<VC-Address>/vSphere-HA-depot
Chapter 5 Installing ESXi Using vSphere Auto Deploy
VMware, Inc. 101

You can use the Add-EsxSoftwarePackage cmdlet to add the package to the image
profile and then update any hosts or rules that were using the older version
of the profile.
Cause
The image profile does not include the vmware-fdm software package, which is required by vSphere HA.
Solution
If you will not use the Auto Deploy hosts in an environment that uses vSphere HA, you can ignore the warning.
If you will use the Auto Deploy hosts in an environment that uses vSphere HA, follow the instructions in thewarning.
1 At the PowerCLI command prompt, add the software depot that includes the vmware-fmd package.
Add-EsxSoftwareDepot http://VC-Address/vSphere-HA-depot
2 (Optional) If the image profile that generated the warning is read-only, clone the image profile.
New-EsxImageProfile -CloneProfile My_Profile -name "Test Profile Error Free"
This example clones the profile named My-Profile and assigns it the name Test Profile Error Free.
3 Run Add-EsxSoftwarePackage to add the package to the image profile.
Add-EsxSoftwarePackage -ImageProfile "Test Profile Error Free" -SoftwarePackage vmware-fdm
Package Warning Message When You Assign an Image Profile to Auto DeployHost
When you run a PowerCLI cmdlet that assigns an image profile that is not Auto Deploy ready, a warningmessage appears.
Problem
When you write or modify rules to assign an image profile to one or more hosts, the following error results:
Warning: Image Profile <name-here> contains one or more software packages that are not stateless-
ready. You may experience problems when using this profile with Auto Deploy.
Cause
Each VIB in an image profile has a stateless-ready flag that indicates whether the VIB can be used with AutoDeploy. You get the error if you attempt to write an Auto Deploy rule that uses an image profile in which oneor more VIBs have that flag set to FALSE.
Solution
1 Use Image Builder PowerCLI cmdlets to view the VIBs in the image profile.
2 Remove any VIBs that are not stateless-ready.
3 Rerun the Auto Deploy PowerCLI cmdlet.
vSphere Installation and Setup
102 VMware, Inc.

Auto Deploy Host Reboots After Five MinutesAn Auto Deploy host boots and displays gPXE information, but reboots after five minutes.
Problem
A host to be provisioned with Auto Deploy boots from gPXE and displays gPXE information on the console.However, after five minutes, the host displays the following message to the console and reboots.
This host is attempting to network-boot using VMware
AutoDeploy. However, there is no ESXi image associated with this host.
Details: No rules containing an Image Profile match this
host. You can create a rule with the New-DeployRule PowerCLI cmdlet
and add it to the rule set with Add-DeployRule or Set-DeployRuleSet.
The rule should have a pattern that matches one or more of the attributes
listed below.
The host might also display the following details:
Details: This host has been added to VC, but no Image Profile
is associated with it. You can use Apply-ESXImageProfile in the
PowerCLI to associate an Image Profile with this host.
Alternatively, you can reevaluate the rules for this host with the
Test-DeployRuleSetCompliance and Repair-DeployRuleSetCompliance cmdlets.
The console then displays the host's machine attributes including vendor, serial number, IP address, and soon.
Cause
No image profile is currently associated with this host.
Solution
You can temporarily assign an image profile to the host by running the Apply-EsxImageProfile cmdlet.
You can permanently assign an image profile to the host as follows.
1 Run the New-DeployRule cmdlet to create a rule that includes a pattern that matches the host with an imageprofile.
2 Run the Add-DeployRule cmdlet to add the rule to a ruleset.
3 Run the Test-DeployRuleSetCompliance cmdlet and use the output of that cmdlet as the input to theRepair-DeployRuleSetCompliance cmdlet.
See vSphere Installation and Setup documentation for details about vSphere Auto Deploy.
Auto Deploy Host with a Built-In USB Flash Drive Does Not Send Coredumps toLocal Disk
If your Auto Deploy host has a built-in USB flash drive, and an error results in a coredump, the coredump islost. Set up your system to use ESXi Dump Collector to store coredumps on a networked host.
Problem
If your Auto Deploy host has a built-in USB Flash, and if it encounters an error that results in a coredump, thecoredump is not sent to the local disk.
Chapter 5 Installing ESXi Using vSphere Auto Deploy
VMware, Inc. 103

Solution
1 Install ESXi Dump collector on a system of your choice.
ESXi Dump Collector is included with the vCenter Server installer.
2 Use ESXCLI to configure the host to use ESXi Dump Collector.
esxcli conn_options system coredump network set IP-addr,port
esxcli system coredump network set -e true
3 Use ESXCLI to disable local coredump partitions.
esxcli conn_options system coredump partition set -e false
Auto Deploy Host Does Not Get a DHCP Assigned AddressThe host you provision with Auto Deploy fails to get a DHCP Address.
Problem
When you attempt to boot a host provisioned with Auto Deploy, the host performs a network boot but is notassigned a DHCP address. The Auto Deploy server cannot provision the host with the image profile.
Cause
You might have a problem with the DHCP service or with the firewall setup.
Solution
1 Check that the DHCP server service is runningon the Windows system on which the DHCP server is setup to provision hosts.
a Click Start > Settings > Control Panel > Administrative Tools.
b Double-click Services to open the Services Management panel.
c In the Services field, look for the DHCP server service and restart the service if it is not running.
2 If the DHCP server is running, recheck the DHCP scope and the DHCP reservations you configured foryour target hosts.
If the DHCP scope and reservations are configured correctly, the problem most likely involves the firewall.
3 As a temporary workaround, turn off the firewall to see whether that resolves the problem.
a Open the command prompt by clicking Start > Program > Accessories > Command prompt.
b Type the following command to temporarily turn off the firewall. Do not turn off the firewall in aproduction environment.
netsh firewall set opmode disable
c Attempt to provision the host with Auto Deploy.
d Type the following command to turn the firewall back on.
netsh firewall set opmode enable
4 Set up rules to allow DHCP network traffic to the target hosts.
See the firewall documentation for DHCP and for the Windows system on which the DHCP server isrunning for details.
vSphere Installation and Setup
104 VMware, Inc.

Auto Deploy Host Does Not Network BootThe host you provision with Auto Deploy comes up but does not network boot.
Problem
When you attempt to boot a host provisioned with Auto Deploy, the host does not start the network bootprocess.
Cause
You did not enable your host for network boot.
Solution
1 Reboot the host and follow the on-screen instructions to access the BIOS configuration.
If you have an EFI host, you must switch the EFI system to BIOS compatibility mode.
2 In the BIOS configuration, enable Network Boot in the Boot Device configuration.
Auto Deploy Host Cannot Contact TFTP ServerThe host you provision with Auto Deploy cannot contact the TFTP server.
Problem
When you attempt to boot a host provisioned with Auto Deploy, the host performs a network boot and isassigned a DHCP address by the DHCP server, but the host cannot contact the TFTP server.
Cause
The TFTP server might have stopped running, or a firewall might block the TFTP port.
Solution
n If you installed the WinAgents TFTP server, open the WinAgents TFTP management console and verifythat the service is running. If the service is running, check the Windows firewall's inbound rules to makesure the TFTP port is not blocked. Turn off the firewall temporarily to see whether the firewall is theproblem.
n For all other TFTP servers, see the server documentation for debugging procedures.
Auto Deploy Host Cannot Retrieve ESXi Image from Auto Deploy ServerThe host you provision with Auto Deploy stops at the gPXE boot screen.
Problem
When you attempt to boot a host provisioned with Auto Deploy, the boot process stops at the gPXE boot screenand the status message indicates that the host is attempting to get the ESXi image from the Auto Deploy server.
Cause
The Auto Deploy service might be stopped or the Auto Deploy server might be unaccessible.
Solution
1 Log in to the system on which you installed the Auto Deploy server.
Chapter 5 Installing ESXi Using vSphere Auto Deploy
VMware, Inc. 105

2 Check that the Auto Deploy server is running.
a Click Start > Settings > Control Panel > Administrative Tools.
b Double-click Services to open the Services Management panel.
c In the Services field, look for the VMware vSphere Auto Deploy Waiter service and restart it if it isnot running.
3 Open a Web browser and enter the following URL and check whether the Auto Deploy server is accessible.
https://Auto_Deploy_Server_IP_Address:Auto_Deploy_Server_Port/vmw/rdb
NOTE Use this address only to check whether the server is accessible.
4 If the server is not accessible, a firewall problem is likely.
a Try setting up permissive TCP Inbound rules for the Auto Deploy server port.
The port is 6501 unless you specified a different port during installation.
b As a last resort, disable the firewall temporarily and enable it again after you verified whether itblocked the traffic. Do not disable the firewall on production environments.
To disable the firewall, run netsh firewall set opmode disable. To enable the firewall, runnetsh firewall set opmode enable.
Auto Deploy Proof of Concept SetupA proof of concept setup of an Auto Deploy environment helps administrators to evaluate the product anddemonstrate its capabilities to management. When you complete the proof of concept setup workflow, youhave a working Auto Deploy environment that includes a reference host and one or more other target hosts.
The proof of concept setup is intended for a test or development environment, but your completed setup canbe the basis for a production environment. The set of tasks starts in an environment in which no Auto Deploycomponents are installed. The task descriptions assume that you are using a flat network with no VLAN taggingbetween the physical hosts and the rest of your environment.
To perform the tasks, you should have the following background knowledge and privileges.
n Experience with vSphere (vCenter Server, ESX, and ESXi).
n Basic knowledge of Microsoft PowerShell and vSphere PowerCLI.
n Administrator rights to the target Windows and vCenter Server systems.
Follow the tasks in the order presented in this document. Some steps can be performed in a different order,but the order used here limits repeated manipulation of some components.
1 Proof of Concept Preinstallation Checklist on page 108Before you can start the proof of concept setup, make sure that your environment meets the hardwareand software requirements and that you have the necessary permissions for the components includedin the setup.
2 Install the TFTP Server on page 109Auto Deploy relies on a TFTP server for sending the boot image to the hosts it provisions. You mustinstall a TFTP server in your environment.
3 Install and Set Up vSphere PowerCLI on page 109You manage Auto Deploy with rules that you create with vSphere PowerCLI cmdlets.
4 Prepare Auto Deploy Target Hosts on page 110You must prepare all target hosts for Auto Deploy.
vSphere Installation and Setup
106 VMware, Inc.

5 Prepare the DHCP Server on page 110The DHCP Server in your proof of concept environment must be set up to serve each target host with agPXE binary.
6 Prepare the DNS Server on page 112Preparing the DNS server involves adding the DHCP information to the DNS server and verifying thatthe DNS entries are working. This task is optional.
7 Install Auto Deploy Server Software on page 113Auto Deploy server software is included with the vCenter Server installation media. This proof of conceptsetup installs the Auto Deploy server on the system on which vCenter Server is installed.
8 Configure the Auto Deploy and TFTP Environment on page 114You must download a TFTP Boot ZIP file from your Auto Deploy server. The customized TFTP serverserves the boot images Auto Deploy provides.
9 Prepare the ESXi Software Depot on page 114Auto Deploy provisions hosts with images described by image profiles. Image profiles are stored insoftware depots. You must make sure the correct image profile is available before you start provisioninghosts.
10 Set Up the First Host and Provision with Auto Deploy on page 115Setting up the first host requires that you understand how to write Auto Deploy rules with vSpherePowerCLI. After you write the rules and add them to the ruleset, you can turn on the host to provisionit.
11 Configure the Proof of Concept Reference Host on page 118You can customize the first ESXi host you boot for your environment and create a host profile. You canset up Auto Deploy to provision other target hosts with that host profile. The ESXi host you create thehost profile from is considered your reference host or template host.
12 Create a Host Profile on page 119Configuration that is shared by a group of hosts is stored in a host profile. You can create the host profilefrom your reference host. Configuration that differs for different hosts, such as a static IP address, canbe managed through the answer file mechanism.
13 Create a Rule for Other Target Hosts on page 120You can create a rule that applies the previously verified image profile and the host profile you justcreated to all target hosts.
14 Provision All Hosts and Create Answer Files on page 121With the rule in place that provisions hosts using an image profile, and with the host profile created fromthe reference host available, you can provision all target hosts. If any host profile items are set to promptthe user for input, the host comes up in maintenance mode. You apply the host profile or update theanswer file to be prompted for the information. The system creates the answer file and associates it withthe host.
Chapter 5 Installing ESXi Using vSphere Auto Deploy
VMware, Inc. 107
Proof of Concept Preinstallation ChecklistBefore you can start the proof of concept setup, make sure that your environment meets the hardware andsoftware requirements and that you have the necessary permissions for the components included in the setup.
You need the following hardware and software for your proof of concept setup.
n vCenter Server 5.0 installed on a Windows system. In this proof of concept setup, you install the AutoDeploy server and the vSphere PowerCLI on the host on which the vCenter Server is running. You performmany of the setup tasks by logging in to that host, either directly into the console or by using RemoteDesktop (RDP).
n Datacenter, clusters, and folders configured on the vCenter Server system.
n At least 4GB of free space on the vCenter Server system. Preferably a second volume or hard drive.
n Storage for ESXi datastores (NFS, iSCSI, or FibreChannel), with servers and storage arrays that areconfigured so the servers can see the LUNs.
n List of target IP addresses for NFS or iSCSi.
n List of target volume information for NFS or iSCSI.
n Two or more hosts to be provisioned with Auto Deploy, and the following information for each host.
n List of MAC addresses for each physical NIC.
n List of IP addresses and fully qualified host names preassigned for target ESXi installs.
n Default route, netmask, and primary and secondary DNS server IP addresses.
n IP address and netmask for the VMkernel primary (management) network.
n IP address and netmask for other VMkernel networks such as storage, vSphere FT, or VMwarevMotion.
CAUTION If you set up Auto Deploy to boot a host, vSphere checks each of the local storage devices onthe system for existing partitions. To avoid the possibility of data loss, vSphere does not create partitionsunder the following conditions:
n A local storage device contains a GPT partition map.
n A local storage device contains an MBR partition table that defines at least one partition.
n Storage is remote.
If hosts have local storage with a partition table that vSphere does not recognize, such as Linux LogicalVolume Manager, vSphere overwrites the storage and creates new partitions. To make sure local storageis not considered for partitioning, you can physically disconnect that storage.
n vSphere installer (DVD or ISO).
n Window 7 or Windows Server 2008 system with Microsoft PowerShell preinstalled.
n vSphere PowerCLI installer binaries downloaded from the Downloads page on the VMware Web site.
n Location of the ESXi software depot on the Downloads page of the VMware Web site. You will use a URLto point to the image profile stored at that location or download a ZIP file to work with a local depot. Donot download the ESXi 5.0 image.
n TFTP installer software such as WinAgents TFTP server. The TFTP server included in Windows 2008 isclosely tied to Windows network deployment and is not suitable.
n DHCP server. The DHCP server included with Windows 2008 is suitable.
vSphere Installation and Setup
108 VMware, Inc.

You also need information about and administrator privileges to the environment's core servers including theActiveDirectory server, DNS server, DHCP server, NTP server, and so on.
You must have complete control of the broadcast domain of the subnet in which you will deploy the setup.Ensure that no other DHCP, DNS, or TFTP server are on this subnet.
Install the TFTP ServerAuto Deploy relies on a TFTP server for sending the boot image to the hosts it provisions. You must install aTFTP server in your environment.
This task only installs the TFTP server. You later download a configuration file to the server. See “Configurethe Auto Deploy and TFTP Environment,” on page 114.
Prerequisites
Make sure your system meets the requirements in the Preinstallation Checklist. See “Proof of ConceptPreinstallation Checklist,” on page 108.
Procedure
1 Log in to the console of the Windows system on which vCenter Server is installed with administratorprivileges, either directly or by using RDP.
2 Download and install the TFTP server software.
This sample setup uses the TFTP server from WinAgents. The TFTP server included with Windows 2008is closely tied to Windows network deployment and not suitable for Auto Deploy.
3 Configure the TFTP root directory as D:\Drive or a similar location (for example, D:\TFTP_Root\).
What to do next
Install and set up vSphere PowerCLI. You use PowerCLI cmdlets to write the rules that assign image profilesand host profiles to hosts. See “Install and Set Up vSphere PowerCLI,” on page 109.
Install and Set Up vSphere PowerCLIYou manage Auto Deploy with rules that you create with vSphere PowerCLI cmdlets.
This proof of concept setup installs vSphere PowerCLI on the same system as the vCenter Server system. Youcan also install PowerCLI on a different Windows system.
Prerequisites
n Verify that Microsoft .NET 2.0 is installed, or install it from the Microsoft Web site following theinstructions on that Web site.
n Verify that Microsoft Powershell 2.0 is installed, or install it from the Microsoft website following theinstructions on that Web site.
PowerShell 2.0 is preinstalled on Windows 2008 and Windows 7 systems.
Procedure
1 Log in to the console of the Windows system on which vCenter Server is installed with administratorprivileges, either directly by using RDP.
2 Open a command prompt and type the following commands in sequence.
powershell <Enter>
Set-ExecutionPolicy RemoteSigned <Enter>
Exit <Enter>
Chapter 5 Installing ESXi Using vSphere Auto Deploy
VMware, Inc. 109

3 Download vSphere PowerCLI from the Download page of the VMware Web site and install the vSpherePowerCLI software.
4 Confirm that PowerCLI is working.
a Double-click the PowerCLI icon on the desktop to open a PowerCLI window.
b Ignore the SSL error, type Get-DeployCommand, and press Enter.
PowerCLI displays a list of cmdlets and their definitions in the PowerCLI window.
What to do next
n If you do not see a list of cmdlets when you run Get-DeployCommand, check your PowerCLI version anduninstall and reinstall if necessary.
n For some background information on PowerCLI, see “Using Auto Deploy Cmdlets,” on page 76. See thevSphere PowerCLI documentation set for details.
n Prepare the hosts you want to provision with Auto Deploy. See “Prepare Auto Deploy Target Hosts,” onpage 110.
Prepare Auto Deploy Target HostsYou must prepare all target hosts for Auto Deploy.
Prerequisites
Hosts you want to provision with Auto Deploy must meet the requirements for ESXi.
See “ESXi Hardware Requirements,” on page 29.
NOTE You cannot provision EFI hosts with Auto Deploy unless you switch the EFI system to BIOS compatibilitymode.
Procedure
1 Change each physical host's BIOS settings to force the host to boot from the primary network device.
2 Reconfirm the MAC address of the primary network device.
What to do next
Prepare the DHCP Server. See “Prepare the DHCP Server,” on page 110.
Prepare the DHCP ServerThe DHCP Server in your proof of concept environment must be set up to serve each target host with a gPXEbinary.
The proof of concept environment uses Active Directory with DNS and DHCP.
The proof of concept illustrates how to use DHCP reservations. Setting up fixed IP addresses for each host istime consuming and not recommended.
Prerequisites
n Make sure your system meets the requirements in the preinstallation checklist. See “Proof of ConceptPreinstallation Checklist,” on page 108.
n Perform all preceding proof of concept setup tasks. See “Auto Deploy Proof of Concept Setup,” onpage 106 for the complete list.
vSphere Installation and Setup
110 VMware, Inc.

Procedure
1 Log in to your DHCP Server as an administrator user.
2 Create a DHCP scope for your IP address range.
a Click Start > Settings > Control Panel > Administrative Tools and click DHCP.
b Drill down to DHCP > hostname > IPv4, right click, and click New Scope.
c Click Next on the Welcome screen and specify a name and description for the scope.
d Specify an IP address range and click Next.
e Click Next until you reach the Configure DHCP Options screen and select No, I will configure thisoption later.
3 If you are planning on using DHCP reservations, create a DHCP reservation for each target ESXi host.
a In the DHCP window, drill down to DHCP > hostname > IPv4 > Autodeploy Scope > Reservations.
b Right-click Reservations and select New Reservation.
c In the New Reservation window, specify a name, IP address, and the MAC address for one of thehosts. Do not include the colon (:) in the MAC address.
d Repeat the process for each of the other hosts.
4 Set up the DHCP Server to point the hosts to the TFTP Server.
The precise process depends on the DHCP Server you are using. This example uses the DHCP serverincluded with Windows 2008.
a In the DHCP window, drill down to DHCP > hostname > IPv4 > Autodeploy Scope > ScopeOptions.
b Right click Scope Options and choose Configure Options.
c In the Scope Options window, click the General tab.
Chapter 5 Installing ESXi Using vSphere Auto Deploy
VMware, Inc. 111
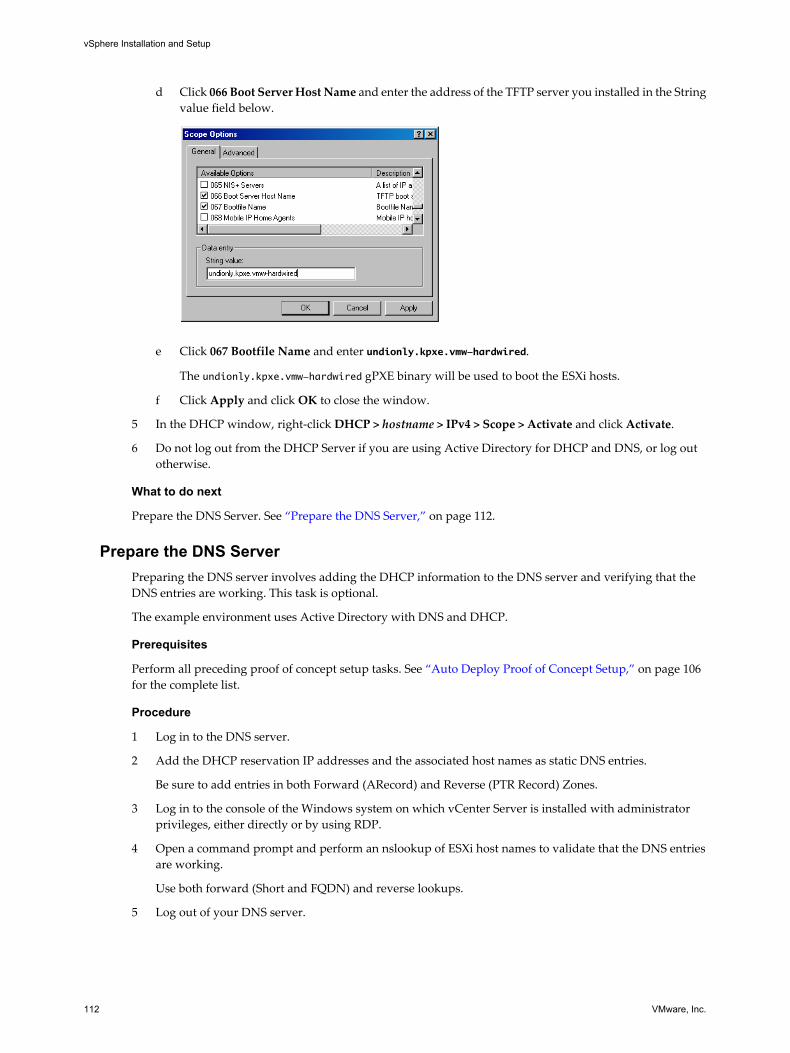
d Click 066 Boot Server Host Name and enter the address of the TFTP server you installed in the Stringvalue field below.
e Click 067 Bootfile Name and enter undionly.kpxe.vmw-hardwired.
The undionly.kpxe.vmw-hardwired gPXE binary will be used to boot the ESXi hosts.
f Click Apply and click OK to close the window.
5 In the DHCP window, right-click DHCP > hostname > IPv4 > Scope > Activate and click Activate.
6 Do not log out from the DHCP Server if you are using Active Directory for DHCP and DNS, or log outotherwise.
What to do next
Prepare the DNS Server. See “Prepare the DNS Server,” on page 112.
Prepare the DNS ServerPreparing the DNS server involves adding the DHCP information to the DNS server and verifying that theDNS entries are working. This task is optional.
The example environment uses Active Directory with DNS and DHCP.
Prerequisites
Perform all preceding proof of concept setup tasks. See “Auto Deploy Proof of Concept Setup,” on page 106for the complete list.
Procedure
1 Log in to the DNS server.
2 Add the DHCP reservation IP addresses and the associated host names as static DNS entries.
Be sure to add entries in both Forward (ARecord) and Reverse (PTR Record) Zones.
3 Log in to the console of the Windows system on which vCenter Server is installed with administratorprivileges, either directly or by using RDP.
4 Open a command prompt and perform an nslookup of ESXi host names to validate that the DNS entriesare working.
Use both forward (Short and FQDN) and reverse lookups.
5 Log out of your DNS server.
vSphere Installation and Setup
112 VMware, Inc.
What to do next
Install the Auto Deploy Server software. See “Install Auto Deploy Server Software,” on page 113.
Install Auto Deploy Server SoftwareAuto Deploy server software is included with the vCenter Server installation media. This proof of conceptsetup installs the Auto Deploy server on the system on which vCenter Server is installed.
Prerequisites
n Make sure your system meets the requirements in the preinstallation checklist. See “Proof of ConceptPreinstallation Checklist,” on page 108.
n Perform all preceding proof of concept setup tasks. See “Auto Deploy Proof of Concept Setup,” onpage 106 for the complete list.
Procedure
1 Log in to the console of the Windows system on which vCenter Server is installed with administratorprivileges, either directly or by using RDP.
2 Secure the installation media for the Auto Deploy server software.
vCenter Server type Action
Virtual Download the vSphere installer CD ISO image and place the ISO on a datastore the vCenter Server can access.
Physical Download the vSphere installer CD ISO image and burn it to disk.
3 Make the ISO available to the vCenter Server.
vCenter Server type Action
Virtual Attach the CD-ROM drive to the ISO, either by using the vSphere Client orfrom the datastore.
Physical Insert the DVD into the physical server's drive.
4 Run Autoplay on the DVD.
5 Select Auto Deploy Server and click Install.
6 When the installer wizard prompts you for the Repository Location, browse to the volume or hard drivethat has enough storage for Auto Deploy use and select that location.
Network shares are not an option when you install Auto Deploy.
7 Leave the defaults for everything else.
8 When the installer prompts you for credentials, use your vCenter Server administrator credentials.
What to do next
n If the vSphere Client software is not installed, install it now.
n Configure the Auto Deploy and TFTP environment. See “Configure the Auto Deploy and TFTPEnvironment,” on page 114.
Chapter 5 Installing ESXi Using vSphere Auto Deploy
VMware, Inc. 113
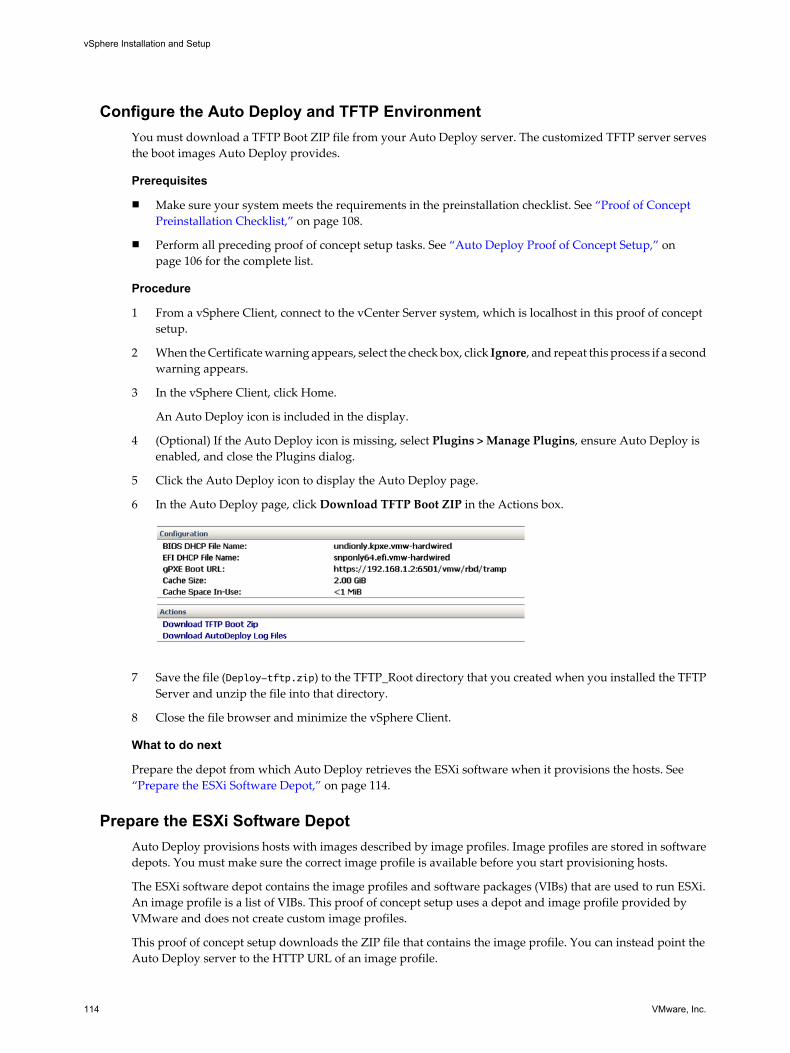
Configure the Auto Deploy and TFTP EnvironmentYou must download a TFTP Boot ZIP file from your Auto Deploy server. The customized TFTP server servesthe boot images Auto Deploy provides.
Prerequisites
n Make sure your system meets the requirements in the preinstallation checklist. See “Proof of ConceptPreinstallation Checklist,” on page 108.
n Perform all preceding proof of concept setup tasks. See “Auto Deploy Proof of Concept Setup,” onpage 106 for the complete list.
Procedure
1 From a vSphere Client, connect to the vCenter Server system, which is localhost in this proof of conceptsetup.
2 When the Certificate warning appears, select the check box, click Ignore, and repeat this process if a secondwarning appears.
3 In the vSphere Client, click Home.
An Auto Deploy icon is included in the display.
4 (Optional) If the Auto Deploy icon is missing, select Plugins > Manage Plugins, ensure Auto Deploy isenabled, and close the Plugins dialog.
5 Click the Auto Deploy icon to display the Auto Deploy page.
6 In the Auto Deploy page, click Download TFTP Boot ZIP in the Actions box.
7 Save the file (Deploy-tftp.zip) to the TFTP_Root directory that you created when you installed the TFTP
Server and unzip the file into that directory.
8 Close the file browser and minimize the vSphere Client.
What to do next
Prepare the depot from which Auto Deploy retrieves the ESXi software when it provisions the hosts. See “Prepare the ESXi Software Depot,” on page 114.
Prepare the ESXi Software DepotAuto Deploy provisions hosts with images described by image profiles. Image profiles are stored in softwaredepots. You must make sure the correct image profile is available before you start provisioning hosts.
The ESXi software depot contains the image profiles and software packages (VIBs) that are used to run ESXi.An image profile is a list of VIBs. This proof of concept setup uses a depot and image profile provided byVMware and does not create custom image profiles.
This proof of concept setup downloads the ZIP file that contains the image profile. You can instead point theAuto Deploy server to the HTTP URL of an image profile.
vSphere Installation and Setup
114 VMware, Inc.

If you require custom VIBs such as custom drivers in your image profile, you can create a custom image profileby using the Image Builder PowerCLI.
The steps in this task instruct you to run PowerCLI cmdlets. For additional information on each cmdlet, typeHelp cmdlet at the PowerCLI prompt or search the vSphere Documentation Center.
Prerequisites
n Make sure your system meets the requirements in the preinstallation checklist. See “Proof of ConceptPreinstallation Checklist,” on page 108.
n Perform all preceding proof of concept setup tasks. See “Auto Deploy Proof of Concept Setup,” onpage 106 for the complete list.
Procedure
1 Log in to the console of the Windows system on which vCenter Server is installed with administratorprivileges, either directly or by using RDP.
2 Download the ESXi Depot ZIP file from the VMware Web site to a location the PowerCLI Windows systemcan access.
The file has a name that follows this pattern: VMware-Esxi-5.0.0-xxxxx-depot.zip.
3 Save the ZIP file to your local D:\ drive or any volume with enough space and note the location of the file.
4 Start a PowerCLI session and run the following cmdlets at the prompt.
Connect-VIServer -Server your_vc_hostname -User username -Password password <Enter>
Add-EsxSoftwareDepot path:\VMware-Esxi-5.0.0-xxxxx-depot.zip <Enter>
Include the complete path and file name of the ZIP file you downloaded.
5 Validate that you successfully added the ZIP file to the depot by checking the contents of the depot withthe Get-EsxImageProfile cmdlet.
Get-EsxImageProfile <Enter>
The cmdlet returns information about all image profiles in the depot.
What to do next
Set up Auto Deploy to provision the first host and provision that host with the image profile in the depot. See“Set Up the First Host and Provision with Auto Deploy,” on page 115.
Set Up the First Host and Provision with Auto DeploySetting up the first host requires that you understand how to write Auto Deploy rules with vSphere PowerCLI.After you write the rules and add them to the ruleset, you can turn on the host to provision it.
You use the PowerCLI command-line interface to specify how Auto Deploy provisions the target hosts. Youdefine rules and add each rule to the active ruleset. The Auto Deploy server checks the ruleset to determinewhich image profile to send to each ESXi host, which host profile to send to each ESXi host, and which locationon the vCenter Server to place the host in.
A rule allows you to specify the following parameters.
Chapter 5 Installing ESXi Using vSphere Auto Deploy
VMware, Inc. 115

Parameter Description
Name Name of the rule, specified with the -Name parameter.
Item One or more items, specified with the -Item parameter. An item can be an image profile to be used, a hostprofile to be used, or a vCenter Server inventory location (datacenter, folder, cluster) for the target host. Youcan specify multiple items separated by commas.
Pattern The pattern specifies the host or group of hosts to which the rule applies. Choose one of the following.
vendor Machine vendor name.
model Machine model name.
serial Machine serial number.
hostname Machine hostname.
domain Domain name.
ipv4 IPv4 address of the machine.
mac Boot NIC MAC address.
asset Machine asset tag.
oemstring OEM-specific strings in the SMBIOS.
Specify -AllHosts to apply the item or items to all hosts.
This proof of concept setup first uses -AllHosts and later uses an IP address range to identify the hosts toprovision.
Procedure
1 Write Rules for the First Host on page 116You specify the image profile to provision the host with by using PowerCLI to write a rule and addingthe rule to the active ruleset.
2 Provision the First Host on page 117You can provision the first host and check its location on the vCenter Server to complete verification ofthe image provisioning of your setup.
Write Rules for the First HostYou specify the image profile to provision the host with by using PowerCLI to write a rule and adding the ruleto the active ruleset.
This task assumes you have a basic knowledge of Microsoft PowerShell and VMware PowerCLI.
Prerequisites
n Make sure your system meets the requirements in the preinstallation checklist. See “Proof of ConceptPreinstallation Checklist,” on page 108.
n Perform all preceding proof of concept setup tasks. See “Auto Deploy Proof of Concept Setup,” onpage 106 for the complete list.
n Make sure you can access the ESXi 5.0 software you downloaded earlier from the system on which yourun the PowerCLI cmdlets.
Procedure
1 Log in to the console of the Windows system on which vCenter Server is installed with administratorprivileges, either directly or by using RDP.
This task assumes you installed PowerCLI on the system on which the vCenter Server system is running.
vSphere Installation and Setup
116 VMware, Inc.

2 Open the PowerCLI window and list the ESXi image profiles.
Get-EsxImageProfile
3 Create a new rule by running the following cmdlet, replacing Esxi-5.0.0-XXXXX-standard with the imageprofile you want to use.
New-DeployRule -Name "InitialBootRule" -Item "Esxi-5.0.0-XXXXX-standard" -AllHosts
4 Add the new rule to the active rule set to make the rule available to the Auto Deploy server.
Add-DeployRule -DeployRule "InitialBootRule"
What to do next
Boot the host and check that Auto Deploy provisions the host and adds it to the vCenter Server inventory. See“Provision the First Host,” on page 117.
Provision the First HostYou can provision the first host and check its location on the vCenter Server to complete verification of theimage provisioning of your setup.
Prerequisites
n Make sure your system meets the requirements in the preinstallation checklist. See “Proof of ConceptPreinstallation Checklist,” on page 108.
n Perform all preceding proof of concept setup tasks. See “Auto Deploy Proof of Concept Setup,” onpage 106 for the complete list.
Procedure
1 Open a console session to the physical host you want to use as the first ESXi target host, boot the host, andlook for messages that indicate a successful gPXE boot.
During the boot process, DHCP assigns an IP address to the host. The IP address matches a name youspecified earlier in the DNS server. The host contacts the Auto Deploy server and downloads the ESXibinaries from the HTTP URL indicated in the gPXE tramp file that you downloaded into the TFTP_Rootdirectory earlier. Each instance of Auto Deploy produces a custom set of files for the TFTP Server.
2 Open the vSphere Client and connect to the vCenter Server system.
In this proof of concept setup, the vCenter Server system is localhost.
3 Click Hosts and Clusters.
4 Check that the newly provisioned host is now in the vCenter Server inventory at the datacenter level.
By default, Auto Deploy adds hosts at the datacenter level when the boot process completes.
What to do next
If you encounter problems, see “Troubleshooting Auto Deploy,” on page 100.
Configure the first host for use as a reference host and save its host profile for use with other hosts. See “Configure the Proof of Concept Reference Host,” on page 118.
Chapter 5 Installing ESXi Using vSphere Auto Deploy
VMware, Inc. 117

Configure the Proof of Concept Reference HostYou can customize the first ESXi host you boot for your environment and create a host profile. You can set upAuto Deploy to provision other target hosts with that host profile. The ESXi host you create the host profilefrom is considered your reference host or template host.
How you configure the reference host depends on what you want to do.
Shared settings Specify settings all hosts share and save a host profile for the host.
Host-specific settings You can customize hosts by setting up the host profile to prompt for user inputfor a limited number of options such as a static IP address. Those settings aresaved in an answer file associated the reference host profile. See “CustomizingHosts with Answer Files,” on page 94.
Auto Deploy applies all common settings from the host profile to all target hosts. If you set up the host profileto ask for user input, all hosts provisioned with that host profile come up in maintenance mode. You mustreapply the host profile or update the answer file to be prompted for the host-specific information.
NOTE Administrators cannot directly access or manipulate answer files. Use the vSphere Client Host ProfilesUI to work with answer files.
Prerequisites
n Make sure your system meets the requirements in the preinstallation checklist. See “Proof of ConceptPreinstallation Checklist,” on page 108.
n Perform all preceding proof of concept setup tasks. See “Auto Deploy Proof of Concept Setup,” onpage 106 for the complete list.
Procedure
1 Use the vSphere Client to connect to the vCenter Server system.
In this proof of concept setup, the vCenter Server system is localhost.
2 Click Hosts and Clusters and select the host that Auto Deploy added to the first datacenter.
3 Configure the host.
The rest of the proof of concept setup assumes that you configure at least one setting that is different fordifferent hosts.
Configuration Description
Networking Configure the following networking components.n Base virtual switch and management port group for VMkernel.n Storage network port group for VMkernel.n Virtual machine networking port group.n Any additional virtual switches and port groups.n Distributed switches, if necessary (transfer port groups to distributed
switches if you use them).
Storage Configure shared storage.
Time settings Configure your time settings.
Security Configure the security profile.
Authentication Configure authentication.
DNS and routing If necessary, configure DNS and route settings
Other Configure advanced settings or any other settings as required in the targetenvironment.
vSphere Installation and Setup
118 VMware, Inc.

What to do next
Create the host profile from the reference host for use with all other target hosts. See “Create a Host Profile,”on page 119.
Create a Host ProfileConfiguration that is shared by a group of hosts is stored in a host profile. You can create the host profile fromyour reference host. Configuration that differs for different hosts, such as a static IP address, can be managedthrough the answer file mechanism.
Auto Deploy provisions each host with a common host profile. In certain cases, Auto Deploy also uses a host-specific answer file that allows you to specify information that differs for different hosts. For example, if youset up a VMkernel port for vMotion or for storage, you can specify a static IP address for the port by using theanswer file mechanism.
In this example, you create a host profile from the reference host, attach that host profile to the same host, andcreate an answer file for the reference host.
Prerequisites
n Make sure your system meets the requirements in the preinstallation checklist. See “Proof of ConceptPreinstallation Checklist,” on page 108.
n Perform all preceding proof of concept setup tasks. See “Auto Deploy Proof of Concept Setup,” onpage 106 for the complete list.
Procedure
1 With the vSphere Client, log in to the vCenter Server system with administrator privileges.
2 Click Home and select Host Profiles.
3 Click Create a Host Profile in the Getting Started tab on the right.
4 In the wizard, make the following selections.
Option Description
Creation Method Create Profile from existing host.
Specify Reference Host Select the host you just configured.
Profile Details Name the profile ESXiGold and add a description.
Ready to Complete Review the information and click Finish.
5 Right-click the ESXiGold host profile, select Attach Host/Cluster, select the ESXi host from which youcreated the profile, and click OK.
If any information is marked as user input in the host profile, you are prompted. In this example, no hostprofile items are set up to prompt you.
6 Put the host into maintenance mode and apply the host profile.
a Go to the Hosts and Clusters view, right-click the ESXi host, and put the host into maintenance mode.
b With the host in maintenance mode, right-click again, and select Apply Profile.
vCenter Server checks the host for compliance and returns Compliant after the rescan is complete.
What to do next
Create a rule that assigns the image profile and the newly-created host profile to all hosts you want to provisionwith Auto Deploy. See “Create a Rule for Other Target Hosts,” on page 120.
Chapter 5 Installing ESXi Using vSphere Auto Deploy
VMware, Inc. 119

Create a Rule for Other Target HostsYou can create a rule that applies the previously verified image profile and the host profile you just created toall target hosts.
This task assumes you have a basic knowledge of Microsoft PowerShell and vSphere PowerCLI.
Prerequisites
n Make sure your system meets the requirements in the preinstallation checklist. See “Proof of ConceptPreinstallation Checklist,” on page 108.
n Perform all preceding proof of concept setup tasks. See “Auto Deploy Proof of Concept Setup,” onpage 106 for the complete list.
Procedure
1 Log in to the console of the Windows system on which vCenter Server is installed with administratorprivileges, either directly or by using RDP.
2 Start a PowerCLI session and type the following commands at the prompt.
Connect-VIServer -Server your_vc_hostname -User username -Password password <Enter>
Add-EsxSoftwareDepot path:\VMware-Esxi-5.0.0-xxxxx-depot.zip <Enter>
Include the complete path and file name of the ZIP file you downloaded earlier. Adding the softwaredepot is required each time you start a new PowerCLI session.
3 (Optional) Display the rules in the active ruleset by typing the following cmdlet at the prompt.
Get-DeployRuleset <Enter>
4 Create the rule that instructs Auto Deploy to provision the set of hosts in the specified IP range with theimage you selected and with the host profile you created from the reference host.
New-DeployRule -name "Production01Rule" -item "image_profile", ESXiGold,target_cluster -
Pattern "ipv4=IP_range" <Enter>
Option Description
image_profile The ESXi image profile you used in the first deploy rule.
target_cluster Name of the cluster in vCenter Server to which you want to add all hosts.
IP_range Either a single IP address or a range of IP addresses for the hosts you wantto provision with the image profile and host profile.
When you specify a target cluster, the host profile is applied to all hosts in the cluster. Applying the hostprofile to each host is not required.
5 Add the new rule to the active ruleset.
Add-DeployRule -DeployRule "Production01Rule" <Enter>
6 (Optional) Remove the deploy rule you created for the initial boot operation.
Remove-DeployRule -DeployRule InitialBootRule <Enter>
7 Check the active rule set.
Get-DeployRuleset<Enter>
PowerCLI displays information similar to the following example.
Name: Production01Rule
PatternList: {ipv4=address_range}
ItemList: {ESXi-5.0.0-XXXXXX-standard, Compute01, ESXiGold}
vSphere Installation and Setup
120 VMware, Inc.

What to do next
Provision all hosts and create an answer file for each host. See “Provision All Hosts and Create AnswerFiles,” on page 121.
Provision All Hosts and Create Answer FilesWith the rule in place that provisions hosts using an image profile, and with the host profile created from thereference host available, you can provision all target hosts. If any host profile items are set to prompt the userfor input, the host comes up in maintenance mode. You apply the host profile or update the answer file to beprompted for the information. The system creates the answer file and associates it with the host.
Prerequisites
n Make sure your system meets the requirements in the preinstallation checklist. See “Proof of ConceptPreinstallation Checklist,” on page 108.
n Perform all preceding proof of concept setup tasks. See “Auto Deploy Proof of Concept Setup,” onpage 106 for the complete list.
n Open a console to each host you want to provision to monitor boot progress.
Procedure
1 Boot the remaining hosts.
Auto Deploy boots the hosts, applies the host profile, and adds the hosts to the vCenter Server inventory.The hosts remain in maintainance mode because the host profile from the reference host is set up to requiresuser input for each host.
2 Open a vSphere Client and connect to the vCenter Server system.
3 Click Home and select Host Profiles.
4 In the panel on the left, select the ESXiGold profile and add the newly booted hosts to that profile.
5 Apply the host profile to each of the hosts, provide the user input information, and reboot each host.
When the reboot progress completes, all hosts are running with the image you specify and use theconfiguration in the reference host profile. The cluster shows that all hosts are fully compliant.
All hosts are now configured with the shared information through the reference host profile and with the host-specific information through the answer file. The next time you boot the hosts, they retrieve that informationand boot completely.
What to do next
With your proof of concept implementation completed successfully, you can start planning your productionsetup.
Chapter 5 Installing ESXi Using vSphere Auto Deploy
VMware, Inc. 121

vSphere Installation and Setup
122 VMware, Inc.

Using vSphere ESXi Image Builder CLI 6The ESXi Image Builder CLI is a set of PowerCLI cmdlets that you can use to manage vSphere image profilesand VIB packages, such as driver VIBs and update VIBs. You can also use Image Builder cmdlets to export animage profile to an ISO or offline depot ZIP file that you can use to install ESXi with a customized set of updates,patches, and drivers.
This chapter includes the following topics:
n “Understanding Image Builder,” on page 123
n “Image Builder Installation and Usage,” on page 130
n “Image Builder Common Tasks,” on page 131
n “Image Builder Workflows,” on page 135
Understanding Image BuilderYou can use the vSphere® ESXi™ Image Builder CLI to manage software depots, image profiles, and softwarepackages (VIBs). Image profiles and VIBs specify the software you want to use during installation or upgradeof an ESXi host.
Image Builder OverviewThe Image Builder PowerCLI supports management of vSphere image profiles and VIBs.
You can manage VIBs and image profiles with vSphere Image Builder. VIBs are software packages, and imageprofiles specify a set of software packages. See “Software Depots and Their Components,” on page 124.
You use Image Builder cmdlets for managing the software to deploy to your ESXi hosts in several differentscenarios.
Create image profiles foruse by Auto Deploy.
Use Image Builder to create an image profile that defines the VIBs that AutoDeploy uses to provision hosts.
Add custom third-partydrivers to existing imageprofile and export to ISO.
To add third-party driver or extension custom VIBs to your ESXi hosts, useImage builder to clone the base image provided by VMware, add the customVIBs, and export to ISO.
VMware, Inc. 123

Perform upgrades. If you upgrade from a 4.0 or 4.1 system that includes custom extensions ordrivers, you can use Image Builder to create an image profile that includes thevSphere 5.0 base VIB and the custom extensions. Export the custom imageprofile to an ISO you can install or to a ZIP that you can use with vSphereUpdate Manager.
Create custom imageswith reduced footprint.
Some customers require a minimal footprint image. These customers can clonethe ESXi base image profile and remove VIBs using Image Builder.
The Image Builder PowerCLI cmdlets take image profiles and VIBs as input and produce different outputs.
Input. Image profiles and VIBs that are located in a software depot are used as inputto PowerCLI cmdlets running on a Windows client.
Output. PowerCLI cmdlets create custom image profiles that can be exported to ISO oran offline depot ZIP file. ISO images are used for installation. The ZIP depotcan be used by vSphere Update Manager or by esxcli software vibcommands to update or install images. Image profiles are also used in vSphereAuto Deploy rules to specify the software to provision ESXi hosts with.
Figure 6-1. Image Builder Architecture
vSphereAuto deploy
vSphere UpdateManager
esxcli
ZIP
ISO
Windows client
Image BuilderPowerCLI
VIBimageprofile
1
depot
imageprofile
2
user-createdimage profile
VIB
Software Depots and Their ComponentsUnderstanding how depots, profiles, and VIBs are structured and where you can use them is a prerequisitefor in-memory installation of a custom ESXi ISO, for provisioning ESXi hosts using vSphere Auto Deploy, andfor certain custom upgrade operations.
The following technical terms are used throughout the vSphere documentation set in discussions of installationand upgrade tasks.
VIB A VIB is an ESXi software package. VMware and its partners package solutions,drivers, CIM providers, and applications that extend the ESXi platform as VIBs.VIBs are available in software depots. You can use VIBs to create and customizeISO images or to upgrade ESXi hosts by installing VIBs asynchronously ontothe hosts.
vSphere Installation and Setup
124 VMware, Inc.

See “SoftwarePackage Object Properties,” on page 128.
Image Profile An image profile defines an ESXi image and consists of VIBs. An image profilealways includes a base VIB, and might include more VIBs. You examine anddefine an image profile using the Image Builder PowerCLI.
See “ImageProfile Object Properties,” on page 127.
Software Depot A software depot is a collection of VIBs and image profiles. The software depotis a hierarchy of files and folders and can be available through an HTTP URL(online depot) or a ZIP file (offline depot). VMware and VMware partners makedepots available. Companies with large VMware installations might createinternal depots to provision ESXi hosts with vSphere Auto Deploy, or to exportan ISO for ESXi installation.
Image Builder PowerCLI OverviewImage Builder PowerCLI cmdlets allow you to manage image profiles and VIBs.
The Image Builder PowerCLI includes the following cmdlets.
NOTE When you run Image Builder cmdlets, provide all parameters on the command line when you invokethe cmdlet. Supplying parameters in interactive mode is not recommended.
Run Get-Help cmdlet_name at the PowerCLI prompt for detailed reference information.
Table 6-1. Image Builder Cmdlets
Cmdlet Description
Add-EsxSoftwareDepot Adds the software depot or ZIP file at the specified location to your current environment.Downloads metadata from the depot and analyzes VIBs for dependencies.
Remove-EsxSoftwareDepot
Disconnects from the specified software depot.
Get-EsxSoftwarePackage
Returns a list of software package objects (VIBs). Use this cmdlet's options to filter the results.
Get-EsxImageProfile Returns an array of ImageProfile objects from all currently added depots.
New-EsxImageProfile Creates a new image profile. In most cases, creating a new profile by cloning an existing profileis recommended. See “Create an Image Profile,” on page 131.
Set-EsxImageProfile Modifies a local ImageProfile object and performs validation tests on the modified profile.The cmdlet returns the modified object but does not persist it.
Export-EsxImageProfile
Exports an image profile as either an ESXi ISO image for ESXi installation, or as a ZIP file.
Compare-EsxImageProfile
Returns an ImageProfileDiff structure that shows whether the two profiles have the sameVIB list and acceptance level. See “Acceptance Levels,” on page 127.
Add-EsxSoftwarePackage
Adds one or more new packages (VIBs) to an existing image profile.
Remove-EsxSoftwarePackage
Removes one or more packages (VIBs) from an image profile.
Chapter 6 Using vSphere ESXi Image Builder CLI
VMware, Inc. 125

Image ProfilesImage profiles define the set of VIBs that an ESXi installation or update process uses. Image profiles apply tohosts provisioned with Auto Deploy and to other ESXi 5.0 hosts. You define and manipulate image profileswith the Image Builder PowerCLI.
Image Profile RequirementsYou can create a custom image profile from scratch or clone an existing profile and add or remove VIBs. Aprofile must meet the following requirements to be valid.
n Each image profile must have a unique name and vendor combination.
n Each image profile has an acceptance level. When you add a VIB to an image profile with an Image BuilderPowerCLI cmdlet, Image Builder checks that the VIB matches the acceptance level defined for the profile.
n You cannot remove VIBs that are required by other VIBs.
n You cannot include two versions of the same VIB in an image profile. When you add a new version of aVIB, the new version replaces the existing version of the VIB.
Image Profile ValidationAn image profile and its VIBs must meet several criteria to be valid.
n Image profiles must contain at least one base VIB and one bootable kernel module.
n If any VIB in the image profile depends on another VIB, that other VIB must also be included in the imageprofile. VIB creators store that information in the SoftwarePackage object's Depends property.
n VIBs must not conflict with each other. VIB creators store conflict information in the SoftwarePackageobject's Conflicts property.
n Two VIBs with the same name, but two different versions, cannot coexist. When you add a new versionof a VIB, the new version replaces the existing version of the VIB.
n No acceptance level validation issues exist.
When you make a change to an image profile, Image Builder checks that the change does not invalidate theprofile.
Dependency Validation When you add or remove a VIB, Image Builder checks that packagedependencies are met. Each SoftwarePackage object includes a Dependsproperty that specifies a list of other VIBs that VIB depends on. See “Structureof ImageProfile, SoftwarePackage, and ImageProfileDiff Objects,” onpage 127
Acceptance LevelValidation
Image Builder performs acceptance level validation each time an image profileis created or changed. Image Builder checks the acceptance level of VIBs in theimage profile against the minimum allowed acceptance level of the profile. Theacceptance level of the VIB is also validated each time the signature of a VIB isvalidated.
VIB Validation During ExportWhen you export an image profile to an ISO, Image Builder validates each VIB by performing the followingactions.
n Checks that no conflicts exist by checking the Conflicts property of each SoftwarePackage object.
vSphere Installation and Setup
126 VMware, Inc.
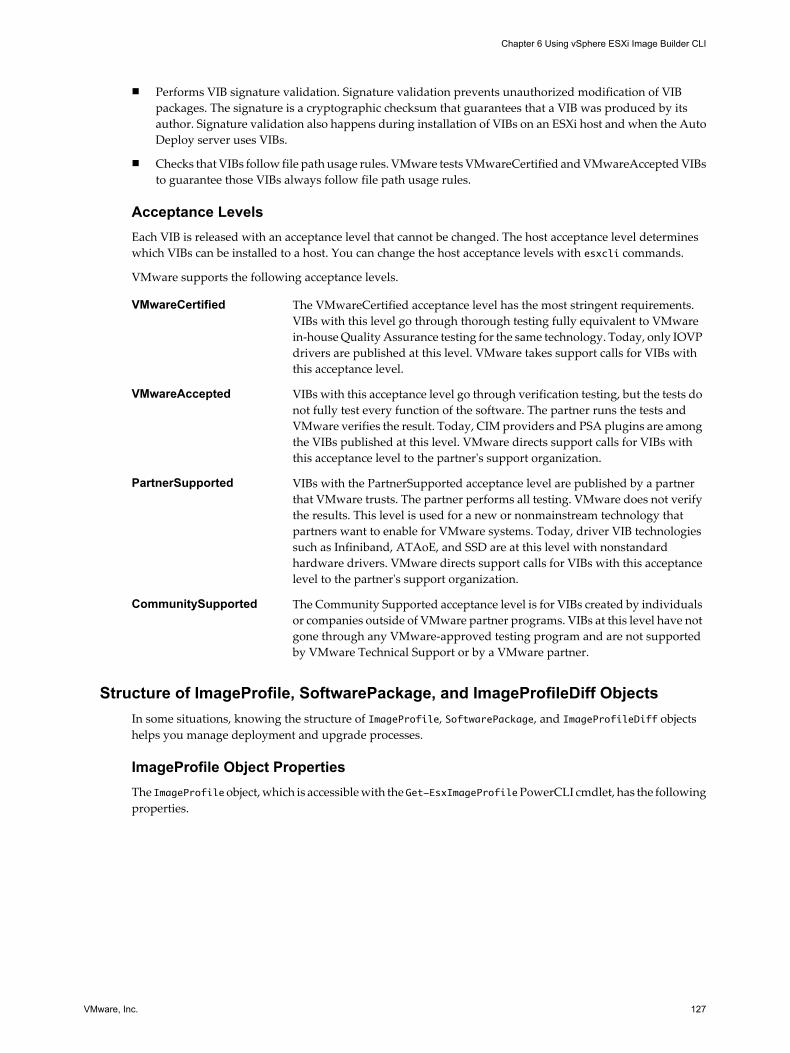
n Performs VIB signature validation. Signature validation prevents unauthorized modification of VIBpackages. The signature is a cryptographic checksum that guarantees that a VIB was produced by itsauthor. Signature validation also happens during installation of VIBs on an ESXi host and when the AutoDeploy server uses VIBs.
n Checks that VIBs follow file path usage rules. VMware tests VMwareCertified and VMwareAccepted VIBsto guarantee those VIBs always follow file path usage rules.
Acceptance LevelsEach VIB is released with an acceptance level that cannot be changed. The host acceptance level determineswhich VIBs can be installed to a host. You can change the host acceptance levels with esxcli commands.
VMware supports the following acceptance levels.
VMwareCertified The VMwareCertified acceptance level has the most stringent requirements.VIBs with this level go through thorough testing fully equivalent to VMwarein-house Quality Assurance testing for the same technology. Today, only IOVPdrivers are published at this level. VMware takes support calls for VIBs withthis acceptance level.
VMwareAccepted VIBs with this acceptance level go through verification testing, but the tests donot fully test every function of the software. The partner runs the tests andVMware verifies the result. Today, CIM providers and PSA plugins are amongthe VIBs published at this level. VMware directs support calls for VIBs withthis acceptance level to the partner's support organization.
PartnerSupported VIBs with the PartnerSupported acceptance level are published by a partnerthat VMware trusts. The partner performs all testing. VMware does not verifythe results. This level is used for a new or nonmainstream technology thatpartners want to enable for VMware systems. Today, driver VIB technologiessuch as Infiniband, ATAoE, and SSD are at this level with nonstandardhardware drivers. VMware directs support calls for VIBs with this acceptancelevel to the partner's support organization.
CommunitySupported The Community Supported acceptance level is for VIBs created by individualsor companies outside of VMware partner programs. VIBs at this level have notgone through any VMware-approved testing program and are not supportedby VMware Technical Support or by a VMware partner.
Structure of ImageProfile, SoftwarePackage, and ImageProfileDiff ObjectsIn some situations, knowing the structure of ImageProfile, SoftwarePackage, and ImageProfileDiff objectshelps you manage deployment and upgrade processes.
ImageProfile Object PropertiesThe ImageProfile object, which is accessible with the Get-EsxImageProfile PowerCLI cmdlet, has the followingproperties.
Chapter 6 Using vSphere ESXi Image Builder CLI
VMware, Inc. 127

Name Type Description
AcceptanceLevel AcceptanceLevel Determines which VIBs you can add tothe profile. Levels areVMwareCertified, VMwareAccepted,PartnerSupported, andCommunitySupported. See “Acceptance Levels,” on page 127.
Author System.String Person who created the profile. 60characters or fewer.
CreationTime System.DateTime Timestamp of creation time.
Description System.String Full text description of profile. Nolength limit.
GUID System.String Globally unique ID of the image profile.
ModifiedTime System.DateTime Timestamp of last modification time.
Name System.String Name of the image profile. 80 charactersor fewer.
ReadOnly System.Boolean When set to true, the profile cannot beedited. Use Set-EsxImageProfile -Readonly to make your custom imageprofiles read only.
Rules ImageProfileRule[] Displays any OEM hardwarerequirements that the image profilemight have. Auto Deploy checks thisproperty when deploying an imageprofile and deploys the profile ifmatching hardware is available.
Vendor System.String Organization that publishes the profile.40 characters or fewer.
VibList SoftwarePackage[] List of VIB IDs the image consists of.
SoftwarePackage Object PropertiesWhen preparing an image profile, you can examine software packages to decide which packages are suitablefor inclusion. The SoftwarePackage object has the following properties.
Name Type Description
AcceptanceLevel AcceptanceLevel Acceptance level of this VIB.
Conflicts SoftwareConstraint[] List of VIBs that cannot be installed atthe same time as this VIB. Eachconstraint uses the following format:package-name[<<|<=|=|>=|<<version]
Depends SoftwareConstraint[] List of VIBs that must be installed at thesame time as this VIB. Same constraintformat as Conflicts property.
Description System.String Long description of the VIB.
Guid System.String Unique ID for the VIB.
LiveInstallOk System.Boolean True if live installs of this VIB aresupported.
LiveRemoveOk System.Boolean True if live removals of this VIB aresupported.
vSphere Installation and Setup
128 VMware, Inc.

Name Type Description
MaintenanceMode System.Boolean True if hosts must be in maintenancemode for installation of this VIB.
Name System.String Name of the VIB. Usually uniquelydescribes the package on a running ESXisystem.
ReleaseDate System.DateTime Date and time of VIB publication orrelease.
SourceUrls System.String[] List of source URLs from which this VIBcan be downloaded.
Summary System.String One-line summary of the VIB.
Tag System.String[] An array of string tags for this packagedefined by the vendor or publisher.Tags can be used to identifycharacteristics of a package.
Vendor System.String VIB vendor or publisher.
Version System.String VIB version.
ImageProfileDiff Object PropertiesWhen you run the Compare-EsxImageProfile cmdlet, you pass in two parameters, first the reference profile,and then the comparison profile. The cmdlet returns an ImageProfileDiff object, which has the followingproperties.
Name Type Description
CompAcceptanceLevel System.String Acceptance level for the second profilethat you passed to Compare-EsxImageProfile.
DowngradeFromRef System.String[] List of VIBs in the second profile that aredowngrades from VIBs in the firstprofile.
Equal System.Boolean True if the two image profiles haveidentical packages and acceptancelevels.
OnlyInComp System.String List of VIBs found only in the secondprofile that you passed to Compare-EsxImageProfile.
OnlyInRef System.String[] List of VIBs found only in the firstprofile that you passed to Compare-EsxImageProfile.
PackagesEqual System.Boolean True if the image profiles have identicalsets of VIB packages.
RefAcceptanceLevel System.String Acceptance level for the first profile thatyou passed to Compare-EsxImageProfile.
UpgradeFromRef System.String[] List of VIBs in the second profile that areupgrades from VIBs in the first profile.
Chapter 6 Using vSphere ESXi Image Builder CLI
VMware, Inc. 129

Image Builder Installation and UsageImage Builder consists of the Image Builder server and the Image Builder PowerShell cmdlets. The ImageBuilder server starts when your run the first Image Builder cmdlet.
Install Image Builder PowerCLI and Prerequisite SoftwareBefore you can run Image Builder cmdlets, you must install vSphere PowerCLI and all prerequisite software.The Image Builder snap-in is included with the PowerCLI installation.
You install Image Builder and prerequisite software on a Microsoft Windows system.
Procedure
1 Install Microsoft .NET 2.0 from the Microsoft website following the instructions on that website.
2 Install Microsoft PowerShell 1.0 or 2.0. from the Microsoft website following the instructions on thatwebsite.
3 Install vSphere PowerCLI, which includes the Image Builder cmdlets.
See the vSphere PowerCLI Installation Guide for detailed instructions.
What to do next
Review “Using Image Builder Cmdlets,” on page 130.If you are new to PowerCLI, read the PowerCLIdocumentation.
Use Image Builder cmdlets and other PowerCLI cmdlets and PowerShell cmdlets to manage image profilesand VIBs. Use Get-Help cmdlet_name at any time for command-line help.
Using Image Builder CmdletsImage Builder cmdlets are implemented as Microsoft PowerShell cmdlets and included in VMware PowerCLI.Users of Image Builder cmdlets can take advantage of all PowerCLI features.
Experienced PowerShell users can use Image Builder cmdlets just like other PowerShell cmdlets. If you arenew to PowerShell and PowerCLI, the following tips help you come up to speed.
You can type cmdlets, parameters, and parameter values in the PowerCLI shell.
n Get help for any cmdlet by running Get-Help cmdlet_name.
n Remember that PowerShell is not case sensitive.
n Use tab completion for cmdlet names and parameter names.
n Format any variable and cmdlet output by using Format-List or Format-Table or their short forms fl orft. See Get-Help Format-List.
Passing Parameters by NameYou can pass in parameters by name in most cases and surround parameter values that contain spaces or specialcharacters with double quotes.
Add-EsxSoftwarePackage -ImageProfile profile42 -SoftwarePackage "partner package 35"
vSphere Installation and Setup
130 VMware, Inc.

Passing Parameters as ObjectsYou can pass parameters as objects if you want to do scripting and automation. You can use the technique withcmdlets that return multiple objects or with cmdlets that return a single object.
1 Bind the output of a cmdlet that returns multiple objects to a variable.
$profs = Get-EsxImageProfile
2 When you run the cmdlet that needs the object as input, access the object by position, with the list startingwith 0.
Add-EsxSoftwarePackage -ImageProfile $profs[4] -SoftwarePackage partner-pkg
The example adds the specified software package to the fifth image profile in the list returned by Get-EsxImageProfile.
Most examples in the documentation pass in parameters by name. “Image Builder Workflows,” on page 135includes examples that pass parameters as objects.
Setting Properties to Support Remote SigningFor security reasons, Windows PowerShell supports an execution policy feature. It determines whether scriptsare allowed to run and whether they must be digitally signed. By default, the execution policy is set toRestricted, which is the most secure policy. If you want to run scripts or load configuration files, you can changethe execution policy by using the Set-ExecutionPolicy cmdlet. To do this, type the following in the vSpherePowerCLI console window.
Set-ExecutionPolicy RemoteSigned
If the command is successful, you can run scripts and load configuration files. For more information about theexecution policy and digital signing in Windows PowerShell, use the following cmdlet.
Get-Help About_Signing
Image Builder Common TasksThe Image Builder PowerCLI cmdlets allow you to manipulate software depots, image profiles, and VIBs.
Create an Image ProfileCloning a published profile is the easiest way to create a custom image profile. Cloning a profile is especiallyuseful if you want to remove a few VIBs from a profile, or if you want to use hosts from different vendors andwant to use the same basic profile, but want to add vendor-specific VIBs. VMware partners or large installationsmight consider creating a profile from scratch.
Administrators performing this task must have some experience with PowerCLI or Microsoft PowerShell.
Prerequisites
n Install the VMware PowerCLI and all prerequisite software. See “Image Builder Installation andUsage,” on page 130.
n Verify that you have access to the software depot that contains the image profile you want to clone.
n If you encounter problems running PowerCLI cmdlets, consider changing the execution policy. See “UsingImage Builder Cmdlets,” on page 130.
Chapter 6 Using vSphere ESXi Image Builder CLI
VMware, Inc. 131
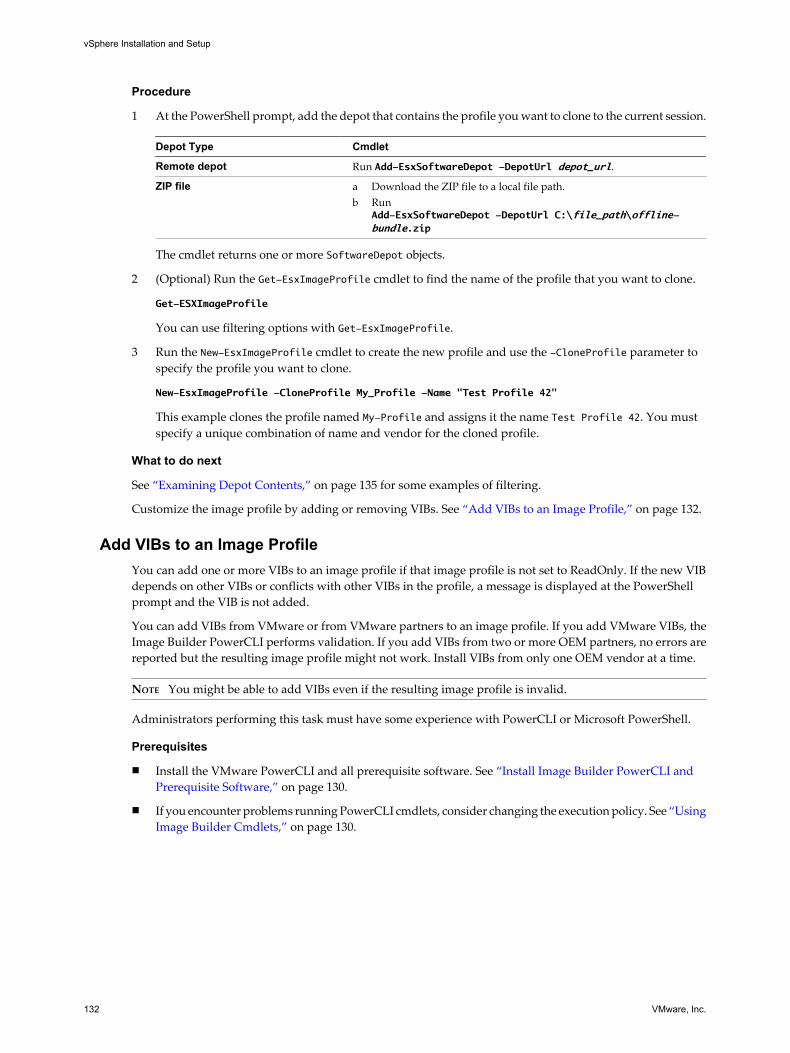
Procedure
1 At the PowerShell prompt, add the depot that contains the profile you want to clone to the current session.
Depot Type Cmdlet
Remote depot Run Add-EsxSoftwareDepot -DepotUrl depot_url.
ZIP file a Download the ZIP file to a local file path.b Run
Add-EsxSoftwareDepot -DepotUrl C:\file_path\offline-bundle.zip
The cmdlet returns one or more SoftwareDepot objects.
2 (Optional) Run the Get-EsxImageProfile cmdlet to find the name of the profile that you want to clone.
Get-ESXImageProfile
You can use filtering options with Get-EsxImageProfile.
3 Run the New-EsxImageProfile cmdlet to create the new profile and use the -CloneProfile parameter tospecify the profile you want to clone.
New-EsxImageProfile -CloneProfile My_Profile -Name "Test Profile 42"
This example clones the profile named My-Profile and assigns it the name Test Profile 42. You mustspecify a unique combination of name and vendor for the cloned profile.
What to do next
See “Examining Depot Contents,” on page 135 for some examples of filtering.
Customize the image profile by adding or removing VIBs. See “Add VIBs to an Image Profile,” on page 132.
Add VIBs to an Image ProfileYou can add one or more VIBs to an image profile if that image profile is not set to ReadOnly. If the new VIBdepends on other VIBs or conflicts with other VIBs in the profile, a message is displayed at the PowerShellprompt and the VIB is not added.
You can add VIBs from VMware or from VMware partners to an image profile. If you add VMware VIBs, theImage Builder PowerCLI performs validation. If you add VIBs from two or more OEM partners, no errors arereported but the resulting image profile might not work. Install VIBs from only one OEM vendor at a time.
NOTE You might be able to add VIBs even if the resulting image profile is invalid.
Administrators performing this task must have some experience with PowerCLI or Microsoft PowerShell.
Prerequisites
n Install the VMware PowerCLI and all prerequisite software. See “Install Image Builder PowerCLI andPrerequisite Software,” on page 130.
n If you encounter problems running PowerCLI cmdlets, consider changing the execution policy. See “UsingImage Builder Cmdlets,” on page 130.
vSphere Installation and Setup
132 VMware, Inc.

Procedure
1 Run Add-EsxSoftwareDepot for each depot you want to work with.
Depot Type Cmdlet
Remote depot Run Add-EsxSoftwareDepot -DepotUrl depot_url.
ZIP file a Download the ZIP file to a local file path.b Run
Add-EsxSoftwareDepot -DepotUrl C:\file_path\offline-bundle.zip
The cmdlet returns one or more SoftwareDepot objects.
2 Run Get-EsxImageProfile to list all image profiles in all currently visible depots.
Get-EsxImageProfile
The cmdlet returns all available profiles. You can narrow your search by using the optional arguments tofilter the output.
3 Clone the profile and make changes to the clone if the image profile is read only.
New-EsxImageProfile -CloneProfile My_Profile -Name "Test Profile 42"
Image profiles published by VMware and its partners are read only.
4 Run Add-EsxSoftwarePackage to add a new package to one of the image profile.
Add-EsxSoftwarePackage -ImageProfile My_Profile -SoftwarePackage partner-package
The cmdlet runs the standard validation tests on the image profile. If validation succeeds, the cmdletreturns a modified, validated image profile. If the VIB that you want to add depends on a different VIB,the cmdlet displays that information and includes the VIB that would resolve the dependency. If theacceptance level of the VIB that you want to add is lower than the image profile acceptance level, an errorresults. Change the acceptance level of the image profile to add the VIB.
5 (Optional)Change the acceptance level of the image profile if an error about acceptance level problemsdisplays.
VIB acceptance levels are set during VIB creation and cannot be changed.
The image profile includes the new VIB.
Export an Image Profile to ISO or Offline Bundle ZIPYou can export an image profile to an ISO image or a ZIP file of component files and folders. You cannot createboth by running the cmdlet once. You can use the ISO image as an ESXi installer or upload the ISO into vSphereUpdate Manager for upgrades. You can use the ZIP file, which contains metadata and the VIBs specified inthe image profile, for upgrades to ESXi 5.0 and later.
Administrators performing this task must have some experience with PowerCLI or Microsoft PowerShell.
Prerequisites
n Install the VMware PowerCLI and all prerequisite software. See “Install Image Builder PowerCLI andPrerequisite Software,” on page 130.
n If you encounter problems running PowerCLI cmdlets, consider changing the execution policy. See “UsingImage Builder Cmdlets,” on page 130.
Chapter 6 Using vSphere ESXi Image Builder CLI
VMware, Inc. 133

Procedure
1 Run Add-EsxSoftwareDepot to connect to the depot that contains the image profile to export.
Depot Type Cmdlet
Remote depot Run Add-EsxSoftwareDepot -DepotUrl depot_url.
ZIP file a Download the ZIP file to a local file path.b Run
Add-EsxSoftwareDepot -DepotUrl C:\file_path\offline-bundle.zip
The cmdlet returns one or more SoftwareDepot objects.
2 Run Export-EsxImageProfile to export the image profile.
To build... Run...
ISO images Export-EsxImageProfile with the -ExportToIso parameter.
Offline depot ZIP files Export-EsxImageProfile with the -ExportToBundle parameter.
For the ISO image, Image Builder validates VIB signatures, adds VIB binaries to the image, and downloadsthe image to the specified location. For the ZIP file, Image Builder validates VIB signatures and downloads theVIB binaries to the specified location.
Example: Exporting an Image Profile to ISO or Offline BundleExport an image profile to ISO from the PowerCLI prompt.
1 Add the software depot.
Add-EsxSoftwareDepot -DepotUrl url_or_file
2 Display all available image profiles to find the name of the image profile to export.
Get-EsxImageProfile
3 Export the image profile.
Export-EsxImageProfile -ImageProfile "myprofile" -ExportToIso -FilePath iso_name
Export an image profile to an offline bundle ZIP from the PowerCLI prompt.
1 Add the software depot.
Add-EsxSoftwareDepot -DepotUrl url_or_file
2 Display all available image profiles to find the name of the image profile to export.
Get-EsxImageProfile
3 Export the image profile.
Export-EsxImageProfile -ImageProfile "myprofile" -ExportToBundle -FilePath C:\my_bundle.zip
What to do next
Use the ISO image in an ESXi installation or upload the ISO image into vSphere Update Manager to performupgrades.
Use the ZIP file to upgrade an ESXi installation.
n Import the ZIP file into vSphere Update Manager for use with patch baselines.
n Download the ZIP file to an ESXi host or a datastore and run esxcli software vib commands to importthe VIBs in the ZIP file.
See the vSphere Upgrade documentation.
vSphere Installation and Setup
134 VMware, Inc.

Preserve Image Profiles Across SessionsWhen you create an image profile and exit the PowerCLI session, the image profile is no longer available whenyou start a new session. You can export the image profile to a ZIP file software depot, and add that depot inthe next session.
Prerequisites
n Install the VMware PowerCLI and all prerequisite software. See “Install Image Builder PowerCLI andPrerequisite Software,” on page 130.
n If you encounter problems running PowerCLI cmdlets, consider changing the execution policy. See “UsingImage Builder Cmdlets,” on page 130.
Procedure
1 In a PowerCLI session, create an image profile, for example by cloning an existing image profile and addinga VIB.
2 Before you exit the session, export the image profile to a ZIP file by calling Export-EsxImageProfile withthe ExportToBundle parameter.
Export-EsxImageProfile -ImageProfile "my_profile" -ExportToBundle -FilePath "C:\isos\temp-
base-plus-vib25.zip"
3 Exit the PowerCLI session.
4 When you start a new PowerCLI session, you can add the depot to access your image profile.
Add-EsxSoftwareDepot "C:\isos\temp-base-plus-vib25.zip"
Image Builder WorkflowsImage Builder workflows are examples for cmdlet usage. Workflows do not represent actual tasks, but illustratehow you might explore different ways of using a cmdlet. Administrators trying out the workflows benefit fromsome experience with PowerCLI, Microsoft PowerShell, or both.
Examining Depot ContentsYou can examine software depots and VIBs with Image Builder PowerCLI cmdlets. This workflow illustratesexamining depot contents and includes examples of wildcard usage.
The workflow itself passes parameters by name, the example below passes parameters as objects by accessingvariables.
Before you use the cmdlets in this workflow, make sure your environment meets the following requirements.
n VMware PowerCLI and prerequisite is software installed. See “Install Image Builder PowerCLI andPrerequisite Software,” on page 130.
n If you encounter problems running PowerCLI cmdlets, consider changing the execution policy. See “UsingImage Builder Cmdlets,” on page 130.
Examining depot contents is facilitated by the use of filtering options and wildcard characters.
1 At the PowerShell prompt, add the depot that you want to examine to the current session.
For remote depots, run Add-EsxSoftwareDepot -DepotUrl depot_url.
For an offline depot ZIP file, you must download the ZIP file first.
a Download the ZIP file to a local file path, but do not unzip it.
b Run Add-EsxSoftwareDepot -DepotUrl C:\file_path\offline-bundle.zip
Chapter 6 Using vSphere ESXi Image Builder CLI
VMware, Inc. 135

2 Retrieve image profiles.
You can filter by vendor, name and acceptance level.
n Get-EsxImageProfiles
Returns an array of ImageProfile objects from all depots you added to the session.
n Get-EsxImageProfile -Vendor "C*"
Returns all image profiles create by a vendor with a name that starts with a C.
3 Retrieve software packages by using Get-EsxSoftwarePackage.
You can filter, for example by vendor or version, and you can use the standard PowerShell wildcardcharacters.
n Get-EsxSoftwarePackage -Vendor "V*"
Returns all software packages from a vendor with a name that starts with a V.
n Get-EsxSoftwarePackage -Vendor "V*" -Name "*scsi*"
Returns all software packages with a name that has the string scsi in it from a vendor with a namethat starts with a V.
n Get-EsxSoftwarePackage -Version "2.0*"
Returns all software packages with a version string that starts with a 2.0.
4 Use -Newest to find the newest package.
n Get-EsxSoftwarePackage -Vendor "V*" -Newest
Returns the newest package for the vendors starting with V and displays the information as a table.
n Get-EsxSoftwarePackage -Vendor "V*" -Newest | format-list
Pipes the output of the request for software packages to the PowerShell format-list cmdlet anddisplays detailed information about each software package.
5 Display the list of VIBs in the image profile.
(Get-EsxImageProfile -Name "Robin's Profile").VibList
VibList is a property of the ImageProfile object. See “Structure of ImageProfile, SoftwarePackage, andImageProfileDiff Objects,” on page 127.
6 Retrieve software packages released before or after a certain date by using the ReleasedBefore orReleasedAfter parameter.
Get-EsxSoftwarePackage -ReleasedAfter 7/1/2010
Example: Depot Content Examination Using VariablesThis example workflow examines depot contents by passing in parameters as objects, accessed by position ina variable, instead of passing in parameters by name. You can run the following commands in sequence fromthe PowerCLI prompt. Replace names with names that are appropriate in your installation.
Get-EsxSoftwarePackage -Vendor "V*"
Get-EsxSoftwarePackage -Vendor "V*" -Name "r*"
Get-EsxSoftwarePackage -Version "2.0*"
$ip1 = Get-EsxImageProfile -name ESX-5.0.0-123456-full
$ip1.VibList
Get-EsxSoftwarePackage -ReleasedAfter 7/1/2010
vSphere Installation and Setup
136 VMware, Inc.

Creating Image Profiles by Cloning WorkflowYou can use Image Builder cmdlets to check which depots are available, to add a depot, to display image profileinformation, and to create a new image profile by cloning one of the available image profiles.
Before you use the cmdlets in this workflow, make sure your environment meets the following requirements.
n VMware PowerCLI and prerequisite is software installed. See “Install Image Builder PowerCLI andPrerequisite Software,” on page 130.
n If you encounter problems running PowerCLI cmdlets, consider changing the execution policy. See “UsingImage Builder Cmdlets,” on page 130.
Published profiles are usually read only and cannot be modified. Even if a published profile is not read only,cloning instead of modifying the profile is a best practice, because modifying the original profile erases theoriginal. You cannot revert to the original, unmodified profile except by reconnecting to a depot.
A profile cloning workflow might include checking the current state of the system, adding a software depot,and cloning the profile.
1 In a PowerShell window, check whether any software depots are defined for the current session.
$DefaultSoftwareDepots
PowerShell returns the currently defined depots, or nothing if you just started PowerShell.
2 If necessary, add the depot that includes the profile you want to clone to the current session.
For remote depots, run Add-EsxSoftwareDepot -DepotUrl depot_url.
For an offline depot ZIP file, you must download the ZIP file first.
a Download the ZIP file to a local file path.
b Run Add-EsxSoftwareDepot -DepotUrl C:\file_path\offline-bundle.zip
PowerShell adds the specified depot to your current session and lists all current depots.
3 Check the $DefaultSoftwareDepots variable, which now returns the newly-added depot.
$DefaultSoftwareDepots
4 Display all currently available image profiles.
Get-EsxImageProfile
Name Vendor Last Modified Acceptance
Level
---- ------ ------------- -------------
ESX-meta-5.0.zip Profile #1 vendor1 6/13/2010 12:... VMwareSupported
ESX-meta-5.0.zip Profile #2 vendor2 6/13/2010 12:... PartnerSupported
base-tbd-v1 vendor1 6/13/2010 12:... CommunitySupported
ESX-meta-5.1.zip Profile #1 vendor1 6/13/2010 12:... PartnerSupported
.....
The list helps you pick a likely candidate for cloning.
5 Clone one of the image profiles by specifying the name displayed in the Name column and a name for thenew profile.
$ip = New-EsxImageProfile -CloneProfile base-tbd-v1 -Name "Test Profile 42"
6 Display the newly created image profile.
Chapter 6 Using vSphere ESXi Image Builder CLI
VMware, Inc. 137

Get-EsxImageProfile
Name Vendor Last Modified Acceptance Level
---- ------ ------------- ----------------
Test Profile 42 user1 9/15/2010 5:45:43... VMwareSupported
Example: Creating Image Profile by Cloning Using VariablesThis sample cmdlet sequence repeats the steps of this workflow, but passes parameters as objects, accessed byposition in a variable, instead of passing parameters by name. You can run the following cmdlets in sequencefrom the PowerCLI prompt.
$DefaultSoftwareDepots
Add-EsxSoftwareDepot -DepotUrl depot_url
$DefaultSoftwareDepots
$profs = Get-EsxImageProfile
$profs
$ip = New-EsxImageProfile -CloneProfile $profs[2] -Name "new_profile_name"
$ip
Creating Image Profiles from Scratch WorkflowIn most situations, you create an image profile by cloning an existing profile. Some VMware customers orpartners might need to create an image profile from scratch. Pay careful attention to dependencies andacceptance levels if you create an image profile from scratch.
Before you use the cmdlets in this workflow, make sure your environment meets the following requirements.
n VMware PowerCLI and prerequisite is software installed. See “Install Image Builder PowerCLI andPrerequisite Software,” on page 130.
n You have access to a depot that includes a base image and one or more VIBs. VMware and VMwarepartners make public depots, accessible by a URL, available. VMware or VMware partners can create aZIP file that you can unzip to your local environment and access by using a file path.
See “Create an Image Profile,” on page 131 for an example of cloning and modifying an image profile.
The system expects that the acceptance level of the VIBs you add to the base image is at least as high as thelevel of the base image. Pass in the -AcceptanceLevel parameter to change the acceptance level of the imageprofile if you have to add a VIB with a lower acceptance level.
As an alternative to specifying the parameters on the command line, you can use the PowerShell promptingmechanism to specify string parameters. Prompting does not work for other parameters such as objects.
The following workflow illustrates creating image profiles from scratch.
1 At the PowerShell prompt, add the depot that contains the packages you want to use to the current session.
For remote depots, run Add-EsxSoftwareDepot -DepotUrl depot_url.
For an offline depot ZIP file, you must download the ZIP file first.
a Download the ZIP file to a local file path.
b Run Add-EsxSoftwareDepot -DepotUrl C:\file_path\offline-bundle.zip
2 List the available packages that you are interested in and bind them to a variable.
Get-EsxSoftwarePackage -RelasedAfter 7/1/2010
3 Create a new profile, assign it a name and vendor, and add a base package.
vSphere Installation and Setup
138 VMware, Inc.
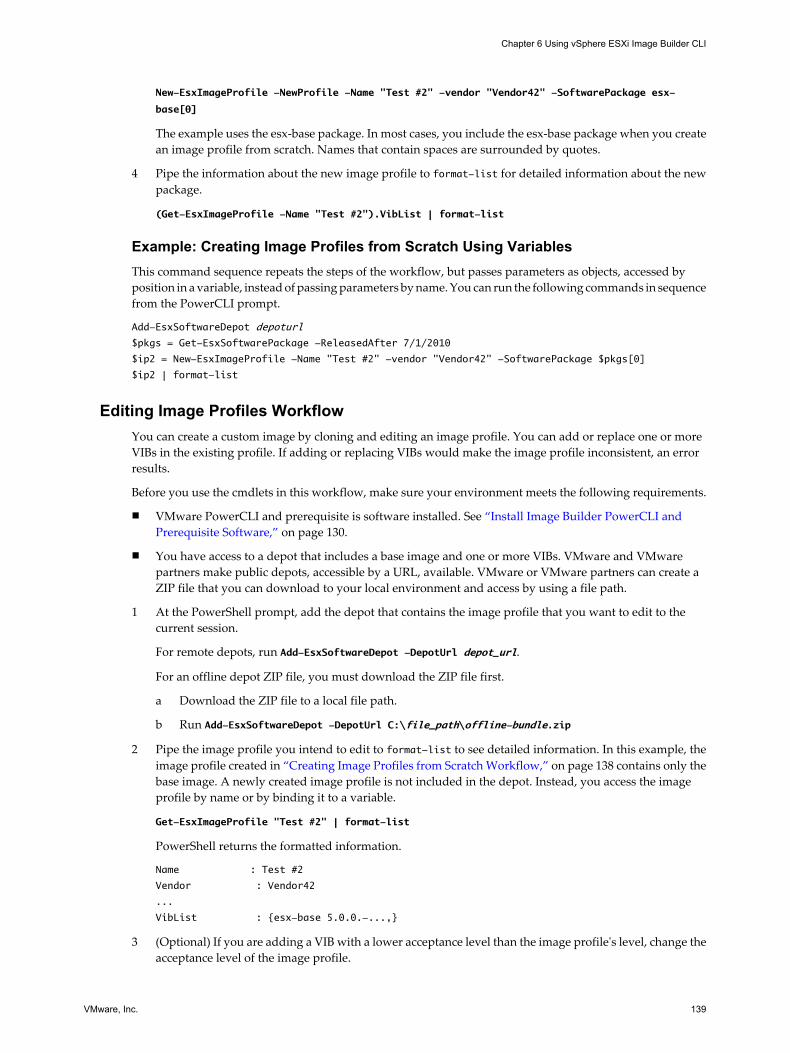
New-EsxImageProfile -NewProfile -Name "Test #2" -vendor "Vendor42" -SoftwarePackage esx-
base[0]
The example uses the esx-base package. In most cases, you include the esx-base package when you createan image profile from scratch. Names that contain spaces are surrounded by quotes.
4 Pipe the information about the new image profile to format-list for detailed information about the newpackage.
(Get-EsxImageProfile -Name "Test #2").VibList | format-list
Example: Creating Image Profiles from Scratch Using VariablesThis command sequence repeats the steps of the workflow, but passes parameters as objects, accessed byposition in a variable, instead of passing parameters by name. You can run the following commands in sequencefrom the PowerCLI prompt.
Add-EsxSoftwareDepot depoturl
$pkgs = Get-EsxSoftwarePackage -ReleasedAfter 7/1/2010
$ip2 = New-EsxImageProfile -Name "Test #2" -vendor "Vendor42" -SoftwarePackage $pkgs[0]
$ip2 | format-list
Editing Image Profiles WorkflowYou can create a custom image by cloning and editing an image profile. You can add or replace one or moreVIBs in the existing profile. If adding or replacing VIBs would make the image profile inconsistent, an errorresults.
Before you use the cmdlets in this workflow, make sure your environment meets the following requirements.
n VMware PowerCLI and prerequisite is software installed. See “Install Image Builder PowerCLI andPrerequisite Software,” on page 130.
n You have access to a depot that includes a base image and one or more VIBs. VMware and VMwarepartners make public depots, accessible by a URL, available. VMware or VMware partners can create aZIP file that you can download to your local environment and access by using a file path.
1 At the PowerShell prompt, add the depot that contains the image profile that you want to edit to thecurrent session.
For remote depots, run Add-EsxSoftwareDepot -DepotUrl depot_url.
For an offline depot ZIP file, you must download the ZIP file first.
a Download the ZIP file to a local file path.
b Run Add-EsxSoftwareDepot -DepotUrl C:\file_path\offline-bundle.zip
2 Pipe the image profile you intend to edit to format-list to see detailed information. In this example, theimage profile created in “Creating Image Profiles from Scratch Workflow,” on page 138 contains only thebase image. A newly created image profile is not included in the depot. Instead, you access the imageprofile by name or by binding it to a variable.
Get-EsxImageProfile "Test #2" | format-list
PowerShell returns the formatted information.
Name : Test #2
Vendor : Vendor42
...
VibList : {esx-base 5.0.0.-...,}
3 (Optional) If you are adding a VIB with a lower acceptance level than the image profile's level, change theacceptance level of the image profile.
Chapter 6 Using vSphere ESXi Image Builder CLI
VMware, Inc. 139

Set-EsxImageProfile -ImageProfile "Test #2" -AcceptanceLevel VMwareAccepted
PowerShell returns the information about the changed profile in tabular format.
Name Vendor Last Modified Acceptance Level
---- ------ ------------- ----------------
Test #2 Vendor42 9/22/2010 12:05:... VMwareAccepted
4 Add a software package (VIB) to the image profile. You can add the package by name.
Add-EsxSoftwarePackage -ImageProfile "Test #2" -SoftwarePackage NewPack3
PowerShell returns the information about the image profile in tabular format.
Name Vendor Last Modified Acceptance Level
---- ------ ------------- ----------------
Test #2 Vendor42 9/22/2010 12:05:... VMwareAccepted
5 Display the image profile again.
Get-EsxImageProfile "Test #2" | format-list
The VIB list is updated to include the new software package and the information is displayed.
Name : Test #2
Vendor : Vendor42
...
VibList : {esx-base 5.0.0.-..., NewPack3}
Example: Editing Image Profiles with VariablesThis cmdlet sequence repeats the steps of the workflow but passes parameters as objects, accessed by positionin a variable, instead of passing parameters by name. You can run the following cmdlets in sequence from thePowerCLI prompt.
Add-EsxSoftwareDepot -DepotUrl depot_url
$ip2 = Get-EsxImageProfile -name "Test #2"
$ip2 | format-list
Set-EsxImageProfile -ImageProfile $ip2 -AcceptanceLevel VMwareAccepted
Add-EsxImageSoftwarePackage -ImageProfile $ip2 -SoftwarePackage NewPack3
$ip2 | format-list
vSphere Installation and Setup
140 VMware, Inc.

Setting Up ESXi 7These topics provide information about using the direct console user interface and configuring defaults for ESXi.
This chapter includes the following topics:
n “ESXi Autoconfiguration,” on page 141
n “About the Direct Console ESXi Interface,” on page 142
n “Set the Password for the Administrator Account,” on page 144
n “Configuring the BIOS Boot Settings,” on page 145
n “Host Fails to Boot After You Install ESXi in UEFI Mode,” on page 146
n “Network Access to Your ESXi Host,” on page 146
n “Configure the Network Settings on a Host That Is Not Attached to the Network,” on page 147
n “Managing ESXi Remotely,” on page 147
n “Configuring Network Settings,” on page 148
n “Storage Behavior,” on page 152
n “View System Logs,” on page 155
n “Configure Syslog on ESXi Hosts,” on page 155
n “Enable Lockdown Mode Using the Direct Console,” on page 156
n “Enable ESXi Shell and SSH Access with the Direct Console User Interface,” on page 157
n “Set the Host Image Profile Acceptance Level,” on page 157
n “Reset the System Configuration,” on page 158
n “Remove All Custom Packages on ESXi,” on page 159
n “Disable Support for Non-ASCII Characters in Virtual Machine File and Directory Names,” onpage 159
n “Disable ESXi,” on page 159
ESXi AutoconfigurationWhen you turn on the ESXi host for the first time or after resetting the configuration defaults, the host entersan autoconfiguration phase. This phase configures system network and storage devices with default settings.
By default, Dynamic Host Configuration Protocol (DHCP) configures IP, and all visible blank internal disksare formatted with the virtual machine file system (VMFS) so that virtual machines can be stored on the disks.
VMware, Inc. 141

About the Direct Console ESXi InterfaceUse the direct console interface for initial ESXi configuration and troubleshooting.
Connect a keyboard and monitor to the host to use the direct console. After the host completes theautoconfiguration phase, the direct console appears on the monitor. You can examine the default networkconfiguration and change any settings that are not compatible with your network environment.
Key operations available to you in the direct console include:
n Configuring hosts
n Setting up administrative access
n Troubleshooting
You can also use vSphere client applications to manage the host.
Table 7-1. Navigating in the Direct Console
Action Key
View and change the configuration F2
Change the user interface to high-contrast mode F4
Shut down or restart the host F12
Move the selection between fields Arrow keys
Select a menu item Enter
Toggle a value Spacebar
Confirm sensitive commands, such as resettingconfiguration defaults
F11
Save and exit Enter
Exit without saving Esc
Exit system logs q
Configure the Keyboard Layout for the Direct ConsoleYou can configure the layout for the keyboard that you use with the direct console.
Procedure
1 From the direct console, select Configure Keyboard and press Enter.
2 Select the layout to use.
3 Press the spacebar to toggle selections on and off.
4 Press Enter.
Create a Security Banner for the Direct ConsoleA security banner is a message that is displayed on the direct console Welcome screen.
Procedure
1 Log in to the host from the vSphere Client.
2 From the Configuration tab, select Advanced Settings.
3 From the Advanced Settings window, select Annotations.
vSphere Installation and Setup
142 VMware, Inc.

4 Enter a security message.
The message is displayed on the direct console Welcome screen.
Redirecting the Direct Console to a Serial PortTo manage your ESXi host remotely from a serial console, you can redirect the direct console to a serial port.
vSphere supports the VT100 terminal type and the PuTTy terminal emulator to view the direct console overthe serial port.
You can redirect the direct console to a serial port in several ways.
n Redirect the Direct Console to a Serial Port by Setting the Boot Options Manually on page 143When you redirect the direct console to a serial port by setting the boot options, the change does notpersist for subsequent boots.
n Redirect the Direct Console to a Serial Port Using the vSphere Client on page 143When you use the vSphere Client to redirect the direct console to a serial port, the boot option you setpersists after subsequent reboots.
n Redirect the Direct Console to a Serial Port in a Host Deployed with Auto Deploy on page 144After you redirect the direct console to a serial port, you can make that setting part of the host profilethat persists when you reprovision the host with Auto Deploy.
Redirect the Direct Console to a Serial Port by Setting the Boot Options ManuallyWhen you redirect the direct console to a serial port by setting the boot options, the change does not persistfor subsequent boots.
Prerequisites
Verify that the serial port is not in use for serial logging and debugging.
Procedure
1 Start the host.
2 When the Loading VMware Hypervisor window appears, press Shift+O to edit boot options.
3 Disable the logPort and gdbPort on com1 and set tty2Port to com1 by entering the following boot options:
"gdbPort=none logPort=none ttry2Port=com1";
To use com2 instead, replace com1 with com2.
The direct console is redirected to the serial port until you reboot the host. To redirect the direct console forsubsequent boots, see “Redirect the Direct Console to a Serial Port Using the vSphere Client,” on page 143
Redirect the Direct Console to a Serial Port Using the vSphere ClientWhen you use the vSphere Client to redirect the direct console to a serial port, the boot option you set persistsafter subsequent reboots.
You can redirect the direct console to either of the serial ports com1 or com2.
The serial port must not be in use for serial logging and debugging, or for ESX Shell (tty1Port).
Prerequisites
Verify that you can access the host from the vSphere Client. The serial port must not already be in use for seriallogging and debugging, or for ESX Shell (tty1Port).
Chapter 7 Setting Up ESXi
VMware, Inc. 143

Procedure
1 From the vSphere Client, connect to the vCenter Server and select the host in the inventory.
2 Click the Configuration tab.
3 Under Software, click Advanced Settings.
4 In the left pane, expand the VMkernel listing and select Boot.
5 Make sure that the VMkernel.Boot.logPort and VMkernel.Boot.gdbPort fields are not set to use the comport that you want to redirect the direct console to.
6 Set VMkernel.Boot.tty2Port to the serial port to redirect the direct console to: com1 or com2.
7 Click OK.
8 Reboot the host.
You can now manage the ESXi host remotely from a console connected to the serial port.
Redirect the Direct Console to a Serial Port in a Host Deployed with Auto DeployAfter you redirect the direct console to a serial port, you can make that setting part of the host profile thatpersists when you reprovision the host with Auto Deploy.
Prerequisites
The serial port must not already be in use for serial logging and debugging.
Procedure
1 From the vSphere Client, connect to the vCenter Server and select the host in the inventory.
2 Click the Configuration tab.
3 Under Software, click Advanced Settings.
4 In the left pane, expand the VMkernel listing and select Boot.
5 Make sure that the VMkernel.Boot.logPort and VMkernel.Boot.gdbPort fields are not set to use the comport that you want to redirect the direct console to.
6 Set VMkernel.Boot.tty2Port to the serial port to redirect the direct console to: com1 or com2.
7 Click OK.
8 Save the host profile and attach the host to the profile. See the vSphere Host Profiles documentation.
The setting to redirect the direct console to a serial port is stored by vCenter Server and persists when youreprovision the host with Auto Deploy.
Set the Password for the Administrator AccountYou can use the direct console to set the password for the administrator account (root).
The administrative user name for the ESXi host is root. By default, the administrative password is not set.
Procedure
1 From the direct console, select Configure Password.
2 (Optional) If a password is already set up, type the password in the Old Password line and press Enter.
3 In the New Password line, type a new password and press Enter.
4 Retype the new password and press Enter.
vSphere Installation and Setup
144 VMware, Inc.

Configuring the BIOS Boot SettingsIf your server has multiple drives, you might need to configure the BIOS settings.
The BIOS boot configuration determines how your server boots. Generally, the CD-ROM device is listed first.
NOTE If you are using ESXi Embedded, the BIOS boot configuration determines whether your server bootsinto the ESXi boot device or another boot device. Generally, the USB flash device is listed first in the BIOS bootsettings on the machine that hosts ESXi.
You can change the boot setting by configuring the boot order in the BIOS during startup or by selecting a bootdevice from the boot device selection menu. When you change the boot order in the BIOS, the new settingaffects all subsequent reboots. When you select a boot device from the boot device selection menu, the selectionaffects the current boot only.
Some servers do not have a boot device selection menu, in which case you must change the boot order in theBIOS even for one-time boots, and then change it back again during a subsequent reboot.
NOTE The boot device selection menu is different from the system boot options that you can configure in thevSphere Client.
With the vSphere Client boot options, you can configure the boot sequence for floppy, CD-ROM, and harddisk drives only. For some servers, the system BIOS has two options. One is for the boot sequence (floppy, CD-ROM, hard disk) and another for the hard disk boot order (USB key, local hard disk). When you are using thevSphere Client, the boot options correspond to the BIOS boot sequence (floppy, CD-ROM, hard disk).
Change the BIOS Boot Setting for ESXiConfigure the BIOS boot setting for ESXi if you want the server to boot into ESXi by default.
ESXi Installable and ESXi Embedded cannot exist on the same host.
Procedure
1 While the ESXi host is powering on, press the key required to enter your host’s BIOS setup.
Depending on your server hardware, the key might be a function key or Delete. The option to enter theBIOS setup might be different for your server.
2 Select the BIOS boot setting.
Option Description
If you are using the installableversion of ESXi
Select the disk on which you installed the ESXi software and move it to thefirst position in the list. The host boots into ESXi.
If you are using ESXi Embedded Select the USB flash device and move it to the first position in the list. Thehost starts in ESXi mode.
Configure the Boot Setting for Virtual MediaIf you are using remote management software to set up ESXi, you might need to configure the boot setting forvirtual media.
Virtual media is a method of connecting a remote storage media such as CD-ROM, USB mass storage, ISOimage, and floppy disk to a target server that can be anywhere on the network. The target server has access tothe remote media, and can read from and write to it as if it were physically connected to the server's USB port.
Prerequisites
ESXi Installable and ESXi Embedded cannot exist on the same host.
Chapter 7 Setting Up ESXi
VMware, Inc. 145

Procedure
1 Connect the media to the virtual device.
For example, if you are using a Dell server, log in to the Dell Remote Access Controller (DRAC) or a similarremote management interface and select a physical floppy or CD-ROM drive, or provide a path to a floppyimage or CD-ROM image.
2 Reboot the server.
3 While the server is powering on, enter the device selection menu.
Depending on your server hardware, the key might be a function key or Delete.
4 Follow the instructions to select the virtual device.
The server boots from the configured device once and goes back to the default boot order for subsequent boots.
Host Fails to Boot After You Install ESXi in UEFI ModeWhen you install ESXi on a host machine in UEFI mode, the machine might fail to boot.
Problem
When you reboot after installing ESXi on a host machine in UEFI mode, the reboot might fail. This problem isaccompanied by an error message similar to Unexpected network error. No boot device available.
Cause
The host system fails to recognize the disk that ESXi is installed on as the boot disk.
Solution
1 While the error message is displayed on screen, press F11 to display boot options.
2 Select an option similar to Add boot option.
The wording of the option might vary, depending on your system.
3 Select the file \EFI\BOOT\BOOTx64.EFI on the disk that you installed ESXi on.
4 Change the boot order so that the host boots from the option that you added.
Network Access to Your ESXi HostThe default behavior is to configure the ESXi management network using DHCP. You can override the defaultbehavior and use static IP settings for the management network after the installation is completed.
Table 7-2. Network Configuration Scenarios Supported by ESXi
Scenario Approach
You want to accept the DHCP-configured IPsettings.
In the ESXi direct console, you can find the IP address assignedthrough DHCP to the ESXi management interface. You can use thatIP address to connect to the host from the vSphere Client andcustomize settings, including changing the management IP address.
One of the following is true:n You do not have a DHCP server.n The ESXi host is not connected to a DHCP
server.n Your connected DHCP server is not functioning
properly.
During the autoconfiguration phase, the software assigns the linklocal IP address, which is in the subnet 169.254.x.x/16. The assignedIP address appears on the direct console.You can override the link local IP address by configuring a static IPaddress using the direct console.
vSphere Installation and Setup
146 VMware, Inc.

Table 7-2. Network Configuration Scenarios Supported by ESXi (Continued)
Scenario Approach
The ESXi host is connected to a functioning DHCPserver, but you do not want to use the DHCP-configured IP address.
During the autoconfiguration phase, the software assigns a DHCP-configured IP address.You can make the initial connection by using the DHCP-configuredIP address. Then you can configure a static IP address.If you have physical access to the ESXi host, you can override theDHCP-configured IP address by configuring a static IP address usingthe direct console.
Your security deployment policies do not permitunconfigured hosts to be powered on the network.
Follow the setup procedure in “Configure the Network Settings on aHost That Is Not Attached to the Network,” on page 147.
Configure the Network Settings on a Host That Is Not Attached to theNetwork
Some highly secure environments do not permit unconfigured hosts on the network to be powered on. Youcan configure the host before you attach the host to the network.
Prerequisites
Verify that no network cables are connected to the host.
Procedure
1 Power on the host.
2 Use the direct console to configure the password for the administrator account (root).
3 Use the direct console to configure a static IP address.
4 Connect a network cable to the host.
5 (Optional) Use the vSphere Client to connect to a vCenter Server system.
6 (Optional) Add the host to the vCenter Server inventory.
Managing ESXi RemotelyYou can us the vSphere Client , the vSphere Web Client, and vCenter Server to manage the host.
To manage the host with the vSphere Client, the vSphere Web Client, and vCenter Server, the applicationsmust be installed on a computer that serves as a management station with network access to the ESXi host.The ESXi host must be powered on. For instructions about downloading and installing vCenter Server, thevSphere Client, and the vSphere Web Client, see the following topics.
n “Download the vCenter Server Installer,” on page 202
n “Install vCenter Server,” on page 202
n “Download the vSphere Client,” on page 208
n “Install the vSphere Client,” on page 208
n “Install and Start the vSphere Web Client,” on page 209
Chapter 7 Setting Up ESXi
VMware, Inc. 147

Configuring Network SettingsESXi requires one IP address for the management network. To configure basic network settings, use thevSphere Client or the direct console.
Use the vSphere Client in the following cases:
n You are satisfied with the IP address assigned by the DHCP server.
n You are allowed to temporarily use the IP address assigned by the DHCP server. In this case, connect tothat address with the vSphere Client, and use the vSphere Client to assign a static IP address.
Use the direct console in the following cases:
n You are not satisfied with the IP address assigned by the DHCP server.
n You are not allowed to use the IP address assigned by the DHCP server.
n ESXi does not have an IP address. This situation could happen if the autoconfiguration phase did notsucceed in configuring DHCP.
n The wrong network adapter was selected during the autoconfiguration phase.
Choose Network Adapters for the Management NetworkTraffic between an ESXi host and any external management software is transmitted through an Ethernetnetwork adapter on the host. You can use the direct console to choose the network adapters that are used bythe management network.
Examples of external management software include the vSphere Client, vCenter Server, and SNMP client.Network adapters on the host are named vmnicN, where N is a unique number identifying the networkadapter, for example, vmnic0, vmnic1, and so forth.
During the autoconfiguration phase, the ESXi host chooses vmnic0 for management traffic. You can overridethe default choice by manually choosing the network adapter that carries management traffic for the host. Insome cases, you might want to use a Gigabit Ethernet network adapter for your management traffic. Anotherway to help ensure availability is to select multiple network adapters. Using multiple network adapters enablesload balancing and failover capabilities.
Procedure
1 From the direct console, select Configure Management Network and press Enter.
2 Select Network Adapters and press Enter.
3 Select a network adapter and press Enter.
After the network is functional, you can use the vSphere Client to connect to the ESXi host.
Set the VLAN IDYou can set the virtual LAN (VLAN) ID number of the ESXi host.
Procedure
1 From the direct console, select Configure Management Network and press Enter.
2 Select VLAN and press Enter.
3 Enter a VLAN ID number from 1 through 4094.
vSphere Installation and Setup
148 VMware, Inc.

Configuring IP Settings for ESXiBy default, DHCP sets the IP address, subnet mask, and default gateway.
For future reference, write down the IP address.
For DHCP to work, your network environment must have a DHCP server. If DHCP is not available, the hostassigns the link local IP address, which is in the subnet 169.254.x.x/16. The assigned IP address appears on thedirect console. If you do not have physical monitor access to the host, you can access the direct console usinga remote management application. See “Using Remote Management Applications,” on page 26
When you have access to the direct console, you can optionally configure a static network address. The defaultsubnet mask is 255.255.0.0.
Configure IP Settings from the Direct ConsoleIf you have physical access to the host or remote access to the direct console, you can use the direct console toconfigure the IP address, subnet mask, and default gateway.
Procedure
1 Select Configure Management Network and press Enter.
2 Select IP Configuration and press Enter.
3 Select Set static IP address and network configuration.
4 Enter the IP address, subnet mask, and default gateway and press Enter.
Configure IP Settings from the vSphere ClientIf you do not have physical access to the host, you can use the vSphere Client to configure static IP settings ifyou are on the same physical subnet and you configure the vSphere Client IP to be on the 169.254.x.x network.
Procedure
1 Select the host in the inventory.
2 Select the Configuration tab and click Networking.
3 Click Properties next to Virtual Switch: vSwitch0.
4 Select Management Network and click Edit.
5 On the IP Settings tab, click Use the following IP settings.
6 Enter a static IP address, subnet mask, and default gateway and click OK.
Configuring DNS for ESXiYou can select either manual or automatic DNS configuration of the ESXi host.
The default is automatic. For automatic DNS to work, your network environment must have a DHCP serverand a DNS server.
In network environments where automatic DNS is not available or not desirable, you can configure static DNSinformation, including a host name, a primary name server, a secondary name server, and DNS suffixes.
Chapter 7 Setting Up ESXi
VMware, Inc. 149

Configure DNS Settings from the Direct ConsoleIf you have physical access to the host or remote access to the direct console, you can use the direct console toconfigure DNS information.
Procedure
1 Select Configure Management Network and press Enter.
2 Select DNS Configuration and press Enter.
3 Select Use the following DNS server addresses and hostname.
4 Enter the primary server, an alternative server (optional), and the host name.
Configure DNS SuffixesIf you have physical access to the host, you can use the direct console to configure DNS information. By default,DHCP acquires the DNS suffixes.
Procedure
1 From the direct console, select Configure Management Network.
2 Select Custom DNS Suffixes and press Enter.
3 Enter new DNS suffixes.
Test the Management NetworkYou can use the direct console to do simple network connectivity tests.
The direct console performs the following tests.
n Pings the default gateway
n Pings the primary DNS name server
n Pings the secondary DNS nameserver
n Resolves the configured host name
Procedure
1 From the direct console, select Test Management Network and press Enter.
2 Press Enter to start the test.
Restart the Management AgentsThe management agents synchronize VMware components and let you access the ESXi host through thevSphere Client or vCenter Server. They are installed with the vSphere software. You might need to restart themanagement agents if remote access is interrupted.
Restarting the management agents restarts all management agents and services that are installed and runningin /etc/init.d on the ESXi host. Typically, these agents include hostd, ntpd, sfcbd, slpd, wsman, and vobd.The software also restarts Fault Domain Manager (FDM) if it is installed.
Users accessing this host through the vSphere Client or vCenter Server lose connectivity when you restartmanagement agents.
Procedure
1 From the direct console, select Troubleshooting Options and press Enter.
vSphere Installation and Setup
150 VMware, Inc.

2 Select Restart Management Agents and press Enter.
3 Press F11 to confirm the restart.
The ESXi host restarts the management agents and services.
Restart the Management NetworkRestarting the management network interface might be required to restore networking or to renew a DHCPlease.
Restarting the management network will result in a brief network outage that might temporarily affect runningvirtual machines.
If a renewed DHCP lease results in a new network identity (IP address or host name), remote managementsoftware will be disconnected.
Procedure
1 From the direct console, select Restart Management Network and press Enter.
2 Press F11 to confirm the restart.
Disable the Management NetworkThe management network synchronizes VMware components and lets you access the ESXi host through thevSphere Client or vCenter Server. It is installed with the vSphere software. You might need to disable themanagement network to isolate a host from the vCenter Server inventory.
Users who access this host through the vSphere Client or vCenter Server lose connectivity when you disablethe management network.
One reason to disable the management network is to isolate an ESXi host from an HA and DRS cluster, withoutlosing your static IP and DNS configurations or rebooting the host.
This operation does not require downtime for virtual machines. The virtual machines continue to run whilethe host is disconnected from vCenter Server and the vSphere Client.
Procedure
1 From the direct console, select Disable Management Network and press Enter.
2 Press F11 to confirm.
Restoring the Standard SwitchA vSphere Distributed Switch functions as a single virtual switch across all associated hosts. Virtual machinescan maintain a consistent network configuration as they migrate across multiple hosts. If you migrate anexisting standard switch, or virtual adapter, to a Distributed Switch and the Distributed Switch becomesunnecessary or stops functioning, you can restore the standard switch to ensure that the host remains accessible.
When you restore the standard switch, a new virtual adapter is created and the management network uplinkthat is currently connected to Distributed Switch is migrated to the new virtual switch.
You might need to restore the standard switch for the following reasons:
n The Distributed Switch is not needed or is not functioning.
n The Distributed Switch needs to be repaired to restore connectivity to vCenter Server and the hosts needto remain accessible.
n You do not want vCenter Server to manage the host. When the host is not connected to vCenter Server,most Distributed Switch features are unavailable to the host.
Chapter 7 Setting Up ESXi
VMware, Inc. 151

Prerequisites
Verify that your management network is connected to a distributed switch.
Procedure
1 From the direct console, select Restore Standard Switch and press Enter.
If the host is on a standard switch, this selection is dimmed, and you cannot select it.
2 Press F11 to confirm.
Test Connectivity to Devices and NetworksYou can use the direct console to perform some simple network connectivity tests. In addition to themanagement network, you can specify other devices and networks.
Procedure
1 From the direct console, select Test Management Network and press Enter.
2 Type addresses to ping or another DNS host name to resolve.
3 Press Enter to start the test.
Storage BehaviorWhen you start ESXi, the host enters an autoconfiguration phase during which system storage devices areconfigured with defaults.
NOTE Partitioning for hosts that are upgraded to ESXi 5.0 differs significantly from partitioning for newinstallations of ESXi 5.0. See the vSphere Upgrade documentation.
When you reboot the ESXi host after installing the ESXi image, the host configures the system storage deviceswith default settings. By default, all visible blank internal disks are formatted with VMFS, so you can storevirtual machines on the disks. In ESXi Embedded, all visible blank internal disks with VMFS are also formattedby default.
CAUTION ESXi overwrites any disks that appear to be blank. Disks are considered to be blank if they do nothave a valid partition table or partitions. If you are using software that uses such disks, in particular if you areusing logical volume manager (LVM) instead of, or in addition to, conventional partitioning schemes, ESXimight cause local LVM to be reformatted. Back up your system data before you power on ESXi for the firsttime.
On the hard drive or USB device that the ESXi host is booting from, the disk-formatting software retains existingdiagnostic partitions that the hardware vendor creates. In the remaining space, the software creates thepartitions described in Table 7-3.
vSphere Installation and Setup
152 VMware, Inc.

Table 7-3. Partitions Created by ESXi on the Host Drive
ESXi Version Partitions Created
ESXi Installable For fresh installations, several new partitions are created forthe boot banks, the scratch partition, and the locker. FreshESXi installations use GUID Partition Tables (GPT) insteadof MSDOS-based partitioning. The partition table itself isfixed as part of the binary image, and is written to the diskat the time the system is installed. The ESXi installer leavesthe scratch and VMFS partitions blank and ESXi creates themwhen the host is rebooted for the first time after installationor upgrade. One 4GB VFAT scratch partition is created forsystem swap. See “About the Scratch Partition,” onpage 153. The VFAT scratch partition is created only on thedisk from which the ESXi host is booting.NOTE To create the VMFS volume and scratch partition, theESXi installer requires a minimum of 5.2GB of free space onthe installation disk.The installer affects only the installation disk. The installerdoes not affect other disks of the server. When you install ona disk, the installer overwrites the entire disk. When theinstaller autoconfigures storage, the installer does notoverwrite hardware vendor partitions. During ESXiinstallation, the installer creates a 110MB diagnostic partitionfor core dumps.
ESXi Embedded One 110MB diagnostic partition for core dumps, if thispartition is not present on another disk. The VFAT scratchand diagnostic partitions are created only on the disk fromwhich the ESXi host is booting. On other disks, the softwarecreates one VMFS5 partition per blank disk, using the wholedisk. Only blank disks are formatted.
Both ESXi Installable and ESXi Embedded One VMFS5 partition on the remaining free space.
You might want to override this default behavior if, for example, you use shared storage devices instead oflocal storage. To prevent automatic disk formatting, detach the local storage devices from the host under thefollowing circumstances:
n Before you start the host for the first time.
n Before you start the host after you reset the host to the configuration defaults.
To override the VMFS formatting if automatic disk formatting already occurred, you can remove the datastore.See the vCenter Server and Host Management documentation.
About the Scratch PartitionFor new installations of ESXi, during the autoconfiguration phase, a 4GB VFAT scratch partition is created ifthe partition is not present on another disk.
NOTE Partitioning for hosts that are upgraded to ESXi 5.0 differs significantly from partitioning for newinstallations of ESXi 5.0. See the vSphere Upgrade documentation.
When ESXi boots, the system tries to find a suitable partition on a local disk to create a scratch partition.
The scratch partition is not required. It is used to store vm-support output, which you need when you createa support bundle. If the scratch partition is not present, vm-support output is stored in a ramdisk. In low-memory situations, you might want to create a scratch partition if one is not present.
Chapter 7 Setting Up ESXi
VMware, Inc. 153
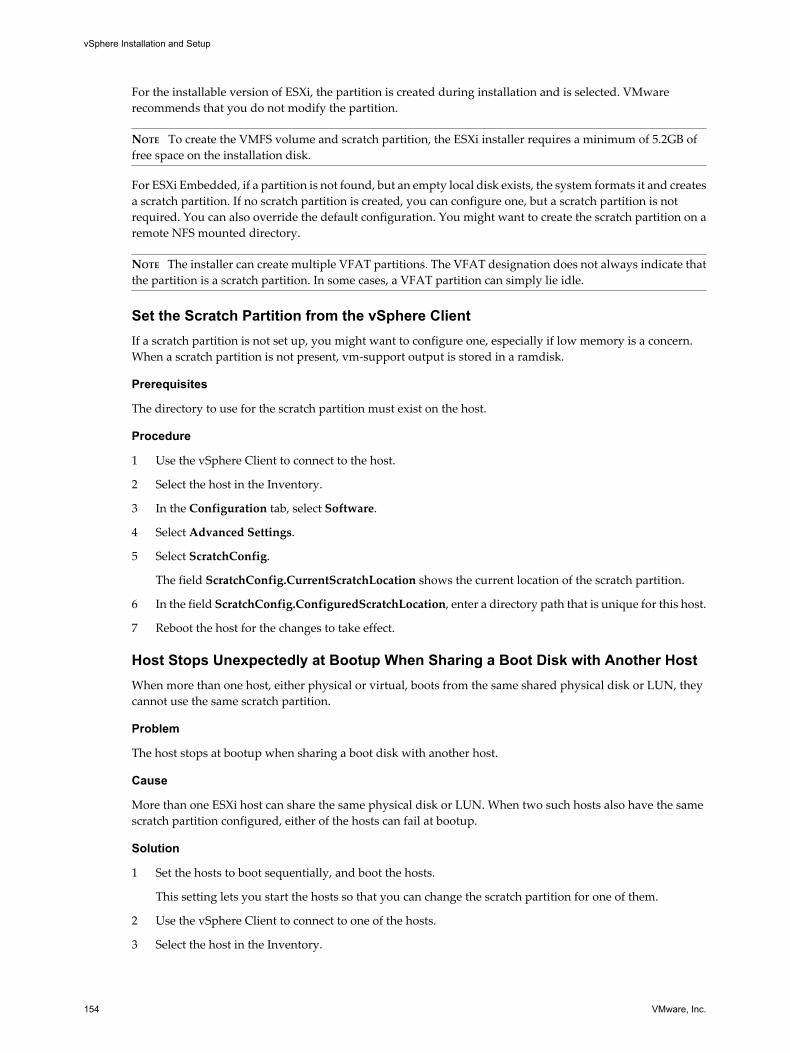
For the installable version of ESXi, the partition is created during installation and is selected. VMwarerecommends that you do not modify the partition.
NOTE To create the VMFS volume and scratch partition, the ESXi installer requires a minimum of 5.2GB offree space on the installation disk.
For ESXi Embedded, if a partition is not found, but an empty local disk exists, the system formats it and createsa scratch partition. If no scratch partition is created, you can configure one, but a scratch partition is notrequired. You can also override the default configuration. You might want to create the scratch partition on aremote NFS mounted directory.
NOTE The installer can create multiple VFAT partitions. The VFAT designation does not always indicate thatthe partition is a scratch partition. In some cases, a VFAT partition can simply lie idle.
Set the Scratch Partition from the vSphere ClientIf a scratch partition is not set up, you might want to configure one, especially if low memory is a concern.When a scratch partition is not present, vm-support output is stored in a ramdisk.
Prerequisites
The directory to use for the scratch partition must exist on the host.
Procedure
1 Use the vSphere Client to connect to the host.
2 Select the host in the Inventory.
3 In the Configuration tab, select Software.
4 Select Advanced Settings.
5 Select ScratchConfig.
The field ScratchConfig.CurrentScratchLocation shows the current location of the scratch partition.
6 In the field ScratchConfig.ConfiguredScratchLocation, enter a directory path that is unique for this host.
7 Reboot the host for the changes to take effect.
Host Stops Unexpectedly at Bootup When Sharing a Boot Disk with Another HostWhen more than one host, either physical or virtual, boots from the same shared physical disk or LUN, theycannot use the same scratch partition.
Problem
The host stops at bootup when sharing a boot disk with another host.
Cause
More than one ESXi host can share the same physical disk or LUN. When two such hosts also have the samescratch partition configured, either of the hosts can fail at bootup.
Solution
1 Set the hosts to boot sequentially, and boot the hosts.
This setting lets you start the hosts so that you can change the scratch partition for one of them.
2 Use the vSphere Client to connect to one of the hosts.
3 Select the host in the Inventory.
vSphere Installation and Setup
154 VMware, Inc.

4 In the Configuration tab, select Software.
5 Select Advanced Settings.
6 Select ScratchConfig.
The field ScratchConfig.CurrentScratchLocation shows the current location of the scratch partition.
7 In the field ScratchConfig.ConfiguredScratchLocation, enter a directory path that is unique for this host.
8 Reboot the host for the changes to take effect.
View System LogsSystem logs provide detailed information about system operational events.
Procedure
1 From the direct console, select View System Logs.
2 Press a corresponding number key to view a log.
vCenter Server Agent (vpxa) logs appear if you add the host to vCenter Server.
3 Press Enter or the spacebar to scroll through the messages.
4 Perform a regular expression search.
a Press the slash key (/).
b Type the text to find.
c Press Enter.
The found text is highlighted on the screen.
5 Press q to return to the direct console.
What to do next
See also “Configure Syslog on ESXi Hosts,” on page 155.
Configure Syslog on ESXi HostsAll ESXi hosts run a syslog service (vmsyslogd), which logs messages from the VMkernel and other systemcomponents to log files.
You can use the vSphere Client or the esxcli system syslog vCLI command to configure the syslog service.
For more information about using vCLI commands, see Getting Started with vSphere Command-Line Interfaces.
Procedure
1 In the vSphere Client inventory, select the host.
2 Click the Configuration tab.
3 In the Software panel, click Advanced Settings.
4 Select Syslog in the tree control.
Chapter 7 Setting Up ESXi
VMware, Inc. 155

5 To set up logging globally, click global and make changes to the fields on the right.
Option Description
Syslog.global.defaultRotate Sets the maximum number of archives to keep. You can set this numberglobally and for individual subloggers.
Syslog.global.defaultSize Sets the default size of the log, in KB, before the system rotates logs. You canset this number globally and for individual subloggers.
Syslog.global.LogDir Directory where logs are stored. The directory can be located on mountedNFS or VMFS volumes. Only the /scratch directory on the local file systemis persistent across reboots. The directory should be specified as[datastorename] path_to_file where the path is relative to the root of the volumebacking the datastore. For example, the path [storage1]var/log/messages maps to thepath /vmfs/volumes/storage1/var/log/messages. If no path isspecified, all log files are sent to /var/log.
Syslog.global.logDirUnique Selecting this option creates a subdirectory with the name of the ESXi hostunder the directory specified by Syslog.global.LogDir. A unique directoryis useful if the same NFS directory is used by multiple ESXi hosts.
Syslog.global.LogHost Remote host to which syslog messages are forwarded and port on which theremote host receives syslog messages. You can include the protocol and theport, for example, ssl://hostName1:514. UDP (default), TCP, and SSL aresupported. The remote host must have syslog installed and correctlyconfigured to receive the forwarded syslog messages. See the documentationfor the syslog service installed on the remote host for information onconfiguration.
6 (Optional) To overwrite the default log size and log rotation for any of the logs.
a Click loggers.
b Click the name of the log you that want to customize and enter the number of rotations and log sizeyou want.
7 Click OK.
Changes to the syslog options take effect immediately.
Enable Lockdown Mode Using the Direct ConsoleTo increase the security of your ESXi hosts, you can put them in lockdown mode.
When you enable lockdown mode, no users other than vpxuser have authentication permissions, nor can theyperform operations against the host directly. Lockdown mode forces all operations to be performed throughvCenter Server.
When a host is in lockdown mode, you cannot run vSphere CLI commands from an administration server,from a script, or from vMA against the host. External software or management tools might not be able to retrieveor modify information from the ESXi host.
NOTE The root user is still authorized to log in to the direct console user interface when lockdown mode isenabled.
Enabling or disabling lockdown mode affects which types of users are authorized to access host services, butit does not affect the availability of those services. In other words, if the ESXi Shell, SSH, or Direct Console UserInterface (DCUI) services are enabled, they will continue to run whether or not the host is in lockdown mode.
vSphere Installation and Setup
156 VMware, Inc.

You can enable lockdown mode using the Add Host wizard to add a host to vCenter Server, using the vSphereClient to manage a host, or using the direct console user interface.
NOTE If you enable or disable lockdown mode using the Direct Console User Interface (DCUI), permissionsfor users and groups on the host are discarded. To preserve these permissions, you must enable and disablelockdown mode using the vSphere Client connected to vCenter Server.
Lockdown mode is available only on ESXi hosts that you add to vCenter Server.
See the vSphere Security documentation for more information about lockdown mode.
Procedure
1 In the direct console, select Configure Lockdown Mode and press Enter.
2 Press the spacebar to select Enable Lockdown Mode and press Enter.
3 Press Enter.
The host is in lockdown mode.
Enable ESXi Shell and SSH Access with the Direct Console UserInterface
Use the direct console user interface to enable the ESXi Shell.
Procedure
1 From the direct console user interface, press F2 to access the System Customization menu.
2 Select Troubleshooting Options and press Enter.
3 From the Troubleshooting Mode Options menu, select a service to enable.
4 Press Enter.
5 (Optional) Set the timeout for the ESXi Shell.
By default, the timeout for the ESXi Shell is 0 (disabled).
The timeout setting is the number of minutes that can elapse before you must log in after ESXi Shell isenabled. After the timeout period, if you have not logged in, the ESXi Shell is disabled.
NOTE If you are logged in when the timeout period elapses, your session persists. However, the ESXiShell is disabled, preventing other users from logging in.
a From the Troubleshooting Mode Options menu, select Modify ESXi Shell timeout and press Enter.
b Type the timeout in minutes.
c Press Enter.
Set the Host Image Profile Acceptance LevelThe Host Image Profile acceptance level determines which vSphere installation bundles (VIBs) are acceptedfor installation.
VIB signatures are checked and accepted for installation based on a combination of the VIB acceptance leveland the host image profile acceptance level. VIBs are tagged with an acceptance level that depends on theirsignature status.
See “Acceptance Levels,” on page 127.
Chapter 7 Setting Up ESXi
VMware, Inc. 157

Prerequisites
Required privileges: Host.Configuration.SecurityProfile and Host.Configuration.Firewall
Procedure
1 Use the vSphere Client to access the host in one of the following ways.
n Connect to the host directly.
n Connect to vCenter Server, and select the host in the inventory.
2 Click the Configuration tab.
3 Under Software, click Security Profile.
4 Under Host Image Profile Acceptance Level, click Edit.
5 Select the acceptance level and click OK.
Table 7-4. Host Image Profile Acceptance Levels
Host Image Profile Acceptance Level Accepted Levels of VIBs
VMwareCertified VMwareCertified
VMwareAccepted VMwareCertified, VMwareAccepted
PartnerSupported VMwareCertified, VMwareAccepted, PartnerSupported
CommunitySupported VMwareCertified, VMwareAccepted, PartnerSupported,CommunitySupported
Reset the System ConfigurationIf you are having trouble determining the source of a problem with your ESXi host, you can reset the systemconfiguration.
Changes in the system configuration can be related to various problems, including problems with connectivityto the network and devices. Resetting the system configuration might solve such problems. If resetting thesystem configuration does not solve the problem, it can still rule out configuration changes made since theinitial setup as the source of the problem.
When you reset the configuration, the software overrides all your configuration changes, deletes the passwordfor the administrator account (root), and reboots the host. Configuration changes made by your hardwarevendor, such as IP address settings and license configuration, might also be deleted.
Resetting the configuration does not remove virtual machines on the ESXi host. After you reset theconfiguration defaults, the virtual machines are not visible, but you make them visible again by reconfiguringstorage and reregistering the virtual machines.
CAUTION When you reset the configuration defaults, users accessing the host lose connectivity.
Prerequisites
Before resetting the configuration, back up your ESXi configuration in case you want to restore yourconfiguration.
Procedure
1 Back up the configuration using the vSphere CLI vicfg-cfgbackup command.
2 From the direct console, select Reset System Configuration and press Enter.
3 Press F11 to confirm.
vSphere Installation and Setup
158 VMware, Inc.

The system reboots after all settings are reset to the default values.
Remove All Custom Packages on ESXiAfter adding custom packages, you might decide to remove them.
Prerequisites
Before you remove custom packages, shut down or migrate running virtual machines off of the ESXi host.
Procedure
1 Reboot the ESXi host.
2 In the direct console, select Remove Custom Extensions and press F11 to confirm.
3 Reboot the host.
All custom packages are removed.
Disable Support for Non-ASCII Characters in Virtual Machine File andDirectory Names
By default, ESXi supports the use of non-ASCII characters for virtual machine file and directory names. Youcan disable this support by modifying the /etc/vmware/hostd/config.xml file.
After you disable this support, you can still enter non-ASCII characters for virtual machine names. vSphereuser interfaces will display the virtual machine names in the non-ASCII characters, but ESXi will convert theactual file and directory names to ASCII strings.
Procedure
1 Using a text editor, open the /etc/vmware/hostd/config.xml file for the ESXi host.
2 Within the <config></config> tag, add the following code.
<g11nSupport>false</g11nSupport>
3 Save and close the file.
4 Reboot the host.
Disable ESXiIf you do not want your server to be an ESXi host, you can deactivate the ESXi setup.
Procedure
1 Remove VMFS datastores on the internal disks so that the internal disks are no longer set up to store virtualmachines.
2 Change the boot setting in the BIOS so that the host no longer boots into ESXi.
3 Install another operating system in its place.
Chapter 7 Setting Up ESXi
VMware, Inc. 159

vSphere Installation and Setup
160 VMware, Inc.

After You Install and Set Up ESXi 8After ESXi is installed and set up, consider managing the host through the vSphere Client, licensing the host,and backing up your ESXi configuration.
This chapter includes the following topics:
n “Managing the ESXi Host with the vSphere Client and the vSphere Web Client,” on page 161
n “Licensing ESXi Hosts,” on page 161
Managing the ESXi Host with the vSphere Client and thevSphere Web Client
The vSphere Client and the vSphere Web Client provide simplest way to manage your ESXi host and operateits virtual machines.
You can use the vSphere Client to connect directly to the ESXi host. If you use vCenter Server, you can alsouse the vSphere Client to connect to and operate vCenter Server. You can use the vSphere Web Client to connectto and operate vCenter Server by Web browser.
To install the vSphere Client and the vSphere Web Client, see the following topics
n vSphere Client
n “Download the vSphere Client,” on page 208
n “Install the vSphere Client,” on page 208
n “Start the vSphere Client,” on page 209
n vSphere Web Clientn “Install and Start the vSphere Web Client,” on page 209
Licensing ESXi HostsvSphere provides several ways to license your hosts.
You can use vCenter Server or the vSphere Client to license an individual host.
For information about managing host licenses, see Managing Licenses on ESXi Hosts in vCenter Server and HostManagement.
You can set up bulk licensing using PowerCLI commands. Bulk licensing works for all ESXi hosts, but isespecially useful for hosts provisioned with Auto Deploy. See “Set Up Bulk Licensing,” on page 77.
You can also operate ESXi without licensing for a 60-day evaluation period, during which you can access thefull ESXi feature set. See “About ESXi Evaluation and Licensed Modes,” on page 15
VMware, Inc. 161
About ESXi Evaluation and Licensed ModesAfter you purchase a host license, VMware provides a serial number that you can use to license vSphere. Youcan use evaluation mode to access the full ESXi feature set, including features you have not purchased a licensefor.
For example, in evaluation mode, you can use vMotion, HA, DRS, and other features, even if you have notlicensed those features.
The installable version of ESXi is always installed in evaluation mode. ESXi Embedded is preinstalled on aninternal USB device by your hardware vendor. It might be in evaluation mode or prelicensed.
The evaluation period is 60 days and begins when you turn on the ESXi host, even if you start in licensed moderather than evaluation mode. Any time during the 60-day evaluation period, you can convert from licensedmode to evaluation mode. To take full advantage of the 60-day evaluation period, you should convert toevaluation mode as soon as possible after you first power on the host. See “Convert an ESXi Host to EvaluationMode,” on page 162.
For information about licensing the host, see the vCenter Server and Host Management.
Convert an ESXi Host to Evaluation ModeYou can switch a licensed ESXi host to evaluation mode to explore all the features of ESXi, including featuresthat you have not licensed.
See “About ESXi Evaluation and Licensed Modes,” on page 15.
Prerequisites
The 60-day evaluation period has not expired.
Procedure
1 From the vSphere Client, select the host in the inventory.
2 Click the Configuration tab.
3 Under Software, click Licensed Features.
4 Click Edit next to ESXi License Type.
5 Click (No License Key).
6 Click OK to save your changes.
You can now access all the features of ESXi.
Recording the ESXi License KeyAll ESXi editions have license keys associated with them. VMware recommends that you write down the licensekey and tape it to the server, or put the license key in a secure, easily accessible location.
You can access the license key from the direct console or the vSphere Client. If the host becomes inaccessibleor unbootable, it is important that you have a record of the license key.
vSphere Installation and Setup
162 VMware, Inc.

Access the ESXi License Key from the Direct ConsoleIf you have physical access to the host or remote access to the direct console, you can use the direct console toaccess the ESXi license key.
Procedure
u From the direct console, select View Support Information.
The license key appears in the form XXXXX-XXXXX-XXXXX-XXXXX-XXXXX, labeled License SerialNumber.
NOTE The physical machine serial number also appears, labeled Serial Number. Do not confuse the licensekey with the physical machine serial number.
Access the ESXi License Key from the vSphere ClientIf you are not local to the host and cannot access the direct console, use the vSphere Client to access the ESXilicense key.
Procedure
1 From the vSphere Client, select the host in the inventory.
2 Click the Configuration tab and click Licensed Features.
The license key appears in the form XXXXX-XXXXX-XXXXX-XXXXX-XXXXX.
Chapter 8 After You Install and Set Up ESXi
VMware, Inc. 163

vSphere Installation and Setup
164 VMware, Inc.
Preparing vCenter Server Databases 9vCenter Server and vSphere Update Manager require databases to store and organize server data.
Each vCenter Server instance must have its own database. vCenter Server instances cannot share the samedatabase schema. Multiple vCenter Server databases can reside on the same database server, or they can beseparated across multiple database servers. For Oracle databases, which have the concept of schema objects,you can run multiple vCenter Server instances in a single database server if you have a different schema ownerfor each vCenter Server instance. You can also use a dedicated Oracle database server for each vCenter Serverinstance.
You do not need to install a new database server for the vCenter Server installation to work. DuringvCenter Server installation, you can point the vCenter Server system to any existing supported database.vCenter Server supports IBM DB2, Oracle, and Microsoft SQL Server databases. Update Manager supportsOracle and Microsoft SQL Server databases. For information about supported database server versions, seethe VMware Product Interoperability Matrix at http://www.vmware.com/resources/compatibility/sim/interop_matrix.php.
CAUTION If you have a VirtualCenter database that you want to preserve, do not perform a fresh installationof vCenter Server. See the vSphere Upgrade documentation.
VMware recommends using separate databases for vCenter Server and Update Manager. For a smalldeployments, a separate database for Update Manager might not be necessary.
This chapter includes the following topics:
n “vCenter Server Database Patch and Configuration Requirements,” on page 165
n “Create a 64-Bit DSN,” on page 166
n “Configure vCenter Server to Communicate with the Local Database,” on page 167
n “About the Bundled Microsoft SQL Server 2008 R2 Express Database Package,” on page 167
n “Maintaining a vCenter Server Database,” on page 167
n “Configure DB2 Databases,” on page 168
n “Configure Microsoft SQL Server Databases,” on page 176
n “Configure Oracle Databases,” on page 186
vCenter Server Database Patch and Configuration RequirementsAfter you choose a database type, make sure you understand the configuration and patch requirements forthe database.
vCenter Server databases require a UTF code set.
VMware, Inc. 165

Contact your DBA for the appropriate database credentials.
For information about specific database versions and service pack configurations supported with vCenterServer, see the VMware Product Interoperability Matrixes.
Table 9-1. Configuration Notes for Databases Supported with vCenter Server
Database Type Configuration Notes
IBM DB2 If the database is not local to the vCenter Server system, install the IBM Data Server RuntimeClient.Install the IBM DB2 native client according to the IBM instructions for your DB2 version.Ensure that the DB2 binaries directory (typically C:\Program Files\IBM\SQLLIB\BIN) is inthe system path. DB2 might be installed at a different location.You might need to restart the Microsoft Windows machine for the service to recognize thechange in the environment variable.Ensure that the machine has a valid ODBC data source name (DSN) entry.NOTE This database is not supported for the vCenter Server Appliance.
Microsoft SQL Server 2008R2 Express
Bundled database that you can use for small deployments of up to 5 hosts and 50 virtualmachines.NOTE This database is not supported for the vCenter Server Appliance.
Microsoft SQL Server 2005 Ensure that the machine has a valid ODBC DSN entry.If Microsoft SQL Server 2005 is not already installed and the machine has MSXML CoreServices 6.0 installed, remove MSXML Core Services 6.0 before installing Microsoft SQL Server2005. If you cannot remove it using the Add or Remove Programs utility, use the WindowsInstaller CleanUp utility. See http://support.microsoft.com/kb/968749.NOTE This database is not supported for the vCenter Server Appliance.
Microsoft SQL Server 2008 Ensure that the machine has a valid ODBC DSN entry.NOTE This database is not supported for the vCenter Server Appliance.
Oracle For Oracle 10g R2, if necessary, first apply patch 10.2.0.4 (or later) to the client and server. Youcan then apply patch 5699495 to the client.Ensure that the machine has a valid ODBC DSN entry.For the Oracle Instant client, copy ojdbc14.jar to the vCenter Server tomcat directory (vCenterinstall location\Infrastructure\tomcat\lib)The Oracle 10g client includes ojdbc14.jar (Oracle client installlocation\oracle\product\10.2.0\instance_name\jdbc\lib). The Oracle 11g clientincludes ojdbc14.jar (Oracle client installlocation\app\Administrator\product\11.1.0\instancename\sqldeveloper\jdbc\lib). The vCenter Server installer copies the ojdbc14.jar file from the Oracle clientinstallation location to the vCenter Server tomcat directory (vCenter installlocation\Infrastructure\tomcat\lib)If the ojdbc14.jar file is not found in the Oracle 10g client location, the vCenter Server installerprompts you to copy the file manually. You can download the file the oracle.com Web site.
Create a 64-Bit DSNThe vCenter Server system must have a 64-bit DSN. This requirement applies to all supported databases.
Procedure
1 Select Control Panel > Administrative Tools > Data Sources (ODBC).
2 Use the application to create a system DSN.
If you have a Microsoft SQL database, create the system DSN for the SQL Native Client driver.
3 Test the connectivity.
The system now has a DSN that is compatible with vCenter Server. When the vCenter Server installer promptsyou for a DSN, select the 64-bit DSN.
vSphere Installation and Setup
166 VMware, Inc.

Configure vCenter Server to Communicate with the Local DatabaseThe machine on which you install or upgrade to vCenter Server must have a computer name that is 15characters or fewer. If your database is located on the same machine on which vCenter Server will be installed,and you have recently changed the name of this machine to comply with the name-length requirement, makesure the vCenter Server DSN is configured to communicate with the new name of the machine.
Changing the vCenter Server computer name impacts database communication if the database server is on thesame computer with vCenter Server. If you changed the machine name, you can verify that communicationremains intact.
The name change has no effect on communication with remote databases. You can skip this procedure if yourdatabase is remote.
NOTE The name-length limitation applies to the vCenter Server system. The data source name (DSN) andremote database systems can have names with more than 15 characters.
Check with your database administrator or the database vendor to make sure all components of the databaseare working after you rename the server.
Prerequisites
n Make sure the database server is running.
n Make sure that the vCenter Server computer name is updated in the domain name service (DNS).
Ping the computer name to test this connection. For example, if the computer name ishost-1.company.com, run the following command in the Windows command prompt:
ping host-1.company.com
If you can ping the computer name, the name is updated in DNS.
Procedure
1 Update the data source information, as needed.
2 Verify the data source connectivity.
About the Bundled Microsoft SQL Server 2008 R2 Express DatabasePackage
The bundled Microsoft SQL Server 2008 R2 Express database package is installed and configured when youselect the bundled database during vCenter Server installation or upgrade.
To install the bundled Microsoft SQL Server 2008 R2 Express database, Microsoft Windows Installer version4.5 (MSI 4.5) is required on your system. You can download MSI 4.5 from the Microsoft Web site. You can alsoinstall MSI 4.5 directly from the vCenter Server autorun.exe installer.
Maintaining a vCenter Server DatabaseAfter your vCenter Server database instance and vCenter Server are installed and operational, performstandard database maintenance processes.
The standard database maintenance processes include the following:
n Monitoring the growth of the log file and compacting the database log file, as needed.
n Scheduling regular backups of the database.
Chapter 9 Preparing vCenter Server Databases
VMware, Inc. 167

n Backing up the database before any vCenter Server upgrade.
See your database vendor's documentation for specific maintenance procedures and support.
Configure DB2 DatabasesIf you use a DB2 database for your vCenter Server repository, you need to configure your database to workwith vCenter Server.
Procedure
1 Configure an IBM DB2 Database User and Group on page 168To use an IBM DB2 database when you install vCenter Server, you must configure the database user andgroup.
2 Add the Database Instance Registry Variables on page 169After connecting to the server as DB2 instance owner, you can configure the DB2 registry variables onthe database server.
3 Add the Client Instance Registry Variable on page 170After connecting to the server as DB2 instance owner, you can configure the DB2 registry variables onthe vCenter Server.
4 Use a Script to Create a DB2 Database on page 171When you use a DB2 database with vCenter Server, the database must have certain buffer pools, tablespaces, and privileges. To simplify the process of creating the database, you can run a DB2 script.
5 (Optional) Use a Script to Create the DB2 Database Schema on page 172The vCenter Server installer creates the schema during installation. Experienced database administratorswho need more control over schema creation because of environmental constraints can use a script tocreate their database schema.
6 Configure a Connection to a Local DB2 Database on Microsoft Windows on page 174You can configure a DB2 database for vCenter Server locally on the same Microsoft Windows machineas vCenter Server.
7 Prepare to Configure a Connection to a Remote DB2 Database on page 174You have several steps you need to complete before you configure a connection to a remote DB2 databaseon Linux, UNIX, or Microsoft Windows.
8 Configure a Connection to a Remote DB2 Database on Linux, UNIX, or Microsoft Windows onpage 175You can configure a DB2 database for vCenter Server remotely on a network-connected MicrosoftWindows, Linux, or UNIX host.
9 (Optional) Configure an IBM DB2 Database User to Enable Database Monitoring on page 176vCenter Server Database Monitoring captures metrics that enable the administrator to assess the statusand health of the database server. Enabling Database Monitoring helps the administrator prevent vCenterdowntime due to a lack of resources for the database server.
Configure an IBM DB2 Database User and GroupTo use an IBM DB2 database when you install vCenter Server, you must configure the database user and group.
You can configure a DB2 database for vCenter Server either locally on the same Microsoft Windows machineas vCenter Server or remotely on a network-connected Linux, UNIX, or Windows host.
vSphere Installation and Setup
168 VMware, Inc.
Prerequisites
n Review the software requirements for vCenter Server with DB2.
n Verify that a DB2 instance is created and configured for incoming TCP connections. See the DB2documentation Web site.
n Make sure that you created a user called vcx.
n The DB2 database server must use codeset UTF-8.
Procedure
1 Create an initial user on the operating system.
By default, DB2 uses the operating system authentication for all its database users.
2 If the database is hosted on a Microsoft Windows machine, add the user vcx as a member of the groupDB2USERS.
3 Create a user group called DBSYSMON and add the user vcx as a member.
4 Open a DB2 command window or Command Line Processor (CLP) as the DB2 instance owner.
n On Microsoft Windows, select Start > IBM DB2 > DB2Copy1 > Command Line Tools > CommandWindow.
n On Linux or UNIX, open a terminal and switch your user to the DB2 instance owner.
5 In the DB2 command window, run the following commands to add the appropriate user group to thegroup of users capable of database system monitoring:
db2 update dbm cfg using sysmon_group dbsysmon
This command affects all databases in this instance.
You now have a DB2 database user that you can reference in the vCenter Server installer.
What to do next
Add the database instance registry variables.
Add the Database Instance Registry VariablesAfter connecting to the server as DB2 instance owner, you can configure the DB2 registry variables on thedatabase server.
Prerequisites
Make sure that you configure an IBM DB2 database user and group.
Procedure
1 Open a DB2 Command window or Command Line Processor (CLP) as the DB2 instance owner.
n On Microsoft Windows, select Start > IBM DB2 > DB2Copy1 > Command Line Tools > CommandWindow.
n On Linux or UNIX, open a terminal and switch your user to the DB2 instance owner.
2 Start the DB2 instance.
db2start
3 Enable the DB2 administrative task scheduler.
db2set DB2_ATS_ENABLE=YES
Chapter 9 Preparing vCenter Server Databases
VMware, Inc. 169
4 Enable the DB2 database system to ignore uncommitted insertions.
db2set DB2_SKIPINSERTED=ON
5 Enable the table or index access scans to defer or avoid row locking until a data record is known to satisfypredicate evaluation.
db2set DB2_EVALUNCOMMITTED=ON
6 Enable the DB2 database system to skip deleted keys during index access and skip deleted rows duringtable access.
db2set DB2_SKIPDELETED=ON
7 Stop and restart the database instance.
db2stop force
db2start
These commands affect all databases in this instance.
All the required registry variables are set up.
What to do next
Add the client instance registry variable.
Add the Client Instance Registry VariableAfter connecting to the server as DB2 instance owner, you can configure the DB2 registry variables on thevCenter Server.
Prerequisites
n Configure an IBM DB2 database user and group.
n Add the database instance registry variables.
n Make sure that the DB2 runtime client is installed on the Windows machine that will host vCenter Server.If the database server and the vCenter Server are running on the same machine, you do not have to installthe runtime client separately.
Procedure
1 Open a DB2 Command window or Command Line Processor (CLP) as the DB2 instance owner.
n On Microsoft Windows, select Start > IBM DB2 > DB2Copy1 > Command Line Tools > CommandWindow.
n On Linux or UNIX, open a terminal and switch your user to the DB2 instance owner.
2 To configure the vSphere Client to behave as a Unicode application, set the DB2CODEPAGE registry variableto 1208.
db2set DB2CODEPAGE=1208
NOTE If you are configuring the DB2 database on the same machine as the one that is running vCenterServer, you need to run the db2set command after connecting to the database server (which is the sameas the vCenter Server host).
What to do next
Create the DB2 database, including all necessary buffer pools, table spaces, and privileges.
vSphere Installation and Setup
170 VMware, Inc.

Use a Script to Create a DB2 DatabaseWhen you use a DB2 database with vCenter Server, the database must have certain buffer pools, table spaces,and privileges. To simplify the process of creating the database, you can run a DB2 script.
Prerequisites
n Configure an IBM DB2 database user and group.
n Add the database instance registry variables.
n Add the client instance registry variable.
Procedure
1 Copy the following DB2 script into a text editor and save it with a descriptive filename, such asvcdbcreate.sql.
The script is located in the /installationdirectory/vpx/dbschema/db2_prereq_connection_configuration.txt vCenter Server installationpackage file.
CREATE DATABASE VCDB
AUTOMATIC STORAGE YES ON 'C:\'
DBPATH ON 'C:\' USING CODESET UTF-8
TERRITORY US
COLLATE USING SYSTEM PAGESIZE 4096;
UPDATE DB CFG FOR VCDB USING AUTO_MAINT ON;
UPDATE DB CFG FOR VCDB USING AUTO_TBL_MAINT ON;
UPDATE DB CFG FOR VCDB USING AUTO_RUNSTATS ON;
UPDATE DB CFG FOR VCDB USING logprimary 32 logsecond 6 logfilsiz 2048;
UPDATE ALERT CFG FOR DATABASE ON VCDB USING db.db_backup_req SET THRESHOLDSCHECKED YES;
UPDATE ALERT CFG FOR DATABASE ON VCDB USING db.tb_reorg_req SET THRESHOLDSCHECKED YES;
UPDATE ALERT CFG FOR DATABASE ON VCDB USING db.tb_runstats_req SET THRESHOLDSCHECKED YES;
CONNECT TO VCDB;
CREATE BUFFERPOOL VCBP_8K IMMEDIATE SIZE 250 AUTOMATIC PAGESIZE 8K;
CREATE LARGE TABLESPACE VCTS_8k PAGESIZE 8K MANAGED BY AUTOMATIC STORAGE EXTENTSIZE 32
OVERHEAD 12.67 PREFETCHSIZE 32 TRANSFERRATE 0.18 BUFFERPOOL VCBP_8K;
CREATE BUFFERPOOL VCBP_16K IMMEDIATE SIZE 250 AUTOMATIC PAGESIZE 16K;
CREATE LARGE TABLESPACE VCTS_16k PAGESIZE 16K MANAGED BY AUTOMATIC STORAGE EXTENTSIZE 32
OVERHEAD 12.67 PREFETCHSIZE 32 TRANSFERRATE 0.18 BUFFERPOOL VCBP_16K;
CREATE BUFFERPOOL VCBP_32K IMMEDIATE SIZE 250 AUTOMATIC PAGESIZE 32K;
CREATE LARGE TABLESPACE VCTS_32k PAGESIZE 32K MANAGED BY AUTOMATIC STORAGE EXTENTSIZE 32
OVERHEAD 12.67 PREFETCHSIZE 32 TRANSFERRATE 0.18 BUFFERPOOL VCBP_32K;
CREATE TABLESPACE SYSTOOLSPACE IN IBMCATGROUP MANAGED BY AUTOMATIC STORAGE EXTENTSIZE 4;
CREATE USER TEMPORARY TABLESPACE SYSTOOLSTMPSPACE IN IBMCATGROUP MANAGED BY AUTOMATIC STORAGE
EXTENTSIZE 4;
CREATE SYSTEM TEMPORARY TABLESPACE VCTEMPTS_8K PAGESIZE 8K MANAGED BY AUTOMATIC STORAGE
BUFFERPOOL VCBP_8K;
CREATE SYSTEM TEMPORARY TABLESPACE VCTEMPTS_16K PAGESIZE 16K MANAGED BY AUTOMATIC STORAGE
BUFFERPOOL VCBP_16K;
CREATE SYSTEM TEMPORARY TABLESPACE VCTEMPTS_32K PAGESIZE 32K MANAGED BY AUTOMATIC STORAGE
BUFFERPOOL VCBP_32K;
GRANT USE OF TABLESPACE VCTS_16K TO USER vcx WITH GRANT OPTION;
GRANT USE OF TABLESPACE VCTS_32K TO USER vcx WITH GRANT OPTION;
Chapter 9 Preparing vCenter Server Databases
VMware, Inc. 171

GRANT USE OF TABLESPACE VCTS_8K TO USER vcx WITH GRANT OPTION;
commit work;
connect reset;
terminate;
2 Customize the following values in the script.
n Database name: VCDB. You must use the same value for the ODBC setup.
n Database path: C:\ for Microsoft Windows, or a UNIX path with sufficient permissions.
n User name: vcx. You must use the same value for the ODBC setup.
Do not modify the script in any other way. Changing the setup for table spaces or buffer pools mightprevent successful installation of vCenter Server.
3 Run the script in a DB2 Command window.
db2 -svtf vcdbcreate.sql
You now have a DB2 database that you can use with vCenter Server.
What to do next
Configure a connection to a local or remote database.
(Optional) Use a Script to Create the DB2 Database SchemaThe vCenter Server installer creates the schema during installation. Experienced database administrators whoneed more control over schema creation because of environmental constraints can use a script to create theirdatabase schema.
To have the vCenter Server installer create your schema for you, see “Configure a Connection to a Local DB2Database on Microsoft Windows,” on page 174 or “Configure a Connection to a Remote DB2 Database onLinux, UNIX, or Microsoft Windows,” on page 175, depending on your environment.
Prerequisites
Create the DB2 database and user. You can create the DB2 database manually or by using scripts.
Procedure
1 Open a DB2 Command Editor window and log in as the user that you created on the vCenter Serverdatabase.
a Open DB2 Control Center.
b Select the database.
c Right-click the database and select Menu > Query.
2 In the directory of the vCenter Server installation package /installation directory/vpx/dbschema, locatethe dbschema scripts.
3 In the DB2 Command Editor window, open the SQL files one at a time and press Ctrl+Enter to run eachSQL file query in the order shown here.
VCDB_db2.sql
TopN_DB_db2.sql
vSphere Installation and Setup
172 VMware, Inc.

For the following files, change the statement termination character from ; to @.
load_stats_proc_db2.sql
purge_stat1_proc_db2.sql
purge_stat2_proc_db2.sql
purge_stat3_proc_db2.sql
purge_usage_stats_proc_db2.sql
stats_rollup1_proc_db2.sql
stats_rollup2_proc_db2.sql
stats_rollup3_proc_db2.sql
cleanup_events_db2.sql
delete_stats_proc_db2.sql
upsert_last_event_proc_db2.sql
load_usage_stats_proc_db2.sql
calc_topn1_proc_db2.sql
calc_topn2_proc_db2.sql
calc_topn3_proc_db2.sql
calc_topn4_proc_db2.sql
clear_topn1_proc_db2.sql
clear_topn2_proc_db2.sql
clear_topn3_proc_db2.sql
clear_topn4_proc_db2.sql
rule_topn1_proc_db2.sql
rule_topn2_proc_db2.sql
rule_topn3_proc_db2.sql
rule_topn4_proc_db2.sql
process_license_snapshot_db2.sql
process_temptable0_proc_db2.sql
process_temptable1_proc_db2.sql
process_temptable2_proc_db2.sql
job_schedule1_db2.sql
job_schedule2_db2.sql
job_schedule3_db2.sql
job_cleanup_events_db2.sql
job_topn_past_day_db2.sql
job_topn_past_week_db2.sql
job_topn_past_month_db2.sql
job_topn_past_year_db2.sql
job_property_bulletin_db2
You now have a database schema that is compatible with vCenter Server.
4 (Optional) you can also run the following scripts to enable database health monitoring. Use @ for thestatement termination character.
job_dbm_performance_data_db2.sql
process_performance_data_db2.sql
5 On the machine that you intend to install vCenter Server on, create a data source name (DSN) that pointsto the database server that has the schema.
6 Run the vCenter Server installer.
When prompted, provide the database user login.
7 If a database reinitialization warning message appears in the vCenter Server installer, select Do notoverwrite, leave my existing database in place and continue the installation.
This message appears if you are using a database that has vCenter Server tables that were created by aprevious installation. The message does not appear if the database is clean.
Chapter 9 Preparing vCenter Server Databases
VMware, Inc. 173

If you leave your existing database in place, you cannot join the vCenter Server to a Linked Mode groupduring the installation. You can join after the installation is complete. (See “Join a Linked Mode GroupAfter Installation,” on page 218.)
Configure a Connection to a Local DB2 Database on Microsoft WindowsYou can configure a DB2 database for vCenter Server locally on the same Microsoft Windows machine asvCenter Server.
NOTE The vCenter Server installer should generate and validate the JDBC URL for the vCenter Server database.However, if you use a local, or indirect, DB2 database, the DB2 analyzer is not able to construct the JDBC URL.You can add the JDBC URL manually. See “JDBC URL Formats for the vCenter Server Database,” onpage 196.
Prerequisites
n Configure a user and group for the database.
n Add the database instance registry variables.
n Add the client instance registry variable.
n Create the database with the required buffer pools, table spaces, and privileges.
Procedure
1 On the Microsoft Windows machine that will host vCenter Server, click Start > Run to open the MicrosoftODBC Administrator utility.
2 Type odbcad32.exe.
3 On the System DSN tab, click Add.
4 Select the driver that corresponds to your database (for example, IBM DB2 ODBC Driver - VCDB2Add)and click Finish.
5 Enter a name for the DSN (for example, VCDB2), and select your database from the menu.
6 Select the DSN and click Configure to verify that the database connection works.
7 Type the database user name (for example, vcx) and password.
8 Click Connect.
The DB2 database is configured.
What to do next
Optionally, you can enable Database Monitoring for DB2 database users. Otherwise, install vCenter Server.When the vCenter Server installer prompts you for a DSN, point to the DSN that you created in this procedure.
Prepare to Configure a Connection to a Remote DB2 DatabaseYou have several steps you need to complete before you configure a connection to a remote DB2 database onLinux, UNIX, or Microsoft Windows.
Prerequisites
If you are using DB2 9.5, fix pack 5 or Hotfix 22318 is required. Fix pack 7 is recommended. If you are usingDB2 9.7, fix pack 2 is required. Fix pack 3a is recommended.
Procedure
1 Download the IBM Data Server Driver for ODBC and CLI from the IBM Software Web site.
vSphere Installation and Setup
174 VMware, Inc.

2 On the remote machine, take the following steps.
a Configure a database user and group.
b Create the database with the required buffer pools, table spaces, and privileges.
c Add the database instance registry variables.
3 On the machine where vCenter Server will be installed, take the following steps.
a Add the client instance registry variable.
b Make sure that the IBM Data Server Runtime Client is installed
4 On the machine where vCenter Server will be installed, catalog the server node and the database.
In a command window, run the following commands.
db2 catalog tcpip node name remote DB Server host name or IP Address server Port number used
db2 catalog db database name at node name authentication SERVER
Configure a Connection to a Remote DB2 Database on Linux, UNIX, or MicrosoftWindows
You can configure a DB2 database for vCenter Server remotely on a network-connected Microsoft Windows,Linux, or UNIX host.
Prerequisites
See “Prepare to Configure a Connection to a Remote DB2 Database,” on page 174.
Procedure
1 On the Microsoft Windows machine that will host vCenter Server, select Start > Run.
2 Type odbcad32.exe to open the Microsoft ODBC Administrator utility.
3 On the System DSN tab, click Add.
4 Select the driver that corresponds to your database (for example, IBM DB2 ODBC Driver - VCDB2_remote)and click Finish.
5 In the IBM DB2 Driver Add dialog box, configure the database values.
n Database name. The default value is vcdb.
n Database alias. The database alias can be the same as the database name.
n DSN name. For example, VCDB2.
You have completed the DB2 database configuration.
What to do next
Optionally, you can enable Database Monitoring for DB2 database users. Otherwise, you can now installvCenter Server. When the vCenter Server installer prompts you for a DSN, point to the DSN that you createdin this procedure.
Chapter 9 Preparing vCenter Server Databases
VMware, Inc. 175

(Optional) Configure an IBM DB2 Database User to Enable Database MonitoringvCenter Server Database Monitoring captures metrics that enable the administrator to assess the status andhealth of the database server. Enabling Database Monitoring helps the administrator prevent vCenterdowntime due to a lack of resources for the database server.
Database Monitoring for vCenter Server enables administrators to monitor the database server CPU, memory,I/O, data storage, and other environment factors for stress conditions. Statistics are stored in the vCenter ServerProfile Logs.
Prerequisites
Configure the IBM DB2 database user group DBSYSMON, and add the group to the group of users capable ofdatabase system monitoring. See “Configure an IBM DB2 Database User and Group,” on page 168.
Procedure
u Make sure the database user is a member of the DBSYSMON group.
Database Monitoring is enabled for all members of the DBSYSMON group.
What to do next
Install vCenter Server.
Configure Microsoft SQL Server DatabasesTo use a Microsoft SQL database for your vCenter Server repository, configure your database to work withvCenter Server.
Procedure
1 Create a SQL Server Database and User for vCenter Server on page 177You must create a database and user for vCenter Server. To simplify the process, you can use a script.
2 Set Database Permissions By Manually Creating Database Roles and the VMW Schema on page 178By using this recommended method, available with vCenter Server 5.0, the vCenter Server databaseadministrator can set permissions for vCenter Server users and administrators to be granted throughMicrosoft SQL Server database roles.
3 Set Database Permissions by Using the dbo Schema and the db_owner Database Role on page 179If you use Microsoft SQL Server database, the simplest way to assign permissions for a vCenter Serverdatabase user is through the database role db_owner. Assign the db_owner role to the vCenter Serverdatabase user on both the vCenter and MSDB databases.
4 Use a Script to Create a vCenter Server User by Using the dbo Schema and db_owner Database Role onpage 179If you set database permissions by using the dbo schema and db_owner database role, you can use ascript to create a vCenter Server user with the db_owner database role.
5 Use a Script to Create a Microsoft SQL Server Database Schema and Roles on page 180In this recommended method of configuring the SQL database, you create the custom schema VMW,instead of using the existing dbo schema.
6 (Optional) Use a Script to Create Microsoft SQL Server Database Objects Manually on page 181You can create database objects manually with this method of configuring the SQL database.
vSphere Installation and Setup
176 VMware, Inc.

7 Configure a SQL Server ODBC Connection on page 184After you create a vCenter Server user, establish a connection with a SQL Server database. This connectionis required to install a vCenter Server system.
8 Configure Microsoft SQL Server TCP/IP for JDBC on page 185If the Microsoft SQL Server database has TCP/IP disabled and the dynamic ports are not set, the JDBCconnection remains closed. The closed connection causes the vCenter Server statistics to malfunction.You can configure the server TCP/IP for JDBC.
9 (Optional) Configure a Microsoft SQL Server Database User to Enable Database Monitoring onpage 186vCenter Server Database Monitoring captures metrics that enable the administrator to assess the statusand health of the database server. Enabling Database Monitoring helps the administrator prevent vCenterdowntime because of a lack of resources for the database server.
Create a SQL Server Database and User for vCenter ServerYou must create a database and user for vCenter Server. To simplify the process, you can use a script.
In the script, you can customize the location of the data and log files.
The user that is created by this script is not subject to any security policy. Change the passwords as appropriate.
Procedure
1 Log in to a Microsoft SQL Server Management Studio session as the sysadmin (SA) or a user account withsysadmin privileges.
2 Run the following script.
The script is located in the vCenter Server installation package at /<installationdirectory>/vpx/dbschema/DB_and_schema_creation_scripts_MSSQL.txt.
use [master]
go
CREATE DATABASE [VCDB] ON PRIMARY
(NAME = N'vcdb', FILENAME = N'C:\VCDB.mdf', SIZE = 2000KB, FILEGROWTH = 10% )
LOG ON
(NAME = N'vcdb_log', FILENAME = N'C:\VCDB.ldf', SIZE = 1000KB, FILEGROWTH = 10%)
COLLATE SQL_Latin1_General_CP1_CI_AS
go
use VCDB
go
sp_addlogin @loginame=[vpxuser], @passwd=N'vpxuser!0', @defdb='VCDB',
@deflanguage='us_english'
go
ALTER LOGIN [vpxuser] WITH CHECK_POLICY = OFF
go
CREATE USER [vpxuser] for LOGIN [vpxuser]
go
use MSDB
go
CREATE USER [vpxuser] for LOGIN [vpxuser]
go
You now have a Microsoft SQL Server database that you can use with vCenter Server.
What to do next
See “Set Database Permissions By Manually Creating Database Roles and the VMW Schema,” on page 178.
Chapter 9 Preparing vCenter Server Databases
VMware, Inc. 177
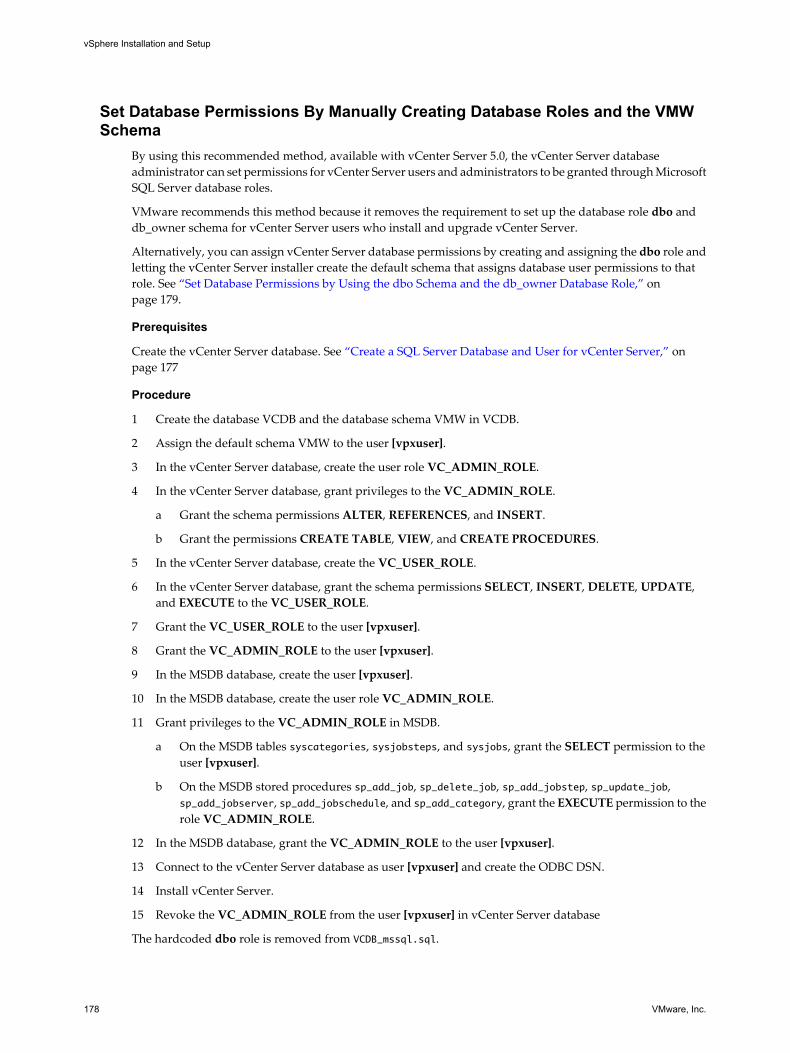
Set Database Permissions By Manually Creating Database Roles and the VMWSchema
By using this recommended method, available with vCenter Server 5.0, the vCenter Server databaseadministrator can set permissions for vCenter Server users and administrators to be granted through MicrosoftSQL Server database roles.
VMware recommends this method because it removes the requirement to set up the database role dbo anddb_owner schema for vCenter Server users who install and upgrade vCenter Server.
Alternatively, you can assign vCenter Server database permissions by creating and assigning the dbo role andletting the vCenter Server installer create the default schema that assigns database user permissions to thatrole. See “Set Database Permissions by Using the dbo Schema and the db_owner Database Role,” onpage 179.
Prerequisites
Create the vCenter Server database. See “Create a SQL Server Database and User for vCenter Server,” onpage 177
Procedure
1 Create the database VCDB and the database schema VMW in VCDB.
2 Assign the default schema VMW to the user [vpxuser].
3 In the vCenter Server database, create the user role VC_ADMIN_ROLE.
4 In the vCenter Server database, grant privileges to the VC_ADMIN_ROLE.
a Grant the schema permissions ALTER, REFERENCES, and INSERT.
b Grant the permissions CREATE TABLE, VIEW, and CREATE PROCEDURES.
5 In the vCenter Server database, create the VC_USER_ROLE.
6 In the vCenter Server database, grant the schema permissions SELECT, INSERT, DELETE, UPDATE,and EXECUTE to the VC_USER_ROLE.
7 Grant the VC_USER_ROLE to the user [vpxuser].
8 Grant the VC_ADMIN_ROLE to the user [vpxuser].
9 In the MSDB database, create the user [vpxuser].
10 In the MSDB database, create the user role VC_ADMIN_ROLE.
11 Grant privileges to the VC_ADMIN_ROLE in MSDB.
a On the MSDB tables syscategories, sysjobsteps, and sysjobs, grant the SELECT permission to theuser [vpxuser].
b On the MSDB stored procedures sp_add_job, sp_delete_job, sp_add_jobstep, sp_update_job,sp_add_jobserver, sp_add_jobschedule, and sp_add_category, grant the EXECUTE permission to therole VC_ADMIN_ROLE.
12 In the MSDB database, grant the VC_ADMIN_ROLE to the user [vpxuser].
13 Connect to the vCenter Server database as user [vpxuser] and create the ODBC DSN.
14 Install vCenter Server.
15 Revoke the VC_ADMIN_ROLE from the user [vpxuser] in vCenter Server database
The hardcoded dbo role is removed from VCDB_mssql.sql.
vSphere Installation and Setup
178 VMware, Inc.
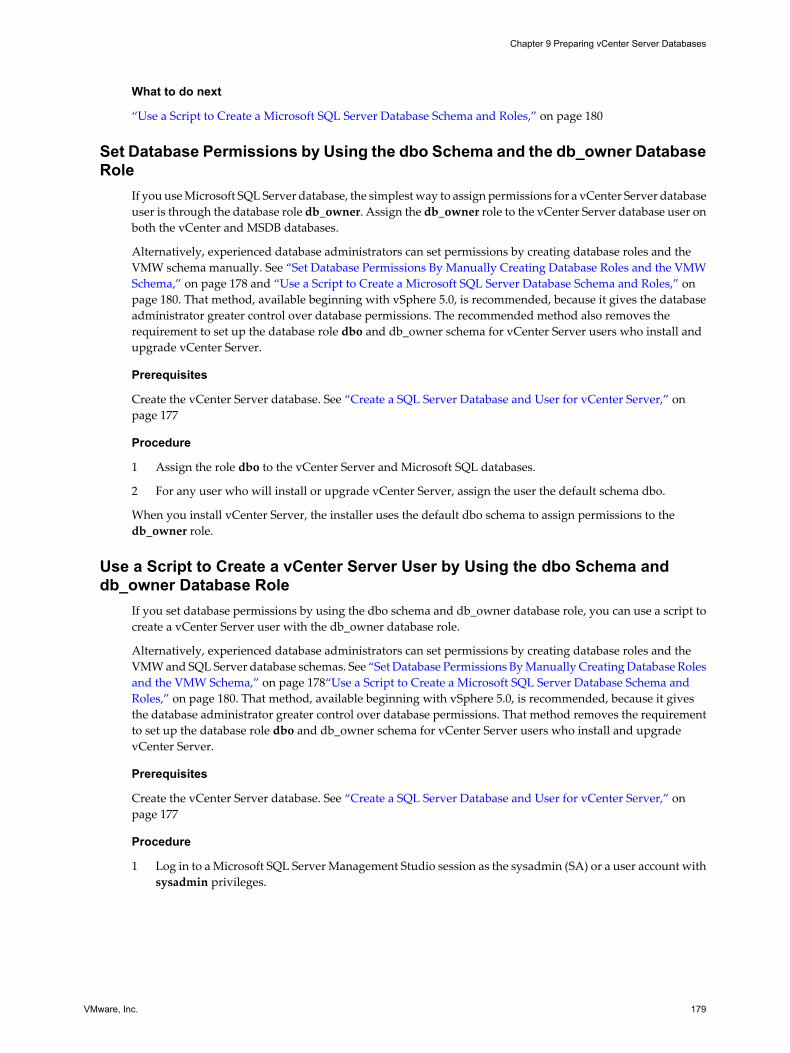
What to do next
“Use a Script to Create a Microsoft SQL Server Database Schema and Roles,” on page 180
Set Database Permissions by Using the dbo Schema and the db_owner DatabaseRole
If you use Microsoft SQL Server database, the simplest way to assign permissions for a vCenter Server databaseuser is through the database role db_owner. Assign the db_owner role to the vCenter Server database user onboth the vCenter and MSDB databases.
Alternatively, experienced database administrators can set permissions by creating database roles and theVMW schema manually. See “Set Database Permissions By Manually Creating Database Roles and the VMWSchema,” on page 178 and “Use a Script to Create a Microsoft SQL Server Database Schema and Roles,” onpage 180. That method, available beginning with vSphere 5.0, is recommended, because it gives the databaseadministrator greater control over database permissions. The recommended method also removes therequirement to set up the database role dbo and db_owner schema for vCenter Server users who install andupgrade vCenter Server.
Prerequisites
Create the vCenter Server database. See “Create a SQL Server Database and User for vCenter Server,” onpage 177
Procedure
1 Assign the role dbo to the vCenter Server and Microsoft SQL databases.
2 For any user who will install or upgrade vCenter Server, assign the user the default schema dbo.
When you install vCenter Server, the installer uses the default dbo schema to assign permissions to thedb_owner role.
Use a Script to Create a vCenter Server User by Using the dbo Schema anddb_owner Database Role
If you set database permissions by using the dbo schema and db_owner database role, you can use a script tocreate a vCenter Server user with the db_owner database role.
Alternatively, experienced database administrators can set permissions by creating database roles and theVMW and SQL Server database schemas. See “Set Database Permissions By Manually Creating Database Rolesand the VMW Schema,” on page 178“Use a Script to Create a Microsoft SQL Server Database Schema andRoles,” on page 180. That method, available beginning with vSphere 5.0, is recommended, because it givesthe database administrator greater control over database permissions. That method removes the requirementto set up the database role dbo and db_owner schema for vCenter Server users who install and upgradevCenter Server.
Prerequisites
Create the vCenter Server database. See “Create a SQL Server Database and User for vCenter Server,” onpage 177
Procedure
1 Log in to a Microsoft SQL Server Management Studio session as the sysadmin (SA) or a user account withsysadmin privileges.
Chapter 9 Preparing vCenter Server Databases
VMware, Inc. 179

2 Run the following script.
The script is located in the vCenter Server installation package /installationdirectory/vpx/dbschema/DB_and_schema_creation_scripts_MSSQL.txt file.
use VCDB
go
sp_addrolemember @rolename = 'db_owner', @membername = 'vpxuser'
go
use MSDB
go
sp_addrolemember @rolename = 'db_owner', @membername = 'vpxuser'
go
What to do next
“Configure a SQL Server ODBC Connection,” on page 184
Use a Script to Create a Microsoft SQL Server Database Schema and RolesIn this recommended method of configuring the SQL database, you create the custom schema VMW, insteadof using the existing dbo schema.
This method requires that you create new database roles and grant them to the database user. See “Set DatabasePermissions By Manually Creating Database Roles and the VMW Schema,” on page 178 and “Use a Script toCreate a Microsoft SQL Server Database Schema and Roles,” on page 180.
Prerequisites
Create the SQL Server database and user for vCenter Server. You can create the database manually or by usinga script. See “Create a SQL Server Database and User for vCenter Server,” on page 177
Procedure
1 Log in to a Microsoft SQL Server Management Studio session as the sysadmin (SA) or a user account withsysadmin privileges.
2 Run the following script.
The script is located in the vCenter Server installation package at /installationdirectory/vpx/dbschema/DB_and_schema_creation_scripts_MSSQL.txt
CREATE SCHEMA [VMW]
go
ALTER USER [vpxuser] WITH DEFAULT_SCHEMA =[VMW]
go
if not exists (SELECT name FROM sysusers WHERE issqlrole=1 AND name = 'VC_ADMIN_ROLE')
CREATE ROLE VC_ADMIN_ROLE;
GRANT ALTER ON SCHEMA :: [VMW] to VC_ADMIN_ROLE;
GRANT REFERENCES ON SCHEMA :: [VMW] to VC_ADMIN_ROLE;
GRANT INSERT ON SCHEMA :: [VMW] to VC_ADMIN_ROLE;
GRANT CREATE TABLE to VC_ADMIN_ROLE;
GRANT CREATE VIEW to VC_ADMIN_ROLE;
GRANT CREATE Procedure to VC_ADMIN_ROLE;
if not exists (SELECT name FROM sysusers WHERE issqlrole=1 AND name = 'VC_USER_ROLE')
CREATE ROLE VC_USER_ROLE
go
vSphere Installation and Setup
180 VMware, Inc.

GRANT SELECT ON SCHEMA :: [VMW] to VC_USER_ROLE
go
GRANT INSERT ON SCHEMA :: [VMW] to VC_USER_ROLE
go
GRANT DELETE ON SCHEMA :: [VMW] to VC_USER_ROLE
go
GRANT UPDATE ON SCHEMA :: [VMW] to VC_USER_ROLE
go
GRANT EXECUTE ON SCHEMA :: [VMW] to VC_USER_ROLE
go
sp_addrolemember VC_USER_ROLE , [vpxuser]
go
sp_addrolemember VC_ADMIN_ROLE , [vpxuser]
go
use MSDB
go
if not exists (SELECT name FROM sysusers WHERE issqlrole=1 AND name = 'VC_ADMIN_ROLE')
CREATE ROLE VC_ADMIN_ROLE;
go
GRANT SELECT on msdb.dbo.syscategories to VC_ADMIN_ROLE
go
GRANT SELECT on msdb.dbo.sysjobsteps to VC_ADMIN_ROLE
go
GRANT SELECT ON msdb.dbo.sysjobs to VC_ADMIN_ROLE
go
GRANT EXECUTE ON msdb.dbo.sp_add_job TO VC_ADMIN_ROLE
go
GRANT EXECUTE ON msdb.dbo.sp_delete_job TO VC_ADMIN_ROLE
go
GRANT EXECUTE ON msdb.dbo.sp_add_jobstep TO VC_ADMIN_ROLE
go
GRANT EXECUTE ON msdb.dbo.sp_update_job TO VC_ADMIN_ROLE
go
GRANT EXECUTE ON msdb.dbo.sp_add_jobserver TO VC_ADMIN_ROLE
go
GRANT EXECUTE ON msdb.dbo.sp_add_jobschedule TO VC_ADMIN_ROLE
go
GRANT EXECUTE ON msdb.dbo.sp_add_category TO VC_ADMIN_ROLE
go
sp_addrolemember VC_ADMIN_ROLE , [vpxuser]
go
(Optional) Use a Script to Create Microsoft SQL Server Database ObjectsManually
You can create database objects manually with this method of configuring the SQL database.
Alternatively, you can configure a SQL Server ODBC connection and run the Install package. The vCenterServer installer will create database objects. See“Configure a SQL Server ODBC Connection,” on page 184.
Using a script to create database objects manually requires that you take one of the following actions.
n Grant the db_owner role to the database user in VCDB and in MSDB. See “Set Database Permissions byUsing the dbo Schema and the db_owner Database Role,” on page 179 and “Use a Script to Create a vCenterServer User by Using the dbo Schema and db_owner Database Role,” on page 179.
Chapter 9 Preparing vCenter Server Databases
VMware, Inc. 181

n Grant the VC_ADMIN_ROLE to the database user in VCDB and in MSDB, and grant theVC_USER_ROLE to the database user in VCDB. See “Set Database Permissions By Manually CreatingDatabase Roles and the VMW Schema,” on page 178.
Prerequisites
Create the SQL Server database. You can create the SQL Server database manually or by using a script. See “Create a SQL Server Database and User for vCenter Server,” on page 177
Procedure
1 Log in to a Microsoft SQL Server Management Studio session as user_name for a user account that youcreated on the vCenter Server and MSDB databases.
2 Locate the dbschema scripts in the vCenter Server installationpackage /installation_directory/vCenter-Server/dbschema directory.
3 Open the sql file through Microsoft SQL Server Management Studio and replace all occurrences of$schema with the schema name in the file VCDB_mssql.SQL.
4 Run the scripts in sequence on the database.
The DBO user must own the objects created by these scripts. Open the scripts one at a time in MicrosoftSQL Server Management Studio and press F5 to execute each script in the order shown here.
VCDB_mssql.SQL
load_stats_proc_mssql.sql
purge_stat1_proc_mssql.sql
purge_stat2_proc_mssql.sql
purge_stat3_proc_mssql.sql
purge_usage_stats_proc_mssql.sql
stats_rollup1_proc_mssql.sql
stats_rollup2_proc_mssql.sql
stats_rollup3_proc_mssql.sql
cleanup_events_mssql.sql
delete_stats_proc_mssql.sql
upsert_last_event_proc_mssql.sql
load_usage_stats_proc_mssql.sql
TopN_DB_mssql.sql
calc_topn1_proc_mssql.sql
calc_topn2_proc_mssql.sql
calc_topn3_proc_mssql.sql
calc_topn4_proc_mssql.sql
clear_topn1_proc_mssql.sql
clear_topn2_proc_mssql.sql
clear_topn3_proc_mssql.sql
clear_topn4_proc_mssql.sql
rule_topn1_proc_mssql.sql
rule_topn2_proc_mssql.sql
rule_topn3_proc_mssql.sql
rule_topn4_proc_mssql.sql
process_license_snapshot_mssql.sql
process_temptable0_proc_mssql.sql
process_temptable1_proc_mssql.sql
process_temptable2_proc_mssql.sql
5 (Optional) You can also run the following scripts to enable database health monitoring.
job_dbm_performance_data_mssql.sql
process_performance_data_mssql.sql
vSphere Installation and Setup
182 VMware, Inc.

6 For all supported editions of Microsoft SQL Server (except Microsoft SQL Server 2005 Express andMicrosoft SQL Server 2008 R2 Express), run these scripts to set up scheduled jobs on the database.
These scripts ensure that the SQL Server Agent service is running.
job_schedule1_mssql.sql
job_schedule2_mssql.sql
job_schedule3_mssql.sql
job_cleanup_events_mssql.sql
job_topn_past_day_mssql.sql
job_topn_past_week_mssql.sql
job_topn_past_month_mssql.sql
job_topn_past_year_mssql.sql
job_property_bulletin_mssql.sql
7 For all the store procedures you created in Step 4, grant the execute privilege to the vCenter Serverdatabase.
grant execute on purge_stat1_proc to vCenter_db_user
grant execute on purge_stat2_proc to vCenter_db_user
grant execute on purge_stat3_proc to vCenter_db_user
grant execute on purge_usage_stat_proc to vCenter_db_user
grant execute on stats_rollup1_proc to vCenter_db_user
grant execute on stats_rollup2_proc to vCenter_db_user
grant execute on stats_rollup3_proc to vCenter_db_user
grant execute on cleanup_events_tasks_proc to vCenter_db_user
grant execute on delete_stats_proc to vCenter_db_user
grant execute on upsert_last_event_proc to vCenter_db_user
grant execute on load_usage_stats_proc to vCenter_db_user
grant execute on load_stats_proc to vCenter_db_user
grant execute on calc_topn1_proc to vCenter_db_user
grant execute on calc_topn2_proc to vCenter_db_user
grant execute on calc_topn3_proc to vCenter_db_user
grant execute on calc_topn4_proc to vCenter_db_user
grant execute on clear_topn1_proc to vCenter_db_user
grant execute on clear_topn2_proc to vCenter_db_user
grant execute on clear_topn3_proc to vCenter_db_user
grant execute on clear_topn4_proc to vCenter_db_user
grant execute on rule_topn1_proc to vCenter_db_user
grant execute on rule_topn2_proc to vCenter_db_user
grant execute on rule_topn3_proc to vCenter_db_user
grant execute on rule_topn4_proc to vCenter_db_user
grant execute on process_license_snapshot to vCenter_db_user
grant execute on process_temptable0_proc to vCenter_db_user
grant execute on process_temptable1_proc to vCenter_db_user
grant execute on process_temptable2_proc to vCenter_db_user
If you ran the script process_performance_data_mssql.sql in Step 4, grant the following execute privilegeto the vCenter Server database.
grant execute on process_performance_data_proc to vCenter_db_user
8 On the machine on which you intend to install vCenter Server, create a DSN that points to the databaseserver with the schema.
9 Run the vCenter Server installer.
Chapter 9 Preparing vCenter Server Databases
VMware, Inc. 183

10 If a database reinitialization warning message appears in the vCenter Server installer, select Do notoverwrite, leave my existing database in place and continue the installation.
This message appears if you are using a database that has vCenter Server tables that were created by aprevious installation. The message does not appear if the database is clean.
If you leave your existing database in place, you cannot join a Linked Mode group during the installation.You can join after the installation is complete. See “Join a Linked Mode Group After Installation,” onpage 218.
11 When prompted, provide the database user login.
Configure a SQL Server ODBC ConnectionAfter you create a vCenter Server user, establish a connection with a SQL Server database. This connection isrequired to install a vCenter Server system.
If you use SQL Server for vCenter Server, do not use the master database.
See your Microsoft SQL ODBC documentation for specific instructions regarding configuring the SQL ServerODBC connection.
CAUTION If you are using a named instance of Microsoft SQL Server 2008 Standard Edition with vCenterServer, do not name the instance MSSQLSERVER. If you do, the JDBC connection does not work, and certainfeatures, such as Performance Charts, are not available.
Prerequisites
n Review the required database patches specified in “vCenter Server Database Patch and ConfigurationRequirements,” on page 165.
n Create a database using SQL Server Management Studio on the SQL Server. See “Create a SQL ServerDatabase and User for vCenter Server,” on page 177
n Set database permissions using one of the following options:
n Option 1 (recommended): Follow the procedures in “Set Database Permissions By Manually CreatingDatabase Roles and the VMW Schema,” on page 178 and “Use a Script to Create a Microsoft SQLServer Database Schema and Roles,” on page 180
n Option 2 (alternative): Follow the procedures in “Set Database Permissions by Using the dbo Schemaand the db_owner Database Role,” on page 179 and “Use a Script to Create a vCenter Server User byUsing the dbo Schema and db_owner Database Role,” on page 179.
Procedure
1 On your vCenter Server system, select Settings > Control Panel > Administrative Tools > Data Sources(ODBC).
2 Click the System DSN tab and do one of the following.
n To modify an existing SQL Server ODBC connection, select the connection from the System DataSource list and click Configure.
n To create a new SQL Server ODBC connection, click Add, select SQL Native Client, and clickFinish.
3 Type an ODBC datastore name (DSN) in the Name text box.
For example, VMware vCenter Server.
4 (Optional) Type an ODBC DSN description in the Description text box.
vSphere Installation and Setup
184 VMware, Inc.
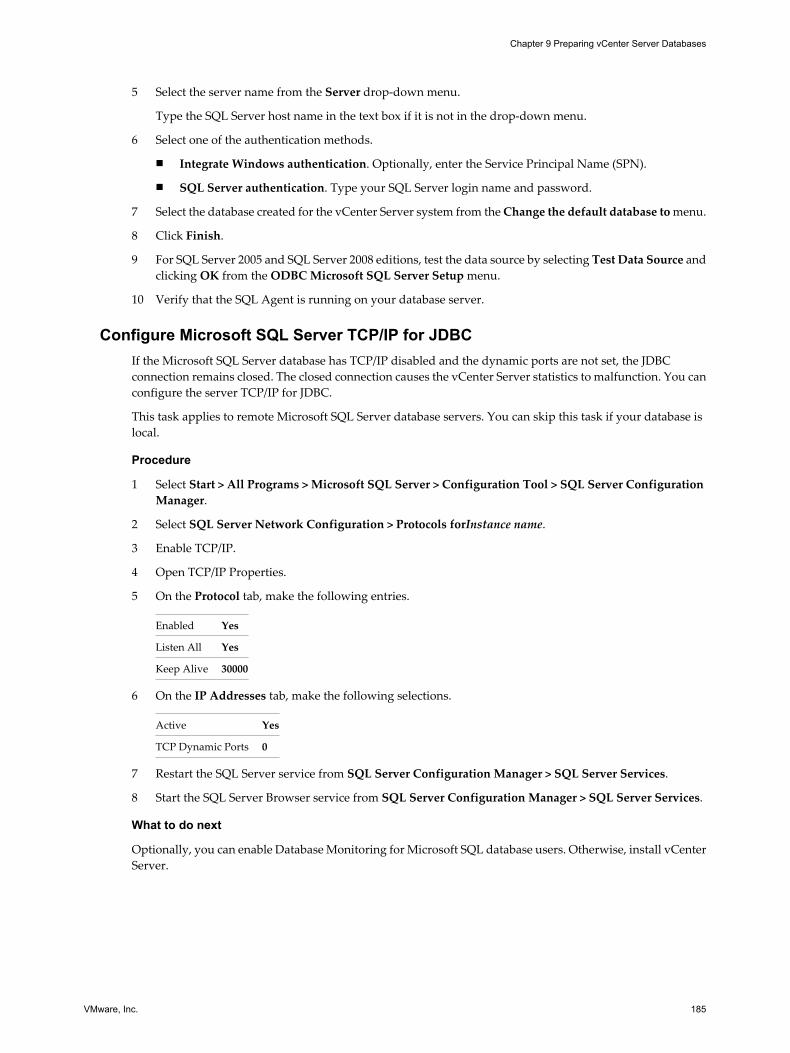
5 Select the server name from the Server drop-down menu.
Type the SQL Server host name in the text box if it is not in the drop-down menu.
6 Select one of the authentication methods.
n Integrate Windows authentication. Optionally, enter the Service Principal Name (SPN).
n SQL Server authentication. Type your SQL Server login name and password.
7 Select the database created for the vCenter Server system from the Change the default database to menu.
8 Click Finish.
9 For SQL Server 2005 and SQL Server 2008 editions, test the data source by selecting Test Data Source andclicking OK from the ODBC Microsoft SQL Server Setup menu.
10 Verify that the SQL Agent is running on your database server.
Configure Microsoft SQL Server TCP/IP for JDBCIf the Microsoft SQL Server database has TCP/IP disabled and the dynamic ports are not set, the JDBCconnection remains closed. The closed connection causes the vCenter Server statistics to malfunction. You canconfigure the server TCP/IP for JDBC.
This task applies to remote Microsoft SQL Server database servers. You can skip this task if your database islocal.
Procedure
1 Select Start > All Programs > Microsoft SQL Server > Configuration Tool > SQL Server ConfigurationManager.
2 Select SQL Server Network Configuration > Protocols forInstance name.
3 Enable TCP/IP.
4 Open TCP/IP Properties.
5 On the Protocol tab, make the following entries. Enabled Yes
Listen All Yes
Keep Alive 30000
6 On the IP Addresses tab, make the following selections. Active Yes
TCP Dynamic Ports 0
7 Restart the SQL Server service from SQL Server Configuration Manager > SQL Server Services.
8 Start the SQL Server Browser service from SQL Server Configuration Manager > SQL Server Services.
What to do next
Optionally, you can enable Database Monitoring for Microsoft SQL database users. Otherwise, install vCenterServer.
Chapter 9 Preparing vCenter Server Databases
VMware, Inc. 185
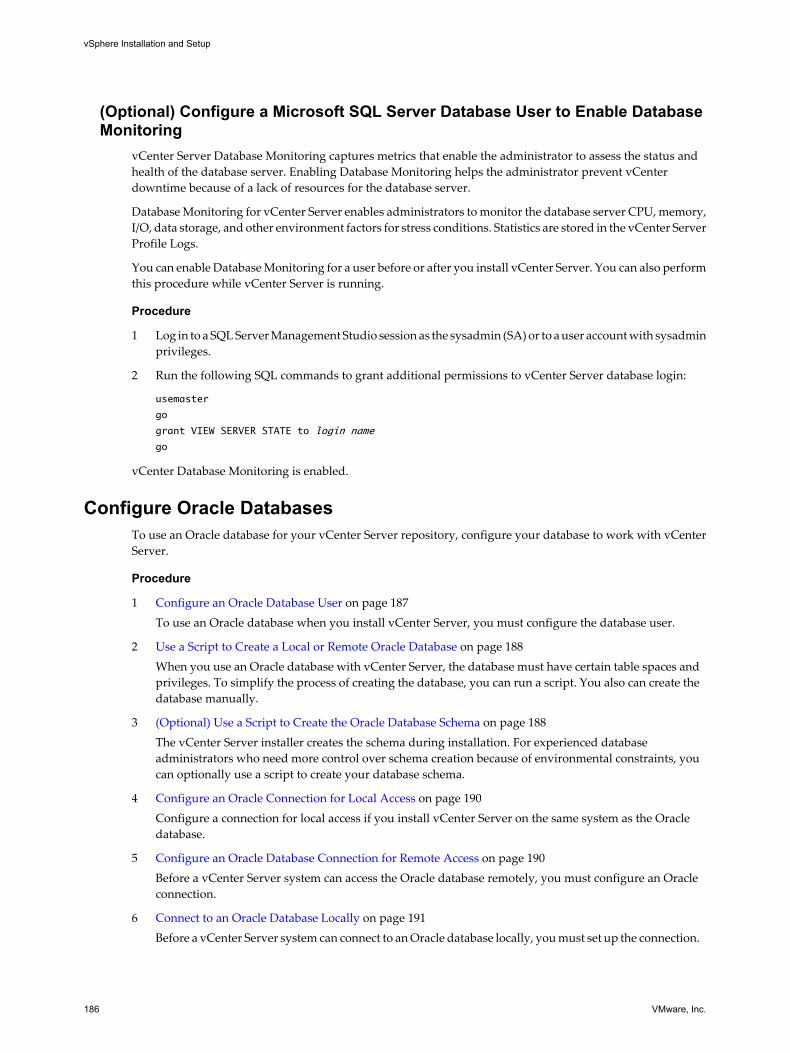
(Optional) Configure a Microsoft SQL Server Database User to Enable DatabaseMonitoring
vCenter Server Database Monitoring captures metrics that enable the administrator to assess the status andhealth of the database server. Enabling Database Monitoring helps the administrator prevent vCenterdowntime because of a lack of resources for the database server.
Database Monitoring for vCenter Server enables administrators to monitor the database server CPU, memory,I/O, data storage, and other environment factors for stress conditions. Statistics are stored in the vCenter ServerProfile Logs.
You can enable Database Monitoring for a user before or after you install vCenter Server. You can also performthis procedure while vCenter Server is running.
Procedure
1 Log in to a SQL Server Management Studio session as the sysadmin (SA) or to a user account with sysadminprivileges.
2 Run the following SQL commands to grant additional permissions to vCenter Server database login:
usemaster
go
grant VIEW SERVER STATE to login name
go
vCenter Database Monitoring is enabled.
Configure Oracle DatabasesTo use an Oracle database for your vCenter Server repository, configure your database to work with vCenterServer.
Procedure
1 Configure an Oracle Database User on page 187To use an Oracle database when you install vCenter Server, you must configure the database user.
2 Use a Script to Create a Local or Remote Oracle Database on page 188When you use an Oracle database with vCenter Server, the database must have certain table spaces andprivileges. To simplify the process of creating the database, you can run a script. You also can create thedatabase manually.
3 (Optional) Use a Script to Create the Oracle Database Schema on page 188The vCenter Server installer creates the schema during installation. For experienced databaseadministrators who need more control over schema creation because of environmental constraints, youcan optionally use a script to create your database schema.
4 Configure an Oracle Connection for Local Access on page 190Configure a connection for local access if you install vCenter Server on the same system as the Oracledatabase.
5 Configure an Oracle Database Connection for Remote Access on page 190Before a vCenter Server system can access the Oracle database remotely, you must configure an Oracleconnection.
6 Connect to an Oracle Database Locally on page 191Before a vCenter Server system can connect to an Oracle database locally, you must set up the connection.
vSphere Installation and Setup
186 VMware, Inc.

7 (Optional) Configure an Oracle Database User to Enable Database Monitoring on page 192vCenter Server Database Monitoring captures metrics that enable the administrator to assess the statusand health of the database server. Enabling Database Monitoring helps the administrator prevent vCenterdowntime because of a lack of resources for the database server.
Configure an Oracle Database UserTo use an Oracle database when you install vCenter Server, you must configure the database user.
You can configure an Oracle database for vCenter Server either locally on the same Microsoft Windowsmachine as vCenter Server or remotely on a network-connected Linux, UNIX or Microsoft Windows host.
Prerequisites
Review the software requirements for vCenter Server with Oracle.
Procedure
1 Log in to a SQL*Plus session with the system account.
2 Run the following SQL command to create a vCenter Server database user with the correct permissions.
The script is located in the vCenter Server installation package /installationdirectory/vpx/dbschema/DB_and_schema_creation_scripts_oracle.txt file.
In this example, the user name is VPXADMIN.
CREATE USER "VPXADMIN" PROFILE "DEFAULT" IDENTIFIED BY "oracle" DEFAULT TABLESPACE
"VPX" ACCOUNT UNLOCK;
grant connect to VPXADMIN;
grant resource to VPXADMIN;
grant create view to VPXADMIN;
grant create sequence to VPXADMIN;
grant create table to VPXADMIN;
grant create materialized view to VPXADMIN;
grant execute on dbms_lock to VPXADMIN;
grant execute on dbms_job to VPXADMIN;
grant select on dba_tablespaces to VPXADMIN;
grant select on dba_temp_files to VPXADMIN;
grant select on dba_data_files to VPXADMIN;
grant unlimited tablespace to VPXADMIN;
By default, the RESOURCE role has the CREATE PROCEDURE, CREATE TABLE, and CREATESEQUENCE privileges assigned. If the RESOURCE role lacks these privileges, grant them to the vCenterServer database user.
NOTE Instead of granting unlimited tablespace, you can set a specific tablespace quota. Therecommended quota is unlimited with a minimum of at least 500MB. To set an unlimited quota, use thefollowing command.
alter user "VPXADMIN" quota unlimited on "VPX";
If you set a limited quota, monitor the remaining available tablespace to avoid the following error.
ORA-01536: space quota exceeded for tablespace '<tablespace>'
3 (Optional) After you have successfully installed vCenter Server with the Oracle database, you can revokethe following privileges.
revoke select on dba_tablespaces from VPXADMIN;
revoke select on dba_temp_files from VPXADMIN;
revoke select on dba_data_files from VPXADMIN;
Chapter 9 Preparing vCenter Server Databases
VMware, Inc. 187
You now have an Oracle database user that you can reference in the vCenter Server installer.
What to do next
Create the Oracle database, including all necessary table spaces and privileges.
Use a Script to Create a Local or Remote Oracle DatabaseWhen you use an Oracle database with vCenter Server, the database must have certain table spaces andprivileges. To simplify the process of creating the database, you can run a script. You also can create thedatabase manually.
When using the script, you can customize the location of the data and log files. The user created by this scriptdoes not follow any security policy. The passwords are provided only for convenience. Change the passwordsas appropriate.
Procedure
1 Log in to a SQL*Plus session with the system account.
2 Run the following script.
The script is located in the vCenter Server installation package /installationdirectory/vpx/dbschema/DB_and_schema_creation_scripts_oracle.txt file.
CREATE SMALLFILE TABLESPACE "VPX" DATAFILE '/u01/app/oracle/oradata/vcdb/vpx01.dbf'
SIZE 1G AUTOEXTEND ON NEXT 10M MAXSIZE UNLIMITED LOGGING EXTENT MANAGEMENT LOCAL SEGMENT
SPACE MANAGEMENT AUTO;
For a Windows installation, change the directory path to the vpx01.dbf file.
You now have an Oracle database that you can use with vCenter Server.
What to do next
You can run a script to create the database schema.
(Optional) Use a Script to Create the Oracle Database SchemaThe vCenter Server installer creates the schema during installation. For experienced database administratorswho need more control over schema creation because of environmental constraints, you can optionally use ascript to create your database schema.
To have the vCenter Server installer create your schema for you, see “Configure an Oracle Connection for LocalAccess,” on page 190 or “Configure an Oracle Database Connection for Remote Access,” on page 190,depending on your environment.
Prerequisites
Create the Oracle database and user. You can create the Oracle database and user manually or by using scripts.
Procedure
1 Open a SQL*Plus window with a user that has schema owner rights on the vCenter Server database.
2 Locate the dbschema scripts in the vCenter Server installation package /installationdirectory/vpx/dbschema directory.
vSphere Installation and Setup
188 VMware, Inc.

3 In SQL*Plus, run the scripts in sequence on the database.
path is the directory path to the /installation directory/vpx/dbschema folder.
@path/VCDB_oracle.SQL
@path/load_stats_proc_oracle.sql
@path/purge_stat1_proc_oracle.sql
@path/purge_stat2_proc_oracle.sql
@path/purge_stat3_proc_oracle.sql
@path/purge_usage_stats_proc_oracle.sql
@path/stats_rollup1_proc_oracle.sql
@path/stats_rollup2_proc_oracle.sql
@path/stats_rollup3_proc_oracle.sql
@path/cleanup_events_oracle.sql
@path/delete_stats_proc_oracle.sql
@path/load_usage_stats_proc_oracle.sql
@path/TopN_DB_oracle.sql
@path/calc_topn1_proc_oracle.sql
@path/calc_topn2_proc_oracle.sql
@path/calc_topn3_proc_oracle.sql
@path/calc_topn4_proc_oracle.sql
@path/clear_topn1_proc_oracle.sql
@path/clear_topn2_proc_oracle.sql
@path/clear_topn3_proc_oracle.sql
@path/clear_topn4_proc_oracle.sql
@path/rule_topn1_proc_oracle.sql
@path/rule_topn2_proc_oracle.sql
@path/rule_topn3_proc_oracle.sql
@path/rule_topn4_proc_oracle.sql
@path/process_license_snapshot_oracle.sql
@path/process_temptable0_proc_oracle.sql
@path/process_temptable1_proc_oracle.sql
@path/process_temptable2_proc_oracle.sql
4 (Optional) You can also run the following scripts to enable database health monitoring.
job_dbm_performance_data_oracle.sql
process_performance_data_oracle.sql
5 For all supported editions of Oracle Server, run these scripts to set up scheduled jobs on the database.
@path/job_schedule1_oracle.sql
@path/job_schedule2_oracle.sql
@path/job_schedule3_oracle.sql
@path/job_cleanup_events_oracle.sql
@path/job_topn_past_day_oracle.sql
@path/job_topn_past_week_oracle.sql
@path/job_topn_past_month_oracle.sql
@path/job_topn_past_year_oracle.sql
@path/job_property_bulletin_oracle.sql
You now have a database schema that is compatible with vCenter Server.
6 On the machine that you are installing vCenter Server on, create a DSN that points to the database serverthat has the schema.
7 Run the vCenter Server installer.
Chapter 9 Preparing vCenter Server Databases
VMware, Inc. 189

8 If a database reinitialization warning message appears in the vCenter Server installer, select Do notoverwrite, leave my existing database in place and continue the installation.
This message appears if you are using a database that has vCenter Server tables that were created by aprevious installation. The message does not appear if the database is clean.
If you leave your existing database in place, you cannot join a Linked Mode group during the installation.You can join after the installation is complete. See “Join a Linked Mode Group After Installation,” onpage 218.
9 When prompted, provide the database user login.
The Oracle dadtabase schema is created.
Configure an Oracle Connection for Local AccessConfigure a connection for local access if you install vCenter Server on the same system as the Oracle database.
Prerequisites
Review the required database patches specified in “vCenter Server Database Patch and ConfigurationRequirements,” on page 165. If you do not prepare your database correctly, the vCenter Server installer displayserror and warning messages.
Procedure
1 Download Oracle 10g or Oracle 11g from the Oracle Web site.
2 Install Oracle 10g or Oracle 11g, and create a database.
3 Configure the TNS Service Name option in the ODBC DSN.
The TNS Service Name is the net service name for the database to which you want to connect. You canfind the net service name in the tnsnames.ora file located in the NETWORK\ADMIN folder in the Oracle databaseinstallation location.
The database is configured for local access.
Configure an Oracle Database Connection for Remote AccessBefore a vCenter Server system can access the Oracle database remotely, you must configure an Oracleconnection.
Prerequisites
Review the required database patches specified in “vCenter Server Database Patch and ConfigurationRequirements,” on page 165. If you do not prepare your database correctly, the vCenter Server installer displayserror and warning messages.
Procedure
1 Install the Oracle client on the vCenter Server system machine.
2 Download and install the ODBC driver.
3 Create a new tablespace for a vCenter Server system using a SQL statement such as the followingstatement.
CREATE TABLESPACE "VPX" DATAFILE 'C:\Oracle\ORADATA\VPX\VPX.dat' SIZE 1000M AUTOEXTEND ON NEXT
500K;
4 Create a user, such as vpxAdmin, for accessing the tablespace through ODBC.
CREATE USER vpxAdmin IDENTIFIED BY vpxadmin DEFAULT TABLESPACE vpx;
vSphere Installation and Setup
190 VMware, Inc.

5 Grant permissions to the user, in one of the following ways.
n Grant dba permission to the user.
n Grant the following permissions to the user.
grant connect to user
grant resource to user
grant create view to user
grant create sequence to user
grant create table to user
grant create materialized view to user
grant execute on dbms_lock to user
grant execute on dbms_job to user
grant unlimited tablespace to user # To ensure space is sufficient
By default, the RESOURCE role has the CREATE PROCEDURE, CREATE TABLE, and CREATESEQUENCE privileges assigned. If the RESOURCE role lacks these privileges, grant them to the vCenterServer database user.
6 Use a text editor or the Net8 Configuration Assistant to edit the tnsnames.ora file located in the directoryC:\Oracle\Oraxx\NETWORK\ADMIN, where xx is either 10g or 11g.
Add the following entry, where HOST is the managed host to which the client must connect.
VPX =
(DESCRIPTION =
(ADDRESS_LIST =
(ADDRESS=(PROTOCOL=TCP)(HOST=vpxd-Oracle)(PORT=1521))
)
(CONNECT_DATA =
(SERVICE_NAME = VPX)
)
)
7 Configure the TNS Service Name option in the ODBC DSN.
The TNS Service Name is the net service name for the database to which you want to connect, in this case,VPX. You can find the net service name in the tnsnames.ora file.
Connect to an Oracle Database LocallyBefore a vCenter Server system can connect to an Oracle database locally, you must set up the connection.
Procedure
1 Create a new tablespace for a vCenter Server system using a SQL statement such as the followingstatement.
CREATE TABLESPACE "VPX" DATAFILE 'C:\Oracle\ORADATA\VPX\VPX.dat' SIZE 1000M AUTOEXTEND ON NEXT
500K;
2 Create a user, such as vpxAdmin, for accessing the tablespace through ODBC.
CREATE USER vpxAdmin IDENTIFIED BY vpxadmin DEFAULT TABLESPACE vpx;
Chapter 9 Preparing vCenter Server Databases
VMware, Inc. 191

3 Grant permissions to the user, in one of the following ways.
n Grant dba permission to the user.
n Grant the following permissions to the user.
grant connect to user
grant resource to user
grant create view to user
grant create sequence to user
grant create table to user
grant create materialized view to user
grant execute on dbms_lock to user
grant execute on dbms_job to user
grant unlimited tablespace to user # To ensure space is sufficient
By default, the RESOURCE role has the CREATE PROCEDURE, CREATE TABLE, and CREATESEQUENCE privileges assigned. If the RESOURCE role lacks these privileges, grant them to the vCenterServer database user.
4 Create an ODBC connection to the database.
The following code shows example settings.
Data Source Name: VMware vCenter Server TNS Service Name: VPX User Id: vpxAdmin
You now have a database that you can connect to locally.
What to do next
Optionally, you can enable Database Monitoring for Oracle database users. Otherwise, install vCenter Server.
(Optional) Configure an Oracle Database User to Enable Database MonitoringvCenter Server Database Monitoring captures metrics that enable the administrator to assess the status andhealth of the database server. Enabling Database Monitoring helps the administrator prevent vCenterdowntime because of a lack of resources for the database server.
Database Monitoring for vCenter Server enables administrators to monitor the database server CPU, memory,I/O, data storage, and other environment factors for stress conditions. Statistics are stored in the vCenter ServerProfile Logs.
Enable Database Monitoring for a user before or after you install vCenter Server. You can perform thisprocedure while vCenter Server is running.
Procedure
1 Log in to a SQL*Plus session with the system account.
2 Run the following SQL commands to grant additional permissions to the vCenter Server database user:
grant select on v_$system_event to user;
grant select on v_$sysmetric_history to user;
grant select on v_$sysstat to user;
grant select on dba_data_files to user;
grant select on v_$loghist to user;
vCenter Database Monitoring is enabled.
vSphere Installation and Setup
192 VMware, Inc.

Before You Install vCenter Server 10You can install vCenter Server on a physical system or on a virtual machine running on an ESXi host. You canalso download the VMware vCenter Server Appliance, a preconfigured Linux-based virtual machineoptimized for running vCenter Server.
This chapter includes the following topics:
n “vCenter Server Prerequisites,” on page 193
n “Using a User Account for Running vCenter Server,” on page 195
n “Installing vCenter Server on IPv6 Machines,” on page 195
n “JDBC URL Formats for the vCenter Server Database,” on page 196
n “Configure the URLs on a Standalone vCenter Server System,” on page 197
n “Running the vCenter Server and vSphere Client Installers from a Network Drive,” on page 198
n “Required Information for Installing vCenter Server,” on page 198
n “Microsoft SQL Database Set to Unsupported Compatibility Mode Causes vCenter Server Installationor Upgrade to Fail,” on page 200
vCenter Server PrerequisitesBefore installing vCenter Server, review the prerequisites.
n Verify that you have the installation DVD or download the vCenter Server installer. See “Download thevCenter Server Installer,” on page 202.
n Verify that your system meets the requirements listed in “vCenter Server and vSphere Client HardwareRequirements,” on page 33 and “vCenter Server Software Requirements,” on page 36, and that the requiredports are open, as discussed in “Required Ports for vCenter Server,” on page 38.
n Verify that your database meets the database requirements. See “vCenter Server Database Patch andConfiguration Requirements,” on page 165 and Chapter 9, “Preparing vCenter Server Databases,” onpage 165.
n Gather the information that the vCenter Server installation wizard requires. See “Required Informationfor Installing vCenter Server,” on page 198.
n Verify that the fully qualified domain name (FQDN) of the system where you will install vCenter Serveris resolvable. To check that the FQDN is resolvable, type nslookup your_vCenter_Server_fqdn at acommand line prompt. If the FQDN is resolvable, the nslookup command returns the IP and name of thedomain controller machine.
VMware, Inc. 193

n Verify that DNS reverse lookup returns a fully qualified domain name when queried with the IP addressof the vCenter Server. When you install vCenter Server, the installation of the web server component thatsupports the vSphere Client fails if the installer cannot look up the fully qualified domain name of thevCenter Server from its IP address. Reverse lookup is implemented using PTR records. To create a PTRrecord, see the documentation for your vCenter Server host operating system.
n Verify that the host name of the machine that you are installing vCenter Server on complies with RFC 952guidelines.
n If the machine that you are installing vCenter Server on has VirtualCenter installed, you might want toupgrade instead of performing a fresh installation of vCenter Server.
IMPORTANT To keep your existing VirtualCenter configuration, see the vSphere Upgrade documentation.
n Verify that no Network Address Translation (NAT) exists between the vCenter Server system and thehosts it will manage.
n Create a vCenter Server database, unless you plan to install the bundled SQL Server 2008 R2 Express.
n If the system that you use for your vCenter Server installation belongs to a workgroup rather than adomain, not all functionality is available to vCenter Server. If assigned to a workgroup, the vCenter Serversystem is not able to discover all domains and systems available on the network when using some features.To determine whether the system belongs to a workgroup or a domain, right-click My Computer. ClickProperties and click the Computer Name tab. The Computer Name tab displays either a Workgroup labelor a Domain label.
n During the installation, verify that the connection between the machine and the domain controller isworking.
n Verify that the computer name is no more than 15 characters.
n The NETWORK SERVICE account is required on the folder in which vCenter Server is installed and onthe HKLM registry.
n Verify that the DNS name of the machine matches the actual computer name.
n Make sure the system on which you are installing vCenter Server is not an Active Directory domaincontroller.
n On each system that is running vCenter Server, make sure that the domain user account has the followingpermissions:
n Member of the Administrators group
n Act as part of the operating system
n Log on as a service
n Consider whether the vCenter Server instance will be standalone or in a Linked Mode group. See “CreatingvCenter Server Linked Mode Groups,” on page 216.
n Install vCenter Server, like any other network server, on a machine with a fixed IP address and well-knownDNS name, so that clients can reliably access the service. Assign a static IP address and host name to theWindows server that will host the vCenter Server system. This IP address must have a valid (internal)domain name system (DNS) registration. Ensure that the ESXi host management interface has a valid DNSresolution from the vCenter Server and all vSphere Clients. Ensure that the vCenter Server has a validDNS resolution from all ESXi hosts and all vSphere Clients. If you use DHCP instead of a static IP addressfor vCenter Server, make sure that the vCenter Server computer name is updated in the domain nameservice (DNS). Ping the computer name to test this connection. For example, if the computer name ishost-1.company.com, run the following command in the Windows command prompt:
ping host-1.company.com
If you can ping the computer name, the name is updated in DNS.
vSphere Installation and Setup
194 VMware, Inc.

Using a User Account for Running vCenter ServerYou can use the Microsoft Windows built-in system account or a user account to run vCenter Server. With auser account, you can enable Windows authentication for SQL Server, and it provides more security.
The user account must be an administrator on the local machine. In the installation wizard, you specify theaccount name as DomainName\Username. You must configure the SQL Server database to allow the domainaccount access to SQL Server.
The Microsoft Windows built-in system account has more permissions and rights on the server than the vCenterServer system needs, which can contribute to security problems.
For SQL Server DSNs configured with Windows authentication, use the same user account for the VMwareVirtualCenter Management Webservices service and the DSN user.
If you do not plan to use Microsoft Windows authentication for SQL Server or you are using an Oracle or DB2database, you might still want to set up a local user account for the vCenter Server system. The only requirementis that the user account is an administrator on the local machine.
NOTE If you install an instance of vCenter Server as a local system account on a local SQL Server databasewith Integrated Windows NT Authentication, and you add an Integrated Windows NT Authentication userto the local database server with the same default database as vCenter Server, vCenter Server might not start.See “vCenter Server Fails to Start When Installed as a Local System Account on a Local SQL Server Databasewith Integrated Windows NT Authentication,” on page 195.
vCenter Server Fails to Start When Installed as a Local System Account on a LocalSQL Server Database with Integrated Windows NT Authentication
vCenter Server is installed as a local system account on a local SQL Server database with Integrated WindowsNT Authentication. When you add an Integrated Windows NT Authentication user to the local database server,vCenter Server fails to start.
Problem
If you install an instance of vCenter Server as a local system account on a local SQL Server database withIntegrated Windows NT Authentication, and you add an Integrated Windows NT Authentication user to thelocal database server with the same default database as vCenter Server, vCenter Server fails to start.
Solution
u Take one of the following actions.
n Remove the Integrated Windows NT Authentication user from the local SQL database server.
n Change the default database for the local system user account to the vCenter Server database for theSQL Server user account setup.
Installing vCenter Server on IPv6 MachinesIf you install vCenter Server on a system that is configured to use IPv6, vCenter Server uses IPv6. When youconnect to that vCenter Server system or install more modules, you must specify the server address in IPv6format, unless you use the fully qualified domain name.
As specified in the Remote Procedure Call (RPC) standards for IPv6 addresses, you must enclose the IPv6address in square brackets: [IPv6-address].
Chapter 10 Before You Install vCenter Server
VMware, Inc. 195

JDBC URL Formats for the vCenter Server DatabaseThe vCenter Server installer generates and validates the JDBC URL for the vCenter Server database. If theinstaller fails to connect to the database using the generated JDBC URL, the installer will prompt you to specifythe JDBC URL.
JDBC URL Formats for Microsoft SQL Server DatabasesFor Microsoft SQL Server databases, you can use the following example JDBC URLs as a model:
n Connect to default (unnamed) SQL Server instance by host name:
jdbc:sqlserver://host;databaseName=database
n Connect to named instance by host name and instance name:
jdbc:sqlserver://host;instanceName=instance;databaseName=database
n Connect to SQL Server by host name and port:
jdbc:sqlserver://host:port;databaseName=database
n Connect by port:
jdbc:sqlserver://localhost:1422;databaseName\=VIM_VCDB (user name, password, and database type tobe passed separately)
n Connect to local server with integrated security:
jdbc:sqlserver://localhost\\SQLEXP_VIM;databaseName=VIM_VCDB;integratedSecurity=true
n Connect to local server without integrated security:
jdbc:sqlserver://localhost\\SQLEXP_VIM;databaseName\=VIM_VCDB (user name, password, anddatabase type to be passed separately)
VMware vCenter Server JDBC configuration for Microsoft SQL Server might not work by default with directIPv6 addresses. You must use one of the following forms:
n Use the host name form for a standard Type-4 JDBC URL (recommended):
jdbc:sqlserver://database-fully-qualified-host-name:port
n Use direct IPv6 address format:
jdbc:sqlserver://;serverName=[IPv6-address]
For more information about JDBC URL formatting for MS SQL databases, including port and instanceconfiguration options, see the msdn.microsoft.com Web site. At the time of this topic's publication, theinformation was available at http://msdn.microsoft.com/en-us/library/ms378428.aspx.
JDBC URL Formats for Oracle DatabasesFor Oracle databases, you can use the following example JDBC URLs as a model:
n This format requires host name and address, port (default 1521) and service name (for example,"oracle.world"):
jdbc:oracle:thin:@host:port/service
n This format requires host name and address, port (default 1521) and SID (for example, "ORCL"):
jdbc:oracle:thin:@host:port:SID
vSphere Installation and Setup
196 VMware, Inc.

n This format is for a fully configured Oracle client with Oracle Net, which is useful for non-TCPconfiguration or Oracle RAC (real application clusters):
jdbc:oracle:thin:@tnsname
n The following example is for an Oracle RAC with a thin driver, without the full Oracle client installed:
jdbc:oracle:thin:@(DESCRIPTION=(ADDRESS=(PROTOCOL=TCP)(HOST=rac1-vip)(PORT=1521))
(ADDRESS=(PROTOCOL=TCP)(HOST=rac2-vip)(PORT=1521))(LOAD_BALANCE=yes)(FAILOVER=ON)
(CONNECT_DATA=(SERVER=DEDICATED)(SERVICE_NAME=RAC.DBTEAM)(FAILOVER_MODE=(BACKUP=rac1)
(TYPE=SELECT)(METHOD=BASIC)))))
In this example, rac1-vip is first node virtual IP, rac2-vip is second node virtual IP, RAC.DBTEAM is RACDB service name, and rac1 is name of failover node.
For more information about JDBC URL formatting for Oracle databases, see the oracle.com Web site. At thetime of this topic's publication, the information was available at http://download.oracle.com/docs/cd/B28359_01/java.111/b31224/urls.htm/BEIJFHHB
JDBC URL Formats for IBM DB2 DatabasesFor IBM DB2 databases, you can use the following example JDBC URLs as a model:
n This format requires host name and address, port (for example, 50000) and database name (as created atthe server):
jdbc:db2://host:port/database
n This format is for a fully configured DB2 client (namely "IBM Data Server Client"), where database isthe local database alias. This example is useful for non-TCP configurations:
jdbc:db2:database
For more information about JDBC URL formatting for IBM DB2 databases, see the publib.boulder.ibm.comWeb site.
Configure the URLs on a Standalone vCenter Server SystemIf you join a standalone vCenter Server system to a Linked Mode group, the domain name of the system mustmatch the machine name. If you change either name to make them match, you must configure the vCenterServer URLs to make them compatible with the new domain name and machine name.
If you do not update the URLs, remote instances of vCenter Server cannot reach the vCenter Server system,because the default vCenter Server URL entries are no longer accurate.
The vCenter Server installer configures default URL entries as follows:
n For the VirtualCenter.VimApiUrl key, the default value is http(s)://FQDN of VC machine/sdk.
n For the Virtualcenter.VimWebServicesUrl key, the default value is https://FQDN of VCmachine:installed-webservices-port/vws.
Procedure
1 From the vSphere Client, connect directly to the vCenter Server instance on which you have changed thedomain or host name.
2 Select Administration > vCenter Server Settings.
3 Click Advanced Settings.
Chapter 10 Before You Install vCenter Server
VMware, Inc. 197

4 For the VirtualCenter.VimApiUrl key, change the value to point to the location where the vSphere Clientand SDK clients can access the vCenter Server system.
For example: http(s)://machine-name/ip:vc-port/sdk.
5 For the VirtualCenter.VimWebServicesUrl key, change the value to point to the location where vCenterServer Webservices is installed.
For example: https://machine-name/ip:webservices-port/vws.
6 For the VirtualCenter.Instancename key, change the value so that the modified name appears in thevCenter Server inventory view.
Running the vCenter Server and vSphere Client Installers from aNetwork Drive
You can run the installers from a network drive, but you cannot install the software on a network drive.
In Windows, you can run the installers from the network drive and install the software on the local machine.
Required Information for Installing vCenter ServerPrepare for the vCenter Server installation by recording the values that the vCenter Server system requires.
The vCenter Server installation wizard prompts you for the installation information. Keep a record of the valuesentered, in case you must reinstall vCenter Server.
Table 10-1. Information Required for vCenter Server Installation
Data Default Comments
Setup Language English This selection controls the language only for the installer.
User name and organization Your organization’s name Follow your organization’s policy.
vCenter Server license key None If you omit the license key, vCenter Server is installed inevaluation mode. After you install vCenter Server, you canenter the vCenter Server license in the vSphere Client.
vCenter Server install location C:\ProgramFiles\VMware\Infrastructure
The default location varies depending on your systemdrive. You can change the default location during theinstallation. Non-ASCII characters are not supported in thepath to the install location.
Standalone or join group Standalone Join a Linked Mode group to enable the vSphere Client toview, search, and manage data across multiple vCenterServer systems.
Fully qualified domain nameof Directory Services for thevCenter Server group
None Required if this instance of vCenter Server is joining agroup. This is the name of a remote instance of vCenterServer. The local and remote instances will be members ofa Linked Mode group.
LDAP port for the DirectoryServices for the remote vCenterServer instance
389 Required if this instance of vCenter Server is joining aLinked Mode group. This is the remote instance’s LDAPport. See “Required Ports for vCenter Server,” on page 38.
Data source name (DSN) None Required to use an existing database. Not required if youare using the bundled database. Leading and trailing spacesare not supported. Remove any spaces from the beginningor end of the DSN.
Database user name None Required to use an existing database. Not required if youare using the bundled database. Non-ASCII characters arenot supported.Database password None
vSphere Installation and Setup
198 VMware, Inc.

Table 10-1. Information Required for vCenter Server Installation (Continued)
Data Default Comments
JDBC URL for database None Required to use an existing database. The vCenter Serverinstaller should generate and validate the JDBC URL for thevCenter Server database. If the installer fails to connect tothe database using the generated JDBC URL, the installerprompts you to specify the JDBC URL.The format of the JDBC URL depends on the database thatyou are using. See “JDBC URL Formats for the vCenterServer Database,” on page 196.
vCenter Server Service accountinformationCan be the Microsoft Windowssystem account or a user-specified account
Microsoft Windows systemaccount
Use a user-specified account if you plan to use MicrosoftWindows authentication for SQL Server. See “Using a UserAccount for Running vCenter Server,” on page 195.
Fully qualified domain name(FQDN) for the vCenter Servermachine
The Fully Qualified Domain Name field displays the FQDNof the system that you are installing vCenter Server on. ThevCenter Server installer checks that the FQDN is resolvable.If not, a warning message is displayed. Change the entry toa resolvable FQDN. You must enter the FQDN, not the IPaddress.
vCenter Inventory Serviceinstall location
C:\ProgramFiles\VMware\Infrastructure
You can change the default location during the installation.
HTTPS port 443 See “Required Ports for vCenter Server,” on page 38.
HTTP port 80
Heartbeat port (UDP) used forsending data to ESX/ESXi hosts
902
VMware VirtualCenterManagement Webservices
8080
VMware VirtualCenterManagement Webservices
8443
Web Services change servicenotification port
60099
LDAP port for the DirectoryServices for the local vCenterServer instance
389
SSL port for the DirectoryServices for the local vCenterServer instance
636
vCenter Inventory ServiceHTTPS port
10443
vCenter Inventory Servicemanagement port
10109
vCenter Inventory Servicelinked mode communicationport
10111
Chapter 10 Before You Install vCenter Server
VMware, Inc. 199
Microsoft SQL Database Set to Unsupported Compatibility ModeCauses vCenter Server Installation or Upgrade to Fail
vCenter Server installation with a Microsoft SQL database fails when the database is set to compatibility modewith an unsupported version.
Problem
The following error message appears: The DB User entered does not have the required permissions neededto install and configure vCenter Server with the selected DB. Please correct the following
error(s): %s
Cause
The database version must be supported for vCenter Server. For SQL, even if the database is a supportedversion, if it is set to run in compatibility mode with an unsupported version, this error occurs. For example,if SQL 2008 is set to run in SQL 2000 compatibility mode, this error occurs.
Solution
u Make sure the vCenter Server database is a supported version and is not set to compatibility mode withan unsupported version. See “vCenter Server Database Patch and Configuration Requirements,” onpage 165
vSphere Installation and Setup
200 VMware, Inc.
Installing vCenter Server 11After you install vCenter Server and the vSphere Client, you can configure communication between them.
This chapter includes the following topics:
n “vCenter Server Components and Support Tools,” on page 201
n “Download the vCenter Server Installer,” on page 202
n “Install vCenter Server,” on page 202
n “Install vCenter Server in a Virtual Machine,” on page 204
n “Download and Deploy the VMware vCenter Server Appliance,” on page 205
vCenter Server Components and Support ToolsWhen you install vCenter Server, other components are also installed.
The following components are installed when you install vCenter Server:
VMware vCenter Server Windows service to manage ESXi and legacy ESX hosts.
Microsoft .NET 3.5 SP1Framework
Software used by the Database Upgrade wizard and the vSphere Client. Alsoused by vCenter Server if you are using the bundled database. If it is notinstalled on your system, the vCenter Server installer installs it.
Microsoft WindowsInstaller version 4.5
If you plan to use the Microsoft SQL Server 2008 R2 Express database that isbundled with vCenter Server, Microsoft Windows Installer version 4.5 (MSI4.5) is required on your system. You can also install MSI 4.5 directly from thevCenter Server autorun.exe installer.
VMware vCenterOrchestrator
vCenter Server module that provides a set of tools to manage your virtual ITenvironment. vCenter Orchestrator module is not supported on IPv6-onlyoperating systems. If you install vCenter Server in a mixed environment (bothIPv4 and IPv6 enabled), the vCenter Orchestrator module can be configuredusing IPv4. See the Administering vCenter Orchestrator.
Microsoft SQL Server2008 R2 Express(optional)
Free, bundled version of the Microsoft SQL Server database for smaller scaleapplications. If you choose to use an existing database, the installer does notinstall the bundled database.
VMware, Inc. 201

The vCenter Server autorun.exe application includes links to install the following optional components:
vSphere Client Client application used to connect to an ESXi or legacy ESX host directly, orindirectly through a vCenter Server.
vSphere Web Client Server application that provides a browser-based alternative to the vSphereClient. You can use the vSphere Web Client to manage an ESXi host by Webbrowser through a vCenter Server.
vSphere UpdateManager
vCenter Server component that provides security monitoring and patchingsupport for hosts and virtual machines.
vSphere ESXi DumpCollector
vCenter Server support tool. You can configure ESXi to dump the vmkernelmemory to a network server, rather than to a disk, when the system hasencountered a critical failure. The Dump Collector collects such memorydumps over the network.
vSphere SyslogCollector
vCenter Server support tool that provides a unified architecture for systemlogging and enables network logging and combining of logs from multiplehosts.
vSphere Auto Deploy vCenter Server support tool that provisions and customizes physical hosts byloading the ESXi image directly into memory. Using Auto Deploy you canprovision and reprovision hundreds of ESXi hosts very efficiently with vCenterServer.
vSphere AuthenticationProxy
vCenter Server support tool that enables ESXi hosts to join a domain withoutusing Active Directory credentials. This tool enhances security for PXE-bootedhosts and hosts that are provisioned using Auto Deploy, by removing the needto store Active Directory credentials in the host configuration.
Download the vCenter Server InstallerYou must download the installer for vCenter Server, the vSphere Client, and associated vCenter componentsand support tools.
Procedure
1 Download the zip file for vCenter Server from the VMware downloads page at http://www.vmware.com/support/.
2 Extract the files from the zip archive.
Install vCenter ServervCenter Server allows you to centrally manage hosts from either a physical or virtual Windows machine, andenables the use of advanced features such as vSphere Distributed Resource Scheduler (DRS), vSphere HighAvailability (HA), vSphere vMotion, vSphere Storage vMotion, and vSphere Auto Deploy.
Prerequisites
See “vCenter Server Prerequisites,” on page 193. Gather the information that is required to complete theinstallation wizard. See “Required Information for Installing vCenter Server,” on page 198.
vCenter Server requires the Microsoft .NET 3.5 SP1 Framework. If your system does not have it installed, thevCenter Server installer installs it. The .NET 3.5 SP1 installation might require Internet connectivity todownload more files.
Procedure
1 In the software installer directory, double-click the autorun.exe file to start the installer.
vSphere Installation and Setup
202 VMware, Inc.
2 Select vCenter Server™.
3 Follow the prompts in the installation wizard to choose the installer language, agree to the end user patentand license agreements, enter your user name, organization name, and license key.
If you omit the license key, vCenter Server will be in evaluation mode, which allows you to use the fullfeature set for a 60-day evaluation period. After installation, you can enter the license key to convertvCenter Server to licensed mode.
4 Choose the type of database that you want to use.
n To use the bundled database, click Install a Microsoft SQL Server 2008 Express instance (for small-scale deployments).
This database is suitable for deployments of up to 5 hosts and 50 virtual machines.
n To use an existing database, click Use an existing supported database and select your database fromthe list of available DSNs. Enter the user name and password for the DSN.
If your database uses Windows NT authentication, the user name and password fields are disabled.
NOTE A dialog box might appear warning you that the DSN points to an older version of a repositorythat must be upgraded. If you click Yes, the installer upgrades the database schema, making the databaseirreversibly incompatible with previous VirtualCenter versions. See the vSphere Upgrade documentation.
5 Set the login information for vCenter Server.
n If you are using a nonbundled database, enter the administrator name and password that you usewhen you log in to the system on which you are installing vCenter Server.
n If you are using the bundled SQL Server database, select Use SYSTEM Account.
You need the user name and password entered here to log in to vCenter Server after you have installedit.
The Fully Qualified Domain Name field displays the FQDN of the system that you are installing vCenterServer on. The vCenter Server installer checks that the FQDN is resolvable. If not, a warning message isdisplayed when you click Next. Change the entry to a resolvable FQDN. You must enter the FQDN, notthe IP address.
6 Either accept the default destination folders or click Change to select another location.
The installation path cannot have commas (,) or periods (.).
NOTE To install the vCenter Server on a drive other than C:, verify that there is enough space in the C:drive to install the Microsoft Windows Installer .msi file. If you do not have enough space, your vCenterServer installation might fail.
7 Select Create a standalone VMware vCenter Server instance or Join Group.
Join a Linked Mode group to enable the vSphere Client to view, search, and manage data across multiplevCenter Server systems. See “Creating vCenter Server Linked Mode Groups,” on page 216.
NOTE This option does not appear if you are upgrading the VirtualCenter or vCenter Server databaseschema. You can join a Linked Mode group after the installation is complete.
Chapter 11 Installing vCenter Server
VMware, Inc. 203

8 If you join a group, enter the fully qualified domain name and LDAP port number of any remote vCenterServer system.
In some cases, you can enter the IP address instead of the fully qualified domain name. To ensureconnectivity, use the fully qualified domain name. For IPv6, unless both the local and the remote machineare in IPv6 mode, enter the fully qualified domain name of the remote machine instead of the IPv6 address.If the local machine has an IPv4 address and the remote machine has an IPv6 address, the local machinemust support IPv4 and IPv6 mixed mode. The domain name server must be able to resolve both IPv4 andIPv6 addresses if your environment has both addressing types in a single Linked Mode group.
9 Enter the port numbers that you want to use or accept the default port numbers.
See “Required Ports for vCenter Server,” on page 38.
10 Select the size of your vCenter Server inventory to allocate memory for several Java services that are usedby vCenter Server.
This setting determines the maximum JVM heap settings for VMware VirtualCenter ManagementWebservices (Tomcat), Inventory Service, and Profile-Driven Storage Service. You can adjust this settingafter installation if the number of hosts in your environment changes. See the recommendations in thevCenter Server Hardware Requirements topic in System Requirements.
11 (Optional) In the Ready to Install the Program window, select Select to bump up the ephemeral portvalue.
This option increases the number of available ephemeral ports. If your vCenter Server manages hosts onwhich you will power on more than 2000 virtual machines simultaneously, this option prevents the poolof available ephemeral ports from being exhausted.
12 Click Install.
Installation might take several minutes. Multiple progress bars appear during the installation of theselected components.
13 Click Finish.
What to do next
After you install vCenter Server, you can display the vCenter Server welcome page by typing the IP addressof the vCenter Server machine or by typing localhost from a browser installed on the vCenter Server machine.From the welcome page, you can download the vSphere Client, or log in to the vSphere Web Client, after thevSphere Web Client is installed and the vCenter Server is registered. You can also access vSpheredocumentation.
See Chapter 12, “After You Install vCenter Server,” on page 207.
Install vCenter Server in a Virtual MachineYou can install vCenter Server in a Microsoft Windows virtual machine that runs on an ESXi host.
Deploying the vCenter Server system in the virtual machine has the following advantages:
n Rather than dedicating a separate server to the vCenter Server system, you can place it in a virtual machinerunning on the same host where your other virtual machines run.
n You can provide high availability for the vCenter Server system by using vSphere HA.
n You can migrate the virtual machine containing the vCenter Server system from one host to another,enabling maintenance and other activities.
n You can create snapshots of the vCenter Server virtual machine and use them for backups, archiving, andso on.
vSphere Installation and Setup
204 VMware, Inc.
Prerequisites
See “vCenter Server Prerequisites,” on page 193.
Procedure
1 On any machine that has network access to your ESXi host, install the vSphere Client.
2 Using the vSphere Client, access the ESXi host directly and create the virtual machine for hosting vCenterServer.
3 In the virtual machine, install vCenter Server.
See “Install vCenter Server,” on page 202.
Download and Deploy the VMware vCenter Server ApplianceAs an alternative to installing vCenter Server on a Windows machine, you can download the VMware vCenterServer Appliance. The vCenter Server Appliance is a preconfigured Linux-based virtual machine optimizedfor running vCenter Server and associated services.
The vCenter Server Appliance has the default user name root and password vmware.
Microsoft SQL Server is not supported for the vCenter Server Appliance. IBM DB2 is supported only for theembedded database provided with the vCenter Server Appliance. The vCenter Server Appliance does notsupport Linked Mode configuration. The vCenter Server Appliance does not support IPv6.
IMPORTANT The embedded database is not configured to manage an inventory that contains more than 5 hostsand 50 virtual machines. If you use the embedded database with the vCenter Server Appliance, exceedingthese limits can cause numerous problems, including causing vCenter Server to stop responding.
For information about configuring the vCenter Server Appliance, see the vCenter Server and Host Managementdocumentation.
Prerequisites
n Verify that vSphere Client is installed.
n You can deploy the vCenter Server Appliance only on hosts that are running ESX version 4.x or ESXiversion 4.x or later.
n The vCenter Server Appliance requires at least 7GB of disk space, and is limited to a maximum size of80GB.
Procedure
1 From the vSphere 5 download page on the VMware Web site, download the .VMDK and .OVF files for thevCenter Server appliance onto your system.
Save the .VMDK and .OVF files in the same folder.
2 In the vSphere Client, select File > Deploy OVF Template and enter the path to the .OVF file on yoursystem.
3 Follow the prompts in the Deploy OVF Template wizard to create the vCenter Server Appliance.
If you do not want to commit to using the maximum 80GB of disk space at deployment, deploy the OVFwith thin provisioning. In the Disk Format panel of the wizard, select Thin provisioned format.
Chapter 11 Installing vCenter Server
VMware, Inc. 205

vSphere Installation and Setup
206 VMware, Inc.
After You Install vCenter Server 12After you install vCenter Server, consider these postinstallation options before adding inventory for thevCenter Server to manage.
General Requirementsn Install the vSphere Client and make sure that you can access the vCenter Server instance.
n Check the license server configuration. A license server is required if this vCenter Server is managingESX 3.5/ESXi 3.5 hosts. See “Using a License Server to Manage Version 3.5 ESX or ESXi Hosts,” onpage 222.
n When vCenter Server and the database are installed on the same machine, after you reboot the machine,you might need to restart the VMware VirtualCenter Management Webservices service. See “VMwarevCenter Management Webservices Service Fails to Start,” on page 222.
Oracle Database Requirementsn For the Oracle Instant client, copy ojdbc14.jar to the vCenter Server tomcat directory vCenter install
location\Infrastructure\tomcat\lib.
n The Oracle 10g client and Oracle 11g client include ojdbc14.jar at: Installlocation\oracle\product\10.2.0\instance_name\jdbc\lib or Installlocation\app\Administrator\product\11.1.0\instance_name\sqldeveloper\jdbc\lib. The vCenterServer installer copies the file from the Oracle client installation location to the vCenter Server tomcatdirectory vCenter install location\Infrastructure\tomcat\lib.
n If the ojdbc14.jar file is not found in the Oracle 10g or Oracle 11g client location, the vCenter Server installerprompts you to copy the file manually. You can download the file from the Oracle.com Web site. At thetime of this topic's publication, the file was available at http://www.oracle.com/technology/software/tech/java/sqlj_jdbc/htdocs/jdbc101040.html.
Security RequirementFor environments that require strong security, VMware recommends that you replace the default certificateson your vCenter Server system with certificates signed by a commercial Certificate Authority (CA). See theinformation on increasing security for session information in the vSphere Examples and Scenarios documentation.
This chapter includes the following topics:
n “Install vCenter Server Components,” on page 208
n “Creating vCenter Server Linked Mode Groups,” on page 216
n “Using a License Server to Manage Version 3.5 ESX or ESXi Hosts,” on page 222
VMware, Inc. 207

n “VMware vCenter Management Webservices Service Fails to Start,” on page 222
n “Back Up the Inventory Service Database on Windows,” on page 223
n “Restore an Inventory Service Database Backup on Windows,” on page 223
n “Back Up the Inventory Service Database on Linux,” on page 224
n “Restore an Inventory Service Database Backup on Linux,” on page 224
n “Update the vCenter Inventory Service URL Configuration,” on page 225
n “Reset the vCenter Inventory Service Database,” on page 225
Install vCenter Server ComponentsYou can install vCenter Server components on the same machine that hosts vCenter Server or on remotemachines.
Download the vSphere ClientThe vSphere Client is a Windows program that you can use to configure the host and to operate its virtualmachines. You can download vSphere Client from any host.
Prerequisites
Verify that you have the URL of the host, which is the IP address or host name.
The system must have an Internet connection.
Procedure
1 From a Windows machine, open a Web browser.
2 Enter the URL or IP address for the vCenter Server or host.
For example, http://exampleserver.example.com or http://xxx.xxx.xxx.xxx.
3 Click Download vSphere Client under Getting Started.
4 Click Save to download the vSphere Client installer.
The vSphere Client installer is downloaded to the system.
What to do next
Install the vSphere Client.
Install the vSphere ClientThe vSphere Client enables you to connect to an ESXi host and to a vCenter Server system.
Prerequisites
n Verify that you have the vCenter Server installer or the vSphere Client installer.
n Verify that you are a member of the Administrators group on the system.
n Verify that the system has an Internet connection.
vSphere Installation and Setup
208 VMware, Inc.

Procedure
1 Run the vSphere Client installer in one of the following ways.
Option Description
If you are installing from the vCenterServer installer
a In the software installer directory, double-click the autorun.exe file.b Select vSphere™ Client.c Click Install.
If you downloaded the vSphereClient
Double-click the VMware-viclient-build number.exe file.
2 Follow the prompts in the wizard to complete the installation.
You can use the vSphere Client to connect to an ESXi host or to connect to a vCenter Server system.
Start the vSphere ClientAfter you install the vSphere Client, you can connect to an ESXi host and to a vCenter Server system.
NOTE Do not use the Windows built-in Guest account to start the vSphere Client. By default, the Guest accountis disabled. When you use the Guest account to log in to Windows, you cannot access the applications that arealready installed on the computer.
Procedure
1 Select Start > Programs > VMware > VMware vSphere Client.
2 In the vSphere Client login window, take one of the following actions.
Option Description
Log in to an ESXi host. Log in as root or as a normal user.
Log in to a vCenter Server system asthe administrator.
a Type the vCenter Server IP address or host name.b Type your user name and password.
When you connect to the vCenter Server, use the vCenter Server IP address with your Windows loginuser name and password. Use the login credentials appropriate to the Windows machine on which vCenterServer is installed.
3 Click Login.
If you cannot connect to the vCenter Server system, start the VMware VirtualCenter ManagementWebservices service manually. Select Settings > Control Panel > Administrative Tools > Services >VMware VirtualCenter Management Webservices and start the service. The service might require severalminutes to start.
4 To ignore the security warnings that appear, click Ignore.
Security warning messages appear because the vSphere Client detects certificates signed by the ESXi hostor vCenter Server system (default setting).
Install and Start the vSphere Web ClientThe vSphere Web Client enables you to connect to a vCenter Server system to manage an ESXi host througha browser.
Prerequisites
n Download the vCenter Server installer.
n Verify that you are a member of the Administrators group on the system.
Chapter 12 After You Install vCenter Server
VMware, Inc. 209

n Verify that the system has an Internet connection.
n Verify that the system meets the software requirements for the vSphere Web Client. See “vSphere Clientand vSphere Web Client Software Requirements,” on page 37. The vSphere Web Client requires a 64-bitoperating system for installation.
Procedure
1 In the software installer directory, double-click the autorun.exe file to start the installer.
2 Select VMware vSphere® Web Client (Server) and click Install.
3 Follow the wizard prompts to complete the installation.
When the vSphere Web Client installation is finished, a browser opens.
4 Register one or more vCenter Servers on the vSphere Web Client Administration Application page in thebrowser.
NOTE If the vCenter Server uses IPv6, you must specify the server address in IPv6 format, unless you usethe fully qualified domain name. As specified in the Remote Procedure Call (RPC) standards for IPv6addresses, you must enclose the IPv6 address in square brackets: [IPv6-address].
5 If the browser fails to open or to display the Administration Application page correctly, open theapplication from the shortcut:
From the Windows Start menu, select Programs > VMware > VMware vSphere Web Client > vSphereAdministration Application.
Install the Update Manager ServerThe Update Manager installation requires a connection with a single vCenter Server instance. You can installUpdate Manager on the same computer on which vCenter Server is installed or on a different computer.
Prerequisites
See Update Manager installation prerequisites in Installing and Administering VMware vSphere UpdateManager.
Procedure
1 In the software installer directory, double-click the autorun.exe file and select vSphere UpdateManager.
If you cannot run autorun.exe, browse to the UpdateManager folder and run VMware-UpdateManager.exe.
2 Select a language for the installer and click OK.
3 Review the Welcome page and click Next.
4 Read the patent agreement and click Next.
5 Accept the terms in the license agreement and click Next.
6 Review the support information, select whether to download updates from the default download sourcesimmediately after installation, and click Next.
If you deselect Download updates from default sources immediately after installation, Update Managerdownloads updates once daily according to the default download schedule or immediately after you clickthe Download Now button on the Download Settings page. You can modify the default downloadschedule after the installation is complete.
If you deselect Download updates from default sources immediately after installation, the updatedownload task runs after installation, but it does not download any updates.
vSphere Installation and Setup
210 VMware, Inc.
7 Type the vCenter Server IP address or name, HTTP port, and the administrative account that theUpdate Manager server will use to connect to the vCenter Server system, and click Next.
8 Select the type of database that you want to use.
n If you do not have an existing database, select Install a Microsoft SQL Server 2008 R2 Expressinstance (for small scale deployments) and click Next.
This database is suitable for deployments of up to 5 hosts and 50 virtual machines.
n If you have a supported database, select Use an existing supported database and select a DSN fromthe drop-down menu. If the DSN does not use Windows NT authentication, type the user name andpassword for the DSN and click Next.
IMPORTANT The DSN must be a 32-bit DSN.
9 (Optional) Select the database options.
n If the system DSN you specify points to an existing Update Manager database with the currentschema, you can either retain your existing database or replace it with an empty one.
n If the system DSN you specify points to an existing Update Manager database with different schema,on the Database Upgrade page, select Yes, I want to upgrade my Update Manager database and Ihave taken a backup of the existing Update Manager database, and click Next.
10 From the drop-down menu, select the IP address or the host name of your Update Manager instance.
If the computer on which you install Update Manager has one NIC, the Update Manager installerautomatically detects the IP address. If the computer has multiple NICs, you must select the correct IPaddress or use a DNS name. The DNS name must be resolved from all hosts that this Update Managerinstance will manage.
11 Specify the Update Manager port settings, select whether you want to configure the proxy settings, andclick Next.
12 (Optional) Provide information about the proxy server, the port, and whether the proxy should beauthenticated, and click Next.
13 Select the Update Manager installation and patch download directories, and click Next.
If you do not want to use the default locations, you can click Change to browse to a different directory.
14 (Optional) In the warning message about the disk free space, click OK.
This message appears when you try to install Update Manager on a computer that has less than 120GBfree space.
15 Click Install to begin the installation.
16 Click Finish.
The Update Manager server component is installed, and the client component appears as an available plug-inin the Plug-in Manager of the vSphere Client.
What to do next
In the vSphere Client, select Plug-ins > Manage Plug-ins to install and enable the Update Manager Client plug-in.
Chapter 12 After You Install vCenter Server
VMware, Inc. 211

Install vSphere ESXi Dump CollectorYou can configure ESXi to dump the vmkernel memory to a network server, rather than to a disk, when thesystem has encountered a critical failure. Install vSphere ESXi Dump Collector to collect such memory dumpsover the network.
NOTE In the vCenter Server Appliance, the ESXi Dump Collector is installed and enabled by default. Theseinstructions apply to Windows-based deployments.
For instructions on configuring ESXi to dump kernel memory to the network server, see “Configure ESXi DumpCollector with ESXCLI,” on page 87. The Dump Collector is most useful for datacenters where ESXi hosts areconfigured using the Auto Deploy process, so it might not have local storage. You can also install the DumpCollector for ESXi hosts that do have local storage, as an additional location where vmkernel memory dumpscan be redirected when critical failures occur.
You can install the Dump Collector on the same machine as the associated vCenter Server, or on a differentmachine that has network connection to the vCenter Server. ESXi Dump Collector does not support vSpheredistributed switches in ESXi 5.0.
The Dump Collector service binds to an IPv4 address for communication with vCenter Server, and does notsupport IPv6. The vCenter Server can be on a host machine in an IPv4-only, IPv4/IPv6 mixed-mode, or IPv6-only network environment, but the machine that connects to the vCenter Server through the vSphere Clientmust have an IPv4 address for the Dump Collector service to work.
Prerequisites
n Verify that you have administrator privileges
n Verify that the host machine has Windows Installer 3.0 or later.
n Verify that the host machine has a supported processor and operating system. The Dump Collectorsupports the same processors and operating systems as vCenter Server. See “vCenter Server SoftwareRequirements,” on page 36 and “vCenter Server and vSphere Client Hardware Requirements,” onpage 33.
n Verify that the host machine has a valid IPv4 address. You can install the Dump Collector on a machinein an IPv4-only or IPv4/IPv6 mixed-mode network environment, but you cannot install the DumpCollector on a machine in an IPv6-only environment.
n If you are using a network location for the Dump Collector repository, make sure the network location ismounted.
Gather the following information to complete the installation:
n The location to install the Dump Collector to, if you are not using the default location.
n The location for the Dump Collector repository where the dump files will be stored.
n (Optional) The maximum size for the Dump Collector repository. The specified network location musthave at least that much free space.
n Whether to install the Dump Collector as a standalone instance or to integrate the Dump Collector witha vCenter Server. The Dump Collector is not supported for integration with vCenter Server versions earlierthan version 5.0.
n If the Dump Collector is integrated with a vCenter Server, the address and credentials for the vCenterServer: IP address or name, HTTP port, user name, and password.
n The Dump Collector server port, if you are not using the default setting.
n The host name or IP address to identify the Dump Collector on the network.
vSphere Installation and Setup
212 VMware, Inc.

Procedure
1 In the software installer directory, double-click the autorun.exe file to start the installer.
2 Select VMware ESXi™Dump Collector and click Install.
3 Follow the wizard prompts to complete the installation.
Install vSphere Syslog CollectorInstall the vSphere Syslog Collector to enable ESXi system logs to be directed to a server on the network, ratherthan to a local disk.
You can install the Syslog Collector on the same machine as the associated vCenter Server, or on a differentmachine that has network connection to the vCenter Server. The Syslog Collector service binds to an IPv4address for communication with vCenter Server, and does not support IPv6. The vCenter Server can be on ahost machine in an IPv4-only, IPv4/IPv6 mixed-mode, or IPv6-only network environment, but the machinethat connects to the vCenter Server through the vSphere Client must have an IPv4 address for the SyslogCollector service to work.
Prerequisites
n Verify that you have administrator privileges.
n Verify that the host machine has Windows Installer 3.0 or later.
n Verify that the host machine has a supported processor and operating system. The Syslog Collectorsupports the same processors and operating systems as vCenter Server. See “vCenter Server SoftwareRequirements,” on page 36 and “vCenter Server and vSphere Client Hardware Requirements,” onpage 33.
n Determine whether to install the Syslog Collector as a standalone instance or to integrate the SyslogCollector with a vCenter Server. The Syslog Collector is not supported for integration with vCenter Serverversions earlier than version 5.0.
n Verify that the host machine has a valid IPv4 address. You can install the Syslog Collector on a machinein an IPv4-only or IPv4/IPv6 mixed-mode network environment, but you cannot install the SyslogCollector on a machine in an IPv6-only environment.
Gather the following information to complete the installation:
n The location to install the Syslog Collector to, if you are not using the default location.
n The location for the Syslog Collector repository where the syslog files will be stored.
n (Optional) The maximum size for the Syslog Collector repository. The specified network location musthave at least that much free space.
n (Optional) The maximum number of Syslog Collector log rotations to keep.
n If the Syslog Collector is integrated with a vCenter Server, the address and credentials for the vCenterServer: IP address or name, HTTP port, user name, and password.
n The Syslog Collector server port, if you are not using the default setting, and whether to use TCP and UDPprotocols for this port.
n The Syslog Collector server SSL port, if you are not using the default setting, and whether to use secureconnection (SSL) for this port.
n The host name or IP address to identify the Syslog Collector on the network.
Procedure
1 In the software installer directory, double-click the autorun.exe file to start the installer.
2 Select VMware® Syslog Collector and click Install.
Chapter 12 After You Install vCenter Server
VMware, Inc. 213
3 Follow the wizard prompts to complete the installation.
Install vSphere Auto DeployInstall vSphere Auto Deploy to provision and customize physical hosts by loading the ESXi image directly intomemory. You can provision and reprovision hundreds of ESXi hosts efficiently with vCenter Server.
You must install the Auto Deploy feature separately for each instance of vCenter Server that you plan to usethe feature with. Auto Deploy is not supported with vCenter Server versions earlier than version 5.0. AutoDeploy supports both IPv4 and IPv6.
Prerequisites
n Verify that you have administrator privileges
n Verify that the host machine has Windows Installer 3.0 or later.
n Verify that the host machine has a supported processor and operating system. Auto Deploy supports thesame processors and operating systems as vCenter Server.
See “vCenter Server Software Requirements,” on page 36 and “vCenter Server and vSphere ClientHardware Requirements,” on page 33.
Gather the following information to complete the installation:
n The location to install Auto Deploy in, if you are not using the default location.
n The location for the Auto Deploy repository. Do not use a network share for the repository.
n (Optional) The maximum size for the Auto Deploy repository. Best practice is to allocate 2GB to haveenough room for four image profiles and some extra space. Each image profile requires approximately350MB. Determine how much space to reserve for the Auto Deploy repository by considering how manyimage profiles you expect to use. The specified disk must have at least that much free space.
n The address and credentials of the vCenter Server that you are installing the Auto Deploy feature for: IPaddress or name, HTTP port, user name, and password.
n The Auto Deploy server port, if you are not using the default setting.
n The host name or IP address to identify Auto Deploy on the network.
Procedure
1 In the software installer directory, double-click the autorun.exe file to start the installer.
2 Select VMware® Auto Deploy and click Install.
3 Follow the wizard prompts to complete the installation.
Install VMware vSphere Authentication ProxyInstall vSphere Authentication Proxy to enable ESXi hosts to join a domain without using Active Directorycredentials. vSphere Authentication Proxy enhances security for PXE-booted hosts and hosts that areprovisioned using Auto Deploy, by removing the need to store Active Directory credentials in the hostconfiguration.
You can install vSphere Authentication Proxy on the same machine as the associated vCenter Server, or on adifferent machine that has network connection to the vCenter Server. The vSphere Authentication Proxy is notsupported with vCenter Server versions earlier than version 5.0.
The vSphere Authentication Proxy service binds to an IPv4 address for communication with vCenter Server,and does not support IPv6. The vCenter Server can be on a host machine in an IPv4-only, IPv4/IPv6 mixed-mode, or IPv6-only network environment, but the machine that connects to the vCenter Server through thevSphere Client must have an IPv4 address for the vSphere Authentication Proxy service to work.
vSphere Installation and Setup
214 VMware, Inc.

Prerequisites
n Install vSphere Auto Deploy. See “Install vSphere Auto Deploy,” on page 214.
n Verify that you have administrator privileges.
n Verify that the host machine has Windows Installer 3.0 or later.
n Verify that the host machine has a supported processor and operating system. vSphere AuthenticationProxy supports the same processors and operating systems as vCenter Server. See “vCenter ServerSoftware Requirements,” on page 36 and “vCenter Server and vSphere Client HardwareRequirements,” on page 33.
n Verify that the host machine has a valid IPv4 address. You can install vSphere Authentication Proxy on amachine in an IPv4-only or IPv4/IPv6 mixed-mode network environment, but you cannot install vSphereAuthentication Proxy on a machine in an IPv6-only environment.
n If you are installing vSphere Authentication Proxy on a Windows Server 2008 R2 host machine, downloadand install the Windows hotfix described in Windows KB Article 981506 on the support.microsoft.comWeb site. If this hotfix is not installed, the Authentication Proxy Adapter fails to initialize. This problemis accompanied by error messages in camadapter.log similar to Failed to bind CAM website with CTLand Failed to initialize CAMAdapter.
Gather the following information to complete the installation:
n The location to install vSphere Authentication Proxy, if you are not using the default location.
n The address and credentials for the vCenter Server that vSphere Authentication Proxy will connect to: IPaddress or name, HTTP port, user name, and password.
n The host name or IP address to identify vSphere Authentication Proxy on the network.
Procedure
1 On the host machine where you will install the vSphere Authentication Proxy service, install the .NETFramework 3.5.
2 Install vSphere Auto Deploy.
You do not have to install Auto Deploy on the same host machine as the vSphere Authentication Proxyservice.
3 Add the host machine where you will install the authentication proxy service to the domain.
4 Use the Domain Administrator account to log in to the host machine.
5 In the software installer directory, double-click the autorun.exe file to start the installer.
6 Select VMware vSphere® Authentication Proxy and click Install.
7 Follow the wizard prompts to complete the installation.
During installation, the authentication service registers with the vCenter Server instance where AutoDeploy is registered.
When you install the vSphere Authentication Proxy service, the installer creates a domain account withappropriate privileges to run the authentication proxy service. The account name begins with the prefix CAM-and has a 32-character, randomly generated password associated with it. The password is set to never expire.Do not change the account settings.
What to do next
Configure ESXi to use vSphere Authentication Proxy to join a domain. See the vSphere Security documentation.
Chapter 12 After You Install vCenter Server
VMware, Inc. 215

Uninstall VMware vSphere ComponentsThe VMware vSphere components and Support Tools are uninstalled separately, even if they are on the samemachine. You must have administrator privileges to uninstall VMware vCenter Server
CAUTION Uninstalling a vCenter Server system while it is running disrupts the vSphere Client connections,which can cause data loss.
Uninstalling the vCenter Server system or the vSphere Client does not uninstall any of the other components,such as the bundled database or Microsoft .NET Framework. Do not uninstall the other components if otherapplications on your system depend on them.
Procedure
1 If you are uninstalling the vCenter Server system, remove the hosts from the Hosts and Clusters inventory.
2 As Administrator on the Microsoft Windows system, select Start > Settings > Control Panel >Add/Remove Programs.
3 Select the component to remove from the list and click Remove.
4 Click Yes to confirm that you want to remove the program.
5 Click Finish.
Creating vCenter Server Linked Mode GroupsA Linked Mode group allows you to log in to any single instance of vCenter Server and view and manage theinventories of all the vCenter Server systems in the group.
You can join multiple vCenter Server systems to form a Linked Mode group. You can configure a Linked Modegroup during vCenter Server installation or after vCenter Server is installed.
To join a vCenter Server group, you enter the fully qualified domain name (or IP address) of a remote machineon which vCenter Server is running. The remote machine can be any vCenter Server instance that is, or willbecome, a member of the Linked Mode group.
You must also provide the LDAP port number of the remote vCenter Server instance.
vCenter Server instances in a group replicate shared global data to the LDAP directory. The global data includesthe following information for each vCenter Server instance:
n Connection information (IP and ports)
n Certificates
n Licensing information
n User roles
The vSphere Web Client can connect to a Linked Mode vCenter Server environment only if thevSphere Web Client is logged in to vCenter Server as a domain user. For example, if the Linked Mode vCenterServers are installed with user "abc" added to domain "xyz," the vSphere Web Client user should log in usingxyz\abc.
NOTE Linked Mode groups that contain both vCenter Server 5.0 and earlier versions of vCenter Server are notsupported. The vSphere Client does not function correctly with vCenter Servers in groups that have bothversion 5.0 and earlier versions of vCenter Server. Do not join a version 5.0 vCenter Server to earlier versionsof vCenter Server, or an earlier version of vCenter Server to a version 5.0 vCenter Server. Upgrade any vCenterServer instance to version 5.0 before joining it to a version 5.0 vCenter Server.
vSphere Installation and Setup
216 VMware, Inc.

Linked Mode Considerations for vCenter ServerConsider several issues before you configure a Linked Mode group.
Before you configure a Linked Mode group, consider the following issues.
n If you upgrade a vCenter Server that is part of a Linked Mode group, it will be removed from the group.vCenter Server does not support Linked Mode groups that contain both version 5.0 and earlier versionsof vCenter Servers. After all vCenter Servers in the group are upgraded to version 5.0, you can rejoin them.
n Each vCenter Server user sees the vCenter Server instances on which they have valid permissions.
n When you set up your vCenter Server Linked Mode group, you must install the first vCenter Server as astandalone instance because you do not yet have a remote vCenter Server machine to join. SubsequentvCenter Server instances can join the first vCenter Server or other vCenter Server instances that have joinedthe Linked Mode group.
n If you join a vCenter Server to a standalone instance that is not part of a domain, you must add thestandalone instance to a domain and add a domain user as an administrator.
n The vCenter Server instances in a Linked Mode group do not need to have the same domain user login.The instances can run under different domain accounts. By default, they run as the LocalSystem accountof the machine on which they are running, which means that they are different accounts.
n During vCenter Server installation, if you enter an IP address for the remote instance of vCenter Server,the installer converts it into a fully qualified domain name.
n You cannot join a Linked Mode group during the upgrade procedure when you are upgrading fromVirtualCenter 25 to vCenter Server 5.0. You can join after the upgrade to vCenter Server is complete.
See the vSphere Upgrade documentation.
n CAUTION If you need to uninstall and reinstall vCenter Server on more than one member of a LinkedMode group, do so with a single vCenter Server at a time. Uninstalling and reinstalling multiple linkedvCenter Servers at the same time is not supported, and can cause errors that prevent vCenter Server fromconnecting to vCenter Inventory Service. If it is necessary to uninstall and reinstall multiple linked vCenterServers at the same time, isolate them from the Linked Mode group first, and rejoin them to the LinkedMode group after the reinstallation is complete.
Linked Mode Prerequisites for vCenter ServerPrepare the vCenter Server system for joining a Linked Mode group.
Before joining a vCenter Server to a Linked Mode group, review “Linked Mode Considerations for vCenterServer,” on page 217.
All the requirements for standalone vCenter Server systems apply to Linked Mode systems.
The following requirements apply to each vCenter Server system that is a member of a Linked Mode group:
n Linked Mode groups that contain both vCenter Server 5.0 and earlier versions of vCenter Server are notsupported. The vSphere Client does not function correctly with vCenter Servers in groups that have bothversion 5.0 and earlier versions of vCenter Server. Do not join a version 5.0 vCenter Server to earlierversions of vCenter Server, or an earlier version of vCenter Server to a version 5.0 vCenter Server. Upgradeany vCenter Server instance to version 5.0 before joining it to a version 5.0 vCenter Server.
n To join a Linked Mode group the vCenter Server must be in evaluation mode or licensed as a Standardedition. vCenter Server Foundation and vCenter Server Essentials editions do not support Linked Mode.
n DNS must be operational for Linked Mode replication to work.
Chapter 12 After You Install vCenter Server
VMware, Inc. 217

n The vCenter Server instances in a Linked Mode group can be in different domains if the domains have atwo-way trust relationship. Each domain must trust the other domains on which vCenter Server instancesare installed.
n When adding a vCenter Server instance to a Linked Mode group, the installer must be run by a domainuser who is an administrator on both the machine where vCenter Server is installed and the target machineof the Linked Mode group.
n All vCenter Server instances must have network time synchronization. The vCenter Server installervalidates that the machine clocks are not more than five minutes apart.
Joining a Linked Mode Group During and After InstallationYou can join a system to a Linked Mode group during the vCenter Server installation or after you install vCenterServer.
For example, suppose you have three machines on which you want to install vCenter Server. You want thethree instances to be members of a Linked Mode group.
1 On Machine 1, you install vCenter Server as a standalone instance because you do not have a remotevCenter Server machine to join.
2 On Machine 2, you install vCenter Server, choose to join a Linked Mode group, and provide the fullyqualified domain name of Machine 1.
3 On Machine 3, you upgrade to vCenter Server 5.0. After the upgrade, you configure Machine 3 to joineither Machine 1 or Machine 2. Machine 1, Machine 2, and Machine 3 are now members of a LinkedMode group.
Join a Linked Mode Group After InstallationAfter installing vCenter Server, you can join a vCenter Server to a Linked Mode group.
Prerequisites
See “Linked Mode Prerequisites for vCenter Server,” on page 217 .
NOTE Joining a version 5.0 vCenter Server to older versions of vCenter Server is not supported.
Procedure
1 Select Start > All Programs > VMware > vCenter Server Linked Mode Configuration.
2 Click Next.
3 Select Modify linked mode configuration and click Next.
4 Click Join this vCenter Server instance to an existing linked mode group or another instance and clickNext.
5 Enter the server name and LDAP port number of a remote vCenter Server instance that is a member ofthe group and click Next.
If you enter an IP address for the remote server, the installer converts it into a fully qualified domain name.
vSphere Installation and Setup
218 VMware, Inc.

6 If the vCenter Server installer detects a role conflict, select how to resolve the conflict.
Option Action
Yes, let VMware vCenter Serverresolve the conflicts for me
Click Next.The role on the joining system is renamed to vcenter_namerole_name, wherevcenter_name is the name of the vCenter Server system that is joining theLinked Mode group, and role_name is the name of the original role.
No, I'll resolve the conflicts myself To resolve the conflicts manually:a Using the vSphere Client, log in to one of the vCenter Server systems
using an account with Administrator privileges.b Rename the conflicting role.c Close the vSphere Client session and return to the vCenter Server
installer.d Click Back and click Next.The installation continues without conflicts.
A conflict results if the joining system and the Linked Mode group each contain a role with the same namebut with different privileges.
7 Click Finish.
vCenter Server restarts. Depending on the size of your inventory, the change to Linked Mode might takefrom a few seconds to a few minutes to complete.
The vCenter Server instance is now part of a Linked Mode group. After you form a Linked Mode group, youcan log in to any single instance of vCenter Server and view and manage the inventories of all the vCenterServers in the group. It might take several seconds for the global data (such as user roles) that are changed onone machine to be visible on the other machines. The delay is usually 15 seconds or less. It might take a fewminutes for a new vCenter Server instance to be recognized and published by the existing instances, becausegroup members do not read the global data very often.
For information about configuring and using your Linked Mode group, see the vCenter Server and HostManagement documentation.
Isolate a vCenter Server Instance from a Linked Mode GroupYou can isolate a vCenter Server instance from a Linked Mode group.
Procedure
1 Select Start > All Programs > VMware > vCenter Server Linked Mode Configuration.
2 Click Modify linked mode configuration and click Next.
3 Click Isolate this vCenter Server instance from linked mode group and click Next.
4 Click Continue and click Finish.
vCenter Server restarts. Depending on the size of your inventory, the change to Linked Mode configurationmight take from a few seconds to a few minutes to complete.
The vCenter Server instance is no longer part of the Linked Mode group.
Chapter 12 After You Install vCenter Server
VMware, Inc. 219

Configure the URLs on a Linked Mode vCenter Server SystemIf you connect a vCenter Server system to a Linked Mode group and the vCenter Server system has a machinename that does not match the domain name, several connectivity problems arise. Correct this situation bychanging the URLs.
If you do not update the URLs, remote instances of vCenter Server cannot reach the vCenter Server system,because the default vCenter Server URL entries are no longer accurate. The vCenter Server installer configuresdefault URL entries as follows:
n For the Virtualcenter.VimApiUrl key, the default value is http(s)://Fully qualified domain name(FQDN) of vCenter Server machine/sdkvCenter Server.
n For the Virtualcenter.VimWebServicesUrl key, the default value is https://FQDN of vCenter Servermachine:installed-webservices-port/vwsvCenter Server.
Procedure
1 Isolate the vCenter Server system from the Linked Mode group.
See “Isolate a vCenter Server Instance from a Linked Mode Group,” on page 219
2 Change the domain name or the machine name to make them match.
3 From the vSphere Client, connect directly to the vCenter Server instance on which you have changed thedomain or machine name.
4 Select Administration > vCenter Server Settings and click Advanced Settings.
5 For the Virtualcenter.VimApiUrl key, change the value to point to the location where the vSphere Clientand SDK clients can access the vCenter Server system.
For example: http(s)://machine-name/IP address:vc-port/sdk.
6 For the Virtualcenter.VimWebServicesUrl key, change the value to point to the location where vCenterServer Webservices is installed.
For example: https://machine-name/ip:webservices-port/vws.
7 For the Virtualcenter.Instancename key, change the value so that the modified name appears in thevCenter Server inventory view.
8 Rejoin the vCenter Server system to the Linked Mode group.
See “Join a Linked Mode Group After Installation,” on page 218.
The URLs are now correctly configured.
Set the IP Address for a Linked Mode vCenter Server with Multiple NetworkInterfaces
If a vCenter Server in a Linked Mode group has multiple network interfaces, you must set the IP address thatthe vCenter Server advertises to the other vCenter Servers in the Linked Mode group.
Unless you set the IP address, vSphere Client searches, lists, and sorting will not work properly. Also, thevSphere Web Client will not work properly with the vCenter Server.
Procedure
1 On the vCenter Server host machine, using a text editor, open the fileInventory_Service_installation_directory/lib/server/config/query-server-config.xml.
2 Find the following line.
!-- <property name="externalAddress" value="192.168.0.1" /> /--
vSphere Installation and Setup
220 VMware, Inc.

3 Change the line as follows.
<property name="externalAddress" value="IP_address" />
IP_address is the IP address of this machine on a subnet that will be used to communicate with other vCenterServer instances in the Linked Mode group.
4 Restart the vCenter Inventory Service.
a In the Administrative Tools control panel, select Services.
b Right-click vCenter Inventory Service and select Start.
The status changes to Started.
The IP address is configured.
Linked Mode TroubleshootingIf you are having trouble with your Linked Mode group, consider the following points.
When you have multiple vCenter Server instances, each instance must have a working relationship with thedomain controller and not conflict with another machine that is in the domain. Conflicts can occur, for example,when you clone a vCenter Server instance that is running in a virtual machine and you do not use sysprep ora similar utility to ensure that the cloned vCenter Server instance has a globally unique identifier (GUID).
If the domain controller is unreachable, vCenter Server might be unable to start. You might be unable to changethe Linked Mode configuration of the affected vCenter Server system. If this occurs, resolve the problem withthe domain controller and restart vCenter Server. If resolving the problem with the domain controller isimpossible, you can restart vCenter Server by removing the vCenter Server system from the domain andisolating the system from its current Linked Mode group.
The DNS name of the machine must match with the actual machine name. Symptoms of machine names notmatching the DNS name are data replication problems, ticket errors when trying to search, and missing searchresults from remote instances.
NOTE Make sure your Windows and network-based firewalls are configured to allow Linked Mode.
Configure a Windows Firewall to Allow a Specified Program AccessvCenter Server uses Microsoft ADAM/AD LDS to enable Linked Mode, which uses the Windows RPC portmapper to open RPC ports for replication. When you install vCenter Server in Linked Mode, you must modifythe firewall configuration on the local machine .
Incorrect configuration of firewalls can cause licenses and roles to become inconsistent between instances.
Prerequisites
n The Windows version must be earlier than Windows Server 2008. For Windows Server 2008, Windowsautomatically configures the firewall to permit access.
n No network-based firewalls can exist between vCenter Server Linked Mode instances. For environmentswith network-based firewalls, see “Configure Firewall Access by Opening Selected Ports,” on page 222.
Procedure
1 Select Start > Run.
2 Type firewall.cpl and click OK.
3 Make sure that the firewall is set to allow exceptions.
4 Click the Exceptions tab.
5 Click Add Program.
Chapter 12 After You Install vCenter Server
VMware, Inc. 221

6 Add an exception for C:\Windows\ADAM\dsamain.exe and click OK.
7 Click OK.
Configure Firewall Access by Opening Selected PortsvCenter Server uses Microsoft ADAM/AD LDS to enable Linked Mode, which uses the Windows RPC portmapper to open RPC ports for replication. When you install vCenter Server in Linked Mode, the firewallconfiguration on any network-based firewalls must be modified.
Incorrect configuration of firewalls can cause licenses and roles to become inconsistent between instances.
Procedure
u Configure Windows RPC ports to generically allow selective ports for machine-to-machine RPCcommunication.
Choose one of the following methods.
n Change the registry settings. See http://support.microsoft.com/kb/154596/en-us.
n Use Microsoft's RPCCfg.exe tool. See http://support.microsoft.com/kb/908472/en-us.
Using a License Server to Manage Version 3.5 ESX or ESXi HostsvCenter Server 5.0 requires a license server to manage ESX/ESXi version 3.5 hosts.
vCenter Server 5.0 does not require a license server to manage ESX or ESXi version 4.x hosts.
If you have a license server installed, you can configure your newly installed or upgraded vCenter Server touse the license server. If you do not have a license server installed, you can download the VMware LicenseServer from the VMware Web site at http://downloads.vmware.com/d/details/esx_35_licenseserver_dt/dGViZGVoKmJkZXBo. After you haveinstalled the license server, configure vCenter Server to use it.
See the information about configuring vCenter Server to use a license server in the vCenter Server and HostManagement documentation.
You can also upgrade legacy hosts to manage them through vCenter Server without a license server.
VMware vCenter Management Webservices Service Fails to StartWhen you reboot the vCenter Server machine after installing vCenter Server, the VMware VirtualCenterManagement Webservices service does not start.
Problem
The VMware VirtualCenter Management Webservices service does not start automatically.
Cause
This problem can occur when vCenter Server and the database are installed on the same machine.
Solution
u Start the service manually.
Select Settings > Control Panel > Administrative Tools > Services > VMware VirtualCenter ManagementWebservices and start the service. The machine might require several minutes to start the service.
vSphere Installation and Setup
222 VMware, Inc.
Back Up the Inventory Service Database on WindowsYou should back up the Inventory Service database as part of your regular vCenter Server databaseadministration.
To move the Inventory Service database to a different host machine, back up the database on the source machineand restore the database on the destination machine. Your vCenter Server database administration should alsoinclude regular backups of your vCenter Server database. See the vendor documentation for your vCenterserver database type.
Prerequisites
n Consult your database administrator about backing up and restoring databases.
n Verify that you have system administrator privileges to perform backup or restore operations.
Procedure
1 On the source machine, open the command prompt in the vCenter Server and change the directory tovCenter_Server_installation_directory\Infrastructure\Inventory Service\scripts.
2 Run the following command at the prompt to back up the Inventory Service database.
backup.bat -file backup_file_name
When the backup operation finishes, the message Backup completed successfully appears.
What to do next
See “Restore an Inventory Service Database Backup on Windows,” on page 223.
Restore an Inventory Service Database Backup on WindowsYou can restore a backup of your Inventory Service database for disaster recovery, after a vCenter Serverupgrade, or to move the database to a new machine.
The machine that you back up the database from is the source machine. The machine that you restore thedatabase to is the destination machine.
Prerequisites
n Consult your database administrator about backing up and restoring databases.
n Verify that you have system administrator privileges to perform backup or restore operations.
Procedure
1 On the destination machine, stop the VirtualCenter service.
a Select Start > Control Panel > Administrative Tools > Services.
b Right-click vCenter Inventory Service and select Stop.
The Status changes from Started to blank.
2 On the destination machine, open the command prompt in the vCenter Server and change the directoryto vCenter Server install location\Infrastructure\Inventory Service\scripts.
3 Run the following command at the command prompt to restore the Inventory Service database.
restore -backup backup_file_name
When the restore operation finishes, the message The Restore completed successfully message appears.
Chapter 12 After You Install vCenter Server
VMware, Inc. 223

Back Up the Inventory Service Database on LinuxYou should back up the Inventory Service database as part of your regular vCenter Server databaseadministration.
To move the Inventory Service database to a different host machine, back up the database on the source machineand restore the database on the destination machine.
Prerequisites
n Consult your database administrator about backing up and restoring databases.
n Verify that you have system administrator privileges to perform backup or restore operations.
Procedure
1 On the source machine, open a command prompt in the vCenter Server and change the directoryto /usr/lib/vmware-vpx/inventoryservice/scripts/.
2 Run the following command to back up the Inventory Service database.
./backup.sh -file backup_file_name
When the backup operation finishes, the message Backup completed successfully appears.
What to do next
See “Restore an Inventory Service Database Backup on Linux,” on page 224.
Restore an Inventory Service Database Backup on LinuxYou can restore a backup of your Inventory Service database for disaster recovery, after a vCenter Serverupgrade, or to move the database to a new machine.
The machine that you back up the database from is the source machine. The machine that you restore thedatabase to is the destination machine.
Prerequisites
n Consult your database administrator about backing up and restoring databases.
n Verify that you have system administrator privileges to perform backup or restore operations.
Procedure
1 On the destination machine, open a console and run the service vmware-inventory service stopcommand to stop the Inventory Service before you restore the Inventory Service database.
2 On the destination machine, open a command prompt in the vCenter Server and change the directoryto /usr/lib/vmware-vpx/inventoryservice/scripts/.
3 Run the following command at the prompt to restore the Inventory Service database.
./restore.sh -backup backup_file_name
When the restore operation finishes, the message The Restore completed successfully message appearsat the command prompt.
vSphere Installation and Setup
224 VMware, Inc.

Update the vCenter Inventory Service URL ConfigurationIf the actual host name or domain name of the vCenter Server machine does not match the name that wasentered at installation, the service does not work. When the host name or domain name of the vCenter Servermachine changes after you install vCenter Server, update the configuration information of the inventoryservice.
Procedure
1 Stop the vCenter Inventory Service.
a From the Windows Start menu, select Administrative Tools > Services.
b Right-click vCenter Inventory Service and select Stop.
2 Open a command prompt.
3 Change directory to Inventory_Service_directory/scripts
The location of the Inventory Service directory is specified during the vCenter Server installation. Forexample, if you installed vCenter Inventory Service in the default location, run this command.
cd /Program Files/VMware/Infrastructure/Inventory Service/scripts
4 Run the register.bat command to update the stored configuration information of the Inventory Service.
register.bat current_vCenter_Server_fully_qualified_domain_name vCenter_Server_HTTPS_port
For example, if the vCenter Server fully qualified domain name is machinename.corp.com and the HTTPSport is 443, run this command.
register.bat machinename.corp.com 443
5 Restart the vCenter Inventory Service.
a From the Windows Start menu, select Administrative Tools > Services.
b Right-click vCenter Inventory Service and select Start.
The vCenter Inventory Service URL configuration is updated.
Reset the vCenter Inventory Service DatabaseIf the vCenter Inventory Service Database is corrupted or otherwise inoperable, you can reset it. You shouldalso reset the vCenter Inventory Service Database if you reset the vCenter Server database.
CAUTION This procedure can cause data loss. Perform this procedure with VMware Technical Support.
Procedure
1 Stop the vCenter Inventory Service.
a From the Windows Start menu, select Administrative Tools > Services.
b Right-click vCenter Inventory Service and select Stop.
2 Open a command prompt.
3 Delete the entire contents of the Inventory_Service_Directory/data directory.
The location of the Inventory Service directory is specified during the vCenter Server installation.
Chapter 12 After You Install vCenter Server
VMware, Inc. 225

4 Change directory to Inventory_Service_directory/scripts
For example, if you installed vCenter Inventory Service in the default location, run this command.
cd /Program Files/VMware/Infrastructure/Inventory Service/scripts
5 Run the createDB.bat command, with no arguments, to reset the vCenter Inventory Service database.
6 Run the register.bat command to update the stored configuration information of the Inventory Service.
register.bat current_vCenter_Server_fully_qualified_domain_name vCenter_Server_HTTPS_port
For example, if the vCenter Server fully qualified domain name is machinename.corp.com and the HTTPSport is 443, run this command.
register.bat machinename.corp.com 443
7 Restart the vCenter Inventory Service.
a From the Windows Start menu, select Administrative Tools > Services.
b Right-click vCenter Inventory Service and select Start.
The vCenter Inventory Service database is reset.
vSphere Installation and Setup
226 VMware, Inc.

Index
Symbols%include command 51%post command 51%pre command 51
Numerics3rd-party modules, removing 15964-bit DSN requirement 166
Aacceptance levels, VIBs 127accepteula command 51access, restricting 156active rule set 66Add-DeployRule 120administrative password 144advanced management (Auto Deploy) 91answer file 63, 85, 92answer files 94, 121Apply-EsxImageProfile cmdlet 84Authentication Proxy, See also vSphere
Authentication ProxyAuto deploy, answer file 92Auto Deploy
answer files 121best practices 97boot file 73boot operation 63boot process 66change target vCenter Server 93coredump 103DHCP address 104DHCP reservations 110DHCP server 73, 110DNS Server 112failing to complete boot 103failure to boot 105gPXE boot 117host profiles 119image profile warning 102installation option 14installing 113network boot problem 105networking 90PowerCLI cmdlets 71
PowerCLI installation 109PowerCLI setup 109preparing 73proof of concept 106proof of concept checklist 108provisioning hosts 82rebooting 83redirection problem 101reference host 85, 118reprovisioning hosts with 83reregister 91rule set compliance 81rules 115static IP address 92tasks 70TFTP server 73, 105timout error 100troubleshooting 100tutorial 106user input 83wrong image 101See also vSphere Auto Deploy
Auto Deploy daemon 91Auto Deploy image 114Auto Deploy on vCenter Server Appliance 93Auto Deploy PowerCLI 75, 78Auto Deploy PowerCLI cmdlets 66Auto Deploy roadmap 70Auto Deploy rules 79, 80Auto Deploy server 63auto-deploy register command 93
Bbanner, security 142best practices, Auto Deploy 97BIOS 145BIOS UUID 63boot command line options 49boot commands, entering 48boot disk, shared 154boot failure in UEFI mode. 146boot file (Auto Deploy) 73boot operations 63boot process, Auto Deploy 66
VMware, Inc. 227

boot prompt 49boot setting 145boot.cfg file 58bootloader kernel options 49bulk licensing 77bundled database 167
CCD-ROM, booting from virtual 145CD/DVD, burning the ESXi ISO image 16clearpart command 51clients, firewall 38, 39cluster location, assign with Auto Deploy 79components included with the vCenter Server
installer 201computer name
Oracle 167SQL Server 167
configuration defaults, resetting 158configuring a DB2 database 168configuring ports 38, 39configuring the keyboard 142Connect-VIServer cmdlet 78–80, 84connecting
Oracle database 190, 191SQL Server database 184
Copy-DeployRule cmdlet 84creating a DB2 database 171creating a SQL Server database 177creating an Oracle database 188custom packages, removing 159
Ddata source name 166Database Monitoring,enabling for Microsoft SQL
Server user 186Database Monitoring,enabling for Oracle
user 192database roles, setting vCenter user rights 178databases
maintaining 167Oracle 190preparing 217SQL Server 184, 185
DB2, creating the schema 172DB2 database
client instance registry variables 170configure for remote connection 174, 175configure locally on Microsoft Windows 174database instance registry variables 169script for creating 171user and group 168
DB2 database configuration 168
DBO privileges 177deactivating ESXi 159default installation scripts 50default root password 50default storage behavior 152defaults, restoring 158depots 135DHCP
direct console 149, 150for PXE booting the ESXi installer 21vSphere Client 149
DHCP reservations, Auto Deploy 110DHCP Scope 110DHCP Server, Auto Deploy 110DHCP server for Auto Deploy 73direct console
boot setting 145configuring the keyboard 142DHCP 149, 150DNS 150IP addressing 149, 150management network 146–148navigating 142network adapters 148network settings 146–148password configuration 144redirecting by setting the boot options 143redirecting to a serial port 143security banner 142static addressing 149, 150testing management network 150, 152VLAN ID 148
direct console, redirecting to a serial port in anAuto Deploy host 144
Directory Services 218, 219disabling the management network 151Distributed Switch, See vSphere Distributed
SwitchDNS 149, 150, 221DNS Requirements 40DNS Server, Auto Deploy 112DNS suffixes, direct console 150domain controller 221Download TFTP ZIP 73download the vCenter Server installer 202DRAC 41dryrun command 51DSN, 64-bit requirement 166Dump Collector, See vSphere ESXi Dump
Collector
vSphere Installation and Setup
228 VMware, Inc.

Eesxcli system coredump 87ESXi
about 141deactivating 159installation options 14installing 43installing interactively 43managing remotely 147syslog service 155system requirements 29
ESXi Dump Collectorhost profiles 89reference host 89
ESXi Image Builder CLI, customized ESXiinstallation images 15
ESXi installation, required information 26ESXi installation script, about 50ESXi ISO image, burning on a CD/DVD 16ESXi setup, post-setup 161ESXi Shell access to host 157ESXi, convert to evaluation mode 162evaluation mode 15, 162
Ffactory defaults, restoring 158firewall
network-based 222Windows 221
floppy, booting from virtual 145folder location, assign with Auto Deploy 79FTP 19
GGet-Help PowerShell cmdlet 75global data 218, 219gpupdate /force command 221gPXE 19gPXE and Auto Deploy 66group policy update 221groups, requirements 217guest operating systems 32GUID 221
Hhardware requirements
ESXi 29vCenter Server 33vCenter Server Appliance 33
hardware requirements,ESXi 31host image profile acceptance level 157host profile from reference host 118host profiles
assign with Auto Deploy 80
Auto Deploy 88Auto Deploy rule 120Network Coredump 88reference host for Auto Deploy 118
host provisioning 63host settings, preserving during ESXi
installation 13hosts, reprovisioning with Auto Deploy 83hosts firewall 38, 39
IIBM DB2, requirements 165IDE disks 29, 31IIS, conflict with vCenter Server over port 80 40ILO 41Image Builder
and Auto Deploy 123overview 123See also ESXi Image Builder CLI
Image Builder CLI, See vSphere ESXi ImageBuilder CLI
Image Builder sessions 135Image Builder, installing 130Image Builder, workflows 135image profile 114image profiles, editing 139Image profiles, cloning 131Image profiles, creating 131, 137image profiles, export 133image profiles, validation 126ImageProfile structure 127include command 51install command 51Installation overview 13installation script
customized in ISO image 18path to 51supported locations 50
installation script, creating 47installation scripts, default 50installing
ESXi 43Update Manager server 210vCenter Server 202vCenter Server in a virtual machine 204VirtualCenter Server 217VMware vSphere Web Client 209vSphere Client 208
installing ESXi, scripted 47installing ESXi interactively 43installorupgrade command 51interactive installation 14
Index
VMware, Inc. 229

Inventory Service, See also vCenter InventoryService
Inventory Service databaseback up on Linux 224back up on Windows 223restore on Linux 224restore on Windows 223
IP, on a detached host 146, 147IP address, vCenter Server with multiple network
interfaces 220IP addressing
direct console 149, 150vSphere Client 149
IPv6 195IPv6 address, format 195iSCSI software disk, installing ESXi on 45ISO
create 133export 133
ISO image, with custom installation script 18
JJDBC 185JDBC URL formats 196JVM heap settings, recommended for vCenter
Virtual Appliance 33
Kkeyboard command 51keyboard, localizing 142kickstart commands 58kickstart file, creating 47ks.cfg 50
LLDAP 218license key 162, 163license server, managing legacy hosts 222licensed mode 15, 162LicenseDataManager 77licensing, bulk licensing 77licensing ESXi hosts 161Linked Mode
and databases 217and permissions 217reachability 197, 220, 221requirements 217troubleshooting 221, 222
local Oracle database 190, 191local SQL Server database 177localizing, keyboard 142lockdown mode 156logging, providing space for 37
logical volume management 152LVM 152
MMAC address 22, 63maintaining the database 167management agents, restarting 150management network
direct console 146–148disabling 151restarting 151testing 150, 152
media options, ESXi installer, supported 15memory, ESXi requirements 29, 31message, security 142Microsoft .NET 75, 130Microsoft .NET Framework 37, 201Microsoft PowerShell 75, 130Microsoft SQL database permissions, setting by
using the dbo schema and db_ownerdatabase role 179
Microsoft SQL Native Client 167Microsoft SQL Server, requirements 165Microsoft SQL Server 2008 R2 Express 167,
201Microsoft SQL Server database schema, creating
with a script (recommendedmethod) 180
Microsoft Windowsauthentication for SQL Server 195system account 195
Microsoft Windows Installer 201
Nnavigating, direct console 142network adapters, direct console 148network boot 110network command 22, 51network core dump 87network drive, installing from 198network settings, direct console 146–148New-DeployRule 116, 120New-DeployRule cmdlet 78–80New-EsxImageProfile cmdlet 131NewEsxImageProfile cmdlet 137non-ASCII characters, disable support for 159
OODBC databases 184offline bundle
create 133export 133
vSphere Installation and Setup
230 VMware, Inc.

Oracle databasechanging the computer name 167remote access 190requirements 165script for creating 188user 187
Oracle database schema 188Oracle, preparing database 190
Pparanoid command 51part command 51partition command 51partitions 152, 153password, administrative 144plug-ins for vCenter Server 208port 80 conflict between vCenter Server and
IIS 40ports
configuring 38, 39firewall 38, 39
ports used by vCenter Server 38ports used by vCenter Server Appliance 39PowerCLI 78PowerCLI cmdlets, Auto Deploy 71PowerCLI sessions 135PowerCLI wildcard characters 135Preface 7preinstallation checklist 108preparing database 191prerequisites for installing vCenter Server 193PXE, configuration files 22PXE boot ESXi installer using PXELINUX, setup
procedure 22, 24, 25PXELINUX
boot ESXi installer using 22, 25boot ESXi installler using 24
Rredirecting log files 155reference host
Auto Deploy 88configuration options 87
reference host for Auto Deploy 85registration of Auto Deploy 91registry settings 221, 222reinstalling vCenter Server 216remote access, restricting 156remote management applications 26remote management of ESXi 147remote Oracle database 190remote SQL Server database 177
removing 3rd-party modules 159removing custom packages 159removing vCenter Server 216Repair-DeployRulesetCompliance cmdlet 81requirements for vSphere Client 37requirements for vSphere Web Client 37resetting configuration defaults 158restarting the management agents 150restarting the management network 151restoring, factory defaults 158restricting access 156ROM image 19root access, restricting 156root password 144rootpw command 51RPCCfg.exe 221, 222RSA 41rule engine 66rule set 63rule set compliance 81rule sets 66rules 66, 120
SSAS disks 29, 31SATA disks 29, 31schema, for DB2 172scratch partition,enabling 154scratch storage 152, 153script, for installing ESXi 50script for DB2 database 171script for Oracle database 188script for SQL Server database 177scripted database schema creation, for DB2 172scripted installation, differences from ESXi
4.x 57scripted installation of ESXi, by PXE Booting 61scripted installation of ESXi, from a USB flash
drive 60scripted installation of ESXi,from a CD or
DVD 59scripted installation option 14SCSI 29, 31SDK 197, 220, 221security 195security banner 142serial port
redirecting the direct console to 143redirecting the direct console using the vSphere
Client 143Service Console, removed in ESXi 5.0 11services, syslogd 155
Index
VMware, Inc. 231

sessions, PowerCLI 135SMBIOS information 63snap-in, Auto Deploy 75software depot 114software depots, examining 135SoftwarePackage structure 127specifications
ESXi hardware requirements 29, 31performance recommendations 29, 31
SQL compatibility mode 200SQL Server
changing the computer name 167Microsoft Windows authentication 195preparing the database 184, 185script for creating 177
SSH access to host 157Standard switch, restoring 151starting the vSphere Client 209state 63static addressing, about 146–148static DNS 149static DNS, direct console 150static IP 149static IP address for Auto Deploy 92storage 152subnet mask 149support information 162, 163syslog, host profile 90Syslog Collector, See vSphere Syslog Collectorsyslog, Auto Deploy 90system requirements, vCenter Server
database 165system swap 152, 153
Ttarget hosts 110TCP/IP setup for SQL Server 185template host for Auto Deploy 85Test-DeployRuleSetCompliance cmdlet 81testing management network, direct
console 152TFTP 19TFTP Boot ZIP 114TFTP server
Auto Deploy 105installing 109
TFTP server for Auto Deploy 73tftp-hpa 19tftpd32 19timeout error, Auto Deploy 100troubleshooting, Linked Mode 220, 221troubleshooting for Linked Mode 197
UUEFI mode, ESXi fails to boot 146uninstalling vCenter Server 216unregister Auto Deploy 93updated information 9upgrade command 51upgrading ESXi, scripted 47URLs, configuring 197, 220USB, bootable ESXi installation 16USB, ESXi installation script 17user and group for DB2 database 168user and group for Oracle database 187user input for Auto Deploy 85user input for Auto Deploy hosts 83
VvCenter Inventory Service, updating URL 225vCenter Orchestrator 201vCenter Server
additional components 208before you install 193components 201configuring URLs 197, 220DB2 database (local) 174DB2 database (remote) 174, 175downloading the installer 202hardware requirements 33install procedure 202installing 201installing from a network drive 198installing in a virtual machine 204installing on IPv6 machine 195joining a group 218, 219Linked Mode 216plug-ins 208ports 38prerequisites for installing 193required information for installation 198required information for vCenter Server
installation 198requirements for joining a group 217setting user rights through database roles 178software requirements 36system requirements 29
vCenter Server ApplianceAuto Deploy 92, 93ports 39See also VMware vCenter Server Appliance
vCenter Server Appliance:Auto Deploy 92, 93vCenter Server database
Microsoft SQL Server 176Oracle 186
vSphere Installation and Setup
232 VMware, Inc.

vCenter Server databases, preparing 165vCenter Server installation, post-installation 207vCenter Server installed as local system
account 195vCenter Server MSSQL database objects,
creating manually with a script 181vCenter Virtual Appliance, JVM heap settings 33vCenterServer.VimApiUrl 197, 220vCenterServer.VimWebServicesUrl 197, 220VIB, third party 123VIB structure 127VIBs 123, 124VIBs, acceptance levels 127VIBs, validation 126viewing, log files 155virtual CD 26virtual machine, installing vCenter Server in 204virtual machines, RAM requirements 29, 31virtual media 145VirtualCenter Management Webservices 207VLAN ID, direct console 148vmaccepteula command 51VMFS 152VMFS datastore, preserving during ESXi
installation 13vmk0 90vmkernel module, removing 159VMware vCenter Management
Webservices 222VMware vCenter Server Appliance
downloading and deploying 205hardware requirements 33software requirements 36
VMware vSphere Web Client, installing andstarting 209
vmware-fdm package 101vmware-rbd-watchdog 93vSphere 5.0, changes from vSphere 4.x.x 11vSphere Authentication Proxy
IIS installation causes port 80 conflict 40installing 214
vSphere Auto Deployinstalling 214installing ESXi with 63
vSphere CLI 154vSphere Client
DHCP 149downloading 208hardware requirements 33installing 208installing from a network drive 198managing ESXi host 161requirements 37
starting 209static addressing 149
vSphere Distributed Switch, restoring standardswitch 151
vSphere ESXi Dump Collector, installing 212vSphere ESXi Image Builder CLI, using 123vSphere HA, Auto Deploy 101vSphere installation and setup, introduction 11vSphere Syslog Collector, installing 213vSphere Update Manager 201vSphere Update Manager,databases 165vSphere Web Client
hardware requirements 33managing ESXi host 161requirements 37See also VMware vSphere Web Client
vSwitch0 90VWS 197, 220, 221
Wwaiter.tgz file 100web client, See VMware vSphere Web Clientwildcard characters, PowerCLI 135working rule set 66
Index
VMware, Inc. 233

vSphere Installation and Setup
234 VMware, Inc.