vsphere security - esxi 5 - vmware · about vsphere security vsphere security provides information...
TRANSCRIPT
vSphere SecurityUpdate 1
ESXi 5.1vCenter Server 5.1
This document supports the version of each product listed andsupports all subsequent versions until the document is replacedby a new edition. To check for more recent editions of thisdocument, see http://www.vmware.com/support/pubs.
EN-001181-00
vSphere Security
2 VMware, Inc.
You can find the most up-to-date technical documentation on the VMware Web site at:
http://www.vmware.com/support/
The VMware Web site also provides the latest product updates.
If you have comments about this documentation, submit your feedback to:
Copyright © 2009–2013 VMware, Inc. All rights reserved. This product is protected by U.S. and international copyright andintellectual property laws. VMware products are covered by one or more patents listed at http://www.vmware.com/go/patents.
VMware is a registered trademark or trademark of VMware, Inc. in the United States and/or other jurisdictions. All other marksand names mentioned herein may be trademarks of their respective companies.
VMware, Inc.3401 Hillview Ave.Palo Alto, CA 94304www.vmware.com
Contents
About vSphere Security 7
1 Security for ESXi Systems 9
ESXi Architecture and Security Features 9Security Resources and Information 16
2 Securing ESXi Configurations 17
Securing the Network with Firewalls 17Securing Virtual Machines with VLANs 22Securing Standard Switch Ports 27Internet Protocol Security 28Securing iSCSI Storage 32Cipher Strength 34Control CIM-Based Hardware Monitoring Tool Access 34
3 Securing the Management Interface 37
General Security Recommendations 37ESXi Firewall Configuration 38ESXi Firewall Commands 43
4 Using the ESXi Shell 45
Use the vSphere Client to Enable Access to the ESXi Shell 45Use the vSphere Web Client to Enable Access to the ESXi Shell 47Use the Direct Console User Interface (DCUI) to Enable Access to the ESXi Shell 48Log in to the ESXi Shell for Troubleshooting 49
5 Lockdown Mode 51
Lockdown Mode Behavior 52Lockdown Mode Configurations 52Enable Lockdown Mode Using the vSphere Client 53Enable Lockdown Mode Using the vSphere Web Client 53Enable Lockdown Mode from the Direct Console User Interface 53
6 ESXi Authentication and User Management 55
Managing Users with the vSphere Client 55Password Requirements 57Assigning Permissions for ESXi 58Assigning ESXi Roles 69Using Active Directory to Manage Users 72Using vSphere Authentication Proxy 75
VMware, Inc. 3
7 vCenter Server Authentication and User Management 83Using vCenter Single Sign-On with vSphere 84How vCenter Single Sign-On Deployment Scenarios Affect Log In Behavior 84Configuring vCenter Single Sign On 87Using vCenter Single Sign On to Manage Users and Groups 95vCenter Server User Directory Settings 100Assigning Permissions for vCenter Server 101Assigning Roles in the vSphere Web Client 104Manually Replicate Data in a Multisite vCenter Single Sign-On Deployment 106Troubleshooting vCenter Single Sign-On 108
8 Encryption and Security Certificates 113
Generate New Certificates for ESXi 114Enable SSL Certificate Validation Over NFC 114Upload an SSL Certificate and Key Using HTTPS PUT 115Replace a Default ESXi Certificate with a CA-Signed Certificate 115Replace a Default ESXi Certificate with a CA-Signed Certificate Using the vifs Command 116Upload an SSH Key Using HTTPS PUT 116Upload an SSH Key Using a vifs Command 117Configure SSL Timeouts 117Modifying ESXi Web Proxy Settings 118Enable Certificate Checking and Verify Host Thumbprints 123Enable Certificate Checking and Verify Host Thumbprints in the vSphere Web Client 123
9 Securing Virtual Machines 125
General Virtual Machine Protection 125Configuring Logging Levels for the Guest Operating System 129Limiting Exposure of Sensitive Data Copied to the Clipboard 132Disable Unexposed Features 133Limiting Guest Operating System Writes to Host Memory 134Removing Unnecessary Hardware Devices 136Prevent a Virtual Machine User or Process from Disconnecting Devices 136Prevent a Virtual Machine User or Process from Disconnecting Devices in the vSphere Web Client 137
10 Securing vCenter Server Systems 139
Hardening the vCenter Server Host Operating System 139Best Practices for vCenter Server Privileges 139Limiting vCenter Server Network Connectivity 141Restricting Use of Linux-Based Clients 141Verifying the Integrity of the vSphere Client 142Set an Inactivity Timeout for the vSphere Client 142Disable Sending Host Performance Data to Guests 142
11 Best Practices for Virtual Machine and Host Security 145
Installing Antivirus Software 145Managing ESXi Log Files 146Securing Fault Tolerance Logging Traffic 148Auto Deploy Security Considerations 148
vSphere Security
4 VMware, Inc.
Image Builder Security Considerations 148Host Password Strength and Complexity 149Synchronizing Clocks on the vSphere Network 151Disable Shell Access for Anonymous Users 152Limit DCUI Access in Lockdown Mode 152Disable the Managed Object Browser (MOB) 153Disable Authorized (SSH) Keys 153Establish and Maintain Configuration File Integrity 154Monitoring and Restricting Access to SSL Certificates 154Delete VMDK Files Securely 154
Index 157
Contents
VMware, Inc. 5

vSphere Security
6 VMware, Inc.
About vSphere Security
vSphere Security provides information about securing your vSphere® environment for VMware® vCenter®
Server and VMware ESXi.
To help you protect your ESXi™ installation, this documentation describes security features built in to ESXi andthe measures that you can take to safeguard it from attack.
Intended AudienceThis information is intended for anyone who wants to secure their ESXi configuration. The information iswritten for experienced Windows or Linux system administrators who are familiar with virtual machinetechnology and datacenter operations.
VMware, Inc. 7

vSphere Security
8 VMware, Inc.
Security for ESXi Systems 1ESXi is developed with a focus on strong security. VMware ensures security in the ESXi environment andaddresses system architecture from a security standpoint.
This chapter includes the following topics:
n “ESXi Architecture and Security Features,” on page 9
n “Security Resources and Information,” on page 16
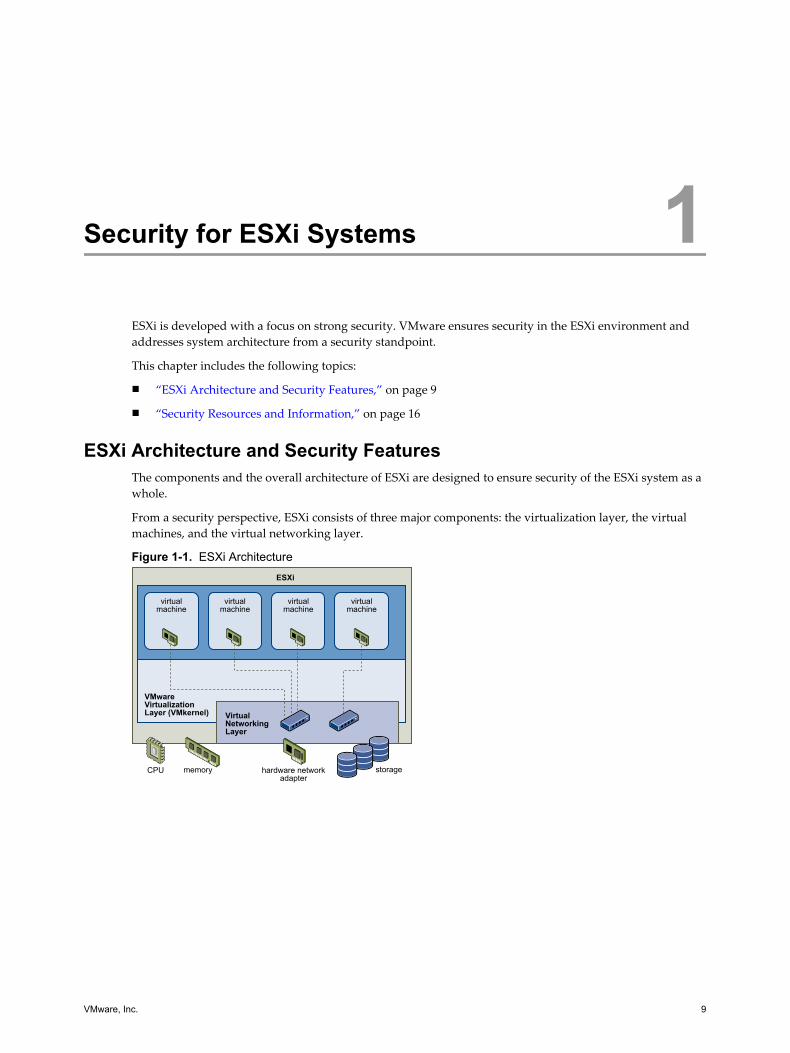
ESXi Architecture and Security FeaturesThe components and the overall architecture of ESXi are designed to ensure security of the ESXi system as awhole.
From a security perspective, ESXi consists of three major components: the virtualization layer, the virtualmachines, and the virtual networking layer.
Figure 1-1. ESXi Architecture
CPU memory storagehardware network adapter
ESXi
virtual machine
virtual machine
virtual machine
virtual machine
VMware Virtualization Layer (VMkernel) Virtual
NetworkingLayer
VMware, Inc. 9
Security and the Virtualization LayerVMware designed the virtualization layer, or VMkernel, to run virtual machines. It controls the hardware thathosts use and schedules the allocation of hardware resources among the virtual machines. Because theVMkernel is fully dedicated to supporting virtual machines and is not used for other purposes, the interfaceto the VMkernel is strictly limited to the API required to manage virtual machines.
ESXi provides additional VMkernel protection with the following features:
Memory Hardening The ESXi kernel, user-mode applications, and executable components such asdrivers and libraries are located at random, non-predictable memoryaddresses. Combined with the non-executable memory protections madeavailable by microprocessors, this provides protection that makes it difficultfor malicious code to use memory exploits to take advantage of vulnerabilities.
Kernel Module Integrity Digital signing ensures the integrity and authenticity of modules, drivers andapplications as they are loaded by the VMkernel. Module signing allowsESXi to identify the providers of modules, drivers, or applications and whetherthey are VMware-certified. VMware software and certain third-party driversare signed by VMware.
Trusted Platform Module(TPM)
vSphere uses Intel Trusted Platform Module/Trusted Execution Technology(TPM/TXT) to provide remote attestation of the hypervisor image based onhardware root of trust. The hypervisor image comprises the followingelements:
n ESXi software (hypervisor) in VIB (package) format
n Third-party VIBs
n Third-party drivers
To leverage this capability, your ESXi system must have TPM and TXT enabled.
When TPM and TXT are enabled, ESXi measures the entire hypervisor stackwhen the system boots and stores these measurements in the PlatformConfiguration Registers (PCR) of the TPM. The measurements include theVMkernel, kernel modules, drivers, native management applications that runon ESXi, and any boot-time configuration options. All VIBs that are installedon the system are measured.
Third-party solutions can use this feature to build a verifier that detectstampering of the hypervisor image, by comparing the image with an image ofthe expected known good values. vSphere does not provide a user interface toview these measurements.
The measurements are exposed in a vSphere API. An event log is provided aspart of the API, as specified by the Trusted Computing Group (TCG) standardfor TXT.
vSphere Security
10 VMware, Inc.
Security and Virtual MachinesVirtual machines are the containers in which applications and guest operating systems run. By design, allVMware virtual machines are isolated from one another. This isolation enables multiple virtual machines torun securely while sharing hardware and ensures both their ability to access hardware and their uninterruptedperformance.
Even a user with system administrator privileges on a virtual machine’s guest operating system cannot breachthis layer of isolation to access another virtual machine without privileges explicitly granted by the ESXi systemadministrator. As a result of virtual machine isolation, if a guest operating system running in a virtual machinefails, other virtual machines on the same host continue to run. The guest operating system failure has no effecton:
n The ability of users to access the other virtual machines
n The ability of the operational virtual machines to access the resources they need
n The performance of the other virtual machines
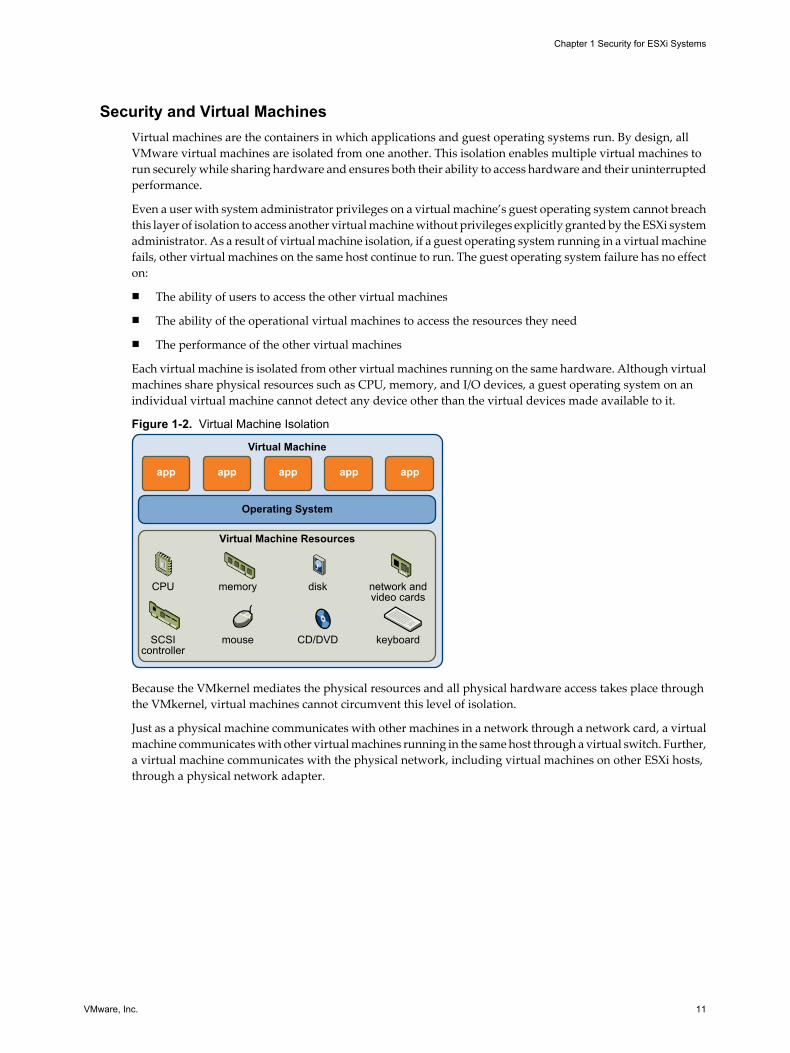
Each virtual machine is isolated from other virtual machines running on the same hardware. Although virtualmachines share physical resources such as CPU, memory, and I/O devices, a guest operating system on anindividual virtual machine cannot detect any device other than the virtual devices made available to it.
Figure 1-2. Virtual Machine Isolation
CPU memory disk network andvideo cards
SCSIcontroller
mouse CD/DVD keyboard
Virtual Machine
Operating System
Virtual Machine Resources
app app app app app
Because the VMkernel mediates the physical resources and all physical hardware access takes place throughthe VMkernel, virtual machines cannot circumvent this level of isolation.
Just as a physical machine communicates with other machines in a network through a network card, a virtualmachine communicates with other virtual machines running in the same host through a virtual switch. Further,a virtual machine communicates with the physical network, including virtual machines on other ESXi hosts,through a physical network adapter.
Chapter 1 Security for ESXi Systems
VMware, Inc. 11
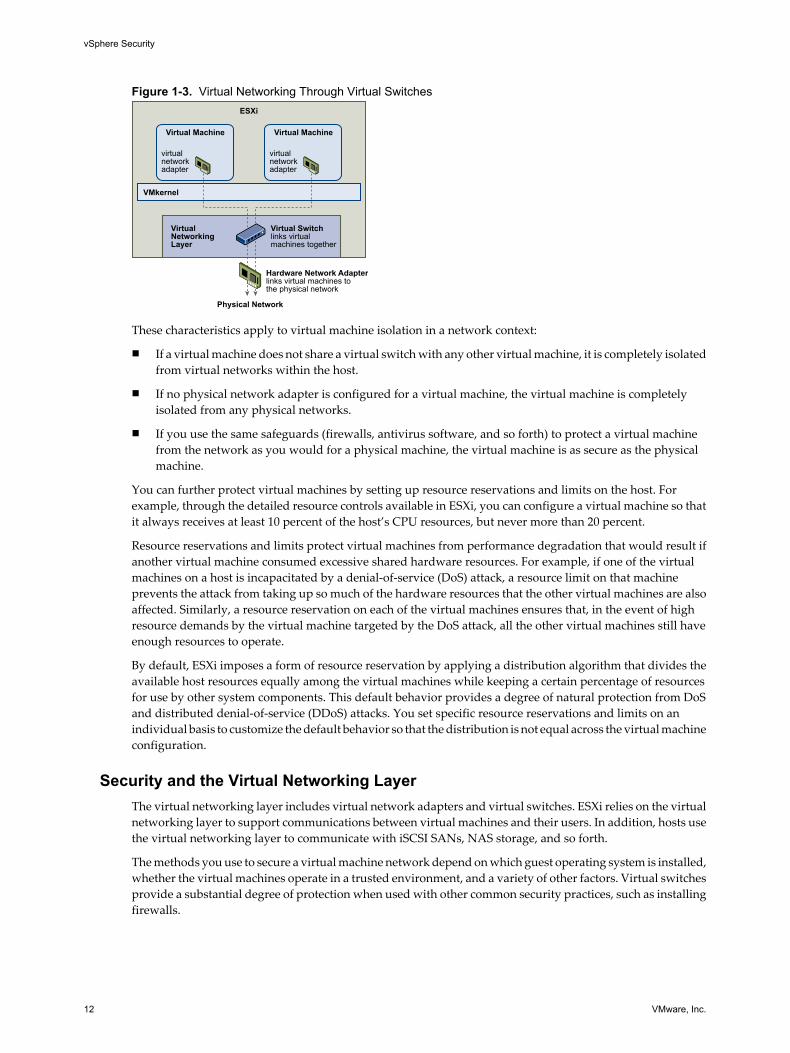
Figure 1-3. Virtual Networking Through Virtual Switches
Hardware Network Adapterlinks virtual machines tothe physical network
Physical Network
virtualnetwork adapter
ESXi
Virtual Machine
virtualnetwork adapter
Virtual Machine
VMkernel
VirtualNetworkingLayer
Virtual Switchlinks virtualmachines together
These characteristics apply to virtual machine isolation in a network context:
n If a virtual machine does not share a virtual switch with any other virtual machine, it is completely isolatedfrom virtual networks within the host.
n If no physical network adapter is configured for a virtual machine, the virtual machine is completelyisolated from any physical networks.
n If you use the same safeguards (firewalls, antivirus software, and so forth) to protect a virtual machinefrom the network as you would for a physical machine, the virtual machine is as secure as the physicalmachine.
You can further protect virtual machines by setting up resource reservations and limits on the host. Forexample, through the detailed resource controls available in ESXi, you can configure a virtual machine so thatit always receives at least 10 percent of the host’s CPU resources, but never more than 20 percent.
Resource reservations and limits protect virtual machines from performance degradation that would result ifanother virtual machine consumed excessive shared hardware resources. For example, if one of the virtualmachines on a host is incapacitated by a denial-of-service (DoS) attack, a resource limit on that machineprevents the attack from taking up so much of the hardware resources that the other virtual machines are alsoaffected. Similarly, a resource reservation on each of the virtual machines ensures that, in the event of highresource demands by the virtual machine targeted by the DoS attack, all the other virtual machines still haveenough resources to operate.
By default, ESXi imposes a form of resource reservation by applying a distribution algorithm that divides theavailable host resources equally among the virtual machines while keeping a certain percentage of resourcesfor use by other system components. This default behavior provides a degree of natural protection from DoSand distributed denial-of-service (DDoS) attacks. You set specific resource reservations and limits on anindividual basis to customize the default behavior so that the distribution is not equal across the virtual machineconfiguration.
Security and the Virtual Networking LayerThe virtual networking layer includes virtual network adapters and virtual switches. ESXi relies on the virtualnetworking layer to support communications between virtual machines and their users. In addition, hosts usethe virtual networking layer to communicate with iSCSI SANs, NAS storage, and so forth.
The methods you use to secure a virtual machine network depend on which guest operating system is installed,whether the virtual machines operate in a trusted environment, and a variety of other factors. Virtual switchesprovide a substantial degree of protection when used with other common security practices, such as installingfirewalls.
vSphere Security
12 VMware, Inc.
ESXi also supports IEEE 802.1q VLANs, which you can use to further protect the virtual machine network orstorage configuration. VLANs let you segment a physical network so that two machines on the same physicalnetwork cannot send packets to or receive packets from each other unless they are on the same VLAN.
Creating a Network DMZ on a Single ESXi HostOne example of how to use ESXi isolation and virtual networking features to configure a secure environmentis the creation of a network demilitarized zone (DMZ) on a single host.
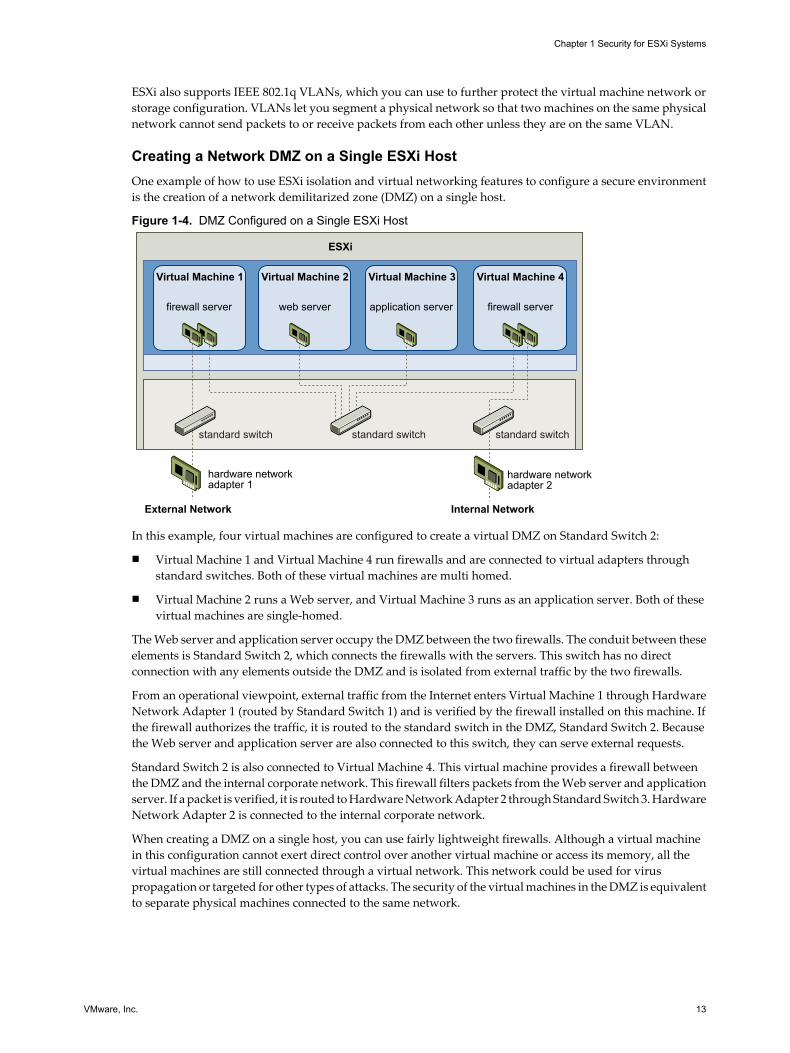
Figure 1-4. DMZ Configured on a Single ESXi Host
hardware network adapter 1
External Network Internal Network
hardware network adapter 2
ESXi
Virtual Machine 1
firewall server web server application server firewall server
standard switch standard switch standard switch
Virtual Machine 2 Virtual Machine 3 Virtual Machine 4
In this example, four virtual machines are configured to create a virtual DMZ on Standard Switch 2:
n Virtual Machine 1 and Virtual Machine 4 run firewalls and are connected to virtual adapters throughstandard switches. Both of these virtual machines are multi homed.
n Virtual Machine 2 runs a Web server, and Virtual Machine 3 runs as an application server. Both of thesevirtual machines are single-homed.
The Web server and application server occupy the DMZ between the two firewalls. The conduit between theseelements is Standard Switch 2, which connects the firewalls with the servers. This switch has no directconnection with any elements outside the DMZ and is isolated from external traffic by the two firewalls.
From an operational viewpoint, external traffic from the Internet enters Virtual Machine 1 through HardwareNetwork Adapter 1 (routed by Standard Switch 1) and is verified by the firewall installed on this machine. Ifthe firewall authorizes the traffic, it is routed to the standard switch in the DMZ, Standard Switch 2. Becausethe Web server and application server are also connected to this switch, they can serve external requests.
Standard Switch 2 is also connected to Virtual Machine 4. This virtual machine provides a firewall betweenthe DMZ and the internal corporate network. This firewall filters packets from the Web server and applicationserver. If a packet is verified, it is routed to Hardware Network Adapter 2 through Standard Switch 3. HardwareNetwork Adapter 2 is connected to the internal corporate network.
When creating a DMZ on a single host, you can use fairly lightweight firewalls. Although a virtual machinein this configuration cannot exert direct control over another virtual machine or access its memory, all thevirtual machines are still connected through a virtual network. This network could be used for viruspropagation or targeted for other types of attacks. The security of the virtual machines in the DMZ is equivalentto separate physical machines connected to the same network.
Chapter 1 Security for ESXi Systems
VMware, Inc. 13
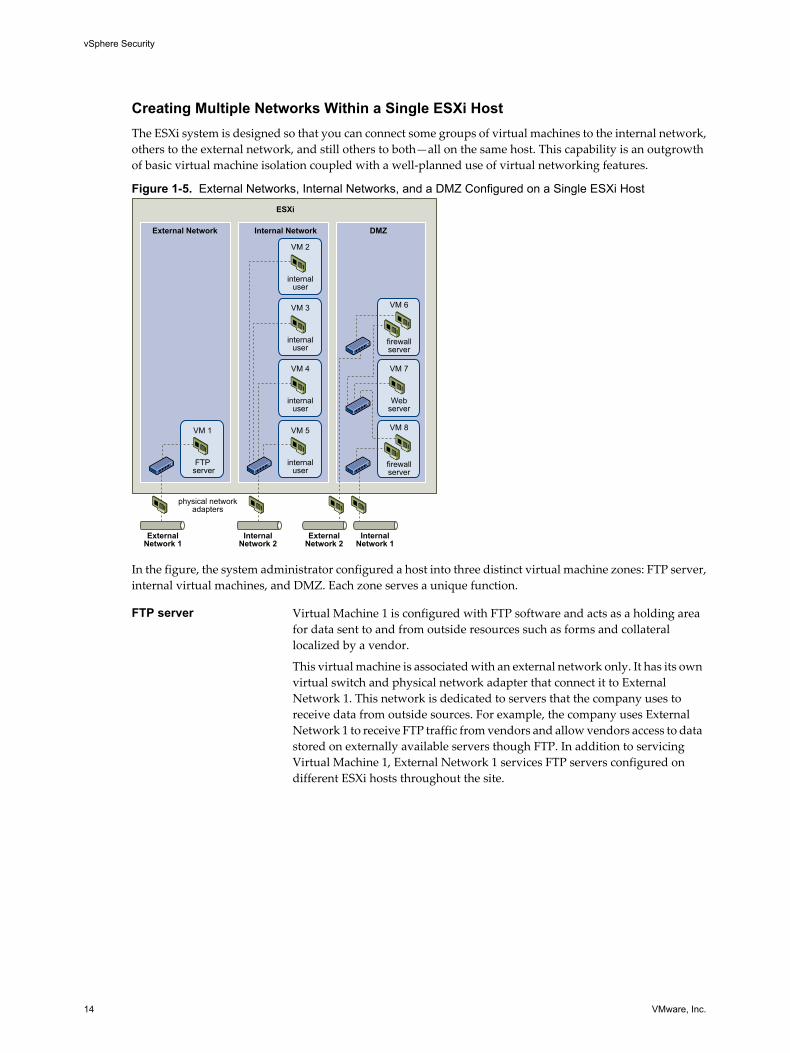
Creating Multiple Networks Within a Single ESXi HostThe ESXi system is designed so that you can connect some groups of virtual machines to the internal network,others to the external network, and still others to both—all on the same host. This capability is an outgrowthof basic virtual machine isolation coupled with a well-planned use of virtual networking features.
Figure 1-5. External Networks, Internal Networks, and a DMZ Configured on a Single ESXi Host
physical network adapters
ExternalNetwork 1
InternalNetwork 2
ExternalNetwork 2
InternalNetwork 1
ESXi
VM 2
internaluser
VM 3
internaluser
VM 4
internaluser
VM 5
internaluser
VM 6
firewallserver
VM 7
Webserver
VM 8
firewallserver
VM 1
FTP server
Internal NetworkExternal Network DMZ
In the figure, the system administrator configured a host into three distinct virtual machine zones: FTP server,internal virtual machines, and DMZ. Each zone serves a unique function.
FTP server Virtual Machine 1 is configured with FTP software and acts as a holding areafor data sent to and from outside resources such as forms and collaterallocalized by a vendor.
This virtual machine is associated with an external network only. It has its ownvirtual switch and physical network adapter that connect it to ExternalNetwork 1. This network is dedicated to servers that the company uses toreceive data from outside sources. For example, the company uses ExternalNetwork 1 to receive FTP traffic from vendors and allow vendors access to datastored on externally available servers though FTP. In addition to servicingVirtual Machine 1, External Network 1 services FTP servers configured ondifferent ESXi hosts throughout the site.
vSphere Security
14 VMware, Inc.
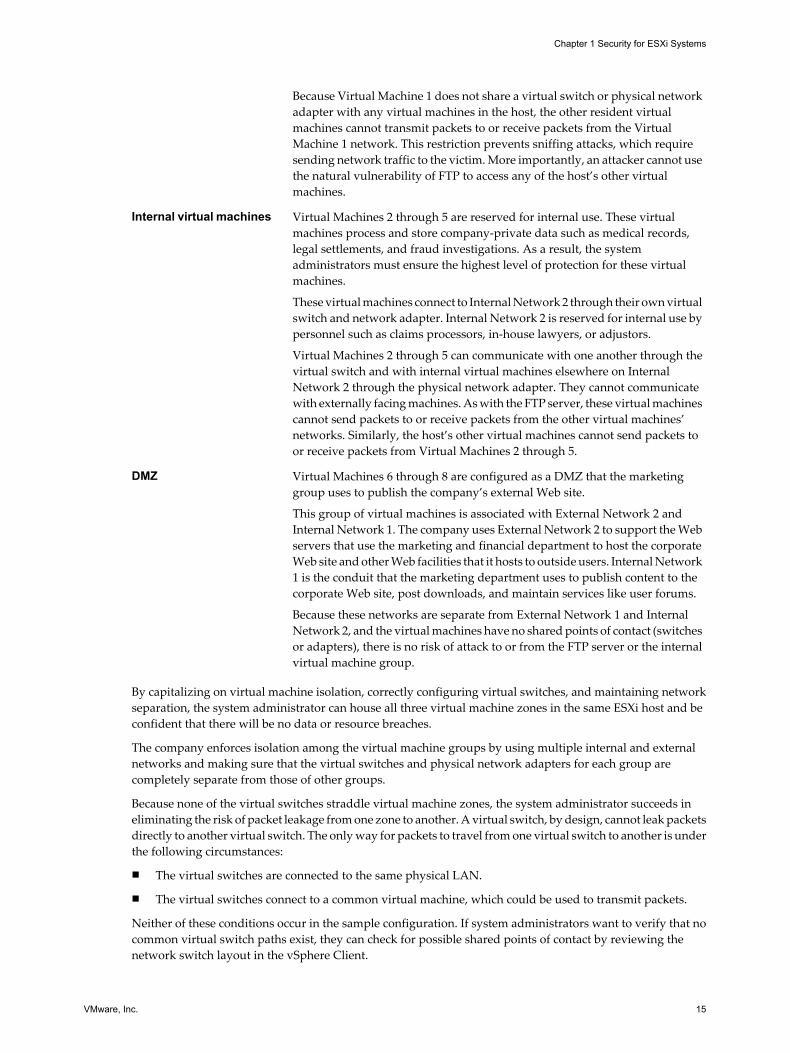
Because Virtual Machine 1 does not share a virtual switch or physical networkadapter with any virtual machines in the host, the other resident virtualmachines cannot transmit packets to or receive packets from the VirtualMachine 1 network. This restriction prevents sniffing attacks, which requiresending network traffic to the victim. More importantly, an attacker cannot usethe natural vulnerability of FTP to access any of the host’s other virtualmachines.
Internal virtual machines Virtual Machines 2 through 5 are reserved for internal use. These virtualmachines process and store company-private data such as medical records,legal settlements, and fraud investigations. As a result, the systemadministrators must ensure the highest level of protection for these virtualmachines.
These virtual machines connect to Internal Network 2 through their own virtualswitch and network adapter. Internal Network 2 is reserved for internal use bypersonnel such as claims processors, in-house lawyers, or adjustors.
Virtual Machines 2 through 5 can communicate with one another through thevirtual switch and with internal virtual machines elsewhere on InternalNetwork 2 through the physical network adapter. They cannot communicatewith externally facing machines. As with the FTP server, these virtual machinescannot send packets to or receive packets from the other virtual machines’networks. Similarly, the host’s other virtual machines cannot send packets toor receive packets from Virtual Machines 2 through 5.
DMZ Virtual Machines 6 through 8 are configured as a DMZ that the marketinggroup uses to publish the company’s external Web site.
This group of virtual machines is associated with External Network 2 andInternal Network 1. The company uses External Network 2 to support the Webservers that use the marketing and financial department to host the corporateWeb site and other Web facilities that it hosts to outside users. Internal Network1 is the conduit that the marketing department uses to publish content to thecorporate Web site, post downloads, and maintain services like user forums.
Because these networks are separate from External Network 1 and InternalNetwork 2, and the virtual machines have no shared points of contact (switchesor adapters), there is no risk of attack to or from the FTP server or the internalvirtual machine group.
By capitalizing on virtual machine isolation, correctly configuring virtual switches, and maintaining networkseparation, the system administrator can house all three virtual machine zones in the same ESXi host and beconfident that there will be no data or resource breaches.
The company enforces isolation among the virtual machine groups by using multiple internal and externalnetworks and making sure that the virtual switches and physical network adapters for each group arecompletely separate from those of other groups.
Because none of the virtual switches straddle virtual machine zones, the system administrator succeeds ineliminating the risk of packet leakage from one zone to another. A virtual switch, by design, cannot leak packetsdirectly to another virtual switch. The only way for packets to travel from one virtual switch to another is underthe following circumstances:
n The virtual switches are connected to the same physical LAN.
n The virtual switches connect to a common virtual machine, which could be used to transmit packets.
Neither of these conditions occur in the sample configuration. If system administrators want to verify that nocommon virtual switch paths exist, they can check for possible shared points of contact by reviewing thenetwork switch layout in the vSphere Client.
Chapter 1 Security for ESXi Systems
VMware, Inc. 15
To safeguard the virtual machines’ resources, the system administrator lowers the risk of DoS and DDoS attacksby configuring a resource reservation and a limit for each virtual machine. The system administrator furtherprotects the ESXi host and virtual machines by installing software firewalls at the front and back ends of theDMZ, ensuring that the host is behind a physical firewall, and configuring the networked storage resourcesso that each has its own virtual switch.
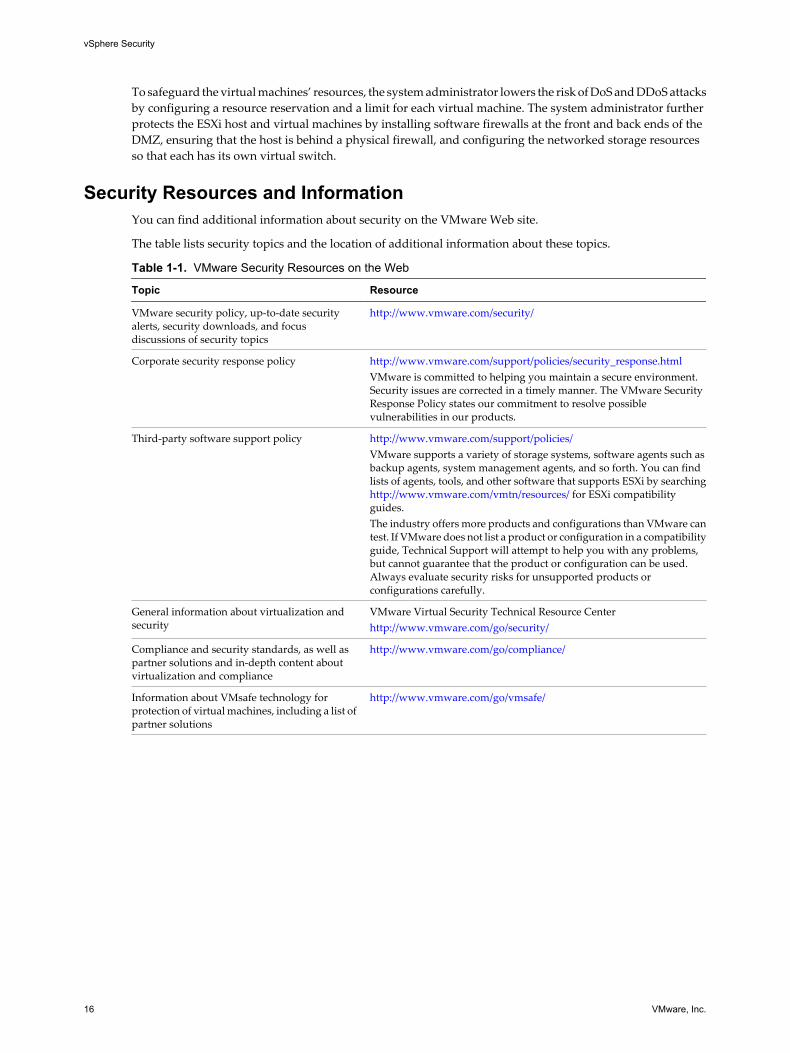
Security Resources and InformationYou can find additional information about security on the VMware Web site.
The table lists security topics and the location of additional information about these topics.
Table 1-1. VMware Security Resources on the Web
Topic Resource
VMware security policy, up-to-date securityalerts, security downloads, and focusdiscussions of security topics
http://www.vmware.com/security/
Corporate security response policy http://www.vmware.com/support/policies/security_response.htmlVMware is committed to helping you maintain a secure environment.Security issues are corrected in a timely manner. The VMware SecurityResponse Policy states our commitment to resolve possiblevulnerabilities in our products.
Third-party software support policy http://www.vmware.com/support/policies/VMware supports a variety of storage systems, software agents such asbackup agents, system management agents, and so forth. You can findlists of agents, tools, and other software that supports ESXi by searchinghttp://www.vmware.com/vmtn/resources/ for ESXi compatibilityguides.The industry offers more products and configurations than VMware cantest. If VMware does not list a product or configuration in a compatibilityguide, Technical Support will attempt to help you with any problems,but cannot guarantee that the product or configuration can be used.Always evaluate security risks for unsupported products orconfigurations carefully.
General information about virtualization andsecurity
VMware Virtual Security Technical Resource Centerhttp://www.vmware.com/go/security/
Compliance and security standards, as well aspartner solutions and in-depth content aboutvirtualization and compliance
http://www.vmware.com/go/compliance/
Information about VMsafe technology forprotection of virtual machines, including a list ofpartner solutions
http://www.vmware.com/go/vmsafe/
vSphere Security
16 VMware, Inc.
Securing ESXi Configurations 2You can take measures to promote a secure environment for your ESXi hosts, virtual machines, and iSCSISANs. Consider network configuration planning from a security perspective and the steps that you can taketo protect the components in your configuration from attack.
This chapter includes the following topics:
n “Securing the Network with Firewalls,” on page 17
n “Securing Virtual Machines with VLANs,” on page 22
n “Securing Standard Switch Ports,” on page 27
n “Internet Protocol Security,” on page 28
n “Securing iSCSI Storage,” on page 32
n “Cipher Strength,” on page 34
n “Control CIM-Based Hardware Monitoring Tool Access,” on page 34
Securing the Network with FirewallsSecurity administrators use firewalls to safeguard the network or selected components in the network fromintrusion.
Firewalls control access to devices within their perimeter by closing all communication pathways, except forthose that the administrator explicitly or implicitly designates as authorized. The pathways, or ports, thatadministrators open in the firewall allow traffic between devices on different sides of the firewall.
IMPORTANT The ESXi firewall in ESXi 5.0 does not allow per-network filtering of vMotion traffic. Therefore,you must install rules on your external firewall to ensure that no incoming connections can be made to thevMotion socket.
In a virtual machine environment, you can plan your layout for firewalls between components.
n Physical machines such as vCenter Server systems and ESXi hosts.
n One virtual machine and another—for example, between a virtual machine acting as an external Webserver and a virtual machine connected to your company’s internal network.
n A physical machine and a virtual machine, such as when you place a firewall between a physical networkadapter card and a virtual machine.
VMware, Inc. 17
How you use firewalls in your ESXi configuration is based on how you plan to use the network and how secureany given component needs to be. For example, if you create a virtual network where each virtual machine isdedicated to running a different benchmark test suite for the same department, the risk of unwanted accessfrom one virtual machine to the next is minimal. Therefore, a configuration where firewalls are present betweenthe virtual machines is not necessary. However, to prevent interruption of a test run from an outside host, youmight set up the configuration so that a firewall is present at the entry point of the virtual network to protectthe entire set of virtual machines.
Firewalls for Configurations with vCenter ServerIf you access ESXi hosts through vCenter Server, you typically protect vCenter Server using a firewall. Thisfirewall provides basic protection for your network.
A firewall might lie between the clients and vCenter Server. Alternatively, vCenter Server and the clients canbe behind the firewall, depending on your deployment. The main point is to ensure that a firewall is presentat what you consider to be an entry point for the system.
For a comprehensive list of TCP and UDP ports, including those for vSphere vMotion™ and vSphere FaultTolerance, see “TCP and UDP Ports for Management Access,” on page 21.
Networks configured with vCenter Server can receive communications through the vSphere Client or third-party network management clients that use the SDK to interface with the host. During normal operation,vCenter Server listens for data from its managed hosts and clients on designated ports. vCenter Server alsoassumes that its managed hosts listen for data from vCenter Server on designated ports. If a firewall is presentbetween any of these elements, you must ensure that the firewall has open ports to support data transfer.
You might also include firewalls at a variety of other access points in the network, depending on how you planto use the network and the level of security various devices require. Select the locations for your firewalls basedon the security risks that you have identified for your network configuration. The following is a list of firewalllocations common to ESXi implementations.
n Between the vSphere Client or a third-party network-management client and vCenter Server.
n If your users access virtual machines through a Web browser, between the Web browser and the ESXihost.
n If your users access virtual machines through the vSphere Client, between the vSphere Client and theESXi host. This connection is in addition to the connection between the vSphere Client and vCenter Server,and it requires a different port.
n Between vCenter Server and the ESXi hosts.
n Between the ESXi hosts in your network. Although traffic between hosts is usually considered trusted,you can add firewalls between them if you are concerned about security breaches from machine tomachine.
If you add firewalls between ESXi hosts and plan to migrate virtual machines between the servers, performcloning, or use vMotion, you must also open ports in any firewall that divides the source host from thetarget hosts so that the source and targets can communicate.
n Between the ESXi hosts and network storage such as NFS or iSCSI storage. These ports are not specific toVMware, and you configure them according to the specifications for your network.
vSphere Security
18 VMware, Inc.
Firewalls for Configurations Without vCenter ServerIf you connect clients directly to your ESXi network instead of using vCenter Server, your firewall configurationis somewhat simpler.
Networks configured without vCenter Server receive communications through the same types of clients asthey do if vCenter Server were present: the vSphere Client or third-party network management clients. Forthe most part, the firewall needs are the same, but there are several key differences.
n As you would for configurations that include vCenter Server, be sure a firewall is present to protect yourESXi layer or, depending on your configuration, your clients and ESXi layer. This firewall provides basicprotection for your network. The firewall ports you use are the same as those you use if vCenter Server isin place.
n Licensing in this type of configuration is part of the ESXi package that you install on each of the hosts.Because licensing is resident to the server, a separate license server is not required. This eliminates theneed for a firewall between the license server and the ESXi network.
Connecting to vCenter Server Through a FirewallThe port that vCenter Server uses to listen for data transfer from its clients is 443. If you have a firewall betweenvCenter Server and its clients, you must configure a connection through which vCenter Server can receive datafrom the clients.
To enable vCenter Server to receive data from the vSphere Client, open port 443 in the firewall to allow datatransfer from the vSphere Client to vCenter Server. Contact the firewall system administrator for additionalinformation on configuring ports in a firewall.
If you are using the vSphere Client and do not want to use port 443 as the port for vSphere Client-to-vCenterServer communication, you can switch to another port by changing the vCenter Server settings in the vSphereClient. To learn how to change these settings, see the vCenter Server and Host Management documentation.
Connecting to the Virtual Machine Console Through a FirewallWhen you connect your client to ESXi hosts through vCenter Server, certain ports are required for user andadministrator communication with virtual machine consoles. These ports support different client functions,interface with different layers on ESXi, and use different authentication protocols.
Port 902 This is the port that vCenter Server assumes is available for receiving data fromESXi. The vSphere Client uses this port to provide a connection for guestoperating system mouse, keyboard, screen (MKS) activities on virtualmachines. It is through this port that users interact with the virtual machineguest operating systems and applications. Port 902 is the port that the vSphereClient assumes is available when interacting with virtual machines.
Chapter 2 Securing ESXi Configurations
VMware, Inc. 19

Port 902 connects vCenter Server to the host through the VMwareAuthorization Daemon (vmware-authd). This daemon multiplexes port 902 datato the appropriate recipient for processing. VMware does not supportconfiguring a different port for this connection.
Port 443 The vSphere Client and SDK use this port to send data to vCenter Servermanaged hosts. Also, the vSphere SDK, when connected directly to ESXi, usethis port to support any management functions related to the server and itsvirtual machines. Port 443 is the port that clients assume is available whensending data to ESXi. VMware does not support configuring a different portfor these connections.
Port 443 connects clients to ESXi through the Tomcat Web service or the SDK.The host process multiplexes port 443 data to the appropriate recipient forprocessing.
Port 903 The vSphere Client uses this port to provide a connection for guest operatingsystem MKS activities on virtual machines. It is through this port that usersinteract with the guest operating systems and applications of the virtualmachine. Port 903 is the port that the vSphere Client assumes is available wheninteracting with virtual machines. VMware does not support configuring adifferent port for this function.
Port 903 connects the vSphere Client to a specified virtual machine configuredon ESXi.
The following figure shows the relationships between vSphere Client functions, ports, and processes.
Figure 2-1. Port Use for vSphere Client Communications with ESXi
ESXi
vSphere Client
Port 443
vmware-hostd vmware-authd
virtual machinemanagement functions
virtual machineconsole
Port 903firewall
If you have a firewall between your vCenter Server system and vCenter Server managed host, open ports 443and 903 in the firewall to allow data transfer to ESXi hosts from vCenter Server .
For additional information on configuring the ports, see the firewall system administrator.
vSphere Security
20 VMware, Inc.
Connecting ESXi Hosts Through FirewallsIf you have a firewall between two ESXi hosts and you want to allow transactions between the hosts or usevCenter Server to perform any source or target activities, such as vSphere High Availability (vSphere HA)traffic, migration, cloning, or vMotion, you must configure a connection through which the managed hostscan receive data.
To configure a connection for receiving data, open ports for traffic from services such as vSphere HighAvailability, vMotion, and vSphere Fault Tolerance. See “TCP and UDP Ports for Management Access,” onpage 21 for a list of ports. Refer to the firewall system administrator for additional information on configuringthe ports.
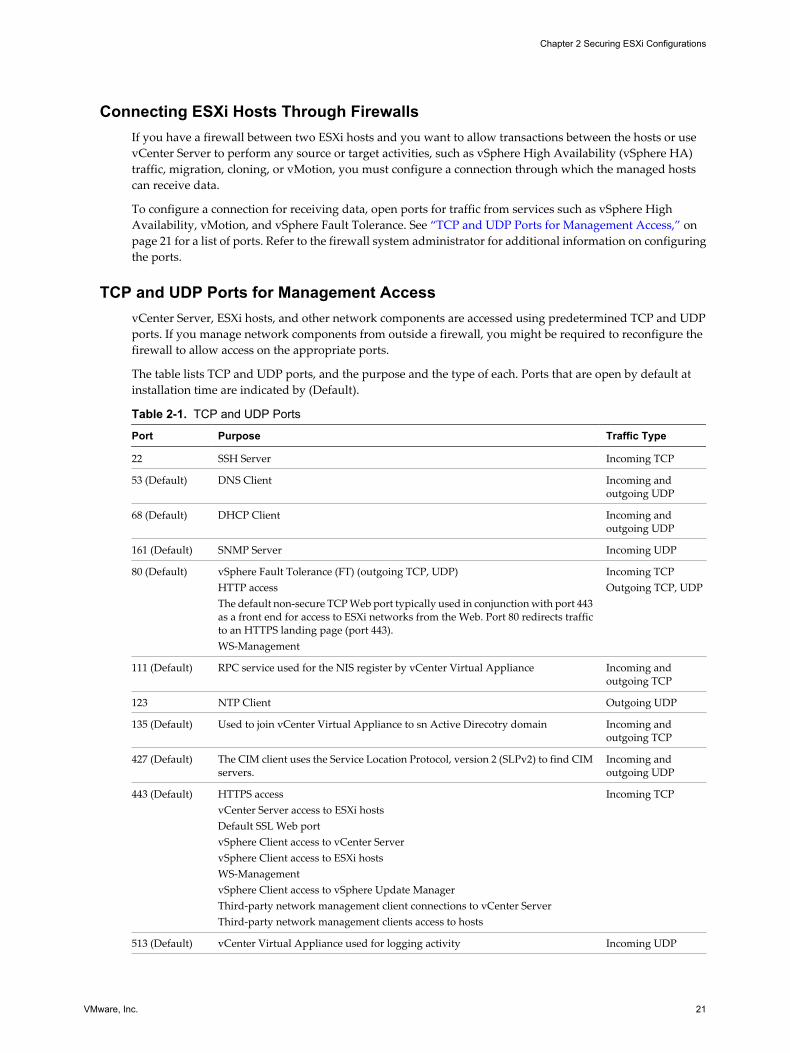
TCP and UDP Ports for Management AccessvCenter Server, ESXi hosts, and other network components are accessed using predetermined TCP and UDPports. If you manage network components from outside a firewall, you might be required to reconfigure thefirewall to allow access on the appropriate ports.
The table lists TCP and UDP ports, and the purpose and the type of each. Ports that are open by default atinstallation time are indicated by (Default).
Table 2-1. TCP and UDP Ports
Port Purpose Traffic Type
22 SSH Server Incoming TCP
53 (Default) DNS Client Incoming andoutgoing UDP
68 (Default) DHCP Client Incoming andoutgoing UDP
161 (Default) SNMP Server Incoming UDP
80 (Default) vSphere Fault Tolerance (FT) (outgoing TCP, UDP)HTTP accessThe default non-secure TCP Web port typically used in conjunction with port 443as a front end for access to ESXi networks from the Web. Port 80 redirects trafficto an HTTPS landing page (port 443).WS-Management
Incoming TCPOutgoing TCP, UDP
111 (Default) RPC service used for the NIS register by vCenter Virtual Appliance Incoming andoutgoing TCP
123 NTP Client Outgoing UDP
135 (Default) Used to join vCenter Virtual Appliance to sn Active Direcotry domain Incoming andoutgoing TCP
427 (Default) The CIM client uses the Service Location Protocol, version 2 (SLPv2) to find CIMservers.
Incoming andoutgoing UDP
443 (Default) HTTPS accessvCenter Server access to ESXi hostsDefault SSL Web portvSphere Client access to vCenter ServervSphere Client access to ESXi hostsWS-ManagementvSphere Client access to vSphere Update ManagerThird-party network management client connections to vCenter ServerThird-party network management clients access to hosts
Incoming TCP
513 (Default) vCenter Virtual Appliance used for logging activity Incoming UDP
Chapter 2 Securing ESXi Configurations
VMware, Inc. 21
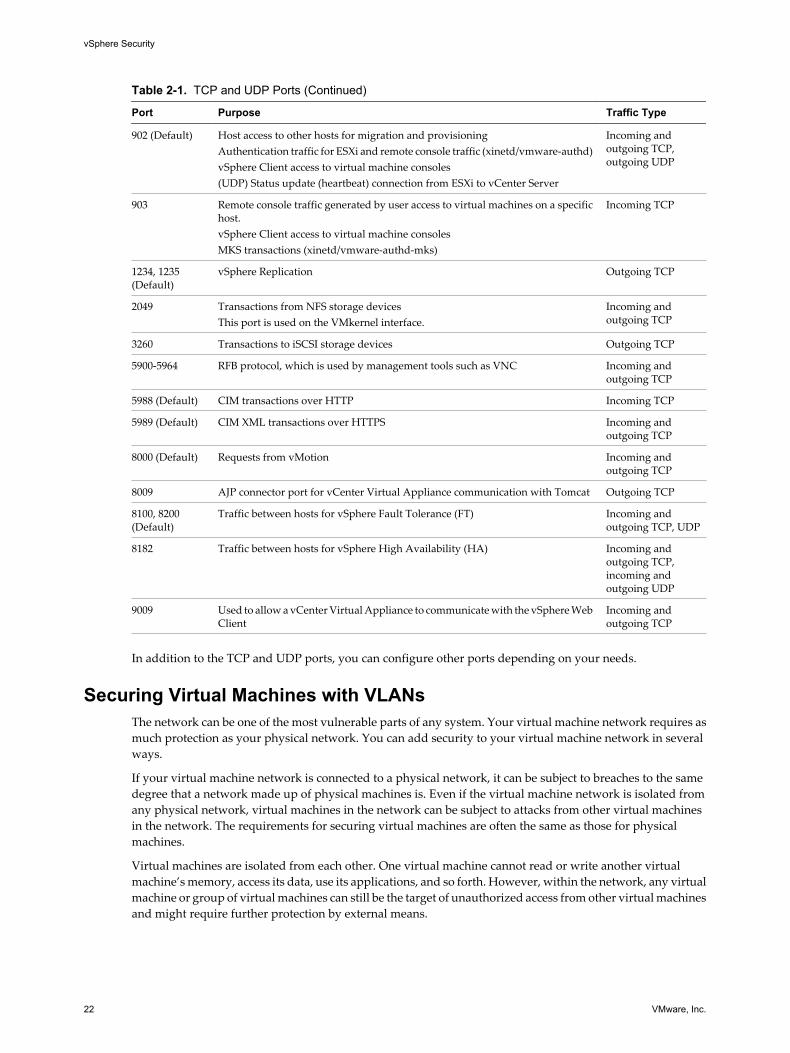
Table 2-1. TCP and UDP Ports (Continued)
Port Purpose Traffic Type
902 (Default) Host access to other hosts for migration and provisioningAuthentication traffic for ESXi and remote console traffic (xinetd/vmware-authd)vSphere Client access to virtual machine consoles(UDP) Status update (heartbeat) connection from ESXi to vCenter Server
Incoming andoutgoing TCP,outgoing UDP
903 Remote console traffic generated by user access to virtual machines on a specifichost.vSphere Client access to virtual machine consolesMKS transactions (xinetd/vmware-authd-mks)
Incoming TCP
1234, 1235(Default)
vSphere Replication Outgoing TCP
2049 Transactions from NFS storage devicesThis port is used on the VMkernel interface.
Incoming andoutgoing TCP
3260 Transactions to iSCSI storage devices Outgoing TCP
5900-5964 RFB protocol, which is used by management tools such as VNC Incoming andoutgoing TCP
5988 (Default) CIM transactions over HTTP Incoming TCP
5989 (Default) CIM XML transactions over HTTPS Incoming andoutgoing TCP
8000 (Default) Requests from vMotion Incoming andoutgoing TCP
8009 AJP connector port for vCenter Virtual Appliance communication with Tomcat Outgoing TCP
8100, 8200(Default)
Traffic between hosts for vSphere Fault Tolerance (FT) Incoming andoutgoing TCP, UDP
8182 Traffic between hosts for vSphere High Availability (HA) Incoming andoutgoing TCP,incoming andoutgoing UDP
9009 Used to allow a vCenter Virtual Appliance to communicate with the vSphere WebClient
Incoming andoutgoing TCP
In addition to the TCP and UDP ports, you can configure other ports depending on your needs.
Securing Virtual Machines with VLANsThe network can be one of the most vulnerable parts of any system. Your virtual machine network requires asmuch protection as your physical network. You can add security to your virtual machine network in severalways.
If your virtual machine network is connected to a physical network, it can be subject to breaches to the samedegree that a network made up of physical machines is. Even if the virtual machine network is isolated fromany physical network, virtual machines in the network can be subject to attacks from other virtual machinesin the network. The requirements for securing virtual machines are often the same as those for physicalmachines.
Virtual machines are isolated from each other. One virtual machine cannot read or write another virtualmachine’s memory, access its data, use its applications, and so forth. However, within the network, any virtualmachine or group of virtual machines can still be the target of unauthorized access from other virtual machinesand might require further protection by external means.
vSphere Security
22 VMware, Inc.
You can add this level of security in different ways.
n Adding firewall protection to your virtual network by installing and configuring host-based firewalls onsome or all of its virtual machines.
For efficiency, you can set up private virtual machine Ethernet networks or virtual networks. With virtualnetworks, you install a host-based firewall on a virtual machine at the head of the virtual network. Thisserves as a protective buffer between the physical network adapter and the remaining virtual machinesin the virtual network.
Installing a host-based firewall on virtual machines at the head of virtual networks is a good securitypractice. However, because host-based firewalls can slow performance, balance your security needsagainst performance before you decide to install host-based firewalls on virtual machines elsewhere inthe virtual network.
n Keeping different virtual machine zones within a host on different network segments. If you isolate virtualmachine zones on their own network segments, you minimize the risks of data leakage from one virtualmachine zone to the next. Segmentation prevents various threats, including Address Resolution Protocol(ARP) spoofing, in which an attacker manipulates the ARP table to remap MAC and IP addresses, therebygaining access to network traffic to and from a host. Attackers use ARP spoofing to generate Man in theMiddle attacks, Denial of Service (DoS) attacks, hijack the target system, and otherwise disrupt the virtualnetwork.
Planning segmentation carefully lowers the chances of packet transmissions between virtual machinezones, which prevents sniffing attacks that require sending network traffic to the victim. Also, an attackercannot use an insecure service in one virtual machine zone to access other virtual machine zones in thehost. You can implement segmentation by using either of two approaches, each of which has differentbenefits.
n Use separate physical network adapters for virtual machine zones to ensure that the zones are isolated.Maintaining separate physical network adapters for virtual machine zones is probably the most securemethod and is less prone to misconfiguration after the initial segment creation.
n Set up virtual local area networks (VLANs) to help safeguard your network. Because VLANs providealmost all of the security benefits inherent in implementing physically separate networks without thehardware overhead, they offer a viable solution that can save you the cost of deploying andmaintaining additional devices, cabling, and so forth.
VLANs are an IEEE standard networking scheme with specific tagging methods that allow routing of packetsto only those ports that are part of the VLAN. When properly configured, VLANs provide a dependable meansfor you to protect a set of virtual machines from accidental or malicious intrusions.
VLANs let you segment a physical network so that two machines in the network are unable to transmit packetsback and forth unless they are part of the same VLAN. For example, accounting records and transactions areamong a company’s most sensitive internal information. In a company whose sales, shipping, and accountingemployees all use virtual machines in the same physical network, you might protect the virtual machines forthe accounting department by setting up VLANs.
Chapter 2 Securing ESXi Configurations
VMware, Inc. 23
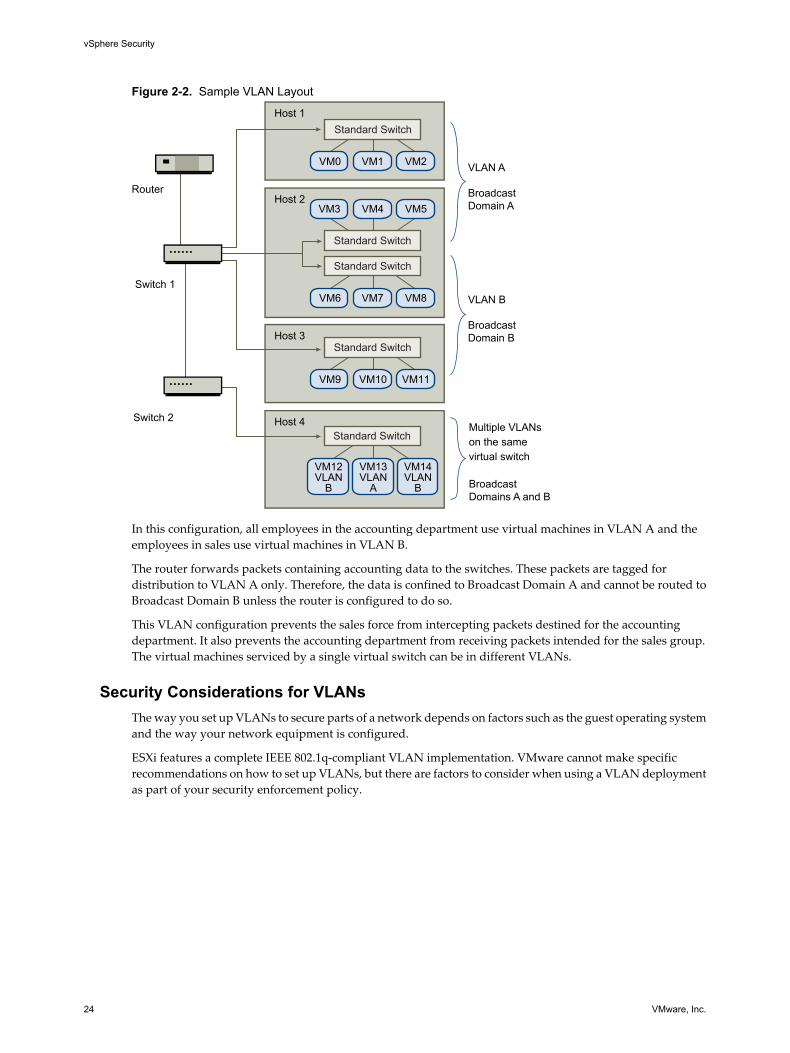
Figure 2-2. Sample VLAN Layout
VM3 VM4
Standard Switch
VM5
Standard Switch
VM6 VM7 VM8
Standard Switch
VM0 VM1 VM2
Standard Switch
VM9 VM10 VM11
VM12VLAN
B
VM13VLAN
A
VM14VLAN
B
Standard Switch
Router
Host 1
Host 3
Host 4
Host 2
Switch 1
Switch 2Multiple VLANson the samevirtual switch
BroadcastDomains A and B
VLAN A
BroadcastDomain A
VLAN B
BroadcastDomain B
In this configuration, all employees in the accounting department use virtual machines in VLAN A and theemployees in sales use virtual machines in VLAN B.
The router forwards packets containing accounting data to the switches. These packets are tagged fordistribution to VLAN A only. Therefore, the data is confined to Broadcast Domain A and cannot be routed toBroadcast Domain B unless the router is configured to do so.
This VLAN configuration prevents the sales force from intercepting packets destined for the accountingdepartment. It also prevents the accounting department from receiving packets intended for the sales group.The virtual machines serviced by a single virtual switch can be in different VLANs.
Security Considerations for VLANsThe way you set up VLANs to secure parts of a network depends on factors such as the guest operating systemand the way your network equipment is configured.
ESXi features a complete IEEE 802.1q-compliant VLAN implementation. VMware cannot make specificrecommendations on how to set up VLANs, but there are factors to consider when using a VLAN deploymentas part of your security enforcement policy.
vSphere Security
24 VMware, Inc.
VLANs as Part of a Broader Security ImplementationVLANs are an effective means of controlling where and how widely data is transmitted within the network.If an attacker gains access to the network, the attack is likely to be limited to the VLAN that served as the entrypoint, lessening the risk to the network as a whole.
VLANs provide protection only in that they control how data is routed and contained after it passes throughthe switches and enters the network. You can use VLANs to help secure Layer 2 of your network architecture—the data link layer. However, configuring VLANs does not protect the physical layer of your network modelor any of the other layers. Even if you create VLANs, provide additional protection by securing your hardware(routers, hubs, and so forth) and encrypting data transmissions.
VLANs are not a substitute for firewalls in your virtual machine configurations. Most network configurationsthat include VLANs also include firewalls. If you include VLANs in your virtual network, be sure that thefirewalls that you install are VLAN-aware.
Properly Configure VLANsEquipment misconfiguration and network hardware, firmware, or software defects can make a VLANsusceptible to VLAN-hopping attacks.
VLAN hopping occurs when an attacker with authorized access to one VLAN creates packets that trick physicalswitches into transmitting the packets to another VLAN that the attacker is not authorized to access.Vulnerability to this type of attack usually results from a switch being misconfigured for native VLANoperation, in which the switch can receive and transmit untagged packets.
To help prevent VLAN hopping, keep your equipment up to date by installing hardware and firmware updatesas they become available. Also, follow your vendor’s best practice guidelines when you configure yourequipment.
VMware standard switches do not support the concept of a native VLAN. All data passed on these switchesis appropriately tagged. However, because other switches in the network might be configured for native VLANoperation, VLANs configured with standard switches can still be vulnerable to VLAN hopping.
If you plan to use VLANs to enforce network security, disable the native VLAN feature for all switches unlessyou have a compelling reason to operate some of your VLANs in native mode. If you must use native VLAN,see your switch vendor’s configuration guidelines for this feature.
Standard Switch Protection and VLANsVMware standard switches provide safeguards against certain threats to VLAN security. Because of the waythat standard switches are designed, they protect VLANs against a variety of attacks, many of which involveVLAN hopping.
Having this protection does not guarantee that your virtual machine configuration is invulnerable to othertypes of attacks. For example, standard switches do not protect the physical network against these attacks;they protect only the virtual network.
Chapter 2 Securing ESXi Configurations
VMware, Inc. 25
Standard switches and VLANs can protect against the following types of attacks.
MAC flooding Floods a switch with packets that contain MAC addresses tagged as havingcome from different sources. Many switches use a content-addressablememory table to learn and store the source address for each packet. When thetable is full, the switch can enter a fully open state in which every incomingpacket is broadcast on all ports, letting the attacker see all of the switch’s traffic.This state might result in packet leakage across VLANs.
Although VMware standard switches store a MAC address table, they do notget the MAC addresses from observable traffic and are not vulnerable to thistype of attack.
802.1q and ISL taggingattacks
Force a switch to redirect frames from one VLAN to another by tricking theswitch into acting as a trunk and broadcasting the traffic to other VLANs.
VMware standard switches do not perform the dynamic trunking required forthis type of attack and, therefore, are not vulnerable.
Double-encapsulationattacks
Occur when an attacker creates a double-encapsulated packet in which theVLAN identifier in the inner tag is different from the VLAN identifier in theouter tag. For backward compatibility, native VLANs strip the outer tag fromtransmitted packets unless configured to do otherwise. When a native VLANswitch strips the outer tag, only the inner tag is left, and that inner tag routesthe packet to a different VLAN than the one identified in the now-missing outertag.
VMware standard switches drop any double-encapsulated frames that avirtual machine attempts to send on a port configured for a specific VLAN.Therefore, they are not vulnerable to this type of attack.
Multicast brute-forceattacks
Involve sending large numbers of multicast frames to a known VLAN almostsimultaneously to overload the switch so that it mistakenly allows some of theframes to broadcast to other VLANs.
VMware standard switches do not allow frames to leave their correct broadcastdomain (VLAN) and are not vulnerable to this type of attack.
Spanning-tree attacks Target Spanning-Tree Protocol (STP), which is used to control bridgingbetween parts of the LAN. The attacker sends Bridge Protocol Data Unit(BPDU) packets that attempt to change the network topology, establishingthemselves as the root bridge. As the root bridge, the attacker can sniff thecontents of transmitted frames.
VMware standard switches do not support STP and are not vulnerable to thistype of attack.
Random frame attacks Involve sending large numbers of packets in which the source and destinationaddresses stay the same, but in which fields are randomly changed in length,type, or content. The goal of this attack is to force packets to be mistakenlyrerouted to a different VLAN.
VMware standard switches are not vulnerable to this type of attack.
Because new security threats develop over time, do not consider this an exhaustive list of attacks. Regularlycheck VMware security resources on the Web to learn about security, recent security alerts, and VMwaresecurity tactics.
vSphere Security
26 VMware, Inc.
Securing Standard Switch PortsAs with physical network adapters, a virtual network adapter can send frames that appear to be from a differentmachine or impersonate another machine so that it can receive network frames intended for that machine.Also, like physical network adapters, a virtual network adapter can be configured so that it receives framestargeted for other machines.
When you create a standard switch for your network, you add port groups to impose a policy configurationfor the virtual machines and storage systems attached to the switch. You create virtual ports through thevSphere Client.
As part of adding a port or standard port group to a standard switch, the vSphere Client configures a securityprofile for the port. You can use this security profile to ensure that the host prevents the guest operating systemsfor its virtual machines from impersonating other machines on the network. This security feature isimplemented so that the guest operating system responsible for the impersonation does not detect that theimpersonation was prevented.
The security profile determines how strongly you enforce protection against impersonation and interceptionattacks on virtual machines. To correctly use the settings in the security profile, you must understand the basicsof how virtual network adapters control transmissions and how attacks are staged at this level.
Each virtual network adapter has its own MAC address assigned when the adapter is created. This address iscalled the initial MAC address. Although the initial MAC address can be reconfigured from outside the guestoperating system, it cannot be changed by the guest operating system. In addition, each adapter has an effectiveMAC address that filters out incoming network traffic with a destination MAC address different from theeffective MAC address. The guest operating system is responsible for setting the effective MAC address andtypically matches the effective MAC address to the initial MAC address.
When sending packets, an operating system typically places its own network adapter’s effective MAC addressin the source MAC address field of the Ethernet frame. It also places the MAC address for the receiving networkadapter in the destination MAC address field. The receiving adapter accepts packets only when the destinationMAC address in the packet matches its own effective MAC address.
Upon creation, a network adapter’s effective MAC address and initial MAC address are the same. The virtualmachine’s operating system can alter the effective MAC address to another value at any time. If an operatingsystem changes the effective MAC address, its network adapter receives network traffic destined for the newMAC address. The operating system can send frames with an impersonated source MAC address at any time.This means an operating system can stage malicious attacks on the devices in a network by impersonating anetwork adapter that the receiving network authorizes.
You can use standard switch security profiles on hosts to protect against this type of attack by setting threeoptions. If you change any default settings for a port, you must modify the security profile by editing standardswitch settings in the vSphere Client.
MAC Address ChangesThe setting for the MAC Address Changes option affects traffic that a virtual machine receives.
When the option is set to Accept, ESXi accepts requests to change the effective MAC address to other than theinitial MAC address.
When the option is set to Reject, ESXi does not honor requests to change the effective MAC address to anythingother than the initial MAC address, which protects the host against MAC impersonation. The port that thevirtual adapter used to send the request is disabled and the virtual adapter does not receive any more framesuntil it changes the effective MAC address to match the initial MAC address. The guest operating system doesnot detect that the MAC address change was not honored.
NOTE The iSCSI initiator relies on being able to get MAC address changes from certain types of storage. If youare using ESXi iSCSI and have iSCSI storage, set the MAC Address Changes option to Accept.
Chapter 2 Securing ESXi Configurations
VMware, Inc. 27
In some situations, you might have a legitimate need for more than one adapter to have the same MAC addresson a network—for example, if you are using Microsoft Network Load Balancing in unicast mode. WhenMicrosoft Network Load Balancing is used in the standard multicast mode, adapters do not share MACaddresses.
MAC address changes settings affect traffic leaving a virtual machine. MAC address changes will occur if thesender is permitted to make them, even if standard switches or a receiving virtual machine does not permitMAC address changes.
Forged TransmissionsThe setting for the Forged Transmits option affects traffic that is transmitted from a virtual machine.
When the option is set to Accept, ESXi does not compare source and effective MAC addresses.
To protect against MAC impersonation, you can set this option to Reject. If you do, the host compares thesource MAC address being transmitted by the operating system with the effective MAC address for its adapterto see if they match. If the addresses do not match, ESXi drops the packet.
The guest operating system does not detect that its virtual network adapter cannot send packets by using theimpersonated MAC address. The ESXi host intercepts any packets with impersonated addresses before theyare delivered, and the guest operating system might assume that the packets are dropped.
Promiscuous Mode OperationPromiscuous mode eliminates any reception filtering that the virtual network adapter would perform so thatthe guest operating system receives all traffic observed on the wire. By default, the virtual network adaptercannot operate in promiscuous mode.
Although promiscuous mode can be useful for tracking network activity, it is an insecure mode of operation,because any adapter in promiscuous mode has access to the packets regardless of whether some of the packetsare received only by a particular network adapter. This means that an administrator or root user within avirtual machine can potentially view traffic destined for other guest or host operating systems.
NOTE In some situations, you might have a legitimate reason to configure a standard switch to operate inpromiscuous mode (for example, if you are running network intrusion detection software or a packet sniffer).
Internet Protocol SecurityInternet Protocol Security (IPsec) secures IP communications coming from and arriving at a host. ESXi hostssupport IPsec using IPv6.
When you set up IPsec on a host, you enable authentication and encryption of incoming and outgoing packets.When and how IP traffic is encrypted is depends on how you set up the system's security associations andsecurity policies
A security association determines how the system encrypts traffic. When you create a security association, youspecify the source and destination, encryption parameters, a name for the security association.
A security policy determines when the system should encrypt traffic. The security policy includes source anddestination information, the protocol and direction of traffic to be encrypted, the mode (transport or tunnel)and the security association to use.
Add a Security AssociationAdd a security association to specify encryption parameters for associated IP traffic.
You can add a security association using the esxcli vSphere CLI command.
vSphere Security
28 VMware, Inc.
Procedure
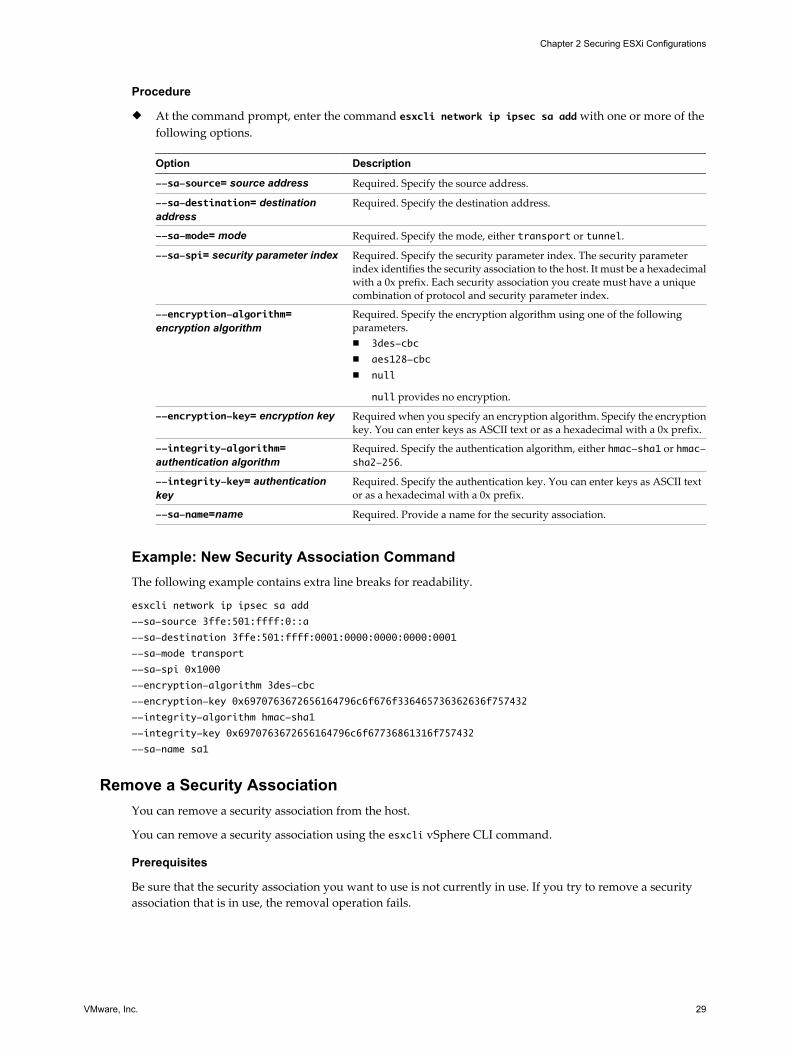
u At the command prompt, enter the command esxcli network ip ipsec sa add with one or more of thefollowing options.
Option Description
--sa-source= source address Required. Specify the source address.
--sa-destination= destinationaddress
Required. Specify the destination address.
--sa-mode= mode Required. Specify the mode, either transport or tunnel.
--sa-spi= security parameter index Required. Specify the security parameter index. The security parameterindex identifies the security association to the host. It must be a hexadecimalwith a 0x prefix. Each security association you create must have a uniquecombination of protocol and security parameter index.
--encryption-algorithm=encryption algorithm
Required. Specify the encryption algorithm using one of the followingparameters.n 3des-cbc
n aes128-cbc
n null
null provides no encryption.
--encryption-key= encryption key Required when you specify an encryption algorithm. Specify the encryptionkey. You can enter keys as ASCII text or as a hexadecimal with a 0x prefix.
--integrity-algorithm=authentication algorithm
Required. Specify the authentication algorithm, either hmac-sha1 or hmac-sha2-256.
--integrity-key= authenticationkey
Required. Specify the authentication key. You can enter keys as ASCII textor as a hexadecimal with a 0x prefix.
--sa-name=name Required. Provide a name for the security association.
Example: New Security Association CommandThe following example contains extra line breaks for readability.
esxcli network ip ipsec sa add
--sa-source 3ffe:501:ffff:0::a
--sa-destination 3ffe:501:ffff:0001:0000:0000:0000:0001
--sa-mode transport
--sa-spi 0x1000
--encryption-algorithm 3des-cbc
--encryption-key 0x6970763672656164796c6f676f336465736362636f757432
--integrity-algorithm hmac-sha1
--integrity-key 0x6970763672656164796c6f67736861316f757432
--sa-name sa1
Remove a Security AssociationYou can remove a security association from the host.
You can remove a security association using the esxcli vSphere CLI command.
Prerequisites
Be sure that the security association you want to use is not currently in use. If you try to remove a securityassociation that is in use, the removal operation fails.
Chapter 2 Securing ESXi Configurations
VMware, Inc. 29
Procedure
u At the command prompt, enter the commandesxcli network ip ipsec sa remove --sa-namesecurity_association_name.
List Available Security AssociationsESXi can provide a list of all security associations available for use by security policies. The list includes bothuser created security associations and any security associations the VMkernel installed using Internet KeyExchange.
You can get a list of available security associations using the esxcli vSphere CLI command.
Procedure
u At the command prompt, enter the command esxcli network ip ipsec sa list.
ESXi displays a list of all available security associations.
Create a Security PolicyCreate a security policy to determine when to use the authentication and encryption parameters set in a securityassociation.
You can add a security policy using the esxcli vSphere CLI command.
Prerequisites
Before creating a security policy, add a security association with the appropriate authentication and encryptionparameters as described in “Add a Security Association,” on page 28.
Procedure
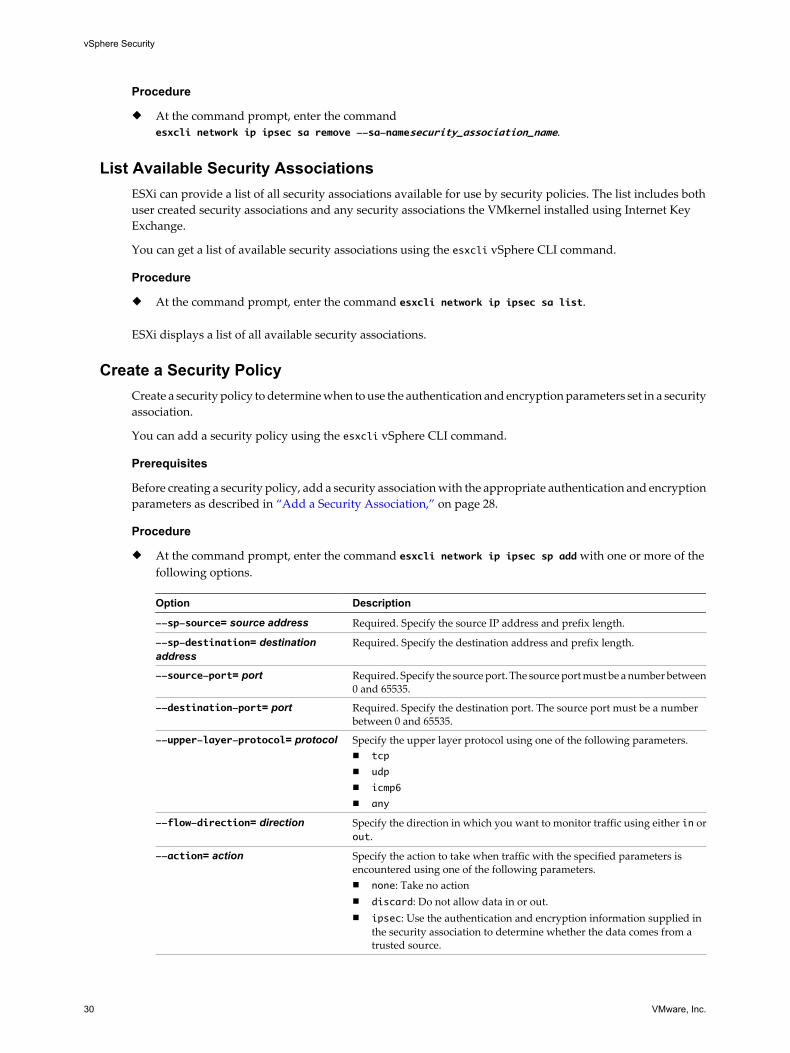
u At the command prompt, enter the command esxcli network ip ipsec sp add with one or more of thefollowing options.
Option Description
--sp-source= source address Required. Specify the source IP address and prefix length.
--sp-destination= destinationaddress
Required. Specify the destination address and prefix length.
--source-port= port Required. Specify the source port. The source port must be a number between0 and 65535.
--destination-port= port Required. Specify the destination port. The source port must be a numberbetween 0 and 65535.
--upper-layer-protocol= protocol Specify the upper layer protocol using one of the following parameters.n tcp
n udp
n icmp6
n any
--flow-direction= direction Specify the direction in which you want to monitor traffic using either in orout.
--action= action Specify the action to take when traffic with the specified parameters isencountered using one of the following parameters.n none: Take no actionn discard: Do not allow data in or out.n ipsec: Use the authentication and encryption information supplied in
the security association to determine whether the data comes from atrusted source.
vSphere Security
30 VMware, Inc.

Option Description
--sp-mode= mode Specify the mode, either tunnel or transport.
--sa-name=security associationname
Required. Provide the name of the security association for the security policyto use.
--sp-name=name Required. Provide a name for the security policy.
Example: New Security Policy CommandThe following example includes extra line breaks for readability.
esxcli network ip ipsec add
--sp-source=2001:db8:1::/64
--sp-destination=2002:db8:1::/64
--source-port=23
--destination-port=25
--upper-layer-protocol=tcp
--flow-direction=out
--action=ipsec
--sp-mode=transport
--sa-name=sa1
--sp-name=sp1
Remove a Security PolicyYou can remove a security policy from the ESXi host.
You can remove a security policy using the esxcli vSphere CLI command.
Prerequisites
Be sure that the security policy you want to use is not currently in use. If you try to remove a security policythat is in use, the removal operation fails.
Procedure
u At the command prompt, enter the commandesxcli network ip ipsec sp remove --sa-name security policy name.
To remove all security policies, enter the command esxcli network ip ipsec sp remove --remove-all.
List Available Security PoliciesESXi can provide a list of all security policies on the host.
You can get a list of available security policies using the esxcli vSphere CLI command.
Procedure
u At the command prompt, enter the command esxcli network ip ipsec sp list.
The host displays a list of all available security policies.
Chapter 2 Securing ESXi Configurations
VMware, Inc. 31
Securing iSCSI StorageThe storage you configure for a host might include one or more storage area networks (SANs) that use iSCSI.When you configure iSCSI on a host, you can take several measures to minimize security risks.
iSCSI is a means of accessing SCSI devices and exchanging data records by using TCP/IP over a network portrather than through a direct connection to a SCSI device. In iSCSI transactions, blocks of raw SCSI data areencapsulated in iSCSI records and transmitted to the requesting device or user.
iSCSI SANs let you make efficient use of existing Ethernet infrastructures to provide hosts access to storageresources that they can dynamically share. iSCSI SANs provide an economical storage solution forenvironments that rely on a common storage pool to serve numerous users. As with any networked system,your iSCSI SANs can be subject to security breaches.
NOTE The requirements and procedures for securing an iSCSI SAN are similar for the hardware iSCSI adaptersyou can use with hosts and for iSCSI configured directly through the host.
Securing iSCSI Devices Through AuthenticationOne means of securing iSCSI devices from unwanted intrusion is to require that the host, or initiator, beauthenticated by the iSCSI device, or target, whenever the host attempts to access data on the target LUN.
The goal of authentication is to prove that the initiator has the right to access a target, a right granted whenyou configure authentication.
ESXi does not support Kerberos, Secure Remote Protocol (SRP), or public-key authentication methods for iSCSI.Additionally, it does not support IPsec authentication and encryption.
Use the vSphere Client to determine whether authentication is being performed and to configure theauthentication method.
Enabling Challenge Handshake Authentication Protocol (CHAP) for iSCSI SANsYou can configure the iSCSI SAN to use CHAP authentication.
In CHAP authentication, when the initiator contacts an iSCSI target, the target sends a predefined ID valueand a random value, or key, to the initiator. The initiator creates a one-way hash value that it sends to thetarget. The hash contains three elements: a predefined ID value, the random value that the target sends, anda private value, or CHAP secret, that the initiator and target share. When the target receives the hash from theinitiator, it creates its own hash value by using the same elements and compares it to the initiator’s hash. If theresults match, the target authenticates the initiator.
ESXi supports unidirectional and bidirectional CHAP authentication for iSCSI. In unidirectional CHAPauthentication, the target authenticates the initiator, but the initiator does not authenticate the target. Inbidirectional CHAP authentication, an additional level of security enables the initiator to authenticate thetarget.
ESXi supports CHAP authentication at the adapter level, when only one set of authentication credentials canbe sent from the host to all targets. It also supports per-target CHAP authentication, which enables you toconfigure different credentials for each target to achieve greater target refinement.
See the vSphere Storage documentation for information about how to work with CHAP.
vSphere Security
32 VMware, Inc.
Disabling iSCSI SAN AuthenticationYou can configure the iSCSI SAN to use no authentication. Communications between the initiator and targetare still authenticated in a rudimentary way because the iSCSI target devices are typically set up tocommunicate with specific initiators only.
Choosing not to enforce more stringent authentication can make sense if your iSCSI storage is housed in onelocation and you create a dedicated network or VLAN to service all your iSCSI devices. The iSCSI configurationis secure because it is isolated from any unwanted access, much as a Fibre Channel SAN is.
As a basic rule, disable authentication only if you are willing to risk an attack to the iSCSI SAN or cope withproblems that result from human error.
See the vSphere Storage documentation for information about how to work with CHAP.
Protecting an iSCSI SANWhen you plan your iSCSI configuration, take measures to improve the overall security of the iSCSI SAN. YouriSCSI configuration is only as secure as your IP network, so by enforcing good security standards when youset up your network, you help safeguard your iSCSI storage.
The following are some specific suggestions for enforcing good security standards.
Protect Transmitted DataA primary security risk in iSCSI SANs is that an attacker might sniff transmitted storage data.
Take additional measures to prevent attackers from easily seeing iSCSI data. Neither the hardware iSCSIadapter nor ESXi iSCSI initiator encrypts the data that they transmit to and from the targets, making the datamore vulnerable to sniffing attacks.
Allowing your virtual machines to share standard switches and VLANs with your iSCSI configurationpotentially exposes iSCSI traffic to misuse by a virtual machine attacker. To help ensure that intruders cannotlisten to iSCSI transmissions, make sure that none of your virtual machines can see the iSCSI storage network.
If you use a hardware iSCSI adapter, you can accomplish this by making sure that the iSCSI adapter andESXi physical network adapter are not inadvertently connected outside the host by virtue of sharing a switchor some other means. If you configure iSCSI directly through the ESXi host, you can accomplish this byconfiguring iSCSI storage through a different standard switch than the one used by your virtual machines.
In addition to protecting the iSCSI SAN by giving it a dedicated standard switch, you can configure your iSCSISAN on its own VLAN to improve performance and security. Placing your iSCSI configuration on a separateVLAN ensures that no devices other than the iSCSI adapter have visibility into transmissions within the iSCSISAN. Also, network congestion from other sources cannot interfere with iSCSI traffic.
Secure iSCSI PortsWhen you run iSCSI devices, ESXi does not open any ports that listen for network connections. This measurereduces the chances that an intruder can break into ESXi through spare ports and gain control over the host.Therefore, running iSCSI does not present any additional security risks at the ESXi end of the connection.
Any iSCSI target device that you run must have one or more open TCP ports to listen for iSCSI connections.If any security vulnerabilities exist in the iSCSI device software, your data can be at risk through no fault ofESXi. To lower this risk, install all security patches that your storage equipment manufacturer provides andlimit the devices connected to the iSCSI network.
Chapter 2 Securing ESXi Configurations
VMware, Inc. 33
Cipher StrengthTransmitting data over insecure connections presents a security risk because malicious users might be able toscan data as it travels through the network. As a safeguard, network components commonly encrypt the dataso that it cannot be easily read.
To encrypt data, the sending component, such as a gateway or redirector, applies cryptographic algorithms,or ciphers, to alter the data before transmitting it. The receiving component uses a key to decrypt the data,returning it to its original form. Several ciphers are in use, and the level of security that each provides isdifferent. One measure of a cipher’s ability to protect data is its cipher strength—the number of bits in theencryption key. The larger the number, the more secure the cipher.
To ensure the protection of the data transmitted to and from external network connections, ESXi uses one ofthe strongest block ciphers available—256-bit AES block encryption. ESXi also uses 1024-bit RSA for keyexchange. These encryption algorithms are the default for the following connections.
n vSphere Client connections to vCenter Server and to ESXi through the management interface.
n SDK connections to vCenter Server and to ESXi.
n Management interface connections to virtual machines through the VMkernel.
n SSH connections to ESXi through the management interface.
SSH SecurityYou can use SSH to remotely log in to the ESXi Shell and perform troubleshooting tasks for the host.
SSH configuration in ESXi is enhanced to provide a high security level.
Version 1 SSH protocoldisabled
VMware does not support Version 1 SSH protocol and uses Version 2 protocolexclusively. Version 2 eliminates certain security problems present in Version1 and provides you with a safe way to communicate with the managementinterface.
Improved cipherstrength
SSH supports only 256-bit and 128-bit AES ciphers for your connections.
These settings are designed to provide solid protection for the data you transmit to the management interfacethrough SSH. If this configuration is too restricted for your needs, you can lower security parameters.
Control CIM-Based Hardware Monitoring Tool AccessThe Common Information Model (CIM) system provides an interface that enables hardware-level managementfrom remote applications using a set of standard APIs. To ensure that the CIM interface is secure, provide onlythe minimum access necessary to these applications. If an application has been provisioned with a root or fulladministrator account and the application is compromised, the full virtual environment might becompromised.
CIM is an open standard that defines a framework for agent-less, standards-based monitoring of hardwareresources for ESXi. This framework consists of a CIM object manager, often called a CIM broker, and a set ofCIM providers.
CIM providers are used as the mechanism to provide management access to device drivers and underlyinghardware. Hardware vendors, including server manufacturers and specific hardware device vendors, canwrite providers to provide monitoring and management of their particular devices. VMware also writesproviders that implement monitoring of server hardware, ESXi storage infrastructure, and virtualization-specific resources. These providers run inside the ESXi system and therefore are designed to be extremelylightweight and focused on specific management tasks. The CIM broker takes information from all CIMproviders, and presents it to the outside world via standard APIs, the most common one being WS-MAN.
vSphere Security
34 VMware, Inc.

Do not provide root credentials to remote applications to access the CIM interface. Instead, create a serviceaccount specific to these applications and grant read-only access to CIM information to any local accountdefined on the ESXi system, as well as any role defined in vCenter Server.
Procedure
1 Create a service account specific to CIM applications.
2 Grant read-only access to CIM information to any local account defined on the ESXi system, as well asany role defined in vCenter Server.
3 (Optional) If the application requires write access to the CIM interface, create a role to apply to the serviceaccount with only two privileges:
n Host.Config.SystemManagement
n Host.CIM.CIMInteraction
This role can be local to the host or centrally defined on vCenter Server, depending on how the monitoringapplication works.
When a user logs into the host with the service account (for example, using the vSphere Client), the user hasonly the privileges SystemManagement and CIMInteraction, or read-only access.
Chapter 2 Securing ESXi Configurations
VMware, Inc. 35

vSphere Security
36 VMware, Inc.

Securing the Management Interface 3Security of the ESXi management interface is critical to protect against unauthorized intrusion and misuse.
If a host is compromised in certain ways, the virtual machines it interacts with might also be compromised.To minimize the risk of an attack through the management interface, ESXi is protected with a firewall.
This chapter includes the following topics:
n “General Security Recommendations,” on page 37
n “ESXi Firewall Configuration,” on page 38
n “ESXi Firewall Commands,” on page 43
General Security RecommendationsTo protect the host against unauthorized intrusion and misuse, VMware imposes constraints on severalparameters, settings, and activities. You can loosen the constraints to meet your configuration needs, but if youdo so, make sure that you are working in a trusted environment and have taken enough other security measuresto protect the network as a whole and the devices connected to the host.
Consider the following recommendations when evaluating host security and administration.
n Limit user access.
To improve security, restrict user access to the management interface and enforce access security policieslike setting up password restrictions.
The ESXi Shell has privileged access to certain parts of the host. Therefore, provide only trusted users withESXi Shell login access.
Also, strive to run only the essential processes, services, and agents such as virus checkers, and virtualmachine backups.
n Use the vSphere Client to administer your ESXi hosts.
Whenever possible, use the vSphere Client or a third-party network management tool to administer yourESXi hosts instead of working though the command-line interface as the root user. Using the vSphereClient lets you limit the accounts with access to the ESXi Shell, safely delegate responsibilities, and set uproles that prevent administrators and users from using capabilities they do not need.
n Use only VMware sources to upgrade ESXi components.
The host runs a variety of third-party packages to support management interfaces or tasks that you mustperform. VMware does not support upgrading these packages from anything other than a VMware source.If you use a download or patch from another source, you might compromise management interfacesecurity or functions. Regularly check third-party vendor sites and the VMware knowledge base forsecurity alerts.
VMware, Inc. 37
In addition to implementing the firewall, risks to the hosts are mitigated using other methods.
n ESXi runs only services essential to managing its functions, and the distribution is limited to the featuresrequired to run ESXi.
n By default, all ports not specifically required for management access to the host are closed. You mustspecifically open ports if you need additional services.
n By default, weak ciphers are disabled and all communications from clients are secured by SSL. The exactalgorithms used for securing the channel depend on the SSL handshake. Default certificates created onESXi use SHA-1 with RSA encryption as the signature algorithm.
n The Tomcat Web service, used internally by ESXi to support access by Web clients, has been modified torun only those functions required for administration and monitoring by a Web client. As a result, ESXi isnot vulnerable to the Tomcat security issues reported in broader use.
n VMware monitors all security alerts that could affect ESXi security and, if needed, issues a security patch.
n Insecure services such as FTP and Telnet are not installed, and the ports for these services are closed bydefault. Because more secure services such as SSH and SFTP are easily available, always avoid using theseinsecure services in favor of their safer alternatives. If you must use insecure services and haveimplemented sufficient protection for the host, you must explicitly open ports to support them.
NOTE Follow only VMware security advisories, found at http://www.vmware.com/security/.
ESXi Firewall ConfigurationESXi includes a firewall between the management interface and the network. The firewall is enabled by default.
At installation time, the ESXi firewall is configured to block incoming and outgoing traffic, except traffic forthe default services listed in “TCP and UDP Ports for Management Access,” on page 21.
NOTE The firewall also allows Internet Control Message Protocol (ICMP) pings and communication withDHCP and DNS (UDP only) clients.
Supported services and management agents that are required to operate the host are described in a rule setconfiguration file in the ESXi firewall directory /etc/vmware/firewall/. The file contains firewall rules andlists each rule's relationship with ports and protocols.
You cannot add a rule to the ESXi firewall unless you create and install a VIB that contains the rule setconfiguration file. The VIB authoring tool is available to VMware partners.
NOTE The behavior of the NFS Client rule set (nfsClient) is different from other rule sets. When the NFS Clientrule set is enabled, all outbound TCP ports are open for the destination hosts in the list of allowed IP addresses.See “NFS Client Rule Set Behavior,” on page 41 for more information.
Rule Set Configuration FilesA rule set configuration file contains firewall rules and describes each rule's relationship with ports andprotocols. The rule set configuration file can contain rule sets for multiple services.
Rule set configuration files are located in the /etc/vmware/firewall/ directory. To add a service to the hostsecurity profile, VMware partners can create a VIB that contains the port rules for the service in a configurationfile. VIB authoring tools are available to VMware partners.
The ESXi 5.x ruleset.xml format is the same as in ESX and ESXi 4.x, but has two additional tags: enabled andrequired. The ESXi 5.x firewall continues to support the 4.x ruleset.xml format.
Each set of rules for a service in the rule set configuration file contains the following information.
n A numeric identifier for the service, if the configuration file contains more than one service.
vSphere Security
38 VMware, Inc.
n A unique identifier for the rule set, usually the name of the service.
n For each rule, the file contains one or more port rules, each with a definition for direction, protocol, porttype, and port number or range of port numbers.
n A flag indicating whether the service is enabled or disabled when the rule set is applied.
n An indication of whether the rule set is required and cannot be disabled.
Example: Rule Set Configuration File<ConfigRoot>
<service id='0000'>
<id>serviceName</id>
<rule id = '0000'>
<direction>inbound</direction>
<protocol>tcp</protocol>
<porttype>dst</porttype>
<port>80</port>
</rule>
<rule id='0001'>
<direction>inbound</direction>
<protocol>tcp</protocol>
<porttype>src</porttype>
<port>
<begin>1020</begin>
<end>1050</end>
</port>
</rule>
<enabled>true</enabled>
<required>false</required>
</service>
</ConfigRoot>
Allow or Deny Access to an ESXi Service or Management AgentYou can configure firewall properties to allow or deny access for a service or management agent.
You add information about allowed services and management agents to the host configuration file. You canenable or disable these services and agents using the vSphere Client or at the command line.
NOTE If different services have overlapping port rules, enabling one service might implicitly enableoverlapping services. To minimize the effects of this behavior, you can specify which IP addresses are allowedto access each service on the host.
Procedure
1 Log in to a vCenter Server system using the vSphere Client.
2 Select the host in the inventory panel.
3 Click the Configuration tab and click Security Profile.
The vSphere Client displays a list of active incoming and outgoing connections with the correspondingfirewall ports.
4 In the Firewall section, click Properties.
The Firewall Properties dialog box lists all the rule sets that you can configure for the host.
Chapter 3 Securing the Management Interface
VMware, Inc. 39
5 Select the rule sets to enable, or deselect the rule sets to disable.
The Incoming Ports and Outgoing Ports columns indicate the ports that the vSphere Client opens for theservice. The Protocol column indicates the protocol that the service uses. The Daemon column indicatesthe status of daemons associated with the service.
6 Click OK.
Allow or Deny Access to an ESXi Service or Management Agent with thevSphere Web Client
You can configure firewall properties to allow or deny access for a service or management agent.
You add information about allowed services and management agents to the host configuration file. You canenable or disable these services and agents using the vSphere Client or at the command line.
NOTE If different services have overlapping port rules, enabling one service might implicitly enableoverlapping services. To minimize the effects of this behavior, you can specify which IP addresses are allowedto access each service on the host.
Procedure
1 Browse to the host in the vSphere Web Client inventory.
2 Click the Manage tab and click Settings.
3 Click Security Profile.
The vSphere Client displays a list of active incoming and outgoing connections with the correspondingfirewall ports.
4 In the Firewall section, click Edit.
5 Select the rule sets to enable, or deselect the rule sets to disable.
The Incoming Ports and Outgoing Ports columns indicate the ports that the vSphere Client opens for theservice. The Protocol column indicates the protocol that the service uses. The Daemon column indicatesthe status of daemons associated with the service.
6 Click OK.
Add Allowed IP AddressesYou can specify which networks are allowed to connect to each service that is running on the host.
You can use the vSphere Client or the command line to update the Allowed IP list for a service. By default, allIP addresses are allowed.
Procedure
1 Log in to a vCenter Server system using the vSphere Client.
2 Select the host in the inventory panel.
3 Click the Configuration tab and click Security Profile.
4 In the Firewall section, click Properties.
5 Select a service in the list and click Firewall.
6 Select Only allow connections from the following networks and enter the IP addresses of networks thatare allowed to connect to the host.
You can enter IP addresses in the following formats: 192.168.0.0/24, 192.168.1.2, 2001::1/64, or fd3e:29a6:0a81:e478::/64.
vSphere Security
40 VMware, Inc.
7 Click OK.
Add Allowed IP Addresses in the vSphere Web ClientYou can specify which networks are allowed to connect to each service that is running on the host.
You can use the vSphere Client or the command line to update the Allowed IP list for a service. By default, allIP addresses are allowed.
Procedure
1 Browse to the host in the vSphere Web Client inventory.
2 Click the Manage tab and click Settings.
3 Under System, click Security Profile.
4 In the Firewall section, click Edit and select a service from the list.
5 In the Allowed IP Addresses section, deselect Allow connections from any IP address and enter the IPaddresses of networks that are allowed to connect to the host.
You can enter IP addresses in the following formats: 192.168.0.0/24, 192.168.1.2, 2001::1/64, or fd3e:29a6:0a81:e478::/64.
6 Click OK.
NFS Client Rule Set BehaviorThe NFS Client rule set behaves differently than other ESXi firewall rule sets. ESXi configures NFS Clientsettings when you mount or unmount an NFS datastore.
When you add or mount an NFS datastore, ESXi checks the state of the NFS Client (nfsClient) firewall ruleset.
n If the NFS Client rule set is disabled, ESXi enables the rule set and disables the Allow All IP Addressespolicy by setting the allowedAll flag to FALSE. The IP address of the NFS server is added to the allowedlist of outgoing IP addresses.
n If the NFS Client rule set is enabled, the state of the rule set and the allowed IP address policy are notchanged. The IP address of the NFS server is added to the allowed list of outgoing IP addresses.
When you remove or unmount an NFS datastore, ESXi performs one of the following actions.
n If ESXi is mounted on any NFS datastore, the IP address of the unmounted NFS server is removed fromthe list of allowed outgoing IP addresses and the NFS Client rule set remains enabled.
n If ESXi is not mounted on any NFS datastore, the IP address of the unmounted NFS server is removedfrom the list of allowed outgoing IP addresses and the NFS Client rule set is disabled.
NOTE If you manually enable the NFS Client rule set or manually set the Allow All IP Addresses policy, eitherbefore or after you add an NFS datastore to the system, your settings are overridden when the last NFS datastoreis unmounted. The NFS Client rule set is disabled when all NFS datastores are unmounted.
Automating Service Behavior Based on Firewall SettingsESXi can automate whether services start based on the status of firewall ports.
Automation helps ensure that services start if the environment is configured to enable their function. Forexample, starting a network service only if some ports are open can help avoid the situation where servicesare started, but are unable to complete the communications required to complete their intended purpose.
Chapter 3 Securing the Management Interface
VMware, Inc. 41
In addition, having accurate information about the current time is a requirement for some protocols, such asKerberos. The NTP service is a way of getting accurate time information, but this service only works whenrequired ports are opened in the firewall. The service cannot achieve its goal if all ports are closed. The NTPservices provide an option to configure the conditions when the service starts or stops. This configurationincludes options that account for whether firewall ports are opened, and then start or stop the NTP servicebased on those conditions. Several possible configuration options exist, all of which are also applicable to theSSH server.
NOTE The settings described in this section only apply to service settings configured through the vSphereClient or applications created with the vSphere Web services SDK. Configurations made through other means,such as the ESXi Shell or configuration files in /etc/init.d/, are not affected by these settings.
n Start automatically if any ports are open, and stop when all ports are closed: The default setting for theseservices that VMware recommends. If any port is open, the client attempts to contact the network resourcespertinent to the service in question. If some ports are open, but the port for a particular service is closed,the attempt fails, but there is little drawback to such a case. If and when the applicable outgoing port isopened, the service begins completing its tasks.
n Start and stop with host: The service starts shortly after the host starts and closes shortly before the hostshuts down. Much like Start automatically if any ports are open, and stop when all ports are closed, thisoption means that the service regularly attempts to complete its tasks, such as contacting the specifiedNTP server. If the port was closed but is subsequently opened, the client begins completing its tasks shortlythereafter.
n Start and stop manually: The host preserves the user-determined service settings, regardless of whetherports are open or not. When a user starts the NTP service, that service is kept running as long as the hostis powered on. If the service is started and the host is powered off, the service is stopped as part of theshutdown process, but as soon as the host is powered on, the service is started again, preserving the user-determined state.
NOTE ESXi firewall automates when rule sets are enabled or disabled based on the service startup policy.When a service starts, its corresponding rule set is enabled. When a service stops, the rule set is disabled.
Set Service or Client Startup OptionsBy default, daemon processes start when any of their ports are opened and stop when all of their ports areclosed. You can change this startup policy for the selected service or client.
Procedure
1 Log in to a vCenter Server system using the vSphere Client.
2 Select the host in the inventory panel.
3 Click the Configuration tab and click Security Profile.
4 In the Firewall section, click Properties.
The Firewall Properties dialog box lists all the services and management agents you can configure for thehost.
5 Select the service or management agent to configure and click Options.
The Startup Policy dialog box determines when the service starts. This dialog box also providesinformation about the current state of the service and provides an interface for manually starting, stopping,or restarting the service.
6 Select a policy from the Startup Policy list.
7 Click OK.
vSphere Security
42 VMware, Inc.
Set Service or Client Startup Options in the vSphere Web ClientBy default, daemon processes start when any of their ports are opened and stop when all of their ports areclosed. You can change this startup policy for the selected service or client.
Procedure
1 Browse to the host in the vSphere Web Client inventory.
2 Click the Manage tab and click Settings.
3 Click Security Profile.
4 In the Services section, click Edit.
5 Select the service or management agent to configure.
6 Select a policy from the Startup Policy list.
7 Click OK.
ESXi Firewall CommandsYou can configure the ESXi firewall at the command line.
Firewall Configuration Using the ESXi ShellThe vSphere Client graphical user interface provides the preferred means of performing many configurationtasks. However, you can use the ESXi Shell to configure ESXi at the command line if necessary.
Table 3-1. Firewall Commands
Command Description
esxcli network firewall get Returns the enabled or disabled status of the firewall and listsdefault actions.
esxcli network firewall set --defaultaction Update default actions.
esxcli network firewall set --enabled Enable or disable the ESXi firewall.
esxcli network firewall load Load the firewall module and rule set configuration files.
esxcli network firewall refresh Refresh the firewall configuration by reading the rule set filesif the firewall module is loaded.
esxcli network firewall unload Destroy filters and unload the firewall module.
esxcli network firewall ruleset list List rule sets information.
esxcli network firewall ruleset set --allowedall Set the allowedall flag.
esxcli network firewall ruleset set --enabled Enable or disable the specified rule set.
esxcli network firewall ruleset allowedip list List the allowed IP addresses of the specified rule set.
esxcli network firewall ruleset allowedip add Allow access to the rule set from the specified IP address orrange of IP addresses.
esxcli network firewall ruleset allowedip remove Remove access to the rule set from the specified IP addressor range of IP addresses.
Chapter 3 Securing the Management Interface
VMware, Inc. 43

vSphere Security
44 VMware, Inc.
Using the ESXi Shell 4The ESXi Shell (formerly Tech Support Mode or TSM) is disabled by default on ESXi. You can enable local andremote access to the shell if necessary.
Enable the ESXi Shell for troubleshooting only. The ESXi Shell can be enabled and disabled whether or not thehost is running in lockdown mode.
ESXi Shell Enable this service to access the ESXi Shell locally.
SSH Enable this service to access the ESXi Shell remotely using SSH.
Direct Console UI (DCUI) When you enable this service while running in lockdown mode, you can login locally to the Direct Console User Interface (DCUI) as a user with the DCUIAccess privilege and disable lockdown mode. You can then access the host byenabling the ESXi Shell.
Only users with the Administrator role can access the ESXi Shell. Users who are in the Active Directory groupESX Admins are automatically assigned the Administrator role. Any user with the Administrator role canexecute system commands (such as vmware -v) using the ESXi Shell.
NOTE Do not enable the ESXi Shell until it is required.
This chapter includes the following topics:
n “Use the vSphere Client to Enable Access to the ESXi Shell,” on page 45
n “Use the vSphere Web Client to Enable Access to the ESXi Shell,” on page 47
n “Use the Direct Console User Interface (DCUI) to Enable Access to the ESXi Shell,” on page 48
n “Log in to the ESXi Shell for Troubleshooting,” on page 49
Use the vSphere Client to Enable Access to the ESXi ShellUse the vSphere Client to enable local and remote access to the ESXi Shell.
Procedure
1 Log in to a vCenter Server system using the vSphere Client.
2 Select the host in the inventory panel.
3 Click the Configuration tab and click Security Profile.
4 In the Services section, click Properties.
VMware, Inc. 45
5 Select a service from the list.
n ESXi Shell
n SSH
n Direct Console UI
6 Click Options and select Start and stop manually.
When you select Start and stop manually, the service does not start when you reboot the host. If you wantthe service to start when you reboot the host, select Start and stop with host.
7 Select Start to enable the service.
8 Click OK.
What to do next
Set the availability and idle timeouts for the ESXi Shell.
Create a Timeout for ESXi Shell AvailabilityThe ESXi Shell is disabled by default. You can set an availability timeout for the ESXi Shell to increase securitywhen you enable the shell.
The availability timeout setting is the amount of time that can elapse before you must log in after theESXi Shell is enabled. After the timeout period, the service is disabled and users are not allowed to log in.
Procedure
1 Select the host in the inventory and click the Configuration tab.
2 Under Software, select Advanced Settings.
3 In the left panel, select UserVars.
4 In the UserVars.ESXiShellTimeOut field, enter the availability timeout setting.
You must restart the SSH service and the ESXi Shell service for the timeout to take effect.
5 Click OK.
If you are logged in when the timeout period elapses, your session will persist. However, after you log out oryour session is terminated, users are not allowed to log in.
Create a Timeout for Idle ESXi Shell SessionsIf a user enables the ESXi Shell on a host, but forgets to log out of the session, the idle session remains connectedindefinitely. The open connection can increase the potential for someone to gain privileged access to the host.You can prevent this by setting a timeout for idle sessions.
The idle timeout is the amount of time that can elapse before the user is logged out of an idle interactive sessions.Changes to the idle timeout apply the next time a user logs in to the ESXi Shell and do not affect existingsessions.
Procedure
1 Select the host in the inventory and click the Configuration tab.
2 Under Software, select Advanced Settings.
3 In the left panel, select UserVars.
4 In the UserVars.ESXiShellInteractiveTimeOut field, enter the availability timeout setting.
You must restart the SSH service and the ESXi Shell service for the timeout to take effect.
vSphere Security
46 VMware, Inc.
5 Click OK.
If you are logged in when the timeout period elapses, your session will persist. However, after you log out oryour session is terminated, users are not allowed to log in.
Use the vSphere Web Client to Enable Access to the ESXi ShellUse the vSphere Web Client to enable local and remote access to the ESXi Shell.
Procedure
1 Browse to the host in the vSphere Web Client inventory.
2 Click the Manage tab and click Settings.
3 Under System, select Security Profile.
4 In the Services panel, click Edit.
5 Select a service from the list.
n ESXi Shell
n SSH
n Direct Console UI
6 Click Service Details and select the startup policy Start and stop manually.
When you select Start and stop manually, the service does not start when you reboot the host. If you wantthe service to start when you reboot the host, select Start and stop with host.
7 Select Start to enable the service.
8 Click OK.
What to do next
Set the availability and idle timeouts for the ESXi Shell.
Create a Timeout for ESXi Shell Availability in the vSphere Web ClientThe ESXi Shell is disabled by default. You can set an availability timeout for the ESXi Shell to increase securitywhen you enable the shell.
The availability timeout setting is the amount of time that can elapse before you must log in after theESXi Shell is enabled. After the timeout period, the service is disabled and users are not allowed to log in.
Procedure
1 Browse to the host in the vSphere Web Client inventory.
2 Click the Manage tab and click Settings.
3 Under System, select Advanced System Settings.
4 Select UserVars.ESXiShellTimeOut and click the Edit icon.
5 Enter the idle timeout setting.
You must restart the SSH service and the ESXi Shell service for the timeout to take effect.
6 Click OK.
If you are logged in when the timeout period elapses, your session will persist. However, after you log out oryour session is terminated, users are not allowed to log in.
Chapter 4 Using the ESXi Shell
VMware, Inc. 47
Create a Timeout for Idle ESXi Shell Sessions in the vSphere Web ClientIf a user enables the ESXi Shell on a host, but forgets to log out of the session, the idle session remains connectedindefinitely. The open connection can increase the potential for someone to gain privileged access to the host.You can prevent this by setting a timeout for idle sessions.
The idle timeout is the amount of time that can elapse before the user is logged out of an idle interactive sessions.Changes to the idle timeout apply the next time a user logs in to the ESXi Shell and do not affect existingsessions.
Procedure
1 Browse to the host in the vSphere Web Client inventory.
2 Click the Manage tab and click Settings.
3 Under System, select Advanced System Settings.
4 Select UserVars.ESXiShellTimeOut and click the Edit icon.
5 Enter the idle timeout setting.
You must restart the SSH service and the ESXi Shell service for the timeout to take effect.
If you are logged in when the timeout period elapses, your session will persist. However, after you log out oryour session is terminated, users are not allowed to log in.
Use the Direct Console User Interface (DCUI) to Enable Access to theESXi Shell
The Direct Console User Interface (DCUI) allows you to interact with the host locally using text-based menus.You can use the Direct Console User Interface to enable local and remote access to the ESXi Shell.
NOTE Changes made to the host using the Direct Console User Interface, the vSphere Client, ESXCLI, or otheradministrative tools are committed to permanent storage every hour or upon graceful shutdown. Changesmight be lost if the host fails before they are committed.
Procedure
1 From the Direct Console User Interface, press F2 to access the System Customization menu.
2 Select Troubleshooting Options and press Enter.
3 From the Troubleshooting Mode Options menu, select a service to enable.
n Enable ESXi Shell
n Enable SSH
4 Press Enter to enable the service.
5 Press Esc until you return to the main menu of the Direct Console User Interface.
What to do next
Set the availability and idle timeouts for the ESXi Shell.
vSphere Security
48 VMware, Inc.
Create a Timeout for Idle ESXi Shell SessionsIf a user enables the ESXi Shell on a host, but forgets to log out of the session, the idle session remains connectedindefinitely. The open connection can increase the potential for someone to gain privileged access to the host.You can prevent this by setting a timeout for idle sessions.
The idle timeout is the amount of time that can elapse before the user is logged out of an idle interactive sessions.Changes to the idle timeout apply the next time a user logs in to the ESXi Shell and do not affect existingsessions.
Procedure
1 From the Troubleshooting Mode Options menu, select Modify ESXi Shell and SSH timeouts and pressEnter.
2 Enter the idle timeout.
You must restart the SSH service and the ESXi Shell service for the timeout to take effect.
3 Press Enter and press Esc until you return to the main menu of the Direct Console User Interface.
If you are logged in when the timeout period elapses, your session will persist. However, after you log out oryour session is terminated, users are not allowed to log in.
Create a Timeout for ESXi Shell Availability in the Direct Console User InterfaceThe ESXi Shell is disabled by default. You can set an availability timeout for the ESXi Shell to increase securitywhen you enable the shell.
The availability timeout setting is the amount of time that can elapse before you must log in after theESXi Shell is enabled. After the timeout period, the service is disabled and users are not allowed to log in.
Procedure
1 From the Troubleshooting Mode Options menu, select Modify ESXi Shell and SSH timeouts and pressEnter.
2 Enter the availability timeout.
You must restart the SSH service and the ESXi Shell service for the timeout to take effect.
3 Press Enter and press Esc until you return to the main menu of the Direct Console User Interface.
4 Click OK.
If you are logged in when the timeout period elapses, your session will persist. However, after you log out oryour session is terminated, users are not allowed to log in.
Log in to the ESXi Shell for TroubleshootingYou should perform ESXi configuration tasks through the vSphere Client or using the vSphere CLI. Log in tothe ESXi Shell (formerly Tech Support Mode or TSM) for troubleshooting purposes only.
Procedure
1 Log in to the ESXi Shell using one of the following methods.
n If you have direct access to the host, press Alt+F1 to open the login page on the machine's physicalconsole.
n If you are connecting to the host remotely, use SSH or another remote console connection to start asession on the host.
Chapter 4 Using the ESXi Shell
VMware, Inc. 49

2 Enter a user name and password recognized by the host.
vSphere Security
50 VMware, Inc.
Lockdown Mode 5To increase the security of your ESXi hosts, you can put them in lockdown mode.
When you enable lockdown mode, no users other than vpxuser have authentication permissions, nor can theyperform operations against the host directly. Lockdown mode forces all operations to be performed throughvCenter Server.
When a host is in lockdown mode, you cannot run vSphere CLI commands from an administration server,from a script, or from vMA against the host. External software or management tools might not be able to retrieveor modify information from the ESXi host.
NOTE Users with the DCUI Access privilege are authorized to log in to the Direct Console User Interface(DCUI) when lockdown mode is enabled. When you disable lockdown mode using the DCUI, all users withthe DCUI Access privilege are granted the Administrator role on the host. You grant the DCUI Access privilegein Advanced Settings.
Enabling or disabling lockdown mode affects which types of users are authorized to access host services, butit does not affect the availability of those services. In other words, if the ESXi Shell, SSH, or Direct Console UserInterface (DCUI) services are enabled, they will continue to run whether or not the host is in lockdown mode.
You can enable lockdown mode using the Add Host wizard to add a host to vCenter Server, using the vSphereClient to manage a host, or using the Direct Console User Interface (DCUI).
NOTE If you enable or disable lockdown mode using the Direct Console User Interface (DCUI), permissionsfor users and groups on the host are discarded. To preserve these permissions, you must enable and disablelockdown mode using the vSphere Client connected to vCenter Server.
Lockdown mode is only available on ESXi hosts that have been added to vCenter Server.
This chapter includes the following topics:
n “Lockdown Mode Behavior,” on page 52
n “Lockdown Mode Configurations,” on page 52
n “Enable Lockdown Mode Using the vSphere Client,” on page 53
n “Enable Lockdown Mode Using the vSphere Web Client,” on page 53
n “Enable Lockdown Mode from the Direct Console User Interface,” on page 53
VMware, Inc. 51
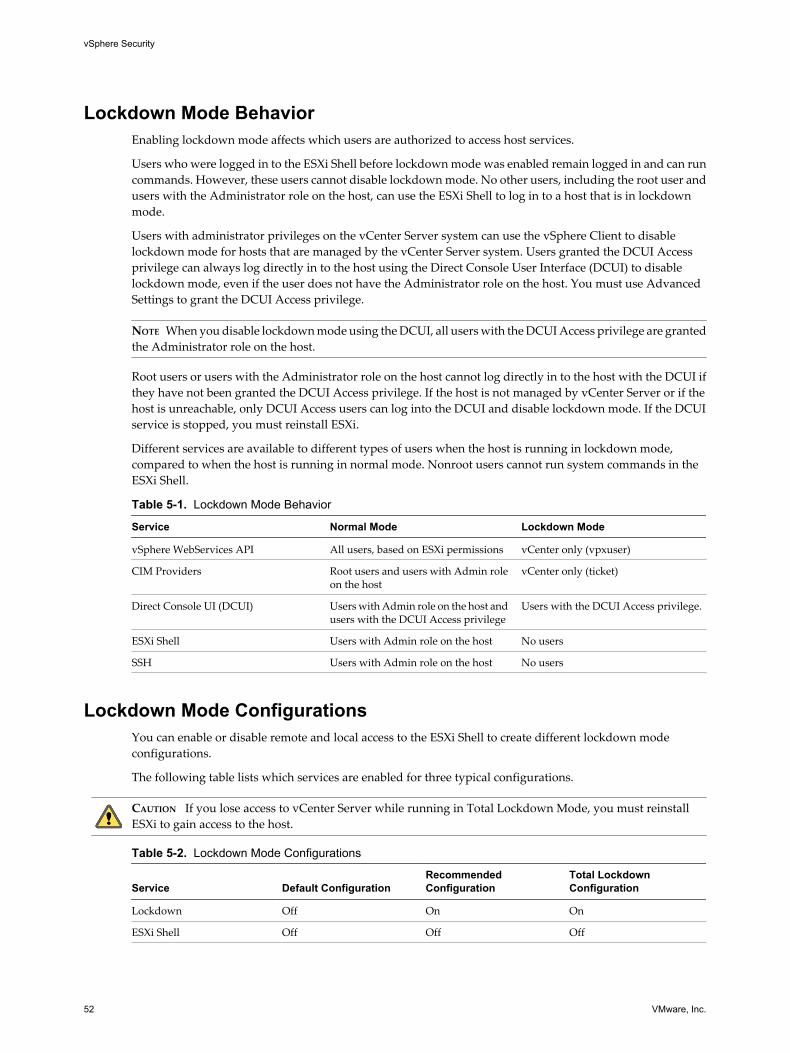
Lockdown Mode BehaviorEnabling lockdown mode affects which users are authorized to access host services.
Users who were logged in to the ESXi Shell before lockdown mode was enabled remain logged in and can runcommands. However, these users cannot disable lockdown mode. No other users, including the root user andusers with the Administrator role on the host, can use the ESXi Shell to log in to a host that is in lockdownmode.
Users with administrator privileges on the vCenter Server system can use the vSphere Client to disablelockdown mode for hosts that are managed by the vCenter Server system. Users granted the DCUI Accessprivilege can always log directly in to the host using the Direct Console User Interface (DCUI) to disablelockdown mode, even if the user does not have the Administrator role on the host. You must use AdvancedSettings to grant the DCUI Access privilege.
NOTE When you disable lockdown mode using the DCUI, all users with the DCUI Access privilege are grantedthe Administrator role on the host.
Root users or users with the Administrator role on the host cannot log directly in to the host with the DCUI ifthey have not been granted the DCUI Access privilege. If the host is not managed by vCenter Server or if thehost is unreachable, only DCUI Access users can log into the DCUI and disable lockdown mode. If the DCUIservice is stopped, you must reinstall ESXi.
Different services are available to different types of users when the host is running in lockdown mode,compared to when the host is running in normal mode. Nonroot users cannot run system commands in theESXi Shell.
Table 5-1. Lockdown Mode Behavior
Service Normal Mode Lockdown Mode
vSphere WebServices API All users, based on ESXi permissions vCenter only (vpxuser)
CIM Providers Root users and users with Admin roleon the host
vCenter only (ticket)
Direct Console UI (DCUI) Users with Admin role on the host andusers with the DCUI Access privilege
Users with the DCUI Access privilege.
ESXi Shell Users with Admin role on the host No users
SSH Users with Admin role on the host No users
Lockdown Mode ConfigurationsYou can enable or disable remote and local access to the ESXi Shell to create different lockdown modeconfigurations.
The following table lists which services are enabled for three typical configurations.
CAUTION If you lose access to vCenter Server while running in Total Lockdown Mode, you must reinstallESXi to gain access to the host.
Table 5-2. Lockdown Mode Configurations
Service Default ConfigurationRecommendedConfiguration
Total LockdownConfiguration
Lockdown Off On On
ESXi Shell Off Off Off
vSphere Security
52 VMware, Inc.
Table 5-2. Lockdown Mode Configurations (Continued)
Service Default ConfigurationRecommendedConfiguration
Total LockdownConfiguration
SSH Off Off Off
Direct Console UI (DCUI) On On Off
Enable Lockdown Mode Using the vSphere ClientEnable lockdown mode to require that all configuration changes go through vCenter Server. You can alsoenable or disable lockdown mode through the Direct Console User Interface (DCUI).
Procedure
1 Log in to a vCenter Server system using the vSphere Client.
2 Select the host in the inventory panel.
3 Click the Configuration tab and click Security Profile.
4 Click the Edit link next to lockdown mode.
The Lockdown Mode dialog box appears.
5 Select Enable Lockdown Mode.
6 Click OK.
Enable Lockdown Mode Using the vSphere Web ClientEnable lockdown mode to require that all configuration changes go through vCenter Server. You can alsoenable or disable lockdown mode through the Direct Console User Interface (DCUI).
Procedure
1 Browse to the host in the vSphere Web Client inventory.
2 Click the Manage tab and click Settings.
3 Under System, select Security Profile.
4 In the Lockdown Mode panel, click Edit.
5 Select Enable Lockdown Mode.
6 Click OK.
Enable Lockdown Mode from the Direct Console User InterfaceYou can enable lockdown mode from the Direct Console User Interface (DCUI).
NOTE If you enable or disable lockdown mode using the Direct Console User Interface, permissions for usersand groups on the host are discarded. To preserve these permissions, you must enable and disable lockdownmode using the vSphere Client connected to vCenter Server.
Procedure
1 At the Direct Console User Interface of the host, press F2 and log in.
2 Scroll to the Configure Lockdown Mode setting and press Enter.
3 Press Esc until you return to the main menu of the Direct Console User Interface.
Chapter 5 Lockdown Mode
VMware, Inc. 53

vSphere Security
54 VMware, Inc.
ESXi Authentication and UserManagement 6
ESXi handles user authentication and supports user permissions.
ESXi 5.1 is not integrated with vCenter Single Sign On and you cannot create ESXi users with thevSphere Web Client. You must create and manage ESXi users with the vSphere Client. vCenter Server is notaware of users that are local to ESXi, and ESXi is not aware of vCenter Server users. However, you can configureSingle Sign On to use an Active Directory domain as an identity source, and configure ESXi to point to thesame Active Directory domain to obtain user and group information. This action allows the same set of usersto be available to the host and to vCenter Server. For information about vCenter Single Sign On, see “Configuring vCenter Single Sign On,” on page 87.
This chapter includes the following topics:
n “Managing Users with the vSphere Client,” on page 55
n “Password Requirements,” on page 57
n “Assigning Permissions for ESXi,” on page 58
n “Assigning ESXi Roles,” on page 69
n “Using Active Directory to Manage Users,” on page 72
n “Using vSphere Authentication Proxy,” on page 75
Managing Users with the vSphere ClientA user is an individual authorized to log in to ESXi or vCenter Server.
In vSphere 5.1, ESXi user management has the following caveats.
n You cannot create ESXi users with the vSphere Web Client. You must log directly into the host with thevSphere Client to create ESXi users.
n ESXi 5.1 does not support local groups. However, Active Directory groups are supported.
To prevent anonymous users such as root from accessing the host with the Direct Console User Interface (DCUI)or ESXi Shell, remove the user's administrator privileges on the root folder of the host. This applies to bothlocal users and Active Directory users and groups.
Add a Local ESXi UserAdding a user to the users table updates the internal user list that the host maintains.
Prerequisites
Review the password requirements described in “Password Requirements,” on page 57.
VMware, Inc. 55
Procedure
1 Log in to ESXi using the vSphere Client.
You cannot create ESXi users with the vSphere Web Client. You must directly log into the host with thevSphere Client to create ESXi users.
2 Click the Local Users & Groups tab and click Users.
3 Right-click anywhere in the Users table and click Add.
4 Enter a login, a user name, and a password.
NOTE Do not create a user named ALL. Privileges associated with the name ALL might not be available toall users in some situations. For example, if a user named ALL has Administrator privileges, a user withReadOnly privileges might be able to log in to the host remotely. This is not the intended behavior.
n Specifying the user name and UID are optional.
n Create a password that meets the length and complexity requirements. The host checks for passwordcompliance using the default authentication plug-in, pam_passwdqc.so. If the password is notcompliant, the following error appears: A general system error occurred: passwd: Authenticationtoken manipulation error.
n ESXi 5.1 does not support local groups.
5 Click OK.
Modify the Settings for a User on the HostYou can change the user ID, user name, and password for a user.
Prerequisites
Review the password requirements as described in “Password Requirements,” on page 57.
Procedure
1 Log in to ESXi using the vSphere Client.
You cannot create ESXi users with the vSphere Web Client. You must log directly into the host with thevSphere Client to create ESXi users.
2 Click the Local Users & Groups tab and click Users.
3 Right-click the user and click Edit to open the Edit User dialog box.
4 Enter a login, a user name, and a password.
NOTE Do not create a user named ALL. Privileges associated with the name ALL might not be available toall users in some situations. For example, if a user named ALL has Administrator privileges, a user withReadOnly privileges might be able to log in to the host remotely. This is not the intended behavior.
n Specifying the user name and UID are optional.
n Create a password that meets the length and complexity requirements. The host checks for passwordcompliance using the default authentication plug-in, pam_passwdqc.so. If the password is notcompliant, the following error appears: A general system error occurred: passwd: Authenticationtoken manipulation error.
n ESXi 5.1 does not support local groups.
5 Click OK.
vSphere Security
56 VMware, Inc.
Remove a Local ESXi User from a HostYou can remove a local ESXi user from the host.
CAUTION Do not remove the root user.
If you remove a user from the host, they lose permissions to all objects on the host and cannot log in again.
NOTE Users who are logged in and are removed from the domain keep their host permissions until you restartthe host.
Procedure
1 Log in to ESXi using the vSphere Client.
2 Click the Local Users & Groups tab and click Users.
3 Right-click the user to remove and select Remove.
Do not remove the root user for any reason.
Sort, Export, and View Local ESXi UsersYou can view, sort, and export lists of a host's local users to a file that is in HTML, XML, Microsoft Excel, orCSV format.
Procedure
1 Log in to ESXi using the vSphere Client.
2 Click the Local Users & Groups tab and click Users .
3 Determine how to sort the table, and hide or show columns according to the information you want to seein the exported file.
n To sort the table by any of the columns, click the column heading.
n To show or hide columns, right-click any of the column headings and select or deselect the name ofthe column to hide.
n To show or hide columns, right-click any of the column headings and select or deselect the name ofthe column to hide.
4 Right-click anywhere in the table and click Export List to open the Save As dialog box.
5 Select a path and enter a filename.
6 Select the file type and click OK.
Password RequirementsBy default, ESXi enforces requirements for user passwords.
When you create a password, include a mix of characters from four character classes: lowercase letters,uppercase letters, numbers, and special characters such as an underscore or dash.
Your user password must meet the following length requirements.
n Passwords containing characters from one or two character classes must be at least eight characters long.
n Passwords containing characters from three character classes must be at least seven characters long.
Chapter 6 ESXi Authentication and User Management
VMware, Inc. 57
n Passwords containing characters from all four character classes must be at least six characters long.
NOTE An uppercase character that begins a password does not count toward the number of character classesused. A number that ends a password does not count toward the number of character classes used.
You can also use a passphrase, which is a phrase consisting of at least three words, each of which is 8 to 40characters long.
Example: Creating Acceptable PasswordsThe following password candidates meet the requirements of ESXi.
n xQaTEhbU: Contains eight characters from two character classes.
n xQaT3pb: Contains seven characters from three character classes.
n xQaT3#: Contains six characters from four character classes.
The following password candidates do not meet the requirements of ESXi.
n Xqat3hb: Begins with an uppercase character, reducing the effective number of character classes to two.Eight characters are required when you use only two character classes.
n xQaTEh2: Ends with a number, reducing the effective number of character classes to two. Eight charactersare required when you use only two character classes.
Assigning Permissions for ESXiFor ESXi, permissions are defined as access roles that consist of a user and the user’s assigned role for an objectsuch as a virtual machine or ESXi host. Permissions grant users the right to perform the activities specified bythe role on the object to which the role is assigned.
For example, to configure memory for the host, a user must be granted a role that includes theHost.Configuration.Memory Configuration privilege. By assigning different roles to users for differentobjects, you can control the tasks that users can perform in your vSphere environment.
When connecting directly to a host with the vSphere Client, the root and vpxuser user accounts have the sameaccess rights as any user assigned the Administrator role on all objects.
All other users initially have no permissions on any objects, which means they cannot view these objects orperform operations on them. A user with Administrator privileges must assign permissions to these users toallow them to perform tasks.
Many tasks require permissions on more than one object. These rules can help you determine where you mustassign permissions to allow particular operations:
n Any operation that consumes storage space, such as creating a virtual disk or taking a snapshot, requiresthe Datastore.Allocate Space privilege on the target datastore, as well as the privilege to perform theoperation itself.
n Moving an object in the inventory hierarchy requires appropriate privileges on the object itself, the sourceparent object (such as a folder or cluster), and the destination parent object.
n Each host and cluster has its own implicit resource pool that contains all the resources of that host orcluster. Deploying a virtual machine directly to a host or cluster requires the Resource.Assign VirtualMachine to Resource Pool privilege.
The list of privileges is the same for both ESXi and vCenter Server.
You can create roles and set permissions through a direct connection to the ESXi host.
vSphere Security
58 VMware, Inc.
Allow Direct Console User Interface (DCUI) Access to Hosts in Lockdown ModeYou can specify which users can log into a host that is lockdown mode. DCUI Access users do not need to havefull administrative privileges on the host. You grant the DCUI Access privilege in Advanced Settings.
In versions of vSphere earlier than vSphere 5.1, the root user can log into the DCUI on a host that is in lockdownmode. In vSphere 5.1, you can specify which local ESXi users are allowed to log into the DCUI when the hostis in lockdown mode. These special users do not need to have full administrative privileges on the host.Specifying users other than the anonymous root user allows you to log which users have performed operationson the host while it is in lockdown mode.
IMPORTANT When you disable lockdown mode using the DCUI, all users with the DCUI Access privilege aregranted the Administrator role on the host.
Procedure
1 Browse to the host in the vSphere Web Client object navigator.
2 Click the Manage tab and select Settings.
3 Click Advanced System Settings and select the setting DCUI.Access.
4 Click Edit and enter the user names, separated by commas.
By default, the root user is specified. You can remove root from the list of DCUI access users, as long asyou specified at least one other user.
5 Click OK.
Hierarchical Inheritance of PermissionsWhen you assign a permission to an object, you can choose whether the permission propagates down the objecthierarchy. You set propagation for each permission. Propagation is not universally applied. Permissionsdefined for a child object always override the permissions that are propagated from parent objects.
The figure illustrates inventory hierarchy and the paths by which permissions can propagate.
Chapter 6 ESXi Authentication and User Management
VMware, Inc. 59
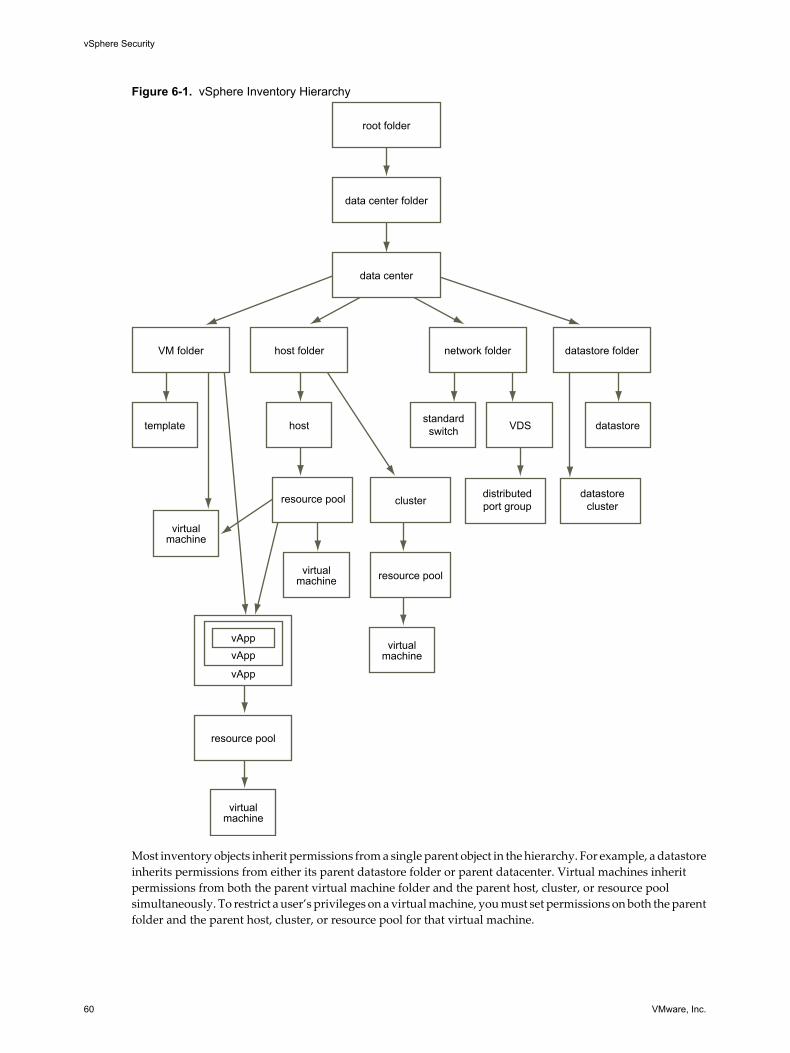
Figure 6-1. vSphere Inventory Hierarchy
template host standardswitch VDS datastore
virtual machine
virtual machine
virtual machine
virtual machine
cluster
resource pool
vAppvApp
vApp
resource pool
VM folder host folder network folder datastore folder
data center folder
data center
root folder
distributedport group
datastorecluster
resource pool
Most inventory objects inherit permissions from a single parent object in the hierarchy. For example, a datastoreinherits permissions from either its parent datastore folder or parent datacenter. Virtual machines inheritpermissions from both the parent virtual machine folder and the parent host, cluster, or resource poolsimultaneously. To restrict a user’s privileges on a virtual machine, you must set permissions on both the parentfolder and the parent host, cluster, or resource pool for that virtual machine.
vSphere Security
60 VMware, Inc.
To set permissions for a distributed switch and its associated distributed port groups, set permissions on aparent object, such a folder or datacenter. You must also select the option to propagate these permissions tochild objects.
Permissions take several forms in the hierarchy:
Managed entities You can define permissions on managed entities.
n Clusters
n Datacenters
n Datastores
n Datastore clusters
n Folders
n Hosts
n Networks (except vSphere Distributed Switches)
n Distributed port groups
n Resource pools
n Templates
n Virtual machines
n vSphere vApps
Global entities Global entities derive permissions from the root vCenter Server system.
n Custom fields
n Licenses
n Roles
n Statistics intervals
n Sessions
Multiple Permission SettingsObjects might have multiple permissions, but only one permission for each user or group.
Permissions applied on a child object always override permissions that are applied on a parent object. Virtualmachine folders and resource pools are equivalent levels in the hierarchy. If you assign propagatingpermissions to a user or group on a virtual machine's folder and its resource pool, the user has the privilegespropagated from the resource pool and from the folder.
If multiple group permissions are defined on the same object and the user belongs to two or more of thosegroups, two situations are possible:
n If no permission is defined for the user on that object, the user is assigned the set of privileges assigned tothe groups for that object.
n If a permission is defined for the user on that object, the user's permission takes precedence over all grouppermissions.
Chapter 6 ESXi Authentication and User Management
VMware, Inc. 61
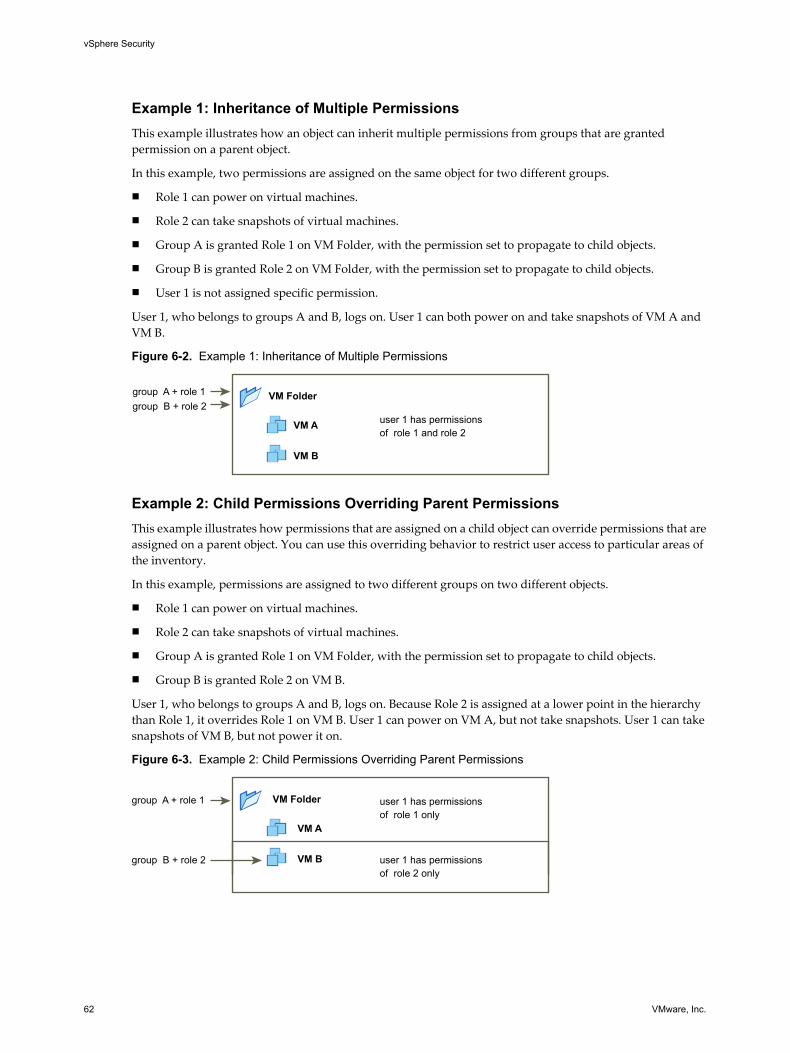
Example 1: Inheritance of Multiple PermissionsThis example illustrates how an object can inherit multiple permissions from groups that are grantedpermission on a parent object.
In this example, two permissions are assigned on the same object for two different groups.
n Role 1 can power on virtual machines.
n Role 2 can take snapshots of virtual machines.
n Group A is granted Role 1 on VM Folder, with the permission set to propagate to child objects.
n Group B is granted Role 2 on VM Folder, with the permission set to propagate to child objects.
n User 1 is not assigned specific permission.
User 1, who belongs to groups A and B, logs on. User 1 can both power on and take snapshots of VM A andVM B.
Figure 6-2. Example 1: Inheritance of Multiple Permissions
VM A
VM B
VM Folder
group B + role 2user 1 has permissions of role 1 and role 2
group A + role 1
Example 2: Child Permissions Overriding Parent PermissionsThis example illustrates how permissions that are assigned on a child object can override permissions that areassigned on a parent object. You can use this overriding behavior to restrict user access to particular areas ofthe inventory.
In this example, permissions are assigned to two different groups on two different objects.
n Role 1 can power on virtual machines.
n Role 2 can take snapshots of virtual machines.
n Group A is granted Role 1 on VM Folder, with the permission set to propagate to child objects.
n Group B is granted Role 2 on VM B.
User 1, who belongs to groups A and B, logs on. Because Role 2 is assigned at a lower point in the hierarchythan Role 1, it overrides Role 1 on VM B. User 1 can power on VM A, but not take snapshots. User 1 can takesnapshots of VM B, but not power it on.
Figure 6-3. Example 2: Child Permissions Overriding Parent Permissions
VM A
VM B
VM Folder
group B + role 2
user 1 has permissions of role 1 only
user 1 has permissions of role 2 only
group A + role 1
vSphere Security
62 VMware, Inc.
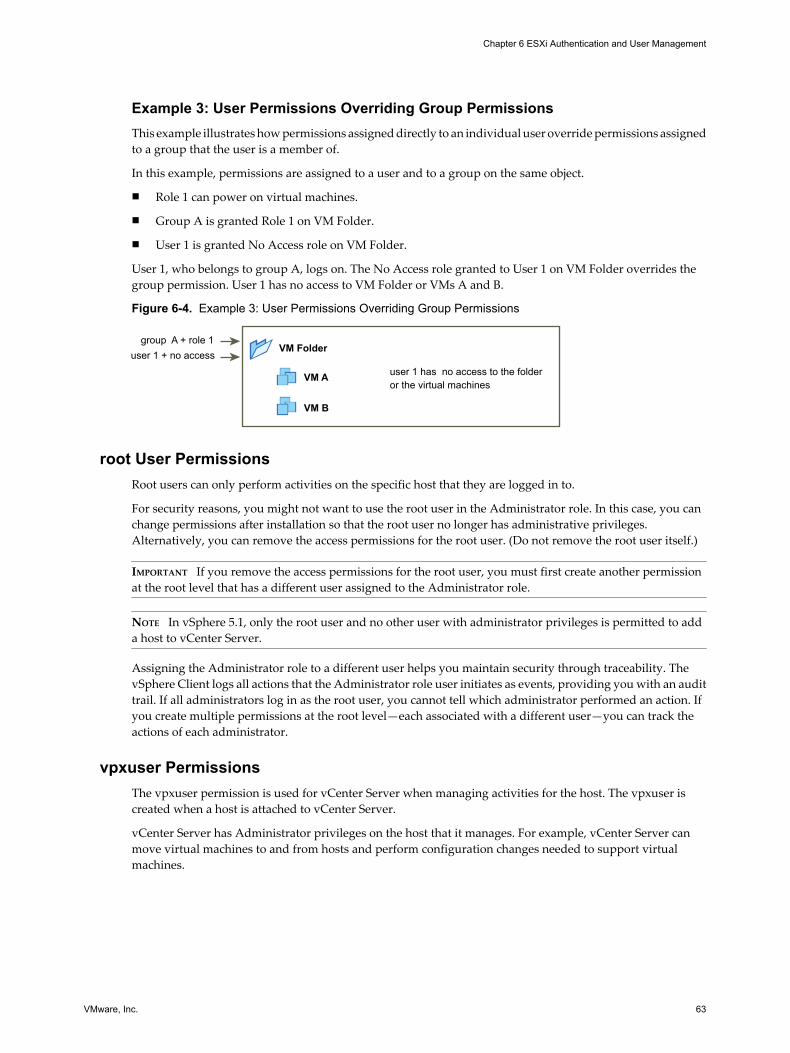
Example 3: User Permissions Overriding Group PermissionsThis example illustrates how permissions assigned directly to an individual user override permissions assignedto a group that the user is a member of.
In this example, permissions are assigned to a user and to a group on the same object.
n Role 1 can power on virtual machines.
n Group A is granted Role 1 on VM Folder.
n User 1 is granted No Access role on VM Folder.
User 1, who belongs to group A, logs on. The No Access role granted to User 1 on VM Folder overrides thegroup permission. User 1 has no access to VM Folder or VMs A and B.
Figure 6-4. Example 3: User Permissions Overriding Group Permissions
VM A
VM B
VM Folder
user 1 + no access
user 1 has no access to the folder or the virtual machines
group A + role 1
root User PermissionsRoot users can only perform activities on the specific host that they are logged in to.
For security reasons, you might not want to use the root user in the Administrator role. In this case, you canchange permissions after installation so that the root user no longer has administrative privileges.Alternatively, you can remove the access permissions for the root user. (Do not remove the root user itself.)
IMPORTANT If you remove the access permissions for the root user, you must first create another permissionat the root level that has a different user assigned to the Administrator role.
NOTE In vSphere 5.1, only the root user and no other user with administrator privileges is permitted to adda host to vCenter Server.
Assigning the Administrator role to a different user helps you maintain security through traceability. ThevSphere Client logs all actions that the Administrator role user initiates as events, providing you with an audittrail. If all administrators log in as the root user, you cannot tell which administrator performed an action. Ifyou create multiple permissions at the root level—each associated with a different user—you can track theactions of each administrator.
vpxuser PermissionsThe vpxuser permission is used for vCenter Server when managing activities for the host. The vpxuser iscreated when a host is attached to vCenter Server.
vCenter Server has Administrator privileges on the host that it manages. For example, vCenter Server canmove virtual machines to and from hosts and perform configuration changes needed to support virtualmachines.
Chapter 6 ESXi Authentication and User Management
VMware, Inc. 63
The vCenter Server administrator can perform most of the same tasks on the host as the root user and alsoschedule tasks, work with templates, and so forth. However, the vCenter Server administrator cannot directlycreate, delete, or edit users and groups for hosts. These tasks can only be performed by a user withAdministrator permissions directly on each host.
NOTE You cannot manage the vpxuser using Active Directory.
CAUTION Do not change vpxuser in any way. Do not change its password. Do not change its permissions. Ifyou do so, you might experience problems when working with hosts through vCenter Server.
dcui User PermissionsThe dcui user runs on hosts and acts with Administrator rights. This user’s primary purpose is to configurehosts for lockdown mode from the Direct Console User Interface (DCUI).
This user acts as an agent for the direct console and cannot be modified or used by interactive users.
Permission ValidationvCenter Server and ESXi hosts that use Active Directory regularly validate users and groups against theWindows Active Directory domain. Validation occurs whenever the host system starts and at regular intervalsspecified in the vCenter Server settings.
For example, if user Smith was assigned permissions and in the domain the user’s name was changed to Smith2,the host concludes that Smith no longer exists and removes permissions for that user when the next validationoccurs.
Similarly, if user Smith is removed from the domain, all permissions are removed when the next validationoccurs. If a new user Smith is added to the domain before the next validation occurs, the new user Smithreceives all the permissions the old user Smith was assigned.
Assign PermissionsYou have defined a role and created a user. To use the role and user, you must assign permissions to the relevantinventory objects.
To assign persmissions, select a user and a role for an object. Permissions propagate to child objects. In aproduction environment, you can assign the same permissions at one time on multiple objects by moving theobjects to a folder and setting the permissions on the folder.
Procedure
1 Log in to the vSphere Web Client as the vCenter Server administrator.
a In the User name text box, type administrator.
b In the Password text box, type My_windows_password.
You configured vCenter Server to use the administrative account of the host Windows machine inthe Getting Started with vCenter Server scenario.
2 Select your vCenter Server system in the object navigator.
3 Click the Manage tab and click Permissions.
4 Click the Add Permission icon (+).
5 In the Add Permission dialog, assign the user and role that you created.
a Click Add.
b In the Domain drop-down menu, select SYSTEM-DOMAIN.
vSphere Security
64 VMware, Inc.
c Select the user user-deploy, and click Add.
d In the Assigned Role drop-down menu, select Deployer of virtual machines from template.
e Click OK.
The roles that are assigned to the object appear in the menu. The privileges contained in the role are listedin the section below the role title.
The new user entry appears in the list of users and groups that have permissions for the vCenter Server system.
What to do next
Deploy a virtual machine from template as the new user.
Change Permission Validation SettingsvCenter Server periodically validates its user and group lists against the users and groups in the WindowsActive Directory domain. It then removes users or groups that no longer exist in the domain. You can changethe interval between validations.
Procedure
1 From the vSphere Client connected to a vCenter Server system, select Administration > vCenter ServerSettings.
2 In the navigation pane, select Active Directory.
3 (Optional) Deselect the Enable Validation check box to disable validation.
Validation is enabled by default. Users and groups are validated when vCenter Server system starts, evenif validation is disabled.
4 If validation is enabled, enter a value in the Validation Period text box to specify a time, in minutes, betweenvalidations.
Change PermissionsAfter a user and role pair is set for an inventory object, you can change the role paired with the user or changethe setting of the Propagate check box. You can also remove the permission setting.
Procedure
1 From the vSphere Client, select an object in the inventory.
2 Click the Permissions tab.
3 Right-click the line item to select the user and role pair.
4 Select Properties.
5 Select a role for the user or group from the drop-down menu.
6 To propagate the privileges to the children of the assigned inventory object, click the Propagate check boxand click OK.
Remove PermissionsRemoving a permission for a user or group does not remove the user or group from the list of those available.It also does not remove the role from the list of available items. It removes the user or group and role pair fromthe selected inventory object.
Procedure
1 From the vSphere Client, click the Inventory button.
Chapter 6 ESXi Authentication and User Management
VMware, Inc. 65
2 Expand the inventory as needed and click the appropriate object.
3 Click the Permissions tab.
4 Click the appropriate line item to select the user or group and role pair.
5 Select Inventory > Permissions > Delete.
Best Practices for Roles and PermissionsUse best practices for roles and permissions to maximize the security and manageability of yourvCenter Server environment.
VMware recommends the following best practices when configuring roles and permissions in yourvCenter Server environment:
n Where possible, grant permissions to groups rather than individual users.
n Grant permissions only where needed. Using the minimum number of permissions makes it easier tounderstand and manage your permissions structure.
n If you assign a restrictive role to a group, check that the group does not contain the Administrator user orother users with administrative privileges. Otherwise, you could unintentionally restrict administrators'privileges in parts of the inventory hierarchy where you have assigned that group the restrictive role.
n Use folders to group objects to correspond to the differing permissions you want to grant for them.
n Use caution when granting a permission at the root vCenter Server level. Users with permissions at theroot level have access to global data on vCenter Server, such as roles, custom attributes, vCenter Serversettings, and licenses. Changes to licenses and roles propagate to all vCenter Server systems in a LinkedMode group, even if the user does not have permissions on all of the vCenter Server systems in the group.
n In most cases, enable propagation on permissions. This ensures that when new objects are inserted in tothe inventory hierarchy, they inherit permissions and are accessible to users.
n Use the No Access role to masks specific areas of the hierarchy that you don’t want particular users tohave access to.
Required Privileges for Common TasksMany tasks require permissions on more than one object in the inventory. You can review the privilegesrequired to perform the tasks and, where applicable, the appropriate sample roles.
The following table lists common tasks that require more than one privilege. You can use the Applicable Roleson the inventory objects to grant permission to perform these tasks, or you can create your own roles with theequivalent required privileges.
Table 6-1. Required Privileges for Common Tasks
Task Required Privileges Applicable Role
Create a virtual machine On the destination folder or datacenter:n Virtual machine.Inventory.Create newn Virtual Machine.Configuration.Add New Disk (if creating a new
virtual disk)n Virtual Machine .Configuration.Add Existing Disk (if using an
existing virtual disk)n Virtual Machine.Configuration.Raw Device (if using a RDM or
SCSI pass-through device)
Virtual MachineAdministrator
On the destination host, cluster, or resource pool:Resource.Assign Virtual Machine to Resource Pool
Virtual MachineAdministrator
vSphere Security
66 VMware, Inc.
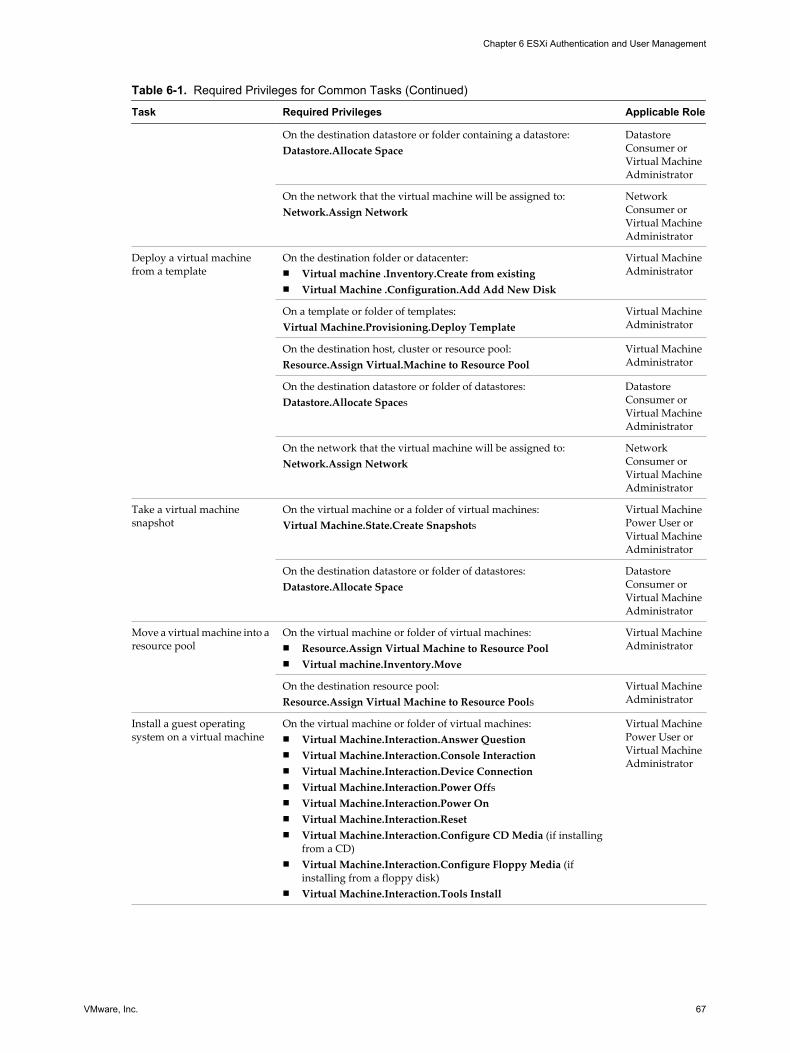
Table 6-1. Required Privileges for Common Tasks (Continued)
Task Required Privileges Applicable Role
On the destination datastore or folder containing a datastore:Datastore.Allocate Space
DatastoreConsumer orVirtual MachineAdministrator
On the network that the virtual machine will be assigned to:Network.Assign Network
NetworkConsumer orVirtual MachineAdministrator
Deploy a virtual machinefrom a template
On the destination folder or datacenter:n Virtual machine .Inventory.Create from existingn Virtual Machine .Configuration.Add Add New Disk
Virtual MachineAdministrator
On a template or folder of templates:Virtual Machine.Provisioning.Deploy Template
Virtual MachineAdministrator
On the destination host, cluster or resource pool:Resource.Assign Virtual.Machine to Resource Pool
Virtual MachineAdministrator
On the destination datastore or folder of datastores:Datastore.Allocate Spaces
DatastoreConsumer orVirtual MachineAdministrator
On the network that the virtual machine will be assigned to:Network.Assign Network
NetworkConsumer orVirtual MachineAdministrator
Take a virtual machinesnapshot
On the virtual machine or a folder of virtual machines:Virtual Machine.State.Create Snapshots
Virtual MachinePower User orVirtual MachineAdministrator
On the destination datastore or folder of datastores:Datastore.Allocate Space
DatastoreConsumer orVirtual MachineAdministrator
Move a virtual machine into aresource pool
On the virtual machine or folder of virtual machines:n Resource.Assign Virtual Machine to Resource Pooln Virtual machine.Inventory.Move
Virtual MachineAdministrator
On the destination resource pool:Resource.Assign Virtual Machine to Resource Pools
Virtual MachineAdministrator
Install a guest operatingsystem on a virtual machine
On the virtual machine or folder of virtual machines:n Virtual Machine.Interaction.Answer Questionn Virtual Machine.Interaction.Console Interactionn Virtual Machine.Interaction.Device Connectionn Virtual Machine.Interaction.Power Offsn Virtual Machine.Interaction.Power Onn Virtual Machine.Interaction.Resetn Virtual Machine.Interaction.Configure CD Media (if installing
from a CD)n Virtual Machine.Interaction.Configure Floppy Media (if
installing from a floppy disk)n Virtual Machine.Interaction.Tools Install
Virtual MachinePower User orVirtual MachineAdministrator
Chapter 6 ESXi Authentication and User Management
VMware, Inc. 67
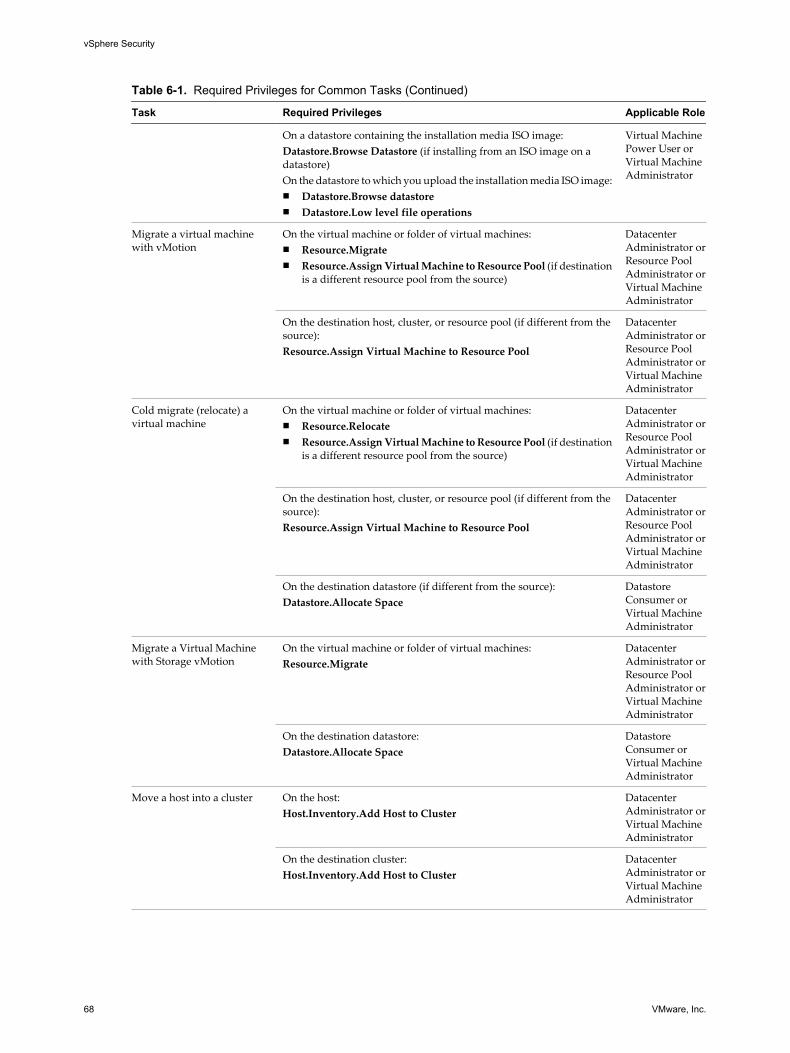
Table 6-1. Required Privileges for Common Tasks (Continued)
Task Required Privileges Applicable Role
On a datastore containing the installation media ISO image:Datastore.Browse Datastore (if installing from an ISO image on adatastore)On the datastore to which you upload the installation media ISO image:n Datastore.Browse datastoren Datastore.Low level file operations
Virtual MachinePower User orVirtual MachineAdministrator
Migrate a virtual machinewith vMotion
On the virtual machine or folder of virtual machines:n Resource.Migraten Resource.Assign Virtual Machine to Resource Pool (if destination
is a different resource pool from the source)
DatacenterAdministrator orResource PoolAdministrator orVirtual MachineAdministrator
On the destination host, cluster, or resource pool (if different from thesource):Resource.Assign Virtual Machine to Resource Pool
DatacenterAdministrator orResource PoolAdministrator orVirtual MachineAdministrator
Cold migrate (relocate) avirtual machine
On the virtual machine or folder of virtual machines:n Resource.Relocaten Resource.Assign Virtual Machine to Resource Pool (if destination
is a different resource pool from the source)
DatacenterAdministrator orResource PoolAdministrator orVirtual MachineAdministrator
On the destination host, cluster, or resource pool (if different from thesource):Resource.Assign Virtual Machine to Resource Pool
DatacenterAdministrator orResource PoolAdministrator orVirtual MachineAdministrator
On the destination datastore (if different from the source):Datastore.Allocate Space
DatastoreConsumer orVirtual MachineAdministrator
Migrate a Virtual Machinewith Storage vMotion
On the virtual machine or folder of virtual machines:Resource.Migrate
DatacenterAdministrator orResource PoolAdministrator orVirtual MachineAdministrator
On the destination datastore:Datastore.Allocate Space
DatastoreConsumer orVirtual MachineAdministrator
Move a host into a cluster On the host:Host.Inventory.Add Host to Cluster
DatacenterAdministrator orVirtual MachineAdministrator
On the destination cluster:Host.Inventory.Add Host to Cluster
DatacenterAdministrator orVirtual MachineAdministrator
vSphere Security
68 VMware, Inc.
Assigning ESXi RolesESXi grants access to objects only to users who are assigned permissions for the object. When you assign a userpermissions for the object, you do so by pairing the user with a role. A role is a predefined set of privileges.
ESXi hosts provide three default roles, and you cannot change the privileges associated with these roles. Eachsubsequent default role includes the privileges of the previous role. For example, the Administrator roleinherits the privileges of the Read Only role. Roles you create yourself do not inherit privileges from any ofthe default roles.
You can create custom roles by using the role-editing facilities in the vSphere Client to create privilege setsthat match your user needs. If you use the vSphere Client connected to vCenter Server to manage ESXi hosts,you have additional roles to choose from in vCenter Server. Also, the roles you create directly on a host arenot accessible within vCenter Server. You can work with these roles only if you log in to the host directly fromthe vSphere Client.
NOTE When you add a custom role and do not assign any privileges to it, the role is created as a Read Onlyrole with three system-defined privileges: System.Anonymous, System.View, and System.Read.
If you manage ESXi hosts through vCenter Server, maintaining custom roles in the host and vCenter Servercan result in confusion and misuse. In this type of configuration, maintain custom roles only invCenter Server.
You can create host roles and set permissions through a direct connection to the ESXi host with the vSphereClient.
Create a RoleVMware recommends that you create roles to suit the access control needs of your environment.
If you create or edit a role on a vCenter Server system that is part of a connected group in Linked Mode, thechanges you make are propagated to all other vCenter Server systems in the group. Assignments of roles tospecific users and objects are not shared across linked vCenter Server systems.
Prerequisites
Verify that you are logged in as a user with Administrator privileges.
Procedure
1 On the vSphere Client Home page, click Roles.
2 Right-click the Roles tab information panel and click Add.
3 Type a name for the new role.
4 Select privileges for the role and click OK.
Clone a RoleYou can make a copy of an existing role, rename it, and later edit it. When you make a copy, the new role isnot applied to any users or groups and objects. You must assign the role to users or groups and objects.
If you create or modify a role on a vCenter Server system that is part of a connected group in Linked Mode,the changes you make are propagated to all other vCenter Server systems in the group. Assignments of rolesto specific users and objects are not shared across linked vCenter Server systems.
Prerequisites
Verify that you are logged in as a user with Administrator privileges.
Chapter 6 ESXi Authentication and User Management
VMware, Inc. 69
Procedure
1 On the vSphere Client Home page, click Roles.
2 To select the role to duplicate, click the object in the list of Roles.
3 To clone the selected role, select Administration > Role > Clone.
A duplicate of the role is added to the list of roles. The name is Copy of rolename.
Edit a RoleWhen you edit a role, you can change the privileges selected for that role. When completed, these privilegesare applied to any user or group assigned the edited role.
If you create or edit a role on a vCenter Server system that is part of a connected group in Linked Mode, thechanges you make are propagated to all other vCenter Server systems in the group. However, assignments ofroles to specific users and objects are not shared across linked vCenter Server systems.
Prerequisites
Verify that you are logged in as a user with Administrator privileges.
Procedure
1 On the vSphere Client Home page, click Roles.
2 Right-click the role to edit and select Edit Role.
3 Select privileges for the role and click OK.
Rename a RoleWhen you rename a role, no changes occur to that role’s assignments.
If you create or modify a role on a vCenter Server system that is part of a connected group in Linked Mode,the changes you make are propagated to other vCenter Server systems in the group. Assignments of roles tospecific users and objects are not shared across linked vCenter Server systems.
Prerequisites
Verify that you are logged in as a user with Administrator privileges.
Procedure
1 On the vSphere Client Home page, click Roles.
2 Click the object in the list of roles that you want rename.
3 Select Administration > Role > Rename.
4 Type the new name.
Remove a RoleWhen you remove a role that is not assigned to any users or groups, the definition is removed from the list ofroles. When you remove a role that is assigned to a user or group, you can remove assignments or replace themwith an assignment to another role.
CAUTION You must understand how users will be affected before removing all assignments or replacing them.Users who have no permissions granted to them cannot log in to vCenter Server.
vSphere Security
70 VMware, Inc.
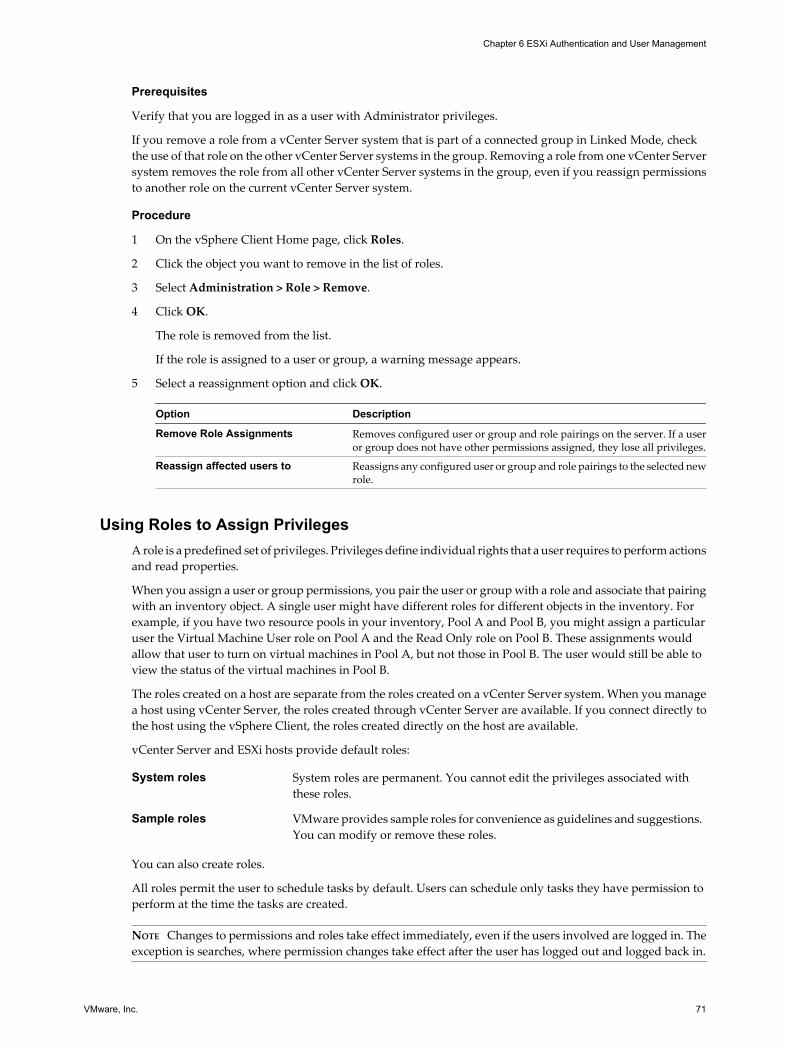
Prerequisites
Verify that you are logged in as a user with Administrator privileges.
If you remove a role from a vCenter Server system that is part of a connected group in Linked Mode, checkthe use of that role on the other vCenter Server systems in the group. Removing a role from one vCenter Serversystem removes the role from all other vCenter Server systems in the group, even if you reassign permissionsto another role on the current vCenter Server system.
Procedure
1 On the vSphere Client Home page, click Roles.
2 Click the object you want to remove in the list of roles.
3 Select Administration > Role > Remove.
4 Click OK.
The role is removed from the list.
If the role is assigned to a user or group, a warning message appears.
5 Select a reassignment option and click OK.
Option Description
Remove Role Assignments Removes configured user or group and role pairings on the server. If a useror group does not have other permissions assigned, they lose all privileges.
Reassign affected users to Reassigns any configured user or group and role pairings to the selected newrole.
Using Roles to Assign PrivilegesA role is a predefined set of privileges. Privileges define individual rights that a user requires to perform actionsand read properties.
When you assign a user or group permissions, you pair the user or group with a role and associate that pairingwith an inventory object. A single user might have different roles for different objects in the inventory. Forexample, if you have two resource pools in your inventory, Pool A and Pool B, you might assign a particularuser the Virtual Machine User role on Pool A and the Read Only role on Pool B. These assignments wouldallow that user to turn on virtual machines in Pool A, but not those in Pool B. The user would still be able toview the status of the virtual machines in Pool B.
The roles created on a host are separate from the roles created on a vCenter Server system. When you managea host using vCenter Server, the roles created through vCenter Server are available. If you connect directly tothe host using the vSphere Client, the roles created directly on the host are available.
vCenter Server and ESXi hosts provide default roles:
System roles System roles are permanent. You cannot edit the privileges associated withthese roles.
Sample roles VMware provides sample roles for convenience as guidelines and suggestions.You can modify or remove these roles.
You can also create roles.
All roles permit the user to schedule tasks by default. Users can schedule only tasks they have permission toperform at the time the tasks are created.
NOTE Changes to permissions and roles take effect immediately, even if the users involved are logged in. Theexception is searches, where permission changes take effect after the user has logged out and logged back in.
Chapter 6 ESXi Authentication and User Management
VMware, Inc. 71
Using Active Directory to Manage UsersYou can configure ESXi to use a directory service such as Active Directory to manage users.
Creating local user accounts on each host presents challenges with having to synchronize account names andpasswords across multiple hosts. Join ESXi hosts to an Active Directory domain to eliminate the need to createand maintain local user accounts. Using Active Directory for user authentication simplifies the ESXi hostconfiguration and reduces the risk for configuration issues that could lead to unauthorized access.
When you use Active Directory, users supply their Active Directory credentials and the domain name of theActive Directory server when adding a host to a domain.
Configure a Host to Use Active DirectoryYou can configure the host to use a directory service such as Active Directory to manage users and groups.
Prerequisites
n Verify that you have an Active Directory domain. See your directory server documentation.
n Verify that the host name of ESXi is fully qualified with the domain name of the Active Directory forest.
fully qualified domain name = host_name.domain_name
Procedure
1 Synchronize the time between ESXi and the directory service system using NTP.
ESXi supports synchronizing time with an external NTPv3 or NTPv4 server that is compliant with RFC5905 and RFC 1305. The Microsoft Windows W32Time service does not meet these requirements whenrunning with default settings. See “Configure a Windows NTP Client for Network ClockSynchronization,” on page 151 or the VMware Knowledge Base for information about how to synchronizeESXi time with a Microsoft Domain Controller.
2 Ensure that the DNS servers you configured for the host can resolve the host names for the Active Directorycontrollers.
a In the vSphere Client, select the host in the inventory.
b Click the Configuration tab and click DNS and Routing.
c Click the Properties link at the top right of the panel.
d In the DNS and Routing Configuration dialog box, verify that the host name and DNS serverinformation for the host are correct.
What to do next
Use the vSphere Client to join a directory service domain.
vSphere Security
72 VMware, Inc.
Configure a Host to Use Active Directory in the vSphere Web ClientYou can configure a host to use a directory service such as Active Directory to manage users and groups.
When you add an ESXi host to Active Directory all user and group accounts are assigned full administrativeaccess to the host if the group ESX Admins exists. If you do not want to make full administrative accessavailable, see VMware Knowledge Base article 1025569 for a workaround.
NOTE When you define user account settings in Active Directory, you can limit the computers that a use canlog in to by the computer name. By default, no equivalent restrictions are set on a user account. If you set thislimitation, LDAP Bind requests for the user account fail with the message LDAP binding not successful, evenif the request is from a listed computer. You can avoid this issue by adding the netBIOS name for the ActiveDirectory server to the list of computers that the user account can log in to.
Prerequisites
n Verify that you have an Active Directory domain. See your directory server documentation.
n Verify that the host name of ESXi is fully qualified with the domain name of the Active Directory forest.
fully qualified domain name = host_name.domain_name
Procedure
1 Synchronize the time between ESXi and the directory service system using NTP.
See “Configure a Windows NTP Client for Network Clock Synchronization,” on page 151 or the VMwareKnowledge Base for information about how to synchronize ESXi time with a Microsoft Domain Controller.
2 Ensure that the DNS servers you configured for the host can resolve the host names for the Active Directorycontrollers.
a Browse to the host in the vSphere Web Client object navigator.
b Click the Manage tab and click DNS and Routing under Networking.
c Click Edit.
d In the DNS and Routing Configuration dialog box, verify that the host name and DNS serverinformation for the host are correct.
What to do next
Use the vSphere Web Client to join a directory service domain.
Add a Host to a Directory Service DomainTo use a directory service, you must join the host to the directory service domain.
You can enter the domain name in one of two ways:
n name.tld (for example, domain.com): The account is created under the default container.
n name.tld/container/path (for example, domain.com/OU1/OU2): The account is created under a particularorganizational unit (OU).
To use the vSphere Authentication Proxy service (CAM service), see “Use vSphere Authentication Proxy toAdd a Host to a Domain,” on page 79.
Prerequisites
Verify that the vSphere Client is connected to a vCenter Server system or to the host.
Chapter 6 ESXi Authentication and User Management
VMware, Inc. 73
Procedure
1 Select a host in the vSphere Client inventory, and click the Configuration tab.
2 Click Properties.
3 In the Directory Services Configuration dialog box, select the directory service from the drop-down menu.
4 Enter a domain.
Use the form name.tld or name.tld/container/path.
5 Click Join Domain.
6 Enter the user name and password of a directory service user who has permissions to join the host to thedomain, and click OK.
7 Click OK to close the Directory Services Configuration dialog box.
Add a Host to a Directory Service Domain in the vSphere Web ClientTo use a directory service, you must join the host to the directory service domain.
You can enter the domain name in one of two ways:
n name.tld (for example, domain.com): The account is created under the default container.
n name.tld/container/path (for example, domain.com/OU1/OU2): The account is created under a particularorganizational unit (OU).
To use the vSphere Authentication Proxy service, see “Use vSphere Authentication Proxy to Add a Host to aDomain,” on page 79.
Procedure
1 Browse to the host in the vSphere Web Client inventory.
2 Click the Manage tab and click Settings.
3 Under System, select Authentication Services.
4 Click Join Domain.
5 Enter a domain.
Use the form name.tld or name.tld/container/path.
6 Enter the user name and password of a directory service user who has permissions to join the host to thedomain, and click OK.
7 Click OK to close the Directory Services Configuration dialog box.
View Directory Service SettingsYou can view the type of directory server, if any, the host uses to authenticate users and the directory serversettings.
Procedure
1 Select a host in the vSphere Client inventory, and click the Configuration tab.
2 Under Software, select Authentication Services.
The Authentication Services Settings page displays the directory service and domain settings.
vSphere Security
74 VMware, Inc.
View Directory Service Settings in the vSphere Web ClientYou can view the type of directory server, if any, the host uses to authenticate users and the directory serversettings.
Procedure
1 Browse to the host in the vSphere Web Client inventory.
2 Click the Manage tab and click Settings.
3 Under System, select Authentication Services.
The Authentication Services page displays the directory service and domain settings.
Using vSphere Authentication ProxyWhen you use the vSphere Authentication Proxy, you do not need to transmit Active Directory credentials tothe host. Users supply the domain name of the Active Directory server and the IP address of the authenticationproxy server when they add a host to a domain.
Install the vSphere Authentication Proxy ServiceTo use the vSphere Authentication Proxy service for authentication, you must install the service on a hostmachine.
You can install the vSphere Authentication Proxy on the same machine as the associated vCenter Server, oron a different machine that has a network connection to the vCenter Server. The vSphere Authentication Proxyis not supported with vCenter Server versions earlier than version 5.0.
The vSphere Authentication Proxy service binds to an IPv4 address for communication with vCenter Server,and does not support IPv6. vCenter Server can be on an IPv4-only, IPv4/IPv6 mixed-mode, or IPv6-only hostmachine, but the machine that connects to vCenter Server through the vSphere Client must have an IPv4address for the vSphere Authentication Proxy service to work.
Prerequisites
n Verify that you have administrator privileges on the host machine where you install the vSphereAuthentication Proxy service.
n Verify that the host machine has Windows Installer 3.0 or later.
n Verify that the host machine has a supported processor and operating system. The vSphere AuthenticationProxy supports the same processors and operating systems as vCenter Server.
n Verify that the host machine has a valid IPv4 address. You can install vSphere Authentication Proxy onan IPv4-only or IPv4/IPv6 mixed-mode host machine, but you cannot install vSphere Authentication Proxyon an IPv6-only host machine.
n If you are installing vSphere Authentication Proxy on a Windows Server 2008 R2 host machine, downloadand install the Windows hotfix described in Windows KB Article 981506 on the support.microsoft.comWeb site. If this hotfix is not installed, the Authentication Proxy Adapter fails to initialize. This problemis accompanied by error messages in camadapter.log similar to Failed to bind CAM website with CTLand Failed to initialize CAMAdapter.
Gather the following information to complete the installation:
n The location where you will install the vSphere Authentication Proxy, if you are not using the defaultlocation.
n The IP address or host name, HTTP port, and credentials for the vCenter Server system that the vSphereAuthentication Proxy will connect to.
Chapter 6 ESXi Authentication and User Management
VMware, Inc. 75
n The host name or IP address to identify the vSphere Authentication Proxy host machine on the network.
Procedure
1 On the host machine where you will install the vSphere Authentication Proxy service, install the .NETFramework 3.5.
2 Install vSphere Auto Deploy.
You do not have to install Auto Deploy on the same host machine as the vSphere Authentication Proxyservice.
3 Add the host machine where you will install the authentication proxy service to the domain.
4 Use the Domain Administrator account to log in to the host machine.
5 In the software installer directory, double-click the autorun.exe file to start the installer.
6 Select VMware vSphere Authentication Proxy and click Install.
7 Follow the wizard prompts to complete the installation.
During installation, the authentication service registers with the vCenter Server instance where AutoDeploy is registered.
The authentication proxy service is installed on the host machine.
NOTE When you install the vSphere Authentication Proxy service, the installer creates a domain account withappropriate privileges to run the authentication proxy service. The account name begins with the prefix CAM-and has a 32-character, randomly generated password associated with it. The password is set to never expire.Do not change the account settings.
What to do next
Configure the host to use the authentication proxy service to join the domain.
Configure a Host to Use the vSphere Authentication Proxy for AuthenticationAfter you install the vSphere Authentication Proxy service (CAM service), you must configure the host to usethe authentication proxy server to authenticate users.
Prerequisites
Install the vSphere Authentication Proxy service (CAM service) on a host as described in “Install the vSphereAuthentication Proxy Service,” on page 75.
Procedure
1 Use the IIS manager on the host to set up the DHCP range.
Setting the range allows hosts that are using DHCP in the management network to use the authenticationproxy service.
Option Action
For IIS 6 a Browse to Computer Account Management Web Site.b Right-click the virtual directory CAM ISAPI.c Select Properties > Directory Security > Edit IP Address and Domain
Name Restrictions > Add Group of Computers.
For IIS 7 a Browse to Computer Account Management Web Site.b Click the CAM ISAPI virtual directory in the left pane and open IPv4
Address and Domain Restrictions.c Select Add Allow Entry > IPv4 Address Range.
vSphere Security
76 VMware, Inc.
2 If a host is not provisioned by Auto Deploy, change the default SSL certificate to a self-signed certificateor to a certificate signed by a commercial certificate authority (CA).
Option Description
Self-signed certificate If you replace the default certificate with a self-signed certificate, add the hostto vCenter Server so that the authentication proxy server will trust the host.
CA-signed certificate Add the CA-signed certificate (Windows format only) to the local trustcertificate store on the system where the authentication proxy service isinstalled and restart the vSphere Authentication Proxy Adapter service.n For Windows 2003, copy the certificate file to C:\Documents and
Settings\All Users\Application Data\VMware\vSphereAuthentication Proxy\trust.
n For Windows 2008, copy the certificate file to C:\ProgramData\VMware\vSphere Authentication Proxy\trust.
Authenticating vSphere Authentication Proxy to ESXiBefore you use the vSphere Authentication Proxy to connect ESXi to a domain, you must authenticate thevSphere Authentication Proxy server to ESXi. If you use Host Profiles to connect a domain with the vSphereAuthentication Proxy server, you do not need to authenticate the server. The host profile authenticates theproxy server to ESXi.
To authenticate ESXi to use the vSphere Authentication Proxy, export the server certificate from the vSphereAuthentication Proxy system and import it to ESXi. You need only authenticate the server once.
NOTE By default, ESXi must authenticate the vSphere Authentication Proxy server when using it to join adomain. Make sure that this authentication functionality is enabled at all times. If you must disableauthentication, you can use the Advanced Settings dialog box to set theUserVars.ActiveDirectoryVerifyCAMCertifcate attribute to 0.
Export vSphere Authentication Proxy CertificateTo authenticate the vSphere Authentication Proxy to ESXi, you must provide ESXi with the proxy servercertificate.
Prerequisites
Install the vSphere Authentication Proxy service on a host as described in “Install the vSphere AuthenticationProxy Service,” on page 75.
Procedure
1 On the authentication proxy server system, use the IIS Manager to export the certificate.
Option Action
For IIS 6 a Right-click Computer Account Management Web Site.b Select Properties > Directory Security > View Certificate.
For IIS 7 a Click Computer Account Management Web Site in the left pane.b Select Bindings to open the Site Bindings dialog box.c Select https binding.d Select Edit > View SSL Certificate.
2 Select Details > Copy to File.
3 Select the options Do Not Export the Private Key and Base-64 encoded X.509 (CER).
Chapter 6 ESXi Authentication and User Management
VMware, Inc. 77
What to do next
Import the certificate to ESXi.
Import a vSphere Authentication Proxy Server Certificate to ESXiTo authenticate the vSphere Authentication Proxy server to ESXi, upload the proxy server certificate to ESXi.
You use the vSphere Client user interface to upload the vSphere Authentication Proxy server certificate toESXi.
Prerequisites
Install the vSphere Authentication Proxy service on a host as described in “Install the vSphere AuthenticationProxy Service,” on page 75.
Export the vSphere Authentication Proxy server certificate as described in “Export vSphere AuthenticationProxy Certificate,” on page 77.
Procedure
1 Select a host in the vSphere Client inventory and click the Summary tab.
2 Upload the certificate for the authentication proxy server to a temporary location on ESXi.
a Under Resources, right-click a datastore and select Browse Datastore.
b Select a location for the certificate and select the Upload File button.
c Browse to the certificate and select Open.
3 Select the Configuration tab and click Authentication Services.
4 Click Import Certificate.
5 Enter the full path to the authentication proxy server certificate file on the host and the IP address of theauthentication proxy server.
Use the form [datastore name] file path to enter the path to the proxy server.
6 Click Import.
What to do next
Set up the host to use vSphere Authentication Proxy server to authenticate users.
Import a Proxy Server Certificate to ESXi in the vSphere Web ClientTo authenticate the vSphere Authentication Proxy server to ESXi, upload the proxy server certificate to ESXi.
You use the vSphere Client user interface to upload the vSphere Authentication Proxy server certificate toESXi.
Prerequisites
Install the vSphere Authentication Proxy service on a host as described in “Install the vSphere AuthenticationProxy Service,” on page 75.
Export the vSphere Authentication Proxy server certificate as described in “Export vSphere AuthenticationProxy Certificate,” on page 77.
Procedure
1 Upload the certificate for the authentication proxy server to a temporary location accessible to the host.
a In the vSphere Web Client, browse to a datastore accessible to the host and click the Manage tab.
b Click Files and click Upload File.
vSphere Security
78 VMware, Inc.

2 Browse to the certificate and select Open.
To upload or download files from a datastore, you must have the Client Integration Plug-in installed onthe system where you use the vSphere Web Client.
3 Browse to the host and click the Manage tab.
4 Select the Configuration tab and click Authentication Services.
5 Click Import Certificate.
6 Enter the full path to the authentication proxy server certificate file on the host and the IP address of theauthentication proxy server.
Use the form [datastore name] file path to enter the path to the proxy server.
7 Click Import.
What to do next
Set up the host to use vSphere Authentication Proxy server to authenticate users.
Use vSphere Authentication Proxy to Add a Host to a DomainWhen you join a host to a directory service domain, you can use the vSphere Authentication Proxy server forauthentication instead of transmitting user-supplied Active Directory credentials.
You can enter the domain name in one of two ways:
n name.tld (for example, domain.com): The account is created under the default container.
n name.tld/container/path (for example, domain.com/OU1/OU2): The account is created under a particularorganizational unit (OU).
Prerequisites
n Verify that the vSphere Client is connected to a vCenter Server system or to the host.
n If ESXi is configured with a DHCP address, set up the DHCP range as described in “Configure a Host toUse the vSphere Authentication Proxy for Authentication,” on page 76.
n If ESXi is configured with a static IP address, verify that its associated profile is configured to use thevSphere Authentication Proxy service to join a domain so that the authentication proxy server can trustthe ESXi IP address.
n If ESXi is using a self-signed certificate, verify that the host has been added to vCenter Server. This allowsthe authentication proxy server to trust ESXi.
n If ESXi is using a CA-signed certificate and is not provisioned by Auto Deploy, verify that the CA certificatehas been added to the local trust certificate store of the authentication proxy server as described in “Configure a Host to Use the vSphere Authentication Proxy for Authentication,” on page 76.
n Authenticate the vSphere Authentication Proxy server to the host as described in “Authenticating vSphereAuthentication Proxy to ESXi,” on page 77.
Procedure
1 In the vSphere Client inventory, select the host.
2 Select the Configuration tab and click Authentication Services.
3 Click Properties.
4 In the Directory Services Configuration dialog box, select the directory server from the drop-down menu.
Chapter 6 ESXi Authentication and User Management
VMware, Inc. 79
5 Enter a domain.
Use the form name.tld or name.tld/container/path.
6 Select the Use vSphere Authentication Proxy check box.
7 Enter the IP address of the authentication proxy server.
8 Click Join Domain.
9 Click OK.
Use vSphere Authentication Proxy to Add a Host to a Domain in thevSphere Web Client
When you join a host to a directory service domain, you can use the vSphere Authentication Proxy server forauthentication instead of transmitting user-supplied Active Directory credentials.
You can enter the domain name in one of two ways:
n name.tld (for example, domain.com): The account is created under the default container.
n name.tld/container/path (for example, domain.com/OU1/OU2): The account is created under a particularorganizational unit (OU).
Prerequisites
n Verify that the vSphere Client is connected to a vCenter Server system.
n If ESXi is configured with a DHCP address, set up the DHCP range.
n If ESXi is configured with a static IP address, verify that its associated profile is configured to use thevSphere Authentication Proxy service to join a domain so that the authentication proxy server can trustthe ESXi IP address.
n If ESXi is using a self-signed certificate, verify that the host has been added to vCenter Server. This allowsthe authentication proxy server to trust ESXi.
n If ESXi is using a CA-signed certificate and is not provisioned by Auto Deploy, verify that the CA certificatehas been added to the local trust certificate store of the authentication proxy server as described in “Configure a Host to Use the vSphere Authentication Proxy for Authentication,” on page 76.
n Authenticate the vSphere Authentication Proxy server to the host.
Procedure
1 Browse to the host in the vSphere Web Client and click the Manage tab.
2 Click Settings and select Authentication Services.
3 Click Join Domain.
4 Enter a domain.
Use the form name.tld or name.tld/container/path.
5 Select Using Proxy Server.
6 Enter the IP address of the authentication proxy server.
7 Click OK.
vSphere Security
80 VMware, Inc.
View vSphere Authentication Proxy SettingsYou can verify the IP address and the port where the proxy server listens.
After you set up a vSphere Authentication Proxy service on a host machine, you can view the host machineaddress and port information in the vSphere Client.
Procedure
u In the vSphere Client, select Inventory > Administration > vSphere Authentication Proxy.
The VMware vSphere Authentication Proxy page is displayed.
Chapter 6 ESXi Authentication and User Management
VMware, Inc. 81

vSphere Security
82 VMware, Inc.
vCenter Server Authentication andUser Management 7
vCenter Server users and groups are authenticated by the vCenter Single Sign On server.
In product versions earlier than vCenter Server 5.1, when users connect to vCenter Server, they wereauthenticated when vCenter Server validated their credentials against an Active Directory domain or the listof local operating system users. In vCenter Server 5.1, users authenticate through vCenter Single Sign On.
The default Single Sign-On administrator is admin@System-Domain with the password you specified atinstallation. You use these credentials to log in to the Single Sign-On administration tool in thevSphere Web Client. You can then assign Single Sign-On administrator privileges to users who are allowed tomanage the Single Sign-On server. These users might be different from the users that administer vCenterServer.
NOTE On the vCenter Server Appliance, local operating system administrators (for example, root) also havevCenter Single Sign-On administrator privileges.
The following information is important for you to manage users and groups.
n Logging in to the vSphere Web Client with Windows session credentials is supported only for ActiveDirectory users of the domain to which the Single Sign On system belongs.
n ESXi 5.1 is not integrated with vCenter Single Sign-On, and you cannot create ESXi users with thevSphere Web Client. You must create and manage ESXi users with the vSphere Client. vCenter Server isnot aware of users that are local to ESXi. In addition, ESXi is not aware of vCenter Server users. However,you can configure Single Sign-On to use an Active Directory domain as an identity source, and configureESXi to point to the same Active Directory domain to obtain user and group information. This actionallows the same set of users to be available to the host and to vCenter Server.
This chapter includes the following topics:
n “Using vCenter Single Sign-On with vSphere,” on page 84
n “How vCenter Single Sign-On Deployment Scenarios Affect Log In Behavior,” on page 84
n “Configuring vCenter Single Sign On,” on page 87
n “Using vCenter Single Sign On to Manage Users and Groups,” on page 95
n “vCenter Server User Directory Settings,” on page 100
n “Assigning Permissions for vCenter Server,” on page 101
n “Assigning Roles in the vSphere Web Client,” on page 104
n “Manually Replicate Data in a Multisite vCenter Single Sign-On Deployment,” on page 106
n “Troubleshooting vCenter Single Sign-On,” on page 108
VMware, Inc. 83
Using vCenter Single Sign-On with vSphereYou use vCenter Single Sign-On to authenticate and manage vCenter Server users.
In vCenter Server versions earlier than vCenter Server 5.1, when a user connects to vCenter Server, vCenterServer authenticates the user by validating the user against an Active Directory domain or the list of localoperating system users. In vCenter Server 5.1, users authenticate through vCenter Single Sign-On.
The Single Sign-On administrative interface is part of the vSphere Web Client. To configure Single Sign-Onand manage Single Sign-On users and groups, you log in to the vSphere Web Client as a user with Single Sign-On administrator privileges. This might not be the same user as the vCenter Server administrator. Enter thecredentials on the vSphere Web Client login page and upon authentication, you can access the Single Sign-Onadministration tool to create users and assign administrative permissions to other users.
vSphere 5.1 users have the option of logging in to vCenter Server with the vSphere Client or with thevSphere Web Client.
n Using the vSphere Client, you log in to each vCenter Server system separately. All linked vCenter Serverinstances are visible on the left pane of the vSphere Client. The vSphere Client does not show vCenterServer systems that are not linked to the vCenter Server that the user logged in to unless the user connectsto those vCenter Server systems explicitly. This behavior is unchanged from vCenter Server versionsearlier than version 5.1.
n Using the vSphere Web Client, you authenticate to vCenter Single Sign-On by entering your credentialson the vSphere Web Client login page. You can then view all of the vCenter Server instances for whichyou have permissions. After you connect to vCenter Server, no further authentication is required. Theactions that you can perform on objects depend on the user's vCenter Server permissions on those objects.
For versions earlier than vCenter Server 5.1, you must explicitly register each vCenter Server system with thevSphere Web Client. For vCenter Server 5.1, vCenter Server systems are automatically detected and aredisplayed in the vSphere Web Client inventory.
How vCenter Single Sign-On Deployment Scenarios Affect Log InBehavior
The way that you deploy vCenter Single Sign-On and the type of user who installs vCenter Single Sign-Onaffects which administrator user accounts have privileges on the Single Sign-On server and on vCenter Server.
During the vCenter Server installation process, certain users are granted privileges to log in to vCenter Serverand certain users are granted privileges to manage vCenter Single Sign-On. The vCenter Server administratormight not be the same user as the vCenter Single Sign-On administrator. This means that when you log in tothe vSphere Web Client as the default Single Sign-On administrator (admin@System-Domain), you might notsee any vCenter Server systems in the inventory. The inventory appears to be empty because you see only thesystems upon which you have privileges in the vSphere Web Client.
This also means that when you log in to the vSphere Web Client as the default vCenter Server administrator,you might not see the vCenter Single Sign-On configuration tool. The configuration tool is not present becauseonly the default vCenter Single Sign-On Administrator (admin@System-Domain) is allowed to view andmanage vCenter Single Sign-On after installation. The Single Sign-On administrator can create additionaladministrator users if necessary.
n Login Behavior When You Use vCenter Simple Install on page 85The vCenter Simple Install process installs vCenter Single Sign-On, the Inventory Service, and vCenterServer on one system. The account you use when you run the Simple Install process affects which usershave privileges on which components.
vSphere Security
84 VMware, Inc.
n Login Behavior When You Deploy vCenter Single Sign-On as a Standalone Server on page 85Deploying vCenter Single Sign-On in Basic mode means that a standalone version of vCenter Single Sign-On is installed on a system. Multiple vCenter Server, Inventory Service, and vSphere Web Client instancescan point to this standalone version of vCenter Single Sign-On.
n Login Behavior When You Install a Cluster of vCenter Single Sign-On Instances on page 86Deploying vCenter Single Sign-On as a cluster means that two or more instances of vCenter Single Sign-On are installed in high availability mode. vCenter Single Sign-On high availability mode is not the sameas vSphere HA. All instances of vCenter Single Sign-On use the same database and point to the sameidentity sources. Single Sign-On administrator users see the primary Single Sign-On instance when theyconnect to vCenter Server through the vSphere Web Client.
Login Behavior When You Use vCenter Simple InstallThe vCenter Simple Install process installs vCenter Single Sign-On, the Inventory Service, and vCenter Serveron one system. The account you use when you run the Simple Install process affects which users have privilegeson which components.
When you log in as a domain account user or local account user to install vCenter Server using vCenter SimpleInstall, the following behavior occurs upon installation.
n By default, users in the local operating system Administrators group can log in to thevSphere Web Client and vCenter Server. These users cannot configure Single Sign-On or view the SingleSign-On management interface in the vSphere Web Client.
n By default, the vCenter Single Sign-On administrator user is admin@System-Domain. This user can log into the vSphere Web Client to configure Single Sign-On and add accounts to manage Single Sign-On ifnecessary. This user cannot view or configure vCenter Server.
n If you are logged in as a domain account user, the default Active Directory identity sources are discoveredautomatically during vCenter Single Sign On installation. If you are logged in as a local account user,Active Directory identity sources are not discovered automatically during vCenter Single Sign Oninstallation.
n The local operating system (localos or hostname) users are added as an identity source.
Login Behavior When You Deploy vCenter Single Sign-On as a Standalone ServerDeploying vCenter Single Sign-On in Basic mode means that a standalone version of vCenter Single Sign-Onis installed on a system. Multiple vCenter Server, Inventory Service, and vSphere Web Client instances canpoint to this standalone version of vCenter Single Sign-On.
In this deployment scenario, the installation process grants admin@System-Domain vCenter Server privilegesby default. In addition, the installation process creates the user admin@System-Domain to manage vCenterSingle Sign-On.
NOTE When you install vCenter Server components with separate installers, you can choose which accountor group can log in to vCenter Server upon installation. Specify this account or group on the Single Sign-OnInformation page of the installer, in the following text box: vCenter Server administrator recognized byvCenter Single Sign-On. For example, to grant a group of domain administrators permission to log in tovCenter Server, type of name of the domain administrators group, such as [email protected].
In high availablity and multisite Single Sign-On modes, there is no local operating system identity source.Therefore, it will not work if you enter Administrators or Administrator in the text box vCenter Serveradministrator recognized by vCenter Single Sign-On. Administrators is treated as the local operating systemgroup Administrators, and Administrator is treated me as local operating system user Administrator.
Chapter 7 vCenter Server Authentication and User Management
VMware, Inc. 85
Installing in Basic Mode as Domain Account UserWhen you log in as a domain account user to install vCenter Single Sign-On in basic mode, on a separate systemfrom the Inventory Service and vCenter Server, the following behavior occurs upon installation.
n By default, the user admin@System-Domain can log in to the vSphere Web Client and vCenter Server.
n The default Active Directory identity sources are discovered.
n The local operating system (localos or hostname) users are added as an identity source.
Installing in Basic Mode as Local Account UserWhen you log in as a local account user to install vCenter Single Sign-On in basic mode, on a separate systemfrom the Inventory Service and vCenter Server, the following behavior occurs upon installation.
n By default, the user admin@System-Domain can log in to the vSphere Web Client and vCenter Server.
n Active Directory identity sources are not discovered.
n The local operating system (localos or hostname) users are added as an identity source.
Login Behavior When You Install a Cluster of vCenter Single Sign-On InstancesDeploying vCenter Single Sign-On as a cluster means that two or more instances of vCenter Single Sign-Onare installed in high availability mode. vCenter Single Sign-On high availability mode is not the same asvSphere HA. All instances of vCenter Single Sign-On use the same database and point to the same identitysources. Single Sign-On administrator users see the primary Single Sign-On instance when they connect tovCenter Server through the vSphere Web Client.
In this deployment scenario, the installation process grants admin@System-Domain vCenter Server privilegesby default. In addition, the installation process creates the user admin@System-Domain to manage vCenterSingle Sign-On.
NOTE When you install vCenter Server components with separate installers, you can choose which accountor group can log in to vCenter Server upon installation. Specify this account or group on the Single Sign-OnInformation page of the installer, in the following text box: vCenter Server administrator recognized byvCenter Single Sign-On. For example, to grant a group of domain administrators permission to log in tovCenter Server, type of name of the domain administrators group, such as [email protected].
In high availablity and multisite Single Sign-On modes, there is no local operating system identity source.Therefore, it will not work if you enter Administrators or Administrator in the text box vCenter Serveradministrator recognized by vCenter Single Sign-On. Administrators is treated as the local operating systemgroup Administrators, and Administrator is treated me as local operating system user Administrator.
When you log in as a domain account user or local account user to install vCenter Single Sign-On in clustermode, on a separate system from the Inventory Service and vCenter Server, the following behavior occursupon installation.
n By default, the user admin@System-Domain can log in to the vSphere Web Client and vCenter Server.
n If you are logged in as a domain account user, the default Active Directory identity sources are discovered.If you are logged in as a local account user, Active Directory identity sources are not discovered.
vSphere Security
86 VMware, Inc.
Configuring vCenter Single Sign OnvCenter Single Sign On lets you add identity sources, manage default domains, configure a password policy,and edit the lockout policy.
Before you configure vCenter Single Sign On, understand the following elements.
Identity Source An identity source is a collection of user and group data. The user and groupdata is stored in a repository, such as Active Directory, LDAP, or a databasethat is internal to Single Sign On or local to an operating system. Uponinstallation, every instance of Single Sign On has the identity source System-Domain. This identity source is internal to Single Sign-On. Administrator userscan create Single Sign-On users and groups. Single Sign-On users have one ofthe following roles:
n The password policy defined in the vCenter Single Sign-On configurationtool determines when your password expires. By default, Single Sign-Onpasswords expire after one year, but your system administrator mightchange this depending on the policy of your organization.
IMPORTANT The vSphere Web Client does not remind you when yourpassword is about to expire. If your password expires and you are unableto log in to the vSphere Web Client, a Single Sign-On user withadministrator privileges can reset it.
n Regular access users are allowed limited self-management capabilities,such as updating an email address or password. Regular users can browseSingle Sign-On users and groups. They can view but not edit Single Sign-On configuration options.
n Administrator access allows a user complete super user privileges on theSingle Sign On system, including the ability to create users and groups,assign permissions, add identity sources, and modify policies (lockout andpassword). Upon installation, only one user (admin@System-Domain) hasthis role.
NOTE On the vCenter Server Appliance, local operating systemadministrators (for example, root) also have vCenter Single Sign-Onadministrator privileges.
Default Domain Every identity source is associated with a domain, and you can specify one ormore domains as default. When attempting to authenticate a user, Single Sign-On searches default domains in the order specified.
Password Policy A Single Sign-On password policy is a set of rules and restrictions on the formatand age of Single Sign-On user passwords. Password policies apply only toSingle Sign-On users. They do not apply to users that are a part of an ActiveDirectory or OpenLDAP domain, nor do they apply to local operating systemusers.
Lockout Policy A lockout policy specifies the conditions under which a user's Single Sign-Onaccount will be locked. In vSphere 5.1, you log in to Single Sign-On rather thaninto individual vCenter Server systems. The lockout policy applies to userswho access vCenter Server by logging in to the vSphere Web Client.
Chapter 7 vCenter Server Authentication and User Management
VMware, Inc. 87
An account might be locked when a user exceeds the allowed number of failedattempts to log in. The lockout policy lets you specify the maximum numberof failed login attempts and how much time can elapse between failed attempts.The policy also specifies how much time must elapse before the account isautomatically unlocked.
To set up vCenter Single Sign-On, you must have Single Sign-On administrator privileges. Having Single Sign-On administrator privileges is different from having the Administrator role on vCenter Server or ESXi.
About Identity SourcesAn identity source is a collection of user and group data. The user and group data is stored in a repository,such as Active Directory, LDAP, or a database that is internal to vCenter Single Sign On or local to an operatingsystem.
vCenter Server versions earlier than version 5.1 supported Active Directory and local operating system usersas user repositories. vCenter Server 5.1 supports the following types of user repositories as identity sources.
n OpenLDAP versions 2.4 and later.
n Active Directory versions 2003 and later.
n Local operating system users.
Local operating system users are local to the operating system where the Single Sign On server is running(for example, Windows). Only one local operating system identity source is allowed. The local operatingsystem identity source exists only in basic Single Sign On server deployments.
A fourth type of user repository is Single Sign On system users (System-Domain). Exactly one system identitysource is always associated with an installation of Single Sign On. These users are contained in a database thatis internal to the Single Sign On server. System users are not the same as local operating system users.
You can attach multiple identity sources from each type to a Single Sign On server.
Manage Default Domains for vCenter Single Sign OnEach identity source known to vCenter Single Sign On is associated with a domain. You can specify one ormore default domains. vCenter Single Sign On uses default domains to authenticate users when a user nameis provided without a domain name.
If a user name exists in more than one of the specified default domains, Single Sign On attempts to authenticatethe user against each domain in the order listed. Authentication succeeds with the first domain that acceptsthe credentials that the user provided. By default, Single Sign On first validates the user against the localoperating system identity source.
Procedure
1 Browse to Administration > Sign-On and Discovery > Configuration in the vSphere Web Client.
2 On the Identity Sources tab, select a domain and click Add to Default Domains.
3 Click the Save icon.
The domain is added to the list of default domains.
4 (Optional) To change the order of the default domains, use the Move Up and Move Down arrows andclick Save.
5 To remove a domain from the list, select the domain and click Remove.
6 Click the Save icon.
The domain is removed from the Default Domains list, but it remains in the list of identity sources.
vSphere Security
88 VMware, Inc.

Create vCenter Single Sign On Administrator UsersYou can assign vCenter Single Sign On administrator privileges to users who are allowed to manage the SingleSign On server. These users might be different from the users that administer vCenter Server.
Prerequisites
Ensure that you have vCenter Single Sign On administrator privileges.
Procedure
1 Browse to Administration > Access > SSO Users and Groups in the vSphere Web Client.
2 Click the Groups tab and click the group Administrators.
3 Click Add Principals.
A principal is the member of a group.
4 Select the identity source that contains the user to add to the Administrators group.
5 (Optional) Enter a search term and click Search.
6 Select the user and click Add.
You can simultaneously add multiple users to a group.
7 Click OK.
The user with Single Sign On administrator privileges appears in the lower panel of the Groups tab.
Add a vCenter Single Sign On Identity SourcevSphere users are defined in an identity source. An identity source can be a directory service like ActiveDirectory and Open LDAP; a database that is internal to the system where vCenter Single Sign On is installed;or operating system users that are local to the system where Single Sign On is installed. You can register morethan one identity source with the vSphere Web Client.
Prerequisites
A directory service such as Active Directory is set up and configured in your environment.
Ensure that you have vCenter Single Sign On administrator privileges.
Procedure
1 Browse to Administration > Sign-On and Discovery > Configuration in the vSphere Web Client.
2 On the Identity Sources tab, click the Add Identity Source icon.
3 Select the type of identity source.
Option Description
OpenLDAP The identity source is an OpenLDAP server. OpenLDAP versions 2.4 andlater are supported.
Active Directory The identity source is a Microsoft Active Directory server. Active Directoryversions 2003 and later are supported.
Local Operating System Users local to the operating system where Single Sign On is installed (forexample, Windows). There can be only one local operating system identitysource.
Chapter 7 vCenter Server Authentication and User Management
VMware, Inc. 89
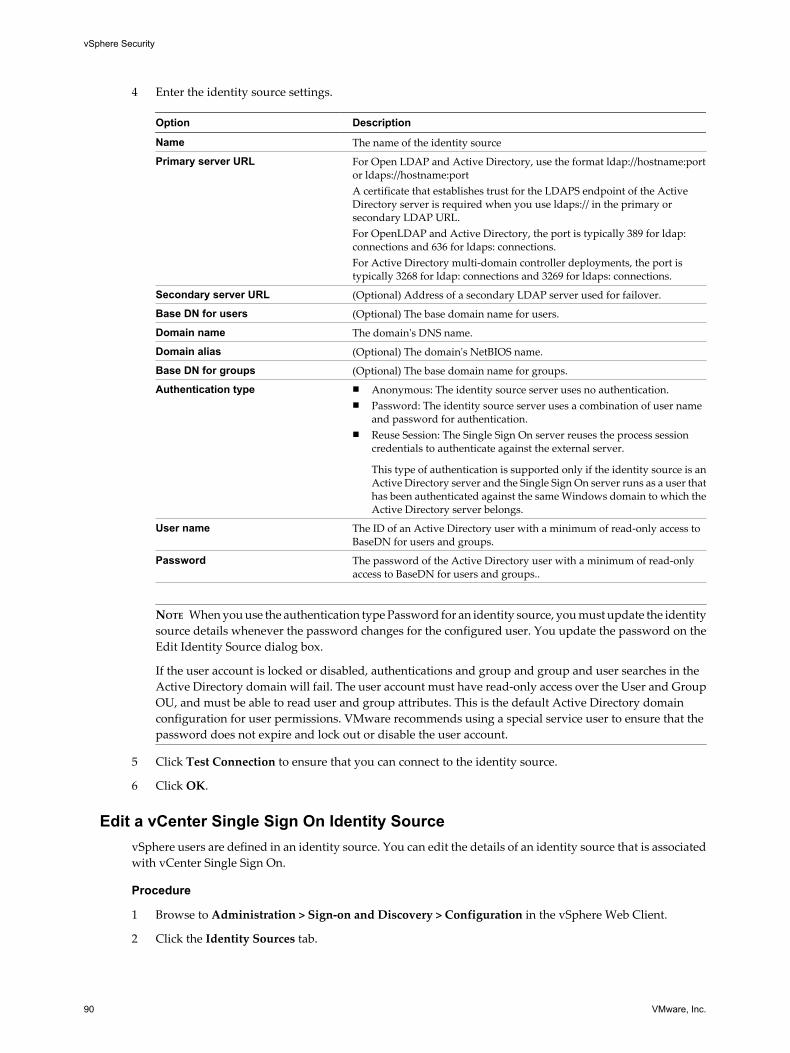
4 Enter the identity source settings.
Option Description
Name The name of the identity source
Primary server URL For Open LDAP and Active Directory, use the format ldap://hostname:portor ldaps://hostname:portA certificate that establishes trust for the LDAPS endpoint of the ActiveDirectory server is required when you use ldaps:// in the primary orsecondary LDAP URL.For OpenLDAP and Active Directory, the port is typically 389 for ldap:connections and 636 for ldaps: connections.For Active Directory multi-domain controller deployments, the port istypically 3268 for ldap: connections and 3269 for ldaps: connections.
Secondary server URL (Optional) Address of a secondary LDAP server used for failover.
Base DN for users (Optional) The base domain name for users.
Domain name The domain's DNS name.
Domain alias (Optional) The domain's NetBIOS name.
Base DN for groups (Optional) The base domain name for groups.
Authentication type n Anonymous: The identity source server uses no authentication.n Password: The identity source server uses a combination of user name
and password for authentication.n Reuse Session: The Single Sign On server reuses the process session
credentials to authenticate against the external server.
This type of authentication is supported only if the identity source is anActive Directory server and the Single Sign On server runs as a user thathas been authenticated against the same Windows domain to which theActive Directory server belongs.
User name The ID of an Active Directory user with a minimum of read-only access toBaseDN for users and groups.
Password The password of the Active Directory user with a minimum of read-onlyaccess to BaseDN for users and groups..
NOTE When you use the authentication type Password for an identity source, you must update the identitysource details whenever the password changes for the configured user. You update the password on theEdit Identity Source dialog box.
If the user account is locked or disabled, authentications and group and group and user searches in theActive Directory domain will fail. The user account must have read-only access over the User and GroupOU, and must be able to read user and group attributes. This is the default Active Directory domainconfiguration for user permissions. VMware recommends using a special service user to ensure that thepassword does not expire and lock out or disable the user account.
5 Click Test Connection to ensure that you can connect to the identity source.
6 Click OK.
Edit a vCenter Single Sign On Identity SourcevSphere users are defined in an identity source. You can edit the details of an identity source that is associatedwith vCenter Single Sign On.
Procedure
1 Browse to Administration > Sign-on and Discovery > Configuration in the vSphere Web Client.
2 Click the Identity Sources tab.
vSphere Security
90 VMware, Inc.
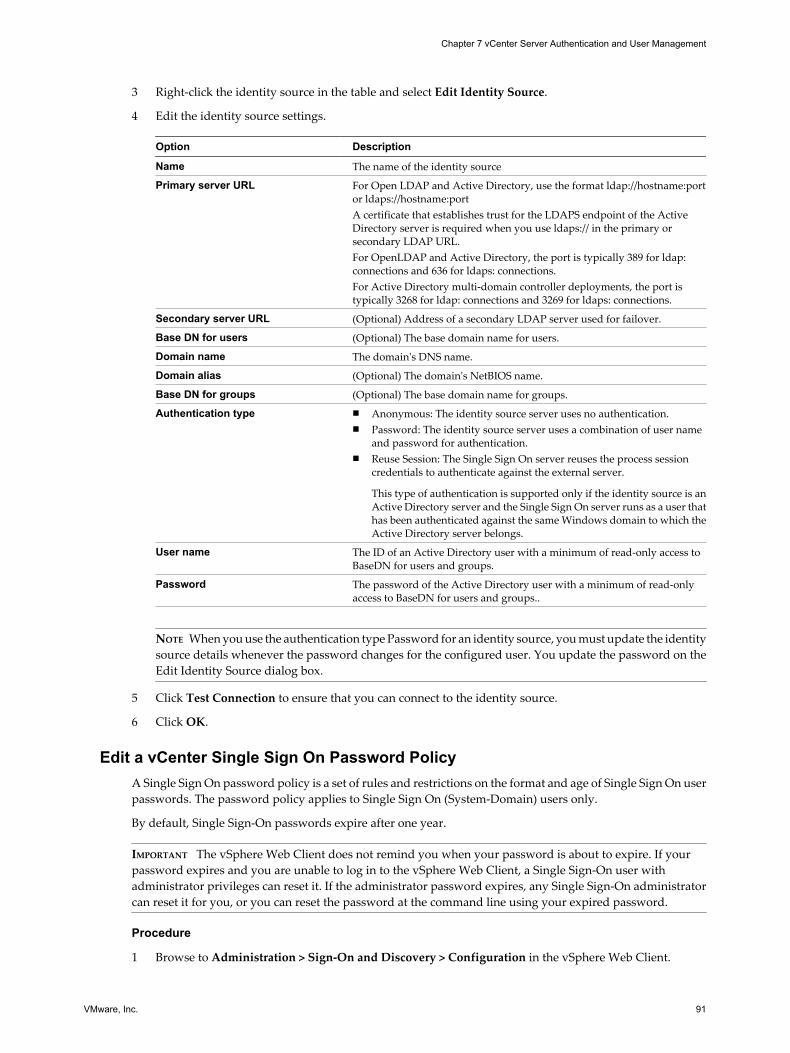
3 Right-click the identity source in the table and select Edit Identity Source.
4 Edit the identity source settings.
Option Description
Name The name of the identity source
Primary server URL For Open LDAP and Active Directory, use the format ldap://hostname:portor ldaps://hostname:portA certificate that establishes trust for the LDAPS endpoint of the ActiveDirectory server is required when you use ldaps:// in the primary orsecondary LDAP URL.For OpenLDAP and Active Directory, the port is typically 389 for ldap:connections and 636 for ldaps: connections.For Active Directory multi-domain controller deployments, the port istypically 3268 for ldap: connections and 3269 for ldaps: connections.
Secondary server URL (Optional) Address of a secondary LDAP server used for failover.
Base DN for users (Optional) The base domain name for users.
Domain name The domain's DNS name.
Domain alias (Optional) The domain's NetBIOS name.
Base DN for groups (Optional) The base domain name for groups.
Authentication type n Anonymous: The identity source server uses no authentication.n Password: The identity source server uses a combination of user name
and password for authentication.n Reuse Session: The Single Sign On server reuses the process session
credentials to authenticate against the external server.
This type of authentication is supported only if the identity source is anActive Directory server and the Single Sign On server runs as a user thathas been authenticated against the same Windows domain to which theActive Directory server belongs.
User name The ID of an Active Directory user with a minimum of read-only access toBaseDN for users and groups.
Password The password of the Active Directory user with a minimum of read-onlyaccess to BaseDN for users and groups..
NOTE When you use the authentication type Password for an identity source, you must update the identitysource details whenever the password changes for the configured user. You update the password on theEdit Identity Source dialog box.
5 Click Test Connection to ensure that you can connect to the identity source.
6 Click OK.
Edit a vCenter Single Sign On Password PolicyA Single Sign On password policy is a set of rules and restrictions on the format and age of Single Sign On userpasswords. The password policy applies to Single Sign On (System-Domain) users only.
By default, Single Sign-On passwords expire after one year.
IMPORTANT The vSphere Web Client does not remind you when your password is about to expire. If yourpassword expires and you are unable to log in to the vSphere Web Client, a Single Sign-On user withadministrator privileges can reset it. If the administrator password expires, any Single Sign-On administratorcan reset it for you, or you can reset the password at the command line using your expired password.
Procedure
1 Browse to Administration > Sign-On and Discovery > Configuration in the vSphere Web Client.
Chapter 7 vCenter Server Authentication and User Management
VMware, Inc. 91
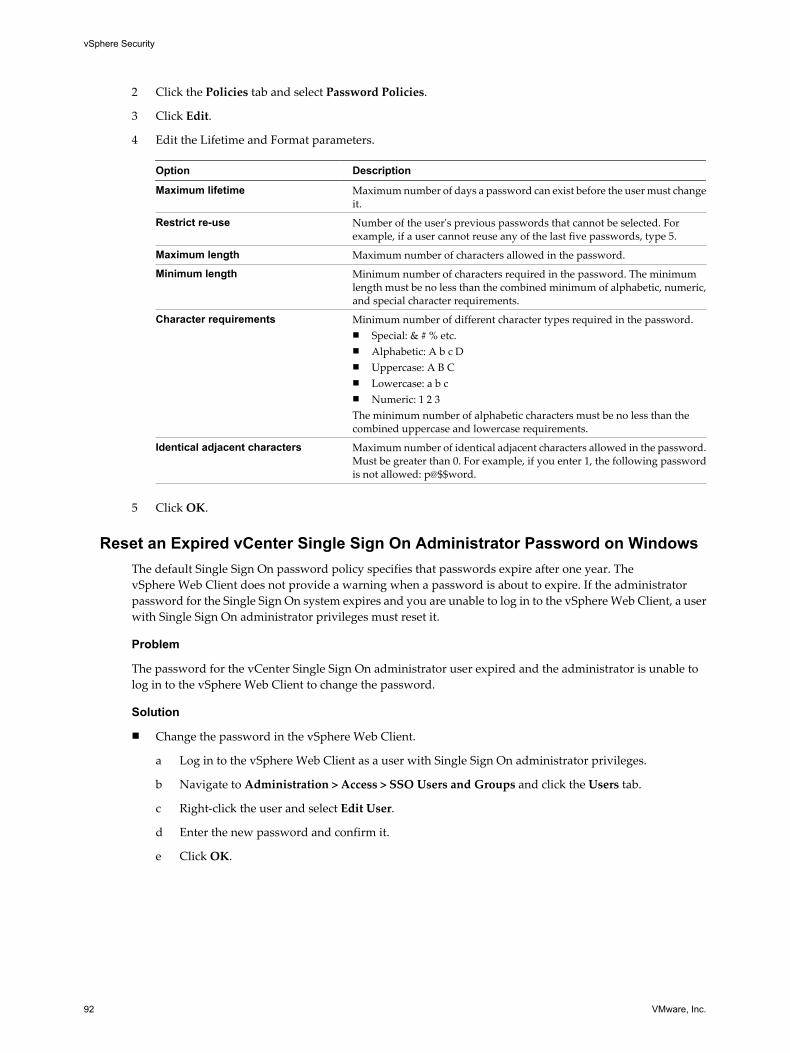
2 Click the Policies tab and select Password Policies.
3 Click Edit.
4 Edit the Lifetime and Format parameters.
Option Description
Maximum lifetime Maximum number of days a password can exist before the user must changeit.
Restrict re-use Number of the user's previous passwords that cannot be selected. Forexample, if a user cannot reuse any of the last five passwords, type 5.
Maximum length Maximum number of characters allowed in the password.
Minimum length Minimum number of characters required in the password. The minimumlength must be no less than the combined minimum of alphabetic, numeric,and special character requirements.
Character requirements Minimum number of different character types required in the password.n Special: & # % etc.n Alphabetic: A b c Dn Uppercase: A B Cn Lowercase: a b cn Numeric: 1 2 3The minimum number of alphabetic characters must be no less than thecombined uppercase and lowercase requirements.
Identical adjacent characters Maximum number of identical adjacent characters allowed in the password.Must be greater than 0. For example, if you enter 1, the following passwordis not allowed: p@$$word.
5 Click OK.
Reset an Expired vCenter Single Sign On Administrator Password on WindowsThe default Single Sign On password policy specifies that passwords expire after one year. ThevSphere Web Client does not provide a warning when a password is about to expire. If the administratorpassword for the Single Sign On system expires and you are unable to log in to the vSphere Web Client, a userwith Single Sign On administrator privileges must reset it.
Problem
The password for the vCenter Single Sign On administrator user expired and the administrator is unable tolog in to the vSphere Web Client to change the password.
Solution
n Change the password in the vSphere Web Client.
a Log in to the vSphere Web Client as a user with Single Sign On administrator privileges.
b Navigate to Administration > Access > SSO Users and Groups and click the Users tab.
c Right-click the user and select Edit User.
d Enter the new password and confirm it.
e Click OK.
vSphere Security
92 VMware, Inc.
n Change the password at the command line.
a Open a terminal window and navigate to C:\ProgramFiles\VMware\Infrastructure\SSOServer\ssolscli.
b Run the following command.
ssopass username
c Enter the current password for the user, even if it has expired.
d Enter the new password and enter it again for confirmation.
The administrator password is reset and the user can log in to the vSphere Web Client with the newcredentials.
Reset an Expired vCenter Single Sign On Administrator Password on LinuxThe default Single Sign On password policy specifies that passwords expire after one year. ThevSphere Web Client does not provide a warning when a password is about to expire. If the administratorpassword for the Single Sign On system expires and you are unable to log in to the vSphere Web Client, a userwith Single Sign On administrator privileges must reset it.
Problem
The password for the vCenter Single Sign On administrator user expired and the administrator is unable tolog in to the vSphere Web Client to change the password.
Solution
n Change the password in the vSphere Web Client.
a Log in to the vSphere Web Client as the system root user.
On Linux systems, the root account is always a Single Sign-On administrator. You can update thepassword of any Single Sign On user by logging in to the vSphere Web Client using the credentialsof the root user.
b Navigate to Administration > Access > SSO Users and Groups and click the Users tab.
c Right-click the user and select Edit User.
d Enter the new password and confirm it.
e Click OK.
n Change the password at the command line.
a Open a terminal window and navigate to the /usr/lib/vmware-sso/bin directory.
b Run the following command.
./ssopass username
c Enter the current password for the user, even if it has expired.
d Enter the new password and enter it again for confirmation.
The administrator password is reset and the user can log in to the vSphere Web Client with the newcredentials.
ssopass [-d lookup-service] [-t thumbprint] username [password] [new-password]
Chapter 7 vCenter Server Authentication and User Management
VMware, Inc. 93
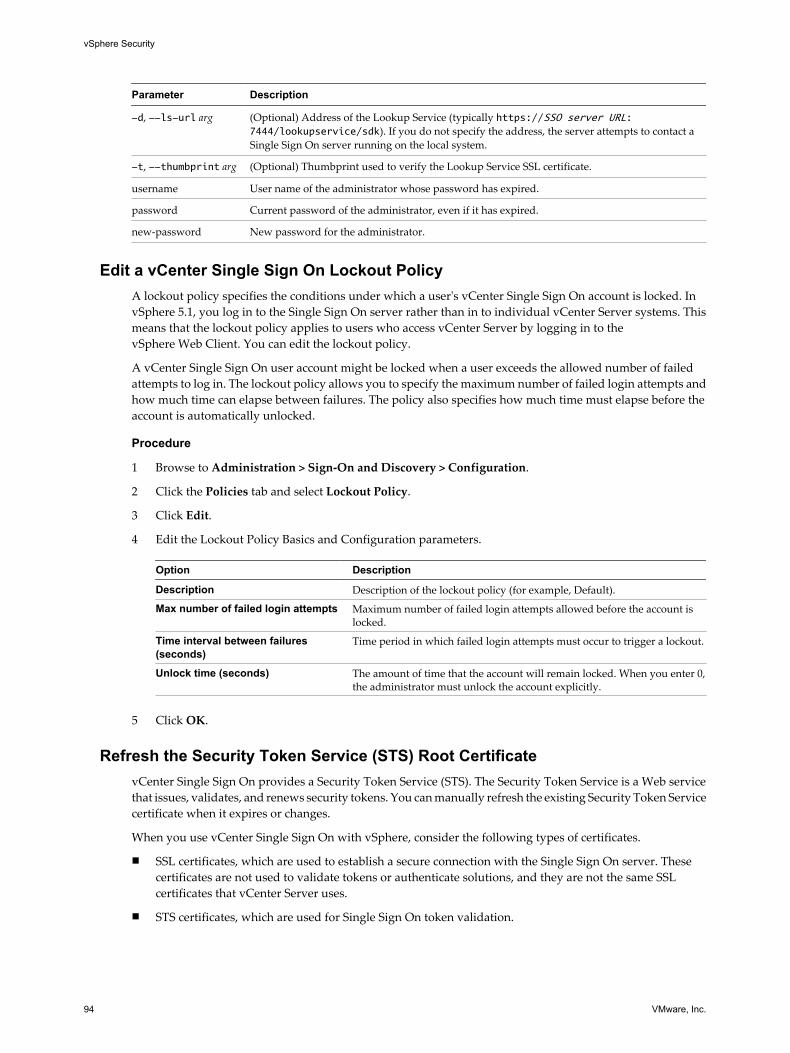
Parameter Description
-d, --ls-url arg (Optional) Address of the Lookup Service (typically https://SSO server URL:7444/lookupservice/sdk). If you do not specify the address, the server attempts to contact aSingle Sign On server running on the local system.
-t, --thumbprint arg (Optional) Thumbprint used to verify the Lookup Service SSL certificate.
username User name of the administrator whose password has expired.
password Current password of the administrator, even if it has expired.
new-password New password for the administrator.
Edit a vCenter Single Sign On Lockout PolicyA lockout policy specifies the conditions under which a user's vCenter Single Sign On account is locked. InvSphere 5.1, you log in to the Single Sign On server rather than in to individual vCenter Server systems. Thismeans that the lockout policy applies to users who access vCenter Server by logging in to thevSphere Web Client. You can edit the lockout policy.
A vCenter Single Sign On user account might be locked when a user exceeds the allowed number of failedattempts to log in. The lockout policy allows you to specify the maximum number of failed login attempts andhow much time can elapse between failures. The policy also specifies how much time must elapse before theaccount is automatically unlocked.
Procedure
1 Browse to Administration > Sign-On and Discovery > Configuration.
2 Click the Policies tab and select Lockout Policy.
3 Click Edit.
4 Edit the Lockout Policy Basics and Configuration parameters.
Option Description
Description Description of the lockout policy (for example, Default).
Max number of failed login attempts Maximum number of failed login attempts allowed before the account islocked.
Time interval between failures(seconds)
Time period in which failed login attempts must occur to trigger a lockout.
Unlock time (seconds) The amount of time that the account will remain locked. When you enter 0,the administrator must unlock the account explicitly.
5 Click OK.
Refresh the Security Token Service (STS) Root CertificatevCenter Single Sign On provides a Security Token Service (STS). The Security Token Service is a Web servicethat issues, validates, and renews security tokens. You can manually refresh the existing Security Token Servicecertificate when it expires or changes.
When you use vCenter Single Sign On with vSphere, consider the following types of certificates.
n SSL certificates, which are used to establish a secure connection with the Single Sign On server. Thesecertificates are not used to validate tokens or authenticate solutions, and they are not the same SSLcertificates that vCenter Server uses.
n STS certificates, which are used for Single Sign On token validation.
vSphere Security
94 VMware, Inc.
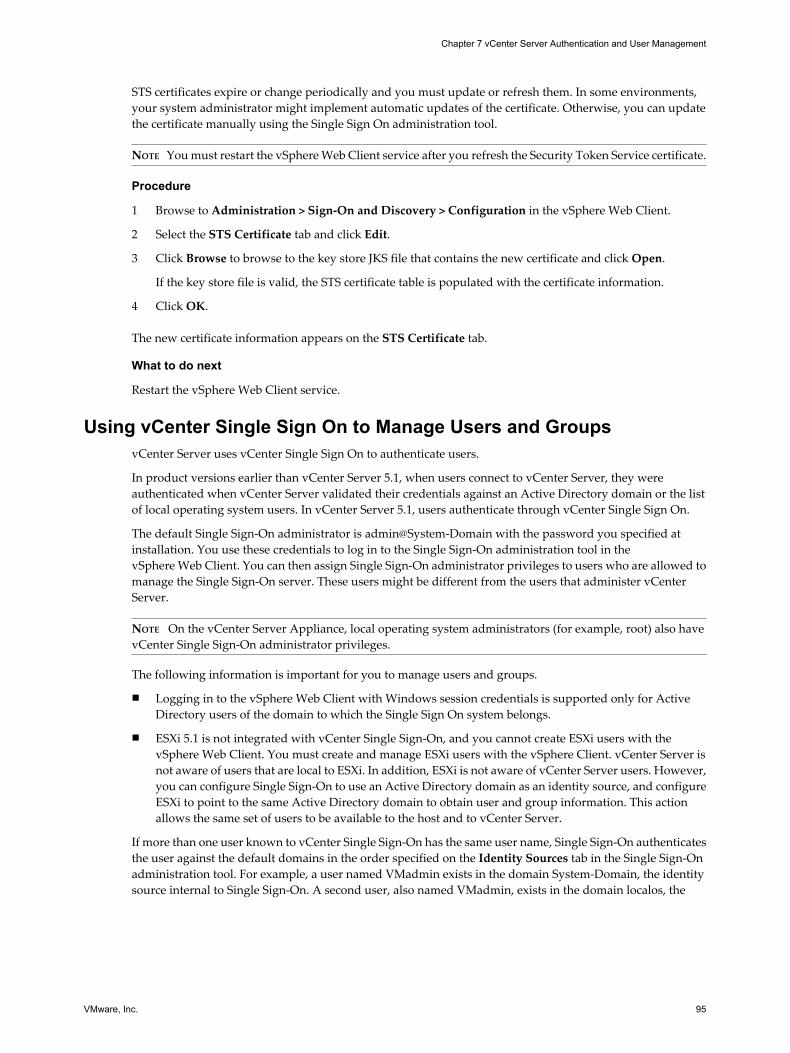
STS certificates expire or change periodically and you must update or refresh them. In some environments,your system administrator might implement automatic updates of the certificate. Otherwise, you can updatethe certificate manually using the Single Sign On administration tool.
NOTE You must restart the vSphere Web Client service after you refresh the Security Token Service certificate.
Procedure
1 Browse to Administration > Sign-On and Discovery > Configuration in the vSphere Web Client.
2 Select the STS Certificate tab and click Edit.
3 Click Browse to browse to the key store JKS file that contains the new certificate and click Open.
If the key store file is valid, the STS certificate table is populated with the certificate information.
4 Click OK.
The new certificate information appears on the STS Certificate tab.
What to do next
Restart the vSphere Web Client service.
Using vCenter Single Sign On to Manage Users and GroupsvCenter Server uses vCenter Single Sign On to authenticate users.
In product versions earlier than vCenter Server 5.1, when users connect to vCenter Server, they wereauthenticated when vCenter Server validated their credentials against an Active Directory domain or the listof local operating system users. In vCenter Server 5.1, users authenticate through vCenter Single Sign On.
The default Single Sign-On administrator is admin@System-Domain with the password you specified atinstallation. You use these credentials to log in to the Single Sign-On administration tool in thevSphere Web Client. You can then assign Single Sign-On administrator privileges to users who are allowed tomanage the Single Sign-On server. These users might be different from the users that administer vCenterServer.
NOTE On the vCenter Server Appliance, local operating system administrators (for example, root) also havevCenter Single Sign-On administrator privileges.
The following information is important for you to manage users and groups.
n Logging in to the vSphere Web Client with Windows session credentials is supported only for ActiveDirectory users of the domain to which the Single Sign On system belongs.
n ESXi 5.1 is not integrated with vCenter Single Sign-On, and you cannot create ESXi users with thevSphere Web Client. You must create and manage ESXi users with the vSphere Client. vCenter Server isnot aware of users that are local to ESXi. In addition, ESXi is not aware of vCenter Server users. However,you can configure Single Sign-On to use an Active Directory domain as an identity source, and configureESXi to point to the same Active Directory domain to obtain user and group information. This actionallows the same set of users to be available to the host and to vCenter Server.
If more than one user known to vCenter Single Sign-On has the same user name, Single Sign-On authenticatesthe user against the default domains in the order specified on the Identity Sources tab in the Single Sign-Onadministration tool. For example, a user named VMadmin exists in the domain System-Domain, the identitysource internal to Single Sign-On. A second user, also named VMadmin, exists in the domain localos, the
Chapter 7 vCenter Server Authentication and User Management
VMware, Inc. 95
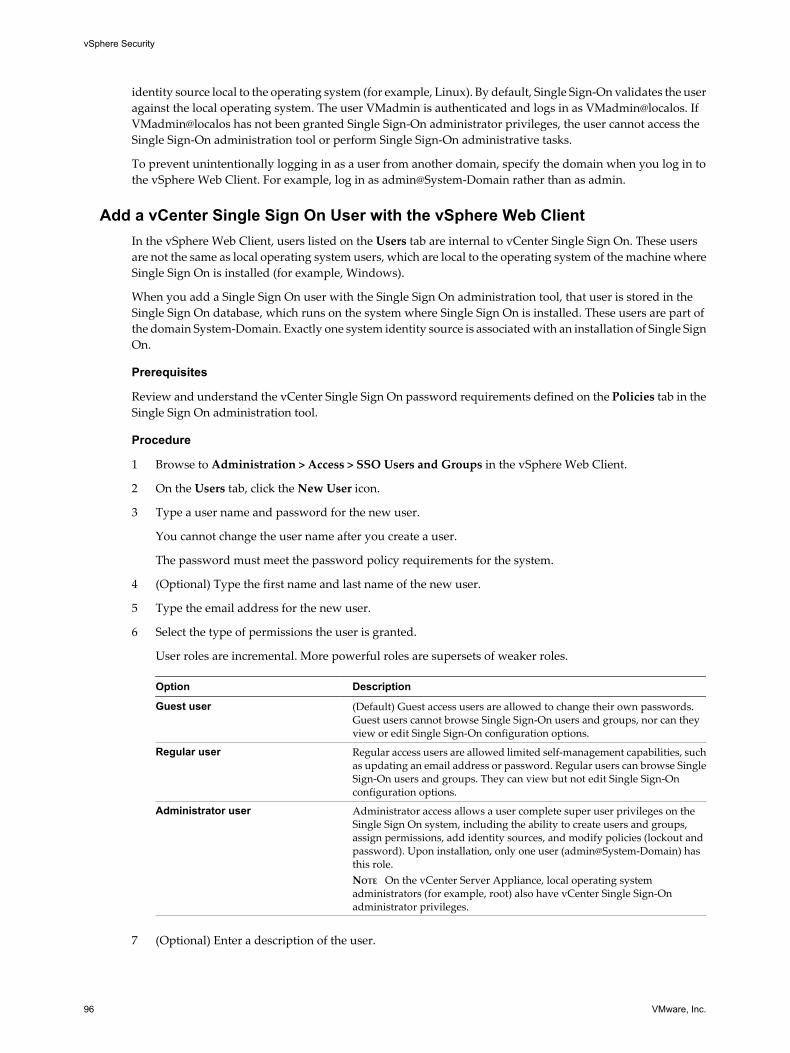
identity source local to the operating system (for example, Linux). By default, Single Sign-On validates the useragainst the local operating system. The user VMadmin is authenticated and logs in as VMadmin@localos. IfVMadmin@localos has not been granted Single Sign-On administrator privileges, the user cannot access theSingle Sign-On administration tool or perform Single Sign-On administrative tasks.
To prevent unintentionally logging in as a user from another domain, specify the domain when you log in tothe vSphere Web Client. For example, log in as admin@System-Domain rather than as admin.
Add a vCenter Single Sign On User with the vSphere Web ClientIn the vSphere Web Client, users listed on the Users tab are internal to vCenter Single Sign On. These usersare not the same as local operating system users, which are local to the operating system of the machine whereSingle Sign On is installed (for example, Windows).
When you add a Single Sign On user with the Single Sign On administration tool, that user is stored in theSingle Sign On database, which runs on the system where Single Sign On is installed. These users are part ofthe domain System-Domain. Exactly one system identity source is associated with an installation of Single SignOn.
Prerequisites
Review and understand the vCenter Single Sign On password requirements defined on the Policies tab in theSingle Sign On administration tool.
Procedure
1 Browse to Administration > Access > SSO Users and Groups in the vSphere Web Client.
2 On the Users tab, click the New User icon.
3 Type a user name and password for the new user.
You cannot change the user name after you create a user.
The password must meet the password policy requirements for the system.
4 (Optional) Type the first name and last name of the new user.
5 Type the email address for the new user.
6 Select the type of permissions the user is granted.
User roles are incremental. More powerful roles are supersets of weaker roles.
Option Description
Guest user (Default) Guest access users are allowed to change their own passwords.Guest users cannot browse Single Sign-On users and groups, nor can theyview or edit Single Sign-On configuration options.
Regular user Regular access users are allowed limited self-management capabilities, suchas updating an email address or password. Regular users can browse SingleSign-On users and groups. They can view but not edit Single Sign-Onconfiguration options.
Administrator user Administrator access allows a user complete super user privileges on theSingle Sign On system, including the ability to create users and groups,assign permissions, add identity sources, and modify policies (lockout andpassword). Upon installation, only one user (admin@System-Domain) hasthis role.NOTE On the vCenter Server Appliance, local operating systemadministrators (for example, root) also have vCenter Single Sign-Onadministrator privileges.
7 (Optional) Enter a description of the user.
vSphere Security
96 VMware, Inc.
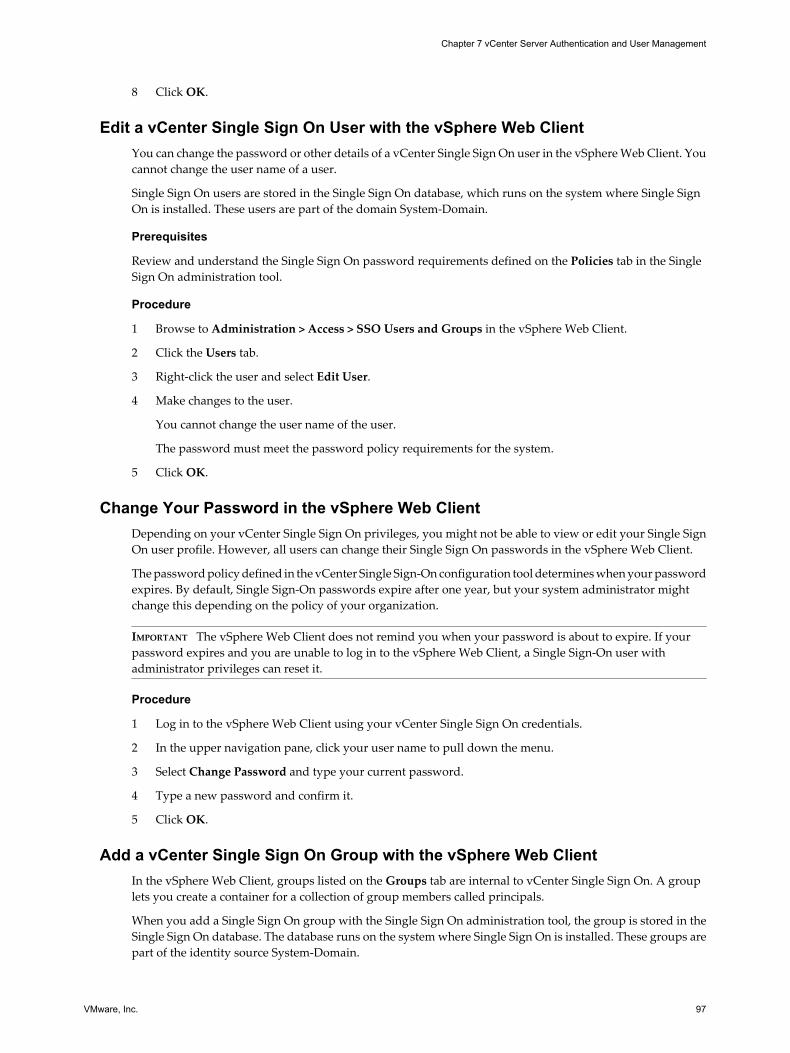
8 Click OK.
Edit a vCenter Single Sign On User with the vSphere Web ClientYou can change the password or other details of a vCenter Single Sign On user in the vSphere Web Client. Youcannot change the user name of a user.
Single Sign On users are stored in the Single Sign On database, which runs on the system where Single SignOn is installed. These users are part of the domain System-Domain.
Prerequisites
Review and understand the Single Sign On password requirements defined on the Policies tab in the SingleSign On administration tool.
Procedure
1 Browse to Administration > Access > SSO Users and Groups in the vSphere Web Client.
2 Click the Users tab.
3 Right-click the user and select Edit User.
4 Make changes to the user.
You cannot change the user name of the user.
The password must meet the password policy requirements for the system.
5 Click OK.
Change Your Password in the vSphere Web ClientDepending on your vCenter Single Sign On privileges, you might not be able to view or edit your Single SignOn user profile. However, all users can change their Single Sign On passwords in the vSphere Web Client.
The password policy defined in the vCenter Single Sign-On configuration tool determines when your passwordexpires. By default, Single Sign-On passwords expire after one year, but your system administrator mightchange this depending on the policy of your organization.
IMPORTANT The vSphere Web Client does not remind you when your password is about to expire. If yourpassword expires and you are unable to log in to the vSphere Web Client, a Single Sign-On user withadministrator privileges can reset it.
Procedure
1 Log in to the vSphere Web Client using your vCenter Single Sign On credentials.
2 In the upper navigation pane, click your user name to pull down the menu.
3 Select Change Password and type your current password.
4 Type a new password and confirm it.
5 Click OK.
Add a vCenter Single Sign On Group with the vSphere Web ClientIn the vSphere Web Client, groups listed on the Groups tab are internal to vCenter Single Sign On. A grouplets you create a container for a collection of group members called principals.
When you add a Single Sign On group with the Single Sign On administration tool, the group is stored in theSingle Sign On database. The database runs on the system where Single Sign On is installed. These groups arepart of the identity source System-Domain.
Chapter 7 vCenter Server Authentication and User Management
VMware, Inc. 97
Group members can be users or other groups, and a group can contain members from across multiple identitysources. After you create a group and add principals, you apply permissions to the group. Members of thegroup inherit the group permissions.
Procedure
1 Browse to Administration > Access > SSO Users and Groups in the vSphere Web Client.
2 Select the Groups tab and click the New Group icon.
3 Enter a name and description for the group.
You cannot change the group name after you create the group.
4 Click OK.
What to do next
n Add principals (members) to the group.
n Assign permissions to the group.
Edit a vCenter Single Sign On Group in the vSphere Web ClientYou can change the description of a Single Sign On group in the vSphere Web Client. You cannot change thename of the group.
Single Sign On groups are stored in the Single Sign On database, which runs on the system where Single SignOn is installed. These groups are part of the identity source System-Domain.
Procedure
1 Browse to Administration > Access > SSO Users and Groups in the vSphere Web Client.
2 Click the Groups tab.
3 Right-click the group to edit and select Edit Group.
4 Edit the description for the group.
You cannot change the group name after you create the group.
5 Click OK.
Add Members to a vCenter Single Sign On Group in the vSphere Web ClientMembers of a vCenter Single Sign On group can be users or other groups from one or more identity sources.Members of a group are called principals.
Groups listed on the Groups tab in the vSphere Web Client are internal to Single Sign On and are part of theidentity source System-Domain. You can add group members from other domains to a local group. You canalso nest groups.
Procedure
1 Browse to Administration > Access > SSO Users and Groups in the vSphere Web Client.
2 Click the Groups tab and click the group (for example, Administrators).
3 Click Add Principals.
4 Select the identity source that contains the principal to add to the group.
5 (Optional) Enter a search term and click Search.
vSphere Security
98 VMware, Inc.
6 Select the principal and click Add.
You can simultaneously add multiple principals.
7 Click OK.
The principal (user or group) is a member of the group and appears in the lower panel of the Groups tab.
Remove Members from a Local Group with the vSphere Web ClientWhen you remove a member (user or group) from a local group, you do not delete the member from the system.Members of a group are called principals.
Procedure
1 Browse to Administration > Access > Users and Groups in the vSphere Web Client.
2 Select the Groups tab and click the group.
3 In the list of group members, select the user or group and click the Remove Principal icon.
4 Click OK.
The principal (user or group) is removed from the group, but it is still available in the system.
Manage Locked vCenter Single Sign On Users in the vSphere Web ClientA vCenter Single Sign On user account might be locked when a user exceeds the allowed number of failedlogin attempts. After a user account is locked, the user cannot log in to the Single Sign On system until theaccount is unlocked, either manually or after a certain amount of time has elapsed.
You specify the conditions under which a user account is locked in the Single Sign On Lockout Policy. Lockeduser accounts appear on the Users and Groups administration page. Users with appropriate privileges canmanually unlock Single Sign On user accounts before the specified amount of time has elapsed.
Prerequisites
You must be a member of the Single Sign On Administrators group to unlock a Single Sign On user.
Procedure
1 Browse to Administration > Access > SSO Users and Groups in the vSphere Web Client.
2 Click the Locked Users tab.
3 Right-click the user and select Unlock.
The Single Sign On user account is unlocked, and the user can log in to the Single Sign On server immediately.
Manage Disabled vCenter Single Sign On Users in the vSphere Web ClientWhen a vCenter Single Sign On user account is disabled, the user cannot log in to the Single Sign On serveruntil the account is enabled by an administrator.
Disabled user accounts remain available in the Single Sign On system, but the user cannot log in or performoperations on the server. Users with appropriate privileges can disable and enable accounts on theAdministration page.
Prerequisites
You must be a member of the Single Sign On Administrators group to manage disabled Single Sign On users.
Chapter 7 vCenter Server Authentication and User Management
VMware, Inc. 99
Procedure
1 Browse to Administration > Access > SSO Users and Groups in the vSphere Web Client.
2 Click the Disabled Users tab.
3 Right-click the user and select Enable.
The Single Sign On user account is enabled, and the user can log in and perform operations immediately.
Manage Application Users in the vSphere Web ClientWhen you install vCenter Single Sign On, vCenter Server instances and extensions are recognized asapplication (or solution) users and are granted privileges on the system. You can remove application users.
Procedure
1 Browse to Administration > Access > Users and Groups in the vSphere Web Client.
2 Click the Applications Users tab, and click the application user name.
3 Click the Delete Application User icon.
4 Click Yes.
The application (or solution) no longer has access to vSphere.
vCenter Server User Directory SettingsYou can limit the number of results returned when you search for users and groups and set a user directorytimeout for vCenter Server.
vCenter Server systems that use a directory service regularly validate users and groups against the userdirectory domain. Validation occurs at regular intervals specified in the vCenter Server settings. For example,if user Smith was assigned permissions and in the domain the user’s name was changed to Smith2, the hostconcludes that Smith no longer exists and removes permissions for that user when the next validation occurs.
Similarly, if user Smith is removed from the domain, all permissions are removed when the next validationoccurs. If a new user Smith is added to the domain before the next validation occurs, the new user Smithreceives all the permissions the old user Smith was assigned.
Adjust the Search List in Large DomainsIf you have domains with thousands of users or groups, or if searches take a long time to complete, adjust thesearch settings in the Select Users or Groups dialog box.
NOTE This procedure applies only to vCenter Server user lists. ESXi host user lists cannot be searched in thesame way.
Prerequisites
To configure Active Directory settings, the vSphere Client must be connected to the vCenter Server system.
Procedure
1 From the vSphere Client connected to a vCenter Server system, select Administration > vCenter ServerSettings.
2 In the navigation pane, select Active Directory.
vSphere Security
100 VMware, Inc.
3 Change the values as needed.
Option Description
Active Directory Timeout Timeout interval in seconds for connecting to the Active Directory server.This value specifies the maximum amount of time vCenter Server allows asearch to run on the selected domain. Searching large domains can take along time.
Enable Query Limit Select the check box to limit the number of users and groups that vCenterServer displays in the Add Permissions dialog box for the selected domain.
Users & Groups value Specifies the maximum number of users and groups vCenter Server displaysfrom the selected domain in the Select Users or Groups dialog box. If youenter 0 (zero), all users and groups appear.
4 Click OK.
Adjust the Search List in Large Domains in the vSphere Web ClientIf you have domains with thousands of users or groups, or if searches take a long time to complete, adjust thesearch settings.
NOTE This procedure applies only to vCenter Server user lists. ESXi host user lists cannot be searched in thesame way.
Procedure
1 Browse to the vCenter Server system in the vSphere Web Client object navigator.
2 Select the Manage tab and click Settings.
3 Click General and click Edit.
4 Select User directory.
5 Change the values as needed.
Option Description
User directory timeout Timeout interval in seconds for connecting to the Active Directory server.This value specifies the maximum amount of time vCenter Server allows asearch to run on the selected domain. Searching large domains can take along time.
Query limit Select the checkbox to set a maximum number of users and groups thatvCenter Server displays.
Query limit size Specifies the maximum number of users and groups vCenter Server displaysfrom the selected domain in the Select Users or Groups dialog box. If youenter 0 (zero), all users and groups appear.
6 Click OK.
Assigning Permissions for vCenter ServerPermissions are access roles that consist of a user and the user’s assigned role for an object such as a virtualmachine or ESXi host. Permissions grant users the right to perform the activities specified by the role on theobject to which the role is assigned.
For example, to configure memory for the host, you must grant a role to a user that includes theHost.Configuration.Memory Configuration privilege. By assigning different roles to users for differentobjects, you control the tasks that users can perform in your vSphere environment.
Chapter 7 vCenter Server Authentication and User Management
VMware, Inc. 101
Users other than root and vpxuser initially have no permissions on any objects, which means they cannot viewthese objects or perform operations on them. A user with Administrator privileges must assign permissionsto these users to allow them to perform tasks.
Many tasks require permissions on more than one object. These rules can help you determine where you mustassign permissions to allow particular operations:
n Any operation that consumes storage space, such as creating a virtual disk or taking a snapshot, requiresthe Datastore.Allocate Space privilege on the target datastore, as well as the privilege to perform theoperation itself.
n Moving an object in the inventory hierarchy requires appropriate privileges on the object itself, the sourceparent object (such as a folder or cluster), and the destination parent object.
n Each host and cluster has its own implicit resource pool that contains all the resources of that host orcluster. Deploying a virtual machine directly to a host or cluster requires the Resource.Assign VirtualMachine to Resource Pool privilege.
The list of privileges is the same for both ESXi and vCenter Server.
Assign Permissions in the vSphere Web ClientAfter you create users and groups and define roles, you must assign the users and groups and their roles tothe relevant inventory objects. You can assign the same permissions at one time on multiple objects by movingthe objects to a folder and setting the permissions on the folder.
Prerequisites
Permissions.Modify permission on the parent object of the object whose permissions you want to modify.
Procedure
1 Browse to the object in the vSphere Web Client object navigator.
2 Click the Manage tab and select Permissions.
3 Click Add Permission.
4 Click Add.
5 Identify the user or group to assign to this role.
a Select the domain where the user or group is located from the Domain drop-down menu.
b Type a name in the Search box or select a name from the list.
The system searches user names, group names, and descriptions.
c Select the user and click Add.
The name is added to either the Users or Groups list.
d (Optional) Click Check Names to verify that the user or group exists in the database.
e Click OK.
6 Select a role from the Assigned Role drop-down menu.
The roles that are assigned to the object appear in the menu. The privileges contained in the role are listedin the section below the role title.
7 (Optional) Deselect the Propagate to Child Objects check box.
The role is applied only to the selected object and does not propagate to the child objects.
vSphere Security
102 VMware, Inc.
8 Verify that the users and groups are assigned to the appropriate permissions and click OK.
The server adds the permission to the list of permissions for the object.
The list of permissions references all users and groups that have roles assigned to the object and indicateswhere in the vCenter Server hierarchy the role is assigned.
Change Permission Validation Settings in the vSphere Web ClientvCenter Server periodically validates its user and group lists against the users and groups in the user directory.It then removes users or groups that no longer exist in the domain. You can disable validation or change theinterval between validations.
Procedure
1 Browse to the vCenter Server system in the vSphere Web Client object navigator.
2 Select the Manage tab and click Settings.
3 Click General and click Edit.
4 Select User directory.
5 (Optional) Deselect the Validation check box to disable validation.
Validation is enabled by default. Users and groups are validated when vCenter Server system starts, evenif validation is disabled.
6 (Optional) If validation is enabled, enter a validation period to specify a time, in minutes, betweenvalidations.
7 Click OK.
Change Permissions in the vSphere Web ClientAfter a user or group and role pair is set for an inventory object, you can change the role paired with the useror group or change the setting of the Propagate check box. You can also remove the permission setting.
Procedure
1 Browse to the object in the vSphere Web Client object navigator.
2 Click the Manage tab and select Permissions.
3 Click the line item to select the user or group and role pair.
4 Click Change role on permission.
5 Select a role for the user or group from the Assigned Role drop-down menu.
6 To propagate the privileges to the children of the assigned inventory object, click the Propagate check boxand click OK.
Remove Permissions in the vSphere Web ClientRemoving a permission for a user or group does not remove the user or group from the list of those available.It also does not remove the role from the list of available items. It removes the user or group and role pair fromthe selected inventory object.
Procedure
1 Browse to the object in the vSphere Web Client object navigator.
2 Click the Manage tab and select Permissions.
3 Click the appropriate line item to select the user or group and role pair.
Chapter 7 vCenter Server Authentication and User Management
VMware, Inc. 103
4 Click Remove permission.
vCenter Server removes the permission setting.
Assigning Roles in the vSphere Web ClientvCenter Server grants access to objects only to users who are assigned permissions for the object. When youassign a user permissions for the object, you pair the user with a role. A role is a predefined set of privileges.
vCenter Server provides three default roles, and you cannot change the privileges associated with these roles.Each subsequent default role includes the privileges of the previous role. For example, the Administrator roleinherits the privileges of the Read Only role. Roles that you create do not inherit privileges from any of thedefault roles.
You can create custom roles by using the role-editing facilities in the vSphere Web Client to create privilegesets that match your user needs. The roles that you create directly on a host are not accessible withinvCenter Server. You can work with these roles only if you log in to the host directly from the vSphere Client.
NOTE When you add a custom role and do not assign any privileges to it, the role is created as a Read Onlyrole with three system-defined privileges: System.Anonymous, System.View, and System.Read.
If you manage ESXi hosts through vCenter Server, maintaining custom roles in the host and vCenter Servercan result in confusion and misuse. In this type of configuration, maintain custom roles only invCenter Server.
Create a Role in the vSphere Web ClientVMware recommends that you create roles to suit the access control needs of your environment.
If you create or edit a role on a vCenter Server system that is part of a connected group in Linked Mode, thechanges that you make are propagated to all other vCenter Server systems in the group. Assignments of rolesto specific users and objects are not shared across linked vCenter Server systems.
Prerequisites
Verify that you are logged in as a user with Administrator privileges.
Procedure
1 Browse to Administration > Role Manager in the vSphere Web Client.
2 Select a vCenter Server system from the drop-down menu.
3 Click Create role action.
4 Type a name for the new role.
5 Select privileges for the role and click OK.
Edit a Role in the vSphere Web ClientWhen you edit a role, you can change the privileges selected for that role. When completed, these privilegesare applied to any user or group that is assigned the edited role.
If you create or edit a role on a vCenter Server system that is part of a connected group in Linked Mode, thechanges you make are propagated to all other vCenter Server systems in the group. Assignments of roles tospecific users and objects are not shared across linked vCenter Server systems.
Prerequisites
Verify that you are logged in as a user with Administrator privileges.
vSphere Security
104 VMware, Inc.
Procedure
1 Browse to Administration > Role Manager in the vSphere Web Client.
2 Select a vCenter Server system from the drop-down menu.
3 Select a role and click Edit role action.
4 Select privileges for the role and click OK.
Clone a Role in the vSphere Web ClientYou can make a copy of an existing role, rename it, and edit it. When you make a copy, the new role is notapplied to any users or groups and objects. You must assign the role to users or groups and objects.
If you create or edit a role on a vCenter Server system that is part of a connected group in Linked Mode, thechanges you make are propagated to all other vCenter Server systems in the group. Assignments of roles tospecific users and objects are not shared across linked vCenter Server systems.
Prerequisites
Verify that you are logged in as a user with Administrator privileges.
Procedure
1 Browse to Administration > Role Manager in the vSphere Web Client.
2 Select a vCenter Server system from the drop-down menu.
3 Click Clone role action.
4 Type a name for the cloned role.
5 Select privileges for the role and click OK.
Rename a Role in the vSphere Web ClientYou might rename a role when you change the role's purpose. When you rename a role, no changes occur tothat role’s assignments.
If you create or modify a role on a vCenter Server system that is part of a connected group in Linked Mode,the changes you make are propagated to other vCenter Server systems in the group. Roles that are assignedto specific users and objects are not shared across linked vCenter Server systems.
Prerequisites
Verify that you are logged in as a user with Administrator privileges.
Procedure
1 Browse to Administration > Role Manager in the vSphere Web Client.
2 Select a vCenter Server system from the drop-down menu.
3 Select the role and click Edit role action.
4 Type a new name for the role.
5 Click OK.
Chapter 7 vCenter Server Authentication and User Management
VMware, Inc. 105
Remove a Role in the vSphere Web ClientWhen you remove a role that is not assigned to any users or groups, the definition of the role is removed fromthe list of roles. When you remove a role that is assigned to a user or group, you can remove assignments orreplace them with an assignment to another role.
CAUTION You must understand how users will be affected before removing all assignments or replacing them.Users who have no permissions granted to them cannot log in to vCenter Server.
Prerequisites
Verify that you are logged in as a user with Administrator privileges.
If you remove a role from a vCenter Server system that is part of a connected group in Linked Mode, checkthe use of that role on the other vCenter Server systems in the group. If you remove a role from one vCenterServer system, you remove the role from all other vCenter Server systems in the group, even if you reassignpermissions to another role on the current vCenter Server system.
Procedure
1 Browse to Administration > Role Manager in the vSphere Web Client.
2 Select a vCenter Server system from the drop-down menu.
3 Select a role and click Delete role.
4 Click Yes.
The role is removed from the list.
If the role is assigned to a user or group, a warning message appears.
5 Select a reassignment option and click OK.
Option Description
Remove Role Assignments Removes configured user or group and role pairings on the server. If a useror group does not have other permissions assigned, the user or group losesall privileges.
Reassign affected users to Reassigns any configured user or group and role pairings to the selected newrole.
Manually Replicate Data in a Multisite vCenter Single Sign-OnDeployment
When you make a change to a node in a multisite vCenter Single Sign-On deployment, you can replicate thechange to other nodes. To transport replication data among the vCenter Single Sign-On nodes in a multisitedeployment, you install each node in multisite mode. You do this procedure manually.
Data that is replicated includes information that determines service behavior and information that is managedthrough the vCenter Single Sign-On management interface. The following list includes examples ofinformation:
n Identity source configuration
n Password policy
n Lockout policy
n STS policy (token lifetimes, clock tolerance, delegation, and renewal count)
n Users from the system identity source, including solution user certificates
vSphere Security
106 VMware, Inc.
n Groups from the system identity source
n Password expiration configuration
n Certificate trust stores
n User lockout status for users from the system identity source
Changes (set or update) to any of these elements trigger the replication state. In addition, when a userunsuccessfully attempts to log in and invokes the lockout policy, a replication state is triggered. Only usersthat are defined in the system identity source can invoke the lockout policy.
IMPORTANT To ensure that data remains in sync during the manual replication process, do not make anychanges to the data to be replicated, for example adding or deleting identity sources or local users.
Manual transport of replication data must be performed sequentially. This process means that changes on anode are propagated to all other nodes in the deployment before changes occur on other nodes. This modelrequires one export and (N-1) imports for each updated node.
Export vCenter Single Sign-On Multisite Replication DataWhen you make a change on a vCenter Single Sign-On system and the system is part of multisite vCenterSingle Sign-On deployment, you can manually broadcast the change to the other systems in the deployment.To broadcast a change, export the replication state from the system where the change occurred.
You must perform manual transport of replication data sequentially. The changes on a node are propagatedto all other nodes in the deployment before changes occur on other nodes.
Prerequisites
Verify that you have vCenter Single Sign-On administrator privileges on the vCenter Single Sign-On systemwhere you export the replication data.
Procedure
1 Log in to the vCenter Single Sign-On system where the change originates.
2 Navigate to the following directory: SSO install directorysso-replication-cli
3 Run the repl_tool.cmd with the following parameters to export the replication state file.
export -f file -u admin_user_name [-p password]
Enter the following command-line parameters in the order listed.
Parameter Value
mode Export
file Relative or absolute path to a file where the data is exported.
admin_user_name Name of a valid vCenter Single Sign-On administrator user.
password Optional. If you do not supply the password, you are prompted for a password when you runthe command.
The file is exported to the directory you specified.
4 Copy the exported file to the target vCenter Single Sign-On systems or to a location that is accessible bythe other systems in the deployment.
What to do next
Import the replication data to the target systems.
Chapter 7 vCenter Server Authentication and User Management
VMware, Inc. 107
Import vCenter Single Sign-On Multisite Replication DataAfter you make a change to a vCenter Single Sign-On system in a multisite deployment, you can broadcast thechange to other vCenter Single Sign-On systems in the deployment. To broadcast a change, import thereplication state of the system where the change originated to the other nodes in the multisite deployment.
IMPORTANT This procedure completely overrides the state of the target node. You must perform manualtransport of replication data sequentially. This means that changes on a node are propagated to all other nodesin the deployment before changes occur on any other nodes.
Prerequisites
Export the replication data from the system where the change originates.
Verify that you have vCenter Single Sign-On administrator privileges on the target vCenter Single Sign-Onsystem where you import the replication data.
Procedure
1 Log in to the vCenter Single Sign-On system where you will apply the change.
2 Navigate to the directory SSO install directorysso-replication-cli
3 Run repl_tool.cmd with the following parameters to import the replication state file. Do not include aspace between the flag and the variable.
import -ffile -uadmin_user_name [-ppassword]
Enter the following command-line parameters in the order listed.
Parameter Value
mode Import.
file Relative or absolute path to a file from which the data is imported.
admin_user_name Name of a valid vCenter Single Sign-On administrator user.
password Optional. If you do not enter the password, you are prompted for a password when you run thecommand.
Single Sign-On imports the replication data and overrides the state of the target node.
Troubleshooting vCenter Single Sign-On
Determining the Cause of a Lookup Service ErrorvCenter Single Sign-On installation displays an error referring to the vCenter Server or the vSphere Web Client.
Problem
vCenter Server and Web Client installers show the error Could not contact Lookup Service. Please checkVM_ssoreg.log....
Cause
This problem has several causes, including unsynchronized clocks on the host machines, firewall blocking,and services that must be started.
vSphere Security
108 VMware, Inc.
Solution
1 Verify that the clocks on the host machines running vCenter Single Sign-On, vCenter Server, and the WebClient are synchronized.
2 View the specific log file found in the error message.
In the message, system temporary folder refers to %TEMP%.
3 Within the log file, search for the following messages.
The log file contains output from all installation attempts. Locate the last message that shows Initializingregistration provider...
Message Cause and solution
java.net.ConnectException:Connection timed out: connect
The IP address is incorrect, a firewall is blocking access to vCenter SingleSign-On, or vCenter Single Sign-On is overloaded.Ensure that a firewall is not blocking the vCenter Single Sign-On port (bydefault 7444) and that the machine on which vCenter Single Sign-On isinstalled has adequate free CPU, I/O. and RAM capacity.
java.net.ConnectException:Connection refused: connect
IThe IP address or FQDN is incorrect and the vCenter Single Sign-On hasnot started or has started within the past minute.Verify that vCenter Single Sign-On is working by checking the status ofvCenter Single Sign-On service (Windows) and vmware-sso daemon(Linux).Restart the service. If this does not correct the problem, see the recoverysection of the vSphere troubleshooting guide.
Unexpected status code: 404. SSOServer failed during initialization
Restart vCenter Single Sign-On. If this does not correct the problem, see theRecovery section of the vSphere Troubleshooting Guide.
The error shown in the UI begins withCould not connect to vCenterSingle Sign-on.
You also see the return code SslHandshakeFailed. This is an uncommonerror. It indicates that the provided IP address or FQDN that resolves tovCenter Single Sign-On host was not the one used when you installedvCenter Single Sign-On.In %TEMP%\VM_ssoreg.log, find the line that contains the followingmessage.host name in certificate did not match: <install-configuredFQDN or IP> != <A> or <B> or <C> where A was the FQDN you enteredduring the vCenter Single Sign-On installation, and B and C are system-generated allowable alternatives.Correct the configuration to use the FQDN on the right of the != sign in thelog file. In most cases, use the FQDN that you specified during vCenter SingleSign-On installation.If none of the alternatives are possible in your network configuration, recoveryour vCenter Single Sign-On SSL configuration.
Unable to Log In Using Active Directory Domain Authentication with the vCenterServer Appliance
If vCenter Single Sign-On does not autodiscover the Active Domain directory, you cannot log in to vCenter.
Problem
After enabling Active Directory domain authentication from the Authentication tab on the Web Console, youcannot log in to vCenter by using an Active Directory domain user.
Cause
The Active Directory domain was not autodiscovered by vCenter Single Sign-On. If Single Sign-Onautodiscovered the Active Directory domain, the Active Directory domain appears in the Identity Sources list.
Chapter 7 vCenter Server Authentication and User Management
VMware, Inc. 109

If the domain is present in the Identity sources list, log in using the qualified name. For example, log in withuser@domain or DOMAIN\user. If your organization requires you to authenticate with an unqualified name,add the domain to the list of default domains.
Solution
1 Open /var/log/vmware/vpx/sso_cfg.log.
2 Verify that you see lines that include the Active Directory domain, DNS Name, NetBIOS name, the primarycontroller and, if one exists, the secondary controller.
You need to know the names of the controllers for a later step.
3 Synchronize the clocks between the vCenter Server Appliance and the Active Directory domaincontrollers.
4 Enter the following code at a command line to verify that each domain controller has a pointer record(PTR) in the Active Directory domain DNS service and that the PTR record information matches the DNSname of the controller.
# dig my-controller.my-ad.com
...
;; ANSWER SECTION:
my-controller.my-ad.com (...) IN A controller IP address
...
# dig -x <controller IP address>
...
;; ANSWER SECTION:
IP-in-reverse.in-addr.arpa. (...) IN PTR
my-controller.my-ad.com
...
5 If the controller LDAP services are SSL-enabled, verify that the SSL certificate is valid.
6 (Optional) If steps 1 through 5 did not resolve the problem, remove the vCenter Server Appliance fromthe Active Directory domain and then rejoin the domain.
7 Restart vCenter Single Sign-On.
vSphere Web Client Fails to Recognize vCenter Single Sign-On LoginWhen you use vCenter Single Sign-On, logging in to the vSphere Web Client fails to validate the log incredentials.
Problem
When you log in to the vSphere Web Client with vCenter Single Sign-On, the credentials fail to validate.
Cause
The most common causes of the failure are an error when entering the credentials or an expired password.
Solution
n Verify that you entered the correct user name and password and that the case is correct.
n Provide a fully qualified domain name in the format user-name@domain-name or NETBIOS-Domain-Name/user-name.
n Verify that your password is valid. An expired password results in the same error for invalid credentials.
vSphere Security
110 VMware, Inc.
n If you are certain that the user name and password are valid, perform the applicable solution.
n If you log in with a user from the System-Domain, request the Single Sign-On administrator to resetyour password through the vSphere Web Client. By default the password for all users in the System-Domain expire in one year.
n If you are the Single Sign-On administrator, reset your password from the Single Sign-On serverconsole.
n If you log in with a user from an Active Directory or LDAP domain, follow your corporate policy toreset the expired password.
n If none of these steps fix the problem, view the logs to determine the cause, then take the correctaction.
You can find the logs for the vSphere Web Client service at the location shown for your OperatingSystem.
n Windows: C:\Program Files\VMware\Infrastructure\vSphere WebClient\DMServer\serviceability\
n Linux: /usr/lib/vmware-vsphere-client/server/serviceability/
vSphere Web Client with vCenter Single Sign-On Login Fails Because the UserAccount is Locked
When you use vCenter Single Sign-On and log in to the vSphere Web Client, you cannot log in if the useraccount is locked.
Problem
After several failed attempts, you cannot log in to the vSphere Web Client using vCenter Single Sign-On. Yousee the message that your account is locked.
Cause
You exceeded the maximum number of failed login attempts (three by default). For security, vCenter SingleSign-On locks your account.
Solution
n If you log in with a user name from the System-Domain, ask your vCenter Single Sign-On administratorto unlock your account.
n If you log in with a user from an Active Directory or LDAP domain, ask your Active Directory or LDAPadministrator to unlock your account.
n Wait until your account is unlocked. By default, the account is unlocked for users in the System-Domainafter 15 minutes.
vCenter Single Sign-On Server Fails to Respond to a vSphere Web Client Log InIf vCenter Single Sign-On fails to respond when logging in to the vSphere Web Client, there might be a problemwith connectivity.
Problem
The vCenter Single Sign-On server shows the error Failed to communicate with the vCenter Single SignOn server <server-address>. The server might have failed to respond or responded in an unexpected
way.
Chapter 7 vCenter Server Authentication and User Management
VMware, Inc. 111
Cause
Connectivity to your vCenter Single Sign-On server is lost. The most common causes are that there is noconnectivity to the Single Sign On server or that Single Sign On is not running.
1 The vCenter Single Sign-On server is working correctly, but there is no network connectivity to it.
2 The vCenter Single Sign-On server is not running.
Solution
1 Verify that the vCenter Single Sign-On server is working by checking the status of the vCenter Single Sign-On (Windows) and vmware-sso (Linux) services.
2 Restart vCenter Single Sign-On.
vCenter Server Appliance Fails to Authenticate Admin User From an ExternalvCenter Single Sign-On Server
When you are configuring a vCenter Server Appliance to work with an external vCenter Single Sign-On server,problems can occur if you set up users incorrectly.
Problem
You receive the Failed to authenticate the Single Sign On Administrator user error.
Cause
This error occurs for several reasons.
Solution
1 Re-enter the user name using email-style qualification, for example, user@domain.
If you log in as root, enter the user name as root@localos.
2 Verify that the user account is not locked or disabled.
Log in to the Web Client with the same user name as the one that generated the error message. If the useraccount is locked or disabled, any other vCenter Single Sign-On administrator can unlock or re-enable theuser account. If necessary, create additional vCenter Single Sign-On administrator accounts.
3 Review /var/log/vmware/sso/utils/sso_servicecfg.log to locate the initial error message.
This log can provide details about the cause of the error and the corrective action to take.
vSphere Security
112 VMware, Inc.
Encryption and Security Certificates 8ESXi and vCenter Server support standard X.509 version 3 (X.509v3) certificates to encrypt session informationsent over Secure Socket Layer (SSL) protocol connections between components. If SSL is enabled, data isprivate, protected, and cannot be modified in transit without detection.
All network traffic is encrypted as long as the following conditions are true:
n You did not change the Web proxy service to allow unencrypted traffic for the port.
n Your firewall is configured for medium or high security.
Certificate checking is enabled by default and SSL certificates are used to encrypt network traffic. However,ESXi and vCenter Server use automatically generated certificates that are created as part of the installationprocess and stored on the server system. These certificates are unique and make it possible to begin using theserver, but they are not verifiable and are not signed by a trusted, well-known certificate authority (CA). Thesedefault certificates are vulnerable to possible man-in-the-middle attacks.
To receive the full benefit of certificate checking, particularly if you intend to use encrypted remote connectionsexternally, install new certificates that are signed by a valid internal certificate authority or purchase a certificatefrom a trusted security authority. For more information, see Replacing Default vCenter and ESXi Certificates.
This chapter includes the following topics:
n “Generate New Certificates for ESXi,” on page 114
n “Enable SSL Certificate Validation Over NFC,” on page 114
n “Upload an SSL Certificate and Key Using HTTPS PUT,” on page 115
n “Replace a Default ESXi Certificate with a CA-Signed Certificate,” on page 115
n “Replace a Default ESXi Certificate with a CA-Signed Certificate Using the vifs Command,” onpage 116
n “Upload an SSH Key Using HTTPS PUT,” on page 116
n “Upload an SSH Key Using a vifs Command,” on page 117
n “Configure SSL Timeouts,” on page 117
n “Modifying ESXi Web Proxy Settings,” on page 118
n “Enable Certificate Checking and Verify Host Thumbprints,” on page 123
n “Enable Certificate Checking and Verify Host Thumbprints in the vSphere Web Client,” on page 123
VMware, Inc. 113
Generate New Certificates for ESXiYou typically generate new certificates only if you change the host name or accidentally delete the certificate.Under certain circumstances, you must force the host to generate new certificates.
Procedure
1 Log in to the ESXi Shell as a user with administrator privileges.
2 In the directory /etc/vmware/ssl, back up any existing certificates by renaming them using the followingcommands.
mv rui.crt orig.rui.crt
mv rui.key orig.rui.key
NOTE If you are regenerating certificates because you have deleted them, this step is unnecessary.
3 Run the command /sbin/generate-certificates to generate new certificates.
4 Restart the host after you install the new certificate.
Alternatively, you can put the host into maintenance mode, install the new certificate, and then use theDirect Console User Interface (DCUI) to restart the management agents.
5 Confirm that the host successfully generated new certificates by using the following command andcomparing the time stamps of the new certificate files with orig.rui.crt and orig.rui.key.
ls -la
Enable SSL Certificate Validation Over NFCNetwork File Copy (NFC) provides a file-type-aware FTP service for vSphere components. ESXi uses NFC foroperations such as copying and moving data between datastores. You can enable SSL certificate validation forNFC operations.
The initial authentication for an NFC transfer occurs using SSL, but by default, the actual data transfer occursin plain text for performance reasons. Because this file transfer occurs over the management network, the riskof data being leaked is related to the isolation of the management network.
When you enable SSL over NFC, connections between vSphere components over NFC are secure. Thisconnection can help prevent man-in-the-middle attacks within a datacenter.
NOTE Enabling SSL over NFC causes some performance degradation.
Prerequisites
Turn off the virtual machine.
Procedure
1 Find the virtual machine in the vSphere Web Client inventory.
a To find a virtual machine, select a datacenter, folder, cluster, resource pool, or host.
b Click the Related Objects tab and click Virtual Machines.
2 Right-click the virtual machine and click Edit Settings.
3 Select VM Options.
4 Click Advanced and click Edit Configuration.
5 Add or edit the parameter nfc.useSSL and set the value to true.
vSphere Security
114 VMware, Inc.
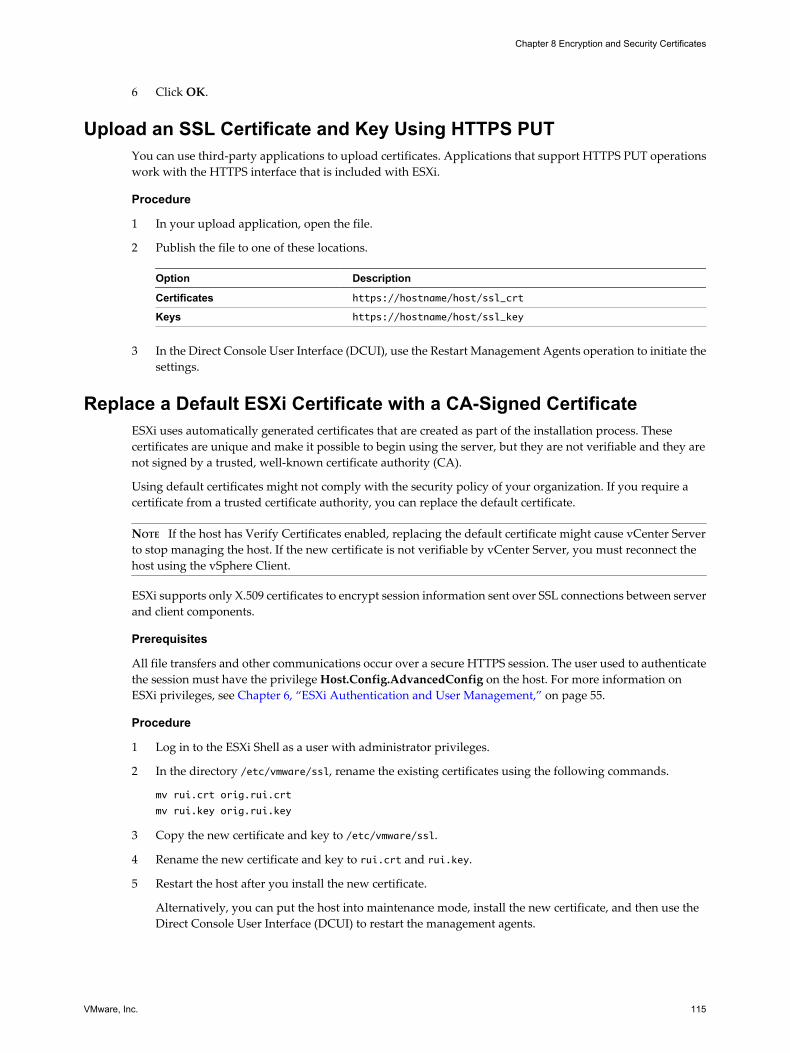
6 Click OK.
Upload an SSL Certificate and Key Using HTTPS PUTYou can use third-party applications to upload certificates. Applications that support HTTPS PUT operationswork with the HTTPS interface that is included with ESXi.
Procedure
1 In your upload application, open the file.
2 Publish the file to one of these locations.
Option Description
Certificates https://hostname/host/ssl_crt
Keys https://hostname/host/ssl_key
3 In the Direct Console User Interface (DCUI), use the Restart Management Agents operation to initiate thesettings.
Replace a Default ESXi Certificate with a CA-Signed CertificateESXi uses automatically generated certificates that are created as part of the installation process. Thesecertificates are unique and make it possible to begin using the server, but they are not verifiable and they arenot signed by a trusted, well-known certificate authority (CA).
Using default certificates might not comply with the security policy of your organization. If you require acertificate from a trusted certificate authority, you can replace the default certificate.
NOTE If the host has Verify Certificates enabled, replacing the default certificate might cause vCenter Serverto stop managing the host. If the new certificate is not verifiable by vCenter Server, you must reconnect thehost using the vSphere Client.
ESXi supports only X.509 certificates to encrypt session information sent over SSL connections between serverand client components.
Prerequisites
All file transfers and other communications occur over a secure HTTPS session. The user used to authenticatethe session must have the privilege Host.Config.AdvancedConfig on the host. For more information onESXi privileges, see Chapter 6, “ESXi Authentication and User Management,” on page 55.
Procedure
1 Log in to the ESXi Shell as a user with administrator privileges.
2 In the directory /etc/vmware/ssl, rename the existing certificates using the following commands.
mv rui.crt orig.rui.crt
mv rui.key orig.rui.key
3 Copy the new certificate and key to /etc/vmware/ssl.
4 Rename the new certificate and key to rui.crt and rui.key.
5 Restart the host after you install the new certificate.
Alternatively, you can put the host into maintenance mode, install the new certificate, and then use theDirect Console User Interface (DCUI) to restart the management agents.
Chapter 8 Encryption and Security Certificates
VMware, Inc. 115
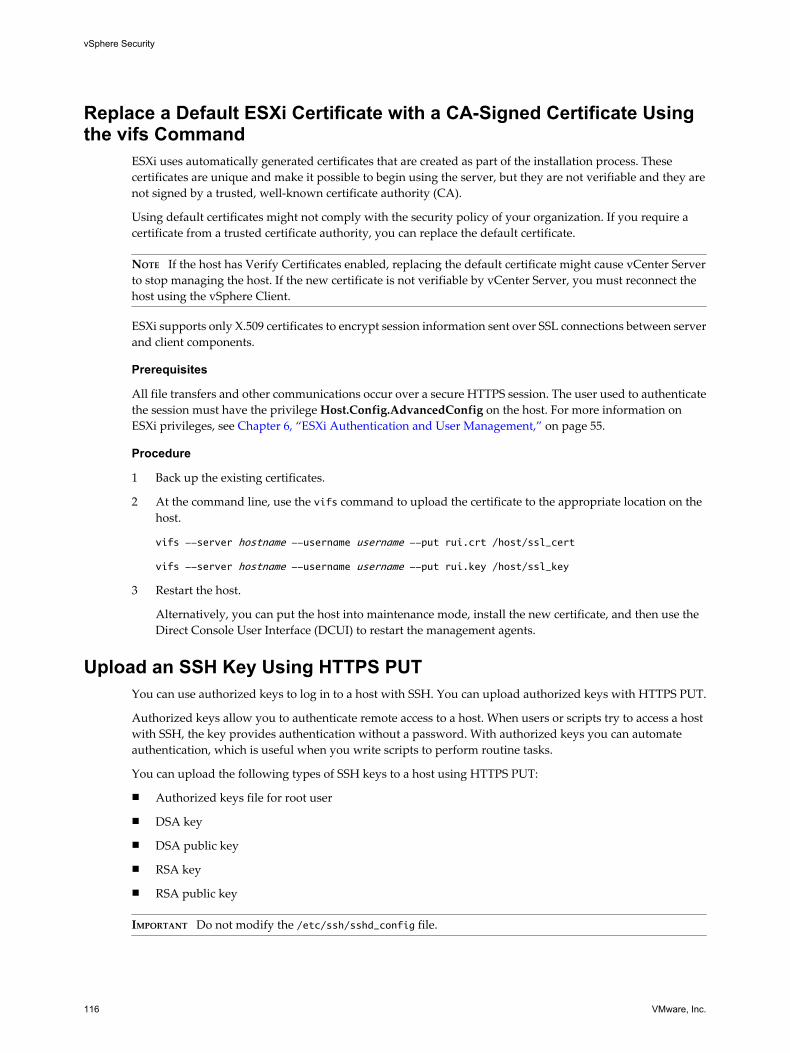
Replace a Default ESXi Certificate with a CA-Signed Certificate Usingthe vifs Command
ESXi uses automatically generated certificates that are created as part of the installation process. Thesecertificates are unique and make it possible to begin using the server, but they are not verifiable and they arenot signed by a trusted, well-known certificate authority (CA).
Using default certificates might not comply with the security policy of your organization. If you require acertificate from a trusted certificate authority, you can replace the default certificate.
NOTE If the host has Verify Certificates enabled, replacing the default certificate might cause vCenter Serverto stop managing the host. If the new certificate is not verifiable by vCenter Server, you must reconnect thehost using the vSphere Client.
ESXi supports only X.509 certificates to encrypt session information sent over SSL connections between serverand client components.
Prerequisites
All file transfers and other communications occur over a secure HTTPS session. The user used to authenticatethe session must have the privilege Host.Config.AdvancedConfig on the host. For more information onESXi privileges, see Chapter 6, “ESXi Authentication and User Management,” on page 55.
Procedure
1 Back up the existing certificates.
2 At the command line, use the vifs command to upload the certificate to the appropriate location on thehost.
vifs --server hostname --username username --put rui.crt /host/ssl_cert
vifs --server hostname --username username --put rui.key /host/ssl_key
3 Restart the host.
Alternatively, you can put the host into maintenance mode, install the new certificate, and then use theDirect Console User Interface (DCUI) to restart the management agents.
Upload an SSH Key Using HTTPS PUTYou can use authorized keys to log in to a host with SSH. You can upload authorized keys with HTTPS PUT.
Authorized keys allow you to authenticate remote access to a host. When users or scripts try to access a hostwith SSH, the key provides authentication without a password. With authorized keys you can automateauthentication, which is useful when you write scripts to perform routine tasks.
You can upload the following types of SSH keys to a host using HTTPS PUT:
n Authorized keys file for root user
n DSA key
n DSA public key
n RSA key
n RSA public key
IMPORTANT Do not modify the /etc/ssh/sshd_config file.
vSphere Security
116 VMware, Inc.
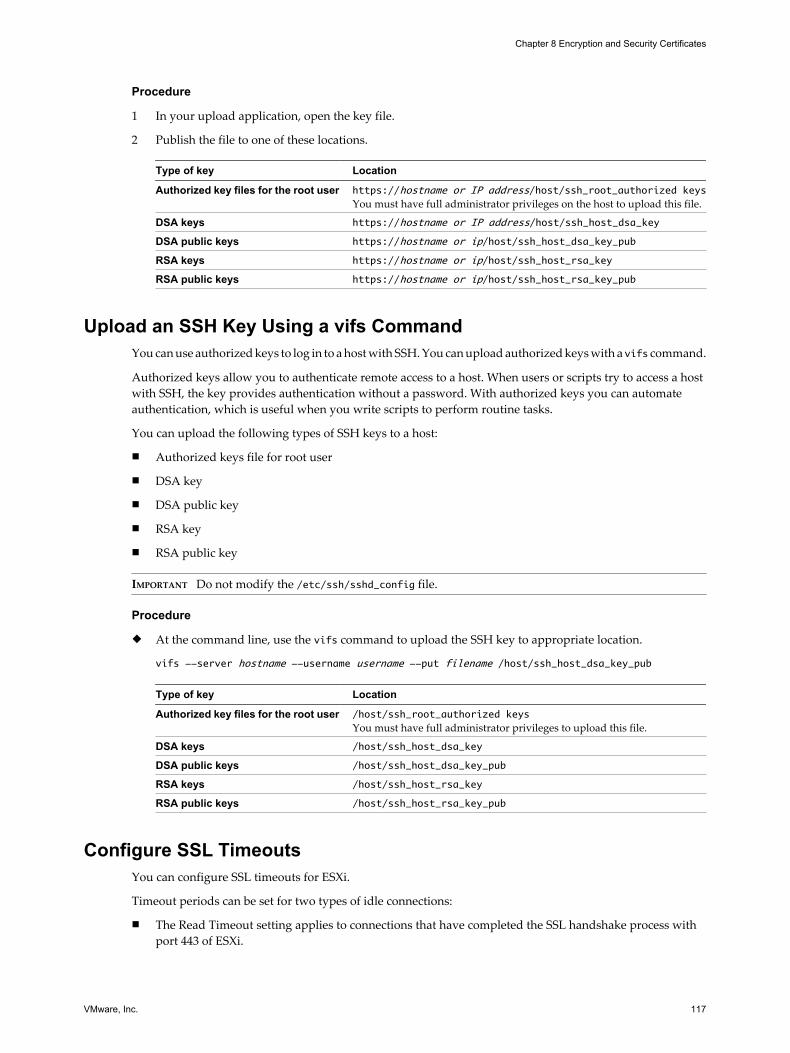
Procedure
1 In your upload application, open the key file.
2 Publish the file to one of these locations.
Type of key Location
Authorized key files for the root user https://hostname or IP address/host/ssh_root_authorized keysYou must have full administrator privileges on the host to upload this file.
DSA keys https://hostname or IP address/host/ssh_host_dsa_key
DSA public keys https://hostname or ip/host/ssh_host_dsa_key_pub
RSA keys https://hostname or ip/host/ssh_host_rsa_key
RSA public keys https://hostname or ip/host/ssh_host_rsa_key_pub
Upload an SSH Key Using a vifs CommandYou can use authorized keys to log in to a host with SSH. You can upload authorized keys with a vifs command.
Authorized keys allow you to authenticate remote access to a host. When users or scripts try to access a hostwith SSH, the key provides authentication without a password. With authorized keys you can automateauthentication, which is useful when you write scripts to perform routine tasks.
You can upload the following types of SSH keys to a host:
n Authorized keys file for root user
n DSA key
n DSA public key
n RSA key
n RSA public key
IMPORTANT Do not modify the /etc/ssh/sshd_config file.
Procedure
u At the command line, use the vifs command to upload the SSH key to appropriate location.
vifs --server hostname --username username --put filename /host/ssh_host_dsa_key_pub
Type of key Location
Authorized key files for the root user /host/ssh_root_authorized keysYou must have full administrator privileges to upload this file.
DSA keys /host/ssh_host_dsa_key
DSA public keys /host/ssh_host_dsa_key_pub
RSA keys /host/ssh_host_rsa_key
RSA public keys /host/ssh_host_rsa_key_pub
Configure SSL TimeoutsYou can configure SSL timeouts for ESXi.
Timeout periods can be set for two types of idle connections:
n The Read Timeout setting applies to connections that have completed the SSL handshake process withport 443 of ESXi.
Chapter 8 Encryption and Security Certificates
VMware, Inc. 117
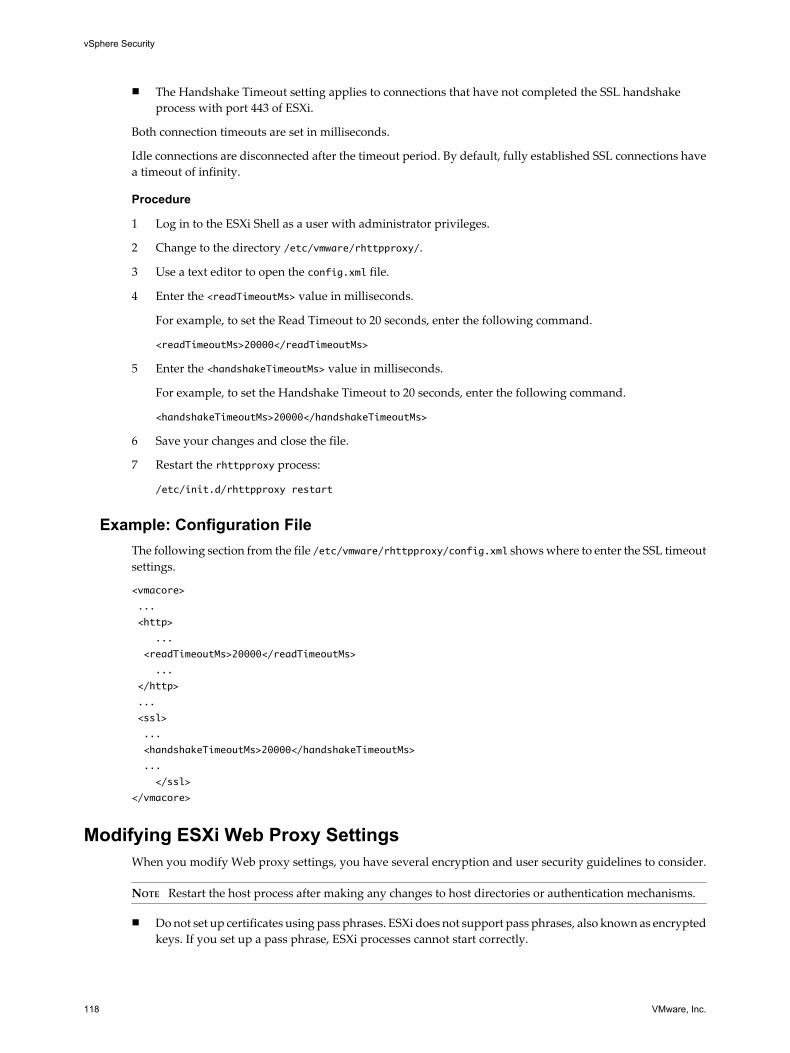
n The Handshake Timeout setting applies to connections that have not completed the SSL handshakeprocess with port 443 of ESXi.
Both connection timeouts are set in milliseconds.
Idle connections are disconnected after the timeout period. By default, fully established SSL connections havea timeout of infinity.
Procedure
1 Log in to the ESXi Shell as a user with administrator privileges.
2 Change to the directory /etc/vmware/rhttpproxy/.
3 Use a text editor to open the config.xml file.
4 Enter the <readTimeoutMs> value in milliseconds.
For example, to set the Read Timeout to 20 seconds, enter the following command.
<readTimeoutMs>20000</readTimeoutMs>
5 Enter the <handshakeTimeoutMs> value in milliseconds.
For example, to set the Handshake Timeout to 20 seconds, enter the following command.
<handshakeTimeoutMs>20000</handshakeTimeoutMs>
6 Save your changes and close the file.
7 Restart the rhttpproxy process:
/etc/init.d/rhttpproxy restart
Example: Configuration FileThe following section from the file /etc/vmware/rhttpproxy/config.xml shows where to enter the SSL timeoutsettings.
<vmacore>
...
<http>
...
<readTimeoutMs>20000</readTimeoutMs>
...
</http>
...
<ssl>
...
<handshakeTimeoutMs>20000</handshakeTimeoutMs>
...
</ssl>
</vmacore>
Modifying ESXi Web Proxy SettingsWhen you modify Web proxy settings, you have several encryption and user security guidelines to consider.
NOTE Restart the host process after making any changes to host directories or authentication mechanisms.
n Do not set up certificates using pass phrases. ESXi does not support pass phrases, also known as encryptedkeys. If you set up a pass phrase, ESXi processes cannot start correctly.
vSphere Security
118 VMware, Inc.
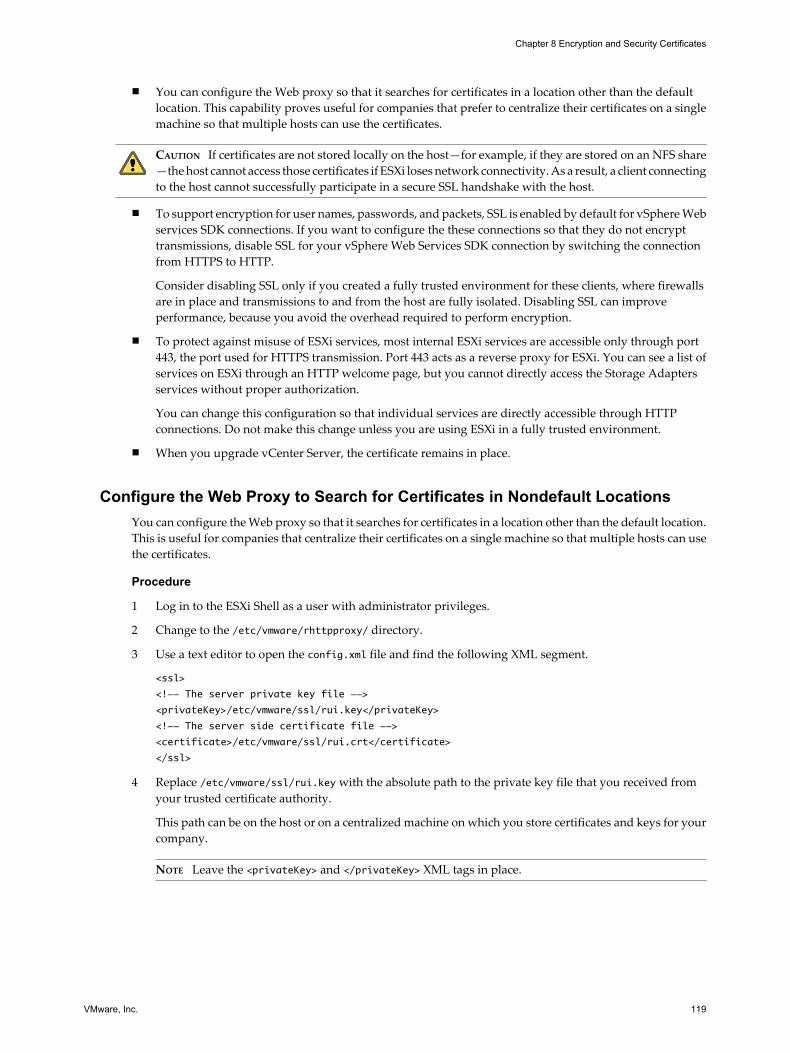
n You can configure the Web proxy so that it searches for certificates in a location other than the defaultlocation. This capability proves useful for companies that prefer to centralize their certificates on a singlemachine so that multiple hosts can use the certificates.
CAUTION If certificates are not stored locally on the host—for example, if they are stored on an NFS share—the host cannot access those certificates if ESXi loses network connectivity. As a result, a client connectingto the host cannot successfully participate in a secure SSL handshake with the host.
n To support encryption for user names, passwords, and packets, SSL is enabled by default for vSphere Webservices SDK connections. If you want to configure the these connections so that they do not encrypttransmissions, disable SSL for your vSphere Web Services SDK connection by switching the connectionfrom HTTPS to HTTP.
Consider disabling SSL only if you created a fully trusted environment for these clients, where firewallsare in place and transmissions to and from the host are fully isolated. Disabling SSL can improveperformance, because you avoid the overhead required to perform encryption.
n To protect against misuse of ESXi services, most internal ESXi services are accessible only through port443, the port used for HTTPS transmission. Port 443 acts as a reverse proxy for ESXi. You can see a list ofservices on ESXi through an HTTP welcome page, but you cannot directly access the Storage Adaptersservices without proper authorization.
You can change this configuration so that individual services are directly accessible through HTTPconnections. Do not make this change unless you are using ESXi in a fully trusted environment.
n When you upgrade vCenter Server, the certificate remains in place.
Configure the Web Proxy to Search for Certificates in Nondefault LocationsYou can configure the Web proxy so that it searches for certificates in a location other than the default location.This is useful for companies that centralize their certificates on a single machine so that multiple hosts can usethe certificates.
Procedure
1 Log in to the ESXi Shell as a user with administrator privileges.
2 Change to the /etc/vmware/rhttpproxy/ directory.
3 Use a text editor to open the config.xml file and find the following XML segment.
<ssl>
<!-- The server private key file -->
<privateKey>/etc/vmware/ssl/rui.key</privateKey>
<!-- The server side certificate file -->
<certificate>/etc/vmware/ssl/rui.crt</certificate>
</ssl>
4 Replace /etc/vmware/ssl/rui.key with the absolute path to the private key file that you received fromyour trusted certificate authority.
This path can be on the host or on a centralized machine on which you store certificates and keys for yourcompany.
NOTE Leave the <privateKey> and </privateKey> XML tags in place.
Chapter 8 Encryption and Security Certificates
VMware, Inc. 119
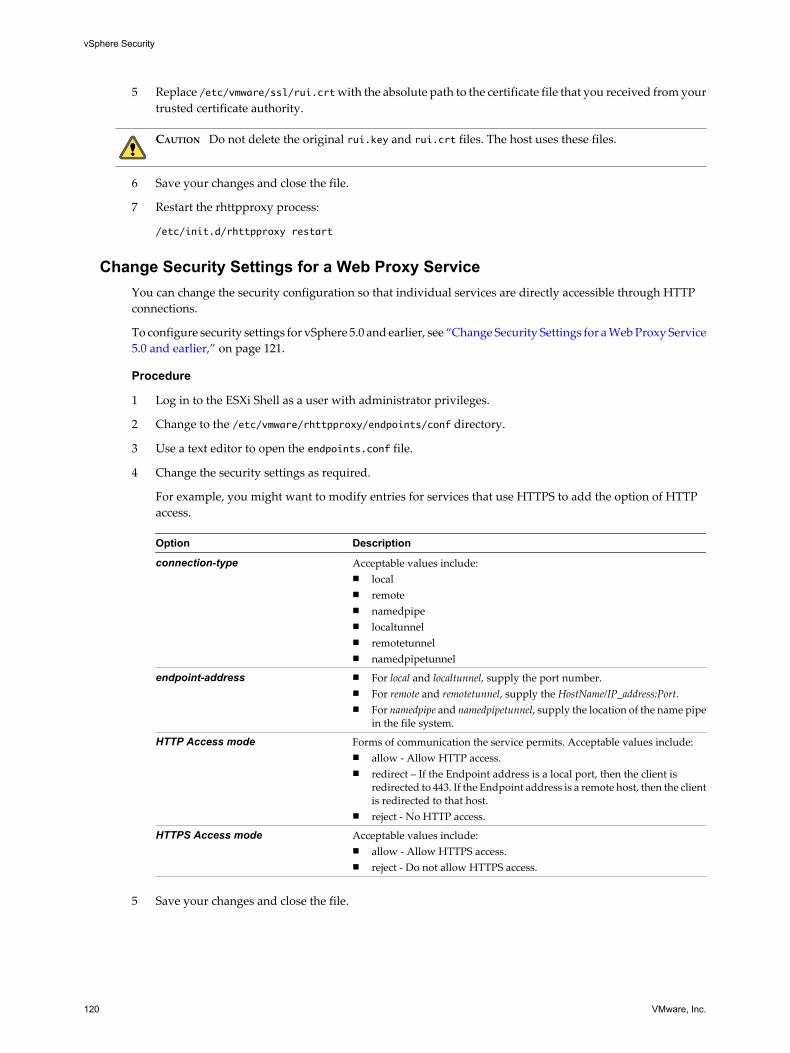
5 Replace /etc/vmware/ssl/rui.crt with the absolute path to the certificate file that you received from yourtrusted certificate authority.
CAUTION Do not delete the original rui.key and rui.crt files. The host uses these files.
6 Save your changes and close the file.
7 Restart the rhttpproxy process:
/etc/init.d/rhttpproxy restart
Change Security Settings for a Web Proxy ServiceYou can change the security configuration so that individual services are directly accessible through HTTPconnections.
To configure security settings for vSphere 5.0 and earlier, see “Change Security Settings for a Web Proxy Service5.0 and earlier,” on page 121.
Procedure
1 Log in to the ESXi Shell as a user with administrator privileges.
2 Change to the /etc/vmware/rhttpproxy/endpoints/conf directory.
3 Use a text editor to open the endpoints.conf file.
4 Change the security settings as required.
For example, you might want to modify entries for services that use HTTPS to add the option of HTTPaccess.
Option Description
connection-type Acceptable values include:n localn remoten namedpipen localtunneln remotetunneln namedpipetunnel
endpoint-address n For local and localtunnel, supply the port number.n For remote and remotetunnel, supply the HostName/IP_address:Port.n For namedpipe and namedpipetunnel, supply the location of the name pipe
in the file system.
HTTP Access mode Forms of communication the service permits. Acceptable values include:n allow - Allow HTTP access.n redirect – If the Endpoint address is a local port, then the client is
redirected to 443. If the Endpoint address is a remote host, then the clientis redirected to that host.
n reject - No HTTP access.
HTTPS Access mode Acceptable values include:n allow - Allow HTTPS access.n reject - Do not allow HTTPS access.
5 Save your changes and close the file.
vSphere Security
120 VMware, Inc.
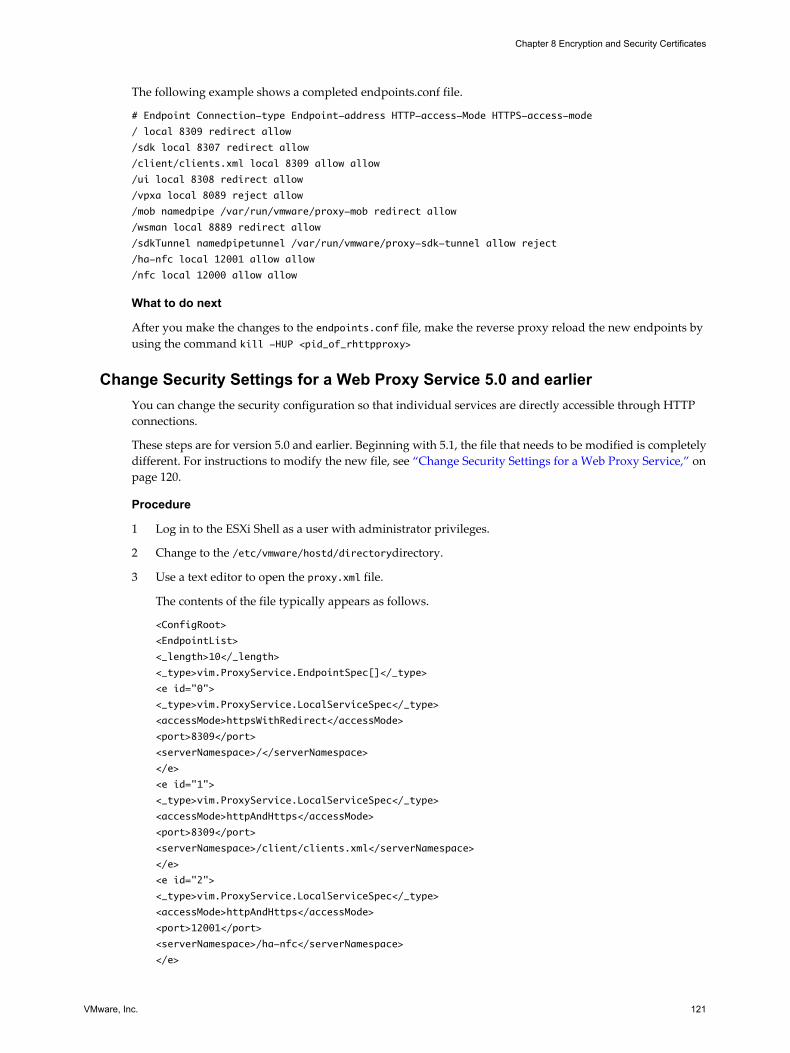
The following example shows a completed endpoints.conf file.
# Endpoint Connection-type Endpoint-address HTTP-access-Mode HTTPS-access-mode
/ local 8309 redirect allow
/sdk local 8307 redirect allow
/client/clients.xml local 8309 allow allow
/ui local 8308 redirect allow
/vpxa local 8089 reject allow
/mob namedpipe /var/run/vmware/proxy-mob redirect allow
/wsman local 8889 redirect allow
/sdkTunnel namedpipetunnel /var/run/vmware/proxy-sdk-tunnel allow reject
/ha-nfc local 12001 allow allow
/nfc local 12000 allow allow
What to do next
After you make the changes to the endpoints.conf file, make the reverse proxy reload the new endpoints byusing the command kill -HUP <pid_of_rhttpproxy>
Change Security Settings for a Web Proxy Service 5.0 and earlierYou can change the security configuration so that individual services are directly accessible through HTTPconnections.
These steps are for version 5.0 and earlier. Beginning with 5.1, the file that needs to be modified is completelydifferent. For instructions to modify the new file, see “Change Security Settings for a Web Proxy Service,” onpage 120.
Procedure
1 Log in to the ESXi Shell as a user with administrator privileges.
2 Change to the /etc/vmware/hostd/directorydirectory.
3 Use a text editor to open the proxy.xml file.
The contents of the file typically appears as follows.
<ConfigRoot>
<EndpointList>
<_length>10</_length>
<_type>vim.ProxyService.EndpointSpec[]</_type>
<e id="0">
<_type>vim.ProxyService.LocalServiceSpec</_type>
<accessMode>httpsWithRedirect</accessMode>
<port>8309</port>
<serverNamespace>/</serverNamespace>
</e>
<e id="1">
<_type>vim.ProxyService.LocalServiceSpec</_type>
<accessMode>httpAndHttps</accessMode>
<port>8309</port>
<serverNamespace>/client/clients.xml</serverNamespace>
</e>
<e id="2">
<_type>vim.ProxyService.LocalServiceSpec</_type>
<accessMode>httpAndHttps</accessMode>
<port>12001</port>
<serverNamespace>/ha-nfc</serverNamespace>
</e>
Chapter 8 Encryption and Security Certificates
VMware, Inc. 121
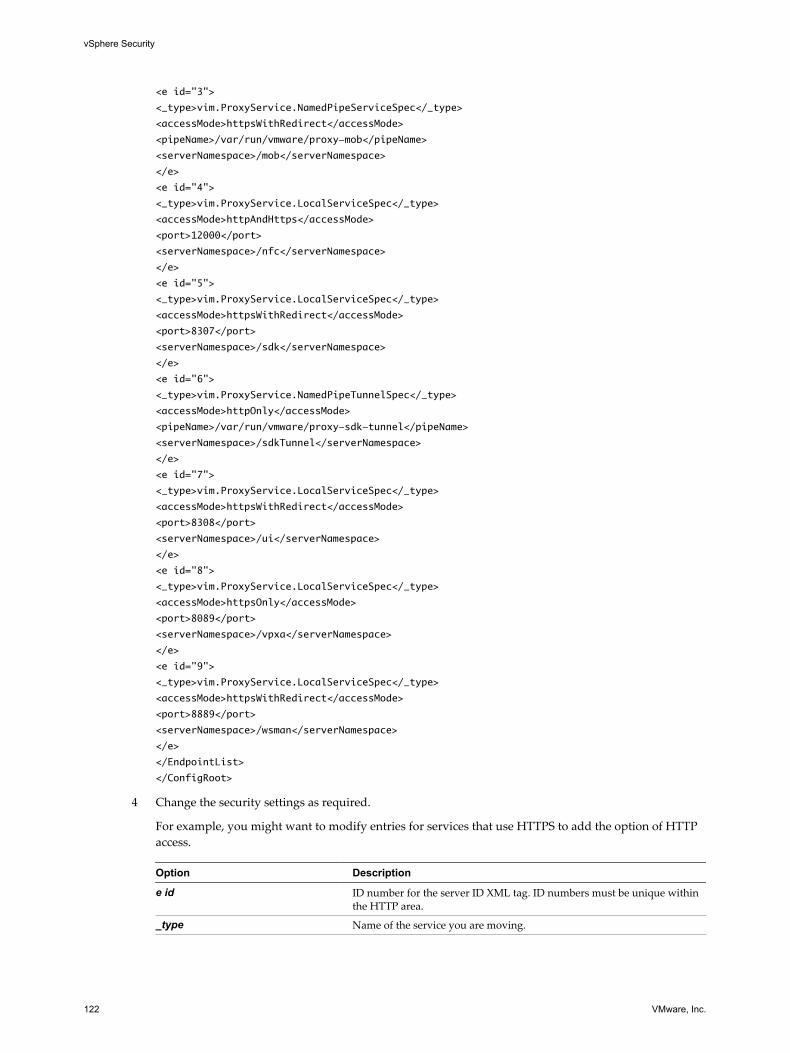
<e id="3">
<_type>vim.ProxyService.NamedPipeServiceSpec</_type>
<accessMode>httpsWithRedirect</accessMode>
<pipeName>/var/run/vmware/proxy-mob</pipeName>
<serverNamespace>/mob</serverNamespace>
</e>
<e id="4">
<_type>vim.ProxyService.LocalServiceSpec</_type>
<accessMode>httpAndHttps</accessMode>
<port>12000</port>
<serverNamespace>/nfc</serverNamespace>
</e>
<e id="5">
<_type>vim.ProxyService.LocalServiceSpec</_type>
<accessMode>httpsWithRedirect</accessMode>
<port>8307</port>
<serverNamespace>/sdk</serverNamespace>
</e>
<e id="6">
<_type>vim.ProxyService.NamedPipeTunnelSpec</_type>
<accessMode>httpOnly</accessMode>
<pipeName>/var/run/vmware/proxy-sdk-tunnel</pipeName>
<serverNamespace>/sdkTunnel</serverNamespace>
</e>
<e id="7">
<_type>vim.ProxyService.LocalServiceSpec</_type>
<accessMode>httpsWithRedirect</accessMode>
<port>8308</port>
<serverNamespace>/ui</serverNamespace>
</e>
<e id="8">
<_type>vim.ProxyService.LocalServiceSpec</_type>
<accessMode>httpsOnly</accessMode>
<port>8089</port>
<serverNamespace>/vpxa</serverNamespace>
</e>
<e id="9">
<_type>vim.ProxyService.LocalServiceSpec</_type>
<accessMode>httpsWithRedirect</accessMode>
<port>8889</port>
<serverNamespace>/wsman</serverNamespace>
</e>
</EndpointList>
</ConfigRoot>
4 Change the security settings as required.
For example, you might want to modify entries for services that use HTTPS to add the option of HTTPaccess.
Option Description
e id ID number for the server ID XML tag. ID numbers must be unique withinthe HTTP area.
_type Name of the service you are moving.
vSphere Security
122 VMware, Inc.
Option Description
accessmode Forms of communication the service permits. Acceptable values include:n httpOnly – The service is accessible only over plain-text HTTP
connections.n httpsOnly – The service is accessible only over HTTPS connections.n httpsWithRedirect – The service is accessible only over HTTPS
connections. Requests over HTTP are redirected to the appropriateHTTPS URL.
n httpAndHttps – The service is accessible both over HTTP and HTTPSconnections.
port Port number assigned to the service. You can assign a different port numberto the service.
serverNamespace Namespace for the server that provides this service, for example /sdkor /mob.
5 Save your changes and close the file.
6 Restart the hostd process:
/etc/init.d/hostd restart
Enable Certificate Checking and Verify Host ThumbprintsTo prevent man-in-the-middle attacks and to fully use the security that certificates provide, certificate checkingis enabled by default. You can verify that certificate checking is enabled in the vSphere Client.
NOTE vCenter Server certificates are preserved across upgrades.
Procedure
1 Log in to the vCenter Server system using the vSphere Client.
2 Select Administration > vCenter Server Settings.
3 Click SSL Settings in the left pane and verify that Check host certificates is selected.
4 If there are hosts that require manual validation, compare the thumbprints listed for the hosts to thethumbprints in the host console.
To obtain the host thumbprint, use the Direct Console User Interface (DCUI).
a Log in to the direct console and press F2 to access the System Customization menu.
b Select View Support Information.
The host thumbprint appears in the column on the right.
5 If the thumbprint matches, select the Verify check box next to the host.
Hosts that are not selected will be disconnected after you click OK.
6 Click OK.
Enable Certificate Checking and Verify Host Thumbprints in thevSphere Web Client
To prevent man-in-the-middle attacks and to fully use the security that certificates provide, certificate checkingis enabled by default. You can verify that certificate checking is enabled in the vSphere Web Client.
NOTE vCenter Server certificates are preserved across upgrades.
Chapter 8 Encryption and Security Certificates
VMware, Inc. 123
Procedure
1 Browse to the vCenter Server system in the vSphere Web Client object navigator.
2 Select the Manage tab, click Settings, and click General.
3 Click Edit.
4 Click SSL Settings and verify that vCenter requires verified host SSL certificates is selected.
5 If there are hosts that require manual validation, compare the thumbprints listed for the hosts to thethumbprints in the host console.
To obtain the host thumbprint, use the Direct Console User Interface (DCUI).
a Log in to the direct console and press F2 to access the System Customization menu.
b Select View Support Information.
The host thumbprint appears in the column on the right.
6 If the thumbprint matches, select the Verify check box next to the host.
Hosts that are not selected will be disconnected after you click OK.
7 Click OK.
vSphere Security
124 VMware, Inc.
Securing Virtual Machines 9The guest operating system that runs in the virtual machine is subject to the same security risks as a physicalsystem. Secure virtual machines as you would secure physical machines.
This chapter includes the following topics:
n “General Virtual Machine Protection,” on page 125
n “Configuring Logging Levels for the Guest Operating System,” on page 129
n “Limiting Exposure of Sensitive Data Copied to the Clipboard,” on page 132
n “Disable Unexposed Features,” on page 133
n “Limiting Guest Operating System Writes to Host Memory,” on page 134
n “Removing Unnecessary Hardware Devices,” on page 136
n “Prevent a Virtual Machine User or Process from Disconnecting Devices,” on page 136
n “Prevent a Virtual Machine User or Process from Disconnecting Devices in the vSphere Web Client,” onpage 137
General Virtual Machine ProtectionA virtual machine is, in most respects, the equivalent of a physical server. Employ the same security measuresin virtual machines that you do for physical systems.
For example, ensure that antivirus, anti-spy ware, intrusion detection, and other protection are enabled forevery virtual machine in your virtual infrastructure. Keep all security measures up-to-date, including applyingappropriate patches. It is especially important to keep track of updates for dormant virtual machines that arepowered off, because it can be easy to overlook them.
Disable Unnecessary Functions Inside Virtual MachinesAny service running in a virtual machine provides the potential for attack. By disabling unnecessary systemcomponents that are not necessary to support the application or service running on the system, you reduce thenumber of components that can be attacked.
Virtual machines do not usually require as many services or functions as physical servers. When you virtualizea system, evaluate whether a particular service or function is necessary.
Procedure
n Disable unused services in the operating system.
For example, if the system runs a file server, turn off any Web services.
VMware, Inc. 125
n Disconnect unused physical devices, such as CD/DVD drives, floppy drives, and USB adaptors.
See “Removing Unnecessary Hardware Devices,” on page 136.
n Turn off screen savers.
n Do not run the X Window system on Linux, BSD, or Solaris guest operating systems unless it is necessary.
Use Templates to Deploy Virtual MachinesWhen you manually install guest operating systems and applications on a virtual machine, you introduce arisk of misconfiguration. By using a template to capture a hardened base operating system image with noapplications installed, you can ensure that all virtual machines are created with a known baseline level ofsecurity.
You can use these templates to create other, application-specific templates, or you can use the applicationtemplate to deploy virtual machines.
Procedure
u Provide templates for virtual machine creation that contain hardened, patched, and properly configuredoperating system deployments.
If possible, deploy applications in templates as well. Ensure that the applications do not depend oninformation specific to the virtual machine to be deployed.
What to do next
You can convert a template to a virtual machine and back to a template in the vSphere Client, which makesupdating templates easy. For more information about templates, see the vSphere Virtual MachineAdministration documentation.
Prevent Virtual Machines from Taking Over ResourcesWhen one virtual machine consumes so much of the host resources that other virtual machines on the hostcannot perform their intended functions, a Denial of Service (DoS) might occur. To prevent a virtual machinefrom causing a DoS, use host resource management features such as setting shares and limits to control theserver resources that a virtual machine consumes.
By default, all virtual machines on a host share resources equally.
Procedure
u Use shares or reservations to guarantee resources to critical virtual machines.
Limits constrain resource consumption by virtual machines that have a greater risk of being exploited orattacked, or that run applications that are known to have the potential to greatly consume resources.
What to do next
See the vSphere Resource Management documentation for information about shares and limits.
Restrict Unauthorized Users from Running Commands within a Virtual MachineBy default, the vCenter Server Administrator role allows users to interact with files and programs within avirtual machine's guest operating system. To reduce the risk of breaching guest confidentiality, availability, orintegrity, create a non-guest access role without the Guest Operations privilege.
Apply the role to users who require administrator privileges, but who are not authorized to interact with filesand programs within a guest operating system.
vSphere Security
126 VMware, Inc.
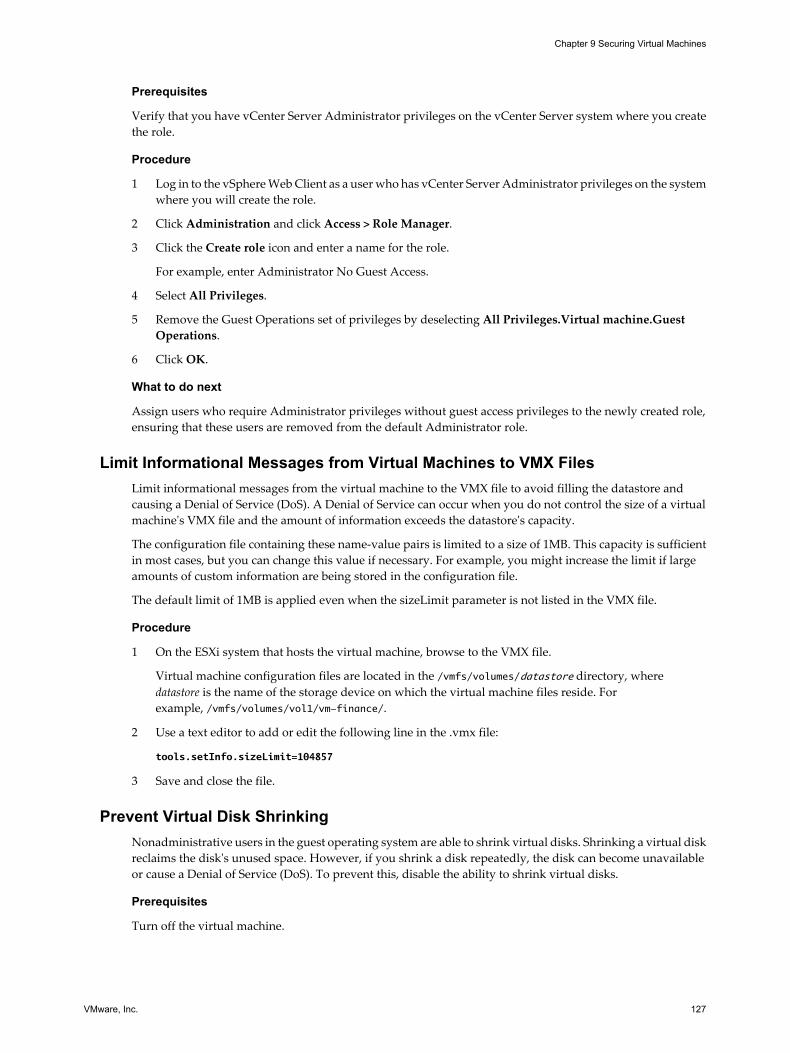
Prerequisites
Verify that you have vCenter Server Administrator privileges on the vCenter Server system where you createthe role.
Procedure
1 Log in to the vSphere Web Client as a user who has vCenter Server Administrator privileges on the systemwhere you will create the role.
2 Click Administration and click Access > Role Manager.
3 Click the Create role icon and enter a name for the role.
For example, enter Administrator No Guest Access.
4 Select All Privileges.
5 Remove the Guest Operations set of privileges by deselecting All Privileges.Virtual machine.GuestOperations.
6 Click OK.
What to do next
Assign users who require Administrator privileges without guest access privileges to the newly created role,ensuring that these users are removed from the default Administrator role.
Limit Informational Messages from Virtual Machines to VMX FilesLimit informational messages from the virtual machine to the VMX file to avoid filling the datastore andcausing a Denial of Service (DoS). A Denial of Service can occur when you do not control the size of a virtualmachine's VMX file and the amount of information exceeds the datastore's capacity.
The configuration file containing these name-value pairs is limited to a size of 1MB. This capacity is sufficientin most cases, but you can change this value if necessary. For example, you might increase the limit if largeamounts of custom information are being stored in the configuration file.
The default limit of 1MB is applied even when the sizeLimit parameter is not listed in the VMX file.
Procedure
1 On the ESXi system that hosts the virtual machine, browse to the VMX file.
Virtual machine configuration files are located in the /vmfs/volumes/datastore directory, wheredatastore is the name of the storage device on which the virtual machine files reside. Forexample, /vmfs/volumes/vol1/vm-finance/.
2 Use a text editor to add or edit the following line in the .vmx file:
tools.setInfo.sizeLimit=104857
3 Save and close the file.
Prevent Virtual Disk ShrinkingNonadministrative users in the guest operating system are able to shrink virtual disks. Shrinking a virtual diskreclaims the disk's unused space. However, if you shrink a disk repeatedly, the disk can become unavailableor cause a Denial of Service (DoS). To prevent this, disable the ability to shrink virtual disks.
Prerequisites
Turn off the virtual machine.
Chapter 9 Securing Virtual Machines
VMware, Inc. 127
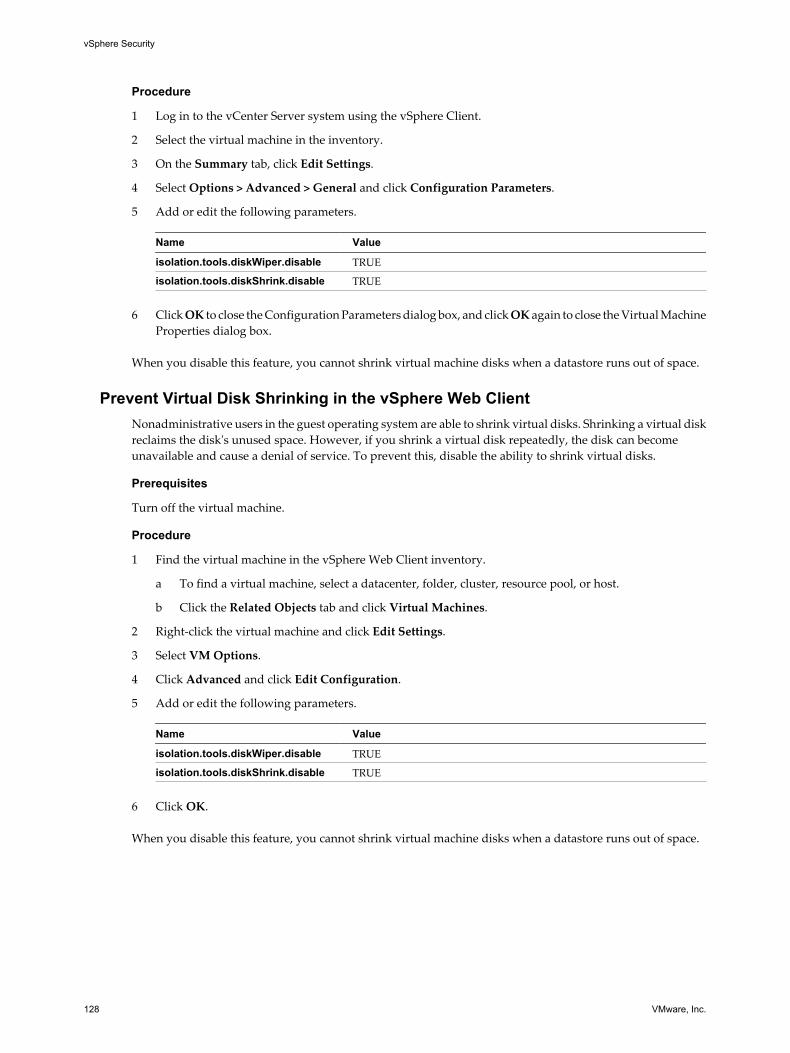
Procedure
1 Log in to the vCenter Server system using the vSphere Client.
2 Select the virtual machine in the inventory.
3 On the Summary tab, click Edit Settings.
4 Select Options > Advanced > General and click Configuration Parameters.
5 Add or edit the following parameters.
Name Value
isolation.tools.diskWiper.disable TRUE
isolation.tools.diskShrink.disable TRUE
6 Click OK to close the Configuration Parameters dialog box, and click OK again to close the Virtual MachineProperties dialog box.
When you disable this feature, you cannot shrink virtual machine disks when a datastore runs out of space.
Prevent Virtual Disk Shrinking in the vSphere Web ClientNonadministrative users in the guest operating system are able to shrink virtual disks. Shrinking a virtual diskreclaims the disk's unused space. However, if you shrink a virtual disk repeatedly, the disk can becomeunavailable and cause a denial of service. To prevent this, disable the ability to shrink virtual disks.
Prerequisites
Turn off the virtual machine.
Procedure
1 Find the virtual machine in the vSphere Web Client inventory.
a To find a virtual machine, select a datacenter, folder, cluster, resource pool, or host.
b Click the Related Objects tab and click Virtual Machines.
2 Right-click the virtual machine and click Edit Settings.
3 Select VM Options.
4 Click Advanced and click Edit Configuration.
5 Add or edit the following parameters.
Name Value
isolation.tools.diskWiper.disable TRUE
isolation.tools.diskShrink.disable TRUE
6 Click OK.
When you disable this feature, you cannot shrink virtual machine disks when a datastore runs out of space.
vSphere Security
128 VMware, Inc.
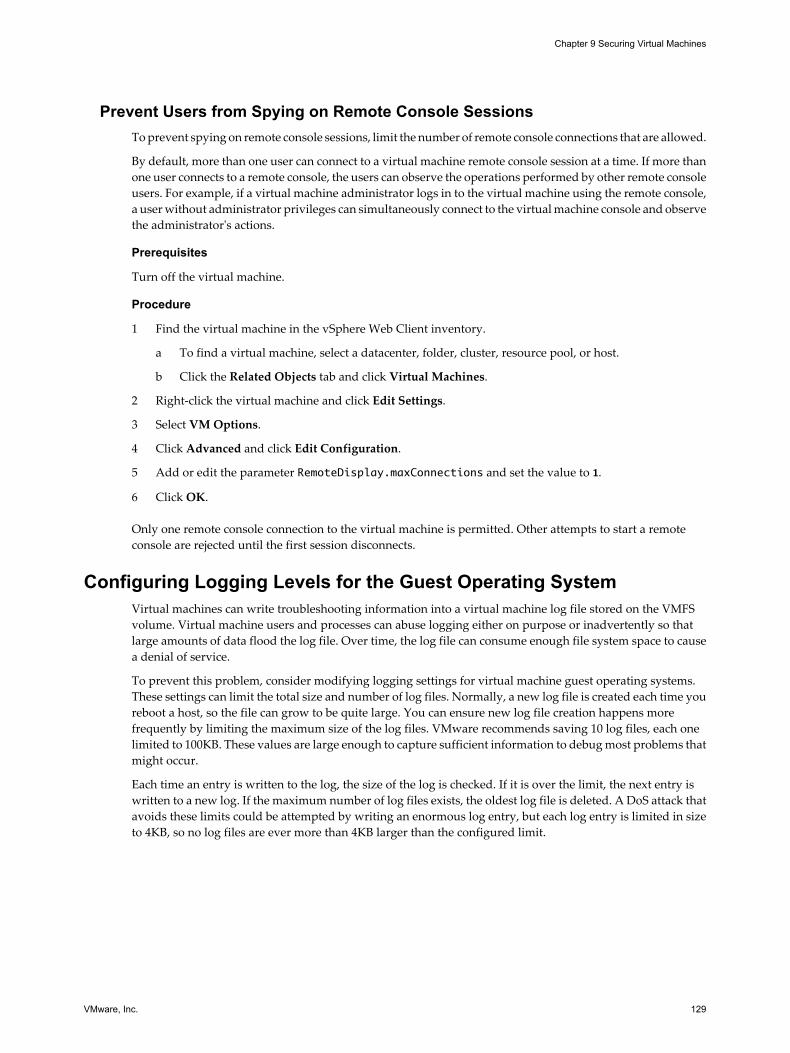
Prevent Users from Spying on Remote Console SessionsTo prevent spying on remote console sessions, limit the number of remote console connections that are allowed.
By default, more than one user can connect to a virtual machine remote console session at a time. If more thanone user connects to a remote console, the users can observe the operations performed by other remote consoleusers. For example, if a virtual machine administrator logs in to the virtual machine using the remote console,a user without administrator privileges can simultaneously connect to the virtual machine console and observethe administrator's actions.
Prerequisites
Turn off the virtual machine.
Procedure
1 Find the virtual machine in the vSphere Web Client inventory.
a To find a virtual machine, select a datacenter, folder, cluster, resource pool, or host.
b Click the Related Objects tab and click Virtual Machines.
2 Right-click the virtual machine and click Edit Settings.
3 Select VM Options.
4 Click Advanced and click Edit Configuration.
5 Add or edit the parameter RemoteDisplay.maxConnections and set the value to 1.
6 Click OK.
Only one remote console connection to the virtual machine is permitted. Other attempts to start a remoteconsole are rejected until the first session disconnects.
Configuring Logging Levels for the Guest Operating SystemVirtual machines can write troubleshooting information into a virtual machine log file stored on the VMFSvolume. Virtual machine users and processes can abuse logging either on purpose or inadvertently so thatlarge amounts of data flood the log file. Over time, the log file can consume enough file system space to causea denial of service.
To prevent this problem, consider modifying logging settings for virtual machine guest operating systems.These settings can limit the total size and number of log files. Normally, a new log file is created each time youreboot a host, so the file can grow to be quite large. You can ensure new log file creation happens morefrequently by limiting the maximum size of the log files. VMware recommends saving 10 log files, each onelimited to 100KB. These values are large enough to capture sufficient information to debug most problems thatmight occur.
Each time an entry is written to the log, the size of the log is checked. If it is over the limit, the next entry iswritten to a new log. If the maximum number of log files exists, the oldest log file is deleted. A DoS attack thatavoids these limits could be attempted by writing an enormous log entry, but each log entry is limited in sizeto 4KB, so no log files are ever more than 4KB larger than the configured limit.
Chapter 9 Securing Virtual Machines
VMware, Inc. 129

Limit Log File Numbers and SizesTo prevent virtual machine users and processes from flooding the log file, which can lead to denial of service,you can limit the number and size of the log files ESXi generates.
ESXi creates a new log file only when you reboot the host. Therefore, the size of log files on the host can becomeunmanageable if you do not reboot the host frequently. To ensure that ESXi creates new log files frequently,you can limit the maximum size of the log files. To restrict the total size of logging data, save 10 log files andlimit each file to 1,000KB.
Procedure
1 Log in to a vCenter Server system using the vSphere Client.
2 On the Summary tab, click Edit Settings.
3 Select Options > General Options and make a record of the path displayed in the Virtual MachineConfiguration File text box.
4 Log into the ESXi Shell as a user with administrator privileges.
5 Change directories to access the virtual machine configuration file whose path you recorded in Step 3.
Virtual machine configuration files are located in the /vmfs/volumes/datastore directory, wheredatastore is the name of the storage device on which the virtual machine files reside. For example, if thevirtual machine configuration file you obtained from the Virtual Machine Properties dialog box is[vol1]vm-finance/vm-finance.vmx, you would change to the following directory.
/vmfs/volumes/vol1/vm-finance/
6 To limit the log size, use a text editor to add or edit the following line to the .vmx file, wheremaximum_size is the maximum file size in bytes.
log.rotateSize=maximum_size
For example, to limit the size to around 100KB, enter 100000.
7 To keep a limited number of log files, use a text editor to add or edit the following line to the .vmx file,where number_of_files_to_keep is the number of files the server keeps.
log.keepOld=number_of_files_to_keep
For example, to keep 10 log files and begin deleting the oldest ones as new ones are created, enter 10.
8 Save your changes and close the file.
Virtual machine logs are unavailable for troubleshooting and support.
Limit Log File Numbers and Sizes in the vSphere Web ClientTo prevent virtual machine users and processes from flooding the log file, which can lead to denial of service,you can limit the number and size of the log files ESXi generates.
Prerequisites
Turn off the virtual machine.
Procedure
1 Find the virtual machine in the vSphere Web Client inventory.
a To find a virtual machine, select a datacenter, folder, cluster, resource pool, or host.
b Click the Related Objects tab and click Virtual Machines.
vSphere Security
130 VMware, Inc.

2 Right-click the virtual machine and click Edit Settings.
3 Select VM Options.
4 Click Advanced and click Edit Configuration.
5 Add or edit the following parameters.
Name Value
log.rotateSize Maximum size of log file in bytes. For example, to limit the size to 100KB,enter 100000.
log.keepOld Number of files to keep. For example, to keep 10 log files and begin deletingthe oldest files as new ones are created, enter 10.
6 Click OK.
Disable Logging for the Guest Operating SystemIf you choose not to write troubleshooting information into a virtual machine log file stored on the VMFSvolume, you can stop logging altogether.
If you disable logging for the guest operating system, be aware that you might not be able to gather adequatelogs to allow troubleshooting. Further, VMware does not offer technical support for virtual machine problemsif logging has been disabled.
Procedure
1 Log in to a vCenter Server system using the vSphere Client and select the virtual machine in the inventory.
2 On the Summary tab, click Edit Settings.
3 Click the Options tab and in the options list under Advanced, select General.
4 In Settings, deselect Enable logging.
5 Click OK to close the Virtual Machine Properties dialog box.
Disable Logging for the Guest Operating System in the vSphere Web ClientIf you choose not to write troubleshooting information into a virtual machine log file stored on the VMFSvolume, you can stop logging altogether.
If you disable logging for the guest operating system, be aware that you might not be able to gather adequatelogs to allow troubleshooting. Further, VMware does not offer technical support for virtual machine problemsif logging has been disabled.
Procedure
1 Find the virtual machine in the vSphere Web Client inventory.
a To find a virtual machine, select a datacenter, folder, cluster, resource pool, or host.
b Click the Related Objects tab and click Virtual Machines.
2 Right-click the virtual machine and click Edit Settings.
3 Select VM Options > Advanced.
4 In Settings, deselect Enable logging.
5 Click OK.
Chapter 9 Securing Virtual Machines
VMware, Inc. 131
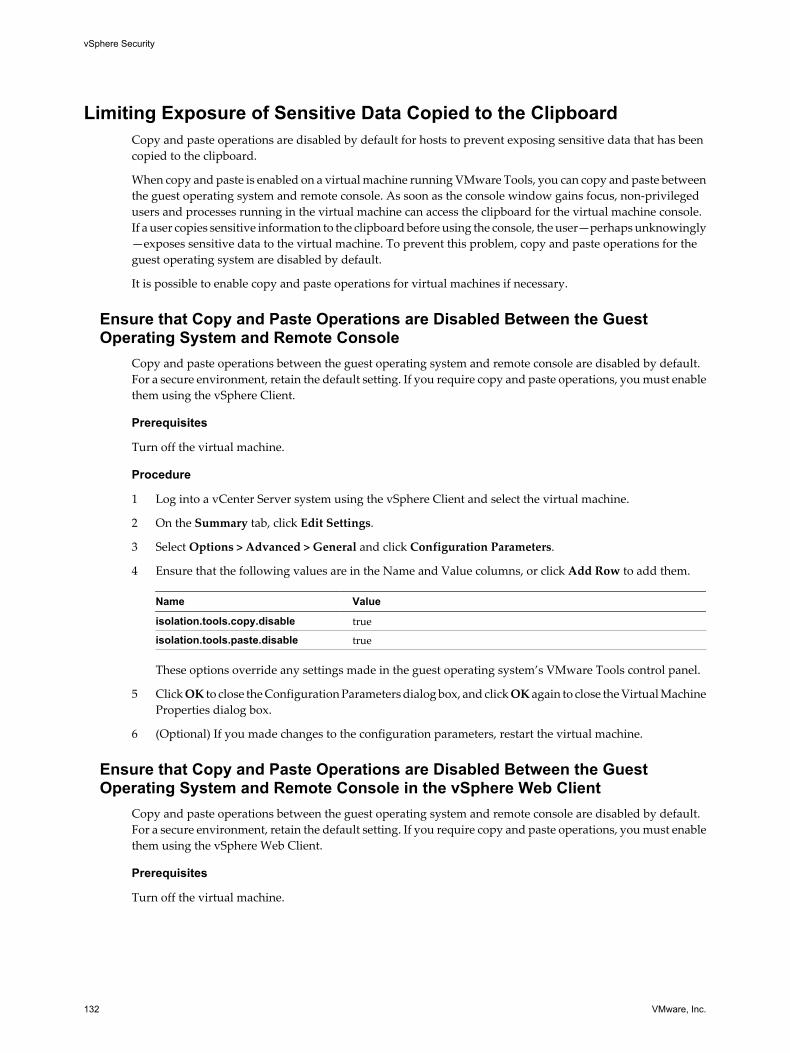
Limiting Exposure of Sensitive Data Copied to the ClipboardCopy and paste operations are disabled by default for hosts to prevent exposing sensitive data that has beencopied to the clipboard.
When copy and paste is enabled on a virtual machine running VMware Tools, you can copy and paste betweenthe guest operating system and remote console. As soon as the console window gains focus, non-privilegedusers and processes running in the virtual machine can access the clipboard for the virtual machine console.If a user copies sensitive information to the clipboard before using the console, the user—perhaps unknowingly—exposes sensitive data to the virtual machine. To prevent this problem, copy and paste operations for theguest operating system are disabled by default.
It is possible to enable copy and paste operations for virtual machines if necessary.
Ensure that Copy and Paste Operations are Disabled Between the GuestOperating System and Remote Console
Copy and paste operations between the guest operating system and remote console are disabled by default.For a secure environment, retain the default setting. If you require copy and paste operations, you must enablethem using the vSphere Client.
Prerequisites
Turn off the virtual machine.
Procedure
1 Log into a vCenter Server system using the vSphere Client and select the virtual machine.
2 On the Summary tab, click Edit Settings.
3 Select Options > Advanced > General and click Configuration Parameters.
4 Ensure that the following values are in the Name and Value columns, or click Add Row to add them.
Name Value
isolation.tools.copy.disable true
isolation.tools.paste.disable true These options override any settings made in the guest operating system’s VMware Tools control panel.
5 Click OK to close the Configuration Parameters dialog box, and click OK again to close the Virtual MachineProperties dialog box.
6 (Optional) If you made changes to the configuration parameters, restart the virtual machine.
Ensure that Copy and Paste Operations are Disabled Between the GuestOperating System and Remote Console in the vSphere Web Client
Copy and paste operations between the guest operating system and remote console are disabled by default.For a secure environment, retain the default setting. If you require copy and paste operations, you must enablethem using the vSphere Web Client.
Prerequisites
Turn off the virtual machine.
vSphere Security
132 VMware, Inc.
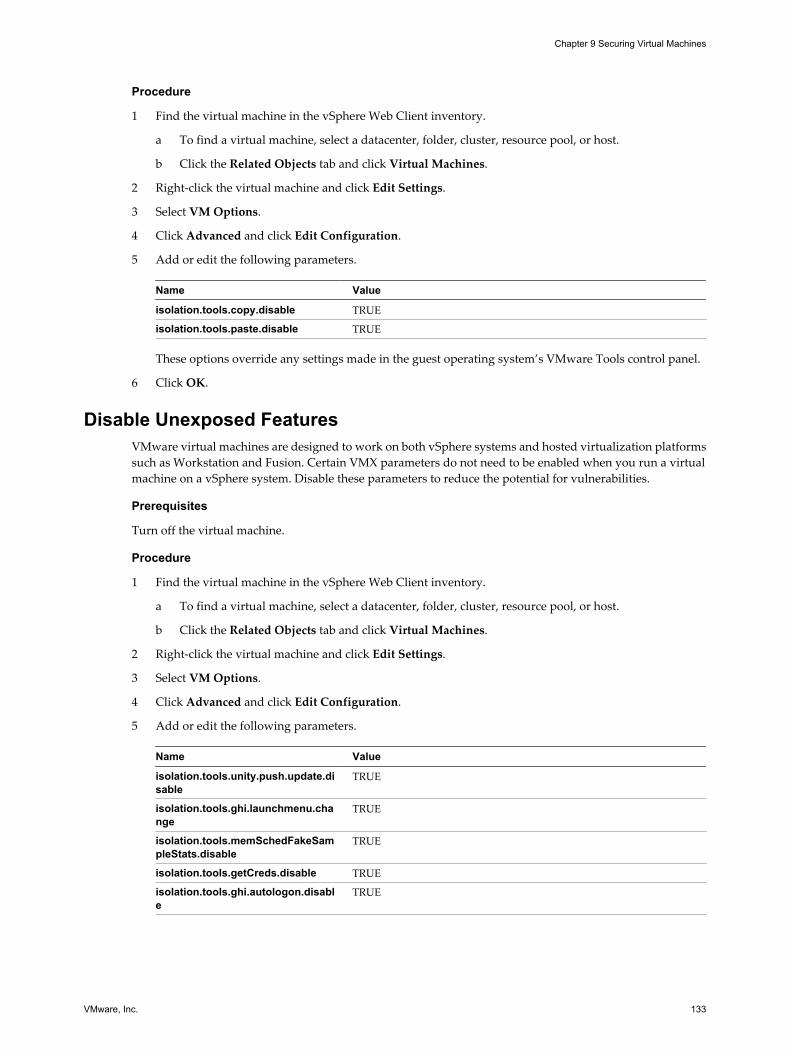
Procedure
1 Find the virtual machine in the vSphere Web Client inventory.
a To find a virtual machine, select a datacenter, folder, cluster, resource pool, or host.
b Click the Related Objects tab and click Virtual Machines.
2 Right-click the virtual machine and click Edit Settings.
3 Select VM Options.
4 Click Advanced and click Edit Configuration.
5 Add or edit the following parameters.
Name Value
isolation.tools.copy.disable TRUE
isolation.tools.paste.disable TRUE These options override any settings made in the guest operating system’s VMware Tools control panel.
6 Click OK.
Disable Unexposed FeaturesVMware virtual machines are designed to work on both vSphere systems and hosted virtualization platformssuch as Workstation and Fusion. Certain VMX parameters do not need to be enabled when you run a virtualmachine on a vSphere system. Disable these parameters to reduce the potential for vulnerabilities.
Prerequisites
Turn off the virtual machine.
Procedure
1 Find the virtual machine in the vSphere Web Client inventory.
a To find a virtual machine, select a datacenter, folder, cluster, resource pool, or host.
b Click the Related Objects tab and click Virtual Machines.
2 Right-click the virtual machine and click Edit Settings.
3 Select VM Options.
4 Click Advanced and click Edit Configuration.
5 Add or edit the following parameters.
Name Value
isolation.tools.unity.push.update.disable
TRUE
isolation.tools.ghi.launchmenu.change
TRUE
isolation.tools.memSchedFakeSampleStats.disable
TRUE
isolation.tools.getCreds.disable TRUE
isolation.tools.ghi.autologon.disable
TRUE
Chapter 9 Securing Virtual Machines
VMware, Inc. 133
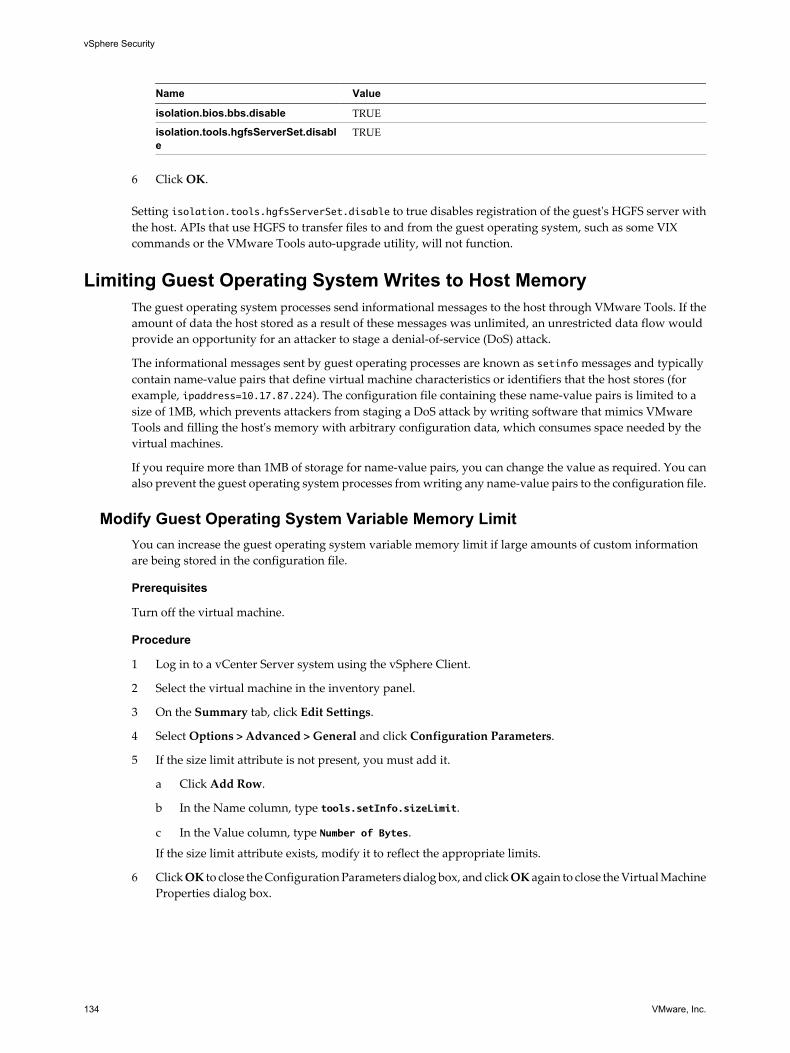
Name Value
isolation.bios.bbs.disable TRUE
isolation.tools.hgfsServerSet.disable
TRUE
6 Click OK.
Setting isolation.tools.hgfsServerSet.disable to true disables registration of the guest's HGFS server withthe host. APIs that use HGFS to transfer files to and from the guest operating system, such as some VIXcommands or the VMware Tools auto-upgrade utility, will not function.
Limiting Guest Operating System Writes to Host MemoryThe guest operating system processes send informational messages to the host through VMware Tools. If theamount of data the host stored as a result of these messages was unlimited, an unrestricted data flow wouldprovide an opportunity for an attacker to stage a denial-of-service (DoS) attack.
The informational messages sent by guest operating processes are known as setinfo messages and typicallycontain name-value pairs that define virtual machine characteristics or identifiers that the host stores (forexample, ipaddress=10.17.87.224). The configuration file containing these name-value pairs is limited to asize of 1MB, which prevents attackers from staging a DoS attack by writing software that mimics VMwareTools and filling the host's memory with arbitrary configuration data, which consumes space needed by thevirtual machines.
If you require more than 1MB of storage for name-value pairs, you can change the value as required. You canalso prevent the guest operating system processes from writing any name-value pairs to the configuration file.
Modify Guest Operating System Variable Memory LimitYou can increase the guest operating system variable memory limit if large amounts of custom informationare being stored in the configuration file.
Prerequisites
Turn off the virtual machine.
Procedure
1 Log in to a vCenter Server system using the vSphere Client.
2 Select the virtual machine in the inventory panel.
3 On the Summary tab, click Edit Settings.
4 Select Options > Advanced > General and click Configuration Parameters.
5 If the size limit attribute is not present, you must add it.
a Click Add Row.
b In the Name column, type tools.setInfo.sizeLimit.
c In the Value column, type Number of Bytes.
If the size limit attribute exists, modify it to reflect the appropriate limits.
6 Click OK to close the Configuration Parameters dialog box, and click OK again to close the Virtual MachineProperties dialog box.
vSphere Security
134 VMware, Inc.
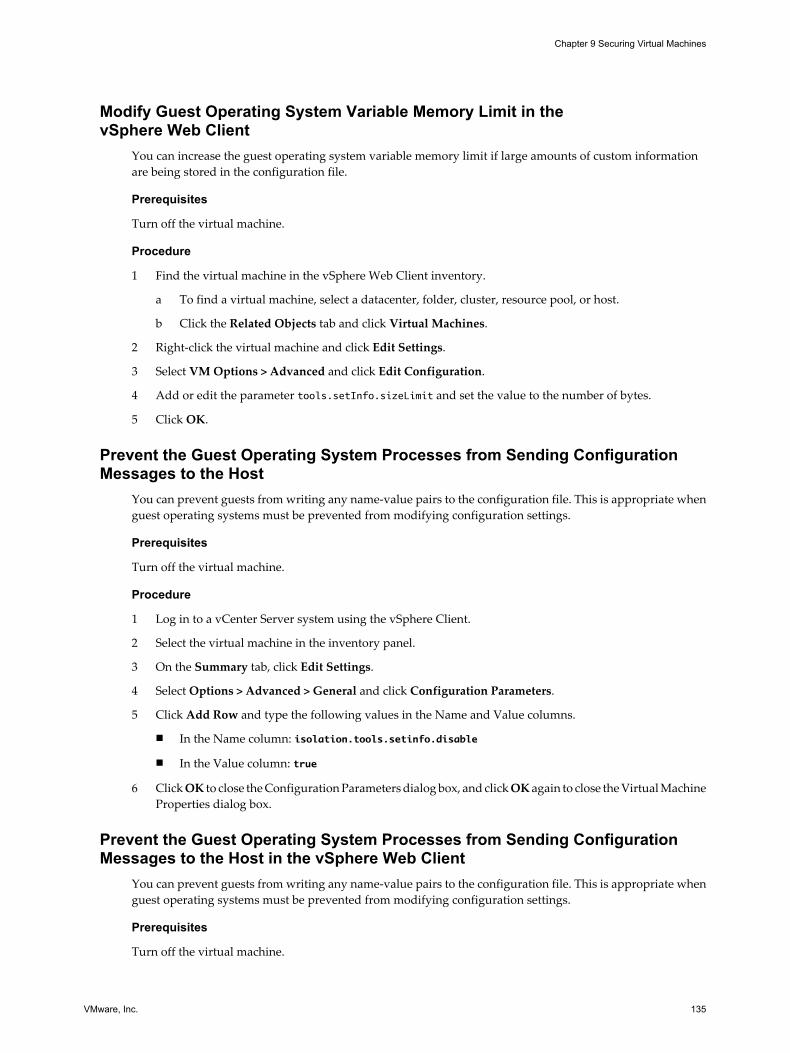
Modify Guest Operating System Variable Memory Limit in thevSphere Web Client
You can increase the guest operating system variable memory limit if large amounts of custom informationare being stored in the configuration file.
Prerequisites
Turn off the virtual machine.
Procedure
1 Find the virtual machine in the vSphere Web Client inventory.
a To find a virtual machine, select a datacenter, folder, cluster, resource pool, or host.
b Click the Related Objects tab and click Virtual Machines.
2 Right-click the virtual machine and click Edit Settings.
3 Select VM Options > Advanced and click Edit Configuration.
4 Add or edit the parameter tools.setInfo.sizeLimit and set the value to the number of bytes.
5 Click OK.
Prevent the Guest Operating System Processes from Sending ConfigurationMessages to the Host
You can prevent guests from writing any name-value pairs to the configuration file. This is appropriate whenguest operating systems must be prevented from modifying configuration settings.
Prerequisites
Turn off the virtual machine.
Procedure
1 Log in to a vCenter Server system using the vSphere Client.
2 Select the virtual machine in the inventory panel.
3 On the Summary tab, click Edit Settings.
4 Select Options > Advanced > General and click Configuration Parameters.
5 Click Add Row and type the following values in the Name and Value columns.
n In the Name column: isolation.tools.setinfo.disable
n In the Value column: true
6 Click OK to close the Configuration Parameters dialog box, and click OK again to close the Virtual MachineProperties dialog box.
Prevent the Guest Operating System Processes from Sending ConfigurationMessages to the Host in the vSphere Web Client
You can prevent guests from writing any name-value pairs to the configuration file. This is appropriate whenguest operating systems must be prevented from modifying configuration settings.
Prerequisites
Turn off the virtual machine.
Chapter 9 Securing Virtual Machines
VMware, Inc. 135
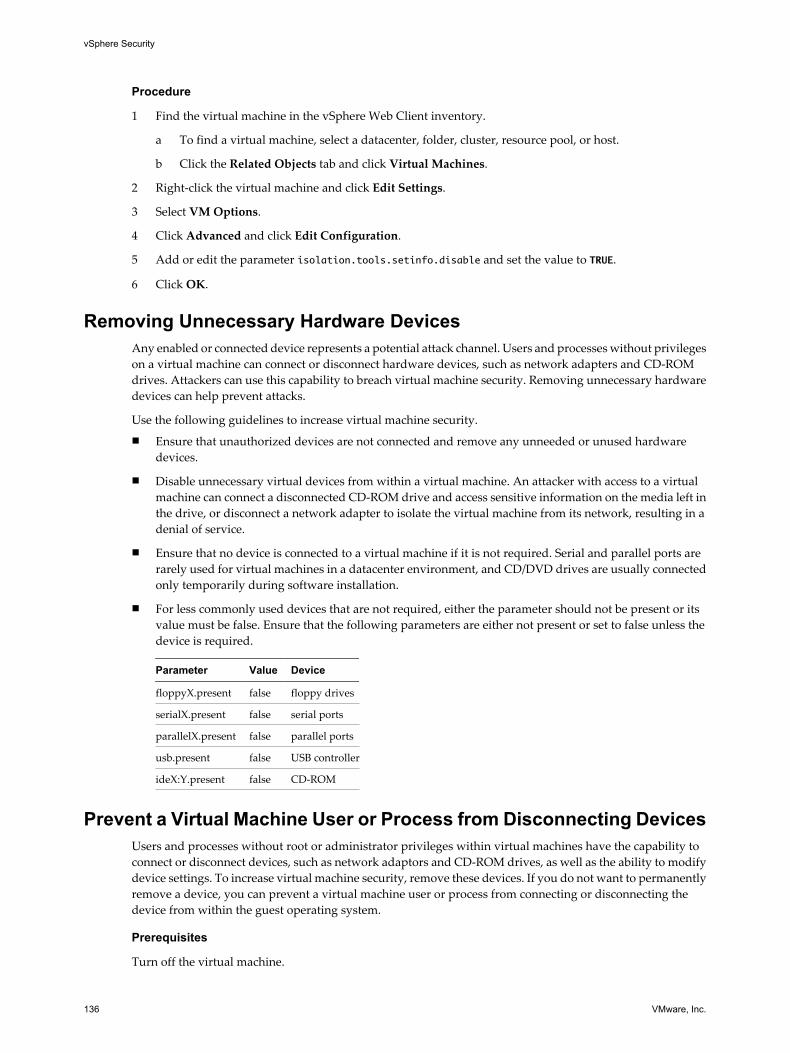
Procedure
1 Find the virtual machine in the vSphere Web Client inventory.
a To find a virtual machine, select a datacenter, folder, cluster, resource pool, or host.
b Click the Related Objects tab and click Virtual Machines.
2 Right-click the virtual machine and click Edit Settings.
3 Select VM Options.
4 Click Advanced and click Edit Configuration.
5 Add or edit the parameter isolation.tools.setinfo.disable and set the value to TRUE.
6 Click OK.
Removing Unnecessary Hardware DevicesAny enabled or connected device represents a potential attack channel. Users and processes without privilegeson a virtual machine can connect or disconnect hardware devices, such as network adapters and CD-ROMdrives. Attackers can use this capability to breach virtual machine security. Removing unnecessary hardwaredevices can help prevent attacks.
Use the following guidelines to increase virtual machine security.
n Ensure that unauthorized devices are not connected and remove any unneeded or unused hardwaredevices.
n Disable unnecessary virtual devices from within a virtual machine. An attacker with access to a virtualmachine can connect a disconnected CD-ROM drive and access sensitive information on the media left inthe drive, or disconnect a network adapter to isolate the virtual machine from its network, resulting in adenial of service.
n Ensure that no device is connected to a virtual machine if it is not required. Serial and parallel ports arerarely used for virtual machines in a datacenter environment, and CD/DVD drives are usually connectedonly temporarily during software installation.
n For less commonly used devices that are not required, either the parameter should not be present or itsvalue must be false. Ensure that the following parameters are either not present or set to false unless thedevice is required.
Parameter Value Device
floppyX.present false floppy drives
serialX.present false serial ports
parallelX.present false parallel ports
usb.present false USB controller
ideX:Y.present false CD-ROM
Prevent a Virtual Machine User or Process from Disconnecting DevicesUsers and processes without root or administrator privileges within virtual machines have the capability toconnect or disconnect devices, such as network adaptors and CD-ROM drives, as well as the ability to modifydevice settings. To increase virtual machine security, remove these devices. If you do not want to permanentlyremove a device, you can prevent a virtual machine user or process from connecting or disconnecting thedevice from within the guest operating system.
Prerequisites
Turn off the virtual machine.
vSphere Security
136 VMware, Inc.
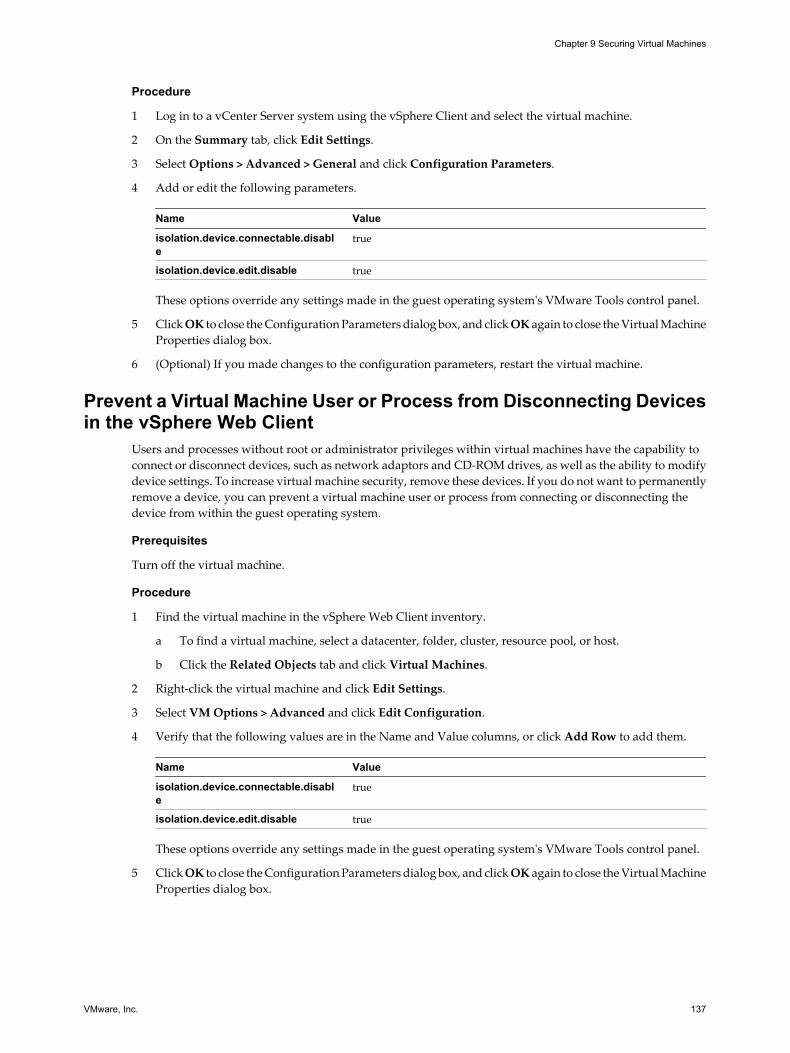
Procedure
1 Log in to a vCenter Server system using the vSphere Client and select the virtual machine.
2 On the Summary tab, click Edit Settings.
3 Select Options > Advanced > General and click Configuration Parameters.
4 Add or edit the following parameters.
Name Value
isolation.device.connectable.disable
true
isolation.device.edit.disable true These options override any settings made in the guest operating system's VMware Tools control panel.
5 Click OK to close the Configuration Parameters dialog box, and click OK again to close the Virtual MachineProperties dialog box.
6 (Optional) If you made changes to the configuration parameters, restart the virtual machine.
Prevent a Virtual Machine User or Process from Disconnecting Devicesin the vSphere Web Client
Users and processes without root or administrator privileges within virtual machines have the capability toconnect or disconnect devices, such as network adaptors and CD-ROM drives, as well as the ability to modifydevice settings. To increase virtual machine security, remove these devices. If you do not want to permanentlyremove a device, you can prevent a virtual machine user or process from connecting or disconnecting thedevice from within the guest operating system.
Prerequisites
Turn off the virtual machine.
Procedure
1 Find the virtual machine in the vSphere Web Client inventory.
a To find a virtual machine, select a datacenter, folder, cluster, resource pool, or host.
b Click the Related Objects tab and click Virtual Machines.
2 Right-click the virtual machine and click Edit Settings.
3 Select VM Options > Advanced and click Edit Configuration.
4 Verify that the following values are in the Name and Value columns, or click Add Row to add them.
Name Value
isolation.device.connectable.disable
true
isolation.device.edit.disable true These options override any settings made in the guest operating system's VMware Tools control panel.
5 Click OK to close the Configuration Parameters dialog box, and click OK again to close the Virtual MachineProperties dialog box.
Chapter 9 Securing Virtual Machines
VMware, Inc. 137

vSphere Security
138 VMware, Inc.
Securing vCenter Server Systems 10Securing vCenter Server includes ensuring security of the host where vCenter Server is running, followingbest practices for assigning privileges and roles, and verifying the integrity of the clients that connect to vCenterServer.
This chapter includes the following topics:
n “Hardening the vCenter Server Host Operating System,” on page 139
n “Best Practices for vCenter Server Privileges,” on page 139
n “Limiting vCenter Server Network Connectivity,” on page 141
n “Restricting Use of Linux-Based Clients,” on page 141
n “Verifying the Integrity of the vSphere Client,” on page 142
n “Set an Inactivity Timeout for the vSphere Client,” on page 142
n “Disable Sending Host Performance Data to Guests,” on page 142
Hardening the vCenter Server Host Operating SystemProtect the host where vCenter Server is running against vulnerabilities and attacks by ensuring that theoperating system of the host (Windows or Linux) is as secure as possible.
n Maintain a supported operating system, database, and hardware for the vCenter Server system. If vCenterServer is not running on a support operating system, it might not run properly, making vCenter Servervulnerable to attacks.
n Keep the vCenter Server system properly patched. By staying up-to-date with operating system patches,the server is less vulnerable to attack.
n Provide operating system protection on the vCenter Server host. Protection includes antivirus andantimalware software.
For operating system and database compatibility information, see the vSphere Compatibility Matrixes.
Best Practices for vCenter Server PrivilegesStrictly control vCenter Server administrator privileges to increase security for the system.
n Full administrative rights to vCenter Server should be removed from the local Windows administratoraccount and granted to a special-purpose local vCenter Server administrator account. Grant full vSphereadministrative rights only to those administrators who are required to have it. Do not grant this privilegeto any group whose membership is not strictly controlled.
VMware, Inc. 139

n Avoid allowing users to log in directly to the vCenter Server system. Allow only those users who havelegitimate tasks to perform to log into the system and ensure that these events are audited.
n Install vCenter Server using a service account instead of a Windows account. You can use a service accountor a Windows account to run vCenter Server. Using a service account allows you to enable Windowsauthentication for SQL Server, which provides more security. The service account must be anadministrator on the local machine.
n Check for privilege reassignment when you restart vCenter Server. If the user or user group that is assignedthe Administrator role on the root folder of the server cannot be verified as a valid user or group, theAdministrator privileges are removed and assigned to the local Windows Administrators group.
n Grant minimal privileges to the vCenter Server database user. The database user requires only certainprivileges specific to database access. In addition, some privileges are required only for installation andupgrade. These can be removed after the product is installed or upgraded.
Restrict Use of the Administrator PrivilegeBy default, vCenter Server grants full administrator privileges to the administrator of the local system, whichcan be accessed by domain administrators. To minimize risk of this privilege being abused, removeadministrative rights from the local operating system's administrator account and assign these rights to aspecial-purpose local vSphere administrator account. Use the local vSphere account to create individual useraccounts.
Grant the Administrator privilege only to administrators who are required to have it. Do not grant the privilegeto any group whose membership is not strictly controlled.
Procedure
1 Create a user account that you will use to manage vCenter Server (for example, vi-admin).
Ensure that the user does not belong to any local groups, such as the Administrators group.
2 Log into the vCenter Server system as the local operating system administrator and grant the role of globalvCenter Server administrator to the user account you created (for example, vi-admin).
3 Log out of vCenter Server and log in with the user account you created (vi-admin).
4 Verify that the user can perform all tasks available to a vCenter Server administrator.
5 Remove the administrator privileges that are assigned to the local operating system administrator user orgroup.
Restrict Use of the Administrator RoleSecure the vCenter Server Administrator role and assign it only to certain users.
Protect the vCenter Server administrator user from regular use by relying on user accounts associated withspecific individuals.
Prerequisites
n Create a user account to manage vCenter Server and assign full vCenter Server administrator privilegesto the user. See “Assigning Permissions for vCenter Server,” on page 101.
n Remove vCenter Server administrator privileges from the local operating system administrator.
Procedure
1 Log in to the vCenter Server system as the vCenter Server administrator you created (for example, vi-admin).
2 Grant full administrator privileges to the minimum number of individuals required.
vSphere Security
140 VMware, Inc.
3 Log out as the vCenter Server administrator.
What to do next
Protect the vCenter Server administrator account password. For example, create a password with two halves,each half of which is known to only one person, or lock a printout of the password in a safe.
Limiting vCenter Server Network ConnectivityAvoid putting vCenter Server on any network other than the management network. By limiting networkconnectivity, you limit certain types of attack.
vCenter Server requires access to the management network only. Avoid putting the vCenter Server system onnetworks such as your production network or storage network, or on any network with access to the publicInternet. vCenter Server does not need access to the network where vMotion operates.
vCenter Server needs network connectivity to the following systems.
n All ESXi hosts
n The vCenter Server database
n Other vCenter Server systems (linked mode only)
n Systems that are authorized to run management clients. For example, the vSphere Client, a Windowssystem where you use the PowerCLI, or any other SDK-based client.
n Systems that run add-on components such as VMware vSphere Update Manager
n Infrastructure services such as DNS, Active Directory, and NTP
n Other systems that run components that are essential to functionality of the vCenter Server system
Use a local firewall on the Windows system where vCenter Server is running or use a network firewall. IncludeIP-based access restrictions so that only necessary components can communicate with the vCenter Serversystem.
Block access to ports that are not being used by vCenter Server using the local firewall on the Windows systemwhere vCenter Server is installed or a network firewall.
Restricting Use of Linux-Based ClientsCommunication between client components and vCenter Server or ESXi are protected by SSL-basedencryption. Linux versions of these components do not perform certificate validation, so you should restrictthe use of these clients.
Even when the management interfaces of vCenter Server and ESXi are available on trusted networks only,encryption and certificate validation add extra layers of defense against an attack. The following componentsare vulnerable when they run on the Linux operating system.
n vCLI commands
n vSphere SDK for Perl scripts
n Programs written using the vSphere SDK
You can relax the restriction against using Linux-based clients if you enforce proper controls.
n Restrict management network access to authorized systems only.
n Use firewalls to ensure that only authorized hosts are allowed to access vCenter Server.
n Use jump-box systems to ensure that Linux clients are behind the jump.
Chapter 10 Securing vCenter Server Systems
VMware, Inc. 141
Verifying the Integrity of the vSphere ClientvSphere Client extensions run at the same privilege level as the user that is logged in. A malicious extensioncan masquerade as a useful plug-in and perform harmful operations such as stealing credentials or changingthe system configuration. To increase security, use a vSphere Client installation that includes only authorizedextensions from trusted sources.
vCenter Server includes a vSphere Client extensibility framework, which provides the ability to extend thevSphere Client with menu selections or toolbar icons that provide access to vCenter add-on components orexternal, Web-based functionality. With this flexibility, there is a risk of introducing unintended capabilities.For example, an administrator might install a plug-in in an instance of the vSphere Client. The plug-in can thenexecute arbitrary commands with the privilege level of that administrator.
To protect against potential compromise, do not install any vSphere Client plug-ins that do not come from atrusted source. Verify which plug-ins are installed in the vSphere Client using the Plug-ins > Manage Plug-ins menu and clicking the Installed Plug-ins tab.
Set an Inactivity Timeout for the vSphere ClientYou can set a timeout for idle vSphere Client sessions. This allows you to close sessions automatically, whichreduces the potential for unauthorized users to access vCenter Server.
Procedure
u On each Windows system where the vSphere Client is installed, verify that an idle timeout is set.
n You can specify the idle timeout as a parameter in the vpxClient.exe.config file (typically, C:\ProgramFiles\VMware\Infrastructure\Virtual Infrastructure Client\Launcher\VpxClient.exe.config).
n Alternatively, advise users to run the vSphere Client executable with a flag set for the timeout value(for example, vpxClient.exe -inactivityTimeout 5, where 5 is five minutes).
What to do next
This client-side setting can be changed by the user. After you set the default timeout value, periodically auditthe configuration file.
Disable Sending Host Performance Data to GuestsvSphere includes virtual machine performance counters on Windows operating systems where VMware Toolsis installed. Performance counters allow virtual machine owners to do accurate performance analysis withinthe guest operating system. By default, vSphere does not expose host information to the guest virtual machine.An adversary might use the information to perform further attacks on the host.
The ability to send host performance data to a guest virtual machine is disabled by default. This default settingprevents a virtual machine from obtaining detailed information about the physical host.
Procedure
1 On the ESXi system that hosts the virtual machine, browse to the VMX file.
Virtual machine configuration files are located in the /vmfs/volumes/datastore directory, wheredatastore is the name of the storage device where the virtual machine files are stored.
2 In the VMX file, verify that the following parameter is set.
tools.guestlib.enableHostInfo=FALSE
3 Save and close the file.
vSphere Security
142 VMware, Inc.
You cannot retrieve performance information about the host from inside the guest virtual machine, where itmight be useful for troubleshooting.
Chapter 10 Securing vCenter Server Systems
VMware, Inc. 143

vSphere Security
144 VMware, Inc.

Best Practices for Virtual Machine andHost Security 11
Consider basic security recommendations when creating and configuring hosts and virtual machines.
This chapter includes the following topics:
n “Installing Antivirus Software,” on page 145
n “Managing ESXi Log Files,” on page 146
n “Securing Fault Tolerance Logging Traffic,” on page 148
n “Auto Deploy Security Considerations,” on page 148
n “Image Builder Security Considerations,” on page 148
n “Host Password Strength and Complexity,” on page 149
n “Synchronizing Clocks on the vSphere Network,” on page 151
n “Disable Shell Access for Anonymous Users,” on page 152
n “Limit DCUI Access in Lockdown Mode,” on page 152
n “Disable the Managed Object Browser (MOB),” on page 153
n “Disable Authorized (SSH) Keys,” on page 153
n “Establish and Maintain Configuration File Integrity,” on page 154
n “Monitoring and Restricting Access to SSL Certificates,” on page 154
n “Delete VMDK Files Securely,” on page 154
Installing Antivirus SoftwareBecause each virtual machine hosts a standard operating system, consider protecting it from viruses byinstalling antivirus software. Depending on how you are using the virtual machine, you might also want toinstall a software firewall.
Stagger the schedule for virus scans, particularly in deployments with a large number of virtual machines.Performance of systems in your environment will degrade significantly if you scan all virtual machinessimultaneously.
Because software firewalls and antivirus software can be virtualization-intensive, you can balance the needfor these two security measures against virtual machine performance, especially if you are confident that yourvirtual machines are in a fully trusted environment.
VMware, Inc. 145
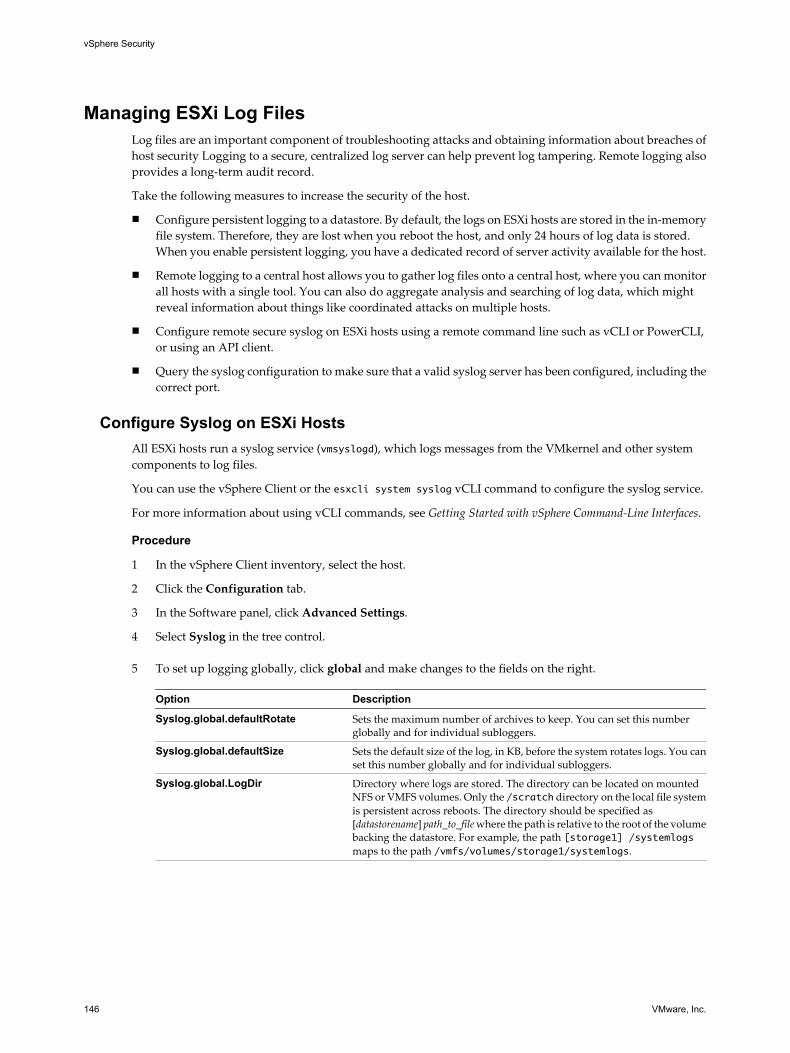
Managing ESXi Log FilesLog files are an important component of troubleshooting attacks and obtaining information about breaches ofhost security Logging to a secure, centralized log server can help prevent log tampering. Remote logging alsoprovides a long-term audit record.
Take the following measures to increase the security of the host.
n Configure persistent logging to a datastore. By default, the logs on ESXi hosts are stored in the in-memoryfile system. Therefore, they are lost when you reboot the host, and only 24 hours of log data is stored.When you enable persistent logging, you have a dedicated record of server activity available for the host.
n Remote logging to a central host allows you to gather log files onto a central host, where you can monitorall hosts with a single tool. You can also do aggregate analysis and searching of log data, which mightreveal information about things like coordinated attacks on multiple hosts.
n Configure remote secure syslog on ESXi hosts using a remote command line such as vCLI or PowerCLI,or using an API client.
n Query the syslog configuration to make sure that a valid syslog server has been configured, including thecorrect port.
Configure Syslog on ESXi HostsAll ESXi hosts run a syslog service (vmsyslogd), which logs messages from the VMkernel and other systemcomponents to log files.
You can use the vSphere Client or the esxcli system syslog vCLI command to configure the syslog service.
For more information about using vCLI commands, see Getting Started with vSphere Command-Line Interfaces.
Procedure
1 In the vSphere Client inventory, select the host.
2 Click the Configuration tab.
3 In the Software panel, click Advanced Settings.
4 Select Syslog in the tree control.
5 To set up logging globally, click global and make changes to the fields on the right.
Option Description
Syslog.global.defaultRotate Sets the maximum number of archives to keep. You can set this numberglobally and for individual subloggers.
Syslog.global.defaultSize Sets the default size of the log, in KB, before the system rotates logs. You canset this number globally and for individual subloggers.
Syslog.global.LogDir Directory where logs are stored. The directory can be located on mountedNFS or VMFS volumes. Only the /scratch directory on the local file systemis persistent across reboots. The directory should be specified as[datastorename] path_to_file where the path is relative to the root of the volumebacking the datastore. For example, the path [storage1] /systemlogsmaps to the path /vmfs/volumes/storage1/systemlogs.
vSphere Security
146 VMware, Inc.
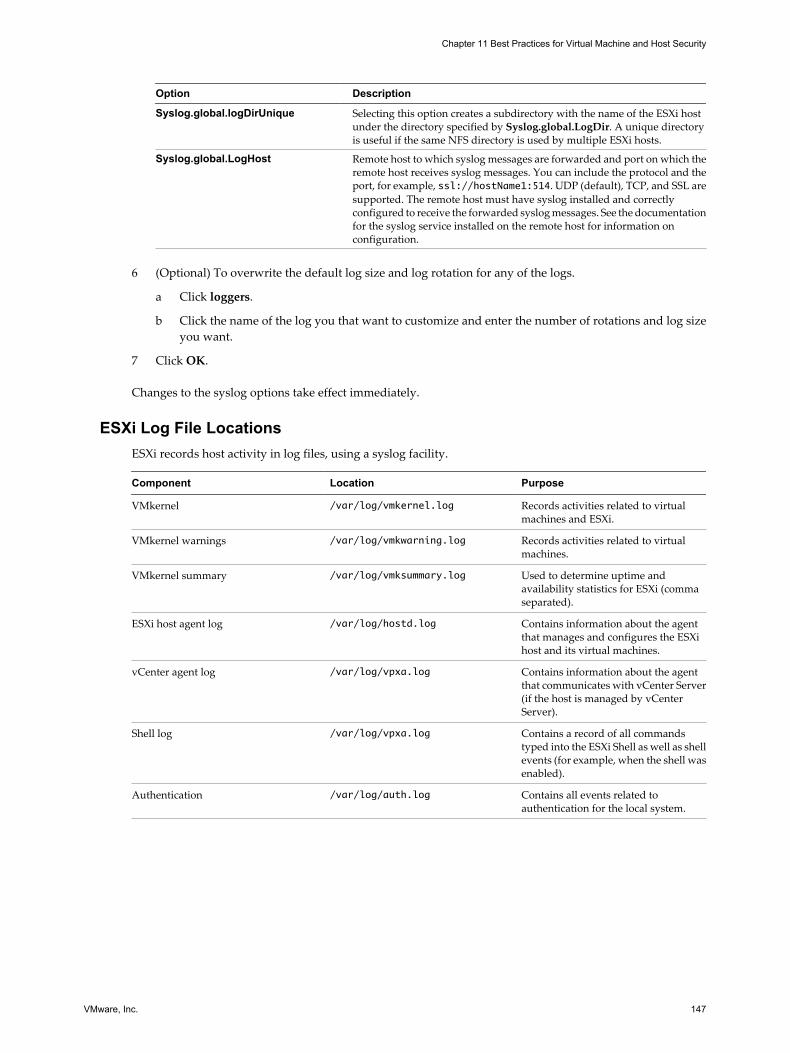
Option Description
Syslog.global.logDirUnique Selecting this option creates a subdirectory with the name of the ESXi hostunder the directory specified by Syslog.global.LogDir. A unique directoryis useful if the same NFS directory is used by multiple ESXi hosts.
Syslog.global.LogHost Remote host to which syslog messages are forwarded and port on which theremote host receives syslog messages. You can include the protocol and theport, for example, ssl://hostName1:514. UDP (default), TCP, and SSL aresupported. The remote host must have syslog installed and correctlyconfigured to receive the forwarded syslog messages. See the documentationfor the syslog service installed on the remote host for information onconfiguration.
6 (Optional) To overwrite the default log size and log rotation for any of the logs.
a Click loggers.
b Click the name of the log you that want to customize and enter the number of rotations and log sizeyou want.
7 Click OK.
Changes to the syslog options take effect immediately.
ESXi Log File LocationsESXi records host activity in log files, using a syslog facility.
Component Location Purpose
VMkernel /var/log/vmkernel.log Records activities related to virtualmachines and ESXi.
VMkernel warnings /var/log/vmkwarning.log Records activities related to virtualmachines.
VMkernel summary /var/log/vmksummary.log Used to determine uptime andavailability statistics for ESXi (commaseparated).
ESXi host agent log /var/log/hostd.log Contains information about the agentthat manages and configures the ESXihost and its virtual machines.
vCenter agent log /var/log/vpxa.log Contains information about the agentthat communicates with vCenter Server(if the host is managed by vCenterServer).
Shell log /var/log/vpxa.log Contains a record of all commandstyped into the ESXi Shell as well as shellevents (for example, when the shell wasenabled).
Authentication /var/log/auth.log Contains all events related toauthentication for the local system.
Chapter 11 Best Practices for Virtual Machine and Host Security
VMware, Inc. 147
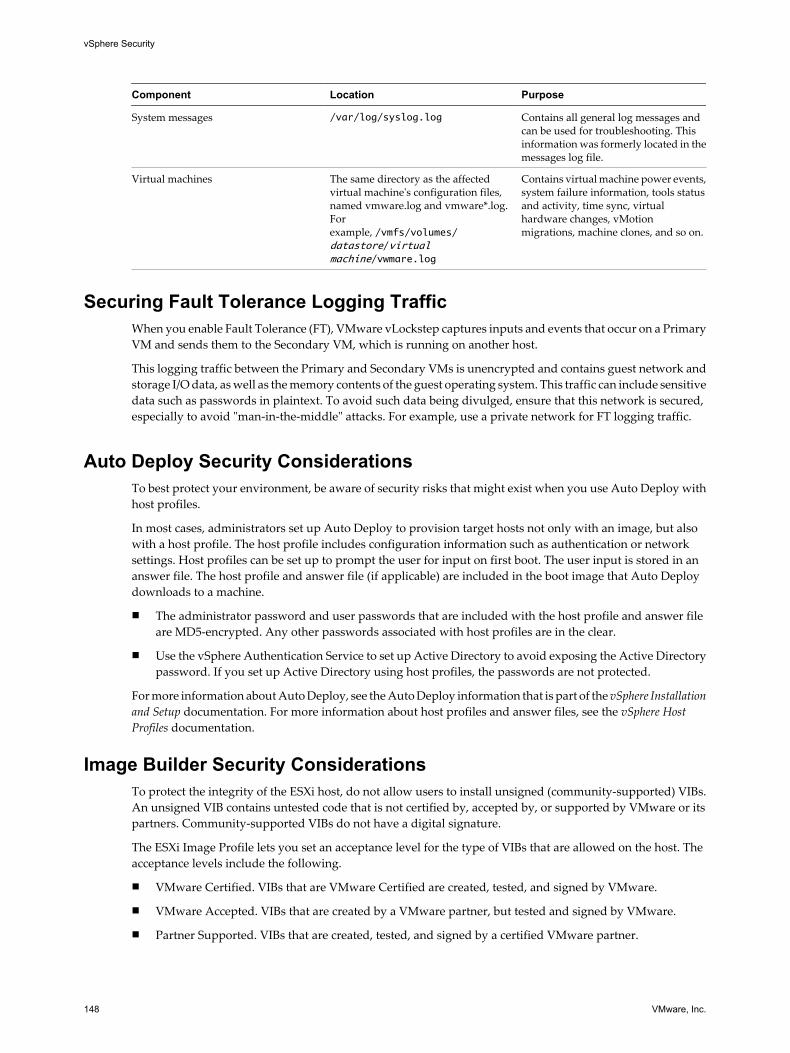
Component Location Purpose
System messages /var/log/syslog.log Contains all general log messages andcan be used for troubleshooting. Thisinformation was formerly located in themessages log file.
Virtual machines The same directory as the affectedvirtual machine's configuration files,named vmware.log and vmware*.log.Forexample, /vmfs/volumes/datastore/virtualmachine/vwmare.log
Contains virtual machine power events,system failure information, tools statusand activity, time sync, virtualhardware changes, vMotionmigrations, machine clones, and so on.
Securing Fault Tolerance Logging TrafficWhen you enable Fault Tolerance (FT), VMware vLockstep captures inputs and events that occur on a PrimaryVM and sends them to the Secondary VM, which is running on another host.
This logging traffic between the Primary and Secondary VMs is unencrypted and contains guest network andstorage I/O data, as well as the memory contents of the guest operating system. This traffic can include sensitivedata such as passwords in plaintext. To avoid such data being divulged, ensure that this network is secured,especially to avoid "man-in-the-middle" attacks. For example, use a private network for FT logging traffic.
Auto Deploy Security ConsiderationsTo best protect your environment, be aware of security risks that might exist when you use Auto Deploy withhost profiles.
In most cases, administrators set up Auto Deploy to provision target hosts not only with an image, but alsowith a host profile. The host profile includes configuration information such as authentication or networksettings. Host profiles can be set up to prompt the user for input on first boot. The user input is stored in ananswer file. The host profile and answer file (if applicable) are included in the boot image that Auto Deploydownloads to a machine.
n The administrator password and user passwords that are included with the host profile and answer fileare MD5-encrypted. Any other passwords associated with host profiles are in the clear.
n Use the vSphere Authentication Service to set up Active Directory to avoid exposing the Active Directorypassword. If you set up Active Directory using host profiles, the passwords are not protected.
For more information about Auto Deploy, see the Auto Deploy information that is part of the vSphere Installationand Setup documentation. For more information about host profiles and answer files, see the vSphere HostProfiles documentation.
Image Builder Security ConsiderationsTo protect the integrity of the ESXi host, do not allow users to install unsigned (community-supported) VIBs.An unsigned VIB contains untested code that is not certified by, accepted by, or supported by VMware or itspartners. Community-supported VIBs do not have a digital signature.
The ESXi Image Profile lets you set an acceptance level for the type of VIBs that are allowed on the host. Theacceptance levels include the following.
n VMware Certified. VIBs that are VMware Certified are created, tested, and signed by VMware.
n VMware Accepted. VIBs that are created by a VMware partner, but tested and signed by VMware.
n Partner Supported. VIBs that are created, tested, and signed by a certified VMware partner.
vSphere Security
148 VMware, Inc.
n Community Supported. VIBs that have not been tested by VMware or a VMware partner.
For more information about Image Builder, see the vSphere Installation and Setup documentation.
Host Password Strength and ComplexityBy default, ESXi uses the pam_passwdqc.so plug-in to set the rules that users must observe when creatingpasswords and to check password strength.
The pam_passwdqc.so plug-in lets you determine the basic standards that all passwords must meet. By default,ESXi imposes no restrictions on the root password. However, when nonroot users attempt to change theirpasswords, the passwords they choose must meet the basic standards that pam_passwdqc.so sets.
A valid password should contain a combination of as many character classes as possible. Character classesinclude lowercase letters, uppercase letters, numbers, and special characters such as an underscore or dash.
NOTE When the number of character classes is counted, the plug-in does not count uppercase letters used asthe first character in the password and numbers used as the last character of a password.
To configure password complexity, you can change the default value of the following parameters.
n retry is the number of times a user is prompted for a new password if the password candidate is notsufficiently strong.
n N0 is the number of characters required for a password that uses characters from only one character class.For example, the password contains only lowercase letters.
n N1 is the number of characters required for a password that uses characters from two character classes.
n N2 is used for passphrases. ESXi requires three words for a passphrase. Each word in the passphrase mustbe 8-40 characters long.
n N3 is the number of characters required for a password that uses characters from three character classes.
n N4 is the number of characters required for a password that uses characters from all four character classes.
n match is the number of characters allowed in a string that is reused from the old password. If thepam_passwdqc.so plug-in finds a reused string of this length or longer, it disqualifies the string from thestrength test and uses only the remaining characters.
Setting any of these options to -1 directs the pam_passwdqc.so plug-in to ignore the requirement.
Setting any of these options to disabled directs the pam_passwdqc.so plug-in to disqualify passwords with theassociated characteristic. The values used must be in descending order except for -1 and disabled.
NOTE The pam_passwdqc.so plug-in used in Linux provides more parameters than the parameters supportedfor ESXi.
For more information on the pam_passwdqc.so plug-in, see your Linux documentation.
Change Default Password Complexity for the pam_passwdqc.so Plug-InConfigure the pam_passwdqc.so plug-in to determine the basic standards all passwords must meet.
Procedure
1 Log in to the ESXi Shell as a user with administrator privileges.
2 Open the passwd file with a text editor.
For example, vi /etc/pam.d/passwd
Chapter 11 Best Practices for Virtual Machine and Host Security
VMware, Inc. 149
3 Edit the following line.
password requisite /lib/security/$ISA/pam_passwdqc.so retry=N min=N0,N1,N2,N3,N4
4 Save the file.
Example: Editing /etc/pam.d/passwdpassword requisite /lib/security/$ISA/pam_passwdqc.so retry=3 min=12,9,8,7,6
With this setting in effect, the password requirements are:
n retry=3: A user is allowed 3 attempts to enter a sufficient password.
n N0=12: Passwords containing characters from one character class must be at least 12 characters long.
n N1=9: Passwords containing characters from two character classes must be at least nine characters long.
n N2=8: Passphrases must contain words that are each at least eight characters long.
n N3=7: Passwords containing characters from three character classes must be at least seven characters long.
n N4=6: Passwords containing characters from all four character classes must be at least six characters long.
Ensure that vpxuser Password Meets PolicyWhen you add a host to the vCenter Server inventory, vCenter Server creates a special user account calledvpxuser on the host. vpxuser is a privileged account that acts as a proxy for all actions initiated through vCenterServer. Ensure that the default settings for the vpxuser password meet the requirements of your organization'spassword policy.
By default, vCenter Server generates a new vpxuser password every 30 days using OpenSSL crypto librariesas a source of randomness. The password is 32 characters long and is guaranteed to contain at least one symbolfrom four character classes: symbols (-./:=@[\\]^_{}~), digits (1-9), uppercase letters, and lowercase letters.Ensuring that the password expires periodically limits the amount of time an attacker can use the vpxuserpassword if it is compromised.
You can change the default value for password expiration and for password length to meet your passwordpolicy.
IMPORTANT To preclude the possibility that vCenter Server is locked out of the ESXi host, the password agingpolicy must not be shorter than the interval that is set to automatically change the vpxuser password.
Procedure
1 To change the password length policy, edit the vpxd.hostPasswordLength parameter in the vCenter Serverconfiguration file on the system where vCenter Server is running.
Operating System Default Location
Windows C:\Documents and Settings\All Users\Application Data\VMwareVirtualCenter\vpxd.cfg
Linux /etc/vmware-vpx/vpxd.cfg
2 To change the password aging requirement, use the Advanced Settings dialog box in the vSphere WebClient.
a Browse to the vCenter Server system in the vSphere Web Client inventory.
b Click the Manage tab and click Settings.
c Select Advanced Settings and locate the VirtualCenter.VimPasswordExpirationInDays parameter.
3 Restart vCenter Server.
vSphere Security
150 VMware, Inc.
Synchronizing Clocks on the vSphere NetworkBefore you install vCenter Single Sign On, install the vSphere Web Client, or deploy the vCenter Serverappliance, make sure all machines on the vSphere network have their clocks synchronized.
If the clocks on vCenter Server network machines are not synchronized, SSL certificates, which are time-sensitive, might not be recognized as valid in communications between network machines. Unsynchronizedclocks can result in authentication problems, which can cause the vSphere Web Client installation to fail orprevent the vCenter Server Appliance vpxd service from starting.
Synchronize ESX and ESXi Clocks with a Network Time ServerBefore you install vCenter Single Sign On, the vSphere Web Client, or the vCenter Server appliance, make sureall machines on the vSphere network have their clocks synchronized.
Procedure
1 From the vSphere Web Client, connect to the vCenter Server.
2 Select the host in the inventory.
3 Select the Manage tab.
4 Select Settings.
5 Select Time Configuration.
6 Click Edit.
7 Select Use Network Time Protocol (Enable NTP Client).
8 Set the NTP Service Status and NTP Service Startup Policy.
9 Enter the IP addresses of the NTP servers to synchronize with.
The host synchronizes with the NTP servers as specified in your settings.
Configure a Windows NTP Client for Network Clock SynchronizationThe clocks of all servers on the vSphere network must be synchronized. You can configure a Windows NTPclient as a source for clock synchronization on Windows servers.
Use the registry editor on the Windows server to make the configuration changes.
Procedure
1 Enable NTP mode.
a Go to the registry settingHKEY_LOCAL_MACHINE\SYSTEM\CurrentControlSet\Services\W32Time\Parameters
b Set the Type value to NTP.
2 Enable the NTP client.
a Go to the registry settingHKEY_LOCAL_MACHINE\SYSTEM\CurrentControlSet\Services\W32Time\Config
b Set the AnnounceFlags value to 5.
Chapter 11 Best Practices for Virtual Machine and Host Security
VMware, Inc. 151
3 Enter the upstream NTP servers to synchronize from.
a Go to the registry settingHKEY_LOCAL_MACHINE\SYSTEM\CurrentControlSet\Services\W32Time\TimeProviders.
b Set the NtpServer value to a list of at least three NTP servers.
For example, you might set the value to 0x1 1.pool.ntp.org,0x1 2.pool.ntp.org,0x1 3.pool.ntp.org.
4 Specify a 150-minute update interval.
a Go to the registry settingHKEY_LOCAL_MACHINE\SYSTEM\CurrentControlSet\Services\W32Time\TimeProviders\NtpClient,
b Set the SpecialPollInterval value to 900.
5 Restart the W32time service for the changes to take effect.
Disable Shell Access for Anonymous UsersTo prevent anonymous users such as root from accessing the host with the Direct Console User Interface (DCUI)or ESXi Shell, remove the user's administrator privileges on the root folder of the host. This applies to bothlocal users and Active Directory users and groups.
Procedure
1 Log in to ESXi using the vSphere Client.
2 Click the Local Users & Groups tab and click Users.
3 Right-click the anonymous user (for example, root) in the Users table and click Properties.
4 Select an access role from the drop-down list.
5 Click OK.
What to do next
By default, available roles are No access, Administrator, and Read-only. You can create new roles to apply tothe user, as described in “Assigning ESXi Roles,” on page 69.
Limit DCUI Access in Lockdown ModeIn versions of vSphere earlier than vSphere 5.1, the root user can log into the Direct Console User Interface(DCUI) on a host that is in lockdown mode. In vSphere 5.1, you can specify which local ESXi users are allowedto log into the DCUI when the host is in lockdown mode. Specifying users other than the anonymous root userallows you to log which users have performed operations on the host while it is in lockdown mode.
Procedure
1 Browse to the host in the vSphere Web Client object navigator.
2 Click the Manage tab and select Settings.
3 Click Advanced System Settings, and select the setting DCUI.Access.
4 Click Edit and enter the user names, separated by commas.
By default, the root user is specified. You can remove root from the list of DCUI access users, as long asyou specified at least one other user.
5 Click OK.
vSphere Security
152 VMware, Inc.
Disable the Managed Object Browser (MOB)The managed object browser provides a way to explore the VMkernel object model. However, attackers canuse this interface to perform malicious configuration changes or actions. The managed object browser lets youchange the host configuration. This interface is used primarily for debugging the vSphere SDK.
Procedure
1 Connect directly to the host using the ESXi Shell.
2 (Optional) Determine if the managed object browser (MOB) is enabled by running the following command.
vim-cmd proxysvc/service_list
If the service is running, the following text appears in the list of services:
...
serverNamespace = '/mob',
accessMode = "httpsWithRedirect",
pipeName = "/var/run/vmware/proxy-mod",
...
3 Disable the service by running the following command.
vim-cmd proxysvc/remove_service "/mob" "httpsWithRedirect"
Changes are effective immediately and persist across reboots.
The managed object browser is no longer available for diagnostics. Some third-party tools use this interface togather information.
What to do next
After you disable the managed object browser, perform tests to verify that third-party applications still functionas expected.
To reenable the service, run the following command.
vim-cmd proxysvc/add_np_service "/mob" httpsWithRedirect /var/run/vmware/proxy-mob
Disable Authorized (SSH) KeysAuthorized keys allow you to enable access to an ESXi host through SSH without requiring user authentication.To increase host security, do not allow users to access a host using authorized keys.
A user is considered trusted if their public key is in the /etc/ssh/keys-root/authorized_keys file on a host.Trusted remote users are allowed to access the host without providing a password.
Procedure
n For day-to-day operations, disable SSH on ESXi hosts.
n If SSH is enabled, even temporarily, monitor the contents of the /etc/ssh/keys-root/authorized_keys fileto ensure that no users are allowed to access the host without proper authentication.
n Monitor the /etc/ssh/keys-root/authorized_keys file to verify that it is empty and no SSH keys havebeen added to the file.
n If you find that the /etc/ssh/keys-root/authorized_keys file is not empty, remove any keys.
Disabling remote access with authorized keys might limit your ability to run commands remotely on a hostwithout providing a valid login. For example, this can prevent you from running an unattended remote script.
Chapter 11 Best Practices for Virtual Machine and Host Security
VMware, Inc. 153
Establish and Maintain Configuration File IntegrityAlthough most configurations on ESXi are controlled via an API, there are a limited set of configuration filesthat are used directly to govern host behavior. These specific files are exposed with the vSphere HTTPS-basedfile transfer API. Tampering with these files has the potential to enable unauthorized access to the hostconfiguration and virtual machines.
Any changes to these files should be correlated with an approved administrative action, such as an authorizedconfiguration change.
IMPORTANT Attempting to monitor files that are not exposed by the file-transfer API can destabilize the system.
View or retrieve configuration files using the managed object browser (MOB) or an API client such as vCLI orPowerCLI. These methods allow you to keep track of the files and their contents, which helps ensure that theyare not improperly modified. Do not monitor log files and other files whose content is expected to changeregularly. You should also account for configuration file changes that are due to deliberate administrativeactivity.
NOTE Not all of the files that are listed are modifiable.
Procedure
u Browse to https://<hostname>/host to view accessible configuration files.
You cannot browse to this URL if the managed object browser (MOB) is disabled. In that case, view orretrieve files with an API client such as vCLI or PowerCLI.
Monitoring and Restricting Access to SSL CertificatesAttackers can use SSL certificates to impersonate vCenter Server and decrypt the vCenter Server databasepassword. You must monitor and strictly control access to the certificate.
Only the service account user requires regular access to the directory that contains vCenter Server SSLcertificates. Infrequently, the vCenter Server system administrator might need to access the directory as well.Because the SSL certificate can be used to impersonate vCenter Server and decrypt the database password,monitor the event log and set an alert to trigger when an account other than the service account accesses thedirectory.
To prevent a user other than the service account user from accessing the directory, change the permissions onthe directory so that only the vCenter Server service account is allowed to access it. This restriction preventsyou from collecting a complete support log when you issue a vc-support script. The restriction also preventsthe administrator from changing the vCenter Server database password.
Delete VMDK Files SecurelyTo help prevent sensitive data in VMDK files from being read off the physical disk after it is deleted, writezeros to the entire contents of a VMDK file ("zero out") before you delete it, overwriting the sensitive data.When you zero out a file, it is more difficult for someone to reconstruct the contents.
Procedure
1 Shut down or stop the virtual machine.
2 On the VMDK file to delete, run the command vmkfstools -writezeroes
3 Delete the file from the datastore.
vSphere Security
154 VMware, Inc.
What to do next
For more information about initializing a virtual disk using vmkfstools, see the vSphere Storage documentation.
Chapter 11 Best Practices for Virtual Machine and Host Security
VMware, Inc. 155

vSphere Security
156 VMware, Inc.
Index
Numerics802.1Q and ISL tagging attacks 25
AActive Directory
vCenter Server 95vCenter Single Sign On 95
Active Directory domain, authentication withvCenter Server Appliance 109
Active Directory Timeout 100Administrator role, restricting 140administrators, vCenter Single Sign On 89allowed IP addresses, firewall 40, 41antivirus software, installing 145application users 100attacks
802.1Q and ISL tagging 25double-encapsulated 25MAC flooding 25multicast brute-force 25random frame 25spanning tree 25
authenticating, vSphere Authentication Proxy 77authentication
ESXi 55ESXi users 55iSCSI storage 32users 55with Active Directory domain 109
authentication proxy 72, 75, 76, 79, 80authentication proxy server 77, 78authorized keys, disabling 153Auto Deploy, security 148availability timeout for the ESXi Shell 49
Bbasic single node install, vCenter Single Sign-
On 85best practices
permissions 66roles 66security 145
CCA-signed certificates 115, 116CAM server 77–79CAM service 76
certificatescertificate file 113checking 123configuring host searches 119default 113disabling SSL for vSphere SDK 118generating new 114key file 113location 113refresh STS for vCenter Single Sign On 94SSL 113uploading 115vCenter Server 113
changing host proxy services 120, 121CHAP authentication 32, 33character classes, passwords 57CIM tool access, limiting 34cipher strength, connections 34client startup options, setting 42, 43cluster install, vCenter Single Sign-On 86configuration files, host security 154connectivity lost 111copy and paste
disabled for guest operating systems 132guest operating systems 132virtual machines 132
Ddcui 64DCUI, limiting access 152DCUI Access 59default certificates, replacing with CA-signed
certificates 115, 116default domains, vCenter Single Sign On 87, 88deployment scenarios, vCenter Single Sign-
On 84device disconnection
preventing 136preventing in the vSphere Web Client 137
direct access 55Direct Console User Interface (DCUI), limiting
access 152directory server, viewing 74, 75directory service
Active Directory 72, 73configuring a host 72, 73
disable user, Single Sign On 99
VMware, Inc. 157
disablingiSCSI SAN authentication 33logging for guest operating systems 131, 135SSL for vSphere SDK 118variable information size 134, 135
distributed switches, permission 59DMZ 14domains, default vCenter Single Sign On 87, 95double-encapsulated attacks 25
Eedit user, Single Sign On 97encryption
certificates 113enabling and disabling SSL 113for user name, passwords, packets 113
ESXiadding users 55authentication 55log files 147syslog service 146users 55
ESXi log files 146ESXi Shell
configuring 45direct connections 49enabling 45, 47, 48enabling with vSphere Client 45enabling with vSphere Web Client 47logging in 49remote connections 49setting availability timeout 45, 47setting idle timeout 45, 47setting timeout 48SSH connections 34timeouts 46, 48, 49
expired passwords, resetting 92, 93exporting, host users 57
FFault Tolerance (FT)
logging 148security 148
firewallcommands 43configuration file 38configuring 43host 38NFS client 41
firewall portsautomating service behavior 41configuring with vCenter Server 18configuring without vCenter Server 19connecting to vCenter Server 19
connecting virtual machine console 19encryption 113host to host 21overview 17SDK and virtual machine console 19vSphere Client and vCenter Server 18vSphere Client and virtual machine
console 19vSphere Client direct connection 19
firewall settings 40, 41firewalls
access for management agents 39, 40access for services 39, 40
forged transmissions 27, 28
Ggenerating certificates 114groups
add members 98adding 97editing 98local 97searching 100, 101
guest operating systemscopy and paste 132disabling copy and paste 132disabling logging 131, 135enabling copy and paste 132limiting variable information size 134, 135logging levels 129
Hhardening the vCenter Server Host OS 139hardware devices, removing 136host certificate searches 119host name, configuring 72, 73host security
authorized keys 153CIM tools 34configuration files 154disabling MOB 153logging 146managed object browser 153performance data 142resource management 126unsigned VIBs 148using templates 126virtual disk shrinking 127, 128VMDK files 154vpxuser 150
host-to-host firewall ports 21
vSphere Security
158 VMware, Inc.
hostsadding ESXi users 55memory 134thumbprints 123
HTTPS PUT, uploading certificates and keys 115,116
Iidentity source
adding to vCenter Single Sign On 89editing for vCenter Single Sign On 90
identity sourcesActive Directory 95vCenter Single Sign On 87, 88, 95
idle session timeout 46, 48, 49idle timeout, vSphere Client 142Image Builder security 148informational messages, limiting 127Internet Protocol Security (IPsec) 28IP addresses, adding allowed 40, 41IPsec, See Internet Protocol Security (IPsec)iSCSI
authentication 32protecting transmitted data 33QLogic iSCSI adapters 32securing ports 33security 32
iSCSI SAN authentication, disabling 33isolation
standard switches 12virtual machines 11virtual networking layer 12VLANs 12
Jjoin domain 76
Kkeys
authorized 116, 117SSH 116, 117uploading 115–117
LLinux-based clients, restricting use with vCenter
Server 141lock user 99lockdown mode
behavior 52configurations 52DCUI access 59direct console user interface 53enabling 53vSphere Client 53
lockout policy, vCenter Single Sign On 94log files
ESXi 146, 147limiting number 130limiting size 130locating 147
log in behavior, vCenter Single Sign-On 85, 86log in to vCenter Server 84–86logging
disabling for guest operating systems 131,135
host security 146logging in, vCenter Server 95logging levels, guest operating systems 129Lookup Service error 108
MMAC address changes 27MAC flooding 25managed entities, permissions 59managed object browser, disabling 153management access
firewalls 39, 40TCP and UDP ports 21
management interfacesecuring 37securing with VLANs and virtual switches 24
multicast brute-force attacks 25multisite replication 106–108
Nnetwork connectivity, limiting 141network file copy (NFC) 114networks, security 22NFC, enabling SSL 114NFS client, firewall rule set 41No Access role 69, 104NTP 41, 72, 73NTP client, configure 151
Ppam_passwdqc.so plug-in 149passphrase 57password policies, vCenter Single Sign On 91passwords
changing vCenter Single Sign On 97character classes 57complexity 149criteria 149host 149length 149pam_passwdqc.so plug-in 149plug-ins 149requirements 57
Index
VMware, Inc. 159
reset expired 92, 93reset Single Sign On 92, 93restrictions 149vCenter Single Sign On policies 91
performance data, disable sending 142permissions
administrator 58, 101and privileges 58, 101assigning 64, 71, 102best practices 66changing 65, 103distributed switches 59inheritance 59, 62, 63overriding 62, 63overview 58, 101removing 65, 103root user 58, 101settings 61user 63, 64validating 64, 65, 100, 103vpxuser 58, 101
plug-ins, pam_passwdqc.so 149policies
lockout in vCenter Single Sign On 94lockout, vCenter Single Sign On 87password, vCenter Single Sign On 87security 30vCenter Single Sign On passwords 91
principals, remove from group 99privileges
assigning 71required for common tasks 66vCenter Server 139
privileges and permissions 58, 101promiscuous mode 27, 28proxy services
changing 120, 121encryption 113
Rrandom frame attacks 25Read Only role 69, 104remote console, limiting sessions 129remote operations, disabling in virtual
machine 126removing users from groups 99replacing, default certificates 115, 116replication
export 107import 108multisite 106–108
required privileges, for common tasks 66resetting passwords, Single Sign On 92, 93resource limits and guarantees, security 11
restricting use of Linux-based clients with vCenterServer 141
rolesAdministrator 69, 104and permissions 69, 104best practices 66cloning 69copy 69creating 69, 104, 105default 69, 104editing 70No Access 69, 104Read Only 69, 104removing 65, 70, 103, 106renaming 70, 105security 69, 104
root login, permissions 58, 63, 101root user, DCUI access 152
SSDK, firewall ports and virtual machine
console 19search lists, adjusting for large domains 100,
101security
architecture 9best practices 145certification 16cipher strength 34DMZ in single host 13, 14features 9host 37hosts 17iSCSI storage 32overview 9permissions 58, 101resource guarantees and limits 11standard switch ports 27virtual machines 11virtual machines with VLANs 22virtual networking layer 12virtualization layer 10VLAN hopping 24VMkernel 10VMware policy 16
security associationsadding 28available 30listing 30removing 29
security policiesavailable 31creating 30
vSphere Security
160 VMware, Inc.
listing 31removing 31
security recommendations 51security token service (STS), vCenter Single Sign
On 94service startup
changing policy 42, 43setting options 42, 43
service startup options, setting 42, 43services
automating 41syslogd 146
setinfo 134shares limits, host security 126shell access, disabling 152simple install, vCenter Single Sign-On 85Single Sign On
disabling users 99editing users 97fails to respond to log in 111locked users 99resetting passwords 92, 93
Single Sign On serverauthentication 83user management 83
Single Sign-Oninvalid credentials 110login fails because user account is locked 111Lookup Service Error 108troubleshooting 108unable to log in using Active Directory
domain 109Single-Sign-On user troubleshooting 112spanning tree attacks 25SSH
ESXi Shell 34security settings 34
SSLenable over NFC 114enabling and disabling 113encryption and certificates 113timeouts 117
SSL certificates, monitoring 154SSO, See Single Sign On See Single Sign-Onstandard switch ports, security 27standard switch security 24standard switches
802.1Q and ISL tagging attacks 25and iSCSI 33double-encapsulated attacks 25forged transmissions 27MAC address changes 27MAC flooding 25multicast brute-force attacks 25
promiscuous mode 27random frame attacks 25security 25spanning tree attacks 25
storage, securing with VLANs and virtualswitches 24
STS, See security token service (STS)synchronize ESX/ESXi clocks on vSphere
network 151synchronize vSphere network clocks 151synchronizing clocks on the vSphere
network 151syslog 146
TTCP ports 21templates, host security 126third-party software support policy 16thumbprints, hosts 123timeout
ESXi Shell 46, 48, 49idle for vSphere Client 142
timeout for ESXi Shell availability 49timeouts
ESXi Shell 47setting 47SSL 117
Trusted Platform Module (TPM) 10
UUDP ports 21unexposed features, disable 133unlock user 99user account locked, SSO fails 111user directory timeout 101user management, ESXi 55user permissions
dcui 64vpxuser 63
usersadding local 96adding to ESXi 55application 100authentication 55direct access 55disabling Single Sign On 99editing Single Sign On 97exporting a user list 57locking 99modifying on hosts 56remove from group 99removing 64, 100removing from hosts 57
Index
VMware, Inc. 161
searching 100, 101security 55unlocking 99viewing user list 57
users and groups, vCenter Server 95
Vvariable information size for guest operating
systemsdisabling 134, 135limiting 134, 135
vCenter Serverauthentication 83connecting through firewall 19firewall ports 18logging in 84–86, 89privileges 139
vCenter Server ApplianceSingle Sign-On troubleshooting 112troubleshooting 112unable to log in 109
vCenter Server Host OS, hardening 139vCenter Server security, SSL certificates 154vCenter Server, user management 83vCenter Single Sign On
Active Directory 89, 90, 95administrators 89changing password 97default domains 95domains 88identity sources 88–90, 95LDAP 89, 90locked users 94OpenLDAP 89, 90password policy 91security token service (STS) 94users and groups 95
vCenter Single Sign-Onabout 84basic single node install 85cluster install 86deployment scenarios 84replication 106–108simple install 85
vifs, uploading certificates and keys 117virtual disks, shrinking 127, 128virtual machine security
disable features 133remote console 129VMX parameters 133
virtual machinescopy and paste 132disable copy and paste 132disabling copy and paste 132
disabling logging 131, 135isolation 13, 14limiting variable information size 134, 135preventing device disconnection 136preventing device disconnection in the vSphere
Web Client 137resource reservations and limits 11securing 127security 11
virtual network, security 22virtual networking layer and security 12virtualization layer, security 10VLAN security 24VLANs
and iSCSI 33Layer 2 security 24security 22, 25VLAN hopping 24
VLANS, configuring for security 25VMDK files
deleting 154host security 154
VMkernel, security 10vMotion, securing with VLANs and virtual
switches 24vmx files, editing 127vpxuser, password 150vSphere Authentication Proxy
authenticating 77installing 75viewing 81
vSphere Authentication Proxy Server 77, 78vSphere Client
firewall ports connecting to virtual machineconsole 19
firewall ports for direct connection 19firewall ports with vCenter Server 18securing 142
vSphere Client securityidle timeout 142plug-ins 142
vSphere Web Clientfailure to recognize SSO 110log in fails 111
WW32time service 151
vSphere Security
162 VMware, Inc.