vworks automation control setup guide
TRANSCRIPT

VWorks Automation ControlVersion 14
Setup Guide
Original Instructions

Notices
Manual Part NumberD0004377 Revision A
November 2020
Copyright© Agilent Technologies, Inc. 2020
No part of this manual may be reproduced in any form or by any means (including electronic storage and retrieval or translation into a foreign language) without prior agreement and written consent from Agilent Technologies, Inc. as governed by United States and international copyright laws.
Contact InformationAgilent Technologies Inc. Automation Solutions 5301 Stevens Creek Blvd. Santa Clara, CA 95051 USA
Web: https://www.agilent.com
Contact page: https://www.agilent.com/en/contact-us/page
Documentation feedback: [email protected]
AcknowledgementsMicrosoft® and Windows® are either registered trademarks or trademarks of the Microsoft Corporation in the United States and other countries.
WarrantyThe material contained in this document is provided “as is,” and is subject to being changed, without notice, in future editions. Further, to the maximum extent permitted by applicable law, Agilent disclaims all war-ranties, either express or implied, with regard to this manual and any information contained herein, including but not limited to the implied warranties of merchantability and fitness for a particular purpose. Agilent shall not be liable for errors or for incidental or consequential damages in connection with the furnishing, use, or performance of this document or of any information con-tained herein. Should Agilent and the user have a separate written agreement with warranty terms covering the material in this document that conflict with these terms, the warranty terms in the separate agree-ment shall control.
Technology Licenses The hardware and/or software described in this document are furnished under a license and may be used or copied only in accordance with the terms of such license.
Restricted Rights LegendIf software is for use in the performance of a U.S. Government prime contract or subcontract, Software is delivered and licensed as “Commercial computer software” as defined in DFAR 252.227-7014 (June 1995), or as a “commercial item” as defined in FAR 2.101(a) or as “Restricted computer software” as defined in FAR 52.227-19 (June 1987) or any equivalent agency regulation or contract clause. Use, duplication or disclosure of Software is subject to Agilent Technologies’ standard commercial license terms, and non-DOD Departments and Agencies of the U.S. Government will receive no greater than Restricted Rights as defined in FAR 52.227-19(c)(1-2) (June 1987). U.S. Government users will receive no greater than Limited Rights as defined in FAR 52.227-14 (June1987) or DFAR 252.227-7015 (b)(2) (November 1995), as applicable in any technical data.
Safety Notices
A WARNING notice denotes a haz-ard. It calls attention to an operating procedure, practice, or the like that, if not correctly performed or adhered to, could result in personal injury or death. Do not proceed beyond a WARNING notice until the indicated conditions are fully understood and met.
A CAUTION notice denotes a hazard. It calls attention to an operating proce-dure, practice, or the like that, if not correctly performed or adhered to, could result in damage to the product or loss of important data. Do not pro-ceed beyond a CAUTION notice until the indicated conditions are fully understood and met.
WARNING
CAUTION

iiiVWorks Automation Control Setup Guide
Contents
Preface . . . . . . . . . . . . . . . . . . . . . . . . . . . . . . . . . . . . . . . . . . . . . . . . . . . . . . . . . . . . . . . . . . . . . . . . . . . . . . . . . . . . . . vAbout this guide. . . . . . . . . . . . . . . . . . . . . . . . . . . . . . . . . . . . . . . . . . . . . . . . . . . . . . . . . . . . . . . . . . . . . . . viAccessing user guides . . . . . . . . . . . . . . . . . . . . . . . . . . . . . . . . . . . . . . . . . . . . . . . . . . . . . . . . . . . . . . . . . ix
1. Setting up the VWorks software . . . . . . . . . . . . . . . . . . . . . . . . . . . . . . . . . . . . . . . . . . . . . . . . . . . . . . . . . . 1VWorks setup workflow . . . . . . . . . . . . . . . . . . . . . . . . . . . . . . . . . . . . . . . . . . . . . . . . . . . . . . . . . . . . . . . . 2Starting up and logging in . . . . . . . . . . . . . . . . . . . . . . . . . . . . . . . . . . . . . . . . . . . . . . . . . . . . . . . . . . . . . . 3Changing your password. . . . . . . . . . . . . . . . . . . . . . . . . . . . . . . . . . . . . . . . . . . . . . . . . . . . . . . . . . . . . . . 5Software components and folder structure . . . . . . . . . . . . . . . . . . . . . . . . . . . . . . . . . . . . . . . . . . . . . . . 6Reporting problems . . . . . . . . . . . . . . . . . . . . . . . . . . . . . . . . . . . . . . . . . . . . . . . . . . . . . . . . . . . . . . . . . . . 9
2. Using compliance features . . . . . . . . . . . . . . . . . . . . . . . . . . . . . . . . . . . . . . . . . . . . . . . . . . . . . . . . . . . . . . 11About features that support compliance . . . . . . . . . . . . . . . . . . . . . . . . . . . . . . . . . . . . . . . . . . . . . . . . 12Audit trails and audit trail reports . . . . . . . . . . . . . . . . . . . . . . . . . . . . . . . . . . . . . . . . . . . . . . . . . . . . . . . 13VWorks records of interest . . . . . . . . . . . . . . . . . . . . . . . . . . . . . . . . . . . . . . . . . . . . . . . . . . . . . . . . . . . . 20Managing record states . . . . . . . . . . . . . . . . . . . . . . . . . . . . . . . . . . . . . . . . . . . . . . . . . . . . . . . . . . . . . . . 24Detecting tampering . . . . . . . . . . . . . . . . . . . . . . . . . . . . . . . . . . . . . . . . . . . . . . . . . . . . . . . . . . . . . . . . . . 28
3. Defining labware . . . . . . . . . . . . . . . . . . . . . . . . . . . . . . . . . . . . . . . . . . . . . . . . . . . . . . . . . . . . . . . . . . . . . . . . 33About defining labware with the Labware Editor. . . . . . . . . . . . . . . . . . . . . . . . . . . . . . . . . . . . . . . . . . 34Labware Editor overview . . . . . . . . . . . . . . . . . . . . . . . . . . . . . . . . . . . . . . . . . . . . . . . . . . . . . . . . . . . . . . 35Workflow for defining labware . . . . . . . . . . . . . . . . . . . . . . . . . . . . . . . . . . . . . . . . . . . . . . . . . . . . . . . . . 39Opening the Labware Editor . . . . . . . . . . . . . . . . . . . . . . . . . . . . . . . . . . . . . . . . . . . . . . . . . . . . . . . . . . . 41Adding a labware entry. . . . . . . . . . . . . . . . . . . . . . . . . . . . . . . . . . . . . . . . . . . . . . . . . . . . . . . . . . . . . . . . 43Setting general properties . . . . . . . . . . . . . . . . . . . . . . . . . . . . . . . . . . . . . . . . . . . . . . . . . . . . . . . . . . . . . 46Setting microplate properties . . . . . . . . . . . . . . . . . . . . . . . . . . . . . . . . . . . . . . . . . . . . . . . . . . . . . . . . . . 48Setting tip and well properties for pipetting . . . . . . . . . . . . . . . . . . . . . . . . . . . . . . . . . . . . . . . . . . . . . . 53Creating and assigning labware classes . . . . . . . . . . . . . . . . . . . . . . . . . . . . . . . . . . . . . . . . . . . . . . . . 55Adding a labware image . . . . . . . . . . . . . . . . . . . . . . . . . . . . . . . . . . . . . . . . . . . . . . . . . . . . . . . . . . . . . . 58Setting Centrifuge Loader properties . . . . . . . . . . . . . . . . . . . . . . . . . . . . . . . . . . . . . . . . . . . . . . . . . . . 60Setting BenchCel properties . . . . . . . . . . . . . . . . . . . . . . . . . . . . . . . . . . . . . . . . . . . . . . . . . . . . . . . . . . . 61Setting Bravo properties . . . . . . . . . . . . . . . . . . . . . . . . . . . . . . . . . . . . . . . . . . . . . . . . . . . . . . . . . . . . . . 65Setting Stacker properties . . . . . . . . . . . . . . . . . . . . . . . . . . . . . . . . . . . . . . . . . . . . . . . . . . . . . . . . . . . . . 66
4. Specifying pipette speed and accuracy . . . . . . . . . . . . . . . . . . . . . . . . . . . . . . . . . . . . . . . . . . . . . . . . . . 69About liquid classes . . . . . . . . . . . . . . . . . . . . . . . . . . . . . . . . . . . . . . . . . . . . . . . . . . . . . . . . . . . . . . . . . . 70Opening the Liquid Library Editor . . . . . . . . . . . . . . . . . . . . . . . . . . . . . . . . . . . . . . . . . . . . . . . . . . . . . . . 72Creating a liquid class . . . . . . . . . . . . . . . . . . . . . . . . . . . . . . . . . . . . . . . . . . . . . . . . . . . . . . . . . . . . . . . . 73Calibrating the pipettor. . . . . . . . . . . . . . . . . . . . . . . . . . . . . . . . . . . . . . . . . . . . . . . . . . . . . . . . . . . . . . . . 76

Contents
iviv VWorks Automation Control Setup Guide
5. Tracking and managing labware in storage . . . . . . . . . . . . . . . . . . . . . . . . . . . . . . . . . . . . . . . . . . . . . . 79About labware inventory management . . . . . . . . . . . . . . . . . . . . . . . . . . . . . . . . . . . . . . . . . . . . . . . . . 80Opening the Inventory Editor . . . . . . . . . . . . . . . . . . . . . . . . . . . . . . . . . . . . . . . . . . . . . . . . . . . . . . . . . . 83About inventory groups . . . . . . . . . . . . . . . . . . . . . . . . . . . . . . . . . . . . . . . . . . . . . . . . . . . . . . . . . . . . . . . 86Creating and managing location groups . . . . . . . . . . . . . . . . . . . . . . . . . . . . . . . . . . . . . . . . . . . . . . . . 88Creating and managing plate groups . . . . . . . . . . . . . . . . . . . . . . . . . . . . . . . . . . . . . . . . . . . . . . . . . . . 91Adding labware information in the inventory database. . . . . . . . . . . . . . . . . . . . . . . . . . . . . . . . . . . . 94Moving labware between storage devices. . . . . . . . . . . . . . . . . . . . . . . . . . . . . . . . . . . . . . . . . . . . . . 103Removing labware information from the inventory database . . . . . . . . . . . . . . . . . . . . . . . . . . . . . 106Using a plate group to process labware . . . . . . . . . . . . . . . . . . . . . . . . . . . . . . . . . . . . . . . . . . . . . . . . 111Creating plate group with barcode input file . . . . . . . . . . . . . . . . . . . . . . . . . . . . . . . . . . . . . . . . . . . . 116Inventory Editor views and filters. . . . . . . . . . . . . . . . . . . . . . . . . . . . . . . . . . . . . . . . . . . . . . . . . . . . . . 119Auditing plate volumes in the Inventory Editor . . . . . . . . . . . . . . . . . . . . . . . . . . . . . . . . . . . . . . . . . . 120Reinventorying the labware inventory. . . . . . . . . . . . . . . . . . . . . . . . . . . . . . . . . . . . . . . . . . . . . . . . . . 123Exporting and importing the inventory data. . . . . . . . . . . . . . . . . . . . . . . . . . . . . . . . . . . . . . . . . . . . . 125Resolving labware inventory problems. . . . . . . . . . . . . . . . . . . . . . . . . . . . . . . . . . . . . . . . . . . . . . . . . 130
6. Tracking experiment data . . . . . . . . . . . . . . . . . . . . . . . . . . . . . . . . . . . . . . . . . . . . . . . . . . . . . . . . . . . . . . . 135About tracking data from experiments. . . . . . . . . . . . . . . . . . . . . . . . . . . . . . . . . . . . . . . . . . . . . . . . . 136Creating and managing experiment IDs . . . . . . . . . . . . . . . . . . . . . . . . . . . . . . . . . . . . . . . . . . . . . . . . 139Creating an experiment ID report. . . . . . . . . . . . . . . . . . . . . . . . . . . . . . . . . . . . . . . . . . . . . . . . . . . . . . 142Archiving, exporting, and restoring experiment data . . . . . . . . . . . . . . . . . . . . . . . . . . . . . . . . . . . . . 145Troubleshooting Experiments database connection . . . . . . . . . . . . . . . . . . . . . . . . . . . . . . . . . . . . . 150
A. Setting up and connecting to a MySQL database . . . . . . . . . . . . . . . . . . . . . . . . . . . . . . . . . . . . . . . . 155Installing MySQL . . . . . . . . . . . . . . . . . . . . . . . . . . . . . . . . . . . . . . . . . . . . . . . . . . . . . . . . . . . . . . . . . . . . 156Installing and setting up a MySQL ODBC . . . . . . . . . . . . . . . . . . . . . . . . . . . . . . . . . . . . . . . . . . . . . . . 167Connecting to Inventory and Experiments databases. . . . . . . . . . . . . . . . . . . . . . . . . . . . . . . . . . . . 175
B. Migrating files from previous VWorks versions . . . . . . . . . . . . . . . . . . . . . . . . . . . . . . . . . . . . . . . . . 177About migration . . . . . . . . . . . . . . . . . . . . . . . . . . . . . . . . . . . . . . . . . . . . . . . . . . . . . . . . . . . . . . . . . . . . 178Migrating files from VWorks v12.3–13.1x . . . . . . . . . . . . . . . . . . . . . . . . . . . . . . . . . . . . . . . . . . . . . . 181

v
Preface This preface contains the following topics:• “About this guide” on page vi• “Accessing user guides” on page ix

PrefaceAbout this guide
vi VWorks Automation Control Setup Guide
About this guide
Who should read this guide
This user guide is for people with the following job roles:
What this guide covers
This guide describes • Setting up the VWorks software• Compliance features• How to create and manage labware definitions and liquid classes• Creating a labware inventory database• Creating an experiments database• How to migrate protocols from previous versions
Table Terms used in this guide
Job role Responsibilities
Integrator Someone who writes software and configures hardware controlled by VWorks Automation Control.
Lab manager, administrator, or technician
Someone who is responsible for:• Developing the applications that are run using VWorks
Automation Control• Developing training materials and standard operating
procedures for operators
Operator Someone who performs the daily production work using VWorks software and solves routine problems.Your organization may choose to create its own procedures for operators including the procedures in this guide.
Term Description
VWorks Automation Control VWorks software component that you use to create the protocols that run your automation devices.
VWorks Plus Collection of software components required for running the VWorks software with compliance features. This edition includes Control Panel, Shared Services, Content Management, and Content Browser.
VWorks Standard Collection of software components required for running the standard VWorks software. This edition includes Control Panel and Shared Services.

vii
PrefaceAbout this guide
VWorks Automation Control Setup Guide
Software version
This guide documents VWorks software 14.0 and later versions.
Related guides
For information about the following VWorks-related topics, see the corresponding Agilent guide.
Content Management (OpenLab component)
VWorks Plus only. The storage repository for VWorks-related records of interest. An administrator can use the Content Browser to view the VWorks project content in Content Management.
Control Panel (OpenLab component)
The Shared Services user interface for configuring and managing user access and licenses.
Microsoft Control Panel Part of the Microsoft Windows operating system.
Shared Services (OpenLab component)
Set of administrative services that control VWorks user access and file storage. Shared Services are accessed via the Control Panel.
Term Description
For information about … See...
Computer requirements and installing the software VWorks Automation Control Installation Guide
• Configuring the software in Control Panel, including managing licenses and user access
• Backing up and restoring the software, Shared Services database, and project content
• VWorks Automation Control Plus Administrator Guide
• VWorks Automation Control Standard Administrator Guide
Setting up a specific device and operating the device using VWorks and device diagnostics software
Relevant Agilent device user guide
General safety information and potential safety hazards that you might encounter when using Automation Solutions products
Automation Solutions Products General Safety Guide
How to use the VWorks software, including:• Setting up devices• Writing protocols and creating forms• Running a protocol • Troubleshooting protocols
VWorks Automation Control User Guide

PrefaceAbout this guide
viii VWorks Automation Control Setup Guide
Related topics
Quick reference guides • VWorks Plus Quick Reference
• VWorks Standard Quick Reference
An overview of how to use the VWorks software VWorks Quick Guide for Protocol Authors
For information about … See...
For information about... See...
How to access user guides “Accessing user guides” on page ix
Setting up the VWorks software “VWorks setup workflow” on page 2
VWorks compliance features “Using compliance features” on page 11

ix
PrefaceAccessing user guides
VWorks Automation Control Setup Guide
Accessing user guides
About this topic
This topic describes the different formats of user information and explains how to access it for the Agilent Automation Solutions products.
Where to find user information
The user information is available in the following locations:• Knowledge base. The help system for the Automation Solutions products is
available from:– Help menu within the VWorks software: Select Help > Knowledge Base or press
F1.
– From the Windows desktop: Select Start ( ) > All Apps > Agilent Technologies > VWorks Knowledge Base.
For guidelines on using the VWorks context-sensitive help and knowledge base features, see Using the knowledge base, below.
• PDF files. The PDF files of the user guides are installed with the VWorks software (C:\Program Files (x86)\Agilent Technologies\VWorks\UserGuides) and are available in the VWorks Knowledge Base.
• Website. You can search the online VWorks Knowledge Base or download the latest version of any PDF file from the Agilent website at www.agilent.com/chem/askb.
Accessing safety information
Safety information for the Agilent Automation Solutions devices appears in the Automation Solutions Products General Safety Guide and in the corresponding device safety guide or user guide.You can also search the knowledge base or the PDF files for safety information.
Using the knowledge base
Knowledge base topics are displayed using web browser software such as Microsoft Edge.Note: If you want to use Internet Explorer to display the topics, you might have to allow local files to run active content (scripts and ActiveX controls). To do this, in Internet Explorer, open the Internet Options dialog box. Click the Advanced tab, locate the Security section, and select Allow active content to run in files on my computer.

PrefaceAccessing user guides
x VWorks Automation Control Setup Guide
Opening the help topic for an area in the VWorks window
To access the context-sensitive help feature:
1 In the main window of the VWorks software, click the help button . The pointer
changes to . Notice that the different icons or areas are highlighted as you move the pointer over them.
2 Click an icon or area of interest. The relevant topic or document opens.

xi
PrefaceAccessing user guides
VWorks Automation Control Setup Guide
Features in the Knowledge Base window
Step For this task...
1 Contents pane. Lists all the books and the table of contents of the books.
2 Search. Allows you to search the Knowledge Base (all products or selected products) using keywords.
3 Topic area. Displays the selected online help topic.
4 Navigation buttons. Enable you to navigate through the next or previous topics listed in the Contents tab.
5 Toolbar buttons: Enable you to:• Expand or collapse all the sections in a topic that has drop-down headings.• Print the topic.• Send feedback by email for a given topic.

PrefaceAccessing user guides
xii VWorks Automation Control Setup Guide
Related topics
For information about... See...
Setting up the VWorks software “VWorks setup workflow” on page 2
VWorks compliance features “Using compliance features” on page 11

1
1 Setting up the VWorks softwareThis chapter contains the following topics:• “VWorks setup workflow” on page 2• “Starting up and logging in” on page 3• “Changing your password” on page 5• “Software components and folder structure” on page 6• “Reporting problems” on page 9

1 Setting up the VWorks softwareVWorks setup workflow
2 VWorks Automation Control Setup Guide
VWorks setup workflow
If you are setting up the software for the first time, use the following workflow:
Step For this task... See...
1 Ensure that the software is configured correctly, including setting up user accounts.
• VWorks Automation Control Plus Administrator Guide
• VWorks Automation Control Standard Administrator Guide
2 Log in to the VWorks software. “Starting up and logging in” on page 3
3 Verify your project folder requirements. “Software components and folder structure” on page 6
4 VWorks Plus only. Understand how audit trails work and set options for audit trails.
“Audit trails and audit trail reports” on page 13
5 If applicable. Migrate protocols from VWorks 12.3 or later versions.
“Migrating files from previous VWorks versions” on page 177
6 Create labware definitions for the labware you will use during protocol runs.
“Defining labware” on page 33
7 If you have a Bravo Platform, specify the pipetting speed and accuracy.The Liquid Library Editor provides tools for specifying properties that affect pipetting speed, accuracy, and precision.
“Specifying pipette speed and accuracy” on page 69
8 Set up the devices. During setup, you add the device in the VWorks software and establish communication with the device.
Device user guide
9 If you have a labware storage device, such as the Labware MiniHub, manage the labware inventory. The Inventory Editor helps you track barcodes and labware as you move them into and out of storage or incubation.
“Tracking and managing labware in storage” on page 79
10 If you are tracking the settings that operators specify for runs of a given application, set up the Experiments database.
“Tracking experiment data” on page 135
11 Create protocols. Protocols determine the sequence of tasks you want to automate in a run. For example, you can use a protocol to apply barcode labels to 100 microplates.
VWorks Automation Control User Guide
3
1 Setting up the VWorks softwareStarting up and logging in
VWorks Automation Control Setup Guide
Starting up and logging in
About this topic
To create, modify, or run a protocol, you must first log in. Contact your lab manager or administrator to set up a user account or to find out your access privileges. This topic explains the following:• “Logging in” on page 3• “Logging out” on page 4• “About changing your VWorks password” on page 5
Logging in
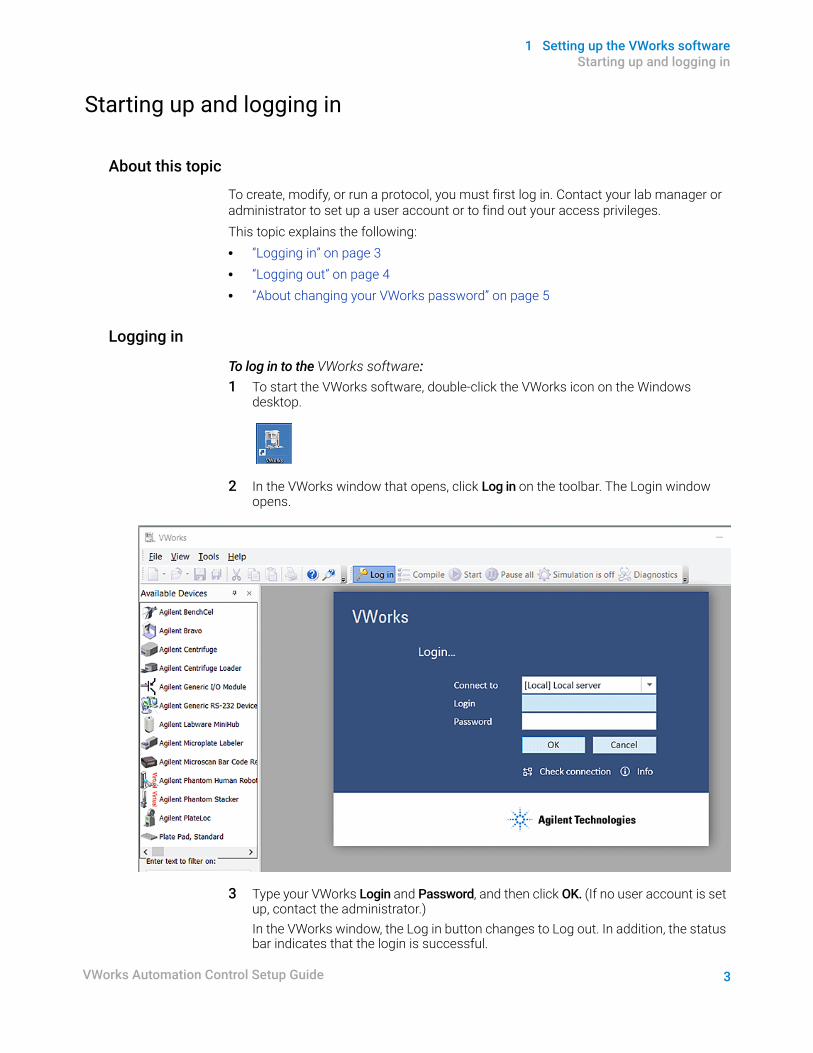
To log in to the VWorks software:1 To start the VWorks software, double-click the VWorks icon on the Windows
desktop.
2 In the VWorks window that opens, click Log in on the toolbar. The Login window opens.
3 Type your VWorks Login and Password, and then click OK. (If no user account is set up, contact the administrator.)In the VWorks window, the Log in button changes to Log out. In addition, the status bar indicates that the login is successful.

1 Setting up the VWorks softwareStarting up and logging in
4 VWorks Automation Control Setup Guide
Note: Logging in establishes the connection to Shared Services and the storage repository.
Logging out
To log out of VWorks software:In the VWorks window, click Log out on the toolbar.
Related information
For information about... See...
Setting up and managing user accounts
• VWorks Automation Control Plus Administrator Guide
• VWorks Automation Control Standard Administrator Guide
Setting up the VWorks software “VWorks setup workflow” on page 2
Audit trails and records of interest “About features that support compliance” on page 12
5
1 Setting up the VWorks softwareChanging your password
VWorks Automation Control Setup Guide
Changing your password
About changing your VWorks password
An administrator uses the Control Panel (OpenLab component) to manage VWorks user access. The following procedure is valid if the following conditions are met:• You have a current user account as a VWorks technician, operator, or guest.• The Control Panel is configured to use Internal (not Windows Domain)
authentication.If you do not have a VWorks user account or need help changing your password, contact your administrator.For administrator instructions, see the VWorks Automation Control Plus Administrator Guide or VWorks Automation Control Standard Administrator Guide.
Procedure
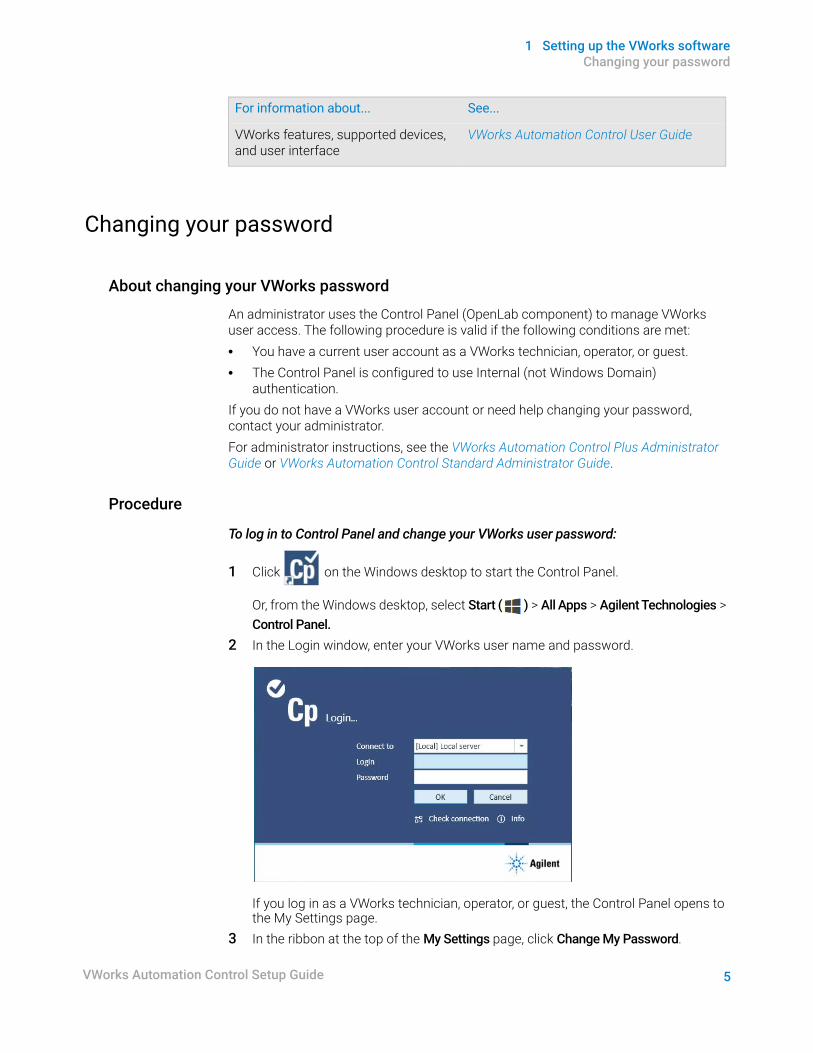
To log in to Control Panel and change your VWorks user password:
1 Click on the Windows desktop to start the Control Panel.
Or, from the Windows desktop, select Start ( ) > All Apps > Agilent Technologies > Control Panel.
2 In the Login window, enter your VWorks user name and password.
If you log in as a VWorks technician, operator, or guest, the Control Panel opens to the My Settings page.
3 In the ribbon at the top of the My Settings page, click Change My Password.
VWorks features, supported devices, and user interface
VWorks Automation Control User Guide
For information about... See...

1 Setting up the VWorks softwareSoftware components and folder structure
6 VWorks Automation Control Setup Guide
4 In the Change My Password dialog box, type the Old password, type the new password in the New password and Confirm new password boxes, and then click OK.
5 If you have finished viewing the My Settings page, close the Control Panel.
Software components and folder structure
Software components
Both VWorks Plus and VWorks Standard editions consist of:• Components of the OpenLab software • VWorks software The following figures show the relationships between these components.
Figure VWorks Plus architecture

7
1 Setting up the VWorks softwareSoftware components and folder structure
VWorks Automation Control Setup Guide
Figure VWorks Standard architecture
OpenLab components• Control Panel and Shared Services. Control Panel is the user interface for Shared
Services, which are set of administrative services. An administrator uses Control Panel to configure the following:– User access management– Software licenses– Storage
• Storage types. Shared Services uses a different storage type for each VWorks edition:– VWorks Plus. Uses Content Management to store VWorks files, records of
interest, and audit trails. The files are stored in a predefined VWorks Projects folder in the Content Management repository. A system administrator can use the Content Browser to view and edit the project structure and contents.
– VWorks Standard. Uses the local file system. Shared Services stores the files in a predefined VWorks Projects folder./VWorks Projects/VWorks
Note: Unlike previous VWorks versions, the VWorks 14.0 editions do not use the Windows Registry for storing records, such as labware definitions and device profiles.
VWorks softwareThe VWorks software controls your automation devices. You create labware definitions and liquid classes, set up your devices and create device profiles, and create and run protocols.VWorks Plus. The VWorks software logs audit trails for records of interest, tracks records by record state (In Development, In Validation, and Released), and performs tamper detection on the records.
VWorks Project folder structure
During installation, a VWorks Projects folder structure is created that includes 4 levels, for example, \VWorks Projects\VWorks\Protocols\General.

1 Setting up the VWorks softwareSoftware components and folder structure
8 VWorks Automation Control Setup Guide
You can create additional subfolders for your files, for example, \VWorks Projects\VWorks\MyExperiments\ExperimentA\MyProtocolsNote: Files saved in folders that you create at any level other than a fourth-level folder will not be compatible with legacy OpenLab ECM 3.x servers. Refer to the following procedure if compatibility with legacy OpenLab ECM 3.x servers is required.
Folder restrictions for compatibility with legacy ECM servers
The legacy Agilent ECM servers do not allow files to be saved in subfolders above or below the fourth level. The VWorks software includes an option to restrict file saving to the fourth level folders to ensure compatibility with legacy ECM servers.
To select or clear the folder-restriction option:1 In the VWorks window, click Tools > Options. The Options dialog box opens.2 Locate the Restrict file saving to 4th level folders only to support legacy ECM servers
check box.This setting ensures that VWorks file-saving is restricted to fourth-level folders. • If you require compatibility with legacy OpenLab ECM 3.x servers, select the
check box.• If you want to remove this restriction, clear the check box.
9
1 Setting up the VWorks softwareReporting problems
VWorks Automation Control Setup Guide
3 VWorks Plus. To continue setting audit trail options, see “Setting audit trail options” on page 15.
4 Click OK to save the changes.5 VWorks Plus. The Audit Comment dialog box opens. An audit comment is required
any time you save a change to the VWorks global options. For details on audit trails and records of interest, see “Using compliance features” on page 11.
For more details on setting VWorks global options, see .the VWorks Automation Control User Guide.
Related information
Reporting problems
Contacting technical support
If you find a problem with the VWorks software, contact Agilent Technical Support. For contact information, go to https://www.agilent.com/en-us/contact-us/page.Note: You can also send a software bug report from within the VWorks software.
Reporting hardware problems
When contacting Agilent Technical Support, make sure you have the serial number of the device or workstation ready. See the device user guide for the location of the label.
Reporting software problems
When you contact Agilent Technical Support, make sure you provide the following:• Short description of the problem
• Software version number• Error message text (or screen capture of the error message dialog box)• Screen capture of the About VWorks software dialog box• Relevant software files
To find the VWorks software version number:In the VWorks software, select Help > About VWorks.
For information about... See...
Setting up the VWorks software “VWorks setup workflow” on page 2
Audit trails and records of interest “About features that support compliance” on page 12
VWorks features, supported devices, and user interface
VWorks Automation Control User Guide

1 Setting up the VWorks softwareReporting problems
10 VWorks Automation Control Setup Guide
To find the Diagnostics software version number:1 Open Diagnostics.2 Read the version number on the title bar of the diagnostics window.
To send compressed protocol and associated files in VZP format:In the VWorks software, select File > Export to export and compress the following files:• Protocol file• Device file (includes the device profile and teachpoint file)• Labware definitions• Liquid classes• Pipette techniques• Hit-picking files• Plate map files• Barcode files• Error library• Log files• Form file (*.VWForm)
Reporting user guide problems
If you find a problem with this user guide or have suggestions for improvement, send your comments using one of the following methods:
• Click the feedback button ( ) in the online help.
• Send an email to [email protected].

5
2 Using compliance featuresThis chapter describes features in VWorks Plus edition that support compliance with Part 11 of Title 21 of the Code of Federal Regulations (21 CFR Part 11).This chapter contains the following topics:• “About features that support compliance” on page 6• “Audit trails and audit trail reports” on page 7• “VWorks records of interest” on page 14• “Managing record states” on page 18• “Detecting tampering” on page 22

2 Using compliance featuresAbout features that support compliance
6 VWorks Automation Control Setup Guide
About features that support compliance
About this topic
Read this topic to understand how features in VWorks Plus support compliance with Part 11 of Title 21 of the Code of Federal Regulations (21 CFR Part 11).
Features that support 21 CFR Part 11
The FDA rules and guidelines for compliant electronic records and computerized systems require secure data handling. The following table lists the applicable VWorks Plus features.
Table Features that support compliance with 21 CFR Part 11
Feature Description For details, see...
Authentication, security, and user management
Prevent unauthorized access and unauthorized modification of records of interest. The Control Panel enables management of users, groups, roles, and privileges.
VWorks Automation Control Plus Administrator Guide
Content Management
Provides secure storage with access control.
Control Panel system activity log
Records events that occur during a Control Panel session, for example, logging in, updates to users, groups, or roles, updates to licenses, and so forth.
Backup and restore procedures for the software and Content Management.
Provide procedures required for disaster recovery planning.
VWorks activity logs Record events that occur during a VWorks session. The logs include the Main log, Pipette log, and Time Constraints log. The Diagnostics software for each device displays a profile activity log, which is also stored in the Main Log.
VWorks Automation Control User Guide
Audit trails and reports
Provides traceability for records of interest, documenting who did what and when.An audit file is logged for each record of interest.
“Audit trails and audit trail reports” on page 7“VWorks records of interest” on page 14
Record state tracking Provides control of records that transition through development, validation and released states to ensure record integrity and traceability. The software also increments the version of a record of interest each time a change is saved.
“Managing record states” on page 18
Tamper detection Detects corrupted records and records that have been modified externally from VWorks Plus.
“Detecting tampering” on page 22

7
2 Using compliance featuresAudit trails and audit trail reports
VWorks Automation Control Setup Guide
Audit trails and audit trail reports
About this topic
This topic describes the audit trail feature in VWorks Plus edition and how to generate an audit trail report for records of interest (ROI). For details about records of interest, see “VWorks records of interest” on page 14.
Audit trails and how changes are tracked
VWorks Plus logs audit trails for files that are considered to be records of interest (ROI). Each record is stored in the Content Management Repository and includes its audit trail and a checksum file. The software uses the checksum file for tamper detection.Note: In the Content Browser for the Repository, the displayed file names include the archive file extension (.roizip), for example, protocol-1.pro.roizip. The audit trail contains the following for each change to a record of interest.
Table Audit trail contents
Exporting and importing protocols
Provides a means to export protocols and associated components to an archive file (.vzp) that can be used to transport protocols between computers, back up and recover protocols, and facilitate troubleshooting problems with protocols and other files when seeking assistance from Agilent Technical Support.
VWorks Automation Control User Guide
Backup and Restore features
Provides a means to backup and restore the following files from an archive file (.vbk). • Labware entries• Labware classes• Liquid classes• Pipetting techniques• Database file (.sql) for labware inventory
VWorks Automation Control User Guide
Feature Description For details, see...
Column Description
Local Time The local date and time of a change to the record of interest.
UTC Time The UTC date and time of a change to the record of interest.
Computer Name The name of the computer on which audit trail is generated.
Software Version The version and build of the VWorks software running on the computer listed above.
User The user name of the logged-in user who made the change to the record of interest.

2 Using compliance featuresAudit trails and audit trail reports
8 VWorks Automation Control Setup Guide
As the following figure shows, the Audit Comment dialog box varies depending on whether the record is subject to or exempt from development state changes.
Figure Audit Comment dialog box examples: A Record exempt from record states, B Record in validation state
State of ROI The development state of the record of interest:• Released, In Validation, or, if applicable, In Development
Logging an audit trail for records in the development state is optional. For details, see “Setting audit trail options” on page 9.
• Exempt For details, see “Records exempt from state changes” on page 16.
Version of ROI The version of the record. The version number increments after changes are made and the file is saved. The version is useful if a record is copied to create another similar record using the Save As command. For example, if you create protocol B from protocol A, it may be helpful to know which version of protocol A was used as the basis to create protocol B.
Description A software-generated description of what the changes were.
Audit Comment A comment (reason for the change) that the user entered in the Audit Comment dialog box for this change.Whenever a record for which the software has logged an audit trail is modified, the Audit Comment dialog box opens and requires the user to enter a comment before saving the record. Comments are restricted to 256 characters.Note: The last 5 audit comments entered are available as options for selection. These comments are stored in C:\VWorks Workspace\Audit Comments\comments.txt.
Column Description

9
2 Using compliance featuresAudit trails and audit trail reports
VWorks Automation Control Setup Guide
Setting audit trail options
By default, the VWorks software is not configured to log audit trails for records that are in development. If you want to log audit trails for records in development, you can use the following procedure to select this option and options for record states.
CAUTIONThe settings in the Options dialog box apply to all protocol runs. Always check the settings before you start a run.
To log audit trail messages for records in the development state:1 In the VWorks window, click Tools > Options. 2 In the Options dialog box, under Options, set your preferences for the following
options.
Option DescriptionLog audit trail for records of interest that are in development state
The option to maintain an audit trail for development state records.• (Default) Clear the check box if you do not want to
log an audit trail for records while they are in the development state.
• Select the check box if you want the Audit Comment dialog box to appear anytime you create or edit records of interest while they are in the development state.
Note: You cannot delete records for which VWorks logs an audit trail.

2 Using compliance featuresAudit trails and audit trail reports
10 VWorks Automation Control Setup Guide
3 Click OK. The Audit Comment dialog box opens.
4 Type or select a comment, and then click OK.Note: For details on setting other options in the Options dialog box, click the ? button in the top right corner to open the corresponding topic in the knowledge base.
Automatically change the state of dependent records
The option to automate record state changes for dependent records when you change the state of a record of interest.• (Default) Clear the check box if you want to manage
record state changes individually.Note: To run a protocol all the records that it references, such as device file, labware entries, liquid classes, and so forth, must have a development state equal to or greater than the protocol.
• Select the check box if you want to automate the record state changes.For example, if you change the state of a protocol from In Development to In Validation or Released, this option automatically changes the state of all the dependent records to match the protocol.Note: If you transition a record to the Released state and the record has a dependency on a device profile that is in the In-Validation state, the profile does not appear in the list of dependent records to be automatically changed to the Released state.
Prompt user with a list of device profiles when running a protocol in RELEASED state
The option to list all the referenced device profiles that are in the validation state when running a protocol that is in the released state, or when running a protocol that references a device file that is in the released state.Note: Device profiles cannot transition to the released state, because adjustments to the device teachpoints for a given device may be required if it is moved to another location or if a hardware collision occurs.• (Default) Clear the check box if you do not want the
profile message to appear.• Select the check box if you want the profile message
to appear.
Option Description

11
2 Using compliance featuresAudit trails and audit trail reports
VWorks Automation Control Setup Guide
Generating an audit trail report
The software performs tamper detection on any record selected for the audit trail report.
IMPORTANTI An audit trail report cannot be generated for a record if the software detects tampering
or corruption of that file.
To generate an audit trail report:1 In the VWorks window, click Tools > Audit Trail Reports. The VWorks Audit Trail
Reports window opens.2 In the Record Type list, select the record type.
Note: For a list of record types, see “VWorks records of interest” on page 14.
3 In the Record Name list, do one of the following.:• Click a record name, and then go to step 5.• Click Browse, and continue to step 4.

2 Using compliance featuresAudit trails and audit trail reports
12 VWorks Automation Control Setup Guide
4 In the Open File dialog box, locate and select the record and then click Open.
Note: If the VWorks options specify to restrict file saving to fourth-level folders, the record must be in a fourth-level folder. Note: If you selected a specific Record Type, you can open only that file type.
5 Ensure that the correct Record Name is selected, and then click Generate Report. The file path of the selected record appears in the box under Record Type. The data for the selected record appears in the window.
Note: For a description of each column in the report, see “Audit trails and how changes are tracked” on page 7.
6 Click Export As CSV to save the report in a comma-separated text file, or click Export As PDF. The Save As dialog box opens.Specify the name and storage location, and then click Save. Click OK to close the confirmation message.

13
2 Using compliance featuresAudit trails and audit trail reports
VWorks Automation Control Setup Guide
Related information
For information about... See...
Compliance features “About features that support compliance” on page 6
Records of interest “VWorks records of interest” on page 14
Record states “Managing record states” on page 18
Backing up and restoring the Content Management repository
VWorks Automation Control Plus Administrator Guide
Backing up and restoring labware definitions, liquid classes, pipette techniques, and inventory database
VWorks Automation Control User Guide
Tamper detection “Detecting tampering” on page 22

2 Using compliance featuresVWorks records of interest
14 VWorks Automation Control Setup Guide
VWorks records of interest
About this topic
Read this topic if you have VWorks Plus.
Types of records of interest
VWorks has two categories for records of interest:
1 Records that are subject to development state changes2 Records exempt from state changes
Records that are subject to development state changes• In Development. By default, the software does not create an audit trail log for
records in development. However, the software includes an option to log the audit trail entries for In Development records.
• In Validation. An audit trail is logged for In Validation records. Such records may be modified but not deleted. The Audit Comment dialog appears any time you modify and save a record in this state.
Figure Example of Audit Comment dialog box
• Released. The software prevents any changes to records that are in the Released state. If you attempt to save a change for a released record, a message appears stating This record is released and cannot be changed.
See “VWorks records that transition through states” on page 15 for the list of records in this category.
Records exempt from state changesSee “Records exempt from state changes” on page 16 for the list of records in this category.VWorks logs all the audit trail entries for an exempt record of interest starting from the creation of the file. The Audit Comment dialog appears any time you modify and save a record of interest that is exempt from record states.

15
2 Using compliance featuresVWorks records of interest
VWorks Automation Control Setup Guide
Figure Example of Audit Comment dialog box for exempt record
VWorks records that transition through states
The following table lists the records of interest (ROI) that are tracked based on their development state. Changes to this type of record:• In Development. Changes may be logged to an audit trail depending on the setting
in the Options dialog box.• In Validation. Changes are always logged to an audit trail.• Released. No changes are permitted.
Record of interest (file extension)
Description
Device file (.dev) A file that contains:• The list of devices the software will communicate with and control• Configuration information of each device• Communication settings (profile)
Device profile (.xml) A file that contains a collection of settings that the VWorks software uses to communicate with a specific device, for example, the Bravo Platform.
IMPORTANT Although profiles can transition from the In Development state to the In Validation state, these records cannot transition to the Released state. This exception is necessary because adjustments to the teachpoints for a given device may be required if the instrument is moved to another location or if a hardware collision occurs. A teachpoint adjustment would result in an update to the device profile.
Error library (.elb) A file that contains a collection of automated error responses.
Form file (.VWform) A file that provides a simplified user interface for running a protocol.
Hit pick format (.xml) A file that is used by hit picking protocols to specify the destination well pattern and a few other items.
Labware entry (.xml) A file that contains a collection of labware properties that the VWorks software uses to handle a given labware type in the automation system.Note: Each labware entry is assigned to a labware class or classes. Labware classes are exempt from record state changes, but labware entries in the released state cannot be removed from a labware class.
Liquid class (.xml) A file that specifies pipetting settings, set up for different liquid types.

2 Using compliance featuresVWorks records of interest
16 VWorks Automation Control Setup Guide
Records exempt from state changes
The following table lists the records of interest that are exempt from record state changes.
Macro library (.mlb) A file that contains a collection of macros. A macro is a collection of protocol tasks in an abbreviated form that you can insert at various places within the same protocol or throughout other protocols where the same task sequence is required.
Pipette technique (.xml)
A file that specifies the x- and y-axis offset when pipetting.
Protocol file (.pro) A file that contains instructions for performing a run.
Runset file (.rst) A file that specifies a collection of protocol runs that can be scheduled in advance to be performed without operator intervention.
Record of interest (file extension)
Description
Record of interest (file extension)
Description
VWorksOptions (.xml)
A global options file that specifies parameter settings that apply to all the protocols on the computer running VWorks Plus. Note: To view these options in the VWorks window, click Tools > Options. For details, see the VWorks Automation Control User Guide.The software logs an audit trail for this record, starting with the creation of the record and tracks any subsequent changes.
Labware class (.xml)**
A file that lists a collection of labware entries that can be used with a given device, for example, Uses Standard Platepad or Uses Filter Platepad.
Teachpoint file (.xml) A device-dependent file that contains your teachpoint settings, for example, a BenchCel teachpoint file.
Miscellaneous files that are imported into the Content Management Repository.The software logs an audit trail for the following records after they are imported into the Repository.
Barcode files (.bar, .csv, or .txt)
An input file for specifying the barcodes to apply to a microplate.
Excel files (.xlsx, .xls, or .xlsm)
A utility for calculating volume requirements or for creating a method used by the AssayMAP Protein Sample Prep Workbench.
Gantt chart files (.gnt)
A file that contains a Gantt chart for one or more protocols while they are running, or for one or more open protocols that have been run in the current VWorks session.Note: You must import these files to view them in the VWorks window.
Hitpick input files (.csv)
An input file used by the Hit Pick Replication task. The file contains information about the source microplate and specifies the dispense pattern in destination microplates.

17
2 Using compliance featuresVWorks records of interest
VWorks Automation Control Setup Guide
Related information
Image files (.jpg, .png, .bmp, or .ico)
An image file referenced by a labware definition or a form file.
Inventory database files (.sql)
A labware inventory database file.
Experiments database files (.expTags)
Archived files and exported files that contain experiment data in XML format.The software saves these files to the local file system, not Shared Services storage. Ensure that you move these files to a secure location.
JavaScript (.js) A text file that contains JavaScript code that is used to execute instructions, for example, in a protocol task.The JS Wrapper task uses a JavaScript task file (.js).
Record of interest (file extension)
Description
For information about... See...
Compliance features “About features that support compliance” on page 6
Audit trails “Audit trails and audit trail reports” on page 7
Record states “Managing record states” on page 18
Global options VWorks Automation Control User Guide
Miscellaneous files VWorks Automation Control User Guide
Tamper detection “Detecting tampering” on page 22
Labware inventory “Tracking and managing labware in storage” on page 79
Experiment tags database “Tracking experiment data” on page 135

2 Using compliance featuresManaging record states
18 VWorks Automation Control Setup Guide
Managing record states
About this topic
Read this topic if you have VWorks Plus. This topic describes record states and how to change them. For a list of records that transition through states, see “VWorks records of interest” on page 14.
Record states defined
A subset of the records of interest, such as device files, protocols, and so forth transition through the record states of In Development, In Validation, and Released. Each state has different limits on editing or deleting files, as the following figure shows.
Figure Editing options in different record states
In Development In Validation Released
Administrator or VWorks Technician
Administrator or VWorks Technician
Administrator only
Record state Description Editing of record allowed?
In Development The VWorks software assigns this state to new records. By default, the software does not log an audit trail records in development. If you want to log the audit trail for records in development, see “Setting audit trail options” on page 9.
Administrator or VWorks technician may edit files.Only administrator can delete files.
In Validation A VWorks administrator or technician can change the record state from In Development to In Validation.The software logs an audit trail for all In Validation records.
VWorks administrator or technician may edit but cannot delete these files.
Released A VWorks administrator or technician can change the record state from In Validation to Released.The software logs an audit trail for all Released records.
No editing or deleting of files allowed.

19
2 Using compliance featuresManaging record states
VWorks Automation Control Setup Guide
About protocols and record-state dependencies
A VWorks protocol has dependencies on other records of interest, such as a device file, labware entries, and so forth. To run a protocol successfully, the dependent records must have a state equal to or greater than the protocol. For example, if you attempt to run a released protocol with labware entries that are still in validation, an error message appears and you must abort the protocol.The following table lists record states permitted for dependent records at each development state of the protocol.
Changing the state of a record
Before you start:
IMPORTANTEnsure that no records are open in the VWorks window. The command to change record of interest (ROI) state is unavailable if any records of interest are open.
• Only an administrator can change the state of a record.• You cannot change a record’s state if it references other records that are at a lower
state. For example, if you are transitioning a protocol from In Development to In Validation, the labware entries must have a state of at least In Validation. In this case, you can either:– Manually change the state of each dependent record before transitioning the
protocol.– Select the option for the software to change the state of dependent records
automatically. For details, see “Setting audit trail options” on page 9.
To change the state of a record:1 Click Tools > Change ROI State. The Change the State of a Record of Interest dialog
box opens.
State of the protocol State of the dependent records
In Development Any of the 3 record states
In Validation In Validation or Released only
Released Released only
Note: Labware classes and teachpoint files (BenchCel) are exempt from record state changes. Note: Device profiles cannot transition to the released state, because teachpoint adjustments may be required if a device is moved to another location or if a hardware collision occurs.

2 Using compliance featuresManaging record states
20 VWorks Automation Control Setup Guide
2 In the Record Type list, select the type of record, for example, Protocol Files.Note: For a list of record types, see “VWorks records of interest” on page 14.
3 In the Record Name list, select the specific record:• Click the name of the record, and then go to step 5.
Note: The record state appears in the Current state of this record field. The label of the Change state button changes depending on the state of the selected record, for example, Change state to In Validation.
• If the record that you want is not in the Record Name list, click browse and then continue to step 4.Note: The Browse option allows you to locate the specified Record Type stored anywhere in the Content Management Repository under the following file path: /VWorks Projects/VWorks.
4 In the Open File dialog box, locate and select the record and then click Open.
Note: The available Files of type options are restricted to the specified Record Type.

21
2 Using compliance featuresManaging record states
VWorks Automation Control Setup Guide
5 Click the Change state to (state) button. a If the Automatically change the state of dependent records option was selected,
a message appears asking you to confirm the state change for the dependent records. – Click Yes to confirm the state change, and then proceed to step b.– Click No to cancel the state change. In this case, you can manually
change the state of each dependent record.
Note: If a record transitioning to the Released state has a dependency on a device profile that is in the In-Validation state, the profile does not appear in the list of dependent records to be automatically changed to the Released state.
b In the Audit Comment dialog box, type or select a comment, and then click OK.If you changed the state of multiple records, the audit comment applies to all the records effected by the transition.
Related information
For information about... See...
Compliance features “About features that support compliance” on page 6
Records of interest “VWorks records of interest” on page 14
Audit trails “Audit trails and audit trail reports” on page 7
Backing up and restoring the Content Management repository
VWorks Automation Control Plus Administrator Guide
Backing up and restoring labware definitions, liquid classes, pipette techniques, and inventory database
VWorks Automation Control User Guide
Tamper detection “Detecting tampering” on page 22

2 Using compliance featuresDetecting tampering
22 VWorks Automation Control Setup Guide
Detecting tampering
About this topic
Read this topic is you have VWorks Plus. This topic describes the tamper detection feature.
About tamper detection
Tamper detection verifies the data integrity of records of interest. The feature detects corrupted records and records that have been modified outside of the VWorks software. Examples of tampering include:• Deleting any file from a record of interest archive (.roiZip) in Content Management.
Note: All records of interest are stored in an .roiZip archive that includes the audit trail file and a checksum file.
• Modifying parameter values in any file outside of the VWorks software.• Changing the structure of an .xml file, such as removing any closing or opening
XML tag.If the software detects tampering, an error message advises you that the file cannot be loaded and to contact the VWorks administrator to try to recover the file. In this case, the VWorks administrator can restore a backup copy or use the Content Browser to recover a previous version of the record. For details, see .the VWorks Automation Control Plus Administrator Guide.
When does tamper detection occur
The VWorks software performs tamper detection for the following actions:
Action Description
Starting the VWorks software and logging in
Checks the VWorks Options.xml file for tampering as well as any files referenced in VWorks Options, for example ErrorLibrary.elb or MacroLibrary.mlb files. For details, see “Tamper detection responses when opening a record of interest” on page 23.
Using the Tamper Detection command
Checks the records of interest stored in the Content Management Repository to verify the data integrity. For details, see “Running the Tamper Detection command” on page 24.Note: Depending on the number of records to be checked, this operation can take a long time.
Opening a record of interest
Checks the record for data integrity before opening the file. For details, see “Tamper detection responses when opening a record of interest” on page 23.
Performing a protocol run
Checks the protocol when the protocol is compiled. During a run, tamper detection occurs at the point in the run when a task parameter value is set by a script or variable and the task actually executes.

23
2 Using compliance featuresDetecting tampering
VWorks Automation Control Setup Guide
Tamper detection responses when opening a record of interest
When you open a record of interest, the software checks the given record for data integrity before loading it. If a record is corrupted or has been tampered, the response can vary depending on the file, as the following table shows. To resolve the problem, an administrator can use the Content Browser to restore a previous, clean version of a record.
Importing a VWorks protocol archive (.vzp file)
Checks the .vzp archive contents if the .vzp was created in VWorks version 14 or later.
Importing or restoring experiments in the Experiments Editor
Checks an experiment file that was archived or exported before allowing you to restore or import the file.
Importing an Inventory database file (.sql)
Checks the file that was exported before allowing you to import the file.
Using VWorks Backup and Restore (.vbk file)
Checks the selected files during:• Backup. An error message lists any corrupted records and provides the option to
continue the backup for clean records only.• Restore. A Restore operation cannot proceed if the backup (.vbk file) is corrupted
or has been tampered.
Generating an audit trail report
Checks the selected record of interest, and generates the audit trail report if the record has not been corrupted or tampered.
Action Description
Type of record VWorks response if record is corrupted or has been tampered
A single record of interest, for example, a device file or labware entry
A message states that the file has been corrupted or modified outside of the VWorks software and cannot be loaded.
A record of interest that references or contains other records
The software response depends on the record type, for example:• Runset that includes a corrupted protocol. A message lists the corrupted record
and states that the runset cannot be loaded.• Protocol that references a corrupted record. A message lists the corrupted
record and states that the record cannot be loaded.• Form that references a corrupted record. The form loads successfully, but the
corrupted record (for example, protocol, device file, or runset) cannot be loaded.
• Labware class that contains a corrupted labware entry. The labware class loads successfully, but the corrupted labware entry cannot be loaded.

2 Using compliance featuresDetecting tampering
24 VWorks Automation Control Setup Guide
IMPORTANTThe software cannot perform tamper detection on the contents of a .vbk or .vzp archive that was generated by earlier versions of the VWorks software.
Running the Tamper Detection command
The Tamper Detection command runs a check of all the records that are present in the Content Management Repository under the file path:/VWorks Projects/VWorks
IMPORTANTDepending on the number of records to be checked, this operation can take a long time.
To run tamper detection:In the VWorks window, click Tools >Tamper Detection.• If tampering is detected, an error message displays a list of the problem records.
An administrator can restore clean versions of the corrupted records if a clean backup archive exists.
• If no tampering is detected, a message states that all the records are clean.
VWorks Options.xml file (Options dialog box)
The software response depends on the issue:• If the VWorksOptions.xml file is corrupted or tampered, an error message
states that the VWorks software must close. In this case, an administrator can use the Content Browser to restore a clean backup copy of the file or a previous version of the file.
• If a file referenced by VWorks Options, such as the error library or macro library, is corrupted or missing an error message states that the file cannot be loaded– Administrator. You may select a different error library file or right-click the
file path, and click Clear field contents in the shortcut menu. – Non-administrators. The VWorks software closes, and you must contact the
administrator for assistance.• If the VWorks Options.xml file is missing, a error message opens and advises
that the software will load the default values for VWorks Options. An administrator can click Tools > Options, and then verify the settings in the Options dialog box. For details on setting the global options, see the VWorks Automation Control User Guide.
Error library or macro library
A message states that the file has been corrupted or modified outside of the VWorks software and cannot be loaded.
Type of record VWorks response if record is corrupted or has been tampered

25
2 Using compliance featuresDetecting tampering
VWorks Automation Control Setup Guide
About restoring records
An administrator can restore records in the following ways:• Rollback the version of a selected record to a previous clean version in the Content
Browser. • Restore records from a clean backup copy..
Related information
For information about... See...
Compliance features “About features that support compliance” on page 6
Audit trails “Audit trails and audit trail reports” on page 7
Record states “Managing record states” on page 18
Content Browser and restoring records
VWorks Automation Control Plus Administrator Guide

2 Using compliance featuresDetecting tampering
26 VWorks Automation Control Setup Guide
This page is intentionally blank.
33
3 Defining labwareThis chapter contains the following topics:• “About defining labware with the Labware Editor” on page 34• “Labware Editor overview” on page 35• “Workflow for defining labware” on page 39• “Opening the Labware Editor” on page 41• “Adding a labware entry” on page 43• “Setting general properties” on page 46• “Setting microplate properties” on page 48• “Setting tip and well properties for pipetting” on page 53• “Creating and assigning labware classes” on page 55• “Adding a labware image” on page 58• “Setting Centrifuge Loader properties” on page 60• “Setting BenchCel properties” on page 61• “Setting Bravo properties” on page 65• “Setting Stacker properties” on page 66
Note: The Labware Editor contains subtabs on the Labware Entries page for the Direct Drive Robot and BenchBot Robot, which are not supported in VWorks software version 14.

3 Defining labwareAbout defining labware with the Labware Editor
34 VWorks Automation Control Setup Guide
About defining labware with the Labware Editor
Labware defined
Labware is a physical object such as a microplate, lid, or tip box that will be acted upon by the tasks stored in your protocol.The VWorks software requires all labware that will be handled by the automation system to be defined in the labware database.
Labware entry defined
A labware entry is the collection of properties or parameter values that describe a specific type of labware. This information is used by the VWorks software to command the robot and other devices to do tasks based on the information in the definition. Each labware entry is saved as an .xml file in Shared Services storage.All labware parameters are entered and accessible through the Labware Editor.VWorks Plus only. The labware entries are records of interest. The software automatically logs audit trails for the labware entries that are in the In Validation and Released states. Optionally, the software can log audit trails for these records while they are In Development.
Labware Editor defined
The Labware Editor is the VWorks software interface through which you can enter information about labware.You must be logged in as an administrator or technician to use the Labware Editor.
Types of information stored
Two main types of information are stored in the labware database:• Information about the labware properties• Information about labware classes
About labware properties or parameters
Labware has physical properties such as width, length, and number of wells. Labware can also have non-physical properties, such as robot-handling speed, robot grip offsets, and microplate-handling options.After labware is defined in the Labware Editor, all you have to do is select the type of labware to use each time you set up a protocol.
About labware classes
Labware classes are sets of labware entries, grouped so they are easier to manage than many individual labware entries. Each labware class is saved as an .xml file in Shared Services storage.

35
3 Defining labwareLabware Editor overview
VWorks Automation Control Setup Guide
Labware classes are used in combination with the device manager to restrict which types of labware can be used on which devices during a protocol run. This prevents wasted runs and damage to the devices on the platform.An example of how damage can be prevented by labware restriction is where a tip box that is too tall for a device crashes into the device as the robot delivers it. VWorks Plus only. The labware classes are records of interest for which the software automatically logs audit trails. These records are exempt from transitioning through development states.
Related information
Labware Editor overview
Labware Editor tabs
The Labware Editor has two tabbed pages:• Labware Entries. Provides tools for creating and editing labware definitions.• Labware Classes. Provides tools for creating and editing labware classes and the
labware entries for each class.
For information about... See...
Workflow for adding labware to the Labware Editor
“Workflow for defining labware” on page 39
Overview of the Labware Editor “Labware Editor overview” on page 35
Opening the Labware Editor “Opening the Labware Editor” on page 41
Audit trails (VWorks Plus only) “Audit trails and how changes are tracked” on page 7

3 Defining labwareLabware Editor overview
36 VWorks Automation Control Setup Guide
Labware Entries tab
Sub-tabsNote: The Direct Drive Robot and BenchBot Robot are not supported in VWorks software version 14. The Labware Entries tab contains the following sub-tabs that contain the properties associated with a labware entry.
To find out more about… See…
Plate Properties tab “Setting microplate properties” on page 48
Pipette/Well Definition tab “Setting tip and well properties for pipetting” on page 53
Labware Classes tab “Creating and assigning labware classes” on page 55
Image tab “Adding a labware image” on page 58
Centrifuge Loader tab “Setting Centrifuge Loader properties” on page 60
BenchCel tab “Setting BenchCel properties” on page 61
Bravo tab “Setting Bravo properties” on page 65
Stacker tab “Setting Stacker properties” on page 66

37
3 Defining labwareLabware Editor overview
VWorks Automation Control Setup Guide
Labware selection listThe labware selection list, which is the left-hand column, displays the list of labware definitions and allows you to select the labware entry that you want to edit.
Labware-Entry General Properties areaThe Labware-Entry General Properties area displays the labware properties that apply across all sub-tabs.
Labware Classes tab
You use the Labware Classes tab to create labware classes and assign defined labware to a labware class.

3 Defining labwareLabware Editor overview
38 VWorks Automation Control Setup Guide
Related information
For information about... See...
The Labware Editor “About defining labware with the Labware Editor” on page 34
Workflow for defining labware in the Labware Editor
“Workflow for defining labware” on page 39
VWorks Plus only. Audit trails “Audit trails and how changes are tracked” on page 7

39
3 Defining labwareWorkflow for defining labware
VWorks Automation Control Setup Guide
Workflow for defining labware
Labware standards and considerations
IMPORTANTAll labware used with Agilent products must conform to the American National Standards Institute (ANSI) microplate standards. This includes deepwell and PCR plates.
Workflow
The following table presents the sequence of steps to define labware for devices that use the VWorks software.
IMPORTANTThe VWorks software supports only the following Agilent devices: Benchcel, Bravo, Centrifuge, Centrifuge Loader, Labware Minihub, Microplate Labeler, Microscan Barcode Reader, and PlateLoc. Any labware settings for other devices are not used.
Note: Some of these steps may be omitted, depending on your system configuration.
Step For this task... See...
1 Add the labware entry to the Labware Editor.
• “Opening the Labware Editor” on page 41
• “Adding a labware entry” on page 43
2 Set the general properties of the labware.
“Setting general properties” on page 46
3 Set the microplate properties. “Setting microplate properties” on page 48
4 Bravo Platform only. Set the pipetting properties.
“Setting tip and well properties for pipetting” on page 53
5 Assign the labware to a class. “Creating and assigning labware classes” on page 55
6 Optional. Add a labware image. “Adding a labware image” on page 58
7 Centrifuge Loader only. Set the robot gripper offset if using a Centrifuge Loader.
“Setting Centrifuge Loader properties” on page 60
8 BenchCel Microplate Handler only. Set the robot and stacker gripping positions.
“Setting BenchCel properties” on page 61
9 Bravo Platform only. Set properties for the Bravo gripper, if applicable.
“Setting Bravo properties” on page 65

3 Defining labwareWorkflow for defining labware
40 VWorks Automation Control Setup Guide
Related information
10 BenchCel Microplate Handler only. Set the gripper and sensor settings and any microplate notch positions.
“Setting Stacker properties” on page 66
11 Save a new or edited labware entry.
“Adding a labware entry” on page 43
Step For this task... See...
For information about... See...
Labware Editor • “About defining labware with the Labware Editor” on page 34
• “Labware Editor overview” on page 35
Opening the Labware Editor “Opening the Labware Editor” on page 41
VWorks Plus only. Audit trails “Audit trails and how changes are tracked” on page 7

41
3 Defining labwareOpening the Labware Editor
VWorks Automation Control Setup Guide
Opening the Labware Editor
About this topic
You use the Labware Editor when you want to view, add, delete, edit, or rename labware entries or labware classes. This topic explains how to open the Labware Editor from the Tools menu and protocol editor in the VWorks software. See the device user guide for details on how to open the Labware Editor from the device diagnostics software.
Before you start
You must be logged in as an administrator or technician to open the Labware Editor.If you are adding labware, make sure you have the following:• Calipers• Two samples of the labware you are adding
Procedure
To open the Labware Editor from the Tools menu:In the VWorks window, choose Tools > Labware Editor. The Labware Editor window opens.

3 Defining labwareOpening the Labware Editor
42 VWorks Automation Control Setup Guide
To open the Labware Editor from the protocol editor:1 Open a protocol file (File > New > Protocol or File > Open). This opens the Main
Protocol area with Process-1 and a list of Plate properties in the Task Parameters area. Note: If the Task Parameters area is empty, click Add Process in the Main Protocol area.
2 Select Edit labware from the Plate type list under Plate identity.
Related information
For information about... See...
Labware Editor • “About defining labware with the Labware Editor” on page 34
• “Labware Editor overview” on page 35
Workflow for adding labware to the Labware Editor
“Workflow for defining labware” on page 39
Adding a labware entry “Adding a labware entry” on page 43
VWorks Plus only. Audit trails “Audit trails and how changes are tracked” on page 7

43
3 Defining labwareAdding a labware entry
VWorks Automation Control Setup Guide
Adding a labware entry
Before you start
You must be logged in as an administrator or technician to perform this procedure.Before you add a new labware entry:• Check to see if it is already defined in the Labware Editor.
Some common labware and some Agilent labware comes already defined in the VWorks software.
• Contact Agilent Technical Support with the definition you need.Agilent Technical Support maintains a large collection of labware definitions and might be able to supply you with what you need. However, these labware definitions will still require some fine-tuning for each particular system. The generic definitions available for some microplate types are a good starting point.
• VWorks Plus only. The labware entries are records of interest. The software automatically logs audit trails for the labware entries that are in the In Validation and Released states. Optionally, the software can log audit trails for these records while they are in the In Development state. For details, see “Setting audit trail options” on page 9.
To find out if a type of microplate is already defined:1 In the VWorks window, click Main Protocol, and select the microplate icon in a
process.2 In the Plate identity area, click the Plate type list and look for the microplate name.
If the list does not contain an entry for the microplate type, it is not yet defined.

3 Defining labwareAdding a labware entry
44 VWorks Automation Control Setup Guide
Procedure
To add a labware entry:1 Open the Labware Editor.2 In the Labware Entries tab, click New labware entry at the bottom left of the window.
Note: You can save time by using a definition for a similar labware type as a template. Select the pre-existing definition in the list, click Save changes as, and enter a name for the new labware definition.
3 In the New Labware Entry dialog box, type a name for the labware type, and click OK. The new entry appears in the labware list. For clarity, enter a detailed name for the labware that includes labware-specific information. For example, the name should include the number of wells, the manufacturer’s name and part number, and descriptive terms, such as square-well, flat-bottom or tip box.
IMPORTANTIf you plan to use a .csv file to import labware into an inventory database, avoid using any commas in the name that you assign to the labware entry in the Labware Editor.
To save the labware entry:1 Edit the properties as appropriate for the labware type. See “Workflow for defining
labware” on page 39.2 Click Save changes to save the newly defined labware entry.3 VWorks Plus only. If an audit trail is being logged for records in the development
state, the Audit Comment dialog box opens. Select or type the audit comment, and then click OK.

45
3 Defining labwareAdding a labware entry
VWorks Automation Control Setup Guide
Related information
For information about... See...
Labware Editor • “About defining labware with the Labware Editor” on page 34
• “Labware Editor overview” on page 35
Plate Properties tab “Setting microplate properties” on page 48
Workflow for adding labware to the Labware Editor
“Workflow for defining labware” on page 39
Opening the Labware Editor “Opening the Labware Editor” on page 41
Audit trails (VWorks Plus only) “Audit trails and how changes are tracked” on page 7

3 Defining labwareSetting general properties
46 VWorks Automation Control Setup Guide
Setting general properties
About general properties
The general properties describe the type of labware that is being entered into the database and are visible on all of the sub-tabs of the Labware Editor.
Before you start
• You must be logged in as an administrator or technician to perform this procedure.• You must first create an entry for the labware.• VWorks Plus only. You cannot edit or delete labware entries that have transitioned
to the Released state. The parameter settings in the Labware Entries tab are unavailable for these labware entries.
Procedure
To define the general properties of a piece of labware:1 Open the Labware Editor.2 In the Labware Entries tab, select the labware from the list.3 Under Labware-Entry General Properties, type a detailed description of the labware in
the Description box.
47
3 Defining labwareSetting general properties
VWorks Automation Control Setup Guide
4 In the Manufacturer part number box, type the appropriate number for your reference.
5 In the Number of wells list, select the number of wells in the microplate. If you are defining a tip box, this is the number of tips that the box can hold.
6 In the Base Class area, select one of the options.The option you select determines which Labware Editor properties are available. For example, when a base class of Microplate is selected, the Length of filter tip/pin tool (mm) property is unavailable.Note: The Pin tool base class is not used.
Related information
For information about... See...
Opening the Labware Editor “Opening the Labware Editor” on page 41
Workflow for adding labware to the Labware Editor
“Workflow for defining labware” on page 39
Setting microplate properties for labware
“Setting microplate properties” on page 48

3 Defining labwareSetting microplate properties
48 VWorks Automation Control Setup Guide
Setting microplate properties
Before you start
• You must be logged in as an administrator or technician to perform this procedure.• You must first create an entry for the labware.• VWorks Plus only. You cannot edit or delete labware entries that have transitioned
to the Released state. The parameter settings in the Labware Entries tab are unavailable for these labware entries.
Setting microplate properties
To set microplate properties:1 Open the Labware Editor.2 In the Labware Entries tab, click the Plate Properties sub-tab.
Figure Plate Properties sub-tab
3 Enter the values for the available parameters according to the labware type you are defining. The following table describes each parameter.Note: The Base Class you select in the General Properties section determines which microplate properties are available.
Parameter Description3-Axis Robot only. Robot gripper offset (mm)
Not supported. This VWorks version does not support the 3-Axis Robot or the BioCel Systems.

49
3 Defining labwareSetting microplate properties
VWorks Automation Control Setup Guide
Thickness (mm)
The distance from the bottom of the microplate skirt to the top of the microplate.For a tip box, this is the distance from the bottom of the box to the top of the tips.For a filter plate that has filter nozzles that extend below the skirt, measure the distance from the bottom of the filter plate skirt to the top of the filter plate. You will use the parameters in the Miscellaneous section to account for the filter nozzles.
Figure Example of the thickness measurement for a filter plate
To increase the number of contact points, measure the distance at the corner of the microplate or tip box (using calipers). This method prevents the calipers from angling inward, which can produce inaccurate measurements.
Stacking thickness (mm)
The thickness of two stacked microplates of the same type minus the thickness of one microplate.Measure the distance using calipers.Example:
Thickness of two stacked microplates (x) = 23.14 mmThickness of one microplate = 14.14 mmStacking thickness: 23.14 mm - 14.14 mm = 9.00 mm
Parameter Description
Vstackplate and stacking thickness00022
Plate Thickness
Stacking Thickness
x
00022

3 Defining labwareSetting microplate properties
50 VWorks Automation Control Setup Guide
Lid depth (nm) The height of the lid interior, which is measured from the bottom resting surface of the lid to the underside of the lid’s top surface.
Can be sealed? The option to include the microplate seal. Sealed thickness (mm)
The thickness of the microplate with a seal in place.Available only if Can be sealed? is selected.
Sealed stacking thickness (mm)
The stacking thickness of the microplate with a seal in place.Available only if Can be sealed? is selected.
Can have lid? The option to include a microplate lid.Lidded thickness (mm)
The thickness of the microplate with a lid in place.Available only if Can have lid? is selected.
Lidded stacking thickness (mm)
The stacking thickness of the microplate with the lid in place.Available only if Can have lid? is selected.
Lid resting height (mm)
The height (c) above the bottom of the microplate (d) at which the bottom of a microplate lid rests.
Lid departure height (mm)
The height (e) above the lid resting height to which the lid is lifted. In the BenchCel Microplate Handler, the lid is lifted to this height, and then the lid is removed.
Plate Handling
Parameter Description
cd
e

51
3 Defining labwareSetting microplate properties
VWorks Automation Control Setup Guide
Lower plate at Microplate Labeler
The option to lower the Microplate Labeler stage if the microplate has a tall skirt or a raised surface in the middle of each side. Lowering the stage allows the Microplate Labeler to place the label above the tall skirt or raised surface.Note: The two vertical plate stage positions are set mechanically. To adjust the positions, see the Microplate Barcode Labeler User Guide for instructions.
Can mount The option to place this microplate on top of another microplate.This property is for filter plates that are placed on top of waste plates during filtration steps of a protocol.This option can also be used to mount lids onto microplates.
Can be mounted
The option to place another microplate on top of this microplate.This property is for collection microplates that collect filtrate from filter plates during the filtration steps of a protocol. Many different microplates might be able to fit under any one type of filter plate.
IMPORTANT The wells of the waste plate must have a large enough diameter that the filter plate does not stick on the waste plate. The robot must be able to pick up the filter plate without the waste plate lifting up with it.
This option can also be used to mount lids onto microplate.Maximum Robot Handling SpeedMaximum robot handling speed
The maximum speed at which the robot can move this type of microplate.In addition to this microplate-specific speed, you set the general robot speed via the Tools > Options menu in the VWorks software. If these speeds are different, the robot uses the slower of the two speeds.Note: To increase throughput, you can use a higher speed when the robot is not carrying labware. To set this option, click Tools > Options to display the Options dialog box. For details, see the VWorks Automation Control User Guide.
Miscellaneous
Parameter Description

3 Defining labwareSetting microplate properties
52 VWorks Automation Control Setup Guide
Related information
Length of filter tip/pin tool (mm)
Available for labware of the Filter plate or Pin tool Base Class only.The length of the pins that protrude below the pin tool head, or the distance that the filter nozzle extends below the bottom edge of the filter plate skirt. Use a caliper to measure the length.
Figure Length of filter tip
Filter channel resting depth
Available for labware of the Filter plate Base Class only.The distance from the tip of the protruding filter nozzles to the point at which the filter plate rests on another plate. Use a caliper to measure the distance.
Figure Filter plate channel resting depth
Figure Filter channel resting depth (filter plate on microplate)
The software uses this parameter to calculate the effective height (Zg-axis) of the gripper and ensure sufficient clearance when gripping and moving the filter plates.
Requires insert The option to require an insert for use with nestable tip boxes.
Parameter Description
For information about... See...
Workflow for adding labware to the Labware Editor
“Workflow for defining labware” on page 39
Opening the Labware Editor “Opening the Labware Editor” on page 41
Setting general properties for labware “Setting general properties” on page 46

53
3 Defining labwareSetting tip and well properties for pipetting
VWorks Automation Control Setup Guide
Setting tip and well properties for pipetting
If the VWorks software is controlling a Bravo Platform, you must set the properties for the labware type in the Pipette/Well Definition sub-tab.
Before you start
• You must be logged in as an administrator or technician to perform this procedure.• You must first create an entry for the labware.• VWorks Plus only. You cannot edit or delete labware entries that have transitioned
to the Released state. The parameter settings in the Labware Entries tab are unavailable for these labware entries.
Setting properties
To set pipette/well properties:1 Open the Labware Editor.2 In the Labware Entries tab, click the Pipette/Well Definition sub-tab.
Figure Pipette/Well Definition sub-tab
3 Enter the values for the available parameters according to the labware type that you are defining. The following table provides a description of each parameter.
IMPORTANTUse calipers to carefully measure the labware you are defining in the Labware Editor.
Parameter DescriptionWell volume Maximum volume (µL) of fluid for one well.

3 Defining labwareSetting tip and well properties for pipetting
54 VWorks Automation Control Setup Guide
Related information
Well depth Distance (mm) from the top of the microplate to the bottom of the well.
Well diameter Diameter of the well (mm).Well Geometry Shape of the wells: round or square.Well-Bottom Shape Shape of the well bottoms: rounded, flat, or V-shaped.Row-wise teachpoint to well
Distance (mm) from the teachpoint to the center of the A1 well along the row (letter axis). This setting should be 0 mm for standard 96-well microplates and 2.25 mm for standard 384-well microplates.
Column-wise teachpoint to well
Distance (mm) from the teachpoint to the center of the A1 well along the column (number axis). This setting should be 0 mm for standard 96-well microplates and 2.25 mm for standard 384-well microplates.
Row-wise well to well
Distance (mm) from well-center to well-center across the row. This setting should be 9 mm for standard 96-well microplates and 4.5 mm for standard 384-well microplates.
Column-wise well to well
Distance (mm) from well-center to well-center across the column. This setting should be 9 mm for standard 96-well microplates and 4.5 mm for standard 384-well microplates.
Disposable tip capacity
Volume capacity (µL) of the disposable tips when labware is a tip box.
Disposable tip length Length (mm) of the disposable tips being used when labware is a tip box.
Parameter Description
For information about... See...
Workflow for adding labware to the Labware Editor
“Workflow for defining labware” on page 39
Opening the Labware Editor “Opening the Labware Editor” on page 41
Setting general properties for labware “Setting general properties” on page 46
Setting microplate properties for labware
“Setting microplate properties” on page 48

55
3 Defining labwareCreating and assigning labware classes
VWorks Automation Control Setup Guide
Creating and assigning labware classes
About labware classes
When you configure a device for the VWorks software, you can associate the device with labware classes to indicate what labware can (and cannot) be used with the device. Associating a device with a labware class is performed in the device file under the Allowed/prohibited labware property.The VWorks software includes several labware classes that are already defined: • Uses Filter Platepad• Uses Standard Platepad• Uses Vacuum PlatepadThese default classes should be enough for your microplate handling needs. However, if you want an additional special class that is excluded from a particular device or set of devices, you can create a new class.VWorks Plus only. Each labware class is a record of interest for which the software logs an audit trail. The labware classes are exempt from transitioning through development states.
About creating and assigning labware classes
The Labware Classes tab in the Labware Editor provides the tools for creating and managing labware classes and labware entry membership. Select a class (in the left-most column) to see the labware entries that are members and non-members for that class (right two columns). In the example below, the class Uses Filter Platepad is selected and the labware that are members and non-members of this class are displayed.

3 Defining labwareCreating and assigning labware classes
56 VWorks Automation Control Setup Guide
Creating labware classes
Before you start:You must be logged in as an administrator or technician to perform this procedure.
To create a new labware class:1 Open the Labware Editor.2 In the Labware Classes tab, click New labware class.3 In the New Labware Class dialog box, enter a name for the labware class and click
OK.The class appears in the list of labware classes.
Note: You can also create a new labware class by clicking Save changes as and entering a different name.
Assigning labware classes
VWorks Plus only. Labware entries are records of interest for which the software logs audit trails. A labware entry that has transitioned to the Released state cannot be deleted from or added to a labware class.
To associate a specific piece of labware with a labware class:1 Open the Labware Editor.2 In the Labware Classes tab, select an item from the middle column.3 Click > to move the labware entries or labware classes to the right-hand column.

57
3 Defining labwareCreating and assigning labware classes
VWorks Automation Control Setup Guide
To select more than one item, use SHIFT+click or CTRL+click. If you want to move all entries, click >>.
4 Click Save Changes to save your changes. 5 VWorks Plus only. The Audit Comment dialog box opens. Select or type a comment
about the changes made, and then click OK.Note: You can also assign labware to a class using the Labware Classes tab on the Labware Entries tab. This may be more convenient when you are defining a new piece of labware and want to assign it to an existing labware class.
Related information
For information about... See...
Opening the Labware Editor “Opening the Labware Editor” on page 41
Workflow for adding labware to the Labware Editor
“Workflow for defining labware” on page 39
VWorks Plus only. Transitioning records through development states
“Managing record states” on page 18
VWorks Plus only. Audit trails. “Audit trails and audit trail reports” on page 7

3 Defining labwareAdding a labware image
58 VWorks Automation Control Setup Guide
Adding a labware image
About labware images
To make it easier for operators to identify a labware type, you can insert an image of it in the Labware Editor.
Before you start
• You must be logged in as an administrator or technician to perform this procedure.• Make sure that the image file is in the JPG, GIF, or BMP format. • VWorks Plus only. You cannot edit or delete labware entries that have transitioned
to the Released state. The parameter settings in the Labware Entries tab are unavailable for these labware entries.
Importing the image file
To import the image file:1 In the VWorks window, click File > Import Misc File. The Select a Miscellaneous File
for Import dialog box opens.
2 Select Image Files as the file type, locate and select the file, and then click Open.3 In the Save File As dialog box, select the storage location and click Save.
For example, you might select /VWorks Projects/VWorks/Labware/Images/ as the storage location.

59
3 Defining labwareAdding a labware image
VWorks Automation Control Setup Guide
4 VWorks Plus only. The Audit Comment dialog box opens. Select or type a comment about the changes made, and then click OK.
Inserting an image in Labware Editor
To insert an image:1 Open the Labware Editor.2 In the Labware Entries tab, select the labware in the left column, and then click the
Image sub-tab.
3 At the Image filename box, click the button to locate the file.
4 In the Open dialog box, select the image file and click Open.The image appears below the file name.
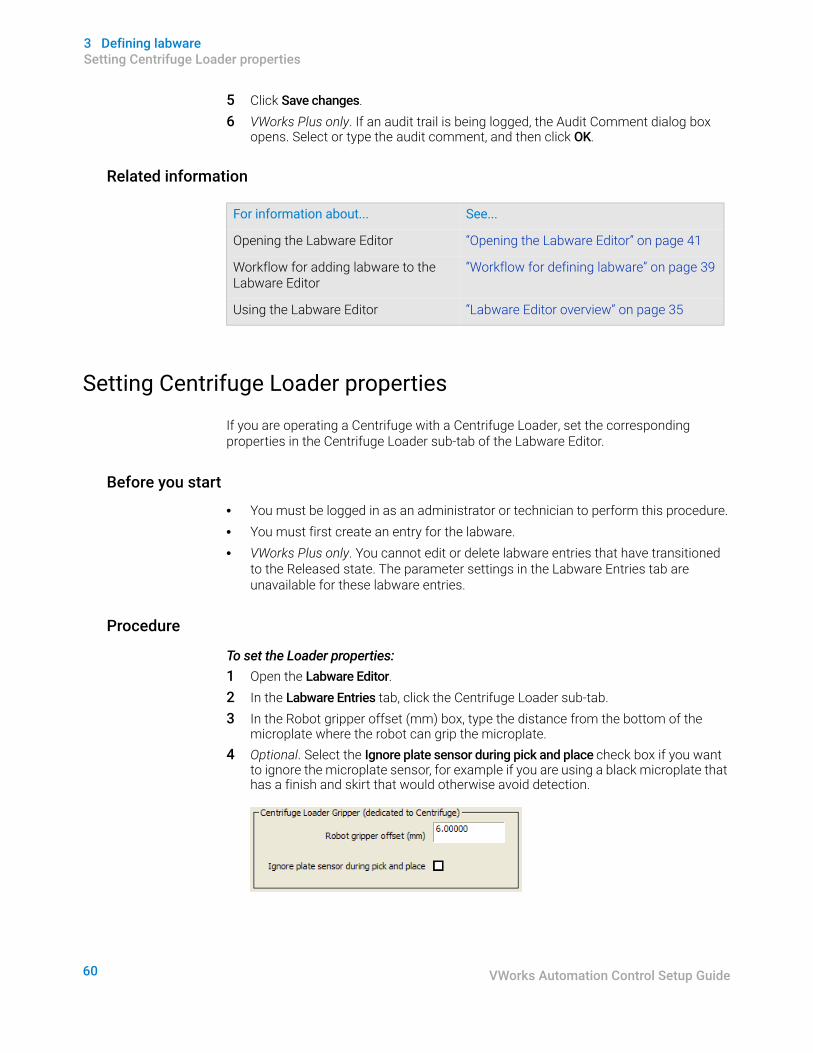
3 Defining labwareSetting Centrifuge Loader properties
60 VWorks Automation Control Setup Guide
5 Click Save changes.6 VWorks Plus only. If an audit trail is being logged, the Audit Comment dialog box
opens. Select or type the audit comment, and then click OK.
Related information
Setting Centrifuge Loader properties
If you are operating a Centrifuge with a Centrifuge Loader, set the corresponding properties in the Centrifuge Loader sub-tab of the Labware Editor.
Before you start
• You must be logged in as an administrator or technician to perform this procedure.• You must first create an entry for the labware.• VWorks Plus only. You cannot edit or delete labware entries that have transitioned
to the Released state. The parameter settings in the Labware Entries tab are unavailable for these labware entries.
Procedure
To set the Loader properties:1 Open the Labware Editor.2 In the Labware Entries tab, click the Centrifuge Loader sub-tab.3 In the Robot gripper offset (mm) box, type the distance from the bottom of the
microplate where the robot can grip the microplate.4 Optional. Select the Ignore plate sensor during pick and place check box if you want
to ignore the microplate sensor, for example if you are using a black microplate that has a finish and skirt that would otherwise avoid detection.
For information about... See...
Opening the Labware Editor “Opening the Labware Editor” on page 41
Workflow for adding labware to the Labware Editor
“Workflow for defining labware” on page 39
Using the Labware Editor “Labware Editor overview” on page 35

61
3 Defining labwareSetting BenchCel properties
VWorks Automation Control Setup Guide
Setting BenchCel properties
About the BenchCel properties
The BenchCel Microplate Handler X-Series and R-Series each have their own gripper offsets and positions. When you add a new labware entry, default parameter values are automatically inserted for both series. These values are approximate and should be ignored because the labware you are defining may be different.Any labware that you are using with the X-Series must be redefined to work with the R-Series BenchCel Microplate Handler because the parameter values are different for the same piece of labware. Note: You must also define a subset of the Stacker properties (under the Stacker sub-tab) because they apply to the built-in stackers of the BenchCel Microplate Handler.
Before you start
• You must be logged in as an administrator or technician to perform this procedure.• You must first create an entry for the labware.• VWorks Plus only. You cannot edit or delete labware entries that have transitioned
to the Released state. The parameter settings in the Labware Entries tab are unavailable for these labware entries.
Procedure
To define the BenchCel properties:1 Open the Labware Editor.2 In the Labware Entries tab, click the BenchCel sub-tab.
For information about... See...
Opening the Labware Editor “Opening the Labware Editor” on page 41
Workflow for adding labware to the Labware Editor
“Workflow for defining labware” on page 39
Using the Labware Editor “Labware Editor overview” on page 35

3 Defining labwareSetting BenchCel properties
62 VWorks Automation Control Setup Guide
Figure BenchCel sub-tab
3 Click the button that corresponds to the BenchCel Microplate Handler type that is currently operating and for which you are defining the labware.
IMPORTANTMake sure you enter values for the correct model of the BenchCel Microplate Handler. Fields for X-Series and R-Series BenchCel Microplate Handlers can be enabled regardless of the type of BenchCel Microplate Handler that you are operating.
4 Measure the labware and enter the values for the following fields.

63
3 Defining labwareSetting BenchCel properties
VWorks Automation Control Setup Guide
Parameter Description
Robot gripper offset (mm) The distance from the bottom of a microplate to where the robot grippers will hold the microplate.
IMPORTANT Make sure that the gripper points do not close at the edge of the skirt. Otherwise, the gripper can slip onto the body of the microplate and drop the microplate.
Gripper open position (mm)
The distance the grippers move from the home position as the robot releases a microplate. A larger value moves the grippers closer together. A smaller value opens the grippers wider.Set this to –1 for R series and 0.1 for X Series BenchCel Microplate Handlers.
Gripper holding plate position (mm)
The distance that the grippers move inward from their home position when holding a microplate that is not in a stack. A larger value moves the grippers closer together and holds the microplate tighter. A smaller value opens the grippers wider.Note: How tightly the robot grippers should hold a microplate depends on the microplate material and design. You might want to run some tests to optimize the parameter.
Gripper holding lidded plate position (mm)
The distance that the grippers move inward from home position when holding a lidded microplate. An increasing value moves the grippers closer together and holds the lidded microplate tighter. A decreasing value opens the grippers wider.
Gripper holding lid position (mm)
The distance the grippers move inward from home position when holding a microplate lid. Increasing the value moves the grippers closer together and holds the lid tighter. Decreasing the value opens the grippers wider.In general, type a value that is less than Gripper holding plate position to open the grippers slightly. Holding the lid too tightly might cause the microplate to be lifted with the lid.
Gripper holding stack position (mm)
The distance the grippers move inward from the home position when holding a microplate that is in a stack. A larger value moves the grippers closer together and holds the microplate tighter. A smaller value opens the grippers wider.Note: Because the weight of the entire stack will be on the robot grippers, you should use a value greater than the Gripper holding plate parameter.

3 Defining labwareSetting BenchCel properties
64 VWorks Automation Control Setup Guide
Related information
Lid gripper offset (mm) The height (a) above the lid resting height (b) at which the gripper can grip the lid.
Stacker gripper offset (mm)
The distance from the bottom of a microplate to where the stacker grippers will hold the microplate.Be careful not to grab the microplate on the top edge of the skirt where the stacker grippers could slip onto the microplate body.Change this value only if the stacker is not gripping the microplates correctly.
Orientation sensor offset (mm)
The distance from the bottom of a microplate to where the orientation sensors will check for notches. You can calculate the initial offset as follows: Determine the halfway distance between the top of the microplate and the top of the microplate skirt, and then add the height of the skirt.
See the BenchCel Microplate Handler User Guide for details on how to determine the optimum Orientation sensor offset.
Stack holding method R-Series only. The option that specifies how the stacker holds the stack of microplates: • Hold with stacker gripper. For the greatest
precision, select this method, for example, if your microplate has a narrow gripping tolerance requiring a specific stacker gripper offset. Holding the stack with grippers results in slower cycle time than the Hold with shelf method.
• Hold with shelf. For faster cycle time, select this method if your microplate has a wider gripping tolerance and does not require a specific stacker gripper offset.
Parameter Description
For information about... See...
Using the Labware Editor “Labware Editor overview” on page 35

65
3 Defining labwareSetting Bravo properties
VWorks Automation Control Setup Guide
Setting Bravo properties
When to set Bravo properties
If you are operating a Bravo Platform that has a robot gripper, use this procedure to ensure that the parameter values are set correctly.Note: The Bravo gripper is an optional feature.
Before you start
• You must be logged in as an administrator or technician to perform this procedure.• You must first create an entry for the labware.• VWorks Plus only. You cannot edit or delete labware entries that have transitioned
to the Released state. The parameter settings in the Labware Entries tab are unavailable for these labware entries.
Procedure
To set Bravo properties:1 Open the Labware Editor.2 In the Labware Entries tabs, click the Bravo sub-tab.3 Under Gripper Offset and Positions, type the Robot gripper offset. This is the height
(mm) of the gripper above any teachpoint when the Bravo gripper is picking up or placing a microplate of this type.
4 Enter the Robot lid gripper offset. This is the height (mm) above the lid resting height at which to grip the lid. (Shown as b below.)
Workflow for adding labware to the Labware Editor
“Workflow for defining labware” on page 39
Opening the Labware Editor “Opening the Labware Editor” on page 41
Setting general properties for labware “Setting general properties” on page 46
For information about... See...

3 Defining labwareSetting Stacker properties
66 VWorks Automation Control Setup Guide
5 Select Ignore plate sensor during pick and place to tell the robot gripper to ignore the feedback from the microplate sensor during a pick and place for this labware. Typically, this is selected when troubleshooting.
Related information
Setting Stacker properties
When to set Stacker properties
If you are using a BenchCel Microplate Handler in your automation system, you must set the properties in the Stacker sub-tab of the Labware Editor.
Before you start
• You must be logged in as an administrator or technician to perform this procedure.• You must first create an entry for the labware.• Make sure you have read the sections of the BenchCel Microplate Handler User
Guide that describe the location and function of the stacker sensors.Note: This VWorks version does not support the Labware Stacker.
• VWorks Plus only. You cannot edit or delete labware entries that have transitioned to the Released state. The parameter settings in the Labware Entries tab are unavailable for these labware entries.
Setting properties
To set stacker properties:1 Open the Labware Editor.2 In the Labware Entries tab, click the Stacker sub-tab.
b
For information about... See...
Opening the Labware Editor “Opening the Labware Editor” on page 41
Workflow for adding labware to the Labware Editor
“Workflow for defining labware” on page 39
Using labware classes “Creating and assigning labware classes” on page 55

67
3 Defining labwareSetting Stacker properties
VWorks Automation Control Setup Guide
3 Enter the values for the available properties according to the labware you are defining. Set only the maximum orientation sensor threshold, sensor intensity, and notch locations. The other settings are not used.
Figure Properties required for the BenchCel Microplate Handler
The following table provides descriptions of each parameter required for the BenchCel Microplate Handler.
Parameter DescriptionStacker ParametersOrientation sensor threshold (max)
Specifies the highest value that an orientation sensor can register when sensing a notch. Any sensor reading above this value indicates that a solid microplate wall is present. Any sensor value below this threshold indicates that either a notch, or no microplate is present.If the stacker does not sense a notch when it should, you will get a “wrong plate type” or a “plate rotated 180 degrees” error message. Adjust the sensor threshold value.The maximum value is 255.
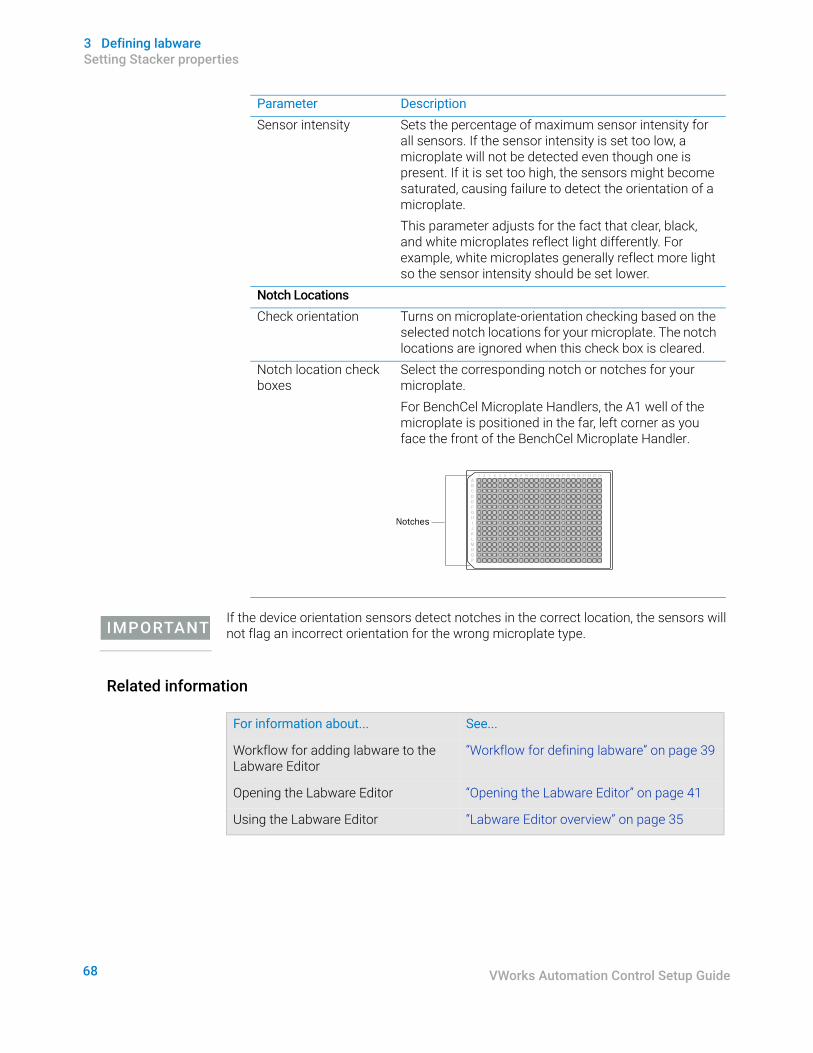
3 Defining labwareSetting Stacker properties
68 VWorks Automation Control Setup Guide
IMPORTANTIf the device orientation sensors detect notches in the correct location, the sensors will not flag an incorrect orientation for the wrong microplate type.
Related information
Sensor intensity Sets the percentage of maximum sensor intensity for all sensors. If the sensor intensity is set too low, a microplate will not be detected even though one is present. If it is set too high, the sensors might become saturated, causing failure to detect the orientation of a microplate.This parameter adjusts for the fact that clear, black, and white microplates reflect light differently. For example, white microplates generally reflect more light so the sensor intensity should be set lower.
Notch LocationsCheck orientation Turns on microplate-orientation checking based on the
selected notch locations for your microplate. The notch locations are ignored when this check box is cleared.
Notch location check boxes
Select the corresponding notch or notches for your microplate.For BenchCel Microplate Handlers, the A1 well of the microplate is positioned in the far, left corner as you face the front of the BenchCel Microplate Handler.
Parameter Description
ABCDEFGHIJKLMNOP
1 2 3 4 5 6 7 8 9 10 11 12 13 14 15 16 17 18 19 20 21 22 23 24
Notches
For information about... See...
Workflow for adding labware to the Labware Editor
“Workflow for defining labware” on page 39
Opening the Labware Editor “Opening the Labware Editor” on page 41
Using the Labware Editor “Labware Editor overview” on page 35
69
4 Specifying pipette speed and accuracyThis chapter contains the following topics:• “About liquid classes” on page 70• “Opening the Liquid Library Editor” on page 72• “Creating a liquid class” on page 73• “Calibrating the pipettor” on page 76

4 Specifying pipette speed and accuracyAbout liquid classes
70 VWorks Automation Control Setup Guide
About liquid classes
Liquid Library Editor defined
The Liquid Library Editor provides tools for users with technician or administrator privileges to enter values for properties that affect pipetting speed, accuracy, and precision.
Figure Liquid Library Editor window
Default liquid library entries
When installing VWorks software, you might have elected to install the default liquid library entries. These entries are provided as examples and thus might only approximate your particular reagents. For the best performance, you should create your own liquid library definitions.
When to use the Liquid Library Editor
You use the Liquid Library to fine-tune the volume aspirated or dispensed by your Bravo Platform.
IMPORTANTVerify the pipetting of your Bravo Platform. Accurate and precise pipetting depends on a variety of factors including the liquid properties.
Liquid classes defined
The values entered into the Liquid Library Editor can be saved as a collection, known as a liquid class. Using liquid classes saves time when writing protocols because you do not have to enter values for the liquid properties every time you create a protocol.
Types of liquid classes You might want to create different classes for different:• Types of liquids
For example, water versus DMSO

71
4 Specifying pipette speed and accuracyAbout liquid classes
VWorks Automation Control Setup Guide
• Volumes of liquidsFor example, 1 µL versus 200 µL
• Liquid operationsFor example, washing versus mixing
How liquid classes are storedEach liquid class is saved as an .xml file in Shared Services storage.VWorks Plus only. The liquid classes are records of interest. The software automatically logs audit trails for liquid classes that are in the In Validation and Released states. Optionally, the software can log audit trails for these records while they are in the In Development state. For details, see “Setting audit trail options” on page 9.
Using a liquid class
When preparing for a protocol run, you select the liquid class that you want to use. During the run, the liquid class values are referenced for pipetting operations.
Calibrating the Bravo Platform
The Liquid Library Editor also has an equation editor that can be used to calibrate the Bravo Platform.
Related information
For information about... See...
Opening the Liquid Library Editor “Opening the Liquid Library Editor” on page 72
Creating a liquid class “Creating a liquid class” on page 73
Calibrating your pipettor “Calibrating the pipettor” on page 76
Audit trails and records of interest “Using compliance features” on page 5

4 Specifying pipette speed and accuracyOpening the Liquid Library Editor
72 VWorks Automation Control Setup Guide
Opening the Liquid Library Editor
Before you start
You must be logged in as an administrator or technician to open the Liquid Library Editor.
Procedure
To open the Liquid Library Editor:1 Select Tools > Liquid Library Editor.
The Liquid Library Editor opens.
Related information
For information about... See...
Liquid classes “About liquid classes” on page 70
Creating a liquid class “Creating a liquid class” on page 73
Calibrating your pipettor “Calibrating the pipettor” on page 76

73
4 Specifying pipette speed and accuracyCreating a liquid class
VWorks Automation Control Setup Guide
Creating a liquid class
About this topic
This topic describes how to create a liquid class using the Liquid Library Editor.You must be logged in as an administrator or technician to perform this procedure.
Liquid compatibility
WARNINGAgilent Technologies products are intended to be used with non-hazardous liquids. Contact Agilent Technical Support before using any non-aqueous solvents or solvents generally considered to be hazardous.
AgilentAutomation Solutions product surfaces are designed to be compatible with small volumes of aqueous solutions, common biological buffers, solvents, and common reducing agents. You can find a list of compatible chemicals in the Automation Solutions Products General Safety Guide.
Procedure
To create a liquid class:1 Open the Liquid Library Editor.2 Click New liquid entry.
3 In the New Liquid Entry dialog box, type a name for the liquid class and click OK.4 Optional. In the box at the top right of the Liquid Library Editor window, type a note
describing the entry for your records.5 On the Aspirate tab, type the values for the following aspirate parameters.

4 Specifying pipette speed and accuracyCreating a liquid class
74 VWorks Automation Control Setup Guide
Note: The upper limits for some of the parameters might not be achievable for the device you are using.
6 Click the Dispense tab and enter values for the dispense properties.
The following table describes the dispense parameters.
Aspirate DefinitionVelocity (µL/s) Specifies the speed of the aspiration stroke.
Acceleration (µL/s2) Specifies acceleration during the aspiration stroke.
Post-aspirate delay (ms) Specifies the time the pipettor waits after aspiration is complete before moving the tips out of the wells.
Z-axis velocity into wells (mm/s)
Specifies how fast the pipettor moves as the tips enter the wells.
Z-axis acceleration into wells (mm/s2)
Specifies the acceleration of the pipettor as the tips move into the wells.
Z-axis velocity out of wells (mm/s)
Specifies how fast the tips leave the wells.
Z-axis acceleration out of wells (mm/s2)
Specifies the acceleration of the pipettor as the tips move out of the wells.
Dispense DefinitionVelocity Specifies the maximum speed of
the dispensing stroke, in microliters per second.
Acceleration Specifies acceleration during the dispensing stroke, in microliters per second squared.

75
4 Specifying pipette speed and accuracyCreating a liquid class
VWorks Automation Control Setup Guide
7 Click Save changes. 8 VWorks Plus only. If an audit trail is being logged, the Audit Comment dialog box
opens. Select or type the audit comment, and then click OK.
Related information
Post-dispense delay Specifies the time the pipettor waits after the dispense stroke before moving the tips out of the wells, in milliseconds.
Z-axis velocity into wells Specifies how fast the pipettor moves as the tips enter the wells, in millimeters per second.
Z-axis acceleration into wells Specifies the acceleration of the pipettor as the tips enter the wells, in milliliters per second squared.
Z-axis velocity out of wells Specifies how fast the pipettor moves as the tips leave the wells, in millimeters per second.
Z-axis acceleration out of wells Specifies the acceleration of the pipettor as the tips leave the wells, in millimeters per second squared.
Dispense Definition
For information about... See...
Liquid classes “About liquid classes” on page 70
Opening the Liquid Library Editor “Opening the Liquid Library Editor” on page 72
Calibrating your pipettor “Calibrating the pipettor” on page 76
Audit trails and records of interest “Using compliance features” on page 5

4 Specifying pipette speed and accuracyCalibrating the pipettor
76 VWorks Automation Control Setup Guide
Calibrating the pipettor
About calibrating the pipettor
You can improve the accuracy of pipetted volumes by:• Calibrating the pipettor• Plotting the actual volume dispensed as a function of the set dispense volume• Calculating the polynomial coefficients of the plot• Entering the coefficients into the liquid library equation editor
Do you need to calibrate your pipettor?
Pipetting accuracy is the ability to dispense an absolute volume of liquid. In practice, the volume that is actually dispensed by a pipettor may be different from the dispense volume that you select. This difference is the absolute error.In some protocols, as long as you dispense an excess of liquid, the actual volume pipetted is not important. In other protocols, pipetting accuracy can be a critical factor. You must remember, though, that every step of an experiment has error and there is no point taking time to improve the accuracy of pipetting to four significant digits if another step in your protocol has error at the third significant digit.If you are sure that the overall error of the experiment is limited by pipetting accuracy, and error at this number of significant figures makes a practical difference to the interpretation of the data, consider performing an accuracy calibration.
Method overview
This section gives an overview of the method you can use to measure pipetting accuracy. It does not give a detailed procedure because that depends on exactly how you choose to conduct the experiment.To calibrate a pipettor, an independent method of measuring dispensed volume is required. One method is to dispense a solution of fluorescein dye and measure the fluorescence emitted from each microplate well.
IMPORTANTWhichever method you use, verify that the error in the detection method is significantly smaller than the pipetting error. Otherwise, the error you detect might be from the detection method and not the pipetting error.
The overall method is:
1 Perform a series of pipetting operations in which different volumes are pipetted.2 Measure the volumes of dispensed liquid using the independent measuring
method.3 In a spreadsheet program, tabulate the dispense volumes that you set in the
software against the measured volumes.4 Plot a graph, with the set dispense volume on the y-axis and measured dispense
volume on the x-axis.The plot will be a curve, reflecting the fact that absolute error is a function of the magnitude of the measurement.

77
4 Specifying pipette speed and accuracyCalibrating the pipettor
VWorks Automation Control Setup Guide
5 Use the statistical functions of the spreadsheet program to fit a curve to the data.Your result might look like this:
The dashed line is a reference line, where the set dispense volume equals the measured dispense volume. The equation is the polynomial for the line, calculated by the spreadsheet program.
6 Enter the curve information into the equation editor of the Liquid Library Editor.If you repeat the experiment, you will find that the curve is much closer to a straight line. This is because the equation you entered adjusts the action of the servo motor that determines aspirate and dispense volumes, thereby calibrating the dispense.
Using the equation editor
You use the equation editor in the Liquid Library Editor to enter the calibration curve data and correct for pipetting inaccuracy.
To enter a polynomial into the equation editor:1 Open the Liquid Library Editor.2 Click the Equation tab to display the equation editor.3 In the Highest order of polynomial text box, enter the value for the highest order of
the polynomial.This is the largest exponent in the equation and tells you how many terms are in the equation. For example, if the highest order of the polynomial is 3, the equation will have the general form: y = a + bx +cx2 + dx3, where ‘x’ is the volume specified by any pipettor task that uses this liquid class. With an exponent of three, four rows are added to the equation editor table.
4 In the Coefficient/Term table, enter the coefficient and exponent for each of the terms in the equation, starting with the zero order term.To enter a value, single-click the Coefficient table row twice. Note that the exponents are already entered for you and cannot be edited.The following example is for the curve displayed in the previous graph.
y = 9E-05x + 0.0027x + 1.0176x - 0.12373 2
45
40
35
30
25
20
15
10
0
5
5 10 15 20 25 30 35 40 45
Set
Dis
pen
se V
olu
me
(µL)
Measured Dispense Volume (µL)

4 Specifying pipette speed and accuracyCalibrating the pipettor
78 VWorks Automation Control Setup Guide
5 Click Save changes.6 VWorks Plus only. If an audit trail is being logged, the Audit Comment dialog box
opens. Select or type the audit comment, and then click OK.
Related information
For information about... See...
Liquid classes “About liquid classes” on page 70
Opening the Liquid Library Editor “Opening the Liquid Library Editor” on page 72
Creating a liquid class “Creating a liquid class” on page 73
Audit trails and records of interest “Using compliance features” on page 5

79
5 Tracking and managing labware in storageThis chapter contains the following topics:• “About labware inventory management” on page 80• “Opening the Inventory Editor” on page 83• “About inventory groups” on page 86• “Creating and managing location groups” on page 88• “Creating and managing plate groups” on page 91• “Adding labware information in the inventory database” on page 94• “Moving labware between storage devices” on page 103• “Removing labware information from the inventory database” on page 106• “Using a plate group to process labware” on page 111• “Creating plate group with barcode input file” on page 116• “Inventory Editor views and filters” on page 119• “Auditing plate volumes in the Inventory Editor” on page 120• “Reinventorying the labware inventory” on page 123• “Exporting and importing the inventory data” on page 125• “Resolving labware inventory problems” on page 130

5 Tracking and managing labware in storageAbout labware inventory management
80 VWorks Automation Control Setup Guide
About labware inventory management
About this topic
This topic provides the background information on how to use the VWorks Inventory Editor to track labware moving into and out of storage devices, such as the Labware MiniHub.You must be logged in as an administrator or technician to open the Inventory Editor.“Creating and managing location groups” on page 88
Barcode tracking versus inventory management
Barcode trackingBarcode tracking without an inventory system is limited because the labware locations are stored in memory and are lost when you exit the VWorks software.
Inventory managementThe inventory management system allows long-term tracking of microplates because barcode data is permanently stored in a database. This is useful for lab automation systems with devices that store microplates for a long time, such as the Agilent Labware MiniHub.VWorks Plus only. The Inventory database file (.sql) is a record of interest that is exempt from record state changes. VWorks logs an audit trail for this file.
Prerequisites
To use inventory management, you must have established a VWorks connection to the Inventory database. For instructions, see “Connecting to Inventory and Experiments databases” on page 175.
How labware is stored
The long-term storage devices (Labware MiniHub) supported by the VWorks software store labware in cassettes and slots. A cassette is a vertical rack that has many slots, where each slot holds one labware.
Information that is stored
The inventory database maintains a list of labware located in long-term labware storage devices. Each labware entry in the database includes the following information:• Device in which the labware is located• Cassette and slot location of the labware• Names of the location and plate groups to which it belongs• Labware type• Any north-side, south-side, east-side, and west-side barcodes• Volume of the wells in the labware
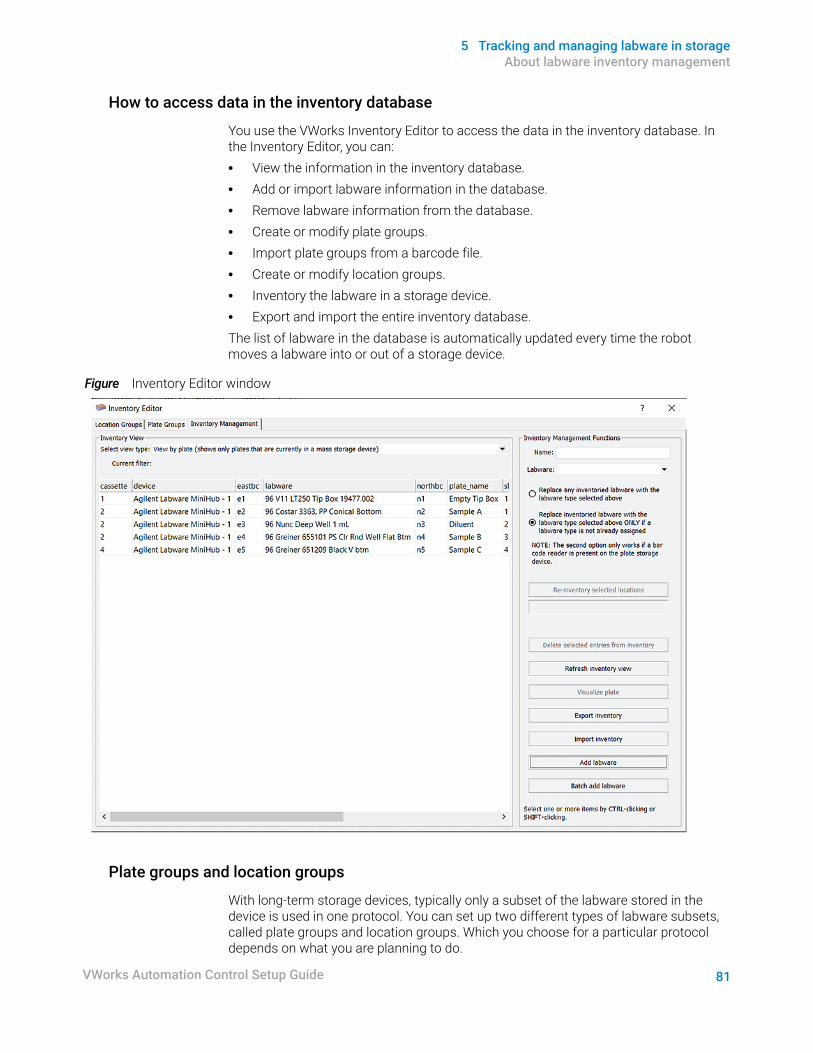
81
5 Tracking and managing labware in storageAbout labware inventory management
VWorks Automation Control Setup Guide
How to access data in the inventory database
You use the VWorks Inventory Editor to access the data in the inventory database. In the Inventory Editor, you can:• View the information in the inventory database.• Add or import labware information in the database.• Remove labware information from the database.• Create or modify plate groups.• Import plate groups from a barcode file.• Create or modify location groups.• Inventory the labware in a storage device.• Export and import the entire inventory database.The list of labware in the database is automatically updated every time the robot moves a labware into or out of a storage device.
Figure Inventory Editor window
Plate groups and location groups
With long-term storage devices, typically only a subset of the labware stored in the device is used in one protocol. You can set up two different types of labware subsets, called plate groups and location groups. Which you choose for a particular protocol depends on what you are planning to do.

5 Tracking and managing labware in storageAbout labware inventory management
82 VWorks Automation Control Setup Guide
• A plate group consists of a group of labware where the group membership is often based on the labware’s unique database identifier.
• A location group is a group of slots in a storage device.For more information, see “About inventory groups” on page 86.
Inventory management tasks
The following protocol tasks interact with the inventory database:• clearInventory• exportDatabase• ImportCsvToInventory• Load• Unload• Incubate at microplate storage deviceFor more information about the tasks, see VWorks Automation Control User Guide.
About adding labware into inventory
You can add labware information into the inventory database using one of the following methods:• Run a protocol to physically move labware into the storage device. During the run,
the system will update the inventory.• Use the Inventory Editor to:
– Add an individual labware into the inventory.– Add multiple labware by importing a CSV file.
For detailed instructions, see “Adding labware information in the inventory database” on page 94.
Terminology
The following terms are used to describe the movement of labware in the system.
Term Definition
Unload The act of moving labware from a storage device into the system.
Load The act of moving labware from the system into a storage device.
System Labware that are being processed by the current protocol are considered to be in the system.For example:• Labware on a platepad is in the system.• Labware being incubated in an incubator is in the system.• Labware half-way up a BenchCel rack is not in the system, unless it
will be moved during the current protocol.• Labware being stored in a Labware MiniHub is not in the system
unless it will be moved during the current protocol.

83
5 Tracking and managing labware in storageOpening the Inventory Editor
VWorks Automation Control Setup Guide
Database backup
You can back up the inventory database by exporting it to an SQL file. For instructions, see “Exporting and importing the inventory data” on page 125.To back up the inventory database along with the VWorks software system files, see VWorks Automation Control User Guide. For assistance, contact Agilent Technical Support.
Related information
Opening the Inventory Editor
About this topic
This topic explains the two ways you can open the Inventory Editor:• “Opening from the Tools menu” on page 84• “Opening from within a protocol” on page 84Read this topic if your lab automation system has a random-access storage device, such as the Labware MiniHub.
Before you start
Before opening the Inventory Editor, make sure you have established a VWorks connection to the Inventory database. For details, see “Connecting to Inventory and Experiments databases” on page 175.You must be logged in as an administrator or technician to open the Inventory Editor.
For information about... See...
Inventory groups, plate groups and location groups
“About inventory groups” on page 86
Setting up the database “Setting up and connecting to a MySQL database” on page 155
Moving labware in and out of a storage device
• “Adding labware information in the inventory database” on page 94
• “Removing labware information from the inventory database” on page 106
• “Moving labware between storage devices” on page 103
Incubating labware “Using a plate group to process labware” on page 111
Using barcode input files “Creating plate group with barcode input file” on page 116

5 Tracking and managing labware in storageOpening the Inventory Editor
84 VWorks Automation Control Setup Guide
Each labware entry in the inventory database is associated with a storage location. To view the contents of the inventory database, you must first open the relevant device file and initialize the devices.
Opening from the Tools menu
To open the Inventory Editor from the Tools menu: In the VWorks window, select Tools > Inventory Editor.
Opening from within a protocol
To open the Inventory Editor from within a protocol:1 In the protocol, select a Load or Unload task.2 Click Storage Load in the Task Parameters area.3 Do one of the following:
• In the Locations tab, click Edit location groups.• In the Groups tab, click Edit plate groups.

85
5 Tracking and managing labware in storageOpening the Inventory Editor
VWorks Automation Control Setup Guide
Related information
For information about... See...
Inventory groups, plate groups and location groups
“About inventory groups” on page 86
Moving labware in and out of a storage device
• “Adding labware information in the inventory database” on page 94
• “Removing labware information from the inventory database” on page 106
• “Moving labware between storage devices” on page 103
Incubating labware “Using a plate group to process labware” on page 111
Using barcode input files “Creating plate group with barcode input file” on page 116

5 Tracking and managing labware in storageAbout inventory groups
86 VWorks Automation Control Setup Guide
About inventory groups
Who should read this
Read this topic if your lab automation system has a random-access storage device, such as the Labware MiniHub.
Inventory groups defined
An inventory group is a group of labware or slots that is a subset of the labware listed in the inventory.
Types of inventory groups
The two types of inventory groups are:• Location groups• Plate groups
Location groups
Location groups are used to move labware to and or from a specific location in the storage device.
Example:In this example, a location group that contains slots 1–10 in cassette 1 is created. When an Unload task uses this location group, the robot moves whatever labware are in cassette 1, slots 1–10, regardless of the identity of the labware, out of the storage device and into the system. When a Load task uses a location group, it moves the labware that are in the system into cassette 1, slots 1–10 of the storage device, regardless of the identity of the labware.
When to useLocation groups are used when:• The storage device is being filled or emptied.• The groups of labware are removed from the lab automation system and replaced
with other groups of labware on a regular basis. This would be done by replacing a cassette of labware with a new one.
Plate groups
Plate groups are used to move specific labware to or from the storage device, but without regard for the location. Plate groups can be used when operators do not routinely remove and replace whole cassettes of labware.When a labware is first moved into the system by the system’s robot, such as when it is downstacked, it is assigned an identifier in the database. After that, the VWorks software tracks where that labware is at all times. This tracking does not require the labware to have barcode labels. The VWorks software tracks the movement of each labware throughout a protocol.

87
5 Tracking and managing labware in storageAbout inventory groups
VWorks Automation Control Setup Guide
Note: You cannot use a plate group with a Load task, unless a native location or location group is associated with it— you must specify a location. You can associate a plate group with the location group so that the labware that are loaded are simultaneously loaded into a plate group as well.Note: When you load into a plate group you must also load into a location group, native location, or choose return to original locations, otherwise the software will not know where to put the labware.
Example:A plate group in a storage device contains the following microplates:• Plate 1• Plate 26• Plate 31• Plate 41These microplates are scattered around the storage device, not necessarily in adjacent slots of the same cassette. When the Unload task uses this plate group, it moves these microplates out of the storage device and into the system.
When to usePlate groups are typically used in compound management systems where labware are housed in the storage device almost permanently. For each protocol, a different plate group is unloaded, run, and then loaded back to a storage device. As long as the identification of the labware is tracked, the labware can be stored in any open location.
Group membership
A single labware can be a member of more than one plate group.
Related information
For information about... See...
Creating a location group “Creating and managing location groups” on page 88
Creating a plate group “Creating and managing plate groups” on page 91
Moving labware in and out of a storage device
• “Adding labware information in the inventory database” on page 94
• “Removing labware information from the inventory database” on page 106
• “Moving labware between storage devices” on page 103
Incubating labware “Using a plate group to process labware” on page 111
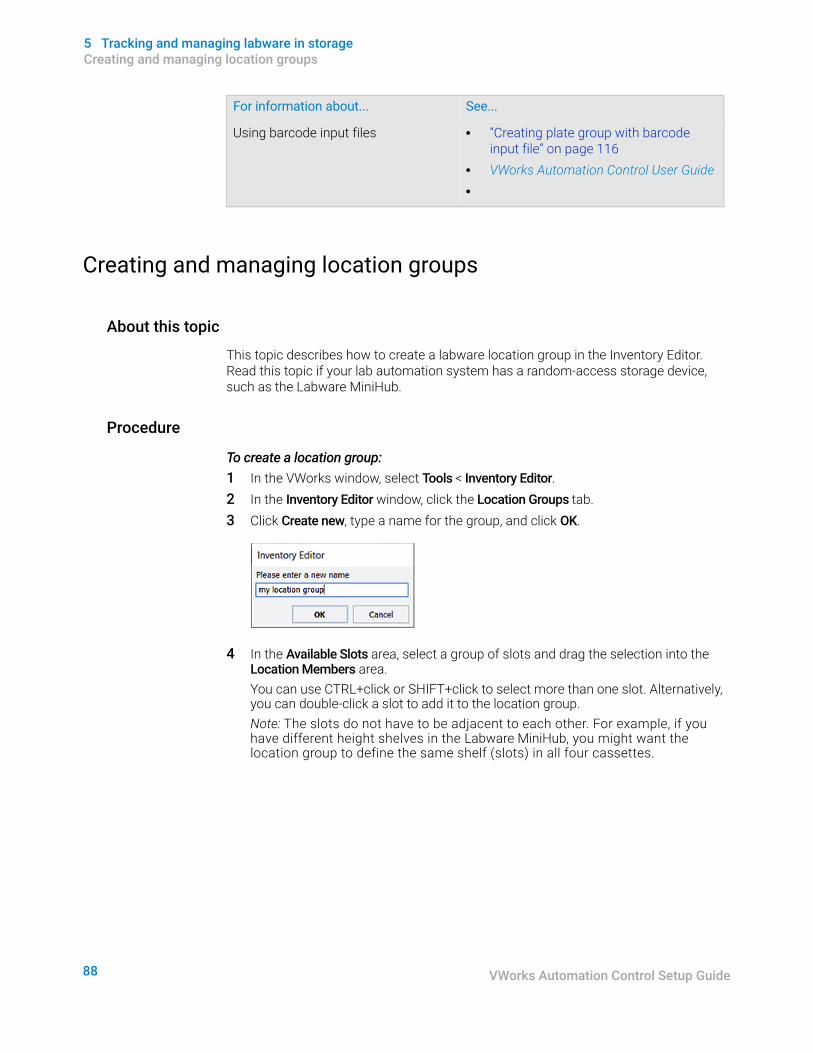
5 Tracking and managing labware in storageCreating and managing location groups
88 VWorks Automation Control Setup Guide
Creating and managing location groups
About this topic
This topic describes how to create a labware location group in the Inventory Editor. Read this topic if your lab automation system has a random-access storage device, such as the Labware MiniHub.
Procedure
To create a location group:1 In the VWorks window, select Tools < Inventory Editor.2 In the Inventory Editor window, click the Location Groups tab.3 Click Create new, type a name for the group, and click OK.
4 In the Available Slots area, select a group of slots and drag the selection into the Location Members area.You can use CTRL+click or SHIFT+click to select more than one slot. Alternatively, you can double-click a slot to add it to the location group.Note: The slots do not have to be adjacent to each other. For example, if you have different height shelves in the Labware MiniHub, you might want the location group to define the same shelf (slots) in all four cassettes.
Using barcode input files • “Creating plate group with barcode input file” on page 116
• VWorks Automation Control User Guide•
For information about... See...

89
5 Tracking and managing labware in storageCreating and managing location groups
VWorks Automation Control Setup Guide
Note: To delete a member of the location group, select the item in the Location Members area, and then press DELETE.
5 Click Save Changes.6 Close the Inventory Editor window.
The new location group is listed as an available location in Locations tab of the Load/Unload Task Parameters area.
Deleting a location group
To delete a location group from the inventory:1 In the Inventory Editor window, click the Location Groups tab.2 Select a location group in the Saved Locations area.3 Click Delete.

5 Tracking and managing labware in storageCreating and managing location groups
90 VWorks Automation Control Setup Guide
Related information
For information about... See...
Creating a plate group “Creating and managing plate groups” on page 91
Opening the Inventory Editor “Opening the Inventory Editor” on page 83
Moving labware in and out of a storage device
• “Adding labware information in the inventory database” on page 94
• “Removing labware information from the inventory database” on page 106
• “Moving labware between storage devices” on page 103
Incubating labware “Using a plate group to process labware” on page 111
Using barcode input files • “Creating plate group with barcode input file” on page 116
• VWorks Automation Control User Guide
Using storage tasks in a protocol VWorks Automation Control User Guide

91
5 Tracking and managing labware in storageCreating and managing plate groups
VWorks Automation Control Setup Guide
Creating and managing plate groups
About this topic
This topic describes how to create a plate group, which is a list of specific labware that can be moved into or out of a labware storage device without regard for which slots they are stored in.Read this topic if your lab automation system has a random-access storage device, such as the Labware MiniHub.For instructions on how to add labware into the database, see “Adding labware information in the inventory database” on page 94.
Procedure
To create a plate group:1 In the VWorks window, select Tools < Inventory Editor.2 In the Inventory Editor window, click the Plate Groups tab.3 Click Create new, type a name for the group, and click OK.
To add labware to the plate group:1 In the Available Plates area, select a group of available labware, and drag the
selection into the Group Members area. You can use CTRL+click or SHIFT+click to select more than one labware. Alternatively, you can double-click a plate to add it to the plate group.

5 Tracking and managing labware in storageCreating and managing plate groups
92 VWorks Automation Control Setup Guide
Note: To delete a plate from the plate group, select the plate in the Group Members area, and then press DELETE.
2 Click Save Changes.3 Close the Inventory Editor window.
The plate group is listed as a available groups in the Groups tab in the Load/Unload Task Parameters area.
Changing the processing order
You can change the order in which the labware in a plate group will be processed.
To change the processing order:1 In the plate group list, select a labware.

93
5 Tracking and managing labware in storageCreating and managing plate groups
VWorks Automation Control Setup Guide
2 Drag it to another position in the list.
Deleting a plate group
To delete a plate group from the inventory:1 In the Inventory Editor window, click the Plate Groups tab.2 In the Saved Groups area, select the plate group.3 Click Delete.
Related information
For information about... See...
Creating a location group “Creating and managing location groups” on page 88
Opening the Inventory Editor “Opening the Inventory Editor” on page 83
Moving labware in and out of a storage device
• “Adding labware information in the inventory database” on page 94
• “Removing labware information from the inventory database” on page 106
• “Moving labware between storage devices” on page 103
Incubating labware “Using a plate group to process labware” on page 111
Using barcode input files • “Creating plate group with barcode input file” on page 116
• VWorks Automation Control User Guide
Using storage tasks in a protocol VWorks Automation Control User Guide

5 Tracking and managing labware in storageAdding labware information in the inventory database
94 VWorks Automation Control Setup Guide
Adding labware information in the inventory database
About this topic
You can add labware information in the inventory database in one of many ways.
You can also use the plateDB and InventoryLabware JavaScript functions to add labware information. For more information, see VWorks Automation Control User Guide.
Running a protocol to load labware into a storage device
You can run a protocol to load a batch of labware into storage devices. During the run, the system will update the inventory database.• If the labware has barcode labels and the system has a barcode reader, see
“Loading labware into storage devices and updating the inventory database” on page 94.
• If the labware does not have barcode labels, or if the system does not have a barcode reader, see “Updating the inventory database without barcode readers” on page 96.
Loading labware into storage devices and updating the inventory database
To run a protocol to load labware into a storage device: 1 Load the labware in a BenchCel labware rack by hand before running the protocol.2 Write a protocol that contains the following:
– Downstack task to move the labware from the BenchCel stacker.– A task that reads the barcode on the labware.
If you want to... See...
• Load a batch of labware into storage devices.
• Add the labware information in the database.
“Running a protocol to load labware into a storage device” on page 94
Add the information for a batch of labware in the database. Note: The labware are already in the storage devices.
“Adding multiple labware by importing a CSV file” on page 97
• Load a few labware into storage devices.• Add the labware information in the
database.
“Adding individual labware in the inventory database” on page 100
Add the information for a few labware in the database. Note: The labware are already in the storage devices.
“Adding individual labware in the inventory database” on page 100

95
5 Tracking and managing labware in storageAdding labware information in the inventory database
VWorks Automation Control Setup Guide
For example, if the barcode reader is on a device with a plate stage, add the Place Plate task. Make sure the process labware parameter specifies the side on which the barcode label resides. The side that you select must match the side on which the barcode reader is installed. In addition, select Barcode not in file from the Barcode or header list.If the storage device has an integrated barcode reader, you might not need to add this task.
– Load task to move the labware into the storage device.
3 Make sure that the Downstack task is configured to use the stacker.
4 When adding the Load task, create a location group: a Select the Load task.b Click Storage Load.c Click the Locations tab.d Click Edit location groups.e See “Creating and managing location groups” on page 88 for instructions.f Make sure that the location group is listed in the Available locations area of the
Load Task Parameters area.

5 Tracking and managing labware in storageAdding labware information in the inventory database
96 VWorks Automation Control Setup Guide
5 Drag the group into the Assigned locations or groups area.
6 Compile the protocol and resolve any error messages.7 Run the protocol (click Start).8 In the Run Configuration dialog box that appears, specify the number of times to run
the protocol. Type a number that is equal to or less than the number of labware you want to load into the storage device.
9 Click Finish. The protocol run starts.10 To confirm that the labware are in the inventory database, open the Inventory
Editor. See “Opening the Inventory Editor” on page 83.
Updating the inventory database without barcode readers
If the labware do not have barcode labels, or if the system does not have a barcode reader:1 Load the labware in a BenchCel labware rack by hand before running the protocol.2 Write the protocol described in “Loading labware into storage devices and updating
the inventory database” on page 94. You do not need to include the barcode-reading task.
3 Add the importCsvToInventory task at the end of the protocol. For more information, see VWorks Automation Control User Guide.

97
5 Tracking and managing labware in storageAdding labware information in the inventory database
VWorks Automation Control Setup Guide
4 Compile the protocol and resolve any error messages.5 Run the protocol (click Start).6 In the Run Configuration dialog box that appears, specify the number of times to
run the protocol. Type a number that is equal to or less than the number of labware you want to load into the storage device.
7 Click Finish. The protocol run starts.8 To confirm that the labware are in the inventory database, open the Inventory
Editor. See “Opening the Inventory Editor” on page 83.
Adding multiple labware by importing a CSV file
You can add the information for a batch of labware by importing a CSV file in the Inventory Editor. Use this method if a large number of labware physically exist in the storage device, and you want to enter the labware information in the inventory database.
CSV file format requirementsThe CSV file must be a text file, created in Notepad or equivalent editor, and have the .csv file name extension. The file can be stored anywhere on the computer that runs the VWorks software. However, if you want to store the file in Shared Services storage, make sure that you import the file using the File > Import Misc File command.Make sure the CSV file meets the following requirements:• The accepted delimiters are comma, tab, colon, and semicolon.• The first row contains the header.• The columns must consist of the following, in the order shown:
Property DescriptionDeviceName Required column. The name of the device in which the
labware resides.Make sure the device name in this column matches the name in the device file. Be sure to include any spaces, underscores, dashes, and capitalization in the name.
Cassette Required column. The cassette in which the labware resides. Make sure the cassette number in this column is valid. For example, if the device only has four cassettes, the valid values are 1, 2, 3, and 4.

5 Tracking and managing labware in storageAdding labware information in the inventory database
98 VWorks Automation Control Setup Guide
The following example shows that the columns in the file are separated by commas. In this example, all required and optional columns are specified in the file.
Instead of commas, you can use one of the other delimiters. The following example shows the use of tabs instead of commas to separate the columns. In this example, only the required columns are included.
Procedure to batch add labware
To add multiple labware by importing a CSV file:1 Physically load the cassettes of labware into the storage device.2 Open the Inventory Editor. See “Opening the Inventory Editor” on page 83.3 Click the Inventory Management tab.
Slot Required column. The slot in which the labware resides. Make sure the slot number in this column is valid. For example, if the cassette only has 5 slots, the valid values are 1, 2, 3, 4, and 5.
Type Required column. The type of labware. Make sure the labware type in this column matches the name in the Labware Editor.
IMPORTANT The labware type may not contain any commas.
Name The name of the labware.WestBC The barcode that is on the west side of the labware.
IMPORTANT The west-side barcode must be unique, or the labware information will not be imported.
EastBC The barcode that is on the east side of the labware.SouthBC The barcode that is on the south side of the labware.NorthBC The barcode that is on the north side of the labware.PlateGroup The plate group to which the labware belongs.LocationGroup The location group to which the labware belongs.
Property Description

99
5 Tracking and managing labware in storageAdding labware information in the inventory database
VWorks Automation Control Setup Guide
4 Click Batch add labware.
5 In the Batch add labware dialog box that opens, click the button, and then click one of the following options:• Browse local storage. The Open dialog box opens. Locate and select the CSV
file in the local file system, and then click Open.• Browse Shared Services storage. The Open File dialog box opens. Locate and
select the CSV file in the Shared Services Repository, and then click Open.
6 Select Overwrite all conflicts if an entry already exists in the database and you want to replace it with the data in the CSV file. If you do not select this option, the software will skip the current labware in the CSV file.
7 Click OK to start importing the labware data.During the import process:• The software will import each row of data in the CSV file.• If one of the required columns is missing, the software will halt the import process
and display an error message.• If the storage location is already occupied by a labware:
– The software will overwrite the existing data if you selected Overwrite all conflicts, and record the incident in the Main log.

5 Tracking and managing labware in storageAdding labware information in the inventory database
100 VWorks Automation Control Setup Guide
– The software will skip the current row in the CSV file if you cleared the Overwrite all conflicts check box.
• If a specified device in the CSV file does not exist in the device file, the software will proceed to add the labware information and record the error in the log file.
• If the west-side barcode is not unique, the system will skip the current row in the CSV file and record the incident in the main log.
IMPORTANTMake sure you reconcile any conflict before running a protocol. Running a protocol with an out-of-date inventory database will cause the run to abort.
n to abort.
Adding individual labware in the inventory database
You can add an individual labware entry in the inventory database. Use this method if you want to add a nominal number of labware entries in the inventory database. For example, instead of running a protocol, you can load the labware in the storage device by hand, and then use the Inventory Editor to update the inventory database.
To add an individual labware in the inventory database:1 Open the Inventory Editor. See “Opening the Inventory Editor” on page 83.2 Click the Inventory Management tab.3 Click Add labware.
4 In the Add Labware to Inventory dialog box, set the labware properties:

101
5 Tracking and managing labware in storageAdding labware information in the inventory database
VWorks Automation Control Setup Guide
Property DescriptionDevice name Required field. The name of the device in which the
labware resides. Select the device from the list.
Cassette Required field. The cassette in which the labware resides. Type the cassette number.
Slot Required field. The slot in which the labware resides. Type the slot number.
Type Required field. The type of labware. Select the labware type from the list.Note: During a protocol run, the labware type specified in the process plate parameters area will override the specification in the inventory database.
Name The name of the labware.Type a name that identifies the labware.
5 Tracking and managing labware in storageAdding labware information in the inventory database
102 VWorks Automation Control Setup Guide
5 When you are finished, click OK to save the changes in the database. The new labware entry appears in the Inventory View.
6 If you have not done so, make sure you physically load the labware in the storage device so that its location matches the information in the database.
Related information
South/West/North/East barcode
The barcode associated with the labware. Type or manually scan the barcode to enter it in the box. Be sure to enter the barcode in the appropriate box to indicate the location of the barcode label. For example, if the barcode label is on the south side of the labware, enter the barcode in the South barcode box.
Plate group The plate group to which the labware belongs.Location group The location group to which the labware belongs.
Property Description
For information about... See...
Moving labware out of a storage device
“Removing labware information from the inventory database” on page 106
Moving labware between storage devices
“Moving labware between storage devices” on page 103
The Load and Unload tasks VWorks Automation Control User Guide
Exporting the database data “Exporting and importing the inventory data” on page 125

103
5 Tracking and managing labware in storageMoving labware between storage devices
VWorks Automation Control Setup Guide
Moving labware between storage devices
About this topic
This topic provides an example to illustrate how you can move a group of labware from one storage device to another storage device. The general procedure could also be used to move a group of labware within a single storage device.
Who should read this
Read this topic if your lab automation system has incubators and random-access storage devices such as the Labware MiniHub.
Before you start
Make sure that both labware storage devices are properly configured in the device manager.
Moving a labware
In this example procedure, a group of four microplates is moved from one storage device (Labware MiniHub1) to another (Labware MiniHub2).
To move a labware:1 Create a process that has a Load and an Unload task, as shown in the following
example.
2 Select either the Load or Unload task, and in the Task Parameters area, click Edit location groups.The Inventory Editor opens.
3 Click the Inventory Management tab and note the device, cassette, and slot locations of the microplates that you want to move.In this example, the microplates will be moved from MiniHub1, cassette 1, slots 1 to 4.
4 Click the Location Groups tab and create a location group for these microplates.

5 Tracking and managing labware in storageMoving labware between storage devices
104 VWorks Automation Control Setup Guide
5 In the Inventory Management tab, note the device, cassette, and slot numbers for the destination slots. In this example, the microplates will be moved to MiniHub2, cassette 2, slots 1 to 4.
6 Click the Location Groups tab and create a location group for these slots.
7 Click Save changes and close the Inventory Editor.8 Select the Unload task, and in the Task Parameters area, drag the location group in
the first device to the Assigned locations area.

105
5 Tracking and managing labware in storageMoving labware between storage devices
VWorks Automation Control Setup Guide
9 Select the Load task, and in the Protocol Task Parameters area drag the location group in the second device to the Assigned locations area.
10 Compile the protocol and check for errors.
11 Click Start to start the run.12 In the Number of Cycles dialog box, type the number of microplates that you are
moving and click OK.13 Open the Inventory Editor, and click the Inventory Management tab to make sure
that the microplates moved as expected.

5 Tracking and managing labware in storageRemoving labware information from the inventory database
106 VWorks Automation Control Setup Guide
Related information
Removing labware information from the inventory database
About this topic
You can remove labware information from the inventory database in one of many ways.
For information about... See...
Creating a location group “Creating and managing location groups” on page 88
Creating a plate group “Creating and managing plate groups” on page 91
Opening the Inventory Editor “Opening the Inventory Editor” on page 83
Moving labware in and out of a storage device
• “Adding labware information in the inventory database” on page 94
• “Removing labware information from the inventory database” on page 106
Incubating labware “Using a plate group to process labware” on page 111
Using barcode input files • “Creating plate group with barcode input file” on page 116
• VWorks Automation Control User Guide
Using storage tasks in a protocol VWorks Automation Control User Guide
If you want to... See...
• Unload a batch of labware from storage devices.
• Remove the labware information from the database.
“Running a protocol to unload labware from a storage device” on page 107
Remove the information for a batch of labware from the database. Note: The labware have been removed from the storage devices previously.
“Removing selected labware information from the database” on page 109
• Unload a few labware from storage devices.
• Remove the labware information from the database.
“Removing selected labware information from the database” on page 109
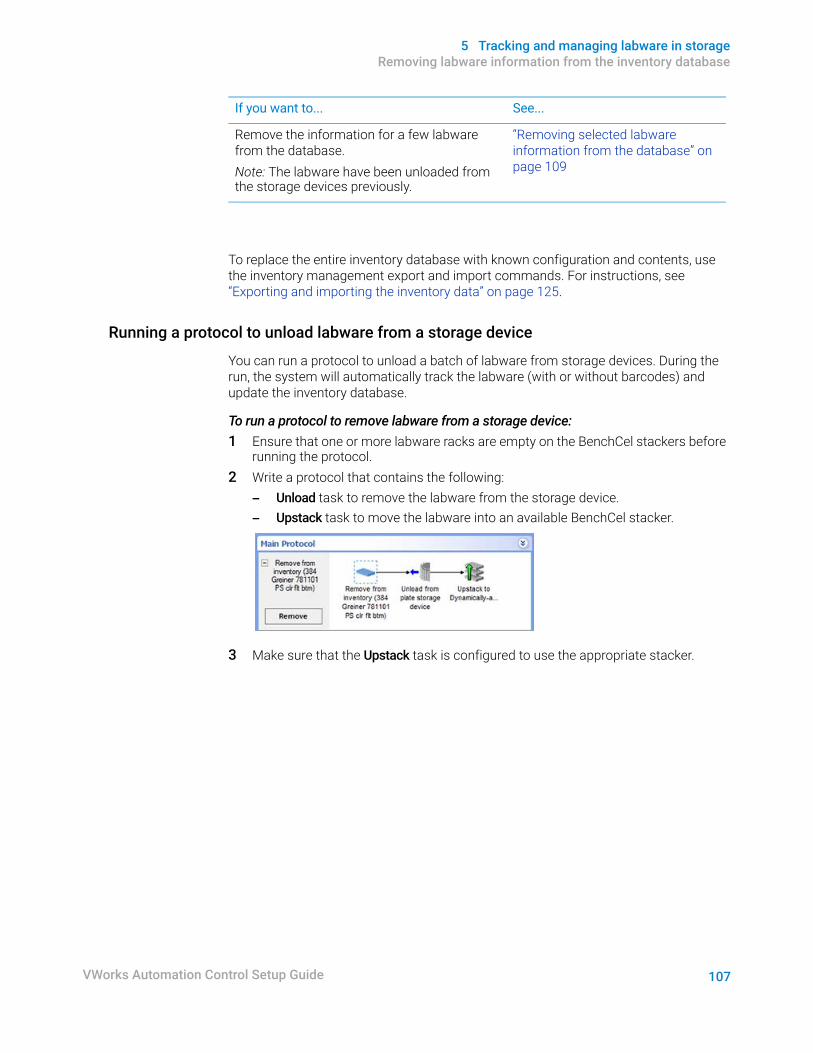
107
5 Tracking and managing labware in storageRemoving labware information from the inventory database
VWorks Automation Control Setup Guide
To replace the entire inventory database with known configuration and contents, use the inventory management export and import commands. For instructions, see “Exporting and importing the inventory data” on page 125.
Running a protocol to unload labware from a storage device
You can run a protocol to unload a batch of labware from storage devices. During the run, the system will automatically track the labware (with or without barcodes) and update the inventory database.
To run a protocol to remove labware from a storage device: 1 Ensure that one or more labware racks are empty on the BenchCel stackers before
running the protocol.2 Write a protocol that contains the following:
– Unload task to remove the labware from the storage device.– Upstack task to move the labware into an available BenchCel stacker.
3 Make sure that the Upstack task is configured to use the appropriate stacker.
Remove the information for a few labware from the database. Note: The labware have been unloaded from the storage devices previously.
“Removing selected labware information from the database” on page 109
If you want to... See...

5 Tracking and managing labware in storageRemoving labware information from the inventory database
108 VWorks Automation Control Setup Guide
4 In the Inventory Editor, identify the labware that you want to move:a Click the Unload task.b Click Storage Load.c Click the Locations tab.d Click Edit location groups to open the Inventory Editor.e Click the Inventory Management tab. Note the device, cassette and slot
numbers for the labware that you want to remove.
5 If necessary, create a location group in the Inventory Editor that contains the labware you want to remove. See “Creating and managing location groups” on page 88 for instructions.Save the changes and confirm it by making sure it is listed in the Available locations area on the Locations tab of the Load Task Parameters toolbar.

109
5 Tracking and managing labware in storageRemoving labware information from the inventory database
VWorks Automation Control Setup Guide
6 Drag the location group into the Assigned locations area.
7 Compile the protocol and resolve any error messages.8 Run the protocol (click Start).9 In the Run Configuration dialog box that appears, specify the number of times to
run the protocol. Type a number that is equal to or less than the number of labware you want to unload from the storage device.
10 Click Finish. The protocol run starts.11 To confirm that the labware are removed from the inventory database, open the
Inventory Editor. See “Opening the Inventory Editor” on page 83.
Removing selected labware information from the database
You can remove individual labware entries in the inventory database. Use this method if you want to remove labware entries under the following scenarios:• Instead of running a protocol, you can unload individual labware in the storage
device by hand, and then use the Inventory Editor to update the inventory database.• A batch of labware was already removed from storage devices, but you need to
remove the corresponding entries from the inventory database.
To remove labware entries from the database:1 Open the Inventory Editor. See “Opening the Inventory Editor” on page 83.2 Click the Inventory Management tab.3 Select the labware entries you want to delete, and then click Delete selected entries
from inventory.If you are deleting a batch of labware entries, you can CTRL+click to select non-contiguous entries, or SHIFT+click to select contiguous entries.

5 Tracking and managing labware in storageRemoving labware information from the inventory database
110 VWorks Automation Control Setup Guide
4 Make sure you physically unload the labware from the storage device so that the storage state of the device matches the information in the database.
5 Storage devices that have their own barcode readers. To validate the changes, in the Inventory Editor Inventory Management tab, click Re-inventory selected locations. For instructions, see “Reinventorying the labware inventory” on page 123.
Related information
For information about... See...
Creating a location group “Creating and managing location groups” on page 88
Creating a plate group “Creating and managing plate groups” on page 91
Moving labware in and out of a storage device
• “Adding labware information in the inventory database” on page 94
• “Moving labware between storage devices” on page 103
Incubating labware “Using a plate group to process labware” on page 111
Exporting the database data “Exporting and importing the inventory data” on page 125
Using barcode input files • “Creating plate group with barcode input file” on page 116
• VWorks Automation Control User Guide•
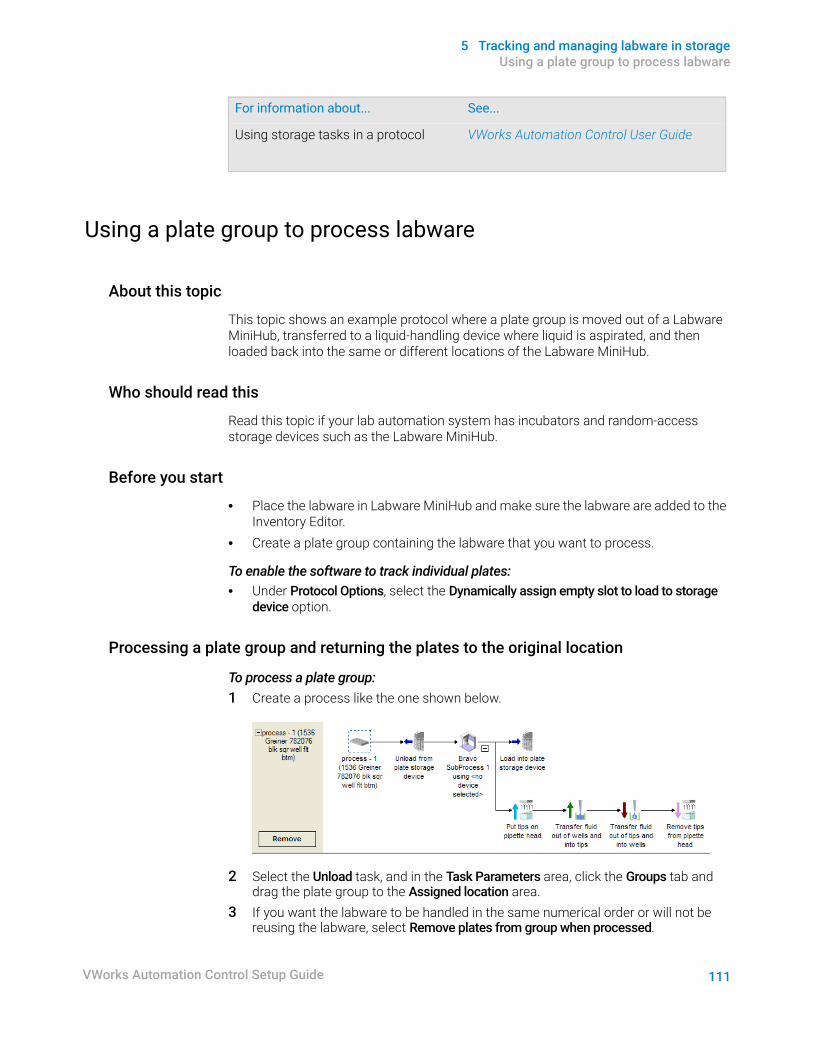
111
5 Tracking and managing labware in storageUsing a plate group to process labware
VWorks Automation Control Setup Guide
Using a plate group to process labware
About this topic
This topic shows an example protocol where a plate group is moved out of a Labware MiniHub, transferred to a liquid-handling device where liquid is aspirated, and then loaded back into the same or different locations of the Labware MiniHub.
Who should read this
Read this topic if your lab automation system has incubators and random-access storage devices such as the Labware MiniHub.
Before you start
• Place the labware in Labware MiniHub and make sure the labware are added to the Inventory Editor.
• Create a plate group containing the labware that you want to process.
To enable the software to track individual plates:• Under Protocol Options, select the Dynamically assign empty slot to load to storage
device option.
Processing a plate group and returning the plates to the original location
To process a plate group:1 Create a process like the one shown below.
2 Select the Unload task, and in the Task Parameters area, click the Groups tab and drag the plate group to the Assigned location area.
3 If you want the labware to be handled in the same numerical order or will not be reusing the labware, select Remove plates from group when processed.
Using storage tasks in a protocol VWorks Automation Control User Guide
For information about... See...
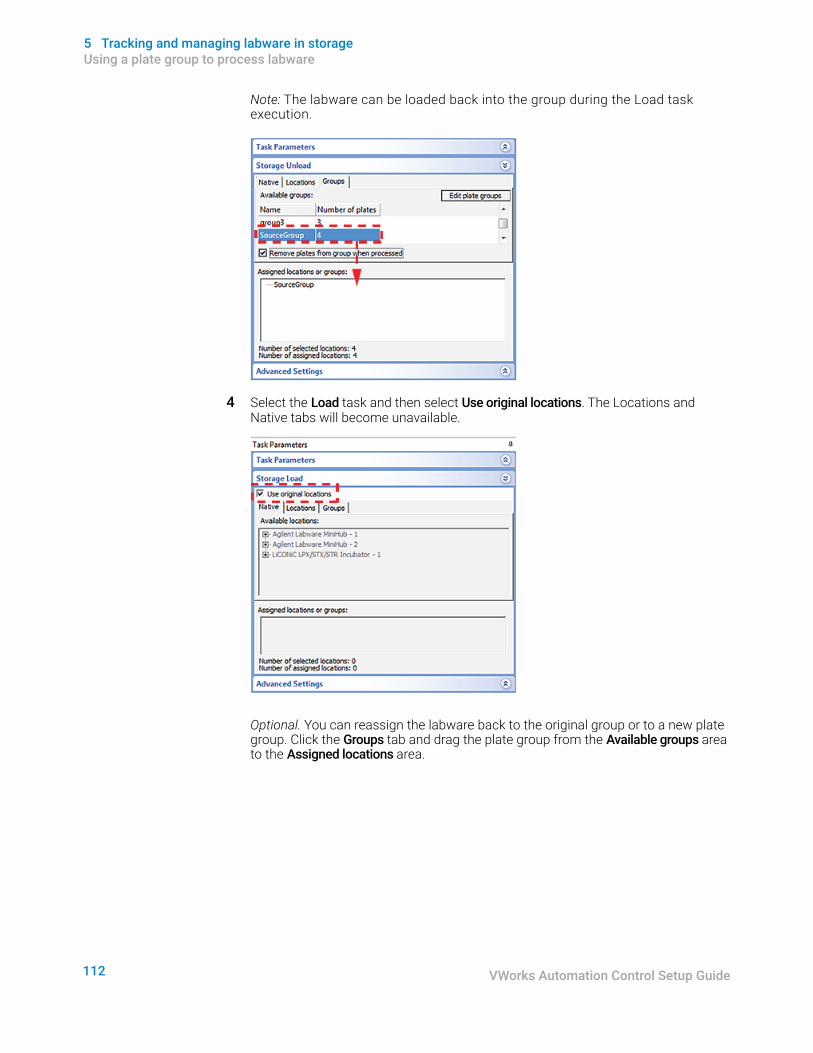
5 Tracking and managing labware in storageUsing a plate group to process labware
112 VWorks Automation Control Setup Guide
Note: The labware can be loaded back into the group during the Load task execution.
4 Select the Load task and then select Use original locations. The Locations and Native tabs will become unavailable.
Optional. You can reassign the labware back to the original group or to a new plate group. Click the Groups tab and drag the plate group from the Available groups area to the Assigned locations area.
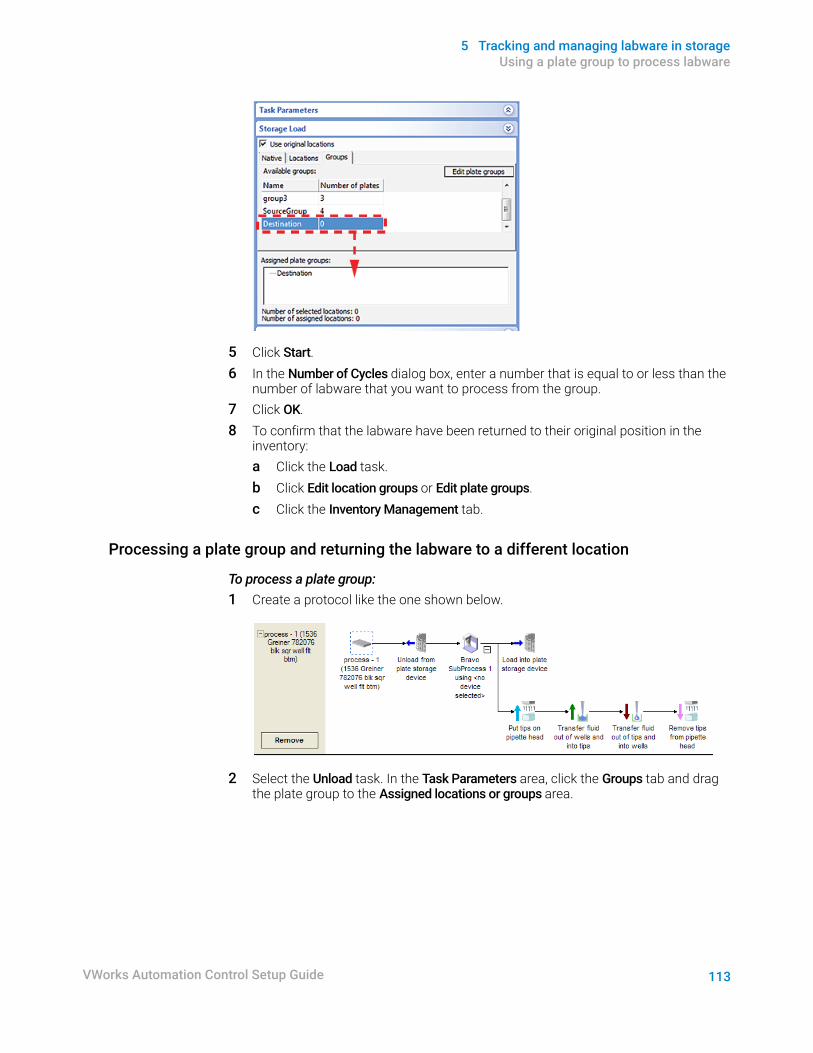
113
5 Tracking and managing labware in storageUsing a plate group to process labware
VWorks Automation Control Setup Guide
5 Click Start.6 In the Number of Cycles dialog box, enter a number that is equal to or less than the
number of labware that you want to process from the group.7 Click OK.8 To confirm that the labware have been returned to their original position in the
inventory:a Click the Load task.b Click Edit location groups or Edit plate groups.c Click the Inventory Management tab.
Processing a plate group and returning the labware to a different location
To process a plate group:1 Create a protocol like the one shown below.
2 Select the Unload task. In the Task Parameters area, click the Groups tab and drag the plate group to the Assigned locations or groups area.

5 Tracking and managing labware in storageUsing a plate group to process labware
114 VWorks Automation Control Setup Guide
3 Select the Load task. In the Task Parameters area, choose one of the following ways to load the labware into a different location.• Specify a predefined location group to load to. To specify a predefined location
group, click the Locations tab and drag the location group to the Assigned locations or groups area.
• Assign specific locations to load to without using a location group, as follows:Click the Native tab, and drag the selected locations to the Assigned locations or groups area.

115
5 Tracking and managing labware in storageUsing a plate group to process labware
VWorks Automation Control Setup Guide
4 Click Start.5 In the Number of Cycles dialog box, enter a number that is equal to or less than the
number of labware that you want to process from the group.6 Click OK.7 To confirm that the labware have been returned to their assigned positions in the
inventory:a Click the Load task.b Click Edit location groups or Edit plate groups.c Click the Inventory Management tab.
Related information
For information about... See...
Software inventory “About labware inventory management” on page 80
Creating a plate group “Creating and managing plate groups” on page 91
Moving labware in and out of a storage device
• “Adding labware information in the inventory database” on page 94
• “Removing labware information from the inventory database” on page 106
• “Moving labware between storage devices” on page 103
Using barcode input files • “Creating plate group with barcode input file” on page 116
• VWorks Automation Control User Guide
Load and Unload tasks VWorks Automation Control User Guide
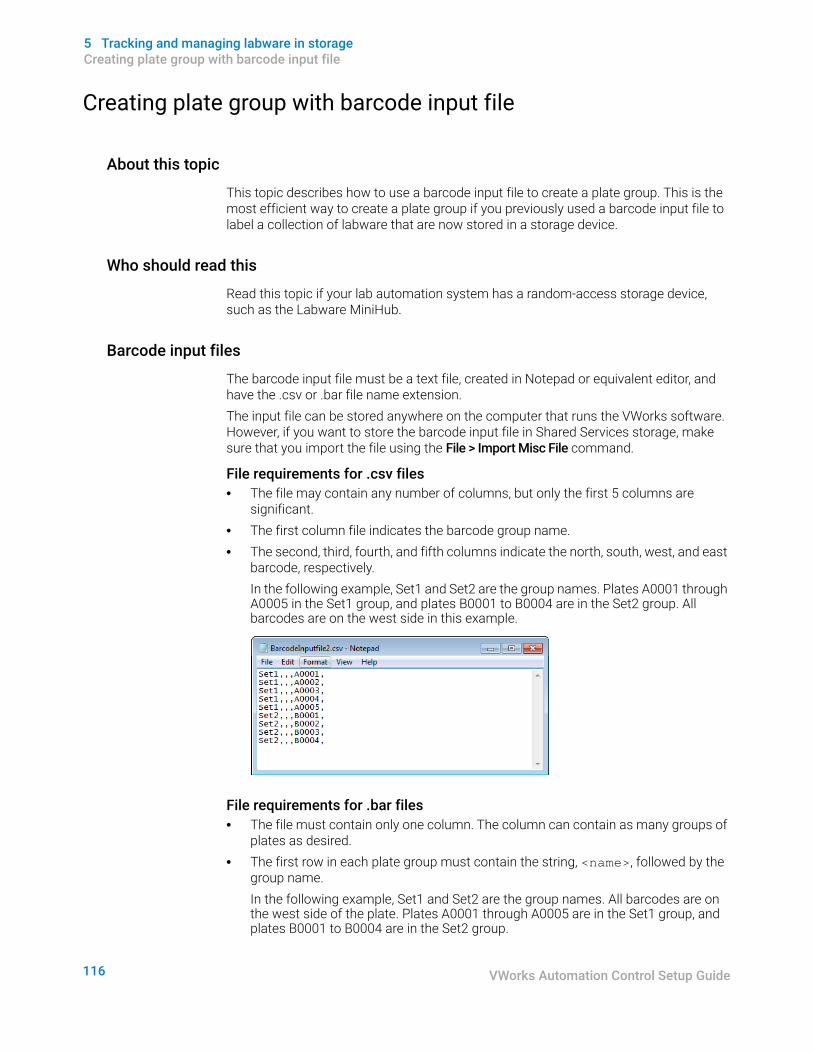
5 Tracking and managing labware in storageCreating plate group with barcode input file
116 VWorks Automation Control Setup Guide
Creating plate group with barcode input file
About this topic
This topic describes how to use a barcode input file to create a plate group. This is the most efficient way to create a plate group if you previously used a barcode input file to label a collection of labware that are now stored in a storage device.
Who should read this
Read this topic if your lab automation system has a random-access storage device, such as the Labware MiniHub.
Barcode input files
The barcode input file must be a text file, created in Notepad or equivalent editor, and have the .csv or .bar file name extension. The input file can be stored anywhere on the computer that runs the VWorks software. However, if you want to store the barcode input file in Shared Services storage, make sure that you import the file using the File > Import Misc File command.
File requirements for .csv files• The file may contain any number of columns, but only the first 5 columns are
significant. • The first column file indicates the barcode group name. • The second, third, fourth, and fifth columns indicate the north, south, west, and east
barcode, respectively.In the following example, Set1 and Set2 are the group names. Plates A0001 through A0005 in the Set1 group, and plates B0001 to B0004 are in the Set2 group. All barcodes are on the west side in this example.
File requirements for .bar files• The file must contain only one column. The column can contain as many groups of
plates as desired.• The first row in each plate group must contain the string, <name>, followed by the
group name.In the following example, Set1 and Set2 are the group names. All barcodes are on the west side of the plate. Plates A0001 through A0005 are in the Set1 group, and plates B0001 to B0004 are in the Set2 group.

117
5 Tracking and managing labware in storageCreating plate group with barcode input file
VWorks Automation Control Setup Guide
Procedure
IMPORTANTAll labware with barcodes listed in the selected barcode input file series must already be in the storage device. To load labware into storage devices, see “Adding labware information in the inventory database” on page 94.
To create a plate group with a barcode input file:1 In the Inventory Editor window, click the Plate Groups tab.
2 In the Bar Code File Input area, click the button, and then click one of the following options:• Browse local storage. The Open dialog box opens. Locate and select the .csv or
.bar file in the local file system, and then click Open. • Browse Shared Services storage. The Open File dialog box opens. Locate and
select the .csv or .bar file in the Shared Services Repository, and then click Open.
The file path of the selected file appears in the Bar Code File Input area.

5 Tracking and managing labware in storageCreating plate group with barcode input file
118 VWorks Automation Control Setup Guide
3 From the Available bar code groups list, select the group that you want to use. If you do not see the desired group name, check the input file. See “Barcode input files” on page 116.If you are using the input file in the following example, you should see Set1 and Set2 in the Available bar code groups list.
4 In the Available bar code sides list, select which of the plate’s four barcodes is going to be matched with a barcode read from the imported file. If the imported file is a .csv file, this list also specifies which column in the .csv file to use when matching the existing plate’s barcode:• northbc means match to column 2• southbc means match to column 3• westbc means match to column 4• eastbc means match to column 5The software ignores the other three barcode columns in the .csv file.
5 Click Import.The labware labeled with the barcodes listed in the series will be used to create a plate group.
6 In the Inventory Management tab, specify a labware type for each labware.
Related information
For information about... See...
Software inventory “About labware inventory management” on page 80
Opening the Inventory Editor “Opening the Inventory Editor” on page 83
Using the labware selection list “Reinventorying the labware inventory” on page 123
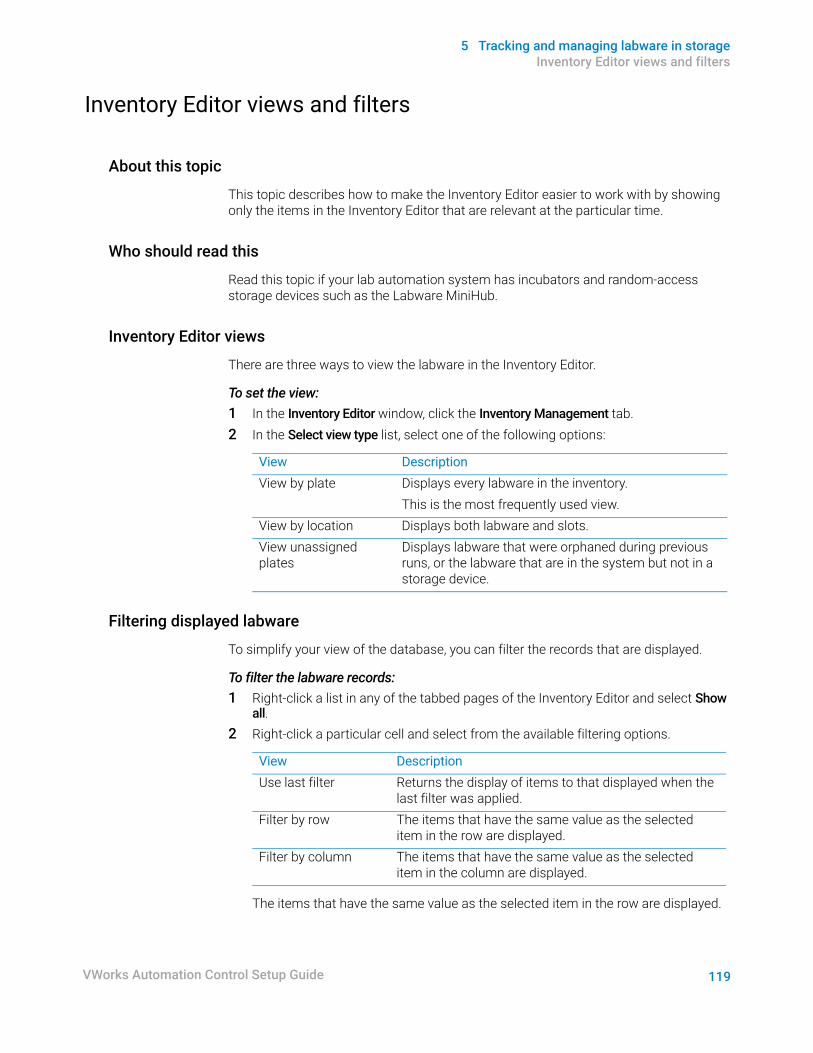
119
5 Tracking and managing labware in storageInventory Editor views and filters
VWorks Automation Control Setup Guide
Inventory Editor views and filters
About this topic
This topic describes how to make the Inventory Editor easier to work with by showing only the items in the Inventory Editor that are relevant at the particular time.
Who should read this
Read this topic if your lab automation system has incubators and random-access storage devices such as the Labware MiniHub.
Inventory Editor views
There are three ways to view the labware in the Inventory Editor.
To set the view:1 In the Inventory Editor window, click the Inventory Management tab.2 In the Select view type list, select one of the following options:
Filtering displayed labware
To simplify your view of the database, you can filter the records that are displayed.
To filter the labware records:1 Right-click a list in any of the tabbed pages of the Inventory Editor and select Show
all.2 Right-click a particular cell and select from the available filtering options.
The items that have the same value as the selected item in the row are displayed.
View DescriptionView by plate Displays every labware in the inventory.
This is the most frequently used view.View by location Displays both labware and slots.View unassigned plates
Displays labware that were orphaned during previous runs, or the labware that are in the system but not in a storage device.
View DescriptionUse last filter Returns the display of items to that displayed when the
last filter was applied.Filter by row The items that have the same value as the selected
item in the row are displayed.Filter by column The items that have the same value as the selected
item in the column are displayed.

5 Tracking and managing labware in storageAuditing plate volumes in the Inventory Editor
120 VWorks Automation Control Setup Guide
The result is that only those plates in cassette number 2 are listed.
To show all labware records:Right-click on the database list and select Show all.
Related information
Auditing plate volumes in the Inventory Editor
About this topic
The VWorks software tracks the pipetting tasks performed on the labware during a protocol run, calculating the volume resulting from those tasks, and storing the information in the database. When the labware is displayed in the software, the volume is represented with color.This topic describes how to use the Inventory Editor to audit the volume in a labware.
For information about... See...
Software inventory “About labware inventory management” on page 80
Opening the Inventory Editor “Opening the Inventory Editor” on page 83

121
5 Tracking and managing labware in storageAuditing plate volumes in the Inventory Editor
VWorks Automation Control Setup Guide
Procedure
To audit the volume of a labware:1 In the Inventory Editor window, click the Inventory Management tab.2 From the Select view type list, select the view.3 Select the labware you want to audit.
4 Click Visualize Plate. The Audit Plate dialog box opens.

5 Tracking and managing labware in storageAuditing plate volumes in the Inventory Editor
122 VWorks Automation Control Setup Guide
The liquid volume is displayed on the right. You can change the limits of this scale in the Scaling area.
The color legend indicates the following conditions.
Click this button... To...Zero based plate limits Set the gradient limits from 0 µL to the
highest volume found in the labware.Auto scale to plate limits Set the scale limits to the lowest and
highest volume found in the labware.Fixed Scales 1-7 µL Set the minimum and maximum limits
to 1 µL and 7 µL, respectively.Manual limits (thresholds) Manually set the lower and upper
limits. Enter the value (in µL) in the Min and Max boxes.
Condition DescriptionNot surveyed The well is not available for
measurement.Empty The well is empty.Below threshold The well is below the lower limit set by
the user.Above threshold The well is above the upper limit set by
the user.

123
5 Tracking and managing labware in storageReinventorying the labware inventory
VWorks Automation Control Setup Guide
Double-click on a color in the legend to change it.
Related information
Reinventorying the labware inventory
About this topic
This topic describes how to use the reinventory feature of labware inventory.This feature can be used to check for mismatches by comparing the identities of the labware actually in a storage device to the labware that the inventory database says should be in the storage device. The reinventory feature can also be used to enter barcode information for labware that have been manually placed into the storage device.Note: Reinventorying requires that the storage device has a barcode reader.
Who should read this
Read this topic if your lab automation system has a storage device that includes an optional barcode reader.
About performing an inventory
The accuracy of the inventory database can be checked by performing a new inventory of the database. You can perform an inventory of the entire storage device or part of it.The device’s barcode reader checks all selected slots for the presence of a barcode and reads those that it finds. The results are checked against the inventory database.
IMPORTANTFor reinventorying to be successful, each labware must have a unique barcode.
Reinventorying logic
If a labware is found in a slot that, according to the inventory database, should be empty, a line is added to the Inventory Editor for that slot and the labware barcode is recorded. If that barcode is already associated with another slot in the database, the previous association is deleted. In doing this, the system assumes that the labware has been manually moved.
For information about... See...
Software inventory “About labware inventory management” on page 80
Opening the Inventory Editor “Opening the Inventory Editor” on page 83

5 Tracking and managing labware in storageReinventorying the labware inventory
124 VWorks Automation Control Setup Guide
If the inventory has a line for a labware in a particular slot, but the inventory finds no labware in that slot, the line is removed from the inventory. However, the data in the system that is associated with the labware is not deleted. If in the future, a labware with an identical barcode is returned to the system, when the next inventory is performed the data can be reassociated with it.
Procedure
To reinventory the storage device:1 In the Inventory Editor window, click the Inventory Management tab.2 From the Select view type list box, select View by location.
This lists the labware in the inventory database by location.3 Select the labware that you want to inventory.
You can use SHIFT+click to select a range of listed labware.4 Under Inventory Management Functions, type the Name of the location group.5 In the Labware list, select the type of labware.
6 Select one of the following options.
7 Click Reinventory selected locations.
Option CommentsReplace any inventoried labware with the labware selected above
Labware for all selected items are replaced with the labware displayed in the list box. This overwrites labware already assigned.
Replace inventoried labware with the labware selected above ONLY if a labware is not already assigned
Labware for all selected items that do not already have a labware entry are replaced with the indicated labware.

125
5 Tracking and managing labware in storageExporting and importing the inventory data
VWorks Automation Control Setup Guide
A barcode reader reads each labware in the storage device and adds the barcode data to the inventory database.
Related information
Exporting and importing the inventory data
About this topic
You can export the inventory data to create a backup copy of the inventory database without performing a system-wide backup. You can also use the backup copy to restore the inventory data in case they become damaged or lost.This topic describes how to use the following methods to back up and recover the inventory data:• “Exporting the inventory data” on page 125• “Importing the inventory data” on page 127To back up all VWorks software system files, see VWorks Automation Control User Guide.
Exporting the inventory data
You can export the inventory data for backup and recovery.VWorks Plus only. The software performs tamper detection on the files selected for export and prevents you from exporting a file that is corrupted or has been modified outside of the VWorks software.
To export the inventory data:1 Open the Inventory Editor. See “Opening the Inventory Editor” on page 83.2 Click the Inventory Management tab.
For information about... See...
Inventory groups, plate groups and location groups
“About inventory groups” on page 86
Moving labware in and out of a storage device
• “Adding labware information in the inventory database” on page 94
• “Removing labware information from the inventory database” on page 106
• “Moving labware between storage devices” on page 103
Changing the labware associated with labware record in the inventory database
“Reinventorying the labware inventory” on page 123

5 Tracking and managing labware in storageExporting and importing the inventory data
126 VWorks Automation Control Setup Guide
3 Make sure the inventory data is up-to-date. See “Reinventorying the labware inventory” on page 123.
4 Click Export inventory.
The Export Inventory dialog box opens.
5 Do one of the following:• If you are exporting the file to local file storage, click Specify file. In the Save As
dialog box, specify the storage location, and then click Save.

127
5 Tracking and managing labware in storageExporting and importing the inventory data
VWorks Automation Control Setup Guide
• If you are exporting the file to the Shared Services repository, click Specify file in storage repository. In the Save File As dialog box, type the file name, and click Save.
VWorks Plus only. In this case, the exported SQL file is a record of interest that is exempt from record state changes.
6 Click OK. The software exports the inventory data. The exported file has an .sql file name extension.
Importing the inventory data
You can import the inventory data as part of the data recovery process.VWorks Plus only. If the imported inventory data was exported from VWorks software v14.0 or later, the software performs tamper detection on the file to be imported. If the software detects that the file is corrupted or has been modified outside of VWorks software v14.0, an error message appears and you cannot import the file.
To import the inventory data:1 Open the Inventory Editor. See “Opening the Inventory Editor” on page 83.2 In the Inventory Management tab, click Import inventory.

5 Tracking and managing labware in storageExporting and importing the inventory data
128 VWorks Automation Control Setup Guide
The Import Inventory dialog box opens.
3 To select the file:• If you are importing the file from local file storage, click Specify file. In the Open
dialog box, select the file and click Open.

129
5 Tracking and managing labware in storageExporting and importing the inventory data
VWorks Automation Control Setup Guide
• If you are importing the file from the Shared Services repository, click Specify file in storage repository. In the Open File dialog box, select the file and click Open.
VWorks Plus only. In this case, the SQL file is a record of interest that is exempt from record state changes.
4 In the Import Inventory dialog box, click OK. The software imports the inventory data. A confirmation message appears if the operation is successful.
Related information
For information about... See...
Inventory groups, plate groups and location groups
“About inventory groups” on page 86
Moving labware in and out of a storage device
• “Adding labware information in the inventory database” on page 94
• “Removing labware information from the inventory database” on page 106
• “Moving labware between storage devices” on page 103
Changing the labware associated with labware record in the inventory database
“Reinventorying the labware inventory” on page 123
Inventory Editor filters “Inventory Editor views and filters” on page 119

5 Tracking and managing labware in storageResolving labware inventory problems
130 VWorks Automation Control Setup Guide
Resolving labware inventory problems
About this topic
This topic describes how to check and test the database connection that is used by the VWorks inventory management system.
Checking the database settings
The inventory database uses a Windows Open Database Connectivity (ODBC) interface. If you encounter inventory management problems, you may need to check the database settings.
To check the database settings:1 Open the ODBC Data Source Administrator as follows:
In the C:\Windows\SysWOW64 folder, right-click odbcad32.exe, and then select Run as administrator.
2 In the ODBC Data Source Administrator (32-bit) dialog box:a Click the System DSN tab.b Select the VWorksInventory data source, and then click Configure.

131
5 Tracking and managing labware in storageResolving labware inventory problems
VWorks Automation Control Setup Guide
The MySQL Connector/ODBC Data Source Configuration dialog box opens.
3 Verify the following settings:
Connection Parameters SettingsData Source Name VWorksInventoryDescription (optional) VWorks Inventory databaseTCP/IP Server localhostUserPasswordDatabase velocity11

5 Tracking and managing labware in storageResolving labware inventory problems
132 VWorks Automation Control Setup Guide
Testing the connection
To test the database connection:1 In the MySQL Connector/ODBC Data Source Configuration dialog box, set the User
and Password as follows.
2 Click Test. 3 When the Connection Successful message appears, click OK.
4 In the Connection Parameters area, clear the User and Password fields, as the following figure shows, and then click OK.Note: The VWorks software will specify the user name and password, so, you must clear the User and Password fields after testing the connection.
Connection Parameters SettingsUser vworksPassword vworks

133
5 Tracking and managing labware in storageResolving labware inventory problems
VWorks Automation Control Setup Guide
5 Click OK to close the ODBC Data Source Administrator (32-bit) dialog box.

5 Tracking and managing labware in storageResolving labware inventory problems
134 VWorks Automation Control Setup Guide
Related information
For information about... See...
Inventory groups, plate groups and location groups
“About inventory groups” on page 86
Moving labware in and out of a storage device
• “Adding labware information in the inventory database” on page 94
• “Removing labware information from the inventory database” on page 106
• “Moving labware between storage devices” on page 103
Changing the labware associated with plates in the inventory database
“Reinventorying the labware inventory” on page 123
Inventory Editor filters “Inventory Editor views and filters” on page 119

135
6 Tracking experiment dataThis chapter contains the following topics:• “About tracking data from experiments” on page 136• “Creating and managing experiment IDs” on page 139• “Creating an experiment ID report” on page 142• “Archiving, exporting, and restoring experiment data” on page 145• “Troubleshooting Experiments database connection” on page 150

6 Tracking experiment dataAbout tracking data from experiments
136 VWorks Automation Control Setup Guide
About tracking data from experiments
About this topic
Read this topic if you are a administrator or a VWorks technician who creates protocols and forms. This topic describes the VWorks Experiments Editor and how to keep track data entered in a form or protocol in the Experiments database.
About the Experiments Editor and Experiments database
The Experiments Editor and database enables the tracking of parameter settings involved in preparing a microplate for downstream analysis. The protocol and form must be associated with an experiment ID and include parameters tagged to be tracked automatically. For each protocol run of a given experiment ID, the software records information for the tagged parameters in the database. To retrieve the data, you can create a report (.pdf file) for any experiment in the Experiments database.
How the data is tagged
The software uses the following tags to track the data of interest:
For each run (iteration) of a given application for an experiment ID, the software records the values assigned to each of the specified fields and the time when the data was recorded in the Experiments database.
Tag Description
Experiment ID The name of the experiment (microplate or group of microplates) that you want to track. An experiment can include one or more applications.
Application The name of the protocol and form.
Iteration The number of times the application has been run for this Experiment ID.
Step name A tagged task sequence or task in the protocol relevant to a given application run. For example, a Wash step might contain a tagged task sequence of Aspirate, Mix, Dispense to Waste.In the protocol, the task sequence is bracketed by a pair of tasks that indicate the starting and stopping points of interest.
Field name The name of a parameter setting within the tagged task sequence for a given step. For example, a Wash step that contains Aspirate, Mix, Dispense to Waste tasks might have field names such as, Aspirate Volume, Mix Volume, Dispense Volume, and so forth.
Field value The setting for a given field name. For example, a field name of Dispense Volume (µL) might have a value or 10 or 0.5.

137
6 Tracking experiment dataAbout tracking data from experiments
VWorks Automation Control Setup Guide
Prerequisites
The Experiments Editor feature requires that you do the following.
Item Requirement See…
1 Set up a MySQL database on the computer that runs the VWorks software.
“Installing MySQL” on page 156
2 Establish a connection to the Experiments database.
“Connecting to Inventory and Experiments databases” on page 175
3 Determine whether to use a form to run the protocol.
• Using a formThe VWorks form has built-in features that expedite how you add tags for the data to be tracked.
“Workflow for using a form to track experiment data” on page 138
• Using a protocol without a formThe VWorks JavaScript interpreter includes an experimentTagsDB object that you use to specify how to add tags for the data to be tracked. To use this built-in object, you should know how to write programs in JavaScript or have a basic understanding of programming.
VWorks Automation Control User Guide, experimentTagsDB object topic
6 Tracking experiment dataAbout tracking data from experiments
138 VWorks Automation Control Setup Guide
Workflow for using a form to track experiment data
If you are creating a form to run the protocol, perform the steps in the following workflow.
Step For this task... See...
1 Create a protocol for your application. VWorks Automation Control User Guide
2 Create a form for the protocol that contains the following components for tagging:
a Application name. The form creator uses a setting in the Form Designer window to specify the application name.
b Experiment ID control. This control lists every Experiment ID in the Experiments database and is required on forms for which you are tracking experiments. The control enables the form user to select an existing experiment or open the Experiments Editor and create an experiment ID.
c Step Name and Field Name tags. For every form control that has a Data entry property, the form creator uses the Experiment tag Step Name and Field Name properties to specify the data to be tracked.
VWorks Automation Control User Guide
3 Edit the protocol associated with the form to include the Step Started/Completed task before and after each task sequence to be tracked.
VWorks Automation Control User Guide
4 To run the protocol:• Open the form and use the Experiments ID control on the
form to select or create an experiment ID for the run.• Specify any other required settings on the form, and then
click the run protocol button.During the protocol run, the software updates the database with the specified information for the selected experiment ID.
“Creating and managing experiment IDs” on page 139
5 Generate reports using the Experiments Editor. “Creating an experiment ID report” on page 142
6 Periodically make a backup copy of the Experiments database and store the backup in a secure location. Ensure that the backup copy includes:• Exported data currently in the Experiments database. • Archived experiment data.
“Archiving, exporting, and restoring experiment data” on page 145

139
6 Tracking experiment dataCreating and managing experiment IDs
VWorks Automation Control Setup Guide
Creating and managing experiment IDs
Before you start
The Experiments Editor requires a connection to the Experiments database. For instructions on how to establish a connection, see “Connecting to Inventory and Experiments databases” on page 175.
Figure Experiments Editor window
Opening Experiments Editor
To open the Experiments Editor from the Tools menu: In the VWorks window, click Tools > Experiments Editor.
To open the Experiments Editor from within a form:1 Open a form that contains the Experiment ID control.2 In the Experiment ID list, click <create new>.
Creating an experiment ID
To create an experiment ID:1 In the Experiment Editor window, type a name in the Create a new Experiment ID box.2 In the Description for experiment box, type a description for this experiment.3 Click Create.
The new ID appears in the Experiment ID table. The Description column displays any comments you provided in step 2. The Status column displays a status of Not yet used.

6 Tracking experiment dataCreating and managing experiment IDs
140 VWorks Automation Control Setup Guide
Note: The software saves each experiment ID with a hidden unique identifier (GUID).
Editing descriptions for an experiment
Note: Archived experiments cannot be edited.VWorks Plus. You may edit the description only for an experiment ID with a status of Not Yet Used.
To edit the description for an experiment:1 In the Experiment Editor window, select the experiment in the Experiment ID table,
and then click Edit description for selected.2 In the Edit Description dialog box, type or modify the description, and then click OK.
The new description appears in the Description column of the Experiment ID table.

141
6 Tracking experiment dataCreating and managing experiment IDs
VWorks Automation Control Setup Guide
Deleting an experiment
An administrator may delete an experiment ID using the following procedure.VWorks Plus. Only an experiment ID with a Not Yet Used status can be deleted.Note: Archived experiments cannot be deleted.
To delete an experiment:1 In the Experiment Editor window, select the experiment in the Experiment ID table,
and then click Delete selected.2 In the confirmation message that appears, click Yes to delete this experiment.
The experiment no longer appears in the Experiment ID table.
Related information
For information about... See...
How to establish a connection to the Experiments database.
“Connecting to Inventory and Experiments databases” on page 175
Tracking experiment data using a VWorks form
“Workflow for using a form to track experiment data” on page 138
Experiment ID reports “Creating an experiment ID report” on page 142
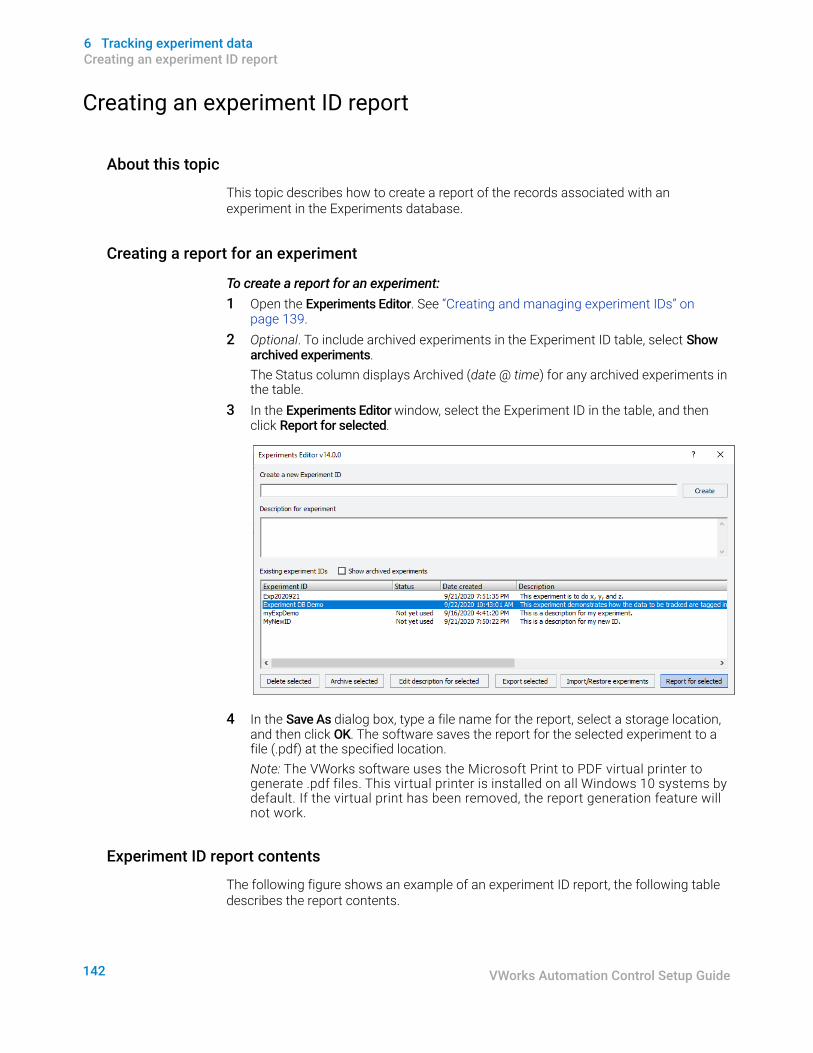
6 Tracking experiment dataCreating an experiment ID report
142 VWorks Automation Control Setup Guide
Creating an experiment ID report
About this topic
This topic describes how to create a report of the records associated with an experiment in the Experiments database.
Creating a report for an experiment
To create a report for an experiment:1 Open the Experiments Editor. See “Creating and managing experiment IDs” on
page 139.2 Optional. To include archived experiments in the Experiment ID table, select Show
archived experiments.The Status column displays Archived (date @ time) for any archived experiments in the table.
3 In the Experiments Editor window, select the Experiment ID in the table, and then click Report for selected.
4 In the Save As dialog box, type a file name for the report, select a storage location, and then click OK. The software saves the report for the selected experiment to a file (.pdf) at the specified location.Note: The VWorks software uses the Microsoft Print to PDF virtual printer to generate .pdf files. This virtual printer is installed on all Windows 10 systems by default. If the virtual print has been removed, the report generation feature will not work.
Experiment ID report contents
The following figure shows an example of an experiment ID report, the following table describes the report contents.

143
6 Tracking experiment dataCreating an experiment ID report
VWorks Automation Control Setup Guide
Figure Example experiment ID report (simulated runs)
Table Report contents
Item Description
Report header The following information appears at the top of the report:• Date that the report was generated• Experiment ID, creation date, and user log in of experiment ID
creator• Description provided for the experiment
Archival status and history, if applicable
Archival status of experiment ID:• Date of archival or restoration• User who archived or restored• File name and path of the archived to or restored from location

6 Tracking experiment dataCreating an experiment ID report
144 VWorks Automation Control Setup Guide
Related information
Application name and iteration number
The name and iteration of the protocol run, and if it was simulated.Note: Each application iteration is listed separately, and ordered by launch time. Two blank lines separate application iterations from subsequent application iterations. Individual steps within an application iteration are separated by a single blank line.
User that ran the given application iteration
The user log in of the user.
Step For each step, the report indicates when the step was started and when it completed, or if not completed.
Field name and value Each field name and field value pair for a given step is listed on its own line. Any field name-and-value pairs that are not part of a step are listed before the first step.
Item Description
For information about... See...
How to establish a connection to the Experiments database.
“Connecting to Inventory and Experiments databases” on page 175
Tracking experiment data using a VWorks form
“Workflow for using a form to track experiment data” on page 138
Archive, export, or import experiment data
“Archiving, exporting, and restoring experiment data” on page 145

145
6 Tracking experiment dataArchiving, exporting, and restoring experiment data
VWorks Automation Control Setup Guide
Archiving, exporting, and restoring experiment data
About archiving and exporting experiments data
IMPORTANTTo ensure that you can recover the experiment data if the computer crashes or data get corrupted or lost, keep a backup copy of all data from the Experiments database and any archived experiments in a secure location.
You can archive closed experiment IDs and export active experiment IDs from the Experiments database to files in the local file system. When importing or restoring experiment IDs, the software performs a tamper check to verify that no changes were made to the exported or archived experiment ID files.• Archiving. Saves all data associated with the archived experiment to a file and then
erases the experiment data from the active database. Archiving helps prevent the database from being overloaded. You can archive individual or multiple experiment IDs to a given archive file. – You should periodically archive the data for experiment IDs that are no longer
active, and keep a backup copy in a secure location.– You can view and generate reports for archived experiments in the
Experiments Editor. However, archived experiments do not appear in the Experiment ID list in a VWorks form.
– You cannot delete or export archived experiments, and you cannot edit their descriptions. If necessary, you can restore archived experiments to active status.
• Exporting. Exports a copy of the experiment data for selected active experiment IDs from the database to a file. You can export individual or multiple experiment IDs to a given file. The exported data does not include archived experiment IDs.– You should periodically export the data for all active experiment IDs to create a
backup copy of the database. You can import the backup copy to recover the experiment data in case the data become damaged or lost.
– You can view and generate reports for active experiments in the Experiments Editor.
– VWorks Plus. If protocols have been run for an experiment ID, the experiment ID description cannot be edited.
Archiving experiments
To archive experiments:1 In the Experiment Editor window, select the experiments in the Experiment ID table,
and then click Archive selected.
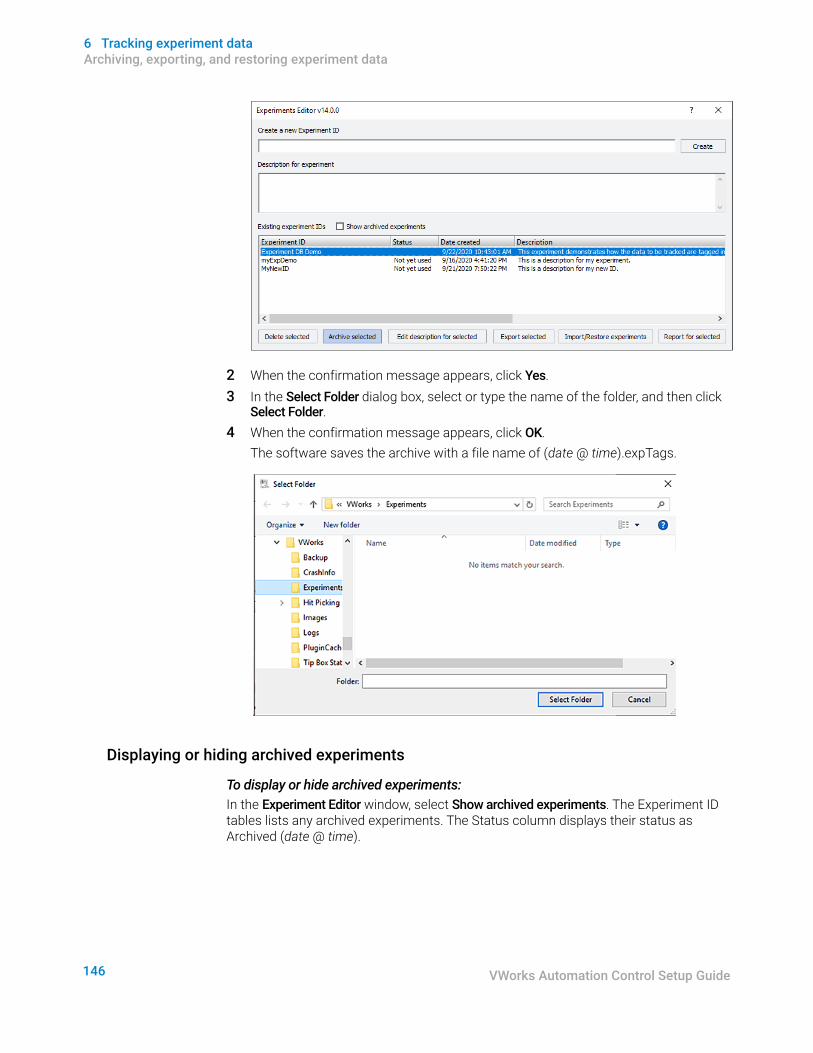
6 Tracking experiment dataArchiving, exporting, and restoring experiment data
146 VWorks Automation Control Setup Guide
2 When the confirmation message appears, click Yes.3 In the Select Folder dialog box, select or type the name of the folder, and then click
Select Folder.4 When the confirmation message appears, click OK.
The software saves the archive with a file name of (date @ time).expTags.
Displaying or hiding archived experiments
To display or hide archived experiments:In the Experiment Editor window, select Show archived experiments. The Experiment ID tables lists any archived experiments. The Status column displays their status as Archived (date @ time).

147
6 Tracking experiment dataArchiving, exporting, and restoring experiment data
VWorks Automation Control Setup Guide
Clear the Show archived experiments check box to remove the archived experiments from the Experiment ID table.To generate a report for an archived experiment, see “Creating an experiment ID report” on page 142.
Restoring an archived experiment to active status
To restore an archived experiment:1 In the Experiment Editor window, click Import/Restore experiments.
2 In the Open dialog box, select the (date @ time).expTags archive, and then click Open.
3 When the confirmation message appears, click OK to restore the experiment to active status.The restored experiment appears in the Experiment ID table, and the Status column no longer specifies Archived.

6 Tracking experiment dataArchiving, exporting, and restoring experiment data
148 VWorks Automation Control Setup Guide
Exporting experiment data
To export the experiments data:1 In the Experiments Editor window, select the experiments from Experiment ID table,
and then click Export selected.
The Save As dialog box opens.
2 Select the storage location, type a file name, and then click OK. The software exports all the data for the selected experiments to an .expTags file, which is in XML format.
Importing experiment data
You can import the experiment data from a previously saved *.expTags file, for example as part of a data recovery process.
To import the experiment data:1 Open the Experiments Editor. See “Creating and managing experiment IDs” on
page 139.2 In the Experiments Editor window, click Import experiments.

149
6 Tracking experiment dataArchiving, exporting, and restoring experiment data
VWorks Automation Control Setup Guide
The Open dialog box opens.
3 Select the file (*.expTags) that contains the data for the experiments to be imported, and then click Open.The software imports the data for all experiments in the selected file, except for any experiments whose experiment ID already exists, into the experiments database.
Related information
For information about... See...
How to establish a connection to the Experiments database.
“Connecting to Inventory and Experiments databases” on page 175
Tracking experiment data using a VWorks form
“Workflow for using a form to track experiment data” on page 138

6 Tracking experiment dataTroubleshooting Experiments database connection
150 VWorks Automation Control Setup Guide
Troubleshooting Experiments database connection
About this topic
This topic describes how to check and test the database connection that is used by the Experiments database.
Checking the database settings
The Experiments database uses a Windows Open Database Connectivity (ODBC) interface. If you encounter connection problems, you may need to check the database settings.
To check the database settings:1 Open the ODBC Data Source Administrator as follows:
In the C:\Windows\SysWOW64 folder, right-click odbcad32.exe, and then select Run as administrator.
2 In the ODBC Data Source Administrator (32-bit) dialog box:a Click the System DSN tab.b Select the VWorksExperiments data source, and then click Configure.
Generating reports “Creating an experiment ID report” on page 142
For information about... See...

151
6 Tracking experiment dataTroubleshooting Experiments database connection
VWorks Automation Control Setup Guide
The MySQL Connector/ODBC Data Source Configuration dialog box opens.
3 Verify the following settings:
Connection Parameters SettingsData Source Name VWorksExperimentsDescription (optional) VWorks Experiments databaseTCP/IP Server localhost
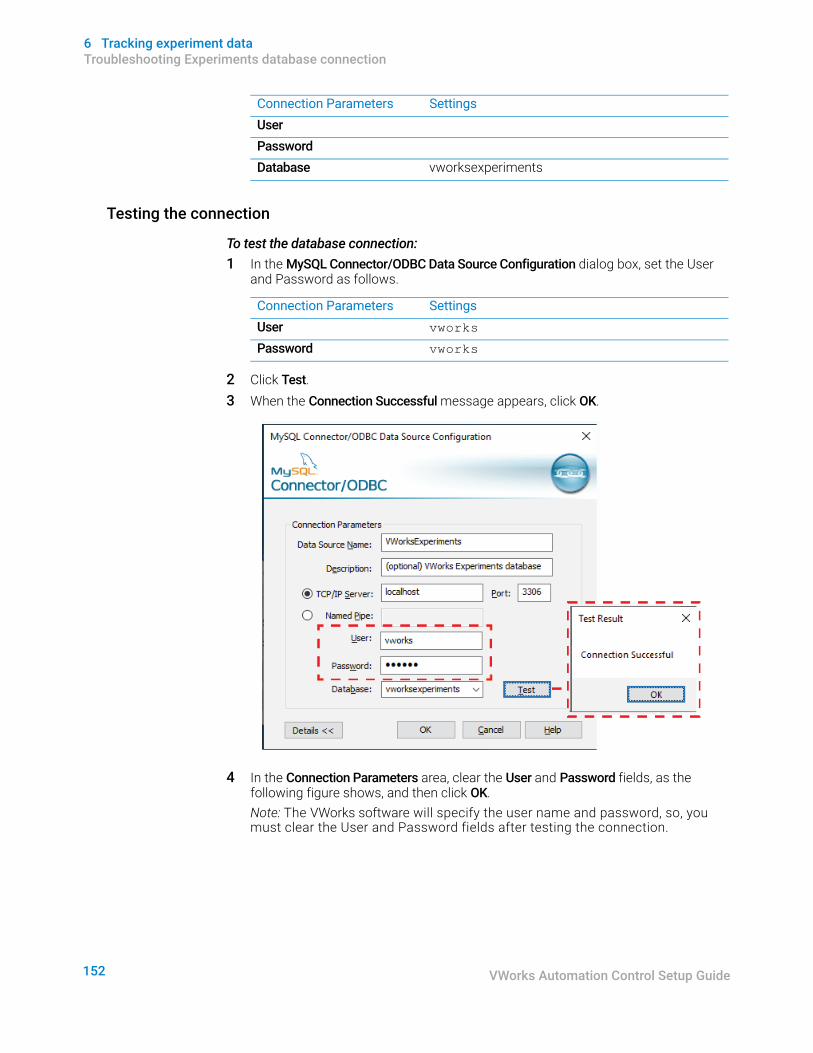
6 Tracking experiment dataTroubleshooting Experiments database connection
152 VWorks Automation Control Setup Guide
Testing the connection
To test the database connection:1 In the MySQL Connector/ODBC Data Source Configuration dialog box, set the User
and Password as follows.
2 Click Test. 3 When the Connection Successful message appears, click OK.
4 In the Connection Parameters area, clear the User and Password fields, as the following figure shows, and then click OK.Note: The VWorks software will specify the user name and password, so, you must clear the User and Password fields after testing the connection.
UserPasswordDatabase vworksexperiments
Connection Parameters Settings
Connection Parameters SettingsUser vworksPassword vworks

153
6 Tracking experiment dataTroubleshooting Experiments database connection
VWorks Automation Control Setup Guide
5 Click OK to close the ODBC Data Source Administrator (32-bit) dialog box.

6 Tracking experiment dataTroubleshooting Experiments database connection
154 VWorks Automation Control Setup Guide
Related information
For information about... See...
How to establish a connection to the Experiments database.
“Connecting to Inventory and Experiments databases” on page 175
Tracking experiment data using a VWorks form
“Workflow for using a form to track experiment data” on page 138
Generating Experiment ID reports “Creating an experiment ID report” on page 142

155
A Setting up and connecting to a MySQL database The VWorks Inventory Editor and Experiments Editor require a MySQL database connection. This section describes how to install MySQL, set up the data sources, and connect to the databases. Note: The inventory and experiments databases may be configured already if the computer was provided by Agilent Technologies.The topics are:• “Installing MySQL” on page 156• “Installing and setting up a MySQL ODBC” on page 167• “Connecting to Inventory and Experiments databases” on page 175

A Setting up and connecting to a MySQL databaseInstalling MySQL
156 VWorks Automation Control Setup Guide
Installing MySQL
If the computer was provided by Agilent Technologies, the MySQL software may already be installed, and the inventory and experiments databases may be configured already. In this case, see “Connecting to Inventory and Experiments databases” on page 175.
Before you start
Required installation filesEnsure you have the following installation files:• VC_redist.x64.exe• VC_redist.x86.exe• mysql-installer-community-8.0.18.0.msi• vworks_mysql_8.0.sql
This file is installed with the VWorks software in C:\\Program Files (x86)\Agilent Technologies\VWorks\Schema\vworks_mysql_8.0.sql.
For assistance, contact Agilent Technical Support.
Required computer settingsBefore you install the software:• Log on to the computer as an administrator with full rights.• In Microsoft Windows Explorer, select the following View > Show settings:
– Select Hidden items.– Select File name extensions.
For detailed instructions, see the Microsoft Windows user documentation.
Installation and setup workflow
Step For this task... See...
1 Uninstall any existing MySQL versions, and then restart the computer.
“Uninstalling previous versions of MySQL” on page 157
2 Install MySQL Server 8.0.18 “Installing MySQL 8.0.18” on page 159
3 Install MySQL ODBC and set up the data sources.
“Installing and setting up a MySQL ODBC” on page 167
4 Connect to the VWorks databases.
“Connecting to Inventory and Experiments databases” on page 175

157
A Setting up and connecting to a MySQL databaseInstalling MySQL
VWorks Automation Control Setup Guide
Uninstalling previous versions of MySQL
Before you uninstall:Make a backup copy of your existing database before uninstalling it. To back up the:• Inventory database (velocity11) only, see “Exporting and importing the inventory
data” on page 125.• Inventory database (velocity11), labware definitions, liquid classes, and pipetting
techniques, see the VWorks Automation Control User Guide.• Experiments database (vworksexperiments), export all the experiment IDs, and
make a backup copy of the files (.expTags) containing the exported experiment IDs and archived experiment IDs.
To uninstall MySQL:1 Log on to the computer as an administrator.2 In the Microsoft Windows desktop, go to Settings > Apps & features, and uninstall
the following:a MySQL Serverb MySQL Connector/ODBC
3 Restart the computer.4 Verify that the MySQL service is completely removed:
a In Microsoft Windows Explorer, right-click the This PC icon. In the shortcut menu, click Manage. The Computer Management window opens.
b In the Computer Management window, click Services and Applications > Services.
c In the list of Services, ensure MySQL does not appear:• If MySQL does not appear, go to step 8.• If MySQL appears in the list, continue to step 5.
5 In the list of Services, right-click MySQL and click Stop. Note: If an error message appears and states that it is unable to stop, ignore the message.
6 Open the Command Prompt window, as follows:

A Setting up and connecting to a MySQL databaseInstalling MySQL
158 VWorks Automation Control Setup Guide
a In the C:\Windows\System32 folder, right-click cmd.exe, and then select Run as administrator.
b Click Yes in the User Account Control dialog box that opens.
c Execute the following line in the Command Prompt window:sc delete MySQL <enter>
7 Check the registry keys for any references to old versions of MySQL as follows:a Open the Registry Editor.b Navigate to HKEY_LOCAL_MACHINE\SOFTWARE\WOW6432Node\MySQL
AB\c If present, delete MySQL Server 5.1 or MySQL Server 5.0.
8 Restart the computer.
IMPORTANTEnsure that you restart the computer after uninstalling th MySQL Server and MySQL Connector/ODBC.

159
A Setting up and connecting to a MySQL databaseInstalling MySQL
VWorks Automation Control Setup Guide
Installing MySQL 8.0.18
Before installing MySQL 8.0.18, install the Microsoft Visual C++ redistributable package.
To install the Microsoft Visual C++ redistributable package:1 Run the vc_redist.x64.exe file.2 Follow the Setup Wizard instructions.3 Run the vc_redist.x86.exe file.4 Follow the Setup Wizard instructions.Note: If the computer already has Microsoft Visual Studio 2017 or Microsoft Visual C++ 2017 Redistributable installed, the MySQL installer might not recognize that the VC 2015 Redistributable is installed even if it is. To fix this issue, go to Settings > Apps. In the Apps & features window, locate Microsoft Visual C++ 201, right-click, and then choose Modify, Click Repair when the installer window opens.
To install MySQL 8.0.18:1 Run the mysql-installer-community-8.0.18.0.msi. The MySQL Installer setup wizard
opens.Note: If Visual Studio 2017 or the Visual C++ 2017 redistributable package is installed on the computer, the MySQL installer might display an error message stating that Visual C++ redistributable is not installed even if it is. To fix this, go to Apps and Features, select Microsoft C++ Redistributable, right-click and then select Modify. In the Microsoft C++ Redistributable Setup screen, click Repair.
2 In the Choosing a Setup Type page, select Custom, and then click Next.

A Setting up and connecting to a MySQL databaseInstalling MySQL
160 VWorks Automation Control Setup Guide
3 In the Select Products and Features page, select the following Available Products and then click the right arrow to move each selection to Products/Features To Be Installed:MySQL Servers > MySQL Server > MySQL Server 8.0 > MySQL Server 8.0.0.1.8- X64 MySQL Connectors > Connector/ODBC > Connector ODBC 8.0.18 -X86 Click Next.
4 In the Installation page: a Make sure that MySQL Server 8.0.18 and Connector/ODBC 8.0.18 are Ready to
Install, and then click Execute.b When the installation is finished, click Next.

161
A Setting up and connecting to a MySQL databaseInstalling MySQL
VWorks Automation Control Setup Guide
5 In the Product Configuration page, click Next.
6 In the High Availability page, select Standalone MySQL Server / Classic MYSQL Replication, and then click Next.

A Setting up and connecting to a MySQL databaseInstalling MySQL
162 VWorks Automation Control Setup Guide
7 In the Type and Networking page, specify the following:• Config Type > Development Computer• TCIP/IP > Open Windows Firewall ports for network access • Show Advanced and Logging Options Click Next.
8 In the Authentication Method page, select Use Legacy Authentication Method (Retain MySQL 5.x Compatibility).Click Next.

163
A Setting up and connecting to a MySQL databaseInstalling MySQL
VWorks Automation Control Setup Guide
9 In the Accounts and Roles page, type agilent for MySQL Root Password and Repeat Password fields. Click Next.
10 In the Windows Service page, specify the following:• Configure MySQL Server as a Windows Service• Make sure you specify .the following:
– Windows Service Name > MySQL– Start the MySQL server at System Startup– Run Windows Service as > Standard System Account
Click Next.

A Setting up and connecting to a MySQL databaseInstalling MySQL
164 VWorks Automation Control Setup Guide
11 In the Logging Options page, accept the default settings. Click Next. Note: The file paths are based on the computer name.
12 In the Advanced Options page, accept the default settings. Click Next.

165
A Setting up and connecting to a MySQL databaseInstalling MySQL
VWorks Automation Control Setup Guide
13 In the Apply Configuration page, click Execute.
14 When the screen displays the configuration was successful text, click Finish.

A Setting up and connecting to a MySQL databaseInstalling MySQL
166 VWorks Automation Control Setup Guide
15 In the Product Configuration page, click Next.
16 Click Finish in the Installation Complete page.
Related information
For information about... See...
Setting up the ODBC data source “Installing and setting up a MySQL ODBC” on page 167
VWorks Inventory Editor “About labware inventory management” on page 80
VWorks Experiments Editor “About tracking data from experiments” on page 136

167
A Setting up and connecting to a MySQL databaseInstalling and setting up a MySQL ODBC
VWorks Automation Control Setup Guide
Installing and setting up a MySQL ODBC
About this topic
This topic describes how to install and set up data sources in MySQL ODBC (open database connectivity) for the following:• VWorks Inventory Editor• VWorks Experiments EditorNote: If the computer was provided by Agilent Technologies, the inventory and experiments databases may be set up already. In this case, see “Connecting to Inventory and Experiments databases” on page 175.During the MySQL ODBC connection setup you will:• Import the VWorks database schema into MySQL. This sets up the database table
structures for use by the VWorks Inventory Editor and Experiments Editor.• Create, define, and configure new ODBC data sources so that MySQL can access
data in the VWorks databases.
Importing the database schema
To import the database schema:1 Copy the following database schema file:
vworks_mysql_8.0.sqlNote: This file is installed with the VWorks software in the folder: C:\\Program Files (x86)\Agilent Technologies\VWorks\Schema\ Paste the copy into the following folder:C:\\Program Files\MySQL\MySQL Server 8.0\bin\

A Setting up and connecting to a MySQL databaseInstalling and setting up a MySQL ODBC
168 VWorks Automation Control Setup Guide
2 Open a Command Prompt window, as follows:a In the C:\Windows\System32 folder, right-click cmd.exe, and then select
Run as administrator.b Click Yes in the User Account Control dialog box that opens.
3 Execute the following lines in the Command Prompt window:cd c:\program files\mysql\mysql server 8.0\bin <enter>mysql -u root -p < vworks_mysql_8.0.sql <enter>
When prompted for password, enter agilent.Make sure no errors occur while executing this command.

169
A Setting up and connecting to a MySQL databaseInstalling and setting up a MySQL ODBC
VWorks Automation Control Setup Guide
Creating ODBC connections
To create ODBC connections:1 Open the ODBC Data Source Administrator to create ODBC connections, as
follows: In the C:\Windows\SysWOW64 folder, right-click odbcad32.exe, and then select Run as administrator. The ODBC Data Source Administrator (64-bit) dialog box opens.
2 In the ODBC Data Source Administrator dialog box:a Remove any previously defined MySQL ODBC Driver Sources as follows:
• Click the User DSN tab, select any predefined MySQL ODBC Driver Sources named velocity11, and click Remove.
• Click the System DSN tab, select any predefined MySQL ODBC Driver Sources named velocity11, and click Remove.
b In the System DSN tab, click Add to create a new data source.c In the Create New Data Source dialog box, select MySQL ODBC 8.0 ANSI Driver,
and then click Finish.

A Setting up and connecting to a MySQL databaseInstalling and setting up a MySQL ODBC
170 VWorks Automation Control Setup Guide
3 In the MySQL Connector/ODBC Data Source Configuration dialog box that opens, define your data source as follows:• To set up the VWorks Inventory database, proceed to step 4.• To set up the VWorks Experiments database skip to step 8.
4 For the VWorks Inventory database, set the following parameters:Note: You do not have to provide a port number. Use the default number displayed.
a Click Details to expand the dialog box.b In the Connection tab, select the Enable automatic reconnect check box.c In the Cursors/Results tab, select the Return matched rows instead of affected
rows check box.5 Click Test. When the Connection Successful message appears, click OK.
Settings for VWorks Inventory databaseConnection Parameters SettingsData Source Name VWorksInventoryDescription (optional) VWorks Inventory databaseTCP/IP Server localhostUser vworksPassword vworksDatabase velocity11

171
A Setting up and connecting to a MySQL databaseInstalling and setting up a MySQL ODBC
VWorks Automation Control Setup Guide
6 In the Connection Parameters area, clear the User and Password fields, as the following figure shows, and then click OK to close the Connector/ODBC dialog box.Note: The VWorks software will specify the user name and password, so, you must clear the User and Password fields after testing the connection.

A Setting up and connecting to a MySQL databaseInstalling and setting up a MySQL ODBC
172 VWorks Automation Control Setup Guide
7 In the System DSN tab, verify that the VWorksInventory data source appears.
• If you are finished configuring data sources, click OK to close the dialog box. • If you are also setting up the VWorks Experiments database, click Add, and then
continue to step 8.

173
A Setting up and connecting to a MySQL databaseInstalling and setting up a MySQL ODBC
VWorks Automation Control Setup Guide
8 For the VWorks Experiments database, set the following parameters:Note: You do not have to provide a port number. Use the default number displayed.
a Click Details to expand the dialog box.b In the Connection tab, select the Enable automatic reconnect check box.c In the Cursors/Results tab, select the Return matched rows instead of affected
rows check box.9 Click Test. When the Connection Successful message appears, click OK.
Settings for VWorks Experiments databaseConnection Parameters SettingsData Source Name VWorksExperimentsDescription (optional) VWorks Experiments databaseTCP/IP Server localhostUser vworksPassword vworksDatabase vworksexperiments

A Setting up and connecting to a MySQL databaseInstalling and setting up a MySQL ODBC
174 VWorks Automation Control Setup Guide
10 In the Connection Parameters area, clear the User and Password fields, as the following figure shows, and then click OK to close the Connector/ODBC dialog box.Note: The VWorks software will specify the user name and password, so, you must clear the User and Password fields after testing the connection.
B
11 In the System DSN tab, verify that the VWorksExperiments data source appears.
Click OK to close the dialog box. To establish a database connection in the VWorks software, see “Connecting to Inventory and Experiments databases” on page 175.

175
A Setting up and connecting to a MySQL databaseConnecting to Inventory and Experiments databases
VWorks Automation Control Setup Guide
Related information
Connecting to Inventory and Experiments databases
About this topic
This topic describes how to connect to the databases for the following:• Inventory Editor • Experiments Editor After establishing a connection to the given database, you can open the corresponding feature from the VWorks Tools menu.
Prerequisites
For each database, a corresponding data source must be configured in the MySQL ODBC: • The Inventory Editor requires the VWorksInventory data source.• The Experiments Editor requires the VWorksExperiments data source.Use the following procedure to connect to the database for either or both of these features.If you are using a computer that was not provided by Agilent, see “Installing and setting up a MySQL ODBC” on page 167 for instructions on how to install MySQL and set up the ODBC data sources.
For information about... See...
VWorks Inventory Editor “About labware inventory management” on page 80
VWorks Experiments Editor “About tracking data from experiments” on page 136

A Setting up and connecting to a MySQL databaseConnecting to Inventory and Experiments databases
176 VWorks Automation Control Setup Guide
Procedure
To connect to the inventory or experiments databases:1 In the VWorks window, click Tools > Options. The Options dialog box appears.2 Under DB Setup, verify the following, and then click OK.
• Enable database connection is selected.• DBUser is vworks• DBPassword is vworks
3 VWorks Plus. The Audit Comment dialog box opens. An audit comment is required any time you save a change to the VWorks global options. For details on audit trails and records of interest, see “Using compliance features” on page 5.
Related information
For information about... See...
VWorks Inventory Editor “About labware inventory management” on page 80
VWorks Experiments Editor “About tracking data from experiments” on page 136

49
B Migrating files from previous VWorks versionsThis chapter contains the following topics:• “About migration” on page 50• “Migrating files from VWorks v12.3–13.1x” on page 53

B Migrating files from previous VWorks versionsAbout migration
50 VWorks Automation Control Setup Guide
About migration
About this topic
This topic describes how to migrate your protocols and other files from these earlier versions.
When to use the Migration Wizard
You can use the Migration Wizard for the following:• VWorks Plus or VWorks Standard is installed on a computer where you uninstalled
a previous version of the VWorks software, including VWorks 12.3, 13.0, or 13.1.x. Note: Even though you must uninstall any previous VWorks versions before installing VWorks Plus or VWorks Standard, the files and records created by the previous version remain on the hard drive of the computer and are accessible by the Migration Wizard.
• You want to migrate all the files and records to the new VWorks version at one time. After you select a runset or protocol to migrate in the Migration Wizard, the wizard automatically selects all VWorks records found on the computer by default, including device files, labware entries, liquid classes, and so forth.
If the computer did not have a previous VWorks version installed or you want to transfer only a few records, you can use the VWorks Export (.vzp file) and Import features instead of the Migration Wizard to transfer any protocols and their associated files created in an earlier VWorks version.
How the Migration Wizard works
In the wizard, you select the runset, protocol, or form files you want to migrate, and the software automatically locates any additional records associated with the selected files (dependencies). For example, if you migrate a protocol, the wizard looks for a device file, form file, inventory file, and so forth. If any of these records are missing, the protocol will not be migrated.Previous versions of the VWorks software stored some records in the Windows Registry. The migration process copies these records from the Windows Registry into files in the Shared Services storage repository.The following table shows all the files types that are migrated and their associated records.

51
B Migrating files from previous VWorks versionsAbout migration
VWorks Automation Control Setup Guide
Table VWorks records and record dependencies
File or record type Associated records (dependencies)
Protocol file (.pro) Device file (.dev)
Form file
Device profile
Inventory file
Labware entry
Labware class
Liquid class
Pipetting technique
HitPick format file
Form file (.VWForm) Protocol file
Runset file
Device file
Form file
Form icon and image files
Device file (.dev) Device profile
Device profile Teach point file (BenchCel Microplate Handler only)
Runset file (.rst) Protocol files
Labware entries Labware image
Labware classes Labware entries
Liquid classes none
Pipetting techniques none
Macro library (.mlb) none
Error library (.elb) none
External files (.js, .sql, .xls, xlsm, HitPick format files)
none
Global options none

B Migrating files from previous VWorks versionsAbout migration
52 VWorks Automation Control Setup Guide
Devices supported in migration
IMPORTANTIf your device files contain profiles for an unsupported device, the profile for that device will not be migrated in the migration process.
Related information
Device type Description
Labware-handling devices • Agilent Benchcel• Agilent Centrifuge• Agilent Centrifuge Loader• Agilent Labware Minihub• Agilent Microplate Labeler• Agilent Microscan Barcode Reader• Agilent PlateLoc
Liquid-handling devices Agilent Bravo
Phantom devices Virtual devices that permit the manual movement of labware during a protocol run: • Agilent Phantom Human Robot• Agilent Phantom Stacker
Location devices Devices where you can place a piece of labware:• Platepad (installed outside of Bravo Platform)• Waste Bin
Devices for manufacturing use only
Agilent Generic I/O Module Agilent Generic RS-232 Device
For information about... See...
Exporting and importing protocols files
VWorks Automation Control User Guide
Backing up and restoring VWorks Automation Control User Guide
Setting up the VWorks software “VWorks setup workflow” on page 2

53
B Migrating files from previous VWorks versionsMigrating files from VWorks v12.3–13.1x
VWorks Automation Control Setup Guide
Migrating files from VWorks v12.3–13.1x
Before you start
Ensure the following on the computer where you want to use the Migration Wizard:• A previous version of the VWorks software (version 12.3, 13.0, or 13.1.x) was
uninstalled.• VWorks Plus or VWorks Standard is installed and configured.• You are logged in as an Administrator.Note: When you select the files to be migrated, the wizard will display a message if any of the file names contain invalid characters. Before migrating these files, the software will rename them using a hyphen (-) to replace any invalid characters.Note: The Migration Wizard does not migrate a file if any dependencies are missing. For example, the wizard does not migrate a protocol if the associated device file cannot be found.
Migrating files procedure
To migrate files:1 In the VWorks window, choose Tools > Migration. The Migration Wizard opens.

B Migrating files from previous VWorks versionsMigrating files from VWorks v12.3–13.1x
54 VWorks Automation Control Setup Guide
2 In the Specify Runset, Protocol, Device, and Form files page, do the following:a Click Add for the file type you want to migrate:
b In the Select Files dialog box, select the files you want to migrate and click Open.Note: You can press SHIFT+click or CTRL+click to select multiple files.
c Repeat steps a and b to add any additional files. Verify the list of files to be migrated. When you have added all the files you want to migrate, click Next.
File type The wizard automatically locates associated …Runset files Protocol files, device files, and form files. You do not need to
add these files in the wizard.Protocol files Device files and form files. You do not need to add these files in
the wizard.Device files Device profilesForm files Protocol files, device files, and image files. You do not need to
add these files in the wizard.

55
B Migrating files from previous VWorks versionsMigrating files from VWorks v12.3–13.1x
VWorks Automation Control Setup Guide
3 In the Specify pipetting techniques, error library, macro library, VWorks Options and external files page of the wizard, do the following:a Click Add to add any of these file types not already associated with the runsets,
protocols, and forms you added on the previous page.Note: The wizard automatically locates the pipetting techniques, error library and macro library files, and external files associated with the runsets, protocols, and forms you added on the previous page.
b In the Select Files dialog box, select the files you want to migrate and click Open.
c Repeat steps a and b to add any additional files. d Under VWorks Options, select the check box if you want to merge the global
option settings.e Click Next.

B Migrating files from previous VWorks versionsMigrating files from VWorks v12.3–13.1x
56 VWorks Automation Control Setup Guide
4 In the device profiles found page, do one of the following, and then click Next.• If you want to migrate all the profiles, select the Migrate All check box (default).• If you want to migrate all but a few of the profiles listed, select No from the
Migrate? column for each profile you do not want to migrate.• If you want to migrate only a few of the profiles listed, clear the Migrate All
check box. Individually select Yes from the Migrate? column for each profile you want to migrate.

57
B Migrating files from previous VWorks versionsMigrating files from VWorks v12.3–13.1x
VWorks Automation Control Setup Guide
5 In the labware classes and entries page, do one of the following, and then click Next.• If you want to migrate all the labware entries and classes, select the Migrate All
check box (default).• If you want to migrate all but a few of those listed, select No from the Migrate?
column for each labware entry and class you do not want to migrate.• If you want to migrate only a few of the ones listed, clear the Migrate All check
box. Individually select Yes from the Migrate? column for each labware entry and labware class you want to migrate.

B Migrating files from previous VWorks versionsMigrating files from VWorks v12.3–13.1x
58 VWorks Automation Control Setup Guide
6 In the liquid classes found page, do one of the following, and then click Next.• If you want to migrate all the liquid classes, select the Migrate All check box
(default).• If you want to migrate all but a few of the liquid classes listed, select No from
the Migrate? column for each one you do not want to migrate.• If you want to migrate only a few of the liquid classes listed, clear the Migrate
All check box. Individually select Yes from the Migrate? column for each liquid class that you want to migrate.
If any file names contain invalid characters, a message opens and lists the new file names. The software uses a hyphen (-) to replace any invalid characters in the file names.

59
B Migrating files from previous VWorks versionsMigrating files from VWorks v12.3–13.1x
VWorks Automation Control Setup Guide
7 In the Specify the name of the folder page, type the name of the folder where the migrated files will be stored, and then click Next.
If any record dependencies cannot be found, a Records not found message opens and displays the list of records that cannot be migrated.

B Migrating files from previous VWorks versionsMigrating files from VWorks v12.3–13.1x
60 VWorks Automation Control Setup Guide
8 When the page appears that lists the records to be migrated, review the list to see if any files have a Yes in the Already on OLSS column.A Yes appears for any record if the same file name already exists in the Shared Services (OLSS) database.For each Yes, select the corresponding Action from the list:• Ignore (default). Does not migrate the current record.• Overwrite. Overwrites the existing record with the one you are migrating.• Append. Migrates the record with the current date appended to the file name.
9 Click Finish. A message opens and states that VWorks must be restarted to load the migrated files.

61
B Migrating files from previous VWorks versionsMigrating files from VWorks v12.3–13.1x
VWorks Automation Control Setup Guide
Related information
For information about... See...
Preparing for migration “About migration” on page 50
Exporting and importing protocols files
VWorks Automation Control User Guide
Backing up and restoring VWorks Automation Control User Guide
Setting up the VWorks software “VWorks setup workflow” on page 2

www.agilent.com© Agilent Technologies, Inc. 2020
November 2020
*D000477*D000477 Revision A
In this guideThis guide describes: • Setting up the VWorks software• Compliance features• How to create and manage labware
definitions and liquid classes• Creating a labware inventory database• Creating an experiments database• How to migrate protocols from previous
versions