walk through user guide v3 - macmillan cancer support
TRANSCRIPT
Cancer Decision Support Tool Walk through user guide
1
These screenshots show exactly how a GP should use the CDS tool, covering the three ways in which
it works, and how to log in to the software.
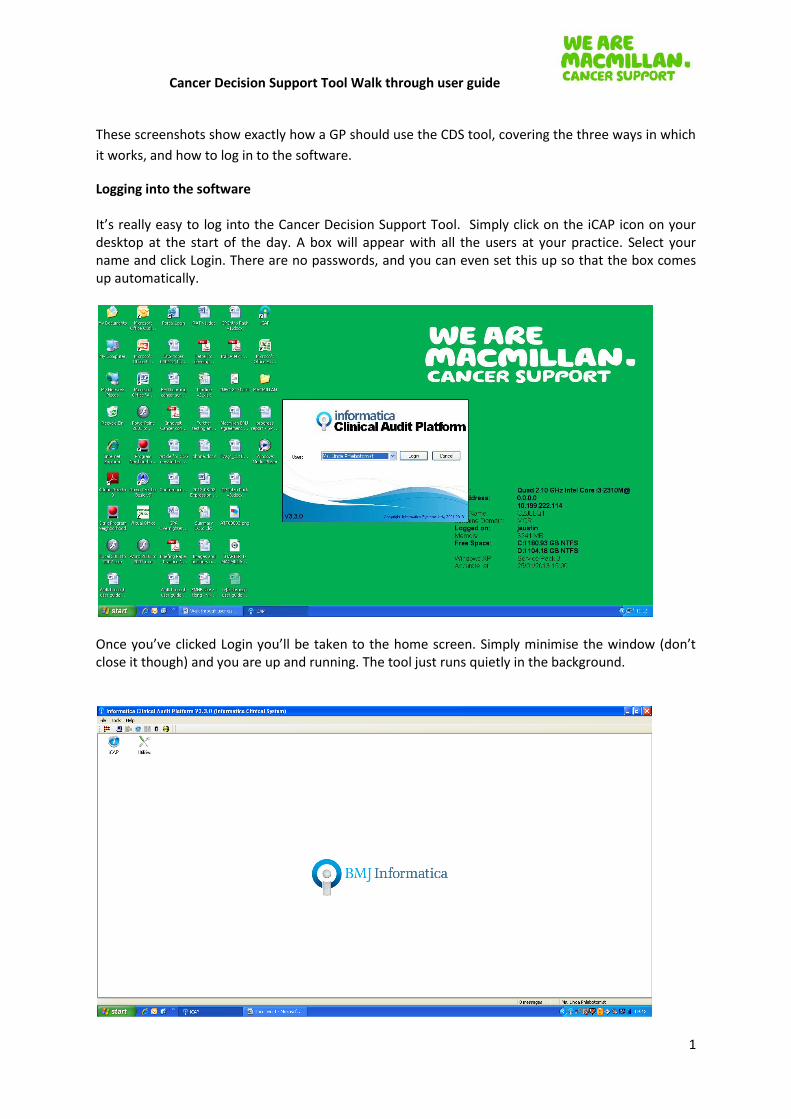
Logging into the software It’s really easy to log into the Cancer Decision Support Tool. Simply click on the iCAP icon on your desktop at the start of the day. A box will appear with all the users at your practice. Select your name and click Login. There are no passwords, and you can even set this up so that the box comes up automatically.
Once you’ve clicked Login you’ll be taken to the home screen. Simply minimise the window (don’t close it though) and you are up and running. The tool just runs quietly in the background.
Cancer Decision Support Tool Walk through user guide
2
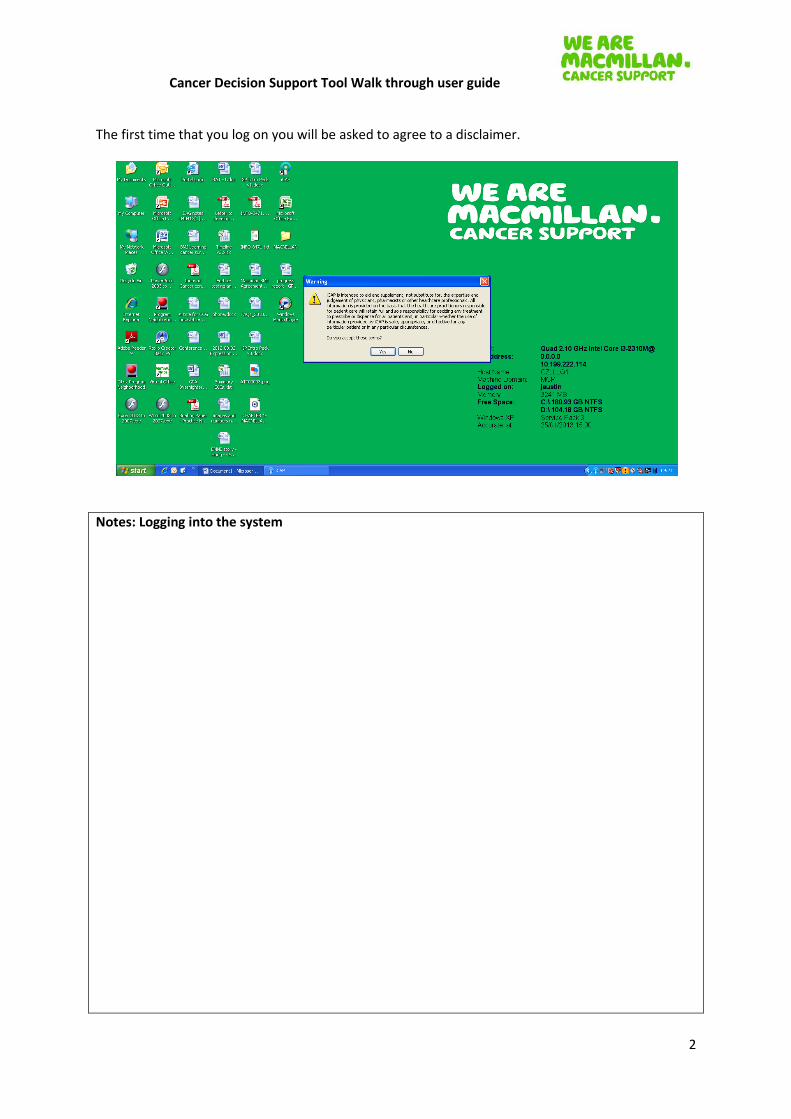
The first time that you log on you will be asked to agree to a disclaimer.
Notes: Logging into the system
Cancer Decision Support Tool Walk through user guide
3
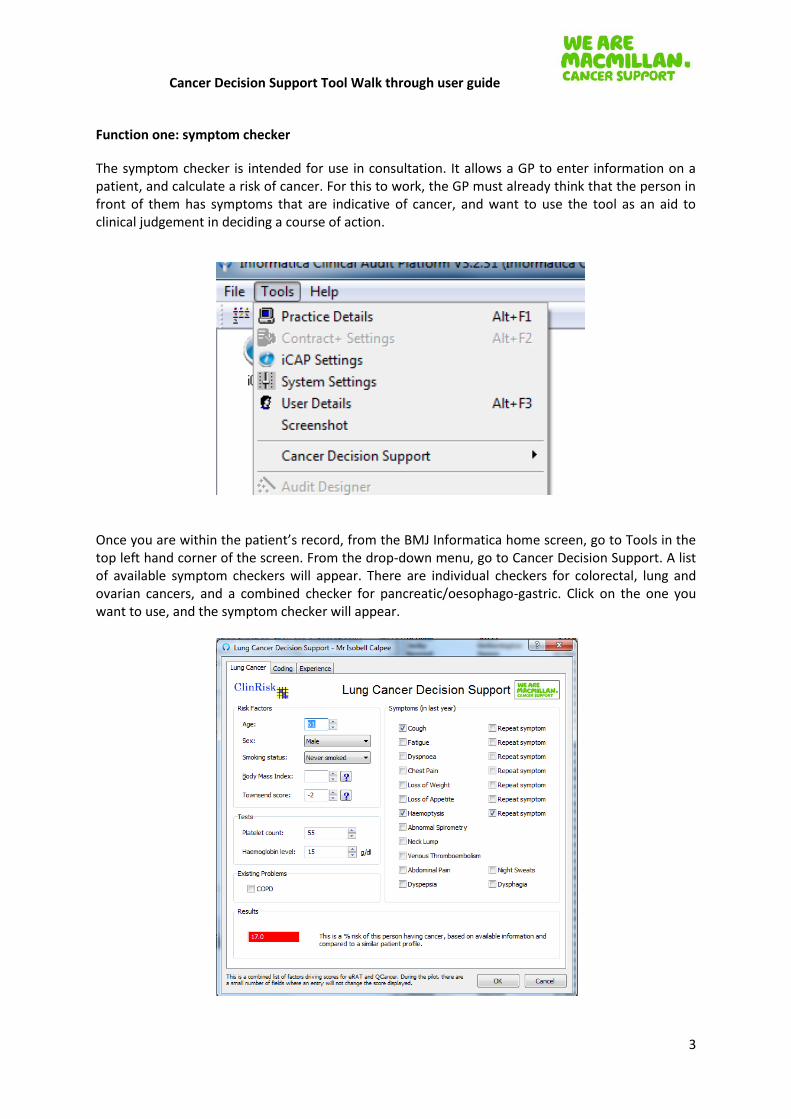
Function one: symptom checker
The symptom checker is intended for use in consultation. It allows a GP to enter information on a patient, and calculate a risk of cancer. For this to work, the GP must already think that the person in front of them has symptoms that are indicative of cancer, and want to use the tool as an aid to clinical judgement in deciding a course of action.
Once you are within the patient’s record, from the BMJ Informatica home screen, go to Tools in the top left hand corner of the screen. From the drop-down menu, go to Cancer Decision Support. A list of available symptom checkers will appear. There are individual checkers for colorectal, lung and ovarian cancers, and a combined checker for pancreatic/oesophago-gastric. Click on the one you want to use, and the symptom checker will appear.

Cancer Decision Support Tool Walk through user guide
4
When you open the symptom checker, it will be pre-populated with any relevant information it can take from the patient record, from demographic information such as age, to symptoms recorded in GP visits for the previous twelve months. You have to be in the right patient’s record for this to work. The risk score is displayed in the bottom left hand corner. These are % risks of cancer. So for example, in the above screen shot, of every 100 people of this age, characteristics and having presented with these symptoms, 17.0 of them will have lung cancer. For RAT, the tool calculates this percentage by taking the two symptoms or repeated symptoms that calculate the highest risk of cancer. For QCancer, the tool calculates this percentage looking across the range of symptoms and non-clinical information such as deprivation. QCancer also has the facility to calculate overall risk of having cancer across a large number of tumour types, and the likelihood that someone does not have cancer. This functionality is not available as part of this project, but you can access this by going to www.qcancer.org. All fields in the symptom checker are clickable; add extra ticks and you will see the risk value in the bottom left hand corner change. Once you have calculated your risk using the symptom checker, you are able to review the Read codes for any new symptoms you have entered, by clicking on the second tab. The most common Read code for that symptom is displayed. You can use this function to enter these new Read codes into the patient record.
Cancer Decision Support Tool Walk through user guide
5
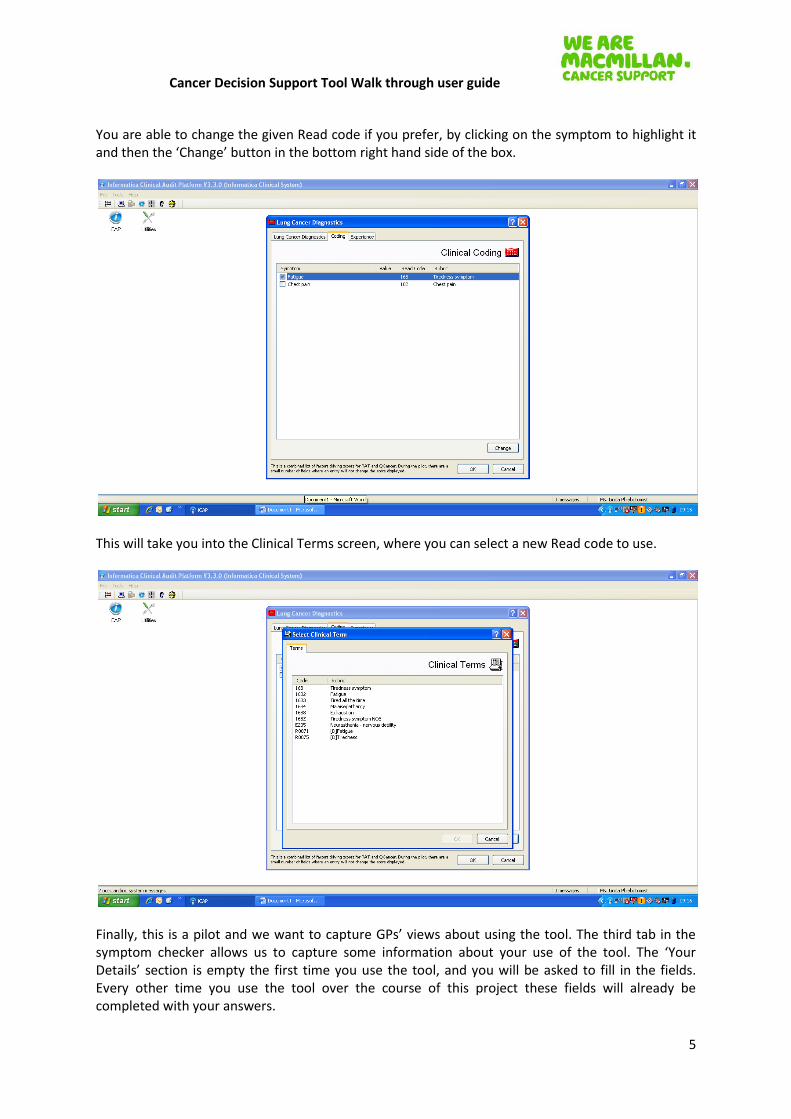
You are able to change the given Read code if you prefer, by clicking on the symptom to highlight it and then the ‘Change’ button in the bottom right hand side of the box.
This will take you into the Clinical Terms screen, where you can select a new Read code to use.
Finally, this is a pilot and we want to capture GPs’ views about using the tool. The third tab in the symptom checker allows us to capture some information about your use of the tool. The ‘Your Details’ section is empty the first time you use the tool, and you will be asked to fill in the fields. Every other time you use the tool over the course of this project these fields will already be completed with your answers.

Cancer Decision Support Tool Walk through user guide
6
The ‘Experience’ section should be completed every time you use the symptom checker. Three quick questions with drop-down options are asked. You are also able to record the specifics of any tests you are ordering. Please note that clicking these boxes will not actually order the tests.
Notes: symptom checker
Cancer Decision Support Tool Walk through user guide
7
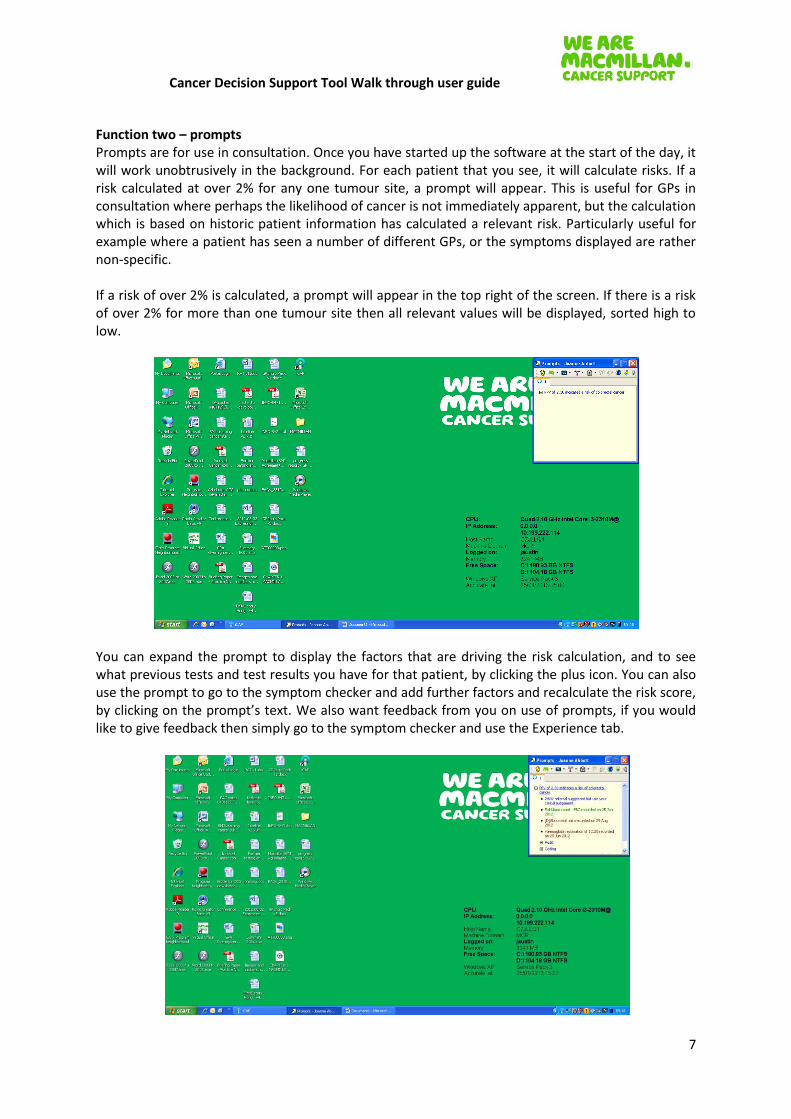
Function two – prompts Prompts are for use in consultation. Once you have started up the software at the start of the day, it will work unobtrusively in the background. For each patient that you see, it will calculate risks. If a risk calculated at over 2% for any one tumour site, a prompt will appear. This is useful for GPs in consultation where perhaps the likelihood of cancer is not immediately apparent, but the calculation which is based on historic patient information has calculated a relevant risk. Particularly useful for example where a patient has seen a number of different GPs, or the symptoms displayed are rather non-specific. If a risk of over 2% is calculated, a prompt will appear in the top right of the screen. If there is a risk of over 2% for more than one tumour site then all relevant values will be displayed, sorted high to low.
You can expand the prompt to display the factors that are driving the risk calculation, and to see what previous tests and test results you have for that patient, by clicking the plus icon. You can also use the prompt to go to the symptom checker and add further factors and recalculate the risk score, by clicking on the prompt’s text. We also want feedback from you on use of prompts, if you would like to give feedback then simply go to the symptom checker and use the Experience tab.

Cancer Decision Support Tool Walk through user guide
8
Notes: Prompt

Cancer Decision Support Tool Walk through user guide
9
Function three – population risk stratification Risk stratification is intended for use out of consultation, as a periodic review undertaken by a GP or practice manager. It’s a good way for a practice to review and identify patients at high risk, and to check what processes they already have in place to engage with that person. A full list of all registered patients who are eligible to have a score calculated are displayed, with their risk shown. To use this function, from the BMJ Informatica home screen click on iCAP and then the Macmillan icon.
Cancer Decision Support Tool Walk through user guide
10
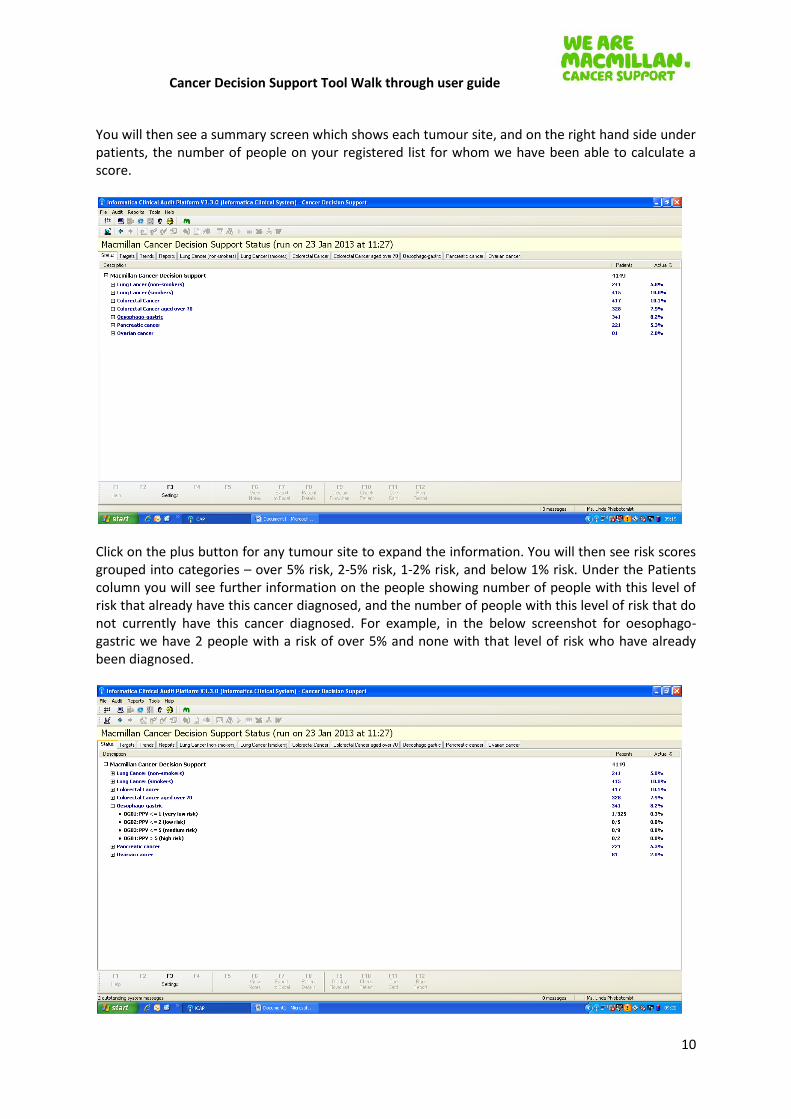
You will then see a summary screen which shows each tumour site, and on the right hand side under patients, the number of people on your registered list for whom we have been able to calculate a score.
Click on the plus button for any tumour site to expand the information. You will then see risk scores grouped into categories – over 5% risk, 2-5% risk, 1-2% risk, and below 1% risk. Under the Patients column you will see further information on the people showing number of people with this level of risk that already have this cancer diagnosed, and the number of people with this level of risk that do not currently have this cancer diagnosed. For example, in the below screenshot for oesophago-gastric we have 2 people with a risk of over 5% and none with that level of risk who have already been diagnosed.
Cancer Decision Support Tool Walk through user guide
11
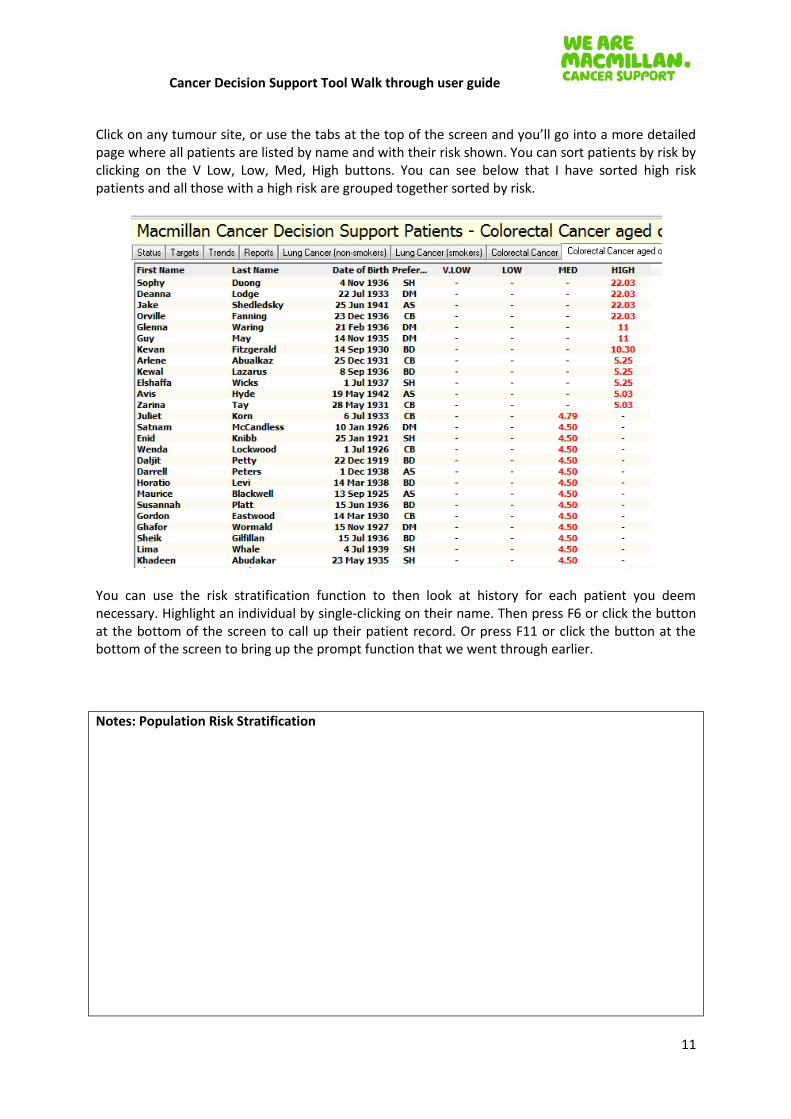
Click on any tumour site, or use the tabs at the top of the screen and you’ll go into a more detailed page where all patients are listed by name and with their risk shown. You can sort patients by risk by clicking on the V Low, Low, Med, High buttons. You can see below that I have sorted high risk patients and all those with a high risk are grouped together sorted by risk.
You can use the risk stratification function to then look at history for each patient you deem necessary. Highlight an individual by single-clicking on their name. Then press F6 or click the button at the bottom of the screen to call up their patient record. Or press F11 or click the button at the bottom of the screen to bring up the prompt function that we went through earlier.
Notes: Population Risk Stratification

Cancer Decision Support Tool Walk through user guide
12
Notes: Population Risk Stratification contd.
For frontline IT support please contact BMJ Informatica at 0845 680 1898 option 2. For any questions about this project or the tool itself, please contact Macmillan at [email protected]