wallst barclays2 paper final - worcester polytechnic … ·...
TRANSCRIPT

KMS BA22
Development of an Operational Process for Continuous
Delivery A Major Qualifying Project Report
completed in partial fulfillment of the Bachelor of Science degree at Worcester Polytechnic Institute, Worcester, MA
Submitted to: On-‐Site Liaison: Mr. Michael Irving Mr. James Berman Project Advisors:
Professor Kevin Sweeney, Department of Management Professor Jon Abraham, Department of Mathematics Professor Michael Ciaraldi, Department of Computer Science
Professor Xinming Huang, Department of Electrical and Computer Engineering
In Cooperation With: Barclays Bank PLC
Submitted by:
Khazhismel Kumykov Computer Science and Mathematical Sciences
Tian Luo
Electrical and Computer Engineering
Alexander K. Shoop Computer Science and Actuarial Mathematics
Borong Zhang
Mathematical Sciences
Date: January, 2016

i
Abstract This project, sponsored by Barclays Bank PLC, focused on improving the continuous
deployment process and developing the guideline for onboarding new applications for the Prime
Financing group. We identified that Jenkins is the better tool for Prime Financing, and explored and
created a few plugins, which could enhance the use of Jenkins and provide management
information system details. Our recommendations aim to eliminate manual steps within the
continuous delivery process and save time on adopting new applications.

ii
Acknowledgement Our group would like to acknowledge everyone that helped to provide an opportunity to
take part in this project and the great success that resulted from it.
First and foremost we would like to thank Barclays and specifically Michael Irving for
supporting us with our project.
We would like to thank James Berman, Technical Lead VP of Barclays Enhanced Enterprise
Reporting, for assisting us with many technical details regarding the project. We sincerely
appreciate the time of guidance and support he provided us during our time at Barclays.
We would also like to thank Christopher Darconte, Prime Service IT, for assisting us with
many technical requests and approvals, and thank Subhash Reddy Boreddy for assisting us with
everything related with Jenkins.
We also would like to thank Louis Lu, Giridhar Manda, Ramkumar Sakthivel and Jeff
Johnston who volunteered their applications to do Jenkins implementations. We sincerely
appreciate their time and support during the whole implementation processes.
Moreover, we would like to thank all Barclays employees we interviewed for providing
relevant information. Their knowledge and experience were greatly beneficial to us understanding
CA Release Automation and Jenkins.
Additionally, we would like to thank our project advisors, Professor Kevin Sweeney,
Professor Jon Abraham, Professor Michael Ciaraldi, Professor Xinming Huang, for their guidance,
support, advice, and assistance throughout the project.
Lastly, we would like to extend our thanks to Worcester Polytechnic Institute for
providing this project opportunity.

iii
Authorship Content Primary Author Title Page Borong Zhang
Abstract Borong Zhang
Acknowledgements Borong Zhang
Authorship Borong Zhang
Table of Content Borong Zhang
Table of Figures Borong Zhang
Executive Summary Borong Zhang
1.0 Introduction Borong Zhang, Khazhy Kumykov
2.0 Background Borong Zhang
2.1 Barclays Borong Zhang
2.2 Agile Software Development Alex Shoop, Tian Luo
2.3 DevOps Borong Zhang, Tian Luo
2.4 Continuous Integration Tian Luo
2.5 Continuous Delivery Borong Zhang
2.6 Continuous Deployment Tian Luo
2.7 CA Release Automation Alex Shoop, Borong Zhang
2.8 Jenkins Khazhy Kumykov
3.0 Methodology Borong Zhang
3.1 1st Objective Borong Zhang
3.2 2nd Objective Borong Zhang
3.3 3rd Objective Borong Zhang
3.4 Summary Borong Zhang
4.0 Results and Analysis Borong Zhang
4.1 Comparative Analysis Alex Shoop
4.2 Jenkins Plugins Khazhy Kumykov
4.3 Reporting Alex Shoop, Khazhy Kumykov
4.4 Summary Borong Zhang

iv
5.0 Conclusions Borong Zhang
5.1 Conclusions Borong Zhang
5.2 Recommendations Tian Luo
5.3 Impact of Our Project Borong Zhang
Appendix A Tian Luo, Alex Shoop
Appendix B Alex Shoop
Appendix C Alex Shoop
Appendix D Khazhy Kumykov
Appendix E Alex Shoop
Appendix F Alex Shoop
Appendix G Alex Shoop
All sections were edited as a team, with equal contributions made by every member.

v
Table of Contents Abstract ........................................................................................................................................................................................... i Acknowledgement ..................................................................................................................................................................... ii Authorship ................................................................................................................................................................................... iii Table of Contents ....................................................................................................................................................................... v Table of Figures ....................................................................................................................................................................... vii Table of Tables ........................................................................................................................................................................ viii Executive Summary .................................................................................................................................................................. 1 1.0 Introduction .......................................................................................................................................................................... 3 2.0 Background ........................................................................................................................................................................... 5 2.1 Barclays ............................................................................................................................................................................. 5 2.2 Agile Software Development .................................................................................................................................... 6 2.2.1 The Agile Manifesto ............................................................................................................................................. 7 2.2.2 Twelve Principles of Agile Software ............................................................................................................. 7
2.3 DevOps ............................................................................................................................................................................... 8 2.3.1 Comparison of Traditional IT and DevOps Oriented Team ............................................................. 10
2.4 Continuous Integration ............................................................................................................................................ 11 2.5 Continuous Delivery .................................................................................................................................................. 12 2.6 Automated Deployment ........................................................................................................................................... 13 2.7 CA Release Automation/Nolio .............................................................................................................................. 14 2.8 Jenkins ............................................................................................................................................................................. 16 2.8.1 Jenkins Promoted Builds ................................................................................................................................ 17
3.0 Methodology ...................................................................................................................................................................... 19 3.1 Evaluated advantages and disadvantages of two different continuous delivery tools ................ 19 3.2 Investigated Workflow Improvements ............................................................................................................. 20 3.3 Generated data reports about continuous delivery processes ............................................................... 20 3.4 Summary ........................................................................................................................................................................ 20
4.0 Results and Analysis ...................................................................................................................................................... 22 4.1 Comparing Tools ......................................................................................................................................................... 22 4.1.1 Investment Bank (IB) Standard Tool and Control Objective .......................................................... 22 4.1.2 Level of Support .................................................................................................................................................. 23 4.1.3 Onboarding Intuitiveness ............................................................................................................................... 24 4.1.4 Deployment Process ......................................................................................................................................... 24 4.1.5 Sample Implementation .................................................................................................................................. 25

vi
4.2 Improving Workflows .............................................................................................................................................. 25 4.2.1 Automatic Deployment Workflow .............................................................................................................. 26 4.2.1.1 Promoted Builds Plugin .......................................................................................................................... 26 4.2.1.2 Build Pipeline Plugin ................................................................................................................................ 28 4.2.1.3 Delivery Pipeline Plugin ......................................................................................................................... 29
4.2.2 Automating Jenkins Configuration ............................................................................................................. 30 4.2.2.1 Using Job DSL to Script Job Creation ................................................................................................. 31 4.2.2.2 Limitations of using the Job DSL / Extending Job DSL .............................................................. 31 4.2.2.3 Using Jenkins API to Duplicate Jobs .................................................................................................. 33 4.2.2.4 Using Groovy to Fetch SVN Branches ............................................................................................... 33 4.2.2.5 Automate what you can – Using Scripting to automate Job creation for branches. ..... 33 4.2.2.6 Jenkins Integration with Plugins ........................................................................................................ 34
4.3 Generating Reports .................................................................................................................................................... 35 4.3.1 Dashboard View Plugin ................................................................................................................................... 36 4.3.2 Data Extraction Plugin ..................................................................................................................................... 36 4.3.2.1 Prototype – Identifying Data Extraction Method ........................................................................ 36 4.3.2.2 Prototype – Extracting Data to File ................................................................................................... 38 4.3.2.3 Java Extraction Tool Plugin ................................................................................................................... 38 4.3.2.4 Outcomes ...................................................................................................................................................... 40
4.3.3 Reporting with Excel Pivot Table ................................................................................................................ 41 4.4 Summary ........................................................................................................................................................................ 42
5.0 Conclusions and Recommendations ....................................................................................................................... 43 5.1 Conclusions ................................................................................................................................................................... 43 5.2 Recommendations ..................................................................................................................................................... 44 5.3 Impact of Our Project ................................................................................................................................................ 44
References .................................................................................................................................................................................. 46 Appendix A: Glossary of Technical Terms ................................................................................................................... 49 Appendix B: Installing Jenkins Plugins .......................................................................................................................... 51 Appendix C: Nolio Installation Instructions ................................................................................................................ 55 Appendix D: job_per_branch.groovy ............................................................................................................................... 57 Appendix E: Excel Reporting using SQL database .................................................................................................... 62 Appendix F: Excel Reports using CSV data .................................................................................................................. 71 Appendix G: Features of our pivot table configuration .......................................................................................... 72 Appendix H: Dashboard View Plugin ............................................................................................................................. 76

vii
Table of Figures Figure 2.1: Process of Agile Software Development ................................................................................................... 6 Figure 2.2: The Ideology of DevOps ................................................................................................................................... 9 Figure 2.3: Hours spent each week carrying out key activities .......................................................................... 10 Figure 2.4: Basic Structure of CI System ....................................................................................................................... 12 Figure 2.5: Launch user interface of CA Release Automation ............................................................................. 14 Figure 2.6: Example dashboard of CA Release Automation’s ROC .................................................................... 15 Figure 2.7: scenario of deploying and promoting an application ...................................................................... 15 Figure 2.8: Jenkins Promoted Builds Plugin ................................................................................................................ 17 Figure 4.1: The DevOps process with approved tools ............................................................................................ 23 Figure 4.2: (Left) Drag-‐and-‐drop actions and flows (Right) Example shell script log .............................. 25 Figure 4.3: Job Page (Left) and Build Page (Right) of Promoted Builds Plugin ........................................... 27 Figure 4.4: Pipeline UI of Build Pipeline Plugin ......................................................................................................... 28 Figure 4.5: Pipeline UI of Delivery Pipeline Plugin .................................................................................................. 29 Figure 4.6: Multiple promotions on the same build ................................................................................................ 30 Figure 4.7: Configuration Screen for a Sync Branches Build Step ..................................................................... 35 Figure 4.8: Configuration Screen with Advanced Options and Error-‐Checking Visible ........................... 35 Figure 4.9: Global Configuration Screen ....................................................................................................................... 35 Figure 4.10: Jenkins Script Console ................................................................................................................................ 37 Figure 4.11: Configuration Screen ................................................................................................................................... 40 Figure 4.12: Error Checking validates credentials and URL ................................................................................ 40 Figure 4.13: Data in SQL ....................................................................................................................................................... 41 Figure 4.14: Pivot Chart created from sample data. ................................................................................................ 42 Figure 7.1: Dashboard status window ........................................................................................................................... 50 Figure 7.2: Promoted Builds Plugin description page. ........................................................................................... 51 Figure 7.3: Manage Jenkins. ................................................................................................................................................ 52 Figure 7.4: Manage Plugins. ................................................................................................................................................ 52 Figure 7.5: Installing an available plugin. ..................................................................................................................... 52 Figure 7.6: Plugin installation status screen. .............................................................................................................. 53 Figure 7.7: Chuck Norris Plugin. ....................................................................................................................................... 53 Figure 7.8: Uploading a custom plugin. ......................................................................................................................... 54 Figure 7.9: Import a SQL database data ........................................................................................................................ 62 Figure 7.10: Data Connection Wizard ............................................................................................................................ 62 Figure 7.11: Select the appropriate database ............................................................................................................. 63 Figure 7.12: write a name and description for the file ........................................................................................... 63 Figure 7.13: Import data (left) and properties window (right) ......................................................................... 64 Figure 7.14: Imported table ............................................................................................................................................... 65 Figure 7.15: Format Cells .................................................................................................................................................... 65 Figure 7.16: Summarize with PivotTable ..................................................................................................................... 66 Figure 7.17: PivotTable Field List .................................................................................................................................... 67 Figure 7.18: Customize row labels .................................................................................................................................. 68 Figure 7.19: Group button (left) and grouping window (right) ......................................................................... 68 Figure 7.20: PivotChart button (left) and Chart style selection (right) ........................................................... 69 Figure 7.21: Sample pivot chart ........................................................................................................................................ 69 Figure 7.22: Customize columns and rows .................................................................................................................. 70 Figure 7.23: Sample chart ................................................................................................................................................... 70 Figure 7.24: raw .CSV data set in Excel .......................................................................................................................... 71
viii
Figure 7.25: Insert PivotTable button (left) and create PivotTable window (right) ................................. 71 Figure 7.26: Group report filter. ....................................................................................................................................... 72 Figure 7.27: Promotion result column label. .............................................................................................................. 72 Figure 7.28: Promotion time row label. ........................................................................................................................ 73 Figure 7.29: Promotion name row label. ...................................................................................................................... 74 Figure 7.30: Pivot chart with trend line. ....................................................................................................................... 75 Figure 7.31: Add a new view when using Dashboard View Plugin ................................................................... 76 Figure 7.32: Jenkins jobs list under dashboard view .............................................................................................. 77 Figure 7.33: Job statistics under dashboard view .................................................................................................... 77 Figure 7.34: Build statistics under Dashboard View ............................................................................................... 78 Figure 7.35: Jobs grid under Dashboard View ........................................................................................................... 78 Figure 7.36: Unstable jobs under Dashboard View .................................................................................................. 78 Figure 7.37: Test statistics under Dashboard View ................................................................................................. 79 Figure 7.38: Test statistics chart under Dashboard View ..................................................................................... 79 Figure 7.39: Test trend chart under Dashboard View ............................................................................................ 80 Figure 7.40: Dashboard View with default portlets ................................................................................................. 80 Figure 7.41: Number of builds plugin ............................................................................................................................ 81 Figure 7.42: RM Build Times Chart ................................................................................................................................. 81 Figure 7.43: Latest Builds with Badges ......................................................................................................................... 82 Figure 7.44: sample code of MyPortlet.java ................................................................................................................ 83 Figure 7.45: sample code of portlet.jelly ...................................................................................................................... 83
Table of Tables Table 7.1: Weather Status ................................................................................................................................................... 50 Table 7.2: Process areas and flows .................................................................................................................................. 55 Table 7.3: Porcesses and Categories ............................................................................................................................... 56

1
Executive Summary The technologies and software development strategies are vital for the competitive nature
of most industries and organizations. To deliver new features and get feedback rapidly would
increase the reputation of an organization and furthermore lead the company in the specific
industry (Kim, 2014). In order to do so, it is essential to release software more often with low risk.
To fulfill this demand, the concept of Agile Software Development has been established. From Agile,
DevOps, previously known as “Agile Operations” was born. DevOps is the collaboration of
development and operation teams throughout all stages of the development lifecycle to ensure code
quality and to release software at any given time (Mueller, Wickett, Gaekwad, & Karayanev, 2011).
Continuous Integration tools and Continuous Delivery platforms have been created to implement
the DevOps initiative.
For Barclays Prime Financing, they have considered several initiatives to adopt an Agile
Software Development approach which would be widely pushed within the organization. Even
though some teams in Prime Financing are using some forms of Continuous Integration tools or a
Continuous Delivery platform, it would be better to standardize the toolset in order to manage
related applications. The strengths and weaknesses of each tool were not clear, so it was hard for
Prime Financing to choose a tool. They were investigating a better DevOps tool that could be used
as a standard tool in their team, and also standardized guideline for onboarding projects to the
specific tool.
The goal of our project was to improve automated deployment in the continuous delivery
process. Our first objective was to evaluate the advantages and disadvantages of two continuous
delivery tools: CA Release Automation and Jenkins Promoted Builds Plugin. We conducted
background research to understand concepts within DevOps and their importance. Through

2
interviewing several experienced employees, we collected the subjective responses regarding the
advantages and disadvantages of each tool. We also identified some objective strength and
weaknesses via sample implementations for each tool. After that, we did a comparative analysis to
reach our conclusion of each tool and provide recommendations. Our second objective was to
implement three volunteer applications from Prime Financing, which enabled us to catalog detailed
functionalities within the chosen tool. We discovered the missing functionalities of the tool and
provided our suggestions to promote the use of the tool. The research and implementations guided
us to form a standardized guideline for the onboarding process for applications onto the tool. Our
final objective was to generate data reports about the chosen tool’s continuous delivery processes.
We retrieved raw data from Jenkins and manipulated them in order to show useful information.
We concluded that Jenkins satisfied Barclays Prime Financing’s requirements, but the
automated deployment of its continuous delivery process can be improved from several aspects.
We suggested adopting Jenkins Promoted Builds based on our comparative analysis of Jenkins and
CA Release Automation. We developed an easily extensible Jenkins Plugin for automatic Jenkins’
configuration with regards to job creation and cleanup from SVN branching. Moreover, we created a
management information system plugin that can extract build and promotion information into a
SQL database and CSV files, and then import into a reusable Excel template we created to show
reports. Our recommendations can help to improve automated deployment of continuous delivery
process within Prime Financing group and to generate reports of continuous delivery process.

3
1.0 Introduction The technologies and software development strategies play essential roles in many
industries and organizations. In order to achieve higher performance in technology, it is necessary
to release software more often. To deliver new features and get feedback faster would increase the
competitive nature of an organization and furthermore lead the company in the specific industry
(Kim, 2014). The concept of Agile Software Development has been established to fulfill this demand,
and DevOps developed naturally from the concepts of Agile Software Development. DevOps is the
collaboration of development and operation teams throughout all stages of the development
lifecycle to ensure code quality and to release software at any given time Important concepts for
Agile and DevOps are Continuous Integration (CI) – the process of continuously merging and
“integration” the code base of different developers so as to avoid pain when having to manually
combine widely diverging code bases, and the bugs associated with combining changes that haven’t
been tested with each other – and Continuous Delivery/Continuous Deployment (CD) – the process
of continuously deploying the product to test and “production like” environments (and eventually
production environments) and running appropriate tests for all builds. In Continuous Deployment
every build that passes tests will be deployed to production, whereas in Continuous Delivery, every
build has the potential to be deployed to production, but may only particular chosen builds are
actually deployed.
Barclays IB is currently adopting Agile, and as part of that initiative teams are adopting
CI/CD practices and automation tools. Already most teams are using CI practices and tools, and
have processes to deploy to and test in Quality Assurance (QA) testing environments and
“production like” User Acceptance Testing (UAT) environments. However, most teams do not have
automated deployment to Production environments, and often the actual deployment process
4
differs between testing and production environments which risks unknown factors impacting
deployment to Production.
For the automated deployment process there are many different products that may be used.
Within Barclays Prime Financing two specific tools were identified for evaluation – CA Release
Automation (formerly known as Nolio), an automated deployment tool identified by the wider IB
organization as recommended, and Jenkins, a primarily continuous integration tool that has
extensions that enable automated deployment and managing of a continuous delivery process. The
strengths and weaknesses of each tool were not made clear, so it was hard for Prime Financing to
choose a tool. Barclays Prime Financing was investigating a better DevOps tool that could be used
as a standard tool in their team, and also desired to have a standardized guideline when onboarding
projects to the specific tool.
The goal of our project was to standardize the guideline to adopt the selected tool on
applications. By conducting research, interviews with experienced employees and comparative
analysis, we concluded that adopting the Jenkins Promoted Builds Plugin is the better option for the
team, which also takes away many manual steps. Based on our implementations of three volunteer
applications, we identified possible improvements to the workflow currently being used. Moreover,
we generated data reports on Jenkins Promoted Builds Plugin’s continuous deployment processes
and managed them to show useful information. Our recommendations can help to improve the
automated deployment process of the Jenkins within Prime Financing and to develop the guideline
for the group to integrate more candidate applications.
5
2.0 Background Nowadays, many more industries rely significantly on technologies and software. For high
performing technological organizations, it is vital to release their software more frequently to
upgrade new features and receive feedback faster to plan for the next deployment (Kim, 2014). In
order to reduce errors and speed up deployments, the concepts of Agile Software Development and
DevOps aim to fulfill the technology demands. The major areas to implement in regards to DevOps
are Continuous Integration and Continuous Delivery, which allow developers to ensure code quality
throughout the software life cycle and release software at anytime. Jenkins is the Continuous
Integration tool being used by many IT teams, and CA Release Automation is the Barclays standard
Continuous Delivery tool.
2.1 Barclays
Barclays Bank PLC, founded in 1690, is one of the largest multinational banking and
financial services companies in the United Kingdom, and its headquarter is in London. Barclays
provides different financial services in retail, wholesale, investment banking, wealth management,
mortgage lending and credit cards, which all operate in multiple countries across Europe, the
Americas, Asia, and Africa. There are four core business sectors of Barclays: Personal & Corporate
(Personal Banking, Corporate Banking, Wealth & Investment Management), Barclaycard,
Investment Banking and Africa. Barclays has a primary listing on the London Stock Exchange and a
secondary listing on the New York Stock Exchange. At the end of 2011, Barclays’ assets achieved
US$2.42 trillion, and it ranked the seventh-‐largest bank worldwide.
Their purpose is “helping people achieve their ambitions – in the right way”, and their
values are “respect, integrity, service, excellence and stewardship” (Barclays, 2015). Their purpose
and values guide them on how to measure and reward people, “not just on commercial results, but
on how they live our Values and bring them to life every day.”

6
As for Barclays in New York, during the 2008 financial crisis, Barclays announced its
agreement to purchase the investment banking and trading divisions of Lehman Brothers. In the
end, Barclays PLC paid US$1.35 billion to acquire the core business of Lehman Brothers, including
Lehman’s US$960 million midtown Manhattan office skyscraper and the responsibility for 9,000
former employees.
2.2 Agile Software Development
Agile software development is a set of software development methods based on iterative
and incremental development, through software developer self-‐organizing, cross-‐functional team
communication and collaboration to complete the development work (Highsmith, 2002).
Figure 2.1: Process of Agile Software Development (Mountain_Goat_Software, 2005)
Software development teams normally set two to four weeks per iteration, as seen in Figure
2.1(Mountain_Goat_Software, 2015). They usually have daily scrum meetings, which are basically
standup meetings, to ensure they are on the same page in order to continuously make progress.
Agile methods sometimes are misunderstood as unplanned and undisciplined approaches.
As a matter of fact, agile methods emphasize adaptability rather than predictability (Cohen,
Lindvall, & Costa, 2003). An adaptive approach focuses on quickly adapting to changing realities.
When the requirements of a project change, the adaptive team should change as well. However, it
might be difficult for the team to predict what would happen in the future.

7
Agile development, a new development model to avoid the shortcomings of the traditional
waterfall model, emphasizes on delivering features as soon as possible and doing continuous
improvements and enhancements throughout the project cycle, which helps the team continuously
adapt its plans so as to maximize the value it delivers (Highsmith & Cockburn, 2002).
Compared to iterative and incremental development methods, agile methods put more
emphasis on high collaboration of the team, which in turn can create a shorter development cycle.
Both software development methods emphasize shipping software in a relatively short cycle.
2.2.1 The Agile Manifesto
We are uncovering better ways of developing software by doing it and helping others do it.
Through this work we have come to value (Beck et al., 2001)1:
Individuals and interactions over Processes and tools
Working software over Comprehensive documentation
Customer collaboration over Contract negotiation
Responding to change over following a plan
That is, while there is value in the items on the right, we value the items on the left more.
2.2.2 Twelve Principles of Agile Software
The following are principles behind the Agile Manifesto (Beck et al., 2001):
Our highest priority is to satisfy the customer through early and continuous delivery of
valuable software.
Welcome changing requirements, even late in development. Agile processes harness change
for the customer's competitive advantage.
1 Kent Beck, James Grenning, Robert C. Martin, Mike Beedle, Jim Highsmith, Steve Mellor, Arie van Bennekum, Andrew Hunt , Ken Schwaber, Alistair Cockburn, Ron Jeffries, Jeff Sutherland, Ward Cunningham, Jon Kern, Dave Thomas, Martin Fowler, Brian Marick © 2001, the above authors. This declaration may be freely copied in any form, but only in its entirety through this notice.

8
Deliver working software frequently, from a couple of weeks to a couple of months, with a
preference to the shorter timescale.
Business people and developers must work together daily throughout the project.
Build projects around motivated individuals. Give them the environment and support they
need, and trust them to get the job done.
The most efficient and effective method of conveying information to and within a
development team is face-‐to-‐face conversation.
Working software is the primary measure of progress.
Agile processes promote sustainable development. The sponsors, developers, and users
should be able to maintain a constant pace indefinitely.
Continuous attention to technical excellence and good design enhances agility.
Simplicity-‐-‐the art of maximizing the amount of work not done-‐-‐is essential.
The best architectures, requirements, and designs emerge from self-‐organizing teams.
At regular intervals, the team reflects on how to become more effective, then tunes and
adjusts its behavior accordingly.
2.3 DevOps
DevOps is a software development ideology concentrated on communication, collaboration
and integration among software development, technology operations and quality assurance
(Mueller et al., 2011). Since the software industry has recognized the necessity to integrate

9
developers and operations engineers in the entire service life cycle, from design to production as
seen in figure 2.2, DevOps is aimed at helping organizations rapidly enhance software products and
services.
Figure 2.2: The Ideology of DevOps Generally, releasing an application is risky and relates to multiple development teams.
However, in an organization that uses DevOps tools, the risk of application release decreases
significantly for the following reasons (InfoQ, 2014):
1. Reducing the scope of change
Compared to the traditional waterfall development model, using agile or iterative
development means more frequent releases and each release contains fewer changes.
Thanks to the high frequency of deployment, each single deployment would not have a huge
impact on the production system. As a result, the application will grow smoothly.
2. Strengthen the coordination of release
It is good to have a strong coordination to bridge skills and communication gaps between
development and operation teams; one must ensure all responsible personnel understand
the content changes and cooperate well through electronic data sheets, teleconferencing,
instant messaging, enterprise portals (wiki, SharePoint) and other collaboration tools
3. Automation
10
Powerful automated deployment tools ensure the repeatability of task and reduce the
possibility of deployment errors. This process takes away the tremendous time and effort
required for manual deployment.
2.3.1 Comparison of Traditional IT and DevOps Oriented Team
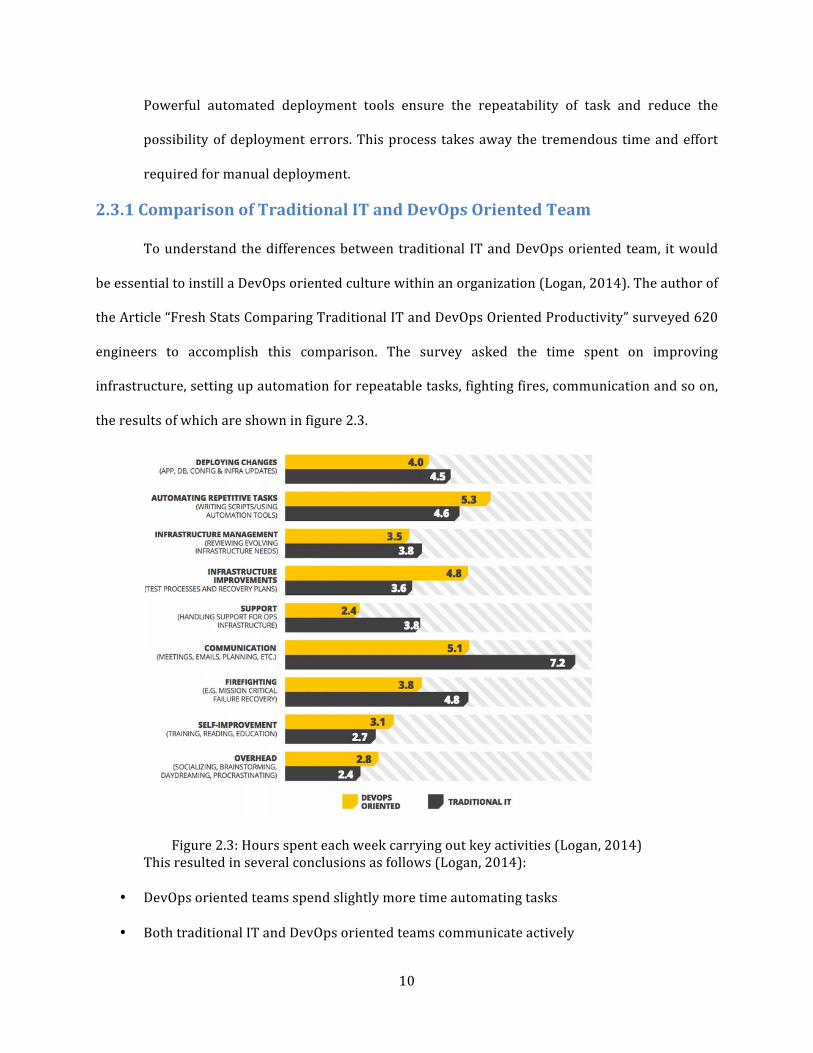
To understand the differences between traditional IT and DevOps oriented team, it would
be essential to instill a DevOps oriented culture within an organization (Logan, 2014). The author of
the Article “Fresh Stats Comparing Traditional IT and DevOps Oriented Productivity” surveyed 620
engineers to accomplish this comparison. The survey asked the time spent on improving
infrastructure, setting up automation for repeatable tasks, fighting fires, communication and so on,
the results of which are shown in figure 2.3.
Figure 2.3: Hours spent each week carrying out key activities (Logan, 2014) This resulted in several conclusions as follows (Logan, 2014):
• DevOps oriented teams spend slightly more time automating tasks
• Both traditional IT and DevOps oriented teams communicate actively

11
• DevOps oriented teams fight fires less frequently
• DevOps oriented team spend less time on administrative support
• DevOps oriented teams work fewer days after-‐hours
2.4 Continuous Integration
Continuous Integration (CI) is a software engineering practice, used by many software
development teams, to ensure code quality throughout the software build life cycle. The practice
was first named and proposed in 1991 by Grady Booch and was adopted by Extreme Programming
(XP), a type of Agile Software Development (Wikipedia, 2015b). The practice was suggested to
avoid large integration issues that arise when integrating large sets of changes with each other. In
XP as well CI was intended to be used along with automated unit tests, which should be designed to
ensure functionality. The major role of CI is to control and react to problems immediately. It is a
practice designed to ease and stabilize software development processes.
CI would bring the following benefits (Martin, 2006):
1. Software Build Automation: Once a configuration is completed, a CI system can build the
target software in accordance with a pre-‐established schedule.
2. Sustainable Automated Inspection: A CI system can continuously obtain added or modified
source code. When the software development teams need to periodically check added or
modified code, the CI system can check whether the added code could destroy the original
software build.
3. Sustainable Automated Testing: Once the code is built, pre-‐established tests would run, and
the CI system would automatically trigger real time notifications via RSS, Email or Instant
Messaging to appropriate developers.
4. Automated Follow-‐up Processes: After the automated inspection and tests complete, there
may be some additional required tasks in the software build cycle, including generated
12
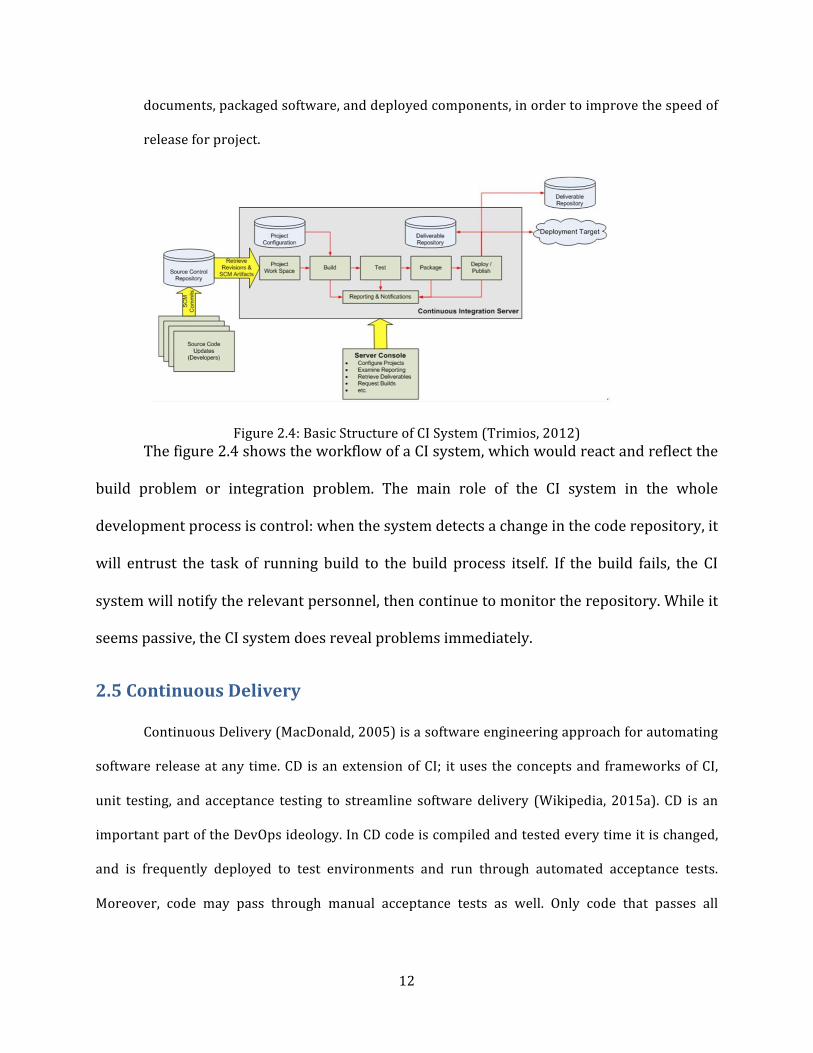
documents, packaged software, and deployed components, in order to improve the speed of
release for project.
Figure 2.4: Basic Structure of CI System (Trimios, 2012) The figure 2.4 shows the workflow of a CI system, which would react and reflect the
build problem or integration problem. The main role of the CI system in the whole
development process is control: when the system detects a change in the code repository, it
will entrust the task of running build to the build process itself. If the build fails, the CI
system will notify the relevant personnel, then continue to monitor the repository. While it
seems passive, the CI system does reveal problems immediately.
2.5 Continuous Delivery
Continuous Delivery (MacDonald, 2005) is a software engineering approach for automating
software release at any time. CD is an extension of CI; it uses the concepts and frameworks of CI,
unit testing, and acceptance testing to streamline software delivery (Wikipedia, 2015a). CD is an
important part of the DevOps ideology. In CD code is compiled and tested every time it is changed,
and is frequently deployed to test environments and run through automated acceptance tests.
Moreover, code may pass through manual acceptance tests as well. Only code that passes all
13
automated and manual tests/approvals is marked as “releasable,” ensuring that even though the
system automates much of the process, code is only “released” once it is ensured to be valid.
Continuous Delivery allows anyone to receive fast, automated feedback regarding any
changes made to their code, and furthermore people can perform push-‐button deployments of any
version to any environment (Farcic, 2014).
2.6 Automated Deployment
Automated deployment means automatically deploying every change to production, and the
main concept of automated deployment is deployment automation (Smith, 2015). Deployment
automation is a solution to deliver applications faster and more efficiently (XebiaLabs, 2015). Even
though there are some difficulties in implementing the fully automated deployment process, such
as the overhead of creating, setting up, configuring and maintaining an automated deployment
mechanism, the benefits of using automated deployment are significant in comparison to the
difficulties.
Automated deployments make the application deployment processes become much less
error-‐prone and much more repeatable, which eliminates manual steps and avoids delivering
incorrect versions (XebiaLabs, 2015). Once the automated deployment process is set, if it works the
first time, it will work many more times afterwards. The knowledge of the automated deployment
process is captured in the system, independent from an individual, and thus anyone in the team can
deploy software. Furthermore, rather than spending time on performing and validating manual
deployments, the software development teams can spend their time on developing the next set of
quality features and enhancements to the software. The target environments and machines can be
changed easily, which simply requires configuring the existing setup and then relying on the new
release automation. The system allows frequent releases in order to ship valuable features to users
more often and to get continuous feedback to enhance the software.

14
2.7 CA Release Automation/Nolio
CA Release Automation, formerly known as Nolio, is an enterprise-‐class, multi-‐release,
continuous delivery solution which automates complex release deployments (CA_Technologies,
2015b). This software is aimed to ease and streamline the deployment process.
CA Release Automation enables to design, manage, and automate application-‐centric
operations across physical, virtual, and cloud environments. It can speed up application release
cycles, reduce errors, and achieve higher quality releases. The software also can create more
frequent releases, reduce costs and promote collaboration and alignment between developers and
operation engineers.
Figure 2.5: Launch user interface of CA Release Automation In regards to the User Interface for every CA Release Automation system, there are two
parts in the launch interface as shown in figure 2.5: Release Operations Center (ROC) and
Automation Studios. ROC is a web application for creating release flows and managing their
execution in terms of the operational functionality, which is organized into tabs in the dashboard,
as seen in figure 2.6. Automation Studio is a legacy client that provides some administrative
features, such as administrative tasks, export and import functions, and process scheduling and
notification settings. ROC is the main area for most development and operation teams.
15
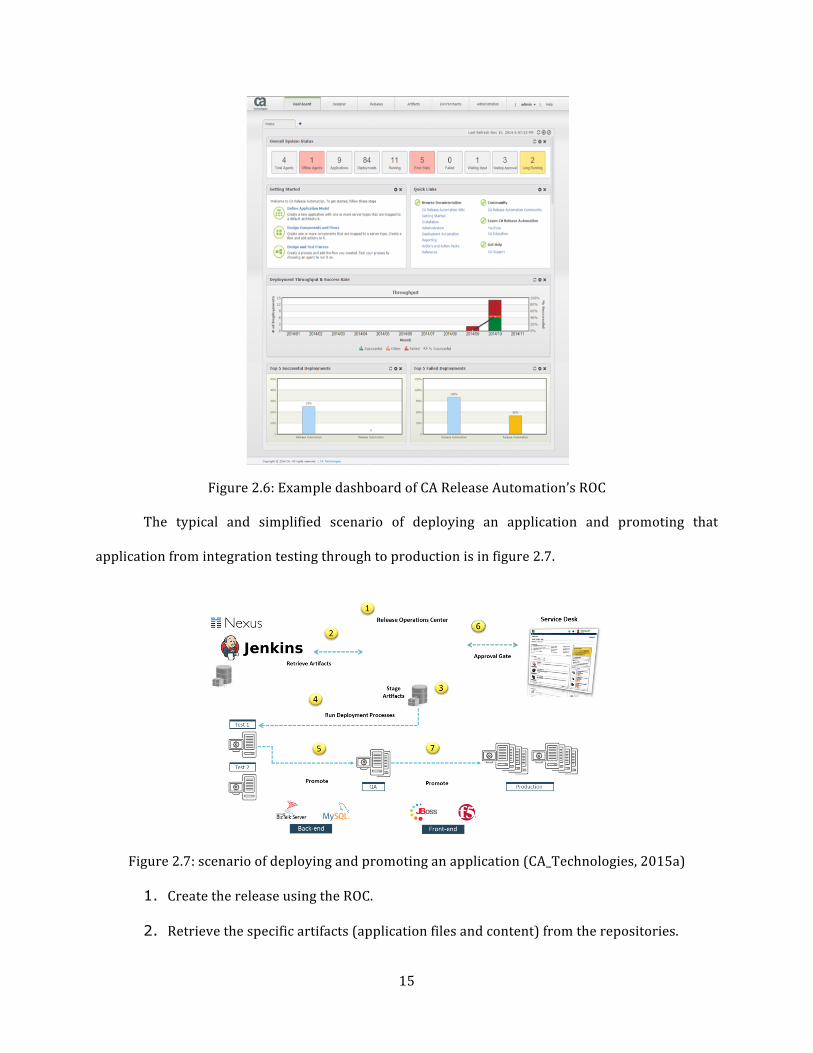
Figure 2.6: Example dashboard of CA Release Automation’s ROC
The typical and simplified scenario of deploying an application and promoting that
application from integration testing through to production is in figure 2.7.
Figure 2.7: scenario of deploying and promoting an application (CA_Technologies, 2015a)
1. Create the release using the ROC.
2. Retrieve the specific artifacts (application files and content) from the repositories.

16
3. Next, stage the artifacts.
4. The next step runs the deployment, which could have a variety of steps. Here it does a
pre-‐deployment verification and configures a load balancer. It then deploys the
application and database and then does some post-‐deployment verification.
5. If everything was successful, the same deployment can be used (with different
environment and release data) to promote the application to the next stage.
6. Prior to the deployment to production, the deployment can go through an approval
process with integration to a service desk.
7. If the approval process passes, the deployment is then promoted to production.
Throughout the process above, it shows how to link a repeatable continuous delivery process.
In general, CA Release Automation enables IT operations to centrally manage, automate and
control application service operations over a data center, as well as standardize application service
operation and application workflows. More terminologies about CA Release Automation are in
Appendix A.
2.8 Jenkins
Jenkins is an open source continuous integration tool with an active community and a rich
ecosystem of extensions (Kawaguchi & Hayes, 2015). Jenkins is written in Java and works on most
operating systems. It is also the world’s most popular open source continuous integration software,
which is being use in more than 65,000 sites worldwide.
Two critical features of Jenkins are monitoring the software development process and
building and testing software projects continuously, which help users to obtain the newest build
and code quality (Kawaguchi, 2015).
Jenkins provides functionality to run jobs -‐ predefined tasks -‐ on certain circumstances,
such as an update to a source control repository, running a task in a set interval of time, or after a

17
manual request to run a job (Kawaguchi, 2015). Jobs are versatile as they can be custom defined to
do anything -‐ build code, run unit tests, check code quality, deploy code to a server environment,
ping a web server, etc. Jenkins provides functionality through its core product and plugin
extensions for running unit tests on a source control repository following the practices of CI. It
could test integration of development and mainline branches before they are merged in. During
testing, it can identify issues ahead of time, automatically run quality assurance, deploy software,
create processes to require manual approval, and test to proceed in a step in the deployment
pipeline. More Jenkins terminologies are in Appendix A, and the instruction on how to use Jenkins
Plugin is in Appendix B.
2.8.1 Jenkins Promoted Builds
Jenkins Promoted Builds Plugin, as shown in figure 2.8, provides a framework for manual
approval within the CD pipeline.
Figure 2.8: Jenkins Promoted Builds Plugin (Inman, 2012)
The plugin creates a User Interface (UI) where automated processes can be run depending
on certain circumstances. For example, a build could be automatically deployed to an automated
acceptance-‐testing environment, or it could wait for manual approval to be deployed to a QA testing
environment. A final step could also be added to automate deployment to production systems once

18
all other steps have been completed. Jenkins with this Promoted Builds Plugins is another
continuous deployment option besides CA Release Automation.

19
3.0 Methodology The goal of this project is to improve automated deployment in the continuous delivery
process. Our measurable objectives were:
1. Evaluated advantages and disadvantages of the firm standard tool (CA Release
Automation) and the tool used in Prime Financing (Jenkins)
2. Investigated workflow improvements of the chosen tool
3. Generated data reports about continuous deployment processes of the chosen tool
We used online research, case studies, interviews, and sample implementations to achieve
our objectives, which we discuss in detail in this chapter.
3.1 Evaluated advantages and disadvantages of two different continuous
delivery tools
The first phase of our project was to compare the two tools to decide the proper one to use
when implementing applications. We did research online to study the related terminologies, such as
Agile Software Development, DevOps, Continuous Integration, and Continuous Delivery. We also
did research of each tool and cataloged features of both tools, Jenkins and CA Release Automation.
Moreover, to understand detailed information concerning implementation, we did case studies via
implementing test applications into the two tools. In order to better understand the two tools, we
interviewed several experienced employees in both Jenkins and CA Release Automation. The team
determined the advantages and disadvantages of each tool and compared feature by feature to
reach a conclusion.

20
3.2 Investigated Workflow Improvements
Once we had decided to recommend Jenkins with the Promoted Builds Plugin for the Prime
Financing group we investigated possible workflow improvements. We investigated plugins
recommended for usage in a continuous delivery with automated deployment environment, and
compared the different recommended plugins in both their feature set and compatability with
Prime Financing’s workflow. As well, we investigated the possibilities for automating Jenkins
configuration, and created a proof of concept for managing configuration through Job DSL, and
through Jenkins’ scripting, and finally created a Jenkins plugin to automate the process of creating
and pruning per-‐release branch jobs. We also explored functionalities of three volunteer
applications to identify core strategies of onboarding the applications to the tool.
3.3 Generated data reports about continuous delivery processes
In order to provide a better way to evaluate continuous deployment processes, we
developed a process to extract raw data from Jenkins. This raw data, which includes useful statistics
such as number of successful/failed builds and promotions, can be saved into a SQL database or
CSV file and then managed in Excel. We used the pivot table functionality in Excel to filter and
manage data, and created a reusable template. To develop the process for extracting data we first
created a rapid proof-‐of-‐concept using Jenkins’ groovy scripting capabilities and by reading the
relevant documentation for identifying the location of the data. By doing so we were able to rapidly
identify and test a process for extracting data, and to agree upon a common data format such that
the finalized extraction plugin and the reporting excel template could be developed in parallel.
Produced were a Jenkins plugin and an Excel reporting template.
3.4 Summary
The methods described above were to fulfill our project goal: to improve automated
deployment in the continuous delivery process. The background research helped us to understand
21
the overall concepts within DevOps and their importance. The experienced employees’ interviews
provided us subjective responses on the advantages and disadvantages of each tool. We identified
some objective strength and weaknesses via sample implementations for each tool, and compared
with the information provided by experienced people. The investigations on workflow of
automated deployment improves the continuous delivery process our sponsor, Prime Financing, to
adopt the chosen tool on their existing application. In order to generate data reports about the
continuous deployment processes, we extracted and managed useful statistics to evaluate overall
processes.
22
4.0 Results and Analysis In this chapter, we discuss our results and analysis on background research, comparative
analysis, and implementations. We evaluated the advantages and disadvantages of both CA Release
Automation, also known as Nolio, and Jenkins Plugin, determined the better tools for Prime
Financing group, and improved workflows of automated deployment within Prime Financing’s
Jenkins. Based on our research and practices, we successfully achieved our goal to improve
automated deployment in the continuous delivery process for our sponsor, Barclays.
4.1 Comparing Tools
To compare Nolio and the Jenkins plugin, we studied extensive online research, both
through publicly available resources and Barclays’ internal resources, and interviewed several
experienced employees regarding each tool.
4.1.1 Investment Bank (IB) Standard Tool and Control Objective
In order to better adopt the DevOps initiative in Barclays, there is a list of IB standard
development tools for each DevOps category, such as Continuous Integration and Continuous
Deployment. Each approved tool has a different level of Barclays’s internal support. In regards to
the standard tool for Continuous Deployment, Nolio is the only listed approved tool. The figure 4.1
shows other approved tools for the DevOps initiative within IB.

23
Figure 4.1: The DevOps process with approved tools Barclays has set up what are called “control objectives” which are mandatory or optional
criteria during an application’s development cycle. One specific mandatory control objective
pertaining to Continuous Deployment states that “no change can be made to any technology
configuration item without appropriate authorization.” Fortunately, both Nolio and the Jenkins
plugin satisfy this control objective.
4.1.2 Level of Support
For Nolio, there is a comprehensive amount of support available within Barclays. There is a
designated Nolio support team in Barclays providing approximately 400 pages of support
documentation as well as email, chat client, and telephone support. The most useful document, “my
first Nolio application,” provides a tutorial on how to implement a “hello world”-‐esque application
into Nolio.
In regards to Jenkins, since Jenkins and the various plugins are open-‐source, it is easy to
retrieve many available resources online to get help. While there is no internal Barclays support for
Jenkins, many employees have basic understandings of the tool.

24
4.1.3 Onboarding Intuitiveness
The Barclays-‐supported Nolio requires an extensive onboarding process which involves
submitting a support ticket onboarding request, requesting to create the Nolio project groups and
then following a long detailed process to onboard an application. Through interviews, especially
with employees of the support team, we received information that the approximate time to
onboard a new application is a week or two. The major reason for the lengthy onboarding time is
because of waiting for approvals or assistance from Barclays’ Nolio support team.
One example team that we interviewed said that they started to onboard their applications
in May 2015 and even today are still working on the Nolio implementation. The team mentioned
that the complexity and heavyweight nature of Nolio is part of the reason for the long
implementation time. On the other hand, there is a separate team who praised the support of the
Barclays’s Nolio support team when onboarding their specific applications.
As for onboarding Jenkins, it is easier. If a project team wishes to onboard with the Jenkins
Promoted Builds Plugin managed by the Prime Financing team, the project team simply has to fill
out a detailed questionnaire, written up by Prime Financing, which asks for most of the necessary
configuration information. Then the project team would have to supply appropriate deployment
scripts so that the deployments can actually run. In general, the time spent in the onboarding
process for Jenkins and the plugin is about only a few hours.
4.1.4 Deployment Process
Nolio and Jenkins plugin are two almost entirely different ecosystems. The main purpose of
Nolio is to do deployments via drag-‐and-‐drop actions and flows on its web dashboard, which is on
the left of figure 4.2. This offers flexibility and robustness for different types of projects, whereas
the Jenkins Promoted Builds Plugin handles deployments through approval gates and the
deployment scripts written by the application team. As the right of figure 4.2 shows, the main

25
deployment procedure in the Jenkins plugin is shell scripting, and the complexity level depends on
the user’s need.
Figure 4.2: (Left) Drag-‐and-‐drop actions and flows (Right) Example shell script log
4.1.5 Sample Implementation
On the Nolio front, we followed the tutorial supplied by Barclays’s Nolio support team to
have a better understanding of the Nolio architecture. However, it was a long and arduous process.
Appendix C shows a summarized step-‐by-‐step procedure of what the tutorial was asking and how
to accomplish a deployment. As for Jenkins, the sample implementation is intuitive. The majority of
investigation and results are on the plugins, as seen in section 4.2.
4.2 Improving Workflows
Besides basic functionalities of Jenkins itself, there are various plugins that are able to
enhance the use of Jenkins. According to the requirements of Prime Financing group, our team
explored some useful plugins within Jenkins in order to fulfill their demands. The major part was to
enhance automated onboarding and deployment process.

26
4.2.1 Automatic Deployment Workflow
Jenkins can be used to build a continuous delivery or deployment pipeline out-‐of-‐the-‐box.
There are numerous plugins that add additional features such as manual approval gates, visual
overviews, and custom permissions, to allow users to better fine tune and fit the automated
deployment set up to their needs. The plugins evaluated were Promoted Builds Plugin, Build
Pipeline Plugin and Delivery Pipeline Plugin.
Promoted Builds Plugin introduces the concept of “promotions”, which have prerequisites
and resulting actions to allow fine tuned control over triggering actions related to an individual
build in Jenkins. Build Pipeline Plugin is an overview of the promotions, which provides an
overview based on built in job relations, as well as providing a new type of relation – a “manual”
build step. Delivery Pipeline Plugin also provides an overview based on built-‐in job relations, as
well as supporting the manual steps of the Build Pipeline Plugin and the promotions of the
Promoted Builds Plugin.
We evaluated the provided functionality of the plugin, including support for “fan-‐out-‐fan-‐in,”
manual approvals, and allowing for specifying build parameters; the look and usability of the
overview; and the complexity of setup.
4.2.1.1 Promoted Builds Plugin
The Promoted Builds Plugin provides the ability to mark certain builds of a job as
“promoted” if the build has fulfilled a certain criteria, as well as to trigger certain actions upon
promotion (Kawaguchi & Hayes, 2015). This plugin extends the functionality of Jenkins to allow
triggering of downstream jobs on more criteria than just if the build passed or failed. It also allows
requiring multiple previous or triggered jobs to complete successfully, manual approval from a
specific set of approvers, and other promotions for the job that have already occurred, in order to
allow one to enforce an order of promotion. Moreover, the plugin allows for specifying build

27
parameters for triggered jobs and allowing a manual approver to provide needed details for a
deployment, such as a service desk ticket number or deployment credentials.
The plugin displays the promotion status of every build directly on the job and build pages,
as shown in figure 4.3.
Figure 4.3: Job Page (Left) and Build Page (Right) of Promoted Builds Plugin
Setting up these promotions is quick, as simple as setting up automatic triggers built into
Jenkins. However, the plugin does not show the upstream/downstream relationships between jobs,
so it can be difficult to see what jobs exactly are triggered and in what order of jobs are related to a
promotion. Ordinarily one would have to click through many pages concerning builds and
promotions to understand the upstream and downstream relationships. Additionally, while the
plugin can require one promotion be completed successfully before another one, one can “approve”
a promotion at any time accidentally. However, it cannot disapprove a promotion even if it hasn’t
occurred yet, which may result in two sequential manual promotions occurring immediately after
one another because of the second out-‐of-‐order accidental approval. If, for example, the first
promotion was to deploy to a manual QA environment and the second a deployment to a beta/UAT
environment, this would not be ideal.

28
4.2.1.2 Build Pipeline Plugin
The build pipeline plugin provides an overview of a continuous deployment “pipeline”
based on an initial “seed” build. The pipeline displays all related downstream jobs trigged by it and
their status. The plugin also provides a new type of trigger/relationship to allow manual approving
for triggering a downstream job, similar to the Promoted Builds Plugin. However it does not allow
for more sophisticated approval requirements, such as restricting who can approve the build, or
requiring that multiple upstream jobs have completed successfully before a job is triggered.
Furthermore, one cannot supply manual parameters for a manual build; such parameters must be
provided at the start of the build cycle, which is not feasible in many cases when builds are
deployed several days or weeks later.
The pipeline UI, in figure 4.4, itself is rather difficult to use and look at, and does not
integrate well with the Jenkins UI.
Figure 4.4: Pipeline UI of Build Pipeline Plugin

29
4.2.1.3 Delivery Pipeline Plugin
Delivery Pipeline Plugin fulfills a similar purpose to Build Pipeline Plugin, however with a
better UI execution, as in figure 4.5. Similarly to the Build Pipeline Plugin, the Delivery Pipeline
Plugin shows an overview based on job upstream/downstream relationships. Additionally, it allows
for grouping of related processes in “stages.” It can use the Build Pipeline Plugin manual build
relationship to allow for manual builds. Like the Build Pipeline Plugin, you cannot specify
parameters for a manually approved build.
Figure 4.5: Pipeline UI of Delivery Pipeline Plugin
It is also compatible with the Promoted Builds Plugin; however support seems to not be
perfect, as multiple promotions on the same build will show as parallel processes, even if the
promotions are sequential as seen in figure 4.6. Also, while promotions can be shown on the
pipeline page, you cannot promote a build directly from the page.

30
Figure 4.6: Multiple promotions on the same build
The Delivery Pipeline Plugin shows promise for showing a comprehensive overhead view of
the jobs related to an initial seed build, and when used with the Promoted Builds Plugin can satisfy
the requirements of allowing restricted manual deployment with specified parameters. However,
its integration with the Promoted Builds Plugins is lacking. The community in Jenkins and the
Delivery Pipeline Plugin has expressed interest in proper integration with the Promoted Builds
Plugin, and it is possible that in the soon future there will be full integration. Even without perfect
integration the Delivery Pipeline Plugin provides a useful overview to see the status of builds,
especially as velocity increases or as more automated test steps are added, such as automated
integration tests in QA, or automated assurances in Production. The Promoted Builds Plugin
provides all the necessary manual approval requirements and parameters, and the per-‐promotion
overview on the builds page provides sufficient overview for many cases.
4.2.2 Automating Jenkins Configuration
Groovy is a scripting language based on top of Java that runs in the Java JVM, and it can
leverage and extend existing Java APIs in a loosely typed, dynamic language. Jenkins is largely based

31
on groovy and allows for extensions based in this scripting language. Moreover, Jenkins has
multiple plugins that allow for executing scripts that can interact with Jenkins’ internal APIs to
manage job creation and Jenkins management. Additionally, there is a plugin that defines a Domain
Specific Language (DSL) for managing job creation and management within Jenkins called the “Job
DSL” Plugin, which simplifies the process of programmatically creating Jenkins Jobs. Through using
Jenkins’ internal APIs, one can automate various aspects of management of Jenkins’ configuration
for certain applications.
4.2.2.1 Using Job DSL to Script Job Creation
Operations that frequently create a large number of jobs and require keeping the
configuration of many jobs up-‐to-‐date may benefit from using the Job DSL.
Using Job DSL to create a simple Job:
mavenJob("my_job") { description("""My great job""") logRotator { daysToKeep(7)
} keepDependencies(false) scm { svn { location(“https://svn/project/branch”) { credentials(SVN_CREDENTIALS_ID) } checkoutStrategy(SvnCheckoutStrategy.UPDATE_WITH_CLEAN) } } triggers { scm('H/10 * * * *') { ignorePostCommitHooks(false) } } }
4.2.2.2 Limitations of using the Job DSL / Extending Job DSL
There are several significant issues, however, with using the Job DSL. The first, most
obvious issue is the learning required to be able to use the Job DSL effectively. While the Job DSL
aims and succeeds at making jobs easier to maintain than by directly using Jenkins APIs, it is still

32
much less intuitive than using the GUI interface, and some more obscure features may not be
supported at all, requiring extending the Job DSL. Furthermore, any updates to Jenkins may be
potentially breaking, as was experienced during evaluation. During evaluation, a Jenkins update
changed the XML format for a “logRotator” plugin, causing the Job DSL implementation to be broken.
One can use groovy to extend the Job DSL classes to either fix or extend the Job DSL. Groovy
provides “mixin” functionality that allows adding methods to existing classes. Due to how the Job
DSL is implemented, one can just add methods to the DSL classes and they are available to use in
the DSL. This functionality can be used to add implementation specific shorthand or to add new
features without having to wait for acceptance by the open source project. However, one must look
at an existing, functional XML configuration to identify the required structure, which can then be
automated.
Using Groovy Mixins to extend the DSL to support an additional feature (“keep builds forever”):
class PromotionActions { static def bind() { javaposse.jobdsl.dsl.helpers.step.StepContext.mixin PromotionActions } /** * Promoted builds flag to keep build forever */ void keepBuildForever() { stepNodes << new Node(null,'hudson.plugins.promoted__builds.KeepBuildForeverAction') } } Using Groovy Mixins to extend the DSL to repair an existing feature that was broken due to a
Jenkins update:
class Job { static def bind() { javaposse.jobdsl.dsl.Job.mixin Job } /** New version of jenkins moved the location of this configuration node Old version used for inspiration: https://github.com/jenkinsci/job-‐dsl-‐plugin/blob/master/job-‐dsl-‐core/src/main/groovy/javaposse/jobdsl/dsl/Job.groovy#L203-‐L216
33
*/ void logRotator(@DslContext(LogRotatorContext) Closure closure) { LogRotatorContext context = new LogRotatorContext() ContextHelper.executeInContext(closure, context) configure { project -‐> project / 'properties' / 'jenkins.model.BuildDiscarderProperty' / 'strategy'(class:'hudson.tasks.LogRotator') { daysToKeep(context.daysToKeep) numToKeep(context.numToKeep) artifactDaysToKeep(context.artifactDaysToKeep) artifactNumToKeep(context.artifactNumToKeep) } } } }
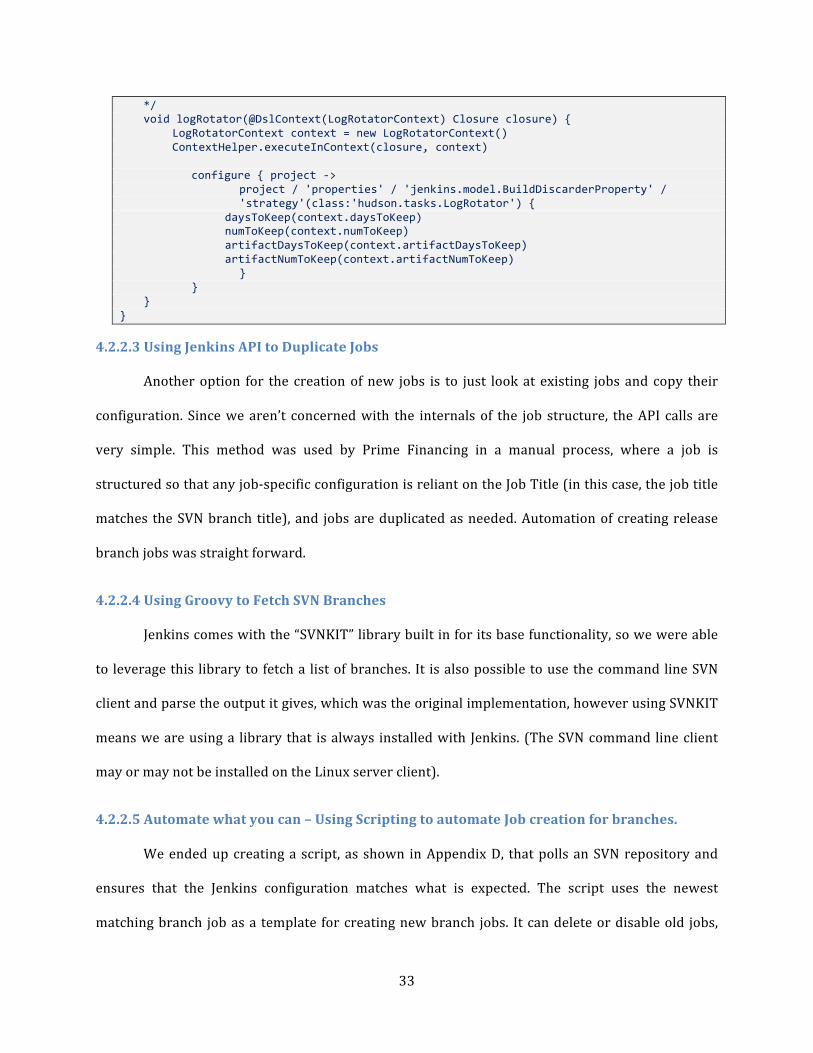
4.2.2.3 Using Jenkins API to Duplicate Jobs
Another option for the creation of new jobs is to just look at existing jobs and copy their
configuration. Since we aren’t concerned with the internals of the job structure, the API calls are
very simple. This method was used by Prime Financing in a manual process, where a job is
structured so that any job-‐specific configuration is reliant on the Job Title (in this case, the job title
matches the SVN branch title), and jobs are duplicated as needed. Automation of creating release
branch jobs was straight forward.
4.2.2.4 Using Groovy to Fetch SVN Branches
Jenkins comes with the “SVNKIT” library built in for its base functionality, so we were able
to leverage this library to fetch a list of branches. It is also possible to use the command line SVN
client and parse the output it gives, which was the original implementation, however using SVNKIT
means we are using a library that is always installed with Jenkins. (The SVN command line client
may or may not be installed on the Linux server client).
4.2.2.5 Automate what you can – Using Scripting to automate Job creation for branches.
We ended up creating a script, as shown in Appendix D, that polls an SVN repository and
ensures that the Jenkins configuration matches what is expected. The script uses the newest
matching branch job as a template for creating new branch jobs. It can delete or disable old jobs,

34
and create new jobs automatically, removing a manual process that required distracting a Jenkins
administrator away from their other responsibilities. The frequency of the polling process is
configurable, but generally it would be set to check on a regular schedule.
Using the Job DSL was not ideal because the configurations were complicated and used
plugins not supported by Job DSL. The jobs were not created with such frequency that using Job
DSL would speed things up, and the learning of Job DSL and requirements of extending Job DSL
would be as error prone if not more error prone than building/modifying Jenkins jobs manually
through GUI. The other benefit of Job DSL over “copy paste” is to keep all jobs with the same
configuration. Since branches are generally for release, old branches are just kept for historical
purposes and do not need to be kept up to date. Copying the last used branch provides the
configuration needed.
4.2.2.6 Jenkins Integration with Plugins
After developing a rapid prototype using Groovy script, the desire for Jenkins configuration
integration arose, and a plugin was developed. Jenkins’ plugin framework allows for quick creation
of configuration menus with error checking, and the similarity of Groovy to Java (the language
Jenkins plugins are by in large written in) allowed for a very quick development cycle (the majority
of the time taken implementing new error checking features). Moreover, the integration with
Jenkins allowed streamlining some of the process – instead of depending on the Groovy plugin, the
EnvInject Plugin, and proper configuration of both, one just installs and configures the Sync
Branches plugin we developed. The plugin is used as a build step and the configuration and error
checking can be seen in figures 4.7 and figure 4.8. A global configuration area was also added for
common configuration, as seen in figure 4.9.

35
Figure 4.7: Configuration Screen for a Sync Branches Build Step
Figure 4.8: Configuration Screen with Advanced Options and Error-‐Checking Visible
Figure 4.9: Global Configuration Screen 4.3 Generating Reports
Metrics and measurements of projects are important to understand whether projects are
improving. We investigated available Jenkins reporting plugins, however they did not meet our
expectations. We decided to look at the source; Jenkins itself keeps all metrics and statistical
information, such as number of successful/failed builds and number of successful/failed
promotions. Therefore we investigated ways of extracting information from Jenkins into a
consumable format that can be used in reporting software to generate reports.
36
4.3.1 Dashboard View Plugin
We explored certain Jenkins plugins that might provide functionality to show Management
Information System details. The Dashboard View Plugin is one such plugin which can show some
straight forward information about jobs and builds.
Dashboard View adds “a new view implementation that provides a dashboard/portal-‐like
view for Jenkins”(Hayes & Ambu, 2015). The plugin allows users to create one or more new “views,”
labeled as Dashboard, which is customizable and contains various portlets with information about
the selected job(s). Portlets are widgets containing useful charts or statistics. Further explanation
on this terminology can found in Appendix A. More information about Dashboard View Plugin can
be found in Appendix H.
Even though Dashboard View provides capabilities to visualize some information about jobs
and builds within the Jenkins web instance, it doesn’t provide any information regarding
promotions. To overcome this limitation we decided to custom implement the ability to access this
information. When deciding how to display the information, we chose to extract the data to be used
in external reporting software as that would provide more flexibility than what was shown in the
Jenkins dashboard for far less work.
4.3.2 Data Extraction Plugin
As part of the project objective to provide MIS reports for Jenkins usage, it was identified
that a tool needed to be created to extract Job and Promotion data from a Jenkins server into an
easily consumable format that could be then analyzed and transformed into a report.
4.3.2.1 Prototype – Identifying Data Extraction Method
During the initial research phase, we used groovy scripting in the Jenkins console, as seen in
figure 4.10, along with documentation to identify where the data we desired resided. The data

37
identified was the build status and time for every build and promotion information within Jenkins.
Jenkins exposes this data through a stable and well defined, albeit internal, API. This method of
extracting data is quick and simple, and leverages the usability of the Jenkins code base.
Figure 4.10: Jenkins Script Console
Alternatives
Also evaluated was the possibility of using the Jenkins REST API – an HTTP API provided by
Jenkins and its plugins. However, in our research we discovered that the API does not have an
endpoint for mass data extraction of this type, but rather allows for investigation and modification
of individual Jobs. It does provide a way to enumerate jobs and builds, however using that endpoint
would still require a new HTTP REST API call for every single job. As well, there is no API endpoint
to enumerate Promotions for a given build. Given these limitations, and given how simple using a
programmatic method is, we chose the latter.
Another possibility is to do manual parsing of the XML files in which the Jenkins
configuration is stored, an idea that was brought up by the sponsor. However, this idea was

38
dropped for a number of reasons: the XML files may be out of sync with the Jenkins instance, and
may change while reading. As well, the overhead of writing the code to parse the XML makes little
sense when Jenkins itself already has done the trouble of that for us.
4.3.2.2 Prototype – Extracting Data to File
Initially, our prototype groovy script was made to extract the desired data to a CSV File. The
next step was to extract into a SQL database. There were three ideas posed: extract the data within
the groovy script to SQL, extract the data with groovy to CSV and then create a second application in
Java to read the CSV and export to SQL, or create a single Jenkins plugin in Java to extract to SQL.
Hypothetically, one can use a feature of the Groovy Jenkins Plugin to add additional jar files
to the classpath of the script VM, allowing for using external jars such as would be required for a
database connector. However, this option was dropped for 2 reasons: 1) due to a bug in the plugin,
it didn’t work, and 2) having to maintain dependencies using complex classpath configurations is
error prone and not intuitive to set up.
Having two separate tools to maintain was not ideal. Creating a Jenkins plugin has
additional benefits, so this path was chosen.
4.3.2.3 Java Extraction Tool Plugin
Jenkins plugins are all written using the Java programming language. Using Java has a few
key benefits: we can structure the project as an actual project rather than a script file and loosely
gather dependencies; a more strongly typed and strict language allows for creation of a more
robust tool; and dependencies can be managed as part of the project and packaged together for
deployment. Furthermore, creating a Jenkins plugin allows for integration with the Jenkins web GUI.

39
Creating a Plugin
Jenkins has a wide-‐ranging plugin extension system that we used to develop our plugin.
Jenkins provides a template for creating the base of a plugin that can be customized to one’s needs.
The plugin was implemented as a Jenkins Build Step, which can be added to and configured in a
Jenkins Job. The plugin was made in Java using Maven for dependencies, which allows for bundling
the required dependencies such as database drivers and helper libraries in the tool distributable in
the plugin file.
Configuration Considerations
Parameters are configurable as a part of the standard Jenkins configuration console. The
target database and credentials are configurable in Jenkins in the build job. Credentials are
encrypted using Jenkins standard methods.
Data Type Considerations
In designing the tool some special considerations were made towards data types for
interoperability. Java dates operate using milliseconds since the Unix Epoch. Microsoft SQL Server,
as a .NET product, operates on 100 nanosecond “ticks” since the year 1 started. While the .NET
DateTime is 10000 times more precise than Java’s milliseconds, in the conversion between .NET
and Java we saw errors where the time recorded was 1 millisecond off from the actual time desired
to be recorded. To prevent such conversion errors, time was stored as a raw long integer
representing the Java Date, in such a way that conversion between different Date styles is not
needed. However, MS Excel does not have an easy way to convert Milliseconds to a local time, so the
data was denormalized and an additional local date column was added that is precise enough for
reporting needs, and in a format that Excel understands.

40
4.3.2.4 Outcomes
A Jenkins Plugin was created and implemented on Prime Financing’s Jenkins server. The
configuration screen is shown in figure 4.11, and it has error checking validates credentials and
URL, as seen in figure 4.12. The plugin will extract new job metadata to the specified SQL server, as
seen in figure 4.13, or to a specified CSV file. The plugin is designed such that it can be run at any
interval, and will only append new data.
Figure 4.11: Configuration Screen
Figure 4.12: Error Checking validates credentials and URL

41
Figure 4.13: Data in SQL
4.3.3 Reporting with Excel Pivot Table
The Job and Promotion information from the SQL server was then imported into Excel. We
decided to use pivot tables to filter and group the very large data set. A pivot table is a data
summarization tool that can automatically sort, count, give average, and do other functions on data
stored in a spreadsheet or table. The actions and filtering are independent of the original data
(MacDonald, 2005). Instructions on how to create a pivot table using a SQL database and CSV file
source can be found in Appendix E and Appendix F respectively. The version of Excel we worked on
was Microsoft Excel 2007, but the pivot table functionality is available in every version of Excel.
Information about the features of our pivot table configuration can be found in Appendix G. The end
result can be as seen in figure 4.14 below. The pivot chart is nice in that it shows an understandable
visual representation of the number of successful/failed promotions across time.

42
Figure 4.14: Pivot Chart created from sample data. 4.4 Summary
By analyzing the strength and weakness of both CA Release Automation and Jenkins and
sample implementations, we determined Jenkins is a better to be widely implemented in Prime
Financing. We explored and tested several Jenkins plugins, which could be helpful, such as pipeline
view, Job DSL, Groovy scripting, and Dashboard View, and we evaluated feasibility of each plugin.
We also demonstrated how to create Management Information System data reports with Jenkins. In
the next chapter, we will conclude our findings and provide our recommendations in order to
enhance the continuous delivery process of the chosen tool, Jenkins, and the process to adopt
candidate applications into Jenkins.
43
5.0 Conclusions and Recommendations In this chapter, we provide our conclusions and recommendations to choose the better tool
and to develop strategies to onboard applications on the chosen tool. We recommend Prime
Financing uses Jenkins based on our comparative analysis of Jenkins and CA Release Automation.
We determined several strategies to enhance the continuous delivery process on Jenkins via
investigating and developing some plugins. We also provided recommendations on how to show
and use management information system details.
5.1 Conclusions
Based on our comparative analysis, both CA Release Automation and Jenkins have their
respective advantages. CA Release Automation provides robust and sharable deployment strategies,
and allows users to configure environments. Moreover, there is less administrative overhead for
frequently changing deployment processes and complicated deployment to many different targets.
As for Jenkins, it follows build-‐your-‐own deployment strategies, which provides convenient
integration with current application configurations. Furthermore, the set-‐up process is quick for
teams with existing deployment scripts or simple deployments.
We explored several plugins that could enhance the automated deployment process. Jenkins
has several available pipeline view plugins, which could show upstream and downstream
relationships. These plugins are useful, but don't integrate well with the Promoted Builds Plugin or
with Prime Financing’s configuration. As for Job DSL Plugin, while it is a powerful tool, it has a high
learning curve and is heavyweight in general. For Groovy scripting, it can accomplish simple and
useful actions, however it has a high learning curve for complicated jobs. In the end, however,
Jenkins plugins written in Java that leverage Jenkins’ API and tools proved the most useful and
44
stable for reliably automating these tasks, while Groovy scripting proved to be a useful tool for
quickly testing and scripting small things.
As for Management Information System reporting, we discovered that any specified data
could be extracted from Jenkins, such as build and promotion information. We created a Jenkins
Plugin to extract data either into a SQL database or CSV files. Furthermore, the extracted
information can be imported into data reporting software, such as Excel, to create reports; we
created a reusable Excel template that creates reports from Prime Financing’s Jenkins instance.
5.2 Recommendations
Based on our research and implementations, we recommend using Jenkins over CA Release
Automation because of minor overhead and quicker set-‐up. In order to eliminate some manual
steps, we recommend using our Jenkins Plugin ‘Sync Branches’ to accomplish automatic job
creation and cleanup from SVN branching instead of manually copying jobs. Moreover, to provide
management information details. We recommend using our Jenkins plugin to extract data into
either a SQL database or CSV files. SQL database is the preferred destination rather than CSV files
because SQL databases are easier to manage data and has better compatibility with different
reporting software. Additionally, we also developed an Excel template to visually show data reports.
We highly recommend using Excel with our template, since Excel is widely used and intuitive for
reporting.
5.3 Impact of Our Project
Our project results and recommendations can help our sponsor, Barclays Prime Financing,
to improve automated deployment in the continuous delivery process, and to generate reports to
understand the continuous delivery process. Implementing strategies we developed could
eliminate a few manual steps within their continuous delivery process. By using our strategies, we

45
hope the continuous delivery process could be more efficient and easy, thus helping address the
challenges of automated deployment.
46
References Ambu, M. (2015). Project Statistics Plugin. Retrieved from https://wiki.jenkins-‐
ci.org/display/JENKINS/Project+Statistics+Plugin
Barclays. (2015). Purpose and Values. Retrieved from https://www.home.barclays/about-‐
barclays/barclays-‐values.html
Beck, K., Beedle, M., Bennekum, A. v., Cockburn, A., Cunningham, W., Fowler, M., . . . Thomas, D.
(2001). Agile manifesto. Retrieved from http://agilemanifesto.org/principles.html
CA_Technologies. (2015a). CA Release Automation. Retrieved from
http://www.ca.com/us/devcenter/ca-‐release-‐automation.aspx
CA_Technologies. (2015b). CA Release Automation 5.5.x: Overview 100.
Cohen, D., Lindvall, M., & Costa, P. (2003). Agile Software Development. Retrieved from
http://citeseerx.ist.psu.edu/viewdoc/download?doi=10.1.1.201.2704&rep=rep1&type=pdf
Farcic, V. (2014). Continuous Delivery: Introduction to concepts and tools. Retrieved from
http://technologyconversations.com/2014/04/29/continuous-‐delivery-‐introduction-‐to-‐
concepts-‐and-‐tools/
Hayes, P., & Ambu, M. (2015). Dashboard View. Retrieved from https://wiki.jenkins-‐
ci.org/display/JENKINS/Dashboard+View
Highsmith, J. (2002). What is Agile Software Development? The Journal of Defense Software
Engineering, 6.
Highsmith, J., & Cockburn, A. (2002). Agile software development: the business of innovation. IEEE
Computer Society, 34(9), 8.
InfoQ. (2014). Introducting DevOps to the Traditional Enterprise. Retrieved from
http://www.neucloud.cn/wp-‐content/uploads/2015/02/Introducing-‐DevOps-‐to-‐the-‐
Traditional-‐Enterprise-‐final.pdf

47
Inman, H. (2012). Continuous Integration for Mobile Apps with Jenkins: Promoted Builds, the QA
Process and Beta Distribution. Retrieved from
https://www.cloudbees.com/blog/continuous-‐integration-‐mobile-‐apps-‐jenkins-‐promoted-‐
builds-‐qa-‐process-‐and-‐beta-‐distribution
Kawaguchi, K. (2015). Meet Jenkins. Retrieved from https://wiki.jenkins-‐
ci.org/display/JENKINS/Meet+Jenkins
Kawaguchi, K., & Hayes, P. (2015). Promoted Builds Plugin. Retrieved from https://wiki.jenkins-‐
ci.org/display/JENKINS/Promoted+Builds+Plugin
Kim, G. (2014). My fifteen year journey studying high performing IT organizations. YouTube:
Docker.
Logan, M. J. (2014). Fresh Stats Comparing Traditional IT and DevOps Oriented Productivity.
Retrieved from http://devops.com/2014/01/23/fresh-‐stats-‐comparing-‐traditional-‐it-‐and-‐
devops-‐oriented-‐productivity/
MacDonald, M. (2005). What is a Pivot Table? Retrieved from
http://archive.oreilly.com/pub/a/windows/archive/whatisapivottable.html
Martin, F. (2006). Continuous Integration. Retrieved from
http://www.martinfowler.com/articles/continuousIntegration.html
Mountain_Goat_Software. (2005). Process of Agile Software Development. Retrieved from
https://www.mountaingoatsoftware.com/agile/scrum/images
Mountain_Goat_Software. (2015). Scrum Overview for Agile Software Development. Retrieved
from https://www.mountaingoatsoftware.com/agile/scrum/overview
Mueller, E., Wickett, J., Gaekwad, K., & Karayanev, P. (2011). What is DevOps? Retrieved from
http://theagileadmin.com/what-‐is-‐devops/
Ramfelt, E. (2015). Terminology. Retrieved from https://wiki.jenkins-‐
ci.org/display/JENKINS/Terminology

48
Rhine, N. (2014). Project Build Times. Retrieved from https://wiki.jenkins-‐
ci.org/display/JENKINS/Project+Build+Times
Smith, C. (2015). The 5 Big Benefits of Automated Deployment. Retrieved from https://www.red-‐
gate.com/blog/5-‐big-‐benefits-‐automated-‐deployment
Trimios. (2012). Basic structure of CI system. Retrieved from https://trimios.com/ci_services.html
Wikipedia. (2015a). Continuous Delivery.
Wikipedia. (2015b). Continuous Integration.
XebiaLabs. (2015). Depolyment Automation. Retrieved from
https://xebialabs.com/solutions/deployment-‐automation/
49
Appendix A: Glossary of Technical Terms General Application: A piece of software that is developed and built by a Barclays development team.
Application and project may be used synonymously within this paper. Onboard: This is the configuration procedure necessary for applications to do when being set up to
a continuous deployment environment, whether that is Nolio or Jenkins. For the case of Jenkins, the application development team is responsible for filling out the Prime Financing-‐supplied questionnaire, setting up the deployment scripts which detail out the build sequence, build dependency, and build frequency as well as notification method.
Jenkins (Ramfelt, 2015) Job/Project: Jenkins seems to use these terms interchangeably. They all refer to runnable tasks
that are controlled and/or monitored by Jenkins. Build: The result of one run of a project. Plugin: Third-‐party plugins can extend Jenkins by adding features not present in the core. This
allows users to satisfy any need, no matter how niche it is without affecting the core. Node/Slave: Slaves are computers that are set up to build projects for a master. Jenkins runs a
separate program called "slave agent" on slaves. When slaves are registered to a master, a master starts distributing loads to slaves. The term Node is used to refer to all machines that are part of Jenkins grid, slaves, and master.
Promotion: This term pertains to the Promoted Builds Plugin. A build that passed any additional
criteria would be marked by promotion icons. This kind of promotion allows triggering of downstream jobs on more criteria than just if the build passed or failed. Users can distinguish good builds from builds that had runtime problems through checking promotions.
Groovy: Groovy is a script programming language based on Java. It is a lightweight language that
can run on a Java server. Since Jenkins runs on Java, a Groovy script is directly compliable and compatible with Jenkins.
Jelly: Jelly is a customizable Java and XML based scripting and processing engine. It turns XML
script into executable code. Jelly is a component of Apache Commons. Portlet: This term pertains to the Dashboard View Plugin. Generally speaking, a portlet is a Java-‐
based web component that processes requests and generates dynamic content. They are deployed in a container, Dashboard View Plugin for the case of our project.

50
View (dashboard status window): In the screenshot shown below, there are two icons that describe the status of the current build. The “S” column represents the “status of the last build". The “W” column represents the “weather report showing aggregated status of recent builds.” Jenkins use these two concepts to introduce the general situation of a build.
Figure 7.1: Dashboard status window
Status: There are four kinds of status of a build.
Successful: Build is completed and considered stable.
Unstable: Build is completed, but is considered unstable.
Broken: Build is failed during building.
Disabled: Build is disabled. Weather: Jenkins will release a robust value (from 0-‐100) for build based on some processor tasks,
which be implemented through plugins. Those tasks may include unit test (JUnit), coverage (Cobertura) and static code analysis (FindBugs). Higher score indicates the build is more stable. Build stability score less than 80 points is considered as unstable.
Table 7.1: Weather Status 80+ 60-‐79 40-‐59 20-‐39 0-‐19
CA Release Automation (CA_Technologies, 2015b) Artifacts: the objects that make up the software application being deployed. Components: a collection of the objects to build a process Actions: an individual operation in the target deployment environment Flow: a group of actions with a defined sequence Process: a set of actions executed in a logical order Environment: a group of computers to which deployments are deployed simultaneously Release Template: each template is contained within Category and provides the processes that
need to be executed for release along with the order they should be executed Pipeline: a way to express a sequence of operations over DevOps
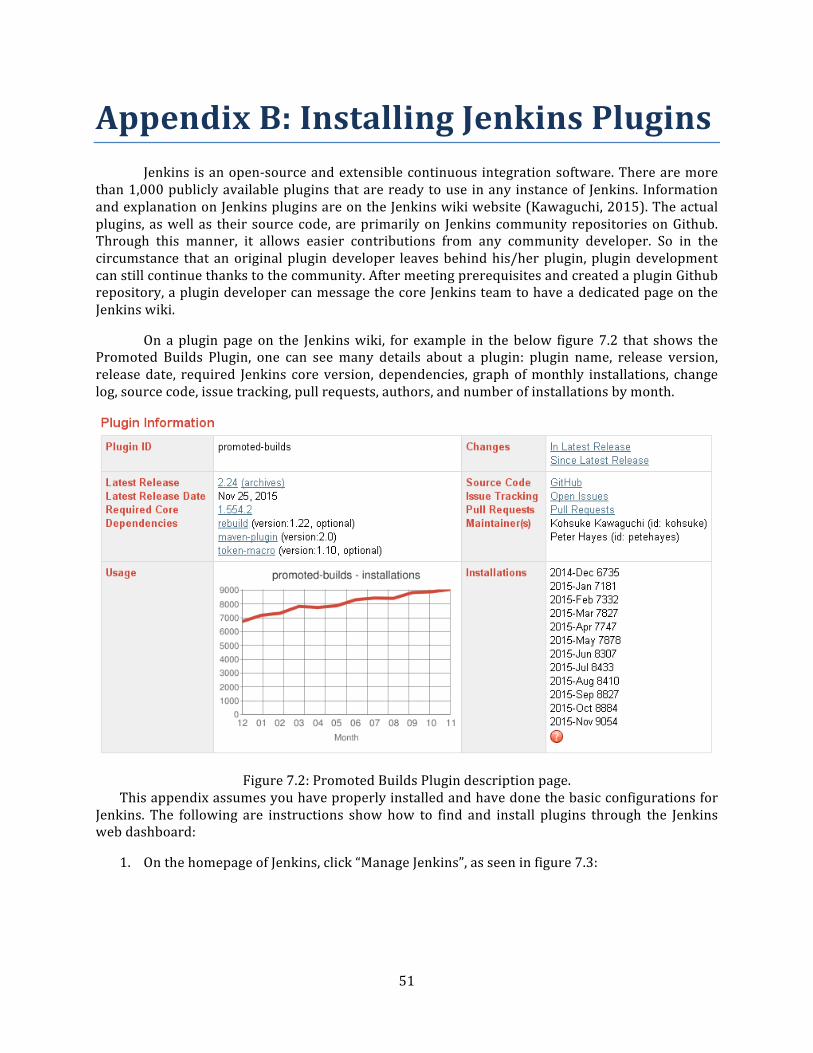
51
Appendix B: Installing Jenkins Plugins Jenkins is an open-‐source and extensible continuous integration software. There are more
than 1,000 publicly available plugins that are ready to use in any instance of Jenkins. Information and explanation on Jenkins plugins are on the Jenkins wiki website (Kawaguchi, 2015). The actual plugins, as well as their source code, are primarily on Jenkins community repositories on Github. Through this manner, it allows easier contributions from any community developer. So in the circumstance that an original plugin developer leaves behind his/her plugin, plugin development can still continue thanks to the community. After meeting prerequisites and created a plugin Github repository, a plugin developer can message the core Jenkins team to have a dedicated page on the Jenkins wiki.
On a plugin page on the Jenkins wiki, for example in the below figure 7.2 that shows the Promoted Builds Plugin, one can see many details about a plugin: plugin name, release version, release date, required Jenkins core version, dependencies, graph of monthly installations, change log, source code, issue tracking, pull requests, authors, and number of installations by month.
Figure 7.2: Promoted Builds Plugin description page. This appendix assumes you have properly installed and have done the basic configurations for
Jenkins. The following are instructions show how to find and install plugins through the Jenkins web dashboard:
1. On the homepage of Jenkins, click “Manage Jenkins”, as seen in figure 7.3:
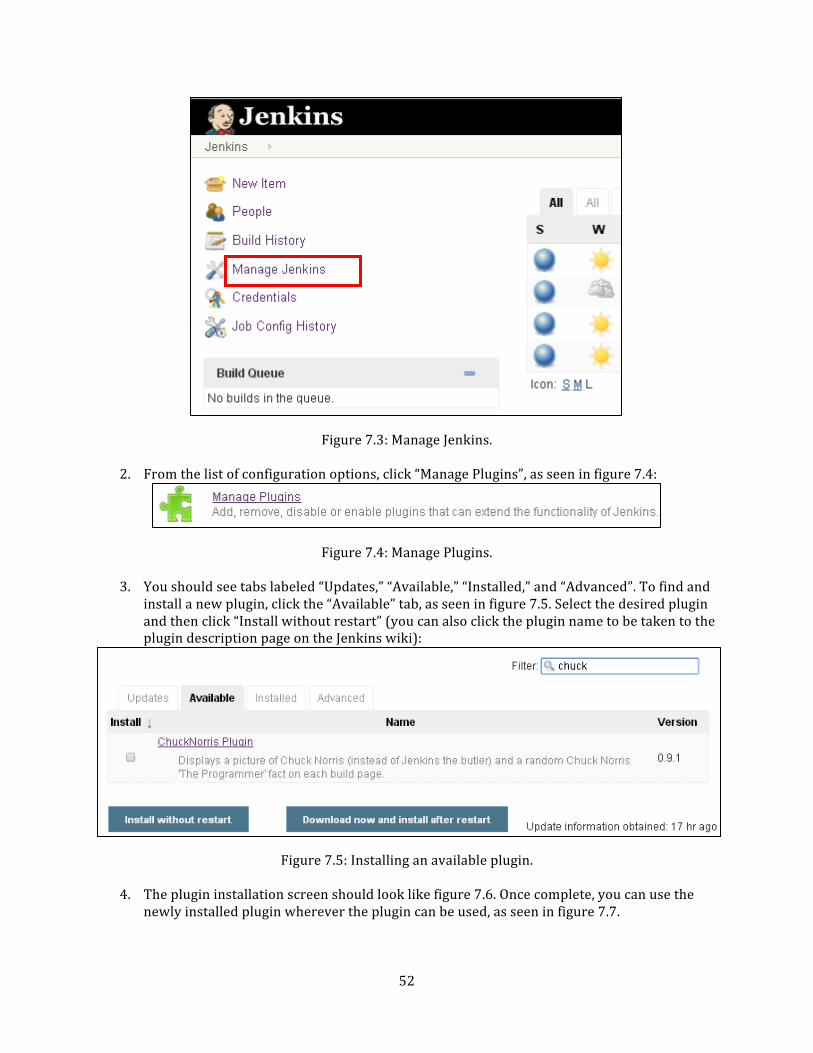
52
Figure 7.3: Manage Jenkins.
2. From the list of configuration options, click “Manage Plugins”, as seen in figure 7.4:
Figure 7.4: Manage Plugins.
3. You should see tabs labeled “Updates,” “Available,” “Installed,” and “Advanced”. To find and install a new plugin, click the “Available” tab, as seen in figure 7.5. Select the desired plugin and then click “Install without restart” (you can also click the plugin name to be taken to the plugin description page on the Jenkins wiki):
Figure 7.5: Installing an available plugin.
4. The plugin installation screen should look like figure 7.6. Once complete, you can use the newly installed plugin wherever the plugin can be used, as seen in figure 7.7.
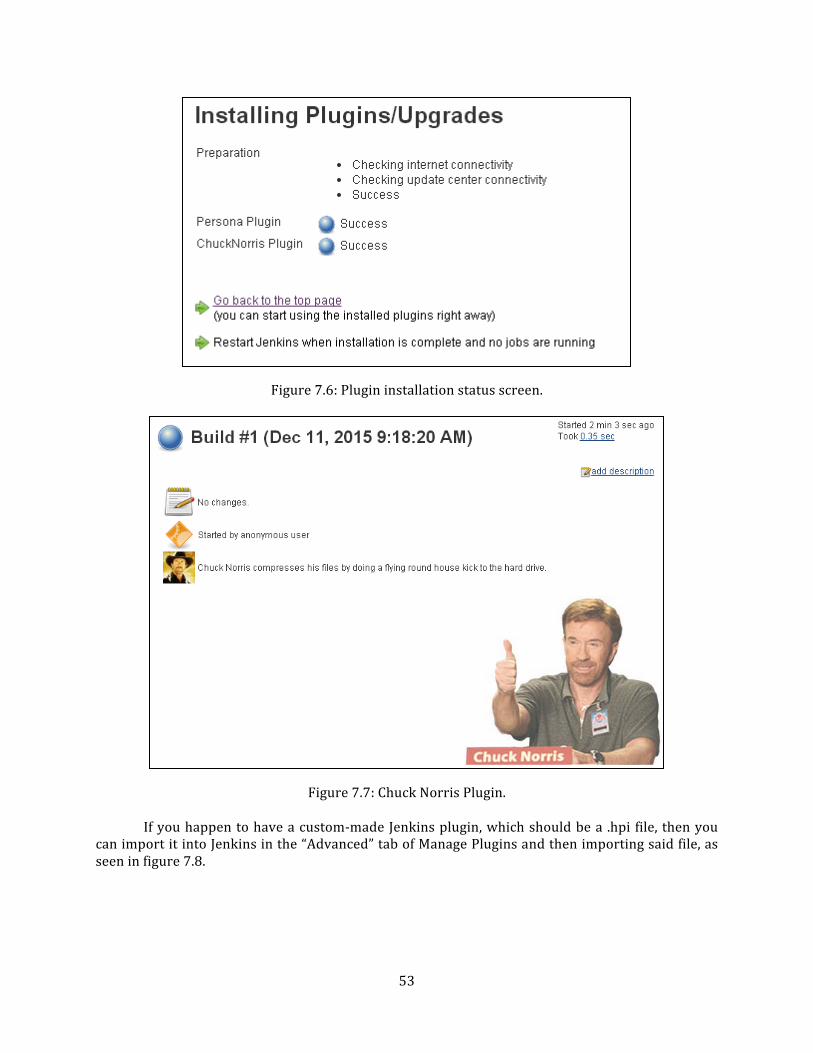
53
Figure 7.6: Plugin installation status screen.
Figure 7.7: Chuck Norris Plugin.
If you happen to have a custom-‐made Jenkins plugin, which should be a .hpi file, then you can import it into Jenkins in the “Advanced” tab of Manage Plugins and then importing said file, as seen in figure 7.8.

54
Figure 7.8: Uploading a custom plugin.

55
Appendix C: Nolio Installation Instructions
1. Request two functional groups to be created, one labeled Dev and one labeled Ops. Functional groups are Barclays system groups for developers to coordinate with each other.
2. Request that the two groups be added to the “sandpit” Nolio instance. An instance can be considered a Nolio website dashboard. Barclays has two different instances: sandpit (for learning and familiarization purposes only) and production (for actual development of flow and deployments).
3. Download a zip file that contains Barclays’s Nolio extended version template from the tutorial page.
4. Go to the Nolio sandpit website dashboard and enter the ROC. 5. Import the zip file making sure to import all components. 6. Set your application as Barclays’s Nolio extended version platform test application. 7. Navigate to Designer -‐> Process Design -‐> Components. 8. Assign shared components from the imported components. For the tutorial, it stated to
assign deploy copy & uncompress, windows service start & stop, and email utility components.
9. Map a server type, the tutorial stated App_Name1, for each shared component. 10. Navigate to Designer -‐> Process Design -‐> Processes. 11. In the process Deployment, select Notify_Deploy_Begin and click “Add Action/Flow” for the
email utility component. 12. Select the f_send_release_begin_email flow from the dropdown list. Save and publish. Make
sure to assign the process to the UAT environment. 13. Repeat steps 11 and 12 for the following as table 7.2.
Table 7.2: Process areas and flows Process Area Flow Post-‐Deployment -‐> Notify_Deploy_End f_send_release_end_email (from email utility
shared component Deployment -‐> Stop_System f_stop_component (from windows service start
& stop shared component) Deployment -‐> Start_System f_start_component (from windows service start
& stop shared component) Deployment -‐> Deploy_Binaries f_deploy_component (from deploy copy &
uncompress shared component) 14. Navigate to Environment -‐> Agent Assignment. 15. Make sure that your Nolio agent is installed and running properly. For our team’s case, we
installed the agent, which is a windows service running in the background, on one of our local work computers.
16. Select the appropriate server name (for our case it was the local computer hostname) and assign it to the server type App_Name1. Also set the environment as UAT.
17. Repeat step 16 for the server type util.Email. 18. Navigate to Artifact -‐> Artifact Management. 19. Select the artifact SC.Compressed and select Add Artifact Definition.

56
20. Be sure to set the file type of the definition as zip and ensure that the server type App_Name1 is selected for the definition.
21. Select the newly created Artifact Definition and then click Add Version. 22. Version can be any version. The artifact source should be the full path where the artifact
source file should be (steps 18-‐20 did not work for our case, so we skipped these steps). 23. Navigate to Releases -‐> Template Categories. Click “New”. 24. Create a new template category with any name. 25. Within the new template category, click “New” and create a new deployment template. 26. Within the new deployment template, click “Add Step”. Add the steps as shown below:
Table 7.3: Porcesses and Categories
27. Drag and drop all deployment steps to the center tab called “Deployment Steps” or “Post Deployment”. This is when you can also set dependencies.
28. Navigate to Environments -‐> Parameter Configuration -‐> Parameters tab. 29. Select the UAT environment. You will see a list of the shared components we selected. It is
here that a user can set up the email addresses for emails to be sent to, the specified windows services to stop and start, and the artifact definition path.
30. Navigate to Releases -‐> Deployment Plans. Click “New”. 31. In the newly created deployment project, click “New Deployment Plan”. 32. Within the settings for a new deployment plan, you must supply a build number and have
the plan use the template that we created. 33. Click on the newly created deployment plan to view details. There should be a “Deploy”
button, which is the final step. 34. Click “Deploy” and you must supply some settings, for the tutorial’s case you must select the
UAT environment. 35. All done!
Process Category Notify_Deploy_Begin Deployment Stop_System Deployment Deploy_Binaries Deployment Start_System Deployment Notify_Deploy_End Post Deployment

57
Appendix D: job_per_branch.groovy /* WPI DevOps MQP Khazhismel Kumykov <[email protected]> <[email protected]> job_per_branch.groovy Overview: This script gets a list of branches from the given SVN repository, sorted by the date of the newest commit in the branch. The script then searches for jobs existing in Jenkins with the *exact same* name as the branch. The script will the matching job for the newest branch as a template for creating new jobs. The script will create new jobs for up to `BRANCHES_TO_KEEP` branches. The script will disable jobs after `BRANCHES_TO_KEEP` branches. The script will *delete* jobs after `BRANCHES_DELETE_AFTER` branches. Branch names *must be* unique between projects. Using: - Must create and configure a base branch job for one of the branches in SVN. - The job must be configured such that copying and renaming the job are the only required configuration changes to allow the job to work for a new branch. (i.e., use $JOB_NAME for SVN branch selector, etc.) - Must create a new Job for each SVN repository you wish to be managed. - Add a required Credentials Parameter named "SVN_CREDS" with the default set to the 'username with password' credentials for your SVN repository. - Check "Prepare environment for the run" - Check "Keep Jenkins Environment Variables" - Check "Keep Jenkins Build Variables" - Add Parameters as needed to "Properties Content" (Do not surround in quotes) e.g.: BRANCHES_REGEX=^WPI_Copy_.* SVN_REPO=http://svn/repos/WPI/ - Set the Job to build periodically as appropriate. - Add a "Execute system Groovy script" build step, select "Groovy script file" and provide the path to this groovy script. - Optionally, you may configure global properties in the global configuration. - "Manage Jenkins" > "Configure System" > "Global Properties" - Check "Environment variables" and add key-value pairs as desired

58
Required Plugins - Subversion Plugin (Comes with Jenkins) - Groovy Plugin (http://wiki.jenkins-ci.org/display/JENKINS/Groovy+plugin) - EnvInject Plugin (https://wiki.jenkins-ci.org/display/JENKINS/EnvInject+Plugin) - Credentials Plugin (https://wiki.jenkins-ci.org/display/JENKINS/Credentials+Plugin) Params: BRANCHES_TO_KEEP - How many branches to keep active projects for. BRANCHES_DELETE_AFTER - How many branches to keep in Jenkins. If there are more jobs than this limit, extra jobs will be deleted. BRANCHES_REGEX - Regex for branches to look at. E.g. "^WPI_Copy_.*" - All branches starting with 'WPI_Copy_' E.g. "^[^_].* - All branches not starting with '_' SVN_REPO - The __root__ of the repository. E.g. "http://svn/repos/WPI/" SVN_CREDS - Must be a username-password credentials ID for accessing the SVN Repo */ import hudson.model.* import com.cloudbees.plugins.credentials.CredentialsProvider import com.cloudbees.plugins.credentials.common.StandardUsernameCredentials import org.tmatesoft.svn.core.io.SVNRepositoryFactory import org.tmatesoft.svn.core.SVNURL import org.tmatesoft.svn.core.auth.BasicAuthenticationManager def log(l) { println ("[SVN Branch Sync] $l") } def resolve(name) { bv = build.buildVariableResolver.resolve(name) if (bv != null) { return bv } else { return build.getEnvironment(listener).get(name) } } SVN_REPO=resolve("SVN_REPO") SVN_CREDS=resolve("SVN_CREDS") BRANCHES_REGEX=resolve("BRANCHES_REGEX") BRANCHES_TO_KEEP=resolve("BRANCHES_TO_KEEP") BRANCHES_DELETE_AFTER=resolve("BRANCHES_DELETE_AFTER") log "Beginning SVN Branch Sync"

59
log "SVN_REPO: $SVN_REPO" log "SVN_CREDS: $SVN_CREDS" log "BRANCHES_REGEX: $BRANCHES_REGEX" log "BRANCHES_TO_KEEP: $BRANCHES_TO_KEEP" log "BRANCHES_DELETE_AFTER: $BRANCHES_DELETE_AFTER" log "" // Lookup the credentials by ID cred = CredentialsProvider.lookupCredentials(StandardUsernameCredentials.class, Hudson.instance).findResult({it.id == SVN_CREDS ? it : null}) if (cred == null) { throw new hudson.AbortException("Could not find credentials with ID: $SVN_CREDS") } // Depending on how they are specified, they may be Ints or Strings. // Will throw if unable to parse. if (!(BRANCHES_TO_KEEP instanceof Integer)) { BRANCHES_TO_KEEP = Integer.parseInt(BRANCHES_TO_KEEP) } if (!(BRANCHES_DELETE_AFTER instanceof Integer)) { BRANCHES_DELETE_AFTER = Integer.parseInt(BRANCHES_DELETE_AFTER) } // Throw if this is invalid if (BRANCHES_DELETE_AFTER < BRANCHES_TO_KEEP) { throw new hudson.AbortException("BRANCHES_DELETE_AFTER should be greater than or equal to BRANCHES_TO_KEEP") } if (BRANCHES_TO_KEEP <= 0) { throw new hudson.AbortException("BRANCHES_TO_KEEP must be greater than 0") } items = Hudson.instance.items.groupBy{ it.name } def repo = SVNRepositoryFactory.create(SVNURL.parseURIDecoded(SVN_REPO)) repo.setAuthenticationManager(new BasicAuthenticationManager(cred.username, cred.password.getPlainText())) def branches = new ArrayList() repo.getDir("branches", repo.getLatestRevision(), true, branches) branches.sort{a,b -> b.date <=> a.date} branches = branches.findAll { log "Found Branch: $it.name - rev. $it.revision ($it.author) - $it.date" should_manage = (it.name =~ BRANCHES_REGEX).matches() if (!should_manage) { log "Ignoring Branch: $it.name"

60
} return should_manage } log "" // Find newest branch that exists newestBranchWithJob = "" for (branch in branches) { if (items.containsKey(branch.getName())) { newestBranchWithJob = branch log "Using ${branch.getName()} as template job." break; } } log "" // Throw if we can't find a template job. if (newestBranchWithJob == "") { throw new hudson.AbortException("Could not find branch job to copy!") } templateJob = items[newestBranchWithJob.name][0] // Iterate over every branch that we aren't ignoring branches.eachWithIndex({branch, idx -> jobExists = items.containsKey(branch.name) job = null if (jobExists) { job = items[branch.name][0] } if (idx >= BRANCHES_TO_KEEP) { // If job exists, we want to disable or delete it if (jobExists) { if (idx >= BRANCHES_DELETE_AFTER) { log "${branch.name} - Deleting job ${job.name}" job.delete() } else { if (job.disabled) { log "${branch.name} - Doing nothing for job ${job.name} - it's disabled as it should be. It will be deleted soon." } else { log "${branch.name} - Disabling job ${job.name} - it will be deleted soon" job.disabled = true job.save() } } } else { log "${branch.name} - Doing nothing - it should be deleted, and

61
is." } } else { // If job doesn't exist, we want to create it. if (jobExists) { if (job.disabled) { log "${branch.name} - Enabling job ${job.name}" job.disabled = false job.save() } else { log "${branch.name} - Doing nothing for job ${job.name} - it exists as it should" } } else { log "${branch.name} - Creating new job ${branch.name} by copying ${templateJob.name}" newJob = Hudson.instance.copy(templateJob, branch.name) // This seems to be required to enable building newJob.disabled = false newJob.save() // Run a new build right after making the job. newJob.scheduleBuild(0, new Cause.UpstreamCause(build)) } } }) // build.result = Result.UNSTABLE log "" log "SVN Branch Sync Complete"

62
Appendix E: Excel Reporting using SQL database 1) Within Excel, click the Data tab and then click “From Other Sources” -‐> “From SQL
Server”, as seen in figure 7.9.
Figure 7.9: Import a SQL database data 2) In the Data Connection Wizard, fill out the SQL server name as well as username and
password log on credentials, as seen in figure 7.10.
Figure 7.10: Data Connection Wizard

63
3) Next you need to select the appropriate database that our plugin extracted the data to. You also need to select the appropriate table from the list:
Figure 7.11: Select the appropriate database 4) At the next window, you’re prompted to write a name and description for the Data
Connection file that has this connection. When finished, click “Finish”:
Figure 7.12: write a name and description for the file
* database name

64
5) The next window will prompt you on how you want to view the data. Make sure “Table” is selected and then click “Properties”, as seen in the left of figure 7.13. In the Connection Properties window, as seen in right of figure7.13, you can edit the refresh settings in the “Usage” tab. Click the “Definition” tab; the important areas here are “Command Type” and “Command Text”. Make sure Command Type is set to “SQL”.
Figure 7.13: Import data (left) and properties window (right) 6) Paste in the following SQL command into the Command Text, as seen below , (please
note the *YOUR_DATABASE_NAME* parts of the command should be replaced with the database name you selected from Step 3). Once complete, click OK and then OK in the “Import Data” window.
SELECT [jobName], [groupName], [number], [result], cast([time] as datetime) as [time], cast([finishTime] as datetime) as [finishTime], [promotionName], [promotionBuildNumber], [promotionBuildResult], cast([promotionBuildTime] as datetime) as [promotionBuildTime], cast([promotionFinishTime] as datetime) as [promotionFinishTime] FROM [*YOUR_DATABASE_NAME*].[dbo].[jenkins_mis_extract_promotions] as prom JOIN [*YOUR_DATABASE_NAME*].[dbo].[jenkins_mis_extract_builds] as build ON (build.id = prom.buildId)

65
7) A “SQL Server Login” window should pop up prompting you for the log on username and password. The table should look like our example shown in figure 7.14:
Figure 7.14: Imported table 8) It is best to have all time related columns displayed as a date. Click any “time” column
and then right-‐click and select “Format Cells,” as seen in figure 7.15. Select the appropriate date:
Figure 7.15: Format Cells

66
9) Next comes the pivot table creation process. Select a part of the table. In the “Table Tools, Design” tab, click “Summarize with PivotTable,” as seen in figure 7.16. Make sure the entire Table is selected, then click OK:
Figure 7.16: Summarize with PivotTable
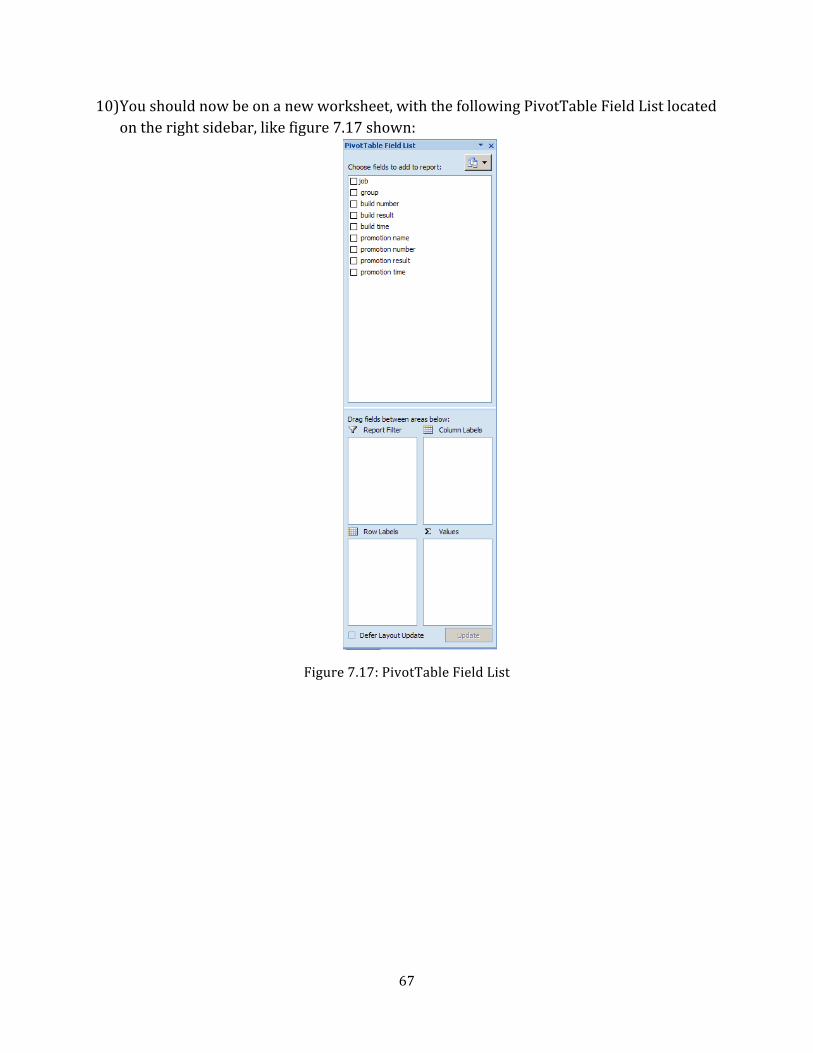
67
10) You should now be on a new worksheet, with the following PivotTable Field List located on the right sidebar, like figure 7.17 shown:
Figure 7.17: PivotTable Field List

68
11) Drag-‐and-‐drop the fields into the areas as shown below (dragging promotionBuildResult to Values should automatically set it as “Count”:
Figure 7.18: Customize row labels
12) Right-‐click any of the dates within the pivot table and click “Group”, as seen in the left of figure 7.19. Here you can select the start date and end date, as seen in the right of figure 7.19, as well as if you wish to view it by years, quarters, months, days, etc. For this tutorial, we will use months:
Figure 7.19: Group button (left) and grouping window (right)

69
13) Click anywhere in the pivot table. From the tabs at the very top, click “Options” under
“PivotTable Tools.” Then click “PivotChart”, as seen in the left of figure 7.20. You can select any appropriate chart, as seen in the right of figure 7.20, but one suggestion is a “stacked column” chart. Now you have a pivot table and associated pivot chart! You can make any adjustments thanks to the versatility of pivot tables.
Figure 7.20: PivotChart button (left) and Chart style selection (right) 14) Figure 7.21 is the pivot chart for our example data set:
Figure 7.21: Sample pivot chart If you would like to have only environments on the X-‐axis and the column bars being project names, then follow these steps:
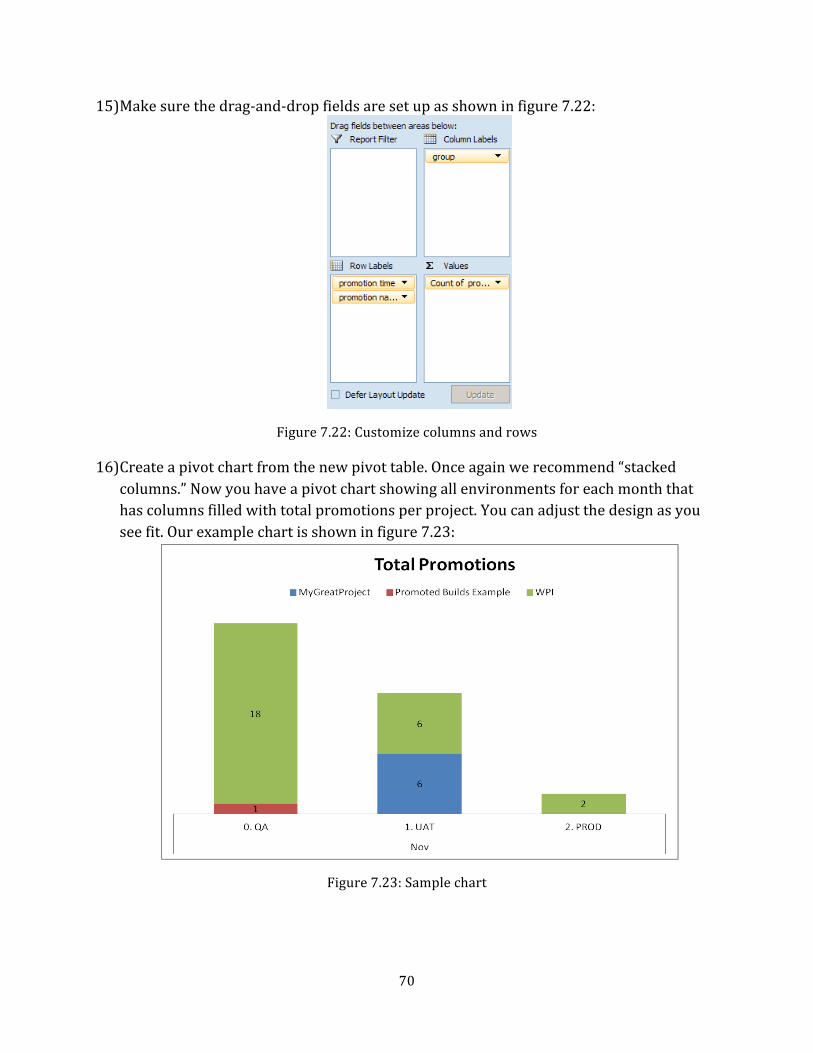
70
15) Make sure the drag-‐and-‐drop fields are set up as shown in figure 7.22:
Figure 7.22: Customize columns and rows
16) Create a pivot chart from the new pivot table. Once again we recommend “stacked columns.” Now you have a pivot chart showing all environments for each month that has columns filled with total promotions per project. You can adjust the design as you see fit. Our example chart is shown in figure 7.23:
Figure 7.23: Sample chart

71
Appendix F: Excel Reports using CSV data
1) As seen in figure 7.24, from the first cell, in the above case it’s G1, highlight all data until the last cell (you can accomplish this quickly by doing ctrl+shift+right arrow key, and then ctrl+shift+down arrow key).
Figure 7.24: raw .CSV data set in Excel 2) In the left of figure 7.25, in the Insert tab, click PivotTable. Use the default selected
table or range. In the right of figure 7.25, you may choose where you would like the PivotTable report to be placed; it will be placed in a new worksheet by default.
Figure 7.25: Insert PivotTable button (left) and create PivotTable window (right)
3) The following steps are similar to the instruction of reporting using SQL database.

72
Appendix G: Features of our pivot table configuration Group report filter
By default, all applications and their respective information from the original data are displayed. Using group report filtering, you can specify either one or more applications to be viewable. Clicking the dropdown arrow next to (All) shows the other applications. See figure 7.26:
Figure 7.26: Group report filter.
Promotion result column label
Each value column represents a promotion result: SUCCESS, FAILURE, and UNSTABLE. You can change the ordering via sorting, or filter out to see only desired promotion results. Clicking the dropdown arrow next to Column Labels shows all promotion results. See figure 7.27:
Figure 7.27: Promotion result column label.

73
Promotion time row label
Our pivot table configuration has it set up on a monthly basis. It’s possible to change the promotion time grouping to daily, quarterly, annually, or a “X number of days” variation. You can also specify the end and start date range. Right click a month, select “Group” and change the date settings. See figure 7.28:
Figure 7.28: Promotion time row label.
Promotion name row label
By default, applications on Prime Financing’s Jenkins have QA, UAT, and PROD promotion environments. It’s possible to set up a custom promotion environment, such as DEV, in the onboarding process. One can set only certain promotion environments to be viewable in the pivot table. Click a promotion name and then click the dropdown arrow next to Row Labels to see all promotion environments. See figure 7.29:

74
Figure 7.29: Promotion name row label. The final pivot table/pivot chart as well as the SQL Database connection configuration can serve as a template for new reports for Prime Financing to create in the future. For example, say you’re a manager for a group of application teams and you currently have promotion data for every month except December this year. Towards the end of December, if you manually tell Jenkins to extract the new data into the ongoing SQL database (or set Jenkins up to extract on a regular basis), then when you refresh the pivot table it will have the new December promotion information. One can adjust the refresh settings for the database table retrieval as well as pivot chart refresh. This helps in further removing manual steps for reporting. Additionally, when considering the promotion trend or even a forecast of the promotion count, one can easily use a trendline on top of the pivot chart, as seen in figure 7.30. The figure has a linear trendline that also forecasts two periods ahead. For our pivot chart configuration, the trendline can only be viewed for a specific promotion result.

75
Figure 7.30: Pivot chart with trend line.

76
Appendix H: Dashboard View Plugin Here are instructions on how to use the Dashboard View Plugin (Hayes & Ambu, 2015):
• On the Jenkins main page, click the “+” tab to start a new view wizard.
• Give it a name, and be sure to select “Dashboard” from the list of possible views as shown in
figure 7.31
Figure 7.31: Add a new view when using Dashboard View Plugin • For the new view configuration, besides selecting the appropriate jobs, the main area to
focus on is the “Dashboard Portlets” area. You can add a dashboard portlet to the top, left
column, right column, and bottom of the view. The view layout is as follows:
Top portlet 1 ……………………………………………………………………. Left portlet 1 Right portlet 1 Left portlet 2 Right portlet 2 Bottom portlet 1 ………………………………………………………………..
Default Available Portlets
There are several default available portlets within this plugin, and we introduce these
portlets in this section.
Standard Jenkins jobs list
In Figure 7.32, this is the default Jenkins job list as seen in a normal Jenkins view.
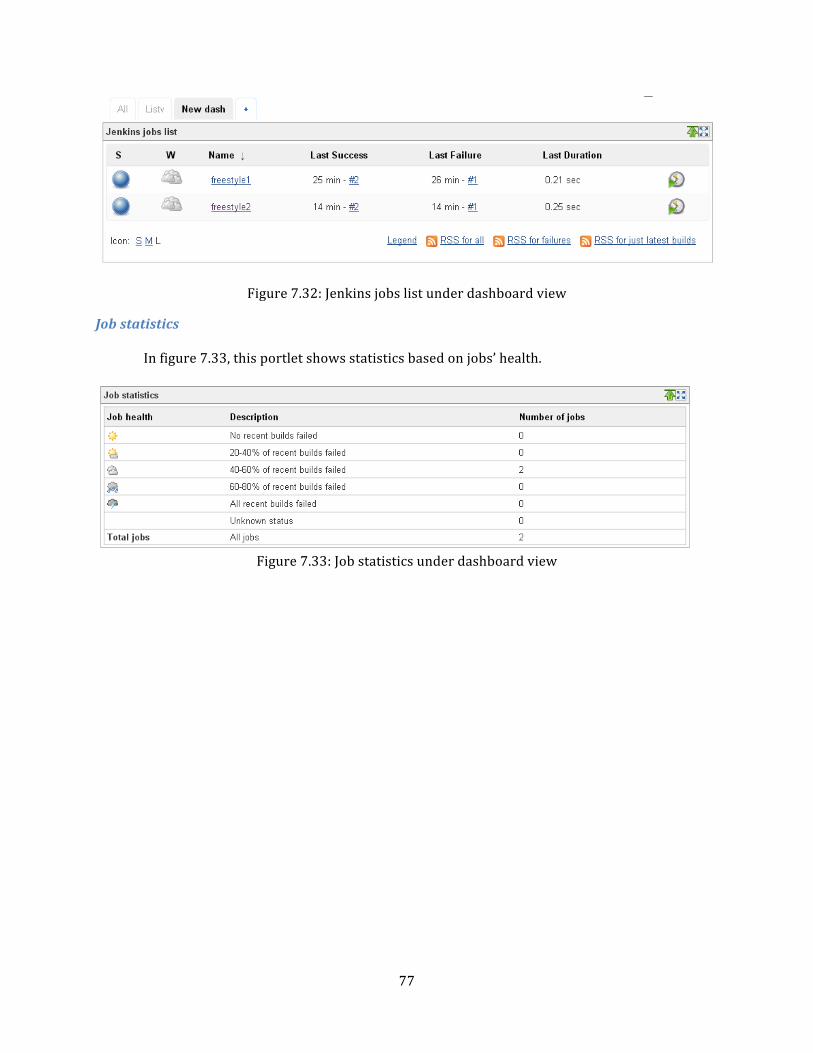
77
Figure 7.32: Jenkins jobs list under dashboard view
Job statistics
In figure 7.33, this portlet shows statistics based on jobs’ health.
Figure 7.33: Job statistics under dashboard view

78
Build statistics
In figure 7.34, this shows statistics based on build status.
Figure 7.34: Build statistics under Dashboard View
Jobs grid
In figure 7.35, this jobs grid portlet displays a multi-‐column table a job’s with current status,
weather, clickable link to the job, and build button.
Figure 7.35: Jobs grid under Dashboard View
Unstable jobs
In figure 7.36, this shows the status, health, and a clickable link to an unstable job.
Figure 7.36: Unstable jobs under Dashboard View

79
Test statistics grid
Figure 7.37 shows detailed test data for the configured jobs.
Figure 7.37: Test statistics under Dashboard View
Test statistics chart
Figure 7.38 shows a pie chart of the configured jobs, including passing, failing, and skipped
jobs, with total number and percentages.
Figure 7.38: Test statistics chart under Dashboard View
Test trend chart
This is a chart, as seen in figure 7.39, which shows all tests over time in aggregate. For
everyday, since the first job was built in the Dashboard View, the trend chart shows the total

80
number of passing, skipped, and failing tests in aggregate across the build. It assumes that if a build
did not occur on a given day, the previous version of build results will be used.
Figure 7.39: Test trend chart under Dashboard View
The plugin also has an Iframe Portlet, Image Portlet, and Slaves Statistics portlet available.
Below, figure 7.40, is an example of a full Dashboard view with default portlets:
Figure 7.40: Dashboard View with default portlets

81
Additional Extend Portlets
Besides these default available portlets within the Dashboard View Plugin, new portlets can
be contributed via other publicly available plugins or your own custom plugin.
Project Statistics plugin
In figure 7.41, this portlet is called “Number of builds” that shows each job’s successful,
unstable, or failed builds (Ambu, 2015).
Figure 7.41: Number of builds plugin
Project Build Times
The portlet, shown in figure 7.42, is called “RM Build Times Chart” which shows cumulative
and separate build times (Rhine, 2014).
Figure 7.42: RM Build Times Chart
Latest Builds with Badges
As figure 7.43 shown, it is a new supportive plugin of Dashboard View called Latest Builds
with Badges, which was created by our team. This plugin serves the same purpose as the default
Latest Builds portlet, but with an additional column that shows the available badges associated with
a job’s build, such as promotions, configuration changes and so on.

82
Figure 7.43: Latest Builds with Badges
Extensible nature of Dashboard View plugin
The Dashboard View plugin’s architecture allows for extensions/custom portlets from any
additional plugin. As retrieved from the plugin’s wiki page, these general steps should be followed:
• Extend the DashboardPortlet class and provide a descriptor that extends the
Descriptor<DashboardPortlet>.
• Create a jelly view called portlet.jelly.
For portlets that wish to use custom parameters such as a default number of builds to show,
one can do that as follows:
• Create a jelly file called config.jelly to be used when the portlet is configured.
• Modify constructor (with @DataBoundConstructor) to receive the new parameters.
Trial and error can help with the creation process, as well as simply looking at the source
code for Dashboard View or any extension plugins such as the previously mentioned ones.
Examples of sample code for an extension plugin are shown in figure 7.44 and figure 7.45.
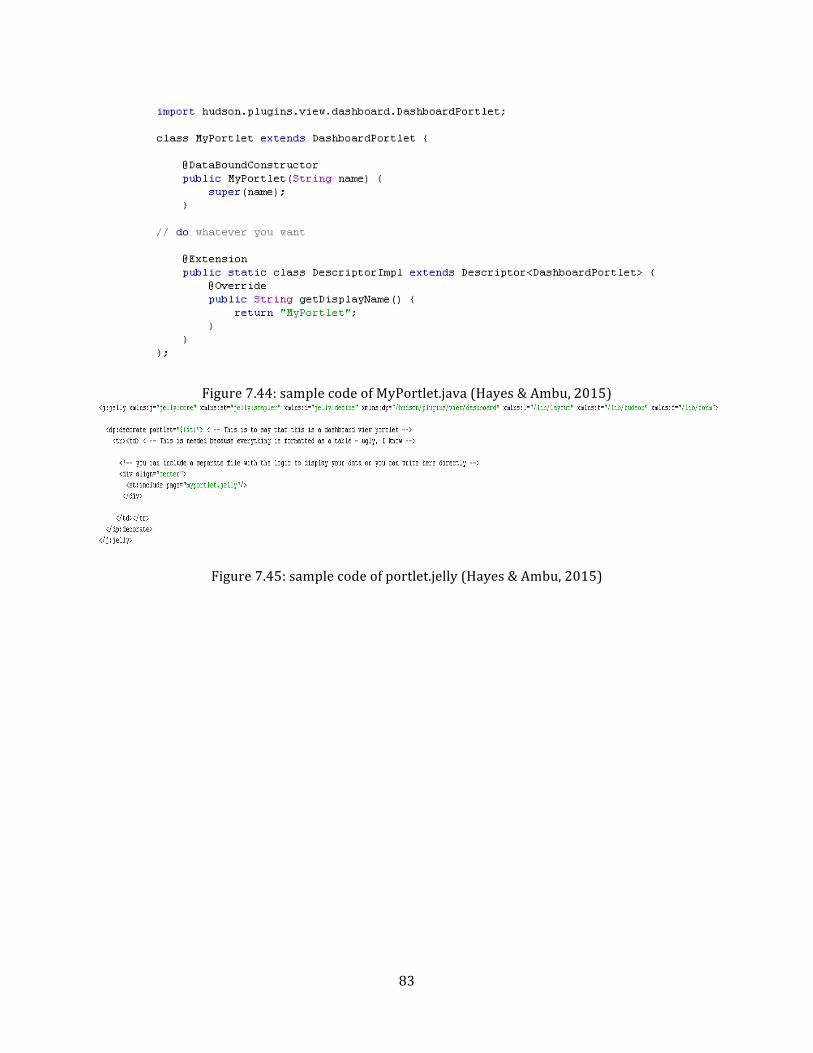
83
Figure 7.44: sample code of MyPortlet.java (Hayes & Ambu, 2015)
Figure 7.45: sample code of portlet.jelly (Hayes & Ambu, 2015)