“warning- - juki | mind & technology · “warning-1. “do not allow to ... devanado de la...
TRANSCRIPT


“WARNING- 1. “Do not allow to be used as a toy. Close attention is necessary when this sewing machine is used by or near
children.” 2. “Use this sewing machine only for its intended use as described in this manual. Use only attachments recommended
by the manufacturer as contained in this manual.” 3. “Never operate this sewing machine if it has a damaged cord or plug, if it is not working properly, if it has been
dropped or damaged, or dropped into water. Return the sewing machine to the nearest authorized dealer or servicecenter for examination, repair, electrical or mechanical adjustment.”
4. “Never operate the sewing machine with any air openings blocked. Keep ventilation openings of the sewing machineand Foot controller free from the accumulation of lint, dust, and loose cloth.”
5. “Never drop or insert any object into any opening.” 6. “Do not use outdoors.” 7. “Do not operate where aerosol (spray) products are being used or where oxygen is being administered.” 8. “To disconnect, turn switch to the off (“0”) position, then remove plug from outlet.” 9. “Do not unplug by pulling on cord. To unplug, grasp the plug, not the cord.”10. “Keep fingers away from all moving parts. Special care is required around the sewing machine needle.”11. “Never sew with a damaged needle plate as this can cause needle to break.”12. “Do not use bent needles.”13. “Do not pull or push fabric while stitching. It may deflect the needle causing it to break.”14. “Switch the sewing machine off (“0”) when making any adjustments in the needle area, such as threading needle,
changing needle, threading bobbin, or changing presser foot, etc.”15. “Always unplug sewing machine from the electrical outlet when removing covers, lubricating, or when making any
other user servicing adjustments mentioned in the instruction manual.”
“CAUTION-“SAVE THESE INSTRUCTIONS”
“This product is for household use, or equivalent.”
“ When using an electrical appliance, basic safety precautions should always be followed, including the following.”“ Read all instructions before using this sewing machine.”
“DANGER-1. “This sewing machine should never be left unattended when plugged in. Always unplug this sewing machine from
the electric outlet immediately after using and before cleaning.”2. “Always unplug before replacing light bulb. Replace bulb with same type rated 15 watts.”
Moving parts-To reduce risk of injury, switch off before servicing. Close cover beforeoperating machine.”
“IMPORTANT SAFETY INSTRUCTIONS”
To reduce the risk of electric shock:”
To reduce the risk of burns, fire, electric shock, or or injury to persons: ”
This appliance complies with EEC Directive 89/336/EEC covering the electromagneticcompatibility.
This equipment is marked with the recycling symbol. It means that at the end of the life of theequipment you must dispose of it separately at an appropriate collection point and not place itinthe normal domestic unsorted waste stream. This will benefit the environment for all.(European Union only)

1
IMPORTANTES INSTRUCCIONES DE SEGURIDAD
Este instrumento se conforma con directivo de CEE 89/336/EECcubriendo supresión contra interferencia de radio.
Cuando se usa un aparato eléctrico, debe seguirse unas precauciones básicas y que vienenincluidas a continuación."Leer las instrucciones antes de usar la máquina de coser."
PELIGRO-1. La máquina no debe dejarse nunca desatendida mientras esté conectada. Desconectar la máquina de la red
eléctrica inmediatamente después de su uso y antes de limpiarla.2. Desconectar la máquina de la red antes de cambiar la bombilla.
Colocar una bombilla del mismo tipo con una potencia de 15 Watios.
CUIDADO- 1. No usar la máquina como un juguete.
Prestar atención si fuese necesario cuando la máquina está siendo usada por niños o cerca de ellos. 2. Usar la máquina de coser solamente como se describe en este manual.
Usar únicamente los accesorios recomendados por el fabricante y que vienen especificados en este manual. 3. No trabajar nunca con la máquina en caso de que tenga el cable o el enchufe en malas condiciones, si no cose
correctamente, en caso de que se haya caído, haya sido dañada o se haya mojado. 4. No usar la máquina con los orificios de ventilación bloqueados. Mantener los orificios de ventilación de la
máquina de coser y el pedal sin acumulación de polvo, suciedad y restos de tejido. 5. No introducir no insertar objetos en los orificios de ventilación. 6. No usar al aire libre. 7. No usar mientras se estén utilizando productos aerosoles (spray) o en lugares donde se esté administrando
oxigeno. 8. Para desconectar, girar el interruptor hasta la posición Off ( "0" ), luego desconectar el enchufe de la red. 9. No desconectar el enchufe tirando del cable. Para desconectar, tirar de la clavija, no del cable.10. Mantener los dedos alejados de todas las partes movibles de la máquina. Tener un cuidado especial con la
aguja.11. Usar siempre la placa de agujas apropiada. Una placa de agujas impropia puede producir la rotura de la aguja.12. No usar agujas despuntadas.13. No presionar ni tirar del tejido mientras se está cosiendo. Esto podría doblar la aguja y romperla.14. Situar el interruptor principal de la máquina en posición Off ( "0" ) cuando se realice algún ajuste en el área de la
aguja como enhebrar la aguja, cambiar la aguja, cambiar la canilla, cambiar el pie prensatelas y similares.15. Desconectar siempre la máquina de la red eléctrica cuando se retiren las tapas, para lubricar, o cuando se
realice algún otro tipo de ajuste mecánico mencionado en el manual de instrucciones.
CONSERVE ESTE MANUAL DEINSTRUCCIONES
Esta máquina de coser es para uso doméstico
Para reducir el riesgo de quemaduras, fuego, descargaseléctricas o causar daños a personas.
Para reducir el riesgo de una descarga eléctrica.
Este equipo está etiquetado con el símbolo de reciclado que puede verse arriba. Esto quieredecir que al final de la vida del equipo, éste debe ser llevado a un punto de recogida específicopara equipos electrónicos, y no a los contenedores normales de residuos domésticos. Estobeneficiará al medio ambiente para todos. (Sólo Unión Europea)


3
Check chart ce .............................................. 72 - 73
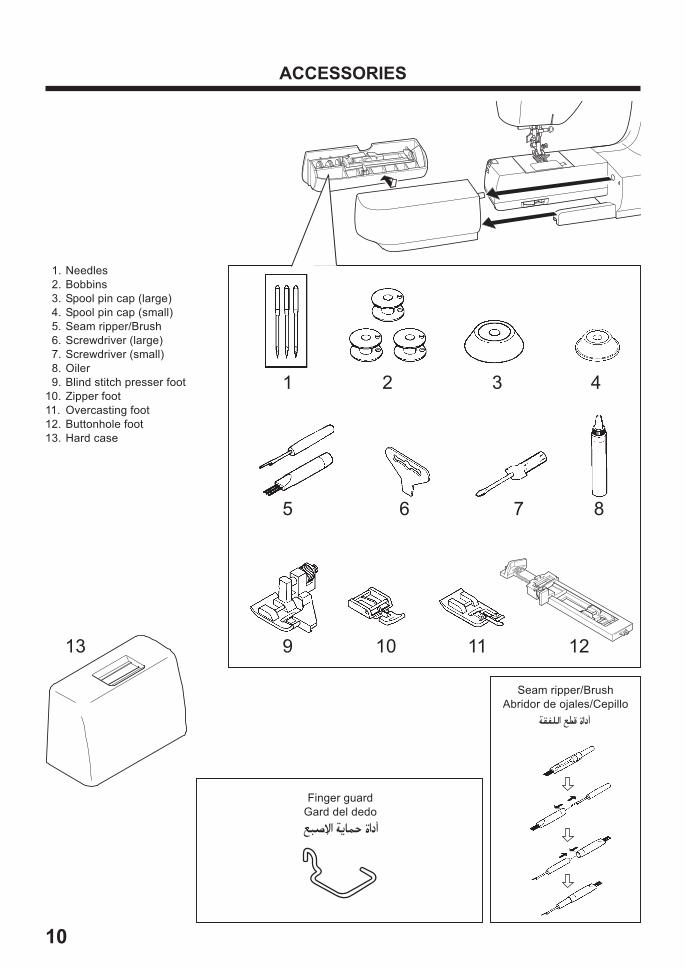
1. KNOWING YOUR SEWING MACHINEMachine identification ............................................. 6 - 9Accessories ......................................................... 10 - 11Setting up your machine ..................................... 12 - 13Spool pins, Presser foot lever ............................. 14 - 15Pressure regulator ............................................... 14 - 15Drop feed lever .................................................... 16 - 17Converting to free-arm sewing ............................ 16 - 17Reverse stitch lever ............................................. 16 - 17Stitch pattern dial and indicator .......................... 18 - 19Stitch length/super (stretch) stitch control .......... 18 - 19Zig zag width adjusting lever .............................. 18 - 19Winding the bobbin ............................................. 20 - 21Threading the bobbin thread ............................... 22 - 23Needle, thread and fabric chart .......................... 24 - 25Threading the top thread ..................................... 26 - 27Using automatic needle threader ........................ 28 - 29Picking up bobbin thread .................................... 30 - 31
2. STARTING TO SEWMachine setting chart .......................................... 32 - 35Straight stitch ....................................................... 36 - 45 Turning a square corner, Darning, Inserting zips and piping, Sewing on heavy fabric, Adjusting top thread tension
TABLE OF CONTENTS
Changing presser feet ......................................... 44 - 45Zigzag stitch ........................................................ 46 - 47 Satin stitchBlind stitch ........................................................... 48 - 49Three-step zigzag ................................................ 50 - 51Double-action stitch ............................................. 50 - 51Shell hem ............................................................. 52 - 53Faggoting ............................................................. 52 - 53Stretch stitches .................................................... 54 - 59 Triple straight stitch, Ric-rac stitch, Overlock stitch, Smocking stitch, Elastic overlock stitch, Fishbone stitch, Stretch overlock stitch, Stretch patching stitchDecorative embroidery designs .......................... 60 - 61 Tips on design stitchingButtonhole making .............................................. 62 - 67 Corded buttonholes, Adjusting stitch balance
3. CARING FOR YOUR MACHINECleaning the feed dogs and shuttle area ........... 68 - 69Changing light bulb ............................................. 70 - 71
4. CHECK CHART FOR PERFORMANCE PROBLEMS
Dimensions: 410 mm × 170 mm × 300 mmMass of the equipment: 7.3 kgRated Voltage: 220V ~Rated Frequency: 60HzRated input: 90WAcoustic noise level: less than 70db(A)
For European version

4
CONTENIDO
Dimensiones: 410 mm × 170 mm × 300 mmPeso del equipo: 7,3 kgVoltaje nominal: 220V ~Frecuencia nominal: 60HzConsumo nominal: 90WNivel de ruido acústico: menos de 70db(A)
Para versión europea
Check chart ce c ........................................... 72 - 73
1. PRINCIPALES PARTES DE LA MAQUINAIdentificación de la máquina ................................... 6 - 9Accesorios ........................................................... 10 - 11Preparación de la máquina ................................. 12 - 13Porta carretes, Palanca pie prensatelas ............ 14 - 15Regulador de presión .......................................... 14 - 15Control de dientes ............................................... 16 - 17Conversión para la costura con brazo ................ 16 - 17Palanca de la puntada de retroceso ................... 16 - 17Selector e indicador de puntadas ....................... 18 - 19Control largo de puntada y puntada super (elástica) .. 18 - 19Selector ancho puntada ...................................... 18 - 19Devanado de la canilla ........................................ 20 - 21Enhebrado del hilo de la canilla .......................... 22 - 23Tabla de hilo, aguja y material ............................ 24 - 25Enhebrado del hilo superior ................................ 26 - 27Empleo del enhebrador aguja ............................. 28 - 29Recogida del hilo de la canilla ............................ 30 - 31
2. EMPEZER A COSEREsquema de ajuste de la máquina ..................... 32 - 35Puntada recta ...................................................... 36 - 45 Giro en esquinas en ángulo recto, Zurcido, Inserción de cremalleras y vivo, Cosiendo materiales pesados, Ajuste de la tensión del hilo superior
Cambio del pie prensatelas ................................ 44 - 45Puntada zig-zag .................................................. 46 - 47 Puntada de rellenoPuntada invisible ................................................. 48 - 49Zig-zag de tres puntadas .................................... 50 - 51Puntada de acción doble .................................... 50 - 51Dobladillo de concha ........................................... 52 - 53Fagoting (Diente de rata) .................................... 52 - 53Puntadas elásticas .............................................. 54 - 59 Puntada recta triple, Puntada zig-zag a dos agujas, Puntada overlock, Puntada nido de abeja, Puntada overlock elástica, Puntada raspa, Puntada overlock elástica, Puntadas elástica de parchesDiseños de bordados decorativos ...................... 60 - 61 Tipos de puntadas decorativasConfección de ojales ........................................... 62 - 67 Ojales con cordón, Ajuste de la compensación puntadas ojal
3. CUIDE SU MAQUINALimpiar el area del transportador y la lanzadera ........ 68 - 69Cambio de la bombilla ........................................ 70 - 71
4. CUADRO DE EXAMEN PARA LOS PROBLEMAS DE EJECUCION


6
2
1
3456
1. KNOWING YOUR SEWING MACHINEMACHINE IDENTIFICATION
78
915
10111213
14
1. Reverse stitch lever 2. Thread guide 3. Pressure regulator 4. Thread take-up 5. Thread tension dial 6. Face cover 7. Thread cutter 8. Auxiliary bed
(Accessory box) 9. Drop feed lever10. Bobbin winder11. Bobbin winding regulator12. Stitch indicator13. Stitch length adjusting dial14. Stitch pattern dial15. Zig zag width adjusting lever16. Retractable spool pin17. Hand wheel18. Light switch19. Speed controller receptacle20. Identification plate21. Handle22. Spool pin23. Buttonhole lever24. Presser foot lever25. Buttonhole stitch adjuster
17
16
18
19
20
21
22
23
24
25


8
26. Automatic needle threader27. Presser foot screw28. Needle29. Hook cover30. Needle bar31. Needle clamp screw32. Presser foot release lever33. Presser foot34. Feed dogs35. Needle plate36. Hook cover release button37. Foot controller38. Instruction manual
26
27
29
28
30
3132
3334
3536
37 38


14
SPOOL PINS
Place a spool of thread on the spool pin. Secure it withthe spool cap (A) leaving a gap between the spool capand the reel of thread to allow the reel to rotate freely.
Pull up the spool pin (B) . This is used for bobbin windingwhen the machine is already threaded.
AB
PRESSER FOOT LEVER
There are three positions for your presser foot.
1. Lower the presser foot to sew.
2. Raise the lifter to the middle position to insert orremove fabric.
3. Lift it to its highest position to change the presser footor to remove thick fabric.
PRESSURE REGULATOR
For most fabrics set the control at 3. For thicker onesincrease it to 4 and for finer ones decrease to a lowernumber.


20
WINDING THE BOBBIN
1. Pass thread from spool through thread guides asshown.
2. Pull end of thread through hole in bobbin as shown.
3. Push bobbin winder to far left position, if it is not alreadythere. Place bobbin onto shaft with end of threadcoming from top of bobbin. Push bobbin winder to rightuntil it clicks. Hold onto end of thread.
4. Start machine. The thread that is held will snap. Bobbinwill cease turning when completely filled. Push shaftto left to remove bobbin.
2
3
4
1


22
1
2
3
4
5
THREADING THE BOBBIN THREAD
1. Raise the needle to its highest position by rotating thehand wheel towards you.
2. Remove the hook cover by pushing the release buttonto the right while pushing the left corner of plate.
3. Insert the bobbin making sure the bobbin rotates anti-clockwise.
4. Pull thread through the slot (A) and then to the left.
With a finger held gently on top of the bobbin, pullthread through the slot (B) until you hear a clickingsound, and then leave about 15 cm of thread.
5. Replace the hook cover onto the needle plate.


26
THREADING THE TOP THREAD
1. Raise the presser foot lever.
2. Raise the needle to its highest position byrotating the hand wheel towards you.
3. Thread the machine in the following orderas illustrated.


28
USING AUTOMATIC NEEDLE THREADER
Raise the needle to its highest position by rotating thehand wheel towards you.
1. Hook thread to thread guide as illustrated.
2. Pull down lever holding the end of thread.
3. Turn the lever as far as it will go.
4. Guide thread into hooked end and pull it upward.
5. Return the lever and needle will be threadedautomatically.
6. Release the lever and pull thread away from you.
NOTE:For smooth threading it is recommended to set themachine at straight stitching (center position) when usingneedle threader.
1
2
3
5
4
6

30
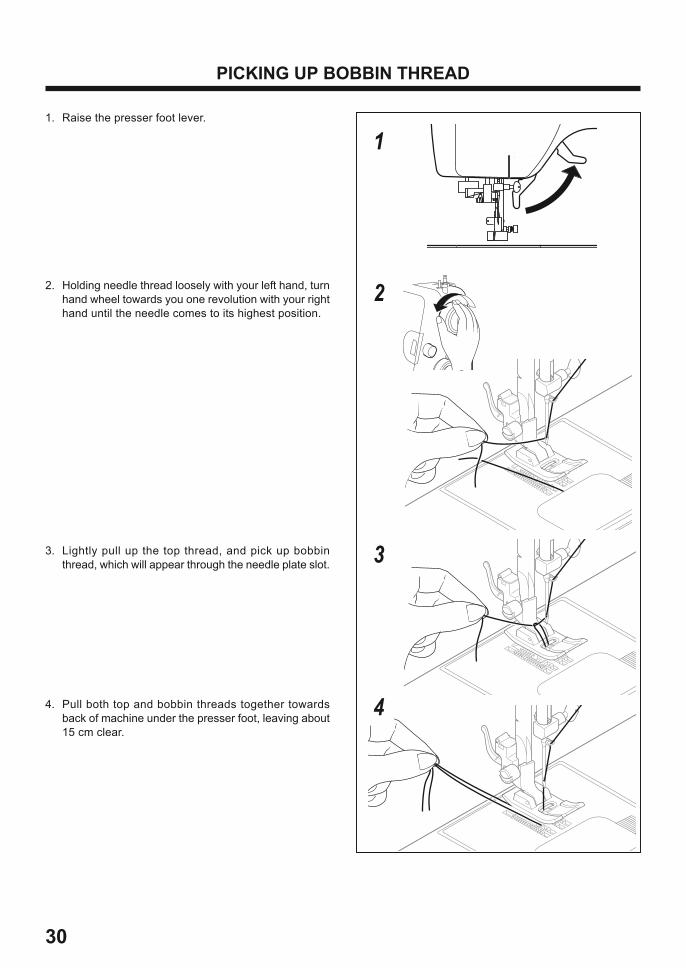
PICKING UP BOBBIN THREAD
1. Raise the presser foot lever.
2. Holding needle thread loosely with your left hand, turnhand wheel towards you one revolution with your righthand until the needle comes to its highest position.
3. Lightly pull up the top thread, and pick up bobbinthread, which will appear through the needle plate slot.
4. Pull both top and bobbin threads together towardsback of machine under the presser foot, leaving about15 cm clear.
1
2
3
4


33
STITCH1.
STITCHINDICATOR
2.STITCH LENGTH/SUPER STITCH
CONTROL
3.ZIG ZAG WIDTH
ADJUSTINGLEVER
4.PRESSER
FOOT
5.DROP FEED
LEVER
BUTTONHOLE .1. E
STRAIGHT (Center position)
2 1 - 4 A (Left position)
ZIGZAG 3 0.5 - 4 MIN. - MAX. A
BLIND 4 1 - 4 MID. - MAX. B
THREE-STEP ZIGZAG 51 - 4 MID. - MAX. A
FOUR-POINT LINGERIE 6
STRETCH BLIND 7 1 - 4 MID. - MAX. A
DECORATIVE8 9
0.5 MID. - MAX. A10. 11.
DOUBLE ACTION 12.
1 - 4 MID. - MAX. A LINGERIE 13.
FAGGOTING 14.
TRIPLE STRAIGHT
(Center position)15. A
(Left position)
RIC-RAC 16. MIN. - MAX.
A RIGHT OVERLOCK 17. MID. - MAX.
SMOCKING 18. MID. - MAX.
LEFT OVERLOCK 19. MID. - MAX. A,C
ELASTIC OVERLOCK 20
MID. - MAX. A
SUPER DECORATIVE
21 22
23 24
FISHBONE 25
STRETCH OVERLOCK 26
STRETCH PATCHING 27
INSERTING ZIPS
2
1 - 4 C
DARNING (Center position)
(Left position)

34
PRENSATELASPUNTADA1.
INDICADOR2.
CONTROLLONGITUDPUNTADA
3.CONTROL
ANCHOPUNTADA
4. 5.CONTROLDIENTES
OJALES .1. E
RECTA (al centro)
2 1 - 4 A (a la izquierda)
ZIG-ZAG 3 0.5 - 4 MIN. - MAX. A
INVISIBLE 4 1 - 4 MED. - MAX. B
ZIG ZAG TRES PUNTADAS 51 - 4 MED. - MAX. A
LENCERIA CUATRO PUNTOS 6
INVISIBLE SUPER ELASTICO 7 1 - 4 MED. - MAX. A
DECORATIVAS8 9
0.5 MED. - MAX. A10. 11.
DOBLE ACCION 12.
1 - 4 MED. - MAX. A LENCERIA 13.
FAGOTING 14.
PUNTADA TRIPLE
(al centro)15. A
(a la izquierda)
ZIG-ZAG 16. MIN. - MAX.
A OVERLOCK DERECHA 17. MED. - MAX.
NIDO DE ABEJA 18. MED. - MAX.
OVERLOCK IZQUIERDA 19. MED. - MAX. A,C
OVERLOCK ELASTICO 20
MED. - MAX. A
SUPER DECORATIVAS
21 22
23 24
RASPA 25
OVERLOCK ELASTICO 26
ELASTICA DE PARCHES 27
INSERCION DE CREMALLERAS
2
1 - 4 C
ZURCIDO (al centro)
(a la izquierda)


36
STRAIGHT STITCH
Straight stitch at center needle position with followingsettings ;
Stitch pattern dial -
Zig zag width adjusting lever -
Straight stitch at left needle position with followingsettings ;
Stitch pattern dial -
Zig zag width adjusting lever -
2
STARTING TO SEWBefore placing the material on the machine, see that theends of the threads have been drawn about 15 cm to therear of the machine. Hold on the threads during the sewingof the first 3 or 4 stitches of the seam.
Fasten each seam by back tacking at the beginning andend of the seam.
REMOVING FABRICFirst turn the handwheel towards you until the needle isat its highest position, then raise the presser foot, drawmaterials to the rear and cut off excess thread with thethread cutter located on the left end of working surface oron the presser bar.