warranty / instruction bookletfe1299bd296a03009be3-3739e7c3010127be61fd7a8237f120ed.r81.cf5.r… ·...
TRANSCRIPT
Warranty / instruction Booklet

WoMens
2 WoMens
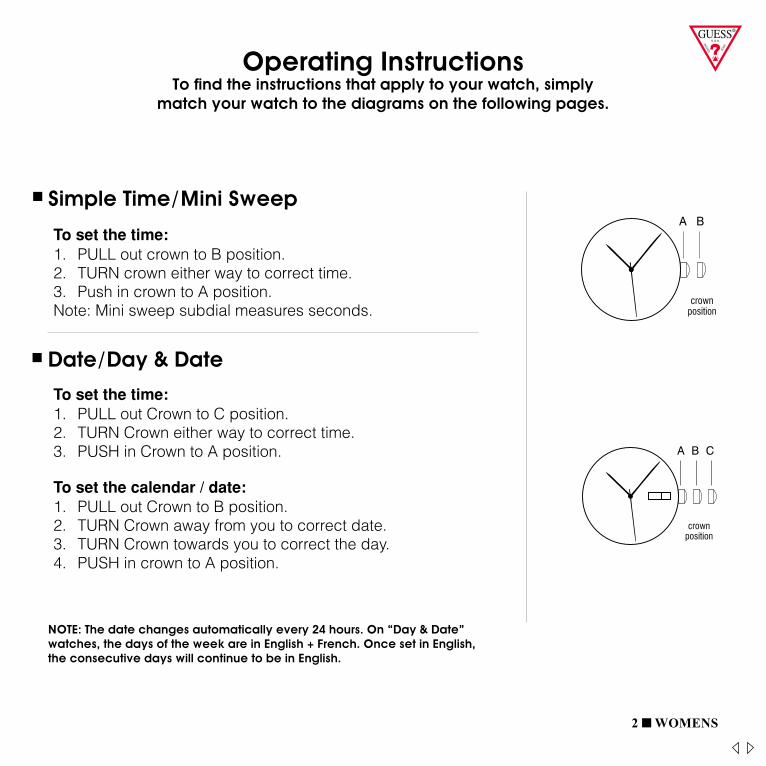
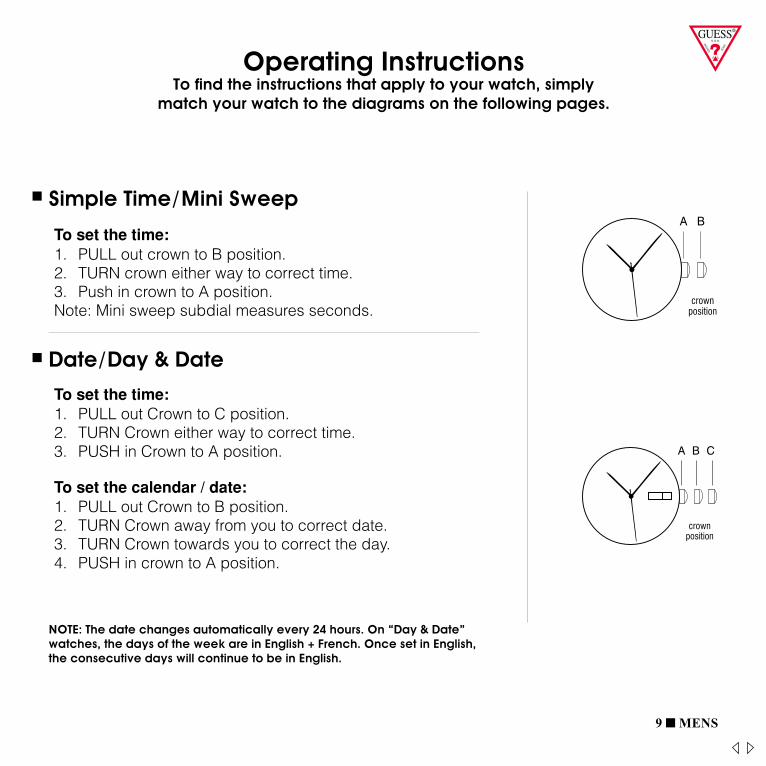
Operating InstructionsTo find the instructions that apply to your watch, simply
match your watch to the diagrams on the following pages.
NOTE: The date changes automatically every 24 hours. On “Day & Date” watches, the days of the week are in English + French. Once set in English, the consecutive days will continue to be in English.
3
OPERATINGINSTRUCTIONS
TO FIND THE INSTRUCTIONSTHAT APPLY, SIMPLY MATCH YOUR WATCH
TO THE DIAGRAMS ON THE FOLLOWING PAGES.
SIMPLE TIME / MINI SWEEP
To set the time:1. PULL out crown to B position.2. TURN crown either way to correct time.3. Push in crown to A position.Note: Mini sweep subdial measures seconds.
DATE / DAY & DATE
To set the time:1. PULL out Crown to C position.2. TURN Crown either way to correct time.3. PUSH in Crown to A position.
To set the calendar / date:1. PULL out Crown to B position.2. TURN Crown away from you to correct date.3. TURN Crown towards you to correct the day.4. PUSH in crown to A position.
NOTE: The date changes automatically every 24 hours.On “Day & Date” watches, the days of the week are in English +French. Once set in English, the consecutive days will continue tobe in English.
Simple Time/Mini Sweep
Date/Day & Date
3
OPERATINGINSTRUCTIONS
TO FIND THE INSTRUCTIONSTHAT APPLY, SIMPLY MATCH YOUR WATCH
TO THE DIAGRAMS ON THE FOLLOWING PAGES.
SIMPLE TIME / MINI SWEEP
To set the time:1. PULL out crown to B position.2. TURN crown either way to correct time.3. Push in crown to A position.Note: Mini sweep subdial measures seconds.
DATE / DAY & DATE
To set the time:1. PULL out Crown to C position.2. TURN Crown either way to correct time.3. PUSH in Crown to A position.
To set the calendar / date:1. PULL out Crown to B position.2. TURN Crown away from you to correct date.3. TURN Crown towards you to correct the day.4. PUSH in crown to A position.
NOTE: The date changes automatically every 24 hours.On “Day & Date” watches, the days of the week are in English +French. Once set in English, the consecutive days will continue tobe in English.
3 WoMens
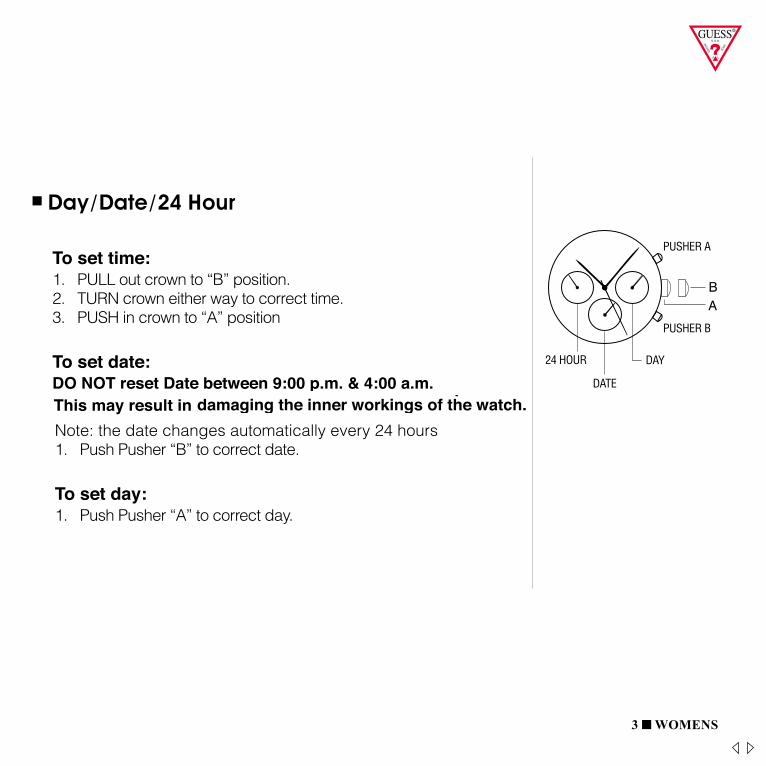
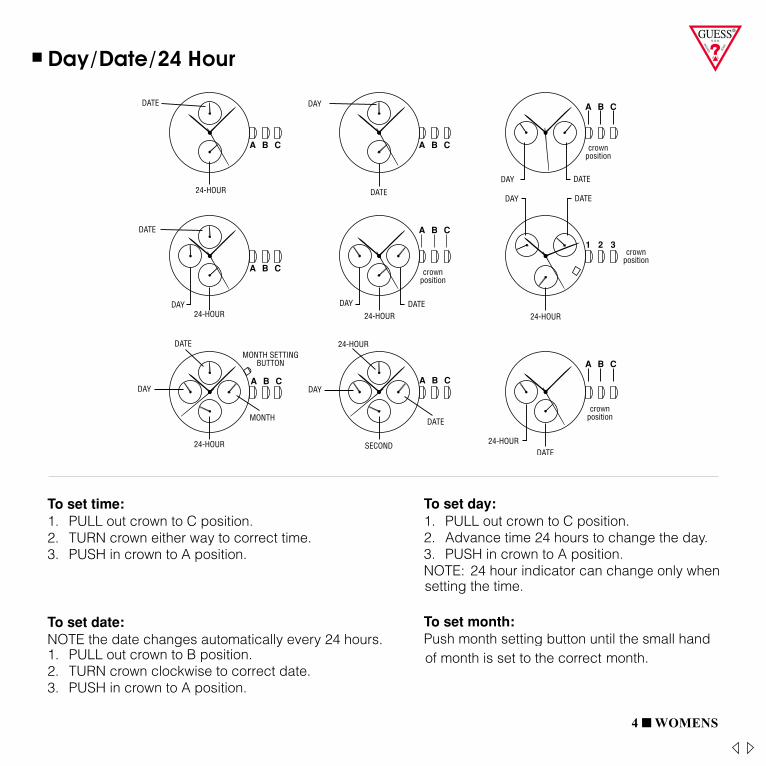
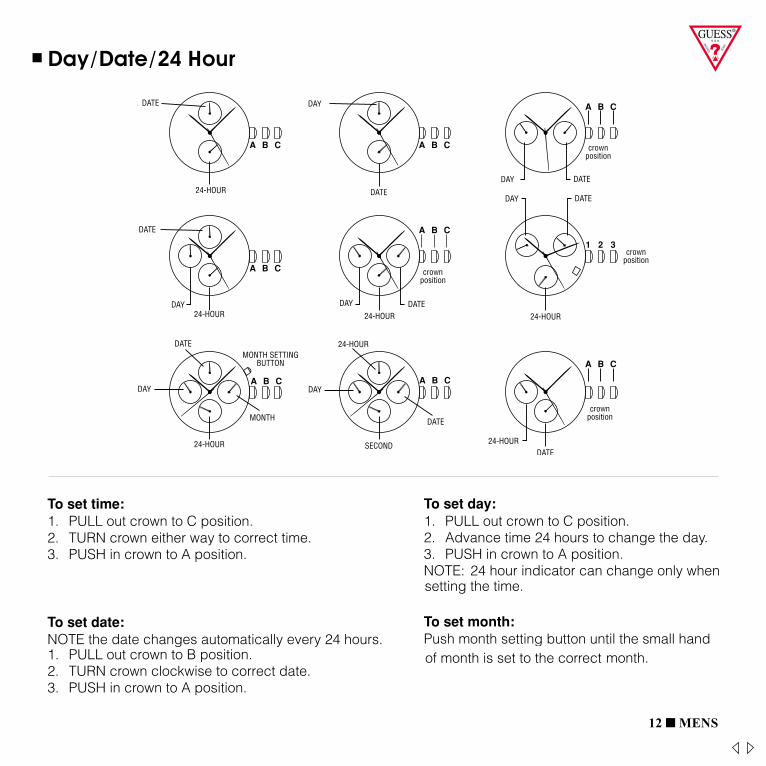
Day/Date/24 Hour
1
DAY / DATE / 24 HOUR
To set time:1. PULL out crown to “B” position.2. TURN crown either way to correct time.3. PUSH in crown to “A” position
To set date:DO NOT reset Date between 9:00 p.m. & 4:00 a.m. This may result indamaging the inner workings of the watch.Note: the date changes automatically every 24 hours1. Push Pusher “B” to correct date.
To set day:1. Push Pusher “A” to correct day.
PUSHER A
PUSHER B
DAY24 HOUR
DATE
4
DAY / DATE / 24 HOUR
To set time:1. PULL out crown to C position.2. TURN crown either way to correct time.3. PUSH in crown to A position.
To set date:NOTE the date changes automatically every 24 hours.1. PULL out crown to B position.2. TURN crown clockwise to correct date.3. PUSH in crown to A position.
DAY
24-HOUR
DATE 24-HOUR
SECOND 24-HOURDATE
DATE
24-HOURDAY DAY
24-HOUR 24-HOUR
A B C
A B C
A B C
A B C
24-HOUR
DATE DAY
DATE
A B C
A B C
DAY DATE
crownposition
crownposition
crownposition
DATE
DAY DATE
1 2 3
crownposition
A B C
DATE
DAYA B C
MONTH
MONTH SETTINGBUTTON
4 WoMens
5
6,12 TWO-EYE CHRONOGRAPH WITH DATE
Crown position “A” , “B” & “C”.Pushers “A” (top) & “B” (bottom).12 o’clock eye “1 minute up to maxinum 60minute”.6 o’clock eye “second”.
This chronograph watch has 3 functions:TIME, CALENDAR, STOPWATCH.
TIMETo set the time:1. PULL crown to “C” position.2. TURN crown either way to correct time.3. PUSH crown in to “A” position, small second hand begins to run.
CALENDARTo set the calendar:1. PULL out crown to “B” position.2. TURN crown clockwise to correct date.3. PUSH in crown to “A” position.NOTE: The date changes automatically every 24 hours.
SECOND
CHRONOGRAPHSECOND HAND
CHRONOGRAPH MINUTE HAND
To set day:1. PULL out crown to C position.2. Advance time 24 hours to change the day.3. PUSH in crown to A position.NOTE: 24 hour indicator can change only when setting the time.
To set month:Push month setting button until the small hand of month is set to the correctmonth.
Day/Date/24 Hour

5
6,12 TWO-EYE CHRONOGRAPH WITH DATE
Crown position “A” , “B” & “C”.Pushers “A” (top) & “B” (bottom).12 o’clock eye “1 minute up to maxinum 60minute”.6 o’clock eye “second”.
This chronograph watch has 3 functions:TIME, CALENDAR, STOPWATCH.
TIMETo set the time:1. PULL crown to “C” position.2. TURN crown either way to correct time.3. PUSH crown in to “A” position, small second hand begins to run.
CALENDARTo set the calendar:1. PULL out crown to “B” position.2. TURN crown clockwise to correct date.3. PUSH in crown to “A” position.NOTE: The date changes automatically every 24 hours.
SECOND
CHRONOGRAPHSECOND HAND
CHRONOGRAPH MINUTE HAND
To set day:1. PULL out crown to C position.2. Advance time 24 hours to change the day.3. PUSH in crown to A position.NOTE: 24 hour indicator can change only when setting the time.
To set month:Push month setting button until the small hand of month is set to the correctmonth.
5 WoMens
6
STOPWATCHThe stopwatch is capable of measuring:1/1 second elapsed up to maxinum of 60 minute (top eye).BEFORE USING THE STOP WATCH, reset the stopwatch hands to the “60”and “0” positions.
To reset stopwatch hands:1. PULL crown to position “C”.2. PRESS pusher “A” intermittently until the chronograph second hand is
reset to “0”.
Standard stopwatch measurement:1. PRESS pusher “A” to start timing.2. PRESS pusher “A” to stop timing.3. PRESS pusher “B” to reset.
Accumulated elapsed time measurement:1. PRESS Pusher “A” to start timing.2. PRESS Pusher “A” to stop timing.3. PRESS pusher “A” to restart timing.4. PRESS Pusher “A” to stop 2nd timing.5. PRESS Pusher “B” to reset.
6,12 Two-Eye Chronograph With Date
7
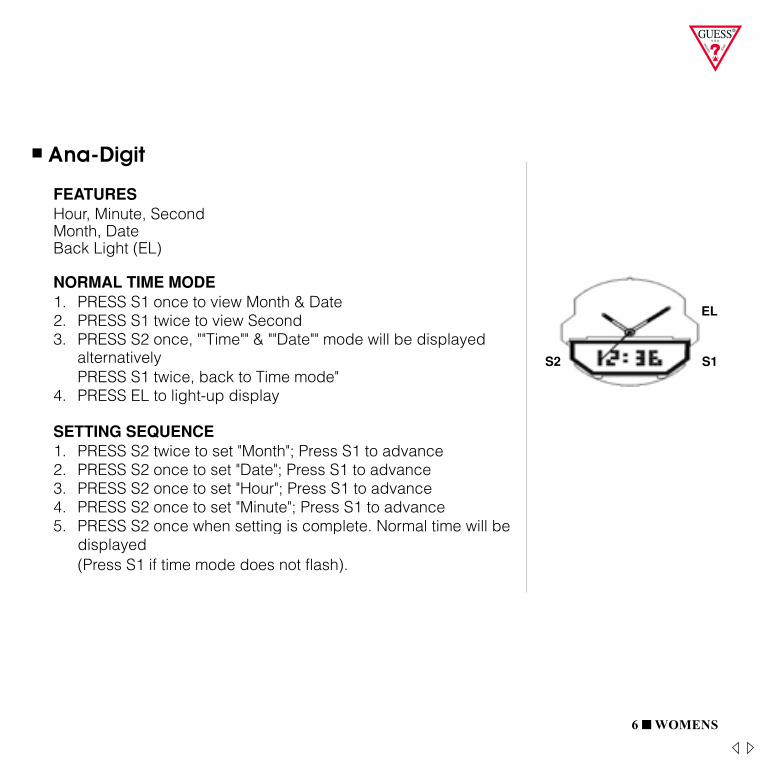
ANA-DIGIT
FEATURESHour, Minute, SecondMonth, DateBack Light (EL)
NORMAL TIME MODE1. PRESS S1 once to view Month & Date2. PRESS S1 twice to view Second3. PRESS S2 once, ""Time"" & ""Date"" mode will be displayed alternatively
PRESS S1 twice, back to Time mode"4. PRESS EL to light-up display
SETTING SEQUENCE1. PRESS S2 twice to set "Month"; Press S1 to advance2. PRESS S2 once to set "Date"; Press S1 to advance3. PRESS S2 once to set "Hour"; Press S1 to advance4. PRESS S2 once to set "Minute"; Press S1 to advance5. PRESS S2 once when setting is complete. Normal time will be displayed
(Press S1 if time mode does not flash).
EL
S1S2
7
ANA-DIGIT
FEATURESHour, Minute, SecondMonth, DateBack Light (EL)
NORMAL TIME MODE1. PRESS S1 once to view Month & Date2. PRESS S1 twice to view Second3. PRESS S2 once, ""Time"" & ""Date"" mode will be displayed alternatively
PRESS S1 twice, back to Time mode"4. PRESS EL to light-up display
SETTING SEQUENCE1. PRESS S2 twice to set "Month"; Press S1 to advance2. PRESS S2 once to set "Date"; Press S1 to advance3. PRESS S2 once to set "Hour"; Press S1 to advance4. PRESS S2 once to set "Minute"; Press S1 to advance5. PRESS S2 once when setting is complete. Normal time will be displayed
(Press S1 if time mode does not flash).
EL
S1S2
6 WoMens
Ana-Digit
7
ANA-DIGIT
FEATURESHour, Minute, SecondMonth, DateBack Light (EL)
NORMAL TIME MODE1. PRESS S1 once to view Month & Date2. PRESS S1 twice to view Second3. PRESS S2 once, ""Time"" & ""Date"" mode will be displayed alternatively
PRESS S1 twice, back to Time mode"4. PRESS EL to light-up display
SETTING SEQUENCE1. PRESS S2 twice to set "Month"; Press S1 to advance2. PRESS S2 once to set "Date"; Press S1 to advance3. PRESS S2 once to set "Hour"; Press S1 to advance4. PRESS S2 once to set "Minute"; Press S1 to advance5. PRESS S2 once when setting is complete. Normal time will be displayed
(Press S1 if time mode does not flash).
EL
S1S2

8
DIGITAL
Features:Hour, minute, seconds, month & date.
Setting Sequence:1. PRESS “B” to get to Normal Time mode.2. Set Month: PRESS “B” to “Month”. PRESS “A” to advance.3. Set Date: PRESS “B” to “Date”. PRESS “A” to advance.4. Set Hour: PRESS “B” to “Hour”. PRESS “A” to advance.
(“A”=A.M., “P”=P.M., “H”=24 hour format)5. Set Minute: PRESS “B” to “Minute”. PRESS “A” to advance.6. When hour & minutes are set, PRESS “A” to confirm.7. Return to Normal Time: PRESS “B”.
To view month & date from Normal Time mode, PRESS “A”.
7 WoMens
Digital

Mens
9 Mens
Operating InstructionsTo find the instructions that apply to your watch, simply
match your watch to the diagrams on the following pages.
NOTE: The date changes automatically every 24 hours. On “Day & Date” watches, the days of the week are in English + French. Once set in English, the consecutive days will continue to be in English.
3
OPERATINGINSTRUCTIONS
TO FIND THE INSTRUCTIONSTHAT APPLY, SIMPLY MATCH YOUR WATCH
TO THE DIAGRAMS ON THE FOLLOWING PAGES.
SIMPLE TIME / MINI SWEEP
To set the time:1. PULL out crown to B position.2. TURN crown either way to correct time.3. Push in crown to A position.Note: Mini sweep subdial measures seconds.
DATE / DAY & DATE
To set the time:1. PULL out Crown to C position.2. TURN Crown either way to correct time.3. PUSH in Crown to A position.
To set the calendar / date:1. PULL out Crown to B position.2. TURN Crown away from you to correct date.3. TURN Crown towards you to correct the day.4. PUSH in crown to A position.
NOTE: The date changes automatically every 24 hours.On “Day & Date” watches, the days of the week are in English +French. Once set in English, the consecutive days will continue tobe in English.
Simple Time/Mini Sweep
Date/Day & Date
3
OPERATINGINSTRUCTIONS
TO FIND THE INSTRUCTIONSTHAT APPLY, SIMPLY MATCH YOUR WATCH
TO THE DIAGRAMS ON THE FOLLOWING PAGES.
SIMPLE TIME / MINI SWEEP
To set the time:1. PULL out crown to B position.2. TURN crown either way to correct time.3. Push in crown to A position.Note: Mini sweep subdial measures seconds.
DATE / DAY & DATE
To set the time:1. PULL out Crown to C position.2. TURN Crown either way to correct time.3. PUSH in Crown to A position.
To set the calendar / date:1. PULL out Crown to B position.2. TURN Crown away from you to correct date.3. TURN Crown towards you to correct the day.4. PUSH in crown to A position.
NOTE: The date changes automatically every 24 hours.On “Day & Date” watches, the days of the week are in English +French. Once set in English, the consecutive days will continue tobe in English.
3
OPERATINGINSTRUCTIONS
TO FIND THE INSTRUCTIONSTHAT APPLY, SIMPLY MATCH YOUR WATCH
TO THE DIAGRAMS ON THE FOLLOWING PAGES.
SIMPLE TIME / MINI SWEEP
To set the time:1. PULL out crown to B position.2. TURN crown either way to correct time.3. Push in crown to A position.Note: Mini sweep subdial measures seconds.
DATE / DAY & DATE
To set the time:1. PULL out Crown to C position.2. TURN Crown either way to correct time.3. PUSH in Crown to A position.
To set the calendar / date:1. PULL out Crown to B position.2. TURN Crown away from you to correct date.3. TURN Crown towards you to correct the day.4. PUSH in crown to A position.
NOTE: The date changes automatically every 24 hours.On “Day & Date” watches, the days of the week are in English +French. Once set in English, the consecutive days will continue tobe in English.
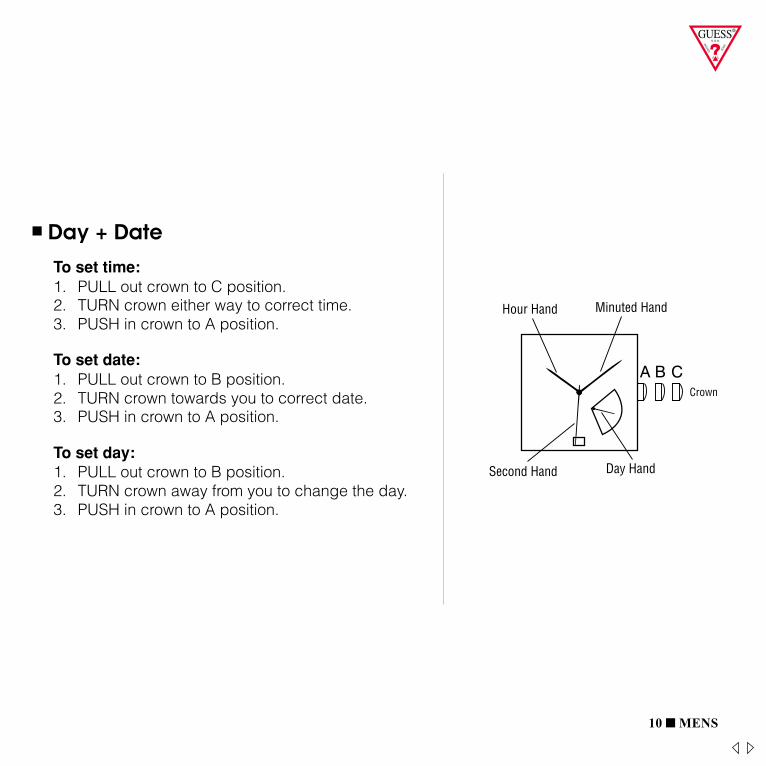
4
DAY + DATE
To set time:1. PULL out crown to C position.2. TURN crown either way to correct time.3. PUSH in crown to A position.
To set date:1. PULL out crown to B position.2. TURN crown towards you to correct date.3. PUSH in crown to A position.
To set day:1. PULL out crown to B position.2. TURN crown away from you to change the day.3. PUSH in crown to A position.
Second Hand Day Hand
Hour Hand Minuted Hand
Crown
10 Mens
Day + Date

5
DAY / DATE /A.M. /P.M. / SUN / MOON
To set the time:1. PULL out Crown to C position.2. TURN Crown clockwise to correct time. Day / am / pm / moon will
also change.3. PUSH in Crown to A position.NOTE: Remember to set time for am or pm (sun or moon)
To set the date:1. PULL out Crown to B position.2. TURN Crown clockwise to correct date.3. PUSH in crown to A position.
To set the day:1. PULL out Crown to C position.2. Advance time 24 hours to change the day.3. PUSH in Crown to A position.
11 Mens
Day/Date/A.M./P.M./Sun/Moon
5
DAY / DATE /A.M. /P.M. / SUN / MOON
To set the time:1. PULL out Crown to C position.2. TURN Crown clockwise to correct time. Day / am / pm / moon will
also change.3. PUSH in Crown to A position.NOTE: Remember to set time for am or pm (sun or moon)
To set the date:1. PULL out Crown to B position.2. TURN Crown clockwise to correct date.3. PUSH in crown to A position.
To set the day:1. PULL out Crown to C position.2. Advance time 24 hours to change the day.3. PUSH in Crown to A position.
4
DAY / DATE / 24 HOUR
To set time:1. PULL out crown to C position.2. TURN crown either way to correct time.3. PUSH in crown to A position.
To set date:NOTE the date changes automatically every 24 hours.1. PULL out crown to B position.2. TURN crown clockwise to correct date.3. PUSH in crown to A position.
DAY
24-HOUR
DATE 24-HOUR
SECOND 24-HOURDATE
DATE
24-HOURDAY DAY
24-HOUR 24-HOUR
A B C
A B C
A B C
A B C
24-HOUR
DATE DAY
DATE
A B C
A B C
DAY DATE
crownposition
crownposition
crownposition
DATE
DAY DATE
1 2 3
crownposition
A B C
DATE
DAYA B C
MONTH
MONTH SETTINGBUTTON
12 Mens
5
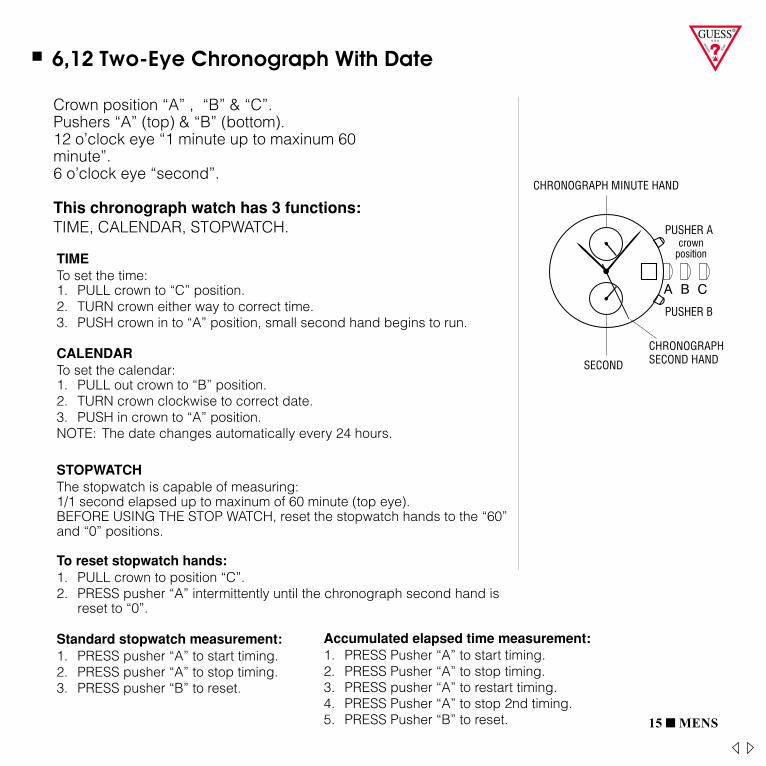
6,12 TWO-EYE CHRONOGRAPH WITH DATE
Crown position “A” , “B” & “C”.Pushers “A” (top) & “B” (bottom).12 o’clock eye “1 minute up to maxinum 60minute”.6 o’clock eye “second”.
This chronograph watch has 3 functions:TIME, CALENDAR, STOPWATCH.
TIMETo set the time:1. PULL crown to “C” position.2. TURN crown either way to correct time.3. PUSH crown in to “A” position, small second hand begins to run.
CALENDARTo set the calendar:1. PULL out crown to “B” position.2. TURN crown clockwise to correct date.3. PUSH in crown to “A” position.NOTE: The date changes automatically every 24 hours.
SECOND
CHRONOGRAPHSECOND HAND
CHRONOGRAPH MINUTE HAND
To set day:1. PULL out crown to C position.2. Advance time 24 hours to change the day.3. PUSH in crown to A position.NOTE: 24 hour indicator can change only when setting the time.
To set month:Push month setting button until the small hand of month is set to the correctmonth.
5
6,12 TWO-EYE CHRONOGRAPH WITH DATE
Crown position “A” , “B” & “C”.Pushers “A” (top) & “B” (bottom).12 o’clock eye “1 minute up to maxinum 60minute”.6 o’clock eye “second”.
This chronograph watch has 3 functions:TIME, CALENDAR, STOPWATCH.
TIMETo set the time:1. PULL crown to “C” position.2. TURN crown either way to correct time.3. PUSH crown in to “A” position, small second hand begins to run.
CALENDARTo set the calendar:1. PULL out crown to “B” position.2. TURN crown clockwise to correct date.3. PUSH in crown to “A” position.NOTE: The date changes automatically every 24 hours.
SECOND
CHRONOGRAPHSECOND HAND
CHRONOGRAPH MINUTE HAND
To set day:1. PULL out crown to C position.2. Advance time 24 hours to change the day.3. PUSH in crown to A position.NOTE: 24 hour indicator can change only when setting the time.
To set month:Push month setting button until the small hand of month is set to the correctmonth.
Day/Date/24 Hour
7
To set month:Push month setting button until the small hand of month is set to thecorrect month.
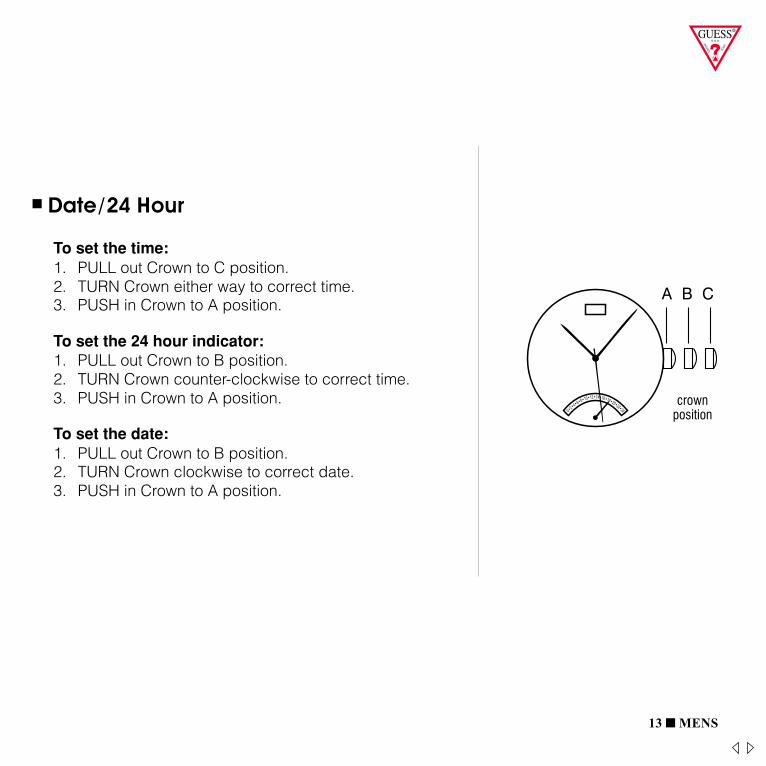
DATE / 24 HOUR
To set the time:1. PULL out Crown to C position.2. TURN Crown either way to correct time.3. PUSH in Crown to A position.
To set the 24 hour indicator:1. PULL out Crown to B position.2. TURN Crown counter-clockwise to correct time.3. PUSH in Crown to A position.
To set the date:1. PULL out Crown to B position.2. TURN Crown clockwise to correct date.3. PUSH in Crown to A position.
0 • 2• 4 • 6 • 8 • 10 • 12 • 14 • 16 • 18 • 20 •22 •24
7
To set month:Push month setting button until the small hand of month is set to thecorrect month.
DATE / 24 HOUR
To set the time:1. PULL out Crown to C position.2. TURN Crown either way to correct time.3. PUSH in Crown to A position.
To set the 24 hour indicator:1. PULL out Crown to B position.2. TURN Crown counter-clockwise to correct time.3. PUSH in Crown to A position.
To set the date:1. PULL out Crown to B position.2. TURN Crown clockwise to correct date.3. PUSH in Crown to A position.
0 • 2• 4 • 6 • 8 • 10 • 12 • 14 • 16 • 18 • 20 •22 •24
13 Mens
Date/24 Hour
8
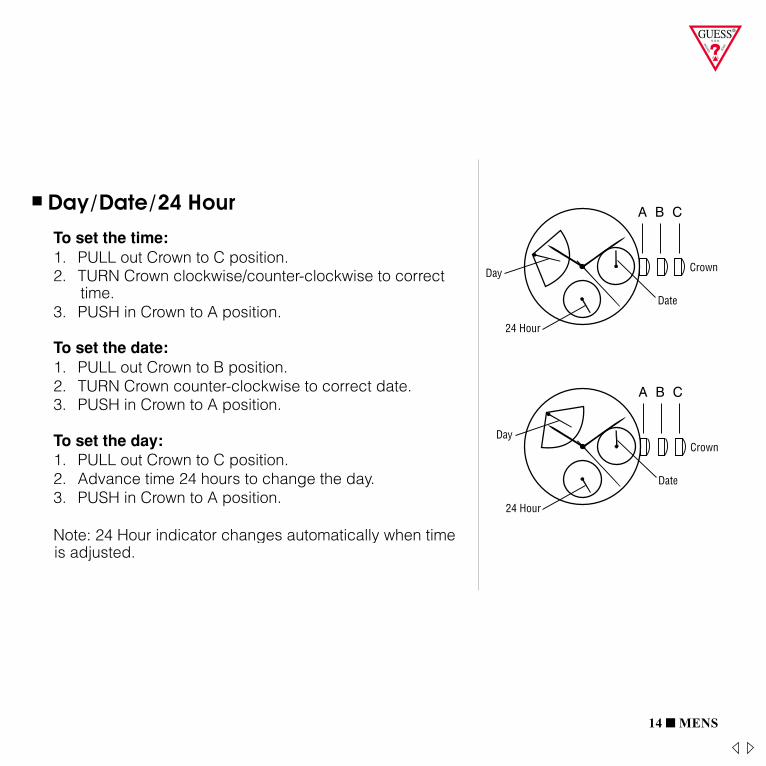
DAY / DATE / 24 HOUR
To set the time:1. PULL out Crown to C position.2. TURN Crown clockwise/counter-clockwise to correct time.3. PUSH in Crown to A position.
To set the date:1. PULL out Crown to B position.2. TURN Crown counter-clockwise to correct date.3. PUSH in Crown to A position.
To set the day:1. PULL out Crown to C position.2. Advance time 24 hours to change the day.3. PUSH in Crown to A position.
Note: 24 Hour indicator changes automatically when time is adjusted.
Crown
Date
24 Hour
DayCrown
Date
24 Hour
Day
8
DAY / DATE / 24 HOUR
To set the time:1. PULL out Crown to C position.2. TURN Crown clockwise/counter-clockwise to correct time.3. PUSH in Crown to A position.
To set the date:1. PULL out Crown to B position.2. TURN Crown counter-clockwise to correct date.3. PUSH in Crown to A position.
To set the day:1. PULL out Crown to C position.2. Advance time 24 hours to change the day.3. PUSH in Crown to A position.
Note: 24 Hour indicator changes automatically when time is adjusted.
Crown
Date
24 Hour
DayCrown
Date
24 Hour
Day
14 Mens
Day/Date/24 Hour
8
DAY / DATE / 24 HOUR
To set the time:1. PULL out Crown to C position.2. TURN Crown clockwise/counter-clockwise to correct time.3. PUSH in Crown to A position.
To set the date:1. PULL out Crown to B position.2. TURN Crown counter-clockwise to correct date.3. PUSH in Crown to A position.
To set the day:1. PULL out Crown to C position.2. Advance time 24 hours to change the day.3. PUSH in Crown to A position.
Note: 24 Hour indicator changes automatically when time is adjusted.
Crown
Date
24 Hour
DayCrown
Date
24 Hour
Day
15 Mens
5
6,12 TWO-EYE CHRONOGRAPH WITH DATE
Crown position “A” , “B” & “C”.Pushers “A” (top) & “B” (bottom).12 o’clock eye “1 minute up to maxinum 60minute”.6 o’clock eye “second”.
This chronograph watch has 3 functions:TIME, CALENDAR, STOPWATCH.
TIMETo set the time:1. PULL crown to “C” position.2. TURN crown either way to correct time.3. PUSH crown in to “A” position, small second hand begins to run.
CALENDARTo set the calendar:1. PULL out crown to “B” position.2. TURN crown clockwise to correct date.3. PUSH in crown to “A” position.NOTE: The date changes automatically every 24 hours.
SECOND
CHRONOGRAPHSECOND HAND
CHRONOGRAPH MINUTE HAND
To set day:1. PULL out crown to C position.2. Advance time 24 hours to change the day.3. PUSH in crown to A position.NOTE: 24 hour indicator can change only when setting the time.
To set month:Push month setting button until the small hand of month is set to the correctmonth.
6
STOPWATCHThe stopwatch is capable of measuring:1/1 second elapsed up to maxinum of 60 minute (top eye).BEFORE USING THE STOP WATCH, reset the stopwatch hands to the “60”and “0” positions.
To reset stopwatch hands:1. PULL crown to position “C”.2. PRESS pusher “A” intermittently until the chronograph second hand is
reset to “0”.
Standard stopwatch measurement:1. PRESS pusher “A” to start timing.2. PRESS pusher “A” to stop timing.3. PRESS pusher “B” to reset.
Accumulated elapsed time measurement:1. PRESS Pusher “A” to start timing.2. PRESS Pusher “A” to stop timing.3. PRESS pusher “A” to restart timing.4. PRESS Pusher “A” to stop 2nd timing.5. PRESS Pusher “B” to reset.
6,12 Two-Eye Chronograph With Date
13
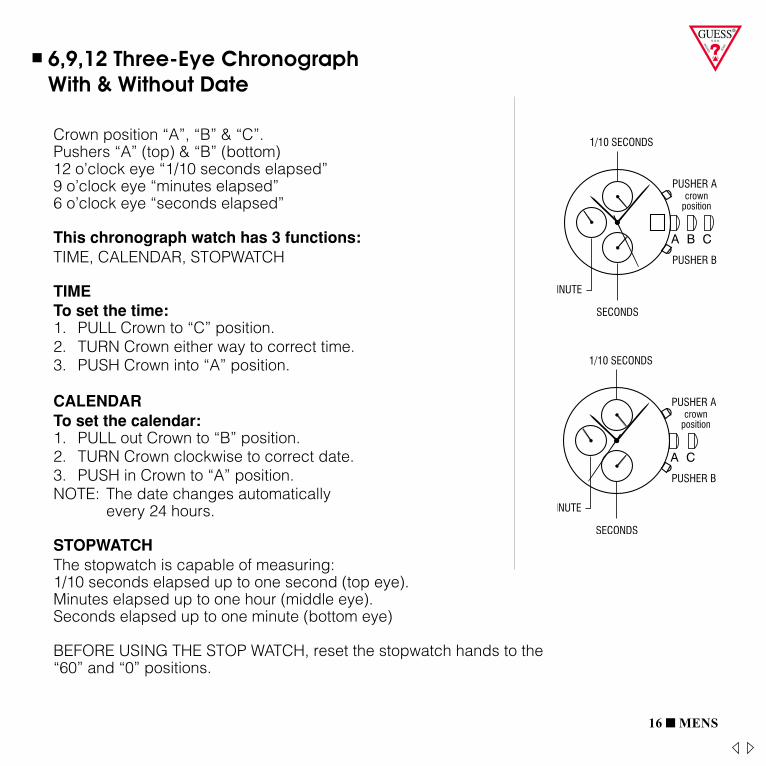
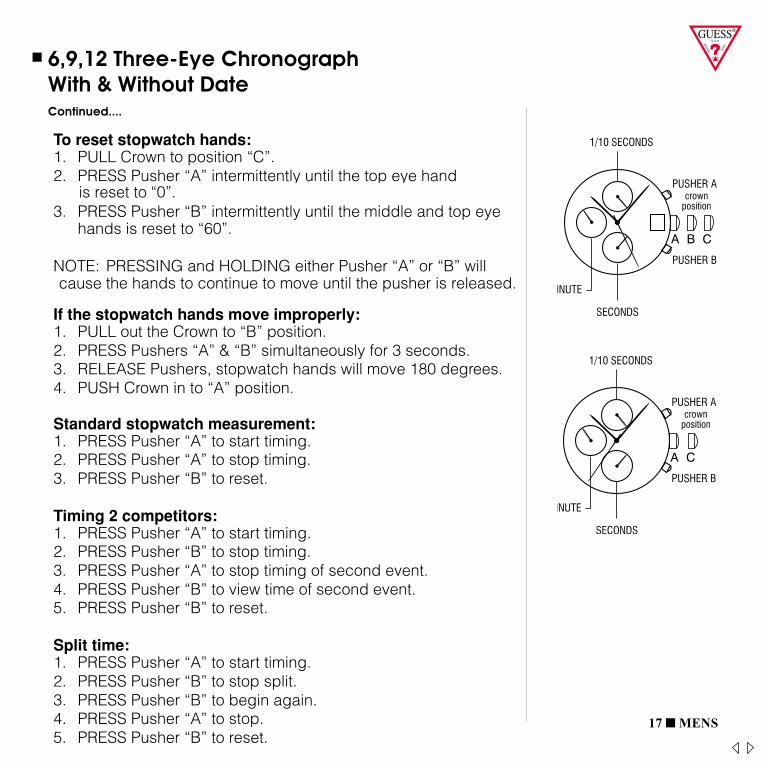
6,9,12 THREE-EYECHRONOGRAPH WITH & WITHOUT DATE
Crown position “A”, “B” & “C”.Pushers “A” (top) & “B” (bottom)12 o’clock eye “1/10 seconds elapsed”9 o’clock eye “minutes elapsed”6 o’clock eye “seconds elapsed”
This chronograph watch has 3 functions:TIME, CALENDAR, STOPWATCH
TIMETo set the time:1. PULL Crown to “C” position.2. TURN Crown either way to correct time.3. PUSH Crown into “A” position.
CALENDARTo set the calendar:1. PULL out Crown to “B” position.2. TURN Crown clockwise to correct date.3. PUSH in Crown to “A” position.NOTE: The date changes automatically
every 24 hours.
STOPWATCHThe stopwatch is capable of measuring:1/10 seconds elapsed up to one second (top eye).Minutes elapsed up to one hour (middle eye).Seconds elapsed up to one minute (bottom eye)
BEFORE USING THE STOP WATCH, reset the stopwatch hands to the“60” and “0” positions.
13
6,9,12 THREE-EYECHRONOGRAPH WITH & WITHOUT DATE
Crown position “A”, “B” & “C”.Pushers “A” (top) & “B” (bottom)12 o’clock eye “1/10 seconds elapsed”9 o’clock eye “minutes elapsed”6 o’clock eye “seconds elapsed”
This chronograph watch has 3 functions:TIME, CALENDAR, STOPWATCH
TIMETo set the time:1. PULL Crown to “C” position.2. TURN Crown either way to correct time.3. PUSH Crown into “A” position.
CALENDARTo set the calendar:1. PULL out Crown to “B” position.2. TURN Crown clockwise to correct date.3. PUSH in Crown to “A” position.NOTE: The date changes automatically
every 24 hours.
STOPWATCHThe stopwatch is capable of measuring:1/10 seconds elapsed up to one second (top eye).Minutes elapsed up to one hour (middle eye).Seconds elapsed up to one minute (bottom eye)
BEFORE USING THE STOP WATCH, reset the stopwatch hands to the“60” and “0” positions.
16 Mens
6,9,12 Three-Eye Chronograph With & Without Date
17 Mens
13
6,9,12 THREE-EYECHRONOGRAPH WITH & WITHOUT DATE
Crown position “A”, “B” & “C”.Pushers “A” (top) & “B” (bottom)12 o’clock eye “1/10 seconds elapsed”9 o’clock eye “minutes elapsed”6 o’clock eye “seconds elapsed”
This chronograph watch has 3 functions:TIME, CALENDAR, STOPWATCH
TIMETo set the time:1. PULL Crown to “C” position.2. TURN Crown either way to correct time.3. PUSH Crown into “A” position.
CALENDARTo set the calendar:1. PULL out Crown to “B” position.2. TURN Crown clockwise to correct date.3. PUSH in Crown to “A” position.NOTE: The date changes automatically
every 24 hours.
STOPWATCHThe stopwatch is capable of measuring:1/10 seconds elapsed up to one second (top eye).Minutes elapsed up to one hour (middle eye).Seconds elapsed up to one minute (bottom eye)
BEFORE USING THE STOP WATCH, reset the stopwatch hands to the“60” and “0” positions.
6,9,12 Three-Eye Chronograph With & Without DateContinued....
14
To reset stopwatch hands:1. PULL Crown to position “C”.2. PRESS Pusher “A” intermittently until the top eye hand is reset to
“0”.3. PRESS Pusher “B” intermittently until the middle and top eye
hands is reset to “60”.
NOTE: PRESSING and HOLDING either Pusher “A” or “B” will causethe hands to continue to move until the pusher is released.
If the stopwatch hands move improperly:1. PULL out the Crown to “B” position.2. PRESS Pushers “A” & “B” simultaneously for 3 seconds.3. RELEASE Pushers, stopwatch hands will move 180 degrees.4. PUSH Crown in to “A” position.
Standard stopwatch measurement:1. PRESS Pusher “A” to start timing.2. PRESS Pusher “A” to stop timing.3. PRESS Pusher “B” to reset.
Timing 2 competitors:1. PRESS Pusher “A” to start timing.2. PRESS Pusher “B” to stop timing.3. PRESS Pusher “A” to stop timing of second event.4. PRESS Pusher “B” to view time of second event.5. PRESS Pusher “B” to reset.
Split time:1. PRESS Pusher “A” to start timing.2. PRESS Pusher “B” to stop split.3. PRESS Pusher “B” to begin again.4. PRESS Pusher “A” to stop.5. PRESS Pusher “B” to reset.

15
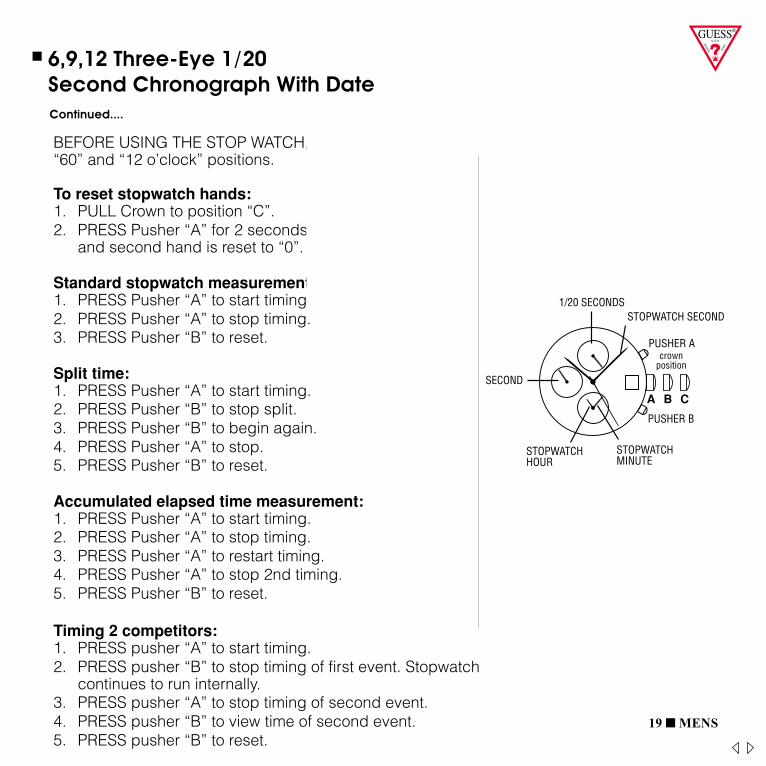
6, 9, 12 THREE EYE1/20 SECOND CHRONOGRAPH WITH DATE
Crown position “A”, “B” & “C”.Pushers “A” (top) & “B”(bottom).6 o’clock eye “hour & minuteselapsed”.9 o’clock eye “second”.12 o’clock eye “1/20 secondselapsed”.
This chronograph watch has 3functions:TIME, STOPWATCH, CALENDA.
TIMETo set the time:1. PULL Crown to “C” position.2. TURN Crown either way to correct time.3. PUSH Crown in to “A” position.
CALENDARTo set the calendar:1. PULL out Crown to “B” position.2. TURN Crown clockwise to correct date.3. PUSH in Crown to “A” position.NOTE: The date changes automatically every 24 hours.
Do not set the date between 9:00 PM and 1:00 AM.
STOPWATCHThe stopwatch is capable of measuring:Hour & Minutes elapsed up to 12 hours (bottom eye).1/20 Seconds elapsed up to 12 hours (top eye).Seconds elapsed up to 12 hours.
1/20 SECONDS
crownposition
A B C
PUSHER B
SECOND
STOPWATCH SECOND
PUSHER A
STOPWATCHMINUTE
STOPWATCHHOUR
18 Mens
6,9,12 Three-Eye 1/20 Second Chronograph With Date
15
6, 9, 12 THREE EYE1/20 SECOND CHRONOGRAPH WITH DATE
Crown position “A”, “B” & “C”.Pushers “A” (top) & “B”(bottom).6 o’clock eye “hour & minuteselapsed”.9 o’clock eye “second”.12 o’clock eye “1/20 secondselapsed”.
This chronograph watch has 3functions:TIME, STOPWATCH, CALENDA.
TIMETo set the time:1. PULL Crown to “C” position.2. TURN Crown either way to correct time.3. PUSH Crown in to “A” position.
CALENDARTo set the calendar:1. PULL out Crown to “B” position.2. TURN Crown clockwise to correct date.3. PUSH in Crown to “A” position.NOTE: The date changes automatically every 24 hours.
Do not set the date between 9:00 PM and 1:00 AM.
STOPWATCHThe stopwatch is capable of measuring:Hour & Minutes elapsed up to 12 hours (bottom eye).1/20 Seconds elapsed up to 12 hours (top eye).Seconds elapsed up to 12 hours.
1/20 SECONDS
crownposition
A B C
PUSHER B
SECOND
STOPWATCH SECOND
PUSHER A
STOPWATCHMINUTE
STOPWATCHHOUR
16
BEFORE USING THE STOP WATCH, reset the stopwatch hands to the“60” and “12 o’clock” positions.
To reset stopwatch hands:1. PULL Crown to position “C”.2. PRESS Pusher “A” for 2 seconds until the stopwatch hour, minute
and second hand is reset to “0”.
Standard stopwatch measurement:1. PRESS Pusher “A” to start timing.2. PRESS Pusher “A” to stop timing.3. PRESS Pusher “B” to reset.
Split time:1. PRESS Pusher “A” to start timing.2. PRESS Pusher “B” to stop split.3. PRESS Pusher “B” to begin again.4. PRESS Pusher “A” to stop.5. PRESS Pusher “B” to reset.
Accumulated elapsed time measurement:1. PRESS Pusher “A” to start timing.2. PRESS Pusher “A” to stop timing.3. PRESS Pusher “A” to restart timing.4. PRESS Pusher “A” to stop 2nd timing.5. PRESS Pusher “B” to reset.
Timing 2 competitors:1. PRESS pusher “A” to start timing.2. PRESS pusher “B” to stop timing of first event. Stopwatch
continues to run internally.3. PRESS pusher “A” to stop timing of second event.4. PRESS pusher “B” to view time of second event.5. PRESS pusher “B” to reset.
19 Mens
6,9,12 Three-Eye 1/20 Second Chronograph With Date
15
6, 9, 12 THREE EYE1/20 SECOND CHRONOGRAPH WITH DATE
Crown position “A”, “B” & “C”.Pushers “A” (top) & “B”(bottom).6 o’clock eye “hour & minuteselapsed”.9 o’clock eye “second”.12 o’clock eye “1/20 secondselapsed”.
This chronograph watch has 3functions:TIME, STOPWATCH, CALENDA.
TIMETo set the time:1. PULL Crown to “C” position.2. TURN Crown either way to correct time.3. PUSH Crown in to “A” position.
CALENDARTo set the calendar:1. PULL out Crown to “B” position.2. TURN Crown clockwise to correct date.3. PUSH in Crown to “A” position.NOTE: The date changes automatically every 24 hours.
Do not set the date between 9:00 PM and 1:00 AM.
STOPWATCHThe stopwatch is capable of measuring:Hour & Minutes elapsed up to 12 hours (bottom eye).1/20 Seconds elapsed up to 12 hours (top eye).Seconds elapsed up to 12 hours.
1/20 SECONDS
crownposition
A B C
PUSHER B
SECOND
STOPWATCH SECOND
PUSHER A
STOPWATCHMINUTE
STOPWATCHHOUR
Continued....
17
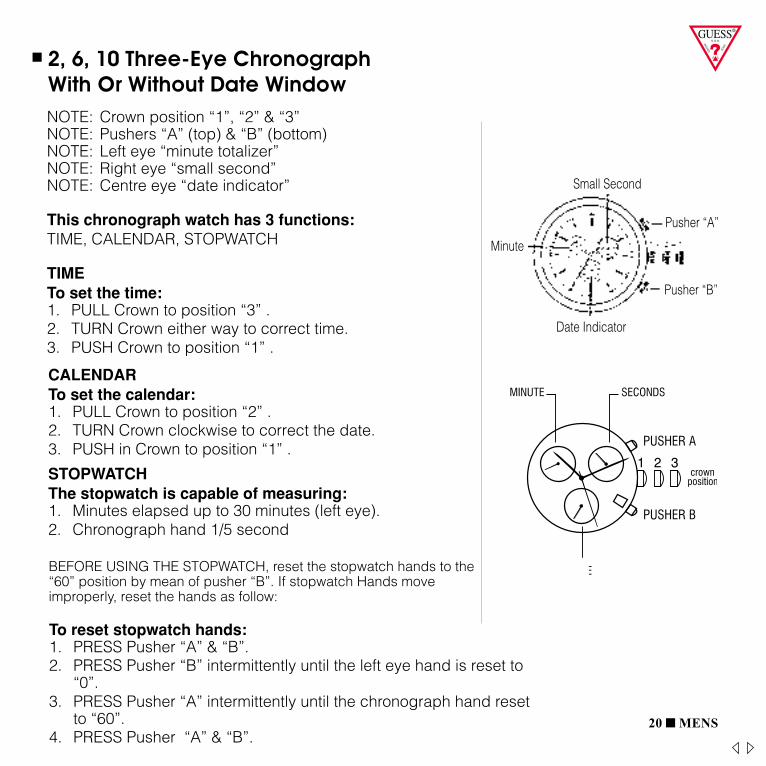
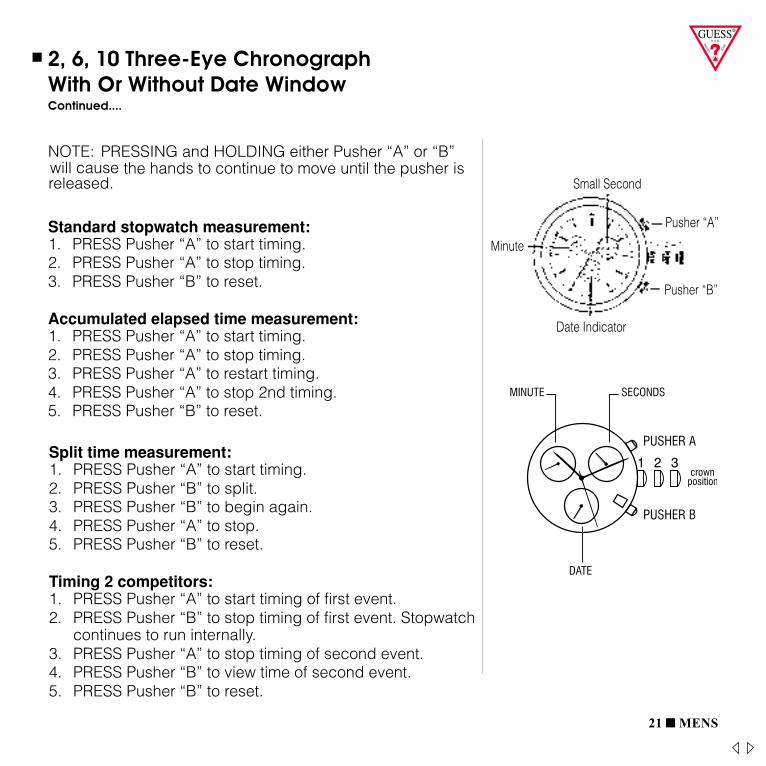
2,6,10 THREE-EYE CHRONOGRAPHWITH OR WITHOUT DATE WINDOW
NOTE: Crown position “1”, “2” & “3”NOTE: Pushers “A” (top) & “B” (bottom)NOTE: Left eye “minute totalizer”NOTE: Right eye “small second”NOTE: Centre eye “date indicator”
This chronograph watch has 3 functions:TIME, CALENDAR, STOPWATCH
TIMETo set the time:1. PULL Crown to position “3” .2. TURN Crown either way to correct time.3. PUSH Crown to position “1” .
Small Second
Date Indicator
Minute
Pusher “A”
Pusher “B”
17
2,6,10 THREE-EYE CHRONOGRAPHWITH OR WITHOUT DATE WINDOW
NOTE: Crown position “1”, “2” & “3”NOTE: Pushers “A” (top) & “B” (bottom)NOTE: Left eye “minute totalizer”NOTE: Right eye “small second”NOTE: Centre eye “date indicator”
This chronograph watch has 3 functions:TIME, CALENDAR, STOPWATCH
TIMETo set the time:1. PULL Crown to position “3” .2. TURN Crown either way to correct time.3. PUSH Crown to position “1” .
Small Second
Date Indicator
Minute
Pusher “A”
Pusher “B”
20 Mens
2, 6, 10 Three-Eye ChronographWith Or Without Date Window
18
CALENDARTo set the calendar:1. PULL Crown to position “2” .2. TURN Crown clockwise to correct the date.3. PUSH in Crown to position “1” .
STOPWATCHThe stopwatch is capable of measuring:1. Minutes elapsed up to 30 minutes (left eye).2. Chronograph hand 1/5 second
BEFORE USING THE STOPWATCH, reset the stopwatch hands to the“60” position by mean of pusher “B”. If stopwatch Hands moveimproperly, reset the hands as follow:
To reset stopwatch hands:1. PRESS Pusher “A” & “B”.2. PRESS Pusher “B” intermittently until the left eye hand is reset to
“0”.3. PRESS Pusher “A” intermittently until the chronograph hand reset
to “60”.4. PRESS Pusher “A” & “B”.
NOTE: PRESSING and HOLDING either Pusher “A” or “B” will causethe hands to continue to move until the pusher is released.
Standard stopwatch measurement:1. PRESS Pusher “A” to start timing.2. PRESS Pusher “A” to stop timing.3. PRESS Pusher “B” to reset.
Accumulated elapsed time measurement:1. PRESS Pusher “A” to start timing.2. PRESS Pusher “A” to stop timing.3. PRESS Pusher “A” to restart timing.4. PRESS Pusher “A” to stop 2nd timing.5. PRESS Pusher “B” to reset.
17
2,6,10 THREE-EYE CHRONOGRAPHWITH OR WITHOUT DATE WINDOW
NOTE: Crown position “1”, “2” & “3”NOTE: Pushers “A” (top) & “B” (bottom)NOTE: Left eye “minute totalizer”NOTE: Right eye “small second”NOTE: Centre eye “date indicator”
This chronograph watch has 3 functions:TIME, CALENDAR, STOPWATCH
TIMETo set the time:1. PULL Crown to position “3” .2. TURN Crown either way to correct time.3. PUSH Crown to position “1” .
Small Second
Date Indicator
Minute
Pusher “A”
Pusher “B”
18
CALENDARTo set the calendar:1. PULL Crown to position “2” .2. TURN Crown clockwise to correct the date.3. PUSH in Crown to position “1” .
STOPWATCHThe stopwatch is capable of measuring:1. Minutes elapsed up to 30 minutes (left eye).2. Chronograph hand 1/5 second
BEFORE USING THE STOPWATCH, reset the stopwatch hands to the“60” position by mean of pusher “B”. If stopwatch Hands moveimproperly, reset the hands as follow:
To reset stopwatch hands:1. PRESS Pusher “A” & “B”.2. PRESS Pusher “B” intermittently until the left eye hand is reset to
“0”.3. PRESS Pusher “A” intermittently until the chronograph hand reset
to “60”.4. PRESS Pusher “A” & “B”.
NOTE: PRESSING and HOLDING either Pusher “A” or “B” will causethe hands to continue to move until the pusher is released.
Standard stopwatch measurement:1. PRESS Pusher “A” to start timing.2. PRESS Pusher “A” to stop timing.3. PRESS Pusher “B” to reset.
Accumulated elapsed time measurement:1. PRESS Pusher “A” to start timing.2. PRESS Pusher “A” to stop timing.3. PRESS Pusher “A” to restart timing.4. PRESS Pusher “A” to stop 2nd timing.5. PRESS Pusher “B” to reset.
21 Mens
17
2,6,10 THREE-EYE CHRONOGRAPHWITH OR WITHOUT DATE WINDOW
NOTE: Crown position “1”, “2” & “3”NOTE: Pushers “A” (top) & “B” (bottom)NOTE: Left eye “minute totalizer”NOTE: Right eye “small second”NOTE: Centre eye “date indicator”
This chronograph watch has 3 functions:TIME, CALENDAR, STOPWATCH
TIMETo set the time:1. PULL Crown to position “3” .2. TURN Crown either way to correct time.3. PUSH Crown to position “1” .
Small Second
Date Indicator
Minute
Pusher “A”
Pusher “B”
2, 6, 10 Three-Eye ChronographWith Or Without Date Window
17
2,6,10 THREE-EYE CHRONOGRAPHWITH OR WITHOUT DATE WINDOW
NOTE: Crown position “1”, “2” & “3”NOTE: Pushers “A” (top) & “B” (bottom)NOTE: Left eye “minute totalizer”NOTE: Right eye “small second”NOTE: Centre eye “date indicator”
This chronograph watch has 3 functions:TIME, CALENDAR, STOPWATCH
TIMETo set the time:1. PULL Crown to position “3” .2. TURN Crown either way to correct time.3. PUSH Crown to position “1” .
Small Second
Date Indicator
Minute
Pusher “A”
Pusher “B”
19
Split time measurement:1. PRESS Pusher “A” to start timing.2. PRESS Pusher “B” to split.3. PRESS Pusher “B” to begin again.4. PRESS Pusher “A” to stop.5. PRESS Pusher “B” to reset.
Timing 2 competitors:1. PRESS Pusher “A” to start timing of first event.2. PRESS Pusher “B” to stop timing of first event. Stopwatch
continues to run internally.3. PRESS Pusher “A” to stop timing of second event.4. PRESS Pusher “B” to view time of second event.5. PRESS Pusher “B” to reset.
Continued....
20
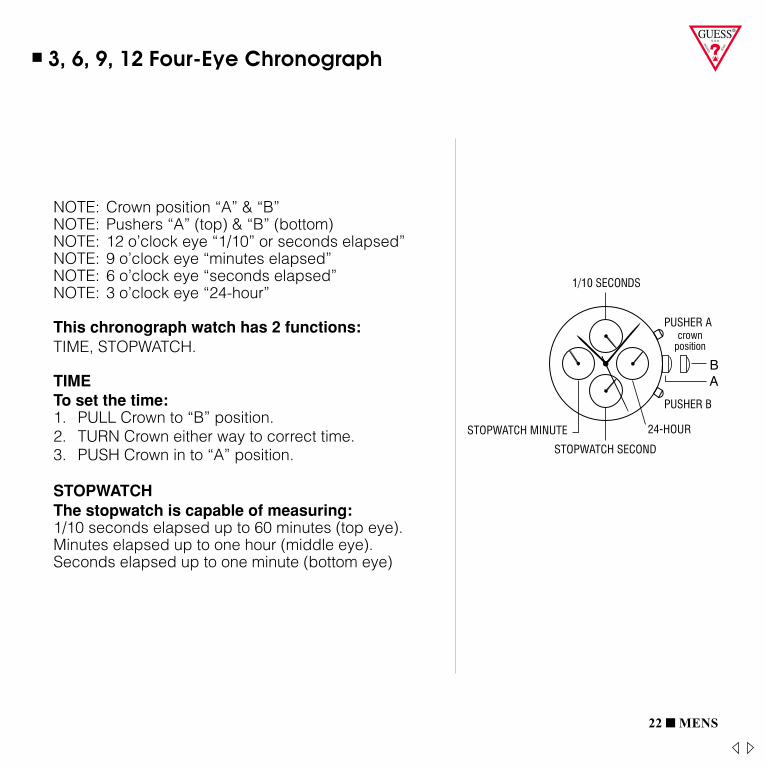
3,6,9,12 FOUR-EYE CHRONOGRAPH
NOTE: Crown position “A” & “B”NOTE: Pushers “A” (top) & “B” (bottom)NOTE: 12 o’clock eye “1/10” or seconds elapsed”NOTE: 9 o’clock eye “minutes elapsed”NOTE: 6 o’clock eye “seconds elapsed”NOTE: 3 o’clock eye “24-hour”
This chronograph watch has 2 functions:TIME, STOPWATCH.
TIMETo set the time:1. PULL Crown to “B” position.2. TURN Crown either way to correct time.3. PUSH Crown in to “A” position.
STOPWATCHThe stopwatch is capable of measuring:1/10 seconds elapsed up to 60 minutes (top eye).Minutes elapsed up to one hour (middle eye).Seconds elapsed up to one minute (bottom eye)
STOPWATCH MINUTE 24-HOUR
STOPWATCH SECOND
22 Mens
3, 6, 9, 12 Four-Eye Chronograph
20
3,6,9,12 FOUR-EYE CHRONOGRAPH
NOTE: Crown position “A” & “B”NOTE: Pushers “A” (top) & “B” (bottom)NOTE: 12 o’clock eye “1/10” or seconds elapsed”NOTE: 9 o’clock eye “minutes elapsed”NOTE: 6 o’clock eye “seconds elapsed”NOTE: 3 o’clock eye “24-hour”
This chronograph watch has 2 functions:TIME, STOPWATCH.
TIMETo set the time:1. PULL Crown to “B” position.2. TURN Crown either way to correct time.3. PUSH Crown in to “A” position.
STOPWATCHThe stopwatch is capable of measuring:1/10 seconds elapsed up to 60 minutes (top eye).Minutes elapsed up to one hour (middle eye).Seconds elapsed up to one minute (bottom eye)
STOPWATCH MINUTE 24-HOUR
STOPWATCH SECOND
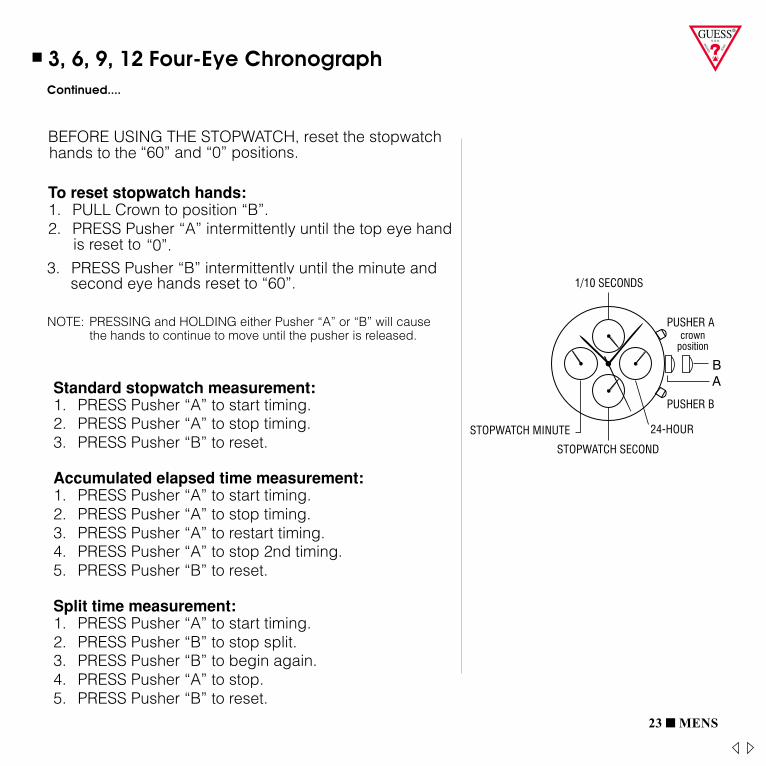
21
BEFORE USING THE STOPWATCH, reset the stopwatch hands to the“60” and “0” positions.
To reset stopwatch hands:1. PULL Crown to position “B”.2. PRESS Pusher “A” intermittently until the top eye hand is reset to
“0”.3. PRESS Pusher “B” intermittently until the minute and second eye
hands reset to “60”.
NOTE: PRESSING and HOLDING either Pusher “A” or “B” will causethe hands to continue to move until the pusher is released.
Standard stopwatch measurement:1. PRESS Pusher “A” to start timing.2. PRESS Pusher “A” to stop timing.3. PRESS Pusher “B” to reset.
Accumulated elapsed time measurement:1. PRESS Pusher “A” to start timing.2. PRESS Pusher “A” to stop timing.3. PRESS Pusher “A” to restart timing.4. PRESS Pusher “A” to stop 2nd timing.5. PRESS Pusher “B” to reset.
Split time measurement:1. PRESS Pusher “A” to start timing.2. PRESS Pusher “B” to stop split.3. PRESS Pusher “B” to begin again.4. PRESS Pusher “A” to stop.5. PRESS Pusher “B” to reset.
23 Mens
3, 6, 9, 12 Four-Eye Chronograph
20
3,6,9,12 FOUR-EYE CHRONOGRAPH
NOTE: Crown position “A” & “B”NOTE: Pushers “A” (top) & “B” (bottom)NOTE: 12 o’clock eye “1/10” or seconds elapsed”NOTE: 9 o’clock eye “minutes elapsed”NOTE: 6 o’clock eye “seconds elapsed”NOTE: 3 o’clock eye “24-hour”
This chronograph watch has 2 functions:TIME, STOPWATCH.
TIMETo set the time:1. PULL Crown to “B” position.2. TURN Crown either way to correct time.3. PUSH Crown in to “A” position.
STOPWATCHThe stopwatch is capable of measuring:1/10 seconds elapsed up to 60 minutes (top eye).Minutes elapsed up to one hour (middle eye).Seconds elapsed up to one minute (bottom eye)
STOPWATCH MINUTE 24-HOUR
STOPWATCH SECOND
21
BEFORE USING THE STOPWATCH, reset the stopwatch hands to the“60” and “0” positions.
To reset stopwatch hands:1. PULL Crown to position “B”.2. PRESS Pusher “A” intermittently until the top eye hand is reset to
“0”.3. PRESS Pusher “B” intermittently until the minute and second eye
hands reset to “60”.
NOTE: PRESSING and HOLDING either Pusher “A” or “B” will causethe hands to continue to move until the pusher is released.
Standard stopwatch measurement:1. PRESS Pusher “A” to start timing.2. PRESS Pusher “A” to stop timing.3. PRESS Pusher “B” to reset.
Accumulated elapsed time measurement:1. PRESS Pusher “A” to start timing.2. PRESS Pusher “A” to stop timing.3. PRESS Pusher “A” to restart timing.4. PRESS Pusher “A” to stop 2nd timing.5. PRESS Pusher “B” to reset.
Split time measurement:1. PRESS Pusher “A” to start timing.2. PRESS Pusher “B” to stop split.3. PRESS Pusher “B” to begin again.4. PRESS Pusher “A” to stop.5. PRESS Pusher “B” to reset.
Continued....
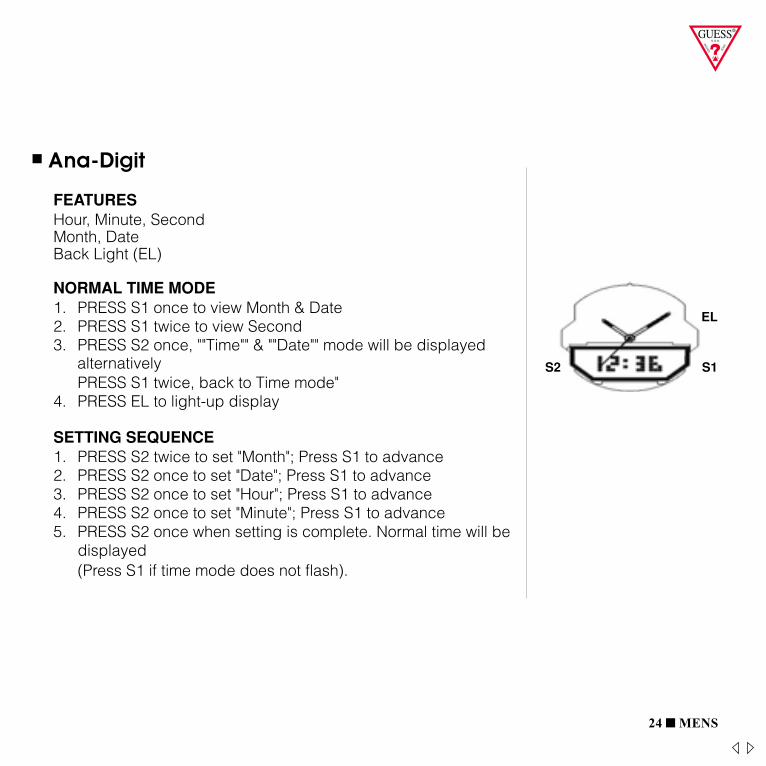
24 Mens
7
ANA-DIGIT
FEATURESHour, Minute, SecondMonth, DateBack Light (EL)
NORMAL TIME MODE1. PRESS S1 once to view Month & Date2. PRESS S1 twice to view Second3. PRESS S2 once, ""Time"" & ""Date"" mode will be displayed alternatively
PRESS S1 twice, back to Time mode"4. PRESS EL to light-up display
SETTING SEQUENCE1. PRESS S2 twice to set "Month"; Press S1 to advance2. PRESS S2 once to set "Date"; Press S1 to advance3. PRESS S2 once to set "Hour"; Press S1 to advance4. PRESS S2 once to set "Minute"; Press S1 to advance5. PRESS S2 once when setting is complete. Normal time will be displayed
(Press S1 if time mode does not flash).
EL
S1S2
7
ANA-DIGIT
FEATURESHour, Minute, SecondMonth, DateBack Light (EL)
NORMAL TIME MODE1. PRESS S1 once to view Month & Date2. PRESS S1 twice to view Second3. PRESS S2 once, ""Time"" & ""Date"" mode will be displayed alternatively
PRESS S1 twice, back to Time mode"4. PRESS EL to light-up display
SETTING SEQUENCE1. PRESS S2 twice to set "Month"; Press S1 to advance2. PRESS S2 once to set "Date"; Press S1 to advance3. PRESS S2 once to set "Hour"; Press S1 to advance4. PRESS S2 once to set "Minute"; Press S1 to advance5. PRESS S2 once when setting is complete. Normal time will be displayed
(Press S1 if time mode does not flash).
EL
S1S2 Ana-Digit
7
ANA-DIGIT
FEATURESHour, Minute, SecondMonth, DateBack Light (EL)
NORMAL TIME MODE1. PRESS S1 once to view Month & Date2. PRESS S1 twice to view Second3. PRESS S2 once, ""Time"" & ""Date"" mode will be displayed alternatively
PRESS S1 twice, back to Time mode"4. PRESS EL to light-up display
SETTING SEQUENCE1. PRESS S2 twice to set "Month"; Press S1 to advance2. PRESS S2 once to set "Date"; Press S1 to advance3. PRESS S2 once to set "Hour"; Press S1 to advance4. PRESS S2 once to set "Minute"; Press S1 to advance5. PRESS S2 once when setting is complete. Normal time will be displayed
(Press S1 if time mode does not flash).
EL
S1S2
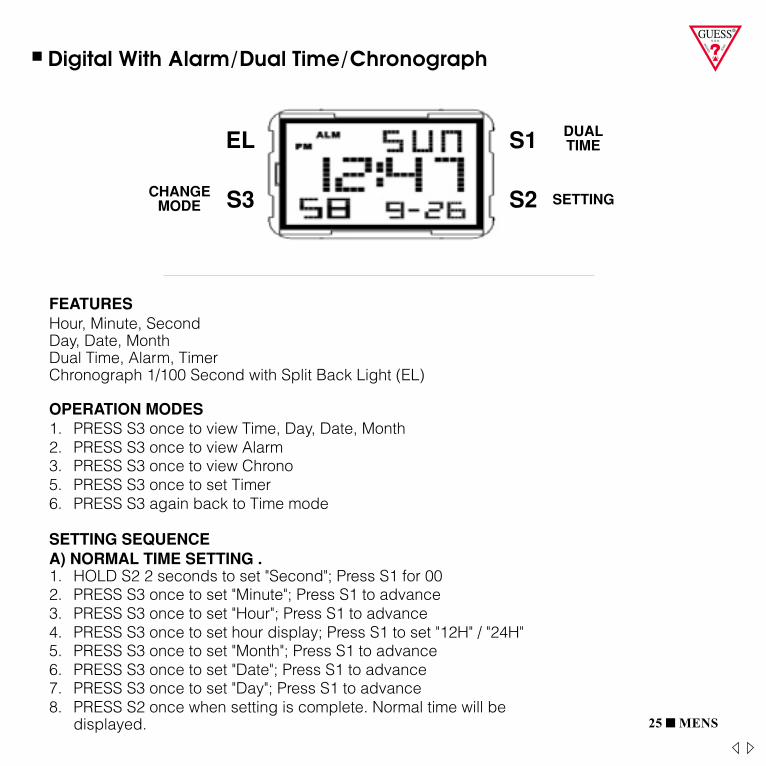
22
DIGITAL WITH ALARM / DUAL TIME /CHRONOGRAPH
FEATURESHour, Minute, SecondDay, Date, MonthDual Time, Alarm, TimerChronograph 1/100 Second with Split Back Light (EL)
OPERATION MODES1. PRESS S3 once to view Time, Day, Date, Month2. PRESS S3 once to view Alarm3. PRESS S3 once to view Chrono5. PRESS S3 once to set Timer6. PRESS S3 again back to Time mode
SETTING SEQUENCEA) NORMAL TIME SETTING .1. HOLD S2 2 seconds to set "Second"; Press S1 for 002. PRESS S3 once to set "Minute"; Press S1 to advance3. PRESS S3 once to set "Hour"; Press S1 to advance4. PRESS S3 once to set hour display; Press S1 to set "12H" / "24H"5. PRESS S3 once to set "Month"; Press S1 to advance6. PRESS S3 once to set "Date"; Press S1 to advance7. PRESS S3 once to set "Day"; Press S1 to advance8. PRESS S2 once when setting is complete. Normal time will be
displayed.
EL S1
S2S3
DUALTIME
SETTINGCHANGEMODE
25 Mens
Digital With Alarm/Dual Time/Chronograph
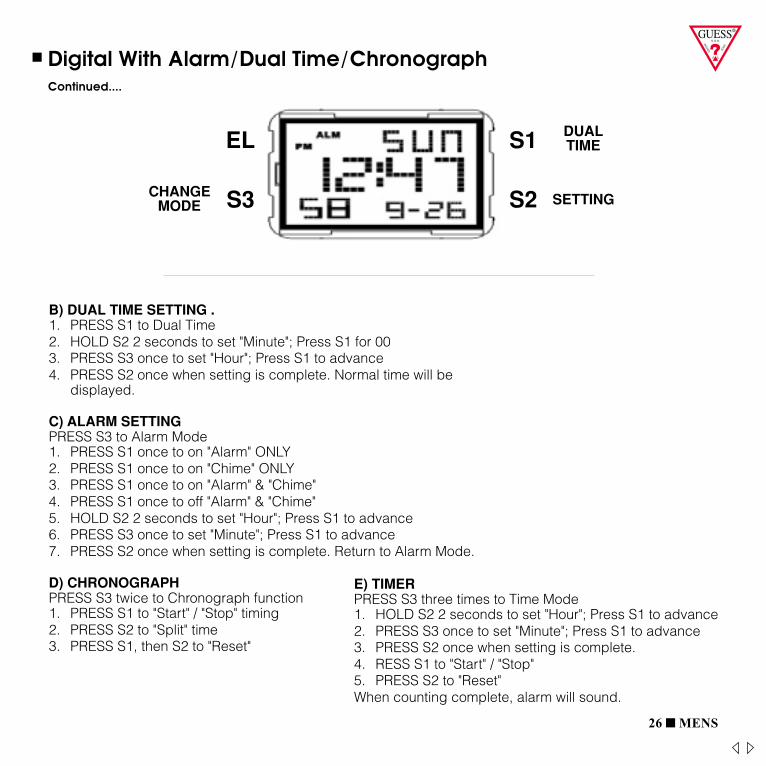
23
B) DUAL TIME SETTING .1. PRESS S1 to Dual Time2. HOLD S2 2 seconds to set "Minute"; Press S1 for 003. PRESS S3 once to set "Hour"; Press S1 to advance4. PRESS S2 once when setting is complete. Normal time will be
displayed.
C) ALARM SETTINGPRESS S3 to Alarm Mode1. PRESS S1 once to on "Alarm" ONLY2. PRESS S1 once to on "Chime" ONLY3. PRESS S1 once to on "Alarm" & "Chime"4. PRESS S1 once to off "Alarm" & "Chime"5. HOLD S2 2 seconds to set "Hour"; Press S1 to advance6. PRESS S3 once to set "Minute"; Press S1 to advance7. PRESS S2 once when setting is complete. Return to Alarm Mode.
D) CHRONOGRAPHPRESS S3 twice to Chronograph function1. PRESS S1 to "Start" / "Stop" timing2. PRESS S2 to "Split" time3. PRESS S1, then S2 to "Reset"
E) TIMERPRESS S3 three times to Time Mode1. HOLD S2 2 seconds to set "Hour"; Press S1 to advance2. PRESS S3 once to set "Minute"; Press S1 to advance3. PRESS S2 once when setting is complete.4. RESS S1 to "Start" / "Stop"5. PRESS S2 to "Reset"When counting complete, alarm will sound.
26 Mens22
DIGITAL WITH ALARM / DUAL TIME /CHRONOGRAPH
FEATURESHour, Minute, SecondDay, Date, MonthDual Time, Alarm, TimerChronograph 1/100 Second with Split Back Light (EL)
OPERATION MODES1. PRESS S3 once to view Time, Day, Date, Month2. PRESS S3 once to view Alarm3. PRESS S3 once to view Chrono5. PRESS S3 once to set Timer6. PRESS S3 again back to Time mode
SETTING SEQUENCEA) NORMAL TIME SETTING .1. HOLD S2 2 seconds to set "Second"; Press S1 for 002. PRESS S3 once to set "Minute"; Press S1 to advance3. PRESS S3 once to set "Hour"; Press S1 to advance4. PRESS S3 once to set hour display; Press S1 to set "12H" / "24H"5. PRESS S3 once to set "Month"; Press S1 to advance6. PRESS S3 once to set "Date"; Press S1 to advance7. PRESS S3 once to set "Day"; Press S1 to advance8. PRESS S2 once when setting is complete. Normal time will be
displayed.
EL S1
S2S3
DUALTIME
SETTINGCHANGEMODE
Digital With Alarm/Dual Time/ChronographContinued....
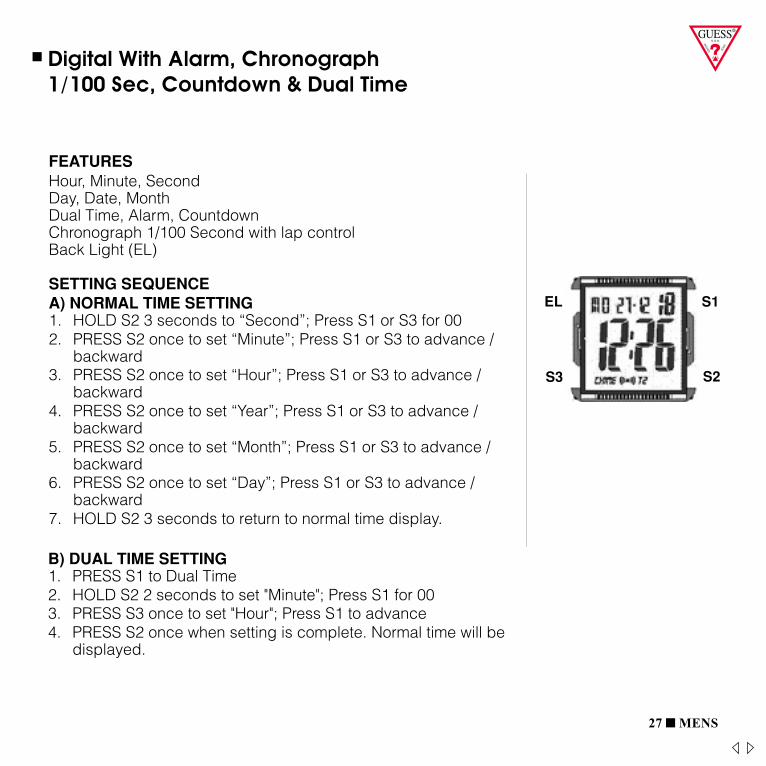
25
DIGITAL WITH ALARM, CHRONOGRAPH 1/100 SEC,COUNTDOWN & DUAL TIME
FEATURESHour, Minute, SecondDay, Date, MonthDual Time, Alarm, CountdownChronograph 1/100 Second with lap controlBack Light (EL)
SETTING SEQUENCEA) NORMAL TIME SETTING1. HOLD S2 3 seconds to “Second”; Press S1 or S3 for 002. PRESS S2 once to set “Minute”; Press S1 or S3 to advance /
backward3. PRESS S2 once to set “Hour”; Press S1 or S3 to advance /
backward4. PRESS S2 once to set “Year”; Press S1 or S3 to advance /
backward5. PRESS S2 once to set “Month”; Press S1 or S3 to advance /
backward6. PRESS S2 once to set “Day”; Press S1 or S3 to advance /
backward7. HOLD S2 3 seconds to return to normal time display.
EL S1
S2S3
27 Mens
Digital With Alarm, Chronograph 1/100 Sec, Countdown & Dual Time
26
B) DUAL TIME SETTING1. PRESS S1 to Dual Time2. HOLD S2 2 seconds to set "Minute"; Press S1 for 003. PRESS S3 once to set "Hour"; Press S1 to advance4. PRESS S2 once when setting is complete. Normal time will be
displayed.
C) ALARM SETTINGPRESS S3 to Alarm Mode1. PRESS S1 to "Alarm 1" – “Alarm 5”2. HOLD S2 2 seconds until “AL” flash
PRESS S1/S3 to set “Alarm” / “Chime”3. PRESS S2 once to set “Hour” Press S1 or S3 to advance /
backward4. PRESS S2 once to set “Minute” Press S1 or S3 to advance /
backward5. HOLD S2 3 seconds when setting is complete. Return to Alarm
Model.
D) COUNTDOWN TIMER SETTING(i) PRESS S3 twice to Countdown Timer function [T1] (1~90 mins)
1) HOLD S2 2 seconds to set "Minute"; Press S1/S3 to advance /backward
2) HOLD S2 3 sec to end setting3) PRESS S2 to start/stop countdown
(ii) PRESS S1 to get into Countdown timer [T2] (from normal time topreset time – within 24hrs)1) HOLD S2 3 seconds to set "Hour"; Press S1/S3 to advance /
backward2) PRESS S2 once to set “Minute” Press S1 or S3 to advance /
backward3) HOLD S2 3 sec to end setting4) PRESS S2 to start/stop countdown. Time different between
Normal time & Preset time will be shown
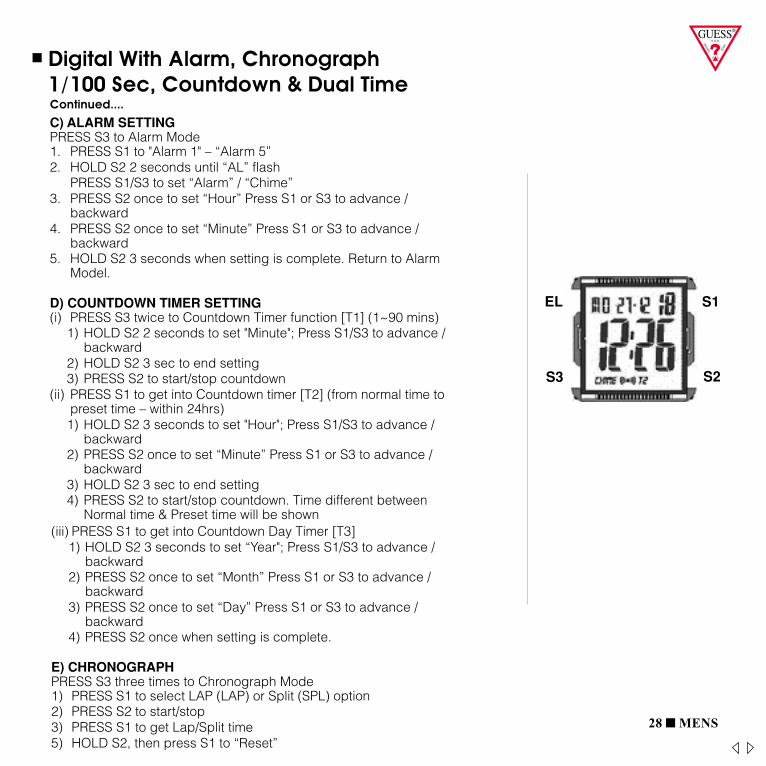
28 Mens
25
DIGITAL WITH ALARM, CHRONOGRAPH 1/100 SEC,COUNTDOWN & DUAL TIME
FEATURESHour, Minute, SecondDay, Date, MonthDual Time, Alarm, CountdownChronograph 1/100 Second with lap controlBack Light (EL)
SETTING SEQUENCEA) NORMAL TIME SETTING1. HOLD S2 3 seconds to “Second”; Press S1 or S3 for 002. PRESS S2 once to set “Minute”; Press S1 or S3 to advance /
backward3. PRESS S2 once to set “Hour”; Press S1 or S3 to advance /
backward4. PRESS S2 once to set “Year”; Press S1 or S3 to advance /
backward5. PRESS S2 once to set “Month”; Press S1 or S3 to advance /
backward6. PRESS S2 once to set “Day”; Press S1 or S3 to advance /
backward7. HOLD S2 3 seconds to return to normal time display.
EL S1
S2S3
Digital With Alarm, Chronograph 1/100 Sec, Countdown & Dual Time
27
(iii) PRESS S1 to get into Countdown Day Timer [T3]1) HOLD S2 3 seconds to set “Year"; Press S1/S3 to advance /
backward2) PRESS S2 once to set “Month” Press S1 or S3 to advance /
backward3) PRESS S2 once to set “Day” Press S1 or S3 to advance /
backward4) PRESS S2 once when setting is complete.
E) CHRONOGRAPHPRESS S3 three times to Chronograph Mode1) PRESS S1 to select LAP (LAP) or Split (SPL) option2) PRESS S2 to start/stop3) PRESS S1 to get Lap/Split time5) HOLD S2, then press S1 to “Reset”
Continued....

intercHanGeaBles
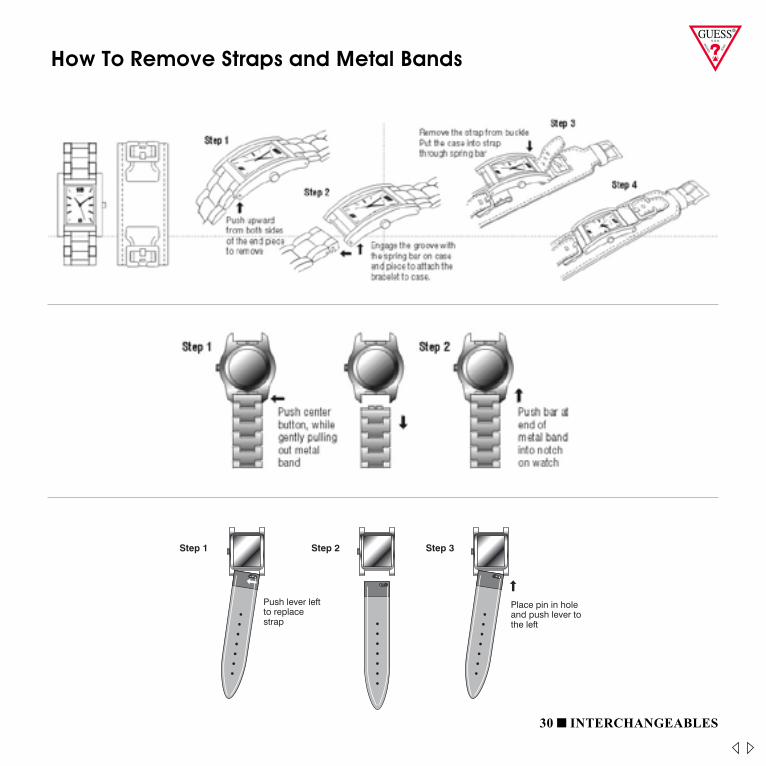
How To Remove Straps and Metal Bands
Guess Watches/ is not responsible for lost or stolen watches.
Return the watch, carefully packed (do not send in original packaging as it will not be returned) and insured to:
Any questions, call customer service at 1-(800)2-GUESS-5 or (1-800-248-3775) Mon. - Fri., 9:00am-5:00pm EST.
with your payment and the completed warranty repair coupon.
145 Woodward Ave., Norwalk CT 06854ATTN: Repair Dept.
This Guess Watch is warranted to you, the owner, for a period of ten years from the date of original purchase against alldefects in material or workmanship. This warranty does not apply to normal wear and tear or abuse or water damageand excludes batteries, case, strap or bracelet; does not cover costs, parts or labor or defects or damage caused byany source other than . We do not recommend changing your own battery. If you would like yourbattery, case / crystal and / or strap replaced, please see the warranty repair coupon for additional charges. Any impliedwarranties are also limited to ten years from date of original purchase. Some states do not allow limitations on how longan implied warranty lasts, so the above limitation may not apply to you. This warranty gives you specific legal rights, and you may also have other rights, which vary from state to state. In the event of a defect or malfunction within thisperiod, it will be repaired or replaced, at our option provided that it is returned prepaid with a check or money order for $7.50 to cover the cost of handling and return postage (This is not a repair charge). DO NOT SEND CASH. Never includea special watch band or any other article of personal value in your shipment.
Battery contains a small amount of mercury. Please recycle or dispose of properly.
LIMITED TEN YEAR WARRANTY
WATCH REPAIR
Please complete this form and enclose it with your carefully packed watch for repair. Add a check for $7.50 (postage and handling). If paying by VISA or MASTERCARD, please see below.
NAME:
ADDRESS:
STATE / CITY:
PHONE#:
ZIP CODE:
DATE SENT:
WATCH REPAIR
PRICEEACH
TOTALPRICE
BATTERY
CASE/CRYSTAL
SHIPPING/HANDLING
TOTAL CHARGES
$4.00
$10.00
$7.50 $7.50
CARD#
EXPIRATION DATE
SIGNATURE
TOTAL CHARGES (with sales tax if applied)
VISA MASTERCARD
(Resident's of CT & NY please apply appropriate sales tax)
Total charges may be paid with a check, money order, or When paying by charge card, please advise:
GU
ES
S
GU
ES
S
12GUESS
12GUESS
Turn counter-clockwise
Place strapson watch turntop ring clockwise
Step 1 Step 3
GU
ES
S
12GUESS
12GUESS
Step 2
Lift offbracelet/strap
Step 2Step 1 Step 3
Place pin in hole and push lever tothe left
Push lever left to replacestrap
PKS(7566)Guess 17.ai 12/08/2009 PKS(7566)Guess 17.ai 12/08/2009
10 Year Limited Warranty
Remove top ringby turning counter-clockwise
Step 1
Place top ringon watch andturn clockwiseto secure
Step 2
30 intercHanGeaBles

care & Warranty

32 care & Warranty
Water Resistant Care and DetailsWatches are marked Water Resistant from 3ATM to 10ATM only as long as lens, buttons, crown, case, caseback and gaskets remain intact. Do NOT operate crowns or buttons when the watch is wet or under water.
Always wipe watch dry after being exposed to water.
Water Resistance levels are marked on case backs.
Example:Water Resistant Withstands splashes of water or rain; do not submerge3 atm/30m/100 ft. Rain, do not submerge5 atm/50m/165 ft Rain, showering do not submerge10atm/100m/330ft. Rain, showering, swimming
Water resistance is not permanent. In the course of time, the gaskets of the cases may become worn and reduce the water resistance of the watches.
Care and Safety Measures
The battery contains a small amount of mercury. Please recycle or dispose of properly. Visit www.watchbatteryrecycle.org for more information.
Battery Care and Safety Measures
33 care & Warranty
34 care & Warranty
Return the watch, carefully packed (do not send in original packaging as it will not be returned) and insured to:
Sequel145 Woodward Avenue
Norwalk, CT 06854ATT: Repair Department
Enclose your payment and the completed warranty coupon.
Any questions, call Customer Service at 1.800.2GUESS5 or 1.800.248.3775Monday - Friday, 8:30am - 5pm EST
We offer a Two Year Warranty on all purchases made from July 1st, 2017. Any purchases made prior to July 1st, 2017 hold a 10 Year Limited Warranty. This GUESS Watch is warranted to you, the owner, for the warranty period from the date of original purchase against all defects in material or workmanship. This warranty does not apply to normal wear and tear or abuse or water damage and excludes batteries, case, strap or bracelet; does not cover costs, parts or labor or defects or damage caused by any source other than SEQUEL. We do not recommend changing your own battery. If you would like your battery, case/crystal and/or strap replaced, please see the warranty repair coupon for additional charges. Any implied warranties are also limited to ten years from date of original purchase. Some states do not allow limitations on how long an implied warranty lasts, so the above limitation may not apply to you. This warranty gives you specific legal rights, and you may also have other rights, which vary from state to state. In the event of a defect or malfunction within this period, it will be repaired or replaced, at our option provided that it is returned prepaid with VISA, MASTERCARD or AMEX for $8.50 to cover the cost of handling and return postage (this is not a repair charge). DO NOT SEND CASH. Never include a special watch band or any other article of personal value in your shipment.
GUESS Watches/SEQUEL is not responsible for lost or stolen watches.
Warranty