wasp wrs100sbr - wasp barcode
TRANSCRIPT

Version: 2018.1
Wasp WRS100SBR1D Ring Barcode Scanner
User’s Manual

51-5960-62
38~4647~49
63-6566-67
ABC-Codabar, CX-Codabar....................................
Industrial 2 of 5, Matrix 2 of 5.................................
20~22 Enable/Disable Barcode Symbology...........26-28SYMBOLOGIES (GROUP 21 - 38)
FULL ASCII(CODE39)TABLE, FUNCTIONKEY TABLE(GROUP 39 - 50)
APPENDIX
28China Postal Code (Toshiba Code)........................2223 MSI, UK Plessey Code........................................... 30
32Code 93, Telepen, IATA..........................................24Interleaved 2 of 5, Code 11.................................... 3425
26 3627Codabar.................................................................. 3828 4029 Codabar Coupling, Codabar Adjacent Required.....41
Standard & Full ASCII Code 39, Code 32...............30 42444546
31 UPC-E....................................................................UPC-E System Number..........................................32
33 UPC-A....................................................................EAN-8.....................................................................
4936 EAN/UCC-128, Code 128......................................5037 GS1 Databar..........................................................
4835 EAN-13, ISBN, ISSN..................................................4734
Full ASCII table(Code 39)...........................Function Key table(Code 39)......................
Appendix 1 Default table........................................Appendix 2 Barcode test chart...............................
9
LED & Beeper Indication..............................................
6
Reading Mode, Button/Illumination Preference.........87
4-532
Send Data Length, Preamble, Postamble................
13
Interface.................................................................BT HID - Getting Connected..................................BT HID - Smartphone/Tablet Touch Keyboard.......Power Off Timeout.................................................Memory Mode - Memory Mode, Delete Record.....Memory Mode - Data Format, Date & Time Setup.Memory Mode - Date Format, Time Format...........
Table of Contents.........................................................
Cloning Mode............................................................How to set up the parameter........................................
Default, Abort, Check Version, Setup Code Read.....12
14-15
Beep tone, Terminator...............................................3
1716
4
18
6
19202122232425
Code ID, Inverse Barcode........................................7
10
Symbologies Code Identifier.....................................Set Code ID....................................................8~9
Inter-block and Inter-character Delay.....................11 Keyboard Layout....................................................
Caplock Mode, Numeric Key, HT/CR/ESC Conversion..12
13141516171819
GENERAL SETTINGS (GROUP 1 - 12)
PREFACE
CONTENTS
10Accuracy Adjustment................................................5 11
12
WIRELESS SCANNER SETTINGS (GROUP 13-20)

LED & BEEPER INDICATION
Scanner
Status Blue LEDGreen LED Red LED Beeper
SuccessfulConnection
Barcode Scan whileDisconnected
SuccessfulBarcodeScan
Low Power
BluetoothDiscoverable
Power Offor Standby
WirelessDisconnection
UnexpectedBarcodeScan duringConfiguration
Memory Full
Flashing
Flashing
1 Flash
1 Flash
2 Flashes
1 Flash
1 Flash
1 Flash
1 Flash
3 Flashes
2 beeps
2 beeps
3 beeps
ReadsConfigurationBarcode
BarcodeScan inMemory Mode
1 beep
1 beep
3 short beeps
3 short beeps
3 short beeps
5 beeps
PoorConnection(Out of Range)
1 Flash 4 beeps(Hi-Lo-Hi-Lo)
CLONING MODE
FORMAT OF CLONING
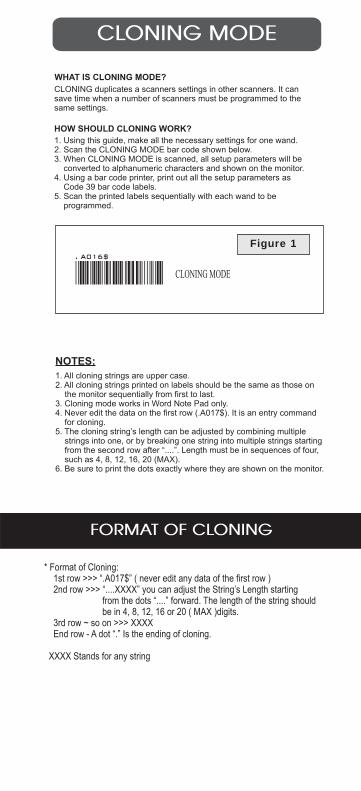
WHAT IS CLONING MODE?CLONING duplicates a scanners settings in other scanners. It cansave time when a number of scanners must be programmed to thesame settings.
HOW SHOULD CLONING WORK?1. Using this guide, make all the necessary settings for one wand.2. Scan the CLONING MODE bar code shown below.3. When CLONING MODE is scanned, all setup parameters will be converted to alphanumeric characters and shown on the monitor.4. Using a bar code printer, print out all the setup parameters as Code 39 bar code labels.5. Scan the printed labels sequentially with each wand to be programmed.
Figure 1
CLONING MODE
NOTES:1. All cloning strings are upper case.2. All cloning strings printed on labels should be the same as those on the monitor sequentially from first to last.3. Cloning mode works in Word Note Pad only.4. Never edit the data on the first row (.A017$). It is an entry command for cloning.5. The cloning string’s length can be adjusted by combining multiple strings into one, or by breaking one string into multiple strings starting from the second row after “....”. Length must be in sequences of four, such as 4, 8, 12, 16, 20 (MAX).6. Be sure to print the dots exactly where they are shown on the monitor.
* Format of Cloning: 1st row >>> “.A017$” ( never edit any data of the first row ) 2nd row >>> “....XXXX” you can adjust the String’s Length starting from the dots “....” forward. The length of the string should be in 4, 8, 12, 16 or 20 ( MAX )digits. 3rd row ~ so on >>> XXXX End row - A dot “.” Is the ending of cloning.
XXXX Stands for any string
. A016$

CORRECT SETTING
WRONG SETTING
EXAMPLE :
1. PROJECT ASSIGNMENTS:1.1. Beep tone: BEEP LOW.1.2. Capslock Mode: CAPSLOCK ON.1.3. Reading Mode: CONTINUOUS AUTO OFF.
2. SETTING PROCEDURE:2.1. Scan BEEP LOW (GROUP 3).2.2. Scan CAPSLOCK ON (GROUP 12).2.3. Scan CONTINUOUS MODE (GROUP2).
3. Scan [.A016$] Cloning Mode. All parameters will be output in alphanumeric characters and shown on the monitor.
4. Print the results shown on the monitor as bar codes with a bar code printer. The bar codes should be in the Code 39 symbology.
5. Scan from the first row to the second and so on sequentially, top to bottom, with the scanner you wish to “clone” these
settings to.
.A017$
....8C068D02980A.
.A017$
....06045A025F04.
4444. (Dot)
.A017$
....06045A025F04.
124+.(Dot)
. A017$
. . . . 8C06
8D02980A.
.A017$
..
..06045A025F04.
Wrong Setting: The string “....” consists of 4 Dots, located at thebeginning of second row; do notbreak the “....” into multiple strings.
Wrong Setting: The string lengths of thesecond and third row do not match thelength requirements, because rows shouldbe in length of four digits.
.A017$
....06045A025F04.
Wrong Setting because you add“....” after .A017$:The .A017$ is a FIXED parameter to enter setup procedure. It is an unchangeableparameter. Never add, delete or rearrangedata from the FIRST row.
.A017$....06045A025F04.
9 x7 x. (Dot)
X444+.(Dot)
CLONING MODE
HOW TO SET PARAMETERS
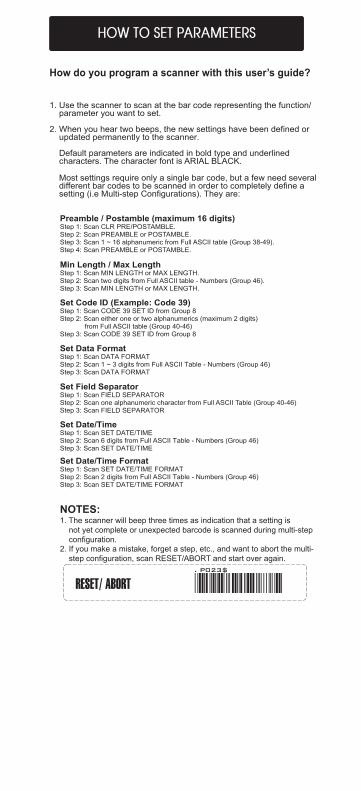
1. Use the scanner to scan at the bar code representing the function/ parameter you want to set.
2. When you hear two beeps, the new settings have been defined or updated permanently to the scanner.
Default parameters are indicated in bold type and underlined characters. The character font is ARIAL BLACK.
Most settings require only a single bar code, but a few need several different bar codes to be scanned in order to completely define a setting (i.e Multi-step Configurations). They are:
How do you program a scanner with this user’s guide?
Preamble / Postamble (maximum 16 digits)Step 1: Scan CLR PRE/POSTAMBLE.Step 2: Scan PREAMBLE or POSTAMBLE.Step 3: Scan 1 ~ 16 alphanumeric from Full ASCII table (Group 38-49).Step 4: Scan PREAMBLE or POSTAMBLE.
Min Length / Max LengthStep 1: Scan MIN LENGTH or MAX LENGTH.Step 2: Scan two digits from Full ASCII table - Numbers (Group 46).Step 3: Scan MIN LENGTH or MAX LENGTH.
Set Code ID (Example: Code 39)Step 1: Scan CODE 39 SET ID from Group 8Step 2: Scan either one or two alphanumerics (maximum 2 digits) from Full ASCII table (Group 40-46)Step 3: Scan CODE 39 SET ID from Group 8
Set Data FormatStep 1: Scan DATA FORMATStep 2: Scan 1 ~ 3 digits from Full ASCII Table - Numbers (Group 46)Step 3: Scan DATA FORMAT
Set Field SeparatorStep 1: Scan FIELD SEPARATORStep 2: Scan one alphanumeric character from Full ASCII Table (Group 40-46)Step 3: Scan FIELD SEPARATOR
Set Date/TimeStep 1: Scan SET DATE/TIMEStep 2: Scan 6 digits from Full ASCII Table - Numbers (Group 46)Step 3: Scan SET DATE/TIME
Set Date/Time FormatStep 1: Scan SET DATE/TIME FORMATStep 2: Scan 2 digits from Full ASCII Table - Numbers (Group 46)Step 3: Scan SET DATE/TIME FORMAT
1. The scanner will beep three times as indication that a setting is not yet complete or unexpected barcode is scanned during multi-step configuration.2. If you make a mistake, forget a step, etc., and want to abort the multi- step configuration, scan RESET/ABORT and start over again.
NOTES:
. P023$
*.P023$*RESET/ ABORT
SETUP CODE OFF
SETUP CODE ON
. A001$
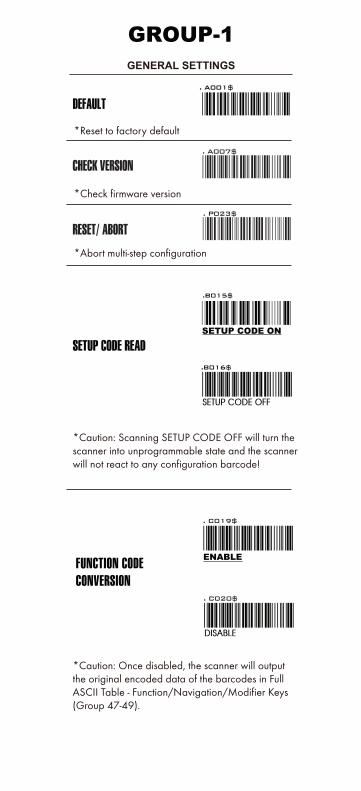
DEFAULT
GROUP-1
SETUP CODE READ
GENERAL SETTINGS
. A007$
CHECK VERSION
RESET/ ABORT. P023$
*Reset to factory default
*Check firmware version
*Abort multi-step configuration
*Caution: Scanning SETUP CODE OFF will turn thescanner into unprogrammable state and the scannerwill not react to any configuration barcode!
*Caution: Once disabled, the scanner will outputthe original encoded data of the barcodes in Full ASCII Table - Function/Navigation/Modifier Keys(Group 47-49).
DISABLE*.C020$*
ENABLEFUNCTION CODECONVERSION
. C019$
. C020$
*.C019$*

GENERAL SETTINGS - READING MODE, BUTTON/ILLUMINATION PREFERENCE
GROUP-2
CONTINUOUS MODE
. F005$
. F002$
TRIGGER MODE
The LED will turn on when the trigger ispressed.The LED will go off when the trigger isreleased.
LED is always on.The trigger does not function inContinuous Mode.
READING MODE
BUTTON PREFERENCE
. F064$
*.F064$*RIGHT BUTTON ONLY
. F065$
*.F065$*LEFT BUTTON ONLY
Scan one of below configuration barcodes to determine whichtouch-sensing button to enable according to your habit:
ILLUMINATION PREFERENCE
. F066$
*.F066$*BOTH BUTTONS
Recommended for left-handed user.
Recommended for right-handed user.
LASER ALWAYS ONLED AUTO-ADAPTIVE
LASER ALWAYS ONLED ON AFTER 1 SEC
. F059$
*.F059$*
. F049$
*.F049$*
LASER ALWAYS ONLED ALWAYS ON
. F048$
*.F048$*
LASER OFFLED ALWAYS ON
. F046$
*.F046$*

. D012$
. D013$
CR+LF
. D014$
TAB. D015$
SPACE
. D010$
NONE
. D016$
ESC
. D011$
LF
.F019$
BEEP HIGH
.F022$
BEEP LOW
BEEP OFF
. F012$
.F018$
BEEP MEDIUM
GROUP-3
GENERAL SETTINGS - BEEP TONE, TERMINATOR
BEEP TONE
TERMINATOR
1. For the BT HID/ USB HID interface the default terminator is CR.2. For the USB VCP interface the default terminator is CR+LF.
3. Below is the position of Terminator among output data string:[Preamble] [Symbology ID] [Barcode Length] [Barcode Data] [Postamble] [Terminator]
4. By default, with Preamble, Postamble, Barcode Length and Symbology IDdisabled, the scanner data output will be:[Barcode Data] [Terminator]
NOTES:
CR
PREAMBLE (16)
. A012$
POSTAMBLE (16)
. A013$
CLEAR PRE/ POSTAMBLE
. A011$
SEND DATA LENGTH ON
.D019$
.D020$
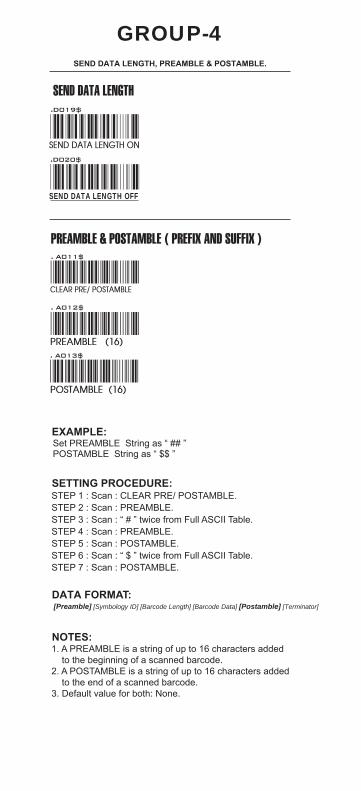
GROUP-4SEND DATA LENGTH, PREAMBLE & POSTAMBLE.
SEND DATA LENGTH
PREAMBLE & POSTAMBLE ( PREFIX AND SUFFIX )
EXAMPLE:
SETTING PROCEDURE:
DATA FORMAT:
NOTES:1. A PREAMBLE is a string of up to 16 characters added to the beginning of a scanned barcode.2. A POSTAMBLE is a string of up to 16 characters added to the end of a scanned barcode.3. Default value for both: None.
[Preamble] [Symbology ID] [Barcode Length] [Barcode Data] [Postamble] [Terminator]
Set PREAMBLE String as “ ## ”POSTAMBLE String as “ $$ ”
STEP 1 : Scan : CLEAR PRE/ POSTAMBLE.STEP 2 : Scan : PREAMBLE.STEP 3 : Scan : “ # ” twice from Full ASCII Table.STEP 4 : Scan : PREAMBLE.STEP 5 : Scan : POSTAMBLE.STEP 6 : Scan : “ $ ” twice from Full ASCII Table.STEP 7 : Scan : POSTAMBLE.
SEND DATA LENGTH OFF
. A010$
0
1
2
3
4
5
6
7
8
9
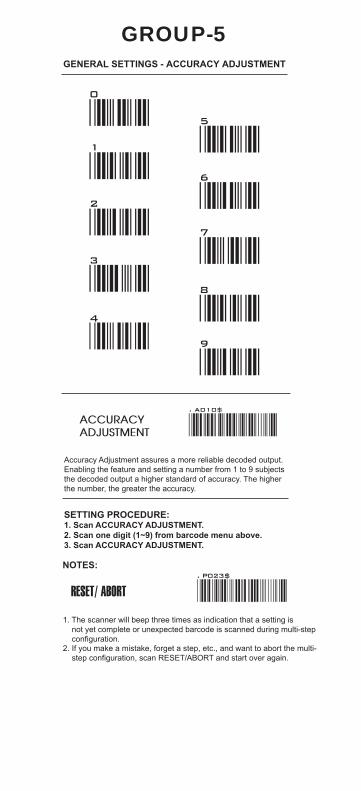
GROUP-5GENERAL SETTINGS - ACCURACY ADJUSTMENT
ACCURACYADJUSTMENT
Accuracy Adjustment assures a more reliable decoded output.Enabling the feature and setting a number from 1 to 9 subjectsthe decoded output a higher standard of accuracy. The higherthe number, the greater the accuracy.
SETTING PROCEDURE:1. Scan ACCURACY ADJUSTMENT.2. Scan one digit (1~9) from barcode menu above.3. Scan ACCURACY ADJUSTMENT.
NOTES:. P023$
RESET/ ABORT
1. The scanner will beep three times as indication that a setting is not yet complete or unexpected barcode is scanned during multi-step configuration.2. If you make a mistake, forget a step, etc., and want to abort the multi- step configuration, scan RESET/ABORT and start over again.

AIM ID ON
.A014$
FACTORY ID ON
.A008$
SET ID ON
.A015$
.A009$
563987 123453 12411145287 ]E0Preamble145287
CODE IDAIM ID : ]E0
BARCODE / DATAEAN 13 +5
OUTPUT : 145287]E0456398712345312411
[READS POSITIVE BARCODE ONLY]
.D021$
ENABLE INVERSE BARCODE[READS POSITIVE & NEGATIVE BARCODES]
.D022$
GROUP-6GENERAL SETTINGS - CODE ID, INVERSE BARCODE
ENABLE INVERSE BARCODE
CODE ID / SYMBOLOGY ID
NOTES:1. Only ONE code ID will be sent.2. The code ID is located at the position before the barcode data and after the preamble.
EXAMPLE :1.Preamble 145287,2.Code ID: enable AIM ID,3.Bar code symbologies : EAN 13+5
4
DISABLE INVERSE BARCODE
DISABLE CODE ID
DATA FORMAT:[Preamble] [Symbology ID] [Barcode Length] [Barcode Data] [Postamble] [Terminator]

GROUP-7GENERAL SETTINGS - SYMBOLOGIES CODE IDENTIFIER
SYMBOLOGIES CODE ID IDENTIFIER
1. The length of a Code ID is either one or two characters. If one character is set, the Code ID output will be one character. If two characters are set, the Code ID output will be two characters.2. Only one type of Code ID will be sent.
NOTES:
Steps:1. Scan the SET ID bar code for a particular symbology.2. Scan one or two alphanumeric characters from the Full ASCII Table.3. Scan the SET ID bar code again.
Example: Define the MSI Code ID = A, Code 93 = G9MSI :Step1: Scan MSI Set ID (Group 9).Step2: “A” from Group 42.Step3: Scan MSI Set ID (Group 9).Code 93:Step1: Scan Code 93 Set ID (Group 8).Step2: “G” from Group 56, Scan “9” from Group 46.Step3: Scan Code 93 Set ID (Group 8).
SET ID - SETTING PROCEDURES
Symbologies Factory ID
AIM ID (new)
Symbologies Factory ID
AIM ID (new)
EAN 128
Code 128
EAN8(+2/+5 OFF)
EAN8(+2 ON)
EAN8(+5 ON)
UPC-E(+2/+5 OFF)
UPC-E(+2 ON)
UPC-E(+5 ON)
UPC-A(+2/+5 OFF)
UPC-A(+2 ON)
UPC-A(+5 ON)
EAN-13(+2/+5 OFF)
EAN-13(+2 ON)
EAN-13(+5 ON)
Code 93
Code 11(disable CDV)
Code 11(send one CD)
Code 11(send two CD)
Code 11(not send CD)Databar
Databar Stacked
Databar Stacked Omnidirectional
Databar Truncated
Telepen(ASCII)
Telepen(Numeric)
J
U
L
F
A
E
S
KT ]C1
]C0]E4]E4]E4]E0]E3]E3]E0]E3]E3]E0]E3]E3]G0]H0]H0]H1]H3]B0]B1
MSI
MSI(MOD 10 / CDV & not send CD)
Code 32
Codabar
Codabar(ABC Codabar)
Codabar(CDV & Send CD)
Codabar(CDV & not send CD)
UK Plessey
Matrix 2 of 5
Full ASCII Code 39(disable CDV)
Full ASCII Code 39(CDV & send CD)
Full ASCII Code 39(CDV & not send CD)
Standard Code 39(disable CDV)
Standard Code 39(CDV & send CD)
Standard Code 39(CDV & not send CD)
IATA 2 of 5
detimiL rabataD5 fo 2 lairtsudnI
Databar Expanded
Databar Expanded Stacked
China Post Code
Interleaved 2 of 5(CDV & send CD)
Interleaved 2 of 5(CDV & not send CD)
Interleaved 2 of 5(disable CDV)
O
B
N
PY
D
M
G
C
Q
RVH
I
]M0]M1]X0]F0]F1]F2]F4]P0]X0]A4]A5]A7]A0]A1]A3
0e]0R]]S0]X0
PDF417 Z ]E0
]I1]I3]I0
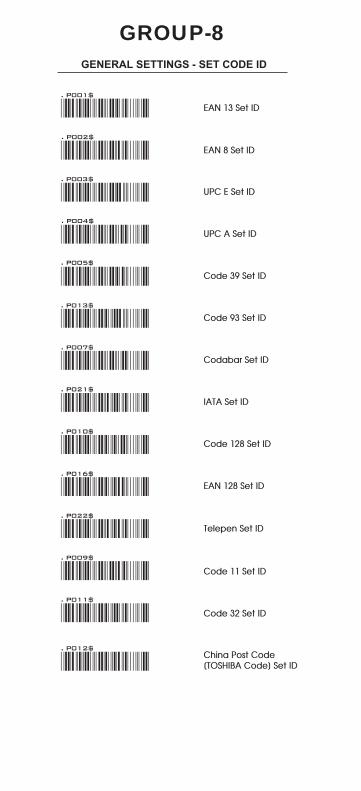
GROUP-8GENERAL SETTINGS - SET CODE ID
. P002$
. P003$
. P004$
. P005$
. P013$
. P007$
. P021$
. P010$
. P016$
. P022$
. P009$
. P011$
. P012$
. P001$
EAN 13 Set ID
EAN 8 Set ID
UPC E Set ID
UPC A Set ID
Code 39 Set ID
Code 93 Set ID
Codabar Set ID
IATA Set ID
Code 128 Set ID
EAN 128 Set ID
Telepen Set ID
Code 11 Set ID
Code 32 Set ID
China Post Code[TOSHIBA Code] Set ID

GROUP-9GENERAL SETTINGS - SET CODE ID
. P015$
. P014$
. P017$
. P006$
. P018$
. P008$
. P019$
. P020$
. P020$
. P024$
MSI Code Set ID
UK Plessey Set ID
Matrix 2 of 5 Set ID
Interleaved 2 of 5Set ID
Industrial 2 of 5 Set ID
Full ASCII Code39Set ID
GS1 Databar (RSS)Limited Set ID
GS1 Databar (RSS)Expanded Set ID
GS1 Databar (RSS)Set ID
LABEL Code Set ID[ Reserved ]
Steps:1. Scan the SET ID bar code for a particular symbology.2. Scan one or two alphanumeric characters from the Full ASCII Table.3. Scan the SET ID bar code again.4. If you make a mistake, forget a step, etc., and want to abort the multi- step configuration, scan RESET/ABORT and start over from step 1 to step 3 again.
. P023$
RESET/ ABORT

GENERAL SETTINGS
GROUP-10
INTERBLOCK DELAY
INTERCHARACTER DELAY
0mS
10mS
50mS
100mS
200mS
500mS
140uS
500uS
1mS
4mS
16mS

GROUP-11GENERAL SETTINGS - KEYBOARD LAYOUT
KEYBOARD LAYOUT. C010$
ENGLISH (USA)
. C018$
ENGLISH (UK)
. C011$
GERMAN
. C012$
FRENCH
. C013$
SPANISH
. C014$
ITALIAN
. C009$
JAPAN (106 key)
CANADIAN (TRADITIONAL)
. C034$
NORWEGIAN
. C029$
SWEDISH
. C026$
PORTUGUESE
. C031$
CANADIAN (FRENCH)
. C025$
. C016$
SWISS (GERMAN)
. C017$
CZECH (QWERTY)
. C022$
CZECH (QWERTZ)
HUNGARIAN (QWERTZ)
. C021$
. C015$
ALT CODE
HUNGARIAN (101 KEY)
. C024$
SWISS (FRENCH)
. C023$
BRAZILIAN (PORTUGUESE)
. C033$
SLOVAK
. C032$
DANISH
. C027$
DUTCH
. C028$
BELGIAN (AZERTY)
. C030$
CAPLOCK OFF
. A005$
CAPLOCK ON
. A004$
NUMERIC KEY
. D017$
. D018$
CAPLOCK FREE
. A006$
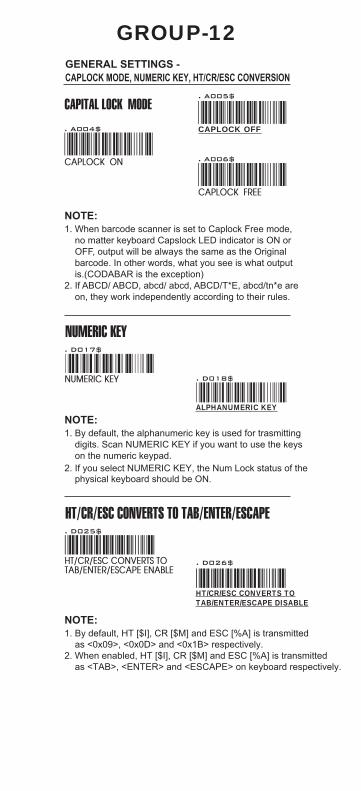
GROUP-12GENERAL SETTINGS -CAPLOCK MODE, NUMERIC KEY, HT/CR/ESC CONVERSION
CAPITAL LOCK MODE
NUMERIC KEY
NOTE:1. When barcode scanner is set to Caplock Free mode, no matter keyboard Capslock LED indicator is ON or OFF, output will be always the same as the Original barcode. In other words, what you see is what output is.(CODABAR is the exception)
NOTE:1. By default, the alphanumeric key is used for trasmitting
2. If you select NUMERIC KEY, the Num Lock status of the
digits. Scan NUMERIC KEY if you want to use the keys
physical keyboard should be ON.
on the numeric keypad.
NOTE:1. By default, HT [$I], CR [$M] and ESC [%A] is transmitted as <0x09>, <0x0D> and <0x1B> respectively.2. When enabled, HT [$I], CR [$M] and ESC [%A] is transmitted as <TAB>, <ENTER> and <ESCAPE> on keyboard respectively.
2. If ABCD/ ABCD, abcd/ abcd, ABCD/T*E, abcd/tn*e are on, they work independently according to their rules.
ALPHANUMERIC KEY
HT/CR/ESC CONVERTS TOTAB/ENTER/ESCAPE ENABLE
. D025$
. D026$
HT/CR/ESC CONVERTS TO TAB/ENTER/ESCAPE
*.D025$*
*.D026$*HT/CR/ESC CONVERTS TOTAB/ENTER/ESCAPE DISABLE

WIRELESS SCANNER SETTINGS
GROUP-13
Emulates a USB virtual com device that transmit eachbarcode data to the host after decode. Barcode data issent via USB cable directly. For VCP driver, please contactour sales representative or technical support team.
. C006$
USB VCP
. C008$
USB HID
INTERFACE. E043$
Memory Mode
. C035$
Emulates a Bluetooth HID keyboard that transmitseach barcode data to the host after decode. Wirelessscanner operates in this mode right out of box. Pleasesee next page (Group 14) for details.
Emulates a USB keyboard that transmits each barcodedata to the host after decode. Barcode data is sent viaUSB cable directly.
Emulates a USB mass storage device that saves eachbarcode data during off-line data collection. See MemoryMode chapter (Group 17-19) for details.
BT HID
WIRELESS SCANNER SETTINGS
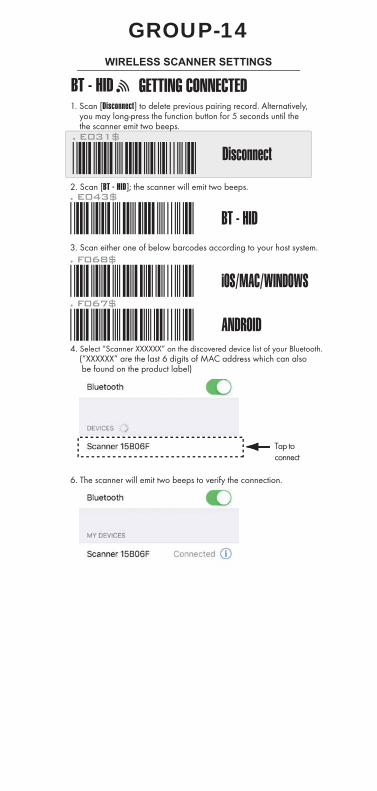
GROUP-14
. E043$
BT - HID*.E043$*. F068$
iOS/MAC/WINDOWS*.F068$*. F067$
ANDROID*.F067$*
Disconnect
1. Scan [Disconnect] to delete previous pairing record. Alternatively, you may long-press the function button for 5 seconds until the the scanner emit two beeps.
2. Scan [BT - HID]; the scanner will emit two beeps.
3. Scan either one of below barcodes according to your host system.
4. Select “Scanner XXXXXX” on the discovered device list of your Bluetooth. (“XXXXXX” are the last 6 digits of MAC address which can also be found on the product label)
6. The scanner will emit two beeps to verify the connection.
. E031$
*.E031$*
GETTING CONNECTEDBT - HID
Tap toconnect
WIRELESS SCANNER SETTINGS
GROUP-15
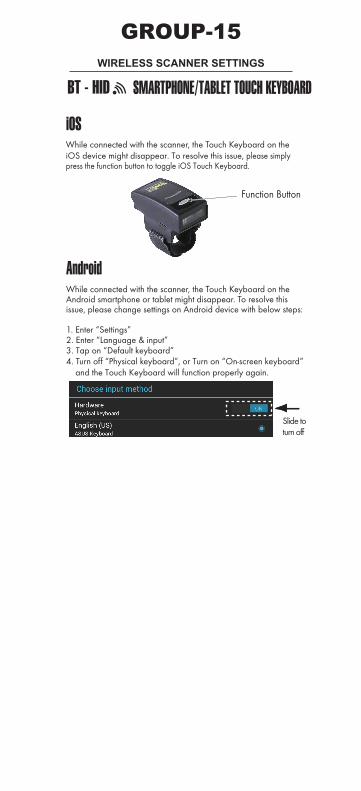
While connected with the scanner, the Touch Keyboard on theiOS device might disappear. To resolve this issue, please simplypress the function button to toggle iOS Touch Keyboard.
Android
iOS
While connected with the scanner, the Touch Keyboard on theAndroid smartphone or tablet might disappear. To resolve thisissue, please change settings on Android device with below steps:
1. Enter “Settings”2. Enter “Language & input”3. Tap on “Default keyboard”4. Turn off “Physical keyboard”, or Turn on “On-screen keyboard”
and the Touch Keyboard will function properly again.
Slide toturn off
SMARTPHONE/TABLET TOUCH KEYBOARDBT - HID
Function Button
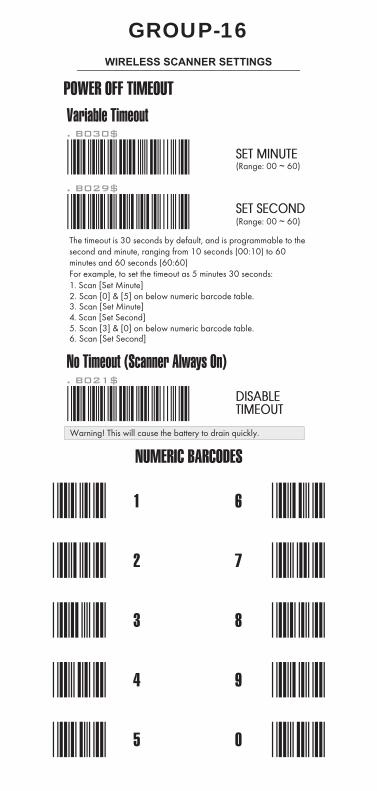
POWER OFF TIMEOUT
WIRELESS SCANNER SETTINGS
GROUP-16
Variable Timeout
No Timeout (Scanner Always On)
. B030$
SET MINUTE
. B029$
SET SECOND
. B021$
DISABLETIMEOUT
The timeout is 30 seconds by default, and is programmable to thesecond and minute, ranging from 10 seconds (00:10) to 60minutes and 60 seconds (60:60)For example, to set the timeout as 5 minutes 30 seconds:1. Scan [Set Minute]2. Scan [0] & [5] on below numeric barcode table.
(Range: 00 ~ 60)
(Range: 00 ~ 60)
3. Scan [Set Minute]4. Scan [Set Second]5. Scan [3] & [0] on below numeric barcode table.6. Scan [Set Second]
NUMERIC BARCODES
1
2
3
4
5
6
7
8
9
0
Warning! This will cause the battery to drain quickly.

WIRELESS SCANNER SETTINGS
GROUP-17
MEMORY MODE
MEMORY MODE
. R005$
DELETE LAST RECORD
DELETE LAST RECORD
CLEAR ALL RECORD
To delete ONE stored data, please scan below barcode or press function button.
After scanning the above barcode, the scanner will be able to collect barcodedata off-line. The barcode data will be stored in the format of:< Date >, < Time >, < Barcode Data > < CR >
To retrieve stored data, please connect the scanner to the host with cable, access removable storage device “MiniScan” from which you may openor copy the file “BARCODE.txt” to your computer.
To exit Memory Mode, simply scan any interface barcode in INTERFACEsection (Group 13)
To delete ALL stored data, simply delete the file “BARCODE.txt” in theremovable storage device “MiniScan” until you hear two beeps.
. C035$
Function Button

WIRELESS SCANNER SETTINGS
GROUP-18
Example: To set Date to 2018-08-01 (Year-Month-Day):1. Scan [Set Date]2. Scan [1], [8], [0], [8], [0], [1] from Group 46.3. Scan [Set Date]
The default Data Format for Memory Mode is <Date>, <Time>, <Barcode Data>below are items and their setup codes:
Example: To set Time to 08:10:30 am (Hr:Min:Sec)1. Scan [Set Time]2. Scan [0], [8], [1], [0], [3], [0] from Group 46.3. Scan [Set Time]
. R006$
SET DATE
. R007$
SET TIME
Default is comma ( , ) . You may replace it with any alphanumericcharacters from the full ASCII table.
Example: To change Field Separator to Semicolon ( ; )1. Scan [Field Separator]2. Scan [ ; ] from the full ASCII table (Group 40-46)3. Scan [Field Separator]
. R010$
FIELD SEPARATOR
. R011$
DATA FORMAT
MEMORY MODE DATE & TIME SETUP
Example: To change Data Format to <Barcode Data>, <Date>, <Time>1. Scan [Data Format]2. Scan [4], [2], [3] from Group 46.3. Scan [Data Format]
23
DateTime
Code Item Code Item
4 Barcode Data
* Full drain of battery may cause the Time and Date to stop. To avoid this, please, please fully charge the scanner for at least 1 hour before use.
MEMORY MODE DATA FORMAT

WIRELESS SCANNER SETTINGS
GROUP-19
The default Date Format for Memory Mode is DD/MM/YYYY (Code = 09),below is full list of available formats and their setup codes:
The default Time Format for Memory Mode is HH:MM:SS (Code = 01),below are available formats and their setup codes:
Example: To set Date Format to MM/DD/YY (Code =12)1. Scan [Date Format]2. Scan [1], [2] from Group 46.3. Scan [Date Format]
Example: To set Time Format to HH:MM (Code = 02)1. Scan [Time Format]2. Scan [0], [2] from Group 46.3. Scan [TimeFormat]
. R008$
DATE FORMAT
. R009$
TIME FORMAT
MEMORY MODE DATE FORMAT
MEMORY MODE TIME FORMAT
0102030405060708
DD-MM-YYYYMM-DD-YYYYDD-MM-YYMM-DD-YYYYYY-MM-DDYY-MM-DDDD-MMMM-DD
Code Format Code Format
0910111213141516
DD/MM/YYYYMM/DD/YYYYDD/MM/YYMM/DD/YYYYYY/MM/DDYY/MM/DDDD/MMMM/DD
01 HH:MM:SS
Code Format Code Format
02 HH:MM
UK PLESSEY CODE
. L010$
CODE 32
. K010$
CHINA POSTAL CODE
. K001$
INTERLEAVED 2 OF 5
. J001$
CODE 128
. J010$
CODABAR
. I 001$
ENABLE ALL CODE
. A002$
INDUSTRIAL 2 OF 5
. N001$
MATRIX 2 OF 5
. M010$
TELEPEN
. L014$
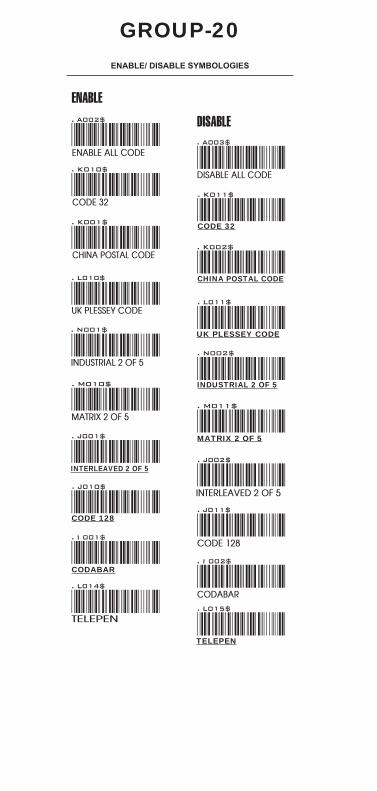
ENABLE/ DISABLE SYMBOLOGIES
CHINA POSTAL CODE. K002$
CODE 128
. J011$
CODABAR
. I 002$
INTERLEAVED 2 OF 5
. J002$
CODE 32
. K011$
UK PLESSEY CODE
. L011$
DISABLE ALL CODE
. A003$
INDUSTRIAL 2 OF 5
. N002$
MATRIX 2 OF 5
. M011$
TELEPEN
. L015$
ENABLE
DISABLE
GROUP-20

. H002$
UPC-A
. H008$
UPC-E
. H014$
EAN-13
. H020$
EAN-8
. I 011$
CODE 11
. G011$
CODE 93
. M002$
EAN-128
. L002$
MSI
. G009$
CODE 39
. N018$
IATA
ENABLE/ DISABLE SYMBOLOGIES
. H001$
UPC-A
. H007$
UPC-E
. H013$
EAN-13
. H019$
EAN-8
. I 010$
CODE 11
. G010$
CODE 93
. M001$
EAN-128
. L001$
MSI
. G008$
CODE 39
. N017$
IATA
ENABLE
DISABLE
GROUP-21

ENABLE
. K002$
DISABLE CDV
. K003$
DISABLE
. K001$
CDV & SEND CD
. K004$
CDV & NOT SEND CD
. K005$
MAX LENGTH [ 48 ]
. K007$
MIN LENGTH [ 11 ]
. K006$
GS1 Databar DISABLE
. N033$
GS1 Databar STACKED DISABLE
. N039$
GS1 Databar LIMITED DISABLE
. N011$
GS1 Databar EXPANDED DISABLE
. N027$
GS1 Databar EXPANDED STACKED DISABLE
. N029$
GS1 Databar ENABLE
. N032$
GS1 Databar STACKED ENABLE
. N038$
GS1 Databar LIMITED ENABLE
. N010$
GS1 Databar EXPANDED ENABLE
. N026$
GS1 Databar EXPANDED STACKED ENABLE
. N028$
ENABLE/DISABLE SYMBOLOGIES, CHINA POSTAL CODE
ENABLE
DISABLE
GROUP-22
CHINA POSTAL CODE [ TOSHIBA CODE ]
0
2
4
6
8
1
3
5
7
9
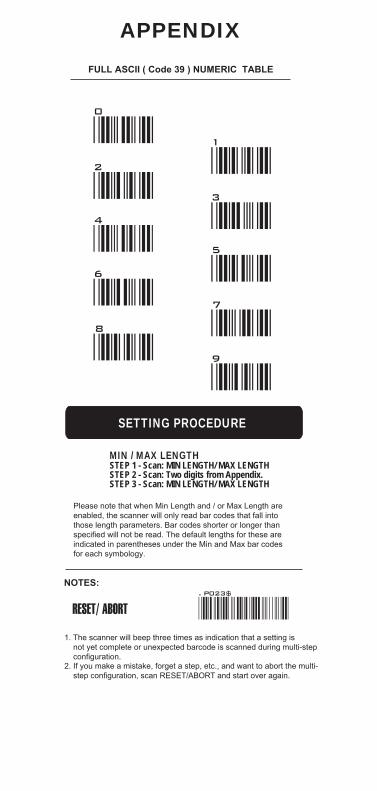
APPENDIXFULL ASCII ( Code 39 ) NUMERIC TABLE
SETTING PROCEDURE
MIN / MAX LENGTHSTEP 1 - Scan: MIN LENGTH/ MAX LENGTHSTEP 2 - Scan: Two digits from Appendix.STEP 3 - Scan: MIN LENGTH/ MAX LENGTH
Please note that when Min Length and / or Max Length areenabled, the scanner will only read bar codes that fall intothose length parameters. Bar codes shorter or longer thanspecified will not be read. The default lengths for these areindicated in parentheses under the Min and Max bar codesfor each symbology.
NOTES:. P023$
RESET/ ABORT
1. The scanner will beep three times as indication that a setting is not yet complete or unexpected barcode is scanned during multi-step configuration.2. If you make a mistake, forget a step, etc., and want to abort the multi- step configuration, scan RESET/ABORT and start over again.

CDV & NOT SEND CD
GROUP-23SYMBOLOGIES: MSI CODE, UK PLESSEY CODE
MSI
UK PLESSEY CODE
ENABLE
DISABLE
CDV & SEND CD
CDV & NOT SEND CD
CHECK DIGIT DOUBLEMOD 10
CHECK DIGIT DOUBLE 11PLUS MOD 10
CHECK DIGIT SINGLEMOD 10
MIN LENGTH [ 6 ]
MAX LENGTH [ 48 ]
ENABLE
DISABLE
CDV & SEND CD
. L001$
. L002$
. L004$
. L003$
. L007$
. L008$
. L009$
. L005$
. L006$
. L010$
. L011$
. L012$
. L013$

0
2
4
6
8
1
3
5
7
9
APPENDIXFULL ASCII ( Code 39 ) NUMERIC TABLE
SETTING PROCEDURE
MIN / MAX LENGTHSTEP 1 - Scan: MIN LENGTH/ MAX LENGTHSTEP 2 - Scan: Two digits from Appendix.STEP 3 - Scan: MIN LENGTH/ MAX LENGTH
Please note that when Min Length and / or Max Length areenabled, the scanner will only read bar codes that fall intothose length parameters. Bar codes shorter or longer thanspecified will not be read. The default lengths for these areindicated in parentheses under the Min and Max bar codesfor each symbology.
NOTES:. P023$
RESET/ ABORT
1. The scanner will beep three times as indication that a setting is not yet complete or unexpected barcode is scanned during multi-step configuration.2. If you make a mistake, forget a step, etc., and want to abort the multi- step configuration, scan RESET/ABORT and start over again.

SYMBOLOGIES: CODE 93, TELEPEN, IATA
CODE 93
TELEPEN
IATA
GROUP-24
ENABLE
MIN LENGTH [ 6 ]
MAX LENGTH [ 48 ]
DISABLE
ENABLE
DISABLE
DISABLE CDV
ENABLE TELEPEN
TELEPEN NUMBER
DISABLE TELEPEN
CDV & NOT SEND CDV
CDV & SEND CD
MAX LENGTH [ 48 ]
MIN LENGTH [ 6 ]
. G010$
. G011$
. G012$
. G013$
. L014$
. L015$
. L020$
. L021$
. N017$
. N018$
. N019$
. N020$
. N021$
. N022$
. N023$
TELEPEN ASCII

0
2
4
6
8
1
3
5
7
9
APPENDIXFULL ASCII ( Code 39 ) NUMERIC TABLE
SETTING PROCEDURE
MIN / MAX LENGTHSTEP 1 - Scan: MIN LENGTH/ MAX LENGTHSTEP 2 - Scan: Two digits from Appendix.STEP 3 - Scan: MIN LENGTH/ MAX LENGTH
Please note that when Min Length and / or Max Length areenabled, the scanner will only read bar codes that fall intothose length parameters. Bar codes shorter or longer thanspecified will not be read. The default lengths for these areindicated in parentheses under the Min and Max bar codesfor each symbology.
NOTES:. P023$
RESET/ ABORT
1. The scanner will beep three times as indication that a setting is not yet complete or unexpected barcode is scanned during multi-step configuration.2. If you make a mistake, forget a step, etc., and want to abort the multi- step configuration, scan RESET/ABORT and start over again.

GROUP-25SYMBOLOGIES: INTERLEAVED 2 OF 5, CODE 11
INTERLEAVED 2 OF 5
CODE 11
. J001$
. J002$
. J003$
. J004$
. J005$
. J008$
. J009$
. J014$
. J006$
. J007$
. I 010$
. I 011$
. I 012$
. I 013$
. I 042$
. I 043$
. I 014$
. I 015$
. I 016$
DISABLE
CDV & SEND CD
CDV & NOT SEND CD
First digit suppressed
Last digit suppressed
MIN LENGTH [ 6 ]
MAX LENGTH [ 48 ]
ENABLE
CDV & SEND CD
CDV & SEND CD(1 DIGIT)
CDV & SEND CD(2 DIGITS)
CDV & NOT SEND CD
MIN LENGTH [ 6 ]
MAX LENGTH [ 32 ]
ENABLE
DISABLE CDV
NO suppressed
DISABLE
DISABLE CDV

0
2
4
6
8
1
3
5
7
9
APPENDIXFULL ASCII ( Code 39 ) NUMERIC TABLE
SETTING PROCEDURE
MIN / MAX LENGTHSTEP 1 - Scan: MIN LENGTH/ MAX LENGTHSTEP 2 - Scan: Two digits from Appendix.STEP 3 - Scan: MIN LENGTH/ MAX LENGTH
Please note that when Min Length and / or Max Length areenabled, the scanner will only read bar codes that fall intothose length parameters. Bar codes shorter or longer thanspecified will not be read. The default lengths for these areindicated in parentheses under the Min and Max bar codesfor each symbology.
NOTES:. P023$
RESET/ ABORT
1. The scanner will beep three times as indication that a setting is not yet complete or unexpected barcode is scanned during multi-step configuration.2. If you make a mistake, forget a step, etc., and want to abort the multi- step configuration, scan RESET/ABORT and start over again.
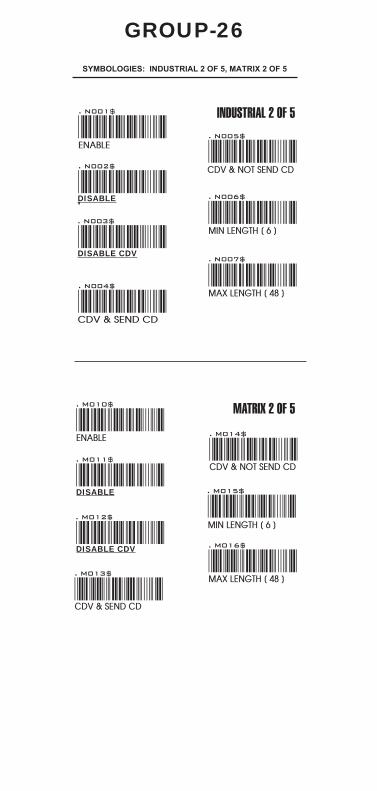
GROUP-26SYMBOLOGIES: INDUSTRIAL 2 OF 5, MATRIX 2 OF 5
INDUSTRIAL 2 OF 5
MATRIX 2 OF 5
. N001$
. N002$
. N003$
. N004$
. N007$
. N006$
. N005$
. M010$
. M011$
. M012$
. M013$
. M016$
. M015$
. M014$
DISABLE
DISABLE CDV
DISABLE
DISABLE CDV
ENABLE
CDV & SEND CD
CDV & NOT SEND CD
MIN LENGTH [ 6 ]
MAX LENGTH [ 48 ]
ENABLE
CDV & SEND CD
MAX LENGTH [ 48 ]
MIN LENGTH [ 6 ]
CDV & NOT SEND CD

0
2
4
6
8
1
3
5
7
9
APPENDIXFULL ASCII ( Code 39 ) NUMERIC TABLE
SETTING PROCEDURE
MIN / MAX LENGTHSTEP 1 - Scan: MIN LENGTH/ MAX LENGTHSTEP 2 - Scan: Two digits from Appendix.STEP 3 - Scan: MIN LENGTH/ MAX LENGTH
Please note that when Min Length and / or Max Length areenabled, the scanner will only read bar codes that fall intothose length parameters. Bar codes shorter or longer thanspecified will not be read. The default lengths for these areindicated in parentheses under the Min and Max bar codesfor each symbology.
NOTES:. P023$
RESET/ ABORT
1. The scanner will beep three times as indication that a setting is not yet complete or unexpected barcode is scanned during multi-step configuration.2. If you make a mistake, forget a step, etc., and want to abort the multi- step configuration, scan RESET/ABORT and start over again.

GROUP-27SYMBOLOGIES: CODABAR
CODABAR
START / STOP
DISABLE
CDV & SEND CD
MAX LENGTH [ 48 ]
MIN LENGTH [ 6 ]
CDV & NOT SEND CD
ST/SP: abcd/abcd
ST/SP: ABCD/TN*E
ST/SP: abcd/tn*e
Not Send START / STOP
CLSI FORMAT ON
ENABLE
DISABLE CDV
ST/SP: ABCD/ABCD
SEND START / STOP
CLSI FORMAT
Example of ST ( Start ) / SP ( Stop )123456 Not Transmit ST/SPA123456B ST/SP: ABCD/ABCDa123456b ST/SP: abcd/abcdA123456N ST/SP: ABCD/TN*Ea123456n ST/SP: abcd/tn*e
CLSI- Enable library space insertion. If you enable the CLSIformat, this option inserts spacesin position 2, 7, 13 of the datastring for use in library systems.
. I 001$
. I 002$
. I 005$
. I 006$
. I 007$
. I 008$
. I 009$
. I 030$
. I 029$
. I 031$
. I 032$
. I 003$
. I 004$
. I 027$
. I 028$
CLSI FORMAT OFF

0
2
4
6
8
1
3
5
7
9
APPENDIXFULL ASCII ( Code 39 ) NUMERIC TABLE
SETTING PROCEDURE
MIN / MAX LENGTHSTEP 1 - Scan: MIN LENGTH/ MAX LENGTHSTEP 2 - Scan: Two digits from Appendix.STEP 3 - Scan: MIN LENGTH/ MAX LENGTH
Please note that when Min Length and / or Max Length areenabled, the scanner will only read bar codes that fall intothose length parameters. Bar codes shorter or longer thanspecified will not be read. The default lengths for these areindicated in parentheses under the Min and Max bar codesfor each symbology.
NOTES:. P023$
RESET/ ABORT
1. The scanner will beep three times as indication that a setting is not yet complete or unexpected barcode is scanned during multi-step configuration.2. If you make a mistake, forget a step, etc., and want to abort the multi- step configuration, scan RESET/ABORT and start over again.
ABC- CODABAR
CX CODE- CODABAR
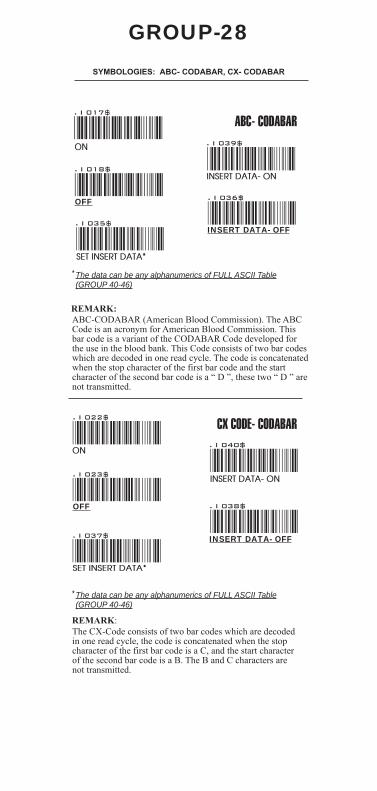
GROUP-28SYMBOLOGIES: ABC- CODABAR, CX- CODABAR
. I 017$
. I 018$
. I 035$
. I 036$
. I 039$
. I 022$
. I 023$
. I 037$
. I 038$
. I 040$
ON
SET INSERT DATA*
INSERT DATA- ON
INSERT DATA- ON
ON
SET INSERT DATA*
OFF
OFF
The data can be any alphanumerics of FULL ASCII Table(GROUP 40-46)
The data can be any alphanumerics of FULL ASCII Table(GROUP 40-46)
ABC-CODABAR (American Blood Commission). The ABCCode is an acronym for American Blood Commission. Thisbar code is a variant of the CODABAR Code developed forthe use in the blood bank. This Code consists of two bar codeswhich are decoded in one read cycle. The code is concatenatedwhen the stop character of the first bar code and the startcharacter of the second bar code is a “ D ”, these two “ D ” arenot transmitted.
The CX-Code consists of two bar codes which are decodedin one read cycle, the code is concatenated when the stopcharacter of the first bar code is a C, and the start characterof the second bar code is a B. The B and C characters arenot transmitted.
INSERT DATA- OFF
INSERT DATA- OFF
ON
. I 019$
OFF
. I 020$
. I 026$
INSERT DATA - ON
. I 041$
SET INSERT DATA*
. I 021$
ON
. I 033$
OFF
. I 034$
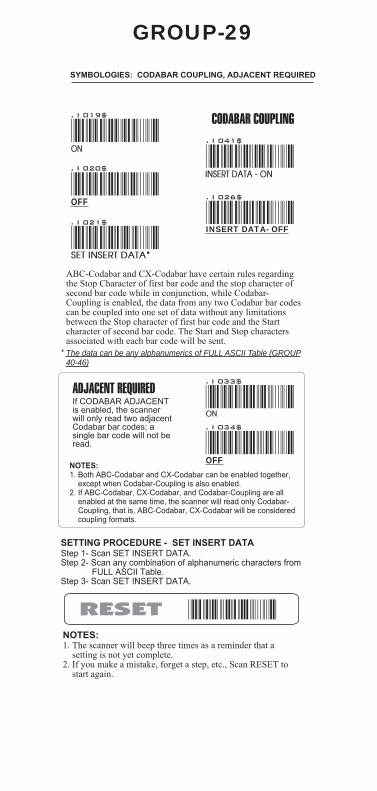
GROUP-29
SYMBOLOGIES: CODABAR COUPLING, ADJACENT REQUIRED
CODABAR COUPLING
ADJACENT REQUIRED
ABC-Codabar and CX-Codabar have certain rules regardingthe Stop Character of first bar code and the stop character ofsecond bar code while in conjunction, while Codabar-Coupling is enabled, the data from any two Codabar bar codescan be coupled into one set of data without any limitationsbetween the Stop character of first bar code and the Startcharacter of second bar code. The Start and Stop charactersassociated with each bar code will be sent.The data can be any alphanumerics of FULL ASCII Table (GROUP40-46)
1. The scanner will beep three times as a reminder that a setting is not yet complete.2. If you make a mistake, forget a step, etc., Scan RESET to start again.
If CODABAR ADJACENTis enabled, the scannerwill only read two adjacentCodabar bar codes; asingle bar code will not beread.
Step 1- Scan SET INSERT DATA.Step 2- Scan any combination of alphanumeric characters from FULL ASCII Table.Step 3- Scan SET INSERT DATA.
NOTES:
NOTES:
1. Both ABC-Codabar and CX-Codabar can be enabled together, except when Codabar-Coupling is also enabled.2. If ABC-Codabar, CX-Codabar, and Codabar-Coupling are all enabled at the same time, the scanner will read only Codabar- Coupling, that is, ABC-Codabar, CX-Codabar will be considered coupling formats.
SETTING PROCEDURE - SET INSERT DATA
INSERT DATA- OFF

. G002$
FULL ASCII CODE 39DISABLE
. G008$
ENABLE
. G009$
DISABLE
. G014$
START / STOP - SEND
. G007$
MAX LENGTH [ 48 ]
. G004$
CDV & SEND CD
. G005$
CDV & NOT SEND CD
. G006$
MIN LENGTH [ 1 ]
. G003$
DISABLE CDV
. G015$
START / STOP Not SEND
. G001$
FULL ASCII CODE 39ENABLE
. K015$
TAILING NOT SEND
. K014$
TAILING SEND
. K013$
LEADING NOT SEND
. K010$
ENABLE
. K011$
DISABLE
. K012$
LEADING SEND
GROUP-30SYMBOLOGIES: STANDARD & FULL ASCII CODE 39, CODE 32
STANDARD CODE 39& FULL ASCII 39
CODE 32
NOTE:The default for Code 39 is Standard Code 39. If Full ASCIICode 39 is enabled, Standard Code 39 will be automaticallydisabled.

0
2
4
6
8
1
3
5
7
9
APPENDIXFULL ASCII ( Code 39 ) NUMERIC TABLE
SETTING PROCEDURE
MIN / MAX LENGTHSTEP 1 - Scan: MIN LENGTH/ MAX LENGTHSTEP 2 - Scan: Two digits from Appendix.STEP 3 - Scan: MIN LENGTH/ MAX LENGTH
Please note that when Min Length and / or Max Length areenabled, the scanner will only read bar codes that fall intothose length parameters. Bar codes shorter or longer thanspecified will not be read. The default lengths for these areindicated in parentheses under the Min and Max bar codesfor each symbology.
NOTES:. P023$
RESET/ ABORT
1. The scanner will beep three times as indication that a setting is not yet complete or unexpected barcode is scanned during multi-step configuration.2. If you make a mistake, forget a step, etc., and want to abort the multi- step configuration, scan RESET/ABORT and start over again.

. H009$
LEAD DIGIT SEND
. H008$
DISABLE
. H007$
ENABLE
. H012$
CHECK DIGIT NO SEND
. H010$
LEAD DIGIT NO SEND
. H011$
CHECK DIGIT SEND
. H037$
+5 ON
. H038$
+ 5 OFF
. H039$
+2 ON
. H040$
+ 2 OFF
. H047$
ADD A SPACE ON
. H048$
ADD A SPACE OFF
. H055$
ADDENDA REQUIRED OFF
. H056$
ADDENDA REQUIRED ON
GROUP-31SYMBOLOGIES FORMATTING: UPC-E
UPC-E
ADD ON SUPPLEMENT
If ADDENDA REQUIRED is set to ON, the scannerwill only read an UPC-E bar code that has an addenda.At the same time please also scan +5 ON or +2 ON sothe scanner will output a 5-digit or 2-digit addendum.
NOTE:
. H053$
ENABLE
. H063$
E ( 0 ) ON
. H064$
E [ 0 ] OFF
. H054$
DISABLE
. H065$
E [ 1 ] ON
. H066$
E ( 1 ) OFF
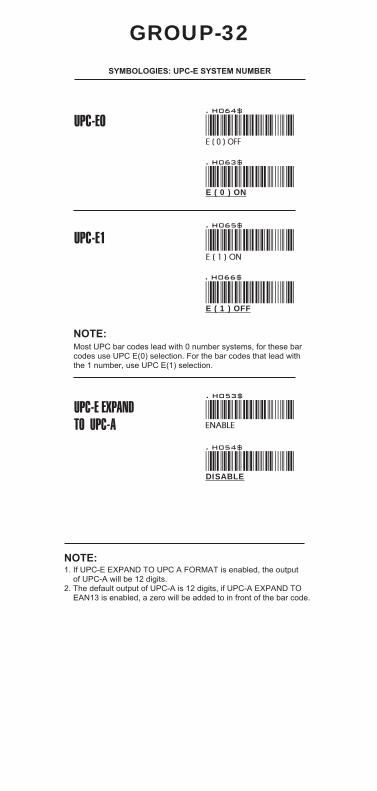
GROUP-32SYMBOLOGIES: UPC-E SYSTEM NUMBER
UPC-E0
UPC-E1
UPC-E EXPANDTO UPC-A
NOTE:
NOTE:Most UPC bar codes lead with 0 number systems, for these barcodes use UPC E(0) selection. For the bar codes that lead withthe 1 number, use UPC E(1) selection.
1. If UPC-E EXPAND TO UPC A FORMAT is enabled, the output of UPC-A will be 12 digits.2. The default output of UPC-A is 12 digits, if UPC-A EXPAND TO EAN13 is enabled, a zero will be added to in front of the bar code.

. H003$
LEAD DIGIT SEND
. H002$
DISABLE
. H001$
ENABLE
. H033$
+5 ON
. H034$
+ 5 OFF
. H035$
+2 ON
. H036$
+ 2 OFF
. H004$
LEAD DIGIT NO SEND
. H005$
CHECK DIGIT SEND
. H006$
CHECK DIGIT NO SEND
. H045$
ADD A SPACE ON
. H046$
ADD A SPACE OFF
. H067$
DISABLE
. H068$
ENABLE
ADDENDA REQUIRED ON
. H060$
ADDENDA REQUIRED OFF
. H059$
GROUP-33SYMBOLOGIES FORMATTING: UPC- A
UPC- A
UPC-A EXPANDTO EAN-13
ADD ON SUPPLEMENT
If ADDENDA REQUIRED is set to ON, the scannerwill only read an UPC-E bar code that has an addenda.At the same time please also scan +5 ON or +2 ON sothe scanner will output a 5-digit or 2-digit addendum.
NOTE:

DISABLE
. H020$
LEAD DIGIT SEND
. H021$
LEAD DIGIT NO SEND
. H022$
CHECK DIGIT NO SEND
. H024$
CHECK DIGIT SEND
. H023$
+ 5 ON
. H029$
+ 5 OFF
. H030$
+ 2 ON
. H031$
+ 2 OFF
. H032$
ADD A SPACE ON
. H043$
. H044$
ADD A SPACE OFF
ENABLE
. H019$
ADDENDA REQUIRED ON
. H062$
ADDENDA REQUIRED OFF
. H061$
If ADDENDA REQUIRED is set to ON, the scannerwill only read an UPC-E bar code that has an addenda.At the same time please also scan +5 ON or +2 ON sothe scanner will output a 5-digit or 2-digit addendum.
NOTE:
GROUP-34SYMBOLOGIES FORMATTING: EAN 8
EAN-8
ADD ON SUPPLEMENT

. H014$
DISABLE
. H013$
ENABLE
. H015$
LEAD DIGIT SEND
. H016$
LEAD DIGIT NO SEND
. H018$
CHECK DIGIT NO SEND
. H017$
CHECK DIGIT SEND
. H025$
+ 5 ON
. H026$
+ 5 OFF
. H027$
+ 2 ON
. H028$
+ 2 OFF
. H041$
ADD A SPACE ON
. H042$
ADD A SPACE OFF
. H052$
ISSN OFF. H051$
ISSN ON
. H050$
ISBN OFF. H049$
ISBN ON
ADDENDA REQUIRED ON
. H058$
ADDENDA REQUIRED OFF
. H057$
GROUP-35SYMBOLOGIES FORMATTING: EAN13, ISBN, ISSN, ISMN
EAN-13
ADD ON SUPPLEMENT
ISBN
ISSN
Both ISSN and ISBN are the extension codes of EAN-13.If scanner is required to read either ISSN or ISBN, EAN-13must be enabled. Otherwise the scanner will not be able toread ISSN or ISBN.
NOTE:
NOTES:1. If ADDENDA REQUIRED is set to ON, the scanner will only read an EAN-13 bar code that has an addenda.2. Either ISSN or ISBN will be considered as an extension of EAN-13. If ISSN or ISBN needs to be read, EAN-13 must be enabled. If ISSN and ISBN need to be read with addenda, EAN-13 must be enabled with ADDENDA REQUIRED set to ON, and +2 ON or +5 ON must be enabled as well.

. M005$
FUNC 1 CHAR SEND
. M006$
FUNC 1 CHAR NOT SEND. M003$
CODE ID ENABLE
. M004$
CODE ID DISABLE
. M001$
ENABLE
. M007$
DEFINE EAN 128
. M002$
DISABLE
. J011$
DISABLE
. J010$
ENABLE
. J012$
MIN LENGTH [ 5 ]
. J013$
MAX LENGTH [ 48 ]
GROUP-36SYMBOLOGIES: EAN/UCC-128, CODE 128
EAN/ UCC-128
CODE 128
NOTES: DEFINE EAN 128
String format:
Setting Procedure:
The first FNC1 character is translated to ]c1, and the secondFNC1 character is translated to an ASCII <GS> character(scan from Group 40-46)
1: Scan DEFINE EAN128.2: Scan ASCII Code (Group 40-46)3: Scan DEFINE EAN128.
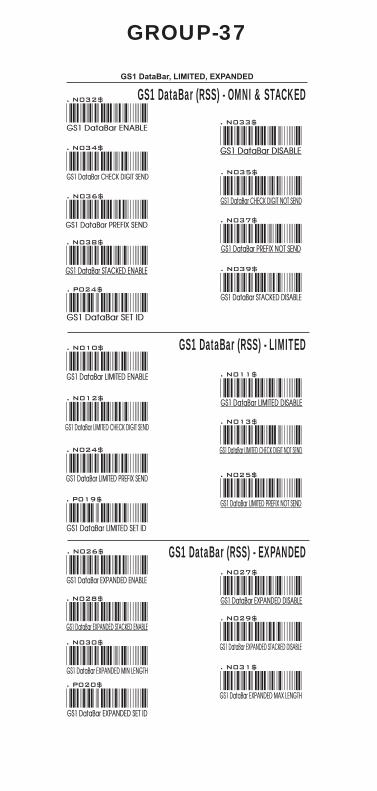
GS1 DataBar, LIMITED, EXPANDED
GS1 DataBar (RSS) - OMNI & STACKED
GS1 DataBar (RSS) - LIMITED
GS1 DataBar (RSS) - EXPANDED
. N032$
GS1 DataBar ENABLE
. N034$
GS1 DataBar CHECK DIGIT SEND
. N036$
GS1 DataBar PREFIX SEND
. N038$
GS1 DataBar STACKED ENABLE
. P024$
GS1 DataBar SET ID
. N033$
GS1 DataBar DISABLE
. N035$
GS1 DataBar CHECK DIGIT NOT SEND
. N037$
GS1 DataBar PREFIX NOT SEND
. N039$
GS1 DataBar STACKED DISABLE
. N010$
GS1 DataBar LIMITED ENABLE
. N012$
GS1 DataBar LIMITED CHECK DIGIT SEND
. N024$
GS1 DataBar LIMITED PREFIX SEND
. P019$
GS1 DataBar LIMITED SET ID
. N011$
GS1 DataBar LIMITED DISABLE
. N013$
GS1 DataBar LIMITED CHECK DIGIT NOT SEND
. N025$
GS1 DataBar LIMITED PREFIX NOT SEND
. N026$
GS1 DataBar EXPANDED ENABLE
. N028$
GS1 DataBar EXPANDED STACKED ENABLE
. N030$
GS1 DataBar EXPANDED MIN LENGTH
. P020$
GS1 DataBar EXPANDED SET ID
. N027$
GS1 DataBar EXPANDED DISABLE
. N029$
GS1 DataBar EXPANDED STACKED DISABLE
. N031$
GS1 DataBar EXPANDED MAX LENGTH
GROUP-37
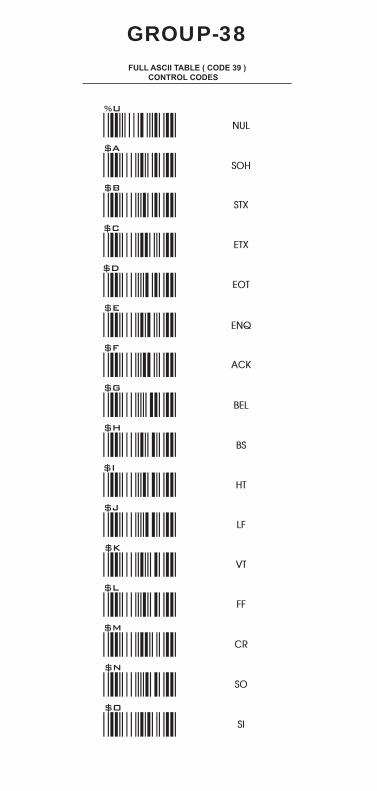
$F
$H
$J
$D
$L
$B
%U
$N
$I
$K
$M
$G
$E
$C
$A
$O
GROUP-38FULL ASCII TABLE ( CODE 39 ) CONTROL CODES
NUL
SOH
STX
ETX
EOT
ENQ
ACK
BEL
BS
HT
LF
VT
FF
CR
SO
SI
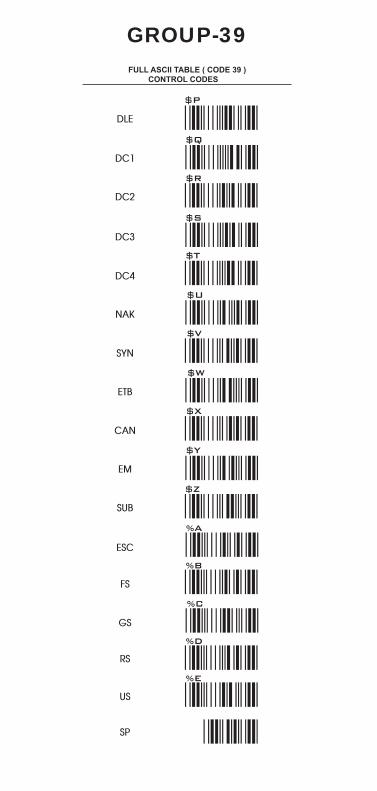
$T
$V
$X
$Z
$P
$R
%D
%B
$Q
$W
$Y
%A
$S
$U
%C
%E
GROUP-39FULL ASCII TABLE ( CODE 39 ) CONTROL CODES
DLE
DC1
DC2
DC3
DC4
NAK
SYN
ETB
CAN
EM
SUB
ESC
FS
GS
RS
US
SP
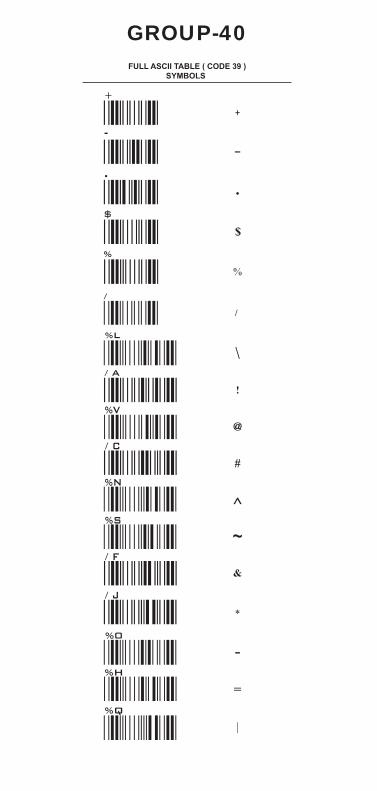
/ F
%H
/ A
/ C
%V
/ J
%Q
%S
%L
%N
%0
GROUP-40FULL ASCII TABLE ( CODE 39 ) SYMBOLS
/ B
%F
%J
%G
/ Z
%I
>
/ G
/ I
/ H
/ L
%P
%R
%T
%W
%K
%M
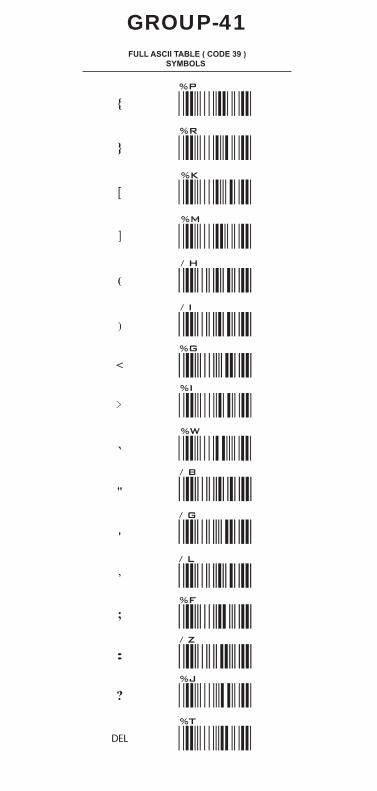
GROUP-41
DEL
FULL ASCII TABLE ( CODE 39 ) SYMBOLS

I
K
L
G
M
H
J
A
C
E
B
F
D
A
B
C
D
E
F
G
H
I
J
K
L
M
GROUP-42FULL ASCII TABLE ( CODE 39 ) UPPER CASE ALPHABETS

X
Z
V
Y
W
N
T
P
R
O
S
Q
U
GROUP-43
N
O
P
Q
R
S
T
U
V
W
X
Y
Z
FULL ASCII TABLE ( CODE 39 ) UPPER CASE ALPHABETS
+F
+H
+J
+L
+G
+I
+K
+M
+E
+B
+A
+C
+D
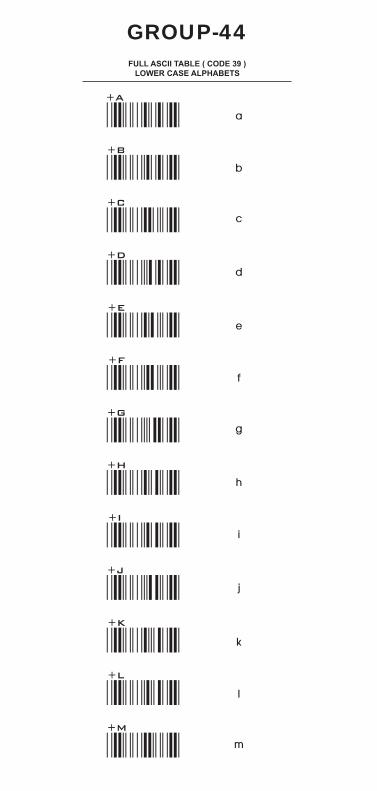
GROUP-44
a
b
c
d
e
f
g
h
i
j
k
l
m
FULL ASCII TABLE ( CODE 39 ) LOWER CASE ALPHABETS

+U
+W
+Y
+V
+X
+Z
+T
+N
+P
+R
+O
+Q
+S
FULL ASCII TABLE ( CODE 39 ) LOWER CASE ALPHABETS
GROUP-45
n
o
p
q
r
s
t
u
v
w
x
y
z
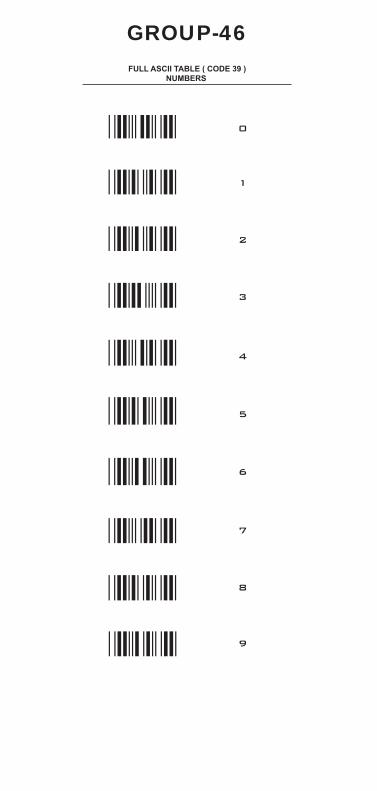
FULL ASCII TABLE ( CODE 39 ) NUMBERS
GROUP-46
0
1
2
3
4
5
6
7
8
9
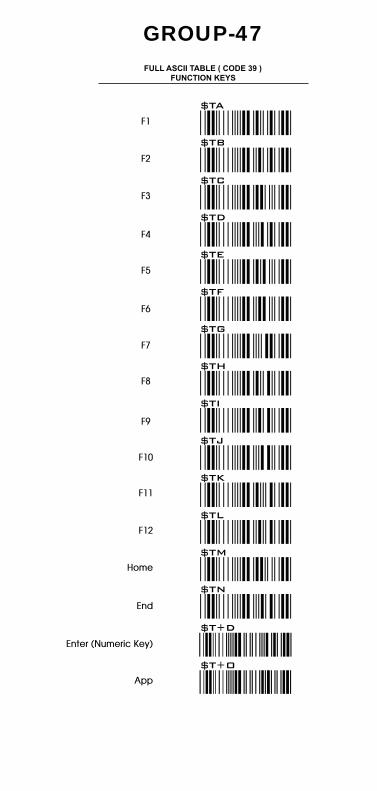
FULL ASCII TABLE ( CODE 39 ) FUNCTION KEYS
GROUP-47
F1
F2
F3
F4
F5
F6
F7
F8
F9
F10
F11
F12
Home
End
Enter (Numeric Key)
App
$TA
$TB
$TC
$TD
$TE
$TF
$TG
$TH
$TI
$TJ
$TK
$TL
$TM
$TN
$T+D
$T+O
$TU
$TW
$TS
$TQ
$TY
$TO
$TZ
$TV
$TT
$TR
$TX
$TP
$T%K
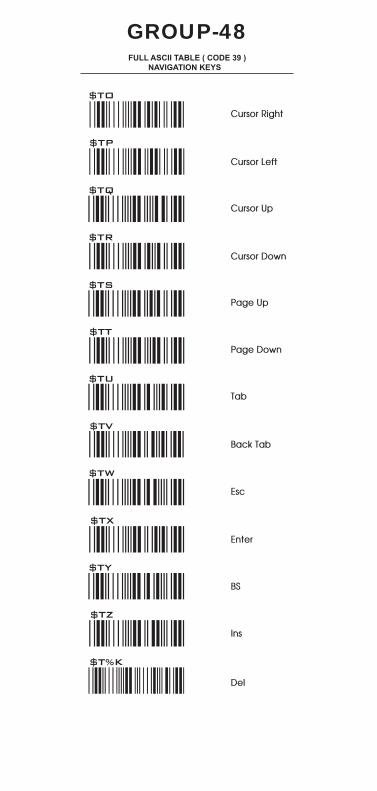
FULL ASCII TABLE ( CODE 39 ) NAVIGATION KEYS
GROUP-48
Cursor Right
Cursor Left
Cursor Up
Cursor Down
Page Up
Page Down
Tab
Back Tab
Esc
Enter
BS
Ins
Del

$T+B
$T+C
$T%M
Alt (Left) break
$T%O
Shift (Left) break
$T+A
Ctrl (Left) break
$T+H
Ctrl (Right) break
$T+F
Alt (Right) break
$T+N
Win (Right) break
$T+L
Win (Left) break
$T+J
Shift (Right) break
$T%L
Alt (Left) make*1
$T%N
Shift (Left) make *2
$T%W
Ctrl (Left) make *3
$T+G
Ctrl (Right) make
$T+E
Alt (Right) make
$T+M
Win (Right) make
$T+K
Win (Left) make
$T+I
Shift (Right) make
FULL ASCII TABLE ( CODE 39 ) MODIFIER KEYS
GROUP-49
For UK Keyboard Special Character
Note:*1: When “Alt(Left)Make” is programmed, please scan “Alt(Left)Break” to resume barcode setting.*2: When “Shift(Left)Make” is programmed, please scan “Shift(Left)Break” to resume barcode setting.*3: When “Ctrl(Left)Make” is programmed, please scan “Ctrl(Left)Break” to resume barcode setting.
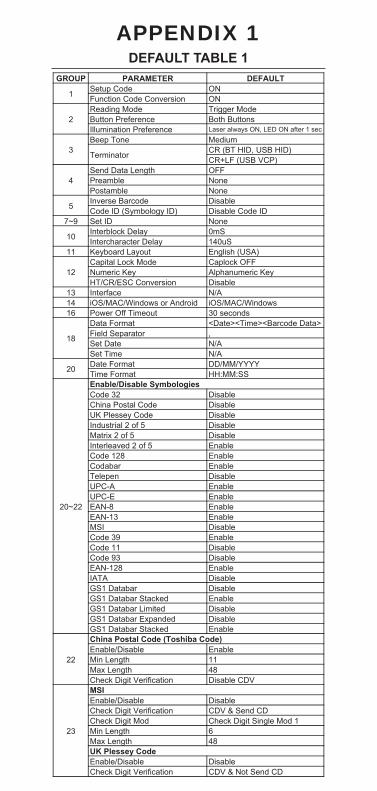
APPENDIX 1DEFAULT TABLE 1
GROUP PARAMETER DEFAULT
1 Setup Code ONFunction Code Conversion ON
2Reading Mode Trigger ModeButton Preference Both ButtonsIllumination Preference Laser always ON, LED ON after 1 sec
3Beep Tone Medium
Terminator CR (BT HID, USB HID)CR+LF (USB VCP)
4Send Data Length OFF
enoNelbmaerPPostamble None
5 Inverse Barcode DisableCode ID (Symbology ID) Disable Code ID
enoNDI teS9~7
10 Interblock Delay 0mSIntercharacter Delay 140uS
11 Keyboard Layout English (USA)
12Capital Lock Mode Caplock OFFNumeric Key Alphanumeric KeyHT/CR/ESC Conversion Disable
A/NecafretnI3114 iOS/MAC/Windows or Android iOS/MAC/Windows16 Power Off Timeout 30 seconds
18
Data Format <Date><Time><Barcode Data>Field Separator ,
A/NetaD teSA/NemiT teS
20 Date Format DD/MM/YYYYTime Format HH:MM:SS
20~22
Enable/Disable SymbologieselbasiD23 edoC
China Postal Code DisableUK Plessey Code DisableIndustrial 2 of 5 DisableMatrix 2 of 5 DisableInterleaved 2 of 5 Enable
elbanE821 edoCelbanErabadoCelbasiDnepeleTelbanEA-CPUelbanEE-CPUelbanE8-NAEelbanE31-NAEelbasiDISMelbanE93 edoCelbasiD11 edoCelbasiD39 edoCelbanE821-NAEelbasiDATAI
GS1 Databar DisableGS1 Databar Stacked EnableGS1 Databar Limited DisableGS1 Databar Expanded DisableGS1 Databar Stacked Enable
22
China Postal Code (Toshiba Code)Enable/Disable EnableMin Length 11Max Length 48Check Digit Verification Disable CDV
23
MSIEnable/Disable DisableCheck Digit Verification CDV & Send CDCheck Digit Mod Check Digit Single Mod 1Min Length 6Max Length 48UK Plessey CodeEnable/Disable DisableCheck Digit Verification CDV & Not Send CD
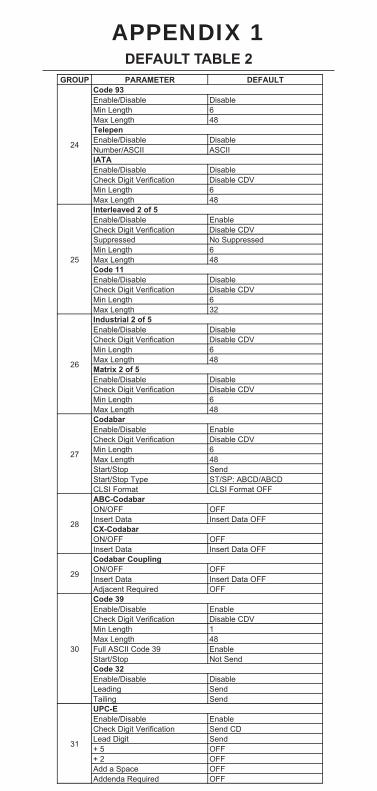
APPENDIX 1DEFAULT TABLE 2
GROUP PARAMETER DEFAULT
24
Code 93Enable/Disable DisableMin Length 6Max Length 48TelepenEnable/Disable DisableNumber/ASCII ASCIIIATAEnable/Disable DisableCheck Digit Verification Disable CDVMin Length 6Max Length 48
25
Interleaved 2 of 5Enable/Disable EnableCheck Digit Verification Disable CDVSuppressed No SuppressedMin Length 6Max Length 48Code 11Enable/Disable DisableCheck Digit Verification Disable CDVMin Length 6Max Length 32
26
Industrial 2 of 5Enable/Disable DisableCheck Digit Verification Disable CDVMin Length 6Max Length 48Matrix 2 of 5Enable/Disable DisableCheck Digit Verification Disable CDVMin Length 6Max Length 48
27
CodabarEnable/Disable EnableCheck Digit Verification Disable CDVMin Length 6Max Length 48
dneSpotS/tratSStart/Stop Type ST/SP: ABCD/ABCDCLSI Format CLSI Format OFF
28
ABC-CodabarFFOFFO/NO
Insert Data Insert Data OFFCX-Codabar
FFOFFO/NOInsert Data Insert Data OFF
29
Codabar CouplingFFOFFO/NO
Insert Data Insert Data OFFAdjacent Required OFF
30
Code 39Enable/Disable EnableCheck Digit Verification Disable CDVMin Length 1Max Length 48Full ASCII Code 39 Enable
dneS toNpotS/tratSCode 32Enable/Disable Disable
dneSgnidaeLdneSgniliaT
31
UPC-EEnable/Disable EnableCheck Digit Verification Send CD
dneStigiD daeLFFO5 +FFO2 +
Add a Space OFFAddenda Required OFF

APPENDIX 1DEFAULT TABLE 3
GROUP PARAMETER DEFAULT
32NO0E-CPU
FFO1E-CPUUPC-E Expand to UPC-A Disable
33
UPC-AEnable/Disable EnableCheck Digit Verification Send CD
dneStigiD daeLUPC-A Expand to EAN-13 Disable
FFO5 +FFO2 +
Add a Space OFFAddenda Required OFF
34
EAN-8Enable/Disable EnableCheck Digit Verification Send CD
dneStigiD daeLFFO5 +FFO2 +
Add a Space OFFAddenda Required OFF
35
EAN-13Enable/Disable EnableCheck Digit Verification Send CD
dneStigiD daeLFFO5 +FFO2 +
Add a Space OFFAddenda Required OFF
FFONBSIFFONSSIFFONMSI
36
EAN/UCC-128Enable/Disable EnableFunc 1 Char Not SendCode 128Enable/Disable EnableMin Length 5Max Length 48
37
GS1 DatabarEnable/Disable DisableCheck Digit Verification Not Send CD
dneS toNxiferPGS1 Databar Stacked/OmnidirectionalEnable/Disable EnableGS1 Databar LimitedEnable/Disable DisableCheck Digit Verification Not Send CD
dneS toNxiferPGS1 Databar ExpandedEnable/Disable DisableGS1 Databar Expanded StackedEnable/Disable EnableMin Length 1Max Length 74

APPENDIX 2BAR CODE TEST CHART
MEDIUM DENSITY
NW-7[CODABAR]
CODE-39
Interleaved 2of5
UPC
EAN
DENSITY
MEDIUMDENSITY
NARROW mm[mil]
WIDE mm[mil]
CHAR.GAP mm[mil]
N/WRATIO
0.25(10) 0.625(25) 0.25(10) 1/2.5

APPENDIX 2BAR CODE TEST CHART
DENSITY
LOWDENSITY
NARROW mm[mil]
WIDE mm[mil]
CHAR.GAP mm[mil]
N/WRATIO
0.33(13) 0.825(32.5) 0.33(13) 1/2.5
LOW DENSITY

Wasp WRS100SBR 1D Ring Barcode Scanner User’s Manual (Rev 1)
Wasp Barcode Technologies1400 10th Street
Plano, Texas USA 75074(214) 547-4100 | www.waspbarcode.com
©2013-2018 Wasp Barcode Technologies