watch instructions and 5 year limited...
TRANSCRIPT

WATCH INSTRUCTIONS AND5 YEAR LIMITED WARR ANTY


THEVINCE CAMUTOWOMEN’STIMEPIECECOLLECTIONis an extension of the Vince Camuto brand’s unique commitment to contemporary design, luxe quality and attention to rich detail. With a focus on classic designs with a fresh, innovative edge the Vince Camuto women’s timepiece collection is jewelry inspired, polished, at times oversized and utilizes premium fi nishes to compliment a trend-driven wardrobe. Vince Camuto timepieces are made with SWAROVSKI® ELEMENTS and feature the signature pyramid stud, a hardware detailed crown, layered dials, and lustrous ceramic links. Th e Vince Camuto timepieces are sophisticated, eye-catching and elegant with modern attitude.

THEVINCE CAMUTOMEN’STIMEPIECECOLLECTIONappeals to the man with a strong sense of individual style. Th e men’s timepieces, inspired by land, air and sea, carefully consider authentic utility and are craft ed with specialty details and sophisticated movements that are atypical in the current watch market. Land gave way to masculine timepieces inspired by the art of automobiles and motorcycles. Air inspired a mechanical design direction, including vintage airplanes and parts. Sea led to innovative wristwatches inspired by the ocean, unexpected materials and colors. Vintage inspired case shapes, mixed materials; including solid stainless steel, silicon and aluminum, paired with textured and layered dials. 21-jewel automatic movements, complex fl yback movements and exhibition casebacks are signature features of the Vince Camuto men’s timepiece collection.
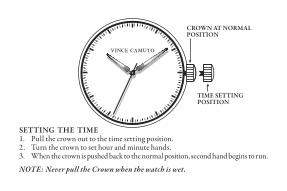
CROWN AT NORMALPOSITION
TIME SETTING POSITION
SETTING THE TIME1. Pull the crown out to the time setting position.2. Turn the crown to set hour and minute hands.3. When the crown is pushed back to the normal position, second hand begins to run.
NOTE: Never pull the Crown when the watch is wet.

CROWN AT NORMALPOSITION
TIME SETTING POSITION
SETTING THE TIME1. Pull the crown out to the time setting position.2. Turn the crown to set hour and minute hands.3. When the crown is pushed back to the normal position, second hand begins to run.
NOTE: Never pull the Crown when the watch is wet.
SMALL SECOND HAND
1L45, VD78

CROWN AT NORMALPOSITION
DAY OF THE WEEK*
[1] [2]
NOTE: *Date & Day of the week position may be located at diff erent position depends on models. Day of the week may not be available.
TIME SETTING POSITION
DATE *
DATE SETTING POSITION
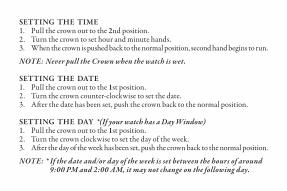
SETTING THE TIME1. Pull the crown out to the 2nd position.2. Turn the crown to set hour and minute hands.3. When the crown is pushed back to the normal position, second hand begins to run.
NOTE: Never pull the Crown when the watch is wet.
SETTING THE DATE1. Pull the crown out to the 1st position.2. Turn the crown counter-clockwise to set the date.3. Aft er the date has been set, push the crown back to the normal position.
SETTING THE DAY *(If your watch has a Day Window)1. Pull the crown out to the 1st position.2. Turn the crown clockwise to set the day of the week.3. Aft er the day of the week has been set, push the crown back to the normal position.
NOTE: * If the date and/or day of the week is set between the hours of around 9:00 PM and 2:00 AM, it may not change on the following day.

CROWN AT NORMALPOSITION
TIME SETTING
[1] [2]
GP11 Analog Quartz watch with calendar date and small second hand
SMALL SECOND HAND
DATE SETTING
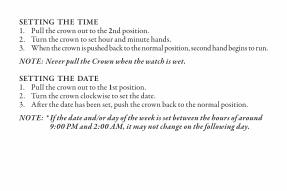
SETTING THE TIME1. Pull the crown out to the 2nd position.2. Turn the crown to set hour and minute hands.3. When the crown is pushed back to the normal position, second hand begins to run.
NOTE: Never pull the Crown when the watch is wet.
SETTING THE DATE1. Pull the crown out to the 1st position.2. Turn the crown clockwise to set the date.3. Aft er the date has been set, push the crown back to the normal position.
NOTE: * If the date and/or day of the week is set between the hours of around 9:00 PM and 2:00 AM, it may not change on the following day.

CROWN AT NORMALPOSITION
TIME SETTING(CLOCKWISE)
[1] [2]
6P25 Analog Quartz watch which was designed with multi hands, to enhance perfection.
Th e hands in the small displays show Day and Date.
DATE SETTING(COUNTERCLOCKWISE)
DAYDATE

NOTE: Actual watch case may be diff erent. Look for the position of the Day, and Date Sub Dials to see if this is your watch.
SETTING THE DAY AND TIME1. Pull the crown out to the 2nd position and rotate the crown counter-clockwise
direction to set a day.2. Turn the crown in a clockwise direction to set the time.3. Push the crown back in to the normal position to re-engage time keeping.
SETTING THE DATE1. Pull the crown out to the 1st position.2. Turn the crown counter-clockwise to set the date.3. Aft er the date has been set, push the crown back to the normal position.
NOTE: Never pull the Crown when the watch is wet. Do not set the date between the hours 9:00PM and 4:00AM. Th e date may not change correctly the next day.

CROWN AT NORMALPOSITION
MONTH ADJUSTMENTBUTTON
DATE
DAYDAY & TIME
SETTING
[1] [2]
6P05 Th e hands in the small displays show Date, Day and Month.
MONTH
DATE SETTING

SETTING THE DAY AND TIME (HOUR, MINUTE AND SECOND)Th e hour, minute, second and day are set by the same operation.
1. Pull the crown out to the 2nd position to stop the second hand at 0 (12 o’clock). Turn the hour/minute hands in a clockwise direction to set a day. In order to set the day, you must advance the hour hand by 24 hours per day.
2. Aft er setting the day, set the hour (and 24 hour) and minute hands.3. Turn the hour/minute hands in a clockwise direction to set the time. To ensure
time is set accurately, fi rst turn the minute hand 5 minutes ahead of desired time and then turn back (in a counterclockwise) to the desired time.
4. Push the crown back in to the normal position to re-engage time keeping.
NOTE: Never pull the Crown when the watch is wet.
NOTE: If the day is set by turning the crown counterclockwise, there is the possibility the date will not change over. Do not set the day by turning the crown in counterclockwise direction. Th e day changes somewhere between 12:00AM and 5:30AM or a little later.
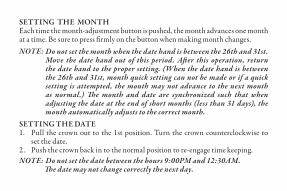
SETTING THE MONTHEach time the month-adjustment button is pushed, the month advances one month at a time. Be sure to press fi rmly on the button when making month changes.
SETTING THE DATE1. Pull the crown out to the 1st position. Turn the crown counterclockwise to
set the date.2. Push the crown back in to the normal position to re-engage time keeping.
NOTE: Do not set the date between the hours 9:00PM and 12:30AM. Th e date may not change correctly the next day.
NOTE: Do not set the month when the date hand is between the 26th and 31st. Move the date hand out of this period. Aft er this operation, return the date hand to the proper setting. (When the date hand is between the 26th and 31st, month quick setting can not be made or if a quick setting is attempted, the month may not advance to the next month as normal.) Th e month and date are synchronized such that when adjusting the date at the end of short months (less than 31 days), the month automatically adjusts to the correct month.

CROWN AT NORMALPOSITION
DATE
DAY
TIME SETTING
[1] [2]
6P29 & 6P79 Th e hands in the small displays show Day, Date, and 24 hour time.
24-HOUR HAND
(Indicates the time on a 24-hour basis)
DATE SETTING

NOTE: Actual watch case may be diff erent. Look for the position of the Day, Date, Month or 24 Hour Sub Dials to see if this is your watch.
SETTING THE TIME1. Pull the crown out to the 2nd position and rotate the crown clockwise or
counter-clockwise until the desired Time and Day are obtained.2. Push the crown back in to the normal position to re-engage time keeping.
NOTE: Never pull the Crown when the watch is wet.
SETTING THE DATE1. Pull the crown out to the 1st position.2. Turn the crown counter-clockwise to set the date.3. Aft er the date has been set, push the crown back to the normal position.
NOTE: Th e 24 hour (Military Time) adjusts automatically when the Time is set. Do not set the date between the hours 9:00PM and 4:00AM. Th e date may not change correctly the next day.

CROWN AT NORMALPOSITION RETROGRADE
DAY INDICATOR*
VX 45
NOTE: *Aft er the day hand reaches the last day of the week, the hand will jump to the fi rst day of the week.
TIME SETTINGPOSITION
DATE
[1][2]
DATE SETTINGPOSITION

SETTING THE TIME1. Pull crown out to the 2nd position when the second hand is at the 12 o’clock position.2. Turn clockwise to advance the hour and minute hands past 12:00 AM.
Doing so will advance the date to the next date.3. Set the hour and minute hands to the desired time taking AM or PM into
consideration. When setting the minute hand, advance it 4 to 5 minutes ahead of the desired time and then turn it back to the exact time.
4. When the crown is pushed back to the normal position, second hand begins to run.
NOTE: Never pull the Crown when the watch is wet.
SETTING THE DATE1. Pull the crown out to the 1st click position.2. Turn the crown counter-clockwise to set the date.3. Turn the crown clockwise to set day day of the week.4. Aft er the date has been set, push the crown back to the normal position.
NOTE: * Do not set the day and date between 9:00PM and 4:00AM Otherwise,it may not turn properly. After the day hand reaches the last day of the week, turn the crown clockwise and the hand will return to the first day of the week.
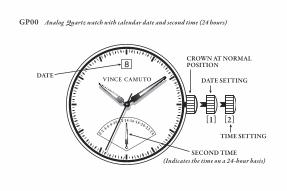
CROWN AT NORMALPOSITION
DATE
TIME SETTING
[1] [2]
GP00 Analog Quartz watch with calendar date and second time (24 hours)
SECOND TIME
(Indicates the time on a 24-hour basis)
DATE SETTING
SETTING THE TIME1. Pull the crown out to the 2nd position.2. Turn the crown to set hour and minute hands.3. When the crown is pushed back to the normal position, second hand begins to run.
NOTE: Never pull the Crown when the watch is wet.
SETTING THE DATE1. Pull the crown out to the 1st position.2. Turn the crown clockwise to set the date.3. Aft er the date has been set, push the crown back to the normal position.
NOTE: If the date and/or day of the week is set between the hours of around 9:00 PM and 2:00 AM, it may not change on the following day.
SETTING THE SECOND TIME1. Pull the crown out to the 1st position.2. Turn the crown counter-clockwise to set the 2nd time (24h).3. Aft er the 2nd time (24h) has been set, push the crown back to the normal position.
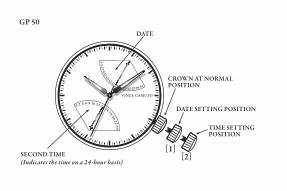
GP 50
CROWN AT NORMALPOSITION
TIME SETTINGPOSITION
SECOND TIME
(Indicates the time on a 24-hour basis)
DATE
[1][2]
DATE SETTING POSITION

SETTING THE TIME1. Pull the crown out to the 2nd position.2. Turn the crown to set hour and minute hands.3. When the crown is pushed back to the normal position, second hand begins to run.NOTE: Never pull the Crown when the watch is wet.
SETTING THE DATE1. Pull the crown out to the 1st position.2. Turn the crown clockwise to set the date.3. Aft er the date has been set, push the crown back to the normal position.NOTE: * If the date is set between the hours of around 9:00 PM and 2:00 AM, the date may not change on the following day.
SETTING THE SECOND TIME (24 hours)1. Pull the crown out to the 1st position.2. Turn the crown counter-clockwise to set the second time(24h).3. Aft er the second time(24h) has been set, push the crown back to the normal position.

CROWN AT NORMALPOSITION
BUTTON (A)*In stopwatch function; Start/Stop
CHRONOGRAPH MINUTE HAND(Moves in minute increments)
CHRONOGRAPHSECOND HAND(To be used as a stopwatch)
24-HOUR HAND(Indicates the time on a 24-hour basis)
TIME SETTING
CALENDAR
0S21
BUTTON (B)*In stopwatch function; it is the Release/Reset button
[1] [2]
DATE SETTING
SETTING THE TIME1. Pull out the crown to the 2nd-click position.2. Turn the crown clockwise to set the hour, minute and the 24-hour hands to the
desired time. As the hour hand moves, the 24-hour hand moves correspondingly. When setting the hour hand, check if the 24-hour hand is set properly.
3. Push the crown back in to the normal position to re-engage time keeping.
SETTING THE DATE1. Pull out the crown to the 1st-click position.2. Turn the crown counter-clockwise to set the date.3. Aft er the date has been set, push the crown back to the normal position.NOTE: * If the date is set between the hours of around 9:00 PM and 1:00 AM, the date may not change on the following day.
NOTE: Never pull the Crown when the watch is wet.

USING THE CHRONOGRAPHTh is chronograph is able to measure and display time in 1/1 second united up tomaximum of 1 hour.
MEASURING TIME WITH THE STOPWATCH :1. Press button A to start the stopwatch.2. The stopwatch can be started and stopped each time button A is pressed.3. Pressing button B resets the stopwatch and stopwatch minute and second hands return
to their zero position.
STOPWATCH RESET (INCLUDING AFTER REPLACING BATTERY):This procedure should be performed when the stopwatch second and minute hand does not return to the zero position.1. Pull the crown out to the 2nd click position.2. Press button A to set the chronograph second hand to the 0 position
NOTE: Th e chronograph hands can be advanced rapidly by continuously pressing button A.
3. Once the hands have been zeroed, reset the time and return the crown to its normal position.

CROWN AT NORMALPOSITION
BUTTON (A)*In stopwatch function Start/Stop
STOPWATCH MINUTE HAND(Move in minute increments)
STOPWATCH SECOND HAND(Move in second increments)
24-HOUR HAND(Indicates the time on a 24-hour basis)
TIME SETTING POSITION
VD 54 B
BUTTON (B)*In stopwatch function Split/SplitRelease/Reset

Before setting the time , check if the stopwatch second and minute hands are in the “60”(12 o’clock) position. If either of the stopwatch hands are not in the “60” position, reset them following the procedure below:1. Pull out the crown.2. Press button A or B to reset the stopwatch second and minute hands to “60”position.
By pressing button A the hands move counter clockwise. By pressing button B the hands move counter clockwise.
3. Push the crown back in to the normal position.
SETTING THE TIME1. Pull out the crown when the second hand is at the 12 o’clock position. Th e second
hand will stop on the spot. Do not press any buttons, otherwise the chronograph hands will move.
2. Turn the crown to set the hour, minute and the 24-hour hands to the desired time. As the hour hand moves, the 24-hour hand moves correspondingly. When setting the hour hand, check if the 24-hour hand is set properly.
3. Push the crown back in to the normal position to re-engage time keeping.
NOTE: Never pull the Crown when the watch is wet.

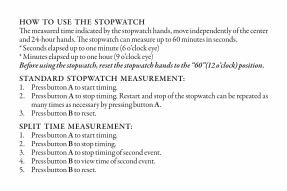
HOW TO USE THE STOPWATCHTh e measured time indicated by the stopwatch hands, move independently of the center and 24-hour hands. Th e stopwatch can measure up to 60 minutes in seconds.* Seconds elapsed up to one minute (6 o’clock eye)* Minutes elapsed up to one hour (9 o’clock eye)Before using the stopwatch, reset the stopwatch hands to the “60”(12 o’clock) position.
STANDARD STOPWATCH MEASUREMENT:1. Press button A to start timing.2. Press button A to stop timing. Restart and stop of the stopwatch can be repeated as
many times as necessary by pressing button A.3. Press button B to reset.
SPLIT TIME MEASUREMENT:1. Press button A to start timing.2. Press button B to stop timing.3. Press button A to stop timing of second event.4. Press button B to view time of second event.5. Press button B to reset.

CROWN AT NORMALPOSITION
BUTTON (A)*In stopwatch function Start/Stop
STOPWATCH MINUTE HAND(Move in minute increments)
STOPWATCH SECOND HAND(Move in second increments)
24-HOUR HAND(Indicates the time on a 24-hour basis)
TIME SETTING
CALENDAR
VD 53
BUTTON (B)*In stopwatch function Split/SplitRelease/Reset
[1] [2]
DATE SETTING

Before setting the time, make sure the chronograph is stopped and set to zero (12:00) position. If either of the chronograph hands is not at the zero (12:00) position, pull crown out to the 2nd click position. Press button A to move hands clockwise, press button B to move hands counter-clockwise.
TIME AND DATE SETTING1. Pull the crown out to the 1st click position when the second hand is at the 12 o’clock
position. Th e second hand will stop on the spot. Do not press any buttons, otherwise the chronograph hands will move.
2. Rotate crown clockwise until the previous day’s date is shown in the date window.3. Pull the crown out to the 2nd click position, rotate crown clockwise until the correct
date is shown in the date window. Continue to rotate crown to set the hour, minute and the 24-hour hands to the desired time. As the hour hand moves, the 24-hour hand moves correspondingly. When setting the hour hand, check if the 24-hour hand is set properly.
4. Aft er the time has been set, push the crown back in to the normal position to re-engage time keeping.
NOTE: Never pull the Crown when the watch is wet. If the date is set between the hours of around 9:00 PM and 1:00 AM, the date may not change on the following day.
HOW TO USE THE STOPWATCHTh e measured time indicated by the stopwatch hands, move independently of the center and 24-hour hands. Th e stopwatch can measure up to 60 minutes in seconds.* Seconds elapsed up to one minute (6 o’clock eye)* Minutes elapsed up to one hour (9 o’clock eye)Before using the stopwatch, reset the stopwatch hands to the “60”(12 o’clock) position.
STANDARD STOPWATCH MEASUREMENT:1. Press button A to start timing.2. Press button A to stop timing. Restart and stop of the stopwatch can be repeated as
many times as necessary by pressing button A.3. Press button B to reset.
SPLIT TIME MEASUREMENT:1. Press button A to start timing.2. Press button B to stop timing.3. Press button A to stop timing of second event.4. Press button B to view time of second event.5. Press button B to reset.

CROWN AT NORMALPOSITION
BUTTON (A)*In stopwatch function Start/Stop
STOPWATCH MINUTE HAND(Move in minute increments)
STOPWATCH SECOND HAND(Move in second increments)
24-HOUR HAND(Indicates the time on a 24-hour basis)
TIME SETTING
CALENDAR
JS 26
BUTTON (B)*In stopwatch function Reset
[1] [2]
DATE SETTING

TIME AND DATE SETTING1. Pull the crown out to the 1st click position when the second hand is at the 12 o’clock
position. Th e second hand will stop on the spot. Do not press any buttons, otherwise the chronograph hands will move.
2. Rotate crown clockwise until the previous day’s date is shown in the date window.3. Pull the crown out to the 2nd click position, rotate crown clockwise until the correct
date is shown in the date window. Continue to rotate crown to set the hour, minute and the 24-hour hands to the desired time. As the hour hand moves, the 24-hour hand moves correspondingly. When setting the hour hand, check if the 24-hour hand is set properly.
4. Aft er the time has been set, push the crown back in to the normal position to re-engage time keeping.
NOTE: Never pull the Crown when the watch is wet. If the date is set between the hours of around 9:00 PM and 1:00 AM, the date may not change on the following day.

USING THE STOPWATCHThis stopwatch is able to measure and display time in 1/1 second united up to maximum of 30 minutes. Stopwatch will stop automatically after running continously for 30 minutes.
MEASURING TIME WITH THE STOPWATCH :1. Press button A to start the stopwatch.2. The stopwatch can be started and stopped each time button A is pressed.3. Pressing button B resets the stopwatch and stopwatch minute and second hands return
to their zero position.
STOPWATCH RESET (INCLUDING AFTER REPLACING BATTERY):This procedure should be performed when the stopwatch second and minute hand does not return to the zero position.1. Pull the crown out to the 2nd click position.2. Press button A to set the stopwatch second hand forward. Press button B to set
the stopwatch second hand back. NOTE: Th e stopwatch minute hand is synchronized with stopwatch second hand. Th e stopwatch second hand can be advanced rapidly by continously pressing button A or B.
3. Once the both hands been zeroed, reset the time and return the crown to its normal position.

CROWN AT NORMALPOSITION
BUTTON (A)*In stopwatch function Start/Stop
STOPWATCH MINUTE HAND(Move in minute increments)
STOPWATCH 1/10 SECOND
STOPWATCH SECOND HAND(Move in second increments)
CALENDAR
TIME SETTING
VD 57
BUTTON (B)*In stopwatch function Split/SplitRelease/Reset
[1] [2]
DATE SETTING

Before setting the time , check if the stopwatch 1/10 second , second and minute hands are stopped and set to zero (12:00) position. If either of the chronograph hands is not at the zero (12:00) position, pull crown out to the 2nd click position. Press button A or B to reset the stopwatch 1/10 second , second and minute hands to the zero (12:00) position. Press button A to set the stopwatch 1/10 second hand. Press button B to set the stopwatch second and minute hands. Th e stopwatch minute hand moves correspondingly with the stopwatch second hand. Th e hands move quickly if the respective buttons are kept pressed.
TIME AND DATE SETTING1. Pull the crown out to the 1st click position when the second hand is at the 12 o’clock
position. Th e second hand will stop on the spot. Do not press any buttons, otherwise the chronograph hands will move.
2. Rotate crown clockwise until the previous day’s date is shown in the date window.3. Pull the crown out to the 2nd click position, rotate crown clockwise until the correct
date is shown in the date window. Continue to rotate crown to set the hour and minute hands to the desired time.
4. Aft er the time has been set, push the crown back in to the normal position to re-engage time keeping.
NOTE: Do not set the date between 9:00 PM and 1:00 AM.

HOW TO USE THE STOPWATCHTh e measurement time is indicated by the stopwatch hands that move independently of the center hands. Th e stopwatch can measure up to 60 minutes in 1/10 seconds.
Before using the stopwatch, reset the stopwatch hands to the “60”(12 o’clock) position.
STANDARD STOPWATCH MEASUREMENT:1. Press button A to start timing.2. Press button A to stop timing. Restart and stop of the stopwatch can be repeated as
many times as necessary by pressing button A.3. Press button B to reset.
SPLIT TIME MEASUREMENT:1. Press button A to start timing.2. Press button B to stop timing.3. Press button A to stop timing of second event.4. Press button B to view time of second event.5. Press button B to reset.

CROWN AT NORMALPOSITION
BUTTON (A) (Day correction)
24-HOUR HAND(Indicates the time on a 24-hour basis)
DATE HAND
DAY HAND(Indicates day of the week)
VX9J
BUTTON (B)(Date correction)
[1]
TIME SETTING
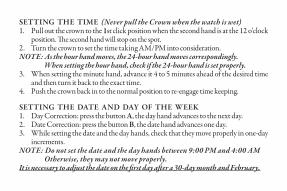
SETTING THE TIME (Never pull the Crown when the watch is wet)1. Pull out the crown to the 1st click position when the second hand is at the 12 o’clock
position. Th e second hand will stop on the spot.2. Turn the crown to set the time taking AM/PM into consideration. NOTE: As the hour hand moves, the 24-hour hand moves correspondingly. When setting the hour hand, check if the 24-hour hand is set properly.3. When setting the minute hand, advance it 4 to 5 minutes ahead of the desired time
and then turn it back to the exact time.4. Push the crown back in to the normal position to re-engage time keeping.
SETTING THE DATE AND DAY OF THE WEEK1. Day Correction: press the button A, the day hand advances to the next day.2. Date Correction: press the button B, the date hand advances one day.3. While setting the date and the day hands, check that they move properly in one-day
increments.NOTE: Do not set the date and the day hands between 9:00 PM and 4:00 AM Otherwise, they may not move properly.It is necessary to adjust the date on the fi rst day aft er a 30-day month and February.

AUTOMATIC MOVEMENT
CROWN AT NORMAL POSITION
(Spring-winding position)
TIME SETTING POSITION
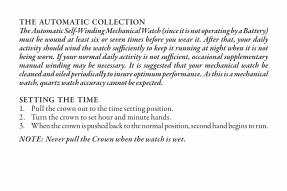
THE AUTOMATIC COLLECTIONTh e Automatic Self-Winding Mechanical Watch (since it is not operating by a Battery) must be wound at least six or seven times before you wear it. Aft er that, your daily activity should wind the watch suffi ciently to keep it running at night when it is not being worn. If your normal daily activity is not suffi cient, occasional supplementary manual winding may be necessary. It is suggested that your mechanical watch be cleaned and oiled periodically to insure optimum performance. As this is a mechanical watch, quartz watch accuracy cannot be expected.
SETTING THE TIME1. Pull the crown out to the time setting position.2. Turn the crown to set hour and minute hands.3. When the crown is pushed back to the normal position, second hand begins to run.
NOTE: Never pull the Crown when the watch is wet.
CROWN AT NORMAL POSITION
(Spring-winding position)
TIME SETTING
POWER RESERVE INDICATOR
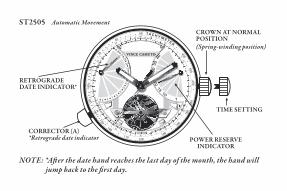
ST2505 Automatic Movement
RETROGRADEDATE INDICATOR*
NOTE: *Aft er the date hand reaches the last day of the month, the hand will jump back to the fi rst day.
CORRECTOR (A)*Retrograde date indicator

THE AUTOMATIC COLLECTIONTh e Automatic Self-Winding Mechanical Watch (since it is not operating by a Battery) must be wound at least six or seven times before you wear it. Aft er that, your daily activity should wind the watch suffi ciently to keep it running at night when it is not being worn. If your normal daily activity is not suffi cient, occasional supplementary manual winding may be necessary. It is suggested that your mechanical watch be cleaned and oiled periodically to insure optimum performance. As this is a mechanical watch, quartz watch accuracy cannot be expected.
SETTING THE TIME1. Pull the crown out to the time setting position.2. Push the corrector A, let the date hand fl y back to the number 1.3. Turn the crown clockwise until the correct date is shown on the retrograde. Continue
to rotate crown to set the hour and minute hands to the desired time.4. When the crown is pushed back to the normal position, second hand begins to run.
NOTE: Never pull the Crown when the watch is wet.

WATER RESISTANCE If your watch is water resistant, the watch is tested to be water resistant to 3-5 atmospheres (100-165 feet).
NOTE: Over time, the gaskets of the case may become worn and reduce the water resistance of the watch. A trained specialist should change the gaskets and the O-ring each time the battery is changed. To avoid any unwanted condensation, watches of all specifi cations (water resistant or not) should not be exposed to extreme temperatures such as cold or heat.
CHANGING THE BATTERY Replace batteries when the watch becomes slow or does not operate.Replace with same or equivalent.
NOTE: Battery change should be performed by a qualifi ed technician who should also check the condition of the gaskets at the same time.
BATTERIES ARE NOT COVERED UNDER WARRANTY.
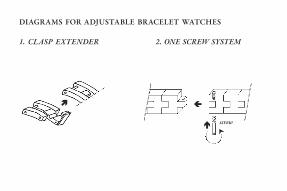
DIAGRAMS FOR ADJUSTABLE BRACELET WATCHES
1. CLASP EXTENDER 2. ONE SCREW SYSTEM
screw
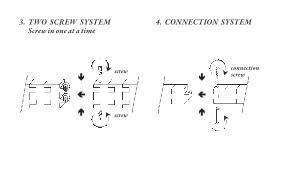
3. TWO SCREW SYSTEM Screw in one at a time
4. CONNECTION SYSTEM
screwconnectionscrew
screw

5. METAL INSERT
METAL INSERTpush to close
push to open
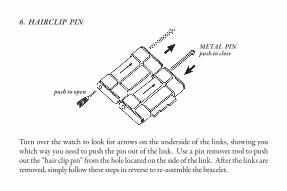
Turn over the watch to look for arrows on the underside of the links, showing you which way you need to push the pin out of the link. Use a pin remover tool to push out the “hair clip pin” from the hole located on the side of the link. Aft er the links are removed, simply follow these steps in reverse to re-assemble the bracelet.
push to open
METAL PINpush to close
6. HAIRCLIP PIN

Side view “B” of Link
Side view “A” of Link
Check the side edge of the watch link, to determine which side of the link is “A” or “B”. Take a pin remover tool and push out the pin from the hole located on side “B”. Aft er the desired links are removed, simply follow these steps in reverse to re-assemble the bracelet.
push to open
METAL PINpush to close
7. PIN & TUBE 1

In order to adjust links for this watch construction, you must switch the pin on the tool kit to the longest pin (approximately 10mm long) found under the tool kit. Th en use the pin remover tool to push out the pins from either side of the links. Aft er the desired links are removed, simply follow these steps in reverse to re-assemble the bracelet.
push to open
METAL PINpush to close
8. PIN & TUBE 2

9. SLIDING BAR
lift up to open
slide alongfor adjustment
push down when done
align protruded line inside the sliding part with desired groove in band
grooves on the back side
top of band
bottom of band

10. FOLD-OVER BUCKLE smallest size
largest size
Compress the push pin, and put the ends into the suitable holes along the buckle.
If your watch did not come with the Extender, please call with the style number (which is engraved on the case back) and the Extender will be shipped to you. THE EXTENDER
EXTENDER TO MAXIMIZE THE SIZE OF THE FOLD-OVER CLASP FOR A LARGER WRIST(For a Smaller Size Wrist discard the Extender)

11. QUICK-RELEASE BUTTERFLY CLASP
Push on both sides to open clasp.
Pull down the back of the sizing clasp to release.Adjust as needed, then push it back to secure.
Fitting the watch may take some trial and error. Start by identifying the small pin that’s attached to the back of the buckle. Insert the pin into a hole in the strap. For thicker wrists use the holes closer to the end of the strap or, for thinner wrists, closer to the watch.

Dear Customer:Help your watch/jewelry retailer protect our environment by properly recycling the button cell battery in your watch. Professional jewelers and watch retailers are best equipped to replace the battery in your watch without damage to the watch case and movement inside. Th ey have the specialized tools and experience to do the job right. Inexperienced people can scar the case and damage the water resistant seal – voiding your warranty. It is important to recycle your watch battery in an environmentally safe way. Watch batteries contain very small amounts of mercury, which is required to prevent corrosion of the battery and damage to your watch. Th ere is no danger to you or your watch from the mercury because it is in the sealed battery. But you need to recycle your watch battery properly. Your professional watch/jewelry retailer is the best person to do this for you. Th ese professionals collect used batteries and recycle them through licensed waste management companies.Do our environment and your watch a favor. Ask your watch/jewelry professional to replace your battery when it expires.

If your watch requires cleaning, lubrication, battery changing, or needs a crystal replaced, VINCE CAMUTO® watches approved Service Centers are available in your area. Th ese repair facilities use VINCE CAMUTO® watches parts and components to assure quality and future performance. Free estimates are available in advance, should you need servicing or repairs not covered under the warranty. Repairs covered under the warranty may require proof of purchase, so retain the purchase receipt.
TO RETURN YOUR WATCH FOR SERVICING:
FROM THE UNITED STATES: Please call 718.482.4195 for a listing of all approved and authorized stations and locations.
TO RETURN YOUR WATCH FOR SERVICING: RETURN IT TO VINCE CAMUTO WATCHES OR
TO AN AUTHORIZED SERVICE CENTER; IT SHOULD NOT BE RETURNED TO PLACE OF PURCHASE.

FROM OUTSIDE OF THE UNITED STATES:
Clarity Ltd. Flat A - B, 12/F, Sing Mei Industrial Building29 - 37 Kwai Wing Road, Kwai Chung, N.T. Hong Kongtel: 852.2424.2211 fax: 852.2424.2077
Carefully pack your watch in a sturdy box (do not send in a gift box for same will not be returned) and mail to the nearest approved authorized service station. Because of possible loss, we recommend that you insure your watch, return receipt requested, when using the mail. If your watch requires cleaning, lubrication, battery changing, or needs a crystal replaced, VINCE CAMUTO® watches approved Service Centers may be available in your area. Th ese repair facilities use VINCE CAMUTO® watches parts and components to assure quality and future performance. Free estimates are available in advance, should you need servicing or repairs not covered under the warranty. Repairs covered under the warranty may require proof of purchase, so retain the purchase receipt. For further information regarding VINCE CAMUTO® watches approved Service Stations and locations, please call the Service Centers listed above, or visit www.egluck.com
5 YEAR LIMITED WARRANTY
Th is VINCE CAMUTO® watch is warranted to you, the owner, for 5 years against all defects in material or workmanship. Th is warranty does not apply to normal wear and tear or abuse and excludes batteries, case, strap, crystal, or bracelet. A copy of the receipt, or dealer stamp in the warranty booklet, is required for proof of purchase. In the event of a defect or malfunction of the movement within this period it will be repaired or replaced, at our option, provided that it is returned prepaid with a check or money order for $14.95 to cover the cost of handling and return postage for a Quartz Movement Watch or $24.95 for an Automatic Movement Watch. (Th is is not a repair charge.) DO NOT SEND CASH. No additional charge will be made unless additional servicing is necessary for reasons beyond our control such as accident, misuse, neglect or replacement of parts not warranted is required such as case, crystal, strap, bracelet or batteries in which event a moderate charge will be made.Th e movement of any timepiece requires periodic cleaning/timing which is not a defect and, as such not warranted. Aft er one year from the date of purchase each cleaning/timing will be performed as required without charging a fee in excess of the

specifi ed $14.95 or $24.95 handling charge. Th e above remedy is exclusive. VINCE CAMUTO® watches shall not be liable for any incidental or consequential damages. Should any other part of your watch require repair, please use our Service Center for quick and inexpensive repairs on your watch. Th is warranty gives you specifi c legal rights and you may also have other rights which may vary from state to state. Some states do not allow limitations on how long an implied warranty lasts, or the exclusion or limitation of incidental or consequential damages, so the above limitations and exclusions may not apply to you. In the event of a problem with warranty service or performance, you may be able to go to Small Claims Court, a State Court or a Federal District Court.
revised 03/19/2014 MB14-104_LP

©2014 E. GLUCK CORPORATION
VINCE CAMUTO® is a registered trademark of Camuto Consulting, Inc. All other identifi ed trademarks or servicemarks are or may be the intellectual property rights of their respective owners.
* SPECIFICATIONS SUBJECT TO CHANGEWITHOUT PRIOR NOTICE FOR PRODUCT IMPROVEMENT,
DESIGN MAY VARY DEPENDING ON THE MODEL.
For the latest information on sizing, service and repairs, please go to:
www.vincecamuto.com/watchwarranty

VENDOR STAMP
-------------------------------------------------------------------------------

VENDOR STAMP


VINCECAMUTO.COM