wax finishes thread chasing 3rd edition grinding and sharpening … · 2016-06-02 · notes...
TRANSCRIPT

Allan Batty
WoodturningNotes
Includes:
lathe speedstool selection and usegrinding and sharpeningwax finishesthread chasingand much more . . .
$4.953rd Edition
Our state of the art woodturning facility featurestoday’s finest wood lathes, tools and equipmentincluding video monitors to show you every detailof instruction as it happens. Individual work sta-tions feature a full set of tools and related suppliesnecessary for the course. Each work station is welllit and features dust extraction making it a safe,comfortable environment condusive to learning.
Learn the craft of woodturning at Craft Supplies USA, NorthAmerica’s premier woodturning school. Whether you want tolearn woodturning or you’re a long time turner looking to refineyour skills, we have a class to suit you your needs.
Three and five day courses taught by some of the worlds finestprofessionals teach you the proper instruction and techniquesnecessary to be successful at woodturning. Make friends withothers sharing a common interest in a relaxing classroom settingthat’s informative and enjoyable.
All participants receive a 10% discount* on
tools, wood and accessories purchased during
the week of the class. *Lathes not included
STATE OF THE ART WOODTURNING FACILITY
LEARN FROM PROFESSIONALS!
SAVE 10%
Meet fellow woodturners and makenew friends while participating inwoodturning courses. Our goal is toteach you woodturning in an atmos-phere that is relaxing and enjoyable.Work at your own pace while receivingone on one instruction from the finestinstructors in the world. We guaran-tee an experience you’ll never forgetand chances are you’ll be back again!
HAVE FUN WHILE YOU LEARN TO TURN...
Allan Batty Intermediate Workshop
“I’ve never come across a finer woodturning facility than here at Craft Supplies USA”–Allan Batty
WOODTURNING WORKSHOPS
For more info:1-800-551-8876
www.woodturnerscatalog.com
Craft Supplies USA
1-800-551-8876 • woodturnerscatalog.com
Bolt Box - by Allan Batty

TheWoodturnersCatalog
-projects-
1-800-551-8876www.woodturnerscatalog.com
-turning blanks-
-pen projects- -and much more...
Woodturners around the world have depended on Craft Supplies USA since1984 for the finest woodturning tools, equipment and accessories available.Our goal is to offer the best quality products and service at reasonable prices.Every product is backed by our 30 day satisfaction guarantee. Visit us onlinefor the very latest in new woodturning products, special offers and promotionsat www.woodturnerscatalog.com. Call 1-800-551-8876 for a free catalog.
Notes:
Woodturning is a fun and exciting hobby for people of all ages and skill levels. The number of things you can create on your lathe with a minimal amount of time and money is limited only to your imagination. When woodturning, there are a number of safety considerations that must be kept in mind so that you can have a great time turning while being safe. Woodturning Safety 101 is intended to create safety awareness so as to prevent personal injury. We hope you will find this information helpful and that you will review it from time to time. Feel free to share this information with other woodturners you know.
Personal Safety…1. Educate yourself on proper turning techniques, chuck operation, tool use and lathe
operation. 2. Always wear a full-face shield at all times. Safety glasses are not sufficient protection against
flying debris.3. Always use a dust mask or air filtration system.4. Wear adequate hearing protection.5. Don’t wear loose clothing, gloves or jewelry as they may become tangled with the lathe. 6. Never start the lathe before checking to make sure the spindle speed is correct for the size of
work being turned. Also, make sure the work clears the tool rest by rotating the hand wheel before starting the lathe.
7. Be sure the work piece is securely mounted and is free of imperfections or poor glue joints.8. Make sure all belt guards and covers are in place before starting the lathe.9. Make sure the tool is on the tool rest before making a cut.10. Always know your capabilities and work within your limits.11. Utilize the tailstock whenever possible.12. Always remove the tool rest support before sanding and finishing. This will help prevent
injuries to your hands and fingers.13. Do Not Overreach! Although many of today’s tools have long blades, this does not mean
they are designed to reach long distances over the tool rest.14. Keep your tools sharp and properly ground. Dull tools are dangerous, as they require
excessive pressure to make them cut.15. Do not use tools for purposes they are not intended for.16. Properly dispose of rags and do not leave finish containers open.17. Never leave the lathe running unattended.18. Stay alert, take frequent breaks and never operate the lathe while under the influence of
drugs or alcohol.19. Use common sense at all times. If unsure at any time, seek the advice of a woodturning
expert or call us at 1-800-551-8876. We are here to help you at all times.
Woodturning Safety 101
1-800-551-8876 • woodturnerscatalog.com

31, Ripon GardensFoxlow Park
BuxtonDerbyshireSK17 9PL
01298 71657
Dear Friend,
These jottings are designed to jog your memory on thesimpler but all important basic points which even thebest of us from time to time froget.
I do hope that you find them useful as you progress in mastering a fascinating, enjoyable – and all-consumingcraft.
Kind regards, and may your skew be always sharp!
Allan Batty
These notes and drawings are the copyright of Allan Battyand may not be reproduced or copied in any way
without the author’s written permission.
©Allan Batty

CONTENTS
CHAPTER PAGE
1 . . . . . . . . . .Lathe Speed . . . . . . . . . . . . . . . . . . . . . . . . . . .12 . . . . . . . . . .The Skew Chisel . . . . . . . . . . . . . . . . . . . . . . . .23 . . . . . . . . . .Problems With a New Skew . . . . . . . . . . . . . . .24 . . . . . . . . . .Problems With Angles of the Skew . . . . . . . . .35 . . . . . . . . . .The Roughing Out Gouge . . . . . . . . . . . . . . . .46 . . . . . . . . . .Measurements of Gouges . . . . . . . . . . . . . . . . .47 . . . . . . . . . .Spindle Gouges . . . . . . . . . . . . . . . . . . . . . . . . .58 . . . . . . . . . .Bowl Gouges . . . . . . . . . . . . . . . . . . . . . . . . . .69 . . . . . . . . . .Grinding of Bowl Gouges . . . . . . . . . . . . . . . .7
10 . . . . . . . . . .Problems of Angles of Bowl Gouges . . . . . . . .811 . . . . . . . . . .Beading & Parting Tool . . . . . . . . . . . . . . . . . .912 . . . . . . . . . .Parting Tool . . . . . . . . . . . . . . . . . . . . . . . . . . .1113 . . . . . . . . . .Scraping Tools . . . . . . . . . . . . . . . . . . . . . . . .1114 . . . . . . . . . .Grinding of Scrapers . . . . . . . . . . . . . . . . . . . .1215 . . . . . . . . . .Beware of Bevel Length . . . . . . . . . . . . . . . . .1316 . . . . . . . . . .Hand Rest – Height . . . . . . . . . . . . . . . . . . . .1417 . . . . . . . . . .Hand Rest – Shapes . . . . . . . . . . . . . . . . . . . .1518 . . . . . . . . . .Grinders, Grinding & Sharpening . . . . . . . . .1619 . . . . . . . . . .Dry Grinding or Wet Grinding? . . . . . . . . . . .1720 . . . . . . . . . .To Hone or Not to Hone? . . . . . . . . . . . . . . . .1721 . . . . . . . . . .Carbon Steel or HSS? . . . . . . . . . . . . . . . . . . .1822 . . . . . . . . . .Carborundum or White Wheels? . . . . . . . . . .1923 . . . . . . . . . .Abrasive Wheel Dressers . . . . . . . . . . . . . . . .1924 . . . . . . . . . .Solving Problems . . . . . . . . . . . . . . . . . . . . . .2025 . . . . . . . . . .The Steady . . . . . . . . . . . . . . . . . . . . . . . . . . .2226 . . . . . . . . . .Beeswax . . . . . . . . . . . . . . . . . . . . . . . . . . . . .2427 . . . . . . . . . .Carnauba Wax . . . . . . . . . . . . . . . . . . . . . . . . .2528 . . . . . . . . . .Beeswax/Carnauba Wax Mix . . . . . . . . . . . . .2529 . . . . . . . . . .Wax Stopper Sticks . . . . . . . . . . . . . . . . . . . . .2530 . . . . . . . . . .Free Hand Thread Chasing . . . . . . . . . . . .26-29

Allan Batty
1
FOR SAFETY SAKE, it is critical that turners know how to select theproper lathe speed. Most serious accidents on lathes can be attributed to
excessive lathe speeds. However, if the speed selected is too low, turningwill be insufficient and take too long to accomplish.
AN area of major concern for new students is “What spindle speedshould I use?”
It is important that the spindle speed selected should be appropriate to thediameter and density of the work to be turned, especially when starting withan unbalanced piece of timber.As a general guide, the larger the diameter and/or the heavier the work piecethe slower should be the speed selected.The charts below give examples of suitable speeds for various sizes of workfor both faceplate and between centers work. If you are in doubt, “slower issafer, except when crossing the road”, as an aged Scots student once confided.
Use the table below as a guide, or another way to generally determine suitable speed is to use Diameter in inches x RPM of the lathe. This shouldequal a number between 6,000 and 9,000 (Dia." x RPM = 6,000 to 9,000).
For example, the table shows a 6" diameter block should be turned at 1500 RPM.
6" x 1500 = 9,000
1 – LATHE SPEED
FACEPLATE TURNING BETWEEN CENTERS TURNING
DISC DIAMETER SQUARE DIMENSION
2000
15001000500400
2000
1500
1000500
6" 2"x2" 3"x3" 4"x4" 5"x5" 6"x6"9" 12" 15" 18"
Diameter
RPMRPM
Woodturning Notes

Allan Batty Woodturning Notes
2
THE skew will produce the finest possible finish when used correctly. Itis important to maintain the sharpest of edges for good results.
The skew is used in two ways in spindle work.
1 With a planing action where the center-to-below-center of thecutting edge slices the timber while maintaining bevel contact withthe wood. (Some turners may prefer a square end chisel for this operation – see Fig. 1).
2 For cleaning end grain, pummels, rolling beads etc., when both long point and heel can be used.
1 If you are working with the traditional rectangular-in-section skewand you are experiencing problems with the planing action then grindoff or slipstone the leading edges of the skew. This will stop theskew from biting into the hand rest while planing and allow the toolto move smoothly along the rest. (See Fig. 2)
2 The older turners (I suppose I’m one now!) always ground away thetop corner of the skew. (See Fig. 2) This acted as a second bevel,allowing the skew to plane through a shallow curve without the topcorner scoring the work.
2 – THE SKEW CHISEL
3 – PROBLEMS WITH A NEW SKEW
Fig. 1 Fig. 2
LEA
DING
EDG
E

Allan Batty
3
Ihave heard of angles from 80˚ to less than 25˚ and this tends to confusestudents as to what angle to select for their own use. I have selected three
different angles in common use and how I would view them.
1 55˚ is towards the hardwood end of the scale (See Fig. 5A). If you gobeyond 55˚ say to 80˚ then this restricts the free movement of the tool.
For example, when turning a bead with raiseddetail either side, the bevel will bottom outbefore the cut can be completed. (See Fig. 4)2 25˚ is towards the softwood end of the
scale. (See Fig. 5C). The edge of thetool becomes too thin and thusvulnerable to chipping if used on theharder woods.
3 It is for the above reasons that I workwith a grinding angle of about 40˚.(See Fig. 5B). This allows me to workboth soft and hard woods, but stillpermits access to beads with raiseddetails etc.
4 Another rule is that the length of thebevel should be 1 1/2 to 2 times thethickness of the skew.
4 – PROBLEMS WITH ANGLES OF THE SKEW
Fig. 4
Fig. 5
HARDWOOD SOFTWOOD
AA
BB
CC
80˚
55˚ 40˚
70˚
25˚
Woodturning Notes

Allan Batty Woodturning Notes
4
AN essential tool for between center work (spindle turning). This toolwill quickly reduce square timber to the round.
Most turners favored a true half circle for this gouge with the cutting edgeground square across (See Fig. 6) which allows all of the edge to be utilized.As you will see from Fig. 7, whichever way you rotate the gouge the cuttingedge remains the same.All roughing out of spindle work can be achieved with this tool and it is alsoideal for long, shallow curves.
5 – THE ROUGHING OUT GOUGE
ALL gouges are measured from the inside to the outside,as shown in Fig. 8.
6 – MEASUREMENTS OF GOUGES
Sizes available 3/4" to 1 1/2"
Angles
I tend to grind the roughing out gouge at a longer angle, of about 35˚, asthis works much better on softer woods. If you are working hardwoods allthe time, then retain the more common angle of 45˚.My personal preference is for the 1 1/4" roughing gouge.
Fig. 7
Fig. 8
Fig. 6
35˚

Allan Batty
5
THESE are the main shaping tools of the spindle turner and are used formost detailed work, beads, coves, ogees etc. to which the modern round
bar is particularly suited.While these are spindle gouges, being round bar section (Fig. 9), they arealso useful for hollowing small objects such as boxes and goblets and areground to an angle of approximately 45˚ for this purpose.(See Pages 8 & 9, Bowl Gouge Angles)
7 – SPINDLE GOUGES
Round bar-section, shallow fluteSizes available 1/4", 3/8", 1/2"
Fig. 9 Fig. 10
45˚ 35˚
Hand forged, shallow fluteSizes available 1/4" to 1 1/2"
The old spindle turner’s favorite tool, it was most commonly ground at anangle of 30˚ – 35˚ with a fingernail shape (Fig. 10) which made it ideal forogees in pummels, and in long, shallow curves, general shaping and detailwork. (This type of gouge was not used for bowl turning as it would not berigid enough for the overhang over the hand rest which would be requiredwhen working inside the bowl.)The larger sized 1 1/4" or 1 1/2" were frequently used as roughing outgouges by many turners. When used for that purpose it was the personalpreference of the turner which decided whether the gouge was groundstraight across (Fig. 6) or fingernail (Fig. 10).The 1/2" is my favorite. I have one that I treasure which belonged to myfather. (The Battys are now into the third generation of wood workers). His
Woodturning Notes

Allan Batty Woodturning Notes
6
gouge had lain unused for years in his box; it is stamped ‘Mathieson ofGlasglow’, a company which no longer exists. It is a credit to them as handforgers of their time – it is beautifully made, fits the hand perfectly andholds a keen edge. It’s pre-war and I value it above all others in my work-shop. It’s getting short now so I use it only for ogees in pummels, a task itseems to have been made for as it follows the curve so naturally.
THE above are the only sizes which were ever available to us for bowlturning. In recent years the modern round bar-section, produced in high
speed steel, has superseded the traditional hand-forged bowl gouge. Thesenot only hold a good edge but have proved superior on the more abrasivetimbers.The following descriptions of the four available gouges will help students toselect the ones to suit their needs.
3/4" Bowl Gouge
This is the roughing gouge of the bowl turner. It was originally used for therapid removal of waste wood from the larger size of bowl. The turnerreduced the bowl, which was turned from wet wood, to a rough wall thick-ness of 1 1/2", the purpose being to speed up drying from years to months.After a period of time the bowl is remounted and re-turned to the requiredshape, sanded and finished.The advantages of this method, which is used by many turners to greateffect, are that not only is the drying time considerably reduced but also thatthe stresses are relieved during the drying process, reducing distortion andhelping produce a very stable finished bowl.
1/2" Bowl Gouge
This is the jack plane of the turner; not only is it suitable for rough turning abowl, as already described, but its rigidity makes it better suited to the turn-ing of a larger bowl where there may be considerable overhang of the toolover the hand rest during hollowing out.
3/8" Bowl Gouge
This is the smoothing plane of the turner’s trade and is by far the most pop-ular. It is an excellent choice for most bowl turning; while maintaining thestrength needed, it will leave a fine finish to the work.
8 – BOWL GOUGES
Round bar-section, deep fluteSizes available 1/4", 3/8", 1/2", 3/4"

Allan Batty
7
THERE are two schools of thought as to which is the better way to grindbowl gouges. Fingernail (See Fig. 11) or square across (See Fig. 12)? The
following might help you make up your mind as to the better way for you.
9 – GRINDING OF BOWL GOUGES
Fingernail
1/4" Bowl Gouge
This is a fine finishing tool when it is sharpened and used correctly. It willleave an extremely good finish to the surface, especially on areas of difficultand stubborn grain.The main drawback with this gouge is its lack of rigidity which results intool chatter if the projection over the hand rest becomes too great.
Fig. 11 Fig. 12
45˚ 45˚
In normal use of these gouges in bowl turning, one will cut almost as wellas the other and both will produce excellent results. There are, though, anumber of reasons that many choose to grind to the fingernail profile:
1 We can use the fingernail profile for shearing cuts in both bowlturning and spindle turning.
2 The fingernail shape makes much easier the point of entry in thehollowing out process.
3 While we never use the hand-forged spindle gouge for bowl turningdue to its lack of strength, the bowl gouge, on the other hand, makesan excellent tool for spindle turning, general shaping, coves, beads.It really comes into its own when turning pummels in larger sectionspindle work, such as big newel posts, large columns etc. where amuch slower speed is needed due to the massive section of the timberbeing turned. We would also have considerable projection of the toolover the hand rest by the time the cut was completed from square toround.
Woodturning Notes

Allan Batty Woodturning Notes
8
The bowl gouge ground to a fingernail profile was often better thanthe skew in these areas.
4 Another area in which the turner can make use of the fingernailprofile in spindle turning is by using a shear cutting principle withbevel contact, as shown (Fig. 13). We can often overcome manysevere interlocking grain problems using this method.
Fig. 13Square Across Gouge
While the square across gouge can and is used successfully for shearing cutsin both bowl and spindle turning, it is restricted in spindle work by the wingsof the gouge when turning beads and coves. It comes into its own, though,and I feel it is superior to the fingernail profile, in bowl turning and in cut-ting end grain and is therefore my personal choice of bowl gouge shape.
ONE of the most asked questions is “Why are there so many differentsuggested angles?” followed by “What should I grind mine at?”
What determines the grinding angle for bowl gouges is the type of bowl youare going to be making; do bear in mind, though, the importance of main-taining bevel contact throughout the cut.You will see from the four following illustrations how each bowl determinesthe angle for you.
See Fig. 14 – as this is a shallow type of bowl we have no restrictions place onthe gouge by the wall of the bowl, therefore none placed on the angle of the tool.
See Fig. 15 – with this bowl, the wall restricts the gouge movement. As thedepth does not exceed the radius, and angle of 45˚ would be ideal to maintainbevel contact throughout the cut.
See Fig. 16 – here the restriction becomes greater as the depth has now exceededthe radius which, in turn, would require a shorter bevel angle of approximately55˚. This would allow the bevel to contact right to the bottom of the bowl.
10 – PROBLEMS OF ANGLES OF BOWL GOUGE

Allan Batty
9
Fig. 14Fig. 15
Fig. 16Fig. 17
Fig. 18
30˚
45˚
55˚
60˚
See Fig. 17 – now the depth has increased even further, which requires aneven shorter angle, in this case approximately 60˚ – 65˚, to allow successfulbevel contact.You can see that the determining factor is what type of bowl you want tomake. An angle of between 45˚ – 55˚ would be good working compromise.
THIS tool is frequently used as the square-across chiselwhich is shown in Fig. 1 and proves particularly useful
for planing cuts in restricted areas. It can also be used forsizing work and, as its name implies, as a beading tool.Ground as a skew, it makes a superb tool for general skewchisel work. These tools are made from square section asopposed to rectangular and this makes it a favorite choice ofmany turners for rolling beads. (Fig. 18)I prefer to grind this tool as a skew chisel with the top corner
11 – BEADING & PARTING TOOL
Sizes available 1/4", 3/8"
Woodturning Notes

Allan Batty Woodturning Notes
10
ground away as in Fig. 2. The tool’s rigidity makes it an ideal choice whenworking well over the rest in larger spindle work.Rolling a bead correctly is one of the most difficult cuts to master becauseof the complex movement of the tool in use. A tip that you may find help-ful in your early attempts is to raise your hand rest above center height.You will find that this reduces the need for such a complex movement of thetool handle – you have only to roll the tool over with hardly any lift to thehandle, as shown in Fig. 19.
Fig. 19
Fig. 20
If the rest is left at center height not only do you have to roll the tool andstrive to keep bevel contact, but you have also to lift the handle into the hori-zontal position, as seen in Fig. 20, which is a much more difficult movement.

Allan Batty
11
ITS ease of use makes this a popular tool with the new turner. It isdesigned to form grooves, work as a small, square across chisel in restrict-
ed areas, roll beads and to completely part off work. (Fig. 21)A useful parting tool 1/16" thick can be made from an engineers hacksawblade. The purpose of off-setting the blade as shown in Fig. 22 is to savehaving to move the rest from its normal position as these blades are twicethe width of a standard blade.
12 – PARTING TOOL
Sizes available 1/8", 1/4"
Fig. 21 Fig. 22
Fig. 23
45˚
70˚40˚ SHAPES are as numerous as are sizes with
these tools and are often ground to a particu-lar shape to suit the needs of the turner as theoccasion arises.Two useful and popular shapes are:
1 Round side-cutting scraper (Fig. 23).This is a useful shape for bowls, goblets andsimilar projects. There is an advantage in intro-ducing a second bevel as shown in Fig. 23.This not only retains an angle of 70˚ but it also
13 – SCRAPING TOOLS
Sizes available 1/2" to 1 1/2"
Woodturning Notes
Allan Batty Woodturning Notes
12
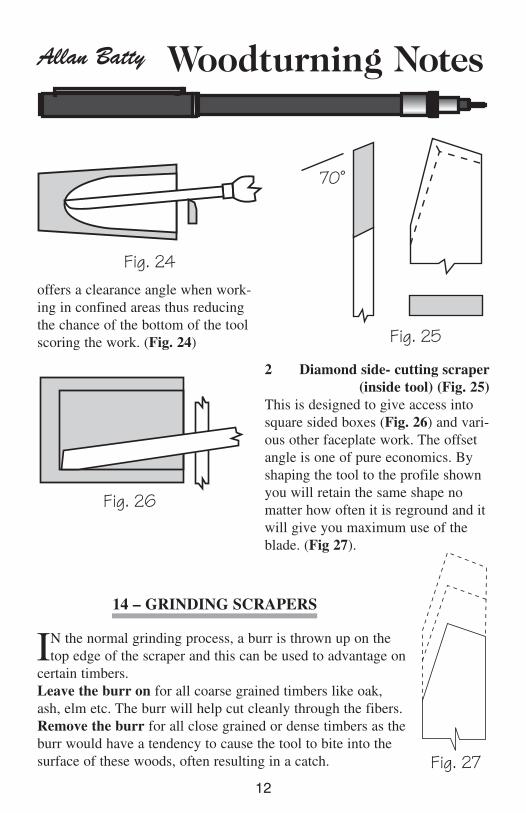
offers a clearance angle when work-ing in confined areas thus reducingthe chance of the bottom of the toolscoring the work. (Fig. 24)
2 Diamond side- cutting scraper(inside tool) (Fig. 25)
This is designed to give access intosquare sided boxes (Fig. 26) and vari-ous other faceplate work. The offsetangle is one of pure economics. Byshaping the tool to the profile shownyou will retain the same shape nomatter how often it is reground and itwill give you maximum use of theblade. (Fig 27).
Fig. 24
70˚
Fig. 25
Fig. 26
IN the normal grinding process, a burr is thrown up on thetop edge of the scraper and this can be used to advantage on
certain timbers.Leave the burr on for all coarse grained timbers like oak,ash, elm etc. The burr will help cut cleanly through the fibers.Remove the burr for all close grained or dense timbers as theburr would have a tendency to cause the tool to bite into thesurface of these woods, often resulting in a catch.
14 – GRINDING SCRAPERS
Fig. 27

Allan Batty
13
The chances of catch can be significantly reduced, if not eliminated, onthese timbers by oilstoning the top surface of the scraper to remove the burr,which will now cut extremely cleanly and safely, especially on timbers suchas ebony, African blackwood and other very dense, exotic timbers.
Remember when using scrapers to maintaina trailing action of the blade. See Fig. 34.
15 – BEWARE OF BEVEL LENGTH
IRECALL a school teacher who used an illustration to show that thingsare not always what they seem. He used two lines (Fig. 28) to show that
although they were the same length they appeareddifferent because the direction of the arrows createdan optical illusion. I draw on this recollectionbecause I recognize that students have a problem inthis area. They often judge the angle of a tool bythe length of the bevel, when this really has nothing
to do with it. From Fig. 29 you can see how two differentthicknesses of blade result in a longer bevel on one of them,although the angle on each remains the same, again creating anoptical illusion.For some years now I have kept two skew chisels of differentthicknesses ground to the same angles, but which look entirelydifferent, to reinforce this point with students.You can check your tool angles by drawing them on a piece ofcard, using a protractor, (Fig. 30), or you can buy a ready made angle finder.
I am grateful to that teacher and to the many superb tradesmen with whom Iserved my apprenticeship.They have contributed in no small measure to these notes by what theytaught me. I hold many fond memories of those men. One in particular Ihave tried to emulate as an instructor.
Fig. 30
55˚ 45˚ 40˚ 25˚30˚70˚
Fig. 28Fig. 29
Woodturning Notes

Allan Batty Woodturning Notes
14
As a young apprentice I was passionately fond of white water canoeing andbuilt my first boat in the garage at home. During the construction JimBradshaw, one of the older men I was working under, kept asking me aboutthe canoe’s progress.Came the fateful day evening, and Jim spent a full five minutes examiningevery detail, without saying a word.Finally he stood up and said, “You know, lad, I would be hard pushed tomatch that job.”Batty’s little chest puffed up with pride until Jim cleverly pointed out howone or two things “Just needed a little adjustment here and there.”What a superb teacher he was, as were so many others in the old work-shops, teaching by example.Yes, memories to treasure.
16 – HAND REST
ANOTHER very common question is “What height should the rest be?”
Spindle Turning
The honest answer would be whatever suits you, but I’ll offer the followingas guide lines only.
Keep your rest on center height (Fig. 31) for all cuts except the planing cutwith the skew; for this you will find it helpful to raise the rest above centerheight (Fig. 32). This position is also better for rolling beads as discussedunder Chapter 11 – BEADING & PARTING TOOL, page 9.Many of the older turners tended to work with the rest above center height.This saved having to move the rest at any time, although it made certaincuts, such as coves, parting off etc., more awkward.
Fig. 31 Fig. 32

Allan Batty
15
Bowl Turning
Here, the rest height is dictatedby the tool which you are usingi.e. when using gouges the resthas to be low enough to allowthe gouge to reach the center ofthe work. (Fig. 33).
Fig. 33
Fig. 34
Fig. 35
When using scraping tools, theheight of the rest has to allow thetool to reach to the center of thework while maintaining a trailingaction with the blade. (Fig. 34).
Use these guides lines untilexperience dictates what is the
best position. 17 – HAND REST
Shapes
THESE are many and varied; some are notsuitably shaped or not rigid enough for our
requirements. The worst I have seen was on animported lathe. The rest had raised numbers onthe top edge, dividing it into inches, which com-pletely hindered the smooth passage of the tool.(The numbers were quickly filed off!)An excellent rest shape is shown in Fig. 35. Thiswas, and still is , the favorite rest shape for turn-ers. Being straight along its length allows thehand to smoothly move backwards and forwards.The curved top gives a natural fulcrum when thetool is raised or lowered in the execution of a cut.
Woodturning Notes

Allan Batty Woodturning Notes
16
18 – GRINDERS, GRINDING & SHARPENING
MY earliest memories of learning to grind tools is as a fifteen year oldapprentice, standing facing a 36" diameter sandstone, driven off an over-
head shaft and trying to master freehand grinding on a very uneven surface.I can still feel the water running down my arms; I finished up soaking wet asthe huge stone revolved deluging me in water. Not a pleasant task in winter,nor were oilskins provided!My early attempts at this most important aspect of my trade were disasters –the tools regularly ended up with more facets than a cut diamond.It took me a long time to master freehand grinding and I therefore know howfrustrating this can be for students.I tell you all this not discourage you, but to reassure you that I now knowthere is a much easier way to sharpen tools. (No, you don’t have to sendthem by parcel post to me…)Nowadays I use a 6" double-ended bench grinder with 60 grit white stoneson each end and adjustable rests. The allows the student to set the rest andany angle to suit the particular tool being ground, therefore offering full sup-
port during the grindingoperation. Hey, presto,the perfect bevel everytime! (See Fig. 36).Time spent practicing inthis department is timewell spent; you will getgood results every time,your tool bevels will nolonger look like cutglass, your turning willimprove – and so willyour confidence.You will be saved a lot offrustration and you willthen find that your abilityto freehand grind will fol-low quite naturally.
Fig. 36

Allan Batty
17
19 – DRY GRINDING or WET GRINDING?
Dry Grinders – Advantages1 Reasonably inexpensive.2 They have a fast cutting action and will remove metal quickly,
which is ideal for sharpening a new tool or adjusting a bevel as theneed arises.
Dry Grinders – Disadvantages1 Some grinders come with very coarse, carborundum wheels.2 Care is needed so as not to overheat the tool in the grinding process.
(These machines run at around 3000 rpm). There is a risk of burningthe edge and drawing the tool steel.There is more danger of this happening in your early days of learningto sharpen, especially in freehand grinding as you search each time toplace the bevel each time in its correct position on the revolvingwheel.
Remember that eye protection is essential when dry grinding.
Wet Grinders – Advantages1 As wet grinders are designed to run much slower (max. 150 rpm,
depending on wheel diameter) and to run in a trough of water, thiskeeps the tool cool during the grinding process which eliminates anyrisk of overheating.
2 The finished cutting edge which can be achieved is excellent and inwoodturning honing would not be required.
Wet Grinders – Disadvantages1 They are expensive.2 They are too slow if a lot of metal has to be removed, as in when
shaping a new tool.
Pay your money and take your choice. If you can afford both you willhave the ultimate in grinding equipment.
20 – TO HONE OR NOT TO HONE?
THERE has been much controversy over this question and I do not wishto add fuel to the fire except to explain what I do – and why.
I served my apprenticeship in the coach-building and cabinet-making tradesand this instilled in me the need to oilstone all my cutting tools with lovingcare, finally stropping the edges, with either the hand or a piece of softleather, until they were like razors.
Woodturning Notes

MOST of my working life has been spent using carbon steel tools butsince the introduction of high speed steel (HSS) I have come to favor
it for the following reasons.
1 Less time spent on sharpening – a sharpened edge will last about sixtimes longer.
2 The tool will therefore last about six times longer.3 The danger of accidentally drawing the temper of the steel during
regrinding is greatly reduced, if not eliminated.4 The student will do little or no harm in practicing sharpening on HSS
unlike carbon steel which can be spoiled by faulty grinding.I have seen students actually blue the edge of carbon steel tools byturning at too high a speed and pressing too hard with the bevel ontothe work.
Allan Batty Woodturning Notes
18
I have a different approach in wood turning. I work almost straight fromthe dry grindstone (fine wheels) except for an occasional rub with a slip-stone in the flute of gouges and a strop with a piece of leather which hangsfrom my belt. (It hangs there so I don’t have to burrow amongst the shav-ings looking for it.)My skew chisels are stropped frequently with this same piece of leatherafter grinding and , depending on the timber, given a light honing; this givesme a super edge which lasts.The reason for this simplified grinding and sharpening is this. With a pieceof 2" diameter timber turning at 2000 rpm the tool is cutting approximately1000' of timber per minute, more than my cabinet-making chisels would doin a month, which means that my wood turning tools need to be groundmuch more often in a day than my cabinet-making tools ever would. If careis taken in the grinding process we can produce a very acceptable cuttingedge without extensive honing.One of my most treasured possessions is a one hundred year old lathe, withan 11' long wooden bed, which I have lovingly restored to its former glory.I have retained the original bed bar which now hangs in place of honorabove the restored lathe. This bed bar bears silent testimony to the fact thatgenerations of wood turners had worked straight from the grinder, deburringtheir tools by jabbing them into the wooden bed, which is well and trulyscarred by the practice. (Try that on a modern steel lathe!)Pat, my wife, jokingly says that I think more of that old lathe that I do ofher. How could that be? “Big Bertha”, my lathe, cannot cook, keep mewarm at night nor feed me on chocolate biscuits…
21 – CARBON STEEL or HIGH SPEED STEEL?

Allan Batty
19
22 – CARBORUNDUM or WHITE WHEELS?
HIGH speed steel can be ground on the conventional dry grinder withcarborundum wheels. However, the normal carborundum wheels tend
to glaze quickly, resulting in lost efficiency which will create overheating inthe tool.It is for this reason that I favor a white wheel. (Soft bonded aluminum oxide).A soft bonded wheel breaks down more quickly and significantly reducesglazing by revealing fresh, sharp particles of abrasive.
For re-grinding high speed steel a 60 grit or 80 grit wheel is recommended.
23 – ABRASIVE WHEEL DRESSERS
ALL grinding wheels will glaze with constant use as particles of metalbecome embedded in their surface. This reduces the efficiency of the
wheel, resulting in overheating of the tools which are being ground.It is therefore important to dress the grinding wheel to expose fresh grit andtherby restore its grinding ability. There are three tools available for thispurpose – they are designed to true, sharpen and shape the grinding wheel.
1 Star wheel dressersThese are easy to use and are relatively inexpensive.
2 Diamond wheel dressing toolThese are easy to use, and can be expensive but the WD300 DiamondDresser sold by Craft Supplies U.S.A. is a wonderful tool for keepinggrinding wheels flat across the face. The 1" width will dress most wheels in one pass, and the dresser will last a lifetime, making otherwheel dressers obsolete.
3 Devil stone – 6" x 1" x 1"This is a composite stone, very easy to use by simply placing on the rest and passing across the face of the grinding wheel. This will notonly rapidly de-glaze but will also true your wheel.
Important points to remember
1 Never use the side of the grinding wheel – it is not designed to takesideways pressure.
2 When replacing a grinding wheel you must ensure that it is designedto run at the speed of your grinder. This information should be on thepaper washers that come bonded to the sides of the wheel. If in doubt,check with your supplier or manufacturer.
Woodturning Notes

Allan Batty Woodturning Notes
20
24 – SOLVING PROBLEMS
Spindle turning
Spiralling towards the headstock1 Check your bearings.2 Possible drive center damage due to constant hammering into the
work piece resulting in a poor fit within the morse taper.Spiralling towards the tailstock
1 This is a common problem and is probably due to a faulty revolvingcenter.
2 If you are using a dead center, the work piece may require tighteningbetween centers due to the dead center burning its way into the work.Keep the dead center lubricated with wax – this will help stop theproblem arising.
Each of the above can contribute to the following:
Tool Chatter1 Check all the points mentioned above.2 The bevel is not in contact with the work.3 The tool is too thin, resulting in the bland flexing in use.4 The work is too thin and needs support. (See 25 – THE STEADY).5 The rest may need to be tightened.6 The rest may be flexing at its extreme ends due to lack of rigidity.7 The tool overhang may be too far over the hand rest.8 The work piece may need to be tightened between centers.
Bowl turning
Spiralling and/or tool chatter1 The work is insecurely mounted onto the screw chuck, or faceplate,
resulting in unwanted movement of the work piece.2 The bevel is not in contact.3 The rest may need to be tightened.4 The rest may be flexing at its extreme ends due to lack of rigidity.5 Pressing too hard with the bevel.6 Trying to cut too quickly.7 Shavings jammed between the tool and the work causing the bevel
to leave the work.8 The tool may be flexing due to it being too thin for the distance of
the blade projection over the rest.

Allan Batty
21
9 The bowl wall thickness may be reduced to a point where it needssupport from your left hand on the side of the bowl while the cut isin progress.
10 Trying to take too heavy a cut.
11 An unusual problem Ihave encountered is one of thechuck not seating properly dueto a faulty headstock spindle. (See Fig. 37).This happened to me at a semi-nar and it was some time until Ifound the source of the problem.It was solved by turning downthe offending part of the spindleusing the diamond side-cuttingscraper. (See Fig. 25).
A problem common to bowl and spindle turning is thatthe tool is not sharp enough.
Fig. 37
GAP
Woodturning Notes

Allan Batty Woodturning Notes
22
25 – THE STEADY
THE success or failure of this type of steady lies in understanding its use.The purpose of the steady is to support thin, slender work as it revolves
and to resist the pressure placed upon it by the tool.
To achieve this it is important to have two points of contact within the “vee”as shown in Fig. 38. Failure to do this will result in thin work moving awayfrom the tool which in turn renders the steady useless.Another common fault with a steady is to make it one fixed position on thebench without making provision for moving the steady backwards or for-wards in the direction of the arrows as shown in Fig. 38.This means that the “vee” will work with only one given diameter becausethe Brace A moves in a downward arc, therefore any change in diameteragain renders the steady useless.
Fig. 38 BB
B
AA
A
WOODTURNING
LATHE BED BAR
BENCH TOP

Allan Batty
23
By making provision for movement, as shown, the steady can be adjustedbackwards and forwards so as to keep the two points of contact with therevolving wood at any time.This makes the steady useful for any diameter from 3/8" to 3".With a little ingenuity, a steady may be made for any lathe.
Useful Points
1 The work must be brought to the round first. With extremely thinwork it can be brought to the round at the point of steady contact bylightly turning down the work with a small gouge, gently supportingthe work with the left hand.
2 You can reduce friction and burning at the point of steady contact byrubbing beeswax/carnauba was onto the revolving surface.
3 By making the top Wedge B a reasonably tight fit it will retain itsposition during the turning process without riding up.
Woodturning Notes

Allan Batty Woodturning Notes
24
26 – BEESWAX
Block
SO well known as not to require description, beeswax produces bestresults if it is used after the finished work has received a coat of sealer
or friction polish.It can be applied by light pressure of the wax block to the workpiece as itrevolves in the lathe.This will leave on the surface an evenly distributed coat of wax which ispolished into the work by friction using a piece of soft cloth. The result willbe a warm, eggshell sheen on the work.
Paste
The paste form of beeswax is extremely useful when polishing both flat andturned work such as is found in cabinet making.Paste wax is best used after sealer or friction polish has been applied to thefinished work. An evenly distributed coat of paste is brought to a warmsheen by burnishing with a soft cloth or shoe brush.This practice has been used to great effect on fumed oak; a few applicationsproduces a finish superior to that of french polish.To make beeswax paste, mix beeswax with genuine turpentine until it reach-es the consistency of butter.You can do this two ways.
1 Finely shred the beeswax into the turpentine and leave overnight,which allows the two to dissolve without the use of heat. Themixture will be ready to use the following morning.
2 Using heat. Care must be taken.Do not use direct heat as both the wax and the turpentine are highlyflammable; direct heat can also de-nature the mixture.The safest way is to place the wax and turpentine together in acontainer which is then placed in hot water. This method will notde-nature the mixture.
Advantages of beeswaxIt is easy to apply; furniture and turned work can be quickly recoated andburnished at any time.Disadvantages of beeswaxIt has a low melting point and treated surfaces are prone to damage fromdamp and from sweaty fingers.

Allan Batty
25
27 – CARNAUBA WAX
THIS is a very hard, vegetable wax which is obtained from the leaves ofa palm tree (copernica cerifera) which grows throughout South America.
Carnauba wax has a high melting point (185˚ to 195˚F) and is the hardestand toughest of the natural waxes. It can be applied in the same way asbeeswax, after sealing the wood, and leaves a very high shine.
Advantages of carnauba waxSince it is extremely hard, it is much more resistant to marking than isbeeswax.Disadvantages of carnauba waxBecause of the hardness of this wax it can mark the surface of the workwhen used on softer woods.
28 – BEESWAX/CARNAUBA WAX MIX
WE can turn the disadvantages of the two aforementioned waxes to ouradvantage by mixing them together.
Two parts beeswax to one of carnauba gives us the ideal wax, not so soft asto readily finger mark, and not so hard as to score our finished work. Themix is applied in the manner already described.
29 – WAX STOPPER STICKS
WHEN mixing the waxes save a portion and add artist’s coloring powdersto make stopper sticks of different colors. Cast them into a suitable
container such as a baking tray.The sticks are ideal for melting into cracks or imperfections in your work soas to render them invisible. Melt them using a soldering iron, a hot wire or alit match.For example, if a small knot is missing from the work you could melt two orthree different shades of brown stopper sticks into the hole and, as eachblends into the other, you will create the impression of a knot.By experimenting you can disguise almost any defect. The beeswax/carnaubawax on its own is just the right shade for pitch pine, beech and similar coloredwoods.
Woodturning Notes

Allan Batty Woodturning Notes
26
Set the lathe speed to between 150 and 500 rpm – (choose the speed withwhich you are comfortable. Allan was working at 300 rpm)
FOR many turning enthusiast, thread chasing, that is the cutting of screwthreads in wood, can be a nightmare. You have this piece of expensive,
beautifully marked hardwood that you intend to turn into your masterpiece.The design demands a threaded lid and you know that just a tiny error ofjudgement on your part could easily ruin it.
This is the method:
Prepare a blank of hardwood which has already been parted to form the twohalves which are to be threaded.
Work on the female end first. The reason will soon become plain.
Hollow out the inside of the blank to the approximate depth required for thethread, being careful to keep the sides parallel. Then cut a rebate at the bot-tom of the hollowed out area, about 1/8" deeper than the area to be threaded(See diagram 1). Round the sharp square end slightly to make the start ofthe thread cutting easier.
Diagram 1
Short Rest
Arm
Rest
Approach to first cut of female thread.

Allan Batty
27
AS indicated in the diagram, use a short rest on the lathe be set at aheight so as to enable the chasing tool to be working at the center axis
of the work. Using the short rest allows the chasing tool to be broughtround in front of your body to start the cut. Use an arm rest across the shortrest to support the tool and give you control over your action. As the threadis cut, the hook on the end of the arm rest is used to pull the chasing toolgently towards you to maintain contact with thread. It’s a good idea to havea dummy run and just go through the motions first, rather like a golfer prac-tices his swing. The feel of the whole setup is important.
For the first part of the thread cutting, run the lathe and keeping the chas-ing tool at an angle, allow it to touch the work at the rounded entry point
and up the curve a little way then lift the tool off the work. This will createthe first shallow threads. By applying the tool again, picking up the samethread and at the same time gradually squaring it up with the work, a deepercut will be taken and the tool will start to be drawn along into the opening.It is essential that you are in control of the tool and that you lift it off theworking face as soon as it gets to the end - hence the rebate at the bottom ofthe opening. Without the rebate, the tool would be drawn hard up againstthe bottom and the threads would be stripped. There is no need to beaggressive with the tool! Gently does it! After just a few passes, the threadwill be cut. Make sure that the thread shape is good and true and that it fitsthe profile of the cutting tool.
Rounding the outer edge at the beginning means that the thread has an easi-er entry for the male thread to screw into when cut.
You will note that no measuring or sizing has been required. You make thefemale opening to whatever suits the work piece and the number of threadscut depends on that too.
If you make a mistake with the female thread, all need not be lost!Providing you leave enough wood, you can start the process again.
Now prepare the male blank.
In the blank which is to form the male thread, turn the end down forming aspigot about 1/8" deep which will just fit neatly into the threaded opening.This is the highest point of the female thread and establishes the lowestpoint of the male thread diameter. Then turn the rest of the material downalong the appropriate length to a diameter which approximates the height ofthe thread to be cut (see diagram 2). It is essential to cut a rebate at the endof the area to be threaded as with the female thread.
Woodturning Notes

Allan Batty Woodturning Notes
28
START the thread by applying the male chaser at an angle to the workand on the center axis. Gradually, bring the tool round to square on to
the workpiece. Again, only a few passes will be required to form thethread. As soon as there appears a thread mark on the spigot, you know thatthe thread is cut to the right depth. You can then try it against the femalethread. If you find that the thread is too tight, just remove a fraction fromthe top of the threads and re-cut it. It is often better to just turn the lathe byhand at this point so that the fit can be exact. When you are satisfied thateverything is right, you can remove the spigot.
You can see that by cutting the female thread first, there is no need forcalipers or careful calculations when it comes to cutting the male thread andyet there is no room for errors to be corrected. It is so much easier to workon the male part to get that to fit the female than the other way around.
The gentle approach makes the whole operation look easy and I’m sure thatwith a little practice, thread chasing is another skill that any enthusiast canadd to their repertoire.
Approach to first cut of male thread.
Diagram 2
Approximate height ofthread to be cut
1/8" spigot cut to fit intofemale thread opening

Allan Batty
29
Some Notes
SizesThread Chasers are to be found in a number of thread types, but wood turn-ers usually use BSW in sizes ranging from 3 threads per inch up to 40tpi.The most common sizes are 16, 18, 20 and these are the best for the learner.
HandlesThe chasing tools are fitted with short handles because they are used infront of the body. Typically, the blade may be 3 1/2" and the handle 5"making the tool 8 1/2" overall.
WoodsIt is best to use hardwoods for screw thread work but not all of them aresuitable. Wood should be close-grained such as boxwood, ligne vitea,cocobolo, blackwood, etc.. Some hardwoods have a tendency to crumble onthe tooth edge, so experiment first. You may be surprised at what worksand what doesn’t! Soft woods are difficult for several reasons and are bestavoided altogether.
SharpeningThread Chasers are sharpened by hollow grinding on the top faces. Nevertouch the teeth. Hollow grinding allows honing. It’s a good idea to roundslightly, the hard square bottom edge of the chaser to enable it to slide alongthe rest more easily. You may also want to grind the internal tool down onit’s back edge to make it thinner. (Dotted line shown in Diagram 3)
Hollow grind on thesesurfaces only
Do Not Touch the teeth points
Diagram 3
Woodturning Notes

TheWoodturnersCatalog
-projects-
1-800-551-8876www.woodturnerscatalog.com
-turning blanks-
-pen projects- -and much more...
Woodturners around the world have depended on Craft Supplies USA since1984 for the finest woodturning tools, equipment and accessories available.Our goal is to offer the best quality products and service at reasonable prices.Every product is backed by our 30 day satisfaction guarantee. Visit us onlinefor the very latest in new woodturning products, special offers and promotionsat www.woodturnerscatalog.com. Call 1-800-551-8876 for a free catalog.
Notes:
Woodturning is a fun and exciting hobby for people of all ages and skill levels. The number of things you can create on your lathe with a minimal amount of time and money is limited only to your imagination. When woodturning, there are a number of safety considerations that must be kept in mind so that you can have a great time turning while being safe. Woodturning Safety 101 is intended to create safety awareness so as to prevent personal injury. We hope you will find this information helpful and that you will review it from time to time. Feel free to share this information with other woodturners you know.
Personal Safety…1. Educate yourself on proper turning techniques, chuck operation, tool use and lathe
operation. 2. Always wear a full-face shield at all times. Safety glasses are not sufficient protection against
flying debris.3. Always use a dust mask or air filtration system.4. Wear adequate hearing protection.5. Don’t wear loose clothing, gloves or jewelry as they may become tangled with the lathe. 6. Never start the lathe before checking to make sure the spindle speed is correct for the size of
work being turned. Also, make sure the work clears the tool rest by rotating the hand wheel before starting the lathe.
7. Be sure the work piece is securely mounted and is free of imperfections or poor glue joints.8. Make sure all belt guards and covers are in place before starting the lathe.9. Make sure the tool is on the tool rest before making a cut.10. Always know your capabilities and work within your limits.11. Utilize the tailstock whenever possible.12. Always remove the tool rest support before sanding and finishing. This will help prevent
injuries to your hands and fingers.13. Do Not Overreach! Although many of today’s tools have long blades, this does not mean
they are designed to reach long distances over the tool rest.14. Keep your tools sharp and properly ground. Dull tools are dangerous, as they require
excessive pressure to make them cut.15. Do not use tools for purposes they are not intended for.16. Properly dispose of rags and do not leave finish containers open.17. Never leave the lathe running unattended.18. Stay alert, take frequent breaks and never operate the lathe while under the influence of
drugs or alcohol.19. Use common sense at all times. If unsure at any time, seek the advice of a woodturning
expert or call us at 1-800-551-8876. We are here to help you at all times.
Woodturning Safety 101
1-800-551-8876 • woodturnerscatalog.com

Allan Batty
WoodturningNotes
Includes:
lathe speedstool selection and usegrinding and sharpeningwax finishesthread chasingand much more . . .
$4.953rd Edition
Our state of the art woodturning facility featurestoday’s finest wood lathes, tools and equipmentincluding video monitors to show you every detailof instruction as it happens. Individual work sta-tions feature a full set of tools and related suppliesnecessary for the course. Each work station is welllit and features dust extraction making it a safe,comfortable environment condusive to learning.
Learn the craft of woodturning at Craft Supplies USA, NorthAmerica’s premier woodturning school. Whether you want tolearn woodturning or you’re a long time turner looking to refineyour skills, we have a class to suit you your needs.
Three and five day courses taught by some of the worlds finestprofessionals teach you the proper instruction and techniquesnecessary to be successful at woodturning. Make friends withothers sharing a common interest in a relaxing classroom settingthat’s informative and enjoyable.
All participants receive a 10% discount* on
tools, wood and accessories purchased during
the week of the class. *Lathes not included
STATE OF THE ART WOODTURNING FACILITY
LEARN FROM PROFESSIONALS!
SAVE 10%
Meet fellow woodturners and makenew friends while participating inwoodturning courses. Our goal is toteach you woodturning in an atmos-phere that is relaxing and enjoyable.Work at your own pace while receivingone on one instruction from the finestinstructors in the world. We guaran-tee an experience you’ll never forgetand chances are you’ll be back again!
HAVE FUN WHILE YOU LEARN TO TURN...
Allan Batty Intermediate Workshop
“I’ve never come across a finer woodturning facility than here at Craft Supplies USA”–Allan Batty
WOODTURNING WORKSHOPS
For more info:1-800-551-8876
www.woodturnerscatalog.com
Craft Supplies USA
1-800-551-8876 • woodturnerscatalog.com
Bolt Box - by Allan Batty