wc 6 1 bbe 9 1 manual final · 2010. 8. 2. · once you have successfully run the setup wizard, you...
TRANSCRIPT

© 2010 Wimba, Inc. 1 Wimba Classroom Wimba Training Materials Kit Version 6
Blackboard Enterprise Edition
Wimba Classroom: Present • Design • Lead
Blackboard Enterprise Edition – Version 9.1
NOT FOR
DISTRIB
UTION

© 2010 Wimba, Inc. 2 Wimba Classroom Wimba Training Materials Kit Version 6
Copyright © 2010 Wimba, Inc. 04282010 All Rights Reserved The content of this manual may not be reproduced or distributed without the express written consent of Wimba, Inc. Users acknowledge that the manual, and all copyright and other intellectual and proprietary rights therein, are and at all times, shall remain the property of Wimba and its licensors, and their respective assignees. Users agree to respect and not to alter, remove, or conceal any copyright, trademark, trade name, or other proprietary marking that appears in this manual.
NOT FOR
DISTRIB
UTION

© 2010 Wimba, Inc. 3 Wimba Classroom Wimba Training Materials Kit Version 6
Contents
Wimba Classroom: Present • Design • Lead ......................................................... 6
How to Use This Manual.................................................................................. 7
My Wimba Classroom Login Information ......................................................... 8
Part One: Wimba Classroom Overview ................................................................ 10
Wimba Classroom Overview.......................................................................... 11
How Do I Get Started?................................................................................... 12
Wimba Classroom – Participant View............................................................ 13
Resize the Interface ....................................................................................... 14
Participant Practice ........................................................................................ 15
Wimba Classroom – Presenter View ............................................................. 18
Wimba Classroom – Presenter Interface ....................................................... 19
Test Your Knowledge: Wimba Classroom Overview .................................... 20
My Notes Part One: Wimba Classroom Overview........................................ 21
Part Two: Presenting a Wimba Session ............................................................... 23
Presenting a Wimba Classroom Session....................................................... 24
Presenting Content On-The-Fly ..................................................................... 25
Quicklet: Importing PowerPoint..................................................................... 26
Quicklet: Show Web Page ............................................................................ 27
Quicklet: eBoard .......................................................................................... 28
Quicklet: Application Sharing ........................................................................ 29
Best Practices for Application Sharing........................................................... 30
Technical Notes for Application Sharing ........................................................ 31
Managing Participant Communication ........................................................... 32
Managing Participant Interaction ................................................................... 33
Quicklet: Breakout Rooms ............................................................................ 34
Quicklet: Pushing Content to Breakout Rooms............................................. 35
NOT FOR
DISTRIB
UTION

© 2010 Wimba, Inc. 4 Wimba Classroom Wimba Training Materials Kit Version 6
Part Two: Presenting a Wimba Session (continued)
Quicklet: Presenter On-The-Fly .................................................................... 36
Presenter Practice ......................................................................................... 37
Test Your Knowledge: Presenter Experience............................................... 38
My Notes Part Two: Presenting a Wimba Classroom Session .................... 39
Part Three: Designing a Wimba Classroom Session ......................................... 41
Designing a Wimba Classroom Session........................................................ 42
Adding a Wimba Classroom to a Blackboard Course.................................... 43
Room & Media Settings ................................................................................. 44
Archive Settings ............................................................................................. 48
Wimba Classroom – Launcher Page ............................................................. 49
Content Types................................................................................................ 50
Quicklet: Create a Folder .............................................................................. 51
Quicklet: Add Content ................................................................................... 52
Quicklet: Create a Poll .................................................................................. 53
Quicklet: Reorder Content ............................................................................ 54
Quicklet: Adding a Branding Image .............................................................. 55
Quicklet: Default Content .............................................................................. 56
Wimba Classroom – PowerPoint Design Tips ............................................... 57
Quicklet: Previewing Content........................................................................ 58
Designer Practice........................................................................................... 59
Designer Practice continued.......................................................................... 60
Test Your Knowledge: Designer Experience ................................................ 61
My Notes Part Three: Designing a Wimba Classroom Session................... 62
Part Four: Leading a Wimba Classroom Session............................................... 64
Leading a Wimba Classroom Session ........................................................... 65
Presenting Content While Managing Interaction............................................ 66
NOT FOR
DISTRIB
UTION

© 2010 Wimba, Inc. 5 Wimba Classroom Wimba Training Materials Kit Version 6
Part Four: Leading a Wimba Classroom Session (continued)
Wimba Classroom Session Presentation Plan .............................................. 67
Getting Ready to Deliver a Live Session ....................................................... 68
Wimba Classroom – Session Presentation Tips............................................ 69
Quicklet: Archiving a Session ....................................................................... 70
Preparing Your Archive.................................................................................. 71
Leader Practice.............................................................................................. 72
Test Your Knowledge: Leader Experience ................................................... 74
My Notes Part Four: Leading a Wimba Classroom Session........................ 75
Part Five: The Wimba Classroom Experience .................................................... 77
Wimba Classroom Terminology..................................................................... 78
Supported File Types..................................................................................... 79
Test Your Knowledge: Wimba Classroom Overview - Answer Key.............. 80
Test Your Knowledge: Presenter Experience – Answer Key........................ 81
Test Your Knowledge: Designer Experience – Answer Key......................... 82
Test Your Knowledge: Leader Experience – Answer Key ............................ 83
Sample PowerPoint Slides............................................................................. 84
Troubleshooting ............................................................................................. 85
Network Connections..................................................................................... 87
NOT FOR
DISTRIB
UTION

© 2010 Wimba, Inc. 6 Wimba Classroom Wimba Training Materials Kit Version 6
Wimba Classroom: Present • Design • Lead
The table below provides an "at-a-glance" overview of the topics, objectives, and activities included in this manual, along with the estimated time to complete each part.
Time Objectives Agenda 30 minutes
• Get to know your learning consultant and other session participants
• Discuss individual session goals and expectations
• Assess the workshop agenda and examine workshop handouts
• Introductions • Needs Assessment • Agenda Review • Discuss Learning
Objectives • Examine Handouts
Part One – Wimba Classroom Overview 2 Hours
• The Participant Experience • Wimba Classroom Orientation • Distinguish the difference between
Participant and Presenter views • Identify the different areas of the
interface
• Wimba Classroom Overview
• Participant Practice • Presenter View • Test Your Knowledge • Lessons Learned
Part Two – Presenting a Wimba Classroom Session 2 Hours
• The Presenter Experience • Deliver content on-the-fly • Manage participant communication • Manage participant interaction
• Overview of Presenter Experience
• Demonstration • Presenter Practice • Test Your Knowledge • Lessons Learned
Part Three – Designing a Wimba Classroom Session 2 Hours
• The Designer Experience • Review presenting activities • Identify differences between Presenter
and Designer functions • Add and manage content
• Overview • Demonstration • Designer Practice • Test Your Knowledge • Lessons Learned
Part Four – Leading a Wimba Classroom Session 2 Hours
• The Leader Experience • Review presenting and designing
activities • Practice all functions
• Review • Leader Practice • Test Your Knowledge • Lessons Learned
Part Five – The Wimba Classroom Experience 30 Minutes
• Review Participant, Presenter, Designer, and Leader experiences
• Create a development plan
• Review • Plan Evaluation
NOT FOR
DISTRIB
UTION

© 2010 Wimba, Inc. 7 Wimba Classroom Wimba Training Materials Kit Version 6
How to Use This Manual
This manual will take you through the Wimba Classroom experience as a Participant, Presenter, Designer, and Leader. It is divided into five parts, each containing the following sections: At-a-Glance Chart – a checklist of the topics, objectives, and activities for each part Details – narrative and visual explanations of the functions performed by Participants, Presenters, Designers, and Leaders Quicklets – quick, one-page how-to lists for the Wimba Classroom functions pertaining to the Presenter, Designer, and Leader experiences In each Quicklet, you will find:
How-to Steps: Easy-to-follow instructions
Wimba Use Case: Suggestions for how to use the function
Key to Success: Tips, reminders, and Best Practices
Try it!– hands-on activities and a checklist of the most common functions performed by Participants, Presenters, Designers, and Leaders
Test Your Knowledge – an assessment of your Wimba Classroom knowledge and skills development (answer keys for each assessment can be found in The Wimba Experience)
Notes – a place to jot down your own thoughts, ideas, and observations The Wimba Experience includes:
• Wimba Classroom Terminology • Answer Keys • Basic Administration
NOT FOR
DISTRIB
UTION

© 2010 Wimba, Inc. 9 Wimba Classroom Wimba Training Materials Kit Version 6
Wimba Classroom: • Overview •
NOT FOR
DISTRIB
UTION

© 2010 Wimba, Inc. 10 Wimba Classroom Wimba Training Materials Kit Version 6
Part One: Wimba Classroom Overview
Please log in to the Wimba Classroom Training Room as a participant. As a participant in a Wimba Classroom session, you can interact with the presenter and other participants in a synchronous, media-rich environment. Through the Participant Experience, you will gain an understanding of what your participants will need to know to take part in the Wimba Classroom sessions that you conduct.
Topic Objectives Activities Wimba Classroom Overview Estimated Time to Complete: 60 minutes
• Orientation to Wimba
Classroom
• Distinguish the difference between Presenter and Participant views
• Identify the different areas of the interface
□ Review Requirements
□ Explain the Views
Participant Practice
• Practice the functions
common to participants □ Run the Setup Wizard
□ Use Yes/No buttons
□ Use Text Chat
□ Use Hand Raise
□ Change User Status
□ Use Audio
□ Use Video
□ Discover Phone Simulcast
□ Adjust Options
□ Use eBoard Tools
Lessons Learned
• Review components of
the Wimba Classroom interface
• Review common participant functions
• Present lessons learned
□ Test Your Knowledge: Wimba Classroom Overview
□ Discuss lessons learned
NOT FOR
DISTRIB
UTION

© 2010 Wimba, Inc. 11 Wimba Classroom Wimba Training Materials Kit Version 6
Wimba Classroom Overview
In Part One, we will explore Wimba Classroom, examine its technical requirements, and take a closer look at both the Participant and the Presenter perspectives. First, let’s make sure you have everything you need. Readiness Checklist:
Wimba Classroom Training Manual Headset with integrated microphone Computer connected to the Internet
Now that you have everything you need to complete this training, let’s get started. What is Wimba Classroom? Wimba Classroom is a fully-featured, synchronous virtual classroom solution with audio, video, application sharing, and content display capabilities. Its pedagogically-based design and ease-of-use ensure that educators and students interact as if they are meeting face-to-face. Audio, video, application sharing, and content display are just the beginning of Wimba Classroom’s capabilities. Advanced features such as polling, eBoard, Presenter On-The-Fly, resizable chat areas and participant lists, usage analytics tools, and MP3 downloads further enable dynamic interaction between students and educators. What are the Technical Requirements for Wimba Classroom? Participant Requirements:
• Windows XP+, Mac OSX 10.5+*, or Linux** • 518 MB RAM (1GB or higher recommended) • IE 7.0 – 8/0, Firefox 3.0 – 3.5, Safari 3.0 – 4.0*** (with Java and JavaScript
enabled) • Internet access at 56k or above
Presenter Requirements:
• Windows XP+, Mac OSX 10.5+*, or Linux* • 1 GB RAM (or higher) • IE 7.0 – 8/0, Firefox 3.0 – 3.5, Safari 3.0 – 4.0*** (with Java and JavaScript
enabled) • Broadband Internet access
* Presently, only Safari is supported on Intel-based Macs. ** Linux systems have limited features and functionality. *** Safari 4.0 is only supported on Mac OS 10.5+. For specific technical requirements for Wimba Classroom, visit our Knowledge Database which can be found at http://www.wimba.com/services/support.
NOT FOR
DISTRIB
UTION

© 2010 Wimba, Inc. 12 Wimba Classroom Wimba Training Materials Kit Version 6
How Do I Get Started?
There are two ways to log in to Wimba Classroom: 1) via integration with a Course Management System, or 2) via a direct connection to the Wimba Classroom server. This training will address the first method. After connecting to the Wimba Classroom server, you will need to run the Setup Wizard. The Wimba Classroom Setup Wizard The Setup Wizard guides you through a series of tests to ensure that your computer settings are optimized for Wimba Classroom. Below are some of the most frequently asked questions about the Setup Wizard: Q: When should I run the Setup Wizard? A: You should run the Setup Wizard before you log in to Wimba Classroom for the first time. Connection speeds vary, so give yourself plenty of time to complete the Setup Wizard prior to the start of your session. You may also wish to run it the day before your session. Q: Do I have to run the Setup Wizard every time I go into my Wimba Classroom? A: No. You should run the Setup Wizard the first time you use Wimba Classroom on a computer, but you do not need to run it every time. Q: Should I run the Setup Wizard if I make changes to my computer? A: Yes. It is recommended that you run the Setup Wizard any time you make a significant change to your computer’s set up, such as adding new programs or new peripherals. Q: Should I run the Setup Wizard again if I am experiencing technical difficulties with Wimba Classroom? A: Yes. Your first step in resolving technical difficulties with Wimba Classroom should be to re-run the Setup Wizard. If this does not resolve the problem, contact Wimba’s 24x7 Technical Support. Please refer to the My Wimba Classroom Login Information page at the beginning of this manual for technical support contact information.
NOT FOR
DISTRIB
UTION

© 2010 Wimba, Inc. 13 Wimba Classroom Wimba Training Materials Kit Version 6
Wimba Classroom – Participant View
Once you have successfully run the Setup Wizard, you are ready to launch Wimba Classroom. For the first part of this training, you will log in to the training course as a participant, so let’s take a closer look at what participants can see and do.
Participant View – Content Frame Participant View –eBoard tools enabled
What Participants Can See & Do Content Frame • View content
• Navigate some types of content, i.e., web pages and PDF documents
eBoard • View annotations of graphics files eBoard Tools • Annotate graphics files using the Arrow, Freehand Draw,
Highlighter, Line, Circle, Rectangle, and Text Tools • Undo the last item, erase annotations, and clear the screen • Import .gif, .jpg, or .png files • Save an eBoard image to the BOR folder (while in a Breakout
Room) Links • Access the Lobby, Wimba Help, and Exit Wimba Classroom Branding Frame • View a customizable branding image Participant Area • View a list of presenters and participants
• View user status • Use the indicator buttons (Yes/No, Hand Raise, and Status
Indicators) • Check Room Pulse
Text Chat Area • Send public text messages • Send private text messages (if private messaging is enabled) • Send private messages to presenters (even if private messaging
has been disabled) Media Bar • View audio input/output levels
• Use the Talk button to speak • Start/stop video • View Telephone Simulcast access information • Adjust media options
NOT FOR
DISTRIB
UTION

© 2010 Wimba, Inc. 14 Wimba Classroom Wimba Training Materials Kit Version 6
Resize the Interface
All users have the capability to resize the Wimba Classroom interface to best suit their viewing needs. The interface can be resized both vertically and horizontally.
To Vertically Resize the Interface
1. Hover your cursor over the bar separating the Media Bar from the bottom areas of the interface. The cursor changes to a double-sided arrow.
2. Click and hold your mouse and: • Drag your mouse up to increase
the size of the Text Chat Area, Participant Area, and Branding Frame (and decrease the size of the Content Frame).
• Drag your mouse down to decrease the size of the Text Chat Area, Participant Area, and Branding Frame (and increase the size of the Content Frame).
3. Release your mouse when satisfied with the dimension changes.
To Horizontally Resize the Text Chat Area and Participant Area
1. Hover your cursor over the bar separating the Text Chat Area from the Participant Area. The cursor changes to a double-sided arrow.
2. Click and hold your mouse and:
• Drag your mouse right to increase the size of the Text Chat Area (and decrease the size of the Participant Area).
• Drag your mouse left to decrease the size of the Text Chat Area (and increase the size of the Participant Area).
3. Release your mouse when satisfied
with the dimension changes.
NOT FOR
DISTRIB
UTION

© 2010 Wimba, Inc. 15 Wimba Classroom Wimba Training Materials Kit Version 6
Participant Practice
Use the Participant Practice checklist below as a guide to using the functions available to participants. Use the notes section to record your observations and any tips you might want to share with participants in your Wimba Classroom.
Setup Wizard
Setup Wizard □ Run the Setup Wizard.
□ Did you experience any difficulties with your computer settings?
□ What advice might you give a new Wimba Classroom user with regard to using the Setup Wizard?
Communication
Yes/No Indicators
□ First click Yes (checkmark) and then No (X), and notice that the Yes/No Indicator automatically changes.
□ What happens when you click No again?
Hand Raise □ Click the Hand Raise button. What happens?
□ Click it again. What happens?
Status Indicators
□ Click the Set Status box and choose one of the items from the list.
□ What does the item mean?
□ What happens when you select a different item?
□ Did you notice the text indication of your status in the Text Chat Area?
NOT FOR
DISTRIB
UTION

© 2010 Wimba, Inc. 16 Wimba Classroom Wimba Training Materials Kit Version 6
Text Chat Area
Text Chat Area □ Select a name from the To: drop-down list, or click a name from within the Participant Area. Send the selected user a private text message.
□ How do private messages differ in appearance from public text messages?
Media Bar
Audio □ Click the Talk button in the Media Bar, or hold the Ctrl key on your keyboard to talk.
□ Adjust your microphone so that others hear you clearly.
Video □ Click the Camera button to open the Video Window.
□ Click the center button. What happens?
□ Click the closed-eye button. What happens?
□ Click the four-arrow button. What happens?
Phone Simulcast □ Click the Phone icon.
□ What information is displayed?
Options Menu □ Click the Options Menu. What options are available to participants?
NOT FOR
DISTRIB
UTION

© 2010 Wimba, Inc. 17 Wimba Classroom Wimba Training Materials Kit Version 6
eBoard Tools
Use eBoard Tools
□ Click the Circle Tool twice. What happens?
□ Click the Freehand Draw Tool twice. What happens?
□ Click the Text Tool and then select a color from the Color Palette Tool.
□ Type something in the eBoard.
□ Did you notice that your message does not appear until you press the Enter key on your keyboard?
□ What does the Import Tool do?
□ How do you erase only the last item you placed on the eBoard?
□ How do you erase all of your annotations, but not the background image?
□ How do you completely clear the eBoard?
NOT FOR
DISTRIB
UTION

© 2010 Wimba, Inc. 18 Wimba Classroom Wimba Training Materials Kit Version 6
Wimba Classroom – Presenter View
The graphic on the next page shows you how the Wimba Classroom looks to a presenter. You will learn how to use the Presenter functions in the next part of this training. For now, note the differences between the Participant and Presenter views.
What Presenters Can See & Do Content Frame • Display content in read-only mode eBoard • Display and annotate graphics files eBoard Tools • Annotate graphics files using the Arrow, Freehand Draw,
Highlighter, Line, Circle, Rectangle, and Text Tools • Undo the last item, erase annotations, and clear the screen • Import .jpg, gif, or .png images • Save eBoard images to the Snapshots folder • Grab an image from the screen to display • Enable or disable eBoard Tools for participants
Presenter’s Console
• Push content to a target area • Access slides in the room • Preview content and push content to Breakout Rooms • Disperse participants to Breakout Rooms and recall them to the
Main Room • Detach the Presenter’s Console for increased view of the Content
Frame/eBoard • Upload PowerPoint on-the-fly • Show a web page on-the-fly • Share an application from the presenter’s computer or enable
desktop sharing for participants • Start/stop session archiving
Links • Access the Lobby, Wimba Help, and Exit Wimba Classroom Branding Frame • Display content in the 135 x 145 pixel frame Participant Area • View a list of presenters and participants
• View NetStats and user status • Control individual audio, video, chat, and Presenter On-The-Fly
privileges • Access indicator buttons (Yes/No, Hand Raise, User Status) • Check the Room Pulse • Manage global communication privileges (audio, video, chat) and
notifications (Yes/No, Hand Raise, and Status Indicators) • Reset or Lock the room • Start a Chat Log
Text Chat Area • Send public and private text chat messages • Receive private text chat messages (even if private messaging has
been disabled) Media Bar • View audio input/output levels
• Use the Talk button to speak; start/stop video; view Telephone Simulcast access information
• Adjust media options and enable Lock Talk
NOT FOR
DISTRIB
UTION

© 2010 Wimba, Inc. 19 Wimba Classroom Wimba Training Materials Kit Version 6
Wimba Classroom – Presenter Interface
Presenter’s Console:
Branding Frame: Participant Area: Text Chat Area:
Links:
eBoard Tools:
Media Bar:
eBoard / Content Frame:
NOT FOR
DISTRIB
UTION
© 2010 Wimba, Inc. 20 Wimba Classroom Wimba Training Materials Kit Version 6
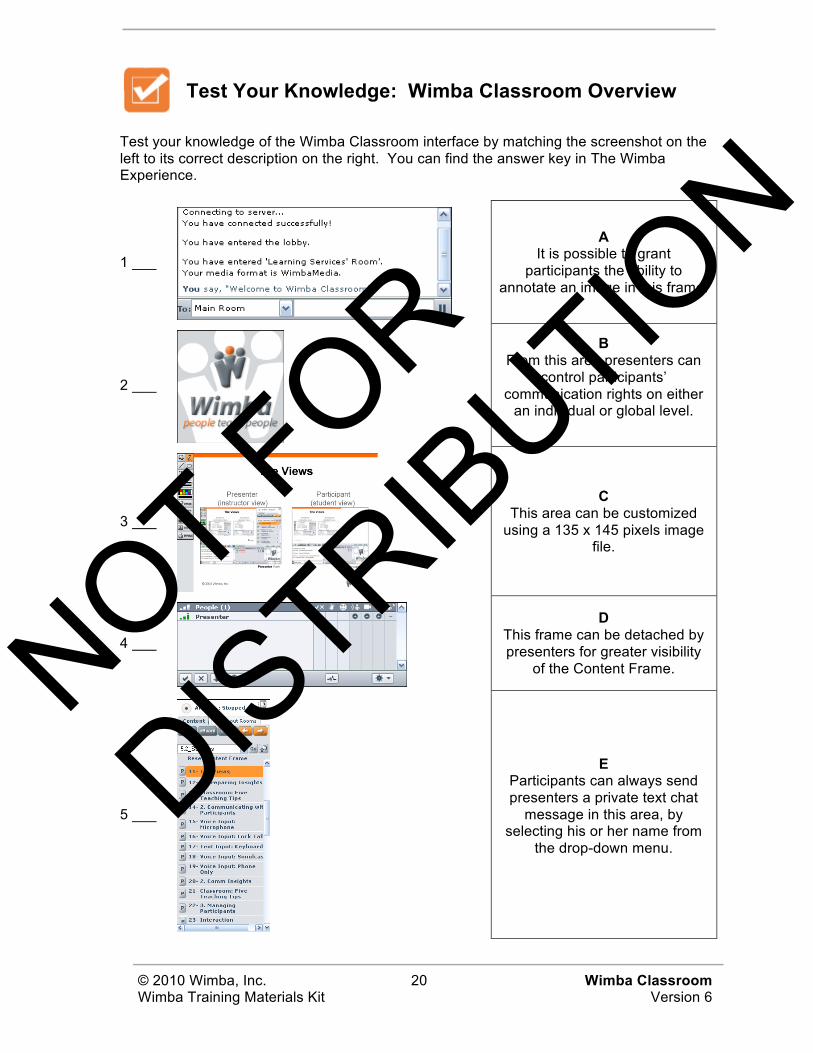
Test Your Knowledge: Wimba Classroom Overview
Test your knowledge of the Wimba Classroom interface by matching the screenshot on the left to its correct description on the right. You can find the answer key in The Wimba Experience.
1 ___
A It is possible to grant
participants the ability to annotate an image in this frame.
2 ___
B From this area presenters can
control participants’ communication rights on either
an individual or global level.
3 ___
C This area can be customized
using a 135 x 145 pixels image file.
4 ___
D This frame can be detached by presenters for greater visibility
of the Content Frame.
5 ___
E
Participants can always send presenters a private text chat
message in this area, by selecting his or her name from
the drop-down menu.
NOT FOR
DISTRIB
UTION

© 2010 Wimba, Inc. 21 Wimba Classroom Wimba Training Materials Kit Version 6
My Notes Part One: Wimba Classroom Overview
NOT FOR
DISTRIB
UTION