web application hosting for linux - amazon web...
TRANSCRIPT

Getting Started with AWSWeb Application Hosting for Linux

Amazon Web Services
Getting Started with AWS Web Application Hosting forLinux

Getting Started with AWS: Web Application Hosting for LinuxAmazon Web ServicesCopyright © 2014 Amazon Web Services, Inc. and/or its affiliates. All rights reserved.
The following are trademarks of Amazon Web Services, Inc.: Amazon, Amazon Web Services Design, AWS, Amazon CloudFront,Cloudfront, Amazon DevPay, DynamoDB, ElastiCache, Amazon EC2, Amazon Elastic Compute Cloud, Amazon Glacier, Kindle, KindleFire, AWS Marketplace Design, Mechanical Turk, Amazon Redshift, Amazon Route 53, Amazon S3, Amazon VPC. In addition,Amazon.com graphics, logos, page headers, button icons, scripts, and service names are trademarks, or trade dress of Amazon inthe U.S. and/or other countries. Amazon's trademarks and trade dress may not be used in connection with any product or service thatis not Amazon's, in any manner that is likely to cause confusion among customers, or in any manner that disparages or discreditsAmazon.
All other trademarks not owned by Amazon are the property of their respective owners, who may or may not be affiliated with, connectedto, or sponsored by Amazon.
Getting Started with AWS Web Application Hosting forLinux

Overview ................................................................................................................................................. 1Getting Started ....................................................................................................................................... 6Step 1: Sign Up for the Service .............................................................................................................. 6Step 2: Install the Command Line Tools .................................................................................................. 7Step 3: Create an Elastic Load Balancer ................................................................................................ 8Step 4: Create and Configure Your Amazon EC2 Security Group ........................................................ 13Step 5: Create a Key Pair ..................................................................................................................... 14Step 6: Launch Amazon EC2 Instances Using Auto Scaling ................................................................ 15Step 7: Create a CloudWatch Alarm ..................................................................................................... 17Step 8: Add Amazon RDS .................................................................................................................... 21
Create a DB Security Group ....................................................................................................... 22Authorize Access ......................................................................................................................... 22Launch an Instance ..................................................................................................................... 23
Step 9: Deploy Your Application ............................................................................................................ 27Connecting to your Amazon EC2 Instance from Your Web Browser Using the MindTerm SSHClient ........................................................................................................................................... 28Connect to Your Amazon EC2 Instance from Windows Using PuTTY ........................................ 29Connecting to Your Amazon EC2 Instance from a Linux/UNIX Machine Using a StandaloneSSH Client ................................................................................................................................... 33Configure the Amazon EC2 Instance .......................................................................................... 34
Step 10: Create a Custom AMI ............................................................................................................. 41Step 11: Launch New Environments Using AWS CloudFormation ....................................................... 42
Create an AWS CloudFormation Template .................................................................................. 42Modify a CloudFormation Template ............................................................................................. 46Create an AWS CloudFormation Stack ....................................................................................... 47
Step 12: Clean Up ................................................................................................................................ 51Terminate Your Amazon EC2 Instances in Your Auto Scaling Group ........................................... 52Terminate Your DB Instance ........................................................................................................ 53Delete Your CloudWatch Alarm ................................................................................................... 54Delete Your Elastic Load Balancer .............................................................................................. 55Delete a Key Pair ......................................................................................................................... 55Delete an Amazon EC2 Security Group ...................................................................................... 56Delete Your Custom AMI ............................................................................................................. 56
Amazon Route 53 ................................................................................................................................. 57Amazon CloudFront .............................................................................................................................. 58Pricing ................................................................................................................................................... 59Amazon EC2 Cost Breakdown ............................................................................................................. 59Amazon RDS Cost Breakdown ............................................................................................................. 61Summing It All Up ................................................................................................................................. 63Related Resources ............................................................................................................................... 65Document History ................................................................................................................................. 67
4
Getting Started with AWS Web Application Hosting forLinux

Overview
If you purchase hardware to run your website, you might find that highly available and scalable webhosting can be a complex and expensive proposition.Your website would likely experience dense peaktraffic periods and significant fluctuations in traffic patterns. This would result in low utilization rates ofyour expensive hardware, and you could incur high operating costs to maintain mostly idle hardware.Amazon Web Services (AWS) provides the reliable, scalable, secure, and high performance infrastructurerequired for the most demanding web applications. AWS enables an elastic, scale-out and scale-ininfrastructure model that matches IT costs with real-time shifts in customer traffic patterns.
This guide will help you use AWS to create scalable, robust web applications that handle sophisticateddemands and workloads. We’ll review an example architecture of a web application hosted on AWS, andwe’ll walk through the process of deploying a sample Drupal application using several key AWS servicesand following best practices. (Drupal is an open source content management system.) You can adaptthis sample to your specific needs if you want. By the end of this walkthrough, you should be able to dothe following:
• Sign up for AWS.
• Launch, connect, secure, and deploy Drupal to a computer in the cloud.
• Create a custom template of a computer containing the hardware, software, and configuration youneed.
• Set up a load balancer to distribute traffic across multiple computers in the cloud.
• Scale your fleet of computers in the cloud.
• Monitor the health of your application and computers.
• Create a database instance and use it with Drupal.
• Create a template for the AWS resources you created.
• Clean up your AWS resources.
For a deeper understanding of AWS best practices and the various options that AWS provides, werecommend that you read Web Application Hosting: Best Practices at AWS Cloud Computing Whitepapers.
If you are looking for a quicker and easier way to deploy your web applications, you can use an applicationmanagement service. AWS application management services help you leverage other AWS serviceswithout having to manage each of them separately and manually:
• AWS Elastic Beanstalk lets you focus on the code while the service manages the rest.
• AWS OpsWorks gives you the flexibility to define your own software stack and deploy, operate, andautomate a variety of applications and architectures.
1
Getting Started with AWS Web Application Hosting forLinux

For additional information about deployment and resource management on AWS, go to Deployment andManagement on AWS.
If this guide is not exactly what you are looking for, you may want to check out the following documents:
• Getting Started with AWS — Provides information about Amazon Web Services, with helpful links forlearning more.
• Getting Started with AWS Free Usage Tier — Provides information about how to get started with thefree usage tier.
• Hosting Websites on Amazon S3 in the Amazon Simple Storage Service Developer Guide — Providesa walkthrough in just a few steps of a static website deployment that does not require running anapplication.
• Getting Started with AWS CloudFormation in the AWS CloudFormation User Guide — Helps you quicklyget started using an AWS CloudFormation WordPress blog sample template without needing to figureout the order in which AWS services need to be provisioned or worry about the subtleties of how tomake those dependencies work.
• Amazon Elastic Compute Cloud Getting Started Guide - Walks you through launching and connectingto an Amazon EC2 Linux instance. For information about configuring software to run on instances (e.g.,MySQL, Tomcat, Python), go to Amazon Machine Images (AMI) in the Amazon Elastic Compute CloudUser Guide.
• Getting Started with AWS Computing Basics for Linux - Introduces you to several key AWS servicesand components—what these services are, why they are important, and how to use them. The guidealso provides a simple example architecture on a Linux platform and walks you through a deploymentthat uses this architecture.You will also learn how to install MySQL server and configure a databaseon an EC2 instance.
How Does AWS Help?If you are responsible for running a web application then there are a variety of infrastructure and architectureissues that you face for which AWS can give you easy, seamless, and cost-effective solutions. Thissection provides a list of Amazon Web Services and components, and it explains the value they add inmeeting the challenges you'll face in this example solution.
BenefitsAmazon Web ServicesChallenges
• Amazon EC2 runs the web server andapplication servers.
• Elastic Load Balancing supportshealth checks on hosts, distribution oftraffic to Amazon EC2 instancesacross multiple Availability Zones, andthe dynamic addition and removal ofAmazon EC2 hosts from theload-balancing rotation.
• Auto Scaling creates capacity groupsof servers that can grow or shrink ondemand.
• Amazon CloudWatch reports metricsdata for Amazon EC2 instances, andthe metrics it gathers are used by AutoScaling.
• Amazon Elastic Compute Cloud (EC2)
• Amazon Elastic Load Balancing
• Auto Scaling
• Amazon CloudWatch
Servers need to beprovisioned tohandle peakcapacity and theunused cycles arewasted at othertimes.
2
Getting Started with AWS Web Application Hosting forLinux
How Does AWS Help?

BenefitsAmazon Web ServicesChallenges
• Amazon CloudFront speeds up theloading of streaming or downloadedstatic content by caching the contentvia a local edge cache at a locationwith the lowest latency.
• Amazon S3 stores data backups fromthe relational database, web, andapplication servers, and for AmazonCloudFront distribution.
• Amazon CloudFront
• Amazon Simple Storage Service(Amazon S3)
Need a contentdelivery network(CDN) to providelow-latency, highdata transferspeeds so endusers don'texperienceunnecessarydelays.
Amazon EBS provides a persistent filesystem for web and application servers.
Amazon Elastic Block Store (AmazonEBS)
Applications mayrequire a database,file system, oraccess to rawblock-level storage.
Amazon RDS provides cost-efficient andresizable capacity while managingtime-consuming database administrationtasks.
Amazon Relational Database Service(Amazon RDS)
Maintaining adatabase can beexpensive andtime-consuming.
Amazon Route 53 is a highly availableand scalable Domain Name System(DNS) web service. It is designed to givedevelopers and businesses an extremelyreliable and cost effective way to routeend users to Internet applications bytranslating human readable names likewww.example.com into the numeric IPaddresses like 192.0.2.1 that computersuse to connect to each other.
Amazon Route 53Developers andbusinesses need areliable andcost-effective wayto route end usersto Internetapplications.
AWS CloudFormation gives developersand systems administrators an easy wayto create a collection of related AWSresources and provision them in anorderly and predictable fashion.
AWS CloudFormationNeed to plan theorder in whichAmazon WebServices will beprovisioned,keeping in minddependenciesamong theservices.
BenefitsAWS ComponentsChallenges
An Amazon Security Group lets youspecify the protocols, ports, and sourceIP address ranges that are allowed toreach your Amazon EC2 instances.
Amazon Security GroupNeed to providesecurity to protectapplication serversfrom outsidemalicious users.
3
Getting Started with AWS Web Application Hosting forLinux
How Does AWS Help?

BenefitsAWS ComponentsChallenges
Availability Zones are distinct locationsengineered to be insulated from failuresin other Availability Zones. EachAvailability Zone provides inexpensive,low latency network connectivity to otherAvailability Zones in the same region.
Availability ZonesNeed to designwith failover inmind.
Web Application Hosting ArchitectureThe following diagram shows an example architecture of a web application using the AWS resourcesmentioned in the previous section.
In this diagram, Amazon EC2 instances run the application and web server and belong to an AmazonEC2 Security Group. The Amazon EC2 Security Group acts as an exterior firewall for the Amazon EC2instances. An Auto Scaling group is used to maintain a fleet of Amazon EC2 instances that can handlethe presented load. This Auto Scaling group spans over multiple Availability Zones to protect againstpotential failures if an Availabilty Zone becomes unavailable. To ensure that traffic is distributed evenlyamong the Amazon EC2 instances, an Elastic Load Balancer is associated with the Auto Scaling group.If the Auto Scaling group launches or terminates instances based on load, then the Elastic Load Balancerwill automatically adjust accordingly. The database tier consists of Amazon RDS database instances,including master and local slave, located in multiple Availability Zones for failover protection. AmazonRDS provides automated backups to Amazon S3. Amazon S3 stores backups and static content. Sincethe consumers of this application may be globally distributed or a large number may visit the site at onetime, high volume static content is edge cached using Amazon CloudFront for better performance. AmazonRoute 53 can be used to provide secure and reliable routing to your infrastructure that uses Amazon WebServices.
For a step-by-step walkthrough of how to build out this architecture, see Getting Started (p. 6). Thiswalkthrough will teach you how to do the following:
4
Getting Started with AWS Web Application Hosting forLinux
Web Application Hosting Architecture

• Sign up for AWS.
• Launch, connect, secure, and deploy Drupal to an Amazon EC2 instance.
• Create a Custom AMI.
• Set up an Elastic Load Balancer to distribute traffic across your Amazon EC2 instances.
• Scale your fleet of instances automatically using Auto Scaling.
• Monitor your AWS resources using Amazon CloudWatch.
• Create a database instance and use it with Drupal.
• Create an AWS CloudFormation template based on the resources you created.
• Clean up your AWS resources.
For more information on how to use Amazon CloudFront in this architecture, see AmazonCloudFront (p. 58). For more information on how to use Amazon Route 53 in this architecture, see AmazonRoute 53 (p. 57).
5
Getting Started with AWS Web Application Hosting forLinux
Web Application Hosting Architecture

Getting Started
Topics
• Step 1: Sign Up for the Service (p. 6)
• Step 2: Install the Command Line Tools (p. 7)
• Step 3: Create an Elastic Load Balancer (p. 8)
• Step 4: Create and Configure Your Amazon EC2 Security Group (p. 13)
• Step 5: Create a Key Pair (p. 14)
• Step 6: Launch Amazon EC2 Instances Using Auto Scaling (p. 15)
• Step 7: Create a CloudWatch Alarm (p. 17)
• Step 8: Add Amazon RDS (p. 21)
• Step 9: Deploy Your Application (p. 27)
• Step 10: Create a Custom AMI (p. 41)
• Step 11: Launch New Environments Using AWS CloudFormation (p. 42)
• Step 12: Clean Up (p. 51)
Let's suppose you want to build a content management system (CMS) application.You want to leveragethe reliable, scalable, secure and high performance infrastructure that AWS offers. It's easy to get started,and for most of the tasks we can use the AWS Management Console. In this topic, we'll walk through aseries of steps to deploy your web application to AWS. There are many different ways you can go aboutdeploying your web application, but this walkthrough shows you one example that follows best practicesand uses many of the AWS services so you can see how the services work together. Let's begin!
NoteIn this example, we are going through the steps in a specific order to minimize the time for billableservices. However, when you deploy your application you will likely start by launching yourAmazon EC2 instance, configuring your application and database, creating a custom AMI, andthen scaling your application.
Step 1: Sign Up for the ServiceIf you don't already have an AWS account, you’ll need to get one.Your AWS account gives you accessto all services, but you will be charged only for the resources that you use. For this example walkthrough,the charges will be minimal.
6
Getting Started with AWS Web Application Hosting forLinux
Step 1: Sign Up for the Service

To sign up for AWS
1. Go to http://aws.amazon.com and click Sign Up.
2. Follow the on-screen instructions.
AWS notifies you by email when your account is active and available for you to use.
You use your AWS account to deploy and manage resources within AWS. If you give other people accessto your resources, you will probably want to control who has access and what they can do. AWS Identityand Access Management (IAM) is a web service that controls access to your resources by other people.In IAM, you create users, which other people can use to obtain access and permissions that you define.For more information about IAM, go to Using IAM.
Step 2: Install the Command Line ToolsWe'll need to install some command line tools for Auto Scaling. Do this first to minimize your usage ofbillable services.
To install the Auto Scaling command line tools to your local computer, go to Using the Command LineTools in the Auto Scaling Developer Guide. After you have installed the command line tools, try a coupleof commands to make sure they work. For example, try typing the as-cmd command at the prompt.
PROMPT>as-cmd
This command returns a list of all the Auto Scaling commands and their descriptions.You should seesomething similar to the following illustration.
7
Getting Started with AWS Web Application Hosting forLinux
Step 2: Install the Command Line Tools

After you have installed the command line tools, you can start creating your AWS resources.You areready to start thinking about launching your Amazon EC2 instances. Even though for the purposes of thistutorial, you only have one Amazon EC2 instance up and running, you'll want to have multiple AmazonEC2 instances running across multiple Availability Zones eventually. This way if one Availability Zonegoes down, the traffic will be rerouted to another Availability Zone. To prepare for the eventuality ofmaintaining multiple Amazon EC2 instances, we'll go ahead and create our Elastic Load Balancer resource.In the AWS CloudFormation step, we can scale out to make use of our Elastic Load Balancer. Let's moveon to the next step to create our Elastic Load Balancer.
Step 3: Create an Elastic Load BalancerElastic Load Balancing is a cost-effective and easy-to-use web service to help you improve the availabilityand scalability of your application. It makes it easy for you to distribute application loads between two ormore Amazon EC2 instances. Elastic Load Balancing enables availability through redundancy and supportstraffic growth of your application.
Elastic Load Balancing lets you automatically distribute and balance the incoming application traffic amongall the instances you are running. The service also makes it easy to add new instances when you needto increase the capacity of your application.You can dynamically register or deregister instances fromthe load balancer as the capacity requirements of your application change with time.
As soon as your load balancer becomes available, you’re billed for each hour or partial hour that youkeep the load balancer running. For more information about Elastic Load Balancing, see the Elastic LoadBalancing details page.
In this step, we will create a load balancer for an HTTP service.We'll specify that the load balancer listenson port 80 and distributes traffic to port 80 on the instances.
NoteWe'll go ahead and create our Elastic Load Balancer resource so that in the future when youhave multiple instances running, your traffic will be load balanced between your instances. ElasticLoad Balancing is a small cost relative to instance hours. In Step 11: Launch New EnvironmentsUsing AWS CloudFormation (p. 42) we'll use AWS CloudFormation to create a template for ourresources and add instances to our Auto Scaling Group.
For more information about elastic load balancers, go to the Elastic Load Balancing Documentation.
To create a load balancer
1. Define a load balancer.
a. Open the Amazon EC2 console at https://console.aws.amazon.com/ec2/.
b. In the top navigation bar, select US East (N. Virginia) from the region selector.
c. In the left navigation pane, click Load Balancers.
d. Click Create Load Balancer.
e. In the Create a New Load Balancer wizard, on the Define Load Balancer page, enter a namefor your load balancer. For this example, type MyLB.
8
Getting Started with AWS Web Application Hosting forLinux
Step 3: Create an Elastic Load Balancer

f. Leave Create LB Inside set to EC2-Classic.
g. Leave the Listener Configuration set to the default values.
h. Click Continue.
2. Configure the health check for your load balancer. Elastic Load Balancing routinely checks the healthof each load-balanced Amazon EC2 instance. If Elastic Load Balancing finds an unhealthy instance,it stops sending traffic to the instance and reroutes traffic to healthy instances
a. For this example, leave Ping Protocol set to its default value of HTTP. When you deploy yourapplication in the future, you can specify HTTPS. For information on using HTTPS with ElasticLoad Balancing, see Elastic Load Balancing Security Features in Elastic Load BalancingDeveloper Guide.
b. For this example, leave Ping Port set to its default value of 80.
Elastic Load Balancing uses the Ping Port to send health check queries to your Amazon EC2instances.
NoteIf you specify a port value, your Amazon EC2 instances must accept incoming trafficon the port that you specified for the health check.You can set a different port valueother than 80, and you can come back and set this value at a later time. However, forthis example, set it to 80.
c. In the Ping Path field, replace the default value with a single forward slash ("/").
Elastic Load Balancing sends health check queries to the path you specify in Ping Path. Thisexample uses a single forward slash so that Elastic Load Balancing sends the query to yourHTTP server's default home page, whether that default page is named index.html,default.html, or a different name. When you deploy your application, consider creating aspecial lightweight file that only responds to the health check. This helps differentiate betweentraffic that is hitting your site and responses to the load balancer.
9
Getting Started with AWS Web Application Hosting forLinux
Step 3: Create an Elastic Load Balancer

d. Set the Healthy Threshold to 2. Leave the rest of the Advanced Details set to their defaultvalues.
e. Click Continue.
3. On the Add Instances to Load Balancer page, click Continue.
4. Review your settings.You can make changes to the settings by clicking the Edit link for a specificstep in the process.
10
Getting Started with AWS Web Application Hosting forLinux
Step 3: Create an Elastic Load Balancer

5. Click Create. On the Create Load Balancer confirmation page, click Close.
Your new load balancer now appears in the list.
As a best practice, you should have sufficient instances across Availability Zones to survive the lossof any one Availability Zone. In the next step, you'll ensure that your load balancer points to multipleAvailability Zones.
6. Add an Availability Zone.
a. In the Load Balancers list, click MyLB.
b. Click the Instances tab.
c. Click Edit Availability Zones.
11
Getting Started with AWS Web Application Hosting forLinux
Step 3: Create an Elastic Load Balancer

d. In the Add and Remove Availability Zones dialog box, do the following:
• Click us-east-1b: 0 instances.
• Click us-east-1c: 0 instances.
• Click Save.
The Availability Zones column for the load balancer now shows the Availability Zones youselected.
Where You're AtHere's where you are at in building your architecture.
12
Getting Started with AWS Web Application Hosting forLinux
Where You're At

Let's move on to the next topic to create your Amazon EC2 security group.You will need to create anAmazon EC2 security group in order to open up ports on your instance.Your security group is essentiallyacting as a firewall.
Step 4: Create and Configure Your Amazon EC2Security Group
An Amazon EC2 security group acts as a firewall that controls the traffic allowed into a group of instances.When you launch an Amazon EC2 instance, you can assign it to one or more security groups. For eachsecurity group, you add rules that govern the allowed inbound traffic to instances in the group. All otherinbound traffic is discarded.You can modify rules for a security group at any time. The new rules areautomatically enforced for all existing and future instances in the group.
In this step, we will do the following:
• Create an Amazon EC2 security group
• Configure an Amazon EC2 security group
To create and configure your security group
1. Open the Amazon EC2 console at https://console.aws.amazon.com/ec2/.
2. Make sure US East (N. Virginia) is selected in the region selector of the navigation bar.
NoteFor this purposes of this walkthrough, we will always use the US East (N. Virginia) region.However when you deploy your application, select the region that is closest to you.
3. In the left navigation pane, click Load Balancers.
4. Select the load balancer that you created earlier, and click the Security tab. In the Source SecurityGroup field, copy or write down the name of the security group that's associated with the loadbalancer.You will need the name to configure your instance's security group rules.
5. In the navigation pane, click Security Groups, then click Create Security Group.
6. In the Create Security Group dialog box, type webappsecuritygroup in the Security groupname box, and a description of your choice in the Description box.
7. On the Inbound tab, click Add Rule, and select HTTP from the Type list.
8. Select Custom IP from the Source list, and enter the name of the security group that's associatedwith your load balancer, for example, amazon-elb/amazon-elb-sg. When you select this source,this means that only traffic that comes through the Elastic Load Balancer can connect to your AmazonEC2 instance.
9. Click Add Rule.
10. Select SSH from the Type list to connect to your Amazon EC2 instances. Select Anywhere fromthe Source list.
13
Getting Started with AWS Web Application Hosting forLinux
Step 4: Create and Configure Your Amazon EC2 SecurityGroup

ImportantThe security group settings are configured to allow access from everywhere: 0.0.0.0/0.Thisis not good practice, and it is only for the purposes of this exercise that we are setting it upthis way. Best practice should be to set rules that restrict access to only those computersor networks that require access to this service. The number after the "/" indicates a rangeof addresses.
11. Click Create.
Your Amazon EC2 security group is not yet enforced. We will enforce this when we create our AutoScaling group. However, you can also apply an Amazon EC2 security group to an Amazon EC2instance. For more information, see Using Security Groups in the Amazon Elastic Compute CloudUser Guide.
Now that we have created our Amazon EC2 security group, we will need a way to access our AmazonEC2 instance to deploy our application. Public AMI instances use a public/private key pair to login ratherthan a password. Let's move on to the next section to create our key pair.
Step 5: Create a Key PairYou can create your key pair so that you can connect to your Amazon EC2 instances. Public AMI instancesuse a public/private key pair to log in rather than a password. The public key half of this pair is embeddedin your instance, allowing you to use the private key to log in securely without a password. After youcreate your own AMIs, you can choose other mechanisms to securely log in to your new instances. Inthis step we will use AWS Management Console to create a key pair.
To generate a key pair
1. Open the Amazon EC2 console at https://console.aws.amazon.com/ec2/.
2. In the top navigation bar, in the region selector, click US East (N. Virginia).
3. In the left navigation pane, under Network and Security, click Key Pairs.
4. Click Create Key Pair.
14
Getting Started with AWS Web Application Hosting forLinux
Step 5: Create a Key Pair

5. Type mykeypair in the new Key pair name box, and then click Yes.
6. Download the private key file, which is named mykeypair.pem, and keep it in a safe place.You willneed it to access any instances that you launch with this key pair.
ImportantIf you lose the key pair, you cannot connect to your Amazon EC2 instances.
For more information about key pairs, see Amazon EC2 Key Pairs in the Amazon Elastic ComputeCloud User Guide.
Since your traffic may vary, you want AWS to scale the number instances appropriately. To do this you'llwant to use Auto Scaling to create an Auto Scaling group. Let's move on to the next step to create ourAuto Scaling group and associate our Auto Scaling group with our Elastic Load Balancer.
Step 6: Launch Amazon EC2 Instances UsingAuto Scaling
Auto Scaling is designed to launch or terminate Amazon EC2 instances automatically based on user-definedpolicies, schedules, and alarms.You can use Auto Scaling to maintain a fleet of Amazon EC2 instancesthat can handle any presented load. As its name implies, Auto Scaling responds automatically to changingconditions. All you need to do is specify how it should respond to those changes. For example, you caninstruct Auto Scaling to launch an additional instance whenever CPU usage exceeds 60 percent for tenminutes, or you could tell Auto Scaling to terminate half of your website’s instances over the weekendwhen you expect traffic to be low.You can also use Auto Scaling to ensure that the instances in yourfleet are performing optimally, so that your applications continue to run efficiently. Auto Scaling groupscan even work across multiple Availability Zones—distinct physical locations for the hosted Amazon EC2instances—so that if an Availability Zone becomes unavailable, Auto Scaling will automatically redistributeapplications to a different Availability Zone. With Auto Scaling, you can ensure that you always have atleast one healthy instance running. For more information, see Auto Scaling.
In this example, we will set up the basic infrastructure that must be in place to get Auto Scaling startedfor most applications. We'll set up an Amazon EC2 application to be load-balanced and auto-scaled witha minimum number of one instance and maximum number of one instance so you are only charged forone instance. However, when you create your actual website you should follow the best practice of havingsufficient instances across Availability Zones to survive the loss of any one Availability Zone. Additionally,increase your maximum number of instances to be greater than your minimum to make use of the AutoScaling feature.You can also specify the maximum number of instances to control your fleet size. AutoScaling in this example is configured to scale out by one when there is a change in capacity. We definethe policy in this topic and then create a CloudWatch alarm in the next section to take action on the policywhen the average CPU usage exceeds a threshold of 60 percent for 10 minutes. Auto Scaling and AmazonCloudWatch work together to launch or terminate instances based on the policies you create. To savetime, we will create just one policy, however, you can create more policies, such as a scale-in policy.
If you haven't already installed the Auto Scaling command line tools, you need to do that now at Usingthe Command Line Tools in the Auto Scaling DeveloperGuide. We will use the command line tools to setup Auto Scaling.
To set up an auto-scaled, load-balanced Amazon EC2 application
1. Open a command prompt window. In Microsoft Windows, start the Command Prompt application(from the Start menu, click Programs, click Accessories, and then click Command Prompt).
2. Use the Auto Scaling as-create-launch-config command. In this example, we use a publiclyavailable Linux AMI running a content management system (CMS).We use a t1.micro instance type,and use the security group and the key pair we created in the previous steps. In this example, the
15
Getting Started with AWS Web Application Hosting forLinux
Step 6: Launch Amazon EC2 Instances Using AutoScaling

key pair file is located in the directory in which we are creating our Auto Scaling group. We will notspecify a region because we want to use the default region.
NoteYou will be charged for launching one Amazon EC2 instance. The charges in this exampleare minimal. For more information about Amazon EC2 pricing, see the Amazon ElasticCompute Cloud (Amazon EC2) details page.
PROMPT>as-create-launch-config MyLC --image-id ami-7813e011 --instance-type t1.micro --group webappsecuritygroup --key mykeypair
Auto Scaling returns output similar to the following example output:
OK-Created launch config
NoteYou can copy and paste the commands from the document into the command line window.To paste the contents in the command line window, use right-click. If you have trouble gettingthe commands to work, make sure the command was pasted correctly.
3. Use the Auto Scaling as-create-auto-scaling-group command. In this example, we use twoAvailability Zones. This is a good practice for building fault-tolerant applications. If one AvailabilityZone experiences an outage, traffic will be routed to another Availability Zone.The number of instancesthat are launched in the Auto Scaling group will be evenly distributed across the Availability Zones.
PROMPT>as-create-auto-scaling-group MyAutoScalingGroup --launch-configuration MyLC --availability-zones us-east-1b, us-east-1c --min-size 1 --max-size 1 --load-balancers MyLB
Auto Scaling returns the following:
OK-Created AutoScalingGroup
4. Use the Auto Scaling as-put-scaling-policy command to create a policy to enlarge your fleetof instances.
PROMPT>as-put-scaling-policy MyScaleUpPolicy --auto-scaling-group MyAutoScal ingGroup --adjustment=1 --type ChangeInCapacity --cooldown 300
Auto Scaling returns output similar to the following example output:
POLICY-ARN arn:aws:autoscaling:us-east-1:012345678901:scalingPolicy:cbe7da4e-5d00-4882-900a-2f8113431e30:autoScalingGroupName/MyAutoScalingGroup:policy Name/MyScaleUpPolicy
NoteTo save time, we only created a scale-out policy. However, you typically would want tocreate a scale-in policy as well. Auto Scaling decreases the number of instances when yourapplication doesn't need the resources, saving you money. To create a scale-in policy,change the policy name and change the adjustment from 1 to -1.
5. Verify that your Auto Scaling group exists by using the as-describe-auto-scaling-groupscommand.
16
Getting Started with AWS Web Application Hosting forLinux
Step 6: Launch Amazon EC2 Instances Using AutoScaling

PROMPT>as-describe-auto-scaling-groups MyAutoScalingGroup --headers
Auto Scaling returns the following:
AUTO-SCALING-GROUP GROUP-NAME LAUNCH-CONFIG AVAILABILITY-ZONES MIN-SIZE MAX-SIZE DESIRED-CAPACITYAUTO-SCALING-GROUP MyAutoScalingGroup MyLC us-east-1b,us-east-1c 1 1 1INSTANCE INSTANCE-ID AVAILABILITY-ZONE STATE STATUS LAUNCH-CONFIGINSTANCE i-xxxxxxxx us-east-1c InService Healthy MyLC
Your Amazon EC2 application has been launched as an auto-scaled and load-balanced application. Formore information about Auto Scaling, see the Auto Scaling Documentation.You will continue to incurcosts as long as your Amazon EC2 instances are running. If at any time you want to terminate theseinstances, see Terminate Your Amazon EC2 Instances in Your Auto Scaling Group (p. 52).
Where You're AtHere's where you are at in building your architecture.
Now that you have created your Auto Scaling group and your Amazon EC2 instance is up and running,you'll want a way to monitor the health of your instance. In the next step, we'll create an AmazonCloudWatch alarm so we can track the Auto Scaling policy you just created.
Step 7: Create a CloudWatch AlarmAmazon CloudWatch is a web service that enables you to monitor, manage, and publish various metrics,as well as configure alarm actions based on data from metrics.
With Amazon CloudWatch you can collect, analyze, and view system and application metrics so that youcan make operational and business decisions quickly and confidently. Amazon CloudWatch automaticallycollects metrics about your AWS resources—such as the performance of your Amazon EC2 instances.You can also publish your own metrics directly to Amazon CloudWatch.
Amazon CloudWatch alarms help you implement decisions more easily by enabling you to send notificationsor automatically make changes to the resources you are monitoring, based on rules that you define. For
17
Getting Started with AWS Web Application Hosting forLinux
Where You're At

example, you can create alarms that initiate Auto Scaling and Amazon Simple Notification Service (AmazonSNS) actions on your behalf.
A common use for Amazon CloudWatch is to keep your applications and services healthy and runningefficiently. For example, you can use it to discover that your website runs best when network traffic remainsbelow a certain threshold level on your Amazon EC2 instances.You can then create an automatedprocedure to ensure that you always have the right number of instances to match the amount of trafficyou have.You can also use Amazon CloudWatch to diagnose problems by looking at system performancebefore and after a problem occurs. Amazon CloudWatch helps you identify the cause and verify your fixby tracking performance in real time. For example, you can set up Amazon CloudWatch to email youright away when your application slows down, to go back and discover that a particular database wasbeing overloaded, and later to watch response times come back up to speed. For more information aboutcreating CloudWatch alarms, go to Creating CloudWatch Alarms in the Amazon CloudWatch DeveloperGuide.
In the previous task, we created an Auto Scaling policy to scale out the number of instances. In this task,you need to associate that Auto Scaling policy with an alarm action to make changes to your resources.This topic walks you through how to create a CloudWatch alarm to alert the application when this thresholdis breached. To save time during this walkthrough, we'll just create one alarm; however, you can applythe same procedure create other alarms. For example, you could create another alarm to scale in yourinstances. For more information about Amazon CloudWatch, see the Amazon CloudWatch details page.
To create an Amazon CloudWatch alarm
1. Select a metric for your alarm.
a. Open the Amazon CloudWatch console at https://console.aws.amazon.com/cloudwatch/.
b. In the top navigation bar, make sure US East (N. Virginia) is selected in the region selector.
c. In the navigation pane, select Alarm under Alarms.
d. Click Create Alarm.
e. On the Select Metric page of the Create Alarm Wizard, select EC2: Aggregated by AutoScaling Group from the Viewing drop-down menu.
18
Getting Started with AWS Web Application Hosting forLinux
Step 7: Create a CloudWatch Alarm
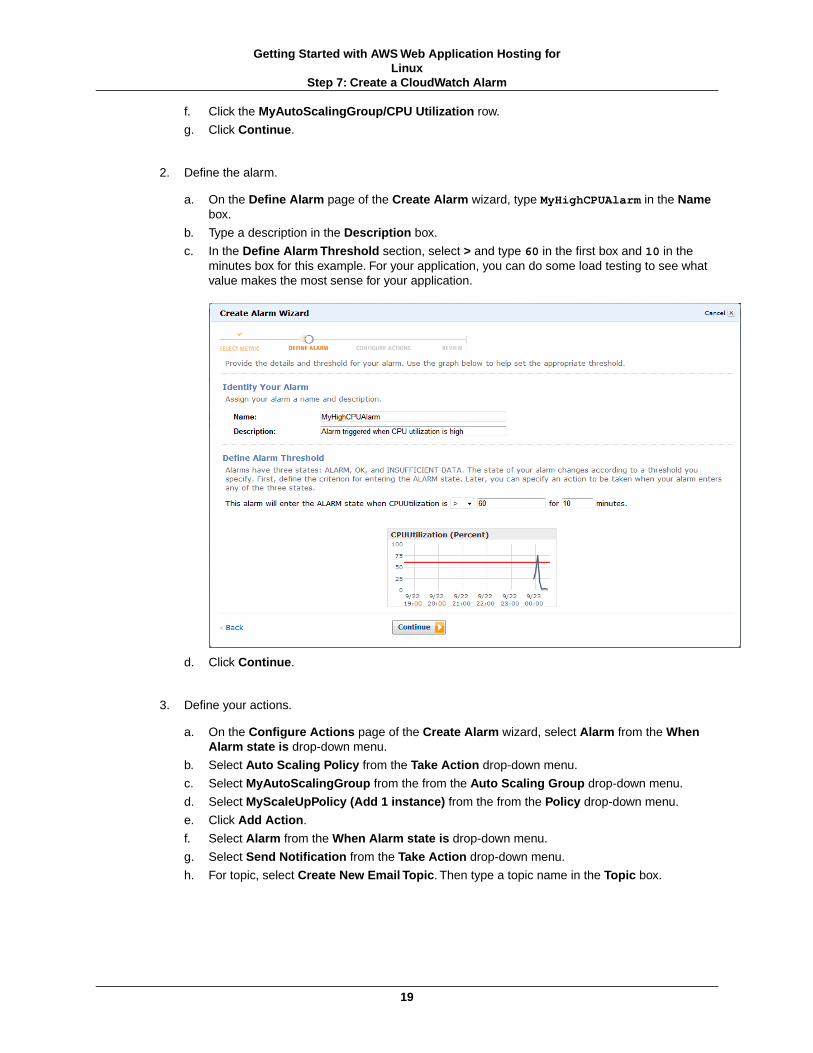
f. Click the MyAutoScalingGroup/CPU Utilization row.
g. Click Continue.
2. Define the alarm.
a. On the Define Alarm page of the Create Alarm wizard, type MyHighCPUAlarm in the Namebox.
b. Type a description in the Description box.
c. In the Define Alarm Threshold section, select > and type 60 in the first box and 10 in theminutes box for this example. For your application, you can do some load testing to see whatvalue makes the most sense for your application.
d. Click Continue.
3. Define your actions.
a. On the Configure Actions page of the Create Alarm wizard, select Alarm from the WhenAlarm state is drop-down menu.
b. Select Auto Scaling Policy from the Take Action drop-down menu.
c. Select MyAutoScalingGroup from the from the Auto Scaling Group drop-down menu.
d. Select MyScaleUpPolicy (Add 1 instance) from the from the Policy drop-down menu.
e. Click Add Action.
f. Select Alarm from the When Alarm state is drop-down menu.
g. Select Send Notification from the Take Action drop-down menu.
h. For topic, select Create New Email Topic. Then type a topic name in the Topic box.
19
Getting Started with AWS Web Application Hosting forLinux
Step 7: Create a CloudWatch Alarm

i. Type an email address in the Email(s) box.
j. Click Add Action.
k. Click Continue.
4. In the Review page, click Create Alarm.
5. Click Close.
20
Getting Started with AWS Web Application Hosting forLinux
Step 7: Create a CloudWatch Alarm

Your new alarm now appears in the list. When you create your MyScaleDownPolicy, you can createanother alarm using the same steps.
Where You're AtHere's where you are at in building your architecture.
Next, let's add a database to the web application. Amazon provides a couple of database options, but forthis example, we'll use Amazon Relational Database Service (Amazon RDS) because it's easy to operateand relieves us from the database administrative overhead.
Step 8: Add Amazon RDSTopics
• Create a DB Security Group (p. 22)
• Authorize Access (p. 22)
• Launch an Instance (p. 23)
Now we are ready to add Amazon Relational Database (Amazon RDS) to our architecture. In this stepwe will launch a Multi-AZ RDS instance.When you create or modify your DB Instance to run as a Multi-AZdeployment, Amazon RDS automatically provisions and maintains a synchronous standby replica in adifferent Availability Zone. Updates to your DB Instance are synchronously replicated across AvailabilityZones to the standby in order to keep both in sync and protect your latest database updates against DBInstance failure. During certain types of planned maintenance, or in the unlikely event of DB Instancefailure or Availability Zone failure, Amazon RDS will automatically fail over to the standby so that you canresume database writes and reads as soon as the standby is promoted. Since the name record for yourDB Instance remains the same, your application can resume database operation without the need formanual administrative intervention. With Multi-AZ deployments, replication is transparent: you do notinteract directly with the standby, and it cannot be used to serve read traffic.
21
Getting Started with AWS Web Application Hosting forLinux
Where You're At

ImportantThe DB Instance you're about to launch will be live (and not running in a sandbox).You will incurthe standard Amazon RDS usage fees for the instance until you terminate it. The total chargeswill be minimal (typically less than a dollar) if you complete the exercise described here in onesitting and terminate your DB Instance when you are finished. For more information about AmazonRDS usage rates, go to the Amazon RDS product page.
NoteThis is an optional step, so if you would like to skip this step, you can continue on to Step 9:Deploy Your Application (p. 27).
To set up your Amazon RDS database you need to do the following:
• Create a DB security group
• Authorize your DB instance
• Launch a DB instance
Create a DB Security GroupTo create a DB Security Group, you need to provide a name and a description.
To create a DB Security Group
1. Sign in to the AWS Management Console and open the Amazon RDS console athttps://console.aws.amazon.com/rds/.
2. Make sure US East (N. Virginia) is selected in the region selector of the navigation bar.
3. In the left navigation pane, click Security Groups.
4. Click the Create DB Security Group button.
5. Type the name of the new DB security group. For this example, type mydbsecuritygroup.
6. Type a description for the new DB Security Group in the Description text box.
7. Click Yes, Create.
Now you're ready to authorize access to the Amazon EC2 security group.
Authorize AccessNow you will need to grant your Amazon EC2 security group access to your DB Security Group.
To authorize your Amazon EC2 security group for access to your DB Security Group
1. Sign in to the AWS Management Console and open the Amazon RDS console athttps://console.aws.amazon.com/rds/.
2. Make sure US East (N. Virginia) is selected in the region selector of the navigation bar.
3. In the left navigation pane, click Security Groups.
4. Select mydbsecuritygroup.
5. In the lower pane, select EC2 Security Group for the Connection Type.
6. Your AWS Account ID appears in the right half of the lower pane. If you want to authorize a differentAWS ID to use this DB Security Group, select Another account, and then type your ID in the AWSAccount ID box.
NoteMake sure to remove the hyphens when you type your account ID.
7. For the EC2 Security Group Name, select webappsecuritygroup.
22
Getting Started with AWS Web Application Hosting forLinux
Create a DB Security Group

8. Click Authorize.
The authorization will take a few moments. After the security group has been authorized, the Statuscolumn in the top pane will say authorized. Move on to the next step to launch your first Amazon RDSdatabase.
Launch an InstanceTo launch an instance
1. Start the launch wizard:
a. Sign in to the AWS Management Console and open the Amazon RDS console athttps://console.aws.amazon.com/rds/.
b. Make sure US East (N. Virginia) is selected in the region selector in the navigation bar.
c. In the left navigation pane, click DB instances.
d. In the Amazon RDS Console Dashboard, click Launch a DB Instance.
2. Click Select next to the MySQL Community Edition.
3. On the DB Instance Details page, specify your DB instance details as shown in the following table.Then click Continue.
Do thisFor this parameter...
Keep the default: general-public-license.License Model
Keep the default: 5.5.27 (default).DB Engine Version
Select db.m1.small.
The DB Instance class defines the CPU and memorycapacity of your DB instance.
DB Instance Class
Choose Yes. Although the Multi-AZ deployment is moreexpensive, it is a best practice.
Multi-AZ Deployment
23
Getting Started with AWS Web Application Hosting forLinux
Launch an Instance
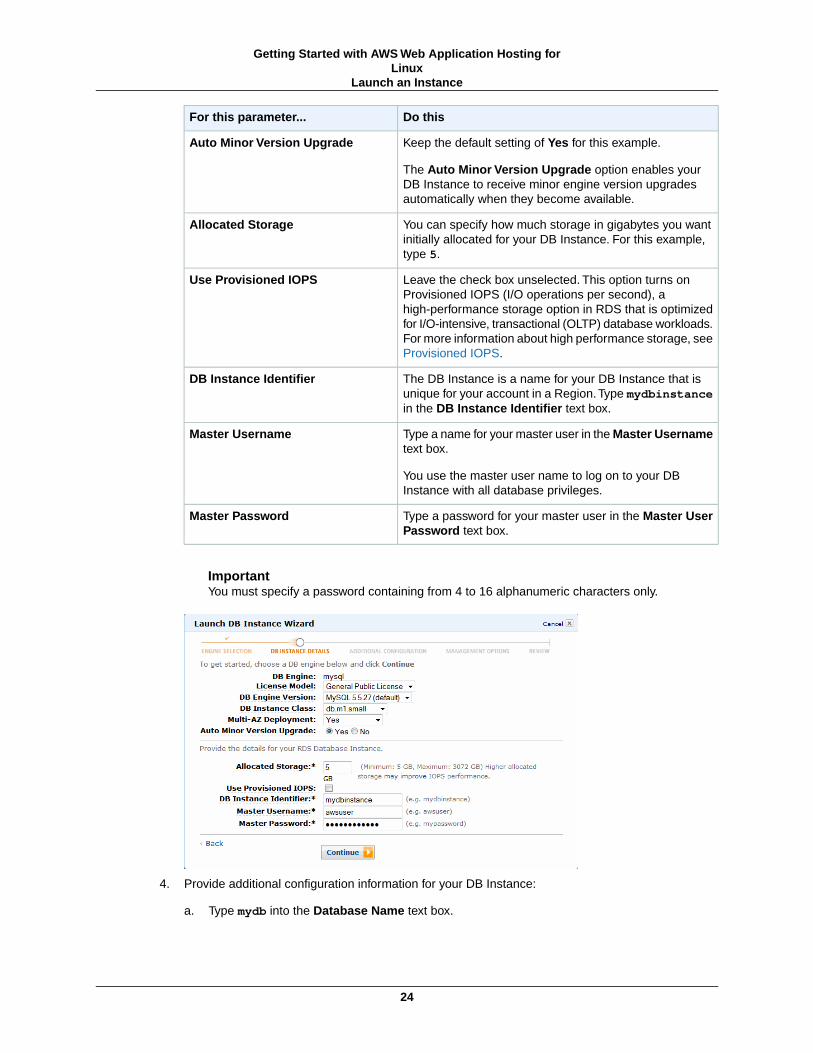
Do thisFor this parameter...
Keep the default setting of Yes for this example.
The Auto Minor Version Upgrade option enables yourDB Instance to receive minor engine version upgradesautomatically when they become available.
Auto Minor Version Upgrade
You can specify how much storage in gigabytes you wantinitially allocated for your DB Instance. For this example,type 5.
Allocated Storage
Leave the check box unselected. This option turns onProvisioned IOPS (I/O operations per second), ahigh-performance storage option in RDS that is optimizedfor I/O-intensive, transactional (OLTP) database workloads.For more information about high performance storage, seeProvisioned IOPS.
Use Provisioned IOPS
The DB Instance is a name for your DB Instance that isunique for your account in a Region.Type mydbinstancein the DB Instance Identifier text box.
DB Instance Identifier
Type a name for your master user in the Master Usernametext box.
You use the master user name to log on to your DBInstance with all database privileges.
Master Username
Type a password for your master user in the Master UserPassword text box.
Master Password
ImportantYou must specify a password containing from 4 to 16 alphanumeric characters only.
4. Provide additional configuration information for your DB Instance:
a. Type mydb into the Database Name text box.
24
Getting Started with AWS Web Application Hosting forLinux
Launch an Instance

You provide a database name so that Amazon RDS will create a default database on your newDB Instance. If you skip this step, Amazon RDS will not create a database on your DB Instance.
b. Select mydbsecuritygroup in the DB Security Groups box.
c. Accept the default values for the rest of the parameters available on this page, and then clickContinue.
5. Use the Management Options page to specify backup and maintenance options for your DB Instance.For this example, accept the default values, and then click Continue.
6. Review the options for your DB Instance. If you need to correct any options, click Back to return toprevious pages and make corrections. When you're ready, click Launch DB Instance to launch yournew DB Instance.
25
Getting Started with AWS Web Application Hosting forLinux
Launch an Instance

7. Launching can take a few minutes to complete. When you see the notice that your instance is beingcreated, click Close.
Your DB instance appears in the list on this page with the status of creating until your DB Instance iscreated and ready for use.
26
Getting Started with AWS Web Application Hosting forLinux
Launch an Instance

After your DB instance changes to the available state, you’re billed for each hour or partial hour that youkeep the DB Instance running (even if the DB Instance is idle).
Where You're AtHere's where you are at in building your architecture.
Now that you have launched your Amazon RDS database, you're ready deploy your sample webapplication.
Step 9: Deploy Your ApplicationTopics
• Connecting to your Amazon EC2 Instance from Your Web Browser Using the MindTerm SSHClient (p. 28)
• Connect to Your Amazon EC2 Instance from Windows Using PuTTY (p. 29)
• Connecting to Your Amazon EC2 Instance from a Linux/UNIX Machine Using a Standalone SSHClient (p. 33)
• Configure the Amazon EC2 Instance (p. 34)
Now that we've created all of our AWS resources, it's time to deploy our application to our Amazon EC2instance. In this step, we'll first connect to the Amazon EC2 instance, and then we'll configure the instanceby using a sample application that is already available on the Linux AMI.
27
Getting Started with AWS Web Application Hosting forLinux
Step 9: Deploy Your Application

Connecting to your Amazon EC2 Instance fromYour Web Browser Using the MindTerm SSH ClientThe steps to connect to a Linux/UNIX instance using your browser are as follows:
1. Install and Enable Java on Your Browser (p. 28)
2. Connect Using the Java SSH Client (p. 28)
Install and Enable Java on Your BrowserTo connect to your instance from the Amazon Elastic Compute Cloud (Amazon EC2) console, you musthave Java installed and enabled in your browser. To install and enable Java, follow the steps Oracleprovides below or contact your IT administrator to install and enable Java on your web browser.
NoteOn a Windows or Mac client, you must run your Web browser with administrator credentials. ForLinux, additional steps may be required if you are not logged in as root.
1. Install Java (see http://java.com/en/download/help/index_installing.xml).
2. Enable Java in your web browser (see http://java.com/en/download/help/enable_browser.xml).
Connect Using the Java SSH Client
To connect to your instance through a web browser
1. Sign in to the AWS Management Console and open the Amazon EC2 console athttps://console.aws.amazon.com/ec2/.
2. In the navigation pane, click Instances.
3. Select your instance, and then click Connect.
4. Click A Java SSH client directly from my browser (Java required). AWS automatically detectsthe public DNS address of your instance and the key pair name you launched the instance with.
5. In User name, enter the user name to log in to your instance. For this example, enter ec2-user.
NoteFor an Amazon Linux instance, the default user name is ec2-user. For Ubuntu, the defaultuser name is ubuntu. Some AMIs allow you to log in as root.
6. The Key name field is automatically populated for you.
7. In Private key path, enter the fully qualified path to your .pem private key file.
8. For Save key location, click Stored in browser cache to store the key location in your browsercache so the key location is detected in subsequent browser sessions, until you clear your browser’scache.
9. Click Launch SSH Client.
10. If necessary, click Yes to trust the certificate.
11. Click Run to run the MindTerm client.
12. If you accept the license agreement, click Accept.
13. If this is your first time running MindTerm, a series of dialog boxes will ask you to confirm setup foryour home directory and other settings.
14. Confirm settings for MindTerm setup.
15. A screen similar to the following opens and you are connected to your instance.
28
Getting Started with AWS Web Application Hosting forLinux
Connecting to your Amazon EC2 Instance from YourWeb Browser Using the MindTerm SSH Client

If you have trouble connecting using MindTerm, check the following:
• Make sure you installed Java and enabled it in your browser.
• Make sure you are using the correct user name.
• Make sure you have typed the correct key pair and path to your private key pair.
• Make sure you have configured your security group to allow you to connect to your instance. .
• If you still continue to experience issues, check the AWS Forums for a possible solution.
16. Use the sudo service httpd start command to start the web server.
sudo service httpd start
Connect to Your Amazon EC2 Instance fromWindows Using PuTTYIf you are running Windows from your local machine, you will need to install PuTTy and PuTTyGen sinceSSH is not built in. To connect to a Linux instance, you must retrieve the initial administrator passwordfirst, and then use it with Microsoft Remote Desktop.You'll need the contents of the private key file thatyou created (e.g., mykeypair.pem) in Step 5: Create a Key Pair (p. 14).
To connect to your Amazon EC2 instance from a Windows machine
1. Install PuTTy and PuTTyGen.
• Download and install PuTTy. A search on "download Putty" on Google returns a list of downloadsites. Be certain that you install both PuTTy and PuTTyGen, because you will need both of them.
2. Convert the key pair using PuTTyGen. (For information on key pairs see Step 5: Create a KeyPair (p. 14)).
a. Launch PuTTyGen and select Import Key from the Conversions menu.
b. Browse for mykeypair.pem, and import the key.
29
Getting Started with AWS Web Application Hosting forLinux
Connect to Your Amazon EC2 Instance from WindowsUsing PuTTY

c. Click Save private key. Ignore the dialog box that asks if you want to do this without apassphrase. Save the key as mykeypair.ppk.
d. Close PuTTyGen.
3. Configure the SSH settings.
a. Launch PuTTy, expand the SSH node, and click Auth.
b. Enter the location for mykeypair.ppk.
4. Modify the keepalive.
a. In the PuTTy Configuration window, in the Category pane, click Connection.
b. Type 60 in the Seconds between keepalives (0 to turn off) box. If you don't change this value,your session will time out.
30
Getting Started with AWS Web Application Hosting forLinux
Connect to Your Amazon EC2 Instance from WindowsUsing PuTTY
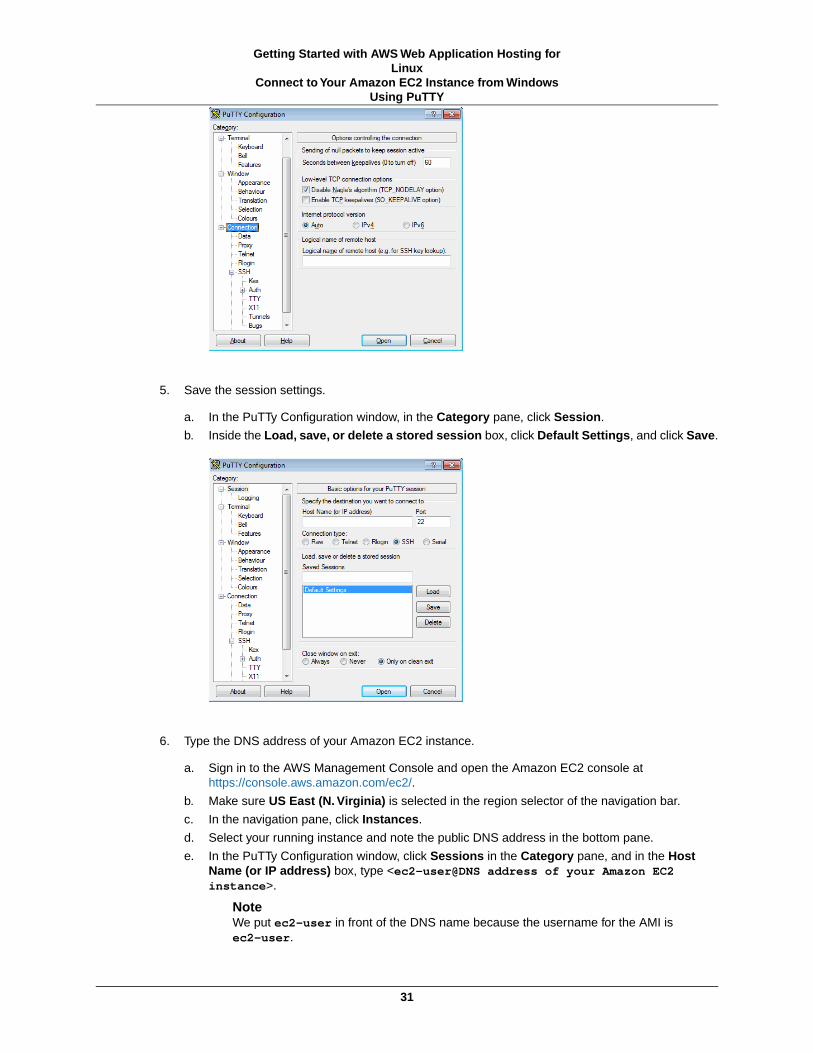
5. Save the session settings.
a. In the PuTTy Configuration window, in the Category pane, click Session.
b. Inside the Load, save, or delete a stored session box, click Default Settings, and click Save.
6. Type the DNS address of your Amazon EC2 instance.
a. Sign in to the AWS Management Console and open the Amazon EC2 console athttps://console.aws.amazon.com/ec2/.
b. Make sure US East (N. Virginia) is selected in the region selector of the navigation bar.
c. In the navigation pane, click Instances.
d. Select your running instance and note the public DNS address in the bottom pane.
e. In the PuTTy Configuration window, click Sessions in the Category pane, and in the HostName (or IP address) box, type <ec2-user@DNS address of your Amazon EC2instance>.
NoteWe put ec2-user in front of the DNS name because the username for the AMI isec2-user.
31
Getting Started with AWS Web Application Hosting forLinux
Connect to Your Amazon EC2 Instance from WindowsUsing PuTTY

f. Click Open. When the PuTTY Security Alert dialog box appears, click Yes to confirm that thefingerprint is OK. The SSH PuTTY window will launch.
NoteThe SSH fingerprint will eventually show up in the system log.You can use the SSHfingerprint as a comparison to protect against a man in the middle attack.
Your screen should look similar to the following screen.
g. Use the sudo service httpd start command to start the web server.
sudo service httpd start
Your screen should look similar to the following screen.
32
Getting Started with AWS Web Application Hosting forLinux
Connect to Your Amazon EC2 Instance from WindowsUsing PuTTY

Now that you have successfully logged into your AMI, you are ready to configure your AMI. Forinstructions on how to configure your AMI, see Configure the Amazon EC2 Instance (p. 34).
Connecting to Your Amazon EC2 Instance from aLinux/UNIX Machine Using a Standalone SSHClientUse the ssh command to connect to your Linux/UNIX instance from a Linux/UNIX machine.
NoteMost Linux and UNIX machines include an SSH client by default. If yours doesn't, the OpenSSHproject provides a free implementation of the full suite of SSH tools. For more information, go tohttp://www.openssh.org .
To use SSH to connect
1. In a command line shell, change directories to the location of the private key file that you created inStep 5: Create a Key Pair (p. 14).
2. Use the chmod command to make sure your private key file isn't publicly viewable. For example, formykeyapir.pem, you would enter:
chmod 400 mykeypair.pem
3. Sign in to the AWS Management Console and open the Amazon EC2 console athttps://console.aws.amazon.com/ec2/.
4. Make sure US East (N. Virginia) is selected in the region selector of the navigation bar.
5. In the left navigation pane, click Instances.
6. Select your instance, and then click Connect.
7. Click A Java SSH client directly from my browser (Java required). AWS automatically detectsthe public DNS address of your instance and the key pair name you launched the instance with.
8. Connect to your instance using the instance's public DNS name. For example, if the key file ismykeypair.pem and the instance's DNS name is ec2-107-20-66-228.compute-1.amazonaws.com,use the following command.
33
Getting Started with AWS Web Application Hosting forLinux
Connecting to Your Amazon EC2 Instance from aLinux/UNIX Machine Using a Standalone SSH Client

ssh -i mykeypair.pem [email protected]
NoteWe use ec2-user as the username in this exercise for this AMI.
You'll see a response like the following.
The authenticity of host 'ec2-107-20-66-228.compute-1.amazonaws.com (10.254.142.33)'can't be established.RSA key fingerprint is 00:00:00:00:00:00:00:00:00:00:00:00:00:00:00.Are you sure you want to continue connecting (yes/no)? yes
9. Enter yes.
You'll see a response like the following.
Warning: Permanently added 'ec2-107-20-66-228.compute-1.amazonaws.com' (RSA)
to the list of known hosts.
10. Use the sudo service httpd start command to start the web server.
sudo service httpd start
You'll see a response like the following.
Starting httpd [OK]
Now that you have successfully logged into your AMI, you are ready to configure your AMI. Forinstructions on how to configure your AMI, see Configure the Amazon EC2 Instance (p. 34).
Configure the Amazon EC2 InstanceIn this topic we will configure the running AMI. First, let's configure the health check for the load balancerso that we can connect to the instance through our load balancer. We will temporarily change the healthcheck to point to the install.php script until our instance is configured. After the instance is configured wewill point the health check back to root.
To configure the health check to point to the install script
1. Open the Amazon EC2 console at https://console.aws.amazon.com/ec2/.
2. Make sure US East (N. Virginia)is selected in the region selector of the navigation bar.
3. In the left navigation pane, click Load Balancers.
4. Click your load balancer and click the Health Check tab.
34
Getting Started with AWS Web Application Hosting forLinux
Configure the Amazon EC2 Instance

5. Click Edit Health Check.
6. In the Configure Health Check dialog box, type /install.php in the Ping Path box. Then clickSave.
Configure the application
1. With your load balancer still selected, click the Description tab. Make a note of the public DNSName.
2. Open your web browser, and type the public DNS address of your load balancer in the address bar.
3. On the Choose profile page, click Standard and Save and continue.
35
Getting Started with AWS Web Application Hosting forLinux
Configure the Amazon EC2 Instance

4. On the Choose language page, click English and Save and continue.
5. On the Set up database page enter the following information.
a. Click MySQL, MariaDB, or equivalent for database type.
b. In the Database name box, type the name of your database. In our example, we use mydb.
c. In the Database username box, type the username for your database. In our example, we useawsuser.
d. In the Database password box, type the password for your database. In our example, we usemypassword.
36
Getting Started with AWS Web Application Hosting forLinux
Configure the Amazon EC2 Instance
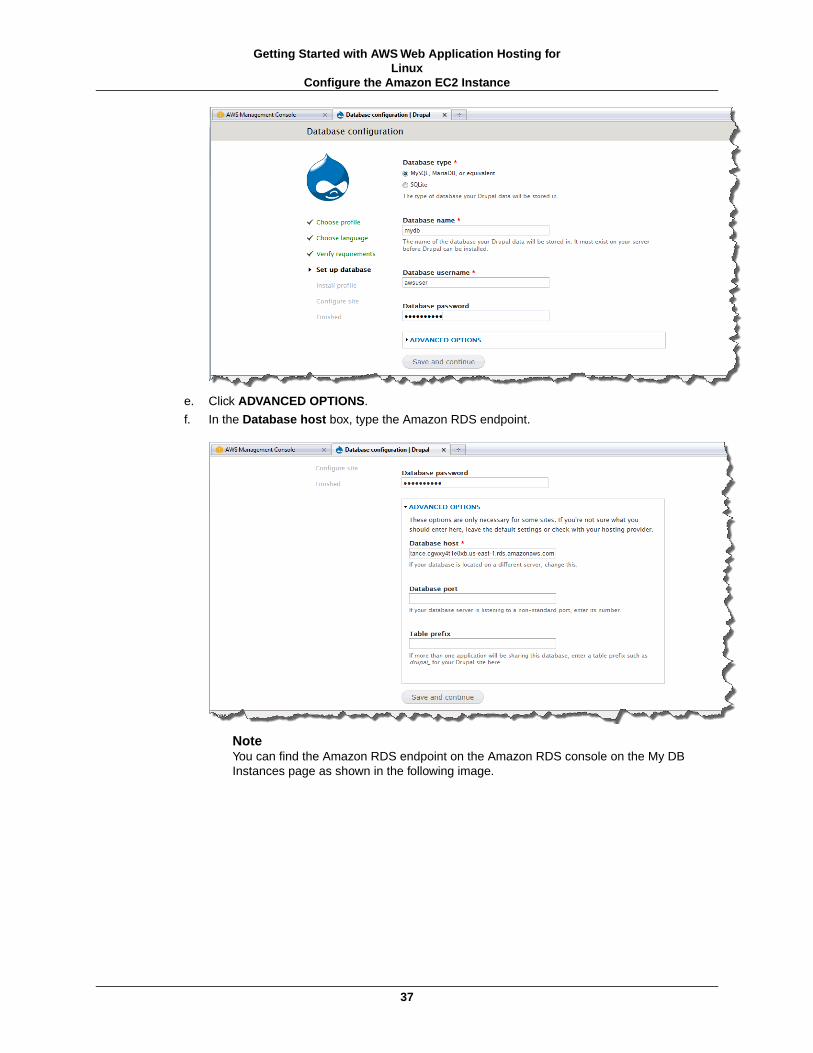
e. Click ADVANCED OPTIONS.
f. In the Database host box, type the Amazon RDS endpoint.
NoteYou can find the Amazon RDS endpoint on the Amazon RDS console on the My DBInstances page as shown in the following image.
37
Getting Started with AWS Web Application Hosting forLinux
Configure the Amazon EC2 Instance

NoteMake sure that your database instance is up and running before proceeding to the nextstep. The status should say available as shown in the above diagram.
g. Click Save and continue. The Configure site page appears.
6. On the Configure site page, enter the following information.
a. In the Site name box, type the DNS address of the load balancer as you did at the beginningof this procedure.
b. In the Site e-mail address box, type an email address.
c. In the Username box, type a username.
d. In the Password box, type a password.
e. In the Confirm password box, re-type the password.
f. Click Save and continue.
38
Getting Started with AWS Web Application Hosting forLinux
Configure the Amazon EC2 Instance

The installation is complete.
7. Click Visit your new site.Your new site appears.
8. Click Add new content to add one new article to your new site.
Now that our new site is created, we can backup your database.
To backup your database
1. At the prompt, type the following command to change to the home directory.
cd
2. At the prompt, type the following command to create a new folder called backups.
mkdir backups
3. At the prompt, type the following command to back up your existing database.
39
Getting Started with AWS Web Application Hosting forLinux
Configure the Amazon EC2 Instance

mysqldump -u awsuser -pmypassword mydb --host=your Amazon RDS endpoint > backups/backup.sql
Make sure to replace the your Amazon RDS endpoint with your Amazon RDS endpoint you notedin the previous step.
4. Verify the backup exists.
a. At the prompt, type the following command to change to the backups folder.
cd backups
b. At the prompt, type the following command to list the contents of the directory.
ls -al
To configure the health check to point to the root document
1. In the AWS Management Console, click the Amazon EC2 tab.
2. Click Instances in the Navigation pane.
3. In the Navigation pane select US East (N. Virginia) from the Region drop-down menu.
4. In the Load Balancers pane, click your load balancer and click the Health Check tab.
5. Click Edit Health Check.a.
b. In the Configure Health Check dialog box, type / in the Ping Path box.
40
Getting Started with AWS Web Application Hosting forLinux
Configure the Amazon EC2 Instance

Congratulations! You just successfully deployed your web application using Amazon Web Services! Now,in the future if we decide we want to launch more instances we don't want to have to customize eachone. Let's move on to the step to create a custom AMI with all our configuration changes.
Step 10: Create a Custom AMINow that we have customized our Amazon EC2 instance, we can save this Amazon Machine Image(AMI) and launch future environments with this saved configuration using AWS CloudFormation. This isan optional step. If you prefer to finish the tutorial now, you can skip ahead to clean up your AWS resourcesin Step 12: Clean Up (p. 51).
To create an AMI from a running Amazon EBS-backed instance
1. Open the Amazon EC2 console at https://console.aws.amazon.com/ec2/.
2. Make sure that US East (N. Virginia) is selected in the region selector of the navigation bar.
3. Click Instances in the navigation pane.
4. On the Instances page, right-click your running instance and select Create Image.
5. Fill in a unique image name and an optional description of the image (up to 255 characters), andclick Create Image.
TipIf you're familiar with Amazon EC2 instance store-backed AMIs, the image name replacesthe manifest name (e.g., s3_bucket/something_of_your_choice.manifest.xml), which uniquelyidentifies each Amazon Amazon EC2 instance store-backed AMI.
Amazon EC2 powers down the instance, takes images of any volumes that were attached, createsand registers the AMI, and then reboots the instance.
6. Go to the AMIs page and view the AMI's status. While the new AMI is being created, its status ispending.
It takes a few minutes for the whole process to finish.
7. Once your new AMI's status is available, go to the Snapshots page and view the new snapshot thatwas created for the new AMI. Any instance you launch from the new AMI uses this snapshot for itsroot device volume.You could update your Auto Scaling group with the new AMI, however we willdo this as part of the AWS CloudFormation step.
41
Getting Started with AWS Web Application Hosting forLinux
Step 10: Create a Custom AMI

We've taken a lot of steps so far to create all of our AWS resources, deploy our application, and customizeour AMI. Wouldn't it be great if we could save all of this information and launch new environments withouthaving to manually configure everything again? We can! AWS CloudFormation is a way to launchenvironments easily. That is, when you launch an AWS CloudFormation environment, you are able tolaunch specific AMIs with particular key pairs, on pre-defined instance sizes, and behind load balancers.And if any portion of your environment fails to launch, the environment rolls itself back, terminating all thepieces along the way. Let's move on to the next topic to begin using AWS CloudFormation.
Step 11: Launch New Environments Using AWSCloudFormation
Topics
• Create an AWS CloudFormation Template (p. 42)
• Modify a CloudFormation Template (p. 46)
• Create an AWS CloudFormation Stack (p. 47)
You can use AWS CloudFormation to create and provision AWS infrastructure deployments predictablyand repeatedly. Use AWS CloudFormation to build highly reliable, highly scalable, cost-effective applicationswithout worrying about creating and configuring the underlying AWS infrastructure. AWS CloudFormationconsists of template files you use to create and delete collections of resources as a single unit (an AWSCloudFormation stack). Using AWS CloudFormation you can leverage other services such as such asAmazon Elastic Compute Cloud (Amazon EC2), Amazon Elastic Block Store (Amazon EBS), AmazonSimple Notification Service (Amazon SNS), Elastic Load Balancing, and Auto Scaling.
In this example, we'll use the CloudFormer tool to generate a template based on the AWS resources wejust created. CloudFormer is intended to create a starting point for your template. After you create thetemplate, you'll customize the template to launch a new enviroment with multiple instances spanningmultiple Availability Zones to enable a fault-tolerant architecture.
This is an optional step. If you want to skip this step, you can move on to Step 12: Clean Up (p. 51) tobegin deleting your resources.
Create an AWS CloudFormation TemplateFirst, you'll need to create a template based on the resources you just created.You'll use a tool calledCloudFormer that collects information about all your running resources and creates a template.CloudFormer is a prototype that helps you get started.You'll then make some tweaks to the templatebefore you create your new stack. Visit the AWS Forums to learn more and to run the tool.
After generating the template and making a few tweaks, you may have something that looks like thefollowing.
42
Getting Started with AWS Web Application Hosting forLinux
Step 11: Launch New Environments Using AWSCloudFormation

{
"AWSTemplateFormatVersion": "2010-09-09", "Resources": { "elbMyLB": { "Type": "AWS::ElasticLoadBalancing::LoadBalancer", "Properties": { "AvailabilityZones": [ "us-east-1b", "us-east-1c" ], "HealthCheck": { "HealthyThreshold": "2", "Interval": "30", "Target": "HTTP:80/", "Timeout": "5", "UnhealthyThreshold": "2" },
"Listeners": [ { "InstancePort": "80", "LoadBalancerPort": "80", "Protocol": "HTTP", "PolicyNames": [ ] } ] } },
"asgMyAutoScalingGroup": { "Type": "AWS::AutoScaling::AutoScalingGroup", "Properties": { "AvailabilityZones": [ "us-east-1b", "us-east-1c" ], "Cooldown": "300", "DesiredCapacity": "1", "MaxSize": "1", "MinSize": "1", "LaunchConfigurationName": { "Ref": "lcMyLC" }, "LoadBalancerNames": [ { "Ref": "elbMyLB" } ] } },
"lcMyLC": { "Type": "AWS::AutoScaling::LaunchConfiguration", "Properties": { "ImageId": "ami-45b77f2c",
43
Getting Started with AWS Web Application Hosting forLinux
Create an AWS CloudFormation Template

"InstanceType": "t1.micro", "KeyName": "mykeypair", "SecurityGroups": [ { "Ref": "sgwebappsecuritygroup" } ] } },
"aspMyScaleUpPolicy" : { "Type" : "AWS::AutoScaling::ScalingPolicy", "Properties" : { "AdjustmentType" : "ChangeInCapacity", "AutoScalingGroupName" : { "Ref" : "asgMyAutoScalingGroup" }, "Cooldown" : "300", "ScalingAdjustment" : "1" } },
"cwCPUAlarmHigh": { "Type": "AWS::CloudWatch::Alarm", "Properties": { "AlarmDescription": "Scale-up if CPU > 60% for 10 minutes", "MetricName": "CPUUtilization", "Namespace": "AWS/EC2", "Statistic": "Average", "Period": "300", "EvaluationPeriods": "2", "Threshold": "60", "AlarmActions": [ { "Ref": "aspMyScaleUpPolicy" } ], "Dimensions": [ { "Name": "AutoScalingGroupName", "Value": { "Ref": "asgMyAutoScalingGroup" } } ], "ComparisonOperator": "GreaterThanThreshold" } },
"rdsmydbinstance": { "Type": "AWS::RDS::DBInstance", "Properties": { "AllocatedStorage": "5", "BackupRetentionPeriod": "1", "DBInstanceClass": "db.m1.small", "DBName": "MyDatabase", "DBParameterGroupName": "default.mysql5.1", "Engine": "mysql", "EngineVersion": "5.1.57", "MasterUsername": "awsuser", "MasterUserPassword": "awsuser", "Port": "3306", "PreferredBackupWindow": "10:00-10:30", "PreferredMaintenanceWindow": "sun:05:00-sun:05:30", "MultiAZ": "true", "DBSecurityGroups": [
44
Getting Started with AWS Web Application Hosting forLinux
Create an AWS CloudFormation Template

{ "Ref": "dbsgmydbsecuritygroup" } ] } },
"sgwebappsecuritygroup": { "Type": "AWS::EC2::SecurityGroup", "Properties": { "GroupDescription": "this is a security group for demo", "SecurityGroupIngress": [ { "IpProtocol": "tcp", "FromPort": "80", "ToPort": "80", "SourceSecurityGroupName": "amazon-elb-sg", "SourceSecurityGroupOwnerId": "amazon-elb" }, { "IpProtocol": "tcp", "FromPort": "22", "ToPort": "22", "CidrIp": "0.0.0.0/0" } ] } },
"dbsgmydbsecuritygroup": { "Type": "AWS::RDS::DBSecurityGroup", "Properties": { "GroupDescription": "my database security group", "DBSecurityGroupIngress": [ { "EC2SecurityGroupName": { "Ref": "sgwebappsecuritygroup" }, "EC2SecurityGroupOwnerId": "123456789012" } ] } } },
"Description": ""}
You'll want to make a couple of changes to this template before you launch your new environment. Inthis tutorial, you only launched one Amazon EC2 instance. However, it's a best practice to launch multipleinstances across multiple Availability Zones; you'll want to update your Auto Scaling group to launch moreinstances.You'll also want to launch a new environment with your custom AMI. Finally, You'll update yourdatabase information to include your database name and password.
45
Getting Started with AWS Web Application Hosting forLinux
Create an AWS CloudFormation Template

Modify a CloudFormation TemplateNow that the template has been created, let's modify it so that you can launch a new environment withthe custom AMI so that you will have multiple instances spanned across multiple Availability Zones.
To launch a new stack with a modified template
1. Open the template you created using CloudFormer.
2. Update the Min Size, Max Size, and Desired Capacity in the Auto Scaling group to 2.
"asgMyAutoScalingGroup": { "Type": "AWS::AutoScaling::AutoScalingGroup", "Properties": { "AvailabilityZones": [ "us-east-1b", "us-east-1c" ], "Cooldown": "300", "DesiredCapacity": "2", "MaxSize": "2", "MinSize": "2", "LaunchConfigurationName": { "Ref": "lcMyLC" }, "LoadBalancerNames": [ { "Ref": "elbMyLB" } ] } },
3. Update the Image ID in the Launch Configuration group to the custom AMI that you created inStep 10: Create a Custom AMI (p. 41).
NoteYour AMI ID will be different than the one you see below.
Add the UserData information as you see below so the web server will startup on bootup.
NoteMake sure to put the comma right after the ] and just before UserData.
"lcMyLC": { "Type": "AWS::AutoScaling::LaunchConfiguration", "Properties": { "ImageId": "ami-91b270f8", "InstanceType": "t1.micro", "KeyName": "mykeypair", "SecurityGroups": [ { "Ref": "sgwebappsecuritygroup" } ],
46
Getting Started with AWS Web Application Hosting forLinux
Modify a CloudFormation Template

"UserData" : { "Fn::Base64" : { "Fn::Join" : ["", [ "#!/bin/bash -v\n", "sed -i 's/AllowOverride None/AllowOverride All/g' /etc/httpd/conf/ht tpd.conf\n", "service httpd start\n" ]]}} } },
4. Update the following parameters in the Database group.
• Update DBName to awsuser.
• Update MasterUserPassword to mypassword.
"mydbinstance": { "Type": "AWS::RDS::DBInstance", "Properties": { "AllocatedStorage": "5", "BackupRetentionPeriod": "1", "DBInstanceClass": "db.m1.small", "DBName": "mydb", "DBParameterGroupName": "default.mysql5.1", "Engine": "mysql", "EngineVersion": "5.1.57", "MasterUsername": "awsuser", "MasterUserPassword": "mypassword", "Port": "3306", "PreferredBackupWindow": "08:30-09:00", "PreferredMaintenanceWindow": "fri:03:30-fri:04:00", "MultiAZ": "true", "DBSecurityGroups": [ { "Ref": "dbsgmydbsecuritygroup" } ] } },
Now that you have modified the template, let's move on to the next step to launch your new environmentusing your template.
Create an AWS CloudFormation StackNow that you have modified your AWS CloudFormation template, let's create a new stack to launch yournew environment. Before you launch your new stack, you can verify that it works by cleaning up all yourAWS resources except for your key pair and custom AMI. For instructions on how to clean up yourresources see Step 12: Clean Up (p. 51).
47
Getting Started with AWS Web Application Hosting forLinux
Create an AWS CloudFormation Stack
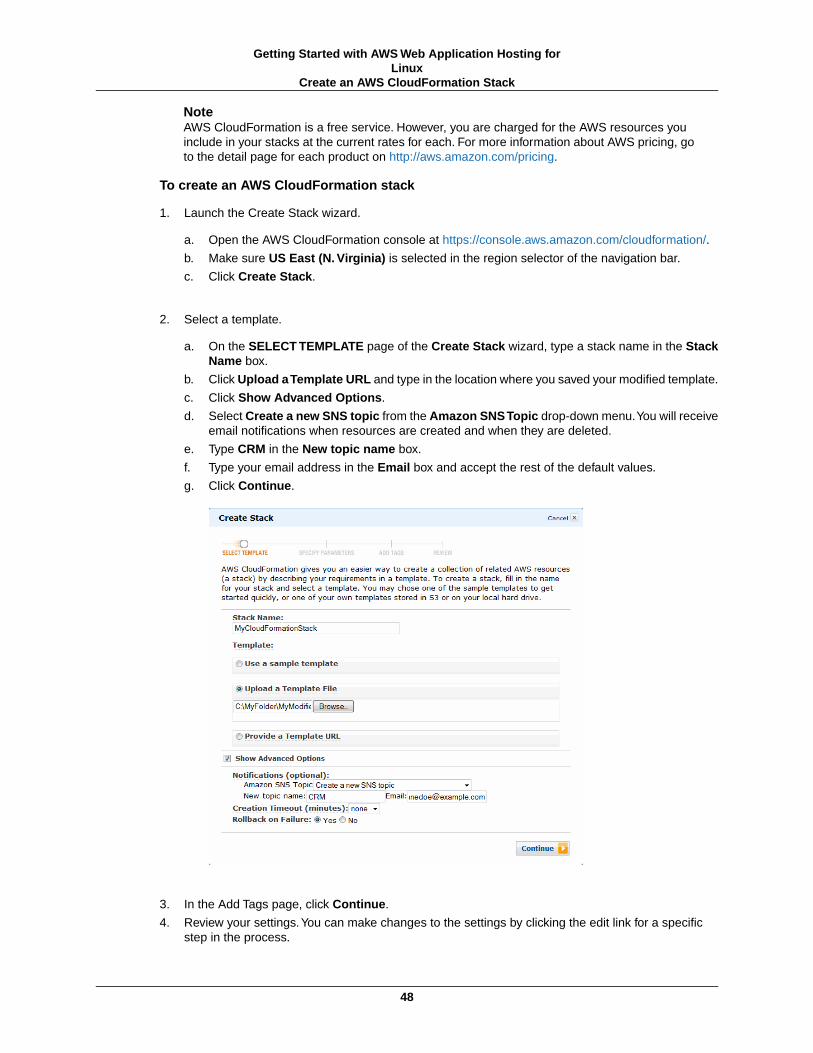
NoteAWS CloudFormation is a free service. However, you are charged for the AWS resources youinclude in your stacks at the current rates for each. For more information about AWS pricing, goto the detail page for each product on http://aws.amazon.com/pricing.
To create an AWS CloudFormation stack
1. Launch the Create Stack wizard.
a. Open the AWS CloudFormation console at https://console.aws.amazon.com/cloudformation/.
b. Make sure US East (N. Virginia) is selected in the region selector of the navigation bar.
c. Click Create Stack.
2. Select a template.
a. On the SELECT TEMPLATE page of the Create Stack wizard, type a stack name in the StackName box.
b. Click Upload a Template URL and type in the location where you saved your modified template.
c. Click Show Advanced Options.
d. Select Create a new SNS topic from the Amazon SNS Topic drop-down menu.You will receiveemail notifications when resources are created and when they are deleted.
e. Type CRM in the New topic name box.
f. Type your email address in the Email box and accept the rest of the default values.
g. Click Continue.
3. In the Add Tags page, click Continue.
4. Review your settings.You can make changes to the settings by clicking the edit link for a specificstep in the process.
48
Getting Started with AWS Web Application Hosting forLinux
Create an AWS CloudFormation Stack

5. Click Continue.
A confirmation window opens.
6. Click Close.
The confirmation window closes, returning you to the CloudFormation page.Your new AWSCloudFormation template appears in the list with the status set to CREATE_IN_PROGRESS.
NoteYour stack will take a few minutes to create. Make sure to click Refresh in the Stacks pageto see when the template has successfully been created.
After your stack has been created, you can verify that it all works.
49
Getting Started with AWS Web Application Hosting forLinux
Create an AWS CloudFormation Stack

To verify your AWS CloudFormation stack works
1. Connect to one of your newly created Amazon EC2 instances as you did in Connecting to YourAmazon EC2 Instance from a Linux/UNIX Machine Using a Standalone SSH Client (p. 33) or Connectto Your Amazon EC2 Instance from Windows Using PuTTY (p. 29).
2. Switch the database to the Amazon Relational Database Service (Amazon RDS) database
a. Navigate to the Amazon RDS console and get your new Amazon RDS endpoint that AWSCloudFormation created. Follow the same process you used in Step 9: Deploy YourApplication (p. 27).
b. In the SSH window, at the prompt type the following command.
cd
c. At the prompt type the following command.
mysql -u awsuser -pmypassword --database=mydb --host=your Amazon RDS endpoint < backups/backup.sql
Make sure to replace your Amazon RDS endpoint with your Amazon RDS endpoint. This is theendpoint that you retrieved in the previous step.
d. At the prompt type the following command.
cd /var/www/html/sites/default
e. At the prompt, type the following command to list the contents of the directory.
ls
f. At the prompt, type the following command to open the settings.php file.
vi settings.php
g. Use the PgDn key to navigate to a section that looks similar to the following.
$databases = array ('default' => array ( 'default' => array ( 'database' => 'mydb', 'username' => 'awsuser', 'password' => 'mypassword', 'host' => 'mydbinstance.cgwxy4t1e0xb.us-east-1.rds.amazonaws.com',
'port' => '', 'driver' => 'mysql', 'prefix' => '', ),
50
Getting Started with AWS Web Application Hosting forLinux
Create an AWS CloudFormation Stack

),);
h. Press the i key to enter Insert mode.
i. Replace mydbinstance.cgwxy4t1e0xb.us-east-1.rds.amazonaws.com with your newAmazon RDS endpoint.
NoteRight-click to paste the contents if you prefer copy and paste.
$databases = array ('default' => array ( 'default' => array ( 'database' => 'mydb', 'username' => 'awsuser', 'password' => 'mypassword', 'host' => 'mycloudformationstack-rdsmydbinstance-1276gxy2eians.cg wxy4t1e0xb.us-east-1.rds.amazonaws.com', 'port' => '', 'driver' => 'mysql', 'prefix' => '', ), ),);
j. Press Esc and then :wq to save the file and quit.
k. Repeat the same steps for the other Amazon EC2 instance.
l. Verify that it all works by navigating to the Amazon EC2 console and getting the DNS name forthe new load balancer your Amazon CloudFormation stack created, just as you did in Step 9:Deploy Your Application (p. 27).
Where You're AtCongratulations! You have just launched your new environment using the AWS resources you createdin this tutorial.Your Elastic Load Balancer is now pointing to both of your Amazon EC2 instances acrossmultiple Availability Zones.
To delete an AWS CloudFormation stack
1. Open the AWS CloudFormation console at https://console.aws.amazon.com/cloudformation/.
2. Click the stack you want to delete, and click Delete Stack.
Step 12: Clean UpTopics
• Terminate Your Amazon EC2 Instances in Your Auto Scaling Group (p. 52)
• Terminate Your DB Instance (p. 53)
51
Getting Started with AWS Web Application Hosting forLinux
Step 12: Clean Up

• Delete Your CloudWatch Alarm (p. 54)
• Delete Your Elastic Load Balancer (p. 55)
• Delete a Key Pair (p. 55)
• Delete an Amazon EC2 Security Group (p. 56)
• Delete Your Custom AMI (p. 56)
Congratulations! You have just deployed your web application. Now, to prevent accruing any furthercharges, let's terminate our environments and clean our resources.
Terminate Your Amazon EC2 Instances in YourAuto Scaling GroupIn this section you will first remove the Amazon EC2 instance, then delete the Auto Scaling group, andfinally delete the launch configuration.
You must terminate all Amazon EC2 instances in an Auto Scaling group before you can delete the group.A simple way to terminate all instances in a group is to update the group so that both the minimum sizeand maximum size are set to zero.
To remove the Amazon EC2 instance from the Auto Scaling group
1. Open a command prompt window: From a Windows computer, click Start. In the Search box, typecmd, and then press Enter.
2. You'll use the as-update-auto-scaling-group command to update the Auto Scaling group thatwe created earlier. At the command prompt, type the following, and then press Enter:
PROMPT>as-update-auto-scaling-group MyAutoScalingGroup --min-size 0 --max-size 0
Auto Scaling returns the following:
OK-Updated AutoScalingGroup
3. Now you'll use the as-describe-auto-scaling-groups command to verify that Auto Scalinghas removed the instance from MyAutoScalingGroup.
It can take a few minutes for the instance to terminate, so you might have to check the status morethan once. At the command prompt, type the following, and then press Enter:
PROMPT>as-describe-auto-scaling-groups MyAutoScalingGroup --headers
If the instance termination is still in progress, Auto Scaling returns information similar to the following.(Your value for INSTANCE-ID will differ):
AUTO-SCALING-GROUP GROUP-NAME LAUNCH-CONFIG AVAILABILITY-ZONES LOAD-BALANCERS MIN-SIZE MAX-SIZE DESIRED-CAPACITYAUTO-SCALING-GROUP MyAutoScalingGroup MyLC us-east-1b,us-east-1c MyLB 0 0 0INSTANCE INSTANCE-ID AVAILABILITY-ZONE STATE STATUS LAUNCH-CONFIG
52
Getting Started with AWS Web Application Hosting forLinux
Terminate Your Amazon EC2 Instances in Your AutoScaling Group
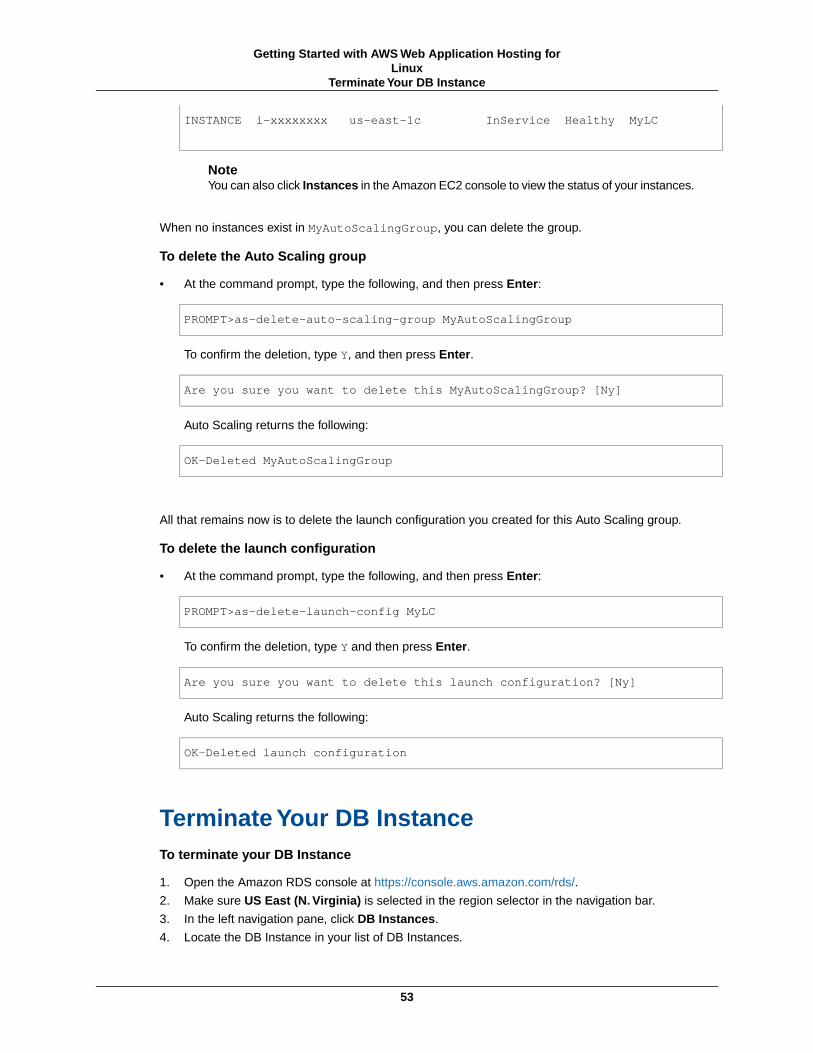
INSTANCE i-xxxxxxxx us-east-1c InService Healthy MyLC
NoteYou can also click Instances in the Amazon EC2 console to view the status of your instances.
When no instances exist in MyAutoScalingGroup, you can delete the group.
To delete the Auto Scaling group
• At the command prompt, type the following, and then press Enter:
PROMPT>as-delete-auto-scaling-group MyAutoScalingGroup
To confirm the deletion, type Y, and then press Enter.
Are you sure you want to delete this MyAutoScalingGroup? [Ny]
Auto Scaling returns the following:
OK-Deleted MyAutoScalingGroup
All that remains now is to delete the launch configuration you created for this Auto Scaling group.
To delete the launch configuration
• At the command prompt, type the following, and then press Enter:
PROMPT>as-delete-launch-config MyLC
To confirm the deletion, type Y and then press Enter.
Are you sure you want to delete this launch configuration? [Ny]
Auto Scaling returns the following:
OK-Deleted launch configuration
Terminate Your DB InstanceTo terminate your DB Instance
1. Open the Amazon RDS console at https://console.aws.amazon.com/rds/.
2. Make sure US East (N. Virginia) is selected in the region selector in the navigation bar.
3. In the left navigation pane, click DB Instances.
4. Locate the DB Instance in your list of DB Instances.
53
Getting Started with AWS Web Application Hosting forLinux
Terminate Your DB Instance
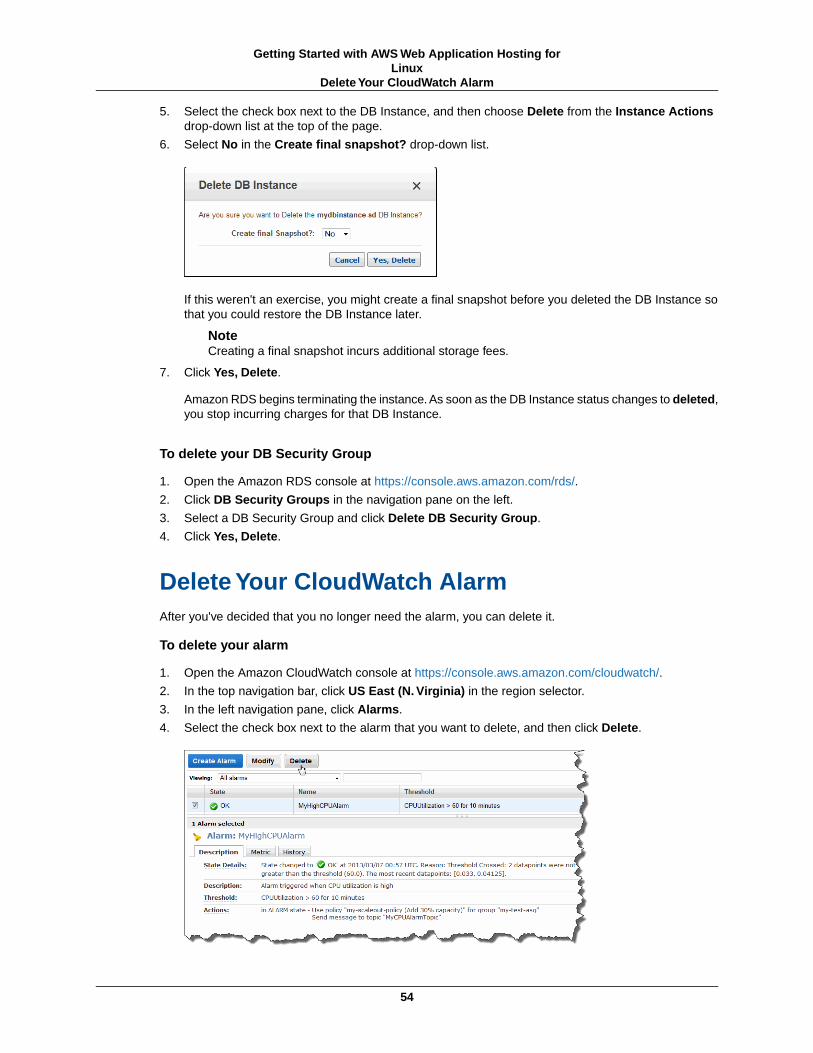
5. Select the check box next to the DB Instance, and then choose Delete from the Instance Actionsdrop-down list at the top of the page.
6. Select No in the Create final snapshot? drop-down list.
If this weren't an exercise, you might create a final snapshot before you deleted the DB Instance sothat you could restore the DB Instance later.
NoteCreating a final snapshot incurs additional storage fees.
7. Click Yes, Delete.
Amazon RDS begins terminating the instance. As soon as the DB Instance status changes to deleted,you stop incurring charges for that DB Instance.
To delete your DB Security Group
1. Open the Amazon RDS console at https://console.aws.amazon.com/rds/.
2. Click DB Security Groups in the navigation pane on the left.
3. Select a DB Security Group and click Delete DB Security Group.
4. Click Yes, Delete.
Delete Your CloudWatch AlarmAfter you've decided that you no longer need the alarm, you can delete it.
To delete your alarm
1. Open the Amazon CloudWatch console at https://console.aws.amazon.com/cloudwatch/.
2. In the top navigation bar, click US East (N. Virginia) in the region selector.
3. In the left navigation pane, click Alarms.
4. Select the check box next to the alarm that you want to delete, and then click Delete.
54
Getting Started with AWS Web Application Hosting forLinux
Delete Your CloudWatch Alarm

5. When a confirmation message appears, click Yes, Delete.
Delete Your Elastic Load BalancerAs soon as your load balancer becomes available, AWS bills you for each hour or partial hour that youkeep the load balancer running. After you've decided that you no longer need the load balancer, you candelete it.
To delete your load balancer
1. Open the Amazon EC2 console at https://console.aws.amazon.com/ec2/.
2. In the top navigation bar, click US East (N. Virginia) in the region selector.
3. In the left navigation pane, click Load Balancers.
4. Select the check box next to the load balancer you want to delete and then click Delete.
5. When a confirmation message appears, click Yes, Delete.
Elastic Load Balancing deletes the load balancer. As soon as the load balancer is deleted, you stopincurring charges for that load balancer.
CautionEven after you delete a load balancer, the Amazon EC2 instances associated with the loadbalancer continue to run.You will continue to incur charges on the Amazon EC2 instanceswhile they are running.
Delete a Key PairThis is an optional step.You are not charged for keeping a key pair, and you may want to reuse the keypair for later use.
55
Getting Started with AWS Web Application Hosting forLinux
Delete Your Elastic Load Balancer

To delete a key pair
1. Open the Amazon EC2 console at https://console.aws.amazon.com/ec2/.
2. In the top navigation bar, click US East (N. Virginia) in the region selector.
3. In the left navigation pane, click Key Pairs.
4. Select the check box beside the key pair you want to delete, and then click Delete.
5. When a confirmation message appears, click Yes.
Delete an Amazon EC2 Security GroupTo delete a security group
1. Open the Amazon EC2 console at https://console.aws.amazon.com/ec2/.
2. In the top navigation bar, click US East (N. Virginia) in the region selector.
3. In the left navigation pane, click Security Groups.
4. In the details pane, under Security Groups, select a security group you want to delete, and thenclick Delete.
5. Click Yes, Delete.
Delete Your Custom AMITo delete an AMI and a snapshot
1. Open the Amazon EC2 console at https://console.aws.amazon.com/ec2/.
2. Make sure US East (N. Virginia) is selected in the region selector in the navigation bar.
3. In the left navigation pane, click AMIs.
4. Right-click your AMI, and select Deregister. When prompted, click Continue.
The image is deregistered, which means it is deleted and can no longer be launched.
5. Go to the Snapshots page, right-click the snapshot, and select Delete Snapshot. When prompted,click Yes, Delete.
The snapshot is deleted.
56
Getting Started with AWS Web Application Hosting forLinux
Delete an Amazon EC2 Security Group

Amazon Route 53
Amazon Route 53 is a scalable Domain Name System (DNS) web service. It provides secure and reliablerouting to your infrastructure that uses Amazon Web Services (AWS) products, such as Amazon ElasticCompute Cloud (Amazon EC2), Elastic Load Balancing, or Amazon Simple Storage Service (AmazonS3).You can also use Amazon Route 53 to route users to your infrastructure outside of AWS.
Amazon Route 53 automatically routes queries to the nearest DNS server in a global network of DNSservers, resulting in low latency. It is an authoritative DNS service, meaning it translates friendly domainsnames like www.example.com into IP addresses like 192.0.2.1.
You can manage your DNS records through the Amazon Route 53 API, or set account-level user andaccess management through the Identity and Access Management (IAM) API. Like other AWS products,there are no contracts or minimum commitments for using Amazon Route 53—you pay only for thedomains you configure and the number of queries that the service answers. For more information aboutAmazon Route 53 pricing, see Amazon Route 53 Pricing.
The following procedure explains the high-level steps you need to take to use Route 53 for this example.For instructions on how to do steps one through four, go to Amazon Route 53 Getting Started Guide. Forinformation on how to create an alias in the last step, go to How to Create an Alias Record Set in theAmazon Route 53 Developer Guide.
To use Amazon Route 53
1. Create a hosted zone for example.com.
2. Create a new DNS record for your static content (e.g., static.example.com) that points to yourCloudFront distribution (e.g., d18k4jybr69gw2.cloudfront.net).
3. Create a new DNS record for your website (e.g., www.example.com) that points to your Elastic LoadBalancer CNAME.
4. Confirm your requests are complete.
5. Update the registrar's name server records.
6. Create an alias for your load balancer which responds to queries for example.com andwww.example.com.You use the hosted zone ID for the load balancer (e.g., Z3DZXE0Q79N41H).
57
Getting Started with AWS Web Application Hosting forLinux
Amazon CloudFront
Amazon CloudFront is a content delivery service from Amazon Web Services that helps you improve theperformance, reliability, and availability of your web sites and applications. The content you deliver withCloudFront will be stored on a server referred to as an origin server. Amazon CloudFront works bydistributing your web content (such as images, video, and so on) using a network of edge locations aroundthe world.Your content is served from your configured Amazon S3 bucket or custom origin, to the edgelocation that is closest to the user who requests it. In this example, to make use of Amazon CloudFront,we would store our static content (images, html, etc.) in an Amazon S3 bucket, and then create aCloudFront distribution from our S3 bucket. Once our CloudFront distribution is created, we simply updatethe code to point our static content to our CloudFront distribution. For more information on how to do this,go to Start Using CloudFront with Amazon S3 in the Amazon CloudFront Getting Started Guide.
58
Getting Started with AWS Web Application Hosting forLinux

Pricing
Topics
• Amazon EC2 Cost Breakdown (p. 59)
• Amazon RDS Cost Breakdown (p. 61)
• Summing It All Up (p. 63)
The AWS Simple Monthly Calculator estimates your monthly bill. It provides per service cost breakdownas well as an aggregate monthly estimate.You can also use the tool to see an estimation and breakdownof costs for common solutions. This topic walks you through an example of how to use the AWS SimpleMonthly Calculator to estimate your monthly bill for the sample web application we just created.
NoteAWS pricing you see in this documentation is current as of the last update to this document.You should go to AWS Service Pricing Overview for the latest pricing.
Amazon EC2 Cost BreakdownThe following table shows the characteristics for Amazon EC2 we have identified for this web applicationhosting architecture.
DescriptionMetricCharacteristic
Assuming there is an average of30.5 days in a month, the instanceruns 732 hours/month
24 hrs/dayUptime
613 MB of memory, up to 2 ECUs(for short periodic bursts), EBSstorage only, 32-bit or 64-bitplatform
For a list of instance types, go tohttp://aws.amazon.com/ec2/instance-types/.
ti.micro instanceMachine Characteristics
59
Getting Started with AWS Web Application Hosting forLinux
Amazon EC2 Cost Breakdown

DescriptionMetricCharacteristic
The AMI is EBS-backed, thevolume will have 10 GBprovisioned storage, and 100 I/Orequests made to the volume persecond.
1 EBS Volume
Storage: 10 GB/Month
100 IOPS
Additional Storage
There are approximately 1,000hits per day and each response isabout 50 KB and each request isabout 5 KB.
Data In: 0.005 GB/day
Data Out: 0.05 GB/day
Data Transfer
On average in a given day, thereare 2 instances running.
2Instance Scale
ELB is used 24 hrs/day, 7days/week
ELB processes a total of 0.055GB/day (data in + data out)
Hourly usage: 732 hrs/month
Data processed: 1.525 GB/month
Elastic Load Balancing
We have setup detailedmonitoring for our Amazon EC2instances.
$3.50 per instance per monthDetailed Monitoring
The following image shows the cost breakdown for Amazon EC2 in the AWS Simple Monthly Calculator.
The total monthly cost is the sum of the cost of the running instances, EBS volumes and I/O requests,elastic load balancers, the data processed by the elastic load balancers, and Amazon CloudWatch metrics.
60
Getting Started with AWS Web Application Hosting forLinux
Amazon EC2 Cost Breakdown

CalculationFormulaVariable
$0.02
2
x 732
-------
$29.28
Instance cost per hour
Number of instances
x Uptime in hours
------------------------
Instance Cost
$0.10 X 10
+ (100 x ~2.6M x $0.10)/1M
-------------------------
$27.35
Storage rate X Storage Amount(GB)
+ (I/O requests rate x secondsper month x Request rate(per 1M
requests))
--------------------------------------------------------------------------
Additional Storage
732 x $0.025
+ 1.6775 x $0.008
-----------------
$18.31
Hours used x Hourly rate
+ (Data processed (GB) xProcess rate)
--------------------------------------
Elastic Load Balancing
2
x $3.50
-------
$7.00
Number of instances
x Detailed Monitoring Rate
--------------------------
Amazon CloudWatch
We use the AWS Simple Monthly calculator to estimate this.With the calculator, the total cost for AmazonEC2 is $81.94.
Amazon RDS Cost BreakdownThe following table shows the characteristics for Amazon RDS we have identified for this web applicationhosting architecture.
DescriptionMetricCharacteristic
24 Assuming there is an averageof 30.5 days in a month, theinstance runs 732 hours/month
24 hrs/dayUptime
1.7 GB memory, 1 ECU (1 virtualcore with 1 ECU), 64-bit platform,Moderate I/O Capacity
Small Amazon RDS instanceDatabase Characteristics
61
Getting Started with AWS Web Application Hosting forLinux
Amazon RDS Cost Breakdown
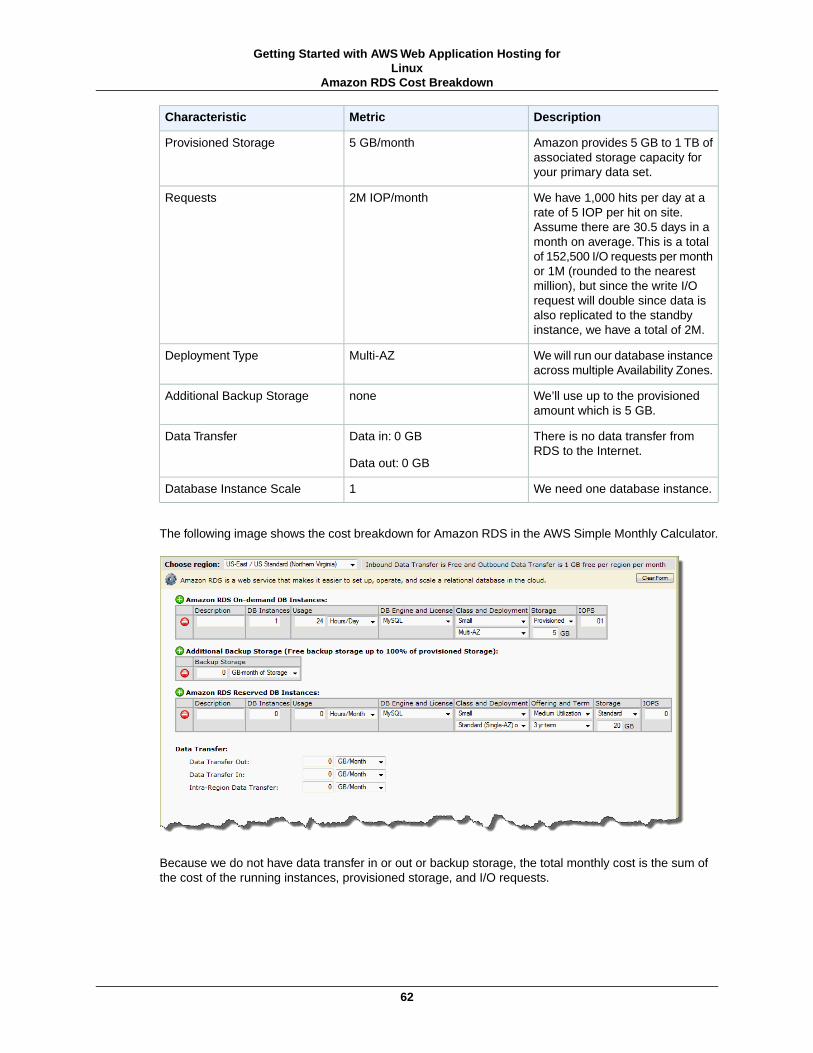
DescriptionMetricCharacteristic
Amazon provides 5 GB to 1 TB ofassociated storage capacity foryour primary data set.
5 GB/monthProvisioned Storage
We have 1,000 hits per day at arate of 5 IOP per hit on site.Assume there are 30.5 days in amonth on average. This is a totalof 152,500 I/O requests per monthor 1M (rounded to the nearestmillion), but since the write I/Orequest will double since data isalso replicated to the standbyinstance, we have a total of 2M.
2M IOP/monthRequests
We will run our database instanceacross multiple Availability Zones.
Multi-AZDeployment Type
We’ll use up to the provisionedamount which is 5 GB.
noneAdditional Backup Storage
There is no data transfer fromRDS to the Internet.
Data in: 0 GB
Data out: 0 GB
Data Transfer
We need one database instance.1Database Instance Scale
The following image shows the cost breakdown for Amazon RDS in the AWS Simple Monthly Calculator.
Because we do not have data transfer in or out or backup storage, the total monthly cost is the sum ofthe cost of the running instances, provisioned storage, and I/O requests.
62
Getting Started with AWS Web Application Hosting forLinux
Amazon RDS Cost Breakdown

CalculationFormulaVariable
$0.153
1
x 732
------
$112.00
Instance cost per hour
Number of instances
x Uptime in hours
------------------------
Instance Cost
$0.20
x 5
-------
$1.00
Storage rate
x Storage Amount (GB)
----------------------
Provisioned Storage
$0.10
x ~2
------
$0.22
I/O rate
x Number of requests (millions)
--------------------
I/O Requests
We use the AWS Simple Monthly calculator to estimate this.With the calculator, the total cost for AmazonRDS is $113.52.
Summing It All UpTo calculate the total cost for this scenario, we add the cost for Amazon EC2, Amazon RDS, and theAWS Data Transfer Out, and subtract any discount that falls into the AWS Free Usage Tier.
The total AWS Transfer Out is an aggregate Data Transfer Out usage across Amazon EC2, and AmazonRDS. For Amazon EC2, we have 0.05 GB per day which is approximately 1.525 GB per month. ForAmazon RDS we did not have any AWS Transfered out. Since up to 1 GB per month of data transferedout is free, we are left with a total of 0.525 GB per month.
CalculationFormulaVariable
0.1525 X $0.00
+ (0.525) X $0.12
-----------------
$0.06
(Data in (GB) X Data In Rate)
+ (Data out (GB) X Data OutRate)
---------------------------------
AWS Data Transfer
The following image shows an example of your monthly estimate.
63
Getting Started with AWS Web Application Hosting forLinux
Summing It All Up

The total cost of this web application is estimated at $160.95 per month including the free tier discount.
64
Getting Started with AWS Web Application Hosting forLinux
Summing It All Up
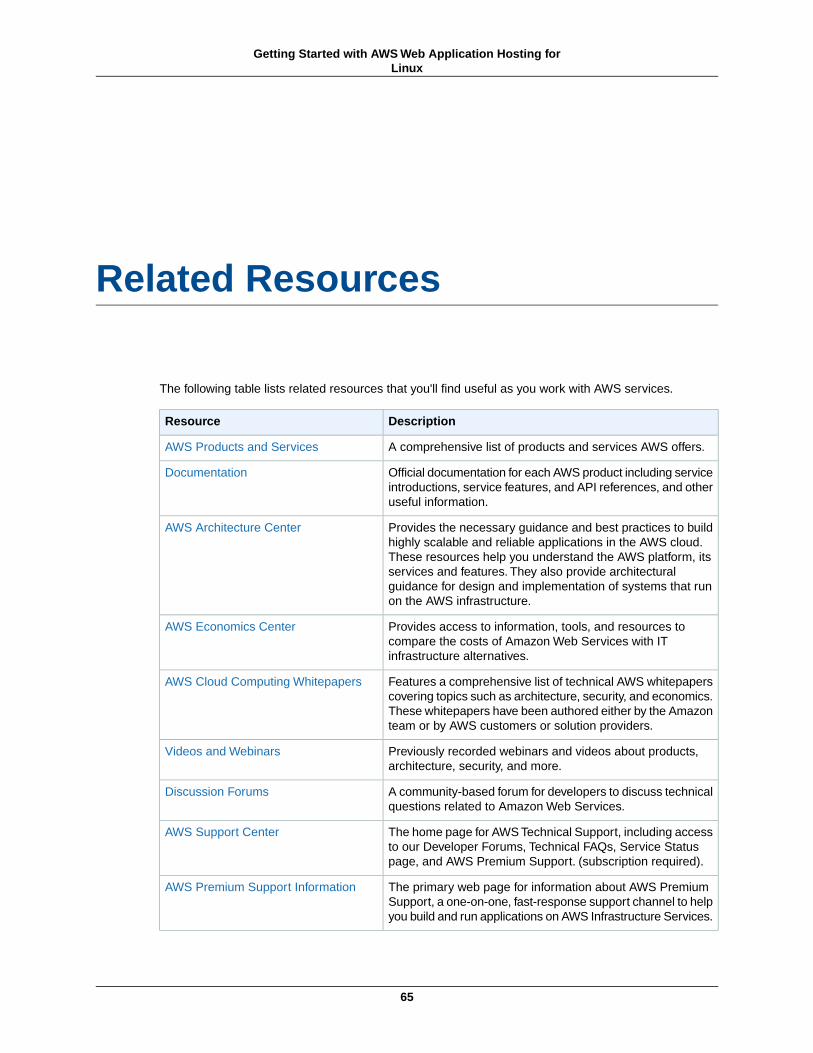
Related Resources
The following table lists related resources that you'll find useful as you work with AWS services.
DescriptionResource
A comprehensive list of products and services AWS offers.AWS Products and Services
Official documentation for each AWS product including serviceintroductions, service features, and API references, and otheruseful information.
Documentation
Provides the necessary guidance and best practices to buildhighly scalable and reliable applications in the AWS cloud.These resources help you understand the AWS platform, itsservices and features. They also provide architecturalguidance for design and implementation of systems that runon the AWS infrastructure.
AWS Architecture Center
Provides access to information, tools, and resources tocompare the costs of Amazon Web Services with ITinfrastructure alternatives.
AWS Economics Center
Features a comprehensive list of technical AWS whitepaperscovering topics such as architecture, security, and economics.These whitepapers have been authored either by the Amazonteam or by AWS customers or solution providers.
AWS Cloud Computing Whitepapers
Previously recorded webinars and videos about products,architecture, security, and more.
Videos and Webinars
A community-based forum for developers to discuss technicalquestions related to Amazon Web Services.
Discussion Forums
The home page for AWS Technical Support, including accessto our Developer Forums, Technical FAQs, Service Statuspage, and AWS Premium Support. (subscription required).
AWS Support Center
The primary web page for information about AWS PremiumSupport, a one-on-one, fast-response support channel to helpyou build and run applications on AWS Infrastructure Services.
AWS Premium Support Information
65
Getting Started with AWS Web Application Hosting forLinux

DescriptionResource
This form is only for account questions. For technicalquestions, use the Discussion Forums.
Form for questions related to your AWSaccount: Contact Us
Detailed information about the copyright and trademark usageat Amazon.com and other topics.
Conditions of Use
66
Getting Started with AWS Web Application Hosting forLinux

Document History
This document history is associated with the 2011-09-30 release of Getting Started. This guide was lastupdated on March 8, 2012.
Release DateDescriptionChange
30 September2011
Created new documentNew content
24 October2011
Added new section to talk about AWS Identity and AccountManagement
Added new section
23 November2011
Modified example to demonstrate how to set up Drupal on anAmazon Linux AMI
Changed applicationand Linux AMI
8 March 2012Added section for connecting to Amazon EC2 using theMindTerm client
Added new section
67
Getting Started with AWS Web Application Hosting forLinux