web applications with django - idc-online · web applications with django django is a modern python...
TRANSCRIPT
Web Applications With Django
Django is a modern Python web framework that redefined web development in the Python
world. A full-stack approach, pragmatic design, and superb documentation are some of the
reasons for its success. If fast web development using the Python language sounds good to
you, then fast web development using the Python language while being integrated with the
whole Java world (which has a strong presence on the enterprise web space) sounds even
better. Running Django on Jython allows you to do just that. And for the Java world, having
Django as an option to quickly build web applications while still having the chance to use the
existing Java APIs and technologies is very attractive. In this chapter we will start with a quick
introduction to allow you to have Django running with your Jython installation in a few steps.
Then we will build a simple web application so you can get a feeling of the framework. In the
second half of the chapter, we will take a look at the many opportunities of integration between
Django web applications and the JavaEE world.
Getting Django
Strictly speaking, to use Django with Jython you only need to have Django itself, and nothing
more. But, without third-party libraries, you won? be able to connect to any database, because
the built-in Django database backends depend on libraries written in C, which aren? available
on Jython. In practice, you will need at least two packages: Django itself and ?jango-
jython,?which, as you can imagine, is a collection of Django add-ons that can be quite useful if
you happen to be running Django on top of Jython. In particular it includes database backends.
Because the process of getting these two libraries slightly varies depending on your platform,
and because it? a manual, boring task, we will use a utility to automatically grab and install
these libraries. The utility is called setuptools. The catch is that we need to manually install
setuptools, of course, but this is quite straightforward. If you haven? installed setuptools before,
please take a look at Appendix A for more details. After you have setuptools installed, the
easy_install command will be available. Note that if you are on a Windows platform you may
need to type easy_install.py instead of just easy_install. Armed with this, we proceed to install
Django.
$ easy_install Django
Note
Note We?e assuming that the bin directory of the Jython installation is on the front of your
PATH. If it? not, you will have to explicitly type that path preceding each command like jython or
easy_install with that path (so you will need to type something like
/path/to/jython/bin/easy_install instead of just easy_install).
By reading the output of easy_install you can see how it is doing all the tedious work of locating
the right package, downloading, and installing it. See Listing 14-1.
Listing 14-1. Output from Easy_install Command
Searching for Django
Reading http://pypi.python.org/simple/Django/
Reading http://www.djangoproject.com/
Reading http://www.djangoproject.com/download/1.1.1/tarball/
Best match: Django 1.1.1
Downloading http://media.djangoproject.com/releases/1.1.1/Django-1.1.1.tar.gz
Processing Django-1.1.1.tar.gz
Running Django-1.1.1/setup.py -q bdist_egg --dist-dir
/tmp/easy_install-nTnmlU/Django-1.1.1/egg-dist-tmp-L-pq4s
zip_safe flag not set; analyzing archive contents...
Unable to analyze compiled code on this platform.
Please ask the author to include a 'zip_safe' setting (either True or False)
in the package's setup.py
Adding Django 1.1.1 to easy-install.pth file
Installing django-admin.py script to /home/lsoto/jython2.5.0/bin
Installed /home/lsoto/jython2.5.0/Lib/site-packages/Django-1.1.1-py2.5.egg
Processing dependencies for Django==1.1.1
Finished processing dependencies for Django==1.1.1
Then we install django-jython:
$ easy_install django-jython
Again, you will get an output similar to what you?e seen in the previous case. Once this is
finished, you are ready. If you want to look behind the scenes, take a look at the Lib/site-
packages subdirectory inside your Jython installation and you will entries for the libraries we just
installed. Those entries are also listed on the easy-install.pth file, making them part of sys.path
by default. Just to make sure that everything went fine, start jython and try the statements
shown in Listing 14-2, which import the top-level packages of Django and django-jython.
Listing 14-2. Import Django Packages
>>> import django
>>> import doj
If you don? get any error printed out on the screen, then everything is okay. Let? start our first
application.
A Quick Tour of Django
Django is a full-stack framework. That means that its features cover everything from
communication to databases, and from URL processing and to web page templating. As you
may know, there are complete books that cover Django in detail. We aren? going to go into
much detail, but we are going to touch many of the features included in the framework, so you
can get a good feeling of its strengths in case you haven? had the chance to know or try Django
in the past. That way you will know when Django is the right tool for a job.
Note
If you are already familiar with Django, you won? find anything especially new in the rest of this
section. Feel free to jump to the section ?2EE Deployment and Integration?to look at what?
really special if you run Django on Jython.
The only way to take a broad view of such a featureful framework like Django is to build
something really simple, and then gradually augment it as we look into what the framework
offers. So, we will start following roughly what the official Django tutorial uses (a simple site for
polls) to extend it later to touch most of the framework features. In other words: most of the code
you will see in this section comes directly from the great Django tutorial you can find
onhttp://docs.djangoproject.com/en/1.0/intro/tutorial01/. However, we?e extended the code to
show more Django features and adapted the material to fit into this section. Now, as we said on
the previous paragraph, Django handles communications with the database. Right now, the
most solid backend in existence for Django/Jython is the one for PostgreSQL. So we encourage
you to install PostgreSQL on your machine and set up a user and an empty database to use it in
the course of this tour.
Starting a Project (and an ?pp?
Django projects, which are usually meant to be web sites (or ?ub-sites?on a bigger portal) are
composed of a settings file, a URL mappings file, and a set of ?pps?that provide the actual
features of the web site. As you surely have realized, many web sites share a lot of features:
administration interfaces, user authentication/registration, commenting systems, news feeds,
contact forms, and the like. That? why Django decouples the actual site features in the
?pp?concept: apps are meant to be reusable between different projects (sites).
As we will start small, our project will consist of only one app at first. We will call our project
?ollsite.?So, let? create a clean new directory for what we will build in this section, move to that
directory and run:
$ django-admin.py startproject pollsite
And a Python package named ?ollsite?will be created under the directory you created
previously. At this point, the most important change we need to make to the default settings of
our shiny new project is to fill in information enabling Django to talk to the database we created
for this tour. So, open the file pollsite/settings.py with your text editor of choice and change lines
starting with DATABASE with something like Listing 14-3.
Listing 14-3. Django Database Settings
DATABASE_ENGINE = 'doj.backends.zxjdbc.postgresql'
DATABASE_NAME = '<the name of the empty database you created>'
DATABASE_USER = '<the name of the user with R/W access to that database>'
DATABASE_PASSWORD = '<the password of that user>'
With this, you are telling Django to use the PostgreSQL driver provided by the doj package
(which, if you remember from the Getting Django section, was the package name of the django-
jython project) and to connect with the given credentials. This backend requires the PostgreSQL
JDBC driver, which you can download at http://jdbc.postgresql.org/download.html.
Once you download the JDBC driver, you need to add it to the Java CLASSPATH. Another way
to do it in Linux/Unix/MacOSX for the current session is:
$ export CLASSPATH=$CLASSPATH:/path/to/postgresql-jdbc.jar
If you are on Windows, the command is different:
$ set CLASSPATH=%CLASSPATH%:\path\to\postgresql-jdbc.jar
After you have done that, you will create the single app which will be the core of our project.
Make sure you are in the pollsite directory and run:
$ jython manage.py startapp polls
This will create the basic structure of a Django app. A Django app is a ?lice?of features of a web
site. For example, Django comes with a comments app that includes all the bits to let you attach
comments to every object of your system. It also has the admin app for providing an
administrative frontend to the web site database. We will cover those two specific apps soon,
but right now the main idea is to know that your Django project (web site) will consist of many
Django apps, one for each major feature. We are starting with the polls app that will handle all
the logic around basic polls of our web site. Note that the polls app was created inside the
project package, so we have the pollsite project and the pollsite.polls app. Now we will see
what? inside a Django app.
Models
In Django, you define your data schema in Python code, using Python classes. This central
schema is used to generate the needed SQL statements to create the database schema, and to
dynamically generate SQL queries when you manipulate objects of these special Python
classes. Now, in Django you don? define the schema of the whole project in a single central
place. Because apps are the real providers of features, it follows that the schema of the whole
project isn? more than the combination of the schemas of each app. By the way, we will switch
to Django terminology now, and instead of talking about data schemas, we will talk about
models (which are actually a bit more than just schemas, but the distinction is not important at
this point). If you look into the pollsite/polls directory, you will see that there is a models.py file,
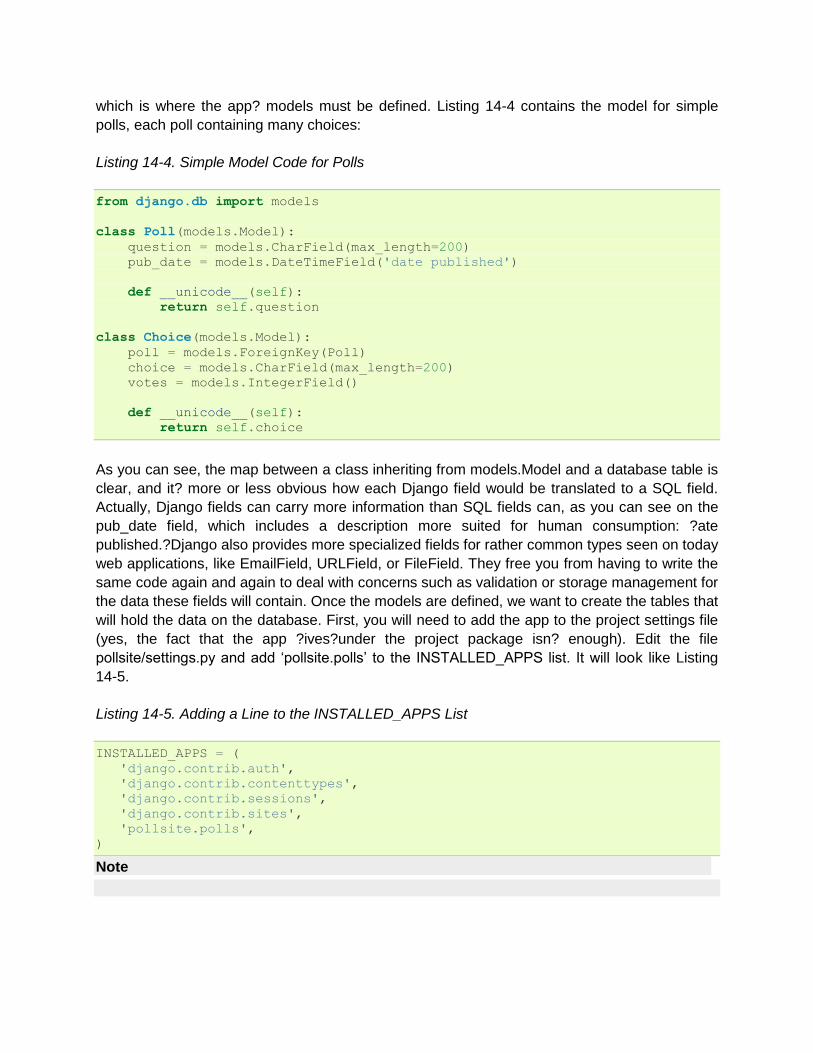
which is where the app? models must be defined. Listing 14-4 contains the model for simple
polls, each poll containing many choices:
Listing 14-4. Simple Model Code for Polls
from django.db import models
class Poll(models.Model):
question = models.CharField(max_length=200)
pub_date = models.DateTimeField('date published')
def __unicode__(self):
return self.question
class Choice(models.Model):
poll = models.ForeignKey(Poll)
choice = models.CharField(max_length=200)
votes = models.IntegerField()
def __unicode__(self):
return self.choice
As you can see, the map between a class inheriting from models.Model and a database table is
clear, and it? more or less obvious how each Django field would be translated to a SQL field.
Actually, Django fields can carry more information than SQL fields can, as you can see on the
pub_date field, which includes a description more suited for human consumption: ?ate
published.?Django also provides more specialized fields for rather common types seen on today
web applications, like EmailField, URLField, or FileField. They free you from having to write the
same code again and again to deal with concerns such as validation or storage management for
the data these fields will contain. Once the models are defined, we want to create the tables that
will hold the data on the database. First, you will need to add the app to the project settings file
(yes, the fact that the app ?ives?under the project package isn? enough). Edit the file
pollsite/settings.py and add ‘pollsite.polls’ to the INSTALLED_APPS list. It will look like Listing
14-5.
Listing 14-5. Adding a Line to the INSTALLED_APPS List
INSTALLED_APPS = (
'django.contrib.auth',
'django.contrib.contenttypes',
'django.contrib.sessions',
'django.contrib.sites',
'pollsite.polls',
)
Note
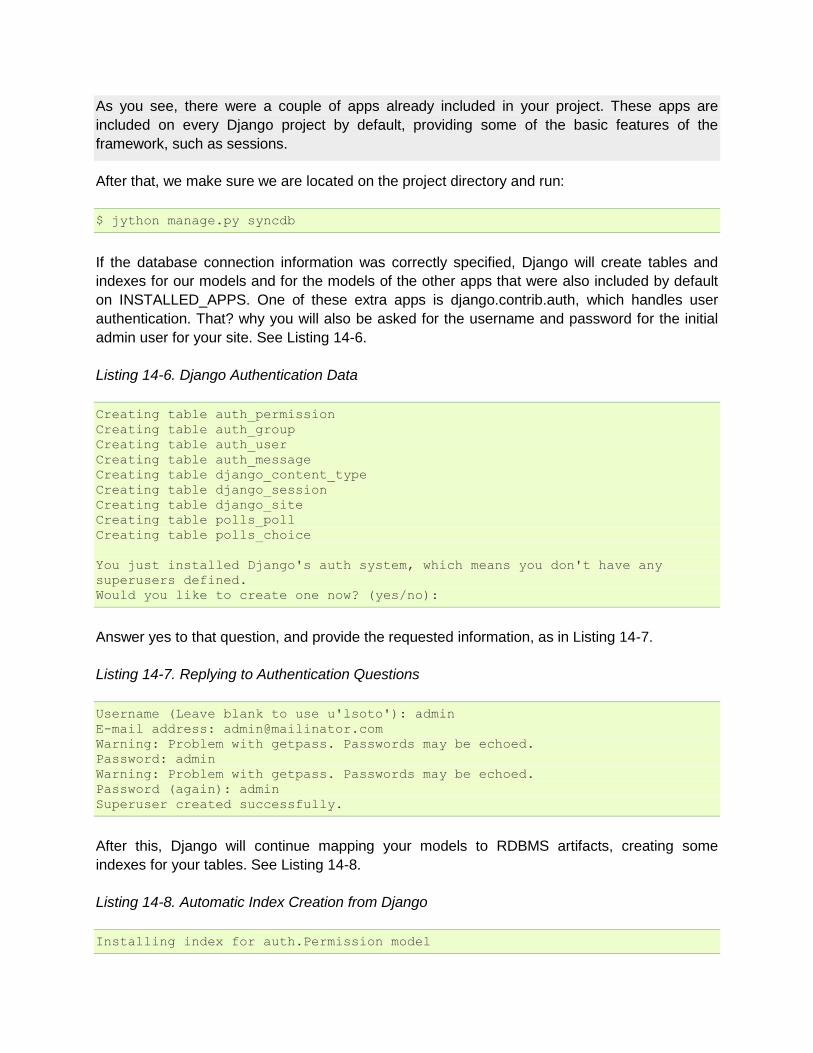
As you see, there were a couple of apps already included in your project. These apps are
included on every Django project by default, providing some of the basic features of the
framework, such as sessions.
After that, we make sure we are located on the project directory and run:
$ jython manage.py syncdb
If the database connection information was correctly specified, Django will create tables and
indexes for our models and for the models of the other apps that were also included by default
on INSTALLED_APPS. One of these extra apps is django.contrib.auth, which handles user
authentication. That? why you will also be asked for the username and password for the initial
admin user for your site. See Listing 14-6.
Listing 14-6. Django Authentication Data
Creating table auth_permission
Creating table auth_group
Creating table auth_user
Creating table auth_message
Creating table django_content_type
Creating table django_session
Creating table django_site
Creating table polls_poll
Creating table polls_choice
You just installed Django's auth system, which means you don't have any
superusers defined.
Would you like to create one now? (yes/no):
Answer yes to that question, and provide the requested information, as in Listing 14-7.
Listing 14-7. Replying to Authentication Questions
Username (Leave blank to use u'lsoto'): admin
E-mail address: [email protected]
Warning: Problem with getpass. Passwords may be echoed.
Password: admin
Warning: Problem with getpass. Passwords may be echoed.
Password (again): admin
Superuser created successfully.
After this, Django will continue mapping your models to RDBMS artifacts, creating some
indexes for your tables. See Listing 14-8.
Listing 14-8. Automatic Index Creation from Django
Installing index for auth.Permission model
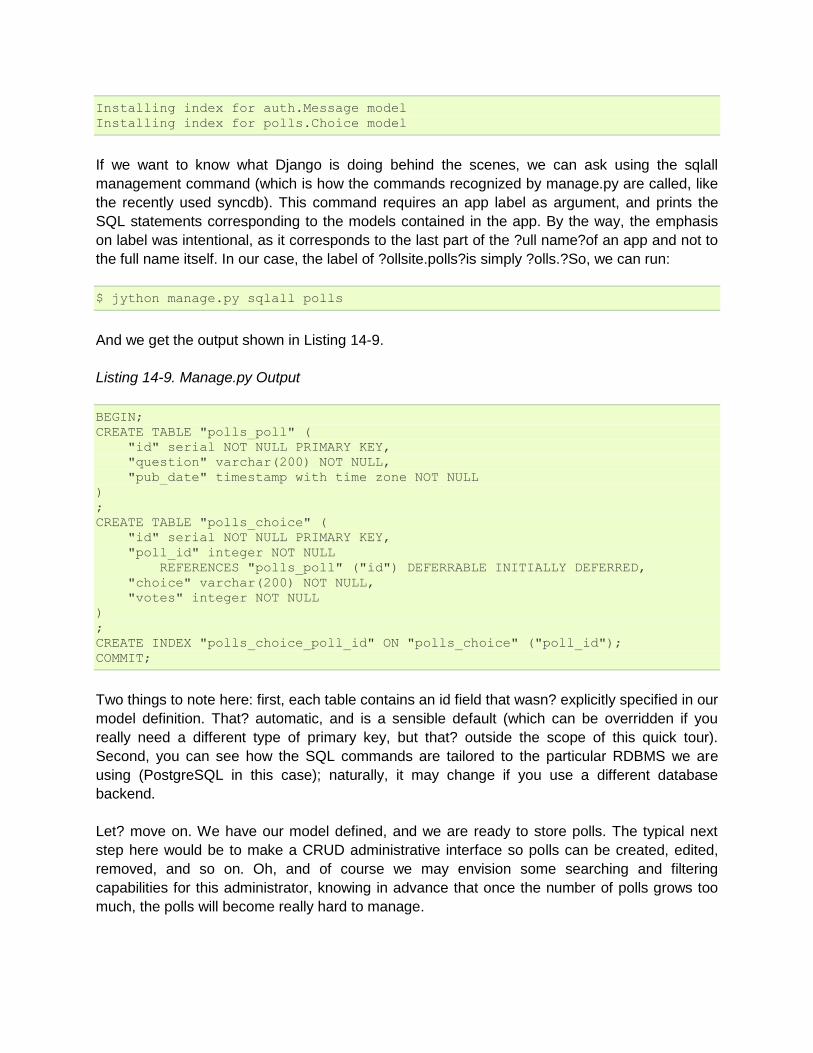
Installing index for auth.Message model
Installing index for polls.Choice model
If we want to know what Django is doing behind the scenes, we can ask using the sqlall
management command (which is how the commands recognized by manage.py are called, like
the recently used syncdb). This command requires an app label as argument, and prints the
SQL statements corresponding to the models contained in the app. By the way, the emphasis
on label was intentional, as it corresponds to the last part of the ?ull name?of an app and not to
the full name itself. In our case, the label of ?ollsite.polls?is simply ?olls.?So, we can run:
$ jython manage.py sqlall polls
And we get the output shown in Listing 14-9.
Listing 14-9. Manage.py Output
BEGIN;
CREATE TABLE "polls_poll" (
"id" serial NOT NULL PRIMARY KEY,
"question" varchar(200) NOT NULL,
"pub_date" timestamp with time zone NOT NULL
)
;
CREATE TABLE "polls_choice" (
"id" serial NOT NULL PRIMARY KEY,
"poll_id" integer NOT NULL
REFERENCES "polls_poll" ("id") DEFERRABLE INITIALLY DEFERRED,
"choice" varchar(200) NOT NULL,
"votes" integer NOT NULL
)
;
CREATE INDEX "polls_choice_poll_id" ON "polls_choice" ("poll_id");
COMMIT;
Two things to note here: first, each table contains an id field that wasn? explicitly specified in our
model definition. That? automatic, and is a sensible default (which can be overridden if you
really need a different type of primary key, but that? outside the scope of this quick tour).
Second, you can see how the SQL commands are tailored to the particular RDBMS we are
using (PostgreSQL in this case); naturally, it may change if you use a different database
backend.
Let? move on. We have our model defined, and we are ready to store polls. The typical next
step here would be to make a CRUD administrative interface so polls can be created, edited,
removed, and so on. Oh, and of course we may envision some searching and filtering
capabilities for this administrator, knowing in advance that once the number of polls grows too
much, the polls will become really hard to manage.
Well, no. We won? write the administrative interface from scratch. We will use one of the most
useful features of Django: the admin app.
Bonus: The Admin
This is an intermission during our tour through the main architectural points of a Django project
(namely, models, views, and templates), but it is a very nice intermission. The code for the
administrative interface we talked about a couple of paragraphs back will consist on less than
20 lines of code!
First, let? enable the admin app. To do this, edit pollsite/settings.py and add
‘django.contrib.admin’ to the INSTALLED_APPS. Then edit pollsite/urls.py, which looks like
Listing 14-10.
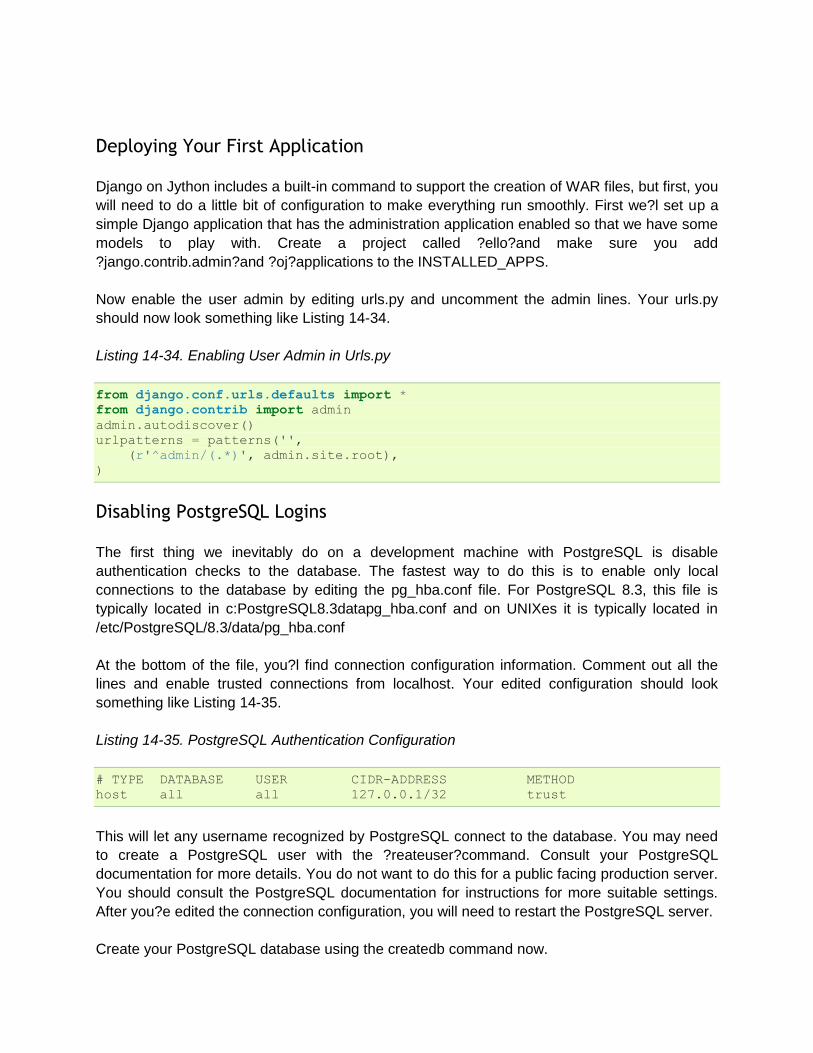
Listing 14-10. The Original Unchanged Urls.py
from django.conf.urls.defaults import *
# Uncomment the next two lines to enable the admin:
# from django.contrib import admin
# admin.autodiscover()
urlpatterns = patterns('',
# Example:
# (r'^pollsite/', include('pollsite.foo.urls')),
# Uncomment the admin/doc line below and add 'django.contrib.admindocs'
# to INSTALLED_APPS to enable admin documentation:
# (r'^admin/doc/', include('django.contrib.admindocs.urls')),
# Uncomment the next line to enable the admin:
# (r'^admin/(.*)', admin.site.root),
)
And uncomment the lines that enable the admin (but not the admin/doc line!), so the file will look
like Listing 14-11.
Listing 14-11. Enabling the Admin App from Urls.py
from django.conf.urls.defaults import *
# Uncomment the next two lines to enable the admin:
from django.contrib import admin
admin.autodiscover()
urlpatterns = patterns('',
# Example:
# (r'^pollsite/', include('pollsite.foo.urls')),
# Uncomment the admin/doc line below and add 'django.contrib.admindocs'
# to INSTALLED_APPS to enable admin documentation:
# (r'^admin/doc/', include('django.contrib.admindocs.urls')),
# Uncomment the next line to enable the admin:
(r'^admin/(.*)', admin.site.root),
)
Now you can remove all the remaining commented lines, so urls.py ends up with the contents
shown in Listing 14-12.
Listing 14-12. Final State of Urls.py
from django.conf.urls.defaults import *
from django.contrib import admin
admin.autodiscover()
urlpatterns = patterns('',
(r'^admin/(.*)', admin.site.root),
)
Although we haven? explained this urls.py file yet, we will go into some more depth in the next
section.
Finally, let? create the database artifacts needed by the admin app:
$ jython manage.py syncdb
Now we will see what this admin looks like. Let? run our site in development mode by executing:
$ jython manage.py runserver
Note
The development web server is an easy way to test your web project. It will run indefinitely until
you abort it (for example, hitting Ctrl + C) and it will reload itself when you change a source file
already loaded by the server, thus giving almost instant feedback. But, be advised that using
this development server in production is a really, really bad idea, because it can? handle
multiple simultaneous connections and just has poor performance in general.
Using a web browser, navigate to http://localhost:8000/admin/. You will be presented with a
login screen. Enter the user credentials you created when we first ran syncdb in the previous
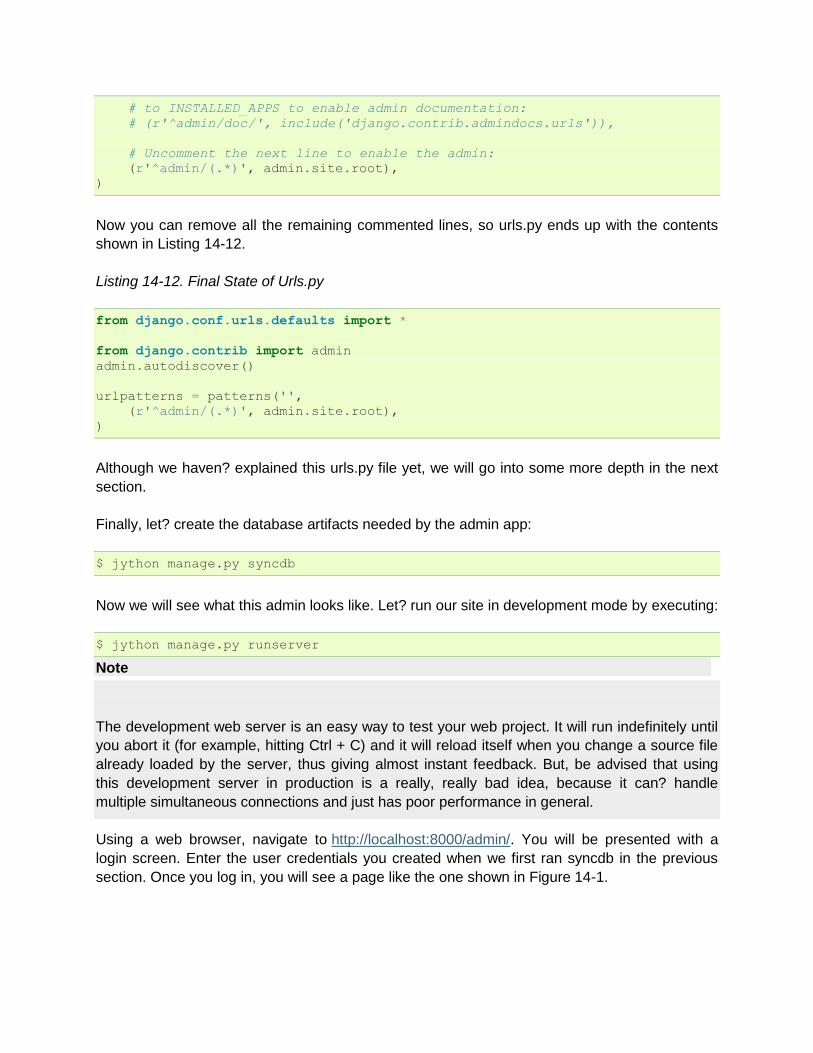
section. Once you log in, you will see a page like the one shown in Figure 14-1.
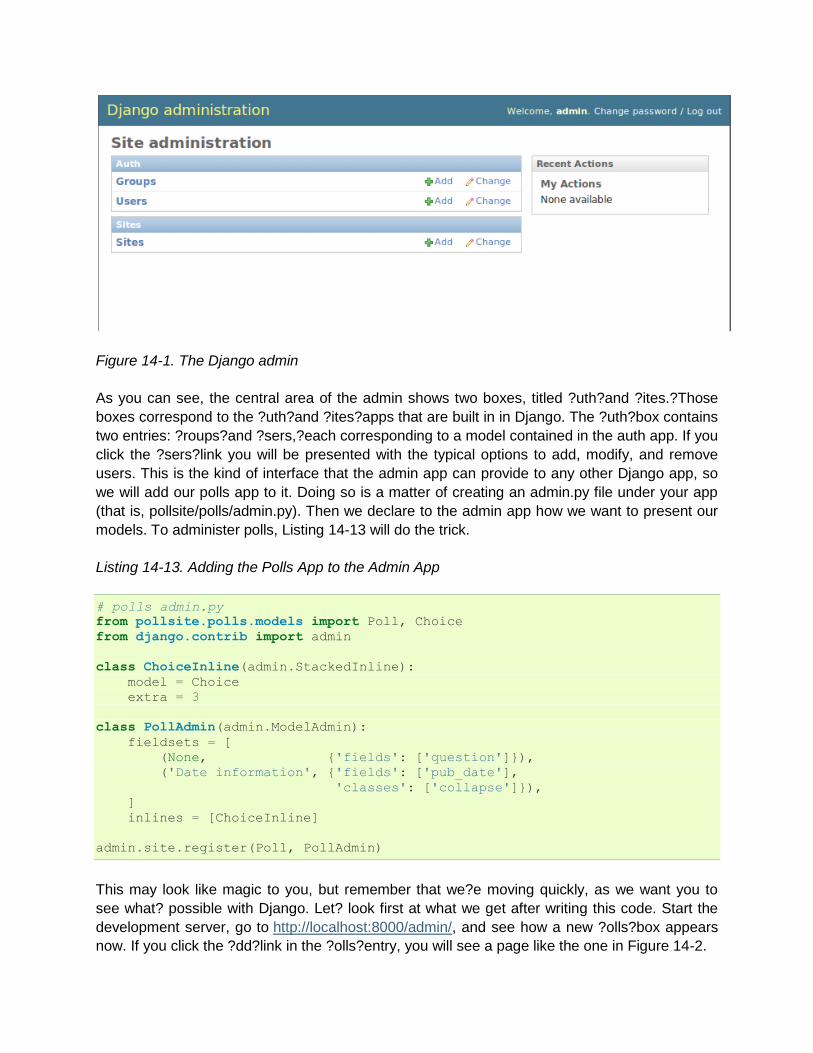
Figure 14-1. The Django admin
As you can see, the central area of the admin shows two boxes, titled ?uth?and ?ites.?Those
boxes correspond to the ?uth?and ?ites?apps that are built in in Django. The ?uth?box contains
two entries: ?roups?and ?sers,?each corresponding to a model contained in the auth app. If you
click the ?sers?link you will be presented with the typical options to add, modify, and remove
users. This is the kind of interface that the admin app can provide to any other Django app, so
we will add our polls app to it. Doing so is a matter of creating an admin.py file under your app
(that is, pollsite/polls/admin.py). Then we declare to the admin app how we want to present our
models. To administer polls, Listing 14-13 will do the trick.
Listing 14-13. Adding the Polls App to the Admin App
# polls admin.py
from pollsite.polls.models import Poll, Choice
from django.contrib import admin
class ChoiceInline(admin.StackedInline):
model = Choice
extra = 3
class PollAdmin(admin.ModelAdmin):
fieldsets = [
(None, {'fields': ['question']}),
('Date information', {'fields': ['pub_date'],
'classes': ['collapse']}),
]
inlines = [ChoiceInline]
admin.site.register(Poll, PollAdmin)
This may look like magic to you, but remember that we?e moving quickly, as we want you to
see what? possible with Django. Let? look first at what we get after writing this code. Start the
development server, go to http://localhost:8000/admin/, and see how a new ?olls?box appears
now. If you click the ?dd?link in the ?olls?entry, you will see a page like the one in Figure 14-2.
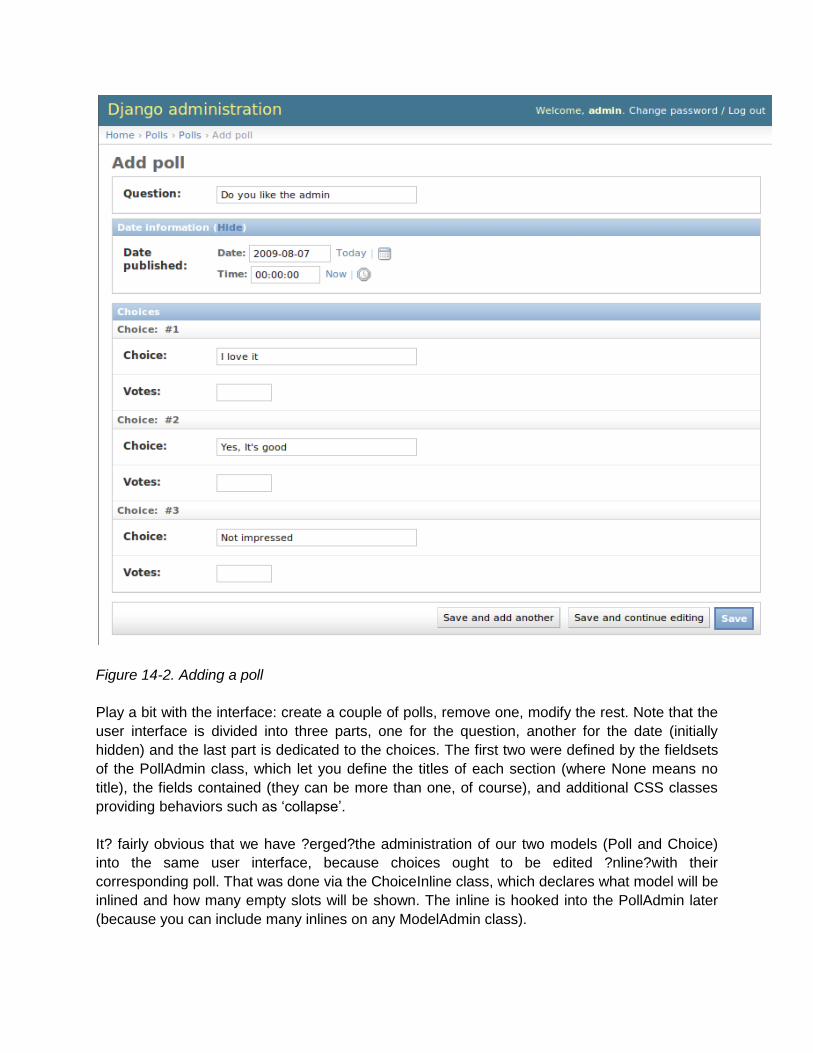
Figure 14-2. Adding a poll
Play a bit with the interface: create a couple of polls, remove one, modify the rest. Note that the
user interface is divided into three parts, one for the question, another for the date (initially
hidden) and the last part is dedicated to the choices. The first two were defined by the fieldsets
of the PollAdmin class, which let you define the titles of each section (where None means no
title), the fields contained (they can be more than one, of course), and additional CSS classes
providing behaviors such as ‘collapse’.
It? fairly obvious that we have ?erged?the administration of our two models (Poll and Choice)
into the same user interface, because choices ought to be edited ?nline?with their
corresponding poll. That was done via the ChoiceInline class, which declares what model will be
inlined and how many empty slots will be shown. The inline is hooked into the PollAdmin later
(because you can include many inlines on any ModelAdmin class).
Finally, PollAdmin is registered as the administrative interface for the Poll model using
admin.site.register(). As you can see, everything is absolutely declarative and works like a
charm.
You may be wondering what happened to the search/filter features we talked about a few
paragraphs ago. We will implement those in the poll list interface that you can access when
clicking the ?hange?link for Polls in the main interface (or by clicking the link ?olls,?or after
adding a Poll).
So, add the following lines to the PollAdmin class:
search_fields = ['question']
list_filter = ['pub_date']
And play with the admin again (that? why it was a good idea to create a few polls in the last
step). Figure 14-3 shows the search working, using ?jango?as the search string.
Figure 14-3. Searching on the Django admin
Now, if you try the filter by publishing date, it feels a bit awkward, because the list of polls only
shows the name of the poll, so you can? see the publishing date of the polls being filtered, to
check if the filter worked as advertised. That? easy to fix, by adding the following line to the
PollAdmin class:
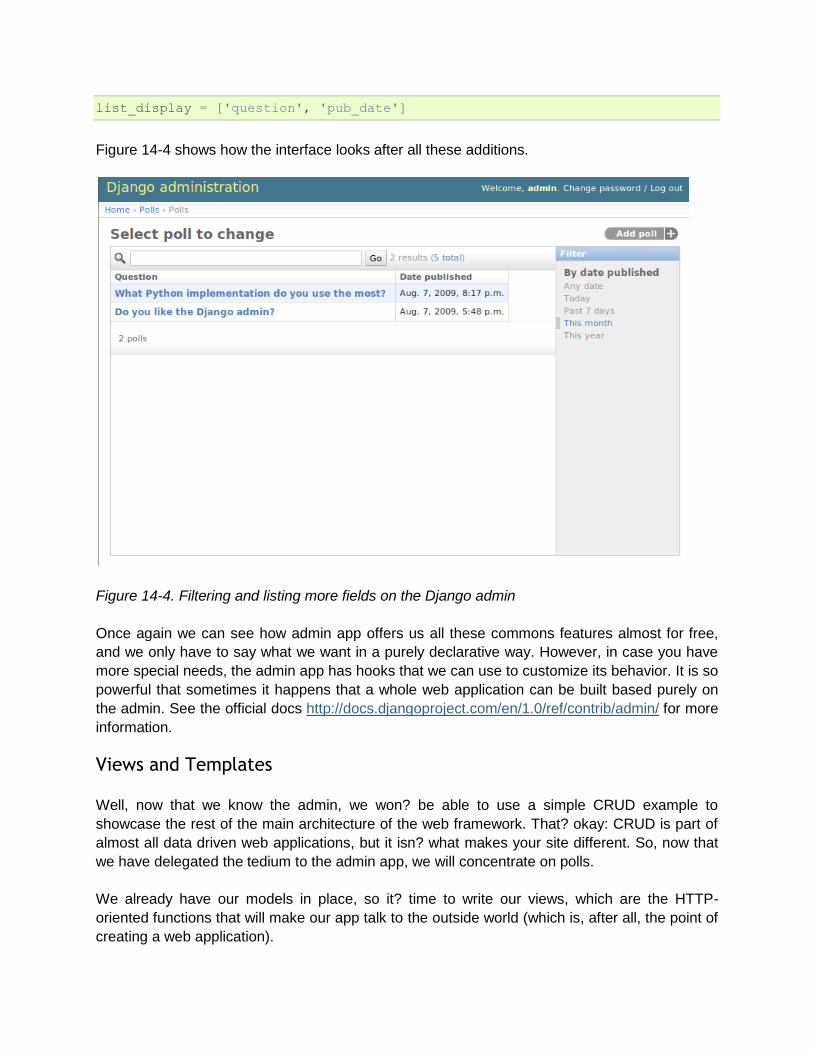
list_display = ['question', 'pub_date']
Figure 14-4 shows how the interface looks after all these additions.
Figure 14-4. Filtering and listing more fields on the Django admin
Once again we can see how admin app offers us all these commons features almost for free,
and we only have to say what we want in a purely declarative way. However, in case you have
more special needs, the admin app has hooks that we can use to customize its behavior. It is so
powerful that sometimes it happens that a whole web application can be built based purely on
the admin. See the official docs http://docs.djangoproject.com/en/1.0/ref/contrib/admin/ for more
information.
Views and Templates
Well, now that we know the admin, we won? be able to use a simple CRUD example to
showcase the rest of the main architecture of the web framework. That? okay: CRUD is part of
almost all data driven web applications, but it isn? what makes your site different. So, now that
we have delegated the tedium to the admin app, we will concentrate on polls.
We already have our models in place, so it? time to write our views, which are the HTTP-
oriented functions that will make our app talk to the outside world (which is, after all, the point of
creating a web application).
Note
Django developers half-jokingly say that Django follows the ?TV?pattern: Model, Template, and
View. These three components map directly to what other modern frameworks call Model, View,
and Controller. Django takes this apparently unorthodox naming schema because, strictly
speaking, the controller is the framework itself. What is called ?ontroller?code in other
frameworks is really tied to HTTP and output templates, so they can be considered part of the
view layer. If you don? like this viewpoint, just remember to mentally map Django templates to
?iews?and Django views to ?ontrollers.?
By convention, code for views goes into the app views.py file. Views are simple functions that
take an HTTP request, do some processing, and return an HTTP response. Because an HTTP
response typically involves the construction of an HTML page, templates aid views with the job
of creating HTML output (and other text-based outputs) in a more maintainable way than just by
manually pasting strings together.
The polls app enables very simple navigation. First, the user will be presented with an
?ndex?with access to the list of the latest polls. He will select one and we will show the poll
?etails,?that is, a form with the available choices and a button so he can submit his choice.
Once a choice is made, the user will be directed to a page showing the current results of the poll
he just voted on.
Before writing the code for the views, a good way to start designing a Django app is to design its
URLs. In Django you map URLs to view functions, using regular expressions. Modern web
development takes URLs seriously, and nice URLs (not difficult to read URLs like
?oSomething.do?or ?hisIsNotNice.aspx? are the norm. Instead of patching ugly names with
URL rewriting, Django offers a layer of indirection between the URL which triggers a view and
the internal name you happen to give to such view. Also, as Django has an emphasis on apps
that can be reused across multiple projects, there is a modular way to define URLs so an app
can define the relative URLs for its views, and they can be later included on different projects.
Lets start by modifying the pollsite/urls.py file to the Listing 14-14.
Listing 14-14. Modifying Urls.py to Define Relative URLs for any App View Functions
from django.conf.urls.defaults import *
from django.contrib import admin
admin.autodiscover()
urlpatterns = patterns('',
(r'^admin/(.*)', admin.site.root),
(r'^polls/', include('pollsite.polls.urls')),
)
Note how we added the pattern that says: if the URL starts with polls/ continue matching it
following the patterns defined on module pollsite.polls.urls. So let? create the file
pollsite/polls/urls.py (note that it will live inside the app) and put the code shown in Listing 14-15
in it.
Listing 14-15. Matching Alternative URLs from Pollsite/polls/urls.py
from django.conf.urls.defaults import *
urlpatterns = patterns('pollsite.polls.views',
(r'^$', 'index'),
(r'^(\d+)/$', 'detail'),
(r'^(\d+)/vote/$', 'vote'),
(r'^(\d+)/results/$', 'results'),
)
The first pattern says: if there is nothing else to match (remember that polls/ was already
matched by the previous pattern), use the index view. The other patterns include a placeholder
for numbers, written in the regular expression as d+, and it is captured (using the parenthesis)
so it will be passed as argument to their respective views. The end result is that a URL such as
polls/5/results/ will call the results view passing the string ‘5’ as the second argument (the first
view argument is always the request object). If you want to know more about Django URL
dispatching, seehttp://docs.djangoproject.com/en/1.1/topics/http/urls/.
So, from the URL patterns we just created, it can be seen that we need to write the view
functions named index, detail, vote and results. Listing 14-16 is code for pollsite/polls/views.py.
Listing 14-16. View Functions to Be Used from URL Patterns
from django.shortcuts import get_object_or_404, render_to_response
from django.http import HttpResponseRedirect
from django.core.urlresolvers import reverse
from pollsite.polls.models import Choice, Poll
def index(request):
latest_poll_list = Poll.objects.all().order_by('-pub_date')[:5]
return render_to_response('polls/index.html',
{'latest_poll_list': latest_poll_list})
def detail(request, poll_id):
poll = get_object_or_404(Poll, pk=poll_id)
return render_to_response('polls/detail.html', {'poll': poll})
def vote(request, poll_id):
poll = get_object_or_404(Poll, pk=poll_id)
try:
selected_choice = poll.choice_set.get(pk=request.POST['choice'])
except (KeyError, Choice.DoesNotExist):
# Redisplay the poll voting form.
return render_to_response('polls/detail.html', {
'poll': poll,

'error_message': "You didn't select a choice.",
})
else:
selected_choice.votes += 1
selected_choice.save()
# Always return an HttpResponseRedirect after successfully dealing
# with POST data. This prevents data from being posted twice if a
# user hits the Back button.
return HttpResponseRedirect(
reverse('pollsite.polls.views.results', args=(poll.id,)))
def results(request, poll_id):
poll = get_object_or_404(Poll, pk=poll_id)
return render_to_response('polls/results.html', {'poll': poll})
We know this was a bit fast, but remember that we are taking a quick tour. The important thing
here is to grasp the high-level concepts. Each function defined in this file is a view. You can
identify the functions because they are defined inside the views.py file. You can also identify
them because they receive a request as a first argument.
So, we defined the views named index, details, vote, and results that are going to be called
when a URL matches the patterns defined previously. With the exception of vote, they are
straightforward, and follow the same pattern: they search some data (using the Django ORM
and helper functions such as get_object_or_404 which, even if you aren? familiar with them, it?
easy to intuitively imagine what they do), and then end up calling render_to_response, passing
the path of a template and a dictionary with the data passed to the template.
Note
The three trivial views described here represent cases so common in web development that
Django provides an abstraction to implement them with even less code. The abstraction is
called ?eneric Views,?and you can learn about them
on http://docs.djangoproject.com/en/1.1/ref/generic-views/, as well as in the Django tutorial
at http://docs.djangoproject.com/en/1.1/intro/tutorial04/#use-generic-views-less-code-is-better.
The vote view is a bit more involved, and it ought to be, because it is the one doing interesting
things, namely, registering a vote. It has two paths: one for the exceptional case, in which the
user has not selected any choice, and one in which the user did select one. See how in the first
case the view ends up rendering the same template which is rendered by the detail view:
polls/detail.html; but we pass an extra variable to the template to display the error message so
the user can know why he is still viewing the same page. In case the user selected a choice, we
increment the votes and redirect the user to the results view.
We could have archived the redirection by just calling the view (something like return
results(request, poll.id)) but, as the comments say, it is good practice to do an actual HTTP
redirect after POST submissions to avoid problems with the browser back button (or the refresh

button). Because the view code doesn? know to what URLs they are mapped (as this left to
chance when you reuse the app), the reverse function gives you the URL for a given view and
parameters.
Before taking a look at templates, we should quickly make a mental note about them. The
Django template language is pretty simple and intentionally not as powerful as a programming
language. You can? execute arbitrary Python code, nor call any function. It is designed this way
to keep templates simple and web-designer-friendly. The main features of the template
language are expressions, delimited by double braces ({{ and }}), and directives (called
?emplate tags?, delimited by braces and the percent character ({% and %}). Expressions can
contain dots that work for accessing Python attributes and also dictionary items (so you write {{
foo.bar }} even if in Python you would write foo[‘bar’]), and also pipes (|) to apply filters to the
expressions (like, for example, cut a paragraph on the first five words: {{
comment.text|truncatewords:5 }}). And that? pretty much it. You see how obvious they are on
the following templates, but we?l give a bit of explanation when introducing some non obvious
template tags.
Now it? time to see the templates for our views. You can infer by reading the views code we just
wrote that we need three templates: polls/index.html, polls/detail.html, and polls/results.html. We
will create the templates subdirectory inside the polls app, and then create the templates under
it. Listing 14-17 shows is the content of pollsite/polls/templates/polls/index.html/.
Listing 14-17. Index File for Polls App Containing Template
{% if latest_poll_list %}
<ul>
{% for poll in latest_poll_list %}
<li><a href="{{ poll.id }}/">{{ poll.question }}</a></li>
{% endfor %}
</ul>
{% else %}
<p>No polls are available.</p>
{% endif %}
Pretty simple, as you can see. Let? move to pollsite/polls/templates/polls/detail.html (Listing 14-
18).
Listing 14-18. The Poll Template
<h1>{{ poll.question }}</h1>
{% if error_message %}<p><strong>{{ error_message }}</strong></p>{% endif %}
<form action="./vote/" method="post">
{% for choice in poll.choice_set.all %}
<input type="radio" name="choice" id="choice{{ forloop.counter }}"
value="{ { choice.id }}" />
<label for="choice{{ forloop.counter }}">{{ choice.choice }}</label><br
/>
{% endfor %}
<input type="submit" value="Vote" />
</form>
One perhaps surprising construct in this template is the {{ forloop.counter }} expression, which
simply exposes the internal counter to the surrounding {% for %} loop.
Also note that the {% if %} template tag will evaluate an expression that is not defined to false,
as will be the case with error_message when this template is called from the detail view.
Finally, Listing 14-19 is pollsite/polls/templates/polls/results.html.
Listing 14-19. The Results Template Code
<h1>{{ poll.question }}</h1>
<ul>
{% for choice in poll.choice_set.all %}
<li>{{ choice.choice }} -- {{ choice.votes }}
vote{{ choice.votes|pluralize }}</li>
{% endfor %}
</ul>
In this template you can see the use of a filter in the expression {{ choice.votes|pluralize }}. It will
output an ??if the number of votes is greater than 1, and nothing otherwise. To learn more
about the template tags and filters available by default in Django,
seehttp://docs.djangoproject.com/en/1.1/ref/templates/builtins/. And to find out how to create
new filters and template tags, seehttp://docs.djangoproject.com/en/1.1/ref/templates/api/.
At this point we have a fully working poll site. It? not pretty, and can use a lot of polishing. But it
works! Try it by navigating to http://localhost:8000/polls/.
Reusing Templates Without ‘’include’‘: Template Inheritance
Like many other template languages, Django also has an ?nclude?directive. But its use is very
rare, because there is a better solution for reusing templates: inheritance.
It works just like class inheritance. You define a base template, with many ?locks.?Each block
has a name. Then other templates can inherit from the base template and override or extend
the blocks. You are free to build inheritance chains of any length you want, just like with class
hierarchies.
You may have noted that our templates weren? producing valid HTML, but only fragments. It
was convenient, to focus on the important parts of the templates, of course. But it also happens
that with very minor modifications they will generate complete, pretty HTML pages. As you have
probably guessed by now, they will extend from a site-wide base template.
Because we?e not exactly good with web design, we will take a ready-made template
from http://www.freecsstemplates.org/. In particular, we will modify this
template: http://www.freecsstemplates.org/preview/exposure/.
Note that the base template is going to be site-wide, so it belongs to the project, not to an app.
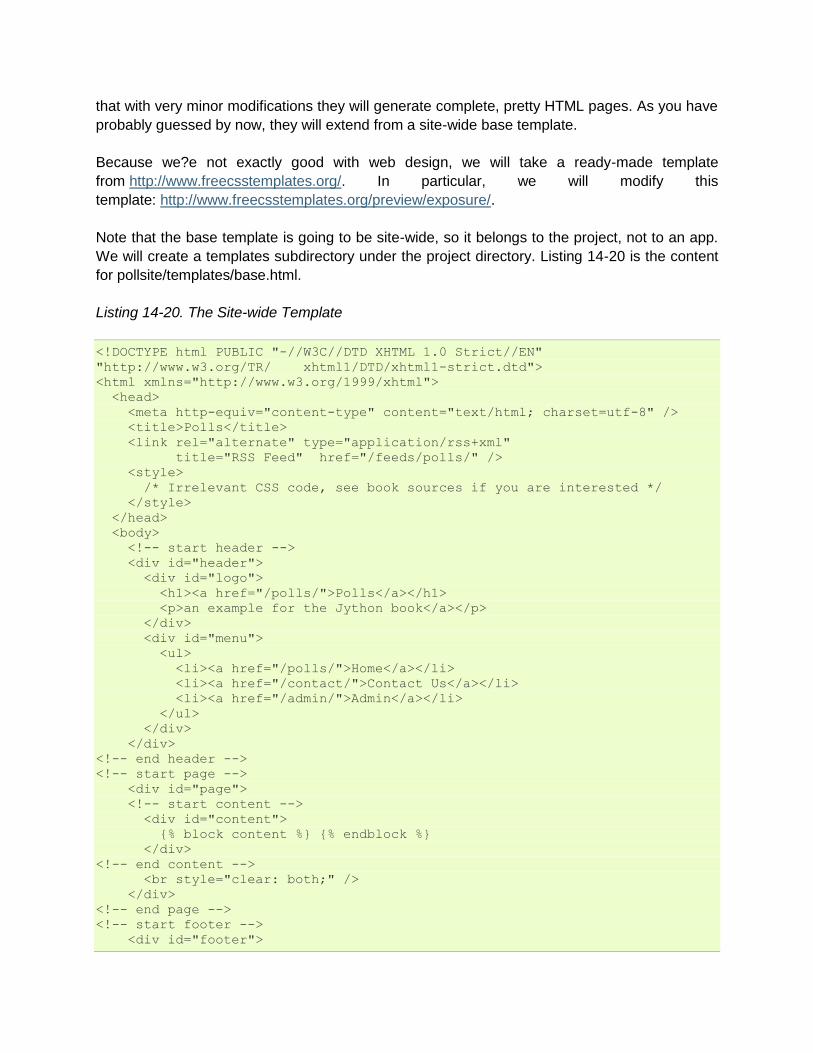
We will create a templates subdirectory under the project directory. Listing 14-20 is the content
for pollsite/templates/base.html.
Listing 14-20. The Site-wide Template
<!DOCTYPE html PUBLIC "-//W3C//DTD XHTML 1.0 Strict//EN"
"http://www.w3.org/TR/ xhtml1/DTD/xhtml1-strict.dtd">
<html xmlns="http://www.w3.org/1999/xhtml">
<head>
<meta http-equiv="content-type" content="text/html; charset=utf-8" />
<title>Polls</title>
<link rel="alternate" type="application/rss+xml"
title="RSS Feed" href="/feeds/polls/" />
<style>
/* Irrelevant CSS code, see book sources if you are interested */
</style>
</head>
<body>
<!-- start header -->
<div id="header">
<div id="logo">
<h1><a href="/polls/">Polls</a></h1>
<p>an example for the Jython book</a></p>
</div>
<div id="menu">
<ul>
<li><a href="/polls/">Home</a></li>
<li><a href="/contact/">Contact Us</a></li>
<li><a href="/admin/">Admin</a></li>
</ul>
</div>
</div>
<!-- end header -->
<!-- start page -->
<div id="page">
<!-- start content -->
<div id="content">
{% block content %} {% endblock %}
</div>
<!-- end content -->
<br style="clear: both;" />
</div>
<!-- end page -->
<!-- start footer -->
<div id="footer">
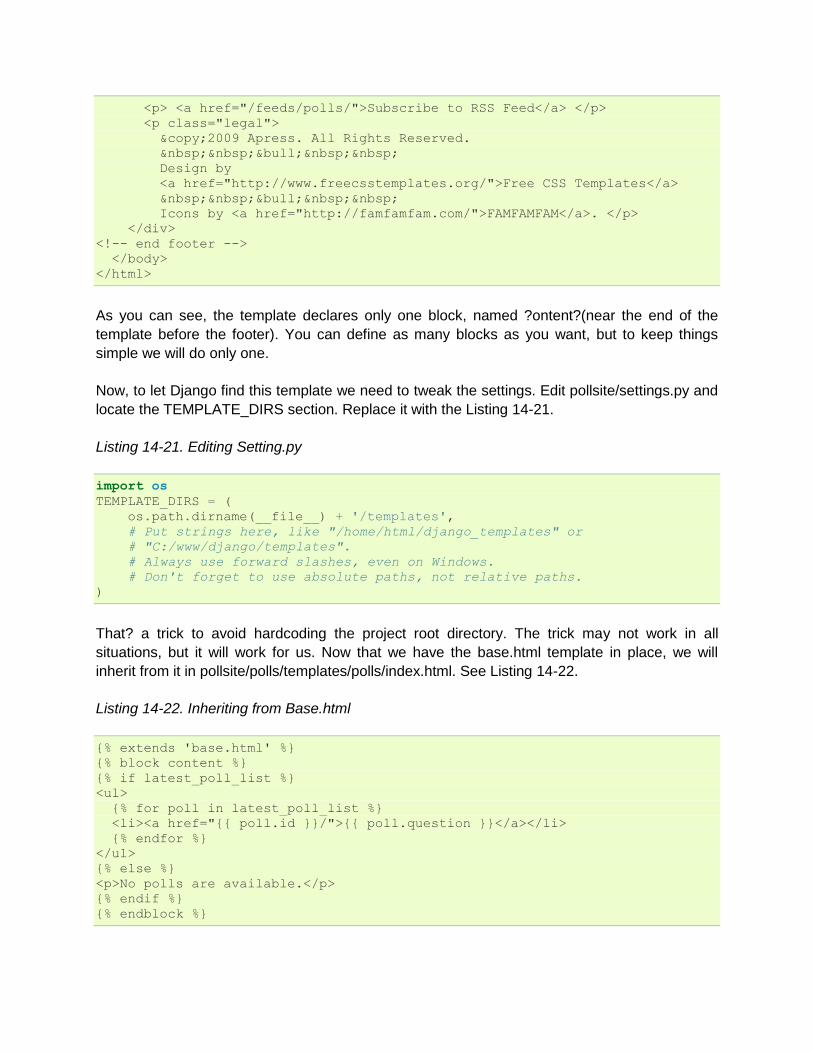
<p> <a href="/feeds/polls/">Subscribe to RSS Feed</a> </p>
<p class="legal">
©2009 Apress. All Rights Reserved.
•
Design by
<a href="http://www.freecsstemplates.org/">Free CSS Templates</a>
•
Icons by <a href="http://famfamfam.com/">FAMFAMFAM</a>. </p>
</div>
<!-- end footer -->
</body>
</html>
As you can see, the template declares only one block, named ?ontent?(near the end of the
template before the footer). You can define as many blocks as you want, but to keep things
simple we will do only one.
Now, to let Django find this template we need to tweak the settings. Edit pollsite/settings.py and
locate the TEMPLATE_DIRS section. Replace it with the Listing 14-21.
Listing 14-21. Editing Setting.py
import os
TEMPLATE_DIRS = (
os.path.dirname(__file__) + '/templates',
# Put strings here, like "/home/html/django_templates" or
# "C:/www/django/templates".
# Always use forward slashes, even on Windows.
# Don't forget to use absolute paths, not relative paths.
)
That? a trick to avoid hardcoding the project root directory. The trick may not work in all
situations, but it will work for us. Now that we have the base.html template in place, we will
inherit from it in pollsite/polls/templates/polls/index.html. See Listing 14-22.
Listing 14-22. Inheriting from Base.html
{% extends 'base.html' %}
{% block content %}
{% if latest_poll_list %}
<ul>
{% for poll in latest_poll_list %}
<li><a href="{{ poll.id }}/">{{ poll.question }}</a></li>
{% endfor %}
</ul>
{% else %}
<p>No polls are available.</p>
{% endif %}
{% endblock %}
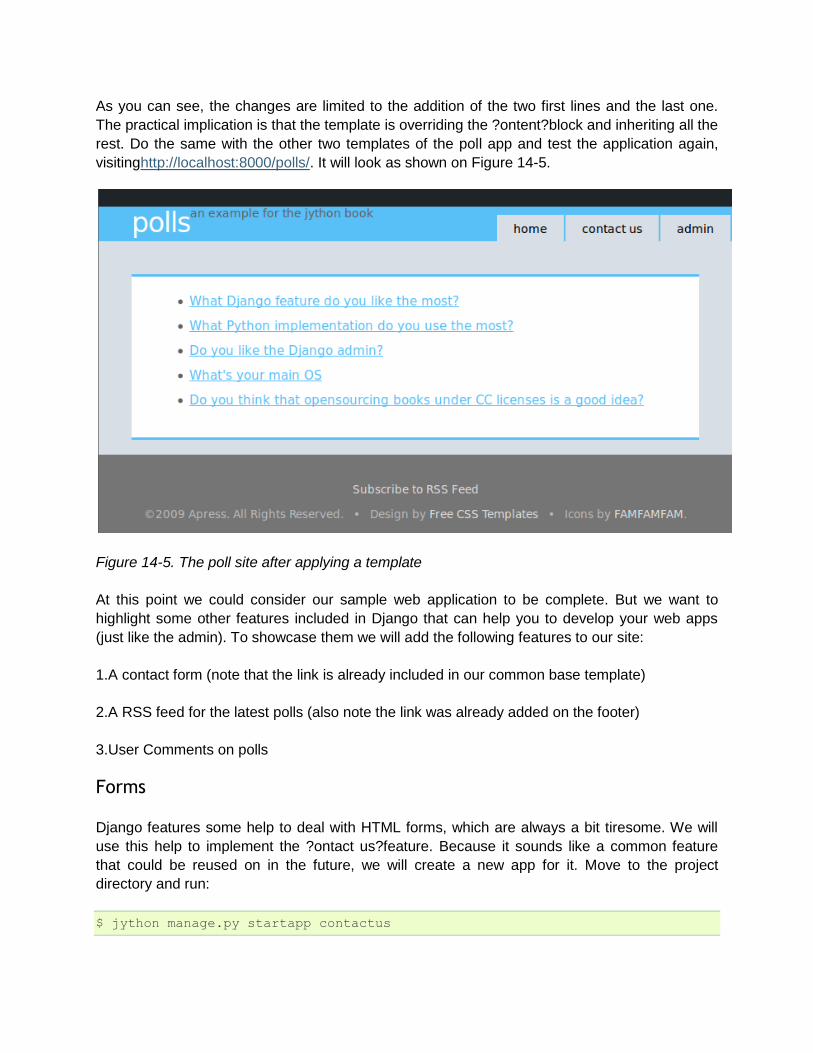
As you can see, the changes are limited to the addition of the two first lines and the last one.
The practical implication is that the template is overriding the ?ontent?block and inheriting all the
rest. Do the same with the other two templates of the poll app and test the application again,
visitinghttp://localhost:8000/polls/. It will look as shown on Figure 14-5.
Figure 14-5. The poll site after applying a template
At this point we could consider our sample web application to be complete. But we want to
highlight some other features included in Django that can help you to develop your web apps
(just like the admin). To showcase them we will add the following features to our site:
1.A contact form (note that the link is already included in our common base template)
2.A RSS feed for the latest polls (also note the link was already added on the footer)
3.User Comments on polls
Forms
Django features some help to deal with HTML forms, which are always a bit tiresome. We will
use this help to implement the ?ontact us?feature. Because it sounds like a common feature
that could be reused on in the future, we will create a new app for it. Move to the project
directory and run:
$ jython manage.py startapp contactus
Remember to add an entry for this app on pollsite/settings.py under the INSTALLED_APPS list
as ‘pollsite.contactus’.
Then we will delegate URL matching the /contact/ pattern to the app, by modifying
pollsite/urls.py and adding one line for it (see Listing 14-23).
Listing 14-23. Modifying Urls.py Again
from django.conf.urls.defaults import *
from django.contrib import admin
admin.autodiscover()
urlpatterns = patterns('',
(r'^admin/(.*)', admin.site.root),
(r'^polls/', include('pollsite.polls.urls')),
(r'^contact/', include('pollsite.contactus.urls')),
)
We now create pollsite/contactus/urls.py. For simplicity? sake we will use only one view to
display and process the form. So the file pollsite/contactus/urls.py will simply consist of Listing
14-24.
Listing 14-24. Creating a Short Urls.py
from django.conf.urls.defaults import *
urlpatterns = patterns('pollsite.contactus.views',
(r'^$', 'index'),
)
And the content of pollsite/contactus/views.py is shown in Listing 14-25.
Listing 14-25. Adding to Views.py
from django.shortcuts import render_to_response
from django.core.mail import mail_admins
from django import forms
class ContactForm(forms.Form):
name = forms.CharField(max_length=200)
email = forms.EmailField()
title = forms.CharField(max_length=200)
text = forms.CharField(widget=forms.Textarea)
def index(request):
if request.method == 'POST':
form = ContactForm(request.POST)
if form.is_valid():
mail_admins(
"Contact Form: %s" % form.title,
"%s <%s> Said: %s" % (form.name, form.email, form.text))
return render_to_response("contactus/success.html")
else:
form = ContactForm()
return render_to_response("contactus/form.html", {'form': form})
The important bit here is the ContactForm class in which the form is declaratively defined and
which encapsulates the validation logic. We just call the is_valid() method on our view to invoke
that logic and act accordingly. See http://docs.djangoproject.com/en/1.1/topics/email/#mail-
admins to learn about the main_admins function included on Django and how to adjust the
project settings to make it work.
Forms also provide quick ways to render them in templates. We will try that now. Listing 14-26
is the code for pollsite/contactus/templates/contactus/form.html, which is the template used
inside the view we just wrote.
Listing 14-26. A Form Rendered in a Template
{% extends "base.html" %}
{% block content %}
<form action="." method="POST">
<table>
{{ form.as_table }}
</table>
<input type="submit" value="Send Message" >
</form>
{% endblock %}
Here we take advantage of the as_table() method of Django forms, which also takes care of
rendering validation errors. Django forms also provide other convenience functions to render
forms, but if none of them suits your need, you can always render the form in custom ways.
Seehttp://docs.djangoproject.com/en/1.1/topics/forms/ for details on form handling.
Before testing this contact form, we need to write the template
pollsite/contactus/templates/contactus/success.html, which is also used from
pollsite.contactus.views.index. This template is quite simple (see Listing 14-27).
Listing 14-27. Contact Form Template
{% extends "base.html" %}
{% block content %}
<h1> Send us a message </h1>
<p><b>Message received, thanks for your feedback!</p>
{% endblock %}

And we are done. Test it by navigation to http://localhost:8000/contact/. Try submitting the form
without data, or with erroneous data (for example with an invalid email address). You will get
something like what? shown in Figure 14-6. Without needing to write much code you get a lot of
validation data basically for free. Of course the forms framework is extensible, so you can create
custom form field types with their own validation or rendering code. Again, we refer you
to http://docs.djangoproject.com/en/1.1/topics/forms/ for detailed information.
Figure 14-6. Django form validation in action
Feeds
It? time to implement the feed we are offering on the link right before the footer. It surely won?
surprise you to know that Django includes ways to state your feeds declaratively and write them
very quickly. Let? start by modifying pollsite/urls.py to leave it as shown in Listing 14-28.
Listing 14-28. Modifying Urls.py
from django.conf.urls.defaults import *
from pollsite.polls.feeds import PollFeed
from django.contrib import admin
admin.autodiscover()
urlpatterns = patterns('',
(r'^admin/(.*)', admin.site.root),
(r'^polls/', include('pollsite.polls.urls')),
(r'^contact/', include('pollsite.contactus.urls')),
(r'^feeds/(?P<url>.*)/$', 'django.contrib.syndication.views.feed',
{'feed_dict': {'polls': PollFeed}}),
)
We are changing the import of the PollFeed class (which we haven? written yet) and we also
need to change the last pattern for URLs starting with /feeds/, because it will map to a built-in
view, which takes a dictionary with feeds as arguments. In our case, PollFeed is the only one.
Writing this class, which will describe the feed, is very easy. Let? create the file
pollsite/polls/feeds.py and put the following code on it. See Listing 14-29.
Listing 14-29. Creating Feeds.py
from django.contrib.syndication.feeds import Feed
from django.core.urlresolvers import reverse
from pollsite.polls.models import Poll
class PollFeed(Feed):
title = "Polls"
link = "/polls"
description = "Latest Polls"
def items(self):
return Poll.objects.all().order_by('-pub_date')
def item_link(self, poll):
return reverse('pollsite.polls.views.detail', args=(poll.id,))
def item_pubdate(self, poll):
return poll.pub_date
And we are almost ready. When a request for the URL /feeds/polls/ is received by Django, it will
use this feed description to build all the XML data. The missing part is how the content of polls
will be displayed in the feeds. To do this, we need to create another template. By convention, it
has to be named feeds/<feed_name>_description.html, where <feed_name> is what we
specified as the key on the feed_dict in pollsite/urls.py. Thus we create the file
pollsite/polls/templates/feeds/polls_description.html with the very simple content shown in
Listing 14-30.
Listing 14-30. Polls Display Description
<ul>
{% for choice in obj.choice_set.all %}
<li>{{ choice.choice }}</li>
{% endfor %}
</ul>
The idea is simple: Django passes each object returned by PollFeed.items() to this template, in
which it takes the name obj. You then generate an HTML fragment which will be embedded on
the feed result.
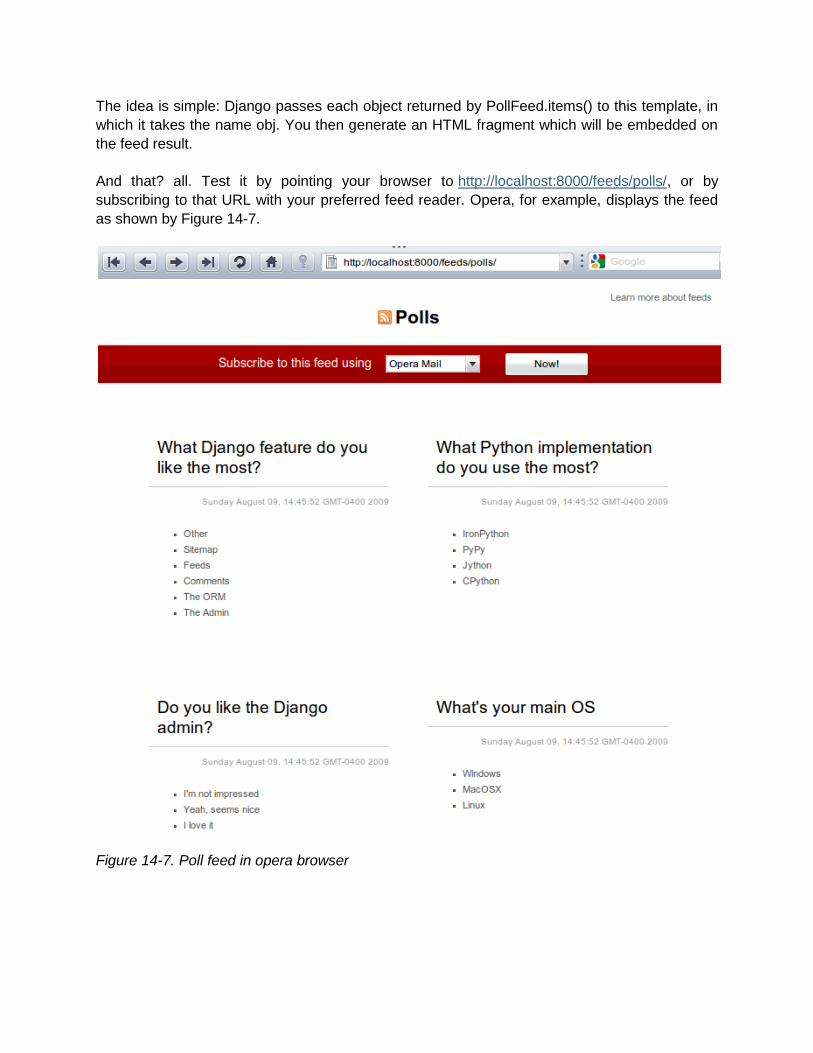
And that? all. Test it by pointing your browser to http://localhost:8000/feeds/polls/, or by
subscribing to that URL with your preferred feed reader. Opera, for example, displays the feed
as shown by Figure 14-7.
Figure 14-7. Poll feed in opera browser
Comments
Because comments are a common feature of current web sites, Django includes a mini-
framework to make the incorporation of comments in any project or app fairly simple. We will
show you how to use it in our project. First, add a new URL pattern for the Django comments
app, so the pollsite/urls.py file will look like Listing 14-31.
Listing 14-31. Adding a New URL Pattern to Urls.py
from django.conf.urls.defaults import *
from pollsite.polls.feeds import PollFeed
from django.contrib import admin
admin.autodiscover()
urlpatterns = patterns('',
(r'^admin/(.*)', admin.site.root),
(r'^polls/', include('pollsite.polls.urls')),
(r'^contact/', include('pollsite.contactus.urls')),
(r'^feeds/(?P<url>.*)/$', 'django.contrib.syndication.views.feed',
{'feed_dict': {'polls': PollFeed}}),
(r'^comments/', include('django.contrib.comments.urls')),
)
Then add ‘django.contrib.comments’ to the INSTALLED_APPS on pollsite/settings.py. After
that, we will let Django create the necessary tables by running:
$ jython manage.py syncdb
The comments will be added to the poll page, so we must edit
pollsite/polls/templates/polls/detail.html. We will add the following code just before the {%
endblock %} line, which currently is the last line of the file (see Listing 14-32).
Listing 14-32. Adding Comments to Details.html
{% load comments %}
{% get_comment_list for poll as comments %}
{% get_comment_count for poll as comments_count %}
{% if comments %}
<p>{{ comments_count }} comments:</p>
{% for comment in comments %}
<div class="comment">
<div class="title">
<p><small>
Posted by <a href="{{ comment.user_url }}">{{ comment.user_name }}</a>,
{{ comment.submit_date|timesince }} ago:
</small></p>
</div>
<div class="entry">
<p>
{{ comment.comment }}
</p>
</div>
</div>
{% endfor %}
{% else %}
<p>No comments yet.</p>
{% endif %}
<h2>Left your comment:</h2>
{% render_comment_form for poll %}
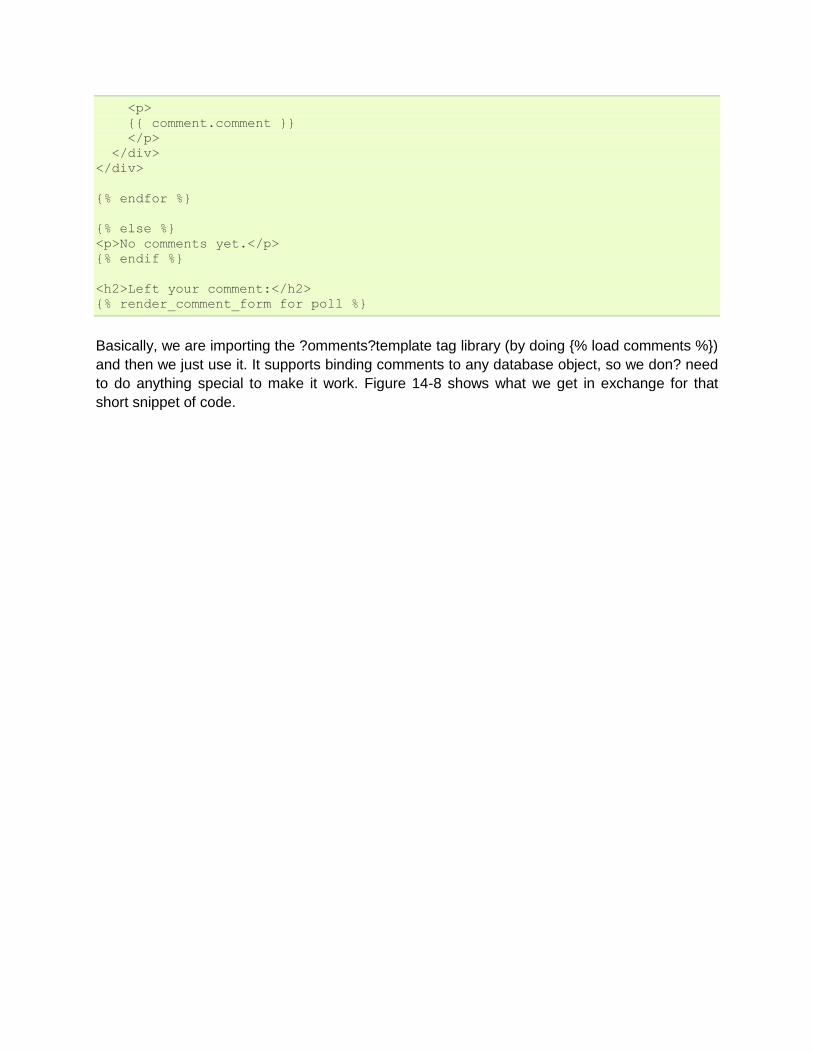
Basically, we are importing the ?omments?template tag library (by doing {% load comments %})
and then we just use it. It supports binding comments to any database object, so we don? need
to do anything special to make it work. Figure 14-8 shows what we get in exchange for that
short snippet of code.
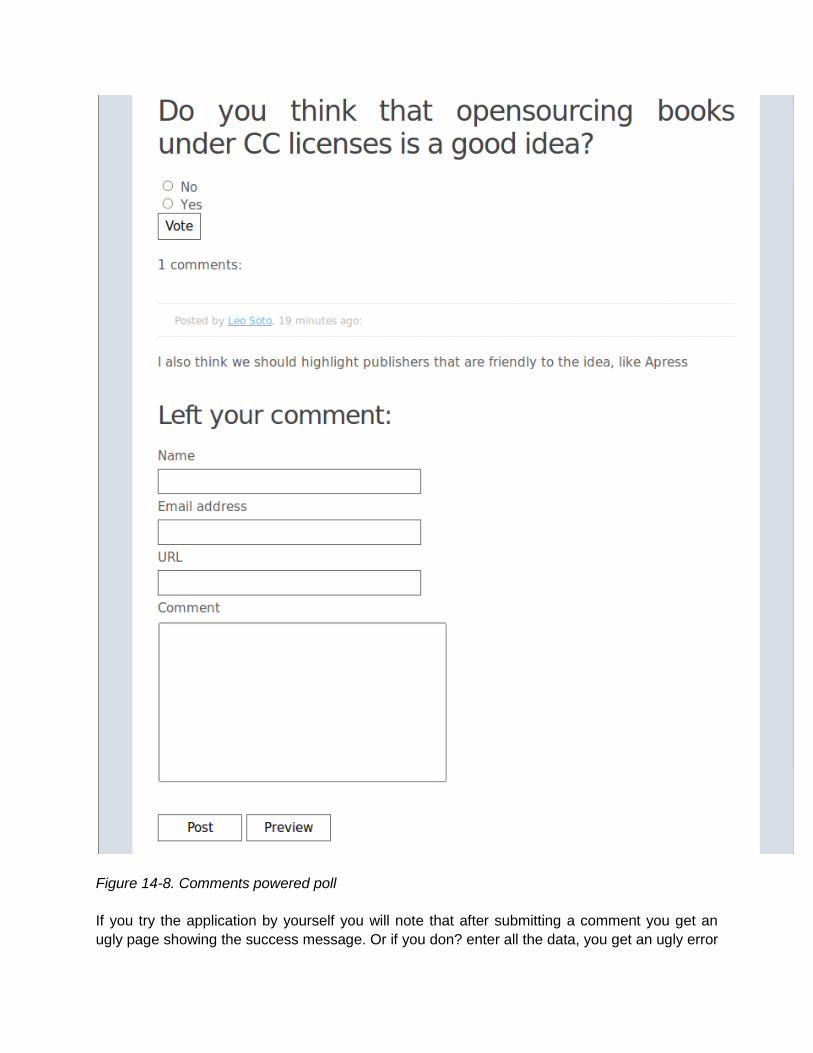
Figure 14-8. Comments powered poll
If you try the application by yourself you will note that after submitting a comment you get an
ugly page showing the success message. Or if you don? enter all the data, you get an ugly error
form. That? because we are using the comments templates. A quick and effective fix for that is
creating the file pollsite/templates/comments/base.html with the following content:
{% extends 'base.html' %}
Yeah, it? only one line! It shows the power of template inheritance: all we needed to do was to
change the base template of the comments framework to inherit from our global base template.
And More...
At this point we hope you have learned to appreciate Django? strengths. It? a very good web
framework in itself, but it also takes the ?atteries included?philosophy, and comes with solutions
for many common problems in web development. This usually speeds up a lot the process of
creating a new web site. And we didn? touch other features Django provides out of the box like
user authentication or generic views.
But this book is about Jython, and we will use the rest of this chapter to show the interesting
possibilities that appear when you run Django on Jython. If you want to learn more about
Django itself, we recommend (again) the excellent official documentation available
on http://docs.djangoproject.com/.
J2EE Deployment and Integration
Although you could deploy your application using Django? built in development server, it? a
terrible idea. The development server isn? designed to operate under heavy load and this is
really a job that is more suited to a proper application server. We?e going to install Glassfish
v2.1?n opensource highly performant JavaEE 5 application server from Sun Microsystems?nd
show deployment onto it.
Let? install Glassfish now; obtain the release from:
https://glassfish.dev.java.net/public/downloadsindex.html
At the time of this writing, Glassfish v3.0 is being prepared for release and it will support Django
and Jython out of the box, but we?l stick to the stable release as its documentation is complete
and its stability has been well established. Download the v2.1 release (currently v2.1-b60e). We
strongly suggest you use JDK6 to do your deployment. Once you have the installation JAR file,
you can install it by issuing:
% java -Xmx256m -jar glassfish-installer-v2.1-b60e-windows.jar
If your glassfish installer file has a different name, just use that instead of the filename listed in
the above example. Be careful where you invoke this command though?lassfish will unpack the
application server into a subdirectory ?lassfish?in the directory that you start the installer. One
step that tripped us up during our impatient installation of Glassfish is that you actually need to
invoke ant to complete the installation. On Unix and its derivatives you need to invoke:
% chmod -R +x lib/ant/bin
% lib/ant/bin/ant -f setup.xml
or for Windows:
% lib\ant\bin\ant -f setup.xml
This will complete the setup .You?l find a bin directory with ?sadmin?or ?sadmin.bat,?which will
indicate that the application server has been installed. You can start the server up by invoking:
% bin/asadmin start-domain -v
On Windows, this will start the server in the foreground. The process will not turn into daemon
and run in the background. On Unix operating systems, the process will automatically become a
daemon and run in the background. In either case, once the server is up and running, you will
be able to reach the web administration screen through a browser by going
to http://localhost:5000/. The default login is ?dmin?and the password is ?dminadmin.?
Currently, Django on Jython only supports the PostgreSQL, Oracle, and MySQL databases
officially, but there is also a SQLite3 backend. Let? get the PostgreSQL backend working?ou
will need to obtain the PostgreSQL JDBC driver from http://jdbc.postgresql.org.
At the time of this writing, the latest version was in postgresql-8.4-701.jdbc4.jar. Copy that jar
file into your GLASSFISH_HOME/domains/domain/domain1/lib directory. This will enable all
your applications hosted in your appserver to use the same JDBC driver.
You should now have a GLASSFISH_HOME/domains/domain1/lib directory with the contents
shown in Listing 14-33.
Listing 14-33. Lib Directory Contents
applibs/
classes/
databases/
ext/
postgresql-8.3-604.jdbc4.jar
You will need to stop and start the application server to let those libraries load up.
% bin/asadmin stop-domain
% bin/asadmin start-domain -v
Deploying Your First Application
Django on Jython includes a built-in command to support the creation of WAR files, but first, you
will need to do a little bit of configuration to make everything run smoothly. First we?l set up a
simple Django application that has the administration application enabled so that we have some
models to play with. Create a project called ?ello?and make sure you add
?jango.contrib.admin?and ?oj?applications to the INSTALLED_APPS.
Now enable the user admin by editing urls.py and uncomment the admin lines. Your urls.py
should now look something like Listing 14-34.
Listing 14-34. Enabling User Admin in Urls.py
from django.conf.urls.defaults import *
from django.contrib import admin
admin.autodiscover()
urlpatterns = patterns('',
(r'^admin/(.*)', admin.site.root),
)
Disabling PostgreSQL Logins
The first thing we inevitably do on a development machine with PostgreSQL is disable
authentication checks to the database. The fastest way to do this is to enable only local
connections to the database by editing the pg_hba.conf file. For PostgreSQL 8.3, this file is
typically located in c:PostgreSQL8.3datapg_hba.conf and on UNIXes it is typically located in
/etc/PostgreSQL/8.3/data/pg_hba.conf
At the bottom of the file, you?l find connection configuration information. Comment out all the
lines and enable trusted connections from localhost. Your edited configuration should look
something like Listing 14-35.
Listing 14-35. PostgreSQL Authentication Configuration
# TYPE DATABASE USER CIDR-ADDRESS METHOD
host all all 127.0.0.1/32 trust
This will let any username recognized by PostgreSQL connect to the database. You may need
to create a PostgreSQL user with the ?reateuser?command. Consult your PostgreSQL
documentation for more details. You do not want to do this for a public facing production server.
You should consult the PostgreSQL documentation for instructions for more suitable settings.
After you?e edited the connection configuration, you will need to restart the PostgreSQL server.
Create your PostgreSQL database using the createdb command now.
> createdb demodb
Setting up the database is straightforward; you just enable the pgsql backend from Django on
Jython. Note that the backend will expect a username and password pair even though we?e
disabled them in PostgreSQL. You can populate anything you want for the DATABASE_NAME
and DATABASE_USER settings. The database section of your settings module should now look
something like Listing 14-36.
Listing 14-36. Database Section of Settings Module for PostgreSQL
DATABASE_ENGINE = 'doj.backends.zxjdbc.postgresql'
DATABASE_NAME = 'demodb'
DATABASE_USER = 'ngvictor'
DATABASE_PASSWORD = 'nosecrets'
Initialize your database now.
> jython manage.py syncdb
Creating table django_admin_log
Creating table auth_permission
Creating table auth_group
Creating table auth_user
Creating table auth_message
Creating table django_content_type
Creating table django_session
Creating table django_site
You just installed Django's auth system, which means you don't have any
superusers defined.
Would you like to create one now? (yes/no): yes
Username: admin
E-mail address: [email protected]
Warning: Problem with getpass. Passwords may be echoed.
Password: admin
Warning: Problem with getpass. Passwords may be echoed.
Password (again): admin
Superuser created successfully.
Installing index for admin.
LogEntry model
Installing index for auth.Permission model
Installing index for auth.Message model
All of this should be review so far, now we?e going to take the application and deploy it into the
running Glassfish server. This is actually the easy part. Django on Jython comes with a custom
?ar?command that builds a self-contained file, which you can use to deploy into any Java
servlet container.
A Note About WAR Files
For JavaEE servers, a common way to deploy your applications is to deploy a ?AR?file. This is
just a fancy name for a zip file that contains your application and any dependencies it requires
that the application server has not made available as a shared resource. This is a robust way of
making sure that you minimize the impact of versioning changes of libraries if you want to
deploy multiple applications in your app server.
Consider your Django applications over time. You will undoubtedly upgrade your version of
Django, and you may upgrade the version of your database drivers. You may even decide to
upgrade the version of the Jython language you wish to deploy on. These choices are ultimately
up to you if you bundle all your dependencies in your WAR file. By bundling up all your
dependencies into your WAR file, you can ensure that your app will ?ust work?when you go to
deploy it. The server will automatically partition each application into its own space with
concurrently running versions of the same code.
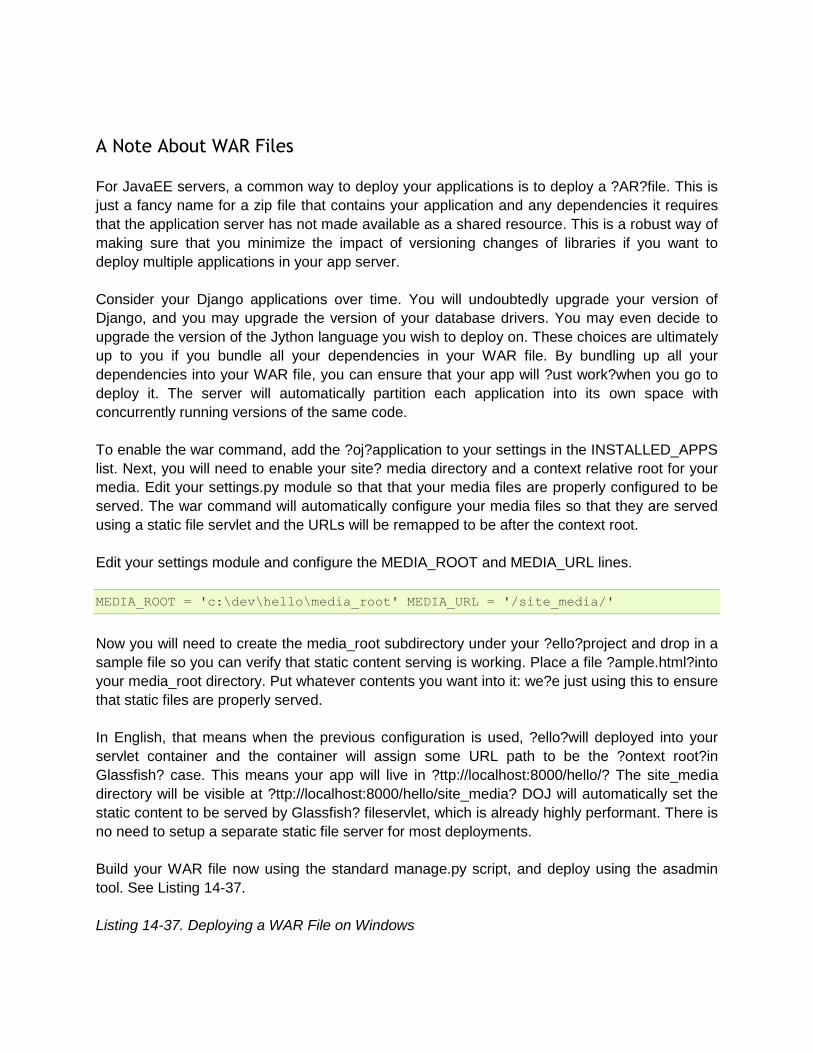
To enable the war command, add the ?oj?application to your settings in the INSTALLED_APPS
list. Next, you will need to enable your site? media directory and a context relative root for your
media. Edit your settings.py module so that that your media files are properly configured to be
served. The war command will automatically configure your media files so that they are served
using a static file servlet and the URLs will be remapped to be after the context root.
Edit your settings module and configure the MEDIA_ROOT and MEDIA_URL lines.
MEDIA_ROOT = 'c:\dev\hello\media_root' MEDIA_URL = '/site_media/'
Now you will need to create the media_root subdirectory under your ?ello?project and drop in a
sample file so you can verify that static content serving is working. Place a file ?ample.html?into
your media_root directory. Put whatever contents you want into it: we?e just using this to ensure
that static files are properly served.
In English, that means when the previous configuration is used, ?ello?will deployed into your
servlet container and the container will assign some URL path to be the ?ontext root?in
Glassfish? case. This means your app will live in ?ttp://localhost:8000/hello/? The site_media
directory will be visible at ?ttp://localhost:8000/hello/site_media? DOJ will automatically set the
static content to be served by Glassfish? fileservlet, which is already highly performant. There is
no need to setup a separate static file server for most deployments.
Build your WAR file now using the standard manage.py script, and deploy using the asadmin
tool. See Listing 14-37.
Listing 14-37. Deploying a WAR File on Windows
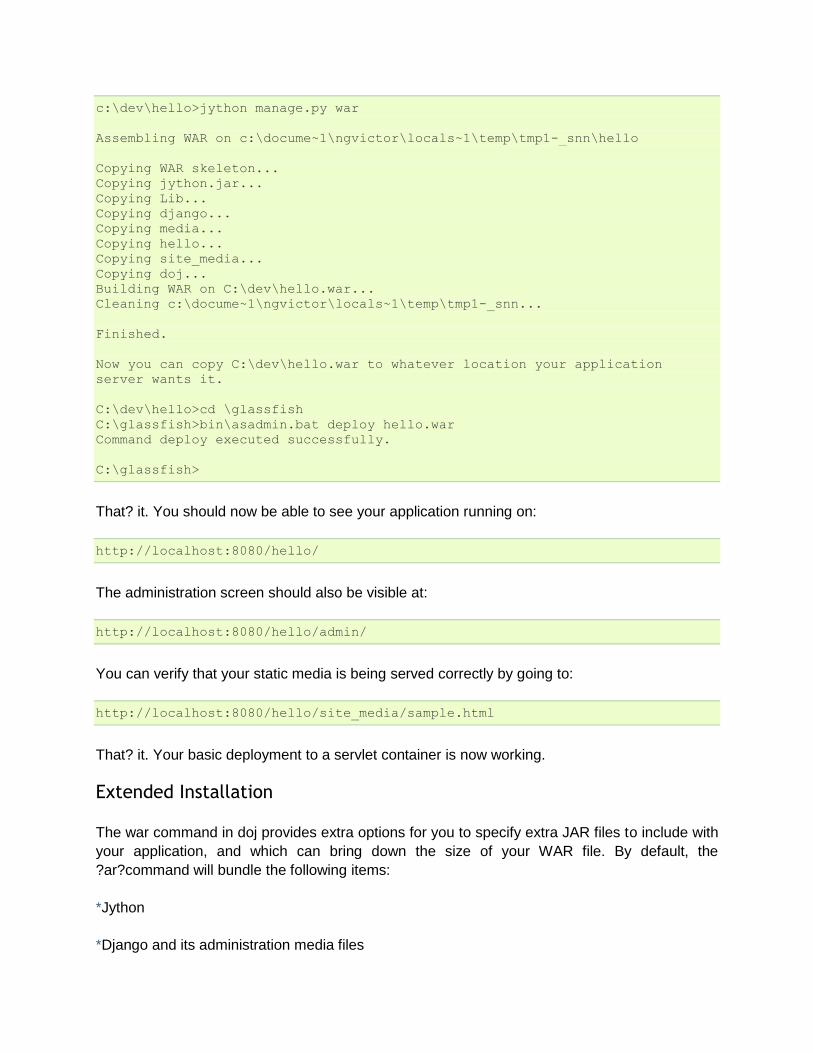
c:\dev\hello>jython manage.py war
Assembling WAR on c:\docume~1\ngvictor\locals~1\temp\tmp1-_snn\hello
Copying WAR skeleton...
Copying jython.jar...
Copying Lib...
Copying django...
Copying media...
Copying hello...
Copying site_media...
Copying doj...
Building WAR on C:\dev\hello.war...
Cleaning c:\docume~1\ngvictor\locals~1\temp\tmp1-_snn...
Finished.
Now you can copy C:\dev\hello.war to whatever location your application
server wants it.
C:\dev\hello>cd \glassfish
C:\glassfish>bin\asadmin.bat deploy hello.war
Command deploy executed successfully.
C:\glassfish>
That? it. You should now be able to see your application running on:
http://localhost:8080/hello/
The administration screen should also be visible at:
http://localhost:8080/hello/admin/
You can verify that your static media is being served correctly by going to:
http://localhost:8080/hello/site_media/sample.html
That? it. Your basic deployment to a servlet container is now working.
Extended Installation
The war command in doj provides extra options for you to specify extra JAR files to include with
your application, and which can bring down the size of your WAR file. By default, the
?ar?command will bundle the following items:
*Jython
*Django and its administration media files
*your project and media files
*all of your libraries in site-packages
You can specialize your WAR file to include specific JAR files and you can instruct doj to
assemble a WAR file with just the python packages that you require. The options for ?anage.py
war?are ?-include-py-packages?and ?-include-jar-libs.?The basic usage is straightforward:
simply pass in the location of your custom python packages and the JAR files to these two
arguments and distutils will automatically decompress the contents of those compressed
volumes and then recompress them into your WAR file.
To bundle up JAR files, you will need to specify a list of files to ?-include-java-libs.? The
following example bundles the jTDS JAR file and a regular python module called urllib3 with our
WAR file.:
$ jython manage.py war --include-java-libs=$HOME/downloads/jtds-1.2.2.jar \
--include-py-package=$HOME/PYTHON_ENV/lib/python2.5/site-
packages/urllib3
You can have multiple JAR files or Python packages listed, but you must delimit them with your
operating system? path separator. For Unix systems, this means ??and for Windows it is ??
Eggs can also be installed using ?-include-py-path-entries?using the egg filename. For example
$ jython manage.py war --include-py-path-
entries=$HOME/PYTHON_ENV/lib/python2.5/site-packages/urllib3
Connection Pooling With JavaEE
Whenever your web application goes to fetch data from the database, the data has to come
back over a database connection. Some databases, such as MySQL, have ?heap?database
connections, but for many databases creating and releasing connections is quite expensive.
Under high-load conditions, opening and closing database connections on every request can
quickly consume too many file handles, and your application will crash. The general solution to
this is to employ database connection pooling. While your application will continue to create new
connections and close them off, a connection pool will manage your database connections from
a reusable set. When you go to close your connection, the connection pool will simply reclaim
your connection for use at a later time. Using a pool means you can put an enforced upper limit
restriction on the number of concurrent connections to the database. Having that upper limit
means you can reason about how your application will perform when the upper limit of database
connections is hit. Although Django does not natively support database connection pools with
CPython, you can enable them in the PostgreSQL driver for Django on Jython. Creating a
connection pool that is visible to Django/Jython is a two-step process in Glassfish. First, we?l
need to create a JDBC connection pool, and then we?l need to bind a JNDI name to that pool.
In a JavaEE container, JNDI, the Java Naming and Directory Interface, is a registry of names
bound to objects. It? really best thought of as a hashtable that typically abstracts a factory that
emits objects. In the case of database connections, JNDI abstracts a ConnectionFactory, which
provides proxy objects that behave like database connections. These proxies automatically
manage all the pooling behavior for us. Let? see this in practice now. First we?l need to create a
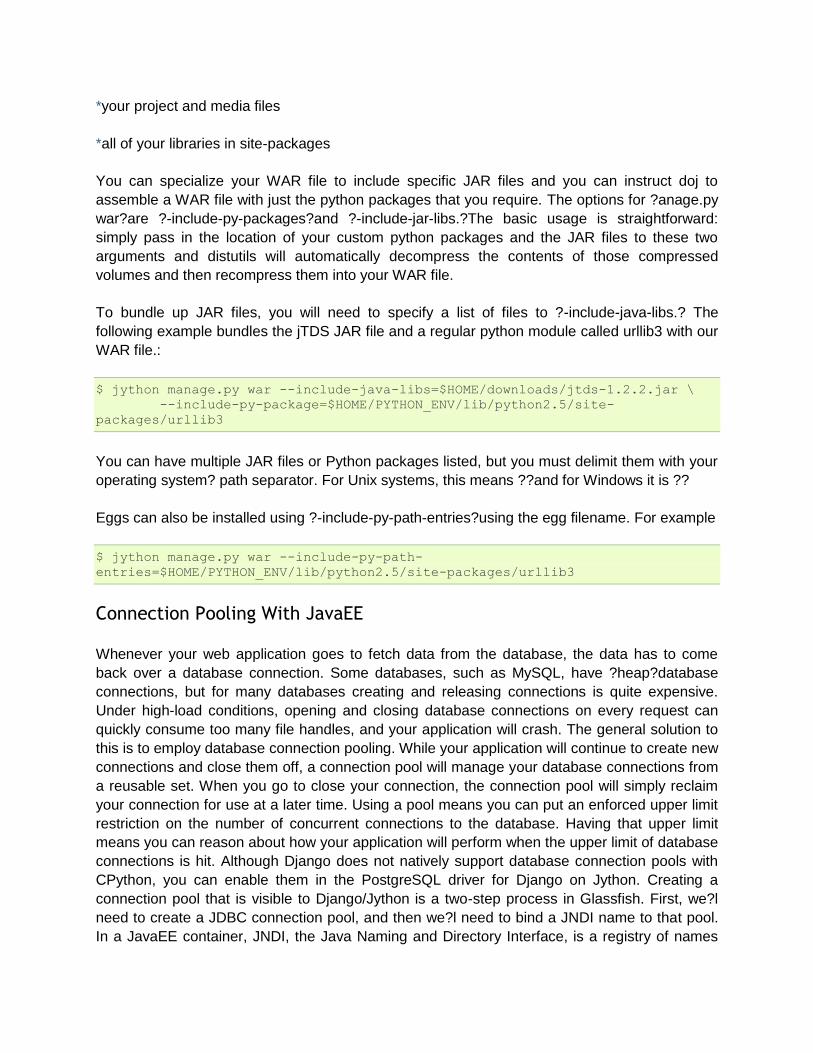
JDBC ConnectionFactory. Go to the administration screen of Glassfish and go down to
Resources/JDBC/JDBC Resources/Connection Pools. From there you can click on the
?ew?button and start to configure your pool. Set the name to ?gpool-demo? the resource type
should be ?avax.sql.ConnectionPoolDataSource?and the Database Vendor should be
PostgreSQL. Your completed form should resemble that which is shown in Figure 14-9. Click
?ext.?
Figure 14-9. Adding a Glassfish JDBC Connection Pool
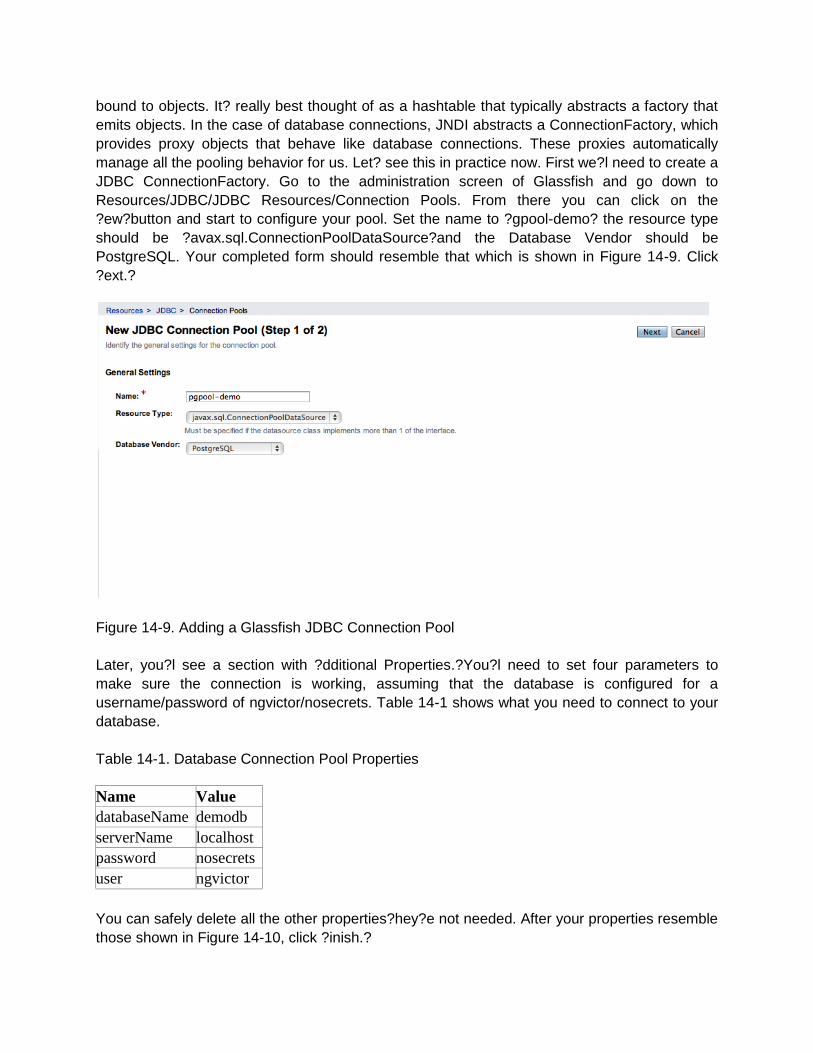
Later, you?l see a section with ?dditional Properties.?You?l need to set four parameters to
make sure the connection is working, assuming that the database is configured for a
username/password of ngvictor/nosecrets. Table 14-1 shows what you need to connect to your
database.
Table 14-1. Database Connection Pool Properties
Name Value
databaseName demodb
serverName localhost
password nosecrets
user ngvictor
You can safely delete all the other properties?hey?e not needed. After your properties resemble
those shown in Figure 14-10, click ?inish.?
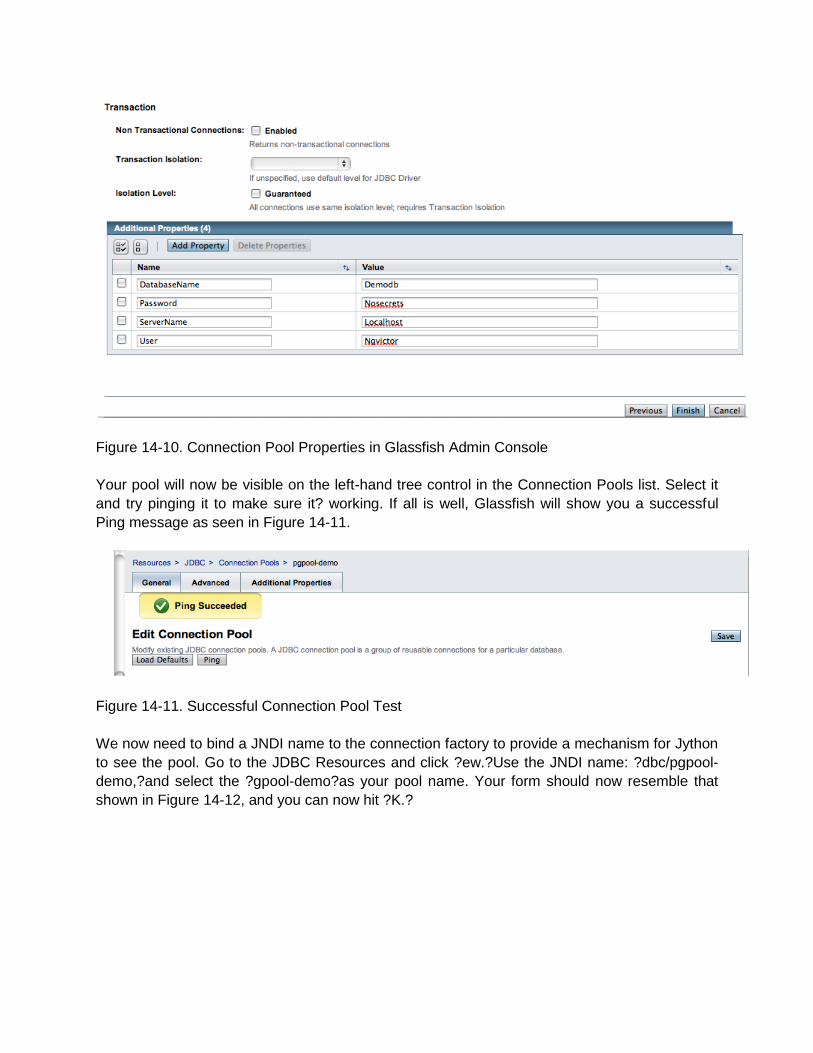
Figure 14-10. Connection Pool Properties in Glassfish Admin Console
Your pool will now be visible on the left-hand tree control in the Connection Pools list. Select it
and try pinging it to make sure it? working. If all is well, Glassfish will show you a successful
Ping message as seen in Figure 14-11.
Figure 14-11. Successful Connection Pool Test
We now need to bind a JNDI name to the connection factory to provide a mechanism for Jython
to see the pool. Go to the JDBC Resources and click ?ew.?Use the JNDI name: ?dbc/pgpool-
demo,?and select the ?gpool-demo?as your pool name. Your form should now resemble that
shown in Figure 14-12, and you can now hit ?K.?
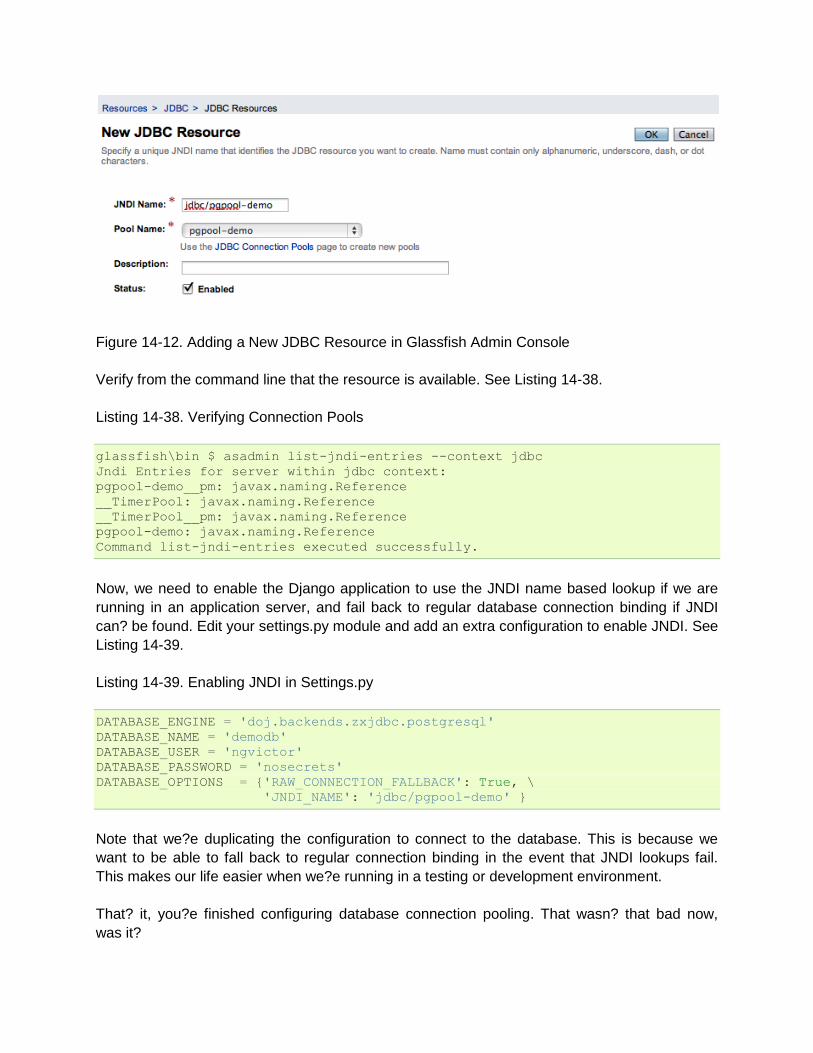
Figure 14-12. Adding a New JDBC Resource in Glassfish Admin Console
Verify from the command line that the resource is available. See Listing 14-38.
Listing 14-38. Verifying Connection Pools
glassfish\bin $ asadmin list-jndi-entries --context jdbc
Jndi Entries for server within jdbc context:
pgpool-demo__pm: javax.naming.Reference
__TimerPool: javax.naming.Reference
__TimerPool__pm: javax.naming.Reference
pgpool-demo: javax.naming.Reference
Command list-jndi-entries executed successfully.
Now, we need to enable the Django application to use the JNDI name based lookup if we are
running in an application server, and fail back to regular database connection binding if JNDI
can? be found. Edit your settings.py module and add an extra configuration to enable JNDI. See
Listing 14-39.
Listing 14-39. Enabling JNDI in Settings.py
DATABASE_ENGINE = 'doj.backends.zxjdbc.postgresql'
DATABASE_NAME = 'demodb'
DATABASE_USER = 'ngvictor'
DATABASE_PASSWORD = 'nosecrets'
DATABASE_OPTIONS = {'RAW_CONNECTION_FALLBACK': True, \
'JNDI_NAME': 'jdbc/pgpool-demo' }
Note that we?e duplicating the configuration to connect to the database. This is because we
want to be able to fall back to regular connection binding in the event that JNDI lookups fail.
This makes our life easier when we?e running in a testing or development environment.
That? it, you?e finished configuring database connection pooling. That wasn? that bad now,
was it?
Dealing With Long-running Tasks
When you?e building a complex web application, you will inevitably end up having to deal with
processes that need to be processed in the background. If you?e building on top of CPython
and Apache, you?e out of luck here?here? no standard infrastructure available for you to handle
these tasks. Luckily these services have had years of engineering work already done for you in
the Java world. We?l take a look at two different strategies for dealing with long running tasks.
Thread Pools
The first strategy is to leverage managed thread pools in the JavaEE container. When your web
application is running within Glassfish, each HTTP request is processed by the HTTP Service,
which contains a threadpool. You can change the number of threads to affect the performance
of the webserver. Glassfish will also let you create your own threadpools to execute arbitrary
work units for you.
The basic API for threadpools is simple:
WorkManager, which provides an abstracted interface to the thread pool.
Work is an interface, which encapsulates your unit of work.
WorkListener, which is an interface that lets you monitor the progress of your Work
tasks.
First, we need to tell Glassfish to provision a threadpool for our use. In the Administration
screen, go down to Configuration/Thread Pools. Click on ?ew?to create a new thread pool. Give
your threadpool the name ?ackend-workers.?Leave all the other settings as the default values
and click ?K.? You?e now got a thread pool that you can use. The threadpool exposes an
interface where you can submit jobs to the pool and the pool will either execute the job
synchronously within a thread, or you can schedule the job to run asynchronously. As long as
your unit of work implements the javax.resource.spi.work.Work interface, the threadpool will
happily run your code. A WorkUnit class may be as simple as Listing 14-40.
Listing 14-40. Implementing a WorkUnit Class
from javax.resource.spi.work import Work
class WorkUnit(Work):
"""
This is an implementation of the Work interface.
"""
def __init__(self, job_id):
self.job_id = job_id
def release(self):
"""
This method is invoked by the threadpool to tell threads
to abort the execution of a unit of work.
"""
logger.warn("[%d] Glassfish asked the job to stop quickly" %
self.job_id)
def run(self):
"""
This method is invoked by the threadpool when work is
'running'
"""
for i in range(20):
logger.info("[%d] just doing some work" % self.job_id)
This WorkUnit class doesn? do anything very interesting, but it does illustrate the basic structure
of what unit of work requires. We?e just logging message to disk so that we can visually see the
thread execute.
WorkManager implements several methods that can run your job and block until the threadpool
completes your work, or it can run the job asynchronously. Generally, we prefer to run things
asynchronously and simply check the status of the work over time. This lets me submit multiple
jobs to the threadpool at once and check the status of each of the jobs.
To monitor the progress of work, we need to implement the WorkListener interface. This
interface gives us notifications as a task progresses through the three phases of execution
within the thread pool. Those states are:
Accepted
Started
Completed
All jobs must go to either Completed or Rejected states. The simplest thing to do then is to
simply build up lists capturing the events. When the length of the completed and the rejected
lists together are the same as the number of jobs we submitted, we know that we are done. By
using lists instead of simple counters, we can inspect the work objects in much more detail.
Listing 14-41 shows the code for our SimpleWorkListener.
Listing 14-41. Writing SimpleWorkListener Code
from javax.resource.spi.work import WorkListener
class SimpleWorkListener(WorkListener):
"""
Just keep track of all work events as they come in
"""
def __init__(self):
self.accepted = []
self.completed = []
self.rejected = []
self.started = []
def workAccepted(self, work_event):
self.accepted.append(work_event.getWork())
logger.info("Work accepted %s" % str(work_event.getWork()))
def workCompleted(self, work_event):
self.completed.append(work_event.getWork())
logger.info("Work completed %s" % str(work_event.getWork()))
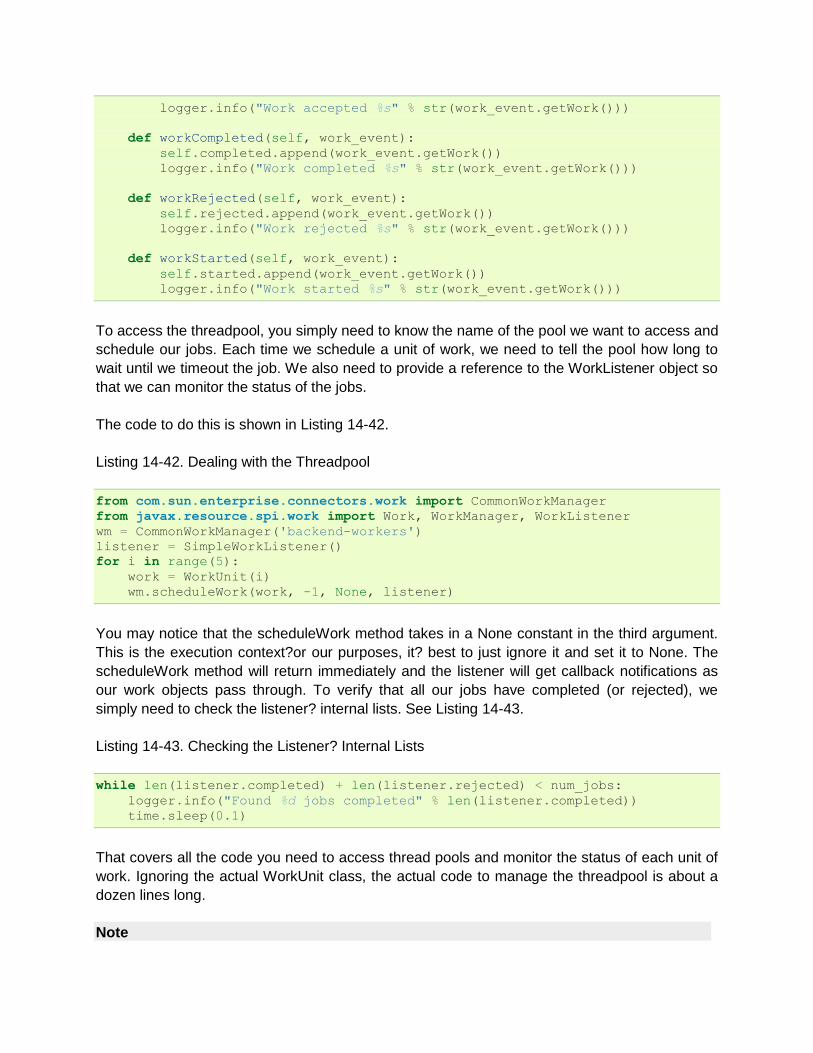
def workRejected(self, work_event):
self.rejected.append(work_event.getWork())
logger.info("Work rejected %s" % str(work_event.getWork()))
def workStarted(self, work_event):
self.started.append(work_event.getWork())
logger.info("Work started %s" % str(work_event.getWork()))
To access the threadpool, you simply need to know the name of the pool we want to access and
schedule our jobs. Each time we schedule a unit of work, we need to tell the pool how long to
wait until we timeout the job. We also need to provide a reference to the WorkListener object so
that we can monitor the status of the jobs.
The code to do this is shown in Listing 14-42.
Listing 14-42. Dealing with the Threadpool
from com.sun.enterprise.connectors.work import CommonWorkManager
from javax.resource.spi.work import Work, WorkManager, WorkListener
wm = CommonWorkManager('backend-workers')
listener = SimpleWorkListener()
for i in range(5):
work = WorkUnit(i)
wm.scheduleWork(work, -1, None, listener)
You may notice that the scheduleWork method takes in a None constant in the third argument.
This is the execution context?or our purposes, it? best to just ignore it and set it to None. The
scheduleWork method will return immediately and the listener will get callback notifications as
our work objects pass through. To verify that all our jobs have completed (or rejected), we
simply need to check the listener? internal lists. See Listing 14-43.
Listing 14-43. Checking the Listener? Internal Lists
while len(listener.completed) + len(listener.rejected) < num_jobs:
logger.info("Found %d jobs completed" % len(listener.completed))
time.sleep(0.1)
That covers all the code you need to access thread pools and monitor the status of each unit of
work. Ignoring the actual WorkUnit class, the actual code to manage the threadpool is about a
dozen lines long.
Note
Unfortunately, this API is not standard in the JavaEE 5 specification yet so the code listed here
will only work in Glassfish. The API for parallel processing is being standardized for JavaEE 6,
and until then you will need to know a little bit of the internals of your particular application
server to get threadpools working. If you?e working with Weblogic or Websphere, you will need
to use the CommonJ APIs to access the threadpools, but the logic is largely the same.
Passing Messages Across Process Boundaries
While threadpools provide access to background job processing, sometimes it may be beneficial
to have messages pass across process boundaries. Every week there seems to be a new
Python package that tries to solve this problem, for Jython we are lucky enough to leverage
Java? JMS. JMS specifies a message brokering technology where you may define
publish/subscribe or point to point delivery of messages between different services. Messages
are asynchronously sent to provide loose coupling and the broker deals with all manner of
boring engineering details like delivery guarantees, security, durability of messages between
server crashes and clustering.
Although you could use a hand rolled RESTful messaging implementation, using OpenMQ and
JMS has many advantages.
It? mature. Do you really think your messaging implementation handles all the corner
cases? Server crashes? Network connectivity errors? Reliability guarantees?
Clustering? Security? OpenMQ has almost 10 years of engineering behind it.
The JMS standard is just that: standard. You gain the ability to send and receive
messages between any JavaEE code.
Interoperability. JMS isn? the only messaging broker in town. The Streaming Text
Orientated Messaging Protocol (STOMP) is another standard that is popular amongst
non-Java developers. You can turn a JMS broker into a STOMP broker using
stompconnect. This means you can effectively pass messages between any messaging
client and any messaging broker using any of a dozen different languages.
In JMS there are two types of message delivery mechanisms:
Publish/Subscribe: This is for the times when we want to message one or more
subscribers about events currently occurring. This is done through JMS ?opics.?* Point
to point messaging: These are single sender, single receiver message queues.
Appropriately, JMS calls these ?ueues.?
We need to provision a couple of objects in Glassfish to get JMS going. In a nutshell, we need
to create a connection factory which clients will use to connect to the JMS broker. We?l create a
publish/subscribe resource and a point to point messaging queue. In JMS terms, these are
called ?estinations? They can be thought of as postboxes that you send your mail to. Go to the
Glassfish administration screen and go to Resources/JMS Resources/Connection Factories.
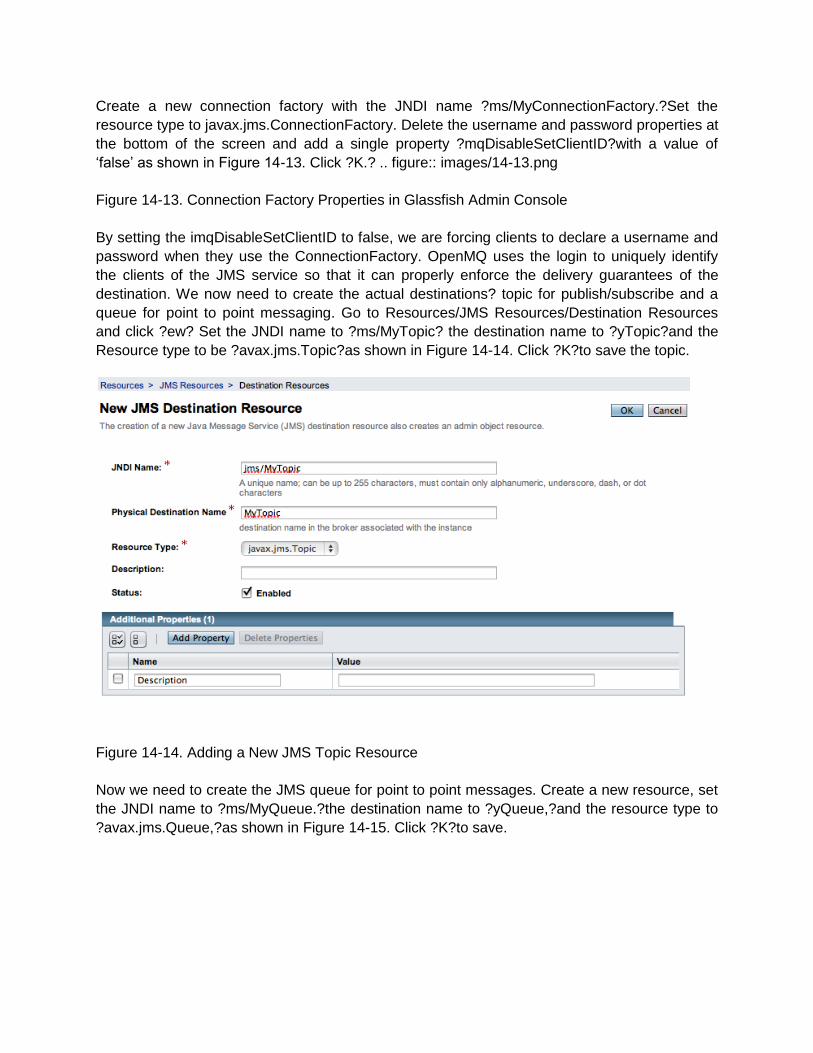
Create a new connection factory with the JNDI name ?ms/MyConnectionFactory.?Set the
resource type to javax.jms.ConnectionFactory. Delete the username and password properties at
the bottom of the screen and add a single property ?mqDisableSetClientID?with a value of
‘false’ as shown in Figure 14-13. Click ?K.? .. figure:: images/14-13.png
Figure 14-13. Connection Factory Properties in Glassfish Admin Console
By setting the imqDisableSetClientID to false, we are forcing clients to declare a username and
password when they use the ConnectionFactory. OpenMQ uses the login to uniquely identify
the clients of the JMS service so that it can properly enforce the delivery guarantees of the
destination. We now need to create the actual destinations? topic for publish/subscribe and a
queue for point to point messaging. Go to Resources/JMS Resources/Destination Resources
and click ?ew? Set the JNDI name to ?ms/MyTopic? the destination name to ?yTopic?and the
Resource type to be ?avax.jms.Topic?as shown in Figure 14-14. Click ?K?to save the topic.
Figure 14-14. Adding a New JMS Topic Resource
Now we need to create the JMS queue for point to point messages. Create a new resource, set
the JNDI name to ?ms/MyQueue.?the destination name to ?yQueue,?and the resource type to
?avax.jms.Queue,?as shown in Figure 14-15. Click ?K?to save.
Figure 14-15. Adding a New JMS Queue Resource
Like the database connections discussed earlier, the JMS services are also acquired in the
JavaEE container through the use of JNDI name lookups. Unlike the database code, we?e
going to have to do some manual work to acquire the naming context which we do our lookups
against. When our application is running inside of Glassfish, acquiring a context is very simple.
We just import the class and instantiate it. The context provides a lookup() method which we
use to acquire the JMS connection factory and get access to the particular destinations that we
are interested in. In Listing 14-44, we?l publish a message onto our topic. Let? see some code
first and we?l go over the finer details of what? going on.
Listing 14-44. Context for Creating a Text Message
from javax.naming import InitialContext, Session
from javax.naming import DeliverMode, Message
context = InitialContext()
tfactory = context.lookup("jms/MyConnectionFactory")
tconnection = tfactory.createTopicConnection('senduser', 'sendpass')
tsession = tconnection.createTopicSession(False, Session.AUTO_ACKNOWLEDGE)
publisher = tsession.createPublisher(context.lookup("jms/MyTopic"))
message = tsession.createTextMessage()
msg = "Hello there : %s" % datetime.datetime.now()
message.setText(msg)
publisher.publish(message, DeliveryMode.PERSISTENT,
Message.DEFAULT_PRIORITY, 100)
tconnection.close()
context.close()
In this code snippet, we acquire a topic connection through the connection factory. To reiterate,
topics are for publish/subscribe scenarios. Next, we create a topic session, a context where we
can send and receive messages. The two arguments passed when creating the topic session
specify a transactional flag and how our client will acknowledge receipt of messages. We?e
going to just disable transactions and get the session to automatically send acknowledgements
back to the broker on message receipt. The last step to getting our publisher is creating the
publisher itself. From there we can start publishing messages up to the broker. At this point, it is
important to distinguish between persistent messages and durable messages. JMS calls a
message ?ersistent?if the messages received by the broker are persisted. This guarantees that
senders know that the broker has received a message. It makes no guarantee that messages
will actually be delivered to a final recipient. Durable subscribers are guaranteed to receive
messages in the case that they temporarily drop their connection to the broker and reconnect at
a later time. The JMS broker will uniquely identify subscriber clients with a combination of the
client ID, username and password to uniquely identify clients and manage message queues for
each client. Now we need to create the subscriber client. We?e going to write a standalone
client to show that your code doesn? have to live in the application server to receive messages.
The only trick we?e going to apply here is that while we can simply create an InitialContext with
an empty constructor for code in the app server, code that exists outside of the application
server must know where to find the JNDI naming service. Glassfish exposes the naming service
via CORBA, the Common Object Request Broker Architecture. In short, we need to know a
factory class name to create the context and we need to know the URL of where the object
request broker is located. The listener client shown in Listing 14-45 can be run on the same host
as the Glassfish server.
Listing 14-45. Creating a Subscriber Client for JMS
"""
This is a standalone client that listens for messages from JMS
"""
from javax.jms import TopicConnectionFactory, MessageListener, Session
from javax.naming import InitialContext, Context
import time
def get_context():
props = {}
props[Context.INITIAL_CONTEXT_FACTORY]="com.sun.appserv.naming.S1ASCtxFactory
"
props[Context.PROVIDER_URL]="iiop://127.0.0.1:3700"
context = InitialContext(props)
return context
class TopicListener(MessageListener):
def go(self):
context = get_context()
tfactory = context.lookup("jms/MyConnectionFactory")
tconnection = tfactory.createTopicConnection('recvuser', 'recvpass')
tsession = tconnection.createTopicSession(False,
Session.AUTO_ACKNOWLEDGE)
subscriber =
tsession.createDurableSubscriber(context.lookup("jms/MyTopic"), 'mysub')
subscriber.setMessageListener(self)
tconnection.start()
while True:
time.sleep(1)
context.close()
tconnection.close()
def onMessage(self, message):
print message.getText()
if __name__ == '__main__':
TopicListener().go()
There are only a few key differences between the subscriber and publisher side of a JMS topic.
First, the subscriber is created with a unique client id?n this case, it? ?ysub.?This is used by
JMS to determine what pending messages to send to the client in the case that the client drops
the JMS connections and rebinds at a later time. If we don? care to receive missed messages,
we could have created a non-durable subscriber with ?reateSubscriber?instead of
?reateDurableSubscriber?and we would not have to pass in a client ID. Second, the listener
employs a callback pattern for incoming messages. When a message is received, the
onMessage will be called automatically by the subscriber object and the message object will be
passed in. Now we need to create our sending user and receiving user on the broker. Drop to
the command line and go to GLASSFISH_HOME/imq/bin. We are going to create two users:
one sender and one receiver. See Listing 14-46.
Listing 14-46. Creating Two JMS Users
GLASSFISH_HOME/imq/bin $ imqusermgr add -u senduser -p sendpass
User repository for broker instance: imqbroker
User senduser successfully added.
GLASSFISH_HOME/imq/bin $ imqusermgr add -u recvuser -p recvpass
User repository for broker instance: imqbroker
User recvuser successfully added.
We now have two new users with username/password pairs of senduser/sendpass and
recvuser/recvpass. You have enough code now to enable publish/subscribe messaging patterns
in your code to signal applications that live outside of your application server. We can potentially
have multiple listeners attached to the JMS broker and JMS will make sure that all subscribers
get messages in a reliable way. Let? take a look now at sending message through a queue: this
provides reliable point to point messaging and it adds guarantees that messages are persisted
in a safe manner to safeguard against server crashes. This time, we?l build our send and
receive clients as individual standalone clients that communicate with the JMS broker. See
Listing 14-47.
Listing 14-47. Sending Messages Through a Queue
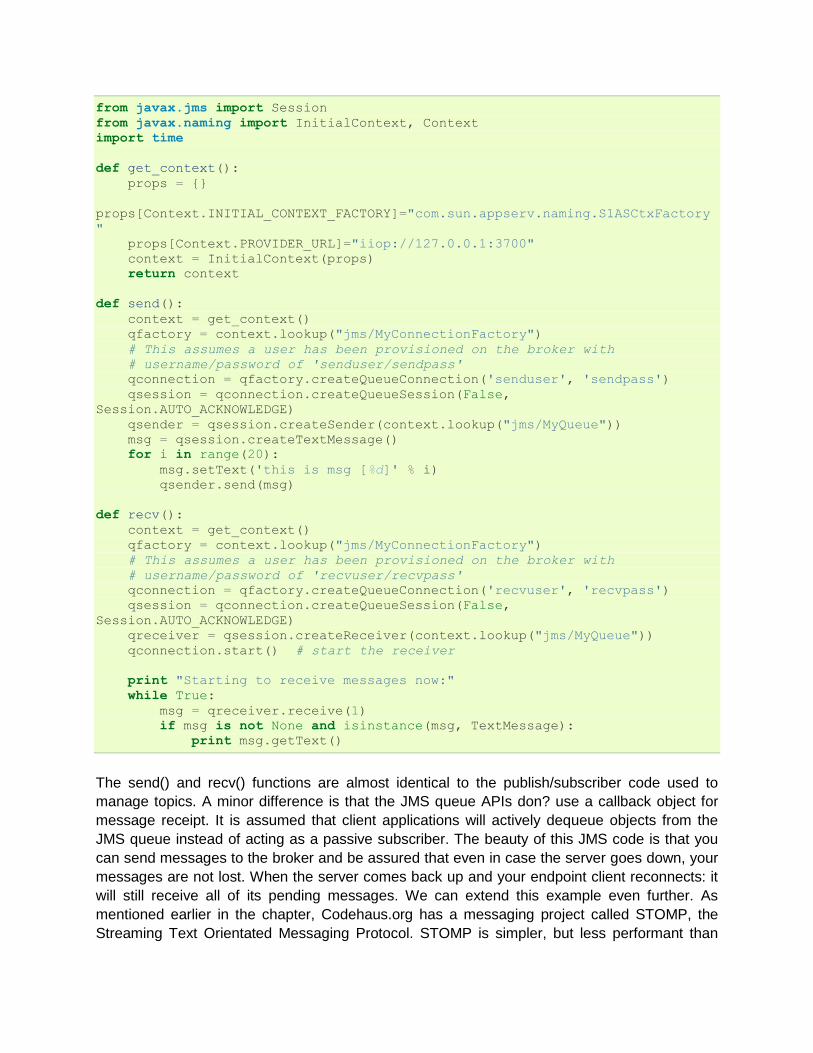
from javax.jms import Session
from javax.naming import InitialContext, Context
import time
def get_context():
props = {}
props[Context.INITIAL_CONTEXT_FACTORY]="com.sun.appserv.naming.S1ASCtxFactory
"
props[Context.PROVIDER_URL]="iiop://127.0.0.1:3700"
context = InitialContext(props)
return context
def send():
context = get_context()
qfactory = context.lookup("jms/MyConnectionFactory")
# This assumes a user has been provisioned on the broker with
# username/password of 'senduser/sendpass'
qconnection = qfactory.createQueueConnection('senduser', 'sendpass')
qsession = qconnection.createQueueSession(False,
Session.AUTO_ACKNOWLEDGE)
qsender = qsession.createSender(context.lookup("jms/MyQueue"))
msg = qsession.createTextMessage()
for i in range(20):
msg.setText('this is msg [%d]' % i)
qsender.send(msg)
def recv():
context = get_context()
qfactory = context.lookup("jms/MyConnectionFactory")
# This assumes a user has been provisioned on the broker with
# username/password of 'recvuser/recvpass'
qconnection = qfactory.createQueueConnection('recvuser', 'recvpass')
qsession = qconnection.createQueueSession(False,
Session.AUTO_ACKNOWLEDGE)
qreceiver = qsession.createReceiver(context.lookup("jms/MyQueue"))
qconnection.start() # start the receiver
print "Starting to receive messages now:"
while True:
msg = qreceiver.receive(1)
if msg is not None and isinstance(msg, TextMessage):
print msg.getText()
The send() and recv() functions are almost identical to the publish/subscriber code used to
manage topics. A minor difference is that the JMS queue APIs don? use a callback object for
message receipt. It is assumed that client applications will actively dequeue objects from the
JMS queue instead of acting as a passive subscriber. The beauty of this JMS code is that you
can send messages to the broker and be assured that even in case the server goes down, your
messages are not lost. When the server comes back up and your endpoint client reconnects: it
will still receive all of its pending messages. We can extend this example even further. As
mentioned earlier in the chapter, Codehaus.org has a messaging project called STOMP, the
Streaming Text Orientated Messaging Protocol. STOMP is simpler, but less performant than
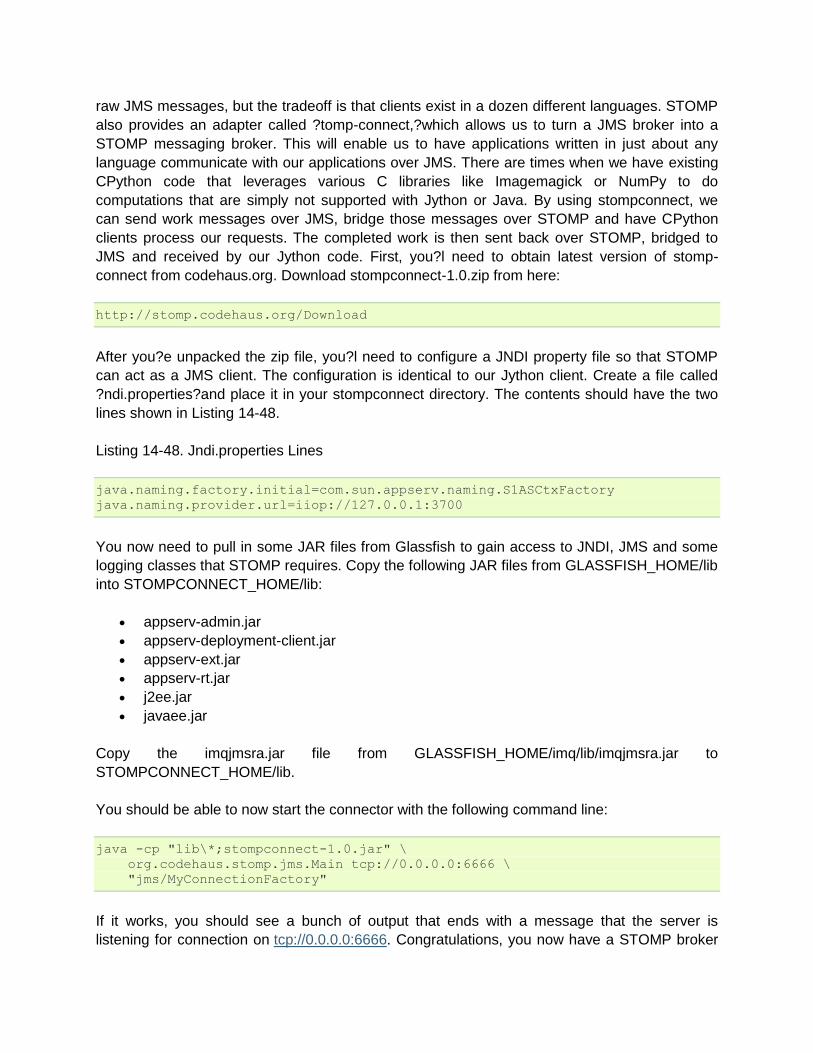
raw JMS messages, but the tradeoff is that clients exist in a dozen different languages. STOMP
also provides an adapter called ?tomp-connect,?which allows us to turn a JMS broker into a
STOMP messaging broker. This will enable us to have applications written in just about any
language communicate with our applications over JMS. There are times when we have existing
CPython code that leverages various C libraries like Imagemagick or NumPy to do
computations that are simply not supported with Jython or Java. By using stompconnect, we
can send work messages over JMS, bridge those messages over STOMP and have CPython
clients process our requests. The completed work is then sent back over STOMP, bridged to
JMS and received by our Jython code. First, you?l need to obtain latest version of stomp-
connect from codehaus.org. Download stompconnect-1.0.zip from here:
http://stomp.codehaus.org/Download
After you?e unpacked the zip file, you?l need to configure a JNDI property file so that STOMP
can act as a JMS client. The configuration is identical to our Jython client. Create a file called
?ndi.properties?and place it in your stompconnect directory. The contents should have the two
lines shown in Listing 14-48.
Listing 14-48. Jndi.properties Lines
java.naming.factory.initial=com.sun.appserv.naming.S1ASCtxFactory
java.naming.provider.url=iiop://127.0.0.1:3700
You now need to pull in some JAR files from Glassfish to gain access to JNDI, JMS and some
logging classes that STOMP requires. Copy the following JAR files from GLASSFISH_HOME/lib
into STOMPCONNECT_HOME/lib:
appserv-admin.jar
appserv-deployment-client.jar
appserv-ext.jar
appserv-rt.jar
j2ee.jar
javaee.jar
Copy the imqjmsra.jar file from GLASSFISH_HOME/imq/lib/imqjmsra.jar to
STOMPCONNECT_HOME/lib.
You should be able to now start the connector with the following command line:
java -cp "lib\*;stompconnect-1.0.jar" \
org.codehaus.stomp.jms.Main tcp://0.0.0.0:6666 \
"jms/MyConnectionFactory"
If it works, you should see a bunch of output that ends with a message that the server is
listening for connection on tcp://0.0.0.0:6666. Congratulations, you now have a STOMP broker

acting as a bidirectional proxy for the OpenMQ JMS broker. Receiving messages in CPython
that originate from Jython+JMS is as simple as Listing 14-49.
Listing 14-49. Receiving Messages via a STOMP Broker
import stomp
serv = stomp.Stomp('localhost', 6666)
serv.connect({'client-id': 'reader_client', \
'login': 'recvuser', \
'passcode': 'recvpass'})
serv.subscribe({'destination': '/queue/MyQueue', 'ack': 'client'})
frame = self.serv.receive_frame()
if frame.command == 'MESSAGE':
# The message content will arrive in the STOMP frame's
# body section
print frame.body
serv.ack(frame)
Sending messages is just as straightforward. From our CPython code, we just need to import
the stomp client and we can send messages back to our Jython code. See Listing 14-50.
Listing 14-50. Sending Messages via a STOMP Broker
import stomp
serv = stomp.Stomp('localhost', 6666)
serv.connect({'client-id': 'sending_client', \
'login': 'senduser', \
'passcode': 'sendpass'})
serv.send({'destination': '/queue/MyQueue', 'body': 'Hello world!'})
Summary
We?e covered a lot of ground here. We?e shown you how to get Django on Jython to use
database connection pooling to enforce limits on the database resources an application can
consume. We?e looked at setting up JMS queues and topic to provide both point to point and
publish/subscribe messages between Jython processes. We then took those messaging
services and provided interoperability between Jython code and non-Java code. In our
experience, the ability to remix a hand-picked collection of technologies is what gives Jython so
much power. You can use both the technology in JavaEE, leveraging years of hard-won
experience and get the benefit of using a lighter weight, more modern web application stack like
Django. The future of Jython and Django support in application server is very promising.
Websphere now uses Jython for its official scripting language and the version 3 release of
Glassfish will offer first class support of Django applications. You?l be able to deploy your web
applications without building WAR files up. Just deploy straight from your source directory and
you?e off to the races.

Source: http://www.jython.org/jythonbook/en/1.0/JythonDjango.html