web cms guide - mksresume.pbworks.commksresume.pbworks.com/f/cms+author+editor+guide+v+1.0.pdf ·...
TRANSCRIPT
Web CMS GuideInteractive Systems & Security

Copyright© 2006, Bright House Networks. All rights reserved.Except as permitted under copyright law, no part of this manual may be reproduced or distributed in any form or by any means without the prior permission.
DisclaimerEvery effort has been made to ensure that the information in this manual is accurate. If errors are found please report them to Technical Communication Resources.
TrademarksBright House Networks is a registered trademark. Other products are trade-marks of their respective companies.
Bright House Networks65 South Keller rd • orlando, Fl 32810
technical communication reSourceS email: [email protected]
Consultants: Mara MarCus, soluna shah, allison su
tCr Editor: Mary K swanson

iiiTable of Contents
ContentsEktron Content Management System ................................................................. 1
Conventions in this Guide ................................................................................... 1Login ................................................................................................................... 1
Workarea/Logout Screen ................................................................................ 2Access Content in Ektron CMS400 .................................................................... 3
Access through the CMS Web Site ................................................................ 3Access through the CMS Workarea .............................................................. 3Search for Content ......................................................................................... 4
For More Help and Information ........................................................................... 4Modifying Existing Content ................................................................................. 5
Content Status .................................................................................................... 5Edit Content Block .............................................................................................. 7
Toolbars .......................................................................................................... 7View Options ............................................................................................... 8Link and Insert Tools ................................................................................... 9
Add Text .......................................................................................................... 9Styles .......................................................................................................... 9
Insert Table ................................................................................................... 10Remove Table ........................................................................................... 11
Insert Image .................................................................................................. 12Insert Image from Library.......................................................................... 12Insert Image from Local Files and Add to Library ..................................... 13Placing an Image with Tables ................................................................... 14
Insert a Non-Image File ................................................................................ 15Remove Hyperlink .................................................................................... 15
Modify Image .................................................................................................... 15Picture Editor ................................................................................................ 15Image Editor ................................................................................................. 16
Publish, Submit, Checkin, Save or Cancel ....................................................... 18Preview ............................................................................................................. 19View Content Difference ................................................................................... 19View History ...................................................................................................... 19Add (Assign) Task ............................................................................................. 21
View Tasks .................................................................................................... 21Properties ......................................................................................................... 21Workarea .......................................................................................................... 22
Managing Content .............................................................................................. 23

Name of Technical Publication iv
Using the Workarea .......................................................................................... 23Content ............................................................................................................. 24
Content Sub-folders ...................................................................................... 26ID .............................................................................................................. 26Status........................................................................................................ 26
Sharing Content Blocks ................................................................................ 27Move or Copy Content Blocks ..................................................................... 28Assign Task................................................................................................... 29
View Tasks ................................................................................................ 30Approve/Decline Content .............................................................................. 31
Approval Report ........................................................................................ 31Add/Edit Content from the Workarea ................................................................ 32
Schedule/Expire Content .............................................................................. 32Expire, Archive, Report (Archive Options) ................................................ 33
Publish .......................................................................................................... 34Page Manager .................................................................................................. 35
Create New Page ......................................................................................... 35Create Page from Template ...................................................................... 36Create Page by Copying an Existing Page............................................... 37Create Page using Application Template .................................................. 37Relative vs. Absolute Hyperlinks............................................................... 39
Modify Page .................................................................................................. 39Delete Page .................................................................................................. 39
Library ............................................................................................................... 40Add Files to Library ....................................................................................... 40
Add Hyperlinks.......................................................................................... 41Web Style Guide ................................................................................................ 43
Quick Guide to Style ......................................................................................... 43Guide to Web Style ........................................................................................... 45
Fonts ............................................................................................................. 45Headers ........................................................................................................ 45Body Text ...................................................................................................... 45Links ............................................................................................................. 45Lists .............................................................................................................. 46
Final list case ............................................................................................ 47Tables ........................................................................................................... 47
Standard table .......................................................................................... 48Appendix ............................................................................................................. 49Index ...................................................................................................................... 55

1Using Ektron CMS
Ektron Content Management SystemEktron CMS400 is a content management system (CMS) designed to allow non-developers to access and update web pages using a common set of templates and styles. These templates and styles are created by Bright House Networks web developers to foster consistent branding across all participating divisions.
By working with the web CMS, you’ll be contributing to a company-wide effort to increase freshness and responsiveness while streamlining content creation, revision and approval.
Conventions in this GuideThis guide will use Central Florida web site examples. Whenever a URL includes “cfl,” please substitute your own prefix, e.g., “tampabay.” When logging in, select the domain specified by your administrator.
Onscreen buttons and links will be signified by a bold font; keyboard keys will be indicated with caps and bold. URLs will be highlighted using a blue Courier font style.
LoginTo log in, enter your CMS site URL into the browser address field:
http://cms.cfl.mybrighthouse.com/admin/ or
http://cms.tampabay.mybrighthouse.com/admin/
A login screen with two buttons will appear.
Login screenClick login. The Login dialog box will open.
It may take several seconds for the login dialog box to appear.

Web CMS Guide 2
In the dialog box, enter your user name and password in the User and Pwd fields.
Your user name and password will likely be the same as your Outlook login.
Login dialogSelect your domain from the Domain dropdown list; your administrator will tell you the appropriate domain.
Login dropdown
Workarea/Logout ScreenWhen logged in successfully, a Logout screen with four buttons will appear.
Workarea buttons
Installation helpIf an error message
or a download/installation request
appears, and you don’t have admin
privileges, see your administrator.
Trouble logging in?Close all browser
windows, open a new browser
window, then clear cookies and cache.

3Using Ektron CMS
Here, you can use logout; Workarea, which gives you access to the Smart Desktop and content; preview, which is used with the Workarea screen; and Help, where you can supplement the information in this small guide with extensive documentation on Ektron CMS400.
Access Content in Ektron CMS400There are two ways to access content in Ektron CMS400. Try both methods to find the one that suits you best. You can also use the Search feature to locate content.
Access through the CMS Web SiteWeb site Method: After login, you can open the live site in CMS mode, locating and editing existing content through the CMS-enabled live public web site. This is a useful view when modifying existing content blocks.
To access content directly through the live site, select File/new or ctrl + n from the login window to create a new window, then enter: http://cms.cfl.mybrighthouse.com/. This opens the live site. “cms” must be a part of the Url to edit. As you move the cursor around the screen, you’ll notice red, green, yellow and grey boxes appear around content. See page 5 to learn more about content status.
Access through the CMS Workarea Workarea Method: After login, click the Workarea button to open the Workarea where you can access, manage, assign, edit, approve and publish content. The Workarea and the Smart Desktop help you navigate using a folder structure. (You can also access the Workarea from the right-click menu in the CMS web site.)
Two ways to workWeb Site Method:Open the live site in CMS mode and locate and edit content through the public web site.
Workarea Method:Open the Workarea to access, manage, assign, edit, approve and publish content.
Your division onlyContent is restricted to users with permissions for that division. If you have permissions to access more than one division, you can access them all through the Workarea.

Web CMS Guide 4
Search for ContentThe Search feature, accessed using the search button under the action menu in the Content section of the Workarea, can be used to locate content.
Search button
Search screen
For More Help and InformationYou have several options for learning more about Ektron CMS400:
• Use the built-in Help files available within CMS using the Help button or open the Settings folder in left panel of the Workarea.
• Go to http://www.ektron.com/cms400-web-cms.aspx?id=922 and view the flash tutorials.
• Download the User Guides on Ektron’s web site at: http://www.ektron.com/web-content-management-solutions.aspx?id=4020.
Remember that some items in the Ektron materials may not match your administrative setup.

5Modifying Existing Content
Modifying Existing ContentThe simplest way to modify content that is already on the public web site is by logging in, then opening the live site in CMS mode (the Web site Method.
After logging in, enter the URL: http://cms.cfl.mybrighthouse.com/to go to the CMS site.
Content StatusAs you move the cursor around the screen, you’ll notice red, green, yellow and grey boxes appear around content. The boxed elements are called “content blocks.” The colored boxes indicate the status of the content block:
green published or checked in. Active and available to edit.
red checked out by another user (cannot be edited).
yellow submitted for publication or deletion and in the approval process (editable by approval group only).
greypending go live. Ready to be published, but the go-live date has not occurred. (See the Managing Content chapter, Schedule/Expire Content.)
Content Block StatusNavigate through the web site to find the content you want to edit. Right-click within that content; a menu will appear. If the content block is available for editing (green), Edit will be a menu choice.
Catch the menu! The menu may appear on a part of the screen that’s out of view. If you right-click and don’t see the menu, right-click on a COrner of the content block.
Web CMS Guide 6
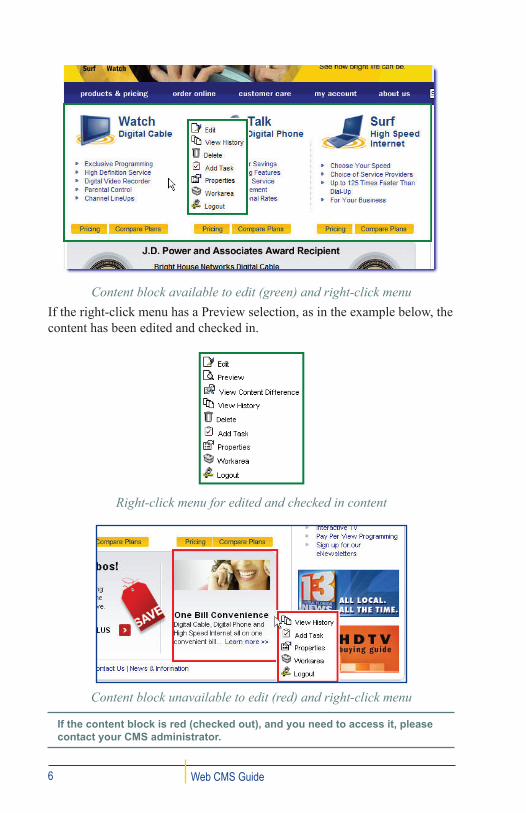
Content block available to edit (green) and right-click menuIf the right-click menu has a Preview selection, as in the example below, the content has been edited and checked in.
Right-click menu for edited and checked in content
Content block unavailable to edit (red) and right-click menu
If the content block is red (checked out), and you need to access it, please contact your CMS administrator.

7Modifying Existing Content
Edit Content BlockClick Edit to open the content block. The Edit window opens to the Content tab, where the default editor is similar to popular word processing software. In the Edit window, you can enter your desired text, then change how it displays in a browser by using the buttons at the top, the right-click menu or keyboard shortcuts to format it. You can also use HTML to edit content once you have opened the content block.
If you have not previously used ektron CMS, error messages may appear indicating that you need to install eWebeditPro, turn on ActiveX, or install ektron DMS400 (the Document Management software). Ask your adminis-trator for assistance.
ToolbarsYour administrator governs what selections are on your standard editing toolbars and which toolbars appear by default.
Standard toolbarsYou can select other toolbars to appear, or deselect others. Right-click on the toolbar.
Select toolbar

Web CMS Guide 8
View OptionsOther View elements that can help you when editing content are View as WYSIWYG or HTML, Show Borders (of tables) and Show Invisible.
View as WYSIWYG
View Source (HTML)
Show Borders
Show Invisible Elements

9Modifying Existing Content
Link and Insert ToolsSome elements on the Toolbar in Edit mode may be unfamiliar: Create Hyperlink, Remove Link, Files/Images/Hyperlinks (Library); Insert Table; nbsp (non-breaking space) and other symbols.
Hyperlink, Library and other symbols
Add TextCreating text in the Edit screen is very similar to any current word processing program: you can write all the text you want on the page and then click the toolbar buttons (such as Bold, Italic and Style) to modify the text. The results will be very similar to what a visitor to your site will see, but not always identical. Use preview to see how it will really look!
To learn about Preview, see the preview section later in this chapter. For a complete description of each toolbar button, see the Appendix.
StylesStyles are defined by the CMS administrator. You can select the page element styles and font styles, faces and sizes from the dropdown boxes on the editing toolbar. Generally, it is best to use the BHN web style guide, Chapter 4 of this guide.
Remove Style, Apply Style
Heading, Font, Size
Tips for adjusting line breaks:Using View Source (HTML), look for extra <p> </p> or <li> </li> tags, which indicate paragraphs and line breaks.reapply the desired style to all associated text.remove extraneous tables or table cells.

Web CMS Guide 10
The main body text should be font face Arial (Helvetica, sans-serif) with a size of 11 px and web color #37383B (almost black). If you start typing in a new area, main body text will be the default.
• To apply a style to text, use the (Apply Style) dropdown box. Select the appropriate style according to the Web Style Guide.
• To remove a style, use the remove style button, to the left of the (Apply Style) dropdown box.
• To change the size of a heading, use the Heading dropdown box.
• To change the font face, use the Font dropdown box.
• To change the size of a font, use the Size dropdown box.
See the Web Style Guide chapter for more about how to select Bright House networks styles.
Insert TableTo insert a new table, click the Insert table button on the toolbar. A dialog box will appear. By default, tables are set up with cell padding (space between cells), but no borders or fill, and this is generally what should be used.
Insert Table dialog box

11Modifying Existing Content
Create a table with the desired number of cells now, or add rows and columns in the editor later by selecting Table or Cell Properties from the table button dropdown menu. Other options can also be changed here after the table is created.
To see the tables you are working with, click the Show Borders button.
To select the tools for creating and modifying tables, select the table or put the cursor inside the table. Then, select the table dropdown button and scroll down to Cell or Table Properties.
Table dropdown menu
You can also display the Table toolbar by right-clicking the toolbar area and selecting Table from the dropdown menu. See page 7.
Now you can modify the table and enter copy.
Remove TableRemove an unwanted table by selecting it and pressing dElEtE or backspacE, or by clicking delete on the toolbar. When you don’t
specify a location for your image, it falls in-line with the text.

Web CMS Guide 12
To select the table in the editor, move the mouse over the table border until you see a double arrow. A selected table will have indicator square over and under each internal border.
Double arrow with selected table
Unwanted table highlighted for removal (Show Invisible and Show Borders are selected)
Insert ImageYou can insert an image or file into a content block from the library or by browsing for a file outside of the CMS library. When inserting an outside file you should also place it in the library.
Insert Image, Hyperlink or File (as link)Valid image extensions are: gif, jpeg, jpg, bmp, png.
Insert Image from LibraryTo add a an image already in the Library to a content block:
1. Place the cursor within the content where you want the image to appear.
2. Click the library button (Files, Images, Hyperlinks) on the toolbar to open the library folder.
Search, Add to Library, Insert, Preview, Back

13Modifying Existing Content
3. From the file types dropdown, select Images.
File Types4. Navigate to the folder using the left panel
folder structure and select the desired image. (Preview using the preview button .)
5. Click the Insert button to insert the file.
Insert Image from Local Files and Add to Library1. Place the cursor within the content where
you want the image to appear.
2. Click the library button (Files, Images, Hyperlinks) to open the library folder.
3. Click the add to library button to locate the image file in your local file system.
Upload and insert local file
Images should be saved in the size they will be displayed. In other words, the image should be the correct size when opened in a browser. If the image is not the correct size, use the Width and Height fields in Picture Properties to change the size.

Web CMS Guide 14
4. Click browse and select the file from your local folders. The file location will appear in the Filename field.
5. Enter a title for the file in the Title field.
6. Enter a description in the Description field.
7. Click the add to library button . The Picture Properties will appear.
8. In the Picture Editor (see page 15), enter the size, spacing and other options to adjust the image. Click preview to see how the file will look. To keep the image as it is, leave the fields blank.
9. Click ok to insert the file and add it to the library.
Placing an Image with TablesYou can use tables to place an image within a content block. When you don’t specify a location for your image, it falls in-line with the text, which is usually appropriate. However, a table provides anchor points so the browser can place the image where you want it.
See how the tables in the example below define the space for each element.
Images and text placed in tables
Image editor changes the library
image (the image accessed by all
users). This is important when
modifying shared images.
Picture editor does not change
the original image in CMS, only the
instance of the image you are
modifying.

15Modifying Existing Content
Insert a Non-Image FileWhen a file other than an image is inserted, the file name appears as a hyperlink within the content and is linked to the file. When a site visitor clicks the hyperlink, the referenced file is opened.
To insert a non-image file, follow the instructions on page 12 for inserting an image file.
Valid file extensions are: ppt, pdf, xls, doc, swf, exe, mov, hqx, zip, fla, wav, wmv.
Remove HyperlinkTo remove a hyperlink from text or graphics, select the hyperlink and click the remove link button in the Edit menu.
Modify ImageYou can modify an image from Ektron CMS in two ways: the Picture Editor, accessed by adding an image to the library or by right-clicking on an image in a content block and selecting Picture; or the Image Editor, accessed by right-clicking and selecting Image Editor.
Picture EditorIn the Picture Editor, you can modify the size, spacing, border, alignment, and aspect to adjust the image.
Using the Picture editor will not change the library image.
Picture properties

Web CMS Guide 16
Image EditorThe Image Editor is the preferred method for making changes to images in Ektron CMS. However, if you need an image similar to one in the library, but you do not wish to make changes to the original in the library, make a copy of the image and insert in the desired content block before modifying the image.
Open Image Editor
Image Editor

17Modifying Existing Content
To use the Image Editor, right-click on the image you want to modify and select Image Editor. A new window will open in the Workarea that includes the image only. From the toolbar, among other options, you can blur and sharpen; select, crop, copy and paste; add objects, lines, color; and add text. From the Image Editor menu, you can change dimensions and contrast; flip; and use all the tools available on the toolbar.
The Image editor WILL change the library image.
Select image dimensions
Change image dimensions

Web CMS Guide 18
Publish, Submit, Checkin, Save or CancelIt’s important to know the difference between publish, submit, checkin, save and cancel. When you have completed your work, you’ll check in, submit or publish the content. If you are not yet finished with your edits, you might save the content, or you may want to cancel any changes you’ve made.
• To cancel edits, click cancel “X” in the CMS toolbar.
• To check content back in and save edits, click checkin.
• To save edits but keep content checked out, click save.
• Never close an editing window using the window close “x” icon!
CMS toolbar with Checkin button highlighted
Button Name Result
Submit Accept changes to the content and approve for publishing to the site. The submit button appears if there are other approvers in the chain.
PublishAccept changes to the content and publish to the site. The publish button appears if you are the last approver in the approval chain (or the only one).
CheckinCheck in for others to edit, saving the content. checkin does not submit the content for approval, nor does it publish content to the site.
Save save the content, but do not make available for others to edit. The content cannot go through the approval chain.
Cancel
cancel all editing changes and return to previous Checkin state. Use the cancel icon “X” within the editing window instead of using the window close icon “x” in the top right corner.
If you click Publish but the content has a task assigned that is incomplete, an error message appears saying that the content cannot be published. The user must complete the assigned task before the content can be published.

19Modifying Existing Content
PreviewUse Preview to view edited content as it will appear on the web site after publishing.
To preview your changes:
1. Make changes to content block.
2. Click save.
3. Go back to web page.
4. Click the browser refresh icon.
5. Right-click on content block and click preview.
You cannot edit from Preview.
View Content DifferenceUse View Content Difference to see how the current unpublished version of the content block compares to the published version.
View HistoryView History gives the user a summary of dates on which the content block was edited and published, as well as which user was the last to edit the content block on those dates. The round green icon indicates publish dates.
To cancel edits, click Cancel “X” in the CMS toolbar. To check content back in and save edits, click Checkin.To save edits but keep content checked out, click Save.never close an editing window using the window close “x” icon!
Only adminis-trators can check in content that has been checked out by others (not authors or editors). non-administrators can assign a task to check in the content.

Web CMS Guide 20
History of content blockFrom the History screen, users with appropriate permissions can retrieve previous versions of a content block. From there, the user can view the difference between the current content block and this previous version, and even restore the previous version if desired.
Restore previous version
View difference
You must save or checkin to use View Content Difference.

21Modifying Existing Content
Add (Assign) TaskFor information on how to use this feature, see the Managing Content chapter.
View TasksOnce a task is added, (with the exception of users given permission to create tasks) only the user who assigned the task and those to whom the task was assigned can view it.
To view tasks assigned to you, go to the Smart Desktop in the Workarea and click Tasks/Assigned to Me.
PropertiesSelecting Properties opens the Properties tab in the Content section of the Workarea. Here, you can see quickly the content block ID, the last user to edit the block, dates in the life of the content block, and the path to the block using the Content navigation (on the left side of the Workarea.)
Properties tab

Web CMS Guide 22
WorkareaSee the Managing Content chapter for information on using the Workarea.

23Managing Content
Managing ContentEditors may find it easier to manage content from the CMS Workarea. From the Workarea, you can access the Smart Desktop, which includes tasks and reports and top level folders, as well as access and edit content blocks just as you can from the CMS site. Access the Workarea using the button in the login/logout screen or from the right-click menu in the CMS site.
Using the WorkareaThe Smart Desktop is the main screen in the Workarea. On the top left are the Smart Desktop folders, Tasks and Reports; on the bottom left are the site folders for Content, Page Manager, Library, Modules and Settings. To get back to the Smart Desktop at any time from the Workarea, click the button
above the left panel. To hide the left panel and increase the work space, click the white “x” above the left panel. To reopen, move the mouse arrow over the bar next to the hidden panel.
Smart Desktop

Web CMS Guide 24
ContentTo access content from the Workarea, click the Content folder or button in the left panel.
To access content blocks, select the content folder for your site by clicking on its name in the folder structure.
From the top-level Content folder, using the menu buttons at the top, you can add new content, folders, blogs and discussions; view collections, menus, archived content, folder properties, etc.; delete content and folders; search the folder; and move and copy content (see page 28).
To access Ektron CMS Help, click the question mark button on the right. (This is the same help as can be accessed from the Help button on the login/logout page.)
Content top-level buttons
New Menu

25Managing Content
View Menu
Delete Menu
Action Menu
To hide the left panel and increase the work space in the Workarea, click the white “x” above the left panel. To reopen, move the mouse arrow over the bar next to the hidden panel.
You can only view content in groups to which you have access.

Web CMS Guide 26
Content Sub-foldersFrom the content sub-folder, select the content block you wish to edit. For each content block, you can see its name, language, ID, status, date modified and last editor.
IDThe content ID is a unique ID assigned by the system so each piece of content can be identified for display by the CMS.
StatusThe status of content shows the same information as the colors of the box surrounding a content block, except here, status is more closely defined. Below, each status is described and related to the color used on the CMS site.
From a content sub-folder, you can also add, delete and move or copy content; add and delete folders; view collections and menus; search folders; view archived content; and view folder properties.
A green Published to the site. active and available to edit.
I green Checked In. Available to edit.
O red Checked out by another user (cannot be edited).
S yellow submitted for publication in the approval process.
M yellow Marked (or Submitted) for deletion.
P grey pending go live. Ready to be published, but the go-live date has not occurred.
T Awaiting completion of tasks.
D Pending deletion. Created, but scheduled for deletion before scheduled start date.

27Managing Content
Sharing Content BlocksYou can share a content block across multiple pages or divisions. Edit it once and all the content blocks that use that as a source will change too. This is most effective on content blocks that are shared across many pages, or across divisions.
To share a content block:
1. Select the content block.
2. Click Edit.3. Select the Block Locations tab.
4. From the Divisions menu, select the division where you want to share the content block.
5. Select the page where you would like to have this content block.
6. Choose from the template the block where you want to place the content.
7. Click submit.
Block locations

Web CMS Guide 28
Content block template of page
Move or Copy Content Blocks To move or copy content blocks, select Move/copy from the Action menu on the toolbar from the content sub-folders.
Moving a block in the folders will not change how or where it is displayed in the page. A copy leaves the original unaffected.
Content sub-folder with Action menu open to Move/Copy Content
The Move/Copy screen will appear.

29Managing Content
Move screenSelect the destination folder, select the items you wish to move or copy using the check boxes, then click Move/copy .
Assign TaskA task can be assigned from the Tasks folder, from a content block in the content folders using the tasks tab, or from a content block on the CMS site, using the right-click menu.
To get to the Tasks folder, go to the Smart Desktop and click the Tasks folder. In the Tasks folder, click the add tasks button .
In the Task fields, enter the name, then select the person the task will be assigned to, content to which the task refers, priority, the start date, and the due date. In the description field, tell the person to whom the task is assigned exactly what is required.
The assigned person can use the State field to report the stage of the task’s completion: active, awaiting data, in hold, completed, etc.

Web CMS Guide 30
Add Task (Assign Task)
Select User
View TasksOnce a task is added, only the user who assigned the task and those to whom the task was assigned can view it (with the exception of users given permission to create tasks).
To view tasks you have assigned, go to the Smart Desktop in the Workarea and click Tasks/Assigned by Me.

31Managing Content
Approve/Decline ContentThe site administrator establishes an approval chain and approver sequence for each folder or content item. The approval chain is a list of people or groups who must approve new or edited content before it is published to the web site, and any deletions from the web site. Any user in a user group assigned to an approval chain can approve content.
Reviewers in the approval chain may:
• change content
• approve it
• decline it
When the last reviewer who is required in the approval chain approves content, the content is published to the Internet.
The chart below illustrates the approval process.
Approval Process
Approval ReportTo approve or decline content through the approval report:
1. From the main Workarea screen (the Smart Desktop), click Reports.
2. Under Reports, click Approvals.
3. Select the content you want to approve or decline. (To select all displayed content, click Select All at the top of the screen.)
The content appears. A toolbar at the top of the screen under the title bar lists tasks you can perform.

Web CMS Guide 32
Add/Edit Content from the WorkareaTo add a content block, select the folder to which you wish to add content and click the Add Content button.
Add Content button (content folder)To edit a content block from the Workarea, select the content block you wish to edit and click the Edit button.
Edit button (content block selected)Use the Edit Content section from Modifying Existing Content chapter to learn more about editing content.
Schedule/Expire ContentScheduling content lets you control when content becomes visible on the Web site (a “go live” date). BHN does not use the expiration option.
Unless you schedule a start and end date, content will be published immediately after all editors have selected Publish, and removed only when deleted.
reports can be generated letting content managers know that content is about to reach its end date (expire) or has expired.
Content that is published but is in “Pending go-live” status will be indicated by a grey box around the content block.
To schedule content (or set an expiration date):
1. Select the content block you wish to schedule.
2. Click the Edit button.
3. Select the Schedule tab.

33Managing Content
4. Enter the Start and End date.
When you select edit from the Workarea content blocks, the left panel automatically minimizes. Once you leave the edit screen, the left panel will open again.
Schedule tab
Expire, Archive, Report (Archive Options)You can also set options for what happens to content after reaching its end date.
archive and remove from sitearchive and remain on site
Relocates the item into the CMS archive folder.
add to the cMs refresh report Lets content managers know that this content block is stale and needs to be updated.
none of the options removes the content block from ektron CMS; CMS authors and editors will still be able to locate, edit and re-publish.

Web CMS Guide 34
Archive Options
PublishIt’s important to know the difference between publish, submit, checkin, save and cancel. When you have completed your work, you’ll check in, submit or publish the content. If you are not yet finished with your edits, you might save the content, or you may want to cancel any changes you’ve made.
• To cancel edits, click cancel “X” in the CMS toolbar (the “X” below the title bar).
• To check content back in and save edits, click checkin.
• To save edits but keep content checked out, click save.
• Never close an editing window using the window close “x” icon!
CMS toolbar with Checkin button highlighted
Button Name Result
Submit Accept changes to the content and approve for publishing to the site. The Submit button appears if there are other approvers in the chain.
PublishAccept changes to the content and publish to the site. The Publish button appears if you are the last approver in the approval chain (or the only one).
CheckinCheck in for others to edit, saving the content. Checkin does not submit the content for approval, nor does it publish content to the site.
Save Save the content, but do not make available for others to edit. The content cannot go through the approval chain.

35Managing Content
Cancel
Cancel all editing changes and return to previous Checkin state. Use the cancel icon “X” within the editing window instead of using the window close icon “x” in the top right corner.
If you click Publish but the content has a task assigned that is incomplete, an error message appears saying that the content cannot be published. The user must complete the assigned task before the content can be published.
Page ManagerPage Manager (beta) allows you to create a new web page (in contrast to a content block), delete a page, or modify an existing page.
Move between fields in the Page Manager by pressing alt + UndErlInEd lEttEr.
Create New PageSelect “Create a new page” to add an entirely new page to the site. Once you have added this page, the page itself can be modified by selecting it using the “Modify existing page;” the page content can be modified through editing the page’s content blocks.

Web CMS Guide 36
Create New Page
Until later this year, there is no approval process for new pages–once created, the page is published to the live site, accessible by entering its UrL. each content block on the page, however, will be published via the approval chain.
Create Page from TemplateTo create a new page using a blank template:
1. Click the Template radio button.
2. Select your division from the Division dropdown list.
3. Choose the template you would like to use from the Template dropdown list. Preview an example of a template by selecting it.
4. Enter the page title in the Page Title field. The page title will appear at the top of the browser window of the published page and in the title bar.

37Managing Content
5. Enter the URL alias. The URL alias is the relative or internal link to the page; for instance, in http://cfl.mybrighthouse.com/customer_care/default.aspx, the URL alias or relative link is “customer_care/default.aspx.”
6. Enter keywords (part of the page’s metadata) into the Search Engine Keywords field. Separate each word or phrase with a comma.
7. Click create new page.
Templates
Create Page by Copying an Existing PageTo create a new page by copying an existing page and then modifying the content:
1. Click the Copy from an Existing Page radio button.
2. Select your division from the Division dropdown list.
3. A folder structure will appear in the Existing Page ID section. Select the page you wish to copy from the folder items. A page ID will appear in the Page ID field.
For steps 4,5, 6 and 7, see “Create New Page from Template,” above.
Create Page using Application TemplateTo create a new page with an application embedded in the page:
1. Click the Template radio button.
2. Select your division from the Division dropdown list.
3. Choose Application Template from the Template dropdown list.

Web CMS Guide 38
4. Enter the URL of the application you wish to access in the Application URL field. (The application will be located in a special domain, not on the public site. This URL will be provided by ISS.)
5. Enter the height of the application (aka, length) in pixels. (Again, this information will be supplied by MIS or your administrator.)
6. Enter the page title in the Page Title field. The page title will appear at the top of the window of the published page or the orange title bar.
5. Enter the URL alias. The URL alias is the relative or internal link to the page; for instance, in http://cfl.mybrighthouse.com/customer_care/default.aspx, the URL alias or relative link is “customer_care/default.aspx.”
6. Enter desired keywords (part of the page’s metadata) into the Search Engine Keywords field. Separate each word or phrase with a comma.
7. Click create new page.
Page ID

39Managing Content
Relative vs. Absolute HyperlinksAn absolute hyperlink in HTML contains a complete Internet address; the link will work as long as the destination page exists. Example: <a href=”http://cfl.mybrighthouse.com/default.aspx”>
A relative hyperlink is a partial address, starting at the level of the web folder you wish to access. (In CMS, the “folder” is virtual, but the concept is the same.) Example: <a href=”/about_us/careers/default.aspx”>.
Modify PageUsing Modfiy Page, you can modify the title, keywords and URL alias (relative URL) of an existing page.
Modify Page
Delete PageUsing Delete Page, you can select a page and delete it from the public site. This does not delete the content blocks on the page, but all links to the deleted page will no longer work.

Web CMS Guide 40
LibraryThe library is the location where image files and other files are stored so they can be accessed by CMS. You can select files, forms, hyperlinks, images and quicklinks.
A hyperlink goes to an outside page; a Quicklink is an internal link which goes to a page on your site.
Valid image extensions are: gif, jpeg, jpg, bmp, png. Valid file extensions are: ppt, pdf, xls, doc, swf, exe, mov, hqx, zip, fla, wav, wmv.
Add Files to Library1. Go to the Library folder. The page will display all of the images and
files which have been uploaded to the system.
2. Select the folder from the left hand navigation; if you don’t make a selection it will put the file in the root directory.
3. Click the add to library button to locate the file in your local file system.
Upload and Insert Local File4. Click browse and select the file from your local folders. The file
location will appear in the Filename field.
5. Enter a title for the file in the Title field. This is how Ektron will access the file when you browse on your system.
6. Enter a description in the Description field.
7. Click the save button.
When uploading images or PDFs make sure you select the appropriate folder and the proper file type. Uploading a PDF in the Images mode creates a thumbnail of the image instead of linking to the file.

41Managing Content
Add HyperlinksHyperlinks can be added to the library so that content creators can insert them into content blocks. To add a hyperlink or quicklink, select Hyperlink from the dropdown menu and enter data in the fields.
BHN uses relative hyperlinks within the CMS. It is best to use absolute hyperlinks when linking to external sources.
Add Hyperlink to Library

Web CMS Guide 42

43Web Style Guide
Web Style Guide This is a guide to styles used on Bright House Networks web sites. Use the Quick Guide on pages 43 and 44 for a quick reference and the style guide on pages 45-48 for more information.
Quick Guide to StyleFontsWhen in CMS, use the drop options from the Style button to select brand approved fonts and types
Header text• If the text is a header and is over a gradient or a paragraph lead-in,
.blackBold14
• If the text is a header over a blue background or white background, .blueBold14
body textBody text on a blue or white background: .blue or .blue9x
linksThis is the styling for links on the pages.
a:link, a:visited, a:active
font: Arial, Helvetica, sans-serif
size: 11px
color: #000099 which is a standard blue listsThe ul.arrow class is applied like this.
<ul class=”arrow”>
<li>First List Element</li>
<li>Second List Element</li>

Web CMS Guide 44
<li>Third List Element</li>
</ul>
This will look similar to the bullets below, however, with the correct html formatting and layout.
► First List Element
► Second List Element
► Third List Element
tablesThe .altRows class is the wrapper class for the table. It will place a white border around the table. The subsequent classes are .even and .odd.
Examples of how to use these are below:
<table class=”border>
<tr>
<td>This is a table test</td>
</tr>
</table>
This is a table test
FOr OTHerS – See DeTAILS In STYLe GUIDe

45Web Style Guide
Guide to Web StyleFontsThese fonts are used in the Bright House Networks web pages:
• Body text
Arial, Helvetica, sans-serif
• Text Boxes in forms
Verdana, Arial, Tahoma
The main body text of the page should be Arial, Helvetica, sans-serif, with a font size of 11px and a color of #37383B .
There are several classes used in the style sheet which relate specifically to font styling:
.blue, .blue9px, .whitereg11, .whitebold11, .blueGrayreg11,
.whitebold11, .blackbold18, .blackBold16, .five, .nine, .eleven,
.blackbold11, .blackbold12, .blackbold14, .bluebold12, .bluebold14,
.bluebold16, .blackreg14, .gray12px.
HeadersIf the text is a header and is over a gradient or a paragraph lead-in, then the classes will be: .blueGrayreg11, .blackbold18, .blackbold16, .blackbold14, .blackbold12 or .blackbold11.
If the text is a header over a blue background or white background, then the classes will be: .bluebold16, .bluebold14, .bluebold12.
Classes .whitereg11, .whitebold11, .gray12px are reserved for naviga-tional buttons and banner logos, both of which must be placed over a dark blue color: #000099 .
Body TextThe body text will be .blue, .blue9x, .nine or .eleven.
Body text on a blue or white background will usually be blue. This can be achieved using the .blue or .blue9x.
Most other text will be inherited from the main body style or the size can be tweaked using the .nine or .eleven. The .five style can be used, but is not recommended due to legibility problems.
LinksThis is the styling for links on the pages:

Web CMS Guide 46
a:link, a:visited, a:active
font: Arial, Helvetica, sans-serif
size: 11px
color: #000099 (a standard blue)
There is no link underline or other change to links, by default.
Additional styles:
curser: hand Changes the curser to a hand icon when you move over a link.
a: hover Same as above, except uses a link underline.
The other link styling in the style sheet is for the various navigational items like the top navigation or the left side navigation.
ListsList are very important to the Bright House Networks brand. There are several types of list and several classes.
The classes related to list are: ul.arrow, ul.arrowGray, ul.noarrow, ul.nobullets, ul.noMargins, ul.arrow ul.The ul.arrow class is applied like this:
<ul class=”arrow”>
<li>First List Element</li>
<li>Second List Element</li>
<li>Third List Element</li>
</ul>
This will look similar to the following, but with the correct html formatting and layout.
► First List Element
► Second List Element
► Third List Element
The arrow bullet has been set in the style sheet; if path to the file is incorrect, the list will display as the default style list, which in most cases is a small black circle.
ul.arrowGray is similar to the above class, except the bullet used is a gray arrow. It is used for News items.

47Web Style Guide
li.noarrow is used on a single list item when the arrow bullet of either type is not needed or wanted–most cases where you have a nested list. Because of the ul.arrow ul style, the bullets will be applied to the sub list.
<ul class=”arrow” >
<li>Item 1</li>
<li>Item 2</li>
<li class=”noArrow”>Item 3
<ul>
<li>Item 3 Sub Item 1</li>
<li>Item 3 Sub Item 2</li>
</ul>
</li>
</ul>
► Item 1
► Item 2
Item 3
► Item 3 Sub Item 1
► Item 3 Sub Item 2
If you want to have a list with three levels, the last level will not contain the Bright House Networks arrows. To create them, use this class: ul.arrow ul ul; then just copy the information inside the brackets for the ul.arrow ul class.
Final list caseTo have the layout of a list without the list bullets (e.g., where you want elements to be aligned without formatting by hand), use the ul.nobullets class. This class is different from the li.noarrow class; the li.noarrow class turns off styling on one item, not the whole list.
TablesTables are used extensively for layout on the Bright House Networks pages. One of the available table classes is the .border class which places a grey border around all the table elements. The other more advanced set of classes are used for tables containing information which is best displayed delineated by row.

Web CMS Guide 48
.altrows is the wrapper class and will place a white border around the table. The subsequent classes are .even and .odd.
Standard table<table class=”border>
<tr>
<td>This is a table test</td>
</tr>
</table>
This is a table test
alternating rows<table class=”altRows”>
<tr class=”even”>
<td> This is an even row</td>
</tr>
<tr class=”odd”>
<td>This is an odd row</td>
</tr>
</table>
Finally, there is a class called whiteleft which will place a white border on any cell that it is declared in. So <td class=”whiteLeft”> will display a white line on the left side of the cell.

49Appendix
AppendixEWebEditPro editor toolbar buttons and their functions.

Web CMS Guide 50

51Appendix

Web CMS Guide 52

53Appendix

Web CMS Guide 54

55Index
Index
Symbols
AAction Menu 25Active 5, 26alignment 15approval chain 31approval report 31aspect 15Awaiting completion 26
BBlock locations 27bmp 12, 40border 12, 15, 47, 48branding 1
Ccfl 1Checked in 5, 26Checked out 5, 26content block 5content ID 26contrast 17, 35copy blocks 28crop 17
DDelete Menu 25Deletion 26doc 15
Eexe 15
F
Files/Images/Hyperlinks 9fla 15flip 17
Ggif 12, 40green 3, 5, 19, 26grey 3, 5, 26, 32, 47
HHelp 3, 4, 24help 4history 19hqx 15Hyperlink 9, 12, 41
Iimage dimensions 17Image Editor 15, 17in-line 11, 14Invisible 8
Jjpeg 12, 40jpg 12, 40
K
Llanguage 26Library 9library image 14, 15line breaks 9login/logout 1, 2, 23, 24
MMarked 26Marked (or Submitted) for deletion 26menu
can’t find 5
Name of Technical Publication 56
right-click 6mov 15Move/Copy 24, 28, 29move blocks 28
Nnbsp 9New Menu 24
O
Ppassword 2pdf 15Pending Deletion 26Pending go live 5, 26Picture Editor 14, 15png 12, 40ppt 15Preview 6, 9Properties 21Published 5, 26
Qquicklink 40, 41
Rred 3, 5, 26Remove Link 9round green icon 19
Ssearch 4settings 4sharpen 17size 15, 17Smart Desktop 3, 21, 23, 29Source 8State 29Styles 9
Submitted 5, 26Submitted for deletion 26Submitted for publication 5, 26swf 15symbols 9
Ttable 9Table borders 8tampabay 1task 29
view 21task completion 26toolbars 7trouble logging in 2
Uuser name 2
VView Menu 25view options 8
Wwav 15wmv 15Workarea 23WYSIWYG 8
Xxls 15
Yyellow 3, 5, 26
Zzip 15

Bright House Networks2201 lucien Way, Suite #201 maitland, Fl 32751
technical communication reSourceS