web conferencing elluminate - sielearning · elluminate web conferencing who can help? • the hub:...
TRANSCRIPT
elluminateweb conferencing
Who can help?• The Hub: eLearning
Support Officer p: (02) 6648 2408 ext: 82408• Workplace or Faculty
eLearning contact - http://intranet/eLearningKit/
Pages/Contacts.aspx
• ServiceDesk: 6586 2235 or 1800 888 233 e: [email protected].
au
What resources willI need?• A PC and internet access.• Audio requirements - a
microphone connected to your computer.
What is Elluminate?Elluminate is web conferencing software, often used by other education providers and government offices to hold presentations and showcases. It is not currently supported by DET, however, you might like to attend something in Elluminate so this Quick-e should get you started.
Functionality wise, Elluminate sits somewhere between Bridgit and Adobe Connect. You will need speakers and a microphone, a web camera is not necessary.
The Elluminate software needs to be downloaded prior to the session. There is a configuration room where you can download software, do a system check, access guides, hints and tips and even listen to recordings about how to use and moderate in Elluminate. Make sure you do all this well in advance of the session!
We also suggest that you test your headset and microphone before entering the conference in your computers Control Panel.
Where can I find more?• Elluminate support site http://www.elluminate.com/support/index.jsp
• Elluminate Configuration Room, Installation Guide, How To’s, etc http://www.flexiblelearning.net.au/flx/go/home/projects/2007/pid/185
Trouble Shooting• Sometimes if there are drop-outs while you’re in a session, you may need to select
a lower connection speed. Go to Tools > Preferences, select the Connection option under Session and choose a slower speed
• If you are having audio issues and you have followed the instructions above, you can run through these solutions
a) Go to Tools > Audio > Audio Setup Wizard (Note: there are other audio options you can try here as well).
b) Tools > Preferences, select the Audio option and adjust the settings c) Check the volume control on your computer Start > All Programs >
Accessories > Entertainment > Volume Control
http://intranet/eLearningKit
getting started...elluminate
Check that your headset and microphone is connected and workingStep 1: Plug in your headset firmly and log on to your
computerStep 2: Go to Start > Control Panel > Sounds and Audio
devices
Step 3: Click on the audio tab – this will tell you which devices you have loaded on to your computer for hearing and recording sound.
Step 4: Make sure the correct device is displayed in the Default device dropdowns for Sound Playback and Sound Recording.
Note: Most North Coast TAFE headsets are called
Soundmax and this should be showing in the two
dropdowns.
Step 5: To check your headset is working, click on the Voice tab
Step 6: Click on Test Hardware
Step 7: Work your way through the wizard. Step 8: If your microphone still doesn’t seem to be
working properly, go to Start > All Programs >
Accessories > Entertainment > Volume Control, make sure no mute boxes are checked.
How do I download and test Elluminate?Step 1: Go to the Elluminate Support website - http://
www.elluminate.com/support/index.jsp
Step 2: Step 1 on this page will check if you have the required software. If you don’t it will guide you through downloading it.
Step 3: Step 2 – will take you to the configuration room. Run the Java software that appears in the dialog box (it will take some time to run, usually about 5 – 10 minutes). Just click OK to run, no need to Save.
Step 4: Unblock if required. If you get any warning messages, select Run.
Step 5: Accept any Session Participation Agreements if there are any
Step 6: You may be asked to select your connect level. E.g. Cable/DSL or LAN.
How do I join and Elluminate session?Step 1: Click on the advertised web session link (usually
sent via email) some time prior to the event.Step 2: Elluminate will attempt to run the Java software
as it did in the configuration and testing steps above
Step 3: Once the software is running, it will attempt to connect to the session, you will need to enter your DET log-in (be patient and keep trying!)
Step 4: You will get an error message and be offered to keep trying to connect to the session. Click Cancel
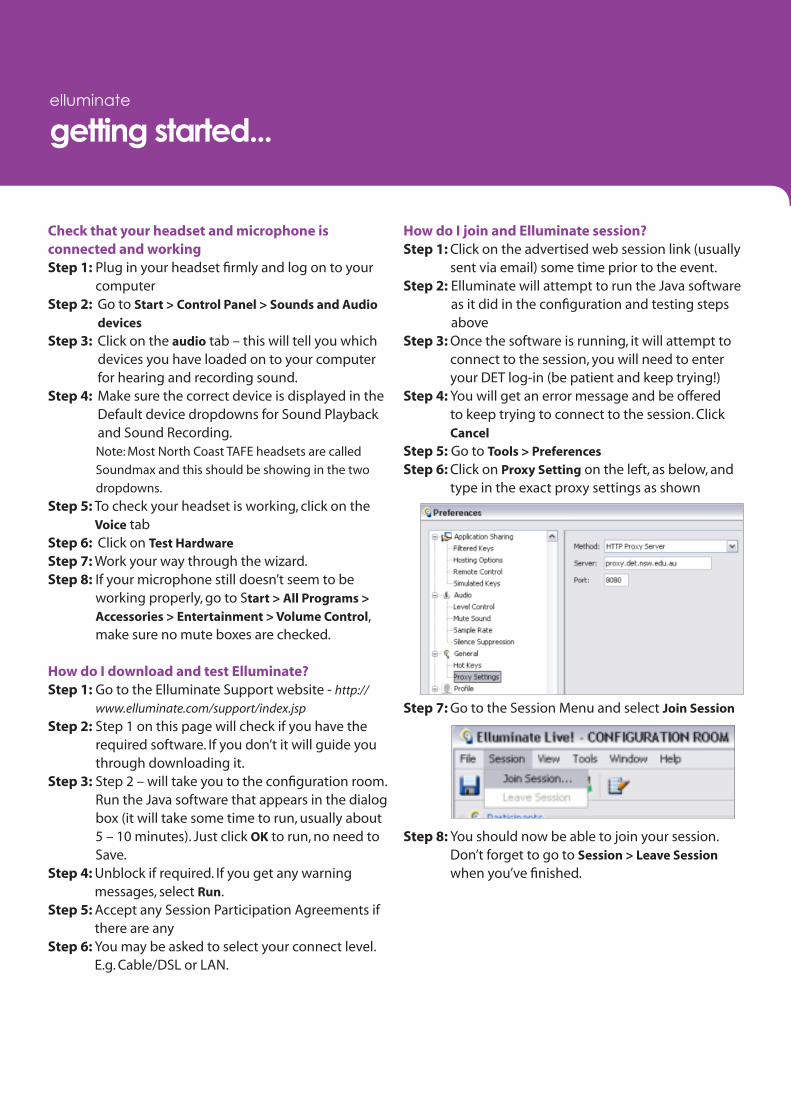
Step 5: Go to Tools > Preferences
Step 6: Click on Proxy Setting on the left, as below, and type in the exact proxy settings as shown
Step 7: Go to the Session Menu and select Join Session
Step 8: You should now be able to join your session. Don’t forget to go to Session > Leave Session when you’ve finished.